

Ver. 2 7/17
•Apple,Mac,MacOS,OSX,MacBook,andiMacaretrademarksofAppleInc.registeredintheU.S.andother
countries.
•iOSisatrademarkorregisteredtrademarkofCiscointheU.S.andothercountriesandisusedunderlicense.
•APPStoreisaservicemarkofAppleInc.
•Microsoft,Windows,WindowsVista,InternetExplorer,.NETFrameworkandPowerPointareeitheraregistered
trademarkortrademarkofMicrosoftCorporationintheUnitedStatesand/orothercountries.
•MicroSaverisaregisteredtrademarkofKensingtonComputerProductsGroup,adivisionofACCOBrandsinthe
U.S.andothercountries.
•AccuBlend,NaViSet,MultiPresenter,andVirtualRemotearetrademarksorregisteredtrademarksofNECDispolay
Solutions,Ltd.inJapan,intheUnitedStateandothercountries.
•ThetermsHDMIandHDMIHigh-DenitionMultimediaInterface,andtheHDMILogoaretrademarksorregistered
trademarksofHDMILicensingAdministrator,Inc.intheUnitedStatesandothercountries.
•HDBaseT™isatrademarkofHDBaseTAlliance.
•TrademarkPJLinkisatrademarkappliedfortrademarkrightsinJapan,theUnitedStatesofAmericaandother
countries and areas.
•Wi-Fi
®
,Wi-FiAlliance
®
,andWi-FiProtectedAccess(WPA,WPA2)
®
areregisteredtrademarksoftheWi-FiAlliance.
•Blu-rayisatrademarkofBlu-rayDiscAssociation.
•CRESTRONandROOMVIEWareregisteredtrademarksofCrestronElectronics,Inc.intheUnitedStatesandother
countries.
•ExtronandXTPareregisteredtrademarksofRGBSystems,Inc.intheUnitedStates.
•EthernetiseitheraregisteredtrademarkortrademarkofFujiXeroxCo.,Ltd.
•AndroidandGooglePlayaretrademarksofGoogleInc.
•Otherproductnamesandlogosmentionedinthisuser’smanualmaybethetrademarksorregisteredtrademarks
of their respective holders.
•VirtualRemoteToolusesWinI2C/DDClibrary,©NicomsoftLtd.
•GPL/LGPLSoftwareLicenses
TheproductincludessoftwarelicensedunderGNUGeneralPublicLicense(GPL),GNULesserGeneralPublic
License(LGPL),andothers.
Formoreinformationoneachsoftware,see“readme.pdf”inthe“aboutGPL&LGPL”folderonthesuppliedCD-
ROM.
NOTES
(1)Thecontentsofthisuser’smanualmaynotbereprintedinpartorwholewithoutpermission.
(2)Thecontentsofthisuser’smanualaresubjecttochangewithoutnotice.
(3)Greatcarehasbeentakeninthepreparationofthisuser’smanual;however,shouldyounoticeanyquestionable
points,errorsoromissions,pleasecontactus.
(4)Notwithstandingarticle(3),NECwillnotberesponsibleforanyclaimsonlossofprotorothermattersdeemed
toresultfromusingtheProjector.
i
Important Information
Safety Cautions
Precautions
PleasereadthismanualcarefullybeforeusingyourNECprojectorandkeepthemanualhandyforfuturereference.
CAUTION
Toturnoffmainpower,besuretoremovetheplugfrompoweroutlet.
Thepoweroutletsocketshouldbeinstalledasneartotheequipmentaspossible,andshouldbeeasily
accessible.
CAUTION
TOPREVENTSHOCK,DONOTOPENTHECABINET.
THEREAREHIGH-VOLTAGECOMPONENTSINSIDE.
REFERSERVICINGTOQUALIFIEDSERVICEPERSONNEL.
Thissymbolwarnstheuserthatuninsulatedvoltagewithintheunitmaybesufcienttocauseelectrical
shock.Therefore,itisdangeroustomakeanykindofcontactwithanypartinsideoftheunit.
Thissymbolalertstheuserthatimportantinformationconcerningtheoperationandmaintenanceofthis
unit has been provided.
The information should be read carefully to avoid problems.
WARNING:TOPREVENTFIREORSHOCK,DONOTEXPOSETHISUNITTORAINORMOISTURE.
DONOTUSETHISUNIT’SPLUGWITHANEXTENSIONCORDORINANOUTLETUNLESSALLTHEPRONGS
CANBEFULLYINSERTED.
DOC Compliance Notice (for Canada only)
ThisClassBdigitalapparatuscomplieswithCanadianICES-003.
Machine Noise Information Regulation - 3. GPSGV,
Thehighestsoundpressurelevelislessthan70dB(A)inaccordancewithENISO7779.
CAUTION
Avoiddisplayingstationaryimagesforaprolongedperiodoftime.
DoingsocanresultintheseimagesbeingtemporarilysustainedonthesurfaceoftheLCDpanel.
Ifthisshouldhappen,continuetouseyourprojector.Thestaticbackgroundfrompreviousimageswill
disappear.
Disposing of your used product
In the European Union
EU-widelegislationasimplementedineachMemberStaterequiresthatusedelectricalandelectronic
productscarryingthemark(left)mustbedisposedofseparatelyfromnormalhouseholdwaste.Thisin-
cludesprojectorsandtheirelectricalaccessories.Whenyoudisposeofsuchproducts,pleasefollowthe
guidanceofyourlocalauthorityand/orasktheshopwhereyoupurchasedtheproduct.
Aftercollectingtheusedproducts,theyarereusedandrecycledinaproperway.Thiseffortwillhelp
usreducethewastesaswellasthenegativeimpacttothehumanhealthandtheenvironmentatthe
minimum level.
ThemarkontheelectricalandelectronicproductsonlyappliestothecurrentEuropeanUnionMember
States.
Outside the European Union
IfyouwishtodisposeofusedelectricalandelectronicproductsoutsidetheEuropeanunion,please
contactyourlocalauthorityandaskforthecorrectmethodofdisposal.
For EU:Thecrossed-outwheeledbinimpliesthatusedbatteriesshouldnotbeputtothegeneralhousehold
waste!Thereisaseparatecollectionsystemforusedbatteries,toallowpropertreatmentandrecycling
inaccordancewithlegislation.
According the EU directive 2006/66/EC, the battery can’t be disposed improperly. The battery shall be
separated to collect by local service.

ii
Important Information
WARNING TO CALIFORNIA RESIDENTS:
Handlingthecablessuppliedwiththisproductwillexposeyoutolead,achemicalknowntotheStateofCalifornia
tocausebirthdefectsorotherreproductiveharm.WASHHANDSAFTERHANDLING.
RF Interference (for USA only)
WARNING
TheFederalCommunicationsCommissiondoesnotallowanymodicationsorchangestotheunitEXCEPT
thosespeciedbyNECDisplaySolutionsofAmerica,Inc.inthismanual.Failuretocomplywiththisgovernment
regulationcouldvoidyourrighttooperatethisequipment.Thisequipmenthasbeentestedandfoundtocomply
withthelimitsforaClassBdigitaldevice,pursuanttoPart15oftheFCCRules.Theselimitsaredesignedto
providereasonableprotectionagainstharmfulinterferenceinaresidentialinstallation.Thisequipmentgenerates,
uses,andcanradiateradiofrequencyenergyand,ifnotinstalledandusedinaccordancewiththeinstructions,
maycauseharmfulinterferencetoradiocommunications.However,thereisnoguaranteethatinterferencewill
not occur in a particular installation.
Ifthisequipmentdoescauseharmfulinterferencetoradioortelevisionreception,whichcanbedeterminedby
turningtheequipmentoffandon,theuserisencouragedtotrytocorrecttheinterferencebyoneormoreofthe
followingmeasures:
•Reorientorrelocatethereceivingantenna.
•Increasetheseparationbetweentheequipmentandreceiver.
•Connecttheequipmentintoanoutletonacircuitdifferentfromthattowhichthereceiverisconnected.
•Consultthedealeroranexperiencedradio/TVtechnicianforhelp.
ForUKonly:InUK,aBSapprovedpowercordwithmouldedplughasaBlack(veAmps)fuseinstalledforusewith
thisequipment.Ifapowercordisnotsuppliedwiththisequipmentpleasecontactyoursupplier.
Important Safeguards
Thesesafetyinstructionsaretoensurethelonglifeofyourprojectorandtopreventreandshock.Pleaseread
themcarefullyandheedallwarnings.
Installation
•Donotplacetheprojectorinthefollowingconditions:
-onanunstablecart,stand,ortable.
-nearwater,baths,ordamprooms.
-indirectsunlight,nearheaters,orheatradiatingappliances.
-inadusty,smokyorsteamyenvironment.
-onasheetofpaperorcloth,rugsorcarpets.
•Ifyouwishtohavetheprojectorinstalledontheceiling:
-Donotattempttoinstalltheprojectoryourself.
-Theprojectormustbeinstalledbyqualiedtechniciansinordertoensureproperoperationandreducetherisk
of bodily injury.
-Inaddition,theceilingmustbestrongenoughtosupporttheprojectorandtheinstallationmustbeinaccordance
withanylocalbuildingcodes.
- Please consult your dealer for more information.
•Donotinstallandstoretheprojectorinthebelowcircumstances.Failuretodosomaycauseofmalfunction.
-Inpowerfulmagneticelds
-Incorrosivegasenvironment
-Outdoors
iii
Important Information
WARNING
•Donotcoverthelenswiththelenscaporequivalentwhiletheprojectorison.Doingsocanleadtomelting
ofthecapduetotheheatemittedfromthelightoutput.
•Donotplaceanyobjects,whichareeasilyaffectedbyheat,infrontoftheprojectionwindow.Doingsocould
leadtotheobjectmeltingfromtheheatthatisemittedfromthelightoutput.
•Donotuseaspraycontainingammablegastogetridofaccumulateddustanddirtontheltersandthe
projectionwindow.Itmaycauseofre.
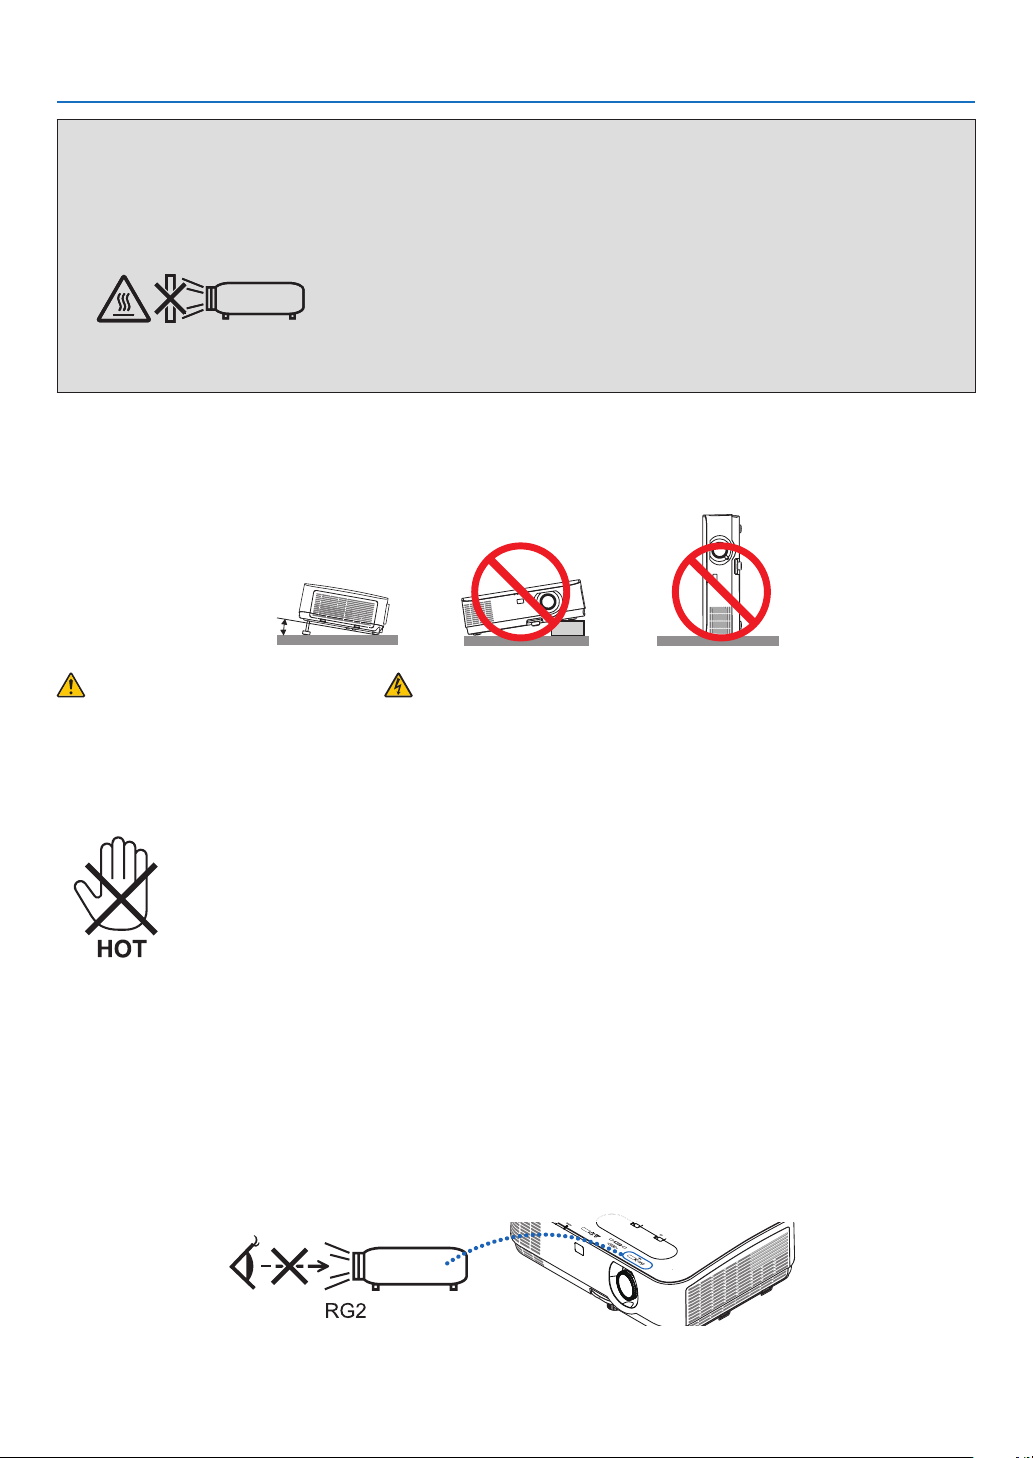
Place the projector in a horizontal position
Thetiltangleoftheprojectorshouldnotexceed10degrees,norshouldtheprojectorbeinstalledinanywayother
thanthedesktopandceilingmount,otherwiselamplifecoulddecreasedramatically.
10˚
Fire and Shock Precautions
•Ensurethatthereissufcientventilationandthatventsareunobstructedtopreventthebuild-upofheatinside
yourprojector.Allowatleast4inches(10cm)ofspacebetweenyourprojectorandawall.
•Donottrytotouchtheexhaustventasitcanbecomeheatedwhiletheprojectoristurnedonandimmediately
after the projector is turned off. Parts of the projector may become temporarily heated if the projector is turned off
withthePOWERbuttonoriftheACpowersupplyisdisconnectedduringnormalprojectoroperation.
Usecautionwhenpickinguptheprojector.
•Preventforeignobjectssuchaspaperclipsandbitsofpaperfromfallingintoyourprojector.Donotattemptto
retrieveanyobjectsthatmightfallintoyourprojector.Donotinsertanymetalobjectssuchasawireorscrewdriver
intoyourprojector.Ifsomethingshouldfallintoyourprojector,disconnectitimmediatelyandhavetheobject
removedbyaqualiedservicepersonnel.
•Donotplaceanyobjectsontopoftheprojector.
•Donottouchthepowerplugduringathunderstorm.Doingsocancauseelectricalshockorre.
•Theprojectorisdesignedtooperateonapowersupplyof100-240VAC50/60Hz.Ensurethatyourpowersupply
tsthisrequirementbeforeattemptingtouseyourprojector.
•Donotlookthelenswhiletheprojectorison.Seriousdamagetoyoureyescouldresult.Thefollowinglabel,that
isindicatednearthelens-mounting-sectionontheprojectorcabinet,describesthisprojectoriscategorizedinthe
riskgroup2ofIEC62471-5:2015.Aswithanybrightsource,donotstareintothebeam,RG2IEC62471-5:2015.

iv
Important Information
•Keepanyitemssuchasmagnifyingglassoutofthelightpathoftheprojector.Thelightbeingprojectedfromthe
lensisextensive,thereforeanykindofabnormalobjectsthatcanredirectlightcomingoutofthelens,cancause
unpredictableoutcomesuchasreorinjurytotheeyes.
•Donotplaceanyobjects,whichareeasilyaffectedbyheat,infrontofaprojectorexhaustvent.
Doingsocouldleadtotheobjectmeltingorgettingyourhandsburnedfromtheheatthatisemittedfromthe
exhaust.
•Donotsplashwaterovertheprojector.Doingsocancauseelectricalshockorre.Iftheprojectorgetswet,turn
offtheprojector,unplugthepowercordandhavetheprojectorservicedbyaqualiedservicepersonnel.
•Handlethepowercordcarefully.Adamagedorfrayedpowercordcancauseelectricshockorre.
-Donotuseanypowercordotherthantheonesuppliedwiththeprojector.
-Donotbendortugthepowercordexcessively.
-Donotplacethepowercordundertheprojector,oranyheavyobject.
-Donotcoverthepowercordwithothersoftmaterialssuchasrugs.
-Donotheatthepowercord.
-Donothandlethepowerplugwithwethands.
•Turnofftheprojector,unplugthepowercordandhavetheprojectorservicedbyaqualiedservicepersonnel
underthefollowingconditions:
-Whenthepowercordorplugisdamagedorfrayed.
-Ifliquidhasbeenspilledintotheprojector,orifithasbeenexposedtorainorwater.
-Iftheprojectordoesnotoperatenormallywhenyoufollowtheinstructionsdescribedinthisuser’smanual.
-Iftheprojectorhasbeendroppedorthecabinethasbeendamaged.
-Iftheprojectorexhibitsadistinctchangeinperformance,indicatinganeedforservice.
•Disconnectthepowercordandanyothercablesbeforecarryingtheprojector.
•Turnofftheprojectorandunplugthepowercordbeforecleaningthecabinetorreplacingthelamp.
•Turnofftheprojectorandunplugthepowercordiftheprojectorisnottobeusedforanextendedperiodoftime.
•WhenusingaLANcable:
Forsafety,donotconnecttotheterminalforperipheraldevicewiringthatmighthaveexcessivevoltage.
CAUTION
•Donotusetheadjustabletiltfootforpurposesotherthanoriginallyintended.Misusessuchasgrippingthe
tilt-footorhangingonthewallcancausedamagetotheprojector.
•Select[HIGH]inFanmodeifyoucontinuetousetheprojectorforconsecutivedays.(Fromthemenu,select
[SETUP]→[OPTIONS(1)]→[FANMODE]→[HIGH].)
•DonotturnofftheACpowerfor60secondsafterthelampisturnedonandwhilethePOWERindicatoris
blinkingblue.Doingsocouldcauseprematurelampfailure.
Remote Control Precautions
•Handletheremotecontrolcarefully.
•Iftheremotecontrolgetswet,wipeitdryimmediately.
•Avoidexcessiveheatandhumidity.
•Donotshort,heat,ortakeapartbatteries.
•Donotthrowbatteriesintore.
•Ifyouwillnotbeusingtheremotecontrolforalongtime,removethebatteries.
•Ensurethatyouhavethebatteries’polarity(+/−)alignedcorrectly.
•Donotusenewandoldbatteriestogether,orusedifferenttypesofbatteriestogether.
•Disposeofusedbatteriesaccordingtoyourlocalregulations.
Note for Canadian Environmental Protection Act, 1999
Thelamp(s)inthisproductcontainsmercury.Pleasedisposeaccordingtoyourlocalauthoritylaw.
FORMOREINFORMATION,CONTACT:
NECDisplaySolutionsofAmerica,Inc.
500ParkBoulevard,Suite1100,Itasca,Illinois60143-1248
TELEPHONE800-836-0655
www.necdisplay.com

v
Important Information
Note for US Residents
Thelampinthisproductcontainsmercury.PleasedisposeaccordingtoLocal,StateorFederalLaws.
Lamp Replacement
•Usethespeciedlampforsafetyandperformance.
•Toreplacethelamp,followallinstructionsprovidedonpage
108.
•Besuretoreplacethelampandlterwhenthemessage[THE LAMP HAS REACHED THE END OF ITS USABLE
LIFE. PLEASE REPLACE THE LAMP AND FILTER.]appears.Ifyoucontinuetousethelampafterthelamphas
reachedtheendofitsusablelife,thelampbulbmayshatter,andpiecesofglassmaybescatteredinthelamp
case.Donottouchthemasthepiecesofglassmaycauseinjury.
Ifthishappens,contactyourdealerforlampreplacement.
A Lamp Characteristic
Theprojectorhasadischargelampforspecialpurposesasalightsource.
Alamphasacharacteristicthatitsbrightnessgraduallydecreaseswithage.Alsorepeatedlyturningthelampon
andoffwillincreasethepossibilityofitslowerbrightness.
Theactuallamplifemayvarydependingupontheindividuallamp,theenvironmentalconditionsandusage.
CAUTION:
•DONOTTOUCHTHELAMPimmediatelyafterithasbeenused.Itwillbeextremelyhot.Turntheprojectoroff
andthendisconnectthepowercord.Allowatleastonehourforthelamptocoolbeforehandling.
•Whenremovingthelampfromaceiling-mountedprojector,makesurethatnooneisundertheprojector.Glass
fragmentscouldfallifthelamphasbeenburnedout.
About High Altitude mode
•Set[FANMODE]to[HIGHALTITUDE]whenusingtheprojectorataltitudesapproximately5500feet/1700meters
orhigher.
Usingtheprojectorataltitudesapproximately5500feet/1700metersorhigherwithoutsettingto[HIGHALTITUDE]
cancausetheprojectortooverheatandtheprotectorcouldshutdown.Ifthishappens,waitacoupleminutes
and turn on the projector.
•Usingtheprojectorataltitudeslessthanapproximately5500feet/1700metersandsettingto[HIGHALTITUDE]
cancausethelamptoovercool,causingtheimagetoicker.Switch[FANMODE]to[AUTO].
•Usingtheprojectorataltitudesapproximately5500feet/1700metersorhighercanshortenthelifeofoptical
components such as the lamp.
About Copyright of original projected pictures:
Pleasenotethatusingthisprojectorforthepurposeofcommercialgainortheattractionofpublicattentioninavenue
suchasacoffeeshoporhotelandemployingcompressionorexpansionofthescreenimagewiththefollowing
functionsmayraiseconcernabouttheinfringementofcopyrightswhichareprotectedbycopyrightlaw.
[ASPECTRATIO],[KEYSTONE],Magnifyingfeatureandothersimilarfeatures.
Turkish RoHS information relevant for Turkish market
EEEYonetmeliğineUygundur.
Thisdeviceisnotintendedforuseinthedirecteldofviewatvisualdisplayworkplaces.Toavoidincommoding
reectionsatvisualdisplayworkplacesthisdevicemustnotbeplacedinthedirecteldofview.

vi
Important Information
Power management function
Theprojectorhaspowermanagementfunctions.Toreducepowerconsumption,thepowermanagementfunctions
(1and2)arefactorypresetasshownbelow.TocontroltheprojectorfromanexternaldeviceviaaLANorserial
cableconnection,usetheon-screenmenutochangethesettingsfor1and2.
1. STANDBY MODE (Factory preset: NORMAL)
To control the projector from an external device, select [NETWORK STANDBY] for [STANDBY MODE].
NOTE:
•When[NORMAL]isselectedfor[STANDBYMODE],thefollowingterminalsandfunctionswillnotwork:
MONITOROUTterminal,AUDIOOUTterminal,LANfunctions,MailAlertfunction,DDC/CI(VirtualRemoteTool).Pleaserefertopage74
aboutdetails.
•When[NETWORKSTANDBY]hasbeensetfor[STANDBYMODE]andtheLANhasbeeninlink-downconditionfor3minutes,[STANDBY
MODE]willtransitinto[NORMAL]automaticallyforthepurposetosavetheconsumptionpower.
2. AUTO POWER OFF (Factory preset: 1 hour)
To control the projector from an external device, select [OFF] for [AUTO POWER OFF].
NOTE:
•When[1:00]isselectedfor[AUTOPOWEROFF],youcanenabletheprojectortoautomaticallyturnoffin60minutesifthereisnosignal
receivedbyanyinputorifnooperationisperformed.

vii
Table of Contents
Important Information ............................................................................................ i
1. Introduction .......................................................................................................... 1
❶What’sintheBox? ........................................................................................................ 1
❷IntroductiontotheProjector ......................................................................................... 2
Featuresyou’llenjoy: .............................................................................................. 2
About this user’s manual ......................................................................................... 3
❸ Part Names of the Projector .......................................................................................... 4
Front/Top ................................................................................................................. 4
Rear ......................................................................................................................... 5
Controls/IndicatorPanel .......................................................................................... 6
TerminalPanelFeatures .......................................................................................... 7
❹PartNamesoftheRemoteControl ............................................................................... 8
BatteryInstallation ................................................................................................... 9
RemoteControlPrecautions ................................................................................... 9
OperatingRangeforWirelessRemoteControl ....................................................... 9
2. Projecting an Image (Basic Operation) .............................................. 10
❶FlowofProjectinganImage ........................................................................................ 10
❷ConnectingYourComputer/ConnectingthePowerCord .......................................... 11
❸TurningontheProjector .............................................................................................. 12
NoteonStartupscreen(MenuLanguageSelectscreen) ...................................... 13
❹SelectingaSource ...................................................................................................... 14
Selectingthecomputerorvideosource ................................................................ 14
❺AdjustingthePictureSizeandPosition ...................................................................... 15
Adjustingtheverticalpositionofaprojectedimage(Lensshift) ........................... 16
Focus ..................................................................................................................... 18
Zoom...................................................................................................................... 18
AdjusttheTiltFoot................................................................................................. 19
❻CorrectingKeystoneDistortion[KEYSTONE] ............................................................. 20
❼OptimizingComputerSignalAutomatically ................................................................ 22
AdjustingtheImageUsingAutoAdjust ................................................................. 22
❽TurningUporDownVolume ....................................................................................... 22
❾TurningofftheProjector ............................................................................................. 23
❿WhenMovingtheProjector ......................................................................................... 24
3. Convenient Features ..................................................................................... 25
❶TurningofftheImageandSound ................................................................................ 25
❷FreezingaPicture........................................................................................................ 25
❸MagnifyingaPicture .................................................................................................... 25
❹ChangingEcoMode/CheckingEnergy-SavingEffect ............................................... 26
UsingEcoMode[ECOMODE] .............................................................................. 26
CheckingEnergy-SavingEffect[CARBONMETER] .............................................. 27
❺Using4-PointCornertoCorrectKeystoneDistortion[CORNERSTONE] ................... 28
Cornerstone ........................................................................................................... 28
Pincushion ............................................................................................................. 30

viii
Table of Contents
❻
PreventingtheUnauthorizedUseoftheProjector[SECURITY] ...................................... 33
❼ControllingtheProjectorbyUsinganHTTPBrowser ................................................. 36
4. Using the Viewer ............................................................................................. 43
❶ What you can do with the Viewer ................................................................................ 43
❷ProjectingimagesstoredinaUSBmemorydevice .................................................... 45
5. Using On-Screen Menu ................................................................................ 51
❶UsingtheMenus ......................................................................................................... 51
❷MenuElements ............................................................................................................ 52
❸ListofMenuItems ....................................................................................................... 53
❹MenuDescriptions&Functions[SOURCE] ................................................................ 56
HDMI1andHDMI2 ................................................................................................ 56
COMPUTER ........................................................................................................... 56
VIDEO .................................................................................................................... 56
HDBaseT(notsupportedbyP603X) ...................................................................... 56
USB-A .................................................................................................................... 56
❺MenuDescriptions&Functions[ADJUST] .................................................................. 57
[PICTURE] .............................................................................................................. 57
[IMAGEOPTIONS] ................................................................................................. 60
[AUDIO] .................................................................................................................. 64
❻MenuDescriptions&Functions[SETUP] .................................................................... 65
[GENERAL]............................................................................................................. 65
[MENU]................................................................................................................... 67
[INSTALLATION] .................................................................................................... 69
[OPTIONS(1)] ......................................................................................................... 72
[OPTIONS(2)] ......................................................................................................... 74
SettinguptheProjectorforaWiredLANConnection[WIREDLAN] .................... 77
SettinguptheProjectorforaWirelessLANConnection(withtheoptional
USBWirelessLANUnitequipped)[WIRLESSLAN] .............................................. 78
❼MenuDescriptions&Functions[INFO.] ...................................................................... 80
[USAGETIME]........................................................................................................ 80
[SOURCE(1)] .......................................................................................................... 81
[SOURCE(2)] .......................................................................................................... 81
[HDBaseT](notsupportedbyP603X) .................................................................... 81
[WIREDLAN] .......................................................................................................... 82
[WIRELESSLAN] ................................................................................................... 82
[VERSION] .............................................................................................................. 82
[OTHERS] ............................................................................................................... 83
❽MenuDescriptions&Functions[RESET] .................................................................... 84
ReturningtoFactoryDefault[RESET] ................................................................... 84
6. Installation and Connections ................................................................... 85
❶SettingUptheScreenandtheProjector .................................................................... 85
Tablesofscreensizesanddimensions ................................................................. 88
Exampleofinstallationonadesktop ..................................................................... 89
Lensshiftingrange ................................................................................................ 91

ix
Table of Contents
❷MakingConnections ................................................................................................... 93
ConnectingYourComputer ................................................................................... 93
ConnectinganExternalMonitor ............................................................................ 95
ConnectingYourDVDPlayerorOtherAVEquipment .......................................... 96
ConnectingComponentInput ............................................................................... 97
ConnectingHDMIInput ......................................................................................... 98
ConnectingtoaWiredLAN ................................................................................... 99
ConnectingtoaWirelessLAN(Optional:NP05LMseries) .................................. 100
ConnectingtoaHDBaseTtransmissiondevice(soldcommercially)
(notsupportedbyP603X) .................................................................................... 103
7. Maintenance .................................................................................................... 105
❶CleaningtheFilters .................................................................................................... 105
❷CleaningtheLens ...................................................................................................... 107
❸CleaningtheCabinet ................................................................................................. 107
❹ReplacingtheLampandtheFilters .......................................................................... 108
8. Appendix ............................................................................................................. 113
❶Troubleshooting ........................................................................................................ 113
Featureofeachindicator ..................................................................................... 113
IndicatorMessage(Statusmessage) .................................................................. 113
IndicatorMessage(Errormessage) ..................................................................... 115
ExplanationonthePOWERindicatorandstandbystate .................................... 116
CommonProblems&Solutions .......................................................................... 118
Ifthereisnopicture,orthepictureisnotdisplayedcorrectly. ........................... 119
❷Specications ............................................................................................................ 120
❸CabinetDimensions .................................................................................................. 122
❹AttachingtheOptionalCableCover(NP12CV) ......................................................... 123
5PinAssignmentsofD-SubCOMPUTERInputTerminal ........................................... 125
6CompatibleInputSignalList ..................................................................................... 126
7PCControlCodesandCableConnection ................................................................ 127
8UsingtheComputerCable(VGA)toOperatetheProjector(VirtualRemoteTool) ... 128
9TroubleshootingCheckList ...................................................................................... 130
❿REGISTERYOURPROJECTOR!(forresidentsintheUnitedStates,Canada,and
Mexico) ................................................................................................................ 132

1
Projector
1. Introduction
❶ What’s in the Box?
Makesureyourboxcontainseverythinglisted.Ifanypiecesaremissing,contactyourdealer.
Pleasesavetheoriginalboxandpackingmaterialsifyoueverneedtoshipyourprojector.
Power cord
(US: 7N080236/7N080242)
(EU: 7N080022/7N080028)
Lens cap (24F54301)
Lens cap strap × 1 (24J23901)
Computer cable (VGA)
(7N520089)
Strap for MultiPresenter
Stick × 1 (24J41711)
NEC Projector CD-ROM
User’s manual (PDF)
(7N952602)
For North America only
Limited warranty
For customers in Europe:
You will find our current valid
Guarantee Policy on our Web
Site:
www.nec-display-solutions.com
• ImportantInfomation(7N8N8492)
• QuickSetupGuide(7N8N8512)
Remote control
(7N901122)
Batteries (AAA × 2)
Unlessotherwisedescribedintheuser’smanual,thedrawingsfortheprojectorcabinetshowexamplesoftheP554W.

2
1. Introduction
❷ Introduction to the Projector
This section introduces you to your new projector and describes the features and controls.
Features you’ll enjoy:
•Quickstart(6seconds*
1
),QuickPowerOff,DirectPowerOff
6 seconds*
1
afterturningonthepower,theprojectorisreadytodisplayPCorvideoimages.
Theprojectorcanbeputawayimmediatelyaftertheprojectorispowereddown.Nocooldownperiodisrequired
after the projector is turned off from the remote control or cabinet control panel.
Theprojectorhasafeaturecalled“DirectPowerOff”.Thisfeatureallowstheprojectortobeturnedoff(even
whenprojectinganimage)byusingtheMainPowerSwitchordisconnectingtheACpowersupply.
ToturnofftheACpowersupplywhentheprojectorispoweredon,useapowerstripequippedwithaswitchand
abreaker.
*
1
Thequickstarttimeisonlywhen[STANDBYMODE]issetto[NETWORKSTANDBY]intheon-screenmes-
sage.
•0.16W(100-130VAC)/0.2W(200-240VAC)instandbyconditionwithenergysavingtechnology
Selecting[NORMAL]for[STANDBYMODE]fromthemenucanputtheprojectorinpower-savingmodethat
consumesonly0.16W(100-130VAC)/0.2W(200-240VAC).
•CarbonMeter
Thisfeaturewillshowenergy-savingeffectintermsofCO
2
emissionreduction(kg)whentheprojector’s[ECO
MODE]issetto[AUTOECO],[NORMAL],or[ECO].
TheamountofCO
2
emissionreductionwillbedisplayedintheconrmationmessageatthetimeofpower-off
andintheINFOoftheon-screenmenu.
•Lamplifeupto8000hours
UsinginEcoMode(ECO)allowsyoutoprolongtheprojector’slamplifeupto8000hours(upto4000hoursin
ECOMODEOFF).
•Widerangeofinputterminals(HDMI×2,HDBaseT,etc.)
Theprojectorisequippedwithavarietyofinputterminals:HDMI(×2),Computer(analog),Video,HDBaseT,etc.
HDMIinputterminalonthisproductsupportsHDCP.HDBaseTisaconnectionstandardforhomeappliances
thatisestablishedbytheHDBaseTAlliance.
•IntegratedRJ-45terminalforwirednetworkingcapabilityalongwithwirelessnetworkingcapabilities
AnRJ-45terminalisstandard.AnoptionalUSBWirelessLANUnitisrequiredforwirelessLANconnection.
•20Wbuilt-inspeakerforanintegratedaudiosolution
Powerful20wattmonauralspeakerprovidesvolumeneedforlargerooms.
•ThesuppliedremotecontrolallowsyoutoassignaCONTROLIDtotheprojector
Multipleprojectorscanbeoperatedseparatelyandindependentlywiththesamesingleremotecontrolbyas-
signinganIDnumbertoeachprojector.
•Convenientutilitysoftware(UserSupportware)
Thisprojectorsupportsourutilitysoftware(NaViSetAdministrator2,VirtualRemoteTool,etc.)NaViSetAdminis-
trator2helpsyoucontroltheprojectorbyacomputerviawiredLANconnection.VirtualRemoteToolhelpsyou
performoperationsbyavirtualremotecontrolsuchasprojector'spoweronoroffandsignalselectionviawired
LANconnection.Moreover,ithasfunctiontosendanimagetotheprojectorandregisteritasthelogodata.
Pleasevisitourwebsitefordownloadingeachsoftware.
URL:
http://www.nec-display.com/dl/en/index.html

3
1. Introduction
•AUTOPOWERONandAUTOPOWEROFFfeatures
TheDIRECTPOWERON,AUTOPOWERON,AUTOPOWEROFF,andOFFTIMERfeatureseliminatetheneed
toalwaysusethePOWERbuttonontheremotecontrolorprojectorcabinet.
•Preventingunauthorizeduseoftheprojector
Enhancedsmartsecuritysettingsforkeywordprotection,cabinetcontrolpanellock,securityslot,andsecurity
chainopeningtohelppreventunauthorizedaccess,adjustmentsandtheftdeterrence.
•HighresolutionuptoWUXGA*
2
Highresolutiondisplay-uptoWUXGAcompatible,XGA(P604X/P603X)/WXGA(P554W/P474W)/WUXGA(P554U/
P474U)nativeresolution.
•Animagewithhigherorlowerresolutionthantheprojector’snativeresolution(P554U/P474U:1920×1200/
P554W/P474W:1280×800/P604X/P603X:1024×768)willbedisplayedwithAdvancedAccuBlend.
*
2
WhenWXGAMODEissettoON.
•CRESTRONROOMVIEWandExtronXTPcompatibility
TheprojectorsupportsCRESTRONROOMVIEWandExtronXTP,allowingmultipledevicesconnectedinthe
networktobemanagedandcontrolledfromacomputerMoreover,itenablestooutputandcontrolimageviaan
ExtronXTPtransmitterconnectedwiththeprojector.
About this user’s manual
Thefastestwaytogetstartedistotakeyourtimeanddoeverythingrightthersttime.Takeafewminutesnowto
reviewtheuser’smanual.Thismaysaveyoutimelateron.Atthebeginningofeachsectionofthemanualyou’llnd
anoverview.Ifthesectiondoesn’tapply,youcanskipit.
4
1. Introduction
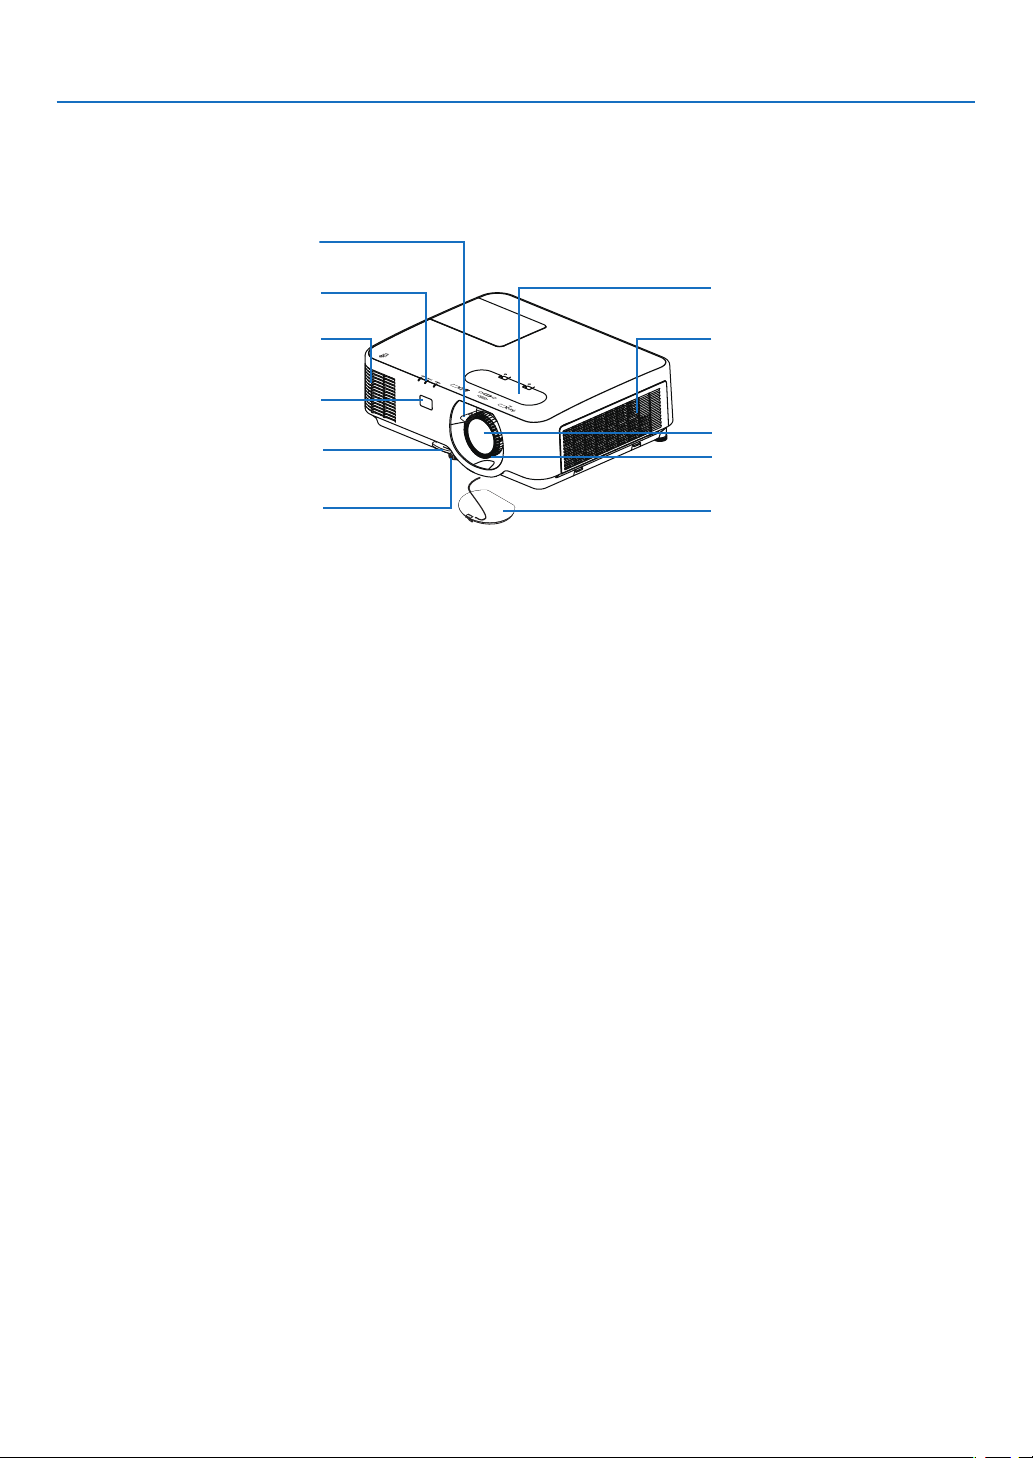
❸ Part Names of the Projector
Front/Top
Lens shift cover
(→ page
16)
Lens
Focus Ring
(→ page
18)
IntakeVent/FilterCover
(→ page
105, 111)
Zoom Lever
(
→
page
18
)
Lens Cap
For protecting lens.
Make sure to take it off during
projection.
Indicators
(→ page
6)
Adjustable Tilt Foot
(→ page
19)
Adjustable Tilt Foot Lever
(→ page
19)
Exhaust Vent
Heated air is exhausted from here.
Remote Sensor
(→ page
9)
5
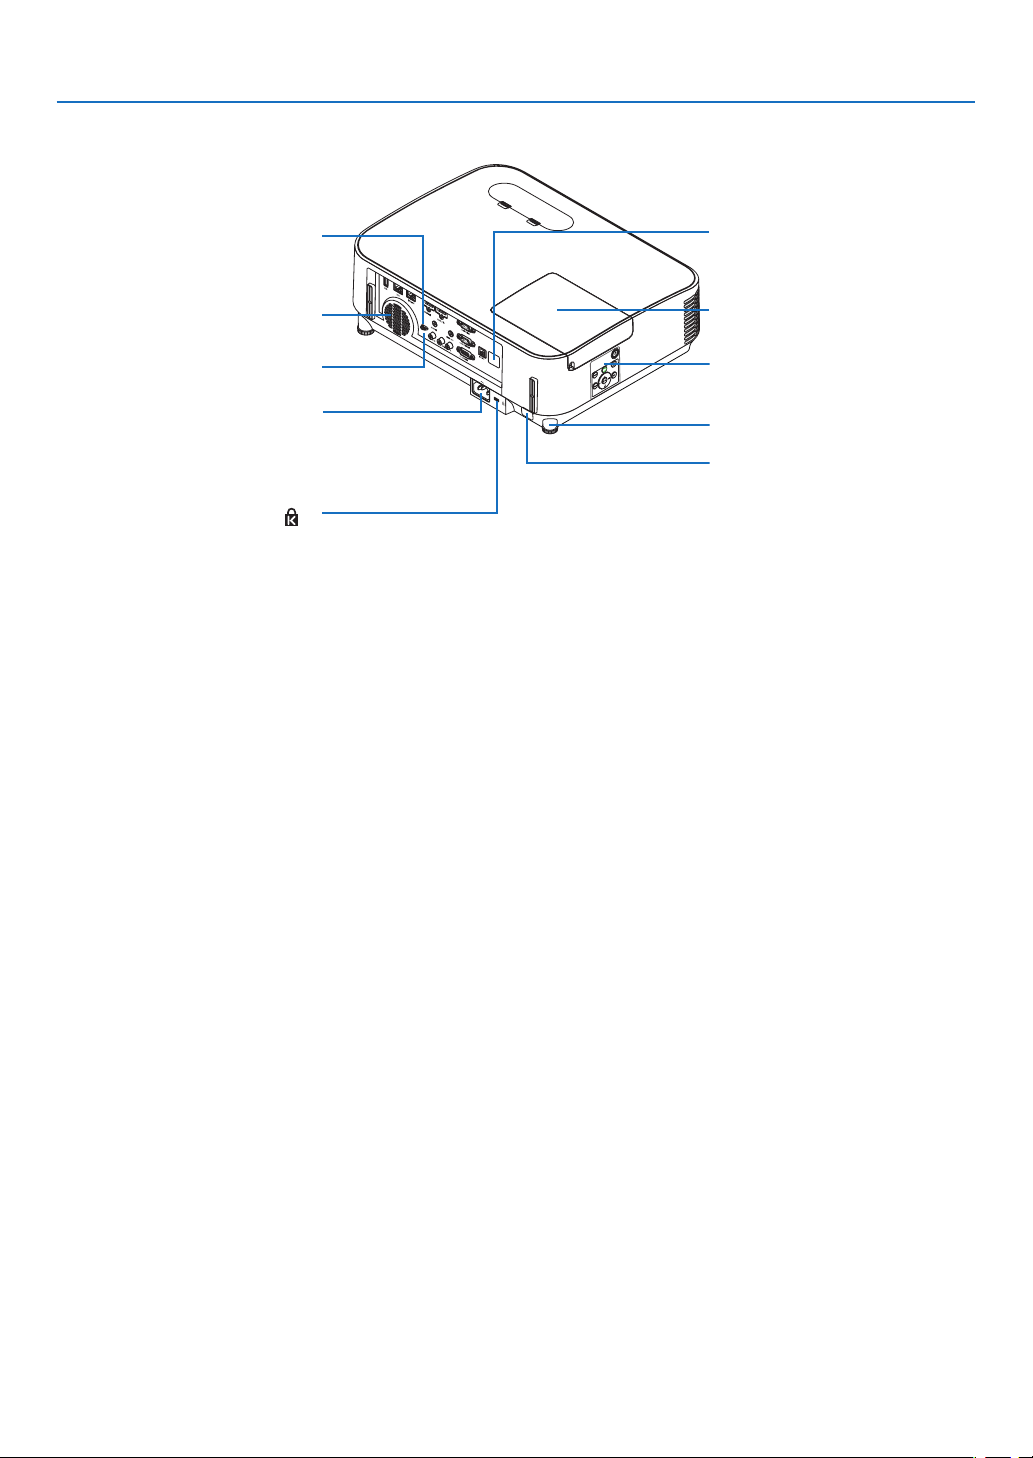
1. Introduction
Built-in Security Slot ( )*
As the theft and dropping-off
prevention measure, fix on the
supplied strap.
Terminal Panel (→ page
7)
Monaural Speaker (20 W)
Lamp Cover (→ page
109)
Remote Sensor (→ page 9)
Rear Foot (→ page
19)
Controls (→ page
6)
Rear
ACInput
Connect the supplied power cord’s
three-pin plug here, and plug the
other end into an active wall outlet.
(→ page
11)
Security chain opening
Attach an anti-theft device.
The security chain opening accepts
security wires or chains up to 0.18
inch/4.6 mm in diameter.
*ThissecurityslotsupportstheMicroSaver
®
SecuritySystem.
6
1. Introduction
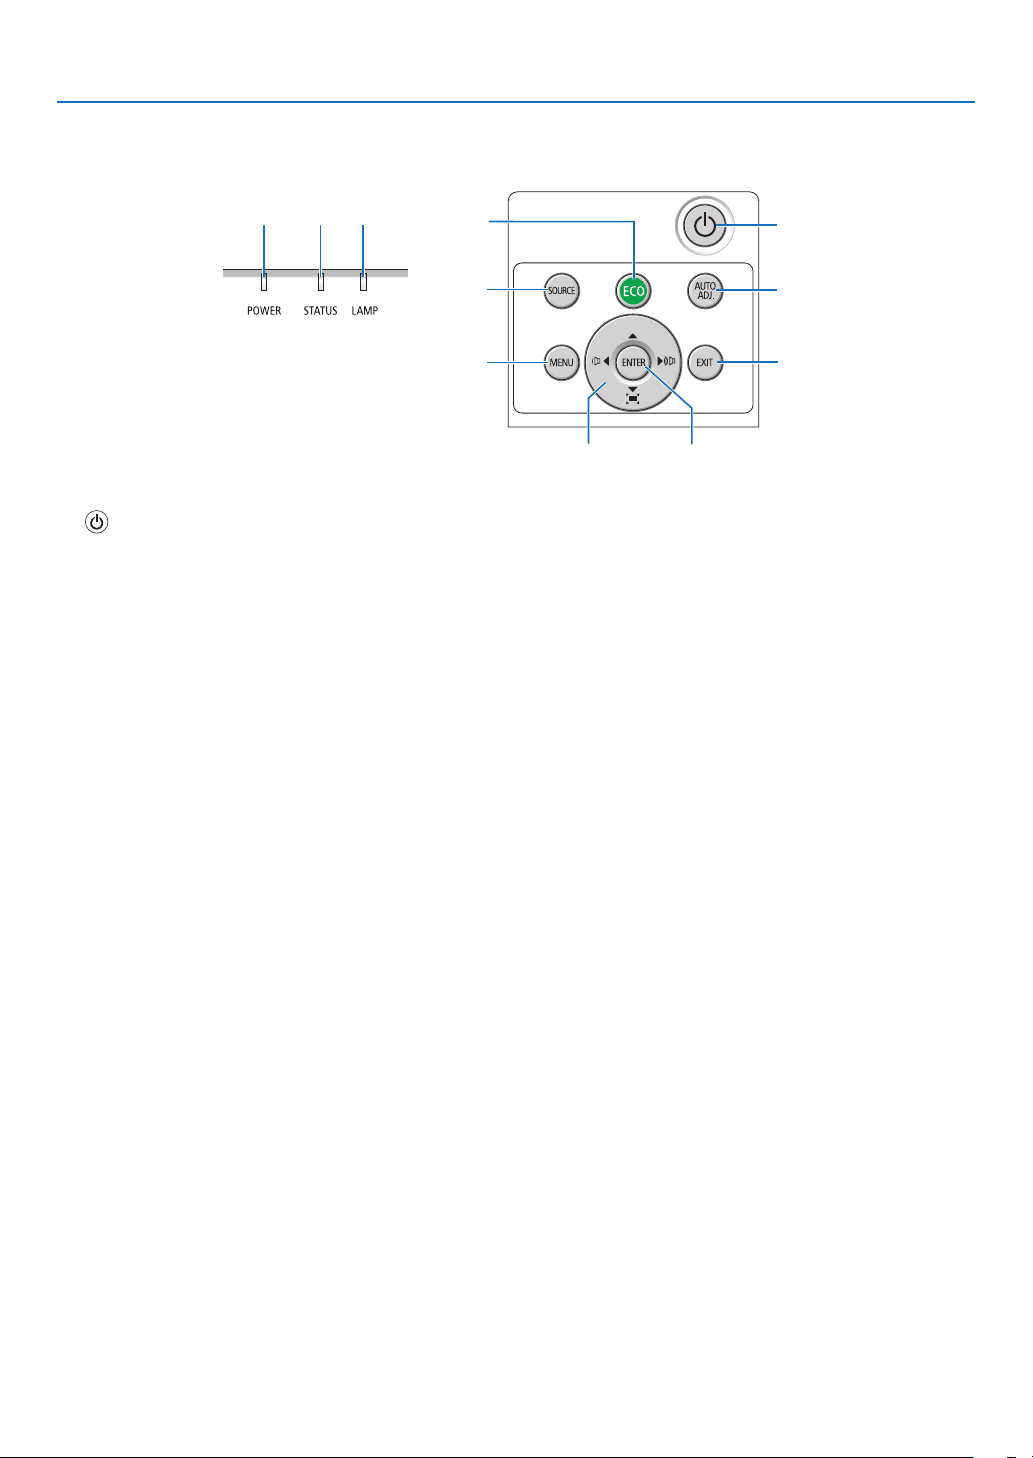
Controls/Indicator Panel
7
9
11
10
2
3 4
6
8
1
5
1. (POWER)Button
(→page
12,23)
2. POWER Indicator
(→page
11,12,23,113)
3.STATUSIndicator
(→page
113)
4.LAMPIndicator
(→page
108,113)
5.ECOButton
(→page
26)
6. SOURCE Button
(→page
14)
7.AUTOADJ.Button
(→page
22)
8.MENUButton
(→page
51)
9. ▲▼◀▶/VolumeButtons◀▶ / Keystone Buttons
(→page
20,22,28,51)
10. ENTER Button
(→page
51)
11.EXITButton
(→page
51)
7
1. Introduction
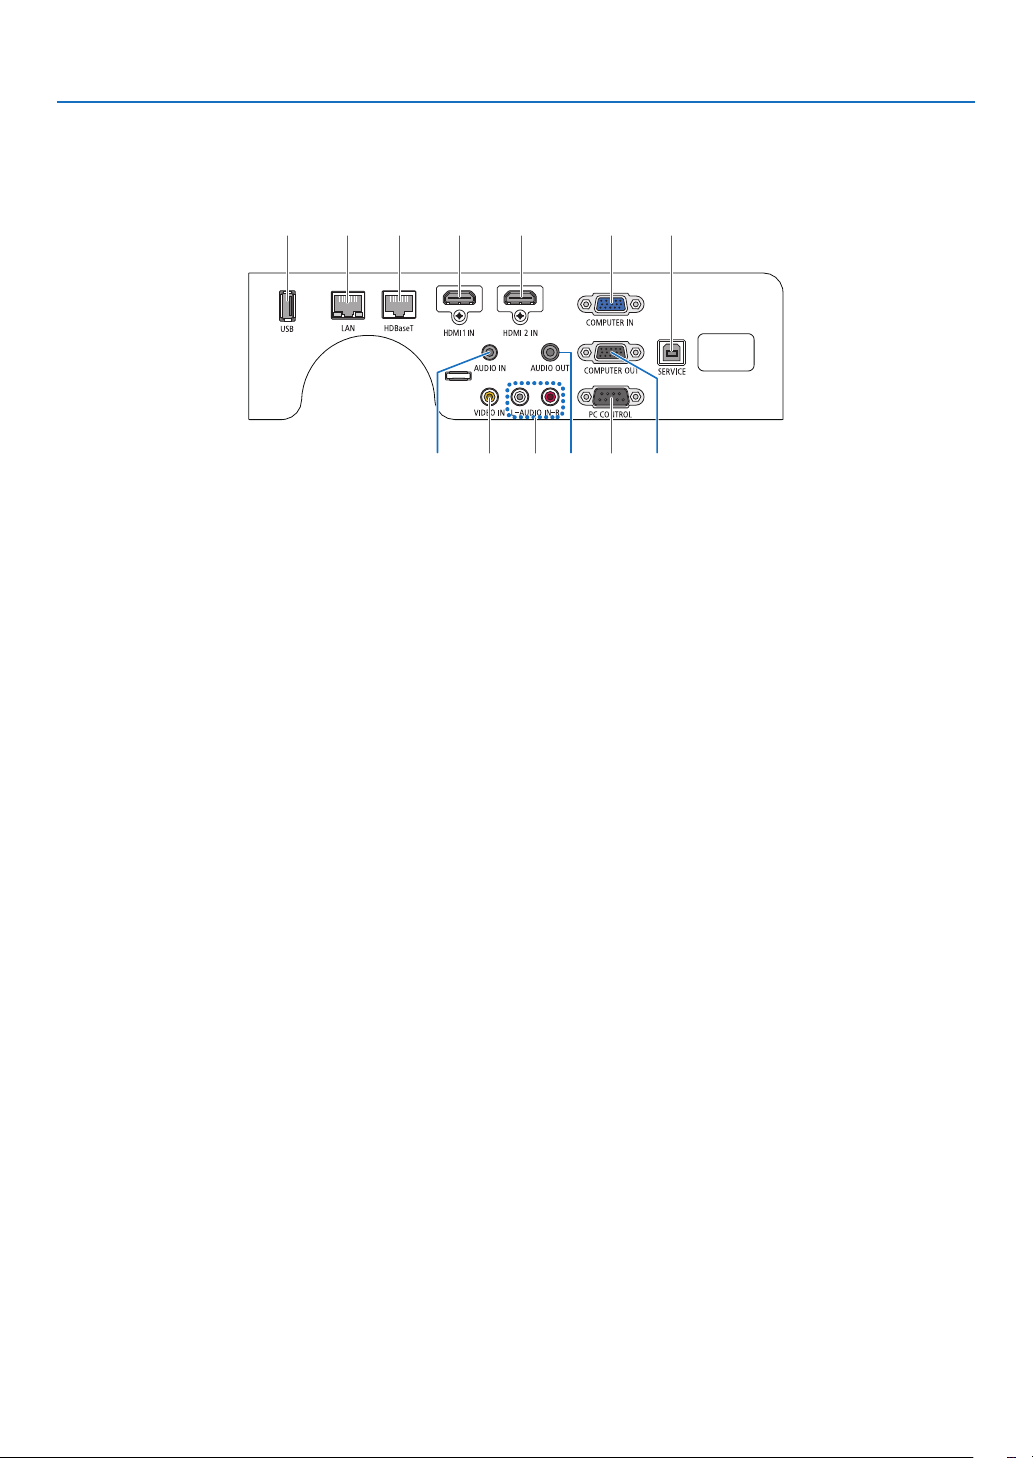
Terminal Panel Features
1. COMPUTER IN/ Component Input Terminal
(MiniD-Sub15Pin)
(→page
93,97)
2.COMPUTERAUDIOINMiniJack(StereoMini)
(→page
93,94,97)
3.HDMI1INTerminal(TypeA)
(→page
93,94,98)
4.HDMI2INTerminal(TypeA)
(→page
93,94,98)
5.SERVICEPort(USBTypeB)
(forservicepurposeonly)
6.COMPUTEROUTTerminal(MiniD-Sub15Pin)
(→page
95)
7.AUDIOOUTMiniJack(StereoMini)
(→page
95)
8.VIDEOINTerminal(RCA)
(→page
96)
9.AUDIOINL,R(RCA)
(→page
96)
10.LANPort(RJ-45)
(→page
99)
11.USBPort(TypeA)
For USB memory
(→page
100)
12.PCCONTROLPort(D-Sub9Pin)
(→page
127)
UsethisporttoconnectaPCorcontrolsystem.
Thisenablesyoutocontroltheprojectorusingserial
communicationprotocol.Ifyouarewritingyourown
program,typicalPCcontrolcodesareonpage
127.
13.HDBaseTPort(RJ-45)
(→page
73,103)
1
2
43131011
98712 6
5
8
1. Introduction
❹ Part Names of the Remote Control
+
3
4
6
7
1
2
10
16
17
15
14
9
5
8
13
30
31
32
20
21
26
28
29
25
24
23
22
27
33
19
18
12
11
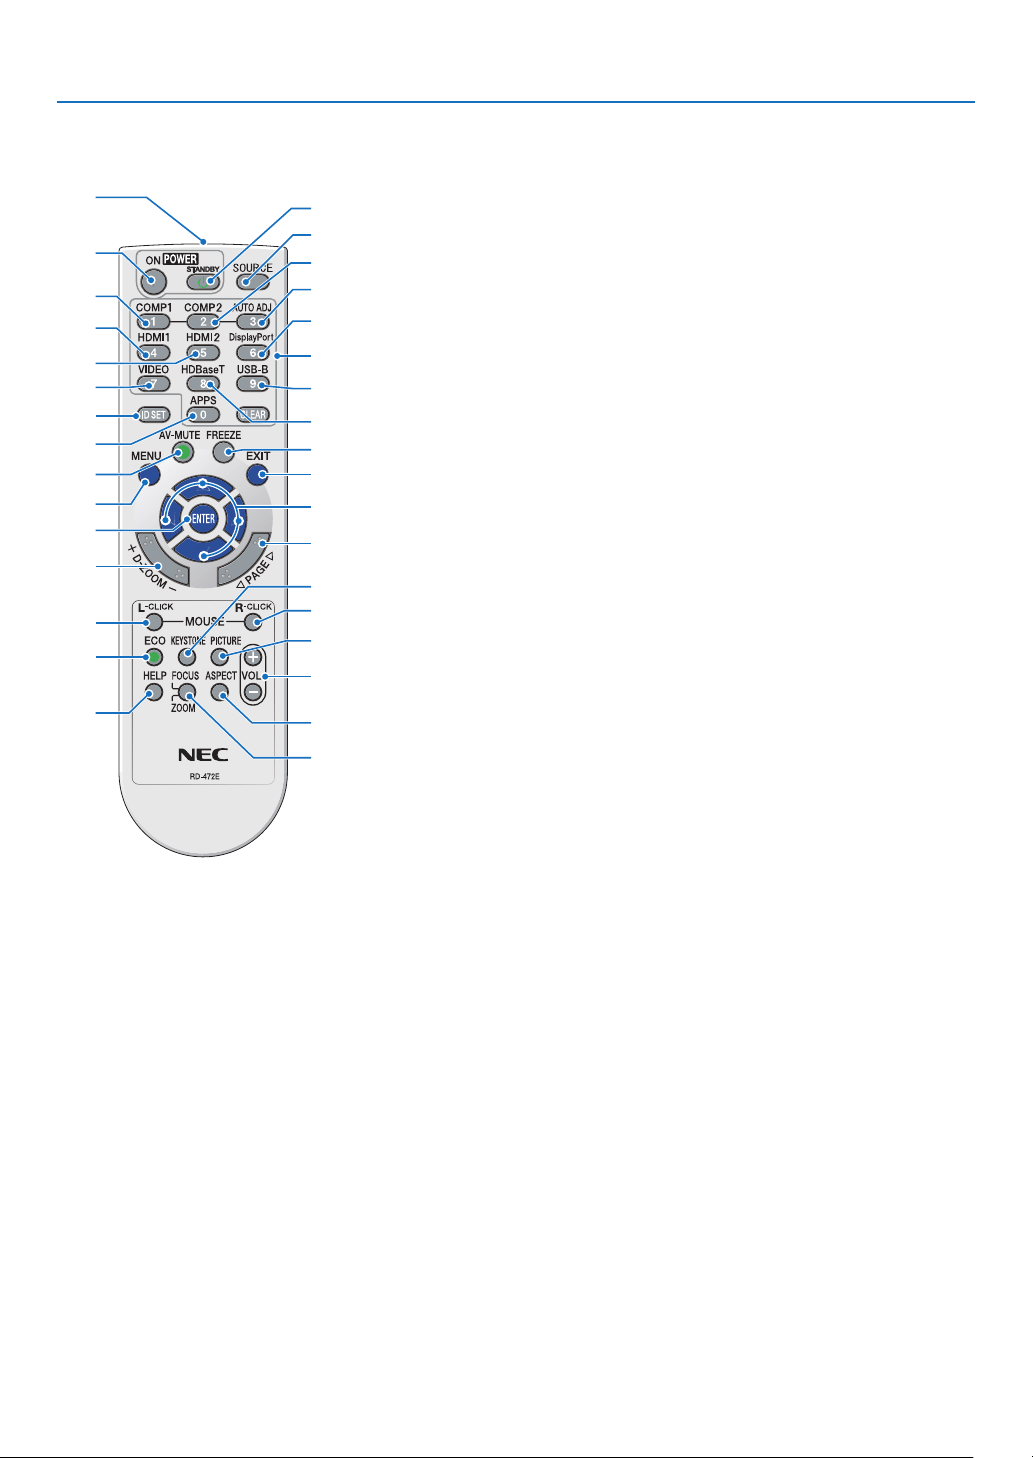
1. Infrared Transmitter
(→page
9)
2. POWER ON Button
(→page
12)
3.POWERSTANDBYButton
(→page
23)
4.SOURCEButton
(→page
14)
5.COMPUTER1Button
(→page
14)
6. COMPUTER 2 Button
(Thisbuttondoesnotworkonthis
seriesofprojectors)
7.AUTOADJ.Button
(→page
22)
8.HDMI1Button
(→page
14)
9. HDMI 2 Button
(→page
14)
10. DisplayPort Button
(Thisbuttondoesnotworkonthis
seriesofprojectors)
11.VIDEOButton
(→page
14)
12. HDBaseT Button
(→page
14,103)
13.USB-BButton
(Thisbuttondoesnotworkonthis
seriesofprojectors)
14.APPSButton
(→page
14,45)
15.IDSETButton
(→page
71)
16. Numeric Keypad Button/
CLEAR Button
(→page
71)
17. FREEZE Button
(→page
25)
18.AV-MUTEButton
(→page
25)
19. MENU Button
(→page
51)
20.EXITButton
(→page
51)
21. ▲▼◀▶ Button
(→page
51)
22. ENTER Button
(→page
51)
23.D-ZOOM(+)(–)Button
(→page
25,26)
24.MOUSEL-CLICKButton
(Thisbuttondoesnotworkonthis
seriesofprojectors)
25.MOUSER-CLICKButton
(Thisbuttondoesnotworkonthis
seriesofprojectors)
26. PAGE ▽/△ Button
(→page
46)
27. ECO Button
(→page
26)
28.KEYSTONEButton
(→page
20,28)
29. PICTURE Button
(→page
57,59)
30.VOL.(+)(–)Button
(→page
22)
31.ASPECTButton
(→page
62)
32.FOCUS/ZOOMButton
(Thisbuttondoesnotworkonthis
seriesofprojectors)
33.HELPButton
(→page
80,84,110)
9
1. Introduction
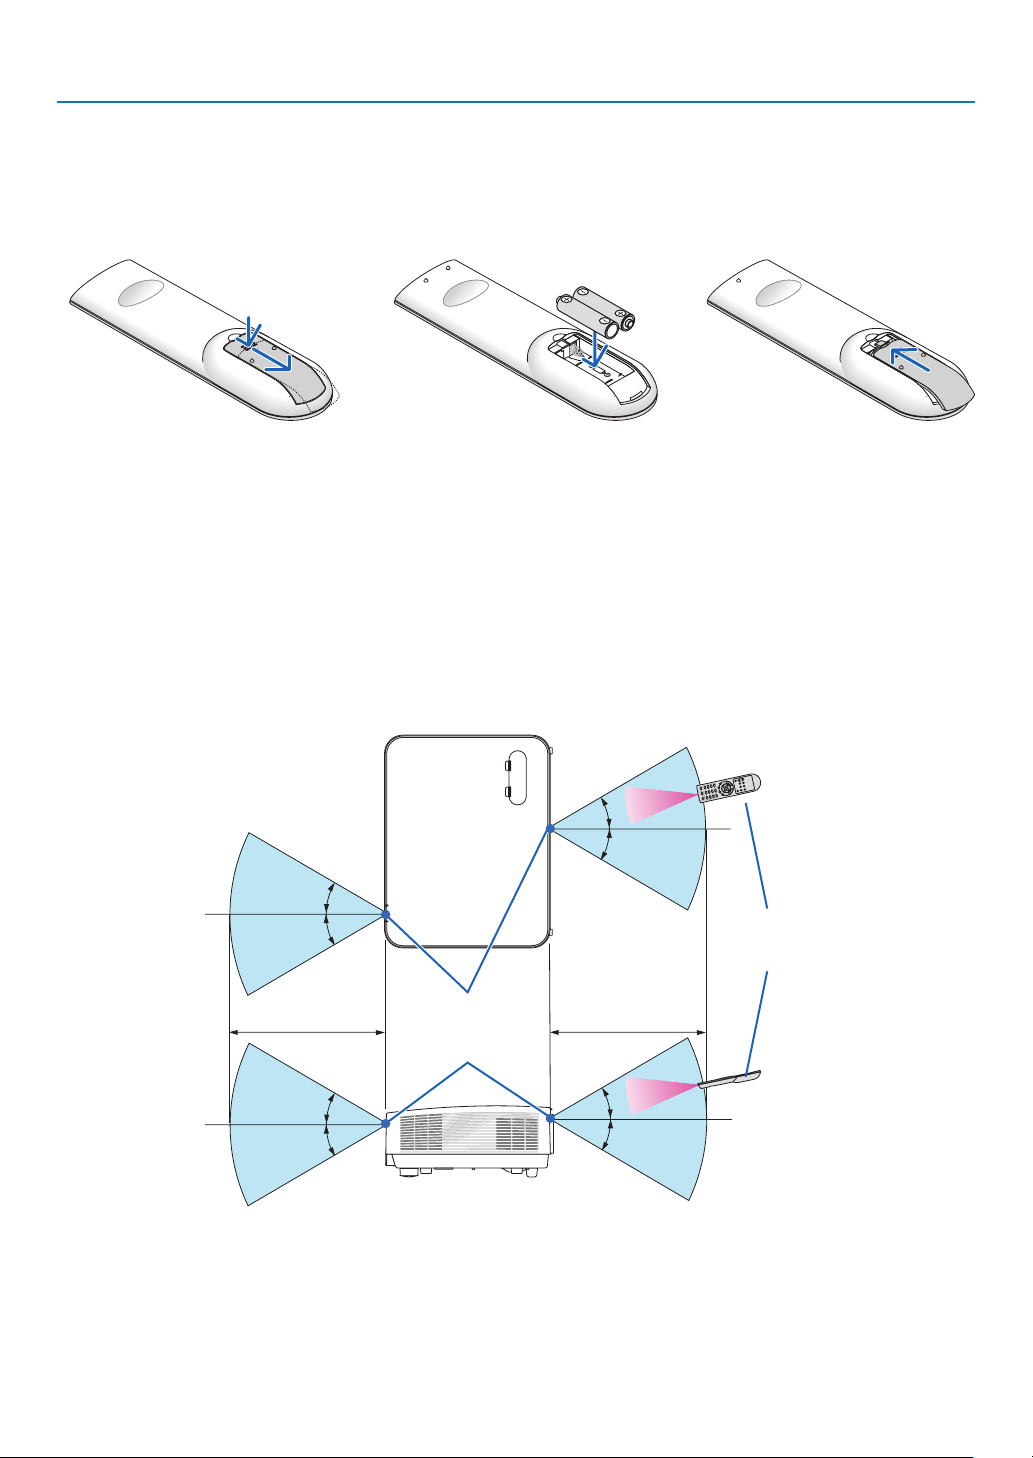
Battery Installation
1. Press firmly and slide the bat-
tery cover off.
2. Install new batteries (AAA).
Ensure that you have the bat-
teries’ polarity (+/−) aligned
correctly.
3. Slip the cover back over the
batteries until it snaps into
place. Do not mix different
types of batteries or new and
old batteries.
OPEN
OPEN
Remote Control Precautions
•Handletheremotecontrolcarefully.
•Iftheremotecontrolgetswet,wipeitdryimmediately.
•Avoidexcessiveheatandhumidity.
•Donotshort,heat,ortakeapartbatteries.
•Donotthrowbatteriesintore.
•Ifyouwillnotbeusingtheremotecontrolforalongtime,removethebatteries.
•Ensurethatyouhavethebatteries’polarity(+/−)alignedcorrectly.
•Donotusenewandoldbatteriestogether,orusedifferenttypesofbatteriestogether.
•Disposeofusedbatteriesaccordingtoyourlocalregulations.
Operating Range for Wireless Remote Control
30°
30°
30°
30°
30°
30°
30°
30°
22 feet/7 m22 feet/7 m
Remote sensor on
projector cabinet
Remote control
•Theinfraredsignaloperatesbyline-of-sightuptoadistanceofabout22feet/7mandwithina60-degreeangle
of the remote sensor on the projector cabinet.
•Theprojectorwillnotrespondifthereareobjectsbetweentheremotecontrolandthesensor,orifstronglight
fallsonthesensor.Weakbatterieswillalsopreventtheremotecontrolfromproperlyoperatingtheprojector.

10
This section describes how to turn on the projector and to project a picture onto the screen.
❶ Flow of Projecting an Image
Step 1
•Connectingyourcomputer/Connectingthepowercord(→ page
11)
Step 2
•Turningontheprojector(→ page
12)
Step 3
•Selectingasource(→ page
14)
Step 4
•Adjustingthepicturesizeandposition(→ page
15)
•Correctingkeystonedistortion[KEYSTONE](→ page
20)
Step 5
•Adjustingapictureandsound
- Optimizing a computer signal automatically (→ page
22)
- Turning up or down volume (→ page
22)
Step 6
•Makingapresentation
Step 7
•Turningofftheprojector(→ page
23)
Step 8
•WhenMovingtheProjector(→ page
24)
2. Projecting an Image (Basic Operation)
11
2. Projecting an Image (Basic Operation)
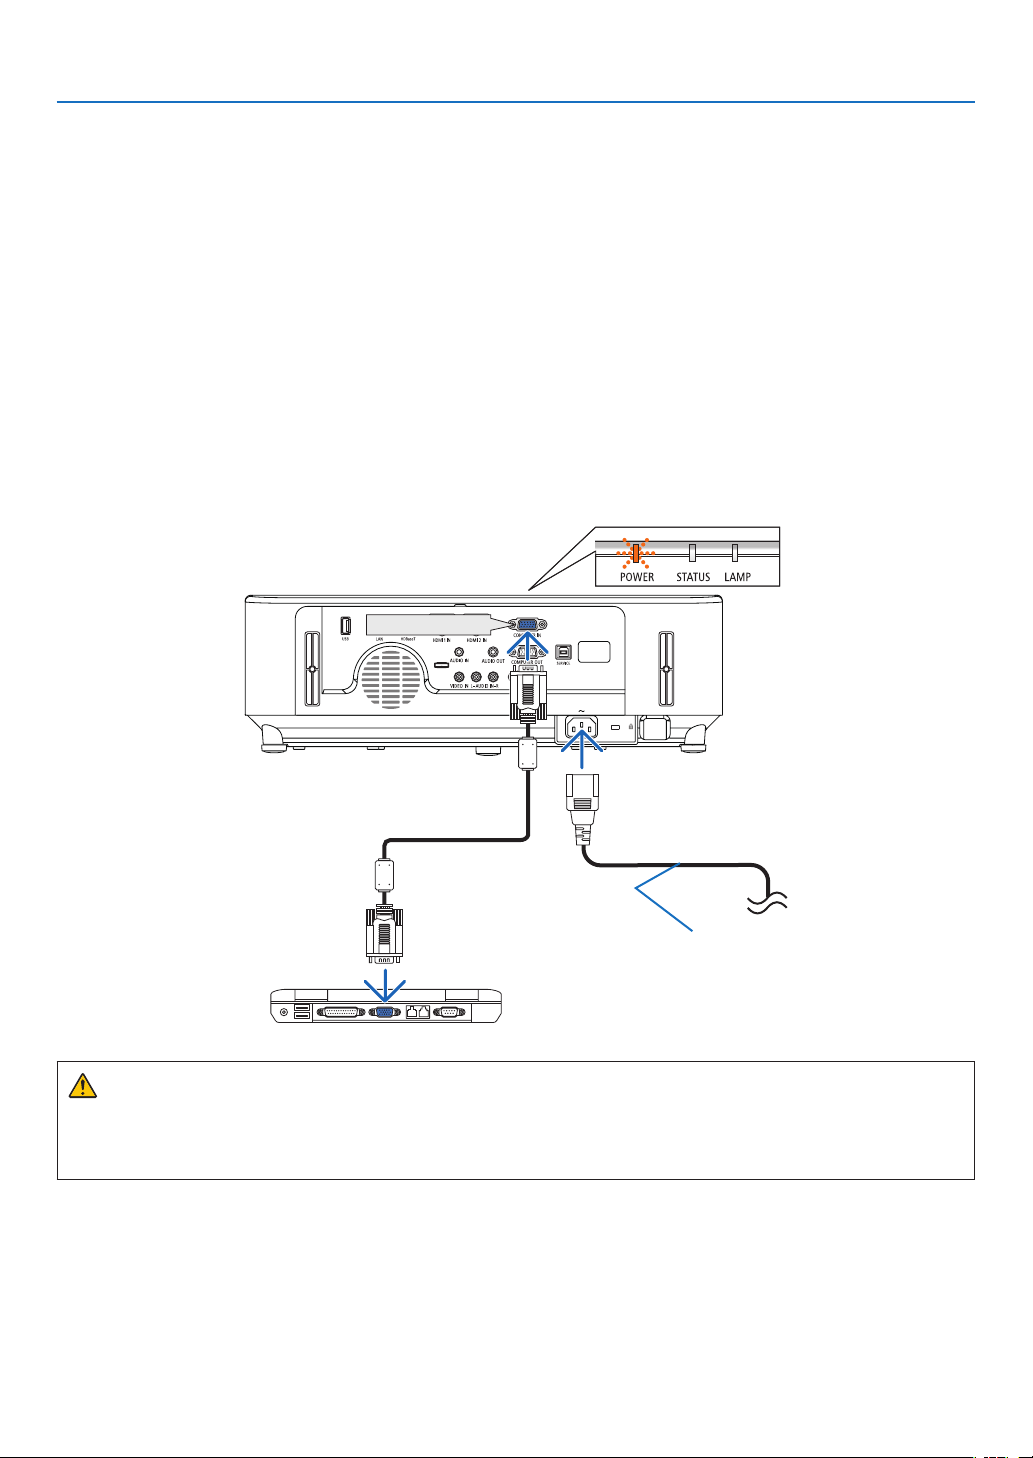
❷ Connecting Your Computer/Connecting the Power Cord
1.Connectyourcomputertotheprojector.
This section will show you a basic connection to a computer. For information about other connections, see “6.
InstallationandConnections”onpage
93.
Connectthecomputercable(VGA)betweentheprojector’sCOMPUTERINterminalandthecomputer’sport(mini
D-Sub 15 Pin). Turn two thumb screws of both terminals to fix the computer cable (VGA).
2.Connectthesuppliedpowercordtotheprojector.
Firstconnectthesuppliedpowercord’sthree-pinplugtotheACINoftheprojector,andthenconnecttheother
plug of the supplied power cord in the wall outlet.
The projector’s power indicator will start blinking orange.
*Thiswillapplyforbothindicatorswhen[NORMAL]isselectedfor[STANDBYMODE].SeethePowerIndicator
section.(→ page
113)
COMPUTER IN
Make sure that the prongs
are fully inserted into both
theACINandthewall
outlet.
To wall outlet ←
CAUTION:
PartsoftheprojectormaybecometemporarilyheatediftheprojectoristurnedoffwiththePOWERbuttonorif
theACpowersupplyisdisconnectedduringnormalprojectoroperation.
Becarefultohandletheprojector.
12
2. Projecting an Image (Basic Operation)
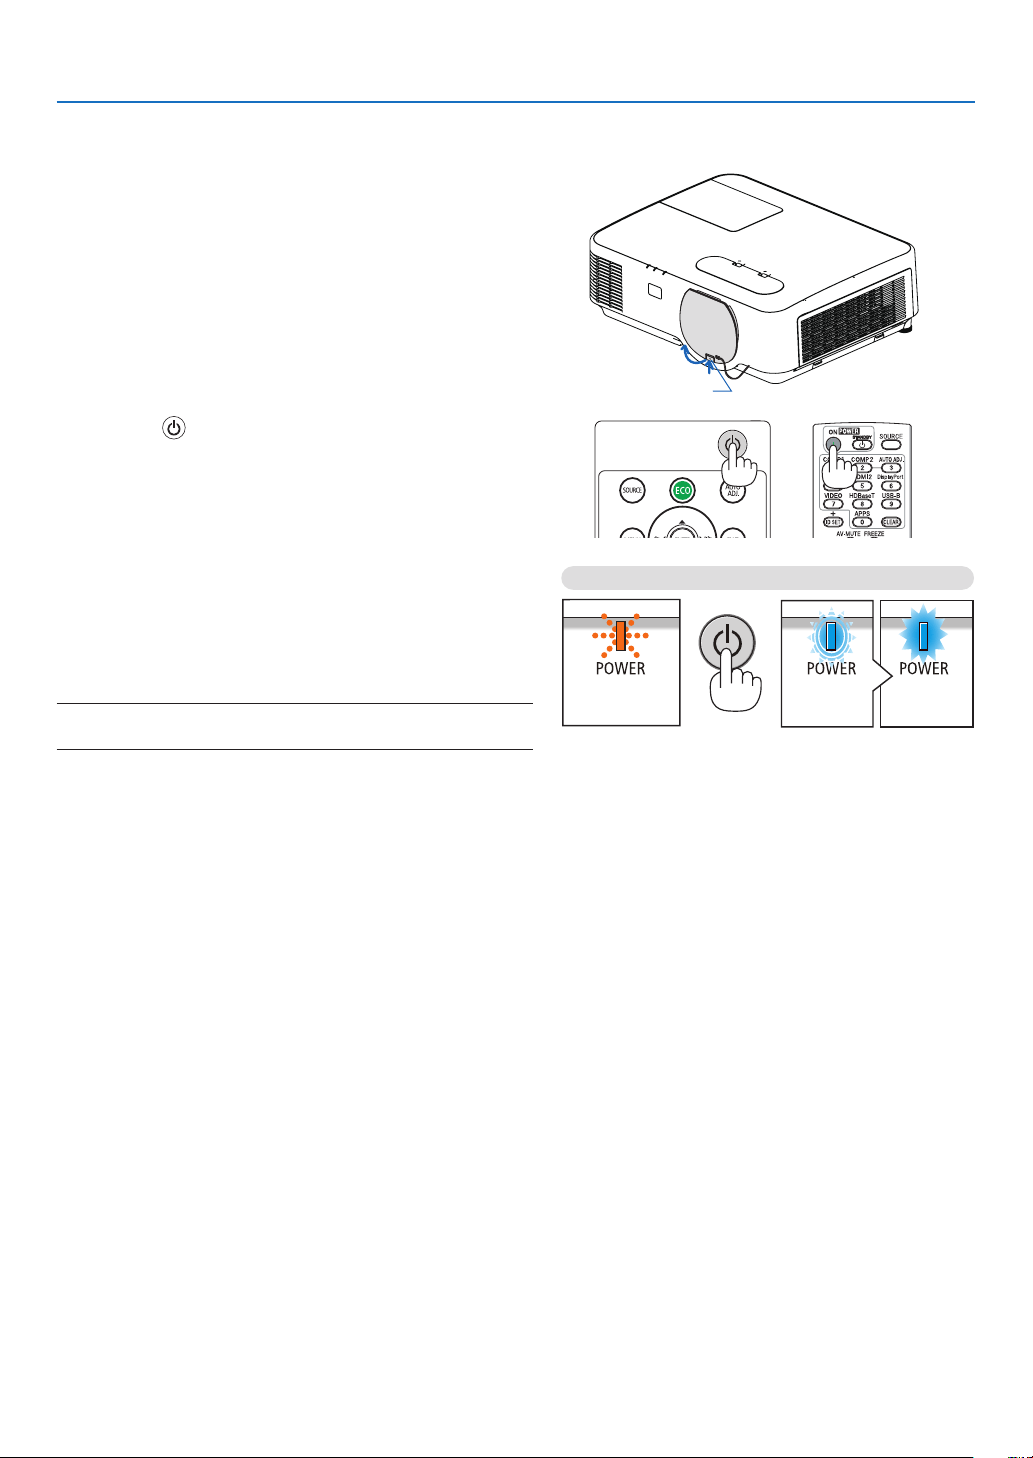
❸ Turning on the Projector
1. Remove the lens cap.
With the lens cap’s stopper pressed up, pull forward and
off.
Stopper
2. Press the (POWER) button on the projector cabinet
or the POWER ON button on the remote control.
The POWER indicator will blink and the projector will
become ready to use.
TIP:
•Whenthemessage“Projectorislocked!Enteryourpassword.”
isdisplayed,itmeansthatthe[SECURITY]featureisturnedon.
(→page
33)
After you turn on your projector, ensure that the computer
or video source is turned on.
NOTE:Whennoinputsignalispresent,theno-signalguidanceisdisplayed
(factorymenusetting).
Standby Blinking Power On
Blinking orange light Blinking blue
light
Steady blue
light
(→page113)
13
2. Projecting an Image (Basic Operation)
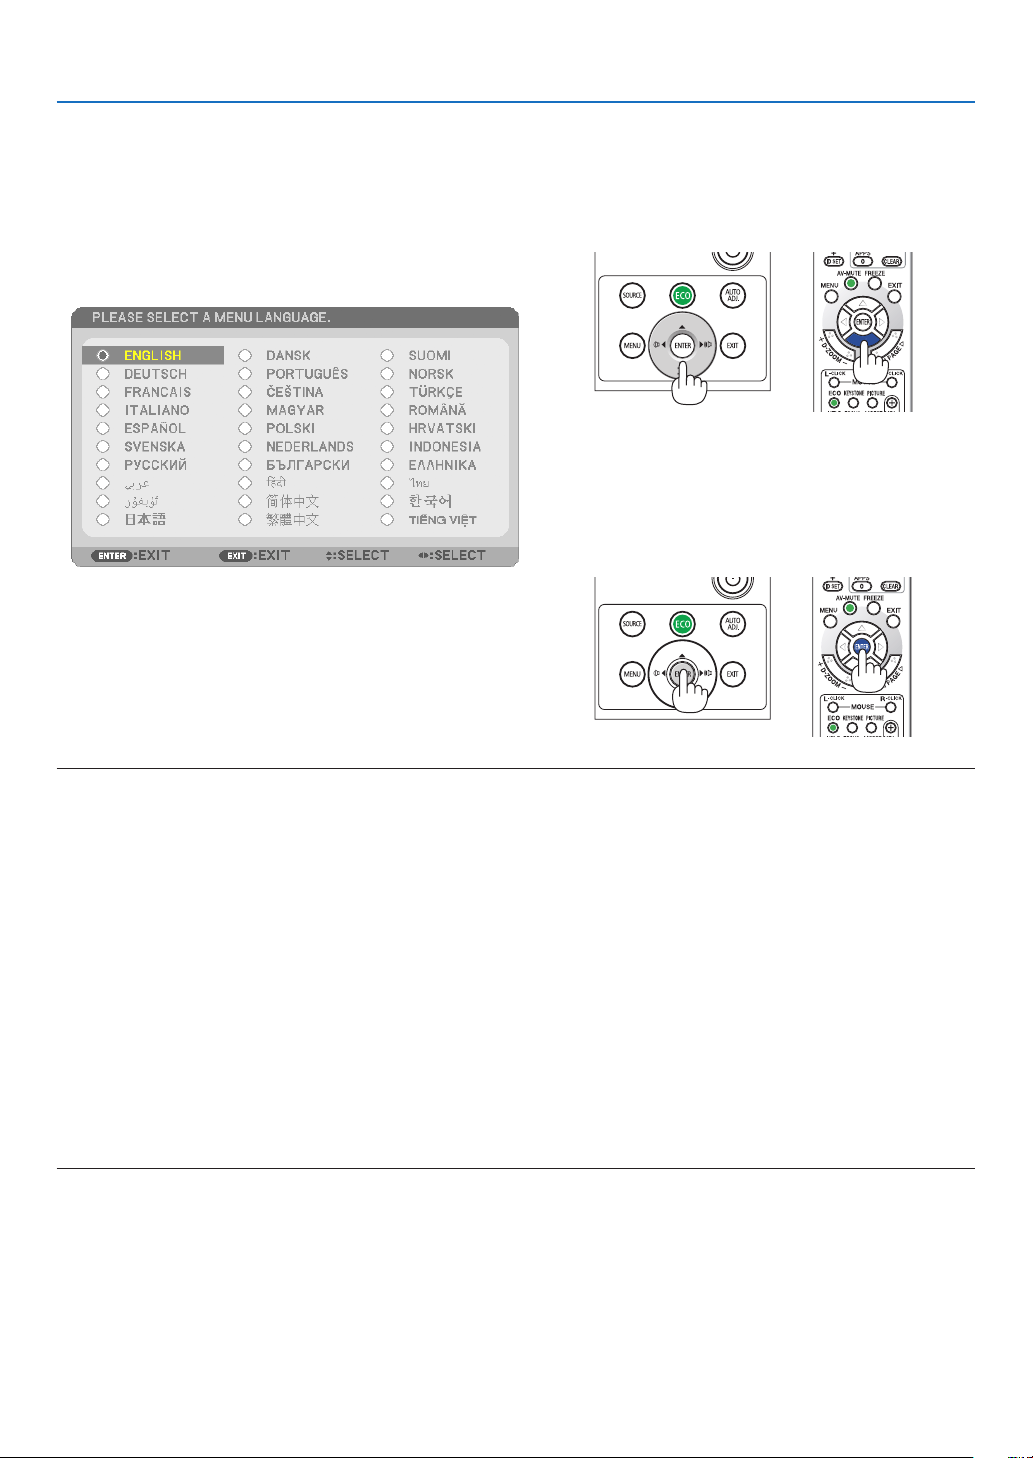
Note on Startup screen (Menu Language Select screen)
Whenyourstturnontheprojector,youwillgettheStartupmenu.Thismenugivesyoutheopportunitytoselect
oneofthe30menulanguages.
Toselectamenulanguage,followthesesteps:
1. Use the ▲, ▼, ◀ or ▶ button to select one of the 30
languages from the menu.
2. Press the ENTER button to execute the selection.
Afterthishasbeendone,youcanproceedtothemenu
operation.
Ifyouwant,youcanselectthemenulanguagelater.
(→[LANGUAGE]onpage
53 and 67)
NOTE:
•IftheprojectorisshutoffbyDIRECTPOWEROFF(pullingoutthepowercord)duringprojection,waitfor1secondatleastforreconnect
thepowercordforturningontheprojector.
Failingtodosocouldresultinnopowertotheprojector.(Therewillbenostand-byLED)
Shouldthishappen,unplugthepowercordandplugitinagain.Turnonthemainpower.
•Ifoneofthefollowingthingshappens,theprojectorwillnotturnon.
-Iftheinternaltemperatureoftheprojectoristoohigh,theprojectordetectsabnormalhightemperature.Inthisconditiontheprojector
willnotturnontoprotecttheinternalsystem.Ifthishappens,waitfortheprojector’sinternalcomponentstocooldown.
-Whenthelampreachesitsendofusablelife,theprojectorwillnotturnon.Ifthishappens,replacethelamp.
-IftheSTATUSindicatorlightsorangewiththepowerbuttonpressed,itmeansthatthe[CONTROLPANELLOCK]isturnedon.Cancel
thelockbyturningitoff.(→page
69)
-Ifthelampfailstolight,andifthePOWERindicatorblinksinredandtheLAMPindicatorlightsinred,waitafullminuteandthenturn
onthepower.
•WhilethePOWERindicatorisblinkingblueinshortcycles,thepowercannotbeturnedoffbyusingthepowerbutton.
•Immediatelyafterturningontheprojector,screenickermayoccur.Thisisnormal.Wait3to5minutesuntilthelamplightingisstabilized.
•Whentheprojectoristurnedon,itmaytakesometimebeforethelamplightbecomesbright.
•Ifyouturnontheprojectorimmediatelyafterthelampisturnedofforwhenthelamptemperatureishigh,thefansrunwithoutdisplaying
animageforsometimeandthentheprojectorwilldisplaytheimage.
14
2. Projecting an Image (Basic Operation)
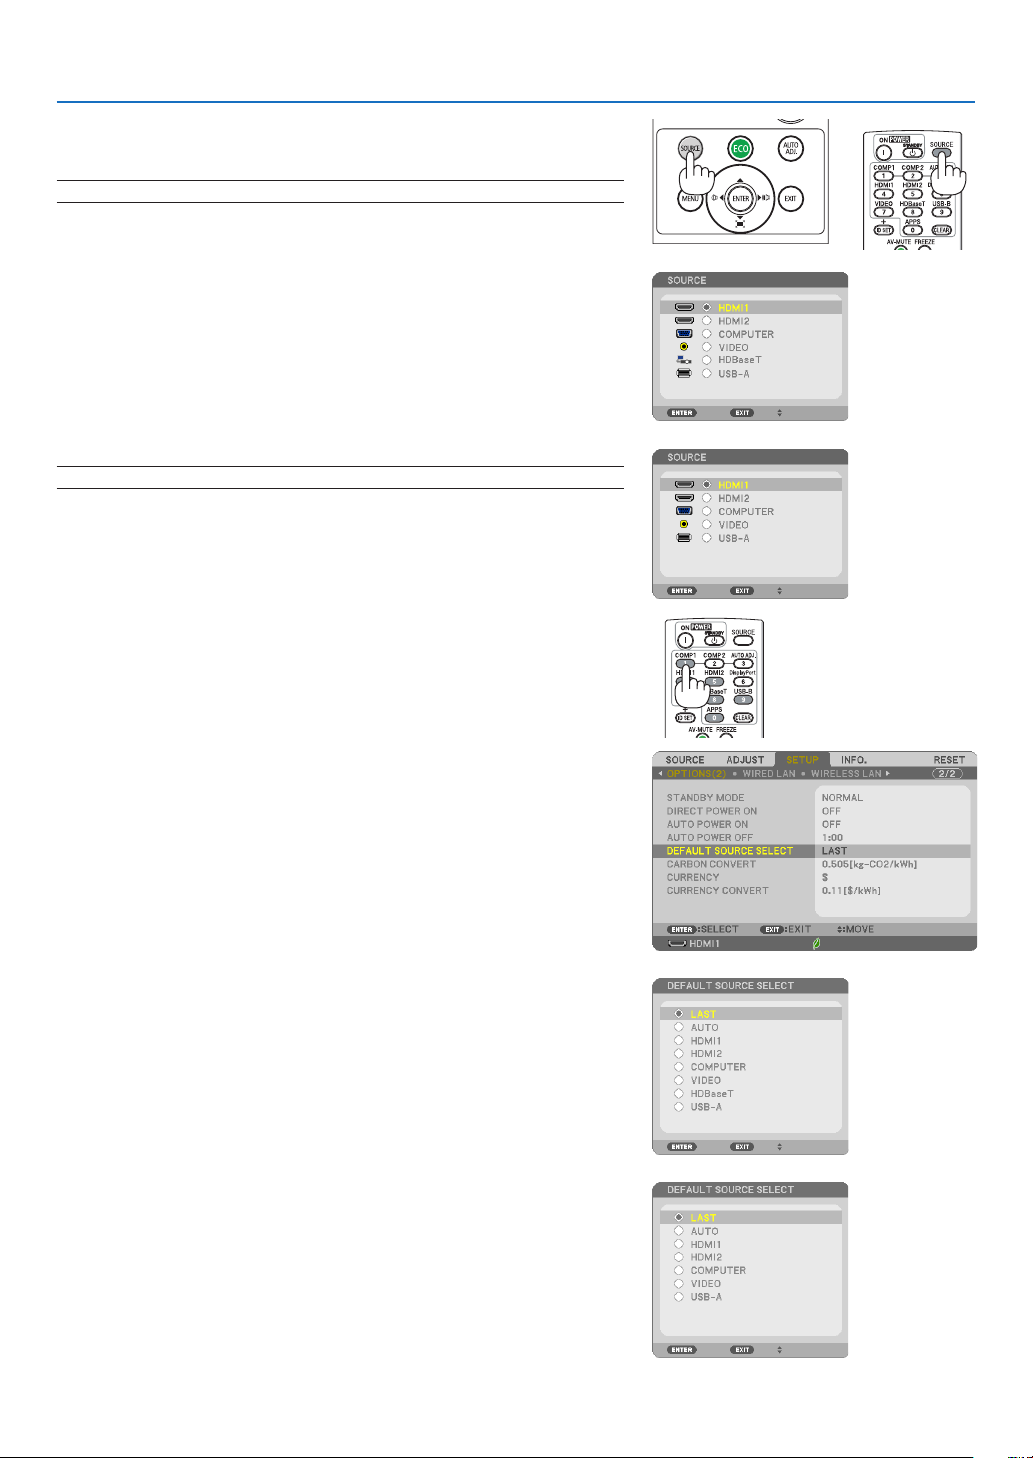
❹ Selecting a Source
Selecting the computer or video source
NOTE:Turnonthecomputerorvideosourceequipmentconnectedtotheprojector.
Detecting the Signal Automatically
PresstheSOURCEbuttononce.Theprojectorwillsearchfortheavail-
ableinputsourceanddisplayit.Theinputsourcewillchangeasfollows:
HDMI1→HDMI2→COMPUTER→VIDEO→HDBaseT→USB-A
•WiththeSOURCEscreendisplayed,youcanpresstheSOURCE
button a few times to select the input source.
•TheHDBaseTsourceisnotsupportedbyP603X.
TIP:Ifnoinputsignalispresent,theinputwillbeskipped.
Using the Remote Control
PressanyoneoftheCOMPUTER1,HDMI1,HDMI2,VIDEO,HDBaseT,
orAPPSbuttons.
Selecting Default Source
Youcansothatitwillbedisplayedeachtimetheprojectoristurnedon.
1. Press the MENU button.
The menu will be displayed.
2. Press the ▶buttontwicetoselect[SETUP]andthe▼ button or
theENTERbuttontoselect[GENERAL].
3.
Press the
▶
buttonfourtimestoselect[OPTIONS(2)].
4. Press the ▼buttonvetimestoselect[DEFAULTSOURCESE-
LECT]andpresstheENTERbutton.
The [DEFAULT SOURCE SELECT] screen will be displayed.
(→ page
75)
5.
Select a source as the default source, and press the ENTER button.
6. Press the EXIT button a few times to close the menu.
7. Restart the projector.
The source you selected in step 5 will be projected.
TIP:
•WhentheprojectorisinStandbymode,applyingacomputersignalfromacomputer
connectedtotheCOMPUTERINinputwillpowerontheprojectorandsimultaneously
projectthecomputer’simage.
([AUTOPOWERON]→page75)
•OnWindows7,acombinationoftheWindowsandPkeysallowsyoutosetupexternal
displayeasilyandquickly.
[P554U/P474U/P554W/P474W/P604X]
[P603X]
[P554U/P474U/P554W/P474W/P604X]
[P603X]
15
2. Projecting an Image (Basic Operation)
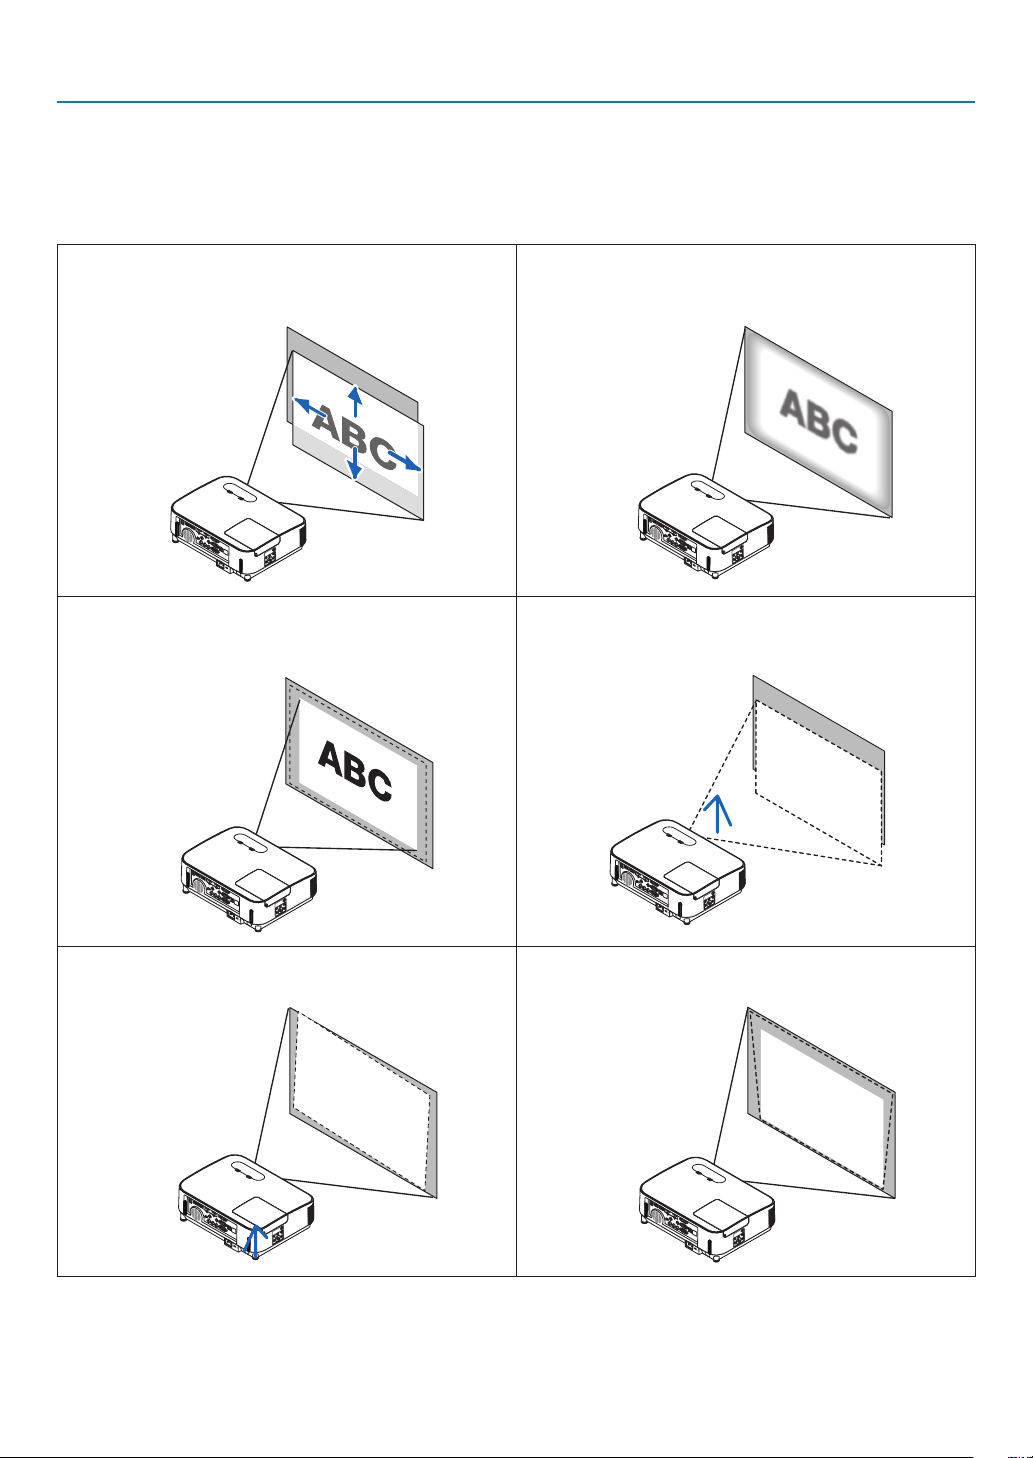
❺ Adjusting the Picture Size and Position
Usethelensshiftdial,theadjustabletiltfootlever,thezoomleverandthefocusringtoadjustthepicturesizeand
position.
Inthischapterdrawingsandcablesareomittedforclarity.
Adjustingtheprojectedimage’sverticalandhorizontal
position[Lensshift]
(→page16)
Adjustingthefocus[Focusring]
(→page18)
Finelyadjustingthesizeofanimage
[Zoomlever]
(→ page18)
Adjustingthethrowangle(theheightofanimage)
[Tiltfoot]
(→page19)
Adjustingtheleftandrighttiltofanimage
[Rearfoot](→page19)
Correctingthekeystonedistortion[Keystone]
(→page20)
16
2. Projecting an Image (Basic Operation)
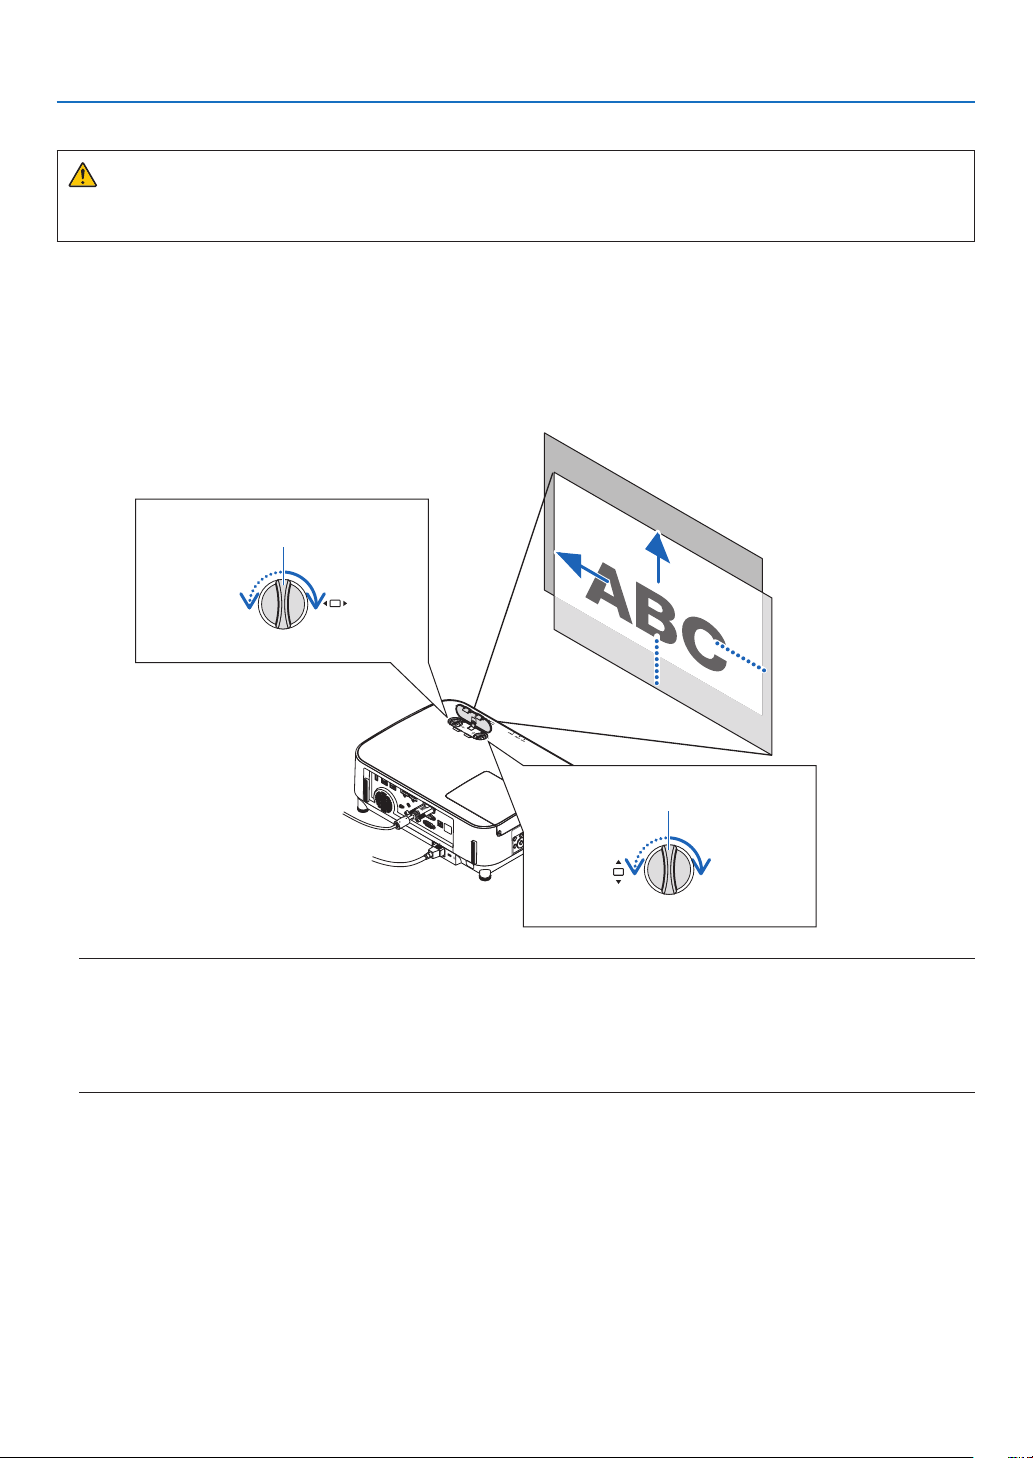
Adjusting the vertical position of a projected image (Lens shift)
CAUTION:
Performtheadjustmentfrombehindorfromthesideoftheprojector.Adjustingfromthefrontcouldexposeyour
eyestostronglightwhichcouldinjurethem.
1. Turn the lens shift dials clockwise or counterclockwise.
Vertical dial
Turn this clockwise or counterclockwise to adjust the projection position in the vertical direction.
Horizontal dial
Turn this clockwise or counterclockwise to adjust the projection position in the horizontal direction.
Lens shift dial
(Horizontal)
Lens shift dial
(Vertical)
Upward
Leftward
Downward
Rightward
NOTE:
•Thedialscanbeturnedmorethanonefullturn,buttheprojectionpositioncannotbemovedmorethantherangeindicatedonthe
followingpage.Donotforcetoturnthedials.Doingsomaydamagethedials.
•Ifthelensisshiftedtothemaximuminthediagonaldirection,theedgesofthescreenwillbedarkorshaded.
•Theverticalshiftadjustmentmustbenishedwithanimageshiftedupward.Ifyounishtheverticalshiftadjustmentwithanimage
shifteddown,thezoom/focusadjustmentsorstrongshakingmaycauseaprojectedimagetoslightlyshiftdown.

17
2. Projecting an Image (Basic Operation)
TIP:
•Thediagrambelowshowsthelensshiftadjustmentrange([ORIENTATION]:[DESKTOPFRONT]).
•Forthelensshiftadjustmentrangeregardingthe[CEILINGFRONT]projection,seepage
91.
[P554U/P474U/P554W/P474W]
100%V
55%V
100%H
15%H
15%H
15%H
15%H
Height of projected image
Width of projected image
[P604X/P603X]
100%V
50%V
100%H
15%H
15%H
15%H
15%H
Height of projected image
Width of projected image
Descriptionofsymbols:Vindicatesvertical(heightoftheprojectedimage),Hindicateshorizontal(widthoftheprojectedimage).
18
2. Projecting an Image (Basic Operation)
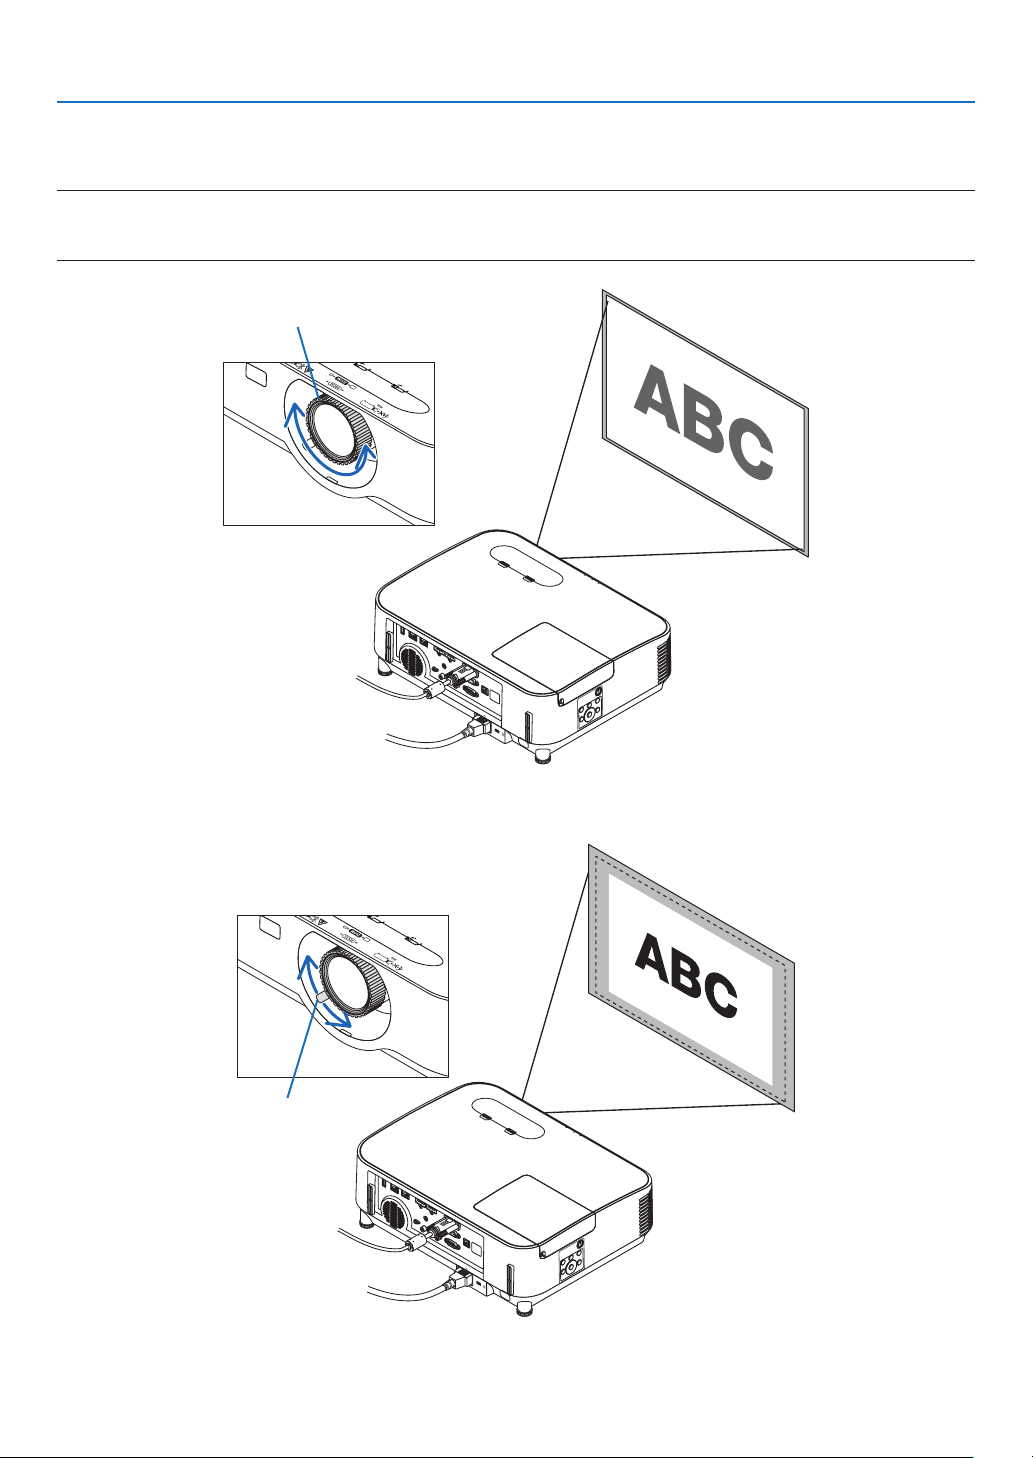
Focus
UsetheFOCUSringtoobtainthebestfocus.
NOTE:
•RecommendtoperformthefocusadjustmentafterleavingtheprojectorunderthestatetheTESTPATTERNhasbeenprojectedforover
30minutes.Pleasereferpage
72abouttheTESTPATTERN.
Focus ring
Zoom
Turnthezoomleverclockwiseandcounterclockwise.
Zoom lever
19
2. Projecting an Image (Basic Operation)
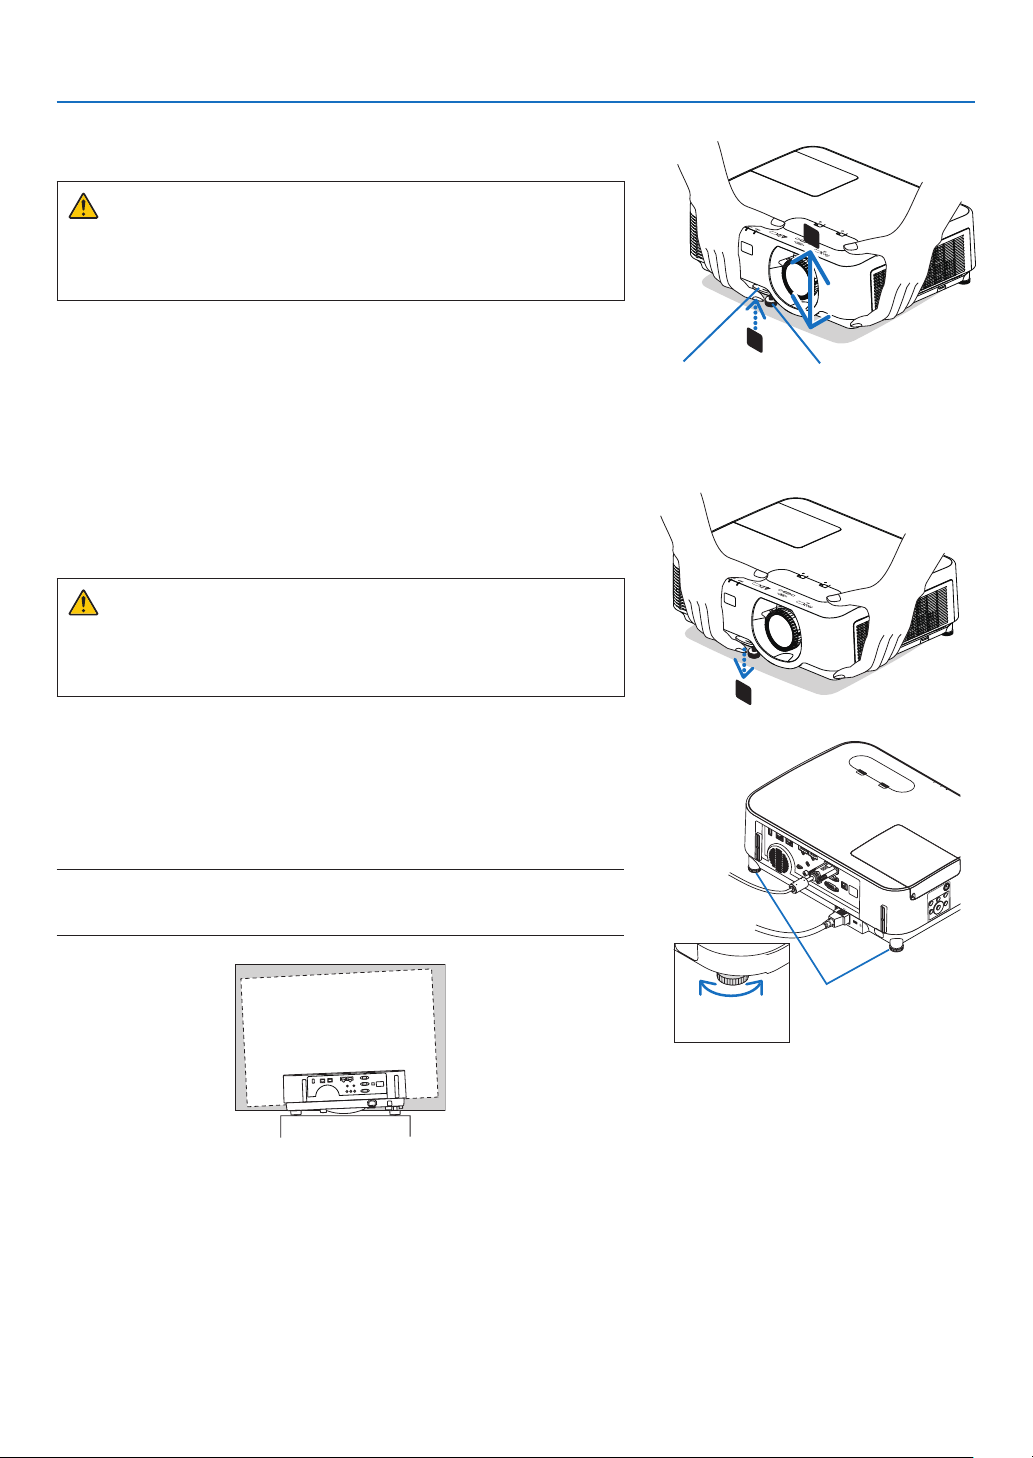
Adjust the Tilt Foot
1. Lift the front edge of the projector.
CAUTION:
DonottrytotouchtheexhaustventduringTiltFootadjustmentas
it can become heated while the projector is turned on and after it is
turned off.
2. Push up and hold the Adjustable Tilt Foot Lever on the front of
the projector to extend the adjustable tilt foot.
3. Lower the front of the projector to the desired height.
4. Release the Adjustable Tilt Foot Lever to lock the Adjustable tilt
foot.
The tilt foot can be extended up to 1.6 inch/40 mm.
There is approximately 10 degrees (up) of adjustment for the front of
the projector.
Rotate the rear foot to the desired height in order to square the image
on the projection surface.
CAUTION:
•Donotusethetilt-footforpurposesotherthanoriginallyintended.
Misusessuchasusingthetiltfoottocarryorhang(fromthewall
orceiling)theprojectorcancausedamagetotheprojector.
Adjustingtheleftandrighttiltofanimage[Rearfoot]
•Rotatetherearfoot.
The rear foot can be extended up to 0.5 inch/12 mm. Rotating the
rear foot allows the projector to be placed horizontally.
NOTE:
•Donotextendtherearfootbeyonditsheightlimit(0.5inch/12mm).Doingsomay
causetherearfoottocomeoutoftheprojector.
Up Down
Rear foot
AdjustableTiltFootAdjustable Tilt
FootLever
2
1
3
20
2. Projecting an Image (Basic Operation)
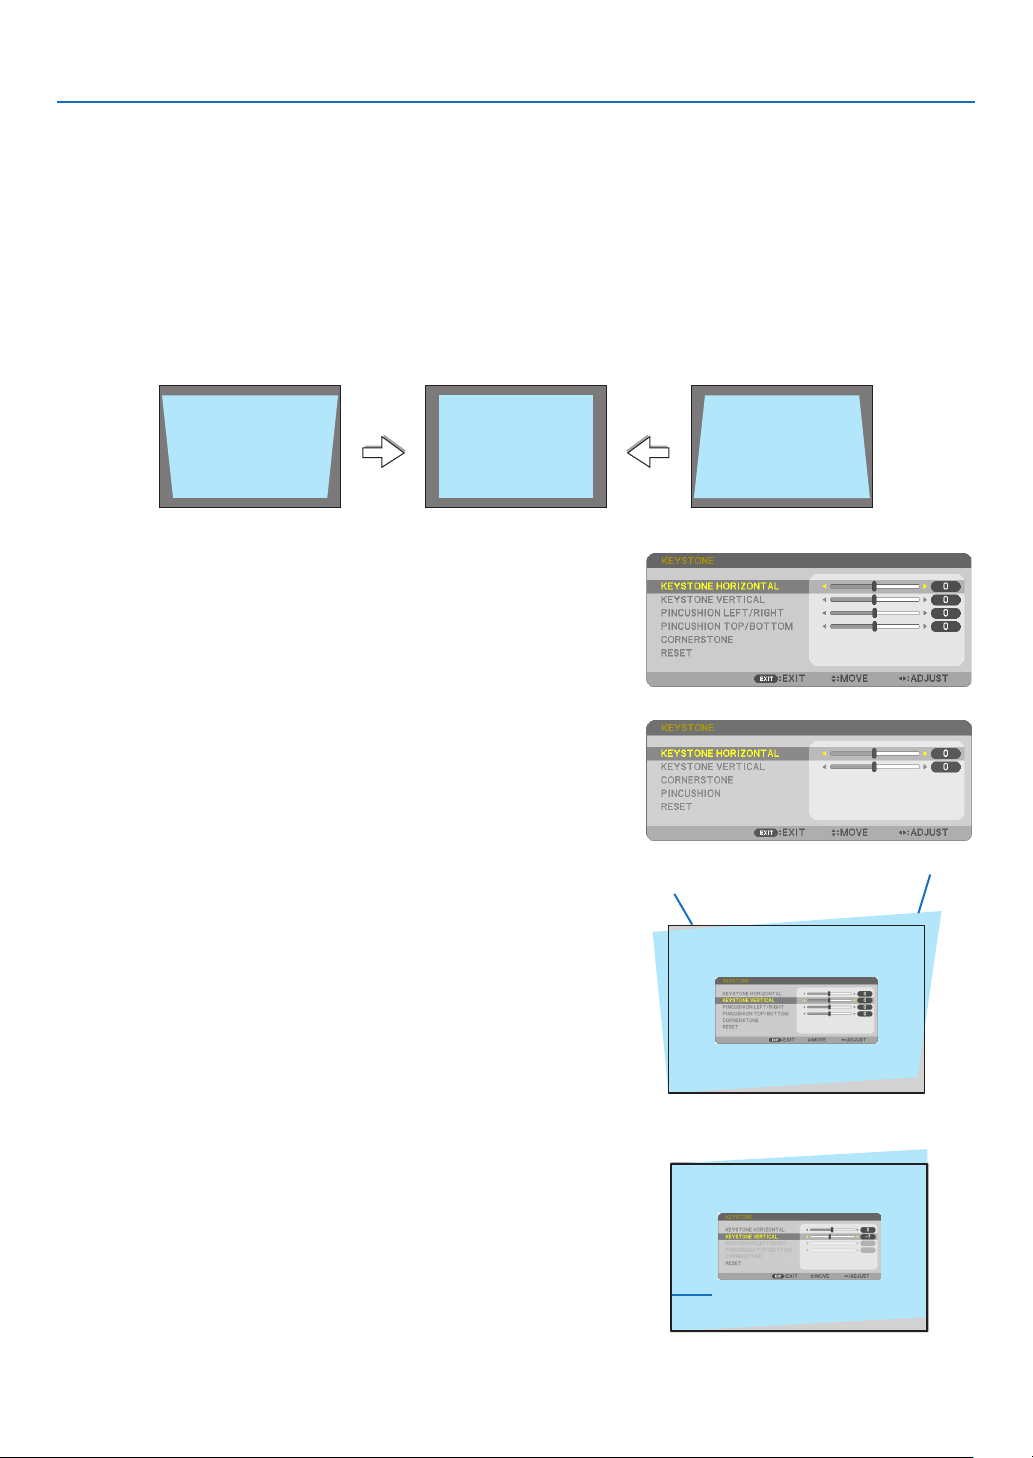
❻ Correcting Keystone Distortion [KEYSTONE]
Whentheprojectorisnotexactlyperpendiculartothescreen,keystonedistortionoccurs.Forcorrectingthisdistor-
tion,youcanusethe“Keystone”function,adigitaltechnologythatcanadjustforkeystone-typedistortion,resulting
inacrisp,squareimage.
Thefollowingprocedureexplainshowtousethe[KEYSTONE]screenfromthemenutocorrecttrapezoidaldistor-
tionswhentheprojectorisplaceddiagonallytothescreen.
•BeforeperformingKEYSTONEcorrection
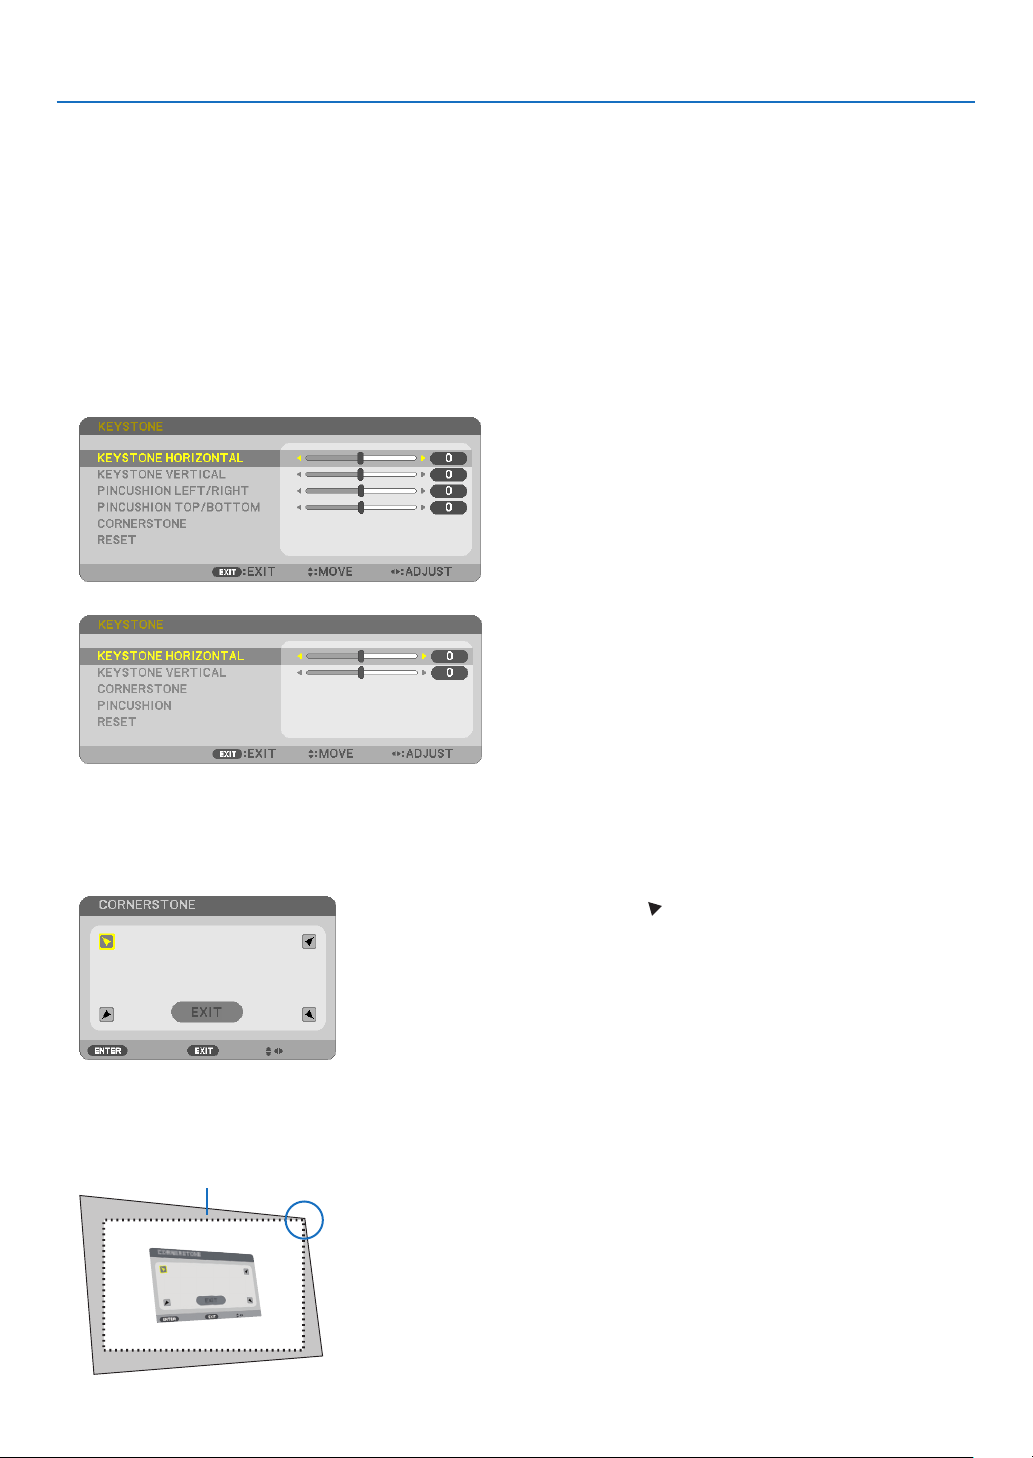
TheKEYSTONEcorrectionhasfourfeatures,KEYSTONEHORIZONTAL,KEYSTONEVERTICAL,PINCUSHION,and
CORNERSTONE.IfthevalueofeitherCONERSTONEorPINCUSHIONhascorrected,KEYSTONEHORIZONTAL
andKEYSTONEVERTICALaredisabled.Inthiscase,RESETthecorrectedvaluesandrestarttocorrectdistortion.
1. Press the ▼ button on the projector cabinet.
The Keystone screen will be displayed on the screen.
•PresstheKEYSTONEbuttonwhenusingtheremotecontrol.
•SeepageforPINCUSHION.
•SeepageforCORNERSTONE.
•SeepageforRESET.
[P554W/P474W/P604X/P603X]
[P554U/P474U]
2. Press the ▼buttontoselect[KEYSTONEVERTICAL]andthen
use the ◀ or ▶ so that the left and right sides of the projected
image are parallel.
* Adjust the vertical keystone distortion.
Projected area
Screen frame
3. Align the left (or right) side of the screen with the left (or right)
side of the projected image.
•Usetheshortersideoftheprojectedimageasthebase.
•Intherightexample,usetheleftsideasthebase.
Align left side
21
2. Projecting an Image (Basic Operation)
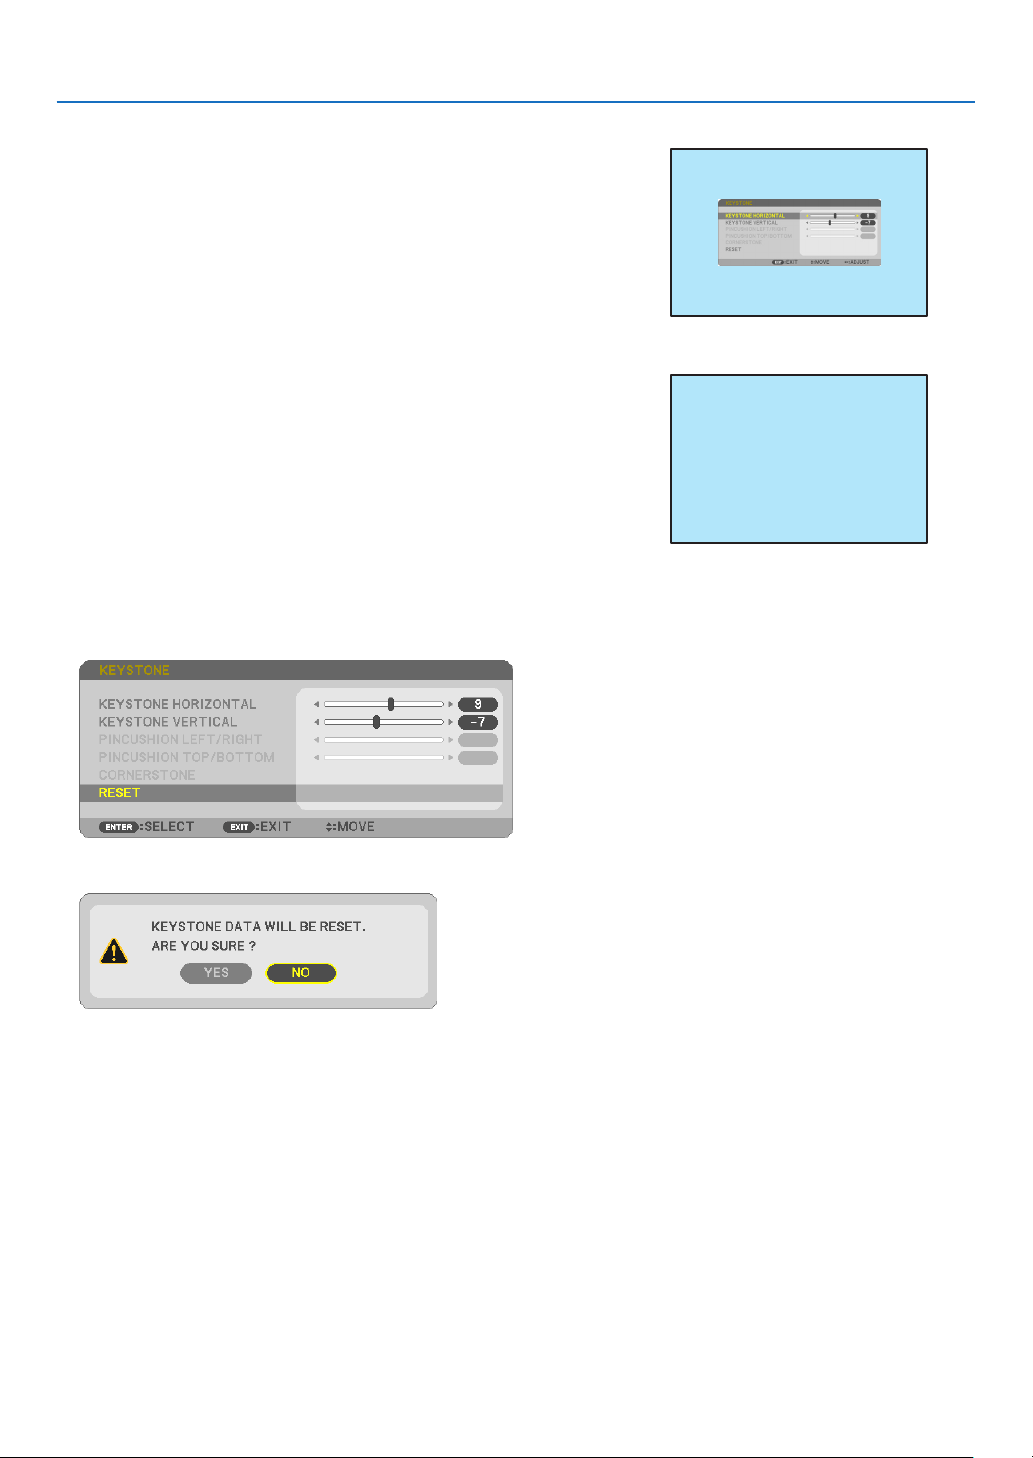
4. Press the ▲buttontoselect[KEYSTONEHORIZONTAL]andthen
use the ◀ or ▶ so that the top and bottom sides of the projected
image are parallel.
•Adjustthehorizontalkeystonedistortion.
5. Repeat steps 2 and 4 to correct keystone distortion.
6.AftercompletingKeystonecorrection,presstheEXITbutton.
The Keystone screen will disappear.
•ToperformKeystonecorrectionagain,pressthe▼ button to display
the Keystone screen and repeat above steps 1 to 6.
Toreturnthekeystoneadjustmentstodefault:
1. Press the ▼buttontoselect[RESET]andpresstheENTERbutton.
2. Press the ◀ or ▶buttontoselect[YES]andpresstheENTERbutton.
The adjustments will be reset.
All the adjustments for all the five items will be reset at the same time.
•TheKEYSTONEfeaturecancauseanimagetobeslightlyblurredbecausethecorrectionismadeelectronically.
22
2. Projecting an Image (Basic Operation)
❼ Optimizing Computer Signal Automatically
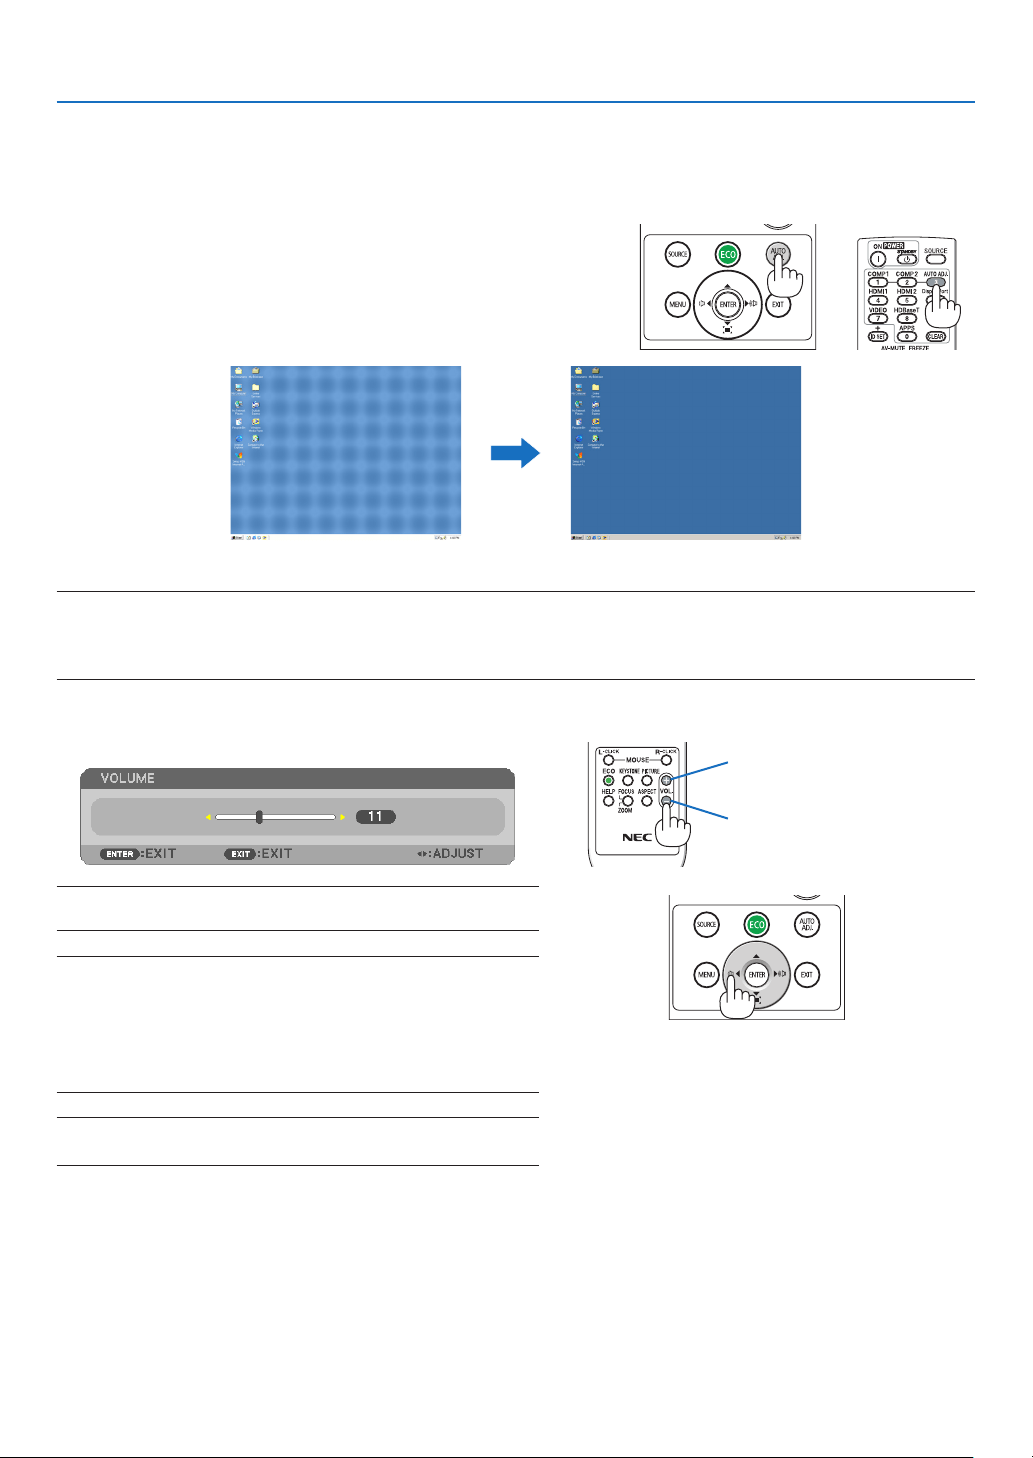
Adjusting the Image Using Auto Adjust
Optimizingacomputerimageautomatically.(COMPUTER)
PresstheAUTOADJ.buttontooptimizeacomputerimageautomatically.
This adjustment may be necessary when you connect your computer
forthersttime.
[Poor picture] [Adjusted picture]
NOTE:
Somesignalsmaytaketimetodisplayormaynotbedisplayedcorrectly.
•IftheAutoAdjustoperationcannotoptimizethecomputersignal,trytoadjust[HORIZONTAL],[VERTICAL],[CLOCK],and[PHASE]manually.
(→page
60,61)
❽ Turning Up or Down Volume
Soundlevelfromthespeakeroraudiooutputcanbeadjusted.
TIP:Whennomenusappear,the◀and▶buttonsontheprojectorcabinet
workasavolumecontrol.
NOTE:
•Volumecontrolisnotavailablewiththe◀or▶buttonwhenanimage
ismagniedbyusingtheD-ZOOM(+)buttonorwhenthemenuis
displayed.
•Volumecontrolisnotavailablewiththe◀or▶buttonwhenVIEWER
isused.
TIP:The[BEEP]soundvolumecannotbeadjusted.Toturnoffthe[BEEP]
sound,fromthemenu,select[SETUP]→[OPTIONS(1)]→[BEEP]→[OFF].
Increasevolume
Decrease volume

23
2. Projecting an Image (Basic Operation)
❾ Turning off the Projector
Toturnofftheprojector:
1. First, press the
(POWER) button on the projector
cabinet or the STANDBY button on the remote control.
The confirmation message will be displayed.
2. Secondly, press the ENTER button or press the
(POWER) or the STANDBY button again.
The lamp will turn off and the projector will go into standby
mode. When in standby mode, the POWER indicator will
blinking orange and the STATUS indicator will turn off when
[NORMAL] is selected for [STANDBY MODE].
Power On
Steady blue light
Standby
Blinking orange
light
CAUTION:
PartsoftheprojectormaybecometemporarilyheatediftheprojectoristurnedoffwiththePOWERbuttonorif
theACpowersupplyisdisconnectedduringnormalprojectoroperation.
Usecautionwhenpickinguptheprojector.
NOTE:
•Whilethepowerindicatorisblinkingblueinshortcycles,thepowercannotbeturnedoff.
•Youcannotturnoffthepowerfor60secondsimmediatelyafterturningitonanddisplayinganimage.
•DonotdisconnecttheACpowersupplytotheprojectorwithin10secondsaftermakingadjustmentorsettingchangesandclosingthe
menu.Doingsocancauselossofadjustmentsandsettings.

24
2. Projecting an Image (Basic Operation)
❿ When Moving the Projector
Preparation:Makesurethattheprojectoristurnedoff.
1. Put on the lens cap.
2. Unplug the power cord.
3. Disconnect any other cables.
•RemovetheUSBmemoryorthewirelessLANUnitifitisinsertedintotheprojector.
(→ page
47, 102)
25
❶ Turning off the Image and Sound
PresstheAV-MUTEbuttontoturnofftheimageandsoundforashortperiodof
time.Pressagaintorestoretheimageandsound.
Theprojector’spower-savingfunctionwillwork10secondsaftertheimageis
turned off.
Asaresult,thelamppowerwillbereduced.
NOTE:
•Eventhoughtheimageisturnedoff,themenustillremainsonthescreen.
•SoundfromtheAUDIOOUTjack(Stereomini)canbeturnedoff.
•Evenwhenthepower-savingfunctionworks,thelamppowermayberestoredtoitsoriginallevel
temporarily.
•Torestoretheimage,evenifyoupresstheAV-MUTEbuttonimmediatelyafterthestartofthe
power-savingfunction,thelampbrightnessmaynotberestoredtoitsoriginallevel.
❷ Freezing a Picture
PresstheFREEZEbuttontofreezeapicture.Pressagaintoresumemotion.
NOTE:Theimageisfrozenbuttheoriginalvideoisstillplayingback.
•ThisfeaturecannotbeusedwhenUSB-Aisselectedastheinputterminal.
❸ Magnifying a Picture
Youcanenlargethepictureuptofourtimes.
NOTE:Themaximummagnicationmaybelessthanfourtimesdependingonthesignal.
To do so:
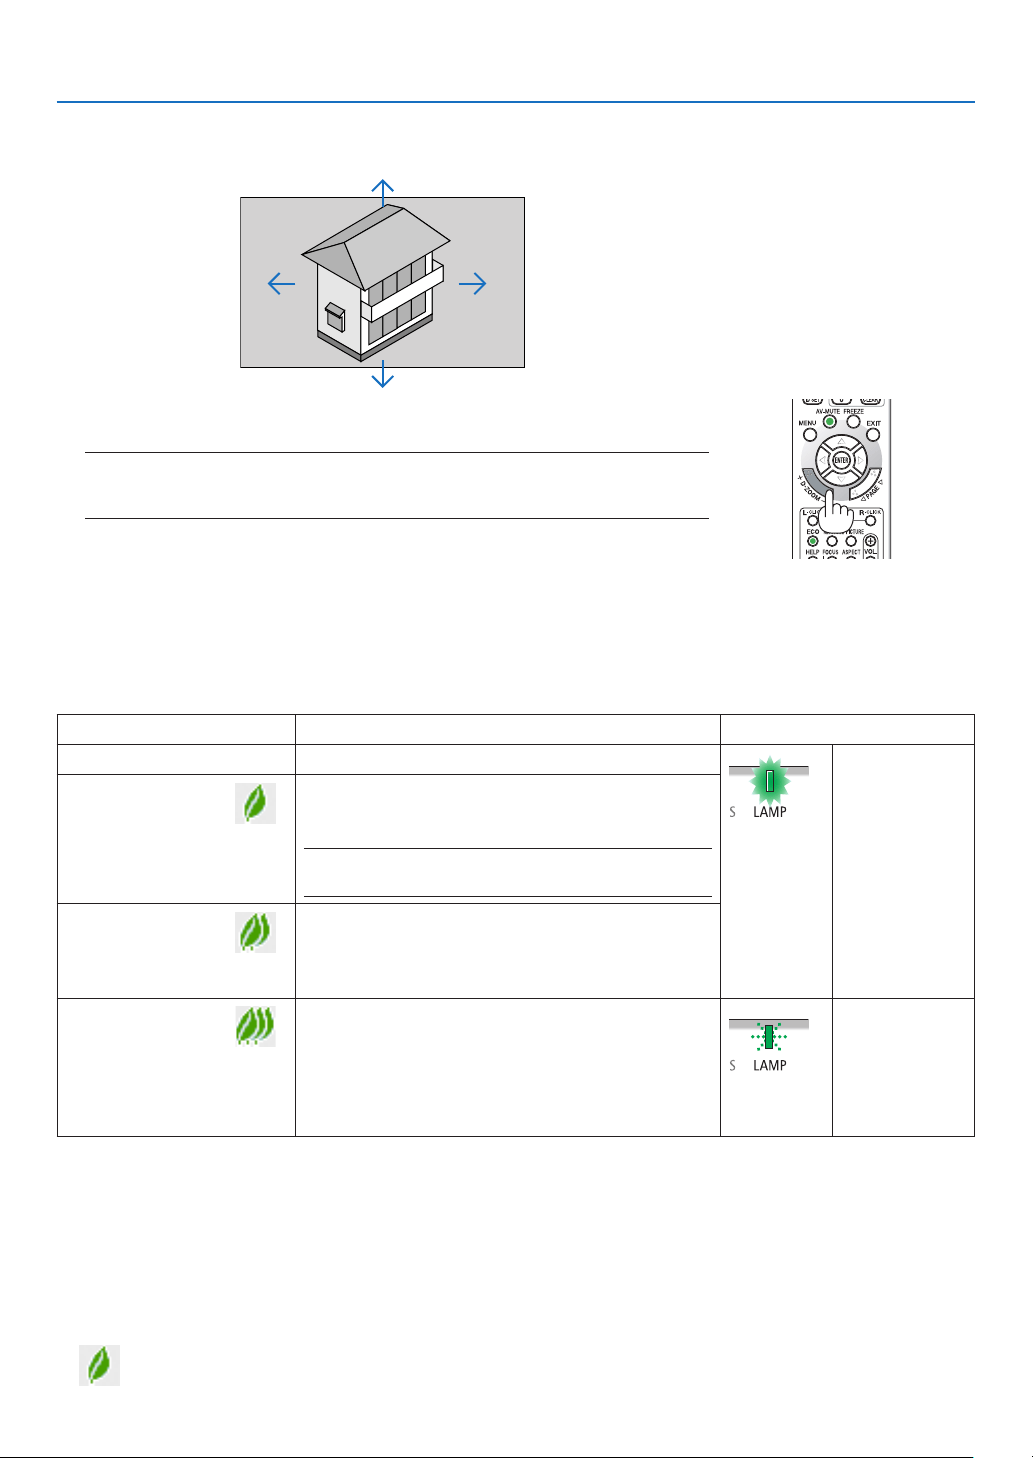
1.PresstheD-ZOOM(+)buttontomagnifythepicture.
To move the magnified image, use the ▲,▼,◀ or ▶ button.
3. Convenient Features
26
3. Convenient Features
2. Press the ▲▼◀▶ button.
The area of the magnified image will be moved.
3.PresstheD-ZOOM(−)button.
Each time the D-ZOOM (−) button is pressed, the image is reduced.
NOTE:
•Theimagewillbemagniedordemagniedatthecenterofthescreen.
•Displayingthemenuwillcancelthecurrentmagnication.
❹ Changing Eco Mode/Checking Energy-Saving Effect
Using Eco Mode [ECO MODE]
TheECOMODE(NORMALandECO)increaseslamplife,whileloweringpowerconsumptionandcuttingdownon
CO
2
emissions.
Fourbrightnessmodesofthelampcanbeselected:[OFF],[AUTOECO],[NORMAL]and[ECO]modes.
[ECOMODE]DescriptionStatusofLAMPindicator
[OFF]Thelampbrightnessis100%.
SteadyGreen
light
[AUTOECO]
Lamppowerconsumptionwillbechangedbetween
[OFF]and[NORMAL]automaticallyaccordingto
picture level
NOTE:Abrightgradationmaybelessvisibledependingon
theimage.
[NORMAL]
Lamppowerconsumption:(approx.80%bright-
nessonP554U/P554W/P604X/P603Xandapprox.
86%onP474U/P474W)Thelamplifewillextendby
loweringthelamppower.
[ECO]
Lamppowerconsumption:(approx.60%brightness
onP554U/P554W/P604X/P603Xandapprox.65%
onP474U/P474W)Thelamplifewillextendlonger
thantheoneonNORMALmodebycontrollingpower
appropriateforthelamp.Themaximumpowerbe-
comesequivalenttothepowerinNORMAL.
BlinkingGreen
light
Toturnonthe[ECOMODE],dothefollowing:
1.PresstheECOButtonontheremotecontroltodisplay[ECOMODE]screen.
2.PresstheECObuttonagaintoselectamodeyouwish.
•EachtimetheECObuttonispressed,thechoiceswillbechanged:
OFF → AUTO ECO → NORMAL → ECO → OFF
TIP:
•TheleafsymbolatthebottomofthemenushowsthecurrentselectionofECOmode.
27
3. Convenient Features
NOTE:
•The[ECOMODE]canbechangedbyusingthemenu.
Select[SETUP]→[GENERAL]→[ECOMODE].
•Thelampliferemainingandlamphoursusedcanbecheckedin[USAGETIME].Select[INFO.]→[USAGETIME].
•Theprojectorisalwaysin[NORMAL]for90secondsafterthelampisturnedon.Thelampconditionwillnotbeaffectedevenwhen
[ECOMODE]ischanged.
•Afteralapseof1minutefromwhentheprojectordisplaysno-signalguidance,ablue,blackorlogoscreen,[ECOMODE]willautomatically
switchto[ECO].Theprojectorwillreturntoitsoriginalsettingonceasignalisaccepted.
•Iftheprojectorisoverheatedin[OFF]mode,theremaybeacasewherethe[ECOMODE]automaticallychangesto[NORMAL]modeto
protecttheprojector.Whentheprojectorisin[NORMAL]mode,thepicturebrightnessdecreases.Whentheprojectorcomesbacktonormal
temperature,the[ECOMODE]returnstoitsoriginalsetting.
Thermometersymbol[
]indicatesthe[ECOMODE]isautomaticallysetto[NORMAL]modebecausetheinternaltemperatureistoohigh.
•Immediatelyafter[ECOMODE]ischangedfrom[ECO]tooneof[OFF],[AUTOECO],or[NORMAL],thelampbrightnessmaydecrease
temporarily.Thisisnotamalfunction.
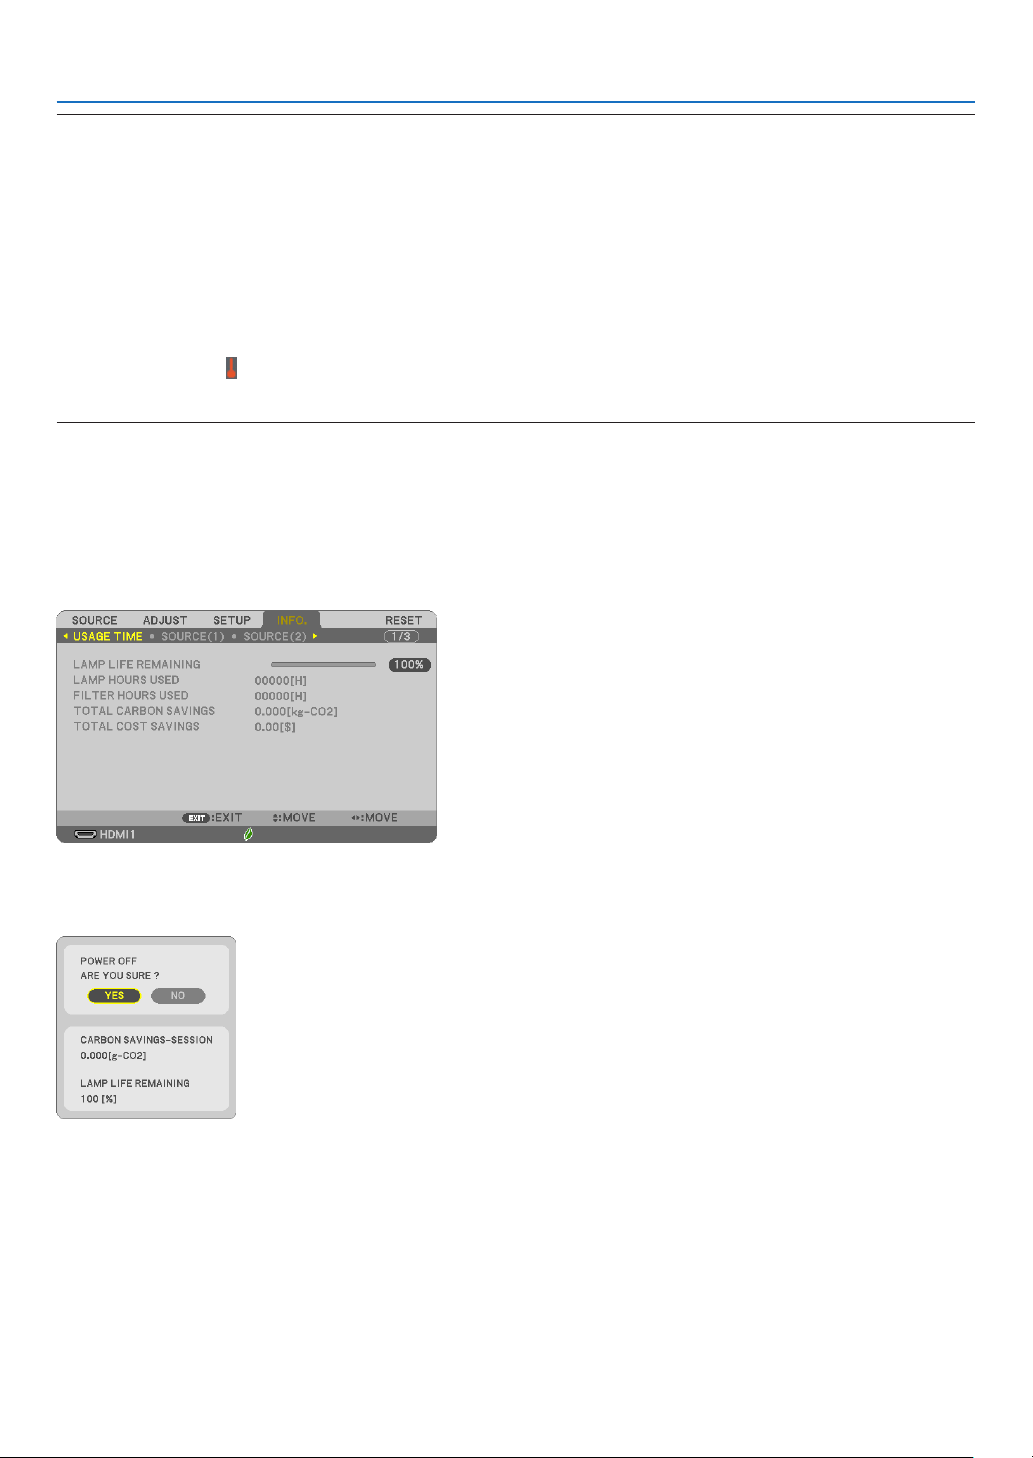
Checking Energy-Saving Effect [CARBON METER]
Thisfeaturewillshowenergy-savingeffectintermsofCO
2
emissionreduction(kg)whentheprojector’s[ECOMODE]
issetto[AUTOECO],[NORMAL],or[ECO].Thisfeatureiscalledas[CARBONMETER].
Therearetwomessages:[TOTALCARBONSAVINGS]and[CARBONSAVINGS-SESSION].The[TOTALCARBON
SAVINGS]messageshowsthetotalamountofCO
2
emissionreductionfromthetimeofshipmentuptonow.You
canchecktheinformationon[USAGETIME]from[INFO.]ofthemenu.(→page
80)
The[CARBONSAVINGS-SESSION]messageshowstheamountofCO
2
emission reduction between the time of
changingtoECOMODEimmediatelyafterthetimeofpower-onandthetimeofpower-off.The[CARBONSAVINGS-
SESSION]messagewillbedisplayedinthe[POWEROFF/AREYOUSURE?]messageatthetimeofpower-off.
TIP:
•TheformulaasshownbelowisusedtocalculatetheamountofCO
2
emissionreduction.
AmountofCO
2
emissionreduction=(PowerconsumptioninOFFforECOMODE−PowerconsumptioninAUTOECO/NORMAL/ECOfor
ECOMODE)×CO
2
conversionfactor.*WhentheimageisturnedoffwiththeAV-MUTEbutton,theamountofCO
2
emmissionreduction
willalsoincrease.
*CalculationforamountofCO
2
emissionreductionisbasedonanOECDpublication“CO
2
EmissionsfromFuelCombustion,2008Edition”.
•The[TOTALCARBONSAVINGS]iscalculatedbasedonsavingsrecordedin15minutesintervals.
•Thisformulawillnotapplytothepowerconsumptionwhichisnotaffectedbywhether[ECOMODE]isturnedonoroff.
28
3. Convenient Features
❺ Using 4-Point Corner to Correct Keystone Distortion
[CORNERSTONE]
Usethe[CORNERSTONE]and[PINCUSHION]featurestocorrectkeystone(trapezoidal)distortiontomakethetop
orbottomandtheleftorrightsideofthescreenlongerorshortersothattheprojectedimageisrectangular.
Before performing correction
TheKEYSTONEcorrectionhasfeatures,KEYSTONE(HORIZONTAL/VERTICAL),PINCUSHION,andCORNERSTONE.
IfthevalueofeitherCONERSTONEorPINCUSHIONhascorrected,KEYSTONEHORIZONTALandKEYSTONE
VERTICALaredisabled.Inthiscase,RESETthecorrectedvaluesandrestarttocorrectdistortion.
Cornerstone
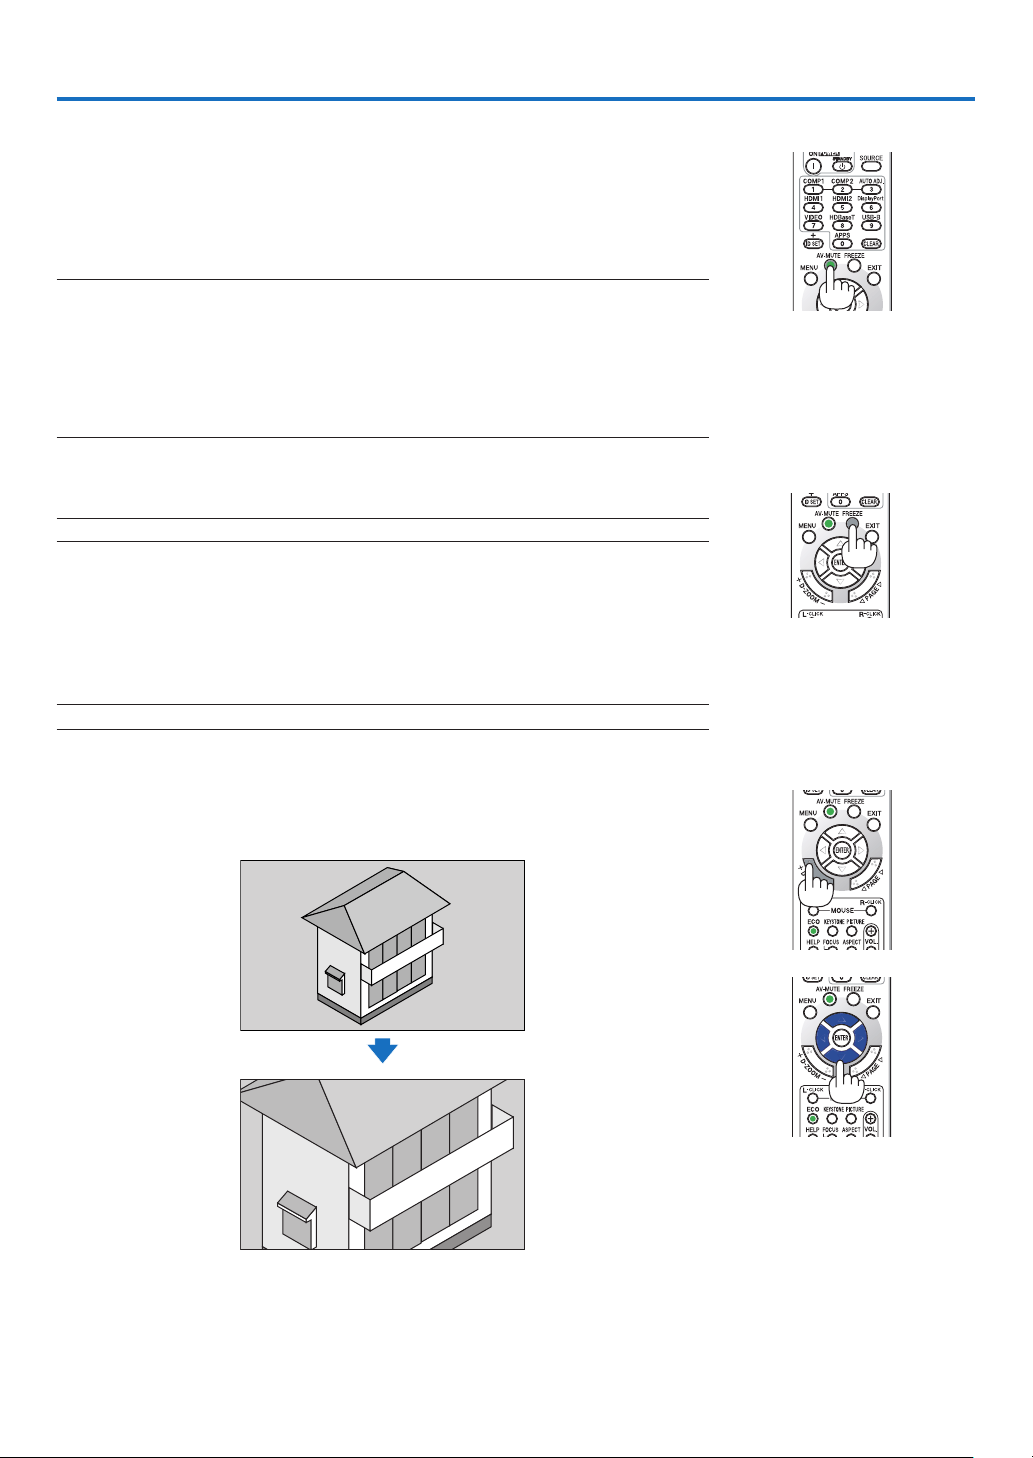
1.PresstheKEYSTONEbuttonwithnomenudisplayed.
[P554W/P474W/P604X/P603X]
[P554U/P474U]
The KEYSTONE screen will be displayed.
•PresstheKEYSTONEbuttonwhenusingtheremotecontrol.
•SeepageforPINCUSHION.
2. Press the ▼buttontoselect[CORNERSTONE]andpresstheENTERbutton.
The drawing shows the upper left icon ( ) is selected.
The CORNERSTONE screen will be displayed.
3. Project an image so that the screen is smaller than the area of the raster.
4. Pick up any one of the corners and align the corner of the image with a corner of the screen.
Projected image
The drawing shows the upper right corner.
29
3. Convenient Features
TIP:IfeitherCORNERSTONEorPINCUSIONisadjusted,theoptionsKEYSTONEVERTICALandKEYSTONEHORIZONTALbecomeunavailable.
Inthiscase,RESETthecorrectedvaluesandrestarttocorrectdistortion.
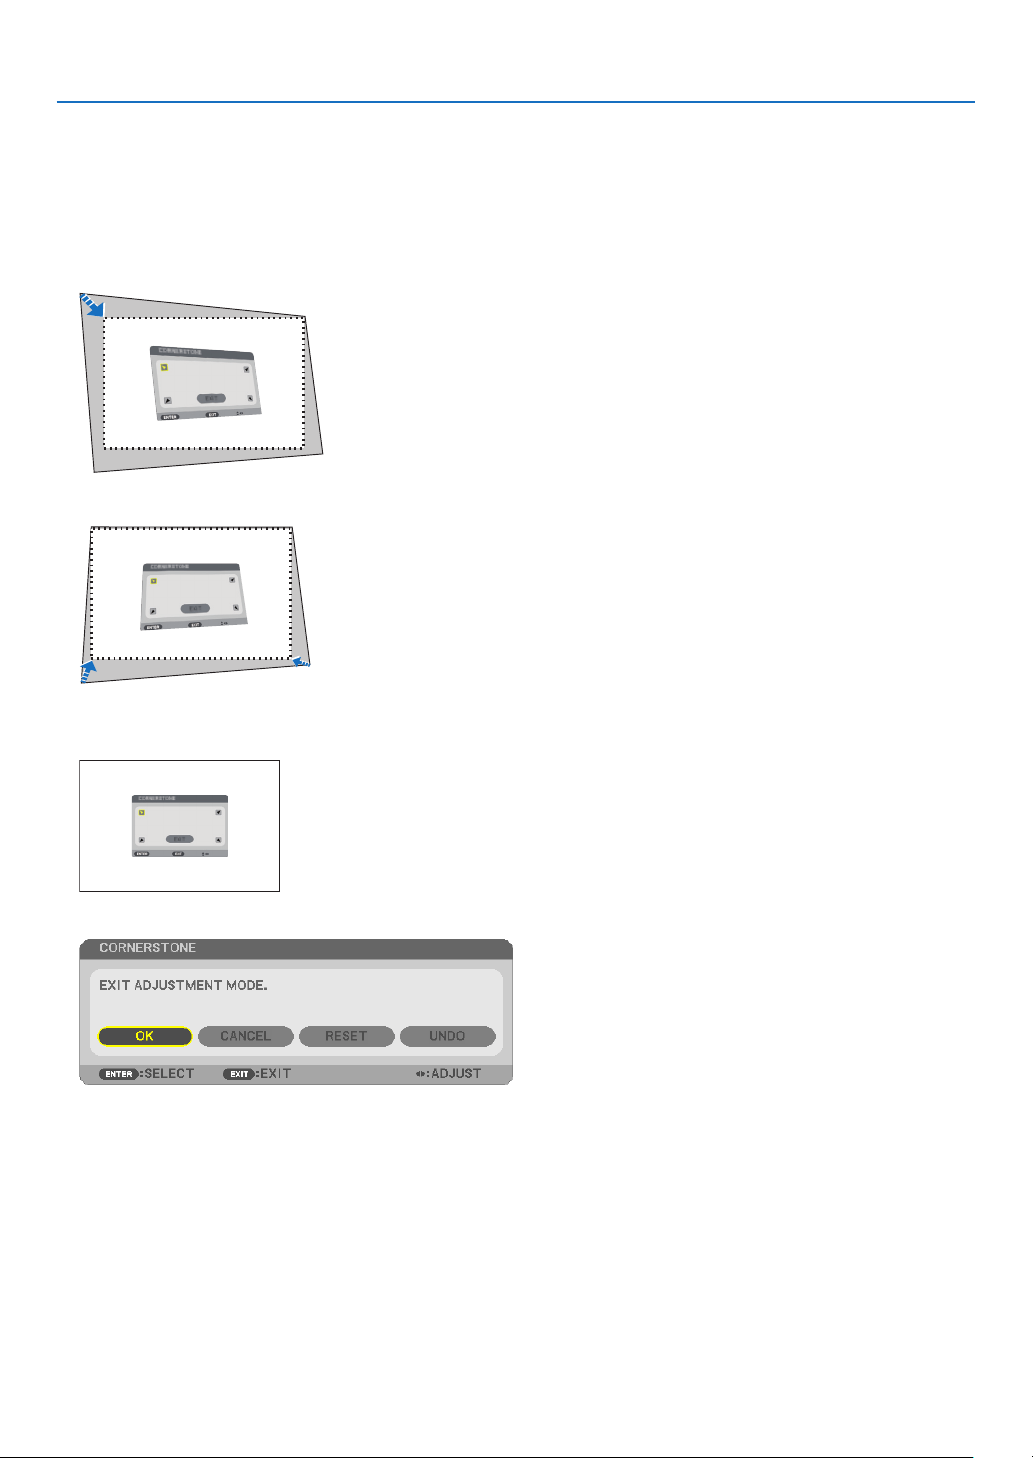
5. Use the ▲▼◀▶ button to select one icon (▲) which points in the direction you wish to move the projected
image frame.
6. Press the ENTER button.
7. Use the ▲▼◀▶ button to move the projected image frame as shown on the example.
8. Press the ENTER button.
9. Use the ▲▼◀▶ button to select another icon which points in the direction.
OntheCornerstoneadjustmentscreen,select[EXIT]orpresstheEXITbuttonontheremotecontrol.
The confirmation screen is displayed.
10
. Press the ◀ or ▶buttontohighlightthe[OK]andpresstheENTERbutton.
ThiscompletestheCornerstonecorrection.
Selecting[CANCEL]willreturntotheadjustmentscreenwithoutsavingchanges(Step3).
Selecting[RESET]willreturntothefactorydefault.
Selecting[UNDO]willexitwithoutsavingchanges.

30
3. Convenient Features
Pincushion
Bythisfeature,itenablestoadjustleftandrightsideortopandbottomsideindependentlyforreformingpincushion
distortion.
[P554W/P474W/P604X/P603X]
1.PresstheKEYSTONEbuttonwithnomenudisplayed.
The KEYSTONE screen will be displayed.
•PresstheKEYSTONEbuttonwhenusingtheremotecontrol.
2. Press the ▼ or ▲buttontoselect[PINCUSHIONLEFT/RIGHT]
or[PINCUSHIONTOP/BOTTOM].
3. Press the ◀ or ▶ button to correct distortion.
NOTE:
•The[PINCUSHIONLEFT/RIGHT]or[PINCUSHIONTOP/BOTTOM]itemisnot
availablewhen[KEYSTONEHORIZONTAL],[KEYSTONEVERTICAL]or[COR-
NERSTONE]isactivated.
•Beforeperformingcorrection,setthelensshifttothecenterposition.
4.PresstheEXITwhenPINCUSHIONadjustmentiscompleted.
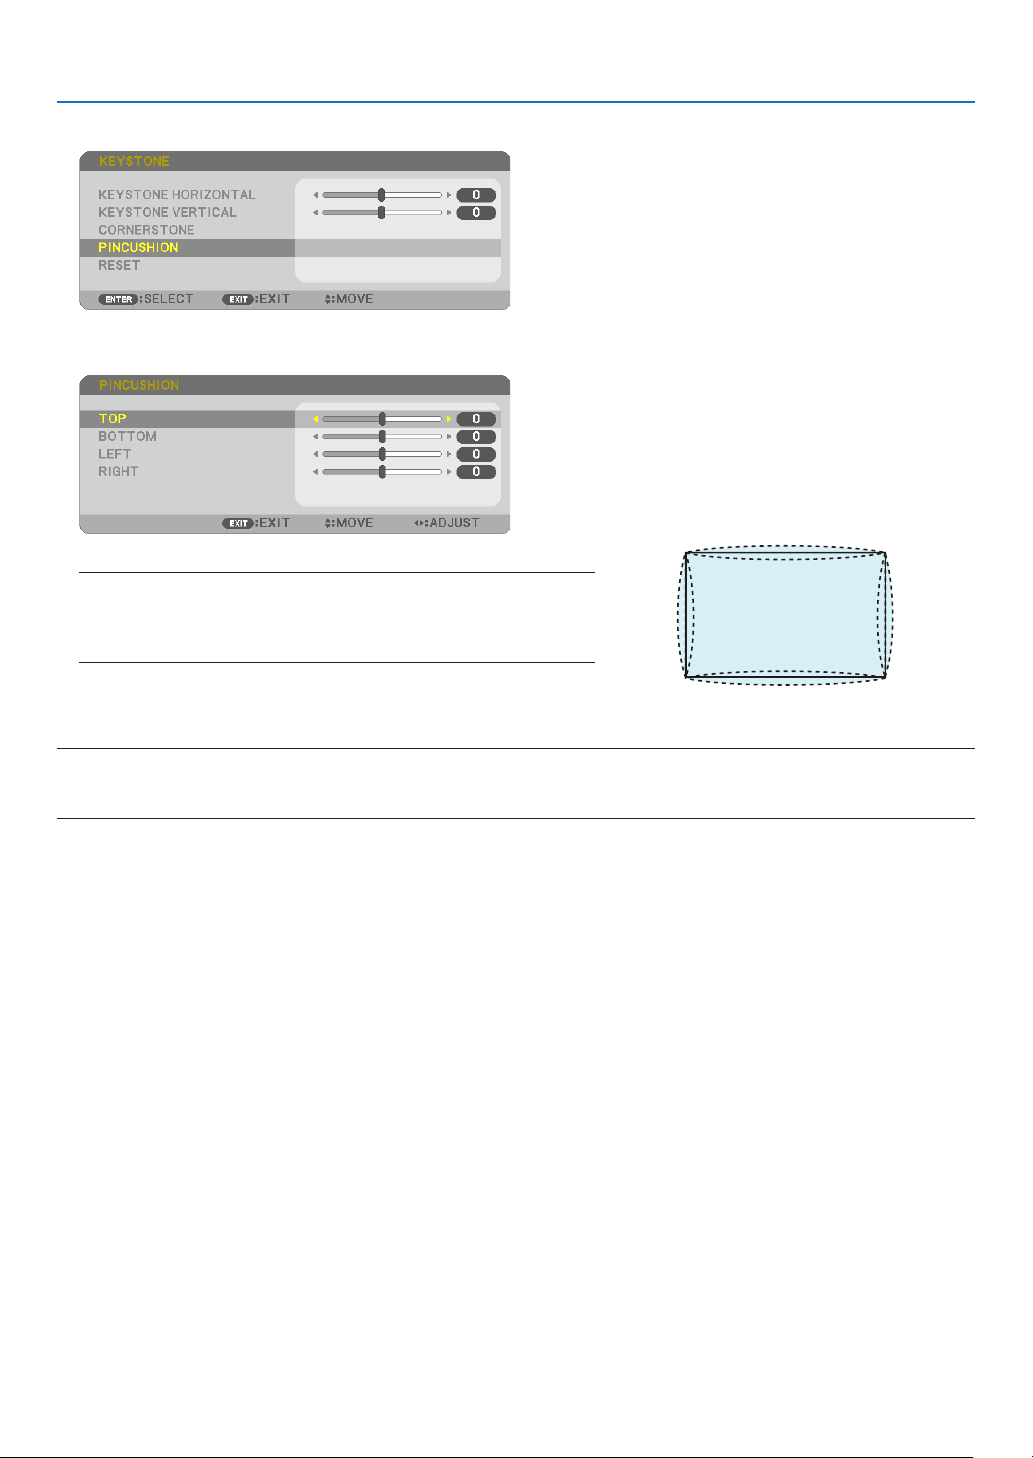
[P554U/P474U]
1.PresstheKEYSTONEbuttonwithnomenudisplayed.
The KEYSTONE screen will be displayed.
•PresstheKEYSTONEbuttonwhenusingtheremotecontrol.
31
3. Convenient Features
2. Press the ▼buttontoselect[PINCUSHION].
3. Press the ▼ or ▲buttontoselect[TOP],[BOTTOM],[LEFT]
or[RIGHT].
4. Press the ◀ or ▶ button to correct distortion.
NOTE:
•The[PINCUSHION]itemisnotavailablewhen[KEYSTONEHORIZONTAL],
[KEYSTONEVERTICAL]or[CORNERSTONE]isactivated.
•Beforeperformingcorrection,setthelensshifttothecenterposition.
5.PresstheEXITwhenPINCUSHIONadjustmentiscompleted.
NOTE:
•Evenwhentheprojectoristurnedon,thelastusedcorrectionvaluesareapplied.
•[PINCUSHION]and[CORNERSTONE]correctionscancausetheimagetobeslightlyblurredbecausethecorrectionismadeelectronically.
32
3. Convenient Features
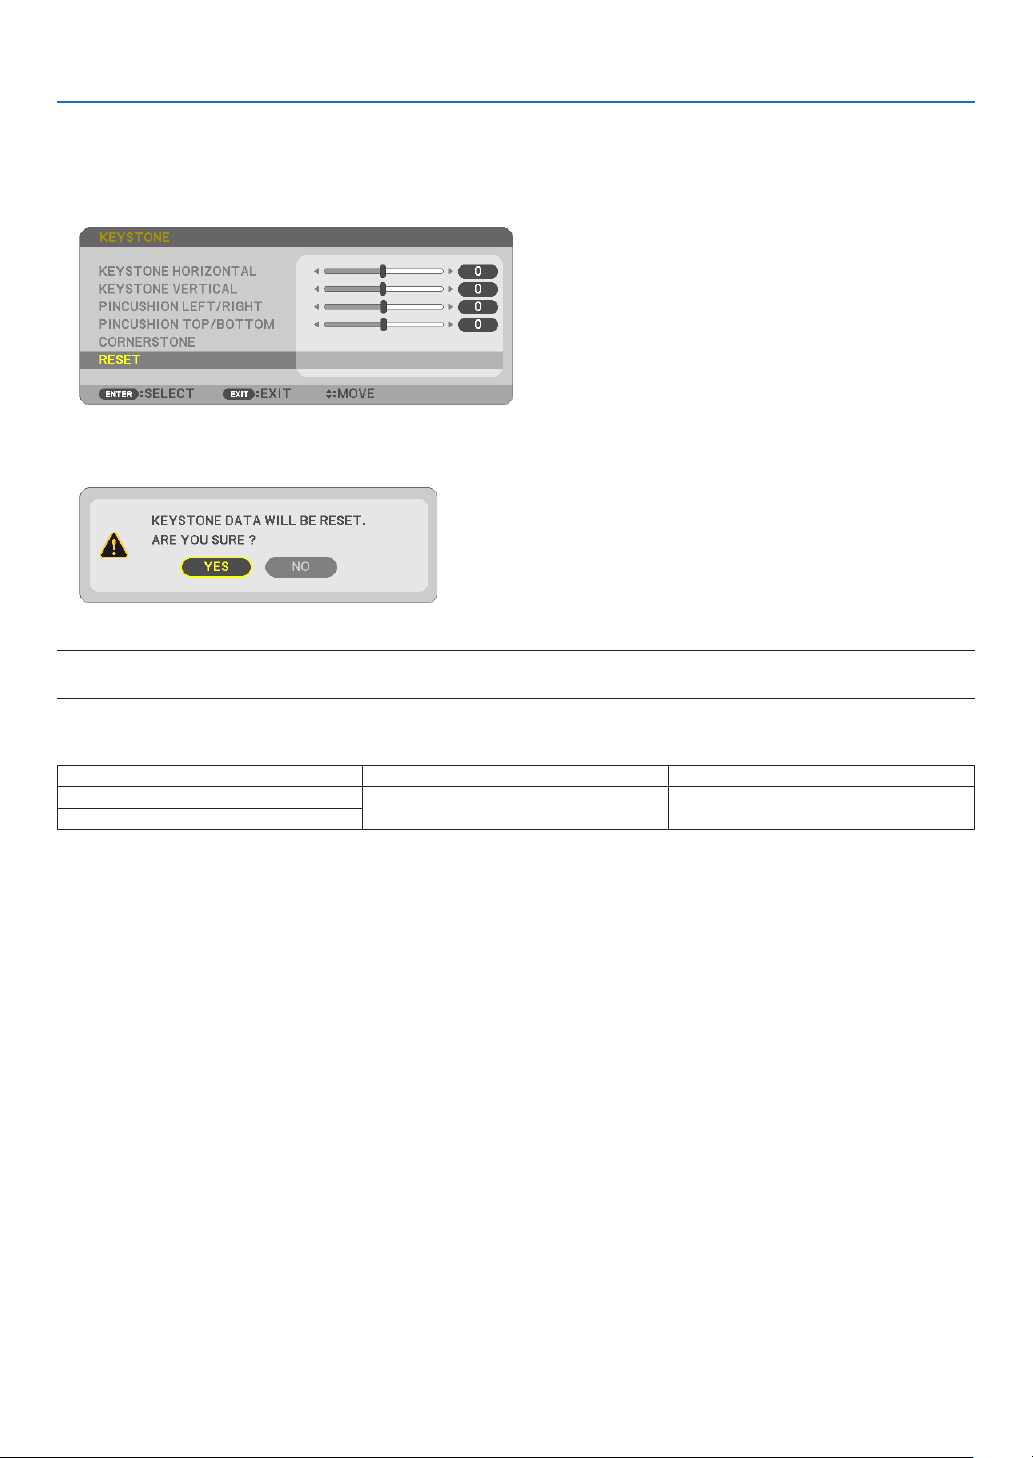
Resetthekeystoneandpincushionadjustmenttothedefaultvalue
1.PresstheKEYSTONEbuttonwithnomenudisplayed.
ON the displayed KEYSTONE menu, set the cursor at RESET using the ▼ button and press ENTER button.
•Conrmationmessageisdisplayedon.
2. Move the cursor onto YES using either ◀ or ▶ button and then press the ENTER.
NOTE:
•AlladjustedvaluessetintheKEYSTONEadjustmentareresettoinitialvalues
TIP:
AdjustablerangeoftheKEYSTONEandtheCORNERSTONE:
HorizontalDirectionVerticalDirection
CORNERSTONE
Approx.±20°(Max)Approx.±30°(Max)
KEYSTONE
Adjustablerangemaybenarrowerdependingoninputsignal.
33
3. Convenient Features
❻
Preventing the Unauthorized Use of the Projector [SECURITY]
AkeywordcanbesetforyourprojectorusingtheMenutoavoidoperationbyanunauthorizeduser.Whenakey-
wordisset,turningontheprojectorwilldisplaytheKeywordinputscreen.Unlessthecorrectkeywordisentered,
theprojectorcannotprojectanimage.
•The[SECURITY]settingcannotbecancelledbyusingthe[RESET]ofthemenu.
To enable the Security function:
1. Press the MENU button.
The menu will be displayed.
2. Press the ▶buttontwicetoselect[SETUP]andpressthe▼buttonortheENTERbuttontoselect[GEN-
ERAL].
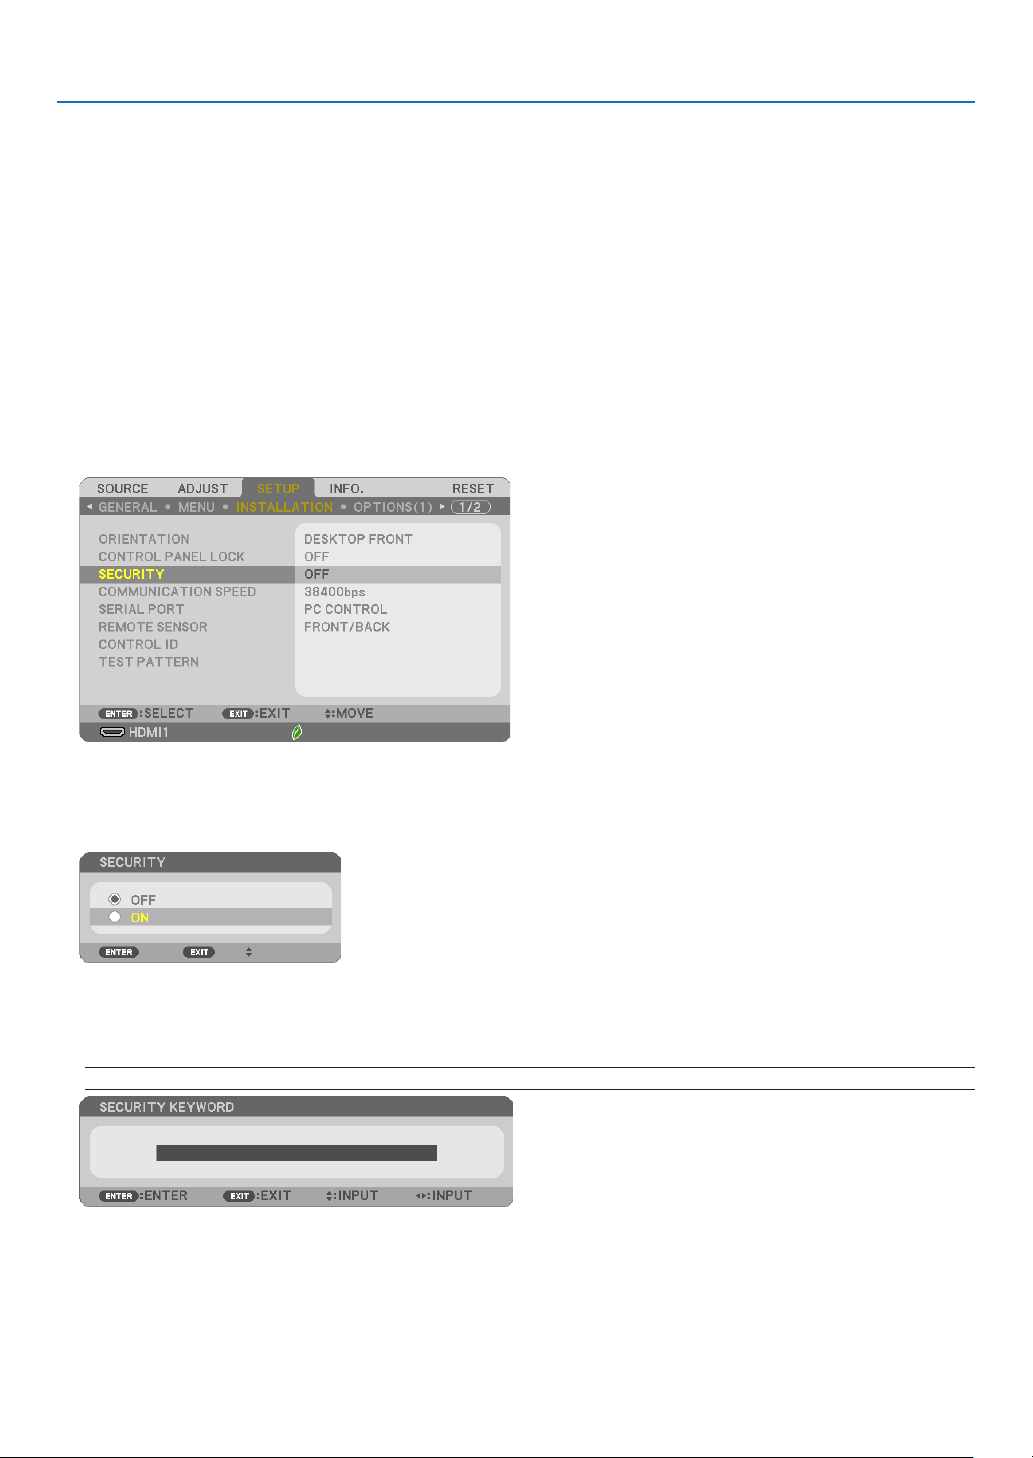
3. Press the ▶buttontoselect[INSTALLATION].
4. Press the ▼buttonthreetimestoselect[SECURITY]andpresstheENTERbutton.
The OFF/ON menu will be displayed.
5. Press the ▼buttontoselect[ON]andpresstheENTERbutton.
The[SECURITYKEYWORD]screenwillbedisplayed.
6. Type in a combination of the four ▲▼◀▶ buttons and press the ENTER button.
NOTE:Akeywordmustbe4to10digitsinlength.
The[CONFIRMKEYWORD]screenwillbedisplayed.
34
3. Convenient Features
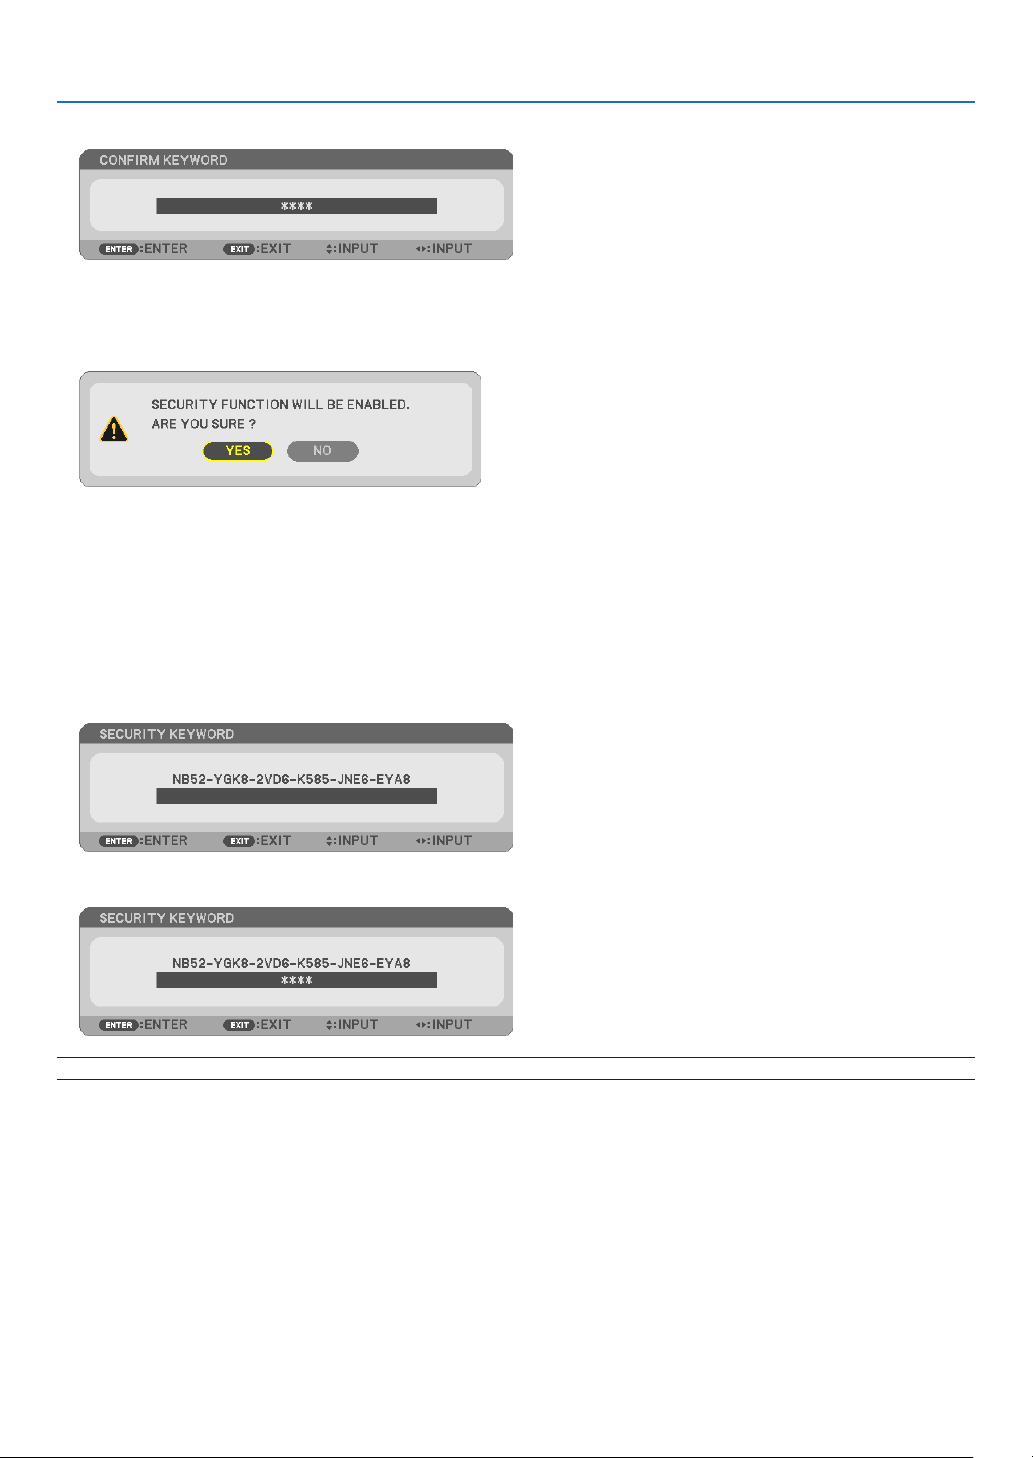
7. Type in the same combination of ▲▼◀▶ buttons and press the ENTER button.
The confirmation screen will be displayed.
8.Select[YES]andpresstheENTERbutton.
TheSECURITYfunctionhasbeenenabled.
Toturnontheprojectorwhen[SECURITY]isenabled:
1. Press the POWER button.
The projector will be turned on and display a message to the effect that the projector is locked.
2. Press the MENU button.
3. Type in the correct keyword and press the ENTER button. The projector will display an image.
NOTE:Thesecuritydisablemodeismaintaineduntilthemainpoweristurnedofforunpluggingthepowercord.

35
3. Convenient Features
TodisabletheSECURITYfunction:
1. Press the MENU button.
The menu will be displayed.
2.Select[SETUP]→[INSTALLATION]→[SECURITY]andpresstheENTERbutton.
The OFF/ON menu will be displayed.
3.Select[OFF]andpresstheENTERbutton.
TheSECURITYKEYWORDscreenwillbedisplayed.
4. Type in your keyword and press the ENTER button.
Whenthecorrectkeywordisentered,theSECURITYfunctionwillbedisabled.
NOTE:Ifyouforgetyourkeyword,contactyourdealer.Yourdealerwillprovideyouwithyourkeywordinexchangeforyourrequestcode.
YourrequestcodeisdisplayedintheKeywordConrmationscreen.Inthisexample[NB52-YGK8-2VD6-K585-JNE6-EYA8]isarequestcode.

36
3. Convenient Features
❼ Controlling the Projector by Using an HTTP Browser
Overview
TheHTTPServerfunctionprovidessettingsandoperationsfor:
1.Settingforwired/wirelessnetwork(NETWORKSETTINGS)
To use wireless LAN connection, the optional USB Wireless LAN Unit is required. (→ page
102)
To use wired/wireless LAN connection, connect the projector to the computer with a commercially available LAN
cable. (→ page
99)
2. Setting Alert Mail (ALERT MAIL)
When the projector is connected to a wired/wireless network, lamp replace time or error messages will be sent
via e-mail.
3. Operating the projector
Power on/off, selecting input, volume control and picture adjustments are possible.
4.SettingPJLinkPASSWORD,AMXBEACON,andCRESTRON
HowtoaccesstotheHTTPserver:
•StarttheWebbrowseronthecomputerviathenetworkconnectedtotheprojectorandenterthefollowing
URL :
http://<the projector’s IP address> /index.html
TIP:ThefactorysettingIPaddressis[DHCPON].
NOTE:
•Tousetheprojectorinanetwork,consultwithyournetworkadministratoraboutnetworksettings.
•Thedisplay’sorbutton’sresponsecanbesloweddownoroperationmaynotbeaccepteddependingthesettingsofyournetwork.
Shouldthishappen,consultyournetworkadministrator.Theprojectormaynotrespondifitsbuttonsarerepeatedlypressedinrapid
intervals.Shouldthishappen,waitamomentandrepeat.Ifyoustillcan’tgetanyresponse,turnoffandbackontheprojector.
•IfthePROJECTORNETWORKSETTINGSscreendoesnotappearinthewebbrowser,presstheCtrl+F5keystorefreshyourwebbrowser
(orclearthecache).
•Thisdeviceuses“JavaScript”and“Cookies”andthebrowsershouldbesettoacceptthesefunctions.Thesettingmethodwillvary
dependingontheversionofbrowser.Pleaserefertothehelplesandtheotherinformationprovidedinyoursoftware.
Preparation before Use
ConnecttheprojectortoacommerciallyavailableLANcablebeforeengaginginbrowseroperations.(→page
99)
Operationwithabrowserthatusesaproxyservermaynotbepossibledependingonthetypeofproxyserverand
thesettingmethod.Althoughthetypeofproxyserverwillbeafactor,itispossiblethatitemsthathaveactuallybeen
setwillnotbedisplayeddependingontheeffectivenessofthecache,andthecontentssetfromthebrowsermay
notbereectedinoperation.Itisrecommendedthataproxyservernotbeusedunlessitisunavoidable.
37
3. Convenient Features
Handling of the Address for Operation via a Browser
RegardingtheactualaddressthatisenteredfortheaddressorenteredtotheURLcolumnwhenoperationofthe
projectorisviaabrowser,thehostnamecanbeusedasitiswhenthehostnamecorrespondingtotheIPaddress
oftheprojectorhasbeenregisteredtothedomainnameserverbyanetworkadministrator,orthehostnamecor-
respondingtotheIPaddressoftheprojectorhasbeensetinthe“HOSTS”leofthecomputerbeingused.
Example1:Whenthehostnameoftheprojectorhasbeensetto“pj.nec.co.jp”,accessisgainedtothenet-
worksettingbyspecifying
http://pj.nec.co.jp/index.html
fortheaddressortheentrycolumnoftheURL.
Example2:WhentheIPaddressoftheprojectoris“192.168.73.1”,accessisgainedtothenetworksettingby
specifying
http://192.168.73.1/index.html
fortheaddressortheentrycolumnoftheURL.
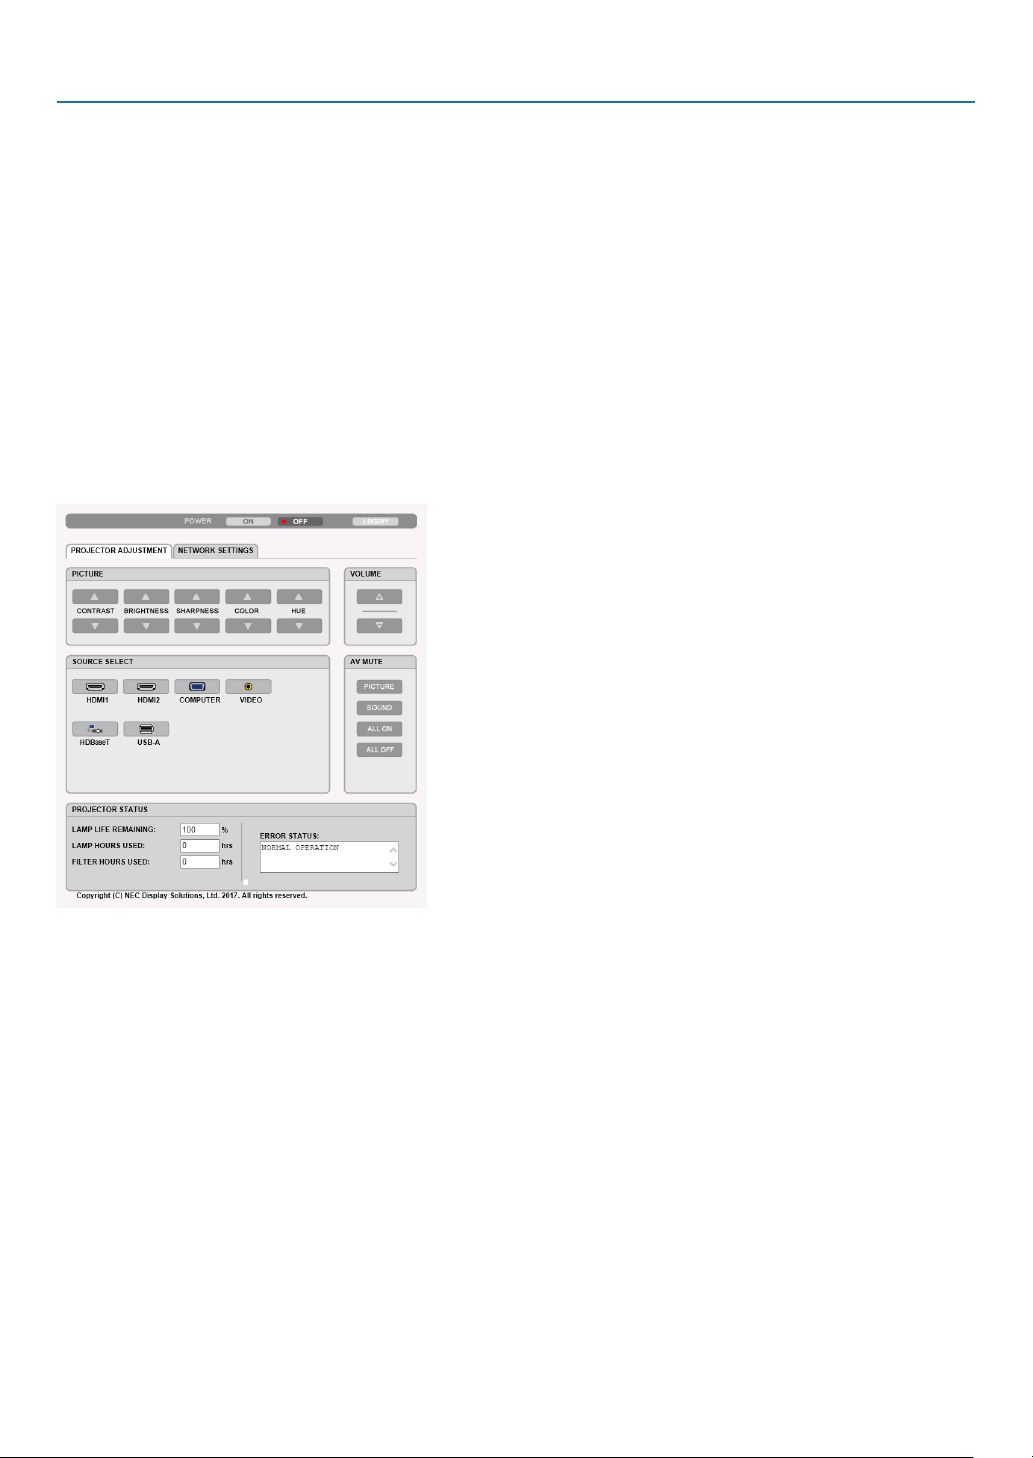
PROJECTOR ADJUSTMENT
POWER:Thiscontrolsthepoweroftheprojector.
ON ���������������������������Power is switched on�
OFF �������������������������� Power is switched off�
VOLUME:Thiscontrolsthevolumeoftheprojector.
▲�����������������������������Increases the volume adjustment value�
▼�����������������������������Decreases the volume adjustment value�
AV-MUTE:Thiscontrolsthemutefunctionoftheprojector.
PICTURE ON �������������Mutes the video�
PICTURE OFF ������������Cancels the video muting�
SOUND ON ���������������Mutes the audio�
SOUND OFF ��������������Cancels the audio muting�
ALL ON ���������������������Mutes each of the video, and audio functions�
ALL OFF �������������������Cancels the muting of each of the video, and audio functions�

38
3. Convenient Features
PICTURE:Controlsthevideoadjustmentoftheprojector.
CONTRAST ▲�����������Increases the contrast adjustment value�
CONTRAST ▼�����������Decreases the contrast adjustment value�
BRIGHTNESS ▲��������Increases the brightness adjustment value�
BRIGHTNESS ▼��������Decreases the brightness adjustment value�
SHARPNESS ▲���������Increases the sharpness adjustment value�
SHARPNESS ▼���������Decreases the sharpness adjustment value�
COLOR ▲ �����������������Increases the color adjustment value�
COLOR ▼ �����������������Decreases the color adjustment value�
HUE ▲ ���������������������Increases the hue adjustment value�
HUE ▼ ���������������������Decreases the hue adjustment value�
•Thefunctionsthatcanbecontrolledwillvarydependingonthesignalbeinginputtotheprojector.(→page
59)
SOURCESELECT:Thisswitchestheinputterminaloftheprojector.
HDMI1 ����������������������Switches to the HDMI 1 IN terminal
HDMI2 ����������������������Switches to the HDMI 2 IN terminal�
COMPUTER ��������������Switches to the COMPUTER IN terminal�
VIDEO �����������������������Switches to the VIDEO IN terminal�
HDBaseT ������������������ Switch to image input sent from a transmission device that supports HDBaseT� (not supported by P603X)
USB-A ���������������������� Switches to the data on the USB memory device�
PROJECTORSTATUS:Thisdisplaystheconditionoftheprojector.
LAMP LIFE REMAINING ���������� Displays the remaining life of the lamp as a percentage�
LAMP HOURS USED ���������������Displays how many hours the lamp has been used�
FILTER HOURS USED �������������Displays how many hours the filter has been used�
ERROR STATUS ���������������������Displays the status of errors occurring within the projector�
LOGOFF:Loggingoffyourprojectorandreturningtotheauthenticationscreen(LOGONscreen).

39
3. Convenient Features
NETWORK SETTINGS
•SETTINGS
WIRED LAN
ENABLETurnonwiredLANconnection
DISABLETurnoffwiredLANconnection
SETTINGSetforwiredLAN.
DHCPONAutomaticallyIPADDRESS,SUBNETMASK,andGATEWAYareassignedtothe
projectorbyyourDHCPserver.
DHCPOFFSetIPADDRESS,SUBNETMASK,andGATEWAYtotheprojectorassignedbyyour
networkadministrator.
IPADDRESSSetyourIPADDRESSofthenetworkconnectedtotheprojector.
SUBNETMASKSetyourSUBNETMASKnumberofthenetworkconnectedtotheprojector.
GATEWAYSetthedefaultGATEWAYofthenetworkconnectedtotheprojector.
AUTODNSONDHCPserverwillautomaticallyassignIPADDRESSofDNSserverconnectedtothe
projector.
AUTODNSOFFSetyourIPADDRESSofDNSserverconnectedtotheprojector.
APPLYMakethesettingsforwiredLANeffective.
WIRELESS LAN
SIMPLEACCESSPOINTSettheprojectorasasimpleaccesspointforconnectingtoacomputerorasmart
phone.
INFRASTRUCTUREConnectthisdevicetoanaccesspoint.
DISABLETurnoffwirelessLANconnection
SETTINGSetforwirelessLAN.
APPLYConnecttothenetworkwirelesslybytheselectedoptionbetweenSIMPLEACCESS
POINTandINFRASTRUCTURE.

40
3. Convenient Features
WIRELESSLAN(SIMPLEACCESSPOINT)
CONNEC-
TION
SSIDSetSSIDasanaccesspoint.SSIDmustbe1to32alphanumericcharacters(includ-
ingaspace).
MODESelectwirelessfrequencyband.
CHANNELSelectwirelesschannel.
SECURITYSECURITY
TYPE
Selectsecuritytype.
SECURITY
KEY
SetaSECURITYKEY.SECURITYKEYmustbe8to63alphanumericcharacters
(includingaspace).
WIRELESSLAN(INFRASTRUCTURE)
IPAD-
DRESS
DHCPONAutomaticallyIPADDRESS,SUBNETMASK,andGATEWAYareassignedtothe
projectorbyyourDHCPserver.
DHCPOFFSetIPADDRESS,SUBNETMASK,andGATEWAYtotheprojectorassignedbyyour
networkadministrator.
IPAD-
DRESS
SetyourIPADDRESSofthenetworkconnectedtotheprojector.
SUBNET
MASK
SetyourSUBNETMASKnumberofthenetworkconnectedtotheprojector.
GATEWAYSetthedefaultGATEWAYofthenetworkconnectedtotheprojector.
AUTODNS
ON
DHCPserverwillautomaticallyassignIPADDRESSofDNSserverconnectedtothe
projector.
AUTODNS
OFF
SetyourIPADDRESSofDNSserverconnectedtotheprojector.
CONNEC-
TION
SSIDEnteranidentier(SSID)asanaccesspoint.SSIDmustbe1to32alphanumeric
characters(includingaspace).
SECURITYSECURITYSelectsecuritytype.
INDEXWhenWEP64bitorWEP128bitisselectedforSECURITY,activatetheINDEX.The
valueforthisisxedat“1”.
SECURITY
KEY
SetaSECURITYKEY.SECURITYKEYmustbe8to63alphanumericcharacters
(includingaspace).
•NAME
PROJECTORNAMEEnteranameforyourprojectorsothatyourcomputercanidentifytheprojector.A
projector name must be 16 characters or less.
TIP:Projectornamewillnotbeaffectedevenwhen[RESET]isdonefromthemenu.
HOSTNAMEEnterthehostnameofthenetworkconnectedtotheprojector.Ahostnamemustbe
16 or less.

41
3. Convenient Features
•ALERTMAIL
ALERTMAIL(English
only)
Thisoptionwillnotifyyourcomputeroflampreplacetimeorerrormessagesviae-mail
whenusingwirelessorwiredLAN.
PlacingacheckmarkwillturnontheAlertMailfeature.
ClearingacheckmarkwillturnofftheAlertMailfeature.
Sampleofamessagetobesentfromtheprojector:
Thelampandltersareattheendofitsusablelife.Pleasereplacethelampand
lters.
ProjectorName:NECProjector
LampHoursUsed:100[H]
SENDER’SADDRESSEntersender’saddress.
SMTPSERVERNAMEEntertheSMTPservernametobeconnectedtotheprojector.
RECIPIENT’SADDRESS
1,2,3
Enteryourrecipient’saddress.Uptothreeaddressescanbeentered.
TESTMAIL
Sendatestmailtocheckwhetheryoursettingsarecorrectornot
NOTE:
•Ifyouexecuteatest,youmaynotreceiveanAlertmail.Shouldthishappen,checkifnetworksettings
arecorrect.
•Ifyouenteredanincorrectaddressinatest,youmaynotreceiveanAlertmail.Shouldthishappen,
checkiftheRecipient’sAddressiscorrect.
SAVEClickthisbuttontosavetheabovesettingsontheprojector.

42
3. Convenient Features
•NETWORKSERVICE
PJLinkPASSWORDSetapasswordforPJLink*.Apasswordmustbe32charactersorless.Donotforget
yourpassword.However,ifyouforgetyourpassword,consultwithyourdealer.
HTTPPASSWORDSetapasswordforHTTPserver.Apasswordmustbe10charactersorless.
AMXBEACONTurnonorofffordetectionfromAMXDeviceDiscoverywhenconnectingtothenet-
worksupportedbyAMX’sNetLinxcontrolsystem.
TIP:
WhenusingadevicethatsupportsAMXDeviceDiscovery,allAMXNetLinxcontrolsystemwillrecognize
thedeviceanddownloadtheappropriateDeviceDiscoveryModulefromanAMXserver.
PlacingacheckmarkwillenabledetectingtheprojectorfromAMXDeviceDiscovery.
ClearingacheckmarkwilldisabledetectingtheprojectorfromAMXDeviceDiscovery.
ExtronXTPSetforconnectingthisprojectortotheExtronXTPtransmitter.Placingacheckmark
willenabletoconnectwiththeXTPtransmitter.Clearingacheckmarkwilldisableto
connect with the XTP transmitter.
*WhatisPJLink?
PJLinkisastandardizationofprotocolusedforcontrollingprojectorsofdifferentmanufacturers.Thisstandard
protocolisestablishedbyJapanBusinessMachineandInformationSystemIndustriesAssociation(JBMIA)in2005.
TheprojectorsupportsallthecommandsofPJLinkClass1.
SettingofPJLinkwillnotbeaffectedevenwhen[RESET]isdonefromthemenu.
CRESTRONROOMVIEWcompatibility
TheprojectorsupportsCRESTRONROOMVIEW,allowingmultipledevicesconnectedinthenetworktobemanaged
and controlled from a computer or a controller.
Formoreinformation,visithttp://www.crestron.com
<Setting Procedure>
AccesstotheHTTPserver,andmakenecessarysettingsfor[CRESTRON]in[NETWORKSETTINGS].
•ROOMVIEWformanagingfromthecomputer.
DISABLEDisablesROOMVIEW.
ENABLEEnablesROOMVIEW.
•CRESTRONCONTROLformanagingfromthecontroller.
DISABLEDisablesCRESTRONCONTROL.
ENABLEEnablesCRESTRONCONTROL.
IPADDRESSSetyourIPaddressofCRESTRONSERVER.
IPIDSetyourIPIDofCRESTRONSERVER.
TIP:TheCRESTRONsettingsarerequiredonlyforusewithCRESTRONROOMVIEW.
Formoreinformation,visit
http://www.crestron.com
•INFORMATION
WIREDLANDisplayalistofsettingsofwiredLANconnection.
WIRELESSLANDisplayalistofsettingsofwirelessLANconnection.
UPDATEReectsettingswhentheyarechanged.

43
4. Using the Viewer
❶ What you can do with the Viewer
TheViewerhasthefollowingfeatures.
•WhenacommerciallyavailableUSBmemorythatstoresimagelesisinsertedintotheUSBport(TypeA)ofthe
projector,theViewerallowsyoutoviewtheimagelesontheUSBmemory.
Evenifnocomputerisavailable,presentationscanbeconductedsimplywiththeprojector.
•SupportedgraphicformatisJPEG.
•TheViewerdisplaysthethumbnailscreen(JPEGExifonly)onwhichyoucanjumptoanyspecicimageyouwish
to project.
•Therearetwowaysofplaybackforslideshow:manualplaybackandautoplayback.Theintervaltimecanbe
changedinautoplayback.
•Theorderofdisplayingimagescanbesetbyname,dateorsize.Ascendingordescendingordercanbeselected.
•Imagescanberotatedby90degreesduringplayback.

44
4. Using the Viewer
NOTE
•TheUSBportoftheprojectordoesnotsupportUSBhub.
•TheUSBportoftheprojectoriscommonuseforthewirelessLANunit.WhenthewirelessLANunitisinstalledon,youcannotutilizethe
VIEWER.
•ThefollowingoperationsbyusingthebuttonsontheprojectorarenotpossiblewhentheVIEWERscreensuchastheslidescreenandthe
thumbnailscreenisdisplayed.
Buttons on the cabinet
-Keystonecorrectionbyusingthe▲ /▼button
-AutoAdjustmentbyusingtheAUTOADJ.button
-Volumecontrolwiththe◀or▶button
ToperformKeystonecorrectionorSourceselectionduringdisplayoftheViewer,presstheMENUbuttontwicetodisplaythemenuand
operateViewerfromthemenu.
Remote control
-AutoAdjustmentbutton
-Freezebutton
•Executing[RESET]→[ALLDATA]fromthemenuwillreturnthesettingsfortheViewertoolbartothefactorydefault.
•USBmemory
-BesuretouseaUSBmemorydeviceformattedwiththeFAT32orFAT16lesystem.
TheprojectordoesnotsupportNTFSformattedUSBmemory.
IftheprojectordoesnotrecognizeyourUSBmemory,checkiftheformatissupported.
ToformatyourUSBmemoryinyourcomputer,refertothedocumentorhelplethatcomeswithyourWindows.
-WedonotwarrantthattheUSBportoftheprojectorwillsupportallUSBmemoriesinthemarket.
•Supportedimages
-SupportedleformatforViewerareasfollows.
WedonotwarrantalltheimagesaresupportedforViewer.
Imagesotherthanmentionedinthetablemaynotbesupported.
ImagetypeExtensionDescription
JPEGJPG/JPEGBaseline/Exifaresupported
-Imagecanbedisplayedataresolutionupto10000×10000pixels.
-Evenifimagesaremetbytheaboveconditions,theremaybesomeimageswhichcannotbeplayedback.
-Morethan200icons(totalnumberofimageleiconsandfoldericons)cannotbedisplayedinathumbnailscreen.
-Longle/foldernamewillbelimitedtothespeciedlength.Thiscanbeshownbybracketadded.
-Ifonefolderhasmanyles,ittakessometimetoplayback.
•Ifasinglefoldercontainstoomanyles,switchingimageswilltaketime.Toshortenswitchingtime,reducethenumberofimagescon-
tainedinasinglefolder.
TIP:
•Exchangeableimageleformat(Exif)isastandardimageleformatusedbydigitalcameraswiththeadditionofspecicshootingdata.
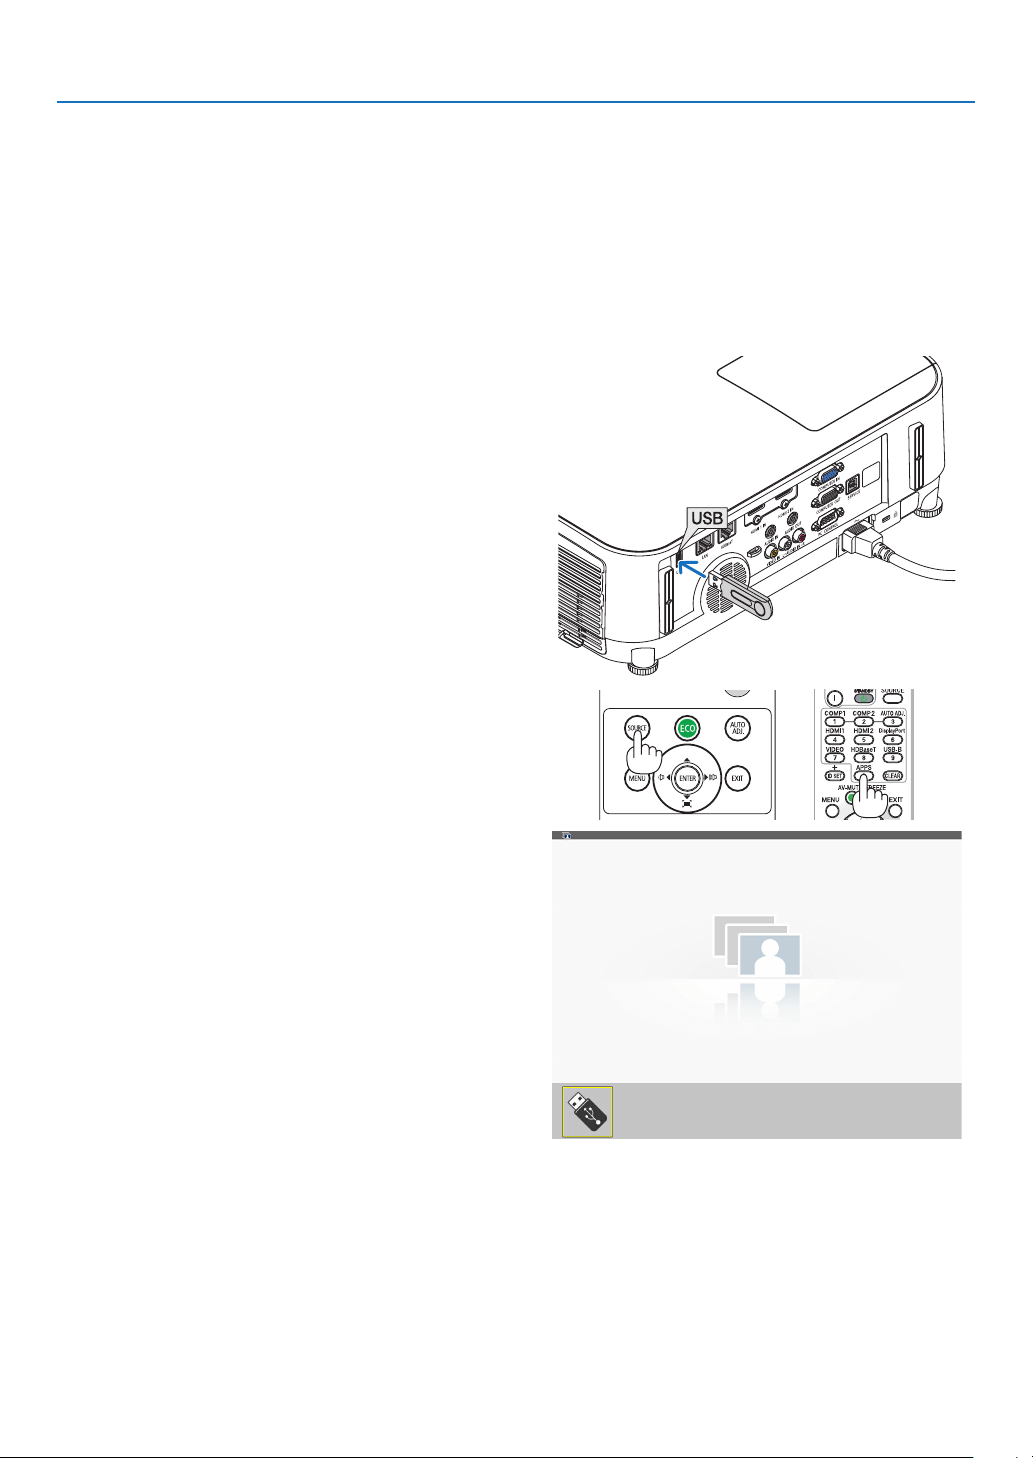
45
4. Using the Viewer
❷ Projecting images stored in a USB memory device
ThissectionexplainsthebasicoperationoftheViewer.
TheexplanationprovidestheoperationalprocedurewhentheViewertoolbar(→page49)issettothefactorydefault.
-StartingtheViewer ......................................................................below
-RemovingtheUSBmemoryfromtheprojector ...................... page47
-ExitingtheViewer .................................................................... page47
Preparation:BeforestartingtheViewer,storeimagestotheUSBmemoryusingyourcomputer.
Starting the Viewer
1. Turn on the projector. (→ page 12)
2. Insert the USB memory into the USB port of the projec-
tor.
• DonotremovetheUSBmemoryfromtheprojectorwhile
it’s LED flashes. Doing so may corrupt the data.
3.PresstheSOURCEbuttonontheprojectorcabinet.
The Viewer start screen will be displayed.
•PresstheAPPSbuttonontheremotecontrol.
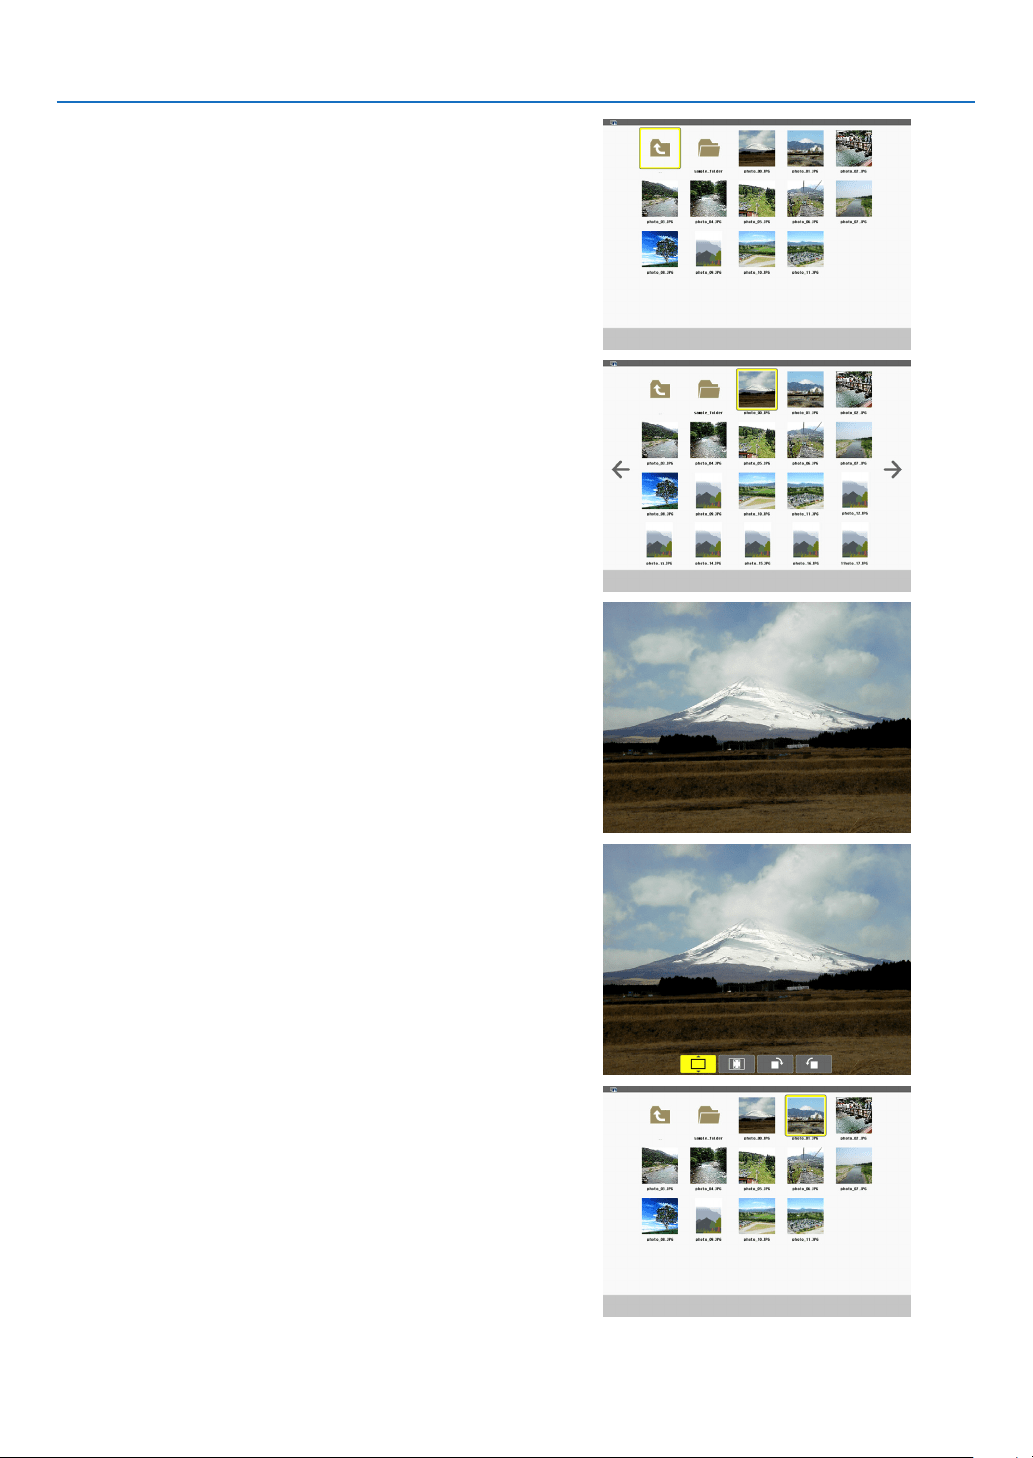
46
4. Using the Viewer
4. Press the ENTER button.
The thumbnail screen will be displayed. (→ page
48)
5. Use the ▲▼◀ or ▶ button to select an icon.
•The→ (arrow) symbol on the right indicates there are more
pages. Pressing the PAGE ▽ (page down) button will show
the next page; pressing the PAGE △ (page up) will show
the previous page.
6. Press the ENTER button.
The selected slide will be displayed.
•Whenafoldericonisselected,iconscontainedinthefolder
will be displayed.
7. Press the ▶ button to select the next slide.
The slide on the right will be displayed.
•The◀ or ▶ button can be used to select the next (right)
slide or the previous (left) slide in the thumbnail screen.
•PressingtheMENUbuttonduringdisplayofthethumbnail
screen, the slide screen, or the slideshow screen will display
the toolbar. The toolbar is used to select or rotate an slide.
(→ page
50)
8. Press the EXIT button when the toolbar is not displayed.
The thumbnail screen will be displayed.
•Anotherwaytodisplaythethumbnailscreenistopressthe
ENTER button.
•Toclosethetoolbar,presstheMENUbuttontoreturnto
the SOURCE list, and press the MENU button again to close
the SOURCE list.
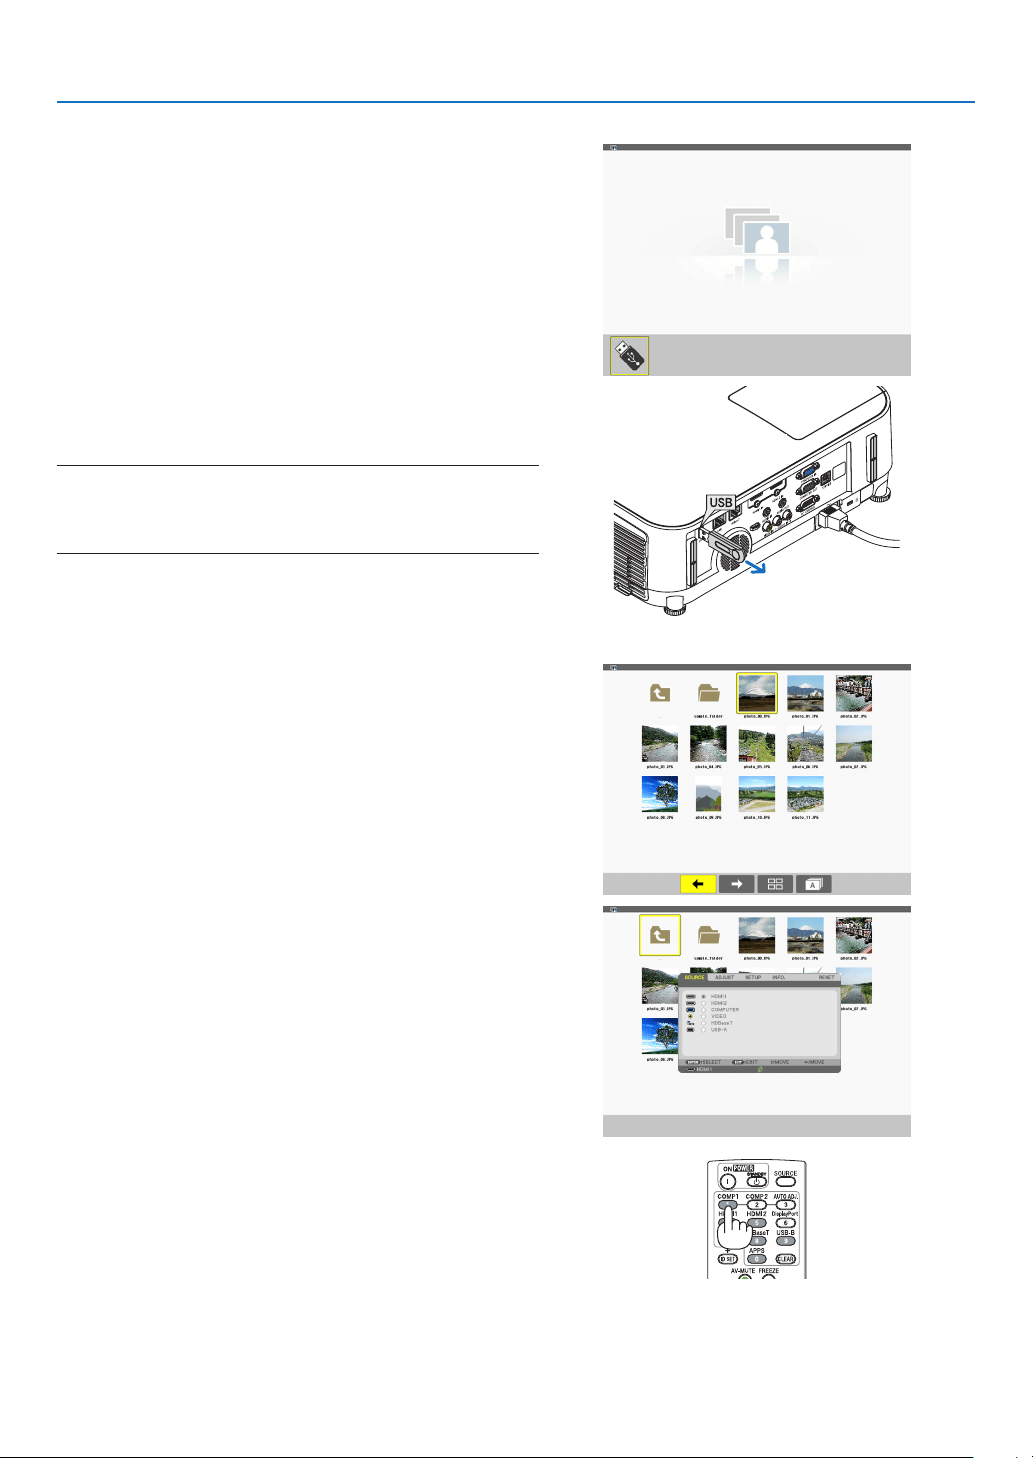
47
4. Using the Viewer
Removing the USB memory from the projector
1.SelecttheVIEWERstartscreen.
PresstheEXITbuttonwithnomenudisplayed.
2. Remove the USB memory from the projector.
Make sure that the LED on the USB memory is not flashing
before removing the USB memory.
NOTE:IfyouremovetheUSBmemoryfromtheprojectorwithaslide
displayed,theprojectormaynotoperatecorrectly.Ifthishappens,turn
offtheprojectorandunplugthepowercord.Wait3minutes,thenconnect
thepowercord,andturnontheprojector.
Exiting the Viewer
1. Press the MENU button with the slide screen or the
thumbnail screen displayed.
The control bar or the pop-up menu will be displayed.
2. Press the MENU button again.
The on-screen menu will be displayed.
3.Selectasourceotherthan[USB-A]andpressthe
ENTER button.
The Viewer will be exited.
TIP:ToexittheViewerusingtheremotecontrol,selectasourceother
than[USB-A].
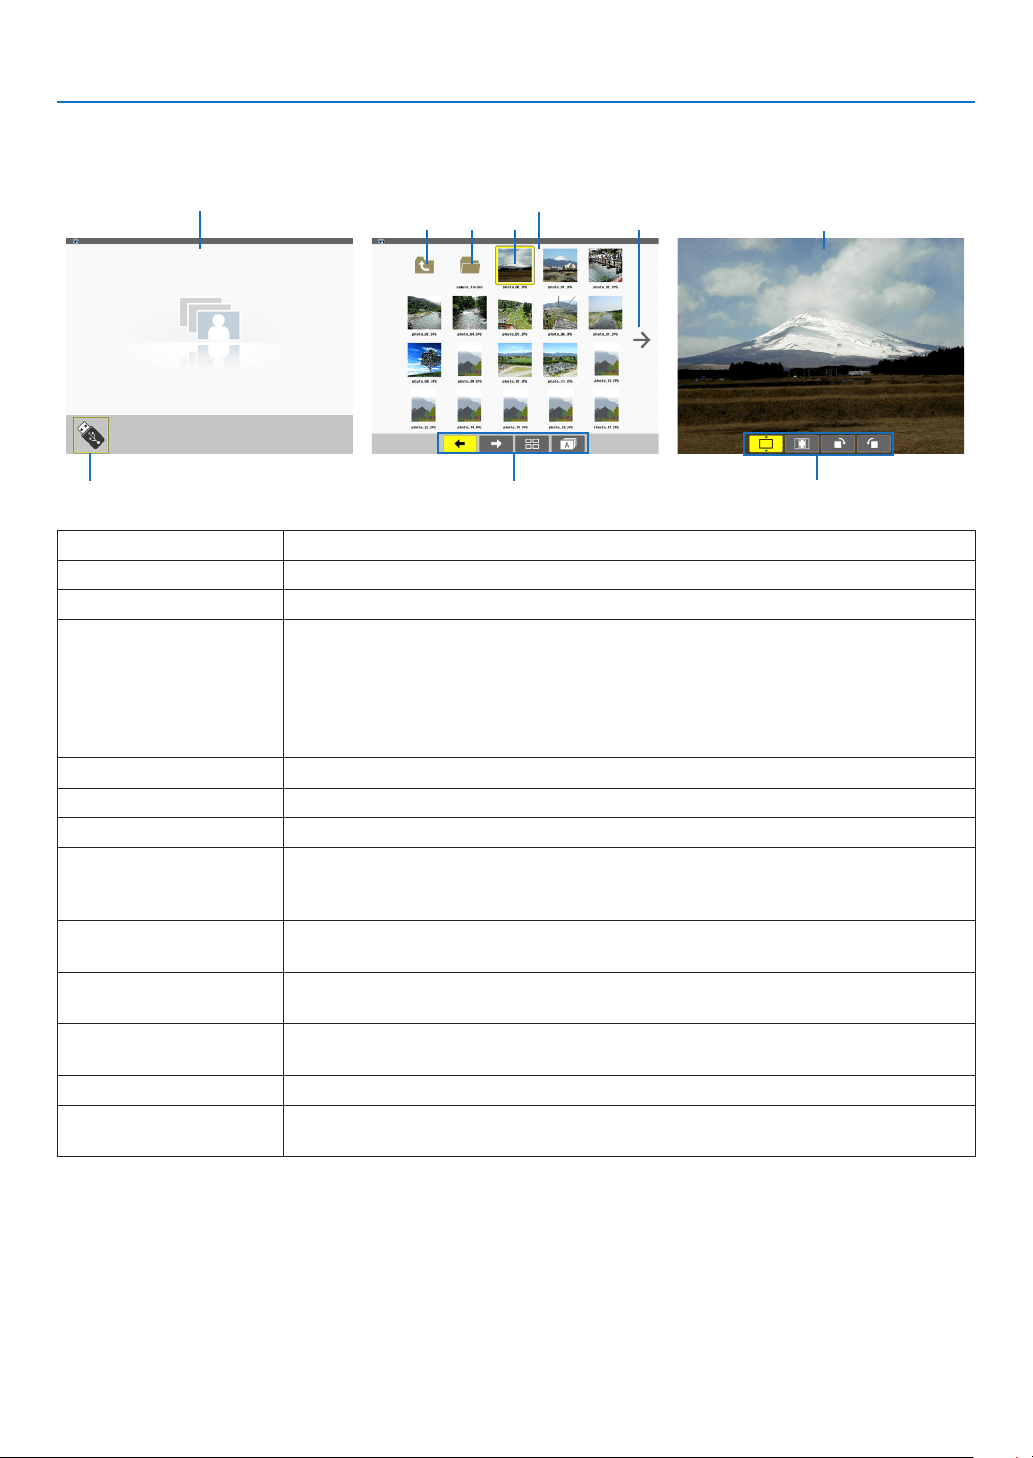
48
4. Using the Viewer
Parts of each screen
The Viewer has four screens.
(1) Viewer start screen (3) Thumbnail screen (9) Slide screen/
(11) Slideshow screen
Name Description
(1)ViewerstartscreenThisscreenwillbedisplayedrstwhenyouselecttheViewer.
(2)USBiconThisiconindicatesthattheUSBmemoryisinsertedintotheprojector.
(3)ThumbnailscreenThisscreenwillshowalistoffoldersandimagelesstoredintheUSBmemory.The
JPEGExifleswillbedisplayedinthumbnailscreenonly.
•Themaximumnumberofimagelesorfolderswithinonepageisdifferentdepend-
ingonthemodel.
P554U/P474U/P554W/P474Ware(6×4lateralbylongitudinal)
P604X/P603Xare(5×4lateralbylongitudinal)
(4)Cursor
Thecursorisusedtoselect(highlight)thefolderorimagelebyusing▲▼◀▶ button.
(5)BackiconThisiconisusedtoreturntotheupper(parent)folder.
(6)FoldericonThisiconshowsthattheUSBmemoryhasfolders.
(7)Pageup(Pagedown)
icon
Thisiconshowsfurtherfoldersorimagelesareavailableinthenext(previous)page.
Use the ▶buttontogotothenext(previous)row.ThePAGE▽orPAGE△ on the
remotecontrolisusedtogotothenextorpreviouspagedirectly.
(8)ThumbnailtoolbarThistoolbarisusedinthethumbnailscreen.PressingtheMENUbuttonwilldisplay
thistoolbar.(→page
49)
(9)SlidescreenThisscreenisusedformanualplayback.Theselectedimagewillbedisplayedinfull
screen.
(10)SlidetoolbarThistoolbarisusedintheslidescreen.PressingtheMENUbuttonwilldisplaythis
toolbar.(→page
50)
(11)SlideshowscreenThisscreenisusedforautoplayback.Theslideswillbechangedautomatically.
(12)SlideshowtoolbarThistoolbarisusedintheslideshowscreen.PressingtheMENUbuttonwilldisplay
thistoolbar.(→page
50)
(5) (6) (4) (7)
(8)(2) (10) (12)
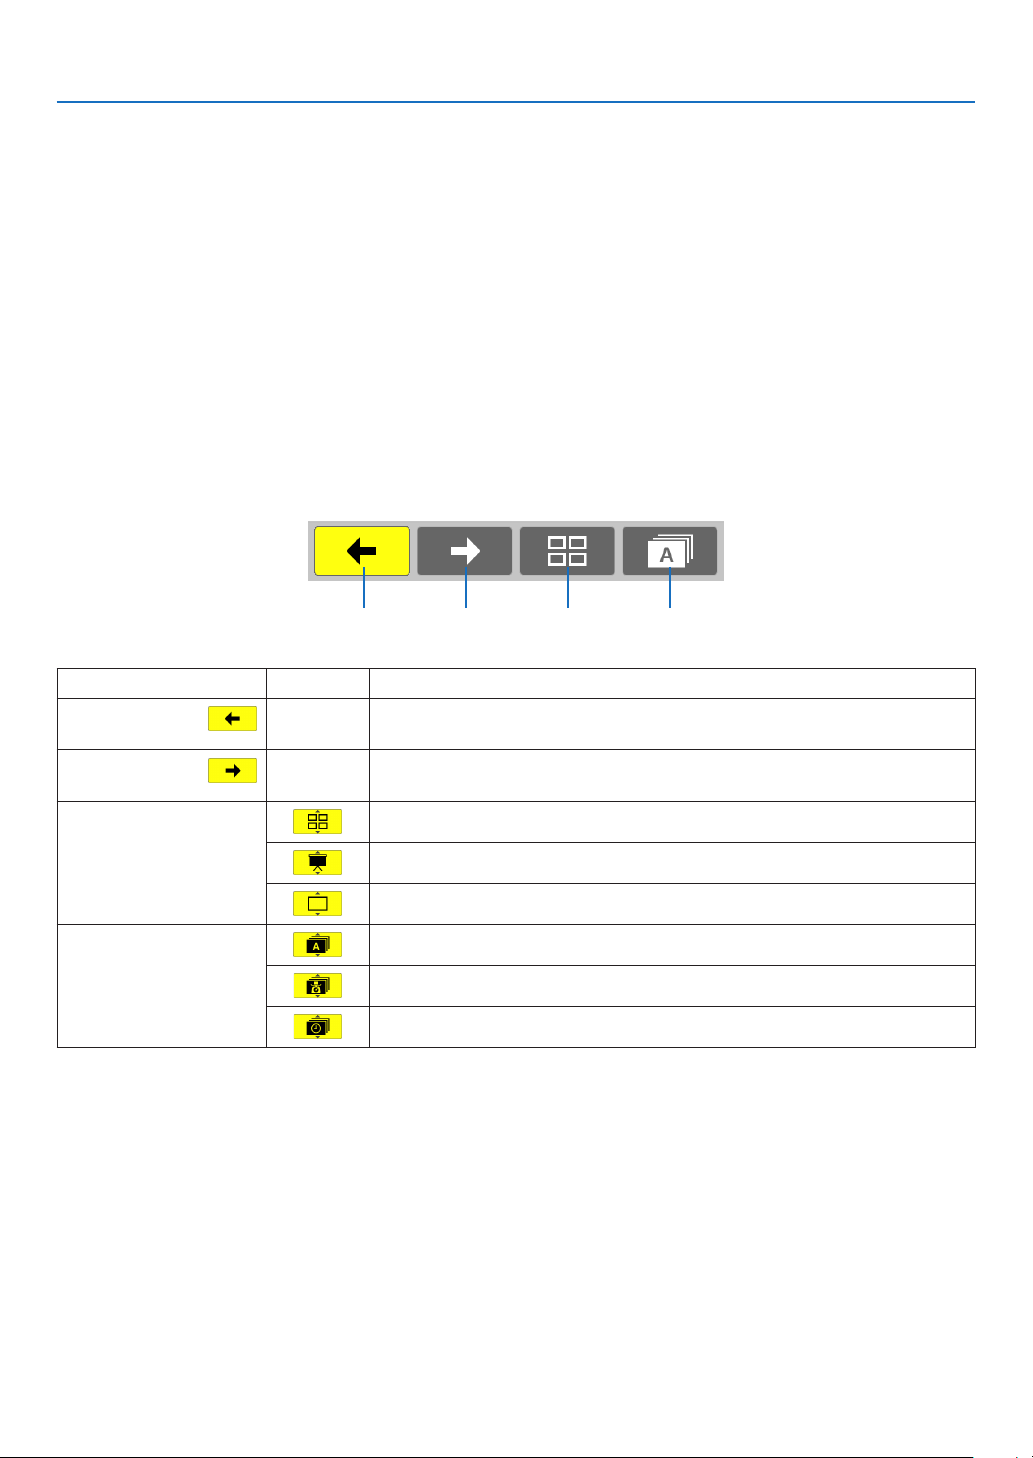
49
4. Using the Viewer
Using the toolbar
1. Press the MENU button.
The toolbar will be displayed.
The SOURCE screen will be displayed as Viewer connection screen.
2. Use the ◀ or ▶ button to select an item and use the ▲ or ▼ button to select its available option.
When the cursor is placed, the selected item will be changed to yellow.
The ▲ or ▼ shows more available choices.
3. Press the ENTER button.
The selected item will be displayed.
4. Press the MENU button two times.
The toolbar will be closed and the SOURCE list will be displayed. Press the MENU button again to close the
SOURCE list.
Thumbnail toolbar
Menu OptionsDescription
(1)Back
— Goesbacktothepreviousimage.Whenthecursorreachesthetopleftof
thescreen,itwillgotothepreviouspage.
(2)Forward
— Goestothenextimage.Whenthecursorreachesthebottomrightofthe
screen,itwillgotothenextpage.
(3)Display
Closesthemenuandreturnstothethumbnailscreen.
Closesthemenuandstartstheslideshowfromthehighlighteditem.
Closesthemenuanddisplaystheslidescreen.
(4)Order
Displaystheiconsalphabeticallybyname.(numberbeforealphabet)
Displaystheiconsindescendingorderoflesize.
Displaystheiconsintheorderofcreationdate
(1) (2) (3) (4)
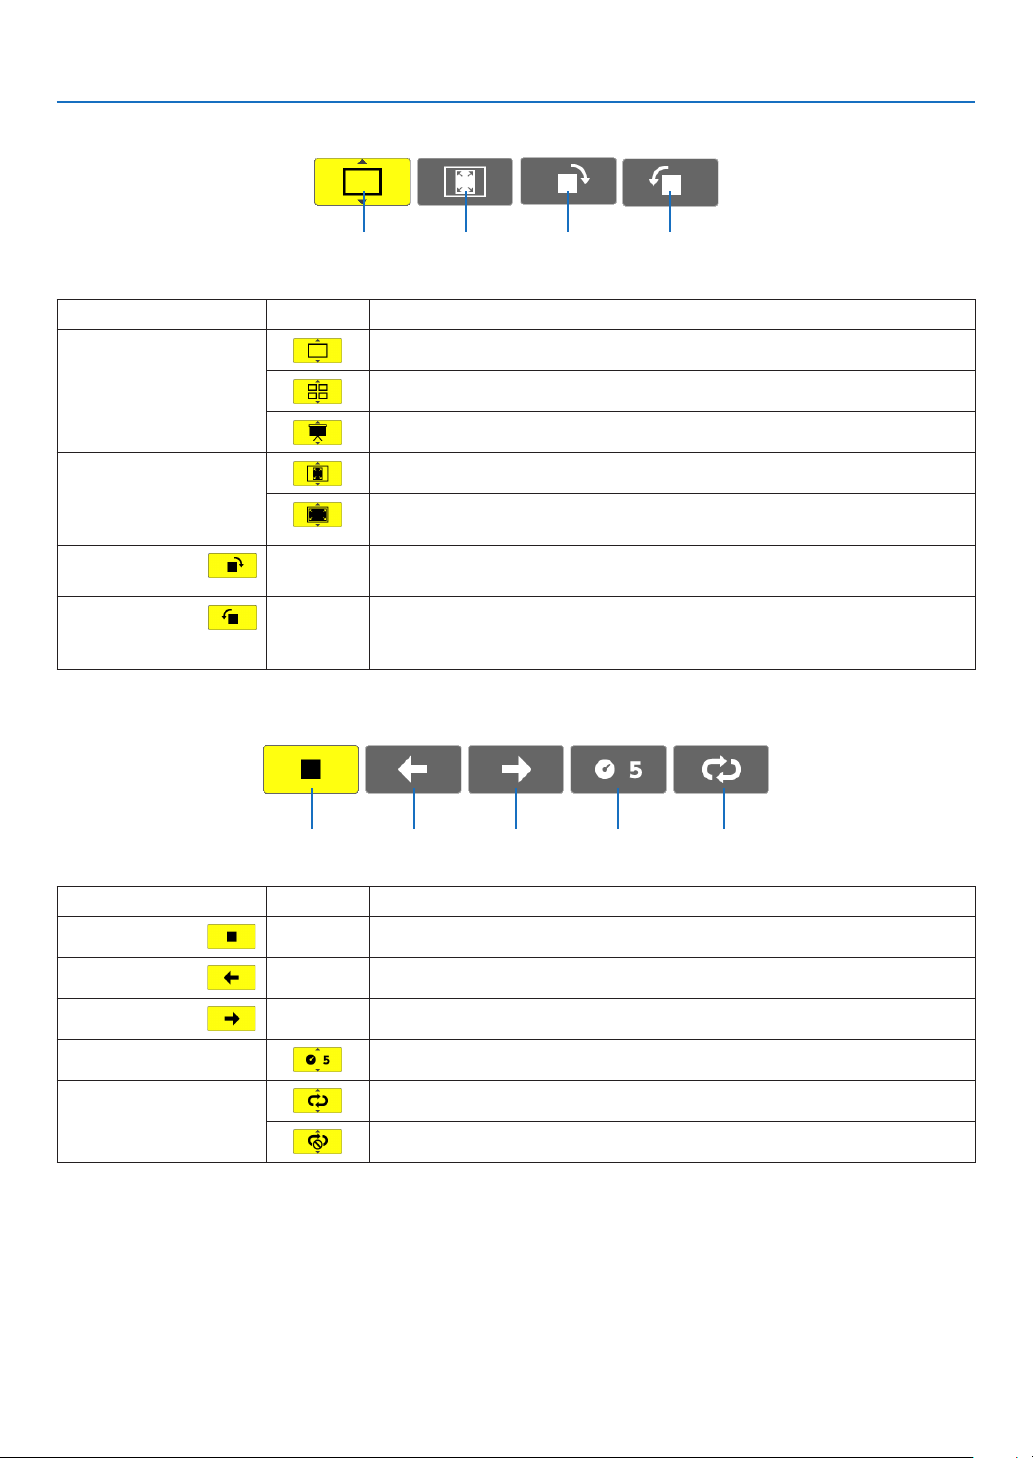
50
4. Using the Viewer
Slide toolbar
Menu OptionsDescription
(1)Display
Closesthemenuandswitchestotheslidescreen.
Closesthemenuanddisplaysthethumbnailscreen.
Closesthemenuandstartstheslideshowfromthehighlighteditem.
(2)Imagedis-
play
Closesthemenuanddisplaystheimageinitsactualsize.
Closesthemenuanddisplaystheimageintheprojector’smaximum
resolution.
(3)Clockwise
rotation
— Closethemenuandrotatetheimage90°clockwise.
(4)Counter-
clockwise
rotation
— Closethemenuandrotatetheimage90°counterclockwise.
Slideshowtoolbar
Menu OptionsDescription
(1)Stop
— Closesthemenuandchangestotheslidescreen.
(2)Back
— Goesbacktothepreviousimage.
(3)Forward
— Goestothenextimage.
(4)Interval
Speciesintervaltimewhenplayingbacktheslides.
(5)Repeat
Repeatstoplaybacktheimagesinthefolder.
Returnstothethumbnailscreen.
TIP:
•Apictureiconatthecenterofthescreenshowsthatthelecannotbedisplayedintheslidescreenorthumbnailscreen.
•Slidetoolbarsettingforrotationwillbecancelledifthefolderismovedfromoneplacetoanother.
(1) (2) (3) (4)
(1) (2) (3) (4) (5)
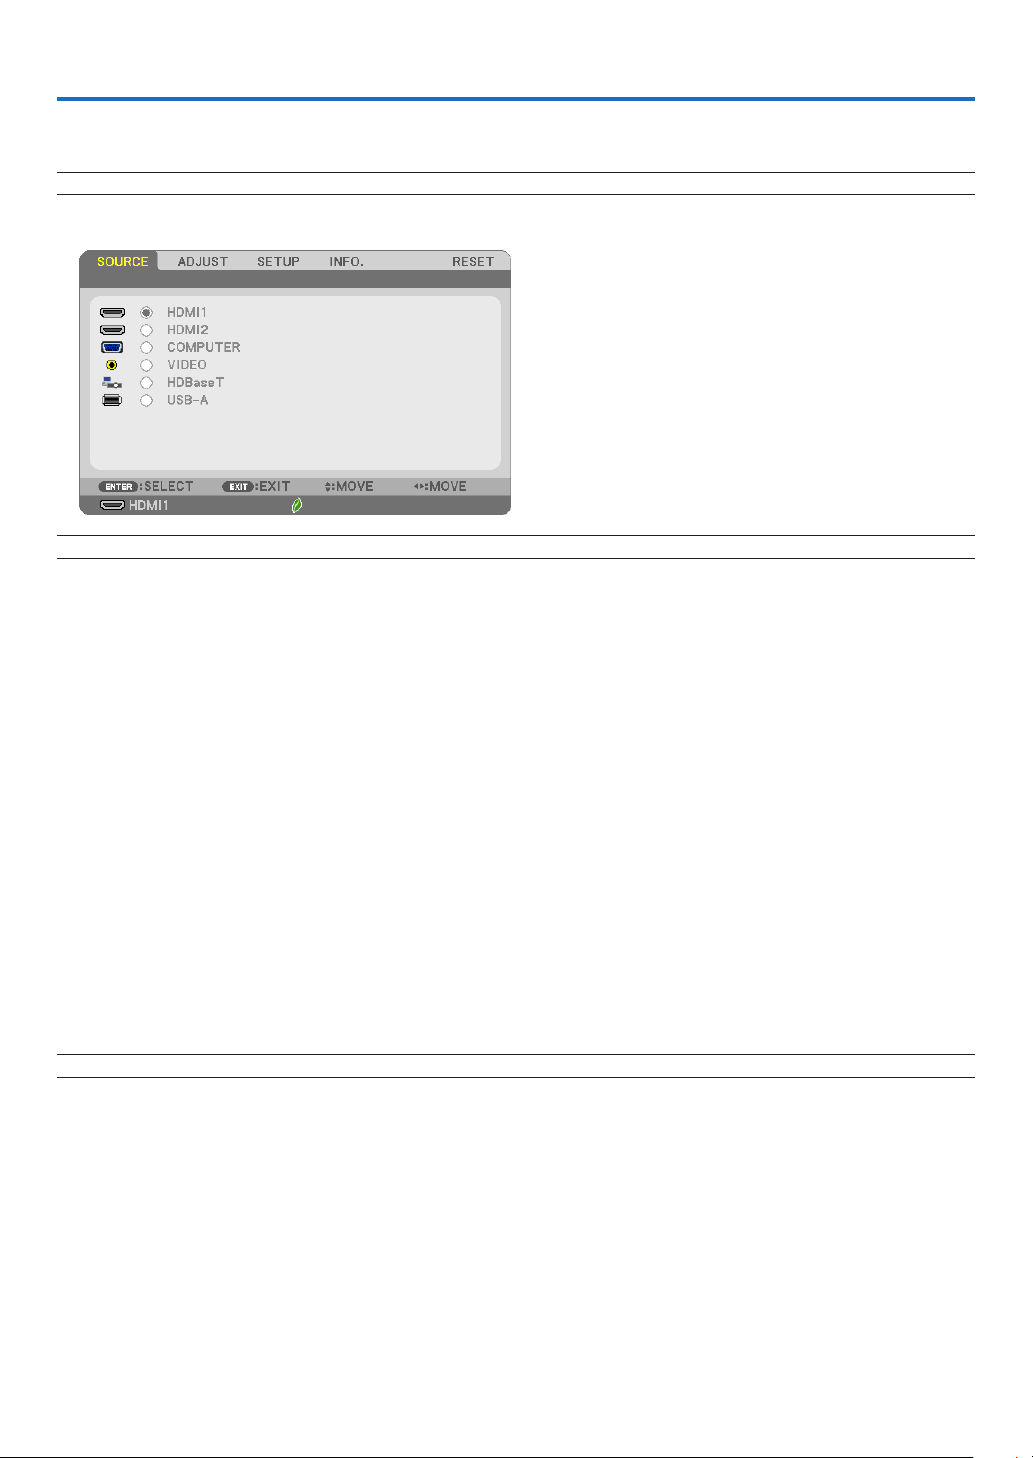
51
5. Using On-Screen Menu
❶ Using the Menus
NOTE:Theon-screenmenumaynotbedisplayedcorrectlywhileinterlacedmotionvideoimageisprojected.
1. Press the MENU button on the remote control or the projector cabinet to display the menu.
NOTE:ThecommandssuchasENTER,EXIT,▲▼,◀▶inthebottomshowavailablebuttonsforyouroperation.
2. Press the ◀▶ buttons on the remote control or the projector cabinet to display the submenu.
3. Press the ENTER button on the remote control or the projector cabinet to highlight the top item or the
first tab.
4. Use the ▲▼ buttons on the remote control or the projector cabinet to select the item you want to adjust
or set.
You can use the ◀▶ buttons on the remote control or the projector cabinet to select the tab you want.
5. Press the ENTER button on the remote control or the projector cabinet to display the submenu window.
6. Adjust the level or turn the selected item on or off by using the ▲▼◀▶ buttons on the remote control or
the projector cabinet.
Changesarestoreduntiladjustedagain.
7. Repeat steps 2 -6 to adjust an additional item, or press the EXIT button on the remote control or the pro-
jector cabinet to quit the menu display.
NOTE:Whenamenuormessageisdisplayed,severallinesofinformationmaybelost,dependingonthesignalorsettings.
8. Press the MENU button to close the menu.
To return to the previous menu, press the EXIT button.
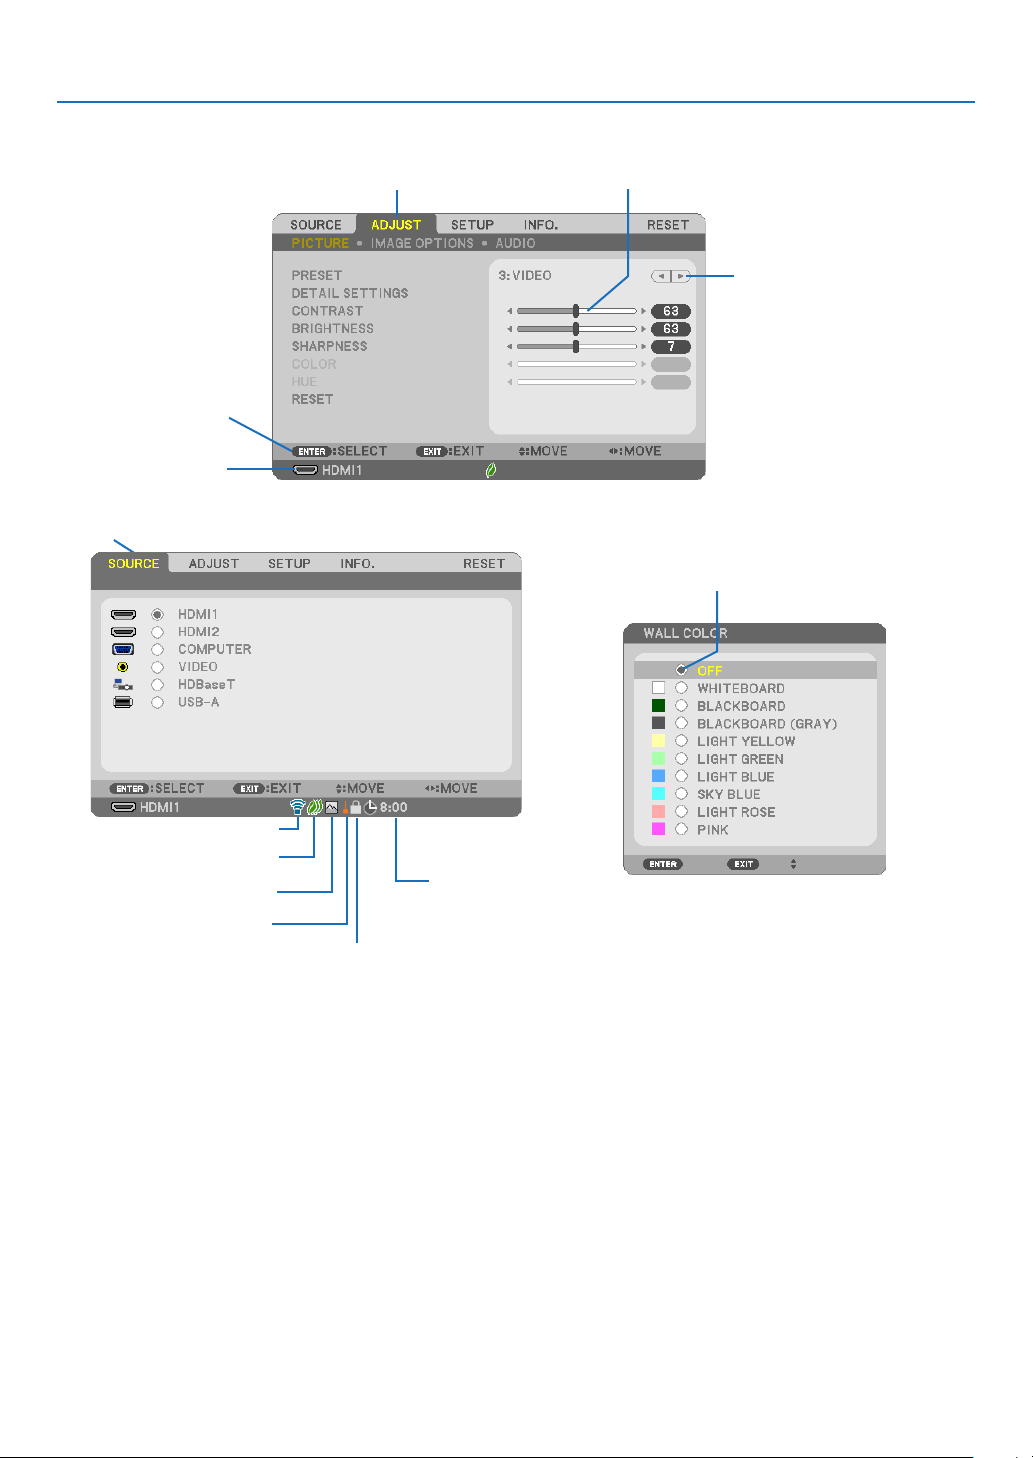
52
5. Using On-Screen Menu
❷
Menu Elements
Slide bar
Solid triangle
Tab
Radio button
High Altitude symbol
ECO mode symbol
Wireless symbol
Menuwindowsordialogboxestypicallyhavethefollowingelements:
Highlight �������������������������������Indicates the selected menu or item�
Solid triangle �������������������������Indicates further choices are available� A highlighted triangle indicates the item is active�
Tab ����������������������������������������Indicates a group of features in a dialog box� Selecting on any tab brings its page to the front�
Radio button ��������������������������Use this round button to select an option in a dialog box�
Source ����������������������������������Indicates the currently selected source�
Off Timer remaining time �������Indicates the remaining countdown time when the [OFF TIMER] is preset�
Slide bar �������������������������������Indicates settings or the direction of adjustment�
ECO mode symbol �����������������Indicates ECO MODE is set�
Key Lock symbol ������������������� Indicates the [CONTROL PANEL LOCK] is enabled�
Thermometer symbol ������������ Indicates the [ECO MODE] is forcibly set to [NORMAL] mode because the internal temperature is too high�
High Altitude symbol��������������Indicates the [FAN MODE] is set to [HIGH ALTITUDE] mode�
Wireless symbol ��������������������Indicate the wireless LAN connection is enabled�
Source
Available buttons
Thermometer symbol
Key Lock symbol
Off Timer remaining
time
Highlight

53
5. Using On-Screen Menu
❸ List of Menu Items
Somemenuitemsarenotavailabledependingontheinputsource.
Menu Item Default Options
SOURCE
HDMI1 *
HDMI2 *
COMPUTER *
VIDEO *
HDBaseT (not supported by P603X) *
USB-A *
ADJUST
PICTURE
PRESET * 1–7
DETAIL SETTINGS
GENERAL
REFERENCE * HIGH-BRIGHT, PRESENTATION, VIDEO, MOVIE, GRAPHIC, sRGB, DICOM SIM�
GAMMA CORRECTION DYNAMIC, NATURAL, BLACK DETAIL
SCREEN SIZE * LARGE, MEDIUM, SMALL
COLOR TEMPERATURE * 5000, 6500, 7800, 8500, 9300, 10500
DYNAMIC CONTRAST * OFF, ON
IMAGE MODE * STILL, MOVIE
COLOR ENHANCEMENT * OFF, ON
WHITE BALANCE
CONTRAST R 0
CONTRAST G 0
CONTRAST B 0
BRIGHTNESS R *
3
BRIGHTNESS G *
3
BRIGHTNESS B *
3
CONTRAST 63
BRIGHTNESS 63
SHARPNESS
6
COLOR
28
HUE 31
RESET
IMAGE OPTIONS
CLOCK *
PHASE *
HORIZONTAL *
VERTICAL *
OVERSCAN * AUTO, 0[%], 5[%], 10[%]
ASPECT RATIO *
P554U/P474U/P554W/P474W: AUTO, 4:3, 16:9, 15:9, 16:10, LETTERBOX,
NATIVE
P604X/P603X: AUTO, 4:3, 16:9, 15:9, 16:10, WIDE ZOOM, NATIVE
POSITION (Not available on P554U/P474U/P554W/
P474W)
0
AUDIO VOLUME 11 0–31
SETUP GENERAL
KEYSTONE
KEYSTONE HORIZONTAL 0
KEYSTONE VERTICAL 0
PINCUSHION LEFT/RIGHT
(not available on P554U/
P474U)
0
PINCUSHION TOP/
BOTTOM (not available on
P554U/P474U)
0
CORNERSTONE 0
PINCUSHION
(not available
on P554W/
P474W/P604X/
P603X)
TOP 0
BOTTOM 0
LEFT 0
RIGHT 0
RESET
WALL COLOR OFF
OFF, WHITEBOARD, BLACKBOARD, BLACKBOARD (GRAY), LIGHT YELLOW,
LIGHT GREEN, LIGHT BLUE, SKYBLUE, LIGHT ROSE, PINK
ECO MODE AUTO ECO OFF, AUTO ECO, NORMAL, ECO
CLOSED CAPTION OFF
OFF, CAPTION1, CAPTION2, CAPTION3, CAPTION4, TEXT1, TEXT2, TEXT3,
TEXT4
OFF TIMER OFF OFF, 0:30, 1:00, 2:00, 4:00, 8:00, 12:00, 16:00
LANGUAGE ENGLISH
ENGLISH, DEUTSCH, FRANÇAIS, ITALIANO, ESPAÑOL, SVENSKA, 日本語
DANSK, PORTUGUÊS, ČEŠTINA, MAGYAR, POLSKI, NEDERLANDS, SUOMI
NORSK, TÜRKÇE,
РУССКИЙ
, ,
Ελληνικά
, 简体中文, 한국어,
TIẾNG ViỆT
ROMÂNĂ, HRVATSKI,
БЪЛГАРСКИ
, INDONESIA, , ไทย, , 繁體
中文
*Theasterisk(*)indicatesthatthedefaultsettingvariesdependingonthesignal.
54
5. Using On-Screen Menu
Menu Item Default Options
SETUP
MENU
COLOR SELECT COLOR COLOR, MONOCHROME
SOURCE DISPLAY ON OFF, ON
ID DISPLAY ON OFF, ON
ECO MESSAGE OFF OFF, ON
DISPLAY TIME AUTO 45 SEC MANUAL, AUTO 5 SEC, AUTO 15 SEC, AUTO 45 SEC
BACKGROUND BLUE BLUE, BLACK, LOGO
FILTER MESSAGE 4000[H] OFF, 100[H], 500[H], 1000[H], 2000[H], 4000[H]
INSTALLATION
ORIENTATION DESKTOP FRONT DESKTOP FRONT, CEILING REAR, DESKTOP REAR, CEILING FRONT
CONTROL PANEL LOCK OFF OFF, ON
SECURITY OFF OFF, ON
COMMUNICATION SPEED 38400bps 4800bps, 9600bps, 19200bps, 38400bps
SERIAL PORT
(not supported by P603X)
PC CONTROL PC CONTROL, HDBaseT
REMOTE SENSOR ALL
ALL, FRONT/BACK, FRONT, BACK, HDBaseT
(HDBaseT is not supported by P603X)
CONTROL ID
CONTROL ID NUMBER 1 1–254
CONTROL ID OFF OFF, ON
TEST PATTERN
OPTIONS(1)
AUTO ADJUST NORMAL OFF, NORMAL, FINE
SEAMLESS SWITCHING OFF OFF, ON
FAN MODE AUTO AUTO, HIGH, HIGH ALTITUDE
SIGNAL SELECT
COMPUTER
RGB/
COMPONENT
RGB/COMPONENT, RGB, COMPONENT
VIDEO AUTO AUTO, NTSC3�58, NTSC4�43, PAL, PAL-M, PAL-N, PAL60, SECAM
WXGA MODE
P554U/P474U/
P554W/P474W:
ON
P604X/P603X:
OFF
OFF, ON
DEINTERLACE ON OFF, ON
HDMI
SETTINGS
HDMI1 VIDEO LEVEL AUTO AUTO, NORMAL, ENHANCED
HDMI2 VIDEO LEVEL AUTO AUTO, NORMAL, ENHANCED
HDBaseT
(not
supported
by P603X)
VIDEO LEVEL AUTO AUTO, NORMAL, ENHANCED
AUDIO SELECT
HDMI1 HDMI1 HDMI1, COMPUTER
HDMI2 HDMI2 HDMI2, COMPUTER
HDBaseT (not supported by P603X) HDBaseT HDBaseT, COMPUTER
BEEP ON OFF, ON
OPTIONS(2)
STANDBY MODE NORMAL NORMAL, NETWORK STANDBY
DIRECT POWER ON OFF OFF, ON
AUTO POWER ON OFF OFF, ON
AUTO POWER OFF
STANDBY
(NORMAL): 1:00
NETWORK
STANDBY: 0:15
OFF, 0:05, 0:10, 0:15, 0:20, 0:30, 1:00
DEFAULT SOURCE SELECT LAST
LAST, AUTO, HDMI1, HDMI2, COMPUTER, VIDEO, HDBaseT, USB-A
(HDBaseT is not supported by P603X)
CARBON CONVERT
CURRENCY $ $, €, JP¥, RMB¥
CURRENCY CONVERT
WIRED LAN
WIRED LAN ENABLE DISABLE, ENABLE
SETTINGS
DHCP: ON
AUTODNS: ON
DHCP, IP ADDRESS, SUBNET MASK, GATEWAY, AUTODNS, DNS
RECONNECT
WIRELESS LAN
PROFILE DISABLE DISABLE, SIMPLE ACCESS POINT, INFRASTRUCTURE
RECONNECT
*Theasterisk(*)indicatesthatthedefaultsettingvariesdependingonthesignal.

55
5. Using On-Screen Menu
Menu Item Default Options
INFO�
USAGE TIME
LAMP LIFE REMAINING
LAMP HOURS USED
FILTER HOURS USED
TOTAL CARBON SAVINGS
TOTAL COST SAVINGS
SOURCE(1)
SOURCE NAME
SOURCE INDEX
HORIZONTAL FREQUENCY
VERTICAL FREQUENCY
SYNC TYPE SEPARATE SYNC, COMPOSITE SYNC, SYNC ON GREEN, SYNC ON VIDEO
SYNC POLARITY
SCAN TYPE
SOURCE(2)
SIGNAL TYPE
VIDEO TYPE
BIT DEPTH 8[bits], 10[bits], 12[bits]
VIDEO LEVEL
HDBaseT
(not supported by
P603X)
SIGNAL QUALITY
OPERATION MODE
LINK STATUS
HDMI STATUS
WIRED LAN
IP ADDRESS
SUBNET MASK
GATEWAY
MAC ADDRESS
WIRELESS LAN
IP ADDRESS
SUBNET MASK
GATEWAY
MAC ADDRESS
SSID
NETWORK TYPE
SECURITY
CHANNEL
SIGNAL LEVEL
VERSION
FIRMWARE
DATA
OTHERS
PROJECTOR NAME
HOST NAME
MODEL NO�
SERIAL NUMBER
LAN UNIT TYPE
CONTROL ID (when [CONTROL ID] is set)
RESET
CURRENT SIGNAL
ALL DATA
CLEAR LAMP HOURS
CLEAR FILTER HOURS
*Theasterisk(*)indicatesthatthedefaultsettingvariesdependingonthesignal.

56
5. Using On-Screen Menu
❹ Menu Descriptions & Functions [SOURCE]
HDMI1 and HDMI2
SelectstheHDMIcompatibleequipmentconnectedtoyourHDMI1or2INterminal.
COMPUTER
SelectsthecomputerconnectedtoyourCOMPUTERinputterminalsignal.
NOTE:WhenthecomponentinputsignalisconnectedtotheCOMPUTERINterminal,select[COMPUTER].
VIDEO
SelectswhatisconnectedtoyourVIDEOinput-VCR,DVDplayerordocumentcamera.
HDBaseT (not supported by P603X)
ProjectingtheHDBaseTsignal.
USB-A
ThisfeatureenablesyoutomakepresentationsusingaUSBmemorythatcontainsslides.
(→page
43“4.UsingtheViewer”)
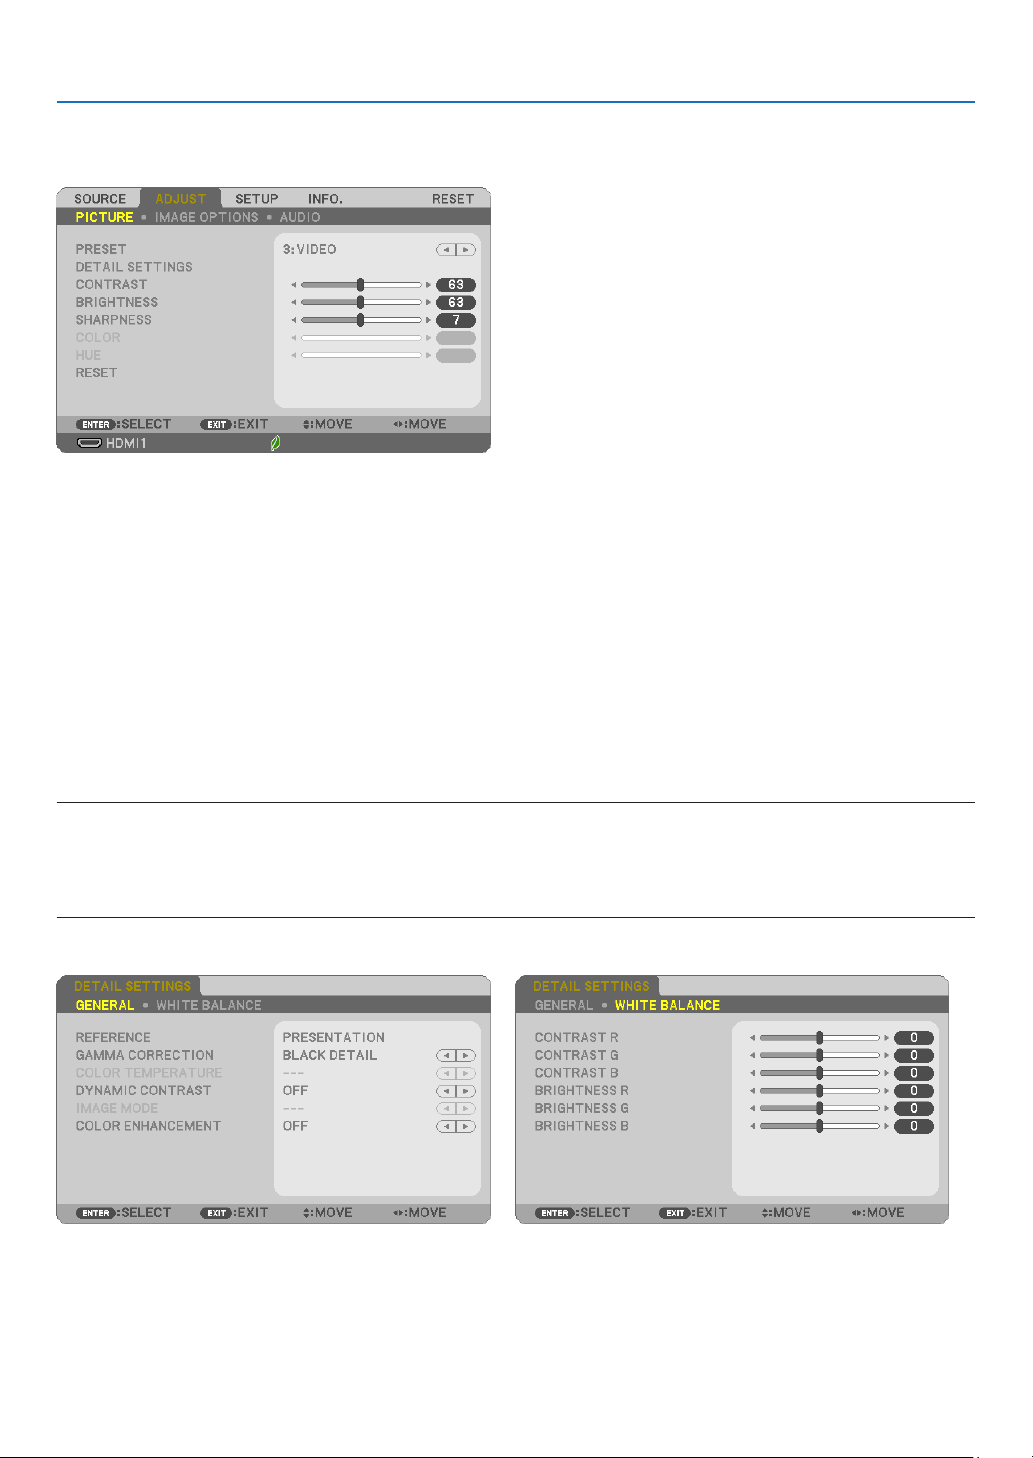
57
5. Using On-Screen Menu
❺ Menu Descriptions & Functions [ADJUST]
[PICTURE]
[PRESET]
Thisfunctionallowsyoutoselectoptimizedsettingsforyourprojectedimage.
Youcanadjustneutraltintforyellow,cyanormagenta.
Therearesevenfactorypresetsoptimizedforvarioustypesofimages.Youcanalsouse[DETAILSETTINGS]toset
useradjustablesettingstocustomizeeachgammaorcolor.
Yoursettingscanbestoredin[PRESET1]to[PRESET7].
HIGH-BRIGHT �����������Recommended for use in a brightly lit room�
PRESENTATION ���������Recommended for making a presentation using a PowerPoint file�
VIDEO �����������������������Recommended for typical TV program viewing�
MOVIE ���������������������� Recommended for movies�
GRAPHIC ������������������Recommended for graphics�
sRGB ������������������������Standard color values
DICOM SIM� ��������������Recommended for DICOM simulation format�
NOTE:
•The[DICOMSIM.]optionisfortraining/referenceonlyandshouldnotbeusedforactualdiagnosis.
•DICOMstandsforDigitalImagingandCommunicationsinMedicine.ItisastandarddevelopedbytheAmericanCollegeofRadiology(ACR)
andtheNationalElectricalManufacturersAssociation(NEMA).
Thestandardspecieshowdigitalimagedatacanbemovedfromsystemtosystem.
[DETAIL SETTINGS]

58
5. Using On-Screen Menu
[GENERAL]
StoringYourCustomizedSettings[REFERENCE]
Thisfunctionallowsyoutostoreyourcustomizedsettingsin[PRESET1]to[PRESET7].
First,selectabasepresetmodefrom[REFERENCE],thenset[GAMMACORRECTION]and[COLORTEMPERATURE].
HIGH-BRIGHT �����������Recommended for use in a brightly lit room�
PRESENTATION ���������Recommended for making a presentation using a PowerPoint file�
VIDEO �����������������������Recommended for typical TV program viewing�
MOVIE ���������������������� Recommended for movies�
GRAPHIC ������������������Recommended for graphics�
sRGB ������������������������Standard color values�
DICOM SIM� ��������������Recommended for DICOM simulation format�
Selecting Gamma Correction Mode [GAMMA CORRECTION]
Eachmodeisrecommendedfor:
DYNAMIC �����������������Creates a high-contrast picture�
NATURAL ������������������Natural reproduction of the picture�
BLACK DETAIL ���������� Emphasizes detail in dark areas of the picture�
NOTE:Thisfunctionisnotavailablewhen[DICOMSIM.]isselectedfor[DETAILSETTINGS].
SelectingScreenSizeforDICOMSIM[SCREENSIZE]
Thisfunctionwillperformgammacorrectionappropriateforthescreensize.
LARGE ����������������������For screen size of 110"
MEDIUM ������������������� For screen size of 90"
SMALL ���������������������For screen size of 70"
NOTE:Thisfunctionisavailableonlywhen[DICOMSIM.]isselectedfor[DETAILSETTINGS].
AdjustingColorTemperature[COLORTEMPERATURE]
This option allows you to select the color temperature of your choice.
NOTE:When[PRESENTATION]or[HIGH-BRIGHT]isselectedin[REFERENCE],thisfunctionisnotavailable.
AdjustingBrightnessandContrast[DYNAMICCONTRAST]
Thisfunctionallowsyoutoadjustthecontrastratioopticallyusingthebuilt-iniris.
Toincreasethecontrastratio,select[ON].
Selecting Still Image Mode or Movie Mode [IMAGE MODE]
Thisfunctionallowsyoutoselectthestillimagemodeorthemoviemode.
STILL �����������������������This mode is for a still image�
MOVIE ���������������������� This mode is for a movie�
NOTE:Thisfunctionisavailableonlywhen[HIGH-BRIGHT]isselectedfor[REFERENCE].

59
5. Using On-Screen Menu
Enhancing the Color [COLOR ENHANCEMENT]
Thisfunctionallowsyoutoenhancethecolorofimage.
ON ���������������������������Enhances the color�
NOTE:Thisfunctionisavailableonlywhen[PRESENTATION]isselected[REFERENCE].
AdjustingWhiteBalance[WHITEBALANCE]
Thisallowsyoutoadjustthewhitebalance.Contrastforeachcolor(RGB)toadjustthewhitelevelofthescreen;
Brightnessforeachcolor(RGB)isusedtoadjusttheblacklevelofthescreen.
[CONTRAST]
Adjuststheintensityoftheimageaccordingtotheincomingsignal.
[BRIGHTNESS]
Adjuststhebrightnesslevelorthebackrasterintensity.
[SHARPNESS]
Controlsthedetailoftheimage.
[COLOR]
Increasesordecreasesthecolorsaturationlevel.
[HUE]
Variesthecolorlevelfrom+/−greento+/−blue.Theredlevelisusedasreference.
InputsignalCONTRASTBRIGHTNESSSHARPNESSCOLORHUE
COMPUTER/HDMI/HDBaseT(RGB)YesYesYesNo No
COMPUTER/HDMI/HDBaseT
(COMPONENT)
YesYesYesYesYes
VIDEOYesYesYesYesYes
USB-AYesYesYesNo No
Yes=Adjustable,No=Notadjustable
[RESET]
Thesettingsandadjustmentsfor[PICTURE]willbereturnedtothefactorysettingswiththeexceptionofthefollow-
ing;Presetnumbersand[REFERENCE]withinthe[PRESET]screen.
Thesettingsandadjustmentsunder[DETAILSETTINGS]withinthe[PRESET]screenthatarenotcurrentlyselected
will not be reset.
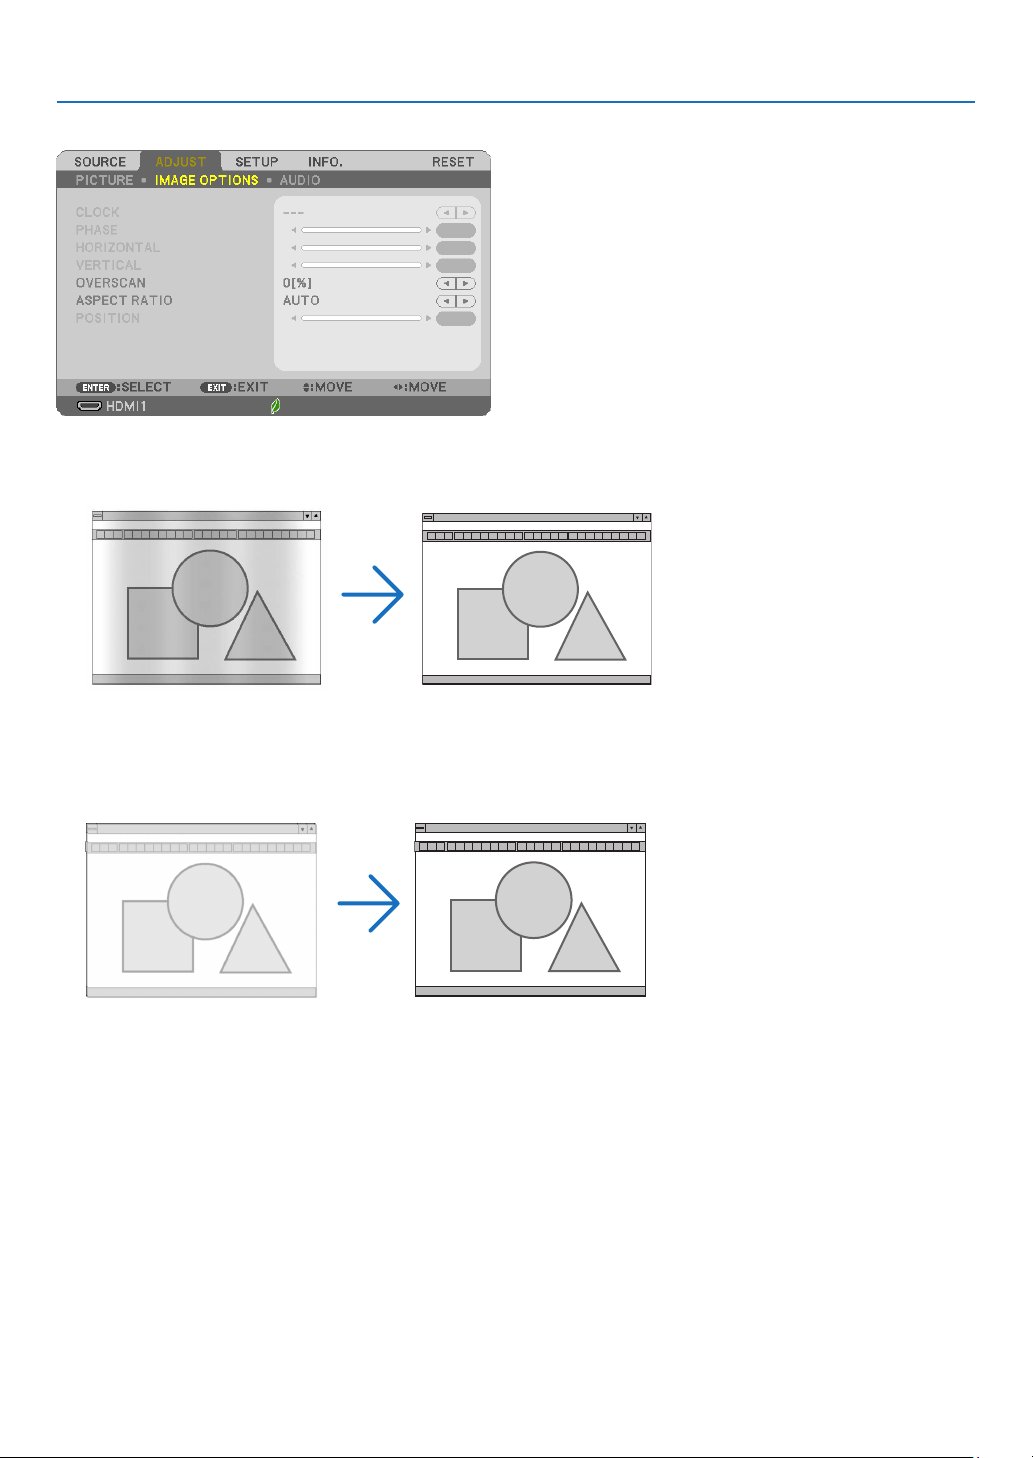
60
5. Using On-Screen Menu
[IMAGE OPTIONS]
AdjustingClockandPhase[CLOCK/PHASE]
ThisallowsyoutomanuallyadjustCLOCKandPHASE.
CLOCK ���������������������Use this item to fine tune the computer image or to remove any vertical banding that might appear� This function
adjusts the clock frequencies that eliminate the horizontal banding in the image�
This adjustment may be necessary when you connect your computer for the first time�
PHASE ����������������������Use this item to adjust the clock phase or to reduce video noise, dot interference or cross talk� (This is evident when
part of your image appears to be shimmering�)
Use [PHASE] only after the [CLOCK] is complete�
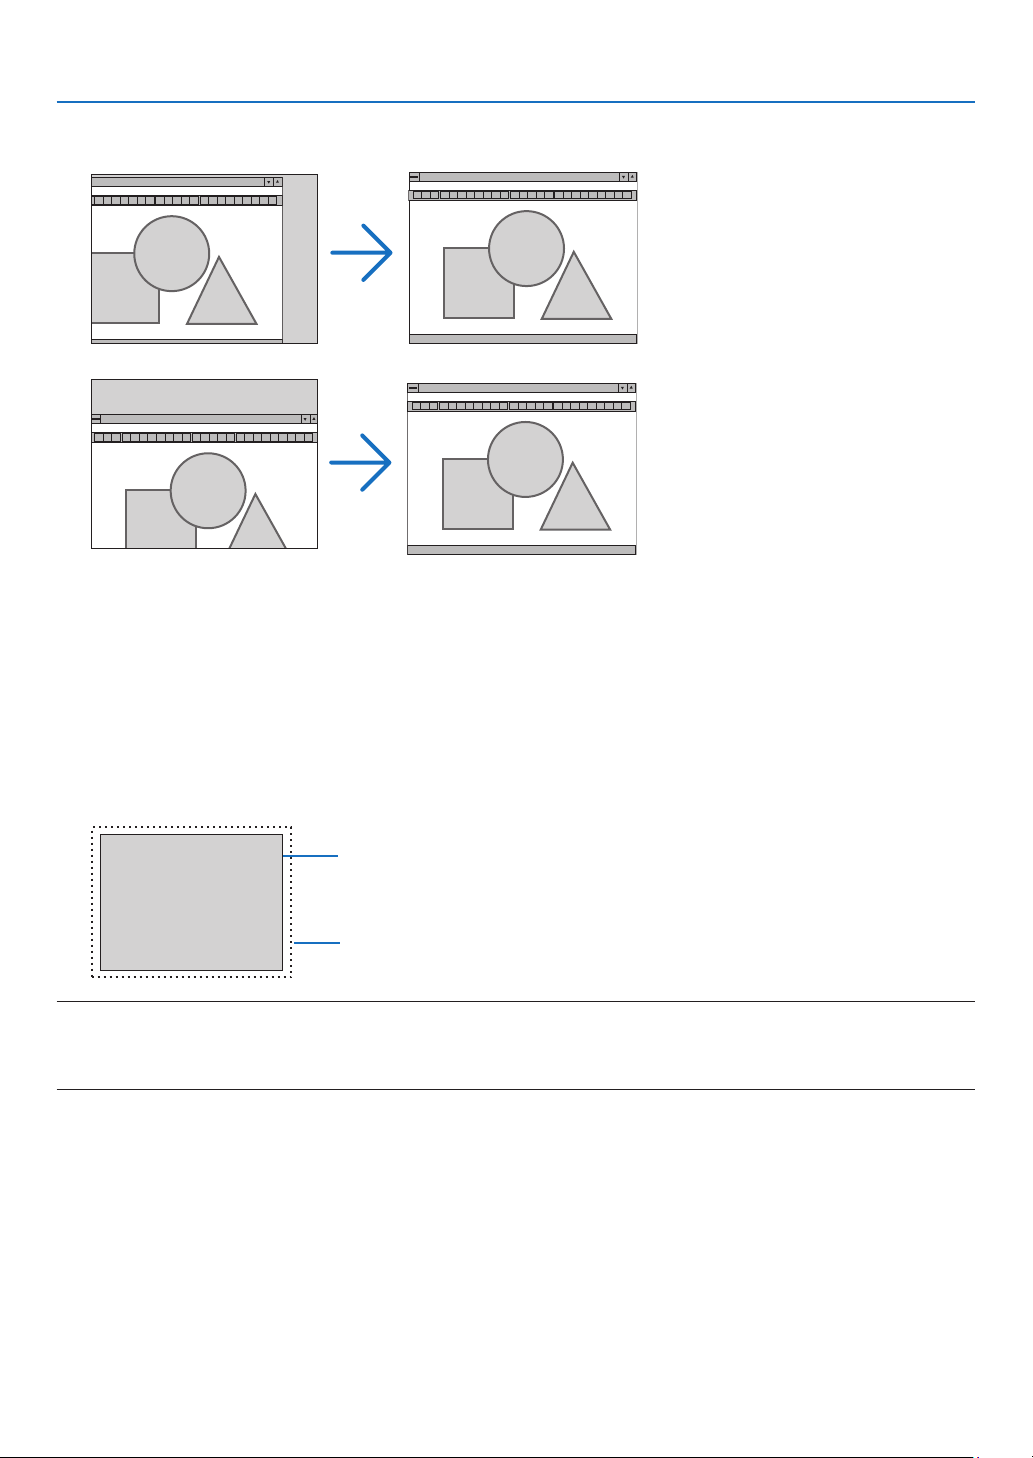
61
5. Using On-Screen Menu
AdjustingHorizontal/VerticalPosition[HORIZONTAL/VERTICAL]
Adjuststheimagelocationhorizontallyandvertically.
-Animagecanbedistortedduringtheadjustmentof[CLOCK]and[PHASE].Thisisnotmalfunction.
-Theadjustmentsfor[CLOCK],[PHASE],[HORIZONTAL],and[VERTICAL]willbestoredinmemoryforthecur-
rentsignal.Thenexttimeyouprojectthesignalwiththesameresolution,horizontalandverticalfrequency,its
adjustments will be called up and applied.
Todeleteadjustmentsstoredinmemory,fromthemenu,youselect[RESET]→[CURRENTSIGNAL]or[ALL
DATA]andresettheadjustments.
SelectingOverscanPercentage[OVERSCAN]
Selectoverscanpercentage(AUTO,0%,5%and10%)forsignal.
Projected image
Overscaned by 10%
NOTE:
•The[0[%]]cannotbeselectedwhenVIDEOsignalisused.
•The[OVERSCAN]itemisnotavailable:
-when[NATIVE]isselectedfor[ASPECTRATIO].
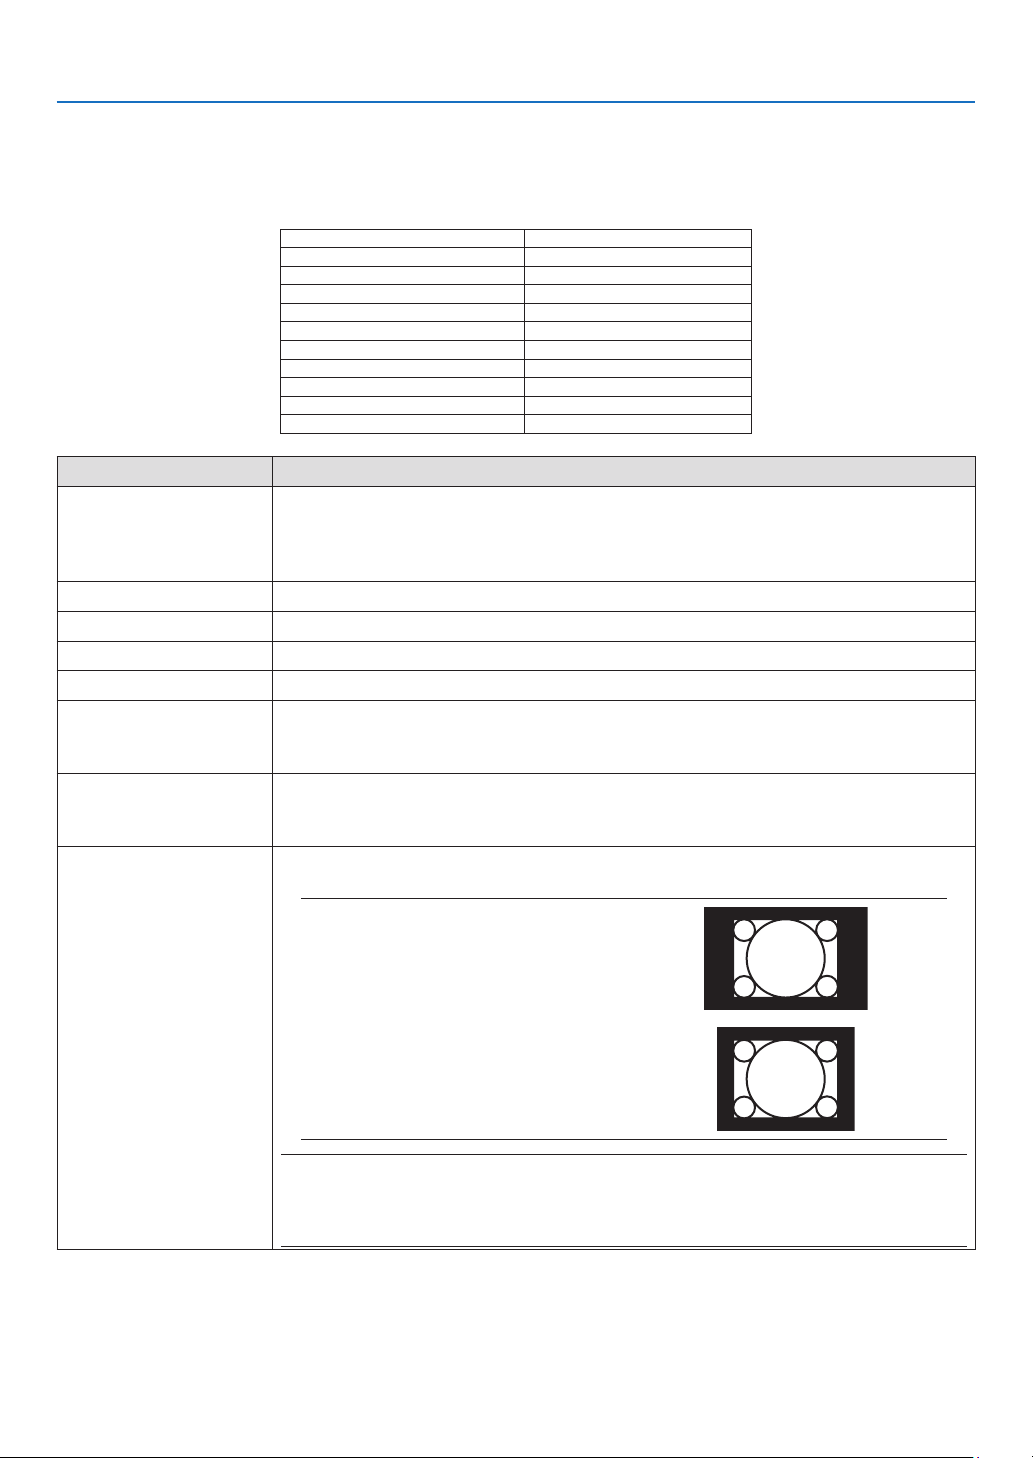
62
5. Using On-Screen Menu
Selecting Aspect Ratio [ASPECT RATIO]
Theterm“aspectratio”referstotheratioofwidthtoheightofaprojectedimage.
Theprojectorautomaticallydeterminestheincomingsignalanddisplaysitinitsappropriateaspectratio.
•Thistableshowstypicalresolutionsandaspectratiosthatmostcomputerssupport.
ResolutionAspectRatio
VGA640×4804:3
SVGA800×6004:3
XGA1024×7684:3
WXGA1280×76815:9
WXGA1280×80016:10
WXGA+1440×90016:10
SXGA1280×10245:4
SXGA+1400×10504:3
UXGA1600×12004:3
WUXGA1920×120016:10
OptionsFunction
AUTOTheprojectorwillautomaticallydeterminetheincomingsignalanddisplayitinitsaspect
ratio.(→
nextpage)
Theprojectormayerroneouslydeterminetheaspectratiodependingonitssignal.If
thisoccurs,selecttheappropriateaspectratiofromthefollowing.
4:3 Theimageisdisplayedin4:3aspectratio.
16:9Theimageisdisplayedin16:9aspectratio.
15:9Theimageisdisplayedin15:9aspectratio.
16:10 Theimageisdisplayedin16:10aspectratio.
WIDEZOOM
(P604X/P603X)
Theimageisstretchedleftandright.
Partsofthedisplayedimagearecroppedattheleftandrightedgesandthereforenot
visible.
LETTERBOX
(P554U/P474U/P554W/
P474W)
Theimageofaletterboxsignalisstretchedequallyinthehorizontalandverticaldirec-
tionstotthescreen.Partsofthedisplayedimagearecroppedatthetopandbottom
edgesandthereforenotvisible.
NATIVETheprojectordisplaysthecurrentimageinitstrueresolutionwhentheincomingcom-
putersignalhasalowerresolutionthantheprojector’snativeresolution.
[Example 1]Whentheincoming
signalwiththeresolutionof800
×600isdisplayedontheP554U/
P474U/P554W/P474W:
[Example 2]Whentheincoming
signalwiththeresolutionof800
×600isdisplayedontheP604X/
P603X:
NOTE:
•Whenanon-computersignalisdisplayed,the[NATIVE]isnotavailable.
•Whenasignalwithahigherresolutionthantheprojector’snativeresolutionisdisplayed,[NATIVE]is
notavailable.
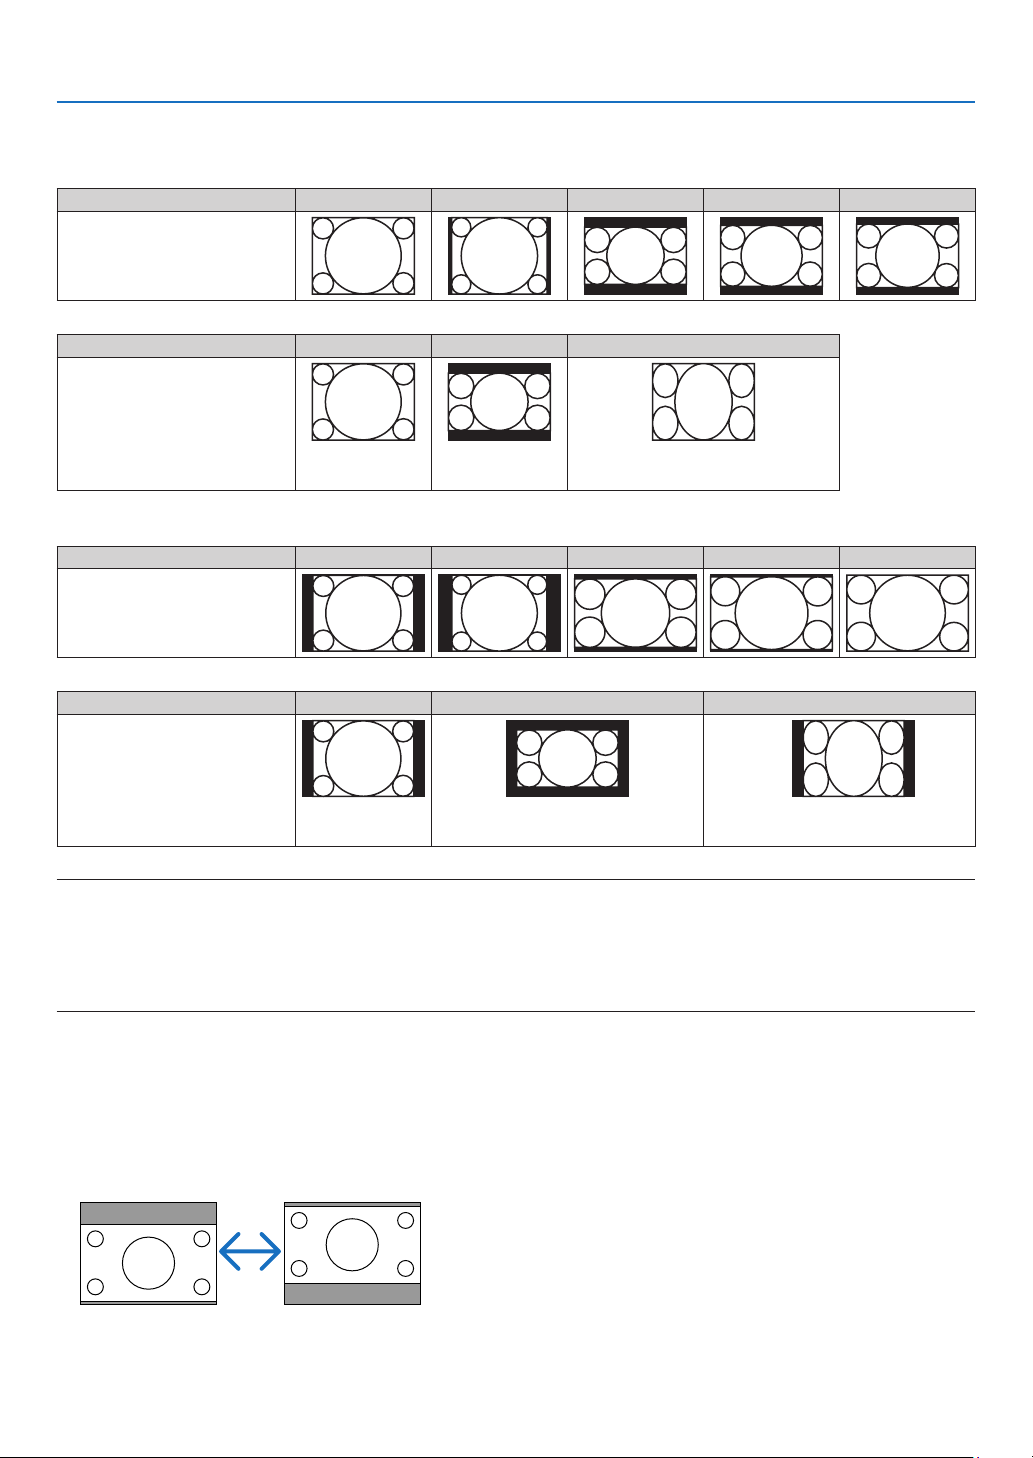
63
5. Using On-Screen Menu
Sampleimagewhentheappropriateaspectratioisautomaticallydetermined
P604X/P603X
[Computersignal]
Aspectratioofincomingsignal4:3 5:4 16:915:916:10
Sampleimagewhentheappro-
priate aspect ratio is automati-
cally determined
[Videosignal]
Aspectratioofincomingsignal4:3 LetterboxSqueeze
Sampleimagewhentheaspect
ratio is automatically determined
NOTE:Todisplayasqueezedsignalproperly,
select[16:9]or[WIDEZOOM].
P554U/P474U/P554W/P474W
[Computersignal]
Aspectratioofincomingsignal4:3 5:4 16:915:916:10
Sampleimagewhentheappro-
priate aspect ratio is automati-
cally determined
[Videosignal]
Aspectratioofincomingsignal4:3 LetterboxSqueeze
Sampleimagewhentheaspect
ratio is automatically determined
NOTE:Todisplayaletterboxsignalproperly,
select[LETTERBOX].
NOTE:Todisplayasqueezedsignalproperly,
select[16:9].
TIP:
•Imagepositioncanbeadjustedverticallyusing[POSITION]whenthe[16:9],[15:9],or[16:10]aspectratiosareselected.
•Theterm“letterbox”referstoamorelandscape-orientedimagewhencomparedtoa4:3image,whichisthestandardaspectratiofora
videosource.
Theletterboxsignalhasaspectratioswiththevistasize“1.85:1”orcinemascopesize“2.35:1”formovielm.
•Theterm“squeeze”referstothecompressedimageofwhichaspectratioisconvertedfrom16:9to4:3.
AdjustingtheVerticalPositionofImage[POSITION](notavailableonP554U/P474U/P554W/
P474W)
(onlywhen[16:9],[15:9],or[16:10]isselectedfor[ASPECTRATIO])
When[16:9],[15:9],or[16:10]isselectedin[ASPECTRATIO],theimageisdisplayedwithblackbordersonthetop
and bottom.
Youcanadjusttheverticalpositionfromthetoptothebottomoftheblackarea.

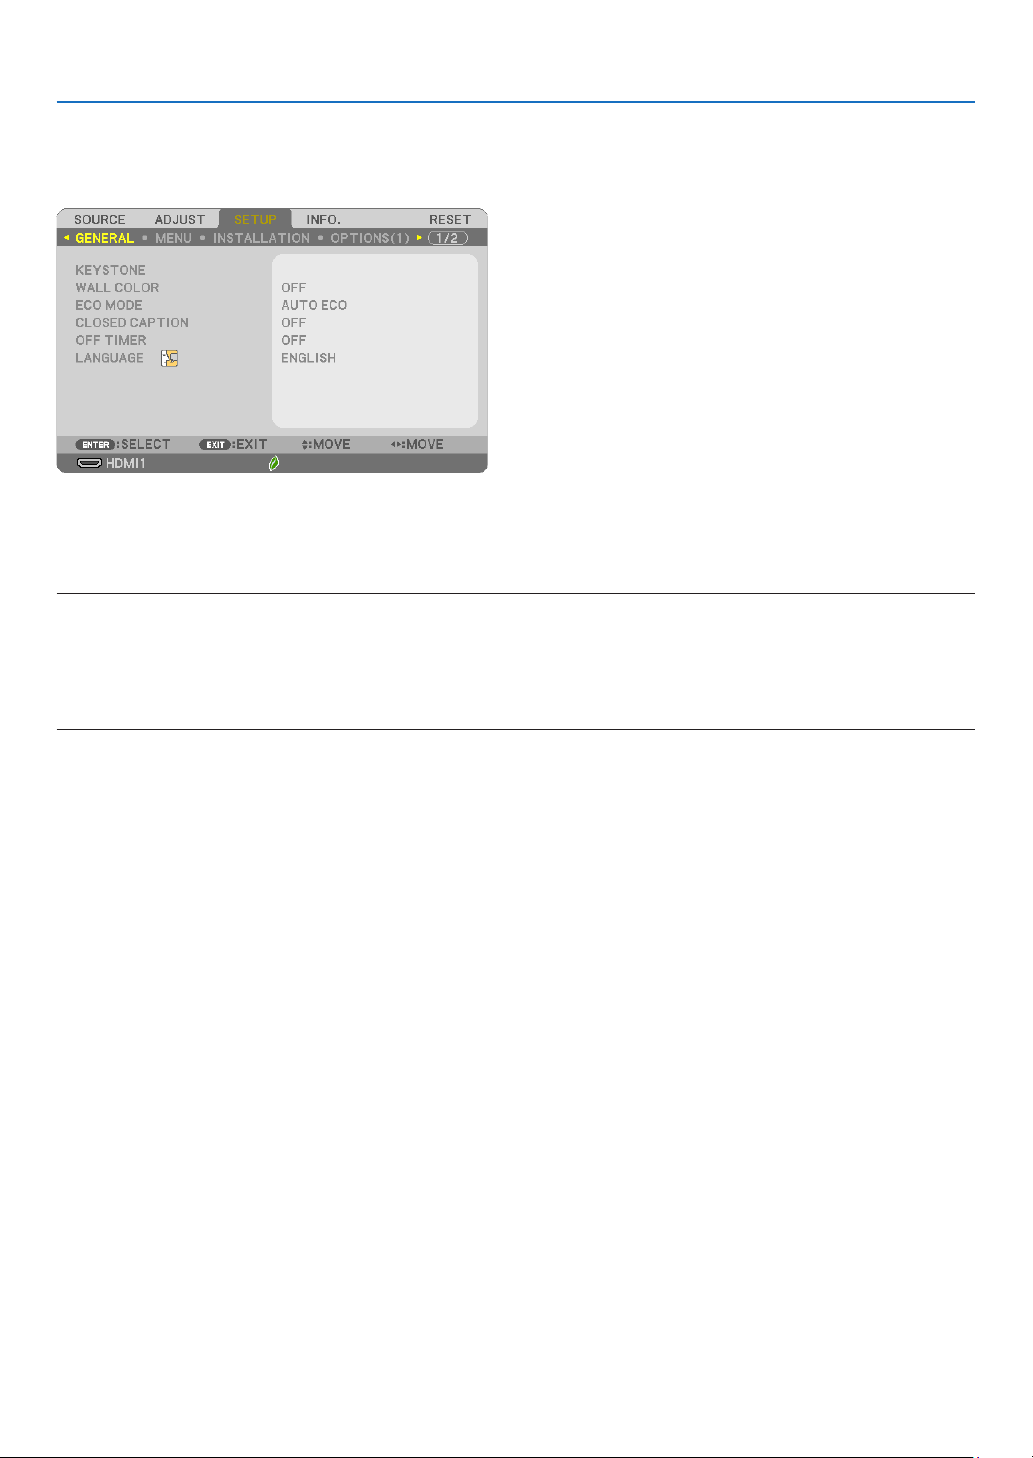
65
5. Using On-Screen Menu
❻ Menu Descriptions & Functions [SETUP]
[GENERAL]
CorrectingKeystoneDistortionManually[KEYSTONE]
Youcancorrecthorizontalorverticalkeystone,pincushionLEFT/RIGHTorTOP/BOTTOM,orcornerstonedistortion
manually.
NOTE:
•[KEYSTONEHORIZONTAL]and[KEYSTONEVERTICAL]canbeadjustedatonce.
•Tochangefromoneitemtoanotheritem,resettherstitem.
•Adjustmentvalueswillbeoverwritten.Theywillnotbedeletedevenwhentheprojectoristurnedoff.
•Using[KEYSTONE],[PINCUSHION]and[CORNERSTONE]correctioncancausetheimagetobeslightlyblurredbecausethecorrectionis
madeelectronically.
KEYSTONE HORIZONTAL ���������������Corrects horizontal keystone distortion� (→ page
20)
KEYSTONE VERTICAL ��������������������Corrects vertical keystone distortion� (→ page
20)
PINCUSHION LEFT/RIGHT ��������������Corrects pincushion distortion at the left or right side� (→ page
30)
PINCUSHION TOP/BOTTOM �����������Corrects pincushion distortion at the top or bottom side� (→ page
30)
CORNERSTONE ����������������������������Fits a projected image within the border of the screen easily by align the four corner of an image to
the ones of the screen� (→ page
28)
PINCUSHION ���������������������������������Corrects pincushion distortion at the top, bottom, left or right side� (→ page
31)
RESET ������������������������������������������Returns all the above items to the factory preset values�
TIP:
•Themaximumadjustmentrangewith[CORNERSTONE]and[KEYSTONE]correctionsis±20°inthehorizontaldirection,±30°inthevertical
direction.
-Dependingoninputsignal,theadjustablerangemaybenarrower.

66
5. Using On-Screen Menu
Using the Wall Color Correction [WALL COLOR]
Thisfunctionallowsforquickadaptivecolorcorrectioninapplicationswherethescreenmaterialisnotwhite.
NOTE:Selecting[WHITEBOARD]reduceslampbrightness.
Setting Eco Mode [ECO MODE]
TheECOMODEincreaseslamplife,whileloweringpowerconsumptionandcuttingdownonCO
2
emissions.
Fourbrightnessmodesofthelampcanbeselected:[OFF],[AUTOECO],[NORMAL]and[ECO]modes.
(→page
26)
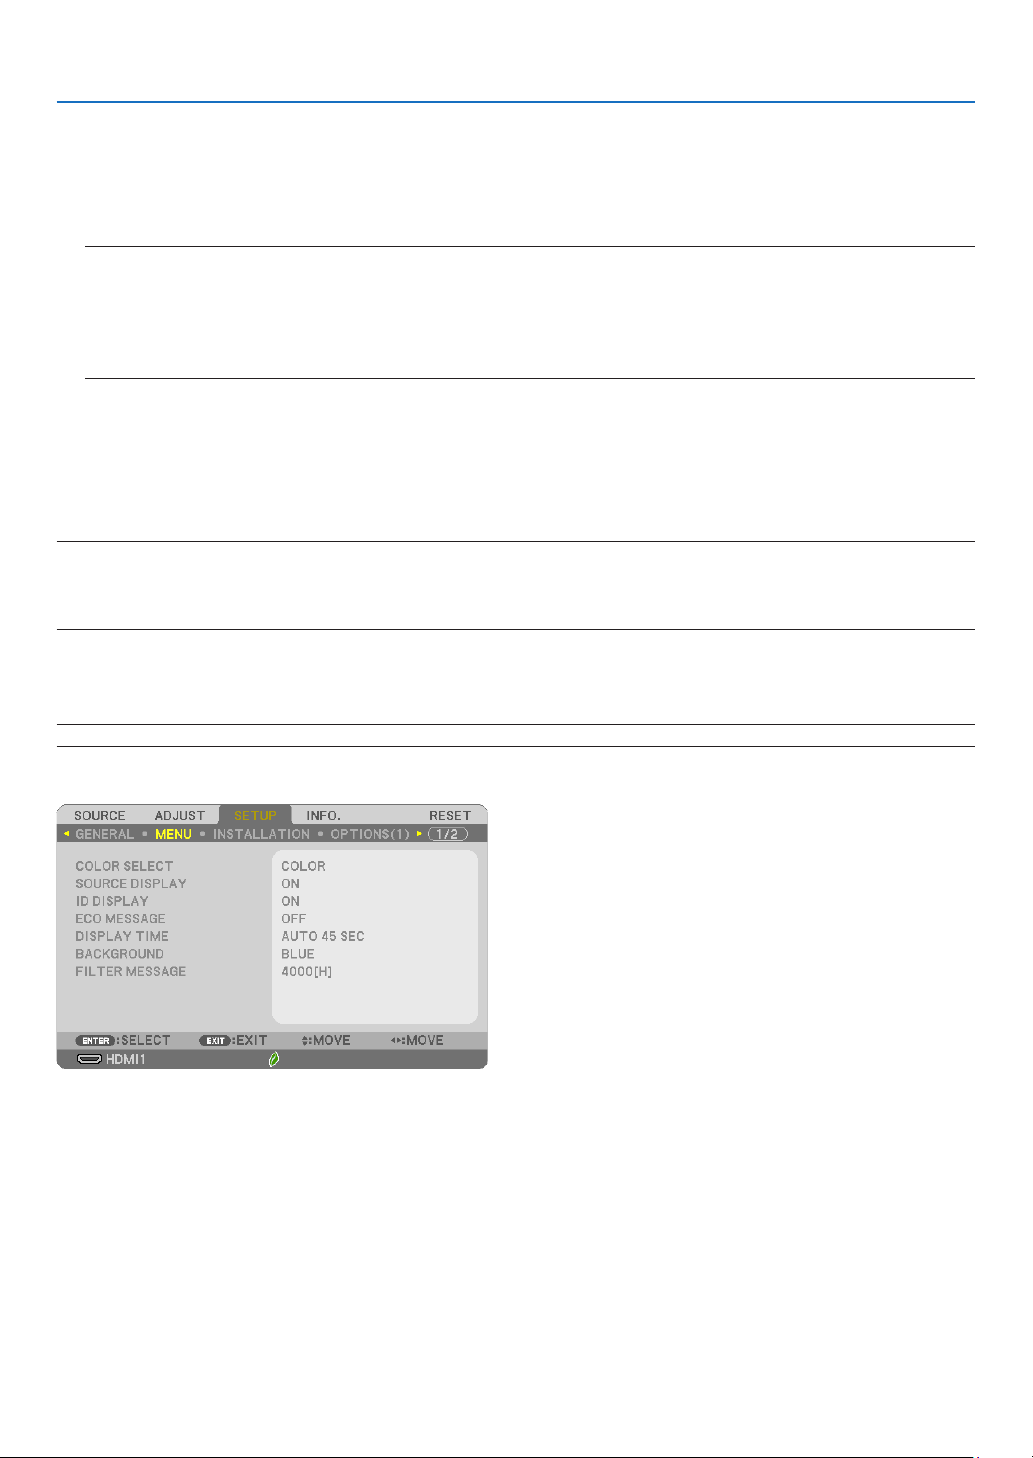
67
5. Using On-Screen Menu
Setting Closed Caption [CLOSED CAPTION]
ThisoptionsetsseveralclosedcaptionmodesthatallowtexttobesuperimposedontheprojectedimageofVideo.
OFF �������������������������� This exits the closed caption mode�
CAPTION 1-4 ������������ Text is superimposed�
TEXT 1-4 ������������������Text is displayed�
NOTE:
•Theclosedcaptionisnotavailableunderthefollowingconditions:
-whenmessagesormenusaredisplayed.
-whenanimageismagnied,frozen,ormuted.
•Portionsofsuperimposedtextorclosedcaptionmaybetruncated.Ifthathappens,trytoplacethesuperimposedtextorclosedcaption
withinthescreen.
Using Off Timer [OFF TIMER]
1. Select your desired time between 30 minutes and 16 hours: OFF, 0:30, 1:00, 2:00, 4:00, 8:00, 12:00, 16:00.
2. Press the ENTER button on the remote control.
3. The remaining time starts counting down.
4. The projector will turn off after the countdown is complete.
NOTE:
•Tocancelthepresettime,set[OFF]forthepresettimeorturnoffthepower.
•Whentheremainingtimereaches3minutesbeforetheprojectoristurnedoff,the[THEPROJECTORWILLTURNOFFWITHIN3MINUTES]
messagewillbedisplayedonthebottomofthescreen.
Selecting Menu Language [LANGUAGE]
Youcanchooseoneof30languagesforon-screeninstructions.
NOTE:Yoursettingwillnotbeaffectedevenwhen[RESET]isdonefromthemenu.
[MENU]
Selecting Menu Color [COLOR SELECT]
Youcanchoosebetweentwooptionsformenucolor:COLORandMONOCHROME.
TurningOn/OffSourceDisplay[SOURCEDISPLAY]
ThisoptionturnsonoroffinputnamedisplaysuchasHDMI1,HDMI2,COMPUTER,VIDEO,HDBaseT,USB-A,to
bedisplayedonthetoprightofthescreen.
Whennoinputsignalispresent,theno-signalguidancepromptingyoutocheckforanavailableinputwillbedis-
played.Whenthe[USB-A]itemisselectedfor[SOURCE],theno-signalguidancewillnotbedisplayed.

68
5. Using On-Screen Menu
TurningON/OFFControlID[IDDISPLAY]
ThisoptionturnsonorofftheIDnumberwhichisdisplayedwhentheIDSETbuttonontheremotecontrolispressed.
Turning On / Off Eco Message [ECO MESSAGE]
Thisoptionturnsonoroffthefollowingmessageswhentheprojectoristurnedon.
TheEcoMessagepromptstheusertosaveenergy.When[OFF]isselectedfor[ECOMODE],youwillgetamessage
topromptyoutoselect[AUTOECO],[NORMAL],or[ECO]for[ECOMODE].
When[AUTOECO],[NORMAL],or[ECO]isselectedfor[ECOMODE]
Toclosethemessage,pressanyoneofthebuttons.Themessagewilldisappearifnobuttonoperationisdonefor
30 seconds.
When[OFF]isselectedfor[ECOMODE]
PressingtheENTERbuttonwilldisplaythe[ECOMODE]screen.(→page26)
Toclosethemessage,presstheEXITbutton.
SelectingMenuDisplayTime[DISPLAYTIME]
Thisoptionallowsyoutoselecthowlongtheprojectorwaitsafterthelasttouchofabuttontoturnoffthemenu.
Thepresetchoicesare[MANUAL],[AUTO5SEC],[AUTO15SEC],and[AUTO45SEC].The[AUTO45SEC]isthe
factory preset.
SelectingaColororLogoforBackground[BACKGROUND]
Usethisfeaturetodisplayablue/blackscreenorlogowhennosignalisavailable.Thedefaultbackgroundis[BLUE].
NOTE:
•Ifthe[LOGO]itemisselectedfor[BACKGROUND]withthe[HDBaseT]sourceselected,the[BLUE]itemwillbeselectedregardlessofits
selection.(notsupportedbyP603X)
•When[SOURCEDISPLAY]isturnedon,theno-signalguidancepromptingyoutocheckforanavailableinputwillbedisplayedatthecenter
ofthescreenregardlessofitsselection.
•Yoursettingwillnotbeaffectedevenwhen[RESET]isdonefromthemenu.
Selecting Interval Time for Filter Message [FILTER MESSAGE]
Thisoptionallowsyoutoselectthetimepreferencebetweendisplayingthemessageforcleaningthelters.Clean
thelterwhenyougetthemessage“PLEASECLEANTHEFILTER.”(→page
105)
Sixoptionsareavailable:
OFF,100[H],500[H],1000[H],2000[H],4000[H]
NOTE:Yoursettingwillnotbeaffectedevenwhen[RESET]isdonefromthemenu.
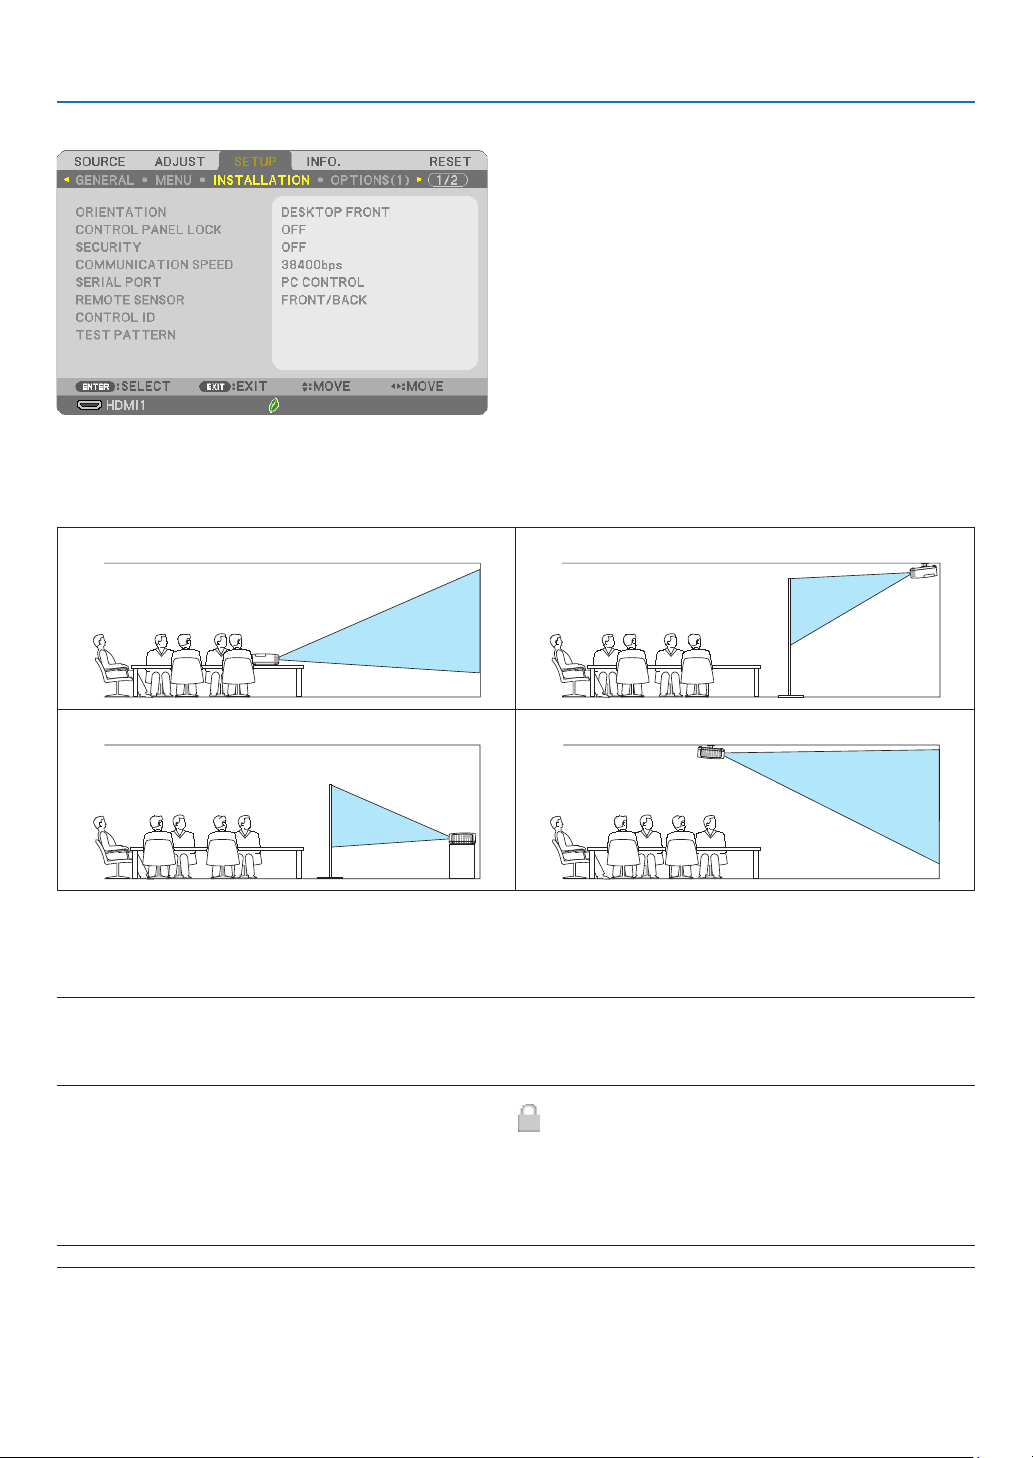
69
5. Using On-Screen Menu
[INSTALLATION]
SelectingProjectorOrientation[ORIENTATION]
Thisreorientsyourimageforyourtypeofprojection.Theoptionsare:desktopfrontprojection,ceilingrearprojec-
tion,desktoprearprojection,andceilingfrontprojection.
DESKTOPFRONTCEILINGREAR
DESKTOPREARCEILINGFRONT
Disabling the Cabinet Buttons [CONTROL PANEL LOCK]
ThisoptionturnsonorofftheCONTROLPANELLOCKfunction.
NOTE:
•ThisCONTROLPANELLOCKdoesnotaffecttheremotecontrolfunctions.
•Whenthecontrolpanelislocked,pressingandholdingtheSOURCEbuttonontheprojectorcabinetforabout10secondswillchangethe
settingto[OFF].
TIP:Whenthe[CONTROLPANELLOCK]isturnedon,akeylockicon[
]willbedisplayedatthebottomrightofthemenu.
EnablingSecurity[SECURITY]
ThisfeatureturnsonorofftheSECURITYfunction.
Unlessthecorrectkeywordisentered,theprojectorcannotprojectanimage.(→page
33)
NOTE:Yoursettingwillnotbeaffectedevenwhen[RESET]isdonefromthemenu.

70
5. Using On-Screen Menu
Selecting Communication Speed [COMMUNICATION SPEED]
ThisfeaturesetsthebaudrateofthePCControlport(D-Sub9P).Itsupportsdataratesfrom4800to38400bps.
Thedefaultis38400bps.Selecttheappropriatebaudrateforyourequipmenttobeconnected(dependingonthe
equipment,alowerbaudratemayberecommendedforlongcableruns).
NOTE:Yourselectedcommunicationspeedwillnotbeaffectedevenwhen[RESET]isdonefromthemenu.
Selectingtheserialport[SERIALPORT](notsupportedbyP603X)
Thissetswhichterminalontheprojectorwillreceivetheserialcontrolsignalsforremotelycontrollingtheprojector
fromacommerciallyavailableHDBaseTtransmissiondevices(controlsignalsforturningthepoweronandoff,etc.).
Thereisnoneedtomakethissettingifnotoperatingtheprojectorbyremotecontrol(onlysendingvideoandaudio).
PC CONTROL �������������������������Control signals (RS232C serial communications) are received at the PC CONTROL terminal�
HDBaseT ������������������������������� The video/audio and control signals (RS232C serial communications) are received at the HDBaseT port�
NOTE:
•When[HDBaseT]isset,itwillnotworkwhentheprojectorisinthestandbymode,regardlessofwhether[STANDBYMODE](→page
74)
issetto[NORMAL]or[NETWORKSTANDBY](thepowercannotbeturnedon).
Themethodsbelowcanbeusedtoturnontheprojector’spowerwhenitisinthestandbymode.
•TheprojectorcanbeoperatedbyconnectingthecomputerandprojectorbyRS232Cserialcommunications(ontheprojector,usingthe
PCCONTROLterminalandthePCControlUtilityapplication,with[STANDBYMODE]setto[NETWORKSTANDBY]).
•Theprojectorcanbeoperatedbyconnectingthecomputerandprojectoroverthenetwork(ontheprojector,usingtheLANportandPC
ControlUtilityapplication,with[STANDBYMODE]setto[NETWORKSTANDBY])
TIP:
•WhencontrollingtheprojectorusingtheLANport,thisworkswitheithersetting.
Turning On or Off Remote Sensor [REMOTE SENSOR]
Settheremotecontrolsensorsontheprojector’sfrontandrearpanelsandtheHDBaseTremotecontrolsensor.
Theoptionsare:ALL,FRONT/BACK,FRONT,BACK,andHDBaseT.
(HDBaseTisnotsupportedbyP603X)
NOTE:
•When[HDBaseT]isset,itwillnotworkwhentheprojectorisinthestandbymode,regardlessofwhether[STANDBYMODE](→page
74)
issetto[NORMAL]or[NETWORKSTANDBY](thepowercannotbeturnedon).
TIP:
•Iftheremotecontrolsystemdoesnotfunctionwhendirectsunlightorstrongilluminationstrikestheremotecontrolsensoroftheprojector,
changeanotheroption.
•Theremotecontrolsensoronthebackoftheprojectorcannotbeusedwhentheseparatelysoldcablecoverismountedontheprojector.
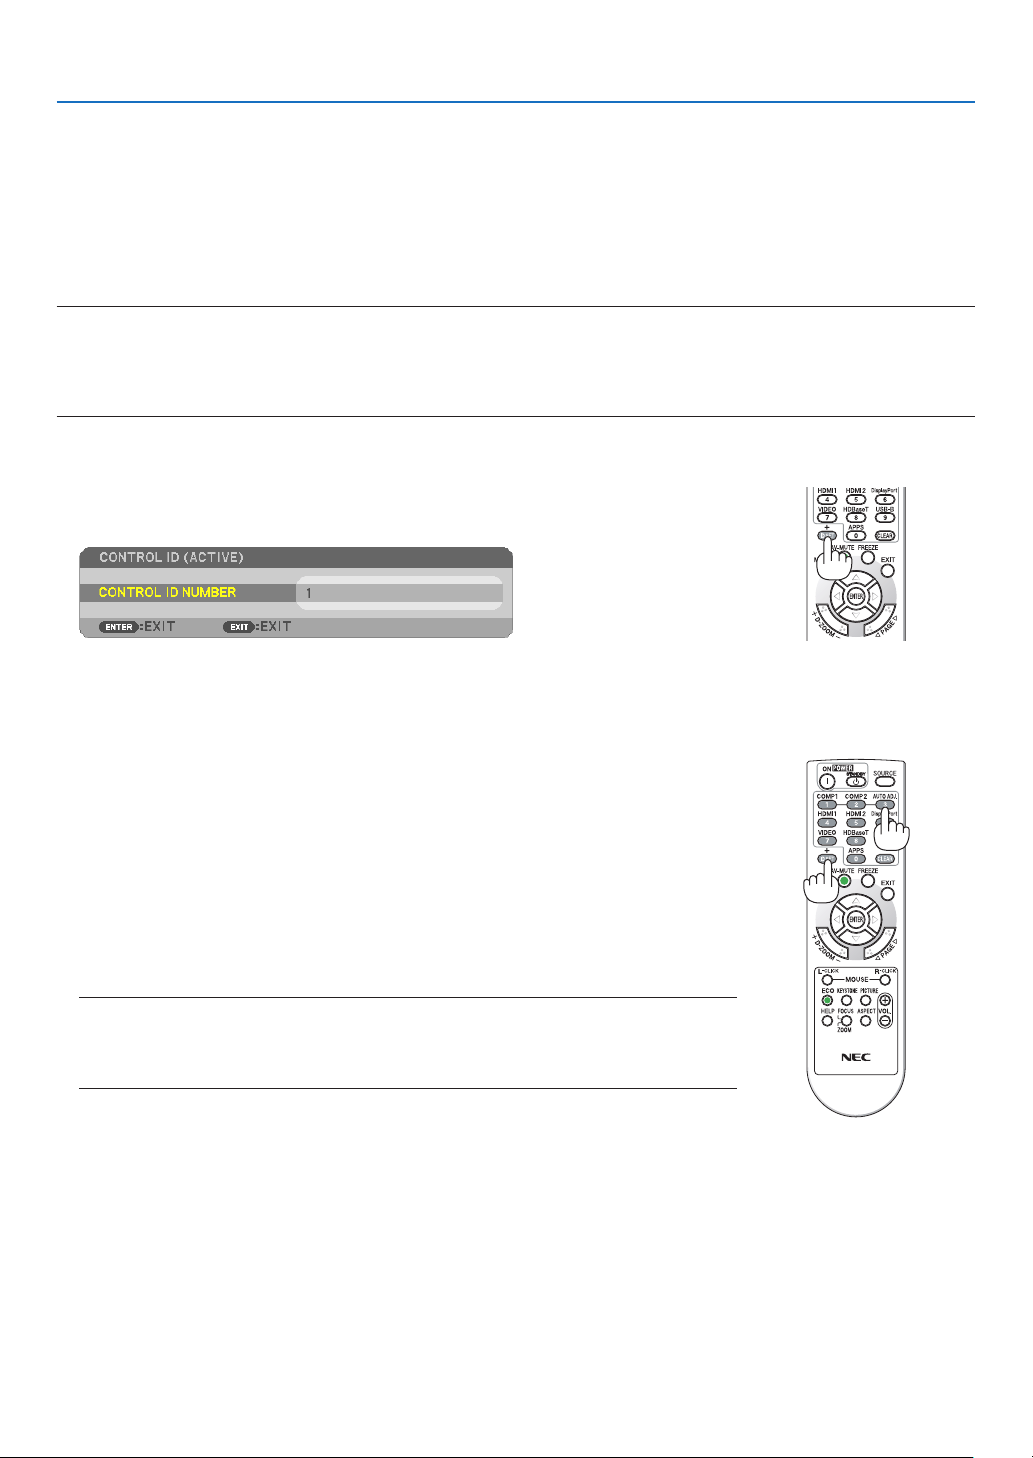
71
5. Using On-Screen Menu
SettingIDtotheProjector[CONTROLID]
YoucanoperatemultipleprojectorsseparatelyandindependentlywiththesingleremotecontrolthathastheCON-
TROLIDfunction.IfyouassignthesameIDtoalltheprojectors,youcanconvenientlyoperatealltheprojectors
togetherusingthesingleremotecontrol.Todoso,youhavetoassignanIDnumbertoeachprojector.
CONTROL ID NUMBER ����������� Select a number from 1 to 254 you wish to assign to your projector�
CONTROL ID ��������������������������Select [OFF] to turn off the CONTROL ID setting and select [ON] to turn on the CONTROL ID setting�
NOTE:
•When[ON]isselectedfor[CONTROLID],theprojectorcannotbeoperatedbyusingtheremotecontrolthatdoesnotsupporttheCONTROL
IDfunction.(Inthiscasethebuttonsontheprojectorcabinetcanbeused.)
•Yoursettingwillnotbeaffectedevenwhen[RESET]isdonefromthemenu.
•PressingandholdingtheENTERbuttonontheprojectorcabinetfor10secondswilldisplaythemenuforcancelingtheControlID.
Assigning or Changing the Control ID
1. Turn on the projector.
2. Press the ID SET button on the remote control.
TheCONTROLIDscreenwillbedisplayed.
IftheprojectorcanbeoperatedwiththecurrentremotecontrolID,the[ACTIVE]will
bedisplayed.Iftheprojectorcannotbeoperatedwiththecurrentremotecontrol
ID,the[INACTIVE]willbedisplayed.Tooperatetheinactiveprojector,assignthe
controlIDusedfortheprojectorbyusingthefollowingprocedure(Step3).
+
3. Press one of numeric keypad buttons while pressing and holding the ID SET
button on the remote control.
Example:
Toassign“3”,pressthe“3”buttonontheremotecontrol.
NoIDmeansthatalltheprojectorscanbeoperatedtogetherwithasingleremote
control.Toset“NoID”,enter“000”orpresstheCLEARbutton.
TIP:TherangeofIDsisfrom1to254.
4. Release the ID SET button.
TheupdatedCONTROLIDscreenwillbedisplayed.
NOTE:
•TheIDscanbeclearedinafewdaysafterthebatteriesarerundownorremoved.
•AccidentallypressinganyoneofthebuttonsoftheremotecontrolwillclearcurrentlyspeciedID
withbatteriesremoved.
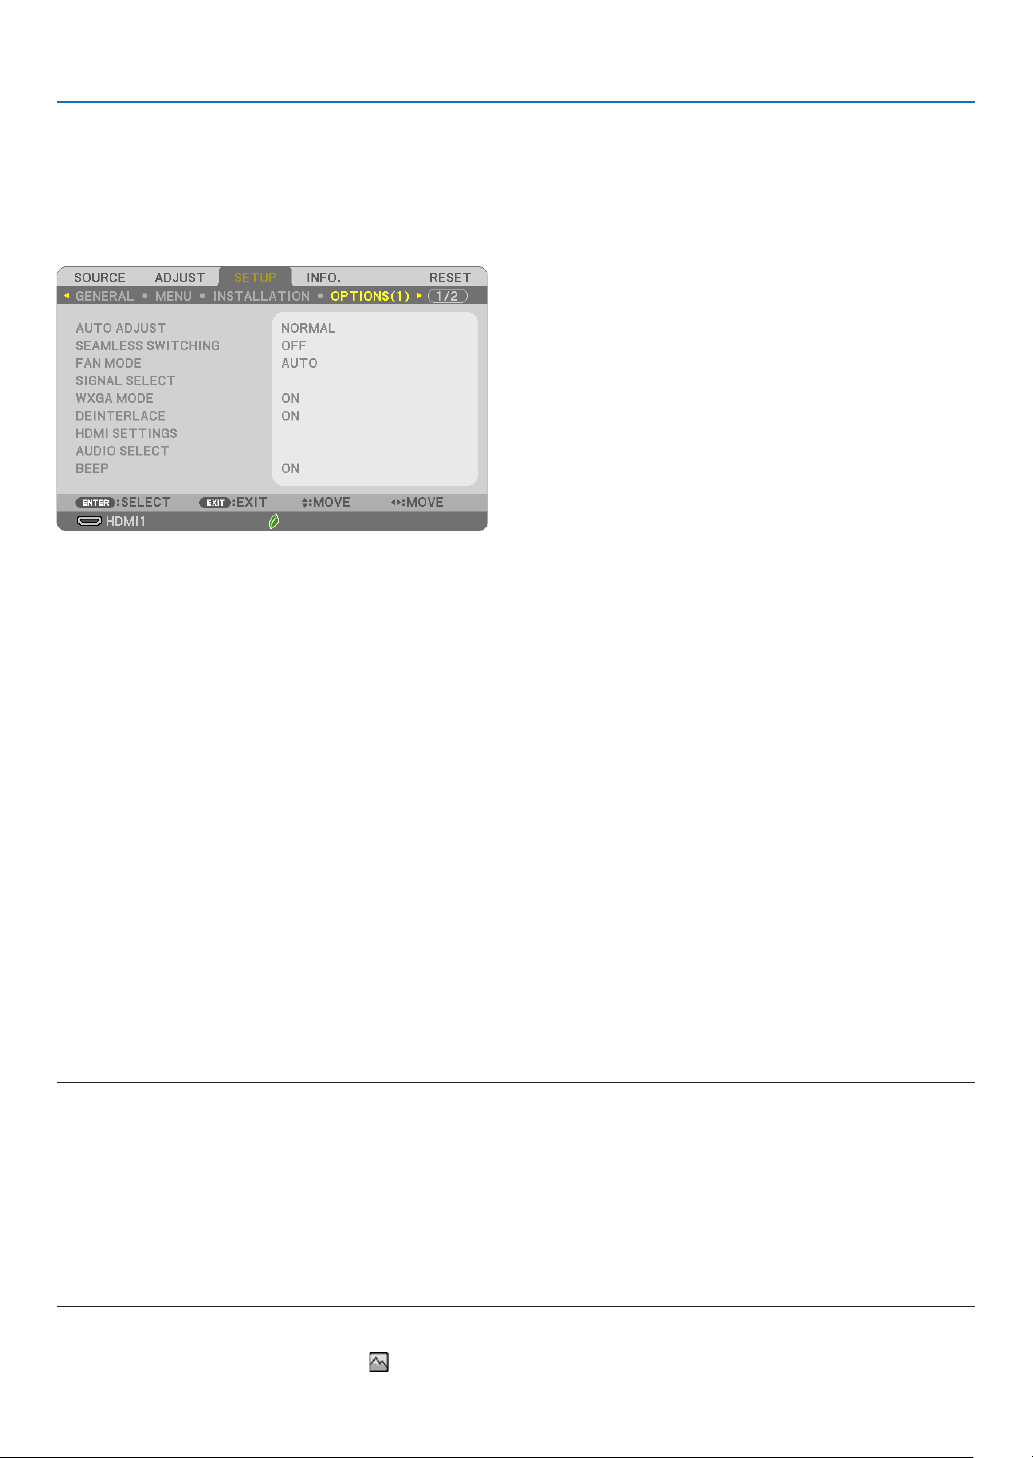
72
5. Using On-Screen Menu
Using Test Pattern [TEST PATTERN]
Displaysthetestpatterntocheckforimagedistortionatthetimeoftheprojectorsetup.PresstheENTERbuttonto
displaythetestpattern;presstheEXITbuttontoclosethetestpatternandreturntothemenu.Menuoperationand
correctionsforkeystone,cornerstoneandpincushionarenotavailablewhenthetestpatternisdisplayed.
[OPTIONS(1)]
SettingAutoAdjust[AUTOADJUST]
ThisfeaturesetstheAutoAdjustmodesothatthecomputersignalcanbeautomaticallyormanuallyadjustedfor
noiseandstability.Youcanautomaticallymakeadjustmentintwoways:[NORMAL]and[FINE].
OFF �������������������������� The computer signal will not be automatically adjusted� You can manually optimize the computer signal�
NORMAL ������������������Default setting� The computer signal will be automatically adjusted� Normally select this option�
FINE �������������������������Select this option if fine adjustment is needed� It takes more time to switch to the source than when [NORMAL]is
selected�
[SEAMLESS SWITCHING]
Whentheinputconnectorisswitched,theimagedisplayedbeforeswitchingisheldtoswitchtothenewimage
withoutabreakduetoabsenceofasignal.
Selecting Fan Mode [FAN MODE]
Thisoptionallowsyoutoselectthreemodesforfanspeed:Automode,Highspeedmode,andHighAltitudemode.
AUTO �����������������������The built-in fans automatically run at a variable speed according to the internal temperature�
HIGH ������������������������The built-in fans run at high speed�
HIGH ALTITUDE ��������� The built-in fans run at a high speed� Select this option when using the projector at altitudes approximately 5500
feet/1700 meters or higher�
Whenyouwishtocooldownthetemperatureinsidetheprojectorquickly,select[HIGH].
NOTE:
•ItisrecommendedthatyouselectHighspeedmodeifyouusetheprojectornon-stopforconsecutivedays.
•Set[FANMODE]to[HIGHALTITUDE]whenusingtheprojectorataltitudesapproximately5500feet/1700metersorhigher.
•Usingtheprojectorataltitudesapproximately5500feet/1700metersorhigherwithoutsettingto[HIGHALTITUDE]cancausetheprojector
tooverheatandtheprotectorcouldshutdown.Ifthishappens,waitacoupleminutesandturnontheprojector.
•Usingtheprojectorataltitudeslessthanapproximately5500feet/1700metersandsettingto[HIGHALTITUDE]cancausethelampto
overcool,causingtheimagetoicker.Switch[FANMODE]to[AUTO].
•Usingtheprojectorataltitudesapproximately5500feet/1700metersorhighercanshortenthelifeofopticalcomponentssuchasthe
lamp.
•Yoursettingwillnotbeaffectedevenwhen[RESET]isdonefromthemenu.
TIP:
•When[HIGHALTITUDE]isselected,anicon[
]isdisplayedatthebottomoftheon-screenmenu.

73
5. Using On-Screen Menu
Selecting Signal Format [SIGNAL SELECT]
[COMPUTER]
Allowsyoutochoose[COMPUTER]foranRGBsourcesuchasacomputer,or[COMPONENT]foracomponent
videosourcesuchasaDVDplayer.Normallyselect[RGB/COMPONENT]andtheprojectorautomaticallydetectsa
componentsignal.Howevertheremaybesomecomponentsignalsthattheprojectorisunabletodetect.Ifthisis
thecase,select[COMPONENT].
[VIDEO]
This feature enables you to select composite video standards automatically or manually.
Factorydefaultsettingis[AUTO]andtheprojectorwillautomaticallydetectthevideostandard.
Inthecasewheretheprojectorhasdifcultydetectingthevideostandard,selecttheappropriatevideostandard
from the menu.
EnablingorDisablingWXGAMode[WXGAMODE]
Selecting[ON]willgiveprioritytoWXGA(1280×768)/WUXGA(1920×1200)signalsinrecognizinganinputsignal.
When[WXGAMODE]issetto[ON],XGA(1024×768)/UXGA(1600×1200)signalsmaynotberecognizedonP604X/
P603X.Inthiscase,select[OFF].
NOTE:
•[OFF]isselectedatthetimeofshipmentofP604X/P603X.
•[ON]isselectedatthetimeofshipmentofP554U/P474U/P554W/P474W.
Enabling the deinterlace [DEINTERLACE]
Turnsonoroffthedeinterlacefunctionforatelecinesignal.
OFF �������������������������� Select this option if there is any jitter or artifacts in video�
ON ���������������������������Default standard setting�
NOTE:ThisfeatureisnotavailableforHDTV(progressive)andcomputersignals.
Setting HDMI1, HDMI2, and HDBaseT [HDMI SETTINGS]
(HDBaseTisnotsupportedbyP603X)
MakethesettingsforeachvideolevelwhenconnectingHDMI1equipmentsuchasaDVDplayerandHDBaseTterminal.
VIDEO LEVEL ������������Select [AUTO] to automatically detect video level� If automatic detection may not work well, select [NORMAL] to
disable the [ENHANCED] feature of your HDMI equipment or select [ENHANCED] to improve image contrast and
increase detail in the dark areas�
Setting Audio [AUDIO SELECT]
MakethesettingsforeachaudiolevelwhenconnectingHDMIequipmentandHDBaseTport.Selectbetweeneach
equipmentandcomputer.
HDMI1, HDMI2
�������������� Select [HDMI1] or [HDMI2] to switch the HDMI1 IN or HDMI 2 IN digital audio signal or select [COMPUTER] to switch
the COMPUTER input audio signal�
HDBaseT ������������������ Select [HDBaseT] or [COMPUTER] to switch the source connected to the network�
(not supported by P603X)
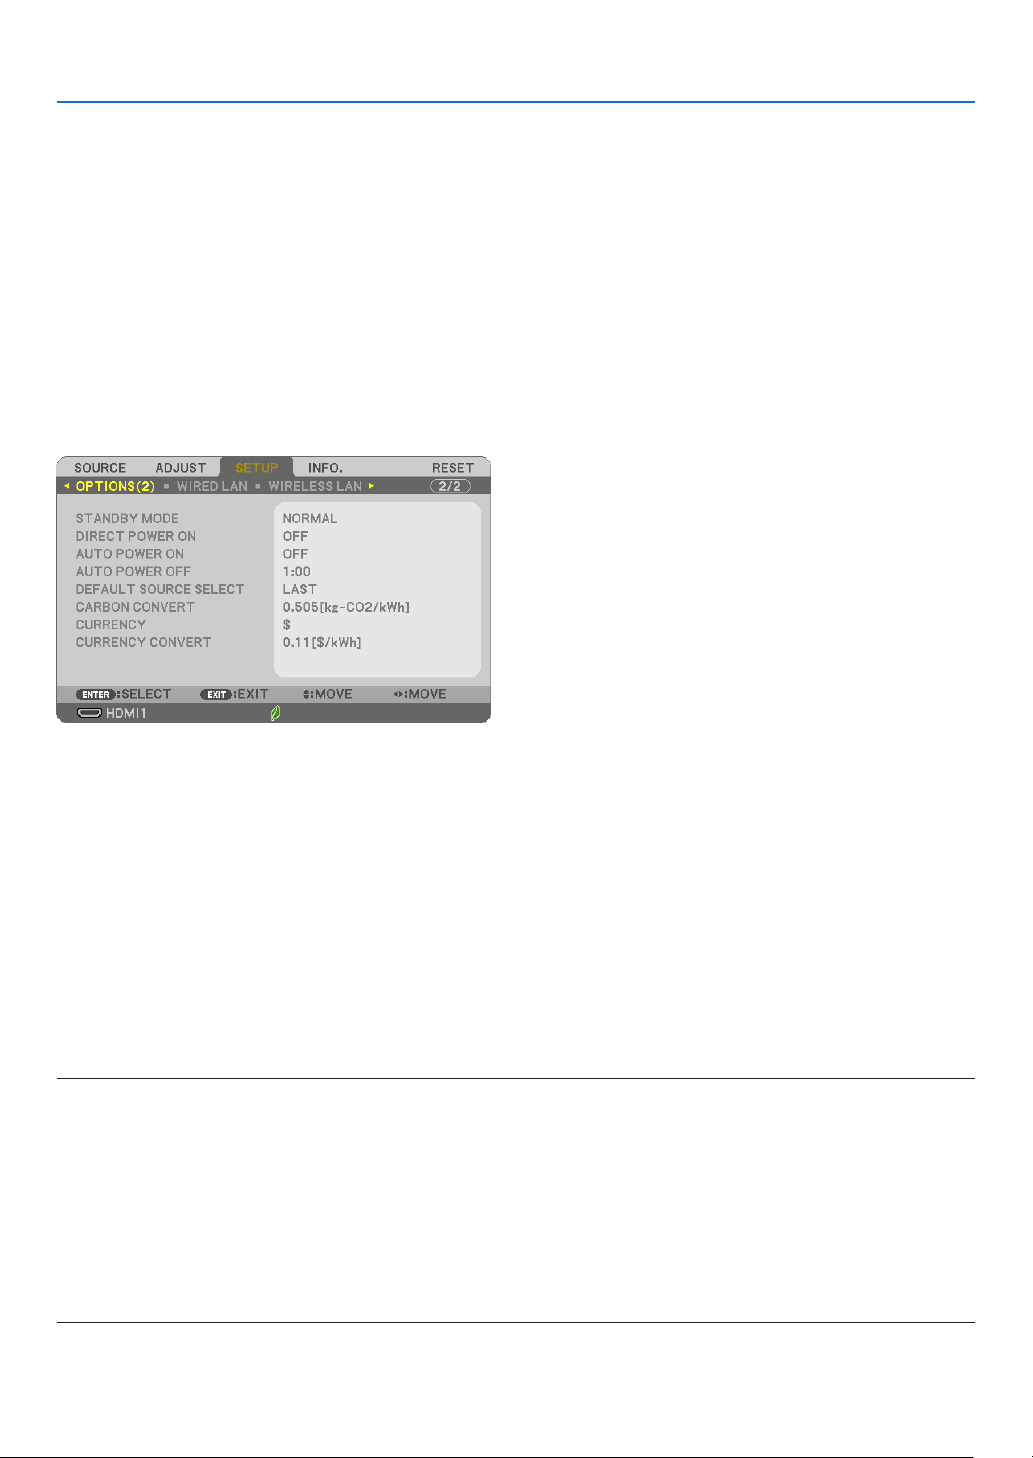
74
5. Using On-Screen Menu
Enabling Key Sound and Error Sound [BEEP]
Thisfeatureturnsonoroffthebuttonsoundoralarmwhenanerroroccursorthefollowingoperationsareperformed.
-Displayingthemainmenu
-Switchingsources
-Resettingdatabyusing[RESET]
-PressingPOWERONorSTANDBYbutton
TIP:
•Volumecontrolfor[BEEP]isdisabled.AV-MUTEbuttonisnoteffectivetostopbeepingsound.IfyouwanttoactivateBEEPfunction,set
[BEEP]to[OFF].
[OPTIONS(2)]
SelectingPower-savingin[STANDBYMODE]
Theprojectorhastwostandbymodes:[NORMAL]and[NETWORKSTANDBY].
TheNORMALmodeisthemodethatallowsyoutoputtheprojectorinthepower-savingconditionwhichconsumes
lesspowerthantheNETWORKSTANDBYmode.
NORMAL �������������������������������When [NORMAL] is selected, only the following buttons and feature will work:
POWER buttons on the projector cabinet and the remote control, AUTO POWER ON, and powering on from
PC Control command�
NETWORK STANDBY ��������������When [NETWORK STANDBY] is selected, the projector can be turned on over a wired LAN connection and
only the following buttons, port, and features will work:
POWER buttons on the projector cabinet and the remote control, powering on from PC Control command,
AUTO POWER ON, wireless LAN unit (optional), operation by User Supportware, LAN feature, and Mail
Alert feature�
IMPORTANT:
•When[NETWORKSTANDBY]hasbeensetfor[STANDBYMODE]andtheLANhasbeeninlink-downconditionfor3minutes,[STANDBY
MODE]willtransitinto[NORMAL]automticiallyforthepurposetosavetheconsumptionpower.
•When[NETWORKSTANDBY]hasbeenselected,[AUTOPOWEROFF]becomesineffective(displayedingrey)and[0:15]isselectedauto-
matically.
When[STANDBYMODE]→[NETWORKSTANDBY]isselected
-When[NETWORKSERVICE]→[AMXSETTINGS]→[ENABLE]isselected
-When[NETWORKSERVICE]→[ExtronXTP]→[ENABLE]isselected
-When[NETWORKSERVICE]→[CRESTRONSETTINGS]→[CRESTRONCONTROL]→[ENABLE]isselected
-When[NETWORKSETTINGS]→[WIRELESSLAN]→Exceptfor[DISABLE]andmountingthewirelessLANunittotheprojector
-Whenthesignalisinputtothecomputer,HDMI1INorHDMI2INterminals

75
5. Using On-Screen Menu
NOTE:
•Evenwhen[NORMAL]isselectedfor[STANDBYMODE],poweronoroffcanbedonebyusingthePCCONTROLport.
•ThepowerconsumptioninthestandbymodewillnotbeincludedincalculatingCO
2
emissionreduction.
•Yoursettingfor[STANDBYMODE]willnotbeaffectedevenwhen[RESET]isdonefromthemenu.
EnablingDirectPowerOn[DIRECTPOWERON]
Turns the projector on automatically when the power cord is inserted into an active power outlet. This eliminates the
needtoalwaysusethePOWERbuttonontheremotecontrolorprojectorcabinet.
TurningOntheProjectorByApplyingComputerSignal[AUTOPOWERON]
WhentheprojectorisinStandbymode,applyingacomputerorHDMIsignalfromacomputerconnectedtothe
COMPUTERINinput,HDMI1,orHDMI2inputwillpowerontheprojectorandsimultaneouslyprojecttheimage.
ThisfunctionalityeliminatestheneedtoalwaysusethePOWERbuttonontheremotecontrolortheprojectorcabinet
to power on the projector.
Tousethisfunction,rstconnectacomputertotheprojectorandtheprojectortoanactiveACinput.
NOTE:
•Disconnectingacomputersignalfromthecomputerwillnotpowerofftheprojector.Werecommendusingthisfunctionincombination
oftheAUTOPOWEROFFfunction.
•Thisfunctionwillnotbeavailableunderthefollowingconditions:
-whenacomponentsignalisappliedtotheCOMPUTERINterminal
-whenaSynconGreenRGBsignalorcompositesyncsignalisapplied
•ToenabletheAUTOPOWERONafterturningofftheprojector,wait5secondsandinputacomputerorHDMIsignal.
IfacomputerorHDMIsignalisstillpresentwhentheprojectoristurnedoff,theAUTOPOWERONwillnotworkandtheprojectorremains
instandbymode.
•Dependingontheprojectorinuse,theAUTOPOWERONmaynotworkproperly.Inthiscase,set[STANDBYMODE]to[NETWORKSTANDBY].
EnablingPowerManagement[AUTOPOWEROFF]
Whenthisoptionisselectedyoucanenabletheprojectortoautomaticallyturnoff(attheselectedtime:0:05,0:10,
0:15,0:20,0:30,1:00)ifthereisnosignalreceivedbyanyinputorifnooperationisperformed.
Selecting Default Source [DEFAULT SOURCE SELECT]
Youcansettheprojectortodefaulttoanyoneofitsinputseachtimetheprojectoristurnedon.
LAST ������������������������Sets the projector to default to the previous or last active input each time the projector is turned on�
AUTO �����������������������Searches for an active source in order of HDMI1 → HDMI2 → COMPUTER → VIDEO → HDBaseT → USB-A →
HDMI1 and displays the first found source�
HDMI1 ����������������������Displays the digital source from the HDMI 1 IN terminal every time the projector is turned on�
HDMI2 ����������������������Displays the digital source from the HDMI 2 IN terminal every time the projector is turned on�
COMPUTER ��������������Displays the computer signal from the COMPUTER IN terminal every time the projector is turned on�
VIDEO �����������������������Displays the Video source from the VIDEO IN terminal every time the projector is turned on�
HDBaseT ������������������ Projects the signal transmitted from the terminals supported HDBaseT� (not supported by P603X)
USB-A ���������������������� Displays slides or plays back movie files from the USB memory device every time the projector is turned on�
Settingcarbonfootprintfactor[CARBONCONVERT]
Adjuststhecarbonfootprintfactorinthecarbonsavingcalculation.Theinitialsettingis0.505[kg-CO2/kWh]based
ontheCO2EmissionsfromFuelCombustion(2008Edition)publishedbyOECD.

76
5. Using On-Screen Menu
Selectingyourcurrency[CURRENCY]
Displayselectricitypricing(availablein4currencyunits).
$ ������������������������������ US Dollar
€ ����������������������������� EU Euro
JP¥ ��������������������������Japanese Yen
RMB¥ �����������������������Chinese Yuan
Changingcurrencysettingandcurrencyconvertsetting[CURRENCYCONVERT]
ChangescurrencysettingandcurrencyconvertsettingforCARBONMETER.
Theinitialsettingareasfollows:
US Dollar ������������������0�11 [$/kWh]
EU Euro �������������������� 0�19 [€/kWh]
Japanese Yen ����������� 20 [¥/kWh]
Chinese Yuan �����������0�48 [¥/kWh]
TheinitialsettingsforUSdollar,EUEuro,andJapaneseYenarebasedon“EnergyPricesandTaxes(secondquarter
2010”publishedbyOECD.
TheinitialsettingforChineseYuanisbasedon“ChineseDataFile(2010)”publishedbyJETRO.

77
5. Using On-Screen Menu
Setting up the Projector for a Wired LAN Connection [WIRED LAN]
Important
•Consultwithyournetworkadministratoraboutthesesettings.
•WhenusingawiredLANconnection,connectaLANcable(Ethernetcable)totheLANport(RJ-45)ofthe
projector.(→page
99)
TIP:Thenetworksettingsyoumakewillnotbeaffectedevenwhen[RESET]isdonefromthemenu.
[WIREDLAN][DISABLE]WiredLANconnectionwillbeturnedoff.
[ENABLE]WiredLANconnectionwillbeturnedon.
[SETTINGS][DHCP]ON ��������������������������� IP address, subnet mask, and gateway will be
automatically assigned to the projector from
your DHCP server�
OFF�������������������������� Specify IP address, subnet mask, and gateway
assigned by your network administrator�
[IPADDRESS]SetyourIPaddressofthenetworkconnectedtothe
projector.
[SUBNETMASK]Setyoursubnetmasknumberofthenetworkconnected
to the projector.
[GATEWAY]Setthedefaultgatewayofthenetworkconnectedtothe
projector.
[AUTODNS]ON ��������������������������� DHCP server will automatically assign IP address
of DNS server connected to the projector�
OFF�������������������������� Set your IP address of DNS server connected
to the projector�
[RECONNECT]Retrytoconnecttheprojectortoanetwork.
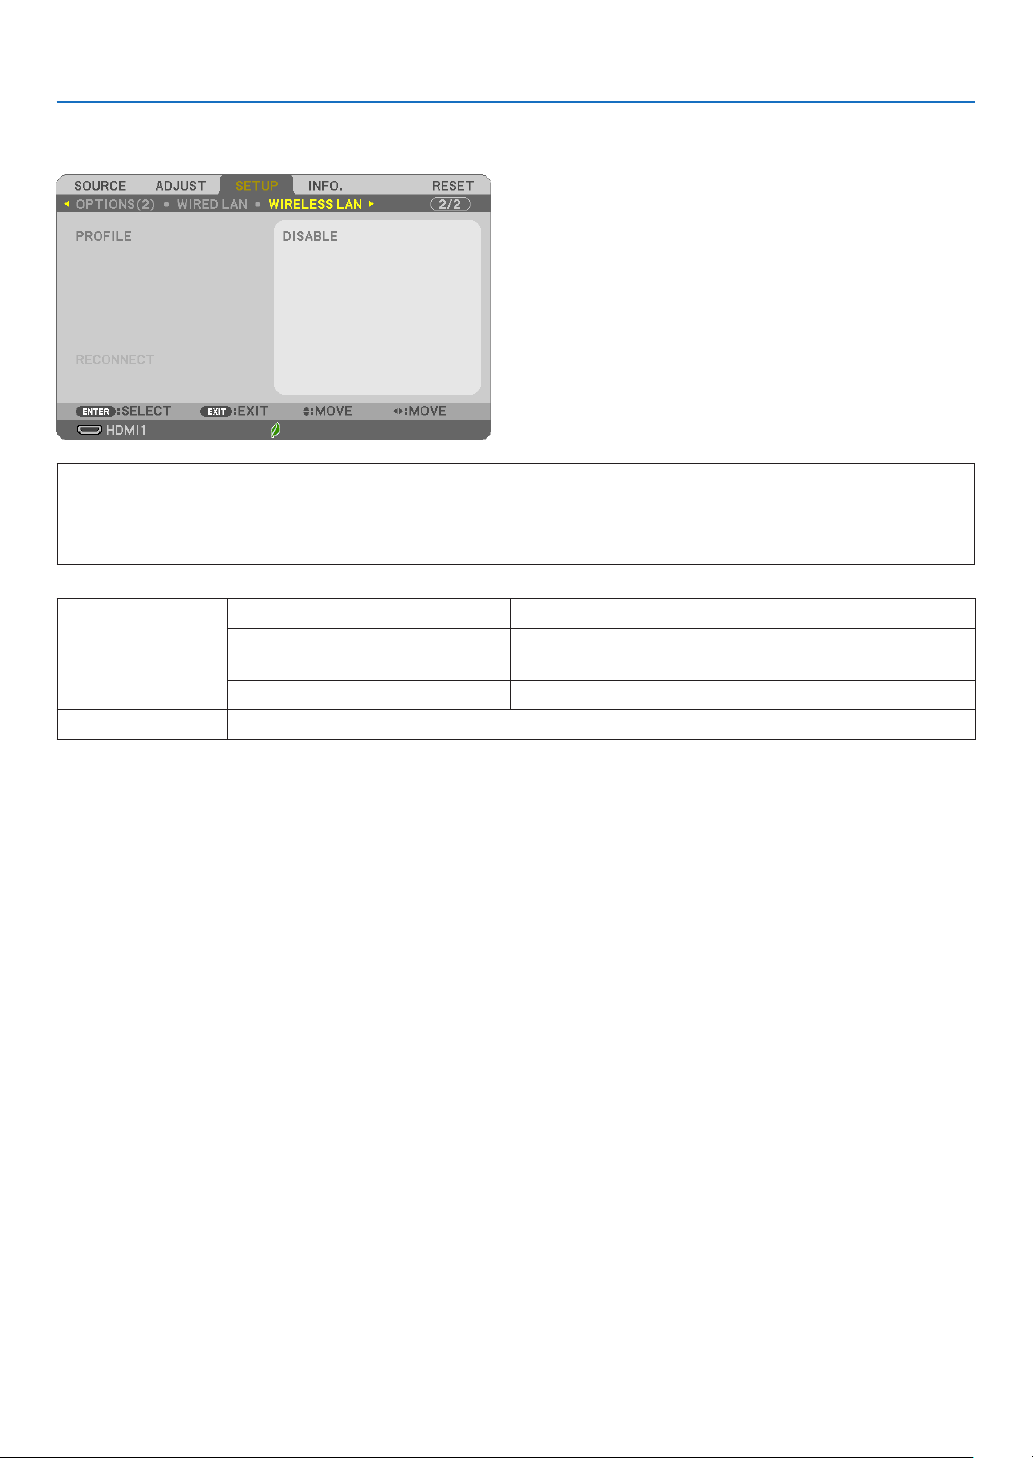
78
5. Using On-Screen Menu
Setting up the Projector for a Wireless LAN Connection (with the optional USB Wireless
LAN Unit equipped) [WIRLESS LAN]
Important
•Consultwithyournetworkadministratoraboutthesesettings.
•WhenusingawirelessLANconnection,attachtheoptionalUSBWirelessLANtotheprojector.(→page
100)
•PerformdetailsettingsforwirelessLANontheHTTPserverscreen.
[PROFILE][DISABLE]WirelessLANconnectionwillbeturnedoff
[SIMPLEACCESSPOINT]Settheprojectoras[SIMPLEACCESSPOINT]forcon-
nectingtoacomputerandasmartphone.
[INFRASTRUCTURE]Connecttheprojectortoanaccesspoint.
[RECONNECT]Retrytoconnecttheprojectortoanetwork.Trythisifyouhavechanged[PROFILE].
Whenyouconnectwithyourcomputertosaveyourproleandselect"Automaticallyconnectwhenwithinrange"
fromthePropertiestabofWirelessNetworkinWindowsforyourselectedprole,yourwirelessLANwillbeaccessed
underthefollowingconditions:
•atthetimeofturningonthecomputerortheprojector
•whenthenotebooktypeiswithintherangeoftheprojector'swirelessLANcanbeachieved.
DatatransmissionbetweenwirelessLANandwiredLANisnotpossible.
When[SIMPLEACCESSPOINT]isset,upto20unitscanbeconnectedsimultaneously.Recommendtoconnect
approx.10unitsfornormaloperation.

79
5. Using On-Screen Menu
HintsonHowtoSetUpLANConnection
To connect a DHCP server:
Fromtheprojectormenu,select[SETUP]→[WIREDLAN]→[SETTINGS]→[DHCP]→[ON]andpresstheENTER
button.TospecifyIPaddresswithoutusingtheDHCPserver,usetheHTTPserver.(→page
39)
TosetonlyforwirelessLAN(NETWORKTYPEandWPA2PSK):
AccesstheHTTPservertodisplaythewebbrowser(→page
36)andselect[NETWORKSETTINGS]→[SETTINGS]
→[WIRELESSLAN]→[INFRASTRUCTURE]andthenclick[APPLY].
Makenecessarysettingsfor[SETTINGS],click[SAVE]forstoringsetvaluesandthenclick[APPLY]toreect
thesevaluestowirelessLANconnection.
To select an SSID:
AccesstheHTTPservertodisplaythewebbrowser(→page
36)andselect[NETWORKSETTINGS]→[SET-
TINGS]→[WIRELESSLAN]→[INFRASTRUCTURE]andthenclick[APPLY].Aftercompletionofthesesteps,
click[SETTING]fortheINFRASTRUCTUREandthenclick[SITESURVEY]onthe[CONNECTION]page,nally
selecttheSSIDyouwanttoconnectonthelist.
Ifyoudonotuse[SITESURVEY],typetheSSIDin[CONNECTION].(→page40)
Toreceivelampreplacementtimeorerrormessagesviae-mail:
AccesstheHTTPservertodisplaythewebbrowser(→page
36)andselect[NETWORKSETTINGS]→[ALERT
MAIL],andset[SENDER’SADDRESS],[SMTPSERVERNAME],and[RECIPIENT’SADDRESS].Last,click[SAVE].
(→page41)
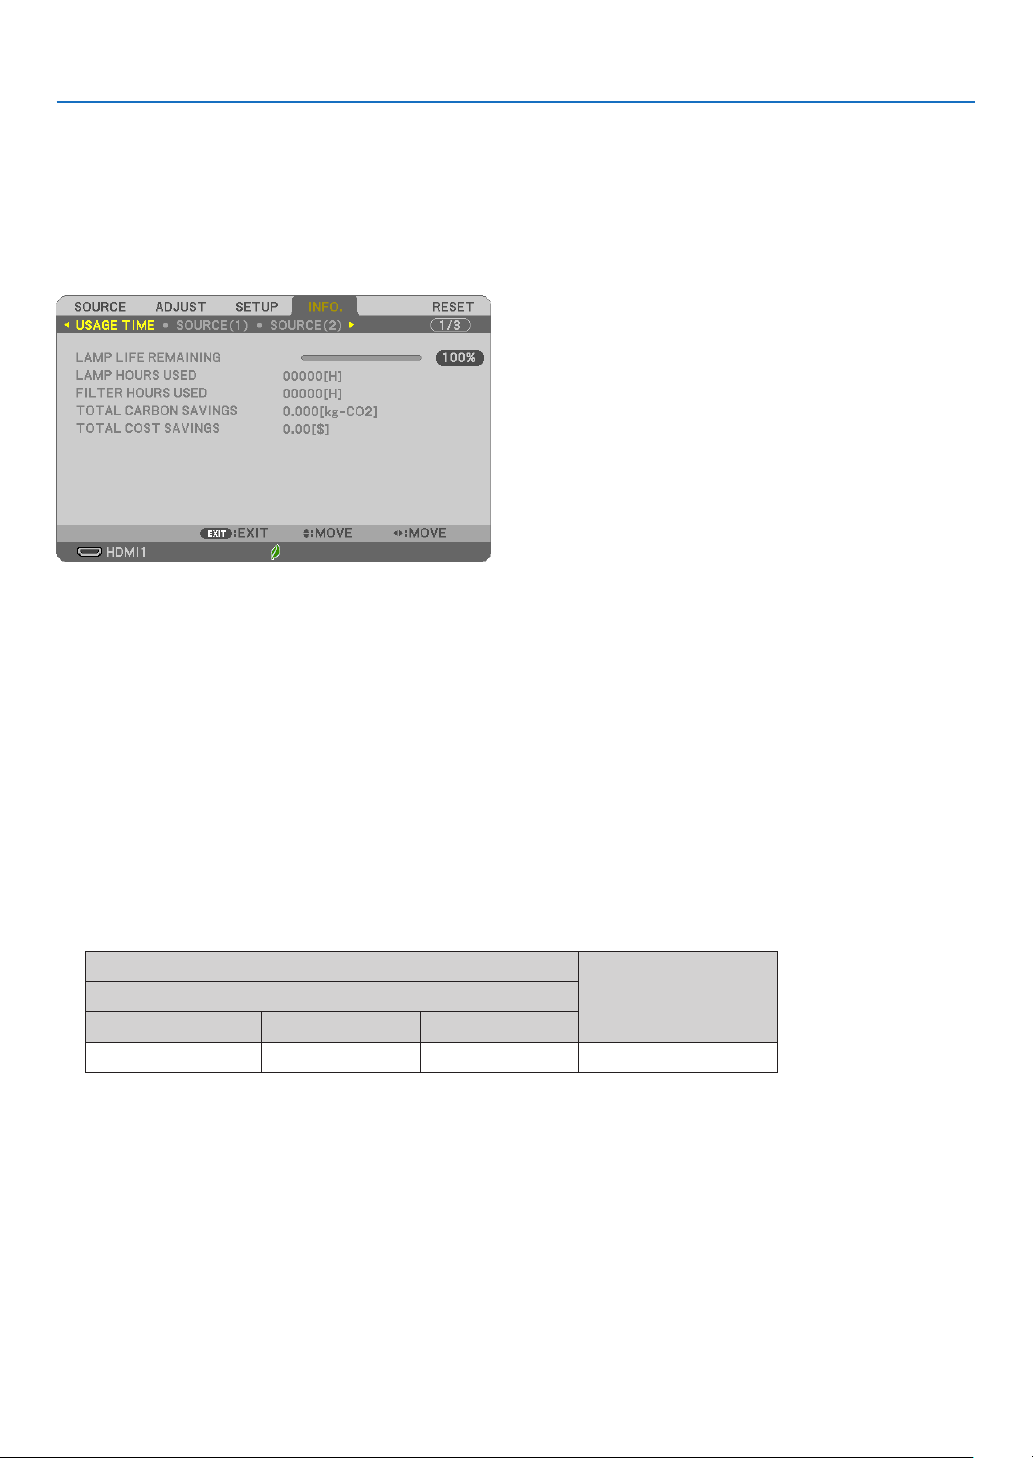
80
5. Using On-Screen Menu
❼ Menu Descriptions & Functions [INFO.]
Displaysthestatusofthecurrentsignalandlampusage.Thisitemhaseightpages.Theinformationincludedisas
follows:
TIP:PressingtheHELPbuttonontheremotecontrolwillshowthe[INFO.]menuitems.
[USAGE TIME]
[LAMPLIFEREMAINING](%)*
[LAMPHOURSUSED](H)
[FILTERHOURSUSED](H)
[TOTALCARBONSAVINGS](kg-CO2)
[TOTALCOSTSAVINGS]
*Theprogressindicatorshowsthepercentageofremainingbulblife.
Thevalueinformsyouoftheamountoflampusage.Whentheremaininglamptimereaches0,theLAMPLIFE
REMAININGbarindicatorchangesfrom0%to100Hoursandstartscountingdown.
Iftheremaininglamptimereaches0hours,theprojectorwillnotturnon.
•Themessagetotheeffectthatthelamportheltersshouldbereplacedwillbedisplayedforoneminutewhen
theprojectoristurnedonandwhenthePOWERbuttonontheprojectorortheremotecontrolispressed.
Todismissthismessage,pressanybuttonontheprojectorortheremotecontrol.
Lamplife(H)
Replacement lamp
ECO MODE
OFF/AUTO ECO NORMAL ECO
4000 6000 8000NP44LP
•[TOTALCARBONSAVINGS]
Thisdisplaystheestimatedcarbonsavinginformationinkg.Thecarbonfootprintfactorinthecarbonsaving
calculationisbasedontheOECD(2008Edition).(→page
27)
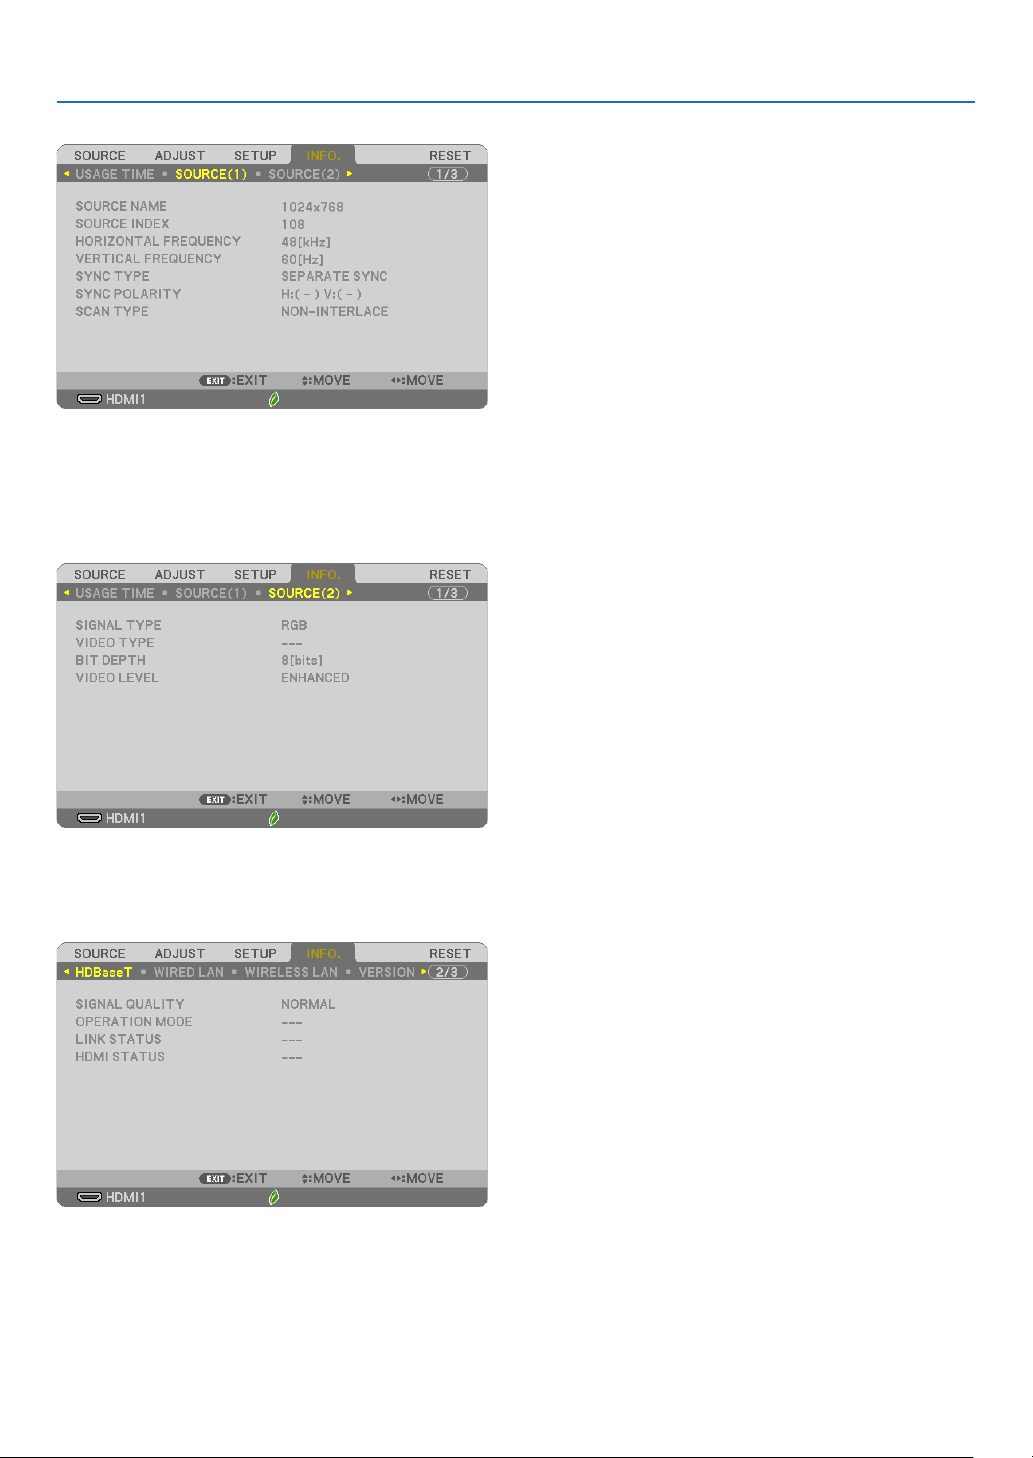
81
5. Using On-Screen Menu
[SOURCE(1)]
[SOURCENAME][SOURCEINDEX]
[HORIZONTALFREQUENCY][VERTICALFREQUENCY]
[SYNCTYPE][SYNCPOLARITY]
[SCANTYPE]
[SOURCE(2)]
[SIGNALTYPE][VIDEOTYPE]
[BITDEPTH][VIDEOLEVEL]
[HDBaseT] (not supported by P603X)
[SIGNALQUALITY][OPERATIONMODE]
[LINKSTATUS][HDMISTATUS]
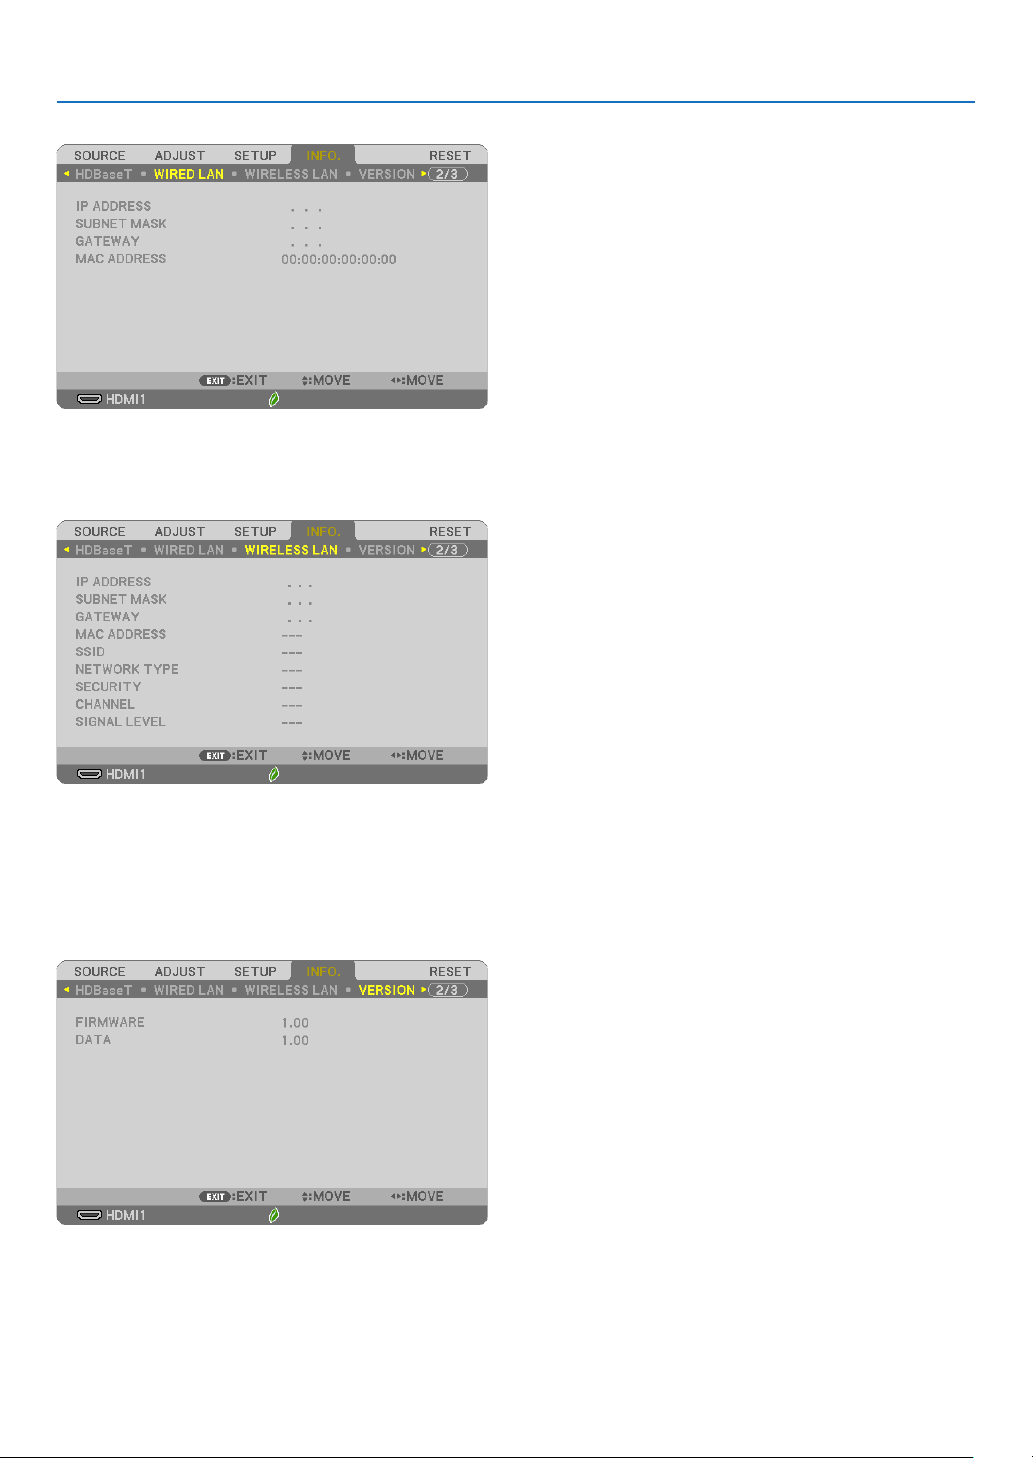
82
5. Using On-Screen Menu
[WIRED LAN]
[IPADDRESS][SUBNETMASK]
[GATEWAY][MACADDRESS]
[WIRELESS LAN]
[IPADDRESS][SUBNETMASK]
[GATEWAY][MACADDRESS]
[SSID][NETWORKTYPE]
[SECURITY][CHANNEL]
[SIGNALLEVEL]
[VERSION]
[FIRMWARE]Version
[DATA]Version

83
5. Using On-Screen Menu
[OTHERS]
[PROJECTORNAME]
[HOSTNAME]
[MODELNO.]
[SERIALNUMBER]
[LANUNITTYPE]
[CONTROLID](when[CONTROLID]isset)

84
5. Using On-Screen Menu
❽ Menu Descriptions & Functions [RESET]
Returning to Factory Default [RESET]
TheRESETfeatureallowsyoutochangeadjustmentsandsettingstothefactorypresetfora(all)source(s)except
thefollowing:
[CURRENTSIGNAL]
Resetstheadjustmentsforthecurrentsignaltothefactorypresetlevels.
Theitemsthatcanberesetare:[PRESET],[CONTRAST],[BRIGHTNESS],[COLOR],[HUE],[SHARPNESS],[AS-
PECTRATIO],[HORIZONTAL],[VERTICAL],[CLOCK],[PHASE],and[OVERSCAN].
[ALLDATA]
Resetalltheadjustmentsandsettingsforallthesignalstothefactorypreset.
All items can be reset EXCEPT[LANGUAGE],[BACKGROUND],[ORIENTATION],[FILTERMESSAGE],[SECU-
RITY],[COMMUNICATIONSPEED],[CONTROLID],[STANDBYMODE],[FANMODE],[CARBONCONVERT],
[CURRENCY],[CURRENCYCONVERT],[LAMPLIFEREMAINING],[LAMPHOURSUSED],[FILTERHOURS
USED],[TOTALCARBONSAVINGS],[WIREDLAN],and[WIRELESSLAN].
Toresetthelampusagetime,see“ClearingLampHourMeter[CLEARLAMPHOURS]”below.
Clearing Lamp Hour Meter [CLEAR LAMP HOURS]
Resetsthelampclockbacktozero.Selectingthisoptiondisplayssubmenuforaconrmation.Select[YES]and
presstheENTERbutton.
NOTE:Elapsedtimeofthelampusewillnotbeaffectedevenwhen[RESET]isdonefromthemenu.
NOTE:Theprojectorwillturnoffandgointostandbymodewhenyoucontinuetousetheprojectorforanother100hoursafterthelamphas
reachedtheendofitslife.Inthisconditionyoucannotclearthelamphourmeteronthemenu.Ifthishappens,presstheHELPbuttononthe
remotecontrolfor10secondstoresetthelampclockbacktozero.Dothisonlyafterreplacingthelamp.
Clearing the Filter Usage Hours [CLEAR FILTER HOURS]
Resetsthelterusagebacktozero.Selectingthisoptiondisplayssubmenuforaconrmation.Select[YES]and
presstheENTERbutton.
NOTE:Elapsedtimeofthelterusewillnotbeaffectedevenwhen[RESET]isdonefromthemenu.
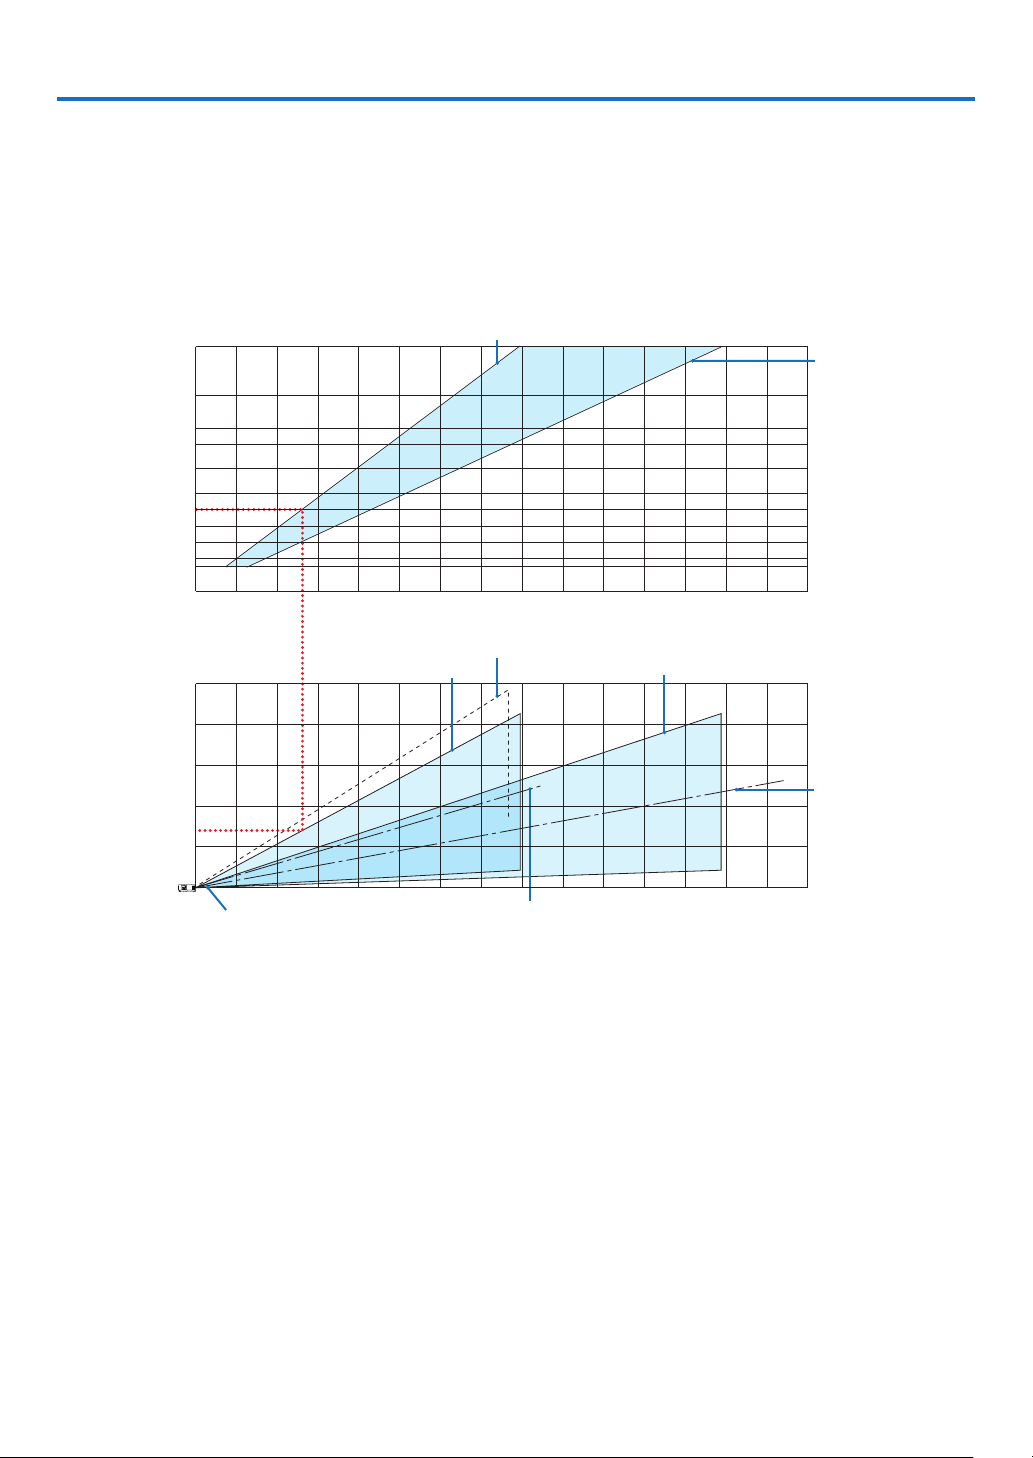
85
6. Installation and Connections
❶ Setting Up the Screen and the Projector
Usethistogetageneralideaofwhatthescreensizewillbewhensetinacertainposition,whatsizescreenyouwill
need,andwhatdistanceyouwillneedtoprojectimagesofthedesiredsize.
Theprojectiondistancerangeatwhichfocusingispossibleis0.8m(fora30model)to12.9m(fora300model).
Installwithinthisrange.
[P554U/P474U]
0123456789101112 13 14 15
12 13 14 15
0
1
2
3
4
5
1234567891011
40
30
60
80
100
120
150
180
200
240
300
(inch)
(m)
Screen size
Screen height from the center of the
projector lens
[Projection distance]
With tilt feet tilted 4° when set to wide
When zoom lever turned to telescopic
Screen center line
(telescopic)
Screen center line (wide)
When zoom lever
turned to wide
Projector lens center
(m)
(m)
When zoom lever turned to wide
When zoom
lever turned to
telescopic
*Theguresindicatedfor“heightofscreenfromprojectorlenscenter”ontheprojectiondistancetablearefora
lensshiftof55%V.
[ReadingtheTable]
Fromtheuppertableonthispage,toprojectwideimagesona100screen,installatabout2.6mfromthefront.
Also,fromthelowertablewecanseethatabout1.3marerequiredfromtheprojector’slenscentertotheupper
edgeofthescreen.Usethistoseewhetherornotenoughheightcanbeprovidedfromtheprojectortotheceiling
andforinstallingthescreen.Thediagramshowstheprojectiondistancewhentheprojectorisinstalledhorizontally.
Theprojectedimagecanbemovedupanddown,leftandrightusingthelensshiftfunction.(→page
16)
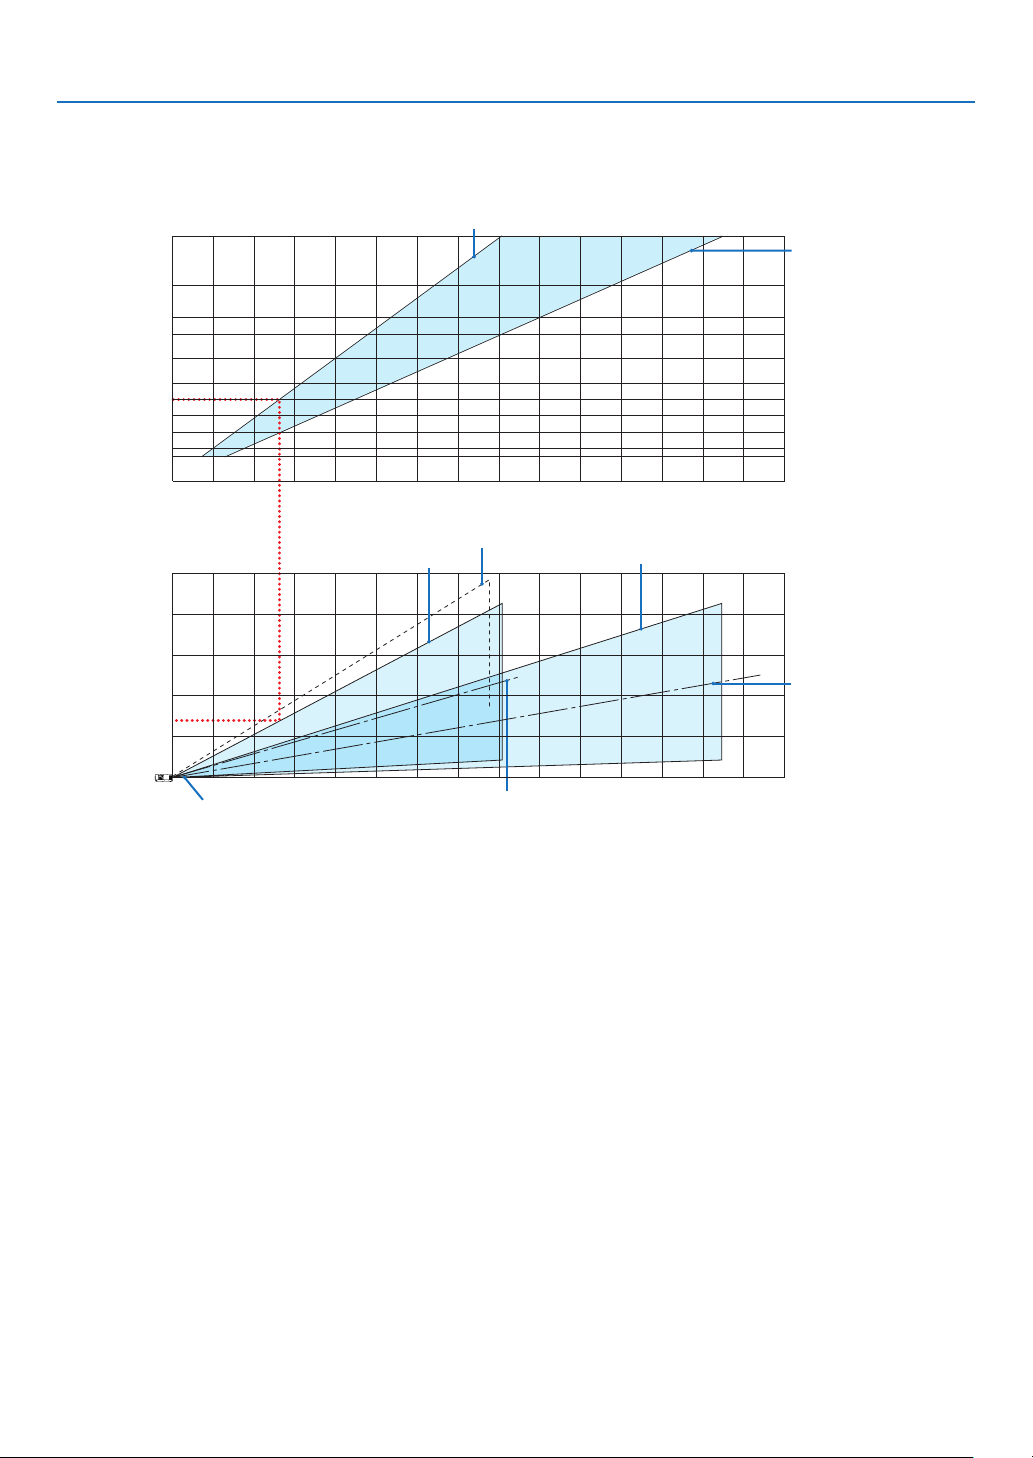
86
6. Installation and Connections
Theprojectiondistancerangeatwhichfocusingispossibleis0.8m(fora30model)to13.5m(fora300model).
Installwithinthisrange.
[P554W/P474W]
012345678910 11 12 13 14 15
12 13 14 15
0
1
2
3
4
5
12345678910 11
40
30
60
80
100
120
150
180
200
240
300
(inch)
(m)
Screen size
Screen height from the center of the
projector lens
[Projection distance]
With tilt feet tilted 4° when set to wide
When zoom lever turned to telescopic
Screen center line
(telescopic)
Screen center line (wide)
When zoom lever
turned to wide
Projector lens center
(m)
(m)
When zoom lever turned to wide
When zoom
lever turned to
telescopic
*Theguresindicatedfor“heightofscreenfromprojectorlenscenter”ontheprojectiondistancetableareforalensshiftof55%
V.
[ReadingtheTable]
Fromtheuppertableonthispage,toprojectwideimagesona100screen,installatabout2.7mfromthefront.
Also,fromthelowertablewecanseethatabout1.3marerequiredfromtheprojector’slenscentertotheupper
edgeofthescreen.Usethistoseewhetherornotenoughheightcanbeprovidedfromtheprojectortotheceiling
andforinstallingthescreen.Thediagramshowstheprojectiondistancewhentheprojectorisinstalledhorizontally.
Theprojectedimagecanbemovedupanddown,leftandrightusingthelensshiftfunction.(→page
16)
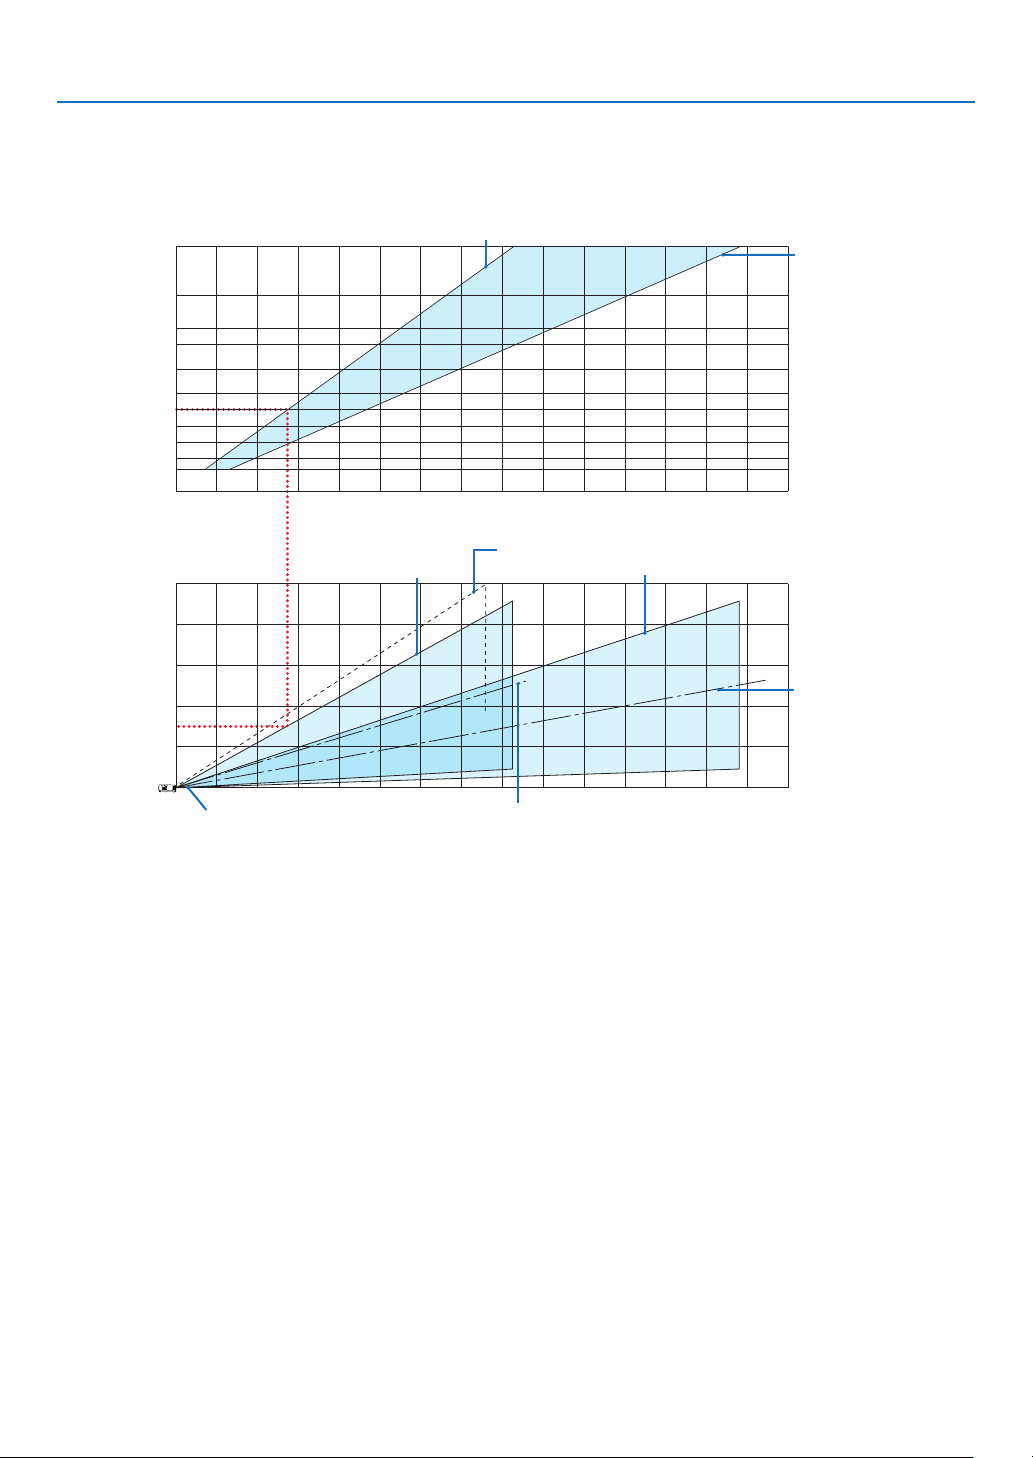
87
6. Installation and Connections
Theprojectiondistancerangeatwhichfocusingispossibleis0.8m(fora30model)to13.8m(fora300model).
Installwithinthisrange.
[P604X/P603X]
012345678910 11 12 13 14 15
12 13 14 15
0
1
2
3
4
5
12345678910 11
40
30
60
80
100
120
150
180
200
240
300
(inch)
(m)
Screen size
Screen height from the center of the
projector lens
[Projection distance]
With tilt feet tilted 4° when set to wide
When zoom lever turned to telescopic
Screen center line
(telescopic)
Screen center line (wide)
When zoom lever
turned to wide
Projector lens center
(m)
(m)
When zoom lever turned to wide
When zoom
lever turned to
telescopic
*Theguresindicatedfor“heightofscreenfromprojectorlenscenter”ontheprojectiondistancetableareforalensshiftof50%
V.
[ReadingtheTable]
Fromtheuppertableonthispage,toprojectwideimagesona100screen,installatabout2.7mfromthefront.
Also,fromthelowertablewecanseethatabout1.5marerequiredfromtheprojector’slenscentertotheupper
edgeofthescreen.Usethistoseewhetherornotenoughheightcanbeprovidedfromtheprojectortotheceiling
andforinstallingthescreen.Thediagramshowstheprojectiondistancewhentheprojectorisinstalledhorizontally.
Theprojectedimagecanbemovedupanddown,leftandrightusingthelensshiftfunction.(→page
16)

88
6. Installation and Connections
Tables of screen sizes and dimensions
[P554U/P474U/P554W/P474W]
Screen
height
Screenwidth
Screensize
(diagonal)
Size(inches)
ScreenwidthScreenheight
(inches)(cm)(inches)(cm)
30 25.4 64.6 15.940.4
40 33.986.221.2 53.8
60 50.9129.231.880.8
8067.8172.3 42.4 107.7
100 84.8215.4 53.0 134.6
120 101.8258.563.6 161.5
150 123.3 313.1 79.5201.9
200 169.6430.8106.0 269.2
240 203.5 516.9127.2 323.1
300 254.4 646.2 159.0403.9
[P604X/P603X]
Screen
height
Screenwidth
Screensize
(diagonal)
Size(inches)
ScreenwidthScreenheight
(inches)(cm)(inches)(cm)
30 24.0 61.0 18.045.7
40 32.0 81.324.0 61.0
60 48.0121.936.0 91.4
8064.0 162.6 48.0121.9
100 80.0203.2 60.0 152.4
120 96.0243.872.0 182.9
150 120.0 304.890.0228.6
200 160.0 406.4 120.0 304.8
240 192.0487.7144.0 365.8
300 240.0 609.6180.0457.2
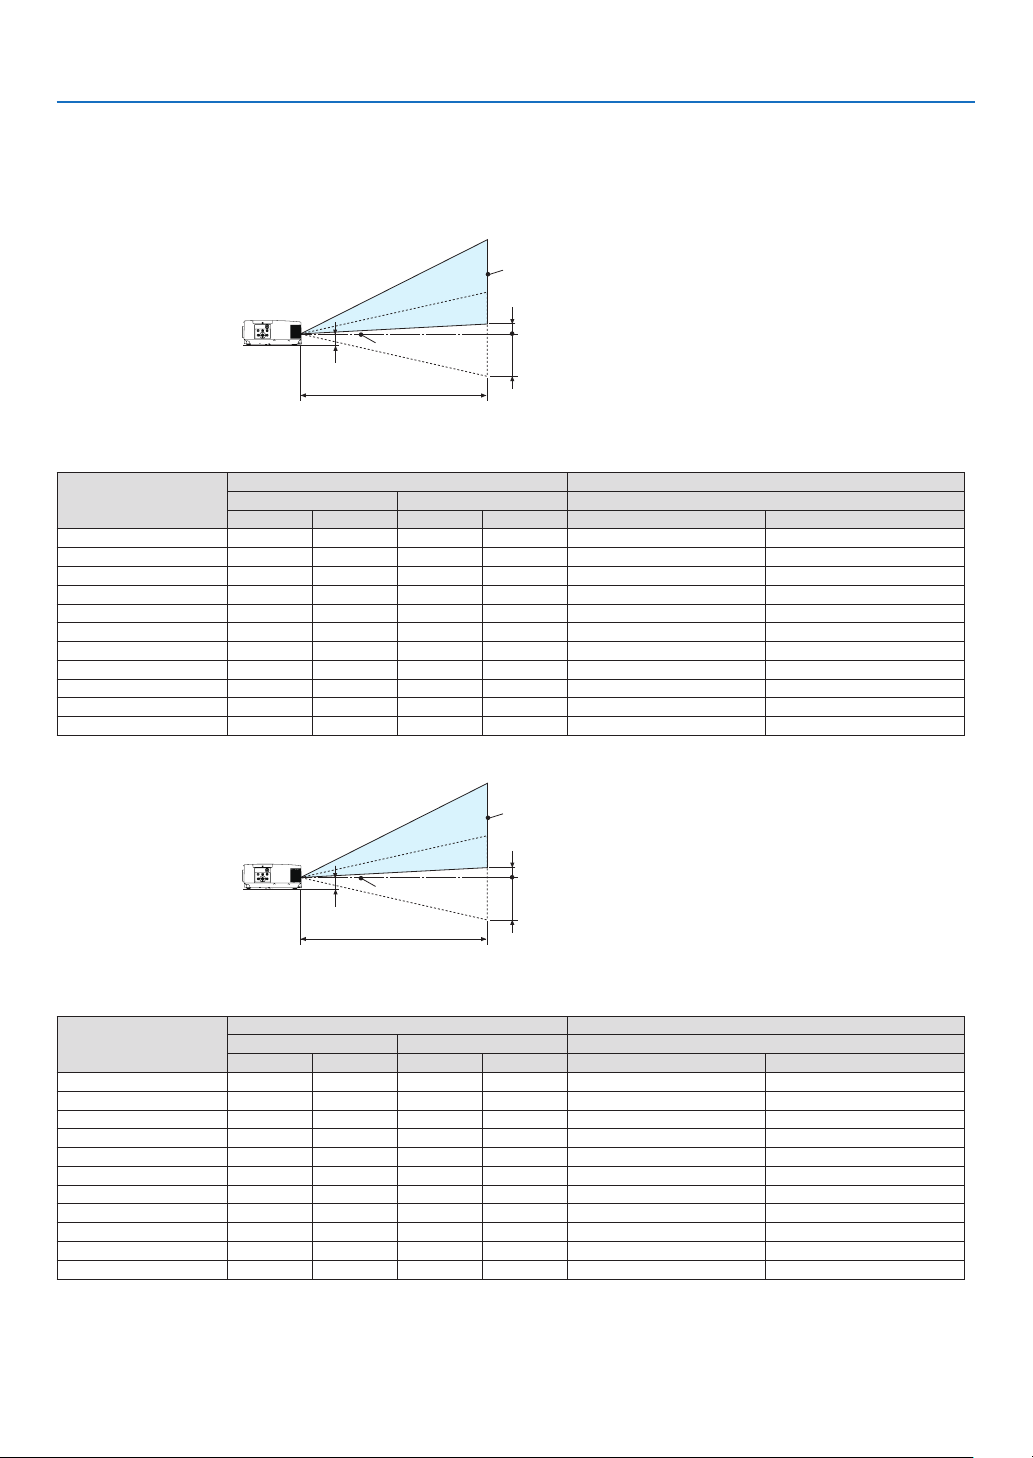
89
6. Installation and Connections
Example of installation on a desktop
Thediagrambelowshowsanexampleofwhentheprojectorisusedonadesktop.
Horizontalprojectionposition:Equaldistancetotheleftandrightfromthecenterofthelens
Verticalprojectionposition:(seetablebelow)
[P554U/P474U]
Screensurface
Loweredgeofscreenwith55%V
Measurement+H
Measurement-H
Loweredgeofscreenwith0%V
Lenscenter
Approximately
68to73mm
ProjectiondistanceL
(Note)Heightfromlenscentertoloweredgeofscreen(withtiltfeetscrewedin)
Screensize(inches)
ThrowdistanceLHeightH
Wide Tele 0%V–55%V
(inches)(m)(inches)(m)(inches)(cm)
30 30 0.75 491.25 –8.0 –+0.9–20.2 –+2.2
40 40 1.02 66 1.68–10.6–+1.2–26.9 –+3.0
60 61 1.55 100 2.54 –15.9 –+1.8–40.4 –+4.5
80822.09134 3.40 –21.2 –+2.4–53.8 –+6.0
100 103 2.62 1684.26 –26.5 –+3.0–67.3 –+7.5
120 124 3.15 202 5.12 –31.8 –+3.5–80.8 –+9.0
150 156 3.95253 6.42 –39.8 –+4.4–101.0–+11.2
1801874.75 303 7.71 –47.7 –+5.3–121.2–+13.5
200 2085.29337 8.57–53.0 –+5.9–134.6–+15.0
240 250 6.35 405 10.29–63.6 –+7.0–161.5 –+17.9
300 313 7.95507 12.88–79.5 –+8.8–201.9 –+22.4
[P554W/P474W]
Screensurface
Loweredgeofscreenwith55%V
Measurement+H
Measurement-H
Loweredgeofscreenwith0%V
Lenscenter
Approximately
68to73mm
ProjectiondistanceL
(Note)Heightfromlenscentertoloweredgeofscreen(withtiltfeetscrewedin)
Screensize(inches)
ThrowdistanceLHeightH
Wide Tele 0%V–55%V
(inches)(m)(inches)(m)(inches)(cm)
30 290.74 50 1.28–8.0 –+0.9–20.2 –+2.2
40 40 1.01 681.73 –10.6 –+1.2–26.9 –+3.0
60 61 1.55 104 2.63 –15.9 –+1.8–40.4 –+4.5
80832.10 1393.53 –21.2 –+2.4–53.8 –+6.0
100 104 2.64 175 4.44 –26.5 –+3.0–67.3 –+7.5
120 125 3.18210 5.34 –31.8 –+3.5–80.8 –+9.0
150 157 4.00 263 6.69–39.8 –+4.4–101.0 –+11.2
1801904.82317 8.05–47.7 –+5.3–121.2 –+13.5
200 211 5.36 352 8.95–53.0 –+5.9–134.6 –+15.0
240 254 6.45 423 10.76 –63.6 –+7.0–161.5 –+17.9
300 3188.08530 13.46 –79.5 –+8.8–201.9 –+22.4
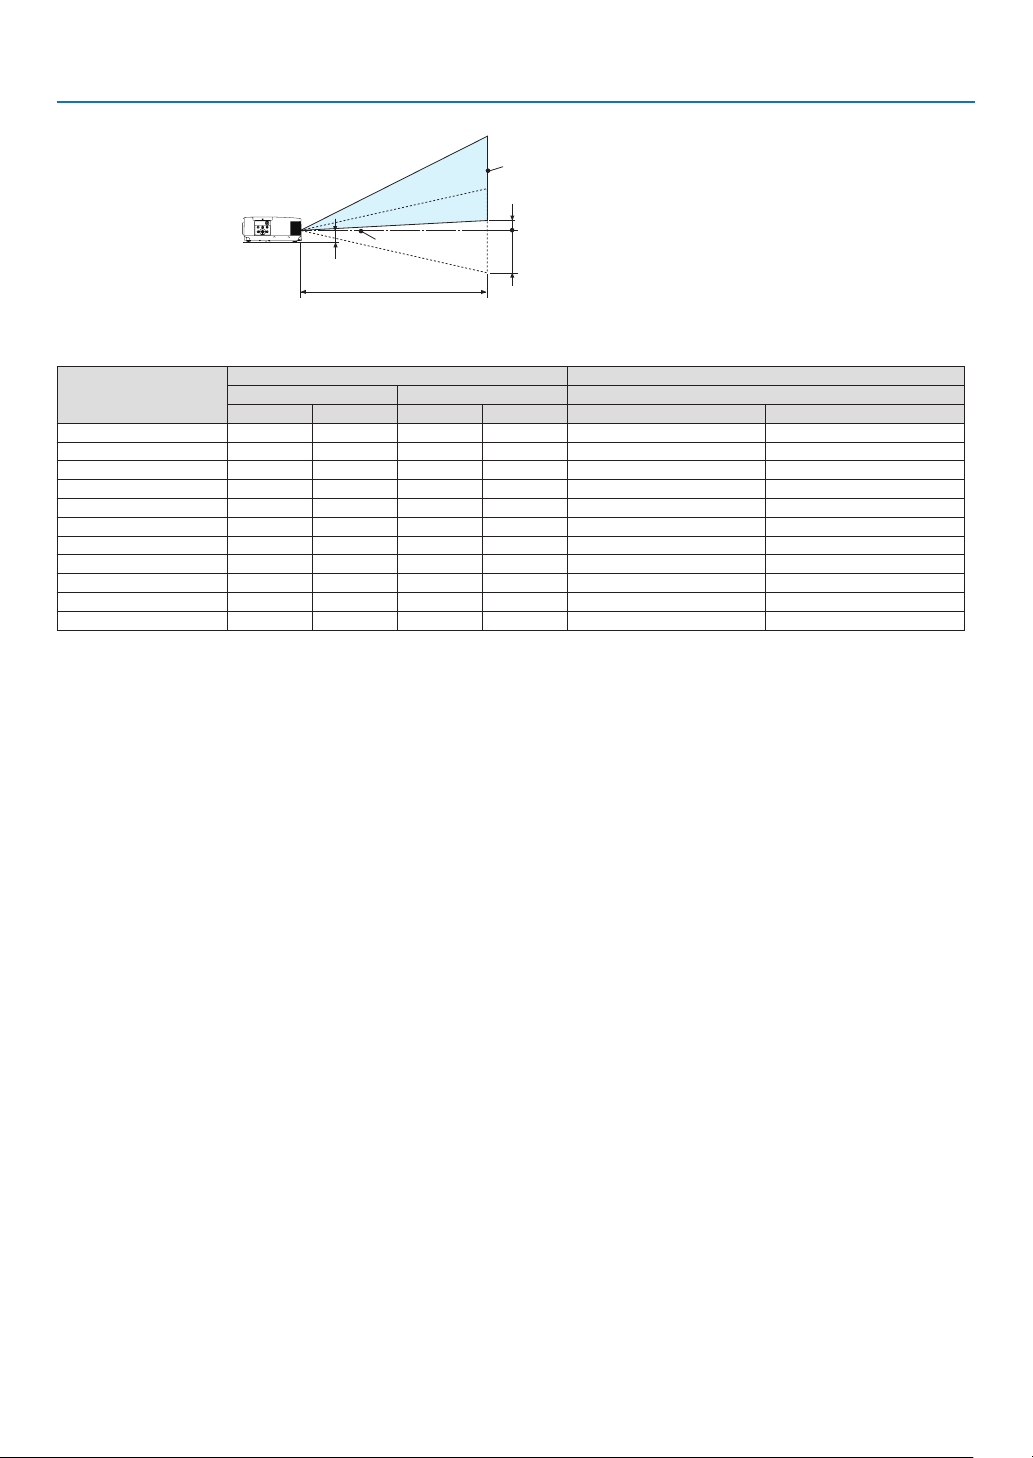
90
6. Installation and Connections
[P604X/P603X]
Screensurface
Loweredgeofscreenwith50%V
Measurement+H
Measurement-H
Loweredgeofscreenwith0%V
Lenscenter
Approximately
68to73mm
ProjectiondistanceL
(Note)Heightfromlenscentertoloweredgeofscreen(withtiltfeetscrewedin)
Screensize(inches)
ThrowdistanceLHeightH
Wide Tele 0%V–50%V
(inches)(m)(inches)(m)(inches)(cm)
30 30 0.75 51 1.31 −9.0 –+0−22.9 –+0
40 41 1.03 70 1.77 −12.0–+0−30.5 –+0
60 63 1.59106 2.69−18.0 –+0−45.7 –+0
80842.15 142 3.61 −24.0 –+0−61.0 –+0
100 106 2.70 1794.54 −30.0 –+0−76.2 –+0
120 1283.26 215 5.46 −36.0 –+0−91.4 –+0
150 161 4.092696.84−45.0 –+0−114.3 –+0
1801944.93324 8.23−54.0 –+0−137.2 –+0
200 216 5.48360 9.15−60.0 –+0−152.4 –+0
240 260 6.59433 11.00 −72.0–+0−182.9 –+0
300 325 8.26542 13.77 −90.0–+0−228.6 –+0
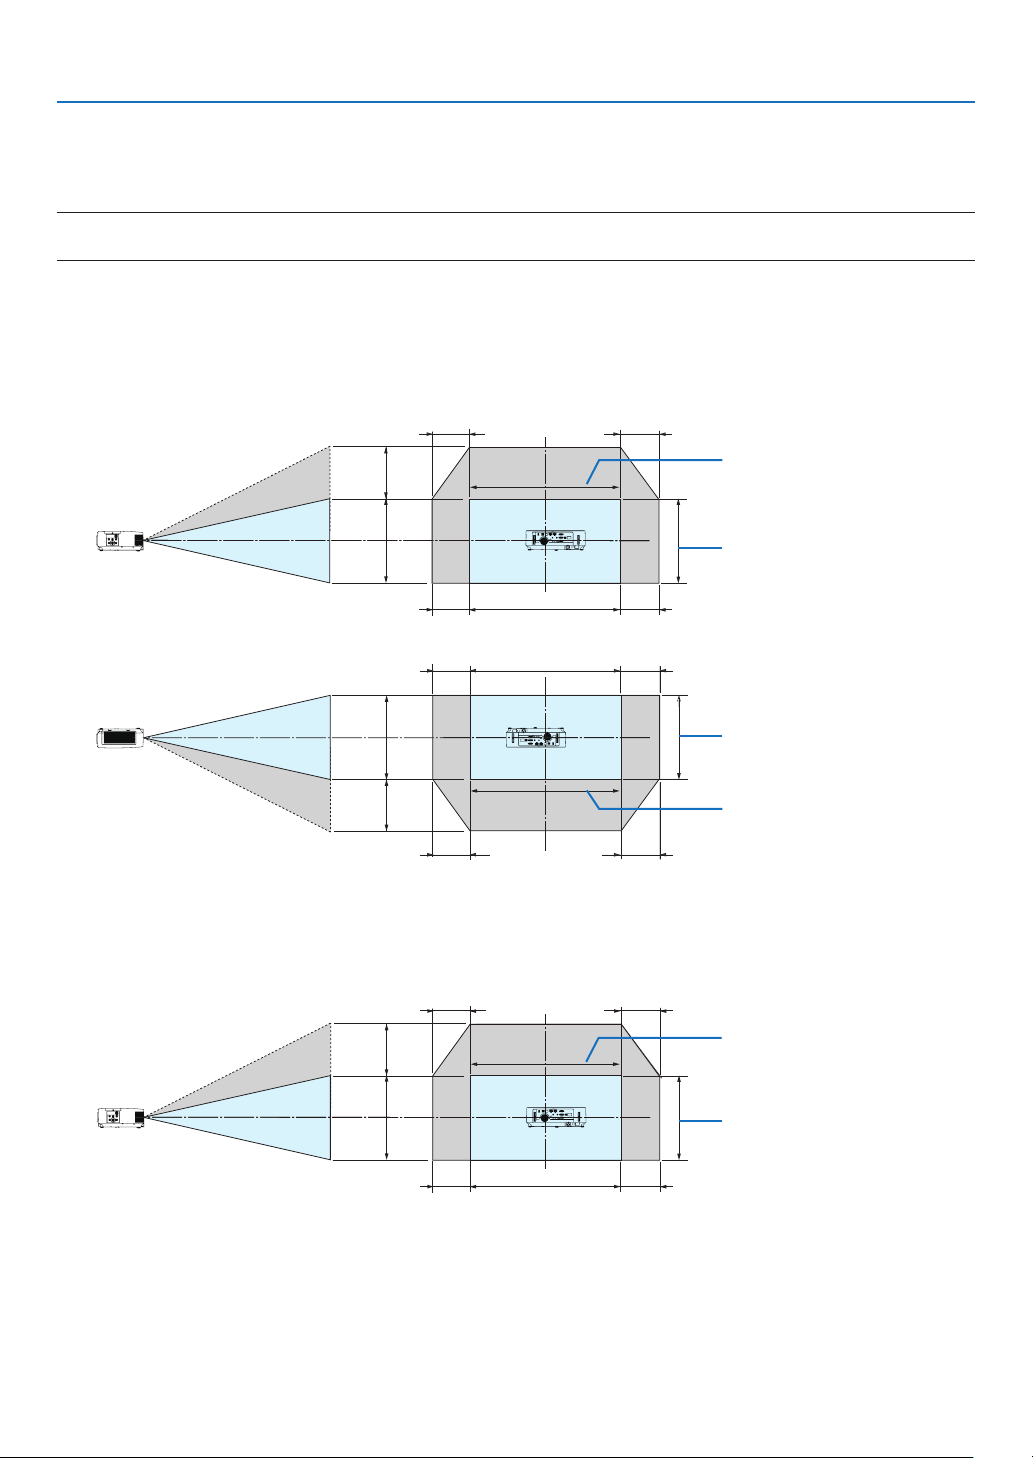
91
6. Installation and Connections
Lens shifting range
Thisprojectorisequippedwithalensshiftfunction(→page
16)foradjustingtheimagepositionusingdials.Lens
shiftingispossiblewithintherangeshownbelow.
NOTE:
•Incaselensshiftedvolumeexceedsthebelowillustratedrange,blurandshademayappeararoundendsofprojectedimage.
Legend:V“Vertical”referstothescreenheightandH“Horizontal”referstothescreenwidth.Thelensshiftrange
isexpressedasaratioofheightandwidth,respectively.
[P554U/P474U/P554W/P474W]
Lensshiftingrange:
Verticaldirection:+55%,−0%
Horizontaldirection:±15%
100%V
55%V
100%H
15%H
15%H
15%H
15%H
Height of projected image
Width of projected image
100%V
55%V
100%H
15%H
15%H
15%H
15%H
Height of projected image
Width of projected image
[P604X/P603X]
Lensshiftingrange:
Verticaldirection:+50%,−0%
Horizontaldirection:±15%
100%V
50%V
100%H
15%H
15%H
15%H
15%H
Height of projected image
Width of projected image
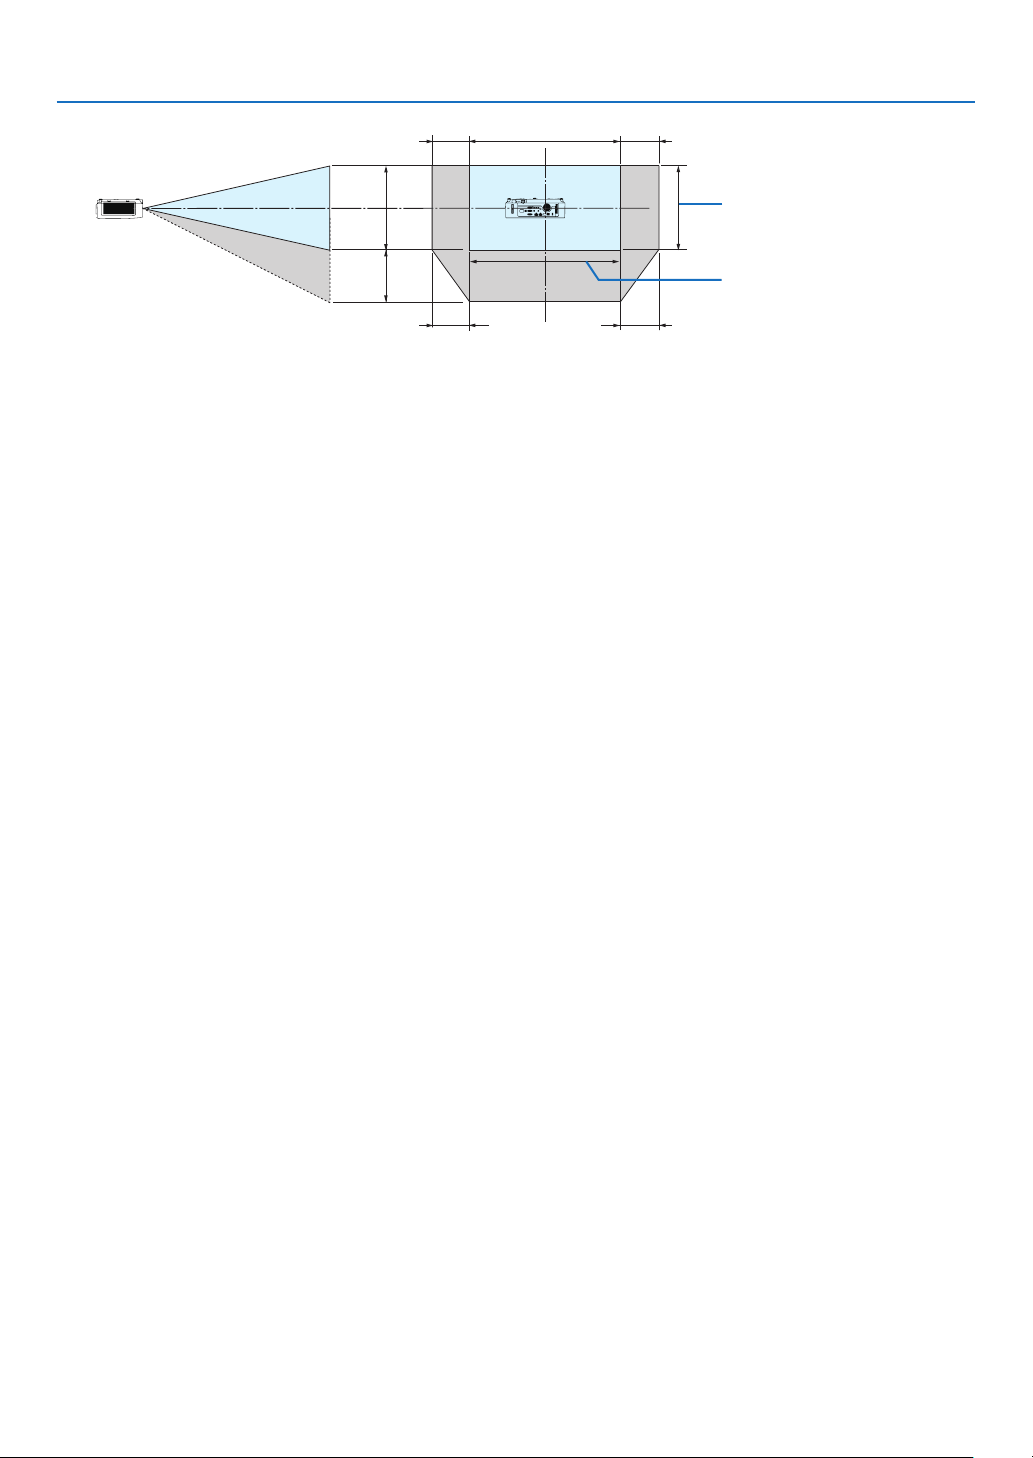
92
6. Installation and Connections
100%V
50%V
100%H
15%H
15%H
15%H
15%H
Height of projected image
Width of projected image
(Example)Whenusingtoprojectona150"screen
[P554U/P474U/P554W/P474W]
Accordingtothe“Tablesofscreensizesanddimensions”(→page
88),H=127"/323cm,V=79"/201.9cm.
Adjustmentrangeintheverticaldirection:theprojectedimagecanbemovedupwards0.55×79"/201.9cm≈
43.5"/111cm(whenthelensisatthecenterposition).
Adjustmentrangeinthehorizontaldirection:theprojectedimagecanbemovedtotheleft0.15×127"/323cm≈
19.1"/48.5cm,totherightapproximately19.1"/48.5cm.
[P604X/P603X]
Accordingtothe“Tablesofscreensizesanddimensions”(→page
88),H=120"/304.8cm,V=90"/228.6cm.
Adjustmentrangeintheverticaldirection:theprojectedimagecanbemovedupwards0.5×90"/228.6cm≈45"/114.3
cm(whenthelensisatthecenterposition).
Adjustmentrangeinthehorizontaldirection:theprojectedimagecanbemovedtotheleft0.15×120"/304.8cm≈
18"/45.7cm,totherightapproximately18"/45.7cm.
*Figuresdifferbyseveral%becausethecalculationisapproximate.
WARNING
*Installingyourprojectorontheceilingmustbedonebyaqualiedtechnician.ContactyourNECdealerformore
information.
*Donotattempttoinstalltheprojectoryourself.
•Onlyuseyourprojectoronasolid,levelsurface.Iftheprojectorfallstotheground,youcanbeinjuredandthe
projectorseverelydamaged.
•Donotusetheprojectorwheretemperaturesvarygreatly.Theprojectormustbeusedattemperaturesbetween
41°F(5°C)and104°F(40°C)(Ecomodeselectedautomaticallyat95°Fto104°F/35°Cto40°C).
•Donotexposetheprojectortomoisture,dust,orsmoke.Thiswillharmthescreenimage.
•Ensurethatyouhaveadequateventilationaroundyourprojectorsoheatcandissipate.Donotcovertheventson
the side or the front of the projector.
Reflecting the Image
Usingamirrortoreectyourprojector’simageenablesyoutoenjoyamuchlargerimagewhenasmallerspaceis
required.ContactyourNECdealerifyouneedamirrorsystem.Ifyou’reusingamirrorsystemandyourimageis
inverted,usetheMENUand▲▼◀▶ buttons on your projector cabinet or your remote control to correct the orienta-
tion.(→page
69)
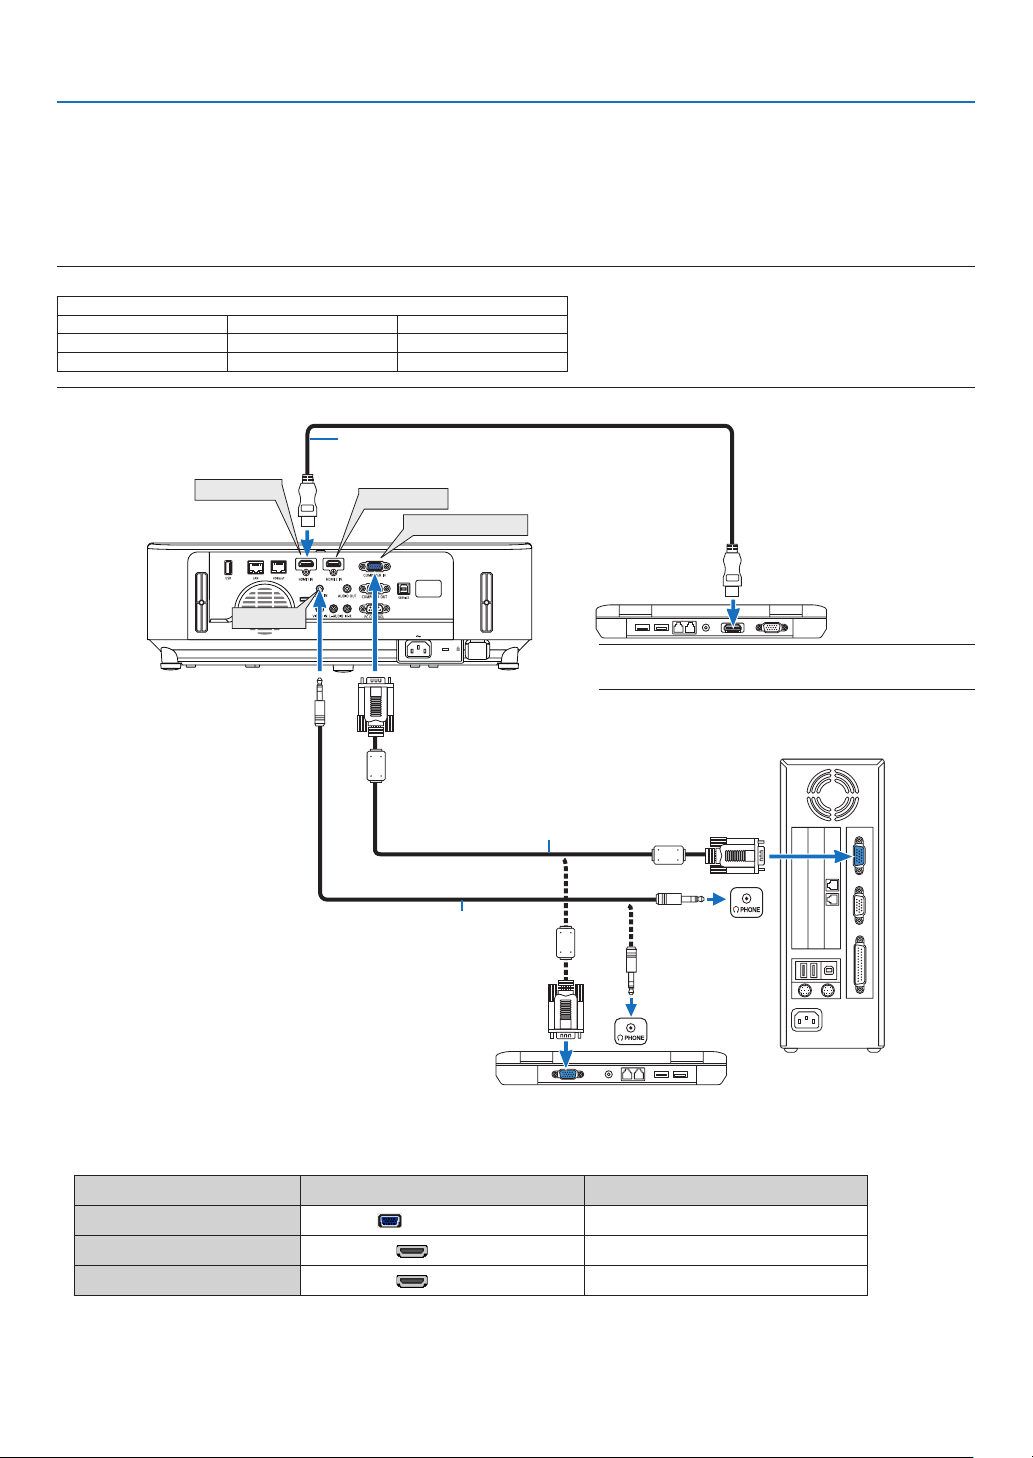
93
6. Installation and Connections
❷ Making Connections
Connecting Your Computer
Computercables,HDMIandUSBcanbeusedtoconnecttoacomputer.Theconnectioncableisnotenclosedwith
theprojector.Pleasegetreadyasuitablecablefortheconnection.
NOTE:SignalssupportedbyPlug&Play(DDC2)
INPUT
COMPUTERINHDMI1INHDMI2IN
analogdigitaldigital
YesYesYes
•Selectthesourcenameforitsappropriateinputterminalafterturningontheprojector.
Inputterminal
SOURCEbuttonontheprojectorcabinet
Buttonontheremotecontrol
COMPUTERIN
COMPUTER
(COMPUTER1)
HDMI1IN
HDMI1(HDMI1*)
HDMI2IN
HDMI2(HDMI2*)
HDMI 1 IN
HDMI 2 IN
COMPUTER IN
AUDIO IN
Computer cable (VGA) (supplied)
To mini D-Sub 15-pin terminal on the
projector.Itisrecommendedthatyouuse
a commercially available distribution
amplifier if connecting a signal cable
longer than the cable supplied.
Stereo mini-plug audio cable (not supplied)
HDMIcable(notsupplied)
UseHighSpeedHDMI®Cable.
NOTE:ForMac,useacommerciallyavailablepinadapter
(notsupplied)toconnecttoyourMac’svideoport.
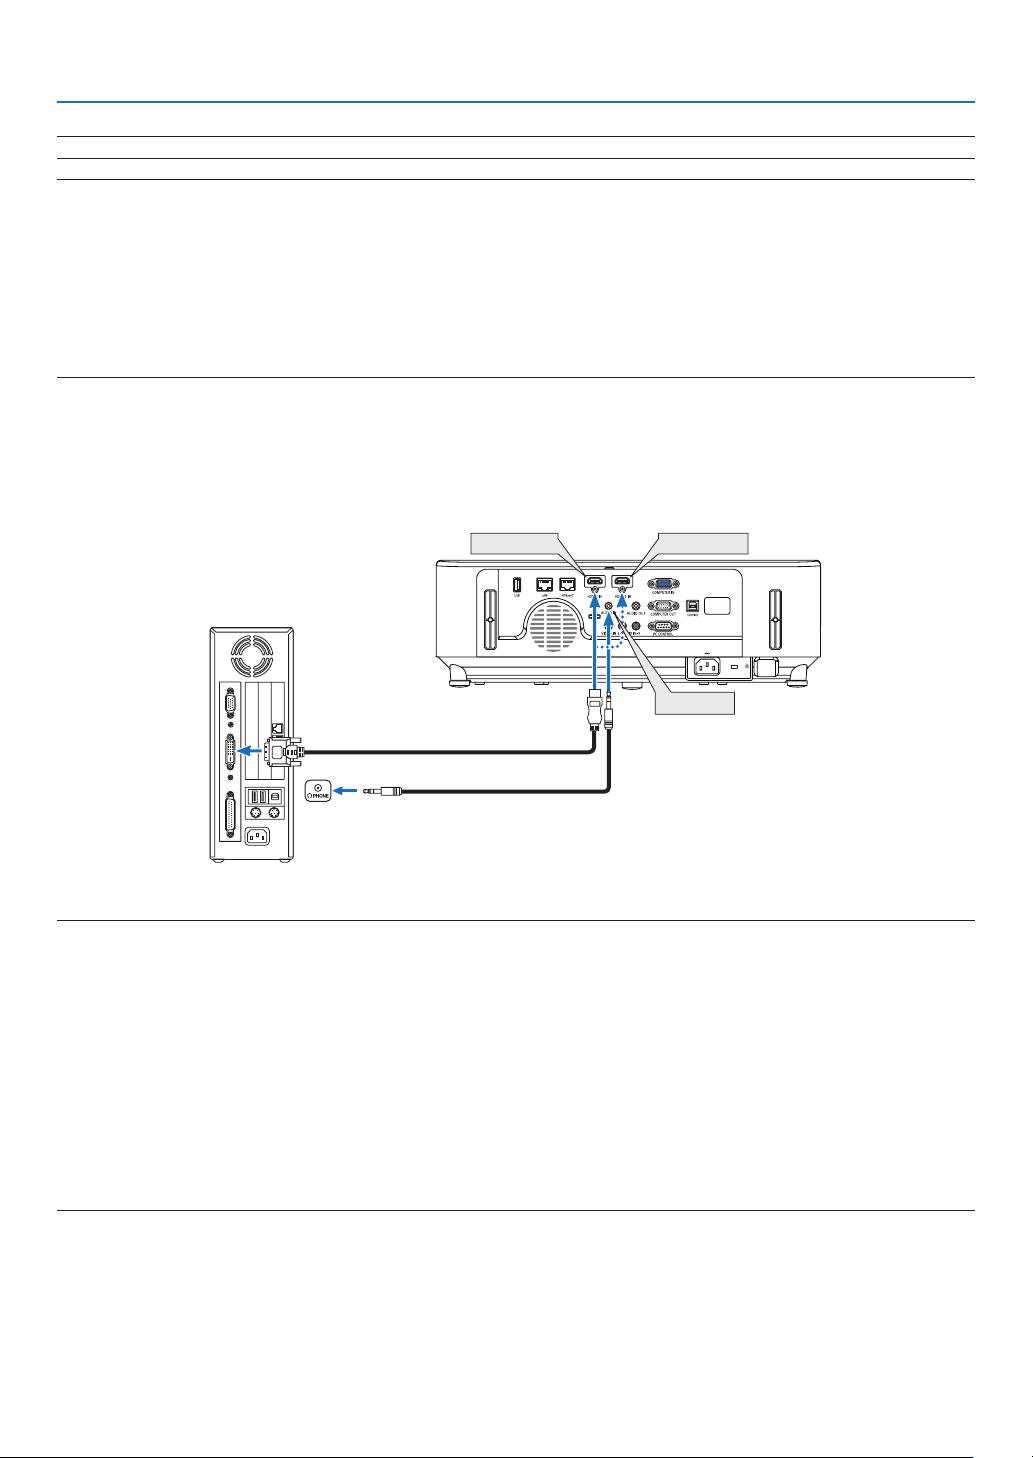
94
6. Installation and Connections
NOTE:TheprojectorisnotcompatiblewithvideodecodedoutputsoftheNECISS-6020switcher.
NOTE:AnimagemaynotbedisplayedcorrectlywhenaVideosourceisplayedbackviaacommerciallyavailablescanconverter.
Thisisbecausetheprojectorwillprocessavideosignalasacomputersignalatthedefaultsetting.Inthatcase,dothefollowing.
*Whenanimageisdisplayedwiththelowerandupperblackportionofthescreenoradarkimageisnotdisplayedcorrectly:
ProjectanimagetollthescreenandthenpresstheAUTOADJ.buttonontheremotecontrolortheprojectorcabinet.
Enabling the computer’s external display
DisplayinganimageonthenotebookPC’sscreendoesnotnecessarilymeanitoutputsasignaltotheprojector.
WhenusingaPCcompatiblelaptop,acombinationoffunctionkeyswillenable/disabletheexternaldisplay.
Usually,thecombinationofthe“Fn”keyalongwithoneofthe12functionkeysgetstheexternaldisplaytocomeonoroff.Forexample,NEC
laptopsuseFn+F3,whileDelllaptopsuseFn+F8keycombinationstotogglethroughexternaldisplayselections.
CautionswhenusingaDVIsignal
•WhenthecomputerhasaDVIoutputterminal,useacommerciallyavailableconvertercabletoconnectthecom-
putertotheprojector’sHDMI1orHDMI2inputterminal(onlydigitalvideosignalscanbeinput).
HDMI 1 IN
HDMI 2 IN
AUDIO IN
NOTE:WhenViewingaDVIDigitalSignal
•Turnoffthepowerofthecomputerandprojectorbeforeconnecting.
•Whenavideodeckisconnectedviaascanconverter,etc.,thedisplaymaynotbecorrectduringfast-forwardingandrewinding.
•UseaDVI-to-HDMIcablecompliantwithDDWG(DigitalDisplayWorkingGroup)DVI(DigitalVisualInterface)revision1.0standard.
Thecableshouldbewithin197"/5mlong.
•TurnofftheprojectorandthePCbeforeconnectingtheDVI-to-HDMIcable.
•ToprojectaDVIdigitalsignal:Connectthecables,turntheprojectoron,thenselecttheHDMIinput.Finally,turnonyourPC.
Failuretodosomaynotactivatethedigitaloutputofthegraphicscardresultinginnopicturebeingdisplayed.Shouldthishappen,restart
yourPC.
•DonotdisconnecttheDVI-to-HDMIcablewhiletheprojectorisrunning.Ifthesignalcablehasbeendisconnectedandthenreconnected,
animagemaynotbecorrectlydisplayed.Shouldthishappen,restartyourPC.
•TheCOMPUTERvideoinputterminalssupportWindowsPlugandPlay.
•AMacsignaladapter(commerciallyavailable)mayberequiredtoconnectaMaccomputer.
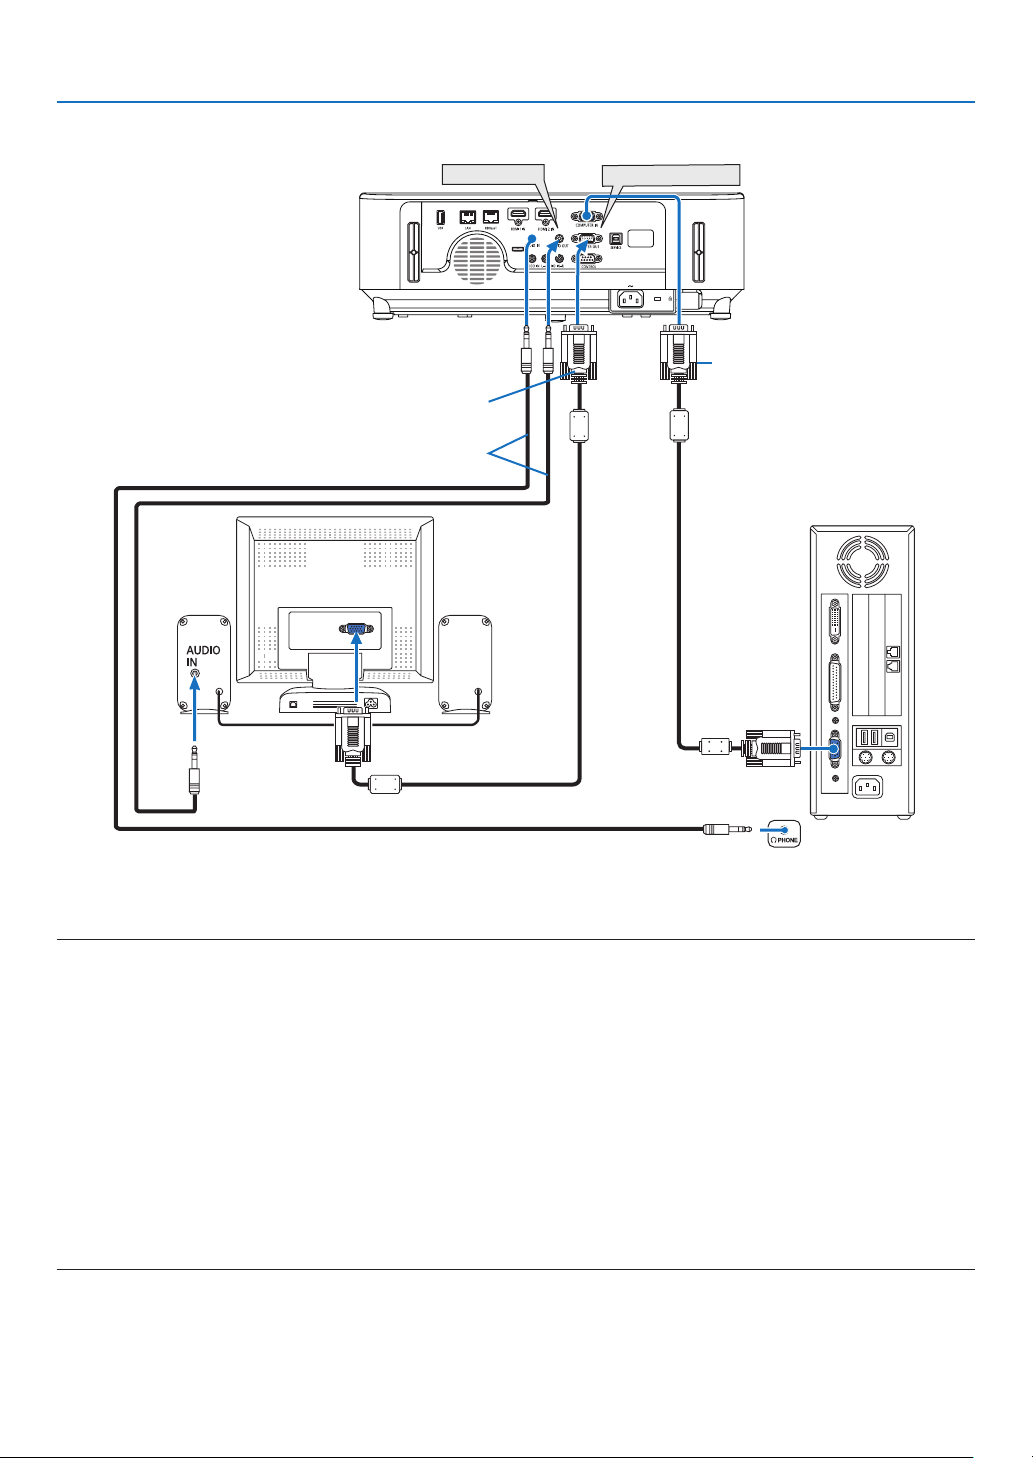
95
6. Installation and Connections
Connecting an External Monitor
Youcanconnectaseparate,externalmonitortoyourprojectortosimultaneouslyviewonamonitorthecomputer
analogimageyou’reprojecting.
NOTE:
•TheAUDIOOUTjackdoesnotsupportheadphoneterminal.
•Whenaudioequipmentisconnected,theprojectorspeakerisdisabled.
•ThesignaloutputfromtheCOMPUTEROUTofthisprojectorisforprojectingimageonexclusiveonedisplay.
•Whennosignalisappliedover3minutesintheconditionofprojectorstandbywhenNETWORKSTANDBYissetintheStandbymode,
outputfromtheCOMPUTEROUTorAUDIOOUTterminalwillbestopped.Inthiscasepulloutthecomputercableandsetitbackafter
inputtingvideosignal
Monitoroutandsleepmode:
•TheCOMPUTEROUTterminalwillnotworkwhen[NORMAL]isselectedfor[STANDBYMODE].
TheCOMPUTEROUTterminalwillworkonlyinthesleepmode.
ApplyingasignalfromtheCOMPUTERINterminalwillputtheprojectorinthesleepmode,whichallowsyoutousetheCOMPUTEROUT
terminalandtheAUDIOOUTminijack.
Thesleepmodeisoneofthestandbymodes.Thesleepmodecannotbeselectedfromthemenu.
•Inthenetworkstandbymode,soundforthelastviewedcomputerorvideosourcewillbeheard.
BNC-to-COMPUTERINterminalconvertedsignalwillnotbeoutputinthestandbymodeandsleepmode.
AUDIO OUT
COMPUTER OUT
Computer cable (VGA) (not supplied)
Computer cable (VGA) (supplied)
Stereo mini-plug audio cable (not supplied)
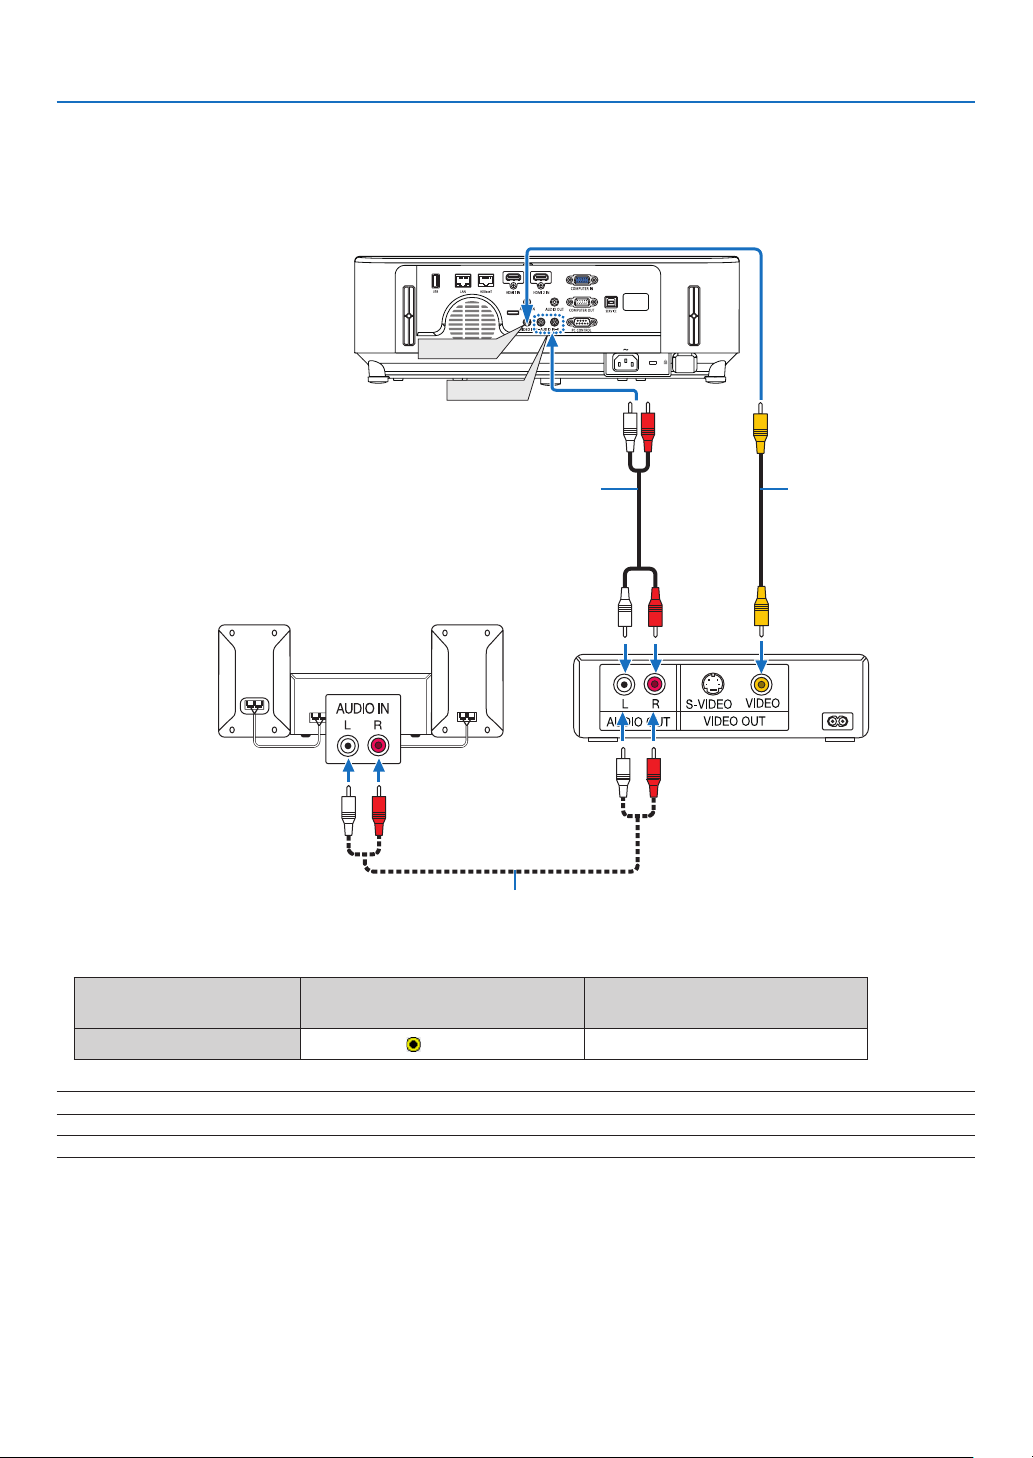
96
6. Installation and Connections
Connecting Your DVD Player or Other AV Equipment
ConnectingVideoInput
AUDIO IN
VIDEO IN
Video cable
(not supplied)
Audio cable (not supplied)
Audio cable (not supplied)
Audio equipment
•Selectthesourcenameforitsappropriateinputterminalafterturningontheprojector.
Inputterminal
SOURCEbuttonontheprojector
cabinet
Buttonontheremotecontrol
VIDEOIN
VIDEO
(VIDEO)
NOTE:RefertoyourVCRowner’smanualformoreinformationaboutyourequipment’svideooutputrequirements.
NOTE:AnimagemaynotbedisplayedcorrectlywhenaVideosourceisplayedbackinfast-forwardorfast-rewindviaascanconverter.
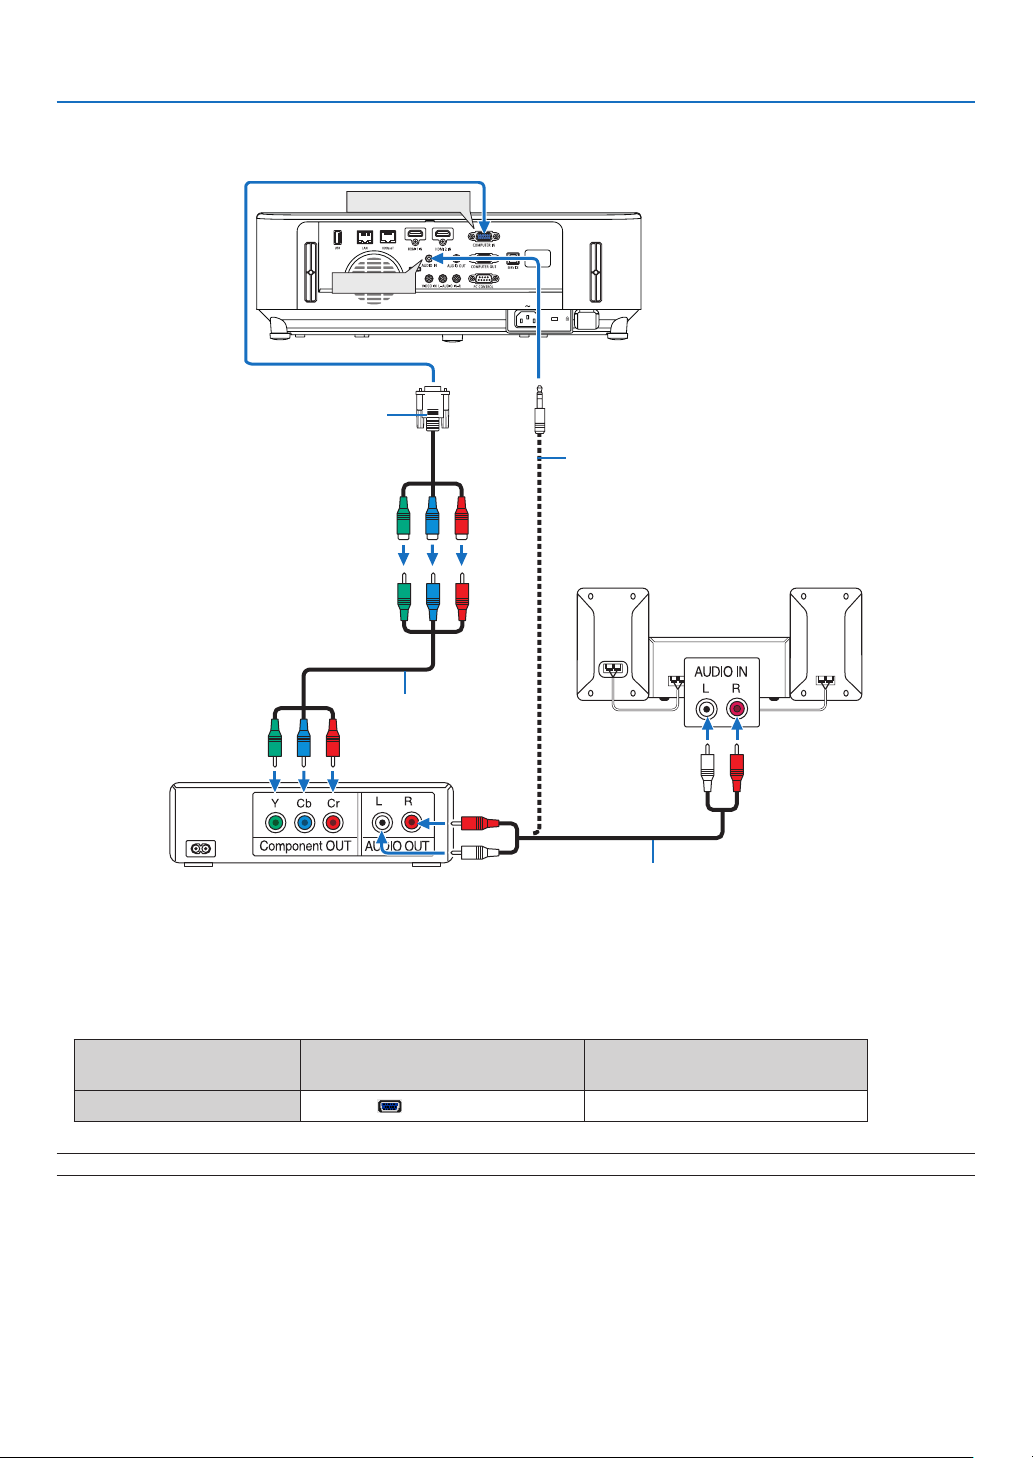
97
6. Installation and Connections
Connecting Component Input
COMPUTER IN
AUDIO IN
15-pin - to - RCA (female) × 3 cable adapter
(ADP-CV1E)
Stereo mini plug - to - RCA audio cable (not supplied)
Component video RCA ×
3 cable (not supplied)
Audio cable (not supplied)
DVD player
Audio Equipment
Acomponentsignalwillbeautomaticallydisplayed.Ifnot,fromthemenu,select[SETUP]→[OPTIONS(1)]→
[SIGNALSELECT]→[COMPUTER],andthenplaceacheckmarkintheComponentradiobutton.
•Selectthesourcenameforitsappropriateinputterminalafterturningontheprojector.
Inputterminal
SOURCEbuttonontheprojector
cabinet
Buttonontheremotecontrol
COMPUTERIN
COMPUTER
(COMPUTER1)
NOTE:RefertoyourDVDplayer’sowner’smanualformoreinformationaboutyourDVDplayer’svideooutputrequirements.
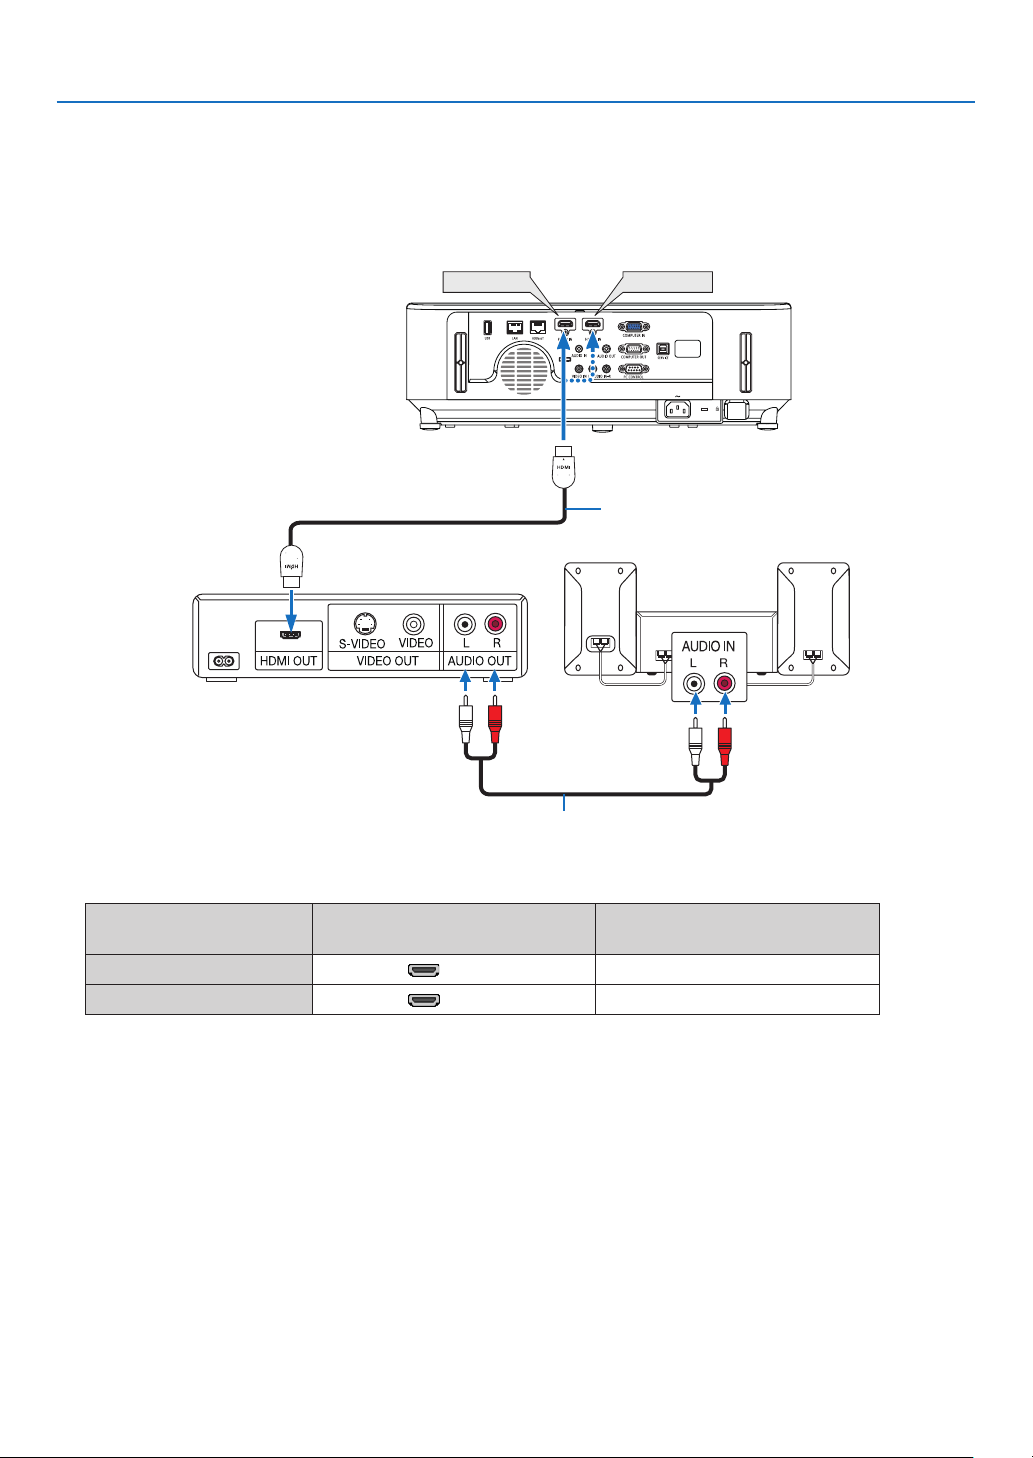
98
6. Installation and Connections
Connecting HDMI Input
YoucanconnecttheHDMIoutputofyourDVDplayer,harddiskplayer,Blu-rayplayer,ornotebooktypePCtothe
HDMIINterminalofyourprojector.
•Selectthesourcenameforitsappropriateinputterminalafterturningontheprojector.
Inputterminal
SOURCEbuttonontheprojector
cabinet
Buttonontheremotecontrol
HDMI1IN
HDMI1(HDMI1)
HDMI2IN
HDMI2(HDMI2)
•WhenconnectingtheHDMI1INterminal(orHDMI2terminal)oftheprojectortotheDVDplayer,theprojector’s
videolevelcanbemadesettingsinaccordancewiththeDVDplayer’svideolevel.Inthemenuselect[HDMI
SETTINGS]→[VIDEOLEVEL]andmakenecessarysettings.
•IftheHDMIinputsoundcannotbeheard,inthemenuselect[AUDIOSELECT]→[HDMI1]or[HDMI2].(→page
73)
HDMI 1 IN
HDMI 2 IN
HDMIcable(notsupplied)
UseHighSpeedHDMI®Cable.
Audio cable (not supplied)
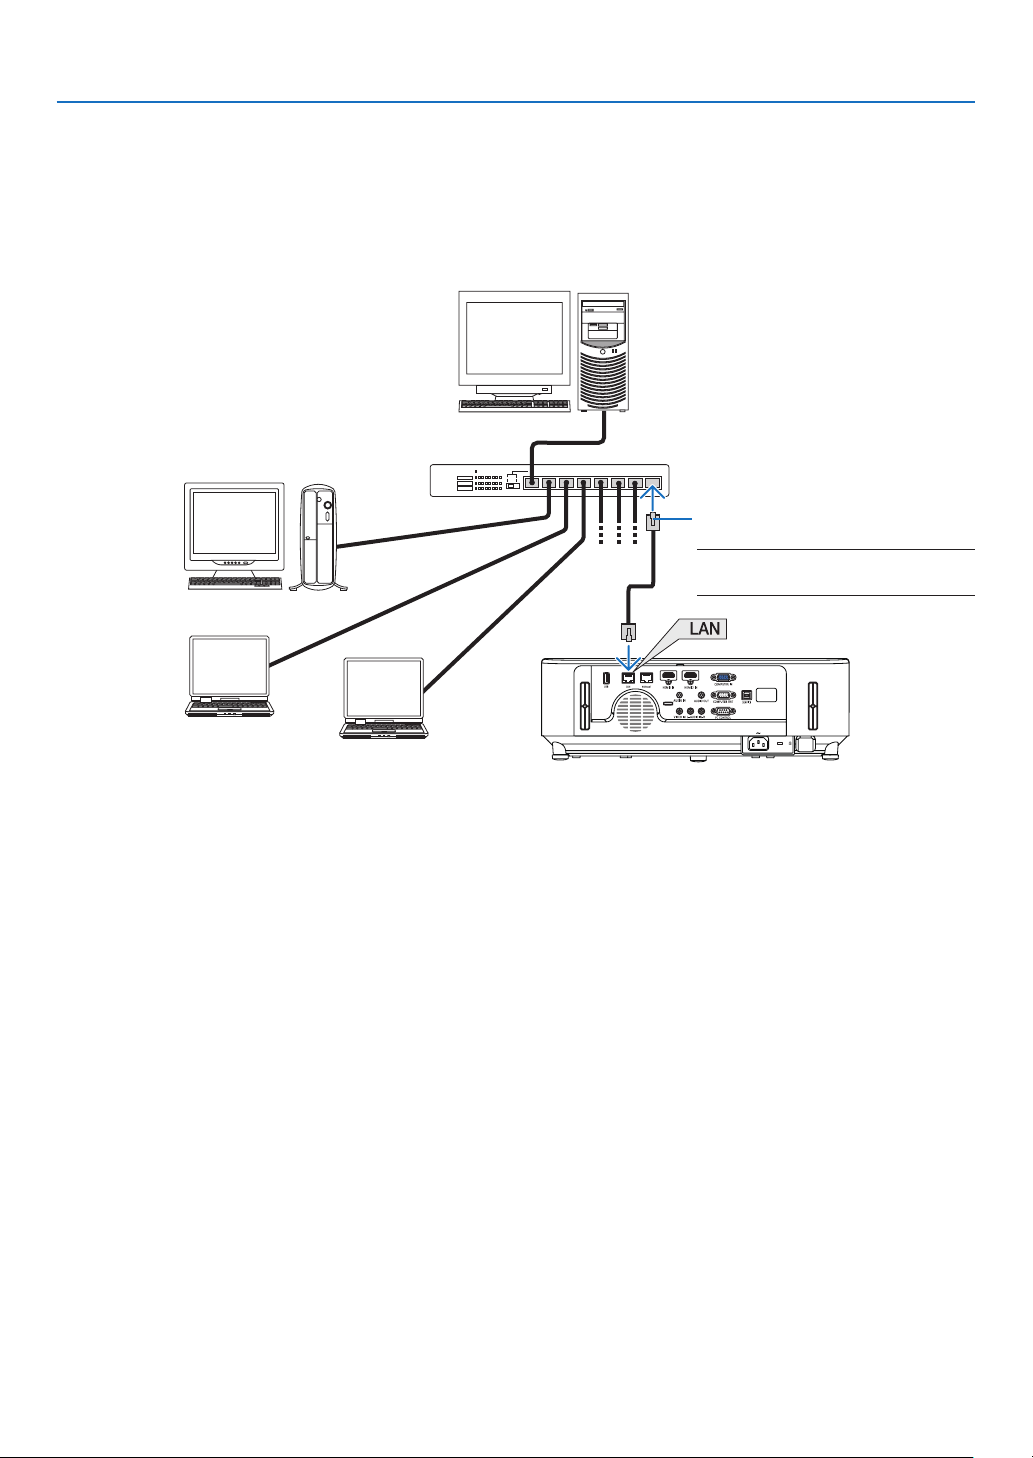
99
6. Installation and Connections
Connecting to a Wired LAN
TheprojectorcomesstandardwithaLANport(RJ-45)whichprovidesaLANconnectionusingaLANcable.
TouseaLANconnection,youarerequiredtosettheLANontheprojectormenu.Select[SETUP]→[WIREDLAN].
(→page
77).
Example of LAN connection
Server
Hub
LAN cable (not supplied)
NOTE:UseaCategory5orhigherLAN
cable.
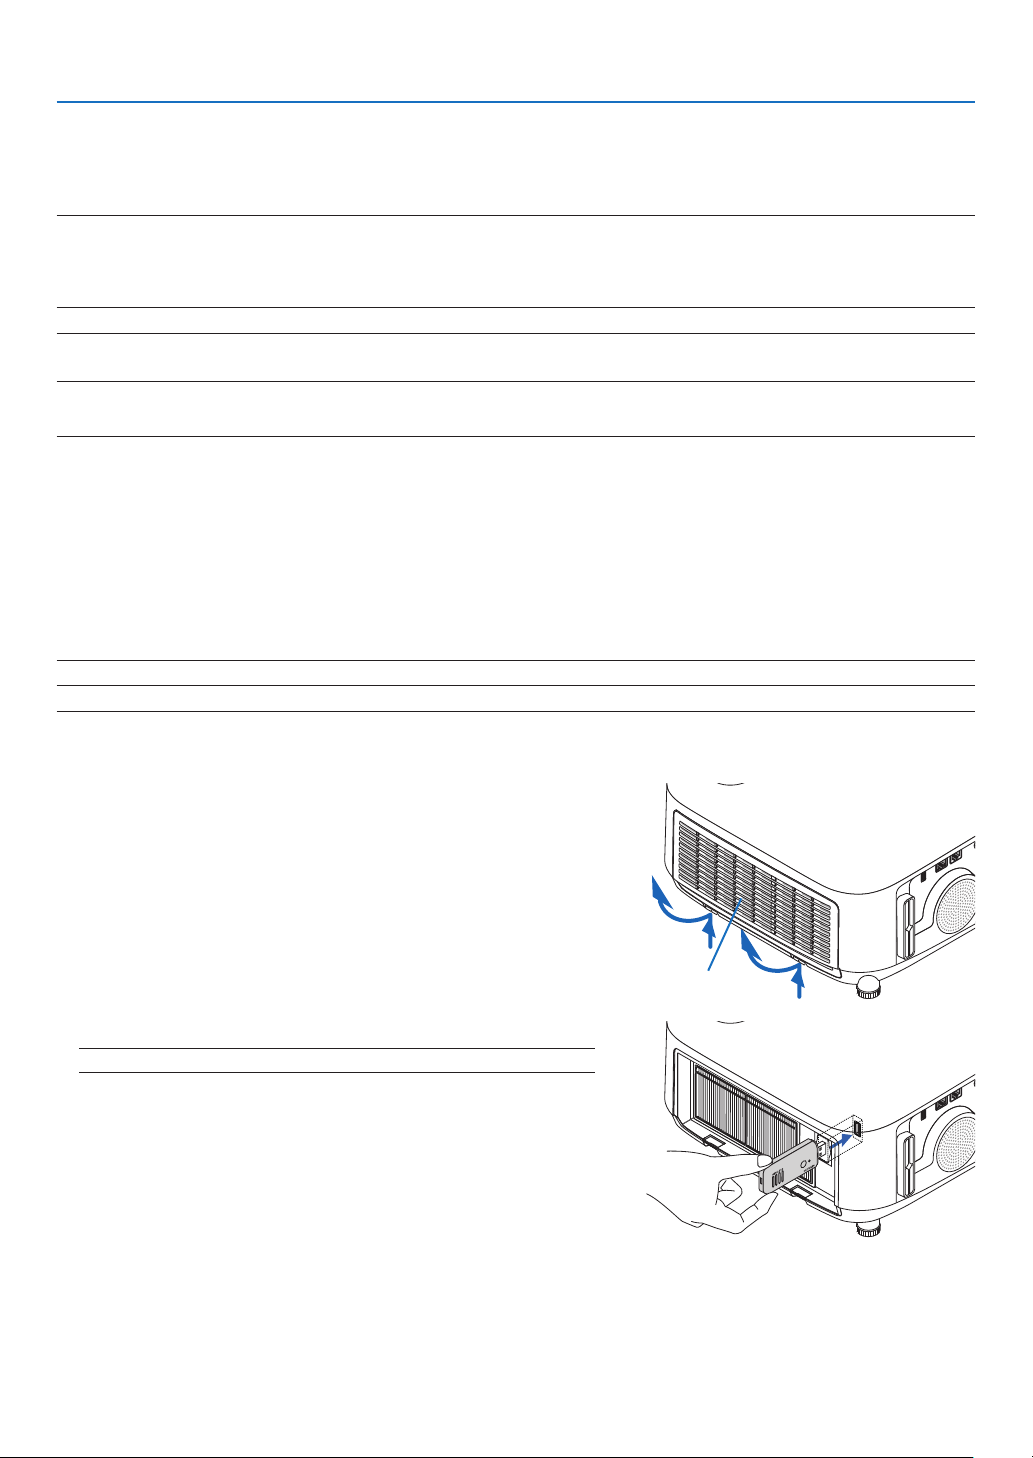
100
6. Installation and Connections
Connecting to a Wireless LAN (Optional: NP05LM series)
TheUSBWirelessLANUnitalsoprovidesawirelessLANconnection.TouseawirelessLANconnection,youare
requiredtoassignanIPaddresstotheprojector.
Important:
•IfyouusetheprojectorwiththeUSBWirelessLANUnitintheareawheretheuseofwirelessLANequipmentisprohibited,removethe
USBWirelessLANUnitfromtheprojector.
•BuytheappropriateUSBWirelessLANUnitforyourcountryorarea.
NOTE:
•Yourcomputer’swirelessLANadapter(orunit)mustbecompliedwithWi-Fi(IEEE802.11a/b/g/n)standard.
Attaching the USB Wireless LAN Unit
NOTE:
•TheUSBWirelessLANUnitmustbeinsertedintotheUSBWirelessLANUnitportinthecorrectdirection.Itcannotbeinsertedinthereverse
direction.IftheUSBWirelessLANUnitisinsertedinthereversedirectionwithexcessiveforceapplied,theUSBportmaybreak.
•BeforetouchingtheUSBWirelessLANUnit,touchametallicobject(suchasadoorknoboraluminumwindowframe)todischargethe
staticelectricityfromyourbody.
•AlwaysinsertorremovetheUSBWirelessLANunitwhenthemainpoweristurnedoff.Failuretodosomaycauseprojectormalfunction
ordamagetotheUSBwirelessLANunit.Iftheprojectorwillnotworkcorrectly,turnofftheprojector,disconnectthepowercord,andthen
connectitagain.
•DonotinsertotherUSBdevicesintotheUSB(wirelessLAN)portinthewirelessLANcover.DonotinserttheUSBWirelessLANunitinto
theUSBport.
NOTE:Whenthecablecoverisattached,removeitbeforeinsertingtheUSBWirelessLANUnit.
1. Press the POWER button to turn off the projector and set it
into standby condition, and disconnect the power cord.
2. Open the filter cover.
Press down two buttons and then pull the filter cover to open it.
Filter cover
3. Insert the wireless LAN unit into the USB (wireless LAN) port.
NOTE:DonotforcetoinserttheUSBWirelessLANUnit.
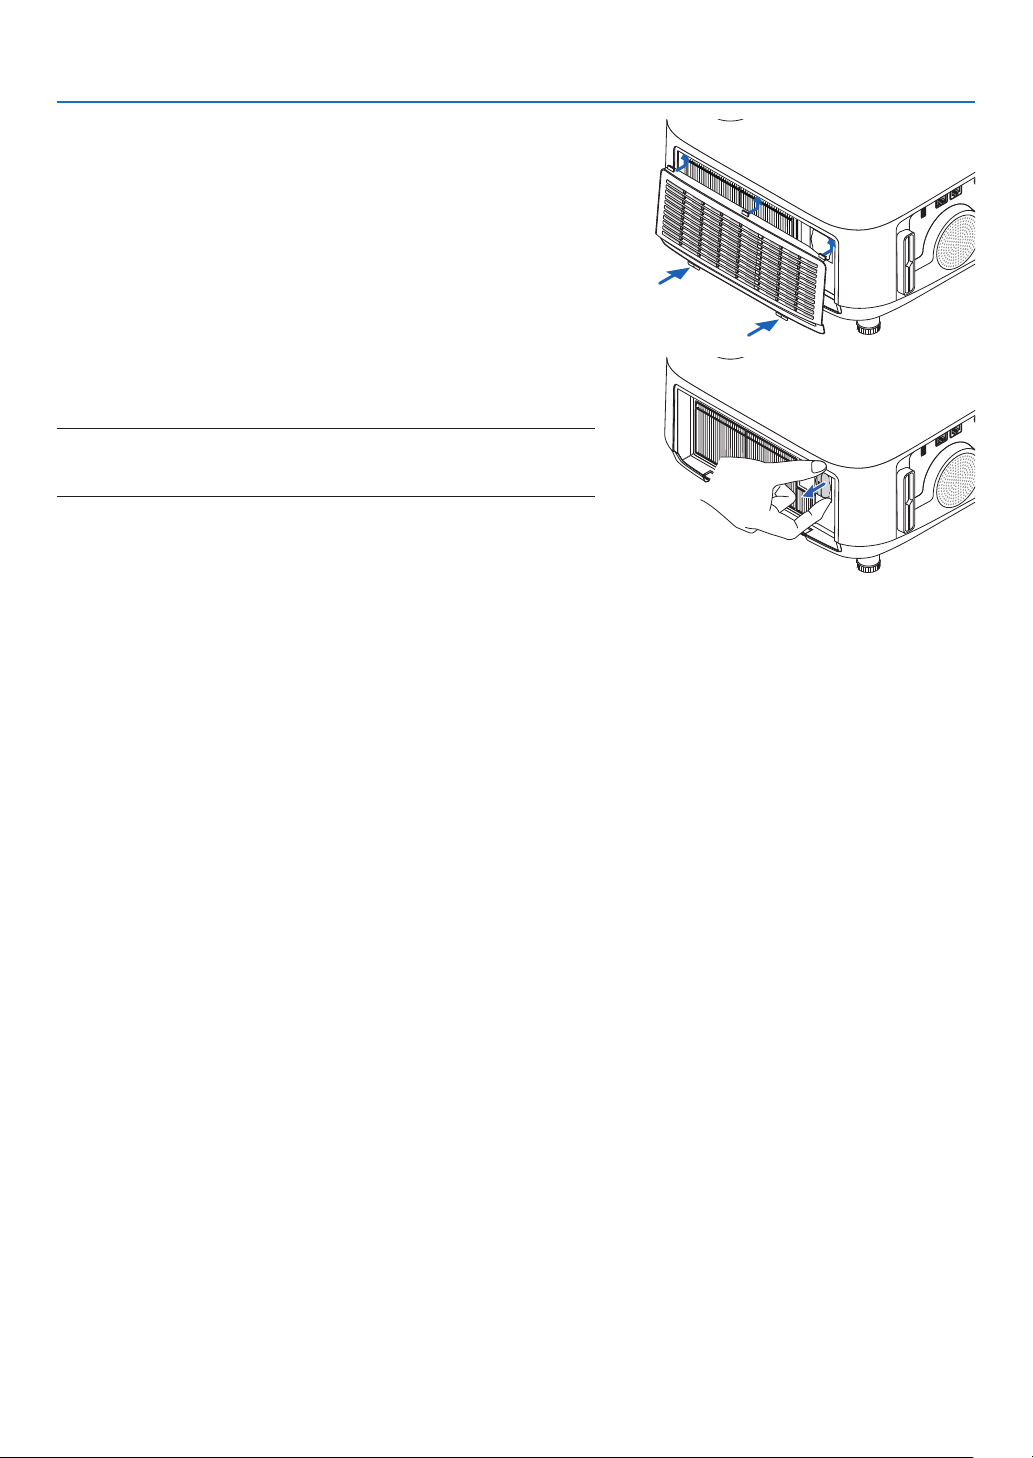
101
6. Installation and Connections
4. Mount the filter cover.
Keep to push the filter cover frame around the buttons until a
“click”soundisheard.Theltercoverwillbesecuredinposition.
* To remove the USB Wireless LAN Unit, disconnect the power
cord and use the above procedure.
NOTE:
•DonotpressthebuttonontheUSBWirelessLANUnit.Thebuttondoesnotwork
withthismodel.
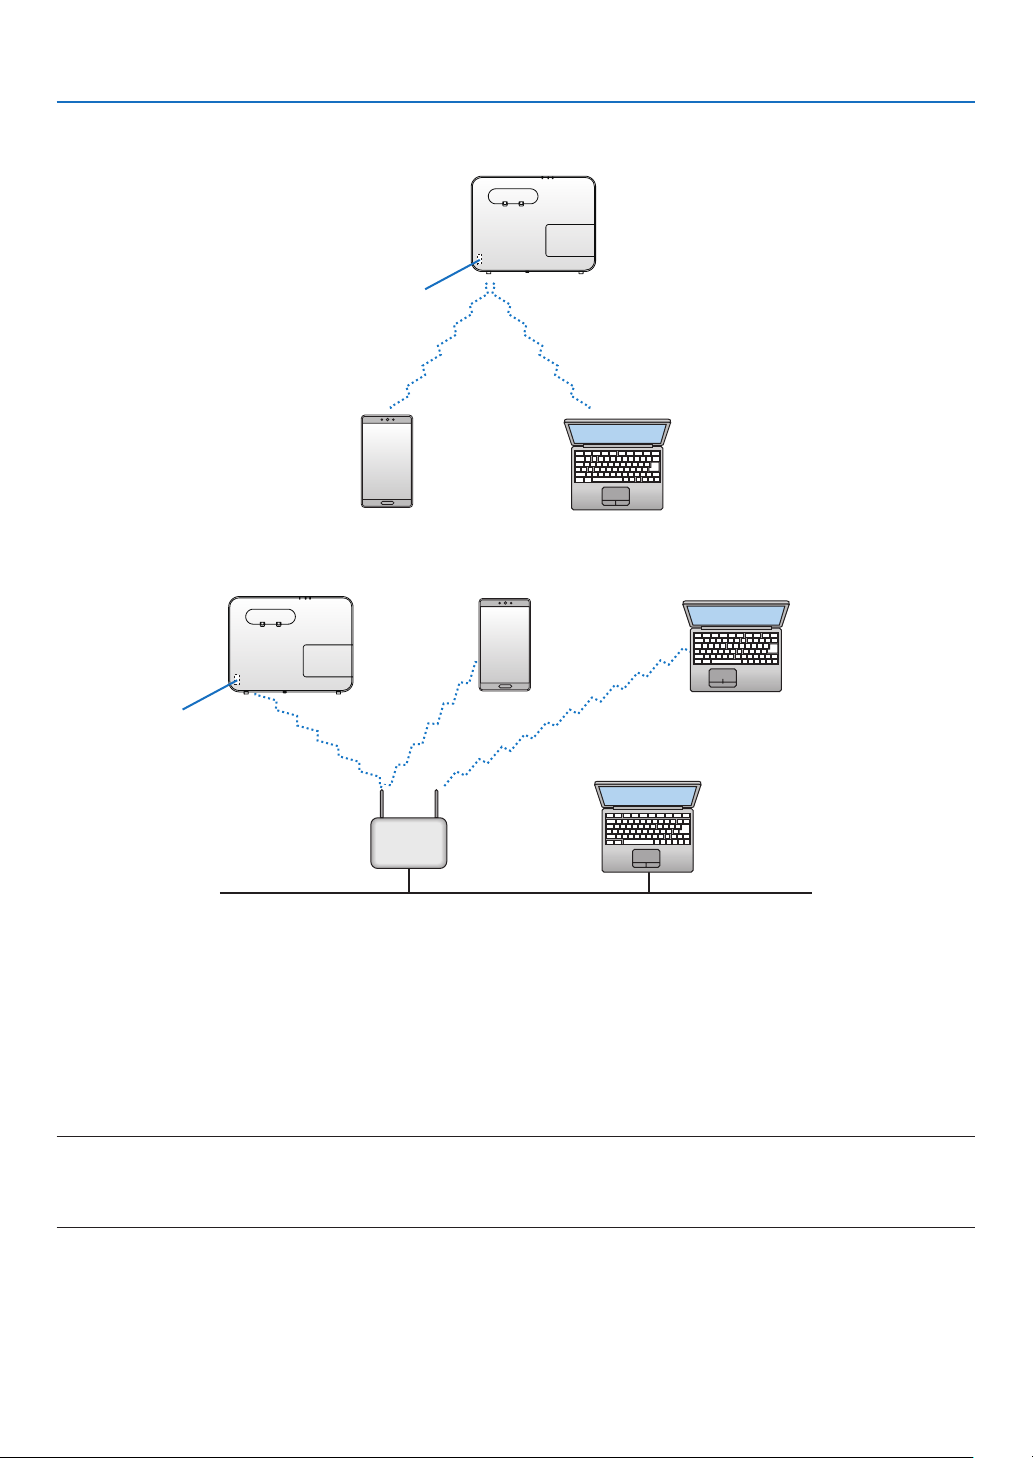
102
6. Installation and Connections
ConnectionExample(1)[SIMPLEACCESSPOINT]
SettheprojectorasSIMPLEACCESSPOINTforconnectingtoterminalsascomputersandsmartphones.
USB Wireless LAN Unit
ConnectionExample(2)[INFRASTRUCTURE]
Connecttheprojectortowired/wirelessLANviawirelessLANaccesspoint.
USB Wireless LAN Unit
Wired LAN
Wireless access point
1.ConnectacomputertotheprojectorviawiredLAN.(→ page
99)
2.Usethecomputer’sbrowsertodisplaytheprojector’sHTTPserver.(→ page
36)
3.UseanHTTPservertosetthewirelessLAN.(→ page
39)
Selecteither[SIMPLEACCESSPOINT]or[INFRASTRUCTURE]for[WIRELESS]in[SETTINGS]of[NETWORK
SETTINGS]andthenperformdetailsettingsin[SETTING].
4.Click[APPLY]toconnecttothewirelessLAN.
NOTE:
•TousetheHTTPserverfunction,theprojectormustbeconnectedtoanetwork.First,connecttheprojectortoanetworkbythewiredLAN
andthenperformrequiredsettingsforthewirelessLANontheHTTPserver.
•Ifnetworkconictisoccurred,theSTATUSIndicatorstartstoblinkinorange.Inthiscase,changetheIPaddress.
IfyouwanttochangethewirelessLANsettingontheprojectoraftersettingitontheHTTPserver,performsetting
changeontheon-screenmenu.(→page
78)
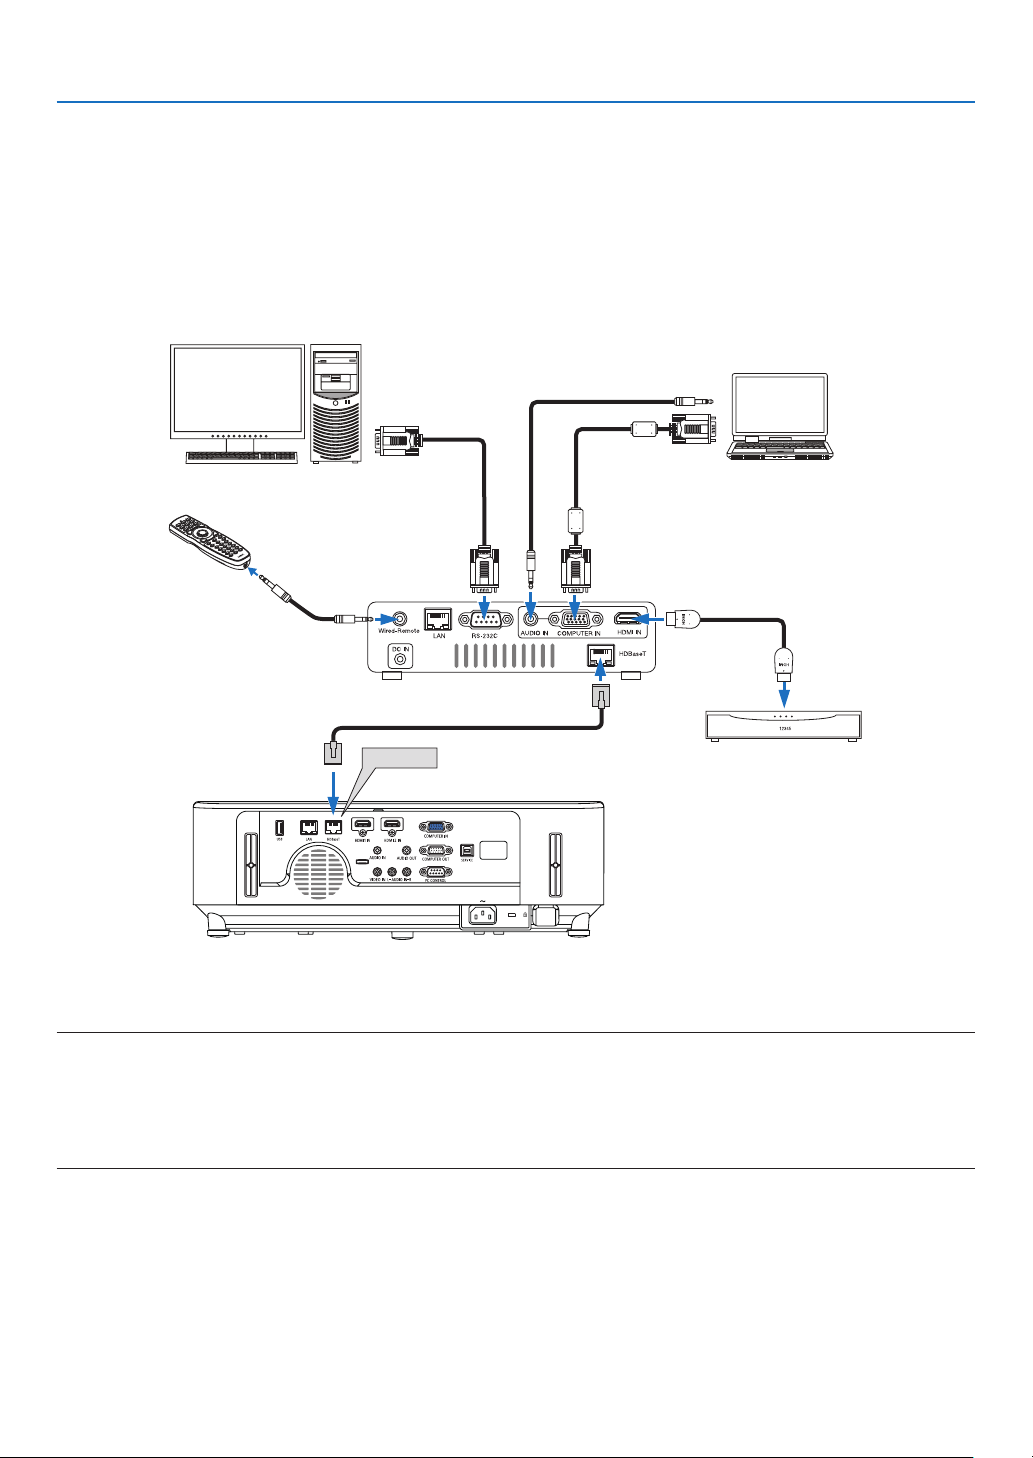
103
6. Installation and Connections
Connecting to a HDBaseT transmission device (sold commercially)
(not supported by P603X)
HDBaseTisaconnectionstandardforhomeappliancesthatisestablishedbytheHDBaseTAlliance.
UseaLANcablesoldcommerciallytoconnecttheHDBaseTportoftheprojector(RJ-45)toaHDBaseTtransmis-
sion device sold commercially.
Controlsignals(serialandLAN)andremotecontrolsignals(IRcommands)fromanexternaldeviceareonlysupported
when the projector’s power is turned on.
Connection example
HDBaseT
Computer (for control use) Computer (for output use)
Example of a transmission device
Remote control
HDMIoutputvideodevice
NOTE:
•Pleaseuseashieldedtwistedpair(STP)cableofCategory5eorhigherfortheLANcable(soldcommercially).
•ThemaximumtransmissiondistanceovertheLANcableis100m.
•PleasedonotuseothertransmissiondevicesbetweentheprojectorandtheHDBaseTtransmissiondevice.Thepicturequalitymaybe
deterioratedasaresult.
•ThisprojectorisnotguaranteedtoworkwithallHDBaseTtransmissiondevicessoldcommercially.
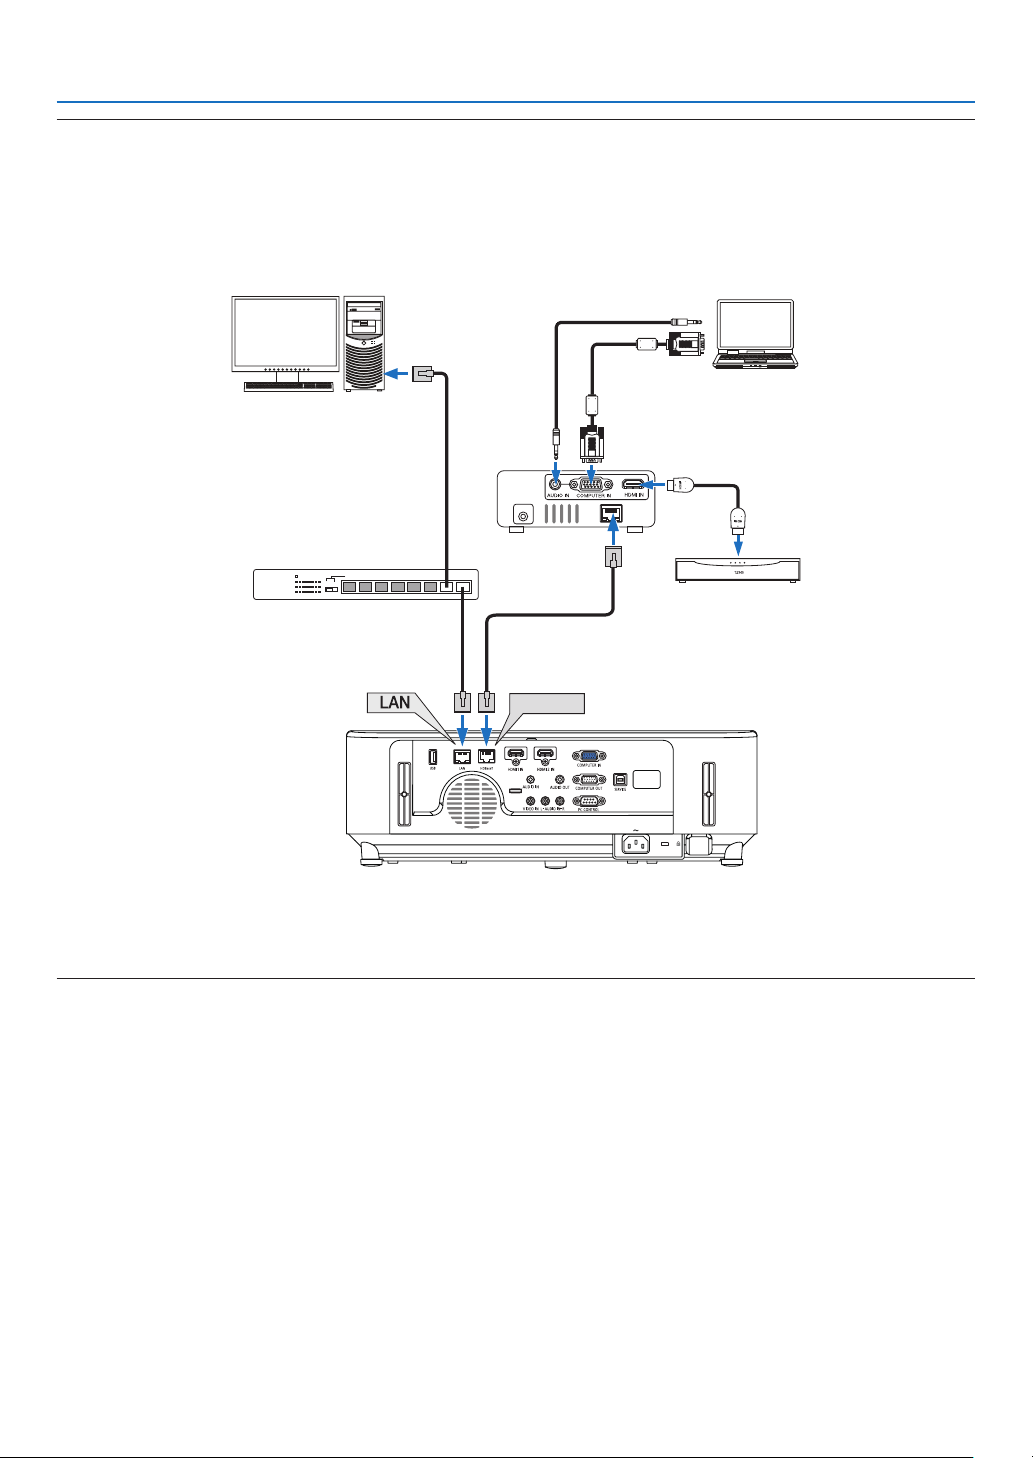
104
6. Installation and Connections
TIP:
•Withtheprojector’sHDBaseTport,remotecontrolisnotavailablewhentheprojectorisinthestandbymode(serialcommunicationsis
notavailable).(Remotecontrolbecomesavailablewhentheprojector’spowerison).The2(two)methodsbelowcanbeusedtoturnon
theprojector’spowerwhenitisinstandbymode.
1.Theprojectorcanbeoperatedbyconnectingthecomputerandprojectortothenetwork(ontheprojector,usingtheLANportwith
[STANDBYMODE]setto[NETWORKSTANDBY]).
HDBaseT
DC IN
HDBaseT
Computer (for projector control)
Computer (for output)
Example of a transmitter
Switching hub, etc.
VideodevicewithHDMIoutput
2.TheprojectorcanbeoperatedbyRS232Cserialcommunication(Onthisprojector,usethePCCONTROLterminalandtheapplication
software,PCControlUtility,andselect[PCCONTROL]forthe[SERIALPORT])with[STANDBYMODE]setto[NETWORKSTANDBY].
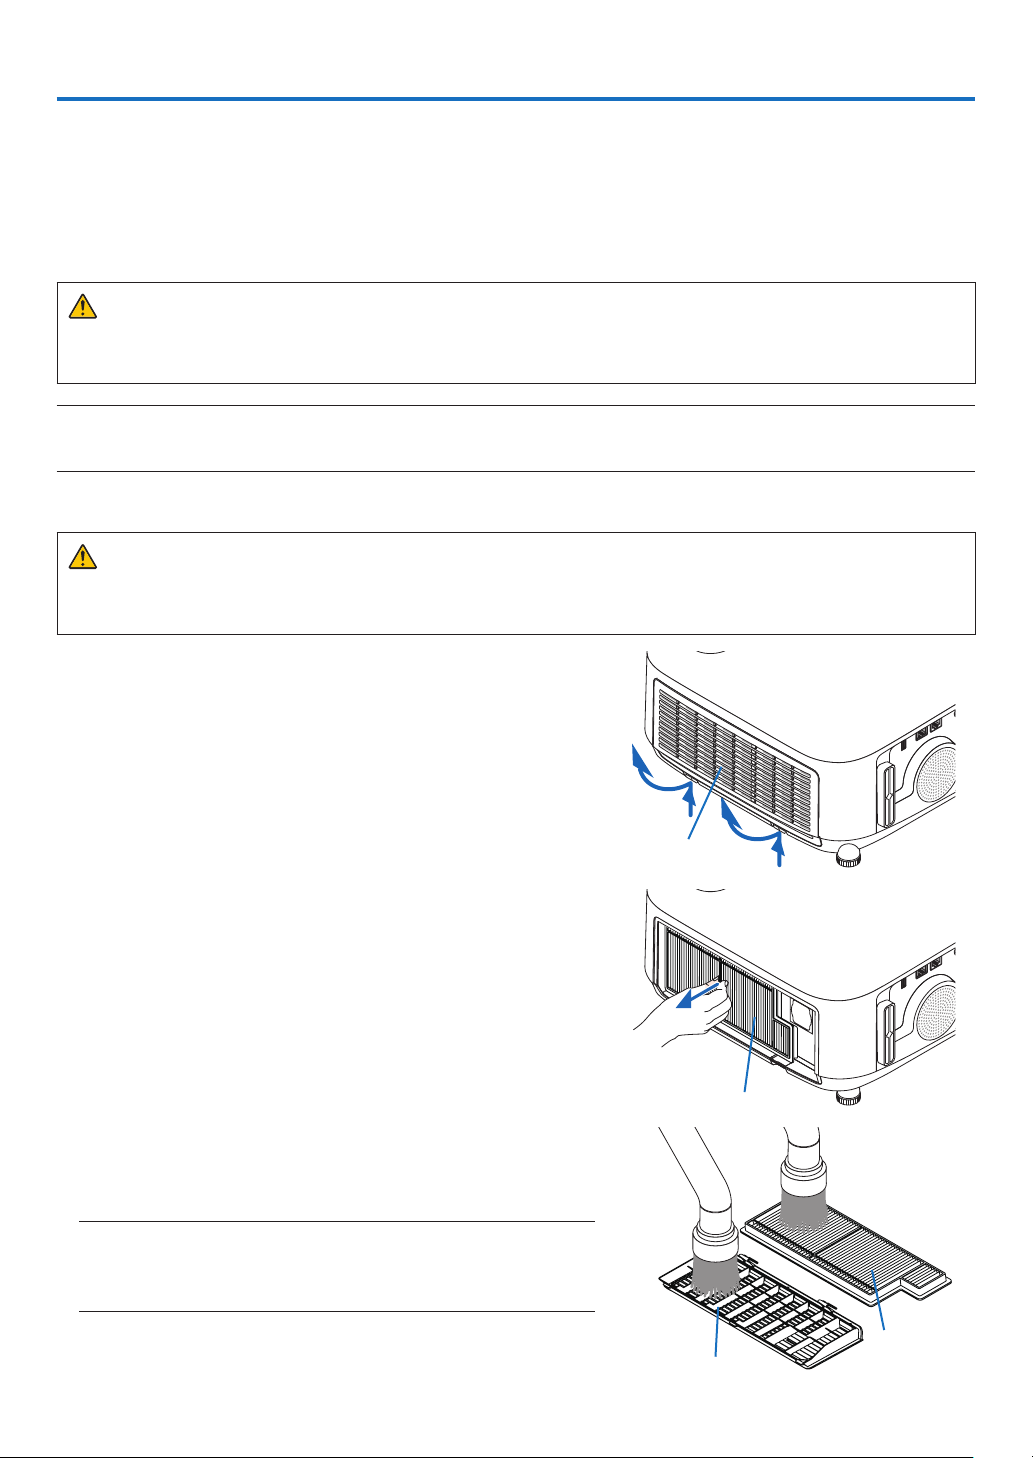
105
7. Maintenance
Thissectiondescribesthesimplemaintenanceproceduresyoushouldfollowtocleanthelters,thelens,thecabinet,
andtoreplacethelampandthelters.
❶ Cleaning the Filters
Thelterattheintakeventkeepsdustanddirtfromgettinginsidetheprojector.Ifthelterisdirtyorclogged,your
projector may overheat.
WARNING
•Pleasedonotuseaspraycontainingammablegastoremovedustattachedtothelters,etc.Doingsomay
resultinres.
NOTE:Themessageforltercleaningwillbedisplayedforoneminuteaftertheprojectoristurnedonoroff.Whenthemessageisdisplayed,
cleanthelters.Thetimetocleantheltersissetto[4000H]attimeofshipment.
Tocancelthemessage,pressanybuttonontheprojectorcabinetortheremotecontrol.
Tocleanthelter,detachthelterunitandtheltercover.
CAUTION
•Beforecleaningthelters,turnofftheprojector,disconnectthepowercordandthenallowthecabinettocool.
Failuretodosocanresultinelectricshockorburninjuries.
1. Press down two buttons and then pull the filter cover towards
you to open it.
Filter cover
2. Pick the center of the filter unit for pulling it out.
Filter unit
3.Vacuumdustonthefrontandbackfacesofthelterunit.
•Getridofdustinthelter.
•Gentlygetridofdustontheltercoverandintheaccordion
pleats of the filter.
NOTE:
•Wheneveryouvacuumthelter,usethesoftbrushtovacuum.Thisistoavoid
damagetothelter.
•Donotwashthelterwithwater.Doingsocanresultinlterclogging.
Filter cover
Filter unit
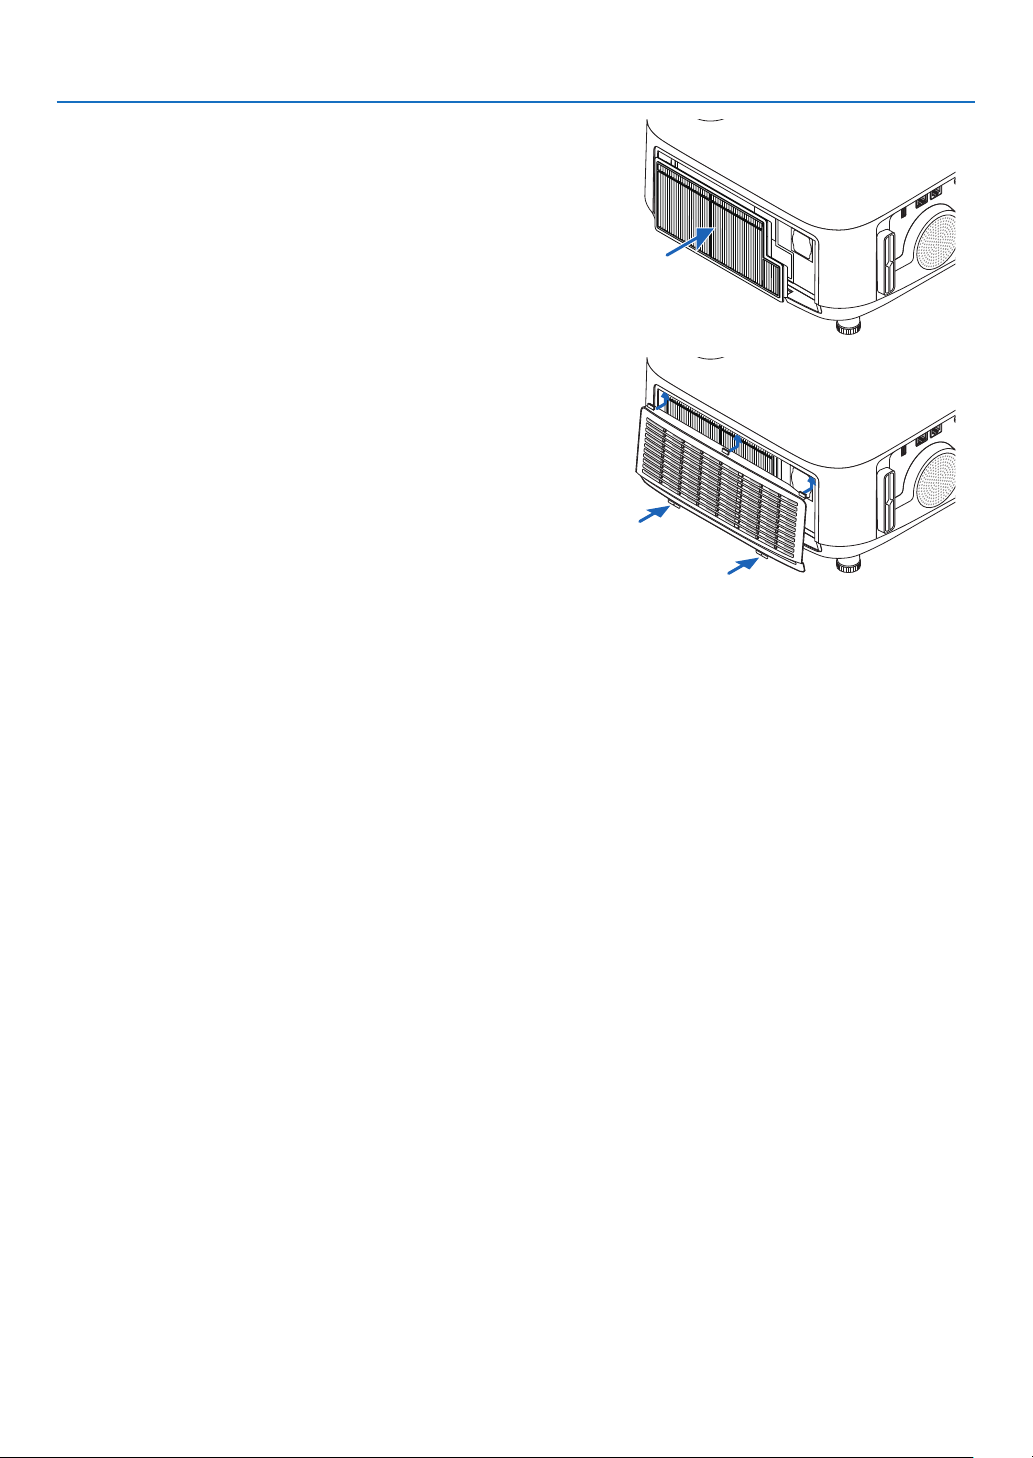
106
7. Maintenance
4. Mount the filter unit back onto the projector cabinet.
Insertthelterunitontotheprojector.
5.Closetheltercover.
Keep to push the filter cover frame around the buttons until a
“click”soundisheard.Theltercoverwillbesecuredinposition.
6.Clearthelterusagehours.
Plug the power cord into the wall outlet, and then turn on the
projector.
From the menu, select [RESET] →[CLEARFILTERHOURS].
(→ page 84)
The interval time to clean the filters is set to [OFF] at time of
shipment. When using the projector as it is, you do not clear the
filter usage.

107
7. Maintenance
❷ Cleaning the Lens
•Turnofftheprojectorbeforecleaning.
•Theprojectorhasaplasticlens.Useacommerciallyavailableplasticlenscleaner.
•Donotscratchormarthelenssurfaceasaplasticlensiseasilyscratched.
•Neverusealcoholorglasslenscleanerasdoingsowillcausedamagetotheplasticlenssurface.
WARNING
•Pleasedonotuseaspraycontainingammablegastoremovedustattachedtothelens,etc.Doingsomay
resultinres.
❸ Cleaning the Cabinet
Turnofftheprojector,andunplugtheprojectorbeforecleaning.
•Useadrysoftclothtowipedustoffthecabinet.
Ifheavilysoiled,useamilddetergent.
•Neverusestrongdetergentsorsolventssuchasalcoholorthinner.
•Whencleaningtheventsorthespeakerusingavacuumcleaner,donotforcethebrushofthevacuumcleaner
into the slits of the cabinet.
Vacuum the dust off the vents.
•Cloggedventsmaycauseariseintheinternaltemperatureoftheprojector,resultinginmalfunction.
•Donotscratchorhitthecabinetwithyourngersoranyhardobjects
•Contactyourdealerforcleaningtheinsideoftheprojector.
NOTE:Donotapplyvolatileagentsuchasinsecticideonthecabinet,thelens,orthescreen.Donotleavearubberorvinylproductinpro-
longedcontactwithit.Otherwisethesurfacenishwillbedeterioratedorthecoatingmaybestrippedoff.

108
7. Maintenance
❹ Replacing the Lamp and the Filters
Whenthelampreachestheendofitslife,theLAMPindicatorinthecabinetwillblinkorangeandthemessage“THE
LAMPHASREACHEDTHEENDOFITSUSABLELIFE.PLEASEREPLACETHELAMPANDFILTER.”willappear
(*).Eventhoughthelampmaystillbeworking,replacethelamptomaintaintheoptimalprojectorperformance.After
replacingthelamp,besuretoclearthelamphourmeter.(→page
84)
CAUTION
•DONOTTOUCHTHELAMPimmediatelyafterithasbeenused.Itwillbeextremelyhot.Turntheprojector
offandthendisconnectthepowercord.Allowatleastonehourforthelamptocoolbeforehandling.
•Usethespeciedlampforsafetyandperformance.
Toorderthereplacementlamp,specifyyourlamptype,NP44LP.
Thereplacementlampcomeswithlters.
•DONOTREMOVEANYSCREWSexceptonelampcoverscrewandtwolamphousingscrews.Youcouldreceive
anelectricshock.
•Donotbreaktheglassonthelamphousing.
Keepngerprintsofftheglasssurfaceonthelamphousing.Leavingngerprintsontheglasssurfacemight
causeanunwantedshadowandpoorpicturequality.
•Theprojectorwillturnoffandgointostandbymodewhenyoucontinuetousetheprojectorforanother100
hoursafterthelamphasreachedtheendofitslife.Ifthishappens,besuretoreplacethelamp.Ifyoucontinue
tousethelampafterthelampreachestheendofitslife,thelampbulbmayshatter,andpiecesofglassmaybe
scatteredinthelampcase.Donottouchthemasthepiecesofglassmaycauseinjury.Ifthishappens,contact
yourNECdealerforlampreplacement.
*NOTE:Thismessagewillbedisplayedunderthefollowingconditions:
•foroneminuteaftertheprojectorhasbeenpoweredon
•whenthe
(POWER)buttonontheprojectorcabinetorthePOWEROFFbuttonontheremotecontrolispressed
Toturnoffthemessage,pressanybuttonontheprojectorcabinetortheremotecontrol.
Optionallampandtoolsneededforreplacement:
•Phillipsscrewdriver(plus-head)
•Replacementlamp
Flow of Replacing the Lamp and the Filters
Step 1. Replace the lamp
Step 2. Replace the filters (→ page
111)
Step 3.Clearthelampusagehoursandthelterusagehours(→ page
112)
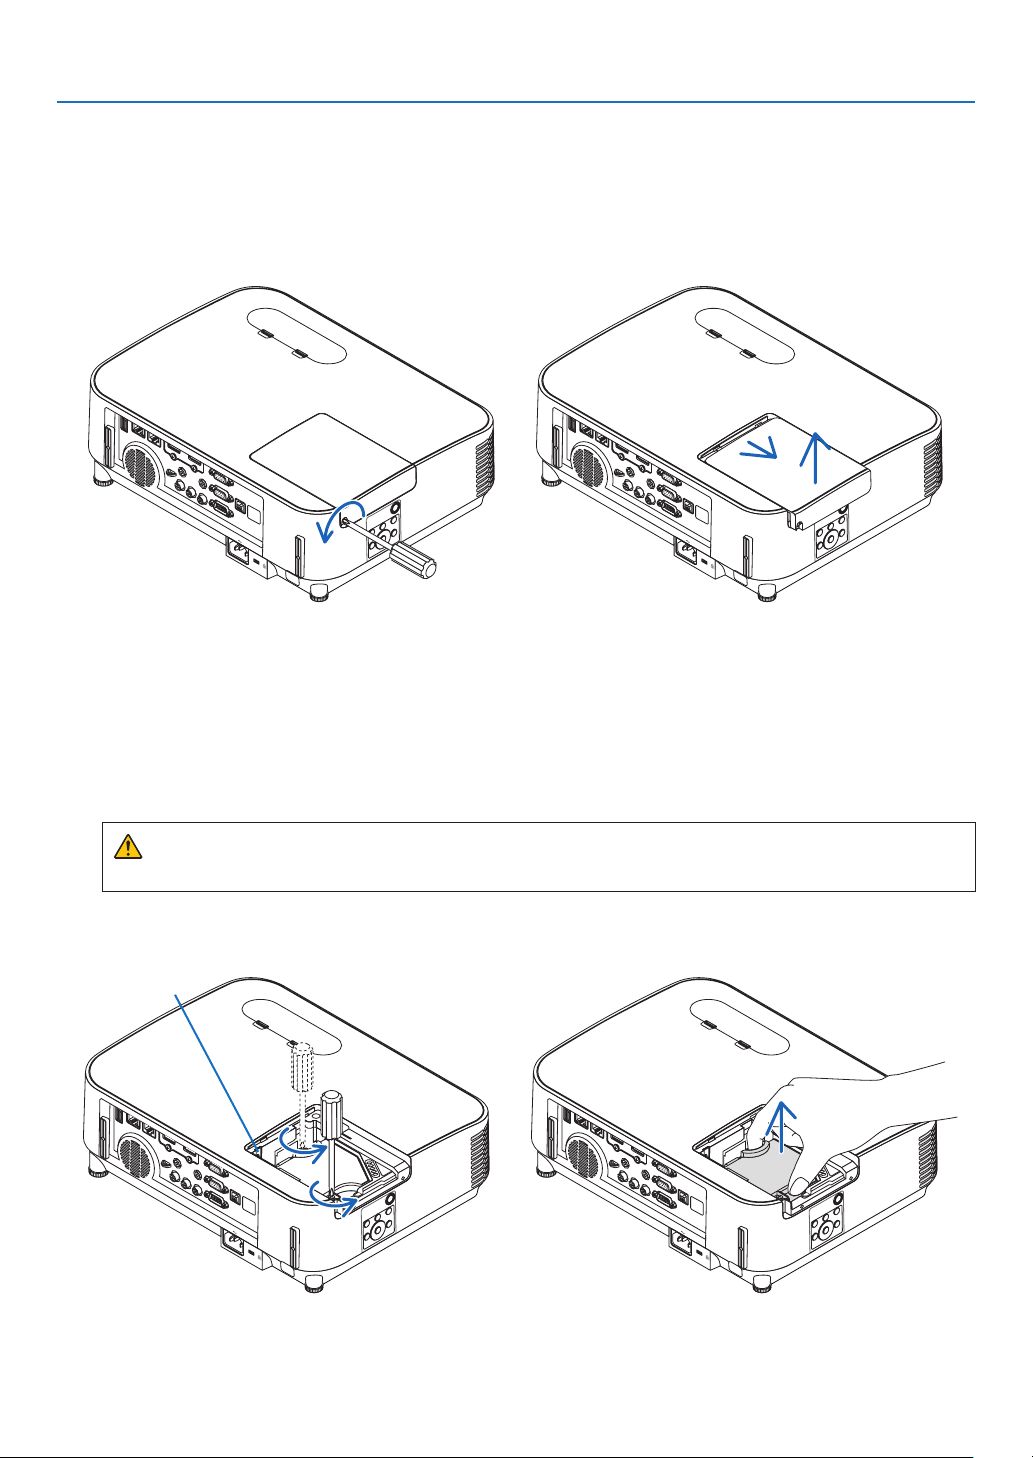
109
7. Maintenance
2. Remove the lamp housing.
(1)Loosenthetwoscrewssecuringthelamphousinguntilthephillipsscrewdrivergoesintoafreewheelingcondi-
tion.
•Thetwoscrewsarenotremovable.
•Thereisaninterlockonthiscasetopreventtheriskofelectricalshock.Donotattempttocircumventthis
interlock.
(2)Removethelamphousingbyholdingit.
CAUTION:
Makesurethatthelamphousingiscoolenoughbeforeremovingit.
To replace the lamp:
1. Remove the lamp cover.
(1)Loosenthelampcoverscrew
•Thelampcoverscrewisnotremovable.
(2)Pushandslidethelampcoveroff.
Interlock
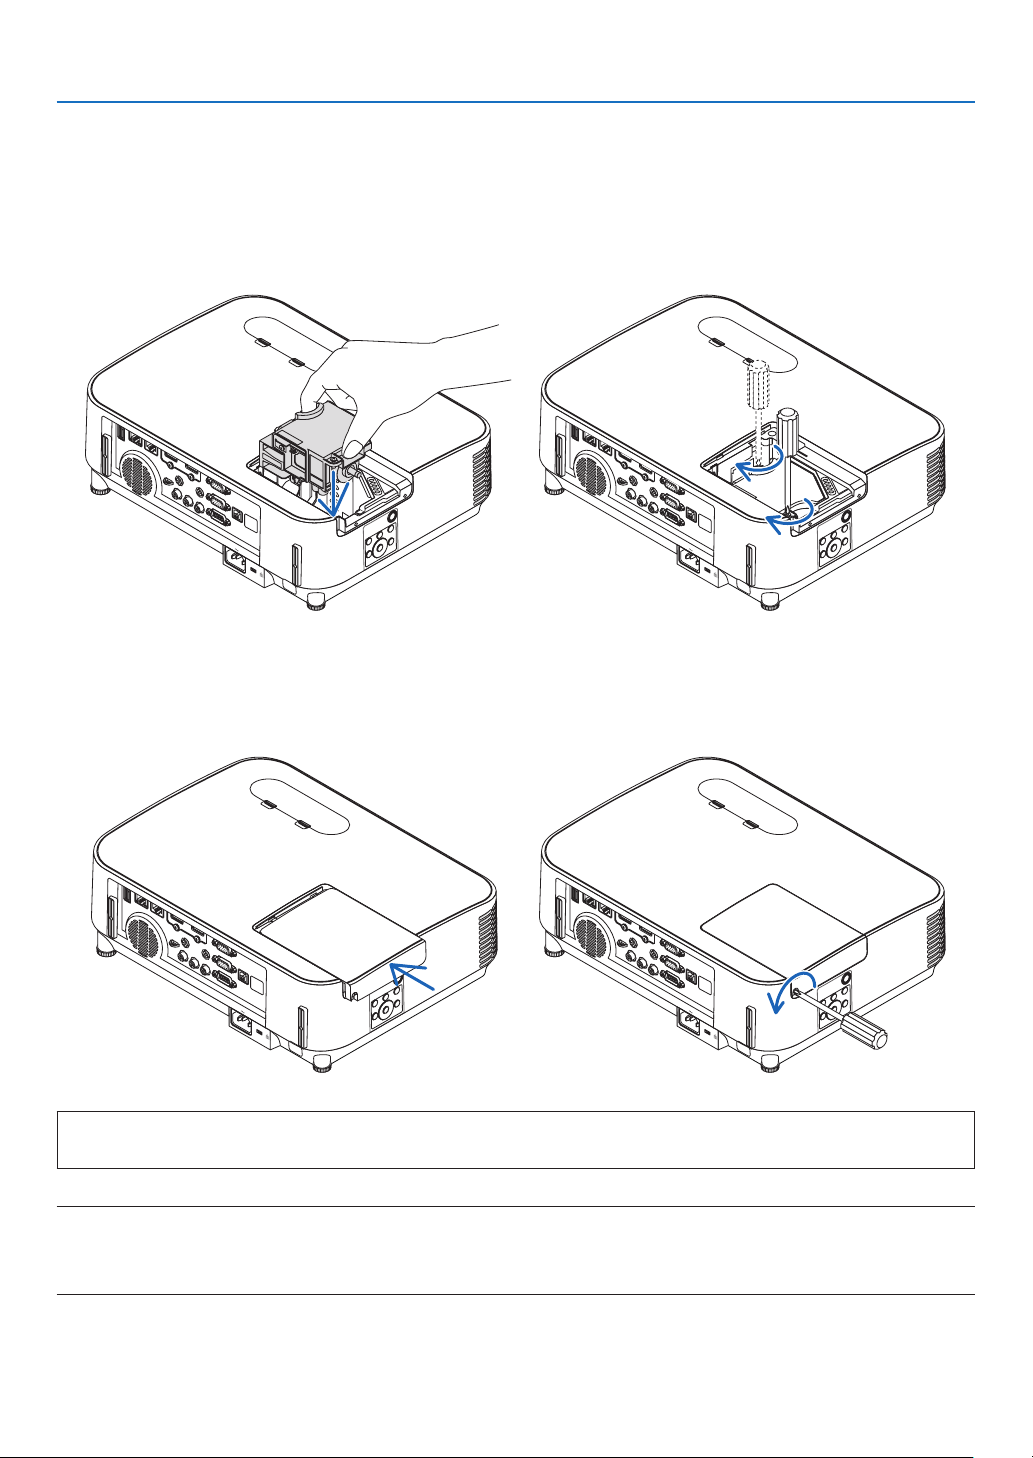
110
7. Maintenance
This completes the lamp replacement.
Go on to the filter replacement.
NOTE:Whenyoucontinuetousetheprojectorforanother100hoursafterthelamphasreachedtheendofitslife,theprojectorcannotturn
onandthemenuisnotdisplayed.
Ifthishappens,presstheHELPbuttonontheremotecontrolfor10secondstoresetthelampclockbacktozero.
Whenthelamptimeclockisresettozero,theLAMPindicatorgoesout.
4. Reattach the lamp cover.
(1)Slidethelampcoverbackuntilitsnapsintoplace.
(2)Tightenthescrewtosecurethelampcover.
•Besuretotightenthescrew.
3. Install a new lamp housing.
(1)Insertanewlamphousinguntilthelamphousingispluggedintothesocket.
(2)Pushthetopcenterofthelamphousingtosecureit.
(3)Secureitinplacewiththetwoscrews.
•Besuretotightenthescrews.
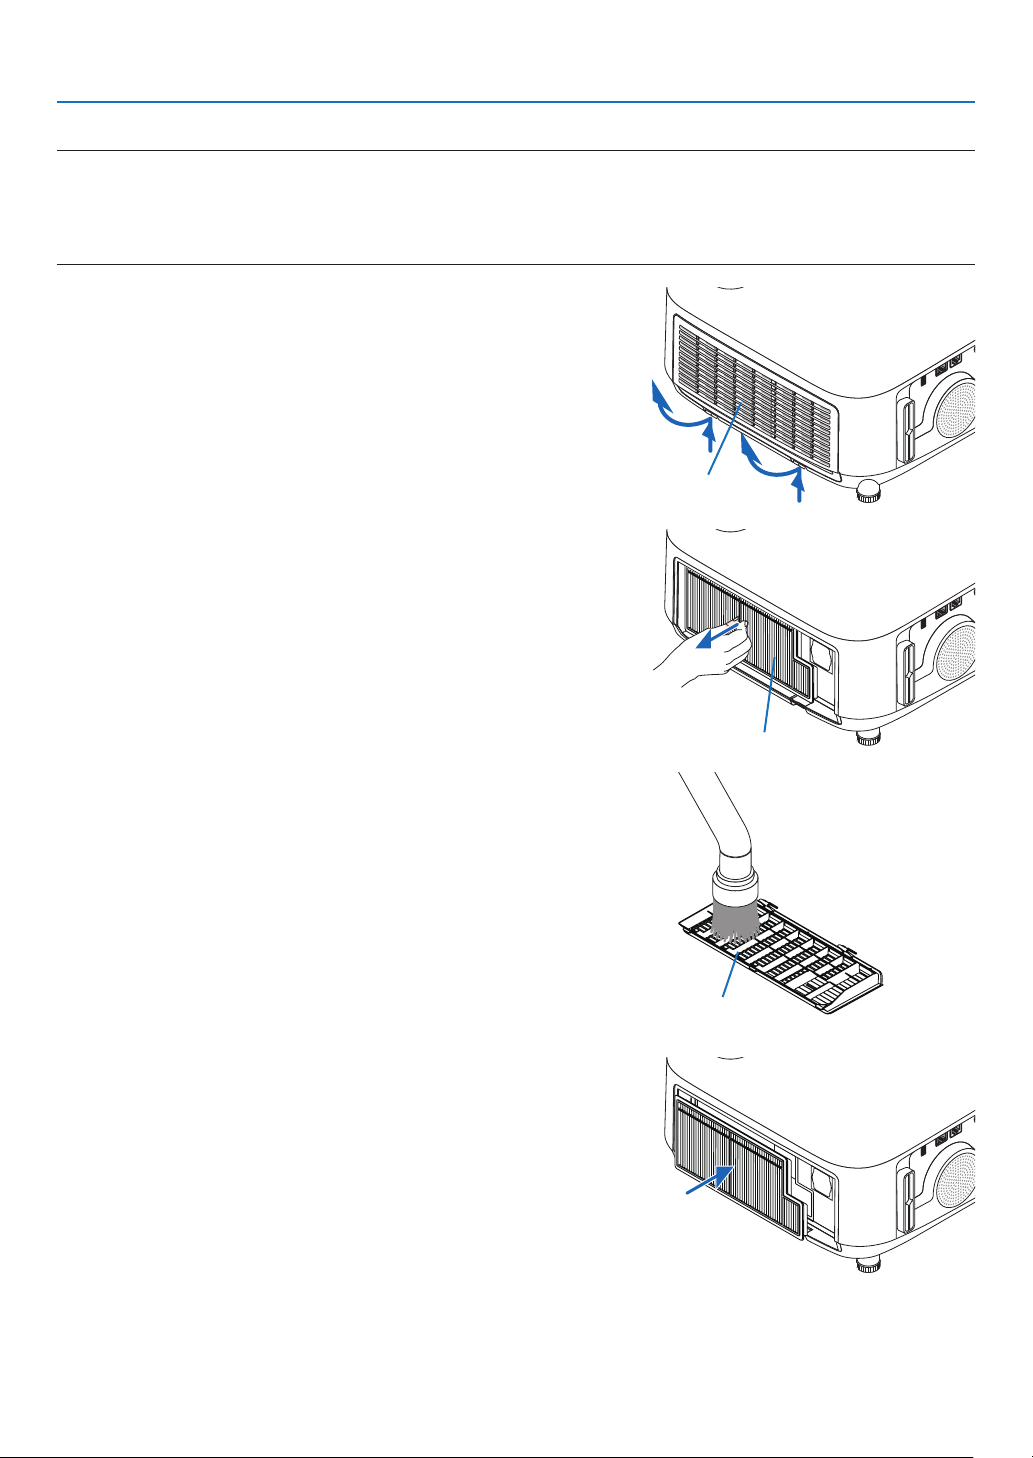
111
7. Maintenance
To replace the filters:
NOTE:
•Beforereplacingthelters,wipeoffdustanddirtfromtheprojectorcabinet.
•Theprojectorisprecisionequipment.Keepoutdustanddirtduringlterreplacement.
•Donotwashthelterswithsoapandwater.Soapandwaterwilldamagetheltermembrane.
•Putltersintoplace.Incorrectattachmentofaltermaycausedustanddirttogetintotheinsideoftheprojector.
1. Press down on the buttons on the left and right and then
pull the filter cover towards you to open it.
The cover will open about 90 degrees before it stops.
Filter cover
2. Pick the center of the filter unit for pulling it out.
Filter unit
3. Remove dust from the filter cover.
Clean both outside and inside.
Filter cover
4. Mount a new filter unit back onto the projector cabinet.
Insertthelterunitontotheprojector.

112
7. Maintenance
5.Closetheltercover.
Keep to push the filter cover frame around the buttons until
a“click”soundisheard.Theltercoverwillbesecuredin
position.
This completes the filter replacement.
Go on to the clearing lamp and filter hour meters.
To clear the lamp usage hours and the filter usage hours:
1. Place the projector where you use it.
2. Plug the power cord into the wall outlet, and then turn on the projector.
3.Clearthelampusagehoursandthelterusagehours.
1. From the menu, select [RESET] → [CLEAR LAMP HOURS] and reset the lamp usage hours.
2.Select[CLEARFILTERHOURS]andresetthelterusagehours.(→ page
84)
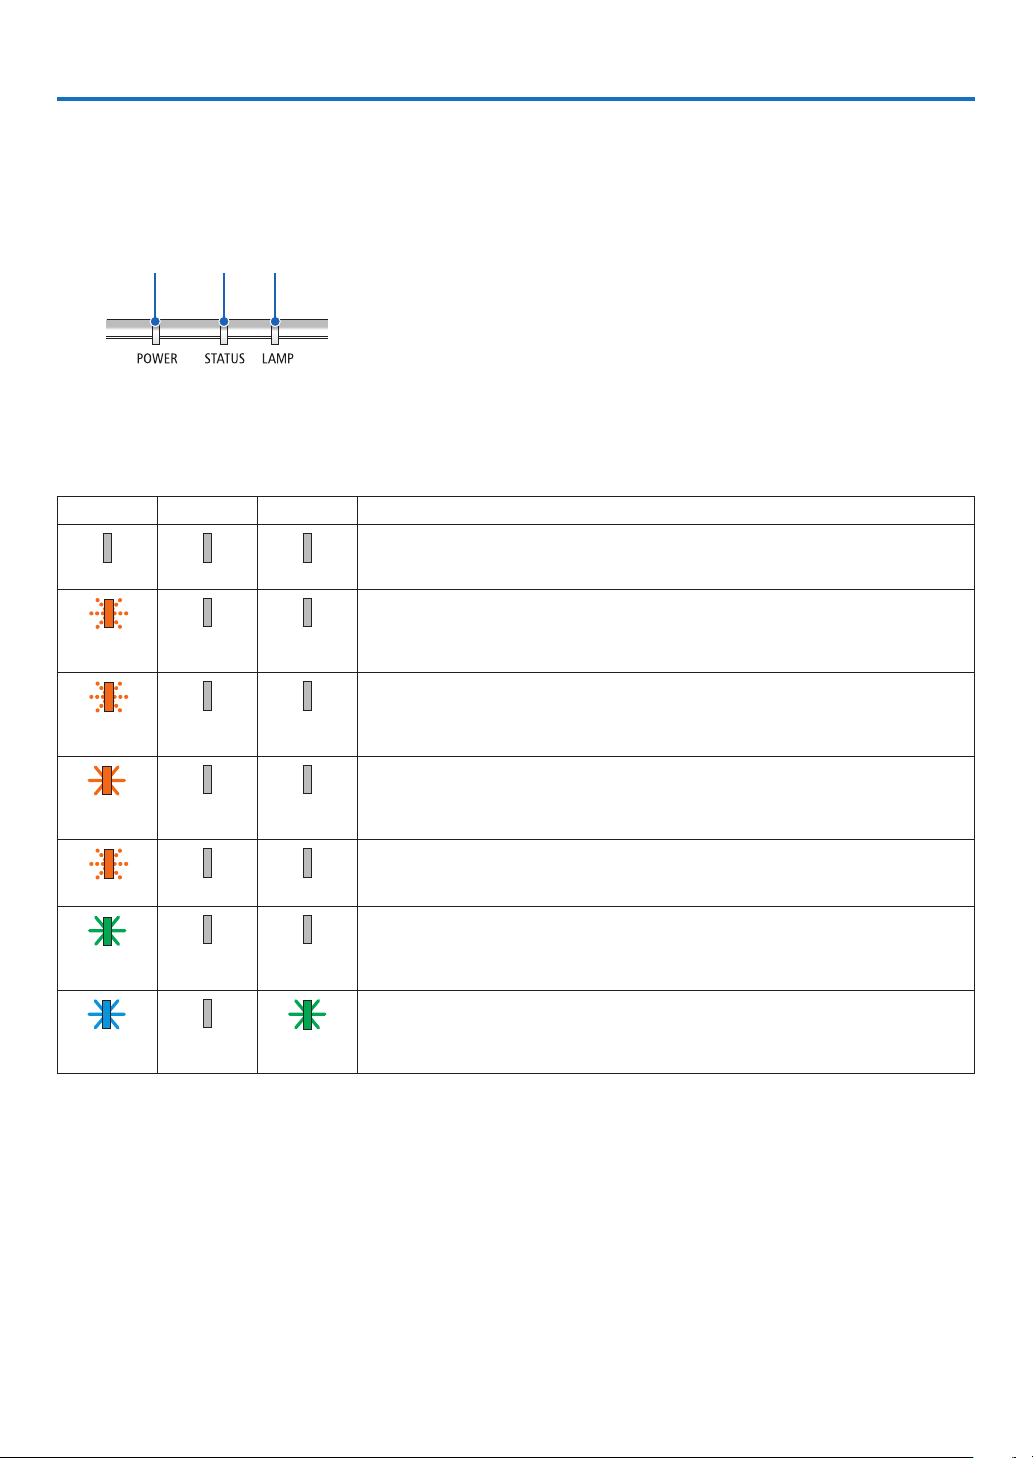
113
8. Appendix
❶ Troubleshooting
Thissectionhelpsyouresolveproblemsyoumayencounterwhilesettinguporusingtheprojector.
Feature of each indicator
②①
③
①POWERindicator
This indicator informs the power status of the projector.
②STATUSindicator
Thisindicatorlights/blinkswhenabuttonispressedwhilethe
CONTROLPANELLOCKfunctionisutilized,orwhileperformingthe
specicoperations.
③LAMPindicator
Thisindicatorinformsthestateoflamp,usagetimeofthelamp,and
thestatusofECOMODE.
Indicator Message (Status message)
POWERSTATUSLAMPProjector status
Power is off
Off Off Off
InthestateofStandby(StandbymodeisNETWORKSTANDBYandnetworkis
ready)
Orange
(Blink*
1
)
Off Off
InthestateofStandby(Networkisunavailable)
Orange
(Blink*
2
)
Off Off
InthestateofStandby(StandbymodeisNETWORKSTANDBYandnetworkis
available)
Orange
(Light)
Off Off
ONtimeastheprogramtimerisactivated.(InthestateofStandby)
Orange (Blink*
3
) Off Off
InthestateofSleep
Green
(Light)
Off Off
Poweredstate(ECOmodeisOFF)
Blue
(Light)
Off Green
(Light)

114
8. Appendix
POWERSTATUSLAMPProjector status
Poweredstate(ECOmodeisON)
Blue
(Light)
Off Green (Blink*
3
)
OFFTimerisactivated,OFFtimeastheprogramtimerisactivated(Poweredstate)
Blue
(Blink*
3
)
Off Status varies
PreparingforpoweringON
Blue
(Blink*
4
)
Off Off
*1Repetitiontolightonfor1.5seconds/offfor1.5seconds
*2Repetitiontolightonfor1.5seconds/offfor7.5seconds
*3Repetitiontolightonfor2.5seconds/offfor0.5seconds
*4Repetitiontolightonfor0.5seconds/offfor0.5seconds
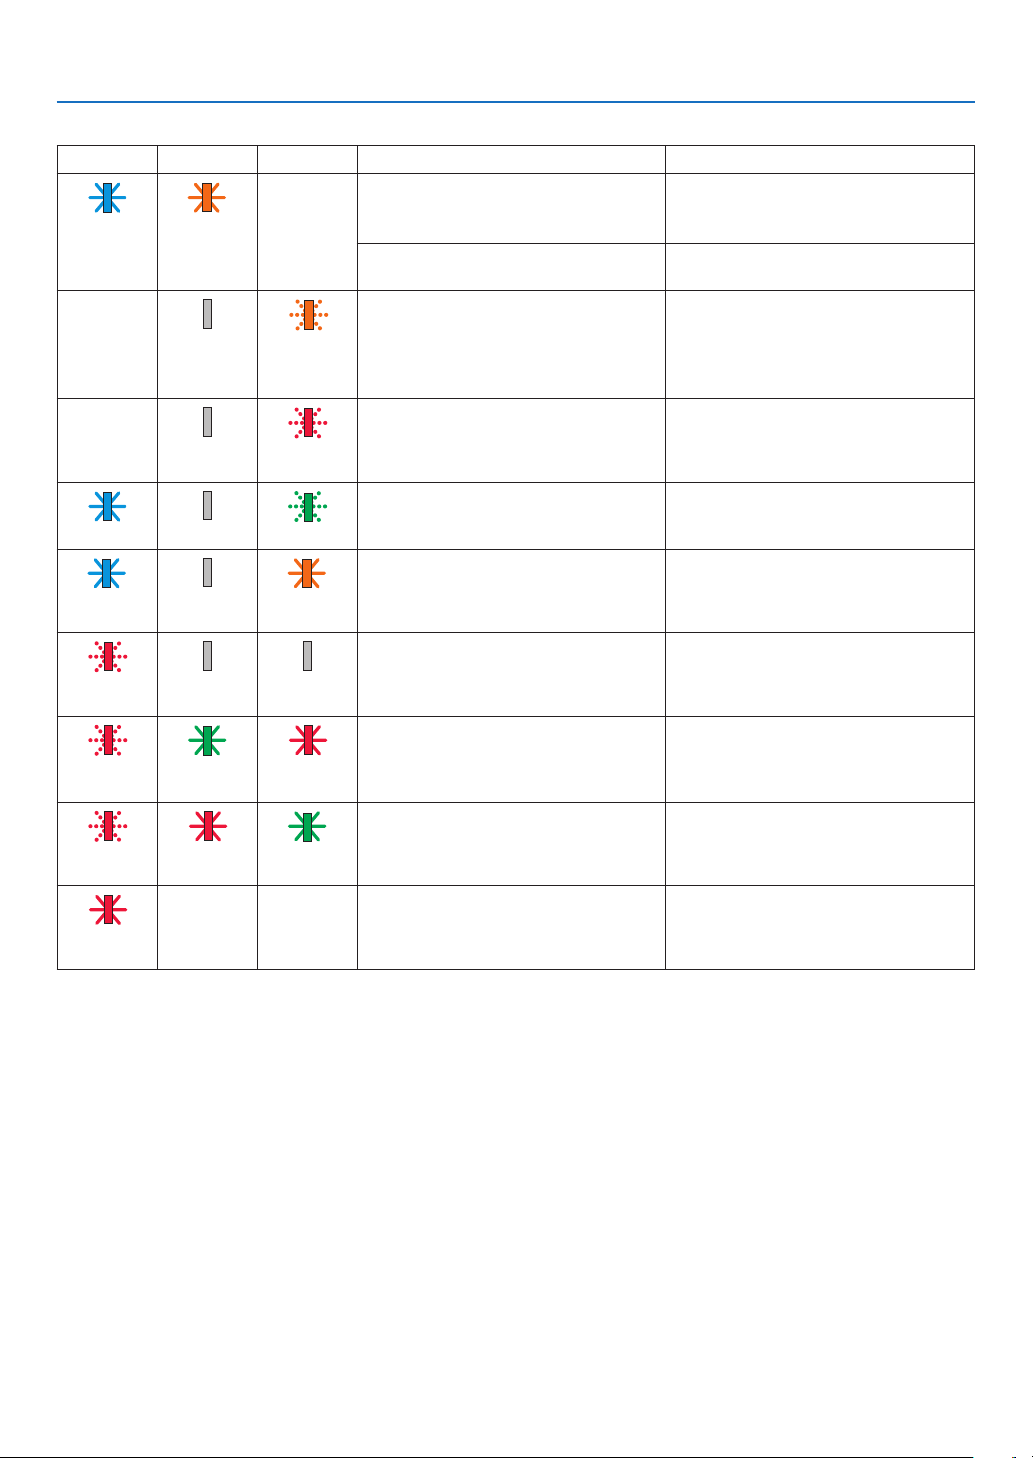
115
8. Appendix
Indicator Message (Error message)
POWERSTATUSLAMPProjector status Procedure
A button has been pressed while the
KEYLOCKisactivated.
Theprojector'skeysarelocked.The
settingmustbecanceledtooperatethe
projector.(→page69)
Blink Orange
(Light)
Status varies
IDnumbersfortheprojectorandthe
remote control do not match.
CheckthecontrolIDs(
→page
71)
Lampreplacementgraceperiod.The lamp has reached the end of its
service life and is now in the replacement
graceperiod(100hours).Replacethe
lamp to new one as soon as possible.
(→page108)
Status varies Off Orange
(Blink*
4
)
Lampreplacementtimeexceeded.Thelamphasexceededitsreplacement
time.Replacethelampimmediately.
Status varies Off Red
(Blink*
4
)
Preparingtorelightlampafterlighting
has failed.
Wait a while.
Blue (Blink*
4
) Off Green (Blink*
4
)
Temperatureproblem(IntheForced
ECO)
Ambienttemperatureishigh.Lowerthe
room temperature.
Blue
(Light)
Off Orange
(Light)
Temperature problem Ambient temperature is out of the opera-
tiontemperature.Checkifanyobstruction
staysneartheexhaustvent.
Red
(Blink*
4
)
Off Off
Lampdoesnotlight.Waitatleast1minute,thenturnonthe
powerbackon.ifthelampstilldoes
notlight,contactyourdealerorservice
personnel.
Red
(Blink*
4
)
Green
(Light)
Red
(Light)
LampcoverproblemLampcoverisnotmountedproperly.
Mountit(→seepage110).
Red
(Blink*
4
)
Red
(Light)
Green
(Light)
ErrorrequiringservicesupportContactyourdealerorservicepersonnel.
Makesuretocheckandinformindicator
statusforaskingtorepair.
Red
(Light)
Status varies Status varies
*1Repetitiontolightonfor1.5seconds/offfor1.5seconds
*2Repetitiontolightonfor1.5seconds/offfor7.5seconds
*3Repetitiontolightonfor2.5seconds/offfor0.5seconds
*4Repetitiontolightonfor0.5seconds/offfor0.5seconds
•Whenthethermalprotectorisactivated:
Wheninsidetemperatureoftheprojectorbecomestoohighorlow,thePOWERindicatorstarttoredblinkina
shortcycle.Afterthishappened,thethermalprotectorwillactivateandtheprojectormaybeturnedoff.
Inthiscase,pleasetakethebelowmeasures:
-Pulloutthepowerplugfromthewallinlet.
-Placetheprojectorincoolplaceifithasbeenplacedinhighambienttemperature.
-Cleantheexhaustventifdusthasaccumulatedon.
-Leavetheprojectorforaboutonehouruntilinsidetemperaturegetslower.
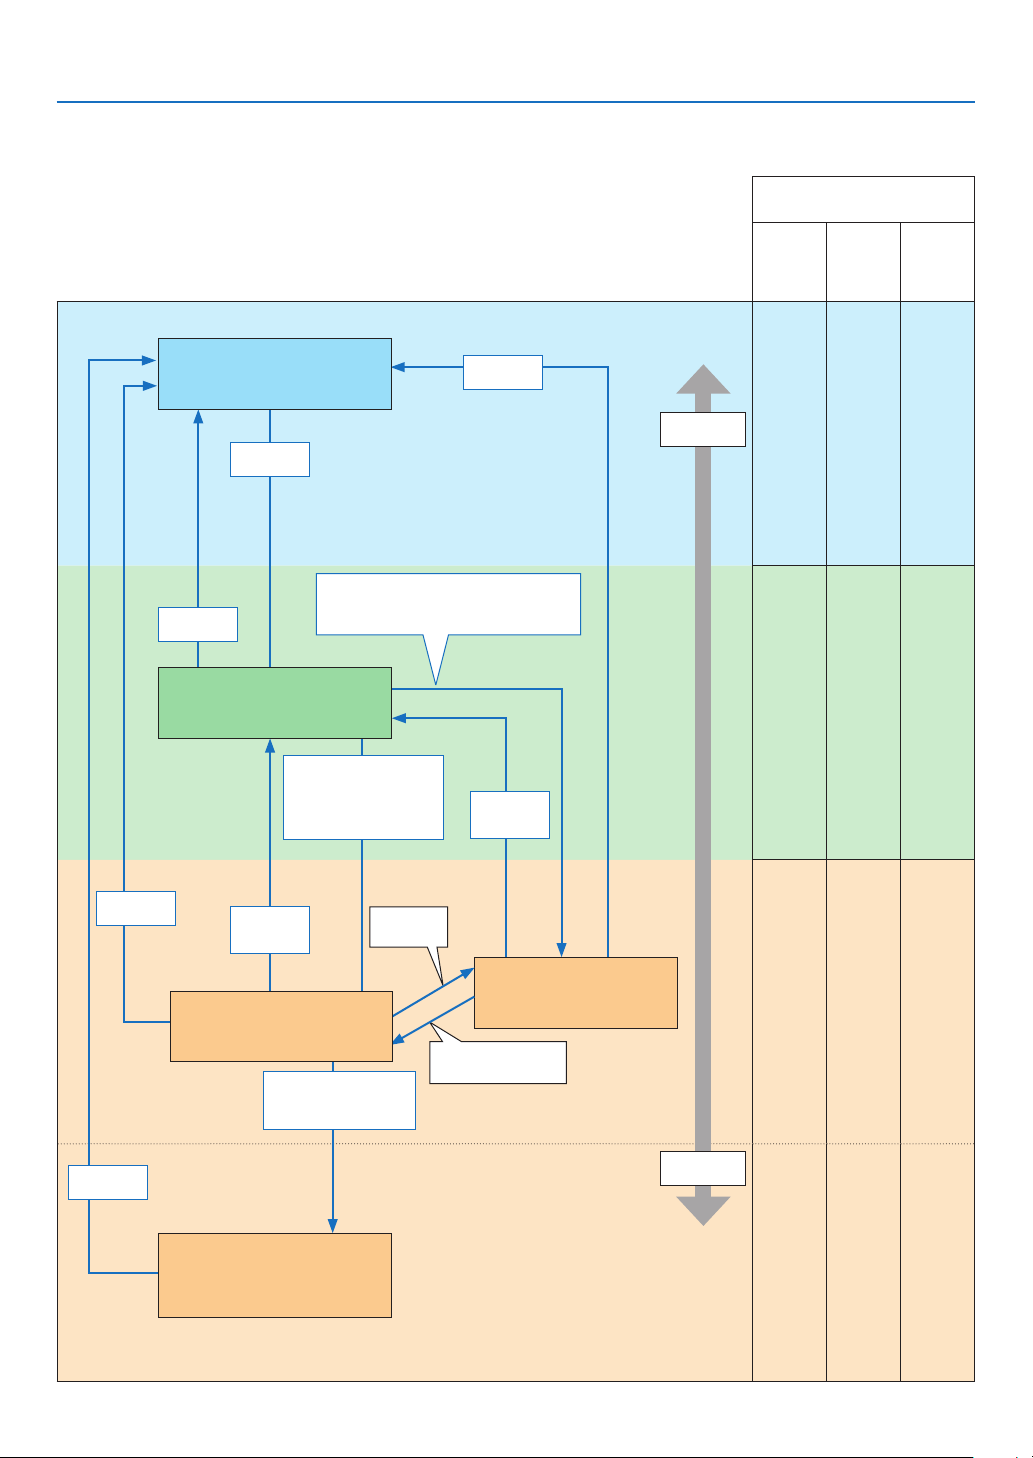
116
8. Appendix
Explanation on the POWER indicator and standby state
InthestatetheselectedSTANBYMODEisNETWORKSTANDBY.
Available ports in each state
(
○:Available,×:Unavailable)
HDBaseTLAN
PCCON-
TROL
○ ○ ○
○ ○ ○
× ○ ○
× × ○
Power
consumption
High
Low
Indicator : Lights in blue
PowerdOnstate
Indicator : Lights in orange
Standbystate:Thenetwork
islinked.
Link-up
network
Link-downnetwork
Nooperation/Link-
downnetwork/No
signalinputforapprox.
180seconds
Link-downforapprox.
180seconds
No operation/No communication with
thelink-upnetwork/Nosignalinputfor
approx.180seconds
PowerOff
PowerOn
PowerOn
Input
signal
Indicator:Blinksinorange(with
long interval)
Standbystate:Thenetworkis
unavailable.
PowerOn
Input
signal
Indicator : Lights in green
Sleepstate
Indicator:Blinksinorange
Standbystate:Waitingtolink
withthenetwork
PowerOn
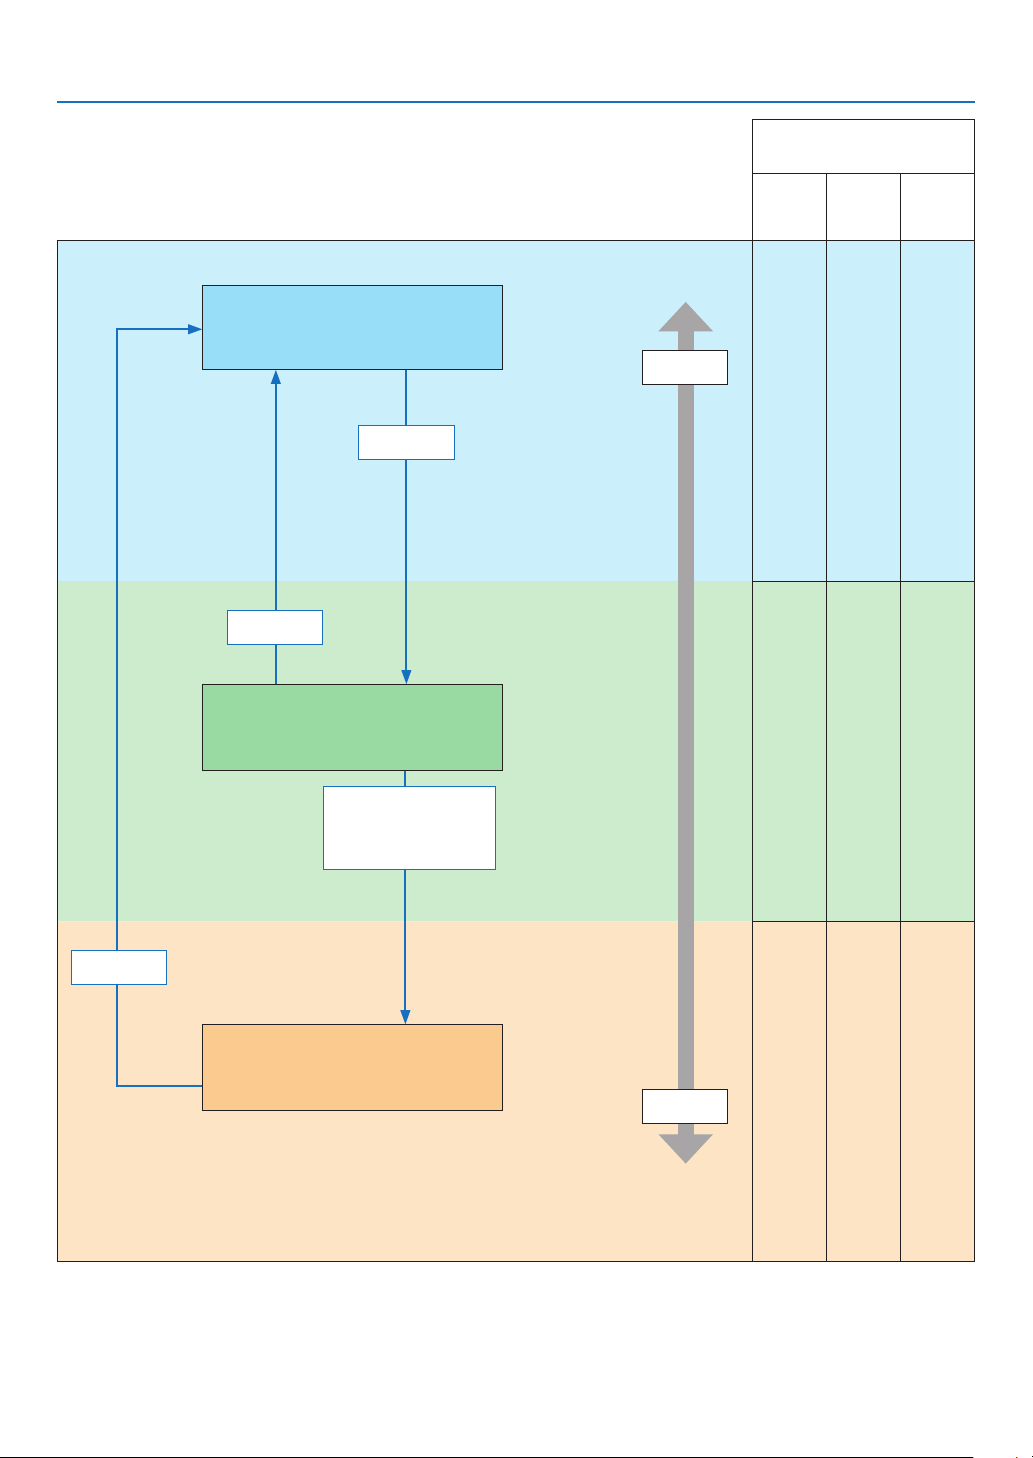
117
8. Appendix
InthestatetheselectedSTANBYMODEisNORMAL.
Available ports in each state
(
○:Available,×:Unavailable)
HDBaseTLAN
PCCON-
TROL
○ ○ ○
○ ○ ○
× × ○
Power
consumption
High
Low
Indicator : Lights in blue
PoweredONstate
PowerOn
Nooperation/Nosignal
inputforapprox.
10 seconds
PowerOff
PowerOn
Indicator:Blinksinorange(withlong
interval)
Standbystate:Thenetworkisunavailable.
Indicator : Lights in green
Sleepstate

118
8. Appendix
Common Problems & Solutions
(→“Power/Status/LampIndicator”onpage
113.)
Problem CheckTheseItems
Does not turn on or shut
down
•Checkthatthepowercordispluggedinandthatthepowerbuttonontheprojectorcabinetortheremotecontrolison.
(→ pages
11, 12)
•Ensurethatthelampcoverisinstalledcorrectly.(→ page
110)
•Checktoseeiftheprojectorhasoverheated.Ifthereisinsufcientventilationaroundtheprojectororiftheroomwhere
you are presenting is particularly warm, move the projector to a cooler location�
•Checktoseeifyoucontinuetousetheprojectorforanother100hoursafterthelamphasreachedtheendofitslife.If
so, replace the lamp� After replacing the lamp, reset the lamp hours used� (→ page
84)
•Thelampmayfailtolight.Waitafullminuteandthenturnonthepoweragain.
•Set[FANMODE]to[HIGHALTITUDE]whenusingtheprojectorataltitudesapproximately5500feet/1700metersorhigher.
Using the projector at altitudes approximately 5500 feet/1700 meters or higher without setting to [HIGH ALTITUDE] can
cause the projector to overheat and the projector could shut down� If this happens, wait a couple minutes and turn on
the projector� (→ page 72)
If you turn on the projector immediately after the lamp is turned off, the fans run without displaying an image for some
time and then the projector will display the image� Wait for a moment�
Will turn off
•Ensurethatthe[OFFTIMER]or[AUTOPOWEROFF]isoff.(→ page
67, 75)
No picture •UsetheCOMPUTER1,HDMI1,HDMI2,VIDEO,HDBaseT,orAPPSbuttonontheremotecontroltoselectyoursource
(COMPUTER, HDMI1, HDMI2, VIDEO, HDBaseT or USB-A)� (→ page 14) If there is still no picture, press the button again�
•Ensureyourcablesareconnectedproperly.
•Usemenustoadjustthebrightnessandcontrast.(→ page 59)
•Resetthesettingsoradjustmentstofactorypresetlevelsusingthe[RESET]intheMenu.(→ page 84)
•EnteryourregisteredkeywordiftheSecurityfunctionisenabled.(→ page 33)
•BesuretoconnecttheprojectorandnotebookPCwhiletheprojectorisinstandbymodeandbeforeturningonthepower
to the notebook PC�
In most cases the output signal from the notebook PC is not turned on unless connected to the projector before being
powered up�
* If the screen goes blank while using your remote control, it may be the result of the computer’s screen-saver or power
management software�
•Seealsothenext page�
Picture suddenly be-
comes dark
•CheckiftheprojectorisintheForcedECOmodebecauseoftoohighambienttemperature.Ifthisisthecase,lowerthe
internal temperature of the projector by selecting [HIGH] for [FAN MODE]� (→ page 72)
Color tone or hue is
unusual
•Checkifanappropriatecolorisselectedin[WALLCOLOR].Ifso,selectanappropriateoption.(→ page
66)
•Adjust[HUE]in[PICTURE].(→ page 57)
Image isn’t square to the
screen
•Repositiontheprojectortoimproveitsangletothescreen.(→ page
15, 19)
•UsetheKeystonecorrectionfunctiontocorrectthetrapezoiddistortion.(→ page 20)
Picture is blurred
•Adjustthefocus.(→ page
18)
•Repositiontheprojectortoimproveitsangletothescreen.(→ page 15, 19)
•Ensurethatthedistancebetweentheprojectorandscreeniswithintheadjustmentrange.(→ page 85)
•Condensationmayformonthelensiftheprojectoriscold,broughtintoawarmplaceandisthenturnedon.Shouldthis
happen, let the projector stand until there is no condensation on the lens�
Flicker appears on screen •
Set [FAN MODE] to other than [HIGH ALTITUDE] mode when using the projector at altitudes approximately 5500 feet/1700 meters
or lower� Using the projector at altitudes less than approximately 5500 feet/1700 meters and setting to [HIGH ALTITUDE] can cause
the lamp to overcool, causing the image to flicker� Switch [FAN MODE] to [AUTO]� (→ page 72)
Image is scrolling verti-
cally, horizontally or both
•Checkthecomputer’sresolutionandfrequency.Makesurethattheresolutionyouaretryingtodisplayissupportedby
the projector� (→ page 126)
•AdjustthecomputerimagemanuallywiththeHorizontal/Verticalinthe[IMAGEOPTIONS].(→ page 61)
Remote control does not
work
•Installnewbatteries.(→ page
9)
•Makesuretherearenoobstaclesbetweenyouandtheprojector.
•Standwithin22feet(7m)oftheprojector.(→ page 9)
Indicator is lit or blinking
•SeethePOWER/STATUS/LAMPIndicator.(→ page
113)
Cross color in RGB mode
•PresstheAUTOADJ.buttonontheprojectorcabinetortheremotecontrol.(→ page
22)
•Adjustthecomputerimagemanuallywith[CLOCK]/[PHASE]in[IMAGEOPTIONS]inthemenu.(→ page 60)
Formoreinformationcontactyourdealer.

119
8. Appendix
If there is no picture, or the picture is not displayed correctly.
•PoweronprocessfortheprojectorandthePC.
BesuretoconnecttheprojectorandnotebookPCwhiletheprojectorisinstandbymodeandbeforeturningon
thepowertothenotebookPC.
InmostcasestheoutputsignalfromthenotebookPCisnotturnedonunlessconnectedtotheprojectorbefore
beingpoweredup.
NOTE:Youcancheckthehorizontalfrequencyofthecurrentsignalintheprojector’smenuunderInformation.Ifitreads“0kHz”,this
meansthereisnosignalbeingoutputfromthecomputer.(→page
81orgotonextstep)
•Enablingthecomputer’sexternaldisplay.
DisplayinganimageonthenotebookPC’sscreendoesnotnecessarilymeanitoutputsasignaltotheprojector.
WhenusingaPCcompatiblelaptop,acombinationoffunctionkeyswillenable/disabletheexternaldisplay.Usu-
ally,thecombinationofthe“Fn”keyalongwithoneofthe12functionkeysgetstheexternaldisplaytocomeon
oroff.Forexample,NEClaptopsuseFn+F3,whileDelllaptopsuseFn+F8keycombinationstotogglethrough
externaldisplayselections.
•Non-standardsignaloutputfromthecomputer
IftheoutputsignalfromanotebookPCisnotanindustrystandard,theprojectedimagemaynotbedisplayed
correctly.Shouldthishappen,deactivatethenotebookPC’sLCDscreenwhentheprojectordisplayisinuse.
EachnotebookPChasadifferentwayofdeactivate/reactivatethelocalLCDscreensasdescribedintheprevi-
ousstep.Refertoyourcomputer’sdocumentationfordetailedinformation.
•ImagedisplayedisincorrectwhenusingaMac
WhenusingaMacwiththeprojector,settheDIPswitchoftheMacadapter(notsuppliedwiththeprojector)ac-
cordingtoyourresolution.Aftersetting,restartyourMacforthechangestotakeaffect.
ForsettingdisplaymodesotherthanthosesupportedbyyourMacandtheprojector,changingtheDIPswitch
onaMacadaptermaybounceanimageslightlyormaydisplaynothing.Shouldthishappen,settheDIPswitch
tothe13"xedmodeandthenrestartyourMac.Afterthat,restoretheDIPswitchestoadisplayablemodeand
thenrestarttheMacagain.
NOTE:AVideoAdaptercablemanufacturedbyAppleInc.isneededforaMacBookwhichdoesnothaveaminiD-Sub15-pinterminal.
•MirroringonaMacBook
*WhenusingtheprojectorwithaMacBook,outputmaynotbesetto1024×768unless“mirroring”isoffon
yourMacBook.Refertoowner’smanualsuppliedwithyourMaccomputerformirroring.
•FoldersoriconsarehiddenontheMacscreen
Foldersoriconsmaynotbeseenonthescreen.Shouldthishappen,select[View]→[Arrange]fromtheApple
menuandarrangeicons.
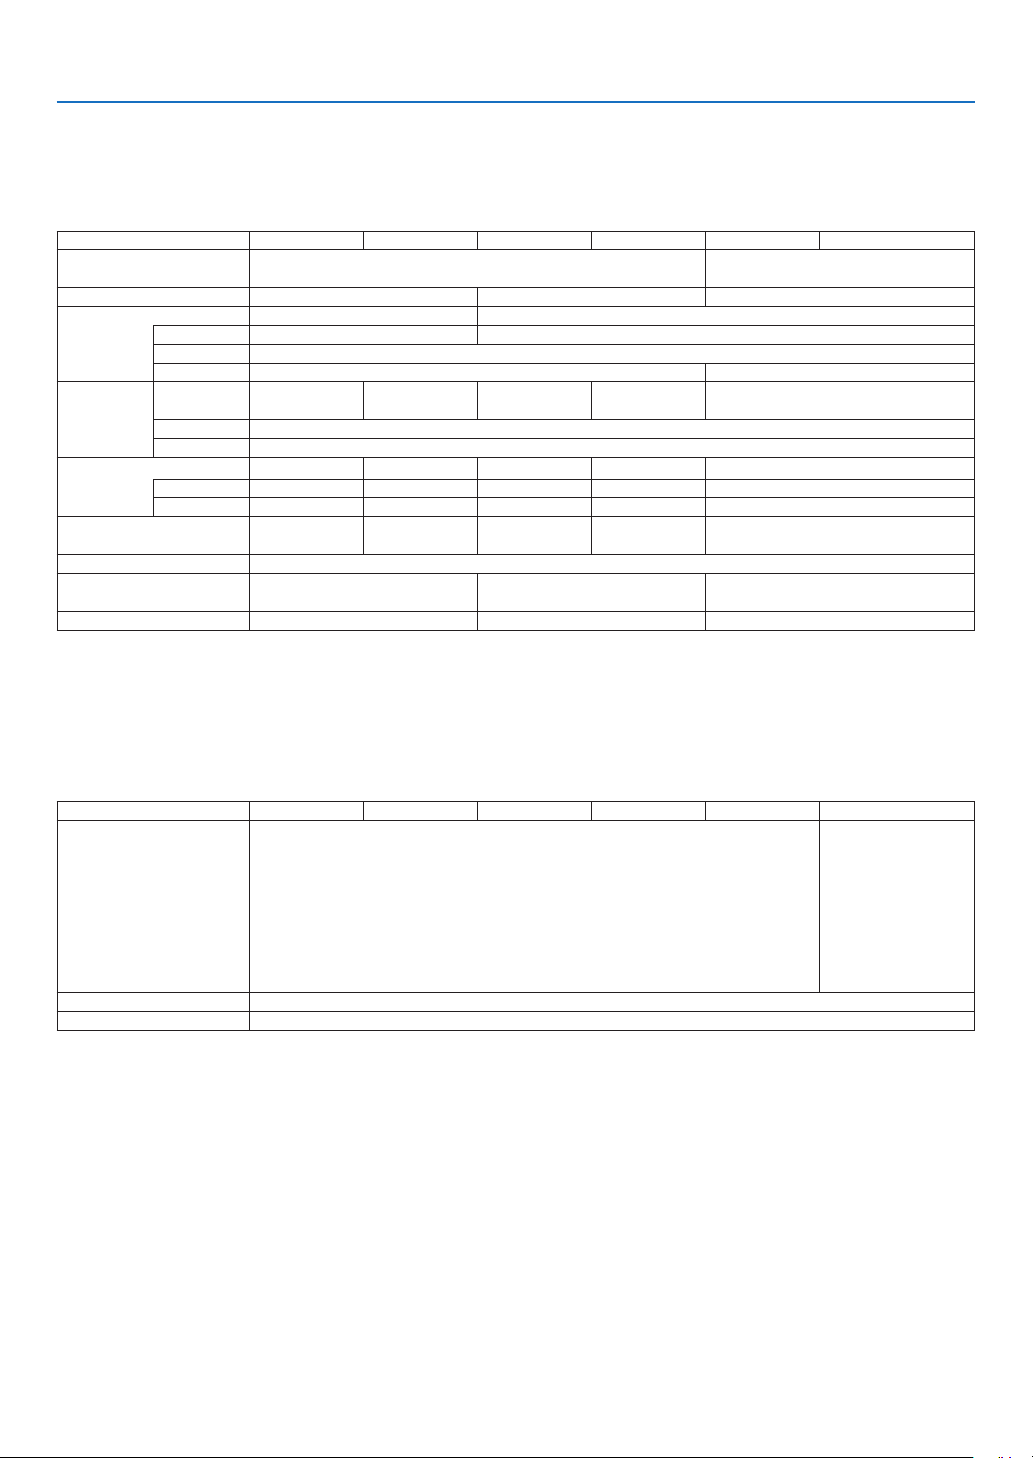
120
8. Appendix
❷ Specifications
This section provides technical information about projector’s performance.
Optical
Model Number P554UP474UP554WP474WP604XP603X
LCDPanel0.64inchLCDwithMicroLensArray(AspectRatio16:10)0.63inchLCDwithMicroLensArray
(AspectRatio4:3)
Resolution*
1
1920×1200pixels(WUXGA)1280×800pixels(WXGA)1024×768pixels(XGA)
LensF=1.50-2.08,f=17.2-27.7mmF=1.7–2.2,f=17.4–29.0mm
Zoom Manual(ZoomRatio=1.6)Manual(ZoomRatio=1.7)
FocusManual
LensshiftingH:±15%,V:+55%,-0%H:±15%,V:+50%,-0%
LampECOMODE
OFF
330 W 305 W 330 W 305 W 330 W
NORMAL264 W
ECO198W
LightOutput*
2
*
3
5,300lumens4,700lumens5,500lumens4,700lumens6,000lumens
NORMAL80%86%80%86%80%
ECO*
4
60%65%60%65%60%
ContrastRatio*
3
(fullwhite:fullblack)
20000:1 18000:1 20000:1 18000:120000:1
ImageSize(Diagonal)30–300inches(0.8–7.6m)
ProjectionDistance
(Min.–Max.)
32-507inches(0.8-12.9m)32–531inches(0.8–13.5m)32–543inches(0.8–13.8m)
ProjectionAngle0-16.0(wide)/0-10.0(tele)0–16.1(wide)/0–9.7(tele)0–16.1(wide)/0–9.6(tele)
*1Effectivepixelsaremorethan99.99%.
*2Thisisthelightoutputvalue(lumens)whenthe[PRESET]modeissetto[HIGH-BRIGHT].Ifanyothermodeisselectedasthe
[PRESET]mode,thelightoutputvaluemaydropslightly.
*3CompliancewithISO21118-2012
*4ThemaximumpowerbecomesequivalenttopowerinNORMAL(ECOMODE).
Electrical
Model Number P554UP474UP554WP474WP604XP603X
Inputs1×RGB/Component(D-Sub15P),2×HDMITypeA(19P,HDMI
®
Terminal)
HDCPsupported*
5
,1×Video(RCA),1×HDBaseT,1×(L/R)RCAAudio,1×
StereoMiniAudio
1×RGB/Compo-
nent(D-Sub15
P),2×HDMIType
A(19P,HDMI
®
Terminal)HDCP
supported*
5
,
1×Video(RCA),1×
(L/R)RCAAudio,1×
StereoMiniAudio
Outputs1×RGB(D-Sub15P),1×StereoMiniAudio
PCControl1×PCControlPort(D-Sub9P)
*5HDMI
®
(DeepColor,LipSync)withHDCP
WhatisHDCP/HDCPtechnology?
HDCPisanacronymforHigh-bandwidthDigitalContentProtection.HighbandwidthDigitalContentProtection(HDCP)isa
systemforpreventingillegalcopyingofvideodatasentoveraHigh-DenitionMultimediaInterface(HDMI).
IfyouareunabletoviewmaterialviatheHDMIinput,thisdoesnotnecessarilymeantheprojectorisnotfunctioningproperly.
WiththeimplementationofHDCP,theremaybecasesinwhichcertaincontentisprotectedwithHDCPandmightnotbedis-
playedduetothedecision/intentionoftheHDCPcommunity(DigitalContentProtection,LLC).
Video:DeepColor;8/10/12-bit,LipSync
Audio:LPCM;upto2ch,samplerate32/44.1/48KHz,samplebit;16/20/24-bit
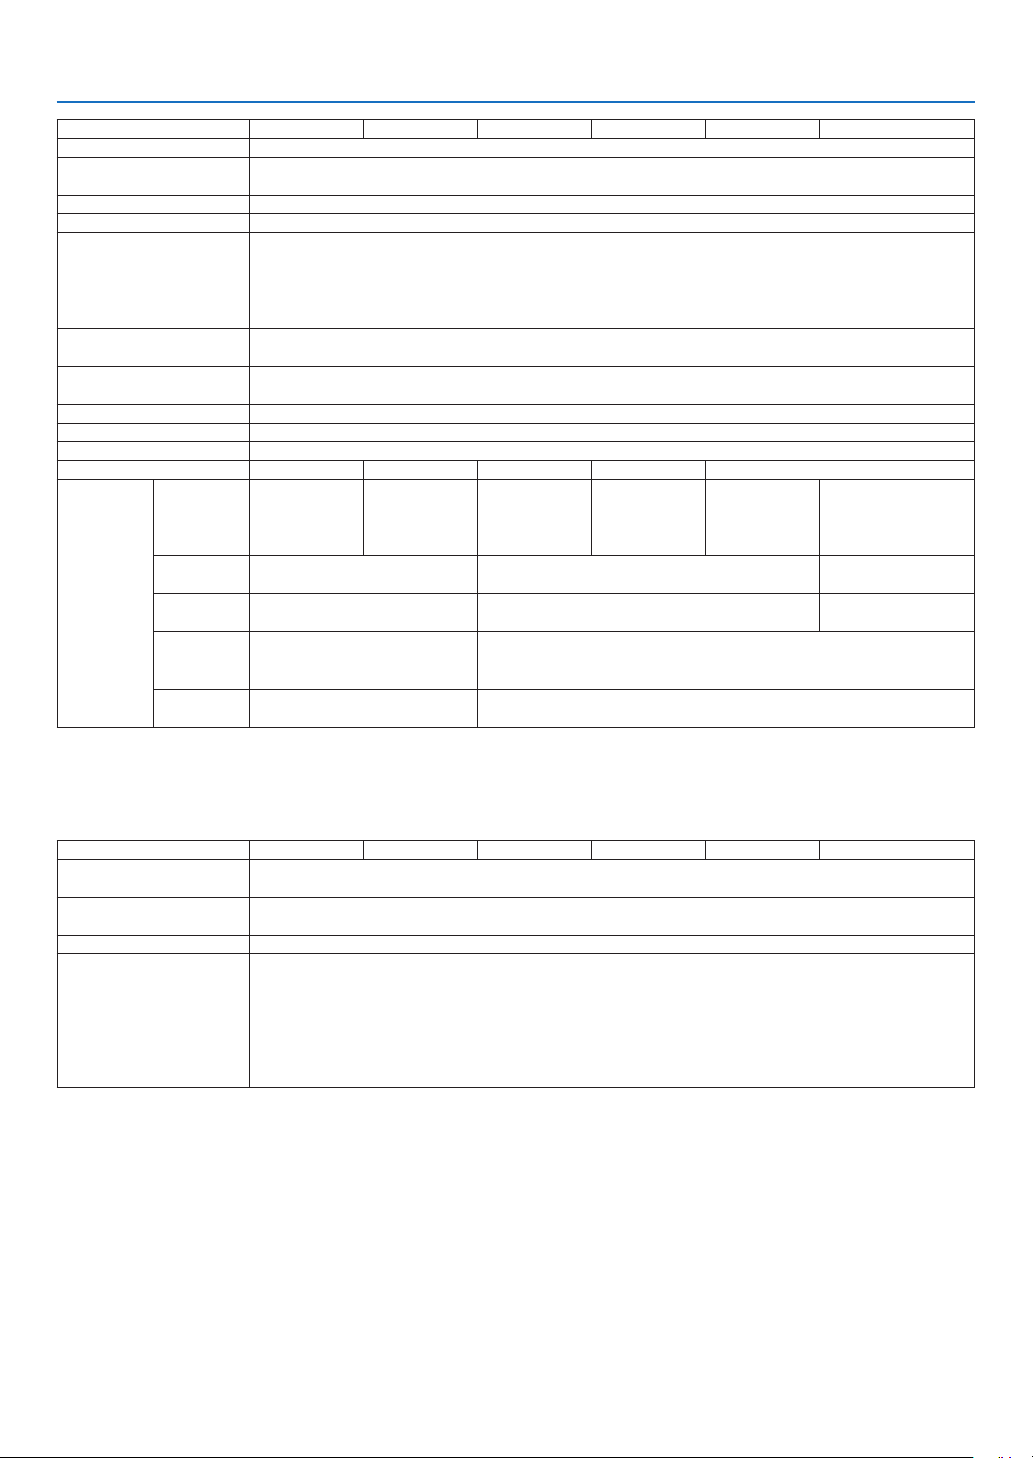
121
8. Appendix
Model Number P554UP474UP554WP474WP604XP603X
WiredLANPort1×RJ-45(10BASE-T/100BASE-TX)
WirelessLANPort
(Optional)
IEEE802.11b/g/n(optionalUSBWirelessLANUnitrequired)
USBPort1×TypeA,1×TypeB
ColorReproduction10-bitsignalprocessing(1.07billioncolors)(Viewer,Network:16.7millioncolors)
CompatibleSignals*
6
Analog:VGA/SVGA/XGA/WXGA/Quad-VGA/SXGA/SXGA+/WXGA+/WXGA++/UXGA/WSXGA+/HD/
FullHD/WUXGA/Mac13",16",21",23"
Component:480i/480p/576i/576p/720p/1080i/1080p
HDMI:VGA/SVGA/XGA/WXGA/Quad-VGA/SXGA/SXGA+/WXGA+/WXGA++/WSXGA+/480p/576p/
720p/1080i/1080p
HorizontalResolution540TVlines:NTSC/NTSC4.43/PAL/PAL-M/PAL-N/PAL60
300TVlines:SECAM
ScanRateHorizontal:15kHzto100kHz(RGB:24kHzorover)
Vertical:50Hzto120Hz(HDMI:50Hzto85Hz)
SyncCompatibilitySeparateSync
Built-inSpeaker20W(monaural)
PowerRequirement100–240VAC,50/60Hz
InputCurrent5.0 A-2.0 A 4.7A-1.9A5.0A-1.9A4.7A-1.8A5.0A-1.9A
PowerCon-
sumption
ECOMODE
OFF
457W(100-130
V)
431W(200-240
V)
424W(100-130
V)
405W(200-240
V)
448W(100-
130V)
422W(200-
240V)
418W(100-
130V)
395W(200-
240V)
448W(100-
130V)
422W(200-
240V)
433W(100-130V)
414W(200-240V)
NORMAL364W(100-130V)
350W(200-240V)
361W(100-130V)
343W(200-240V)
347W(100-130V)
334W(200-240V)
ECO286W(100-130V)
277W(200-240V)
280W(100-130V)
267W(200-240V)
273W(100-130V)
258W(200-240V)
STANDBY
(NETWORK
STANDBY)
2.0W(100-130V)/2.1W(200-
240V)
2.0W(100-130V)/2.0W(200-240V)
STANDBY
(NORMAL)
0.14W(100-130V)/0.17W(200-
240V)
0.16W(100-130V)/0.2W(200-240V)
*6Animagewithhigherorlowerresolutionthantheprojector’snativeresolution(P604X/P603X:1024×768/P554W/P474W:
1280×800/P554U/P474U:1920×1200)willbedisplayedwithAdvancedAccuBlend.(→page
126)
Mechanical
Model Number P554UP474UP554WP474WP604XP603X
Installation
Orientation
Desktop/Front,Desktop/Rear,Ceiling/Front,Ceiling/Rear
Dimensions16.5"(W)×5.2"(H)×12.7"(D)/420mm(W)×133mm(H)×322mm(D)(notincludingprotrusions)
16.5"(W)×5.5"(H)×13.0"(D)/420mm(W)×141mm(H)×329.3mm(D)(includingprotrusions)
Weight4.7kg/10.4lbs
Environmental
Considerations
OperationalTemperatures:41°to104°F(5°to40°C),
(ECOmodeselectedautomaticallyat95°Fto104°F/35°Cto40°C)
20%to80%humidity(non-condensing)
StorageTemperatures:14°to122°F(-10°to50°C),
20%to80%humidity(non-condensing)
Operatingaltitude:0to2700m/8800f(Set[FANMODE]to[HIGHALUTITUDE]whenusingthe
projectorataltitudesapproximately1700m/5500f)orhigher.
Foradditionalinformationvisit:
US:
http://www.necdisplay.com/
Europe:http://www.nec-display-solutions.com/
Global:http://www.nec-display.com/global/index.html
Forinformationonouroptionalaccessories,visitourwebsiteorseeourbrochure.
Thespecicationsaresubjecttochangewithoutnotice.
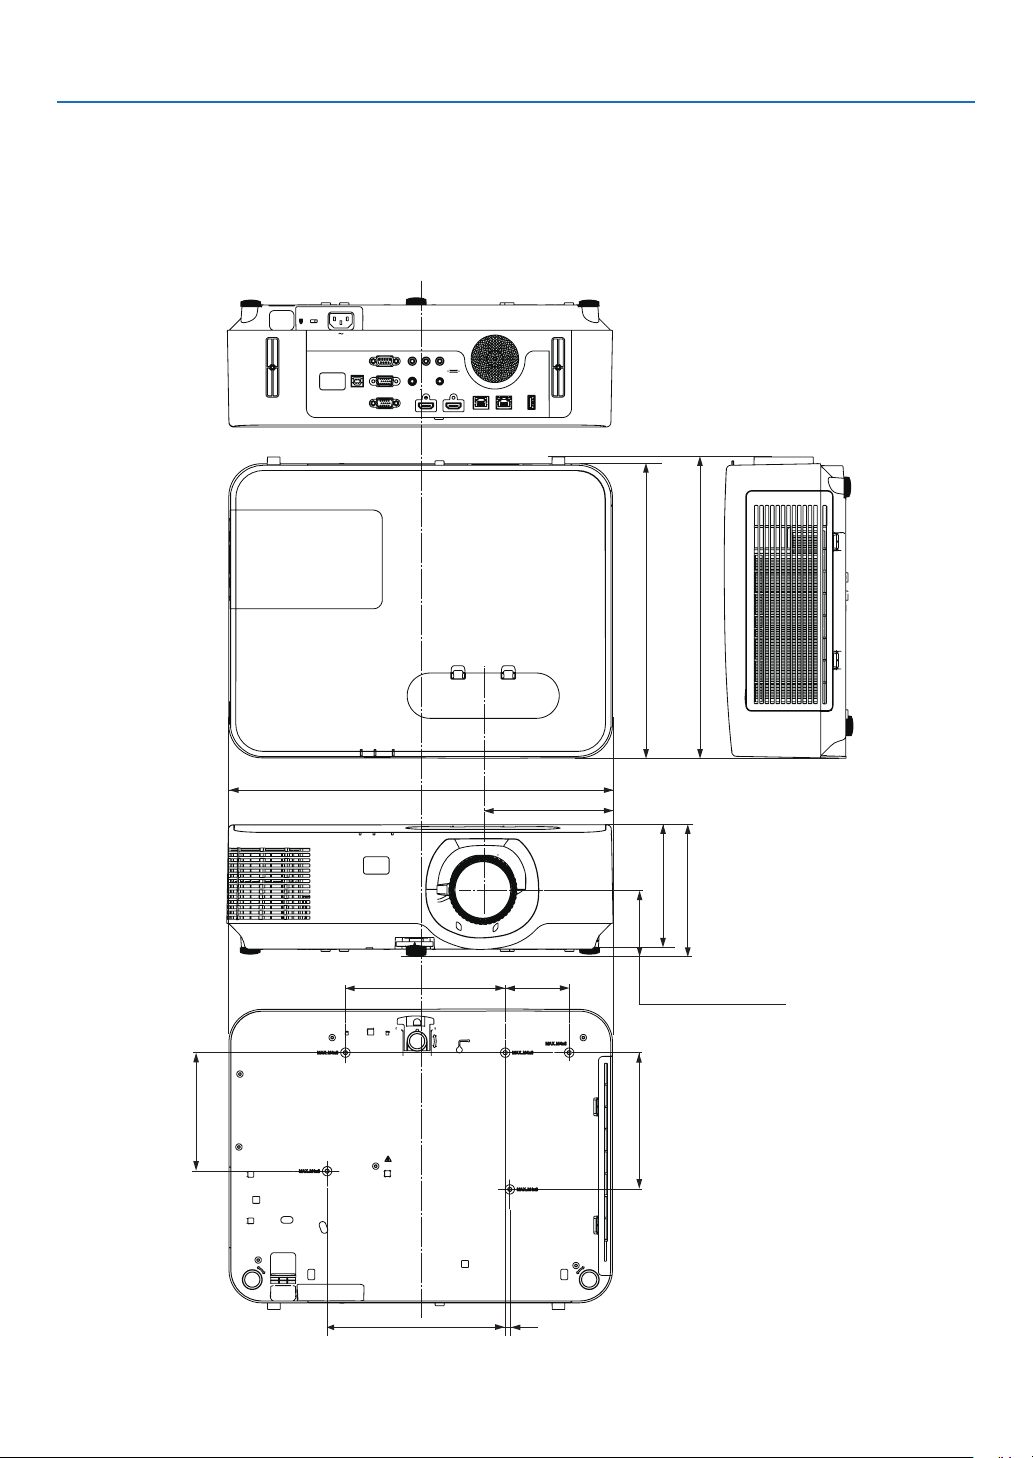
122
8. Appendix
420 (16.5)
175 (6.9)
70 (2.8)
195 (7.7)
5 (0.2)
141.5 (5.6)
329.3(13)
68.8 (2.7)
133 (5.2)
130 (5.1)
150 (5.9)
141 (5.5)
322(12.7)
❸ Cabinet Dimensions
Unit:mm(inch)
Lens center
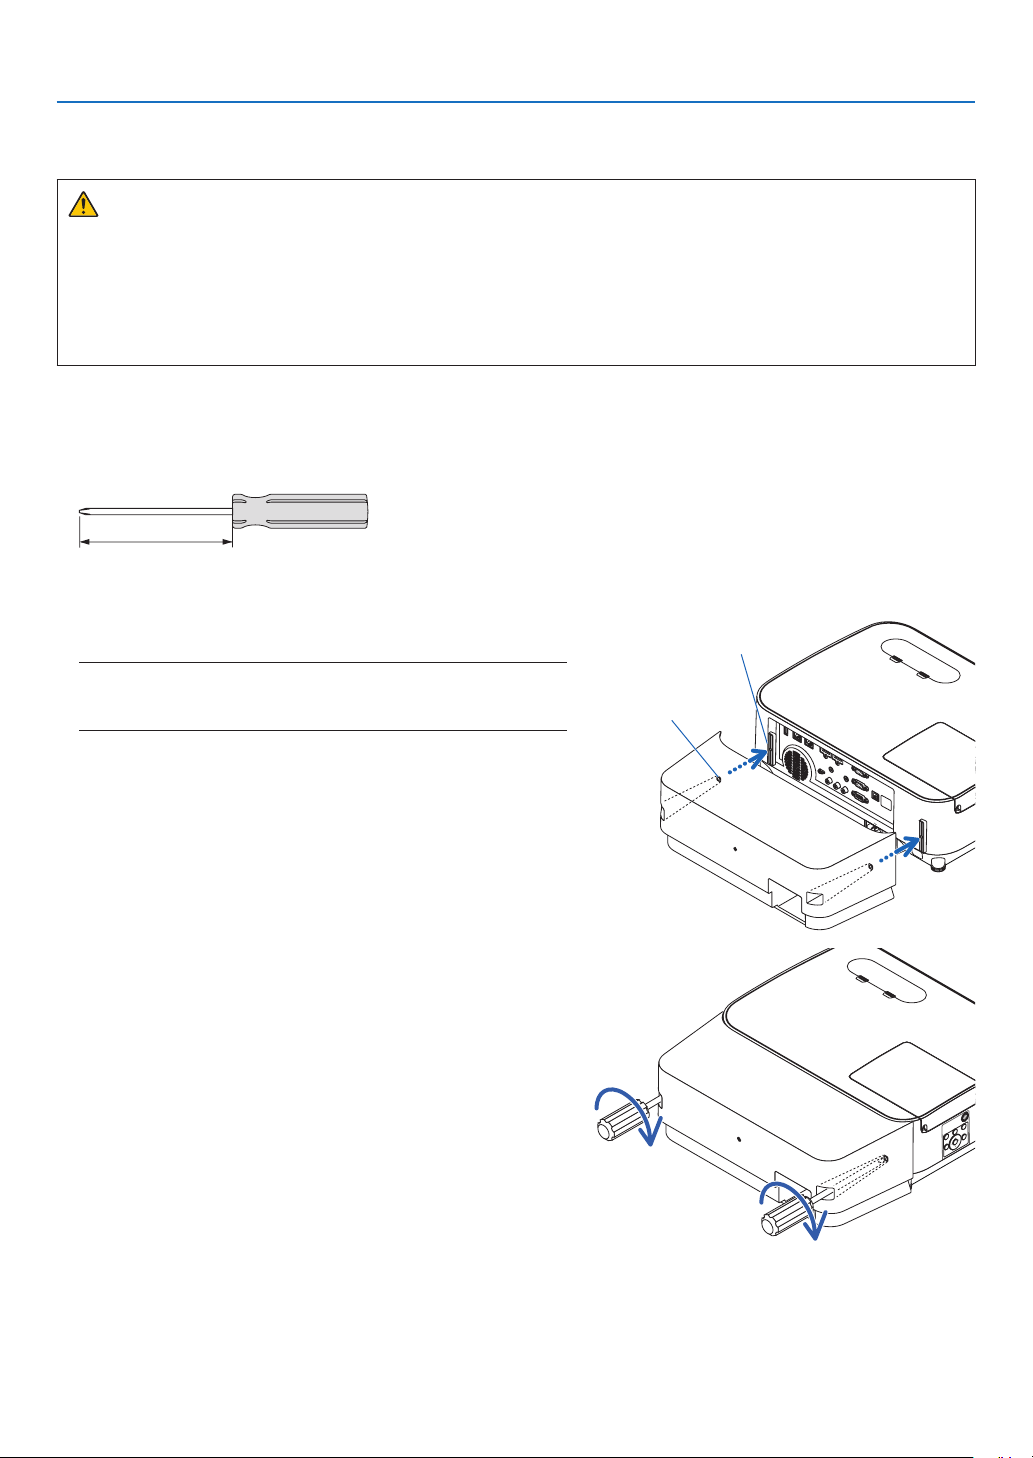
123
8. Appendix
❹ Attaching the Optional Cable Cover (NP12CV)
Afternishingconnections,attachthesuppliedcablecovertoproperlyhidethecables.
CAUTION:
•Besuretotightenthescrewsafterattachingthecablecover.Failuretodosomaycausethecablecoverto
comeoffandfall,resultingininjuryordamagetothecablecover.
•Donotputbundledcablesinthecablecover.Doingsomaydamagethepowercord,resultinginare.
•Donotholdthecablecoverwhilemovingtheprojectorordonotapplyexcessiveforcetothecablecover.
Doingsomaydamagethecablecover,resultingininjury.
Attaching the cable cover
Tool needed:
•Phillipsscrewdriver(plus-head)about12cm/4.7inchesinlength
12 cm/4.7 inches
1. Align the left and right fixing screw holes on the cable cover
and the projector, and then put screws to each hole.
NOTE:
•Becarefulnottogetcablescaughtinbetweenthecablecoverandthe
projector.
Cable cover fixing screw hole
Fixing screw
2. Tighten the cable cover screws.
•Besuretotightenthescrews.
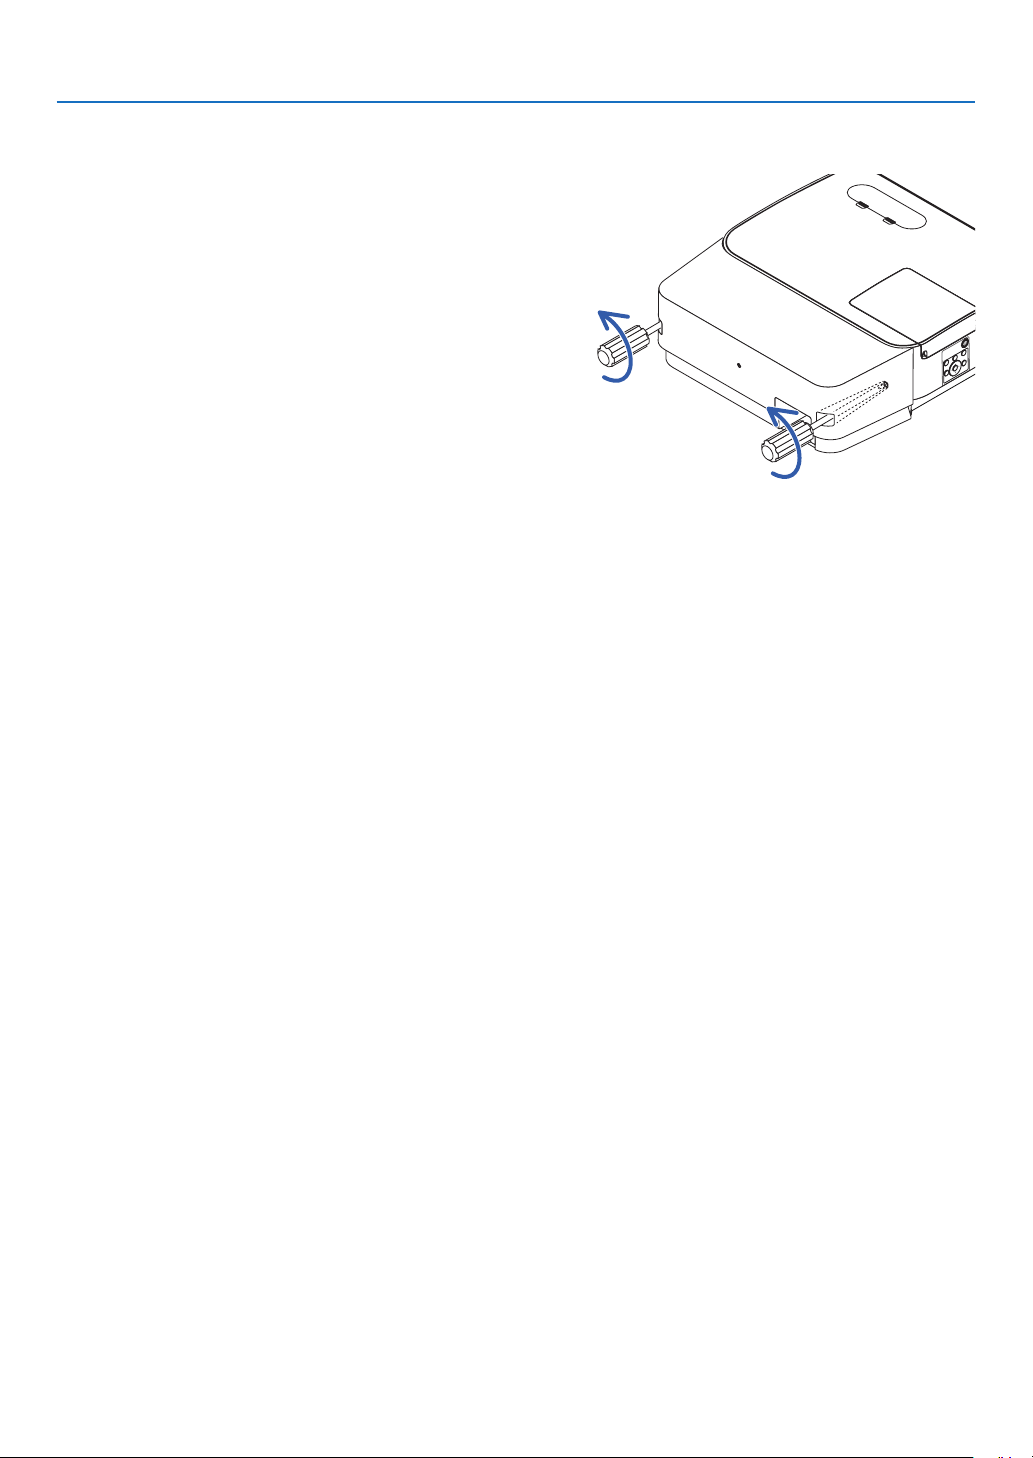
124
8. Appendix
Removing the cable cover
1. Loosen the cable cover screws until the Phillips screw-
driver goes into a freewheeling condition and remove the
cover.
•Whensuspendedfromtheceiling,holdsothatthecable
cover does not drop.
•Thescrewscannotberemoved.
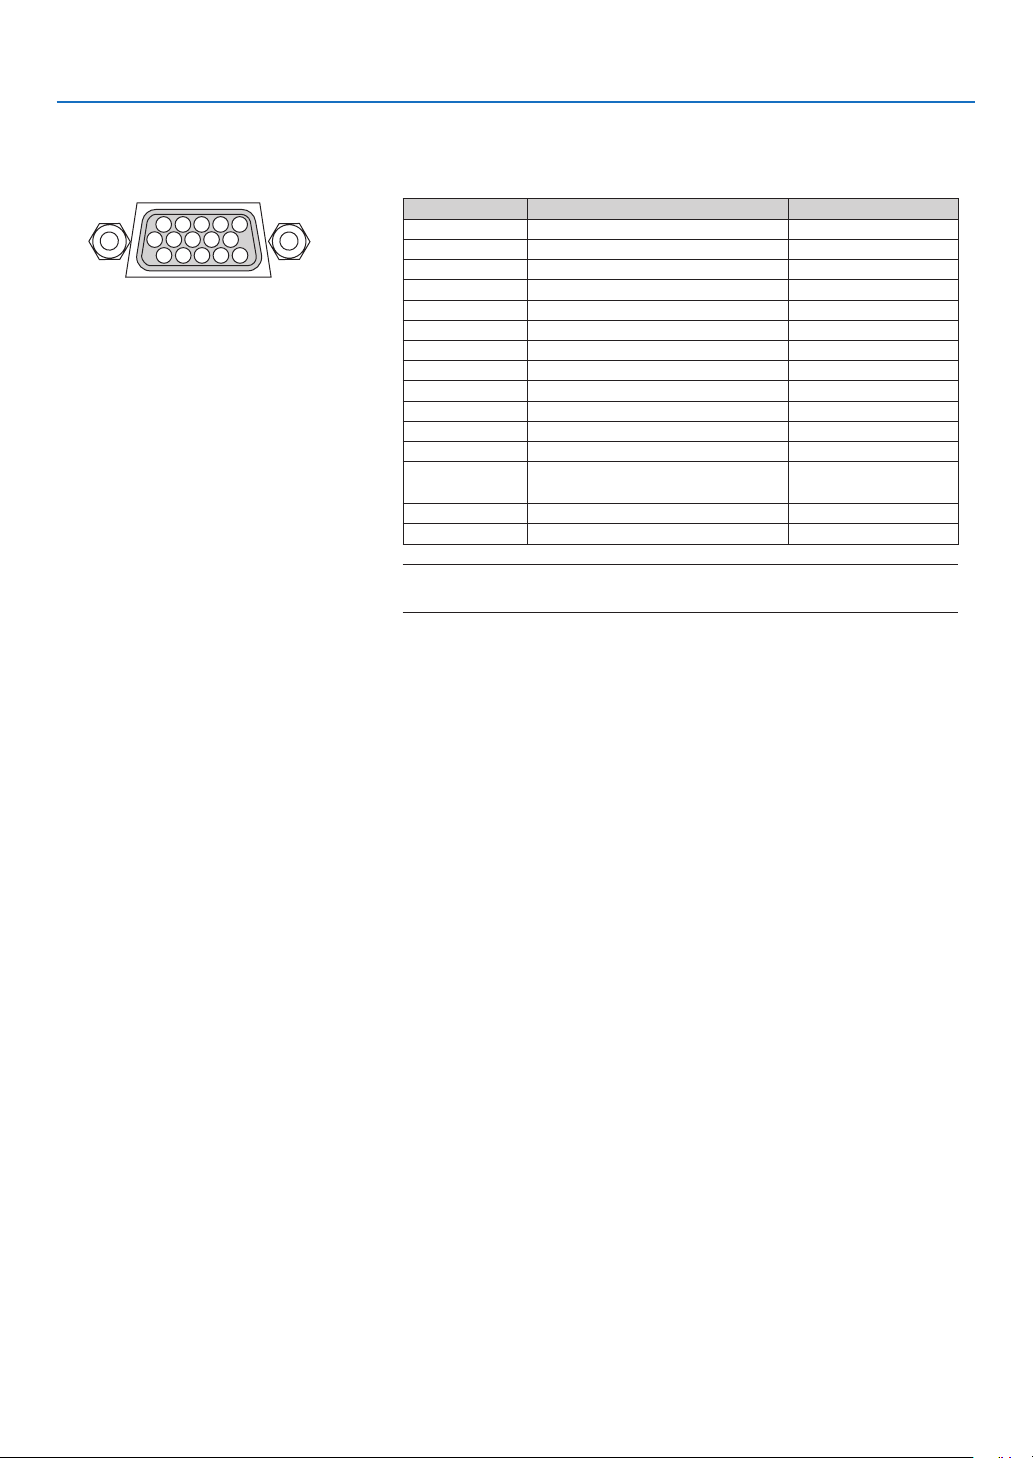
125
8. Appendix
5 Pin Assignments of D-Sub COMPUTER Input Terminal
Mini D-Sub 15 Pin Terminal
SignalLevel
Videosignal:0.7Vp-p(Analog)
Syncsignal:TTLlevel
51423
10
11 12 13 14 15
6978
Pin No. RGBSignal(Analog)YCbCrSignal
1 RedCr
2 GreenorSynconGreenY
3 BlueCb
4 Ground
5 Ground
6 RedGroundCrGround
7 GreenGroundYGround
8BlueGroundCbGround
9Hotplug
10 SyncSignalGround
11 NoConnection
12 Bi-directionalDATA(SDA)
13 HorizontalSyncorComposite
Sync
14 VerticalSync
15 DataClock
COMPUTER IN
NOTE:PinNos.12and15arerequiredforDDC/CI.

126
8. Appendix
6 Compatible Input Signal List
Analog RGB
Signal
Resolution
(dots)
AspectRatio
RefreshRate
(Hz)
VGA640 ×4804:3 60/72/75/85/
iMac
SVGA800×600 4:3 56/60/72/75/85/
iMac
XGA1024 ×768*
1
4:3 60/70/75/85/
iMac
WXGA1280 ×768*
2
15:960
1280×800*
2
16:10 60
1360 ×768*
3
16:960
1366 ×768*
3
16:960
Quad-VGA1280×9604:3 60/75
SXGA1280 ×1024 5:4 60/75
SXGA+1400 × 1050 4:3 60
WXGA+1440 ×90016:10 60
WXGA++1600 ×900*
3
16:960
UXGA1600 × 1200*
4
4:3 60
WSXGA+1680 ×1050 16:10 60
HD1280 ×720 16:960
FullHD1920×108016:960
WUXGA1920 ×1200*
5
*
6
16:10 60
MAC13"640 ×4804:3 67
MAC16"832×624 4:3 75
MAC19"1024 ×7684:3 75
MAC21"1152 ×8704:3 75
MAC23"1280× 1024 5:4 65
Component
SignalFormatAspectRatio
RefreshRate
(Hz)
HDTV(1080p)1920×108016:950/60
HDTV(1080i)1920 ×108016:950/60
HDTV(720p)1280 ×720 16:950/60
SDTV(480p)720 ×4804:3/16:960
SDTV(576p)720 ×576 4:3/16:950
SDTV(480i)720 ×4804:3/16:960
SDTV(576i)720 ×576 4:3/16:950
NOTE:
•Animagewithhigherorlowerresolutionthantheprojector’snativeresolution(P604X/P603X:1024×768/P554W/P474W:1280×800/
P554U/P474U:1920×1200)willbedisplayedwithAdvancedAccuBlend.
•SynconGreenandCompositesyncsignalsarenotsupported.
•Signalsotherthanthosespeciedinthetableabovemaynotbedisplayedcorrectly.Ifthisshouldhappen,changetherefreshrateor
resolutiononyourPC.RefertoDisplayPropertieshelpsectionofyourPCforprocedures.
CompositeVideo
SignalAspectRatio
RefreshRate
(Hz)
NTSC4:3 60
PAL4:3 50
PAL604:3 60
SECAM4:3 50
HDMI
Signal
Resolution
(dots)
AspectRatio
RefreshRate
(Hz)
VGA640 ×4804:3 60
SVGA800×600 4:3 60
XGA1024 ×768*
1
4:3 60
WXGA1280 ×768*
2
15:960
1280×800*
2
16:10 60
1366 ×76816:960
Quad-VGA1280×9604:3 60
SXGA1280 ×1024 5:4 60
SXGA+1400 × 1050 4:3 60
WXGA+1440 ×90016:10 60
WXGA++1600 ×90016:960
WSXGA+1680 ×1050 16:10 60
WUXGA1920 ×1200 16:10 60*
7
HDTV(1080p)1920×108016:950/60
HDTV(1080i)1920 ×108016:950/60
HDTV(720p)1280 ×720 16:950/60
SDTV(480p)720 ×4804:3/16:960
SDTV(576p)720 ×576 4:3/16:950
SDTV(480i)720 ×4804:3/16:960
SDTV(576i)720 ×576 4:3/16:950
*1NativeresolutiononXGAmodel(P604X/P603X)
*2NativeresolutiononWXGAmodel(P554W/P474W)
*3Theprojectormayfailtodisplaythesesignalscorrectlywhen[AUTO]
isselectedfor[ASPECTRATIO]intheon-screenmenu.
Thefactorydefaultis[AUTO]for[ASPECTRATIO].Todisplaythese
signals,select[16:9]for[ASPECTRATIO].
*4WXGAMODE:OFF
*5WXGAMODE:ON
*6NativeresolutiononWUXGAmodel(P554U/P474U)
*7RB(Reducedblankingsignal)iseffectiveupto154MHz.
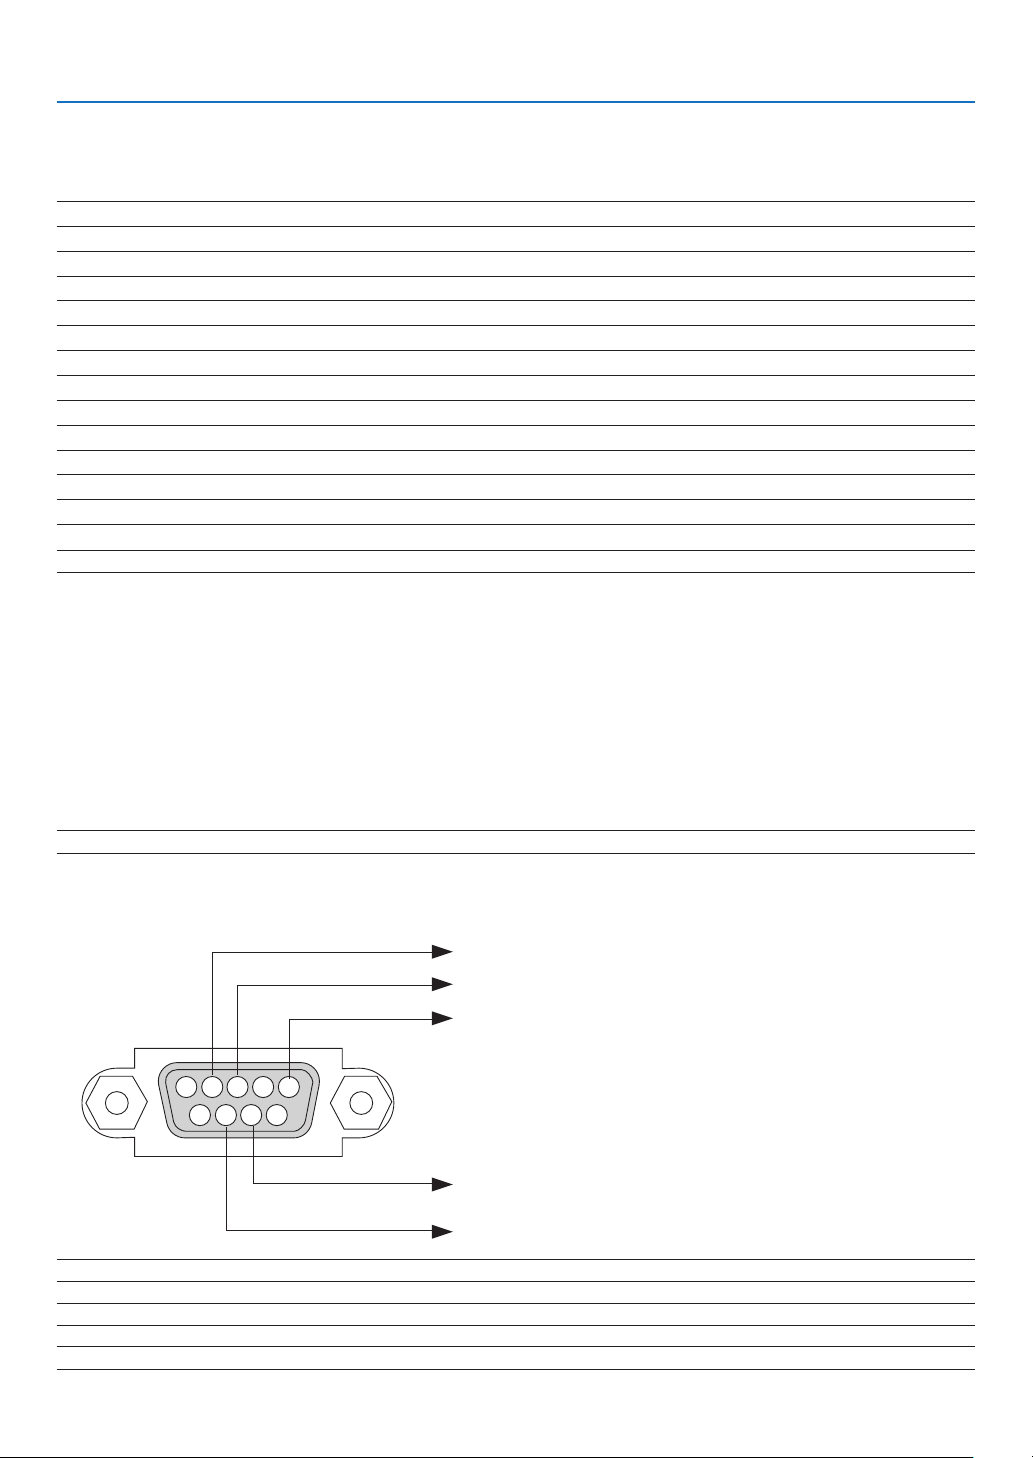
127
8. Appendix
7 PC Control Codes and Cable Connection
PC Control Codes
Function Code Data
POWER ON 02H 00H 00H 00H 00H 02H
POWER OFF 02H 01H 00H 00H 00H 03H
INPUT SELECT COMPUTER 02H 03H 00H 00H 02H 01H 01H 09H
INPUT SELECT HDMI1 02H 03H 00H 00H 02H 01H A1H A9H
INPUT SELECT HDMI2 02H 03H 00H 00H 02H 01H A2H AAH
INPUT SELECT VIDEO 02H 03H 00H 00H 02H 01H 06H 0EH
INPUT SELECT HDBaseT 02H 03H 00H 00H 02H 01H BFH C7H
INPUT SELECT USB-A 02H 03H 00H 00H 02H 01H 1FH 27H
PICTURE MUTE ON 02H 10H 00H 00H 00H 12H
PICTURE MUTE OFF 02H 11H 00H 00H 00H 13H
SOUND MUTE ON 02H 12H 00H 00H 00H 14H
SOUND MUTE OFF 02H 13H 00H 00H 00H 15H
NOTE:ContactyourlocaldealerforafulllistofthePCControlCodesifneeded.
Cable Connection
CommunicationProtocol
Baud rate ������������������������������������������� 38400 bps
Data length ���������������������������������������� 8 bits
Parity �������������������������������������������������No parity
Stop bit ���������������������������������������������� One bit
X on/off ���������������������������������������������� None
Communications procedure ���������������� Full duplex
NOTE:Dependingontheequipment,alowerbaudratemayberecommendedforlongcableruns.
PC Control Terminal (D-SUB 9P)
NOTE1:Pins1,4,6and9arenoused.
NOTE2:Jumper“RequesttoSend”and“CleartoSend”togetheronbothendsofthecabletosimplifycableconnection.
NOTE3:Forlongcablerunsitisrecommendedtosetcommunicationspeedwithinprojectormenusto9600bps.
15243
67 98
To GND of PC
To RxD of PC
To TxD of PC
To RTS of PC
To CTS of PC
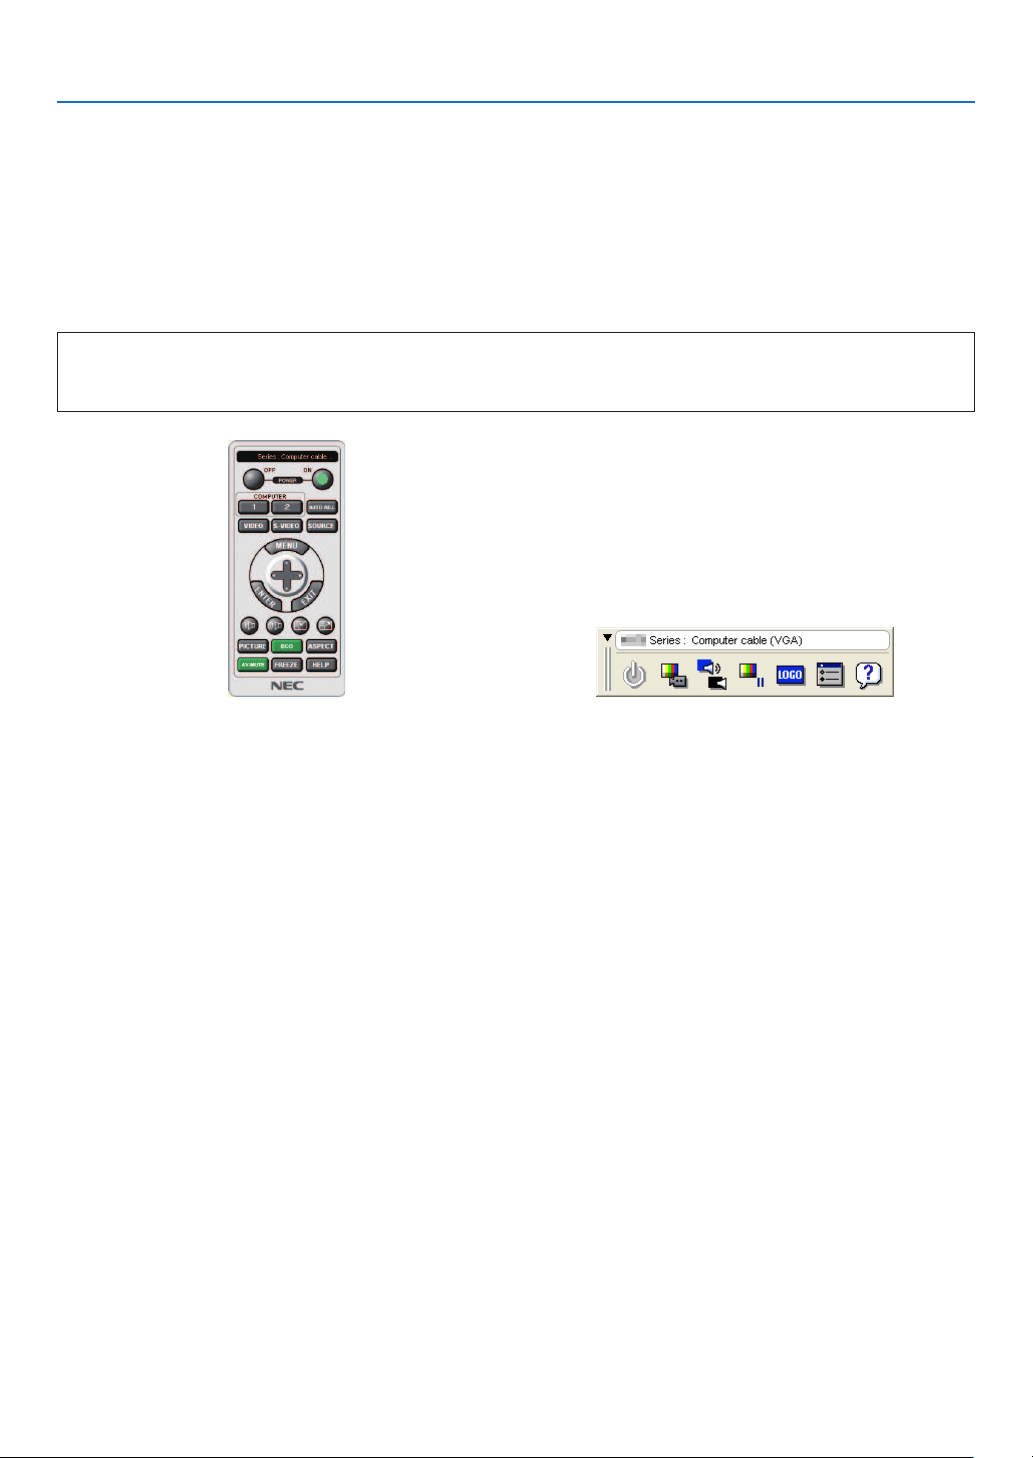
128
8. Appendix
8 Using the Computer Cable (VGA) to Operate the Projector
(Virtual Remote Tool)
Usingtheutilitysoftware“VirtualRemoteTool”thatisavailabletodownloadfromourwebsite,VirtualRemotescreen
(ortoolbar)canbedisplayedonyourcomputerscreen.
Thiswillhelpyouperformoperationssuchasprojector’spoweronoroffandsignalselectionviathecomputer
cable(VGA),serialcable,orLANconnection.OnlyviaserialorLANconnectionitisalsousedtosendanimageto
theprojectorandregisteritasthelogodataoftheprojector.Afterregisteringit,youcanlockthelogotopreventit
fromchanging.
Control Functions
PowerOn/Off,signalselection,picturefreeze,picturemute,audiomute,Logotransfertotheprojector,and
remotecontroloperationonyourPC.
VirtualRemotescreenToolbar
ForgettingtheVirtualRemoteTool,pleasevisitourwebsiteanddownloadit:
http://www.nec-display.com/dl/en/index.html

129
8. Appendix
NOTE:
•When[COMPUTER]isselectedfromyoursourceselection,theVirtualRemotescreenorthetoolbarwillbedisplayedaswellasyour
computerscreen.
•Usethesuppliedcomputercable(VGA)toconnecttheCOMPUTERINterminaldirectlywiththemonitoroutputterminalofthecomputer
touseVirtualRemoteTool.
Usingaswitcherorothercablesthanthesuppliedcomputercable(VGA)maycausefailureinsignalcommunication.
VGAcableterminal:
PinNos.12and15arerequiredforDDC/CI.
•VirtualRemoteToolmaynotworkdependingonyourcomputer’sspecicationsandversionofgraphicadaptersordrivers.
•TorunVirtualRemoteTool,“Microsoft.NETFrameworkVersion2.0”isrequired.TheMicrosoft.NETFrameworkVersion2.0,3.0or3.5is
availablefromMicrosoft’swebpage.Downloadandinstallitonyourcomputer.
•Logodata(graphics)thatcanbesenttotheprojectorwithVirtualRemoteToolhasthefollowingrestrictions:
(OnlyviaserialorLANconnection)
-Filesize:Lessthan1MB
-Imagesize(resolution):
P554U/P474U:Horizontal1920×vertical1200dotsorless
P554W/P474W:Horizontal1280×vertical800dotsorless
P604X/P603X:Horizontal1024×vertical768dotsorless
-Numberofcolors:256colorsorless
•Toputthedefault"NEClogo"backinthebackgroundlogo,youneedtoregisteritasthebackgroundlogobyusingtheimagele(P554U/
P474U:/Logo/necpj_bbwux.bmp,P554W/P474W:/Logo/necpj_bbwx.bmp,P604X/P603X:/Logo/necpj_bb_x.bmp)incluldedonthe
suppliedNECProjectorCD-ROM.
TIP:
•VirtualRemoteToolcanbeusedwithaLANandaserialconnection.
•Theprojector’sCOMPUTERINterminalsupportsDDC/CI(DisplayDataChannelCommandInterface).DDC/CIisastandardinterfacefor
bidirectionalcommunicationbetweendisplay/projectorandcomputer.

130
8. Appendix
9 Troubleshooting Check List
Beforecontactingyourdealerorservicepersonnel,checkthefollowinglisttobesurerepairsareneededalsoby
referringtothe“Troubleshooting”sectioninyouruser’smanual.Thischecklistbelowwillhelpussolveyourproblem
moreefciently.
*Printthispageandthenextpageforyourcheck.
Frequency of occurrence □ always □ sometimes (How often?_____________________) □ other (__________________)
Power
□
No power (POWER indicator does not light blue) See also “Status
Indicator (STATUS)”�
□
Power cord’s plug is fully inserted into the wall outlet�
□
Main power switch is pressed to the ON position�
□
Lamp cover is installed correctly �
□
Lamp Hours Used (lamp operation hours) was cleared after lamp
replacement�
□
No power even though you press and hold the POWER button�
□
Shut down during operation�
□
Power cord’s plug is fully inserted into the wall outlet�
□
Lamp cover is installed correctly �
□
[AUTO POWER OFF] is turned off (only models with the [AUTO
POWER OFF] function)�
□
[OFF TIMER] is turned off (only models with the [OFF TIMER]
function)�
Video and Audio
□
No image is displayed from your PC or video equipment to the projector�
□
Still no image even though you connect the projector to the PC
first, then start the PC�
□
Enabling your notebook PC’s signal output to the projector�
•Acombinationoffunctionkeyswillenable/disabletheexternal
display.Usually,thecombinationofthe“Fn”keyalongwithone
ofthe12functionkeysturnstheexternaldisplayonoroff.
□
No image (blue or black background, no display)�
□
Still no image even though you press the AUTO ADJUST button�
□
Still no image even though you carry out [RESET] in the projec-
tor’s menu�
□
Signal cable’s plug is fully inserted into the input terminal
□
A message appears on the screen�
( _____________________________________________ )
□
The source connected to the projector is active and available�
□
Still no image even though you adjust the brightness and/or the
contrast�
□
Input source’s resolution and frequency are supported by the
projector�
□
Image is too dark�
□
Remains unchanged even though you adjust the brightness and/
or the contrast�
□
Image is distorted�
□
Image appears to be trapezoidal (unchanged even though you carry
out the [KEYSTONE] adjustment)�
□
Parts of the image are lost�
□
Still unchanged even though you press the AUTO ADJUST button�
□
Still unchanged even though you carry out [RESET] in the projec-
tor’s menu�
□
Image is shifted in the vertical or horizontal direction�
□
Horizontal and vertical positions are correctly adjusted on a
computer signal�
□
Input source’s resolution and frequency are supported by the
projector�
□
Some pixels are lost�
□
Image is flickering�
□
Still unchanged even though you press the AUTO ADJUST button�
□
Still unchanged even though you carry out [RESET] in the projec-
tor’s menu�
□
Image shows flickering or color drift on a computer signal�
□
Still unchanged even though you change [FAN MODE] from [HIGH
ALTITUDE] to [AUTO]�
□
Image appears blurry or out of focus�
□
Still unchanged even though you checked the signal’s resolution
on PC and changed it to projector’s native resolution�
□
Still unchanged even though you adjusted the focus�
□
No sound�
□
Audio cable is correctly connected to the audio input of the projector�
□
Still unchanged even though you adjusted the volume level�
□
AUDIO OUT is connected to your audio equipment (only models with
the AUDIO OUT terminal)�
Other
□
Remote control does not work�
□
No obstacles between the sensor of the projector and the remote
control�
□
Projector is placed near a fluorescent light that can disturb the
infrared remote controls�
□
Batteries are new and are not reversed in installation�
□
Buttons on the projector cabinet do not work (only models with the
[CONTROL PANEL LOCK] function)
□
[CONTROL PANEL LOCK] is not turned on or is disabled in the menu�
□
Still unchanged even though you press and hold the SOURCE button
for a minimum of 10 seconds�
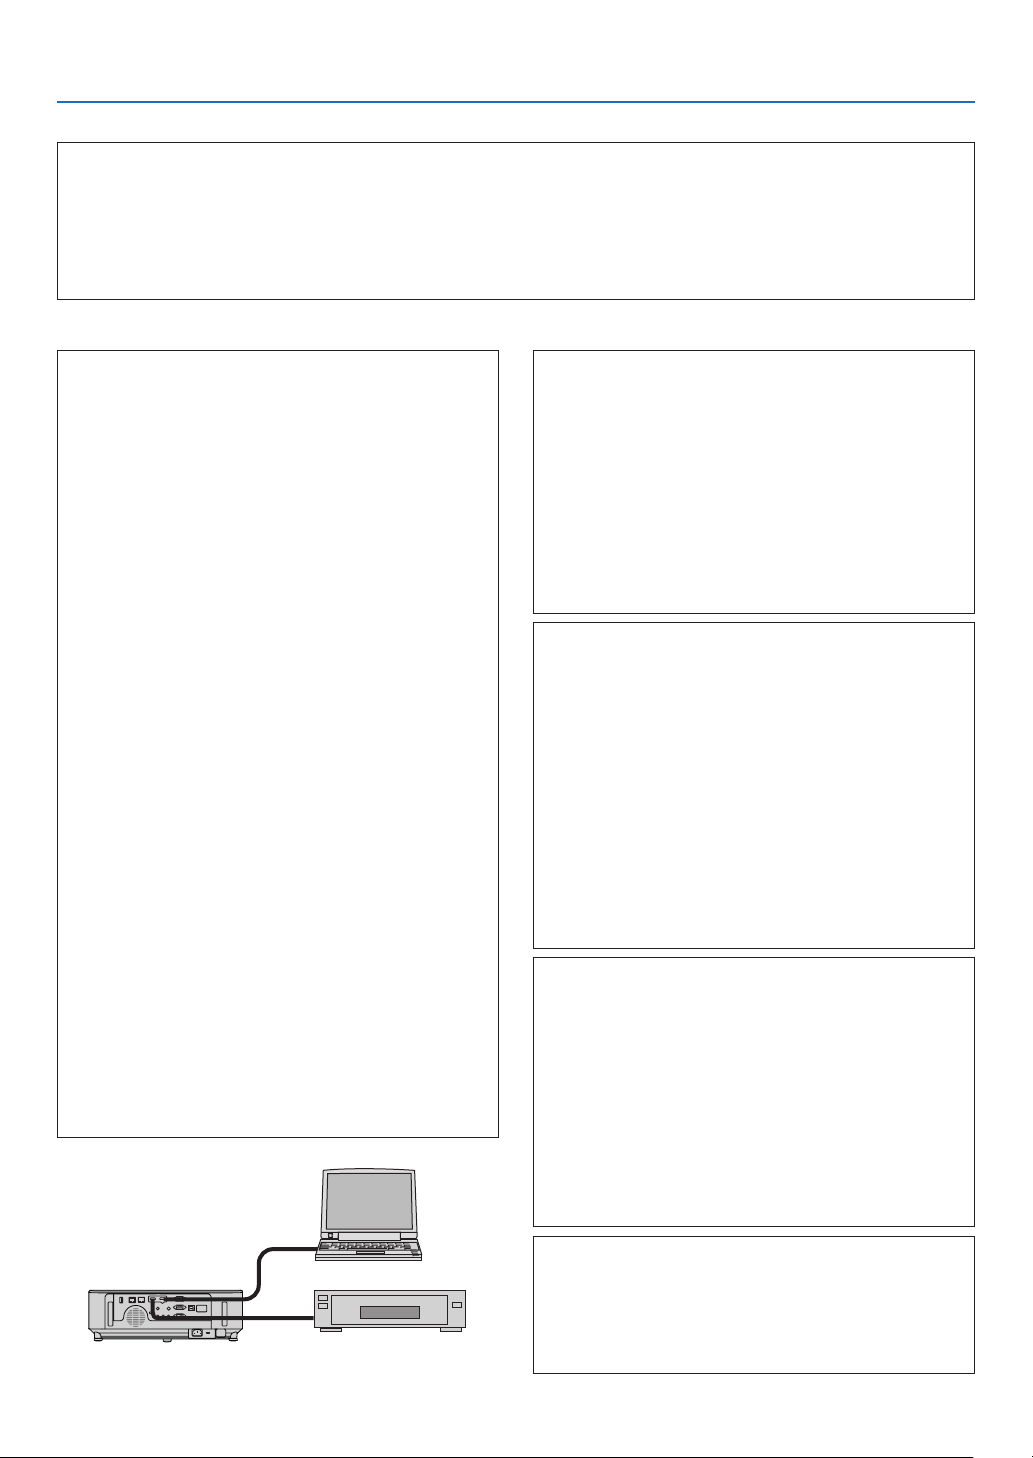
131
8. Appendix
In the space below please describe your problem in detail.
Information on application and environment where your projector is used
Projector
PC
DVD player
Projector
Model number:
Serial No�:
Date of purchase:
Lamp operating time (hours):
Eco Mode: □ OFF □ AUTO ECO
□ NORMAL □ ECO
Information on input signal:
Horizontal synch frequency [ ] kHz
Vertical synch frequency [ ] Hz
Synch polarity H □ (+) □ (−)
V □ (+) □ (−)
Synch type □ Separate □ Composite
□ Sync on Green
Indicator Message:
□ POWER
Blinks in □ Blue □ Green □ Orange □ Red
[ ] cycles
Lights in □ Blue □ Green □ Orange □ Red
□ STATUS
Blinks in □ Blue □ Green □ Orange □ Red
[ ] cycles
Lights in □ Blue □ Green □ Orange □ Red
□ LAMP
Blinks in □ Blue □ Green □ Orange □ Red
[ ] cycles
Lights in □ Blue □ Green □ Orange □ Red
Remote control model number:
Installation environment
Screen size: inch
Screen type: □ White matte □ Beads □ Polarization
□ Wide angle □ High contrast
Throw distance: feet/inch/m
Orientation: □ Ceiling mount □ Desktop
Power outlet connection:
□ Connected directly to wall outlet
□ Connected to power cord extender or other (the number
of connected equipment______________)
□ Connected to a power cord reel or other (the number of
connected equipment______________)
Computer
Manufacturer:
Model number:
Notebook PC □ / Desktop □
Native resolution:
Refresh rate:
Video adapter:
Other:
Videoequipment
VCR, DVD player, Video camera, Video game or other
Manufacturer:
Model number:
Signal cable
NEC standard or other manufacturer’s cable?
Model number: Length: inch/m
Distribution amplifier
Model number:
Switcher
Model number:
Adapter
Model number:

132
8. Appendix
❿ REGISTER YOUR PROJECTOR! (for residents in the United
States, Canada, and Mexico)
Pleasetaketimetoregisteryournewprojector.ThiswillactivateyourlimitedpartsandlaborwarrantyandInstaCare
serviceprogram.
Visitourwebsiteatwww.necdisplay.com,clickonsupportcenter/registerproductandsubmityourcompleted
form online.
Uponreceipt,wewillsendaconrmationletterwithallthedetailsyouwillneedtotakeadvantageoffast,reliable
warrantyandserviceprogramsfromtheindustryleader,NECDisplaySolutionsofAmerica,Inc.

©NECDisplaySolutions,Ltd.20177N952602