Loading ...
Loading ...
Loading ...

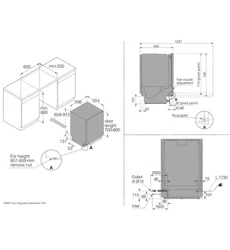
Setup
• The dimensions and connection information are included in the separate installation instructions.
Check that all dimensions and connections are correct before commencing the installation. Note
that the height of the exterior panel can be adjusted to match other fittings.
• Handle the front corners of the dishwasher with care so that they do not get bent, which can
affect door opening.
• Make sure the area on which the dishwasher is to be installed is firm. Adjust the adjustable feet
so that the dishwasher is level. Tighten the lock nuts.
• If the dishwasher is built-in the surrounding cabinetry must be resistant to any condensation
from the dishwasher.
• Mount the protective film beneath the worktop and up around the edge. The function of the
protective film is to protect the worktop from moisture. (The protective film is in the enclosed
plastic bag.)
• Check that the machine is installed such that the door opens freely, otherwise door lock
functionality may be disrupted.
• Note that the door springs may need adjusting after a cover door has been fitted. Adjust the left
and right door springs equally until the door is evenly balanced.
Drainage connection
This dishwasher is suitable for installing in a raised recess (to attain an ergonomic working height).
This means that the dishwasher can be placed so that the drainage hose runs to a lower level than
the bottom of the dishwasher, such as by routing it directly to a floor drain.
The drainage hose can also be connected to a connection nipple on the sink unit’s water trap. The
connection nipple must have an internal diameter of at least 14 mm.
The drainage hose may be extended by a maximum of 2.5 m (the total length of the drainage hose
must not exceed 4.5 m). Any joints and connecting pipes must have an internal diameter of at least
14 mm. However, the drainage hose should ideally be replaced with a new hose without joints.
No part of the drainage hose may be more than 950 mm above the bottom of the dishwasher.
Attach the drainage hose with a hose clamp. Ensure that the drainage hose has no kinks.
Connection to water supply
Use only the inlet hose supplied with the dishwasher. Do not re-use old or other spare hoses.
The supply pipe must be fitted with a water tap (stopcock). The water tap must be easily accessible,
so that the water can be shut off if the dishwasher has to be moved.
Once the installation is complete, turn on the water tap and allow the pressure to settle for a while.
Check that all connections are watertight.
NOTE!
Only cold water connection is suitable for this appliance.
The water pressure must be between 0.03 and 1.0 MPa.
Connecting a dishwasher to the water supply via certain types of pressure limiting valves may
restrict the water supply! This may cause the error message “Water inlet fault” to be displayed.
If the water pressure is higher than 1.0 MPa a pressure limiting valve must be fitted.
46
Installation
Loading ...
Loading ...
Loading ...