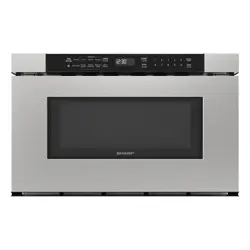

Microwave Oven/ micro-ondes
INSTRUCTION MANUAL
Model/ Modèle:
MDR245SS
BEFORE USE, PLEASE READ AND FOLLOW ALL
SAFETY RULES AND OPERATING INSTRUCTIONS AS
SHOWN IN THIS MANUAL.
Write Serial Number here:
______________________
Felix Storch, Inc.
An ISO 9001:2015 registered
company
Summit Appliance Division
770 Garrison Avenue
Bronx, NY 10474
www.summitappliance.com

2
PRECAUTIONS TO AVOID POSSIBLE
EXPOSURE TO EXCESSIVE
MICROWAVE ENERGY
(a) Do not attempt to operate this oven with the door open since an open-
door operation can result in harmful exposure to microwave energy.
It is important to not tamper with the safety interlocks.
(b) Do not place any object between the oven front face and the door or allows soil or
cleaner residue to accumulate on sealing surfaces.
(c) Do not operate the oven if it is damaged. It is particularly important that
the oven door close properly and that there is no damage to the:
(1) DOOR (bent)
(2) HINGES AND LATCHES (broken or loosened)
(3) DOOR SEALS AND SEALING SURFACES
(d) The oven should not be adjusted or repaired by anyone except properly
qualified service personnel.
Specifications
Model
MDR245SS
Rated Voltage
120V~ 60Hz
Microwave Input
1500W
Microwave Output
1000W

3
IMPORTANT SAFETY INSTRUCTIONS
When using electrical appliances basic safety precautions should be followed, including
the following:
WARNING -
To reduce the risk of burns, electric shock, fire, injury to persons, or exposure
to excessive microwave energy:
1) Read all instructions before using the appliance.
2) Read and follow the specific instructions: " PRECAUTIONS TO AVOID POSSIBLE
EXPOSURE TO EXCESSIVE MICROWAVE ENERGY" found on page 2.
3) This appliance must be grounded. Connect only to a properly grounded outlet.
See " GROUNDING INSTRUCTIONS" found on page 4 for more information.
4) Install or locate this appliance only in accordance with the provided installation
instructions.
5) Some products such as whole eggs and sealed containers - for example, closed glass
jars - can explode and should not be heated in this oven.
6) Use this appliance only for its intended use as described in the manual. Do not use
corrosive chemicals or vapors in this appliance. This type of oven is specifically
designed to heat, cook, or dry food. It is not designed for industrial or laboratory use.
7) As with any appliance, close supervision is necessary when used around children.
8) Do not operate this appliance if it has a damaged cord or plug, if it is not working
properly, or if it has been damaged or dropped.
9) This appliance should be serviced only by qualified service personnel. Contact the
nearest authorized service facility for examination, repair, or adjustment.
10) Do not cover or block any openings on the appliance.
11) Do not store this appliance outdoors. Do not use this product near water - for example,
near a kitchen sink, in a wet basement, near a swimming pool, or a similar location.
12) Do not immerse the cord or plug in water.
13) Keep the cord away from the heated surface.
14) Do not let the cord hang over the edge of the table or counter.
15) When cleaning surfaces of door and oven that comes together on closing the door,
use only mild, nonabrasive soaps, or detergent applied with a sponge or soft cloth.
16) To reduce the risk of fire in the oven cavity:
a) Do not overcook food. Carefully attend to the appliance when paper, plastic, or other
combustible materials are placed inside the oven to facilitate cooking.
b) Remove wire twist-ties from paper or plastic bags before placing the bag in the oven.
c) If material inside of the oven ignites, keep the oven door closed, the urn oven off, and
disconnect the power cord or shut off power at the fuse or circuit breaker panel.
d) Do not use the cavity for storage purposes. Do not leave paper products, cooking
utensils, or food in the cavity when not in use.
17) Liquids, such as water, coffee, or tea can be overheated beyond the boiling point
without appearing to be boiling. Visible bubbling or boiling when the container is
removed from the microwave oven is not always present.

4
THIS COULD RESULT IN VERY HOT LIQUID SUDDENLY BOILING OVER WHEN
THE CONTAINER IS DISTURBED OR A UTENSIL IS INSERTED
INTO THE LIQUID.
To reduce the risk of injury to persons:
• Do not overheat the liquid.
• Stir the liquid both before and halfway through heating it.
• Do not use straight-sided containers with narrow necks.
• After heating, allow the container to stand in the microwave oven for a short time
before removing the container.
• Use extreme care when inserting a spoon or other utensil into the container.
18) Do not operate any heating or cooking appliance beneath the appliance.
19) Do not mount the unit over or near any other heating appliance or cooking appliance.
20) Do not mount over a sink.
21) Do not store anything directly on top of the appliance surface when the appliance is in
operation.

5
GROUNDING INSTRUCTIONS
This appliance must be grounded. In the event of an electrical short circuit, grounding
reduces the risk
of electric shock by providing an escape wire for the electric current. This
appliance is equipped with a cord having a grounding wire with a grounding plug. The plug
must be plugged into an outlet that is properly installed and grounded.
WARNING -
Improper use of the grounding can result in a risk of electric shock.
Consult a qualified electrician or service personnel if the grounding instructions are not
completely understood, or if doubt exists as to whether the appliance is properly grounded.
If it is necessary to use an extension cord, use only a 3-wire extension cord that has a
3-blade grounded plug and 3-slot
receptacle that will accept the plug on the appliance.
The marked rating of the extension cord shall be equal to or greater than the electrical
rating of the appliance.
DANGER - Electric Shock Hazard
Touching some of the internal components can cause serious personal injury or death.
Do not disassemble this appliance.
WARNING - Electric Shock Hazard
Improper use of the grounding can result in electric shock. Do not plug into an outlet until the
appliance is properly installed and grounded
• A short power-supply cord is provided to reduce the risks of entangling or tripping over a
longer cord. Longer cord sets or extension cords are available and may be used if care
is exercised in their use.
• If a long cord or extension cord is used:
o The marked electrical rating of the cord set, or extension cord should be
at least as great as the electrical rating of the appliance.
o The extension cord must be a grounding-type 3-wire cord.
o The longer cord should be arranged so that it will not drape over the
countertop or tabletop where it can be pulled on by children or tripped
over unintentionally.
RADIO INTERFERENCE
1. Operation of the microwave oven may cause interference to your radio, TV, or
similar equipment.
2. When there is interference, it may be reduced or eliminated by taking the following
measures:
1) Clean the door and the seal surface of the oven
2) Reorient the receiving antenna of radio or television.
3) Relocate the microwave oven with respect to the receiver.
4) Move the microwave oven away from the receiver.
Plug the microwave oven into a different outlet so that the microwave oven and receiver
are on different branch circuits.

6
UTENSILS
CAUTION - Personal Injury Hazard
Tightly closed utensils could explode. Closed containers should be opened, and plastic
pouches should be pierced before cooking.
See the instructions on "Materials you can use in microwave oven or be avoided in a
microwave oven."
There may be certain non-metallic utensils that are not safe to use for microwaving. If
in doubt, you can test the utensil in question following the procedure below.
Utensil Test:
1. Fill a microwave-safe container with 1 cup of cold water (250ml) along with the
utensil in question.
2. Cook on maximum power for 1 minute.
3. Carefully feel the utensil. If the empty utensil is warm, do not use it for microwave
cooking.
4. Do not exceed 1 minute of cooking time.
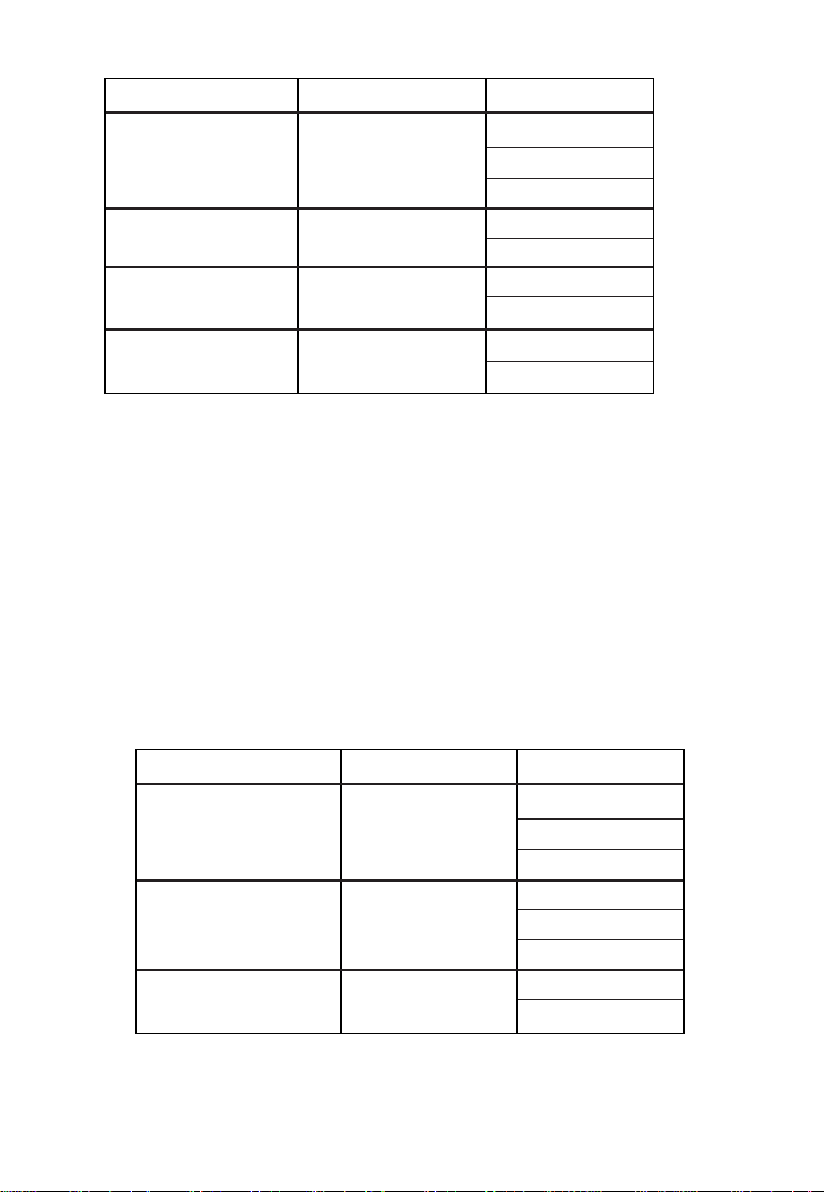
Materials you can use in a microwave oven
Utensils Notes
Browning dish
Dinnerware
Glass jars
Glassware
Oven cooking
bags
Paper plates
and cups
Paper towels
Parchment
paper
Follow manufacturer* instructions. The bottom of the browning dish must
be at least 3/16 inch (5mm) above the turntable. Incorrect usage may
cause the turntable to break.
Microwave-safe only. Follow manufacturer's instructions. Do not use
cracked or chipped dishes.
Always remove lid. Use only to heat food until just warm. Most glass jars
are not heat resistant and may break.
Heat-resistant oven glassware only. Make sure there is no metallic trim.
Do not use cracked or chipped dishes.
Follow manufacturer* instructions. Do not close with a metal tie. Make
slits to allow steam to escape.
Use for short*erm cooking/warming only. Do not leave the oven
unattended while cooking.
Use to cover food for reheating and absorbing fat. Use with supervision
for short-term cooking only.
Use as a cover to prevent splattering or a wrap for steaming.

7
Materials you can use in a microwave oven
Utensils Notes
Plastic
Plastic wrap
Microwave-safe only. Follow the manufacturer* instructions. Should be
labeled "Microwave Safe". Some plastic containers soften, as the food
inside gets hot. "Boiling bags" and tightly closed plastic bags should be
slit, pierced, or vented as directed by the package.
Microwave-safe only. Use to cover food during cooking to retain
moisture. Do not allow plastic wrap to touch food.
Thermometers Microwave-safe only (meat and candy thermometers).
Wax paper Use as a cover to prevent splattering and retain moisture.
Materials to be avoided in a microwave oven
Utensils Notes
Aluminum tray
Food carton with
metal handle
Metal or metal-
trimmed utensils
Metal twist ties
Paper bags
Plastic foam
Wood
May cause arcing. Transfer food into a microwave-safe dish.
May cause arcing. Transfer food into a microwave-safe dish.
Metal shields the food from microwave energy. Metal trim may
cause arcing.
May cause arcing and could cause a fire in the oven.
May cause a fire in the oven.
The plastic foam may melt or contaminate the liquid inside when
exposed to high temperatures.
Wood will dry out when used in the microwave oven and may split
or crack.
8
SETTING UP YOUR OVEN
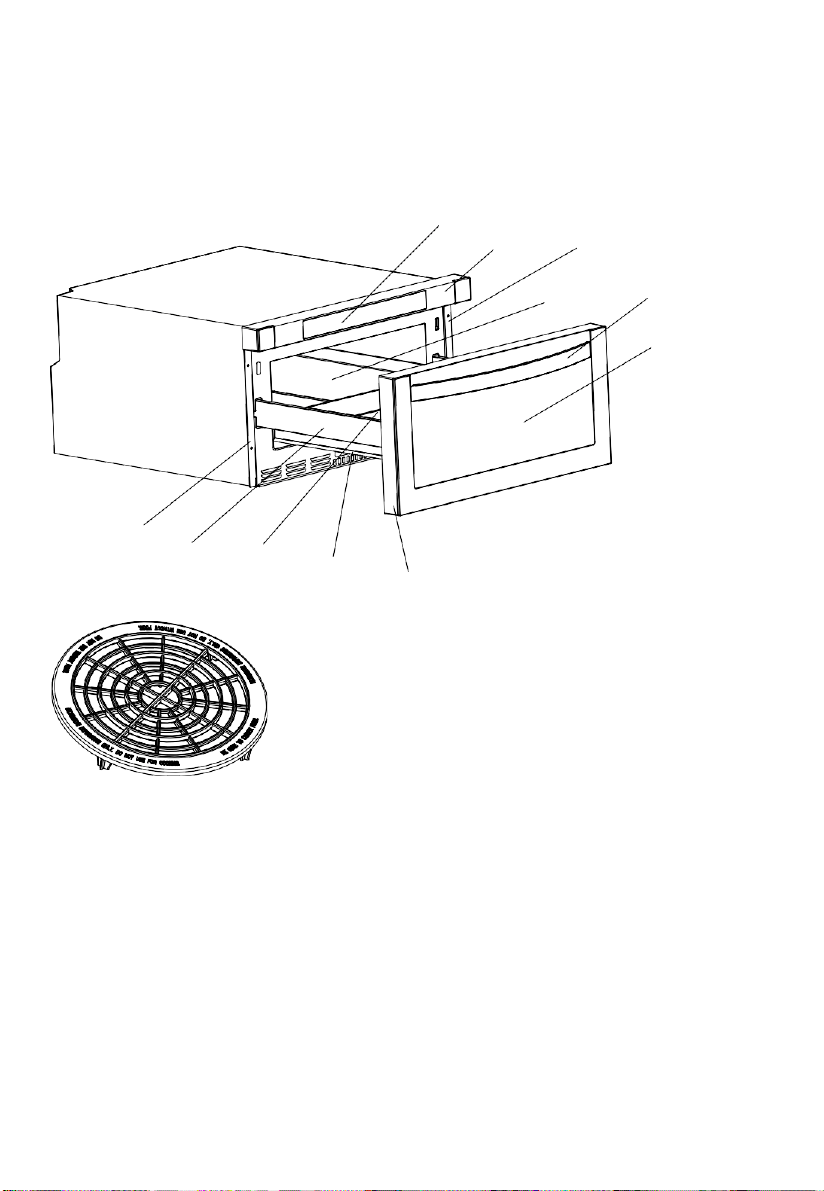
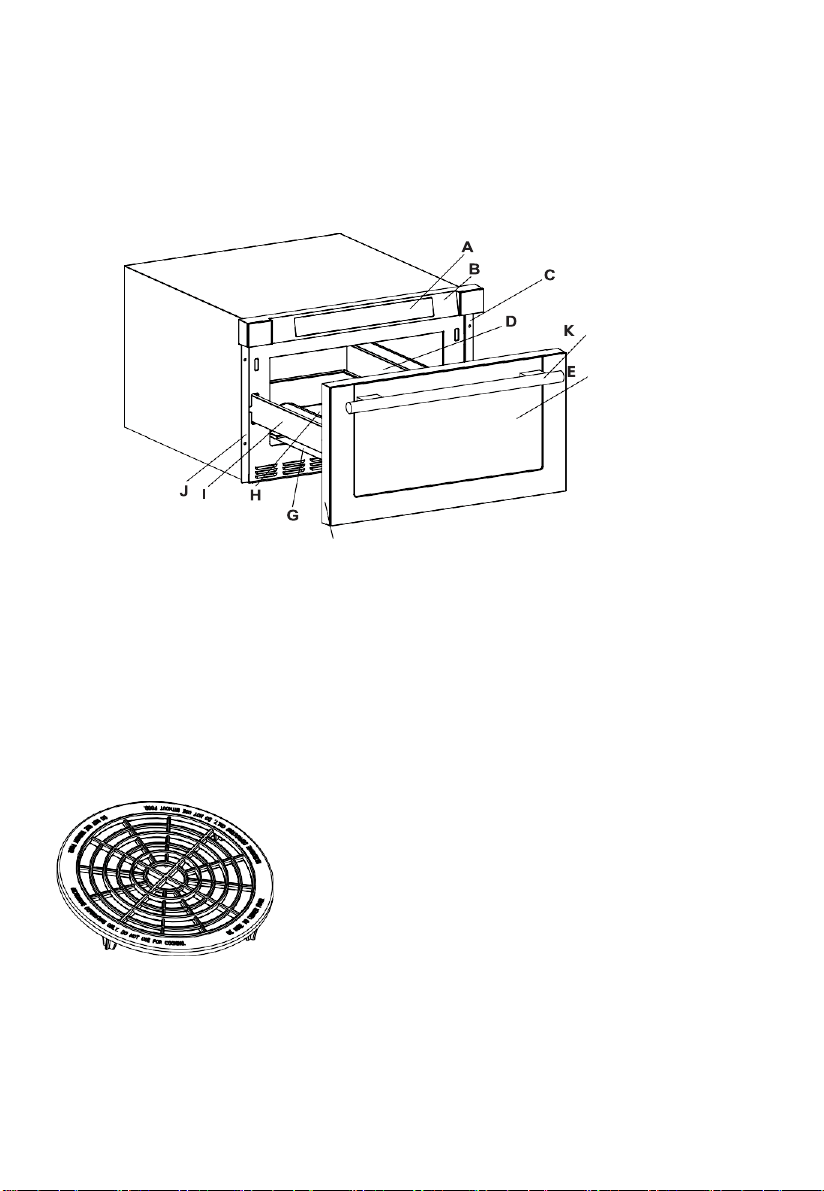
Names of Oven Parts and Accessories
Remove the oven and all materials from the carton and oven cavity.
Your oven comes with the following accessories:
A
B
C
D
E
F
A) Control Patch
K
B) Control Box
J
I
H
C) Right Mounting Plate
G
D) Cavity
E) Handle
F) Windows
G) Door Frame
H) Automatic putter
I) Drawer
J) Hinge Joint Board
K) Left Mounting Plate
Defrosting Rack (Only be used in defrosting function
and do not use for cooking. Do not use without food)
9
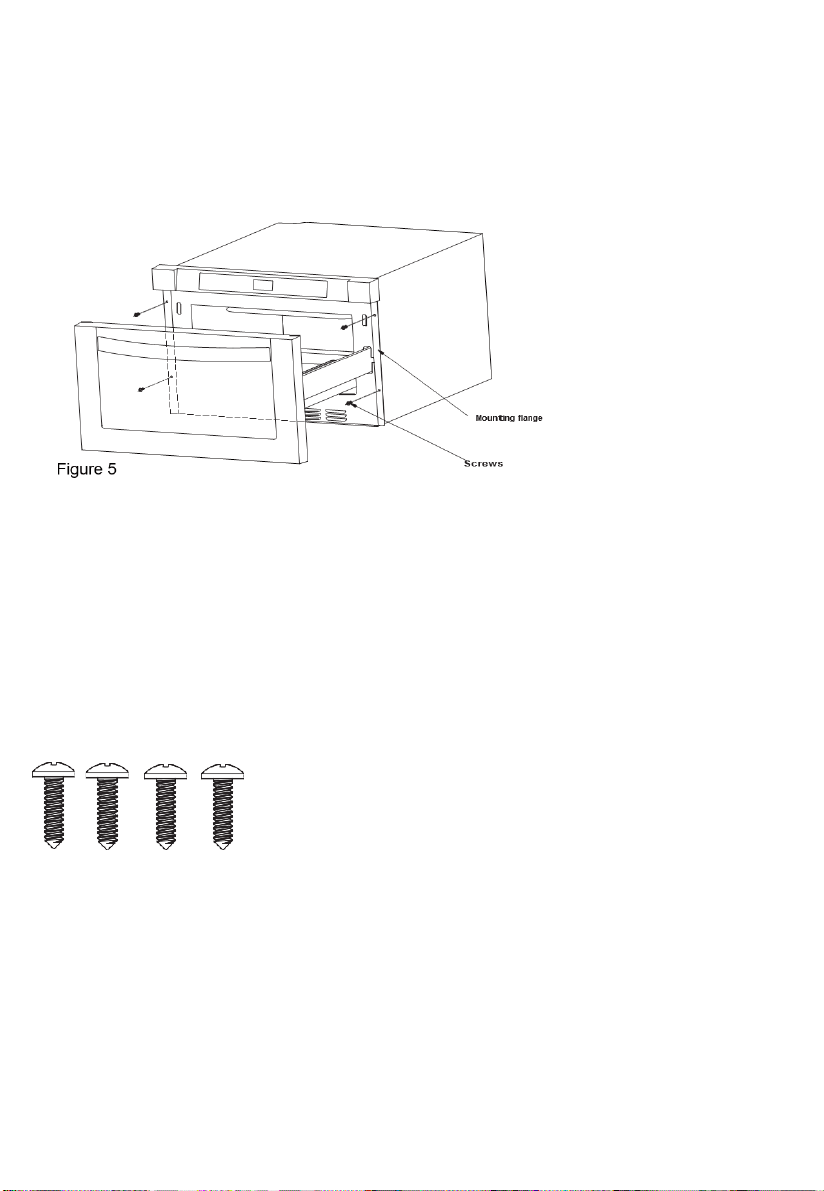
Drawer Installation
1. Place the drawer adjacent to the wall or cabinet opening. Plug the power supply cord into the
electrical outlet.
2. Carefully guide the drawer into the prepared opening. Avoid pinching the cord between the
oven and the wall.
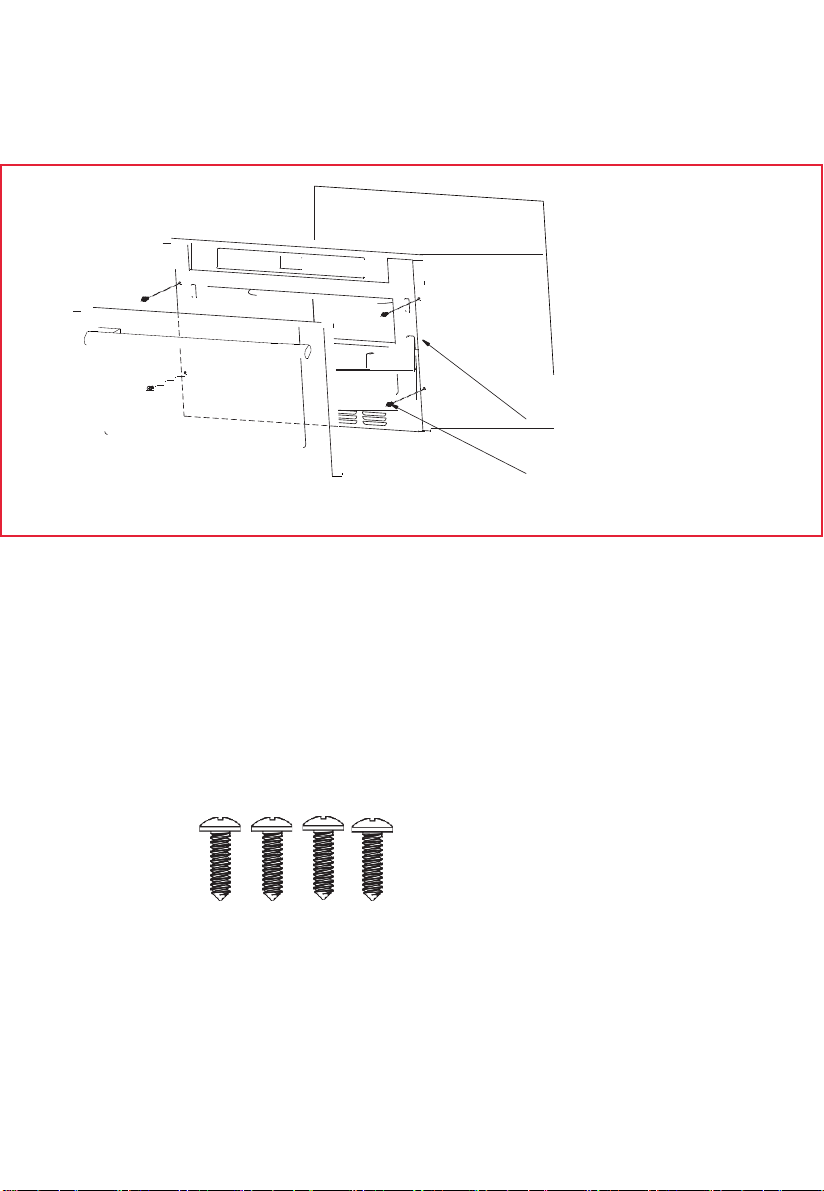
3. Slide the drawer all the way until the mounting flange is flush with the face of the cabinet. See
Figure 5.
4. Open the drawer. Using the 4 holes on the drawer as a template, predrill the cabinet using a
1/16" bit. See Figure 5.
5. Secure the drawer with the 4 screws supplied. See Figure 6.
4 Screws
Figure 6

10
Countertop Installation
Remove all packing material and accessories.
Examine the oven for any damage such as
dents or broken door. Do not install if oven is
damaged.
Cabinet:
Remove any protective film found
on the microwave oven cabinet surface.
Do not remove the light brown Mica cover
that is attached to the oven cavity to
protect the magnetron.
Installation
1.
Select a level surface that provides
enough open space for the intake
and/or outlet vents.
12 inches(30cm)
(3)
Blocking the intake and/or outlet openings
can damage the oven.
(4)
Place the oven as far away from
radios and TV as possible.
Operation of microwave oven may
3.0 inch(7.5cm)
3.0 inch(7.5cm)
OPEN
cause interference to your radio or TV
reception.
2.
Plug your oven into a standard household
outlet. Be sure the voltage and the
frequency are the same as the voltage
and the frequency on the rating label.
WARNING:
Do not install the oven over a
A minimum clearance of 3 inches (7.5cm)
is required between the oven and any
adjacent walls. One side must be open.
(1)
Leave a minimum clearance of 12
inches (30cm) above the oven.
(2)
Do not remove the legs from the
bottom of the oven.
range cooktop or another heat-producing
appliance. If installed near or over a heat
source, the oven could be damaged, and
the warranty would be void.
The accessible surface
may be hot during
operation.

11
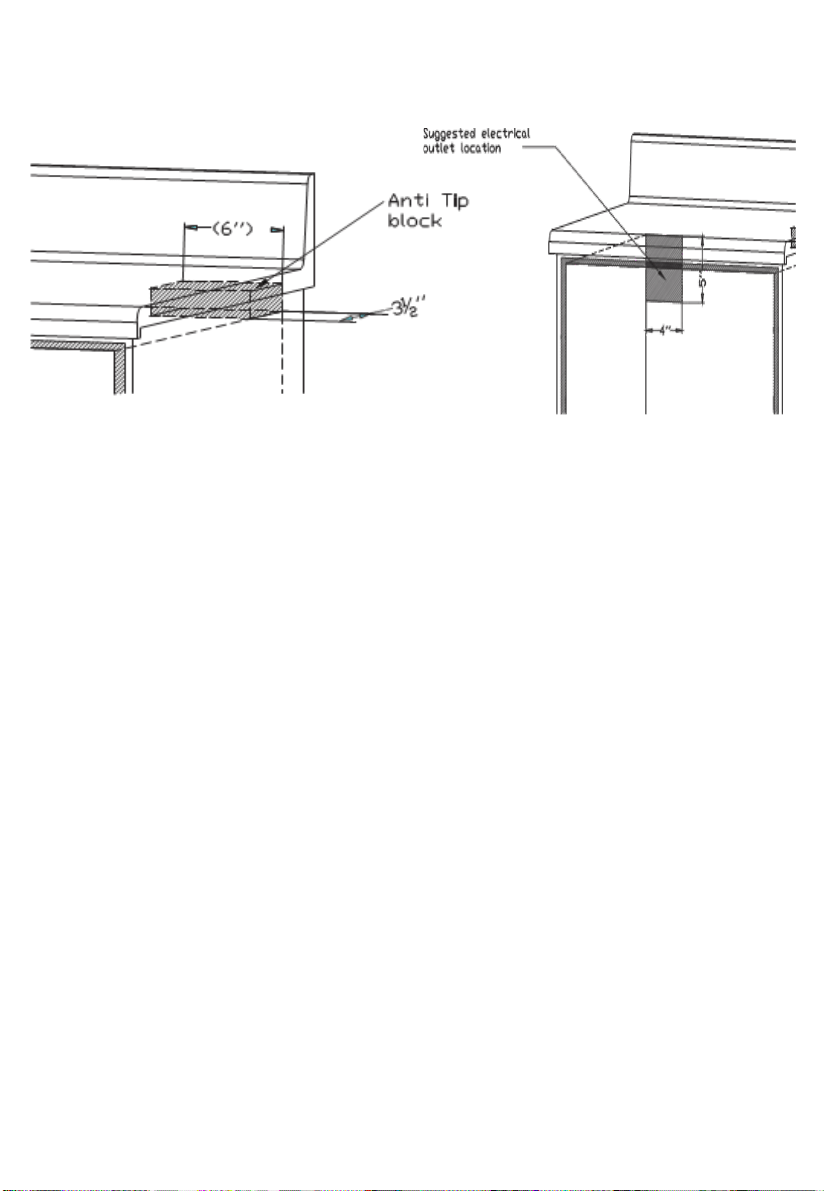
Clearances and Dimensions
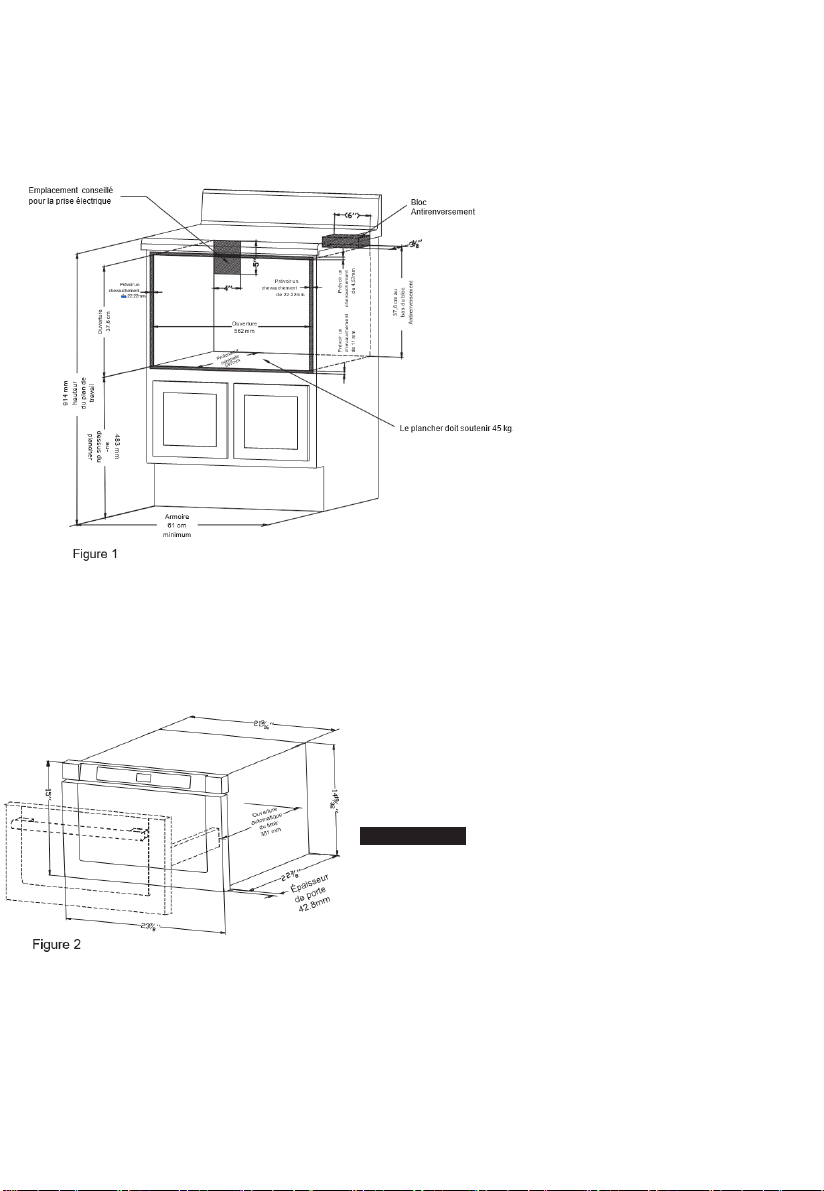
• Dimensions that are shown in
Figure 1 must be used. Given
dimensions provide minimum
clearance. Locate the
electrical outlet in the shaded
area in the upper left-hand
corner of the cutout. See
Figure 3.
• Contact surface must be solid
and level. Pay special
attention to the floor on which
the Microwave Drawer will sit.
The floor of the opening
should be constructed of
plywood strong enough to
support the weight of the oven
(~100 pounds).
• Check the location where the
Microwave Drawer will be
installed for proper electrical
supply
• Your oven can be built into a
cabinet or wall by itself or
under a gas or electric wall
oven.
• Be sure that the clearance of
the floor between the wall
oven and the microwave
drawer is a minimum of 2-
inches.
• The microwave interior will
easily accommodate a 9" x
13" oblong dish or a bag of
microwave popcorn.

12
Microwave Drawer Measurements
Figures 1 and 2 contain many Microwave
Drawer measurements for reference when
planning the drawer's location. This
Microwave Drawer can be installed below
any electric or gas wall oven.
*Can also be installed using an electrical
outlet in an adjacent cabinet within the area
where the provided electrical cord can
reach. The power cord access hole in the
cabinet should be a minimum of 1 1/2" in
diameter and devoid of all sharp edges.
IMPORTANT Always allow sufficient
power cord length to the electrical outlet to
prevent tension Always check electrical
codes for requirements
Figure 1
Figure 2
13
Anti-Tip Block
Figure 3
NORMAL INSTALLATION STEPS
ANTI-TIP BLOCK INSTALLATION
INSTRUCTIONS
To reduce the risk of tipping the
drawer, the Anti-Tip block must be
properly installed and located 13-16
inches above the floor on which the
Microwave Drawer will sit. The 6-inch
Anti-Tip block must be provided by the
installer. See Figures 1 and 3. The
Anti-Tip block prevents serious injury
that might result from spilled hot
liquids.
If the Microwave Drawer is ever moved
to a different location, the Anti-Tip
block must also be moved and
installed, when installed on the wall
make sure that the screws completely
penetrate the drywall and are secured
in wood or metal so that the block is
stable. When fastening, be sure that
the screws do not penetrate electrical
wiring or plumbing.
Electrical Outlet
Figure 4
The electrical requirements are a 120-
volt, 60Hz, AC only,15 amp. or more
protected electrical supply. It is
recommended that a separate circuit
serving only this appliance be
provided.
The drawer is equipped with a 3-prong
grounding plug, it must be plugged into
a wall receptacle that is professionally
installed and grounded. Should you
only have a 2-prong outlet, and have a
qualified electrician install a correct
wall receptacle.
Note: If you have any questions about
the grounding or electrical
Instructions, consult a qualified
electrician or service person.
*Can also be installed using an
electrical outlet in an adjacent cabinet
within the area where the provided
electrical cord can reach.
Always check electrical codes for
requirements.

14
OPERATION
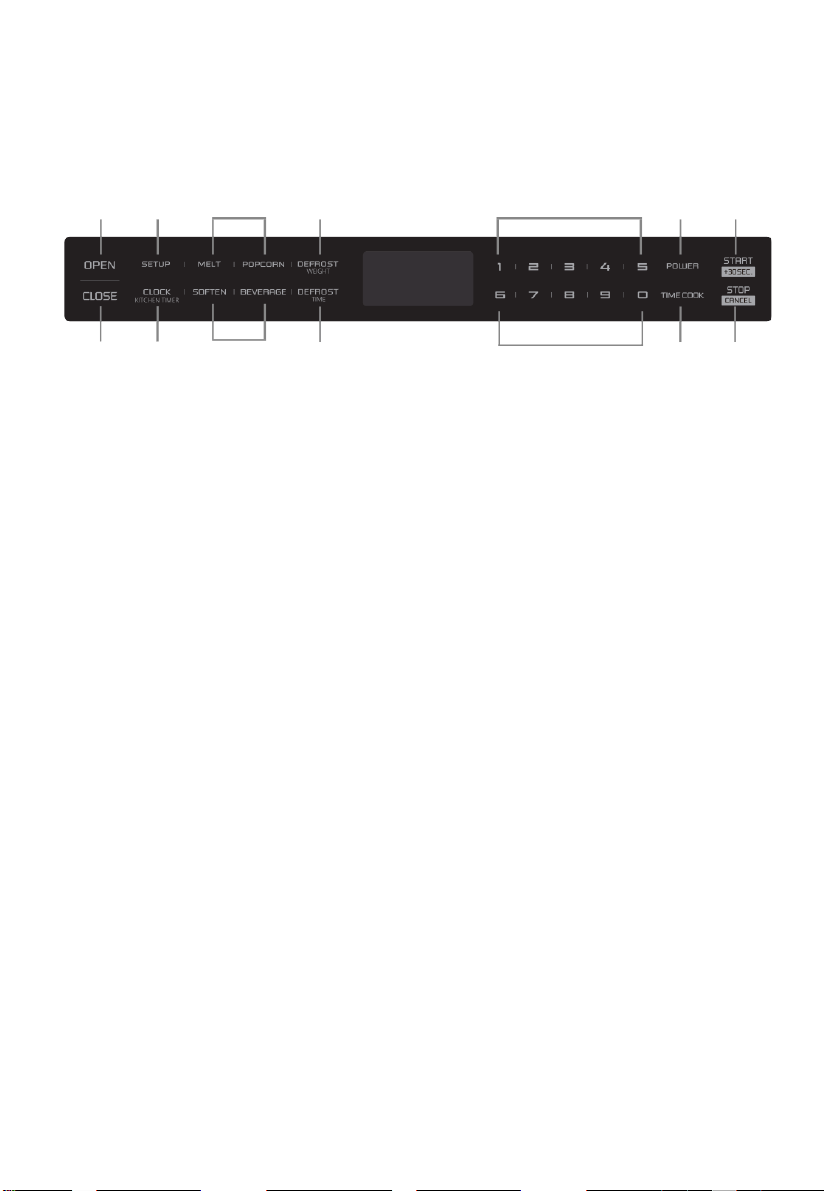
Control Panel and Features
(1)
(2)
(3)
(4)
(8)
(9) (10)
(5)
(6)
(3)
(7)
(8)
(11) (12)
(1) Open
(2) Setup
(3) Auto Menu
(4) Weight Defrost
(5) Close
(6) Clock/Kitchen timer
(7) Time Defrost
(8) Number keys
(9) Power
(10) Start/ +30sec.
(11) Time Cook
(12) Stop/Cancel

15
OPERATION
1. Power On
(1) When the microwave oven is plugged into an outlet, the buzzer sounds once. The screen
will display "WELCOME". Then the oven will enter standby mode. The screen will display
“00:00".
(2) In standby mode, the screen will display the current time if the clock has been
set. Otherwise, "00:00" will display.
(3) Press the "OPEN" button to open the drawer, and the screen displays "OPEN". The
screen will display "PLEASE CLOSE" when the drawer is fully opened.
Press the "CLOSE" button to close the drawer, and the screen displays "CLOSE". The
screen will display the current time or "00:00" when the drawer is fully closed.
If there are mistakes to open or close the drawer, the buzzer will sound five times, and
the screen will display "OPEN OR CLOSE".
2. Clock Setting
(1) Press the "CLOCK/KITCHEN TIMER" button once. First, the hour will flash and the
other "0" will light up.
(2) Press the number buttons to enter the correct time. The input time should be between
01:00 and 12:59.
(3) Press "CLOCK/KITCHEN TIMER" to finish the setting. ":" will flash.
Note: In the process of clock setting, if the "STOP/CANCEL" button is pressed or if there
is no operation within 1 minute, the oven will go back to its former setting
automatically.
3. Kitchen Timer
(1) Press the "CLOCK/KITCHEN TIMER" button twice, Screen will display 00:00.
"FUNCTION" will light.
(2) Press the number buttons to enter the time. The maximum cooking time is 99 minutes
and 99 seconds.
(3) Press "START/+30SEC." to confirm the setting. The time begins to count down.
(4) When the kitchen timer is done, the buzzer will ring 5 times. The oven will enter standby
mode. The screen will display the current time if the clock has been set. Otherwise, Screen
will display "00:00".
Note: 1) The kitchen timer is different from the 12-hour system. The kitchen timer is a timer.
2) In the process of Kitchen Timer operation, any cooking program cannot be
operated.
3) "STOP/CANCEL" can be pressed to cancel the Kitchen Timer.

16
4. Microwave Cooking Function
11 power levels are available.
Level
10
9
8
7
6
5
4
3
2
1
0
Power
100%
90%
80%
70%
60%
50%
40%
30%
20%
10%
0%
Display
PL100
PL90
PL80
PL70
PL60
PL50
PL40
PL30
PL20
PL10
PL00
(1) Press "TIME COOK" button, Screen will display "00:00". "FUNCTION" will light.
Press number buttons to input the cooking time. The maximum cooking time is 99
minutes 99 seconds.
(2) Press the "POWER" button to set the power. The default power level is
"PL100". Press number buttons to select different power levels.
(3) Press "START/+30SEC." to start cooking. The buzzer will sound once. The cooking
time begins to count down. When cooking is finished, the buzzer will sound five
times, and "FINISH" displays.
Note: If the "STOP/CANCEL" button is pressed or if there is no operation within 1
minute, the oven will go back to the former setting automatically.
5. Fast Cooking
(1) In standby mode, instant cooking at 100% power level with 30 seconds' cooking time
can be started by pressing "START/+30SEC". Each press on the same button will
increase cooking time by 30 seconds.
(2) During microwaving and defrost by time, "START/+30SEC." can be pressed to increase
cooking time. Each press will increase by 30 seconds.
Note: "START/+30SEC." cannot be pressed to increase cooking time for defrost by weight
and Auto menu cooking.
6. Weight Defrost Function
(1) Press the "DEFROST WEIGHT" button. The screen will display "WEIGHT
DEFROST". And "FUNCTION" will light.
(2) Press number buttons to input the weight to be defrosted.
The input weight should be between 0.1-6.0 lbs.
(3) Press "START/+30SEC." to start defrosting. The buzzer will sound once. The
defrosting time begins to count down. When cooking is finished, the buzzer will sound
five times, and "FINISH" displays.

17
7. Time Defrost Function
(1) Press the "DEFROST TIME" button. Screen displays "TIME
DEFROST". And "FUNCTION" will light.
(2) Press number buttons to enter the defrosting time between 00:01-99:99.
(3) Press "START/+30SEC." to start defrosting. The buzzer will sound once. The
defrosting time begins to count down. When cooking is finished, the buzzer will sound
five times, and "FINISH" displays.
Note: The defrosting power level is PL30.
8. Auto Menu--Beverage
(1) Press the "BEVERAGE" button. The screen will display "1". "AUTO MENU" and "
" indicators will light.
(2) Continue to press the "BEVERAGE" button, "1" or "2" will display in order.
(3) Press "START/+30SEC." to start cooking. The buzzer will sound once. The cooking
time begins to count down. When cooking is finished, the buzzer will sound five
times, and "FINISH" displays.
9. Auto Menu--Popcorn
(1) Press the "POPCORN" button. Screen displays "1.75". "AUTO MENU" and "OZ"
indicators will light.
(2) Continue to press "POPCORN" button, "1.75", "3" or "3.5" will display in order.
(3) Press "START/+30SEC." to start cooking. The buzzer will sound once. "OZ" will go
out. The cooking time begins to count down. When cooking is finished, the buzzer will
sound five times, and "FINISH" displays.
10. Auto Menu--Melt
(1) Press the "MELT" button. Screen displays "BUTTER". "AUTO MENU" indicator will light.
(2) Continue to press the "MELT" button, "BUTTER", "CHOCOLA", "CHEESE" or
"MARSHMA" will display in order.
(3) Press "START/+30SEC." to confirm the selection.
(4) Press the "MELT" button to select the weight. "OZ" will light except for the butter menu.
(5) Press "START/+30SEC." to start cooking. The buzzer will sound once. "OZ" will go
out. The cooking time begins to count down. When cooking is finished, the buzzer will
sound five times, and "FINISH" displays.
18
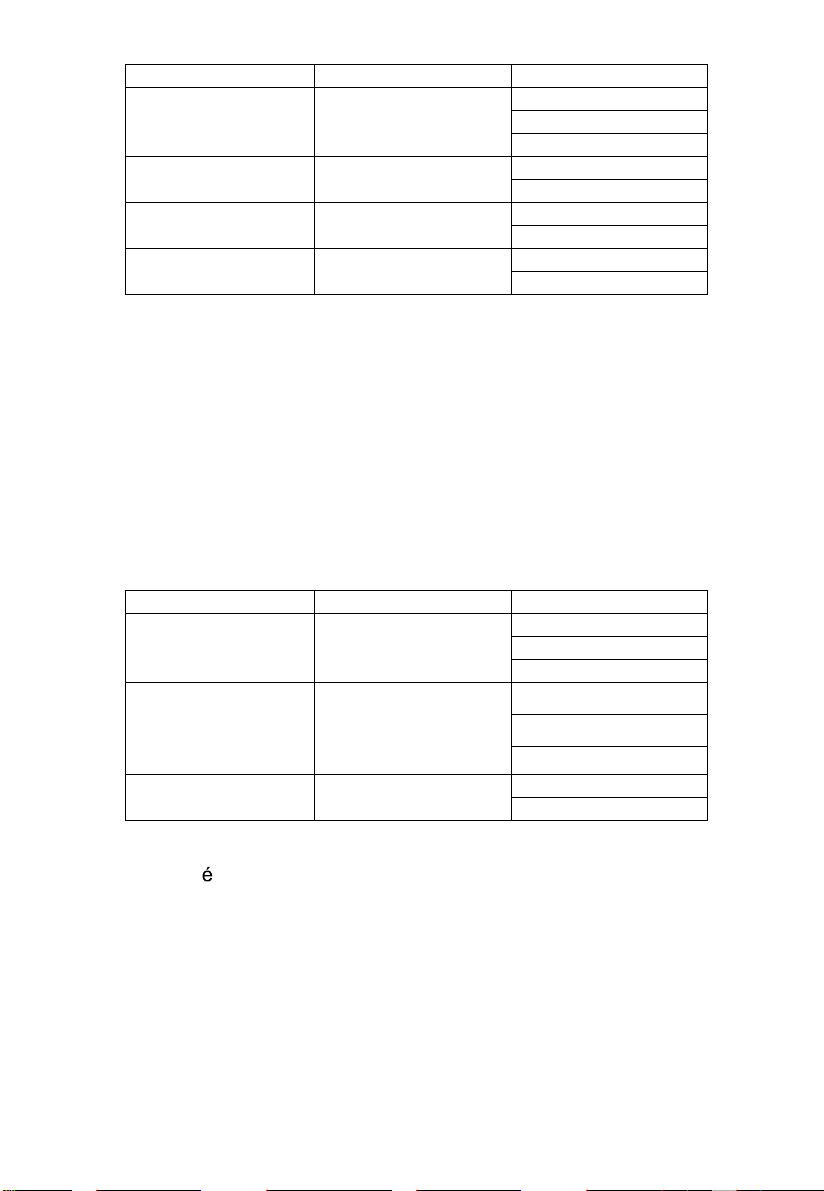
Menu
Display
Weight
Butter/Margarine
BUTTER
1(STICH)
2(STICHS)
3(STICHS)
Chocolate
CHOCOLA
4
8
Cheese
CHEESE
8
16
Marshmallows
MARSHMA
5
10
11. Auto Menu--Soften
(1) Press the "SOFTEN" button. Screen displays "BUTTER". "AUTO MENU" indicator will
light.
(2) Continue to press the "SOFTEN" button, "BUTTER", "ICE-CRE" or "CHEESE" will
display in order.
(3) Press "START/+30SEC." to confirm the selection.
(4) Press the "SOFTEN" button to select the weight. "OZ" will light except for the butter
menu.
(5) Press "START/+30SEC." to start cooking. The buzzer will sound once. "OZ" will go
out. The cooking time begins to count down. When cooking is finished, the buzzer will
sound five times, and "FINISH" displays.
Menu
Display
Weight
Butter
BUTTER
1(STICH)
2(STICHS)
3(STICHS)
Ice cream/ Frozen juice
ICE-CRE
8
16
32
Cream Cheese
CHEESE
3
8

19
12. Buzzer On/Off
(1) Press the "SETUP" button. Screen displays "BUZ OFF".
(2) Press the "START/+30SEC." button. The oven will enter standby mode. The buzzer
is turned off. No beep will sound.
(3) Press the "SETUP" button. Screen displays "BUZ ON".
(4) Press the "START/+30SEC." button. The oven will enter standby mode. The buzzer
is turned on. The buzzer will sound normally.
13. LOCK FUNCTION FOR CHILDREN
Lock: In standby mode, press "STOP/CANCEL" for 3 seconds, and the oven will enter
the children-lock state. The screen will display the current time if the clock has
been set. Otherwise, "00:00" will display.
Lock quitting: In a locked state, press "STOP/CANCEL" for 3 seconds to release the lock.
14. INQUIRING FUNCTION
(1) In the cooking state, press the "CLOCK/KITCHEN TIMER" button to check the
clock. The current time will display for 3 seconds.
(2) In the microwave cooking state, press the "POWER" button to inquire
about the microwave power. The current microwave power will display for 3 seconds.
15. OTHER SPECIFICATIONS
(1) In the cooking state, "OPEN" cannot be pressed to open the drawer unless the
"STOP/CANCEL" button is pressed to pause the cooking. Press the "CLOSE" button to
close the drawer. Then "START/+30SEC." button must be pressed to continue cooking.
(2) If the cooking program has been set, "START/+30SEC." is not pressed in 1 minute, The
current time will be displayed. The setting will be canceled.
(3) If the oven door is open, the lamp will light until the oven is powered off.

20
MAINTENANCE
Troubleshooting
Check your problem by using the chart below and try the solutions for each problem. If the
microwave oven still does not work properly, contact the nearest authorized service center.
TROUBLE
POSSIBLE CAUSE
POSSIBLE REMEDY
The oven will not
start
a.
Electrical cord for the
oven is not plugged in.
b.
Door is open.
c.
The Wrong operation is set.
a.
Plug into the outlet.
b.
Close the door and try
again.
c.
Check instructions.
Arcing or sparking
a.
Materials to be avoided in
microwave oven were
used.
b.
The oven is operated when
empty.
c.
Spilled food remains in the
cavity.
a.
Use microwave-safe
cookware only.
b.
Do not operate with oven
empty.
c.
Clean cavity with wet towel.
Unevenly cooked
a.
Materials to be avoided in
microwave oven were
used.
b.
Food is not defrosted
completely.
c.
Cooking time, power level
is not suitable.
d.
Food is not turned or stirred.
a.
Use microwave-safe
cookware only.
b.
Completely defrost food.
foods
c.
Use correct cooking time,
power level.
d.
Turn or stir food.
Overcooked foods
Cooking time, power level is
not suitable.
Use correct cooking time,
power level.
Undercooked foods
a.
Materials to be avoided in
microwave oven were used.
b.
Food is not defrosted
completely.
c.
Oven ventilation ports are
restricted.
d.
Cooking time, power level is
not suitable.
a.
Use microwave-safe
cookware only.
b.
Completely defrost food.
c.
Check to see that oven
ventilation ports are not
restricted.
d.
Use correct cooking time,
power level.
Improper defrosting
a.
Materials to be avoided in
microwave oven were used.
b.
Cooking time, power level is
not suitable.
c.
Food is not turned or stirred.
a.
Use microwave-safe
cookware only.
b.
Use correct cooking time,
power level.
c.
Turn or stir food.

21
NOTES
22
WARNING: This product can expose you to chemicals including Nickel
(Metallic) which is known to the State of California to cause cancer.
For more information go to www.P65Warnings.ca.gov
Note: Nickel is a component in all stainless steel and some other metallic compositions.
LIMITED WARRANTY
90- DAY LIMITED WARRANTY
Within the 48 contiguous United States, for 90 days from the date of purchase, when this appliance is
operated and maintained according to instructions attached to or furnished with the product, warrantor
will pay for factory-specified parts and repair labor to correct defects in materials or workmanship. Service
must be provided by a designated service company. Outside the 48 states, all parts are warranted for 90
days from manufacturing defects. Plastic parts, shelves and cabinets are warranted to be manufactured
to commercially acceptable standards and are not covered from damage during handling or breakage.
ITEMS WARRANTOR WILL NOT PAY FOR:
1. Service calls to correct the installation of your appliance, to instruct you how to use your appliance, to
replace or repair fuses or to correct wiring or plumbing.
2. Service calls to repair or replace appliance light bulbs or broken shelves. Consumable parts (such as
filters) are excluded from warranty coverage.
3. Damage resulting from accident, alteration, misuse, abuse, fire, flood, acts of God, improper installation,
installation not in accordance with electrical or plumbing codes, or use of products not approved by
warrantor.
4. Replacement parts or repair labor costs for units operated outside the United States.
5. Repairs to parts or systems resulting from unauthorized modifications made to the appliance.
6. The removal and reinstallation of your appliance if it is installed in an inaccessible location or is not
installed in accordance with published installation instructions.
DISCLAIMER OF IMPLIED WARRANTIES; LIMITATION OF REMEDIES
CUSTOMER'S SOLE AND EXCLUSIVE REMEDY UNDER THIS LIMITED WARRANTY SHALL BE
PRODUCT REPAIR AS PROVIDED HEREIN. IMPLIED WARRANTIES, INCLUDING WARRANTIES OF
MERCHANTABILITY OR FITNESS FOR A PARTICULAR PURPOSE, ARE LIMITED TO 90 DAYS.
WARRANTOR SHALL NOT BE LIABLE FOR INCIDENTAL OR CONSEQUENTIAL DAMAGES. SOME
STATES DO NOT ALLOW THE EXCLUSION OR LIMITATION OF INCIDENTAL OR CONSEQUENTIAL
DAMAGES, OR LIMITATIONS ON THE DURATION OF IMPLIED WARRANTIES OF
MERCHANTABILITY OR FITNESS, SO THESE EXCLUSIONS OR LIMITATIONS MAY NOT APPLY
TO YOU. THIS WARRANTY GIVES YOU SPECIFIC LEGAL RIGHTS AND YOU MAY ALSO HAVE
OTHER RIGHTS, WHICH VARY FROM STATE TO STATE.
Summit Appliance
Division of Felix Storch, Inc.
An ISO 9001:2015 registered company
770 Garrison Avenue
Bronx, NY 10474
www.summitappliance.com

23
PRÉCAUTIONS POUR
ÉVITER L'EXPOSITION
POSSIBLE À L'ÉNERGIE MICROONDE
EXCESSIVE
(a) N’essayez pas de faire fonctionner ce four avec la porte ouverte, car cela peut
entraîner une exposition nocive à l’énergie des micro-ondes.
Il est important de ne pas annuler ou altérer les dispositifs de verrouillage de
sécurité.
(b) Ne pas placer un objet entre la face avant et la porte, ou laisser de la saleté ou des
résidus de nettoyage s’accumuler sur les surfaces du joint.
(c) N’utilisez pas le four s’il est endommagé. Il est particulièrement important que la
porte du four se ferme correctement et qu’il n’y ait aucun dommage aux:
(1) PORTE (courbée)
(2) CHARNIÈRES ET LOQUETS (cassés ou desserrés)
(3) JOINTS DE PORTE ET SURFACE D’ÉTANCHÉITÉ
(d) Le four ne doit pas être réglé ou réparé par quelqu’un qui n’est pas un personnel de
dépannage qualifié.
Caractéristiques
Modèle :
MDR245SS
Tension Nominale :
120V~ 60Hz
Puissance Nominale d’Entrée
(micro-ondes) :
1500W
Puissance Nominale de Sortie
(micro-ondes) :
1000W
For parts and accessory ordering,
troubleshooting, and helpful hints,
visit:
www.summitappliance.com/support

24
CONSIGNES DE SÉCURITÉ IMPORTANTES
Lors de l’utilisation d’appareils électriques, des précautions de sécurité de base doivent
être respectées, notamment les suivantes :
ATTENTION — Pour réduire les risques de brûlures, d’électrocution, d’incendie, de
blessures ou d’exposition à une énergie microonde excessive :
1. Lisez toutes les instructions avant d’utiliser l’appareil.
2. Lisez et suivez les spécificités : "PRÉCAUTIONS POUR ÉVITER L'EXPOSITION
POSSIBLE À L'ÉNERGIE MICROONDE EXCESSIVE" à la page 3.
3. Cet appareil doit être mis à la terre. Branchez l’appareil uniquement à une prise
correctement mise à la terre. Voir "INSTRUCTIONS DE MISE À LA TERRE" à la
page 5.
4. Installez ou placez ce four uniquement conformément aux instructions d’installation
fournies.
5. Certains produits tels que les œufs entiers et les récipients scellés — par exemple
bocaux en verre fermés — peuvent exploser et ne doivent pas être chauffés dans un
four à micro-ondes.
6. N’utilisez cet appareil que pour les utilisations prévues décrites dans ce manuel.
N’utilisez pas de produits chimiques ou de vapeurs corrosifs dans cet appareil. Ce
four à microondes est spécialement conçu pour chauffer, cuire ou sécher des
aliments. Il n’est pas conçu pour une utilisation industrielle ou en laboratoire.
7. Comme pour tout appareil, une surveillance étroite est nécessaire lorsqu’il est utilisé
par des enfants.
8. N’utilisez pas ce four si le cordon ou la fiche est endommagé, s’il ne fonctionne pas
correctement, s’il est endommagé ou s’il est tombé.
9. Cet appareil ne doit être entretenu que par du personnel qualifié. Contactez le centre
de service agréé le plus proche pour examen, réparation ou réglage.
10. Ne couvrez ni ne bloquez les ouvertures de l’appareil.
11. Ne rangez pas cet appareil à l’extérieur. N’utilisez pas ce four près de l’eau, par
exemple près d’un évier de cuisine, dans un sous-sol humide, près d’une piscine ou
dans des endroits similaires.
12. N’immergez pas le cordon ou la fiche dans l’eau.
13. Gardez le cordon éloigné des surfaces chaudes.
14. Ne laissez pas le cordon pendre du bord d’une table de travail ou d’un comptoir.
15. Lors du nettoyage des surfaces de la porte et du four qui advient en même temps à la
fermeture de la porte, utilisez uniquement des savons ou détergents doux non
abrasifs appliqués avec une éponge ou un chiffon doux.
16. Pour réduire le risque d’incendie dans la cavité du four :
1). Ne faites pas trop cuire les aliments. Surveillez attentivement l’appareil si vous
avez placé un objet en papier, plastique ou autre matériau combustible dans la
cavité pour faciliter la cuisson.
2). Retirez les attaches métalliques des sacs en papier ou en plastique avant de les
placer dans le four à microondes.
3). Si des matériaux à l’intérieur du four à microondes s’enflamment, gardez la
porte fermée, éteignez le four et débranchez le cordon d’alimentation ou coupez
l’alimentation au niveau du fusible ou du panneau de disjoncteur.

25
4). N’utilisez pas la cavité à des fins de rangement. Ne laissez pas de produits en
papier, d’ustensiles de cuisine ou de nourriture dans la cavité lorsqu’elle n’est
pas utilisée.
17. Les liquides, tels que l’eau, du café ou du thé, peuvent surchauffer au-delà du point
d’ébullition sans avoir l’air de bouillir. Un bouillonnement ou une ébullition visible
lorsque le récipient est retiré du four à microondes n’apparaît pas toujours.
CELA POURRAIT EN RÉSULTER DES LIQUIDES TRÈS CHAUDS QUI
DEVIENNENT SOUDAINEMENT EN ÉBULLITION LORSQUE LE RÉCIPIENT EST
PERTURBÉ OU UN USTENSILE EST INSÉRÉ DANS LE LIQUIDE.
Pour réduire le risque de blessures aux personnes :
1) Ne surchauffez pas le liquide.
2) Remuez le liquide avant et à mi-cuisson.
3) N’utilisez pas de récipients à parois droites à col étroit.
4) Après chauffage, laissez le récipient reposer dans le four à micro-ondes
pendant un court instant avant de retirer le récipient
5) Soyez extrêmement prudent lorsque vous insérez une cuillère ou un autre
ustensile dans le récipient.
18. N’utilisez aucun appareil de chauffage ou de cuisson sous l’appareil.
19. Ne montez pas l’appareil sur ou à proximité d’une partie de l’appareil de chauffage ou
de cuisson.
20. Ne le montez pas au-dessus d’un évier.
21. Ne mettez aucun objet directement sur la surface de l’appareil lorsqu’il est en marche.
CONSERVER CES INSTRUCTIONS

26
INSTRUCTIONS DE MISE À LA TERRE
Cet appareil doit être mis à la terre. En cas de court-circuit, la mise à la terre réduit le
risque d’électrocution en fournissant un fil d’échappement pour le courant électrique. Cet
appareil est équipé avec un fil électrique ayant un conducteur et une prise de terre. La
fiche doit être branchée dans une prise correctement installée et mise à la terre.
ATTENTION — Une mauvaise utilisation de la mise à la terre peut entraîner un risque
d’électrocution.
Consulter un électricien qualifié ou un réparateur si les instructions de mise à la terre ne
sont pas parfaitement comprises ou si un doute existe sur la bonne mise à la terre de
l’appareil. S’il est nécessaire d’utiliser une rallonge, utilisez uniquement une rallonge à
3 fils dotée d’une fiche de mise à la terre à 3 broches et des prises à 3 positions qui
acceptent la fiche de l’appareil. La puissance nominale de la rallonge doit être égale ou
supérieure à la puissance électrique de l’appareil.
DANGER — Risque de décharge électrique
Toucher des composants internes peut causer de graves blessures corporelles ou le décès. Ne
pas démonter cet appareil.
ATTENTION — Risque de décharge électrique
La mauvaise utilisation de la terre peut entraîner une électrocution. Ne pas brancher
l’appareil à une prise de courant tant qu’il n’est pas installé correctement et mis à la terre.
1. Le fil d’alimentation est court pour réduire le risque de le coincer ou de trébucher
dessus s’il est plus long.
2. Des jeux de cordons plus longs ou des rallonges sont disponibles et peuvent être
utilisés si un soin particulier est apporté à leur utilisation.
3. Si vous utilisez un long cordon ou une rallonge :
1) La capacité électrique du fil ou de la rallonge doit être au moins aussi grande
que la capacité de l’appareil.
2) La rallonge doit être à 3 fils avec une mise à la terre.
3) Un long fil d’alimentation doit être mis de façon à ne pas dépasser du comptoir
ou de la table d’où il peut être tiré par des enfants ou faire trébucher.
INTERFÉRENCE RADIO
1. Le fonctionnement du four à microondes peut provoquer des interférences avec
votre radio, télévision ou équipement similaire.
2. Lorsqu’il y a des interférences, elles peuvent être réduites ou éliminées en prenant
les mesures suivantes :
1) Nettoyez la porte et les surfaces d’étanchéité du four
2) Réorientez l’antenne de réception de la radio ou du téléviseur.
3) Déplacez le four à microondes par rapport au récepteur.
4) Éloignez le four à microondes du récepteur.
Branchez le four à microondes dans une autre prise de sorte qu’il se trouve
avec le récepteur sur des circuits de dérivation différents.

27
USTENSILES
ATTENTION — Risque de blessure corporelle
Les ustensiles hermétiquement fermés peuvent exploser. Les récipients fermés doivent
être ouverts et les sachets en plastique doivent être percés avant la cuisson.
Voir les instructions dans "Matériaux que vous pouvez utiliser dans un four à micro-
ondes".
Certains ustensiles non métalliques ne sont pas sûrs pour être utilisés pour le micro-onde.
En cas de doute, vous pouvez tester l’ustensile en question en procédant de la façon
suivante.
Test d’ustensile :
1) Remplir un conteneur à micro-onde avec 250 ml d’eau froide et y déposer l’ustensile.
2) Chauffer à puissance max. pendant 1 minute.
3) Toucher doucement l’ustensile. Si l’ustensile vide est chaud, ne pas l’utiliser pour la
cuisson au micro-onde.
4) Ne pas dépasser 1 minute.
Matériaux que vous pouvez utiliser dans un four à micro-ondes
Ustensiles
Remarques
Plat à rôtir
Suivez les instructions du fabricant *. Le fond du plat doit être à
au moins 5 mm du plateau. Un mauvais usage peut briser le
plateau.
Vaisselle
Allant au four à micro-ondes uniquement. Suivre les instructions
du fabricant. Ne pas utiliser des plats fendus ou ébréchés.
Pots en verre
Toujours retirer le couvercle. Utiliser l’appareil uniquement pour
réchauffer les aliments jusqu’à ce qu’ils soient chauds. La
plupart des pots en verre ne résistent pas à la chaleur et peuvent
casser.
Verrerie
Uniquement le verre résistant à la chaleur. S’assurer qu’il n’y a
pas de garniture métallique. Ne pas utiliser des plats fendus ou
ébréchés.
Sacs de cuisson au
four
Suivez les instructions du fabricant *. Ne pas fermer avec un
couvercle métallique. Fendre l’emballage pour permettre à la
vapeur de s’échapper.
Assiettes et tasses
en papier
N’utiliser que pour la cuisson ou réchauffage court. Ne pas
laisser la cuisson sans surveillance.
Serviettes en
papier
Utiliser pour couvrir les aliments à réchauffer et absorber le gras.
N’utiliser que pour la cuisson courte.
Papier parchemin
Utiliser comme couvercle pour éviter les éclaboussures ou
envelopper pour cuire à la vapeur.
Plastique
Allant au four à micro-ondes uniquement. Suivez les instructions
du fabricant *. Doit être estampillé "Sûr pour le micro-onde".
Certains conteneurs en plastique s’amollissent quand les
aliments deviennent chauds. Les sacs à bouillir et les sacs en
plastique fermés doivent être fendus, percés ou ventilés comme
indiqué sur l’emballage.

28
Ustensiles
Remarques
Enveloppe en
plastique
Allant au four à micro-ondes uniquement. Utiliser pour couvrir les
aliments pendant la cuisson pour retenir l’humidité. Ne pas
laisser l’enveloppe en plastique toucher les aliments.
Thermomètres
Sûr pour le micro-onde uniquement (thermomètres à viande ou
gâteau).
Papier ciré
Utiliser comme couvercle pour éviter les éclaboussures ou
retenir l’humidité.
Matériaux à éviter dans le four à micro-ondes
Ustensiles
Remarques
Plateau en
aluminium
Peut provoquer un arc. Mettre les aliments dans un conteneur
prévu pour micro-ondes.
Carton alimentaire
avec poignée
métallique
Peut provoquer un arc. Mettre les aliments dans un conteneur
prévu pour micro-ondes.
Ustensiles
métalliques ou
recouverts de
métal
Le métal bloque les micro-ondes sur les aliments. Une garniture
métallique peut
provoquer un arc.
Liens métalliques
Peuvent provoquer un arc et entraîner un incendie dans le four.
Sacs en papier
Peuvent prendre feu dans le four.
Mousse en
plastique
La mousse en plastique peut fondre ou contaminer le liquide
contenu en l’exposant à de hautes températures.
Bois
Le bois sèche quand il est utilisé dans le micro-onde et peut se
fendre ou craquer.
29
INSTALLATION DE VOTRE FOUR
Noms des pièces et accessoires du four
Retirer le four et tous les matériaux du carton et dans le four.
Votre four est fourni avec les accessoires suivants:
K
E
F
A)
Panneau de contrôle
B)
Boîtier de commande
C)
Plaque de montage de droite
D)
Cavité
E)
Fenêtres
F)
Cadre de porte
G)
Fermeture en
douceur
automatique
H)
Tiroir
I)
Plaque de charnière articulée
J)
Plaque de montage de
gauche
K)
Poigné
Grille de décongélation (à utiliser
uniquement avec la fonction de
décongélation, ne pas utiliser pour la
cuisson. Ne pas utiliser sans
aliments).
30
INSTALLATION DU TIROIR À MICRO-
ONDES
1.Placez le tiroir à micro-ondes près du mur ou de l’ouverture de l’armoire. Branchez le
cordon d’alimentation à une prise électrique.
2.Accompagnez avec soin le four à tiroir dans l’ouverture que vous avez préparé. Évitez
d’écraser le cordon entre le four et la paroi.
3.Faites glisser entièrement le four à tiroir dans l’ouverture jusqu’à ce que la bride de
montage soit au même niveau que la face de l’armoire. Voir la Figure 5.
4. Ouvrez le tiroir. En utilisant comme gabarit les 4 trous du tiroir, percez au préalable
l’armoire à l’aide d’un forêt de 1,5 mm. Voir la Figure 5.
5. Fixez le four à tiroir à l’aide des 4 vis fournies. Voir la Figure 6.
Bride de montage
Figure 5
Vis
4 vis
Figure 6

31
Installation sur comptoir
Retirer tout le matériel d’emballage et les
accessoires.
Examiner le four pour les dommages tels
que la porte ébréchée ou cassée. NE PAS
installer le four s’il est endommagé.
Armoire : Retirer le film de protection du
four à microondes
qui est fixé à la cavité du four pour
protéger le magnétron.
Installation sur comptoir
Retirer tout le matériel d’emballage et les
accessoires.
Examiner le four pour les dommages tels
que la porte ébréchée ou cassée. NE PAS
installer le four s’il est endommagé.
Armoire : Retirer le film de protection du
four à microondes
Ne pas retirer le mica marron qui est fixé
à la cavité du four pour protéger le
magnétron.
Installation
1. Sélectionner une surface de niveau
ayant assez d’espace pour les évents
d’entrée ou de sortie.
30 cm
7,5 cm OUVRIR
7,5 cm
Vous devez laisser un espace minimal
d’environ 7,5 cm entre le four et toute
paroi adjacente. Un côté doit être libre.
(1)
Laissez un espace minimal d’environ
30 cm au-dessus du four.
(2) Le blocage des ouvertures d’entrée
ou de sortie peut endommager le
four.
(3) Placer le four aussi loin que possible
des radios et télévisions.
Les opérations du four à microondes
peuvent interférer avec la réception
de radio ou télévision.
2. Brancher le four dans une prise de
courant standard. S’assurer que la
tension et la fréquence sont les
mêmes que celles sur la plaque
signalétique.
ATTENTION : Ne pas mettre le four au-
dessus de cuiseurs ou autre appareil
produisant de la chaleur. S’il est installé à
proximité ou au-dessus d’une source de
chaleur, le four pourrait être endommagé
et la garantie annulée.
La surface
accessible
peut être
chaude
pendant les
opérations.

32
DIMENSIONS ET ESPACEMENTS
• Utilisez les dimensions illustrées à la figure
1. Les dimensions indiquées fournissent
l’espacement minimal. Repérez la prise
électrique dans la zone hachurée et dans
le coin supérieur gauche de la découpe.
Voir la Figure 3.
• La surface de contact doit être solide et
plane. Prêtez une attention particulière au
sol sur lequel le tiroir à micro-ondes
reposera. Le plancher de l’ouverture doit
être construit en contreplaqué
suffisamment solide pour soutenir le poids
du four (environ 45 kg).
• Vérifiez que l’endroit où le micro-onde à
tiroir sera installé est bien alimenté en
électricité.
• Votre four peut être intégré dans une
armoire ou un mur, seul ou sous un
four encastré à gaz ou électrique.
• Assurez-vous que l’espacement du
plancher entre le four encastré et le tiroir
à micro-ondes est d’au moins 5 cm.
• L’intérieur du micro-onde peut facilement
accueillir un plat oblong de 22 x 33 cm ou
un sac de pop-corn pour micro-onde.
33
DIMENSIONS DU TIROIR À MICRO-
ONDES
Les figures 1 et 2 fournissent de nombreuses mesures
du micro-ondes à tiroir données à titre de référence pour
choisir l’emplacement d’installation du tiroir. Ce micro-
ondes à tiroir peut être installé sous un four électrique ou
à gaz.
Vous pouvez également l’installer en utilisant une prise
électrique dans une armoire adjacente accessible à
l’aide du cordon électrique fourni. Le trou d’accès au
cordon d’alimentation dans l’armoire doit avoir un
diamètre minimal de 38 mm et être dépourvu de toute
arête vive.
IMPORTANT : prévoyez toujours une longueur
suffisante de cordon électrique jusqu’à la prise de
courant pour éviter toute contrainte. Vérifiez toujours les
codes électriques pour connaître les dispositions.

34
BLOC ANTI-
RENVERSEMENT
PROCÉDURE D’INSTALLATION
NORMALE INSTRUCTIONS
D’INSTALLATION DU BLOC ANTI-
RENVERSEMENT
Pour réduire le risque de renversement du
four à tiroir, installez correctement le bloc
anti-renversement à environ 37,6 cm au-
dessus du plancher sur lequel le micro-
onde à tiroir reposera. L’installateur doit
pourvoir le bloc anti-renversement de 15 cm.
Voir les figures 1 et 3. Le bloc anti-
renversement empêche les blessures
graves qui pourraient résulter de la
projection de liquides chauds.
Si vous déplacez le micro-onde à tiroir à un
autre endroit, vous devrez également
déplacer et installer le bloc anti-
renversement. Dans le cas d’une
installation au mur, assurez-vous que les
vis pénètrent complètement dans le mur
sec et sont fixées solidement dans le
matériau en bois ou en métal de la paroi
afin que le bloc soit totalement stable. Au
moment du serrage des vis, assurez-vous
qu’elles n’entrent pas en contact avec un
câble électrique ou un élément de
tuyauterie.
PRISE
ÉLECTRIQUE
Les besoins en électricité sont de
seulement 120 CA 60Hz 15A ou exigent
une alimentation électrique plus
protégée. Nous vous recommandons de
brancher l’appareil sur un circuit séparé.
Le four à tiroir est équipé d’une fiche à 3
broches dont une de mise à la terre. Elle
doit être branchée à une prise murale
correctement installée et reliée à la terre.
Si vous ne disposez que d’une prise à 2
broches, demandez à un électricien
qualifié d’installer une prise murale
correcte.
Remarque : Si vous avez des questions
concernant la mise à la terre ou les
instructions électriques, consultez un
électricien ou un technicien qualifié.
* Vous pouvez également
l’installer en utilisant une prise
électrique dans une armoire
adjacente accessible à l’aide du
cordon électrique fourni. Vérifiez
toujours les codes électriques
pour les dispositions.
35
FONCTIONNEMENT
Panneau de commande et caractéristiques
(1) (2)
(3)
(4)
(8) (9) (10)
(5) (6) (3)
(7)
(8)
(11) (12)
(1) Ouvrir
(2) Installation
(3) Menu Auto
(4) Poids de décongélation
(5) Fermer
(6) Horloge/minuteur de cuisine
(7) Durée de décongélation
(8) Touches numériques
(9) Puissance
(10) Démarrer/+30 s
(11) Cuisson minutée
(12) Arrêter/annuler

36
FONCTIONNEMENT
1.
Mise sous tension
(1) Dès que vous branchez le microonde à une prise électrique, l’avertisseur sonne
une fois. L’écran affiche "WELCOME". Le four passera en mode veille. L’écran
indique "00:00".
(2) En mode veille, l’écran affiche l’heure actuelle si vous l’avez réglée. Sinon, il
indique "00:00".
(3) Appuyez sur la touche "OPEN" pour ouvrir le tiroir : l’écran affiche "OPEN".
L’écran indiquera "PLEASE CLOSE" lorsque le tiroir est entièrement ouvert.
Appuyez sur la touche "CLOSE" pour fermer le tiroir : l’écran affiche "CLOSE".
L’écran affiche l’heure actuelle ou "00:00" quand le tiroir est entièrement fermé. Si
vous ouvrez ou fermez mal le tiroir, l’avertisseur sonnera cinq fois et l’écran
affichera
"CLOSEOR OPEN"
.
2.
Réglage de l’horloge
(1) Appuyez brièvement sur la touche "CLOCK/KITCHEN TIMER". La première
partie de l’heure se met à clignoter et l’autre partie indique "0".
(2) Appuyez sur les touches numériques pour saisir l’heure correcte. L’heure saisie doit
être comprise entre "01:00" et "12:59".
(3) Appuyez sur "CLOCK/KITCHEN TIMER" pour terminer le réglage de l’heure. Le
symbole " : " se met à clignoter.
Remarque : Au cours du réglage de l’horloge, si vous appuyez sur la touche
"STOP/CANCEL" ou si vous n’effectuez aucune opération pendant 1 minute, le
four revient automatiquement au réglage précédent.
3.
Minuteur de cuisine
(1) Appuyez deux fois sur la touche "CLOCK/KITCHEN TIMER" : l’écran affiche
"00:00" et l’indicateur "FUNCTION" s’allume.
(2) Appuyez sur les touches numériques pour saisir la durée de cuisson. La durée
maximale de cuisson est de 99 minutes et 99 secondes.
(3) Appuyez sur la touche "START/+30SEC" pour confirmer le réglage. Le compte à
rebours de cuisson démarre.
(4) Une fois le compte à rebours terminé, l’avertisseur sonnera 5 fois. Le four
repassera en mode veille. L’écran affichera l’heure actuelle si vous l’avez réglée.
Sinon, il indiquera "00:00".
Remarque :
1) Le minuteur de cuisine fonctionne différemment de l’horloge sur 12 heures. Le
minuteur de cuisine est à tous les effets un minuteur.
2) Pendant le fonctionnement du minuteur de cuisine, aucun programme de
cuisson ne peut être utilisé.
3) Appuyez sur la touche "STOP/CANCEL" pour désactiver le minuteur de
cuisine.

37
4.
Fonction de cuisson au microonde
11 niveaux de puissance sont à votre disposition.
Niveau
10
9
8
7
6
5
4
3
2
1
0
Puissance
100 %
90%
80%
70%
60%
50%
40%
30%
20%
10%
0 %
Affichage
PL100
PL90
PL80
PL70
PL60
PL50
PL40
PL30
PL20
PL10
PL00
(1) Appuyez sur la touche "TIME COOK" : l’écran affiche "00:00" et l’indicateur
"FUNCTION" s’allume. Appuyez sur les touches numériques pour saisir la durée
de cuisson. La durée maximale de cuisson est de 99 minutes et 99 secondes.
(2) Appuyez sur la touche "POWER" pour régler la puissance. Le niveau de
puissance par défaut est "PL100". Appuyez sur les touches numériques pour
sélectionner un niveau de puissance différent.
(3) Appuyez sur la touche "START/+30SEC" pour démarrer la cuisson. L’avertisseur
sonne une fois. Le compte à rebours de cuisson démarre. Une fois la cuisson
terminée, l’avertisseur sonne cinq fois et l’indication "FINISH" s’affiche.
Remarque : Au cours du réglage, si vous appuyez sur la touche "STOP/CANCEL" ou si
vous n’effectuez aucune opération pendant 1 minute, le four revient
automatiquement au réglage précédent.
5.
Cuisson rapide
(1) En mode veille, vous pouvez lancer la cuisson immédiate à 100 % de la puissance
pendant une durée de cuisson de 30 secondes en appuyant sur la touche
"START/+30SEC". Chaque fois que vous appuyez sur cette touche, vous
augmentez la durée de cuisson de 30 secondes.
(2) Pendant la cuisson au microonde ou une décongélation minutée, appuyez sur la
touche "START/+30SEC" pour augmenter la durée de cuisson ou de
décongélation. Chaque appui augmente la durée de 30 secondes.
Remarque : cette opération n’est pas disponible si vous appuyez sur la touche
"START/+30SEC" pour augmenter la durée de décongélation par poids ou la
durée de la cuisson démarrée à partir du menu "Auto".
6.
Fonction de décongélation par poids
(1) Appuyez sur la touche "DEFROST WEIGHT". L’écran affiche l’indication
"WEIGHT DEFROST"
L’indicateur "FUNCTION" s’allume également.
(2) Appuyez sur les touches numériques pour saisir le poids de l’aliment à décongeler.
Le poids doit être compris entre 0,1 et 6 livres (soit entre 45 g et 2,7 kg).
(3) Appuyez sur la touche "START/+30SEC" pour démarrer la décongélation.
L’avertisseur sonne une fois. Le compte à rebours de décongélation démarre. Une
fois la cuisson terminée, l’avertisseur sonne cinq fois et l’indication "FINISH"
s’affiche.
7.
Fonction de décongélation minutée
(1) Appuyez sur la touche "DEFROST TIME". L’écran affiche l’indication "TIME
DEFROST". L’indicateur "FUNCTION" s’allume également.

38
(2) Appuyez sur les touches numériques pour saisir la durée de décongélation entre
"00:01" et "99:99".
(3) Appuyez sur la touche "START/+30SEC" pour démarrer la décongélation.
L’avertisseur sonne une fois. Le compte à rebours de décongélation démarre. Une
fois la cuisson terminée, l’avertisseur sonne cinq fois et l’indication "FINISH"
s’affiche.
Remarque : Le niveau de puissance pour la décongélation est "PL30".
8.
Menu Auto — Boisson
(1) Appuyer sur la touche "BEVERAGE". L’écran affiche "1". Les indicateurs
"AUTO MENU" et " " s’allument.
(2) Appuyez de nouveau sur la touche "BEVERAGE", l’écran affiche ""1" ou "2"
dans l’ordre.
(3) Appuyez sur la touche "START/+30SEC" pour démarrer la cuisson. L’avertisseur
sonne une fois. Le compte à rebours de cuisson démarre. Une fois la cuisson
terminée, l’avertisseur sonne cinq fois et l’indication "FINISH" s’affiche.
9.
Menu Auto — Pop-corn
(1) Appuyer sur la touche "POPCORN". L’écran affiche "1.75". Les indicateurs
"AUTO MENU" et "OZ" s’allument.
(2) Appuyez de nouveau sur la touche "POPCORN", l’écran affiche "1.75", "3" ou
"3.5" dans l’ordre.
(3) Appuyez sur la touche "START/+30SEC" pour démarrer la cuisson. L’avertisseur
sonne une fois. L’indicateur "OZ" s’éteint. Le compte à rebours de cuisson
démarre. Une fois la cuisson terminée, l’avertisseur sonne cinq fois et l’indication
"FINISH" s’affiche.
10.
Menu Auto — Fondu
(1) Appuyer sur la touche "MELT". L’écran affiche "BUTTER". L’indicateur "AUTO
MENU" s’allume.
(2) Appuyez de nouveau sur la touche "MELT", l’écran affiche "CHOCOLA",
"CHEESE" ou "MARSHMA" dans l’ordre.
(3) Appuyez sur la touche "START/+30SEC" pour confirmer la sélection.
(4) Appuyez sur la touche "MELT" pour sélectionner le poids. L’indicateur "OZ"
s’allumera sauf pour l’option de menu "BUTTER".
(5) Appuyez sur la touche "START/+30SEC" pour démarrer la cuisson. L’avertisseur
sonne une fois. L’indicateur "OZ" s’éteint. Le compte à rebours de cuisson
démarre. Une fois la cuisson terminée, l’avertisseur sonne cinq fois et l’indication
"FINISH" s’affiche.
39
Menu
Affichage
Poids
Beurre/margarine
BUTTER
1 (STICH)
2 (STICHS)
3 (STICHS)
Chocolat
CHOCOLA
4
8
Fromage
CHEESE
8
16
Guimauves
MARSHMA
5
10
11.
Menu Auto — Ramollir
(1) Appuyer sur la touche "SOFTEN". L’écran affiche "BUTTER". L’indicateur
"AUTO MENU" s’allume.
(2) Appuyez de nouveau sur la touche "SOFTEN", l’écran affiche "ICE-CRE" ou
"CHEESE" dans l’ordre.
(3) Appuyez sur la touche "START/+30SEC" pour confirmer la sélection.
(4) Appuyez sur la touche "SOFTEN" pour sélectionner le poids. L’indicateur "OZ"
s’allumera sauf pour l’option de menu "BUTTER".
(5) Appuyez sur la touche "START/+30SEC" pour démarrer la cuisson. L’avertisseur
sonne une fois. L’indicateur "OZ" s’éteint. Le compte à rebours de cuisson
démarre. Une fois la cuisson terminée, l’avertisseur sonne cinq fois et l’indication
"FINISH" s’affiche.
Menu
Affichage
Poids
Beurre/margarine
BUTTER
1 (STICH)
2 (STICHS)
3 (STICHS)
Glace/Jus surgele
ICE-CRE
8
16
32
Fromage Frais
CHEESE
3
8
12.
Activation/d sactivation de l’avertisseur
(1) Appuyer sur la touche "SETUP". L’écran affiche "BUZ OFF".
(2) Appuyez sur la touche "START/+30SEC". Le four repassera en mode veille.
L’avertisseur est désactivé. Aucune sonnerie ne retentira.
(3) Appuyer sur la touche "SETUP". L’écran affiche "BUZ ON".
(4) Appuyez sur la touche "START/+30SEC". Le four repassera en mode veille.
L’avertisseur est activé. L’avertisseur sonne normalement.

40
13.
FONCTION DE VERROUILLAGE POUR ENFANTS
Verrouillage : en mode veille, appuyez sur la touche "STOP/CANCEL" pendant
3 secondes. Le four sera verrouillé pour éviter toute
manipulation par des enfants. L’écran affichera l’heure actuelle
si vous l’avez réglée. Sinon, il indique "00:00".
Déverrouillage : en mode verrouillé, appuyez sur la touche "STOP/CANCEL"
pendant 3 secondes pour déverrouiller le four.
14.
FONCTION D’INFORMATIONS
(1) En mode cuisson, appuyez sur la touche "CLOCK/KITCHEN TIMER" pour
vérifier
l’horloge. L’heure actuelle s’affiche pendant 3 secondes.
(2) En mode cuisson au micro-onde, appuyez sur la touche "POWER" pour
vérifier la puissance micro-onde. La puissance micro-onde actuelle
s’affiche pendant
3 secondes.
15.
AUTRES SPÉCIFICATIONS
(1) Si vous appuyez bien sur les commandes, l’avertisseur sonne une
fois, sinon l’avertisseur ne sonnera pas.
(2) En mode cuisson, vous ne pouvez pas appuyer sur la touche "OPEN" pour
ouvrir le tiroir à moins que vous ayez appuyé sur la touche
"STOP/CANCEL" pour interrompre la cuisson. Appuyez sur la touche
"CLOSE" pour fermer le tiroir. Appuyez ensuite sur la touche
"START/+30SEC" pour reprendre la cuisson.
(3) Une fois le programme de cuisson réglé, n’appuyez pas sur la touche
"START/+30SEC" pendant 1 minute. L’heure actuelle s’affichera sur l’écran. Le
programme est annulé.
(4) Si vous ouvrez la porte du four, la lampe reste allumée tant que vous
n’éteignez pas le four

41
MAINTENANCE
Dépannage
Recherchez votre problème dans le tableau ci-dessous et essayez les solutions proposées
pour le résoudre. Si le four à microondes ne fonctionne toujours pas correctement, contactez
le centre de service agréé le plus proche.
PROBLÈME
CAUSES POSSIBLES
SOLUTIONS POSSIBLES
Le four ne démarre pas
a. Le cordon électrique du
b. four n’est pas branché.
c. La porte est ouverte.
d. Mauvaise opération
choisie.
a. Branchez l’appareil à une prise
électrique.
b. Fermez la porte et
réessayez.
c. Consultez le guide
d’utilisation.
Arc ou étincelle
a. Vous avez introduit des
matériaux qu’il faut éviter
d’utiliser dans un four à
microondes.
b. Le four est utilisé à vide.
c. La cavité contient de la
nourriture renversée.
a. Utilisez uniquement des plats
allant au four à microondes.
b. N’utilisez pas le four à
vide.
c. Nettoyez la cavité avec une
serviette humide.
Aliments mal cuits
a. Vous avez introduit des
matériaux qu’il faut éviter
d’utiliser dans un four à
microondes.
b. Les aliments ne sont pas
entièrement décongelés.
c. Temps de cuisson ou niveau
de puissance inapproprié.
d. Les aliments ne sont ni
retournés ni remués.
a. Utilisez uniquement des plats
allant au four à microondes.
b. Décongelez entièrement les
aliments.
c. Utilisez un temps de cuisson ou
un niveau de puissance
approprié.
d. Retournez ou remuez les
aliments.
Aliments trop cuits
Temps de cuisson ou niveau de puissance
inapproprié.
Utilisez un temps de cuisson
ou un niveau de puissance approprié.
Aliments insuffisamment
cuits
a. Vous avez introduit des
matériaux qu’il faut éviter
d’utiliser dans un four à
microondes.
b. Les aliments ne sont pas
entièrement décongelés.
c. Les orifices de ventilation du four
sont obstrués.
d. Temps de cuisson ou
niveau de puissance inapproprié.
a. Utilisez uniquement des plats
allant au four à microondes.
b. Décongelez entièrement les
aliments.
c. Vérifiez que les orifices de
ventilation du four ne sont pas
obstrués.
d. Utilisez un temps de
cuisson ou un niveau de puissance
approprié.
Décongélation incorrecte
a. Vous avez introduit des
matériaux qu’il faut éviter
d’utiliser dans un four à
microondes.
b. Temps de cuisson ou niveau
de puissance
inapproprié.
c. Les aliments ne sont ni retournés
ni remués.
a. Utilisez uniquement des plats
allant au four à microondes.
b. Utilisez un temps de cuisson ou
un niveau de puissance
approprié.
c. Retournez ou remuez les
aliments.

42
GARANTIE LIMITÉE
GARANTIE LIMITÉE DE 90 JOURS
Dans les 48 États américains contigus, pendant 90 jours à compter de la date d’achat, lorsque cet
appareil est utilisé et entretenu conformément aux instructions jointes au produit ou fournies avec celui-ci,
le garant paiera pour l’usine. . .pièces spécifiées et main-d’œuvre de réparation pour corriger les défauts
dans les matériaux ou la fabrication. Le service doit être fourni par une entreprise de service désignée. En
dehors des 48 états, toutes les pièces sont garanties pendant 90 jours à partir des défauts de fabrication.
Il est garanti que les pièces, les étagères et les armoires en plastique sont fabriquées conformément aux
normes commerciales acceptables et ne sont pas couvertes contre les dommages pendant la
manutention ou la rupture.
LA GARANTIE DES ARTICLES NE PAIERA PAS :
1. Appels de service pour corriger l’installation de votre appareil, pour vous indiquer comment
utiliser votre appareil, pour remplacer ou réparer les fusibles ou pour corriger le câblage ou la
plomberie.
2. Appels de service pour réparer ou remplacer des ampoules ou des étagères brisées. Les
pièces consommables (comme les filtres) ne sont pas couvertes par la garantie.
3. Dommages résultant d’un accident, d’une altération, d’un mauvais usage, d’un abus, d’un
incendie, d’une inondation, d’une mauvaise installation, d’une installation non conforme aux
codes d’électricité ou de plomberie, ou de l’utilisation de produits non approuvés par le garant.
4. Pièces de rechange ou coûts de main-d’œuvre de réparation pour les unités exploitées à
l’extérieur des États-Unis.
5. Réparations de pièces ou de systèmes résultant de modifications non autorisées apportées à
l’appareil.
6. Le retrait et la réinstallation de votre appareil s’il est installé dans un endroit inaccessible ou
n’est pas installé conformément aux instructions d’installation publiées.
EXCLUSION DE GARANTIE IMPLICITE ; LIMITATION DES RECOURS
LE SEUL ET EXCLUSIF RECOURS DU CLIENT EN VERTU DE CETTE GARANTIE LIMITÉE SERA LA
RÉPARATION DU PRODUIT CONFORMÉMENT AUX PRÉSENTES. LES GARANTIES IMPLICITES, Y
COMPRIS LES GARANTIES DE QUALITÉ MARCHANDE OU D’ADÉQUATION À UN USAGE
PARTICULIER, SONT LIMITÉES À 90 JOURS. LE GARANT NE SERA PAS RESPONSABLE DES
DOMMAGES ACCESSOIRES OU CONSÉCUTIFS. CERTAINS ÉTATS N’AUTORISENT PAS
L’EXCLUSION OU LA LIMITATION DE DOMMAGES ACCESSOIRES OU CONSÉCUTIFS, OU LES
LIMITES DE LA DURÉE DES GARANTIES IMPLICITES DE QUALITÉ MARCHANDE OU
D’ADAPTATION, DE SORTE QUE CES EXCLUSIONS OU LIMITATIONS PEUVENT NE PAS
S’APPLIQUER À VOUS. CETTE GARANTIE VOUS CONFÈRE DES DROITS JURIDIQUES
SPÉCIFIQUES ET VOUS POUVEZ AVOIR D’AUTRES DROITS QUI VARIENT D’UN ÉTAT À L’AUTRE.
Summit Appliance
Division of Felix Storch, Inc.
An ISO 9001:2015 registered company
770 Garrison Avenue
Bronx, NY 10474
www.summitappliance.com
For parts and accessory ordering,
troubleshooting, and helpful hints,
visit:
www.summitappliance.com/support