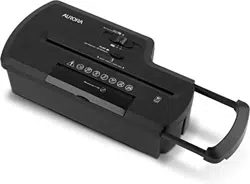
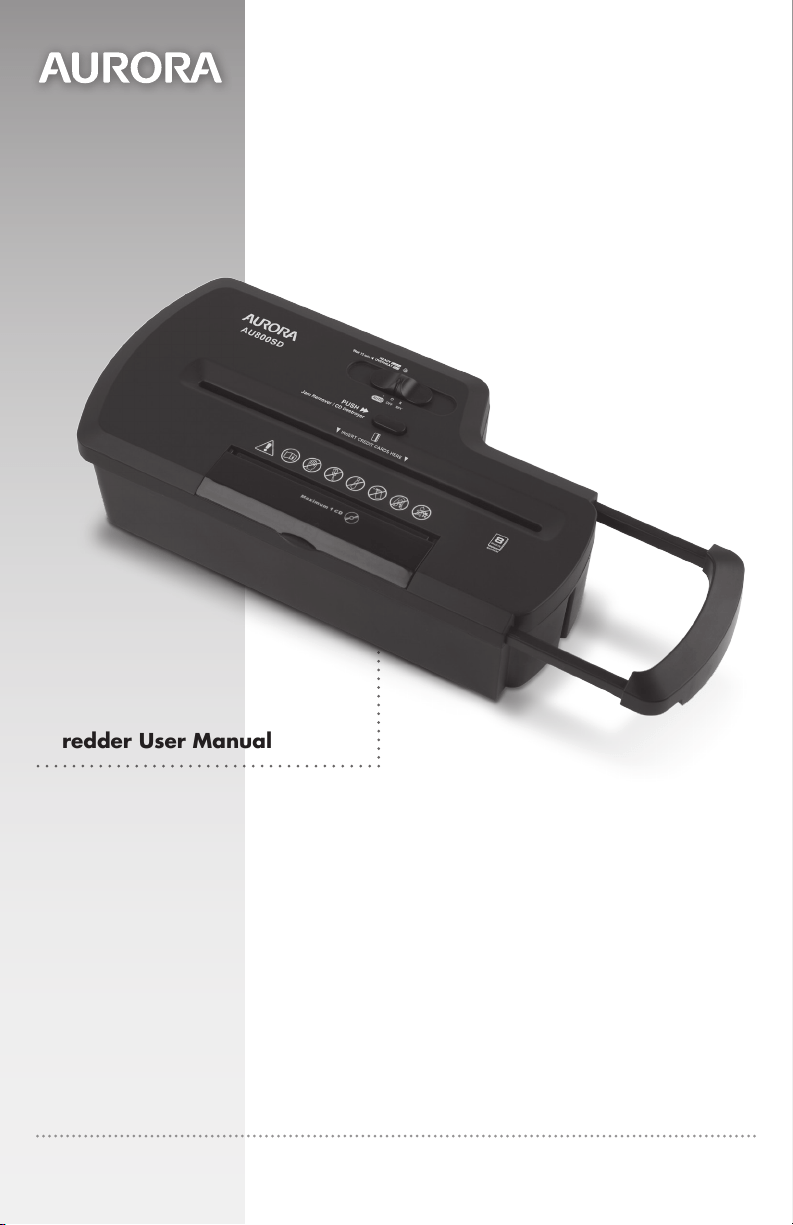
AU800SD
Model No.
Modelo No.
1-800-327-8508
USA Only • Los Estados Unidos Solomente
1-310-793-5650
International • Internacional
Email: [email protected]
For more information, please visit us at:
www.auroracorp.com
Please read these operating instructions before using the unit.
Antes de operar esta unida, por favor lea todas las instrucciones.
Shredder User Manual
Manual del usuario de la trituradora

3ENGLISH
WARNING
:
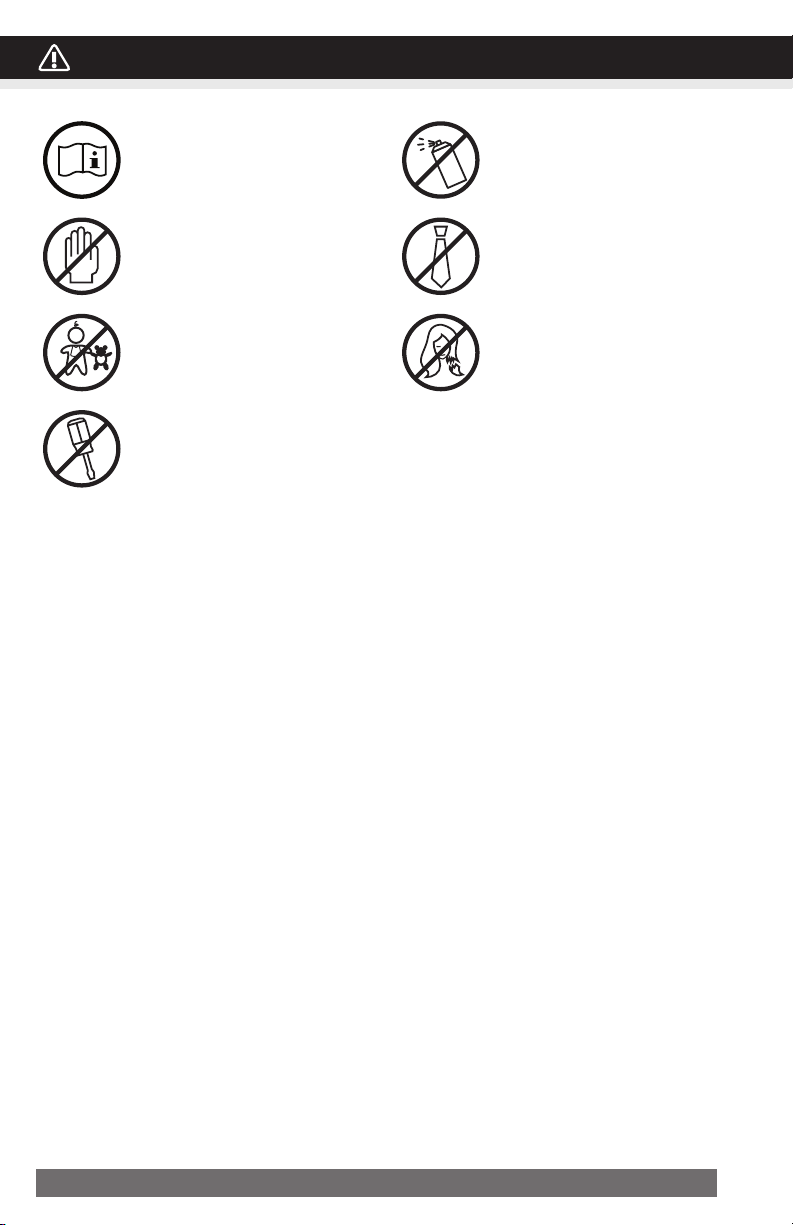
SAFETY INSTRUCTIONS, READ BEFORE USING!
Read instructions before use.
Avoid touching the document
feed opening with hands.
Product is not intended for use by
children (product is not a toy).
Do not insert foreign objects into
the paper entry slot.
Do not spray or keep any
aerosol products in or around the
shredder.
Keep loose clothing or jewelry
away from the paper entry slot.
Avoid getting hair near the
paper entry slot.
•AlwaysturntheshredderoffandunplugthepowercordfromtheACoutletwhen
notinuse,beforecleaningit,movingit,oremptyingthewastebasket.
•RISKOFFIRE-Seriousinjury,lossordamagemayoccur. Never use any petroleum based
or flammable oils, spray can oil or lubricants, or any aerosol products in or around the machine as
some oils can combust causing serious injury.
•NEVER dispose of flammable chemicals or materials that have come into contact with flammable
chemicals (for example, nail polish, acetone and gasoline) in the shredder basket.
•Nevershredlargepaperclips,windoworinsulatedenvelopes,continuousforms,
newsprint,boundpages(inexample:notepads,checkbooks,magazines,etc...),
transparencies,laminateddocuments,cardboard,anyitemswithadhesives,hard
materialsorplastic(exceptCreditCardsandCDs).
•DonotholdCD/DVDwithfingerthroughthecenterringwhilefeedingintotheshredder.
Seriousinjurymayoccur.
•A socket-outlet should be near the equipment and be easily accessible.
•Never let the wastebasket become full. This will lead to shredded material being pulled back up into
the shredder and cause jams.
•Never place the shredder near water or any heat source.
•Do not use the shredder if the power cord is damaged in any way.
•Do not attempt to service this product yourself as doing so may expose you to sharp cutting blades
and/or electricity and will void the manufacturer's warranty.
•Never try to clean or clear the shredder blade.
•Never shred beyond the specified sheet capacity. This may result in extensive damage to the machine.
4 ENGLISH
PaperShredder
OperatingInstructions
Installation
Operation
Maintenance
Troubleshooting
Service Center
Limited Warranty
*ONEFOLDEDSHEETOFPAPEREQUATESTO2SHEETSOFPAPER
Heavier paper, humidity or other than rated voltage may reduce shredding capacity.
Sheet Capacity
Paper Shred Size:
Paper Feed Entry Width
Credit Card & CD Capacity
Duty Cycle
Voltage
8 Sheets of 20 lb. bond paper*
1/4” (0.65 cm) wide strips
CD: 4 pieces (1 3/8 in)
8.7" (22 cm)
Only one per pass
2 min. on / 15 min. off
120V~60Hz / 1.2 A
INSTALLATION
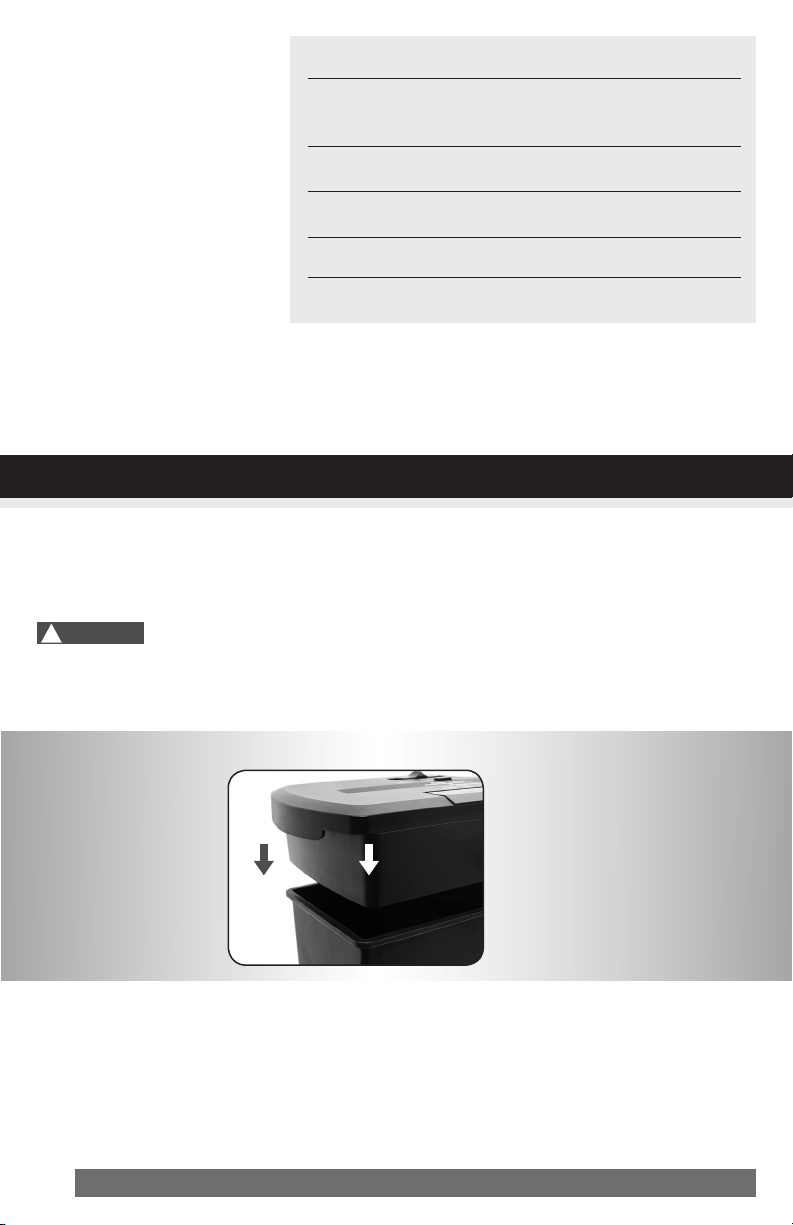
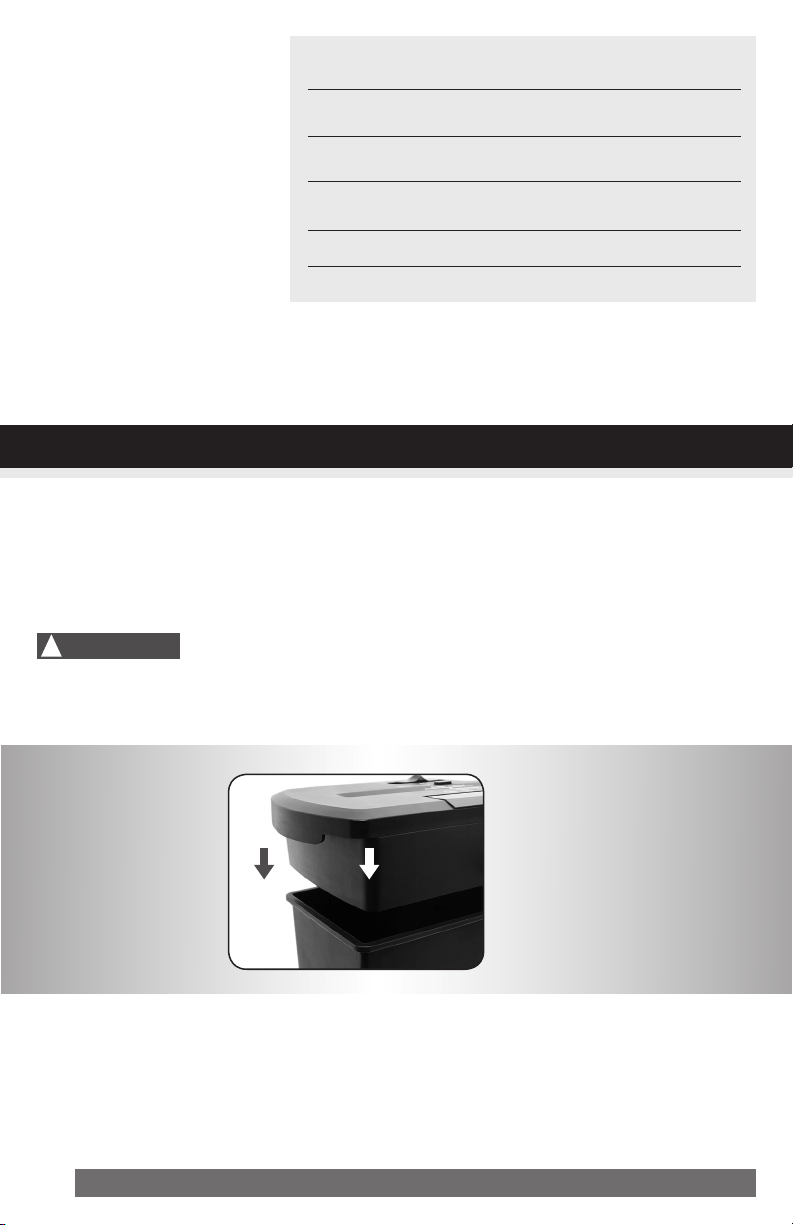
1. Mount the shredder securely to the rim of the waste basket. (FIGURE 1, basket not included)
2. A socket-outlet should be near the equipment and be easily accessible.
3. Connect the power cord to any standard 120 volt AC outlet.
Shredders may have very sharp exposed blades on the underside.
Use care when mounting the shredder on the wastebasket.
!
Caution:
FIGURE1
5ENGLISH
INSTALLATION
OPERATION
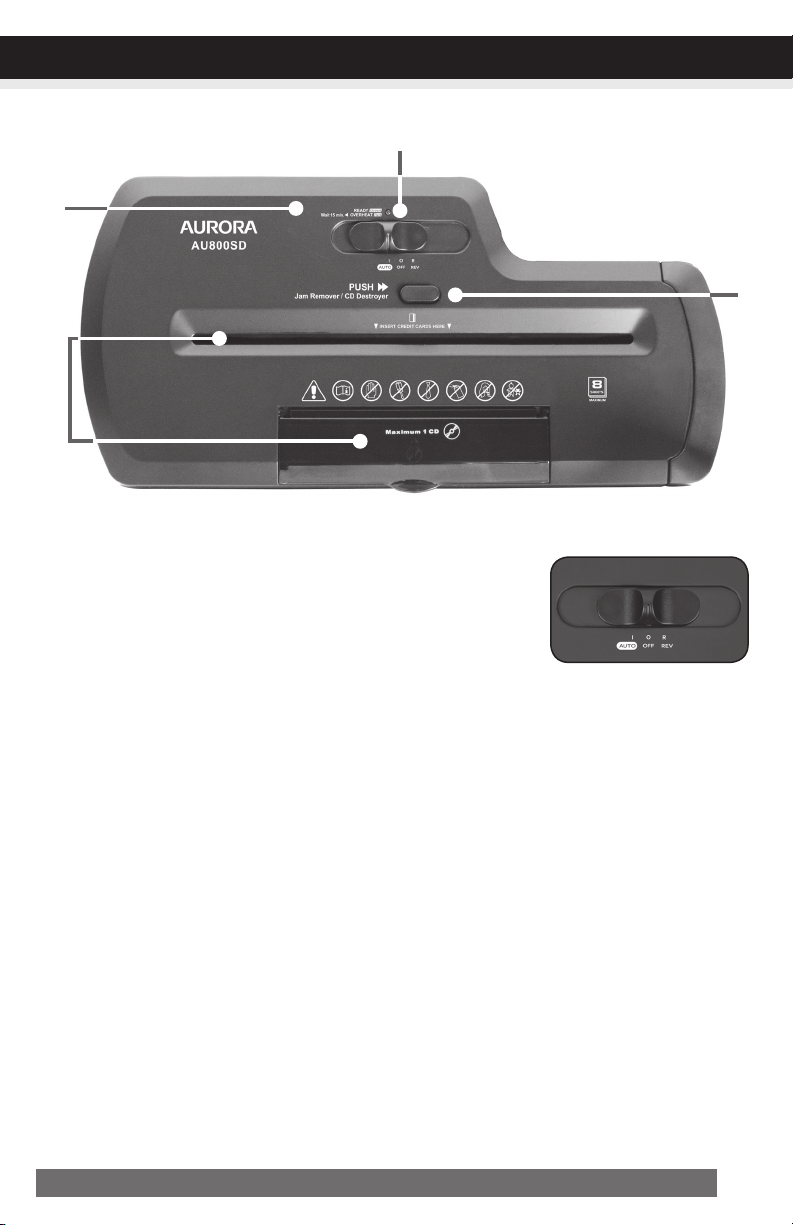
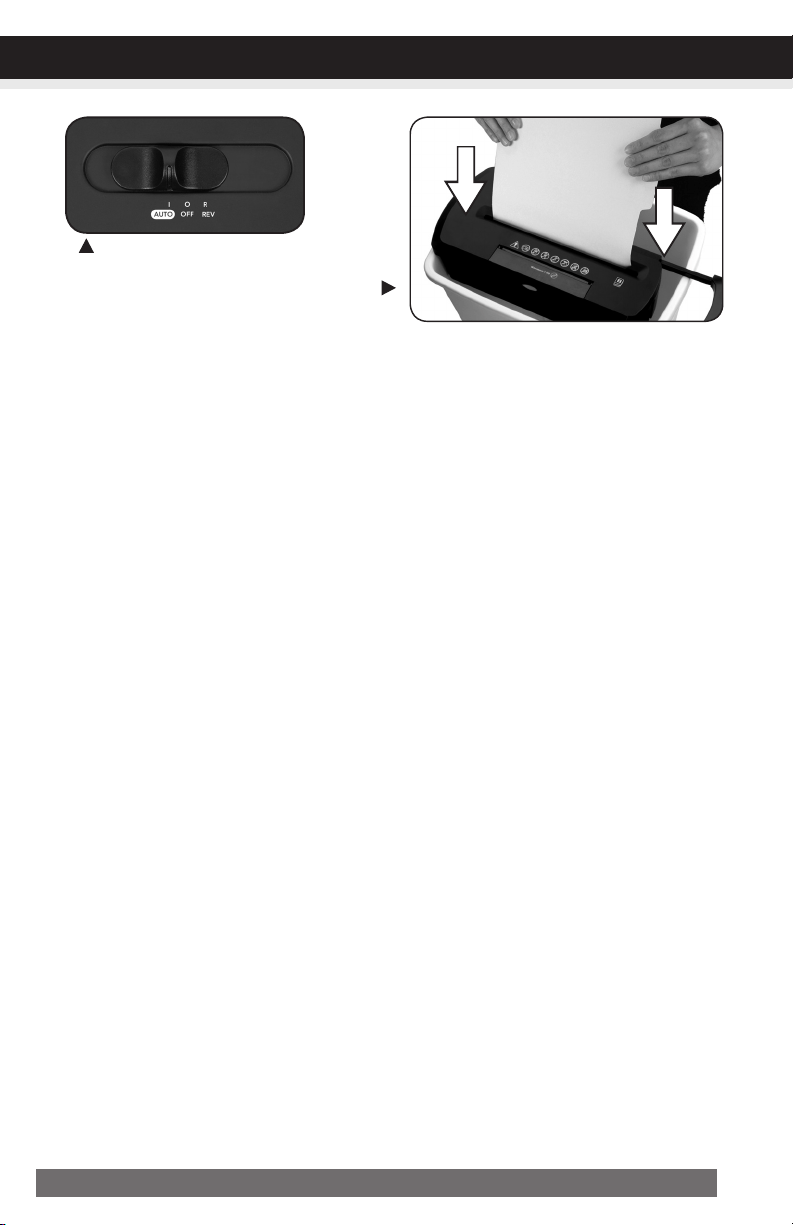
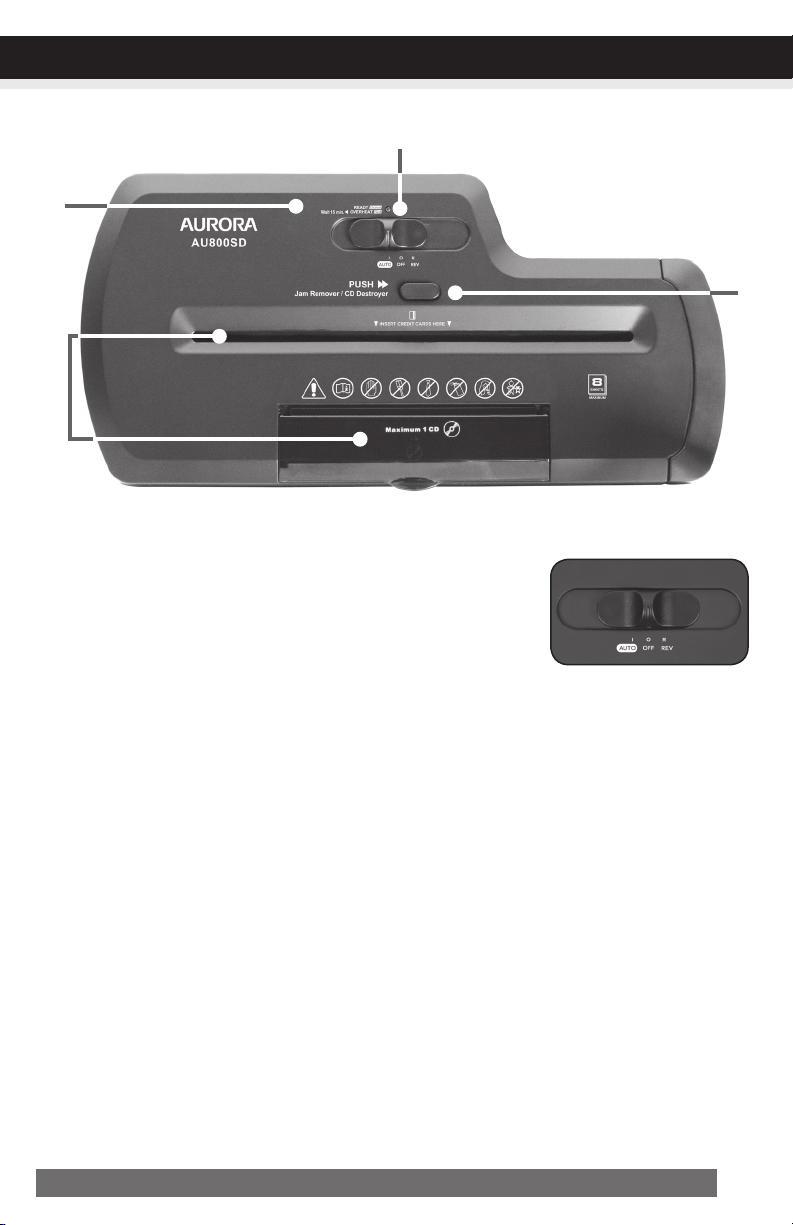
ControlSwitch
Using the switch located on the unit, select one of the following settings
by sliding the switch either left or right. (FIGURE 2)
I AUTO:
This setting allows the shredder to be automatically started by inserting paper into the feed slot. Al-
ways feed the paper in as straight as possible. When the paper has passed through, the shredder
will automatically stop.
O OFF:
This setting turns off all features of the shredder. For safety reasons, we recommend that you leave
the shredder in the “Off” position whenever the shredder is unattended or not in use.
R REV(REVERSE):
In the unlikely event of a paper jam, the reverse setting can be used to help clear the cutters of
paper that did not pass through. Never attempt to clear a jam by using the reverse function until
you have emptied the wastebasket.
JAMREMOVER/CDDESTROYER:
The forward setting can also be used to help clear the cutters in the event of a paper jam.
This allows to manually activate the shredder into cutting mode.
CONTINUED NEXT PAGE
FIGURE2
6 ENGLISH
NOTE:
•Always turn off and unplug the shredder when not in use.
•This shredder will shred staples and small paper clips. It is recommended that you remove paper
clips whenever possible to extend the lifespan of your shredder.
•Only shred credit cards by feeding them vertically i nto the middle of the entry, releasing when shred
ding begins. Never feed more than one credit card at a time.
•Overfeeding the shredder: Shredding beyond the specified sheet capacity can result in extensive
damage to the shredder. Overfeeding will strain the machine and quickly wear and break the cut-
ting blades and internal components.
•Overheating with extended use: In the event that the shredder has shred continuously beyond the
maximum running time and overheating, the unit will automatically shut off. If this happens, switch
the shredder Off for 15 minutes or longer before resuming normal operation.
OPERATION
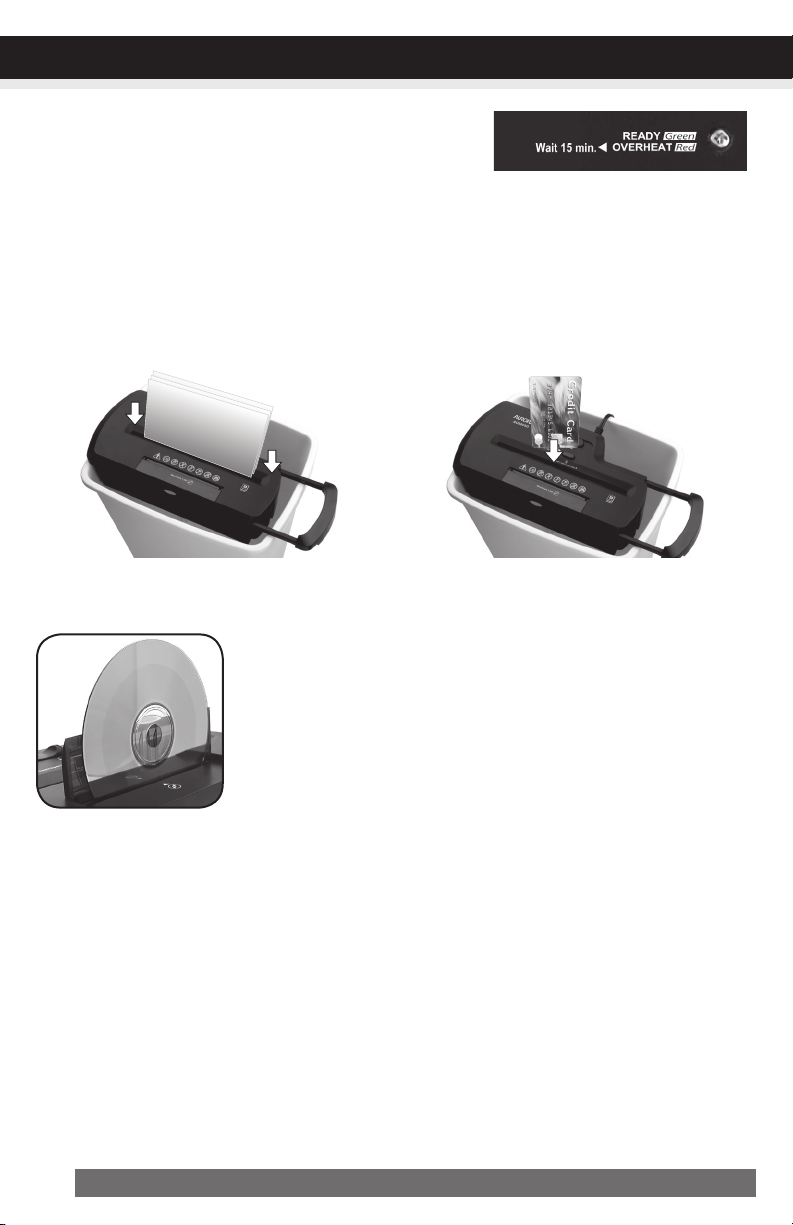
Paper/CDs/CreditCardEntry:
Make sure you do not exceed sheet
count per pass (8 sheets max).
Insert paper as straight as pos-
sible into feed slot and release.
Insert one credit card at a time into
the middle of the feed slot. (basket
not included)
Lift safety cover to expose the CD/DVD entry. Press the CD Destroyer/
Reset button to activate the shredding feature. Hold the CD/DVD by the
edge and feed one at a time into the slot. You may have to gently push
the disc down to engage the cutting blades. Release the button once the
entire CD/DVD has passed through and destroyed. Close cover when
done shredding media.
•Ready(PowerOn):
The Green LED light indicates the shredder is “On” and ready
to operate when paper is inserted.
•Overheat:
Red light – Shredder has shred continuously beyond the maximum shred time and needs to cool
down before operation can restart. If this happens, switch the shredder off for 15 minutes or longer
before resuming normal operation.
Ready(PowerOn)/
Overheat
LEDStatusIndicators:
7ENGLISH
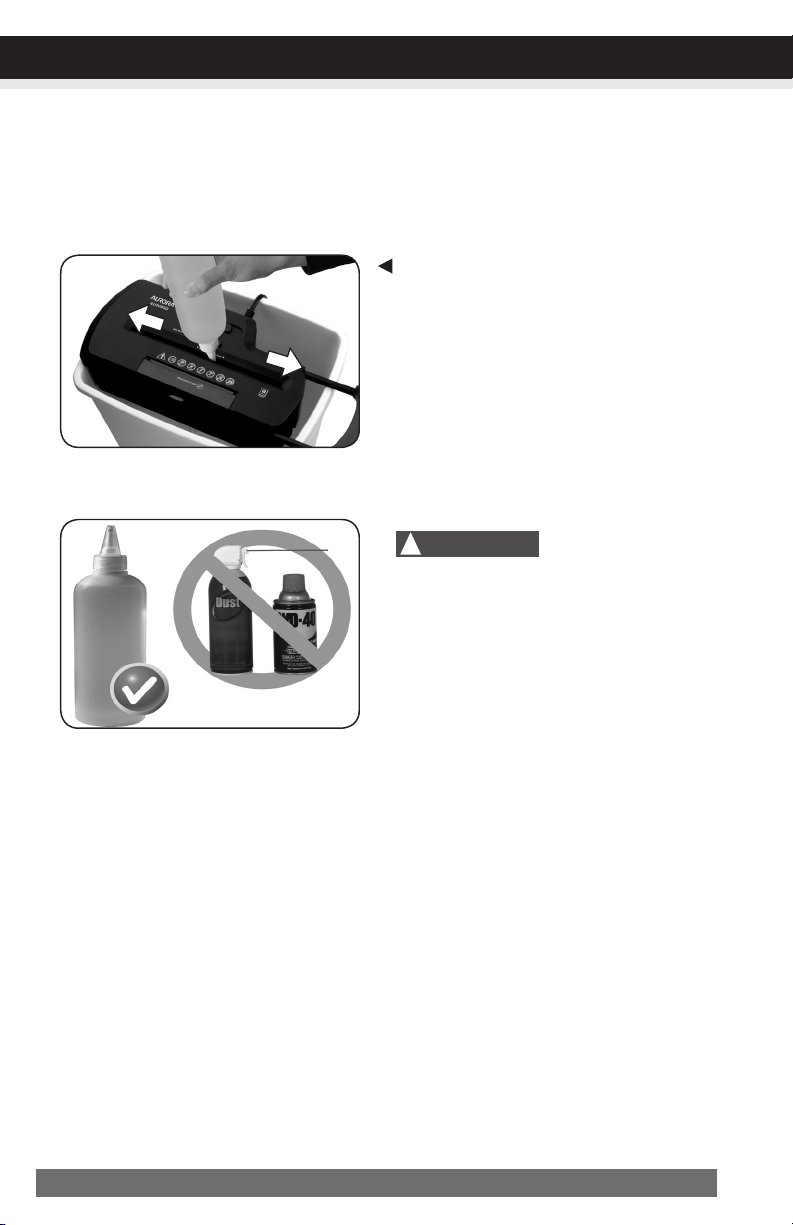
MAINTENANCE
Warning:Failuretoproperlymaintainyourshredderwillvoidthewarranty.
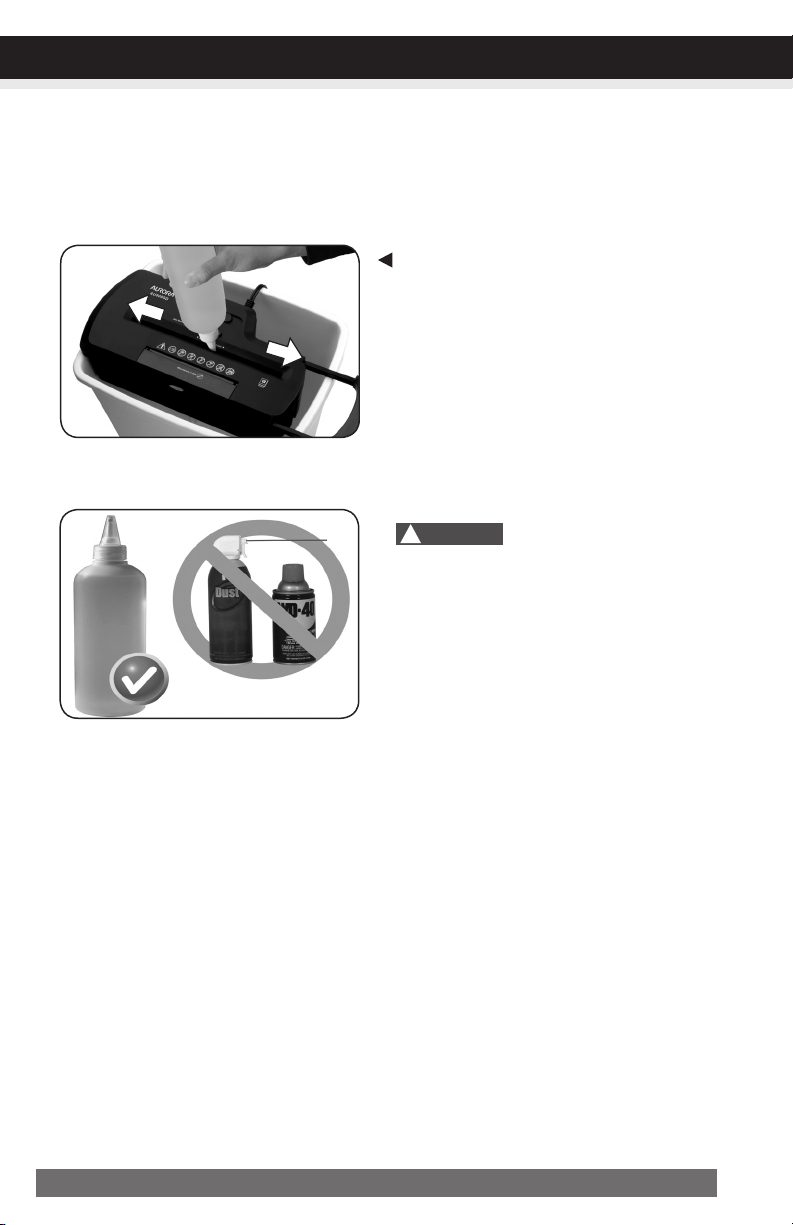
Oil the shredder blades every month with basic vegetable, cooking oil or shredder oil. Follow oiling
procedure below (FIGURE 3). It helps to keep the shredder blades operating well over many years of
use.
Oilingprocedure:
1. Turn off shredder.
2. Apply shredder oil across paper entry.
3. Turn shredder in reverse mode for 3~5 seconds.
Note:1.lubricatingoilisNOTincluded.
2.basketnotincluded
• Donotsprayorkeepanyaerosolproducts
inoraroundshredder.
• DONOTUSECANNEDAIRONSHREDDER.
CLEANING:
• ALWAYS UNPLUG THE SHREDDER BEFORE CLEANING!
• Only clean the shredder by carefully wiping the unit with a dry soft cloth or towel.
• Do not clean or immerse shredder in water. Having the unit wet may result in damage or malfunction to
the electrical components. If the shredder happens to get wet, be sure to completely dry the unit immedi-
ately with a cloth or towel.
• Never use anything flammable to clean the shredder. This may result in serious injury or damage to the product.
FIGURE3
Shredder
Oil
DONOTUSE
AEROSOLPRODUCTS!
!
Caution:

8 ENGLISH
TROUBLESHOOTING
CONTINUED NEXT PAGE
If there is a problem with your shredder, check below for the symptoms and steps to resolve. If you
continue to have problems, contact customer support at our Service Center 1-800-327-8508. DO
NOT ATTEMPT TO REPAIR BY OPENING THE SHREDDER HEAD. This will completely void the
product warranty.
Theshredderdoesnotworkatall.
1)Make sure the unit is pluggedin and that the outlet is in good working order.
2) Overheatingwithextendeduse: In the event that the shredder has shred continuously
beyond the maximum running time and overheated, the unit will automatically shut off. If this hap-
pens, switchtheshredderOfffor15minutes or longer before resuming normal operation.
3) The activation sensor of the shredder is located near the center of the feed slot. Be sure to feed
directly into the center area to activate the machine (especially applies to smaller pieces of paper
or credit cards).
Theshredderrunsin“Rev(Reverse)”modebutnotin“Auto(On)”mode.
While in “Auto” mode, the motor will not start running until paper is inserted into the feed slot. Set the
unit to “Auto” and insert paper to shred. The sensor that activates the shredder in Auto mode is located
directly in the center of the slot. If the paper you are inserting is narrow, it may not be activating the
optical sensor. It is also possible that the feed slot has become blocked with paper. Insert an index card
or any rigid sheet of cardstock (old greeting card or folded file folder), directly in the center of the feed
slot, while applying force to help push the jammed paper through. This will usually clear any paper
blockage.
Howtoclearapaperjamintheshredder.
1) Switch the shredder over into Reverse (REV) mode. While in Reverse, the shredder will back up and
loosen the jammed paper. If required, you may need to tug and remove several sheets to effectively
clear the machine. When jammed paper is loosened or removed, switch back to the Auto-On mode
to continue shredding. Repeat steps if needed.
2) With stubborn situations where the reverse function does not help, you may loosen the jammed
paper with shredder oil (cooking oil is acceptable, nothing aerosol). Start by drizzling oil into the
feed slot where the paper is jammed. Let it soak for about 30 minutes to completely saturate. Return
the shredder back to Auto-Onmode. Ifrequired,anindexcardorarigidsheetof
cardstock(oldgreetingcardorfoldedfilefolder)canbefedintotheshredderto
helppushthejammedpaperthrough.
9ENGLISH
TROUBLESHOOTING
Theshredderisconstantlyrunningwhilein“Auto(On)”mode.
1) It is possible that the activation sensor, which starts the shredder, has become blocked with paper.
Insert an index card or any rigid sheet of cardstock (old greeting card or folded file folder), directly
in the center of the feed slot, while applying force to help push the jammed paper through. This will
usually clear any paper blocking the activation sensor and feed entry.
2) The activation sensor is being triggered by dust, debris, or oil. A cotton swab may be
used to clean the sensor. DO NOT USE CANNED AIR. The activation sensor of the shredder is
located around the center of the feed entry.
Powerswitchinautoposition
Usethickpaperstockorgreetingcard
topushthejamthrough

10 ENGLISH
If you have any questions in regards to the operation of this shredder or in need of a spare part, please
contact our service center at:
Aurora Corp. of America
Telephone: 1-800-327-8508(U.S.A.only)or1-310-793-5650(International)
Business hours: Monday to Friday 8:00 am - 5:00 pm PST (Pacific Standard Time)
Email: [email protected]
Or for more information, please visit our website at http://www.auroracorp.com
Aurora warrants the cutting cylinders of the machine against defects of workmanship and material for a
period of 3years from the original purchase date to the original consumer. Aurora warrants all other
parts of the machine against defects of workmanship and material for a period of 1year from the
original purchase date to the original consumer.
Should there be a defect or malfunction of this product, Aurora will repair or replace the product free
of charge. Customer is responsible for all shipping charges to return the defective product to Aurora. A
copyoftheproofofpurchaseshowingoriginalpurchasedateisrequired. This warranty
is void if the product has been subject to damage, unreasonable use, improper service, or other causes
not arising from defects in original material or workmanship. This warranty is void if factory seal is bro-
ken or removed from the product. This warranty does not include adjustments, parts or repairs required
by circumstances beyond the control of Aurora.
There are no expressed warranties other than those stated herein.
Any expressed or implied warranties, including but not limited to merchantability and fitness for a par-
ticular purpose are limited to the above warranty period. Aurora shall not be liable for any incidental
or consequential cost, expenses or damages resulting from any failure defect or malfunction of this
product.
Some states do not allow the exclusion of limitations of implied warranties or consequential damages,
therefore, the above limitations may not apply to you.
This warranty grants you specific legal rights, and you may also have other rights that vary from state to state.
Beforereturninganyproduct,pleasecallourServiceCenterforspecificreturninstructions.
AuroraCorp.ofAmerica:1-800-327-8508USAONLY
1-310-793-5650INTERNATIONAL•[email protected]
SERVICECENTER
LIMITEDPRODUCTWARRANTY

11ESPAÑOL
ADVERTENCIA:
Instrucciones De Seguridad. ¡Leer Antes De Usar!
Lea las instrucciones antes de
usar el producto.
Evite tocar con sus manos la
abertura de alimentación de
documentos.
El producto no debe ser utilizado
por los niños (no es un juguete).
No inserte objetos extraños
dentro de la ranura de entrada
de papel.
No pulverice o mantenga ningún
aerosol sobre o cerca de la máquina
destructora de documentos.
Aleje la ropa o las alhajas
sueltas de la ranura de entrada
de papel.
Evite acercar el cabello a la ranura
de entrada de papel.
•ApaguesiemprelatrituradoraydesenchufeelcabledeltomadeCAcuandonola
utilice,antesdelimpiarla,almoverlaoalvaciarlapapelera.
•PELIGRODEINCENDIO.Nuncautilicepetróleooaceitesinflamablesolubricantes dentro o
alrededor de la máquina ya que algunos aceites pueden incendiar causando heridas graves.
•No eche NUNCA productos químicos inflamables, o materiales que han estado en contacto con
productos químicos inflamables (por ejemplo: esmalte de uñas, acetona y gasolina) en el canasto de
los papeles de la máquina destructora de documentos.
•Nuncatrituresujetapapelesgrandes,sobresconventanasoconprotección,formu
larioscontinuos,papeldeperiódico,páginasencuadernadas(porejemplo,cuader-
nos,chequeras,revistas,etc.),transparencias,documentosplastificados,cartulina,
artículosconadhesivos,materialesdurosoplástico(exceptotarjetasdecréditoyCDs).
•NoinserteundedoatravésdelorificiocentraldeunCD/DVDparasostenerloal
introducirloenladestructora.Ellopodríaderivarenlesionesgraves.
•El enchufe debe instalarse cerca del equipo y su acceso debe ser fácil.
•Nunca deje la papelera llena. Esto provocará que el material triturado sea jalado por la máquina
trituradora de documentos y se atore.
•Nunca coloque la máquina destructora de documentos cerca de agua o de alguna fuente de calor.
•No utilice la máquina destructora de documentos si el cordón eléctrico está dañado en alguna forma.
•No intente dar servicio a este producto usted mismo ya que se expone a las hojas filosas y/o a la
electricidad. Asimismo invalidará la garantía del fabricante.
•No trate nunca de limpiar/desatascar la cuchilla de la máquina destructora de documentos.
•Nunca triture una cantidad superior a la capacidad de hojas especificada. Esto puede provocar un
daño masivo en la máquina.
12 ESPAÑOL
INSTALACIONES
1. Asegure la máquina destructora de documentos en la montura de la papelera. (FIGURA 1, Canasta
no está incluido)
2. El enchufe debe instalarse cerca del equipo y su acceso debe ser fácil.
3. Conecte el cordón eléctrico en cualquier tomacorriente estándar de 120 voltios AC.
La trituradora la papel tienen cuchillas muy filosas y expuestas en la parte inferior.
Tenga mucho cuidado cuando esté montando la máquina destructora de documentos a la papelera.
FIGURA1
Trituradoradepapel
Instruccionesparaoperar
Instalaciones
Operación
Mantenimiento
Solucionar Problemas de la
Máquina Trituradora
Centro De Mantenimiento
Garantía Limitada
*UNAHOJADEPAPELDOBLADAEQUIVALEA2HOJASDEPAPEL
Si el papel es más pesado, si está húmedo a las tensión es otra, la capacidad puede disminuir.
Capacidad de
destrucción a la vez
Tamaño de corte
Apertura de la
alimentación
Capacidad de CDs y
tarjetas de crédito
Ciclo de funcionamiento
Voltaje
8 hojas de papel de cortes de 20 libras*
en tiras de 0.65 cm
CD: 4 fragmentos (1 3/8)
8.7 in / 22.0 cm
introdúzcalos en la ranura uno por uno
2 min encendida / 15 min apagada
120V~60Hz / 1.2 A
!
Precaución:
OPERACIÓN
13ESPAÑOL
OPERACIÓN
Interruptordecontrol
Utilizando el interruptor ubicado en la unidad, seleccione una de las
siguientes conguraciones deslizando el interruptor hacia la izquierda
o hacia la derecha. (FIGURA 2)
I AUTO/ON: Esta posición permite que la máquina destructora de documentos empiece a trabajar
automáticamente cuando se inserta el papel en a boca de la trituradora. Siempre inserte el papel tan
derecho como sea posible. Cuando el papel haya pasado a través de la máquina, ésta se detendrá.
O OFF: Esta posición apaga todas las características de la máquina destructora de documentos. Por
razones de seguridad, recomendamos que deje la máquina destructora de documentos en la posición
de apagada cuando la máquina destructora de documentos se deje desatendida o no se esté utili-
zando.
R REV(REVERSE): En la remota posibilidad de que el papel se atore, la posición de reversa puede
ser utilizara para desatascar las cortadoras del papel que no ha pasado a través de ellas. Nunca
intente desatorar utilizando la función de reversa hasta que haya vaciado la papelera.
EliminadorDeAtascos/DestructorDeCD:
El parámetro de avance también se puede utilizar para ayudar a despejar las cuchillas en el caso
de que se produzca un atasco de papel.
Esto permite activar manualmente la trituradora en el modo de corte.
CONTINÚE LA PÁGINA SIGUIENTE
FIGURA2
14 ESPAÑOL
NOTA:
•Apague siempre la trituradora y desenchúfela cuando no la esté utilizando.
•Esta trituradora triturará grapas y sujetapapeles pequeños. Se recomienda retirar los sujetapapeles
cuando sea posible para extender la vida útil de su trituradora.
•Solo triture tarjetas de crédito colocándolas en posición vertical en el medio de la ranura de entrada,
y soltándolas cuando comience el proceso de triturado. Nunca coloque más de una tarjeta de
crédito por vez.
• Sobrecarga de la trituradora: Triturar una cantidad superior a la capacidad de hojas especificada
puede producir un daño masivo en la trituradora. La sobrecarga forzará la máquina, y gastará y
romperá rápidamente las cuchillas de corte y los componentes internos.
• Sobrecalentamiento por uso prolongado: En caso de que la trituradora haya funcionado en forma
continua durante un lapso superior al tiempo de funcionamiento máximo y se sobrecaliente, la uni-
dad se apagará automáticamente. Si esto sucede, coloque la trituradora en posición Off (apagado)
durante 15 minutos o más antes de reiniciar la operación normal.
OPERACIÓN
Entradadepapel/tarjetasdecrédito/CD:
Asegúrese de no superar la cantidad de hojas por
pasada (8 hojas como máximo). Inserte el papel lo más
recto posible en la ranura de alimentación y suéltelo.
Inserte una tarjeta de crédito por vez
en el medio de la ranura de alimentación.
(Canasta no está incluido)
Levante la tapa de seguridad para dejar al descubierto la entrada de
CD/DVD. Presione el botón Destructor de CD para activar la función de
trituración. Sostenga el CD/DVD por el borde e introdúzcalo uno por
uno en la ranura. Puede que tenga que empujar suavemente el disco
hacia abajo para enganchar las cuchillas de corte. Libere el botón
cuando todo el CD/DVD haya pasado y se haya destruido. Cierre la
tapa cuando la trituración del medio se haya completado.
•PowerOn(Encendido):
La luz LED verde indica que la trituradora está encendida y
lista para operar cuando se inserte papel.
•Overheat(Sobrecalentamiento):
La luz LED roja indica que la trituradora ha estado operando continuamente más allá del tiempo de
funcionamiento máximo y se sobrecalentó; la unidad se apagará automáticamente. Si esto ocurre,
apague la trituradora por al menos 15 minutos antes de reanudar el funcionamiento normal.
LEDStatusIndicators:
PowerOn(Encendido)/
Overheat(Sobrecalentamiento)
15ESPAÑOL
MANTENIMIENTO
FIGURA3
Aceitepara
trituradoras
¡NOUTILICEPRODUC-
TOSENAEROSOL!
Advertencia:Lafaltademantenimientoadecuadodesutrituradoraanularálagarantía.
Lubrique las cuchillas de la trituradora todos los meses con aceite vegetal básico, de cocina o para
trituradoras. Siga el procedimiento de lubricado a continuación. (FIGURA 3) Contribuye a que las
cuchillas de la trituradora continúen funcionando bien luego de muchos años de uso.
Procedimientodelubricado:
1. Apague la trituradora.
2. Aplique aceite para trituradoras en la entrada
de papel.
3. Coloque la trituradora en modo retroceso durante
3 a 5 segundos.
Nota:1.ElaceitelubricanteNOseincluye.
2.Canastanoestáincluido
• Norocíelatrituradoraniguardeproductos
enaerosoldentroocercadeella.
• NOUTILICEAIREENVASADOENLA
TRITURADORA.
LIMPIEZA:
• DESENCHUFE SIEMPRE LA MÁQUINA DESTRUCTORA DE DOCUMENTOS ANTES DE LIMPIARLA!
• Limpie únicamente la máquina destructora de documentos pasándole cuidadosamente a la unidad
un paño o toalla suave y seca.
• No limpie con agua o sumerja en agua la máquina destructora de documentos. Si la unidad se
moja, los componentes eléctricos pueden dañarse o funcionar mal. Si la máquina se moja,
asegúrese de secar totalmente y de inmediato la unidad con un paño o toalla.
• No utilice nunca nada inflamable para limpiar la máquina destructora de documentos. Esto puede
resultar en lesiones graves o daño al producto.
!
Precaución:

16 ESPAÑOL
SOLUCIÓNDEPROBLEMAS
CONTINÚE LA PÁGINA SIGUIENTE
Si tiene algún problema con su trituradora, revise los síntomas y los pasos para resolverlos a continuación. Si
continúa teniendo problemas, comuníquese con el servicio de asistencia al cliente en nuestro Centro de Man-
tenimiento 1-800-327-8508. NO INTENTE REPARAR LA TRITURADORA ABRIENDO EL CABEZAL.
Esto anulará completamente la garantía del producto.
Lamáquinatrituradoradedocumentosnofunciona.
1)Asegúrese que la unidad esté conectada y que el interruptor al que esté conectada esté en buenas condiciones.
2) Sobrecalentamientoporusoprolongado: En caso de que la trituradora haya funcionado
en forma continua durante un lapso superior al tiempo de funcionamiento máximo y se sobrecaliente,
la unidad se apagará automáticamente. Si esto sucede, coloquelatrituradoraenposiciónOff
(apagado)durante15minutos o más antes de reiniciar la operación normal.
4) El sensor de activación de la trituradora está ubicado cerca del centro de la ranura de alimentación.
Asegúrese de cargarla directamente en el área central para activar la máquina (esto se aplica
especialmente a pedazos de papel más pequeños o tarjetas de crédito).
Latrituradorafuncionaenmodo“Rev(Reverse)”,peronoenmodo“Auto(On)”.
Mientras esté en modo “Auto”, el motor no comenzará a funcionar hasta que se inserte el papel en
la ranura de alimentación. Configure la unidad en “Auto” e inserte el papel que desea triturar. El sensor
que activa la trituradora en el modo Auto está ubicado directamente en el centro de la ranura. Si el
papel que está insertando es angosto, puede ser que no esté activando el sensor óptico. Es posible
que la ranura de alimentación esté bloqueada con papel. Inserte una tarjeta o una hoja rígida de
cartulina (Tarjeta de felicitación vieja o carpeta plegada) directamente en el centro de la ranura de
alimentación y, a la vez, empuje con fuerza para que el papel atascado pueda salir. En general, esto
desatascará cualquier bloqueo de papel.
Cómodesbloquearunatascodepapelenlatrituradora.
1) Cambie la trituradora al modo Reverse (REV). Mientras esté en Reverse, la trituradora funcionará
de manera inversa y aflojará el papel atascado. De ser necesario, quizás deba jalar y retirar
varias hojas de papel para desatascar efectivamente la máquina. Cuando pueda aflojar o quitar
el papel atascado, vuelva al modo Auto-On (encendido automático) para seguir triturando papel.
Repita los pasos de ser necesario.
2) Si el problema persiste y la función reversa no lo soluciona, puede aflojar el papel atascado con aceite
para trituradora (puede utilizar aceite de cocina; no use ningún producto en aerosol). Comience ro-
ciando con aceite las cuchillas en las que el papel está atascado. Deje que se absorba durante 30
minutos hasta que esté completamente empapado. Regrese la trituradora al modo Auto-On. De ser
necesario,puedecolocarunahojarígidadecartulina(Tarjetadefelicitaciónviejao

17ESPAÑOL
carpetaplegada)enlatrituradoraparaayudaraempujarelpapelatascado.
Latrituradorafuncionaininterrumpidamentemientrasestáenmodo“Auto(On)”.
1) Es posible que el sensor de activación, que hace que la trituradora comience a funcionar, esté
bloqueado con papel. Inserte una tarjeta o una hoja rígida de cartulina (Tarjeta de felicitación vieja
o carpeta plegada) directamente en el centro de la ranura de alimentación y, a la vez, empuje con
fuerza para que el papel atascado pueda salir. En general, esto desatascará cualquier papel que
esté bloqueando el sensor de activación y la entrada de alimentación.
2) El polvo, la basura o el aceite accionan el sensor de activación. Puede utilizarse un hisopo de algodón
para limpiar el sensor. NO UTILICE AIRE ENVASADO. El sensor de activación de la trituradora está
ubicado cerca del centro de la entrada de alimentación.
SOLUCIÓNDEPROBLEMAS
Utilicecartulinagruesaounatarjetade
felicitaciónparaeliminarelatasco
Interruptorenposición
automática

18 ESPAÑOL
Si tiene alguna pregunta sobre el funcionamiento de esta trituradora o necesita un repuesto,
comuníquese con nuestro centro de mantenimiento:
Aurora Corp. of America
Teléfono: 1-800-327-8508(EE.UU.únicamente)o1-310-793-5650(Internacional)
Horario de atención: lunes a viernes de 8:00 a.m. a 5:00 p.m., PST (hora estándar del Pacífico)
Correo electrónico: [email protected]
O si desea obtener más información, visite nuestro sitio web en http://www.auroracorp.com
CENTRODEMANTENIMIENTO
Aurora garantiza los cilindros cortantes de la máquina contra defectos en la fabricación y en los ma-
teriales por un período de 3años a partir de la fecha original de compra por parte del consumidor
original. Aurora garantiza todas las demás piezas de la máquina contra defectos en la fabricación y
en los materiales por un período de 1año a partir de la fecha original de compra por parte del
consumidor original.
En caso de defecto o mal funcionamiento de este producto, Aurora repare o sustituirá el producto gra-
tuitamente. El cliente es responsable por todos los gastos de envío que correspondan a la devolución del
producto defectuoso a Aurora. Serequiereunacopiadeuncomprobantedecompraque
muestrelafechadelacompraoriginal. Esta garantía es nula si el producto ha sido dañado
o utilizado de manera equivocada, ha recibido mantenimiento indebido, u otras causas que no hayan
surgido de defectos en el material o la fabricación originales. Esta garantía es nula si el sello de fábrica
es roto o se saca del producto. Esta garantía no incluye ajustes, partes o reparaciones requeridas por
circunstancias mas allá del control de Aurora, incluyendo pero no limitado a maltrato de escape.
No se proporcional garantías expresas más que las que están aquí establecidas.
Cualesquiera garantías escritas o implícitas, incluyendo pero sin limitarse a la comercialización y
capacidad para servir un propósito particular, se limitan al período de garantía mencionado anterior-
mente. Aurora no será responsable por ninguno de los costos, gastos o daños accesorios o consecuen-
tes que resulten de cualquier falla, defecto o mal funcionamiento de este producto.
Algunos estados no permiten la exclusion de limitaciones de garantías implícitas o daños consecuentes,
por lo que la limitación arriba mencionada puede no aplicar a usted.
Esta garantía le brinda derechos legales específicos y usted puede también tener otros derechos que
varín de Estado a Estado.
Antesdedevolverunproducto,llameanuestroCentrodeMantenimientopararecibir
instruccionesespecíficassobrelasdevoluciones.
CorporaciónAuroradeAmérica:1-800-327-8508LOSESTADOSUNIDOSSÓLO
1-310-793-5650INTERNACIONAL•info@auroracorp.com
GARANTÍALIMITADA

CENTRODEMANTENIMIENTO
GARANTÍALIMITADA

091119
© 2019 Aurora Corp. of America
3500 Challenger Street, Torrance, CA 90503 USA
1-800-327-8508
Usa Only / Los Estados Unidos Solomente
•
1-310-793-5650
International / Internacional
•
Email: [email protected]
•
For more information, please visit us at:
www.auroracorp.com