Loading ...
Loading ...
Loading ...
123456-ABC
05 06
BASICS
Station Settings
* This step is only required if you do not receive the Add Device notification within the app.
Prior to mounting/positioning your sensors, make sure your station is receiving sensor data.
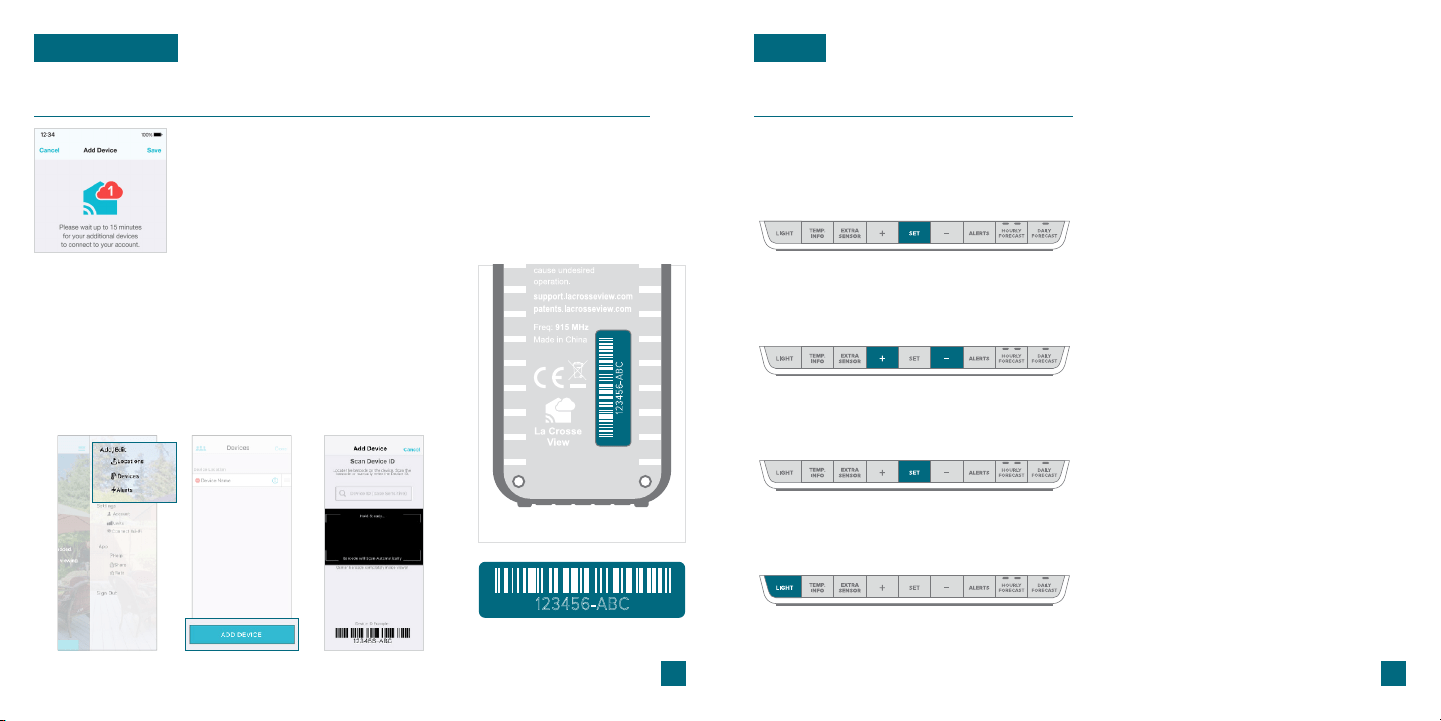
Adding Your Sensors to the App
LA CROSSE VIEW
Upon getting the station connected to your Wi-Fi network, the app will
explain how your connected sensor should be brought in. Within the
next 15 minutes, you should receive an Add Device notification in your
app. This is indicated by the Red Cloud and the numbers inside of it.
Tap this icon to begin adding your sensors into the app.
1.
Manually Add Sensors Into the App*
3.
4.
2.
Open your La Crosse View app. On the Main Menu, scroll to
ADD/EDIT and select DEVICES.
Scan the Barcode on your Sensor or type in the Device ID
manually.
Confirm the sensor image and Device ID and add a Device
Name and Location Name. Select DONE.
On the Devices page, select the ADD DEVICE or PLUS (+) button.
123456-ABC
Back of Sensor
Settings Menu Order
• Greeting/HELLO
• Language (English/Spanish/French)
• Beep ON/OFF
• 12/24 Hour Time Format
• Hour | Minute | Year | Month | Date
• Calendar Order Month/Date or Date/Month
• Temperature Units (Fahrenheit/Celsius)
• Pressure Units (InHg/hPa)
• Pressure Number Setting
The default pressure reading is 29.91 INHg (1013 hPa).
The station will acclimate on it’s own if the pressure
number is not set. Learn more on page 16
• THANK YOU
Important: Settings such as language and units of measure must
be set manually within the station’s Settings Menu. These are not
controlled by the La Crosse View app.
When a language is selected, the following instructions and
weekday will be presented in that language.
Weekday will set automatically after year, month, and date
settings are adjusted.
When in 24 hour time format, seconds will show in place of
AM/PM markings.
If you’re connected to Wi-Fi, the time/date will automatically
update from the Internet. See pages 3-4 for more info.
When the station is first powered on, it will begin searching for your sensors,
which should connect within 10 minutes.
Navigating the Settings Menu
To manually set language, time/date, and
other settings, hold the SET button to
enter the Settings Menu.
1.
Use the +/- buttons on the top of the
station to adjust the values.
2.
Press the SET button to confirm your
selection and move to the next setting.
3.
You may exit the Settings Menu at any
time by pressing the LIGHT button.
4.
Loading ...
Loading ...
Loading ...