
60CM BUILT-IN OVEN
PBO6500A
PBO6501A
PBO6500A
PBO6501A

1
I Important Safety Instructions
This manual explains the proper installation and use of your oven, please read it carefully before
using it, even if you are familiar with the product. The manual should be kept in a safe place for
future reference.
General Warnings
If the supply cord is damaged, the cord must be
replaced by the manufacturer, its service agent or
similar qualified persons in order to avoid a
hazard.
This product has not been designed for any uses
other than those specified in this booklet.
This appliance must not be used as a space
heater.
In order to avoid fire, the appliance must be kept
clean and vents kept unobstructed.
Do not spray aerosols within the vicinity of the
appliance during operation.
Do not store flammable materials in or under the
appliance, e.g. aerosols.
Do not line the bottom of the oven with foil or
cookware.
Always use gloves when handling hot items inside
the oven.
Always turn the grill off immediately after use as
fat left behind may catch fire.
Do not leave the appliance unattended when
cooking. Oils and fats may catch fire due to
overheating or over boiling.
Do not place pans weighing over 15Kgs on the
oven’s opened door.
Do not use the appliance in the event of a
technical fault. Any failure must be fixed by a
qualified and authorized person.
In the event of any incident caused by a technical
fault, disconnect power and report the failure to
the service centre to be repaired.
The rules and provisions contained in this
instruction manual should be strictly observed.
Do not allow anybody who is not familiar with the
contents of this instruction manual to operate the
appliance.
Child Safety
This appliance is not intended for use by persons
(including children) with reduced physical, sensory
or mental capabilities, or lack of experience and
knowledge, unless they’ve been given supervision
or instruction concerning use of the appliance by a
person responsible for their safety.
Children should be supervised to ensure that they
do not play with the appliance.
This appliance gets hot during use. Care should be
taken to avoid touching hot surfaces, e.g. oven
door, heating elements.
Accessible parts will also get hot when in use.
To avoid burns and scalds children should be kept
away.
Installation, Cleaning & Servicing
The appliance must be installed only by an
authorized person in compliance with the
instructions provided. Incorrect installation may
cause harm to persons, animals or may damage
property.
Before using the appliance, ensure that all packing
materials are removed from the appliance.
In order to avoid any potential hazard, the
enclosed installation instructions must be followed.
Ensure that all specified vents, openings and air
spaces are not blocked.
The panels adjacent to the oven must be made of
heat-resistant material.
Cabinet with a veneer exterior must be assembled
with glues which can stand temperature of up to
120°C.
2
To reduce the risk of fire, do not place or install
this unit in areas where the ventilation or
circulation ducts may become blocked. Make sure
there are at least 70mm of space between the
back of your oven and the wall.
The unit's power cord must be connected to a
properly grounded and protected, 220-240V
electrical outlet.
When transporting or storing the unit, keep it in a
dry location, free from dust, excessive vibration or
other factors, which may damage the unit.
Do not operate oven with a damaged cord, plug or
if the oven has malfunctioned or has been
dropped or damaged in any manner. Return
oven to authorized service center for repair.
Only authorized personnel should carry out
servicing.
Always ensure the appliance is switched off
before cleaning or replacing parts.
Do not use steam cleaners, as this may cause
moisture build-up.
Always clean the appliance immediately after any
food spills.
THIS APPLIANCE MUST BE GROUNDED.
To maintain safe operation, it is recommended
that the product is inspected every five years by
an authorized service person.
Oven
This appliance gets hot during use. Care should
be taken to avoid touching the hot surfaces inside
the oven.
Switch the appliance off before removing the oven
light glass for bulb replacement.
To avoid an accident, ensure that oven shelves
and fittings are always inserted into the appliance
in accordance with the instructions.
Do not use the door as a shelf.
Do not push down when the oven door is open.
Grill
Do not cover the grill insert with foil, as fat built up
may catch on fire.
Always keep the grill dish clean as any build up
may catch on fire.
Do not leave the grill unattended during use.
To avoid fire, ensure that grill trays and fittings are
always inserted into the appliance in accordance
with the instructions.
Do not place thick portions of food under the grill.
Foods may curl or catch fire.
Accessible parts may become hot when grill is in
use. Children should be kept away.
Environmental Hints
Use the oven efficiently by cooking many trays of
food at the same time, e.g. cook 2 trays of scones,
small cakes or sausage rolls at the same time.
Select the correct shelf location for food being
cooked.
Do not open the oven door more than necessary.
After the oven is turned off it retains heat for some
time.
This product must not be disposed together
with domestic waste. This product has to be
disposed at an authorized place for recycling
of electrical and electronic appliances.
By collecting and recycling waste, you help save natural
resources, and make sure the product is disposed in an
environmental friendly and healthy way.
3
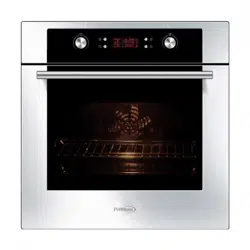
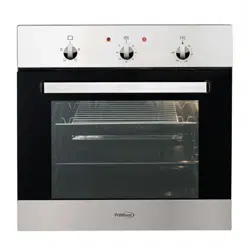
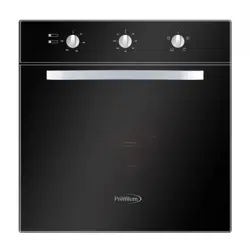
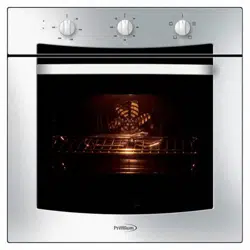
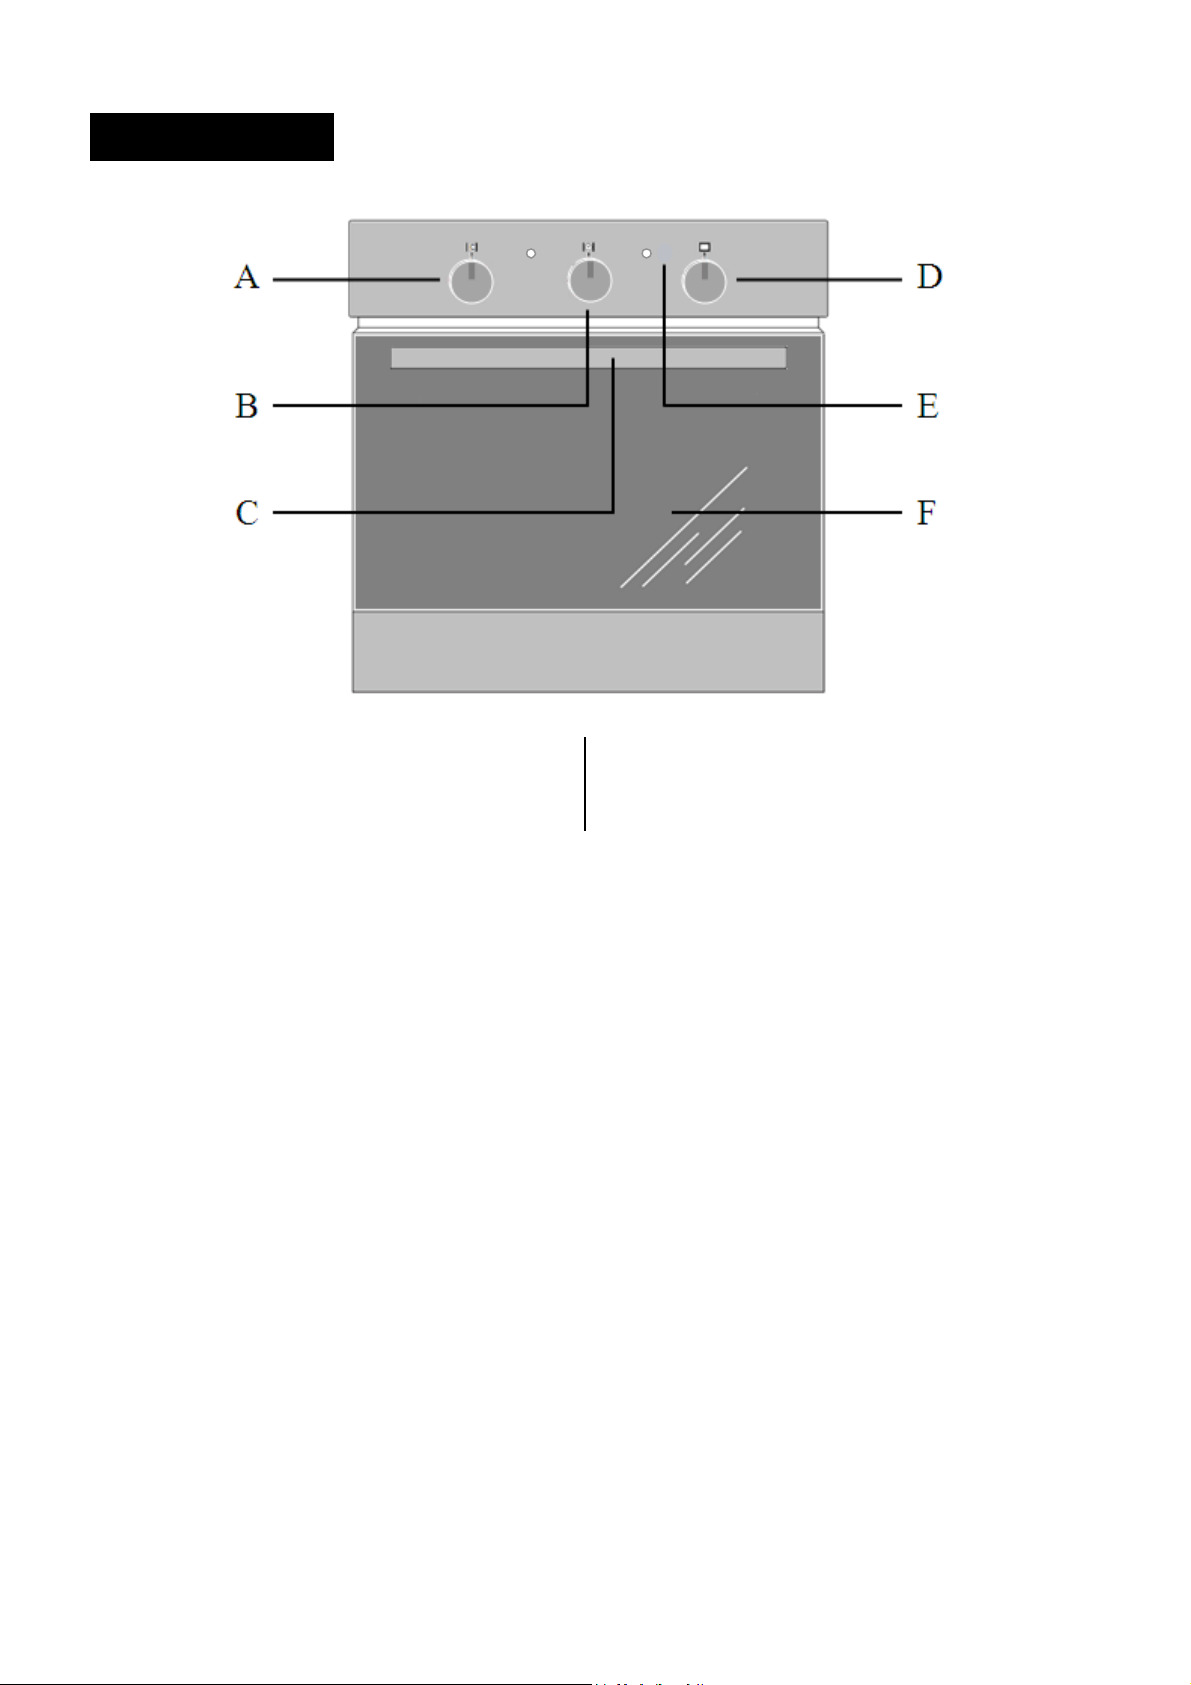
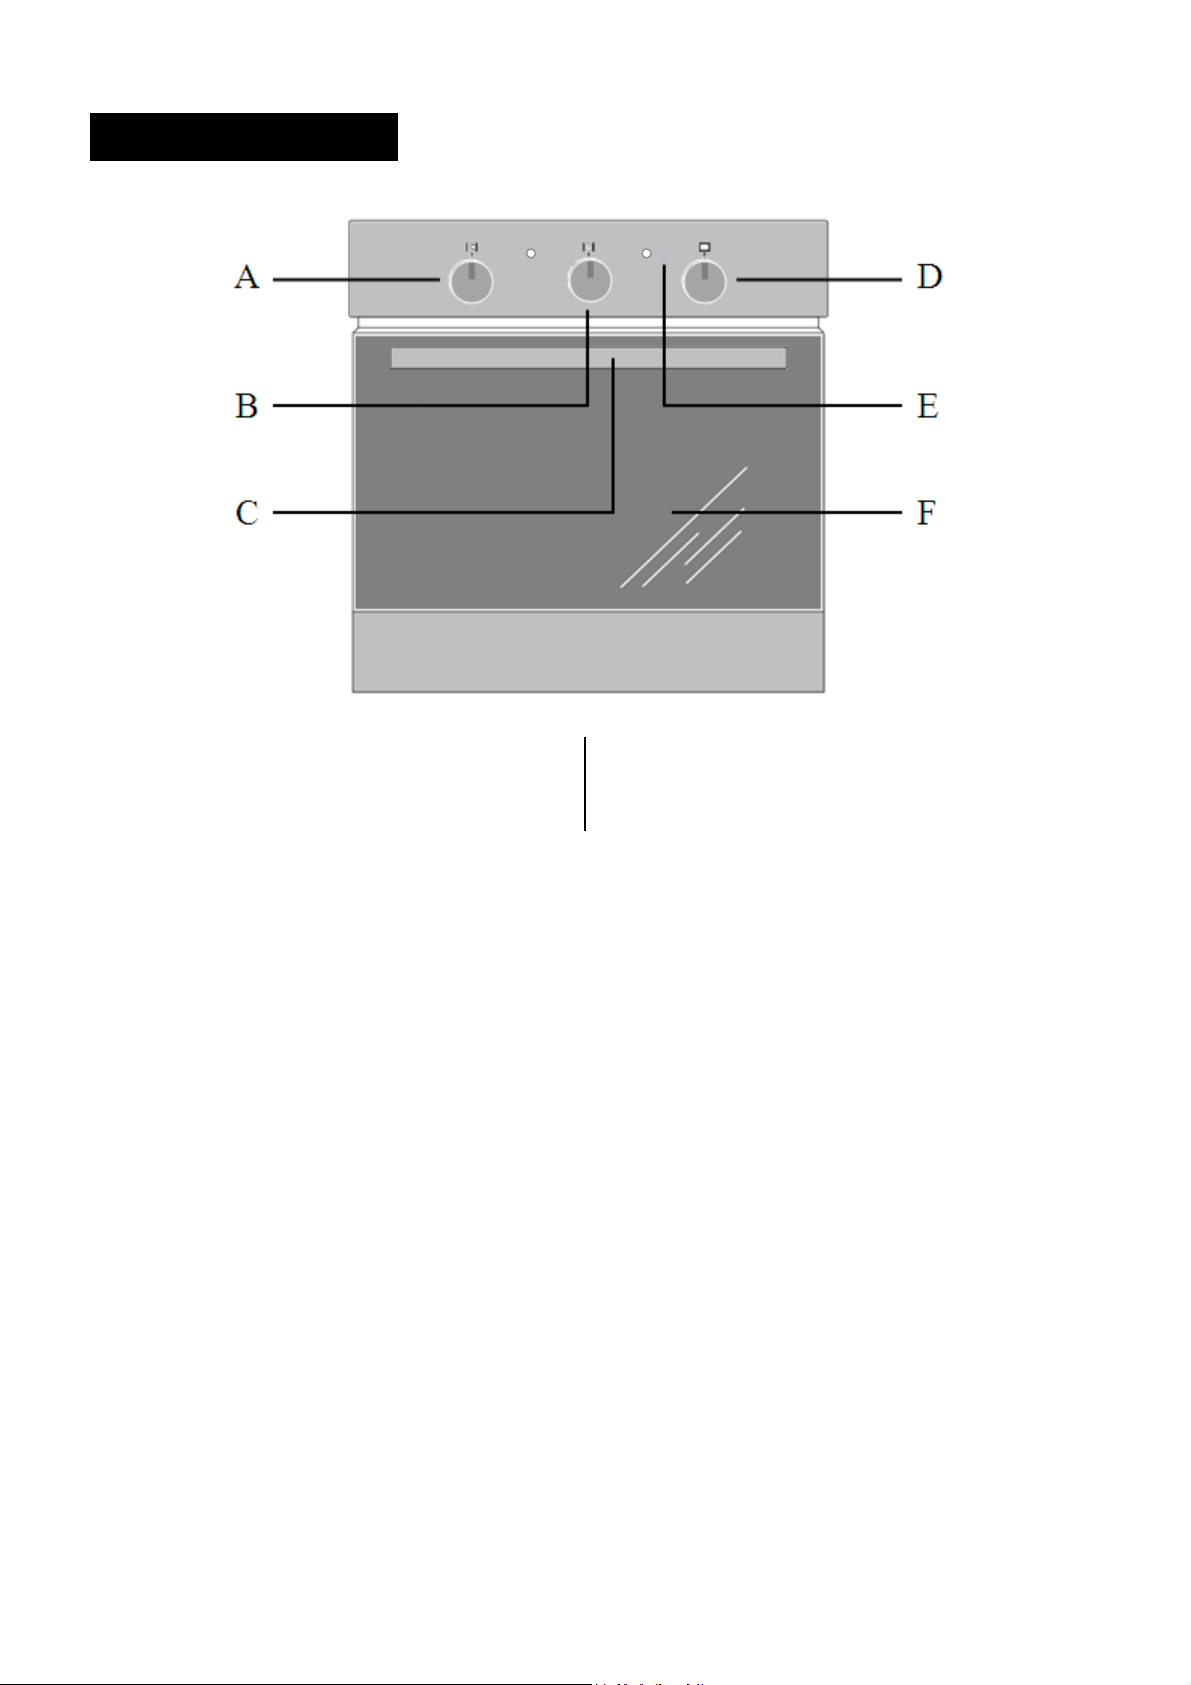
Product Description
¾ Model PBO6500A&PBO6501A
A. Function Selection Knob
B. Timer Knob
C. Door Handle
D. Temperature Control Knob
E. Heating Indicator Light
F. Glass Do or
4
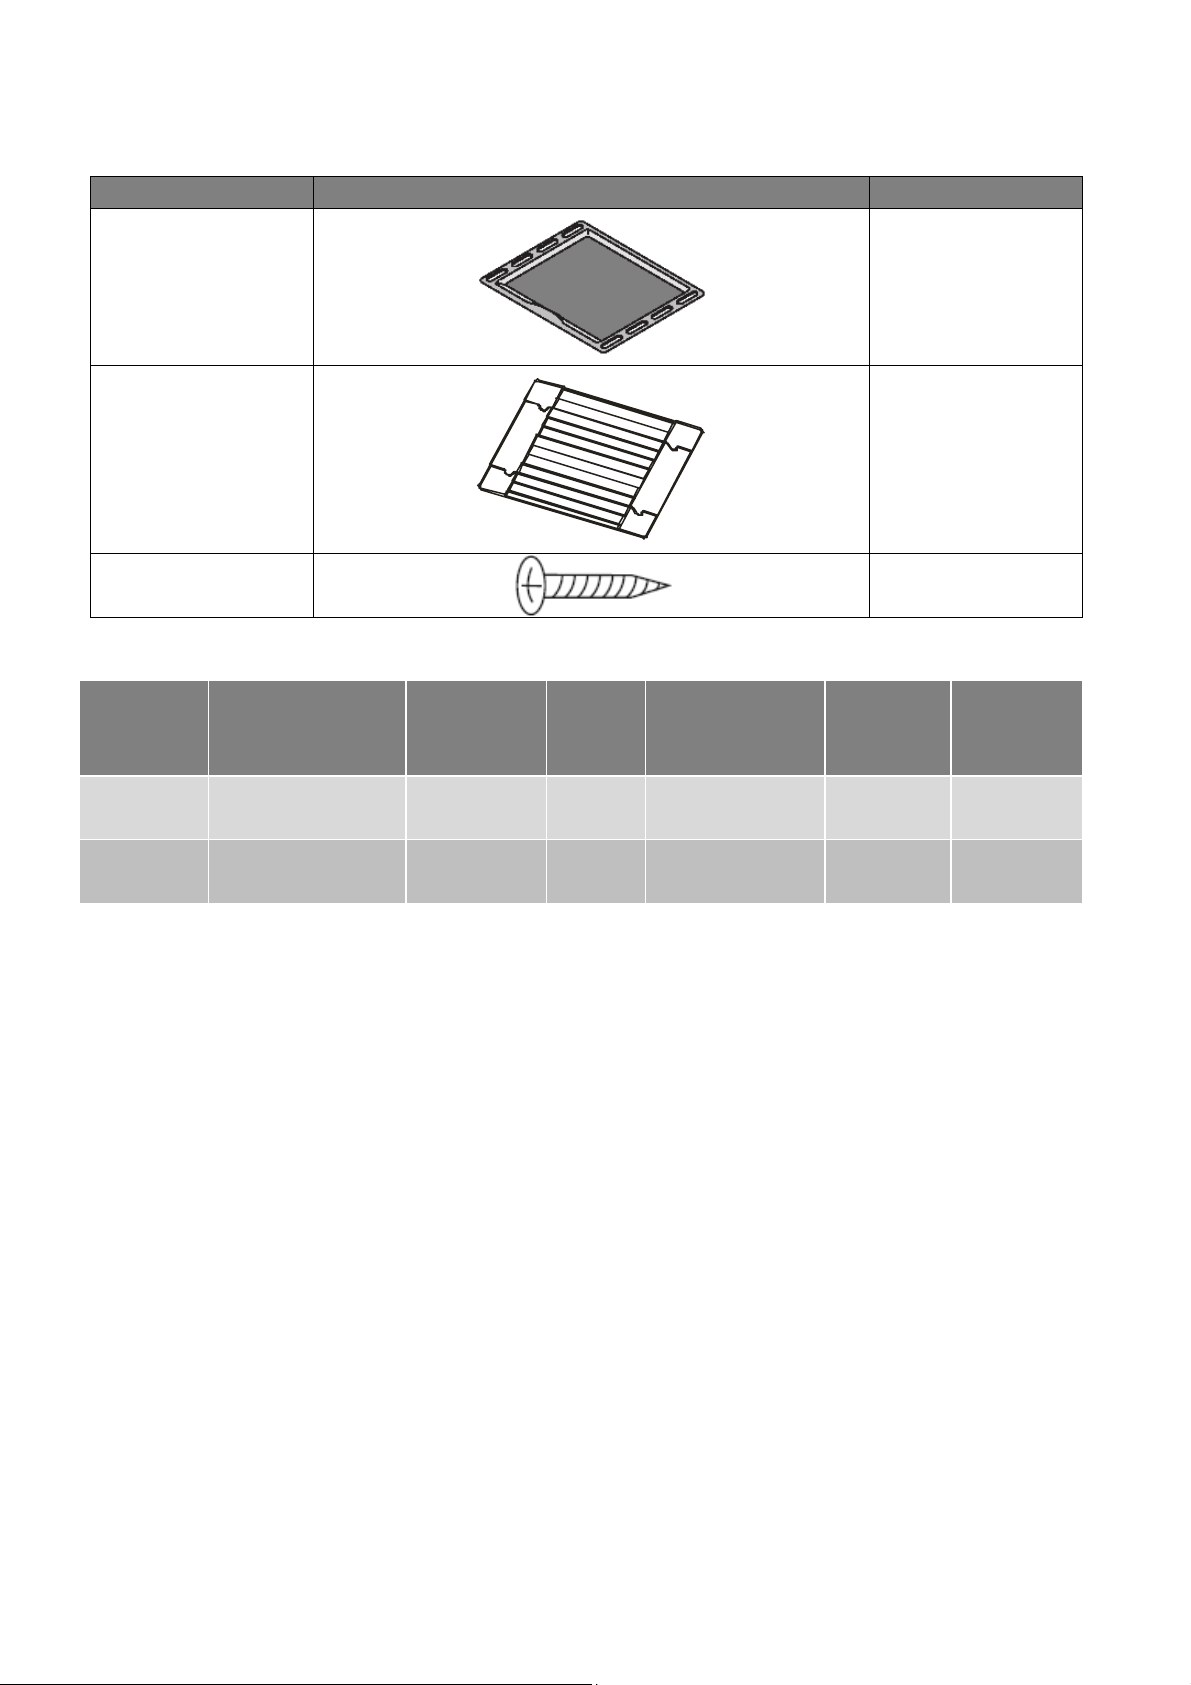
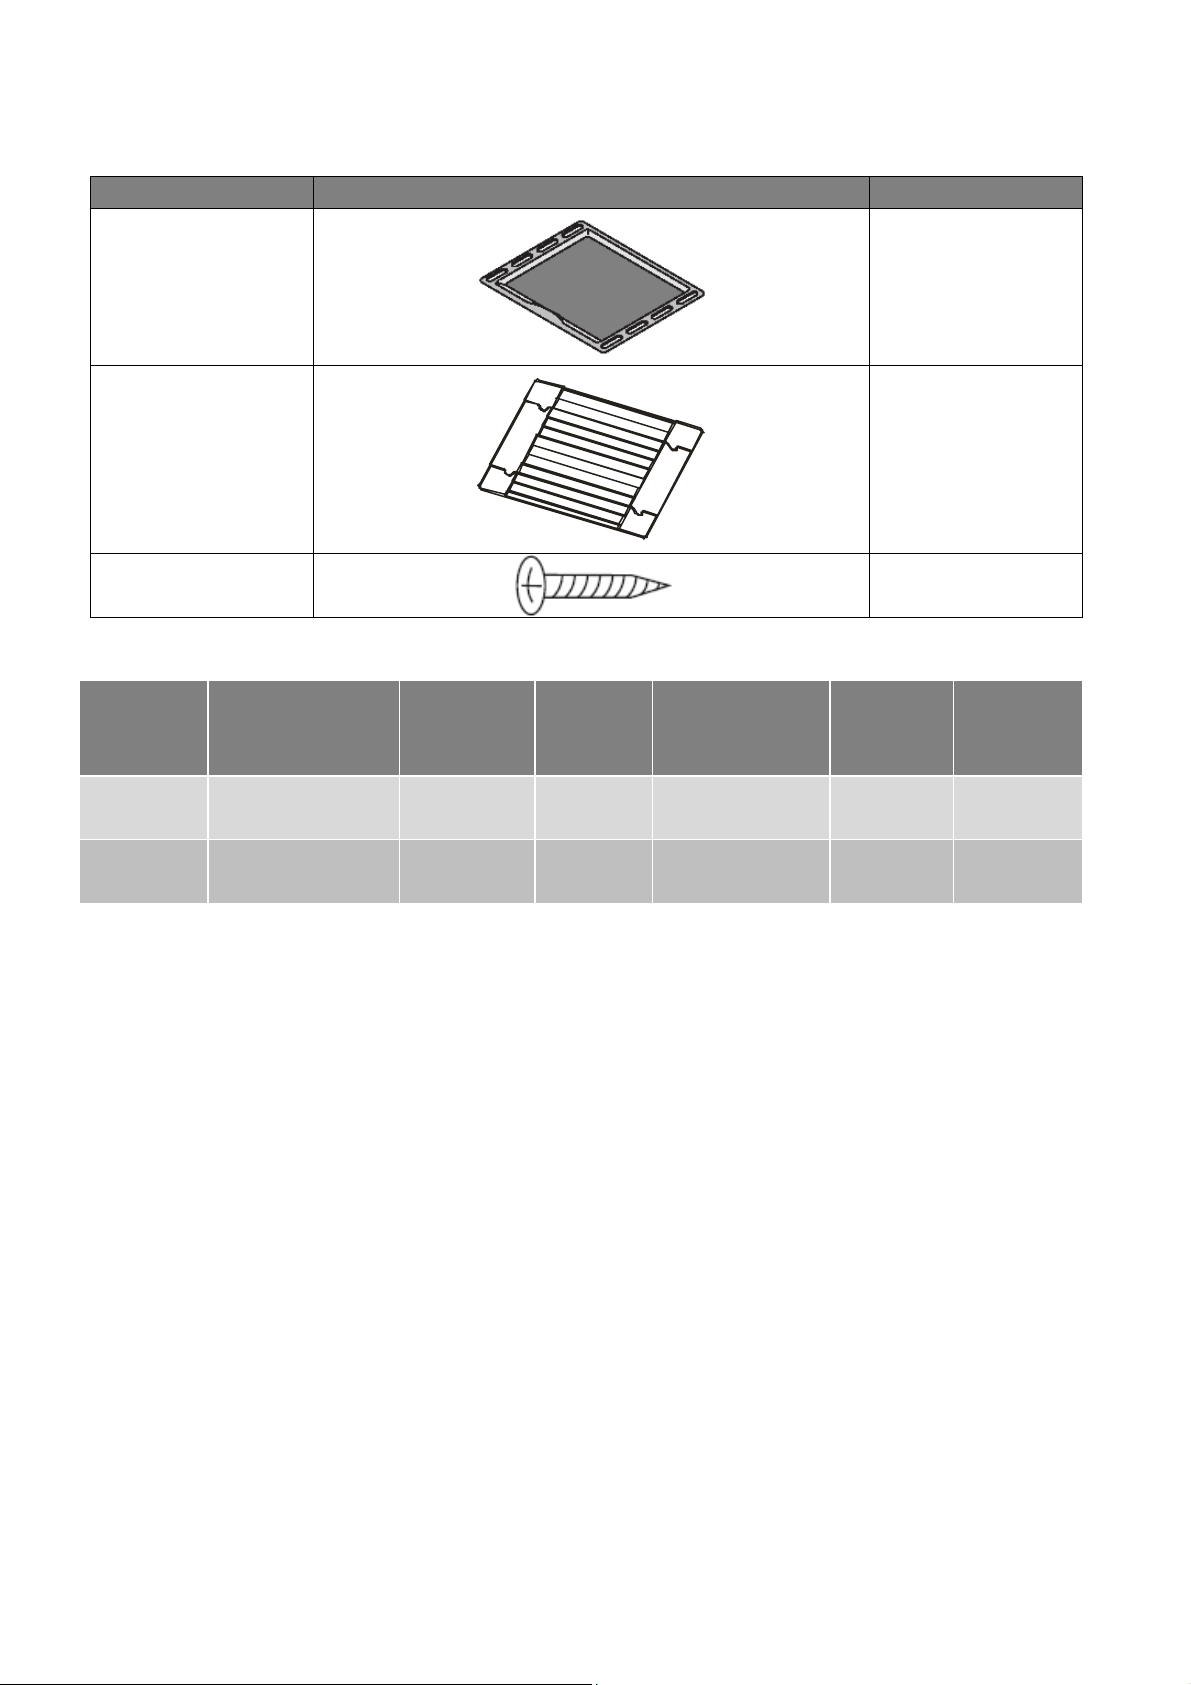
Accessory Name Picture Quantity
Baking tray
1
Grill rack
1
Screws(ST4x35) 4
Technical Specifications
model
product dimensions
(h x w x d) mm net weight
usable
capacity
electrical
connection
max. power
rating
max.
current
rating
PBO6500A 595 x 595 x 575 Approx.
38Kg
60 litres 220-240V/50Hz 2.2kW 10Amp
PBO6501A 595 x 595 x 575 Approx.
38Kg
60 litres 220-240V/50Hz 2.2kW 10Amp
5
Installation
WARNING!
Please follow the points below when installing the appliance
Hire an authorized technician
No alterations or changes in the electricity supply
should be carried out.
Connections diagram is located on the
connection box’s cover. Remember that
connection wire should match the connection
type and oven’s power rating.
Refer to data plate for rating information. The
data plate is located on the side of appliance.
Connection cable must be secured with a
strain-relief clamp.
A safety circuit must be connected to the terminal
marked with
in connection box.
A means of disconnection with a contact
separation of at least 3mm must be supplied in
the fixed wiring.
Disconnect the appliance’s power plug from the
power terminal during maintenance or repairs.
This Appliance Must Be Properly
Grounded
Do not lift the appliance by the door handles.
Prepare the cabinet opening to match your
appliance measurements. (See diagrams).
Slide appliance in to cabinet cavity, ensuring
supply cable is not obstructed (kinked, jammed
or twisted).
To prevent tipping or dislodging of the appliance,
secure appliance to the cabinet with 4 screws
(provided), through the holes in the appliance
frame.
The cabinet material, where the appliance is built
into, must be capable of withstanding 70°C.
Installation into low temperature tolerant
cabinetry (E.g. vinyl coated) may result in
deterioration of coating by discoloring or
bubbling.
The cabinet panels to the oven must be heat
resistant. With veneered wood units, glues must
resist up to 100°C.
If the appliance is to be installed adjacent to vinyl
wrapped surfaces, use an installation kit
available from the vinyl-wrap supplier.
We cannot accept responsibility for damages
caused by installation into low temperature
tolerant cabinets.
After installation, test and ensure the appliance
operates correctly before handing it over to the
customer.
CAUTION!
Where the appliance is connected via power supply
cable to a power point, the installed power point must
remain accessible after appliance installation
A dedicated power circuit is recommended for the unit
but not required. Additional electrical appliances on
the same circuit may exceed the current (amperage)
rating for that circuit. If after the installation of your
unit the circuit breaker trips or the fuse fails on a
repeated basis, then a dedicated circuit will likely be
required.
WARNING!
To avoid any potential hazard, you must
follow our instructions during installation.
Failure to install the appliance correctly
could invalidate any warranty or liability
claims and lead to prosecution.
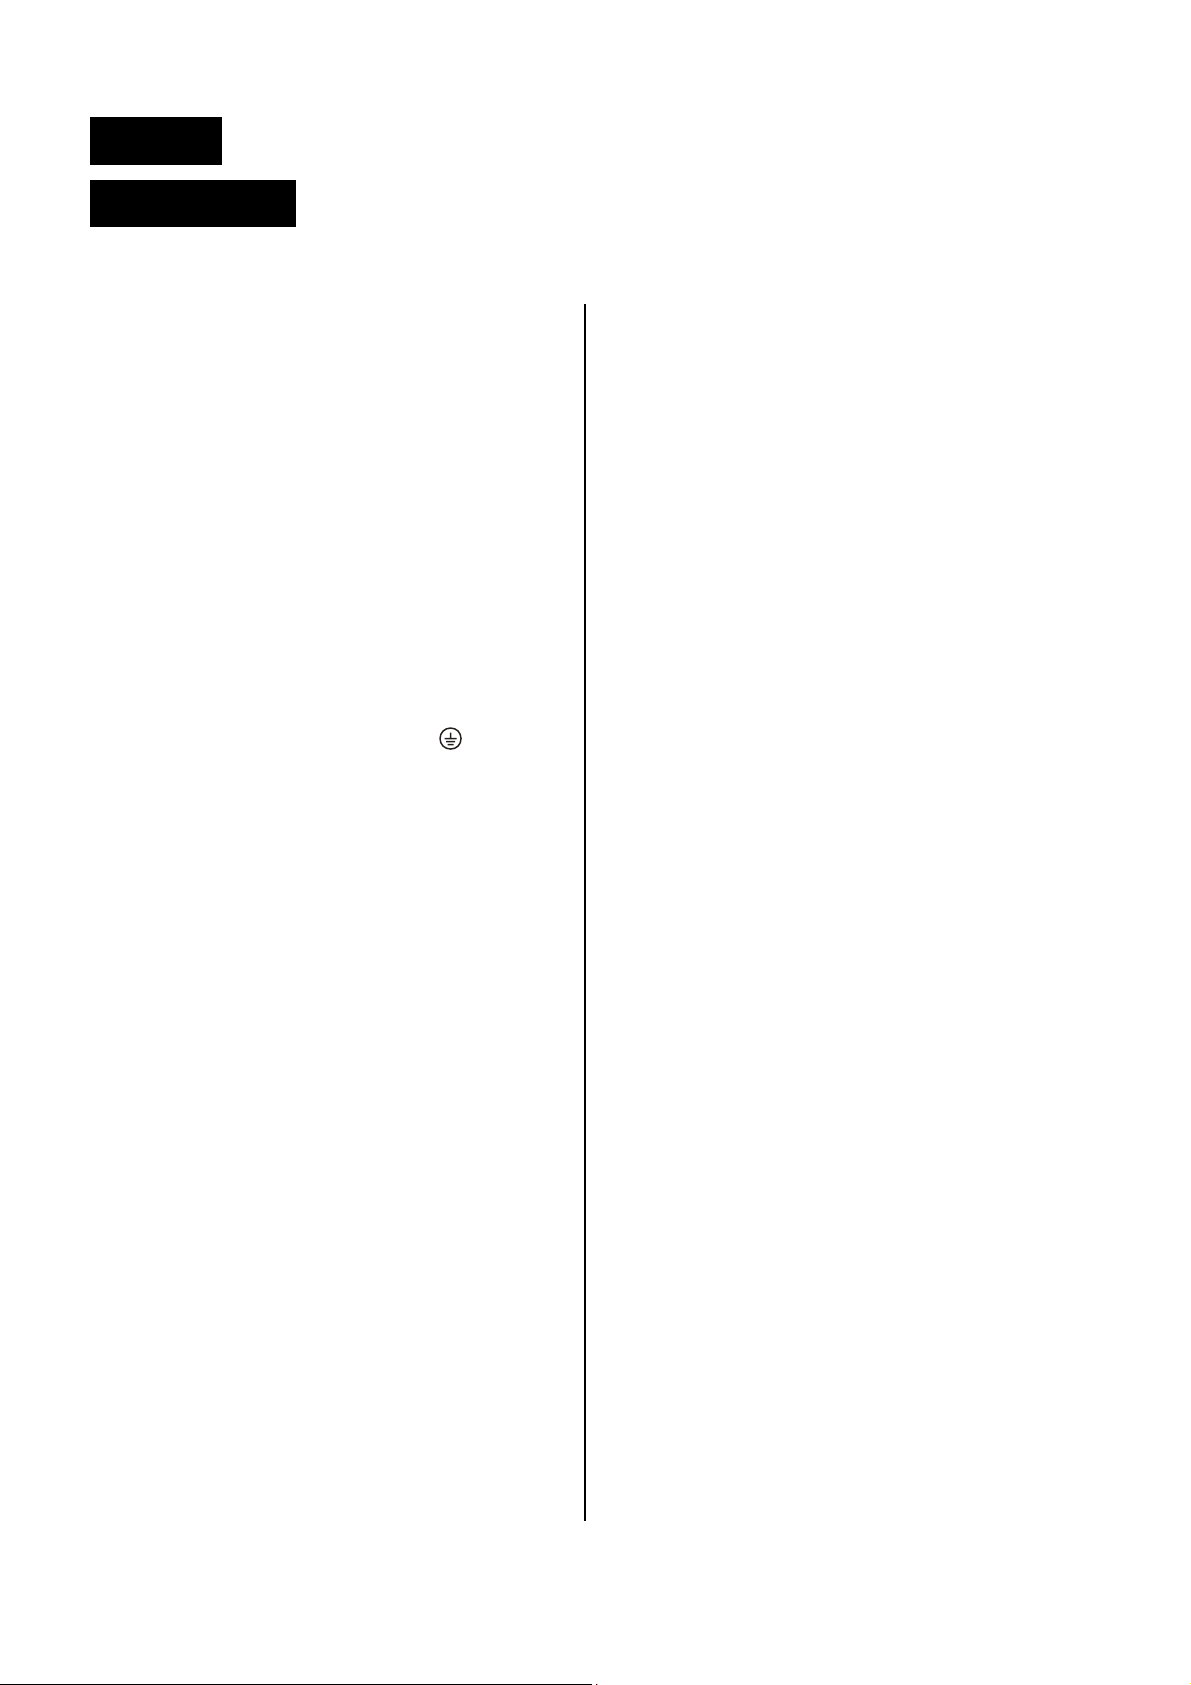
6
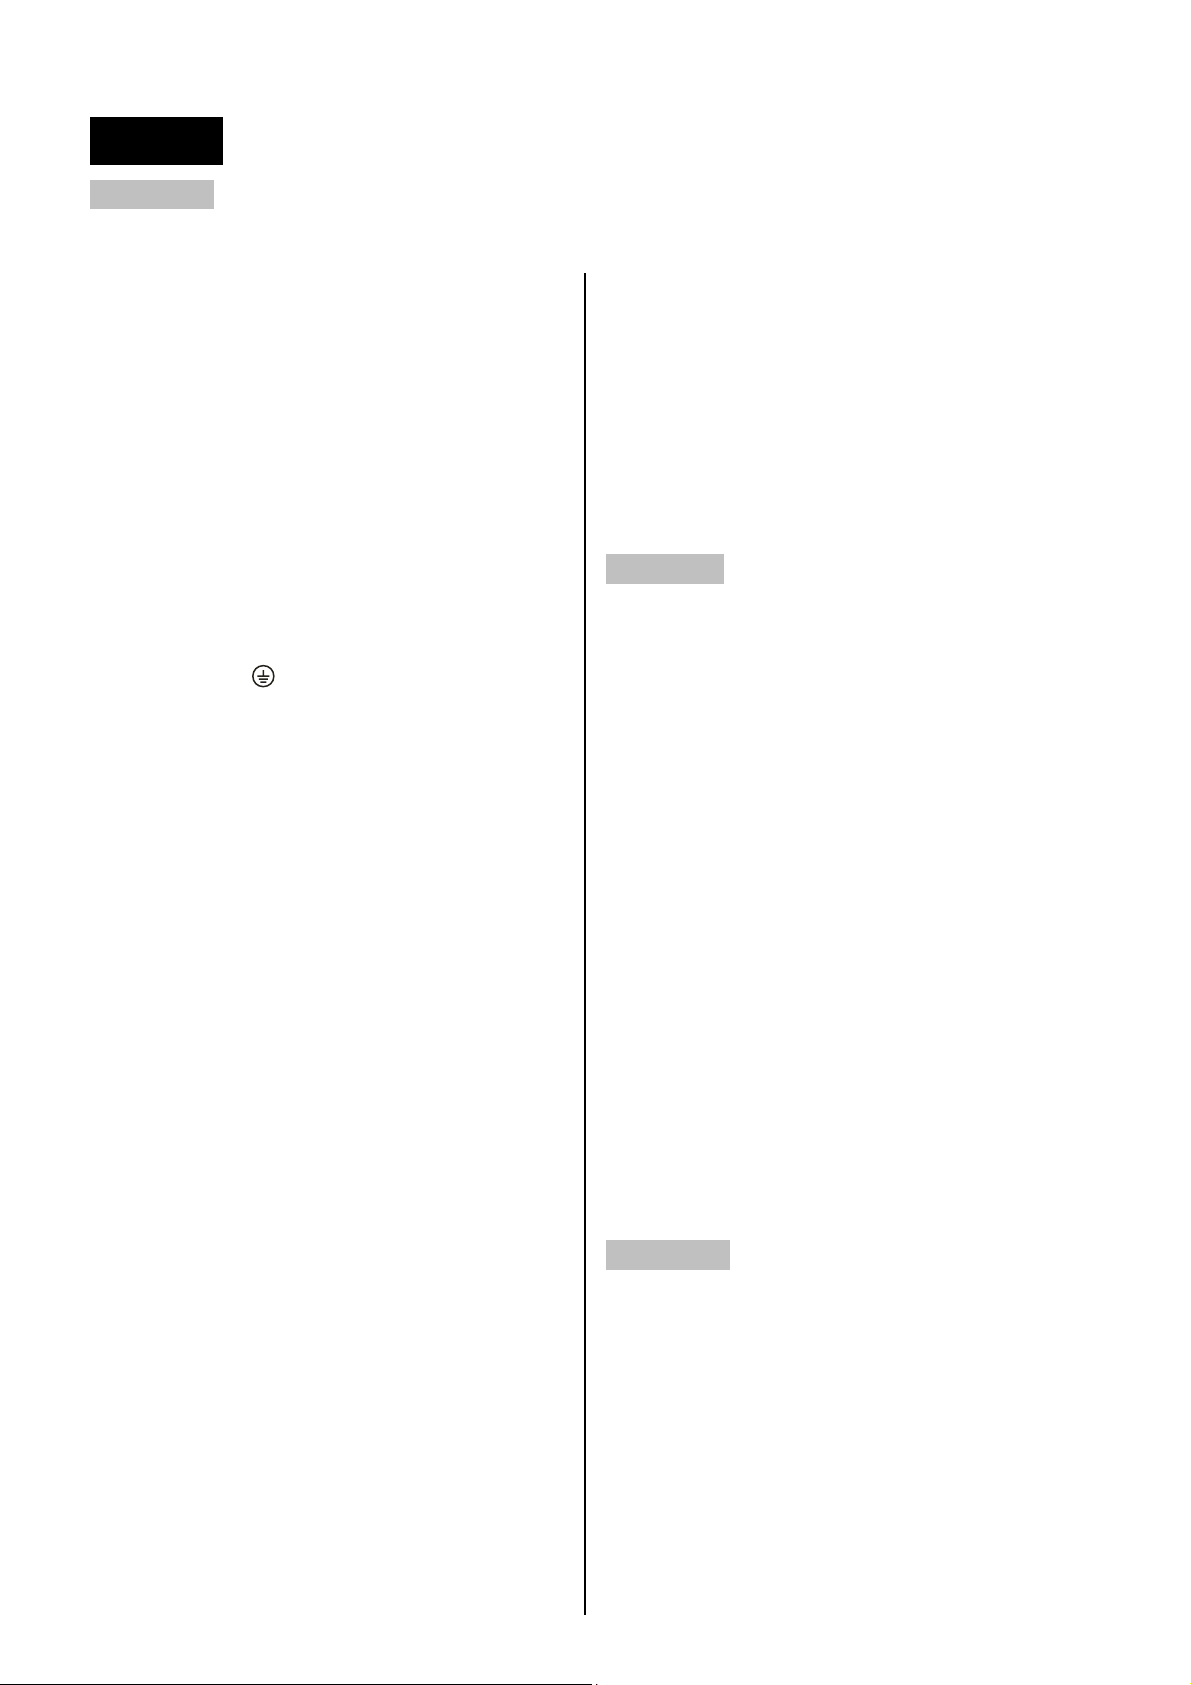
Cut-out dimensions
CAUTION!
Your appliance must be mounted on a flat surface for
the full width and depth of the product.
Connect power supply cord
Open terminal board cover at rear panel of
appliance.
Connect wires as below:
Close the terminal board cover.
Mounting Screw
7
Start Using Your Oven
Preparing Your Oven
1. Please remove all stickers and packing material from the door and oven interior before operation.
2. Please wipe out the oven interior prior to operation with warm soapy water and polish dry with a soft clean
cloth.
Do not close the oven door until the oven is completely dry
.
3. To remove the new cooker smell, heat up the oven when it is empty and closed. An hour of top/bottom
heating at 240°C is ideal for this purpose. Ensure that no packaging remnants have been left in the
cooking compartment.
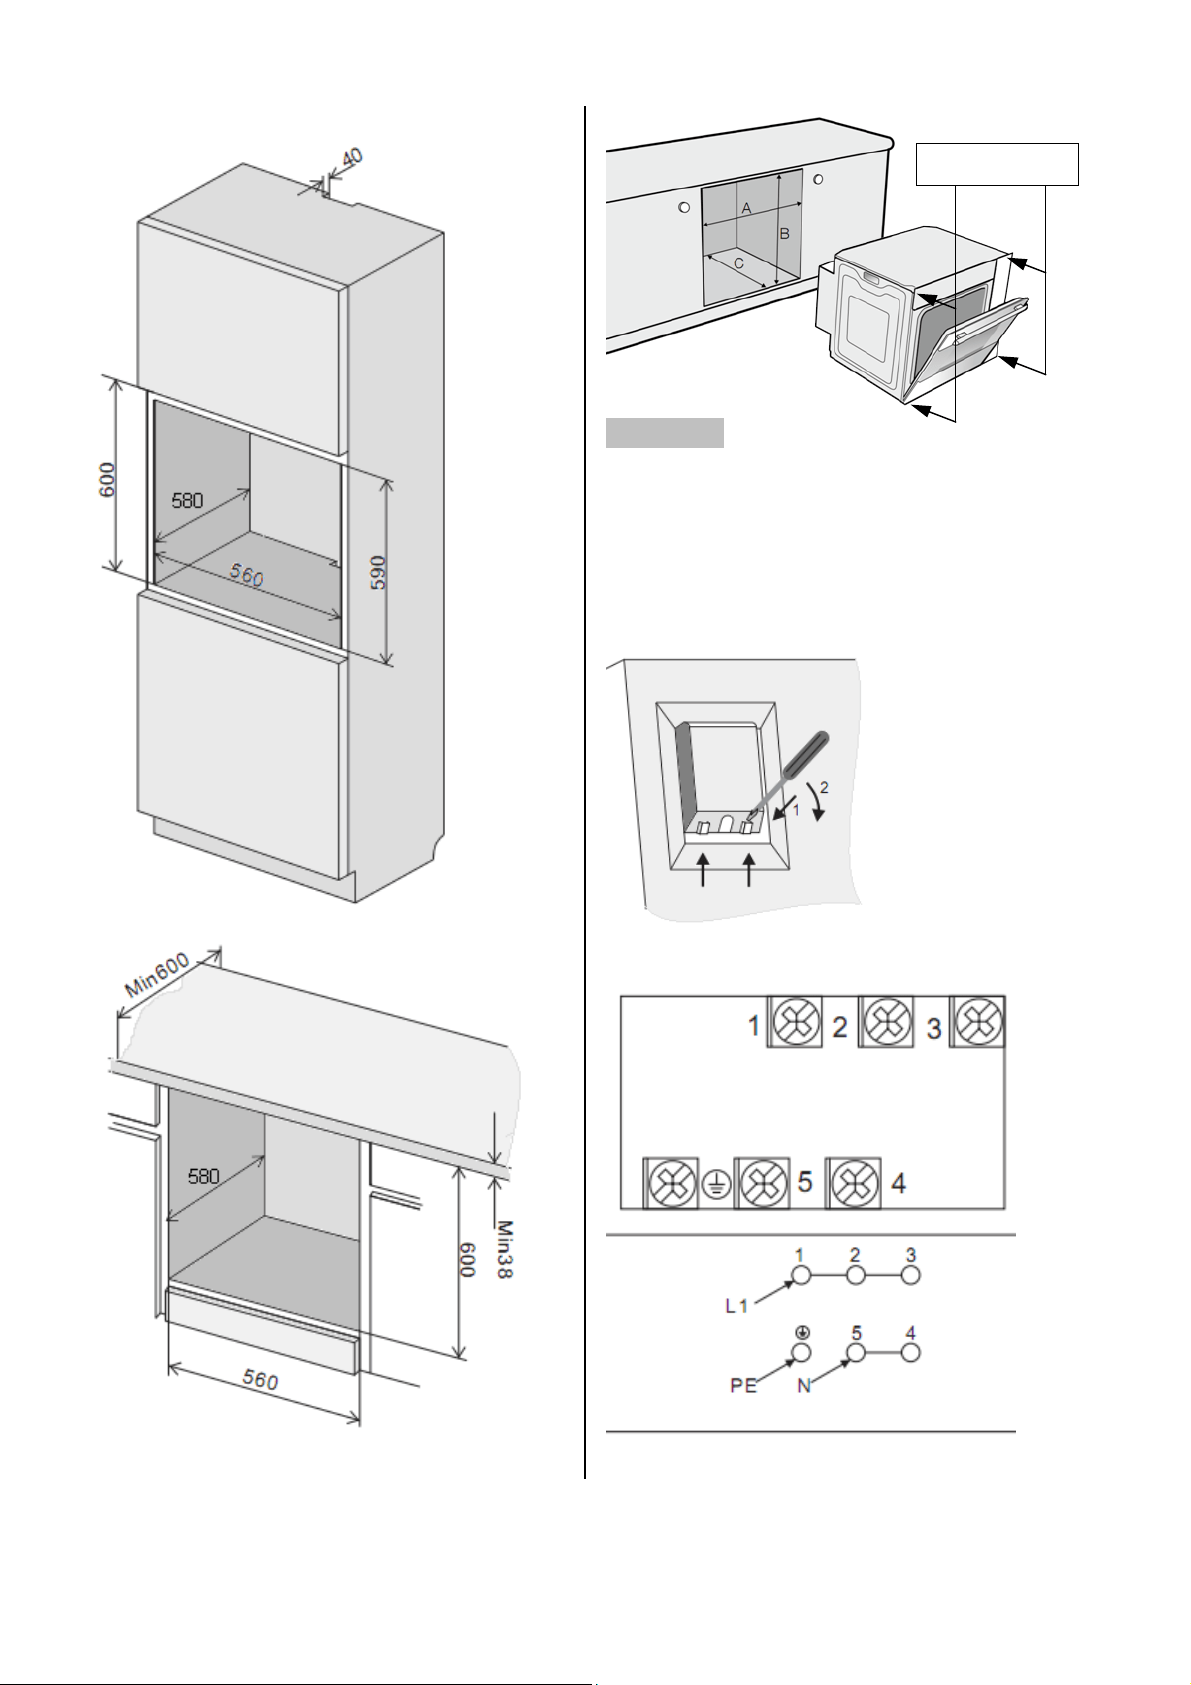
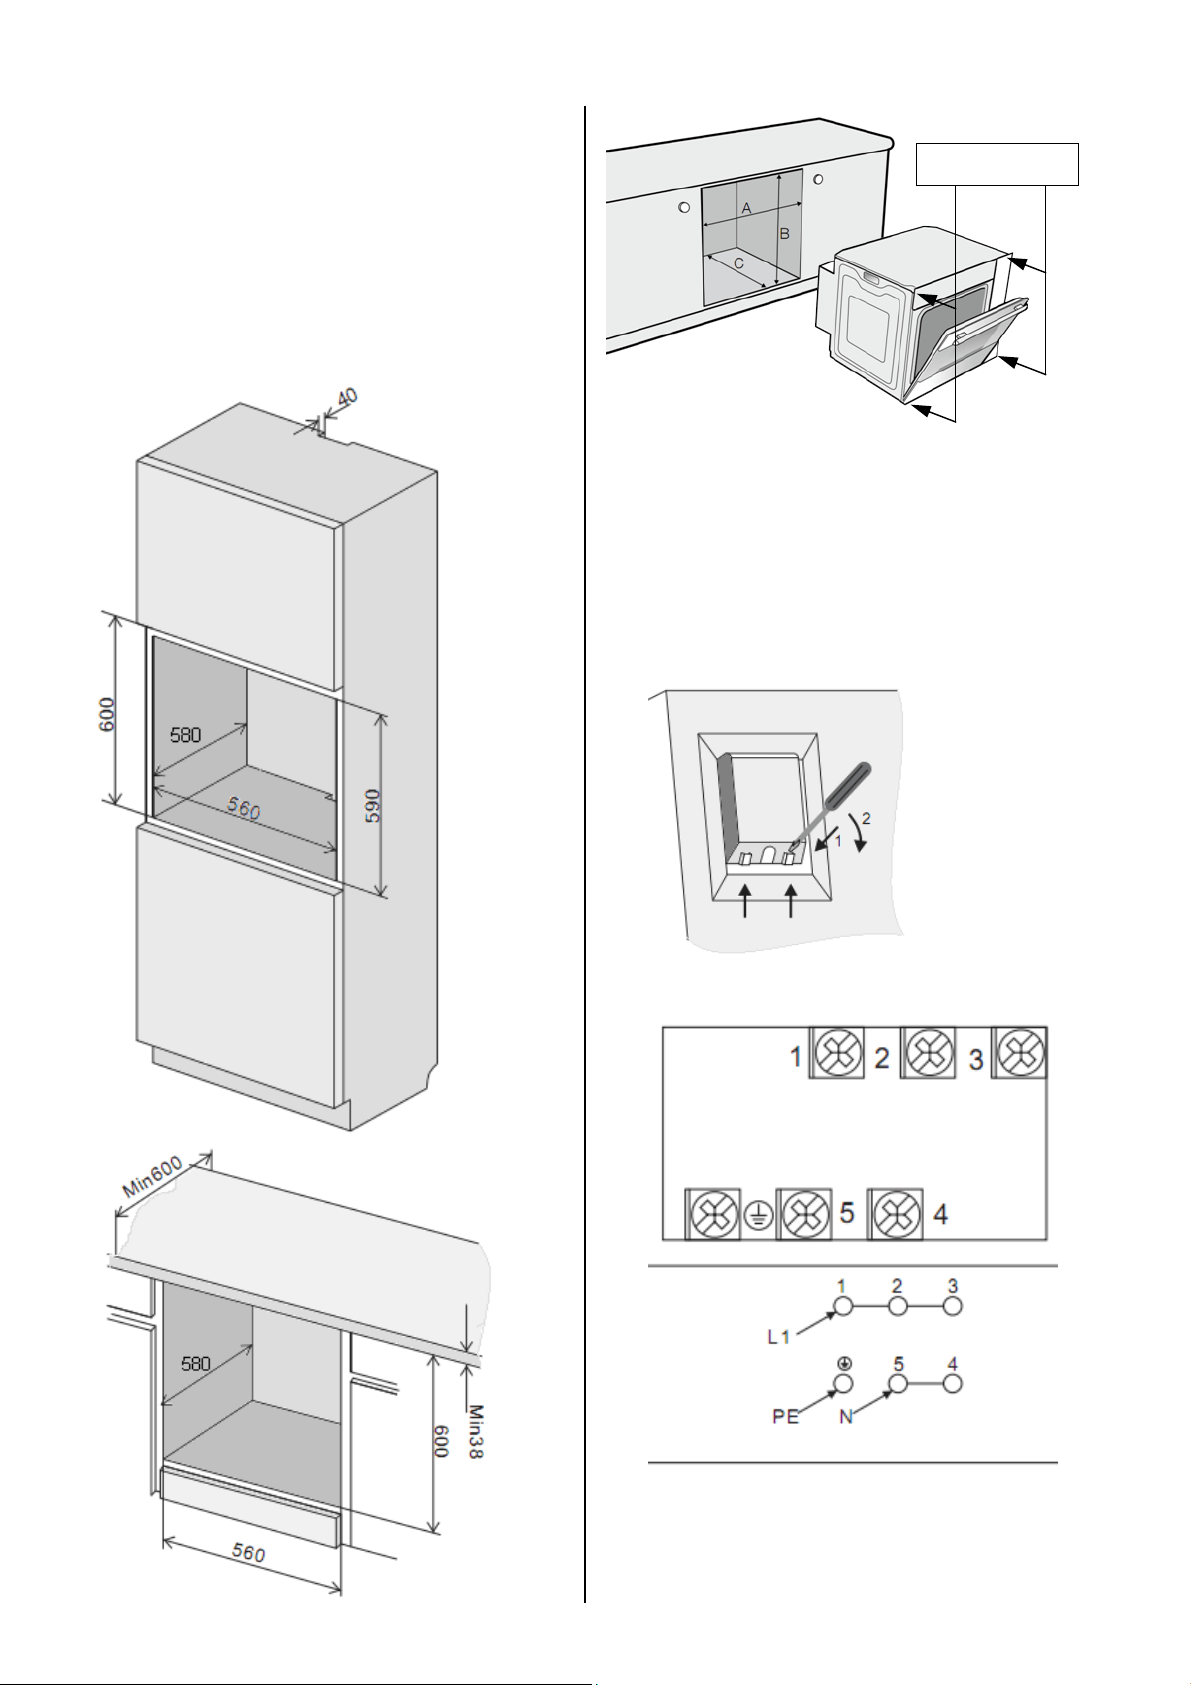
Select the functions ( All Models )
To select the desired function, push the “Function Selection Knob” and the knob will pop up. Turn the knob in any
direction to select the desired function.
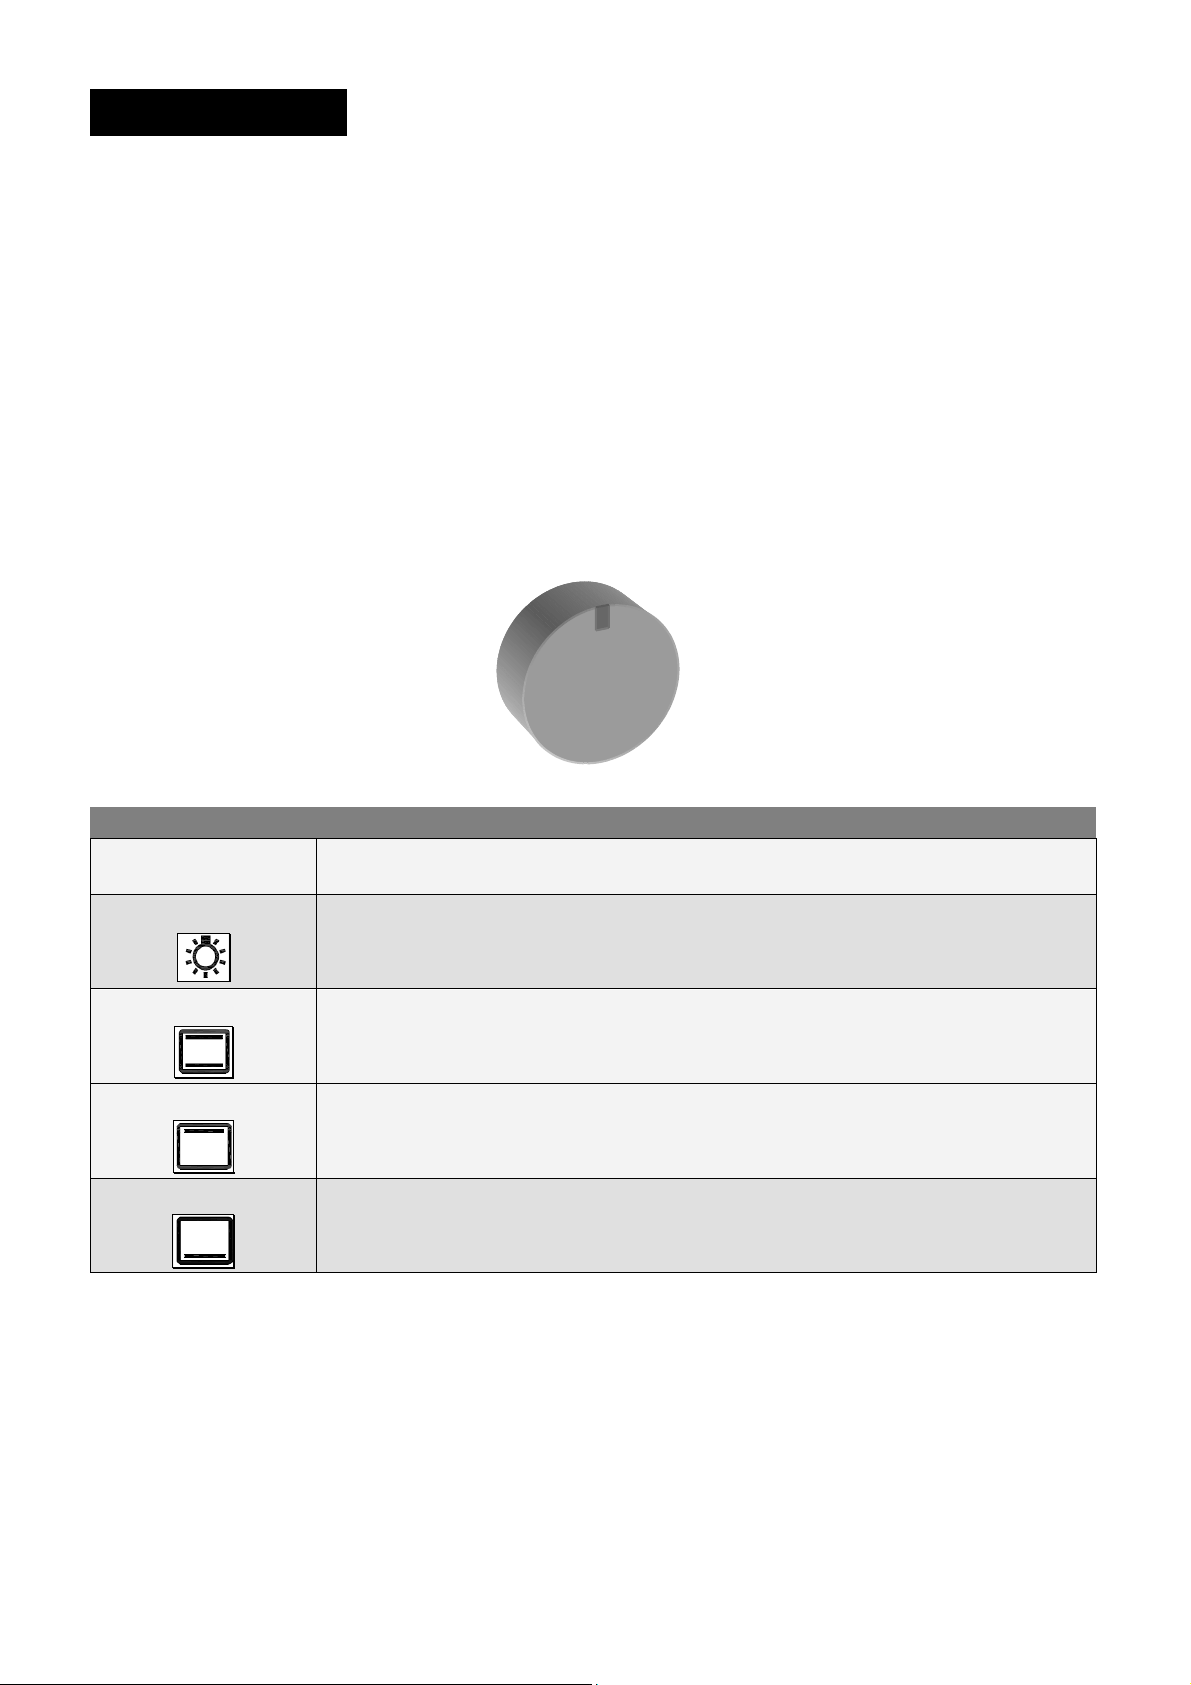
Function Description
0 Switch off function
Oven Light
By setting the knob to this position the lighting inside the oven is switched on, e.g. use
when washing the oven chamber.
Bottom & Top
Elements
Allows the oven to be heated conventionally.
Top Element
Oven is heated using only the top element.
Bottom Element
Oven is heated using only the bottom element.
8
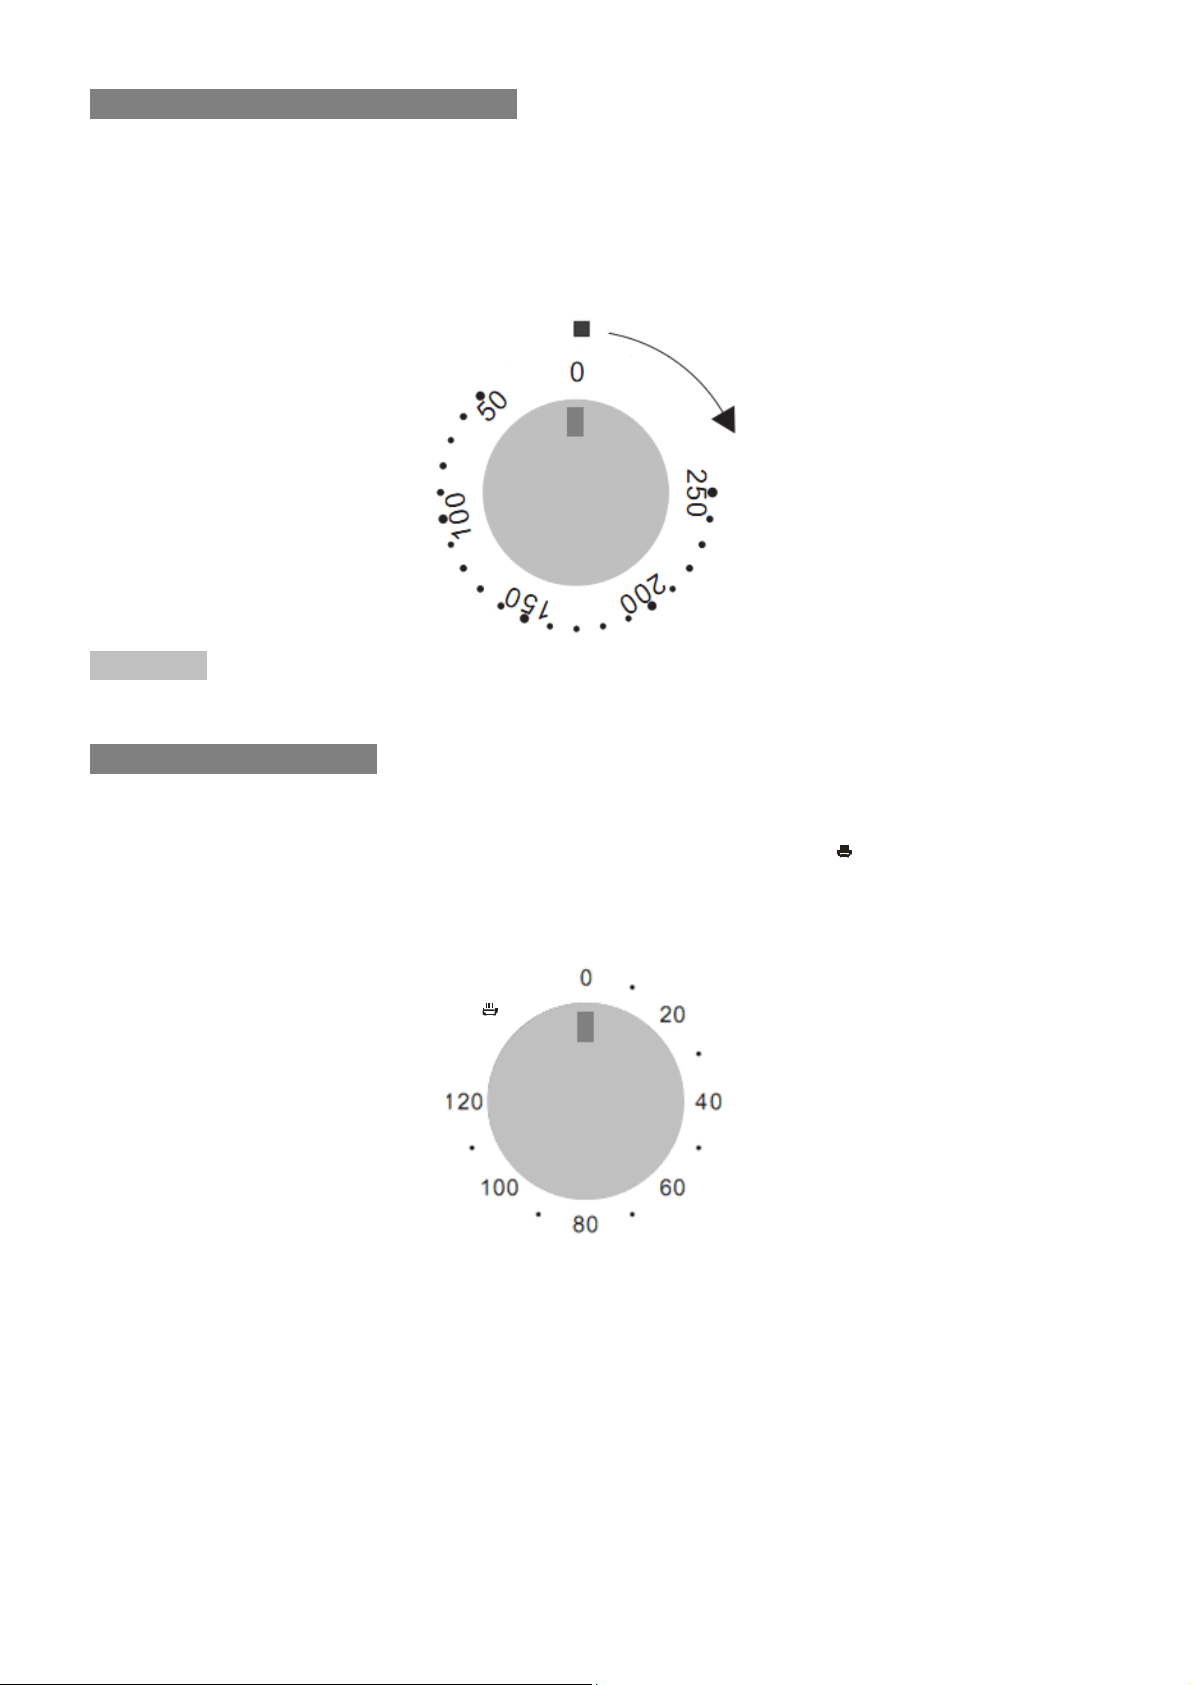
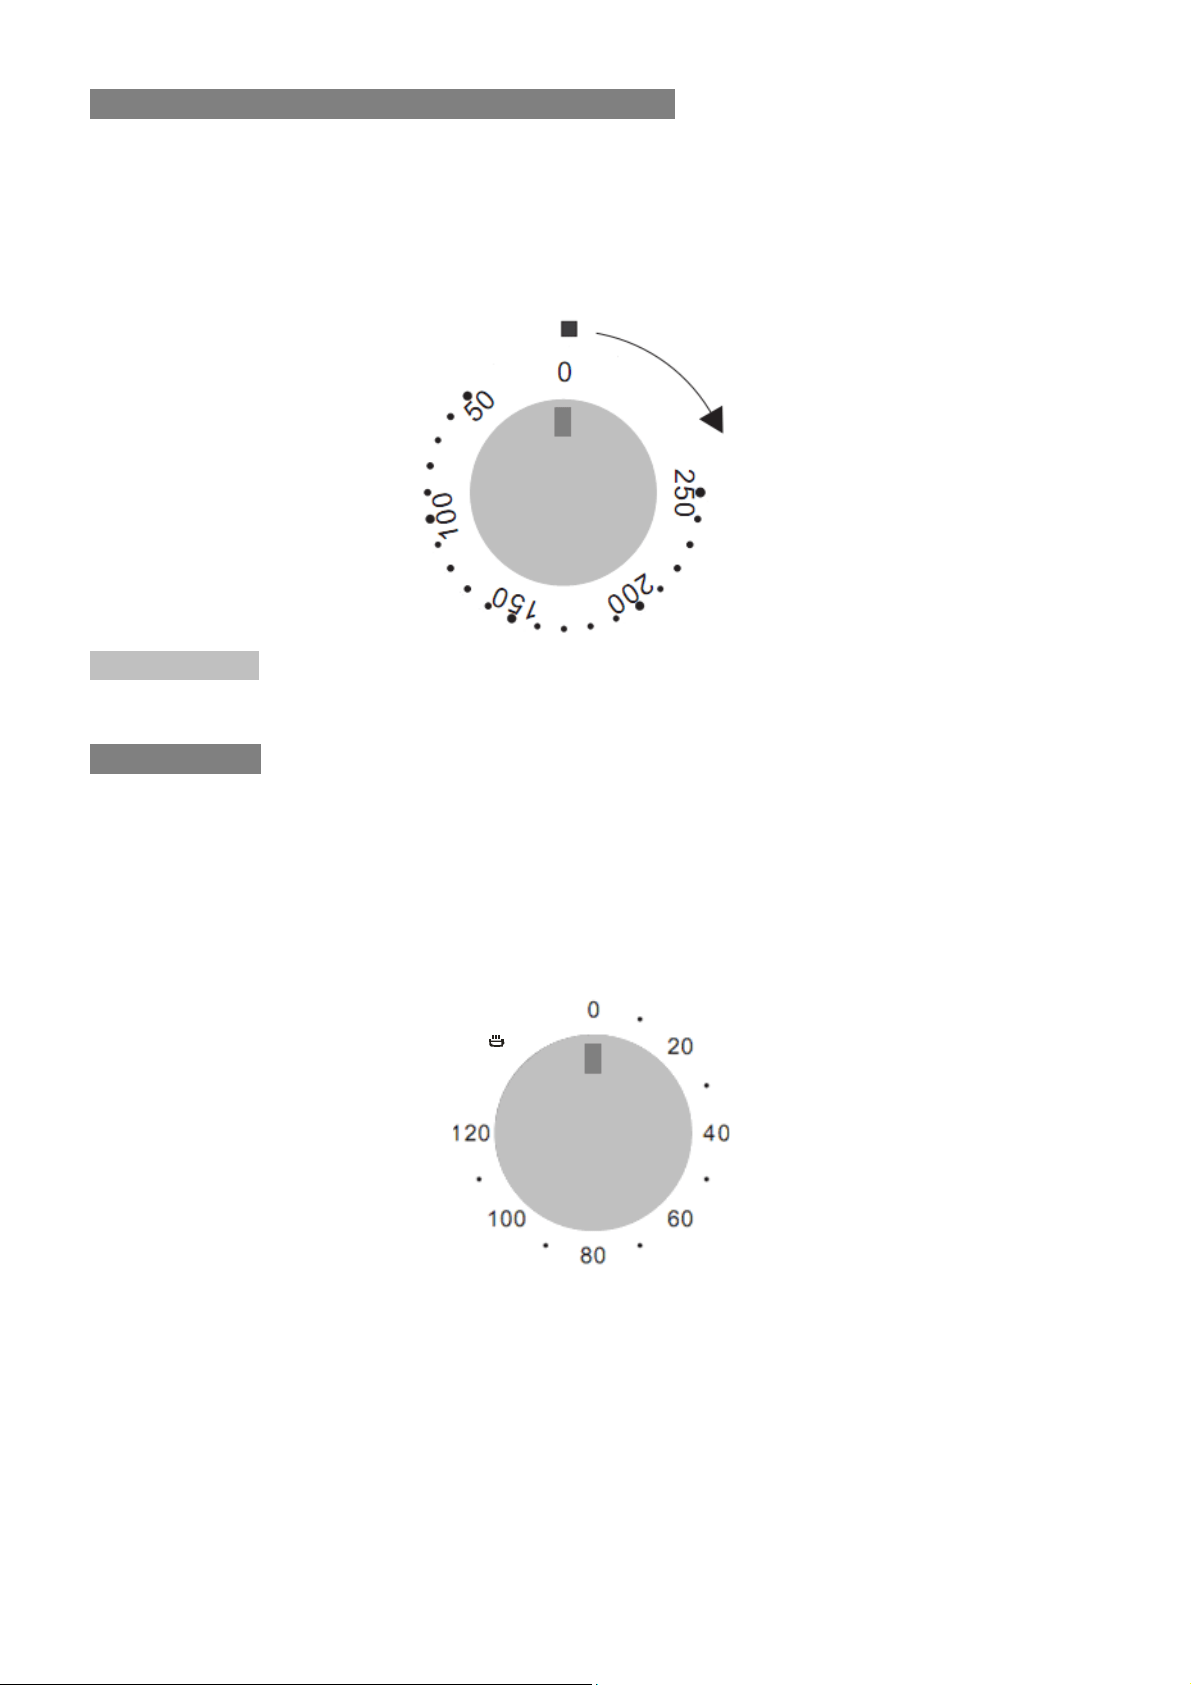
Select the temperature ( All Models )
To select the desired temperature, push the “Temperature Control Knob” and the knob will pop up. Turn the
knob in a clockwise direction to desired temperature (50°C ~ 250°C).
A thermostat controls the temperature in your oven. Heating Indicator Light remains ON when heating the
oven. Heating Indicator Light will turn OFF when the oven reaches set temperature.
Once the food is cooked, turn the temperature selector back in an anti-clockwise direction. Do not force it
right round in a clockwise direction as this will result in damage to the thermostat.
CAUTION!
The desired cooking function must be selected before the turning oven on.
Work With Minute Timer
The timer can be used independently of an oven cooking function for a time period of up to 120 minutes.
To set the timer, turn the knob fully clockwise until it stops and then turn it back anticlockwise to the
required time.
The time period that has been set will expire when the control knob reaches zero, a brief audible signal will
sound.

9
Troubleshooting
In the event of an emergency, you should:
Switch OFF all controls of the appliance
Disconnect the mains plug
Call the service centre
Some minor faults can be fixed by referring to the instructions given in the table below. Before calling the
customer support centre or the service centre check the following points:
Fault Cause Solution
The upper crust is dark and
the lower part too pale
Not enough heat from the bottom - Use the natural convection position
- Use deeper cake tins
- Lower temperature
- Place tin on a lower shelf
The lower part is dark and
the upper crust too pale
Excessive heat from the bottom - Use the natural convection position
- Use lower side tins
- Lower temperature
- Place tin on a higher shelf
The outside is overcooked
and the inside is not cooked
enough
Temperature is too high - Lower temperature and increase the cooking
time
The outside is too dry even
though it looks cooked
Temperature is too low - Increase temperature and reduce the cooking
time.
The appliance does not work Break in power supply Check the household fuse box, if there is a blown
fuse replaces it with a new one.
The oven lighting does not
work
Bulb is loose or damaged Tighten up or replace the blown bulb (see chapter
Cleaning and Maintenance)

10
Maintenance and Cleaning
WARNING!
Before cleaning your oven, or performing maintenance, disconnect it from the
power supply.
Do not use steam cleaners.
Do not line oven bottom with aluminium foil, as the consequent accumulation of
heat could compromise the cooking and even damage the enamel.
To protect against the risk of electrical shock, do not immerse the unit, cord or plug
in water or other liquid or sprinkle water to clean the appliance!
Do not clean the appliance when it is still hot! The inside and external surface of
the oven should preferably be cleaned with a damp cloth when it has cooled down.
Wash all accessories in hot sudsy water or in a dishwasher, wipe dry with a paper
or cloth towel.
If you use your oven for an extended period of time, condensation may form. Dry it
using a soft cloth.
Stainless steel panels
All grades of stainless steel can stain, discolour or become greasy. You must clean these areas regularly by
following the procedures below, if you want your appliance to look its best, perform well and have a long life.
Care must be taken when wiping exposed stainless steel edges, they can be sharp!
The front frame around the oven can be cleaned with stainless steel cleaners if it becomes soiled or
discoloured.
The stainless steel should only be cleaned with warm water and a mild detergent.
DO NOT use abrasive cleaners or harsh solvents.
NOTE: Make sure you follow the polish or brushing lines in the stainless steel
Glass
Glass surfaces on doors and control panels are best cleaned immediately after soiling.
A damp cloth may help remove baked on food deposits.
Oven cleaners can be used to remove stubborn marks and stains.
The glass door on this appliance is made from a tough, durable material that withstands heating and cooling
without breaking. However, it must be remembered that it is GLASS, it may break. Treat it accordingly!
Do not use harsh abrasive cleaners or sharp metal scrapers to clean the oven door since they can scratch
the surface, which may result in shattering of the glass.
Oven
Always keep your appliance clean. Ensure fats and oils do not accumulate around elements, burners or fans.
Always keep the oven dish, baking trays and grill dish inserts clean, as any fat deposits may catch fire.
Always wrap your meats in foil or an oven roasting bag to minimise cleaning. Any polyunsaturated fats can
leave a varnish-like residue which is very difficult to remove.
11
Grill
Always keep the grill dish and grill insert clean, as any fat deposits may catch fire.
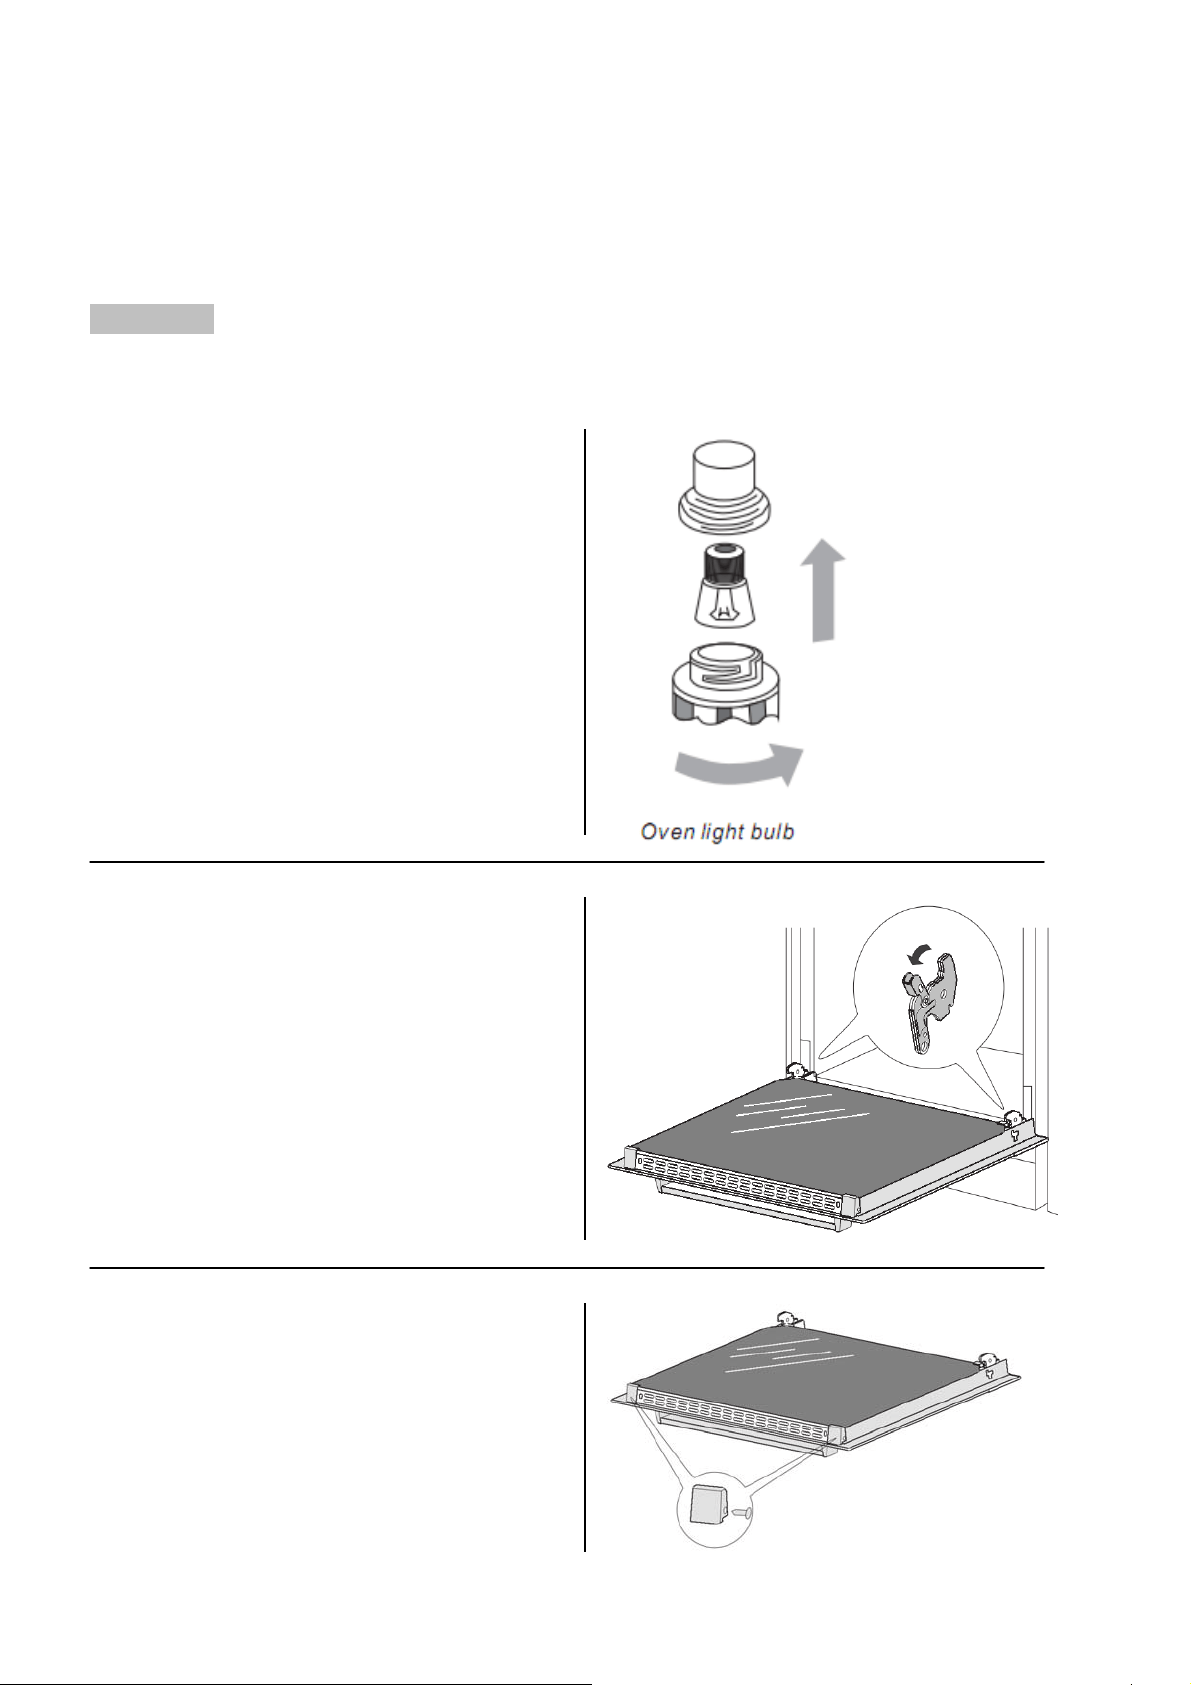
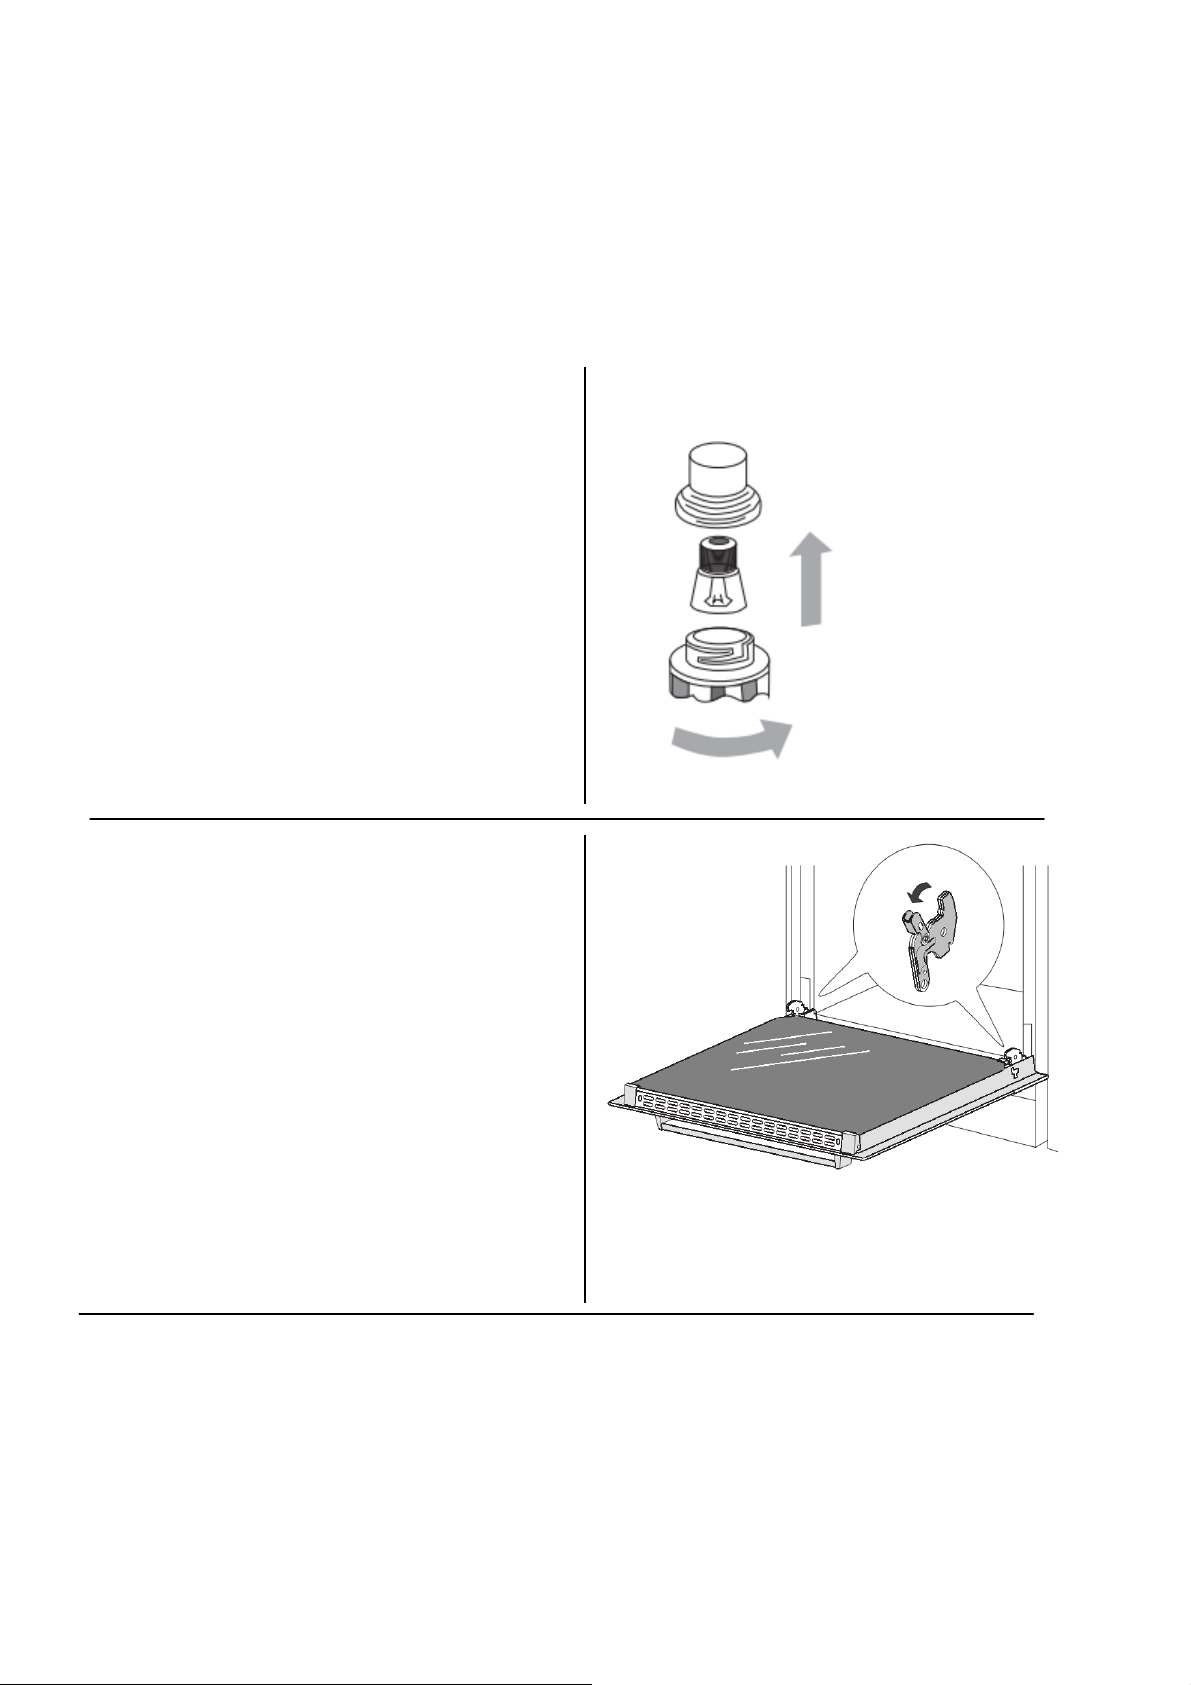
Replacement Of The Oven Light Bulb
WARNING!
In order to avoid the possibility of an electric shock ensure that the appliance is
disconnected from the power supply before replacing the bulb.
Set all control knobs to the “OFF” position (● / 0)
and disconnect the mains plug
.
Unscrew and wash the lamp cover and then
wipe it dry.
Unscrew the light bulb from the socket, replace
the bulb with a new one-a high temperature
bulb (300°C) with the following parameters:
-voltage230V
-power 25W
-thread E14
Screw the bulb in, making sure it is properly
inserted into the ceramic socket.
Screw in the lamp cover.
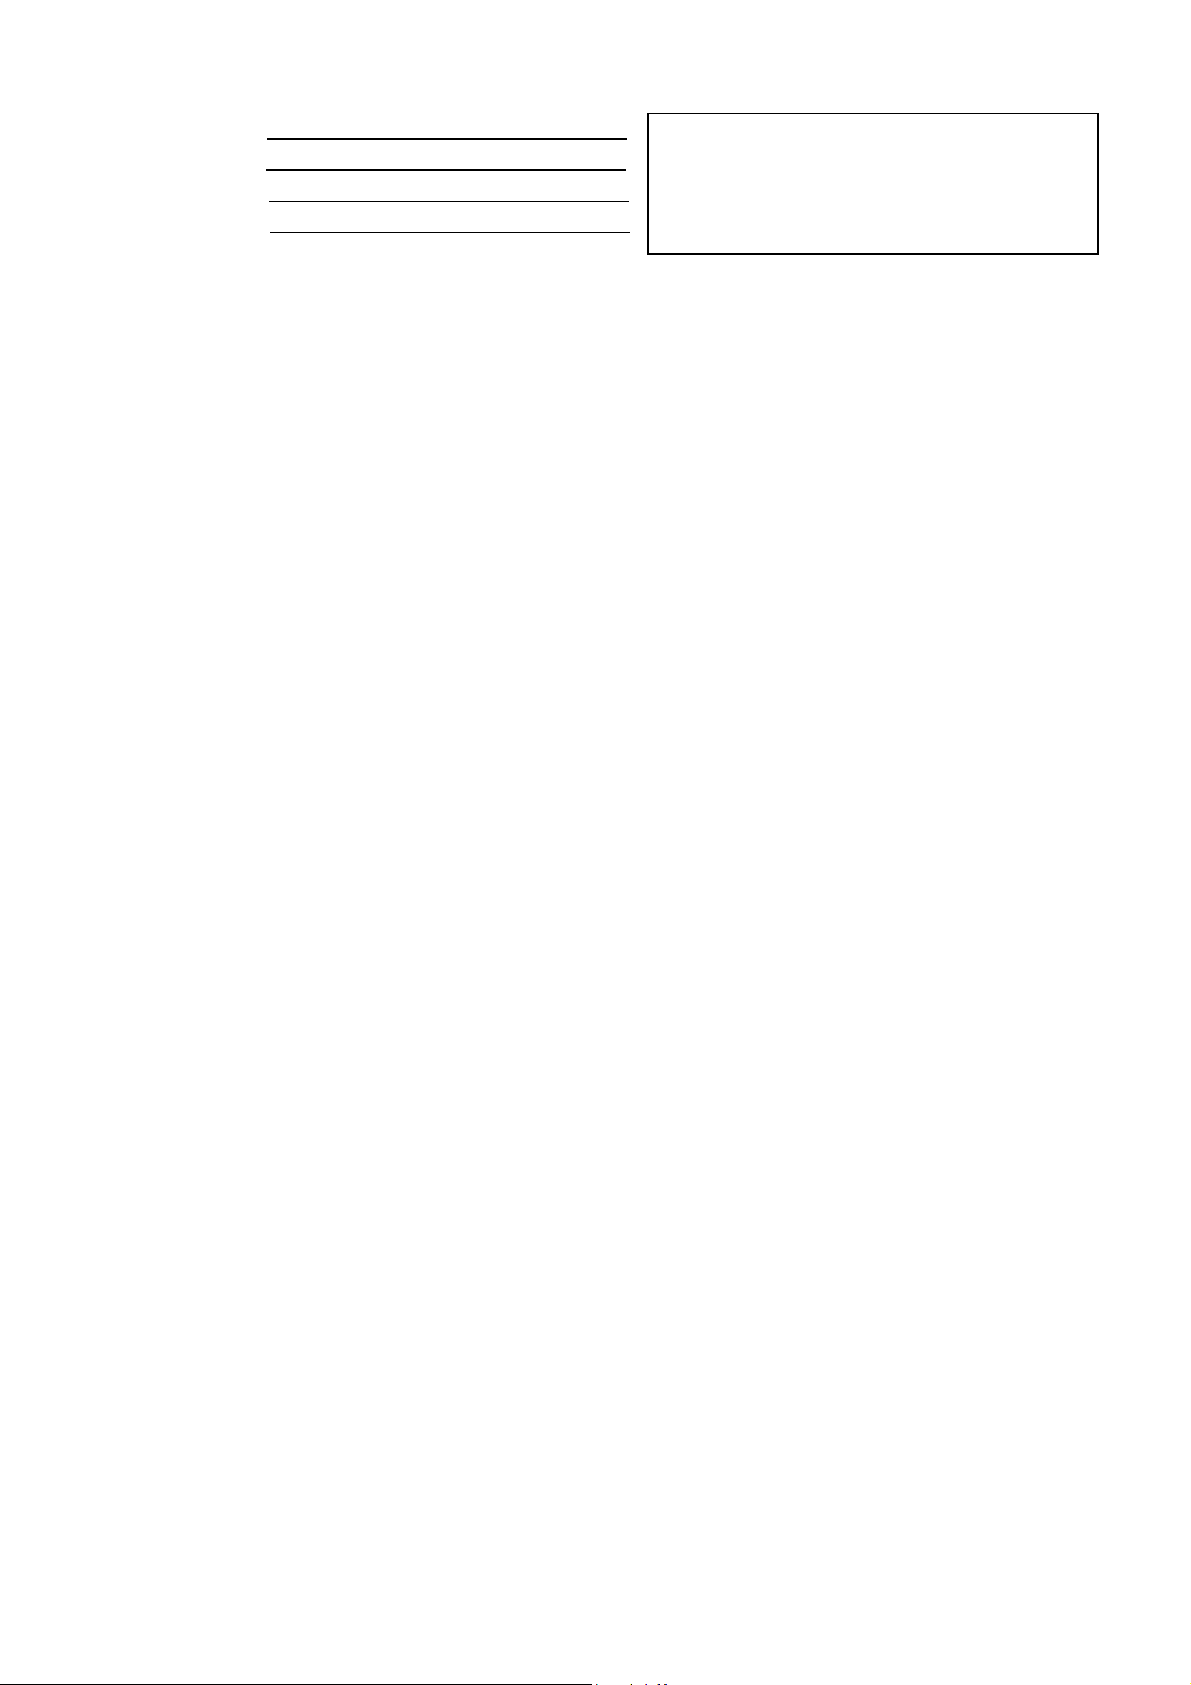
Door Removal
In order to obtain easier access to the oven chamber
for cleaning, it is possible to remove the door. To do
this, tilt the safety catch part of the hinge upwards.
Close the door lightly, lift and pull it out towards you.
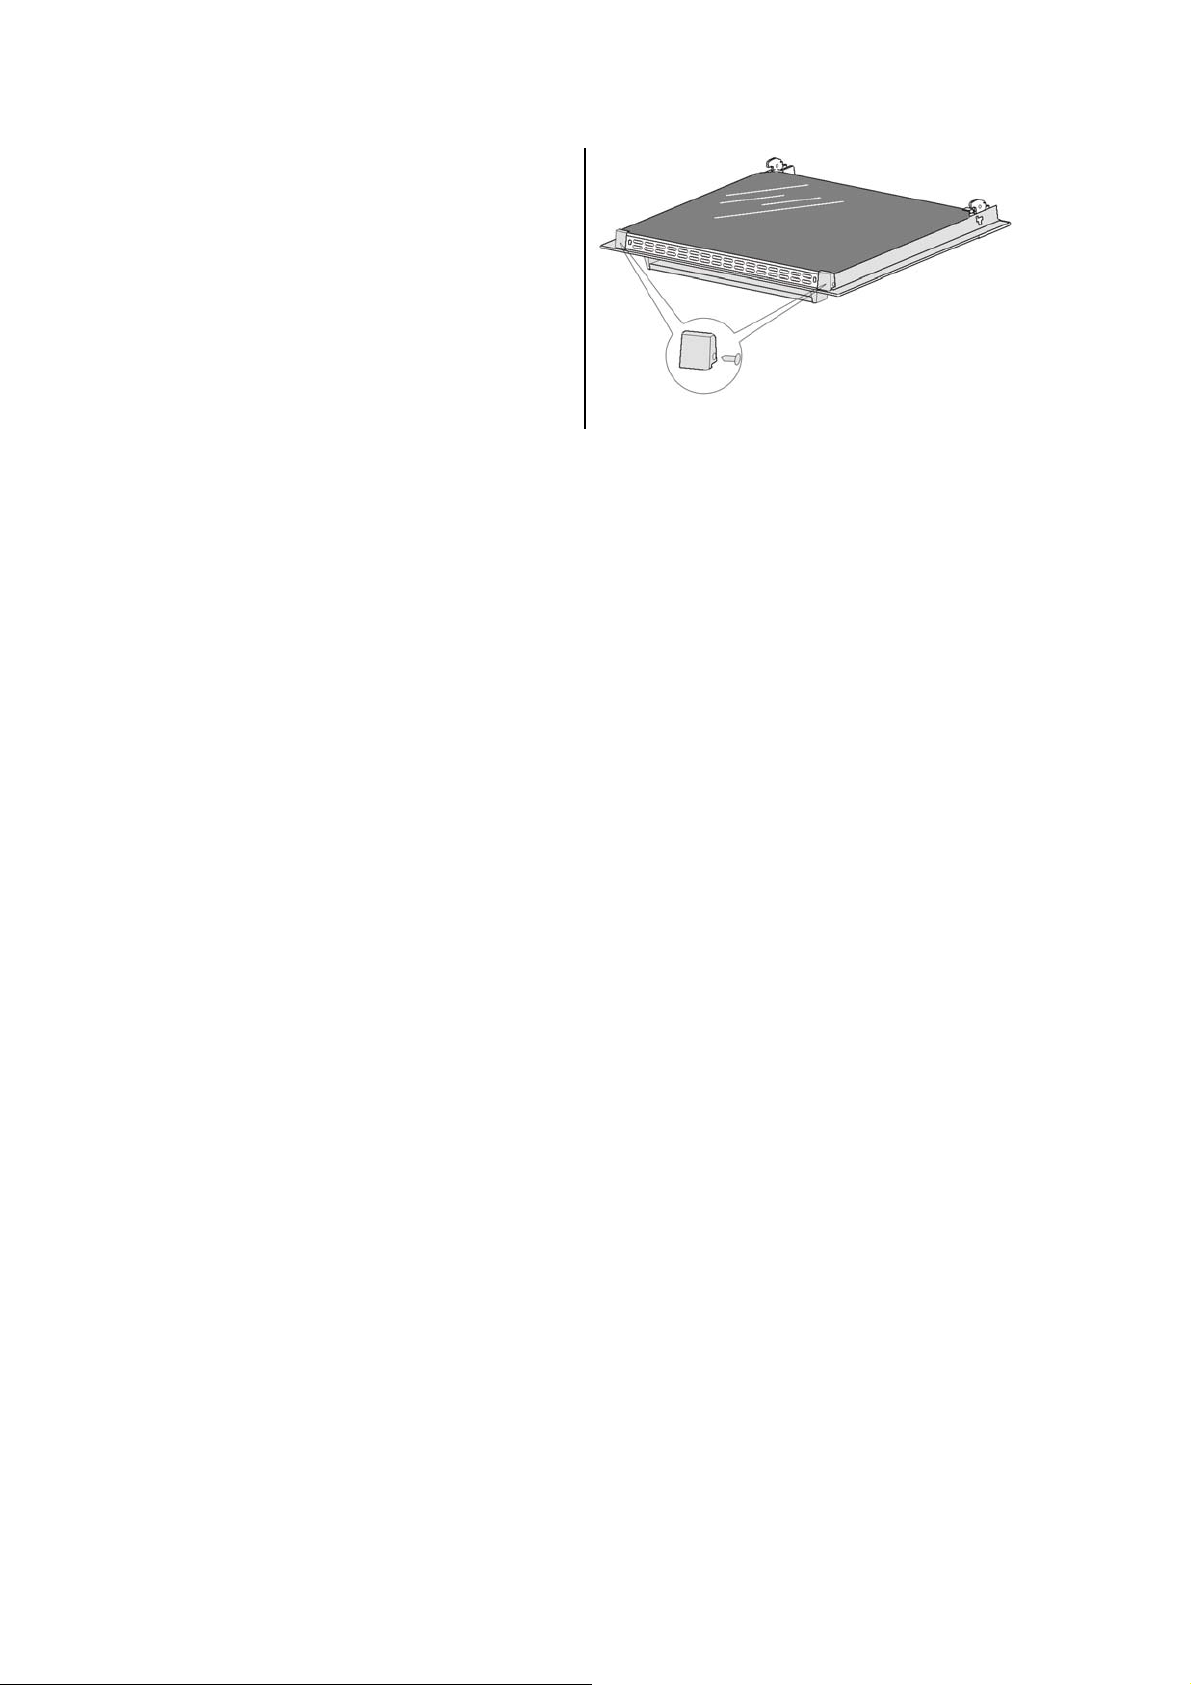
In order to fit the door back on to the oven, do the
inverse. When fitting, ensure that the notch of the
hinge is correctly placed on the protrusion of the
hinge holder. After the door is fitted to the oven, the
safety catch should be carefully lowered down again.
If the safety catch is not set it may cause damage to
the hinge when closing the door.
Removal Of The Internal Glass Panel
Unscrew and unfasten the plastic latch that is in the
corner at the top of the door.
Next take out the glass from the second blocking
mechanism and remove.
After cleaning, insert and block the glass panel, and
screw in the blocking mechanism.

12
Warranty
The benefits conferred by this warranty are in addition
to all implied warranties, other rights and remedies in
respect of the product which the consumer has under
the Trade Practices Act and similar State and Territory
Laws.
The original purchaser of this Premium product is
provided with the following warranty, subject to the
following warranty conditions.
This product is covered by a 2 Year In Home
Warranty from the date of purchase. The warranty
covers rectification free of charge of any fault arising
from defective materials or components, or faulty
workmanship. The product will be repaired or
replaced at the option of Premium after sales team.
WARRANTY CONDITIONS
1. This warranty is only valid for appliances installed
and used according to the manufacturer’s
instructions.
2. This warranty does not apply to damage caused if
your appliance has been dismantled, repaired or
serviced by any person other than someone
authorized by the Company.
3. If you live outside the service area of the Company
or one of its service agents, this warranty does not
cover the cost of transport of the appliance for
service nor the service agent’s traveling costs to
and from your home.
4. If you are required to transport the appliance to the
Company or its service agent, you must ensure it is
securely packed and insured. The Company does
not accept any responsibility for loss or damage of
the appliance prior to it being received by the
Company or its service agent.
5. This warranty does not cover loss, damage or
expense to this appliance caused directly or
indirectly by power surges, electrical storm damage
or connected to incorrect power supply.
6. The Company (and any company related to the
Company) will not be liable for any special,
incidental or consequential damages or for loss,
damage or expense or for personal injury or loss or
destruction of property arising directly or indirectly
from the use or inability to use this appliance or any
of its parts.
7. Warranty will only be given where proof of
purchase is provided, e.g. original invoice.
8. Not designed or warranted for industrial or
commercial use (Commercial use applies to shops,
offices, schools, factories & workshops etc.).
DO NOT SEND IN THIS WARRANTY
Fill out the following details and file with your
purchase invoice.
Your Purchase Receipt/Invoice is proof of date of
purchase. If you are unable to establish the date of
purchase, or if the fault is not covered by this warranty,
or if the product is found to be in working order, you
will be required to bear all service call charges.
Premium reserves the right to discontinue items,
modify designs and change specifications without
incurring obligation.
Whilst every effort is made to ensure that descriptions,
specifications and other information in this publication
is correct, no warranty is given in respect thereof and
the company shall not be liable for any errors therein.
You may not make claim under this warranty unless the defect claimed is due to faulty or defective parts or
workmanship. Premium Sales is not liable in the following situations (which are not exhaustive): 1. accident, 2. misuse
or abuse including failure to maintain, 3. normal wear and tear, 4. power surges, electrical storm damage or incorrect
power supply, 5. incorrect or incomplete installation, 6. incorrect operation and use, 7. any modification to appliance
without consent, 8. the appliance is serviced by anyone other than a Premium Sales authorized service agent.
13
Purchased from:
Co. Name:
Address:
Date of Purchase:
NOTES:
Serial number:
NOTE: Consistent with our continuing product
development policy, improvements may have
been made which render the contents of this
packaging slightly different to that shown.

14
Instrucciones de seguridad importantes
Este manual explica la instalación y el uso de su horno, por favor, lea cuidadosamente antes de
usarlo, incluso si usted está familiarizado con el producto. El manual debe ser guardado en un
lugar seguro para referencia futura.
Advertencias generales
Si el cable de alimentación está dañado debe ser
reemplazado por el fabricante, su agente de
servicio o personas cualificadas similares con el
fin de evitar un peligro.
Este producto no ha sido diseñado para usos que
no sean los especificados en este manual.
Este aparato no debe ser utilizado como un
calentador de ambientes.
Para evitar incendios, el aparato debe
mantenerse limpio y las rejillas sin obstrucciones.
No rociar aerosoles en las proximidades del
aparato mientras esté en funcionamiento.
No almacene materiales inflamables en o debajo
del aparato, por ejemplo, aerosoles.
No forre el fondo del horno con papel de aluminio
o utensilios de cocina.
Utilice siempre guantes al manipular objetos
calientes dentro del horno.
Siempre apague la parrilla inmediatamente
después de su uso, porque la grasa restante
podría incendiarse.
No deje el aparato sin vigilancia cuando esté
cocinando. Los aceites y grasas pueden
incendiarse por el exceso de calor.
No ponga recipientes que pesen más de 15 kg
sobre la puerta abierta del horno.
No utilice el aparato en caso de una falla técnica.
Cualquier falla debe ser reparado por una
persona debidamente cualificada y autorizada.
En caso de cualquier incidente provocado por un
fallo técnico, desconecte la alimentación y reporte
la falla al centro de servicio para su reparación.
Las normas y disposiciones contenidas en este
manual de instrucciones deben respetarse
estrictamente.
No permita que nadie que no esté familiarizado
con el contenido de este manual de instrucciones
manipule el aparato.
Seguridad infantil
Este aparato no está diseñado para ser utilizado
por personas (incluidos niños) con discapacidades
físicas, sensoriales o mentales, o con falta de
experiencia y conocimiento, a menos que hayan
recibido supervisión o instrucciones relativas al
uso del aparato por una persona responsable de
su seguridad.
Los niños deben ser supervisados para asegurar
que no jueguen con el aparato.
El horno se calienta durante su uso. Se debe tener
cuidado para evitar tocar superficies calientes, por
ejemplo, puerta del horno o resistencias de
calentamiento.
Partes accesibles también se calienta cuando está
en uso.
Para evitar quemaduras y escaldaduras, los niños
deben mantenerse alejados.
Instalación, Limpieza y Mantenimiento
El aparato debe ser instalado por una persona
autorizada de acuerdo con las instrucciones
proporcionadas. La instalación incorrecta puede
causar daños a personas, animales o puede dañar
el aparato o los gabinetes.
Antes de utilizar el aparato, asegúrese de que
todos los materiales de empaque sea retirado del
aparato.
A fin de evitar cualquier peligro potencial, las
instrucciones de instalación adjuntas deben ser
seguidas estrictamente.
Asegúrese de que todas las rejillas de ventilación,
las aberturas especificadas y
espacios de aire no
están obstruidas.
Los paneles adyacentes al horno deben ser de
material resistente al calor.
Gabinetes con una chapa exterior debe
ensamblarse con adhesivos que resistan
temperaturas de hasta 120ºC.
Para reducir el riesgo de incendio, no coloque ni
instale esta unidad en áreas donde los conductos

15
de la ventilación o circulación pueden bloquearse.
Asegúrese de que hay al menos 70 mm de
espacio entre la parte posterior del horno y la
pared. Guarde un poco de distancia a cada lado
del horno para facilitar la instalación.
El cable de la unidad de alimentación debe estar
conectado a un tomacorriente de 220-240V
protegido con polo a tierra. Utilice siempre la
protección de polo a tierra cuando sea requerido
por el código eléctrico.
Para transportar o almacenar la unidad, guárdela
en un lugar seco y libre de polvo, vibraciones
excesivas u otros factores, que pueden dañar la
unidad.
No utilice el horno si el cable, el enchufe o si el
horno no funciona correctamente o se ha caído o
dañado de alguna manera. Lleve el horno a un
centro de servicio autorizado para su reparación.
Sólo personal autorizado debe realizar el
mantenimiento.
Compruebe siempre que el aparato esté apagado
antes de limpiar o reemplazar partes.
No utilice limpiadores de vapor, ya que puede
causar acumulación de humedad.
Siempre limpie el aparato inmediatamente
después de cualquier derrame de alimentos.
ESTE APARATO DEBE SER CONECTADO A
TIERRA.
Para mantener una operación segura, se
recomienda que el producto sea inspeccionado
cada cinco años por un técnico de servicio
autorizado.
Horno
El aparato se calienta durante su uso. Se debe
tener cuidado para evitar tocar las superficies
calientes dentro del horno.
Apague el aparato antes de reemplazar la
bombilla de la lámpara.
Para evitar un accidente, asegúrese que los
estantes del horno y los accesorios se insertan
siempre en el aparato de acuerdo con las
instrucciones.
No utilice la puerta, como una estantería.
No haga presión hacia abajo sobre la puerta
mientras se encuentre abierta.
Parrilla
No cubra la parrilla con papel de aluminio pues la
grasa acumulada puede iniciar un fuego.
Siempre mantenga la parrilla limpia como
cualquier acumulación puede incendiarse.
No deje la parrilla desatendida mientras esté en
uso.
Para evitar incendios, asegúrese de que los
soportes de la parrilla y los accesorios se inserten
siempre en el aparato de acuerdo con las
instrucciones.
No coloque porciones gruesas de los alimentos en
la parrilla. Los alimentos pueden curvarse, o iniciar
un fuego.
Las partes accesibles pueden calentarse cuando
la parrilla está en uso. Los niños deben
mantenerse alejados.
Consejos ambientales
Utilice el horno de manera eficiente con la cocción
de muchas bandejas de comida a la vez, por
ejemplo cocine por 2 bandejas de bollos, pasteles
o rollos de salchicha pequeños al mismo tiempo.
Seleccione la ubicación correcta conservación de
alimentos que se cocinan.
No abra la puerta del horno más de lo necesario.
Después de que el horno se apaga lo conserva
calor durante algún tiempo.
Este producto no debe desecharse con la basura
doméstica. Este producto tiene que estar desecharse
en un lugar autorizado para el reciclaje de aparatos
eléctricos y electrónicos.
Al recoger y reciclar los residuos, usted ayuda a
conservar los recursos naturales, y facilita que el
producto se deseche de una manera respetuosa del
medio ambiente.
16
Descripción del producto
¾ Modelo PBO6500A&PBO6501A
A. Perilla de selección de función
B. Perilla del Temporizador
C. Manija de puerta
D. Perilla de control de temperatura
E. Luz indicadora de calentamiento
F. Puerta de Vidrio
17
Accesorio Imagen Cantidad
Bandeja de horneo
1
Parrilla
1
Tornillo (ST4x35) 4
Especificaciones Técnicas
Modelo
Dimensiones de
producto
(L x A x P) mm Peso neto
Capacidad
utilizable
Conexión
eléctrica
Potencia
Máxima
Corriente
máxima
PBO6500A 595 x 595 x 575 Approx.
38Kg
60 litros 220-240V/50Hz 2.2kW 10Amp
PBO6501A 595 x 595 x 575 Approx.
38Kg
60 litros 220-240V/50Hz 2.2kW 10Amp
18
instalación
ADVERTENCIA!
Por favor, siga los siguientes puntos al instalar el aparato
Contacte un técnico autorizado
No altere en ningún aspecto el cableado
eléctrico.
El diagrama de conexiones se encuentra en la
cubierta de la caja de conexiones. Recuerde que
el cable de conexión debe coincidir con el tipo de
conexión y la potencia del horno.
Consulte la placa de información técnica. La
placa de datos se encuentra en un lado del
aparato.
El cable de conexión debe asegurarse con una
abrazadera de alivio de tensión.
Un circuito de seguridad debe conectarse al
terminal marcado con el símbolo
en la caja
de conexiones.
Un medio de desconexión con una separación
de contacto de al menos 3 mm deberá
presentarse en el cableado fijo.
Desconecte el enchufe del aparato del
tomacorriente cuando realice el mantenimiento o
reparación de la unidad.
Este aparato debe estar correctamente
conectado a tierra
No levante el aparato de las manijas de la
puerta.
Prepare el gabinete para que la cavidad coincida
con las medidas del electrodoméstico. (Ver
diagrama).
Deslice el aparato en la cavidad del gabinete, de
manera que el cable no se atasque, doble, o
tuerza.
Para evitar que el horno se vuelque o se
desprenda asegúrelo con 4 tornillos (incluidos),
a través de los agujeros en el armazón del
electrodoméstico.
Cuando el aparato sea instalado en un gabinete
enchapado, el recubrimiento debe resistir al
menos 70°C, y el pegante debe resistir al menos
100°C. La instalación en armarios recubiertos de
vinilo (de baja resistencia altas temperaturas)
puede resultar en un deterioro del recubrimiento
por decoloración o formación de burbujas.
Si el aparato va a ser instalado adyacente a
superficies envueltas en vinilo, utilice un kit
protector (no incluido).
Premium no acepta ninguna responsabilidad por
los daños causados por la instalación en
armarios de baja tolerancia a la temperatura.
Después de la instalación, comprobar y
asegurarse de que el aparato funciona
correctamente antes de entregarlo al cliente.
¡CUIDADO!
Cuando el aparato está conectado a través del cable
de alimentación a un tomacorriente, éste debe
quedar accesible después de la instalación aparato.
Un circuito de energía dedicado se recomienda para
la unidad, pero no es obligatorio. Al conectar otros
aparatos eléctricos en el mismo circuito se puede
superar la corriente (amperaje) del circuito. Si
después de la instalación de su unidad el fusible se
dispara de manera repetida, entonces será necesario
un circuito dedicado para el horno únicamente.
19
ADVERTENCIA!
Para evitar cualquier riesgo potencial,
debe seguir estrictamente nuestras
instrucciones al instalar el aparato. Si no
se instala correctamente el dispositivo
podría anular la garantía o reclamaciones
de responsabilidad y podría llevarlo a
juicio.
Dimensiones de la cavidad:
¡CUIDADO!
El aparato debe ser montado sobre una
superficie plana para el ancho y la
profundidad del producto.
Conecte el cable de alimentación
Abra la cubierta de la placa de conexión en la
parte posterior del aparato.
Conecte los cables de la siguiente manera
Cierre la cubierta de la placa de conexión.
Mounting Screw
20
Instrucciones de uso
Preparando su horno
1. Elimine todas las pegatinas, folletos y material de embalaje de la puerta y del piso del horno antes iniciar la
operación.
2. Limpie el interior del horno antes de la operación con agua jabonosa tibia y seque con un paño suave y limpio.
No cierre la puerta del horno hasta que esté completamente seco.
3. Para quitar el olor inicial (y posiblemente un poco de humo), calentar el horno cuando está vacío y cerrado.
Una hora a 240°C con ambas resistencias (arriba y abajo) es ideal para este propósito. Asegúrese de que
no queden restos de embalaje en el compartimento de cocción.
Selección de las funciones (todos los modelos)
Para seleccionar la función deseada, presione el "Botón de función" y gire la perilla en cualquier dirección para
seleccionar la función deseada.
Función Descripción
0 Apagado
Lámpara
Enciende la lámpara dentro del horno.
Arriba y abajo
Se encienden simultáneamente las resistencias superior e inferior.
Solo arriba
Se enciende únicamente la resistencia superior.
Solo abajo
Se enciende únicamente la resistencia inferior.
21
Selección de la temperatura ( Todos los modelos )
Para seleccionar la temperatura deseada, presione el "Botón de control de temperatura, gire la perilla en el
sentido de las agujas del reloj hasta la temperatura deseada (50°C ~ 250°C).
Un termostato controla la temperatura de su horno. La luz indicadora permanece encendida mientras se
calienta el horno, la luz indicadora se apagará cuando el horno alcanza la temperatura establecida.
Una vez termine de cocinar, devuelva la perilla a la posición inicial girándola en el sentido contrario a las
agujas del reloj. No la force a dar la vuelta completa porque puede dañarla.
PRECAUCIÓN!
La función de cocción deseada debe ser seleccionada antes de elegir la temperatura.
Temporizador
Este modelo cuenta con un temporizador para dar una alerta de sonido cuando pasa el tiempo asignado.
Para seleccionar esta función, presione el "Botón Timer Minute" y gire la perilla hacia la derecha para
establecer el tiempo requerido.
El temporizador puede ser usado independientemente de una función de cocción en el horno durante un
período de tiempo de hasta 120 minutos.
El período de tiempo que se ha establecido expirará cuando la perilla de control llega a cero, una breve
señal audible sonará.

22
Solución de problemas
En caso de una emergencia, usted debe:
Apagar todos los controles del aparato
Desconectar el enchufe de la red
Llamar al centro de servicio
Algunos fallos menores pueden ser resueltos siguiendo las instrucciones dadas en la tabla siguiente. Antes de
llamar al centro de atención al cliente o al servicio técnico revise los siguientes puntos que se presentan en la
tabla.
Falla Causa Solución
La parte superior de los
alimentos está muy quemada y
la parte inferior muy pálida.
No hay suficiente calor en la parte
inferior
- Utilice la posición convección natural
- Utilizar moldes más produndos
- Bajar la temperatura
- Coloque el molde en el estante inferior
La parte inferior es oscura y la
corteza superior demasiado
pálido
Hay exceso de calor de la parte
inferior
- Utilice la posición convección natural
- Se recomienda reducir las latas laterales
- Bajar la temperatura
- Coloque el pastel en el estante más alto
El exterior está demasiado
cocinado y el interior no se
cocina lo suficiente
La temperatura es demasiado alta - Bajar la temperatura y aumentar el tiempo de
cocción
El exterior es demasiado seco
aunque parezca cocida
La temperatura es demasiado
baja
- Aumentar de la temperatura y reducir el tiempo
de cocción.
El aparato no funciona Interrupción de la fuente de
alimentación
- Comprobar la caja de fusibles del hogar, si hay
un fusible fundido, reemplazarlo con uno nuevo.
La luz del horno no funciona La bombilla está floja o dañada - Apretar o sustituir la bombilla gastada (véase
capítulo Limpieza y Mantenimiento)

23
Mantenimiento y limpieza
ADVERTENCIA!
Antes de limpiar el horno, o realizar el mantenimiento, desconéctelo de la fuente de
alimentación.
No utilice limpiadores a vapor.
No forre el fondo del horno con papel de aluminio, ya que la acumulación de calor
podría dañar el esmalte.
Para protegerse contra el riesgo de choque eléctrico, no sumerja el aparato, el
cable o el enchufe en agua u otro líquido, ni rocíe agua para limpiar el aparato!
No limpie el aparato cuando esté caliente! La superficie interior y exterior del horno
se debe limpiar con un paño húmedo cuando se haya enfriado.
Lave todos los accesorios con agua jabonosa caliente o en el lavavajillas, seque
con una toalla de papel o un paño.
Si utiliza el horno durante un período prolongado de tiempo, puede formarse
condensación. Seque con un paño suave.
Superficies de Acero Inoxidable
Todos los grados del acero inoxidable puede mancharse, decolorar o ponerse grasosos. Usted debe limpiar
regularmente estas áreas siguiendo los siguientes procedimientos, si desea que su aparato luzca bien, y
tenga un buen desempeño y una larga vida.
Cuidado! Tenga mucho cuidado al limpiar los bordes expuestos de acero inoxidable, pueden ser afilados!
El marco delantero alrededor del horno se puede limpiar con productos de limpieza de acero inoxidable si se
ensucia o decolora.
El acero inoxidable sólo se debe limpiar con agua tibia y un detergente suave o productos espacializados
para acero inoxidable.
NO use limpiadores abrasivos o solventes agresivos.
NOTA: Asegúrese de que sigue las líneas de pulido o cepillado del acero inoxidable
Vidrio
Las superficies de vidrio en las puertas y paneles de control se deben limpiar inmediatamente después de
ensuciarse.
Un paño húmedo puede ayudar a eliminar los depósitos de alimentos horneados.
Se puede utilizar limpiadores especializados para horno para quitar marcas y manchas difíciles.
La puerta de cristal en este aparato está hecho de un material resistente, duradero que resiste
calentamiento y enfriamiento sin rotura. Sin embargo, no hay que olvidar que es de cristal y puede romperse.
Trátala con cuidado!
No utilice limpiadores abrasivos ni raspadores metálicos afilados para limpiar la puerta del horno ya que
pueden rayar la superficie, lo que puede resultar en rotura del vidrio.
Oven
Mantenga siempre el aparato limpio. Asegúrese de que las grasas y los aceites no se acumulan alrededor
de los elementos, quemadores o ventiladores.
Mantenga siempre las bandejas para hornear y parrillas de asar limpias, puesto que los depósitos de grasa
pueden inflamarse.
Siempre envuelva las carnes en papel de aluminio o una bolsa de cocción al horno para minimizar la
limpieza. Cualquier derrame de grasa puede dejar un residuo similar al barniz que es muy difícil de eliminar.
24
Parrilla
Mantenga siempre las parrillas limpias, porque los depósitos de grasa pueden inflamarse.
Reemplazo de la bombilla del horno
ADVERTENCIA!
Con el fin de evitar la posibilidad de una descarga eléctrica asegurarse de que el aparato está desconectado de
la fuente de alimentación antes de cambiar la bombilla.
Ajuste todas las perillas de control a la posición
"OFF" (● / 0) y desconecte el enchufe de la red.
Desenrosque y lave la cubierta de la lámpara y
luego séquela.
Desenrosque la bombilla de la toma, sustituya la
bombilla por una nueva, una bombilla de alta
temperatura (300
°C
) con los siguientes
parámetros:
-voltage230 V
-potencia 25 W
-con rosca E14
Atornille la bombilla, asegurándose de que está
correctamente introducido en la toma de
cerámica.
Atornille la cubierta de la lámpara.
Como desmontar la puerta
Con el fin de facilitar el acceso a la cámara de
horno para la limpieza, es posible extraer la puerta.
Para ello, incline la parte pestillo de seguridad de
las bisagras hacia arriba. Cierre la puerta
suavemente, levante y tire de ella hacia usted.
Para volver a montar la puerta en el horno, haga lo
inverso.
Durante el montaje, asegúrese de que la muesca
de la bisagra está correctamente colocada en el
saliente del soporte de bisagra. Después de que la
puerta se monta en el horno, el cierre de seguridad
debe ser cuidadosamente puesto de nuevo. Si el
cierre de seguridad no está bien puesto puede
causar daños a la bisagra al cerrar la puerta.
25
Extracción del panel de vidrio interior
Desatornille y desenganche el pestillo de plástico
que está en la esquina en la parte superior de la
puerta.
A continuación, saque el cristal del segundo
mecanismo de bloqueo y sáquelo.
Después de la limpieza, inserte y bloquee el panel
de vidrio, y el tornillo en el mecanismo de
bloqueo.

26
Garantia
Los beneficios otorgados por esta garantía son
adicionales a todas las garantías implícitas, otros
derechos y remedios en relación con el producto que
el consumidor bajo la Ley de Prácticas de Comercio y
leyes estatales similares.
El comprador original de este producto Premium
cuenta con la siguiente garantía, y está sujeto a las
siguientes condiciones de garantía.
Este producto está cubierto por una Garantía de 2
años en casa desde la fecha de compra. La garantía
cubre gratuitamente la rectificación de cualquier error
que surja de defectos en los materiales o
componentes o mano de obra defectuosa. El
producto será reparado o reemplazado a opción de
Premium appliances.
CONDICIONES DE LA GARANTIA
1. Esta garantía sólo es válida para los aparatos
instalados y utilizados de acuerdo con las
instrucciones del fabricante.
2. Esta garantía no se aplicará a los daños causados
si el aparato ha sido desmontado, reparado o
reparado por una persona distinta de una persona
autorizada por la Compañía.
3. Si usted vive fuera del área de servicio de la
Compañía o de uno de sus agentes de servicio,
esta garantía no cubre los gastos de transporte del
dispositivo para el servicio ni los gastos de viaje del
agente de servicio hacia y desde su casa.
4. Si usted está obligado a transportar el aparato a la
Compañía o su agente de servicio, debe
asegurarse de que está bien embalado y
asegurado. La Compañía no asume ninguna
responsabilidad por la pérdida o daño del aparato
antes de ser recibido por la Compañía o su agente
de servicio.
5. Esta garantía no cubre la pérdida, daño o gasto
causados directa o indirectamente por las
sobretensiones, daños por Tormenta Eléctrica o
por conexiones incorrectas a la red eléctrica.
6. La empresa (y cualquier empresa relacionada con
la Compañía) no será responsable de ningún daño
especial, incidental o consecuente, o por pérdida,
daño o gasto o por lesiones personales o pérdida o
destrucción de bienes derivados directa o
indirectamente del uso o la imposibilidad de utilizar
este aparato o ninguna de sus partes.
7. Esta garantía sólo será válida si se presenta la
prueba de compra, por ejemplo, factura original.
8. No está diseñado ni está autorizado para uso
industrial o comercial (el uso comercial se aplica a
tiendas, oficinas, escuelas, fábricas y talleres, etc.)
el uso comercial es este electrodoméstico anula la
garantía.
NO ENVIE ESTA GARANTIA
Rellene los siguientes datos (en la siguiente página) y
envíelos con la factura de compra.
Su recibo de compra / factura es prueba de la fecha
de compra. Si usted es incapaz de establecer la
fecha de compra, o si el fallo no está cubierto por
esta garantía, o si se encuentra que el producto
funciona correctamente, se le pedirá que pague los
gastos de llamadas de servicio.
Premium se reserva el derecho de descontinuar
productos, modificar los diseños y cambiar las
especificaciones sin incurrir en obligaciones.
Si bien hace todo lo posible para asegurarse de que
las descripciones, especificaciones y otra información
contenida en esta publicación sea correcta, no se
ofrece garantía alguna, de los mismos y la empresa
no se hace responsable de los posibles errores en el
mismo.
Usted no podrá hacer reclamación bajo esta garantía a menos que la falla se deba a partes defectuosas o
errores de mano de obra. Premium no se hace responsable en los siguientes casos (que no son exhaustivos): 1.
accidente, 2. mal uso o abuso, incluyendo la falta de mantenimiento, 3. desgaste normal, 4. sobretensiones,
daños de la tormenta eléctrica o fuente de alimentación incorrecta, 5. instalación incorrecta o incompleta, 6. uso
y operación incorrectas, 7. cualquier modificación al aparato sin consentimiento 8. el aparato es reparado por
alguien que no sea un agente de servicio autorizado de Premium.
27
Comprado en:
Nombre de la Co:
Dirección:
Fecha de Compra:
NOTAS:
Número de Serie:
NOTA: De acuerdo con nuestra política de
desarrollo continuo de productos, se pueden
haber hecho mejoras en el diseño, provocando
que el contenido de este envase sea
ligeramente diferente al mostrado.