......,. Owner's
instructions
Register your product at www,samsung.com/global/register
Record your Model and Serial number here for future reference.
•Model . Serial No.
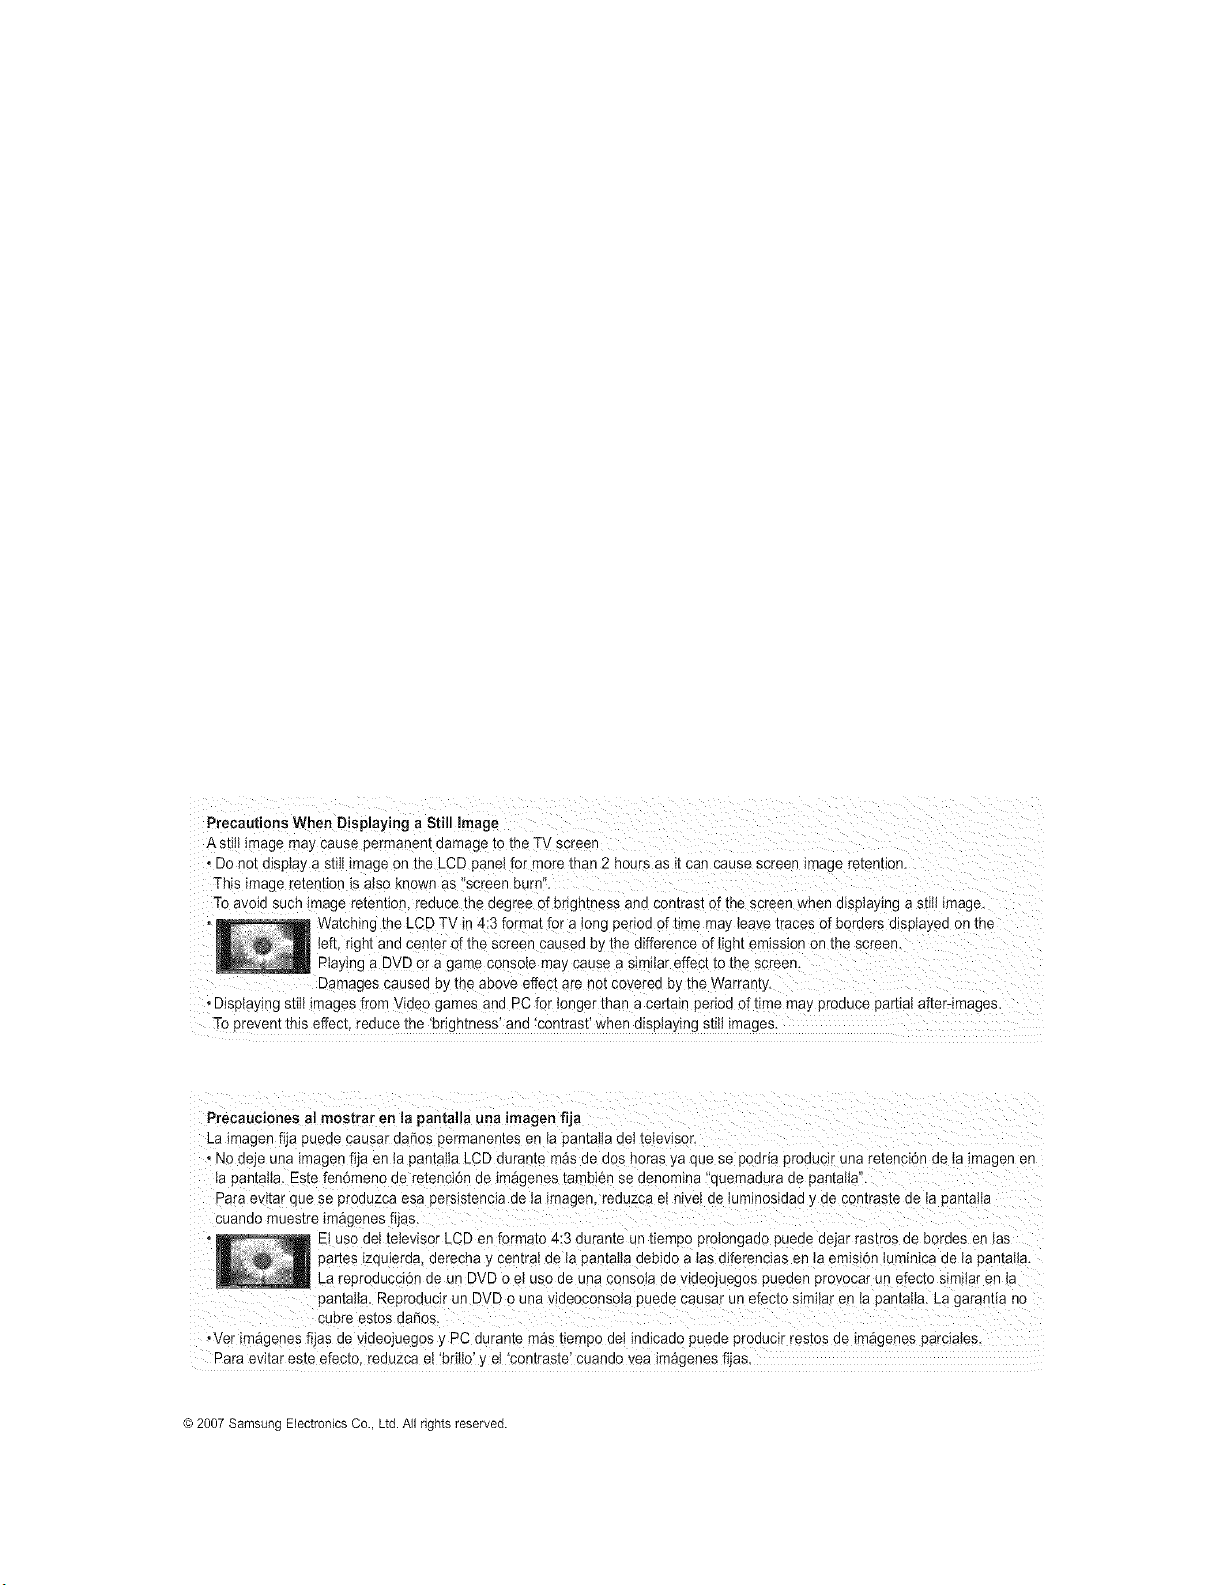
Precautions When Displaying a Stillimage
A stih_magemay causepermanen[ oamage 1othe TVscreer
• Do no[ o_sptaya stitt in-age on the LCD panelfor Fore than 2 hours as _[can cause screen _mageretention.
This image retention _salsoknown as"screen burn"
Tc avoid sucn image retention, reduce the degree of brightness ana con[fast of the screen when displaying a stillimage.
Watching the LCDTVir 4:3 format for a long period oftime ma] _eavetraces of bc "aersaJsptayeaon [ne
left, right and center ofthe screen caused by the difference oflight emission on the screen.
Playinga DVD or a game console may cause asimilar effect to the screen.
Damagescausea oyme above effectare not covered by the Warranty.
• Diselaying still_mages fromVideo games and PC for onger than acertain period of time may proauce partiat after-images.
Toerevent this effect reduce the 'brightness' and 'contrast' when displaying still images.
La imagen fijapuede causar dories permanentes en ta pantal!adeI teIevisor,
,N0deje una imagenfiJa enta pantalia LCDdurante m_sdedOShoras ya que se podrta produc!r una retenci6n de !a !magenen
tapantaiia. Estefen6meno de retenci6n de im_genes tambien sedenomina 'quemadura de pantalla".
Para evitar clue se produzca esa persistencia de taimagen, reduzca e! hive!de tuminesidad y de contraste deta Isantaita
Cuando muestre iF&genes fijas.
E! use det televiso r LCDenformate 4;3 durante un tiempo protongado puede dejar rastros dehordes en tas
partes izquierda, derecha y centra! de ta pantai!adebido a tasdiferencias en la ernisi6n iuminica de ia pantai!a.
La reproducci6n de unDVD o el use de una consota de videojuegos pueden provocar un efecto similar en la
pantalla. Reproducir un DVD 0 una v!deec0ns#ta puede causar un efectosimi!ar en la pantatia. La garantia no
cubre estos daSos.
,Vet im_genes fijas de videojuegos y PC durante m_s tiempo dei indicado puede producir testes de im_genes parciates.
Para evitar esteefecto, reduzca eI'britlo' y et 'contraste' cuando vea im_genes fijas
@2007 Samsung Electronics Co., Ltd. All rights reserved.
Contents
[] List of Features 2 [] Selecting the Antenna ............................................ 37
[] Accessories ................................................................ 2 [] Clearing Scrambled Channels - Digkal _37
[] Viewing the Control Panel 3 [] Setting the Channel Lists ........................ 38
[] Viewing the Connection Panel 4 [] To set-up Your Favorite Channels .......................... 39
[] Remote Control .......................................................... 5 [] Using the Channel Lists ......................................... 40
[] nstalling Batteries in the Remote Control ............... 6 [] Viewing the Channel Lists 40
[] Labeling Channels ................................................. 41
[] LNA (Low Noise Amplifier) ..... 41
[] Fine Tuning Analog Channels .......................... 42
[] Connecting VHF and UHF Antennas 6 [] Checking the Digital-Signal Strength ..................... 42
[] Connecting Cable TV 7
[] Connecting a VCR 8
[] Connecting a Camcon]er 9
[] Connecting a DVD Player/Set-Top Box 9 [] Using Your TV as a Computer (PC) Display ...43
[] Connecting a DVD Player/Set-Top Box via HDMI ..... 10 [] Display Moues ....................................................... 43
[] Connecting a DVD Player/Set-Top Box via DVl ....... 10 [] Setting up the TV with your PC .............................. 44
[] Connecting a Digital Audio S;s[em ................ 1! [] Setting the Home Theater PC _45
[] Connecting an Amolifier/DVD Home Theater ............ 11
[] Connecting a PC ..................... 1t
[] Setting the Clock .................................................... 46
[] Turning theTV On and Off 12
[] P Jg & Pla_ Feature ......... t2
[] Changing Channels .... t3 [] Selecting a Menu Language .49
[] Adjusbng the Volume 14 [] Setting the Blue Screen Mode ............................... 49
[] Viewing the Display .................................................... 14 [] Using me Game Mode ....... 49
[] Viewing the Menus !5 [] Viewing Closed Capuons ,On-Screen Text
[] Memorizing the Channe s ....................................... 15 Messages) -Analog ............................... 50
[] Setting UpYour Remote Control 17 [] Viewing Closed Capuons tOn-Screen Text
[] Remote Control Codes .............................................. 19 Messages) - Digital ................................................. 51
[] To Select the Source (depending on tee model 22 [] Menu Transparency Level 52
[] To Edit the Input Source Name
,',dependingon the model 22
[] Using Automatic Picture Settings 23
[] Activating BacklJght 24
[] Adjusting the Color Tone ................................ 24
[] Adjusting the Detailed Settings ............................. 25
[] Changing the Screen Size ..................................... 28
[] Setting the Active Color ......................................... 29
[] DNle (Digital Natural Image engine) 29
[] Setting the Film Mode ............................................ 29
[] Freezing me Picture ............................................... 30
[] Setting the HDMIBlack Levele .................................. 30
[] Viewing Picture-in-Picture 30
[] Using the Energy Saving Feature .......................... 52
[] Setting the Function Help .............. 53
[] Digital Noise Reduction .................................... 53
[] Using the V-Chip .......................................... 54
[] Upgrading the Software 61
[] Troubleshooting ............................................... 62
[] Installing the Stano 64
[] Disconnecung the Stand ......................... 64
[] Wall-Mount Adjus_men[
LN-T4042H LN-T4642H ............................... 65
[] WattMount Kit Seecifications VESA] ........................ 66
[] Using the Anti-Theft Kensington Lock.. 67
[] Specifications ........................................... 68
[] Customizing the Souna ............... 32
[] Using Automatic Sound Settings 32
[] Setting the TruSurround XT.................................... 33
[] Choosing a Multi-Channel Sound ,MTS_
track - D_g]tal ........................................ 33
[] Choosing a Multi-Channel Sound (MTS_
track - AnaJog .................................................. 34
[] Au[omatlc Volume Control ..................................... 34
[] Selecting [ne Internal Mute ..................................... 35
[] Setting the On!Off Melod_ ......... 35
[] Listening to the Sound of the Sub (PIP Picture _..36
[] Resetting the Sound Settings to the Factory
Defaults .................................................................. 36
[] Connecting Headphones 36
Symbol
m
Press m_)or[am Note One-Touch
3U[[O{]
English - _]
General information
List of Features
, Adjustable picture settings that can be stored in the TV's memory.
Automatic timer to turn the TV on and off.
A special sleep timer.
V-Chip function,
Excellent Digital Interface & Networking :
With abuilt-in HD digital tuner, non-subscription HD broadcasts can be viewed with no Set-Top Box needed.
Remote Control
The supplied remote can be used to operate the TV as well as most DVD players, Set-top boxes, Cable Boxes and
VCRs.
Excellent Picture Quality
- DNle technology provides life-like clear images.
SRS TruSurround XT
- SRS TruSurround XT provides a virtual Dolby surround system.
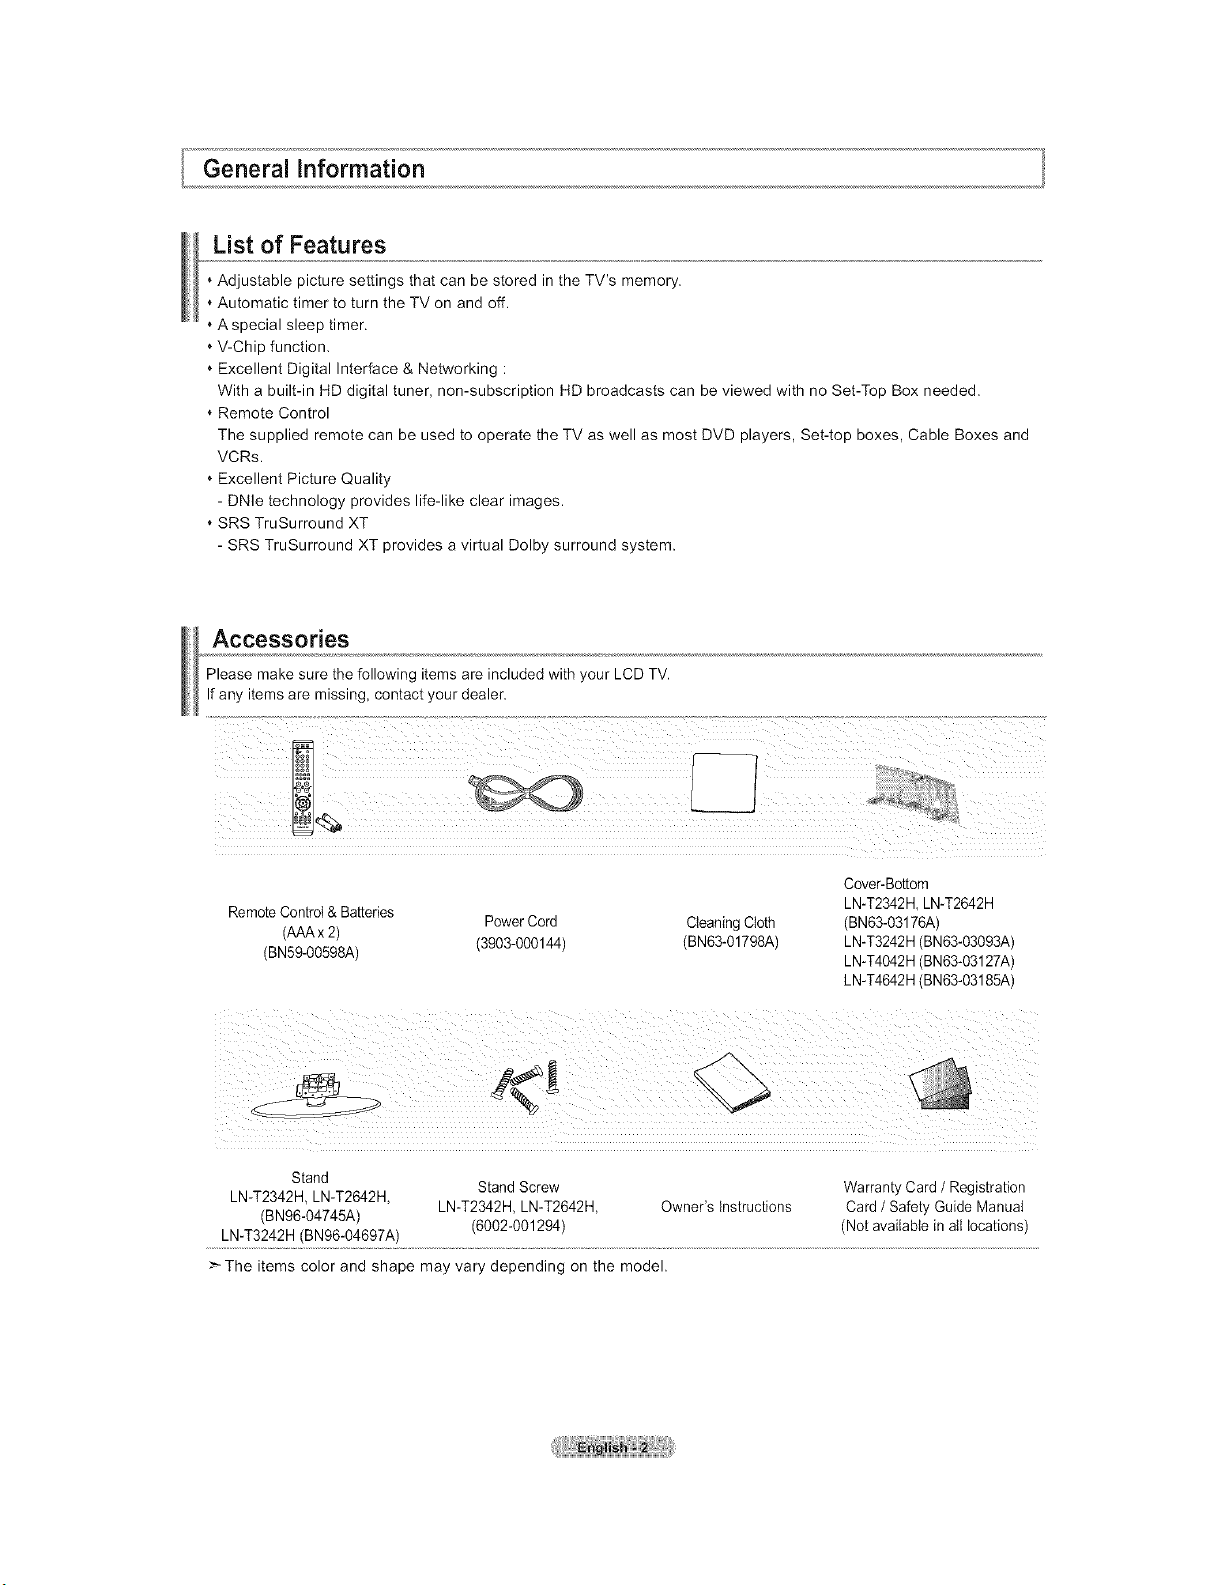
Accessories
Please make sure the following items are included with your LCD TV.
Ifany items are missing, contact your dealer.
RemoteControl & Batteries
Power Cord CleaningCloth
(AAAx2)
(BN59-00598A) (3903-000144) (BN63-01798A)
Cover-Bottom
LN-T2342H LN-T2642H
(BN63-03176A)
LN-T3242H(BN63-03093A)
LN-T4042H(BN63-03127A)
LN-T4642H(BN63-03185A)
Stand
Stand Screw Warranty Card /Registration
LN-T2342H, LN-T2642H,
(BN96-04745A) LN-T2342H, LN-T2642H, Owner's instructions Card /Safety Guide Manual
LN-T3242H (BN96-04697A) (6002-001294) (Not available in aIt locations)
>The items color and shape may vary depending on the model.
_,o,View!n.9 the Control Panel
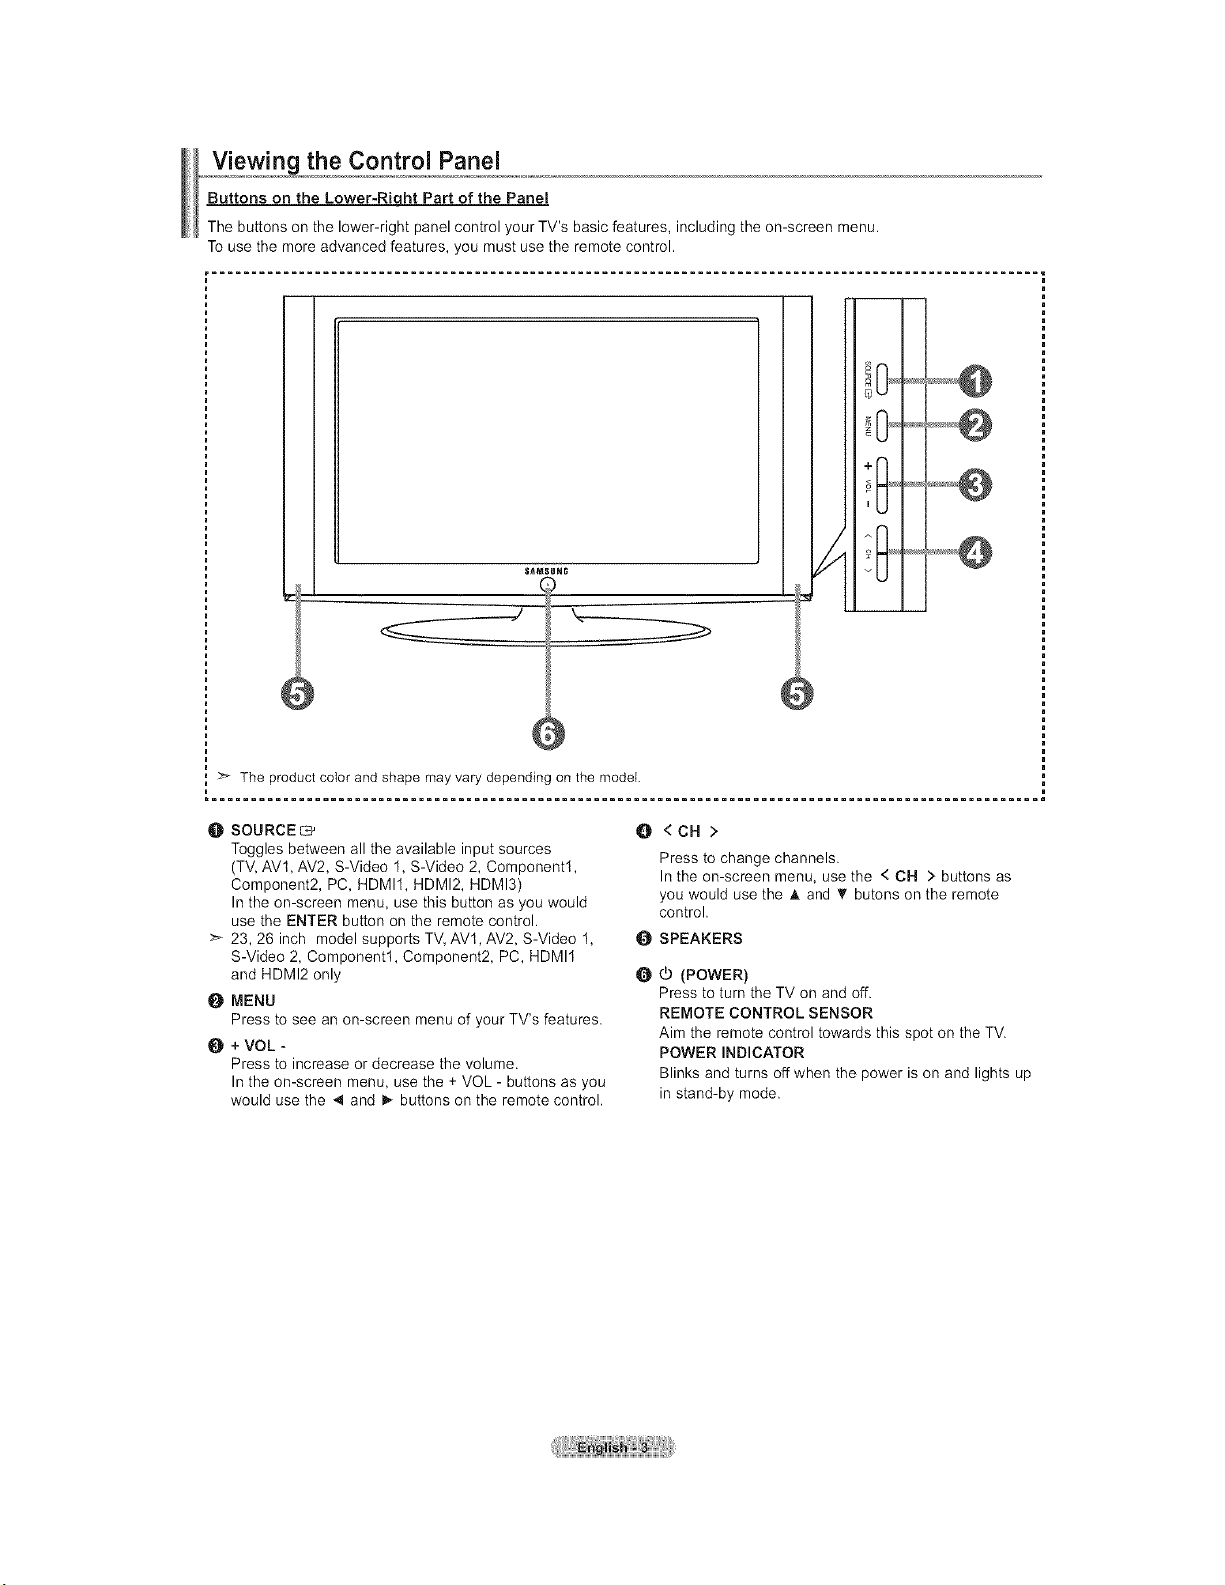
Buttons on the Lower-Right Part of the Panel
The buttons on the lower-right panel control your TV's basic features, including the on-screen menu.
To use the more advanced features, you must use the remote control.
S_MSUNG
The product color and shape may vary depending on the model.
..................@
+1 J
y ..................@
O SOURCE G'
Toggles between all the available input sources
(TV,AVt, AV2, S-Video 1, S-Video 2, Component1,
Component2, PC, HDMI1, HDMI2, HDMI3)
Inthe on-screen menu, use this button as you would
use the ENTER button on the remote control.
>_ 23, 26 inch model supports TV, AV1, AV2, S-Video 1,
S-Video 2, Component1, Component2, PC, HDMI1
and HDMI2 only
MENU
Press to see an on-screen menu of your TV's features.
+VOL -
Press to increase or decrease the volume.
Inthe on-screen menu, use the +VOL - buttons as you
would use the 4 and _ buttons onthe remote control.
O<CH>
Press to change channels.
Inthe on-screen menu, use the < CH > buttons as
you would use the A and _' butons on the remote
control.
_SPEAKERS
O _ (POWER)
Press to turn the TV on and off.
REMOTE CONTROL SENSOR
Aim the remote control towards this spot on the TV.
POWER INDICATOR
Blinks and turns off when the power is on and lights up
in stand-by mode.
_,.,V!ew!onogthe Connection Panel
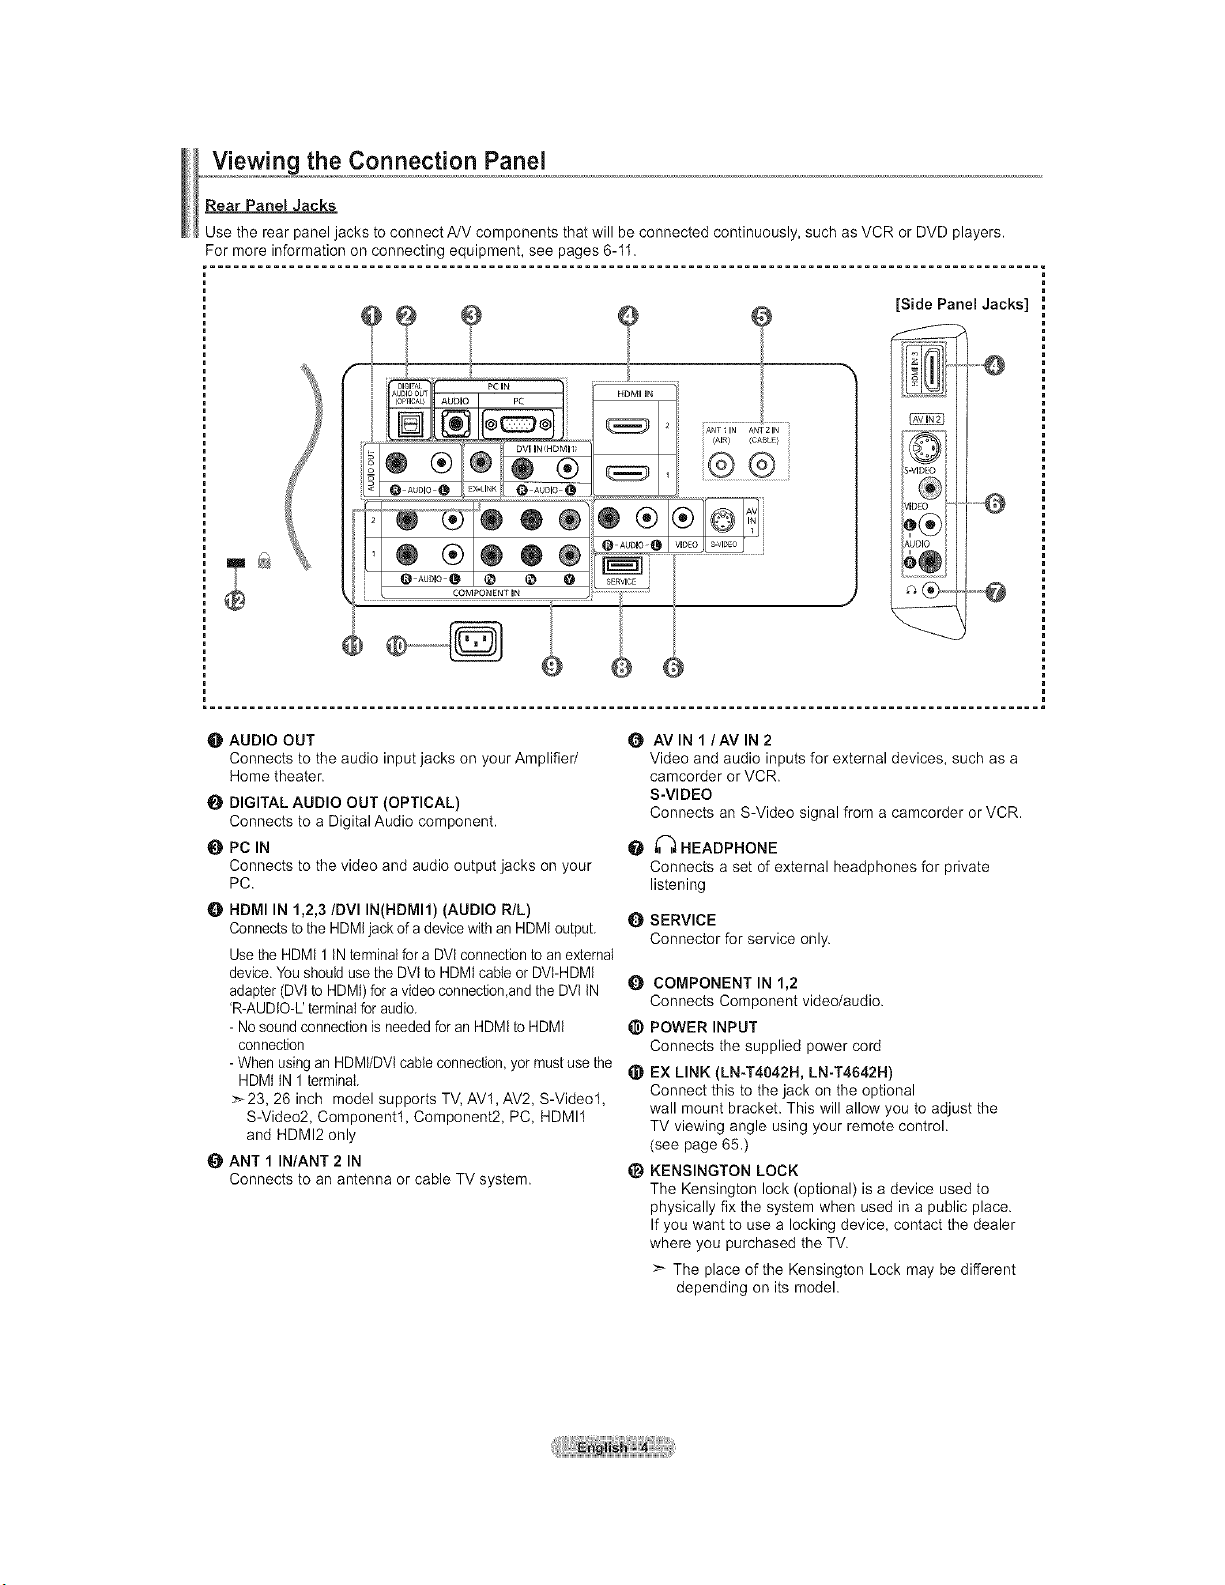
Rear Panel Jacks
Use the rear panel jacks toconnect A/V components that will be connected continuously, such as VCR or DVD players.
For more information on connecting equipment, see pages 6-11.
[Side Panel Jacks]
®
rid
,o
AU[
6
O AUDIO OUT
Connects to the audio input jacks on your Amplifier/
Home theater.
DIGITAL AUDIO OUT (OPTICAL)
Connects to a Digital Audio component.
O PC IN
Connects to the video and audio output jacks onyour
PC.
HDMI IN 1,2,3/DVI IN(HDMI1) (AUDIO R/L)
Connects to the HDMIjack ofa device with an HDMI output.
Use the HDMt 1IN terminalfora DVlconnection toan external
device.You should usetheDVlto HDMI cane or DVt-HDMI
adapter (DVl toHDMI)fora video connection,andthe DVt tN
'R-AUDtO-L' terminaIforaudio.
- No soundconnection isneededfor anHDMI toHDMI
connection
- When using an HDMt/DVtcableconnection, yor mustuse the
HDMttN1 terminal.
>_23, 26 inch model supports TV,AVl, AV2, S-Video1,
S-Video2, Component1, Component2, PC, HDMI1
and HDMI2 only
tt_ ANT 1 IN/ANT 2 IN
Connects to an antenna or cable TV system.
O AVIN I/AV IN2
Video and audio inputs for external devices, such as a
camcorder or VCR.
S-VIDEO
Connects an S-Video signal from a camcorder or VCR.
_ HEADPHONE
Connects a set of external headphones for private
listening
Q SERVICE
Connector for service only.
Q COMPONENT IN 1,2
Connects Component video/audio.
_) POWER INPUT
Connects the supplied power cord
_) EX LINK (LN-T4042H, LN-T4642H)
Connect this to the jack on the optional
wall mount bracket. This will allow you to adjust the
TV viewing angle using your remote control.
(see page 65.)
_) KENSINGTON LOCK
The Kensington lock (optional) is a device used to
physically fix the system when used in apublic place.
Ifyou want to use a locking device, contact the dealer
where you purchased the TV.
>_The place of the Kensington Lock may be different
depending on its model.
Remote Control
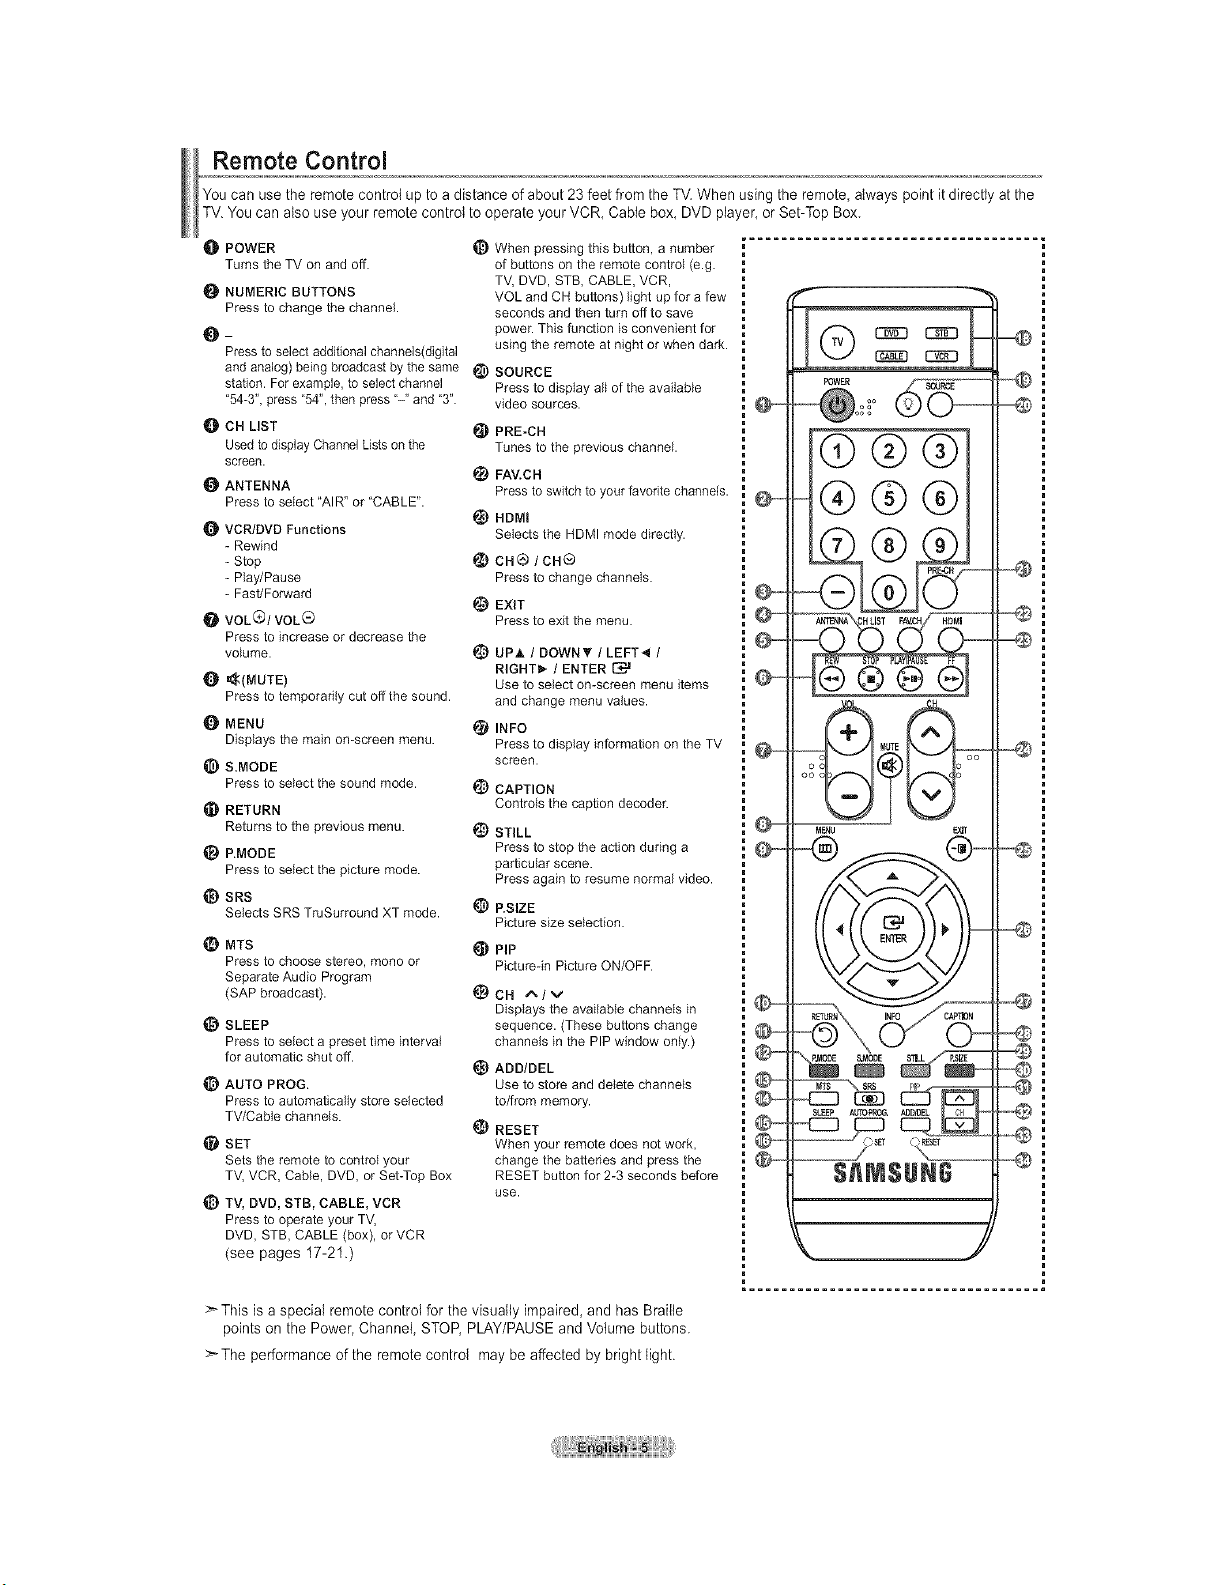
You can usethe remotecontrol up to adistance of about 23 feet from the TV. When using theremote, always pointit directly at the
TV. You can alsouse your remote control to operate your VCR, Cable box,DVD pla/er, orSet-TopBox.
O POWER
Turns the TV on and off.
NUMERIC BUTTONS
Press to change the channel
Press to select additional channels(digital
and analog) being broadcast by the same _)
station. For example, to select channel
"54-3", press "54", then press "-" and "3".
_]b CH LIST
Used to display Channel Listson the
screen.
ANTENNA
Press to select "AIR" or "CABLE".
VCR/DVD Functions
- Rewind
- Stop
- Play/Pause
- Fast/Forward
@ VOL(_I VOL_
Press to increase or decrease the
volume.
_(MUTE)
Press to temporarily cut off the sound.
{) MENU
Displays the main on-screen menu.
_) S.MODE
Press to select the sound mode.
_! RETURN
Returns to the previous menu.
_) P.MODE
Press to select the picture mode.
_) SRS
Selects SRS TruSurround XT mode.
_) When pressing this button, a number
of buttons on the remote control (e.g.
TV, DVD, STB, CABLE, VCR,
VOL and CH buttons) light up for a few
seconds and then turn off to save
powe_:This function isconvenient for
using the remote at night or when dark.
SOURCE
Press to display all of the available
video sources.
PRE-CH
Tunes to the previous channel.
_) FAV.C H
Press to switch to your favorite channels.
_) HDMI
Selects the HDMI mode directly.
ca ®/ Ca®
Press to change channels.
@ EXIT
Press to exit the menu.
_) UPh, / DOWN_ / LEFT4 /
RIGHT_," / ENTER
Use to select on-screen menu items
and change menu values.
INFO
Press to display information on the TV
screen.
@
@
@
_) MTS
Press to choose stereo, mono or
Separate Audio Program
(SAP broadcast).
SLEEP
Press to select a preset time interval
for automatic shut off.
1_) AUTO PROG.
Press to automatically store selected
TV/Cabie channels.
SET
Sets the remote to control your
TV, VCR, Cable, DVD, or Set-Top Box
_} TV, DVD, STB, CABLE, VCR
Press to operate your TV,
DVD, STB, CABLE (box), orVCR
(see pages 17-21.)
CAPTION
Controls the caption decoder.
STILL
Press to stop the action during a
particular scene.
Press again to resume normal video.
P.SIZE
Picture size selection.
PIP
Picture-in Picture ON/OFF.
I_CH A/v
Displays the available channels in
sequence. (These buttons change
channels in the PIP window only.)
_) ADD/DEL
Use to store and delete channels
to/from memory.
_) RESET
When your remote does not work,
change the batteries and press the
RESET button for 2-3 seconds before
use.
>This isaspecial remote controlfor the visually impaired, and has Brailte
points on the Power, Channel, STOP,PLAY/PAUSE and Volume buttons.
> The performance of the remotecontrol maybe affected by bright light.
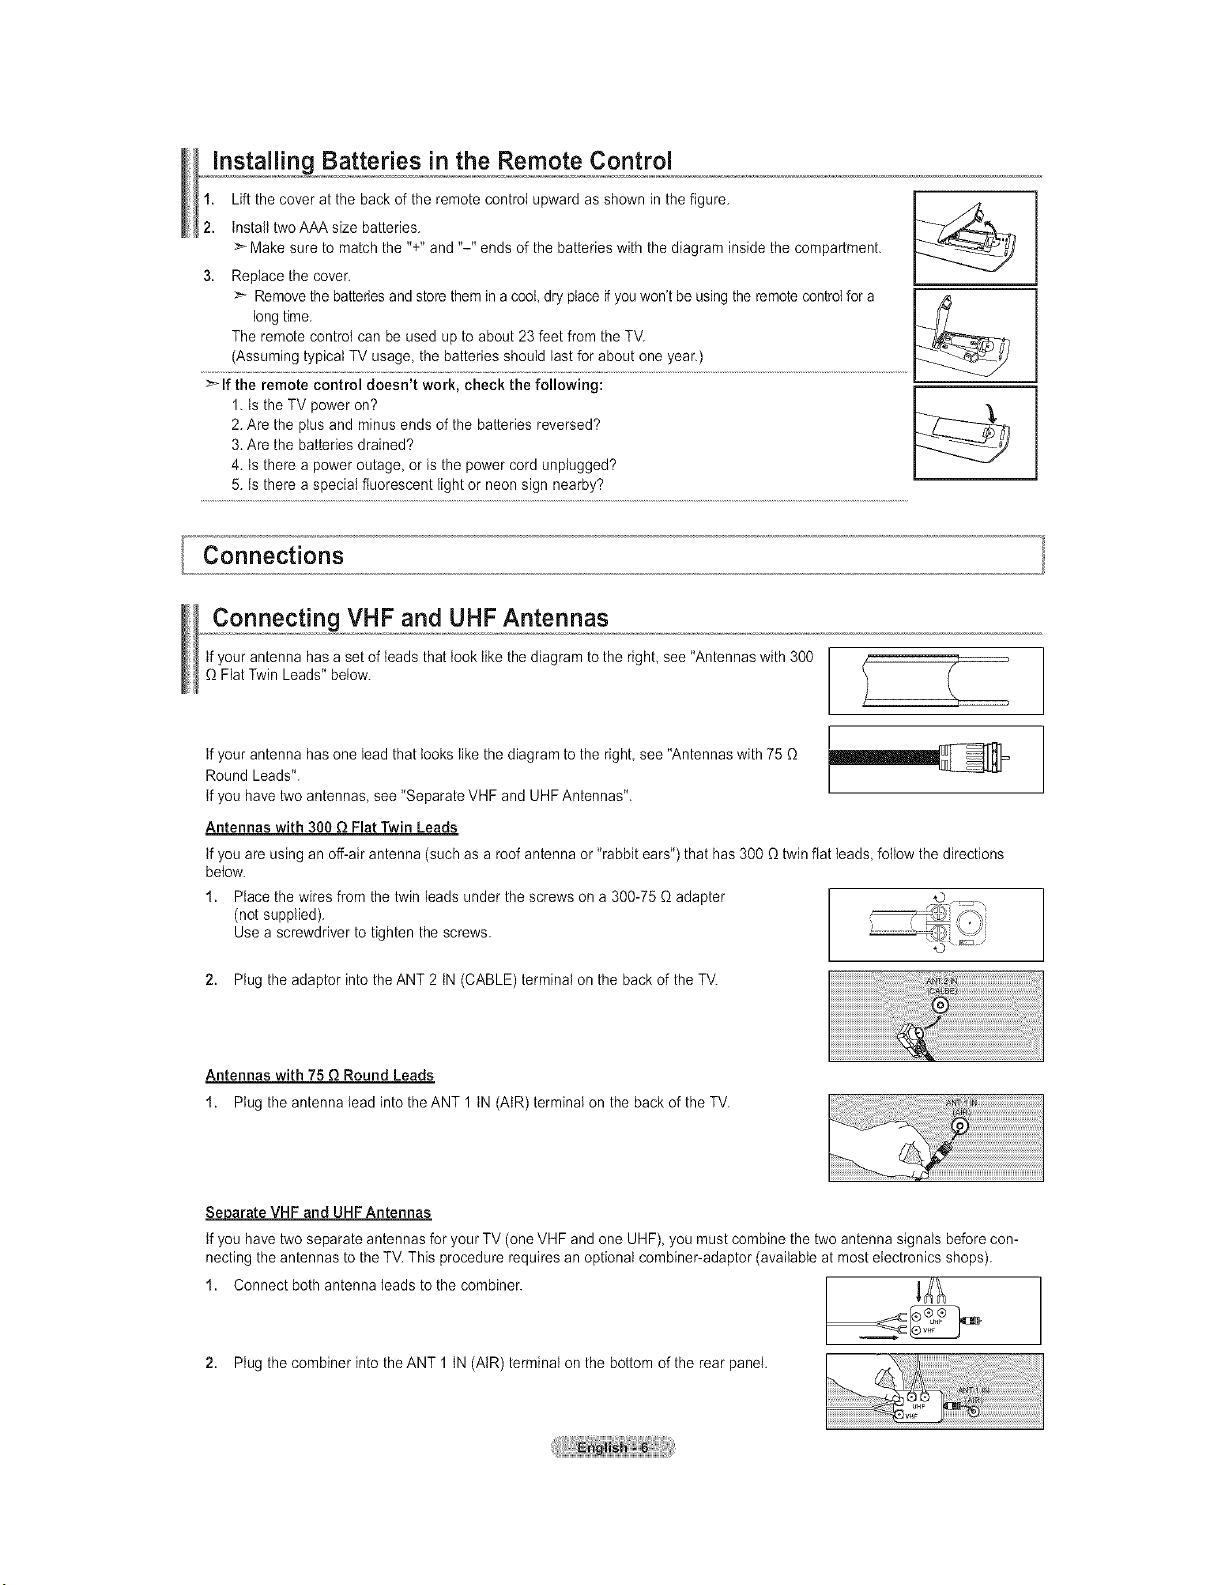
jnsota!!]n_ Batteries in the Remote Control
1. Liftthe cover at the back of the remote control upward asshown in the figure.
/7,
2. tnsta{l two AAA size batteries. -_/_----,_
>_ Makesure to matchthe "+"and "-" ends of the batteries with the diagram insidethe compartment.
3. Replace the cover.
>- Remove the batteries and store theminacool, dry place _ youwon't be using theremotecontrol for a /&
longtime.
The remote control can be used up to about 23 feet from the TV.
(Assumingtypical TV usage, the batteries should lastforabout one year.)
>_ Ifthe remote control doesn't work, check the following:
1.IstheTV power on?
2.Are the plusand minus ends ofthe batteries reversed?
3.Are the batteriesdrained?
4. tsthere a power outage, or isthe power cord unplugged?
5. Isthere a special fluorescent light or neon sign nearby?
Connections
Connecting VHF and UHF Antennas
tf your antenna hasaset of leads that tooklike the diagram to the right see "Antennaswith 300
Fiat Twin Leads" below.
tf your antenna hasone lead that looks like the diagram to the right see "Antennas with 75
Round Leads".
If you havetwo antennas see "SeparateVHF and UHFAntennas".
Antennas with 300 Q Flat Twin Leads
tf you are using anoff-air antenna (suchas a roof antenna or"rabbit ears") that has 300 _ twin flat leads, follow the directions
below.
1. Place the wires from the twin leadsunder the screws on a300-75 _ adapter
(notsupplied).
Use a screwdriver to tighten the screws.
2. Plug the adaptor into the ANT 2 tN(CABLE) terminal on the back of theTV.
Antennas with 75QRound Leads
1. Plugthe antenna lead intotheANT 1tN(AtR) terminal on the back ofthe TV.
Separate VHFand UHF Antennas
tf you havetwo separate antennas for your TV (oneVHF and one UHF), you mustcombine the two antenna signals beforecon-
necting the antennas to the TV. This procedure requires an optional combiner-adaptor (available at most electronics shops).
1. Connect both antenna leads to the combiner.
,ogthecomb,ner,ntothe term,na,onthebottomoftherearpane,.
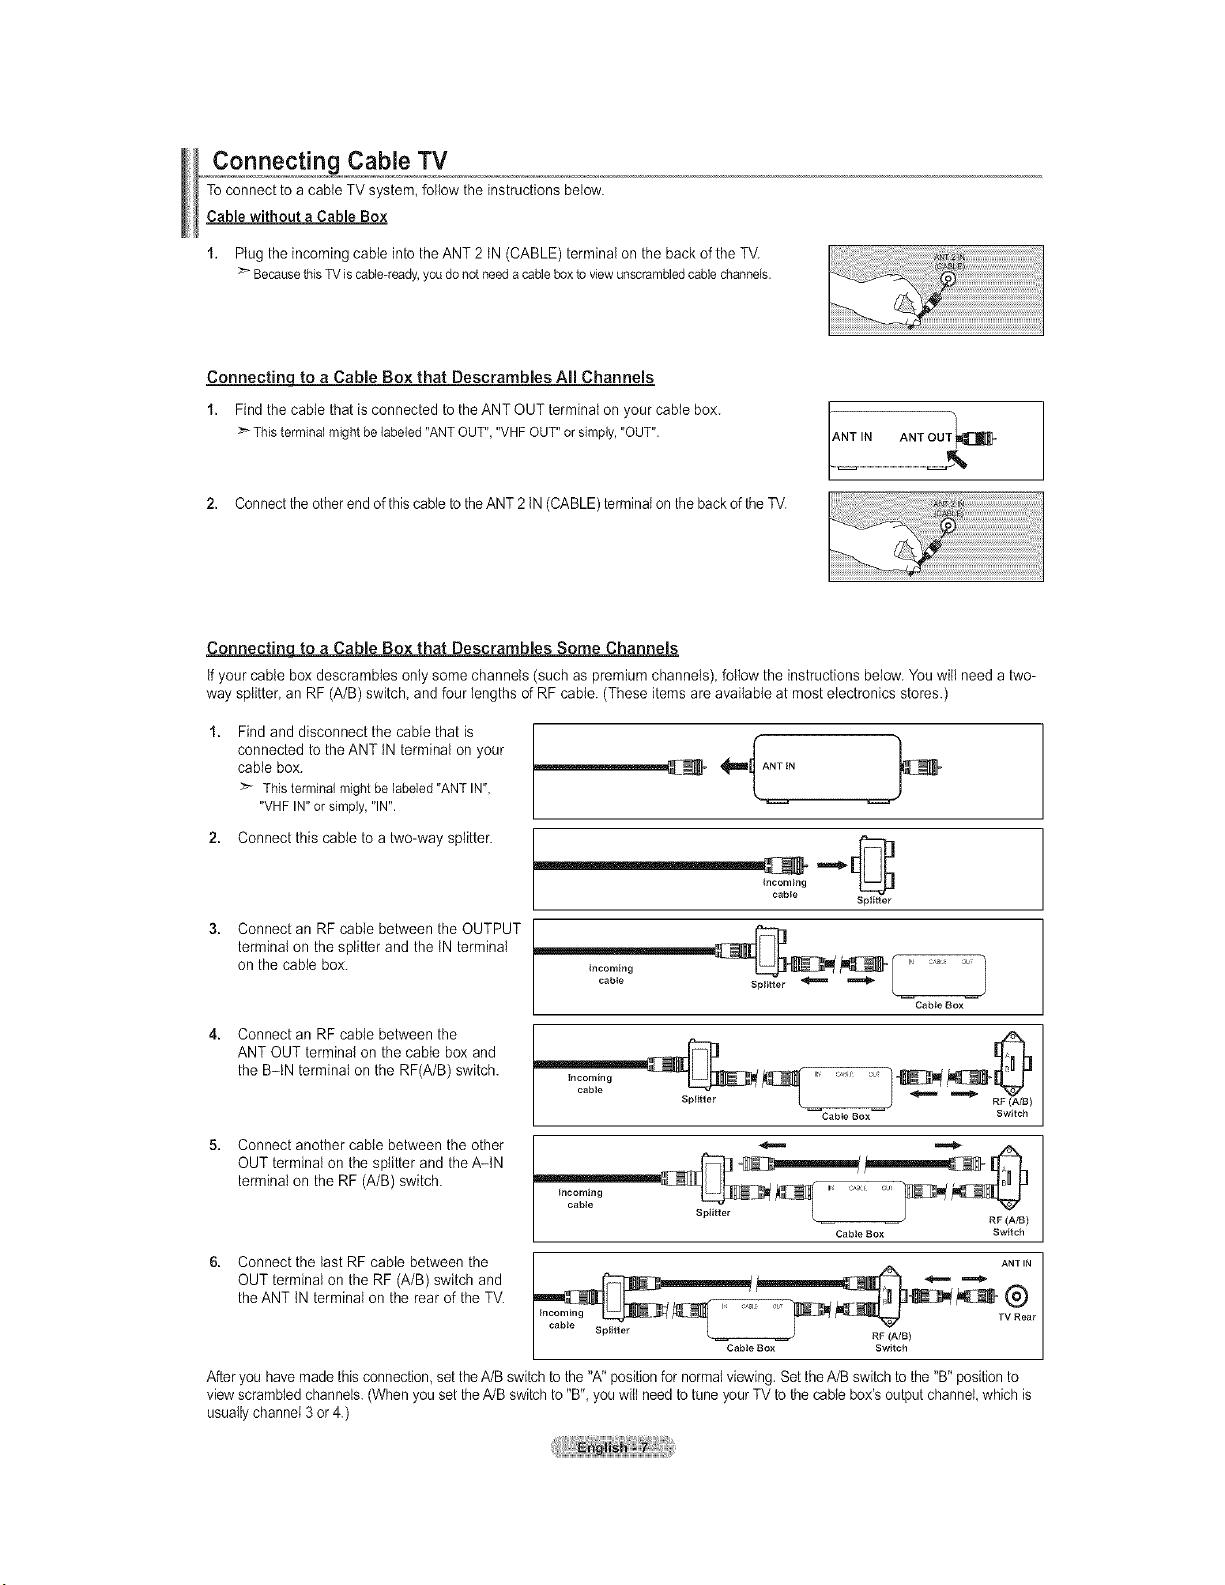
Connecting Cable TV
Toconnect to acable TV system,follow the instructions below.
Cable without a Cable Box
1. Ptug the incomingcable into the ANT 2 tN(CABLE) terminalon the back ofthe TV.
BecausethisTVis cable<eady,youdonot needacableboxto viewunscrambledcablechannels.
Connectinq to a Cable Box that Descrambles All Channels
1. Find the cable that isconnected to the ANTOUT terminatonyour cable box.
Thisterminalmightbelabeled"ANTOUT","VHFOUT"orsimply,"OUT".
2. Connectthe other end of this cable totheANT 2 tN(CABLE)terminal onthe back of the TV.
ANT IN ANT OUT_]_
Connectinq to a Cable Box that Descrambles Some Channels
if your cable box descrambtes only some channels (such as premium channels), follow the instructions below.You will need atwo-
way splitter, an RF(A/B)switch, and four lengths ofRF cable. (These items areavailable at most electronics stores.)
Find and disconnect the cable that is
connected to the ANT tN terminal onyour
cable box.
> Thisterminalmightbe labeled"ANTIN",
"VHFIN"orsimply,"IN".
2. Connect this cable to a two-way splitter.
Connect an RFcable between the OUTPUT
terminal on the splitter and the tNterminal
on the cable box.
Incoming
cabte
spg_ter
Incoming
cable
J
Cabie Box
Connect an RFcable between the
ANT OUT terminal on thecable box and
the B-IN terminal on the RF(A/B) switch.
Switch
Connect another cable between the other
OUT terminal on the splitter and the A-IN
terminal on the RF (A/B)switch.
Incoming J cAi o_ s
Spittt er L RF (A/B)
Cable Box Switch
Connect the last RF cable between the
OUT terminal on the RF (A/B)switch and
the ANT tN terminal on the rearof the TV.
ANT IN
cable , _
Splitter L _ RF (A/B)
Cable Box Switch
After you havemadethisconnection, setthe A/Bswitch to the "A" position fornormal viewing.Set theA/B switchtothe "B" positionto
viewscrambledchannels.(When youset the A/Bswitch to "B", youwiltneed to tune your TVto the cable box'soutput channel,whichis
usually channel 3or4.)
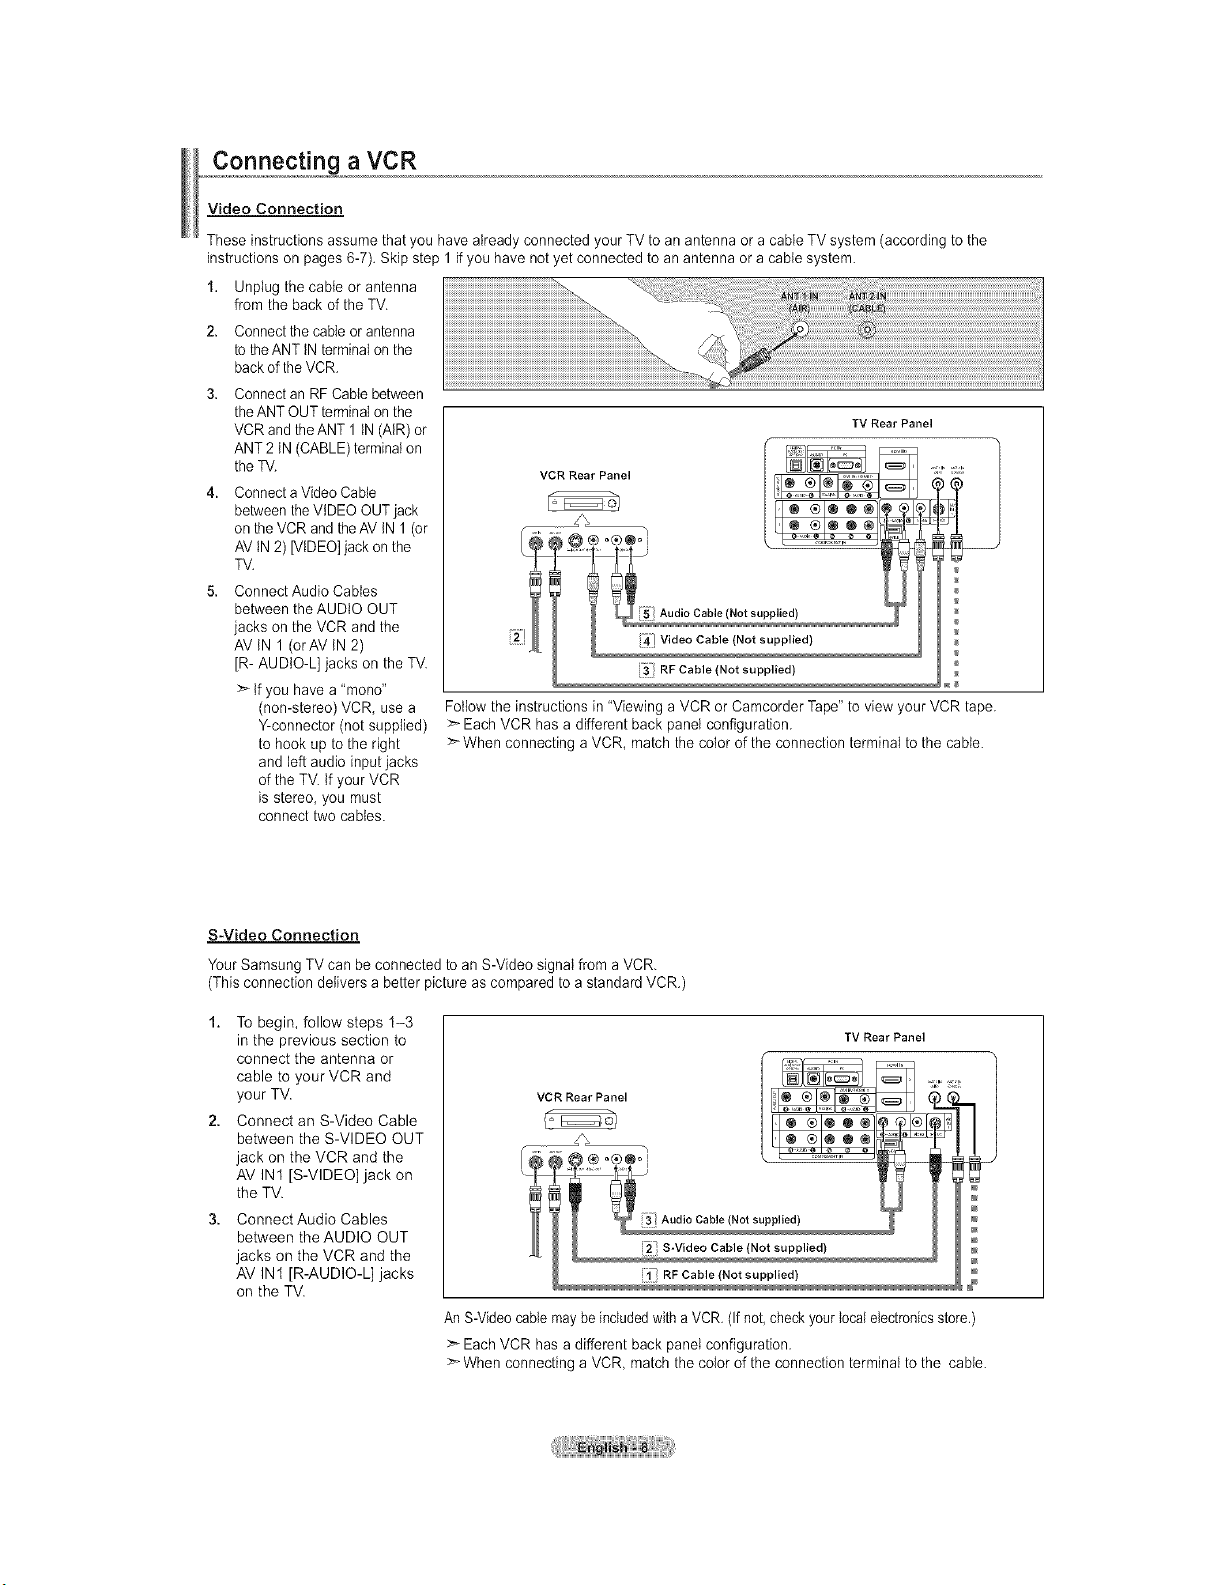
Connecting a VCR
Video Connection
These instructions assume that you have alreadyconnected your TV toan antenna oracable TVsystem (according to the
instructions on pages6-7). Skip step 1 if you havenot yet connected to an antenna oracable system.
1. Unplug the cable or antenna
from the backof the TV.
2. Connectthe cable orantenna
to the ANT tN terminal on the
back of the VCR.
3. Connectan RFCable between
the ANT OUT terminal on the
VCR and the ANT1 tN(AIR)or
ANT 2IN(CABLE)terminalon
the TV.
4. Connecta Video Cable
between the VIDEO OUT jack
on the VCR and theAV IN1(or
AV tN2)[VIDEO]jack on the
TV.
5. ConnectAudio Cables
between the AUDIO OUT
jacks on the VCR and the
AV IN 1(orAV IN 2)
JR- AUDIO-L] jacks on the TV.
>` tf you have a "mono"
(non-stereo) VOR, usea
Y-connector (not supplied)
tohook up tothe right
and left audio inputjacks
ofthe TV. tfyour VCR
isstereo, you must
connect two cables.
TV Rear Panel
VCR Rear "'_
Audio Cable (Not supplied)
Video Cable (Not supplied)
RFCabletNotsupplied)
Follow the instructions in "Viewing a VCR orCamcorder Tape" toview your VCR tape.
EachVCR has adifferent back panel configuration.
>`When connecting a VCR, match the color of the connection terminal to the cable.
S-Video Connection
Your Samsung TVcan be connected toan S-Video signalfrom a VCR.
(This connection delivers a better pictureas compared to astandardVCR.)
1. To begin, follow steps 1-3
in the previous section to
connect the antenna or
cable to your VCR and
your TV.
2. Connect an S-Video Cable
between the S-VIDEO OUT
jack on the VCR and the
AV IN1 [S-VIDEO] jack on
the TV.
3. Connect Audio Cables
between the AUDIO OUT
jacks on the VCR and the
AV IN1 [R-AUDIO-L] jacks
on the TV.
TV Rear Panel
RF Cab e (Not supp ed)
An S-Videocable maybe included with a VCR. (Ifnot, checkyour localelectronicsstore.)
:_Each VCR has a different back panelconfiguration.
>-When connecting a VCR, matchthe colorofthe connection terminal to the cable.
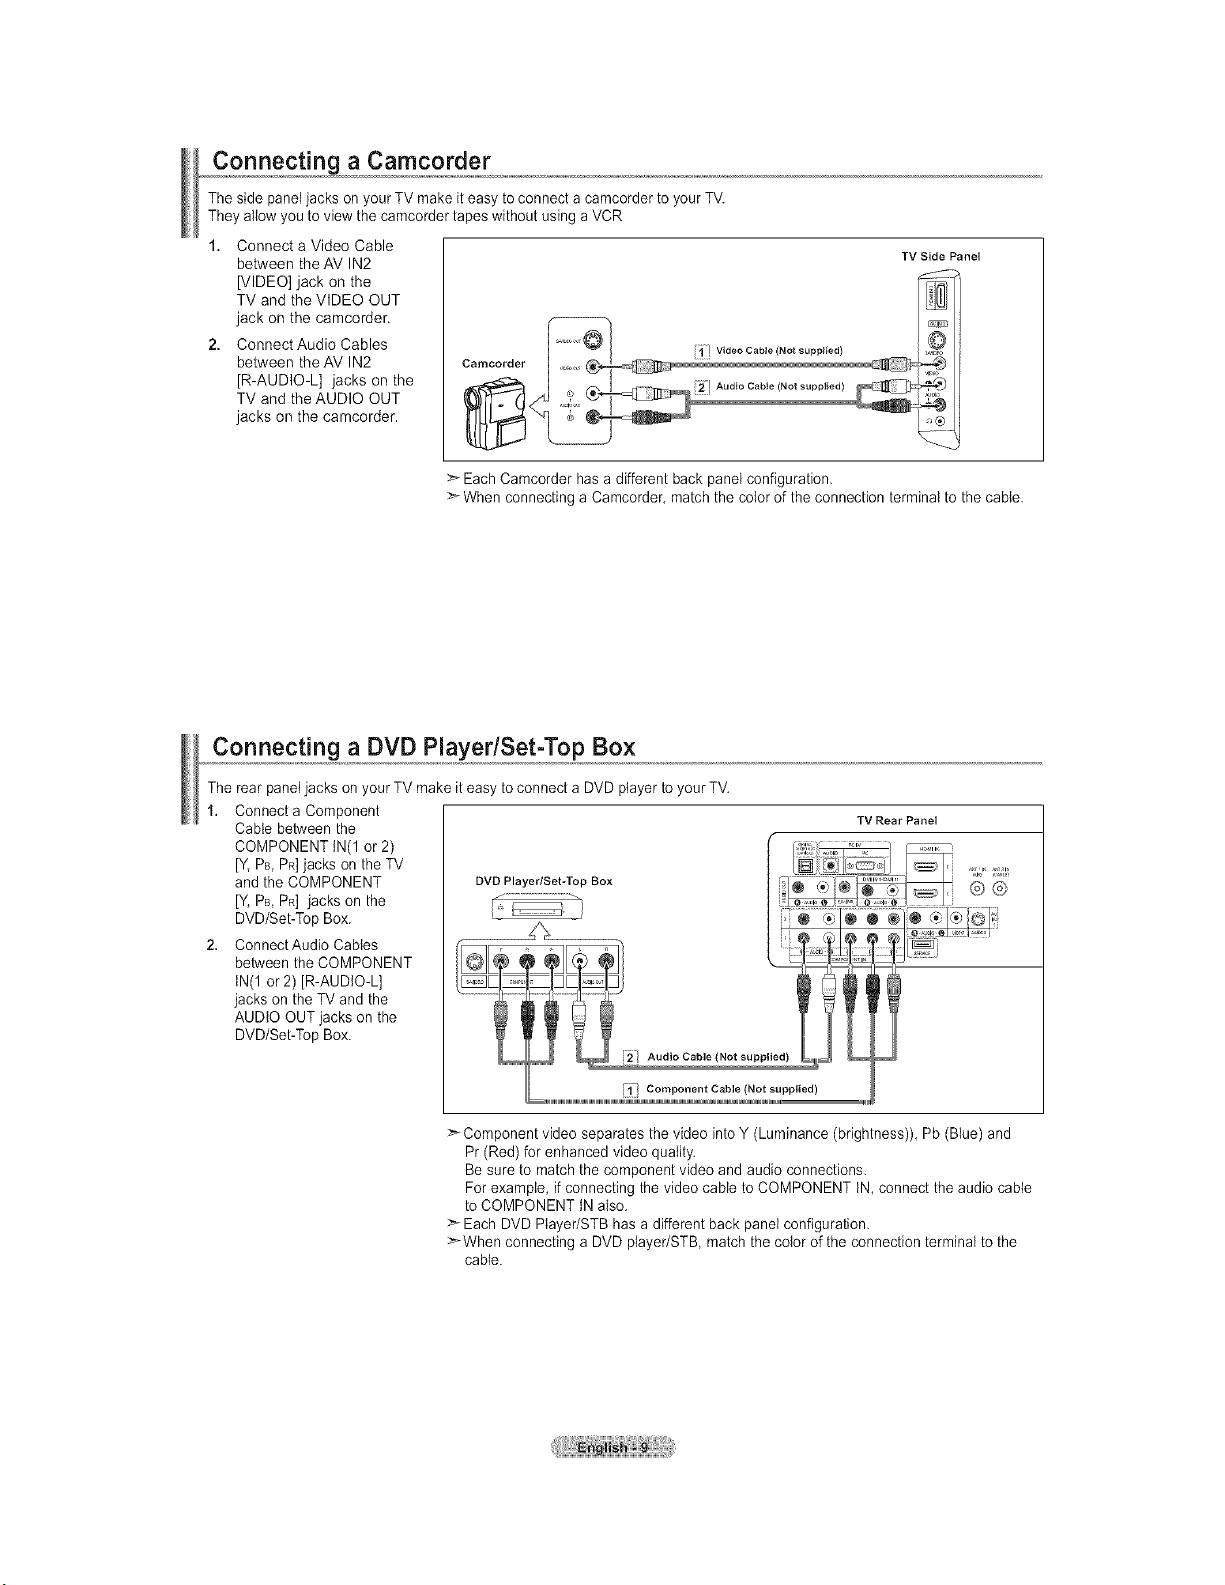
Connecting a Camcorder
The side paneljacks on your TVmake it easy to connect acamcorder to your TV.
They allow youtoview the camcorder tapeswithout using a VCR
1. Connect a Video Cable
between the AV IN2
[VIDEO] jack on the
TV and the VIDEO OUT
jack on the camcorder.
2. Connect Audio Cables
between the AV IN2
[R-AUDIO-L] jacks on the
TV and the AUDIO OUT
jacks on the camcorder.
TVSide Panel
>- Each Camcorder hasadifferent back panel configuration.
When connecting a Camcorder, matchthe colorof the connection terminal tothe cable.
Connecting a DVD Player/Set-Top Box
The rear paneljacks on your TV makeit easy to connect a DVD playerto your TV.
1. Connect aComponent
Cable between the
COMPONENT IN(1 or2)
[Y. PB,PR]jacks on the TV
and the COMPONENT
IV, PB, PR] jacks on the
DVD/Set-Top Box.
2. ConnectAudio Cables
between the COMPONENT
tN(1 or2) JR-AUDIO-L]
jacks on the TV and the
AUDIO OUT jacks on the
DVD/Set-Top Box.
TV Rear Panel
i_i! Component Cable (Not supplied)
>_Component video separates the video into Y (Luminance (brightness)), Pb (Blue) and
Pr(Red) for enhanced video quality.
Be sure to matchthe component video and audio connections.
For example, if connecting the video cable toCOMPONENT tN, connect the audio cable
toCOMPONENT INalso.
Each DVD Player/STB hasa different back panelconfiguration.
>_When connecting a DVDplayer/STB matchthe colorof the connection terminal to the
cable.
Connecting a DVD Player/Set-Top Box via HDMI
Thisconnection can onlybe made if there is an HDMt Outputconnector on the external device.
1. Connect an HDMI Cable
between the HDMI IN DVO Player Rear Panel
(1,2or 3) connector on the TV
and the HDMtconnector on the
DVDplayer/Set-TopBox. I_ _i i ,i
TV Rear Panel
HDMI Cable (Not supplied) _ or_
®
9®
_®
What isHDMI?
• HDMl(High-Definition Multimedia Interface), is an interface that
enables the transmission of digital audio and video signals using asingle cable.
• The difference between HDMI and DVI is that the HDMI device is smaller in size,
has the HDCP (High Bandwidth Digital Copy Protection) coding feature installed.
>` Each DVD player/STB has a different back panel configuration..
>-32, 40, 46 inch model supports HDMI3 only
Connecting a DVD Player/Set-Top Box via DVl
Thisconnection can onlybe made if thereisa DVt Output connector on the externaldevice.
1. Connect aDVlto HDMI
Cable or DVt-HDMI Adapter
between the HDMt IN1
connector onthe TVand
the DVI connector on the
DVD player/Set-Top Box.
ConnectAudio Cables
between the DVt IN(HDMt 1)
[R-AUDIO-L] jack on the
TVand theAUDtO OUT jacks
on the DVD player/
Set-TopBox.
Audio Cable (Not supplied)
DVI to HDMI Cable (Not supplied)
TV Rear Panel
>- Each DVD p}ayer/STB has adifferent back pane} configuration.
>-When connecting a DVD player/STB, match the co}or of the connection terminal to the cable.
>- When using an HDMI/DVl cable connection, you must use the HDMI IN 1terminal.
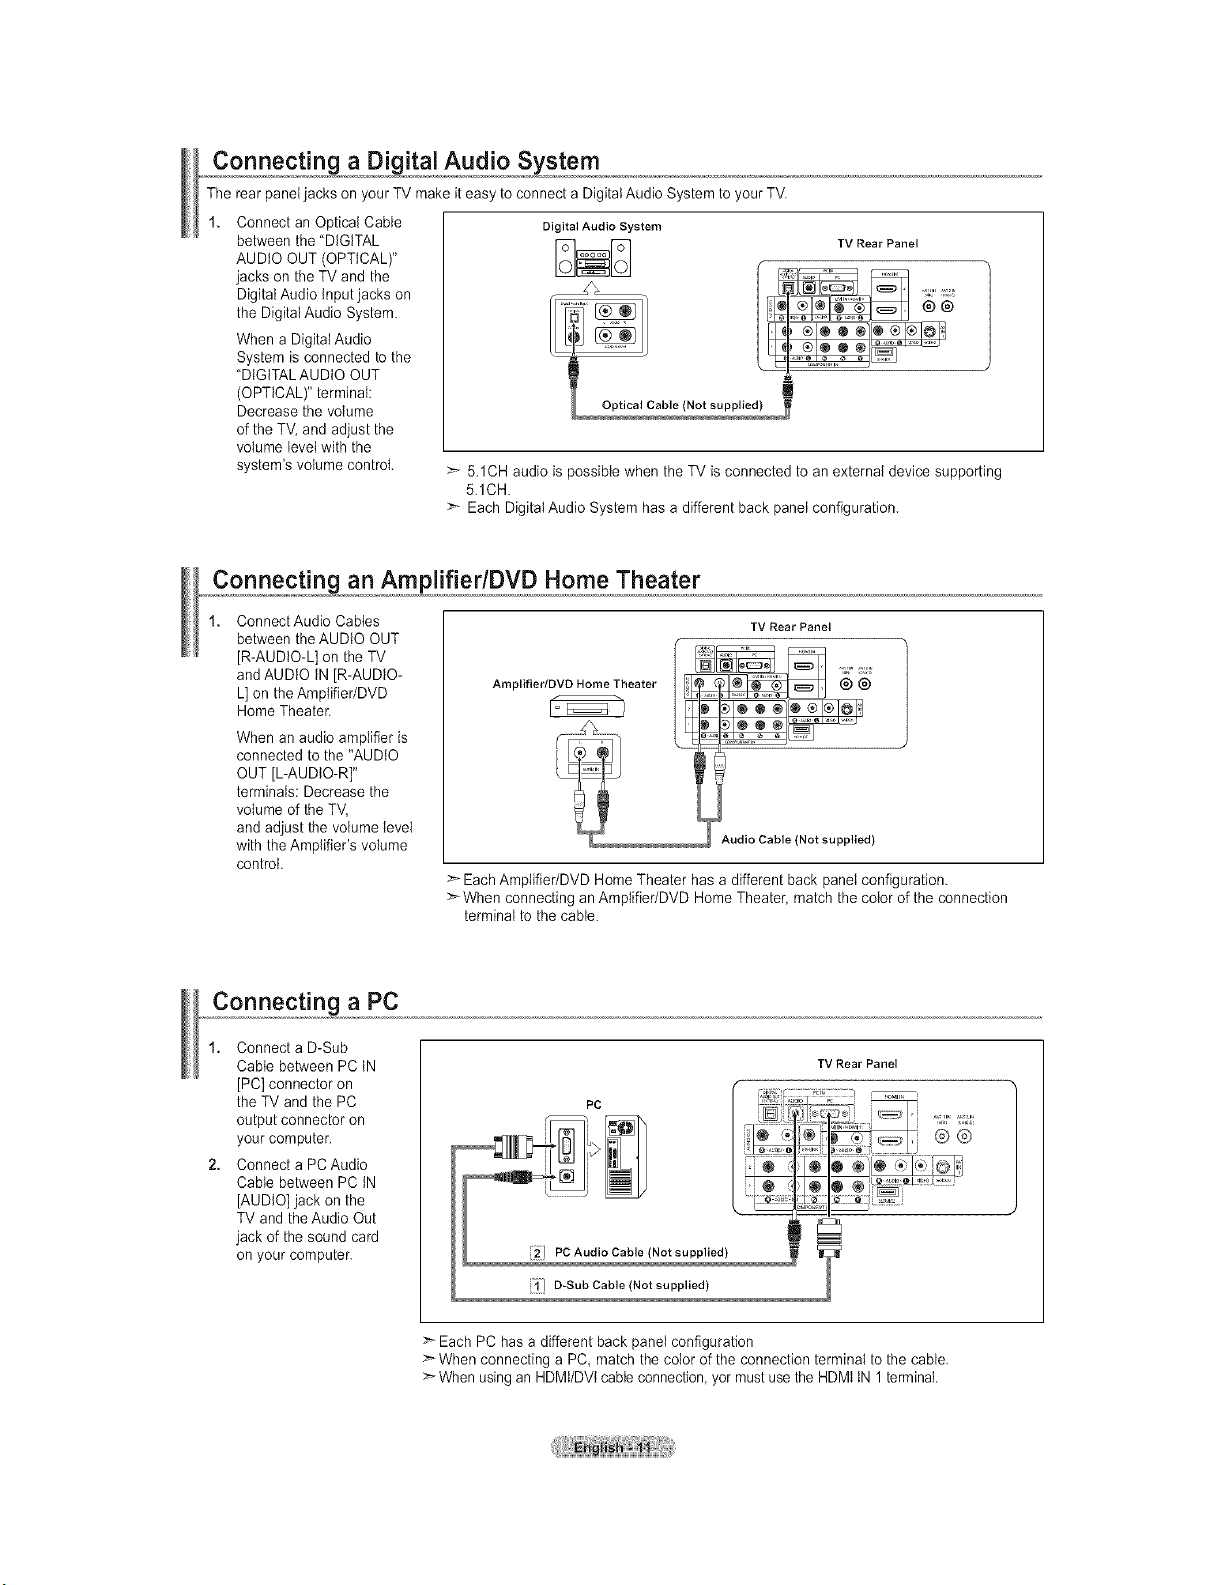
Connecting a Digital Audio System
The rearpaneljacks on your TVmake it easy to connect a DigitalAudio System to your TV.
Connect an Optical Cable
between the "DIGITAL
AUDIO OUT (OPTICAL)"
jacks on the TV and the
Digital Audio Input jacks on
the Digital Audio System.
When aDigital Audio
System is connected to the
"DIGITAL AUDIO OUT
(OPTICAL)" terminal:
Decrease the volume
ofthe TV, and adjust the
volume levelwith the
system's volume control.
Digital Audio System
TV Rear Panel
>- 5.1CH audio ispossible when the TV isconnected to an external device supporting
5.1CH
>- Each Digital Audio System has adifferent back panet configuration.
,,,,,,C0nnect_Ln_an AmplifierlDVD Home Theater
ConnectAudio Cables
between the AUDIO OUT
[R-AUDIO-L] on the TV
and AUDIO IN[R-AUDIO-
L]on the Amptifier/DVD
Home Theater.
When an audio amplifier is
connected tothe "AUDIO
OUT [L-AUDIO-R]"
terminals: Decreasethe
volume of the TV,
and adjust the volume level
with the Amplifier's volume
control.
TV Rear Panel
Amplifier/DVD Home Theater
®®
Audio Cable (Not supplied)
>- Each Amplifier/DVD Home Theater has a different back panelconfiguration.
:_When connecting an Amplifier/DVD Home Theater,match the color of the connection
terminalto the cable.
Connecting a PC
1. Connect aD-Sub
Cable between PC tN
[PC] connector on
the TVand the PC
output connector on
your computer.
2. Connect aPCAudio
Cable between PC IN
[AUDIO]jack on the
TVand the Audio Out
jack of the sound card
on your computer.
D-Sub Cable (Not supplied)
TV Rear Panel
Each PC hasa different back panel configuration
>* When connecting aPC, matchthe color of the connectionterminal tothe cable.
:_Whenusing an HDMt/DVt cable connection, yor mustuse the HDMt tN1 terminal.
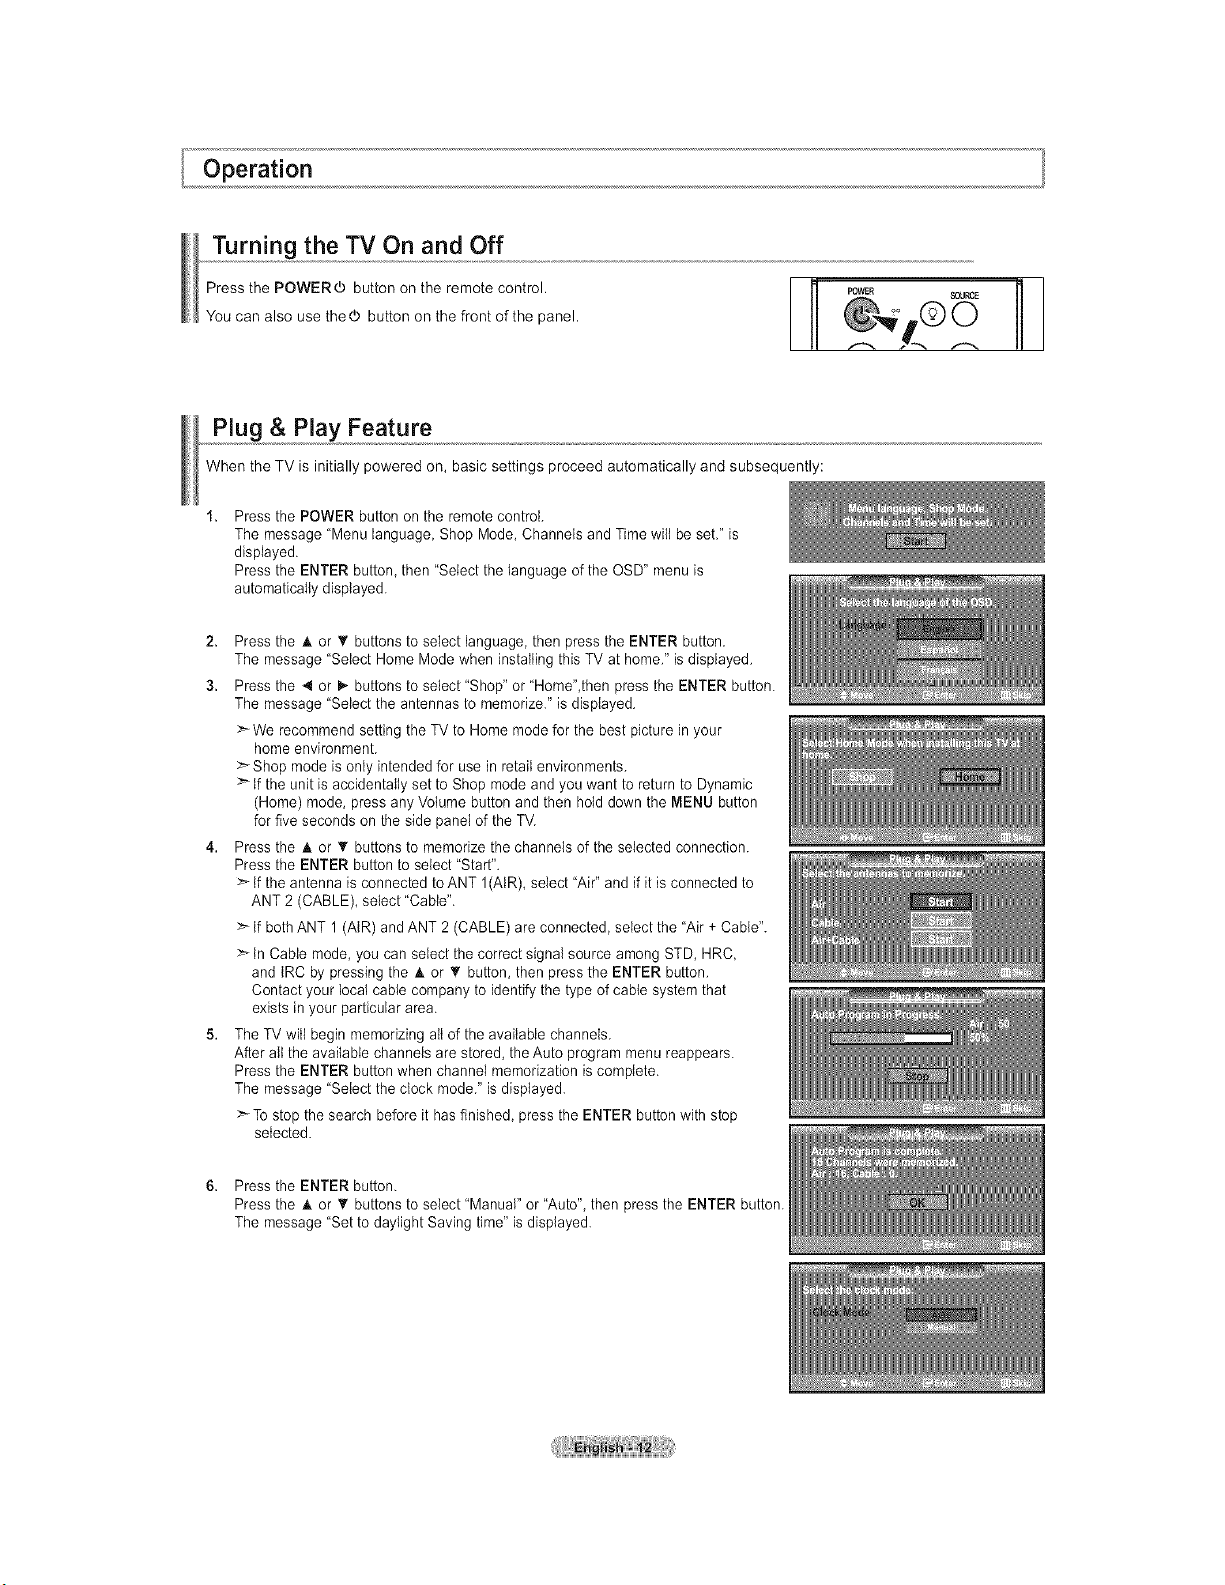
Operation
Turning the TV On and Off
Press the POWER_ button on the remote control.
You can also use thed) button on the front of the panel.
Plug & Play Feature
When the TV is initially powered on, basic settings proceed automatically and subsequently:
Pressthe POWER button on the remote control.
The message "Menu language, Shop Mode, Channels and Time wilt be set." is
displayed.
Pressthe ENTER button, then "Selectthe language ofthe OSD" menu is
automatically displayed.
2. Pressthe A. or • buttons toselect language, then press the ENTER button.
The message "Select Home Mode when installing thisTV at home."isdisplayed.
3. Pressthe _ or i_ buttons to select "Shop" or'Home",then pressthe ENTER button.
The message "Select the antennas to memorize." isdisplayed.
>*We recommend setting the TVto Home mode for the best picturein your
home environment.
>*Shop mode is only intended for use in retail environments.
>* tf the unitis accidentally set to Shop mode and you want to returnto Dynamic
(Home) mode, press anyVolume button and then holddown the MENU button
for five seconds on the side panelof the TV.
4. Pressthe A or T buttons tomemorize the channels of the selected connection.
Pressthe ENTER button to select "Start".
>* tf theantenna isconnected toANT 1(AtR), select "Air" and if it isconnected to
ANT 2(CABLE), select 'Cable".
>* If both ANT 1(AIR) and ANT 2 (CABLE) areconnected, select the "Air +Cable".
>* tn Cable mode, you can select the correct signal source among STD, HRC,
and IRC by pressing the A. or _' button, then pressthe ENTER button.
Contact your local cable company toidentify the type of cable systemthat
existsin your particular area.
5. TheTVwill begin memorizing aIt of the available channels.
After aIt the available channels are stored, the Auto program menu reappears.
Pressthe ENTER button when channel memorization iscomplete.
The message "Select the clock mode." isdisplayed
>*To stop the search beforeit hasfinished, press the ENTER buttonwith stop
selected.
6. Pressthe ENTER button.
Pressthe A. or _' buttons to select "Manual"or "Auto", then press the ENTER button.
The message "Setto daylight Saving time" isdisplayed.
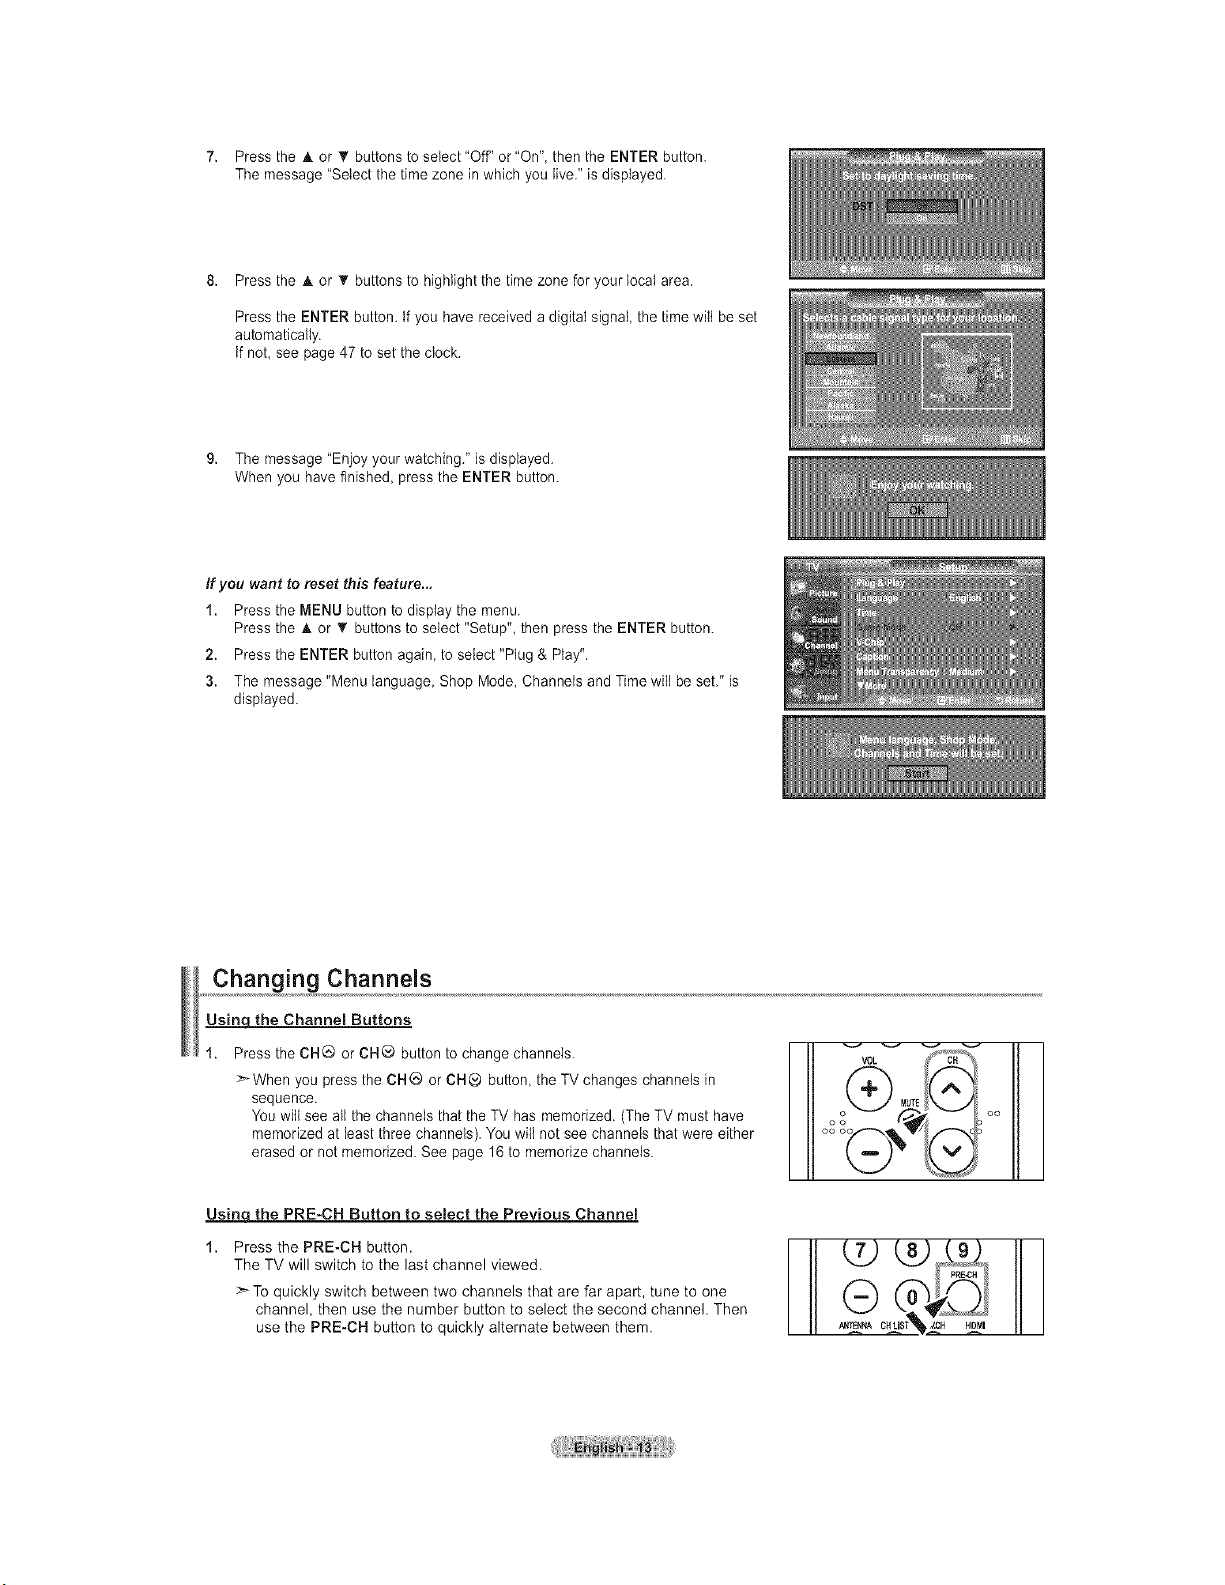
7. PresstheAorTbuttonstoselect"Off"or"On",thentheENTERbutton.
Themessage"Selectthetimezoneinwhichyoulive."isdisplayed.
8. PresstheAor_'buttonstohighlightthetimezoneforyourlocalarea.
PresstheENTERbutton,tfyouhavereceivedadigitalsignalthetimewiltbeset
automatically.
tfnot,seepage47tosettheclock.
9. Themessage"Enjoyyourwatching."isdisplayed.
Whenyouhavefinished,presstheENTERbutton.
If you want to reset this feature...
1. Pressthe MENU button to display the menu.
Pressthe _kor '_ buttons to select "Setup", then press the ENTER button.
2. Press the ENTER button again toselect "Plug & Play".
3. The message "Menu language, Shop Mode,Channets and Time wilt be set." is
displayed.
Changing Channels
Us_ the Channel Buttons
Pressthe CHQ or CH_ button tochange channels.
_When you pressthe CHG orCH@ button, the TVchanges channels in
sequence.
You will see allthe channels that the TVhas memorized. (The TV must have
memorized at least threechannels). You wiltnot see channels that were either
erased ornot memorized. See page 16 tomemorize channels.
VOL c"%"_%
It
MUTE
Usima the PRE-CH Button to select the Previous Channel
Press the PRE-CH button.
The TV will switch to the last channel viewed.
:_Toquickly switch between two channels that are far apart, tune to one
channel, then use the number button to select the second channel. Then
use the PRE-CH button toquickly alternate between them.
_aRE.CH
cur_ _
usting the Volume
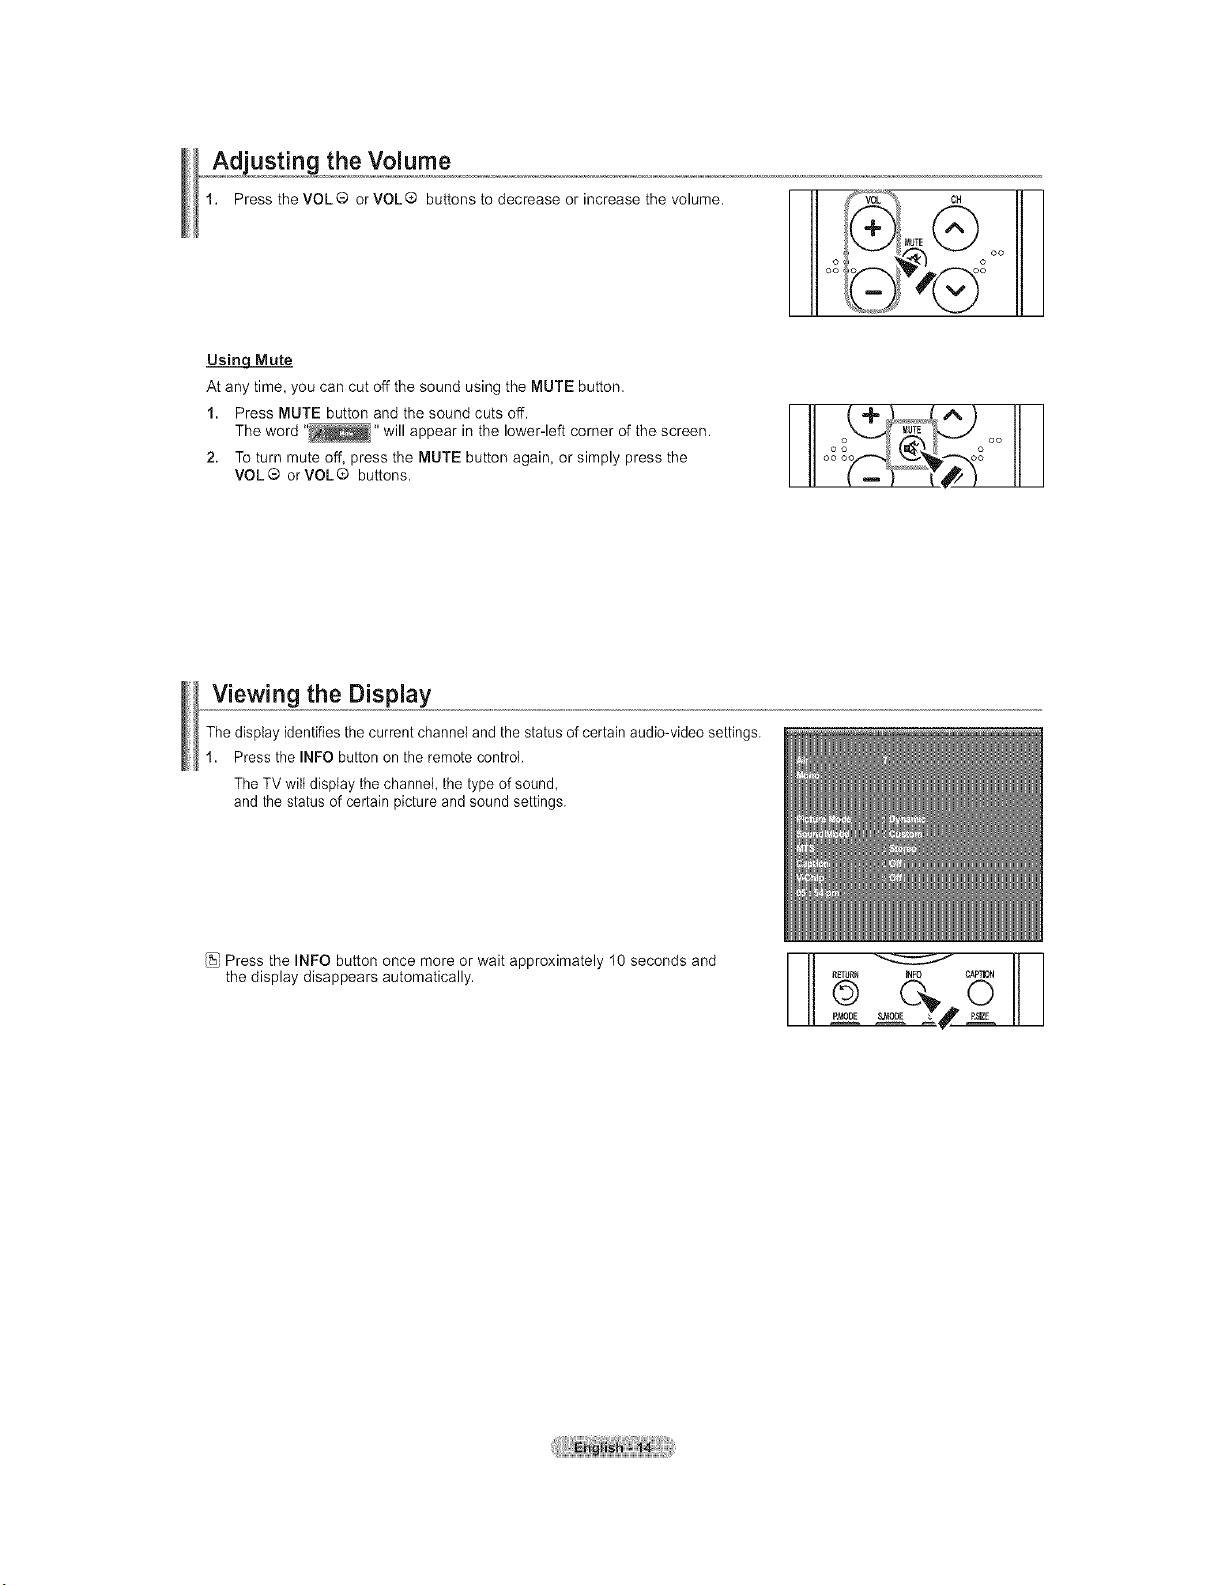
Press the VOL® or VOL® buttons todecrease or increase the volume.
III oo
02 _I
Usin_LMute
At any time, you can cut offthe sound using the MUTE button.
1. Press MUTE button and the sound cuts off.
The word .... will appear in the lower-left corner ofthe screen.
2. Toturn mute off, press the MUTE button again, or simply press the
VOL® orVOL® buttons.
I ooo oo
Viewing the Display
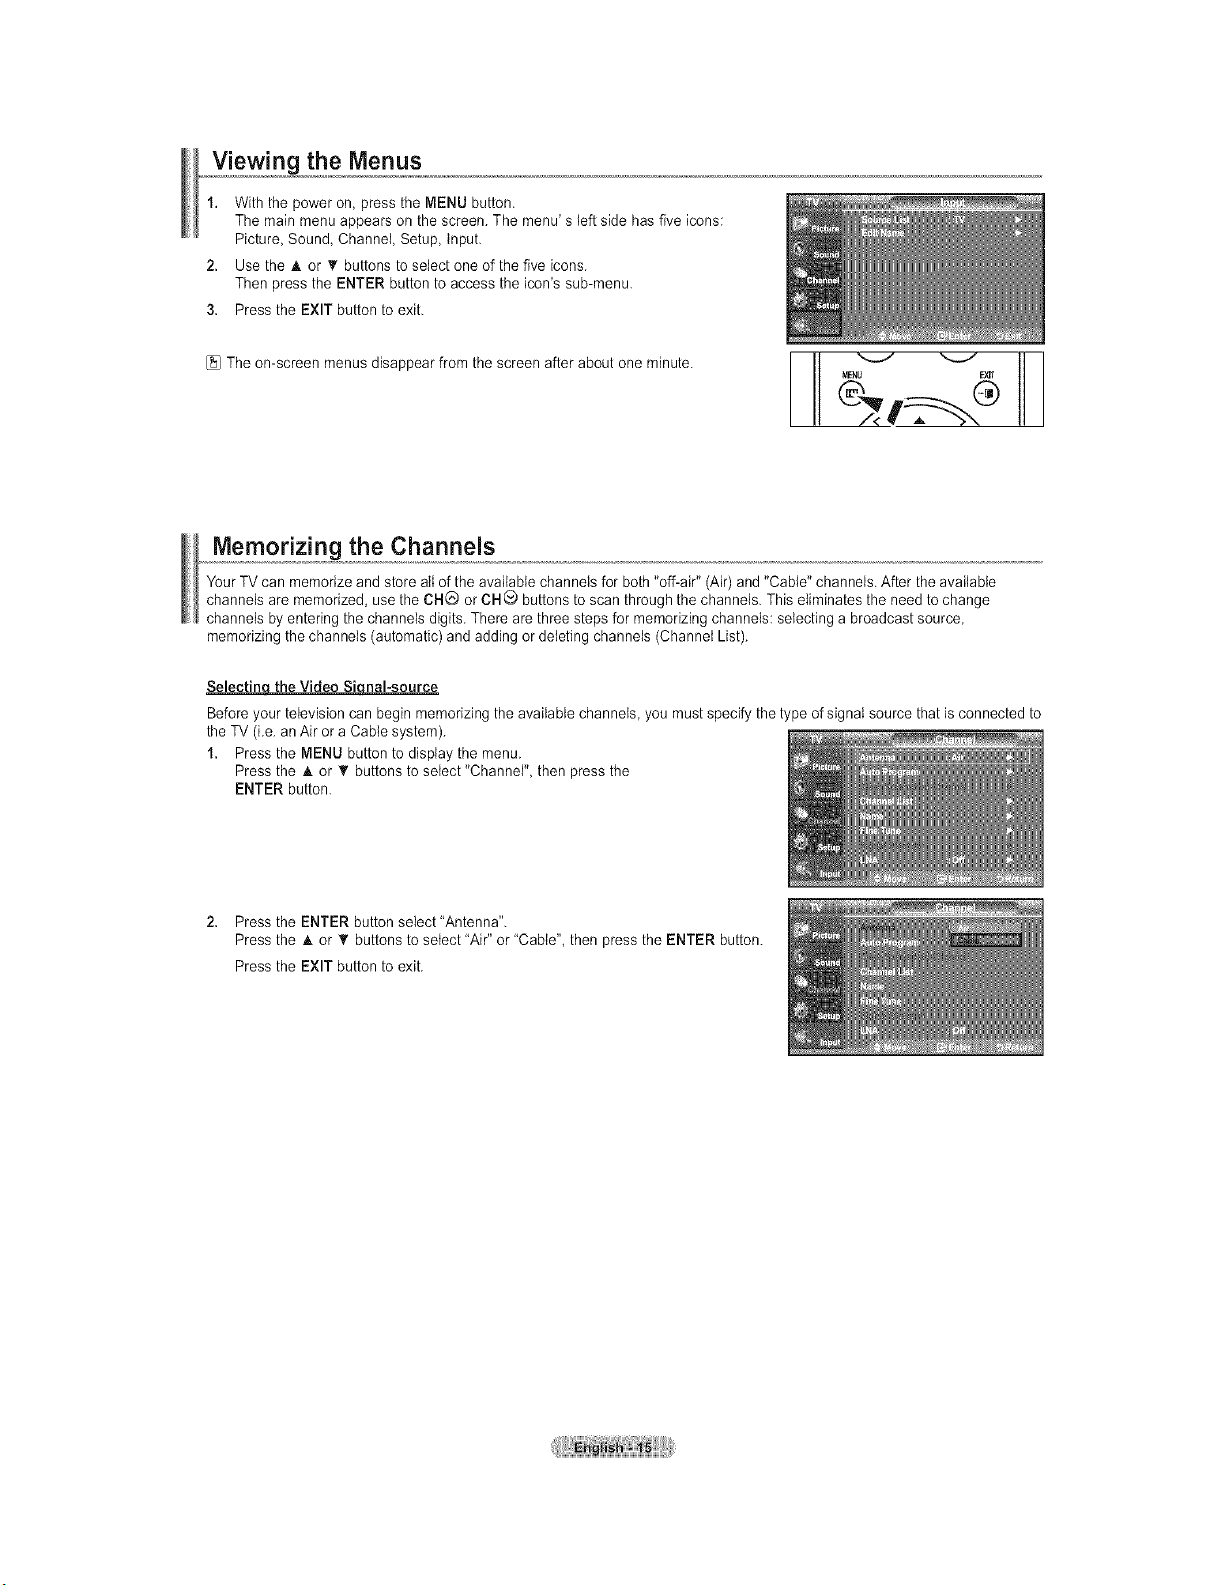
Thedisplay identifies thecurrent channel and the status of certainaudio-video settings.
1. Pressthe INFO button onthe remote control.
The TV wiltdisplay the channel, the type ofsound,
and the status of certainpicture and sound settings.
Press the INFO button once more or wait approximately 10 seconds and
the display disappears automatically.
RETURR _FO CAPTION
III .oo0E_E Z# __L
Viewing the Menus
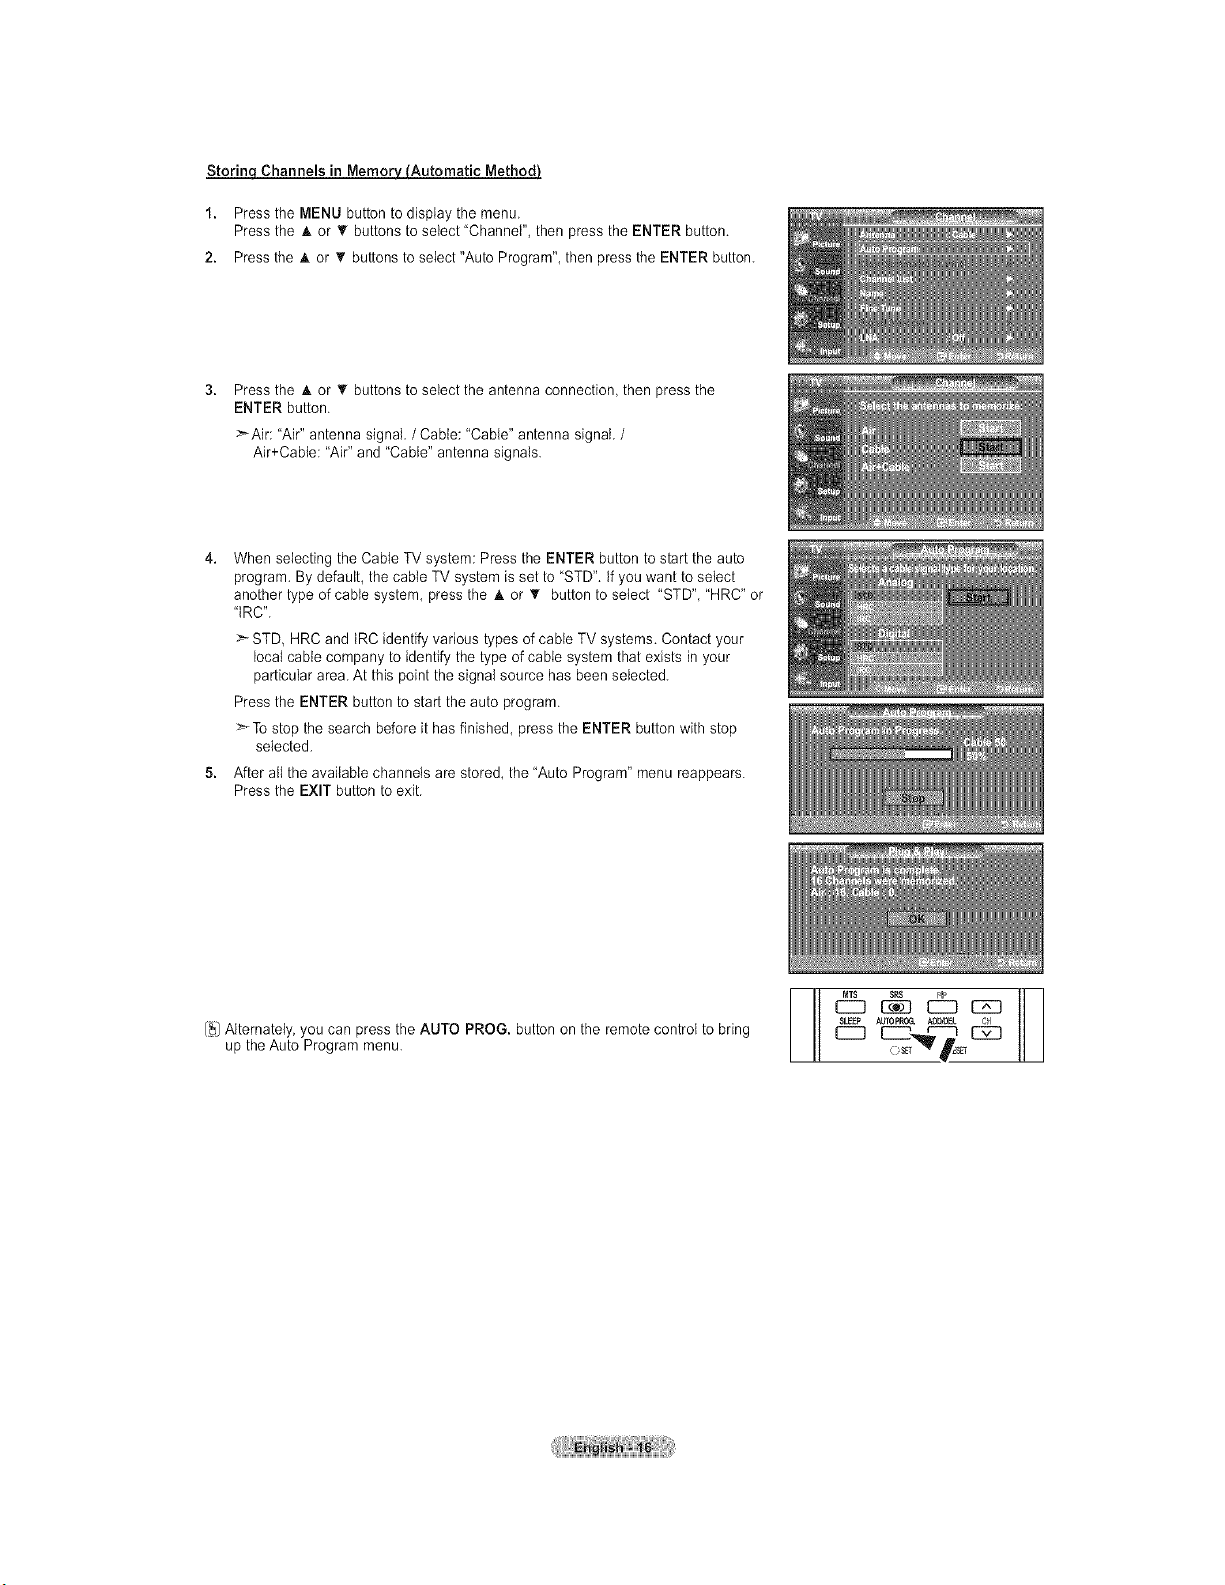
1. Withthe power on, press the MENU button.
The main menu appears onthe screen. The menu' s left side has five icons:
Picture, Sound, Channel, Setup, Input.
2. Use the A or _' buttonsto select one ofthe five icons.
Then pressthe ENTER button to access the icon's sub-menu.
3. Pressthe EXIT button to exit.
[_JTheon-screen menusdisappear from the screen afterabout one minute.
Memorizing the Channels
Your TV can memorize and store allof the available channels for both "off-air" (Air) and "Cable" channels. After the available
channels arememorized, usetheCH@ orCHO buttons toscan through the channels. Thiseliminates the need to change
channels by entering the channels digits. There arethree stepsfor memorizing channels: selecting a broadcast source,
memorizing the channels (automatic) and addingor deleting channels (Channet List).
Selectin theVideo Si nal-source
Before your television can beginmemorizing the available channels, you mustspecifythe type of signal sourcethat is connected to
the TV(i.e. an Air or aCablesystem).
1. Pressthe MENU button to display the menu.
Pressthe A or _rbuttons to setect "Channel", then pressthe
ENTER button.
2. Pressthe ENTER button select "Antenna".
Pressthe & or _rbuttons to select "Air" or"Cable", then pressthe ENTER button.
Pressthe EXIT button to exit.
StorinqChannels in Memorv_Automatic MethodJ
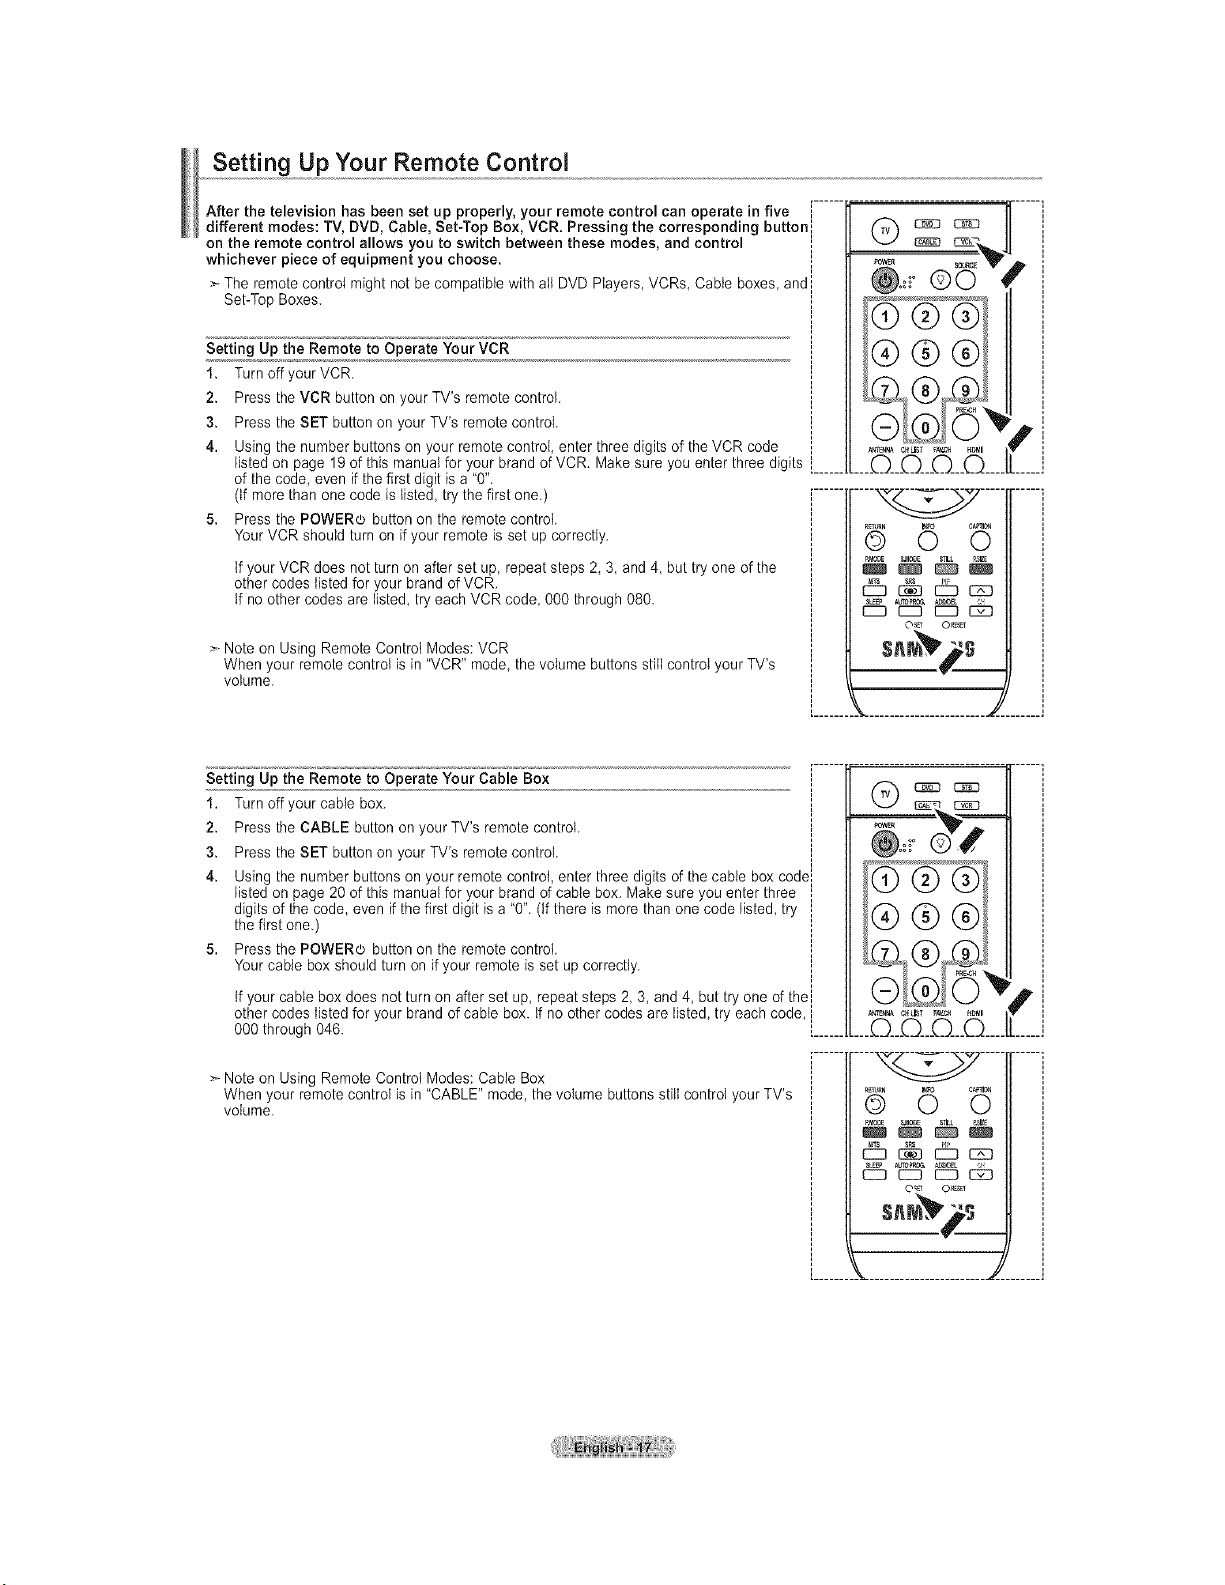
1. Press the MENU button to display the menu.
Pressthe A or _' buttonsto select "Channel", then pressthe ENTER button.
2. Press the A or _' buttonsto seiect"Auto Program",then pressthe ENTER button.
Pressthe A or _' buttonsto select the antenna connection, then press the
ENTER button.
>-Air: "Air" antenna signal. /Cable: "Cable" antenna signal. /
Air+Cable: "Air" and "Cable" antenna signals.
When selecting the Cable TVsystem: Pressthe ENTER button tostart the auto
program. Bydefault, the cable TV system isset to"STD". tfyouwant to select
another type ofcable system, pressthe A or T button toselect "STD", "HRC"or
"tRC".
STD, HRCand tRCidentify various types of cable TV systems. Contact your
local cable company to identifythetype of cable system that exists in your
particular area. At this pointthe signal source has been selected.
Pressthe ENTER button tostart the auto program.
>_Tostop the search before it hasfinished, pressthe ENTER button with stop
selected.
After all the available channels are stored, the "Auto Program" menu reappears.
Pressthe EXIT button to exit.
[_JAlternately, youcan press the AUTO PROG. button on the remote control to bring
up the Auto Program menu.
Setting Up Your Remote Control
After the television has been set up properly, your remote control can operate in five J
different modes: TV, DVD, Cable, Set-Top Box, VCR. Pressing the corresponding buttonl
on the remote control allows you to switch between these modes, and control
whichever piece of equipment you choose.
> The remote control might not becompatible with all DVD Players, VCRs, Cable boxes, and
Set-TopBoxes.
Setting Up the Remote to Operate Your VCR
1. Turn off yourVCR.
2. Pressthe VCR button onyour TV's remote control.
3. Pressthe SET button on your TV's remote control.
4. Usingthe number buttons on your remote control, enter threedigits of the VCR code
listed onpage 19 of thismanual foryour brand ofVCR. Make sure you enterthree digits [......
ofthe code, even if the first digit isa "0".
(tf morethan one code is listed, try thefirst one.) .......
5. Pressthe POWERd_button on the remote control.
Your VCR should turn on if your remote isset up correctly.
Ifyour VCR does not turn on after set up, repeat steps 2,3, and 4, but try one of the
othercodes listedfor your brandof VCR.
tfno other codes are listed, try each VCR code, 000 through080.
> Note on Using Remote Control Modes:VCR
When your remote control isin "VCR" mode, the volume buttonsstitt control your TV's
volume.
©0
_t_/NA C_L_T _V,_ HOMI
____Q___Q___Q___Q....
BMOBE _0_
O_ O_ r
p,
Setting Up the Remote to Operate Your Cable Box
1. Turn off your cable box. i
I
2. Pressthe CABLE button on your TV's remote control. !
3. Pressthe SET button on your TV's remote control. J
4. Usingthe number buttons on your remote control, enterthree digits of the cable box codell
listed onpage 20of thismanual foryour brand ofcable box. Makesure youenter three iI
digits ofthe code, even if the first digit isa "0". (Ifthere ismore than one code listed, try !
the first one.) j
5. Pressthe POWER(L, button on the remote control, i
Your cable box should turn on if your remote isset up correctly. !
Ifyour cable boxdoes not turn on after set up, repeatsteps 2, 3,and 4, but tryone of thei
othercodes listedfor your brandof cable box. tfno other codes are listed, try each code,i
000 through 046. L......
>_Note onUsing Remote Control Modes: Cable Box
When your remote control isin "CABLE" mode, the volume buttons stillcontrol your TV's
volume.
...........................................
;®®®
___Q__Q___O___Q....
.... ....
QR_N 6 C_O
O_ 0_
s.r #s
P
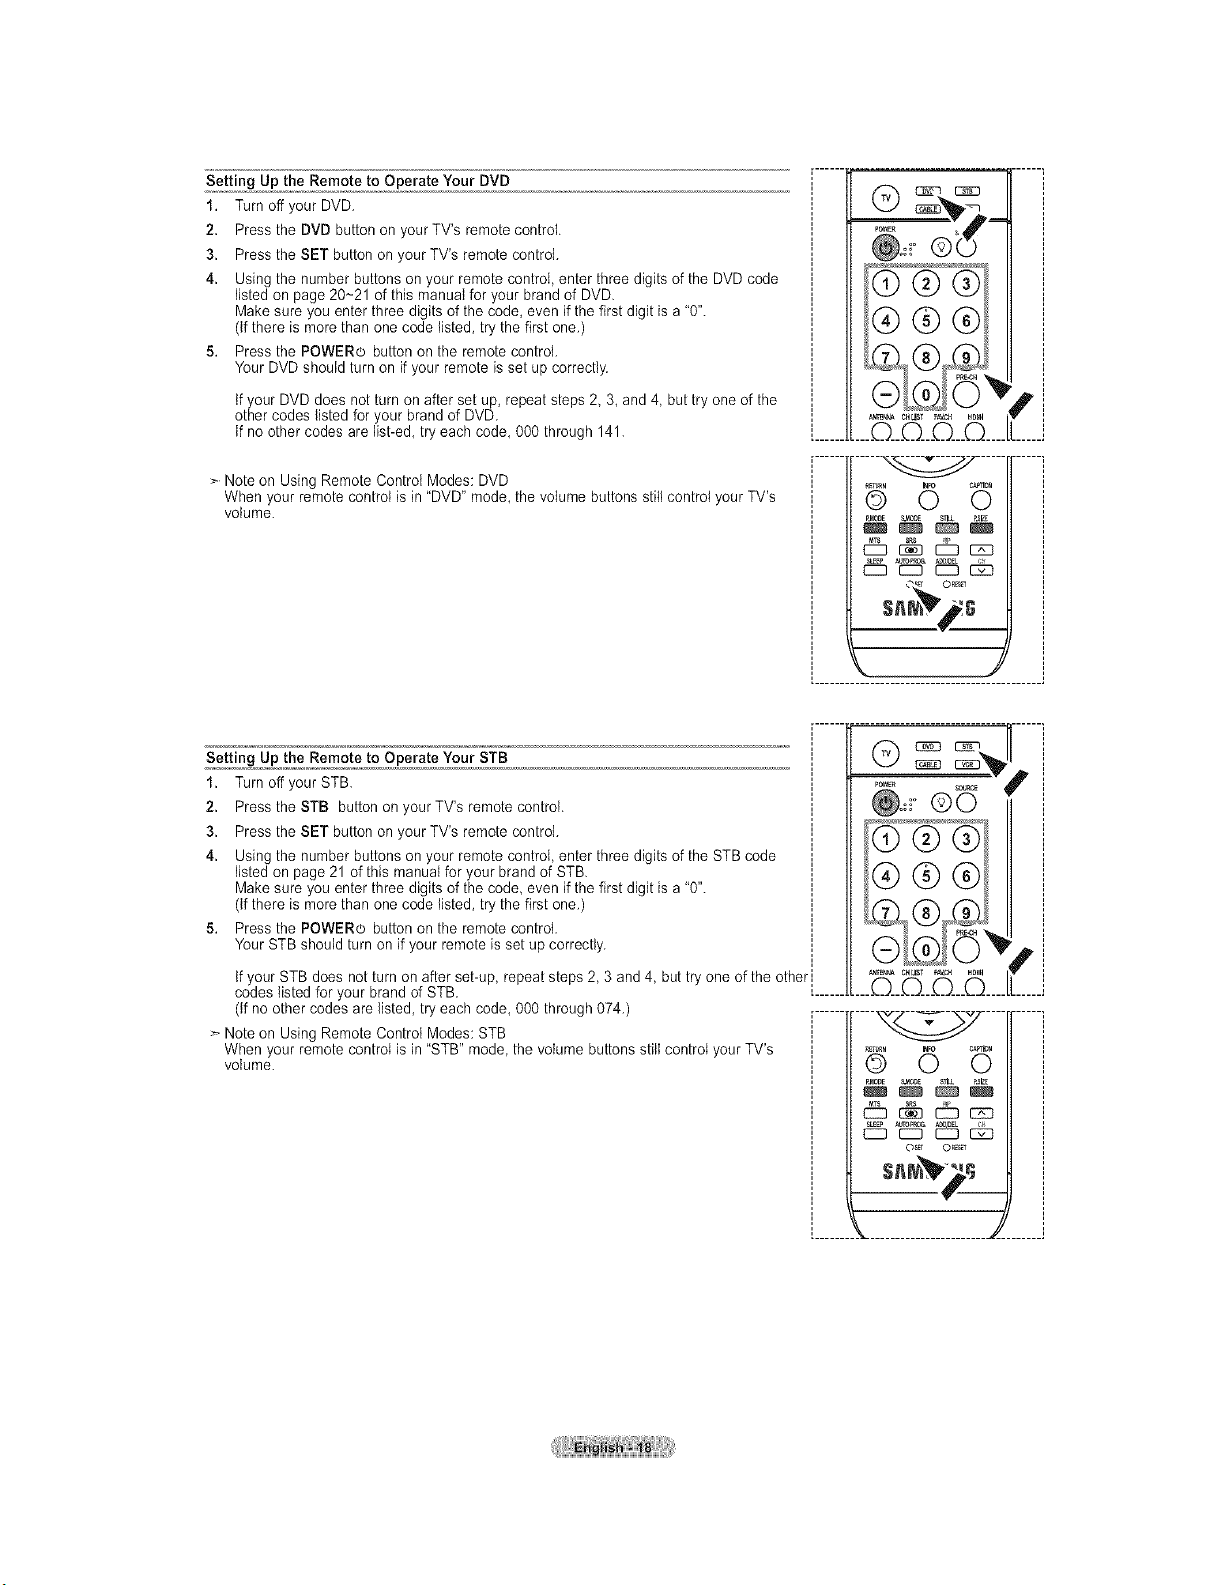
Setting Up the Remote to Operate Your DVD
1. Turn offyour DVD.
2. Pressthe DVD button on your TV's remote control.
3. Pressthe SET button on your TV's remote control.
4. Usingthe number buttonson your remote controI, enter threedigits of the DVD code
listed onpage 20~21 ofthis manualfor your brand of DVD.
Make sure you enter three digits ofthe code, even if the first digit is a"0".
(ifthere is more than one codelisted, try the first one.)
5. Pressthe POWERo button on the remote control.
Your DVD should turn on if your remote isset up correctly.
Ifyour DVD does not turnon after set up, repeat steps 2 3, and 4,but try one ofthe
othercodes listed foryour brandof DVD.
tfno other codes are list-ed, try eachcode, 000 through 141.
> Note on UsingRemote Control Modes: DVD
When your remote control isin "DVD" mode, the volume buttons stillcontrol your TV's
volume.
_OWER S
0
....©__©__D___©....
Q_Tlkl O c_lr_o
_M0_ S.e33E
SL_p _tOF_O& _I_
C]9 C]9 EZ]] _
F
Setting Up the Remote to Operate Your STB
1. Turn offyour STB
2. Pressthe STB button on your TV's remote control.
3. Pressthe SET button on your TV's remote control.
4. Usingthe number buttonson your remote controI, enter threedigits of the STB code
listed onpage 21 of thismanual foryour brand of STB
Make sure you enter three digits ofthe code even if thefirst digit is a"0".
(ifthere is more than one codelisted, try the first one.)
5. Pressthe POWERo button on the remote control.
Your STB should turn on if your remote isset up correctly.
Ifyour STB does not turnon after set-up repeat steps 2 3 and 4, but try one of the other l
codes listed for your brand of STB [......
(if no othercodes arelisted, try eachcode, 000 through 074.) .......
> Note on UsingRemote Control Modes: STB
When your remote control isin "STB" mode, the volume buttonsstill control your TV's
volume.
CHLIST F_CH HOI_I
....D___Q_D___©....
db _ _ czo
EC3 CC3 EC3 _
O_ O_
¥
Remote Control Codes
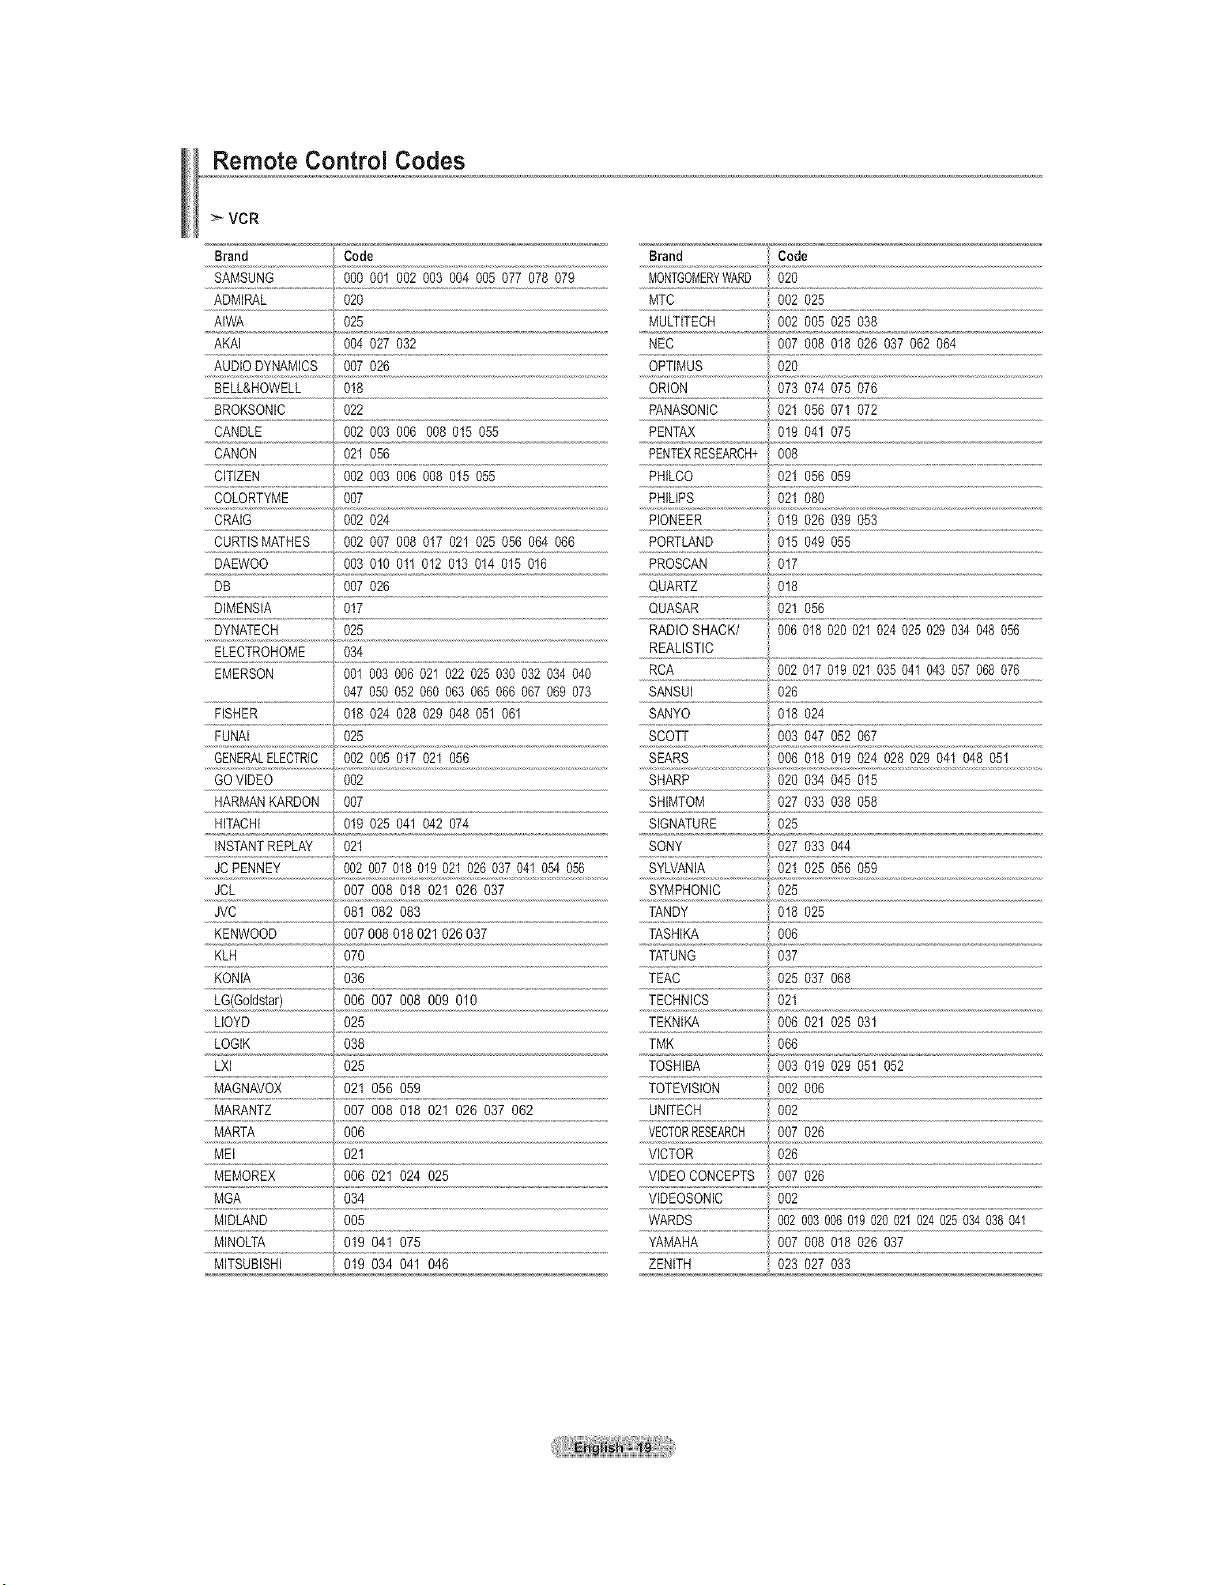
VCR
Brand Code Brand Code
SAMSUNG %0 001 002 003 004 005 077 078 079 NONTGOMERYWARD 020
ADMIRAL 020 MTC 002 025
AIWA _ 025 MULTITECH 002 005 025 038
AKAI 004 027 032 NEC 007 008 018 026 037 062 064
AUDIO DYNAMICS 007 026 OPTIMUS 020
BELL&HOWELL 018 ORION 073 074 075 076
BROKSONIC 022 PANASONIC 021 056 07I 072
CANDLE 002 003 006 008 015 055 PENTAX 019 04t 075
CANON 021 056 PENTEXRESEARCH+ 008
CITIZEN 002 003 006 008 015 055 PHILCO 021 056 059
COLORTYME 007 PHILIPS 021 080
CRAIG 002 024 PIONEER 019 026 039 053
CURTISMATHES 002 007 008 017 021 025 056 064 066 PORTLAND 015 049 055
DAEWOO 003 010 011 012 013 014 015 016 PROSCAN 017
DB 007 026 QUARTZ 018
DIMENSIA 017 QUASAR 021 056
DYNATECH 025 RADIO SHACK/ 006 018 020 021 024 025 029 034 048 056
ELECTROHOME 034 REALISTIC
EMERSON 001 003 006 021 022 025 030 032 034 040 RCA 002 017 019 021 035 041 043 057 068 076
047 050 052 060 063 065 066 067 069 073 SANSUI 026
FISHER 018 024 028 029 048 051 061 SANYO 018 024
FUNAI 025 SCOTT 003 047 052 067
GENERALELECTRIC 002 005 017 021 056 SEARS 006 018 019 024 028 029 041 048 051
GOVIDEO 002 SHARP 020 034 045 015
HARMANRARDON 007 SHIMTOM 027 033 038 058
HITACHI 019 025 041 042 074 SIGNATURE 025
INSTANTREPLAY 021 SONY 027 033 044
JCPENNEY 002 007 018 019 021 026 037 041 054 056 SYLVANIA 021 025 056 059
JCL 007 008 018 021 026 037 SYMPHONIC 025
JVC 081 082 083 TANDY 018 025
KENWOOD 007 008 018 021 026 037 TASHIRA 006
......KLH.............................................070 TATUNG 037
KONIA 036 TEAC 025 037 068
006 007 008 009 010
NQ4
.....X_ZX]_,ff_t!LL.................................. .....LEZ_!_]Xt ...................................._L ...............................................................................................................................
LLOYD 025 TEKNW_ 006 021 025 031
LOGIK 038 TMK 066
LXI 025 TOSHIBA 003 019 029 051 052
......M 9.Avox..........................op To!Evisiooo o%
MARTA 006 VECTORRESEARCH 007 026
MEI 021 VICTOR 026
MEMOREX 006 021 024 025 VIDEO CONCEPTS 007 026
MGA 034 VIDEOSONIC 002
MIDLAND 005 WARDS 002 003 006 019 020021 024 025 034 038 041
YAMAHA
MINOLTA 019 041 075 007 008 018 026 037
MITSUBISHI 019 034 041 046 ZENITH 023 027 033
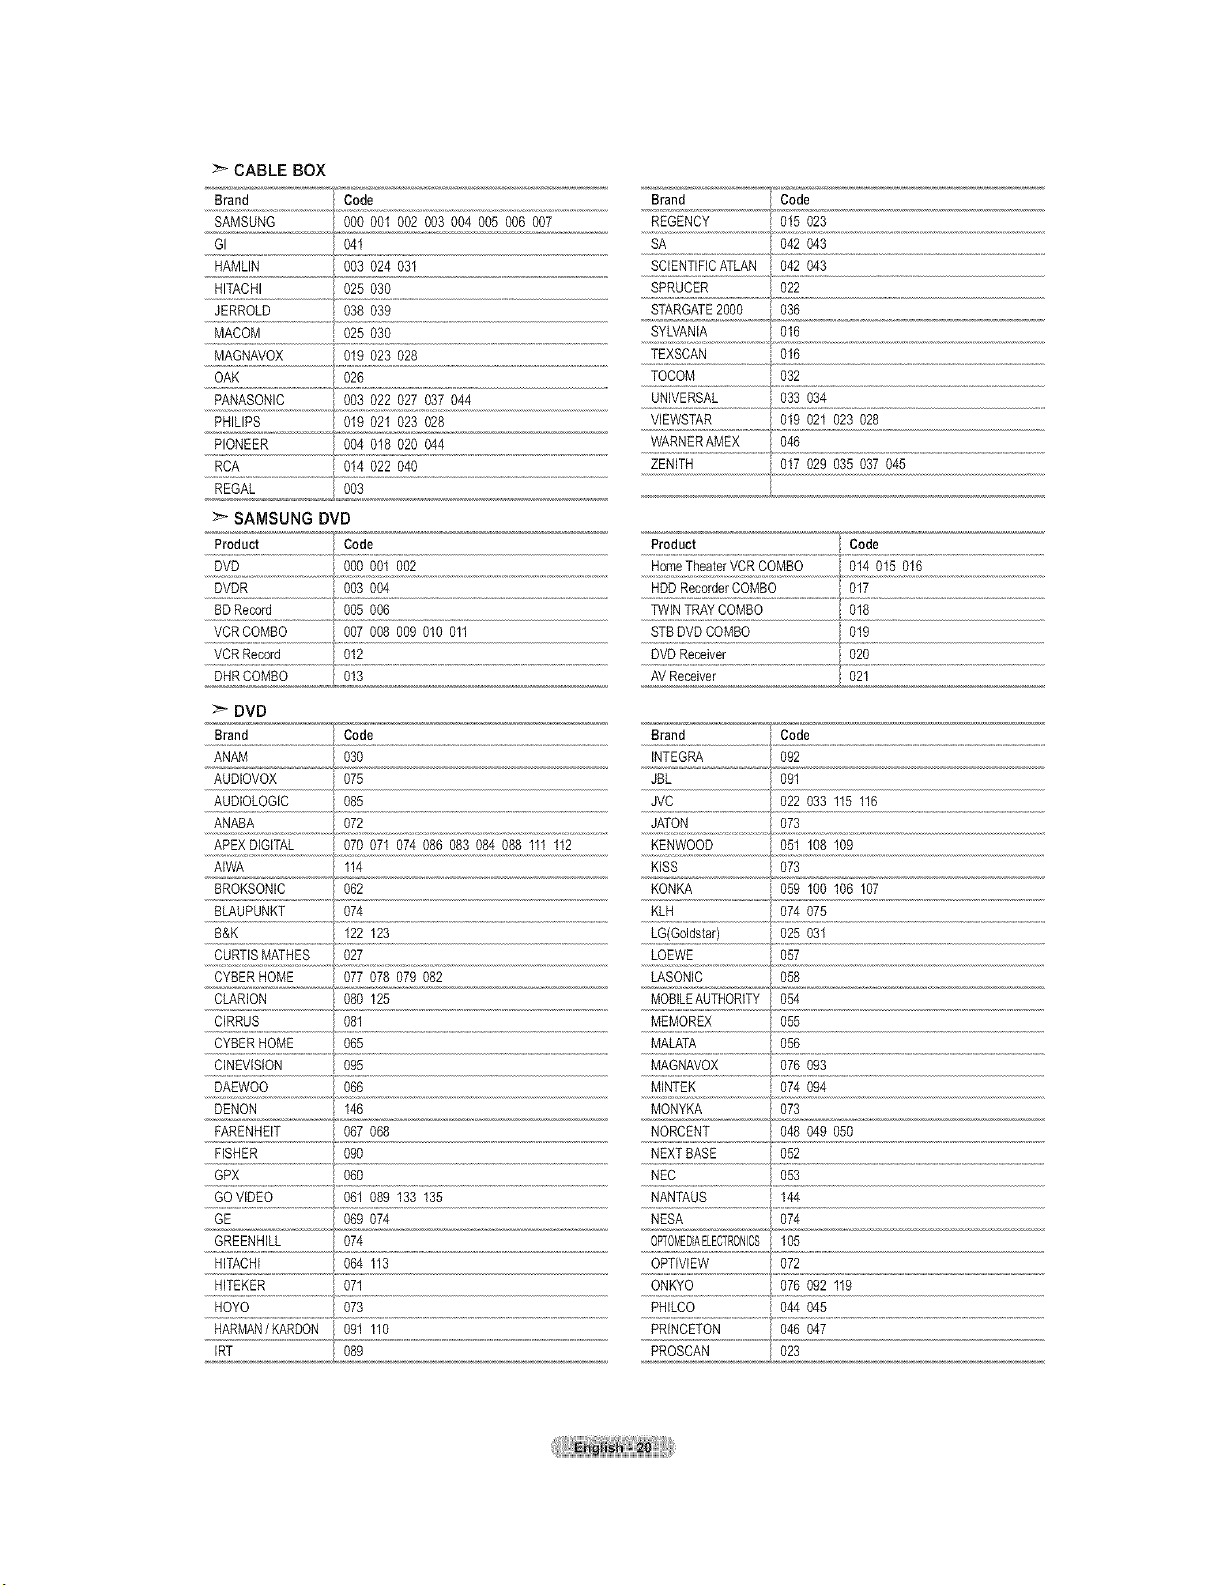
CABLEBOX
Brand Code
SAMSUNG 000 00I 002 003 004 005 006 007
GI 04I
HAMLIN 003 024 03I
HITACHI 025 030
JERROLD 038 039
MACOM 025 030
MAGNAVOX 019 023 028
Brand Code
REGENCY 015 023
SA 042 043
SCIENTIFICATLAN 042 043
SPRUCER 022
STARGATE2000 036
SYLVANIA 016
TEXSCAN 016
OAK 026 TOCOM 032
PANASONIC 003 022 027 037 044 UNIVERSAL 033 034
PHuPS 01902I02s028 ......V[EWSXR....................,01902102s028
PIONEER 004 018 020 044 WARNERAMEX
046
RCA 014 022 040 ZENITH 017 029 035 037 945
REGAL 003
:_ SAMSUNG DVD
Product Code
DVD 000 001 002
DVDR 003 004
BDRecord 005 006
VCRCOMBO 007 008 009 010 011
VCR Record 012
DHRCOMBO 013
Product Code
HomeTheaterVCR COMBO 014 015 016
HDD RecorderCOMBO 017
TWINTRAYCOMBO 018
STB DVD COMBO 019
DVD Receiver 020
AVReceiver 02_
DVD
Brand Code Brand Code
ANAM 030 INTEGRA 092
AUDIOVOX 075 JBL 091
AUDIOLOGIC 085 JVC 022 033 115 116
ANABA 072 JATON 073
APEX DIGITAL 070 07I 074 086 083 084 088 III 112 KENWOOD 051 108 109
AIWA II4 KISS 073
BROKSONIC 062 KONKA 059 100 I06 107
BLAUPUNKT 074 KLH 074 075
.....B_K !_ !2_ _G{e°!d!!a!:!..........................025031
CURTISMATHES 027 LOEWE 057
CYBER HOME 077 078 079 082 LASONIC 058
CLARION 080 I25 MOBILEAUTHORITY 054
CIRRUS 081 MEMOREX 055
CYBER HOME 065 MALATA 056
CINEVISION 095 MAGNAVOX 076 093
DAEWOO 066 MINTEK 074 094
DENON I46 MONYKA 073
FARENHEIT 067 068 NORCENT 048 049 050
FISHER 090 NEXTBASE 052
GPX 060 NEC 053
GOVIDEO 061 089 133 135 NANTAUS 144
GE 069 074 NESA 074
GREENHILL 074 OPTOMEDIAELECTRONCS 105
.............................................................. #
HITACHI 064 II3 OPTIVlEW 072
HITEKER 071 ONKYO 076 092 119
HOYO 073 PHILCO 044 045
HARMAN/KARDON 091 110 PRINCETON 046 047
IRT _ 08 PROSCAN 023
S
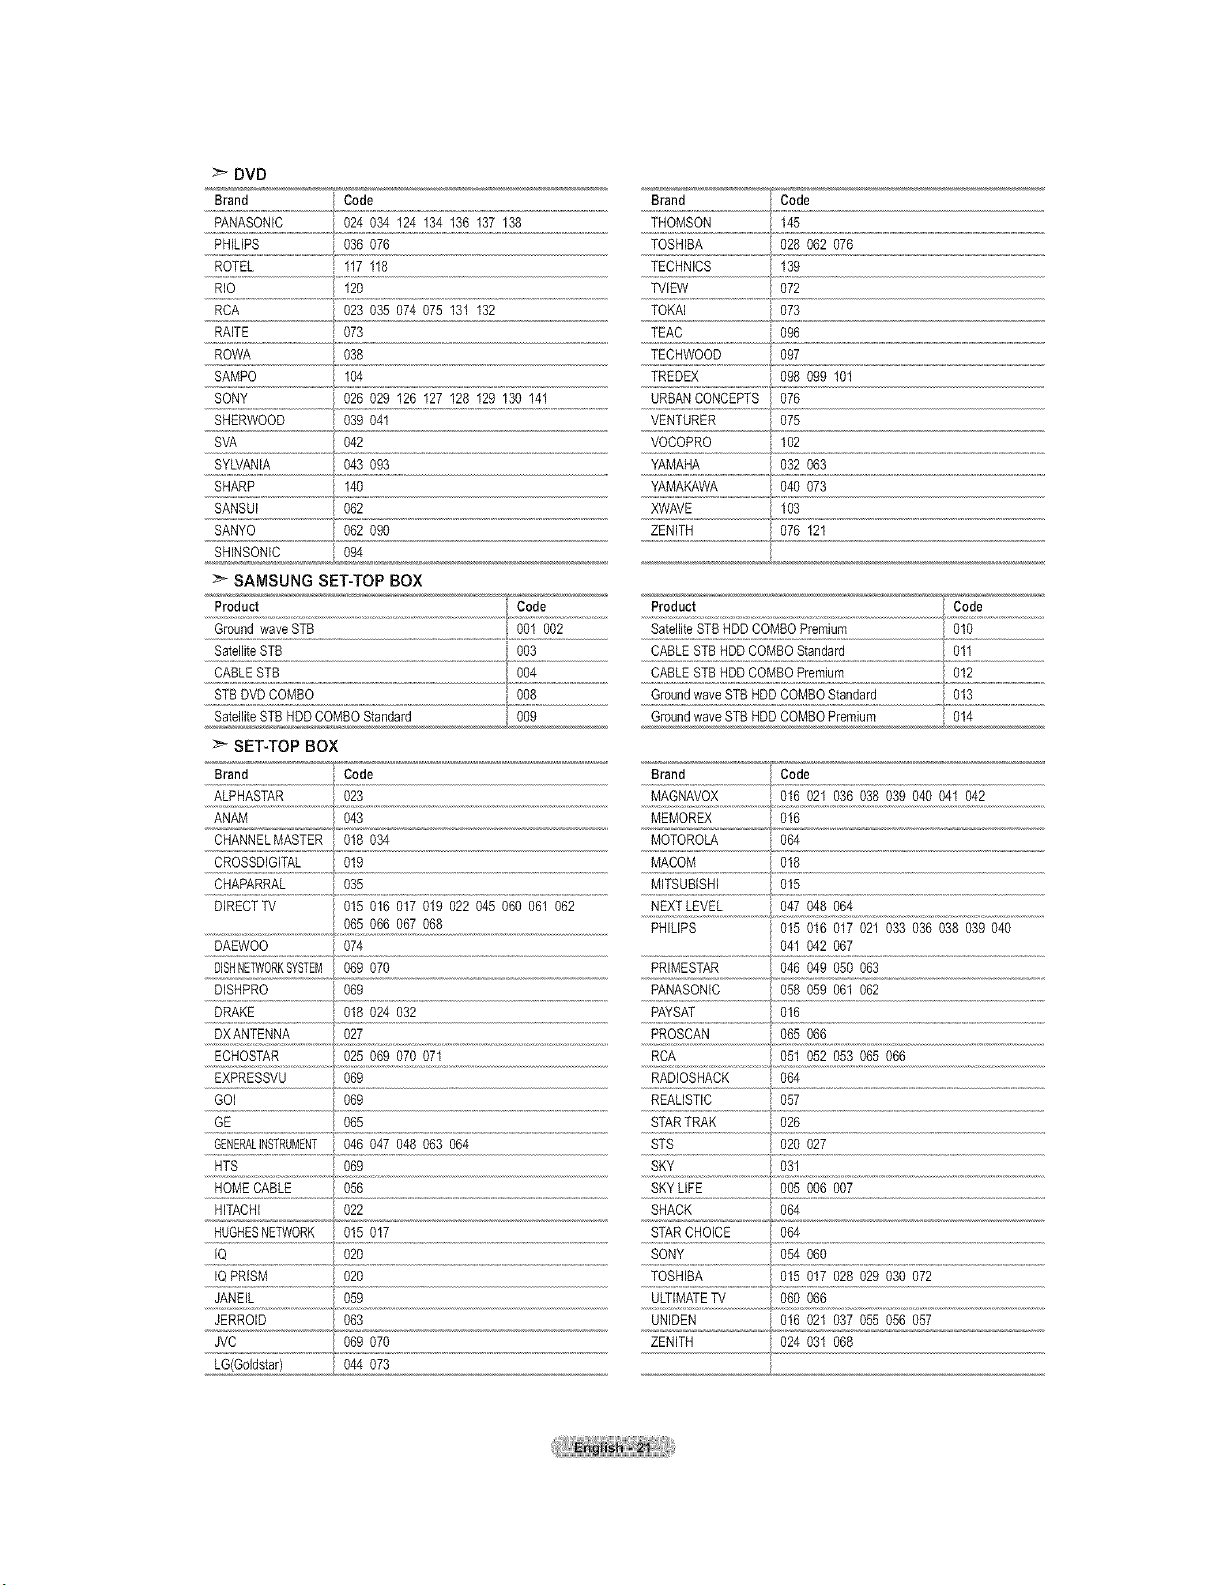
DVD
Brand Code Brand Code
PANASONIC 024 034 124 134 136 137 138 THOMSON 145
PHILIPS 036 076 TOSHIBA 028 062 076
ROTEL 117 118 TECHNICS , 139
RIO 120 TVlEW 072
......................................................................................................................................................RCA 023 035 074 075 131 132 TOKAi 073
RAITE 073 TEAC 096
ROWA 038 TECHWOOD 097
SAMPO 104 TREDEX 098 099 101
SONY 026 029 I26 127 I28 129 130 141 URBANCONCEPTS 076
.............................................................................................................................................................................................................................................................................................},
SHERWOOD 039 041 VENTURER 075
SVA 042 VOCOPRO 102
SYLVANIA 043 093 YAMAHA 032 063
................................................................../..........................................................................................................................
SHARP t40 YAMAKAWA 040 073
SANSUI 062 XWAVE 103
SANYO 062 090 ZENITH 076 121
SHINSONIC 094
> SAMSUNG SET-TOPBOX
Product *:i_Code Product Code
Ground wave STB 001 002 SatelliteSTB HDDCOMBOPremium 010
STB DVD COMBO 008 Groundwave STBHDDCOMBOStandard 013
Satellite STB HDDCOMBO Standard j 009 Ground wave STB HDD COMBO Premium 014
:_ SET-TOP BOX
Brand Code Brand Code
ALPHASTAR 023 MAGNAVOX 016 021 036 038 039 040 041 042
ANAM 043 MEMOREX 016
CHANNELMASTER 018 034 MOTOROLA 064
CROSSDIGITAL 019 MACOM 018
CHAPARRAL 035 MITSUBISHI 015
DIRECTTV 015 016 017 019 022 045 060 06I 062 NEXTLEVEL 047 048 064
065 066 067 068 PHILIPS 015 016 017 021 033 036 038 039 040
DAEWOO 074 041 042 067
DISHNETW0RKSYSTEM069 070 PRIMESTAR 046 049 050 063
DISHPRO 069 PANASONIC 058 059 061 062
DRAKE 018 024 032 PAYSAT 016
DXANTENNA 027 PROSCAN 065 066
ECHOSTAR 025 069 070 071 RCA 05t 052 053 065 066
EXPRESSVU 069 RADIOSHACK 064
GOI 069 ......REAlISTiC...................................@ .........................................................................................
GE 065 STARTRAK 026
GENERALINSTRUMENT046 047 048 063 064 STS 020 027
HTS 06g SKY 031
HOMECABLE 056 SKY LIFE 005 006 007
HITACHI 022 SHACK 064
HUGHESNETWORK 015 017 STAR CHOICE 064
IQ 020 SONY 054 060
IQPRISM 020 TOSHIBA 015 017 028 029 030 072
osg ULTIMATEW 06006B
JERROID....................................063 ,,,,UN[DE,N ,],,11,6,`021,o,,03Z,'0,,55,9,,56,05_
JVC 069 070 ZENITH 024 031 068
LG(Goldstar) 044 073
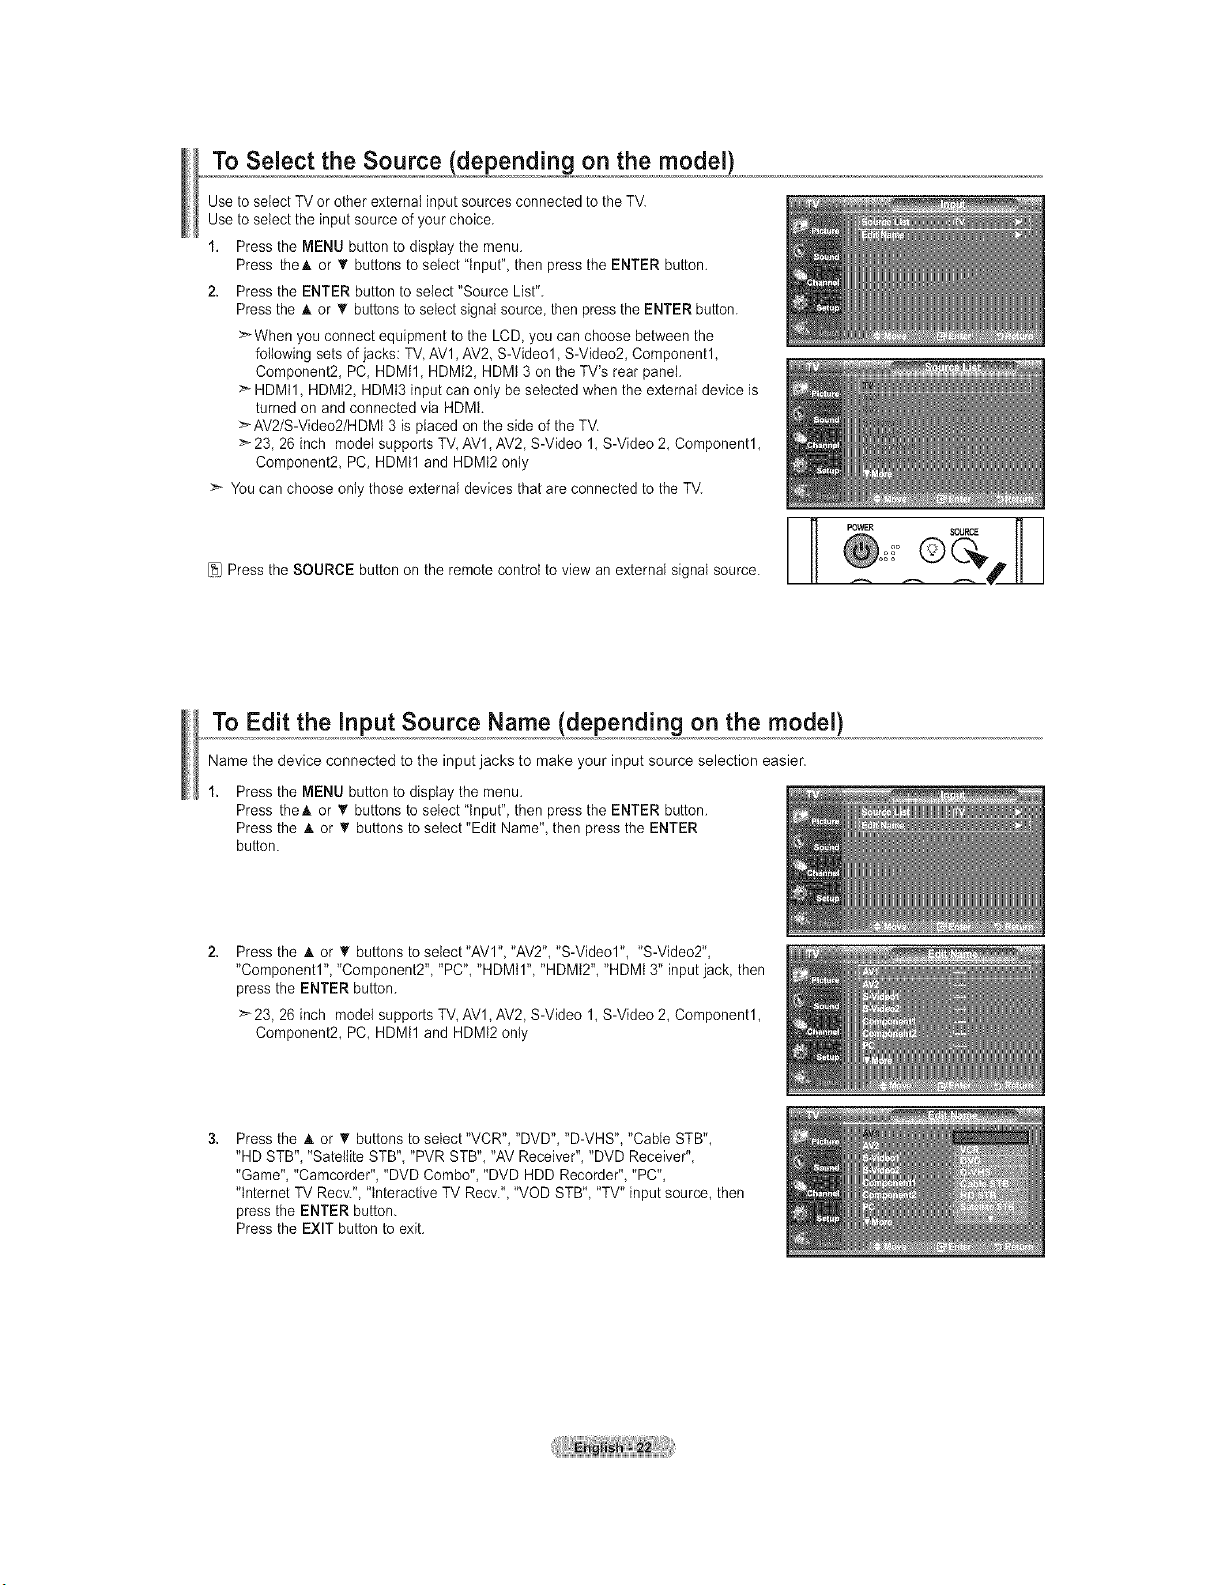
TO Select the Source ,/d nd!onogpn the,m, gde !}
Use to select TVor other external inputsources connected to the TV.
Use to select the input sourceof your choice.
1. Pressthe MENU button to display the menu.
Press theA or _' buttons toselect "input", then press the ENTER button.
2. Press the ENTER button to select "Source List".
Press the A or T buttons to select signalsource,then pressthe ENTER button.
>When you connect equipment to the LCD,you can choose between the
following sets ofjacks: TV AV1,AV2, S-Video1, S-Video2, Component1,
Component2, PC, HDMI1, HDMI2, HDMt 3on the TV's rear panel.
> HDMtl, HDMI2, HDMI3 inputcan only be selected when the externaldevice is
turned on and connected via HDMI.
>AV2/S-Video2/HDMt 3isplaced on the side of the TV.
:_23, 26 inch model supports TV, AV1,AV2, S-Video 1, S-Video2, Component1,
Component2 PC, HDMtl and HDMt2 only
> You can choose only those external devicesthat are connected to the TV.
[_1 Press the SOURCE button on the remote control to view an external signal source.
To Edit the input Source Name (depending on the model)
Name the device connected to the input jacks to make your input source selection easier.
Pressthe MENU button todisplay the menu.
Press theA or V buttons to select "input", then press the ENTER button.
Pressthe A or _r buttons tosetect "Edit Name", then press the ENTER
button.
Pressthe A or _r buttons toselect "AVI", "AV2","S-Video1", "S-Video2",
"Component1", "Component2", "PC", "HDMil", "HDMi2", "HDMi 3" inputjack, then
pressthe ENTER button.
>23, 26 inch model supports TV, AV1,AV2, S-Video 1, S-Video2, Component1,
Component2, PC, HDMtl and HDMt2 only
Pressthe A or _' buttonsto select "VCR", "DVD", "D-VHS", "Cable STB",
"HD STB","Satellite STB", "PVRSTB", "AV Receiver", "DVD Receiver",
"Game","Camcorder", "DVD Combo", "DVD HDDRecorder", "PC",
"tnternet TVRecv.", "interactive TV Recv.","VOD STB", "TV" input source, then
pressthe ENTER button.
Pressthe EXIT button to exit.
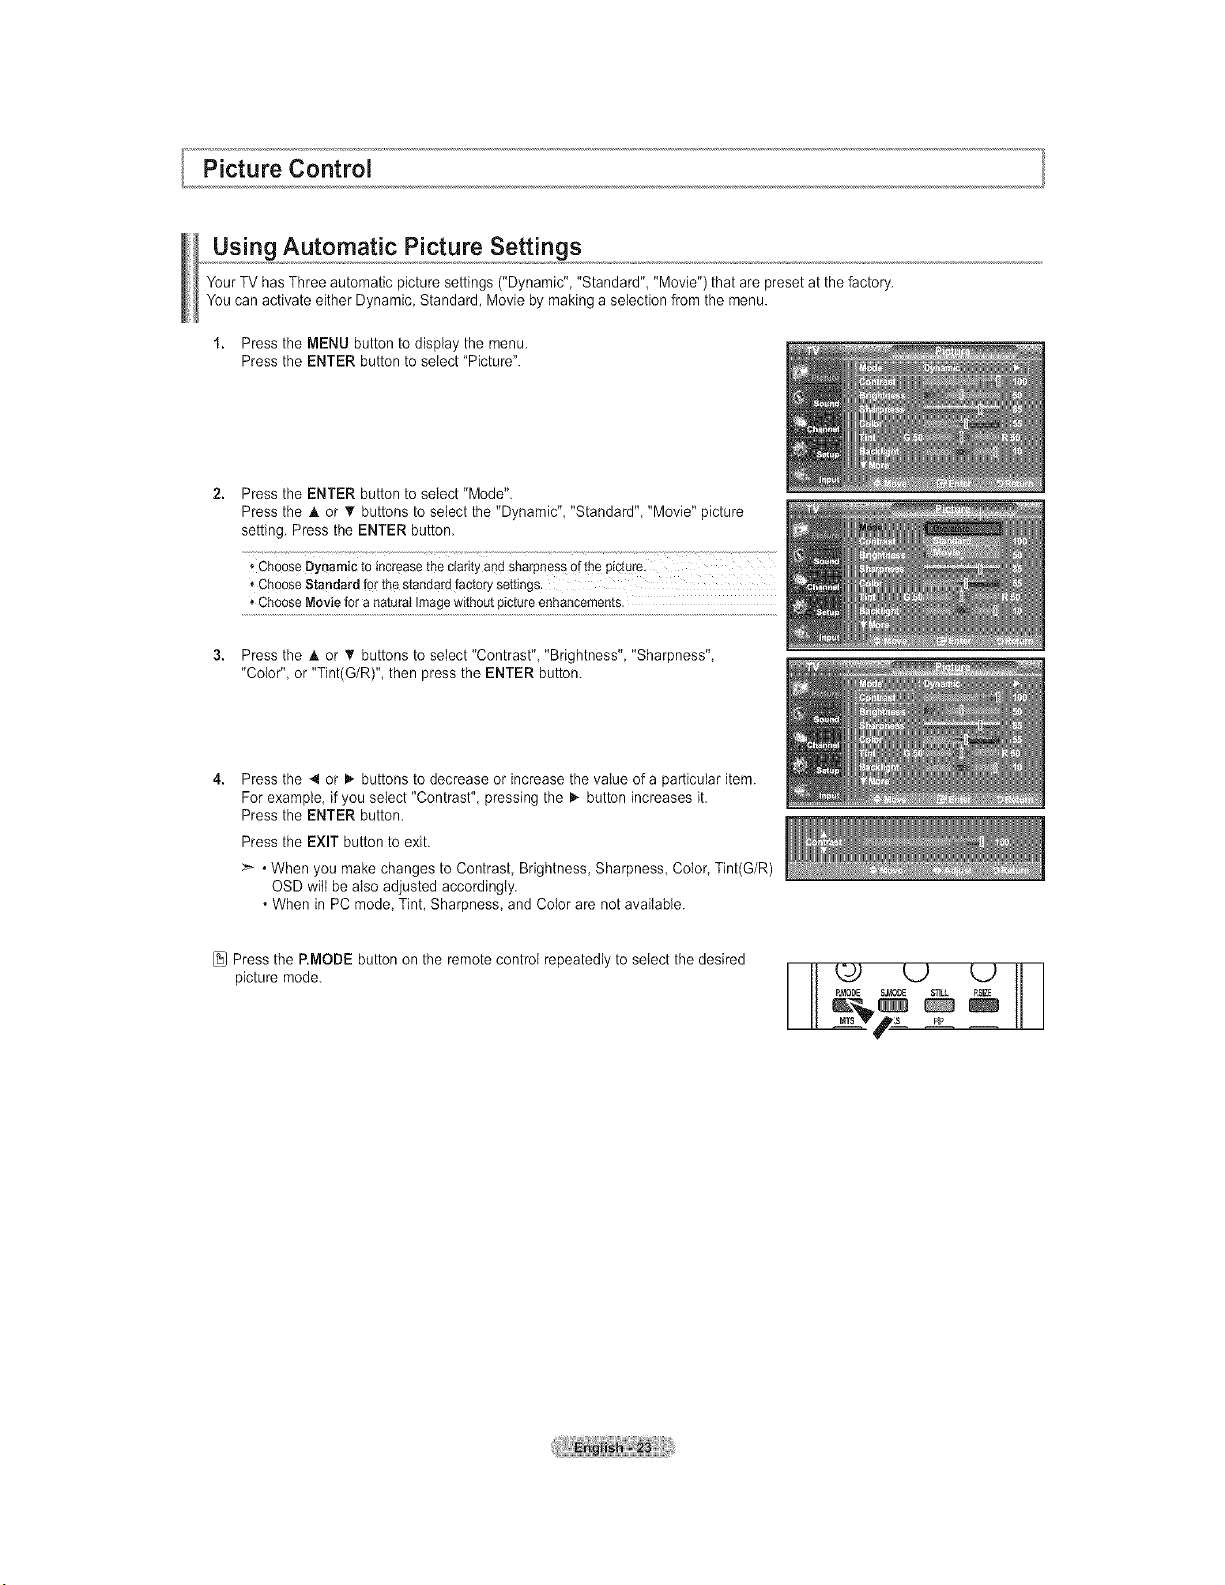
Picture Control
Using Automatic Picture Settings
Your TV hasThree automatic picture settings ("Dynamic", "Standard", "Movie") that are presetatthe factory.
You can activateeither Dynamic, Standard, Movie by making aselection fromthe menu.
1. Press the MENU button todisplay the menu.
Press the ENTER button to select "Picture".
Press the ENTER button to select "Mode".
Press the A or T buttons toselect the "Dynamic" "Standard" "Movie" picture
setting. Press the ENTER button.
* ChooseDynamicto increasethe Clarityand sharpnessof the picture.
,'ChooseStandardforthe standardfactorysettings.
* ChooseMoviefora naturatImagewithoutpictureenhancements.
Press the A or V'buttons to select "Contrast", "Brightness", "Sharpness",
"Color", or"Tint(G/R)", then press the ENTER button.
Press the 4 or I,.buttons to decrease or increase the value of aparticular item.
For example, if you select "Contrast", pressing the 1_-button increases it.
Press the ENTER button.
Press the EXIT button to exit.
>_ • When you make changes to Contrast, Brightness, Sharpness Color, Tint(G/R)
OSD will be also adjusted accordingly.
• When in PC mode, Tint, Sharpness, and Color are not available.
[_1Pressthe RMODE button onthe remote control repeatedly toselect the desired
picture mode.
L2 L2
M._LT_T_,sL i_
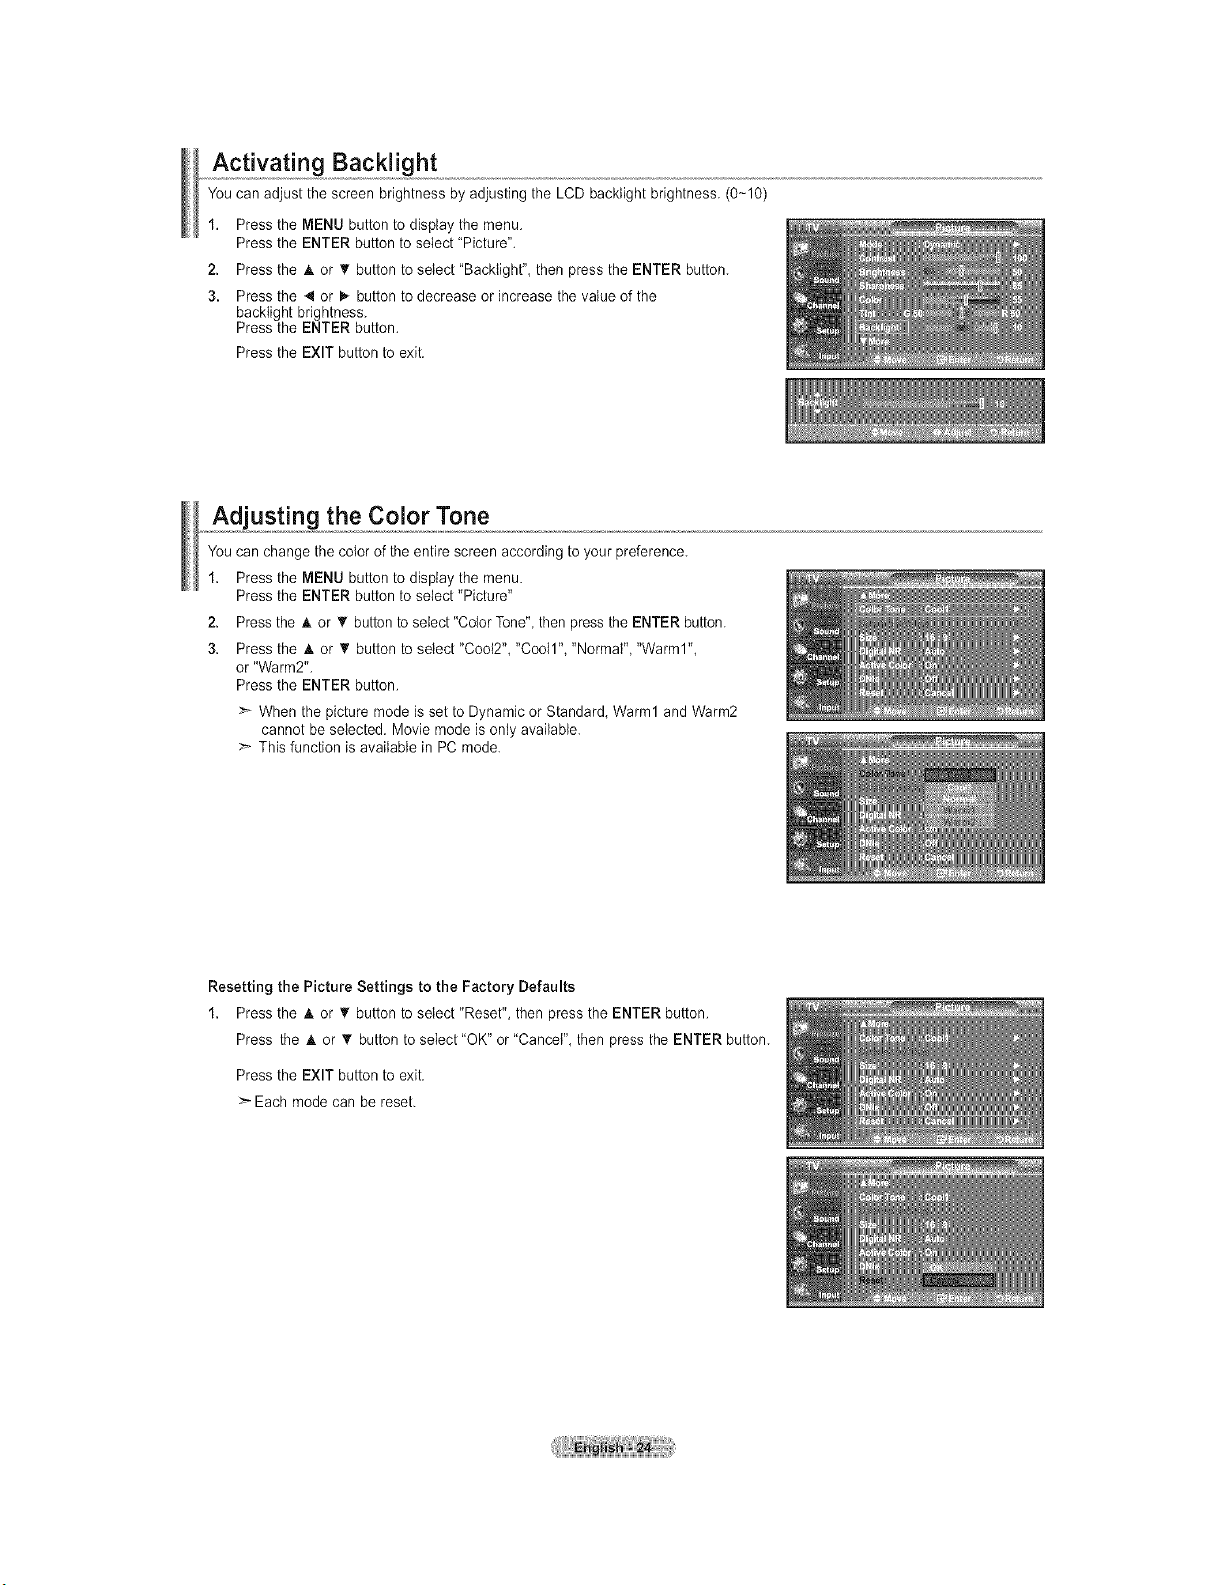
Activating Backlight
You canadjust the screen brightness by adjusting the LCDbacktight brightness. (0-10)
1. Pressthe MENU button to display the menu.
Pressthe ENTER button toselect "Picture".
2. Press the _k or T button toselect "Backlight", then pressthe ENTER button.
3. Press the 4 or I_ button to decrease or increase the value of the
backtightbrightness.
Pressthe ENTER button.
Pressthe EXIT button to exit.
Adjusting the Color Tone
You canchange the colorofthe entire screen according to your preference.
1. Pressthe MENU button to display the menu.
Pressthe ENTER button toselect "Picture"
2. Press the h.or T button to select"Color Tone", then presstheENTER button.
3. Press the A or _r button toselect "Coo12","Coo11","Normal", "Warm1",
or"Warm2".
Pressthe ENTER button.
>* When the picturemode isset toDynamic or Standard, Warm1 and Warm2
cannot be selected. Movie mode isonly available.
>- This function is available in PC mode.
Resetting the Picture Settings to the Factory Defaults
1. Pressthe A or _' button to select "Reset", then pressthe ENTER button.
Press the & or _' button to select "OK" or"Cancel", then press the ENTER button.
Pressthe EXIT button to exit.
>- Each mode can be reset.
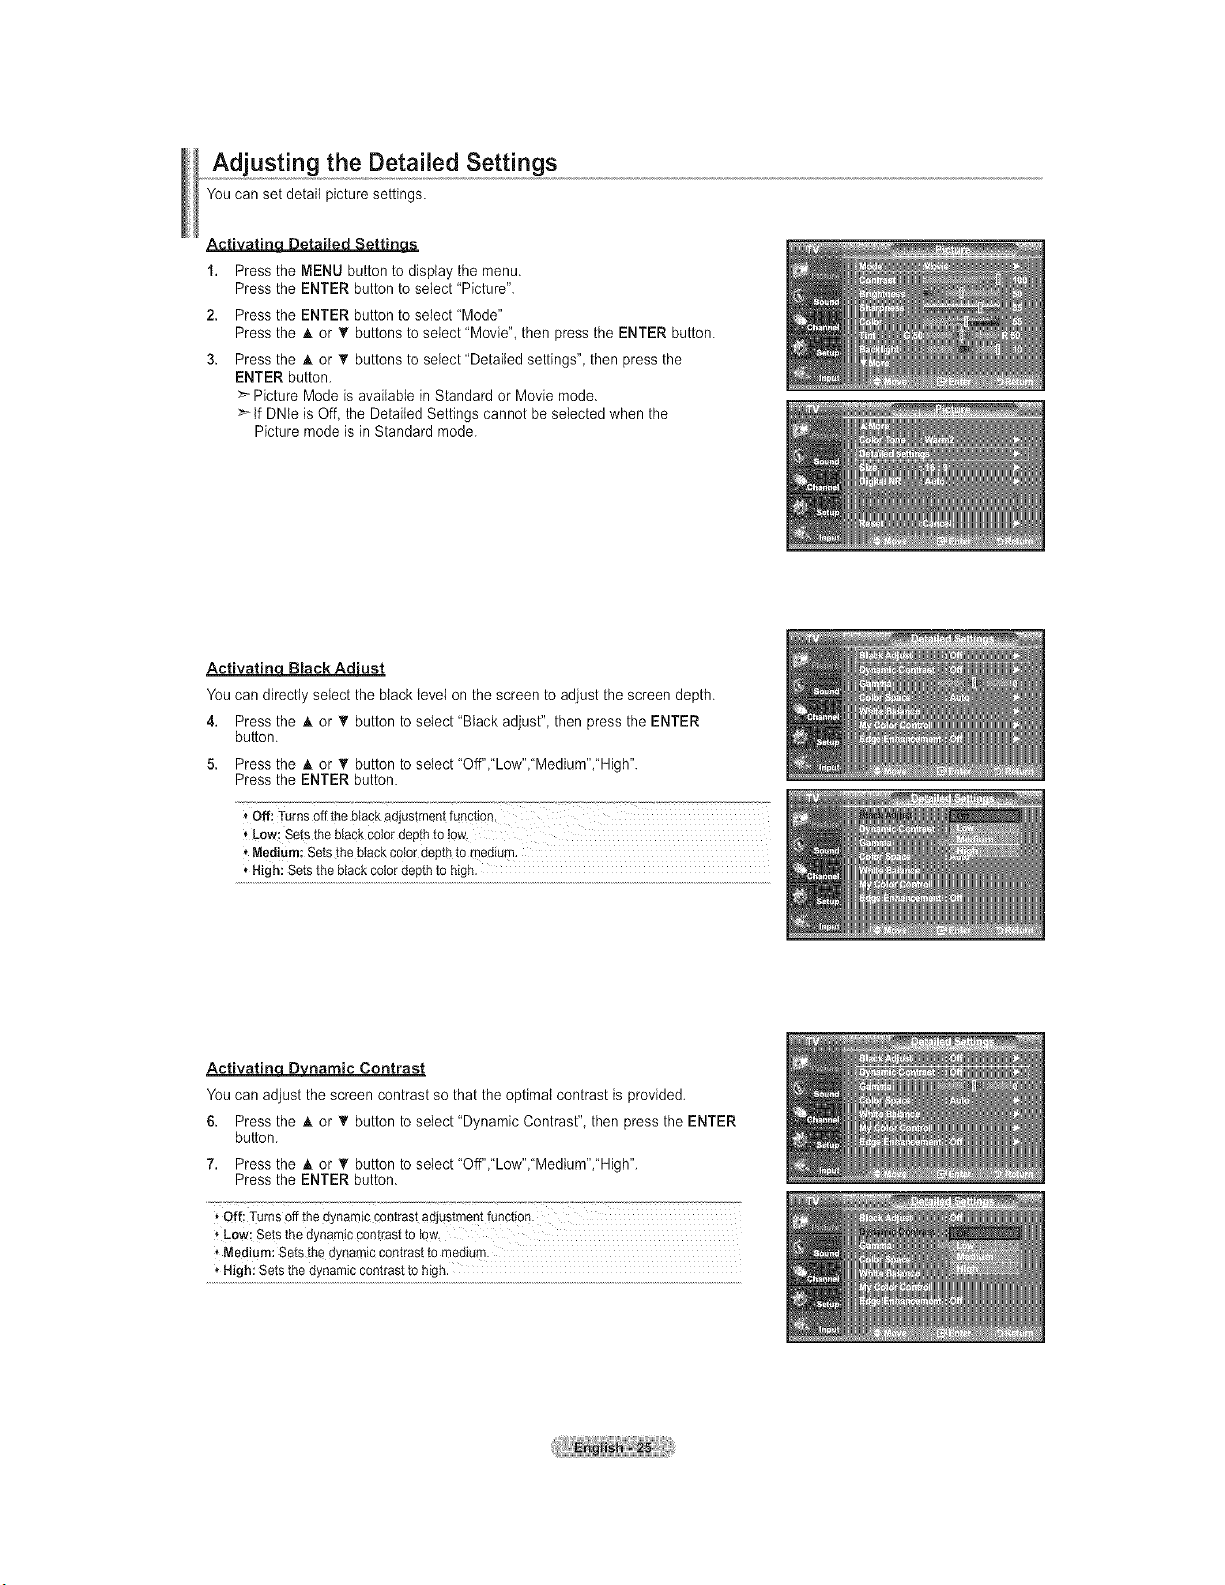
Adjusting the Detailed Settings
You can set detail picturesettings.
• " t" t'_
1. Pressthe MENU button to display the menu.
Pressthe ENTER button toselect "Picture".
2. Pressthe ENTER button toselect "Mode"
Pressthe A or _' buttons to select 'Movie", then pressthe ENTER button.
3. Pressthe A or • buttons to select 'Detailed settings", then pressthe
ENTER button.
_'- Picture Mode is available in Standard or Movie mode.
_tf DNteisOff, the Detailed Settings cannot be selected when the
Picture mode isin Standard mode.
Activatin Black Ad'ust
You can directly select the black level onthe screen to adjust thescreen depth.
4. Pressthe A or T button to select 'Black adjust", then press the ENTER
button.
5. Pressthe A or T button to select"Off","Low","Medium","High".
Pressthe ENTER button.
"Off: Turnsoff tile blackadjustmentfunction, .............................
* Medium:Setsthe btackcotordepthtomedium.
* High:Setsthe blackcotordepthtohigh.
ActivatinqD3LDnarnic Contrast
You can adjust the screencontrast so that the optimal contrast isprovided.
6. Pressthe A or T button to select "Dynamic Contrast", then press the ENTER
button.
7. Pressthe _. or _' button toselect "Off","Low","Medium","High".
Pressthe ENTER button.
Off;TurnsOffthe dynamiccontrastadjustmentfunction.
* Low:Setsthedynamiccont[asttotow.
Medium:Setsthe dynamiccontrastto medium.
* High:Setsthe dynamiccontrastto high.
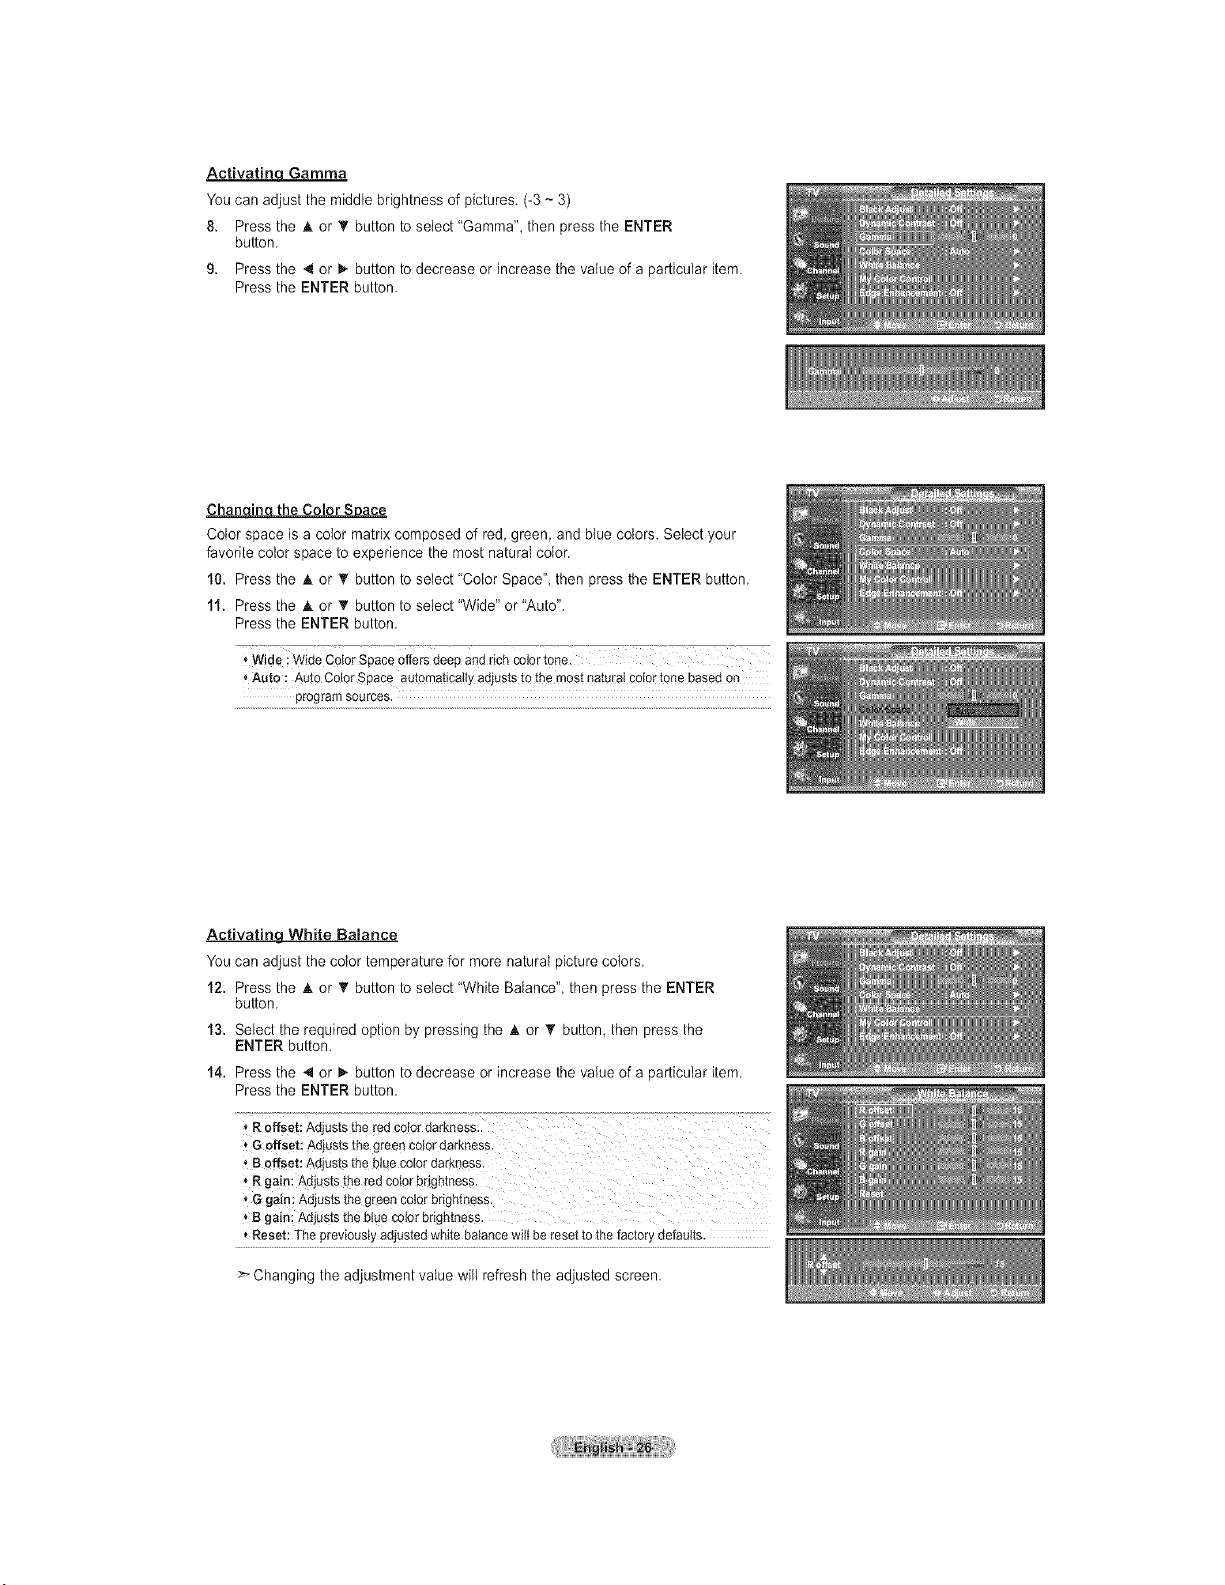
Activatinq Gamma
You can adjust the middle brightness of pictures. (-3 ~3)
8. Pressthe h. or T button toselect "Gamma", then press the ENTER
button.
9. Pressthe 4 or _ button todecrease or increase the value of a particular item.
Pressthe ENTER button.
Chan_ the Color S_ace
Color space isacolor matrix composed of red,green, and btue colors. Select your
favorite colorspace toexperience the most natural color.
10. Pressthe _kor _' button toselect "Color Space" then pressthe ENTER button.
11. Pressthe _kor _' button toselect "Wide" or"Auto".
Pressthe ENTER button.
sAute: Aut0CotorSpace autQmaticatlyadjuststo themostnaturalco!Qrtonebasedon
programsources.
Activating White Balance
You can adjust the colortemperature for more naturaI picturecolors.
12. Pressthe h.or _' button toselect "White Balance", then press the ENTER
button.
13. Select the required option by pressing the h. or • button, then press the
ENTER button.
14. Pressthe 4 or _,.button todecrease or increase the value of a particular item.
Pressthe ENTER button.
, Roffset: Adjuststhe redcolordarkness..
I Goffset:Adjuststhe greenceiordarkness.
'_B offset:Adjuststhe bluecolordarkness.
• R gain."Adjuststhe redcolorbrightness.
'_Ggain_Adjuststhe greencoterbrightness.
• B gain; Adjuststhe btuecolorbrightness.
• Reset:]-hepreviouslyadjustedwhitebalancewilt be resetto the factorydefaults.
Changing the adjustment value wilt refresh the adjusted screen.
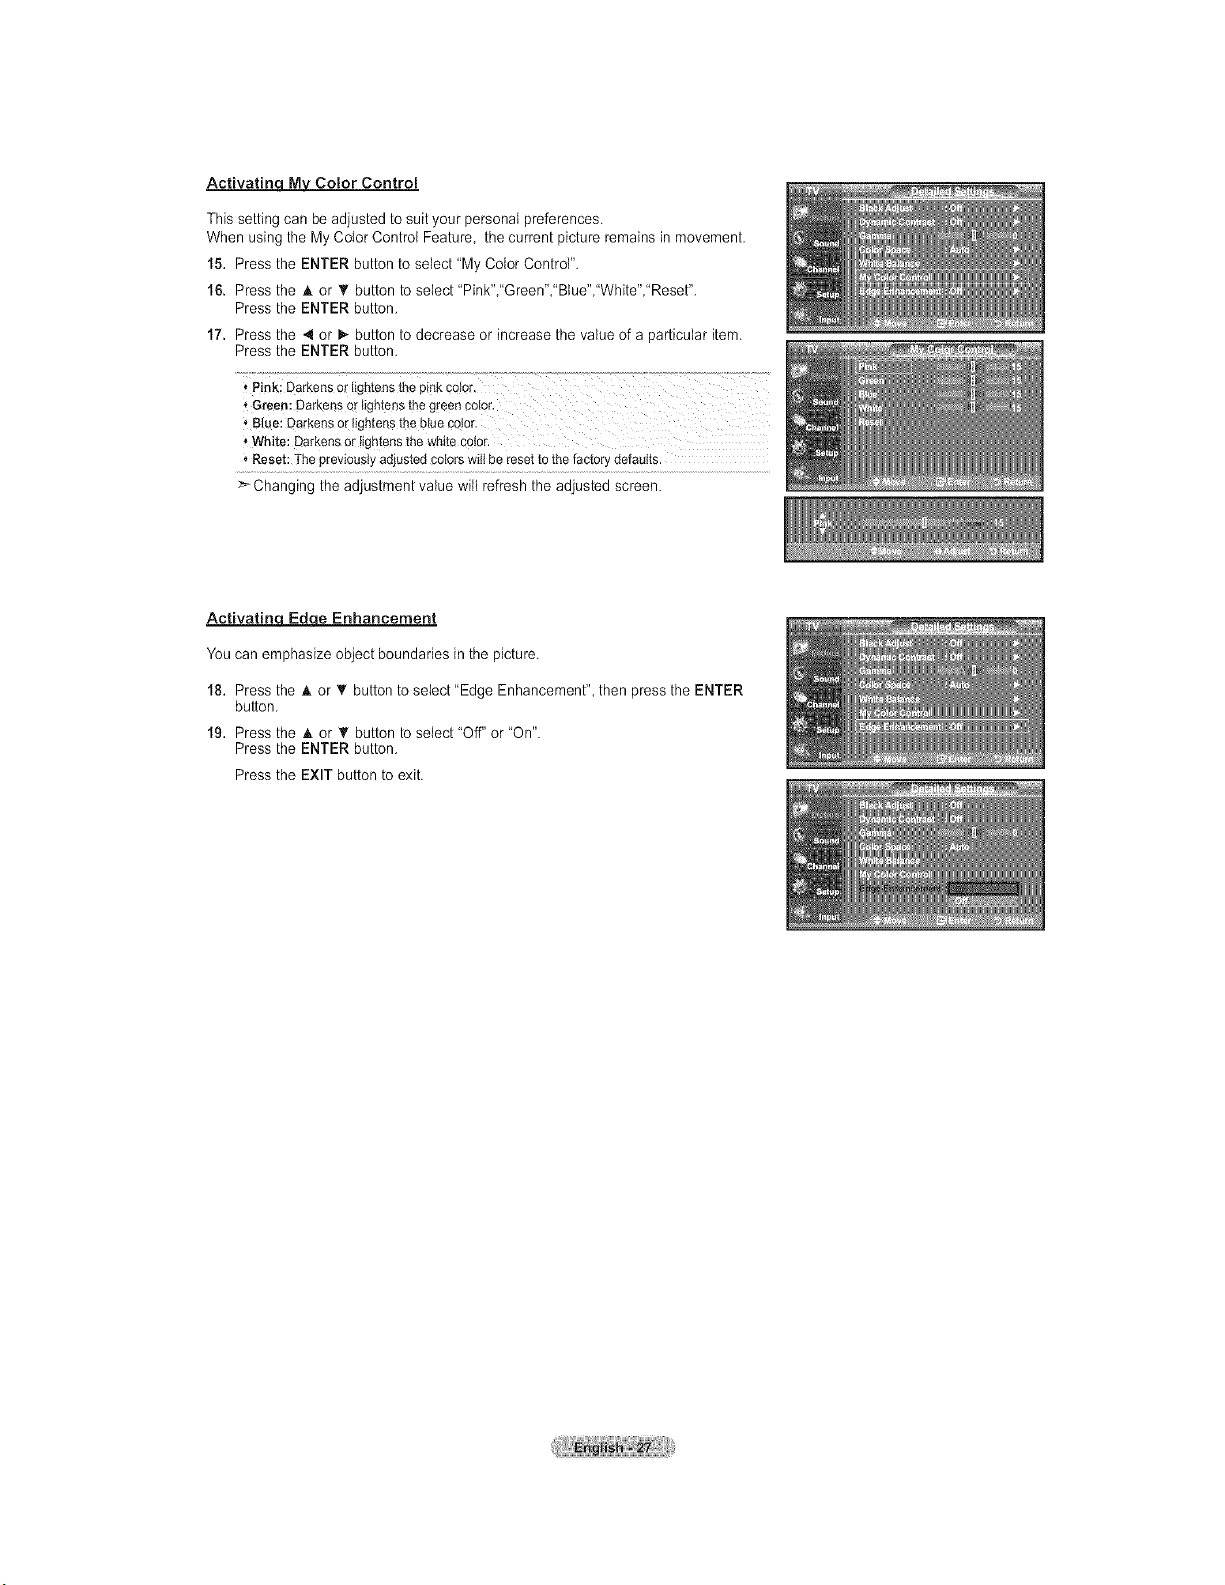
Activatinc_MyM Color Control
Thissetting can be adjusted to suit your personal preferences.
When using the MyColor Control Feature, the current picture remains inmovement.
15. Pressthe ENTER button to select "My Color Control".
16. Pressthe A or T button to select 'Pink","Green',"Btue","White","Reset".
Pressthe ENTER button.
17. Pressthe 4 or _-button todecrease or increase the valueof a particular item.
Pressthe ENTER button.
i Pi,lk;Darkensortightensthepinkcelor,
* Green:DarkensOrlightensthe g[eenc0ior.
'_Bl_e:Darkenso_"!ightsn$theblueco!or.
_,White: Darkensortighter_sthe whitecolor.
"_Reset:Thepreviouslyadjustedcotorswitibe resetto thefactorydefaults.
>-Changing the adjustment value wilt refresh the adjusted screen.
Activatin_ Enhancement
You can emphasize object boundaries in the picture.
18. Pressthe A or T button to select "Edge Enhancement", then pressthe ENTER
button.
19. Pressthe A or T button to select 'Off" or "On".
Pressthe ENTER button.
Pressthe EXIT button to exit.
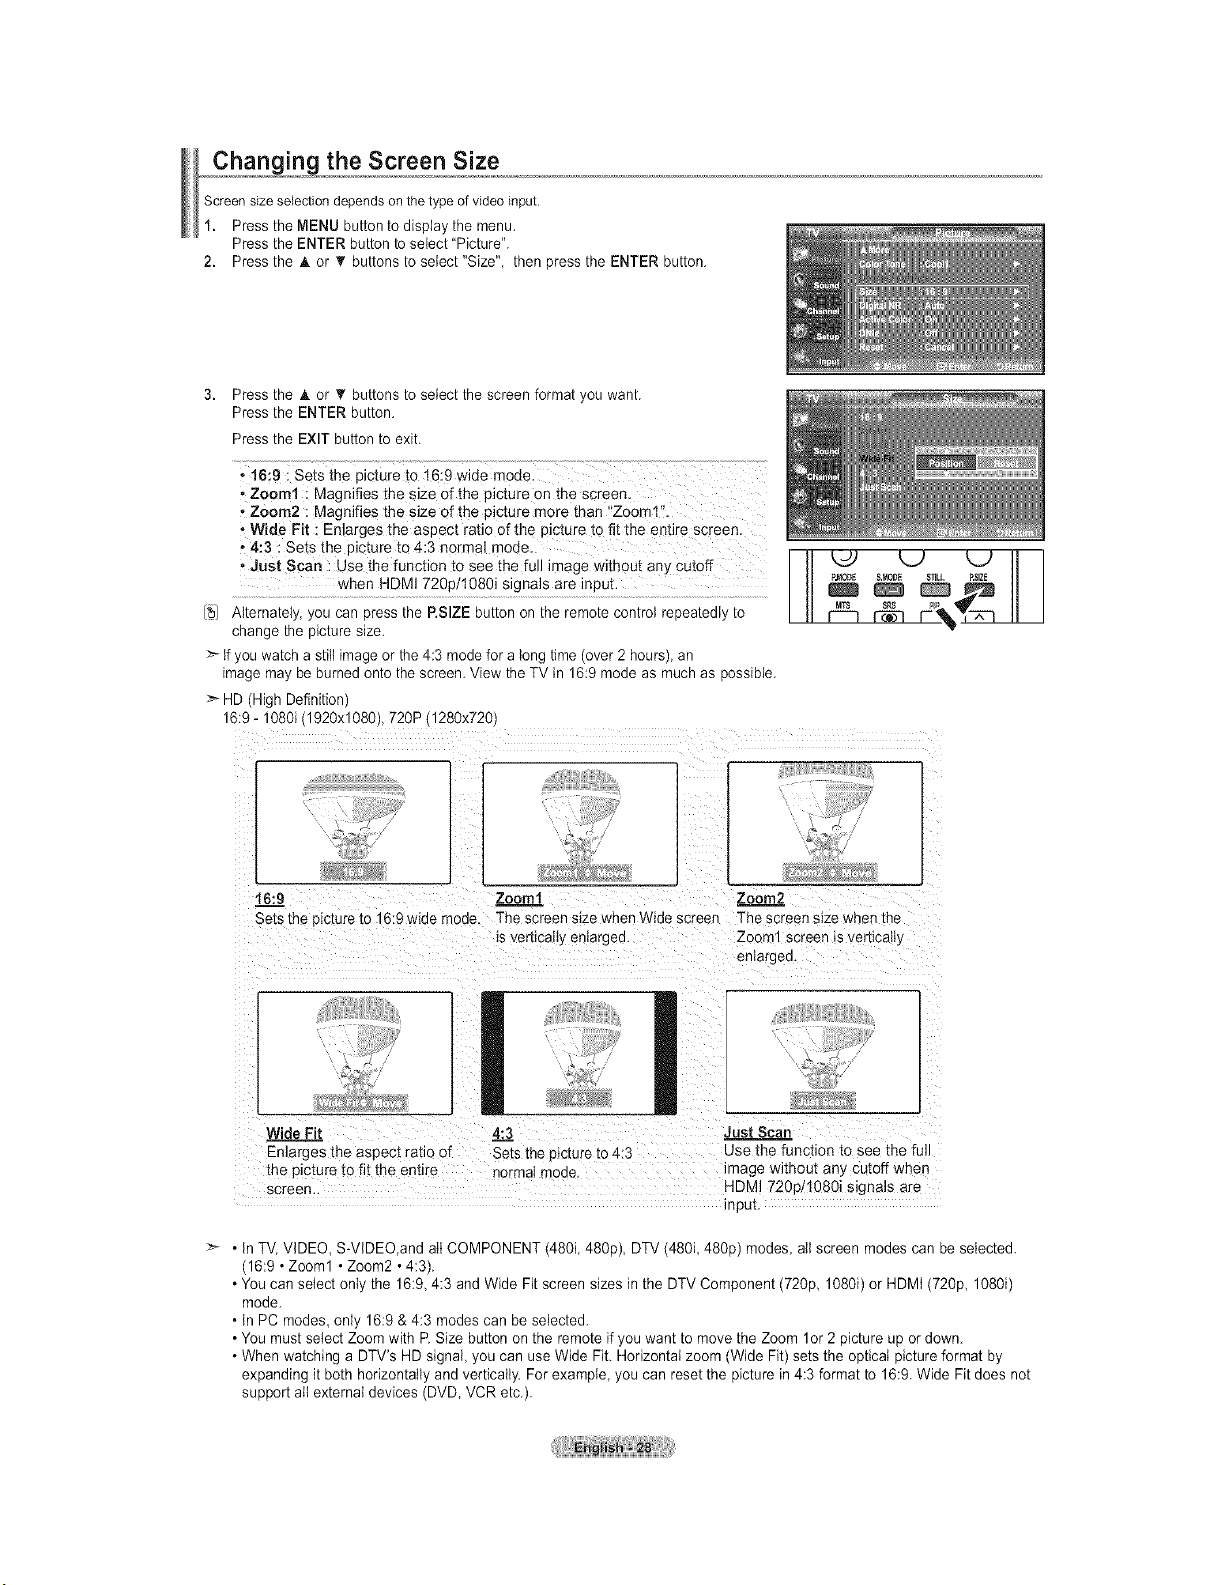
,,, chaon ingthe Screen Size
Screensize selectiondepends on thetypeofvideo input.
1. Pressthe MENU button to display the menu.
Pressthe ENTER button toselect "Picture".
2. Press the A or _r buttonsto setect "Size", then pressthe ENTER button.
3. Press the _k or _' buttonsto select the screenformat you want.
Pressthe ENTER button.
Pressthe EXIT button to exit.
.16:9 i sets the picture to t6:9 wide mode.
,Zoom1 ! Magnifies the Size 0f the picture on the Screen.
oZ0om2 :Magnifies the size of the picture more than '_Zooml'L
o Wide Fit _Enlarges the aspect ratio efth € picture tofit the entire screen.
• 4:3 : Sets the picture to 4-:3normal mode.
o ,,lust Scan :Use the function to Seethe full image without any Cutoff
[_/ Alternately, you can press the P.SIZEbutton on the remotecontrol repeatedly to
changethe picturesize.
>" tf youwatch astillimageor the 4:3 mode for along time(over2 hours), an
imagemay be burnedonto thescreen. View the TV in 16:9 mode as muchas possible.
> HD (High Definition)
16:9 - 1080i(1920xl 080),720P(1280x720)
16:9 Zoomt Zoom2.2
Setsthe pictureto 16:9 wide -'lode. The screensize when Wide screen Thescreen size when the
isverbcaHy en_argea. Zoom1 screen _sver_icalty
anlargea.
Wide Fit 4:3 Just Scan
Enlarges _ne aspect ratio of Setsthe pictureto 4:3 Use the function to see the full
the picture to fit the entire norma;mode. image without any cutoff when
screen HDMI 720p/1080i signals are
input.
• In TV, VIDEO, S-VIDEO,and att COMPONENT (480i 480p), DTV (480i 480p) modes allscreen modes can be selected.
(16:9• Zoom1 •Zoom2 • 4:3).
• You canselect only the 16:9, 4:3 and Wide Fit screensizes in the DTV Component (720p, 1080i) or HDMI (720p, 1080i)
mode.
• In PC modes, only 16:9 & 4:3 modescan beselected.
• You mustselect Zoom with R Size button on the remote if you want to move the Zoom 1or2 picture up or down.
• When watching a DTV's HD signal,you can use Wide Fit. Horizontal zoom (Wide Fit) setsthe optical picture format by
expanding it both horizontally and vertically. For example you can reset the picture in 4:3 format to 16:9. Wide Fit does not
support atl external devices (DVD,VCR etc.).
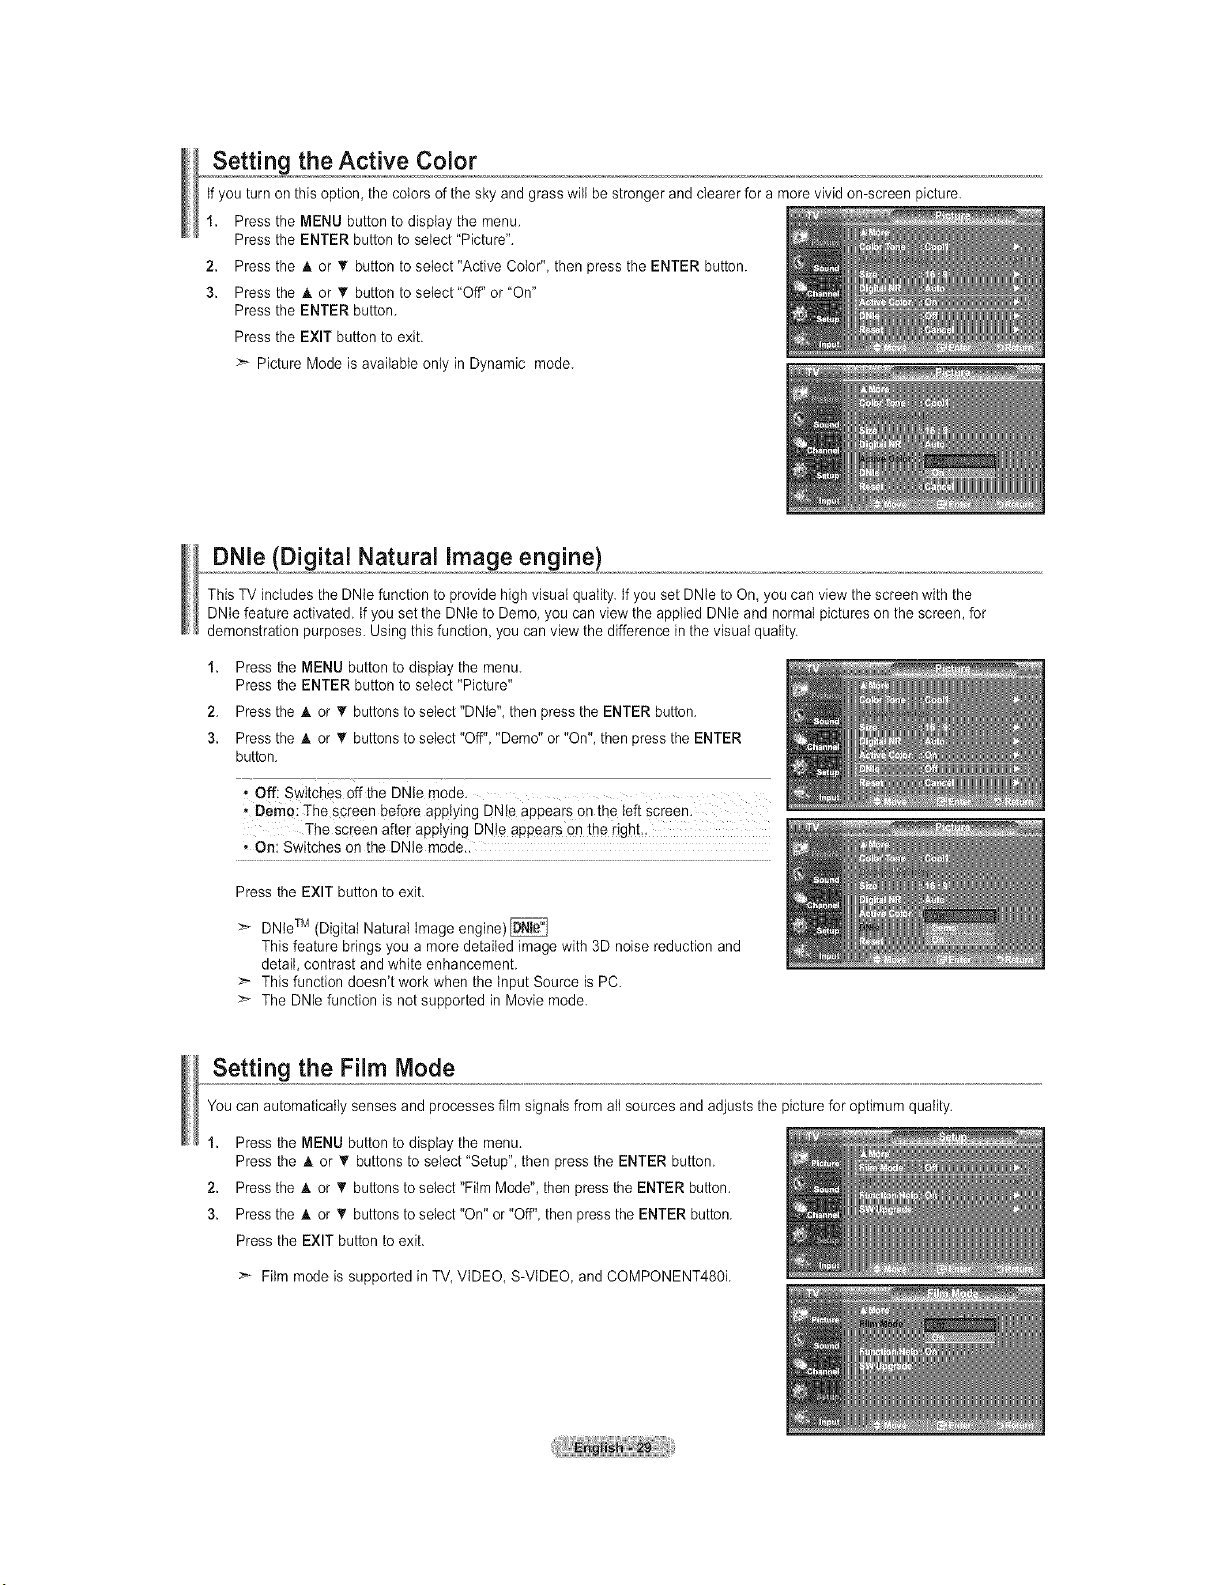
Setting the Active Color
tfyouturn on thisoption, the colors of the sky and grasswilt be stronger and clearer for a morevivid on-screen picture.
1. Pressthe MENU button to display the menu.
Pressthe ENTER button to select "Picture".
2. Pressthe A or _' button to select"Active Color", then press the ENTER button.
3. Pressthe A or T button to setect"Off" or"On"
Pressthe ENTER button.
Pressthe EXIT button to exit.
Picture Mode isavailable only in Dynamic mode.
DNle (Digital Natural Image engine)
This TVincludes the DNIe function toprovide highvisual quality Ifyou setDNte to On,you canview the screenwith the
DNIefeature activated. Ifyou setthe DNIe toDemo, youcan viewthe applied DNIeand normal pictures onthe screen, for
demonstration purposes. Usingthisfunction you can viewthe difference in the visual quality.
1.
2.
3.
Pressthe MENU button todisplay the menu.
Pressthe ENTER button toselect "Picture"
Press the A or _' buttons to select"DNIe",then pressthe ENTER button.
Press the A or _' buttons to select"Off" "Demo" or"On", then pressthe ENTER
button.
• Off: Switches offthe DNle mode.
• Demo: The screen before applying DNle appears onthe Ieft screen.
The screen after applying DNte appears onthe right..
• On: Switches on the DNle mode..
Pressthe EXIT buttonto exit.
:-'> DNteTM (Digital Natural tmage engine)
This feature bringsyou a moredetailed imagewith 3D noise reduction and
detail, contrast and white enhancement.
This function doesn't work when the Input Source isPC.
The DNie function isnot supported in Movie mode.
Setting the Film Mode
You canautomatically senses and processesfilm signals from allsources and adjusts the picturefor optimum quality.
1. Press the MENU button to display the menu.
Pressthe h. or _' buttonsto select "Setup", then pressthe ENTER button.
2. Press the _t.or _' buttonsto select "Film Mode",then pressthe ENTER button.
3. Press the A or _rbuttonstoselect"On" or"Off", then pressthe ENTER button.
Pressthe EXIT button to exit.
:_ Filmmode issupported in TV, VIDEO, S-VtDEO, and COMPONENT480L
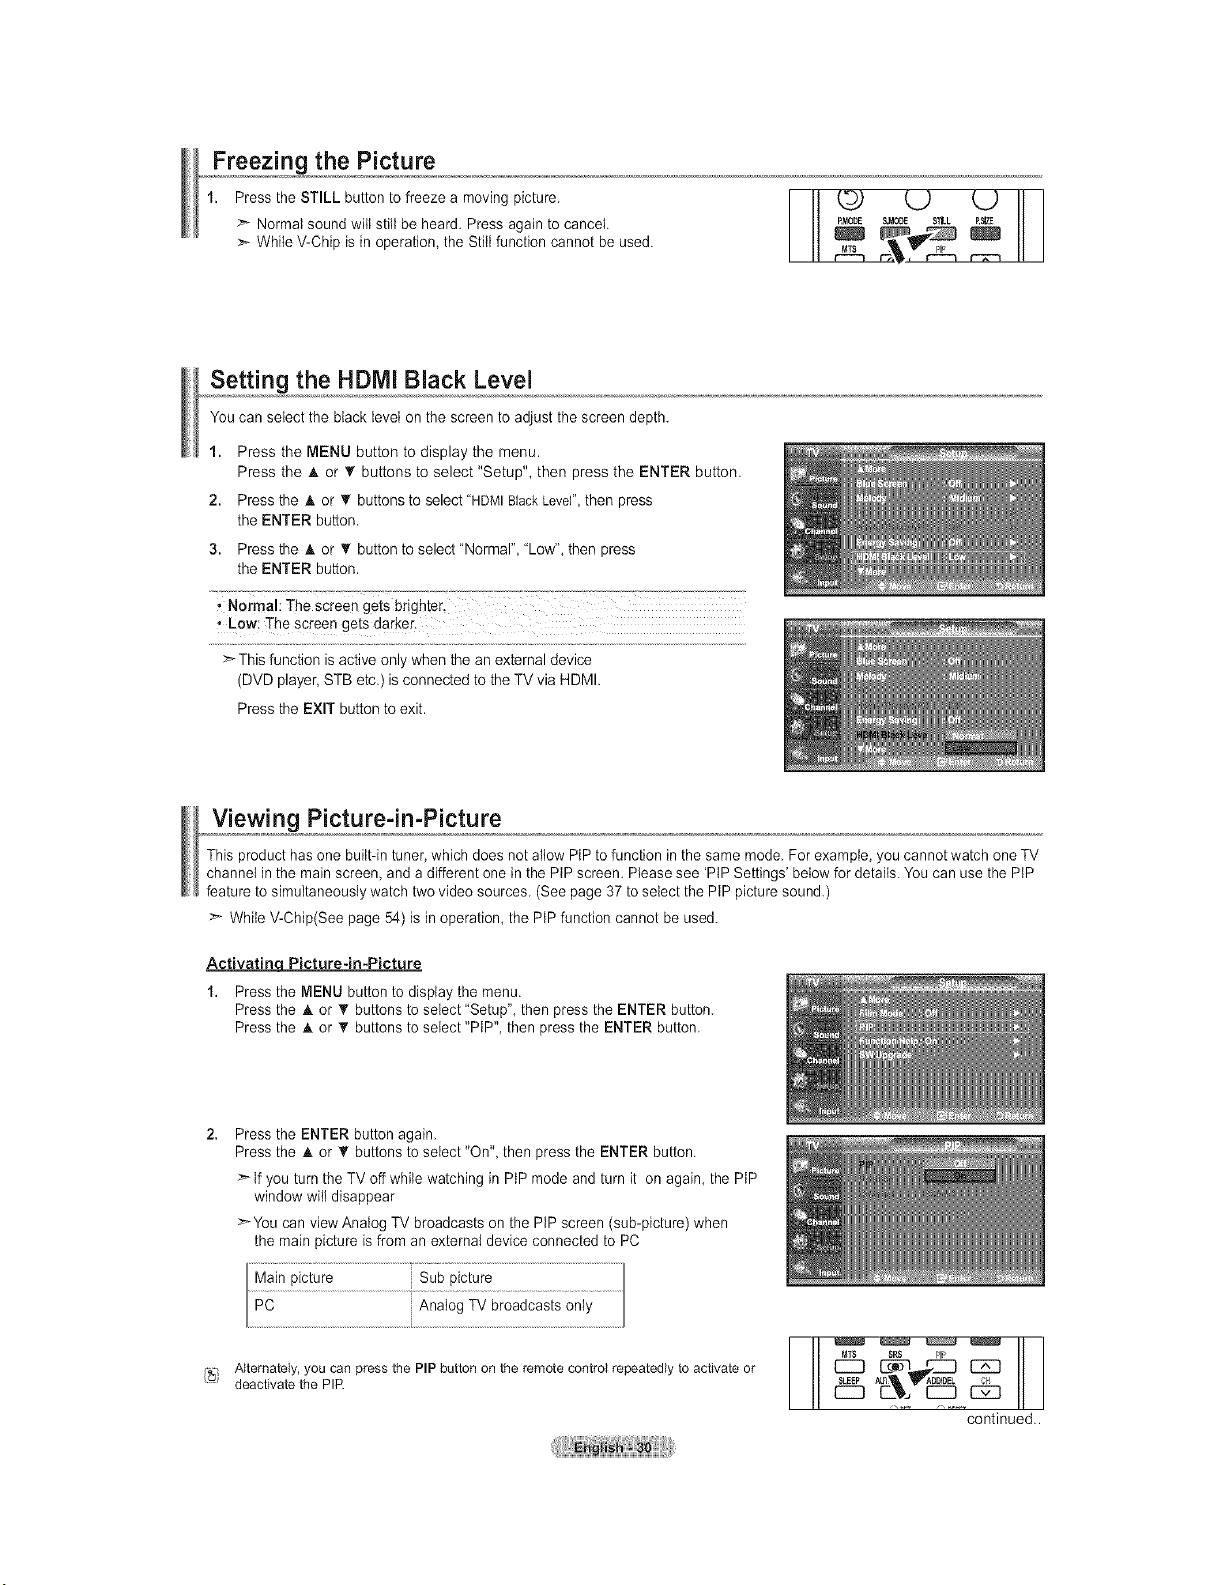
Freezing the Picture
1. Pressthe STILL button tofreeze a moving picture.
> Normal sound witlstill be heard. Press againto cancel.
>" While V-Chip is in operation, the Stillfunction cannot be used.
-- t# U UF1
R_ODE SJ_OOE S_EL R_E
Setting the HDMI Black Level
You can select the blacklevel on the screento adjust the screen depth.
1. Press the MENU button to display the menu.
Press the _kor _' buttons to select "Setup", then press the ENTER button.
2. Press the A. or '_ buttons to select "HDMIBlackLevel",then press
the ENTER button.
3. Press the A or T button to select "Normal", "Low", then press
the ENTER button.
, Normal: The screen gets brighter,
• Low: The screen getsdarker.
>" Thisfunction isactive only when the an external device
(DVD player,STB etc.) isconnected to the TV via HDMI.
Press the EXIT button toexit.
Viewing Picture-in-Picture
This product hasonebuilt-in tuner, which does not aliow PIPtofunction in thesame mode. For example, youcannot watch one TV
channel inthe mainscreen, and adifferent one in the PtP screen. Please see 'PIP Settings' belowfor details.You can use the PtP
feature to simultaneously watch two video sources. (See page 37 to select the PtP picturesound.)
>" While V-Chip(See page 54) isin operation, the PtPfunction cannot be used.
Activatine_ Picture-in-Picture
1. Pressthe MENU button to display the menu.
Pressthe A or T buttons toselect "Setup", then press the ENTER button.
Pressthe A or _rbuttons to setect "PIP", then press the ENTER button.
Pressthe ENTER button again.
Pressthe A or T buttons toselect "On", then press the ENTER button.
>" tf youturn the TV off while watching in PIPmode and turn it on again, the PtP
window will disappear
>-You canviewAnalog TV broadcasts on the PIP screen (sub-picture) when
the main picture isfrom an external device connected to PC
PC i Analog TV broadcasts only
i_} Alternately, you can press the PIP button on the remote control repeatedly to activate or
deactivate the PIP.
continued..
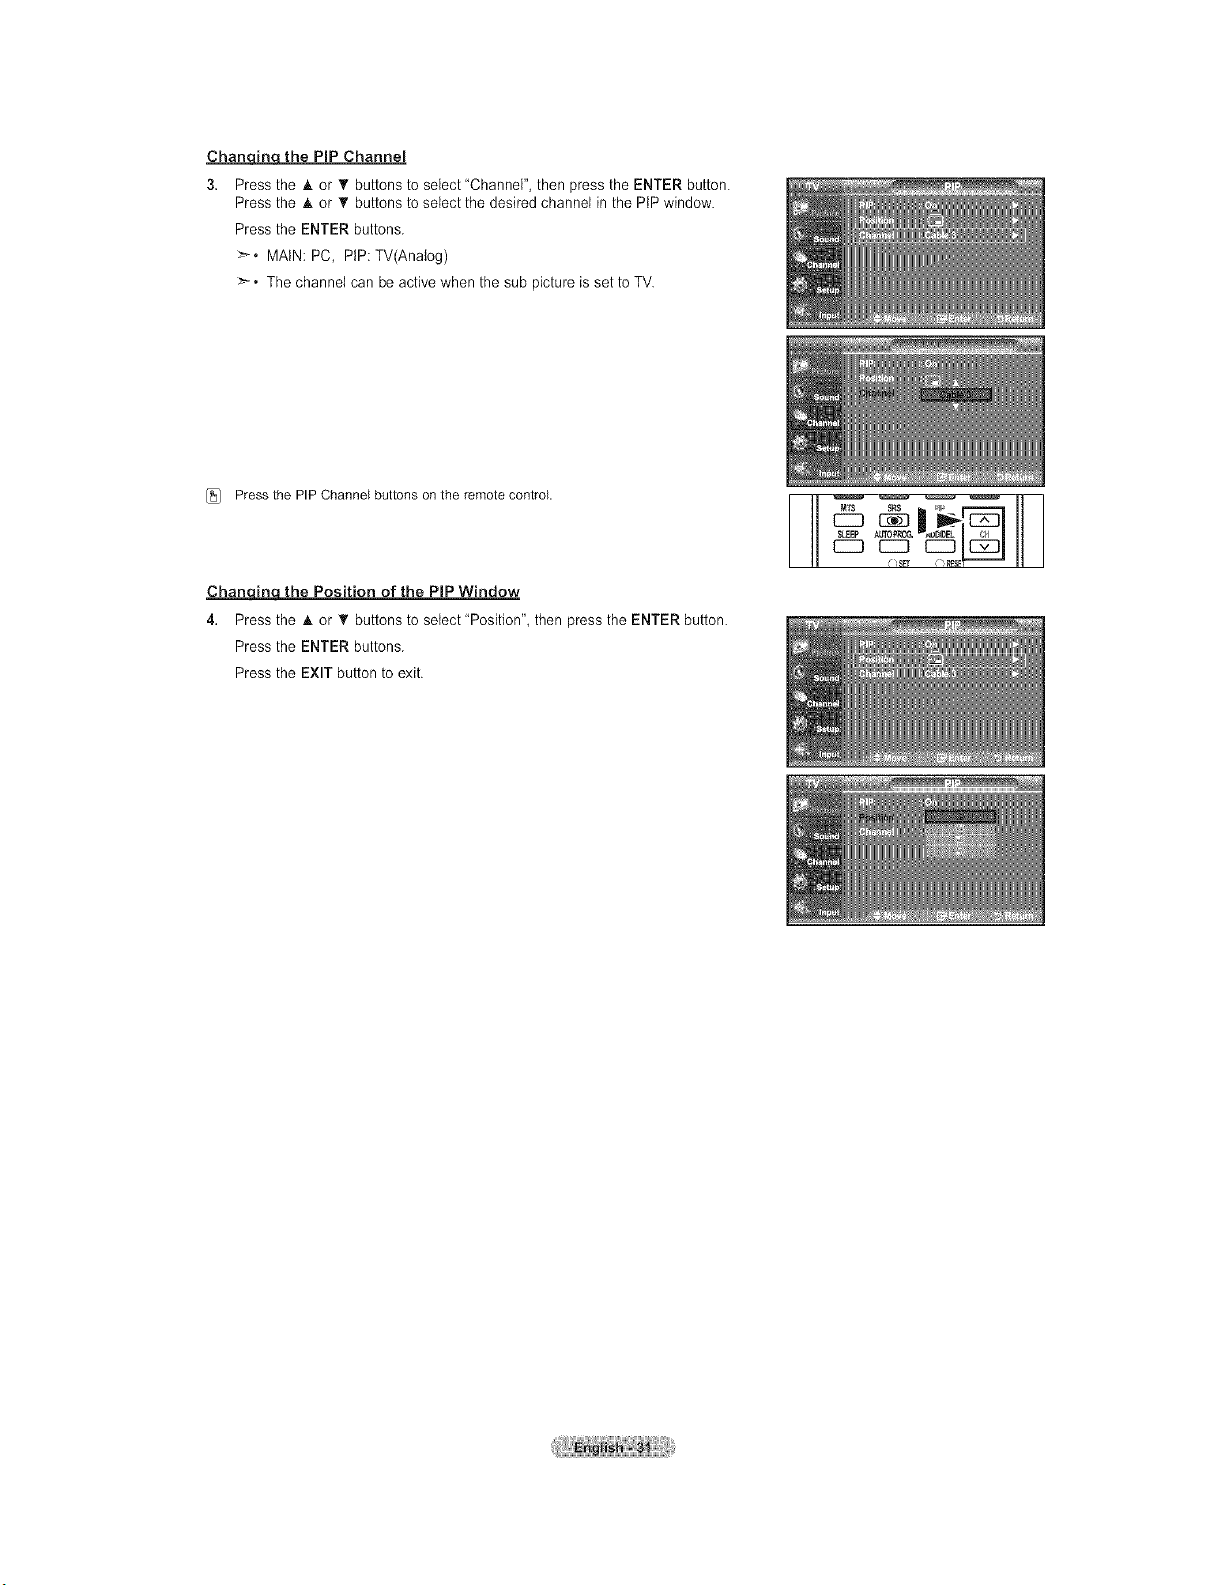
Chanc_nqthe PiP Channel
3. Pressthe _kor • buttons to select"Channel", then press the ENTER button.
Pressthe _kor T buttons to select the desired channel inthe PtPwindow.
Pressthe ENTER buttons.
_'-. MAIN: PC, PtP:TV(Analog)
>-. Thechannel can be active when the sub pictureisset toTV.
[_ Press the PIP Channel buttons on the remote control
Chanc_n_tthe Position of the PiP Window
4. Pressthe _kor T buttons to setect"Position", then press the ENTER button.
Pressthe ENTER buttons.
Pressthe EXIT button to exit.
C_SFr
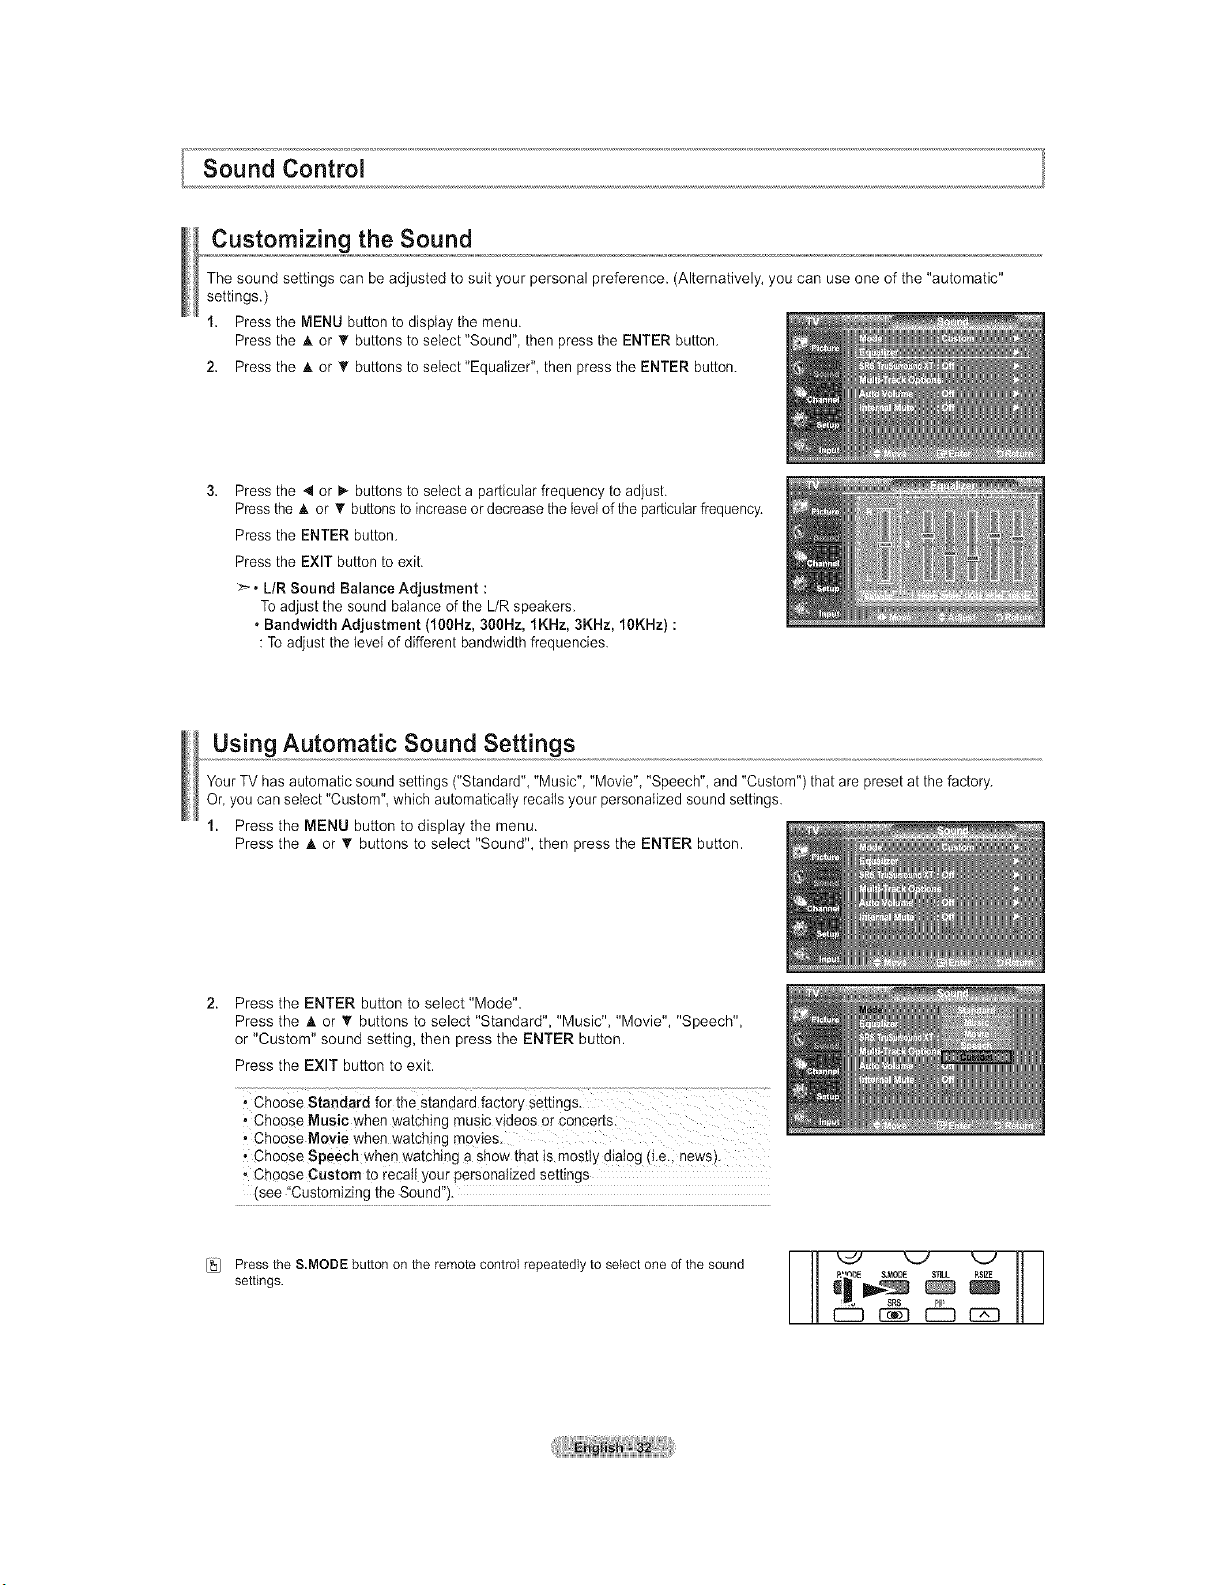
Customizing the Sound
The sound settings can be adjusted to suit your personal preference. (Alternatively, you can use one of the "automatic"
settings.)
1. Pressthe MENU button to display the menu.
Pressthe _, or _' buttons to select "Sound", then pressthe ENTER button.
2. Pressthe _, or • buttons toseIect"EquaIizer", then pressthe ENTER button.
Pressthe 4 or P-buttons toselect a particularfrequency to adjust.
Pressthe A or T buttonsto increase ordecreasethe levelofthe particularfrequency.
Pressthe ENTER button.
Pressthe EXIT button to exit.
>. LtR Sound Balance Adjustment :
Toadjust the sound balance ofthe L/R speakers.
• Bandwidth Adjustment (100Hz, 300Hz, 1KHz, 3KHz, 10KHz) :
:Toadjust the level of different bandwidthfrequencies.
Using Automatic Sound Settings
Your TV hasautomatic sound settings ("Standard", "Music", "Movie", "Speech", and "Custom") that arepreset atthe factory.
Or, you canselect "Custom",which automatically recallsyour personalized soundsettings.
1. Press the MENU button to display the menu.
Press the _, or _' buttons to select "Sound", then press the ENTER button.
2. Press the ENTER button to select "Mode".
Press the A or '_ buttons to select "Standard", "Music", "Movie", "Speech",
or "Custom" sound setting, then press the ENTER button.
Press the EXIT button to exit.
, Choose Music when watching music videos or concerts.
, Choose Movie when watching movies
,,Choose Speech when watching a showthat ismostly dialog (i.e., news).
• Choose Custom to recaii your personalized settings
(see "Customizing the Sound").
Press the S.MODE button on the remote control repeatedly to select one of the sound
settings.
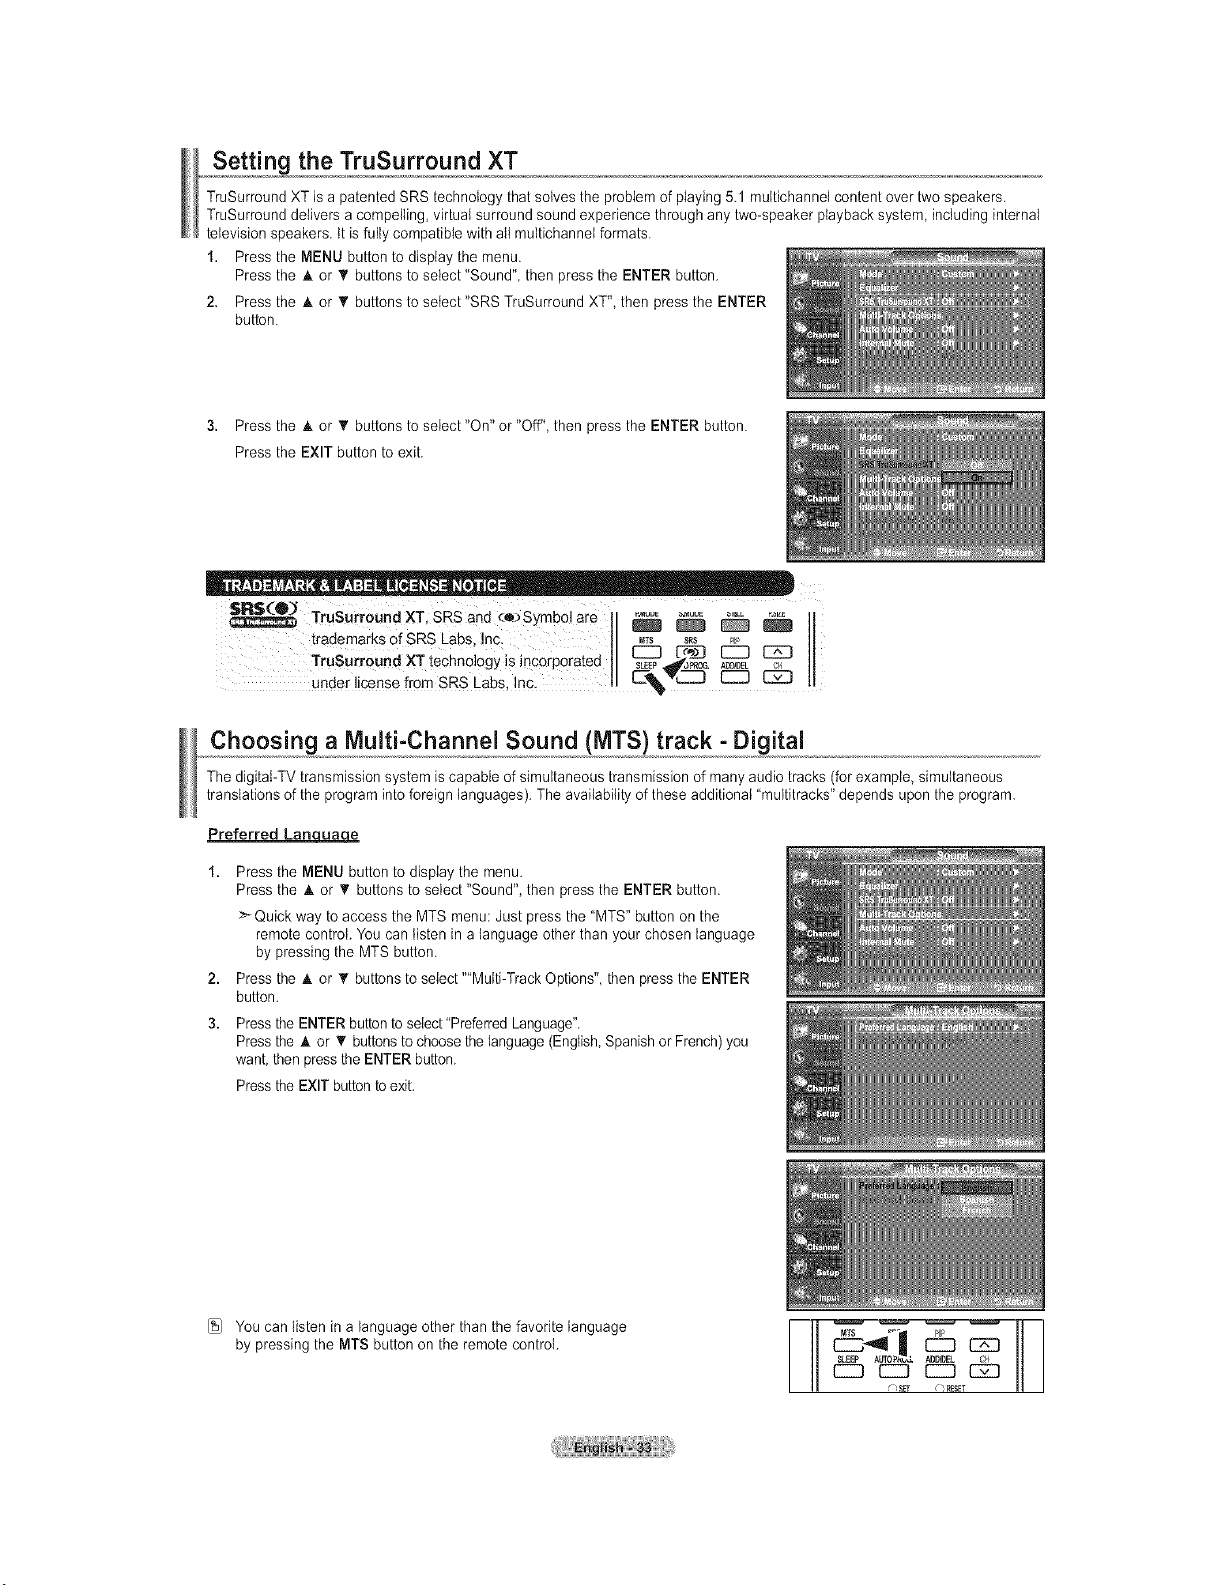
Setting the TruSurround XT
TruSurround XTisa patented SRS technology that solves the problemof playing5.1 multichannel contentover two speakers.
TruSurround delivers a compelling, virtual surround soundexperience through any two-speaker playback system, including internal
television speakers, ttisfully compatible withall multichannei formats.
1. Pressthe MENU button to display the menu.
Pressthe A or _' buttons to select "Sound", then pressthe ENTER button.
2. Pressthe A or • buttons to setect"SRS TruSurround XT", then press the ENTER
button.
3. Pressthe h, or _' buttons to select "On" or "Off",then pressthe ENTER button.
Pressthe EXIT button to exit.
TruSurr0undXT, sRS and _:e:>Symb01are _ _ _
trademarks of SRS Labs, Inc M_ sRs _, II
TruSutround XT techn01ogyisinc0rp0rated s_C:_._,_[_. _
under license fr0m SRS Labs, lnc: tl C:7%_ C::3 _ 11
Choosing a Multi-Channel Sound (MTS) track - Digital
Thedigitat-TV transmission system iscapable ofsimultaneous transmission ofmany audiotracks (for example, simultaneous
translationsof the program intoforeign languages). Theavailability oftheseadditional "multitracks" dependsupon the program.
Preferred Lancjuao.e
2,
3.
Pressthe MENU button todisplay the menu.
Pressthe A or _' buttonsto select "Sound", then press the ENTER button.
>_Quick way toaccess the MTS menu: Just pressthe "MTS" button onthe
remote control. You can listen in alanguage otherthan your chosen language
by pressing the MTS button.
Pressthe h, or _' buttonsto select""Multi-Track Options", then pressthe ENTER
button.
Press the ENTER buttontoselect"Preferred Language".
Press the A or • buttons tochoose the language (English,Spanishor French)you
want, then pressthe ENTER button.
Press the EXIT button to exit.
[_} You can listen in a languageother than the favorite language
by pressing the MTS button on the remote control. E2:3
ADD/DEL
CZ] CZ]] CZ]] C]E]
¢?SFT d__FT
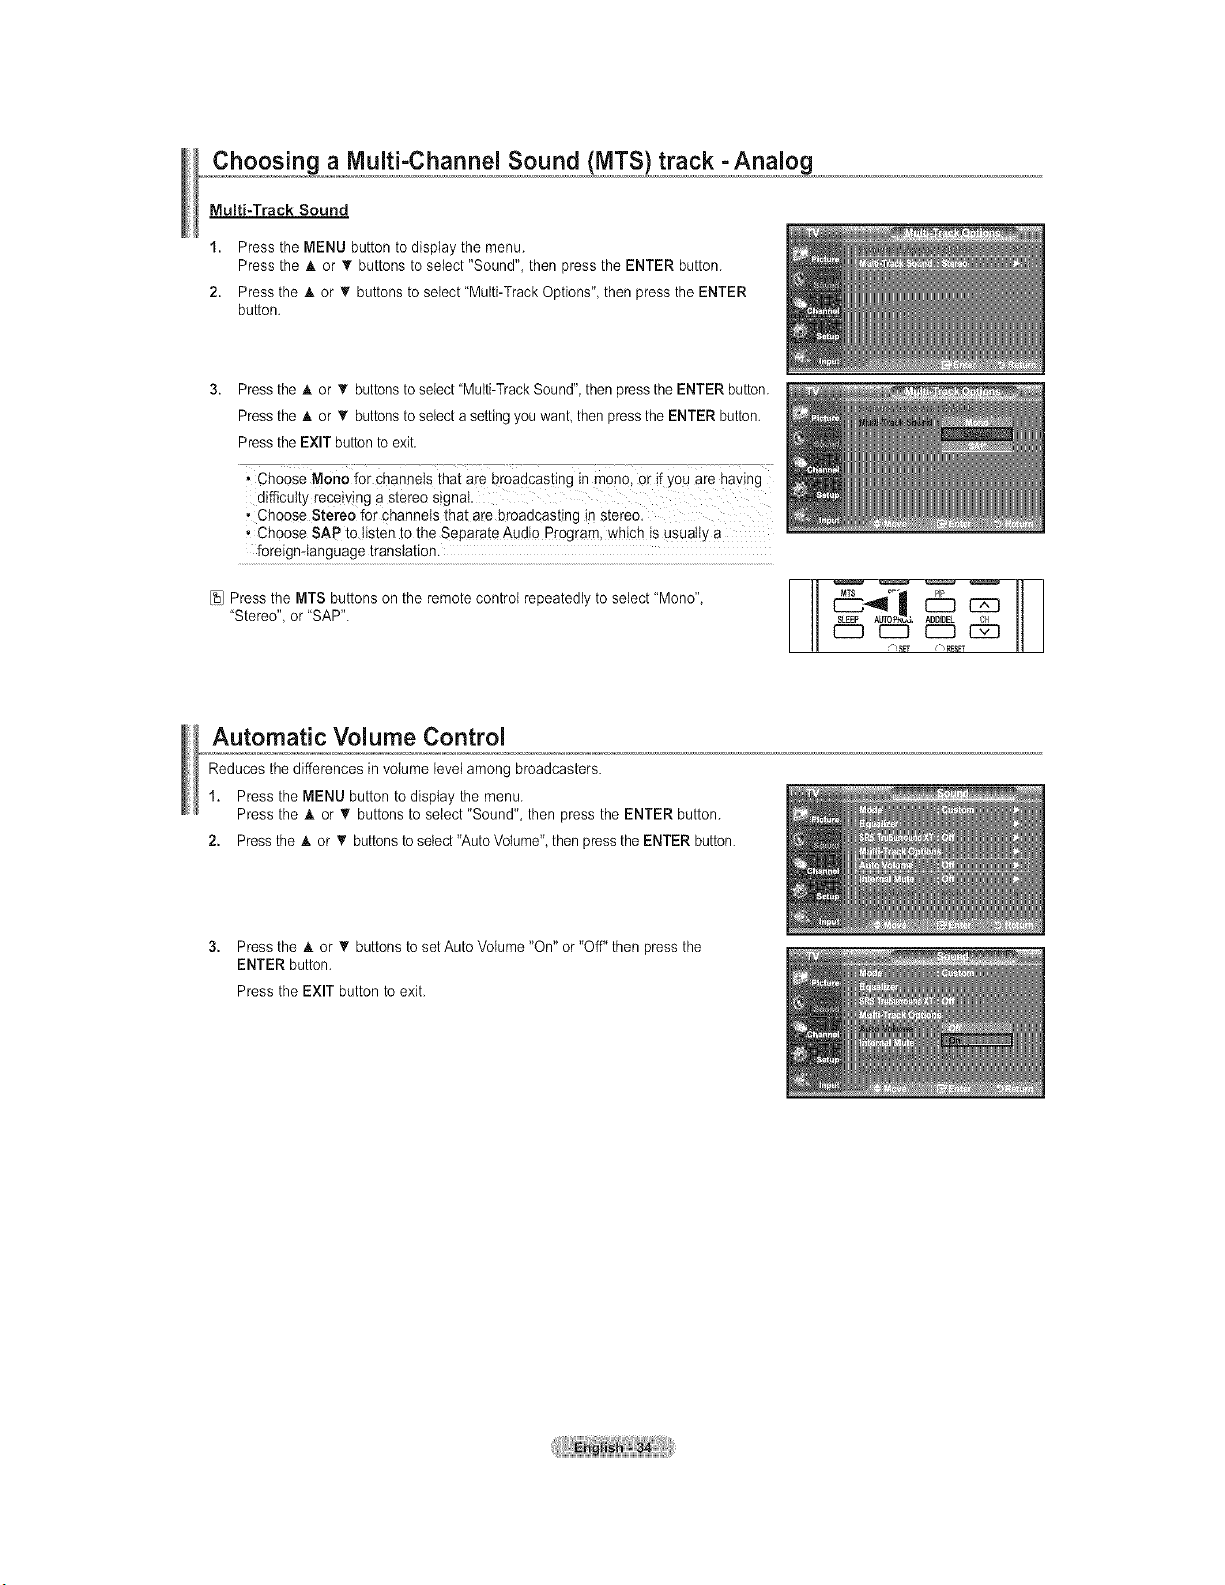
Multi-Track Sound
1. Pressthe MENU button to dispIay the menu.
Pressthe A or T buttons toselect "Sound", then press the ENTER button.
2. Press the A or V buttonsto setect"Multi-Track Options", then press the ENTER
button.
3. Press the _k or _' buttons to select "Multi-TrackSound", then press the ENTER button.
Press the A or T buttons to select asettingyou want then pressthe ENTER button.
Press the EXIT button toexit.
, Choose Mono for channels that are broadcasting in rnon0, Or if you are having
difficulty receiving a Stereo Signal
,Choose Stereo forchanneIs that ate broadcasting in stereo.
-Choose SAP to listen tothe Separate Audio Program, which isusually a
foreign-Ianguage translation.
[sJPress the MTS buttonson the remote control repeatedly to select "Mono",
"Stereo", or"SAP".
I
Automatic Volume Control
Reduces the differences in volume Bevelamong broadcasters.
1. Press the MENU button to display the menu.
Press the A or V buttons to select "Sound", then pressthe ENTER button.
2. Press the A or T buttons to select"AutoVolume", then pressthe ENTER button.
3. Pressthe A or T buttons to setAuto Volume "On" or"Off" then pressthe
ENTER button.
Press the EXIT button toexit.
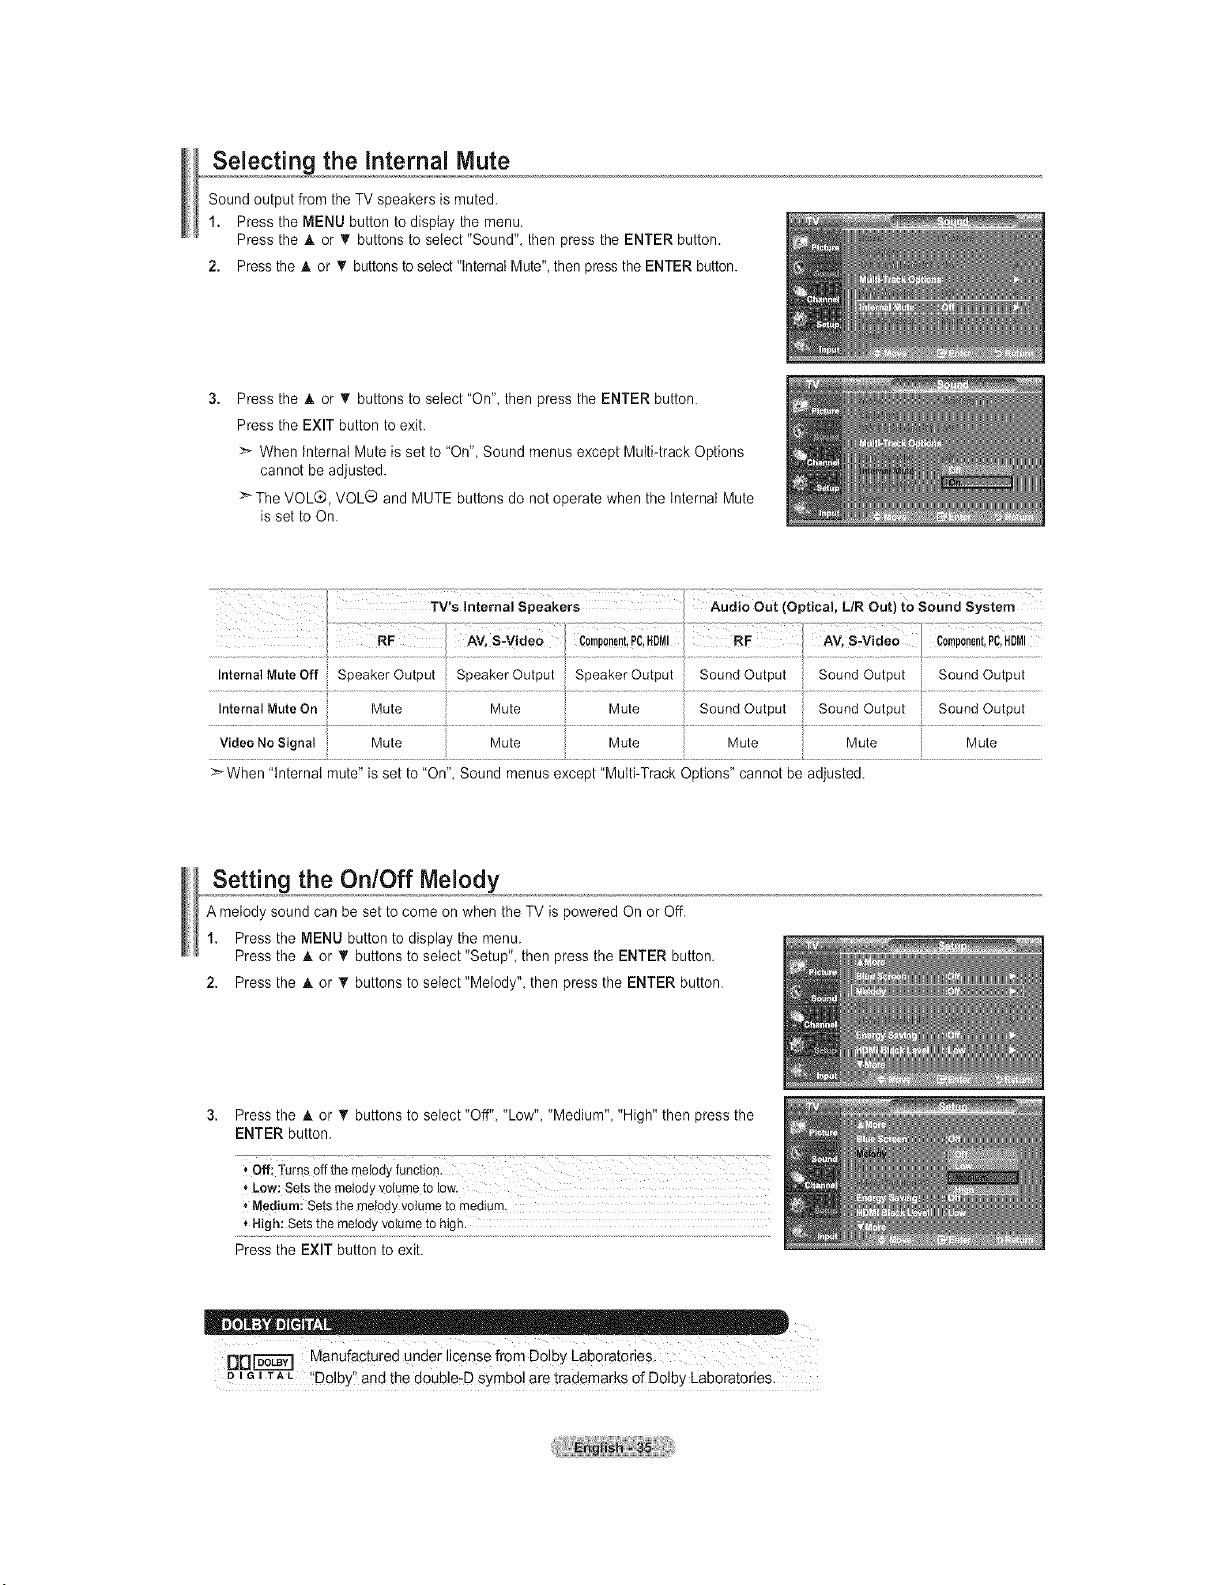
,,o,,,Se!ect!n_ the Internal Mute
Sound output from the TV speakers ismuted.
1. Press the MENU button to display the menu.
Press the A or _' buttons toselect "Sound", then pressthe ENTER button.
2. Press the A or • buttonsto select"internal Mute",then pressthe ENTER button.
Press the _kor T buttons to select "On", then press the ENTER button.
Press the EXIT button toexit.
:_ When internal Mute isset to"On", Sound menus except Multi-track Options
cannot be adjusted.
TheVOLQ, VOL® and MUTE buttons do not operate when the tnternal Mute
isset toOn.
When "internal mute" isset to "On",Sound menus except "Multi-Track Options" cannot be adjusted.
Sett!n9 the On/Off Melody
A melody soundcan be set to comeon when the TV ispowered On orOff.
1. Pressthe MENU button to display the menu.
Pressthe A or _' buttons to select "Setup", then pressthe ENTER button.
2. Pressthe A or T buttons to setect"Metody", then pressthe ENTER button.
3. Pressthe A or T buttons to select"Off" "Low" "Medium", "High" then pressthe
ENTER button.
_"Medium:Setsthe metodyvolumeto medium.
* High: Setsthe melodyvolumeto high.
Pressthe EXIT button to exit.
_Di-'_-'_'] Manufactured under license from Dolby Laboratories.
u, G, TAL 'DoIby'_and the d0Uble-D SYmbol aretrademarks Of Delby Laboraiories.
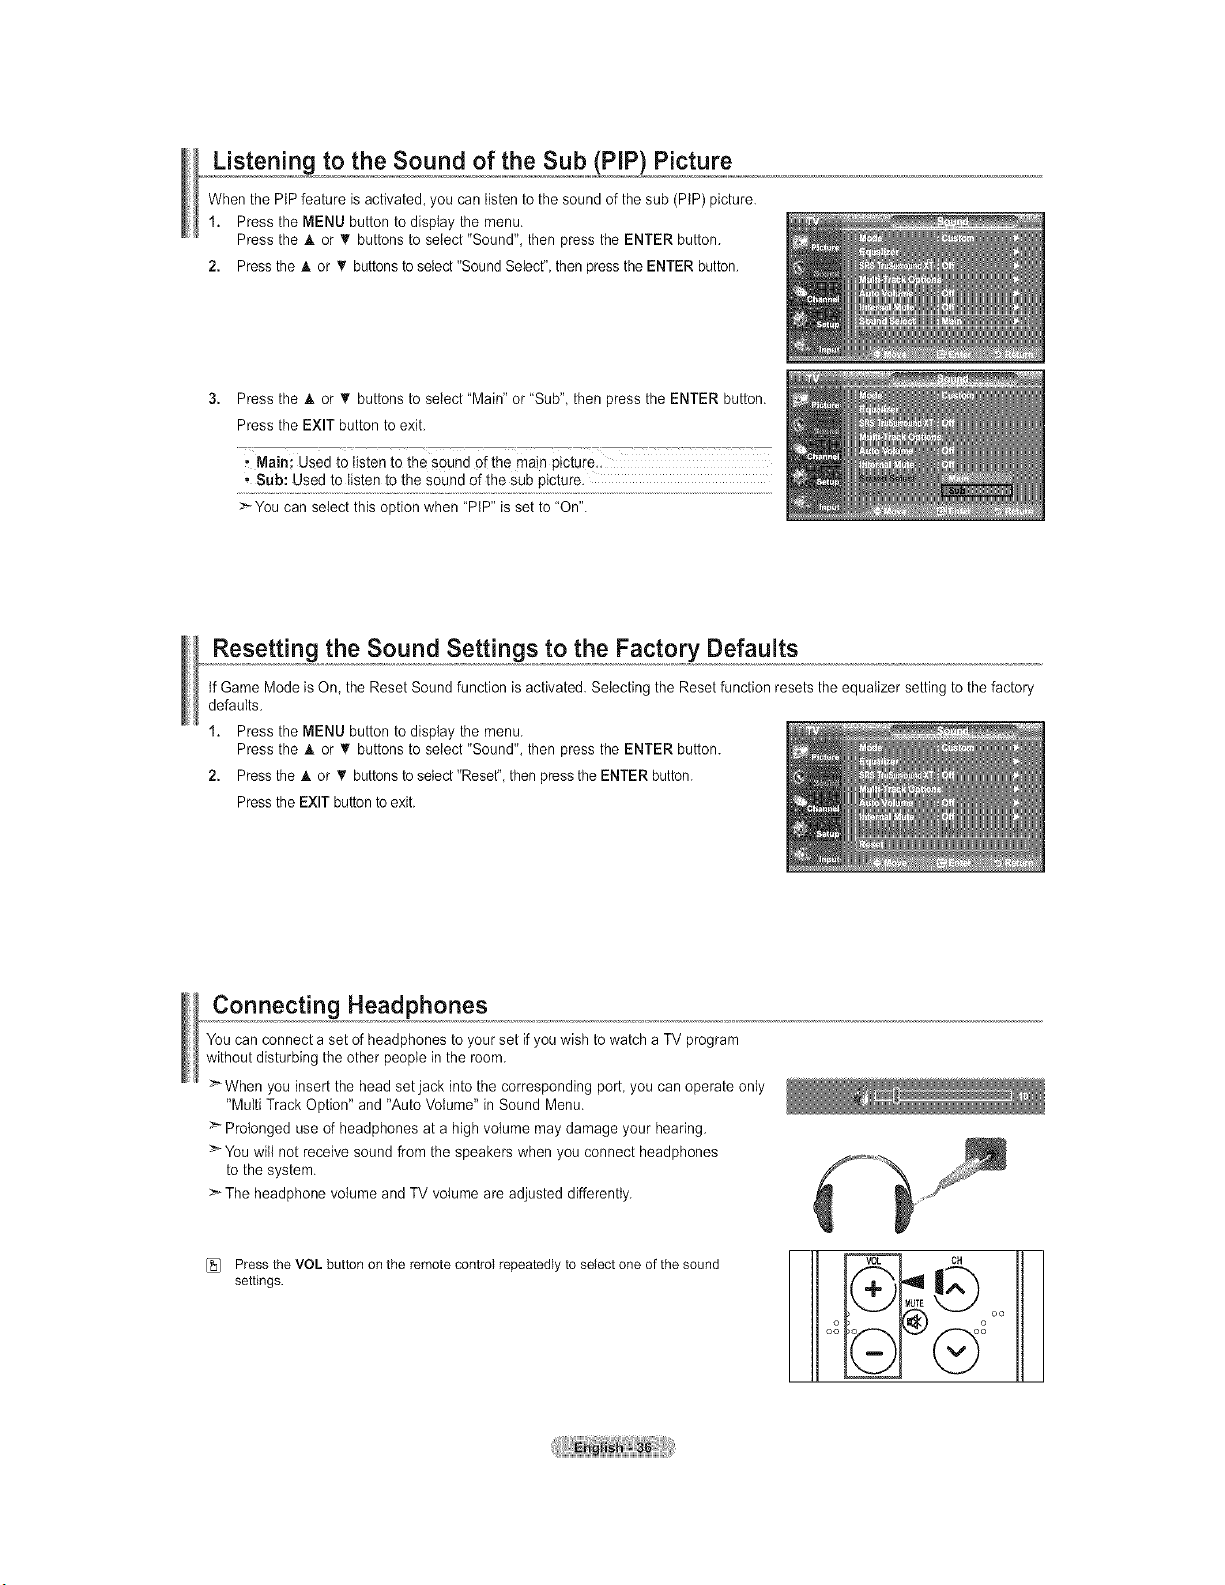
_,_Usten!n_,to the Sound of the Sub (PIP) Picture
Whenthe PIPfeature isactivated,you can listentothe soundofthe sub (PIP) picture.
1. Press the MENU button to display the menu,
Press the & or _' buttons toselect "Sound", then pressthe ENTER button,
2. Press the A or _rbuttonsto select"Sound Seiecf', then press the ENTER button,
3. Press the A or _r buttons toselect "Main" or"Sub", then press the ENTER button.
Press the EXIT button toexit.
, Sub: Used tolisten to the sound of the subpicture.
>You can select this optionwhen "PIP" isset to "On".
Resetting the Sound Settings to the Factory Defaults
tfGame Mode isOn, the Reset Sound function isactivated. Selecting the Resetfunction resetsthe equalizer setting to the factory
defaults.
1. Press the MENU button to display the menu.
Press the h. or _' buttons to select "Sound", then pressthe ENTER button.
2. Press the A or _rbuttonsto select"Reset_',then pressthe ENTER button.
Press the EXIT buttontoexit.
Connecting Headphones
You can connect asetof headphones to your set if youwish towatch a TV program
without disturbing the other peoplein the room.
>When you insert the head set jack into the corresponding port you can operate only
"Multi Track Option" and "Auto Voiume" in Sound Menu.
Prolonged useofheadphones at a highvolume maydamage your hearing.
> Youwill not receive sound from the speakers when you connect headphones
tothe system.
> The headphone volume and TV volume are adjusted differently.
[_ Press the VOL button on the remote control repeatedly to select one of the sound
settings.
m o
oo
Go
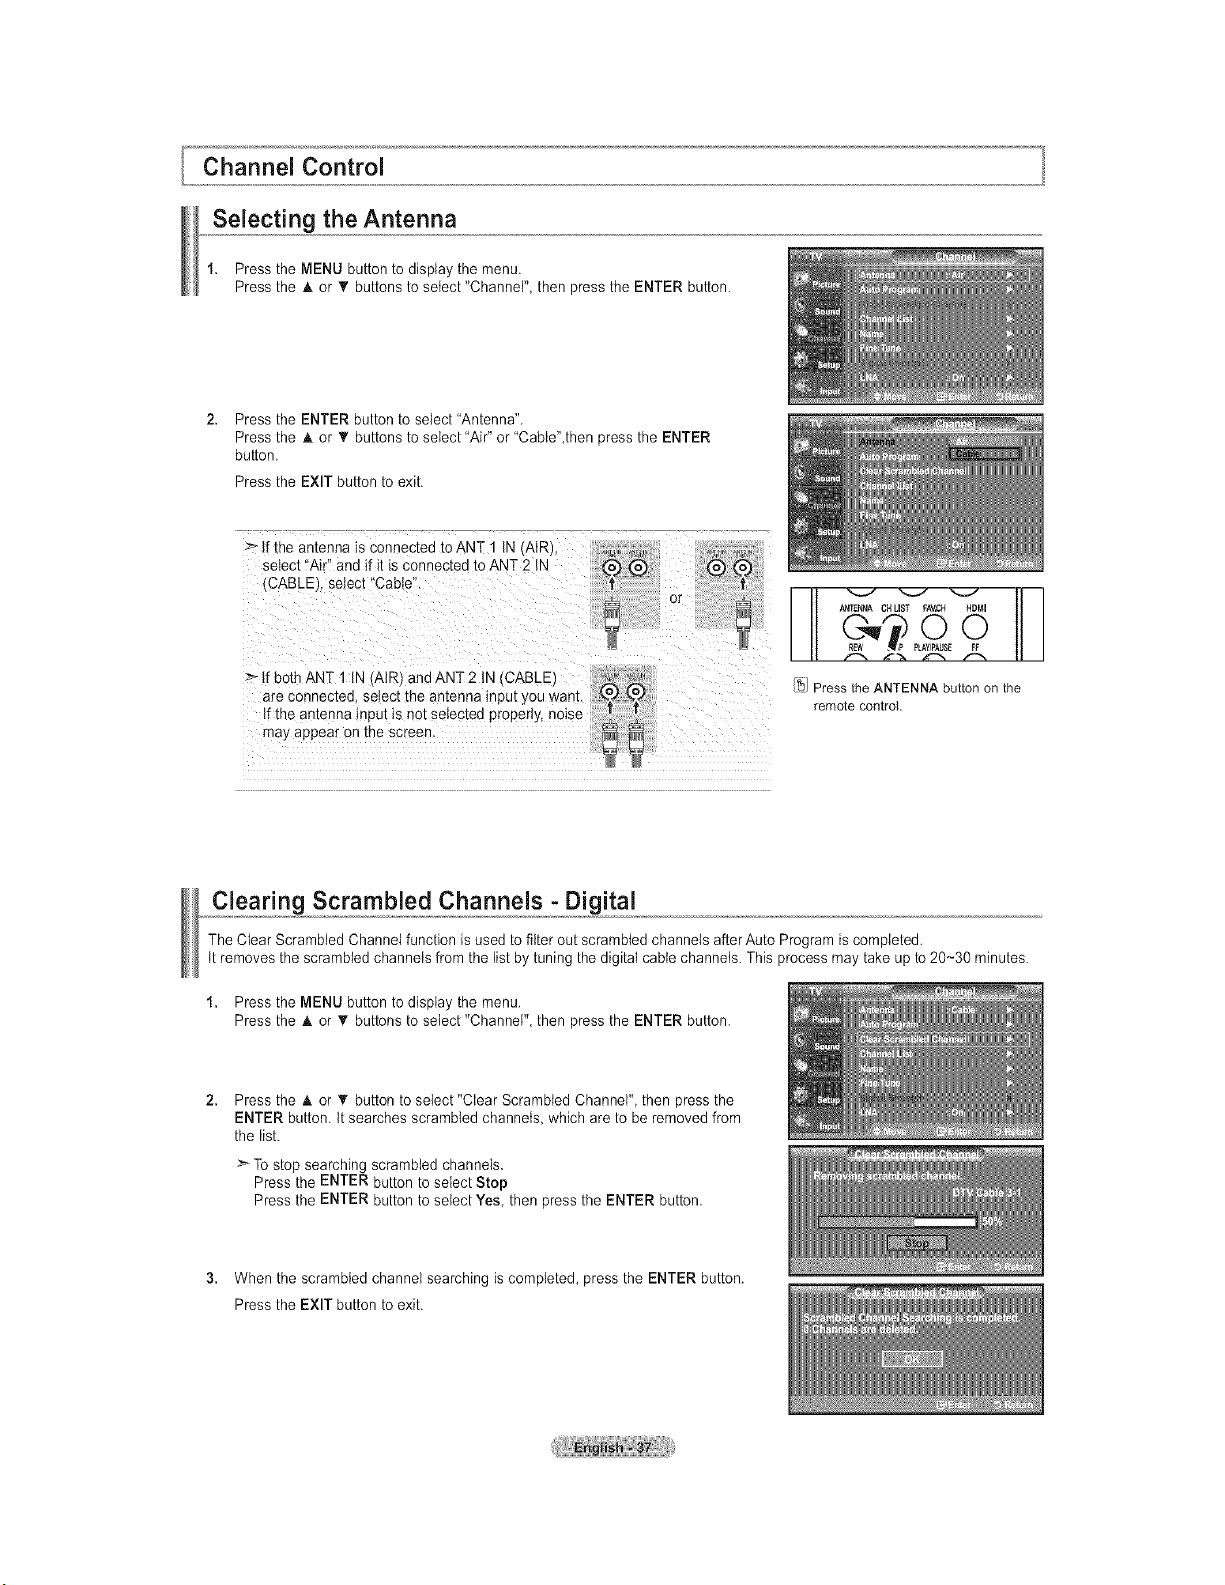
Channel Control
Selecting the Antenna
1. Pressthe MENU button to display the menu.
Pressthe A or _rbuttons to setect "Channel", then pressthe ENTER button.
Pressthe ENTER button toselect "Antenna".
Pressthe A or _' buttons to select "Air" or"Cabte",then press the ENTER
button.
Pressthe EXIT button to exit.
:_ If the antenna isconnected to ANT 1 IN AIR/.
select "Air" and if it isconnected to ANT2 IN
tCABLEI, select "Cable".
>- If both ANT 1IN AIR/and ANT2 IN(CABLE _" "'._
are connec,ea, setec, _neantenna input you wan,. {_J £,05
Ifthe antenna inout is not selected properly, noise
may appear onthe screen
A_TEi_NA CNLIST FAV.CH HDMI
E
['_!Press the ANTENNA buttononthe
remote control
Clearing Scrambled Channels - Digital
The Clear Scrambled Channelfunction isusedto filter out scrambled channels after Auto Program iscompleted.
ttremoves the scrambled channels from the list by tuning the digital cable channels.This process may take up to 20-30 minutes.
1. Pressthe MENU button to display the menu.
Pressthe A or _r buttons tosetect "Channel", then pressthe ENTER button.
Pressthe A or T button to select "Clear Scrambled Channel", then pressthe
ENTER button, tt searches scrambled channels, whichare to be removedfrom
the list.
>-To stop searching scrambled channels.
Pressthe ENTER button toselect Stop
Pressthe ENTER button tosetect Yes, then pressthe ENTER button.
3. When the scrambled channel searching iscompleted, press the ENTER button.
Pressthe EXIT button to exit.
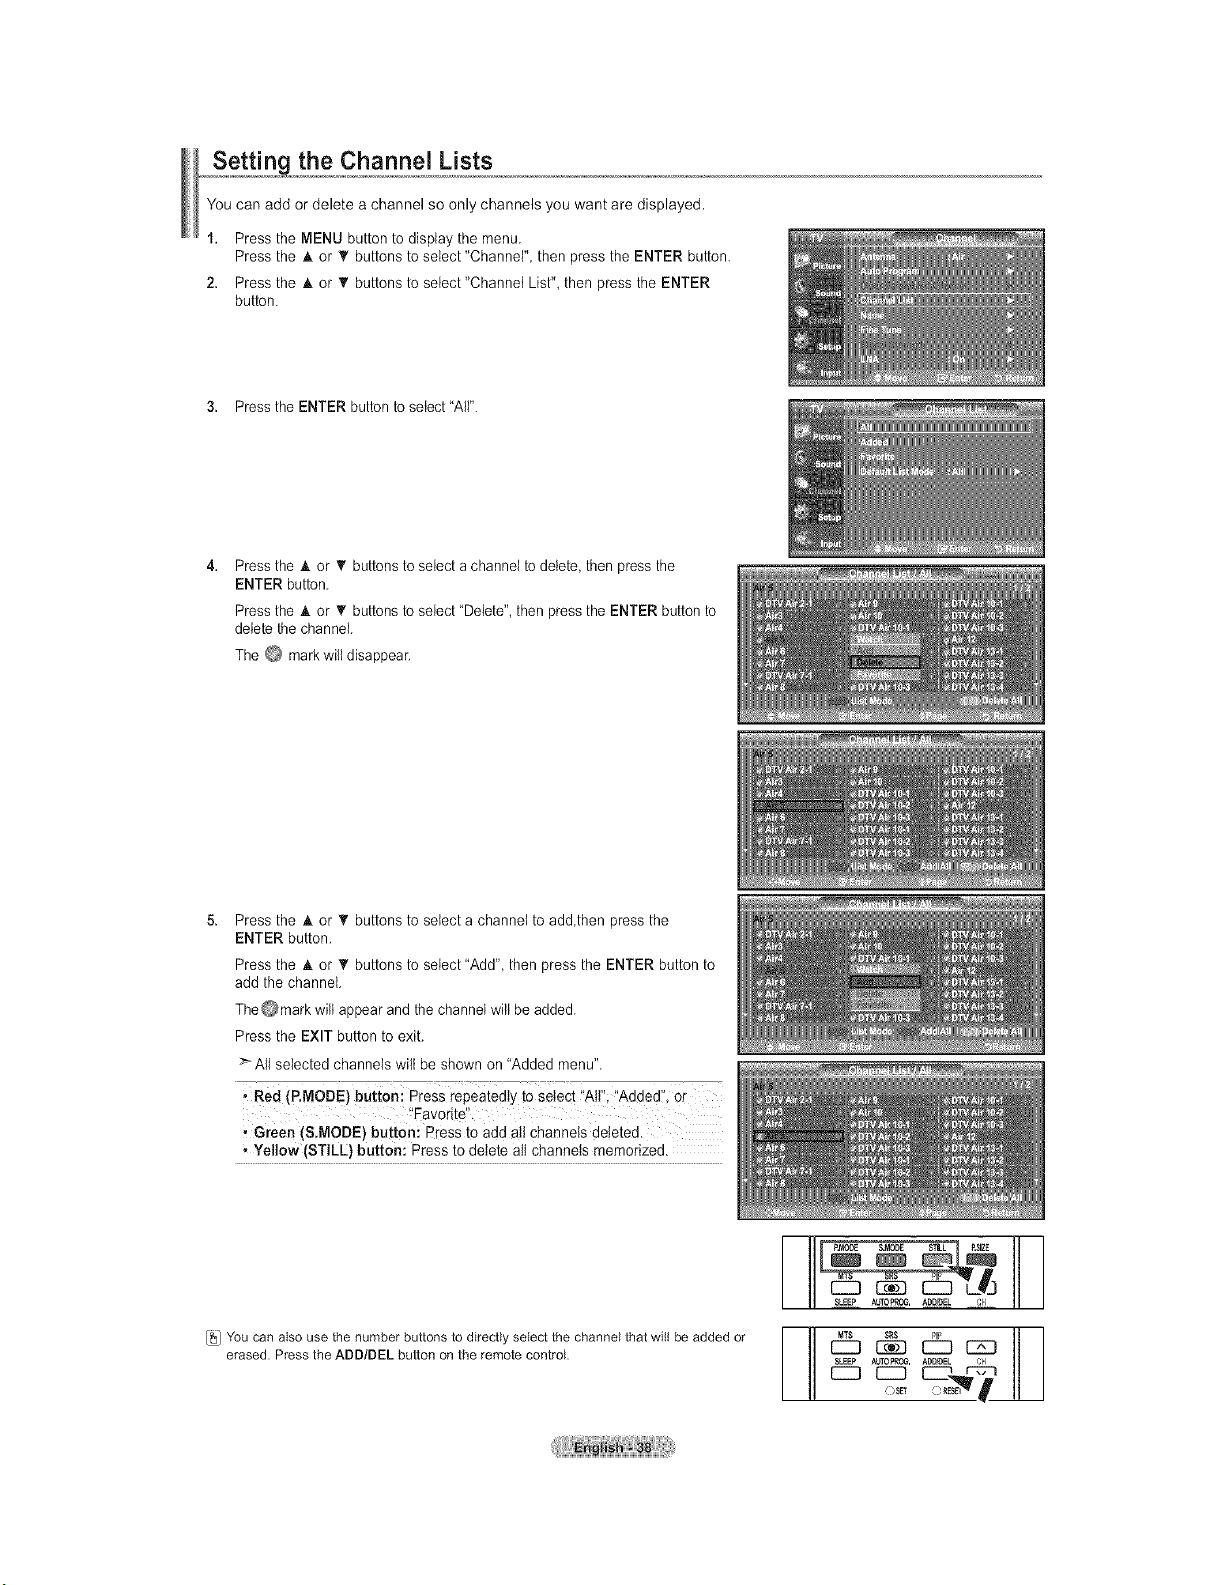
_,,,_,_t!,,ng_the Channel Lists
You can add or delete achannel so only channels you want are displayed.
1. Pressthe IVlENUbutton to display the menu.
Pressthe A or _' buttons to select "Channel", then pressthe ENTER button.
2. Pressthe A or _' buttons to seiect"Channet List", then press the ENTER
button.
3. Pressthe ENTER button toselect"All".
Pressthe A or _t'buttonsto selectachannel to delete,then pressthe
ENTER button.
Pressthe A or _' buttonsto select"Delete",then pressthe ENTER button to
deletethe channel.
The C_ mark will disappear.
Pressthe A or • buttons to select achannet toadd,then press the
ENTER button.
Pressthe A or _' buttons to select "Add", then press the ENTER button to
add the channel.
TheOmark willappear and the channel wiltbe added.
Pressthe EXIT button to exit.
All selected channels will be shown on "Added menu".
, Green (S.MODE) button: Press to add allchannels deleted.
• Yellow (STILL) button: Press todelete allchannels memorized.
You can also use the number buttons to directly select the channel that will be added or
erased. Press the ADD/DEL button on the remote control
, ADD_DEL {_1
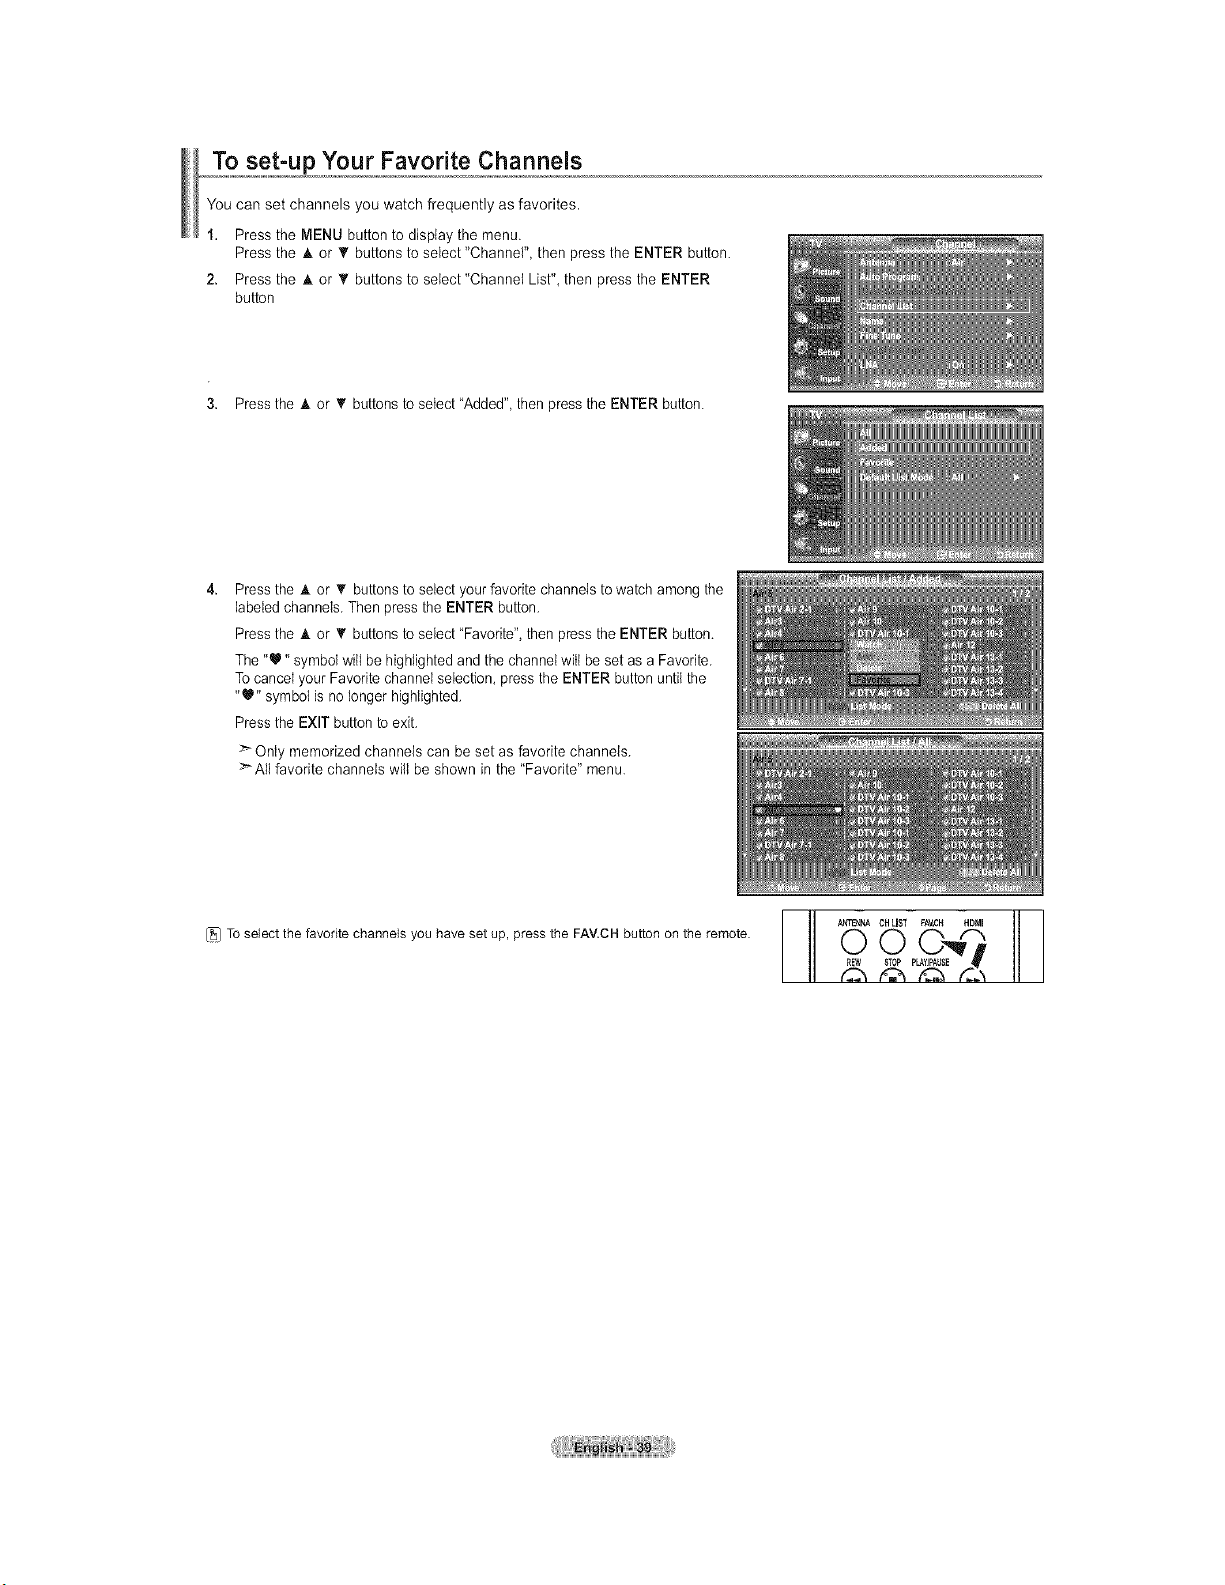
To set-up Your Favorite Channels
You can set channels you watch frequently asfavorites.
1. Pressthe MENU button to display the menu.
Pressthe A or _' buttons to select "Channel", then pressthe ENTER button.
2. Pressthe A or _' buttons to seiect"Channet List", then press the ENTER
button
3. Pressthe A or _' buttonsto setect"Added", then pressthe ENTER button.
Pressthe A or _' buttonsto selectyour favorite channelsto watch among the
labeled channels.Then pressthe ENTER button.
Pressthe A. or _' buttonsto select "Favorite",then pressthe ENTER button.
The"U" symbol will be highlighted and the channel will be set as a Favorite.
Tocancel your Favoritechannel selection, presstheENTER buttonuntilthe
"_" symbol isno longer highlighted.
Pressthe EXIT buttontoexit.
> Only memorized channels can be set as favorite channels.
>All favorite channels wilt be shown in the "Favorite" menu.
_1 To selectthe favorite channels youhaveset up, press the FAV.CHbutton on the remote. O
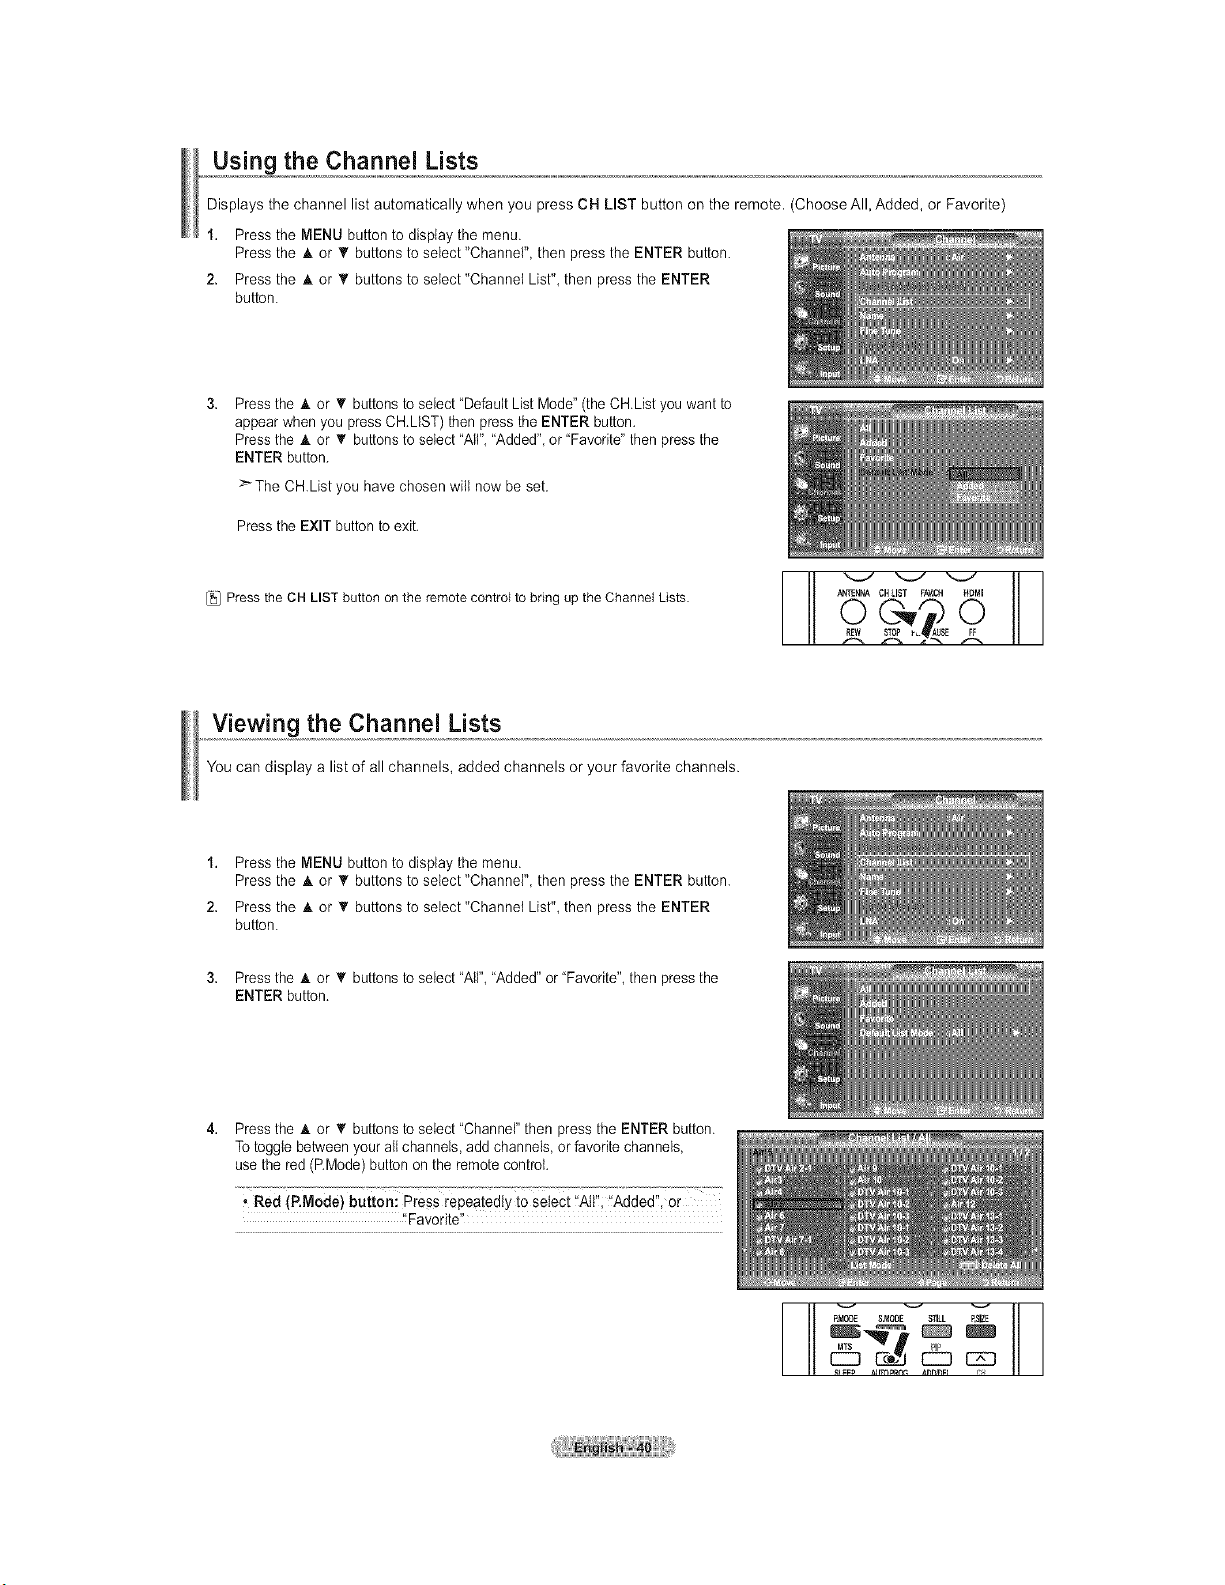
Using the Channel Lists
Displays the channel list automatically when you press CH LIST button on the remote. (Choose All, Added, or Favorite)
1. Pressthe MENU button to display the menu.
Pressthe A or _' buttons to select "Channel", then pressthe ENTER button.
2. Pressthe A or _' buttons to seiect"Channet List", then press the ENTER
button.
Pressthe A or V buttons to select"DefaultList Mode"(theCH.Listyou want to
appear when youpressCH.LtST) then pressthe ENTER button.
Pressthe A or T buttons toselect"All", "Added",or"Favorite" then pressthe
ENTER button.
> The CHList you havechosen wilt now beset.
Pressthe EXIT button to exit.
Press the OH LIST button on the remote control to bring up the Channel Lists.
I-
ANTENNACHLIST FAV.CH HDMI
E
L
Viewing the Channel Lists
You can display a list of all channels, added channels or your favorite channels.
1. Pressthe MENU button to display the menu.
Pressthe A or _' buttons to select "Channel", then pressthe ENTER button.
2. Pressthe A or _' buttons to seiect"Channet List", then press the ENTER
button.
3. Pressthe A or _r buttonsto select "All", "Added"or "Favorite",thenpressthe
ENTER button.
Pressthe A or T buttons toselect"Channer' then press the ENTER button.
Totogglebetween your allchannels, add channels orfavoritechannels
usethered(PMode) button on the remote control.
• Red (P,Mode) button: Press repeatedly to Select !tAll'!;'!Added'!, or
'!Favorite"
_ v v v
P.MODE &MODE S'_LL P,SIZE
MTS --
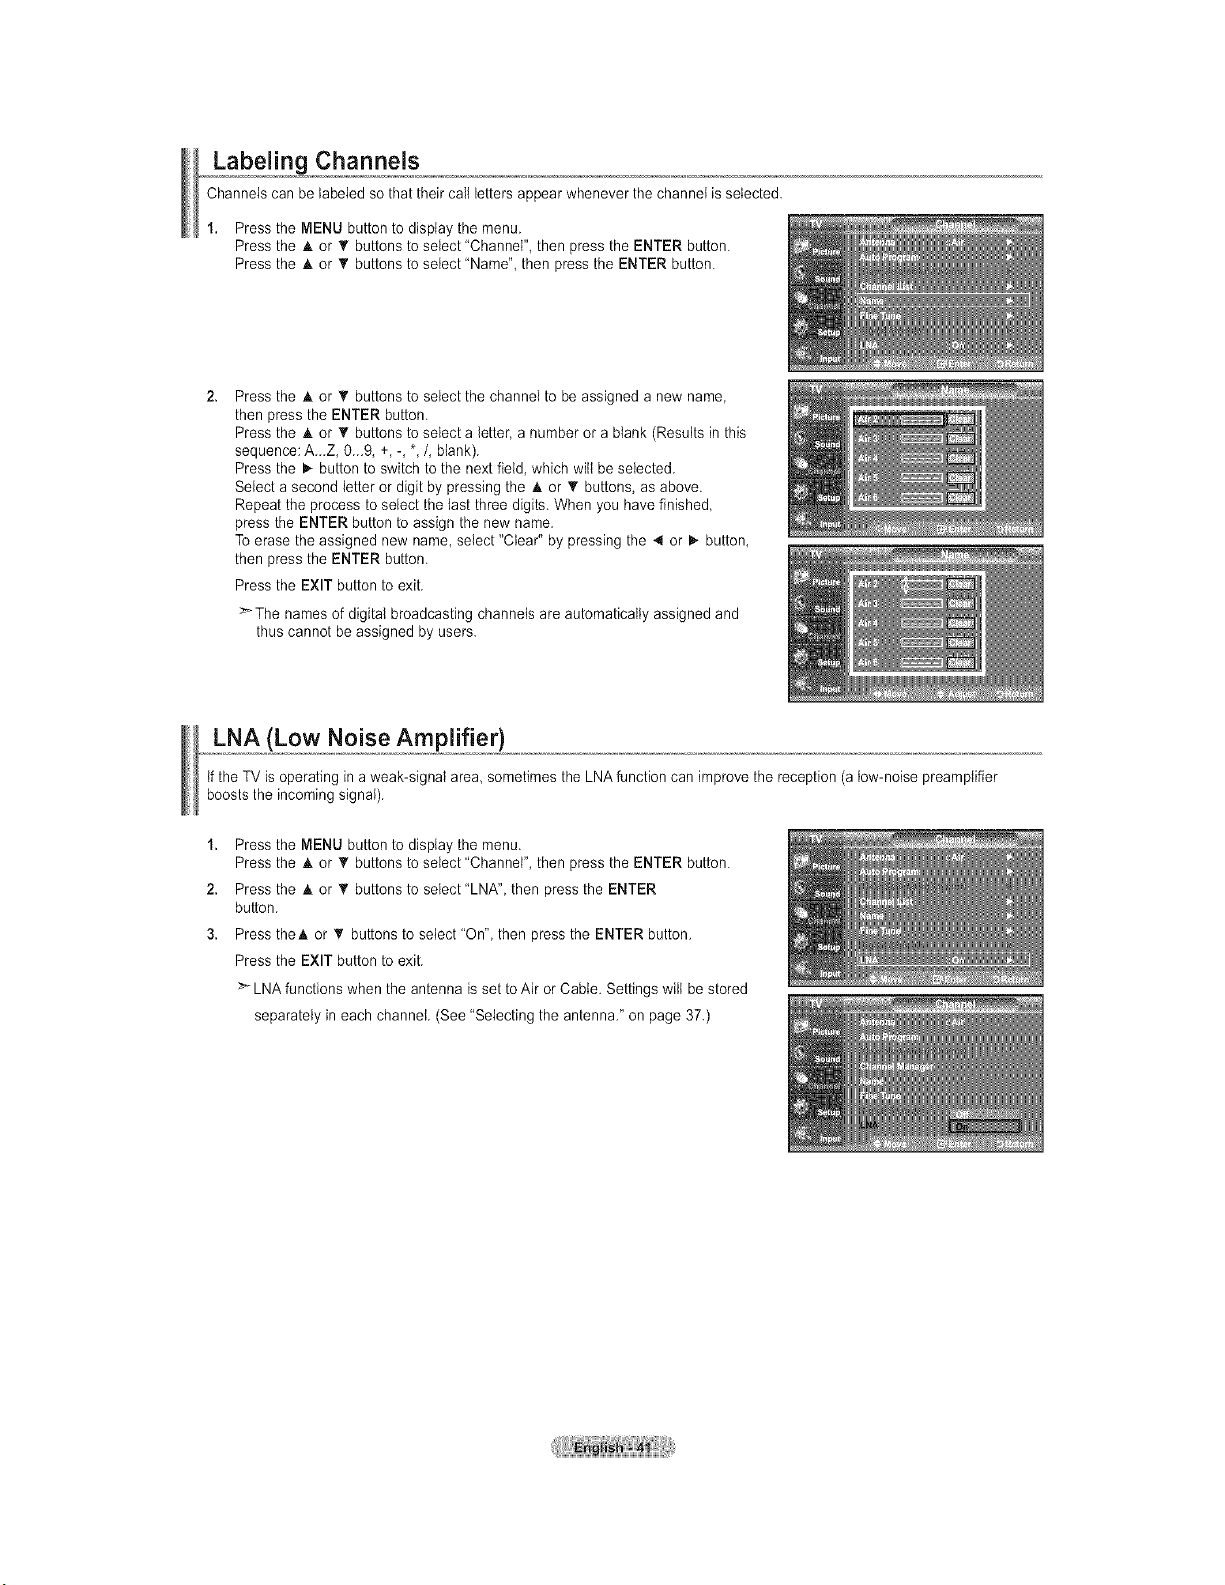
Labeling Channels
Channels can be labeled so that their call lettersappear whenever the channetisselected.
1. Pressthe MENU button to display the menu.
Pressthe A or T buttons toselect "Channel", then press the ENTER button.
Pressthe A or _rbuttons to select "Name", then pressthe ENTER button.
Pressthe A or _rbuttons to select the channel to be assigned a new name,
then press the ENTER button.
Pressthe A or T buttons toselect a letter, a number or ablank (Results in this
sequence: A._Z, 0._9, +,-, *,/, blank).
Pressthe _ button to switch to thenext field, which wiltbeselected.
Select a second letter or digitby pressing the A or _' buttons, as above.
Repeat the process to select the last three digits.When you have finished,
press the ENTER button toassign the new name.
Toerase the assigned new name, select "Clear" by pressing the 4 or D,.button,
then press the ENTER button.
Pressthe EXIT button to exit.
The names of digital broadcasting channels are automatically assigned and
thus cannot be assigned by users.
LNA (Low Noise Amplifier)
tfthe TVisoperating in aweak-signal area sometimes the LNA function can improvethe reception (a low-noise preamplifier
boosts the incoming signal).
1. Pressthe MENU button to display the menu.
Pressthe A or V buttons toselect 'Channel", then press the ENTER button.
2. Pressthe h, or _rbuttons toselect"LNA", then pressthe ENTER
button.
3. PresstheA or _r buttons to select "On", then pressthe ENTER button.
Pressthe EXIT button to exit.
>- LNA functions when the antenna isset to Air orCable. Settings wilt be stored
separately in each channet. (See "Selecting the antenna." on page 37.)
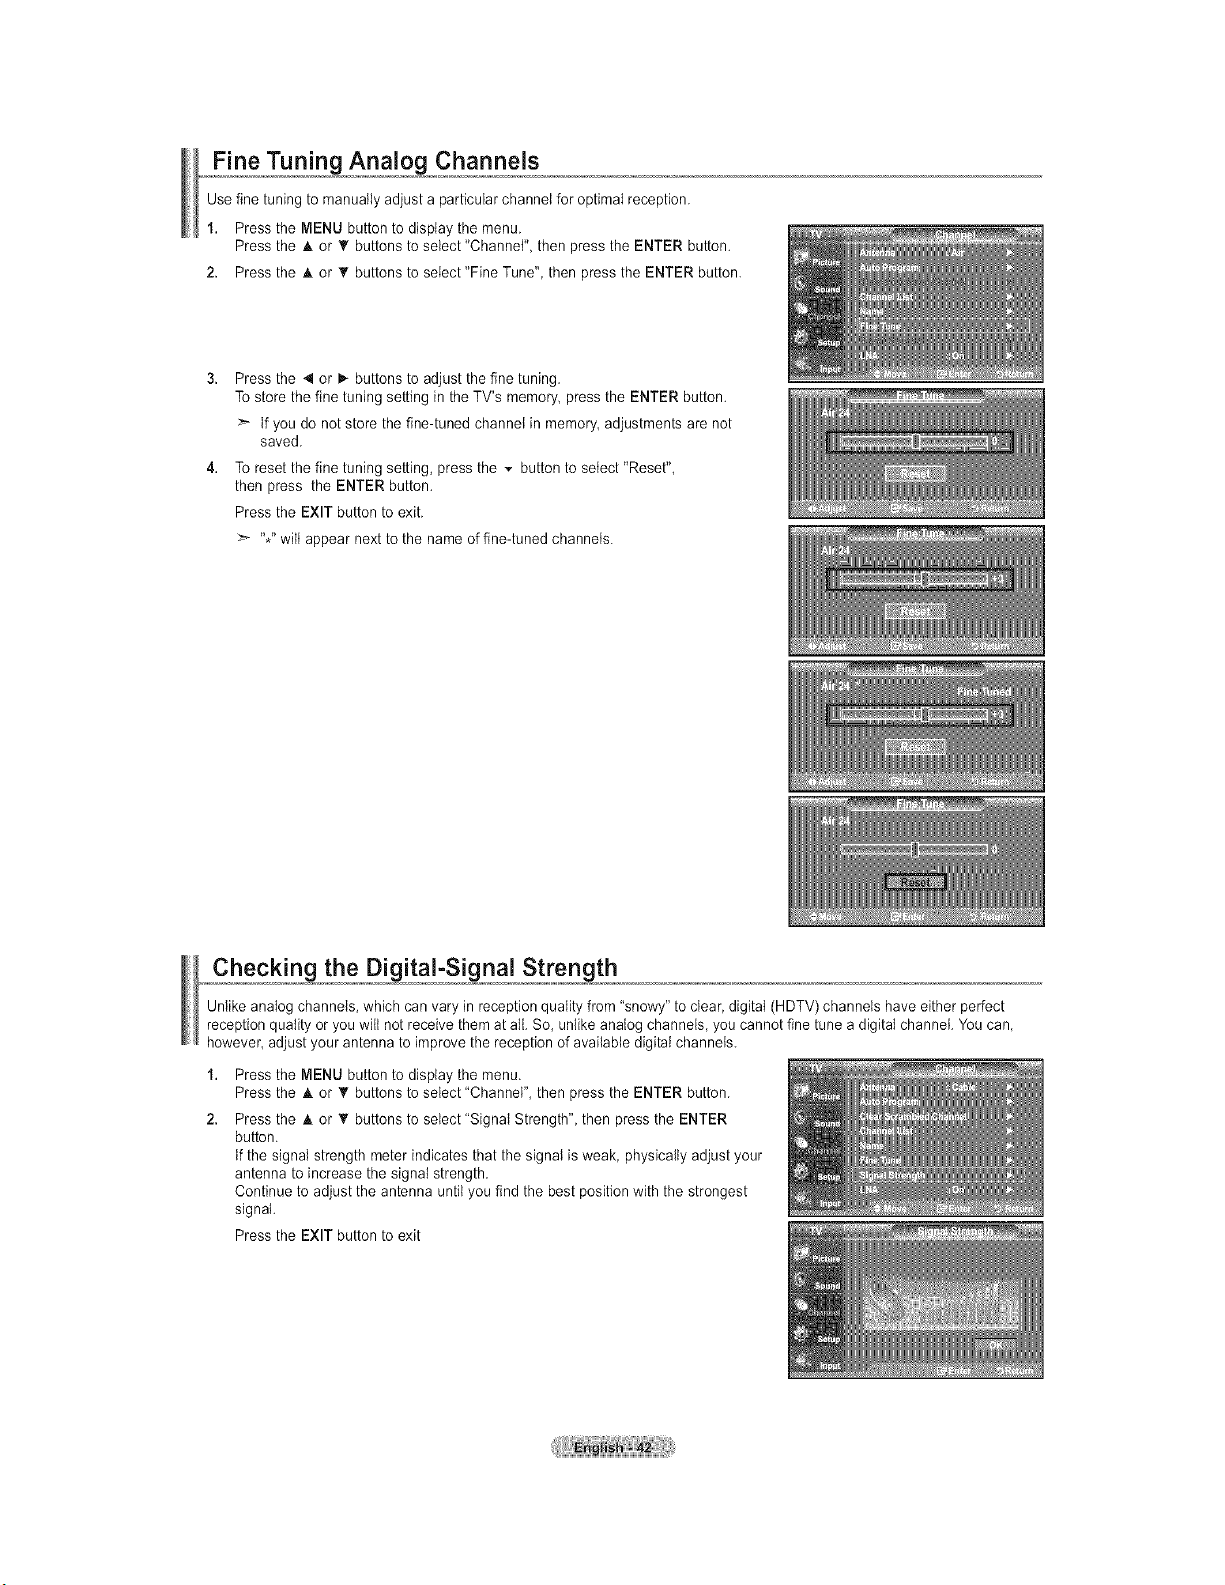
_,o A na,Jo_,Channels
Use fine tuning to manuatly adjust a particular channel for optimal reception.
1. Pressthe MENU button to display the menu.
Pressthe A or _' buttons to select "Channel", then pressthe ENTER button.
2. Pressthe A or _t'buttons to seiect"Fine Tune", then press the ENTER button.
Pressthe 4 or _-buttons to adjust the fine tuning.
Tostore the fine tuning setting in the TV's memory pressthe ENTER button.
tfyou do not store the fine-tuned channet in memory adjustments arenot
saved.
Toreset the fine tuning setting, press the v button tosetect "Reset",
then press the ENTER button.
Pressthe EXIT button to exit.
_'- %" wiltappear nextto the name offine-tuned channels.
Uniike analog channels, which canvary in reception quality from"snowy" to clear,digitat (HDTV) channels haveeither perfect
reception quality or youwiit not receive them at ai{. So, unlikeanalog channels, youcannot finetune a digital channet.You can,
however, adjust your antenna toimprove thereception of available digitalchannels.
1,
2.
Pressthe MENU button to display the menu.
Pressthe A or T buttons toselect "Channel", then press the ENTER button.
Pressthe _kor T buttons to select "Signal Strength",then pressthe ENTER
button.
tfthe signal strength meter indicates that the signal isweak, physically adjust your
antenna to increase the signai strength.
Continue toadjust the antenna until you find the bestposition with the strongest
signal
Pressthe EXIT button to exit
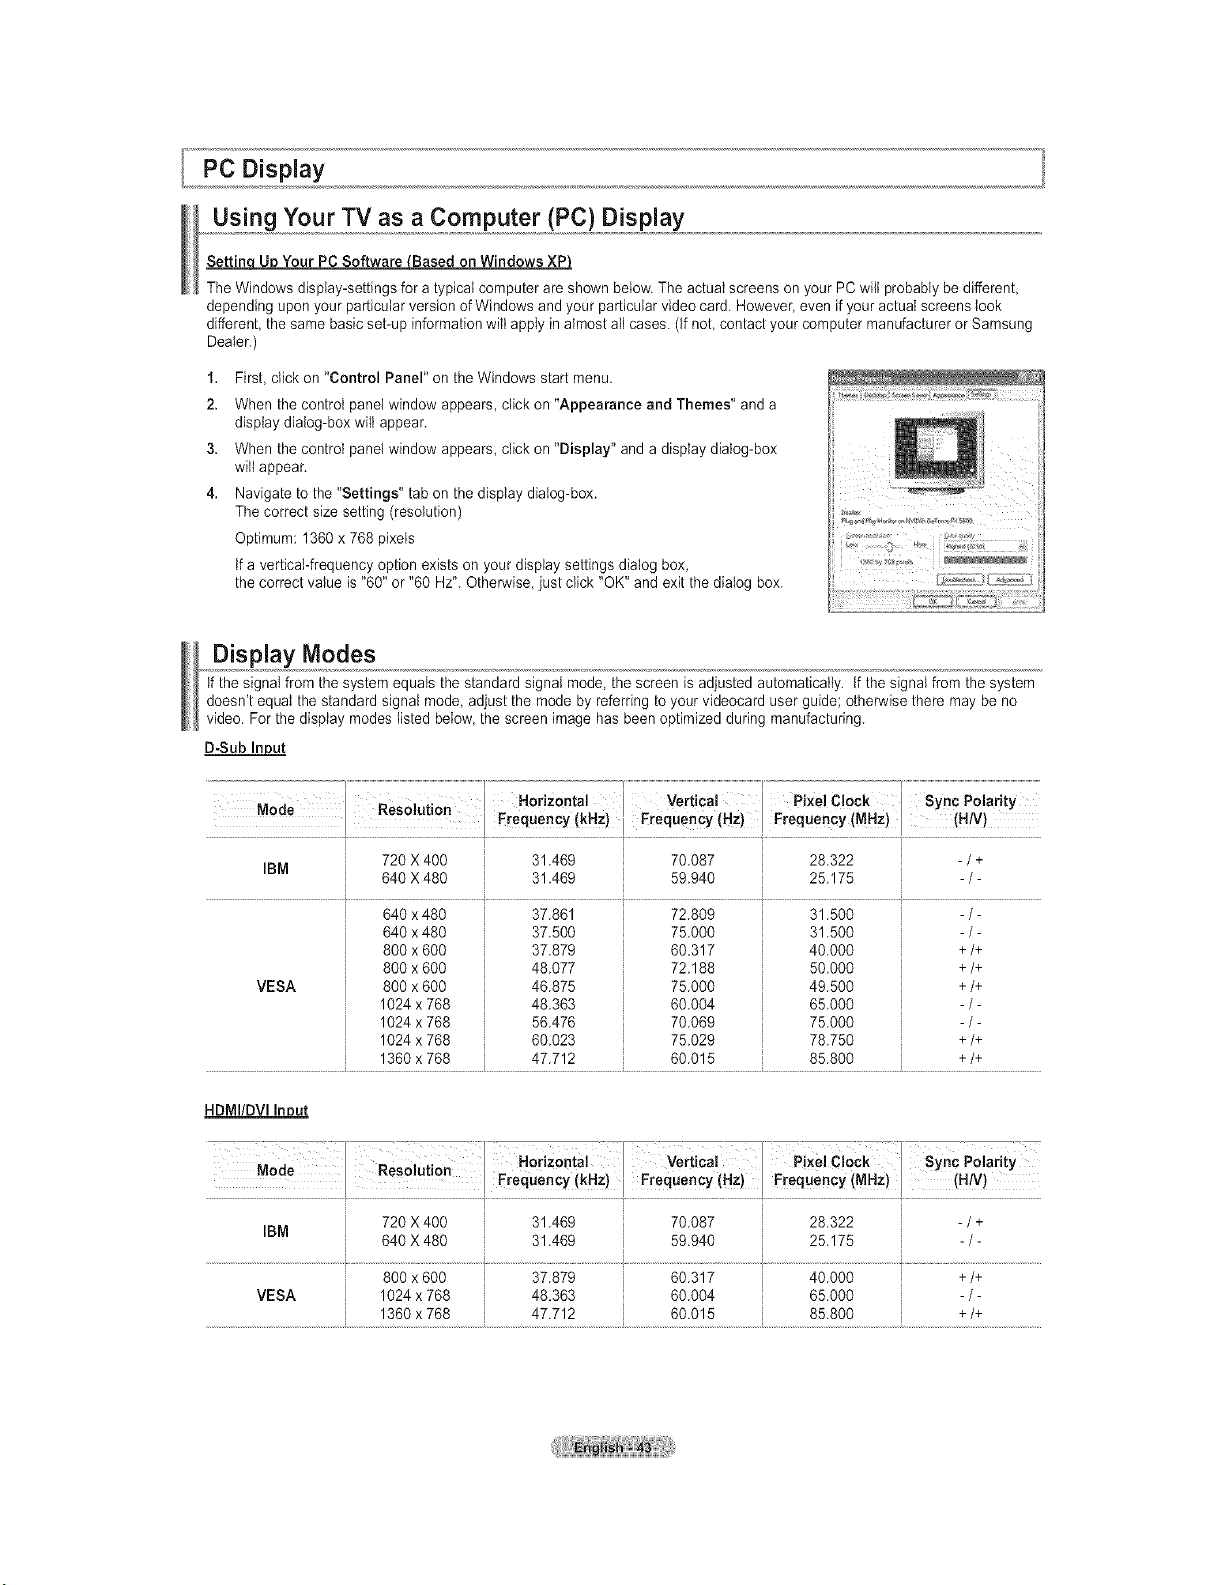
PC Display
Using Your TV as a Computer (PC) Display
Your PC Software J[Based onWindows XP}
TheWindows display-settings foratypical computer areshown below.The actual screens onyour PC wilt probably be different,
depending upon your particular version of Windows and your particularvideo card. However, even if your actual screens look
different, the same basicset-up information wilt apply in almost allcases. (if not contact your computer manufacturer orSamsung
Dealer.)
1. First, click on "Control Panel" on theWindows start menu.
2. When the control panel window appears, click on "Appearance and Themes" and a
display dialog-box wiltappear.
3. When the control panel window appears, click on "Display" and a display dialog-box
will appear.
4. Navigate to the "Settings" tabon the display dialog-box.
Thecorrect size setting (resolution)
Optimum: 1360 x 768 pixels
tfa vertical-frequency option exists on your display settings dialog box,
the correct value is"60" or "60 Hz".Otherwise, just click "OK"and exit the dialog box.
Display Modes
if the signal from the system equals the standard signal mode, the screen is adjusted automatically, if thesignaI from the system
doesn't equat the standard signal mode, adjust the mode by referringtoyour videocard user guide; otherwise there may be no
video. For the display modes listed below,the screen image hasbeenoptimized during manufacturing
M_-,-- _L..L, i,.... Horizontal Vertical Pixel Clock Sync Poladty
...... .... ,,u, FrequencY (kHz) Frequency (HZ) Frequency (MHZ) (H/v)
720 x 400 31.469 70.087 28.322 -/
+
IBM
640 X 480 31.469 59.940 25.175 -/ -
VESA
640 x480
640 x480
800 x 600
800 x 600
800 x 600
1024 x 768
1024 x 768
1024 x 768
1360 x 768
37.861
37.500
37.879
48.077
46.875
48.363
56.476
60.023
47.712
72.809
75.000
60.317
72.188
75.000
60.004
70.069
75.029
60.015
31.500
31.500
40.000
50.000
49.500
65.000
75.000
78.750
85.800
-/-
-/-
+/+
+/+
+/+
-/-
-/-
+/+
+/+
HDMI/DVI In ut
720 X 400 31.469 70.087 28.322 -/ +
IBM
640 X 480 31.469 59.940 25.175 -/ -
800 x 600 37.879 60.317 40.000 +/+
VESA 1024 x 768 48.363 60.004 65.000 -/ -
1360 x 768 47.712 60.015 85.800 +/+
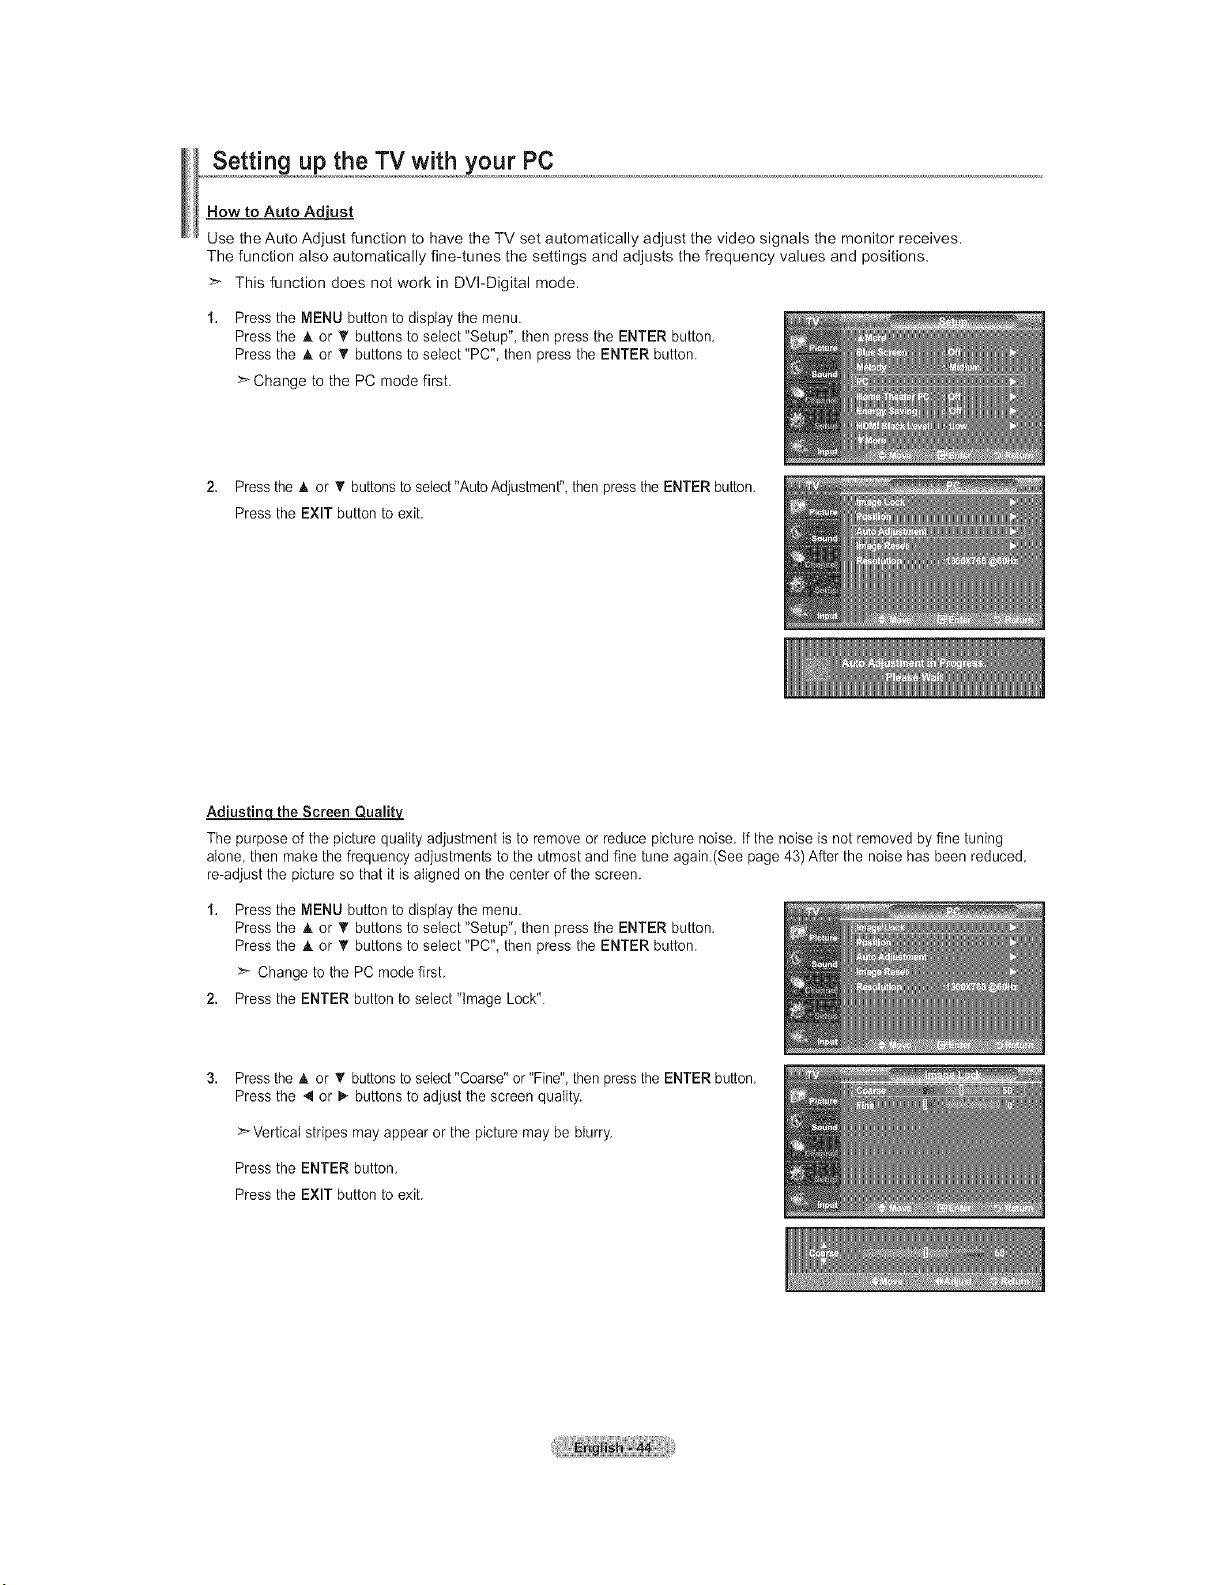
Setting up the TV with your PC
How to Auto Adiust
Use the Auto Adjust function to have the TV set automatically adjust the video signals the monitor receives.
The function also automatically fine-tunes the settings and adjusts the frequency values and positions.
>_ This function does not work in DVI-Digital mode.
Pressthe MENU button to display the menu.
Pressthe A or V buttons toselect "Setup", then pressthe ENTER button.
Pressthe A or T buttons toselect "PC", then press the ENTER button.
>*Change to the PC mode first.
2. Pressthe A or _' buttons toselect"Auto Adjustment",then pressthe ENTER button.
Pressthe EXIT button to exit.
the Screen
The purpose of the picture quality adjustment isto remove or reduce picture noise. If the noise is not removed byfine tuning
alone,then makethe frequency adjustments to the utmost and fine tune again.(See page 43)After the noise has been reduced,
re-adjust the pictureso that it isaligned on the center of the screen.
1. Pressthe MENU button to display the menu.
Pressthe A. or _' buttons to select "Setup", then pressthe ENTER button.
Pressthe A or T buttons toselect "PC", then press the ENTER button.
>'- Change to the PC mode first.
2. Pressthe ENTER button tosetect "image Lock".
Pressthe h, or _' buttons to select "Coarse" or"Fine", then pressthe ENTER button.
Pressthe 4 or I,_buttons toadjust the screenquality.
>_Verticat stripes mayappear orthe picture may be blurry.
Pressthe ENTER button.
Pressthe EXIT button to exit.
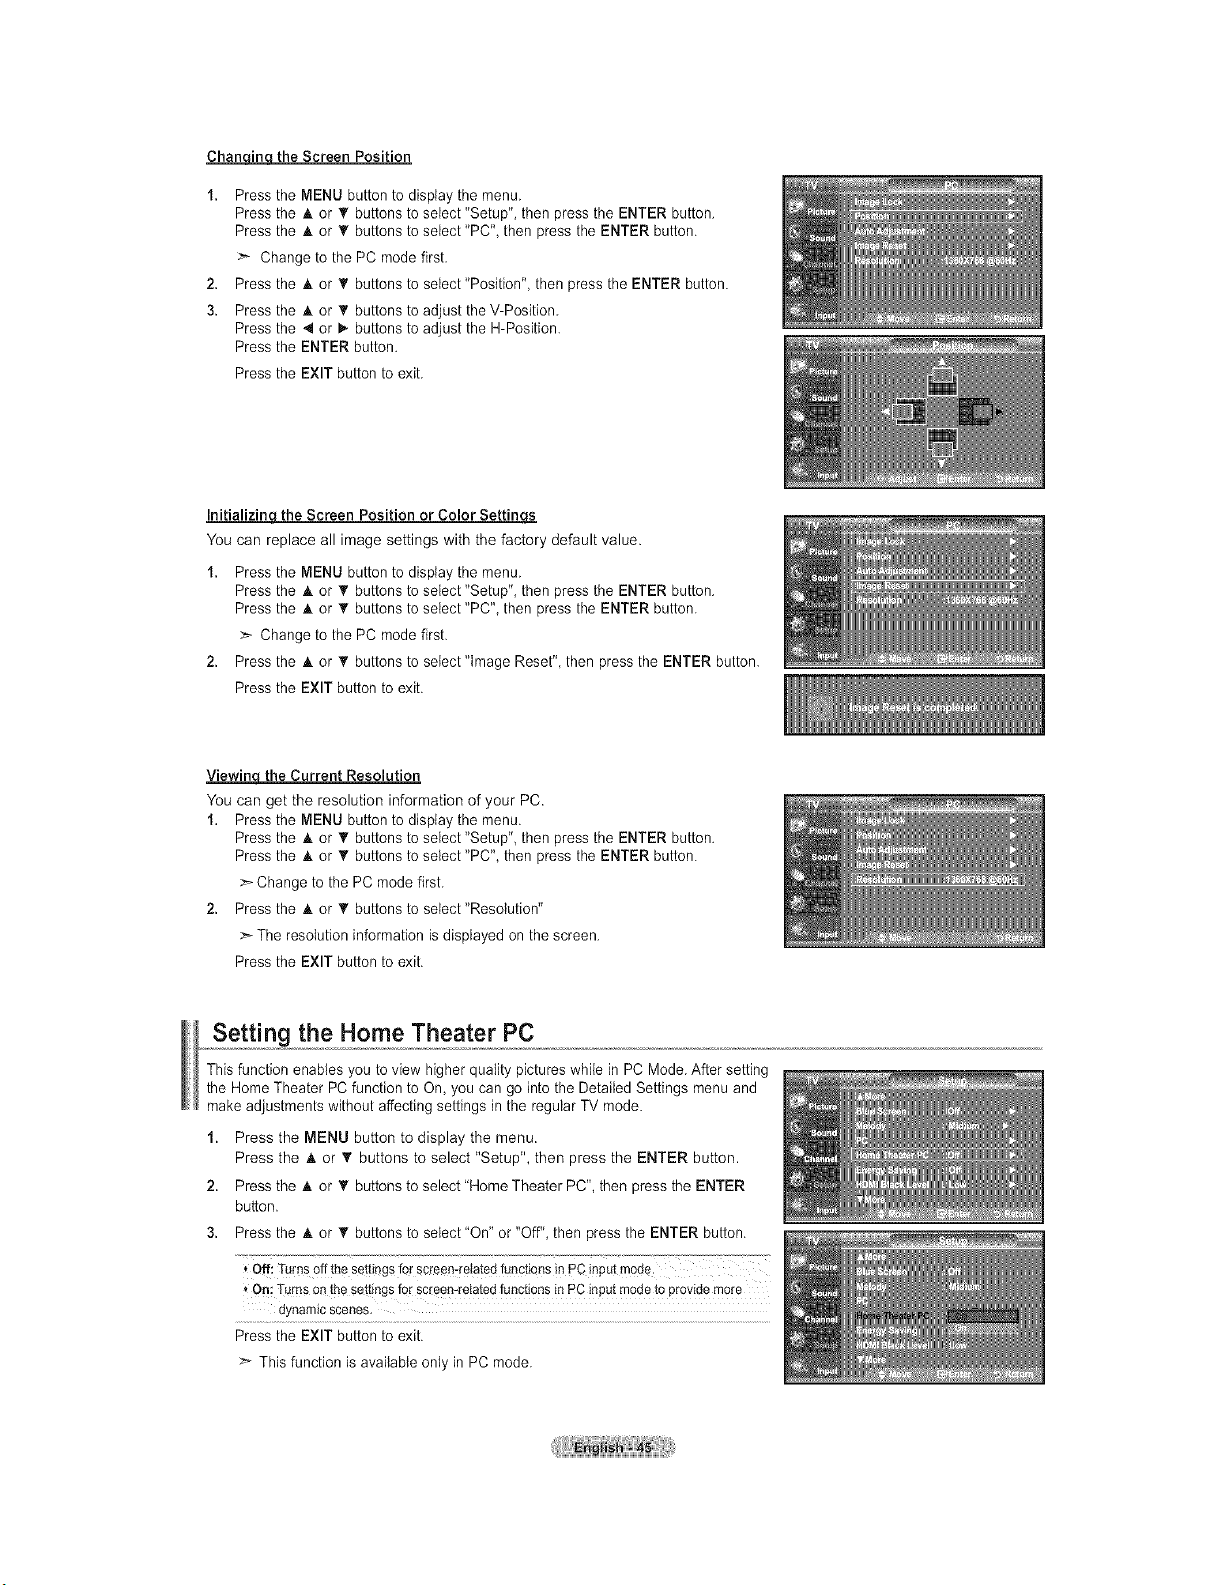
ChangLo_ the Screen Position
1. Pressthe MENU button to display the menu.
Pressthe & or V buttons toselect "Setup", then pressthe ENTER button.
Pressthe & or _' buttons to select "PC", then press the ENTER button.
Change to the PC mode first.
2. Pressthe _kor _' buttons to select"Position", then press the ENTER button.
3. Pressthe & or _' buttons to adjust the V-Position.
Pressthe 4 or D,.buttons to adjust the H-Position.
Pressthe ENTER button.
Pressthe EXIT button to exit.
Initializinq the Screen Position or Color Settine.s
You can replace all image settings with the factory default value.
1. Pressthe MENU button to display the menu.
Pressthe A. or T buttons to select "Setup", then pressthe ENTER button.
Pressthe A or _rbuttons to select "PC", then press the ENTER button.
>- Change tothe PC mode first.
2. Pressthe A or _rbuttons to setect"tmage Reset", then pressthe ENTER button.
Pressthe EXIT button to exit.
Viewing the Current Resolution
You can get the resolution information of your PC.
1. Pressthe MENU button to display the menu.
Pressthe A. or _' buttons to select "Setup", then pressthe ENTER button.
Pressthe _. or T buttons to select "PC", then press the ENTER button.
:_ Change to the PC mode first.
2. Pressthe A or _' buttons to select"ResoIution"
:_ The resolution information isdisplayed on the screen.
Pressthe EXIT button to exit.
Setting the Home Theater PC
Thisfunction enables you to view higher quality pictures while inPC Mode. Aftersetting
the Home Theater PC function toOn, you can go into the Detailed Settings menu and
makeadjustments without affecting settings in the regular TV mode.
1. Press the MENU button to display the menu.
Press the _t. or _' buttons to select "Setup", then press the ENTER button.
2. Pressthe h. or T buttons to select "HomeTheater PC",then press the ENTER
button.
3. Pressthe A or _rbuttons to select"On" or"Off", then pressthe ENTER button.
Qffi Turnsoff thesettingsforscreemrelatedfunctionsinPC inputmode.
On:Turnsonthe settingsforscreen-relatedfunctionsinPC inputmodetoprovidemore
dynamic scenes.
Pressthe EXIT button to exit.
> This function isavailable only in PC mode.
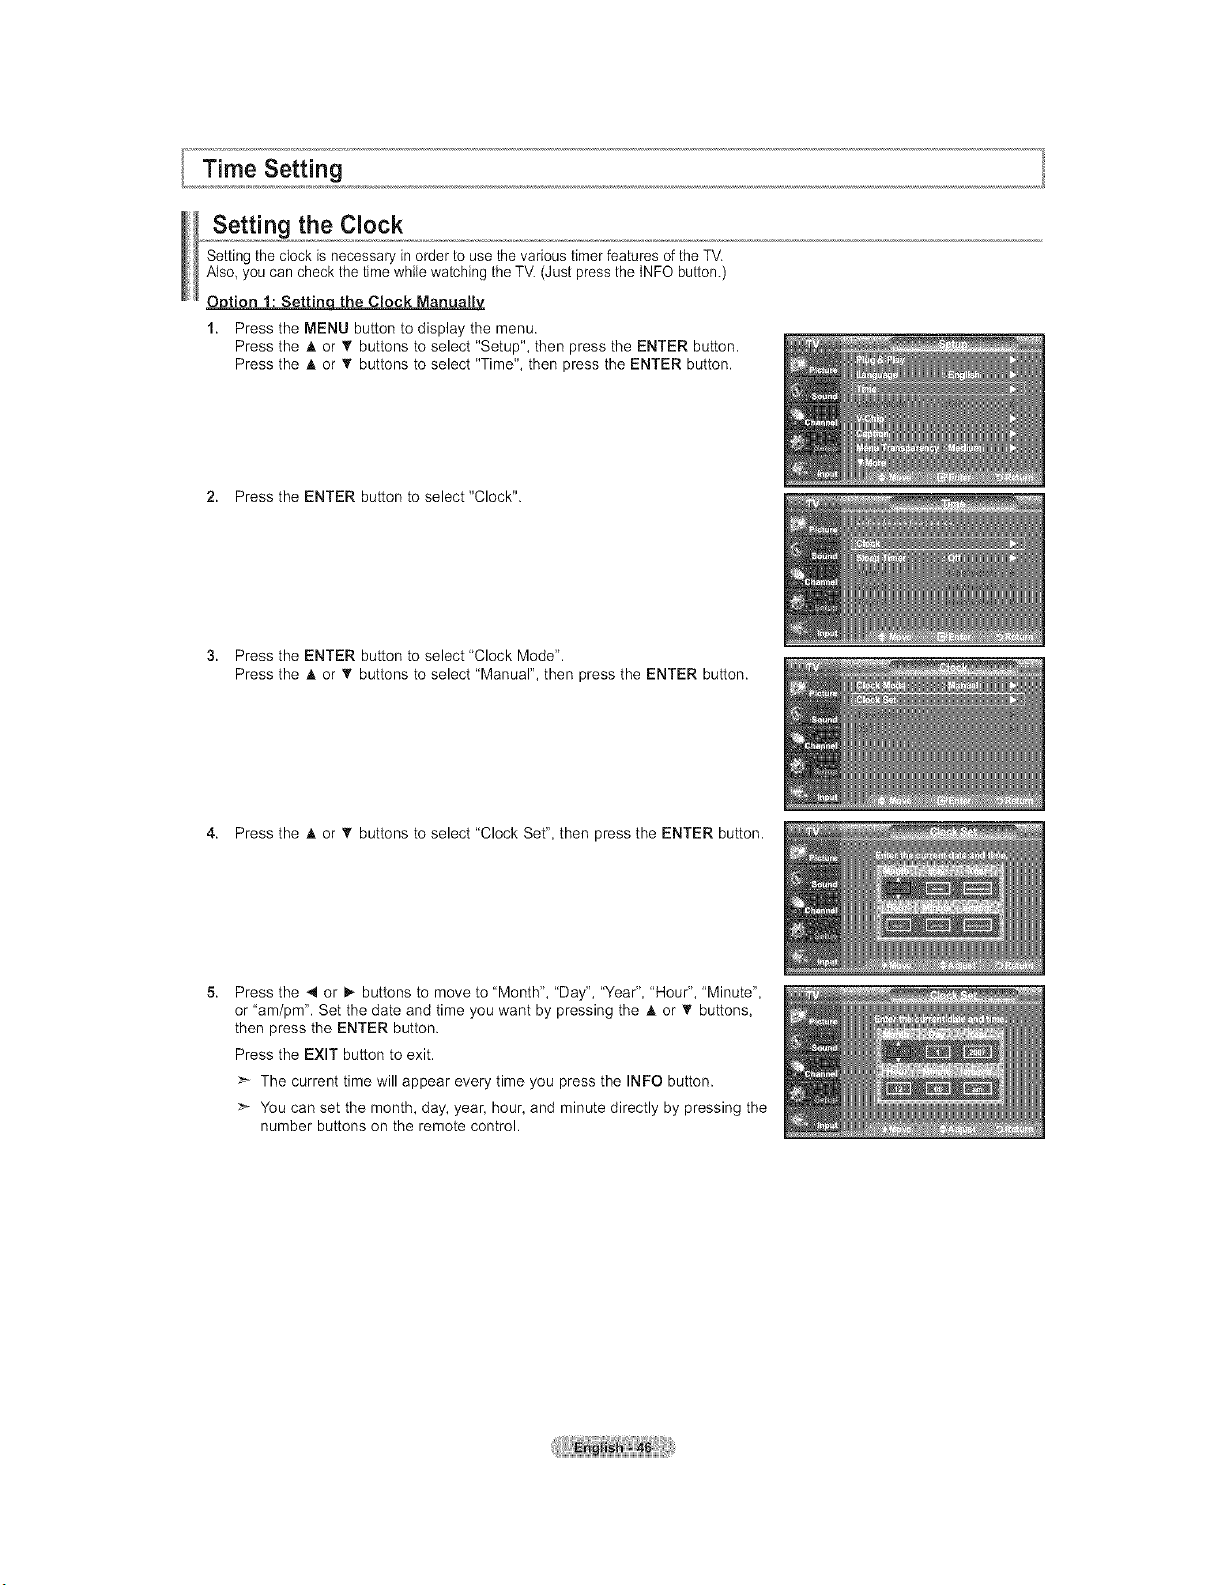
Time Setting
Setting the Clock
Setting the clock isnecessary in order to use the various timer features of the TV.
Also, youcan check thetimewhile watching the TM (Just pressthe tNFO button.)
Option 1: Settinqthe Clock Manually
1. Press the MENU button to display the menu.
Press the _k or T buttons to select "Setup", then press the ENTER button.
Press the A or _' buttons to select "Time", then press the ENTER button.
2. Press the ENTER button to select "Clock".
3. Press the ENTER button to select "Clock Mode".
Press the A or _' buttons to select "Manual", then press the ENTER button.
4. Press the A or _' buttons to select "Clock Set", then press the ENTER button.
5.
Press the _1 or 1_ buttons to move to "Month", "Day", "Year", "Hour", "Minute",
or "am/pm". Set the date and time you want by pressing the A or _' buttons,
then press the ENTER button.
Press the EXIT button to exit.
The current time will appear every time you press the INFO button.
You can set the month, day, year, hour, and minute directly by pressing the
number buttons on the remote control.
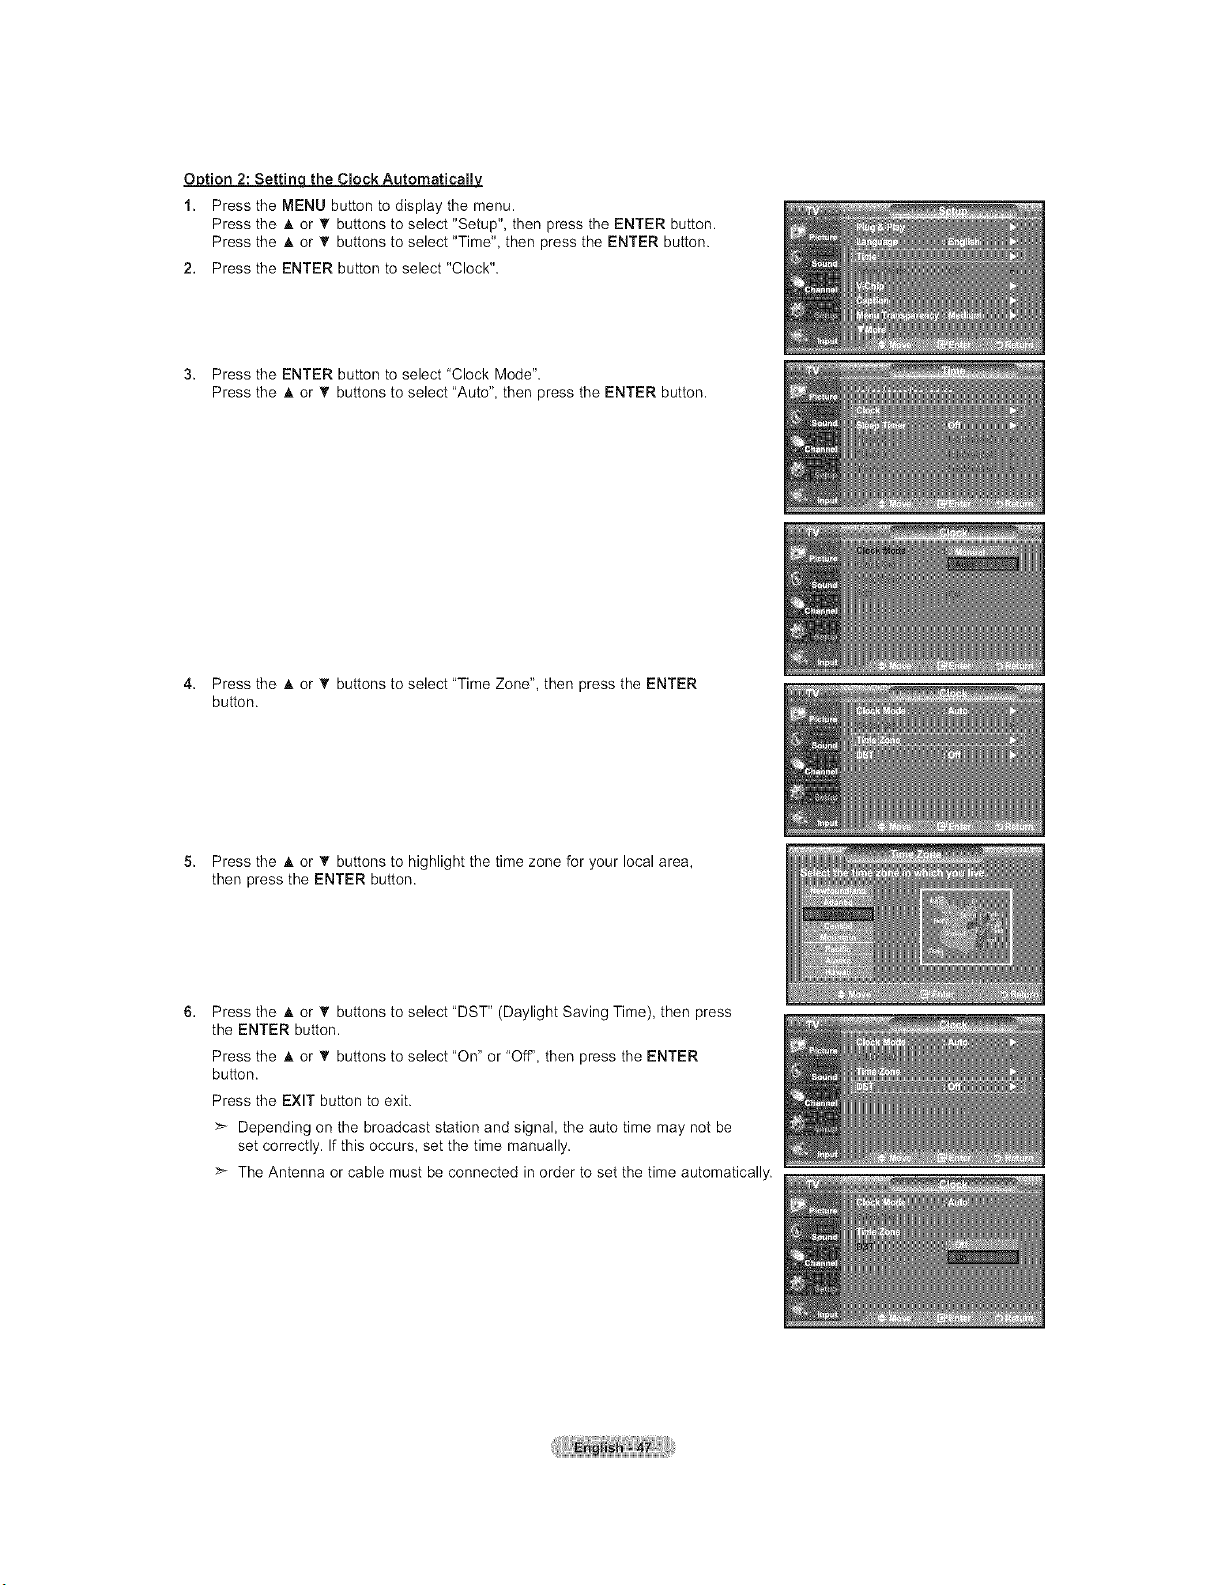
Option 2: Setting the Clock Automatically
1. Press the MENU button to display the menu.
Press the A or V buttons to select "Setup", then press the ENTER button.
Press the A or _' buttons toselect "Time", then press the ENTER button.
2. Press the ENTER button to select "Clock".
3. Press the ENTER button to select "Clock Mode".
Press the A or _' buttons toselect "Auto", then press the ENTER button.
4. Press the A or _' buttons to select "Time Zone", then press the ENTER
button.
5. Press the A or T buttons to highlight the time zone for your local area,
then press the ENTER button.
6.
Press the A. or '_ buttons toselect "DST" (Daylight Saving Time), then press
the ENTER button.
Press the A or _' buttons toselect "On" or "Off', then press the ENTER
button.
Press the EXIT button to exit.
Depending on the broadcast station and signal, the auto time may not be
set correctly. Ifthis occurs, set the time manually.
The Antenna orcable must be connected in order to set the time automatically.
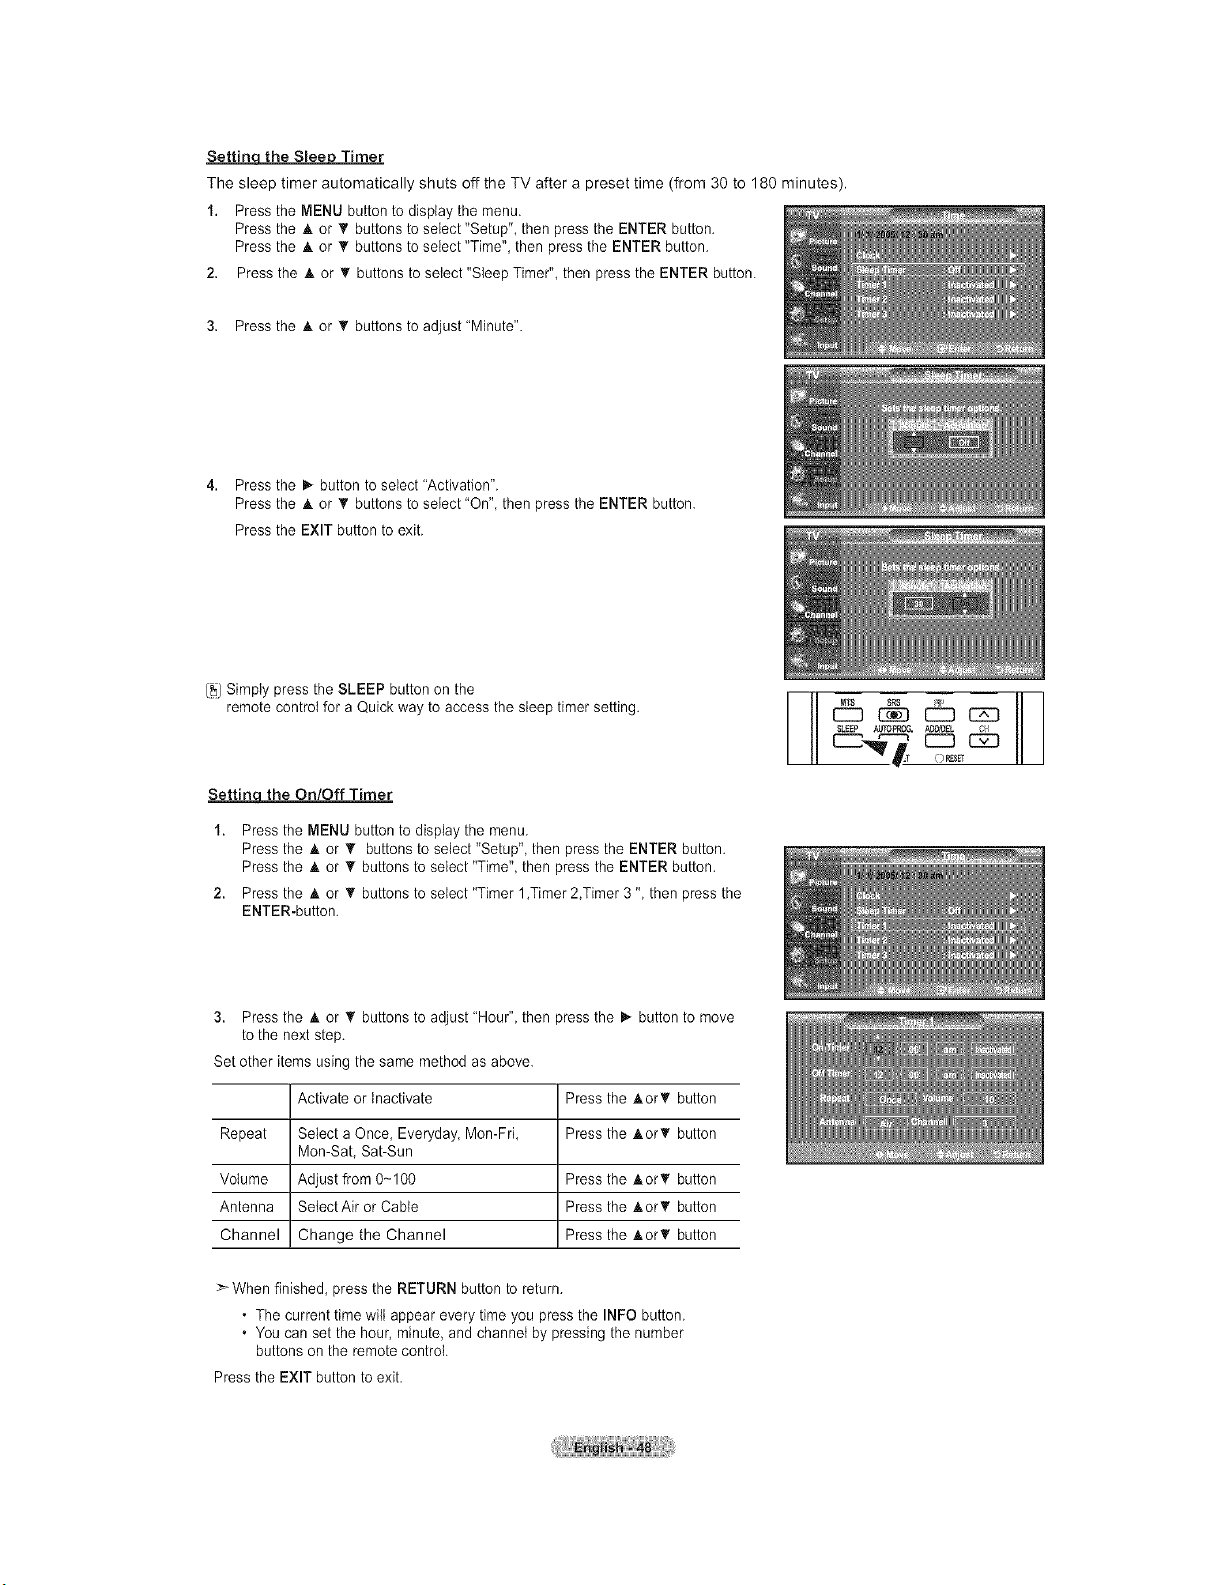
Settin the S_ee Timer
The sleep timer automatically shuts off the TV after a preset time (from 30 to 180 minutes).
1. Pressthe MENU button to display the menu.
Pressthe A or _' buttons to select "Setup", then pressthe ENTER button.
Pressthe A or _' buttons to select "Time", then pressthe ENTER button.
2. Press the A or • buttons tosetect"Sleep Timer", then press the ENTER button.
3. Pressthe A or T buttons to adjust"Minute".
4. Pressthe i_ button toselect"Activation".
Pressthe & or T buttons toselect "On", then press the ENTER button.
Pressthe EXIT button to exit.
[_JSimply pressthe SLEEP button on the
remote control for aQuick way to access the sleep timer setting.
Settinq the On/Off Timer
1. Pressthe MENU button to display the menu.
Pressthe A. or V buttons toselect "Setup", then pressthe ENTER button.
Pressthe A or _' buttonsto select "Time",then press the ENTER button.
2. Press the A or _' buttonsto select "Timer 1,Timer 2,Timer3 ", then press the
ENTER-button.
3. Press the A or _' buttonsto adjust "Hour",then pressthe il_button to move
to the next step.
Set other items using the same method as above.
Activate or Inactivate Press the AorT button
Repeat Select a Once, Everyday Mon-Fri, Press the AorT button
Mon-Sat, Sat-Sun
Volume Adjust from0-100 Press the AorT button
Antenna SetectAir or Cable Press the AorT button
Channel Change the Channel Press theAorT button
>_When finished, press the RETURN button to return.
• The current timewilt appear every time you pressthe INFO button.
• You can setthe hour,minute, and channet by pressing the number
buttonson the remotecontrol.
Pressthe EXIT button to exit.
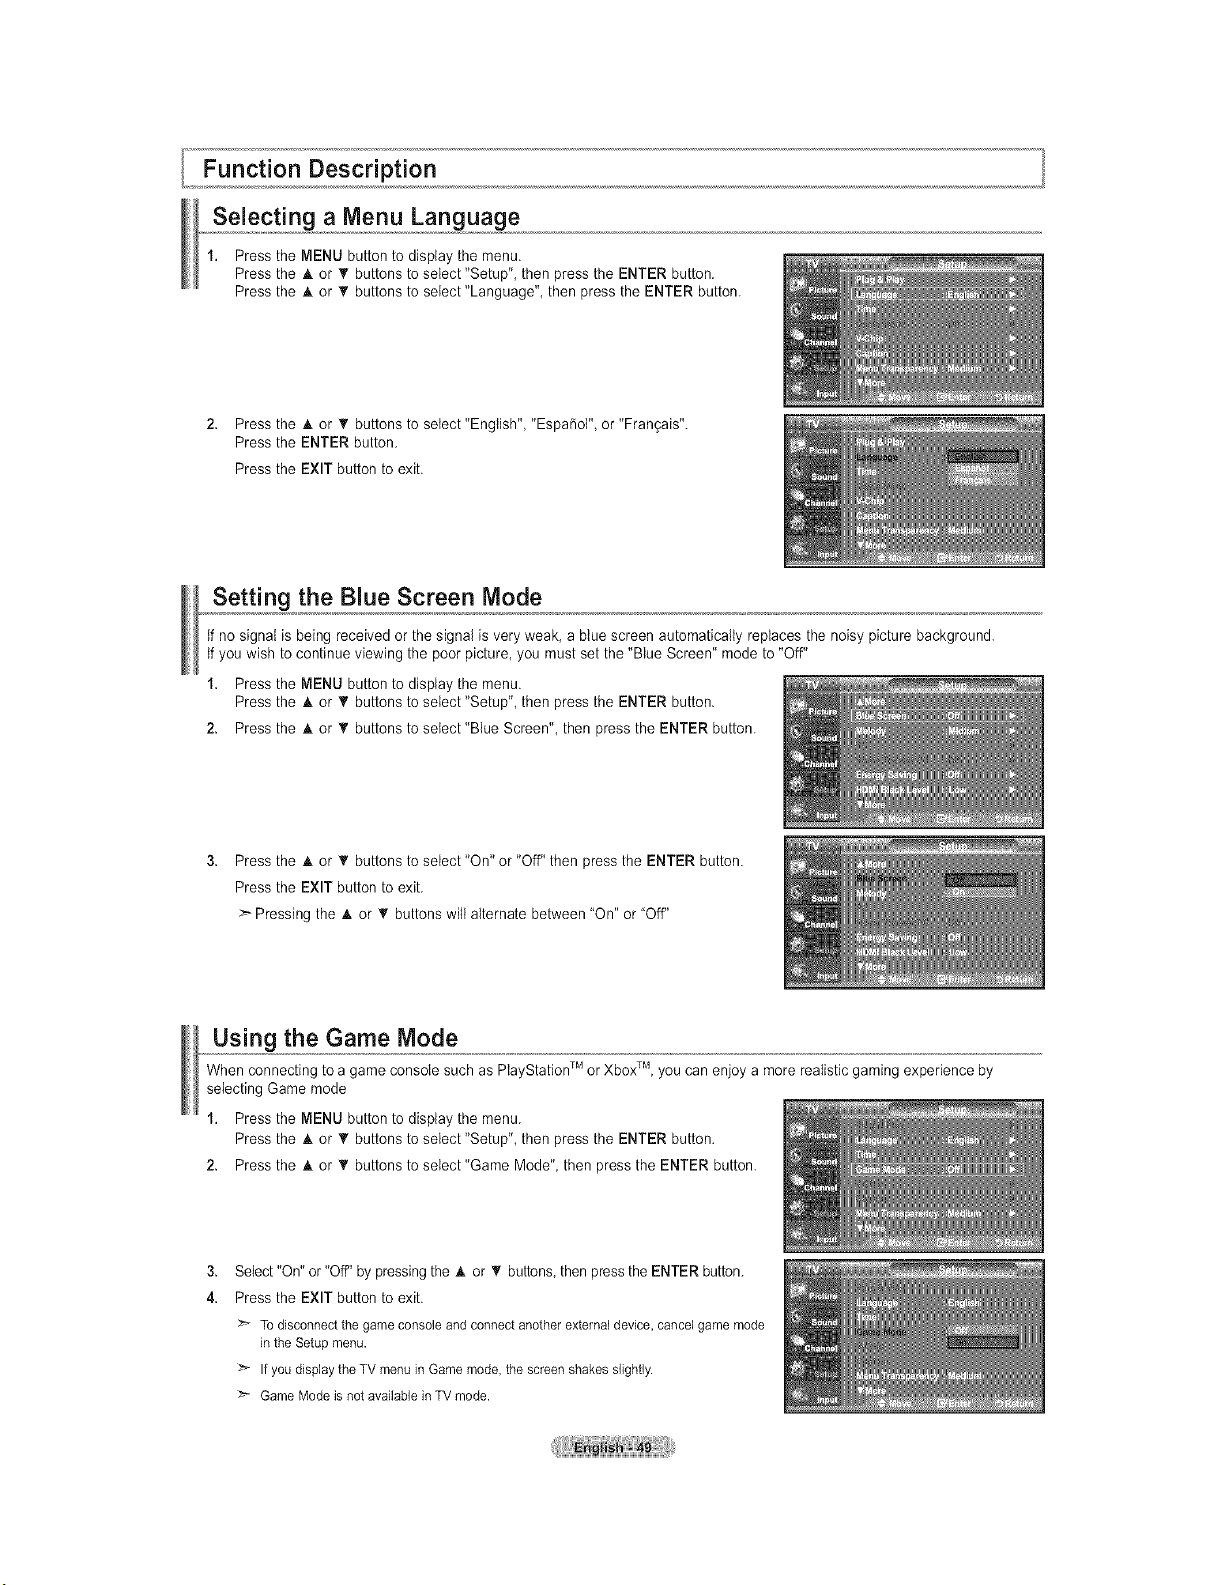
Function Description
Selecting a Menu Language
1. Pressthe MENU button to display the menu.
Pressthe A or T buttons toselect "Setup", then pressthe ENTER button.
Pressthe A or _rbuttons to select "Language", then pressthe ENTER button.
2. Pressthe A or _rbuttons to setect"Engtish", "Espa_o{",or "Fran9ais".
Pressthe ENTER button.
Pressthe EXIT button to exit.
Setting the Blue Screen Mode
Ifno signal is being received orthe signal isvery weak, a blue screen automatically replaces the noisy picture background.
tfyouwish to continue viewing the poorpicture, you must setthe"Blue Screen" mode to "Off"
1. Pressthe MENU button to display the menu.
Pressthe A or _' buttons to select "Setup", then pressthe ENTER button.
2. Pressthe A or _rbuttons to setect"Blue Screen", then press the ENTER button.
3. Pressthe A or _' buttons to select "On" or "Off"then pressthe ENTER button.
Pressthe EXIT button to exit.
> Pressing the A or V buttonswilt alternate between "On" or "Off"
Using the Game Mode
When connectingto agame console such as PlayStationTM orXboxTM, you canenjoy a more realistic gaming experience by
selecting Game mode
1. Pressthe MENU button to display the menu.
Pressthe A or _' buttons to select "Setup", then pressthe ENTER button.
2. Pressthe A or _' buttons to seIect"Game Mode",then pressthe ENTER button.
3.
4.
Select "On" or "Off" by pressing the A or _' buttons, then press the ENTER button.
Press the EXIT button to exit.
>'- To disconnect the game console and connect another external device, cancel game mode
in the Setup menu.
:_ Ifyou display the TV menu in Game mode, the screen shakes slightly.
Game Mode isnot available in TV mode.
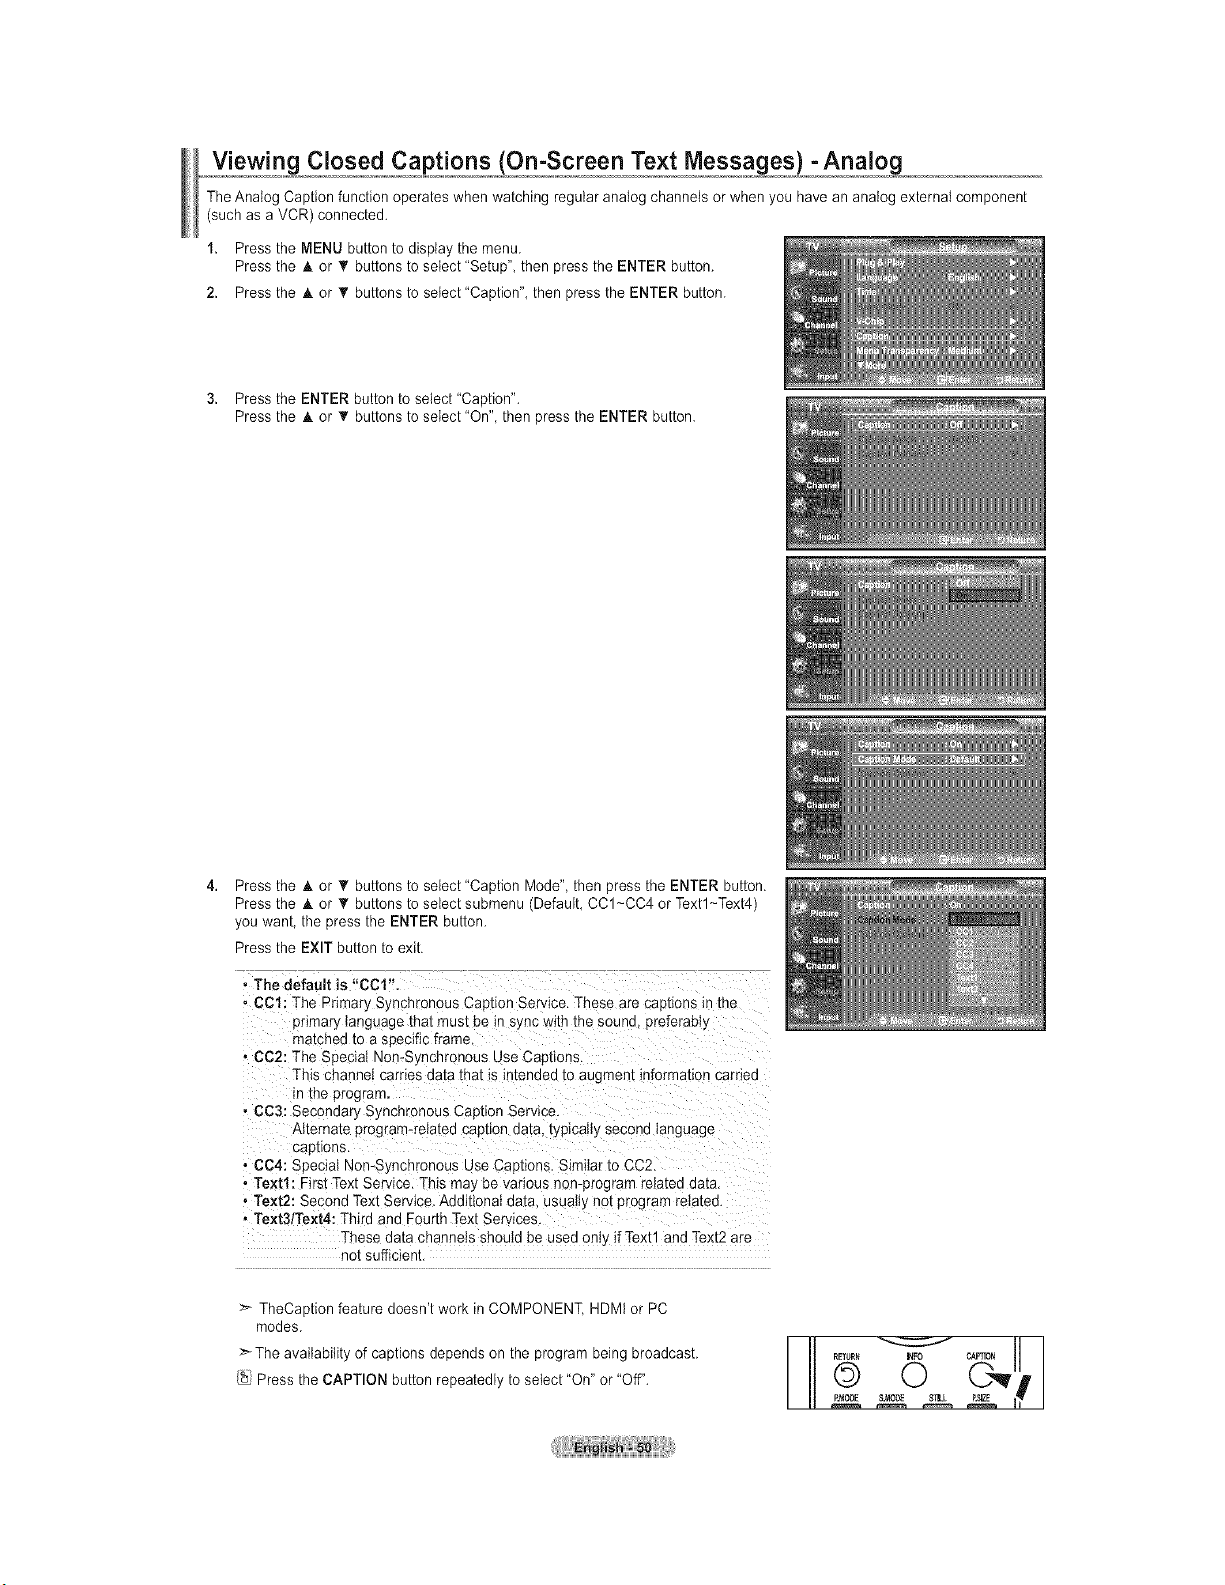
Viewing Closed Captions (O_n-Screen Te,,,,,,xtMesj.jsa,_es_,),cAna_.!£_,
TheAnalog Caption function operates when watching regularanalog channels orwhen you haveananalog external component
(suchas a VCR) connected.
1. Pressthe MENU button to display the menu.
Pressthe A or _' buttons to select 'Setup" then press the ENTER button.
2. Pressthe A or _rbuttons to setect"Caption", then press the ENTER button.
3. Pressthe ENTER button toselect "Caption".
Pressthe A or _' buttons to select "On", then press the ENTER button.
Pressthe _, or _' buttons to select "Caption Mode",then press the ENTER button.
Pressthe A or V buttons toselect submenu (Default, CC1~CC4 or Textl~Text4)
you want, the pressthe ENTER button.
Pressthe EXIT button to exit.
,The default is "CCt".
• CCl: The Primary Synchronous Caption Service. These arecao[_onsin the
primary _ang_.agethat must bein sync with the sound, preferabl_
matchedto aspecific frame
• CC2: The Seeciat Non-Synchronous Use Cao_lons
This channe_carries data that is _ntenaea_o augment information carriec
in me program.
, CC3: Secondary SI nchronous Caotion Service.
Alternate program-related caption ua[a. typically second language
captions
• C04: Special Non-Synchronous Use Captions. Simitar toCC2.
,Text1: First Text Service. This ma_ be various non-program rela[eu aa[a.
,Text2: Second Text Service. Additional data. usuaity not program related.
• Te×t3/Te×t4: Third and FourthText Services
These data channeis should De useuon if Text1 and Text2 are
not sufficient.
>- TheCaption feature doesn't work in COMPONENT, HDMt or PC
modes.
Theavailability of captions depends on the program beingbroadcast.
Press the CAPTION button repeatedly to select "On" or "Off".
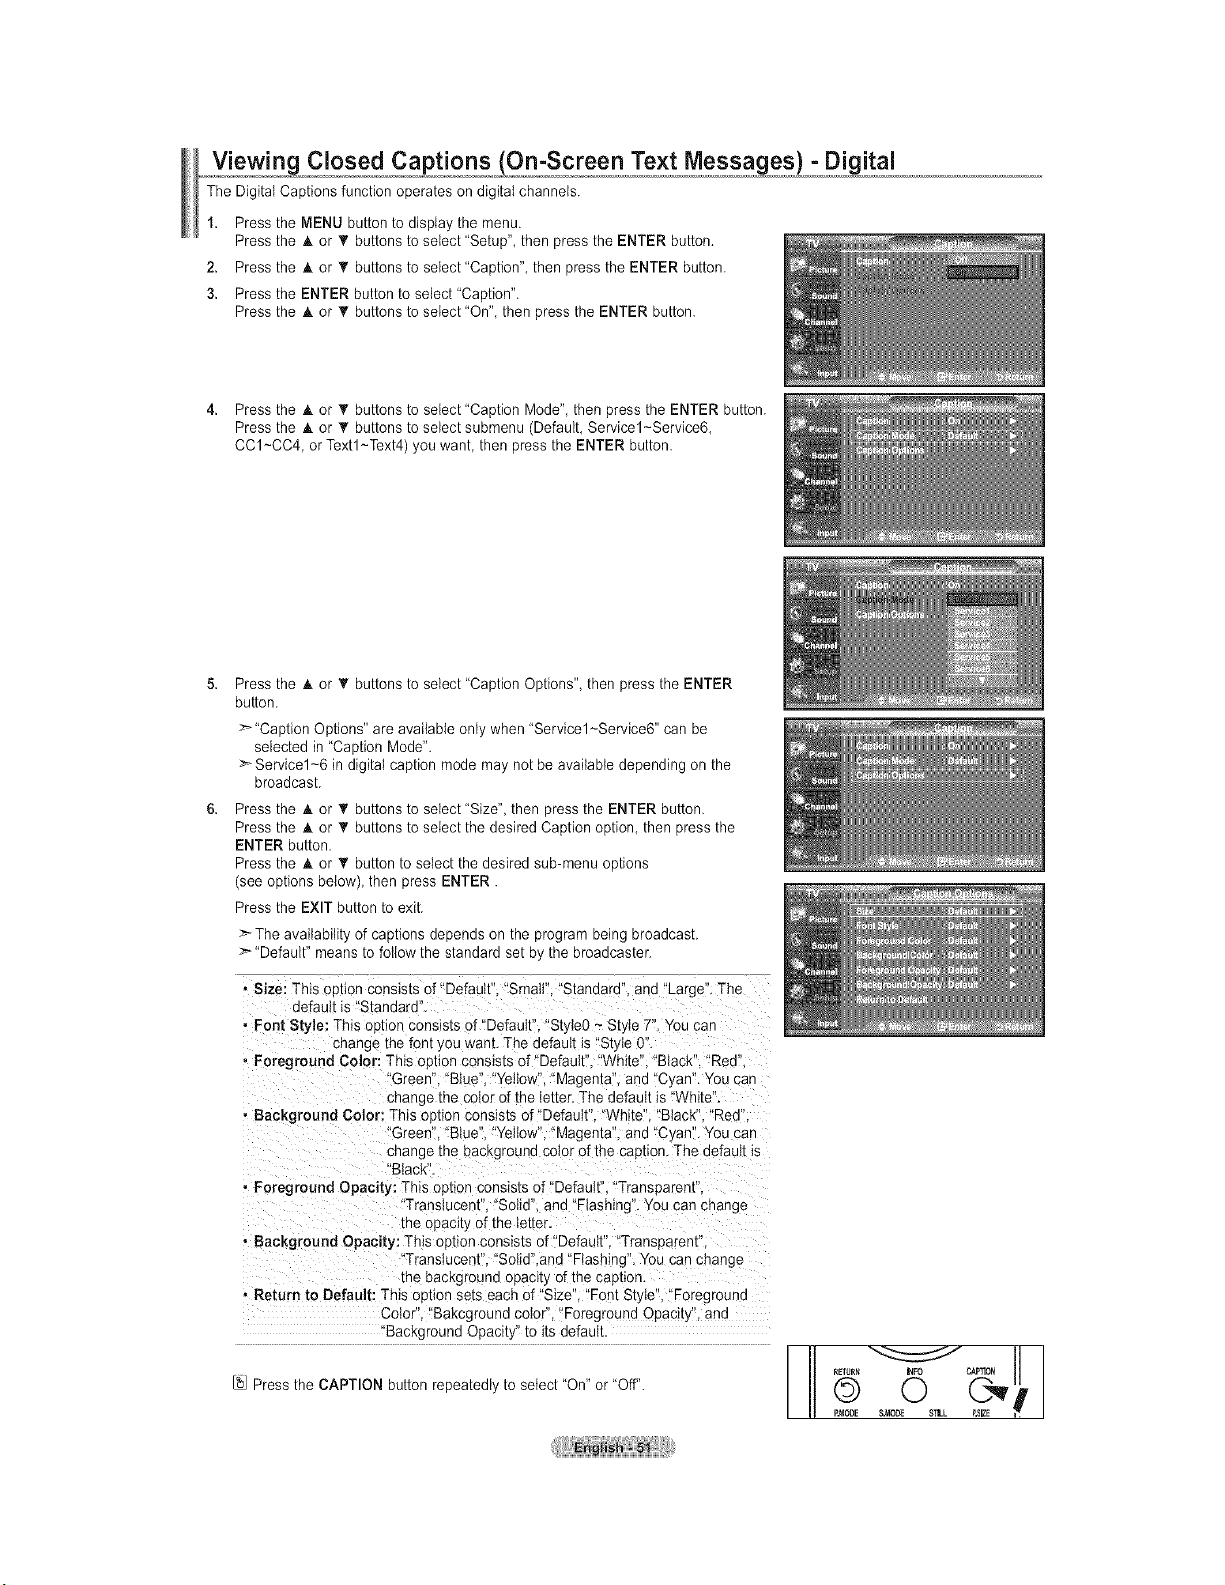
Closed Captions On enjext , ,Messa ges )- Digital
The DigitalCaptions function operates on digital channels.
1. Pressthe MENU button to display the menu.
Pressthe A or _' buttons to select 'Setup", then press the ENTER button.
2. Pressthe A or _rbuttons to select 'Caption", then press the ENTER button.
3. Pressthe ENTER button toselect"Caption".
Pressthe A or V buttons toselect "On", then press the ENTER button.
4. Pressthe A or T buttons to select"Caption Mode",then press the ENTER button.
Pressthe _t.or T buttons toselect submenu (Default, Servicel~Service6,
CC1~CC4, or Textl~Text4) you want then pressthe ENTER button.
Pressthe h. or T buttons to select "Caption Options", then press the ENTER
button.
>-"Caption Options" are available only when "Servicel~Service6" can be
selected in "Caption Mode".
_Servicel~6 in digital caption mode may not be available depending on the
broadcast.
Pressthe A or _' buttons to select "Size", then pressthe ENTER button.
Pressthe A or _' buttons to select the desired Caption option, then press the
ENTER button.
Pressthe A or • button toselect the desiredsub-menu options
(see options below) then pressENTER.
Pressthe EXIT button to exit.
Theavailability of captions depends on the program beingbroadcast.
>'"Default" means to follow [ne s[anuaru set D} [neDroaucas[er,
• Size: This ootion consists of "Default"."Small". "Standard". and "Large". The
default is"Standard
, Font Style: This ou[ion consists of "Default". "Style0 ~Style 7". You can
change the font y )u wan[. The default is"St'_e (
, Foreground Color: This ootion consists of "Default"."White". "Black". "Red"
"Green". "Blue"."Yellow". "Magenta". and "C/an". You can
changethe cc )r of the letter. Thedefault is"White".
, Background Color: This option consists of"DefauIt' 'White". "Black"."Red"
Green' "Blue". "Yellow". "Magenta". and "C/an". You can
changeI"-a bacKgrounrJcolorof the caption. The defauIt _s
"Black'
, Foreground Opacity: This oo[_ci consists of"Default. "Transparent.
"Translucent". "Solid" and "Flashing". You can change
me opacity of the letter.
• Background Opacity: This optionconsists of"Default". "Transoarent
"Translucent. "Sotid".and "Flashing. You canchange
me backgro[ nd opacity of the caphon.
• Return to Default: This oution sets each of "Size. "Font Style", "Foregrouna
Color. "Bakcgrouna coior, "Foreground Opacit_ aria
BacKgrouna Opacity' to its default.
[_ Press the CAPTION button repeatedly to select "On"or "Off".
0
$_-L P,SIZE
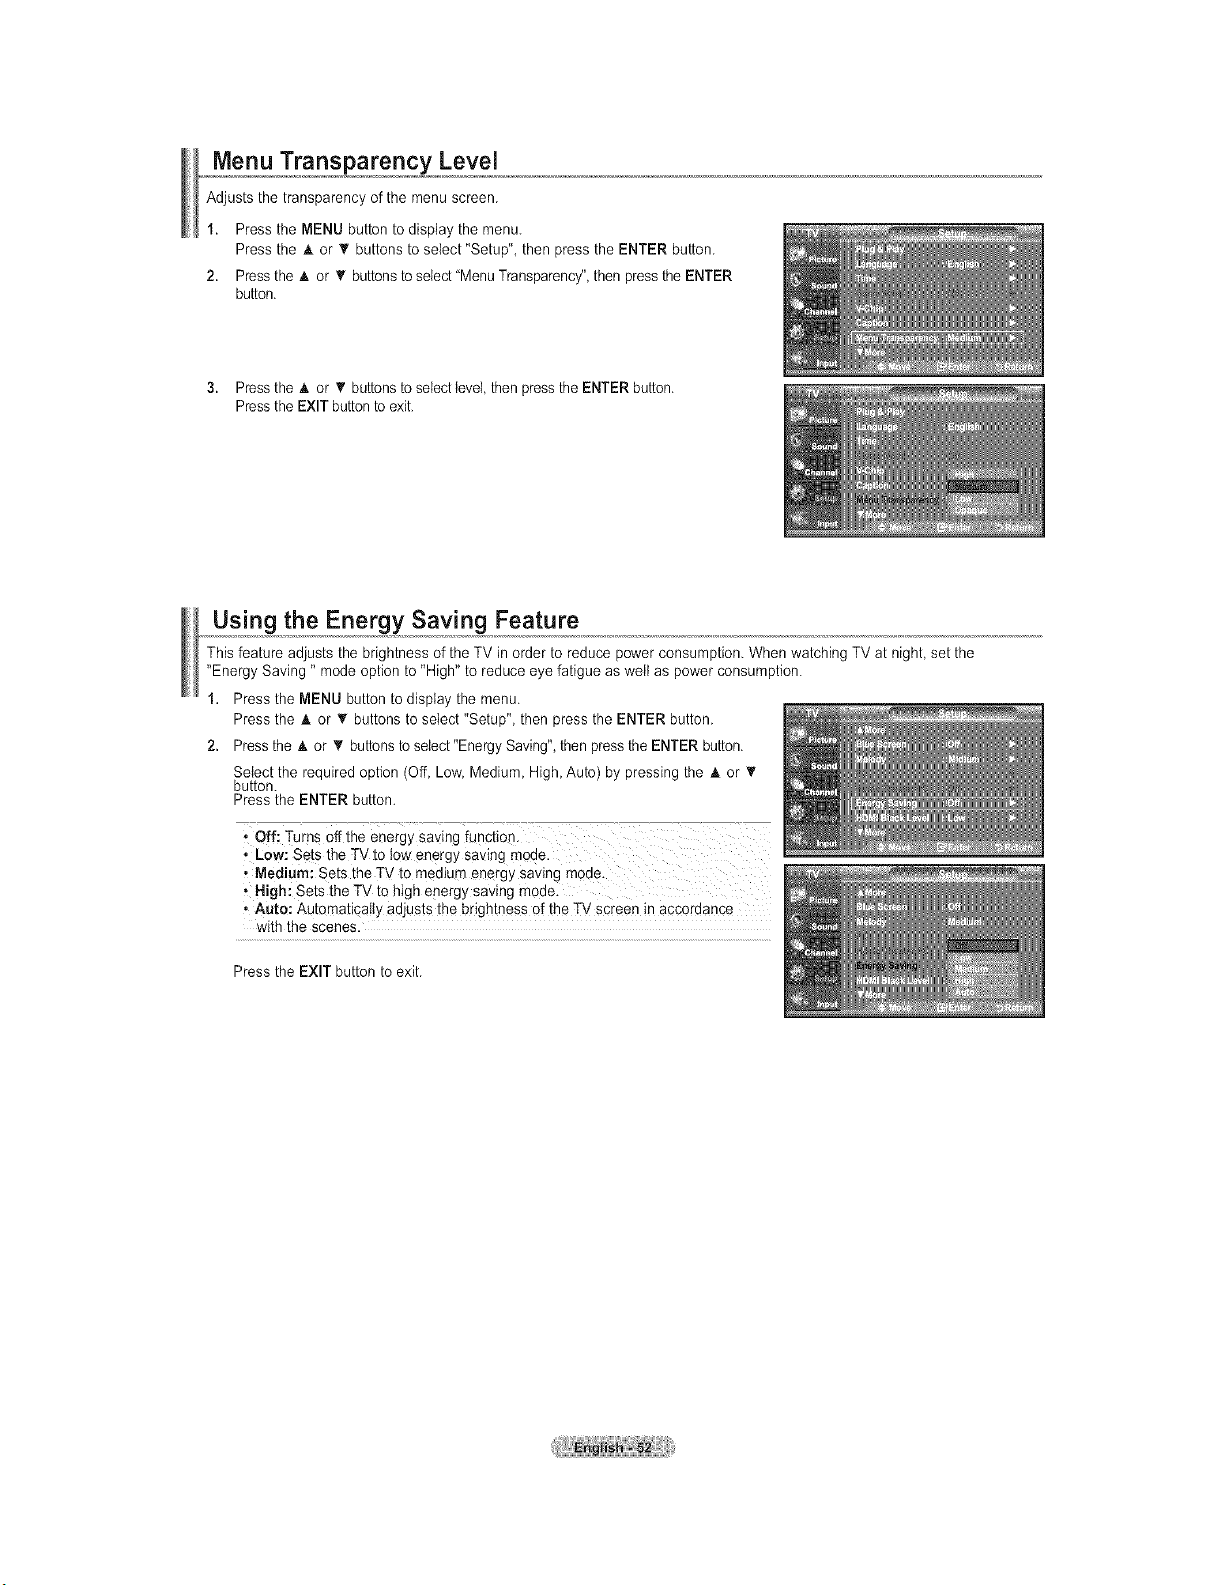
Menu Transparency Level
Adjusts the transparency of the menu screen.
1. Press the MENU button to display the menu.
Pressthe A or _' buttons to select "Setup", then pressthe ENTER button.
2. Press the A or V buttons to select"MenuTransparency",then pressthe ENTER
button.
3. Press the & or _' buttonsto selectlevel then pressthe ENTER button.
Press the EXIT buttontoexit.
Using the Energy Saving Feature
Thisfeature adjusts the brightness of the TV in order to reduce power consumption. When watching TV atnight, setthe
"Energy Saving " mode option to "High" to reduce eye fatigue as well as power consumption.
1. Press the MENU button todisplay the menu.
Press the & or T buttons toselect "Setup", then press the ENTER button.
2. Pressthe & or T buttons to seiect"Energy Saving", then pressthe ENTER button.
Select the required option (Off, Low, Medium,High,Auto) by pressing the & or _'
button.
Press the ENTER button.
• Low: Sets the TVto low energy saving mode.
• Mediura: Setsthe TV to medium energy saving mede.
, Nigh: Setsthe TV to high energy saving model
• Auto: Automatically adjusts the brightness ofthe TV screen in accordance
with the scenes.
Press the EXIT button to exit.
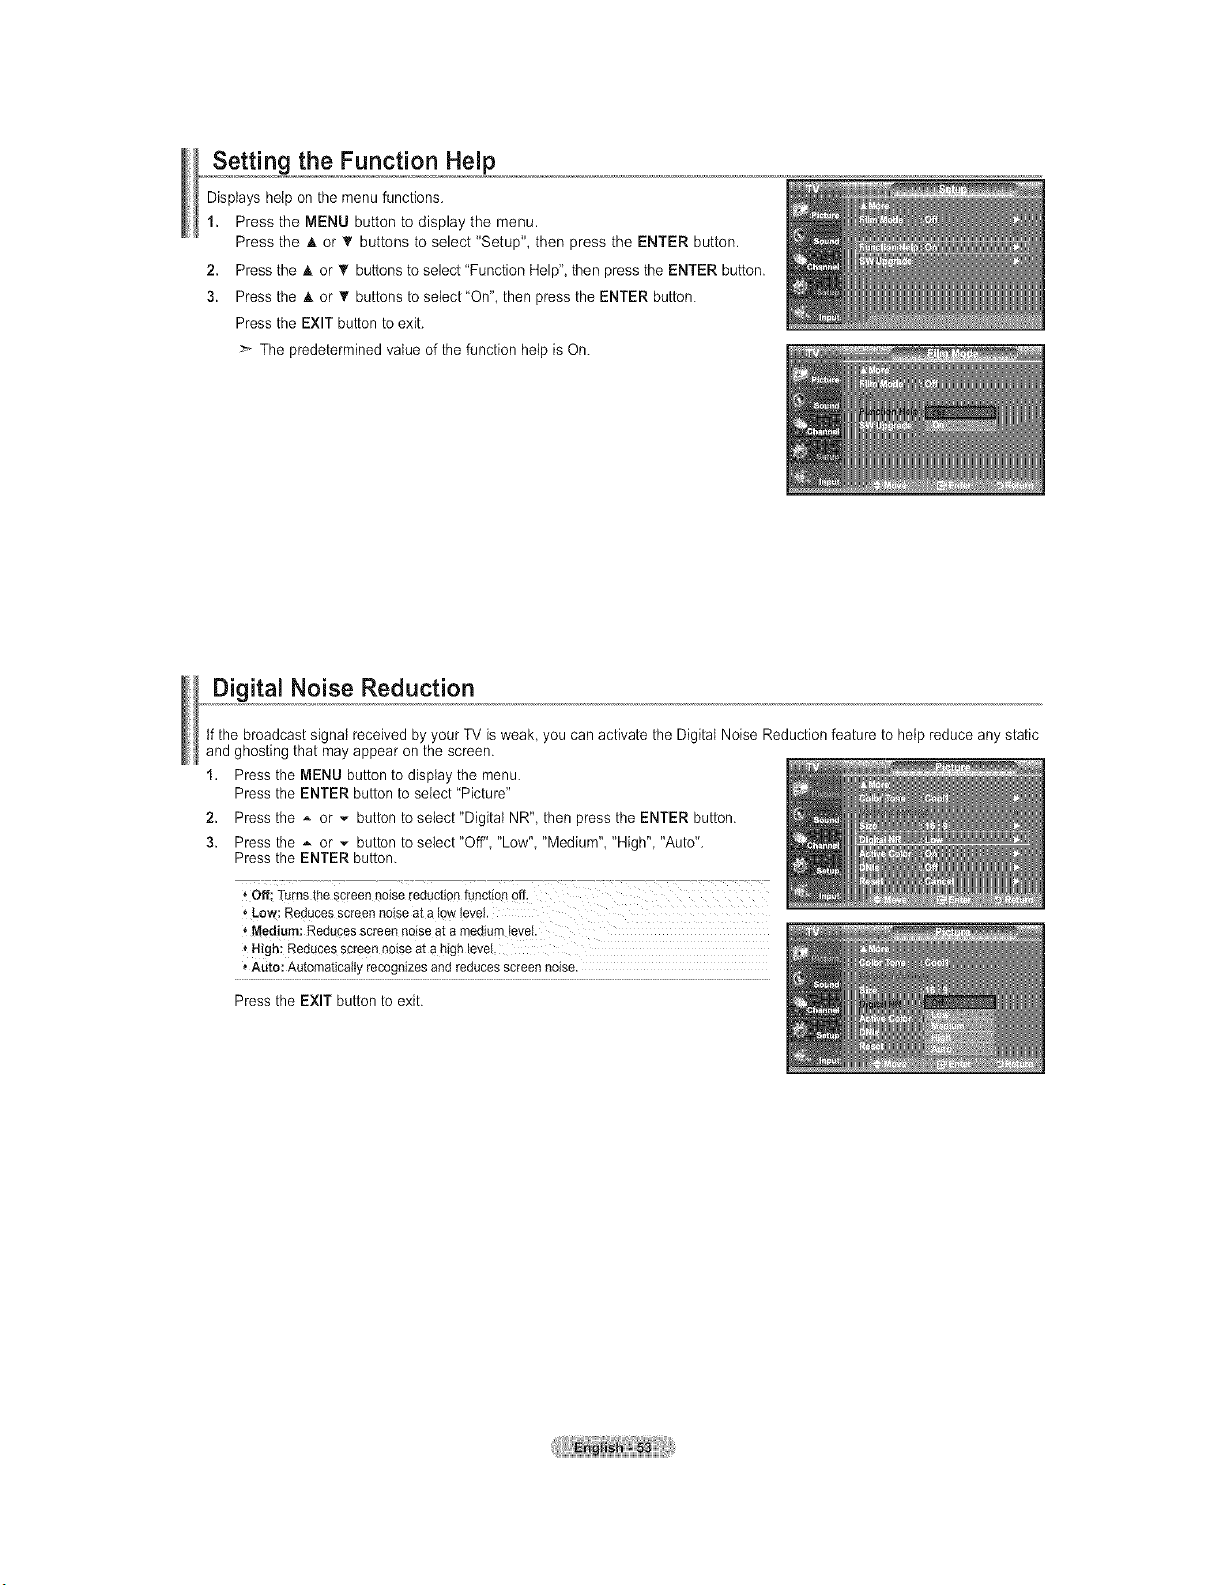
_,o,,Sett!n_the Function Help
Displays helpon the menufunctions.
1. Press the MENU button to display the menu.
Press the A or T buttons toselect "Setup", then press the ENTER button.
2. Press the A or _' buttons to select "Function Help",then pressthe ENTER button.
3. Press the A or T buttons to select"On", then press the ENTER button.
Pressthe EXIT buttonto exit.
The predetermined value of the function help isOn.
Digital Noise Reduction
tfthe broadcast signal received by your TV isweak, you can activate the Digital Noise Reduction feature to help reduce any static
and ghosting that mayappear on the screen.
1. Pressthe MENU button to display the menu.
Pressthe ENTER button to select "Picture"
2. Pressthe _ or _ button toselect"DigitaI NR", then pressthe ENTER button.
3. Pressthe A or _ button toselect "Off" "Low" "Medium" "High" "Auto".
Pressthe ENTER button.
_Low: Reducesscreennoiseat a low_evel.
'_Medium:Reducesscreennoiseat a mediumtevei.
Nigh: Reducesscreennoiseat ahighlevel.
* Auto:Automaticallyrecognizesandreducesscreennoise.
Pressthe EXIT button to exit.
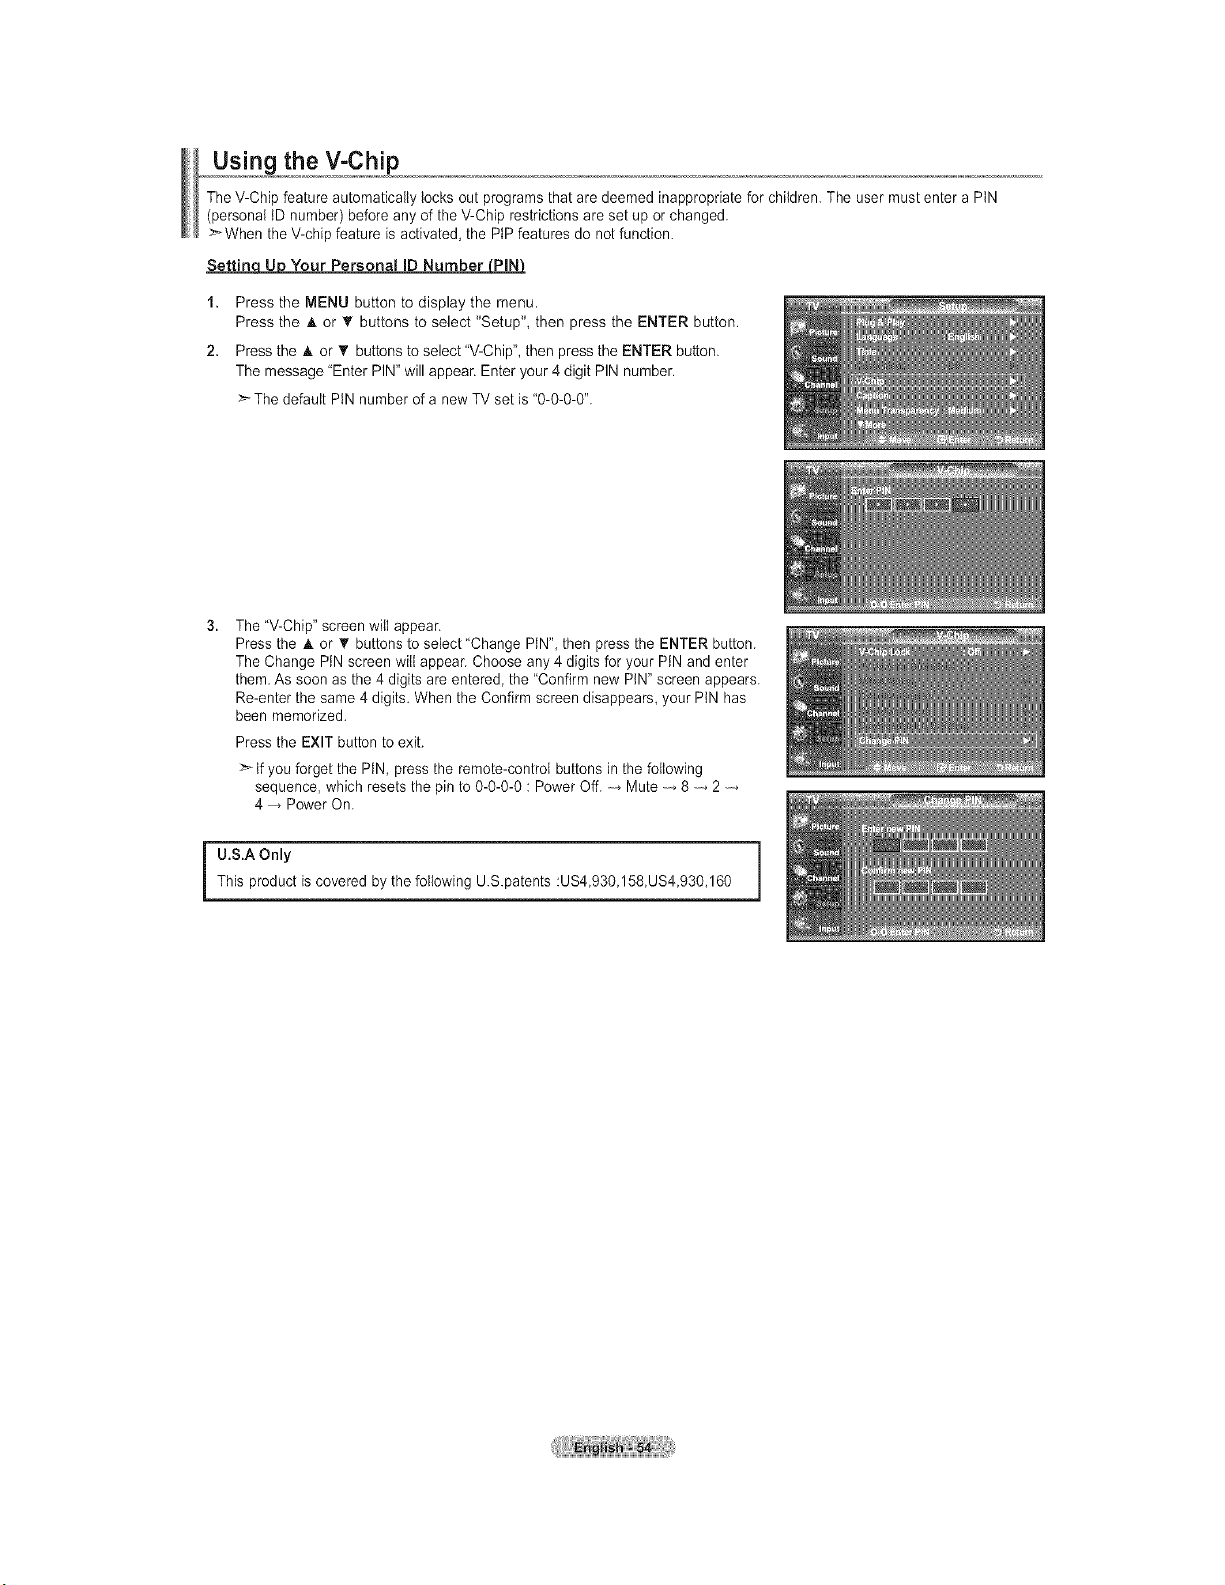
the V-Chip
TheV-Chip feature automatically locks out programs that aredeemed inappropriatefor children. The user mustenter a PtN
(personal tD number) before any ofthe V-Chip restrictions are setup orchanged.
When the V-chipfeature is activated,the PtPfeatures do not function.
SettinqUpU Your Personal ID Number PILPLN_
1. Press the MENU button to display the menu.
Press the A or T buttons toselect "Setup", then press the ENTER button.
2. Press the A or _' buttons to select "V-Chip", then pressthe ENTER button.
The message "Enter PIN"willappean Enter your 4 digit PIN number.
Thedefault PtN number ofa newTV set is"0-0-0-0".
3.
The "V-Chip"screen will appear.
Pressthe A or • buttons to select 'Change PIN", then press the ENTER button.
The Change PIN screen will appear. Choose any4 digits for your PIN and enter
them. As soonas the 4 digits areentered, the "Confirm new PIN"screen appears.
Re-enterthe same4 digits. When the Confirm screen disappears, your PtN has
been memorized.
Pressthe EXIT buttonto exit.
>- If you forget the PiN, pressthe remote-controI buttons in the following
sequence, whichresets the pin to 0-0-0-0 :Power Off. Mute 8 2
4 Power On.
U.S.A Only
This product iscovered bythefollowing US.patents :US4,930,158,US4,930,160
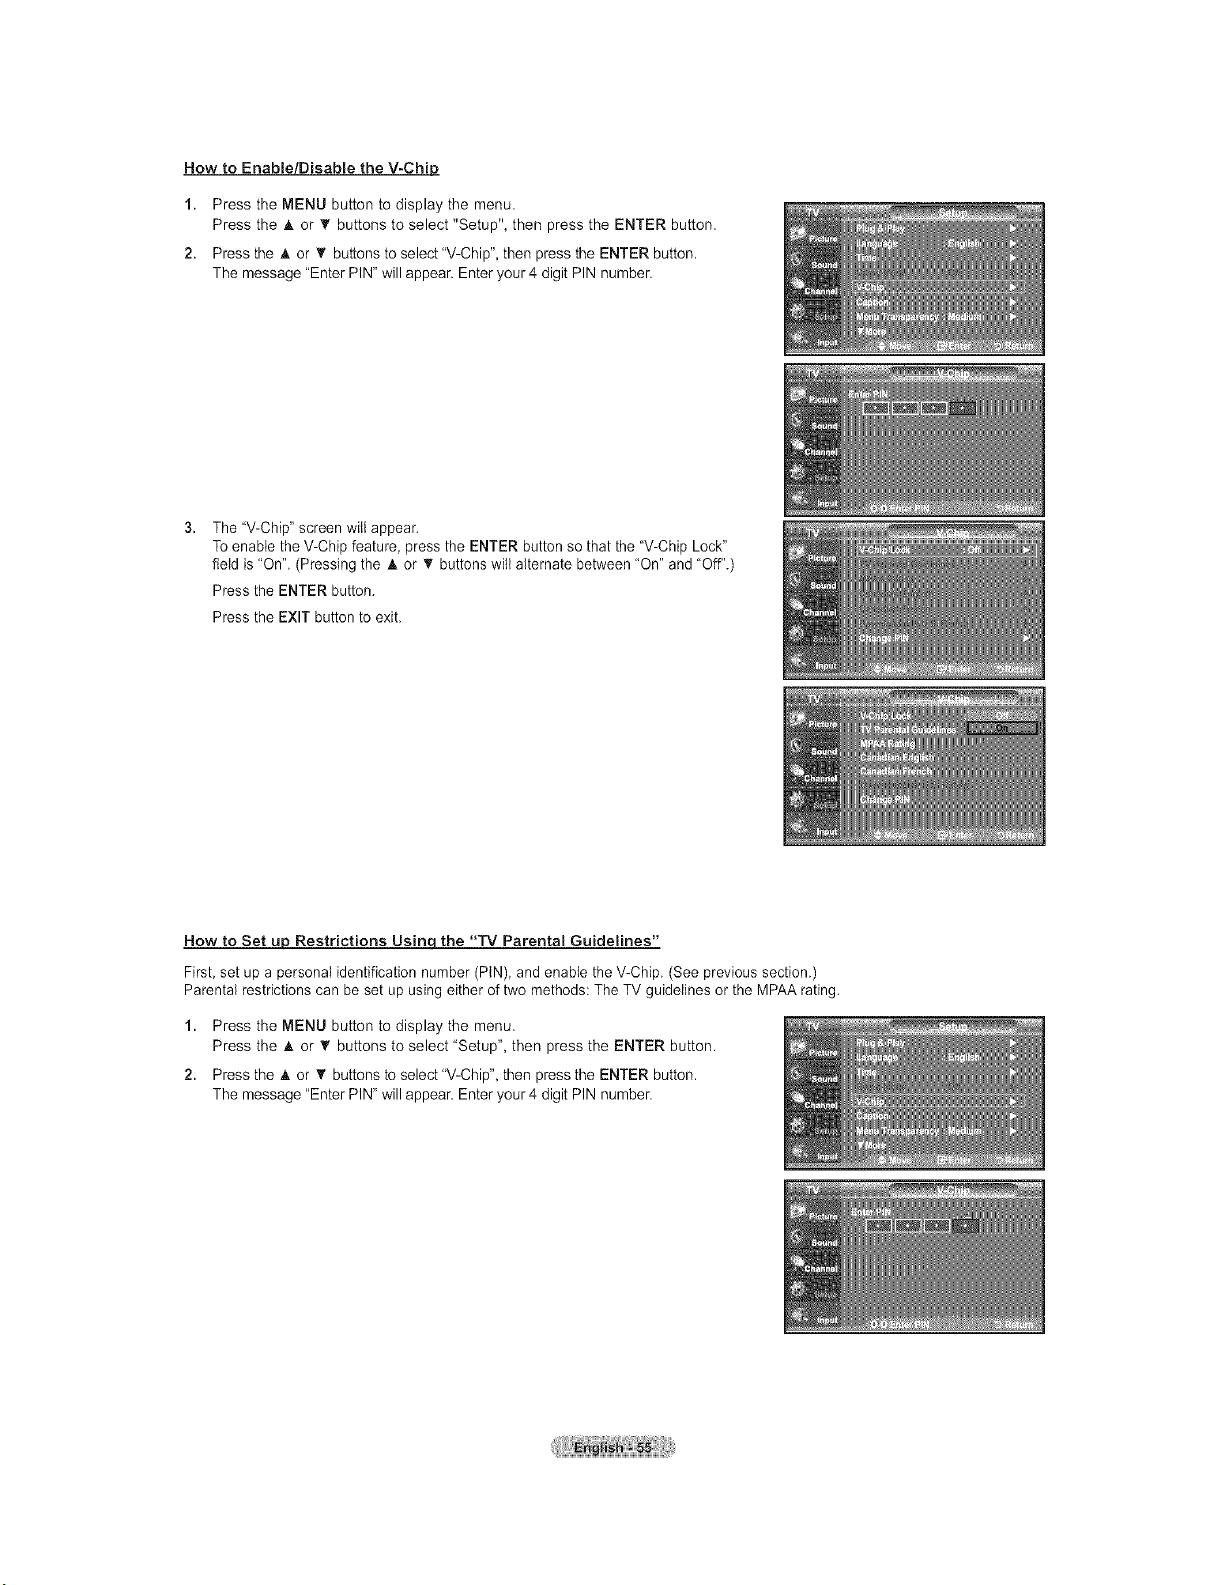
How to Enable/Disable the V-Chip
1. Press the MENU button to display the menu.
Press the & or _' buttons to select "Setup", then press the ENTER button.
2. Press the A. or _' buttons to select"V-Chip", then press the ENTER button.
The message "Enter PIN"will appear. Enter your 4digit PIN number.
The"V-Chip" screen will appear.
ToenabletheV-Chip feature, press the ENTER button so that the "V-Chip Lock"
field is"On". (Pressing the A or _' buttonswiltalternate between "On" and "Off".)
Press the ENTER button.
Press the EXIT button toexit.
How to Set up Restrictions Usinc[the "TV Parental Guidelines"
First, setup apersonaI identification number (PIN), and enable the V-Chip. (Seeprevious section.)
Parental restrictions can be set upusing either oftwo methods: The TVguidelines or the MPAArating.
1. Press the MENU button to display the menu.
Press the & or T buttons to select "Setup", then press the ENTER button.
2. Press the & or _' buttons toselect"V-Chip", then press the ENTER button.
The message "Enter PIN"will appear. Enter your 4digit PIN number.
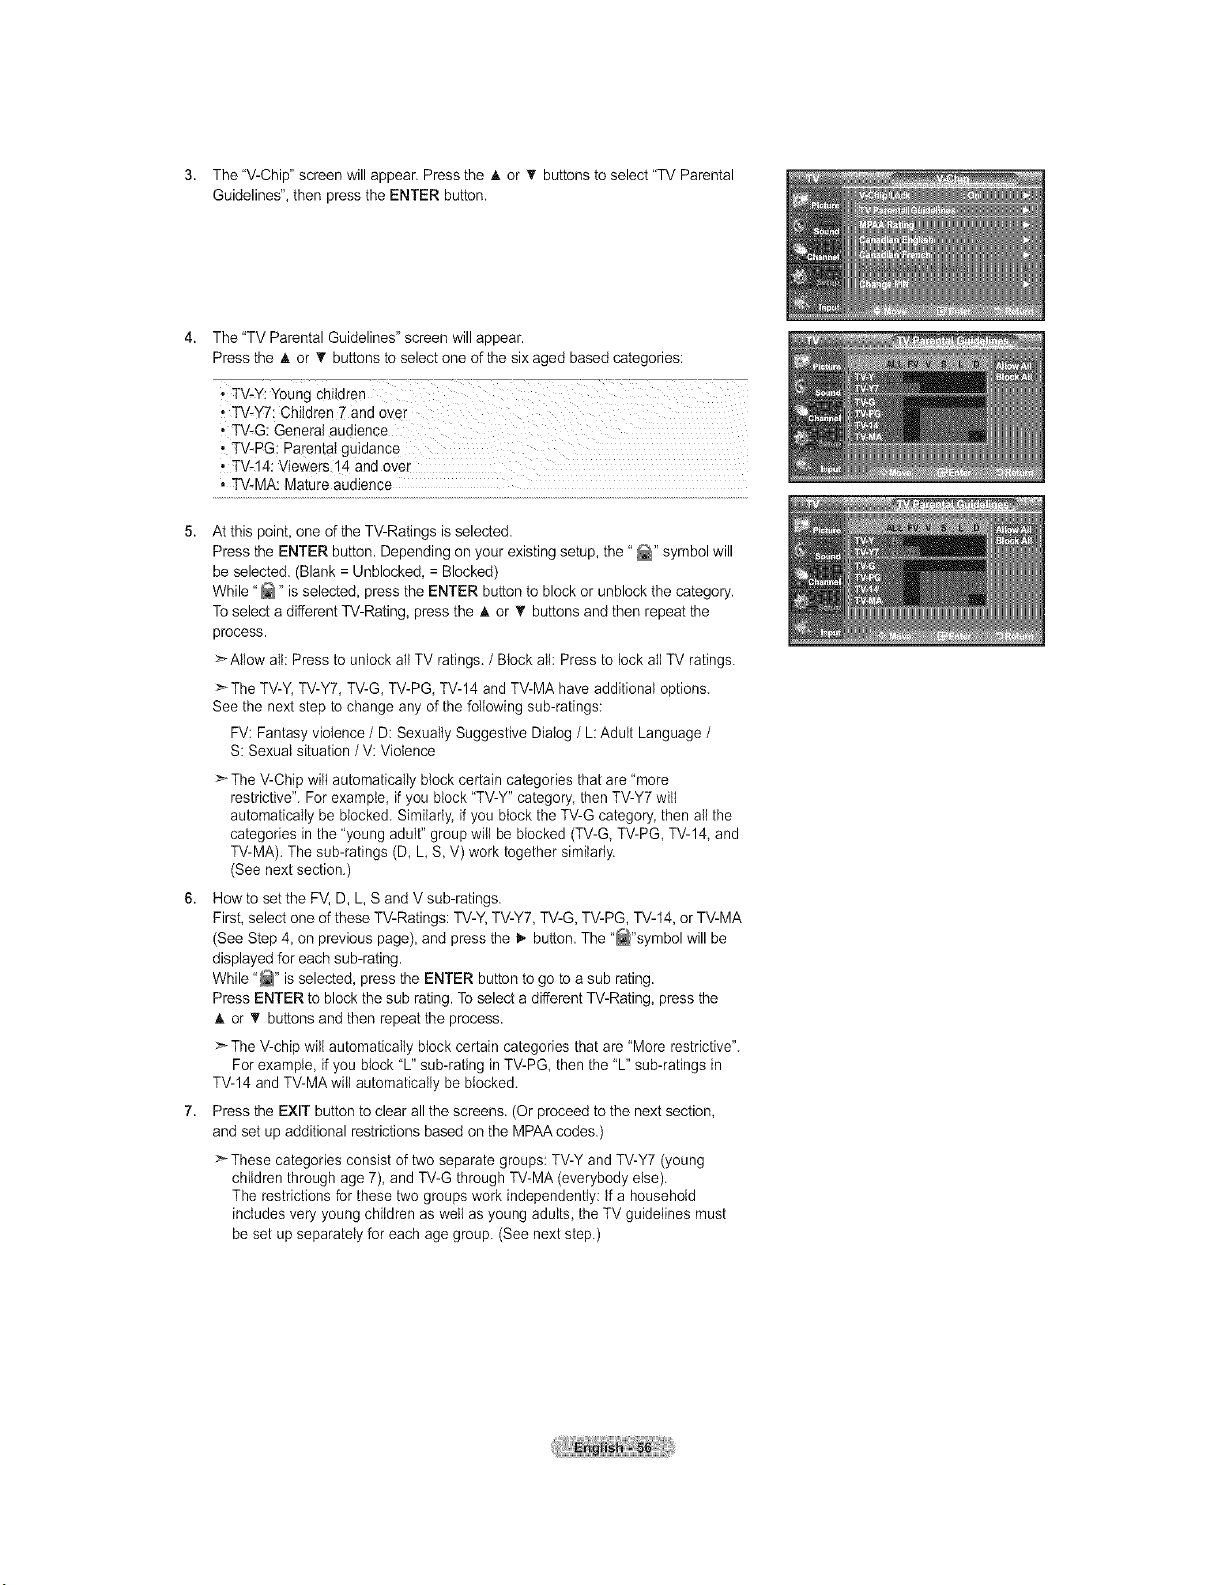
3. The"V-Chip"screenwillappear.PresstheAor_'buttonstoselect"TVParental
Guidelines",thenpresstheENTERbutton.
4. The"TVParentalGuidelines"screenwillappear.
PresstheAor_'buttonstoselectoneofthesixagedbasedcategories:
•TV-PG:Parentalguidance
•TV-14:Viewers14andove_.
,TV-MA:Matureaudience
Atthispoint,oneoftheTV-Ratingsisselected.
PresstheENTERbutton.Dependingonyourexistingsetup,the"_" symbolwill
beselected.(Blank=Unblocked,=Blocked)
While"_" isselected,presstheENTERbuttontoblockorunblockthecategory.
ToselectadifferentTV-Rating,presstheAor_'buttonsandthenrepeatthe
process.
>Allowall:PresstounlockallTVratings./Block all: Press to lock allTV ratings.
>The TV-Y, TV-Y7,TV-G, TV-PG,TV-14 and TV-MA haveadditional options.
See the next step tochange any ofthe following sub-ratings:
FV:Fantasy violence / D:Sexually Suggestive Dialog /L: Adult Language/
S: Sexual situation /V: Violence
> TheV-Chip wilt automatically block certain categories that are "more
restrictive". For example, if you block "TV-Y" category, then TV-Y7 will
automatically be blocked. Similarty, if you block the TV-G category, then allthe
categories in the 'young adult" group wilt be blocked (TV-G,TV-PG, TV-14,and
TV-MA).The sub-ratings (D, L S, V) work together similarly.
(See next section.)
Howto setthe FV, D, L,S and V sub-ratings.
First, select one of theseTV-Ratings: TV-Y, TV-Y7, TV-G, TV-PG, TV-14,or TV-MA
(See Step 4, on previous page),and press the I_ button. The"_"symbol will be
displayed for each sub-rating.
While "_" isselected, pressthe ENTER button to go toa sub rating.
Press ENTER to blockthe sub rating. Toselect adifferentTV-Rating, press the
A or _' buttons and then repeatthe process.
TheV-chip will automatically block certain categories that are"More restrictive".
For example, if you block "L" sub-rating inTV-PG, then the "L" sub-ratings in
TV-14and TV-MA wiltautomatically be blocked.
Press the EXIT button toclear allthe screens. (Orproceed tothe nextsection,
and set upadditional restrictions basedon the MPAA codes.)
> These categories consist oftwo separate groups: TV-Yand TV-Y7 (young
children through age 7),and TV-G throughTV-MA (everybody else).
The restrictions for these twogroups work independently: tf a household
includes very young children as well as young adults, the TV guidelines must
be set up separately for each age group. (See next step.)
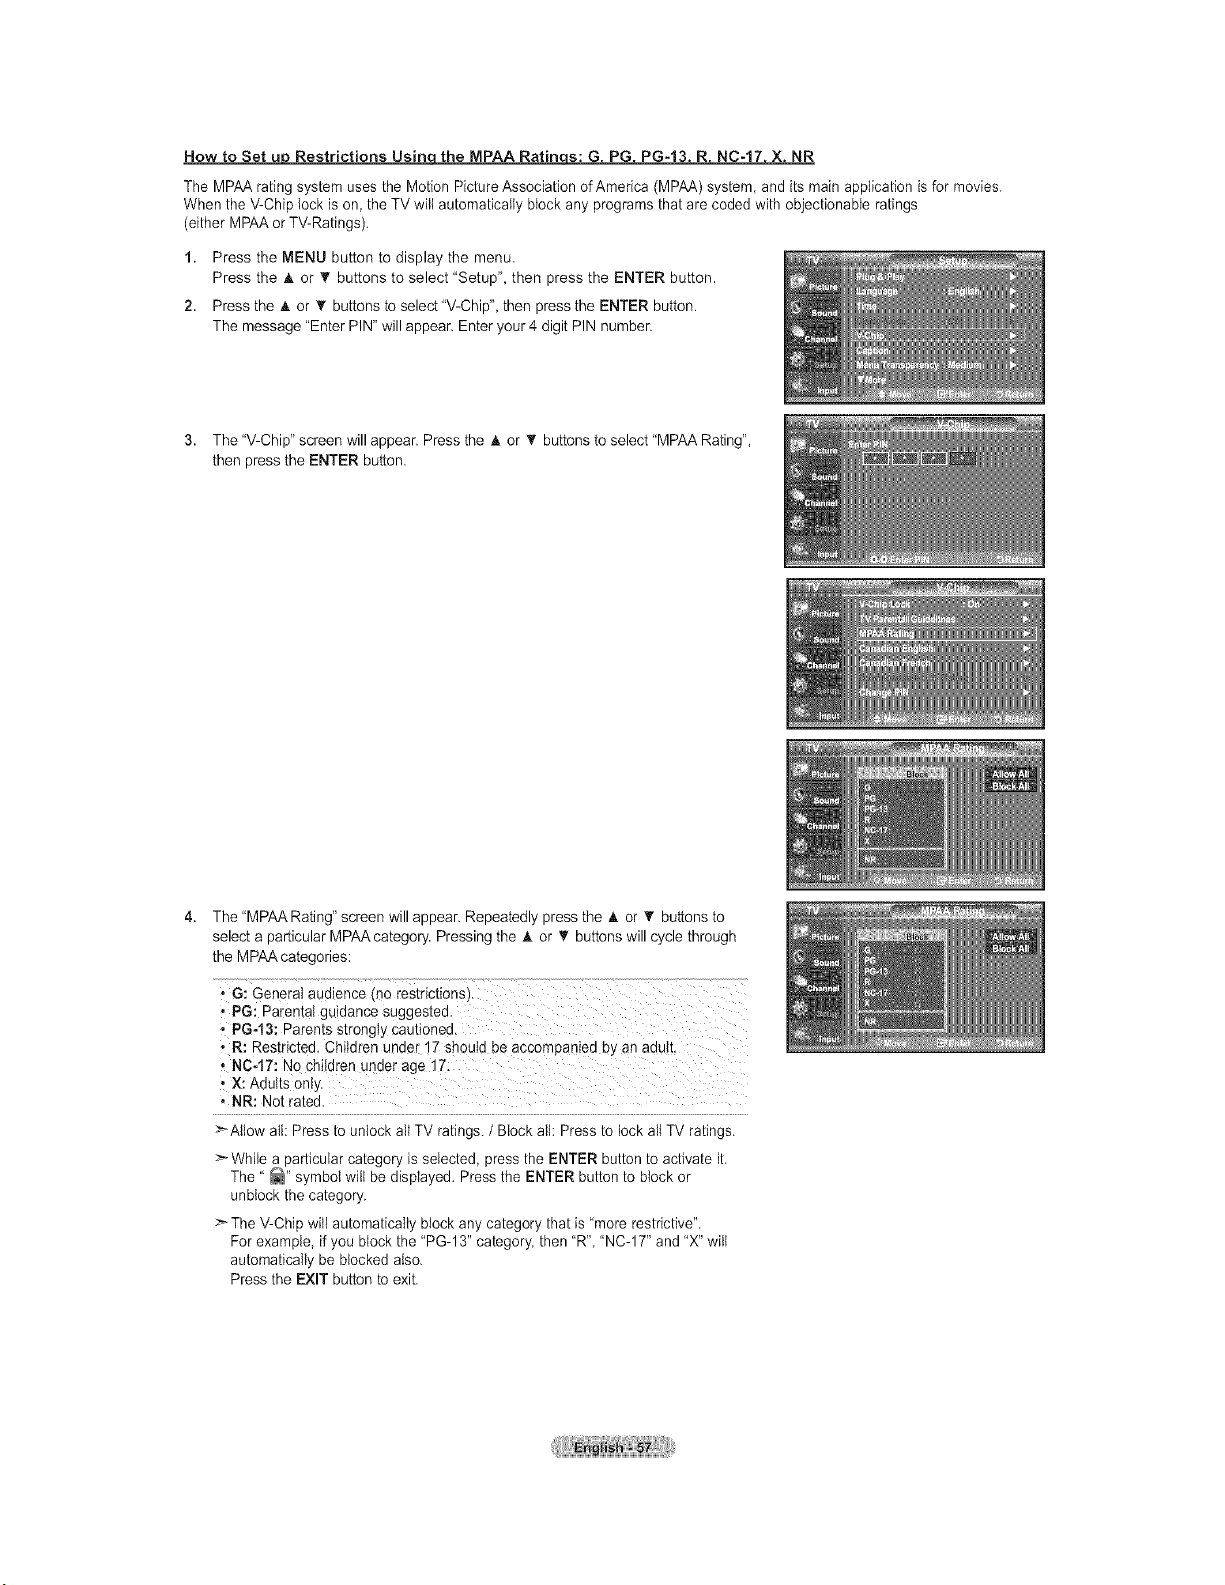
How to Set u_ Restrictions Usinqthe MPAA Ratin s: G PG PG-13 R NC-17 X NR
The MPAA rating system uses the Motion Picture Association of America (MPAA) system, and its mainapplication isfor movies.
When the V-Chip lock ison, the TVwilt automatically block any programs that arecoded with objectionable ratings
(eitherMPAA orTV-Ratings).
1. Press the MENU button to display the menu.
Press the A or _' buttons to select "Setup", then press the ENTER button.
2. Press the A or _' buttons toselect"V-Chip", then press the ENTER button.
The message "Enter PIN"will appear. Enter your 4digit PIN number.
3. The"V-Chip" screen will appear. Press the A or _' buttonsto select "MPAARating",
then press the ENTER button.
The"MPAA Rating" screen will appear. Repeatedly pressthe A or _' buttonsto
select aparticular MPAA category. Pressingthe A or T buttons will cyclethrough
the MPAAcategories:
• G: General aualence mo restnct{ons_.
, PG: Parenta_gulaance sugges[ea.
• PG-t3: Parents strongly cau[{onee.
• R: Restricted. Children unaer 17 should be accompanied by anadult.
• NC-17: Nochildren unaerage 17.
• X: Adults onl,.
• NR: No[ ra[ea
>_Altowatl: Pressto unlock all TVratings. / Block all: Press to lock allTV ratings.
>-While a particular category is selected, pressthe ENTER button to activate it.
The' _" symbol wilt be displayed. Pressthe ENTER button toblock or
unNock the category.
_ TheV-Chip will automatically block any category that is"more restrictive".
For example, if you block the 'PG-13" category, then "R","NC-17" and "X" wilt
automatically be blocked also.
Pressthe EXIT button to exit.
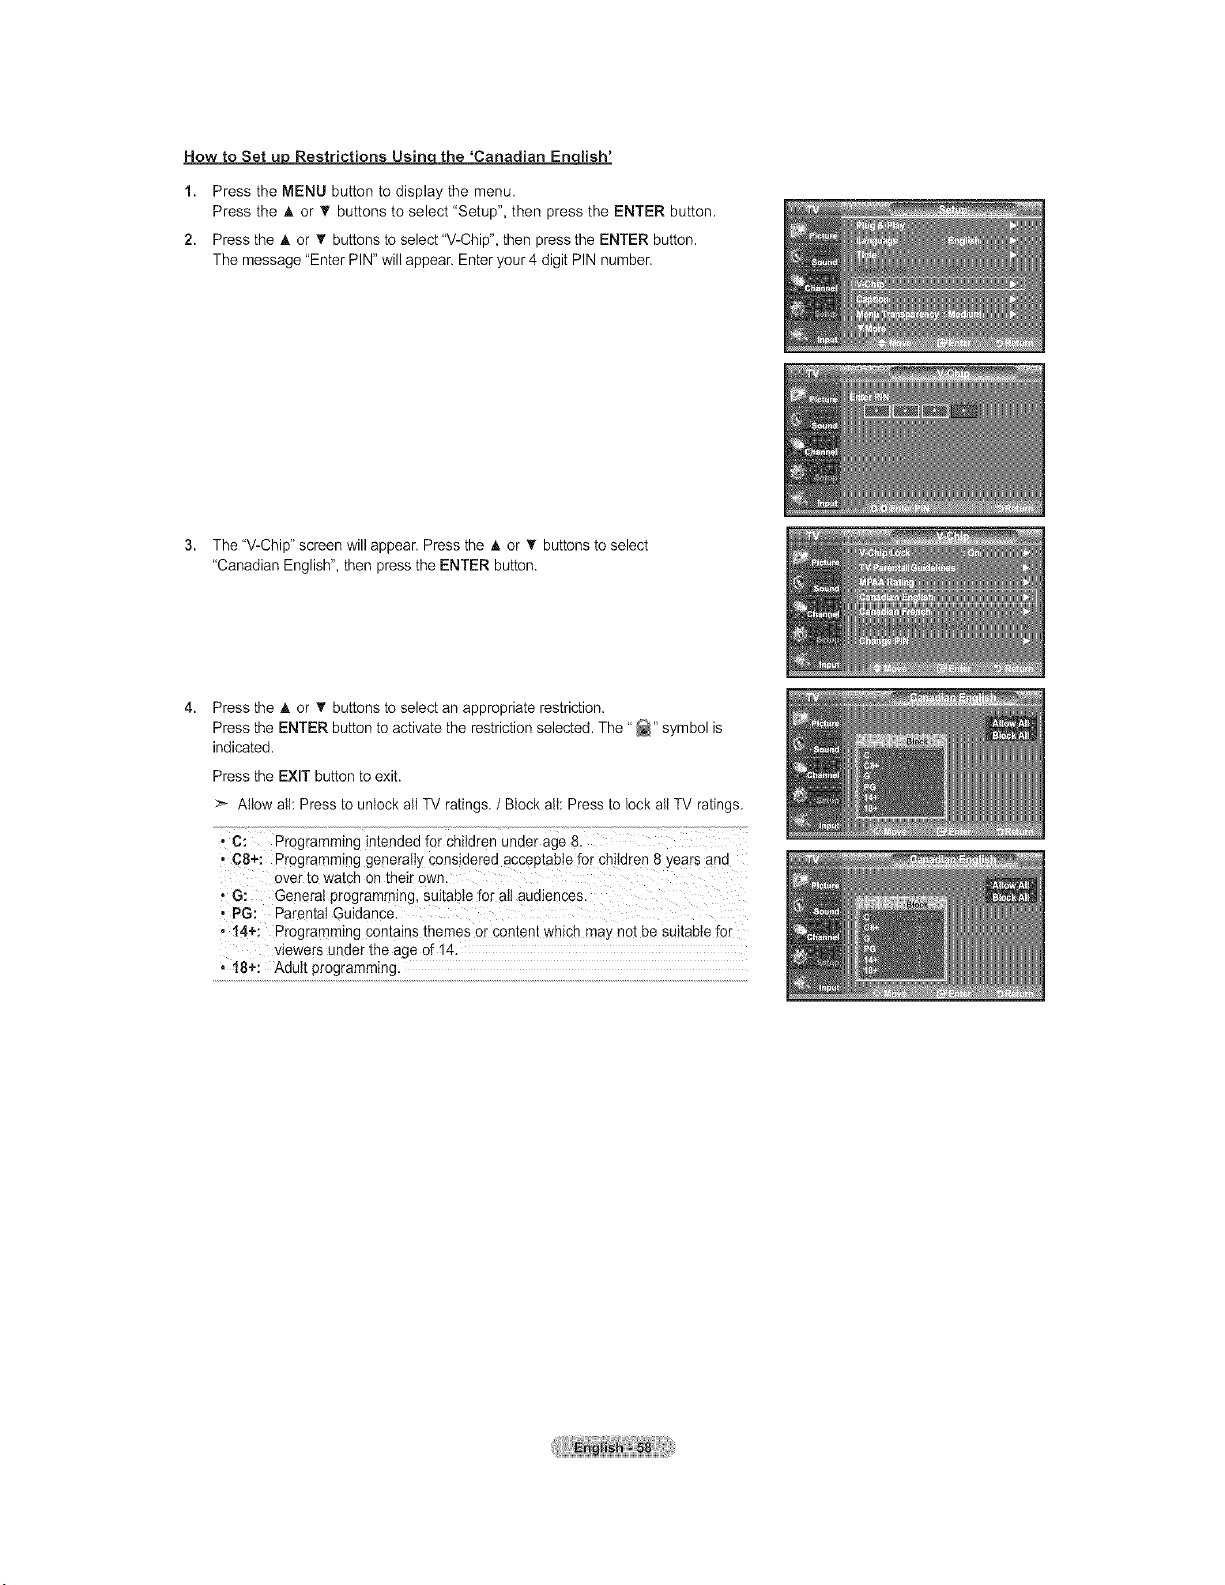
How to Set u_ Restrictions Usinqthe 'Canadian Enqlish'
1. Press the MENU button to display the menu.
Press the A or _' buttons to select "Setup", then press the ENTER button.
2. Press the A or _' buttons toselect"V-Chip", then press the ENTER button.
The message "Enter PIN"will appear. Enter your 4digit PIN number.
3. The"V-Chip" screen will appear. Press the A or T buttonsto select
"Canadian English", then pressthe ENTER button.
Press the A or _' buttons toselectan appropriate restriction.
Press the ENTER button to activatethe restriction selected.The" _" symbol is
indicated.
Press the EXIT button toexit.
Altow all: Press tounlock all TVratings./ Block all:Press tolock allTV ratings.
• C: Programming intended for Children under age 8.
• C8+: Programming generally considered acceptable for ch!ldren 8years and
over to watch on their own.
, G: General programming, suitable for allaudiences.
• PG: Parental Guidance.
,14+: Programming contains themes orcontent whi@ may not be suitable for
viewers under the age of14.
18÷: Adultprogramming.
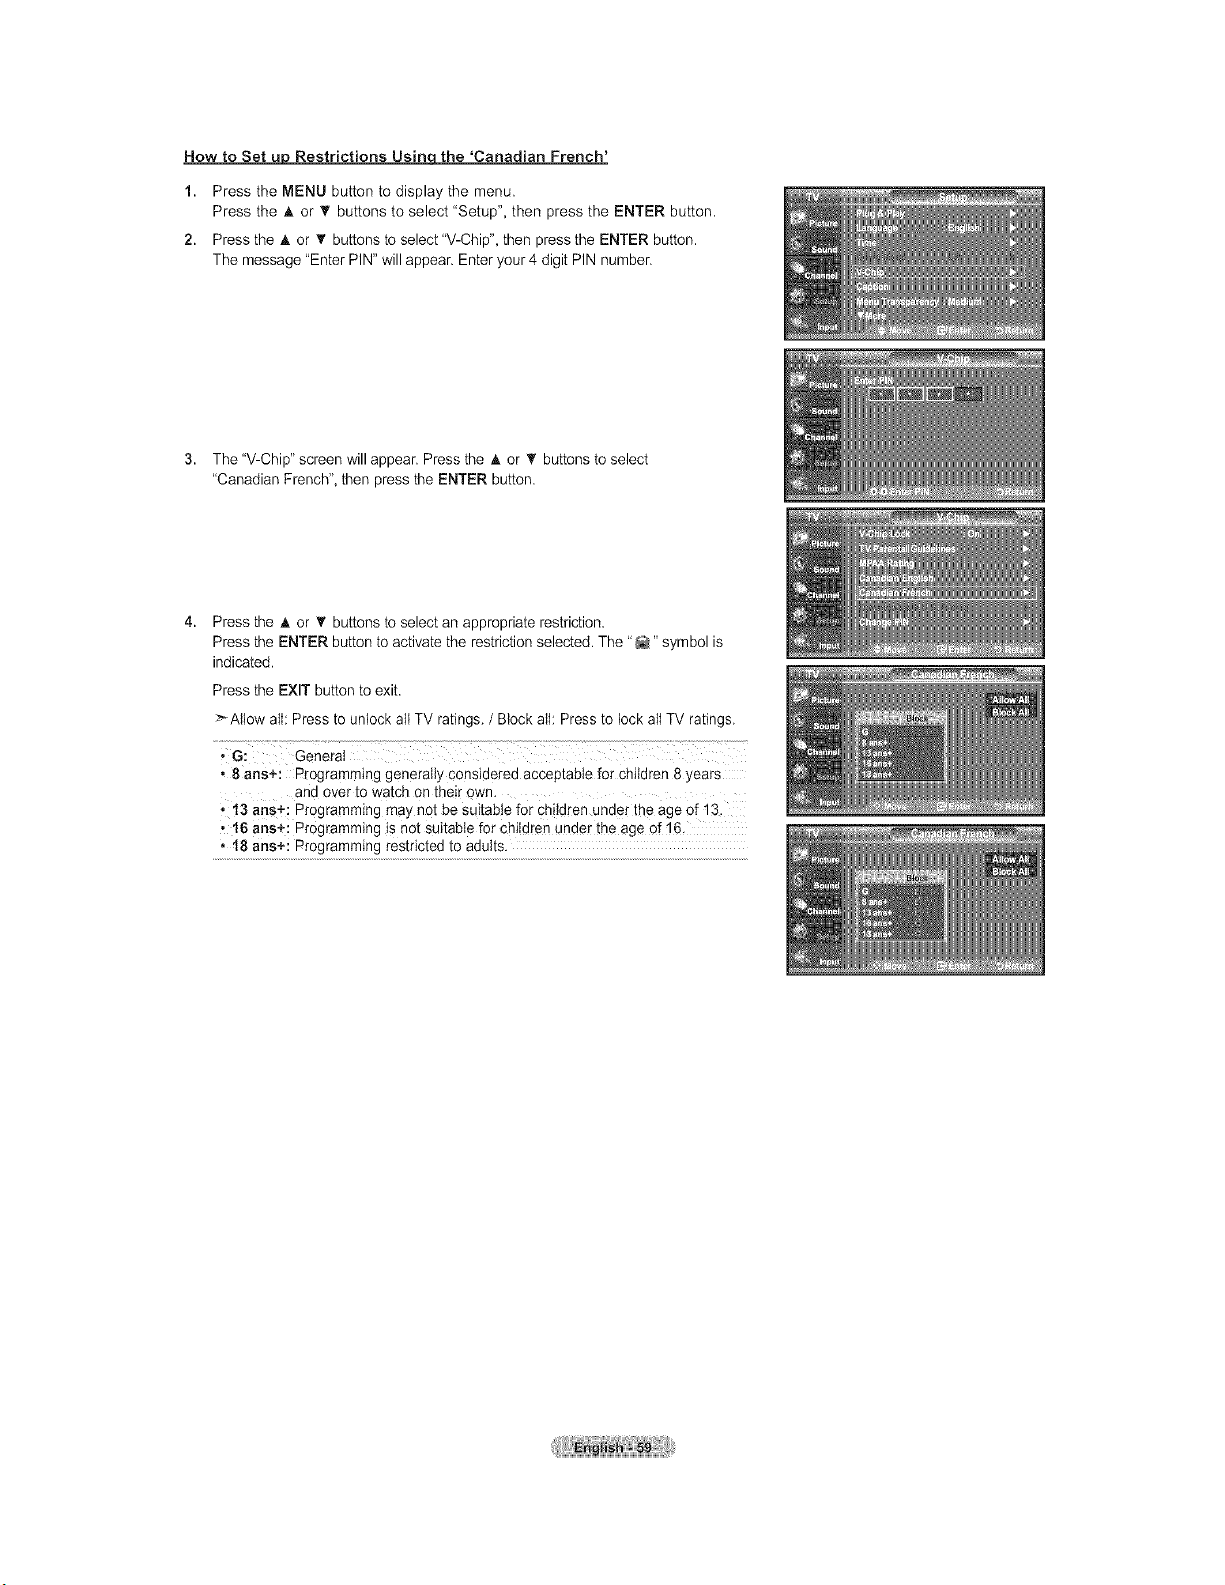
How to Set u_ Restrictions Usinqthe 'Canadian French'
1. Press the MENU button to display the menu.
Press the A or _' buttons to select "Setup", then press the ENTER button.
2. Press the A or _' buttons toselect"V-Chip", then press the ENTER button.
The message "Enter PIN"will appear. Enter your 4digit PIN number.
3. The"V-Chip" screen will appear. Press the A or _' buttonsto select
"Canadian French", then pressthe ENTER button.
Press the A or _' buttons toselectan appropriate restriction.
Press the ENTER button to activatethe restriction selected.The "_" symbol is
indicated.
Press the EXIT button toexit.
>Allow all: Press to unlockall TVratings. / Block all: Press to lock allTV ratings.
,8 arts+: Programming generally considered acceptable for children 8 years
and over to watch on their own.
• t3 ans+: Programming may not be suitable for children under theage of 13.
, 16 ans÷: Programming is not suitable forchildren underthe age of 16.
• 18 arts+: Programming restricted toadults.
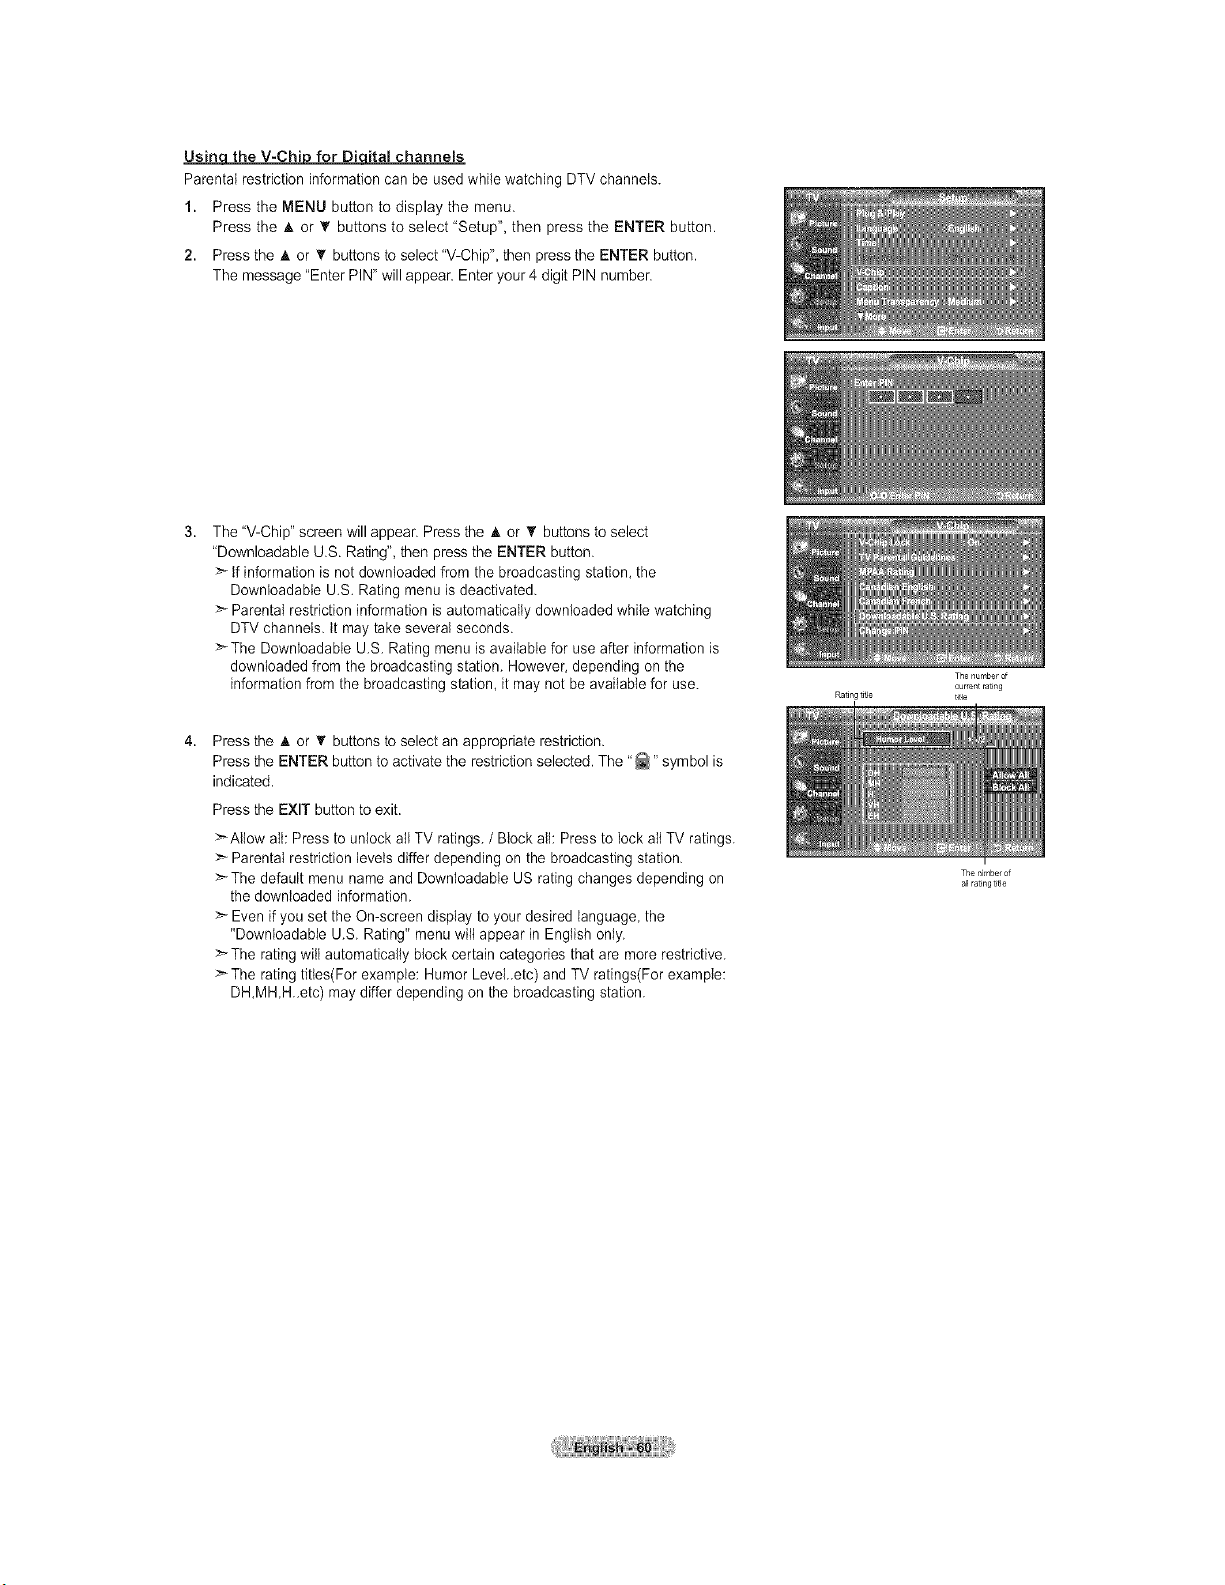
Usin the V-Chi forDi ital channels
Parental restriction information can be usedwhile watching DTVchannels.
1. Press the MENU button to display the menu.
Press the A or _' buttons to select "Setup", then press the ENTER button.
2. Press the A or 'V buttons to select"V-Chip", then press the ENTER button.
The message "Enter PIN"will appear. Enter your 4digit PIN number.
The"V-Chip" screen will appear. Press the A or 'V buttons toselect
"Downloadable U.S. Rating", then pressthe ENTER button.
>" tf information is not downloaded from the broadcasting station, the
Downloadabte U.S. Rating menu isdeactivated.
>" Parentalrestriction information isautomatically downloaded while watching
DTVchannels, tt maytake several seconds.
>-The Downioadabie U.S. Rating menu isavailable foruse after information is
downloaded from the broadcasting station. However, depending on the
information from the broadcasting station, it may not be available for use.
Press the A or _' buttons toselectan appropriate restriction.
Press the ENTER button to activatethe restriction selected.The "_" symbol is
indicated.
Press the EXIT button toexit.
>'Allow aIt: Press to unlockall TV ratings. /Block all: Pressto lock aIt TV ratings.
:_ Parentalrestriction levels differ depending on the broadcasting station.
>'The default menu name and Downloadable US rating changes depending on
the downloaded information.
>" Evenifyou set the On-screen display to your desired language, the
"Downloadable U.S. Rating" menu wiltappear in English only.
>" The rating will automatically block certain categories that are more restrictive.
>" The rating titles(For example: Humor LeveLetc) and TVratings(For example:
DH,MH,H_etc) may differ depending on the broadcasting station.
Rating title
The n mber of
c rrent rating
title
The nimber of
all rating title
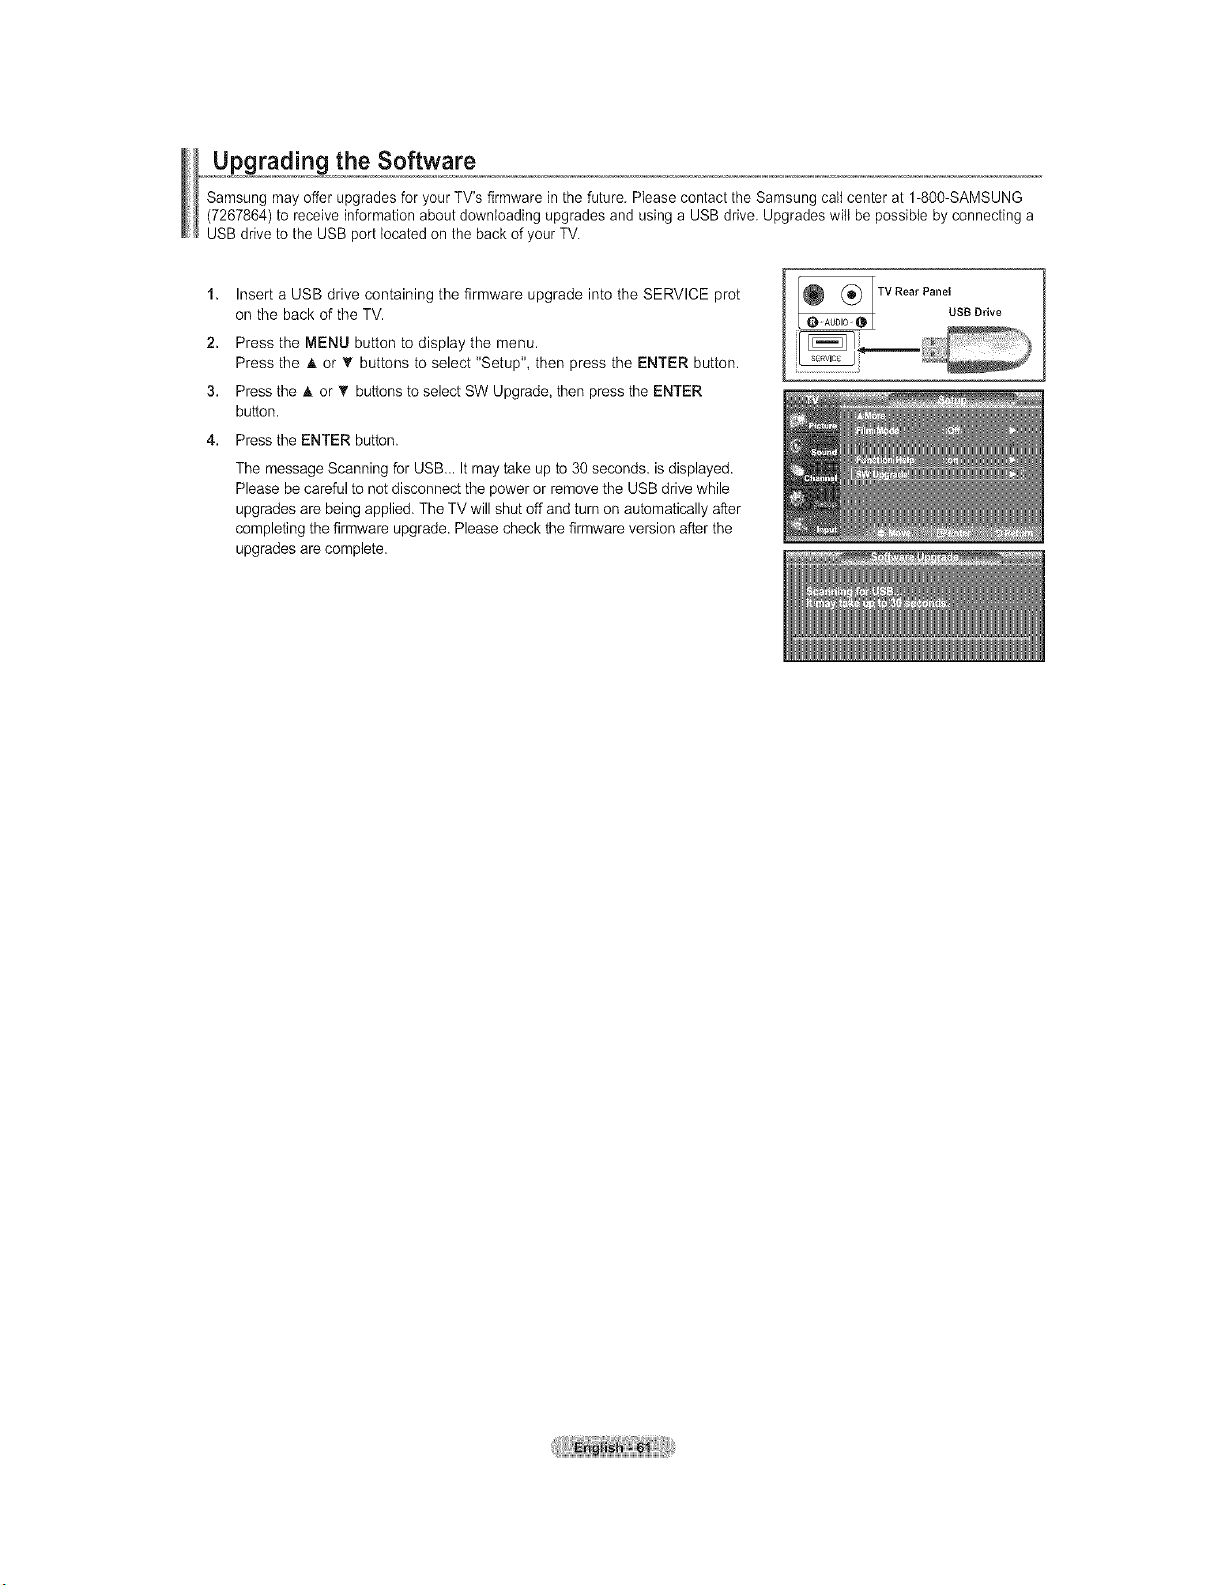
the Software
Samsung mayoffer upgrades for your TV's firmware in the future, Please contact the Samsung call center at 1-800-SAMSUNG
(7267864) to receive information about downloading upgrades and using a USBdrive. Upgrades will be possible by connecting a
USB driveto the USB port located on the backof your TV.
1. Insert aUSB drive containing the firmware upgrade into the SERVICE prot
on the back of the TV.
2. Press the MENU button to display the menu.
Press the h, or T buttons to select "Setup", then press the ENTER button.
3. Press the A or _' buttons to select SW Upgrade, then press the ENTER
button.
4. Press the ENTER button.
The message Scanning for USB... It may take up to30 seconds, isdisplayed.
Please becarefulto not disconnect the power or removethe USB drive while
upgrades arebeing applied. TheTV will shutoff and turnon automatically after
completing the firmware upgrade. Please check the firmware version afterthe
upgrades arecomplete.
TV Rear PanelusB Drive
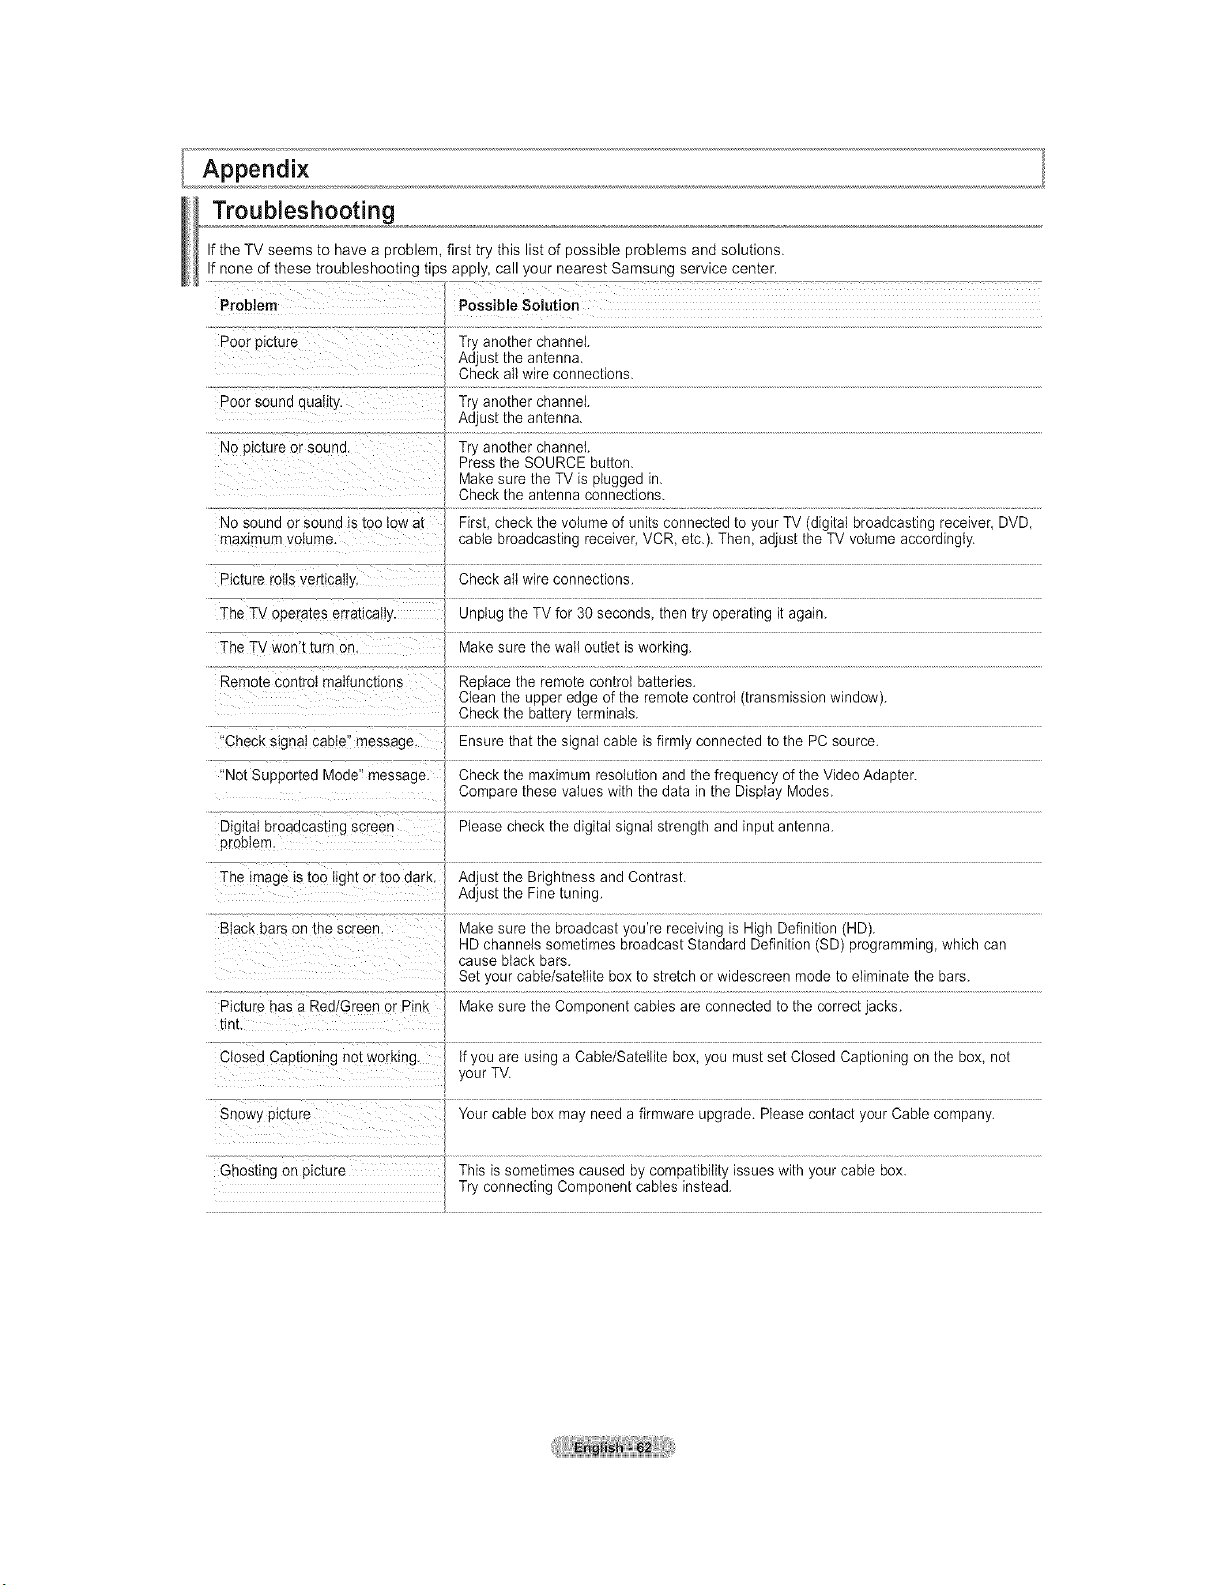
Appendix
Troubleshooting
Ifthe TVseems to have a problem, first try this list of possible problems and solutions.
If none of these troubleshooting tips apply, call your nearest Samsung service center.
....: Poor sound quatityl .................... ....................................................................................................................................................................................................................................................................
Adjust the antenna.
Tryanother channel
Pressthe SOURCE button.
Makesure the TVis plugged in.
Checkthe antenna connections.
No sound orSound istoo'ioWat.........First, check the volume of units connected to your TV (digital broadcasting receiver, DVD,
maximum volume, cable broadcasting receiver,VCR, etc.). Then, adjust the TV volume accordingly.
picture re!ts Vertica!!y, Check all wireconnections.
The TVoperates erratically Unplug the TVfor 30 seconds, then try operating it again.
The TV Won't turn on. Makesure the wail outlet is working.
....%m_e coniroi maiu;lct;ons .........................ace ihe remoie contro baiier es .........................................................................................................................................................................................................
Clean the upper edge of the remote control (transmission window).
"Check signa! cable! message. Ensure that the signal cable isfirmly connected to the PC source.
!'NotSupported Mode'! message: Check the maximum resolution and the frequency ofthe Video Adapter.
Compare these values with the data in the Display Modes.
The imag eistoo !!ght 0! too dark' AdjustAdjustthetheFineBrightneSStuning.andContrast.
Blackbars on the Screen, ...................................................................................
HDchannels sometimes broadcast Standard Definition (SD) programming, which can
cause black bars.
Set your cable/satellite boxto stretchor widescreen mode toeliminate the bars.
CtosedCaptioning not working, ify0u areusing a CabieiSaieliite box,you musi sei Ciosed Capiioning on ihe box, noi..................
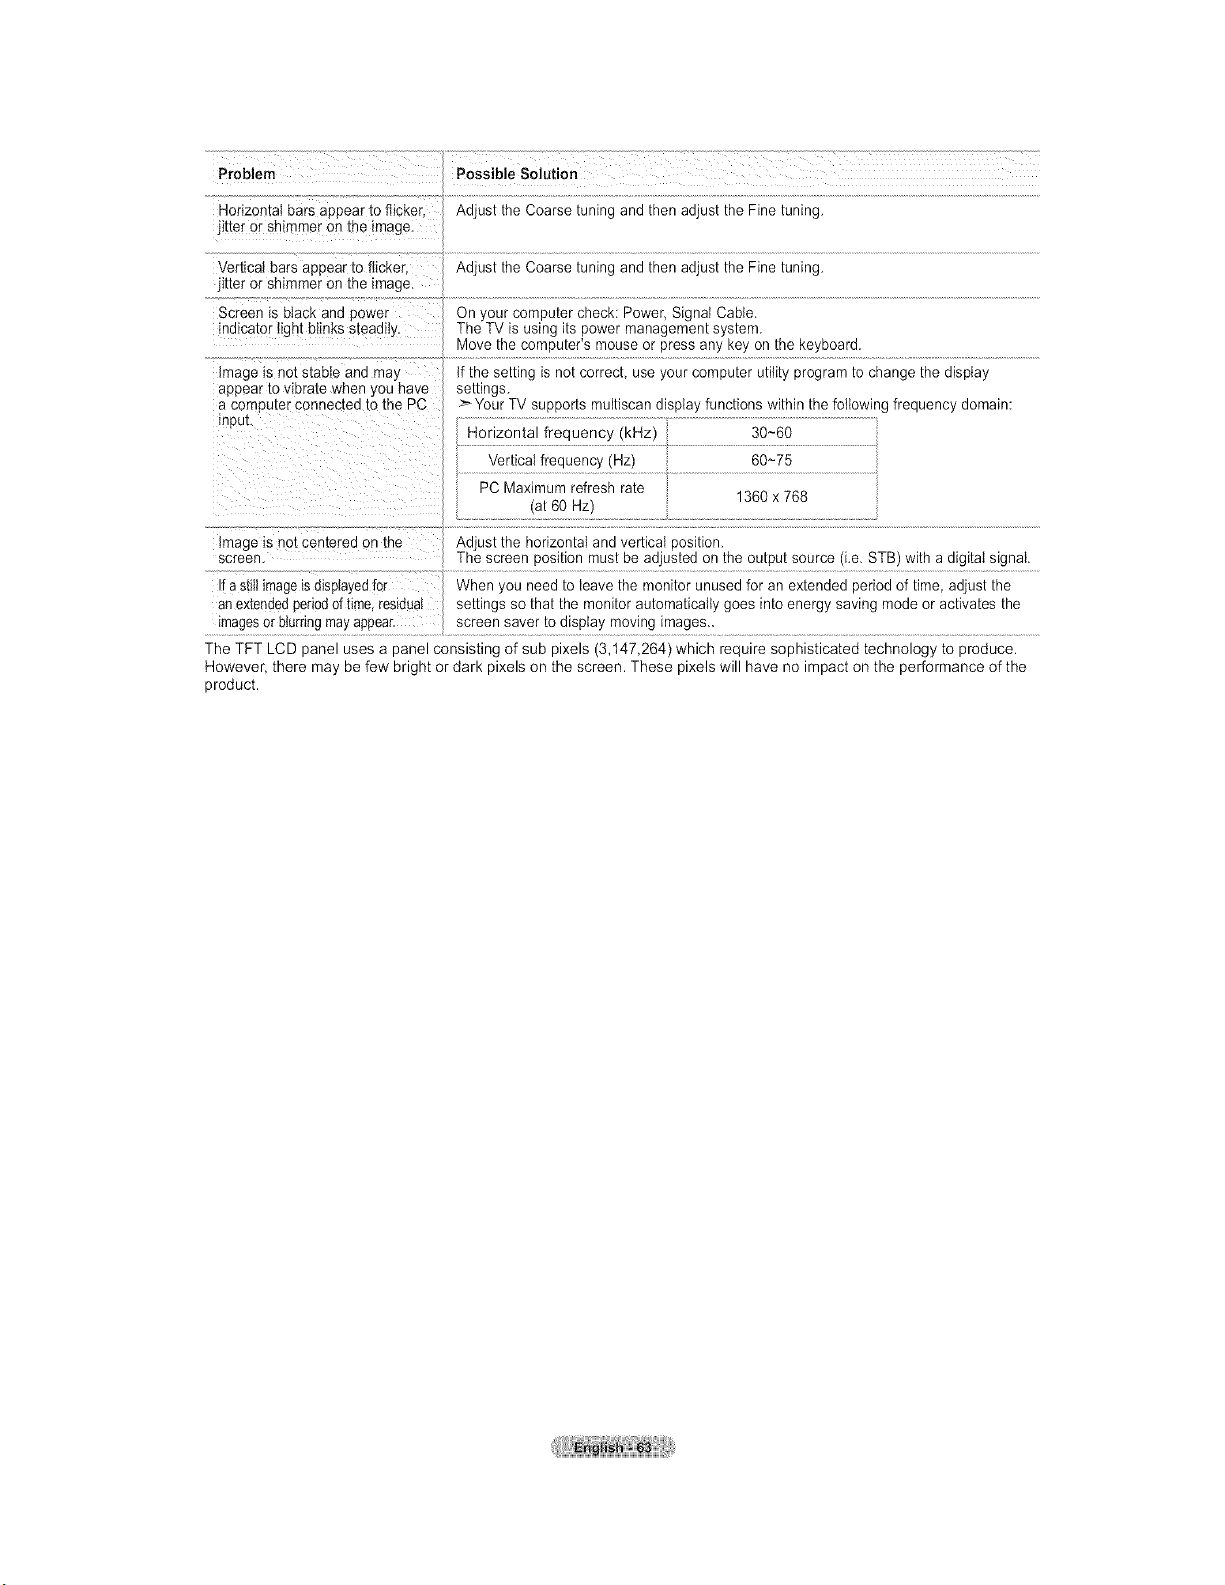
Problem Possible Solution
Horizontal bars aeoear to flicker Ad Js[[ne Coarse [umng ana men aatus[the Fine tuning
jitter or shimmer on ine image.
Vertical bars appear toflicker,
jitter or shimmer on the image.
Screen _sblack and Dower
indicator light blinks steadily.
image isnot stable and ma/
aooear to vibrate when you have
acomputer connec[ee tothe PC
inpuL
Ad Js[[ne Coarse [umng an(] men aajus[ the Fine tuning
On/our computer cnecK:Power Signal Cable.
TheTV isusing itsDowermanagement sys[en-
Movethe computer's mouse or Dressany Keyon me KeyDoara
tfthe seeing s no[ correct use/our computer u[_ Lyprogram [o cnange the display
seeings
>Your T SUPportsmul[_scanalsp{ay functions within the following frequency domain:
Horizontal freuuency (kHz
30~60
/eruca_freauenc, rlZ 60~75
PC Maximum refresh rate
1360 x 768
at60 rlZ
_mage_sno[ Den[ergo on the Adjust [ne horizontal and vertica cost[Jan
screen Thescreer c)s{uon mustDe aajus[ea on me cutout source .e STB) with a digital signal.
fa s_liimageisaisplayedfor When/ou nee(]toleave the monitor unusedfor an ex_en(]e(] 3eriodof time, adjust the
an ex[enaedoenoaoftime. residual seeings sothat the monitor automaticaL, goes into energy savng mode or activates the
imagesorolumngmayappear screensaver [o (]lsDlay movng mages..
The TFT LCD panel uses a panel consisting of sub pixels (3,t47,264) which require sophisticated technology to produce.
However, there may befew bright or dark pixels on the screen. These pixels will have no impact on the performance of the
product.
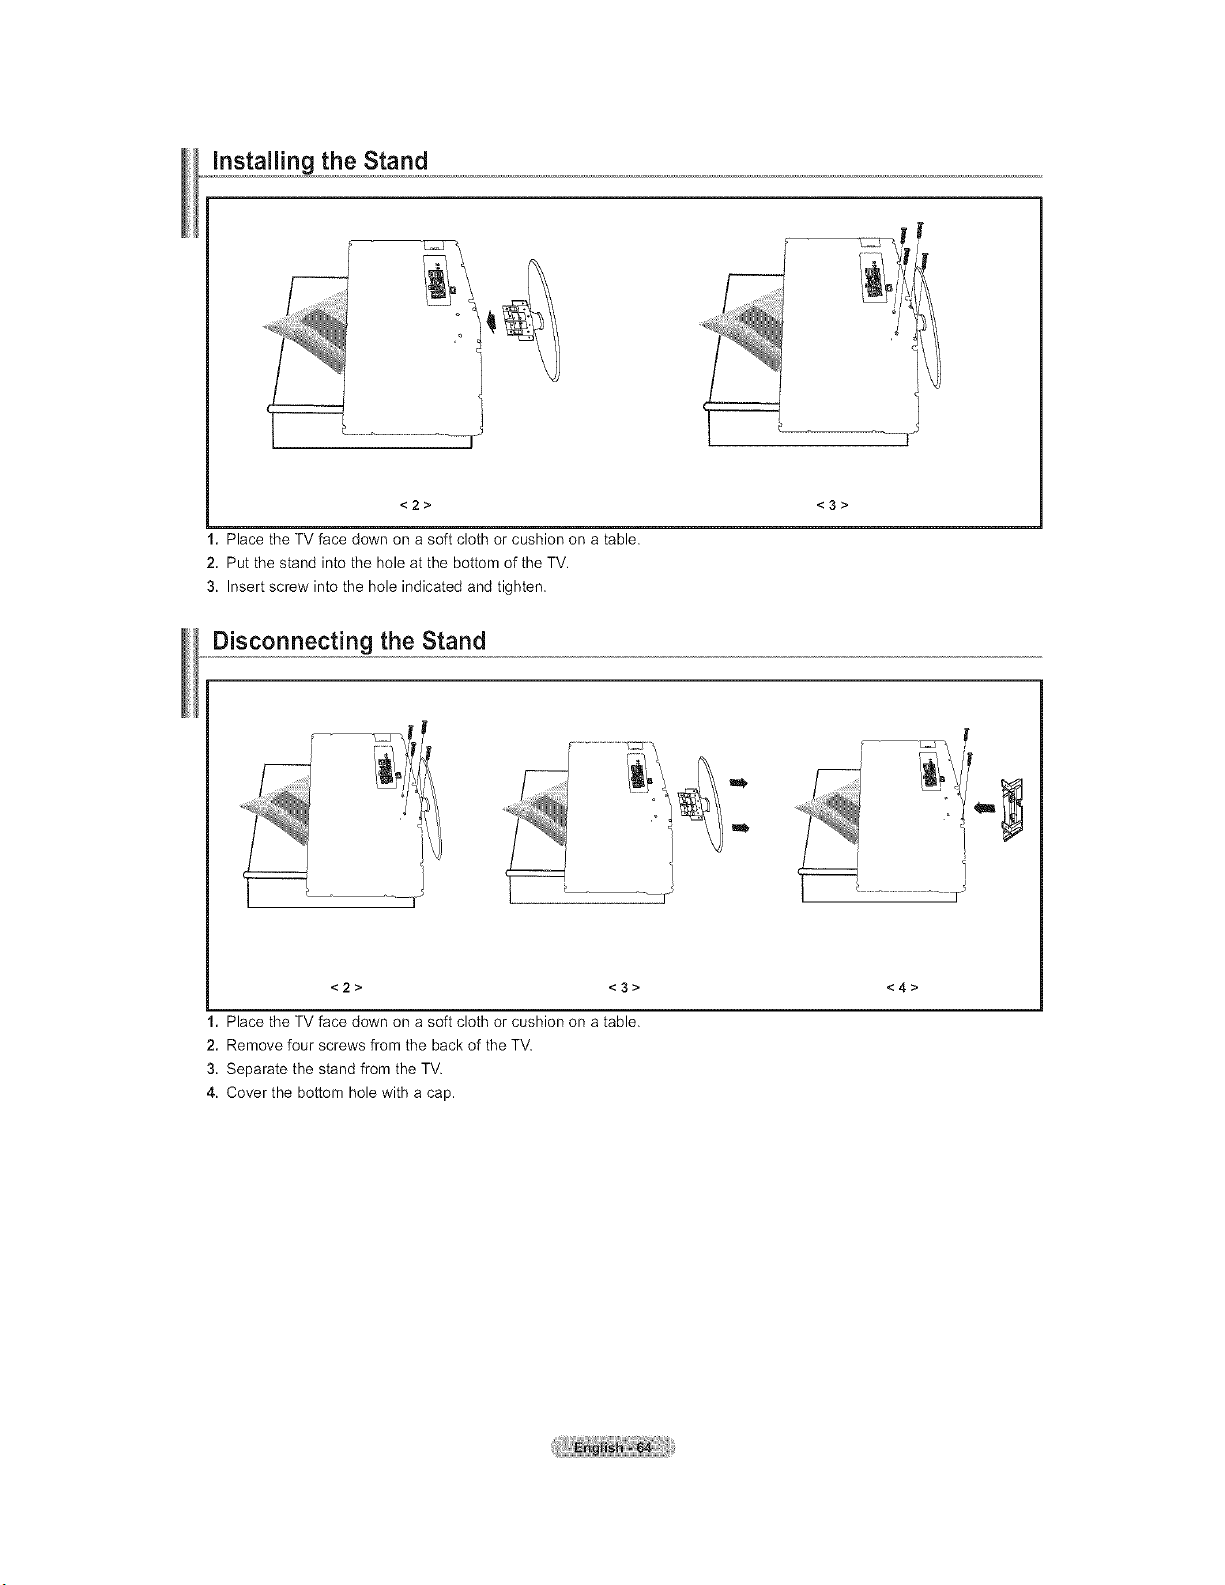
<2> <3>
I, Place the TV face down on a soft cloth or cushion on a table.
2. Put the stand into the hole at the bottom of the TV,
3, Insert screw into the hole indicated and tighten,
Disconnecting the Stand
m
<2> <3> <4>
1. Place the TVface down on asoft cloth or cushion on atable.
2. Remove four screws from the back of the TV.
3. Separate the stand from the TV.
4. Cover the bottom hole with a cap.
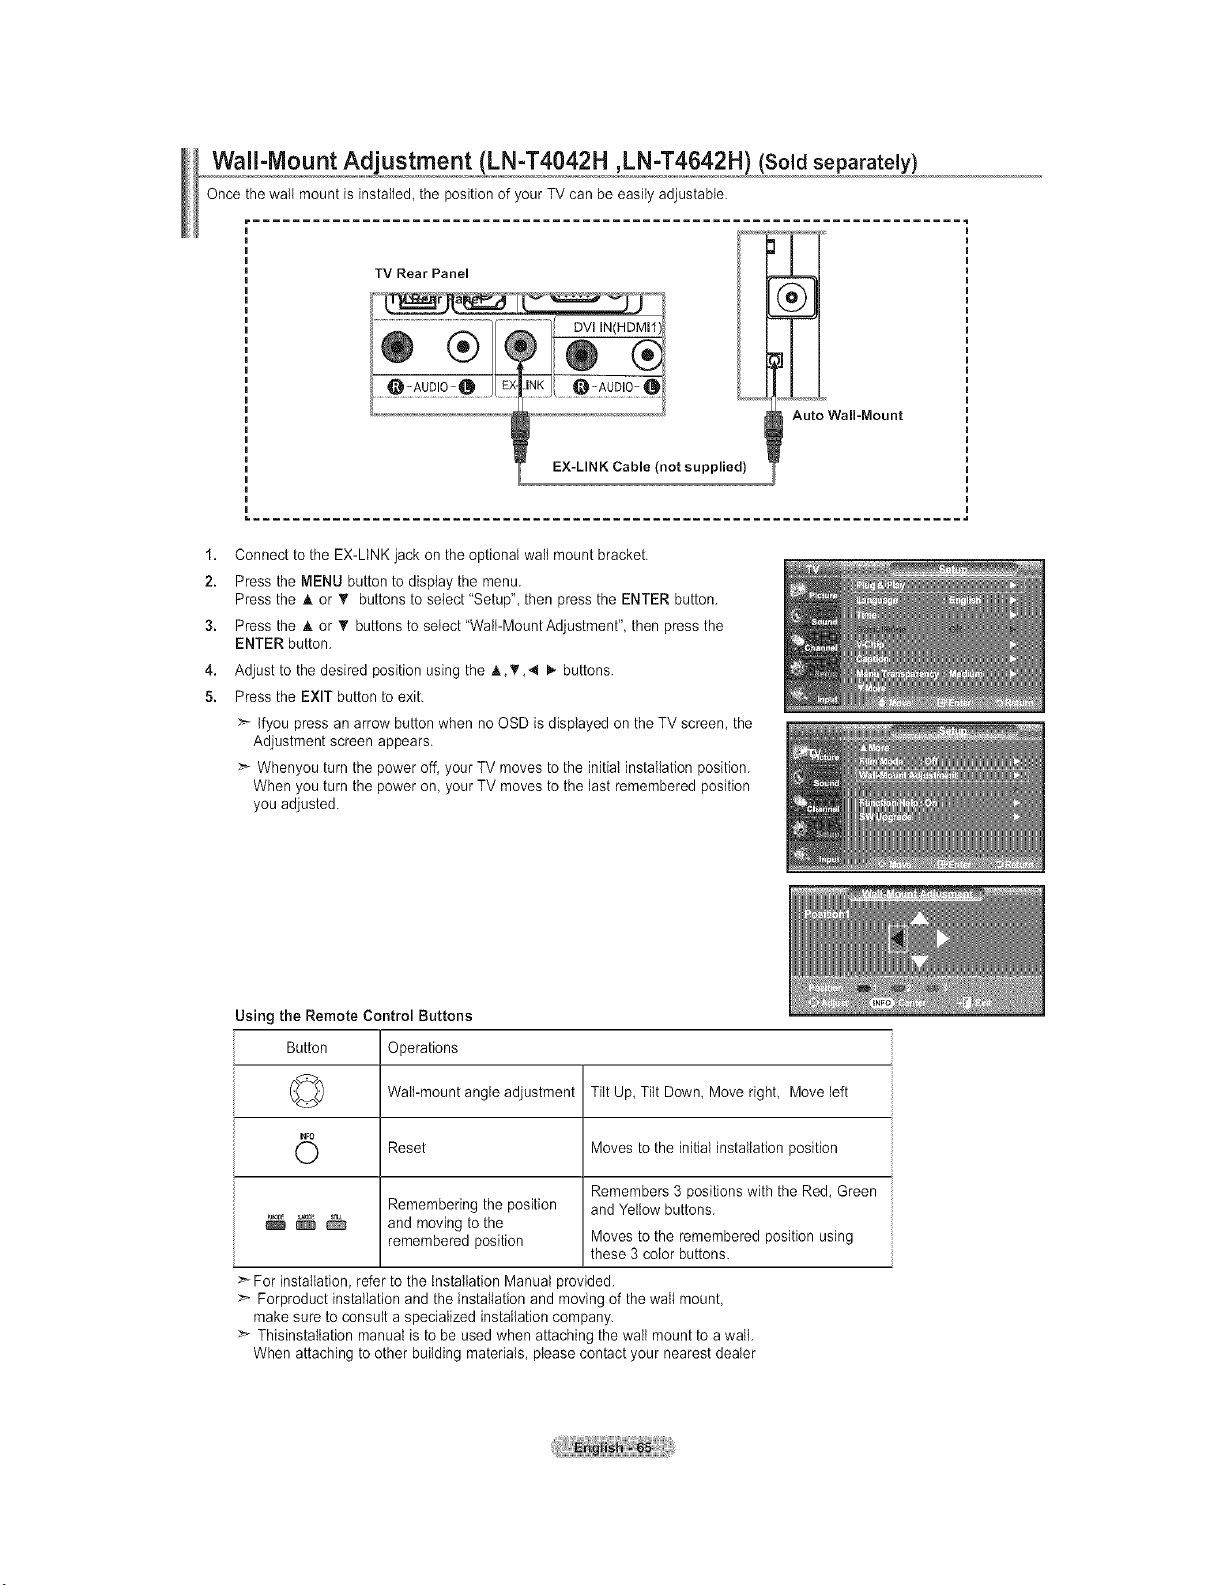
Wall-Mount Adjustment (LN-T4042H ,LN-T4642H) '(Soldseparately}
Once the wail mount is instaIled,the positionof your TVcan be easily adjustable.
TV Rear Panel
EX-LINK Cable (not supplied)
Auto Wall-Mount
1.
2.
3.
4.
5.
Connect to the EX-LtNKjack on the optional wailmount bracket.
Press the MENU button to display the menu.
Pressthe A or _' buttons to select "Setup", then press the ENTER button.
Press the A or • buttons to setect "Wail-MountAdjustment", then pressthe
ENTER button.
Adjust to the desired position using the A,T,4 I,. buttons.
Pressthe EXIT button to exit.
:_ tfyou pressanarrow button when no OSD is displayed on the TV screen, the
Adjustment screenappears.
>_Whenyou turn the power off, your TVmoves to the initialinstallation position.
When you turn the power on, your TV moves tothe lastremembered position
you adjusted.
Using the Remote Control Buttons
Button Operations
(_:>_) Wall-mount angleadjustment Tilt Up, Tilt Down,Move right, Move left
O Reset Moves to the initial installation
position
Remembers 3 positions with the Red, Green
Remembering the position and Yellow buttons.
_ _ and moving tothe
remembered position Moves tothe remembered position using
these 3 color buttons.
For installation, referto the installation Manual provided.
:_ Forproduct installation and the installation and moving of the wall mount,
makesure to consult aspecialized installation company.
ThisinstaItation manualisto be usedwhen attaching the wail mount to await.
When attaching toother building materials, please contact your nearest dealer
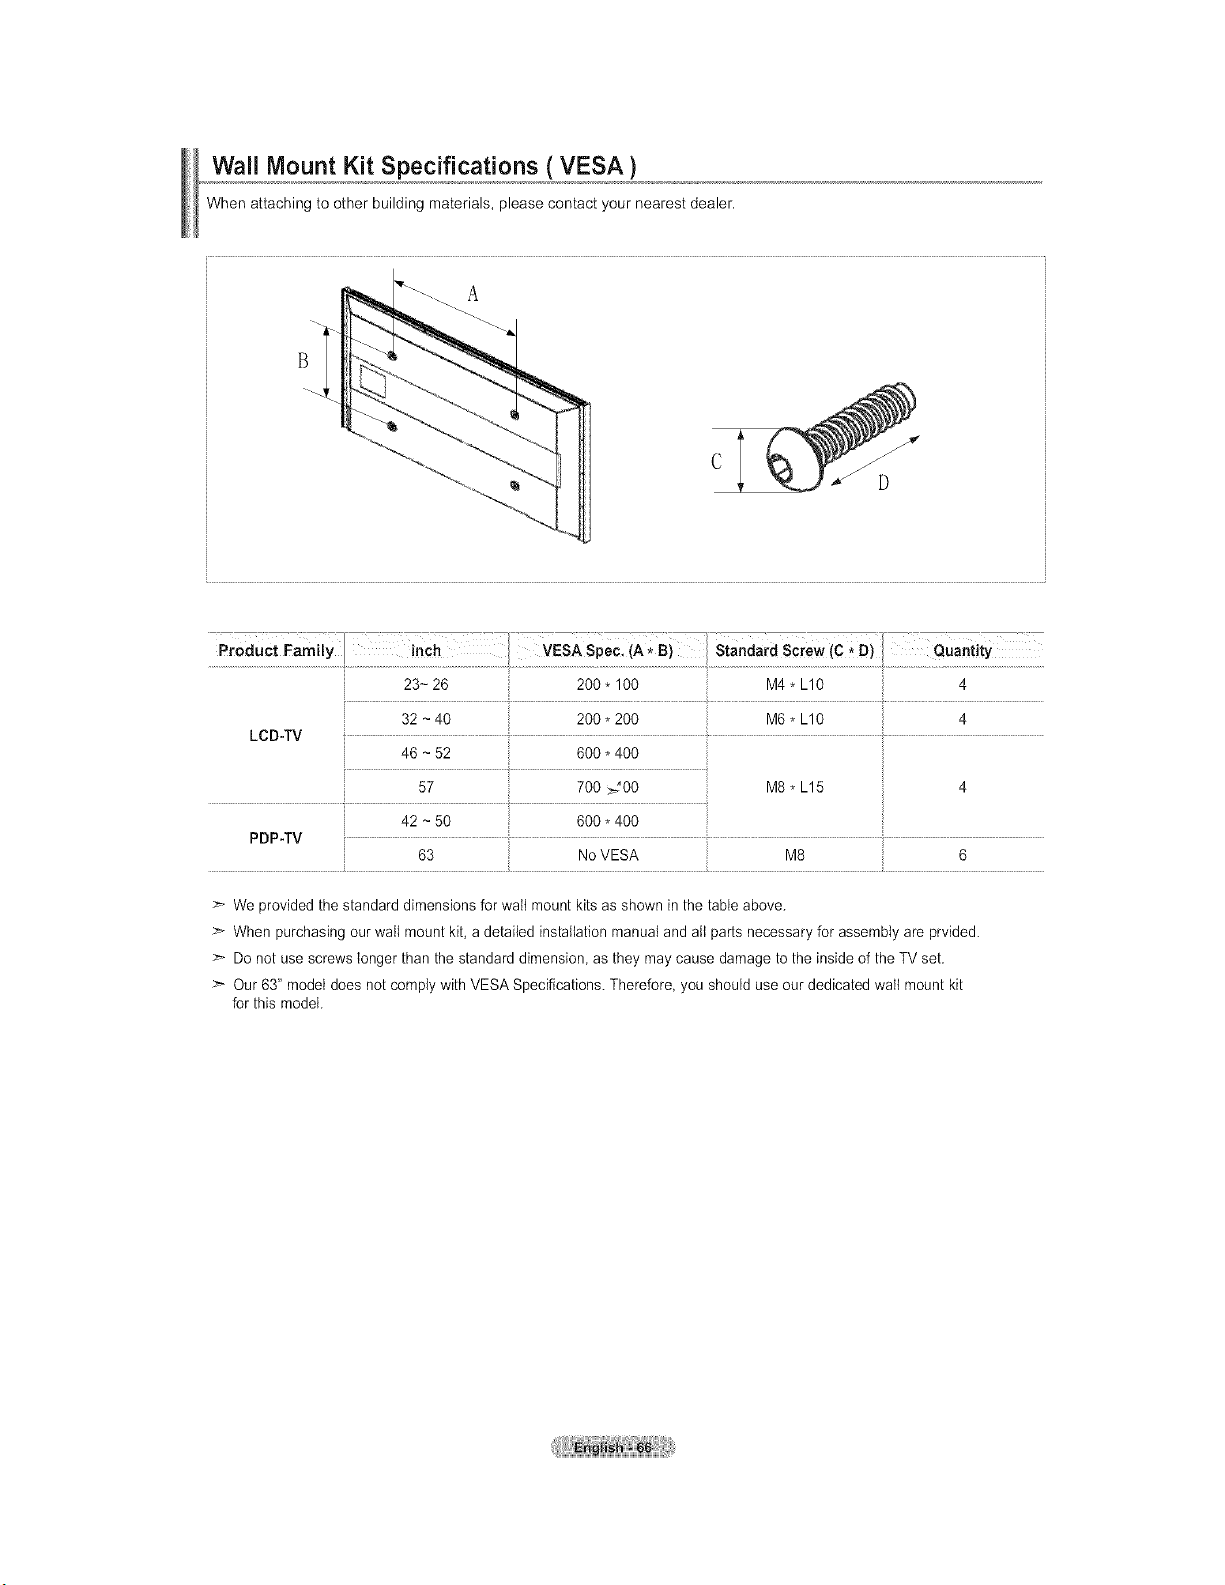
Wall Mount Kit Specifications ( VESA )
When attaching toother building materials, please contact your nearest dealer.
C
D
M6 * L10 4
LCD.TV
46 ~52 600 * 400
57 700 >200 M8 * L15 4
i
42 ~50 600 * 400
PDP-TV
63 No VESA M8 6
> We provided the standard dimensions for wait mount kitsas shown in the table above.
> When purchasing ourwall mount kit,a detailed installation manual and aIt parts necessary for assembly are prvided.
:_ Do not use screws longer than the standard dimension, as they maycause damage tothe insideof the TVset.
:_ Our 63" model does not comply with VESA Specifications. Therefore, youshould use ourdedicated wail mount kit
forthis model.
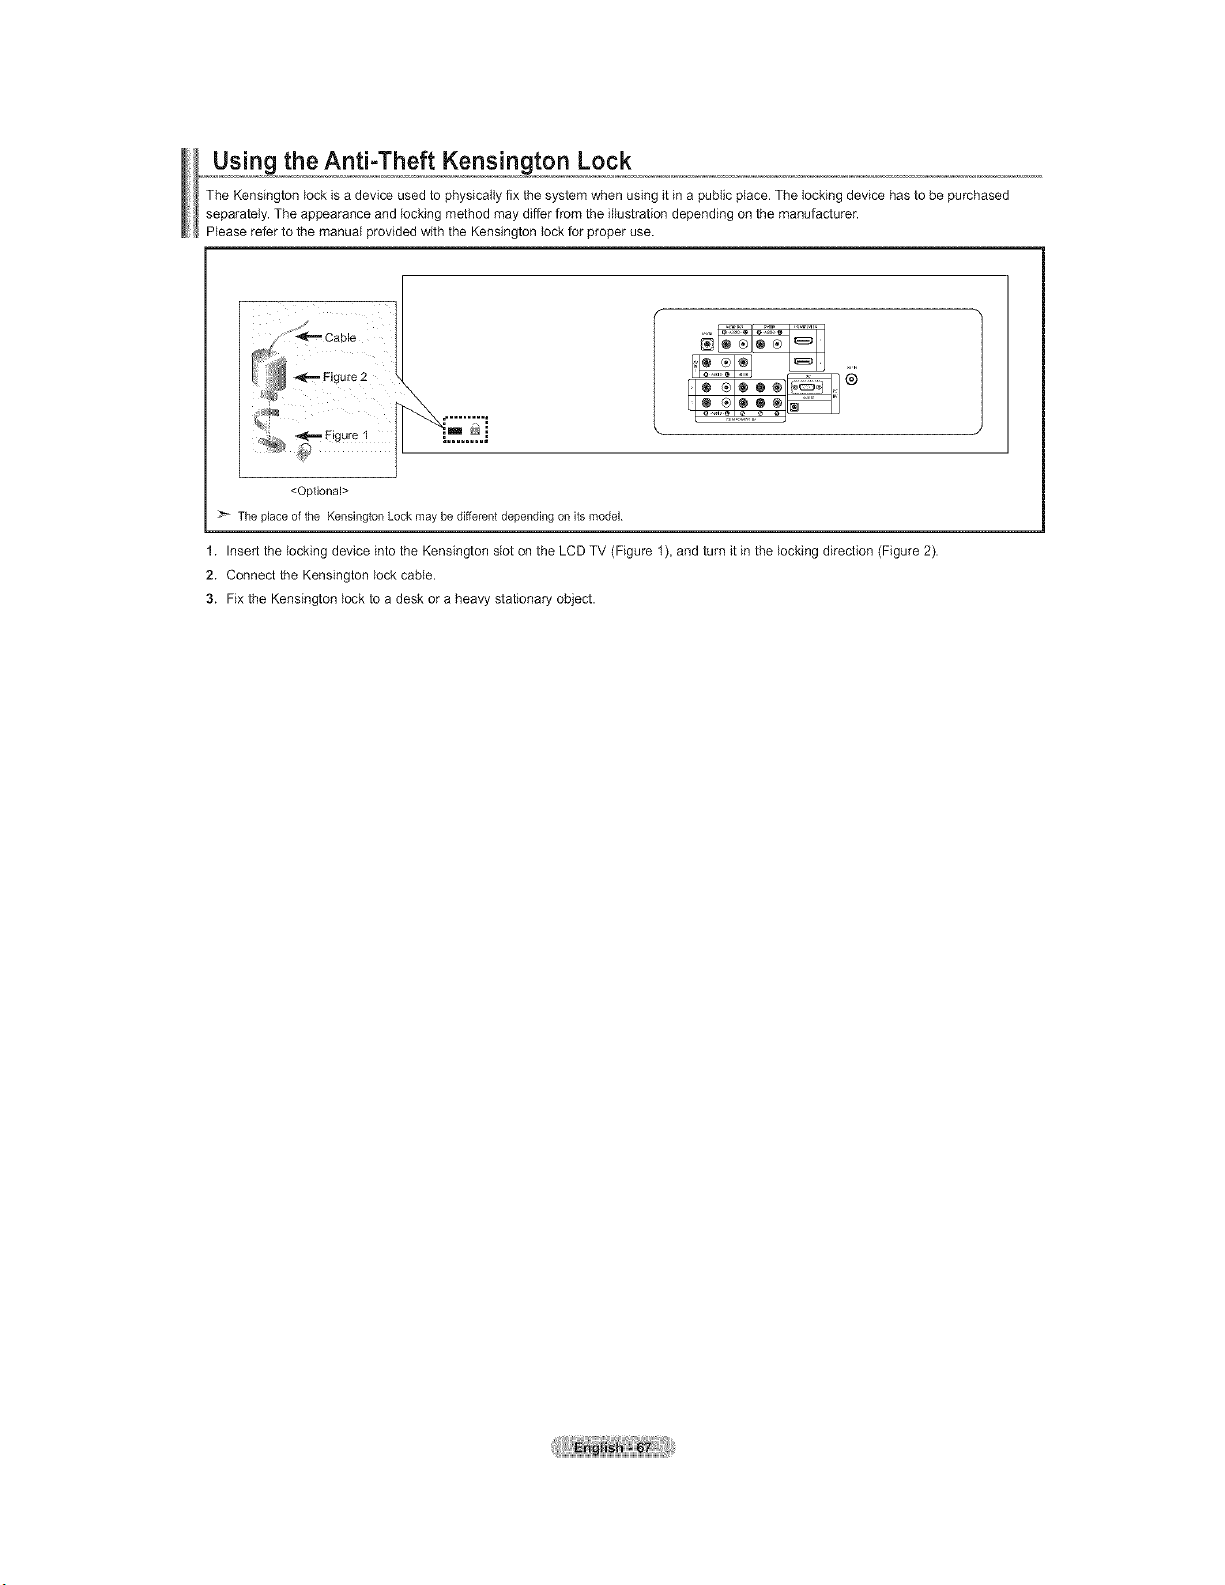
....u s!.ng,,,theA_ heftKensington Lock
The Kensington lock isa device used to physically fix the system when using it in apublic place. The locking device has to be purchased
separately. The appearance and locking method may differ from the i%stration depending on the manufacturer.
Please refer to the manual provided with the Kensington lock for proper use.
<Optional>
:z_ The place of the Kensington Lock may be different depending on its model
1. Insert the locking device into the Kensington slot on the LCD TV (Figure 1), and turn it in the locking direction (Figure 2).
2. Connect the Kensington lock cable.
3. Fix the Kensington lock to adesk or a heavy stationary object.
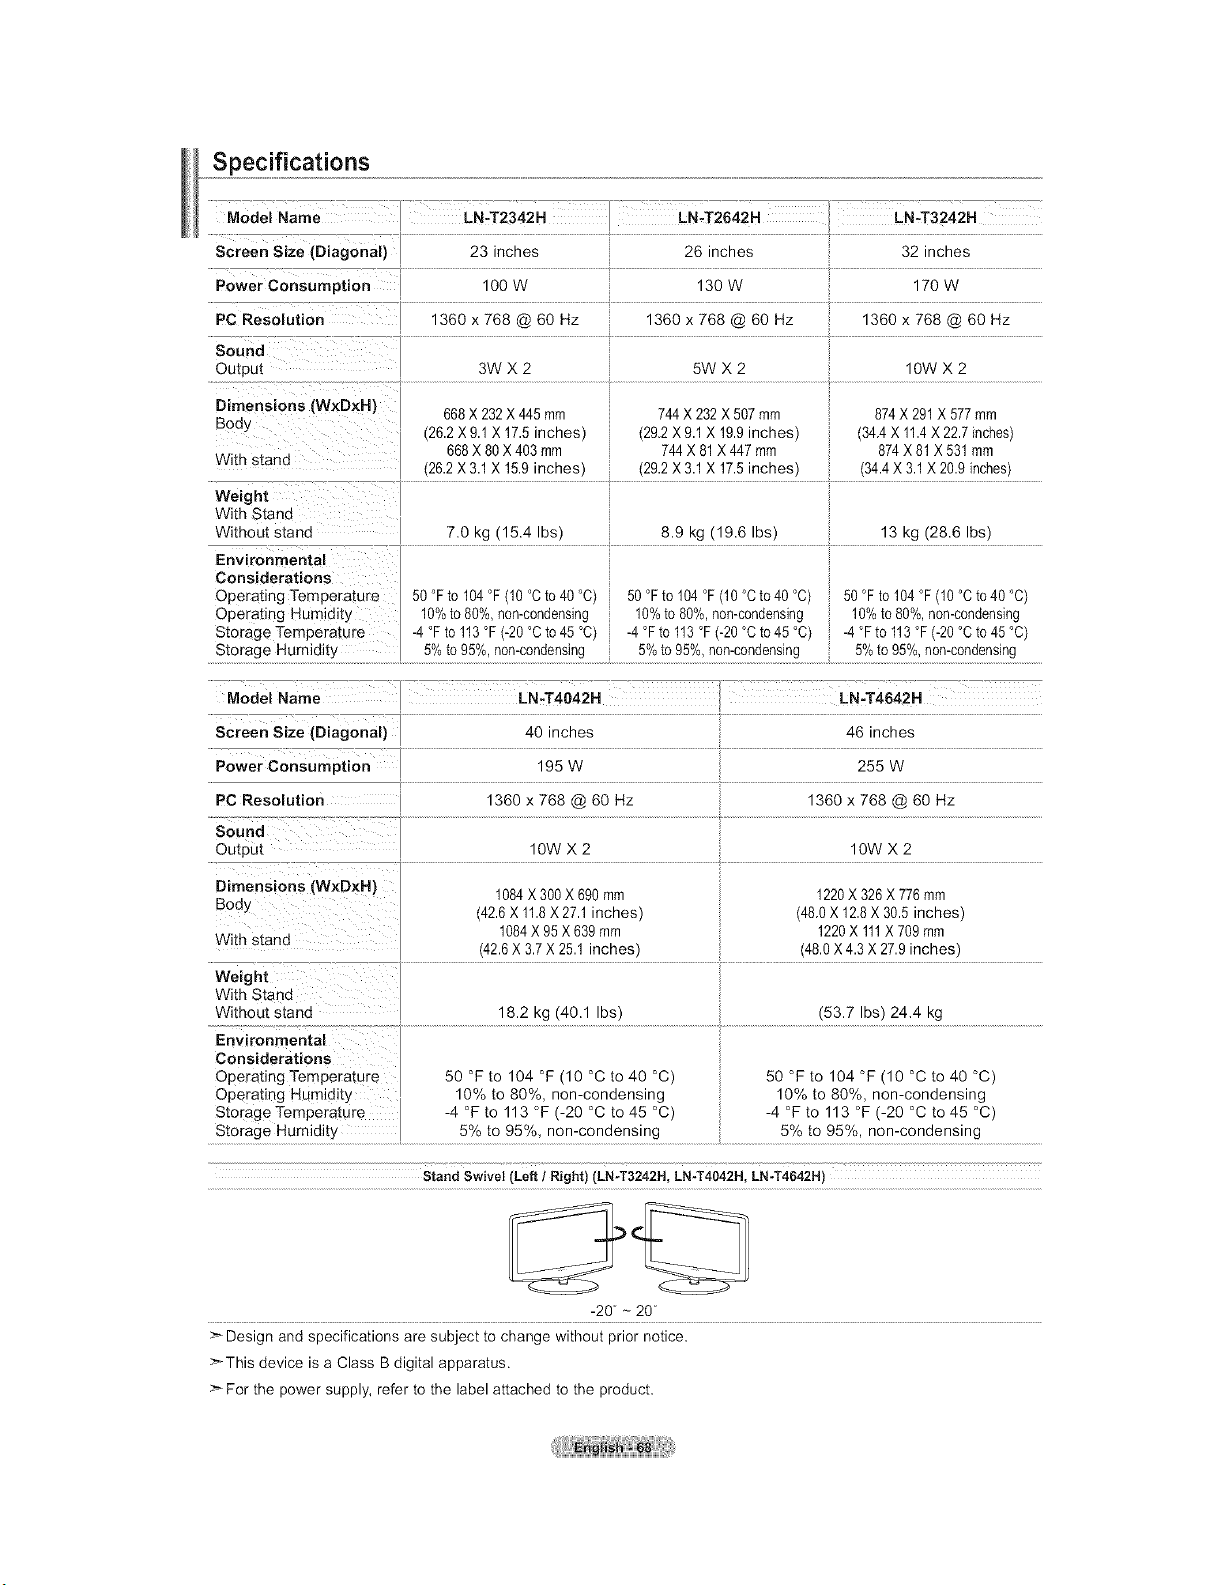
Specifications
Model Name LN_T26-42H LN.T3242H
.....Screen 23 inches _! 26 inches '; 32 inches
Powerconsumptio, lOOw i 130w ! 170w
PC ReSOlUtion 1360 x 768 @ 60 Hz 1360 x 768 @ 60 Hz 1360 x 768 @ 60 Hz
Output 3W X 2 5W X 2 10W X 2
Dimensions (WxD×H) 668 X 232X 445 mm 744 X 232 X 507 mm 874X 291 X 577 mm
Body (2&2 X 9.1X 17.5 inches) (292X 9.1X 19.9 inches) (84A X 11.4X 22.7inches)
668X 80 X 403 mm 744 X 81 X 447 mm 874 X 81 X 531 mm
With stand
(26.2 X 8.1 X 15.9inches) (29.2X 8.1X 17.5 inches) (34.4 X 8.1 X 20.9 inches)
Weight ..............................................................................................................................................................................................................................................................................................................................................................................
WithStand
Without stand 7.0 kg (15.4 Ibs) 8.9 kg (19.6 Ibs) 13 kg (28.6 Ibs)
Considerations i
Operating Temperature 50°Ftol04°F(10°Cto40°C) i 80°Ftol04°F(10°Cto40°C) i 80°Ftol04°F(10°Cto40°C)
operating Humidity 10%to 80%,non-condensing ;i 10%to 80%,non-condensing i 10% to 80%,non-condensing
Storage Temperature -4°Fto113 °F(-20°Cto 45 °C) -4°Fto113 °F (-20°Cto 48 °C) i 4°Fto113°F(-20°Cto45°C)
storage Humidity 5% to 95%, non-condensing _ 5% to 95%, non-condensing _: 5%to 95%, non-condensing
__'- _'-_"_"_"_ .......... <--" ................ i¸¸--<7 -77 ...................................
Model Name
Screen Size (Diagonal)
Power Consumption
PC Resolution
Sound
Outpu[
Dimensions (W×D×H)
Bod:
With stand
Weight
With Stand
Without stand
Environmental
Considerations
Operating Temperature
Operating Humidity
Storage Temperature
Storage Humidity
LN-T4042H _ LN=T4642H
40inches
195W
1360 x 768@60 Hz
1OWX 2
1084X 300 X 690 mm
42.6X 11.8X 27.1inches)
1084X 95 X 639 mm
(42.6X 3.7X 28.1 inches)
18.2 kg (40.1 Ibs)
50 °F to 104 °F (10 °C to 40 °C)
10% to 80%, non-condensing
-4 °F to 113 °F (-20 °C to 45 °C)
5% to 95%, non-condensing
46 inches
255 W
1360 x 768 @ 60 Hz
10WX2
1220X 326X 776mm
(48.0X 12.8X 30.8 inches)
1220X 111X 709 rnm
(48.0X 4.3 X 27.9inches)
(53.7 Ibs) 24.4 kg
50 °F to 104 °F (10 °C to 40 °C)
10% to 80%, non-condensing
-4 °F to 113 °F (-20 °C to 45 °C)
5% to 95%, non-condensing
Stand Swivel (LEE/Right) (LN-T3242H, LN-T4042H, LN-T4642H)
-20 - 20
Design and specifications are subject to change without prior notice.
>_This device isa Class B digital apparatus.
_For the power supply, refer to the label attached to the product.
4, ThisproductusespartsofthesoftwarefromtheIndependentJPEGGroup.
• ThisproductusespartsofthesoftwareownedbytheFreetypeProject(www.freetype,org).
• ThisproductusessomesoftwareprogramswhicharedistributedundertheGPL/LGPLlicense,Accordingly,thefollowingGPLand
GPLsoftware:LinuxKernelBusybox,Binutils
LGPLsoftware:Gtibc
The GNU General Public License (GPL) (LN-T2353H,LN-T2354H,LN-T2653H)
Version 2,June 1991
Copyright (C) 1989, 1991 FreeSoftware Foundation, Inc.
59 Temple Place, Suite 339, Boston,MA 92111-1397 USA
Everyone ispermitted to copy anddistribute verbatim copies
of this license document, but changing it isnot allowed.
Preamble
The licenses for most software are designed totake away yourfreedom to share and change it.By contrast, the GNU General Public License is intended
to guarantee your freedom to share and change free software--to make sure the software isfree forall its users. This General Public License applies to
most ofthe Free Software Foundation's software and to any other program whose authors commit to using it.(Some other Free Software Foundation
software iscovered bythe GNU Library General Public License instead.) You canapply it to your programs, too.
When we speak of freesoftware, we are referring tofreedom, not price. Our General Public Licenses are designed to make sure that you have the
freedom to distribute copies of free software (and charge for this service ifyou wish), that you receive source code or can getit if you want it,that you can
change the software oruse pieces ofit innewfree programs; and th at you know you cando these things.
To protect your rights,we need tomake restrictions that forbid anyone to deny you these rights orto askyou to surrender the rights. These restrictions
translate to certain responsibilities for you if you distribute copies of thesoftware, orif you modify it.
Forexample, if you distribute copies of such aprogram, whether gratis orfor afee, you must give therecipients all the rights that you have. You must
make sure that they, too, receive orcan getthe source code.And you must show them these terms sothey know their rights.
We protect your rights with two steps: (1)copyright the software, and (2) offer you this license which gives you legal permission to copy, distribute and/or
modify the software.
Also, for each author's protection and ours, we want to make certain that everyone understands that there isnowarranty for this free software. Ifthe
software ismodified bysomeone else and passed on, we want its recipients to know that what they have is notthe original, sothat any problems
introduced by others willnot reflect on theoriginal authors' reputations.
Finally,any free program isthreatened constantly by software patents. We wish to avoid thedanger that redistributors of afree program will individually
obtain patent licenses, in effect makingthe program proprietary. To prevent this, we have made it clear that any patent must be licensed for everyone's
free use ornot licensedat all.
The precise terms and conditions for copying, distribution and modification follow.
TERMS AND CONDITIONS FOR COPYING, DISTRIBUTION AND MODIFICATION
0. This License applies to any program orother work which contains anotice placed bythe copyright holder saying it may be distributed under theterms
of this General Public License. The"Program", below, refers to any such program orwork, and a "work based on the Program" means either the Program
or any derivative work under copyright law: that isto say, awork containing the Program ora portion of it, either verbatim orwith modifications and/or
translated into another language. (Hereinafter, translation is includedwithout limitation inthe term "modification".) Each licensee isaddressed as"you".
Activities other than copying, distribution and modification are notcovered by this License;they are outside its scope. Theact of running the Program is
not restricted, andthe output from the Program iscovered only if its contents constitute awork based on theProgram (independent of having been made
by running the Program). Whether that istrue depends on what the Program does.
1.Youmay copy and distribute verbatim copies of the Program's source code asyou receive it,in any medium, provided that you conspicuously and
appropriately publish on each copy an appropriate copyright notice and disclaimer of warranty; keep intact all the notices that refer to this License and to
the absence of any warranty; and give any other recipients of the Program acopy of thisLicense along with theProgram.
You maycharge afee forthe physical act of transferring acopy, and you mayat your option offer warranty protection in exchange for afee.
2. You may modify your copy or copies ofthe Program orany portion of it, thus forming awork based on the Program, and copy and distribute such
modifications orwork under theterms of Section 1above, provided that you also meet all of these conditions:
a) You must cause themodified files to carry prominent notices stating that you changed the files and the date of any change.
b) You must cause any work that you distribute or publish, that inwhole or inpart contains or isderived from the Program orany part thereof, to be
licensed as awhole at no charge toall third parties underthe terms of this License.
c) Ifthe modified program normally reads commands interactively when run,you must cause it,when started running for such interactive use inthe
most ordinary way,to print ordisplay an announcement including an appropriate copyright notice and anotice that there isno warranty (orelse,
saying that you provide awarranty) and that users mayredistribute the program under these conditions, and telling the user how to view acopy of
this License. (Exception: if the Program itselfis interactive but does not normally print such an announcement, your work based on theProgram is
not required to print an announcement.)
Continued...
These requirements applyto themodified work asawhole. Ifidentifiable sections of that work are notderived from the Program, and can be reasonably
considered independent and separate works in themselves, then this License, and its terms, do notapply to those sections when you distribute them as
separate works. Batwhen you distribute the same sections as partof awhole which isawork based on theProgram, thedistribution ofthe whole must be
on theterms of this License,whose permissions for other licensees extend to the entire whole, and thus to each and every partregardless of who wrote it.
Thus, it isnotthe intent of this section to claim rights orcontest your rights to work written entirely byyou; rather,the intent isto exercise theright to
control thedistribution of derivative or collective works based on the Program.
Inaddition, mere aggregation of another work notbased on the Program with the Program (orwith awork based on the Program) on avolume ofa
storage ordistribution medium does not bringthe other work under the scope of this License.
3. You may copy and distribute theProgram (or awork based on it,under Section 2)in object code orexecutable form underthe terms of Sections 1and
2 aboveprovided that youalso do one of thefollowing:
a)Accompany it with thecomplete corresponding machine-readable source code, which must bedistributed under theterms of Sections 1and 2
above on amedium customarily usedfor software interchange; or,
b)Accompany it with awritten offer, valid for at least three years, to give any third party, for acharge no more than yourcost of physically performing
source distribution, acomplete machine-readable copy ofthe corresponding source code, to bedistributed under theterms of Sections 1and 2
above on amedium customarily usedfor software interchange; or,
c) Accompany it with the information you received astothe offer to distribute corresponding source code. (Thisalternative isallowed only for
noncommercial distribution and only ifyou received the program inobject code orexecutable form with such an offer,in accord with Subsection b
above.)
The source code for awork means the preferred formof thework for making modifications to it. For an executable work, complete source code means
all the source code for all modules it contains, plus any associated interface definition files, plus the scripts used to control compilation and installation of
the executable. However, asaspecial exception, the source code distributed neednot include anything that is normally distributed (in either source or
binary form) with the major components (compiler, kernel, and soon) of theoperating system on which theexecutable runs, unless that component itself
accompanies the executable.
Ifdistribution of executable orobject code ismade byoffering access to copy from adesignated place, then offering equivalent access to copy thesource
code from thesame placecounts asdistribution of the source code, even though third parties are notcompelled to copythe source along with the object
code.
4. You may not copy,modify, sublicense, ordistribute the Program except as expressly provided underthis License. Any attempt otherwise to copy,
modify, sublicense or distribute the Program is void, and will automatically terminate your rights under this License. However, parties who have received
copies, orrights, from you under this License will nothave their licenses terminated solong assuch parties remain in full compliance.
5. You are not required to accept this License, sinceyou have not signed it. However, nothing else grants you permission to modify ordistribute the
Program orits derivative works. These actions are prohibited by lawif you donot accept this License. Therefore, bymodifying ordistributing the Program
(or any work based onthe Program), youindicate your acceptance of this License to do so, and all its terms and conditions for copying, distributing or
modifying the Program orworks based on it.
6. Each time you redistribute theProgram (or anywork basedon the Program), the recipient automatically receives a license from the original licensor to
copy,distribute ormodify the Program subject to these terms and conditions. You maynot impose anyfurther restrictions on therecipients' exercise ofthe
rights granted herein. You are notresponsible for enforcing compliance by third parties to this License.
7. If,as aconsequence of acourt judgment orallegation of patent infringement orfor any other reason (not limitedto patent issues), conditions are
imposed on you (whether bycourt order, agreement orotherwise) that contradict the conditions of this License, they do notexcuse you from the
conditions of this License. Ifyou cannot distribute so asto satisfy simultaneously your obligations under thisLicense and any other pertinent obligations,
then as aconsequence you may notdistribute the Program at all. For example, if a patent license would not pemlit royalty-free redistribution of the
Program by allthose who receive copies directly orindirectly through you,then the only way you could satisfy both it and thisLicense would be to refrain
entirely from distribution of theProgram.
Ifany portion of this section isheld invalid or unenforceable under any particular circumstance, the balance of thesection isintended to apply and the
section asawhole isintended to apply in other circumstances.
Itisnotthe purpose of this sectionto induce you to infringe any patents orother property right claims orto contest validity of any such claims; this section
has the sole purpose ofprotecting the integrity of thefree software distribution system, which is implemented by public license practices. Many people
have made generous contributions to the wide range ofsoftware distributed through that system in reliance onconsistent application of that system; it is
up to the author/donor to decide ifhe orshe iswilling to distribute software through anyother system and a licensee cannot impose that choice.
This section isintended to make thoroughly clear what isbelieved to be aconsequence of the rest of this License.
B. Ifthe distribution and/or use of the Program isrestricted in certain countries either by patents or bycopyrighted interfaces, theoriginal copyright holder
who placesthe Program under thisLicense may add an explicitgeographical distribution limitation excluding those countries, sothat distribution is
permitted only in or among countries notthus excluded. In such case,this License incorporates thelimitation as if written in the body of this License.
9. The FreeSoftware Foundation may publish revised and/or new versions of theGeneral Public License from timeto time. Such new versions willbe
similar in spirit tothe present version, butmay differ in detail to address new problems or concerns.
Each version is givena distinguishing version number. Ifthe Program specifies aversion number ofthis License which applies to it and "any later version",
you have the option offollowing theterms and conditions either of that version orof any later version published bythe FreeSoftware Foundation. Ifthe
Program does notspecify aversion number ofthisLicense, you maychoose any version ever published bythe Free Software Foundation.
Continued...
10. Ifyou wish to incorporate parts of the Program into other free programs whose distribution conditions are different, write to theauthor to askfor
permission. For software which iscopyrighted bythe Free Software Foundation, write to the Free Software Foundation; we sometimes make exceptions
for this. Our decision will be guided bythetwo goals ofpreserving thefree status of aftderivatives of our free software and of promoting the sharing and
reuse ofsoftware generally.
NO WARRANTY
11,BECAUSE THE PROGRAM IS LICENSED FREE OF CHARGE, THERE IS NOWARRANTY FOR THE PROGRAM, TOTHE EXTENT PERMITTED
BYAPPLICABLE LAW. EXCEPT WHEN OTHERWISE STATED IN WRITING THE COPYRIGHT HOLDERS AND/OR OTHER PARTIES PROVIDE
THE PROGRAM "ASIS" WITHOUT WARRANTY OFANY KIND, EITHER EXPRESSED OR IMPLIED, INCLUDING, BUT NOT LIMITED TO, THE
IMPLIED WARRANTIES OFMERCHANTABILITYAND FITNESS FORA PARTICULAR PURPOSE. THE ENTIRE RISKAS TO THE QUALITY
AND PERFORMANCE OFTHE PROGRAM IS WITH YOU. SHOULD THE PROGRAM PROVE DEFECTIVE, YOUASSUME THE COST OFALL
NECESSARY SERVICING, REPAIROR CORRECTION.
12. IN NO EVENT UNLESS REQUIRED BY APPLICABLE LAW ORAGREED TO IN WRITING WILL ANY COPYRIGHT HOLDER, OR ANY OTHER
PARTY WHO MAY MODIFY AND/OR REDISTRIBUTE THE PROGRAM AS PERMITTED ABOVE, BE LIABLE TOYOU FOR DAMAGES, INCLUDING
ANY GENERAL, SPECIAL, INCIDENTAL OR CONSEQUENTIAL DAMAGES ARISING OUT OF THE USEOR INABILITY TO USETHE PROGRAM
(INCLUDING BUT NOT LIMITED TOLOSS OF DATAOR DATA BEING RENDERED INACCURATE OR LOSSES SUSTAINED BY YOU OR THIRD
PARTIES OR A FAILURE OFTHE PROGRAM TOOPERATE WITH ANYOTHER PROGRAMS), EVEN IFSUCH HOLDER OR OTHER PARTY HAS
BEENADVISED OFTHE POSSIBILITY OFSUCH DAMAGES.
END OFTERMS AND CONDITIONS
How to Apply These Terms to Your New Programs
Ifyou develop anew program, and you want itto be of the greatest possible use to the public,the best way to achieve this isto make it free software
which everyone can redistribute and change under these terms.
Todo so, attach thefollowing notices to the program. It issafest to attach them to thestart of each source file to most effectively convey the exclusion of
warranty; and each file should have at least the "copyright" lineand apointer to where thefull notice isfound.
One lineto give theprogram's name and abrief idea of what it does.
Copyright (C) <year> <name of author>
This program isfree software; you can redistribute it and/or modify it underthe terms of the GNU General Public License as published by the Free
Software Foundation; either version 2 ofthe License, or (at your option) any later version.
This program isdistributed in the hope that it will beuseful, butWITHOUT ANY WARRANTY; without even the implied warranty of
MERCHANTABILITY orFITNESS FOR APARTICULAR PURPOSE. See theGNU General Public License for more details.
You should have received acopy of the GNUGeneral Pubflc License along with this program; if not, write to the FreeSoftware Foundation, Inc.,59
Temple Place, Suite 330, Boston, MA 02111-1307 USA
Also add information on how to contact you by electronic and papermail.
Ifthe program isinteractive, make it output ashort notice like this when it starts in an interactive mode:
Gnomovision version 69,Copyright (C)year name of author Gnomovision comes with ABSOLUTELY NO WARRANTY; for detailstype 'show w'.This
isfree software, and you arewelcome to redistribute it under certain conditions; type 'show c'for details.
The hypothetical commands "show w' and 'show c' should show the appropriate parts of the General Public License. Ofcourse, the commands you use
may be called something other than 'show w' and'show c'; they could even be mouse-dicks or menu items--whatever suitsyour program.
You should also get your employer (if you work asa programmer) oryour school, if any,to sign a "copyright disclaimer" for the program, if necessary. Here
isasample; alter the names:
Yoyodyne, Inc., hereby disclaims all copyright interest in the program 'Gnomovision (which makes passes at compilers) written by James Hacker.
signature of Ty Coon, 1April 1989
Ty Coon, President ofVice
This General Public License does notpermit incorporating your program into proprietary programs. Ifyour program isa subroutine library, you may
consider itmore useful to permit linkingproprietary applications with thelibrary. Ifthisiswhat youwant to do,use the GNU LibraryGeneral PublicLicense
instead of this License.
Continued...
GNU Lesser General Public License (LGPL)
Version2.1,February 1999
Copyright (C)1991,1999FreeSoftwareFoundation, Inc.59 Temple Place, Suite 330, Boston,MA02111-I307 USAEveryoneispermitted to copy and
distributeverbatim copiesofthislicensedocument,butchangingit isnotallowed.
)Thisisthefirst releasedversiond theLesser GPL. Italso counts asthesuccessor d theGNUUbrary PublicLicense,version2,hencetheversionnumber
2.1.]
Preamble
Thelicenses for most softwareare designedto takeaway your freedomto share and changeit. By contrast, the GNUGeneralPublicLicenses are intended to
guarantee your freedomto share andchangefreesoftware--to make sure the software isfreeforall itsusers.
Thislicense,theLesserGeneralPublicLicense,applies to somespeciallydesignatedsoftware packages--typicallylibraries--of theFreeSoftwareFoundationand
other authors who decideto useit. Youcan useittoo, butwe suggest you first think carefullyabout whetherthis licenseorthe ordinaryGeneralPublicLicense is
thebetterstrategyto use in any particular case,basedon theexplanationsbelow.
When we speakof free software,we are referringto freedom of use,notprice. Our GeneralPuNic Licensesare designedto makesure that you have thefreedom
to distributecopiesoffreesoftware(andchargefor thisservice if youwish); that you receivesource codeorcanget it if youwant it;thatyou can changethe
software and use piecesof itin new flee programs; and that youare informedthat youcan do these things.
Toprotectyourrights,we needto makerestrictionsthat forbid distributorsto denyyou theserights orto askyoutosurrender these rights.These restrictions
translateto certain responsibilitiesforyouifyoudistributecopiesofthelibraryorif you modify it.
Forexample,if you distributecopiesd the library,whethergratisorforafee, youmustgive therecipients all therights that we gaveyou.Youmustmake surethat
they,too, receiveorcangetthesourcecode. Ifyou linkother code withthelibrary,you must provide completeobjectfiles to therecipients,sothat theycan relink
themwith thelibraryafter makingchangesto thelibraryand recompiling it.And youmustshow themthese terms sotheyknow their rights.
We protectyour rights with atwo-step method: (I) we copyrightthelibrary,and (2)weofferyouthislicense,which gives you legal permission to copy,distribute
and/or modify thelibrary.
Toprotecteach distributor, wewant to makeitveryclear that there isno warrantyfor thefreelibrary.Also,if thelibraryismodifiedbysomeone else and passed
on,therecipients should know thatwhat theyhave isnottheoriginalversion, sothat theoriginalauthor'sreputationwillnot beaffectedbyproblemsthatmightbe
introduced byothers.
Finally,software patents pose aconstant threatto theexistenceofanyfreeprogram.We wish to make surethat acompanycannot effectivelyrestrict theusers
d afreeprogrambyobtainingarestrictive licensefromapatentholder.Therefore,we insistthatanypatent license obtained for a versionofthelibrarymust be
consistentwith thefull freedom d usespecified inthislicense.
Most GNUsoftware,including some libraries,iscoveredbytheordinary GNUGeneralPublicLicense.Thislicense,the GNULesserGeneralPublicLicense,
applies tocertain designatedlibraries, and isquite differentfrom theordinaryGeneralPublicLicense.Weusethislicense for certain libraries in order to permit
linking those librariesinto non-freeprograms.
When aprogramislinked with alibrary,whether statically orusingasharedlibrary,the combinationofthetwo islegally speakinga combined work,aderivativeof
theoriginallibrary.TheordinaryGeneralPublicLicense therefore permits such linking only if theentire combinationfits its criteria d freedom.The Lesser General
PublicLicense permits more lax criteriafor linking other code withthelibrary.
We call thislicense the"Lesser"GeneralPublicLicense because itdoes Lesstoprotectthe user's freedom than theordinaryGeneralPublicLicense.Italso
provides other freesoftware developersLess of anadvantageovercompeting non-freeprograms. These disadvantages are thereasonwe usetheordinary
GeneralPublicLicense for many librades. However,theLesserlicenseprovides advantages incertainspecialcircumstances.
Forexample,onrare occasions,there maybe aspecial needto encouragethewidest possible use of acertain library, sothat it becomesade-factostandard.To
achieve this, non4ree programsmustbeallowedtousethelibrary.Amorefrequentcaseisthatafreelibrarydoes the samejob aswidely used non-freelibraries.
Inthis case,there islittletogainby limitingthefree libraryto freesoftware only, sowe usetheLesserGeneralPublicLicense.
Inothercases,permissionto useaparticular libraryin non4ree programsenables agreater numberofpeople to usealargebodyof free software.For example,
permissionto usethe GNUCLibraryinnon-freeprogramsenablesmany more peopleto usethewhole GNUoperating system,aswell asits variant, theGNU/
Unux operatingsystem.
Although theLesser GeneralPublicLicense isLessprotectived the users' freedom,itdoes ensurethat theuserofa programthatislinkedwith theLibraryhas
thefreedomand thewherewithaltorunthatprogramusingamodified versiond theLibrary.
Thepreciseterms andconditions for copying,distribution and modification follow. Payclose attentionto thedifferencebetween a"work basedon thelibrary"anda
"work that usesthelibrary".Theformercontainscodederivedfromthelibrary, whereas thelattermust be combined with the libraryin orderto run.
TERMS AND CONDITIONS FOR COPYING, DISTRIBUTION AND MODIFICATION
0.This LicenseAgreement applies to any software libraryor other programwhich containsanotice placed bythecopyrightholderorother authorized partysaying
it maybe distributed undertheterms ofthisLesser GeneralPublicLicense(alsocalled1hisLicense").Each licenseeisaddressed as"you".
A"library" means acollection of software functions and/or data prepared soastobeconvenientlylinked with applicationprograms(whichuse someofthose
functions anddata)toform executables.
The"Library",below,refersto any such software libraryorworkwhichhas beendistributedunderthese terms.A"work basedonthe Library"meanseither the
Libraryorany derivative work undercopyrightlaw: that isto say, awork containingthe Libraryor aportionof it, either verbatim orwith modifications and/or
translatedstraightforwardlyintoanotherlanguage.(Hereinafter,translation isincludedwithout limitationin theterm "modification".)
Continued...
"Source code" for awork means the preferred form ofthe work for makingmodifications to it. For alibrary, complete source code means all the source
code for all modules it contains, plus any associated interface definition files, plus the scripts used to control compilation and installation of the library.
Activities other than copying, distribution and modification are notcovered by this License;they are outside its scope. Theact of running aprogram using
the Library isnotrestricted, and output from such aprogram is covered only if its contents constitute awork basedon the Library (independent of the use
of the Library in atool for writing it).Whether that istrue depends on what theLibrary does and what the program that uses the Library does.
1.Youmay copy and distribute verbatim copies of the Library's complete source code asyou receive it, in any medium, provided that you conspicuously
and appropriately publish on each copy an appropriate copyright notice and disclaimer of warranty; keep intact all the notices that referto this License and
to the absence of any warranty; and distribute a copy of this License along with the Library.
You may charge afee for the physical act of transferring acopy, and you mayat your option offer warranty protection in exchange for afee.
2. You may modify your copy or copies ofthe Library or any portion of it, thus forming awork based onthe Library, and copy and distribute such
modifications orwork under theterms of Section 1above, provided that you also meet all of these conditions:
a) Themodified work must itself be asoftware library.
b) You must cause thefiles modified to carry prominent notices stating that you changed the files and the date of any change.
c) You must cause the whole of the work to be licensed at no charge to all third parties under theterms of thisLicense.
d) Ifafacility in the modified Library refers to afunction or atable of data to be supplied by an application program that uses the facility, other than as
an argument passedwhen the facility is invoked,then youmust make a goodfaith effort to ensure that, in the event an application does not supply
such function ortable, thefacility still operates, and performs whatever partof its purpose remains meaningful.
(For example, afunction in alibrary to compute square roots has apurpose that isentirelywell-defined independent of the application. Therefore,
Subsection 2d requires that any application-supplied function ortable used bythis function must be optional: if theapplication does not supply it,the
square rootfunction must still compute square roots.)
These requirements applyto themodified work asawhole. Ifidentifiable sections of that work are notderived from theLibrary, and can bereasonably
considered independent and separateworks in themselves, then thisLicense, and its terms, donotapply to those sections whenyou distributethem as
separate works. Butwhen you distributethe same sections aspartof awhole which isawork basedon the Library,the distribution of thewhole must be
on theterms of this License,whose permissions for other licensees extend to the entire whole,and thusto each andevery part regardless of who wrote
it.
Thus, it isnotthe intent of this section to claim rights orcontest your rightstowork written entirely by you;rather,the intent isto exercise the right to
control the distribution of derivative orcollective works based onthe Library.
Inaddition, mere aggregation of another work not based on the Library with the Library (orwith awork based on theLibrary) onavolume of a
storage ordistribution medium does not bringthe other work under the scope of this License.
3. You may optto applythe terms of the ordinary GNU General Public License instead of thisLicense to agiven copy of theLibrary. To do this, you must
alter all the notices that referto this License, sothat they referto the ordinary GNU General Public License, version 2,instead of to this License. (If a
newer version than version 2of the ordinary GNU General PublicLicense has appeared, then you can specify that version instead if you wish.) Do not
make any other change in these notices.
Once this change ismade in agivencopy, it isirreversible for that copy,sothe ordinary GNUGeneral Public License applies to all subsequent copies and
derivative works made from that copy.
This option isusefulwhen you wish to copy partof the code of the Library into aprogram that isnotalibrary.
4. You may copy and distributethe Library (or aportion orderivative of it, underSection 2) inobject code orexecutable form under theterms of Sections 1
and 2 above providedthat you accompany it with the complete corresponding machine-readable source code, which must be distributed underthe terms
of Sections 1and 2above on amedium customarily used forsoftware interchange.
If distribution of objectcode ismade byoffering access to copy froma designated place, then offering equivalent access to copy the source code from the
same place satisfies the requirement to distribute thesource code, even though third parties are not compelled to copy the source along with the object
code.
5, A program that contains no derivative of anyportion of the Library, but isdesigned to work with the Library bybeing compiled or linked with it, iscalled a
"work that usesthe Library". Such awork, in isolation, isnotaderivative work of the Library, and therefore falls outside the scope of this License.
However,linking a"work that uses the Library" with the Library creates an executable that is aderivative of the Library (because it contains portions of
the Library), rather than a"work that usesthe library". The executable istherefore covered bythis License. Section 6states temls for distribution of such
executables.
When a"work that uses the Library" uses material from aheader file that ispart of the Library,the object code for thework maybe a derivative work of the
Libraryeven though the source code is not. Whether this istrue isespecially significant if thework can be linked without the Library, or if thework isitself
a library.The threshold for thisto be true isnot precisely defined bylaw.
Ifsuch an object file uses only numerical parameters, data structure layouts and accessors, and small macros andsmall inline functions (tenlines or less
in length), then the use of the object file isunrestricted, regardless of whether it islegally aderivative work. (Executables containing this object code plus
portions of the Library will stillfall under Section 6.)
Continued...
Otherwise, if thework is aderivative of the Library, youmay distribute the object code for the work under the terms of Section 6.Any executables
containing that work also fall under Section 6, whether ornotthey are linked directly with the Library itself.
6.As anexception to the Sections above, you may also combine orlink a "work that uses the Library"with the Library to produce awork containing
portions of the Library, and distribute thatwork under terms of your choice, provided that thetemls permit modification of thework for the customer's own
use and reverse engineering for debugging such modifications.
You must give prominent notice with each copy of thework that the Library isused in it and that the Library and its use are covered bythis License. You
must supply a copy ofthis License. Ifthe work during execution displays copyright notices, youmust include the copyright notice for the Library among
them, aswell asareference directing the user to the copy of this License.Also, you must do one of these things:
a)Accompany thework with the complete corresponding machine-readable source code for the Library including whatever changes were used
in thework (which must be distributed under Sections 1and 2above); and, if the work isan executable linked with the Library, with the complete
machine-readable "work that uses theLibrary", as object code and/or source code, sothat the user can modify the Library and then relink to produce
a modified executable containing the modified Library. (Itis understood that the user who changes the contents of definitions files in the Library will
not necessarily be ableto recompile the application to usethe modified definitions.)
b) Use asuitable shared library mechanism for linking with theLibrary. A suitable mechanism isone that (1)uses at runtime acopy of the library
already present on the user's computer system, rather than copying library functions into the executable, and (2)will operate properly with a modified
version of the library, if theuser installs one, as longasthe modified version isinterface-compatible with the version that the work was made with.
c) Accompany the work with awritten offer, valid forat least three years, to give the same user the materials specified in Subsection 6a,above, for a
charge no more than the costof performing this distribution.
d) Ifdistribution of thework ismade by offering access to copyfrom a designated place, offer equivalent access to copy the above specified
materials from thesame place.
e)Verify that the user has already received acopy ofthese materials orthat you have already sentthis user acopy.
For an executable, therequired form ofthe "work that uses the Library" must include any data and utility programs needed for reproducing the executable
from it. However, as aspecial exception, the materials to be distributed need notinclude anything that isnormally distributed (in either source or binary
form) with the major components (compiler, kernel, and so on) of theoperating system on whichthe executable runs, unless that component itself
accompanies theexecutable.
Itmay happen that this requirement contradicts the license restrictions of other proprietary libraries that do not normally accompany the operating system.
Such acontradiction means you cannot use both them and theLibrary together in an executable that you distribute.
7, You may place libraryfacilities that are awork based on theLibrary side-by-side in asingle library together with other library facilities not covered
bythis License, and distribute such acombined library, provided that the separate distribution of the work based on the Library andof the other library
fadlities isotherwise permitted, and provided that you do these two things:
a)Accompany thecombined librarywith acopy ofthe same work based on the Library, uncombined with any other libraryfacilities. Thismust be
distributed under theterms of the Sections above.
b) Giveprominent notice with the combined library of thefact that partof it is awork based onthe Library, and explaining where to find the
accompanying uncombined form of thesame work.
8. You may notcopy, modify,sublicense, link with,or distribute the Library except as expressly provided underthis License. Anyattempt otherwise to
copy,modify, sublicense, link with, ordistribute theLibrary is void, and willautomatically terminate your rights under this License. However, parties who
have received copies, orrights, from you under this License will nothave their licenses terminated so long assuch parties remain in full compliance.
9. You are not required to accept thisLicense, since you have not signed it. However, nothing else grants you permission to modify or distribute the
Library orits derivative works. These actions are prohibited by law if you donot accept this License. Therefore, bymodifying ordistributing the Library
(orany work basedon the Library), youindicate your acceptance of this License to do so, and all its terms and conditions for copying, distributing or
modifying the Library orworks based onit.
10. Each time you redistribute the Library (orany work based on theLibrary), the recipient automatically receives alicense from the original licensor
to copy,distribute, link with ormodify the Library subject to these terms and conditions. You maynot impose any further restrictions onthe recipients'
exercise of the rights granted herein. Youare not responsible for enforcing compliance bythird parties with this License.
11. If,as aconsequence of acourt judgment orallegation of patent infringement orfor any other reason (not limitedto patent issues), conditions
are imposed on you (whether by court order, agreement or otherwise) that contradict the conditions of this License, they do notexcuse you from the
conditions of this License. Ifyou cannot distribute soasto satisfy simultaneously your obligations underthis License and any other pertinent obligations,
then asa consequence you maynot distribute the Library at all. For example, if apatent license would not permit royalty-free redistribution of the Library
byall those who receive copies directly orindirectly through you,then the only way you could satisfy both it and this License would be to refrain entirely
from distribution of the Library.
Ifany portion of this section isheldinvalid or unenforceable under any particular circumstance, the balance of the section isintended to apply, and the
section asawhole isintended to apply in other circumstances.
Itisnot thepurpose of this sectionto induce youto infringe any patents or other property right claims orto contest validity of any such claims; this section
has thesole purpose of protecting the integrity of thefree software distribution system which isimplemented bypublic license practices. Many people
have made generous contributions to the wide range ofsoftware distributed through that system in reliance on consistent application of that system; it is
up tothe author/donor to decide if he orshe iswilling to distribute software through any other system and alicensee cannot impose that choice.
Continued...
This section is intended to make thoroughly clear what is believed to be aconsequence of the rest of thisLicense.
12. Ifthe distribution and/or use of the Library isrestricted in certain countries either bypatents or bycopynghted interfaces, the obginal copyright
holder who places the Library under thisLicense may add an explicit geographical distribufion limitation excluding those countries, sothat distribution is
pemlitted only in oramong countries notthus excluded. In such case,this License incorporates thelimitation asif written in the body of this License.
13.The Free Software Foundation maypublish revised and/or new versions of the Lesser General PublicLicense from time to time. Such new versions
will be similar in spirit to the presentversion, but maydiffer in detailto address new problems or concerns.
Each version is givenadistinguishing versionnumber. Ifthe Library specifies aversion number of this License which applies to it and "any later version",
you have the option offollowing theterms and conditions either of that version or of any laterversion published bythe Free Software Foundation. Ifthe
Library does notspecify a license version number, youmay choose any version ever published bythe FreeSoftware Foundation.
14. Ifyou wish to incorporate parts of the Libraryinto otherfree programs whose distribution conditions are incompatible with these, write to theauthor
to askfor permission. For software which is copyrighted bythe Free Software Foundation, write to the FreeSoftware Foundation; we sometimes make
exceptions for this. Our decision will be guided bythe two goals ofpreserving thefree status of all derivatives of our free software and of promoting the
sharing and reuse of software generally.
NO WARRANTY
15. BECAUSE THE LIBRARY IS LICENSED FREE OFCHARGE, THERE ISNOWARRANTY FOR THE LIBRARY, TOTHE EXTENT PERMITTED
BYAPPLICABLE LAW. EXCEPT WHEN OTHERWISE STATED IN WRITING THE COPYRIGHT HOLDERS AND/OR OTHER PARTIES PROVIDE
THE LIBRARY "AS IS" WITHOUT WARRANTY OFANY KIND, EITHER EXPRESSED OR IMPLIED, INCLUDING, BUT NOT LIMITED TO, THE
IMPLIED WARRANTIES OFMERCHANTABILITYAND FITNESS FORA PARTICULAR PURPOSE. THE ENTIRE RISKAS TO THE QUALITYAND
PERFORMANCE OFTHE LIBRARY IS WITH YOU. SHOULD THE LIBRARY PROVE DEFECTIVE, YOU ASSUME THE COST OFALL NECESSARY
SERVICING, REPAIR OR CORRECTION.
16, IN NO EVENT UNLESS REQUIRED BY APPLICABLE LAW ORAGREED TOIN WRITING WILL ANY COPYRIGHT HOLDER, OR ANY OTHER
PARTY WHO MAY MODIFYAND/OR REDISTRIBUTE THE LIBRARYAS PERMITTED ABOVE, BE LIABLE TOYOU FOR DAMAGES, INCLUDING
ANY GENERAL, SPECIAL, INCIDENTAL OR CONSEQUENTIAL DAMAGES ARISING OUT OF THE USEOR INABILITY TO USETHE LIBRARY
(INCLUDING BUT NOT LIMITED TOLOSS OF DATAOR DATA BEING RENDERED INACCURATE OR LOSSES SUSTAINED BY YOU OR THIRD
PARTIES OR A FAILURE OFTHE LIBRARY TOOPERATE WITHANY OTHER SOFTWARE), EVEN IFSUCH HOLDER OR OTHER PARTY HASBEEN
ADVISED OFTHE POSSIBILITY OF SUCH DAMAGES.
END OFTERMS AND CONDiTiONS
How toApply These Terms to Your New Libraries
Ifyou develop anew library, and you want itto be of the greatest possible use to the public, we recommend making it free software that everyone can
redistribute and change. You can do so bypermitting redistribution under these terms (or, alternatively, undertheterms of the ordinary General Public
License).
Toapply these temls, attachthe following notices to the library. Itissafest to attachthem to the start of each source file to most effectively convey the
exclusion of warranty; and each file should have at least the"copyright" line and apointer to where thefull notice isfound.
<one lineto give the library's name and an idea of what it does.> Copyright (C)<year> <name of author>
This library isfree software; you can redistribute it and/or modify it undertheterms of the GNULesser General Public License aspublished bythe
FreeSoftware Foundation; either version 2.1of the License, or (at your option) any later version.
This library isdistributed in the hope that it will beuseful, butWITHOUT ANYWARRANTY; without even the implied warranty of MERCHANTABILITY
or FITNESS FOR A PARTICULAR PURPOSE. Seethe GNU Lesser General PublicLicense for more details.
You should have received acopy of the GNULesser General Public License along with thislibrary; if not,write to the FreeSoftware Foundation, Inc.,
59 Temple Place, Suite 330, Boston,MA 02111-1307 USA
Also add information on how to contact you by electronic and papermail.
You should also get your employer (if you work asa programmer) oryour school, if any,to sign a "copyright disclaimer" for the library, ifnecessary. Here is
asample; alter the names:
Yoyodyne, Inc., hereby disclaims all copyright interest in the library 'Frob'(a libraryfor tweaking knobs) written by James Random Hacker.
signature of Ty Coon, 1April 1990
Ty Coon, President of Vice
That's all there isto it!
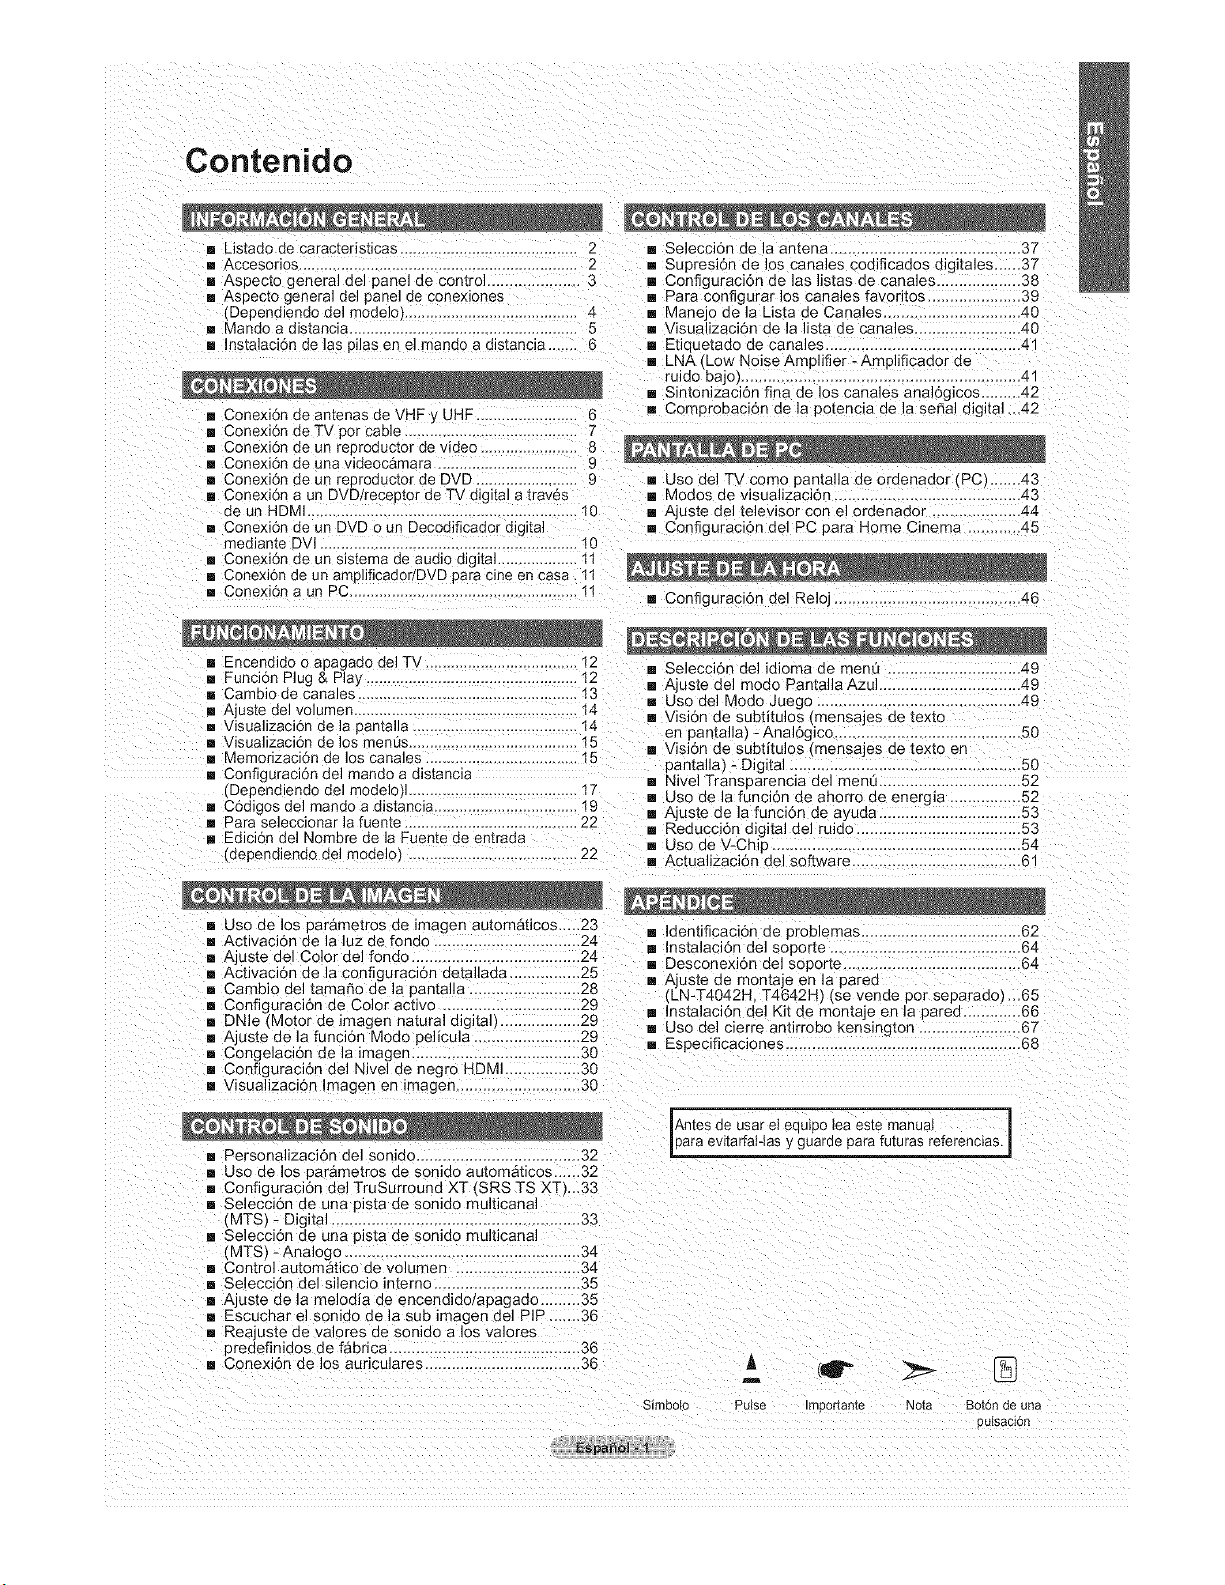
Contenido
i _istado decaracteristicas 2
[] Accesodos .................................................................. 2
[] Aspecto general del panel de control ..................... 3
[] Aspecto general del panel de conexiones
(Dependiendo del modelc- 4
[] Vlando a distancis 5
[] Instalaci6n de las pilas en el manoo a dBtancJa 6
[] Conexi6n de antenas de VHF y UHF 6
! Conexi6n de TV por cable ......................................... 7
[] Conexi6n de un reproductor de video. 8
[] Conexi6n de una videocgmara ......... 9
[] Conexi6_ de un reEroductor d_ DVD ........................ 9
[] Conexlon a un DVD/receotor de TV digital a trav6s
[] Selecci6n de la antena ............... 37
[] Supresi6n de los canales codificados digitales,..,.,37
[] Configuraci6n de las listas de canales 38
[] Para configurar los canales fa_ontos 39
[] Manejo de la Lista de Canales ......
[] Visualizacl6n de la IJsta de canales 40
[] Etlquetado de canales ....................................... 41
[] LNA Low NoiseAmplifier -Amplificador de
ruido bajo) ........................................................ 41
[] Sintonizaci6n fina de los canales anal6gicos ...42
[] Comprobaci6n de la potencia de la serial digital ...42
[] Uso del TV como pantalla de ordeoador (PC_ ...43
[] Modos de visualizaci6n ............... 43
de un HDMI ................................................................ 10 [] Ajuste de] televisor con el ordenador ........... 44
[] Conexi6n de un DVD o un Decodificador digital [] Configuraci6n del PC para Home Cinema ............ 45
medJante DVl 10
[] Conexi6n de un sJstemade audio d jita] ................... 11
[] Conexi6n ae un amplificador/DVD _ aracme en casa. 11
[] Conexi6n a un PC...................................................... tl [] Configuraci6n del Reloj 46
[] Encendido oapagado del TV.................................... !2
[] Funci6n Plug & Pla, 12
[] Cambio de canales 13
[] Ajuste del volumen 14
[] Visualizaci6n de la pantalla. 14
[] Visualizaci6n de los _en0s 15
[] Memodzaci6n de los canales .................................... 15
[] Configuraci6n del mando a distancia
(Depena enao del rnodelo'. 17
[] C6digos del rnando adistancB 19
[] _ara seleccionar la fuente ....................................... 22
[] Edici6n del Nombre de la Fuente de entrada
laependiendo del modelo} ............................... 22
[] Selecci6n del idloma de menu .............................. 49
[] Ajuste del modo Pantalla Azul ............................... 49
[] Uso del Mode Juego ...................................... 49
[] Visi6n de subtitulos (mensaJes de texto
en pantalla -Anal6gico ................................... 50
[] Visi6n de subtitulos _mensajes ae iex_o en
pantalla) - Digital ......................................................
[] Nivel Transparencia del men0 52
[] uso de la funci6n de ahorro de energla ................ 52
[] Ajuste de la funci6n de ayuaa ................................ 53
[] Reducci6n digital del ruldo 53
[] Uso ae V-Chip 54
[] Actualizaci6n del software 61
[] Uso de los parametros de imageo automaticos..._23
[] Activaci6n de la luz de fonao ........................... 24
[] Ajuste del Color del fondo ...................................... 24
[] Activaci6n de la configuraci6n detallada ................ 25
[] Cambio del tamaro de la pantalla ......................... 28
[] Configuraci6n de Color activc 29
[] DNle t Motor de imagen natural digital) 29
[] Ajus_e ae la funci6n Modo pelicula 29
[] Congelaci6n de la imagen ...................................... 30
[] Conflguraci6n del Nivel de negro HDMI 30
[] Visualizaci6n Imagen en imagen ..................... 30
[] Personalizaci6n del sonido .................................... 32
[] Uso de los parame_ros de sonldo automaticos ...... 32
[] Confiauraci6n del TruSurround XT l SRS TS XT_._33
[] Selec_ci6n de una oista de sonido multicanal
(MTS_ - D_gital .............. 33
[] Selecci6n de una pista de sonido multicanal
(MTS) - Analogo ..................................................... 34
[] Control automatico de volumen ............................ 34
[] Se ecci6n del sileocio mterno ................................ 35
[] Ajuste de la melodia ae encendido/apagado ......... 35
[] Escuchar el sonido de la sub imagen del PIP ....... 36
[] Reajuste de valores de sonido a los valores
predefinidos de fabdca 36
[] Conexi6n de los auriculares ...36
[] Identiflcaci6n de problemas 62
[] Instalaci6n del soporte ... 64
[] Desconexi6n del sopor[e ................................. 64
[] Ajuste de montaje en la pare(]
LN-T4042H. T4642H )tse venae por separaao) ...65
[] Instalaci6n del Kit de montaje en la pared ............. 66
[]Use del cierre antirrobo kensington ....................... 67
[] Especificaciones ..68
Es_pa_ol_ t
IAntes de usar el equJpo lea este manual /
_e parafuturas referencias.J
Simboto
A 4,- >,-
Pulse mportante Nora Boronde una
[}utsaci6r
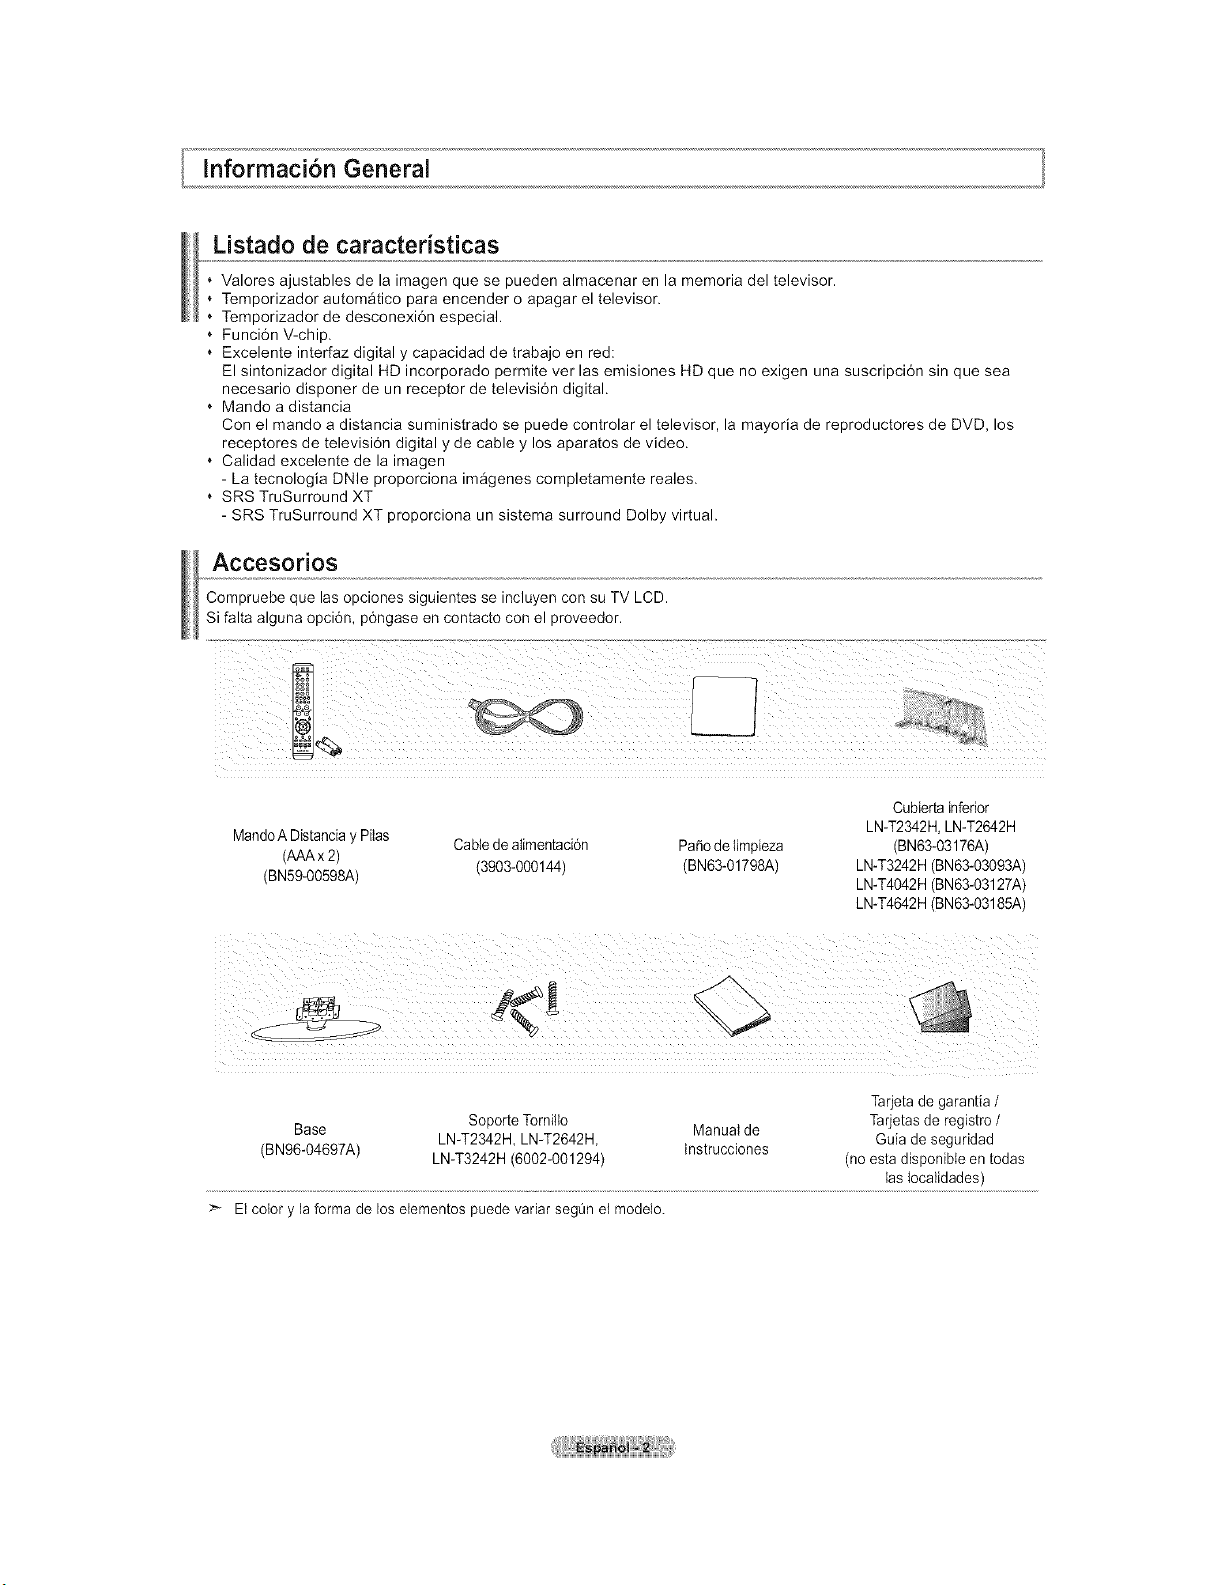
Informacion General
Listado de caracteristicas
, Valores ajustables de la imagen que se pueden almacenar en la memoria del televisor.
, Temporizador autom_tico para encender o apagar el televisor.
Temporizador de desconexi6n especial.
Funci6n V-chip.
, Excelente interfaz digital y capacidad de trabajo en red:
El sintonizador digital HD incorporado permite ver las emisiones HD que no exigen una suscripci6n sin que sea
necesario disponer de un receptor de televisi6n digital.
, Mando a distancia
Con el mando adistancia suministrado se puede controlar el televisor, la mayoria de reproductores de DVD, los
receptores de televisi6n digital y de cable y los aparatos de video.
Calidad excelente de la imagen
- La tecnologia DNle proporciona im_genes completamente reales.
SRS TruSurround XT
- SRS TruSurround XT proporciona un sistema surround Dolby virtual.
Accesorios
Compruebe que lasopciones siguientes se incluyen con su TV LCD.
Sifalta alguna opci6n, p6ngase en contacto con el proveedor.
MandoADistanciay PiIas Cabledeatimentaci6n PaSodetimpieza
(AAAx2)
(BN59-00598A) (3903-000144) (BN63-01798A)
Cubierta inferior
LN-T2342H,LN-T2642H
(BN63-03176A)
LN-T3242H(BN63-03093A)
LN-T4042H(BN63-03127A)
LN-T4642H(BN63-03185A)
Tarjeta de garantia /
Base Soporte Tornilto Manualde Tarjetasde registro /
LN-T2342H, LN-T2642H, Guia de seguddad
(BN96-04697A) LN-T3242H (6002-001294) tnstrucciones (noesta disponibteen todas
lasIocalidades)
Elcolor y la forma de losetementos puede variar segQn et modelo.
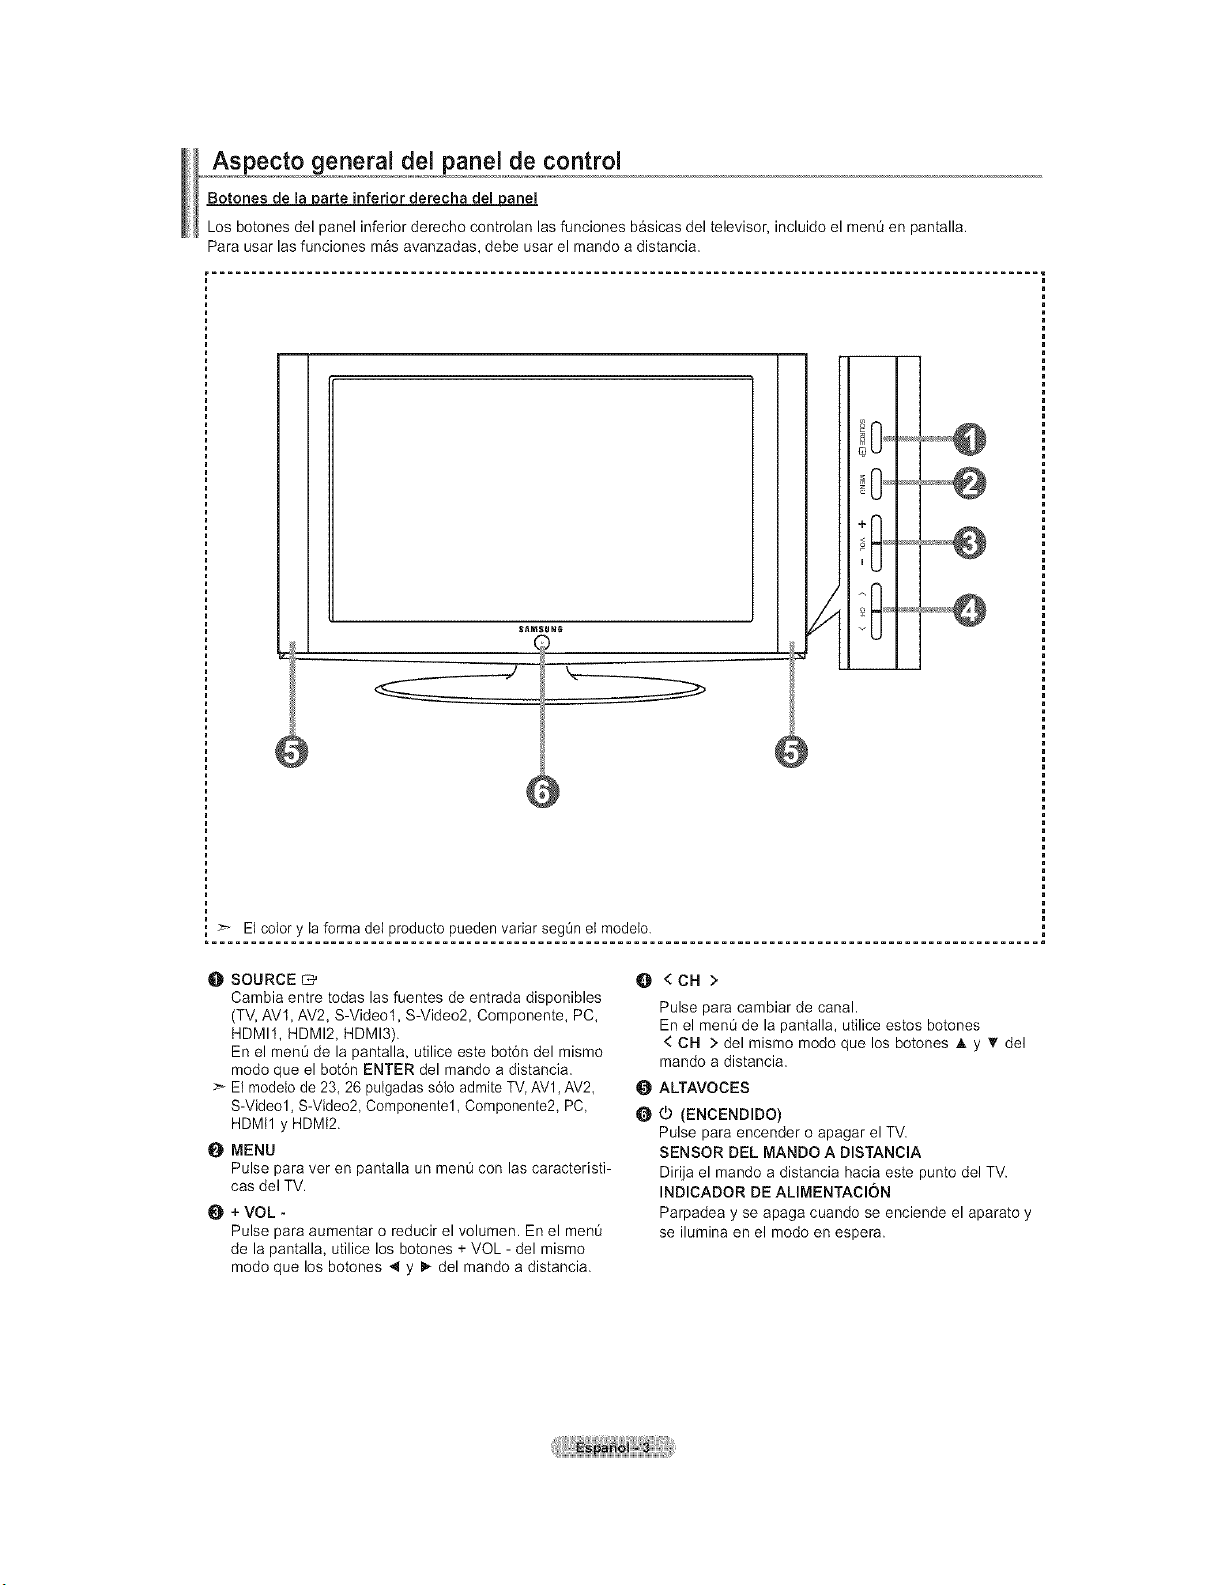
Aspecto general del panel de control
Botones de _arte inferior derecha del a_anel
Los botones del panel inferior derecho controlan las funciones basicas del televisor, incluido el menOen pantalla.
Para usar las funciones m_s avanzadas, debe usar el mando a distancia.
_ '_---_-_
m ,J
÷11
Elcolor y la forma dei producto pueden variar segOn et modeto.
O SOURCE
Cambia entre todas las fuentes deentrada disponibles
(TV,AV1, AV2, S-Video1, S-Video2, Componente, PC,
HDMI1, HDMI2, HDMI3).
En el men0 de la pantalla, utilice este bot6n del mismo
modo que el bot6n ENTER del mando a distancia.
>- El modelo de 23, 26pulgadas s6{o admite TV, AV1,AV2
S-Video1, S-Video2, Componentel, Componente2, PC,
HDMtl y HDMt2.
@ MENU
Pulse para ver en pantalla un ment] con las caracteristi-
cas del TV.
+VOL -
Pulse para aumentar o reducir el volumen. En el ment]
de la pantalla, utilice los botones + VOL - del mismo
modo que los botones _ y _ del mando a distancia.
O <CH>
Pulse para cambiar de canal.
En el men0 de la pantalla, utilice estos botones
< CH > del mismo modo que los botones i, y 'I' del
mando adistancia.
ALTAVOCES
(b (ENCENDIDO)
Pulse para encender oapagar el TV.
SENSOR DEL MANDO A DISTANClA
Dirija el mando a distancia hacia este punto del TV.
INDICADOR DE ALIMENTAClON
Parpadea y se apaga cuando se enciende el aparato y
se ilumina en el modo en espera.
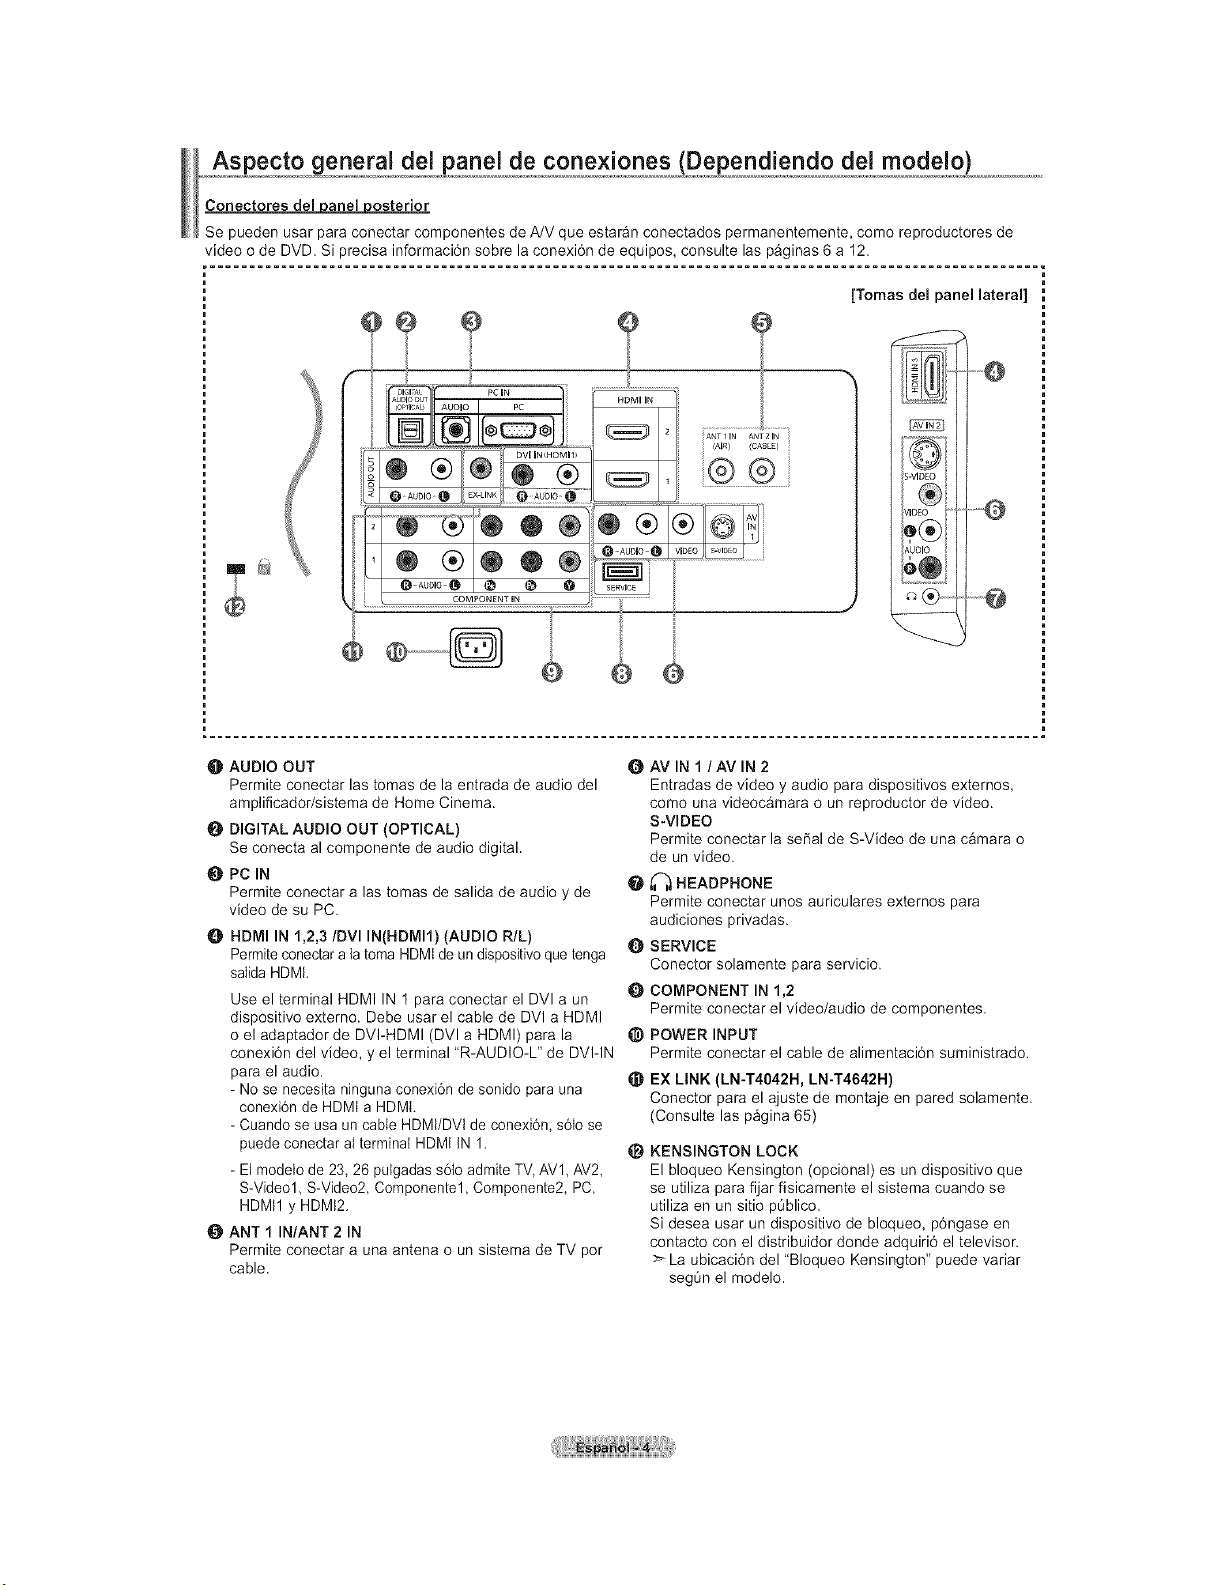
Aspecto general del panel de conexJones/Dependiendo del modeio,)_ .................................
Conectoresdel ariel osterior
Se pueden usar para conectar componentes de A/V que eatar_n conectados permanentemente, como reproductores de
video ode DVD. Si precisa informaci6n sobre la conexi6n de equipos, consulte laa p_ginaa 6a 12.
®
COMPONENT IN
?
io PC IN PC ii
0®
®®®®
@
o t
iANTII N ANT21N
i (AIR} (CABLE}
[Tomas del panel lateral]
VID
O
AU[
Q
O AUDIO OUT
Permite conectar las tomas de la entrada de audio del
amplificador/sistema de Home Cinema.
O DIGITAL AUDIO OUT (OPTICAL)
Se conecta al componente de audio digital.
PC IN
Permite conectar alas tomas de salida de audio y de
video de su PC.
0 HDMI IN 1,2,3/DVI IN(HDMI1) (AUDIO R/L)
Permiteconectar a la toma HDMtde un dispositivo que tenga
salidaHDML
Use el terminal HDMI IN 1para conectar el DVl a un
dispositivo externo. Debe usar el cable de DVl a HDMI
oel adaptador de DVI-HDMI (DVI a HDMI) para la
conexi6n del video, y el terminal "R-AUDIO-L" de DVI-IN
para el audio.
- Nose necesita ninguna conexi6n de sonido para una
conexi6n de HDMI a HDMI.
- Cuando seusa un cable HDMI/DVI de conexi6n, s6tose
puede conectar atterminai HDMI IN 1.
- Elmodelo de 23, 26pulgadas s6{o admite TV, AV1,AV2,
S-Video1, S-Video2, Componentel, Componente2, PC,
HDMtl y HDMt2.
O ANT 1 IN/ANT 2 IN
Permite conectar a una antena o un sistema de TV por
cable.
O AV IN 1 /AV IN 2
Entradas de video y audio para dispositivos externos,
como una videocamara o un reproductor de video.
S-VIDEO
Permite conectar la serial de S-Video de una c_mara o
de un video.
_--,_HEADPHONE
Permite conectar unoa auriculares externos para
audiciones privadaa.
Q SERVICE
Conector solamente para servicio.
{) COMPONENT IN 1,2
Permite conectar el video/audio de componentea.
_) POWER INPUT
Permite conectar el cable de alimentaci6n suministrado.
_) EX LINK (LN-T4042H, LN-T4642H)
Conector para el ajuste de montaje en pared solamente.
(Consulte las p&gina 65)
@
KENSINGTON LOCK
El bloqueo Kensington (opcional) es un dispositivo que
se utiliza para fijar fisicamente el sistema cuando se
utiliza en un sitio peblico.
Si desea usar un dispositivo de bloqueo, p6ngase en
contacto con el distribuidor donde adquiri6 el televisor.
>_La ubicaci6n del "Bloqueo Kensington" puede variar
seg0n el modelo.
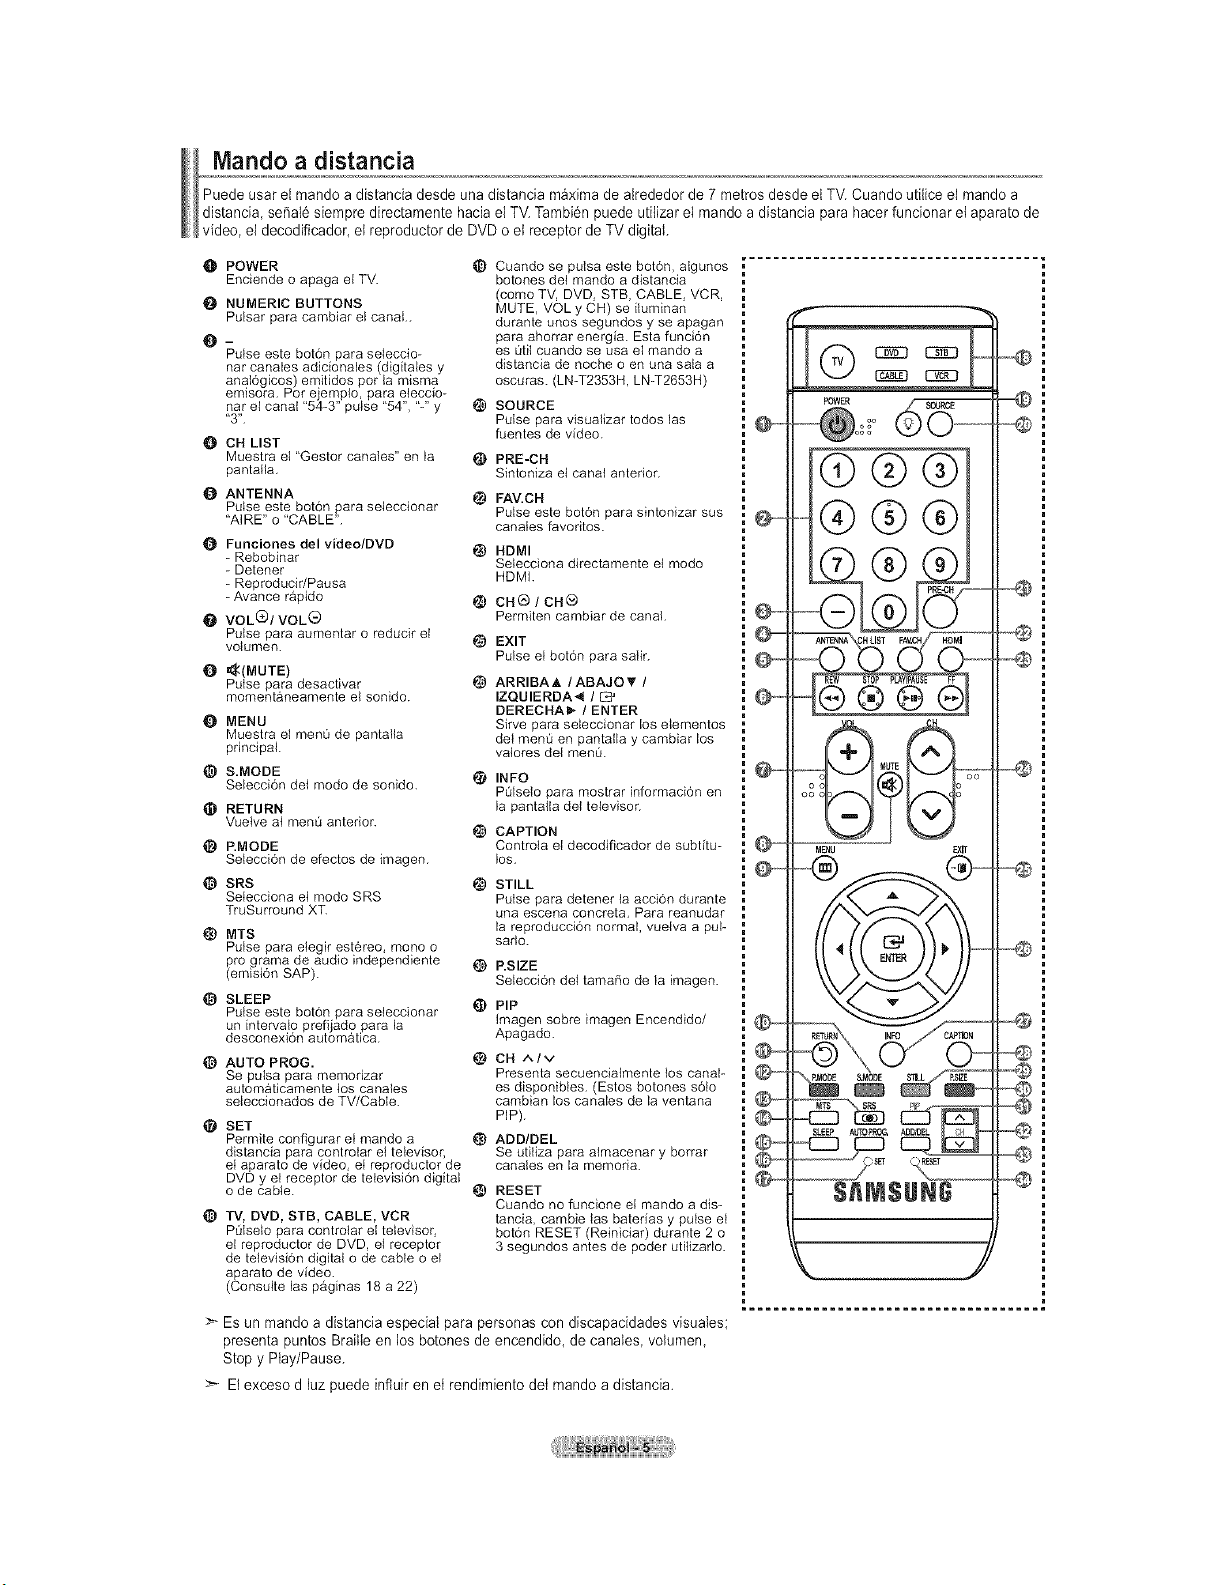
Mando a distancia
Puede usar el mando a distancia desde una distancia m_xima de alrededor de 7 metrosdesde el TV.Cuando utflice el mandoa
distancia, serial6 siempre directamente hacia el TV.Tambi6npuede utilizar el mando a distancia para hacer funcionar et aparato de
video, el decodificador, et reproductor deDVD o etreceptor de TVdigital.
O POWER _)
Enciende o apaga el TV.
O NUMERIC BUTTONS
Pulsar para cambiar et canal..
@-
Pulseeste bot6n para seieccio-
nar canales adicionales (digitales y
anat6gicos) emitidos pot la misma
emisora. Pot e emplo, para eteccio-
nar et canal "54-3" pu se "54", "-" y
"3".
O CH LIST
Muestra el "Gestor canales" en la _)
pantafla,
O ANTENNA
Pulse este bot6n para seleccionar
"AIRE" o "CABLE".
Q Funciones del video/DVD
- Rebobinar
- Detener
- Reproducir/Pausa
-Avance rapido
O VOL(_/VOL_
Puise para aumentar o reducir el
votumen. _)
{) _(MUTE)
Pulse para desactivar
momentaneamente el sonido.
Q MENU
Muestra el men0 de pantalla
principal.
@ S.MODE
Seteccion det mode de sonido.
O RETURN
Vuetve at men0 anterior.
_) RMODE
Setecci6n de efectos de imagen.
© SRS
Setecciona et modo SRS
TruSurround XT.
@ MTS
Putse para etegir esteree, meno o
fro grama de audio independiente
emisi6n SAP).
SLEEP
Pulse este boron para seteccionar
un intervalo prefijado para la
descenexi6n autom&tica.
_) AUTO PROG.
Se putsa para memenzar
automaticamente tos canales
seleccionados de TV/Cabte.
SET
Permite configurar et mando a _)
distancia para controlar el televisor,
et aparato de video, et reproductor de
DVD y et receptor de televisi6n digital
o de cable.
O TV, DVD, STB, CABLE, VCR
P_tseto para controtar el televisor,
et reproductor de DVD, el receptor
de tetevisi6n digital o de cable o el
aparato de video.
(Consulte las paginas 18 a 22)
Cuando se putsa este boron, algunos
botones det mando a distancia
(come TV, DVD, STB, CABLE, VCR,
MUTE, VOL y CH) se iiuminan
durante unos segundos yse apagan
para ahorrar energia. Esta funcion
es 0tit cuando se usa el mando a
distancia de noche o en una sala a
oscuras. (LN-T2353H, LN-T2653H)
SOURCE
Pulse para visualizar todos las
fuentes de video.
PRE-CH
Sintoniza el canal anterior.
FAV.CH
Purse este boron para sintonizar sus
canates favoritos.
HDMI
Setecciona directamente et mode
HDMI.
CHO / CHG
Permiten cambiar de canal.
EXIT
Pulse et bot6n para safir.
ARRIBAA / ABAJO_' /
IZQUIERDA41 / [S_
DERECHAI_ / ENTER
Sirve para seleccienar los etementos
del menQ en pantatla y cambiar los
vateres del men0.
i_ INFO
P01selo para mostrar informaci6n en
la pantaila det televisor.
CAPTION
Controta el decodificador de subfitu-
les.
i_ STILL
Pulse para detener ta acci6n durante
una escena concreta, Para reanudar
la reproducci6n normal, vuelva a pul-
sado.
RSIZE
Setecci6n del tamafio de la imagen.
t_ PiP
Imagen sobre imagen Encendido/
Apagado.
CH ^Iv
Presenta seceencialmente los canal-
es disponibies. (Estos botones s6to
cambian los canales de la ventana
PIP).
ADD/DEL
Se uti{iza para atmacenar y borrar
canaies en la memoda.
RESET
Cuando no funcione et mando a dis-
tancia, cambie las baterias y pulse et
bot6n RESET (Reiniciar) durante 2 o
3 segundos antes de poder utilizarlo.
Es un mando adistancia especial parapersonas con discapacidades visuales;
presenta puntos Braille en losbotones de encendido, de canales, volumen,
Stop y Play/Pause.
>- Elexceso d luz puede influir en et rendimiento det mando a distancia.
@@
@@
_g
REW @TOP PLAYIPAUSE FF
@@@(9
M_
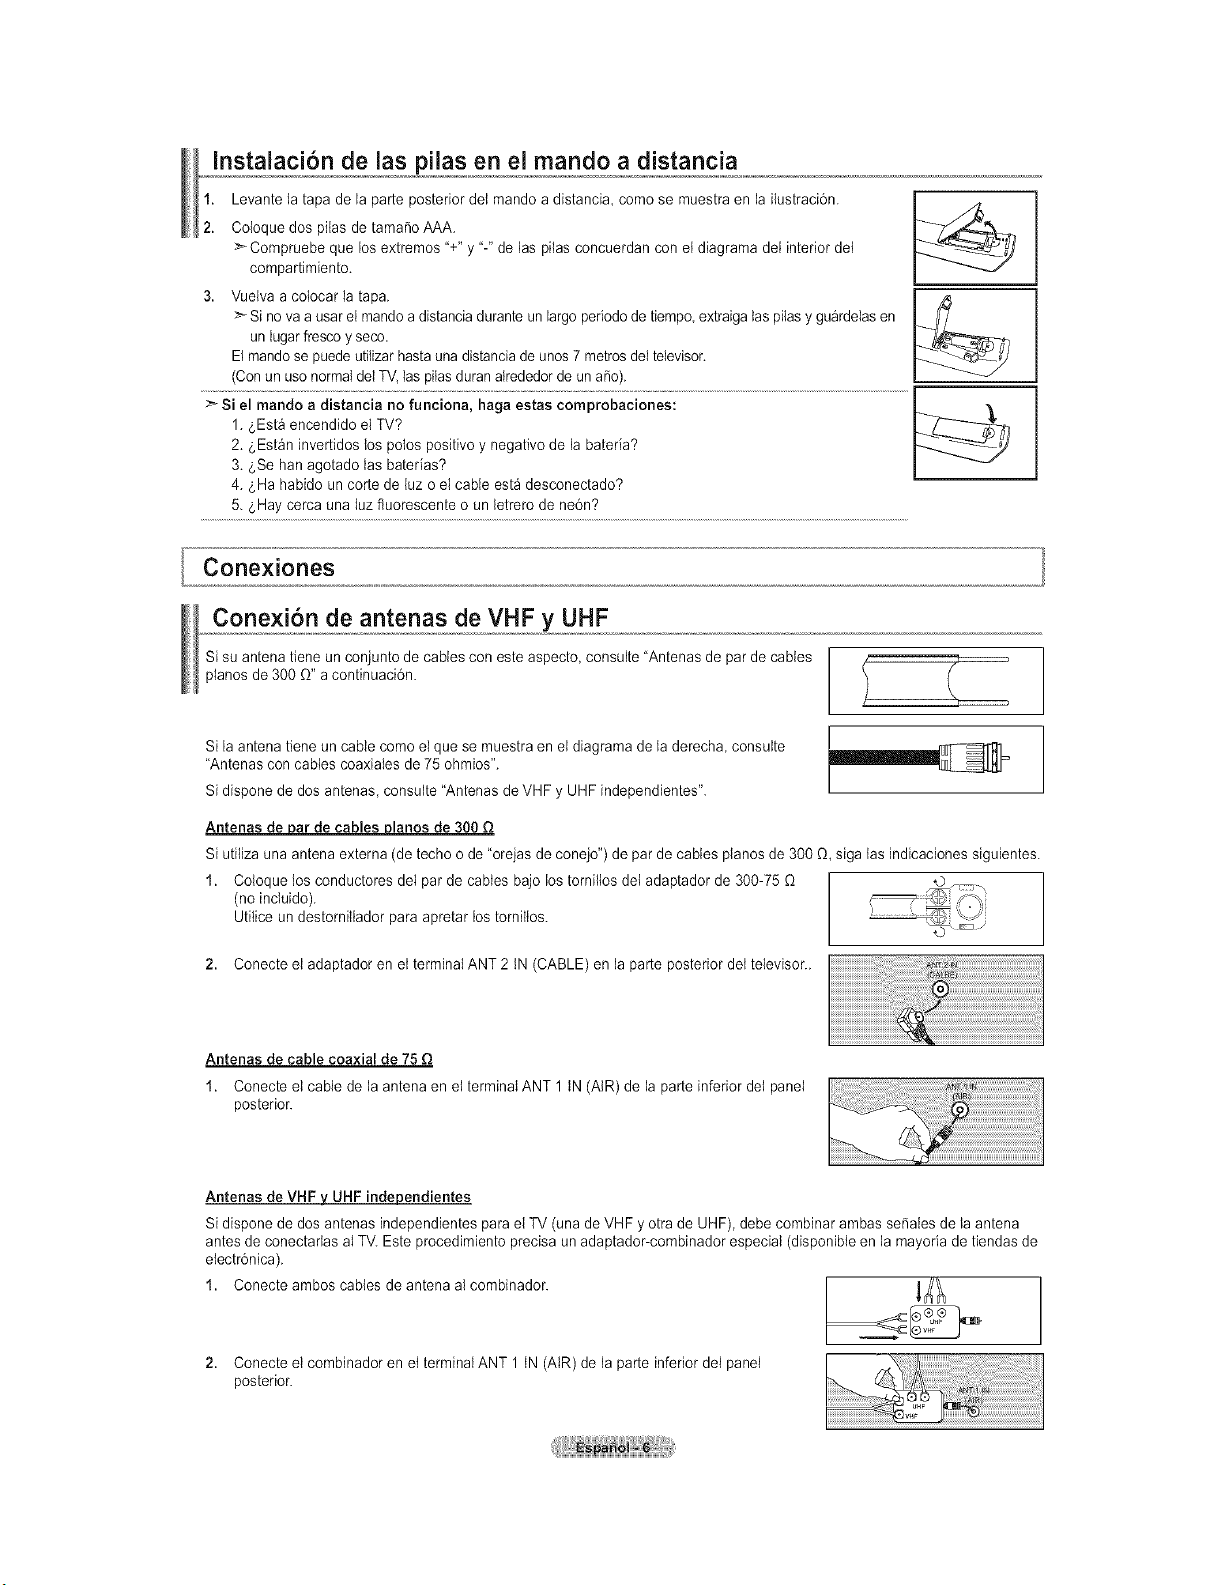
Instalaci6n de las pilas en el mando a distancia
1. Levante la tapa de la parte posterior det mando adistancia comose muestraen la ilustraci6n.
2. Cotoque dos piias de tama_o AAA.
>_Compruebe que losextremos "+"y "-" de las pilas concuerdan conetdiagrama dei interior det
compartimiento.
3. Vuelva aco{ocar la tapa.
>* Si no va a usar el mando adistancia durante un largo periododetiempo extraiga taspilas y gu_rdelas en
un lugar frescoy seco.
Elmandose puede utitizar hastauna distancia de unos7metros del televisor.
(Conun uso normal del TV, laspilasduranalrededor de un aSo).
Conexiones
Cone×i6n de antenas de VHF y UHF
Si su antena tiene un conjunto de cables con esteaspecto, consuite "Antenas de parde cables
pianos de 300 O" a continuaci6n.
Si la antena tiene un cable como el que se muestra enel diagrama de la derecha consulte
"Antenas con cables coaxiates de 75 ohmios".
Si dispone de dos antenas, consulte "Antenas de VHF y UHF independientes".
Antenas de par de cables pianos de 300 Q
Si utilizauna antena externa (de techoode "orejas de conejo") de par de cables pianos de 300 O,sigalas indicaciones siguientes.
1. Coloque losconductores del par de cables bajo los torniltos det adaptador de 300-75
(noincluido).
Utitice un destorniltador para apretar los torniltos.
2. Conecte el adaptador en etterminal ANT 2 tN (CABLE) en la parte posterior det televisor..
Antenas decable coaxial de 75 Q
1. Conecte el cable de la antena en et terminal ANT 1tN (AIR)de la parteinferior det panel
posterior.
Antenas deVHF ,/UHF independientes
Si dispone de dos antenas independientes parael TV(una de VHF y otrade UHF), debe combinar ambas seSalesde la antena
antes de conectarlas aI TV.Este procedimiento precisa un adaptador-combinador especial (disponibteen lamayoria de tiendas de
etectr6nica).
1. Conecte amboscables de antena al combinador.
2. Conecte el combinador en et terminalANT 1 tN(AtR) de la parte inferior dei panel
posterior.
ii............!ii!i;ii!i;i!i!
:::::.....................!!!!!!!!!!!!!!!!!!!!!
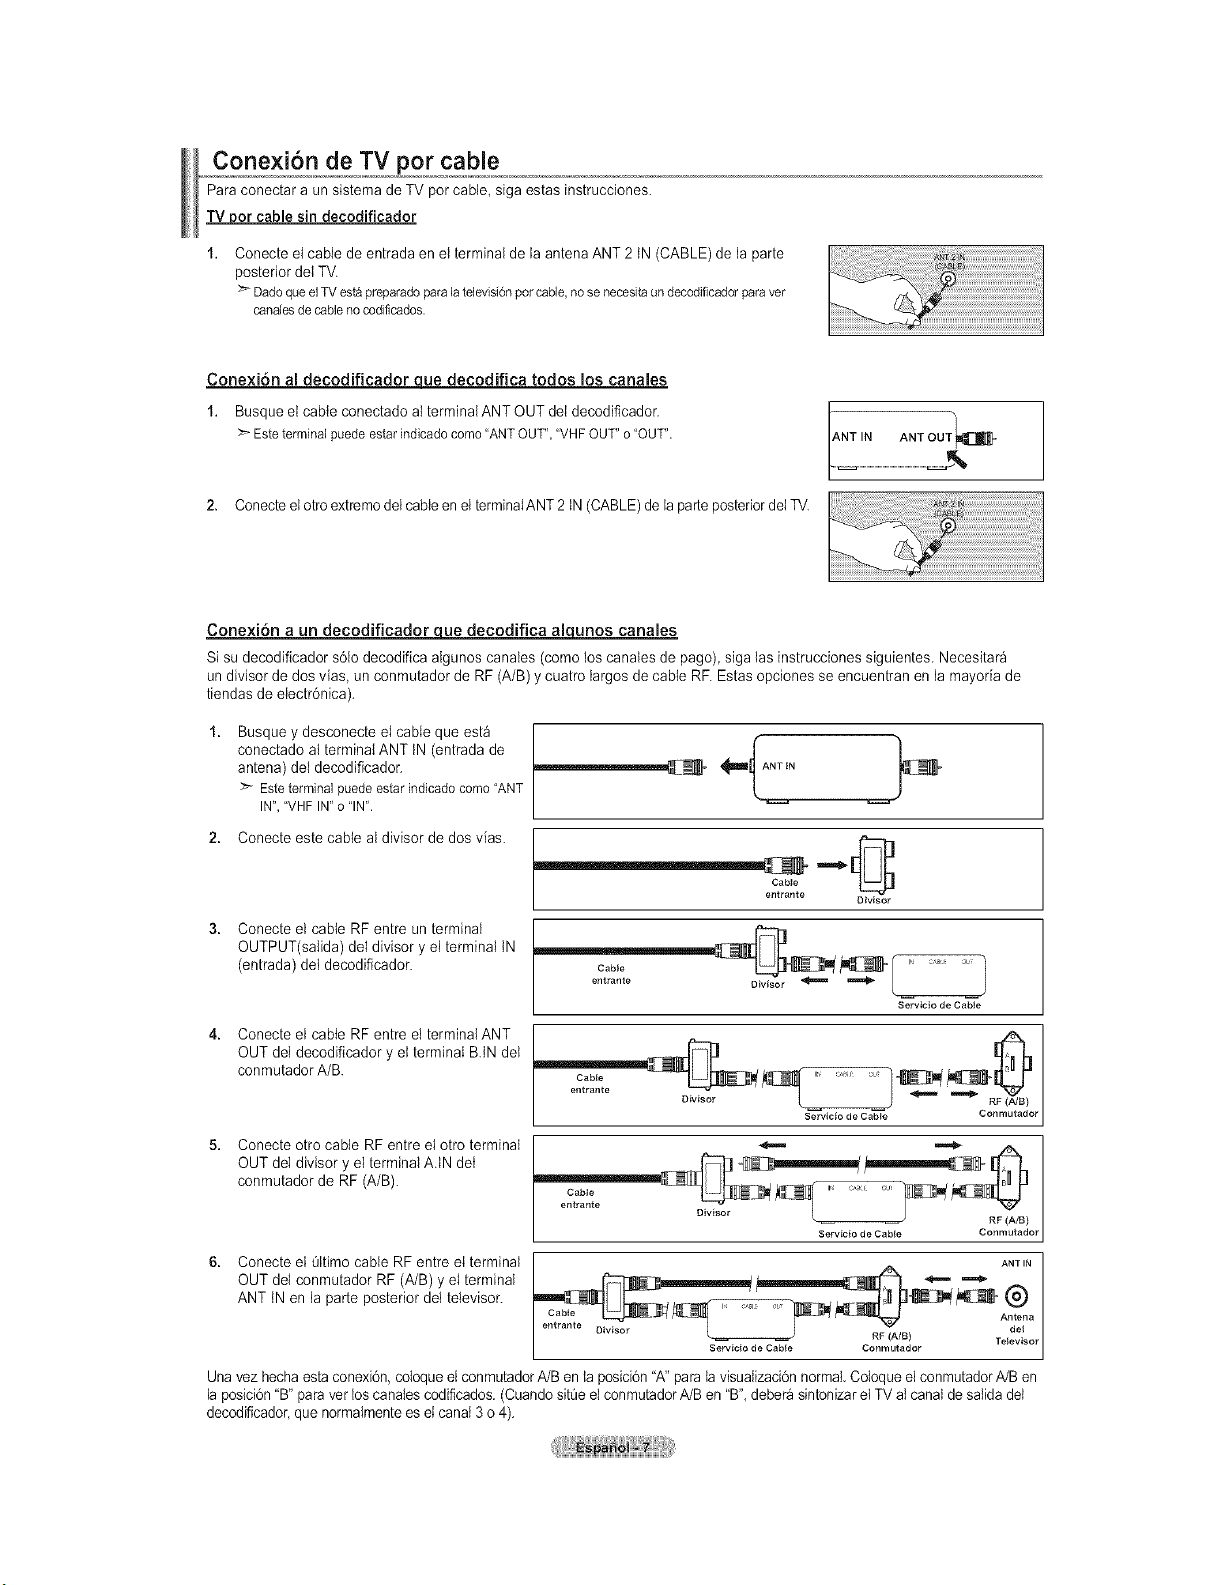
Conexi6n de TV por cable
Para conectar aun sistemade TV percable, sigaestas instrucciones.
_oor cable sin decodificador
Conecte et cable de entrada en el terminalde la antenaANT 2 tN (CABLE) de laparte
posterior delTV.
DadoqueelTVestapreparadoparalatelevisi6npercable,nosenecesitaandecodificadorparaver
canalesde cablenocodificados.
Conexi6n al decodificador uque decodifica todos los canales
1. Busque el cable conectado aI terminalANTOUT deldecodificador.
Esteterminalpaedeestariedicadocome"ANTOUT","VHFOUT"o "OUT".
2. Conecteelotroextremodet cable en et terminaIANT2tN(CABLE)dela parte posteriordei TV.
ANT IN ANT OUT_
Conexi6n a un decodificador _ decodifica alqunos canales
Sisu decodificador s61odecodifica algunos canales (como loscanates de page) siga lasinstrucciones siguientes. Necesitara
un divisorde dos vias, unconmutador de RF(A/B)y cuatro largos de cane RF.Estas opcionesse encuentran en la mayoria de
tiendas de electr6nica).
Busque y desconecte el cable que esta
conectado at terminal ANT tN(entrada de
antena) del decodificador.
:_ Esteterminalpuedeestarindicadocomo"ANT
IN","VHFIN"o"IN".
2. Conecte este cable al divisor de dosvias.
Cable
entrante
Divisor
Conecte el cable RF entre un terminal
OUTPUT(salida) del divisor y el terminal tN
(entrada) detdecodificador. Cable
entrante
J
Servicio de Cabte
Conecte el cable RF entre el terminalANT
OUT deI decodificador yet terminal BIN det
conmutador A/B.
Cabte in _ au_
entrante
Divisor
Servicio de Cabte
Conrnutador
Conecte otro cable RFentre el otto terminal
OUT deI divisor yel terminalAJN det
conmutador de RF (A/B).
Cable J cAi o _ s
Divisor L RF (A/B)
Servicio de Cable Conmutador
6. Conecte el Oltimocable RF entreel terminal ANTIN
OUT det oonmutador RF (A/B)y el terminal cl_bt_ _ _ ---ANT tNen la parteposterior del televisor. Cable W _ _ "_m_ _ml[-_ @
Antena
entran e * , _
Servieio de Cable Conrnutador I
Unavez hechaestaconexi6n, coloque el conmutador A/Benla posici6n "A" para la visualizaci6n normal.Coloqueel conmutador IVBen
la posici6n "B" para vet los canalescodificados.(Cuando sit_e elconmutadorIVBen"B', deber_ sintonizar el TVal canal de salidadel
decod_icador,que normalmente esel canal 3 o4).
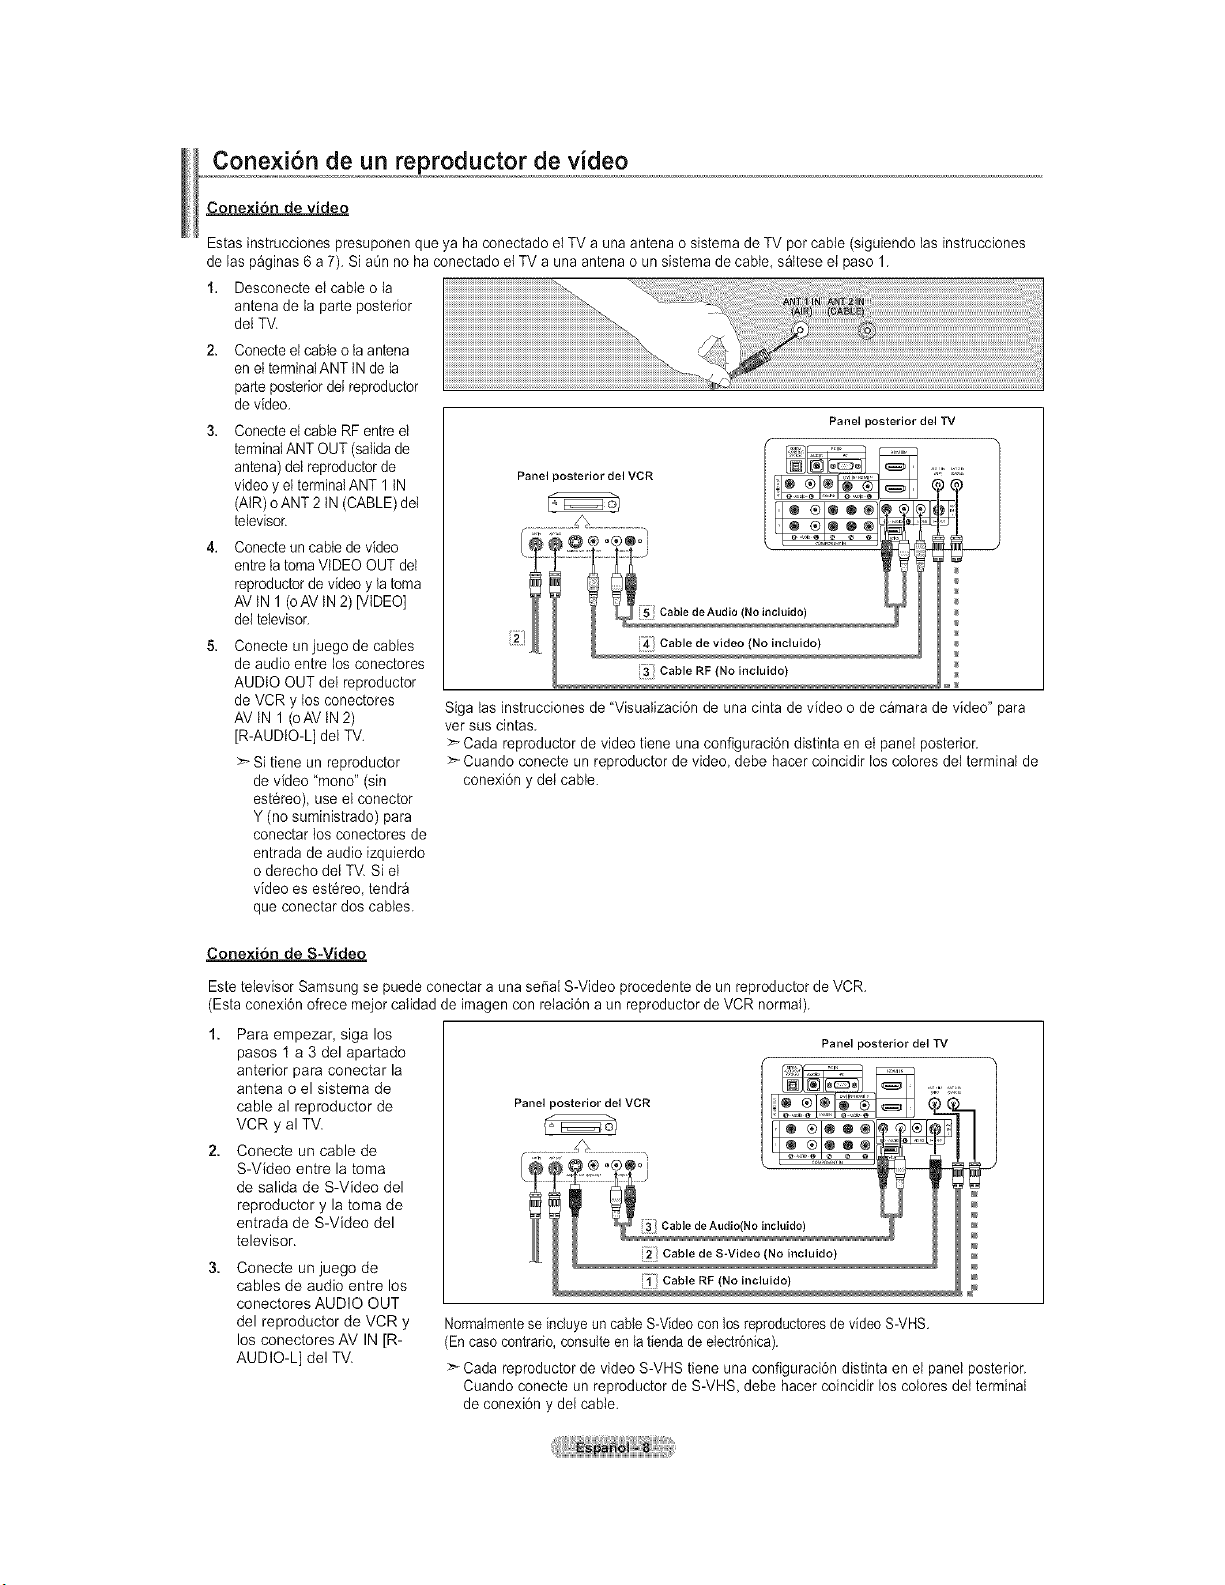
Conexi6n de un reproductor de video
Cone×i6n de video
Estas instrucciones presuponen que ya haconectado elTVauna antena o sistemade TV porcable(siguiendo las instrucciones
de ias p_ginas 6 a 7). SiaQnno ha conectado et TVauna antena oun sistema de cable, s_ltese el paso 1.
1. Desconecte el cable o ta
antena de la parLe posterior
del TV.
Conecteel cable o la antena
en elterminalANTtNde la
parLeposteriordeireproductor
de video.
Conecteel cable RFentreel
terminalANTOUT (salida de
antena) delreproductor de
video y el terminal ANT1tN
(AIR) o ANT2 tN (CABLE) det
televisor.
Conecteun cable de video
entre la toma VIDEO OUT del
reproductor de video y latoma
AV tN1(oAV tN2) [VIDEO]
del televisor.
Conecte an juego de cables
de audio entre los conectores
AUDIO OUT del reproductor
de VCR y los conectores
AVIN 1(oAVIN 2)
[R-AUDIO-L] del TV.
>" Si tiene un reproductor
de video "mono" (sin
est6reo), use el conector
Y (no suministrado) para
conectar los conectores de
entrada deaudio izquierdo
oderecho del TV. Si el
video es est6reo, tendr_
que conectar dos cables.
Panel posterior del TV
Panel posterior del VCR "P t',
Cable RF (No incluido)
Siga tas instrucciones de "VisuaIizaci6n de una cinta de video ode c_mara de video" para
vet suscintas.
>-Cada reproductor de video tiene una conflguraci6n distinta en et panelposterior.
>_Cuando conecte unreproductor de video, debe hacer coincidir los colores deiterminal de
conexi6n y dei cable.
Conexion de S-Video
Estetelevisor Samsung se puede conectar auna sepal S-Video procedente de un reproductor de VCR.
(Esta conexi6n ofrece meier calidad de imagen conreiaci6n aun reproductor deVCR normal).
1. Para empezar, siga los
pasos 1a 3del apartado
anterior para conectar la
antena oel sistema de
cable al reproductor de
VCR y al TV.
2. Conecte un cable de
S-Video entre la toma
de salida de S-Video del
reproductor y la toma de
entrada de S-Video del
televisor.
3. Conecte un juego de
cables de audio entre los
conectores AUDIO OUT
del reproductor de VCR y
los conectores AV IN[R-
AUDIO-L] del TV.
Panel posterior del TV
Cable RF (No incluido)
Normalmentese incluyeun cable S-Videoconlosreproductoresde video S-VHS.
(En caso contrario, consulteen la tiendade electr6nica).
Cada reproductorde video S-VHS tiene una configuraci6n distinta en el panel posterior.
Cuando conecte unreproductor de S-VHS, debe hacer coincidir los colores det terminal
de conexi6n y del cable.
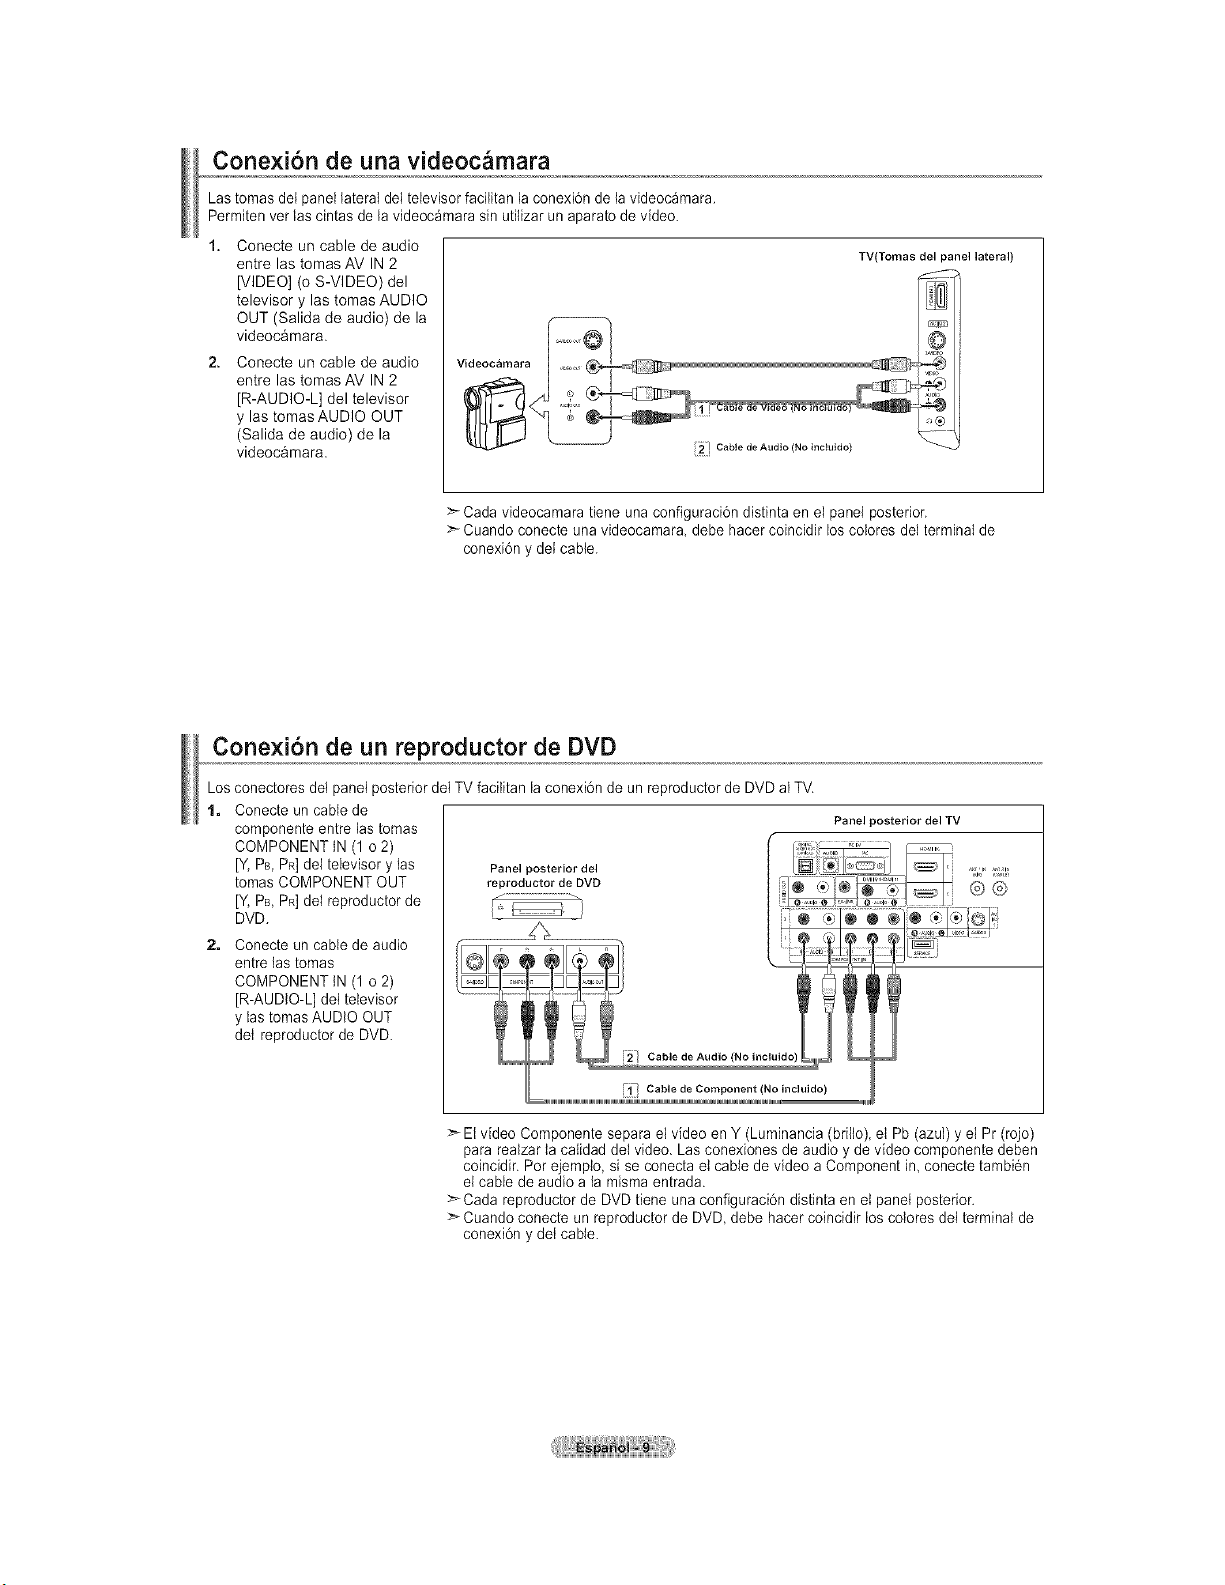
Conexi6n de una videoc_mara
Lastomas det panel lateral deltelevisor faciiitan la conexbn de la videoc_mara.
Permitenver lascintas de la videoc_mara sin utilizarun aparato de video.
1. Conecte un cable de audio
entre lastomas AV IN2
[VIDEO] (o S-VIDEO) del
televisor y las tomas AUDIO
OUT (Salida de audio) de la
videoc&mara.
2. Conecte un cable de audio
entre las tomas AM IN 2
[R-AUDIO-L] del televisor
y las tomas AUDIO OUT
(Salida de audio) de la
videoc&mara.
TVtTomas del panel lateral)
2_ Cable de Audio (No ineluido)
Cada videocamara tiene una configuracidn distinta en el panel posterior.
> Cuando conecte una videocamara debe hacer coincidir loscolores del terminal de
conexi6n y deicable.
Conexi6n de un reproductor de DVD
Los conectores det panet posteriordet TVfacilitan la conexi6n de un reproductor de DVD al TV.
t, Conecte un cable de
componente entre las tomas
COMPONENTtN (1 o 2)
IV, PB, PR] del televisor y las
tomas COMPONENT OUT
[Y, PB,PR]del reproductor de
DVD.
2. Conecte un cable de audio
entrelas tomas
COMPONENT tN(1 o2)
[R-AUDIO-L] del televisor
y las tomasAUDIO OUT
det reproductor de DVD.
Panel posterior del TV
i_[ Cable de Component (No incluido)
>El video Componente separa el video enY (Luminancia (brilto) el Pb (azul)y el Pr (rojo)
para realzar tacaIidad del video. Las conexiones de audio y devideo componente deben
coincidir. Parejemplo, si se conecta et cable de video aComponent in conecte tambi6n
el cable de audio a la misma entrada.
Cada reproductor de DVD tiene una configuraci6n distinta en et panelposterior.
Cuando conecte unreproductor de DVD, debe hacer coincidir los coIores dei terminal de
conexi6n y det cable.
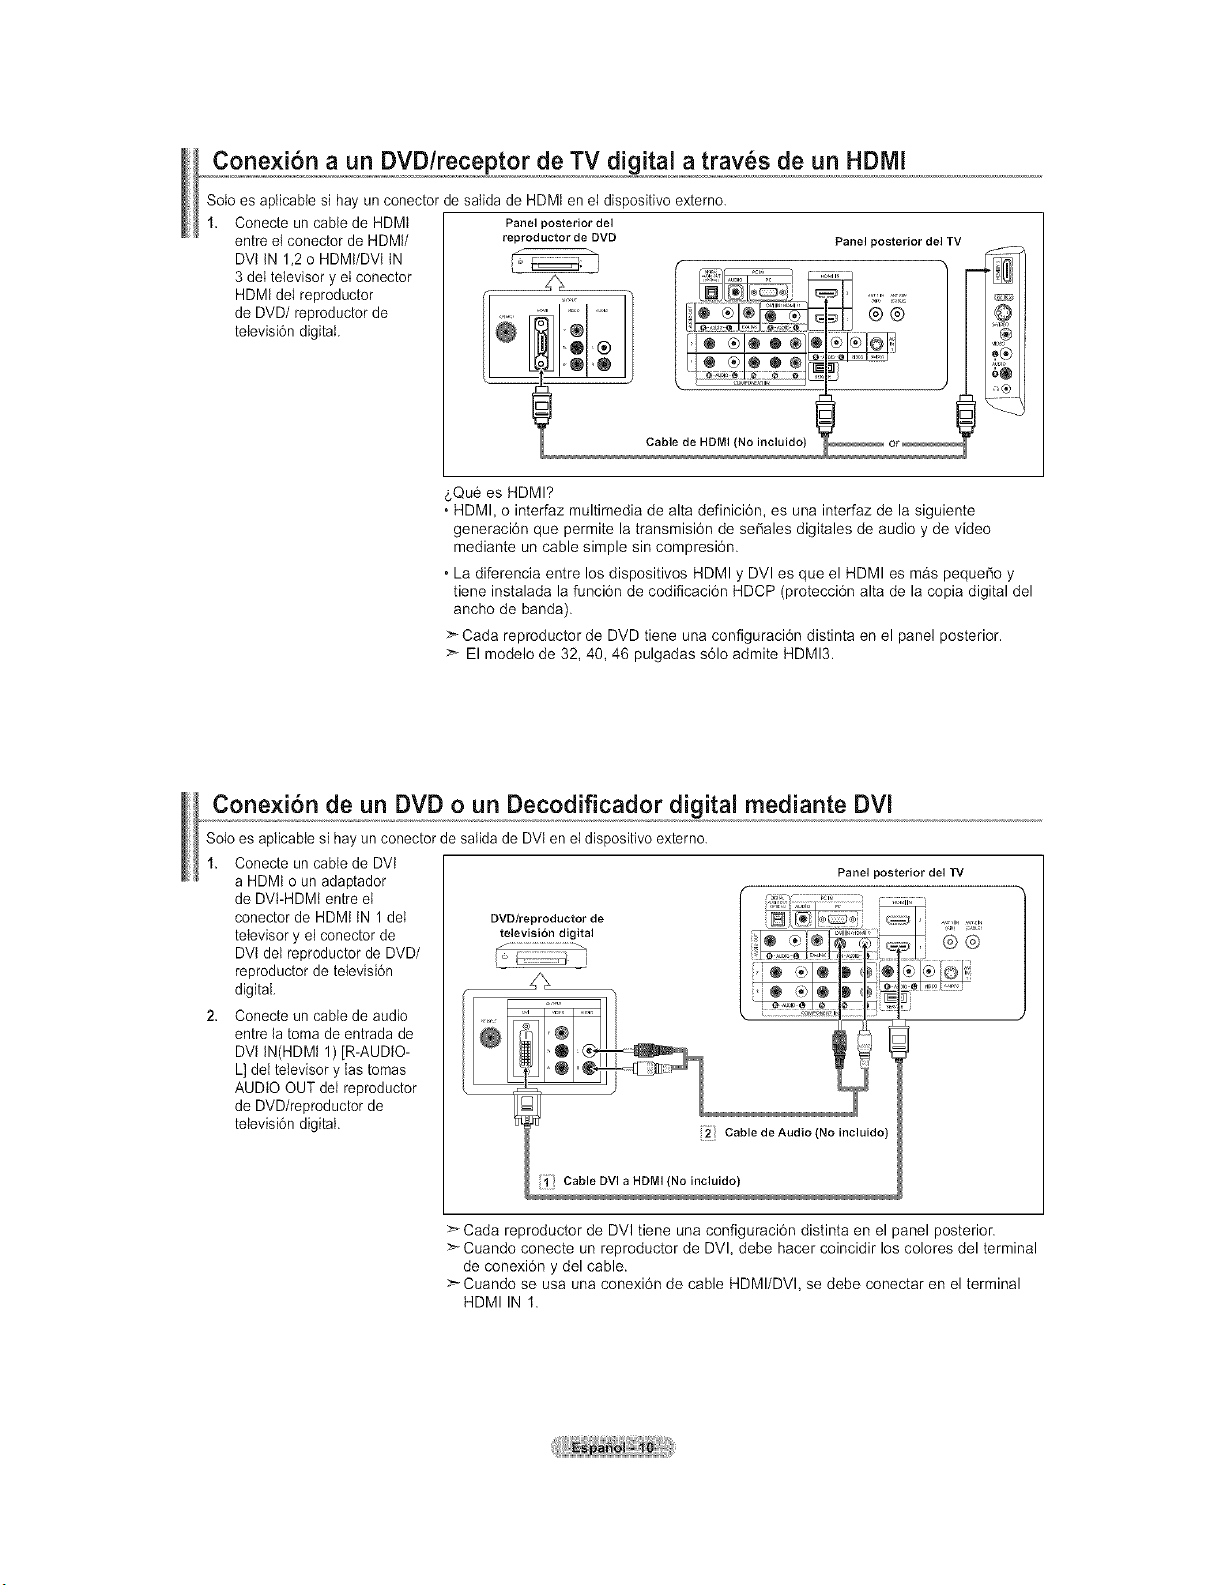
Conexion a un DVD/receptor de TV digital a trav_s de un HDMi
Solo es aplicabte si hay un conector de satida de HDMten el dispositivo externo.
Conecte un cable de HDMt
entreel conector de HDMI/
DVt tN 1,2 oHDMt/DVl tN
3del televisor y elconector
HDMIdel reproductor
de DVD/reproductor de
televisi6ndigital.
Panel posterior del
reproductor de DVD
6Qu6 es HDMI?
Panel posterior del TV
Cable de HDMI (No incluido)
• HDMI, o interfaz multimedia de alta definici6n, es una interfaz de la siguiente
generaci6n que permite la transmisi6n de se_ales digitales de audio y de video
mediante un cable simple sin compresi6n.
• La diferencia entre los dispositivos HDMI y DVl es que el HDMI es mas peque_o y
tiene instalada la funci6n de codificaci6n HDCP (protecci6n alta de la copia digital del
ancho de banda).
Cada reproductor de DVD tiene una configuraci6n distinta en el panel posterior.
>- El modelo de 32, 40, 46 pulgadas s61oadmire HDMI3.
Conexion de un DVD o un Decodificador digital mediante DVI
Soloes apiicable si hayun conector de saIida de DVt en el dispositivo externo.
1. Conecte un cable de DVt
aHDMt oun adaptador
de DVI-HDMI entre et
conector de HDMI IN 1 del DVD/reproductor de
televisory el conector de televisi6ndigital
DVt del reproductor de DVD/ I _ _:
reproductor de televisi6n
digital.
2. Conecte un cable de audio
entrela toma de entrada de
DVI tN(HDMI 1)JR-AUDIO-
L]dei televisor y lastomas
AUDIO OUT del reproductor
de DVD/reproductor de
televisi6n digital.
Panel posterior del TV
Cable de Audio (No incluido)
Cable DVI a HDrvll (No incluido)
>Cada reproductor de DVl tiene una configuraci6n distinta en el panel posterior.
>-Cuando conecte un reproductor de DVl, debe hacer coincidir loscolores del terminal
de conexi6n y del cable.
> Cuando se usa una conexi6n de cable HDMI/DVl, se debe conectar en el terminal
HDMI IN 1.
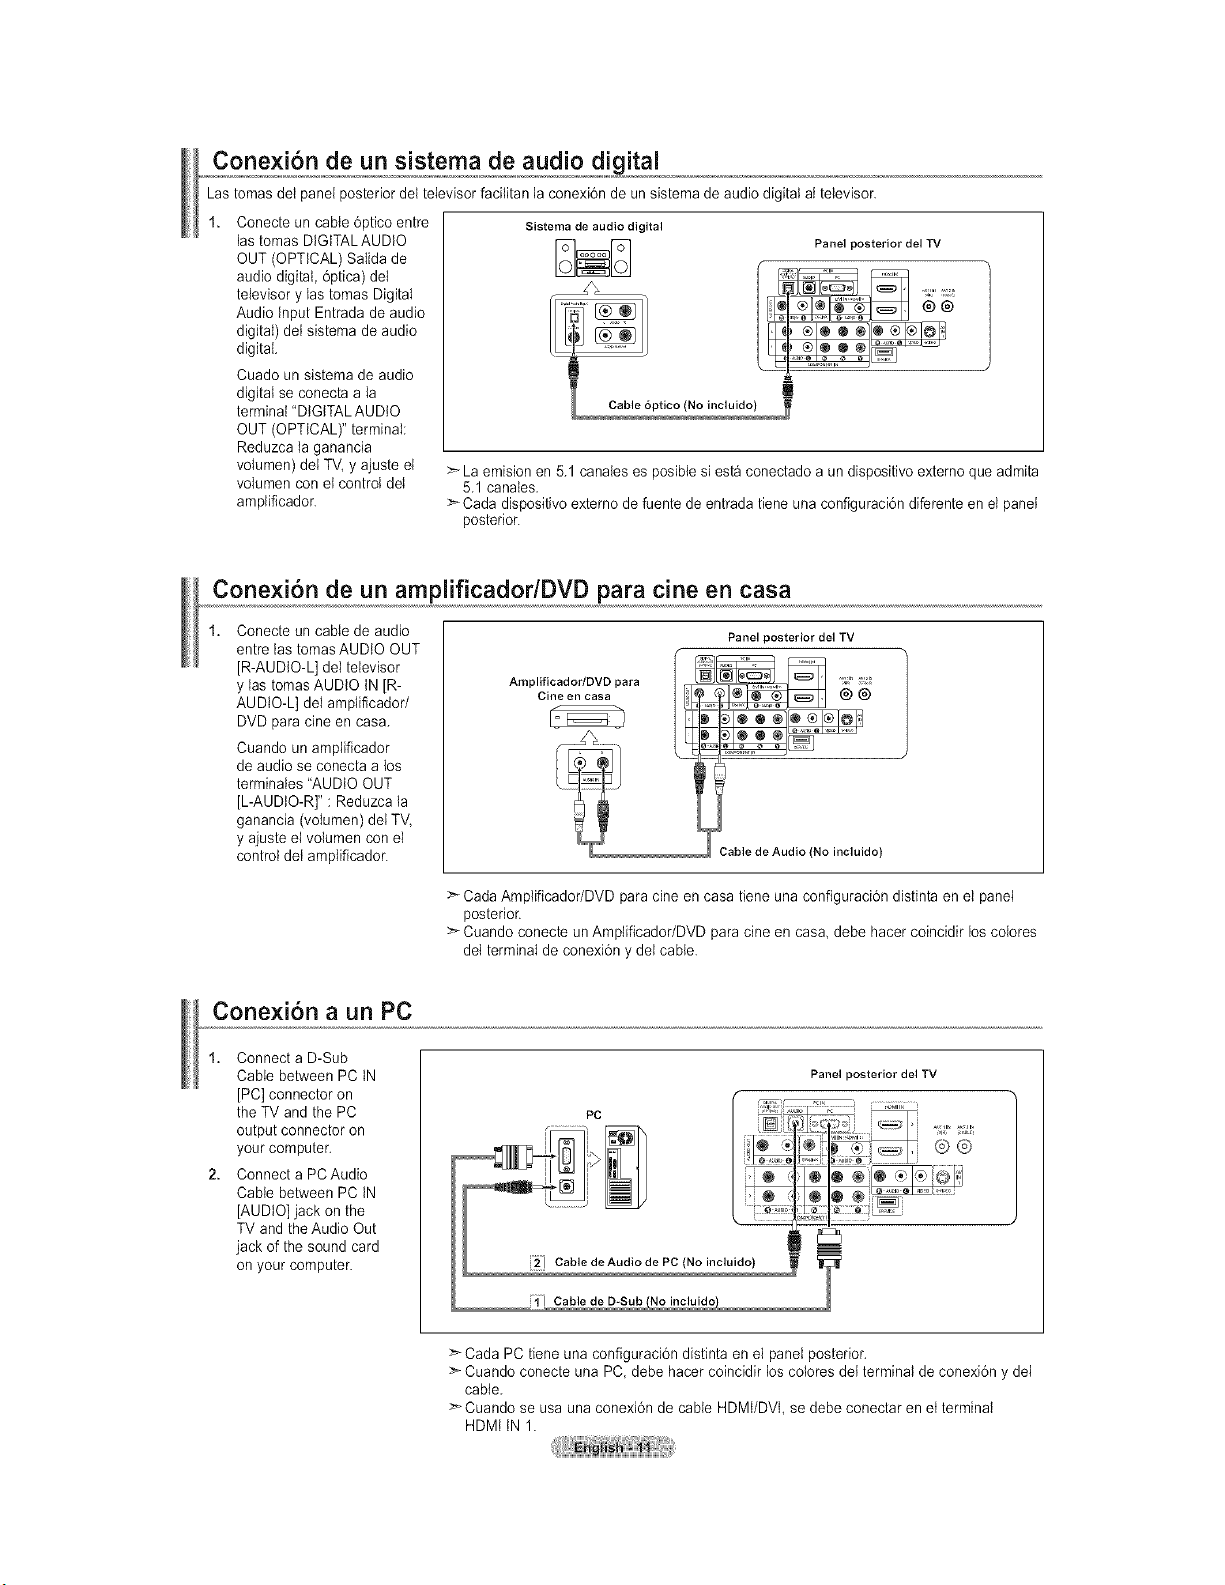
Lastomasdelpanelposteriordeltelevisorfacilitanlaconexi6ndeunsistemadeaudiodigitalattelevisor.
Conecteuncable6pticoentre
lastomasDIGITALAUDIO
OUT(OPTICAL)SaIidade
audiodigital,6ptica)del
televisorylastomasDigital
AudioInputEntradadeaudio
digital)detsistemadeaudio
digital.
Cuadounsistemadeaudio
digitalseconectaaIa
terminal"DIGITALAUDIO
OUT(OPTICAL)"terminal:
Reduzcataganancia
volumen)deiTV,yajusteet
volumenconetcontroldel
amplificador.
Sistema de audio digital
Panel posterior del TV
>-La emisionen 5.1 canales es posiblesiesta conectado aun dispositivo externo que admita
5.1 canales.
:_Cada dispositivo externo de fuente de entrada tiene una configuraci6n diferenteenet panet
posterior.
Conexi6n de un amplificador/DVD para cine en casa
Conecte un cable de audio
entrelas tomasAUDIO OUT
JR-AUDIO-L]del televisor
y las tomasAUDIO INJR-
AUDIO-L] del amplificador/
DVD para cine en casa.
Cuando un amplificador
de audio se conecta a los
terminales "AUDIO OUT
[L-AUDIO-R]" : Reduzca la
ganancia (votumen) delTV,
y ajuste el volumen con el
controldet amplificador.
Arnplificador/DVD para
Cine en casa
Panel posterior del TV
@®
Cable de Audio (No incluido)
:_Cada Amplificador/DVD para cine en casa tiene una configuraci6n distinta en el panel
posterior.
>* Cuando conecte un Amplificador/DVD paracine encasa debe hacer coincidir loscolores
det terminal de conexi6n ydei cable.
Conexi6n a un PC
1. Connect aD-Sub
Cable between PC tN
[PC] connector on
the TVand the PC
output connecter on
your computer.
2. Connect aPCAudio
Cable between PC IN
[AUDIO]jack on the
TVand the Audio Out
jack of the sound card
on your computer.
Panel posterior del TV
:>-CadaPC tieneuna configuraci6n distinta en el panel posterior.
>'-Cuando conecte una PC, debe hacer coincidir los colores det terminal deconexi6n y dei
cable.
>_Cuando se usa una conexi6n de cable HDMt/DVt, se debe conectar enet terminal
HDMt tN1.
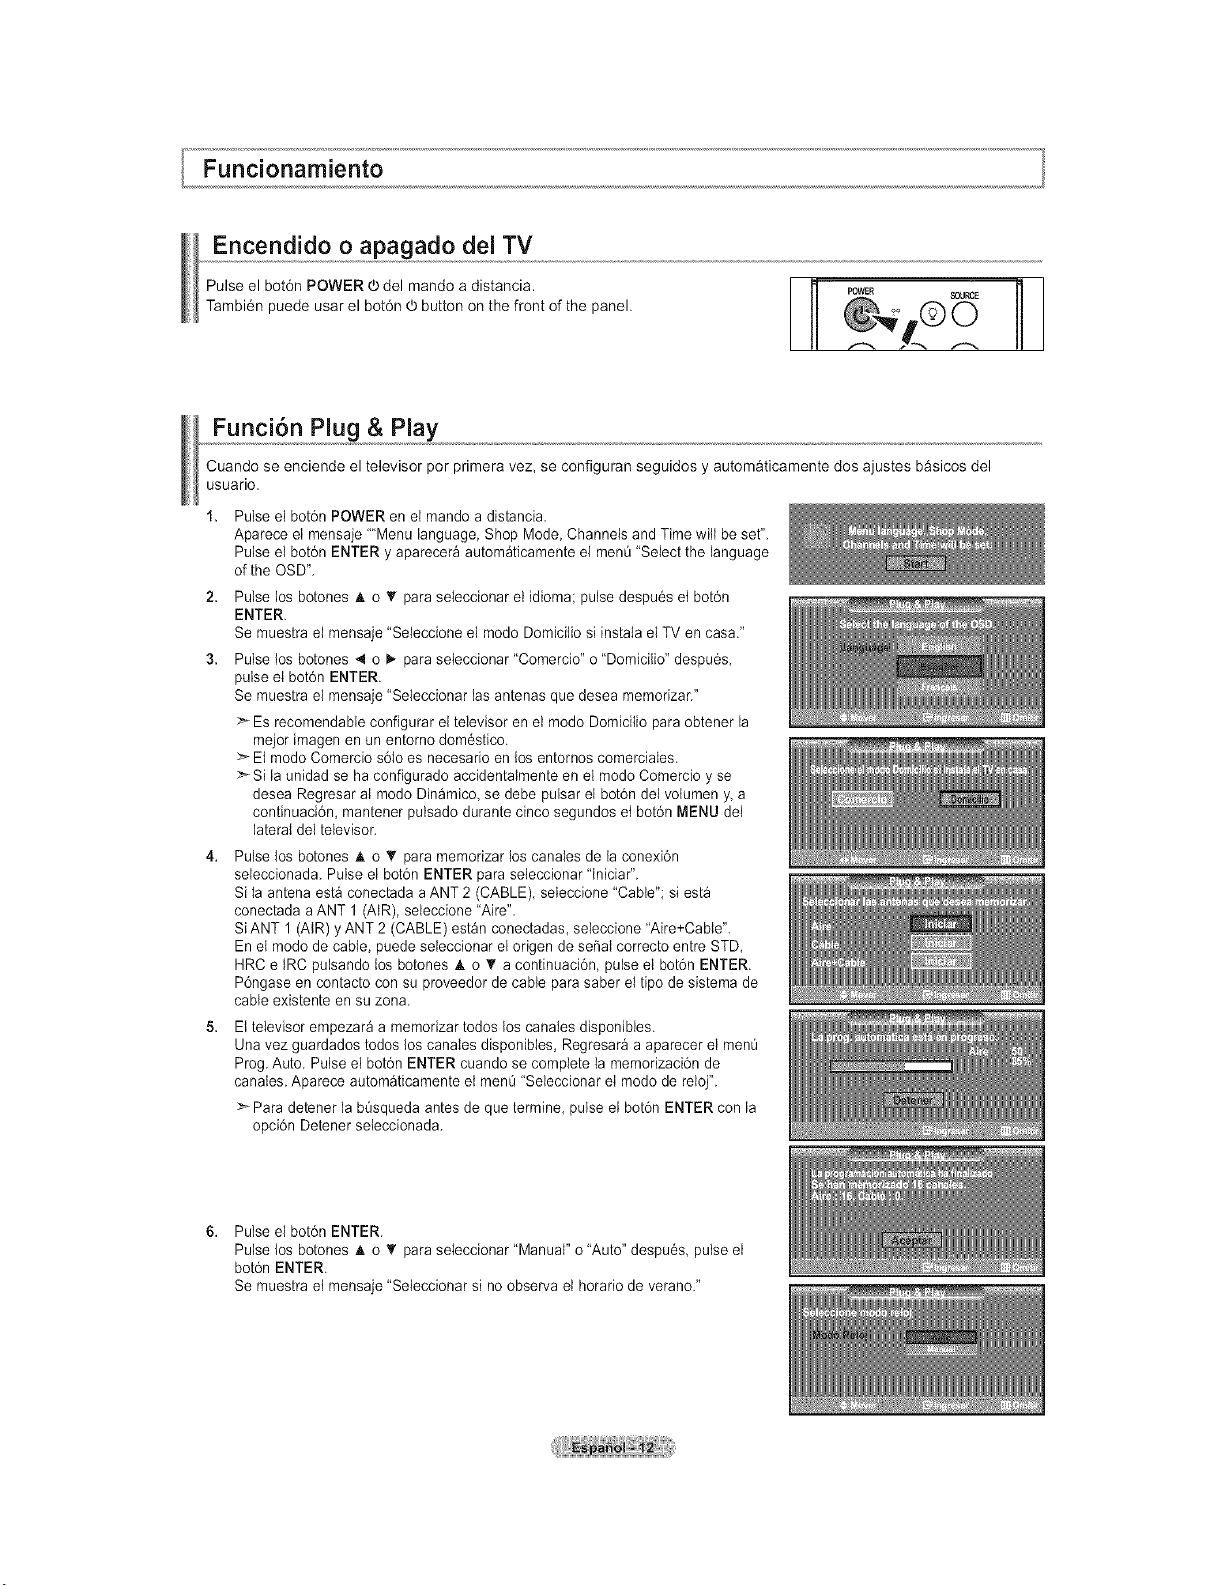
Encendido o apagado del TV
Pulse el bot6n POWER d)del mando a distancia.
Tambi6n puede usar el bot6n _ button on the front of the panel.
Funci6n Plug & Play
Cuando se enciende el televisor por primera vez, se configuran seguidos y autom&ticamente dos ajustes b&sicos del
usuario.
Pulse el bot6n POWER en el mando adistancia.
Aparece el mensaje ""Menu language, Shop Mode, Channels and Time will be set".
Pulse el bot6n ENTER y aparecer_ autom_ticamente el menQ"Select the language
ofthe OSD".
Pulse los botones _k oT para seleccionar el idioma; pulse despu6s et bot6n
ENTER.
Be muestra el mensaje "Seleccione el modo Domicilio si instaIa el TV en casa."
Pulse los botones 4 o I,. para seleccionar "Comercio" o"Domicilio" despu6s,
pulse el bot6n ENTER.
Se muestra el mensaje "Seleccionar las antenas que desea memorizar."
Es recomendabie configurar el televisor en el modo Domicitio paraobtener la
mejor imagen en un entorno dom_stico.
>- El modo Comercio s61oes necesario enlos entornos comerciales.
:_Si la unidad se ha configurado accidentaImente en el modo Comercio y se
desea Regresar al modo Dinamico, se debe pulsar el bot6n del volumen y,a
continuaci6n, mantener pulsado durante cinco segundos et bot6n MENU dei
lateral del televisor.
Pulse los botones A oT para memorizar los canales de la conexi6n
seleccionada. Pulse el bot6n ENTER paraseleccionar 'Iniciar".
SiIaantena est_ conectada a ANT 2 (CABLE), seleccione "Cable"; siest_
conectada aANT 1 (AtR), seleccione "Aire".
SiANT 1(AIR) y ANT2 (CABLE) est_n conectadas, seleccione 'Aire+Cable".
En el modo de cable, puede seleccionar el origen de serial correcto entre STD,
HRC e tRC pulsando los botones ,t. o '_ acontinuaci6n, pulse el bot6n ENTER.
P6ngase en contacto con su proveedor de cable parasaber elripede sistema de
cable existente en su zona.
Eltelevisor empezar_ a memorizar todos los canales disponibles.
Unavez guardados todoslos canates disponibles, Regresar_ aaparecer el menQ
Prog. Auto. Pulse el bot6n ENTER cuandose complete la memodzaci6n de
canaIes. Aparece autom_ticamente et menQ"Seleccionar el modo de reloj".
>Para detener la bOsquedaantesde que termine, pulse el bot6n ENTER con la
opci6n Detenerseteccionada.
Pulse el bot6n ENTER.
Pulse los betones A o• para seleccionar "Manual" o"Auto" despu6s, pulse el
bot6n ENTER.
Be muestra et mensaje "Seleccionar si no observa et horario de verano."
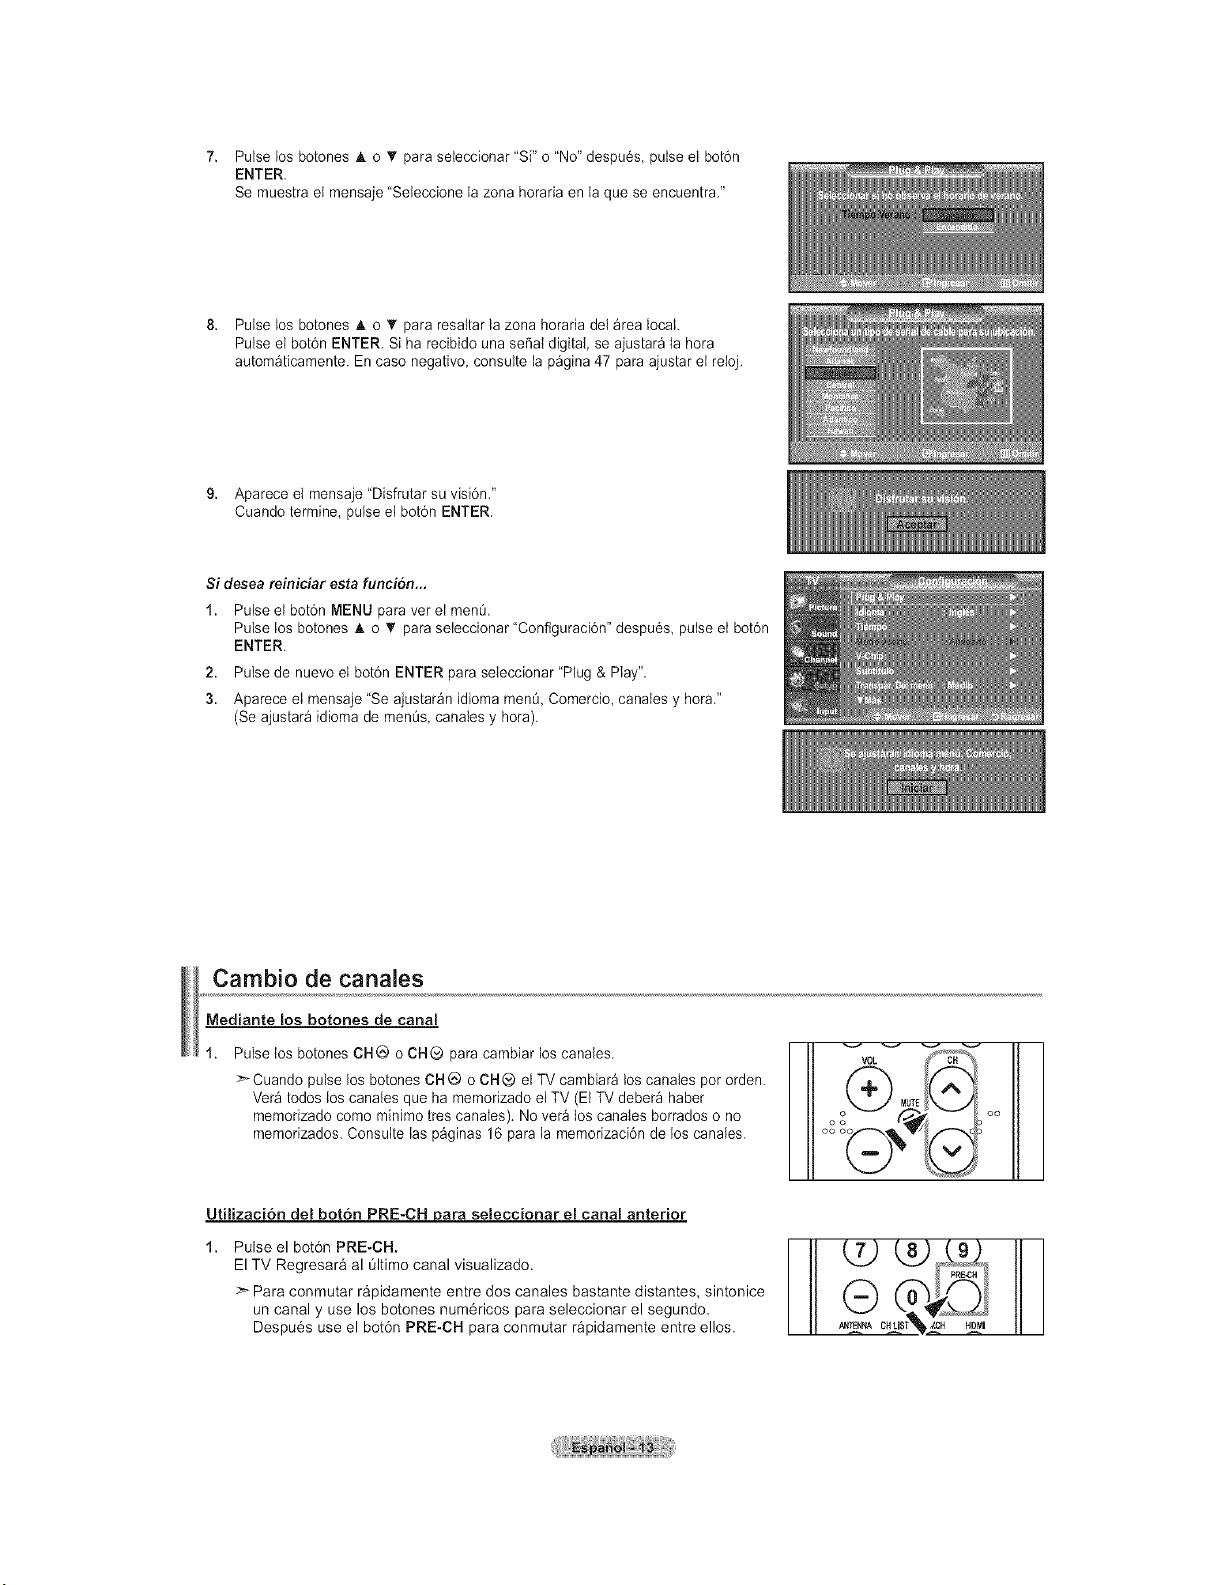
7. Pulselosbotones& o _rpara seleccionar 'Si" o "No"despu6s pulse el botdn
ENTER.
Se muestra et mensaje "Seteccione la zona horaria en la que se encuentra."
8. Pulse los botones • o _' para resaltar la zona horaria del _rea local.
Pulse el bot6n ENTER. Si ha recibido una sepal digital, se ajustar_ tahora
autom_ticamente. En caso negativo, consulte lap_gina47 para ajustarel reioj.
9. Aparece el mensaje "Disfrutar su visidn."
Cuando termine, pulse et botdn ENTER.
Sidesea reiniciar esta funcion_.
1. Pulse el bot6n MENU para vet el men0.
Pulse los botones A o V paraseteccionar "Configuraci6n" despu6s, pulse et bot6n
ENTER.
2. Pulse de nuevo el bot6n ENTER paraseleccionar "Plug & Play".
3. Aparece el mensaje "Seajustar_n idioma men0, Comercio, canales y hora."
(Seajustar_ idioma de menQs,canales y hora).
Cambio de canales
Mediante los botones de canal
Pulse los botones CH@ o CH® para cambiar loscanales.
> Cuando pulse losbotones CH_) o CH_ el TVcambiar_ loscanales pot orden.
Ver_ todos loscanales que ha memorizado el TV (El TV deber_ haber
memorizado come minimo ires canales). Nover_ los canales borrados o no
memorizados. Consulte lasp_ginas 16 parala memorizaci6n de los canales.
VOL c"%"_%
It
MUTE
Utilizaci6n del boron PRE-CH para seleccionar el canal anterior
Pulse el bot6n PRE-CH.
ElTV Regresara al Oltimocanal visualizado.
Para conmutar rapidamente entre dos canales bastante distantes, sintonice
un canal y use los botones num6ricos para seleccionar el segundo.
Despu6s use el bot6n PRE-CH para conmutar r&pidamente entre ellos.
PRE*CH
cH r_ _
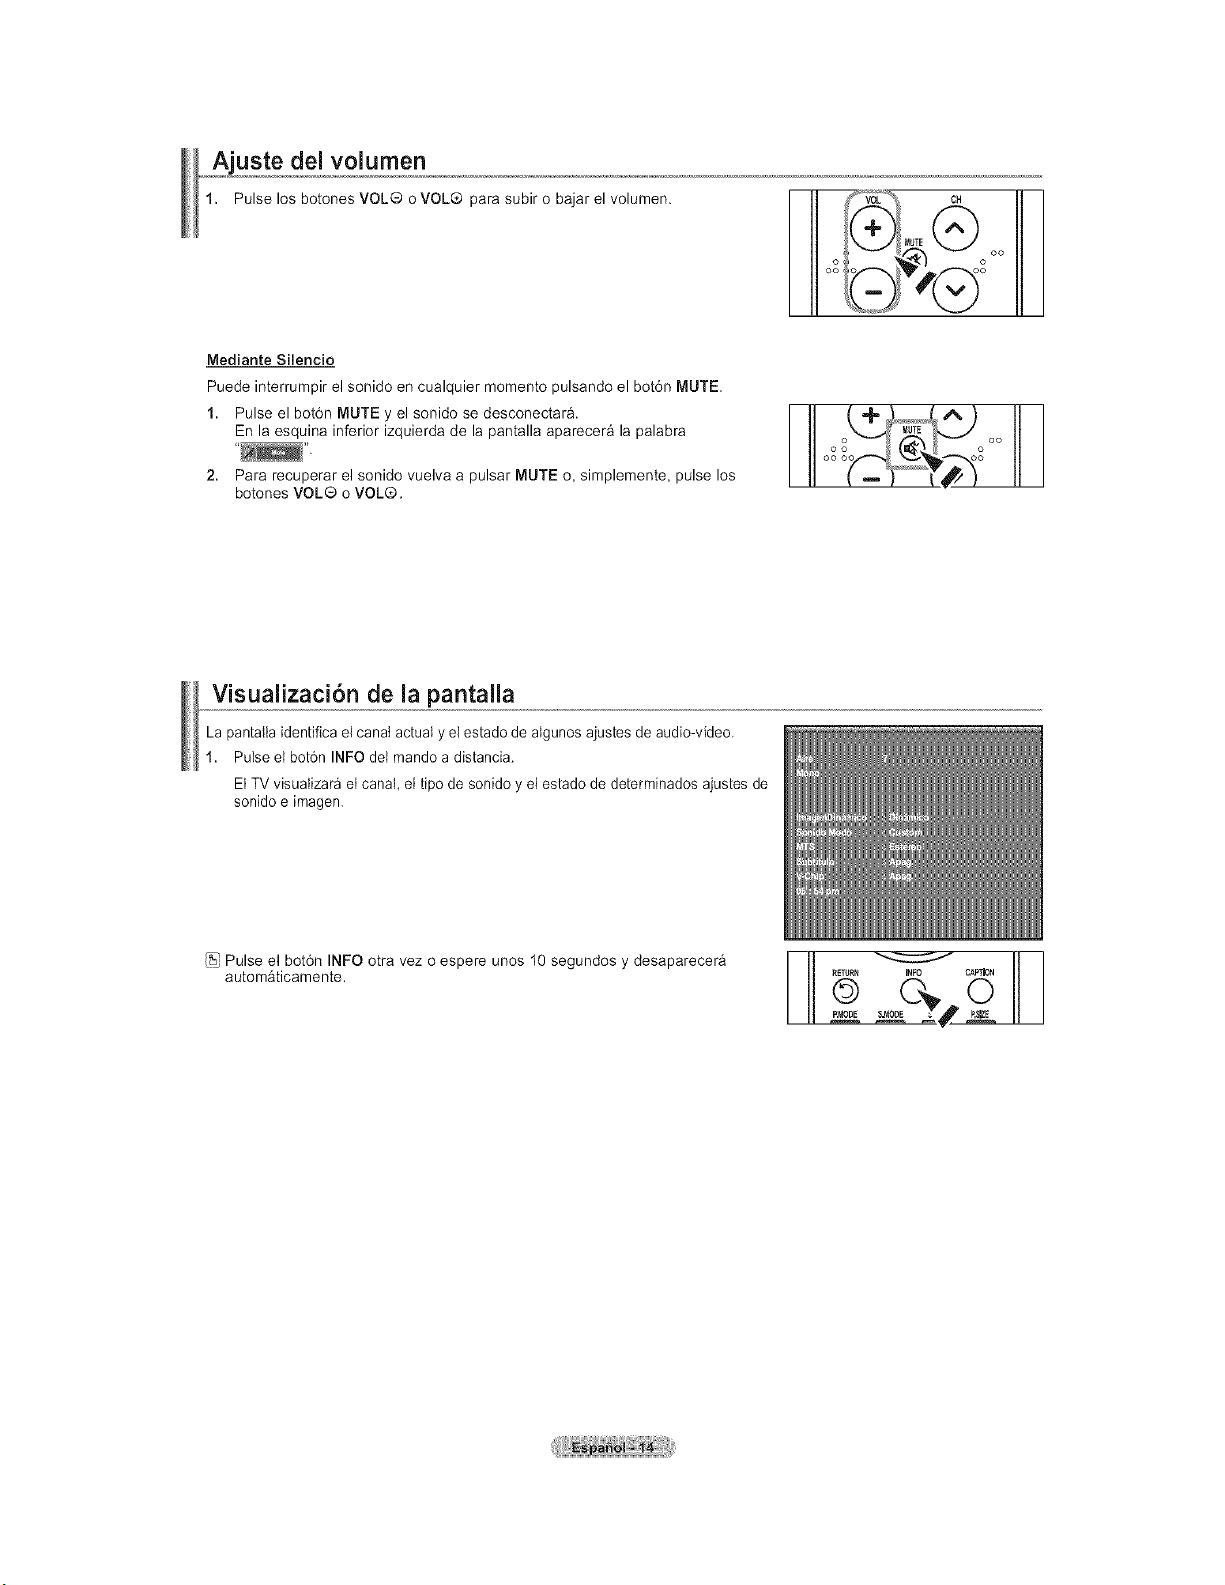
uste dei volumen
Pulse los botones VOL® o VOL® para subir obajar el volumen.
III oo
02 _I
Mediante Silencio
Puede interrumpir el sonido encualquier momento pulsando el bot6n MUTE.
1. Pulse el bot6n MUTE y el sonido se desconectar&.
En la esquina inferior izquierda de la pantalla aparecera la palabra
2. Para recuperar el sonido vuelva a pulsar MUTE o, simplemente, pulse los
botones VOL® oVOL®.
I ooo oo
Visualizaci6n de la pantalla
La pantatla identifica el canatactualy el estado de algunos ajustes de audio-video.
1. Pulse el bot6n INFO del mando adistancia.
ElTVvisualizar_ et canal, el ripe de sonido y el estadode determinados ajustes de
sonido eimagen.
Pulse el bot6n INFO otra vez o espere unos 10 segundos y desaparecer_
automaticamente.
_FO CAPTION
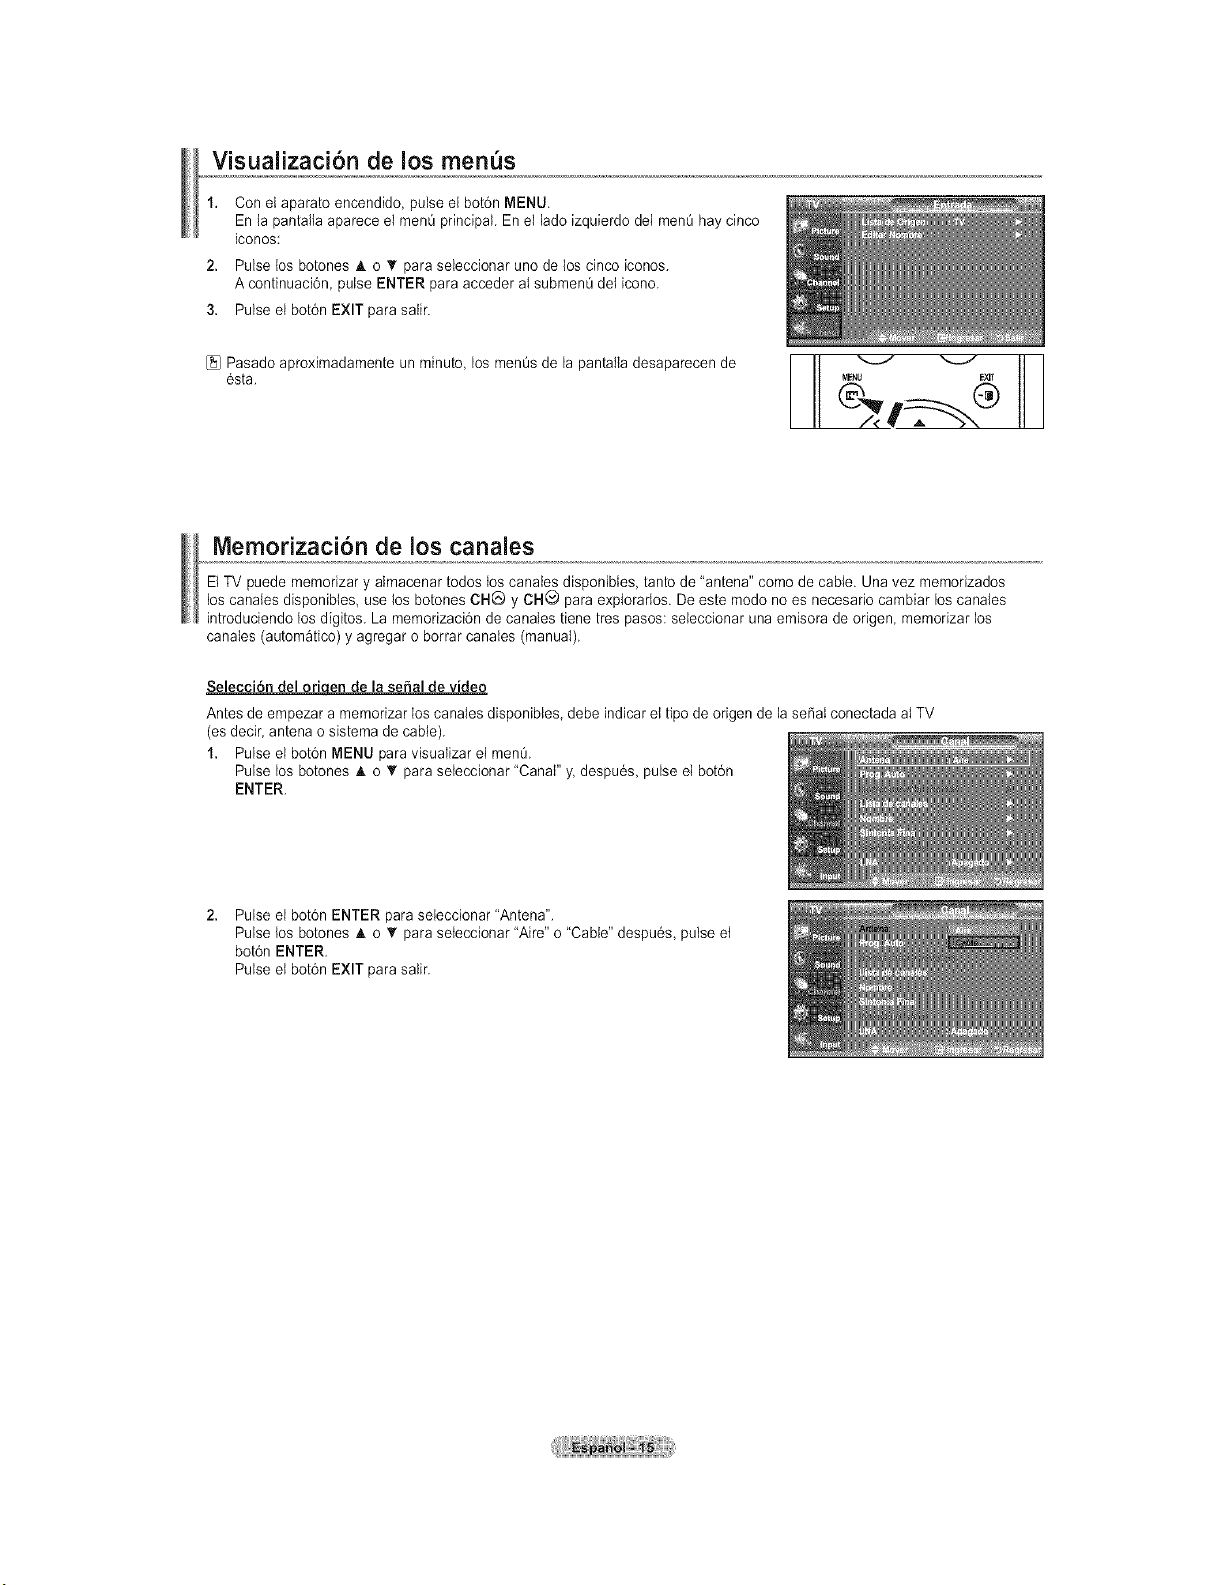
Visualizacion de los men s
2.
3.
Conel aparato encendido, pulse el bot6n MENU.
En la pantalla aparece el men0 principal. En el ladoizquierdo dei men0 hay cinco
iconos:
Pulse los botones A. o V'para seleccionar uno de loscinco iconos.
A continuaci6n pulse ENTER para acceder aI submenQdeticono.
Pulse el bot6n EXIT parasaIir.
[_JPasadoaproximadamente un minute, los menOsde la pantalla desaparecen de
6sta.
Memorizaci6n de los canales
ElTV puede memorizar y aImacenar todos loscanales disponibtes, tanto de "antena" comode cable. Unavez memorizados
loscanaIes disponibtes, uselos botones CHC) y CH_ paraexplorarIos. De este modo no es necesario cambiar loscanaIes
introduciendo los digitos. La memorizaci6n de canales tiene tres pasos: seieccionar una emisora de origen, memorizar los
canales (autom_tico) y agregar oborrar canates (manual).
Seleccion del orio.ende la serial de video
Antesde empezar a memorizar los canates disponibles, debe indicar ettipo de origen delase_aI conectada aI TV
(es decir,antena o sistema de cable).
1. Pulse el bot6n MENU paravisuaIizar el menO.
Pulse los botones A o '_ para seteccionar "Canal" y. despu6s, pulse et bot6n
ENTER.
Pulse el bot6n ENTER paraseieccionar "Antena".
Pulse los botones A o • para seteccionar "Aire" o "Cable"despu6s, pulse et
bot6n ENTER.
Pulse et bot6n EXIT parasalir.
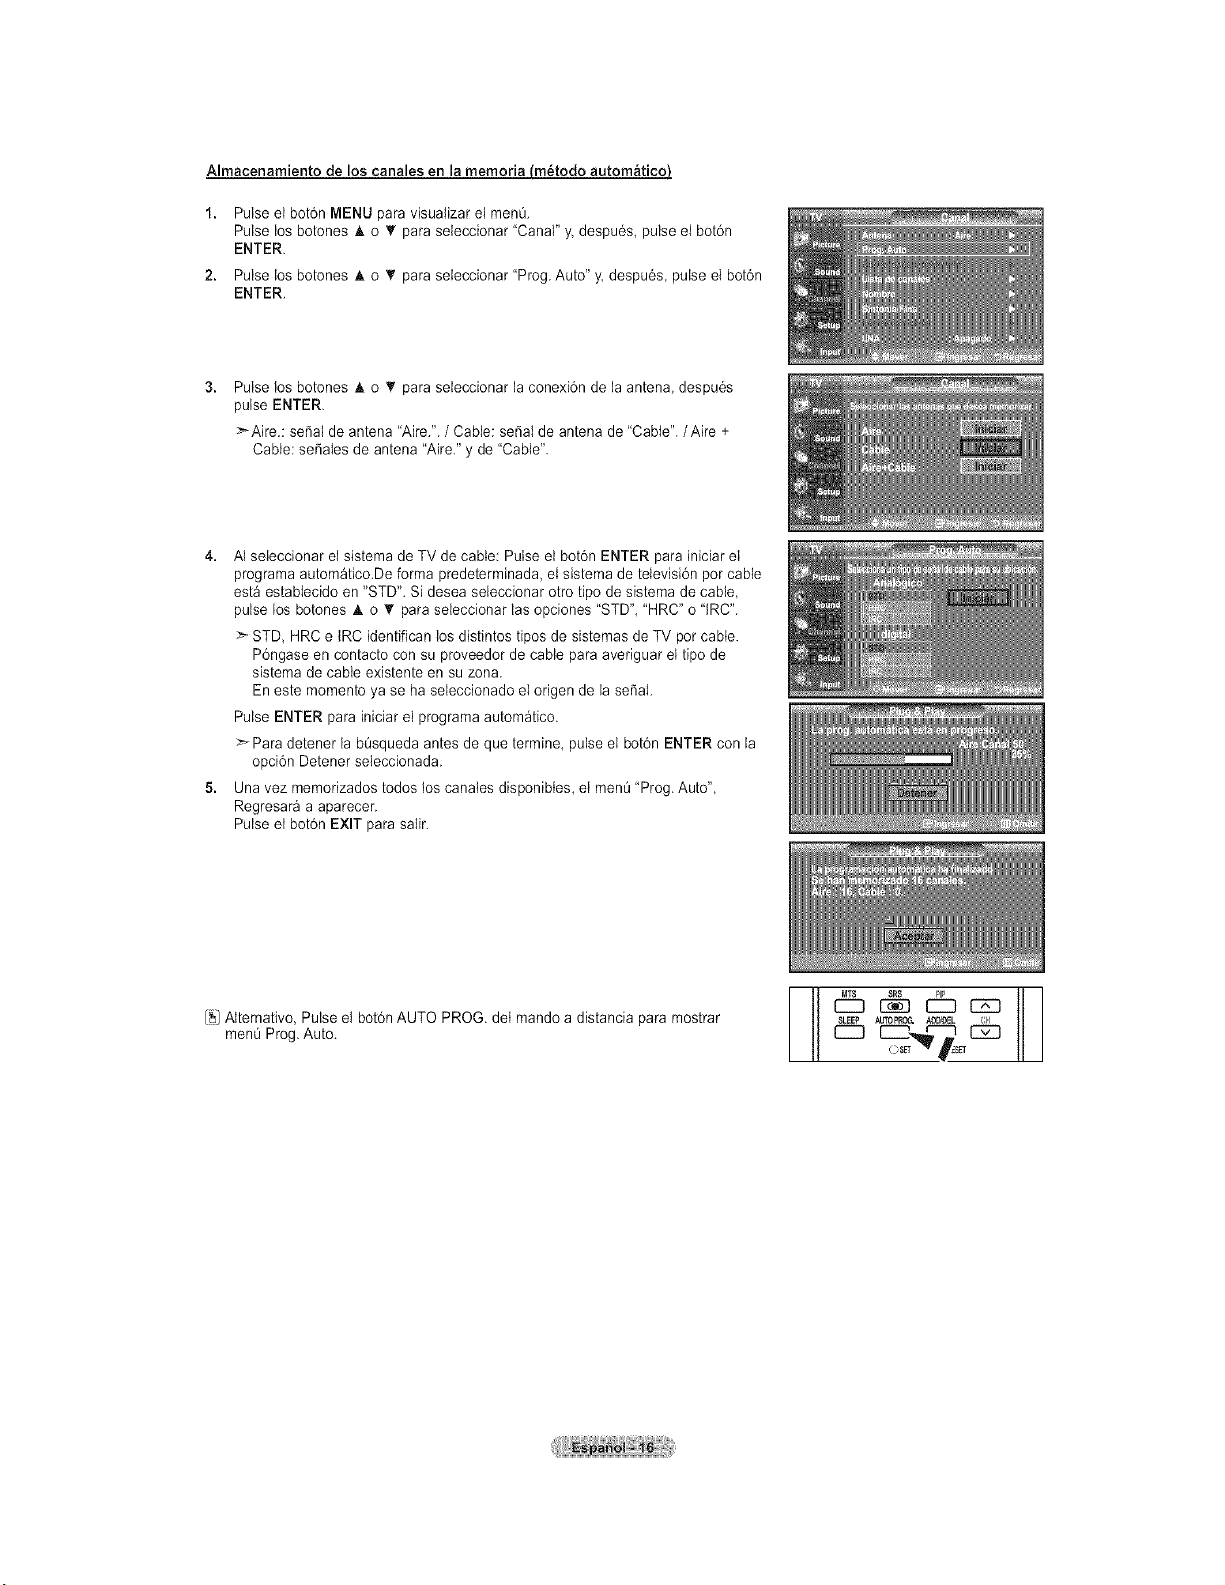
Almacenamiento deloscanales en lamemoria (m_todo autom_lticoJ
Pulse el bot6n MENU para visualizar el menO.
Pulse los botones A o T paraseleccionar "Canal" y.despu6s, pulse el bot6n
ENTER.
Pulse los botones A o • paraseleccionar "Prog.Auto" y. despu6s, pulse et bot6n
ENTER.
Pulse los botones A o T paraseleccionar la conexi6n de la antena despu6s
pulse ENTER.
:_Aire.: seSal deantena "Aire.". /Cable: seSal de antena de"Cable"./Aire +
Cable: seSaIesdeantena "Aire." y de "Cable".
4. AI seieccionar el sistema de TV de cable: Pulse el bot6n ENTER parainiciar el
programaautom_tico.De forma predeterminada, el sistema de televisi6n pot cable
est_ establecido en "STD". Sidesea seleccionar otto ripe desistema de cable,
pulse los botones h, o T paraseleccionar lasopciones "STD", "HRC"o "tRC".
:_STD, HRCe IRCidentifican losdistintos tipos de sistemas de TV pot cabte.
P6ngase en contacto con su proveedor de cable paraaveriguar elripede
sistema de cable existente en suzona.
En este memento ya se ha seleccionado el origen de la seSat.
Pulse ENTER para iniciar el programaautomatico.
>Para detener la b0squeda antes de que termine, pulse el bot6n ENTER con la
opci6n Detener seleccionada.
5. Una vez memorizadostodos los canates disponibles, etmen0 "Prog.Auto",
Regresar_ aaparecer.
Pulse et bot6n EXIT parasalir.
[_1Altemativo, Pulse el bot6n AUTO PROG. del mandoa distancia paramostrar
menQProg. Auto.
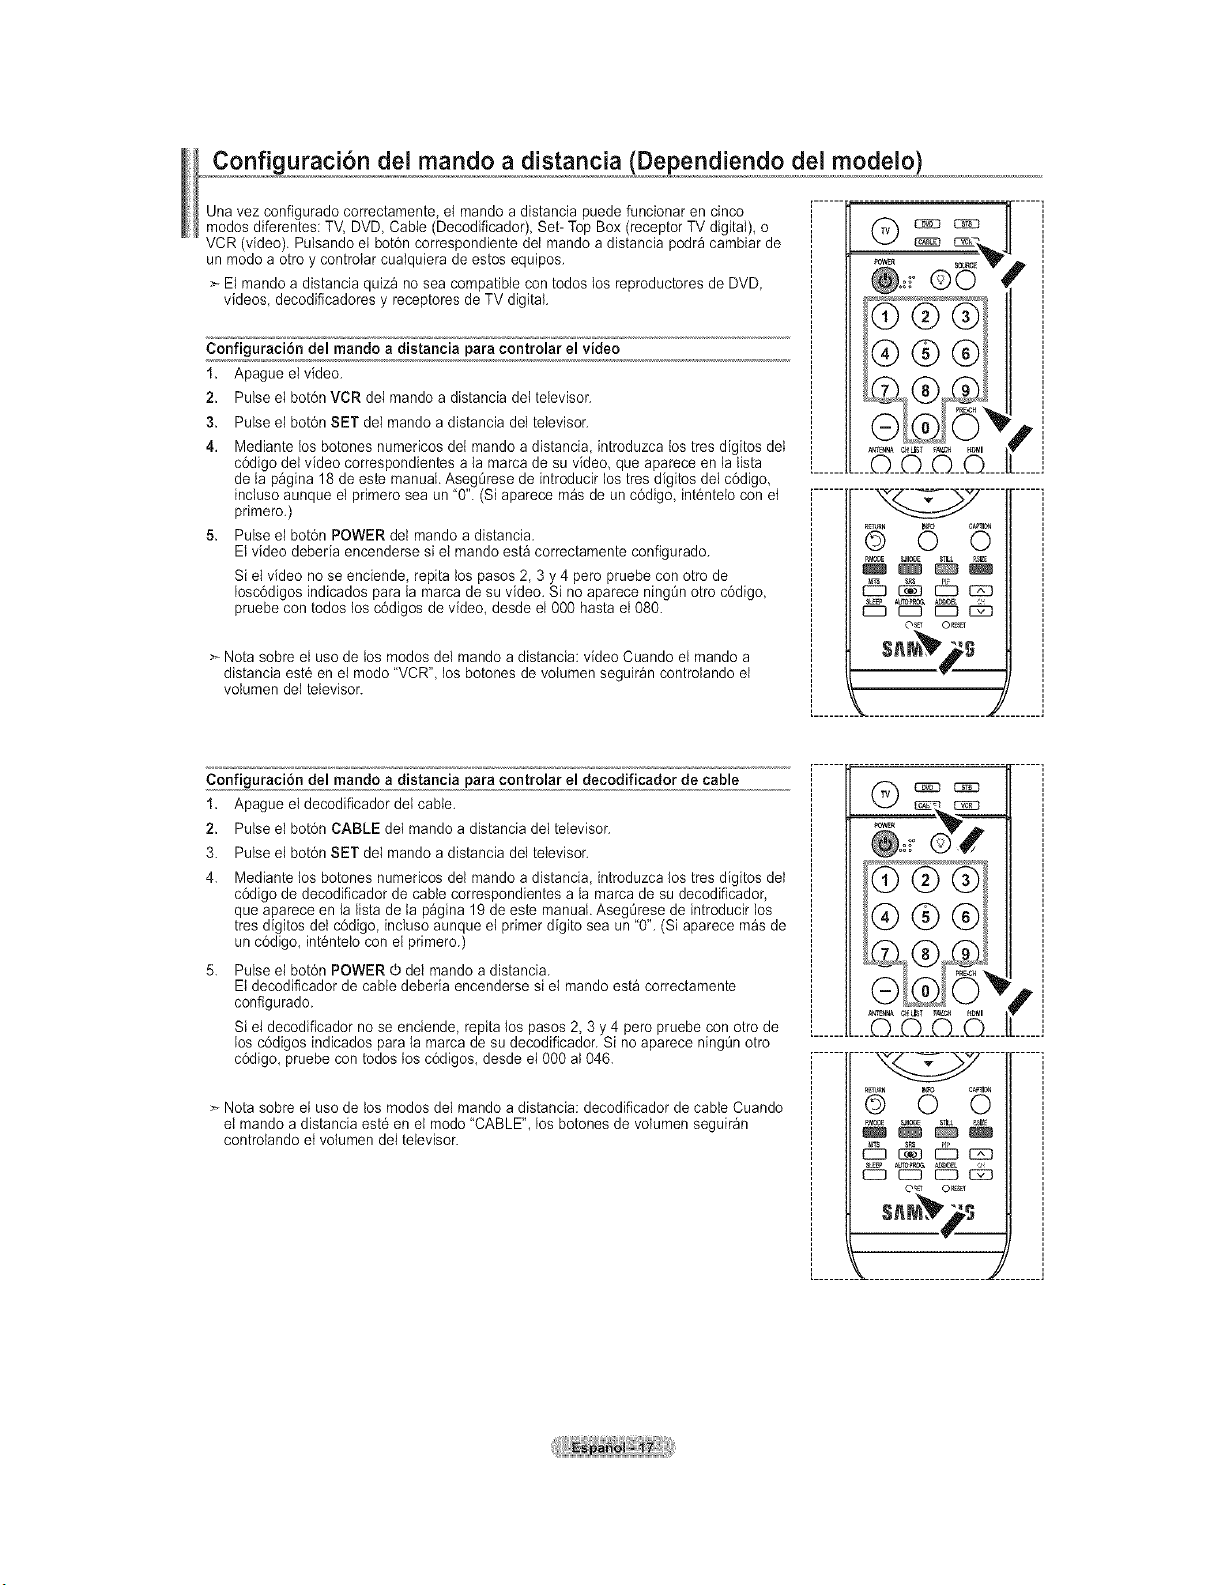
C figuraci6n deJ mando a distancia (Dependiendo del modelo)
Unavez configurado correctamente, et mando a distancia puede funcionar en dnco
modosdiferentes: TV,DVD, Cable (Decodificador) Set- Top Box(receptor TV digital), o
VCR (video), Pulsando el bot6n correspondiente del mando adistancia podr_cambiar de
un modo aotro y controtar cualquiera de estos equipos,
> Elmando a distanda quiz_ no sea compatible con todos los reproductores de DVD,
videos, decodificadores y receptores de TVdigital,
Configuracibn del mando a distancia para controlar el video
1. Apague el video.
2. Pulse el bot6n VCR dei mando a distancia det televisor.
3. Pulse el bot6n SET del mando a distancia deI televisor.
4. Mediante losbotones numericos del mando adistanda introduzca los ires digitos del
c6digo dei video correspondientes ala marca de su video, que aparece en la tista
de la pagina 18 deeste manual.Aseg0rese de introducir los ires digitos del c6digo,
inciuso aunque el primero sea un "0".(Si aparece m_sdeun c6digo, int6ntelo con et
pdmero.)
5. Pulse el bot6n POWER del mando a distancia.
Elvideo deberia encenderse si el mando est_ correctamente configurado.
Siel video no se enciende, repita lospasos 2, 3 y 4 pete pruebecon otto de
Iosc6digos indicados para{amarca de su video. Si no aparece ning0n otro c6digo,
pruebe con todos losc6digos de video, desde el 000 hastael 080.
:_Nota sobre el uso de los modosdel mando adistancia: video Cuando el mandoa
distancia est6 en el mode "VCR", losbotones de volumen seguir_n controlando el
volumen dei televisor.
©0
_S/NA C_LB? _Av.C_ H_MI
.........._Q___Q___O___©....
O_ or_
..................................
p,
Configuraci6n del mando a distancia para controlar el decodificador de cable
1. Apague el decodificador del cable.
2. Pulse el bot6n CABLE det mando a distancia del televisor.
3. Pulse el bot6n SET del mando a distancia del televisor.
Mediante los botones numericos del mando adistancia, introduzca los tres digitos del
c6digo de decodificador de cable correspondientes a la marca desu decodificador,
que aparece en la lista dela pagina 19 deeste manual. AsegQresede introducir los
tres digitos deI c6digo, incluso aunque etprimer digito sea un"0". (Si aparece m_s de
un c6digo, int6ntelo con el primero.)
Pulse et bot6n POWER @del mando adistancia.
Eldecodiflcador de cable debeda encenderse si el mando est_ correctamente
configurado.
Siel decodificador no se endende, repita los pasos 2,3 y 4 pete pruebe con otto de
losc6digos indicados parala marca de sudecodificador. Si no aparece ningOn otto
c6digo, pruebe con todoslos c6digos, desde el 000 aI 046.
> Nota sobre el use de los modosdel mando adistancia: decodificador decable Cuando
el mando a distancia est6 en el modo "CABLE", los botonesde volumen seguir_n
controlando et volumen dei televisor.
;®®®/
___G__Q___O___©....
.... ....
QR_I_N 6 c_EaO
db cz:
s.r s
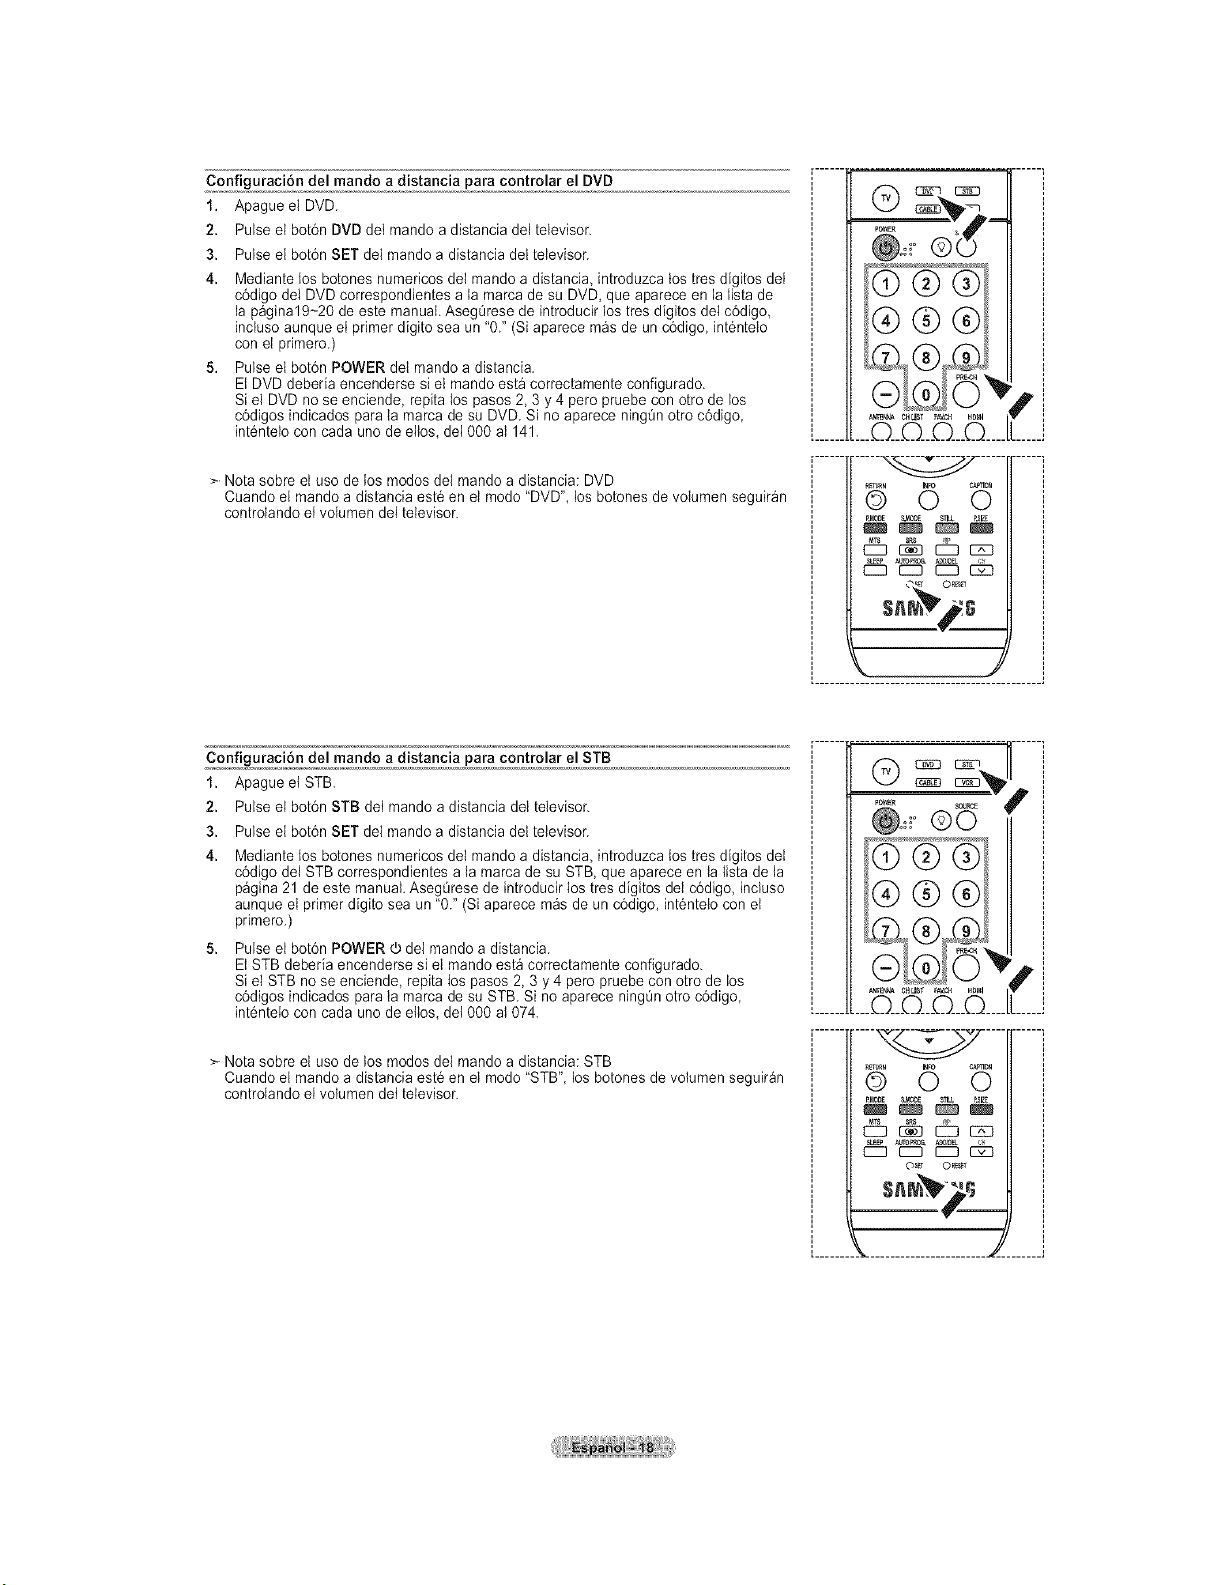
Configuracion del mando a distancia para controlar el DVD
1. Apague el DVD,
2. Pulse el bot6n DVD det mande adistancia del televisor,
3. Pulse el bot6n SET del mando a distancia del televisor.
4. Mediante losbotones numericos del mando a distancia introduzca los ires digitos dei
c6digo del DVD correspondientes a la marca de su DVD, que aparece en la lista de
la p_gina19~20 de este manual. AsegQresede introducir lostres digitos del c6digo,
incluso aunque el primer digito sea un "0." (Si aparece mas de un c6digo, int6ntelo
con el primero.)
5. Pulse el bot6n POWER del mando a distancia.
El DVD deberia encenderse si el mando estacorrectamente configurado.
Siel DVD nose enciende, repita los pasos 2,3 y 4 peropruebe con otrode los
c6digos indicados parala marca de su DVD. Si no aparece ningQnotro c6digo,
int6ntelo con cada uno de ellos, dei 000 a1141.
> Nota sobre el uso de los modosdel mando a distancia: DVD
Cuando el mando adistancia est6 en et mode "DVD", losbotones de volumen seguir_n
controIando et volumen dei televisor.
0
NC't_',,A Cfl[lST F_tt_ HB_I
...._Q___Q___Q__©....
E25_ _ Ez_
SL_F A/FOF_0_ AII_
EZ3 E::3 E::3 _
F
Configuracion del mando a distancia para controlar el STB
1. Apague et STB.
2. Pulse el bot6n STB det mando a distancia del televisor.
3.
4.
Pulse el bot6n SET del mando a distanda del televisor.
Mediante los botones numedcos del mando a distancia, introduzca los ires digitos del
c6digo del STB correspondientes ala marca desu STB, que aparece en la lsta de la
pagina 21 de este manual. AsegOresede introducir lostres digitos del c6digo, incluso
aunque el primer digito sea un"02 (Si aparece m_sde un c6digo, int6ntelo conet
primero.)
Pulse el botOnPOWER 0 del mando a distancia.
Et STB deberia encenderse siel mando esta correctamente configurado.
Siel STB no se enciende, repita los pasos 2, 3 y 4 peropruebe conotro de los
cOdigos indicados parata marca de su STB. Si no aparece ningOnotro cOdigo,
int6nteio con cada uno de elos, det 000 aI 074.
Nota sobre el uso detos modosdel mando a distancia: STB
Cuando el mando adistancia est6 en el modo "STB", los botonesde volumen seguir_n
controlando el volumen det televisor.
©0
..........._Q___Q___Q___©....
(_TURI 6 C_NO
aMON _E
O_T 01_
.......... _ .......................
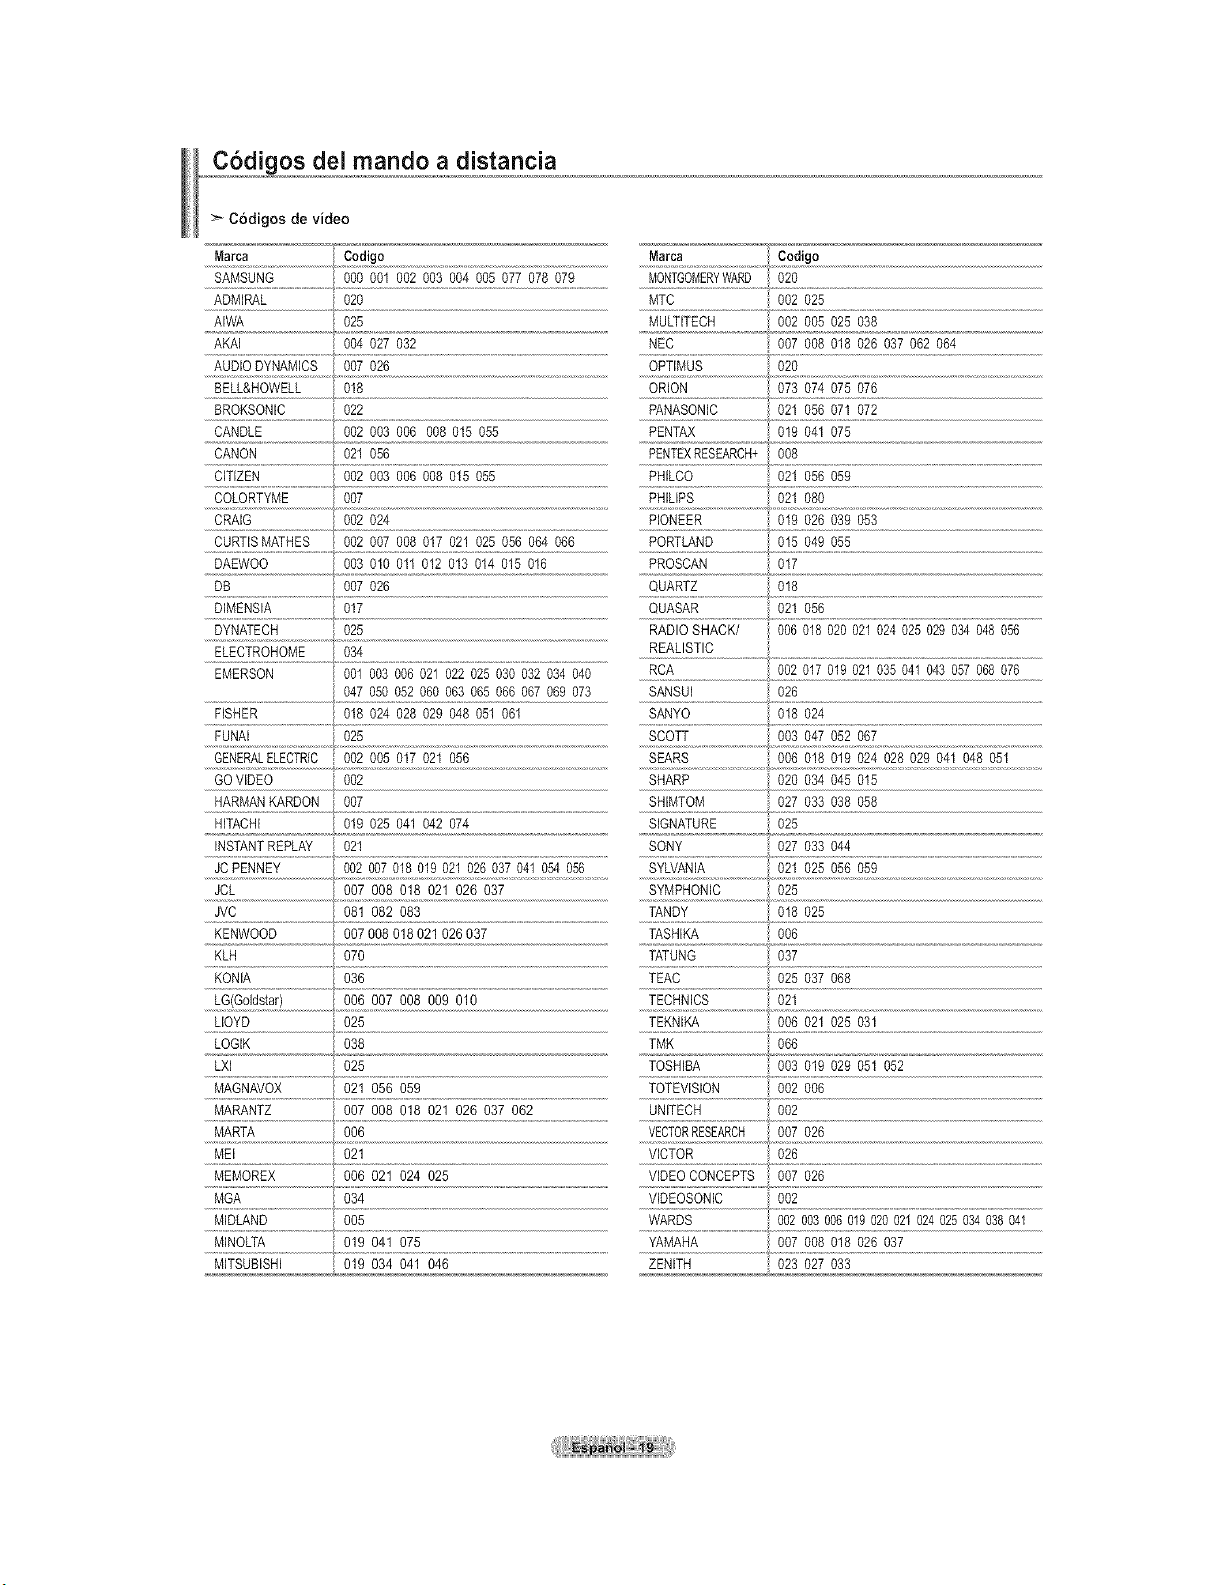
os dei mando a distancia
C6digos de video
Marca Codigo Marca Codigo
SAMSUNG 000 001 002 003 004 005 077 078 079 MONTGOMERYWARD 020
..............................................
ADMIRAL 020 MTC 002 025
AIWA _ 025 MULTITECH 002 005 025 038
ARAI 004 027 032 NEC 007 008 018 026 037 062 064
AUDIO DYNAMICS 007 026 OPTIMUS 020
BELL&HOWELL 018 ORION 073 074 075 076
BROKSONIC 022 PANASONIC 021 056 07I 072
CANDLE 002 003 006 008 015 055 PENTAX 019 04t 075
%
CANON 021 056 PENTEXRESEARCH+ 008
CITIZEN 002 003 006 008 015 055 PHILCO 021 056 059
COLORTYME 007 PHILIPS 021 080
CRAIG 002 024 PIONEER 019 026 039 053
CURTISMATHES 002 007 008 017 021 025 056 064 066 PORTLAND 015 049 055
DAEWOO 003 010 011 012 013 014 015 016 PROSCAN 017
DB 007 026 QUARTZ 018
DIMENSIA 017 QUASAR 021 056
DYNATECH 025 RADIO SHACK/ 006 018 020 021 024 025 029 034 048 056
ELECTROHOME 034 REALISTIC
EMERSON 001 003 006 021 022 025 030 032 034 040 RCA 002 017 019 021 035 041 043 057 068 076
047 050 052 060 063 065 066 067 069 073 SANSUI 026
FISHER 018 024 028 029 048 051 061 SANYO 018 024
FUNAI 025 SCOTT 003 047 052 067
GENERALELECTRIC 002 005 017 021 056 SEARS 006 018 019 024 028 029 041 048 051
GOVIDEO 002 SHARP 020 034 045 015
HARMANRARDON 007 SHIMTOM 027 033 038 058
HITACHi 019 025 041 042 074 SIGNATURE 025
INSTANTREPLAY 02I SONY 027 033 044
JCPENNEY 002 007 018 019 021 026 037 041 054 056 SYLVANIA 021 025 056 059
JCL 007 008 018 021 026 037 SYMPHONIC 025
JVC 081 082 083 TANDY 018 025
KENWOOD 007 008 018 021 026 037 TASHIRA 006
......KLH.............................................070 TATUNG 037
KONIA 036 TEAC 025 037 068
006 007 008 009 010
Nq4
LLOYD 025 TEKNW_ 006 021 025 031
LOGIK 038 TMK 066
LXI 025 TOSHIBA 003 019 029 051 052
......M 9.Avox..........................op To!Evisiooo o%
MARTA 006 VECTORRESEARCH 007 026
MEI 021 VICTOR 026
MEMOREX 006 021 024 025 VIDEO CONCEPTS 007 026
MGA 034 VIDEOSONIC 002
MIDLAND 005 WARDS 002 003 006 019 020021 024 025 034 038 041
YAMAHA
MINOLTA 019 041 075 007 008 018 026 037
MITSUBISHI 019 034 041 046 ZENITH 023 027 033
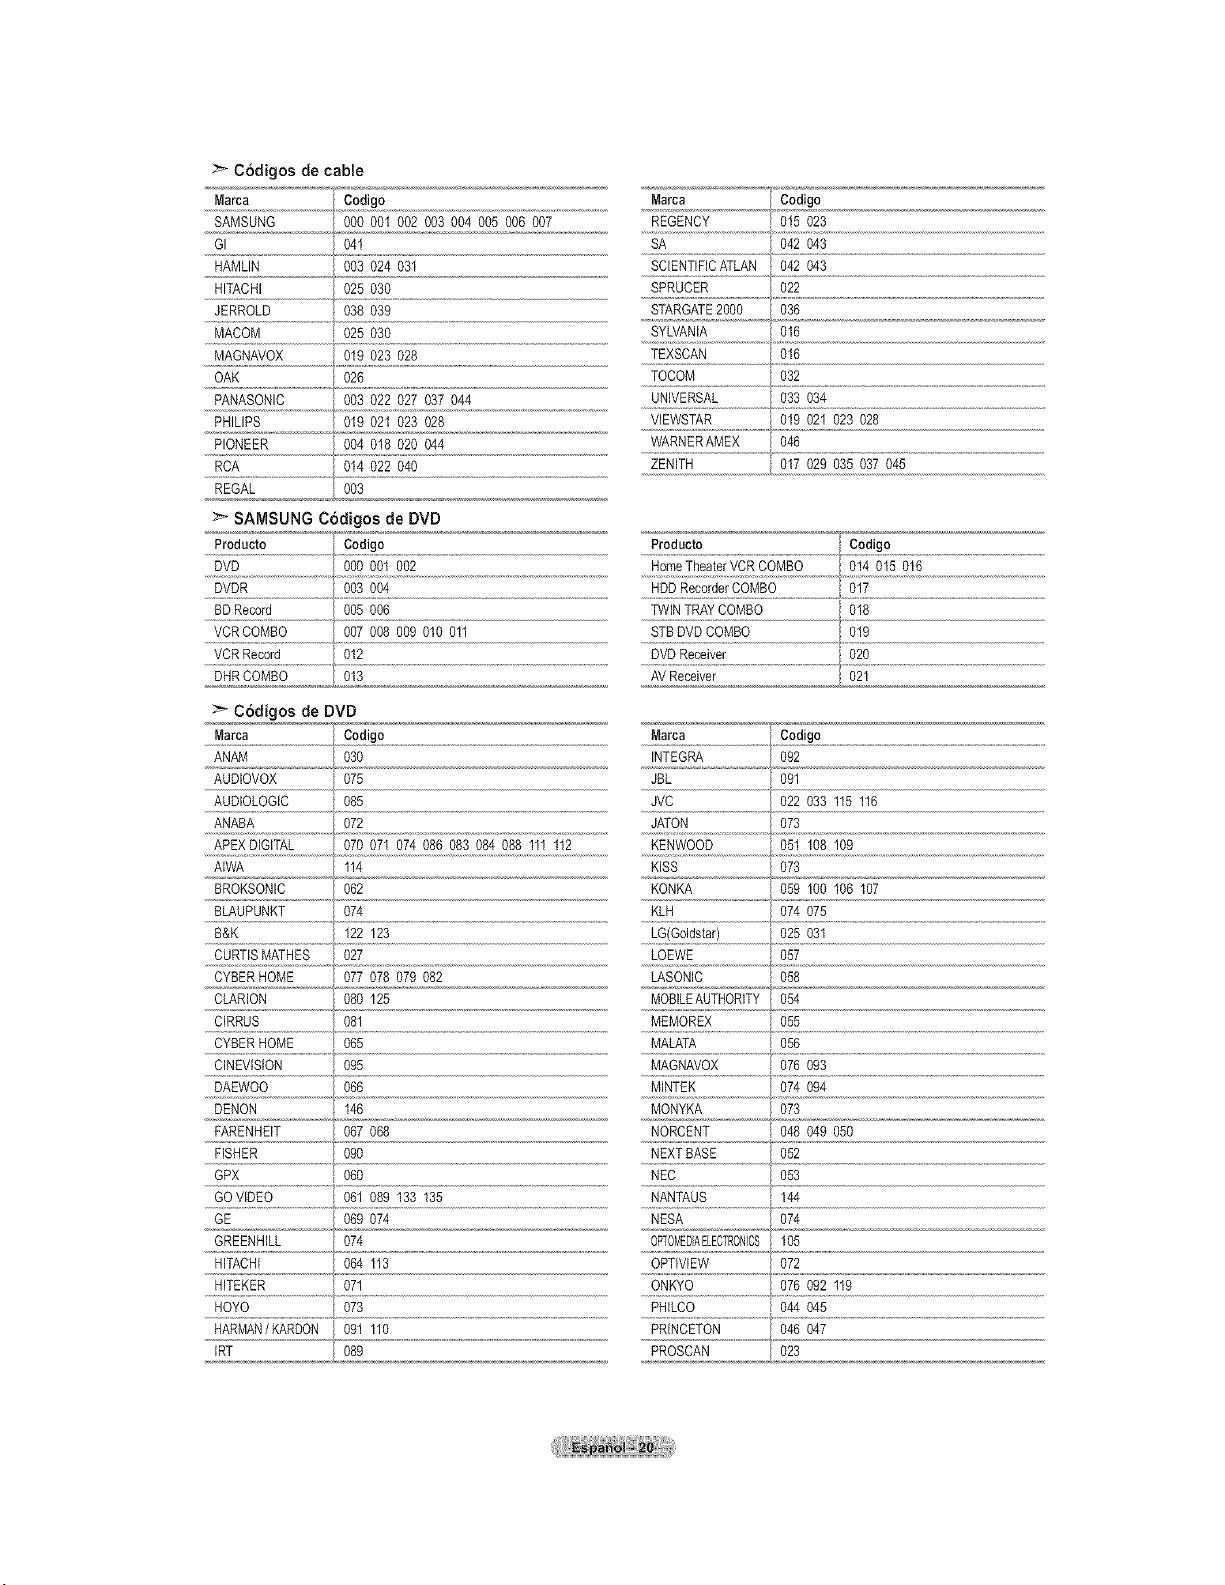
:_Codigosdecable
Marca Codigo
SAMSUNG 000 00I 002 003 004 005 006 007
GI 04I
HAMLIN 003 024 03I
HITACHI 025 030
JERROLD 038 039
MACOM 025 030
MAGNAVOX 019 023 028
OAK 026
PANASONIC 003 022 027 037 044
PHILIPS 019 021 023 028
PIONEER 004 018 020 044
RCA 014 022 040
:_ SAMSUNG Cddigos de DVD
Producto Codigo
DVDR 003 004
Marca " Codigo
REGENCY 015 023
SA O42 O43
SCIENTIFICATLAN 042 043
SPRUCER O22
STARGATE2000 036
SYLVANIA 016
TEXSCAN 016
TOCOM 032
UNIVERSAL 033 034
VIEWSTAR 019 021 023 028
WARNERAMEX 046
ZENITH 017 029 035 037 045
BDRecord 005 006 TWINTRAYCOMBO 018
VCR COMBO 007 008 009 010 011 STB DVD COMBO 019
.....VCR_eoo_:d........................O!_ DVD_ece_ve,: Op
_..pHRCOMBO...........................oj2 ............ AVReceiver 02_ .....................
_" Codigos de DVD
ANAM 030 INTEG_ 092
AUDIOVOX 075 JBL 091
/
AUDIOLOGIC 085 JVC 022 033 115 116
ANABA 072 JATON 073
APEX DIGITAL 070 07I 074 086 083 084 088 III 112 KENWOOD 051 108 109
AIWA II4 KISS 073
BROKSONIC 062 KONKA 059 100 106 I07
BLAUPUNKT 074 KLH 074 075
B&K 122 123 LG(Goldstar) 025 031
CURTISMATHES 027 LOEWE 057
CYBER HOME 077 078 079 082 LASONIC 058
CLARION 080 I25 MOBILEAUTHORITY 054
CIRRUS 081 MEMOREX 055
CYBER HOME 065 MALATA 056
CINEVISION 095 MAGNAVOX 076 093
DAEWOO 066 MINTEK 074 094
DENON I46 MONYKA 073
FARENHEIT 067 068 NORCENT 048 049 050
FISHER 090 NEXTBASE 052
.....GPx o_o .Ec oss
GOVDEO 061 089 133 135 NANTAUS I44
GE 069 074 NESA 074
GREENHILL 074 OPTOMEDIAELECTRONCS 105
HITACHI 064 II3 OPTIVlEW 072
HITEKER 071 ONKYO 076 092 119
HOYO 073 PHILCO 044 045
HARMAN/KARDON 091 110 PRINCETON 046 047
IRT _ 08 PROSCAN 023
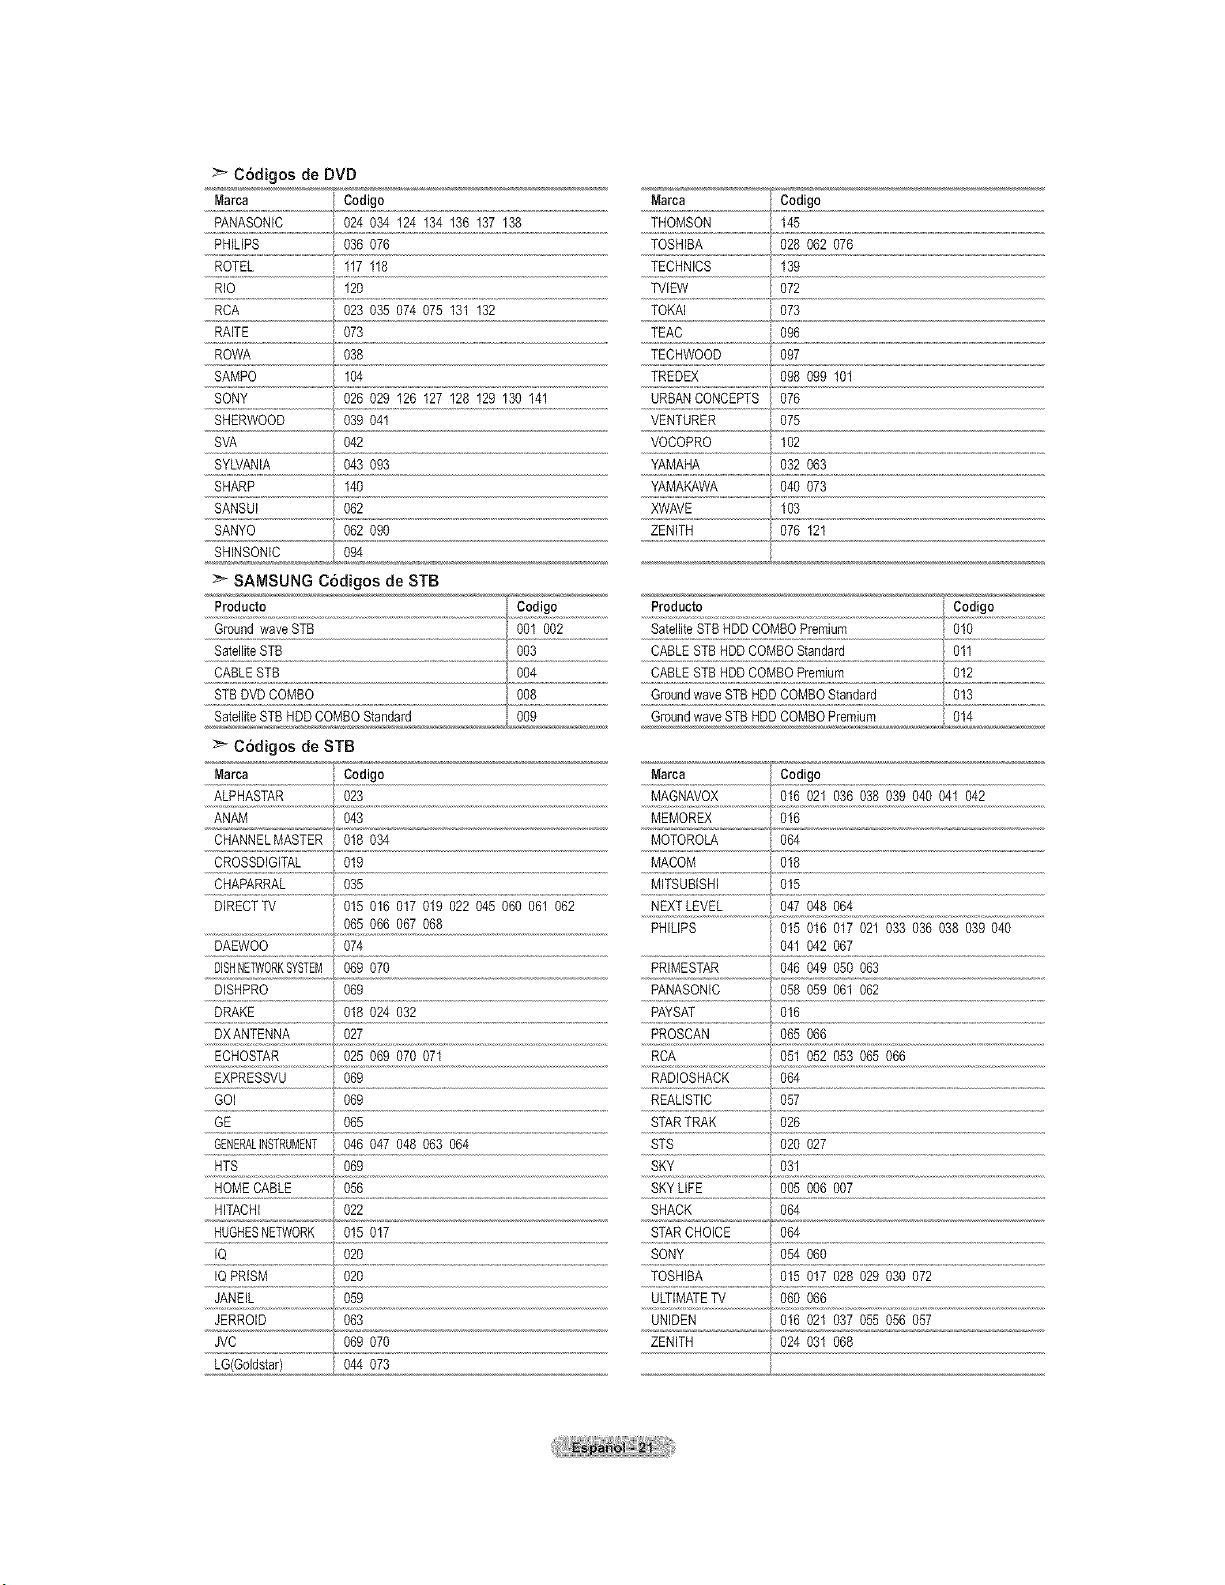
C6digosde DVD
......Marca Cod)go Marca , Codigo
PANASONIC 024 034 124 134 136 137 138 THOMSON 145
PHILIPS 036 076 TOSHIBA 028 062 076
................................................................................................................................................................................................................. ?
ROTEL 117 118 TECHNICS 139
RiO 120 TVIEW 072
RCA 023 035 074 075 131 132 TOKAi 073
RAITE 073 TEAC 096
ROWA 038 TECHWOOD 097
SAMPO 104 TREDEX 098 %9 101
SONY 026 029 I26 I27 128 129 130 I41 URBANCONCEPTS 076
SHERWOOD 039 04t VENTURER 075
SVA 042 VOCOPRO 102
SYLVANIA 043 093 YAMAHA 032 063
SHARP 140 YAMAKAWA 040 073
...................................... _r
SANSUi 062 XWAVE 103
062 0g0SANYO ZENITH 076 121
SHINSONiC 094
SAMSUNG C6digos de STB
CABLE STB
STB DVD COMBO 008 Groundwave STBHDDCOMBOStandard 013
SatelliteSTB HDD COMBOStandard ,i_%9 Groundwave STBHDDCOMBO Premium 014
:_ C6digos de STB
Marca Codigo ......Marca Codigo
ALPHASTAR 023 MAGNAVOX 016 021 036 038 039 040 041 042
ANAM 043 MEMOREX 016
CHANNELMASTER 018 034 MOTOROLA 064
CROSSDIGITAL 019 MACOM 018
CHAPARRAL 035 MiTSUBISHI 015
DIRECTTV 015 016 017 019 022 045 060 06I 062 NEXTLEVEL 047 048 064
065 066 067 068 PHILIPS 015 016 017 021 033 036 038 03g 040
DAEWOO 074 041 042 067
DISHNE]_fl0RKSYSTEM06g 070 PRIMESTAR 046 04g 050 063
DiSHPRO 069 PANASONiC 058 059 061
062
DRAKE 018 024 032 PAYSAT 016
EXPRESSVU%_ ......_A_JOSHACt!.............................0_4.......................................................................................................................................
GOI 069 REALISTIC 057
GE 065
GENERALINSTRUMENT046 047 048 063 064
HTS 069
HOMECABLE 056
HITACHi O22
IQPRISM 020 TOSHIBA 015 017 028 029 030 072
JANEIL 059 ULTIMATETV 060 066
JERROID i %S ,,UN[DF2 ,],,0702L237O,,SS,O,S_227
JVC 069 070 ZENITH 024 031 068
LG(Goldatar) i, 044 073
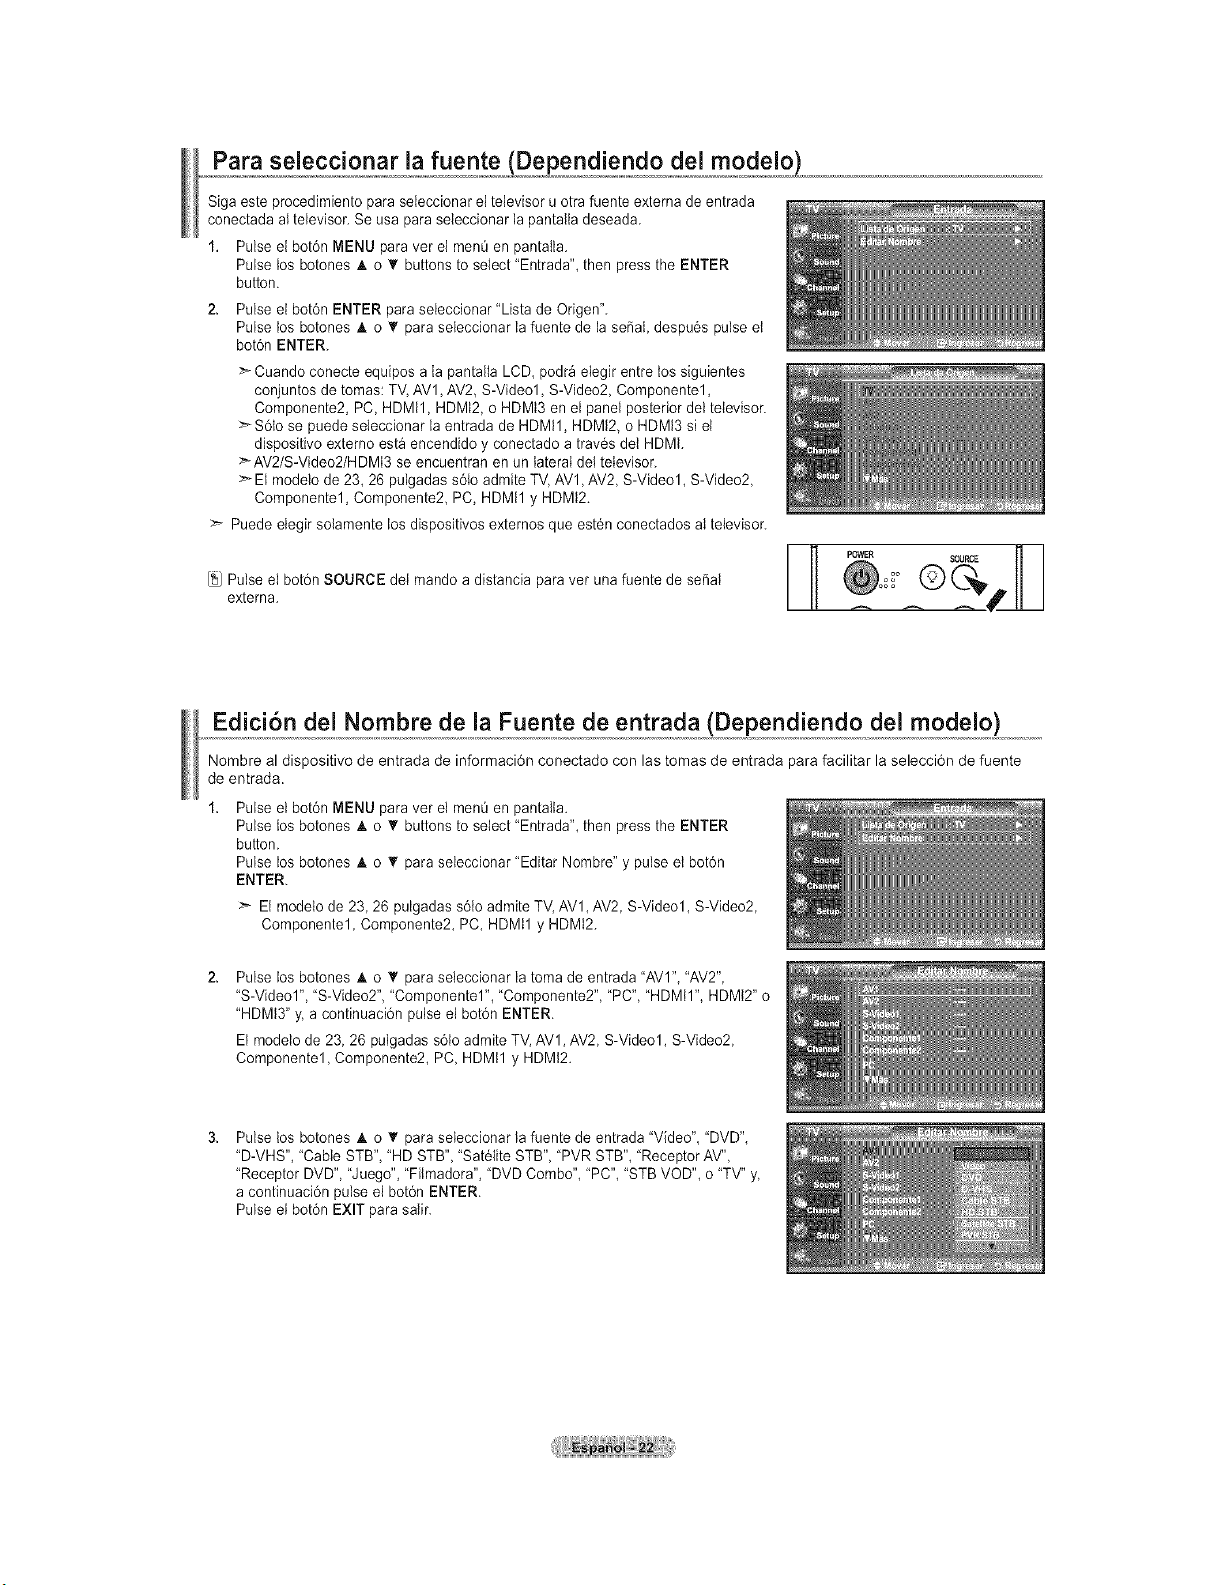
Para seleccionar la fuente _(Dependiendo del modelo}_
Siga este procedimiento paraseleccionar el televisor u otrafuente externa de entrada
conectada aI televisor. Se usa para seleccionar la pantalla deseada.
1. Pulse el bot6n MENU paravet el menQ en pantatia.
Pulse los botones A o • buttons to select "Entrada", then pressthe ENTER
button.
2. Pulse el bot6n ENTER paraseieccionar "Lista de Origen".
Pulse los botones & o T paraseleccionar lafuente de iaserial,despu6s pulse et
bot6n ENTER.
>_Cuando conecte equipos a la pantalla LCD,podr_ elegir entretos siguientes
conjuntos de tomas: TV, AVl, AV2,S-Video1, S-Video2, Componentel,
Componente2, PC, HDMI1, HDMt2, oHDMt3 en el panel posterior deltelevisor.
_"-S6to se puedeseleccionar la entrada de HDMtl, HDMI2, oHDMI3 siet
dispositivo externo esta encendido y conectado a trav6sdet HDMt.
>'AV2/S-Video2/HDMI3 seencuentran en un lateral deltelevisor.
>- El modelode 23, 26pulgadas s61oadmiteTV, AV1,AV2, S-Video1, S-Video2,
Componentel, Componente2 PC, HDMI1 y HDMt2.
>- Puede etegir solamente los dispositivos externos que est6n conectados al televisor.
Pulse el botdn SOURCE dei mandoa distancia paraver una fuente de sepal
extema.
_30URCE
Edicion del Nombre de la Fuente de entrada (Dependiendo del modelo)
Nombre al dispositivo de entrada de informaci6n conectado con las tomas de entrada para facilitar la selecci6n de fuente
de entrada.
Pulse el bot6n MENU para ver el menQ en pantaIta.
Pulse los botones A o '_ buttons toselect "Entrada", then pressthe ENTER
button.
Pulse los botenes A o T paraseIeccionar "Editar Nombre" y pulse etbot6n
ENTER.
>- El modelode 23 26 pulgadas s6toadmiteTV,AV1,AV2,S-Video1, S-Video2,
Componentel, Componente2, PC, HDMtl y HDMt2.
Pulse los botones A. o T para seleccionar la toma de entrada "AVI", "AV2",
"S-Video1", "S-Video2", "Componentel", "Componente2", "PC", "HDMtl", HDMt2"o
"HDMt3" y, a continuaci6n pulse el bot6n ENTER.
El modelode 23, 26 pulgadas s61oadmite TV, AVl, AV2, S-Video1, S-Video2,
Componentel, Componente2, PC, HDMtl y HDMt2.
Pulse los botones A o T paraseleccionar lafuente deentrada "Video", "DVD",
"D-VHS", "Cable STB", "HD STB","Sat61iteSTB", "PVR STB", "ReceptorAV",
"Receptor DVD","Juego", "Filmadora", "DVDCombo", "PC", "STB VOD", o"TV" y
acontinuaci6n pulse el bot6n ENTER.
Pulse el bot6n EXIT para satir.
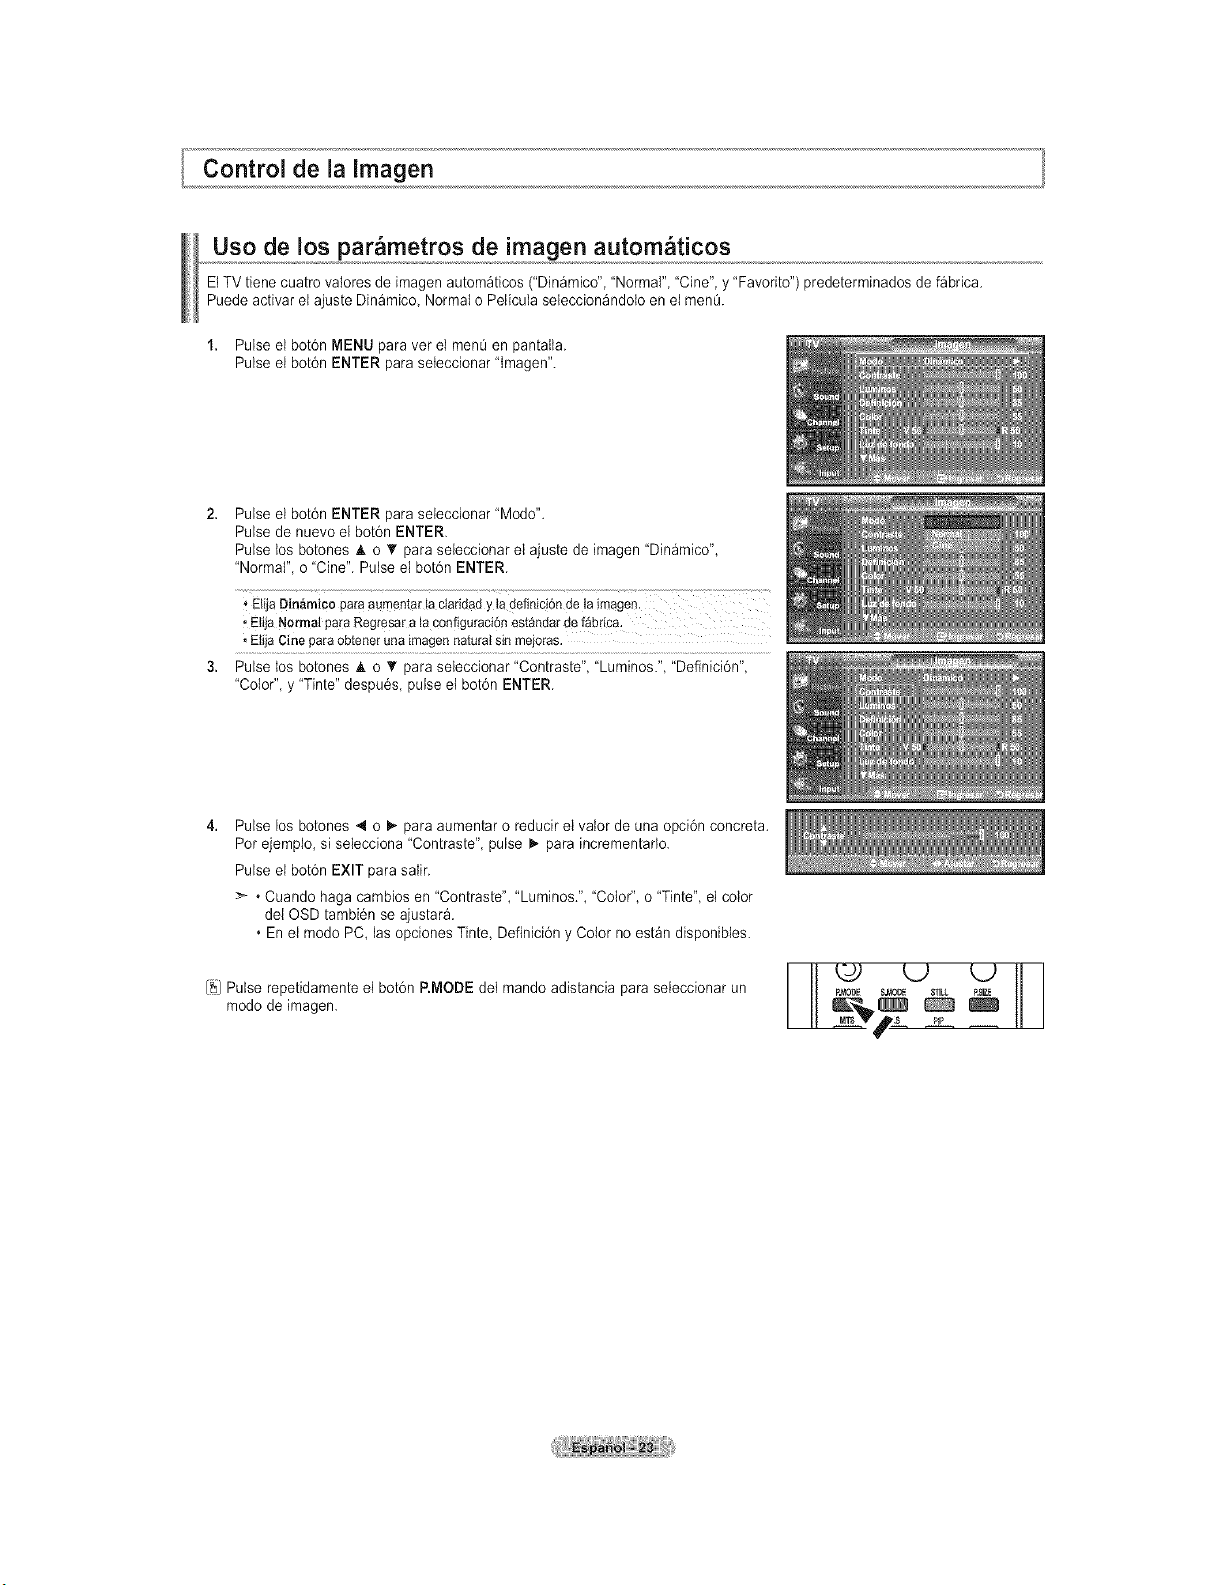
Control de la Imagen
Uso de los par metros de imagen autom ticos
ElTVtiene cuatro vaIoresde imagen autom_ticos ("Din_mico", 'Normal", "Cine",y "Favorito") predeterminados defabdca.
Puede activar el ajuste Din_mico Normal oPelicula seleccion_ndoto enel menQ.
1. Pulse el bot6n MENU paraver el men_ en pantalta.
Pulse el bot6n ENTER paraseteccionar "tmagen".
Pulse el bot6n ENTER paraseleccionar "Modo".
Pulse de nuevoel bot6n ENTER.
Pulse los botones _, o _rpara seleccionar el ajuste de imagen "Dinamico",
"Normal", o "Cine". Pulse el bot6n ENTER.
ElijaDin_micoparaaumentarta ctaridady ta definici6nde ta irn
• EtijaNormalparaRegresara ia configuraci6nestandarde fabrica,
,ElijaCineparaobteneruna imagennaturalsinmejoras.
Pulse los botones A. o _' para seleccionar "Contraste", "Luminos.", "Definicidn",
"Color", y "Tinte" despu6s, pulse et botdn ENTER.
Pulse los botones 4 o _ para aumentar o reducir et valor de una opci6n concreta.
Pot ejempio, siselecciona "Contraste", pulse I,. paraincrementarlo.
Pulse el bot6n EXIT parasaIir.
• Cuando haga cambios en "Contraste", "Luminos.", "Color", o "Tinte", el color
del OSD tambi6n seajustar_.
• En el modo PC, iasopciones Tinte, Definici6n y Color noest_n disponibtes.
[_j Pulse repetidamente el bot6n P.MODE det mando adistancia paraseieccionar un
modo de imagen.
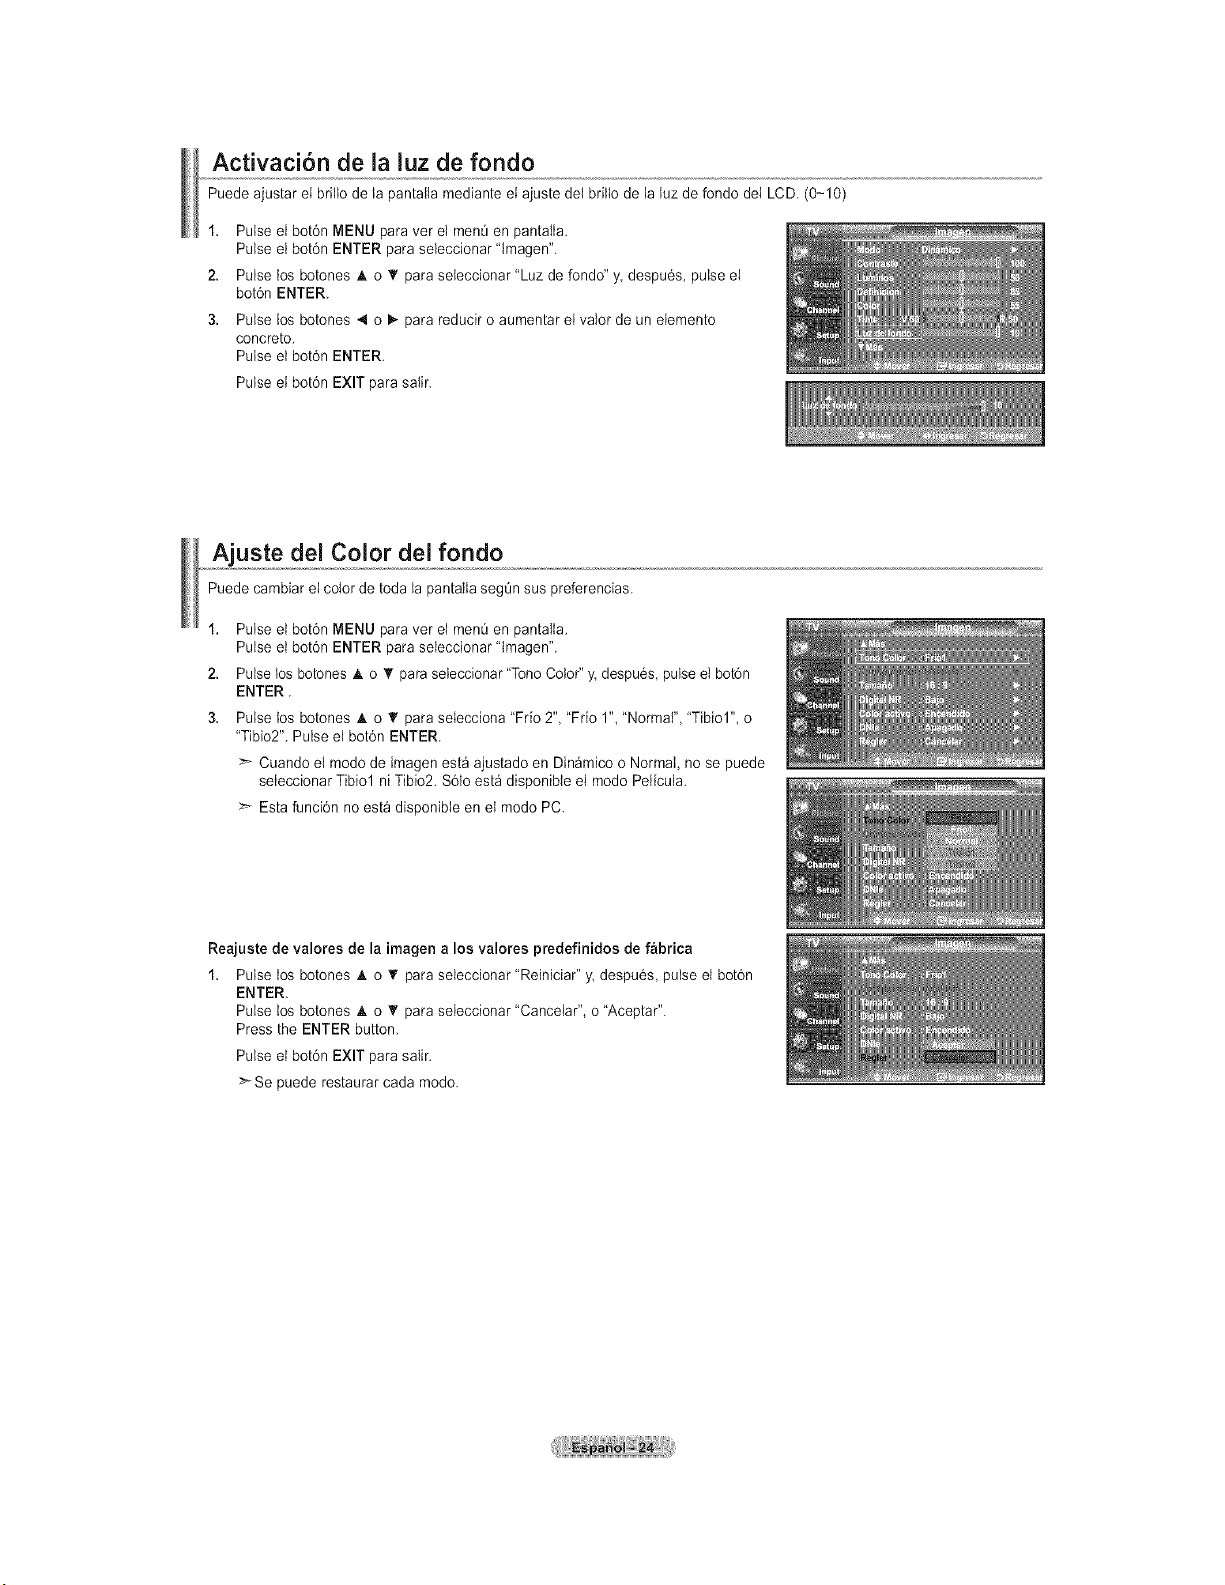
Acfivaci6n de la luz de fondo
Puedeajustar el briltode la pantaila mediante el ajuste del briltode la luzde fondo del LCD. (0-10)
1, Pulse el bot6n MENU paravet el men0 enpantalia.
Pulse el bot6n ENTER paraseleccionar lmagen".
2, Pulse los botones _ko T paraseteccionar "Luz de rondo" y,despu6s, pulse el
bot6n ENTER.
3. Pulse los botones 4 o _ para reducir oaumentar el vator deun elemento
concreto.
Pulse el bot6n ENTER.
Pulse el bot6n EXIT para saIir.
Ajuste del Color del rondo
Puedecambiar elcolor detoda la pantalla seg0nsus preferencias.
1. Pulse el bot6n MENU paravet el menO en pantalla.
Pulse el bot6n ENTER paraseleccionar "Imagen".
2, Pulselosbotones _ko T paraseleccionar "TonoColor"y. despu6s, pulse et bot6n
ENTER.
3. Pulse tos botones A o T para selecciona Trio 2", Trio 1", "Normal", "Tibiol", o
"Tibio2".Pulse el bot6n ENTER.
Cuando el modo de imagenesta ajustado en Din_mico o Normal, no se puede
seteccionar Tibiol ni Tibio2.S6lo est_ disponibteel modo Peiicula.
Esta funci6n no esta disponible en el modo PC.
Reajuste de valores de la imagen a los valores predefinidos de fabrica
1. Pulse los botones A o _' paraseleccionar "Reiniciar" y. despu6s, pulse el bot6n
ENTER.
Pulse tos botones A o T paraseleccionar "Canceiar", o "Aceptar".
Pressthe ENTER button.
Pulse el bot6n EXIT para salir.
>-Se puede restaurar cada modo.
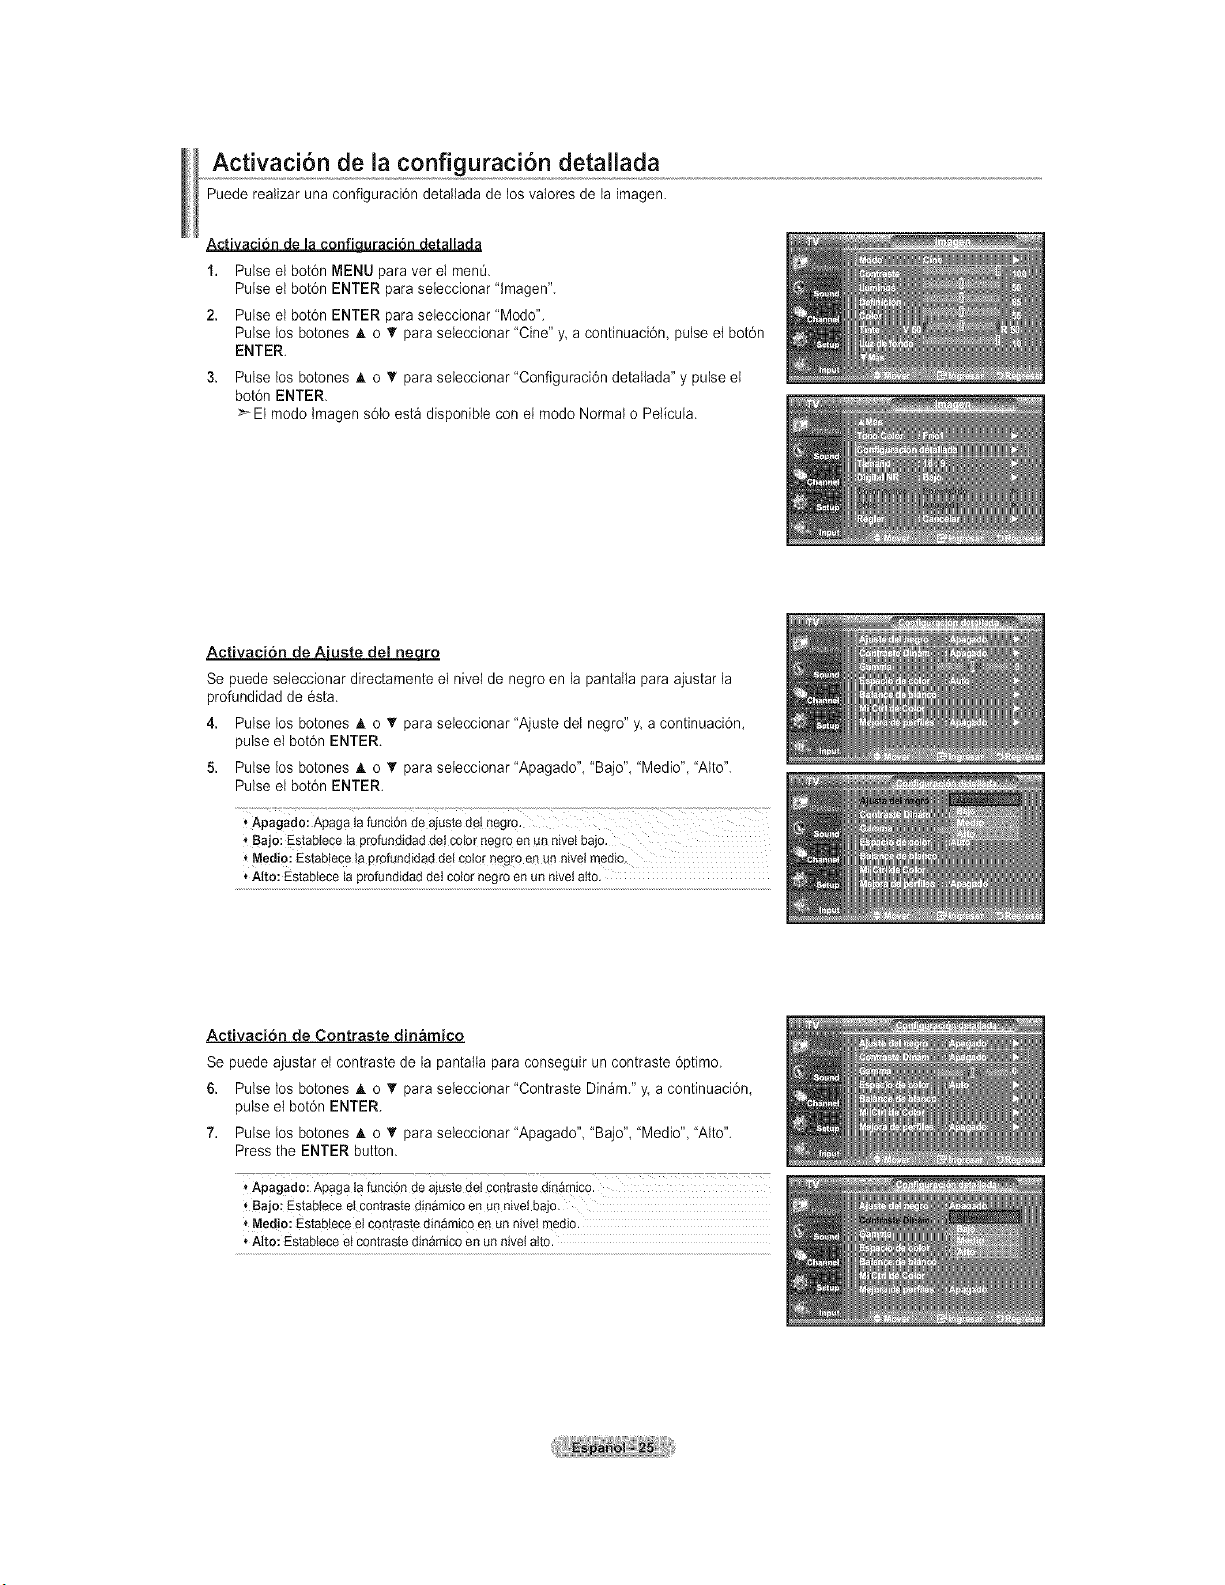
Activacion de laconfiguracibn detallada
Puede realizar una configuraci6n detallada de losvaIoresde la imagen.
• H . ,
1. Pulse el bot6n MENU paravet el menO.
Pulse el bot6n ENTER paraseleccionar "tmagen".
2. Pulse el bot6n ENTER paraseieccionar"Modo".
Pulse los botones A o V para seleccionar "Cine" y a continuaci6n, pulse etbot6n
ENTER.
3. Pulse los botones A o _' para seieccionar "Configuraci6n detaIlada" y pulse el
bot6n ENTER.
_EI mode tmagen s61eest_ dispenibtecon el mode Normal e Peticula.
Activacion de Aiuste del nee.to
Se puede seieccionar directamente el nivel de negroen la pantatla paraajustar la
profundidad de 6sta.
4. Pulse los botones & o T para seieccionar "Ajuste del negro" y. acontinuaci6n,
pulse el bot6n ENTER.
5. Pulse los botones A o _' para seteccionar "Apagado", "Bajo", "Medio","Alto".
Pulse el bot6n ENTER.
' Apagado:Apagala funci6nde ajustedet negro" .....................................................................................
'_Bajo:Establecelaprofundidadde!color negroen Unnivetbajo.
Medio:Establecela profundidaddelc_lQ_"negr0en un nivelmedio.
* Alto: Estabteceta profundidaddet cotornegroen un niveiatto.
Activacion de Contraste din&rnico
Se puede ajustar el contraste de la pantaila para conseguir un contraste 6primo.
6. Pulse los botones A o T para seleccionar "Contraste Din_m." y. a continuaci6n,
pulse el bot6n ENTER.
7. Pulse los botones A o _' para seleccionar "Apagado", "Bajo", "Medio","Alto".
Pressthe ENTER button.
,, Bajo: Estableceetcontrastedinamicoen unniveibajo.
* Medio:Estabteceelcontrastedinamicoen un nivelmedio.
* Alto: Estabieceet contrastedinamicoen un niveiatto.
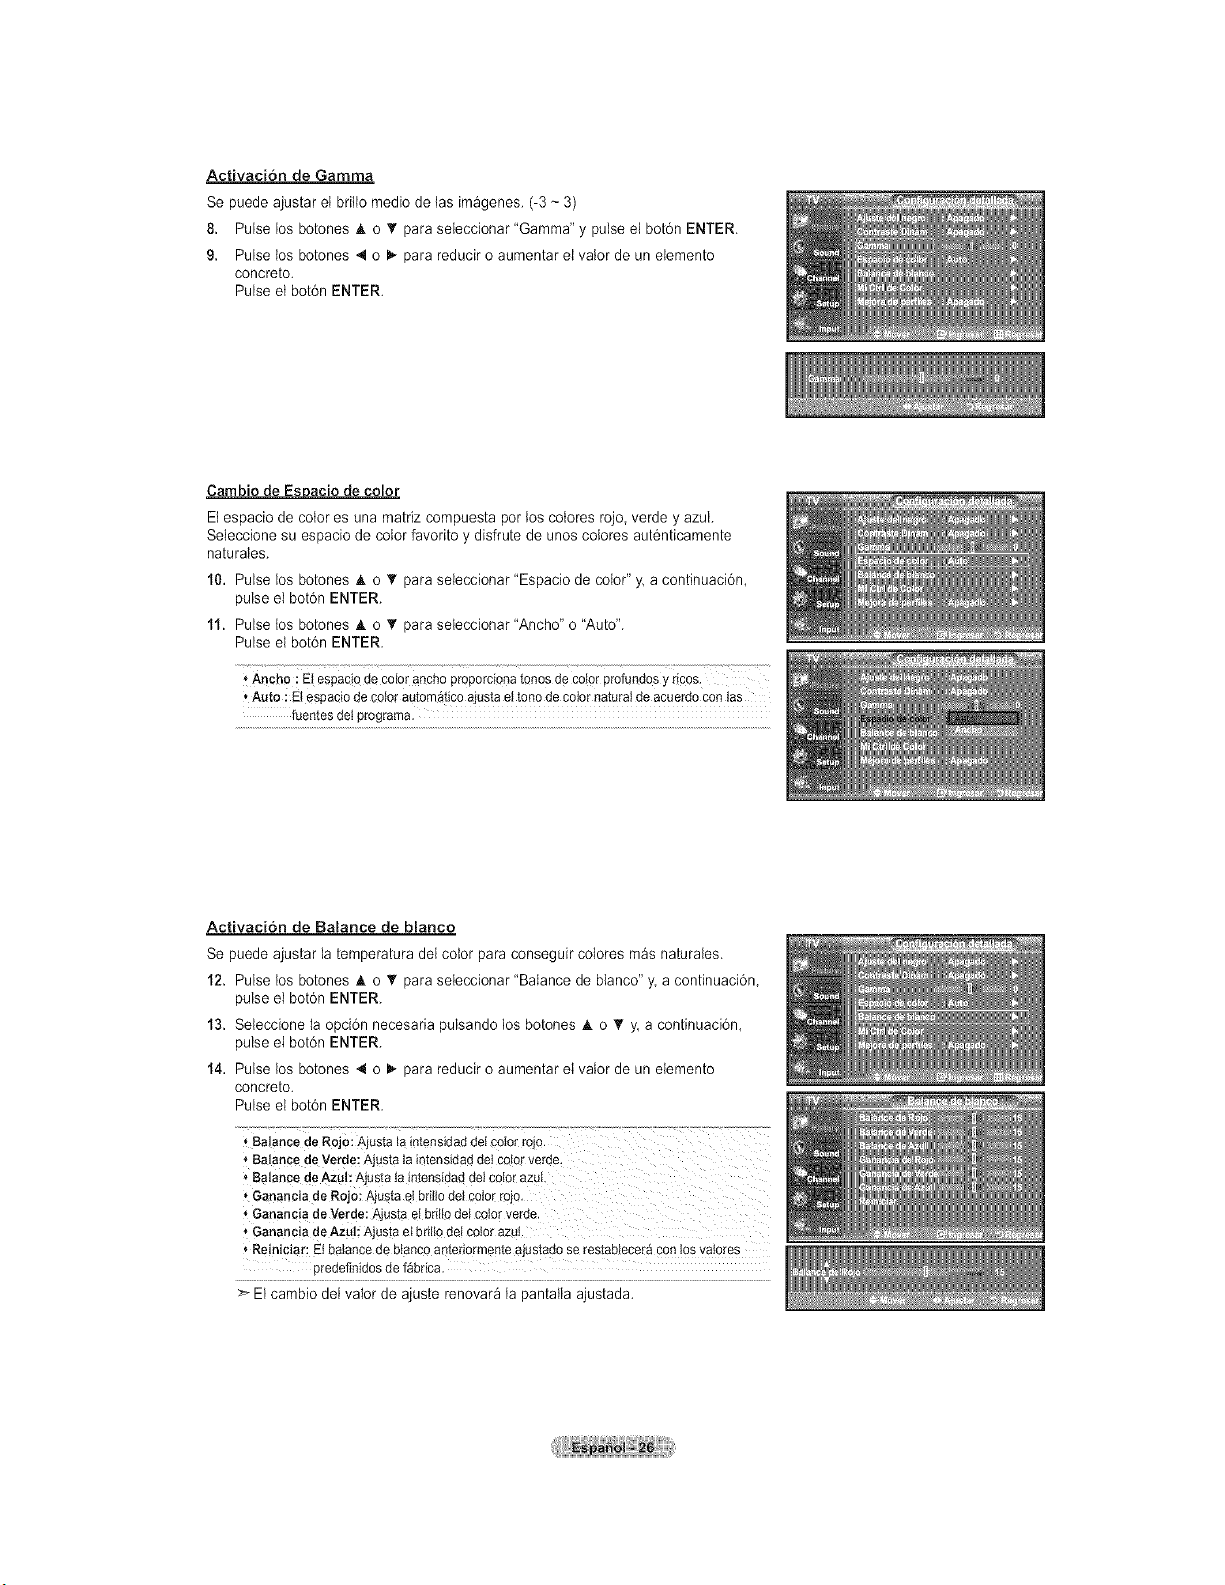
Activacion de Gamma
Se puede ajustar el britlomedio de las im_genes. (-3 ~3)
8. Pulse los botones & o _' para seleccionar "Gamma" y pulse el bot6n ENTER.
9. Pulse los botones 4 o _ para reducir oaumentar el valor de un elemento
concreto.
Pulse et bot6n ENTER.
Cambio de Espacio de color
Elespacio de colores una matrizcompuesta porlos co{oresrojo, verde y azul.
Seleccione su espacio de color favorito y disfrutede unoscolores aut6nticamente
naturales.
10. Pulse los botones A o _' para seleccionar "Espacio decolor" y.acontinuaci6n,
pulse el bot6n ENTER.
11. Pulse los botones • o _" para seleccionar "Ancho" o"Auto".
Pulse el bot6n ENTER.
* Ancho i Elespaciode coloranchoproporcionatonesdecolorprofundosy rices.
* Auto :Eiespaciode colorautom_ticoajustael tonedecolornaturalde acuerdoconlas
fuentesdotprograma.
Activaci6n de Balance de blanco
Se puede ajustar la temperatura dei color paraconseguir colores m_s naturaies.
12. Pulse los botones J, o T para seleccionar "Balance de blanco"y. a continuaci6n,
pulse el bot6n ENTER.
13. Seleccione la opci6n necesaria pulsando los botones A o _' y.acontinuaci6n,
pulse el bot6n ENTER.
14. Pulse los botones 4 o D,.para reducir o aumentar el valor de unelemento
concreto.
Pulse el bot6n ENTER.
_,Balance de Rojo: Ajusta la intensidad dei coior rojo. ...............................
* BalancedeVerde:Ajustataintensidaddotcolorverde.
"Balance deAZU!iAjustalaintensidaddei€olorazuL
',Gananciade Rojo:Ajustaelbriltodelcolorrojo.
_ Ganan¢iade Verde:Ajustael briltodel cotorverde.
, GananciadeAzu!; Ajustaetbrillode! colorazut.
Reiniciar:Et balancede btancoante[iormenteajustadoserestableceraconlosvalores
predefinidosde f&brica.
>*Elcambio dei valor deajuste renovar_ la pantatia ajustada.
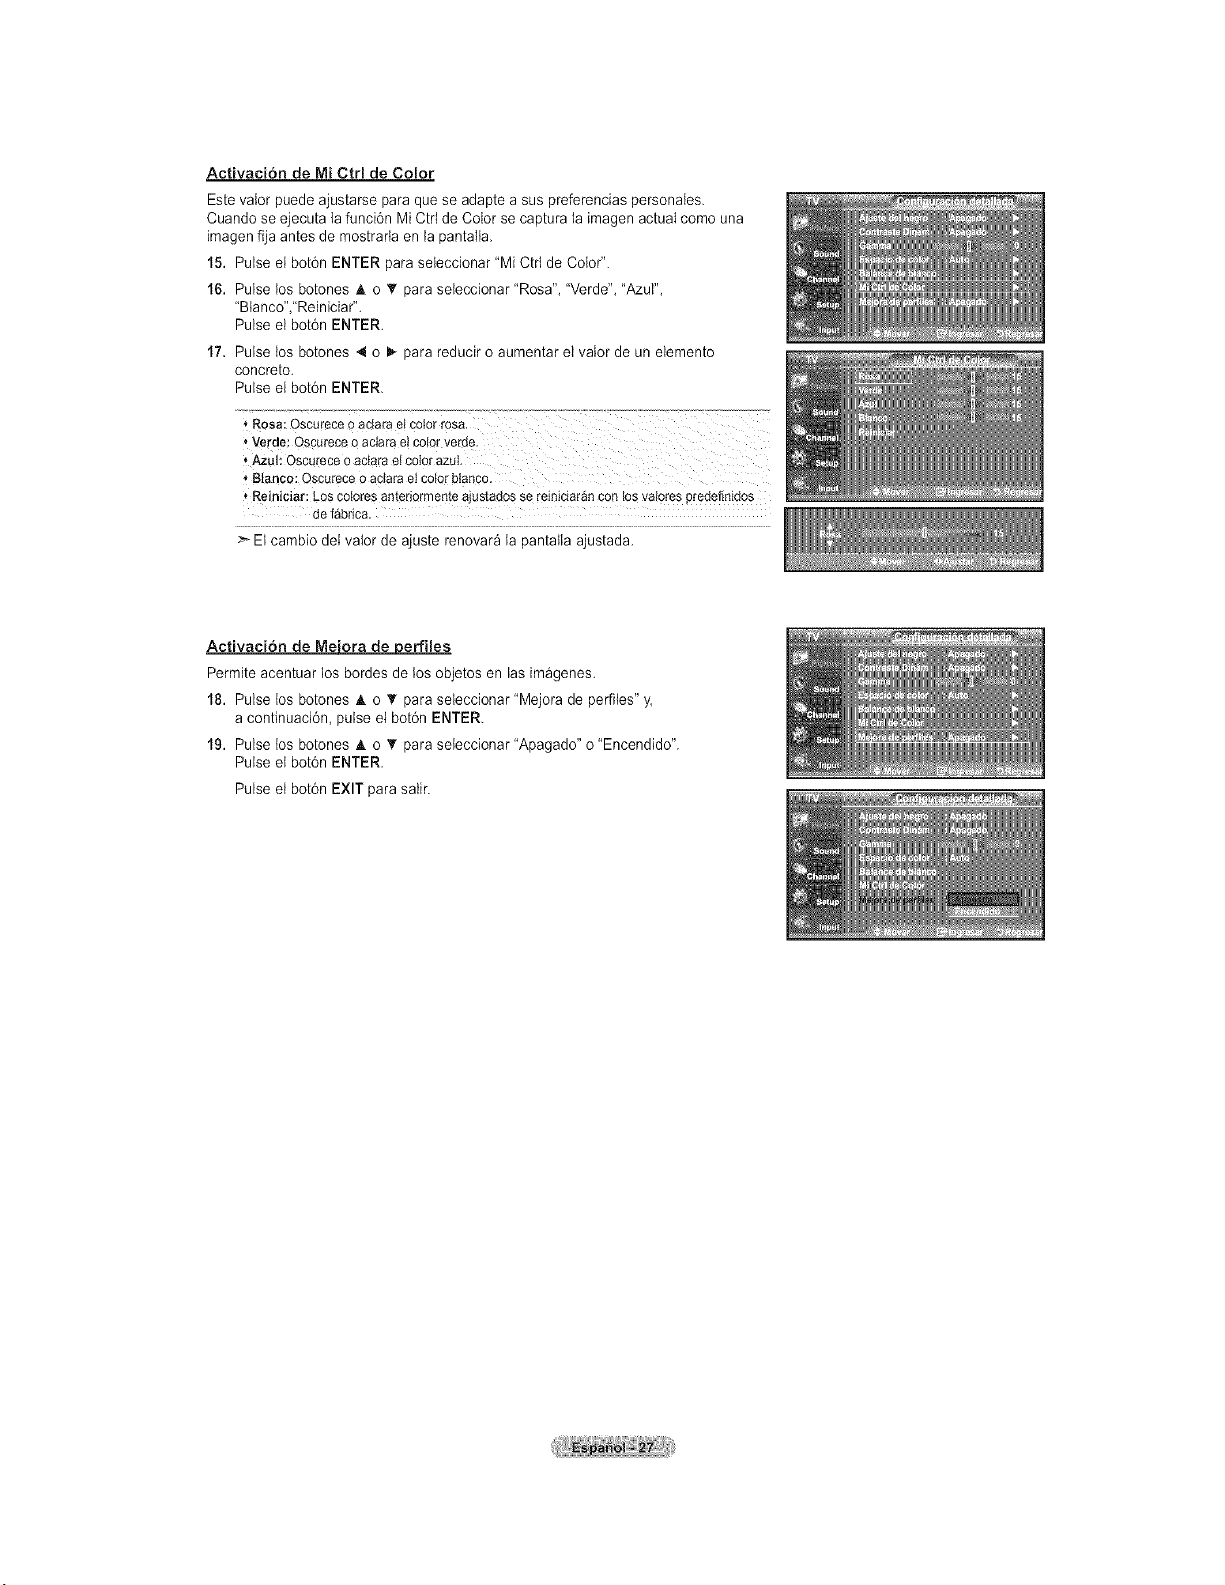
Activaci6n de NliCtrl de Color
Estevalor puede ajustarse para que se adapte asus preferencias personales.
Cuando seejecuta la funci6n MiCtdde Color secaptura la imagen actual como una
imagenfijaantes de mostrarta en la pantaIta.
15. Pulse el bot6n ENTER paraseleccionar "MiCtd de Color".
16. Pulse los botones A o _rpara seteccionar "Rosa", "Verde", "Azul",
"Btanco","Reiniciar".
Pulse el bot6n ENTER.
17. Pulse los botones 4 o _ para reducir o aumentar el valor de unelemento
concreto.
Pulse el bot6n ENTER.
', Azul: Oscu(ece oactara el c
'_Blanco: Qscurece oaclara el color btanco.
* Reiniciar: Los cotores anteriarmente ajustados se reiniciar&ncon losvalores predefin!dos
de fabrica.
:_ El cambio dei valor de ajuste renovar_ la pantatia ajustada.
Activaci6n de Me'ora de erfiles
Permite acentuar los bordes de losobjetos en las imagenes.
18. Pulse los botones A o _' para seleccionar "Mejora de perfiles"y.
acontinuaci6n, pulseel bot6n ENTER.
19. Pulse los botones A o _' para seteccionar "Apagado" o"Encendido'.
Pulse et bot6n ENTER.
Pulse el bot6n EXIT parasalir.
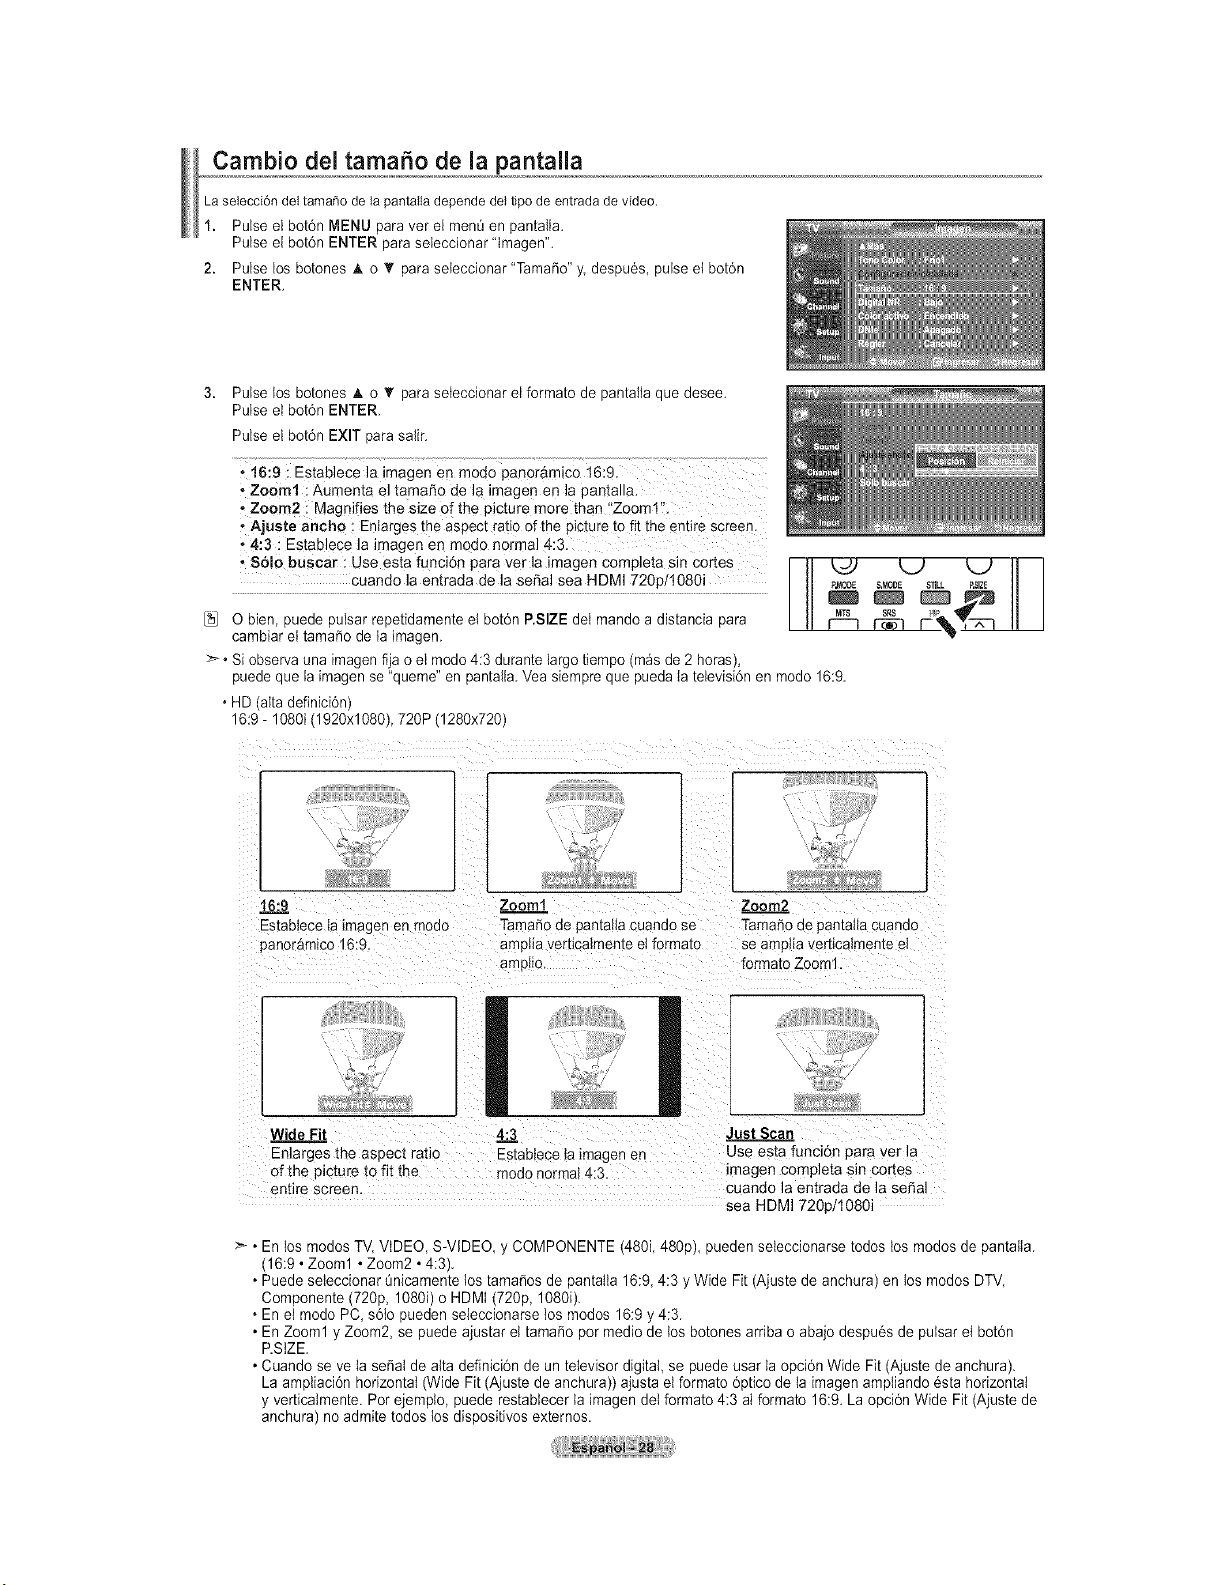
Cambio del tamafio de la pantalla
La seiecci6ndel tama_ode la pantaliadependedeltipodeentradade video
1. Pulse el bot6n MENU paraver el menQ en pantalla.
Pulse el bot6n ENTER paraseleccionar 'Imagen".
2. Pulse los botones A o _r paraseteccionar "Tama_o" y despu6s, pulse etbot6n
ENTER.
3. Pulse tos botones A o _!'paraseleccionar el formato de pantaIiaque desee.
Pulse el bot6n ENTER.
Pulse el bot6n EXIT para salir.
.16:9 :Establece la imagen en modo panoramico t6:9.
• Zoom1 :Aumenta eltamar_o de la imagen en la pantalla.
,Zoom2 : Magnifies the size ofthe picture more than i'Zooml":
,Ajuste ancho ;Enlarges the aspect ratio of the picture to fit the _ntire screen.
.4:3 i Establece la imagen en mQdo normal 4:3.
.S6!0buscar: U seestafunci6nparaverlaimagencompletasincorte s _ _ ,_LJk_)_ "_t'-_ H I
cuando la entrada de la sepal sea HDMI 720p/t080i P_,_ SMODE S_U- _.SlZ_
O bien,puede pulsar repetidamente el bot6n P.SIZEdeI mandoa distancia para r_
cambiarel tamafio de ia imagen.
>_• Siobservauna imagen fijaoel modo 4:3 durante largo tiempo(m_s de2 horas),
puede que laimagense "queme"enpantaiia. Vea siempre que pueda Ia televisi6nenmodo 16:9.
• HD (aita definici6n)
16:9- 1080i(1920xl080), 720P(1280x720)
t6:9
Estabtecetalmagenen mouo
panor&mico 16:9
Zooml Zoom2_
Tamafio de aantallacuando se Tamaho ae pantaHacuanuo
amplia verticatmente et formato se amptia verticalmente el
amplio formatoZoom1.
Wide Fit
Enlarges me aspect ratio
afthe picture to fit the
entire screen
4"3 Just Scan
Estabiece la lmagen en Use esta funci6n para vet la
_noaonormal 4:3. _magen completa sin cortes
cuando la entrada de la sepal
sea HDMI 720p/t080i
• En los modosTV, VIDEO, S-VIDEO y COMPONENTE (480i 480p) pueden seleccionarse todoslos modos de pantatla.
(16:9• Zoom1• Zoom2 • 4:3).
• Puedeseleccionar Qnicamente los tamafios de pantatla 16:9, 4:3 y Wide Fit (Ajustede anchura) en los modos DTV
Componente (720p, 1080i) oHDMI (720p, 1080i).
• En el modo PC, s61opueden seieccionarse tos modos 16:9 y 4:3.
• En Zoom1 y Zoom2, se puedeajustar el tamaSo pormedio de los botonesarriba o abajo despues de pulsarel bot6n
P.StZE.
• Cuando se ve la se_aI de alta definici6n de un televisor digital, se puede usar ta opci6n Wide Fit (Ajuste de anchura).
La ampliaci6n horizontal (Wide Fit (Ajuste de anchura)) ajusta elformato 6ptico de la imagen ampliando esta horizontal
y verticatmente. Por ejempto, puede restablecer la imagen del formato 4:3aI formato 16:9. La opci6n Wide Fit (Ajuste de
anchura) no admite todos tosdispositivos externos.
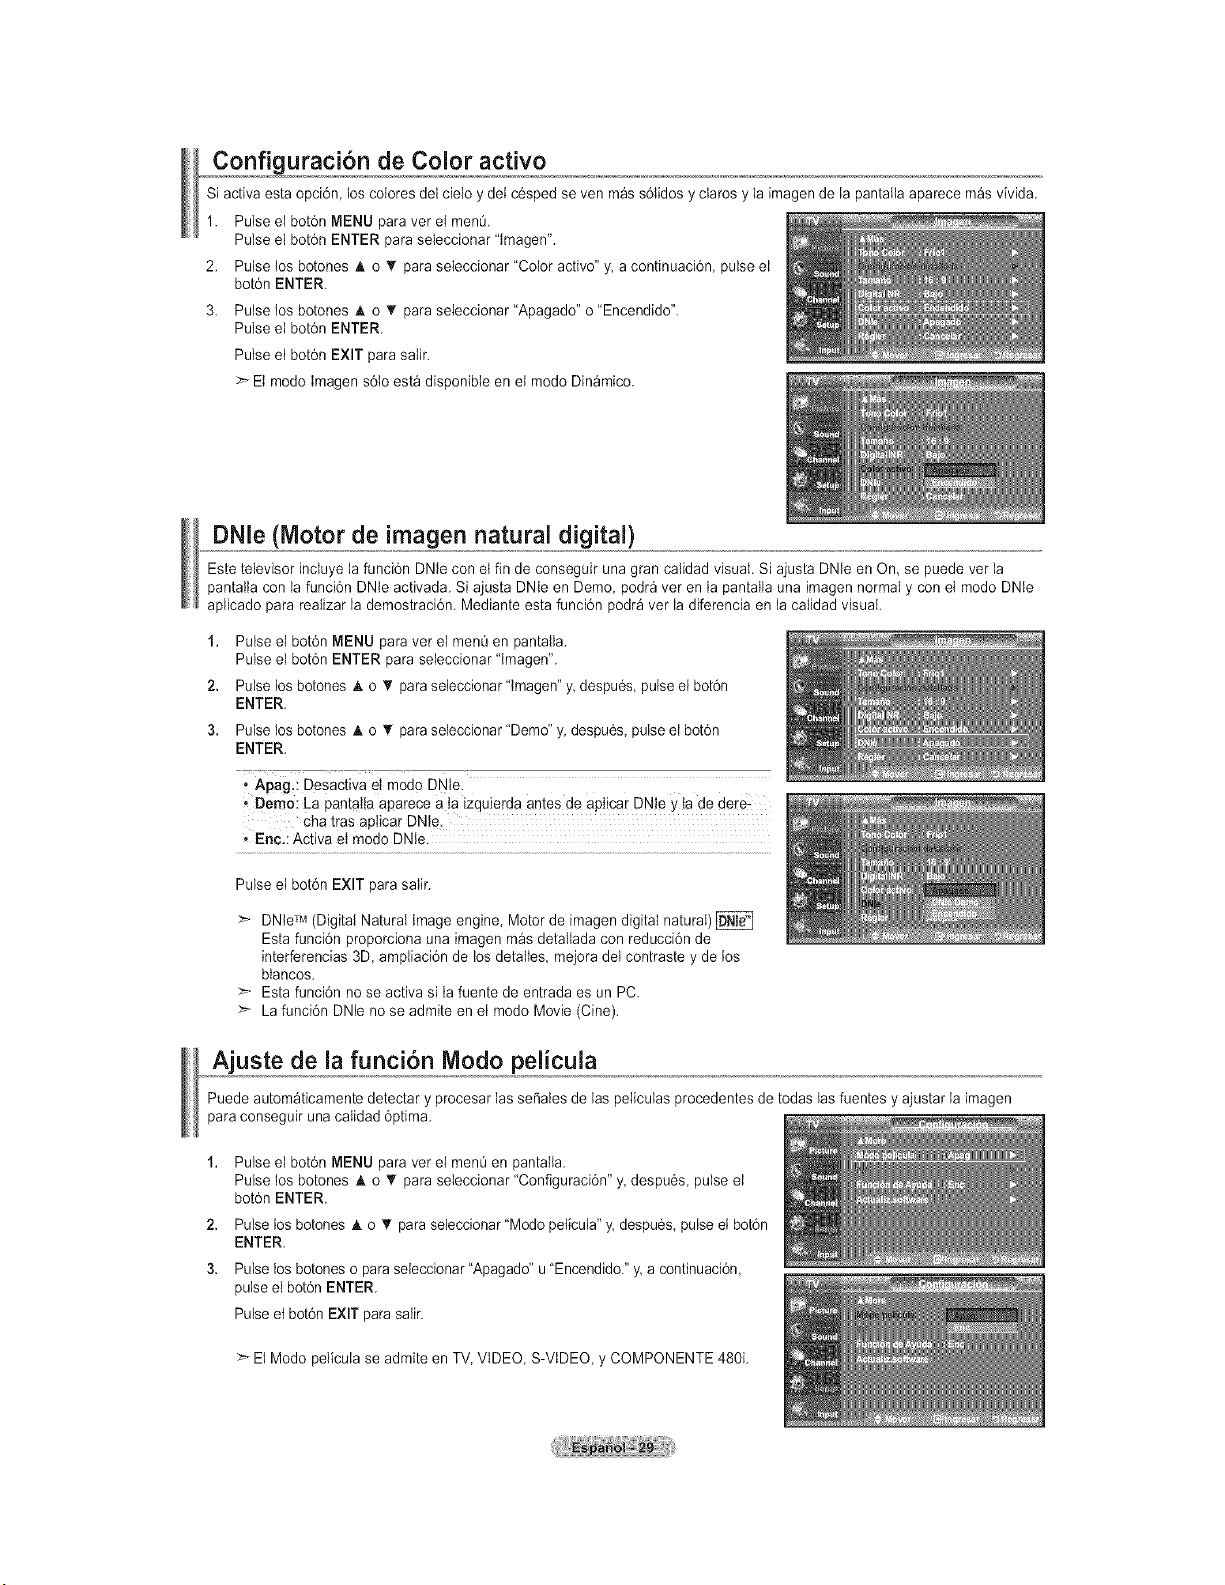
Configuraci6n de Color activo
Siactiva esta opci6n loscolores del cieio y dei c6sped seven m_ss6Iidos y claros y la imagende ia pantalla aparece masvivida.
1. Pulse el bot6n MENU paravet etmenO.
Pulse el bot6n ENTER paraseleccionar 'Imagen".
2. Pulse los botones A oT para seleccionar "Color active" y acontinuaci6n, pulse el
bot6n ENTER.
3. Pulse los botones • oI!' para seieccionar "Apagado" o "Encendido".
Pulse el bot6n ENTER.
Pulse el bot6n EXIT parasatir.
EI modo Imagen s61oesta disponible en et modo Dinamico.
DNle (Motor de imagen natural digital)
Este televisor inctuyeta funci6n DNle con et fin deconseguir una grancalidad visual. Siajusta DNle en On,se puede vet la
pantalla con ta funci6n DNteactivada. Si ajusta DNle en Demo, podravet en la pantaIlauna imagen normal y con et mode DNte
aplicado parareaIizar la demostraci6n. Mediante estafunci6n podr_ vet ia diferencia enia cafidad visual.
1,
2.
3.
Pulse el bot6n MENU paravet el men0 enpantalla.
Pulse el bot6n ENTER para seleccionar 'Imagen".
Pulse los botones _t.o '_ paraseleccionar"tmagen" y despu6s, pulse el bot6n
ENTER.
Pulse los botones A o _' paraseleccionar"Demo" y despu6s pulse el bot6n
ENTER.
' Apag.: Desactiva et mode DNle.
, Demo: La pantattaaparece a taizquierda antesde apticar DNIe y ta dedere:
cha tras apticar DNle.
.Enc.: Activa eI modo DNle.
Pulse el bot6n EXIT parasatir.
_- DNteTM (Digital Natural Image engine, Motorde imagen digital natural)
Estafunci6n proporcionauna imagen masdetallada con reducci6n de
interferencias 3D,ampiiaci6n de Dosdetalles mejora det contraste y de los
btancos.
Estafunci6n no se activa si lafuente de entrada esun PC.
>- La funci6n DNle no se admite en el mode Movie (Cine).
Ajuste de la funci6n Modo pelicula
Puede autom_ticamente detectar y procesar lasse_ales de las peliculas procedentes de todas las fuentes y ajustar la imagen
para conseguir una calidad 6ptima.
2.
3.
Pulse el bot6n MENU para ver el menOen pantaIla.
Pulse los botones A o_' para seleccionar "Configuraci6n" y despu6s, pulse el
bot6n ENTER.
Pulse DosbotonesA o T paraseleccionar"Modopeticula" y despu6s pulse el bot6n
ENTER.
Pulse los botones o para seleccionar "Apagado"u "Encendido."y acontinuaci6n,
pulse el bot6n ENTER.
Pulse et bot6n EXIT parasaIir.
>_ ElMode pelicula se admireen TV, VIDEO, S-ViDEO, y COMPONENTE 480L
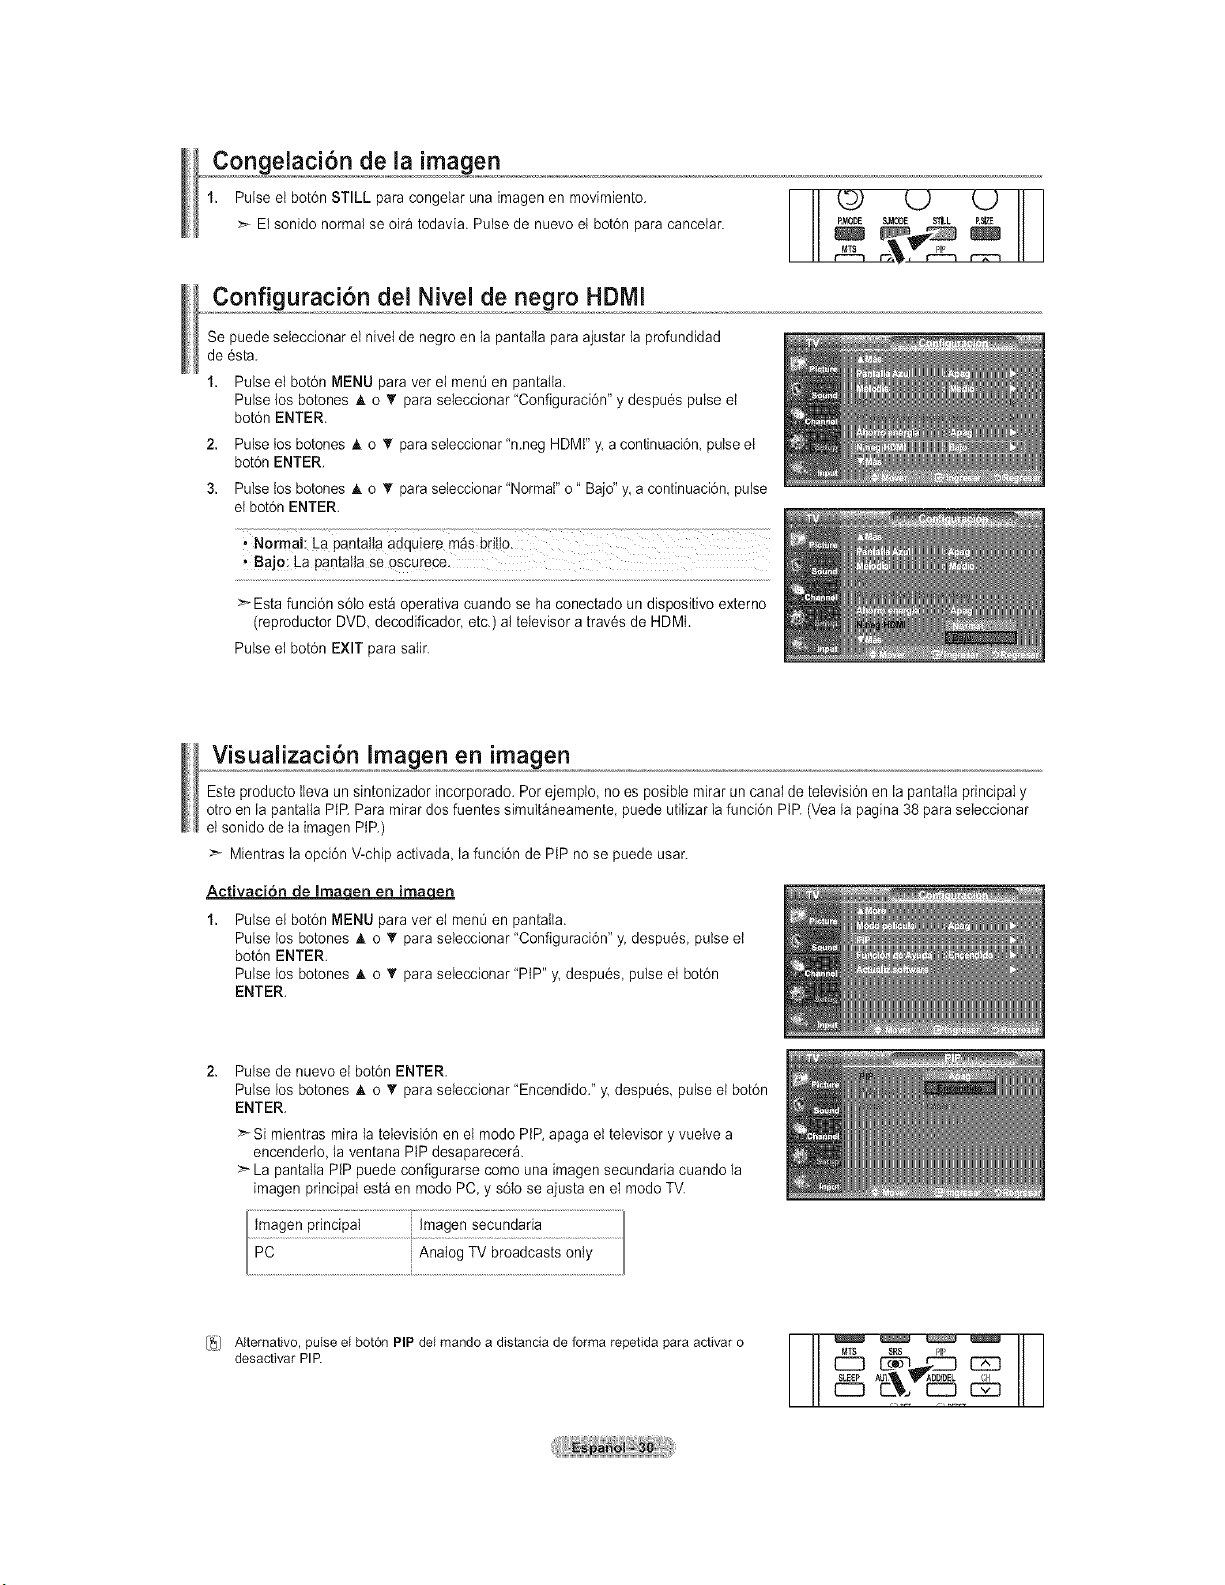
PulseelbotOnSTILLparacongelarunaimagenenmovimiento.
>-Elsonidonormalseoir_todavia.PulsedenuevoetbotOnparacancelar.
_MODE S{1LL _E
Configuracion del Nivel de negro HDMI
Se puede seleccionar elnivel de negroen la pantatla paraajustarla profundidad
de 6sta.
1. Pulse el botOnMENU paravet el men0 en pantaila.
Pulse los botones A o_r para seleccionar "ConfiguraciOn" y despuOs pulseel
botOnENTER.
2. Pulse tos botones & o T paraseieccionar"n.neg HDMFy, a continuaciOn, pulse el
botOnENTER.
3. Pulse los botonesA o T paraseieccionar "Normal" o" Bajo" y,acontinuaci6n, pulse
et botOn ENTER.
• Bajo: La pantatia se oscurece
>_ Estafunci6n s6{o esta operativa cuando se ha conectado un dispositivo externo
(reproductor DVD, decodificador, etc.) attelevisor atraves de HDMI.
Pulse et botOnEXIT parasaIir.
Este producto[levaun sintonizador incorporado. Porejemplo, no es posib[e mirar uncanal de television en [a pantalla principal y
otroen la pantalia PIR Para mirardos fuentes simult_neamente, puede utilizar Ia funciOnPtR (Vea la pagina 38 paraseleccionar
et sonido de ta imagen PIP.)
Mientrasta opciOnV-chip activada Ia funciOndePtP nose puede usar.
ActivaciOn de Ima_qen
1. Pulse e[ botOnMENU paravet el men0en pantaIia.
Pulse los botones h, o T para seleccionar "ConfiguraciOn"y.despuOs,pulse et
botOnENTER.
Pulse los botones A o _' para seleccionar "PIP" y. despuOs,pulse etbotOn
ENTER.
Pulse de nuevoel botOnENTER.
Pulse los botones & o _rpara seleccionar "Encendido." y despuOs pulse el botOn
ENTER.
>Si mientras mira la teievisiOn en el modo PiP,apaga el televisor y vuelve a
encenderto, la ventana PIPdesaparecer_.
>- La pantalla PIP puede configurarse como una imagensecundada cuando la
imagenprincipal est_ en modo PC, y sOto se ajusta en el mode TV.
Imagen principal Imagen secundaria
PC Analog TV broadcasts only
I_/ AIternativo, pulse el bot6n PiP del mando a distancia de forma repetida para activar o
desactivar PIP.
_-_ r--3
_ AUI_ _ADD_DEL '
C__. CC3 12_Z3
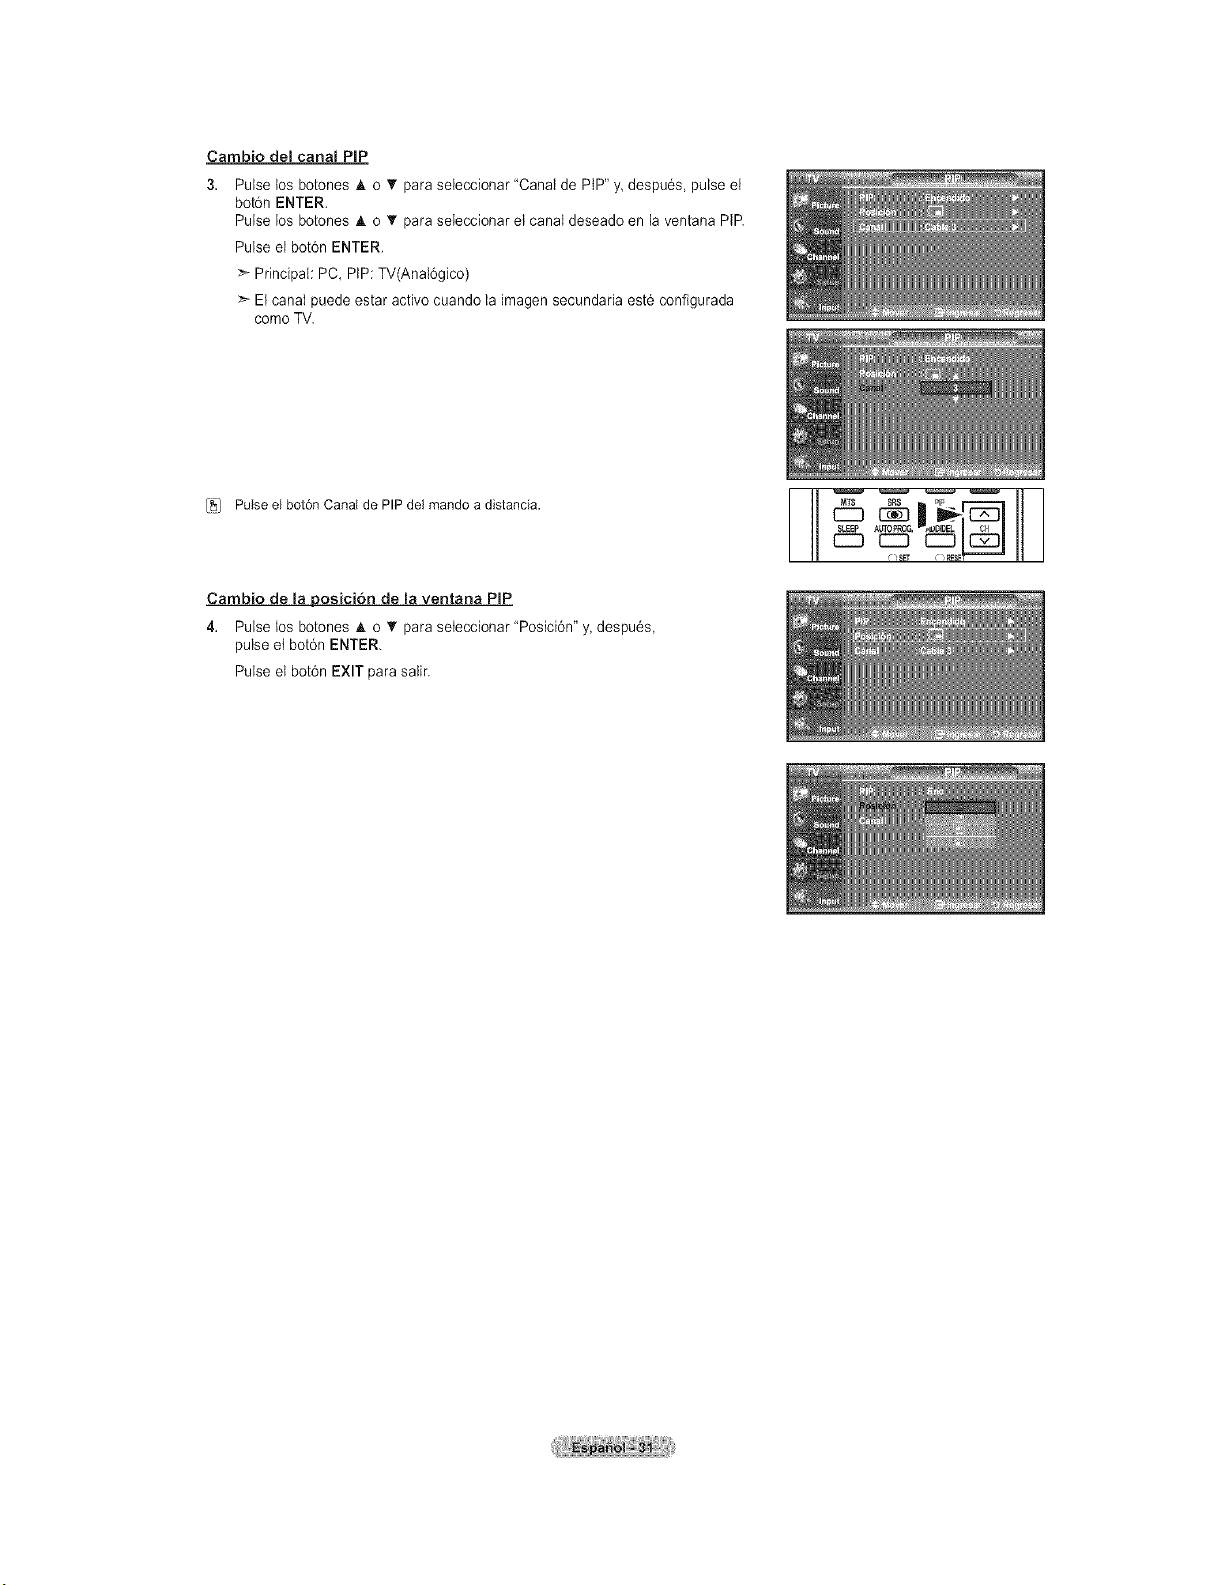
Cambio del cana_ PIP
3. Pulse los botones _. o _t'para seleccionar "Canal de PtP" y, despu6s, pulse el
boton ENTER.
Pulse los botones A o T para seIeccionar etcanal deseado en la ventana PtP.
Pulse el bot6n ENTER.
:_ Principal: PC, PiP: TV(Anal6gico)
Elcanal puede estar active cuando la imagen secundaria est6 configurada
comeTV.
[_] Pulse el bot6n Canal de PIP del mando a distancia.
Cambio de la posicion de la ventana PIP
4. Pulse los botones _k o T para seteccionar "Posici6n" y, despu6s,
pulse etbot6n ENTER.
Pulse et bot6n EXIT parasalir.
t_TS S_
13_3
CSSFr _
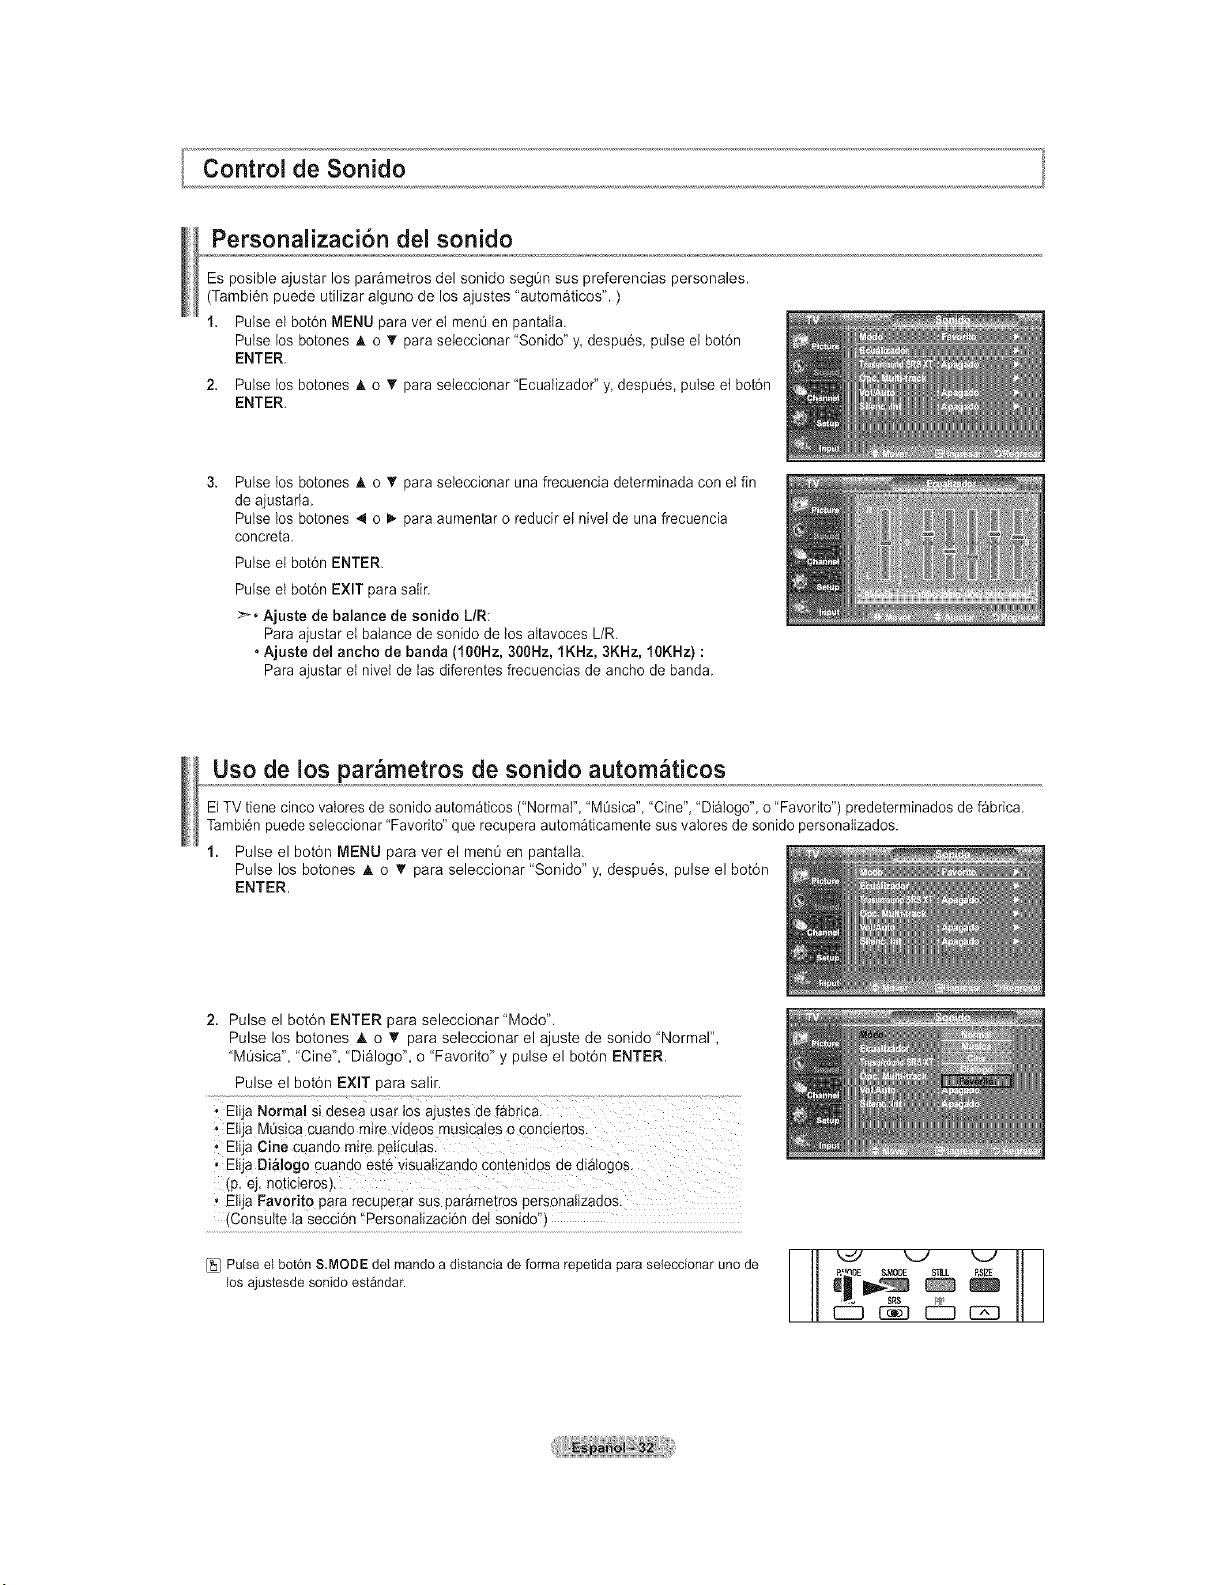
Personalizaci6n del sonido
Es posible ajustar los par&metros del sonido segOn sus preferencias personales.
(Tambi6n puede utilizar alguno de los ajustes "automaticos". )
1. Pulse el bot6n MENU paravet el men0en pantalla.
Pulse los botones A o T para seieccionar "Sonido" y despu6s, pulse etbot6n
ENTER.
2. Pulse los botones A o _rpara seieccionar "Ecualizador" y despu6s, pulse et bot6n
ENTER.
Pulse los botones & o _' para seleccionar una frecuencia determinada con el fin
de ajustarla.
Pulse los botones 4 o D,.para aumentar o reducir et nivei de una frecuencia
concreta.
Pulse el bot6n ENTER.
Pulse el bot6n EXIT parasalir.
>_. Ajuste de balance de sonido L/R:
Para ajustar el balance de sonido de los aitavoces L/R.
• Ajuste del ancho de banda (100Hz, 300Hz, 1KHz, 3KHz, 10KHz) :
Para ajustar el nivet delas diferentes frecuencias de ancho de banda.
Uso de los par_metros de sonido autom_ticos
ElTVtiene cinco vatoresde sonido autom_ticos ("NormaI","M0sica", "Cine",'Dialogo", o"Favorito") predeterminados de fabrica.
Tambi6npuede seleccionar "Favorito" que recupera autom_ticamente susvalores desonido personaIizados.
1. Pulse el bot6n MENU para ver el mem_en pantalla.
Pulse los botones A o T para seleccionar "Sonido" y, despu6s, pulse el bot6n
ENTER.
2. Pulse el bot6n ENTER para seleccionar"Modo".
Pulse los botones A o _r para seleccionar el ajuste de sonido "Normal",
"MOsica", "Cine", "Dialogo", o"Favorito" y pulse el bot6n ENTER.
Pulse el bot6n EXIT para salir.
, Etia MQsicacuando mire videos musicaies o conciertos.
- Etija Cine Cuando mire pelicu!as
• Eli a Di_!ogo cuando estevisua!izand0 Contenid0s de diatogos.
(p. ej. neticieroS).
• Elija Favodto pararecuperar Sus par&metrospersonaiizados.
(ConsuIte ta secci6n _Personatizaci6n det sonido'!)
[_ Pulse el bot6n S.MODE del mando adistancia de forma repetida para seleccionar uno de
los ajustesde sonido estandar. BSlZE
CZ3 1:_9 EZZ] C2Z]
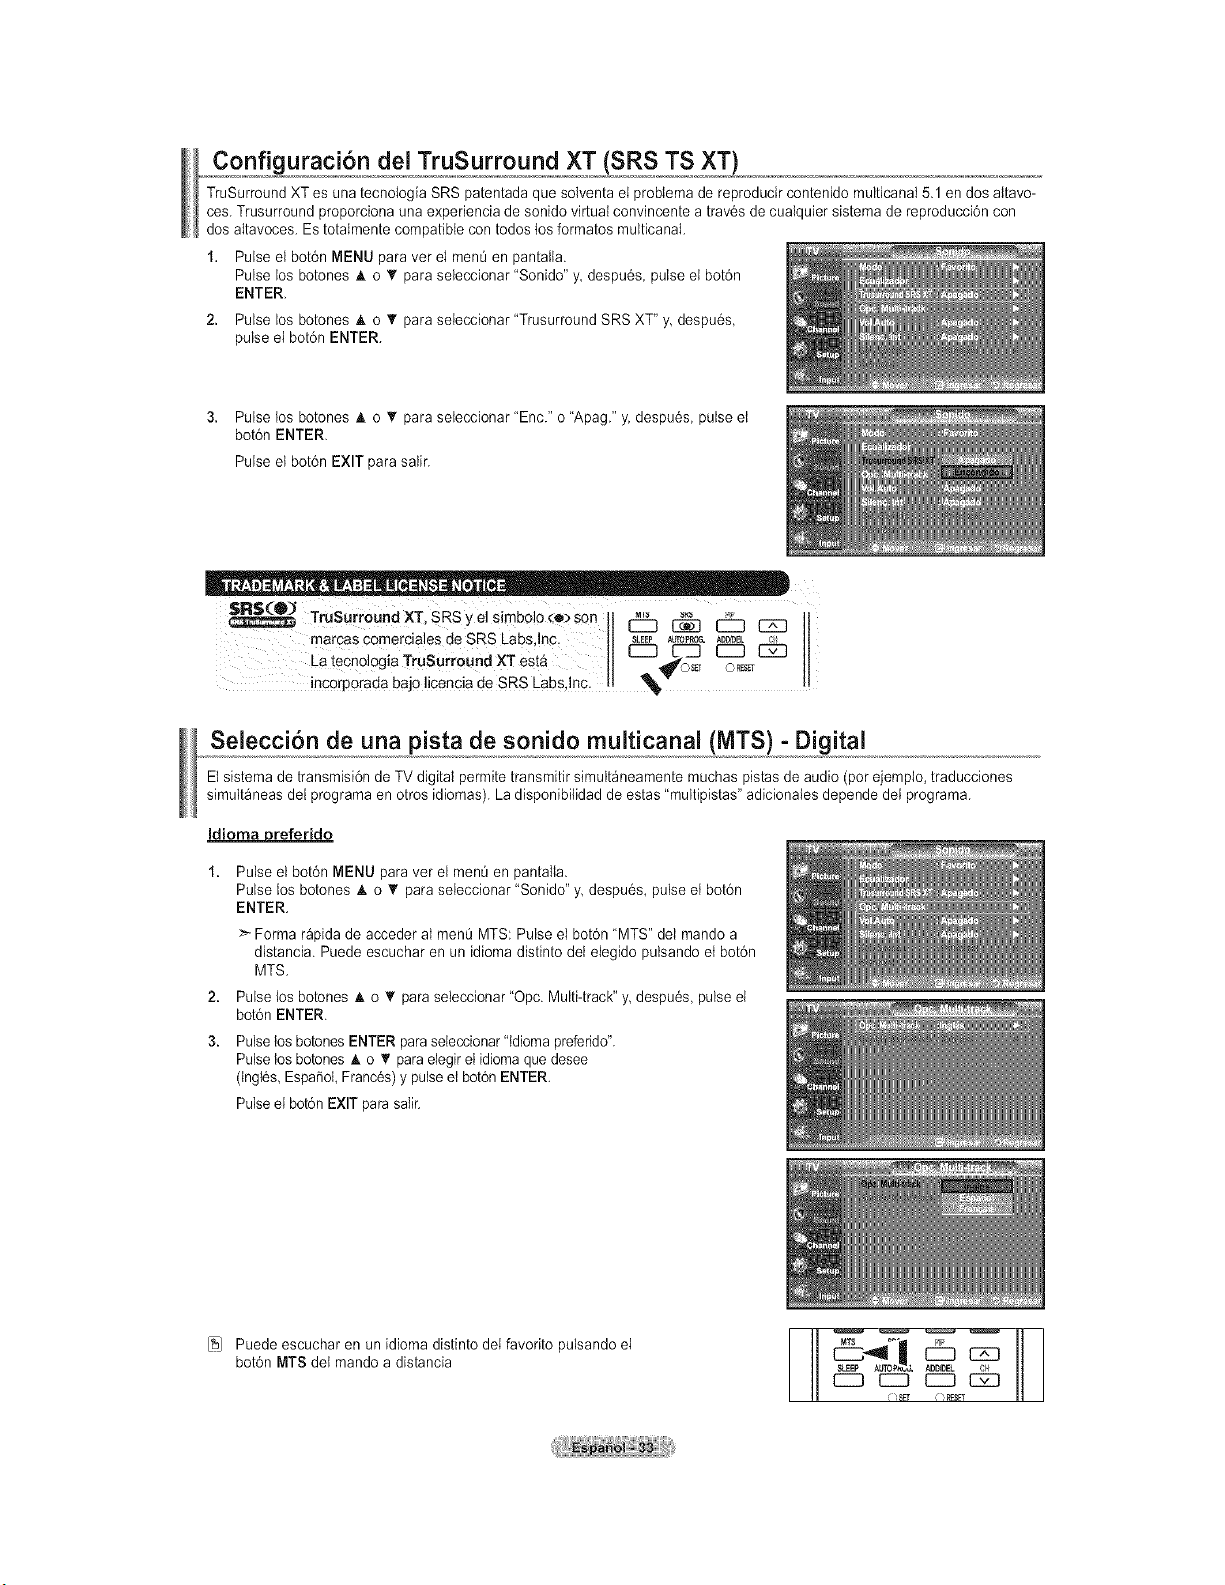
Configuraci6n del TruSurround XT (SRS.TSXT 1
TruSurround XTes una tecnoIogia SRS patentada que solventa el probIema dereproducir contenido multicanal 5.1 en dos aItavo-
ces.Trusurround proporciona una experiencia de sonido virtual convincente a trav6sde cualquier sistema de reproducci6n con
dosaltavoces. EstotaImente compatible contodos losformatos multicanal.
1. Pulse el bot6n MENU paravet el men0en pantaIia.
Pulse los botones A o _rpara seleccionar "Sonido" y despu6s, pulse el bot6n
ENTER.
2, Pulse los botones _k o t!' para seleccionar "Trusurround SRS XT" y despu6s,
pulse el bot6n ENTER.
3, Pulse los botones h. o _rpara seteccionar "Enc." o"Apag." y.despu6s, pulse et
bot6n ENTER.
Pulse et bot6n EXIT parasalir.
SRS (®3
TruSurroundXT, SRSyelsimbolo_:e)son [:_ _ _
marcas €omerciales deSRS Labs,inc. SLEEPAu_o_o__eL _
La tecnologia Trusurround XT est& C:3d_L-i_s_T I:_, _
incorp0rada bajolicencia de SRS Labs Inc _, 'V .... o
Selecci6n de una pista de sonido multicanal (MTS) - Digital
Et sistema de transmisi6n de TV digital permite transmitirsimult_neamente muchas pistasdeaudio (pot ejempio, traducciones
simultaneas del programa enotros idiomas). La disponibilidad de estas "multipistas"adicionaies depende dei programa.
Idioma preferido
2,
3.
Pulse el bot6n MENU para ver el menu en pantalla.
Pulse los botones A o _' para seleccionar "Sonido" y despu6s, pulse et bot6n
ENTER.
>- Forma rapida deacceder al menOMTS: Pulse el bot6n "MTS" del mando a
distancia. Puede escuchar en un idioma distinto del eiegido pulsando et bot6n
MTS.
Pulse los botones h.o _r para seleccionar "Opc. Multi-track" y despu6s, pulse et
bot6n ENTER.
Pulse los botones ENTER paraseleccionar'ldioma preferido".
Pulse los botones A. o _' para elegirel idioma que desee
(Ingt6s,EspaSol,Franc6s)y pulse etbot6n ENTER.
Pulse elbot6n EXIT parasatir.
[_] Puedeescuchar en un idioma distinto deifavorito pulsando el
bot6n MTS det mando adistancia
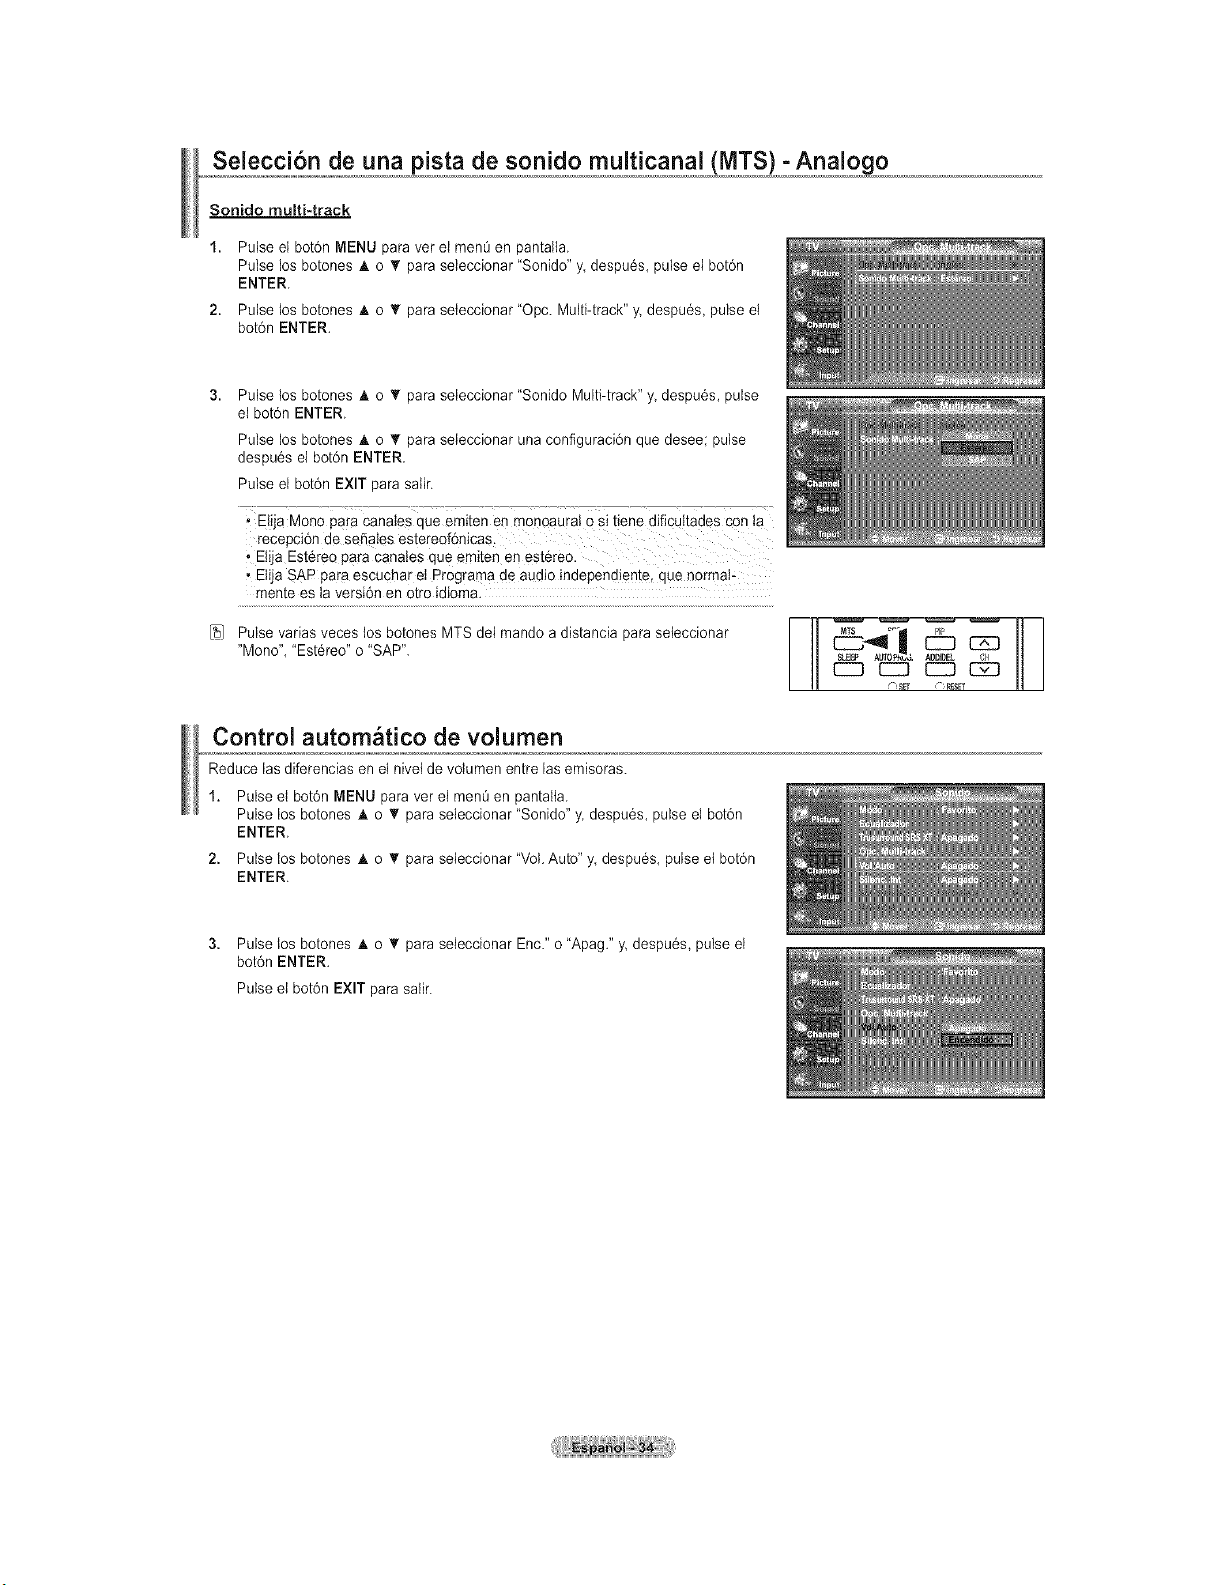
Selecci6n de una pista de sonido multicanal (NITS) - Analogo
Sonido muEti-track
1. Pulse el bot6n MENU para vet el men_ en pantaIla.
Pulse los botones & o _' para seleccionar "Sonido" y despu6s, pulse el botdn
ENTER.
2. Pulse losbotones A o T para seteccionar "Opc. Multi-track" y.despu6s, pulse el
bot6n ENTER.
Pulse los botones A o T para seleccionar "Sonido Multi-track" y despu6s, pulse
el botdn ENTER.
Pulse los botones _ko T para seieccionar una configuraci6n que desee; pulse
despu6s el botdn ENTER.
Pulse el bot6n EXIT para satir.
• ElijaMona pare Canales qua emiten en monoaurat 0Sitiene dificultades con la
recepci6n de Se_ates estereef6nicas.
, Elija EstCreapare Canates que emiten enest6reo.
• ElijaSAP pareescuchar et Programa de audio independiente, qua norma!-
mente estaversi6n en otroidioma.
[5i Pulse varias veces tos botones MTS dei mando adistancia para seteccionar
"Mono", "Est6reo"o "SAP".
Control autom tico de volumen
Reduce las diferencias en el nivet de voIumenentre las emisoras.
1. Pulse el bot6n MENU paravet el menQ en pantatta.
Pulse los botones h. o T paraseleccionar "Sonido" y.despu6s, pulse el bot6n
ENTER.
2. Pulse los botones A o _' paraseieccionar "VoI.Auto" y, despu6s, pulseet bot6n
ENTER.
3. Pulse los botones h. o _r paraseieccionar Enc." o "Apag." y. despu6s, pulse el
bot6n ENTER.
Pulse el bot6n EXIT parasaIir.
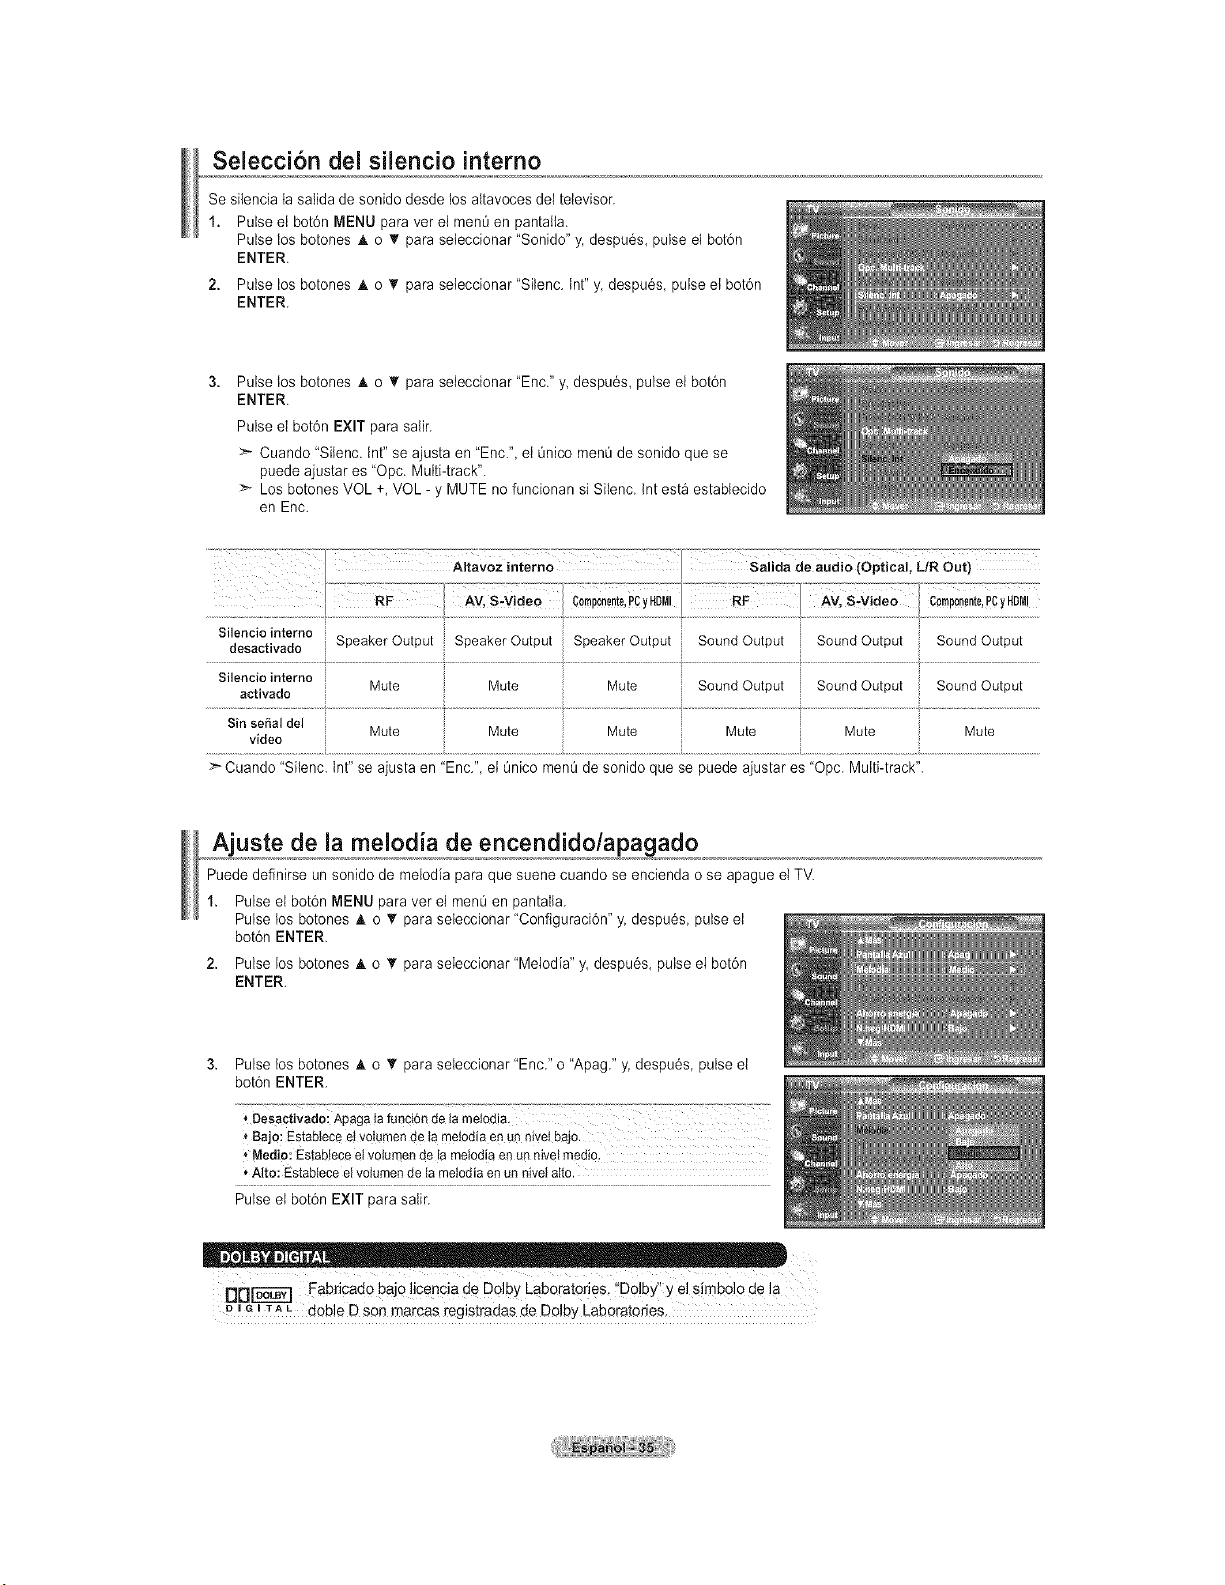
Selecci6n del siiencio interno
Se silencia ta saIida de sonido desde losaltavoces del televisor.
1. Pulse el bot6n MENU paravet el men0 en pantaita.
Pulse los botones A o T paraseteccionar "Sonido" y. despu6s, pulse el bot6n
ENTER.
2. Pulse los botones A o _r para seteccionar "Silenc. tnt" y despu6s, pulse etbot6n
ENTER.
Pulse los botones A o • paraseleccionar "Enc." _ despu6s, pulse el bot6n
ENTER.
Pulse el bot6n EXIT parasalir.
:_ Cuando 'Silenc. Int" se ajusta en"Enc.", el 0nico menO de sonido que se
puede ajustar es "Opc. Multi-track".
>- Los botonesVOL +,VOL- y MUTEno funcionan siSitenc. tntest_ establecido
en Enc.
S,,eoclOdes ot,v.eiO.eroeSpeakerOutputSpeakerOutputi SpeakerOutputi SoundOutputi SoundOutputi SoundOutput
Silencio interne
activado Mute Mute Mute SoundOutput SoundOutput Sound Output
Sin se_al del
Mute Mute Mute Mute Mute Mute
video
_" Cuando "Silenc. tnt" se ajusta en "Enc.", el OnicomenOde sonido que se puedeajustar es "Opc. Multi-track".
Ajuste de la melodia de encendido/apa_ado
Puede definirse un sonido de melodia para que suenecuando se encienda ose apague et TV.
1. Pulse el bot6n MENU paravet el menOen pantaIla.
Pulse los botones A o T para seleccionar "Configuraci6n" y.despu6s, pulse el
bot6n ENTER.
2. Pulse los botones A o T para seleccionar "Melodia" y despu6s, pulse el bot6n
ENTER.
3. Pulse los botones A o _rpara seleccionar "Enc." o "Apag." y, despu6s pulse el
bot6n ENTER.
* Bajo: Estabiece etvolumen de ta meiodia en un niveI bajo.
Medio: Estabiece el volumen de ta meiodia en unnivet medio.
*Alto: Estabtece el volumen de la metodia en un nivei atto.
Pulse el bot6n EXIT para salir.
DDF6"5-_'_ Fabricado bajo licencia de Dolby Laboratories. "Dolby"y el simbolo de la
mo m1-A L doble Dson marcas registradas deDo!by Laboratories,
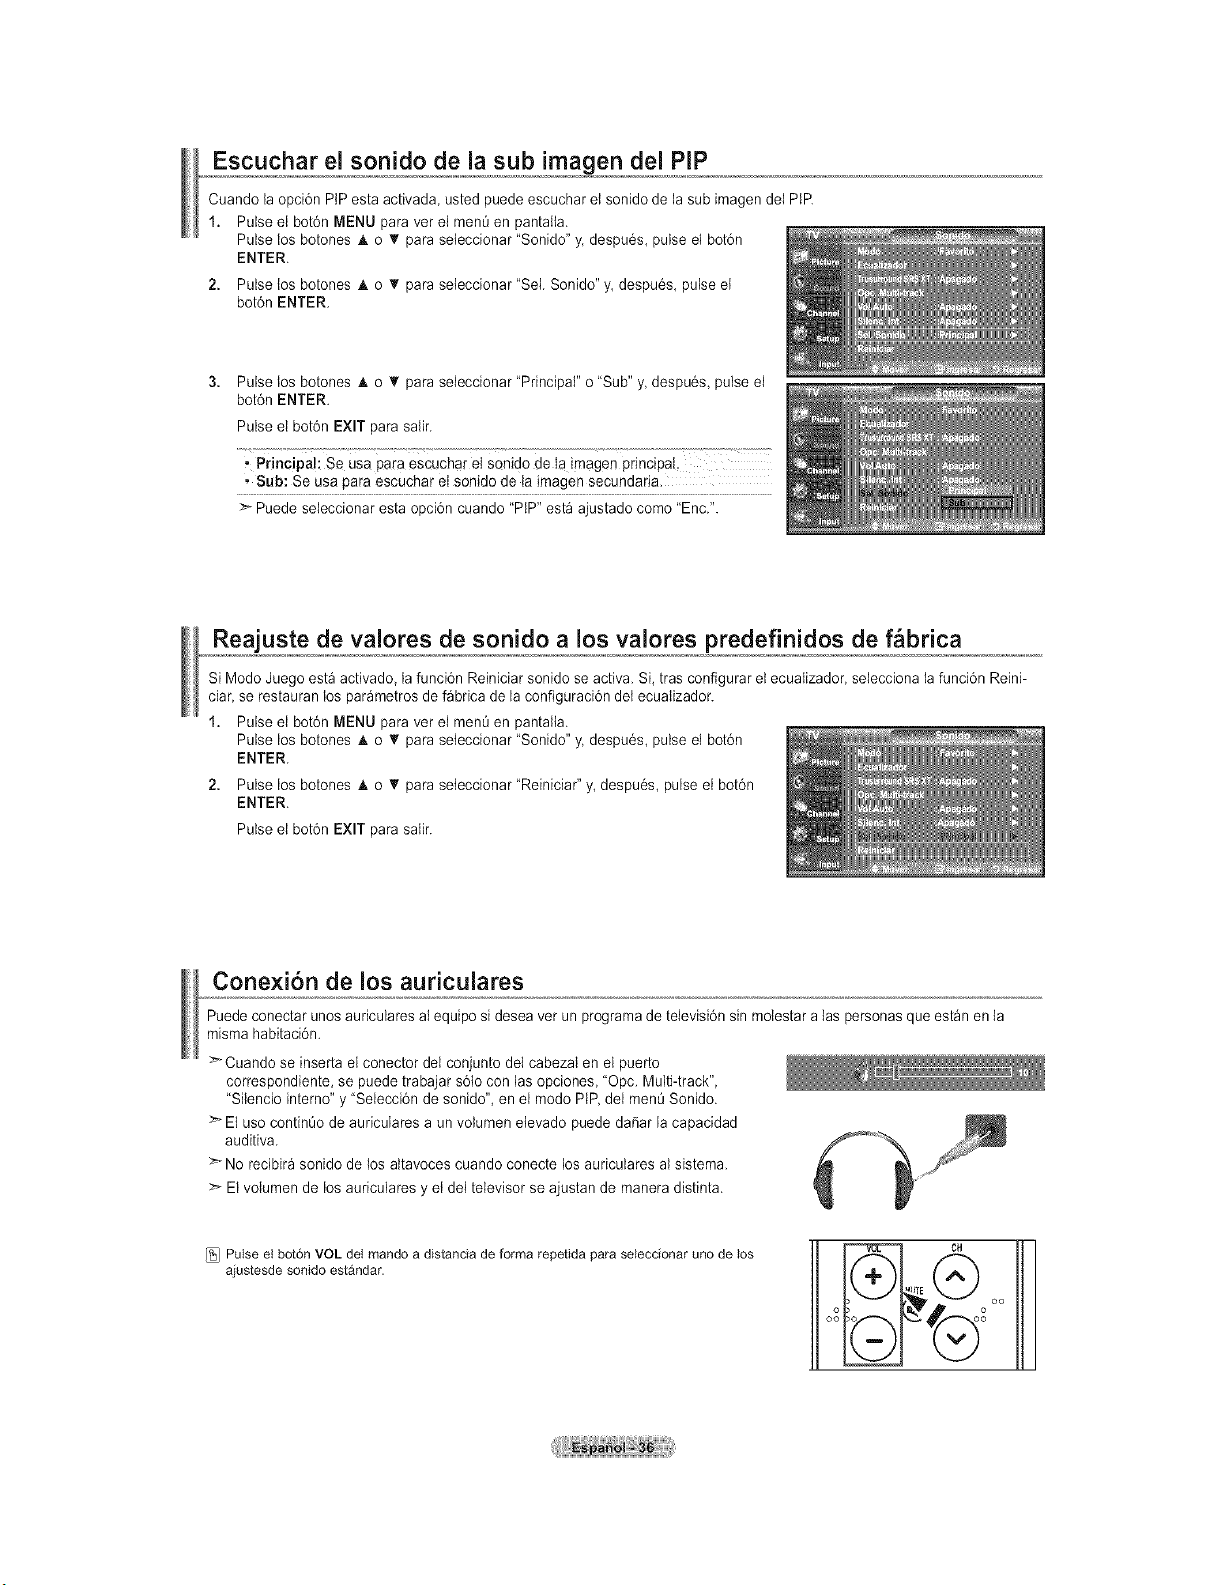
Escuchar el sonido de la sub imagen del PiP
Cuando la opci6n PtPesta activada, usted puede escuchar et sonido de la sub imagen dei PtR
1. Pulse el bot6n MENU paravet el men0 en pantaIia.
Pulse los botones & o T paraseteccionar "Sonido" y. despu6s, pulse el botdn
ENTER.
2. Pulse los botones A o T para seteccionar "Sei. Sonido"y, despu6s, pulse et
bot6n ENTER.
Pulse los botones A o • paraseleccionar "Principal" o "Sub" _ despu6s, pulse el
bot6n ENTER.
Pulse el bot6n EXIT parasalir.
, Principal: Se usa paraescuchar el senido de ta imagen pnncipal
, Sub: Se Usa paraescuchar et sonido de taimagen secundaria.
Puedeseleccionar esta opci6n cuando "PtP" estaajustado come "Enc.".
Reajuste de valores de sonido a los valores predefinidos de f_brica
SiModo Juego estaactivado, la funci6n Reiniciar sonido se activa. Si,tras configurar et ecuaIizador,seiecciona lafunci6n Reini-
ciar,se restauran los par_metros de fabrica de la configuraci6n det ecuaIizador.
1. Pulse el bot6n MENU paravet el men0 en pantaIia.
Pulse los botones & o T paraseteccionar "Sonido" y. despu6s, pulse el botdn
ENTER.
2. Pulse los botones A o T para seteccionar "Reiniciar"y, despu6s, pulse el botdn
ENTER.
Pulse el bot6n EXIT parasalir.
Conexion de los auriculares
Puedeconectar unosauriculares aI equipo sideseavet un programa detelevisi6n sinmolestar alas personas que estan en la
misma habitaci6n.
>Cuando se insertael conector del conjunto del cabezal en el puerto
correspondiente, se puede trabajar s6to con lasopciones, "Opc. Multi-track",
"Silencio inferno"y "Seleccidn de sonido", en el modo PIP,dei menOSonido.
El uso continQo de auriculares a un volumen etevado puede dafiar la capacidad
auditiva.
No recibir_sonido de losattavoces cuando conecte losauriculares aIsistema.
> Elvolumen delos auriculares y et dei televisor se ajustan de manera distinta.
[_ Pulse el bot6n VOL del mando adistancia de forma repetida para seleccionar uno de los
ajustesde sonido estandar.
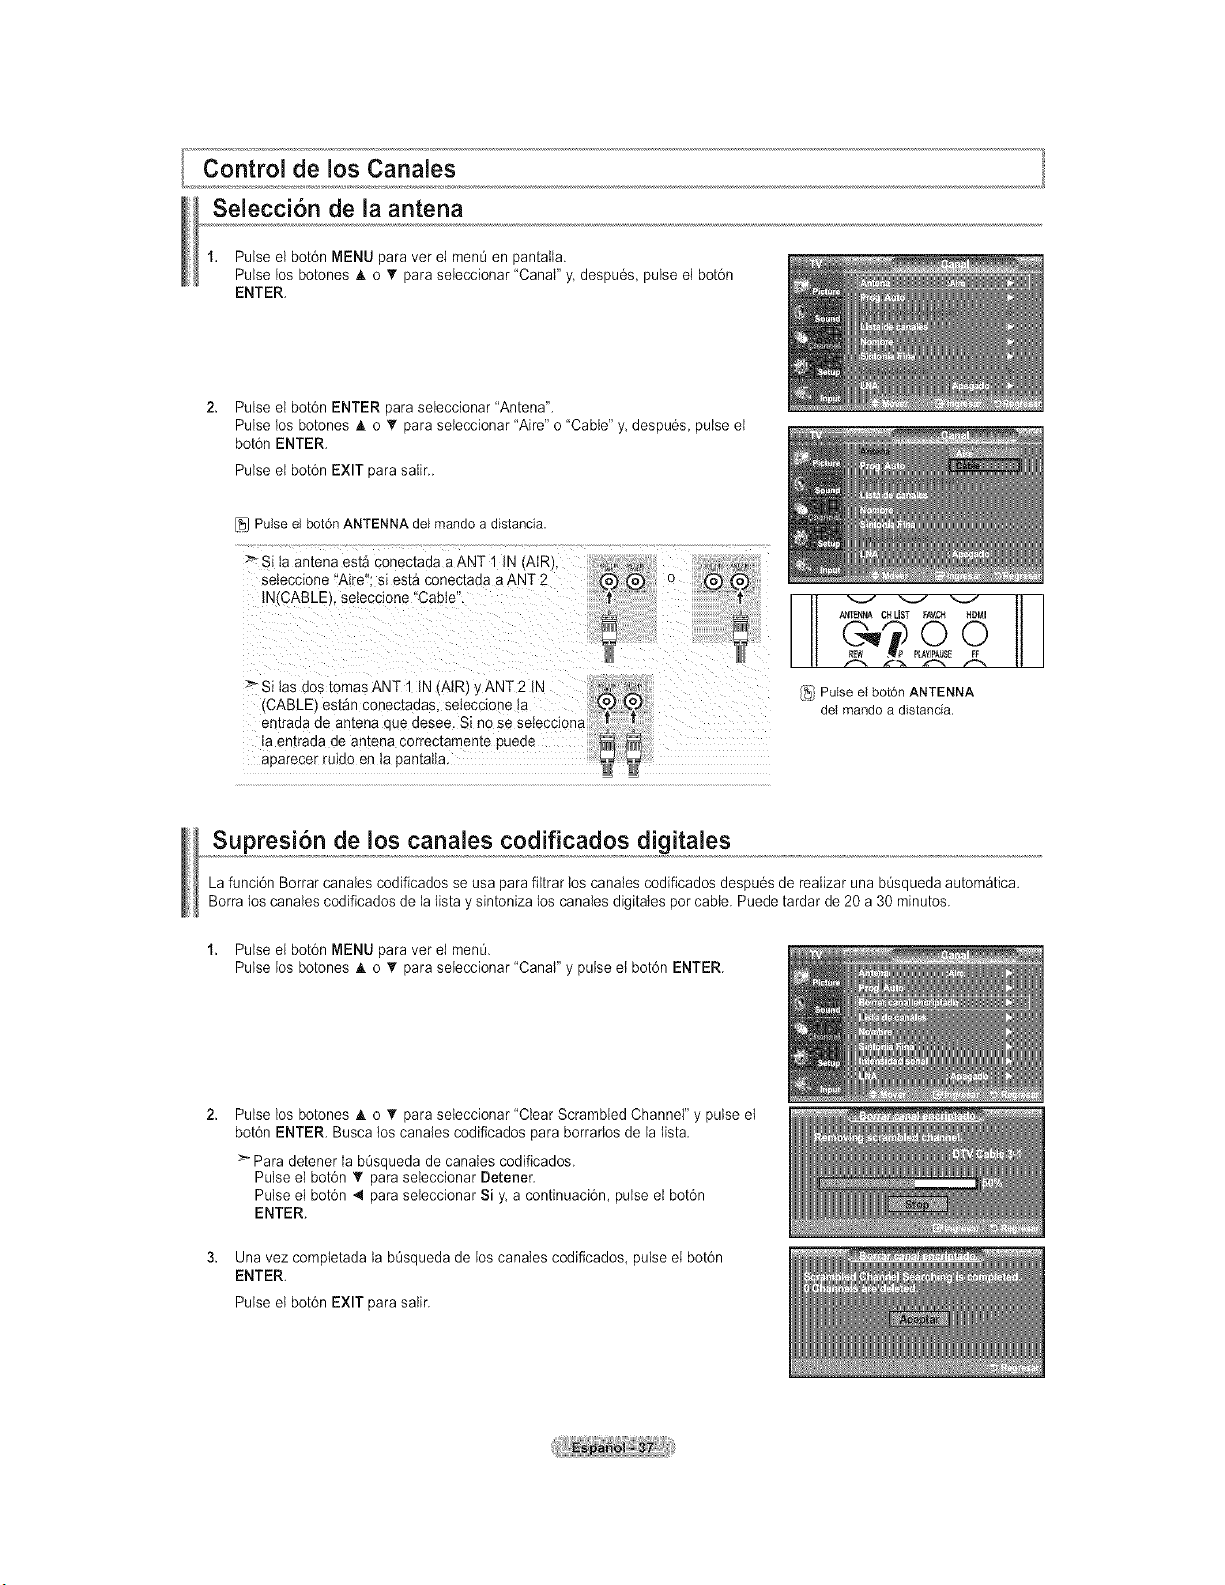
Control de los Canales
Selecci6n de la antena
1. Pulse el bot6n MENU paravet el menOen pantalla.
Pulse los botones A o _' para seleccionar "Canal" y. despu6s, pulse el bot6n
ENTER.
Pulse el bot6n ENTER paraseieccionar "Antena".
Pulse los botones h. o _rpara seteccionar "Aire" o "Cable" y despu6s, pulse el
bot6n ENTER.
Pulse el bot6n EXIT parasalir_
[_1Pulse el bot6n ANTENNA del mando a distancia.
Si ta antena est_ conectada a ANT 1IN(AIR
_eteccione "Aire": si est_ conec[aaa aANT 2
\I(CABLEI. seleccione "Cable
:_Si lasdos tomBs ANT 1 INl AIR) y ANT2 IN ..... _"....
(CABLE est_n conectadas, setecc_onela _
£n[raaa ae antena aue desee. Si no se setecclona =,_ j_
aemraaa ae ar:ena correc[amente pueae _
aparecer rulao en la aan[alta
AN_B_A CHLIST FAV.CH HDMI
REW , P PLAYIPAUS_
/_i Pulse el bot6n ANTENNA
del mando adistancia.
Supresi6n de los canales codificados digitales
La funci6n Borrar canales codificados se usa parafiltrar los canalescodificados despu6s de reaIizar una b_squeda autom_tica.
Borralos canalescodificados de ia lista ysintoniza los canales digitatespot cable. Puede tardar de 20 a 30 minutes.
1. Pulse el bot6n MENU paravet el men&
Pulse los botones A o _rpara seteccionar "Canal" y pulse et bot6n ENTER.
Pulse los botones A. o • para seleccionar "Clear Scrambled Channel" y pulse et
bot6n ENTER. Busca tos canales codificados paraborrarlos dela fist&
>Para deteneria bOsquedadecanates codificados.
Pulse elbot6n T para seleccionar D_ener.
Pulse eibot6n 4 paraseteccionarSi_ a continuacbn, pulse eibot6n
ENTER.
Unavez comptetada la bt_squeda de loscanates codificados, pulse el bot6n
ENTER.
Pulse et bot6n EXIT parasalir.
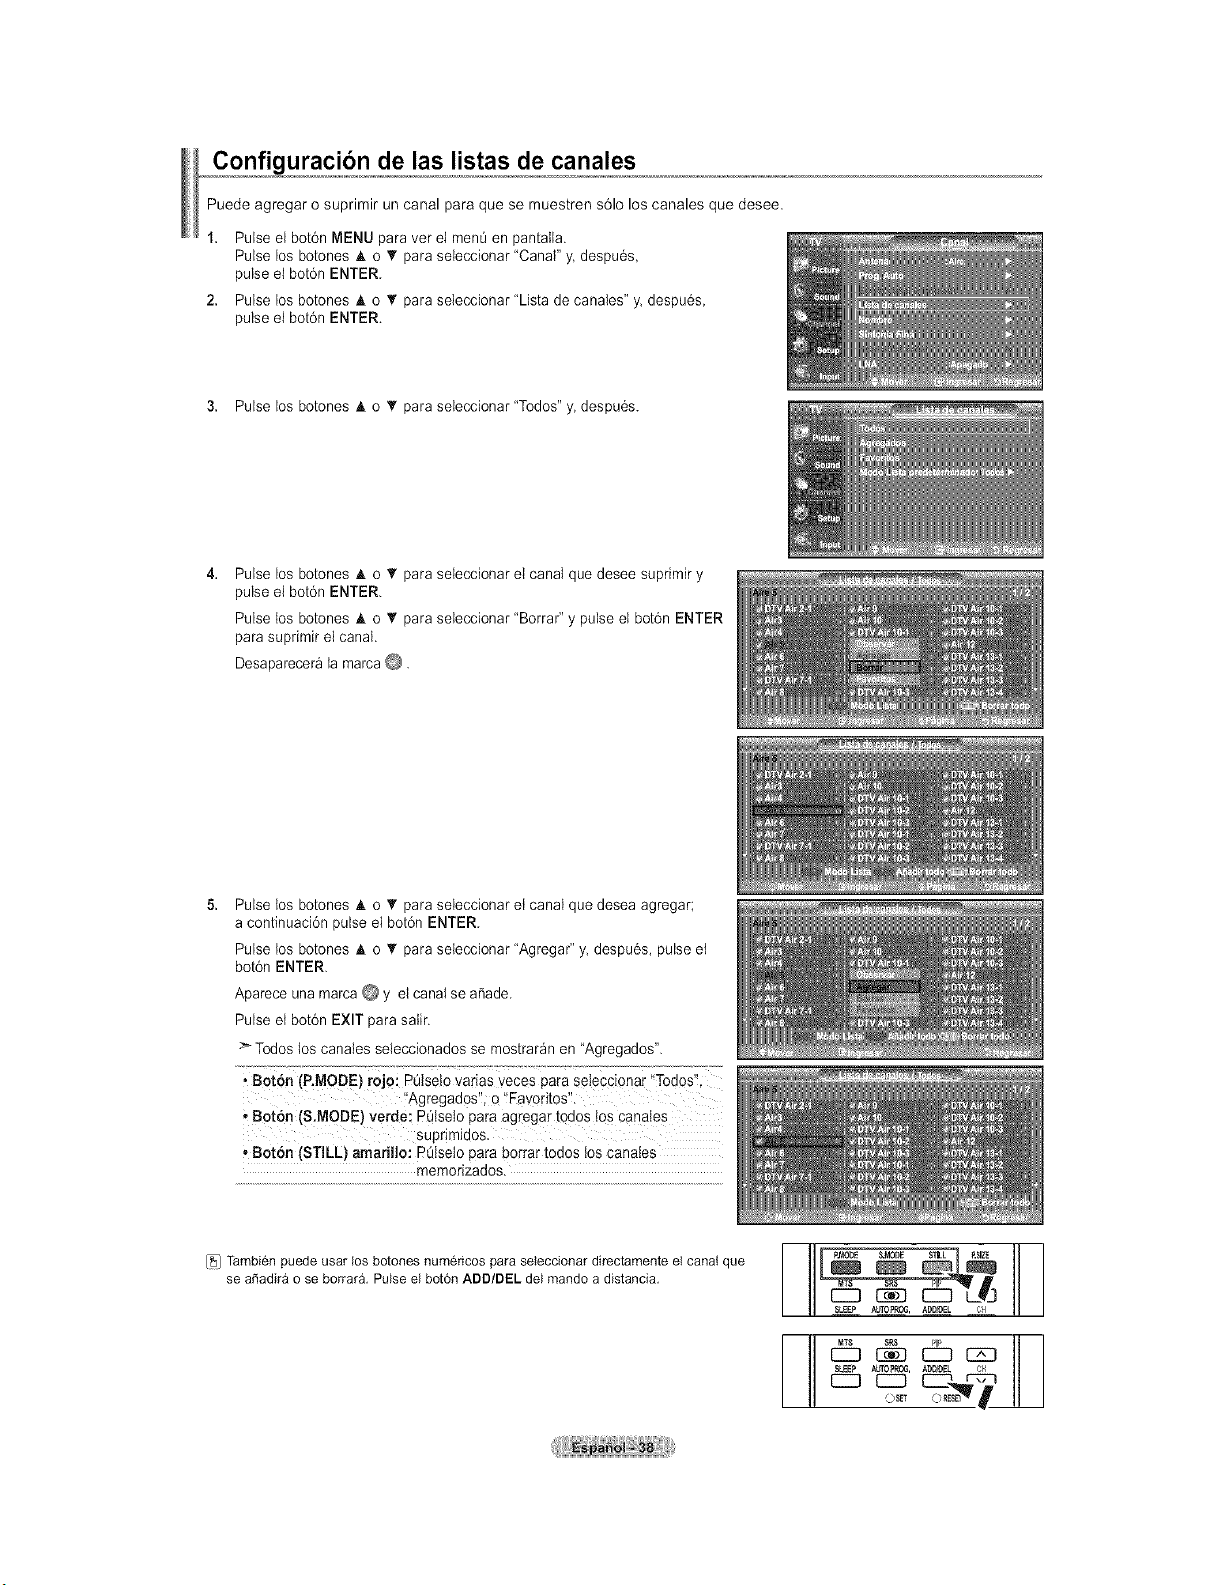
,,,€onf!guraci6n de las listas de canales
Puede agregar osuprimir uncanal para que se muestren s61olos canales que desee.
1. Pulse el bot6n MENU paraver el menOen pantaIla.
Pulse los botones A o T para seleccionar "Canal" y. despu6s,
pulse el bot6n ENTER.
2. Pulse los botones A o V para seleccionar "Lista de canales" y. despu6s,
pulse el bot6n ENTER.
3. Pulse los botones A o • para seleccionar "Todos" y despu6s.
Pulse los botones A o T para seleccionar el canal que desee suprimir y
pulse el bot6n ENTER.
Pulse los botones A o V para seleccionar "Borrar" y pulse el bot6n ENTER
parasuprimir el canal.
Desaparecer_la marca @.
Pulse los botones A o _' para seleccionar et canal que desea agregar;
acontinuaci6n pulse el bot6n ENTER.
Pulse los botones A o T para seleccionar "Agregar" y despu6s, pulse et
bot6n ENTER.
Aparece una marca@ y elcanalsea_ade.
Pulse et bot6n EXIT parasatir.
> Todosloscanales seleccionados se mostrar_n en "Agregados".
i B0t6n (P.MODE} r0jo: PQiseiovarias veces paraseteccionar "Tod0s'!
_'Agregados'!;o' Favoritos'!.
, Bot6n (S.MODE) verde: POlseto paraagregar t0dos t0s canales
Suprimidos.
Boron (STILL) amarillo: POlselo paraborrar todos los canales
memorizados.
[_j Tambien puede usar los botones numericos para seleccionar directamente el canal que
se a6adira o se borrara. Pulse el bot6n ADD/DEL del mando adistancia.
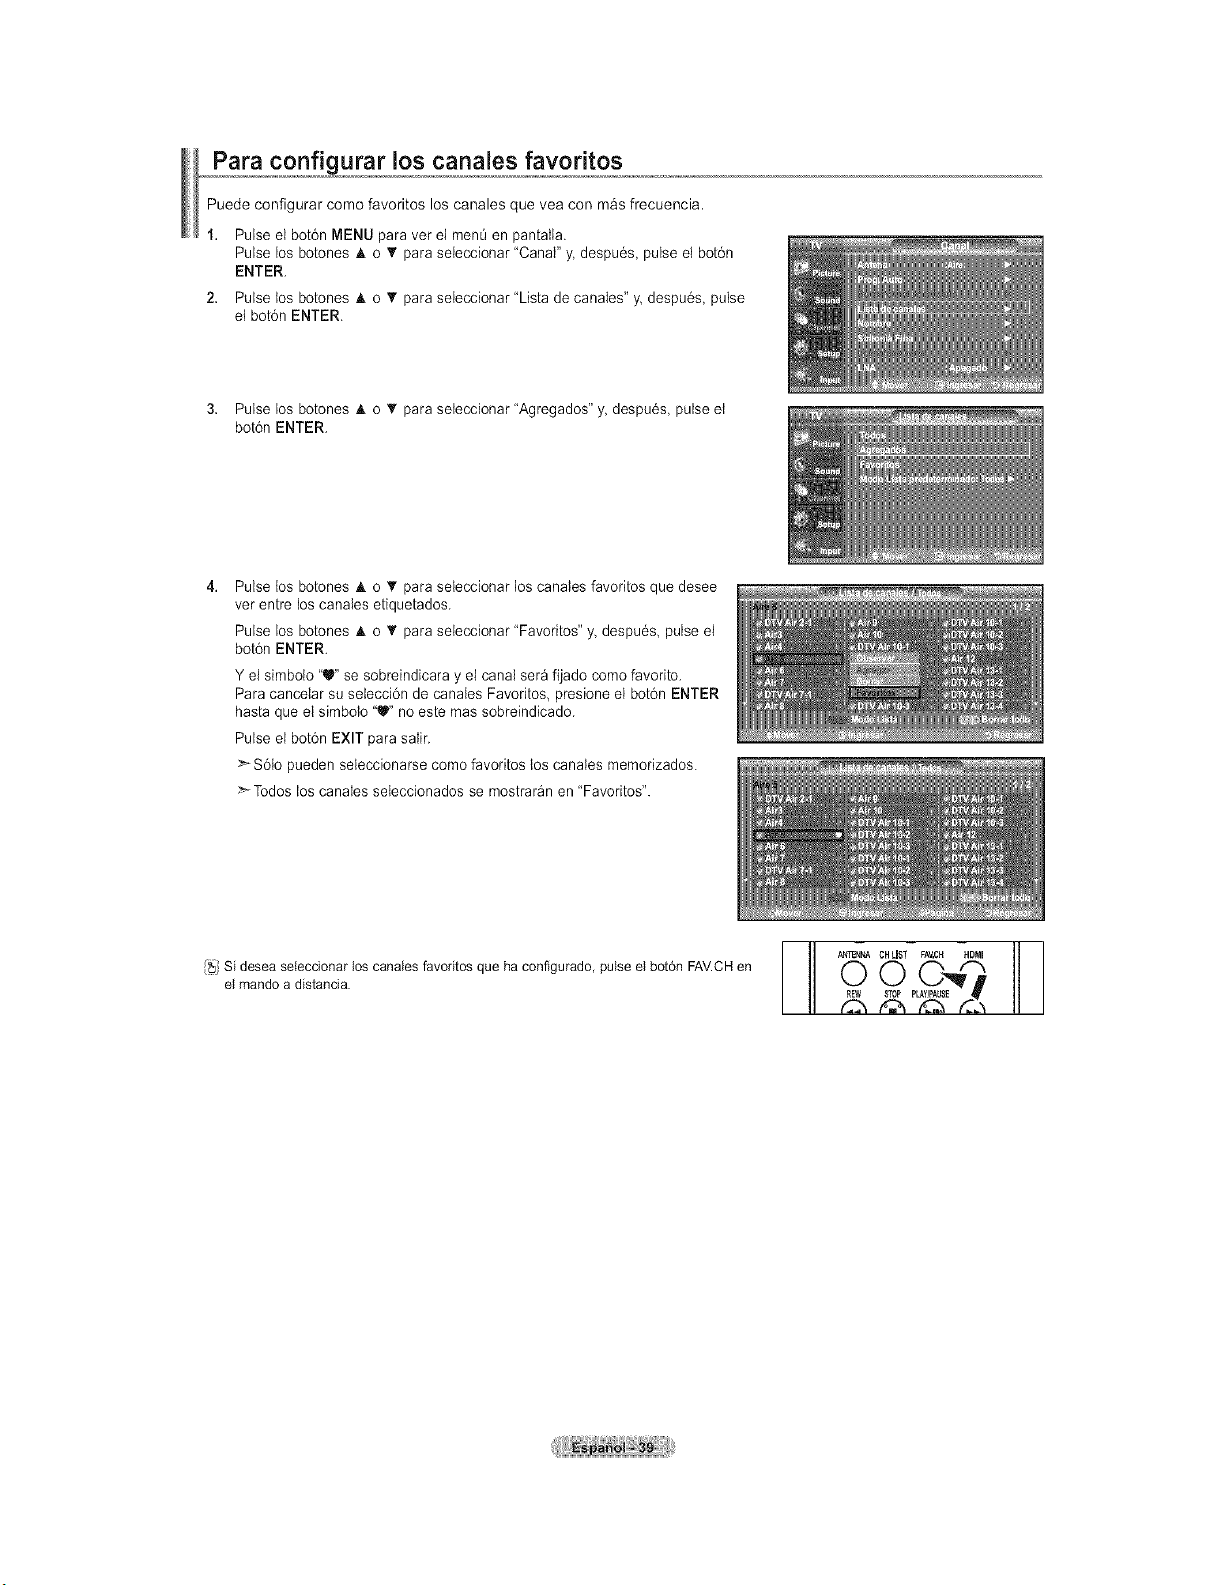
,,,,_para co_Rf!_urar los caRales favoritos
Puede eonfigurar eomo favoritoa los canalea que vea con maa ffecuencia.
1. Pulse el bot6n MENU paravet el men_en pantall&
Pulse los botones & o _' para seieccionar "Canal" y. despu6s, pulse el botdn
ENTER.
2. Pulse tos botones A o T para seleccionar "Lista de canales" y. despu6s, pulse
etbot6n ENTER.
3. Pulse los botones A o • para seteccionar "Agregados" y despu6s, pulse et
bot6n ENTER.
Pulse los botones A o T para seleccionar loscanaIes favoritos que desee
ver entre loscanaIes etiquetados.
Pulse los botones A o _' para seleccionar "Favorites" y despu6s pulse el
bot6n ENTER.
Y el simbolo "U"se sobreindicara y el canal ser_ fijado como favorite.
Para cancelar suseiecci6n decanales Favorites, presione el bot6n ENTER
hasta que el simbolo "_" no este massobreindicado.
Pulse el bot6n EXIT parasalir.
>-S6to pueden seleccionarse come favorites los canaIes memorizados.
-'_Todos loscanaIes seleccionados se mostraran en"Favorites".
Si desea seieccionarloscanaiesfavodtosque ha configurado,pulse el bot6n FAV.CHen 0 CO'_m
el mandoadistancia. /_ P_E
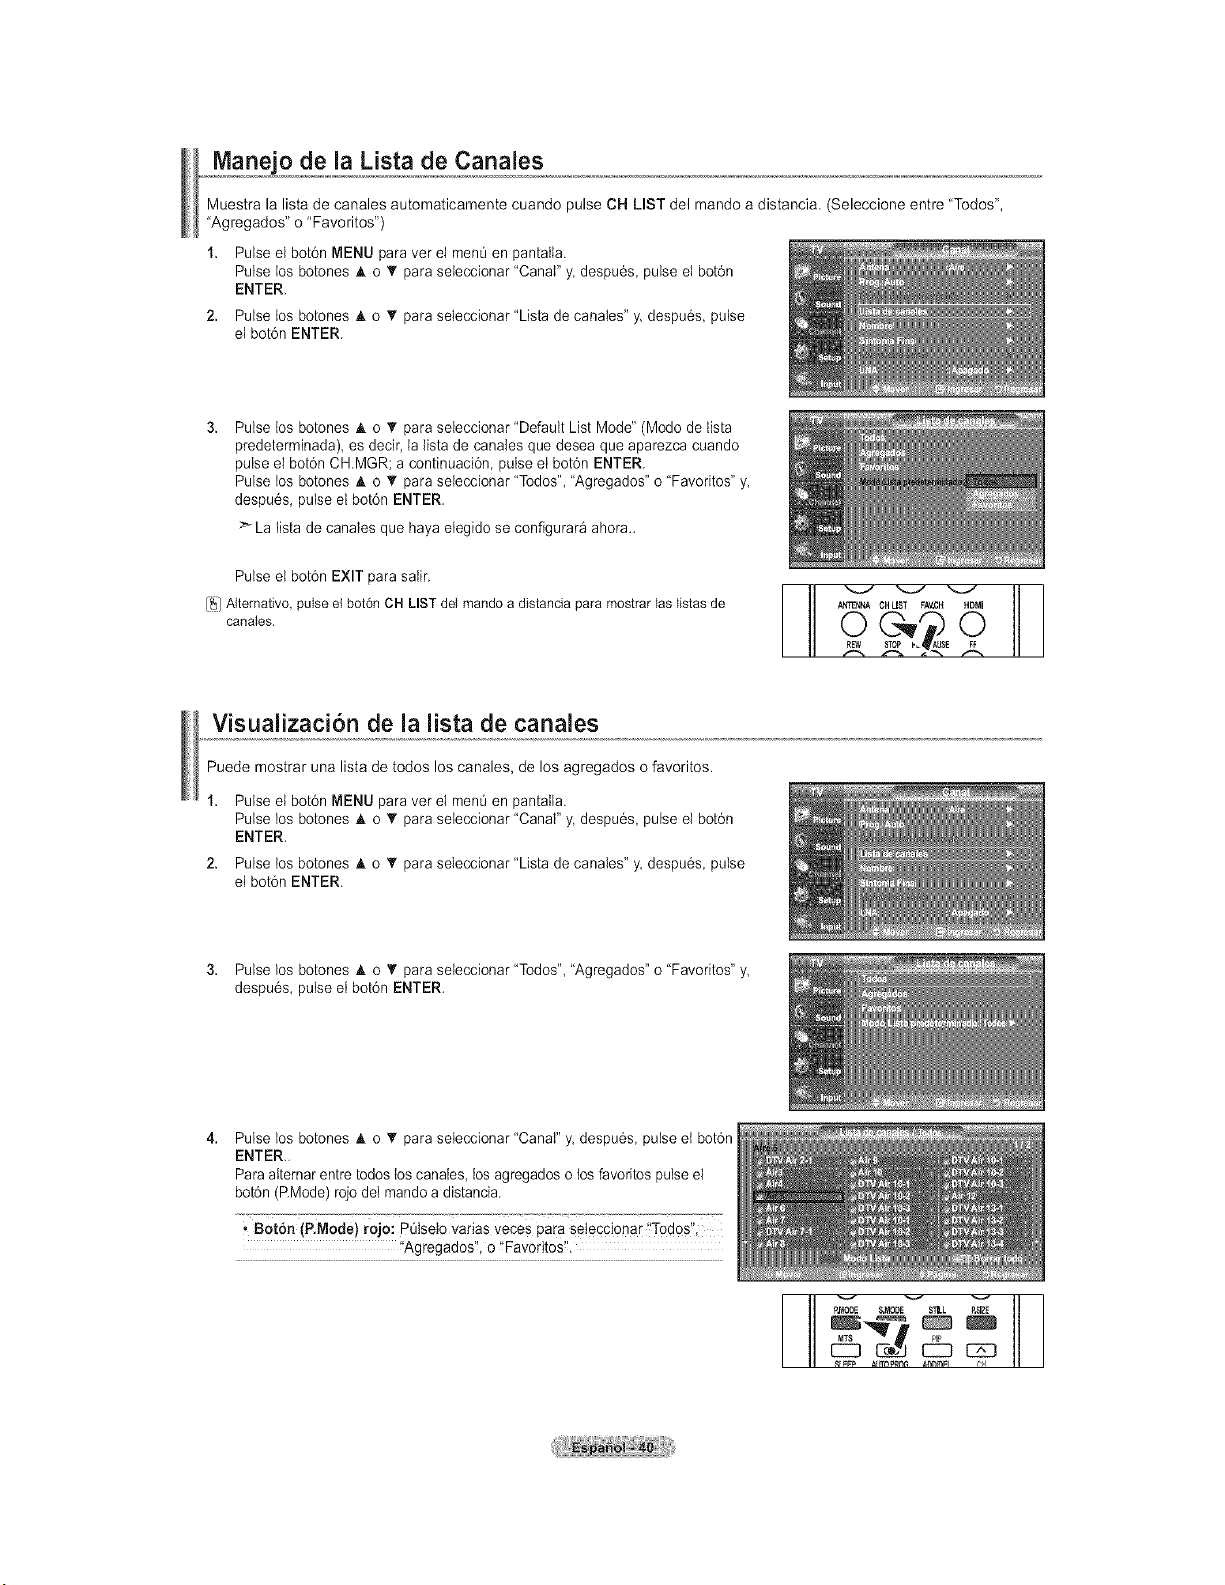
o de la Lista de Canales
Muestra la lista de canales automaticamente cuando pulseCH LIST del mando adistancia. (Seleccione entre "Todos",
"Agregados" o "Favoritos")
1. Pulse el bot6n MENU paravet el men0en pantalla.
Pulse los botones A o T para seieccionar "Canal" y. despu6s, pulse el bot6n
ENTER.
2. Pulse los botones A o _rpara seleccionar "Lista decanaIes" y.despu6s, pulse
el bot6n ENTER.
Pulse los botones A o _' para seieccionar "Default List Mode" (Modo de lista
predeterminada), es decir,la tista decanales que desea que aparezca cuando
pulse el bot6n CHMGR; a continuaci6n, pulse el bot6n ENTER.
Pulse los botones A o T para seieccionar "Todos", "Agregados"o "Favorites" y
despu6s, pulse el bot6n ENTER.
>La lista de canaIes que haya elegido se conflgurar_ ahora..
Pulse el bot6n EXIT para satir.
[_] Altemativo, pulse el bot6n OH LIST del mando a distancia para mostrar }as }istas de
cana}es.
Iq
ANTENNA CHUST FAV,CH HDMI
E
L
Visualizacion de la lista de canales
Puede mostrar una lista de todos loscanales, de los agregados ofavoritos.
Pulse et bot6n MENU para ver el men0 en pantaIla.
Pulse los botones A o _rpara seleccionar "Canal" y. despu6s, pulseet bot6n
ENTER.
Pulse los botones A o T para seleccionar "Lista de canales" y. despu6s, pulse
el bot6n ENTER.
3. Pulse los botones A o _' para seleccionar "Todos", "Agregados" o "Favoritos" y
despu6s, pulse et bot6n ENTER.
Pulse los botones A o T para seieccionar "Canal" y. despu6s pulse et bot6n
ENTER.,
Para alternar entre todoslos canales, los agregadosotosfavoritos pulse el
bot6n (RMode) rojo deI mandoadistancia.
• Botdn(P.Mode) rojo: PQIsetoVarias veceS paraseleccionar !'Todos",
t'Agregados'_,o'!Favorites_I.
S,MODE_ STLL P,SI'_
MTS _ PP
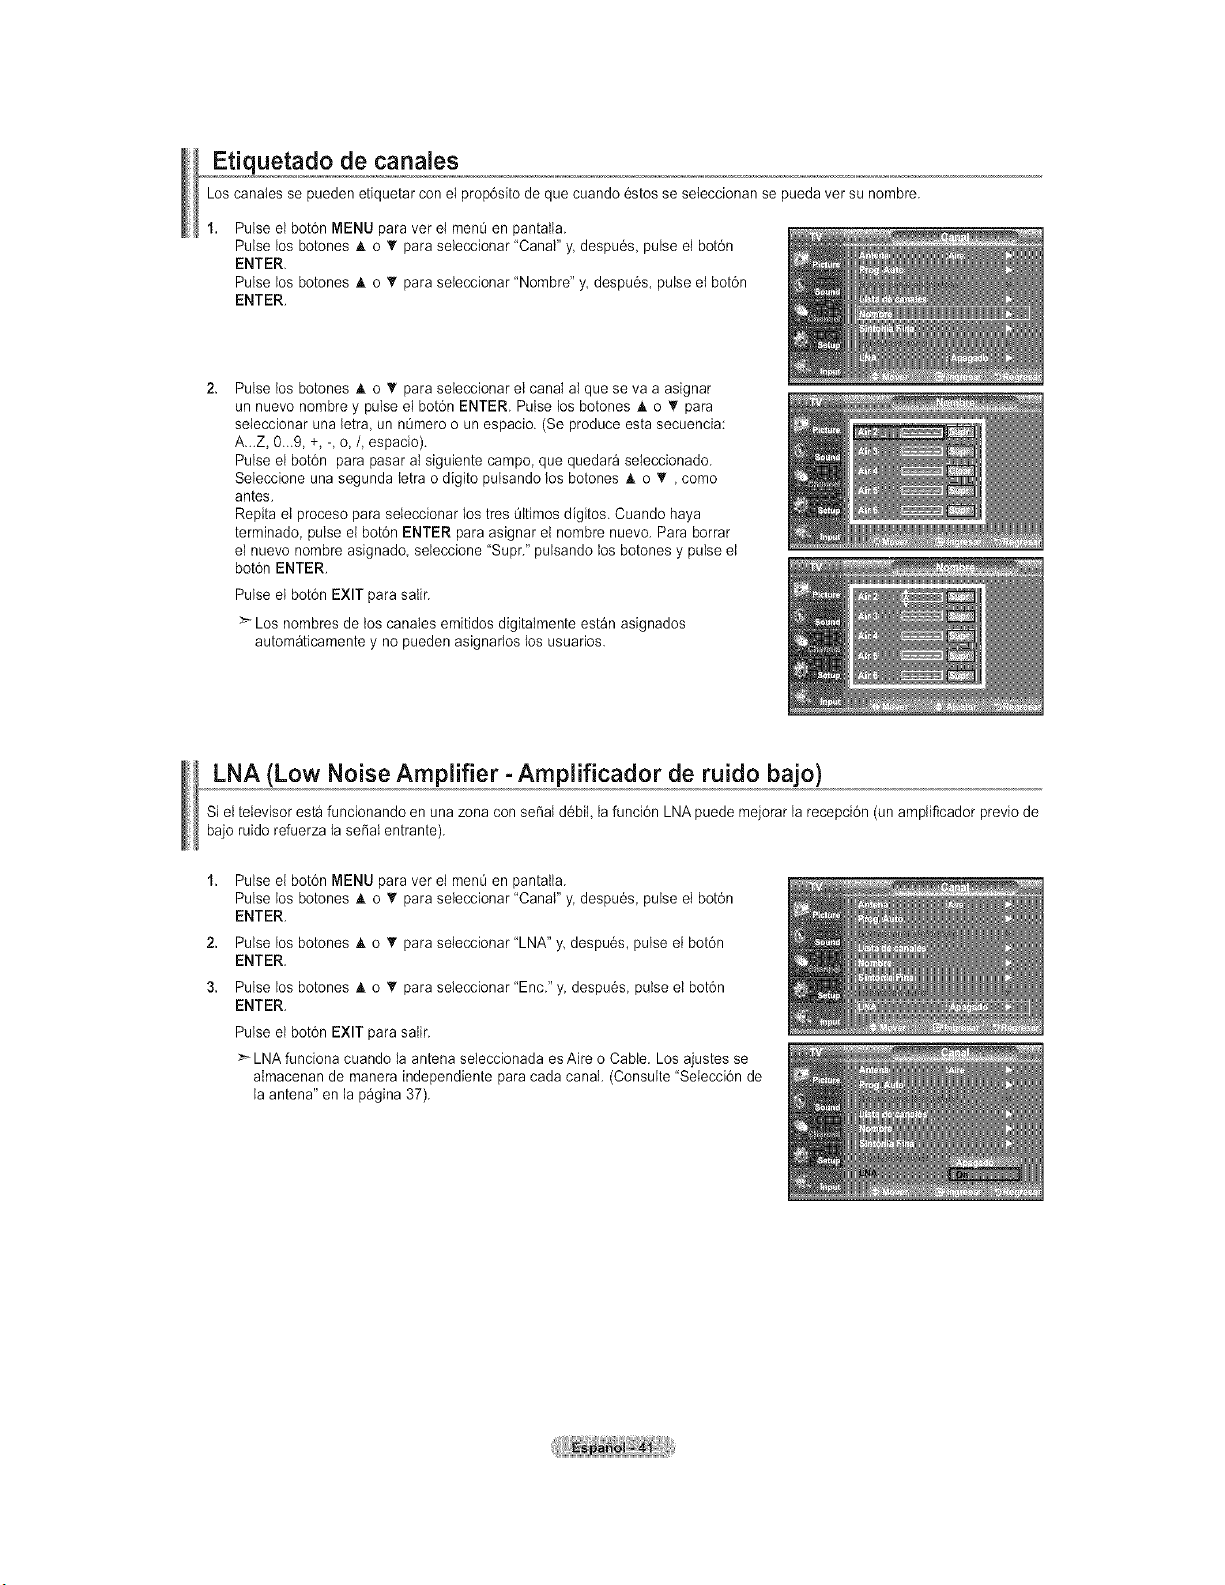
Etiquetado de canales
LoscanaIes se pueden etiquetar conel prop6sito de que cuando6stos se seteccionan se pueda ver su nombre.
Pulse el bot6n MENU para vet el men0 en pantalla.
Pulse los botones A o T para seleccionar "Canal" y. despu6s, pulse el bot6n
ENTER.
Pulse los botones A o _rpara seteccionar "Nombre" y,despu6s, pulse et bot6n
ENTER.
Pulse los botones A o _' para seleccionar el canal al que se va a asignar
un nuevo nombre y pulse el bot6n ENTER. Pulse losbotones A o 'V para
seleccionar una letra, un n0meroo un espacio. (Se produce esta secuencia:
A_.Z, 0._9, +,-,o,/, espacio).
Pulse el bot6n parapasar aIsiguiente campo, que quedara seleccionado.
Seleccione una segunda letra odigito pulsando los botones h, o T ,como
antes.
Repita el proceso paraseleccionar lostres Oltimos d[gitos. Cuando haya
terminado, pulse el bot6n ENTER paraasignar el nombre nuevo. Para borrar
el nuevo nombre asignado, seleccione "Supt." pulsando los botones y pulse el
bot6n ENTER.
Pulse el bot6n EXIT parasaIir.
:_Los nombres de los canales emitidos digitalmente est_n asignados
autom_ticamente y no pueden asignarlos losusuarios.
Low Noise Amplifier- Amplificador de ruido bajo)
Siel televisor estafuncionando en una zona con se_atd6bil, la funci6n LNA puede mejorar la recepci6n (unamplificador previo de
bajo ruido refuerza laseSal entrante).
2.
3.
Pulse el bot6n MENU paraver el menOen pantaIla.
Pulse los botones h, o _rpara seleccionar "Canal" y. despu6s, pulse et bot6n
ENTER.
Pulse los botones A o T para seleccionar "LNA" y despu6s, pulse el bot6n
ENTER.
Pulse los botones h, o _rpara seleccionar "Enc." y despu6s pulse el bot6n
ENTER.
Pulse el bot6n EXIT parasalir.
> LNA funciona cuando la antena seIeccionada es Aire o Cable. Losajustes se
aImacenan de manera independiente para cada canal. (Consulte "Seiecci6n de
la antena" en la p_gina 37).
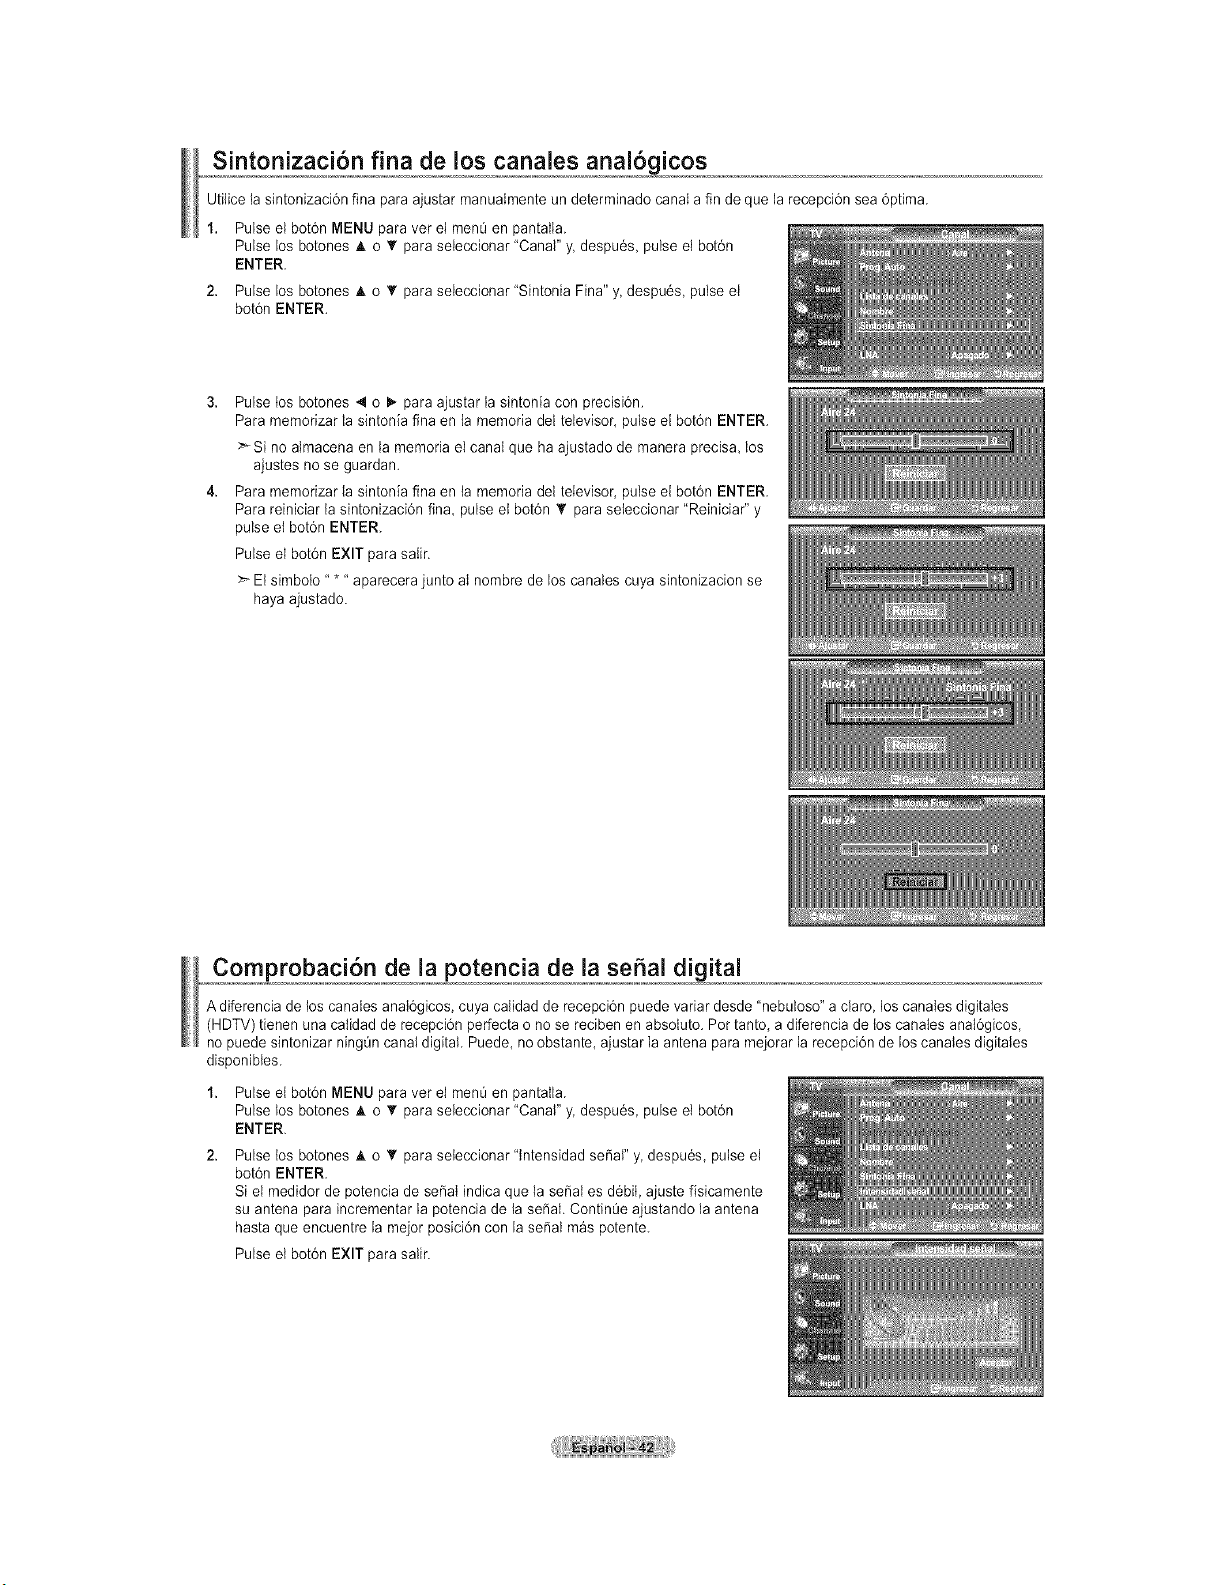
Utilicelasintonizaci6nfinaparaajustarmanualmenteundeterminadocanalafindequelarecepci6nsea6ptima.
1. Pulseelbot6nMENUparavetelmen_enpantalla.
PulseDosbotones& o T para seieccionar "Canal" y. despu6s, pulse el botdn
ENTER.
2. Pulse Dosbotones A o T para seleccionar "Sintonia Fina" y despu6s, pulse el
bot6n ENTER.
Pulse los botones 4 o _ para ajustar la sintonia con precisi6n.
Para memorizar lasintonia fina en la memoria del televisor, pulse el bot6n ENTER.
>Si no almacena enla memoria el canal que haajustado de manera precisa, los
ajustes no se guardan.
Para memorizar iasintonia fina en ta memoria del televisor, pulse el bot6n ENTER.
Para reiniciar la sintonizaci6n fina pulse et bot6n _r paraseteccionar "Reiniciar" y
pulse etbot6n ENTER.
Pulse el bot6n EXIT parasalir.
> Elsimbo{o..... aparecera junto aI nombre de los canales cuya sintonizacion se
hayaajustado.
Comprobaci6n de la potencia de la seSal digital
A diferencia delos canaIes anat6gicos, cuyacalidad de recepcidn puede variar desde "nebuloso" aclaro, loscanaIesdigitales
(HDTV) tienen una catidad derecepci6n perfecta o nose recibenen absoluto. Pot tanto, adiferencia de loscanales anal6gicos,
no puede sintonizar ningQncanaldigital. Puede,no obstante, ajustarla antena para mejorar la recepci6nde loscanaIes digitales
disponibtes.
Pulse el bot6n MENU paraver el menOen pantaIla.
Pulse los botones A o _rpara seleccionar "Canal" y. despu6s, pulseet bot6n
ENTER.
Pulse los botones A o T para seteccionar "tntensidad seSaI" y despu6s, pulse el
bot6n ENTER.
Si el medidor depotencia de seSatindica que la seSat es d_bit,ajuste fisicamente
su antena para incrementar la potencia dela seSal. ContinOe ajustando la antena
hasta que encuentre la mejor posici6n con la seSal m_s potente.
Pulse et bot6n EXIT parasalir.
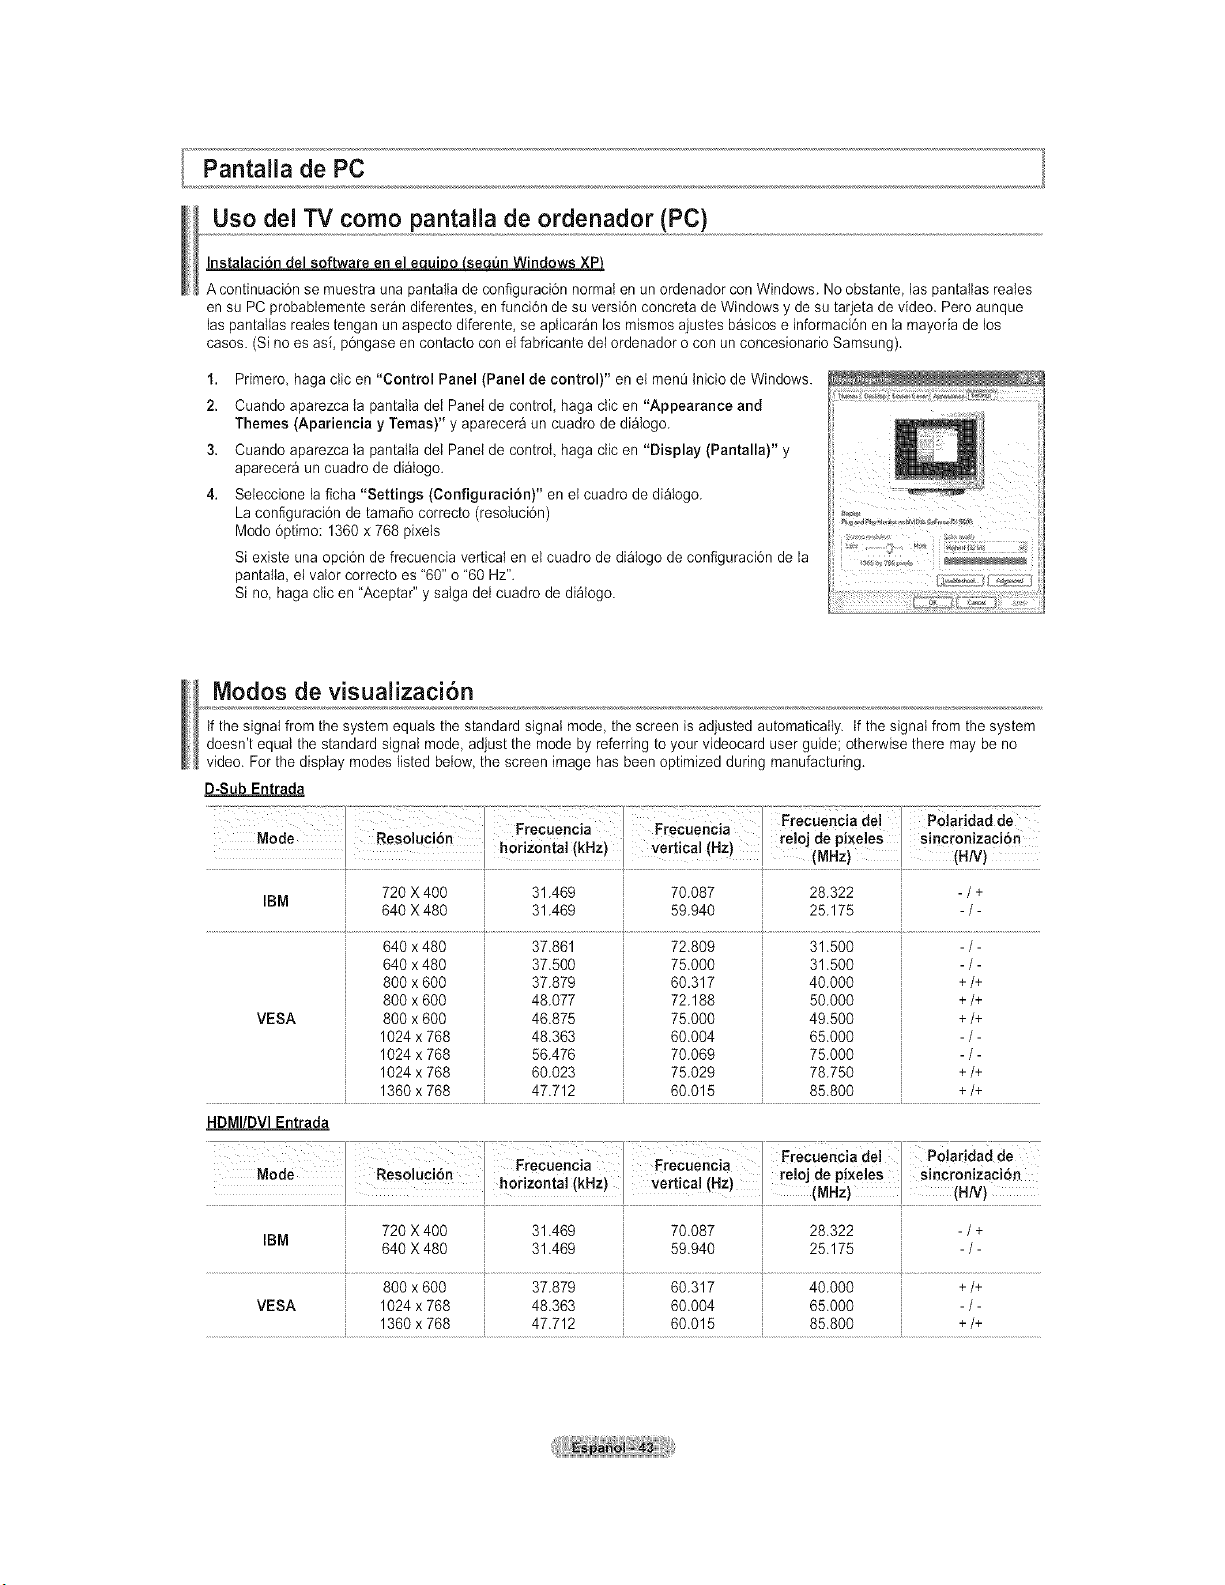
Pantalla de PC
Uso del TV como pantalla de ordenador (PC)
In--ware en el e ui o se _n Windows XP}
A continuaci6n se muestra una pantaIiade configuraci6n normal enun ordenador con Windows. No obstante laspantaIlas reales
en su PC probablemente ser_n diferentes, en funci6n de su versi6n concreta deWindows y de su tarjeta de video. Pero aunque
laspantallas realestengan un aspecto diferente, seapiicar_n losmismosajustes b_sicos e informaci6n en la mayoda de los
casos. (Si no es asi, p6ngase encontacto conel fabricante del ordenador ocon un concesionario Samsung).
1. Primero haga clicen "Control Panel (Panel de control)" en el menQtniciode Windows.
2. Cuando aparezca ia pantaltadei Panetdecontro{, haga clic en "Appearance and
Themes (Apariencia y Temas)" y aparecer_ un cuadro de di_logo.
3. Cuando aparezca la pantalla dei Panelde control, haga clic en "Display (Pantalla)" y
aparecer_ un cuadro dedialogo.
4. Seleccione laficha "Settings (Configuraci6n)" en et cuadro de di_logo.
La configuraci6n detama5o correcto (resoluci6n)
Modo 6ptimo: 1360 x 768 pixels
Si existe una opci6n de frecuencia verticai en el cuadro de di_Iogo de configuraci6n de la
pantalla, el valor correcto es "60" o'60 Hz".
Si no, haga clic en "Aceptar" y satga deicuadro de di_Iogo.
Modos de visualizaci6n
if the signal from the system equals the standard signal mode, the screen is adjusted automatically, if thesignat from the system
doesn't equaI the standard signal mode, adjust the mode by referringtoyour videocard user guide; otherwise there may be no
video. For the display modes listed below,the screen image hasbeenoptimized during manufacturing.
D-Sub Entrada
i . Frecuencia del
. . _ ... P,oo o°o,oP,oo,o°c,a..... Po,a,daddo
Nooe Keso uc on re oJde pxe es
.................................................................................................................... ...........,,,,,.............................
720 X 400 31.469 70.087 28.322 -/ +
IBM
640 X 480 31.469 59.940 25.175 -/ -
640 x 480 37.861 72.809 31.500 _)- ..................................
VESA
640 x480
800 x 600
800 x 600
800 x 600
1024 x 768
1024 x 768
1024 x 768
1360 x 768
37.500
37.879
48.077
46.875
48.363
56.476
60.023
47.712
75.000
60.317
72.188
75.000
60.004
70.069
75.029
60.015
31.500
40.000
50.000
49.500
65.000
75.000
78.750
85.800
-/-
+/+
+/+
+/+
-/-
-/-
+/+
+/+
HDMI/DVI Entrada
720 X 400 31.469 70.087 28.322 -/ +
IBM
640 X 480 31.469 59.940 25.175 -/ -
800 x 600 37.879 60.317 40.000 +/+
VESA 1024 x 768 48.363 60.004 65.000 -/ -
1360 x 768 47.712 60.015 85.800 +/+
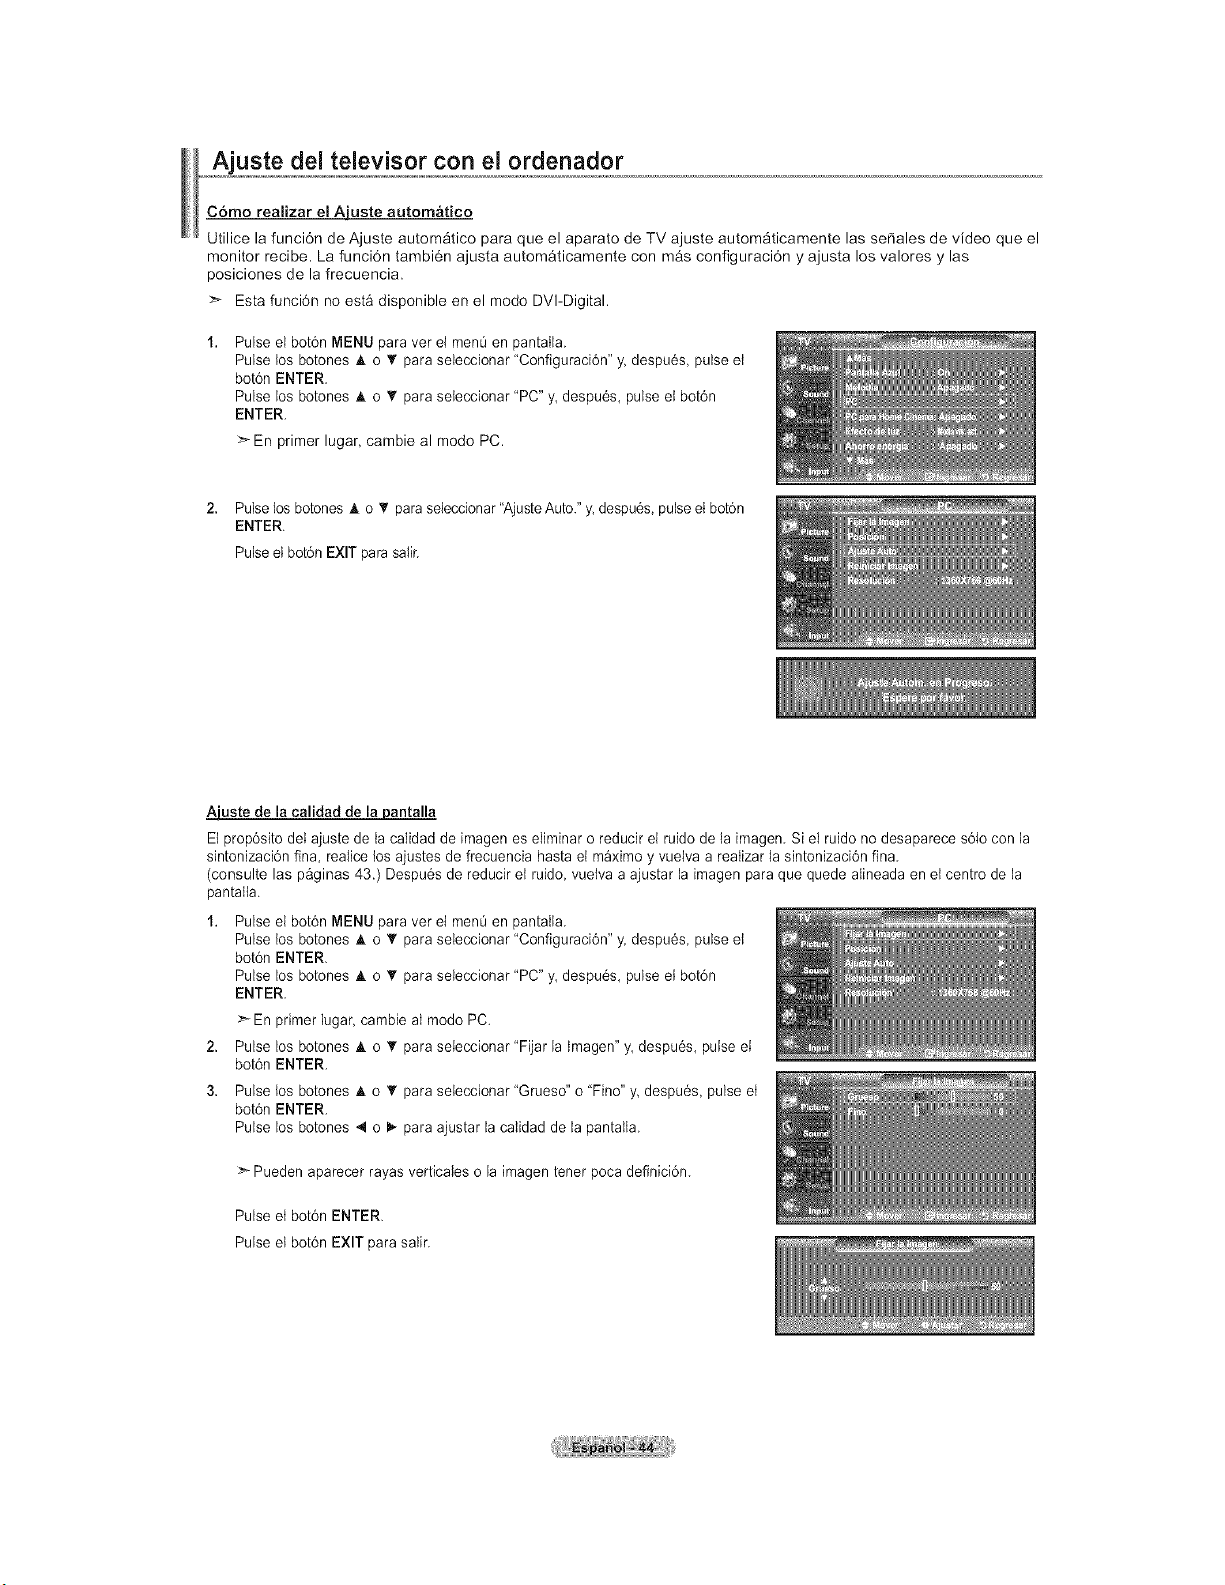
Ajuste del televisor con el ordenador
Como realizar elAiuste automatico
Utilice la funci6n de Ajuste autom_tico para que el aparato de TV ajuste autom_ticamente las sefiales de video que el
monitor recibe. La funci6n tambi6n ajusta autom_ticamente con m_e configuraci6n y ajusta los valores y las
poeiciones de la frecuencia.
>- Esta funci6n no est_ disponible en el mode DVI-Digital.
Pulse el bot6n MENU para vet el men0 en pantatla.
Pulse los botones A o _' para seleccionar "Configuraci6n" y.despu6s pulse et
bot6n ENTER.
Pulse los botones A o • para seleccionar "PC" y, despu6s, pulse et bot6n
ENTER.
>- En primer lugar, cambie al mode PC.
2. Pulse los botonesA o 'r paraseleccionar"Ajuste Auto." y.despu6s, pulse et bot6n
ENTER.
Pulse el bot6n EXIT parasaIir.
Aiuste de la calidad de lai0antalla
El prop6sito del ajuste de ta caIidad de imagen es eliminar oreducir el ruido de la imagem Si el ruido no desaparece s61ocon la
sintonizaci6n fina, realice losajustes defrecuencia hasta el maximo y vuelva areatizar lasintonizaci6n fina.
(consulte las paginas 43.) Despu6s de reducir etruido, vueiva aajustar la imagen paraque quede aIineadaen et centro de la
pantalla.
Pulse el bot6n MENU para vet el men0 en pantatla.
Pulse los botones A o T para seleccionar "Configuraci6n" y.despu6s pulse et
bot6n ENTER.
Pulse los botones A o _rpara seleccionar "PC" y, despu6s, pulse et bot6n
ENTER.
_En primer lugar, cambie al modo PC.
2. Pulse los botones _k o T para seieccionar "Fijar la tmagen" y, despu6s, pulse el
bot6n ENTER.
3. Pulse los botones _t. o T para seieccionar "Grueso" o"Fino" y despu6s, pulse et
bot6n ENTER.
Pulse los botones 4 o 1_-para ajustar la calidad de la pantalla.
>- Puedenaparecer rayas verticales o la imagen tener poca definici6n.
Pulse et bot6n ENTER.
Pulse et bot6n EXIT parasalir.
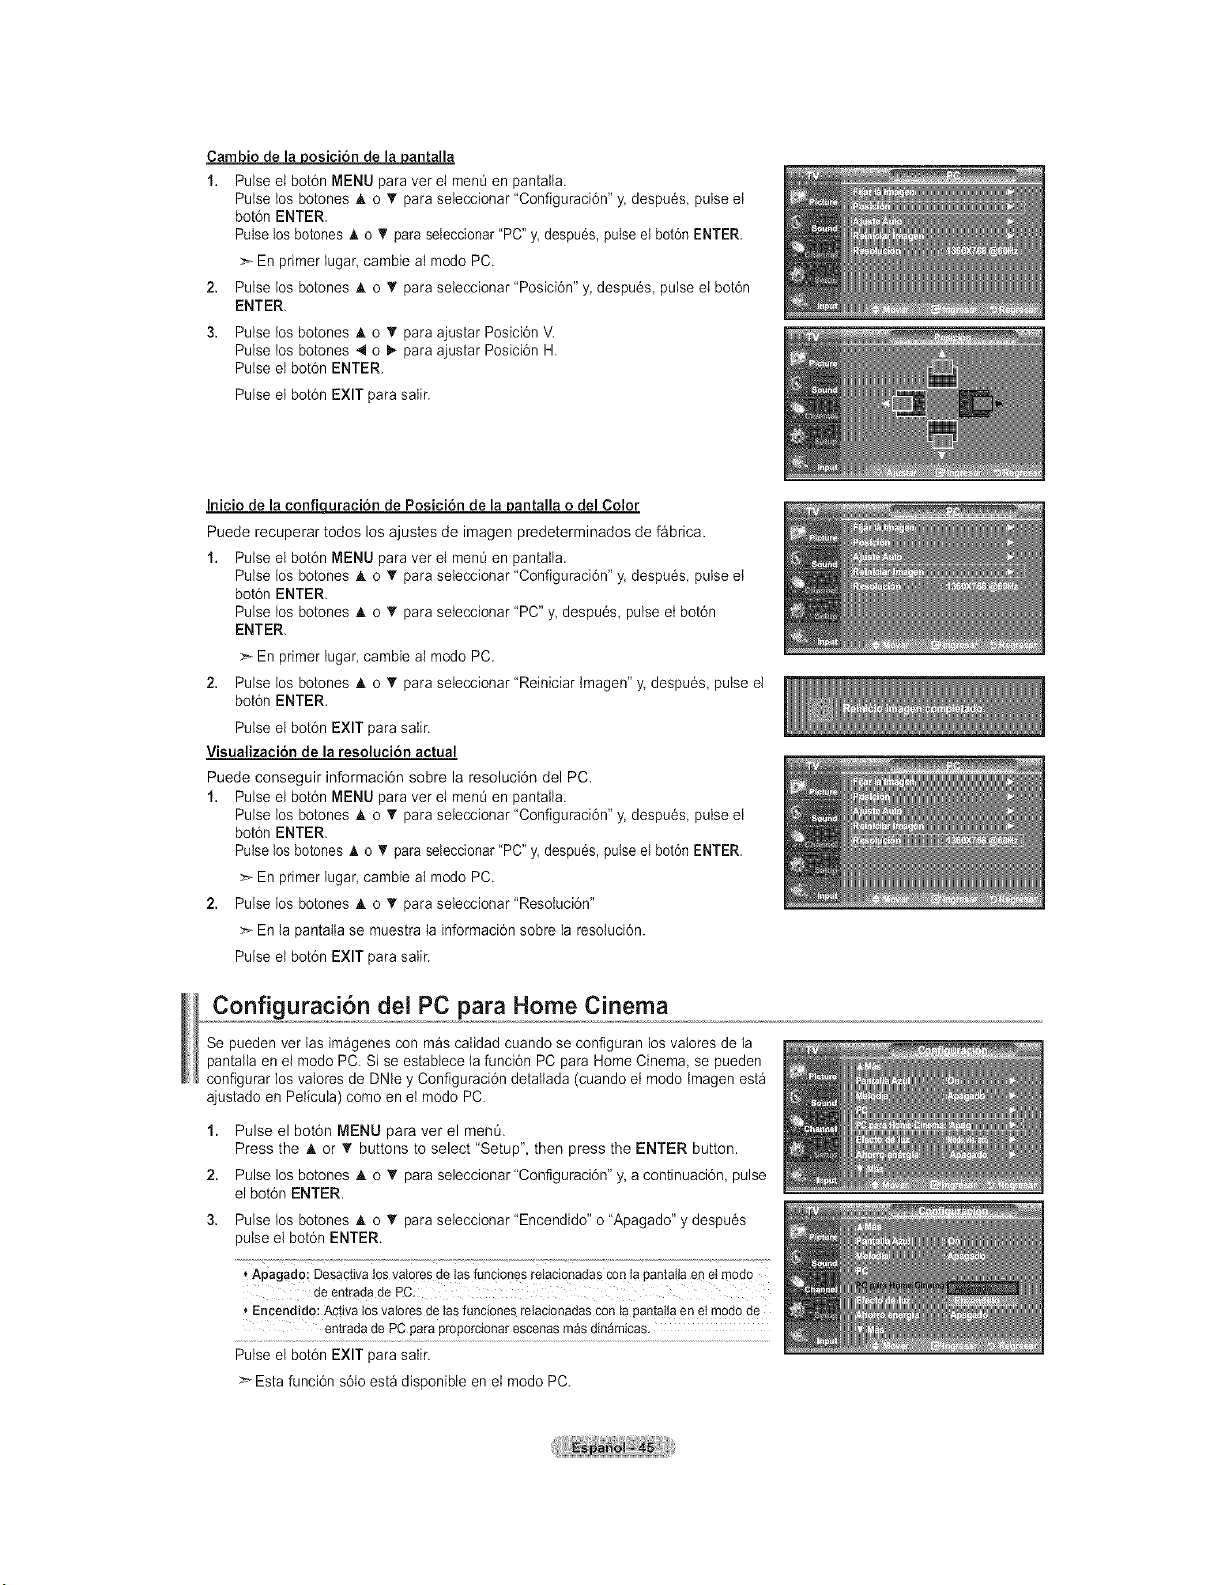
Carnbio de la posici6n de la pantalla
1. Pulse et bot6n MENU paraver el men0 en pantatla.
Pulse tos botones _t. o _' para seleccionar "Configuraci6n" y. despu6s, pulse et
bot6n ENTER.
Pulse los botones _.o V paraseleccionar "PC" y,despu6s,pulse el boton ENTER.
En primer lugar cambie al modo PC.
2. Pulse los botones & o _' para seleccionar "Posici6n" y despu6s, pulse el bot6n
ENTER.
3. Pulse los botones A o _rpara ajustar Posici6n V.
Pulse los botones 4 o _,.para ajustar Posici6n H
Pulse et bot6n ENTER.
Pulse et bot6n EXIT parasalir.
Inicio de la confiquracion de Posicion de la#antalla odel Color
Puede recuperar todos los ajustes de imagen predeterminados de f&brica.
1. Pulse el bot6n MENU paraver el men0 en pantatla.
Pulse los botones & o T para seleccionar "Configuraci6n" y.despu6s pulse et
bot6n ENTER.
Pulse los botones h. o _rpara seteccionar "PC" y despu6s, pulse etbot6n
ENTER.
:_ En primer lugar, cambie al modo PC.
2. Pulse los botones h. o T para seieccionar "Reiniciar tmagen" y. despu6s, pulse et
bot6n ENTER.
Pulse el bot6n EXIT parasatir.
Visualizaci6n de la resoluci6n actual
Puede conseguir informaci6n sobre la resoluci6n del PC.
1. Pulse el bot6n MENU paravet el men0en pantalla.
Pulse los botones A o T para seieccionar "Configuraci6n" y,despu6s, pulse et
bot6n ENTER.
Pulse los botones ,Lo 'Vparaseleccionar "PC" y, despu6s,pulse el boton ENTER.
En primer lugar, cambie al modo PC.
2. Pulse los botones A o _' para seleccionar"Resoiuci6n"
>_ En la pantatlase muestra la informaci6n sobre la resoluci6n.
Pulse el bot6n EXIT parasalir.
Configuraci6n del PC para Home Cinema
Se pueden vet las im_genes con m_s calidad cuando se configuran los valores dela
pantaitaen el modo PC. Sise establece lafunci6n PC paraHome Cinema, se pueden
configurar los valores de DNte y Configuraci6n detallada (cuando et mode tmagen est_
ajustado en Pelicula) comeen el mode PC.
1.
2.
3.
Pulse el bot6n MENU para ver el men&
Press the A or V buttons to select "Setup", then press the ENTER button.
Pulse los botones A o _' para seleccionar"Conf]gurad6n" y, a continuad6n, pulse
el bot6n ENTER.
Pulse los botones A o _' para seleccionar "Encendido" o"Apagado" y despu6s
pulse el bot6n ENTER.
Apagado: Desactivalosyaloresde tas{uncionesretacionadasconla panta!iaenet modo
de entradade PC.
Encendido:Activalosvaioresde Insfuncionesrelacionadasconla panta!iaen elmodode
entradade PCpara proporcionarescenasmasdinamicas.
Pulse el bot6n EXIT parasaIir.
>- Esta funci6n s61oest_ disponible en el mode PC.
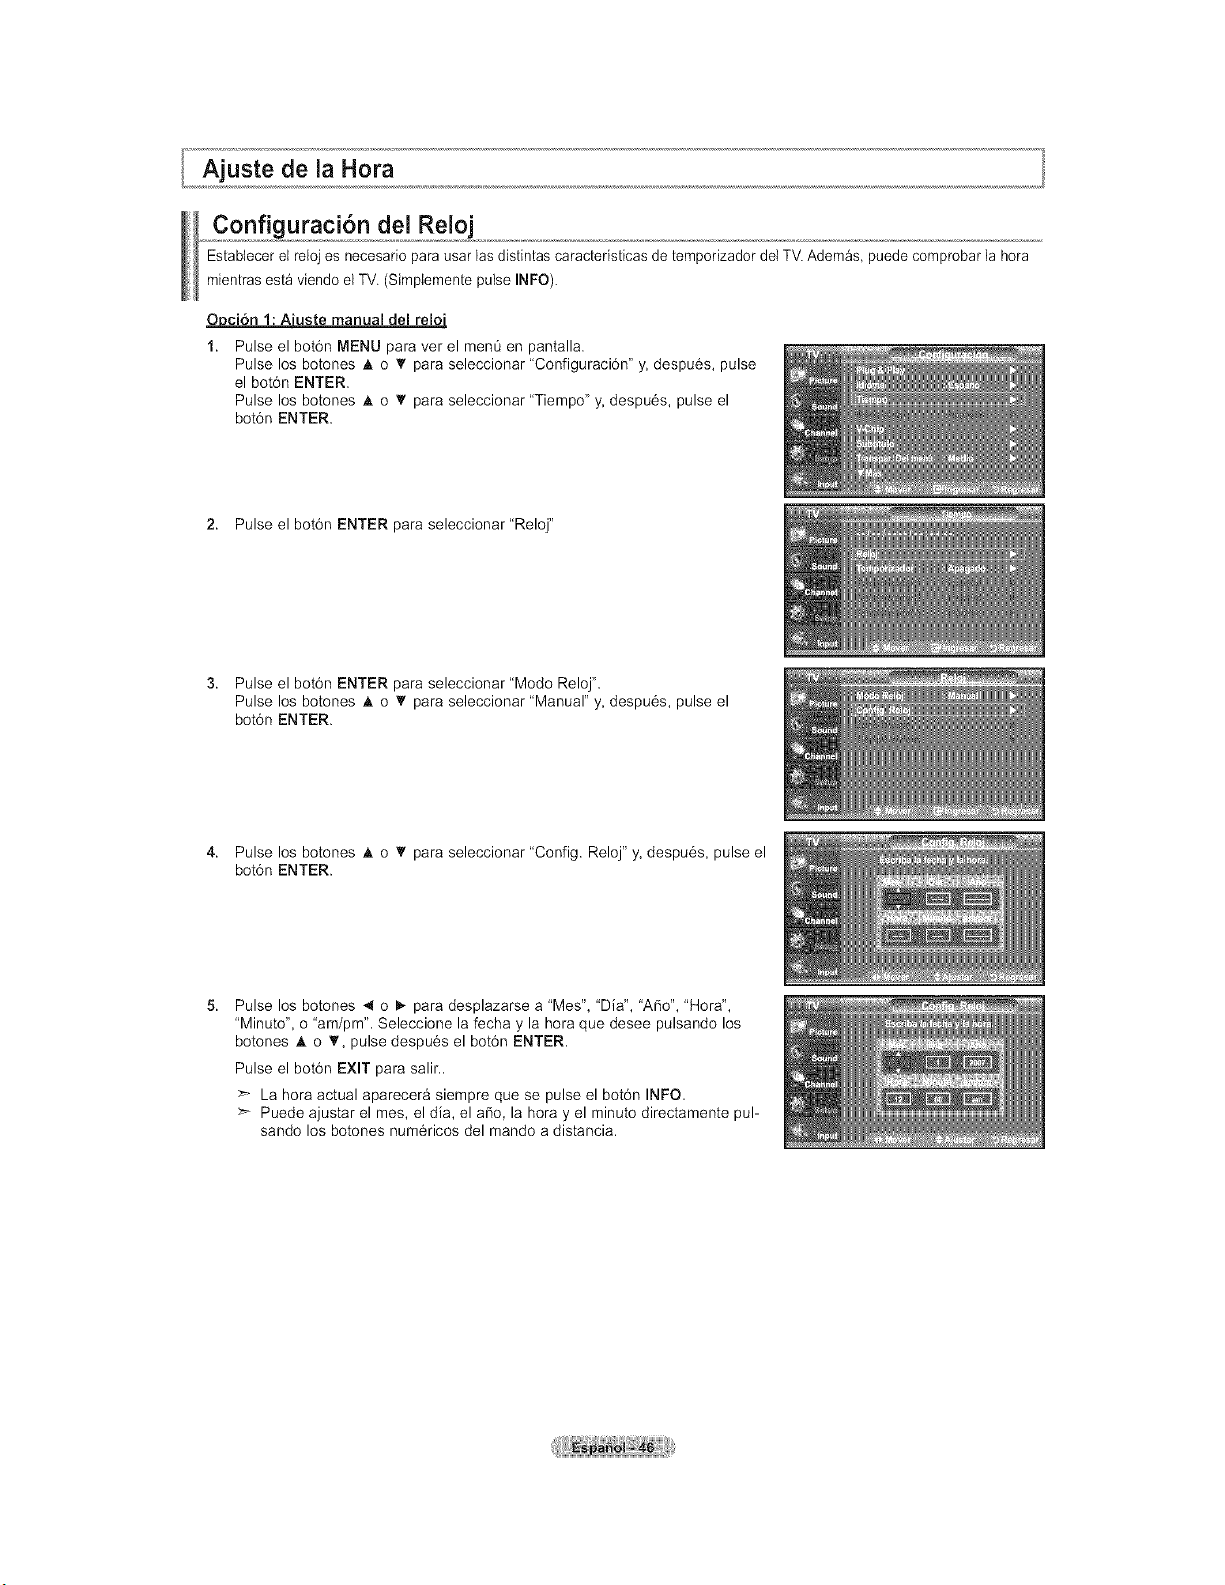
Ajuste de la Hora
Configuracion del Reloj
Estabtecer el relojes necesario parausar las distintas caracteristicas de temporizador detTV. Ademas, puede comprobar la hora
mientrasest_ viendo el TV,(Simplemente pulse INFO).
_uste manual del reloj
Pulse el bot6n MENU para ver el ment_ en pantalla.
Pulse los botones _, o T para seleccionar "Configuraci6n" y, despu6s, pulse
el bot6n ENTER.
Pulse los botones _, o 'I' para seleccionar "Tiempo" y,despu6s, pulse el
bot6n ENTER.
2. Pulse el bot6n ENTER para seleccionar"Reloj"
3. Pulse el bot6n ENTER para seleccionar"Modo Reloj".
Pulse los botones _, o 'I' para seleccionar "Manual" y, despu6s, pulse el
bot6n ENTER.
4. Pulse los botones _, o T para seleccionar "Config. Reloj" y, despu6s, pulse el
bot6n ENTER.
5.
Pulse los botones 4 o i_ para desplazarse a"Mes", 'Dia", 'Argo", "Hora",
"Minuto", o "am/pm". Seleccione la fecha y la hora que desee pulsando los
botones A o _', pulse despu6s el bot6n ENTER.
Pulse el bot6n EXIT para salir..
>" La hora actual aparecera siempre que se pulse el bot6n INFO.
Puede ajustar el rues, el dia, el afio, la hora y el minuto directamente pul-
sando los botones num6ricos del mando adistancia.
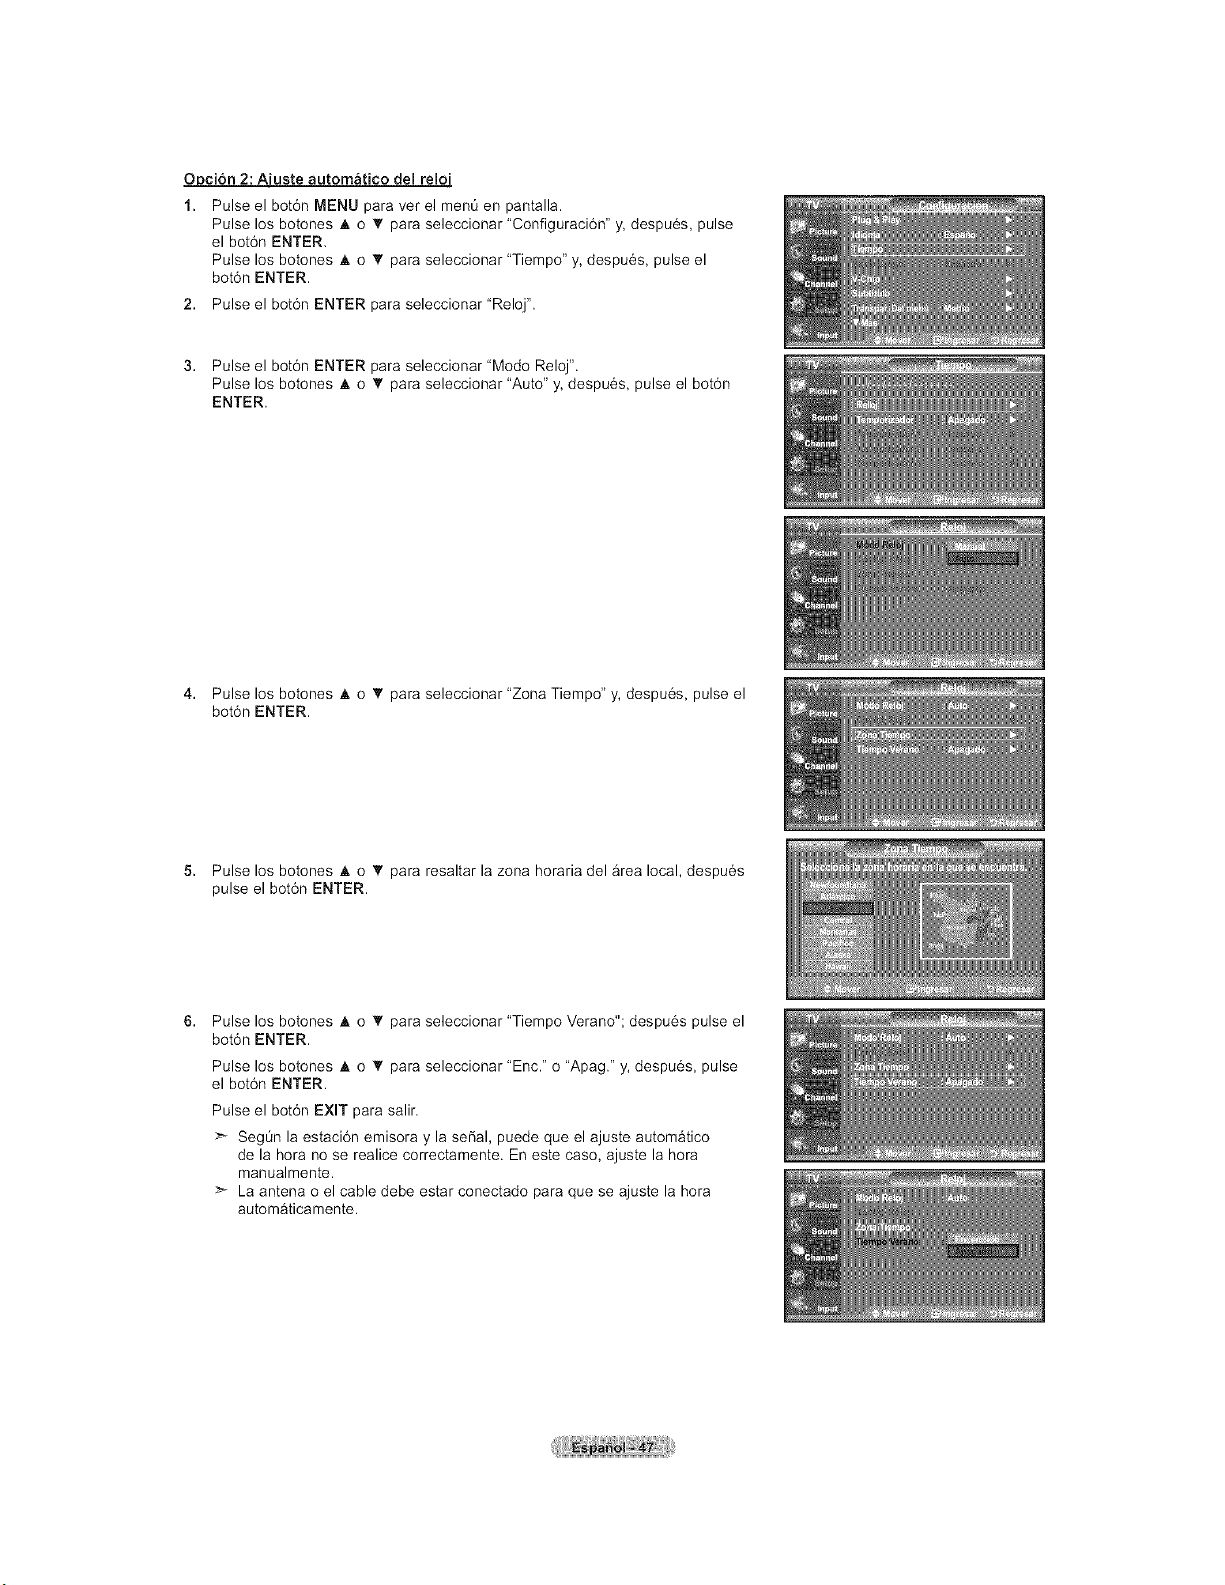
_uste automatico del reloj
1. Pulse el bot6n MENU para ver el men0 en pantalla.
Pulse los botones A o 'I' para seleccionar "Configuraci6n" y, despu6s, pulse
el bot6n ENTER.
Pulse los botones • o 'I' para seleccionar "Tiempo" y, despu6s, pulse el
bot6n ENTER.
2. Pulse el bot6n ENTER para seleccionar"Reloj".
3. Pulse el bot6n ENTER para seleccionar "Modo Reloj".
Pulse los botones A o T para seleccionar "Auto" y, despu6s, pulse el bot6n
ENTER.
4. Pulse los botones A o T para seleccionar "Zona Tiempo" y, despu6s, pulse el
bot6n ENTER.
5. Pulse los botones A o T para resaltar la zona horaria del area local, despu6s
pulse el bot6n ENTER.
6.
Pulse los botones A o 'I' para seleccionar "Tiempo Verano"; despu6s pulse el
bot6n ENTER.
Pulse los botones A o 'I' para seleccionar "Enc." o "Apag." y, despu6s, pulse
el bot6n ENTER.
Pulse el bot6n EXIT para salir.
>'- SegOn la estaci6n emisora y la seSal, puede que el ajuste automatico
de la hora no se realice correctamente. En este caso, ajuste la hora
manualmente.
>_ La antena o el cable debe estar conectado para que se ajuste la hora
autom&ticamente.
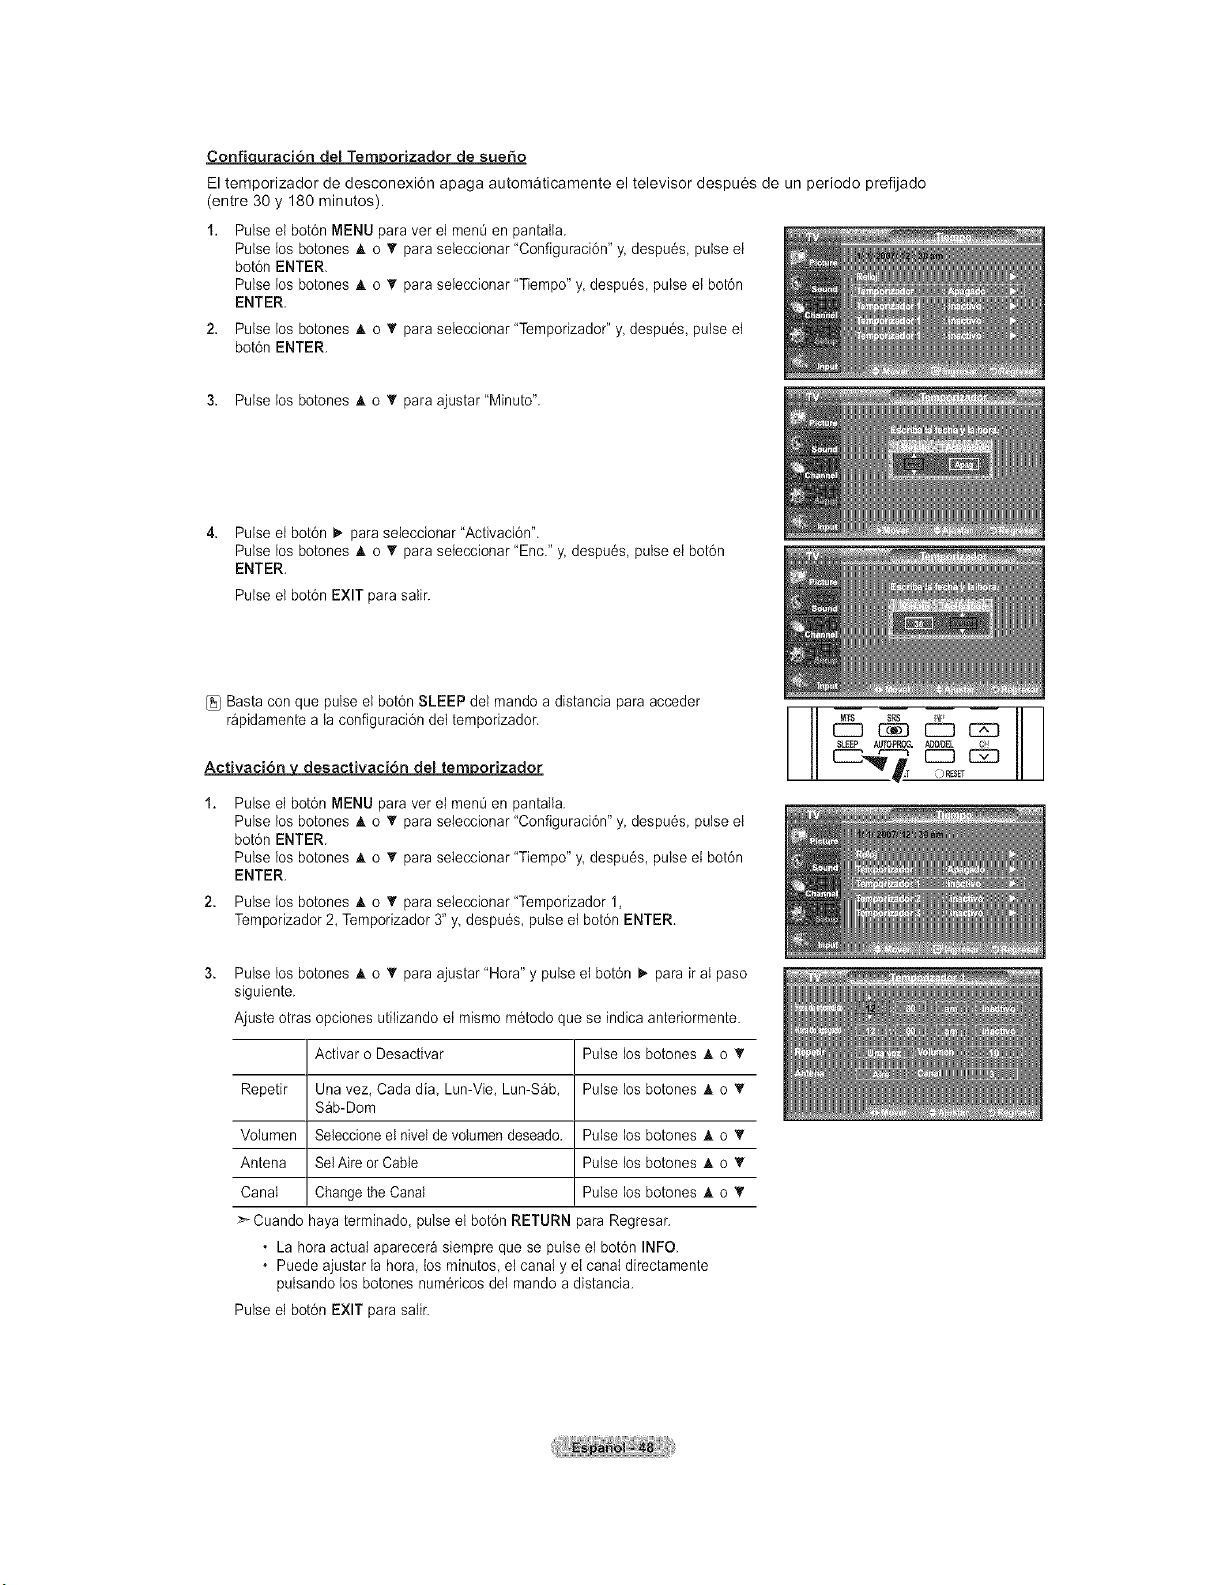
Confiquraci6n del Temporizador de sueSo
El temporizador de desconexi6n apaga autom_ticamente el televisor despu6s de un periodo prefijado
(entre 30 y 180 minutes).
Pulse el bot6n MENU para vet el men0 en pantatla.
Pulse los botones A o _rpara seleccionar "Configuraci6n" y. despu6s pulse el
bot6n ENTER.
Pulse los botones h, o _rpara seleccionar "Tiempo" y, despu6s, pulse etbot6n
ENTER.
2. Pulse los botones A o _' para seleccionar "Temporizador" y despu6s, pulse et
bot6n ENTER.
3. Pulse los botones A o T para ajustar"Minuto".
Pulse el bot6n _ paraseieccionar "Activaci6n".
Pulse los botones & o _rpara seteccionar "Enc." y. despu6s, pulse el botdn
ENTER.
Pulse et bot6n EXIT parasalir.
[]_ Basta con que pulse el bot6n SLEEP del mando adistancia paraacceder
r_pidamente a la configuraci6n det temporizador.
Activacion y desactivacion del ternporizador
Pulse el bot6n MENU para vet el men0 en pantalla.
Pulse los botones A o T para seieccionar "Configuraci6n" y despu6s, pulse el
bot6n ENTER.
Pulse los botones A o _rpara seleccionar "Tiempo" y. despu6s, pulseel bot6n
ENTER.
Pulse los botones A o T para seleccionar "Temporizador 1,
Temporizador 2, Temporizador 3" y despu6s, pulse et bot6n ENTER.
S_EPA_PRCG._ _
IT _R_ET
Pulse los botones _k o T para ajustar"Hora" y pulse et bot6n I,. para ir aIpaso
siguiente.
Ajuste otras opciones utilizando etmismo m6todo que se indica anteriormente.
Activar o Desactivar Pulse los botones A o _r
Repetir Una vez, Cada dia Lun-Vie, Lun-S_b, Pulse los botones A o T
S_b-Dom
Votumen Seleccioneel nivel de volumen deseado. Pulse losbotones A o T
Antena SelAire or Cable Pulse los botones A o T
Canal Change the Canal Pulse los botones A o _r
>Cuando haya terminado, pulse el bot6n RETURN paraRegresar.
• La hora actual aparecera siempre que se pulseel bot6n INFQ
• Puede ajustar la hora, los minutos, el canal y el canal directamente
pulsando los botones num6ricos det mando a distancia.
Pulse el bot6n EXIT parasalir.
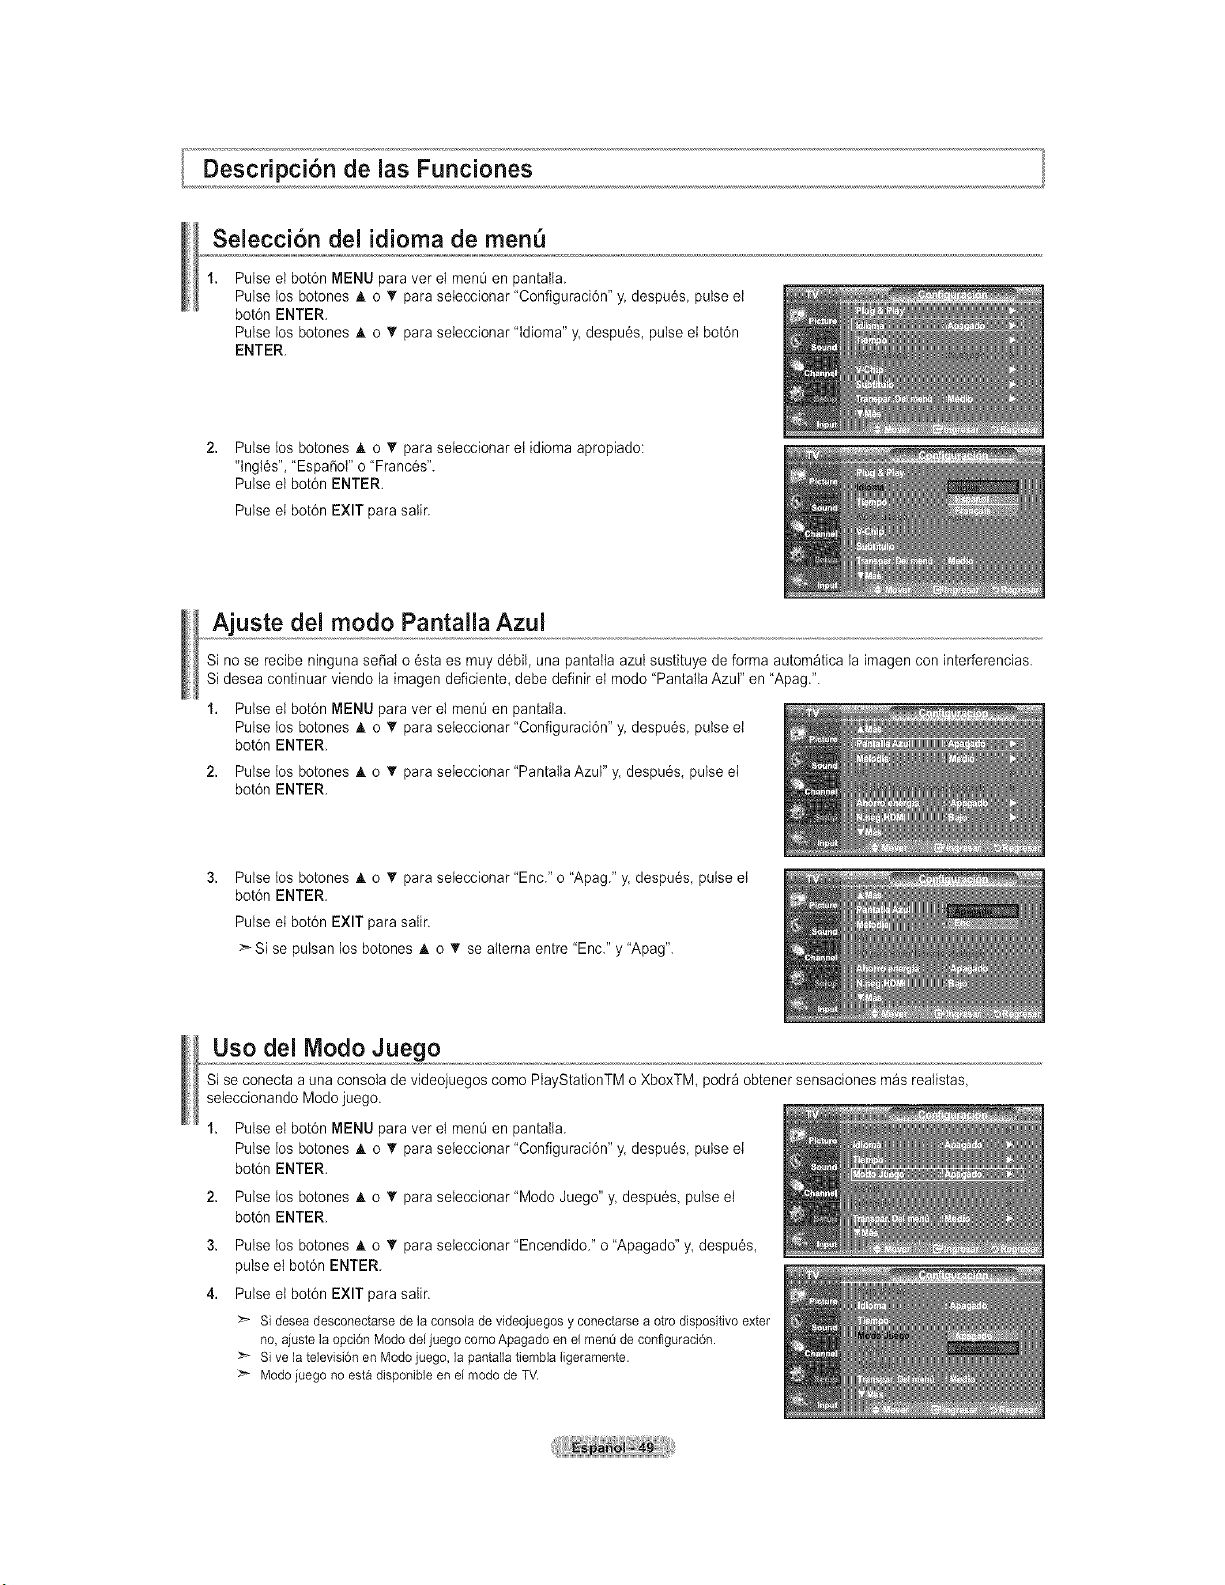
Descripci6n de las Funciones
Seiecci6n del idioma de menu
1.
Pulse el bot6n MENU paraver el men0 en pantaIla.
Pulse los botones A o _rpara seleccionar "Configuraci6n" y. despu6s pulse el
bot6n ENTER.
Pulse Dosbotones _, o • para seleccionar "tdioma" y.despu6s, pulse el bot6n
ENTER.
Pulse los botones A. o T para seleccionar et idioma apropiado:
'lngi6s", "Espafiot" o"Franc6s".
Pulse el bot6n ENTER.
Pulse el bot6n EXIT parasalir.
Ajuste del modo Pantalla Azul
Si no se recibe ninguna serial o 6staes muy d6bil, una pantaItaazulsustituye de forma autom_tica la imagen con interferencias.
Sidesea continuar viendo la imagen deficiente, debe definir el mode "PantaIlaAzul" en "Apag.".
1. Pulse el bot6n MENU paravet el men0en pantalla.
Pulse tos botones A o _rpara seleccionar "Configuraci6n" y.despu6s, pulse el
bot6n ENTER.
2. Pulse los botones _, o T para seleccionar "PantallaAzul" y. despu6s, pulseel
bot6n ENTER.
Pulse los botones A o _rpara seteccionar "Enc." o "Apag." y. despu6s, pulse et
bot6n ENTER.
Pulse el bot6n EXIT parasafir.
:_Si se pulsan Dosbotones _, o _' se aIternaentre "Enc."y "Apag".
Uso del Modo Juego
Sise conecta auna consola de videojuegos come PlayStationTM oXboxTM, podr_ obtener sensaciones m_srealistas,
seleccionando Mode juego.
1, Pulse el bot6n MENU paravet el men0en pantaIla.
Pulse los botones A o T para seleccionar "Configuraci6n" y.despu6s, pulse el
bot6nENTER.
2, Pulse los botones A o T para seleccionar "Mode Juego" y. despu6s pulse el
bot6nENTER.
3, Pulse los botones A o T para seteccionar "Encendido/' o"Apagado"y despu6s,
pulse el bot6n ENTER.
4. Pulse ei bot6n EXIT parasalir.
Sideseadesconectarsede la consoladevideojuegosyconectarsea otto dispositivoexter
no,ajustela opci6nMododeljuego comoApagadoen el men0de configuraci6n.
_'* Sive latelevisi6nen Modojuego,la pantallatiemblaligeramente.
Modojuego no estadisponibleenelmododeTV.
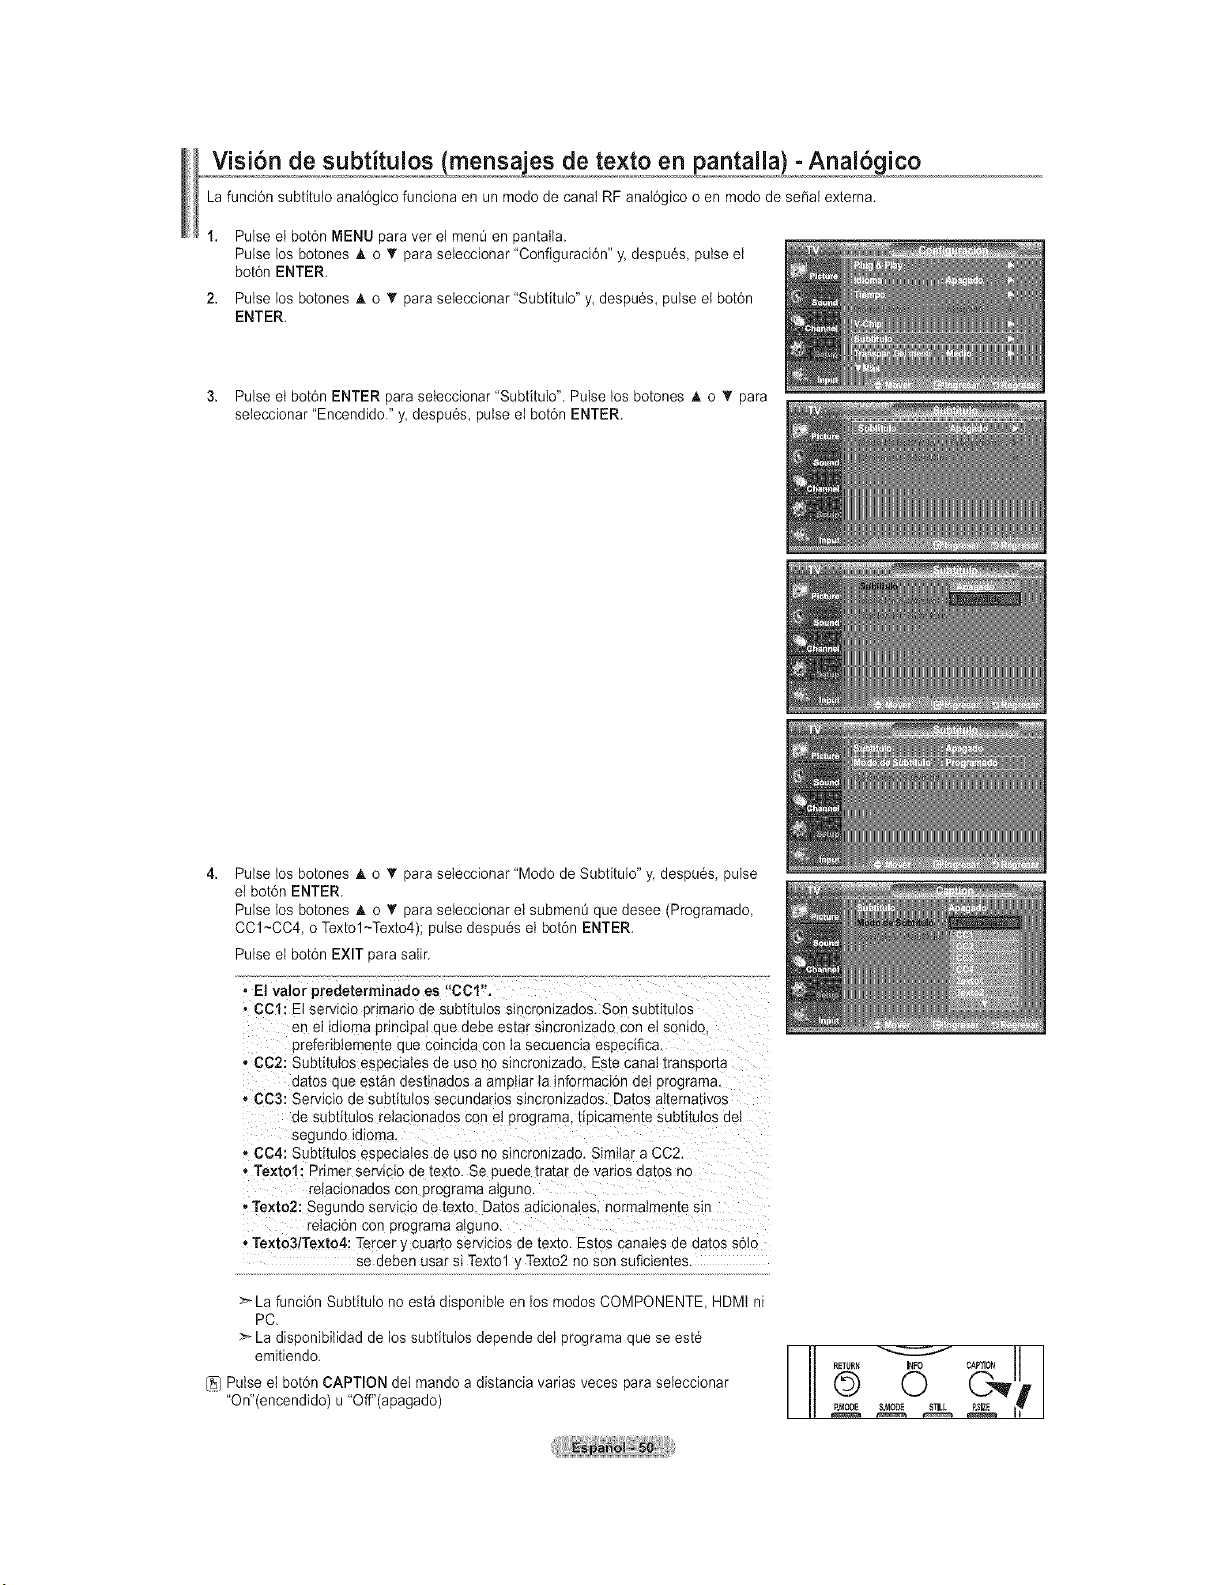
Visi6n de subtitulos (mensa es de texto en pantalla) - Anal6gico
La funci6n subfitulo anaI6gico funciona en un modo decanal RFanaI6gico o en modo dese_aI externa.
Pulse el bot6n MENU para vet el menOen pantatla.
Pulse los botones A o T para seieccionar "Configuraci6n" y.despu6s, pulse et
bot6n ENTER.
Pulse los botones A o •para seteccionar "Subfitulo" y despu6s, pulse etbot6n
ENTER.
3. Pulse et bot6n ENTER paraseleccionar 'SubfituIo". Pulse los botones A o T para
seteccionar "Encendido." y despu6s, pulse el bot6n ENTER.
Pulse tos botones _ko T para seleccionar "Modo deSubtitulo" y. despu6s, pulse
el bot6n ENTER.
Pulse tos botones A o _' para seieccionar el submen_ que desee (Programado,
CC1~CC4, oTextol~Texto4); pulse despu6s el bot6n ENTER.
Pulse el bot6n EXIT parasalir.
, Elvalor predeterminado es "CCl".
• CCl: Et servicic arimano ae subtitulos sincronizae )s.Son subtitutos
en eI idioms pnnclpaI que aeoe estar s_ncron_zaaocon et sonido
oreferiblemente oue coincida conla secuencia especifica
,,CC2: Subtitulos esDec_alesaeuso no sincronizado. Estecanal transpor_a
aa[os aue estAn destinaaos aamutiartainformaci6n det programa.
- CC3: Serviciode subtitulos secundarios sincronizados. Datos atternatwos
de subtitulos retaclonados con et orograma,tiDicamente subtitulos deI
segundotdloma.
" CC4: Subtitulos esDecJalesde uso nosincronizado. Similar aCC2.
,, Textol: Dnmerserviclo detexto. Se pueae [radarae vanos aa[os no
relacionados conprograma atguno.
,Texto2: Segunaoserv_ctoae [ex[o. ]atos adicionaIes, normalmente s_n
relac_cq con programa atguno.
• Texto3/Texto4: Tercer_/cuarto servicios de texto. Estos canates de datos soIo
se deben usar siTextol y Texto2 no son suficientes.
>La funci6n Subfitulo noest_disponibte en los modosCOMPONENTE, HDMt ni
PC.
:_La disponibilidad de lossubfitulos depende del programa que se est6
emitiendo.
[5] Pulse el botdn CAPTION dei mando a distancia varias veces para seieccionar
"On'(encendido) u "Off"(apagado)
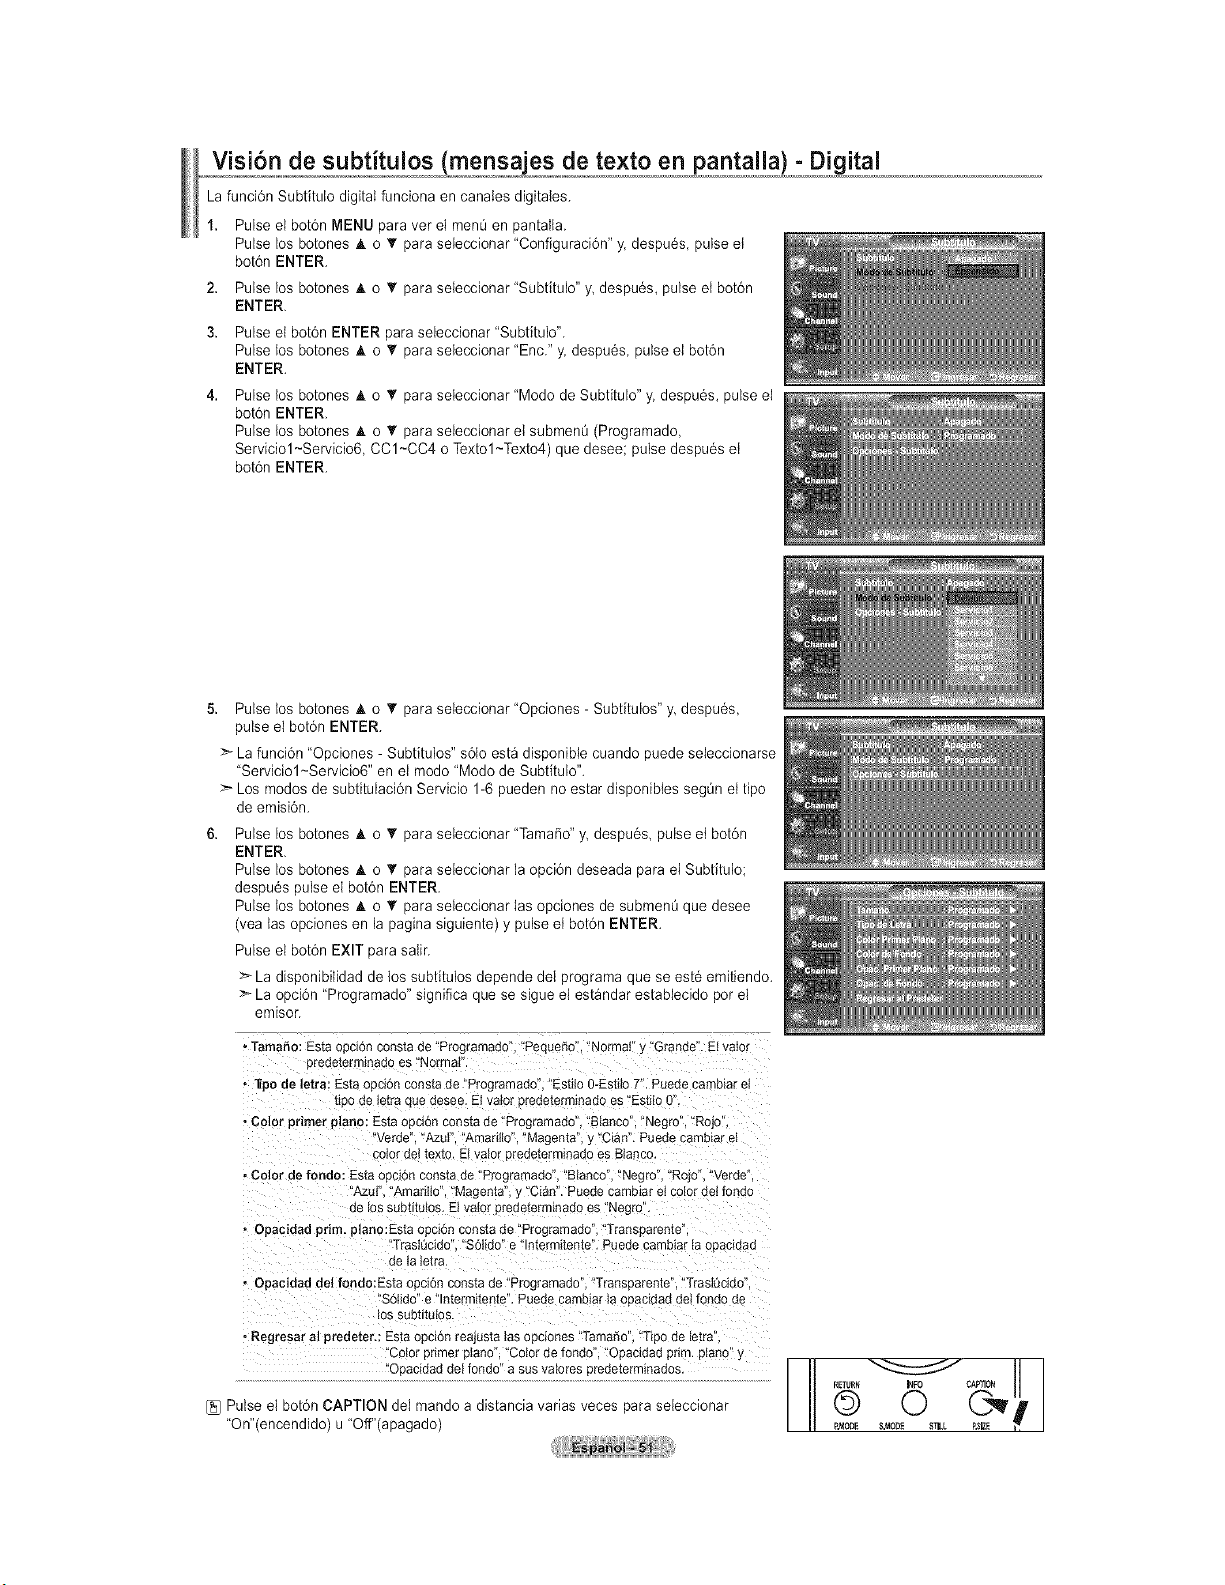
Visi6n de subtitulos (mensaies de texto en pantalla) - Digital
La funci6n Subtitulo digital funciona encanales digitales.
1. Pulse el bot6n MENU paraver eImen0 en pantaIla.
Pulse Ins botones A o T para seieccionar "Configuraci6n" y. despu6s, pulse et
bot6n ENTER.
2. Pulse los botones A o • para seleccionar "Subtftulo" y despu6s, pulse et bot6n
ENTER.
3. Pulse el bot6n ENTER paraseieccionar"Subtftulo".
Pulse los botones A o T para seleccionar "Enc." y. despu6s, pulse el bot6n
ENTER.
Pulse Ins botones _ko V para seleccionar "Modo de SubfituW' y, despu6s, pulse el
bot6n ENTER.
Pulse ins botones _k o T para seieccionar etsubmenL_(Programado,
Serviciol~Servicio6, CC1~CC4 oTextol~Texto4) que desee; pulse despu6s et
bot6n ENTER.
5. Pulse los botones J, o T para seleccionar "Opciones - Subfitulos" y despu6s,
pulse el bot6n ENTER.
>_La funci6n "Opciones - Subtituios" s61oest_ disponible cuandopuede seieccionarse
"Serviciol~Servicio6" en el rondo 'Modo de SubtituIo".
Los rondos de subtitulaci6n Servicio 1-6 pueden no estar disponibles segOn el ripe
de ernisi6n.
Pulse los botones A o T para seleccionar "TamaSo" y despu6s pulse etbot6n
ENTER.
Pulse los botones A o _' para seieccionar la opci6n deseada parael Subfitulo;
despu6s pulse el bot6n ENTER.
Pulse tos botones A o T" para seleccionar Ias opciones de submenL_que desee
(vea tas opcionesen la pagina siguiente) y pulseet bot6n ENTER.
Pulse el bot6n EXIT parasalir.
>-La disponibilidad de los subfitulos depende del programa que se est6 emitiendo.
:_La opci6n "Programado" significa que se sigueel est_ndar estabiecido perel
emisor.
•TamaSo:Estaopci6nconstade "Projramaao Pequeno',"Normal"y "Grande".Elvalor
oredetermlnadoes"Normal
• _po de letra: Estae mi6nconstade"Programa]o Estiio0-Esti{oT'. Puedecambtarel
[_UOae letraauedesee.El valororedeterminadoes "Esti{oO
,Color primer piano:EstaOOClOnconstade "Programaao Blanco"."Negro","Rojo",
"verde "Azur Amarillo"."Magema,y 'Cian".Puedecambiarel
colorne_texto. Elvalororedeterminadoes Btanco
- Color derondo: Estaopcionconstade "Programado"."Bianco"."Negro","Rojo"."Verde
"Azul Amarillo","Magenta",y Cian".Puedecambiarelcotorde{rondo
de los subtitulos.Elvalororedeterminadoes"Negro
• Opacidadprim. plane:Estaof :i6nconstade "Programado"."Transoareme
TrasKtcido"."S6tido'e n_erm_tente".Paedecamblarta oBacldad
ne ta le_ra.
• Opacidaddel fondo:Estaopcionconstade "Programado","Transparente"."Tras{_cido"
"S6tido"e "lnte-mitente".PuedecamotariaooaciaaddeIrondode
Ins SUDIIIUIOS
,Regresar al predeter.: Esta opcton reajusta las opciones "Tama5o "T _o de Ietra'
_.o{or oBmer otano 'Color de fondc Ooacldad Brim. piano •
'0_acida_e_0nd?"_S_'Sva!ffPsBr_?e'er'_'n_°°_........... [--
[]_ Pulse el bot6n CAPTION dei mando a distancia varias veces para seieccionar
"On"(encendido) u "Off"(apagado)
RETURN I_O CAP]ION
©
RMO[IE
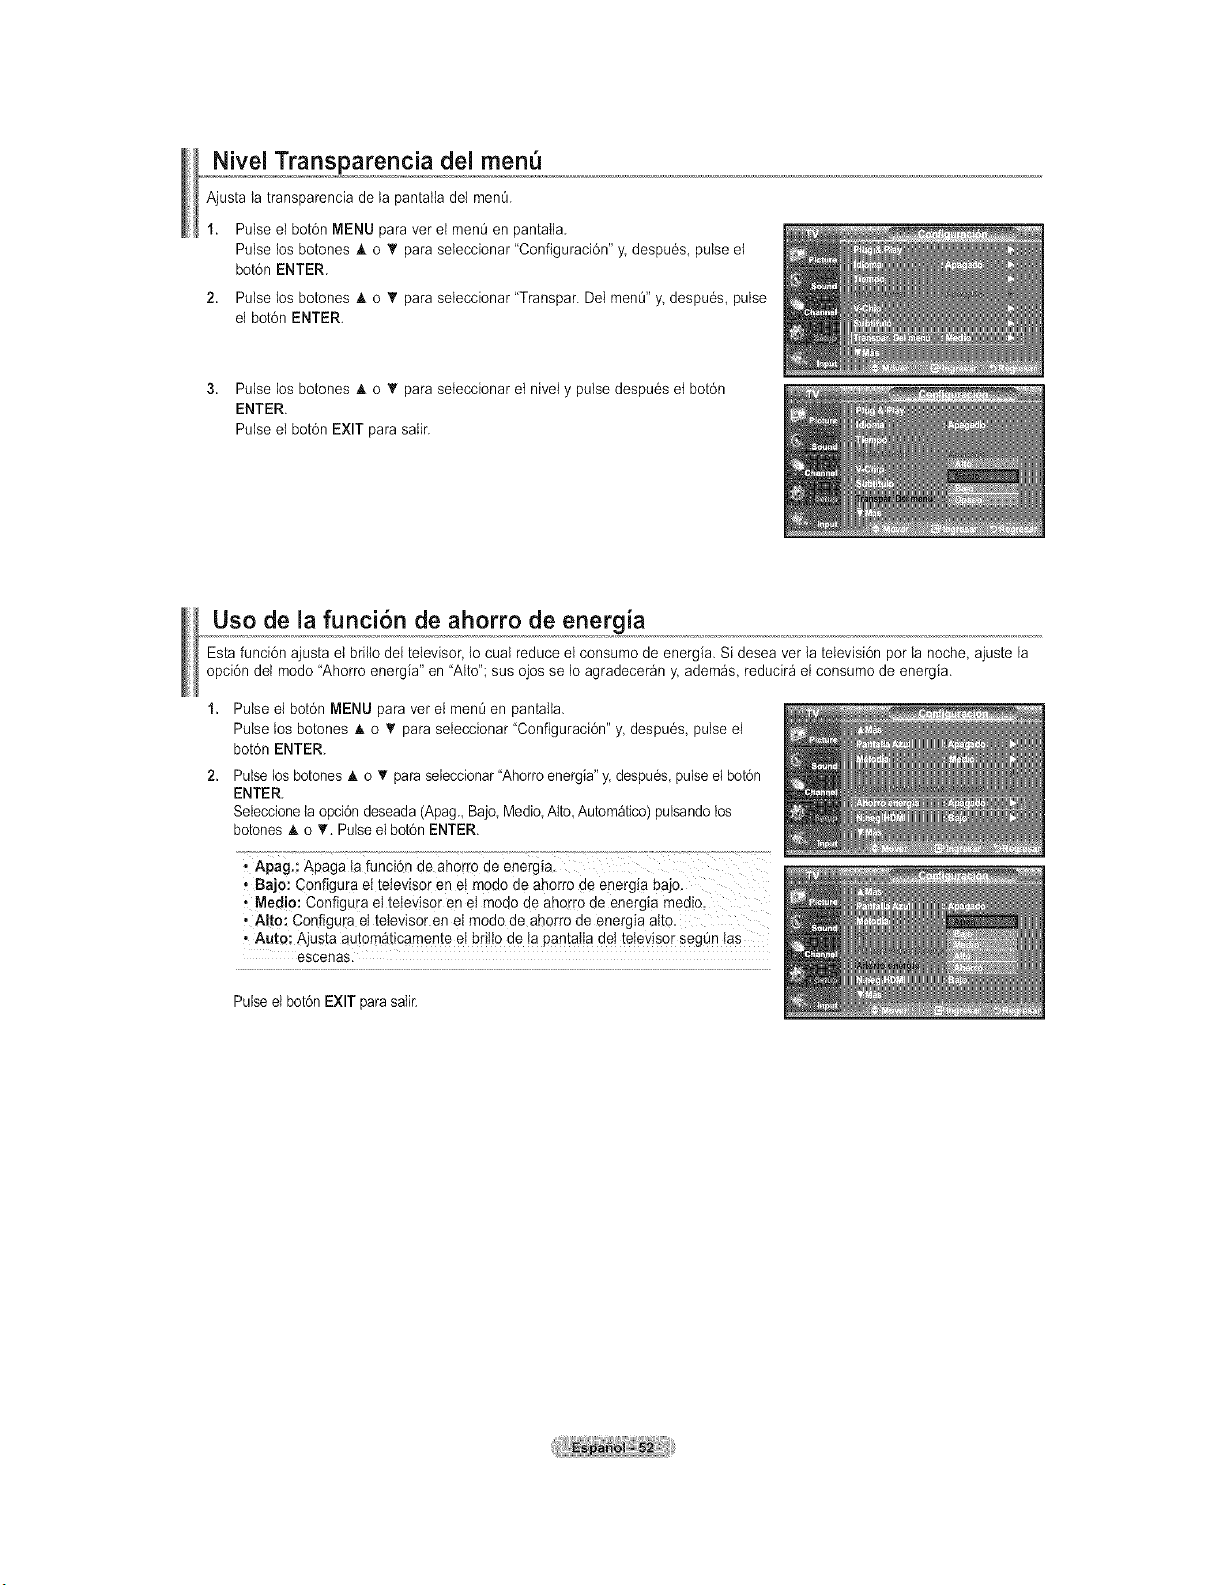
Nivel Transparencia del men
Ajusta la transparencia de la pantatladel men&
1. Pulseel bot6n MENU paravet el men_ enpantatla.
Pulse los botones & o _' para seteccbnar "Configuraci6n" y. despu6s, pulse et
bot6n ENTER.
2. Pulselos botones _, o _' paraseteccbnar "Transpar. DeImenQ"y despu6s, pulse
el botdn ENTER.
3. Pulse losbotones A o T paraseteccbnar et nivei y pulse despu6s etbot6n
ENTER.
Pulse et bot6n EXIT parasaIir.
Uso de la funci6n de ahorro de energia
Estafunci6n ajusta et briltodel televisor, Io cuaI reduce el consume de energia. Sidesea vet {a[elevisi6n per la noche, ajuste la
opci6n det mode "Ahorro energia" en "Alto";sus ojos se Deagradecer_n y adem_s, reducir_ el consume deenergia.
1. Pulse el bot6n MENU para vet el men_ en pantalta.
Pulse los botones A o _r paraseleccbnar "Configuraci6n" y despu6s, pulse el
bot6n ENTER.
2. Pulse Dosbotones _, oT paraseIeccbnar"Ahorro energia" y. despu6s, pulse el bot6n
ENTER.
Seleccionela opci6n deseada (Apag. Bajo Medb Alto Autom_tico) pulsando los
botones _, o_'. PuDseel bot6n ENTER.
, Apag.: Apaga ta funci6n de aho
, Bajo: Configura et televisor en et mode de ahorro deenerg!a bajo.
,Medio: Configurael televisor en etmode de aherro de energia med!c
• A!t0: Configura et televisor en el mode de ahorro de energia alto.
• Auto: Ajusta autom&ticamente et britlo de la pantatta det televisor segOn tas
escenas.
PuDseetbot6nEXIT para satir.
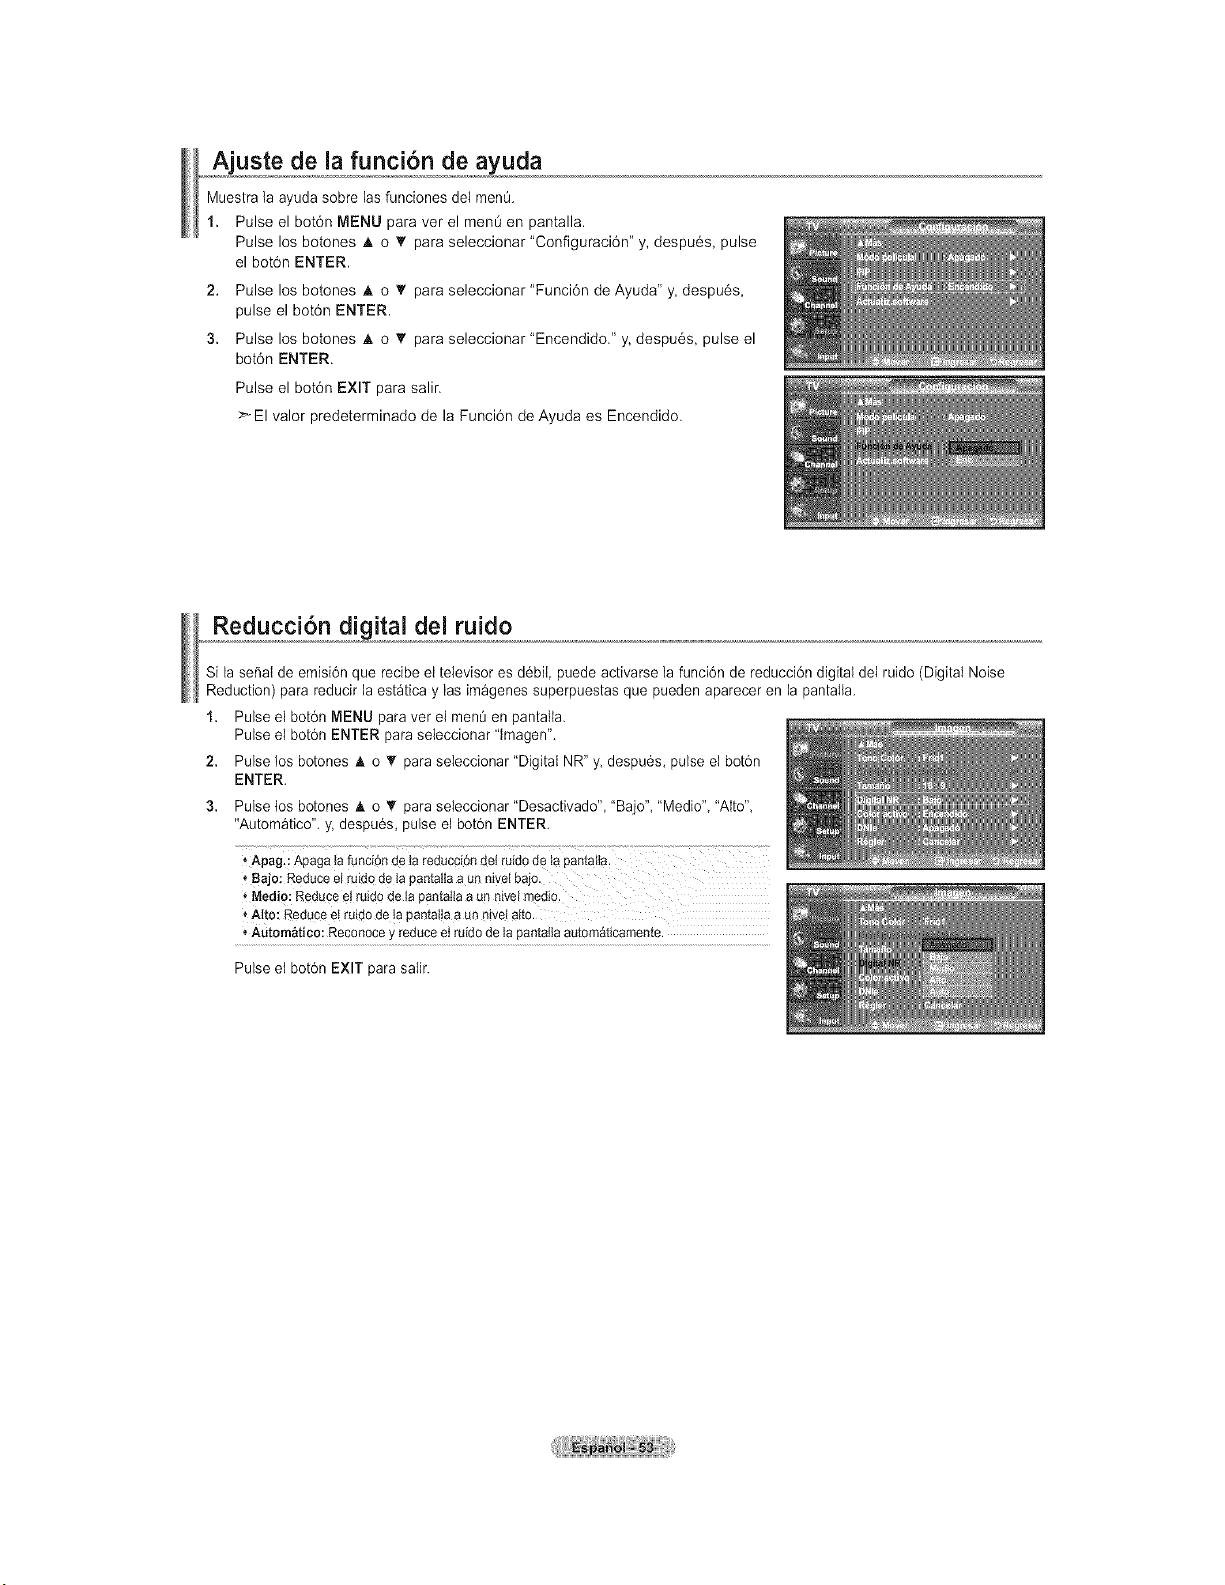
AjLIste de la funci6n de ayuda
Muestra la ayudasobre lasfunciones del men_.
1. Pulse el bot6n MENU para ver el ment_ en pantalla.
Pulse los botones A o _' para seleccionar "Configuraci6n" y, despu6s, pulse
el bot6n ENTER.
2. Pulse los botones A o _' para seleccionar "Funci6n de Ayuda" y,despu6s,
pulse el bot6n ENTER.
3. Pulse los botones A o _' para seleccionar "Encendido." y, despu6s, pulse el
bot6n ENTER.
Pulse el bot6n EXIT para salir.
>El valor predeterminado de la Funci6n de Ayuda es Encendido.
....RedU_.d,.!._ital del ruido
Si la se_al de emisi6nque recibeel televisor es d6bil, puede activarse lafunci6n de reducci6n digital del ruido (Digital Noise
Reduction) parareducir laest_tica y las imagenes superpuestas que pueden aparecer en la pantaIla.
1. Pulse el bot6n MENU paravet el menO en pantalla.
Pulse el bot6n ENTER paraseleccionar 'Imagen".
2. Pulse los botones A o_' para seleccionar "Digital NR" y despu6s, pulse el bot6n
ENTER.
Pulse tos botones A. o_' para seleccionar "Desactivado" "Bajo", "Medio" "Alto"
"Autom_tico". y, despu6s, pulse el bot6n ENTER.
Apag.:Apagatafunci6nde Ia reducci6ndelruidode tapantaHa.
_Bajo:Reduceelruidode la pantallaa un nivelbao.
'_Medio:Redugee!ruidode la pantatlaaun nivelmedio.
Alto:Reducee!ruidodelapantat!aa un rfive!alto.
* Automatico:Reconocey reduceetruidode la pantallaautomaticamente.
Pulse et bot6n EXIT parasaIir.
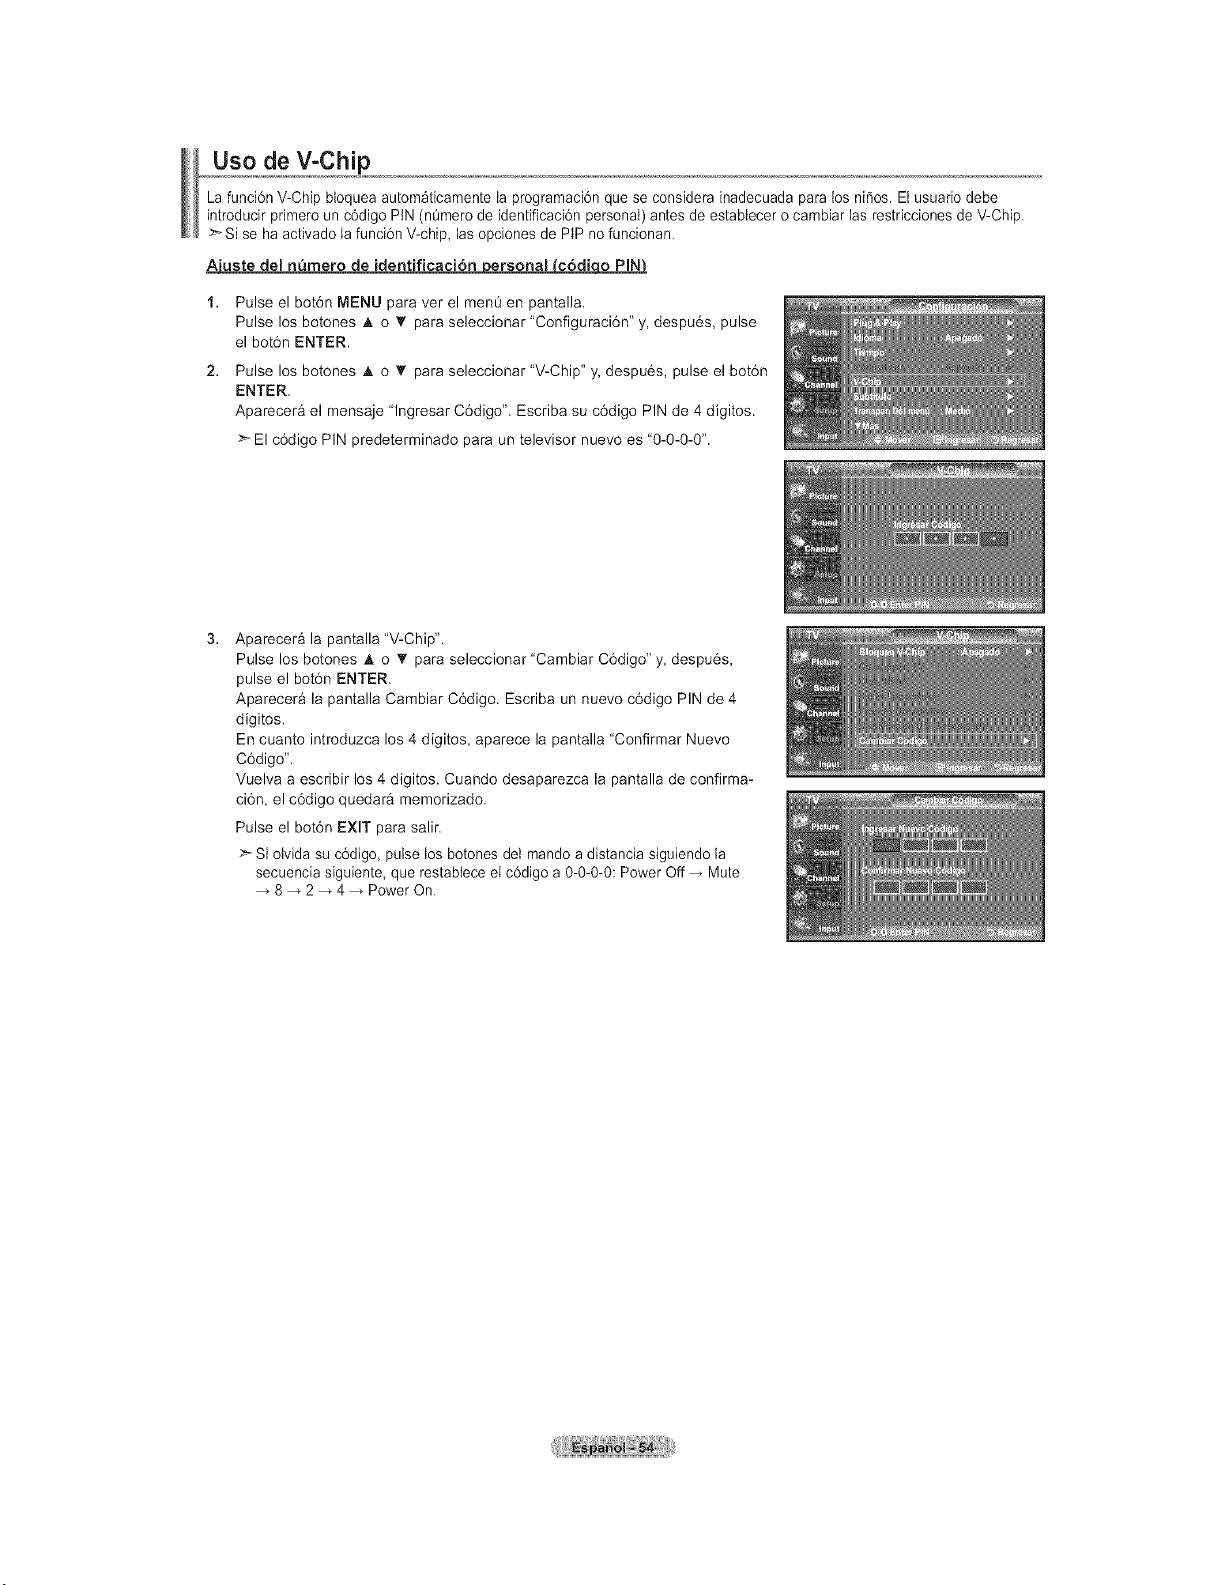
Uso de V-Chip
La funci6n V-Chip bloquea autom_ticamente la programaci6n que se considera inadecuada paralos nifios, Et usuario debe
introducir primero un c6digo PIN (nOmero de identificaci6n personal) antes deestabtecer o cambiar las restricciones de V-Chip.
Si se haactivado lafunci6n V-chip, lasopciones de PtP no funcionan.
A'_ficaci6n ersonal c6di o PIN
1. Pulse el bot6n MENU para ver el men0 en pantalla.
Pulse los botones A o '_ para seleccionar "Configuraci6n" y, despu6s, pulse
el bot6n ENTER.
2. Pulse los botones A o _ para seleccionar "V-Chip" y, despu6s, pulse el bot6n
ENTER.
Aparecera el mensaje "lngresar C6digo". Escriba su c6digo PIN de 4 digitos.
>- El c6digo PIN predeterminado para untelevisor nuevo es "0-0-0-0".
3.
Aparecera la pantalla "V-Chip".
Pulse los botones A o T para seleccionar "Cambiar C6digo" y, despu6s,
pulse el bot6n ENTER.
Aparecera la pantalla Cambiar C6digo. Escriba un nuevo c6digo PIN de 4
digitos.
En cuanto introduzca los 4 digitos, aparece la pantalla "Confirmar Nuevo
C6digo".
Vuelva a escribir los 4 digitos. Cuando desaparezca la pantalla deconfirma-
ci6n, el c6digo quedar_ memorizado.
Pulse el bot6n EXIT para salir.
>Si olvida su c6digo, pulse los botones del mando adistancia siguiendo la
secuencia siguiente, que restabtece elc6digo a 0-0-0-0: Power Off Mute
8 2 4 Power On.
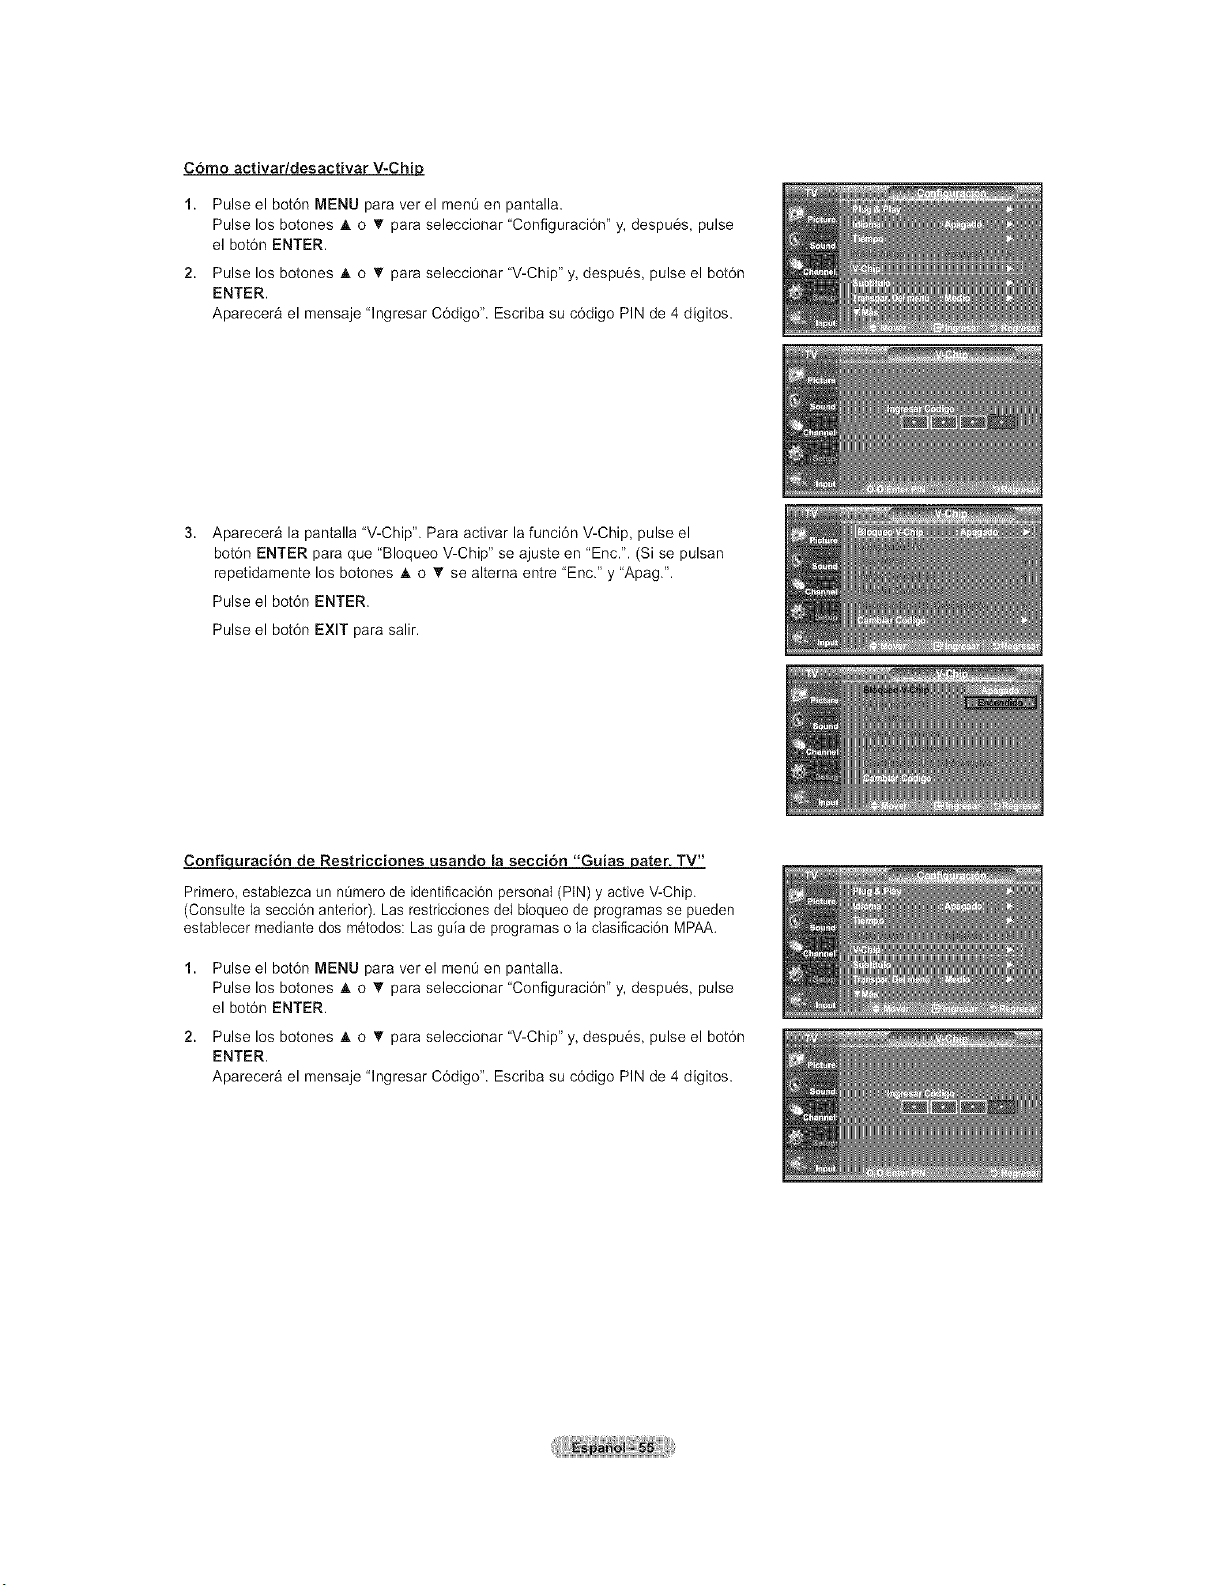
C6mo activar/desactivar V-Chip
1. Pulse el bot6n MENU para ver el menOen pantalla.
Pulse los botones A o T para seleccionar "Configuraci6n" y, despu6s, pulse
el bot6n ENTER.
2. Pulse los botones A o T para seleccionar "V-Chip" y, despu6s, pulse el bot6n
ENTER.
Aparecer& el mensaje "lngresar C6digo". Escriba su c6digo PIN de 4 digitos.
Aparecera la pantalla "V-Chip". Para activar la funci6n V-Chip, pulse el
bot6n ENTER para que "Bloqueo V-Chip" se ajuste en "Enc.". (Si se pulsan
repetidamente los botones • o '_ se alterna entre "Enc." y "Apag.".
Pulse el bot6n ENTER.
Pulse el bot6n EXIT para salir.
Confiquraci6n de Restricciones usando la seccion "Guias pater. TV"
Primero, establezca un n_mero de identificaci6n personal(PIN) y active V-Chip.
(Consultela secci6n anterior). Las restricciones del bloqueo de programas se pueden
estabtecer mediante dos m6todos: Lasguia de programas ola clasificaci6n MPAA.
1. Pulse el bot6n MENU para ver el men0 en pantalla.
Pulse los botones A o '_ para seleccionar "Configuraci6n" y, despu6s, pulse
el bot6n ENTER.
2. Pulse los botones A o T para seleccionar "V-Chip" y, despu6s, pulse el bot6n
ENTER.
Aparecera el mensaje "lngresar C6digo". Escriba su c6digo PIN de 4 digitos.
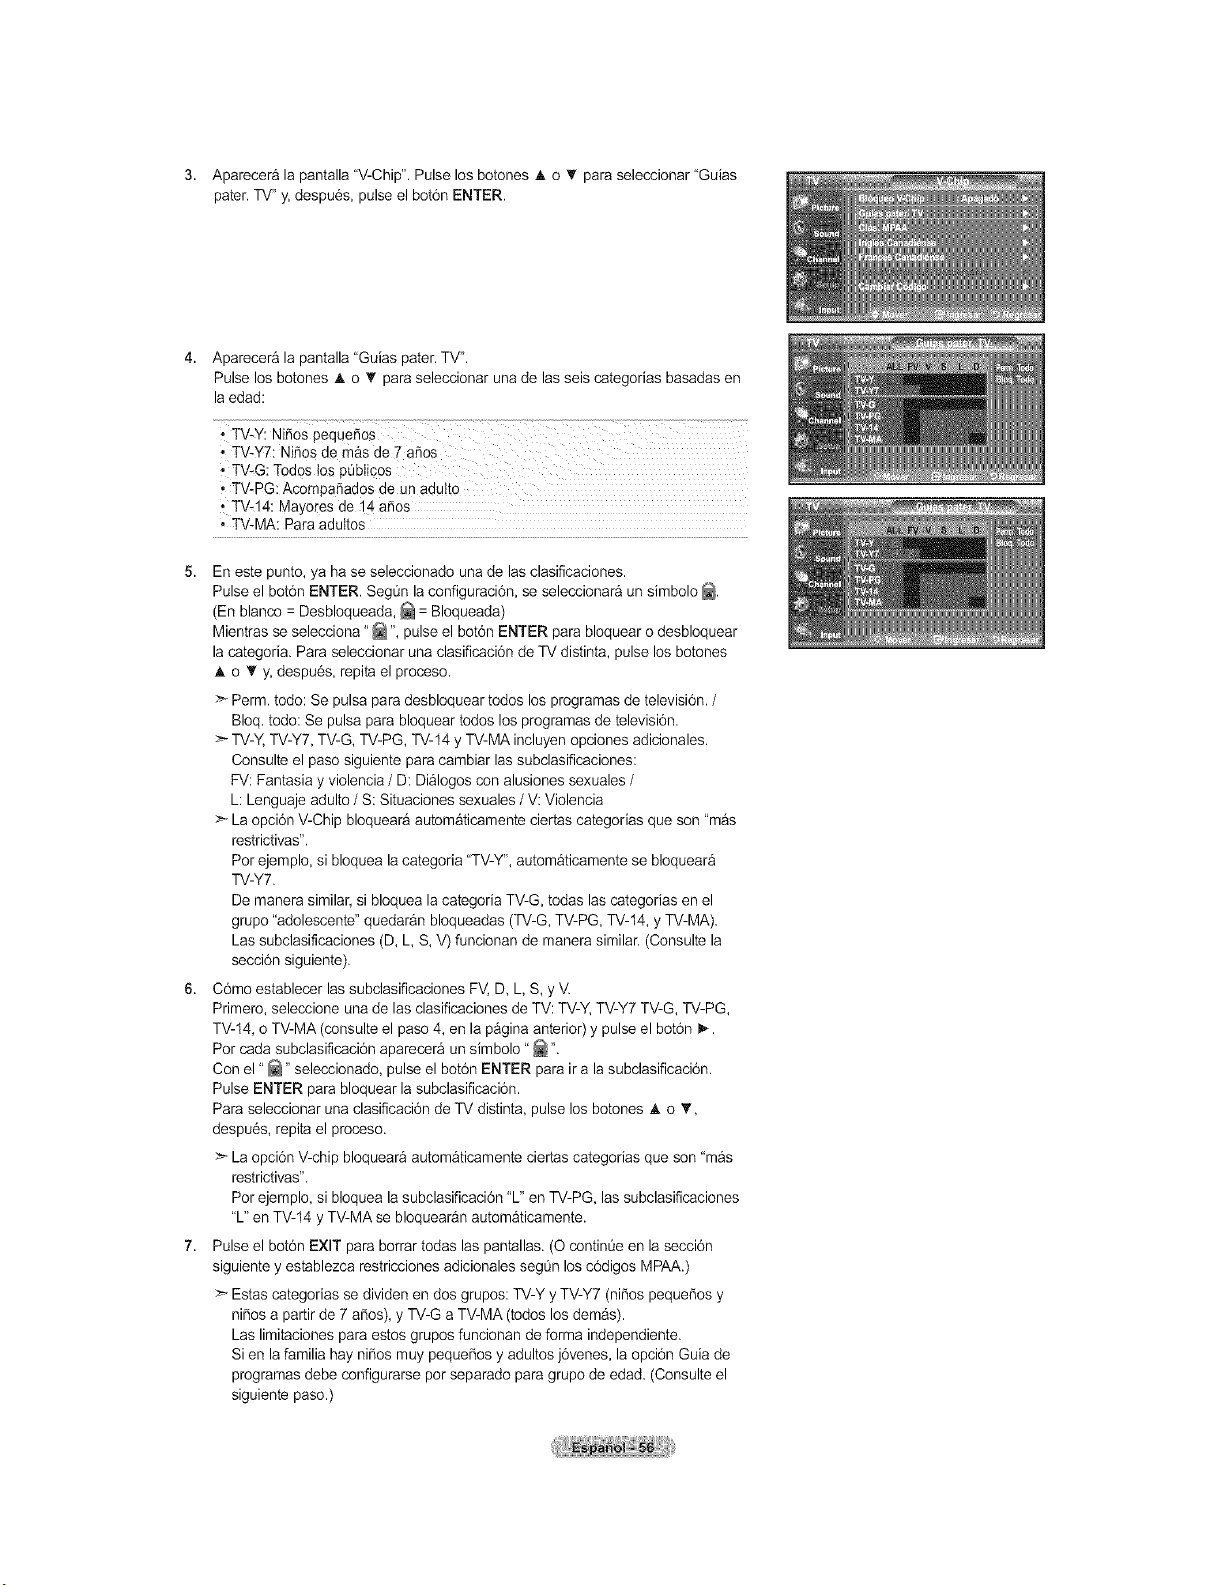
3. Apareceralapantalla"V-Chip".Pulselosbotones_,o'I'paraseleccionar"Guias
pater.TV"y,despu6s,pulseelbot6nENTER.
4. Aparecer&lapantalla"Guiaspater.TV".
PulselosbotonesAo_ paraseleccionarunadelasseiscategoriasbasadasen
laedad:
• TV-G: Todos tospObticos
,TV-PG: AcompaSados de un adu!to
TV-14: Mayoresde 14 a_os
• TV-MA: Para aduItos
5. En este punto, ya haseselecoionado una de las clasificaciones.
Pulse el bot6n ENTER. SegOn la configuraci6n, se seleccionara unsimbolo _.
(En blanco =Desbloqueada, _ =Bloqueada)
Mientras seselecciona "_ ", pulse el bot6n ENTER parabloquear odesbloquear
la categoria. Para seleccionar una clasificaci6n deTV distinta, pulse losbotones
•, o T y, despu6s, repita el proceso.
Perm. todo: Se pulsa para desbloquear todos losprogramas de televisi6n. /
Bloq.todo: Se pulsa para bloquear todos los programas de televisi6n.
TV-Y, TV-Y7, TV-G, TV-PG, TV-14y TV-MA incluyen opciones adicionales.
Consulte el pasosiguiente paracambiar lassubclasificaciones:
FV:Fantasia y violencia/ D:Dialogos con alusiones sexuales /
L:Lenguaje adulto/S: Situaciones sexuales /V: Violencia
La opci6n V-Chip bloqueara automaticamente ciertas categorias que son"m_s
restrictivas".
Porejemplo, sibloquea la categoria "TV-Y", automaticamente se bloqueara
TV-Y7.
Demanera similar, sibloquea la categoria TV-G, todas lascategorias enel
grupo "adolescente" quedaran bloqueadas (TV-G,TV-PG, TV-14,y TV-MA).
Lassubclasificaciones (D, L,S, V)fundonan de manera similar. (Consulte la
secd6n siguiente).
6. C6mo establecer lassubdasificadones FV, D, L, S, y V.
Primero, seleccione una de lasclasificaciones de TV:TV-Y, TV-Y7 TV-G, TV-PG,
TV-14,oTV-MA (consulteel paso4,en la p&gina anterior)y pulse el bot6n i_.
Porcada subclasificaci6n aparecera un simbolo" _ ".
Conel "_" seleccionado, pulse el bot6n ENTER para ira la subdasificad6n.
Pulse ENTER para bloquear lasubclasificaci6n.
Para seleccionar una clasificad6n de TV distinta, pulse los botones A o 'I',
despu6s, repita el proceso.
La opci6n V-chip bloquear&autom&ticamente ciertas categorias que son "mas
restrictivas".
Porejemplo, sibloquea la subclasificaci6n "L" en TV-PG, lassubclasificaciones
"L"en TV-14 y TV-MA se bloquear&nautomaticamente.
7. Pulse el bot6n EXIT paraborrar todas las pantallas. (O continOe en la secoi6n
siguiente y establezca restricciones adicionales segOn losc6digos MPAA.)
>_ Estas categorias se dividen en dos grupos: TV-Yy TV-Y7 (nitros pequer'iosy
nitrosapartirde 7 a_os), y TV-G a TV-MA (todos losdemas).
Laslimitaciones para estos gruposfuncionan de forma independiente.
Si en la familia hay nitros muy pequdios y adultos j6venes, la opci6n Guia de
programas debe configurarse porseparado paragrupo de edad. (Consulteel
siguiente paso.)
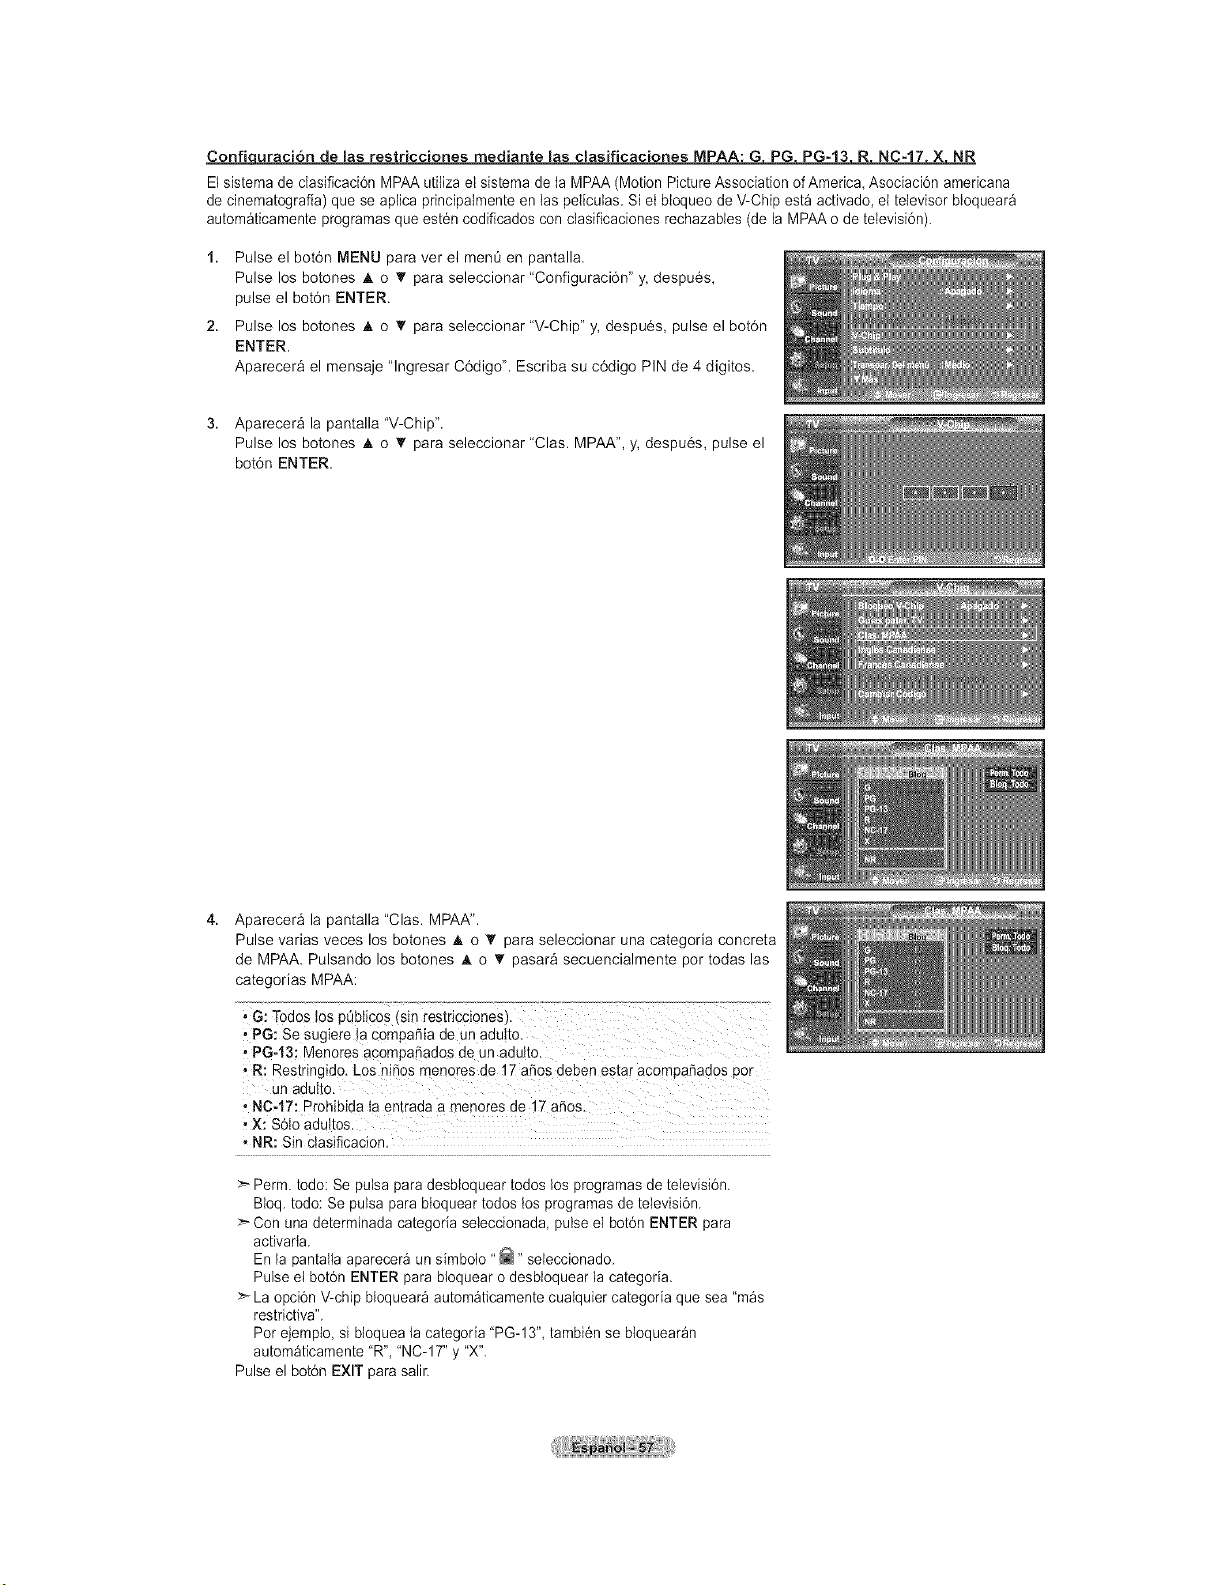
Confi _ones MPAA: G PG PG-13 R NC-17 X NR
Elsistema de clasificaci6n MPAA uti{iza el sistema de taMPAA (Motion Picture Association of America, Asociaci6n americana
de cinematografia) que se aplica principalmente en las peliculas, Si etbloqueo deV-Chip esta activado, el televisor btoquear_
autom_ticamente programas que est6n codificados con clasificaciones rechazables (dela MPAAo de televisi6n).
1. Pulse el bot6n MENU para ver el menOen pantalla.
Pulse los botones A o • para seleccionar "Configuraci6n" y,despu6s,
pulse el bot6n ENTER.
2. Pulse los botones A o T para seleccionar "V-Chip" y, despu6s, pulse el bot6n
ENTER.
Aparecer& el mensaje "lngresar C6digo". Escriba su c6digo PIN de 4 digitos.
3. Aparecera la pantalla "V-Chip".
Pulse los botones • o 'I' para seleccionar "Clas. MPAA", y, despu6s, pulse el
bot6n ENTER.
4. Aparecera la pantalla "Clas. MPAA".
Pulse varias veces los botones A o T para seleccionar una categoria concreta
de MPAA. Pulsando los botones A o T pasar& secuencialmente por todas las
categorias MPAA:
, G: Todos los pObticosisin restricciones). ...........................
, PG: Se sugiere!a cempafiia de un adu!to.
• PG-t3: Menores ac0mpafiados de un adutto.
, R: Restringido. Los nifios menores de 17afios deben estar acompa_ados pot
Unadulto.
, NC-17: Prohibida taentrada a menores de 17 afios.
,x: $6to aduttos.
• NR: Sinctasificacion.
>*Perm. todo: Se pulsa para desbloquear todos losprogramas de televisi6n.
Bloq.todo: Se pulsa para bloquear todos los programas de televisi6n.
>-Con una determinada categoria seleccionada pulse el bot6n ENTER para
activarla.
En la pantalla aparecer_ unsimbo{o ' _" seleccionado.
Pulse et bot6n ENTER para bloquear o desbloquear la categoria.
>_ Laopci6n V-chipbtoquear_ autom_ticamente cualquier categoda que sea "mas
restrictiva".
Porejemplo, si bloquea la categoda "PG-13", tambi6n se bloquear_n
automaticamente "R","NC- 17"y "X".
Pulse el bot6n EXIT parasalir.
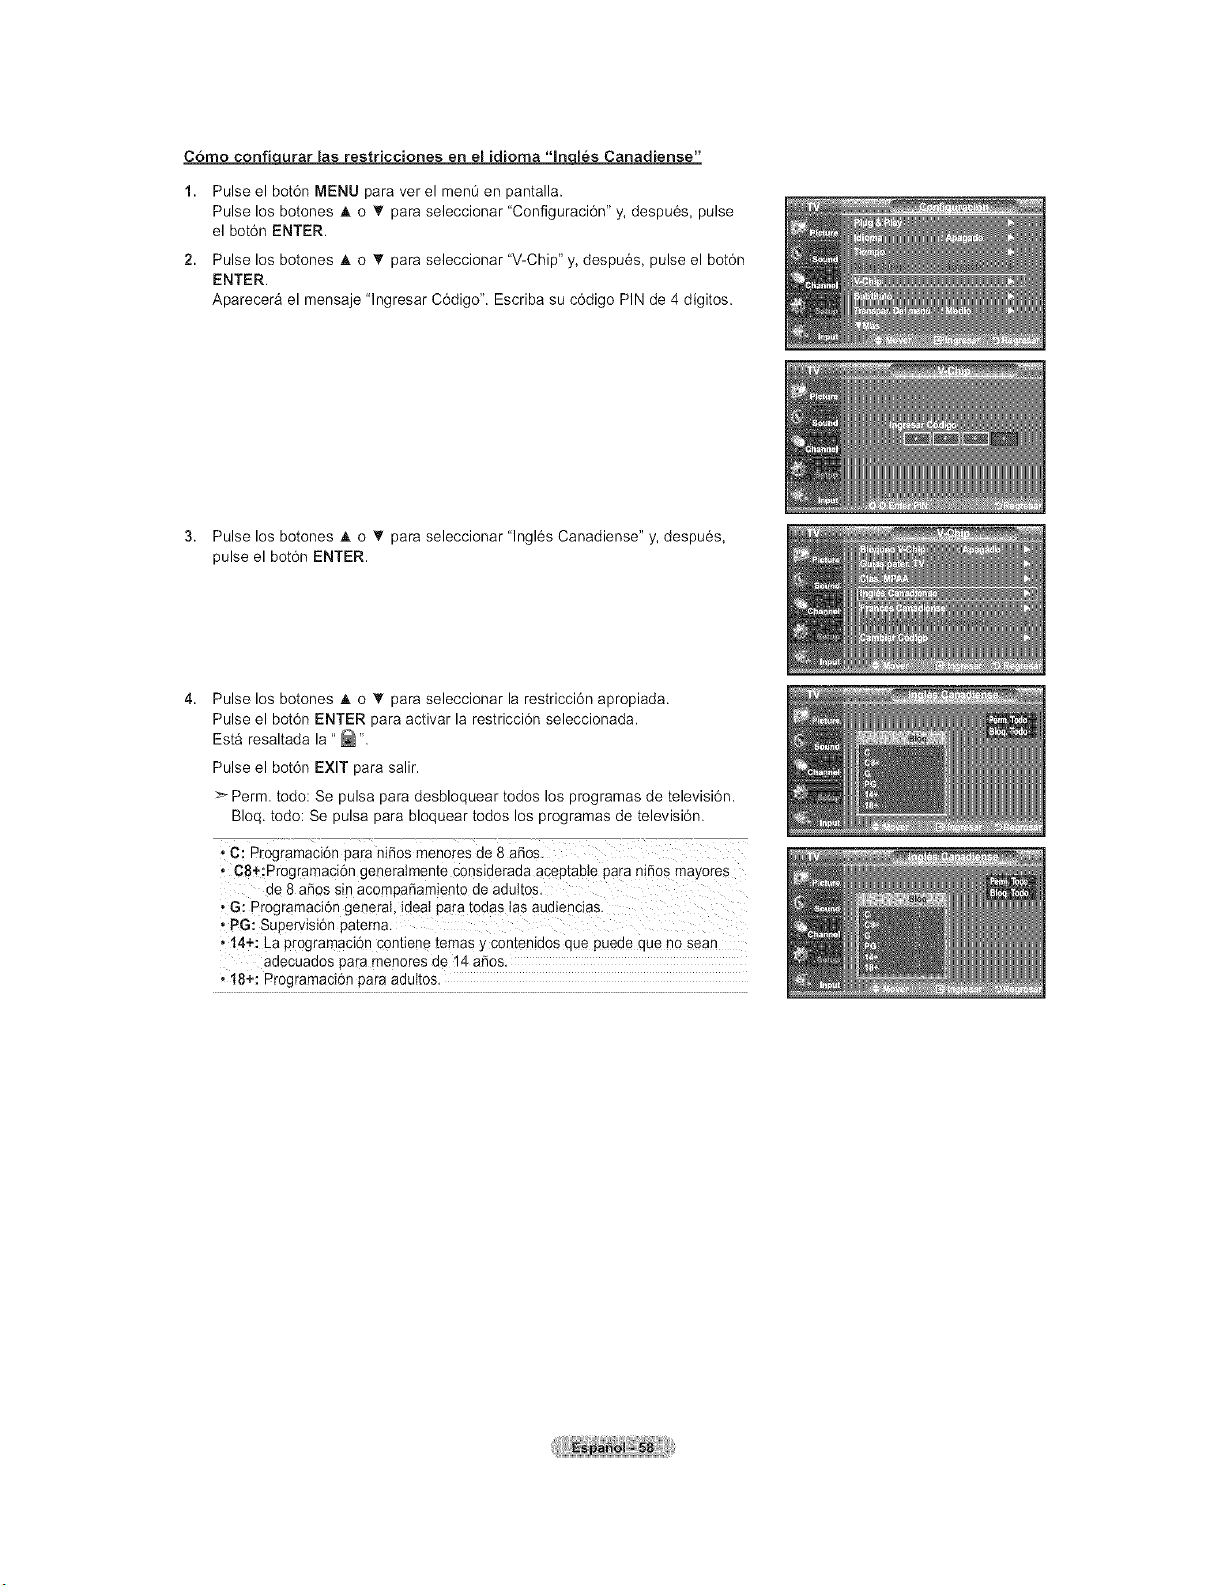
Corno confiqurar [as restricciones en el idioma "In [_s Canadiense"
1. Pulse el bot6n MENU para ver el men0 en pantalla.
Pulse los botones A o '_ para seleccionar "Configuraci6n" y, despu6s, pulse
el bot6n ENTER.
2. Pulse los botones A o '_ para seleccionar "V-Chip" y, despu6s, pulse el bot6n
ENTER.
Aparecer_ el mensaje "lngresar C6digo". Escriba su c6digo PIN de 4 digitos.
3. Pulse los botones A o '_ para seleccionar "lngl6s Canadiense" y,despu6s,
pulse el bot6n ENTER.
Pulse los botones A o Y para seleccionar la restricci6n apropiada.
Pulse el bot6n ENTER para activar la restricci6n seleccionada.
Est& resaltada la " _"
Pulse el bot6n EXIT para salir.
_'- Perm. todo: Se pulsa para desbloquear todos los programas de televisi6n.
Bloq. todo: Se pulsa para bloquear todos los programas de televisi6n.
• C: P_-ogramaci6npara niffos menores de 8asos.
• CB+:Programaci6n generatmente considerada aceptabte paran ffos mayores
de 8 afros Sinacompaffamient0 de adultosl
,G: programaci6n general, ideal parat0das [asaudiencias.
• P6: Supervisi6n patema.
,14+: La pr0gramaci6n c0ntiene temas y contenidos que puede que no sean
adecuados pa_-amenores de 14 afros.
,18÷: Programaci6n para adultos.
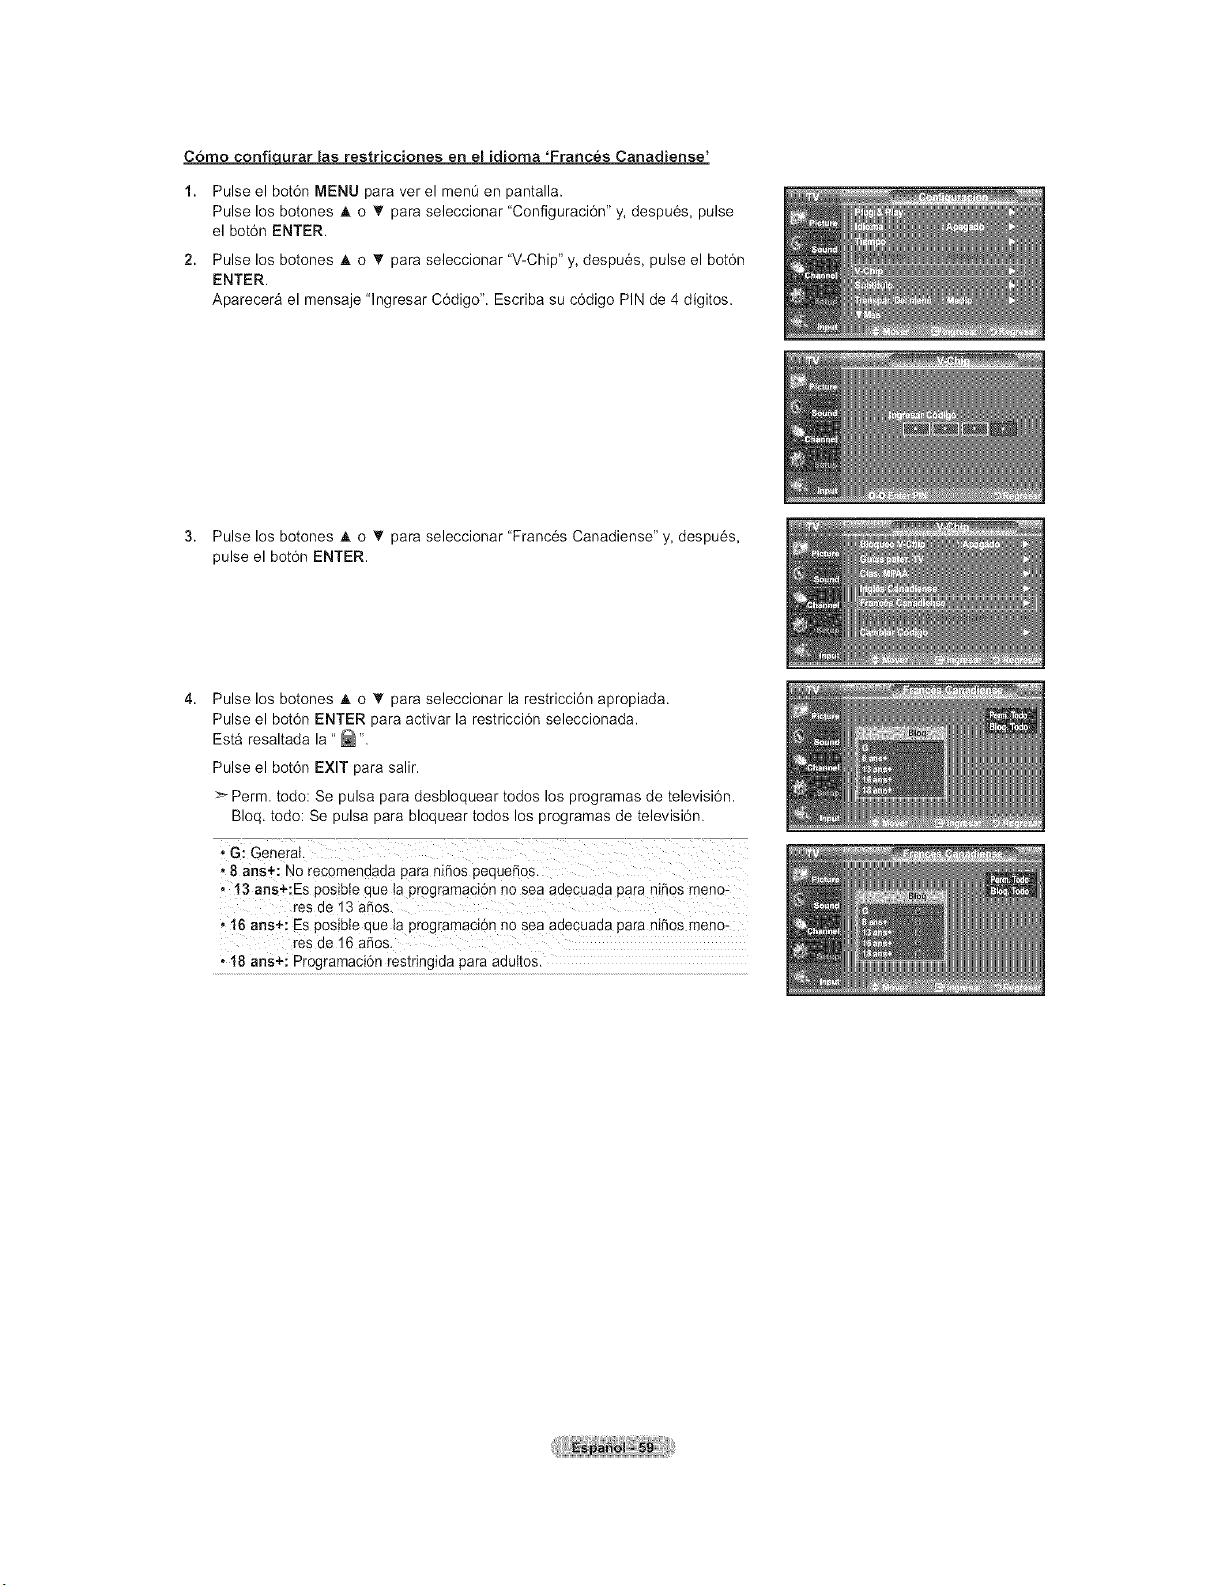
Corno confiqurar las restricciones en el idiorna 'Franc_s Canadiense'
1. Pulse el bot6n MENU para ver el men_ en pantalla.
Pulse los botones A o _' para seleccionar "Configuraci6n" y, despu6s, pulse
el bot6n ENTER.
2. Pulse los botones A o _' para seleccionar "V-Chip" y, despu6s, pulse el bot6n
ENTER.
Aparecer_ el mensaje "lngresar C6digo". Escriba su c6digo PIN de 4 digitos.
3. Pulse los botones A o _' para seleccionar "Franc6s Canadiense" y,despu6s,
pulse el botdn ENTER.
Pulse los botones A o T para seleccionar la restricci6n apropiada.
Pulse el bot6n ENTER para activar la restricci6n seleccionada.
Est& resaltada la " _ ".
Pulse el botdn EXIT para salir.
>- Perm. todo: Se pulsa para desbloquear todos los programas de televisi6n.
Bloq. todo: Se pulsa para bloquear todos los programas de televisi6n.
• 8 ans÷: Norecomendada parani_os pequefios.
, 13 ans+:Es posibie que taprogramaci6n no sea adecuada para nifios meno=
res de 13 afios,
• t6 arts+; Es posibte que ia programaci6n nosea adecuada pa[a nifios meno-
res de 16 afios.
• 18 ans+: Programaci6n restringida para adultos.
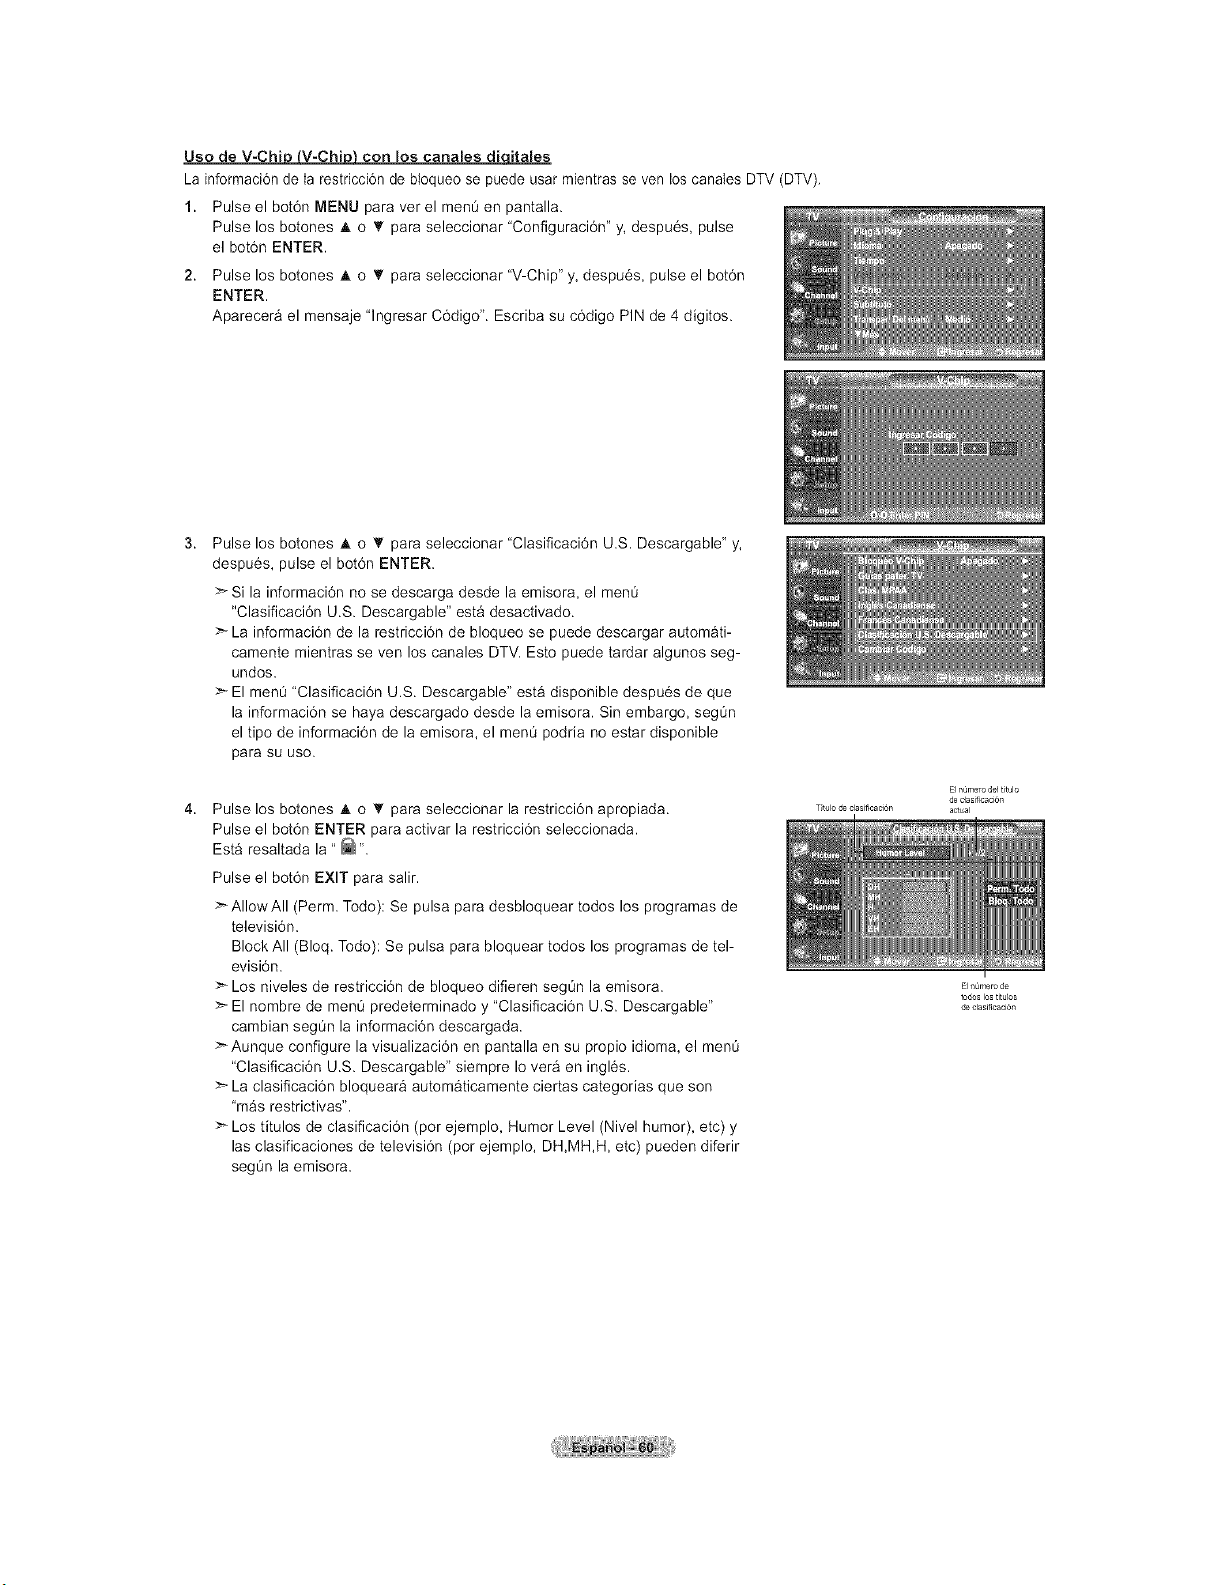
Uso de V-Chi@con los canales di_tales
La informaci6n de la restricci6n de bloqueo se puede usar mientras seven loscanates DTV (DTV).
1. Pulse el bot6n MENU para ver el men0 en pantalla.
Pulse los botones A o T para seleccionar "Configuraci6n" y, despu6s, pulse
el bot6n ENTER,
2. Pulse los botones A o T para seleccionar "V-Chip" y, despu6s, pulse el bot6n
ENTER,
Aparecer& el mensaje "lngresar C6digo". Escriba su e6digo PIN de 4 digitos.
Pulse los botones A o T para seleccionar "Clasificaci6n U.S. Descargable" y,
despu6s, pulse el bot6n ENTER.
>Si la informaci6n no se descarga desde la emisora, el menÙ
"Clasificaci6n U.S. Descargable" est&desactivado.
=_ Lainformaci6n de la restricci6n de bloqueo se puede descargar automati-
camente mientras seven los canales DTV. Esto puede tardar algunos seg-
undos.
ElmenO 'Clasificaci6n U.S. Descargable" est& disponible despu6s de que
la informaci6n se haya descargado desde la emisora. Sin embargo, segOn
el tipo de informaci6n de la emisora, el menO podria no estar disponible
para su uso.
Pulse los botones A o T para seleccionar la restricci6n apropiada.
Pulse el bot6n ENTER para activar la restricci6n seleccionada.
Est& resaltada la " _ ".
Pulse el botdn EXIT para salir.
>_AIIowAII (Perm. Todo): Se pulsa para desbloquear todos los programas de
televisi6n.
BlockAll (Bloq. Todo): Se pulsa para bloquear todos los programas de tel-
evisi6n.
>- Los niveles de restricci6n de bloqueo difieren segOn la emisora.
Elnombre de men0 predeterminado y "Clasificaci6n U.S. Descargable"
cambian segOn la informaci6n descargada.
>Aunque configure la visualizaci6n en pantalla en su propio idioma, el menO
"Clasificaci6n U.S. Descargable" siempre Io ver& en ingles.
:_ La clasificaci6n bloqueara automaticamente ciertas categorias que son
mas restrictivas".
>*Los titulos de clasificaci6n (por ejemplo, Humor Level (Nivel humor), etc) y
lasclasificaciones detelevisi6n (por ejemplo, DH,MH,H, etc) pueden diferir
seg0n la emisora.
[] n0mero del t_t/_lo
de dasificaci6n
Ttulo de dasificac16n actual
[] n_n_de
todos los t_t los
de clasificaci6n
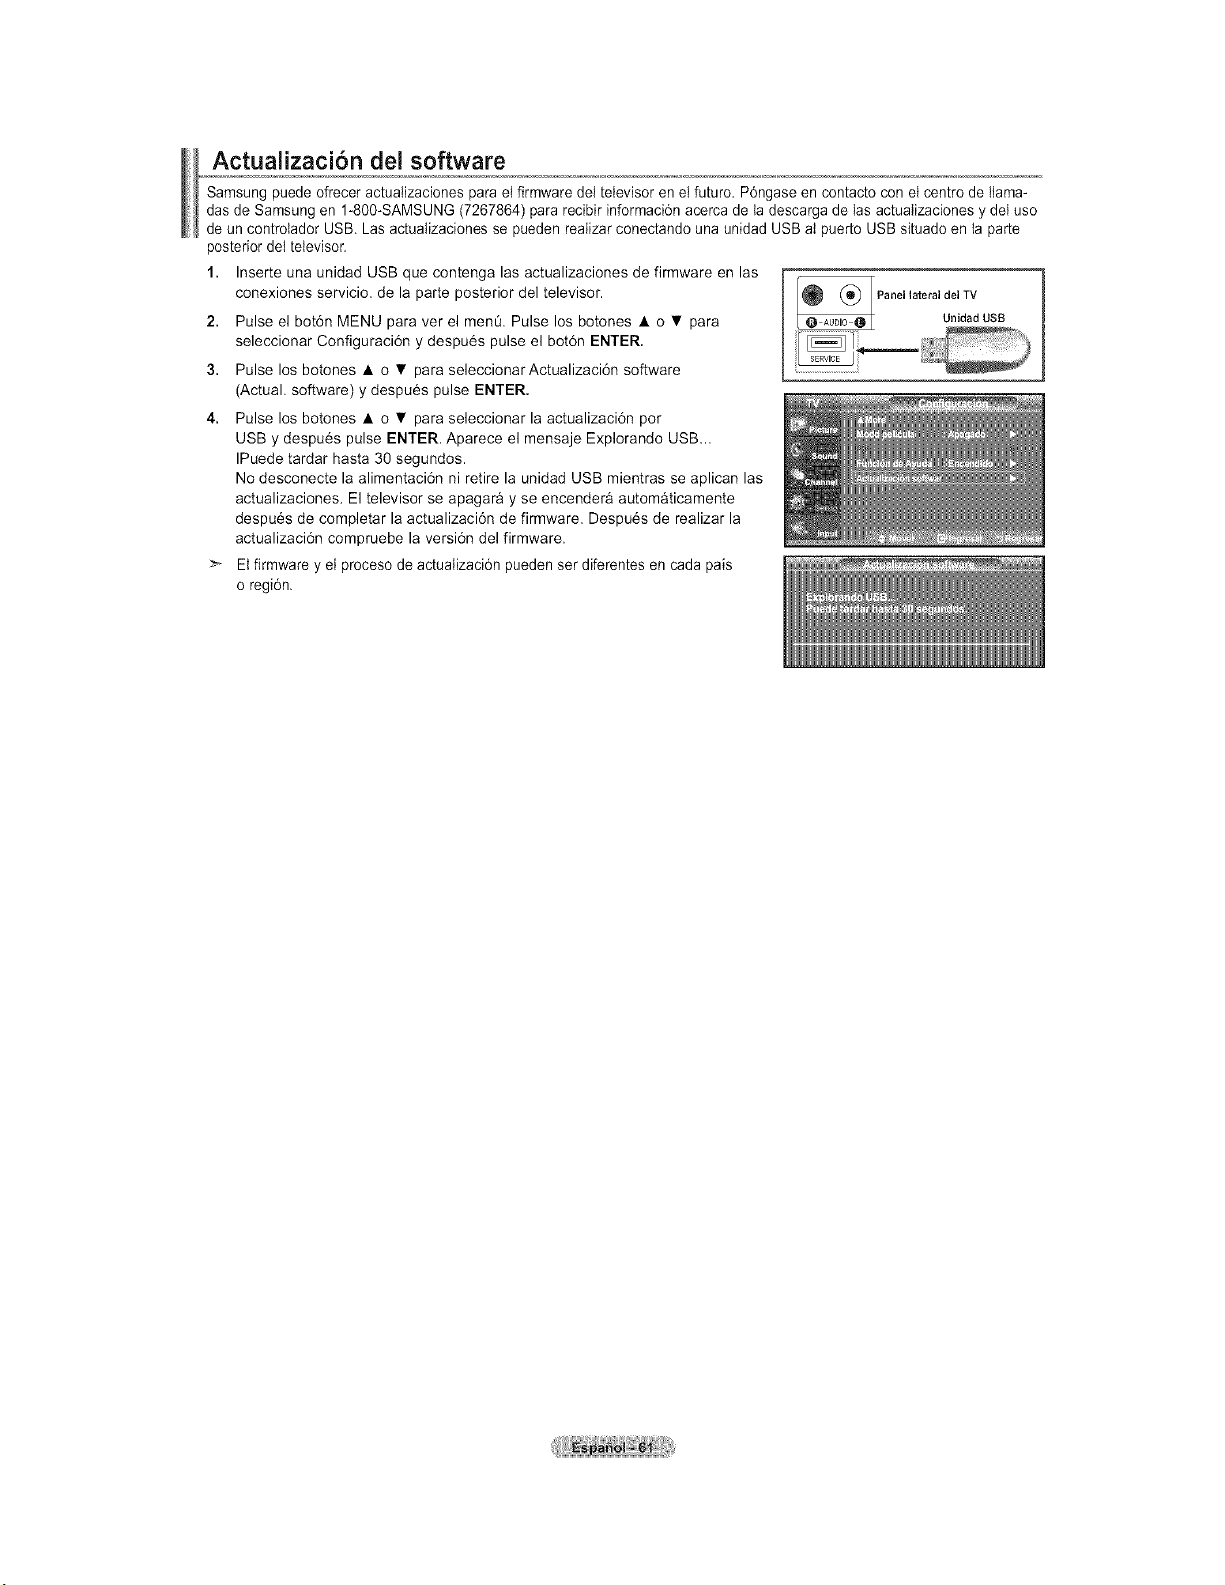
ActualizacJ6n deJ software
Samsung puede ofreceractualizaciones parael firmware del televisor en elfuturo. P6ngase en contacto conel centro de Ilama-
dasde Samsung en 1-800-SAMSUNG (7267864) para recibir informaci6n acerca de la descargade lasactuaIizaciones y del use
de un controtador USB. Lasactuatizaciones se pueden reatizarconectando una unidad USB at puerto USBsituado en {aparte
posterior det televisor.
1. Inserte una unidad USB que contenga las actualizaciones de firmware en las
conexiones servicio, de la parte posterior del televisor. _ (_ Panel lateral del TV
2. Pulse el bot6n MENU para ver el men& Pulse los botones • o • para _ UnidadUSB
seleccionar Configuraci6n y despu6s pulse el bot6n ENTER.
3. Pulse los botones • o • para seleccionarActualizaci6n software
(Actual. software) y despu6s pulse ENTER.
4. Pulse los botones • o • para seleccionar la actualizaci6n por
USB y despu6s pulse ENTER. Aparece el mensaje Explorando USB...
IPuede tardar hasta 30 segundos.
Nodesconecte la alimentaci6n ni retire la unidad USB mientras se aplican las
actualizaciones. El televisor se apagar_ y se encender_ autom_ticamente
despu6s de completar la actualizaci6n de firmware. Despu6s de realizar la
actualizaci6n compruebe la versi6n del firmware.
_ Et firmware y el proceso de actuaIizaci6n pueden ser diferentes en cada pais
oregi6n.
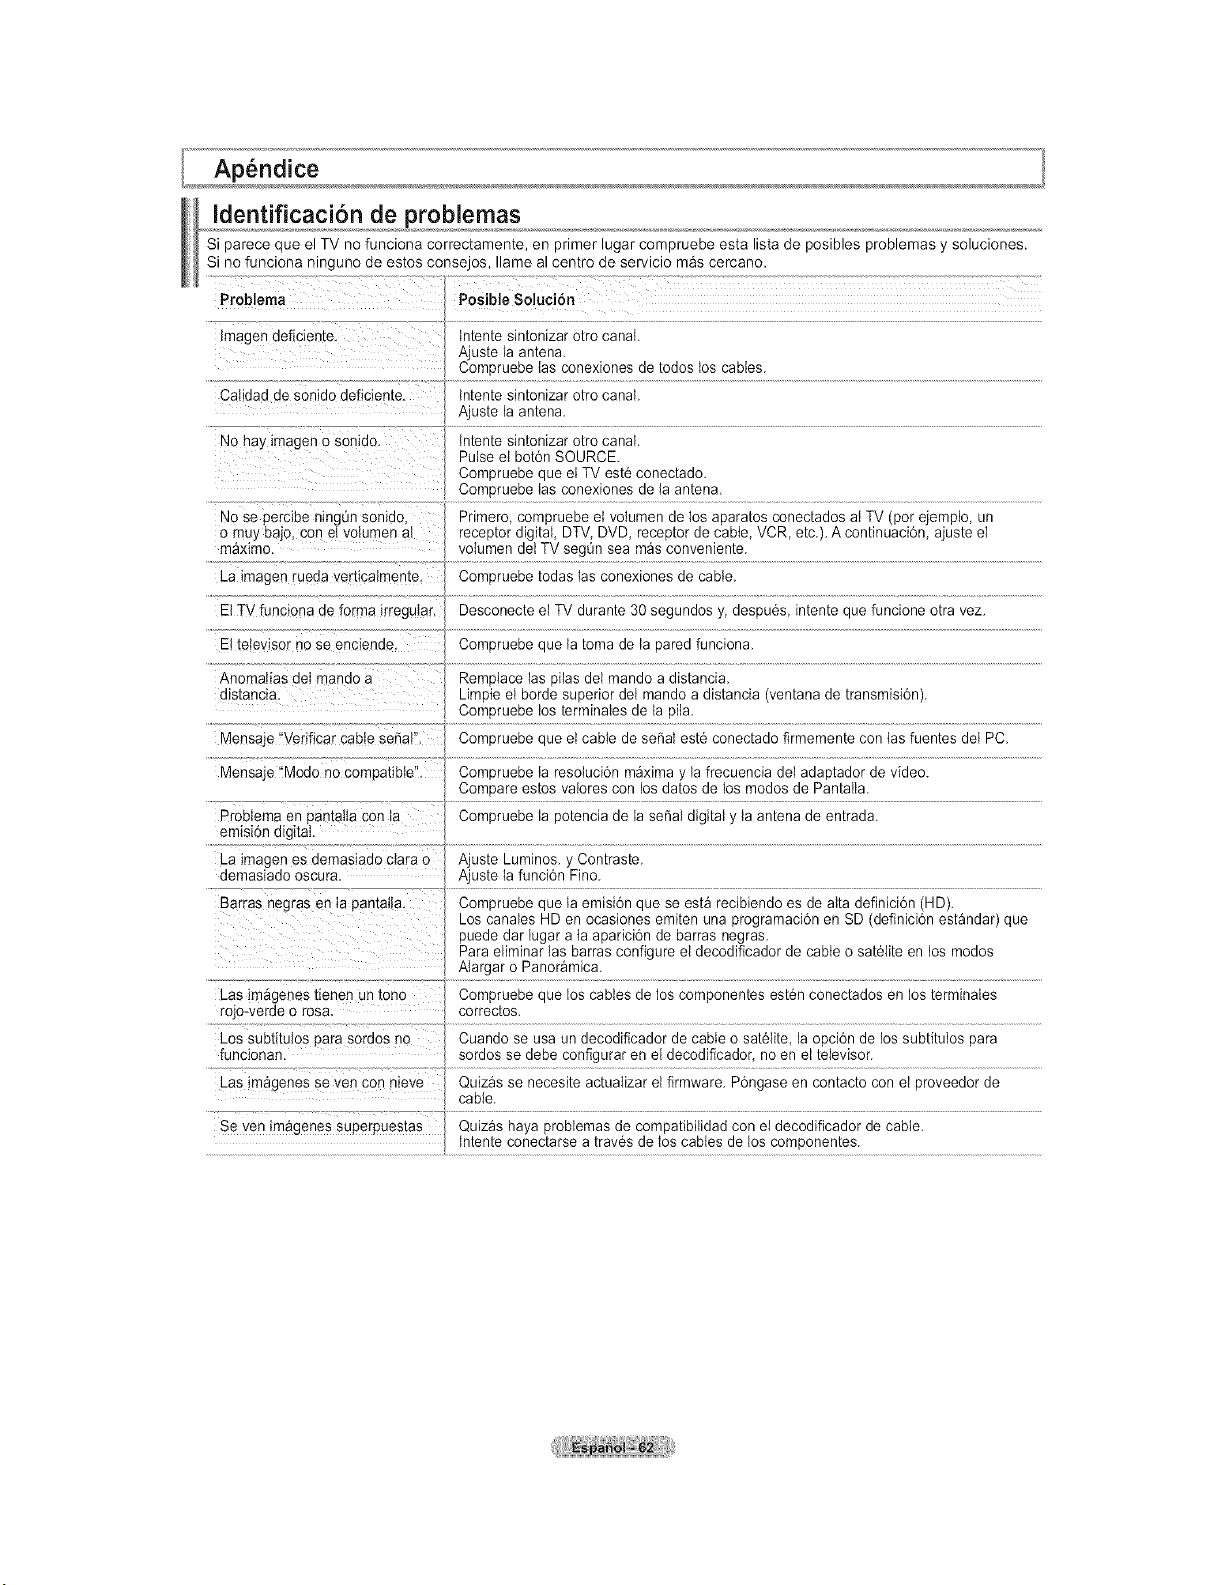
Identificaci6n de problemas
Si parece que el TV nofunciona correctamente, en primer lugar compruebe esta lists de posibles problemas y soluciones.
Si no funciona ninguno de estos consejos, Ilame al centro de servicio mas cercano.
Posible Soluci6nProblems
Lmagendeficiente.
Cal aaa ae sonido deficiente.
Nohay imageno son_ao.
Nose perc_benmgun son*so:
o muy bajo, conetvotumen aI
_nsxlmc
La _magenrueaa vertlcatmente.
m[en[e sintonizar otro canal
Ajus[e Is amens
ComDruebe las conexiones de todos los Gables.
m[en[e sm[onlzar otrocanal
Ajus[e la an[ena
tntente smtonlzar otrocanaI
Pulse el bot6n SOURCE
ComDruebe aue elTV est6conectado.
Come_ueuetas conexiones ae la antena.
Primero. compruebe el volumen delos aparatos conectados al TV (pot ejemplo, un
receptor c gital, DTV, DVD, receptor de cable, VCR, etc.). A continuaci6n, ajuste el
volumen dei TV seg0n sea masconveniente.
ComDruebe todas las conexiones de cable.
ElTVfunciona de forms irregular. Desconecte el TVdurante 30segundos y, despu6s intente que funcione otra vez.
Et televisor no Se enciende.
Anomatias detmando a
distancia. Limpieel borde superior del mando adistancia (ventana de transmisi6n).
Compruebe los terminales de la pile.
Mensaje !'verificar CableSesa!'. Compruebe que el cable desefiat eat6 conectado firmemente con tas fuentes det PC.
Mensaje '!Modo no compatible!'. Compruebe ta resolucbn maxima y lafrecuencia del adaptador devideo.
Compare estos vatores con losdatos de losmodos de Pantatla.
Pr0btema enpantatla conta Compruebe la potencia de la se_aIdigital y la antena deentrada.
emisi6ndigital.
La imagen es demasiado clara0 Ajuste Luminos. y Contraste.
demasiado oscura. Ajuste la funci6n Fino.
Barras negras enIa pantatta. Compruebe que {aemisi6n que se est_recibiendo es de aIta definicidn (HD).
ParsPUedeL°ScsnsIeSeliminsrdsr lugsr.DlsssanbsrrsstsOCSSioneSspsrici6nconfigureemitendebsrrSSe,decodificsdorUnSnegrss.progrsmsci6ndecabteanSD(definici6nosst61itean IoseSt_ndSr)modosqua
Las irn_genes tienen un tono Compruebe que loscables delos componentes est6n conectados en los terminales
rojo-verde o rosa. , 21[!£!!ts:
..................,1
Lossubtitulos pars sordos no Cuando se usa un decodificador decable o sat61ite,la opci6n de los subtitulos pars
funcionan, sordosse debe configurar en el decodificador, no en el televisor.
Quizgs se necesite actualizar el firmware. P6ngase en contacto con el proveedor de
cable.
Se yen imggenes superpuestas Quizgs hays problemas de compatibilidad con el decodificador decable.
Intente conectarse atrav6s de los cables de los componentes.
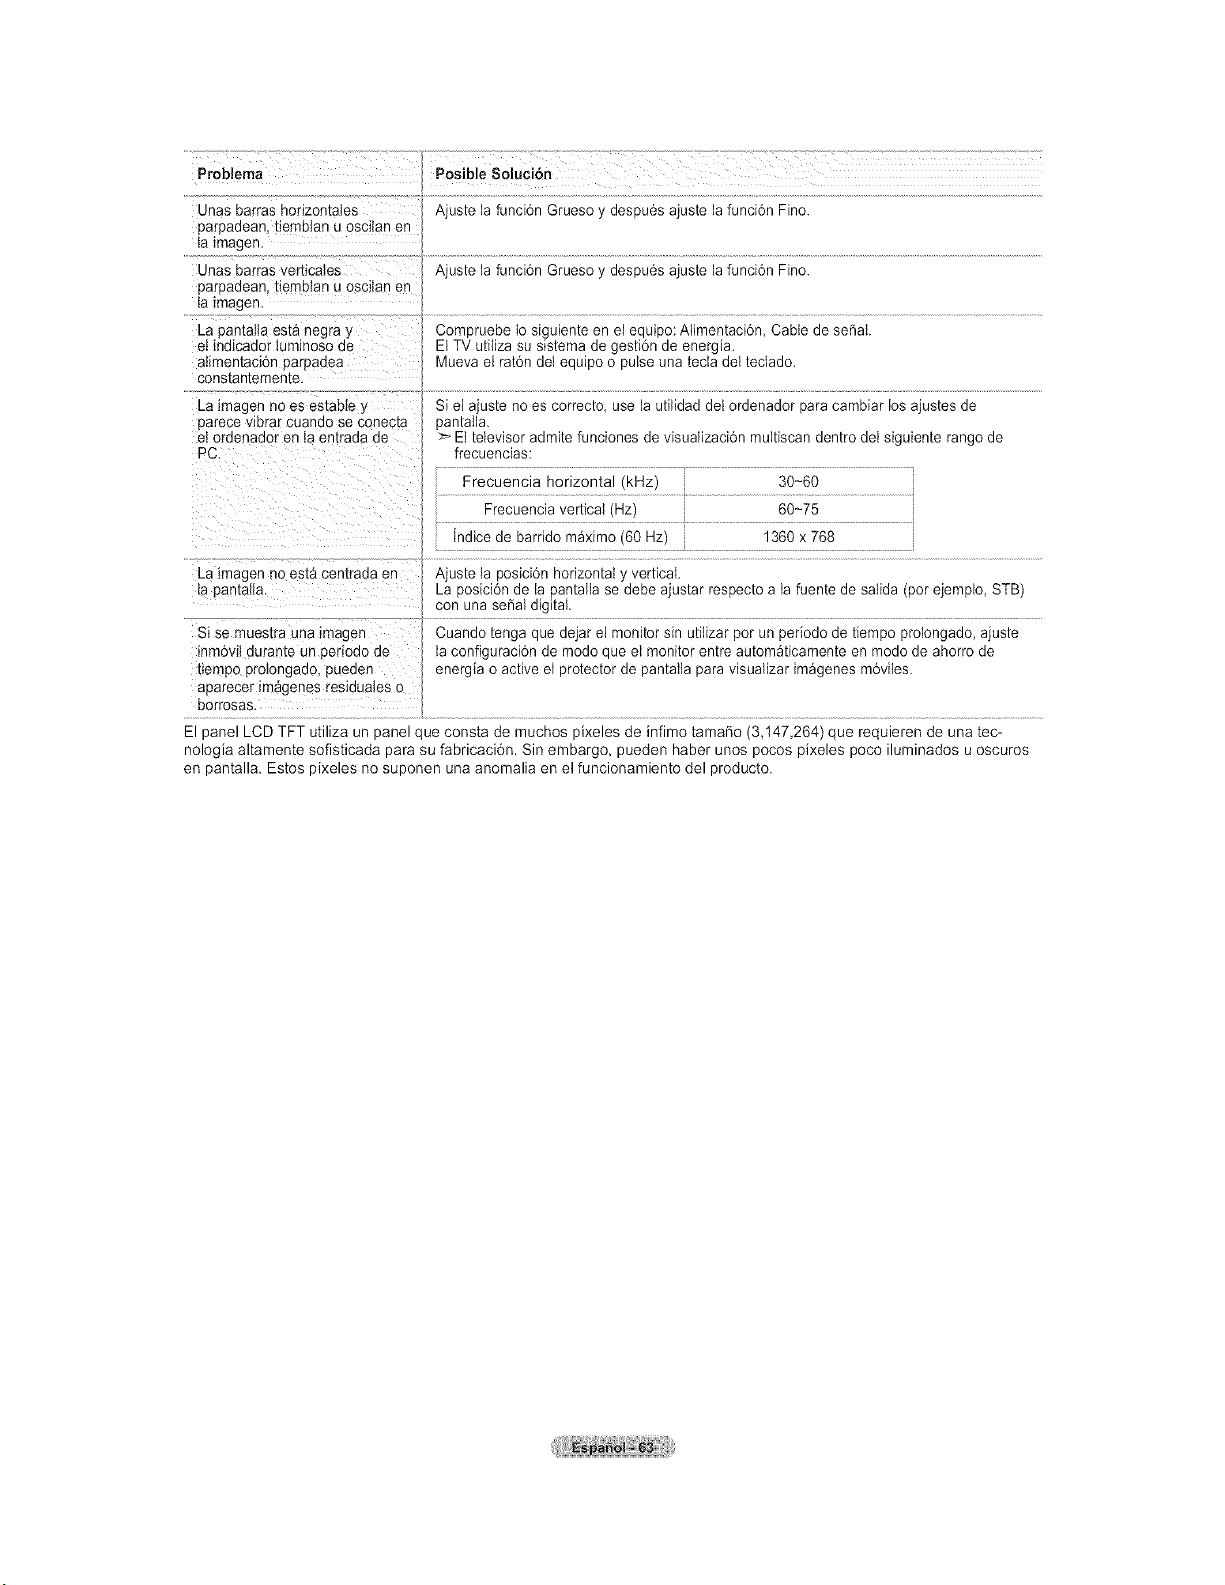
Probiema
Unas barras hodzontales
DarDaaean.tiembtanu oscitan en
la tmagen.
Unas barrasverticales
paroaaean. [temblanu osc_tanen
la tmagen.
La Dan[alia es[a negray
etmdlcador Iummoso de
atimentacion oaroaae_
cons[an[ememe.
La _magenno es estabIe y
parece viorar cuanao seconec[a
el ordenador en Ia entrada de
PC.
............ _ ....... _--
Posible Soluci6n
Ajus[e lafuncidn Gruesoy despu6s ajuste la funci6n Fino.
Ajus[e lafuncidn Gruesoy despu6s ajuste la funci6n Fino.
Comoruebe to siguiente en el equipo:Atimentaci6n, Cable de sePaL
E T utiiiza su sistema de gesti6n de energia.
Muevael rat6n delequipo o pulse una tectadel teclado.
Si el ajuste no es correcto, usela utilidad del ordenador paracambiar losajustes de
oantalta
:_ Eltelevisor admite funciones devisualizacidn multiscan dentrodel siguiente range de
frecuencias:
Frecuencia horizontal ',kHz)
Frecuencia vertical (Hz)
Jnalceae barrido m_ximo (60Hz)
30-60
60-75
1360 x 768
La imagen no es[a cemraaa en
la pan[alia,
Sise mues[ra una lmagen
inmow auran[e ur periodo de
[_empoprotongado, pueaen
aparecer _m_genesres_duatesc
borrosas,
Ajus[e la posici6n horizontal y vertical.
La uosici6n ae ta pantalla sedebe ajustar respecto ata fuente de saIida (por ejemplo, STB)
sonunasepal digital.
Cuando tenga que dejar el monitor sin utiiizar por un periodo de tiempo prolongado, ajuste
aconfiguraci6n de modo que el monitor entreautomaticamente en modo de ahorro de
energia oactive et protector de pantalla para visualizar im_genes m6viles.
El panel LCD TFT utiliza un panel que consta de muchos pixeles de infimo tamafio (3,147,264) que requieren de una tec-
nologia altamente sofisticada para su fabricaci6n. Sin embargo, pueden haber unos pocos pixeles poco iluminados uoscuros
en pantalla. Estos pixeles no suponen una anomalia en el funcionamiento del producto.
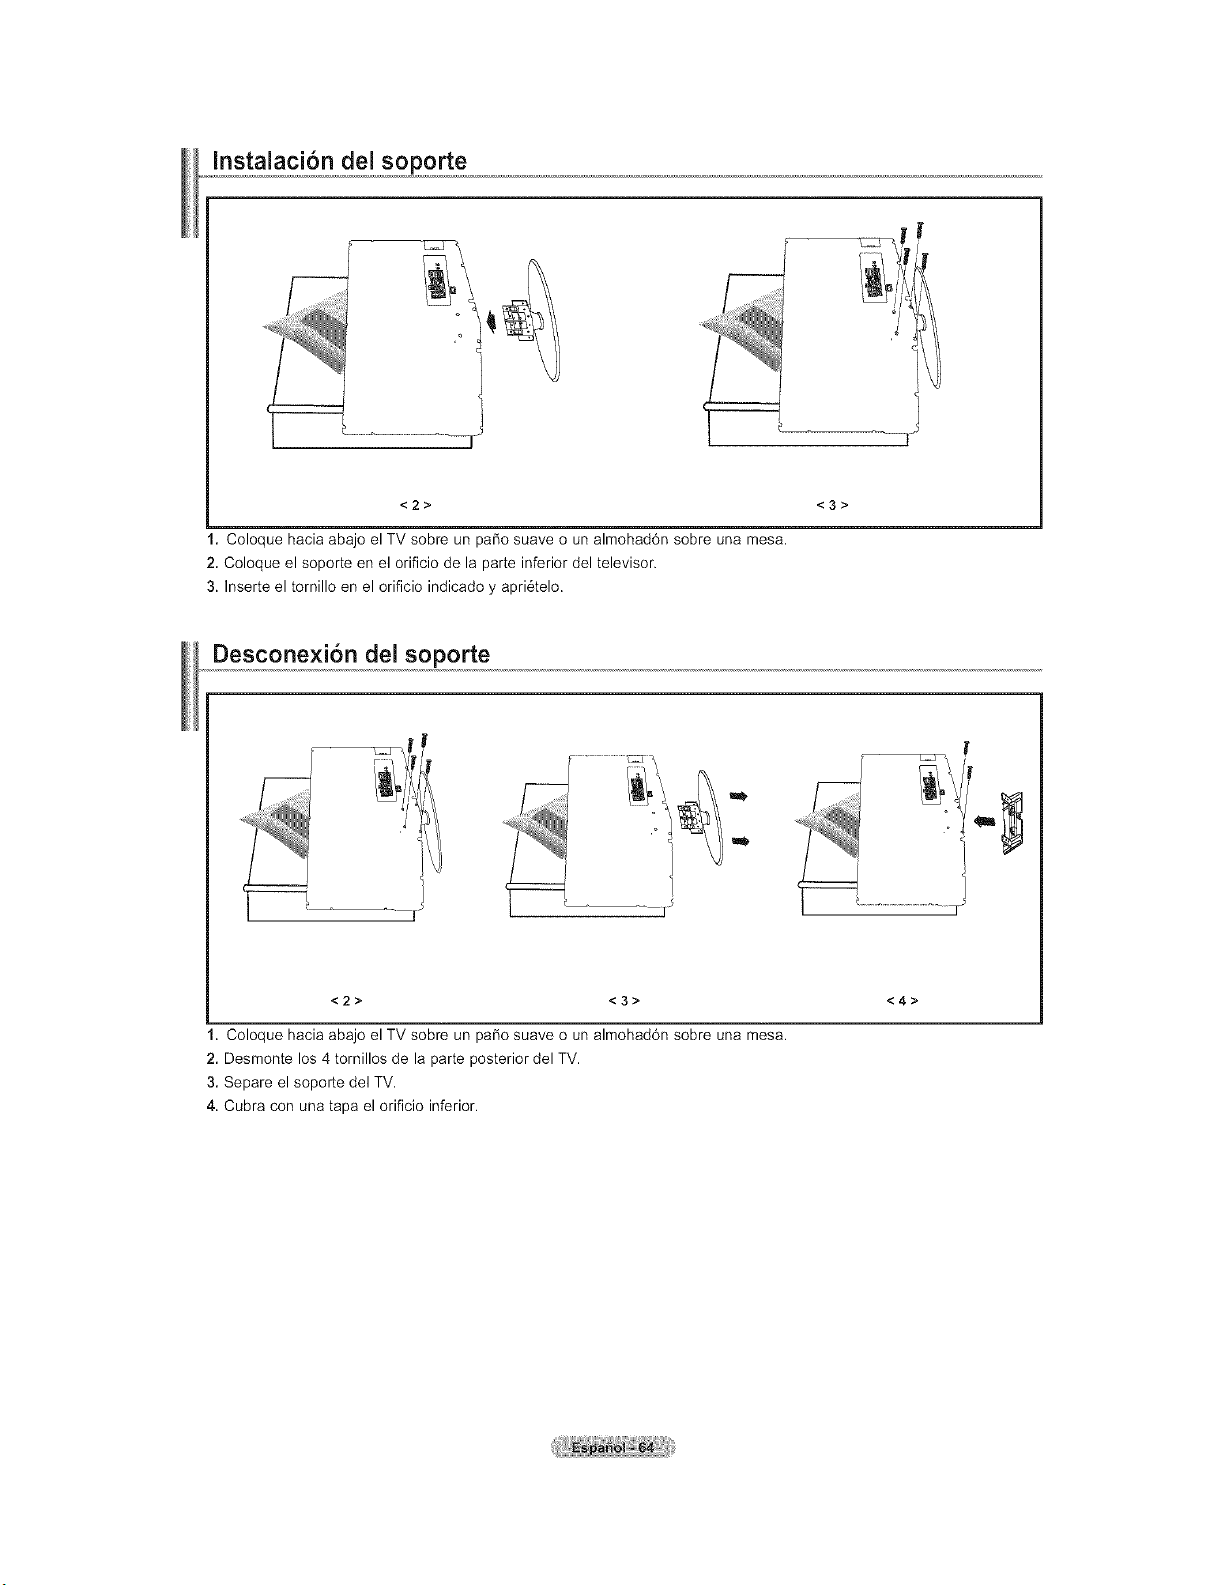
Instalaci6n del soporte
<2> <3>
1. Coloque hacia abajo el TV sobre un patio suave o un almohad6n sobre una mesa.
2. Coloque el soporte en el orificio de la parte inferior del televisor.
3. Inserte el tornillo en el orificio indicado y apri6telo.
Desconexi6n del soporte
m
m
--I
<2> <3> <4>
1. Coloque hacia abajo el TV sobre un paso suave o un almohad6n sobre una mesa.
2. Desmonte los4 tornillos de la parte posterior del TV.
3. Separe el soporte del TV.
4. Cubra con una tapa el orificio inferior.
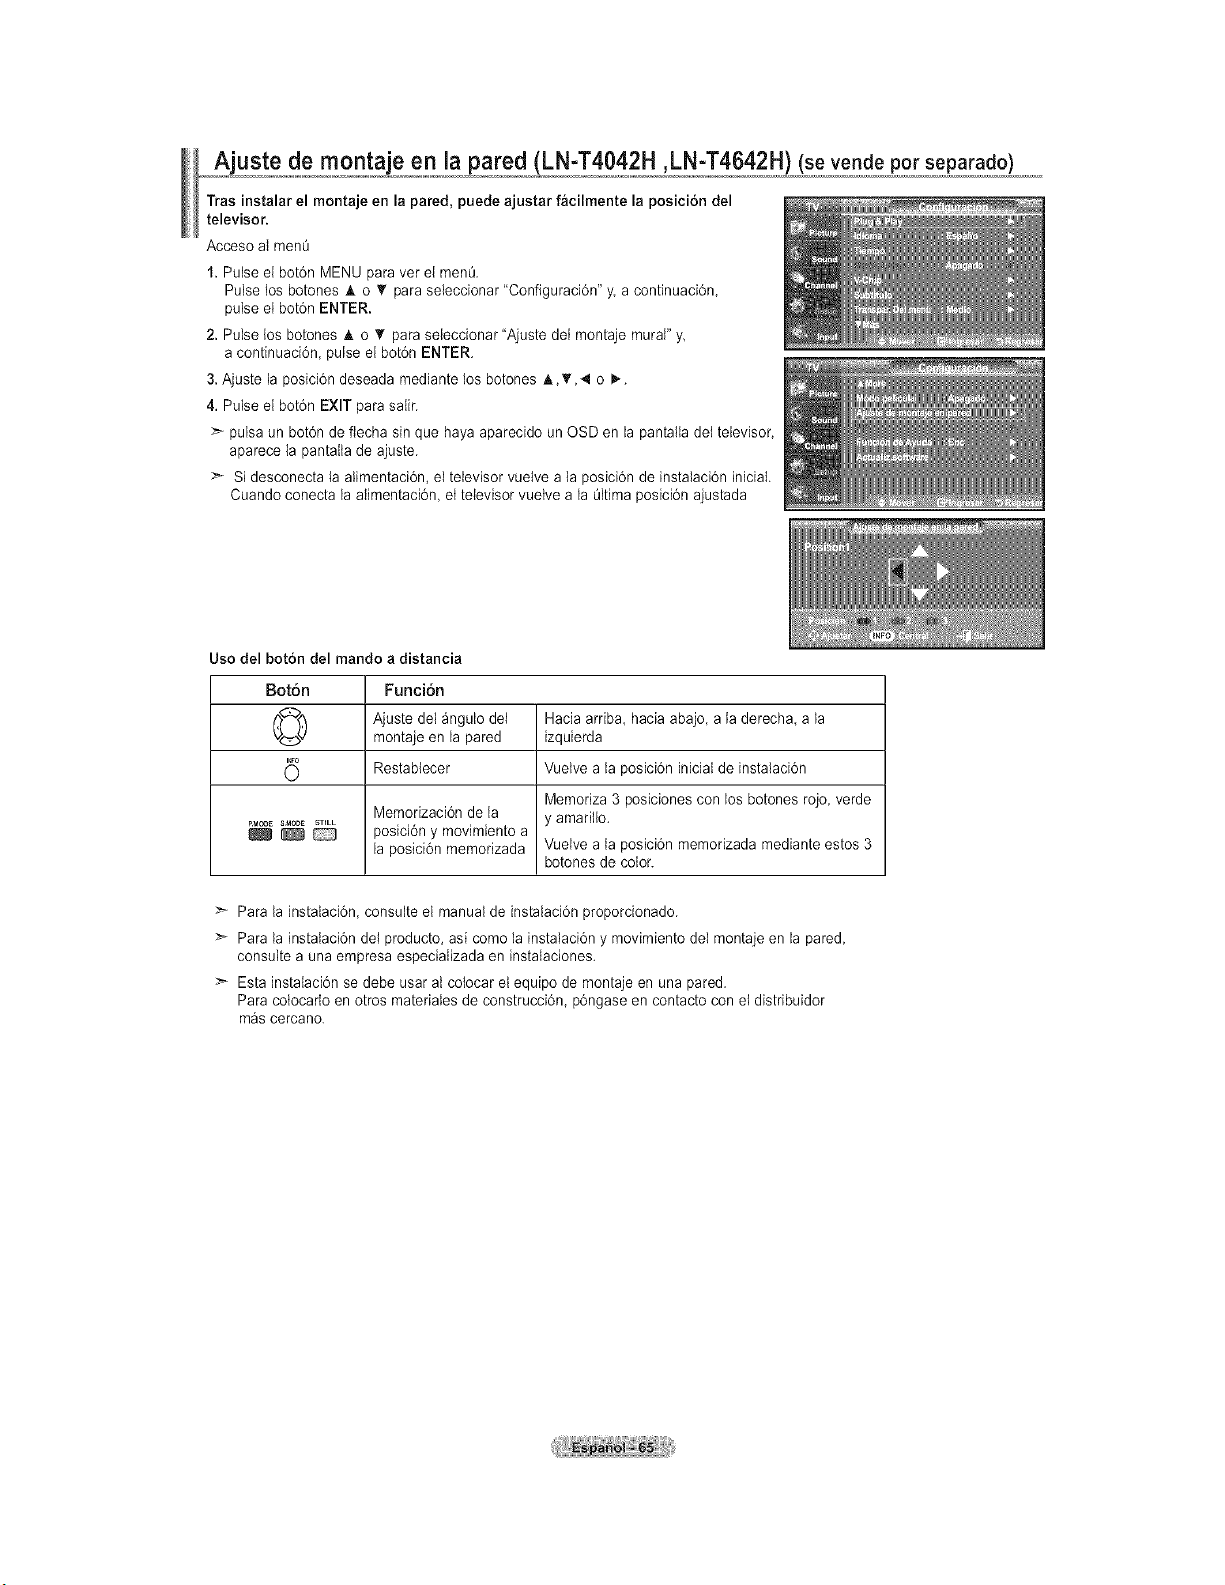
Ajuste de montaie en ia pared (LN-T4042H ,LN-T4642H) (se vende pot separado)
Tras instalar el montaje en la pared, puede ajustar facilmente la posicion del
televisor.
Acceso ai men0
1.Pulse el bot6n MENU paravet el men0.
Pulse los botones _k o _' para seleccionar "Configuraci6n" y.acontinuaci6n,
pulse el bot6n ENTER.
2.Pulse los botones A o _' paraseleccionar "Ajuste det montaje mural"y,
acontinuaci6n, pulseel bot6n ENTER.
3. Ajuste la posici6n deseada mediante los botones h.,T,4 o I,..
4.Pulse el bot6n EXIT parasalir.
pulsa un bot6n deflecha sin que hayaaparecido un OSD en la pantalla det televisor,
aparece la pantalla de ajuste.
>- Si desconecta la alimentacidn, el televisor vuelve ala posici6n de instaIaci6n iniciaL
Cuando conecta la aIimentaci6n, et televisor vuetve ala Oltimaposici6n ajustada
Uso del boton del mando adistancia
Boton Funci6n
(_) Ajuste del _ngulo del Haciaardba, hacia abajo, a la derecha, ala
montaje en la pared izquierda
Restabtecer Vuetve a la posici6n iniciaI de instalaci6n
Memoriza 3 posiciones con losbotones rojo, verde
Memorizaci6n de la y amarillo.
PMo_ SMODE 5TELL
_ _ posici6n y movimiento a
la posici6n memorizada Vuelve a la posici6n memorizada mediante estos3
botonesde color.
Para la instalaci6n, consulte el manual de instalaci6n proporcionado.
Para la instalaci6n de{producto, asi comola instalaci6n y movimiento del montaje en la pared,
consulte a una empresa especializada en instalaciones.
>_ Esta instalaci6n se debe usar atcolocar et equipo de montajeen una pared.
Para co{ocado en otros materiaIes de construcci6n, p6ngase en contacto con et distribuidor
m_s cercano.
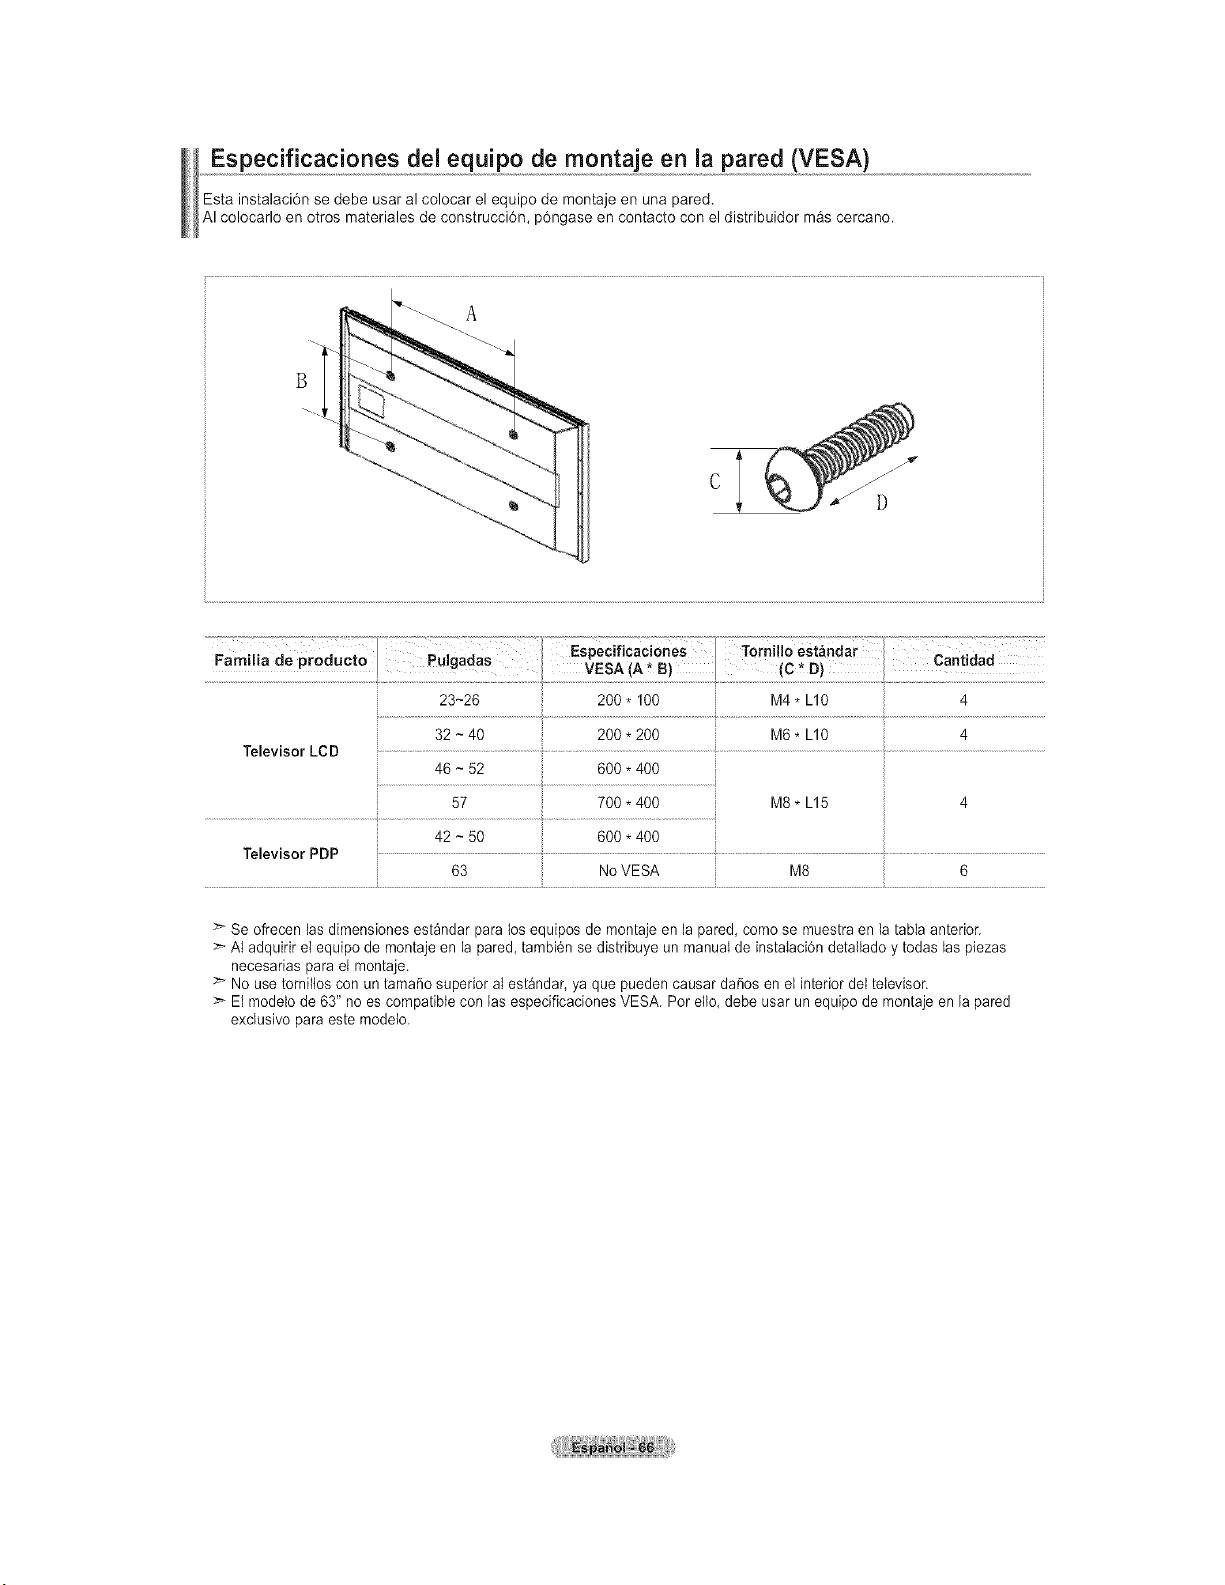
Especificaciones del equipo de montaje en la pared (VESA)
Esta instalaci6n se debe usar al colocar el equipo de montaje en una pared.
AI colocarlo en otros materiales de construcci6n, p6ngase en contacto con el distribuidor m&scercano.
.............................................................._ EsPecfcacones ! Torn o esi_ndar ....................................
ham a ae proaucto _U gaaas VESA A* B C* D Cant dad
32 ~40 200 * 200 M6* L10 4
Televisor LCD ...............................................................................................
46 ~ 52 600 * 400
57 700 * 400 M8 * L15 4
42 ~ 50
Televisor PDP
63 NoVESA 6
:_ Se ofrecen las dimensiones est_ndar paralosequipos de montaje en la pared, comose muestraen latabIa anterior.
AI adquirir el equipo de montaje en ia pared,tambi6n se distribuye unmanual deinstaIaci6n detallado y todaslas piezas
necesarias para el montaje.
:_ No usetornilios con un tamaSo superior al est_ndar,ya que pueden causar daSos en el interiordel televisor.
>- El modelo de 63" no escompatible con las especiflcaciones VESA. Pot ella,debe usar un equipo de montajeen la pared
exclusivo para este modeto.
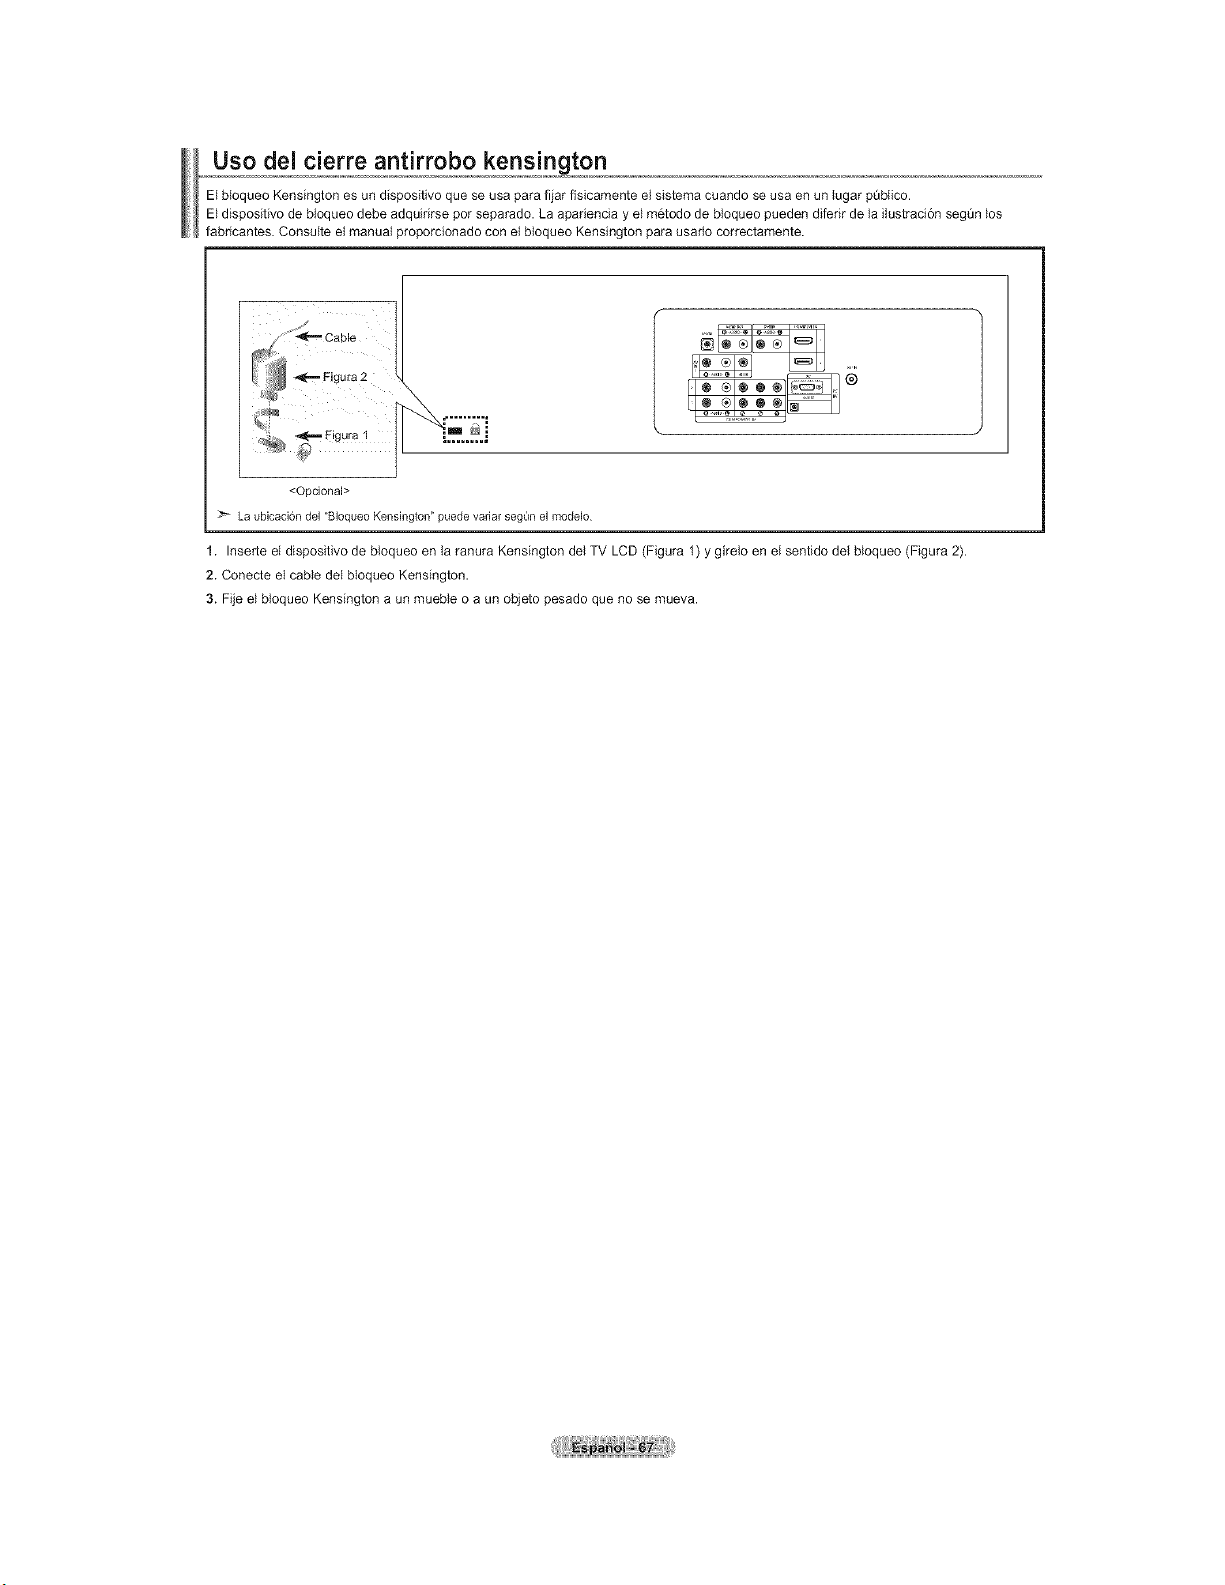
Uso del cierre antirrobo kensington
Elbloqueo Kensington es un dispositivo que se usa para fijar fisicamente el sistema cuando seusa en un lugar pQblico.
Eldispositivo de bloqueo debe adquidrse pot separado. La apadencia y el m6todo de bloqueo pueden diferir de la ilustraci6n segQn los
fabdcantes. Consulte el manual proporcionado con el bloqueo Kensington para usado correctamente.
<Opcional>
La ubicaci6n del "Bloqueo Kensington" puede variar seg_n el modelo
1. Inserte el dispositivo de bloqueo en la ranura Kensington del TV LCD (Figura 1)y girelo en el sentido del bloqueo (Figura 2).
2. Conecte el cable del bloqueo Kensington.
3. Fije el bloqueo Kensington a un mueble o a un objeto pesado que no se mueva.
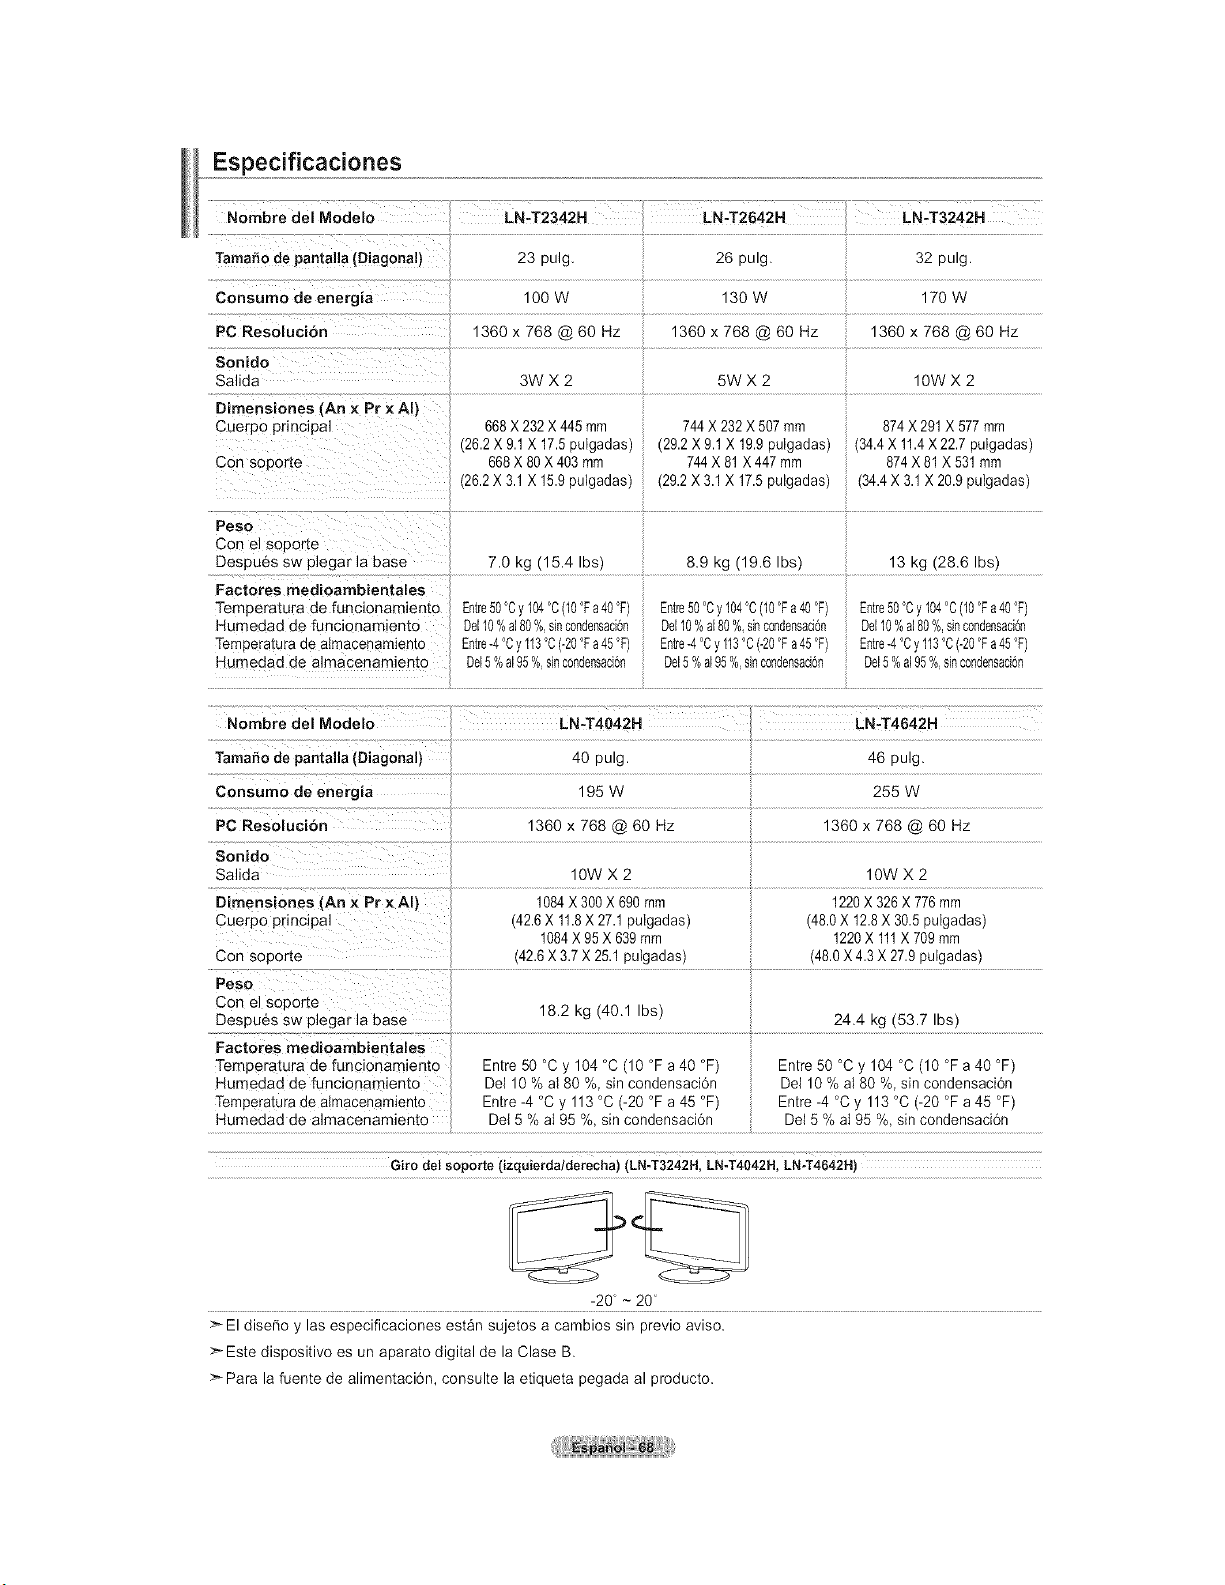
Especificaciones
Nombre del Modelo
Tamafio de pantalla (Diagonal)
Consumo de energia
PC Resoluci6n
Sonido
Salida
Dimensiones (An x Pr ×AI}
Cuerpo pnnclpai
Con soporte
Peso
Con el soporte
Despues sw plegar la base
Factores medioambientales
Temperatura de funcionamiento
Hume(]ad de funcionamiento
Tempera[uraae almacenamiemo
Humedad de almacenamiento
............ ,.,2042, L":T3242".....
23 ping 26 pulg. 32 pulg.
100 N 130 W 170 W
1360 x 768 @ 60 Hz 1360 x 768 @ 60 Hz 1360 x 768 @ 60 Hz
3WX2 5WX2 IOWX2
668X 232X 445 mm
26.2X 9.1X 17.5Du ]ac]as
668X 80X 403 mm
26.2X 3.1 X 15.9DU_aaas
7.0 kg (15.4 Ibs)
Entre50°Cy 104°C(I0 °Fa40°F)
De110%a180% s_nconaensacl0n
Entre-4°0y 113°C(-20°Fa45°F)
Del5%a195%s_ncon0ensaclon
744X 232X 507mm
29.2X 9.1 X 19.9pulgadas)
744X 81X 447 mm
29.2X 3.1 X 17.5pulgadas)
8.9 kg (19.6 Ibs)
Entre50°Cy 104°C(I0°Fa40°F)
De110X a[80%,sinc0ndensad6n
Entre-4°Cy113°C(-20°Fa45°F)
Del5%a195%=sinc0ndensad6n
874X 291 X 577 mm
34.4X 11.4X 22.7 pulgadas)
874 X 81 X 531rnm
(34.4X 3.1X 20.9 pulgadas)
13 kg (28.6 Ibs)
Entre50°Cy 104°C(10°Fa40°F)
De110%a180%,sinc0ndensacbn
i Entre-4°Cy 113°C(-20°Fa45°F)
Del5%a195%=sinc0ndensacbn
.................................................................................................................................................................................................................................................i..................................................................................................................................................................................................................................
.......['iombre del M0delo LN,T4042H :7 LN-T4642H
i ................................................................................................................................................................................................................................................................................................................................................
Consume de energia 195 W 255 W
Sonido
Salida IOWX2 IOWX2
Dimensienes (An x Pr xAI) 1084X 300X 690mm 1220X326X 776mm
Cuerpo principal (42.6X 11.8X 27.1 pulgadas) (48.0X 12.8X 30.5 pulgadas)
1084X 95X 639mm 1220X 111X 709 mm
Con soporte (42.6x 3.7 x 25.1pulgadas) (48.0 X4.3 X 27.9 pulgadas)
Con el seporte 18.2 kg (40.1 Ibs)
Despues sw plegar la base ...............................................................................................................................................................................................................................................................................................
Factores medioambientales
Temperatura de funcionamiento Entre 50 °C y 104 °C(10 °Fa40 °F) Entre 50 °Cy 104 °C (10 °F a 40 °F)
Humedad de funcionamient0 De110 % al 80 %,sincondensaci6n De110 %al 80 %,sincondensaci6n
Temperaturade a!macenamiento Entre -4 °C y 113 °C (-20 °Fa 45 °F) Entre -4 °C y 113 °C (-20 °Fa45 °F)
Humedad de almacenamiento De{ 5 %aI95 %,sincondensacidn Del 5 %aI95 %,sincondensacidn
Giro detsoporte (izquierda/derecha)(LN-T3242H,LN-T4042H,LN-T4642H)
-20 - 20
>-El diser_o y las especificaciones est&n sujetos a cambios sin previo aviso.
>- Este dispositivo es un aparato digital de la Clase B.
>- Para la fuente de alimentaci6n, consulte la etiqueta pegada al producto.
ContactSAMSUNGWORLD-WIDE
Ifyou have any questions o comments relating to Samsung products, please contact the SAMSUNG
customer care center.
Contacte con SAMSUNG WORLD-WIDE
Si tiene alguna pregunta o comentario referente a nuestros productos, por favor contacte con nuestro Servicio de
Atenci6n al Cliente.
r.L.,r,, ......................................
Customer Care Center"Z_ Web Site Address
Samsung Electronics Canada Inc., Customer
Service 55 Standish Court Mississauga, Ontario
L5R 4B2 Canada
CA.ADAt-800-SAMSU.G(7267864)www.samsung.com/ca ...............
_ la Client61e 55 Standish Court Mississauga,
Ontario L5R 4B2 Canada
Samsung Electronics America, Inc.
U.S.A 1-800-SAMSUNG (7267864) www.samsung.com 105 Challenger Road
Ridgefield Park, NJ 07660-0511
BN68-O1167A-O0
Contact SAMSUNG WORLD-WIDE
If you have any questions or comments relating to Samsung prortucts, please contact the SAMSUNG
customer care center.
Contacte con SAMSUNG WORLD-WIDE
Si tiene alguna pregunta o comentario referente a nuestros prortuctos, pot favor contacte con nuestro Servicio de
Atencion al Cliente.
Country Customer Care Center_ Web Site Address
Samsung Electronics Canada Inc, Customer
Service 55 Standish Court Mississauga,
Ontario L5R 4B2 Canada
CANADA 1-880-SAMSUNG (7267864) _/samsung.com/ca
Samsung Electronique Canada Inc.,
Service _ la Cfientele 55 Slandish Court
Mississauga, Ontario L5R 4B2 Canada
Samsung Electronics America, Inc.
USA 1-800-SAMSUNG (7267864) www.samsung.com 105 Challenger Road
Ridgefield Park, NJ 07660-0511
BN68-01167A-00