Contact SAMSUNG WORLDWIDE
Ifyou have any questions or comments relating to Samsung products, ptease contact the SAMSUNG
customer care center.
Contacte con SAMSUNG WORLDWIDE
Si tiene alguna pregunta o comentario referente anuestros productos, per favor contacte con nuestro Servicio de Atenci6n al
CIiente.
Samsung Electronics Canada Inc., Customer
Service 55 Standish Court Mississauga_
Ontario L5R 4B2 Canada
CANADA 1-800-SAMSUNG(726-7864) www.samsung.com/ca
Samsung Etectronique Canada Inc.,
Service a la Clientele 55 Standish Court
Mississauga, Ontario L5R 4B2 Canada
Samsung Electronics America, Inc.
U.S.A 1-800-SAMSUNG(726-7864) www.samsung.com 105 Challenger Road
Ridgefield Park, NJ 07660-0511
I
BN68-01514C-00
imagine the possibilities
Thank you for purchasing a Samsung product,
To receive a more comolete service olease
register your product at
www.samsung.com/globaliregister
Mode Serial No,

I important Warranty Regarding Viewing
information Television Format
Wide screen format LCD Displays (16:9, the aspect ratio of the screen width to height) are primarily designed to view wide screen format
full-motion video. The images displayed on them should primarily be in the wide screen 16:9 ratio format, or expanded to filt the screen
if your model offers this feature and the images are constantly moving. Displaying stationary graphics and images on screen, such as
the dark side-bars on nonexpanded standard format television video and programming, should be limited to no more than 5% of the total
television viewing per week.
Additionally, viewing other stationary images and text such as stock market reports, video game displays, station loges, web sites or
computer graphics and patterns, should be limited as described above for all televisions. Displaying stationary images that exceed the
above guidelines can cause uneven aging of LCD Displays that leave subtle, but permanent burned-in ghost images in the LCD picture. To
avoid this, vary the programming and images, and primarily display full screen moving images, not stationary patterns or dark bars.
On LCD models that offer picture sizing features, use these controls to view different formats as a fult screen picture
Be careful in the selection and duration of television formats used for viewing. Uneven LCD aging as a result of format selection and use,
as well as burned-in images, are not covered by your Samsung limited warranty.
U.S.A Only
The product und accompanying this user manual is licensed under certain intellectual property rights of certain third parties. In particular,
this product is licensed under the following US patents: 5,991,715, 5,740,317, 4,972,484, 5,214,678, 5,323,396, 5,539,829, 5,606,618,
5,530,655, 5,777,992, 6,289,308, 5,610,985, 5,481,643, 5,544,247, 5,960,037, 6,023,490, 5,878,080, and under US Published Patent
Application No. 2001-44713-A1.
This license is limited to private non-commercial use by end-user consumers for licensed contents. No rights are granted for commercial
use. The license does not cover any product unit other than this product unit and the license does not extend to any unlicensed product
unit or process conforming to ISO/IEC 11172-3 or ISO/IEC 13818-3 used or sold in combination with this product unit. The license only
covers the use of this product unit to encode and/or decode audio files conforming tothe ISO/{EC 11172-3 or tSO/IEC 13818-3. No rights
are granted under this license for product features or functions that do not conform to the ISO/tEC 11172-3 or ISO/IEC 13818-3.
Other countries
The product unit accompanying this user manual is licensed under certain intellectual property rights of certain third parties. This license is
limitedto private non-commercial use by end-user consumers for licensed contents. No rights are granted for commercial use. The license
does not cover any product unit other than this product unit and the license does not extend to any unlicensed product unit or process
conforming to ISO/IEC 1t172-3 or ISO/IEC 13818-3 used or sold in combination with this product unit. The license only covers the use of
this product unit to encode and/or decode audio files conforming to the ISO/IEC 11172-3 or ISO/IEC 13818-3. No rights are granted under
th s cense for product features or funct ons that do not conform to the SO EC 11172-3 or SO/EC 13818-3.
8AMSUNG ELECTRONICS NORTH AMERICAN LiMiTED WARRANTY STATEMENT
Subject _otne requirements, conditions, exclusions and I_nitations of tne onginai Limited Warranty supplied with Samsun§ Electromcs
(SAMSUNG) proauc_s, ana the requlremems, eonoi[lons exclusions and iimttanons containea harem SAMSUNG will additional., Drovlae
Narramy Repair Service in the United States on SAMSUNG proaucts purcnased in Canada and in Canada on SAMSUNG products uumnasea
the United States. for the warranty penod onglnally suecified, and to the Originat Purchaser _my.
The above descneea warranty repairs must be perforr-ed by aSAMSUNG Authorized Service CenteL &long with this Statement LheOriginal
Limited Warrant, Statemem ano a dated Bil of Sale as Proof of Purchase must Depresemee to the Service Center Transportation to and from
me Service Center isthe responstetHty of the uurchaser
_oi"]luons covered are ltml[ea only "_ontanufacturing defects in ma[enal or worKmansnie, ano only Tnoseencoun[erea in normal use of the
croat. _'(
Excluded cut not ilml[ea [o. are any onginally specified provisions for. in-home oron-sire services minimum or maximum repair rimes
exenanges orreetacements, accessoues, options, upgraaes, or consumables
For the location of a SAMSUNG Authorized Service Center please call [o -free
In the United States : 1-800-SAMSUNG (1-800-726-7864) in Canada : "G800-SAMSUNG
See the warranty card for more information on warrantyterms.
Precauti0ns When Displaying astill Image
A stitt imagemay cause perraanentdamage tothe TV screen
• Donot displaya stillimageonthe LCDpanelfor more than 2 hours as it cancausescreenimageretention.]-hisimageretentionisatso
knownas !'screenburn!'.Toavoid such imageretention,reducethe dagree of brightnessandcontrast ofthe screen 'whendisPlayinga stil
image.
WatchingtheLCD TV in4:3format fora longperiodoftime mayleavetracesof borders displayeden the left,right and
center ofthe Screencaused bythedifferenceoftightemissiononthe screen.
PlayingaDVD or a game conso!e maycause asimila_effecttothe screen.
the ab°ve effectaren°t c°vered bYthe Warranty
•Displaying stillimagesfromVideo gamesand PC fortonger than a certainperiod of timemay producepartialafter-images.
Topreven!thiseffect,reduce!ha'brightness'and '€ontrastl"whendisplaying stil! images.
©2008SamsungElectronicsCo.,Ltd Allrightsreserved.
Contents
[] List of Features......................................................................2 [] UsingYourTVas aComputer(PC)Displa_ .....34
[] Accessories................................................................... 2 [] DisptaI Modes .............................................. 34
[] v_ewlngtheControtPane ....3 [] SettinguptheTVwith.,ourPC ..................................................35
[] vlewlng[neConnectionPanel................................. 4
e RemoteControl...........................................................
[] insratltncBatteriesin the RemoteControl....................................6 [] SettingtheClock........................................................................37
......................................... [] Setectir] a MenuLanguage 40
[] ConnectingCabteTV ...............................................................7
[] ConnectingaDVDPlayeror CableBox/Satellitereceiver
(Set-TopBox)viaHDMI........... 8
[] ConnectingaDVDPlayerorCableBox/Sate!ie rece,,,er
(Set-TopBox) aDVt ..................................................................8
[] ConnectingaDVDPlayerorCableBox/Satellitereceiver
(Set-TopBox)viaComponentcaoJes...........................................9
[] ConnectingaCamcorder..................................................... 9
[] ConnectingaVCR. 10
[] Connecunga DigitalAudioSystem ............I1
[] ConnecnnganAmptlher/DVDHomeTheater ............11
[] ConnectinoaPC........................................................................12
[] Usingthe V-Chi_ ......41
[] ViewingClosedCaptions(On-ScreenTextMessages)
- Analog...............................................................................48
[] ViewingClesedCaptions(On-ScreenTextMessages
- Digitat.....................................................................................49
[] Aojus[Ing[neTVOn/OffMelodySouna......................................50
[] usingthe EnergySavingC_arure.........................................50
[] dpgradingtheSoftware..............................................................51
[] Troubleshootinc .....................................................................52
[] Howto AdusttheStand.............................................................54
[] Howto Adjustthe AngleoftheTV..........................................54
[] ins[ailingthe WaltMountKit.................. 54
[] installingVESACompliantMountingDevices......................... 54
[] usingthe DecorationCovers ....................................54
[] installingthe Stand.......... 55
DisconnectingtheStand.................................................... 55
[] WaltMountKitSpecifications(VESAI......... 56
usingtheAntFTheftKensingtonLOCK......................................57
58
[] TurningtheTVOnandOff........................................................13
[] Plug & Play :eature...............................................................13
[] ChangingChannels.............. 14
[] Adjusungthe Volume........ 15
[] viewingthe Displa} ..............................................!5
[] Viewingthe Menus.....................................................................15
[] using the TOOLSButton.........................................................11_ [] Soecificafions.......................
[] MemorizingtheChannens..........
[] ToSelectthe Source .18
[] ToEditthe InputSourceName..................................................18
[] Changingthe PictureStandarc .............................................19
[] CustomizingthePictureSetnngs............................................19
[] ConfiguringPictureOpnons...................................................20
[] Resettingthe PictureSettingstothe Factor, 3efautts...............23
[] ChangingrneSoundStandard....................... 24
[] CustomizingtheSound .........24
[] SettingtheTruSurroundXT.... 25
[] Choosinga Multi-ChannelSound MTS)track-Digital.............25
[] Choosinga Multi-ChannelSouna MTS)track- Analoc .......26
[] AutomaucvolumeControl..........................................................26
[] SemngtheTVSpeakersOn/Off.......................... 27
[] ConnectingHeadphones(Soldseparately)................................27
[] ClearingScrambledChannels-Digital.....................................28
[] AddingandErasingChannens......................................... 29
[] ToSet-UpYourFavoriteChannels.......................... 30
[] vie_,,qgthe ChannelLists........................................... 31
[] LabeIingChannels................................................................ 32
[] FineTuningAnalogChannets........... 33
[] CheckingtheDigital-SignalStrengm .......33
A
m
Symbol Press
Note One-Touch
Butter
List of Features
Adjustable picture settings that can be stored in the TV% memory.
* Automatic timer to turn the TV on and off.
A special sleep timer.
Excellent Digital Interface & Networking :
With a built-in HD digital tuner, non-subscription HD broadcasts can be viewed with no Cable Box/Satellite receiver
(Set-Top Box) needed.
* HDMI/DVI connection of your PC tothis TV.
* Excellent Picture Quality
SRS TruSurround XT
- SRS TruSurround XT provides a virtual surround system.
Accessories
Please make sure the following items are included with your LCD TV.
Ifany items are missing, contact your dealer.
RemoteControl & Batteries (AAAx 2) PowerCord Cleaning Cloth Owner's Instructions
(LN19A330J1D: BN59-00678A) (3903-000144) (BN63-01798A)
(LN19A331J1D: BN59-00678B)
Wall Mountkit DecorationCover
WarrantyCard/RegistrationCard/ (BN96-04960A) (LN19A330J1D: Right:BN63-03217A
SafetyGuide Manual Left: BN63-03216A)
(Notavailable in alllocations) (LN19A331J1D: Right: BN63-03217B)
>_The items color and shape may vary depending on the model.
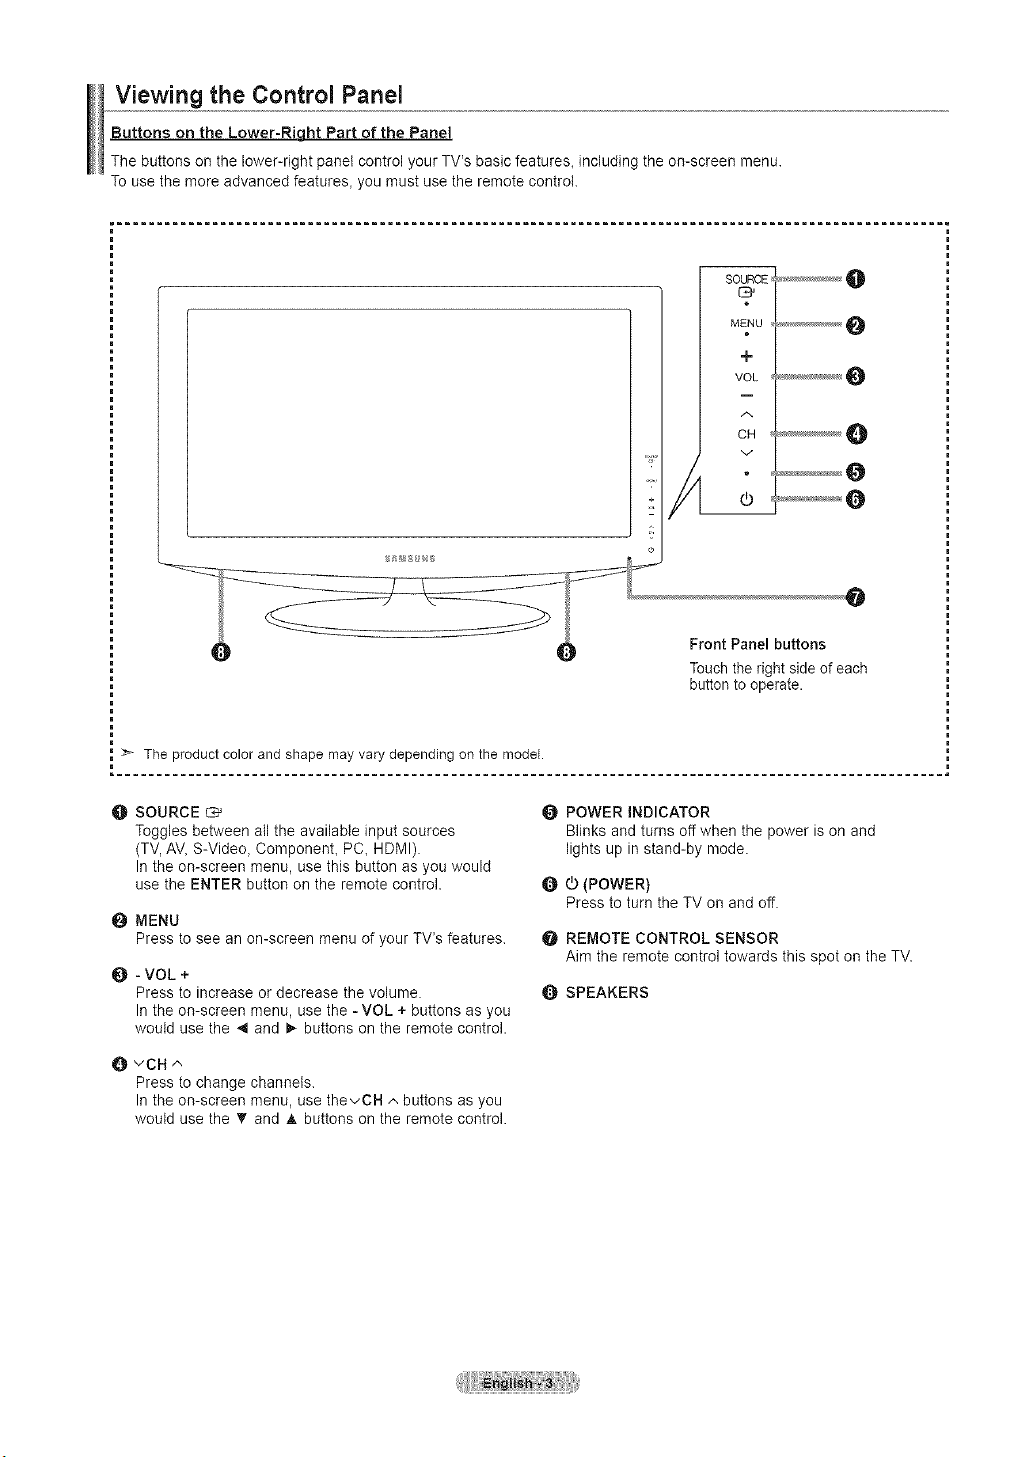
Viewing the Control Panel
Buttons on the Lower-Riqht Part of the Panel
The buttons on the lower-right panel control your TV's basic features, including the on-screen menu.
Touse the more advanced features, you must use the remote control.
SOURCE
MENU
+
VOL
A
CH
v
Touch the right side of each
button to operate.
O SOURCE C,_
Toggles between atl the available input sources
(TV, AV,S-Video, ComponenL PC, HDMI).
Inthe on-screen menu, use this button as you would
use the ENTER button on the remote control.
0 MENU
Press to see an on-screen menu of your TV's features.
O - VOL +
Press to increase or decrease the volume.
Inthe on-screen menu, use the -VOL +buttons as you
would use the ,,I and _ buttons on the remote control.
O POWER iNDICATOR
Blinks and turns off when the power ison and
lights up in stand-by mode.
Q 0 (POWER)
Press to turn the TV on and off.
O REMOTE CONTROL SENSOR
Aim the remote control towards this spot on the TV.
SPEAKERS
O vCH ^
Press to change channels.
Inthe on-screen menu, use thevCH ^ buttons as you
would use the V and A buttons on the remote control.
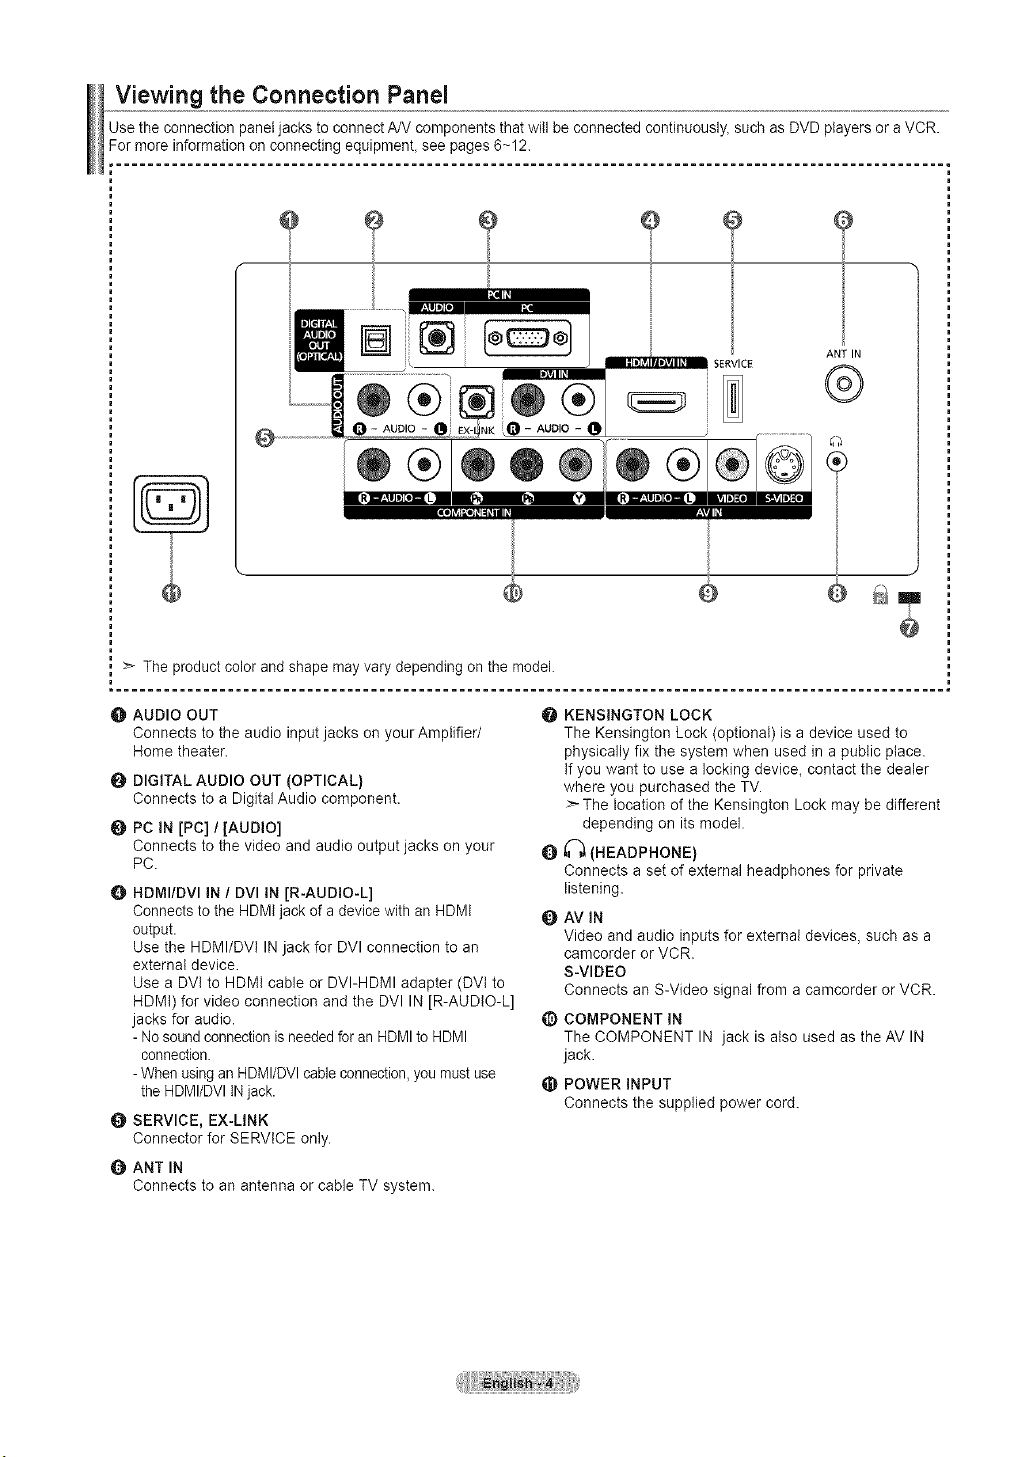
Viewing the Connection Panel
Use the connection panel jacks to connect A/V components that will be connected continuously, such asDVD players oraVCR.
For more information on connecting equipmenL see pages 6~12.
........................................................................................................
@
J
...........
®®
=_Jii
®®
_LO- AUO,O-
00®
SERVICE
ANT IN
®
an
>" The product color and shape may varydepending on the model.
O AUDIO OUT
Connects to the audio input jacks on your Amplifier/
Home theater.
O DIGITAL AUDIO OUT (OPTICAL}
Connects to a Digital Audio component.
O PC IN [PC] /[AUDIO]
Connects to the video and audio output jacks on your
PC.
O HDMI/DVI IN / DVI IN [R-AUDiO-L]
Connects to the HDMI jack of a device with an HDMI
output.
Use the HDMI/DVI IN jack for DVI connection to an
external device.
Use a DVt to HDMt cable or DVI-HDMI adapter (DVI to
HDMI) for video connection and the DVI IN [R-AUDIO-L]
jacks for audio.
- Nosoundconnection isneededfor an HDMIto HDMI
connection.
- When using an HDMI/DVI cable connection,you mustuse
the HDMI/DVI INjack.
O SERVICE, EX-LINK
Connector for SERVICE only.
Q ANT IN
Connects to an antenna or cable TV system.
O
O
Q
@
@
KENSINGTON LOCK
The Kensington Lock (optional) is adevice used to
physically fix the system when used in apublic place.
Ifyou want to use alocking device, contact the dealer
where you purchased the TV.
>-The location of the Kensington Lock may be different
depending on its model.
I_ (HEADPHONE}
Connects a set of external headphones for private
listening.
AM iN
Video and audio inputs for external devices, such as a
camcorder or VCR.
S-VIDEO
Connects an S-Video signal from a camcorder or VCR.
COMPONENT iN
The COMPONENT IN jack is also used as the AV IN
jack.
POWER INPUT
Connects the supplied power cord.
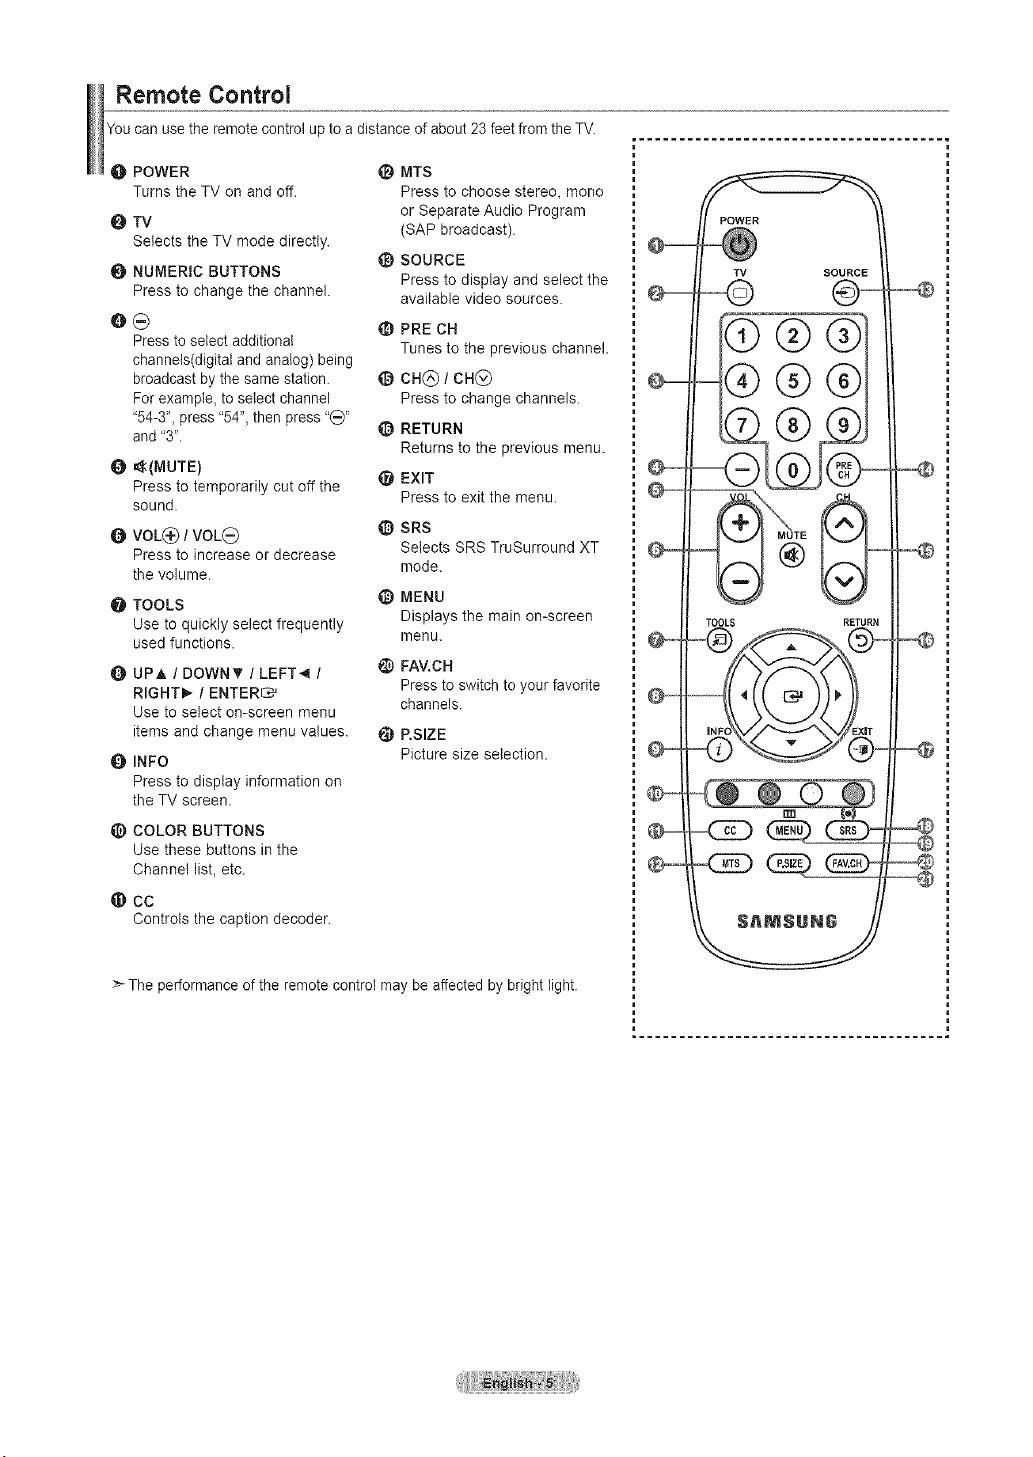
Remote Control
You can usetheremote controlup toa distance of about 23 feet fromthe TV.
O POWER
Turns the TV on and off.
O TV
Selects the TV mode directly.
O NUMERIC BUTTONS
Press to change the channel.
e_
Pressto select additional
channels(digital and analog) being
broadcast by the samestation.
For example, toselect channel
"54-3",press "54", then press"_"
and "3".
0 _(MUTE)
Press to temporarily cut off the
sound.
O VOL_:) / VOL_)
Press to increase or decrease
the volume.
TOOLS
Use to quickly select frequently
used functions.
Q UPA / DOWNT / LEFT_I /
RIGHTI_ / ENTER_
Use to select on-screen menu
items and change menu values.
INFO
Press to display information on
the TV screen.
COLOR BUTTONS
Use these buttons in the
Channel list, etc.
@ CC
Controls the caption decoder.
_) MTS
Press to choose stereo, mono
or Separate Audio Program
(SAP broadcast).
_) SOURCE
Press to display and select the
available video sources.
PRE CH
Tunes to the previous channel.
@ ca@ / CH@
Press to change channels.
_) RETURN
Returns to the previous menu.
_t EXIT
Press to exit the menu.
_) SRS
Selects SRS TruSurround XT
mode.
_) MENU
Displays the main on-screen
menu.
_) FAV.CH
Pressto switch to your favorite
channels.
e RSIZE
Picture size selection.
>-The performance ofthe remote control may be affected by bright light.
--
POWER
TV SOURCE
=@@@
-Q
_D
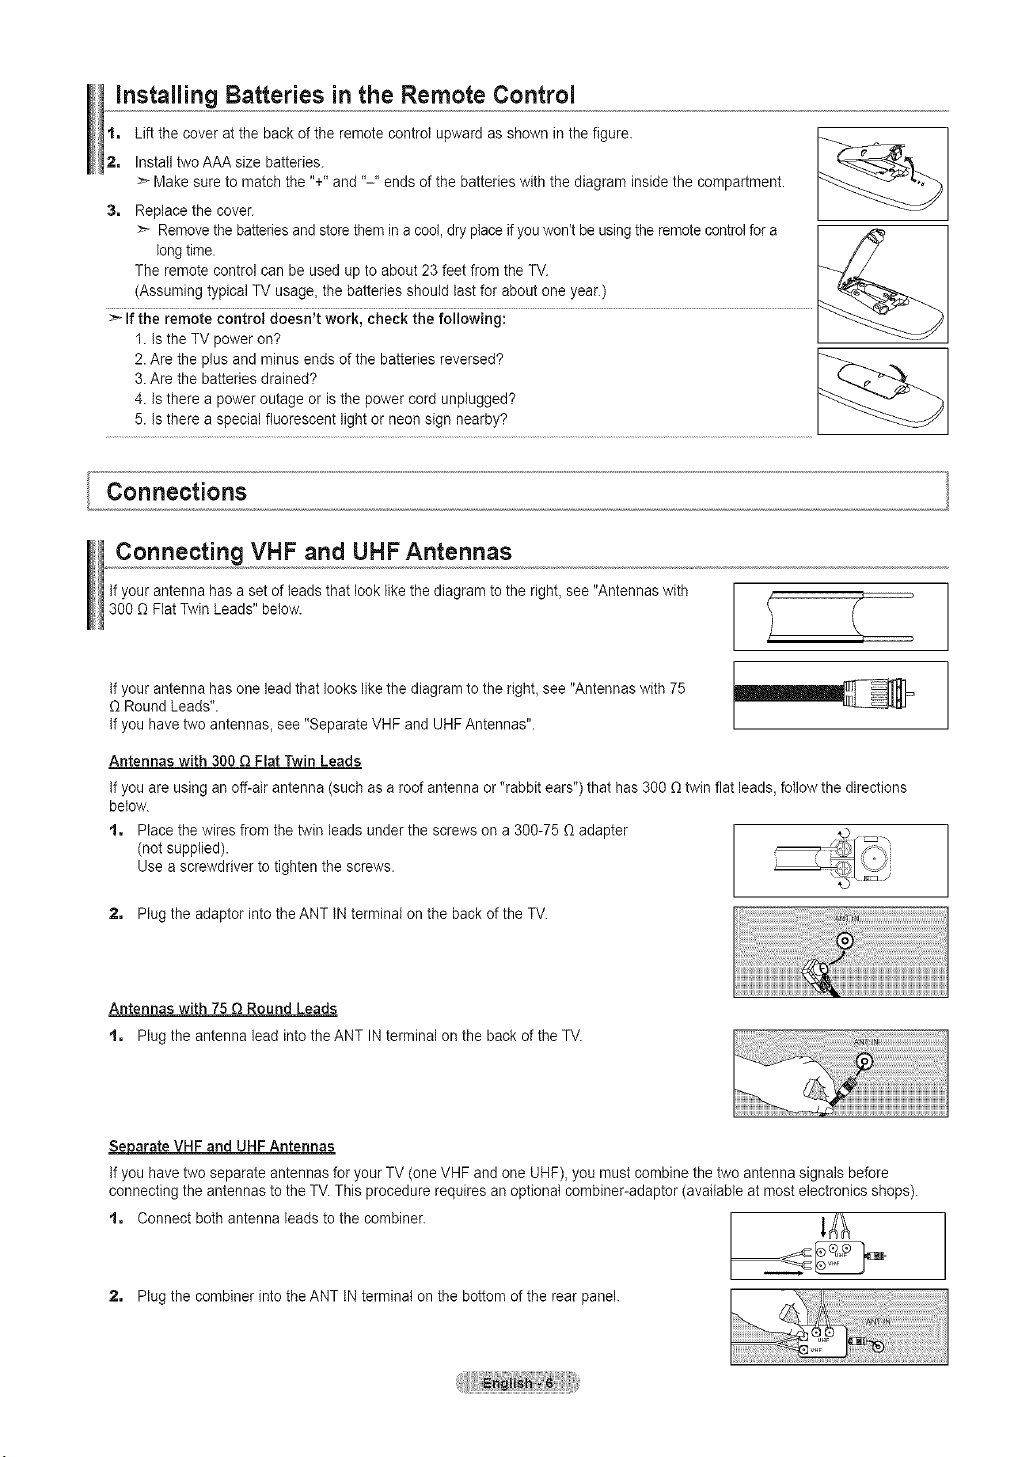
Installing Batteries inthe Remote Control
2, Install twoAAAsize batteries.
> Makesure to matchthe "+"and "-" ends of the batteries with the diagram inside the compartment.
3, Replacethe cover.
> Removethe batteriesand store them in a cool, dry place if youwon't be using the remote controlfor a [ _ ]
Iongtime. I / / /
The remote control can be used up to about 23feet fromthe TV. I'_,_-_ /
(Assunling typical TV usage, tile batteries should last for about one year.)
1. Is the TV poweron? L _'_---_ J
2.Are the plus and minus endsofthe batteries reversed?
3.Are the batteries drained?
4. Is there apower outage or isthe power cord unplugged?
5. Is there aspecial fluorescent lightor neon sign nearby?
Connecting VHF and UHF Antennas
Ifyour antenna has asetof leads that looklike the diagram to the right, see"Antennas with
300 O Flat Twin Leads" below.
Ifyour antenna has one leadthat lookslike the diagram tothe right, see "Antennaswith 75
O Round Leads".
Ifyou havetwo antennas_see "Separate VHFand UHF Antennas".
Antennas with 300 Q Flat Twin Leads
Ifyou areusing an off-air antenna (such asaroofantenna or "rabbitears") that has 300 Otwin flat leads, follow the directions
below.
t, Place the wires from the twin leadsunder the screws on a 300-75 Oadapter
(notsupplied).
Use ascrewdriver totightenthe screws.
2, Plugthe adaptor intothe ANT INterminal on the back of the TV.
Antennas with 75Q Round Leads
t, Plugthe antenna lead into the ANT INterminal on the back of the TV.
Separate VHF and UHFAntennas
Ifyou havetwo separate antennas for your TV (oneVHF and one UHF), you mustcombine the two antennasignals before
connecting the antennas to the TV.This procedure requires an optional combiner-adaptor (available at mostelectronics shops).
t, Connect both antenna leads tothe combiner. 1_
2, Plugthe combiner into the ANT INterminal on the bottom of the rear panel.
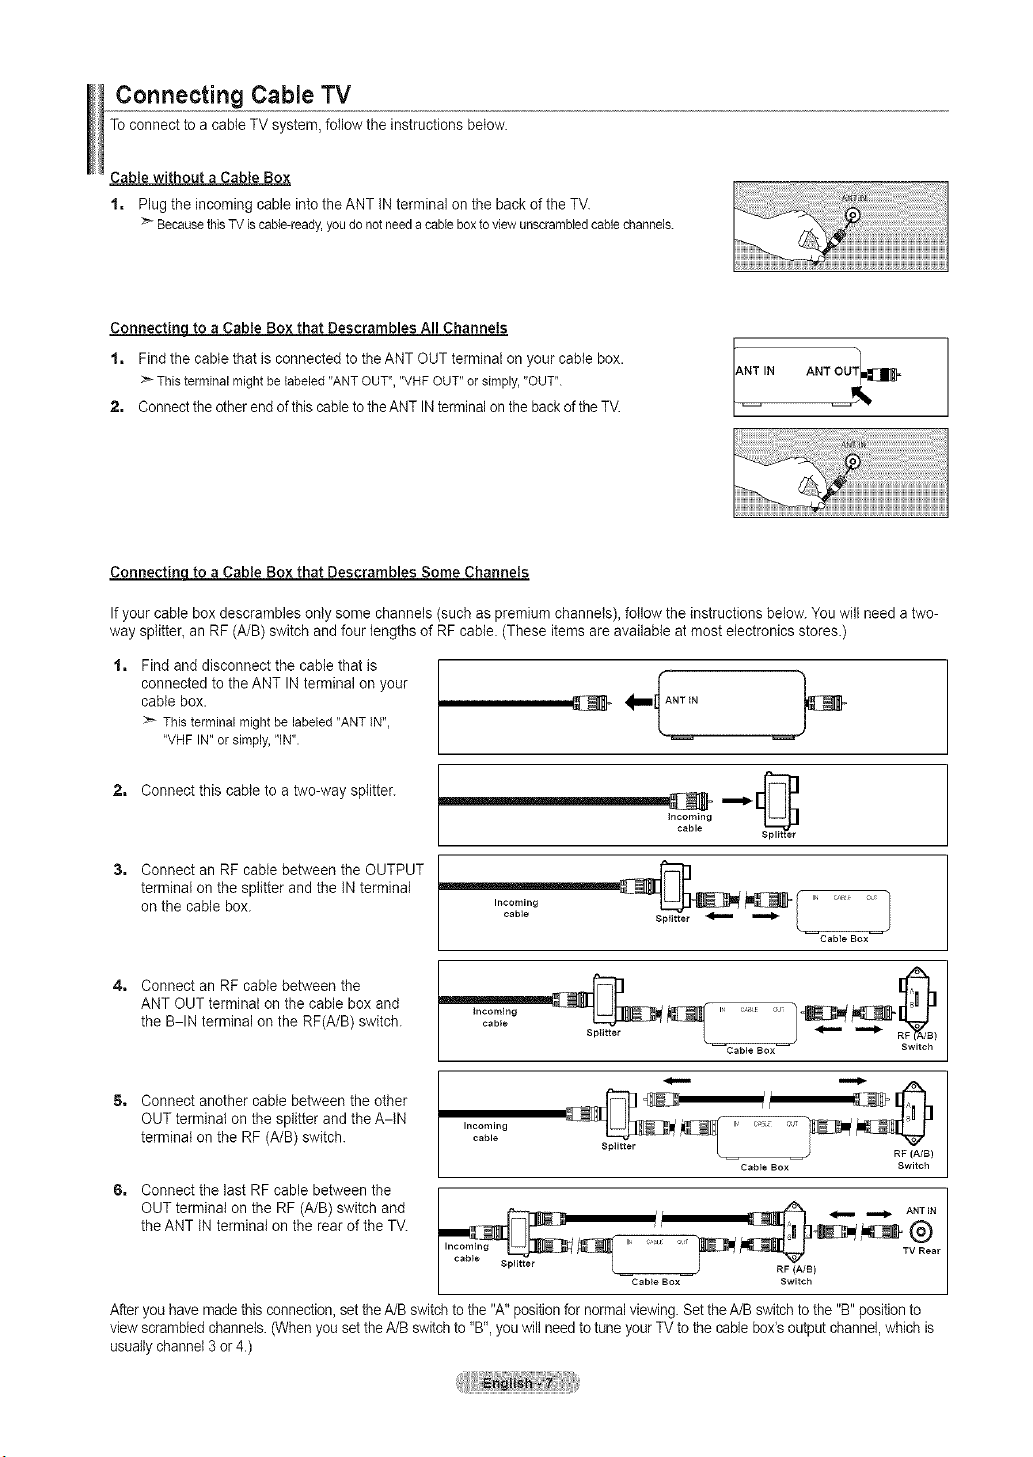
Connecting Cable TV
Toconnect to acable TV system,follow the instructionsbelow.
Cable without a Cable Box
1, Plugtheincoming cable intothe ANT INterminal on the back of the TV.
BecausethisTViscable-ready,youdonotneeda cableboxto viewunscrambledcablechannels.
Connectinq to aCable Box that Descrambles All Channels
1, Findthe cable that isconnected tothe ANT OUT terminat on your cabtebox.
:_Thisterminalmightbelabeled"ANTOUT","VHFOUT"orsimply,"OUT".
2, Connectthe otherend of this cable tothe ANT IN terminalon the backofthe TV.
NTIN ANTOUT_=
Connectinq to aCable Box that Descrambles Some Channels
Ifyour cable box descrambles only some channels (such aspremium channels), follow the instructions below.You wilt need atwo-
way splitter, an RF (A/B)switch and four lengths of RF cable. (These items are available at most electronics stores.)
1, Findand disconnect the cable that is
connected to the ANT INterminal on your
cable box.
:_ Thisterminalmightbelabeled"ANTIN",
"VHFIN"orsimply,"IN".
2, Connect this cable to atwo-way splitter.
Incoming
cable
3, Connect an RF cable between the OUTPUT
terminal on the splitter and the INterminal
on the cable box.
Incoming
cable
Splitter
,===_
J
Cable BOX
4, Connect an RF cable between the
ANT OUT terminal on the cable box and
the B-IN terminal on the RF(A/B) switch.
incoming
cable
Splitter
Cable BOX
5, Connect another cable between the other
OUT terminal on the splitter and the A-IN
terminal on the RF (A/B) switch.
Incoming
cable
RF (A/B)
Cable Box Switch
°. onne tthe,ost ,,e,et ee t,e
OUT terminal on the RF (A/B)switch and _ _ A,T_,
the ANT INterminal on the rear of the TV. _ _i_-7_. @
Incoming .... ,11.... TV Rear
1'70_:'g s_ _ _ _ _ I
/ Cab,_Oo× Sw,_ch I
After youhave made thisconnection, settheA/Bswitch tothe "A" positionfor normalviewing.Set theA/B switchto the "B" positionto
viewscrambledchannels.(When you set theA/B switchto "B",youwillneed totune your TV tothe cable box'soutput channel,which is
usually channel 3or4.)
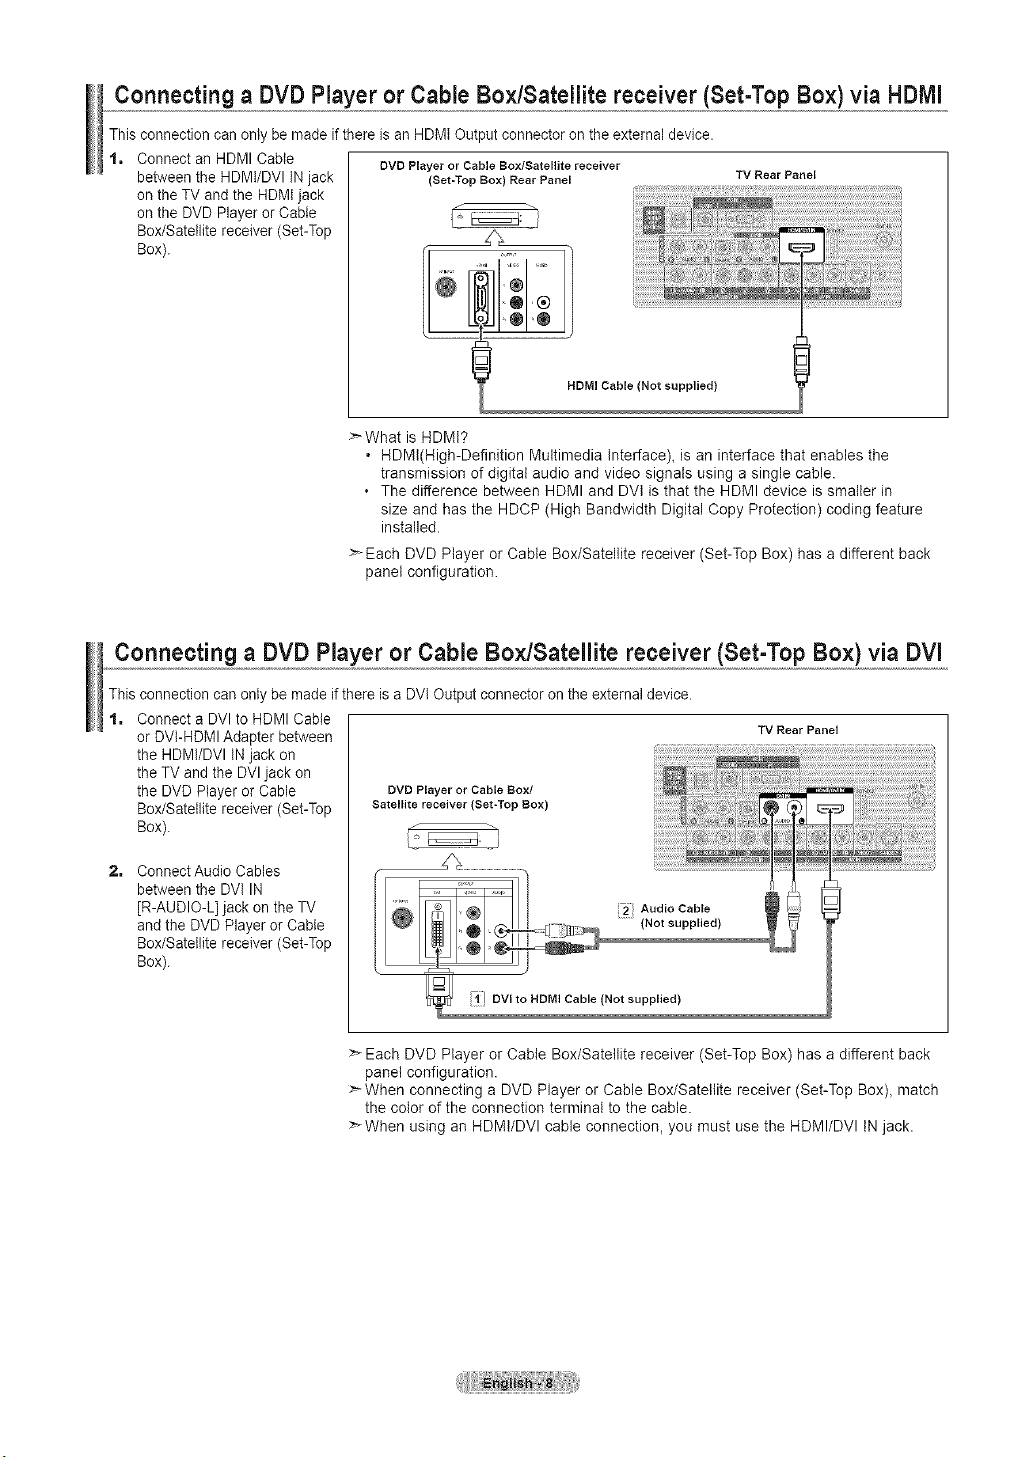
Connecting a DVDPlayer orCableBox/Satellitereceiver (Set-Top Box) via HDIVll
This connection can only be made if there isan HDMI Output connector on the external device.
1, Connect an HDMI Cable
DVD Player or Cable Bo×/aatellite receiver
between the HDMI/DVI IN jack (Set-Top Box) Rear Panel TV Rear Panel
on the TVand the HDMIjack
on the DVD Player orCable
Box/Satellite receiver (Set-Top ___,,
ox,
HDMI Cable (Not supplied)
>What is HDMt?
• HDMt(High-Definition Multimedia Interface), is an interface that enables the
transmission of digital audio and video signals using a single cable.
The difference between HDMI and DVl is that the HDMI device issmaller in
size and has the HDCP (High Bandwidth Digital Copy Protection) coding feature
installed.
>Each DVD Player or Cable Box/Satellite receiver (Set-Top Box) has a different back
panel configuration.
Connecting a DVD Player or Cable Box,/Satellite receiver (Set-Top Box) via DVl
Thisconnection can only be made if there isa DVlOutput connector onthe externaldevice.
1, Connect a DVI to HDMI Cable
or DVI-HDMI Adapter between
the HDMI/DVI INjack on
the TV and the DVI jack on
the DVD Player or Cable DVD Playeror Cable Box/
Box/Satellite receiver (Set-Top Satellite receiver (Set-Top Box)
Box).
2, Connect Audio Cables
between the DVI IN
[R-AUDIO-L] jack on the TV
and the DVD Player orCable
Box/Satellite receiver (Set-Top
Box).
TV Rear Panel
> Each DVD Player or Cable Box/Satellite receiver (Set-Top Box) has adifferent back
panel configuration.
>When connecting a DVD Player or Cable Box/Satellite receiver (Set-Top Box), match
the color of the connection terminal to the cable.
>When using an HDMI/DVl cable connection, you must use the HDMI/DVl IN jack.
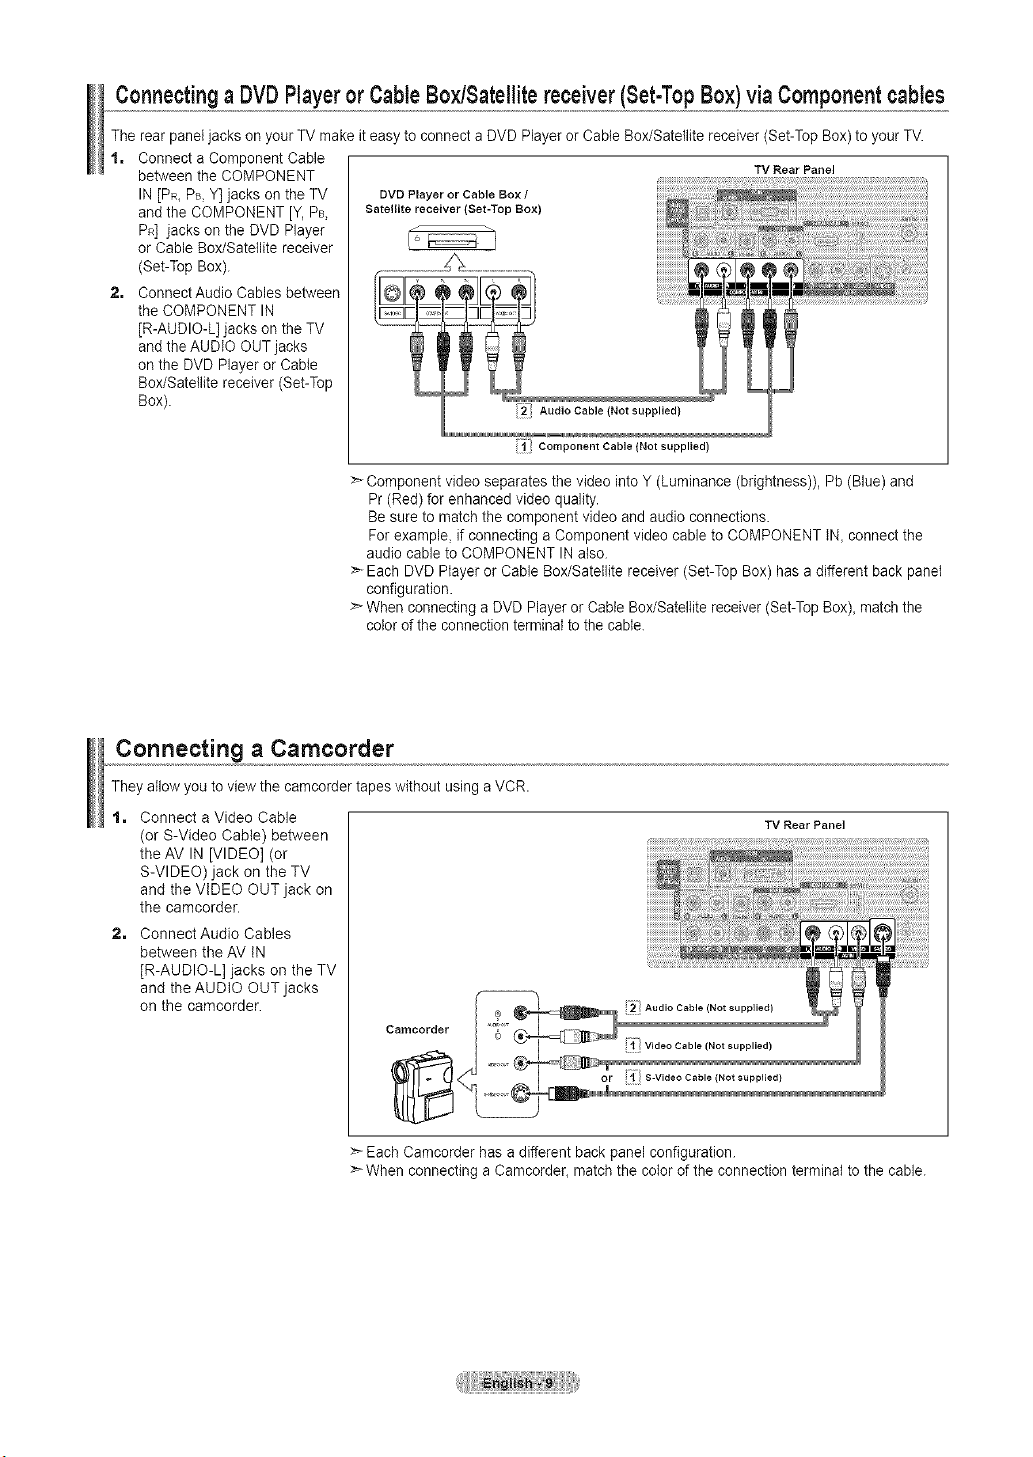
Connectinga DVDPlayeror CableBoyJSatellitereceiver(Set-TopBox)viaComponentcables
The rear paneljacks onyour TV makeit easy toconnect a DVD Player orCable Box/Satellite receiver (Set-TopBox) to your TV.
1. Connect aComponent Cable
between the COMPONENT
IN[PR_PB,Y] jacks on the TV
and the COMPONENT [Y, PB,
PR] jacks on the DVD Player
or Cable Box/Satellite receiver
(Set-Top Box).
2. ConnectAudio Cables between
the COMPONENT IN
[R-AUDIO-L] jacks on the TV
and the AUDIO OUT jacks
on the DVD Playeror Cable
Box/Satellite receiver (Set-Top
Box).
DVD Player or Cable Box /
Satellite receiver (Set-Top Box)
TV Rear Panel
Component Cable (Not supplied)
:>-Component video separates the video into Y (Luminance (brightness)), Pb (Blue) and
Pr(Red) for enhanced video quality.
Be sure to match the component video and audio connections.
For example, if connecting aComponent video cable to COMPONENT IN,connect the
audio cable to COMPONENT INalso.
>- Each DVD Player or Cable Box/Satellite receiver (Set-Top Box) has a different back panel
configuration.
>- When connecting aDVD Player or CableBox/Satellitereceiver (Set-TopBox), matchthe
colorofthe connection terminalto the cable.
Connecting a Camcorder
They allow youtoviewthe camcordertapes without using aVCR.
1. Connect a Video Cable
(or S-Video Cable) between
the AV IN[VIDEO] (or
S-VIDEO) jack on the TV
and the VIDEO OUT jack on
the camcorder.
2. Connect Audio Cables
between the AV IN
[R-AUDIO-L] jacks on the TV
and the AUDIO OUT jacks
on the camcorder.
eamoorder
TV Rear Panel
>_EachCamcorder has a different backpanel configuration.
>- When connecting a Camcorder, matchthe colorof the connection terminal tothe cable.
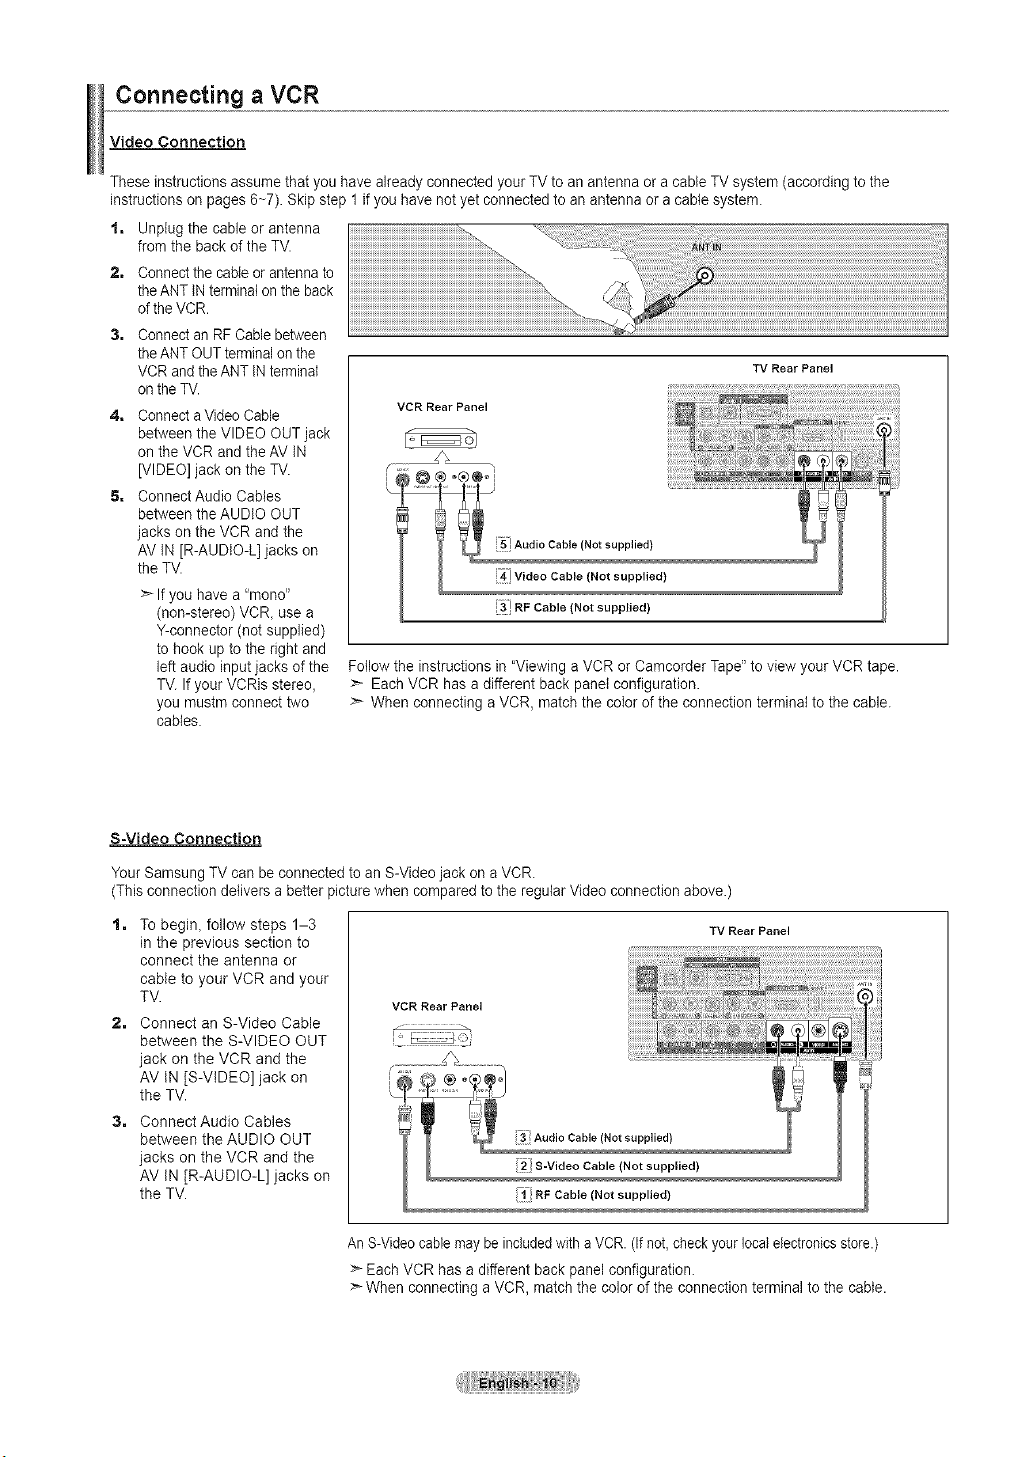
Connecting a VCR
Video Connection
These instructions assume that you have already connected your TVto an antennaor a cable TV system (according to the
instructions on pages 6~7). Skip step 1 if you have not yetconnected to an antenna oracable system.
1. Unplugthe cable or antenna
from the back of the TV.
2, Connectthe cable orantennato
the ANTINterminatonthe back
ofthe VCR.
Connectan RFCable between
the ANTOUT terminal on the
VCR and the ANTINterminal
on the TV.
4, Connecta VideoCable
between the VIDEO OUT jack
on the VCR and the AV IN
[VIDEO] jack on the TV.
5, ConnectAudio Cables
between the AUDIO OUT
jacks on the VCR and the
AV IN [R-AUDIO-L] jacks on
the TV.
>_Ifyou have a"mono"
(non-stereo) VCR, use a
Y-connector (not supplied)
tohook up to the right and
left audio inputjacks ofthe
TV.If your VCRis stereo,
you mustm connect two
cables.
VCR Rear Panel
TV Rear Panel
i5_ Audio Cable (Not supplied)
!41}Video Cable (Not supplied)
i3: RF Cable (Not supplied)
Followthe instructionsin "ViewingaVCR orCamcorder Tape"toview your VCR tape.
:_ EachVCR hasadifferent backpanel configuration.
:_ When connecting a VCR, matchthe color of the connection terminal to the cable.
S=Video Connection
Your Samsung TVcan be connected to an S-Videojack ona VCR.
(This connection delivers abetter picture when compared to the regular Video connection above.)
1. To begin, follow steps 1-3
in the previous section to
connect the antenna or
cable to your VCR and your
TV.
2. Connect an S-Video Cable
between the S-VIDEO OUT
jack on the VCR and the
AV tN [S-VIDEO] jack on
the TV.
3. Connect Audio Cables
between the AUDIO OUT
jacks on the VCR and the
AV tN [R-AUDIO-L] jacks on
the TV.
VCR Rear Panel
i;I RF Cable (Not supplied)
TV Rear Panel
An S-Videocablemaybeincludedwith a VCR. (Ifnot, checkyour localelectronicsstore.)
>- EachVCR has a different back panel configuration.
:_When connecting a VCR, matchthe color of the connection terminal to the cable.
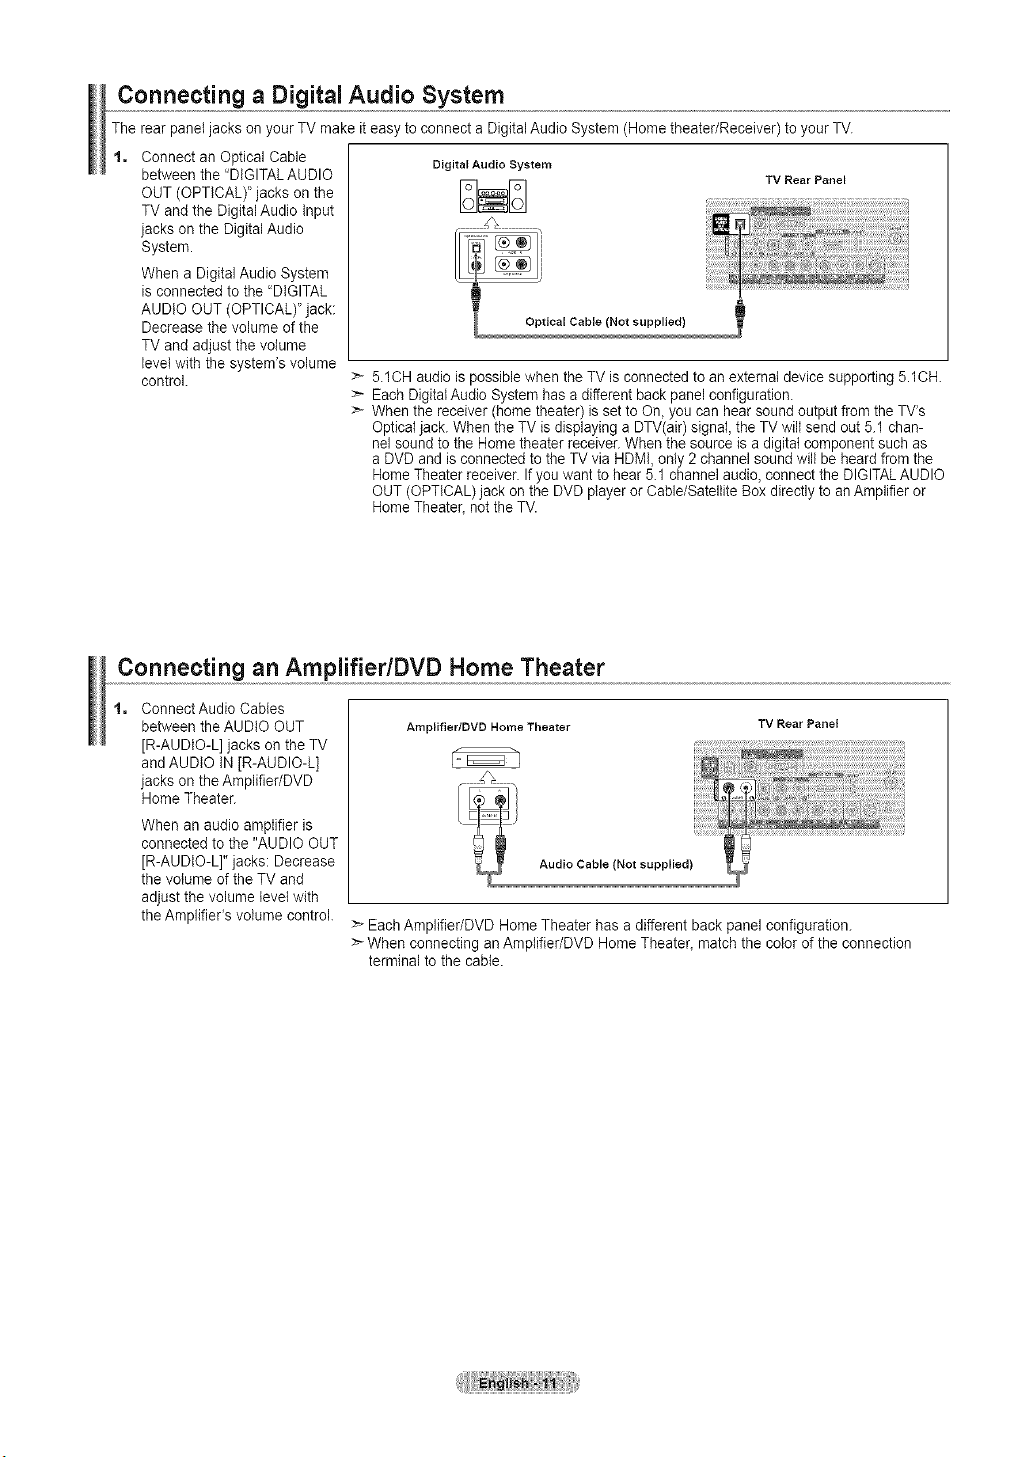
Connecting a Digital Audio System
The rear paneljackson your TV make it easy toconnect a DigitalAudioSystem (Home theater/Receiver) to your TV.
t, Connect an Optical Cable
between the "DIGITAL AUDIO
OUT (OPTICAL)' jacks onthe
TV and the Digital Audio Input
jacks on the Digital Audio
System.
When a DigitalAudio System
isconnected to the "DIGITAL
AUDIO OUT (OPTICAL)"jack:
Decreasethe volume of the
TV and adjust the volume
level with the system's volume
control.
Digital Audio System
DND
TV Rear Panel
> 5iCH audiois possible when the TV is connectedtoan externatdevice supporting 5.1CH.
> EachDigital Audio System has a different back panelconfiguration.
> Whenthereceiver (home theater) issetto On,you can hearsound outputfrom the TV's
Optical jack. When the TV isdisplaying aDTV(air)signal, the TV wiltsend out 5.1 chan-
nel soundto the Home theater receiver.When the sourceisa digital component such as
aDVD and isconnectedto the TV viaHDMI, only 2 channel soundwill be heard from the
Home Theaterreceiver.If youwantto hear 5.1 channel audio, connect the DIGITALAUDIO
OUT (OPTICAL) jack on the DVD playerorCable/Satellite Boxdirectlytoan Amplifieror
Home Theater_not the TV.
Connecting an Amplifier/DVD Home Theater
t, Connect Audio Cables
between the AUDIO OUT
[R-AUDIO-L]jacks on the TV
and AUDIO IN[R-AUDIO-L]
jacks on the Amplifier/DVD
Home Theater.
When an audio amplifier is
connected to the "AUDIO OUT
[R-AUDIO-L]" jacks: Decrease
the volume ofthe TV and
adjust the volume level with
the Amplifier's volume control.
AmpJifier/OVD Home Theater
TV Rear Panel
Audio Cable (Not supplied)
> EachAmplifier/DVD Home Theater hasadifferent backpanel configuration.
> When connecting an Amplifier/DVD Home Theater_matchthe colorofthe connection
terminal tothe cable.
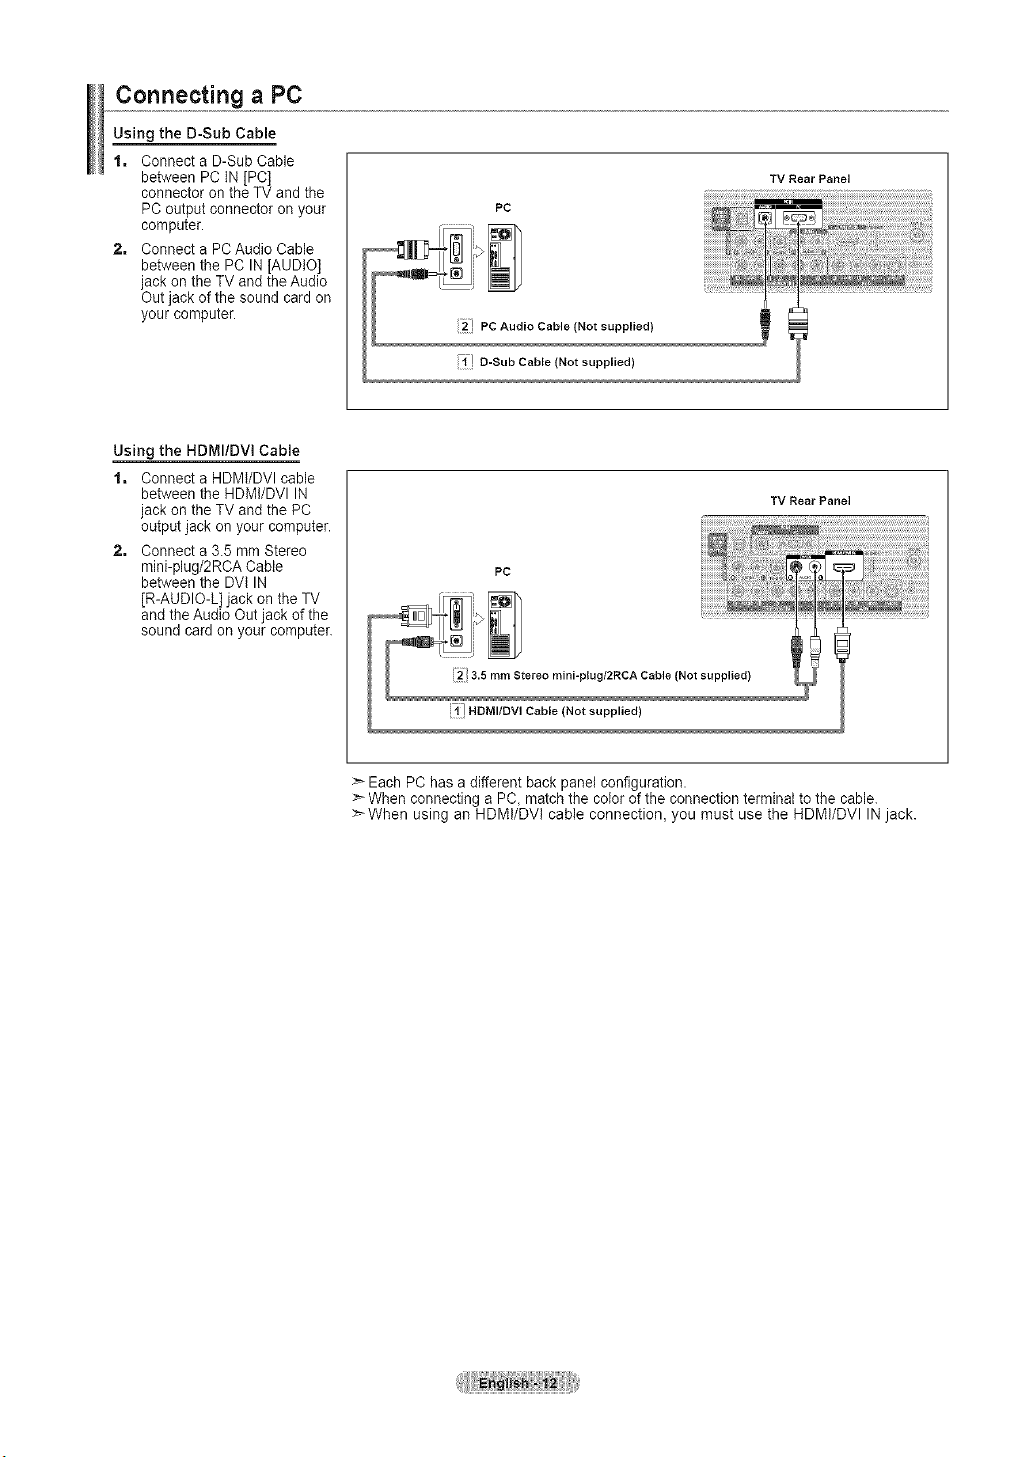
Connecting a PC
Using the D-Sub Cable
1, Connect a D-SubCable
between PC IN[PC]
connector on the TV and the
PC output connector on your
computer,
2, Connect a PC Audio Cable
between the PC IN[AUDIO]
jack on the TV and the Audio
Out jack of the sound card on
your computer.
PC
2' PC Audio Cable (Not supplied)
i;/ D-Sub Cable (Not supplied)
TV Rear Panel
Using the HDMI/DVI Cable
1, Connect a HDMI/DVI cable
between the HDMt/DVI IN
jack on the TV and the PC
output jack on your computer.
2, Connect a3.5 mm Stereo
mini-plug/2RCA Cable
between the DVI IN
[R-AUDIO-L] jack on the TV
and the Audio Outjack of the
sound card on your computer.
TV Rear Panel
PC
3.5 rnm Stereo rnini-plug/2RCA Cable (Not supplied)
!;1! HDMI/DVl Cable (Not supplied)
Each PC hasa different back panel configuration.
_--When connecting a PC, match the color of the connection terminat tothe cable.
:_When using an HDMI/DVI cable connection, you must use the HDMI/DVI INjack.
Turning the TV On and Off
Press the POWER(b button on the remote control.
You can also use the POWERd) button on the TV.
/ POWER
SOURCE
Plug & Play Feature
When the TV isinitially powered on_basic settings proceed automatically and
subsequently.
>- The Screen Saver is activated if there is no remote control key inputfor longer than 1
minutewhile "Plug & Play' isrunning.
>The Screen Saver is activated if there is no operating signal for longerthan 15
minutes.
1. Press the POWER(b button on the remote control.
The message "MenuLanguage_Store Demo_Channels and Time wiltbe set." is
displayed.
Pressthe ENTER _ button, then "Select the language ofthe OSD" menu
isautomatically displayed.
2=
3=
Pressthe A or _' button to select language, then press the ENTER _ button.
The message "Select'Home Use' when installing this TV inyour home." is
displayed.
Pressthe 4 or 1_ button to select "Store Demo_or"Home Use",then
pressthe ENTER _ button.
The message "Selectthe antennas to memorize." isdisplayed.
>_ We recommend setting the TVto "Home Use' mode for the bestpicture in your
home environment.
>* "Store Demo" mode isonly intendedfor use in retail environments.
>* Ifthe unitis accidentally setto "Store Demo' mode and youwant to return to
"Home Use" (Standard): Press the Volume button on the TV.Whenthe volume
OSD isdisplayed_ press and hold the MENU button on the TV for 5seconds.
4= Pressthe ,_ or ,lr button tomemorize the channels ofthe selected connection.
Pressthe ENTER _ button to select "Start'.
:"--Air: "Air" antenna signal.
Cable: "Cable" antennasignal.
Auto: "Air' and "Cable' antenna signals.
>_In Cable mode_you can select the correct signal source among STD, HRC, and
IRC bypressing the A, _', 4 or _- button, then press the ENTER _ button.
Ifyou have Digital cable, select the cable system signal sourcefor both Analog
and Digital.Contact your local cable company to identifythe type ofcable
system that exists in your particular area.
5. The TVwill begin memorizing alt of the available channels.
>To stop the search before it hasfinished, pressthe ENTER _ button with "Stop"
selected.
:_Afler alltheavailable channels are stored, it startsto remove scrambled
channels (see page 28).TheAuto program menu then reappears.
Pressthe ENTER _ button when channel memorization is complete. The
message "Setthe Clock Mode." isdisplayed.
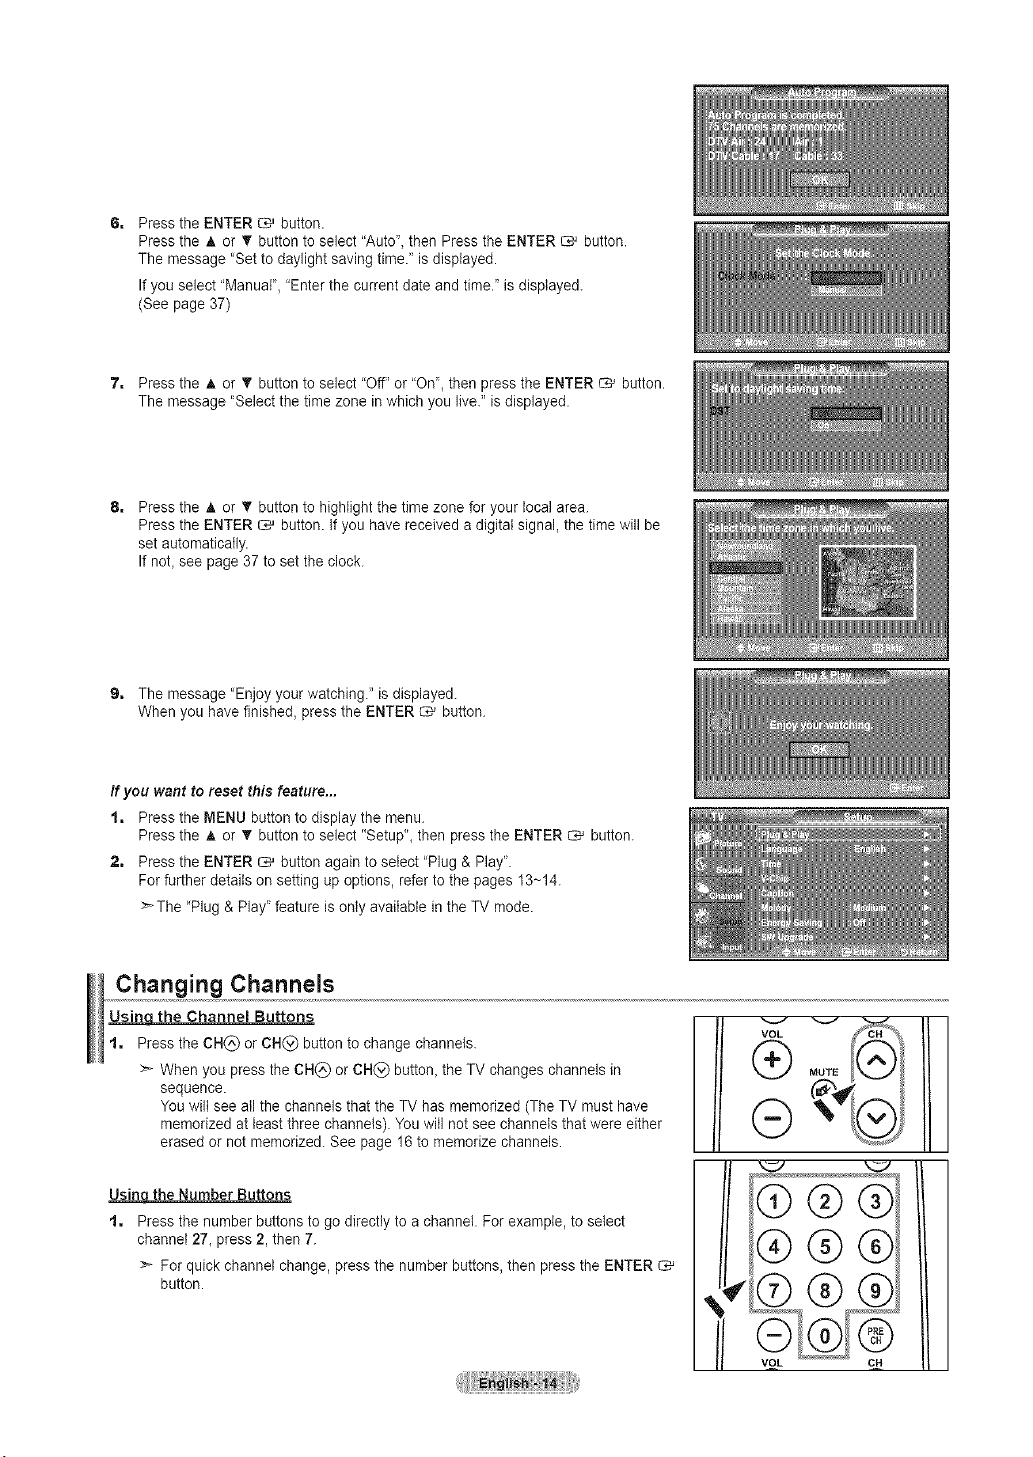
PresstheENTER_ button.
PresstheAorT buttontoselect"Auto",thenPresstheENTER_ button.
Themessage"Settodaylightsavingtime."isdisplayed.
Ifyouselect"Manual","Enterthecurrentdateandtime."isdisplayed.
(Seepage37)
7, PresstheAorT buttontoselect"Off"or"On",thenpresstheENTER_ button.
Themessage"Selectthetimezoneinwhichyoulive."isdisplayed.
Pressthe_, or _r button to highlight the time zone for your local area.
Pressthe ENTER _ button. If you have received adigital signal,the timewill be
set automatically.
Ifnot_see page 37 to set the clock.
9, The message "Enjoyyour watching." isdisplayed.
When you havefinished, pressthe ENTER _ button.
Ifyou want te reset this feature...
1, Press the MENU button todisplay the menu.
Pressthe A or T button toselect "Setup"_then pressthe ENTER _ button.
2, Press the ENTER _ button again toselect "Plug & Play'.
For further details on setting up options, refer to the pages 13~14.
>-The "Plug & Play"feature isonly available in the TV mode.
Changing Channels
Usinq the Channel Buttons
t, Pressthe CH(_) or CN(_) button to changechannels.
>- When you pressthe CH(_) or CH(_) button, the TV changes channels in
sequence.
You wiltsee allthe channels that the TV has memorized (The TV must have
memorized atleast three channels). Youwill not see channels that were either
erased or not memorized. See page 16 tomemorize channels.
the Number Buttons
t=
Pressthe number buttonsto go directly to achannel. For example, toselect
channel 27, press 2, then 7.
:_ For quick channel change, press the number buttons,then press the ENTER
button.
m
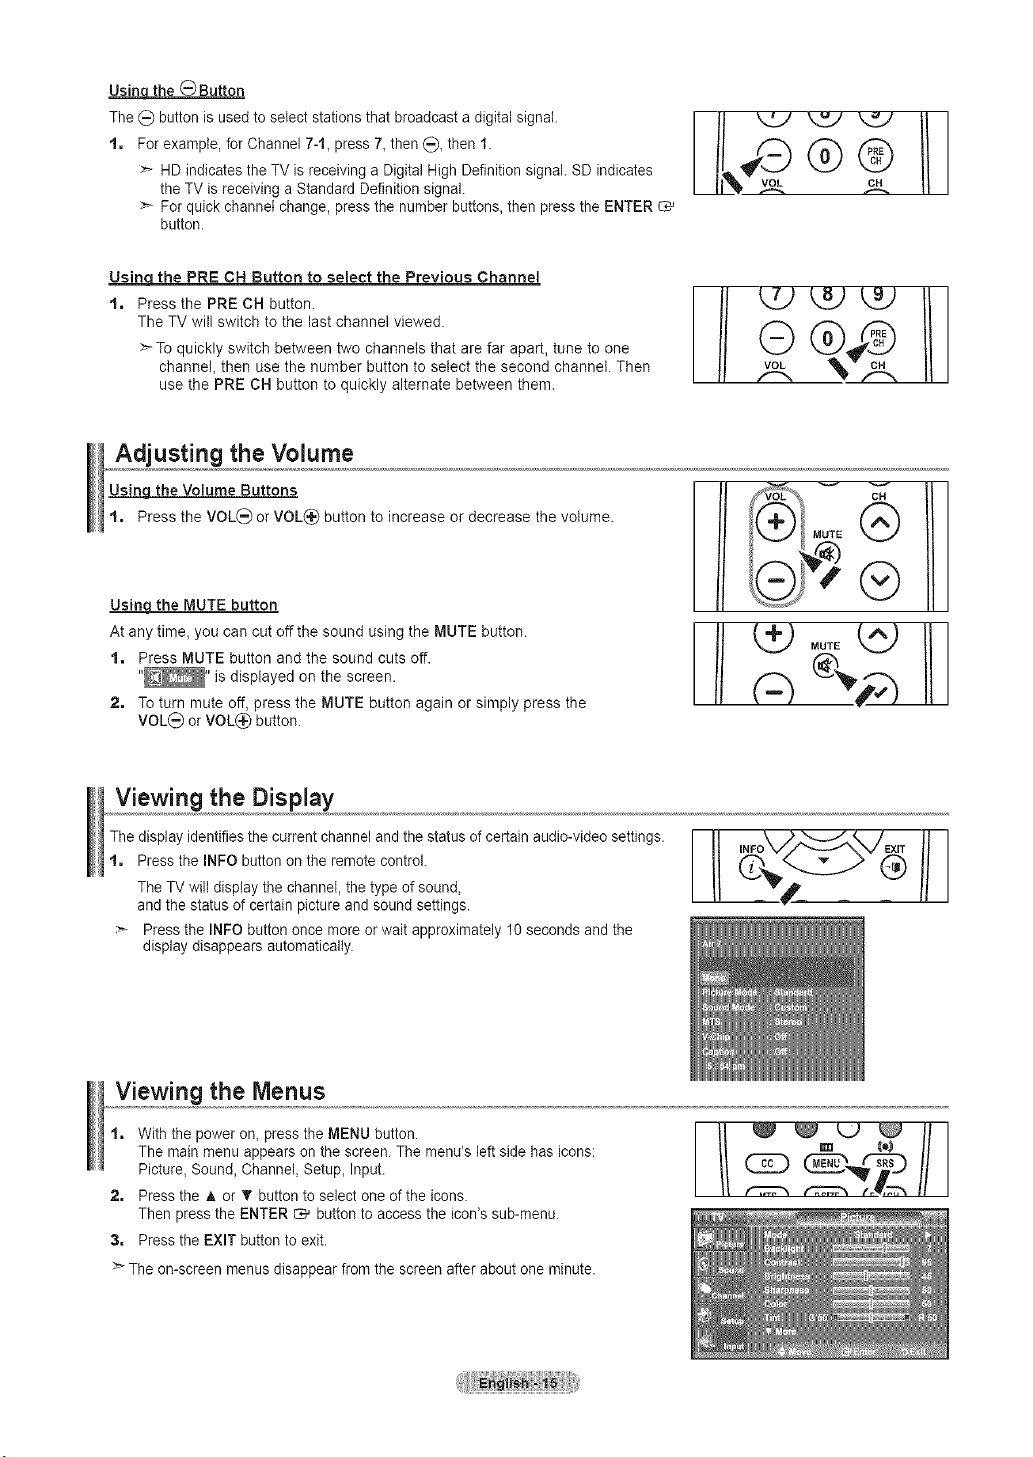
Usinq the _Button
The (_ button is usedto select stationsthat broadcast a digital signal.
t. For example, forChannel 7-1, press 7,then _), then 1.
>` HD indicates the TV isreceiving a Digital High Definition signal. SD indicates
the TVis receiving a Standard Definition signal.
>` For quick channet change, press the number buttons, then press the ENTER
button.
Usinq the PRE CN Button to seJect the Previous Channel
t. Press the PRE CH button.
The TVwill switch to the last channel viewed.
>-To quickly switch between two channels that are far apart, tune to one
channel, then use the number button to select the second channel. Then
use the PRE CH button to quickly alternate between them.
Adjusting the Volume
Using the Volume Buttons
t. Press the VOL(_ orVOL(_ button to increase or decrease the volume.
Usinqthe MUTE button
At any time, you can cut offthe sound using the MUTE button.
1. Press MUTE button and the sound cuts off.
"_' is displayed on the screen.
2. Toturn mute off, press the MUTE button again or simply press the
VOL(_ or VOL(_ button.
imt ®
Viewing the Display
Thedisplay identifies the current channel and the status of certain audio-video settings.
t. Pressthe INFO button on the remote controk
The TVwiltdisplay the channel, thetype of sound,
and the status ofcertain picture and sound settings.
Pressthe INFO button once more orwait approximately 10seconds and the
display disappears automatically.
Viewing the Menus
t. Withthe poweron, pressthe MENU button.
The mainmenu appears on the screen. The menu's leftside has icons:
Picture, Sound, Channel, Setup, Input.
2. Press the A or T button to select one of the icons.
Then pressthe ENTER _ button to access the icon's sub-menu.
3. Press the EXIT button to exit.
>` Theon-screen menus disappear from the screen after about one minute.
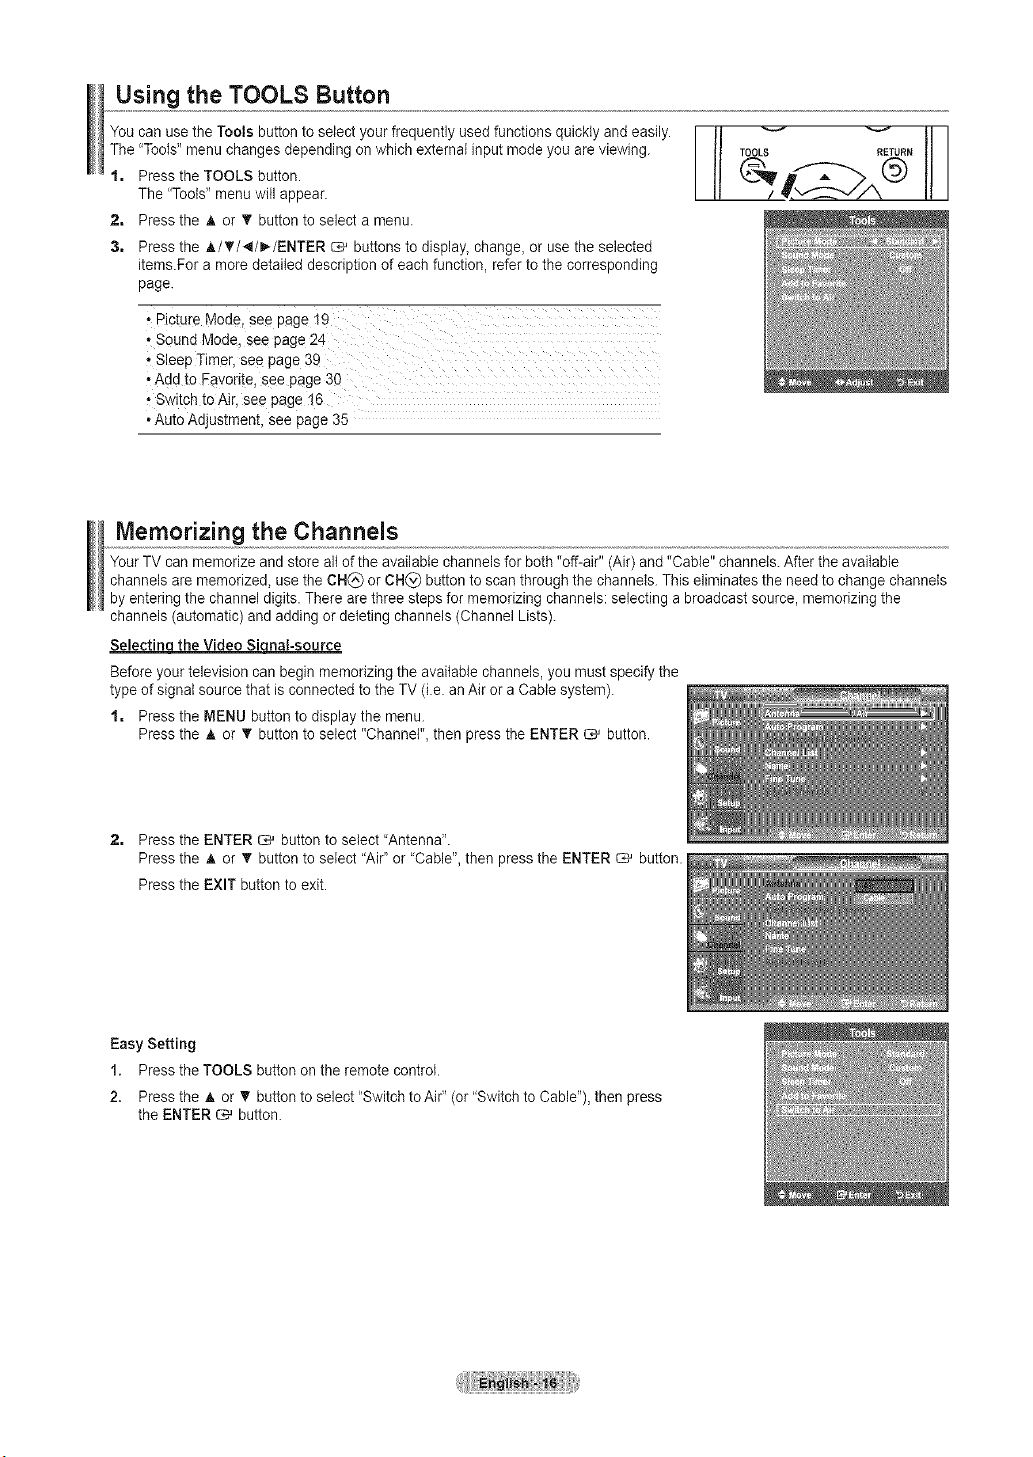
Using the TOOLS Button
You canuse theTools buttonto select your frequently used functionsquickly and easily.
The"Tools"menu changes depending on which external inputmode you areviewing.
1, Press the TOOLS button.
The "Tools"menu will appear.
2, Press the _, or T button to select a menu.
TOOLS RETURN
3, Press the A/V'/_I/_/ENTER _ buttons to display, change,or use the selected
items.For amore detailed description of eachfunction, referto the corresponding
page.
• Picture Mode, see page 19
• Sound Mode, see page 24
"Add to Favorite, see page 30
Switch to Air, see page 16
• Auto Adjustment, see page 35
Memorizing the Channels
Your TVcan memorize and store altofthe available channels forboth "off-air" (Air)and "Cable" channels. After the available
channels arememorized, use the CH(_) orCH(_) button to scan through the channels. Thiseliminates the need to changechannels
by entering the channel digits. There arethree steps for memorizing channels:selecting a broadcast source, memorizing the
channels (automatic) and adding ordeleting channels (Channel Lists).
Selectinqthe Video Siqnal-source
Before your television canbegin memorizing the available channels,you must specify the
typeofsignal source that isconnected tothe TV (i.e. an Air oraCable system).
1, Press the MENU button todisplay the menu.
Pressthe A or T button toselect "Channel", then pressthe ENTER _ button.
2, Press the ENTER _ button to select "Antenna".
Pressthe _,or T button toselect "Air" or 'Cable", then pressthe ENTER _ button.
Pressthe EXIT button to exit.
Easy Setting
1. Press the TOOLS button on the remote control.
2. Press the A or _' button to select "Switchto Air"(or "Switchto Cable"),then press
the ENTER _ button.

Storinq Channels in Memory(Automatic Method}
1, Press the MENU button to display the menu.
Pressthe A or _' button toselect 'Channel", then pressthe ENTER _ button,
2, Pressthe A or T button toselect "Auto Program",then presstheENTER _ button,
31
Pressthe _,or • buttontoselect theantenna connection, then pressthe
ENTER _ button.
:_Air: "Air" antenna signal.
Cable: "Cable" antenna signal.
Auto: "Air" and "Cable" antenna signals.
4, When selecting the Cable TV system:
Pressthe ENTER _ button to start the auto program.
Pressthe 4 or _,-button, then pressthe A or T to select the correct analogsignal
cable systemsource among "STD", "HRC', and "IRC'. Pressthe ENTER _ button.
Ifyou have Digital cable TV, select the cable system signal source for both Analog
and Digital.
>-STD, HRCand IRCidentify various types of cable TVsystems. Contact your
local cable company to identifythe type ofcable system that exists in your
particular area.At this point the signal source has been selected.
5, The TVbegins memorizing alt available stations.
After allthe available channels are stored, it start to remove scrambled
channels(see page 28).
:- Ifyouwant to stopAuto Programming, press the ENTER _ button. The "Stop
Auto Program?" message wilt bedisplayed. Select "Yes"by pressing the _ or
button, then pressthe ENTER _ button.
Pressthe EXIT button to exit.
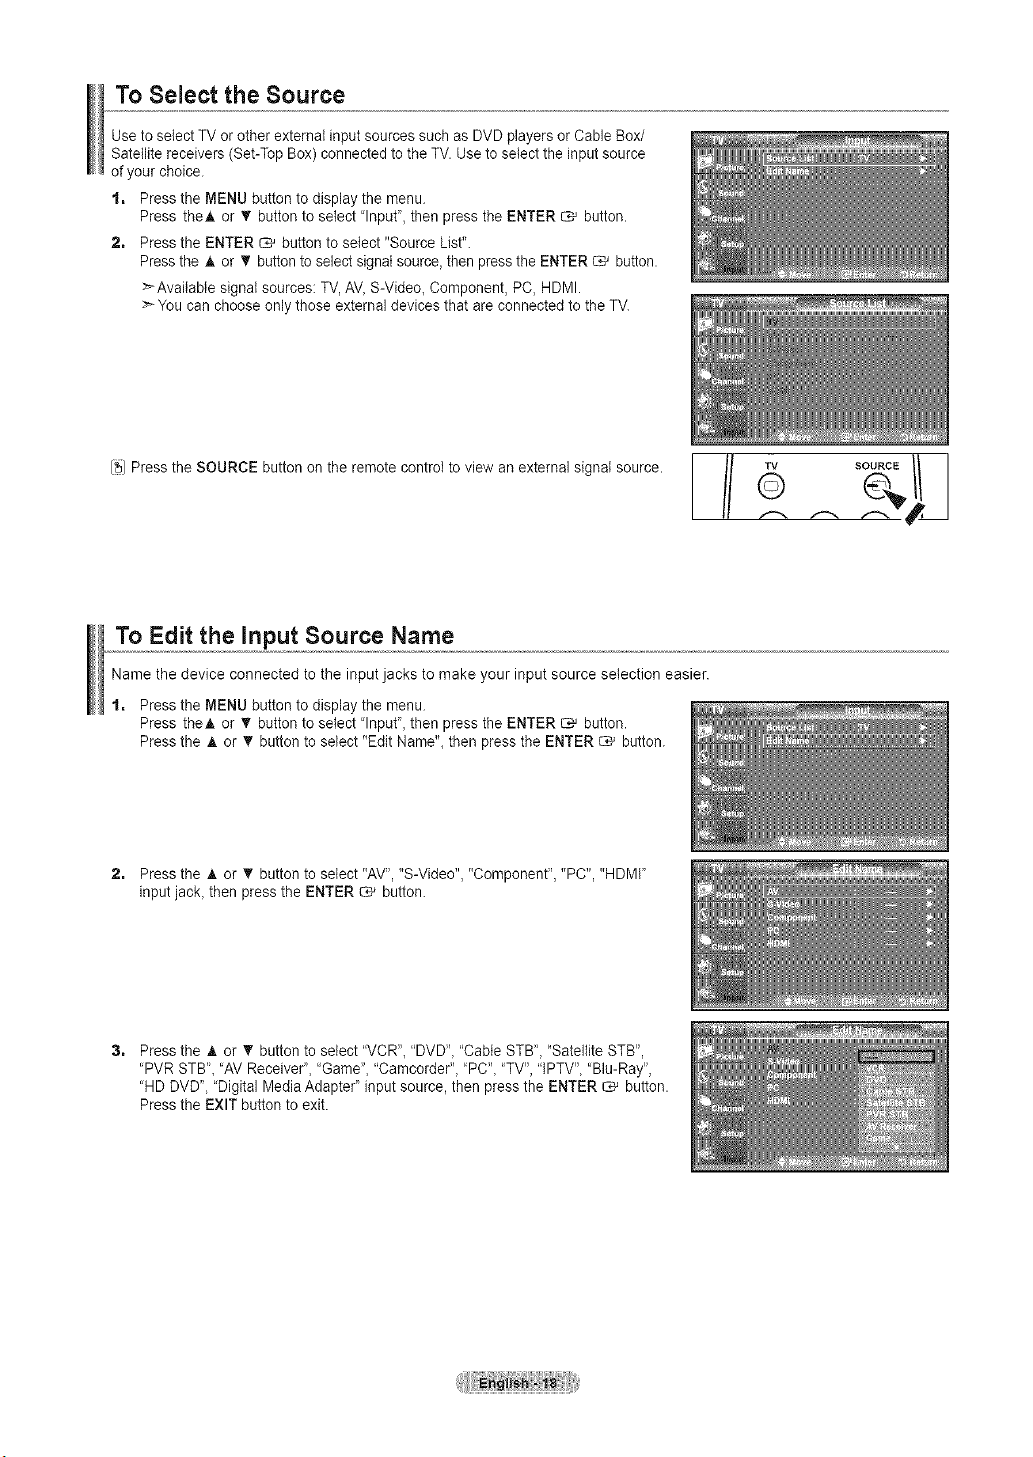
To Select the Source
Use toselect TVorother external inputsources such as DVD players or Cable Box/
Satellite receivers (Set-Top Box) connected to the TV.Usetoselect the input source
ofyour choice.
1, Press the MENU button to display the menu.
Press the_, or T buttonto select "Input", then press the ENTER _ button.
2, Pressthe ENTER _ button to select "Source List".
Pressthe A or T button toselectsignal source,then pressthe ENTER _ button.
>Available signal sources: TV, AV_S-Video_Component, PC, HDMI.
>'-You can choose onlythose external devices that are connected to the TV.
,,, e th SOU C utto o theremoteoo tro,
..-.. ..-.. ..--. t I
To Edit the input Source Name
Name the device connected to the input jacks to make your input source selection easier.
1, Press the MENU button to display the menu.
Press theA or T button to select "Input', then press the ENTER _ button.
Pressthe A or _' button to select "Edit Name"_then pressthe ENTER _ button.
2, Pressthe A or T button to select "AV', "S-Video", "Component", "PC", "HDMI"
input jack_then pressthe ENTER C,_ button.
Pressthe A or • button to select "VCR', "DVD"_"Cable STB', "Satellite STB",
'PVR STB'_ 'AV Receiver', "Game", "Camcorder"_' PC"_"TV', "IPTV', "Blu-Ray"_
"HD DVD", "Digital MediaAdapter' input source,then pressthe ENTER _ button.
Pressthe EXIT button to exit.
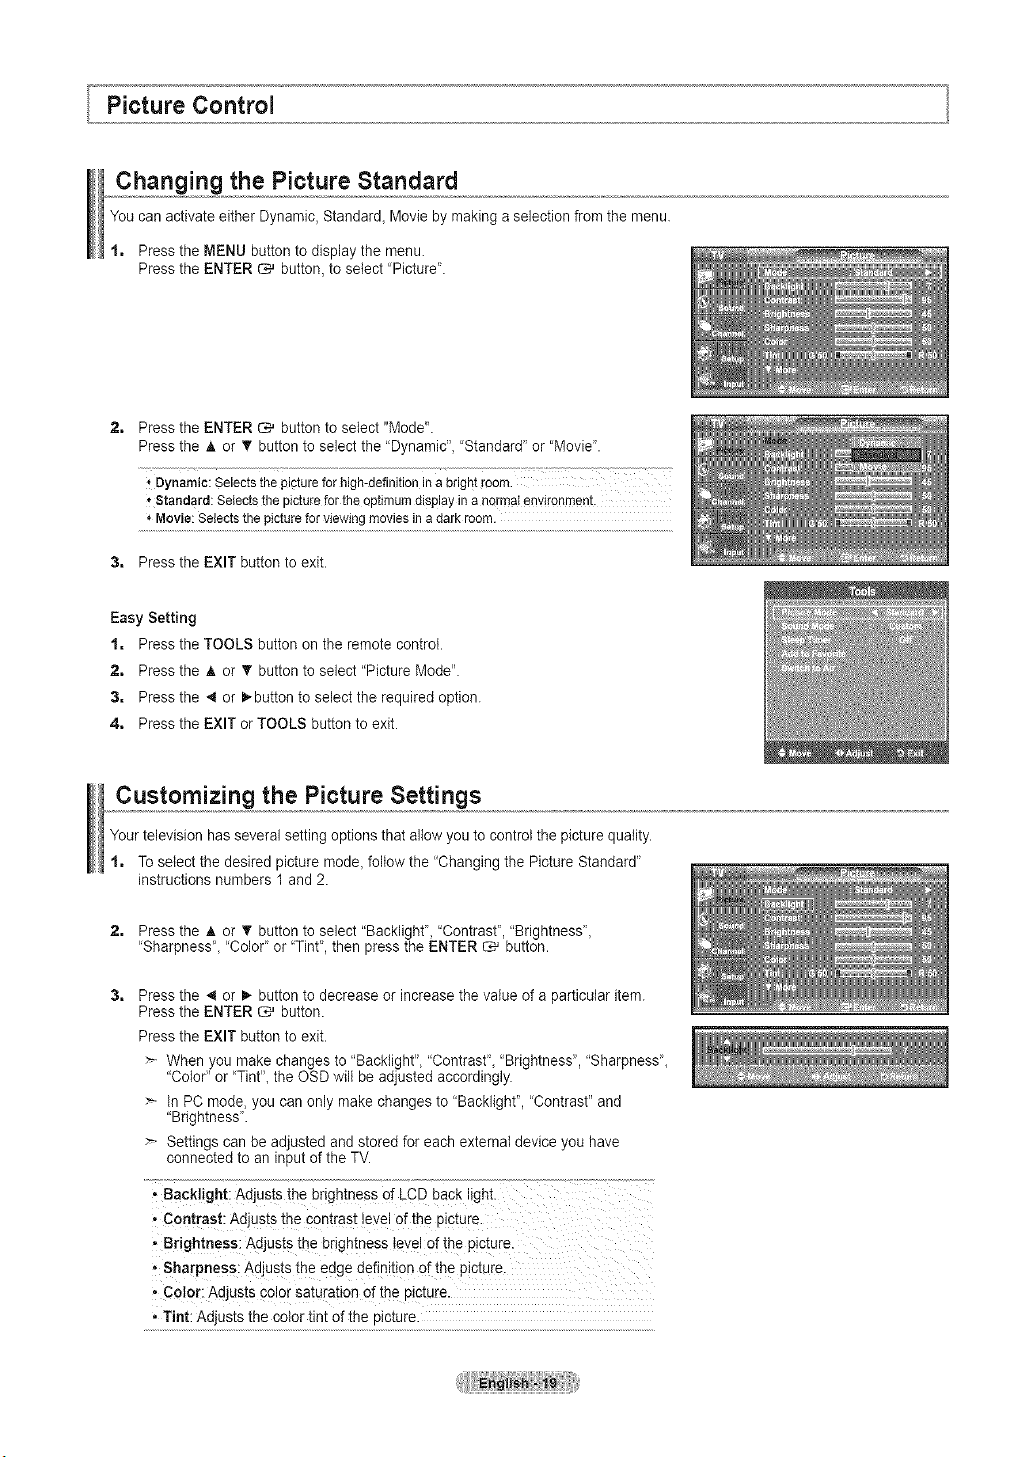
Changing the Picture Standard
You canactivate either Dynamic,Standard, Movie by making aselection fromthe menu.
1. Press the MENU button todisplay the menu.
Pressthe ENTER _ button, to select 'Picture".
2, Pressthe ENTER _ button to select "Mode".
Pressthe A or _' button to select the "Dynamic", "Standard" or "Movie'.
Dynamic:Selectsthepiptureforhigh-definitioninabrightroom.
'*Standard:Setectsthe picturefortheoptimumdisplayinanQrntatenvironment.
,,Movie:Selectsthe pictureforviewingmoviesina darkroom.
3. Press the EXIT button to exit.
Easy Setting
1. Press the TOOLS button on the remote control.
2. Press the & or • button to select "Picture Mode".
3. Press the _ or _,-button to select the required option.
4. Press the EXIT orTOOLS button to exit.
Customizing the Picture Settings
Your television has several setting options that allowyouto controlthe picture quality.
1. Toselect the desired picture mode, follow the "Changing the Picture Standard'
instructions numbers 1and 2.
2,
Pressthe A or T button toselect "Backlight', "Contrast', "Brightness",
'Sharpness', "Color" or 'Tint", then press the ENTER _ button.
Pressthe 4 or I_ button to decrease or increase the value ofa particular item.
Pressthe ENTER _ button.
Pressthe EXIT button to exit.
When you make changes to "Backlight', "Contrast"_ "Brightness", "Sharpness'_
"Color" or 'Tint'_the OSDwilt be adjusted accordingly.
> InPC mode, youcan only makechanges to "Backlight", "Contrast" and
"Brightness'.
> Settings can be adjusted and stored foreach external device you have
connected to an inputof the TV.
' Back!ight: Adjusts the brightness ofLCD back light.
• Contrast: Adjusts the contrast levelofthe picture.
•"Brightness: Adjusts the brightness !eveIofthe picture,
' Sharpness: Adjusts the edge definition of the picture.
• Color: Adjusts colorsaturation of the picture
. Tint: Adjusts the color tint of the picture.
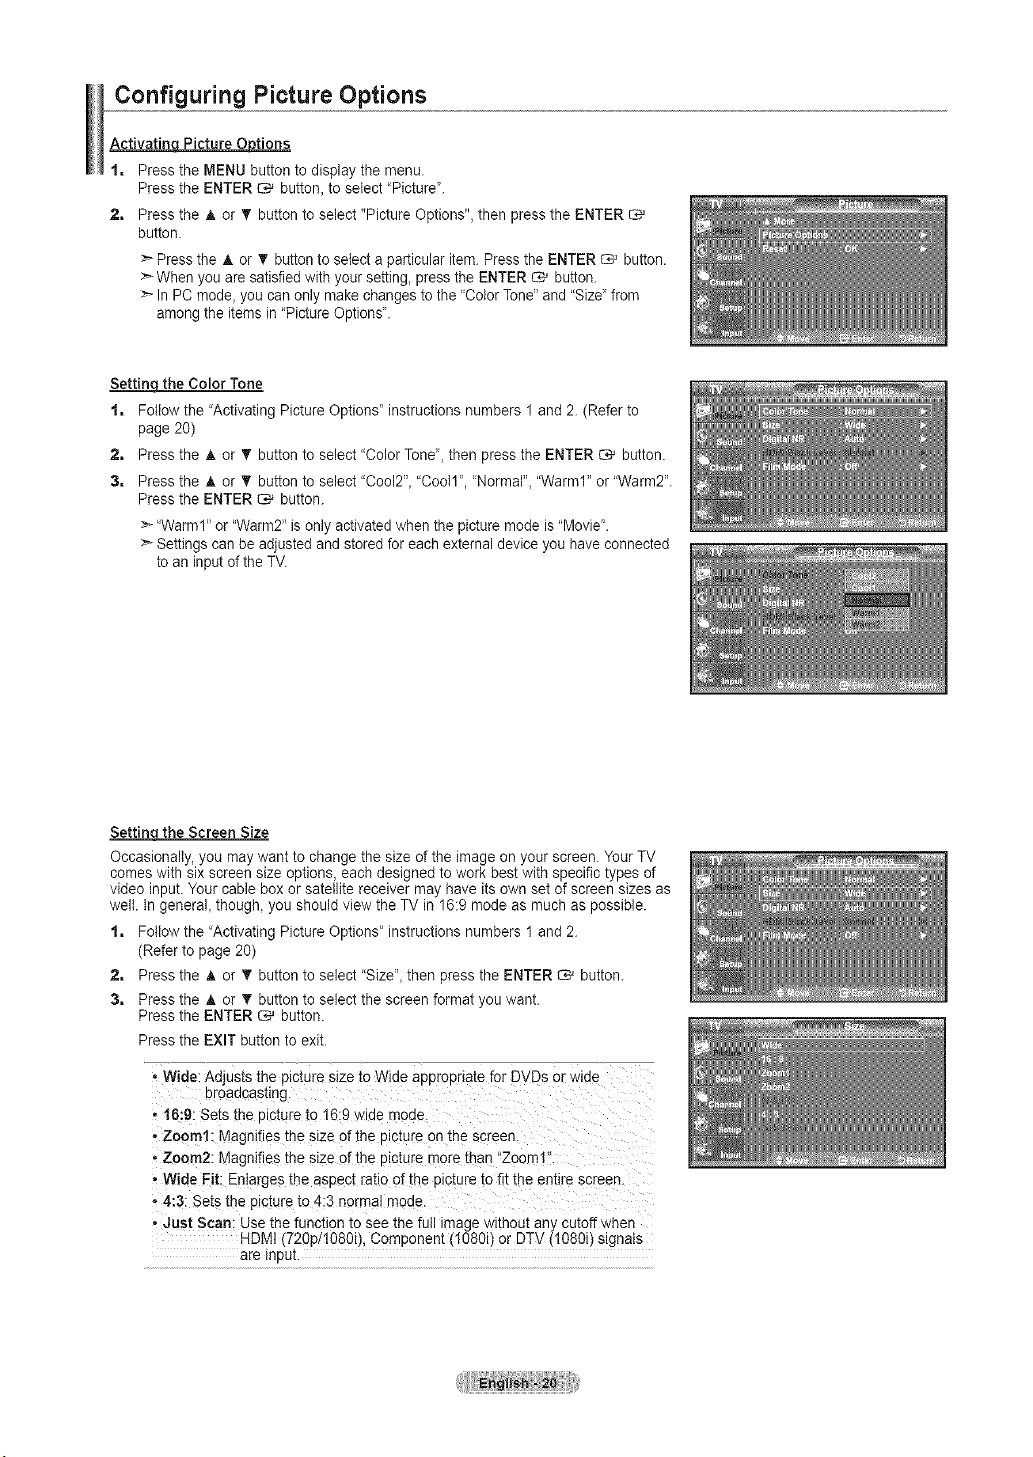
Configuring Picture Options
Activatin Picture 0 tions
1, Press the MENU button todisplay the menu.
Pressthe ENTER C*_ button, to select "Picture".
2, Press the A or _r button to select "Picture Options", then press the ENTER
button,
Pressthe A or _' button to selectaparticular item. Press the ENTER _ button.
>_When youaresatisfied with your setting, presstheENTER _ button.
>- In PC mode, youcan only makechanges tothe "ColorTone" and "Size" from
among the items in'Picture Options'.
Settin- the Color Tone
1, Followthe "Activating Picture Options" instructions numbers 1and 2.(Refer to
page 20)
2, Press the _, or T button toselect "Color Tone_,then pressthe ENTER _ button.
3, Press the A or T button to select "Cool2", "Cool1", 'Normal", "Warm1" or "Warm2".
Pressthe ENTER C,_ button.
:_"Warm1" or "Warm2" isonlyactivatedwhen the picturemode is"Movie'.
:_Settingscan be adjusted and storedfor eachexternaldevice you haveconnected
toan inputof the TM
Settin the Screen Size
Occasionally, you may want to change the size ofthe imageon your screen. Your TV
comes with six screen size options, each designed to workbest with specific types of
video input. Your cable box orsatellite receiver may haveits own set of screen sizes as
welt. In general, though, you should view the TVin 16:9 mode asmuch as possible.
1, Followthe "Activating Picture Options' instructions numbers 1and 2.
(Refer topage 20)
2, Press the A or _' button to select "Size", then pressthe ENTER _ button.
3, Press the A or T button to select the screen format you want.
Pressthe ENTER _ button.
Pressthe EXIT button to exit.
* Wide:Adjusts the p_c[uresize to Wide appropriate for DVDs orw_ae
Droaacasung
.1i}:9: Sets_ne picture to 16:9 wide moae.
,Zoom1: Magnifies the size of the olc_ureon the screen.
- Zoom2: Magnifies the size of the picture morethan "Zoom1"
,Wide Fit: Enlarges the aspect ratio ofthe pictureto fit the entire screen.
- 4:3: Setsthe picture to 4:3 normal moae.
- ,Just Scan: Use the function to see the futl imagew_thout any cutoffwhen
HDMI(720p/!080i), Component (1080i) or DTV(1080i) signals
are InDUL
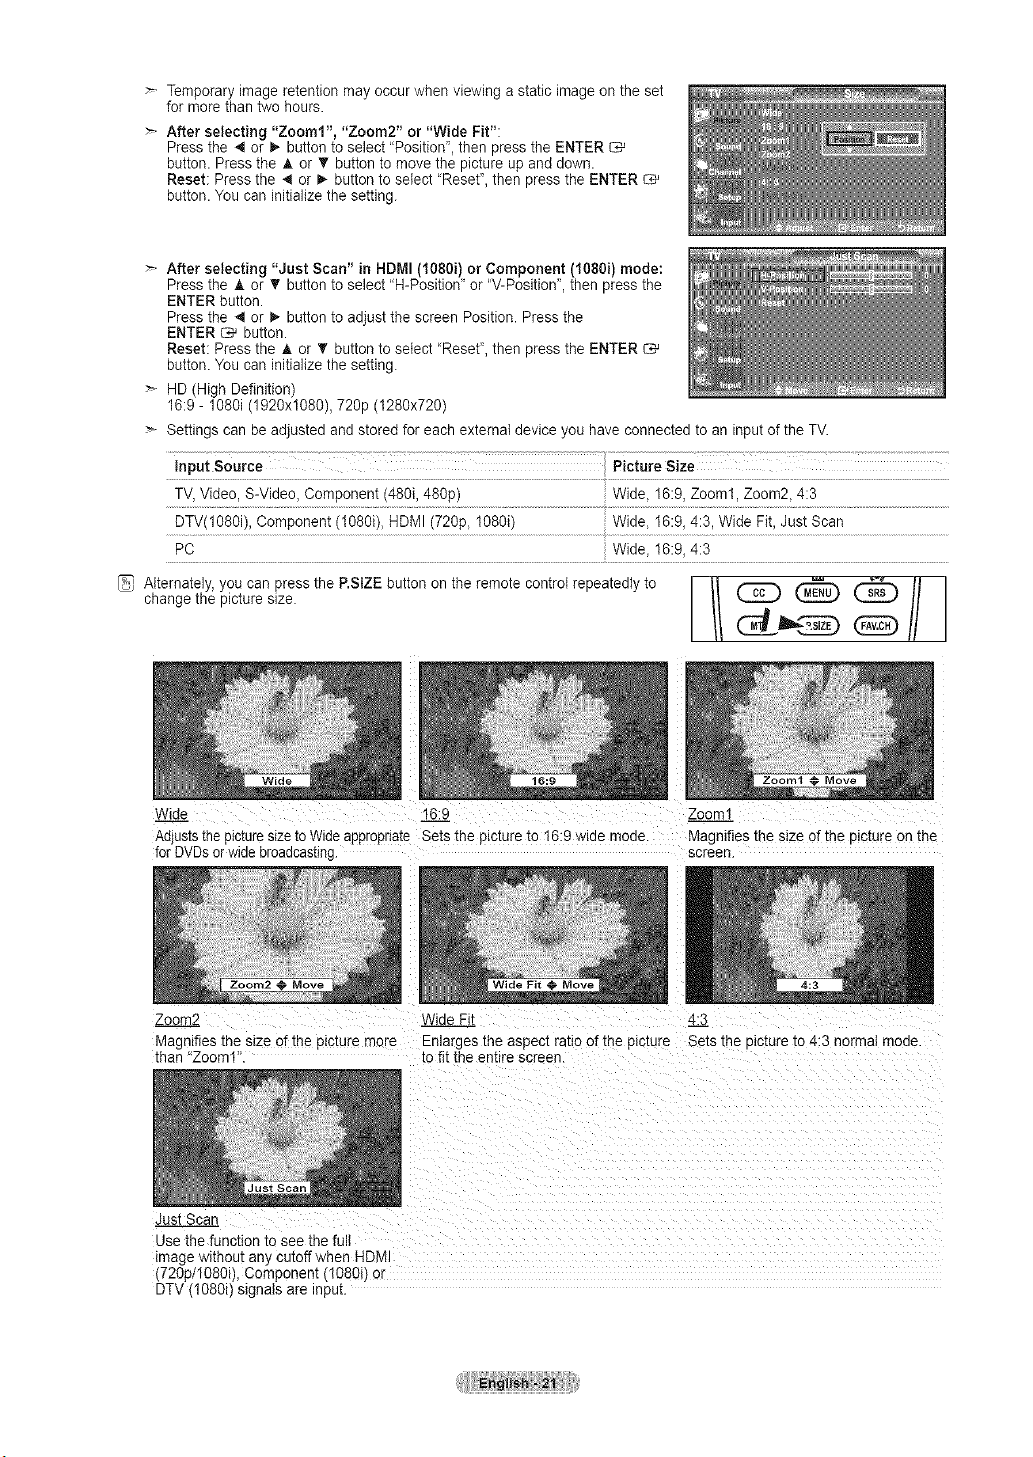
Temporaryimage retention may occur when viewing astatic imageon the set
for morethan two hours.
After selecting "Zooml", "Zoom2" or "Wide Fit":
Pressthe 4 or _,-button to select "Position', then press the ENTER
button. Press the A or V' button to movethe picture up and down.
Reset: Pressthe ,,_or D,,button to select "Reset", then press the ENTER
button. You caninitialize the setting.
After selecting "Just Scan" in HDMI(1080i) or Component (1080i) mode:
Pressthe A or T button to select "H-Position" or "V-Position", then press the
ENTER button.
Pressthe 4 or I_ button to adjust the screen Position. Press the
ENTER _ button.
Reset: Pressthe A or • button to select "Reset", then press the ENTER
button. You caninitialize the setting.
HD (High Definition)
16:9 - 1O8Oi(1920x1080), 720p (1280x720)
Settings can be adjusted and stored foreach external device you have connected to an inputofthe TV.
l°putSoo,ce Pict,,,eSize
TV,Video, S-Video, Component (480i, 480p) Wide, 16:9, Zoom1, Zoom2, 4:3
}
DTV(1O80i),Component (1080i), HDMI (720p, 1080i) Wide, 16:9, 4:3, Wide Fit, Just Scan
_ Alternately,you can pressthe P.StZEbutton on the remote control repeatedlytOchangethe picture size. F// (_ @_________
Wide 16:9 Zoom1
Adjuststhe p_c[ures_zetoWide appropriate Sets the picture to 16:9 wide mode. Magnifiesthe size of the oJc_ureon me
forDVDsorwidebroadcasting screen
JVideFitZoom2 4:3
Magnifiesthe size of the _tcture more Enlarges the aspect ratio ofthe picture Setsthe pictureto 4:3 normal mode.
than "Zoom1 to fit the entire screen.
Just Sca
Use the function to see the full
mage w_thoutany cutoffwhen HDMI
720p/1080i), Component (1O8Oi)or
DTV 1080i) signals are input.
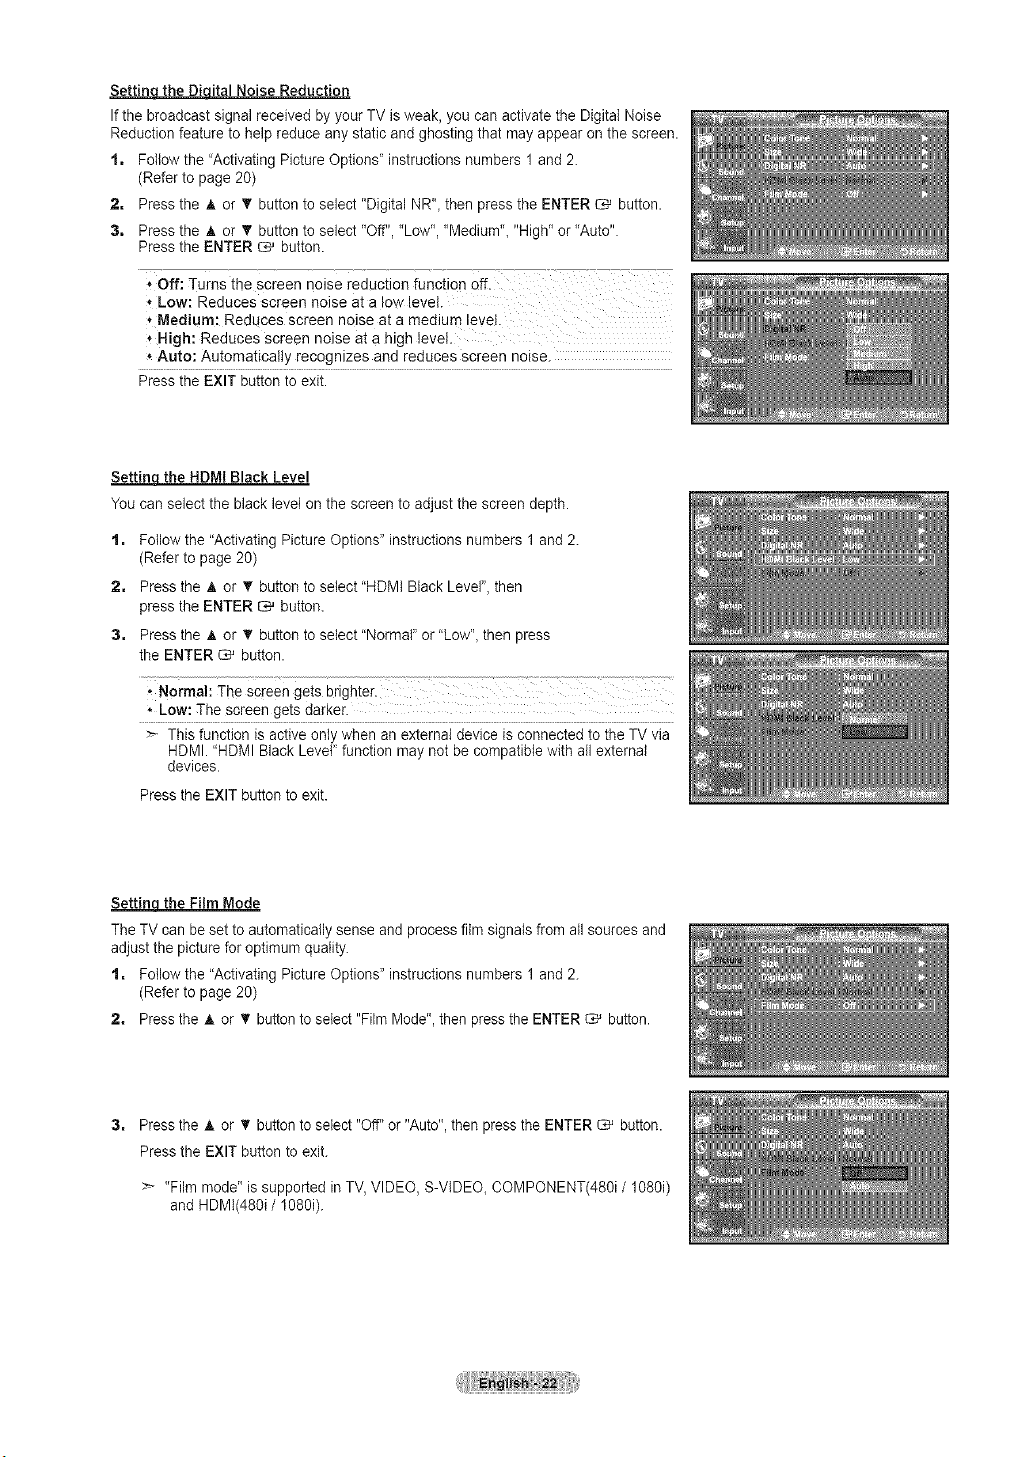
Settin_qital Noise Reduction
Ifthe broadcast signal received by your TV isweak. you can activatethe DigitaI Noise
Reduction feature tohelp reduce any static and ghosting that mayappear on the screen.
1. Followthe "Activating Picture Options' instructions numbers 1and 2.
(Refer topage 20)
2. Pressthe A or T button toselect "Digital NR", then pressthe ENTER _ button.
3. Press the A or T button to select "Off". "Low". "Medium", "High" or"Auto".
Pressthe ENTER _ button.
, Off: Turns the screen noise reduction function off.
, Low: Reduces screen noise at a low levei.
*Medium: Reduces screen noise at a medium !evek
* High: Reduces screen noise at a high level
* Auto: Automatically recognizes and reduces screen noise.
Pressthe EXIT button to exit.
Settinq the HDMI Black Level
You can select the black level on the screen to adjust the screendepth.
t. Follow the "Activating PictureOptions" instructions numbers 1 and 2.
(Refer to page 20)
2. Pressthe A or T button to select"HDMt Black Level".then
press the ENTER _ button.
3, Pressthe A or T button to select"Normal" or "Low", then press
the ENTER _ button.
, Normal: The Screengets brighter.
• Low: Thescreen gets darker.
This function isactive onlywhen an external device isconnected to the TV via
HDMI."HDMI Black LeveF function may not be compatible with all external
devices.
Pressthe EXIT button to exit.
Settin the Film Mode
TheTV can be set to automatically sense and process film signals fromatl sources and
adjust the picture foroptimum quality.
t. Follow the "Activating PictureOptions" instructions numbers 1 and 2.
(Refer to page 20)
2. Press the A or _' buttontoselect "Film Mode". then pressthe ENTER C_'button.
Pressthe A or _' button toselect "Off"or "Auto".then pressthe ENTER _ button.
Pressthe EXIT button to exit.
:- "Film mode" is supported in TV.VIDEO. S-VIDEO, COMPONENT(480i /1080i)
and HDMI(480i / 1080i).

Resetting the Picture Settings to the Factory Defaults
1, Press the MENU button to display the menu.
Pressthe ENTER button, toselect "Picture".
2, Pressthe A or _r button to select "Reset", then press the ENTER C# button.
Pressthe A or T button toselect "OK"or "Cancel" then pressthe ENTER
button.
Pressthe EXIT button to exit.
Eachmode canbe reset.
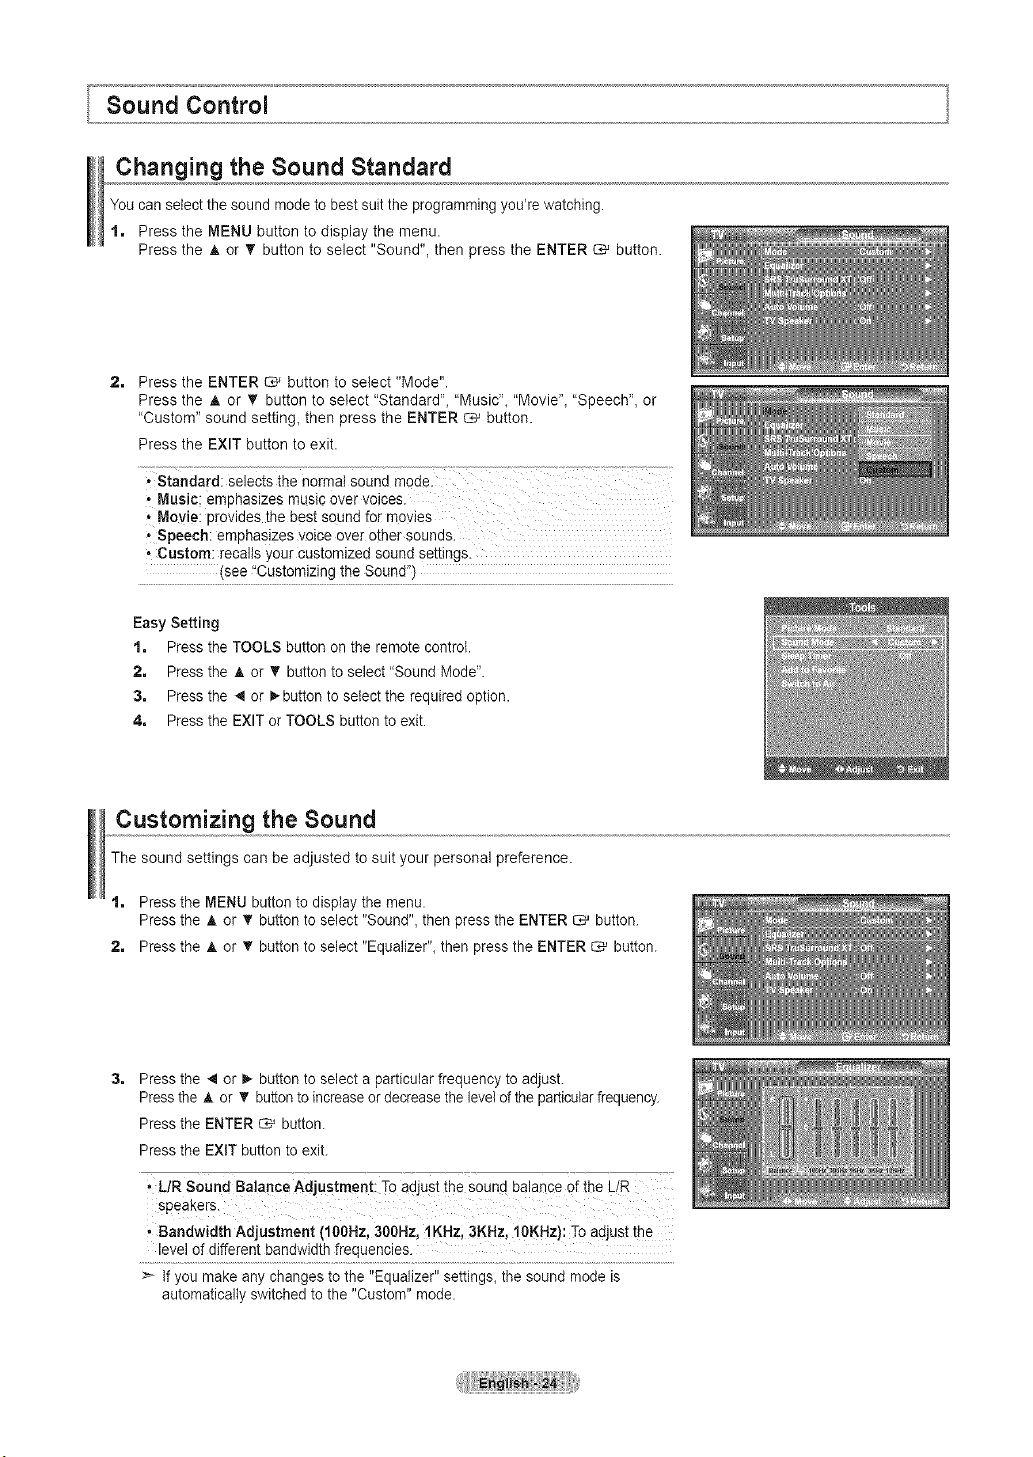
Changing the Sound Standard
You canselect the sound mode to best suittile programming you're watching.
1. Press the MENU button todisplay the menu.
Press the A or _' button to select "Sound", then press the ENTER _ button.
2= Press the ENTER _ button to select "Mode".
Press the A or T button to select "Standard", "Music", "Movie"_ "Speech", or
"Custom" sound setting, then press the ENTER _ button.
Press the EXIT button to exit.
° standard: selects the normal sound mode.
• Music: emphasizes music Overvoices.
Movie Providesthe bestsound for moyies
, Speech: emphasizes voice over other sounds.
° Custom: recallsyour customized sound settings.
(see "Customizingthe Sound")
Easy Setting
t. Pressthe TOOLS button on the remote control.
2. Press the A or T button to select"Sound Mode".
3. Press the _ or _,-buttontoselect the required option.
4. Press the EXIT or TOOLS button to exit.
Customizing the Sound
The sound settings can be adjusted to suit your personal preference.
t. Press the MENU button to display the menu.
Press the A or _' button to select "Sound", then press the ENTER _ button.
2. Press the A or _' button to select "Equalizer", then pressthe ENTER _ button.
Press the 4 or _,-button to select aparticular frequency to adjust.
Pressthe A or T buttonto increaseor decrease the levelof the particularfrequency.
Press the ENTER _ button.
Press the EXIT button to exit.
• L/R Sound Balance Adjustment: Toadust the Soundbalance of the L/R
speakers.
• Bandwidth Adjustment (100Hz, 300Hz,1KHz, 3KHz, 10KHz): To adjust the
level of different bandwidth frequencies.
>- If you make any changes to the "Equalizer" settings,the sound mode is
automatically switched tothe "Custom" mode.
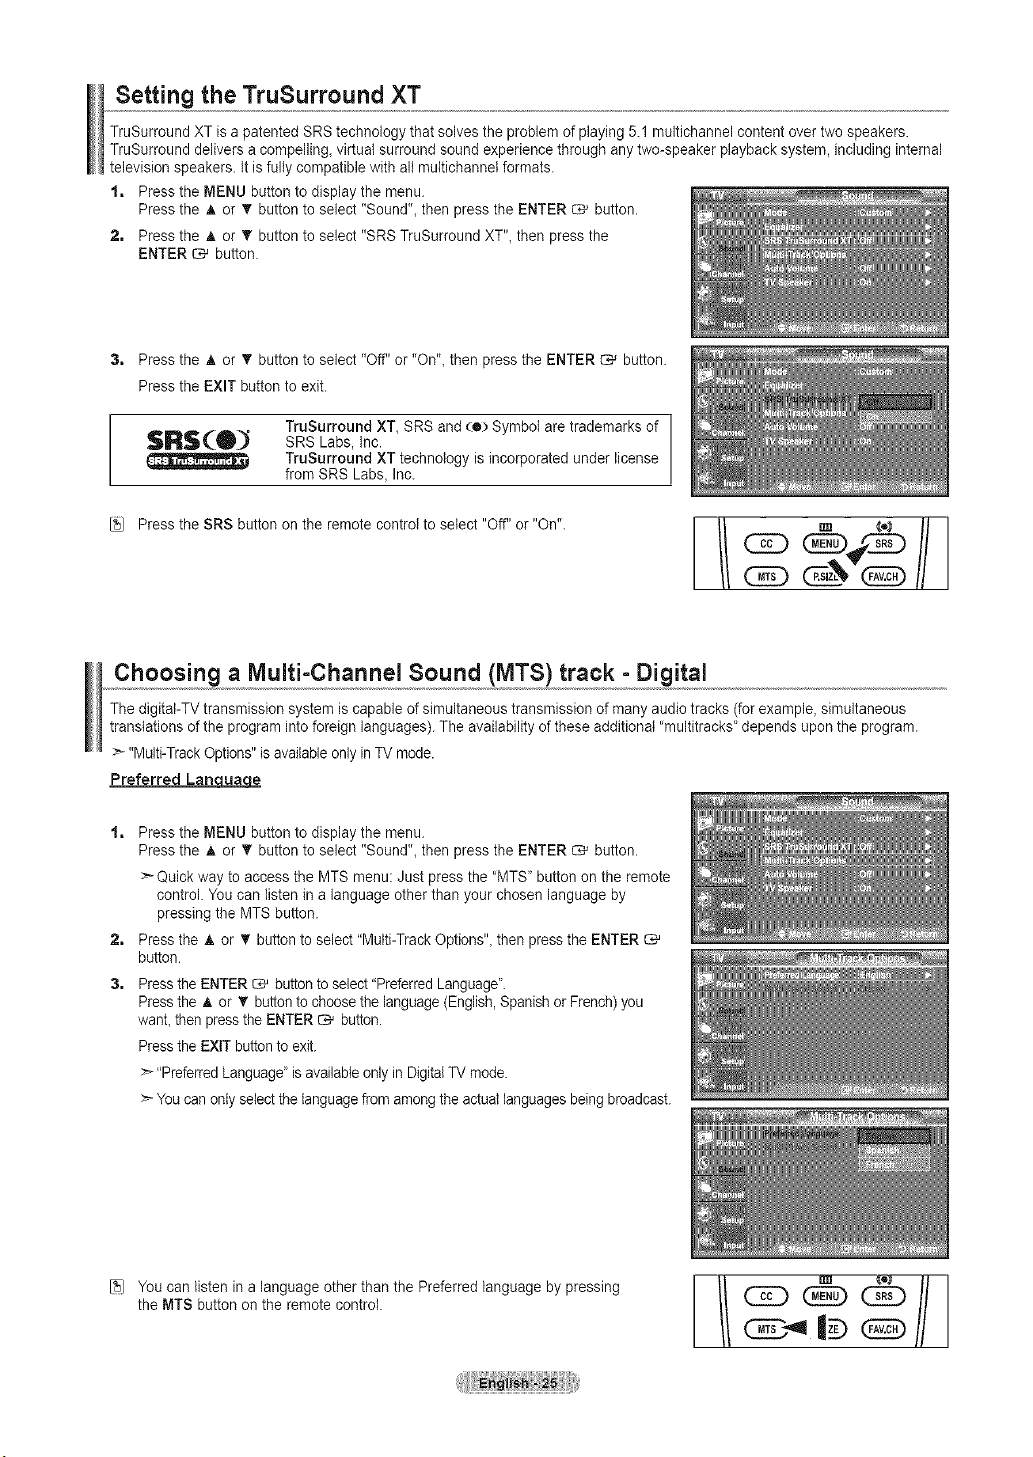
Setting the TruSurround XT
TruSurround XT is a patented SRS technology that solves the problem of playing 5.1 multichannel content over two speakers.
TruSurround delivers a compelling, virtual surround soundexperience through anytwo-speaker playback system, including internal
televisionspeakers. It isfully compatible with all muttichannetformats.
1. Press the MENU button todisplay the menu.
Pressthe A or T button toselect "Sound"_then pressthe ENTER C-_ button.
2. Press the A or V' button to select "SRS TruSurround XT"_then pressthe
ENTER _ button.
Pressthe A or _r button to select "Off" or "On",then pressthe ENTER _ button.
Pressthe EXIT button to exit.
TruSurround XT, SRS and (o) Symbol aretrademarks of
$R$(_ SRS Labs, inc.
TruSurround XTtechnology isincorporated under license
from SRS Labs, Inc.
[_) Press the SRS button on the remote controlto select "Off" or"On".
[1!®
Choosing a Multi-Channel Sound (MTS) track =Digital
ThedigitaI-TVtransmission system iscapable of simultaneous transmission ofmany audiotracks (forexample, simultaneous
translations of the programinto foreign languages). The availability of these additional "multitracks' depends upon the program.
>- "Multi-TrackOptions" isavailableonly inTVmode.
Preferred Lan ucLuacJe
2=
3,
Pressthe MENU button to display the menu.
Pressthe A or • button to select "Sound", then pressthe ENTER C,_ button.
> Quick way toaccess the MTS menu: Just pressthe "MTS' button on the remote
control. Youcan listen in a language otherthan your chosen language by
pressing the MTS button.
Pressthe _.or • button to select"Multi-TrackOptions", then pressthe ENTER
button.
Pressthe ENTER _ button toselect"PreferredLanguage".
Pressthe A or _' button tochoose the language (English,Spanish orFrench)you
want, then pressthe ENTER _ button.
Pressthe EXIT button toexit.
> "Preferred Language' isavailable onlyinDigital TVmode.
> You canonlyselectthelanguage fromamongtheactual languagesbeingbroadcast.
[5) Youcan listen in a language otherthan the Preferred language by pressing
the MTS buttonon the remote control.
CAD
Choosing a Multi=Channel Sound (MTS) track - Analog
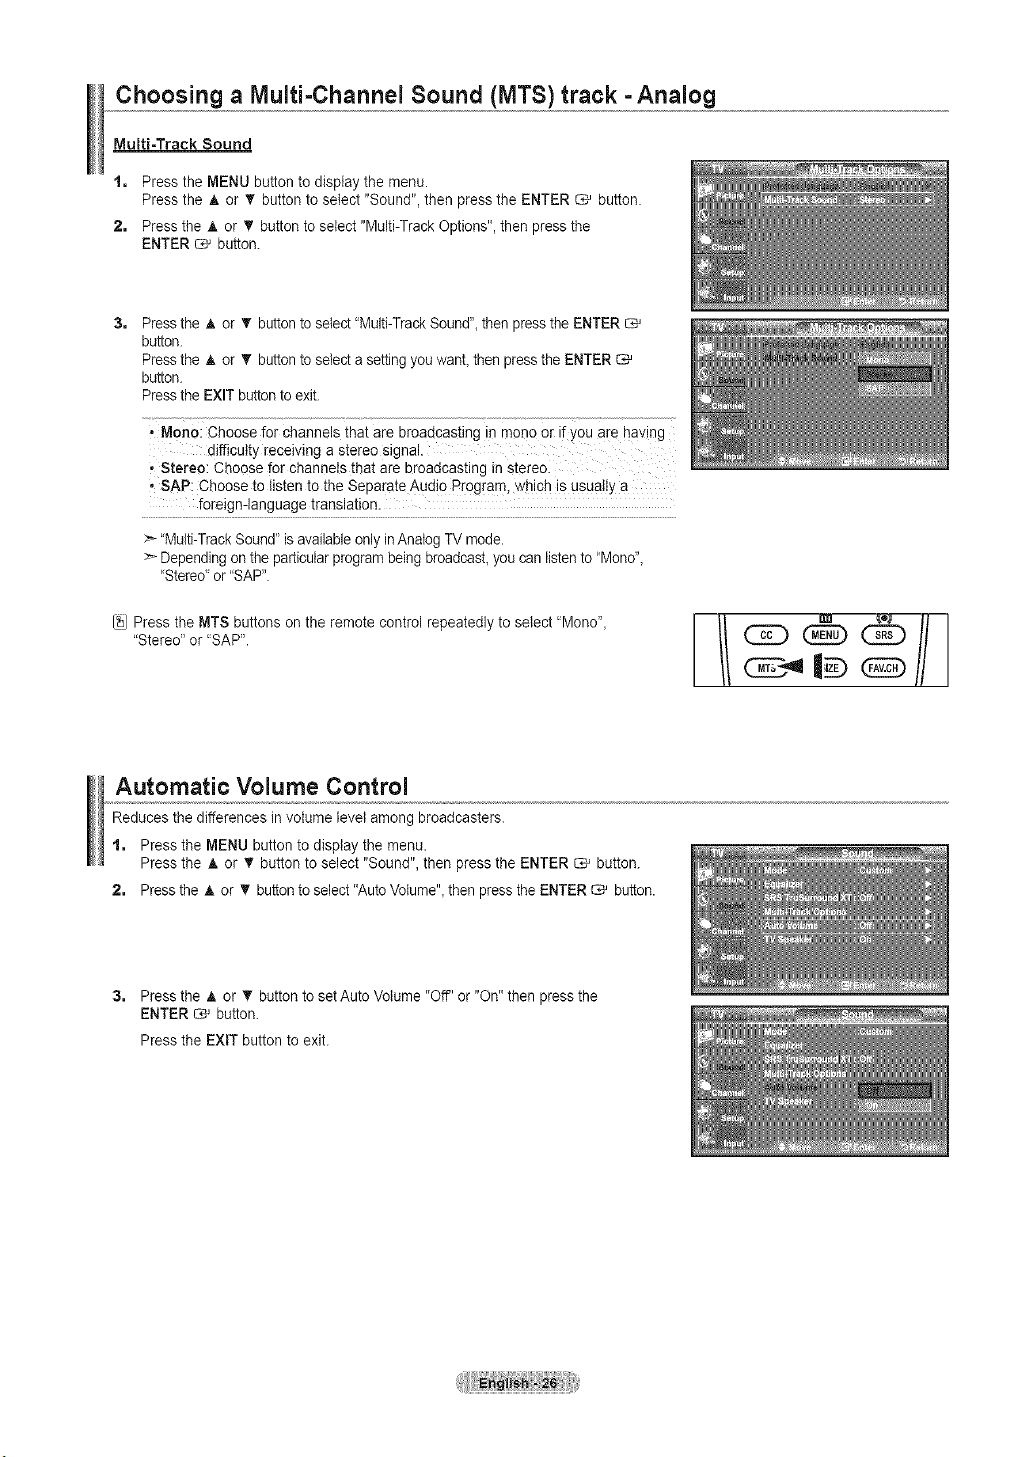
Multi-Track Sound
t, Pressthe MENU button to display the menu.
Pressthe A or _' button to select "Sound", then press the ENTER _ button.
2, Pressthe A or T button to select "Multi-TrackOptions", then pressthe
ENTER _ button.
3=
Pressthe A or T button to select'Multi-TrackSound'_then pressthe ENTER
button.
Pressthe A or T button to selectasetting youwahl then pressthe ENTER
button.
Pressthe EXIT buttonto exit.
• Mono:Choose for channels that are broadcasting in mono or if youare hawing
difficulty receiving astereo signal.
• Stereo: Choosefor channels that arebroadcasting in stereo:
• SAR Choose tolisten to the Separate Audio p[ogram, which is USUallya
foreign-language translation.
>_'Multi-TrackSound" isavailableonly inAnalog TVmode.
>- Dependingon the particular programbeingbroadcast_you can listento "Mono"_
'Stered or"SAP".
Pressthe MTS buttonson the remote control repeatedly to select 'Mono"_
"Stereo" or 'SAP".
Automatic Volume Control
Reduces the differences in volume level among broadcasters.
t, Pressthe MENU button to display the menu.
Pressthe A or _' button to select "Sound",then pressthe ENTER _ button.
2, Press the A or _' buttontoselect"AutoVotume"_then pressthe ENTER _ button.
3, Press the A or T button to setAuto Volume "Off"or "On"then pressthe
ENTER _ button.
Pressthe EXIT button to exit.
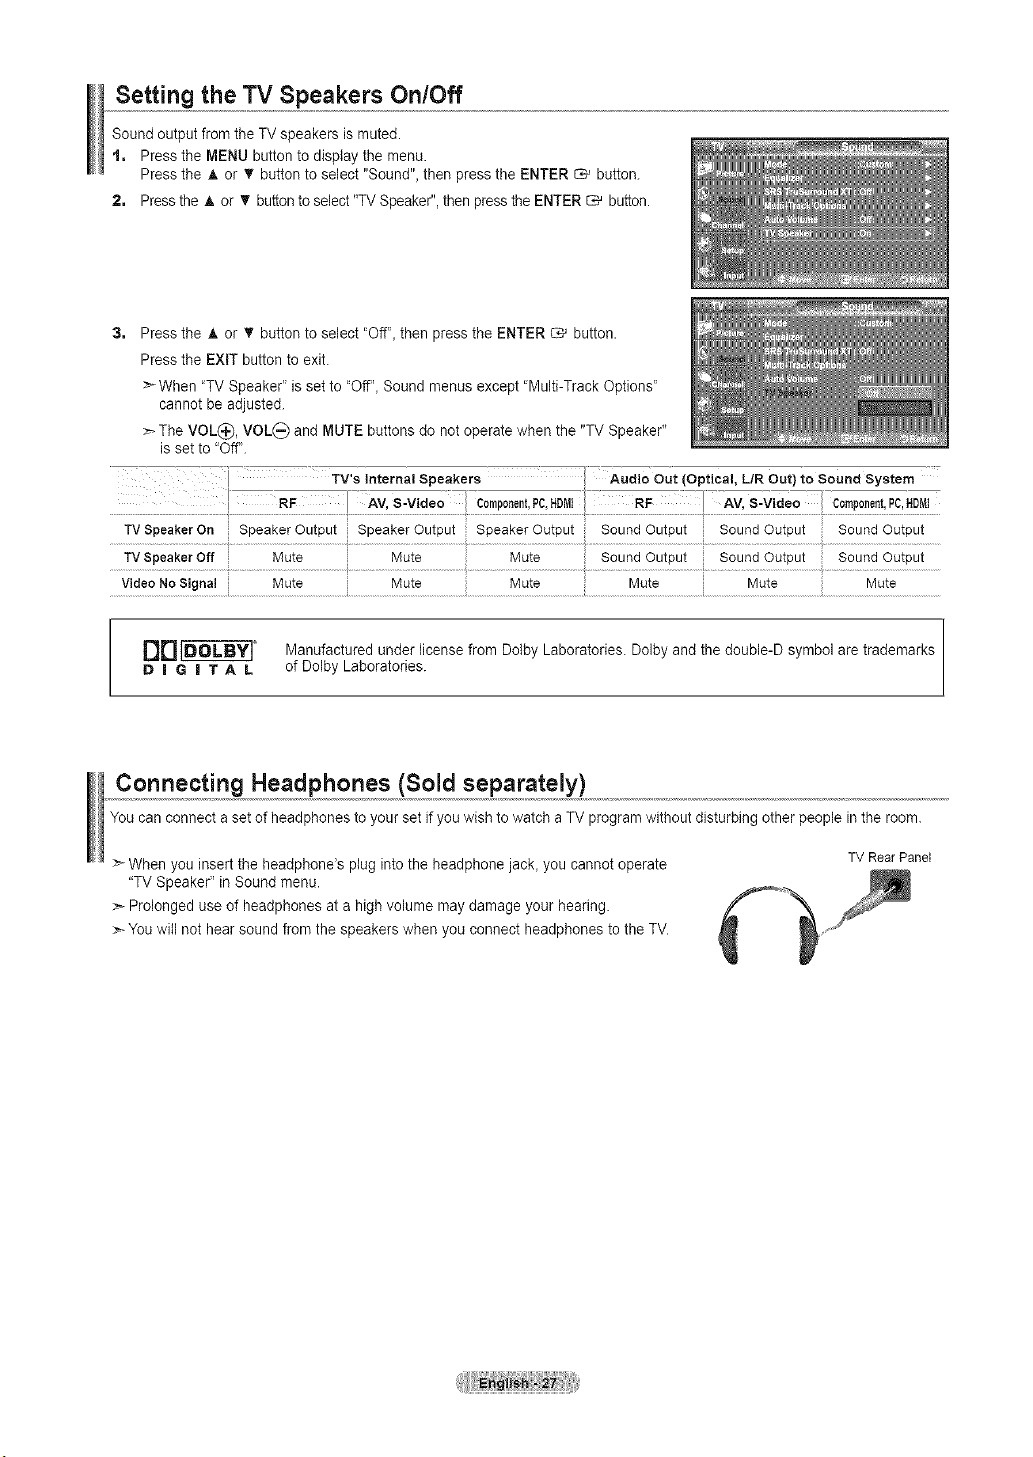
Setting the TV Speakers On/Off
Soundoutput from the TV speakers is muted.
t. Pressthe MENU button to display the menu.
Pressthe A or _' button to select "Sound",then pressthe ENTER _ button.
2. Press the A or T button to select"TV Speaker",then pressthe ENTER _ button.
3, Press the _, or V' button toselect "Off",then press the ENTER _ button.
Pressthe EXIT button to exit.
>-When "TV Speaker' isset to ,,Off,,Sound menus except 'Multi-Track Options'
cannot be adjusted.
_.-TheVOL(_), VOL_) and MUTE buttons do not operate when the "TV Speaker"
isset to "Off'.
TVSpeakerOn SpeakerOutput SpeakerOutput SpeakerOutput SoundOutput _: SoundOutput _: SoundOutput
TVSpeakerOff Mute Mute Mute _:SoundOutput SoundOutput :: SoundOutput
[_['_ _" Manufactured under license from DolbyLaboratories. Dolby and the double-D symbol aretrademarks
D ! G II T A L of Dolby Laboratories.
Connecting Headphones (Sold separately)
You canconnect a setofheadphones to your set if youwish to watch aTV program withoutdisturbing otherpeople in the room.
When you insertthe headphone's plug intothe headphone jack, you cannot operate
"TV Speaker" in Sound menu.
:_Prolonged use of headphones ata high volume maydamage your hearing.
>_You will not hearsound fromthe speakers when you connect headphones tothe TV.
TV Rear Panel
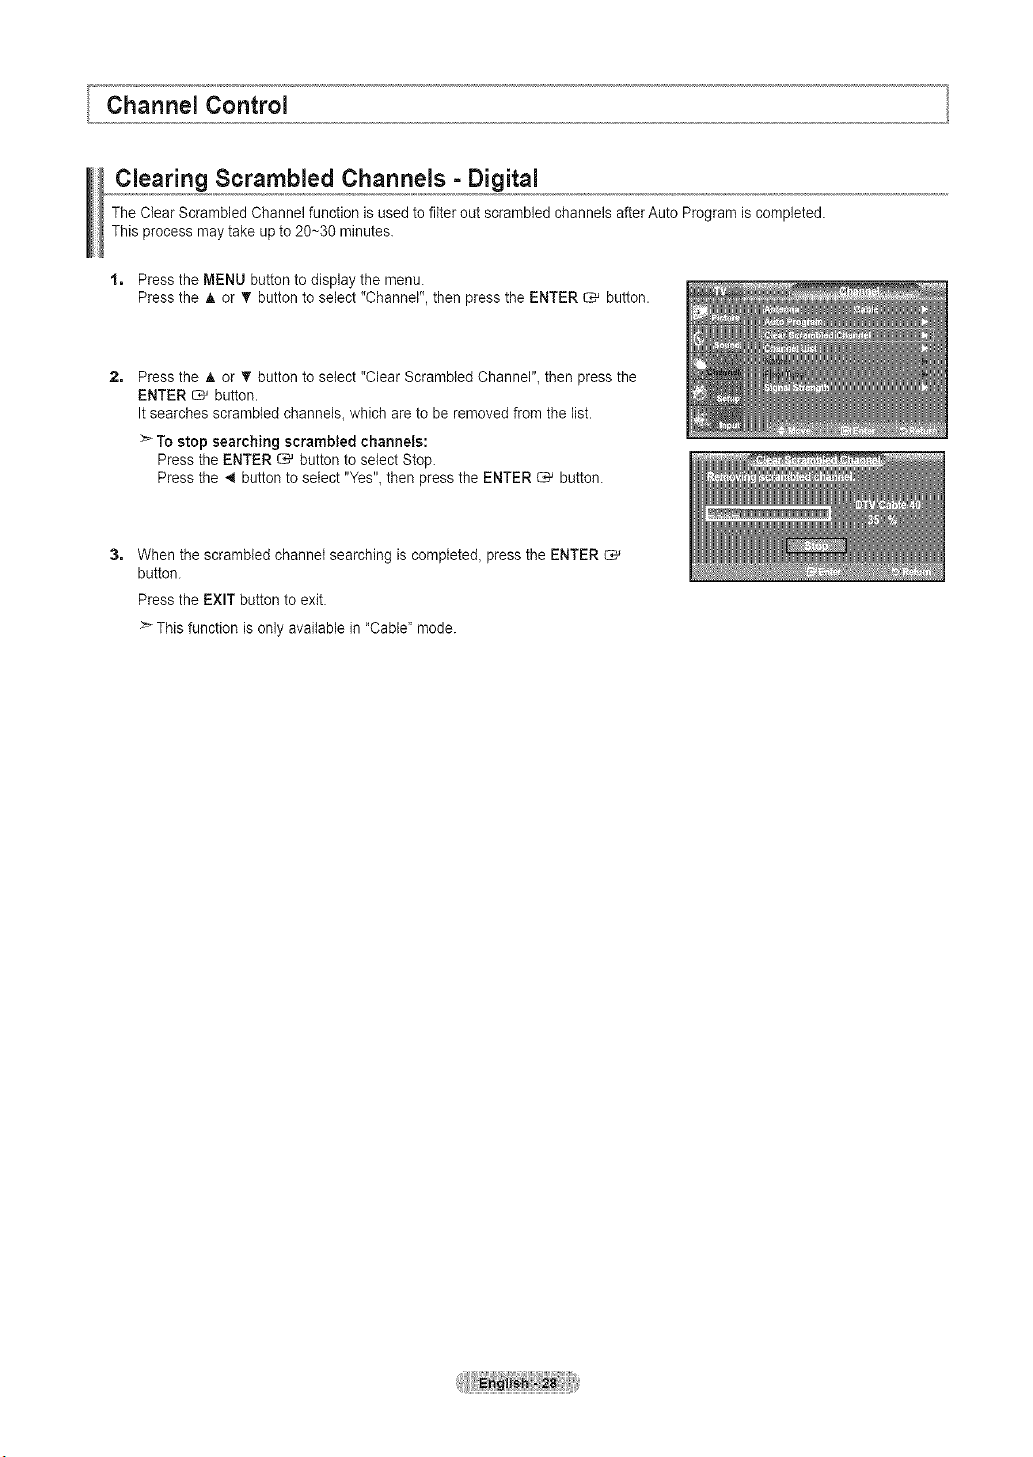
Clearing Scrambled Channels - Digital
The Clear Scrambled Channel function isused to fitter out scrambled channels afterAuto Programis completed.
This process may take up to 20~30 minutes.
1, Press the MENU button to display the menu.
Pressthe A or T button toselect "Channel", then press the ENTER _ button.
2=
Pressthe & or T button toselect "Clear Scrambled Channel"_then pressthe
ENTER _ button.
Itsearches scrambled channels, which areto be removed from the list.
>_Tostop searching scrambled channels:
Pressthe ENTER _ button to select Stop.
Pressthe 4 buttonto select "Yes",then press the ENTER _ button.
3, When the scrambled channel searching iscompleted_pressthe ENTER C*_
button.
Pressthe EXIT buttonto exit.
>- Thisfunction is only available in"Cable" mode.
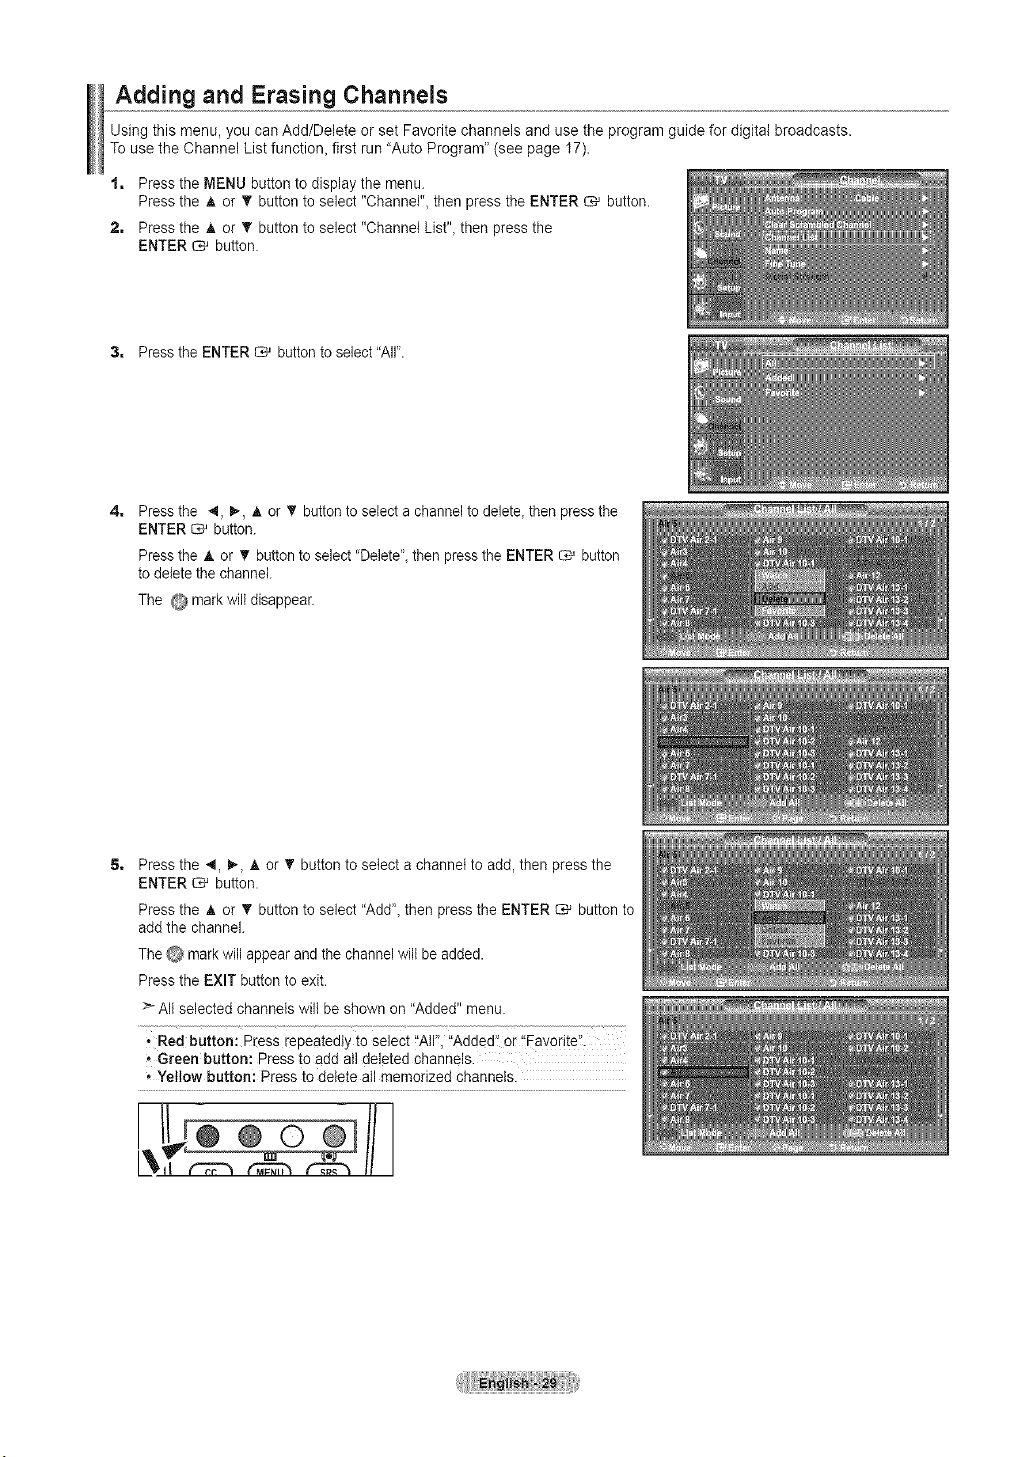
Adding and Erasing Channels
Using this menu, you can Add/Delete or set Favorite channels and use the program guide for digital broadcasts.
Touse the Channel List function_ first run "Auto Program" (see page 17).
1. Press the MENU button to display the menu.
Pressthe A or T button to select "Channel", then pressthe ENTER _ button.
2. Press the A or V' button to select "Channel List"_then press the
ENTER _ button.
3. Press the ENTER _ button to select"All'.
4=
Pressthe _1, _, A or • button toselect achanneltodelete_then pressthe
ENTER _ button.
Pressthe _. or T button toselect"Delete', then pressthe ENTER _ button
todeletethe channel
The @ mark will disappear.
Pressthe 4, 1%A or _' button to select achannel to add, then pressthe
ENTER _ button.
Pressthe _, or T button to select "Add", then pressthe ENTER _ button to
add the channel.
The0 mark will appear and the channel will be added,
Pressthe EXIT button to exit,
_" AIt selected channels wilt beshown on "Added" menu.
, Red button: Press repeatedly to select _'AII'!,'_Added'!Orl'FavoriteL
• Green button: Pressto add all deleted channels.
, Yellow button: Press todelete allmemorized channels.
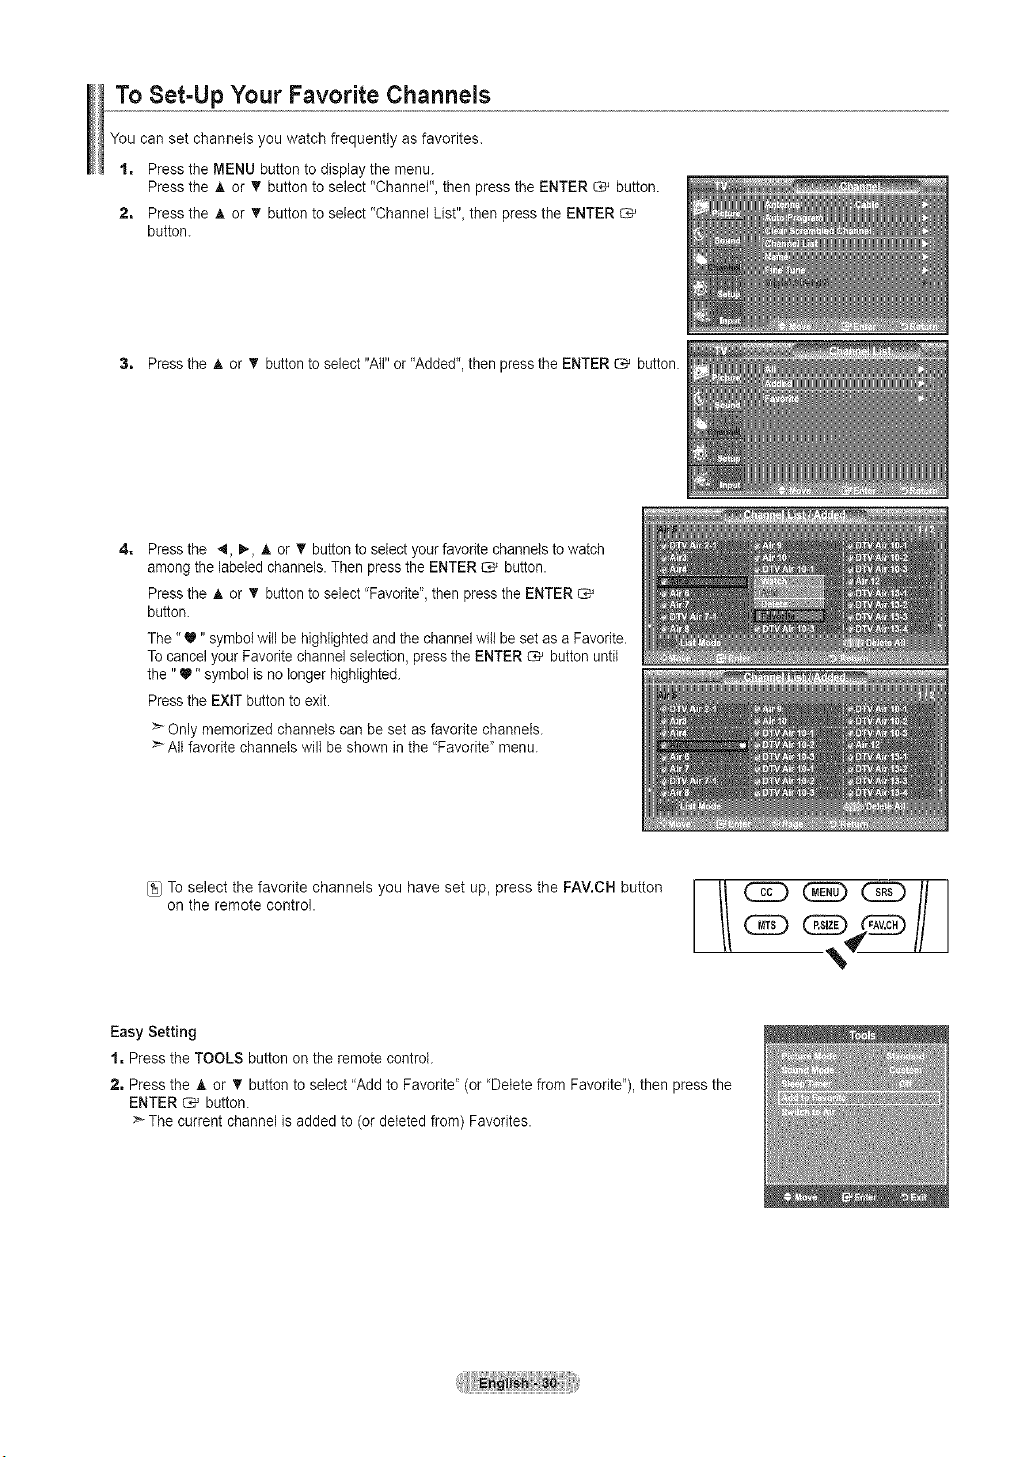
To Set-Up Your Favorite Channels
You can set channels you watch frequently asfavorites.
1, Press the MENU button to display the menu.
Pressthe A or _r button to select "Channel", then press the ENTER _ button.
2, Pressthe A or T button toselect "Channel List"_then pressthe ENTER
button.
3, Pressthe A or _' button to select"All"or "Added",then pressthe ENTER _ button.
4=
Pressthe 4, _, A or V' button toselectyour favoritechannelsto watch
among the labeled channels.Then pressthe ENTER C*J button.
Pressthe A or T button toselect"Favorite",then pressthe ENTER C*_
button.
The "_" symbolwitlbehighlighted and the channel witibe setas a Favorite.
Tocancel your Favoritechannel selection, pressthe ENTER _ button until
the "_" symbolisno longer highlighted.
Pressthe EXiT buttontoexit.
:_ Only memorized channels can beset as favorite channels.
All favorite channelswill be shown in the "Favorite" menu.
,seeotthe, vortech nnesh veset ,VC.onthere o eco tro //
Easy Setting
1, Pressthe TOOLS button on the remotecontrol.
2, Pressthe A or T button to select"Add to Favorite" (or 'Delete from Favorite"),then pressthe
ENTER _ button.
>" Thecurrent channel isadded to (or deleted from) Favorites.
Viewing the Channel Lists
You can display alist of all channets_added channels or your favorite channels.
1, Press the MENU button todisplay the menu.
Pressthe A or T button toselect "Channel", then pressthe ENTER _ button.
2, Press the _, or '_' button to select "Channel List"_then press the
ENTER _ button.
3, Press the A or T button toselect'AIl"_'Added"or "Favoritd_ then pressthe
ENTER _ button.
4=
Pressthe A or T button to select"Channer, then pressthe ENTER _ button.
Totogglebetween your allchannels,add channels orfavorite channels,
usetheRed button onthe remote control.
i Red button: Press repeatedly to se!e_t':Air,'Added:' oriEavorite:_
vii
i°2
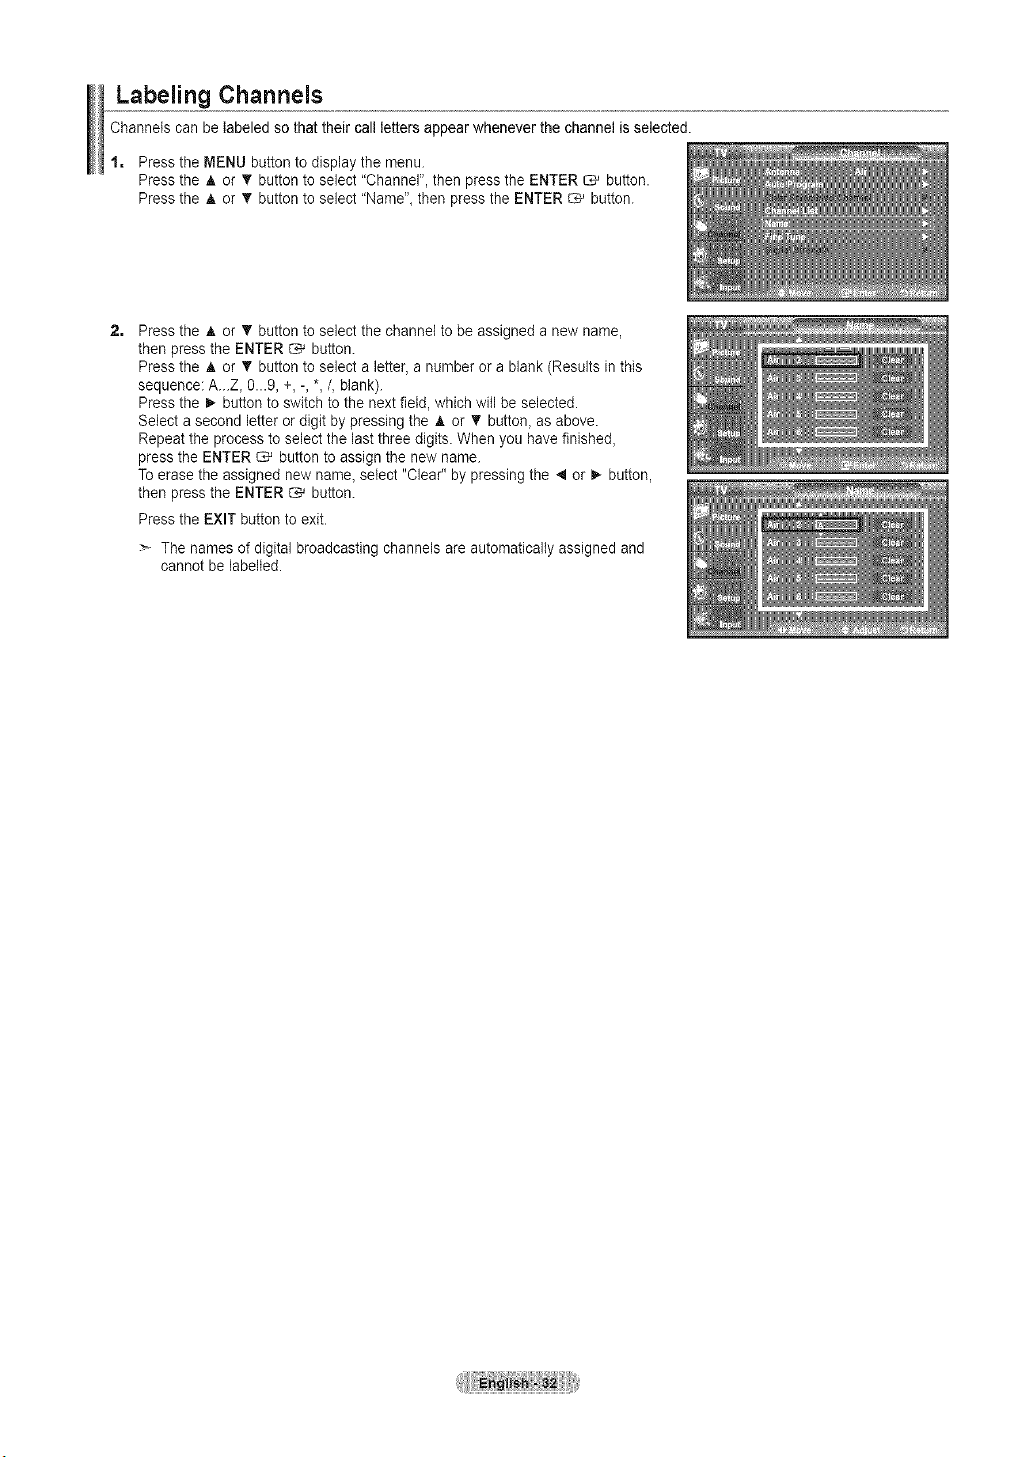
Labeling Channels
Channels can be labeled so that their call letters appear whenever the channel is selected.
1, Press the MENU button to display the menu.
Pressthe A or _r button to select "Channel", then press the ENTER _ button.
Pressthe A or _r button to select "Name", then pressthe ENTER G' button.
2=
Pressthe A or T button to select the channel tobe assigneda newname,
then press the ENTER _ button.
Pressthe A or _r button to select a letter, a number or ablank (Results in this
sequence: A...Z_0...9, +, -,*,/, blank).
Pressthe _ button to switch to the next field, which will be selected.
Select asecond letter ordigit by pressing the A or T button, as above.
Repeat the process to select the lastthree digits. When you have finished,
pressthe ENTER _ button to assignthe new name.
Toerase the assigned new name_select "Clear" by pressing the 4 or I,- button,
then press the ENTER _ button.
Pressthe EXIT button to exit.
The namesof digital broadcasting channels are automatically assigned and
cannot be labelled.
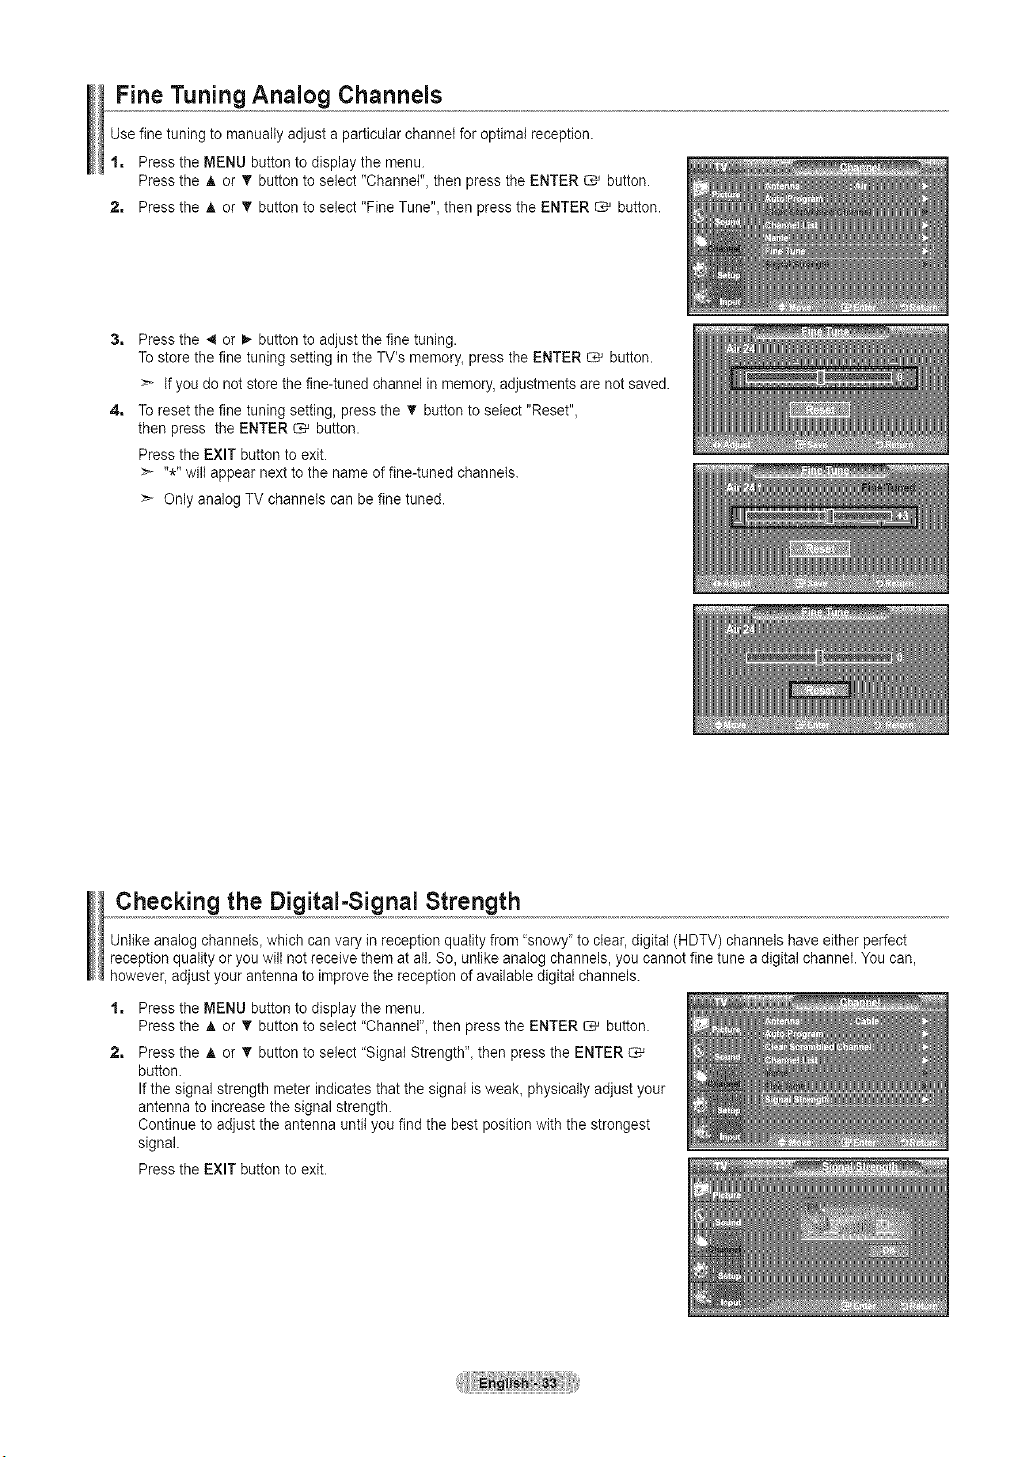
Fine Tuning Analog Channels
Use fine tuningto manually adjust a particular channel for optimal reception.
1, Press the MENU button todisplay the menu.
Pressthe ,_or T button toselect "Channel", then pressthe ENTER _ button.
2, Press the A or _' button to select "Fine Tune", then press the ENTER _ button.
4=
Pressthe 4 or I,- button to adjust the fine tuning.
Tostore the fine tuning setting in the TV's memory_press the ENTER _ button.
Ifyou do not store the fine-tuned channel in memory,adjustments arenot saved.
Toreset the fine tuning setting, press the _' button to select "Reset",
then press the ENTER _ button.
Pressthe EXIT button to exit.
:_ "*" wiltappear nextto the name offine-tuned channels.
> Only analogTV channels can be fine tuned.
Checking the Digital-Signal Strength
Unlike analogchannels, which can vary in reception quality from'snowy' to clear,digital (HDTV) channels haveeither perfect
reception quality oryou wiltnot receive them at all. So, unlike analog channels,you cannot finetune adigital channel. You can,
however, adjust your antennato improvethe reception of available digital channels.
1=
2,
Pressthe MENU button to display themenu.
Pressthe A or T button to select "Channel", then press the ENTER _ button.
Pressthe A or T button toselect "Signal Strength'_ then press the ENTER
button.
Ifthe signal strength meterindicates that the signal isweak_physically adjust your
antenna to increase the signal strength.
Continue to adjust the antenna until you find the best position with the strongest
signal.
Pressthe EXIT button to exit.
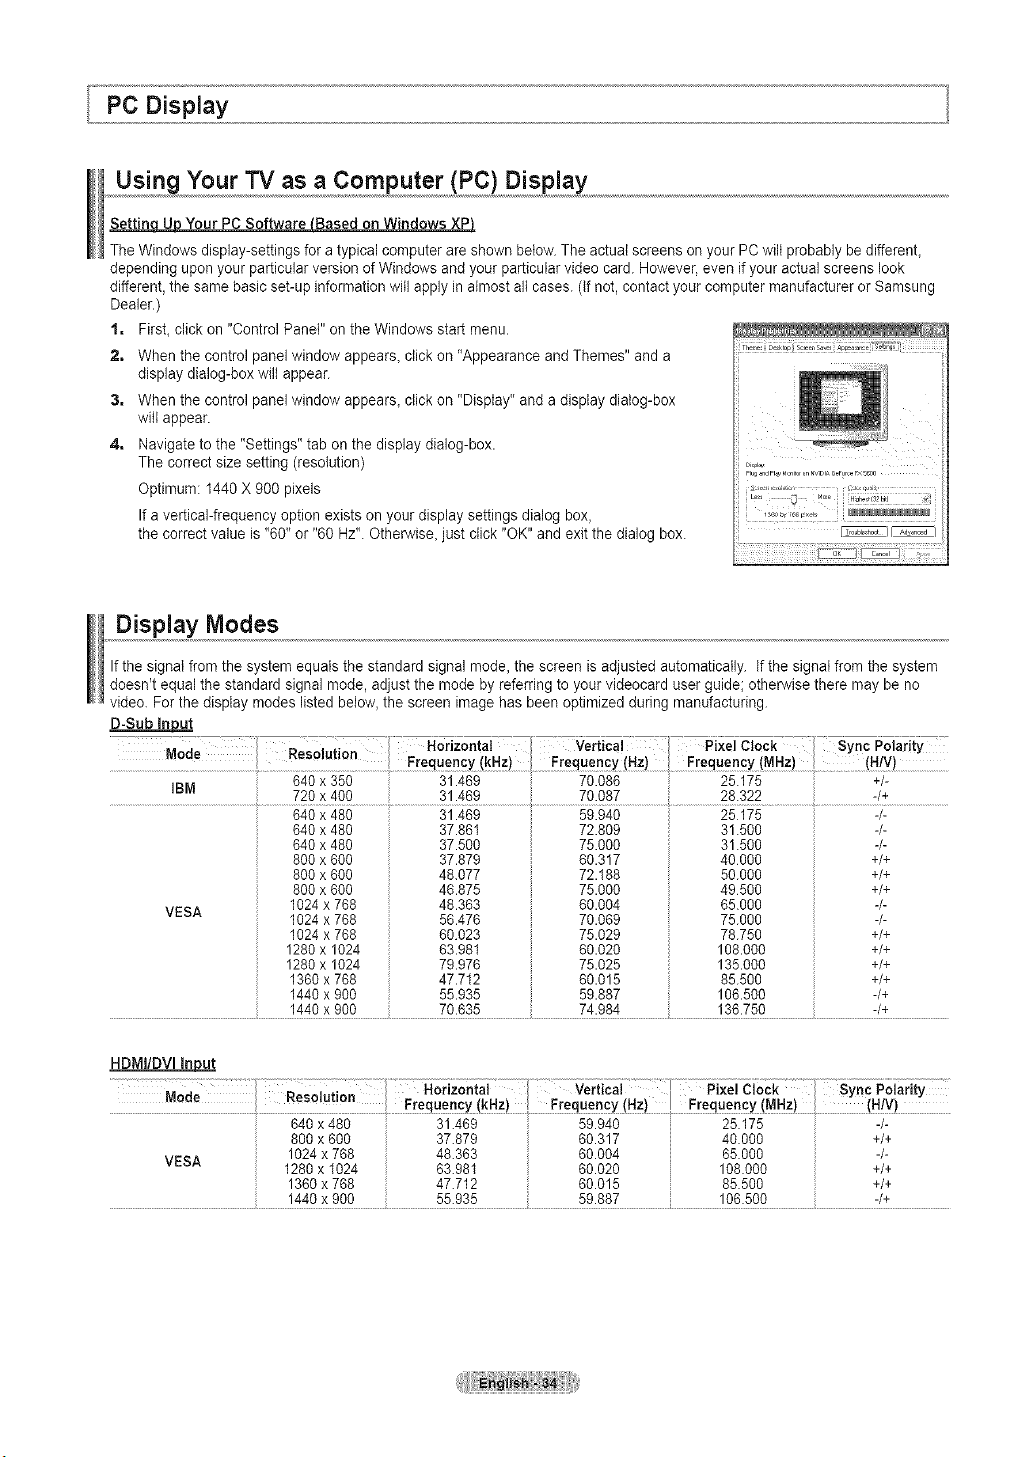
Using Your TV as a Computer (PC) Display
Your PC SoftwareLBased on Windows XPI
TheWindows display-settings foratypical computer areshown below.The actual screens on your PC wiltprobably be different,
depending upon your particular version of Windows and your particular video card. However, even if your actual screens look
different,the samebasic set-up information will apply in almost all cases. (Ifnot, contact your computer manufacturer orSamsung
Dealer.)
1, First, click on "ControlPanel" on the Windows start menu.
2, When the control panel window appears, click on "Appearance and Themes" and a
display dialog-box wiltappear.
3, When the control panel window appears, click on "Display" and a display dialog-box
will appear.
4, Navigate tothe "Settings" tab on the display dialog-box.
The correctsize setting (resolution)
Optimum: 1440 X 900 pixels
Ifa vertical-frequency option exists onyour display settings dialog box,
the correct value is"60" or "60 Hz".Otherwise, just click "OK"and exit the dialog box.
Display Modes
Ifthe signal fromthe system equals the standard signal mode, the screen isadjusted automatically. If the signal from the system
doesn't equal the standard signal mode, adjust the mode by referring toyour videocard user guidel otherwise there may be no
video. For the display modes listed below,the screen imagehas been optimized during manufacturing.
D-Sub In12_!
Mode Resol{i
u on
! ! Frequency(kHz _ Frequency Hz) [ Frequency(MHz (H/V
ItJlVt
' 720 x 400 ' 81.488 70.087 28.322 ' -/+
VESA
840 x 480
840 x 480
840 x 480
800 x 800
800 x 800
800 x 600
1024x 788
1024x 788
1024x 788
1280x 1024
1280x 1024
1360x 788
1440x 900
31.469
37.861
37.500
37.879
48.077
46.875
48.363
56.478
60.023
63.981
79.978
47.712
55.935
59.940
72.809
75.000
60.317
72.188
75.000
60.004
70.069
75.029
60.020
75.025
60.015
59.887
25175
31.500
31.500
40000
50.000
49500
65.000
75.000
78.750
108.000
135.000
85.500
106.500
-/-
-/-
-/-
+/+
+/+
+/+
-/-
-/-
+/+
+/+
+/+
+/+
-/+
HDMi/DVI_
. 1.................. Ver,,ca,
_o_e S
! • Frequency(kHz) ! Frequency(Hz) ! Frequency (MHz)! (H!V)
800 x 800 37.879 i 80.317 40.000 +/+
VESA 1024x 788 48.363 i 80.004 85.000 -/-
i 1280x 1024 83.981 i 80.020 i 108.000 i +/+
i 1360x 788 47 712 i 80 015 i 85 500 i +/+
....................................................................................i 1440x900 55.935 i 59.887 i 108.500 i -/+
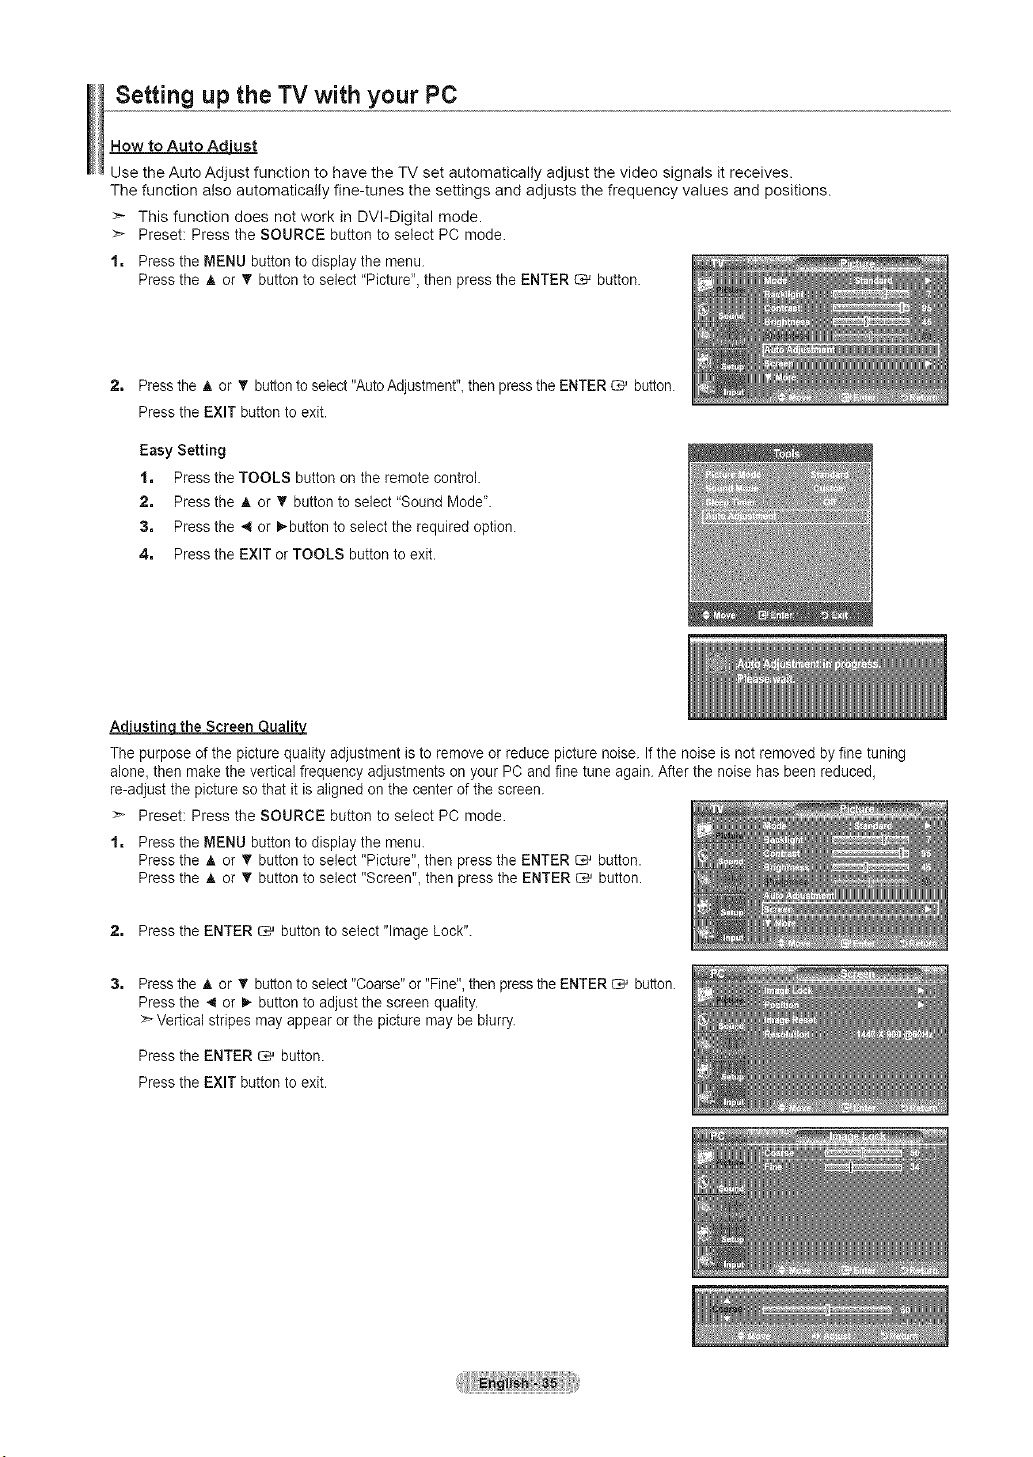
Setting up the TV with your PC
How to Auto Ad'uLustt
Use the Auto Adjust function to have the TV set automatically adjust the video signals it receives.
The function also automatically fine-tunes the settings and adjusts the frequency values and positions.
>* This function does not work in DVI-Digital mode.
>* Preset: Press the SOURCE button to select PC mode.
1, Press the MENU button to display the menu.
Pressthe A or _' button to select "Picture", then pressthe ENTER _ button.
2=
Pressthe A or _' button toselect"AutoAdjustment",thenpressthe ENTER _ button.
Pressthe EXIT button to exit.
Easy Setting
1. Press the TOOLS button on the remote control.
2. Pressthe A or • button to select "Sound Mode'.
3. Pressthe _ or _button to selectthe required option.
4. Pressthe EXIT or TOOLS button to exit.
Ad_ the Screen ualit
Thepurpose of the picturequality adjustment isto remove or reduce picture noise. If the noise isnot removed by fine tuning
alone,then makethe vertical frequency adjustments on your PC and fine tune again. After the noise has been reduced,
re-adjust the picture so that it isaligned on the center of the screen.
>* Preset: Press the SOURCE button to select PC mode.
1, Press the MENU button to display the menu.
Pressthe A or T button to select "Picture", then press the ENTER _ button.
Pressthe A or T button toselect "Screen", then pressthe ENTER _ button.
2, Press the ENTER _ button to select "ImageLock".
Pressthe A or T button toselect"Coarse" or"Fine", then pressthe ENTER C,_ button.
Pressthe _1or _ button to adjust the screen quality.
>*Vertical stripes may appear orthe picture maybe blurry.
Pressthe ENTER _ button.
Pressthe EXIT button to exit.
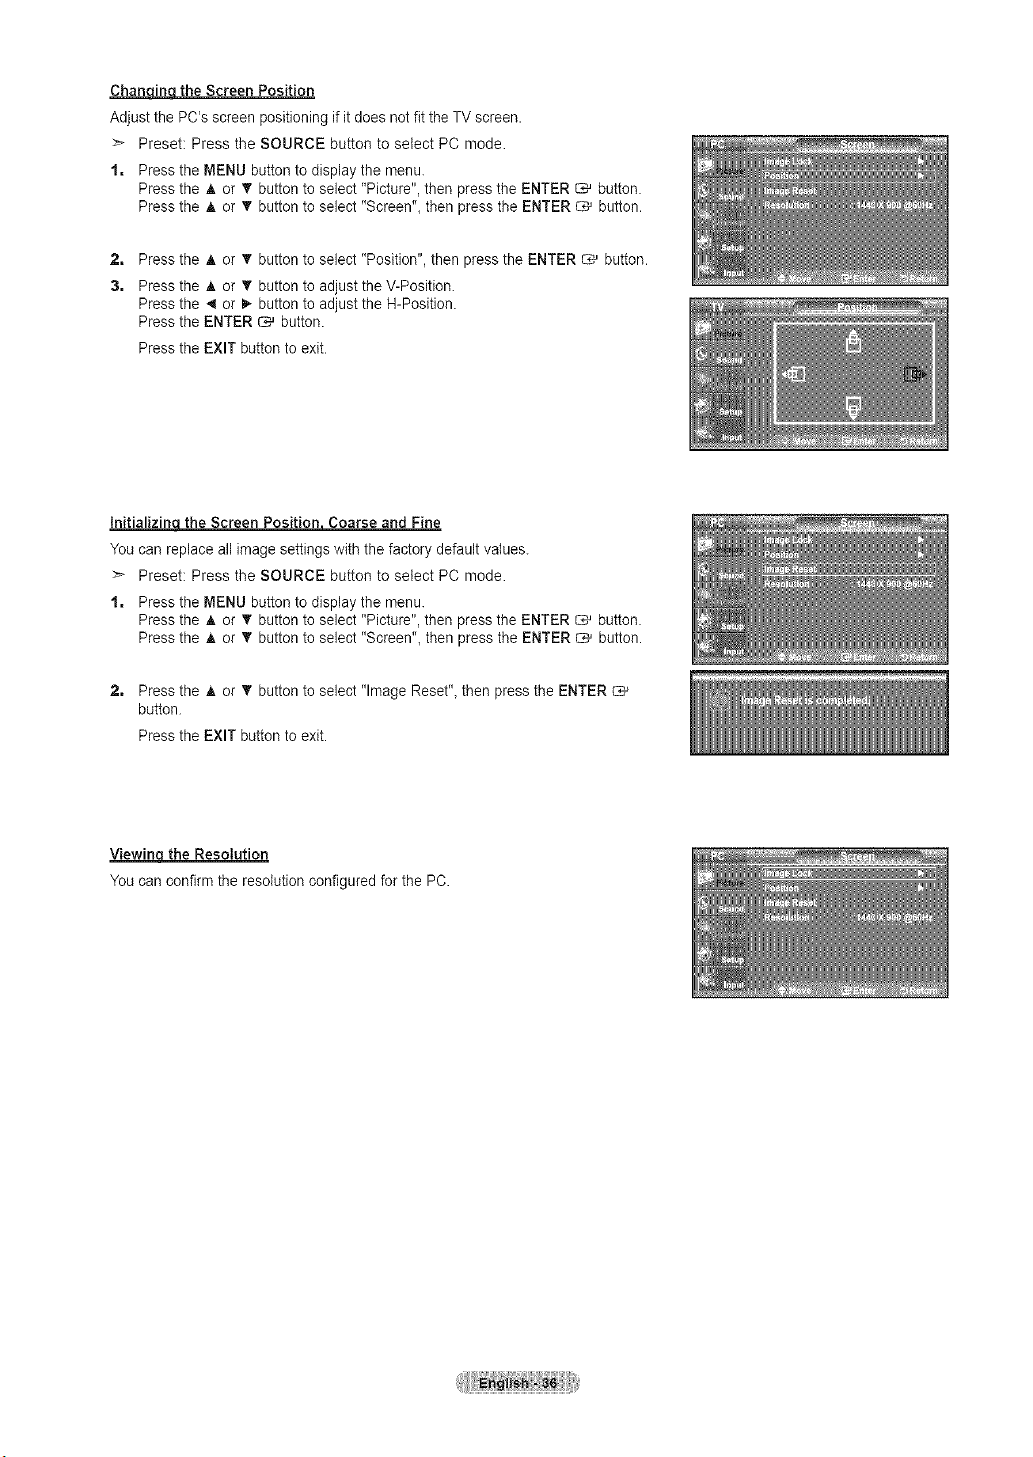
ChanqJ_l the Screen Position
Adjust the PC's screen positioning if it does not fit the TV screen.
:_ Preset: Press the SOURCE button to select PC mode.
1, Press the MENU button todisplay the menu.
Pressthe A or • button to select "Picture", then press the ENTER _ button.
Pressthe A or T button toselect "Screen", then pressthe ENTER _ button.
2, Press the ,_ or T button to select "Position", then pressthe ENTER _ button.
3, Press the A or '_' button to adjust the V-Position.
Pressthe 4 or I_ button to adjust the H-Position.
Pressthe ENTER _ button.
Pressthe EXIT button to exit.
Initializincl the Screen Positionj Coarse and Fine
You can replace allimage settings with the factory default values.
>* Preset: Press the SOURCE button to select PC mode.
1, Press the MENU button todisplay the menu.
Pressthe _t,or _' button to select "Picture", then press the ENTER _ button.
Pressthe A or _' button to select "Screen", then pressthe ENTER _ button.
2, Press the A or _' button to select "Image Reset", then pressthe ENTER
button.
Pressthe EXIT button to exit.
Viewin the Resolution
You can confirm the resolution configured for the PC.
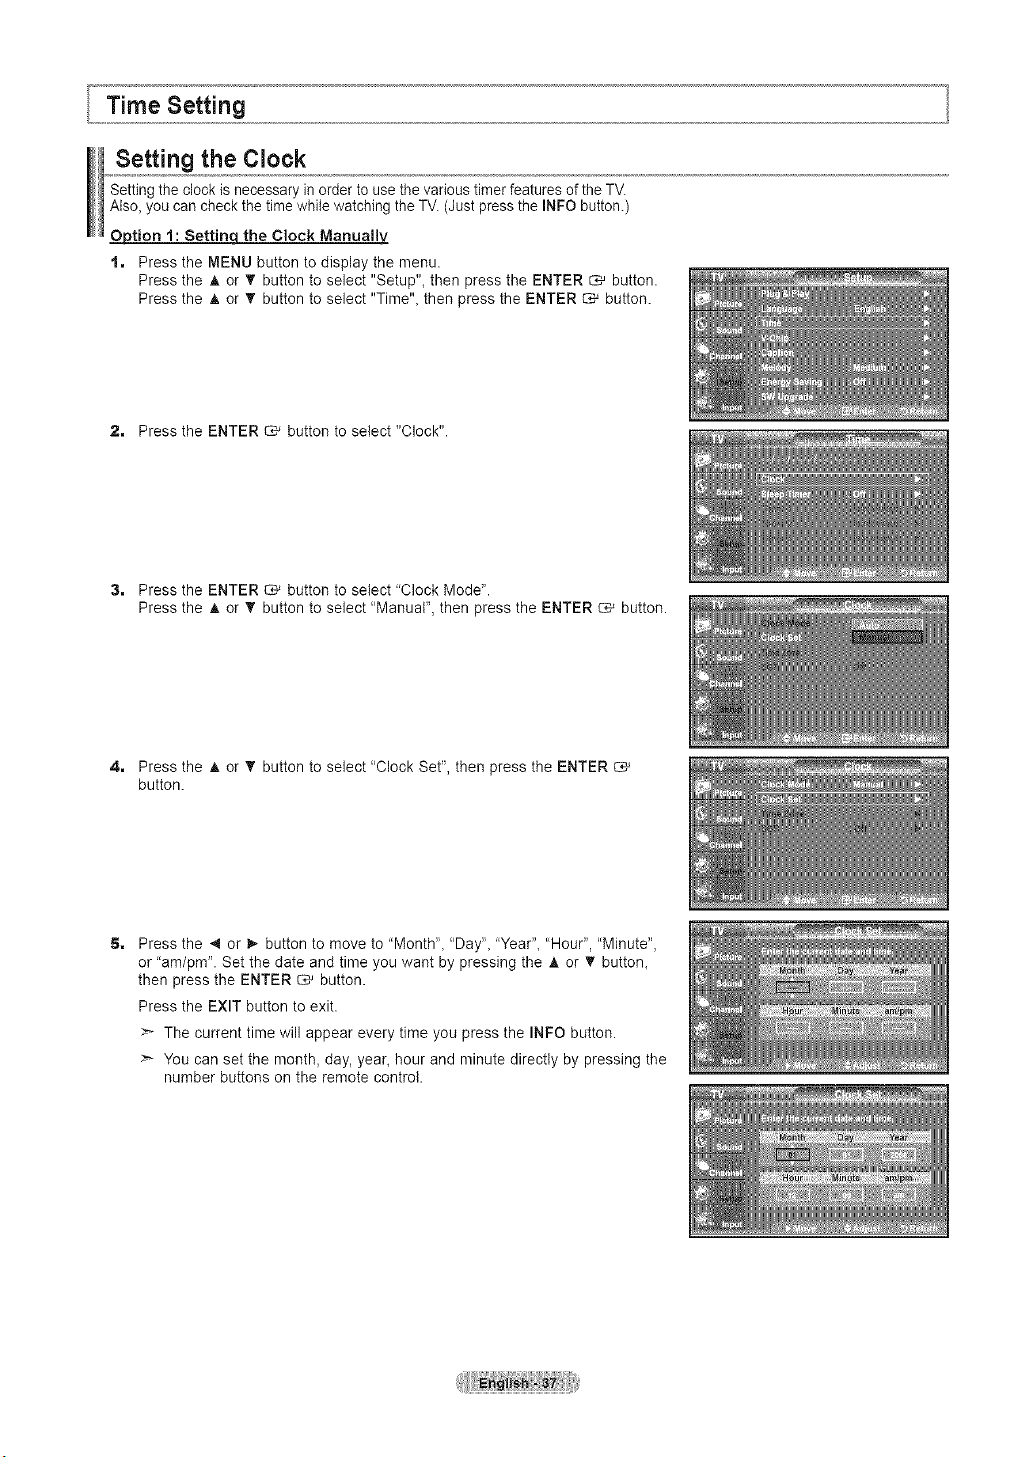
Setting the Clock
Setting the clock isnecessary in order to usethevarious timer features oftile TV.
Also_youcan checkthe timewhile watching the TM (Justpressthe INFO button.)
Option 1: Settinqthe Clock Manualbz
1, Press the MENU button todisplay the menu.
Press the A or T button to select "Setup"_ then press the ENTER _ button.
Press the A or T button to select "Time"_ then press the ENTER _ button.
2, Press the ENTER _ button toselect "Clock".
3, Press the ENTER _ button toselect 'Clock Mode".
Press the A or _' button to select "Manual", then press the ENTER _ button.
4, Press the A or _' button to select "Clock Set", then press the ENTER
button.
Press the 4 or 1_button to move to 'Month", "Day", 'Year", "Hour", "Minute",
or "am/pm". Set the date and time you want by pressing the A or T button_
then press the ENTER _ button.
Press the EXIT button to exit.
The current time will appear every time you press the INFO button.
>- You can set the month, day, year, hour and minute directly by pressing the
number buttons on the remote control.
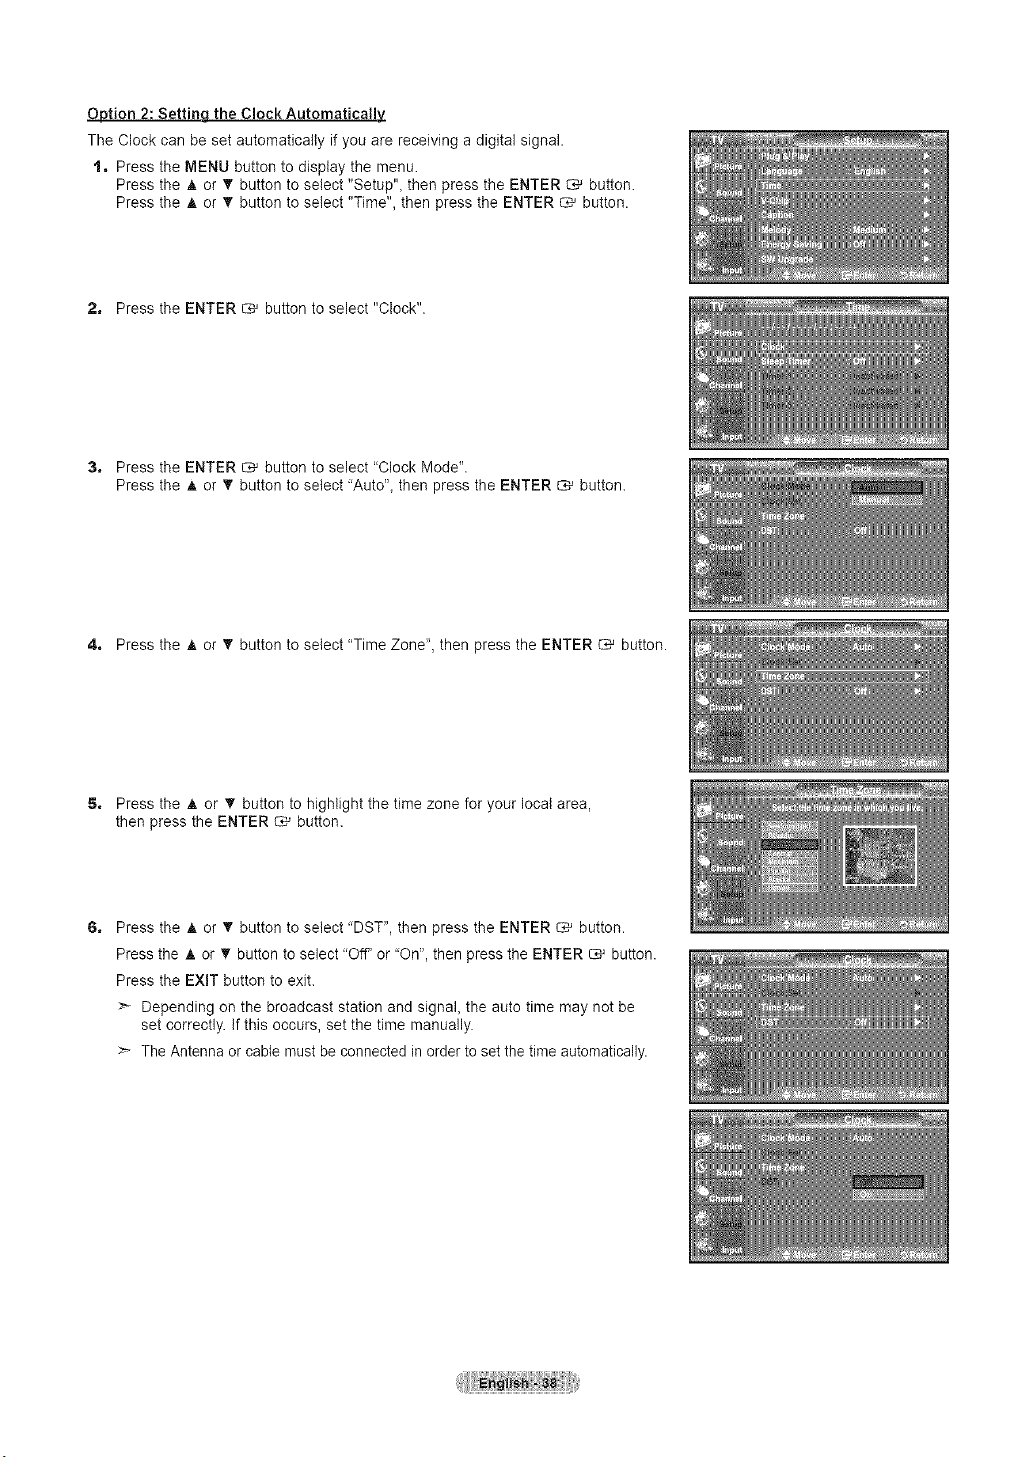
Option 2: Setting the Clock Automatically.
The Clock can beset automatically if you are receiving a digital signal.
1, Press the MENU button to display the menu.
Press the A or _' button to select "Setup", then press the ENTER _ button.
Press the A or _' button to select "Time", then press the ENTER _ button.
2, Press the ENTER _ button to select "Clock".
3, Press the ENTER _ button to select "Clock Mode".
Press the A or T button to select 'Auto", then press the ENTER _ button.
4, Press the A or _' button to select "Time Zone", then press the ENTER _ button.
5, Press the A or T button to highlight the time zone for your local area,
then press the ENTER _ button.
Press the A or T button to select 'DST", then press the ENTER _ button.
Press the A or T button to select 'Off' or 'On", then press the ENTER _ button.
Press the EXiT button to exit.
>* Depending on the broadcast station and signal, the auto time may not be
set correctly, if this occurs, set the time manually.
The Antenna orcable must be connected in order to set the time automatically.
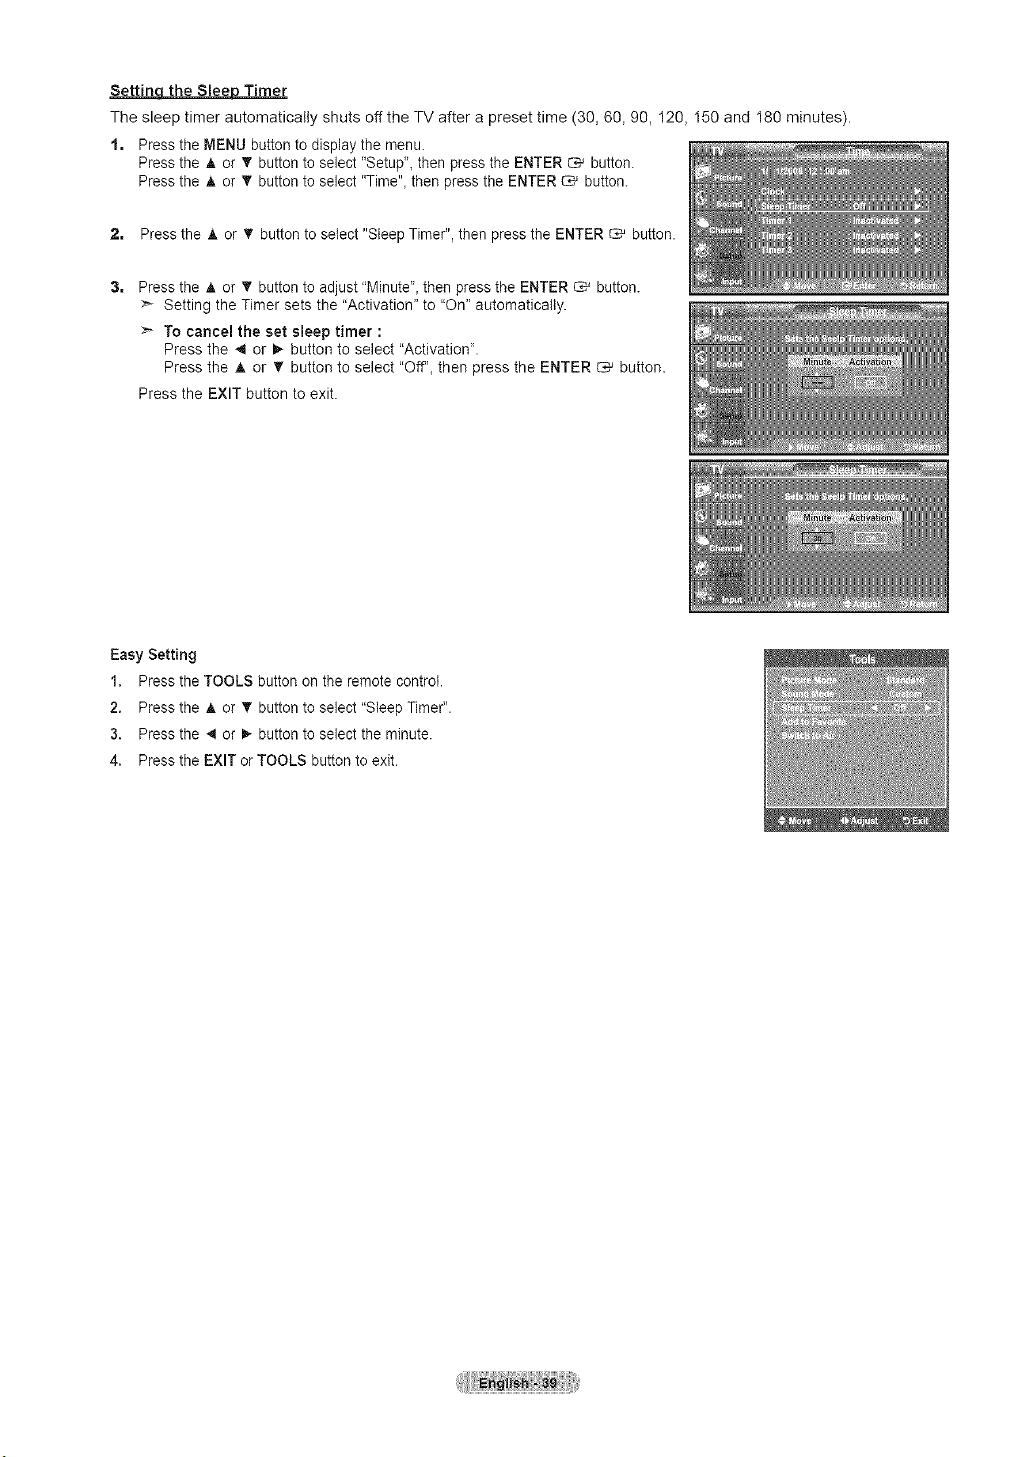
Settin_ Timer
The sleep timer automatically shuts off the TV after a preset time (30, 60, 90, I20, I50 and I80 minutes).
1, Press the MENU button todisplay the menu.
Pressthe _t,or T button toselect "Setup"_then pressthe ENTER C,_ button.
Pressthe A or T button toselect "Time"_then pressthe ENTER _ button.
2, Pressthe A or _' button to select "Sleep Timer", then press the ENTER _ button.
Pressthe A or T button to adjust "Minute"_then pressthe ENTER CM button.
Setting the Timer sets the "Activation" to "On" automatically.
To cancel the set sleep timer :
Press the _ or _ button to select "Activation".
Press the A or _' button to select "Off'_ then press the ENTER _ button.
Press the EXIT button to exit.
Easy Setting
1. Press the TOOLS button on the remote control.
2. Press the A or • button to select "Sleep Timer".
3. Press the _ or _ button to select the minute.
4. Press the EXIT orTOOLS button to exit.

Settinq the On/Off Timer
1, Pressthe MENU button to display the menu.
Pressthe ,_or T button toselect "Setup", then pressthe ENTER C_'button.
Pressthe A or _' button to select "Time", then press the ENTER _ button.
2, Three different On/Off Timer Settings can be made. Press the A or T button to
select 'Timer 1","Timer 2"or "Timer 3', then pressthe ENTER _ button.
Pressthe 4 or I,-button to select the desired itembelow.
Pressthe ,t,or T button to adjust the setting,
- On Time: Set the Hour.Minute. am pm, end Activation/Inactivation.
,To activatetimer with the setting youve cnosen, se[ to
"Actwate".,
oOff Time: Set the Hour Minute. amlum, anu Acbvat_on/tnact_vauon.
•Toactivatet_merw_ththe sethng you've chosen set to
Activate".
• Volume: Set the remired volume le_el.
- Channel: Select the desired channel.
* Repeat: Select "Once". "Everyday". "Mon~FrR "Mon~Sat". "Sa[~Sun".or
Manual
When"Manual" is selected, _"essme i_ DuEon[0selec[ me desired
aayofthe week. Pressthe ENTER _ button over the desired da,
and the V"mark wilIappear.
Pressthe EXIT button to exit.
:_ You can set the hour, minuteand channel by pressing the number buttons on
the remote control.
Auto Power Off
When you setthe timer On, the television will eventually turn off, if no controls
areoperated for 3 hours after the TV was turned onby the timer. This function
isonly available in timer On mode and prevents overheating, which may occur
if a TVis on fortoo longtime.
Function Description
Selecting a Menu Language
1, Press the MENU button todisplay the menu.
Pressthe A or _' button to select "Setup", then pressthe ENTER O,_ button.
Pressthe A or _' button to select "Language"_then press the ENTER _ button.
2, Press the A or T button to select "English", "Espa_ol" or "Frangais".
Pressthe ENTER _ button.
Pressthe EXIT button to exit.
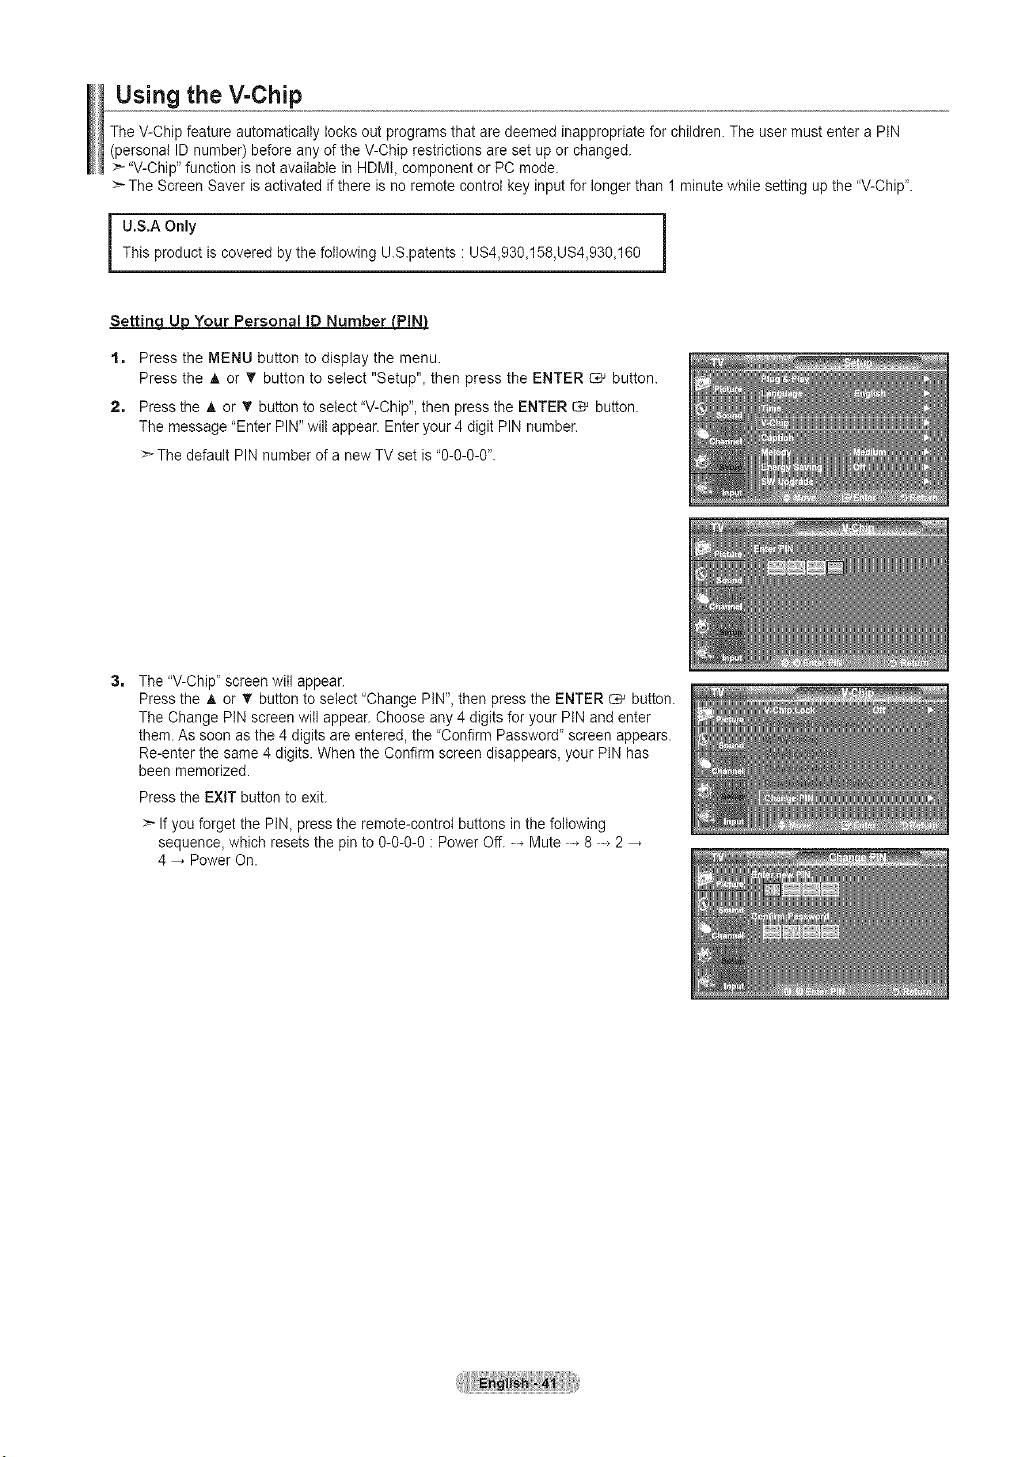
Using the V=Chip
TheV-Chip feature automatically locks out programs that aredeemed inappropriatefor children. The user must enter aPIN
(personal ID number)before any of the V-Chip restrictions are set up or changed.
>` "V-Chip" function isnot available in HDMI, component or PC mode.
>` TheScreen Saver isactivated if there isno remote control keyinputfor longer than 1minute while setting up the "V-Chip".
U.S.A Only iThis product iscovered by the following U.S.patents • US4,930_158,US4,930_160
Setting UUDYour Persona! Ig Number tPIN_
t. Press the MENU button to display the menu.
Press the A or T button to select "Setup"_then press the ENTER _ button.
2. Press the A or T button to select"V-Chip", then pressthe ENTER _ button.
The message "Enter PIN"will appear. Enter your 4digit PIN number.
>-The default PIN number of anew TV set is"0-0-0-0".
The "V-Chip' screen will appear.
Pressthe A or _' button to select "Change PIN', then press the ENTER _ button.
The Change PIN screen will appear. Choose any4 digits for your PIN and enter
them. As soon as the 4 digits areentered, the "Confirm Password' screen appears.
Re-enter the same4digits. When the Confirm screen disappears, your PIN has
been memorized.
Pressthe EXIT button to exit.
>_Ifyou forget the PIN, press the remote-control buttons inthe following
sequence, which resetsthe pin to 0-0-0-0 :Power Off. Mute 8 2
4 PowerOn.
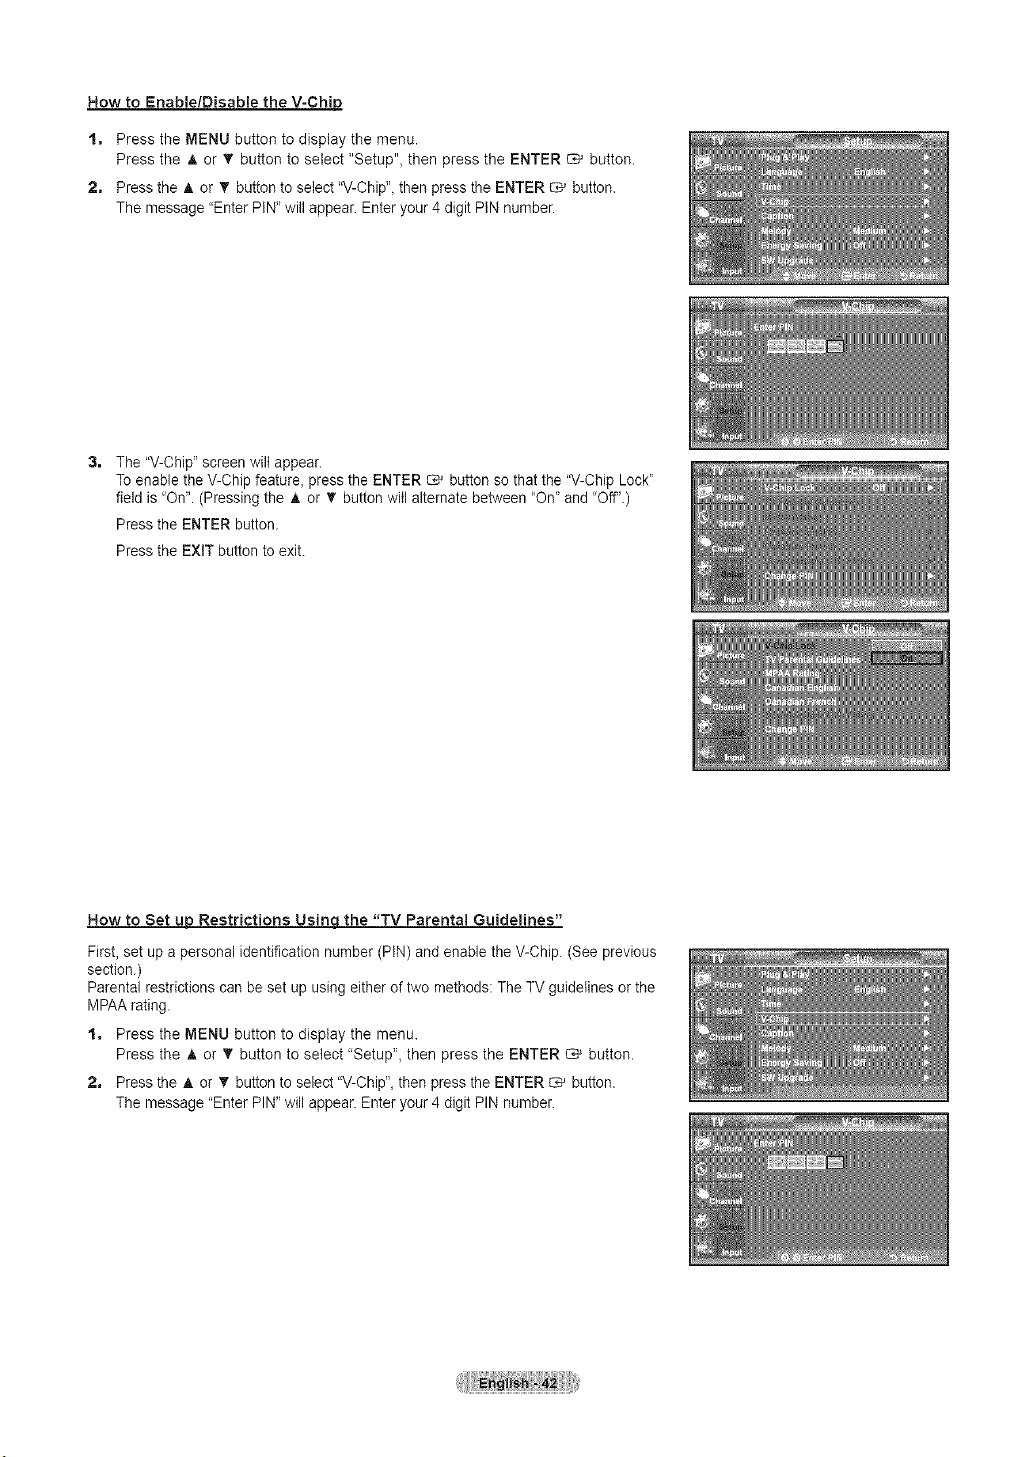
How to Enable/Disable the V-Chip
t, Press the MENU button to display the menu.
Press the A or _' button to select "Setup", then press the ENTER _ button.
2, Press the A or _' button to select "V-Chip",then press the ENTER _ button.
The message 'Enter PIN"will appear. Enter your 4 digit PIN number.
The"V-Chip" screenwilt appear.
Toenable the V-Chip feature, pressthe ENTER _ button sothat the "V-ChipLock'
field is "On'. (Pressing the A or _' button will alternate between "On" and "Off".)
Pressthe ENTER button.
Pressthe EXIT button to exit.
How to Set u_ Restrictions Usinqthe "TV Parental Guidelines"
First, set up a personal identification number (PIN)and enablethe V-Chip. (See previous
section.)
Parentalrestrictions canbeset up using either of two methods: The TVguidelines or the
MPAArating.
t, Press the MENU button to display the menu.
Press the A or T button to select "Setup", then press the ENTER C# button.
2, Pressthe A or _r button to select "V-Chip", then press the ENTER _ button.
The message "Enter PIN"will appear. Enter your 4 digit PIN number.
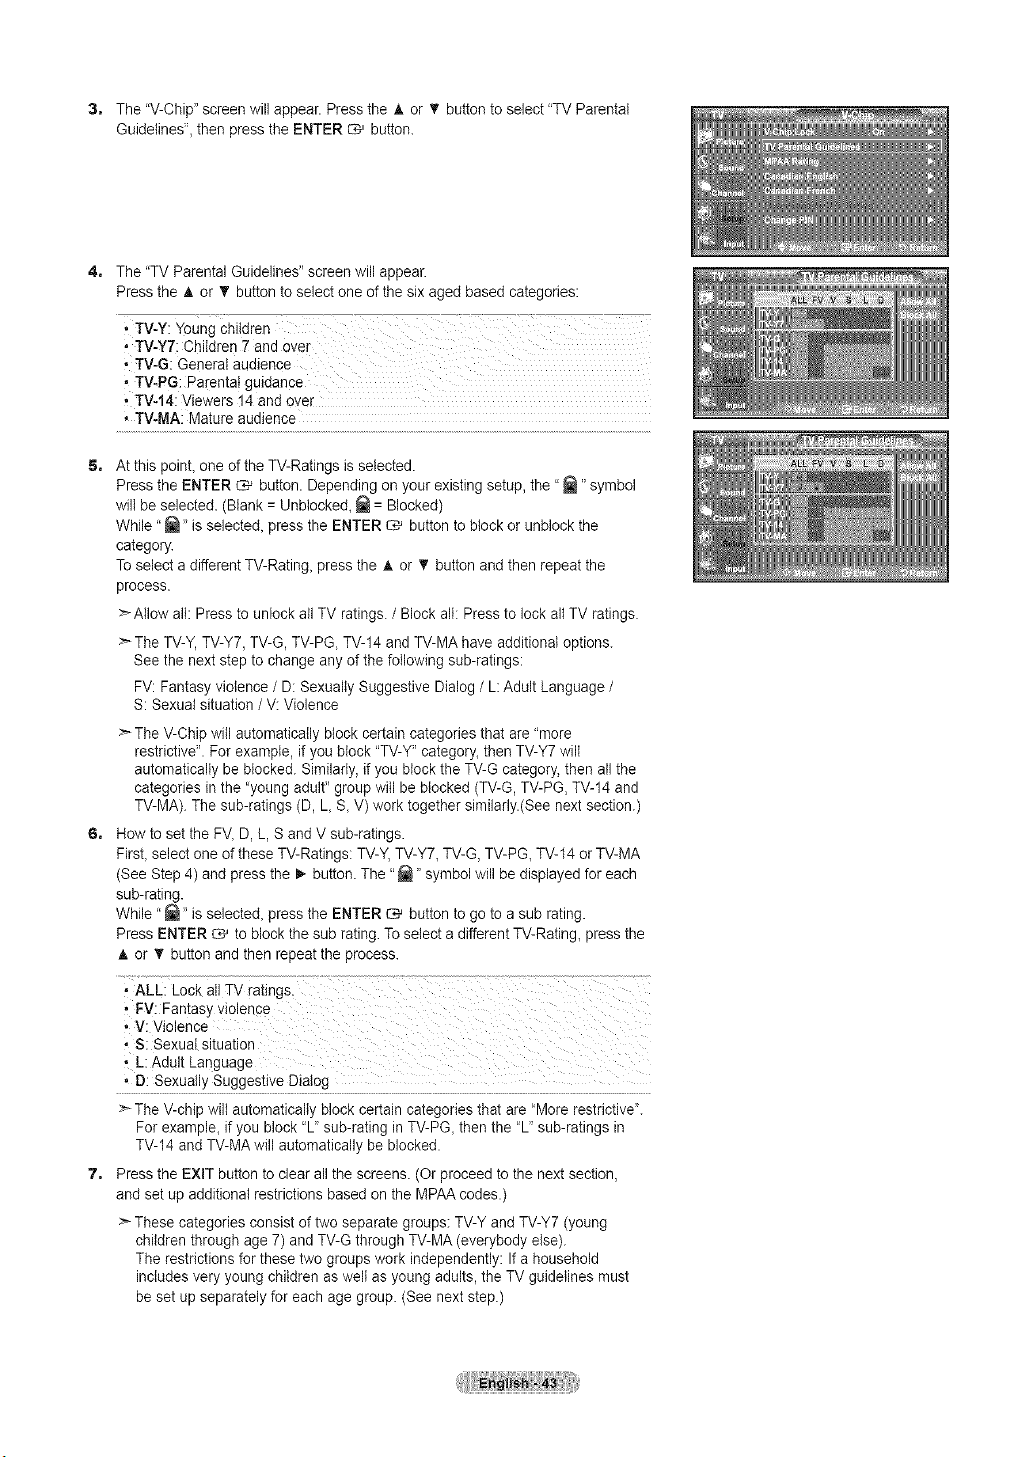
3. The"V-Chip" screen will appear. Pressthe A or _' button to select "TV Parental
Guidelines_,then press the ENTER _ button.
4. The"TV Parental Guidelines" screenwill appear.
Pressthe A or T button toselect one of the six aged based categories:
, TV-G: General audience
• TV.PG: Parentat guidance
• TV-14:Viewers 14 and over
• TV-MA: Mature audience
5. At this point,one of the TV-Ratings isselected.
Pressthe ENTER C,_ button. Dependingon your existing setup, the "_" symbol
will be selected. (Blank= Unbtocked, _ =Blocked)
While "_ '' isselected, pressthe ENTER _ buttonto blockor unblock the
category.
Toselect a differentTV-Rating, press the A or _' button and then repeatthe
process.
:_AIIow all: Press tounlock allTV ratings. /Block all: Press to lock allTV ratings.
>_TheTV-Y,TV-Y7, TV-G, TV-PG,TV-14 and TV-MA have additional options.
See the next stepto change any of the following sub-ratings:
FV:Fantasy violence / D:Sexually Suggestive Dialog / L: Adult Language /
S: Sexual situation /V: Violence
>_TheV-Chip will automatically block certain categories that are "more
restrictive". For example, if you block "TV-Y" category, then TV-Y7 wilt
automatically be blocked. Similarly, if you block the TV-G category, then all the
categories in the "young adult" groupwill be blocked (TV-G,TV-PG, TV-14and
TV-MA).The sub-ratings (D, L, S, V)work together similarly.(See next section.)
6. Howto set the FV, D, L,S and V sub-ratings.
First, selectone of theseTV-Ratings: TV-Y, TV-Y7, TV-G, TV-PG, TV-14or TV-MA
(See Step 4) and press the _ button. The "_" symbol will be displayed foreach
sub-rating.
While "_" isselected, pressthe ENTER _ button to go to asub rating.
PressENTER _ to block the sub rating. Toselect adifferent TV-Rating, press the
A or T button and then repeatthe process.
• ALL: Lock allTV ratings_ .......
, L: Adult Language
, D: Sexually Suggestive Dialog
TheV-chipwill automatically block certain categories that are"More restrictive".
For example_ if you block "L"sub-rating inTV-PG_then the "L"sub-ratings in
TV-14 and TV-MA will automatically be blocked.
7. Press the EXIT button to clear all the screens. (Or proceed to the next section,
and set up additional restrictions based on the MPAA codes.)
>- These categories consist oftwo separate groups: TV-Y and TV-Y7 (young
children through age 7)andTV-G through TV-MA (everybody else).
The restrictions forthese two groups work independently: Ifahousehold
includes very young children as welt asyoung adults, the TV guidelines must
be set up separately for each age group. (Seenext step.)

How to Set u_ Restrictions Usinqthe MPAA Ratin s: G PG PG-13 R NC-17 X NR
The MPAA rating system uses the Motion Picture Association ofAmerica (MPAA) system and itsmain application isfor movies.
When the V-Chip lock is on, the TVwilt automatically block any programs that are coded with objectionable ratings
(eitherMPAA orTV-Ratings).
to Press the MENU button to display the menu.
Press the A or _' button to select "Setup", then press the ENTER _ button.
2. Press the A or _' button to select "V-Chip",then press the ENTER _ button.
The message 'Enter PIN"will appear. Enter your 4 digit PIN number.
3. The"V-Chip" screen will appear. Press the A or T button to select
"MPAA Rating", then pressthe ENTER C# button.
4. The"MPAA Rating" screen will appear. Repeatedly pressthe A or T button to
select a particular MPAA category. Pressingthe A or _' button will cycle through
the MPAAcategories:
, G: Generalaudience (no restrictions).
, PG: Parental guidance suggested.
, PG-13: Parents strongly cautioned.
R: Restricted. Children under 17 should be accompanied by an adutL
, NC.17: Nochildren under age !71
• X: Adults only.
• NR: Not rated.
_'-Atlow alt: Press tounlock allTV ratings.
Blockall: Press to lock allTV ratings.
:_While a particular category is selected, pressthe ENTER _ button to activate it.
The "_" symbol will be displayed. Pressthe ENTER _ button to block or
unblockthe category.
:_TheV-Chip will automatically block any category that is"more restrictiveL
For example, if you blockthe "PG-13" category,then "R","NC-17" and "X" wilt
automatically be blocked also.
Pressthe EXIT button to exit.
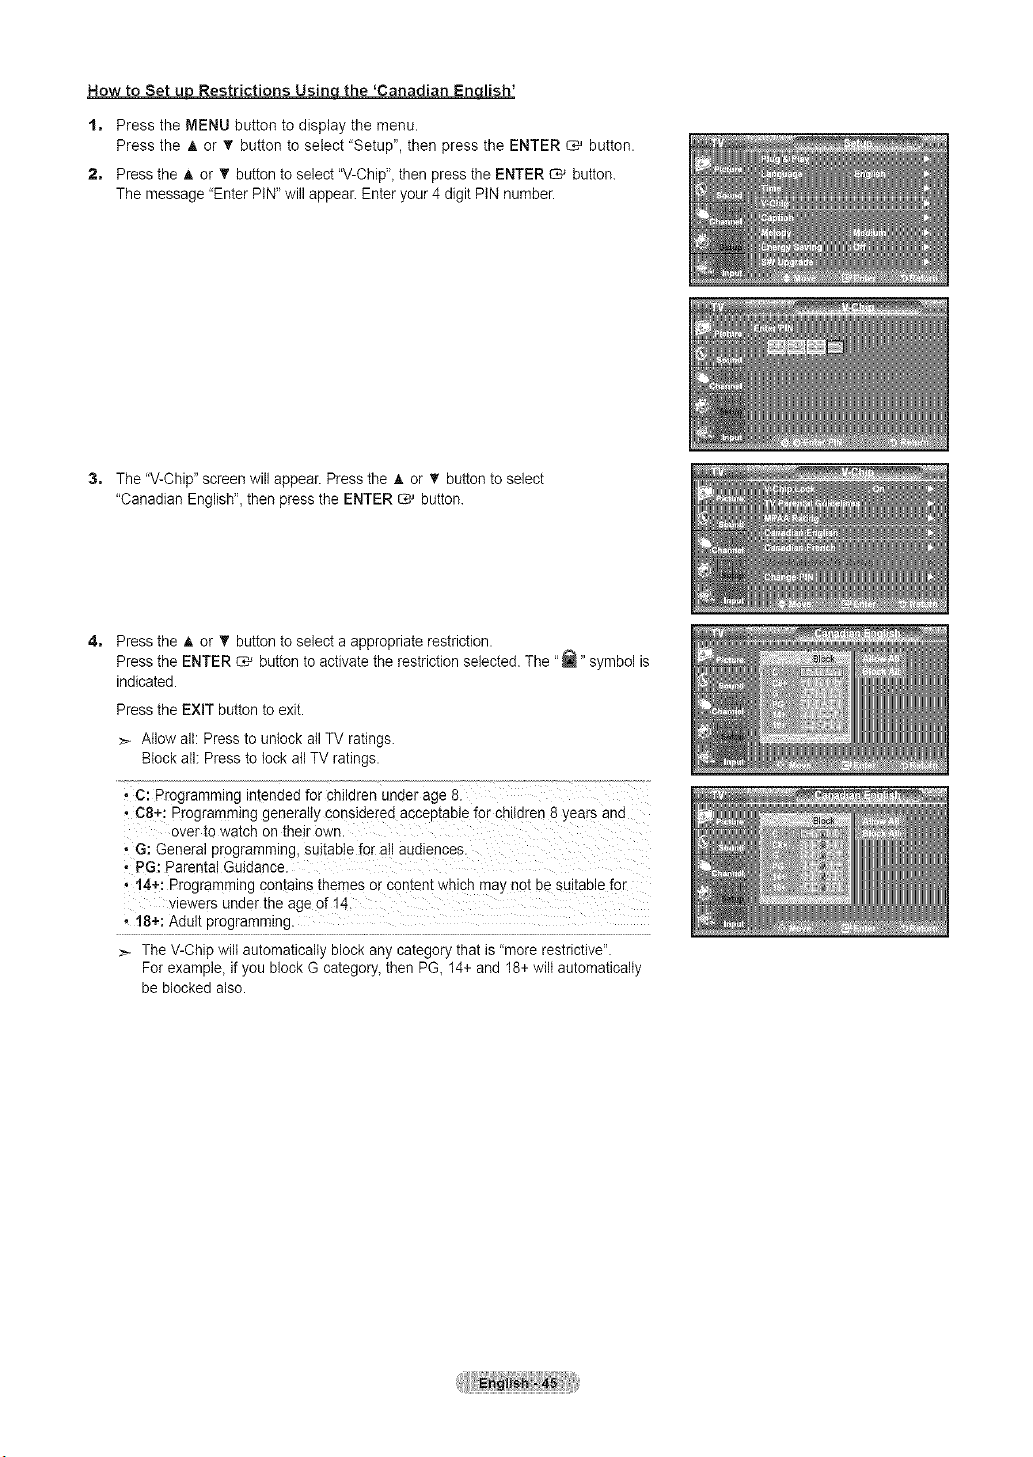
How to Set _ Restrictions Usinqthe 'Canadian Enqlish'
t, Press the MENU button to display the menu.
Press the _, or _' button to select "Setup", then press the ENTER _ button.
2, Press the A or T button to select "V-Chip",then press the ENTER _ button.
The message "Enter PIN"will appear. Enter your 4 digitPIN number.
3, The"V-Chip" screen will appear. Press the A or T button to select
"Canadian English", then press the ENTER _ button.
4, Press the A or T button to select a appropriate restriction.
Pressthe ENTER C,_ button to activate the restrictionselected. The "_" symbol is
indicated.
Pressthe EXiT button toexit.
>- Allow all: Press to unlock allTV ratings.
Blockall Pressto lock all TV ratings.
_C: Programming intended for children under age 8.
• C8",-_Programming generally conside[ied acceptable for children 8 Years and
over to watch on their own.
• G: General programming, suitablefor atl audiences.
• PG: Parenta! Guidance.
,t4+: Programming contains themes or content whicb maynot be sgitablefor
viewers under the age of 14
• 18+: Adult programming.
>- The V-Chip wiltautomatically block any category that is"more restrictive".
For example, if you block G category,then PG, 14+and 18+ wilt automatically
be blocked also.
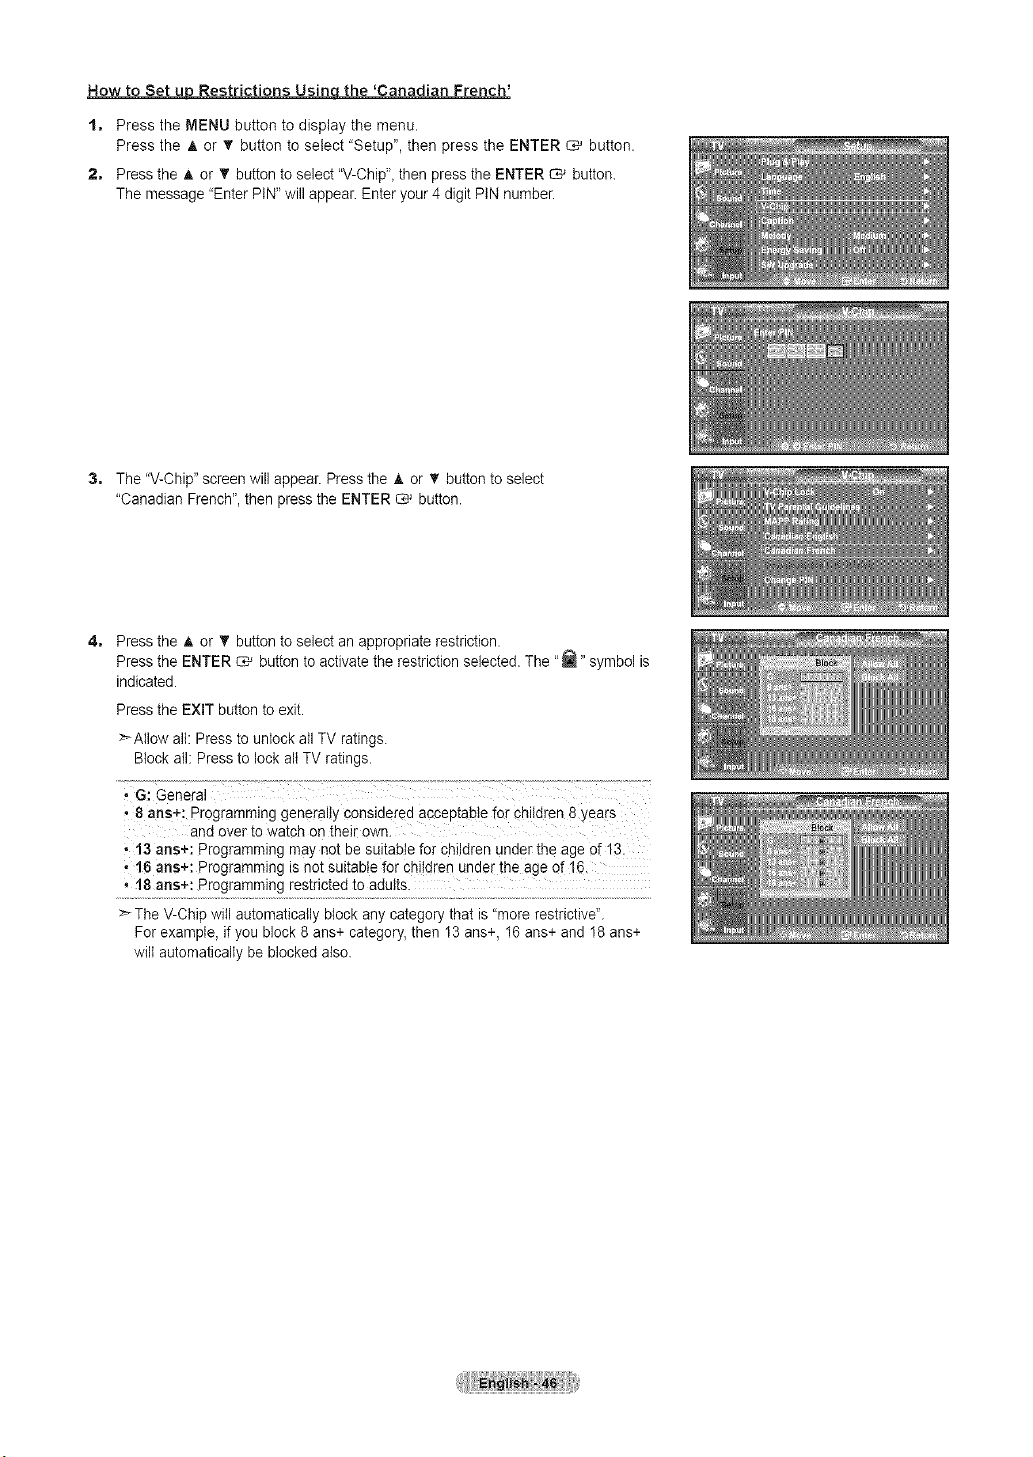
How to Set _ Restrictions Usinqthe 'Canadian French'
t, Press the MENU button to display the menu.
Press the _, or _' button to select "Setup", then press the ENTER _ button.
2, Press the A or T button to select "V-Chip",then press the ENTER _ button.
The message "Enter PIN"will appear. Enter your 4 digitPIN number.
3, The"V-Chip" screen will appear. Press the A or T button to select
"Canadian French",then pressthe ENTER _ button.
4, Press the A or T button to select an appropriate restriction.
Pressthe ENTER C,_ button to activate the restrictionselected. The "_" symbol is
indicated.
Pressthe EXIT button to exit.
>Allow alt: Press tounlock allTV ratings.
Blockaft: Press to lock allTV ratings.
,,8 arts+: Programming generally considered acceptable for ohiIdren8years
and over to watch on their own.
,13 arts÷: Programming may not be suitable for children under the age of 13.
16 arts+: Programming is not suitablefor children under the age of16,
,18 arts+: Programming restricted to adults.
> TheV-Chip will automatically block any categorythat is"more restrictiveL
For example, if you block 8ans+ category, then 13 ans+, 16 ans+ and 18 ans+
wiltautomatically be blockedalso.

Usin the V-Chi for Di ita! channels
Parental restriction information canbe usedwhile watching DTVchannels.
t. Press the MENU button to display the menu.
Press the A or _' button to select "Setup", then press the ENTER _ button.
2. Press the A or T button to select "V-Chip",then press the ENTER _ button.
The message "Enter PIN"will appear. Enter your 4 digitPIN number.
3. The"V-Chip" screen will appear. Press the A or T button to select
"Downloadable U.S. Rating", then pressthe ENTER _ button.
:_If information isnot downloaded from the broadcasting station, the
Downloadable U.S. rating menu isdeactivated.
Parental restriction information is automatically downloaded whilewatching
DTVchannels. Itmay take several seconds.
> The Downloadable U.S. rating menu isavailable for useafter information is
downloaded from the broadcasting station. However, depending on the infer
mationfrom the broadcasting station, it may not be available for use.
4. Press the _, or T button to select a appropriate restriction.
Pressthe ENTER C# button to activate the restriction selected. The "_" symbol is
indicated.
Pressthe EXIT button to exit.
>Allow all: Pressto unlock allTV ratings. / Block all: Press to lock altTV ratings.
> Parental restriction levels differ depending on the broadcasting station.
>_The defaultmenu name and DownloedabIe US rating changes depending on
the downloaded information.
>_Even ifyou set the On-screen display to your desired language, the
"Downloadable U.S. Rating" menu wiltappear in English only.
>>The ratingwill automatically block certain categories that aremore restrictive.
> The rating titles(For example: HumorLevel.,etc) and TVratings (For example:
DH,MH, H. etc) may differ depending onthe broadcasting station.
The r_urnbe_of
Ratingtide cu_re_/trat r_gtiSe
Now to Reset the TV after the V-Chil:) Blocks a Channel {"Ernergencv Escar:)e"_
Ifthe TV is tuned to arestricted channel, the V-Chip wilt btock it. The screen
wiltgo blank and the following message wilt appear:
t. Enter your PIN.
Toresume normal viewing_ tune to adifferent channel using CH(_ or CH_)
button. Under certain conditions (depending on the rating of the local TV
programs) the V-Chip might lock out all the channels. In this case, use the
V-Chip function for an "emergency escape":
2. Press the MENU button. Press the A or _' button to select "Setup", then press
the ENTER _ button.
3. Press the _k or _' button to select "V-Chip", then press the ENTER C,_ button.
4. Enter your PIN, then press the ENTER _ button and press the A or _' button to
temporarily disable the V-Chip Lock.
> If you forget the PIN_ press the remote-control buttons in the following
sequence_ which resets the pin toO-O-O-O: Power Off. MUTE 8
2 4 Power On.
The nurl_er of
allratingtitle
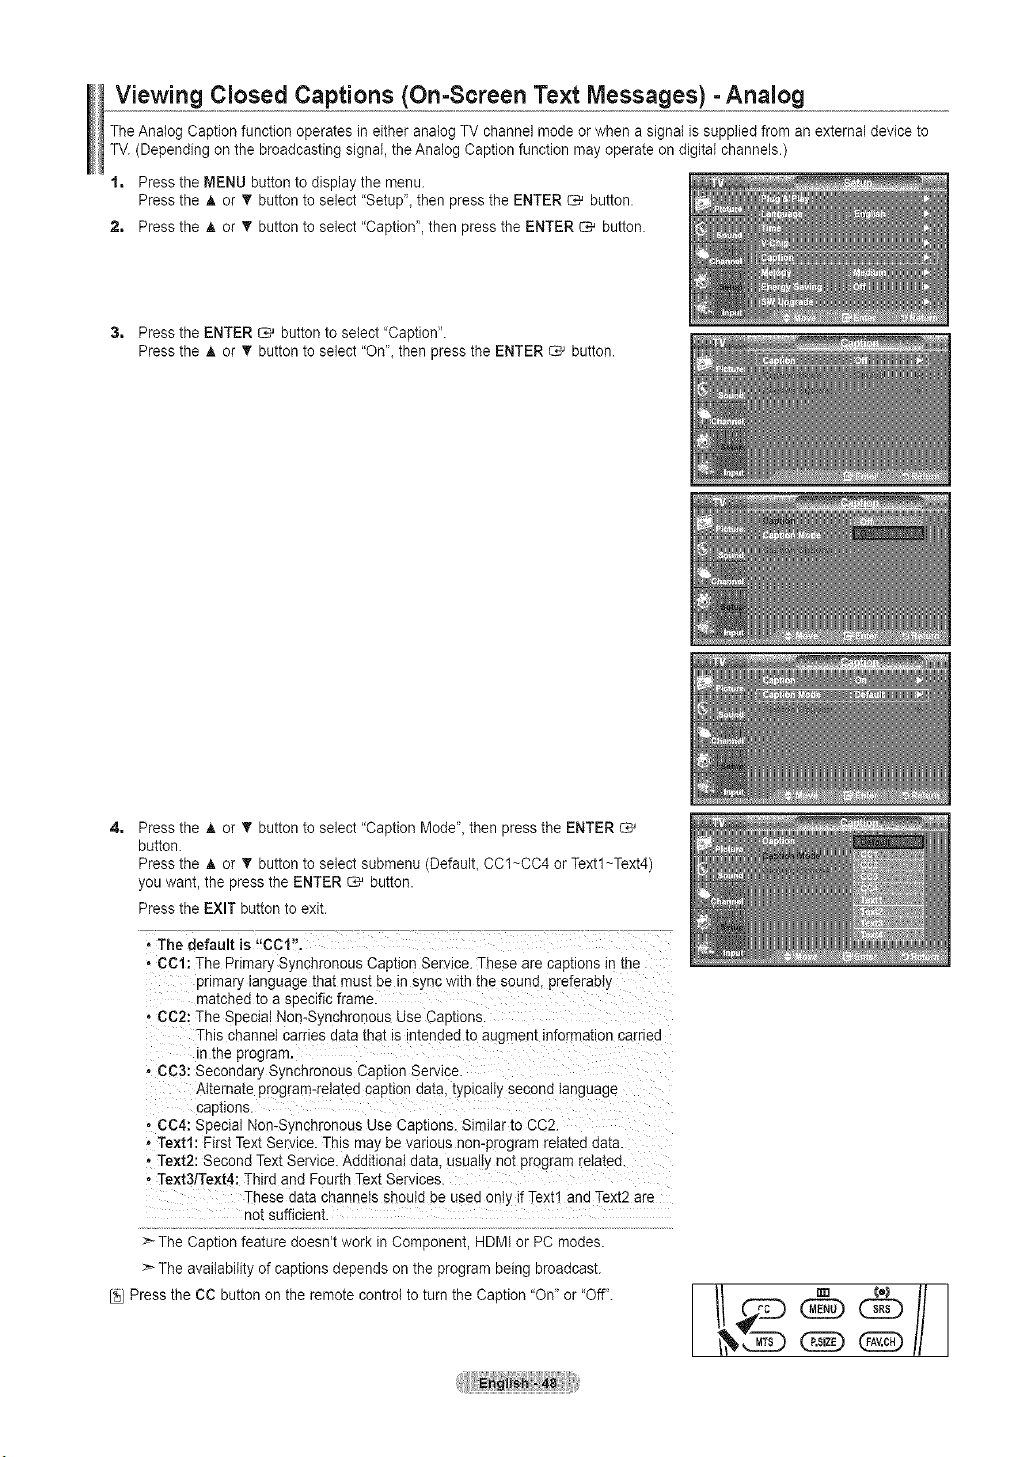
Viewing Closed Captions (On-Screen Text Messages) -Analog
TheAnalog Caption function operates in either analog TVchannel mode orwhen a signal issupplied from an external device to
TV.(Depending on the broadcasting signal,theAnalog Caption function mayoperate on digital channels.)
1, Press the MENU button to display the menu.
Pressthe A or T button to select "Setup"_then press the ENTER _ button.
2, Press the A or _' button to select "Caption', then press the ENTER _ button.
3, Press the ENTER _ button to select "Caption".
Pressthe A or _' button to select "On"_then press the ENTER _ button.
4=
Pressthe A or _r button toselect "Caption Mode'_ then pressthe ENTER
button.
Pressthe A or V' button toselect submenu (DefaulL CC1~CC4 orTextl~Text4)
youwant, the press the ENTER _ button.
Pressthe EXIT button to exit.
- The default is "CCl".
- CCI: The Primary Synchronous Caption Service. These are captions in the
3nmary language that must be tr sync wire the sound preferably
"na[cnea_o a soecific frame.
• CC2: The Special Non-Synchronous Use Caotions.
This channel carries data that ts ntended to augment informa[ion carnea
tnthe program.
• CC3: Secondary Synchronous Caption Service
Alternate program-reta[ea cap[tonaata. typically second language
caD[ions.
• CC4: Special Non-S_,ncnronousUse Captions. Similar to CC2
• Te×tf: First Text Service.This maybevanous non-program related data
• Te×t2: Second Text Service.Additional data. usually not program retatea.
- Text3/Text4: Thirdand FourthText Services.
-hese data channels should beused only if Text1 and Text2 are
nol sufficient
TheCaution feature aoesn[WOrKtnCorr 3onent HDMI orPC moaes.
Theavailability ofcaotions deeenas on me program Deng Droaacas[
[_ Pressthe CC button on the remote control to turn the Caption "On_:or 'Off".
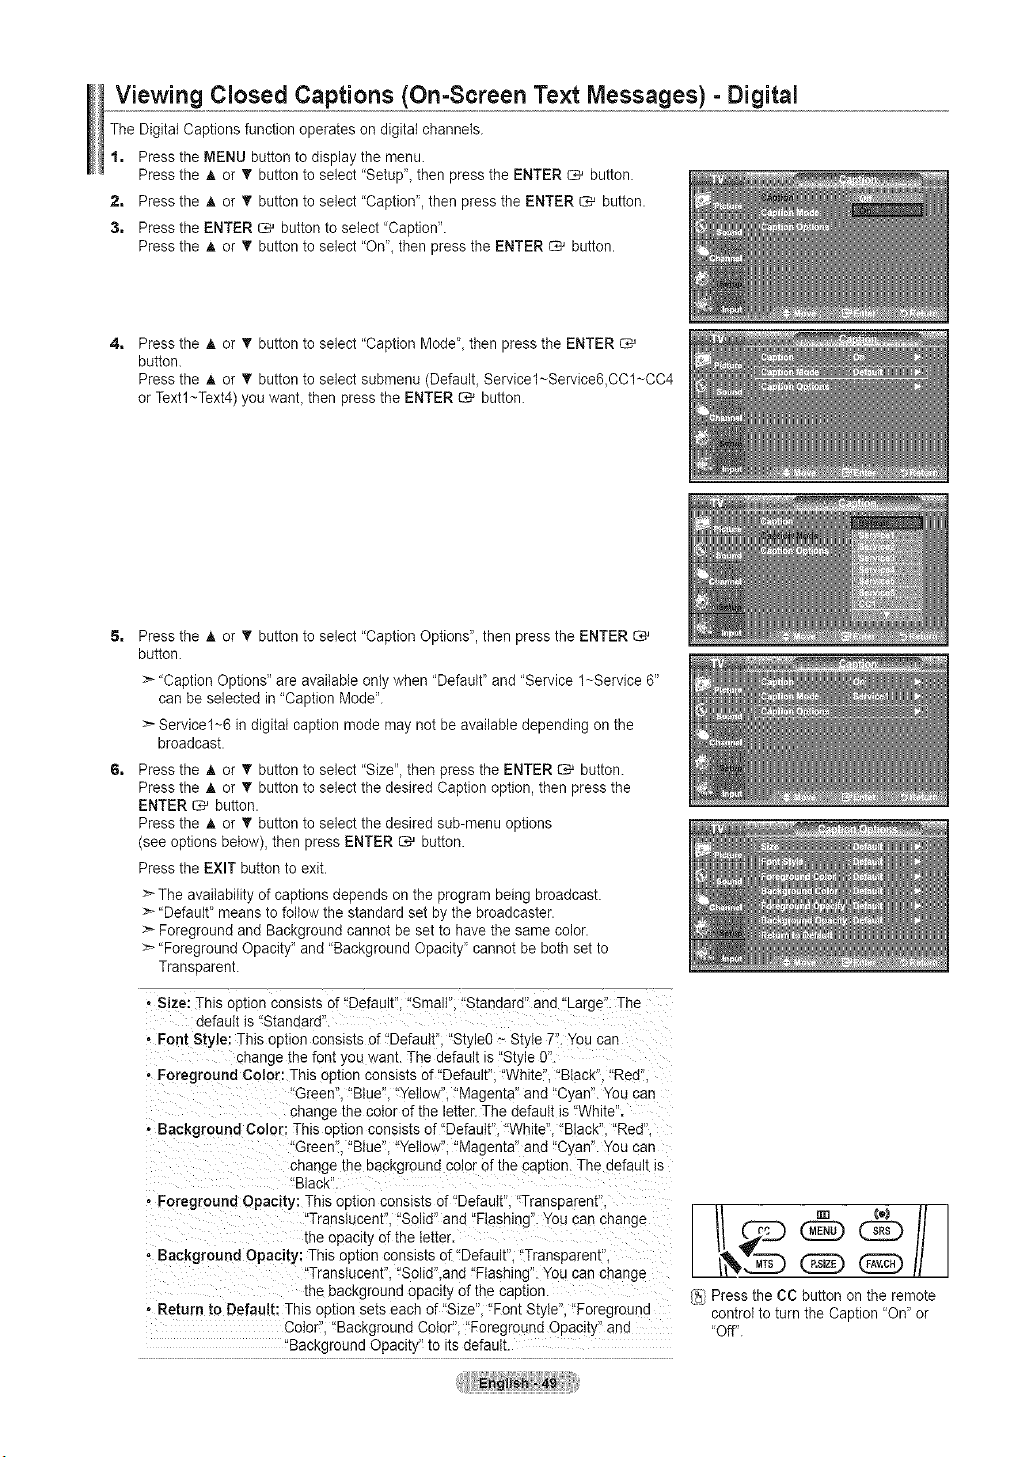
Viewing Closed Captions (On-Screen Text Messages) - Digital
TheDigital Captions function operates on digital channels.
1, Press the MENU button todisplay the menu.
Pressthe A or T button toselect "Setup'_then press the ENTER _ button.
2, Press the A or T button to select "Caption', then press the ENTER _ button.
3, Press the ENTER _ button to select "Caption".
Pressthe A or _' button to select "On"_then press the ENTER _ button.
4=
Pressthe A or T button toselect "Caption Mode"_then pressthe ENTER
button.
Pressthe A or • button to select submenu (Default_ Servicel~Service6,CCl~CC4
orTextl~Text4) you wanL then press the ENTER C_ button.
Pressthe A or T button toselect "Caption Options", then pressthe ENTER
button.
>-"Caption Options" areavailable onlywhen "Default' and "Service 1~Service 6"
can be selected in "Caption Mode".
>-Service1~6 indigital caption mode may not be available depending on the
broadcast.
Pressthe A or T button to select "Size", then pressthe ENTER _ button.
Pressthe A or 'V button toselect the desired Caption option, then press the
ENTER _ button.
Pressthe A or T button toselect the desired sub-menu options
(see options below), then press ENTER _ button.
Pressthe EXIT button to exit.
Theavailability ofcaptions depends on the programbeing broadcast.
>_"Default' meansto follow the standard set by the broadcaster.
:_Foreground and Background cannot be set to have the same color.
>-"Foreground Opacity" and "Background Opacity' cannot be both set to
Transparent.
• Size: This option consists of"Default". "Small". "Standard" and "Large".The
default is"Standard".
, Font Style: This outlon consists of 'Default", "Style0- Style 7".You car'
cnange the font you want. The defau _is"Style0L
• Foreground Color: This opuon consists of'Default. "White". "Black'_.'Red".
Green" 'Blue'_.'Yellow", "Magen[a ann "C/an. YOUcan
changethe color of the letter The default is"White'
• Background Color: This oouon consls[s of "Default".'White". "Black". "Red'
Green". "Blue"."Yellow". "Magen[a ann "C_,an'.You can
changethe background colorof the caution. The default is
"Black'
• Foreground Opacity: This oution consists of "Default. "Transuarent".
Translucent "Solid" and "F ashing".You can cnange
rneopacay of the letter,
- Background Opacity: Thisopuon consists of"Default. "Transparem
"Translucent. "Soiid".and "Flashing. Youcan cnange
[ne backgrouna opacity ofthe cap[ion.
• Return to Default: This oprton sets each of"Size "Font StyW_,"Foregrouna
Color. 'Background Color "Foreground Opaci[_ and
'Background Opacity to itsdefault.
[_i Press the CC button on the remote
control to turn the Caption "On" or
'Off".
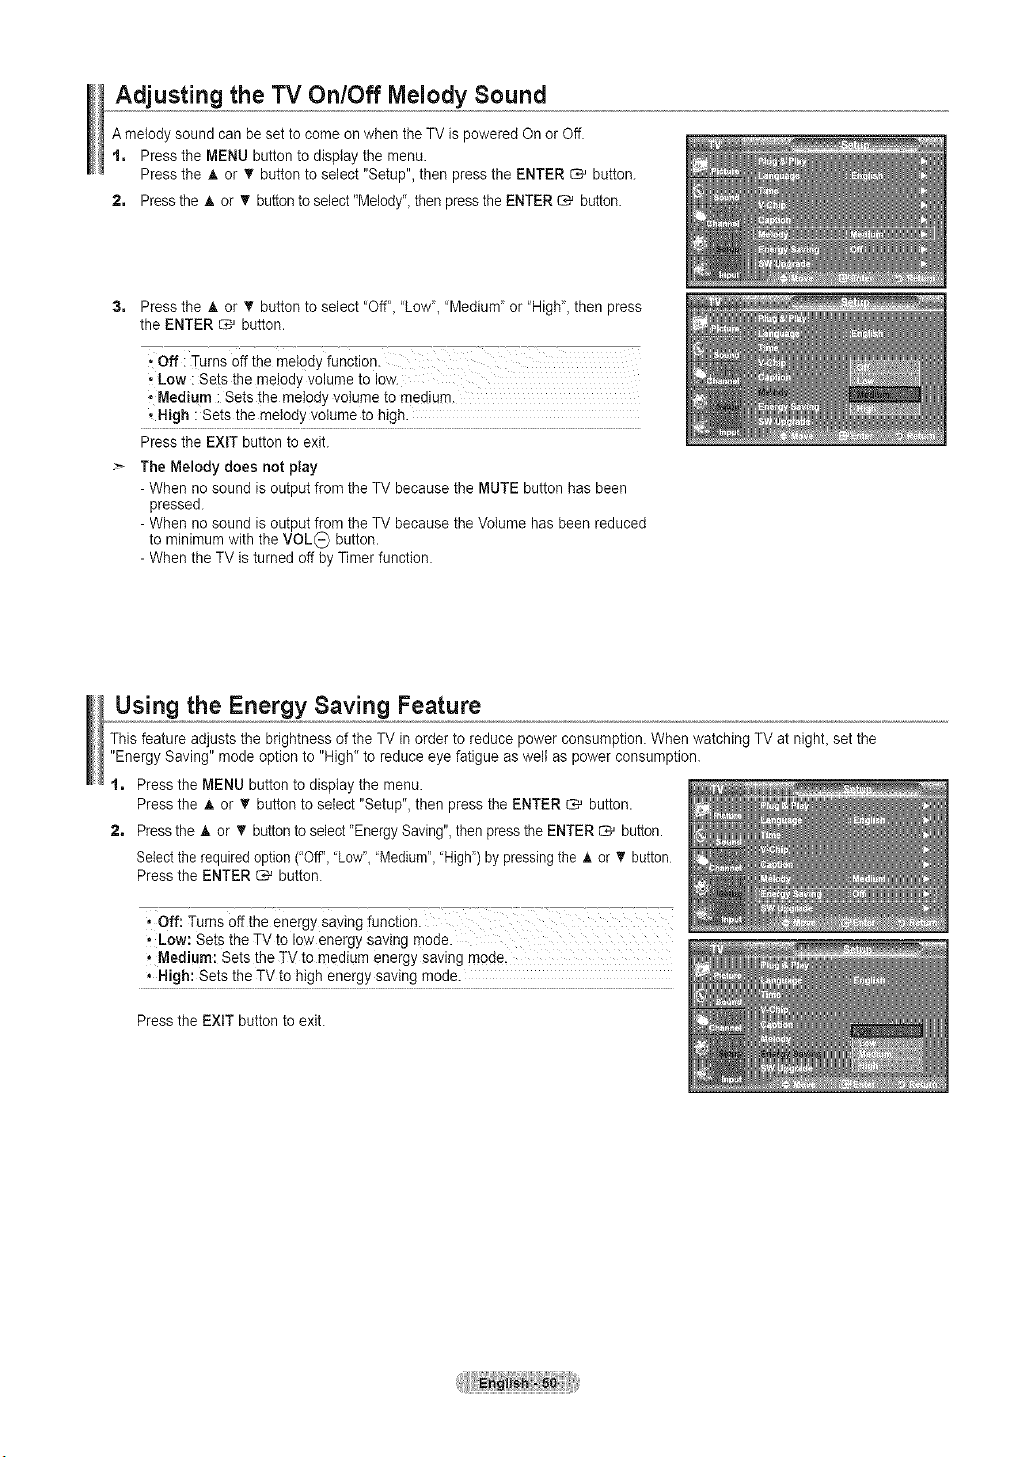
Adjusting the TV On/Off Melody Sound
A melody sound can be set to come on when the TV ispowered Onor Off.
t. Pressthe MENU button to display the menu.
Pressthe A or V button toselect "Setup",then pressthe ENTER _ button.
2. Press the A or T button to select"Melody"_then pressthe ENTER _ button.
3, Press the A or V' button to select "Off"_"Low"_"Medium" or "High", then press
the ENTER _ button.
• Off i Turns off the melody function.
-Low : Sets the melody volume to low.
,Medium :Setsthe melody volume to medium.
• High : Sets the melody votumeto high.
Pressthe EXiT button toexit.
The Melody does not play
- When no sound isoutput fromthe TV because the MUTE button has been
pressed.
- When no sound isoutput fromthe TV because the Volume has been reduced
to minimum with the VOL_ button.
- When the TV isturned offby Timerfunction.
Using the Energy Saving Feature
Thisfeature adjusts the brightness of the TVin order to reduce power consumption. When watching TV at nigtlL set the
"Energy Saving" mode option to"High" to reduce eyefatigue as welt as powerconsumption.
t. Pressthe MENU button to display the menu.
Pressthe A or V'button to select "Setup", then pressthe ENTER _ button.
2. Pressthe A or _' buttontoselect"EnergySaving",then presstheENTER _ button.
Selectthe required option("Off", 'Low", 'Medium", 'High") bypressing the _. or _ button
Pressthe ENTER _ button.
, Off: Turns off the energy saving function.
, Low: Setsthe TVto low energy saving mode.
,* Medium: Sets the TV to mediumenergy saving mode,
* High: Sets the TVto highenergy saving mode.
Pressthe EXIT button to exit.

Upgrading the Software
Samsung may offer upgrades forTV'sfirmware inthefuture. Please contact the Samsung call center at 1-800-SAMSUNG
(726-7864) to receive information about downloading upgrades and using a USBdrive. Upgrades will be possible byconnecting a
USB drivetothe USB port located on your TV.
1, insert aUSB drive containing the firmware upgrade intothe SERVICE porton
the rear of the TV.
Software can not be upgraded through the LAN connection.
2, Pressthe MENU button to display the menu.
Pressthe A or _' button to select "Setup", then press the ENTER _ button•
3, Pressthe A or _' button to select "SW upgrade",then pressthe ENTER _ button•
4, Pressthe ENTER C,# button.
The message "Scanning for USB... It maytake up to 30 seconds•" isdisplayed.
5, The message "Upgrade version XXXX to version XXXX The system would be reset
afterupgrade." isdisplayed.
Pressthe _ or 1_to select the "Yes",then pressthe ENTER _ button•
Please be carefulto not disconnect the power orremove the USB drivewhile
upgrades arebeing applied•The TVwill turn off and turn on automatically after
completingthe firmware upgrade•Please checkthe firmware version afterthe
upgrades arecomplete• When software is upgraded, video and audio settingsyou
havemade will return to their default (factory) settings.We recommend youwrite
down your settings so that you can easily reset them afterthe upgrade.
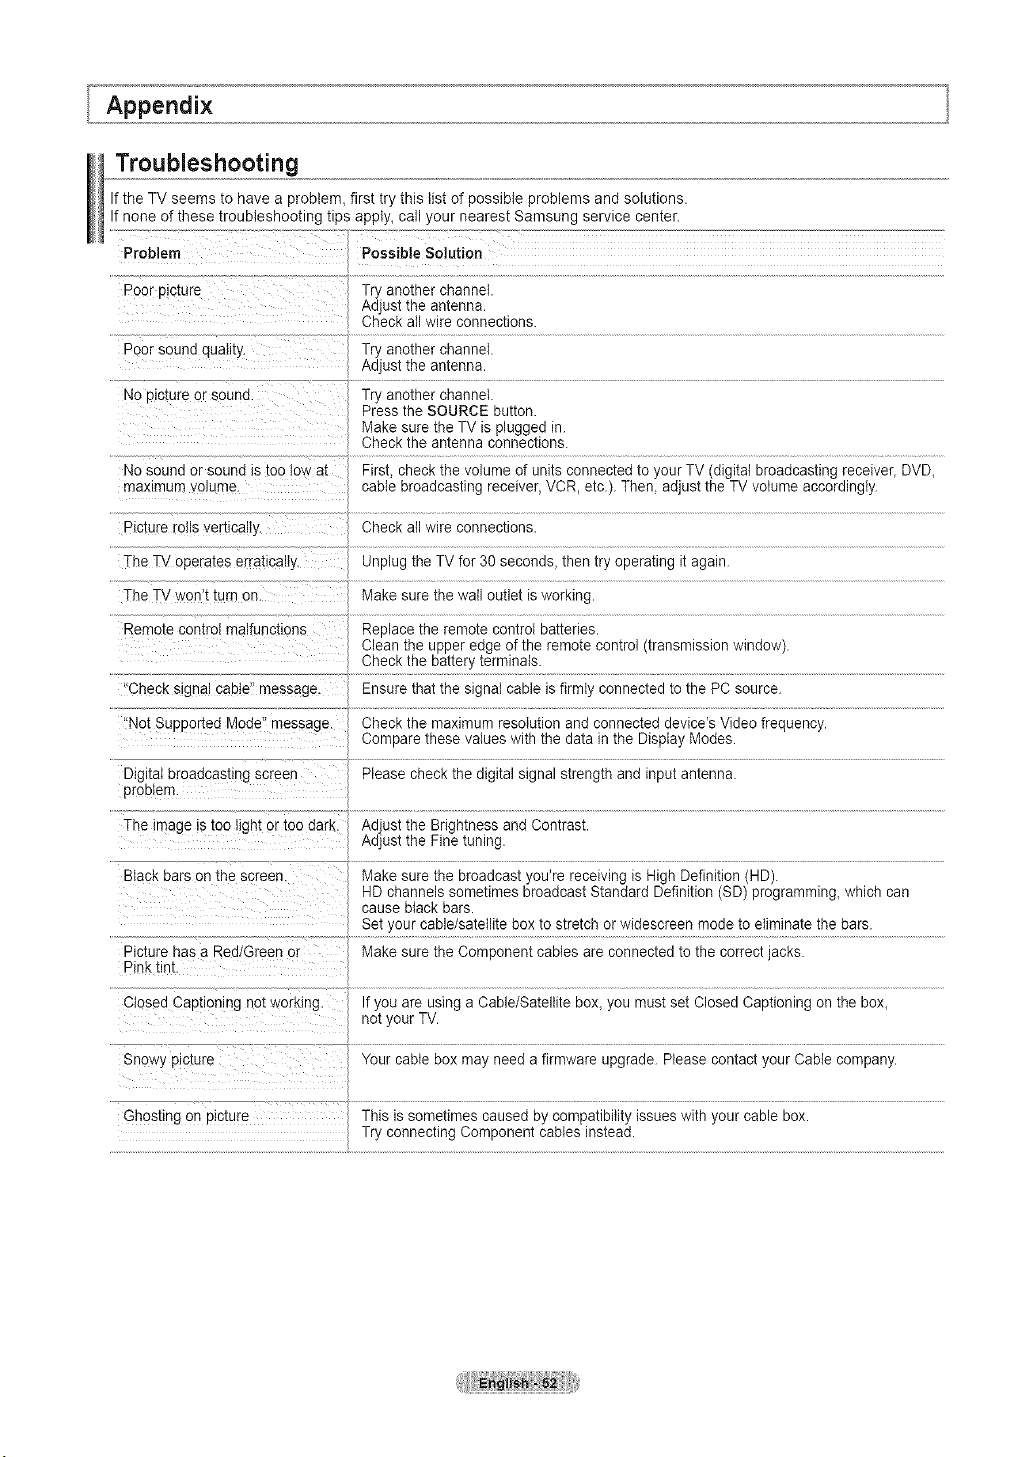
Troubleshooting
Ifthe TVseems to have a problem, first try this list of possible problems and solutions.
Ifnone of these troubleshooting tips apply, call your nearest Samsung service center.
Problem Possible Solution
Poor D_cture Try another channel.
Adjust the antenna.
Checkall wire connections.
Poor sound quality Try another channel.
Adjust the antenna.
No_ ctute orsauna. Try another channel.
Pressthe SOURCE button.
Makesure the TV isplugged in.
Checkthe antenna connections.
First, check the volume of unitsconnected to your TV(digital broadcasting receiver_ DVD_
cable broadcasting receiver, VCR, etc.). Then, adjust the TV volume accordingly.
Checkall wire connections.
Unplugthe TVfor 30 seconds, then try operating it again.
Nosound orsound istoo low al
maximum olume.
Picture roils vert_calIy
TheTVoperates erra[ically.
TheTVwon't turn or,
Remote control malfunctions
_ Replace ihe remote conir0t baiteries.
clean the upperedge ofthe remote control(transmission window).
Check!he )a!te[y }ermin_als:.............................
Checks 9nalcable" message. Ensurethat the signal cable isfirmly connected to the PC source.
}
'Not SupPorted Mode"message. Checkthe maximum resolution and connected device's Videofrequency.
Compare these values with the data inthe Display Modes.
Digkaturoaacasur ] screen Please check the digital signal strength and inputantenna.
proDtem.
Theimage istoo lightortoo darK. Adjust the Brightness and Contrast.
Adjust the Fine tuning.
Blackbars on the screer Makesure the broadcast you're receiving is High Definition (HD).
HDchannels sometimes broadcast Standard Definition (SD) programming_which can
cause black bars.
Set your cable/satellite box to stretch or widescreen mode to eliminate the bars.
Picture has a Red Green or Makesure the Component cables are connected to the correct jacks.
Pink tint.
Closed Caotlon ng not working. Ifyou areusing a Cable/Satellite box_you must set Closed Captioning on the box_
not your TV.
Snowy picture Your cable box may need a firmware upgrade. Please contact your Cable company.
Ghostingon picture This is sometimes caused by compatibility issueswith your cable box.
Try connecting Component cables instead.
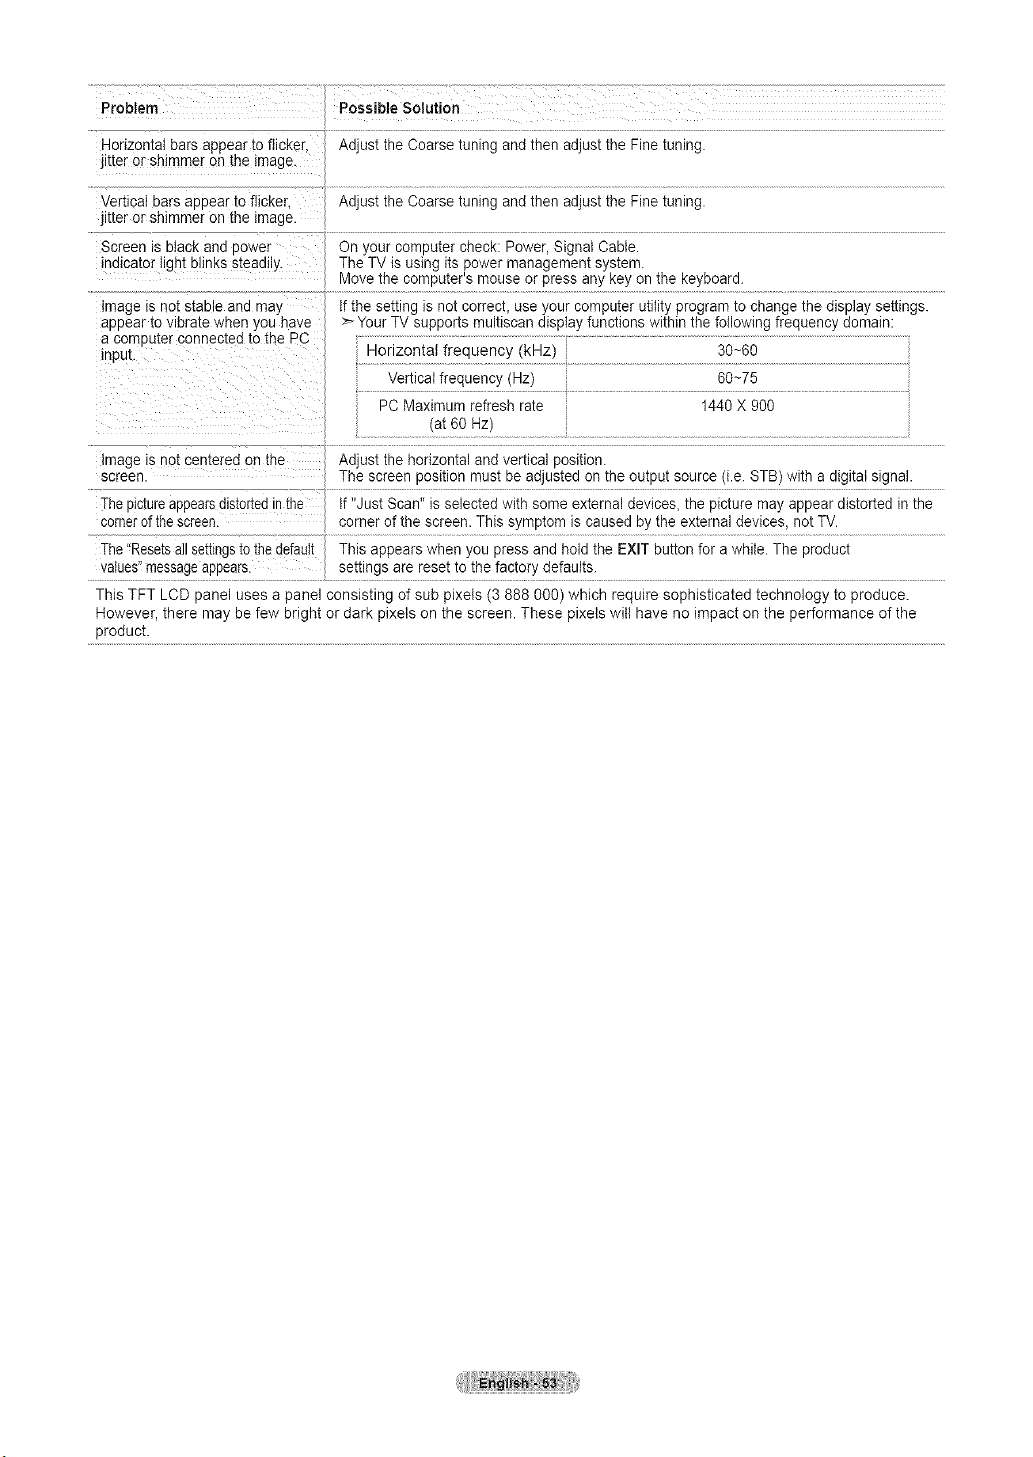
Problem
Honzoma_barsappeartoflicker.
litterorshimmerontheimage
VertJcaIbarsaDueartoflicken
litterorshimmerontheimage
Screenisblackanooower
indicatorgn[blinkss[eaaHy
PossibleSolution
Adjust the Coarse tuning and then adjust the Fine tuning.
image is not s[aole ana maj
appear to vleral[ewnen you nave
acomputer connected _othe PC
lnpu_
Adjust the Coarse tuning and then adjust the Fine tuning.
On your corr_uter check: Power, Signal Cable.
The TVis using itspower management system.
Vlove the computer's mouseor press anykey on the keyboard.
fthe setting is not correcL use your computer utility programto changethe display settings.
Your TV supports multiscan display functions within the following frequency domain:
donzon[at frequency (kHz)
Vertical frequency (Hz)
PC Maximum refresh rate
(at60Hz)
30~60
60~75
1440 X 900
Image is not centered on me Adjus[ me nonzoma and vertical position.
screen. The screen position must be adjusted on the output source (i.e. STB)with a digital signal.
Thepictureappearsals_onean_ne f "Just Scan" isselected with some externaldevices, the picture mayappear distorted in the
cornerof the screen, corner of the screen. This symptom iscaused by the external devices, not TV.
The"Resetsallse_lngsto thedefault This auuears when you pressand holdthe EXIT button for a while.The product
va!ues"messageappeals_.................. se_!!ngsart reset !fi !he fac!€,[y defaults:............................................
This TFT LCD panel uses a panel consisting of sub pixels (3 888 000) which require sophisticated technology to produce.
However, there may be few bright ordark pixets on the screen. These pixels witl have no impact on the performance of the
product.
How to Adjust the Stand
(1) (2)
1. Place the front of the TVonto a soft cloth or
cushion on a table as in Figure (1).
-Align the TV bottom along the table edge.
2. Press on the center of the TV back.
Adjust the stand as in Figure (2) while
pressing the button on the back of the stand.
3. Place the TV on the table so that the TV sits
safely onthe table.
How to Adjust the Angle of the TV
( 1 )Angleadjustmentwhen usingthe
TVon itsstand,
( 2)Angle adjustment when converting from
Stand to Wall mount (1_3, 3d)
( 3 )Angle adjustment when LCD
TV is wall=mounted
> When you adjust the stand, press the buttonon the back of the stand.
1. Figure(1) shows the adjustment angle (-2°-14 °)when you use the LCD on itsstand.
Excessive tilting can turnthe LCDTV over which may cause damage.
2. Figure(2) shows the adjustment angle (14°-80°)when you convertthe LCDfrom stand-based usetowall-mount.
3. Figure(3) shows the adjustment angle (0°-10°)when you mount the LCDTV toa walt.
>You will heara 'Click" soundwhen changing the anglefrom 1 to 2 or 3 to 2.
Installing the Wall Mount Kit
Wall mount items (sold separately) allowyou to mount the TV on the wall. For the detailed information on installingthe Wall
Mount, see the instruction intheWall Mount items. Contact a technician for installing the walt bracket. Samsung Electronics isnot
responsible for any damage tothe product orinjury toyourself or others ifyou choose to installthe TV on your own.
installing VESA Compliant Mounting Devices
(1) (2)
1. Place the TV face down on a soft cloth or cushion
on a table.
2.Adjust the stand, pressing the button on the back
ofthe stand.
3.Align the mounting interface pad (not supplied)
with the holes in the stand bottom and secure it
with the four screws that come with the arm-type
base, wall mount hanger or other bases (not
supplied).
Using the Decoration Covers
(2)
1.When installing the TV on the wall without using
the stand, insert decoration covers into the holes
as described in the picture (1).
2.After inserting the decoration covers, fasten them
with 4 screws as described in the picture (2).
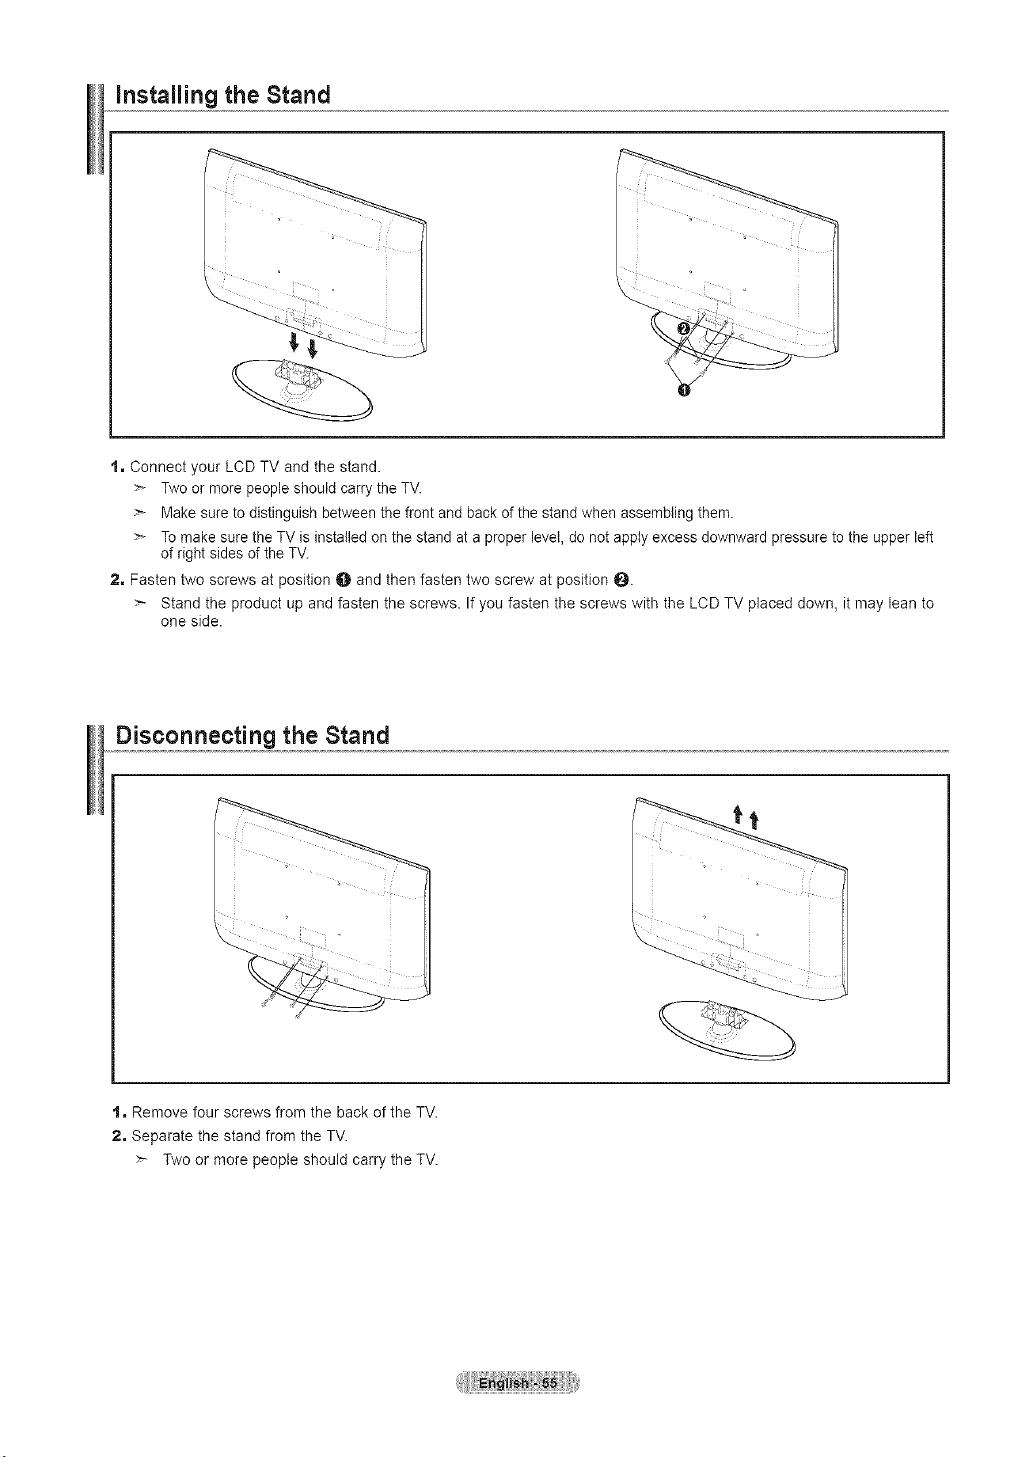
Installing the Stand
1, Connect your LCD TV and the stand.
Twoor more peopleshould carry the TV.
Make sure to distinguish between the front and back ofthe standwhen assembling them.
Tomake sure the TV isinstalled on the stand at a proper level, do not apply excess downward pressure to the upper left
ofright sides ofthe TV.
2, Fasten two screws at position O and then fasten two screw at position 0.
Stand the product up and fasten the screws. Ifyou fasten the screws with the LCD TV placed down, it may lean to
one side.
Disconnecting the Stand
1, Remove four screws from the back of the TV.
2, Separate the stand from the TV.
Two or more people should carry the TV.
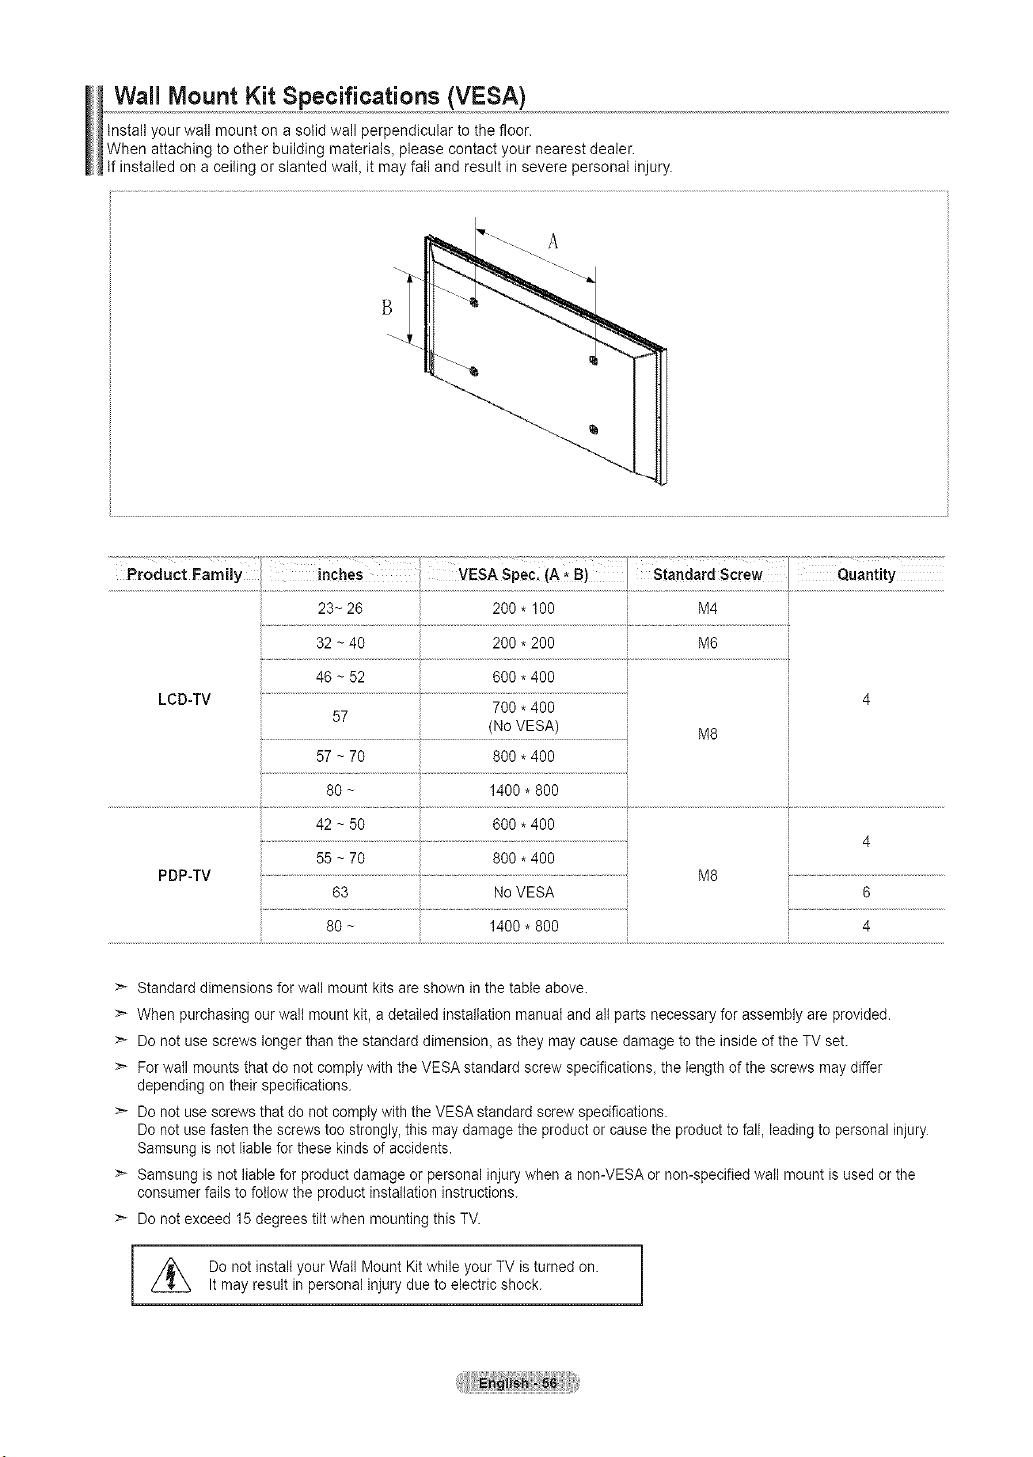
Wall Mount Kit Specifications (VESA)
Install your watl mount on a solid wall perpendicular to the floor.
When attaching toother building material& please contact your nearest dealer.
If installed on aceiling or slanted wall, it may fall and result in severe personal injury.
32 ~40 _: 200 * 200 M6
46 ~52 600 * 400
LCD-TV ........................................................................................... 4
700 * 400
57
(No VESA) M8
57 ~70 800 * 400
80 ~ 1400 * 800
PDP-TV
42 ~50 600 * 400
55 ~70 800 * 400
63 NoVESA
80 ~ 1400 * 800
M8
6
4
>- Standard dimensions for wail mount kits areshown in the table above.
> When purchasing ourwalt mount kit, adetailed installation manualand allparts necessary for assembly are provided.
Donot use screws longer than the standard dimension_ as they may cause damage to the inside of the TVset.
>* For waftmounts that do not comply with the VESA standard screw specifications, the lengthof the screws may differ
depending on their specifications.
Donot usescrewsthat do not complywith the VESA standard screw specifications.
Donot usefastenthescrews too strongly, this may damagethe productor cause the producttofall, leading topersonal injury
Samsung is not liable forthese kinds of accidents.
> Samsung isnot liablefor product damage or personal injury when a non-VESA ornon-specified wail mount isused or the
consumer fails to follow the product installation instructions.
>* Donot exceed 15 degrees tiltwhen mounting this TV.
Do not install your Wail Mount Kitwhile your TV isturned on.
Itmay result in personal injury due toelectric shock.
Using the Anti-Theft Kensington Lock
The Kensington Lock is a device used to physically fix the system when using it ina public place. The locking device
has to be purchased separately. The appearance and locking method may differ from the illustration depending on the
manufacturer. Refer tothe manual provided with the Kensington Lock for proper use. The locking device has tobe
_urchased separately.
<Optional>
The location of the Kensington Lock may be different depending on its model.
1, Insert the locking device into the Kensington slot on the LCD TV (Figure 1) and turn it in the locking direction (Figure 2).
2, Connect the Kensington Lock cable.
3, Fix the Kensington Lock to a desk or a heavy stationary object.
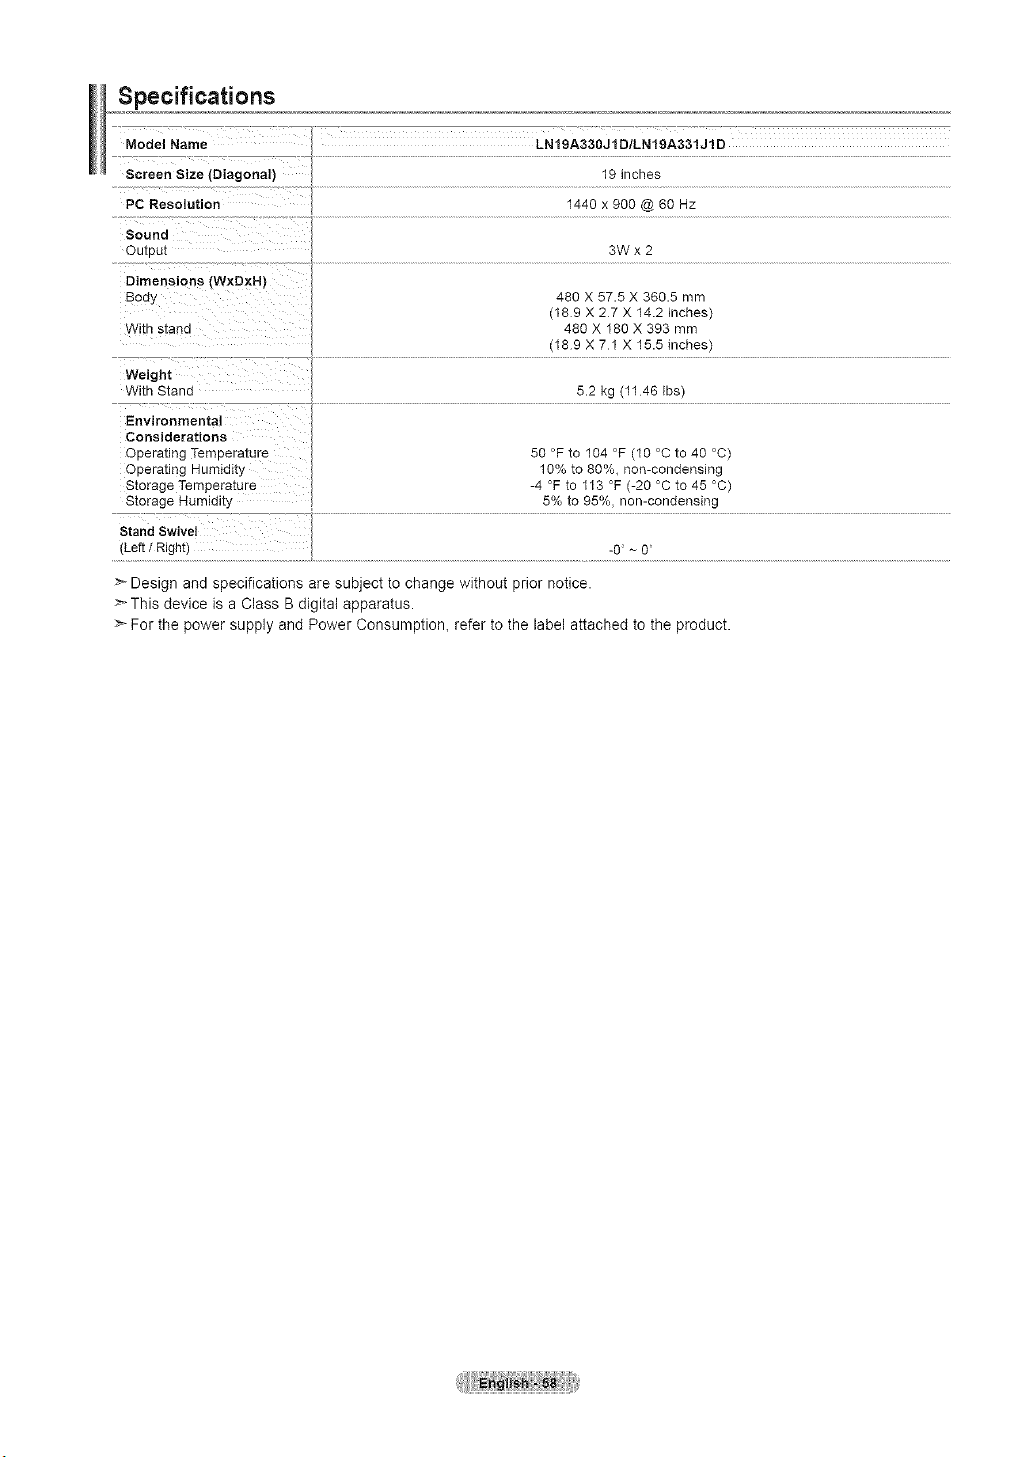
Specifications
Model Name
Screen Size tDiagonai)
PC Resolution
LNIgA330J1D/LN19A331J1D
19 inches
1440 x 900 @ 66 Hz
Sound
Outou_
Dimensions [WxDxN)
3od_
With stana
3Wx2
480 X 57.5 X 360.5 mm
(189 X 27 X 14.2 inches)
480 X 180 X 393 mm
(189 X 71 X 15.5 inches)
Weight
With Stone
5.2 kg (1146 Ibs)
Environmental
Considerations
Oeera_mg Temperature
Oeeratmg Humidity
Storage Temperature
Storage Humlal[y
50 °F to 104 °F (10 °C to 40 °C)
10% to 80%, non-condensing
-4 °F to 113 °F (-20 °C to 45 °C)
5% to 95%, non-condensing
Stand Swivel
Left / Right -0 ~ 0
>" Design and specifications are subject to change without prior notice.
>-This device is a Class B digital apparatus.
>- For the power supply and Power Consumption, refer to the label attached to the product.
I Informacion sabre lagarantia relativealforrnatodevisualization del televisor
irnportante
Las pantallas LCD con formato de pantalla panor_mica (16:9, la relaci6n de aspecto ancho:atto de la pantalla) estan disefiadas
principalmente para visualizar videos de movimiento de formato panoramieo Las imagenes deben estar pfineipalmente en el formato
panor_mico de relaci6n 16:9, o ampliadas para Ilenar la pantalla si el modelo tiene esta opcidn, y las im_genes estan en movimiento
constante. La visuatizaei6n de im_genes y graficos est_ticos en la pantalla, coma las barras oscuras laterales en programaei6n y videos
de televisidn en formato estandar no ampliados, debe limitarse ano mas del 5% del tiempo total de visualizacidn del televisor par semana
Adem_ts, la visualizaci6n de otras im_genes estatieas y texto, coma los informes de balsa, pantallas de videojuegos, Iogotipos de
emisoras, sitios Web o gr_tficos y dibujos de ordenador, deber_ limitarse en todos los televisores coma ya se ha deserito. La visuatizaei6n
de im_genes estaticas que supere los limites de las instrueciones anteriores puede producir un envejecimiento desigual de las pantallas
LCD, Io que provocar_ una reproducci6n superpuesta sutil pero permanente de la imagen de la LCD. Para evitarlo, varie la programaci6n
y las imagenes y, sabre todo, visualice imagenes en movimiento a toda pantalla, no gr_ficos est_ticos ni barras oscuras.
En modelos de LCD que ofrezcan opciones para el tamafio de la imagen, utilice estos eontroles para ver los distintos formatos coma
imagen a toda pantalla.
Tenga cuidado en la seleccidn y duraci6n de los formatos de televisidn utilizados para la visualizaci6n. La garantia limitada de Samsung
no cubre el envejecimiento desigual de la LCD coma resultado de la selecci6n y usa de formatos, asi coma otras im_genes retenidas.
S6to EE.UU.
La unidad del producto que se incluye con este manual del usuario se suministra con liceneia bajo derechos de propiedad inteleetual de
arras empresas. Enconcreto, este produeto se suministra con licencia bajo las siguientes patentes de EE.UU.: 5,99t,715, 5,740,317,
4,972,484, 5,214,678, 5,323,396, 5,539,829, 5,606,618, 5,530,655, 5,777,992, 6,289,308, 5,610,985, 5,481,643, 5,544,247, 5,960,037,
6,023,490, 5,878,080 y bajo el nOmero de aplicaci6n de patentes publicadas de EEUU. 2001-44713-A1.
Esta licencia est_ limitada al usa no comerciat privado de consumidores que sean usuarios finales para contenido con licencia. No
se otorga ningOn derecho para usa comercial. La licencia no eubre a ninguna unidad del producto que no sea _sta y la licencia no se
extiende a ninguna unidad del producto o proceso sin licencia en conformidad con el ISO/iEC 1t172-3 o ISO/iEC 13818-3 utilizada
o vendida en eombinacidn con esta unidad del produeto. La licencia s61ocubre el usa de esta unidad para codificar y/o descodificar
archivos de audio en conformidad con el ISO/iEC 11172-3 o ISO/tEC 13818-3. No se otorga ningOn derecho bajo esta licencia para
caraeteristieas o funciones del producto que no est_n eonformes con el ISO/IEC 11172-3 o ISO/iEC 13818-3.
Otros paises
La unidad del producto que se incluye con este manual del usuario se suministra con licencia bajo derechos de propiedad intelectual de
otras empresas. Esta licencia esta limitada al usa no comercial privado de consumidores que sean usuarios finales para contenido con
licencia. No se otorga ning_'_nderecho para usa comercial. La licencia no eubre ninguna unidad del producto que no sea _sta y la liceneia
no se extiende a ninguna unidad del produeto oproceso sin licencia en conformidad con el ISO/IEC 11172-3 o ISO/IEC 13818-3 utilizada
o vendida en eombinaci6n con esta unidad del produeto. La licencia s61ocubre el usa de esta unidad para codifiear y/o descodificar
archivos de audio en conformidad con el ISO/iEC 11172-3 o ISO/tEC 13818-3. No se otorga ningOn derecho bajo esta licencia para
caraeter steas o funcones de producto que no est_n eonformes con e SO/EC 11172-3 o SO/EC 13818-3.
Precauctones al mostrar en la pantalla una imagenfija
La imagenfijapuedecausardar_ospermanentesenla aan[a aeei.televisor.
• Nodejeuna imagenfijaenta pantalla LCDdurante masdedoshoras ya que se podria prouuetruna re[eecidndela lmagenen ta
pantalia.Estefenomenoae retenei6nde tm&genes[amD1ense denomina '_uemaauradepantalla
Para evil:atque se _"oauzoaesapersls[enolade laJmagen,reauzoael nlvet de iumlnoslaau y ae comras[e ae la pan[ailacuanao
roues[reimageriesfijas.
Elusa ee_[eievisorLCDen formato 4:3 durante Jntiempoproiongadopuededejar ras[rosrJeeorees en tas
pares tzquteraa,derecna, cemrataela pan[aliadebidoa tasdifereneJasenla em si6nIuminicade la pan[alia. La
reproaucci6nde un D'_Doei usadeuna consotaee weeojuegospuedenprovocarunefectosimilaren tepan[aria.
)roducirunDVD ouna viaeoconsolapuedecausarunefectosimilarenla Dan[alia._a garantlanocuure es[os
anises.
•Verlmagenesfijas de vtdeojuegosy PC durante mastteIT30detindicadopuedeproductrrestosde tmagenesparciaies.
Para evitaresteefeetc reduzca el 'briIW, el con[ras[ecuaneo veatmagenesfijas.
©2008SamsungElectronicsCo.,Ltd Allrightsreserved.
Contenido
= Llstadode carac[ens[lcas ..........................................................2
= Accesonos......................................................................................2
= Aspectogeneralaelpanelae _on[rol...................... 3
= AspectogeneralGelpanelaeconexlones.............. 4
mMandoad_s[anc_a.............. 5
ins[alaclondelasDiiasenelrnandoadistancJa.............................6
= Conexbnde antenasdeVHF• UHF...................... 6
= 3onexidndeTVpotcable............................................................
Conexi6nde un rebroddctordeDVDorecep[oresue [elevlston
3orcable/satelltedecodlflcadoresa travdsdeHC_,4t...................8
Conexlonae un rebroductordeUVUorecep[oresde [ele_sion
3orcabte/satelltedecodificadoresatravdsdeDV ......................S
mConexbnde un reprodubtorde DVDo recep[oresde television
3orcabte/sat¢titedebodlflcadoresa [ravesdelos cablesde
comDonemes 9
Conexi6nde Jnavlueocamara................. 9
mConexi6ndeun reproauc[o[aevlaeo......... I0
= Conexbnde un sis[emaae audioalgtiai ...... 1]
= Conexidnde un amblificador/DVDpardcineen casa..................1t
= Conexi6naun PC .12
= Encendidoo apagaaodelTV............. 13
= _unci6nPlug& Ptay........................ 13
B Cambiodecandles.......................................................... 14
i Ajus[eael /olumen............... 15
Vlsuahzaclonde la pamaila...........................................................15
vtsuanzaclonoe tosmenus. ..15
= Usodelbot6nTOOLS.................................................... 16
= Memorizaci6nde loscandles................ 16
Pardseleccionartafuente................. 18
= Edicidndel Nombrede taFuentede entrada...............................18
= UsodelTVcomooamauaaeoroenaaorfPC ..............................34
Modosde vJsualizacJ6n................................... 34
= Ajustedettelevisorcone!ordenador............................................35
= Configuracbnde!Reto..................................................................37
= Selecci6ndelidiomaaemenu ............................ 40
= UsodeV-Chu..............................................................................4I
= VlSlOndesuDnwiosmensajesae[ex[oenpantalla)-Anatoglbo.48
Visi6ndesubtitulos mensajesae[ex[oen pantalla)- DigitaL......49
= Ajustede tamelodiade encendidoyapagadodel[elevisor.........50
Usodela funebndeahorroae energla .....50
= Guiadeabtualizaci6ndeisoftware...............................................5I
= tdenbflcaclonde proelemas..................... 52
= C6moajus_arelsopone..............................................................54
m Cdmoajustarelanguloaen_elev_sor..... 54
i ins[alaolon ael equlpo ae mon[aje en la pared ............................. 54
= Instalaci6nde disposlwosaemoma.econformeconVESA 54
= Usodelastape[asaecorauvas................ 54
Instalaclonaelsoporte...........................................................55
= Desconexi6ndelsoGor[e 55
Especfflcacionesdelequlpodemontajeen laparedNESA' 56
= usodelclerreantlrrobot_ensHlg[on..............................................57
= Especlflcactones............................................ 58
R 3ambiodelformatodeta imogen...............................................I9
Dersonalizabbnde taconflgurablonae ia imagen 19
mActtvablonde losopcuonesdela imogen 20
Reajus_eaevaloresae laimagena losvalo[esGredefinidos
de fabrica......................................................................................23
= Cambiodelestandarae sonluo............................................ 24
= Personalizabidn_elsonldo .......................................................24
= Configuraci6ndelTruSurroundXT fSRSTSXT'.......................25
Selecbbndeunaptstadesonldomultlcanal(MTS)- Digitat........25
Selecbidnde unaptstadesonidomultlcana!MTSl-Anaiogibo.26
Controlautomaticode volumen.................................................26
Eneendiddapagadodel altavozdettelevisor............................ 27
= Conexidnde los auricutares(sevenaepot separaao) ......27
I Antes d_usar el equlpo lea es_e manual para_
guarde para futuras referencias I
= SuDreslondelOScanabscodificadosdlgl[aIes............. 28
Adlclonysupreslonde canales....................................................29
Paracon1gurarloscanalesfavoritos .30
wsuanzaelonde Ia llstade candles..............................................31
Etiaue_auoaecandles ............................................................ A
Sintonizacidntqa de lOScandlesanalog"os............ 33 ,m
= Comprobaclonae ia 3otenclade laserialdlgl[al. 33 Simbolo Pulse
'qota Botonde una
pulsacidn
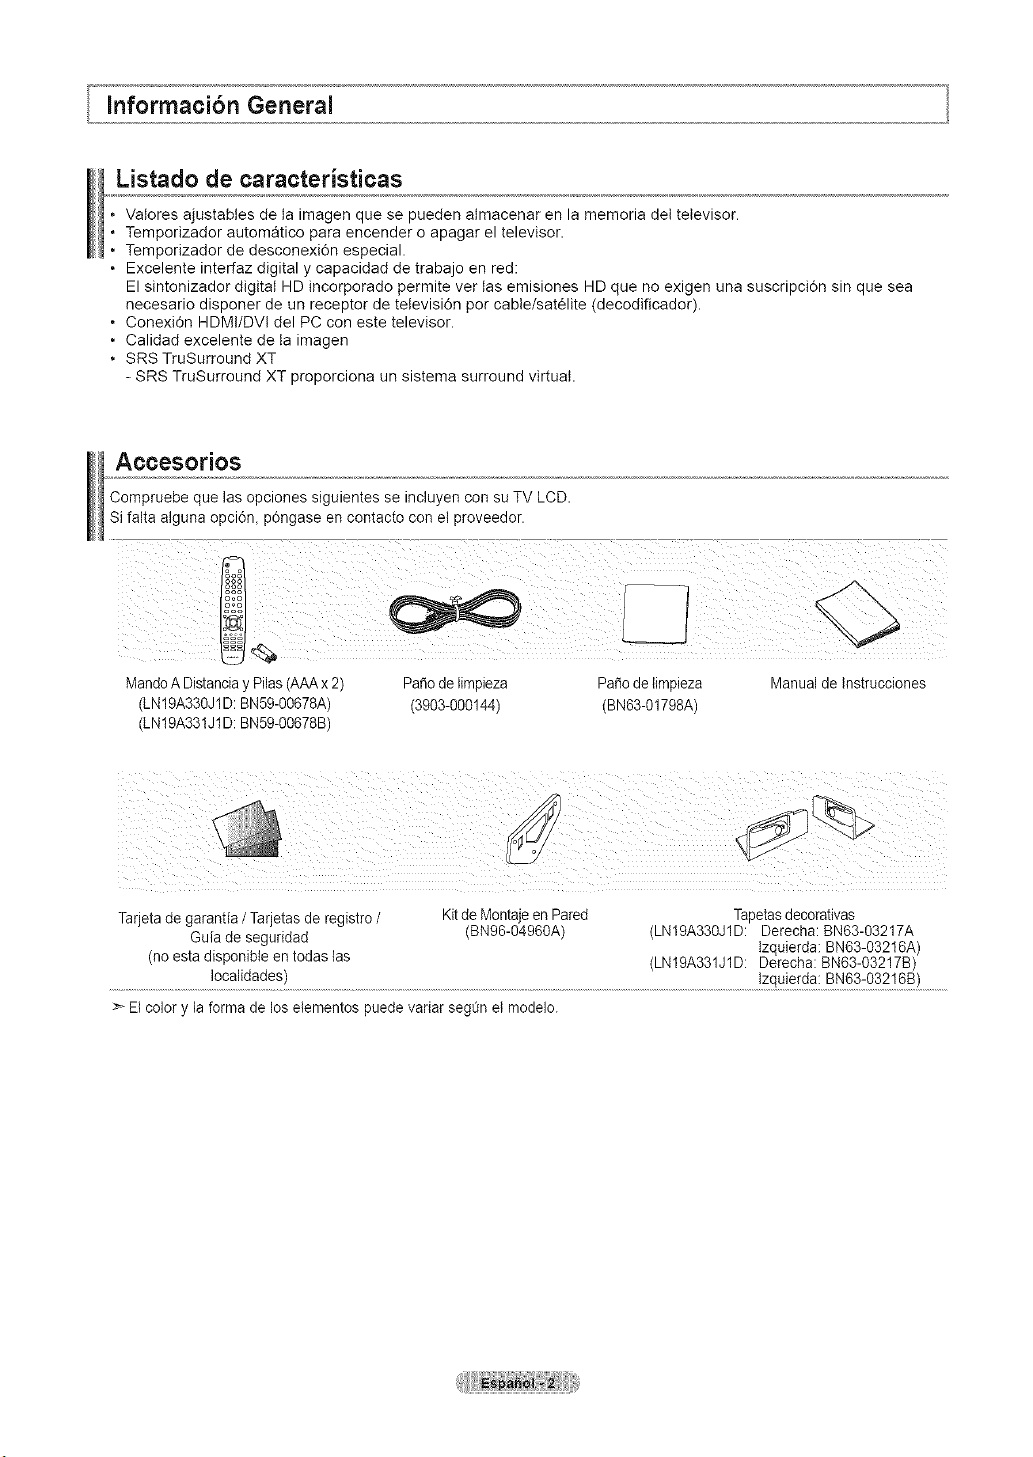
Listado de caracteristicas
• Valores ajustables de la imagen que se pueden almacenar en la memoria del televisor.
• Temporizador automatico para encender o apagar el televisor.
• Temporizador de desconexi6n especial.
• Excelente interfaz digital y capacidad de trabajo en red:
El sintonizador digital HD incorporado permite ver las emisiones HD que no exigen una suscripci6n sin que sea
necesario disponer de un receptor de tetevisi6n per cable/satelite (decodificador).
• Conexi6n HDMI/DVt del PC con este televisor.
• Calidad excelente de ta imagen
• SRS TruSurround XT
- SRS TruSurround XT proporciona un sistema surround virtual.
Accesorios
Compruebe que las opciones siguientes se incluyen con su TV LCD.
Sifalta alguna opci6n_ p0ngase en contacto con el proveedor.
MandoA Distancia yPilas (AAAx2)
(LN19A330J1D: BN59-00678A)
(LN19A331JID: BN59-00678B)
Patiode limpieza PaSodelimpieza
(3903-000144) (BN63-01798A)
Manualde tnstrucciones
Tarjeta de garantia /Tarjetas de registro / Kitde Montaje en Pared Tapetasdecorativas
Guia de seguridad (BN96-04960A) (LN19A330J1D: Derecha: BN63-03217A
lzquierda: BN63-O3216A)
(noesta disponible en todas las (LN19A331J1D: Derecha: BN63-O3217B)
..................................................!°t !!dadts! ...............
Elcolor y la forma de losetementos puede variar seg0n etmodelo.
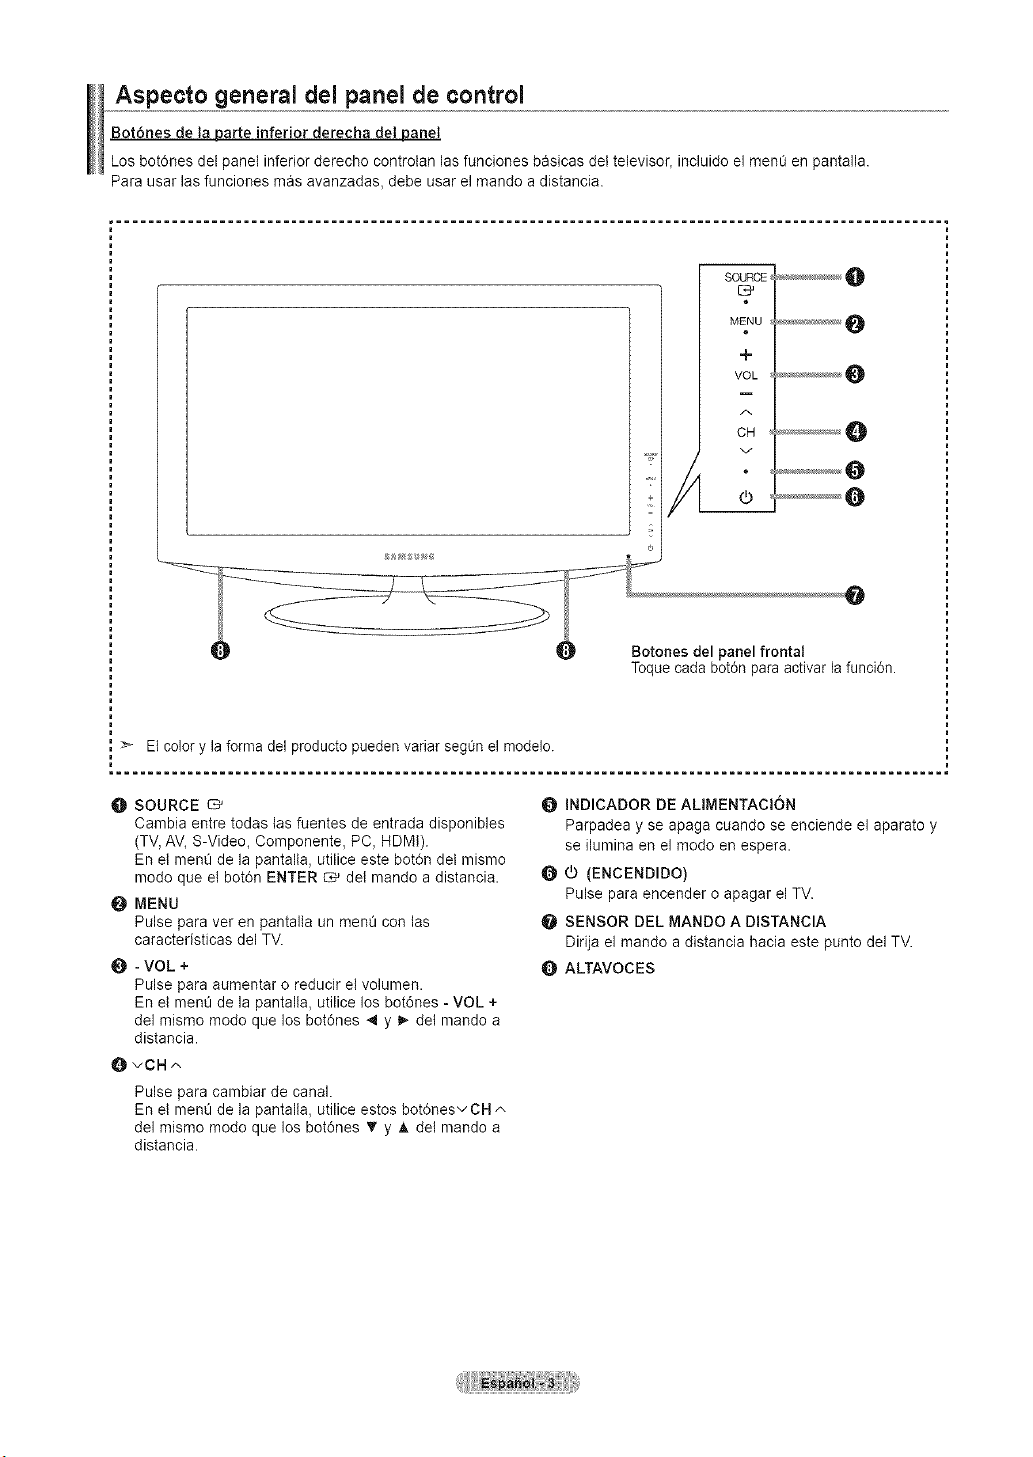
Aspecto general del panel de control
Bot6nes de taparte inferior dereeha det panel
Los bot6nes del panel inferior derecho controtan lasfunciones basicas del televisor_ incluido el men_ en pantalla.
Para usar las funciones mas avanzadas, debe usar el mando a distancia.
SOURCE_,
MENU
e
+
VOL
CH
v
Botones del panel frontal
Toquecada bot0n para activar la funci6n.
> El colory la forma del productopueden variar segt_nel modelo.
= ........................................................................................................ =
O SOURCE
Cambia entre todas las fuentes de entrada disponibles
(TV,AV, S-Video, Componente, PC, HDMt).
En el menQde la pantalla, utilice este botOndet mismo
modo que el botOnENTER _ det mando adistancia.
O MENU
Pulse para ver en pantalla un men0 con las
caracteristicas del TV.
O - VOL +
Pulse para aumentar o reducir el volumen.
En el menOde la pantalta, utilice los bot6nes -VOL +
del mismo modo que los bot6nes 4 y I_ det mando a
distancia.
OvCH^
Pulse para cambiar de canal.
En el menOde la pantalta, utilice estos botOnesvCH ^
del mismo modo que los bot6nes • y Jt, detmando a
distancia.
O INDICADOR DE ALIMENTAClON
Parpadea y se apaga cuando se enciende el aparato y
se ilumina en el modo enespera.
O O (ENCENDIDO)
Pulse para encender o apagar el TV.
O SENSOR DEL MANDO A DISTANClA
Dirija el mando adistancia hacia este punto del TV.
Q ALTAVOCES
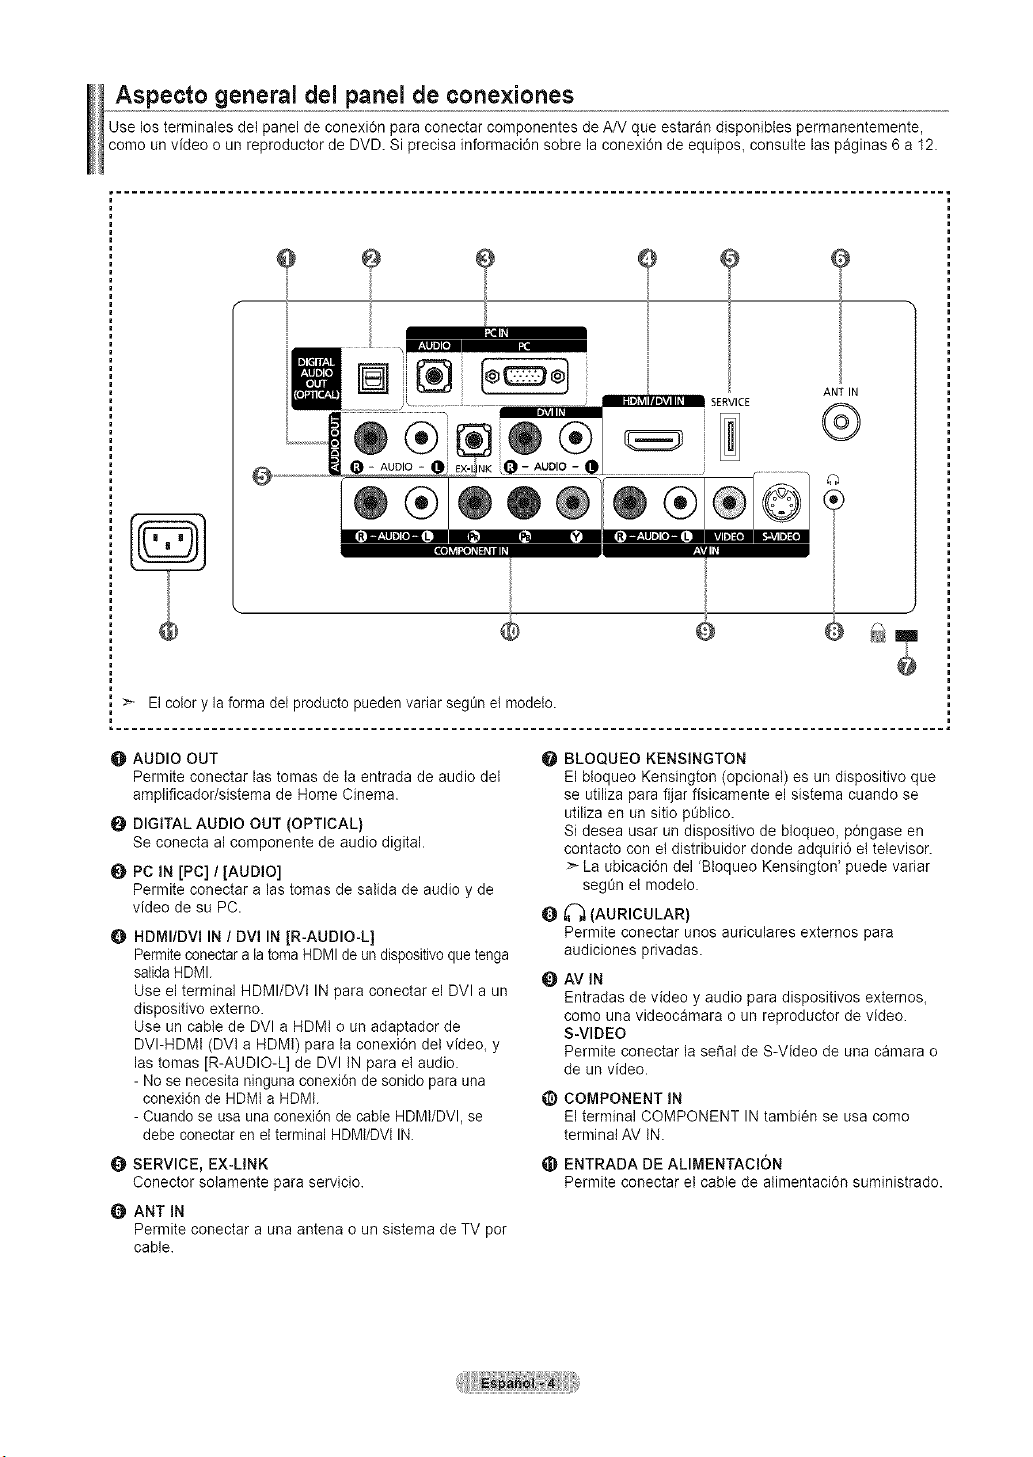
Aspecto general dei panel de conexiones
Use losterrninales del panel deconexi6n para conectar componentes de A/V que estaran disponibles permanentemente,
como un video oun reproductor de DVD. Si precisa informaci6n sobre la conexi6n de equipos+ consutte las paginas 6a 12.
÷ e
()
+
ANT IN
®
@n
O AUDIO OUT
Permite conectar las tomas de la entrada de audio det
ampliflcador/sistema de Home Cinema.
O DIGITAL AUDIO OUT (OPTICAL)
Se conecta al componente de audio digital.
0 PC IN [PC] / [AUDIO]
Permite conectar alas tomas de salida deaudio y de
video de su PC.
HDMI/DVI IN / DVl IN JR-AUDIO-L]
Permiteconectara latoma HDMI de un dispositivo que tenga
satidaHDMI.
Use el terminal HDMI/DVI IN para conectar el DVI aun
dispositivo extemo.
Use un cable de DVl a HDMt o un adaptador de
DVI-HDMt (DVt a HDMt) para la conexi6n del video+ y
las tomas [R-AUDIO-L] de DVl tN para el audio.
- Nose necesita ningunaconexi0n de sonido para una
conexi6n de HDMIa HDMt.
- Cuando se usauna conexi6nde cable HDMI/DVI, se
debe conectaren el terminal HDMI/DVI IN.
O SERVICE, EX-LINK
Conector solamente para servicio.
ANT IN
Permite conectar auna antena o un sistema de TV por
cable.
O
Q
Q
BLOQUEO KENSINGTON
El bloqueo Kensington (opcional) es undispositivo que
se utiliza para fijar fisicamente el sistema cuando se
utiliza en un sitio pOblico.
Si desea usar un dispositivo de bloqueo, p6ngase en
contacto con el distribuidor deride adquiri6 el televisor.
>- La ubicaci6n del 'Bloqueo Kensington' puede variar
segOn el modelo.
_'_ (AURICULAR)
Pemlite coneotar unos auriculares externos para
audiciones privadas.
AV IN
Entradas de video y audio para dispositivos externos+
como una videocamara o un reproductor de video.
S-VIDEO
Permite conectar la sei_alde S-Video de una camara o
de un video.
@ COMPONENT iN
El terminal COMPONENT IN tambien se usa como
terminal AV tN.
_) ENTRADA DE ALIMENTACION
Permite conectar etcable de alimentaci6n suministrado.
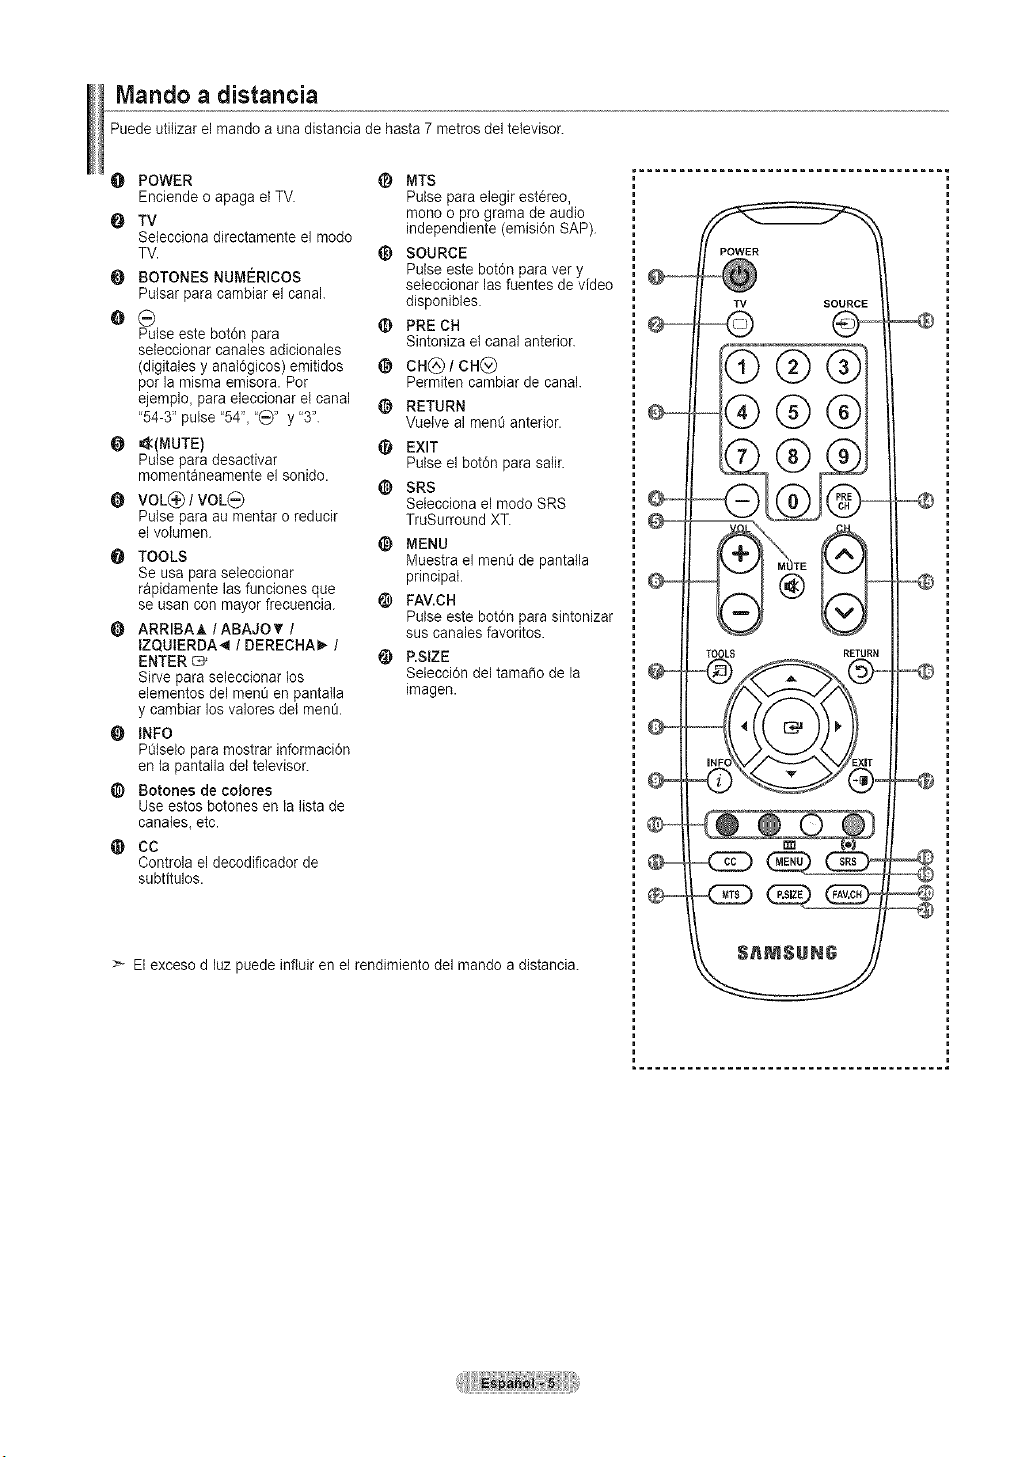
Mando a distancia
Puede utitizar el mando a una distancia de hasta 7 metros del televisor.
O POWER _ MTS
Enciende oapaga el TV. Pulse para elegir est6reo,
O TV mono opro grama de audio
Selecciona directamente el mode independiente (emisi6n SAP).
TV. _) SOURCE
O BOTONES NUMI'-:RICOS Pulse este botdn paravet y
seteccionar las fuentes de video
Pulsar paracambiar el canal, disponibles.
O (_) ¢ PRE CH
Pulse este bot0n para Sintoniza et canal anterior.
seleccionar canales adicionales
(digitales y anal0gicos) emitidos @ CH(_) / CH(_)
per la misma emisora. Per Permiten cambiar de canal.
ejemplo_ paraeleccionar el canal @ RETURN
"54-3" pulse "54"_"_Y' y "3". Vuetve al men_ anterior.
O _<(MUTE) @ EXIT
Pulse para desactivar Pulse el bot0n para satir.
momentaneamente el sonido.
¢ SRS
O VOL(_ /VOL_) Seteccionael modo SRS
Pulse para au mentar o reducir TruSurround XT.
el velumen.
@ MENU
O TOOLS Muestra el men0 de pantatla
Se usa paraseteccionar principal.
rapidamente lasfunciones que
se usan conmayor frecuencia. @ FAV.CH
Pulse este botdn parasintonizar
O ARRIBAA /ABAJO V'/ suscanales favorites.
IZQUIERDA_ /DERECHA_ /
ENTER "_ _) P.SIZE
Sirvepara seleccionar los Setecci6n del tamale de la
elementos del menOen pantatla imagen.
y cambiar los valores del men_.
INFO
POtseloparamostrar informaci6n
en ta pantalla del televisor.
_) Botones de colores
Use estos botones en la lista de
canates, etc.
@ CC
Controla el decodificador de
subtitulos.
>_ Elexceso dluz puede influir en et rendimiento del mando a distancia.
O ....
POWER
TV SOURCE
=®®®
®®
TOOLS RETURN
....
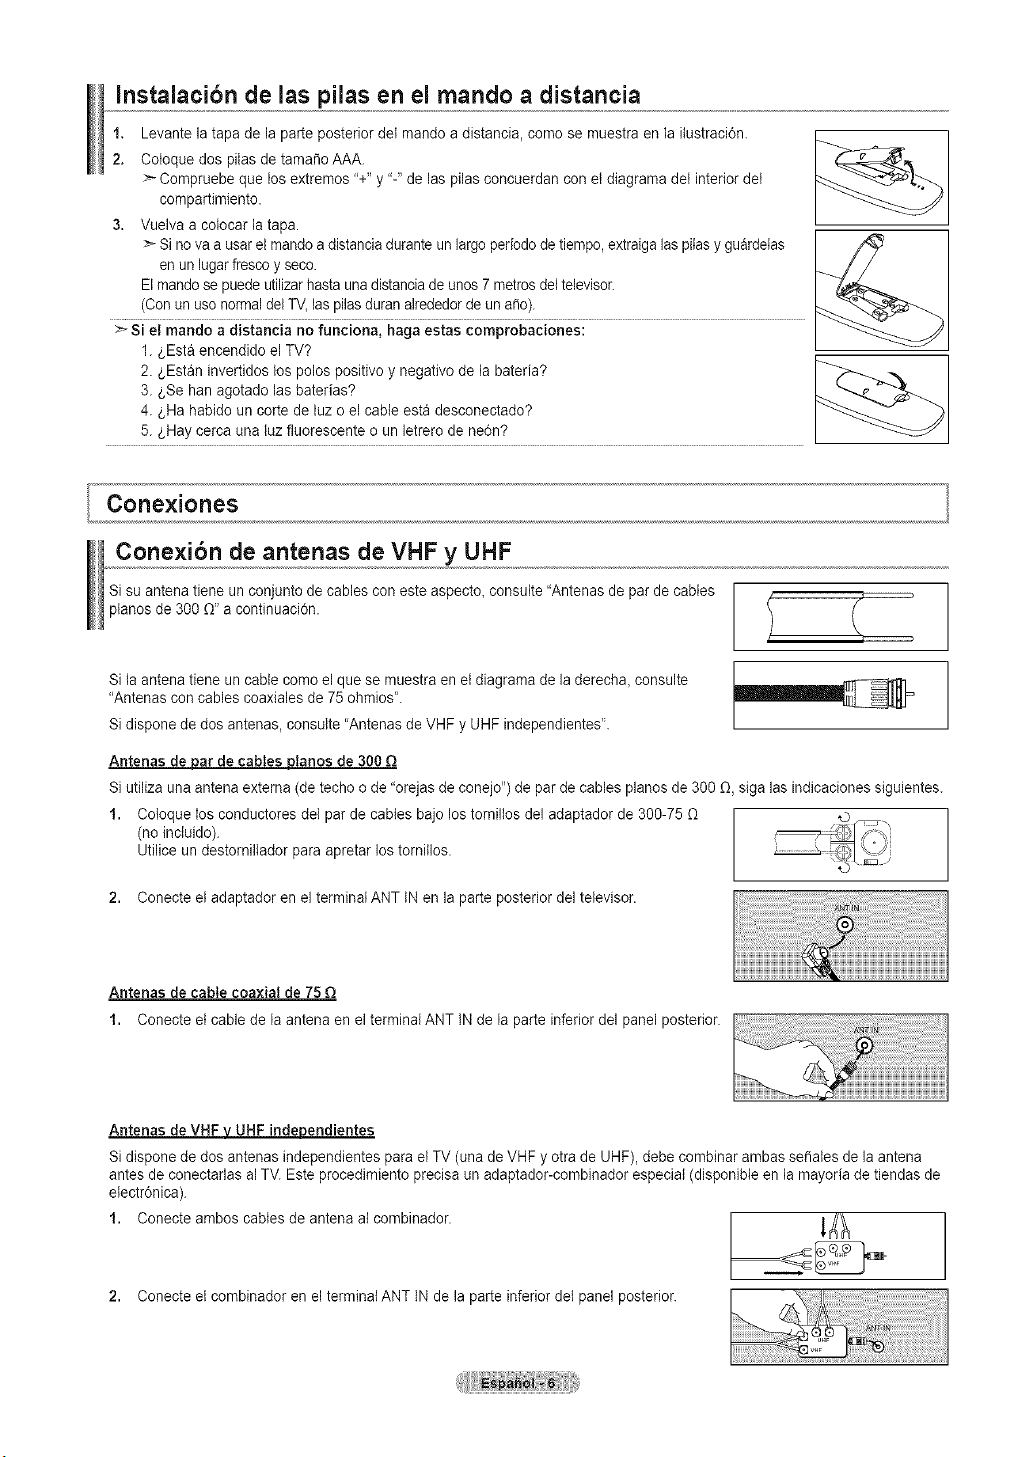
Instalacibn de las pilas en el mando a distancia
1. Levante la tapa de la parteposterior dei mando a distancia, comose maestraen la itastraci6n.
2. Cotoque dos pitas de tamafio AAA.
>- Compraebe que losextremos "+"y "-"delas pilas concaerdan con etdiagrama det interior dei
compartimiento.
3. Vuelva a colocar la tapa.
>_Sinovaausar el rnando a distanciaduranteun largo periododetiempo,extraiga laspitas y guardetas
en un lugar frescoy seco.
Elmando se puede utilizarhasta una distancia de anos7metrosdeltelevisor.
(Conanusonormal del TV,las pilasduran alrededorde un a_o).
> Si el mando adistancia no funciona, haga estas comprobaciones:
1._,Estaencendido elTV?
2. _,Estaninvertidos los polos positivo y negativo de la bateria?
3. t,Se han agotado las baterias?
4. t,Ha habido un corte de luzoel cable esta desconectado?
5. _,Haycerca una laz fluorescente o un letrero dene6n?
Cortexione$
Conexibn de antenas de VHF y UHF
Si suantena tiene un conjanto de cables coneste aspecto, consulte "Antenas de parde cables
pianos de 300 (1" a continuaci6n.
Si {aantena tieneuncable comoel que se muestra en el diagrama de la derecha, consulte
"Antenas con cables coaxialesde 75 ohmios'.
Si dispone de dos antenas,consalte "Antenas de VHFy UHF independientes'.
Antenas _ar de cables ptanos de 300 Q
Si utiliza una antena externa (detecho ode "orejas de conejo') de parde cables pianos de 300 D,siga las indicaciones sigaientes.
1. Coloque los conductores del par de cables bajo lostorniltos del adaptador de 300-75 (1
(noinclaido).
Utilice un destornilIador para apretar lostorniflos.
2. Conecte el adaptador en el terminatANT IN en la parte posterior del televisor.
Antenas de cable coaxial de75
1. Conecte etcable de la antena en el terminalANT INde laparte inferior del panel posterior.
Antenas de VHF_endientes
Si dispone de dos antenasindependientes parael TV (una de VHF y otra de UHF), debe combinar ambasse_ates de la antena
antes de conectarlas al TV.Este procedimiento precisa an adaptador-combinador especial (disponibleen la mayoria de tiendas de
etectr6nica).
1. Conecte ambos cables de antena alcombinador. 1_
2. Conecte etcombinador en el terminatANT INde la parteinferior det panel posterior.
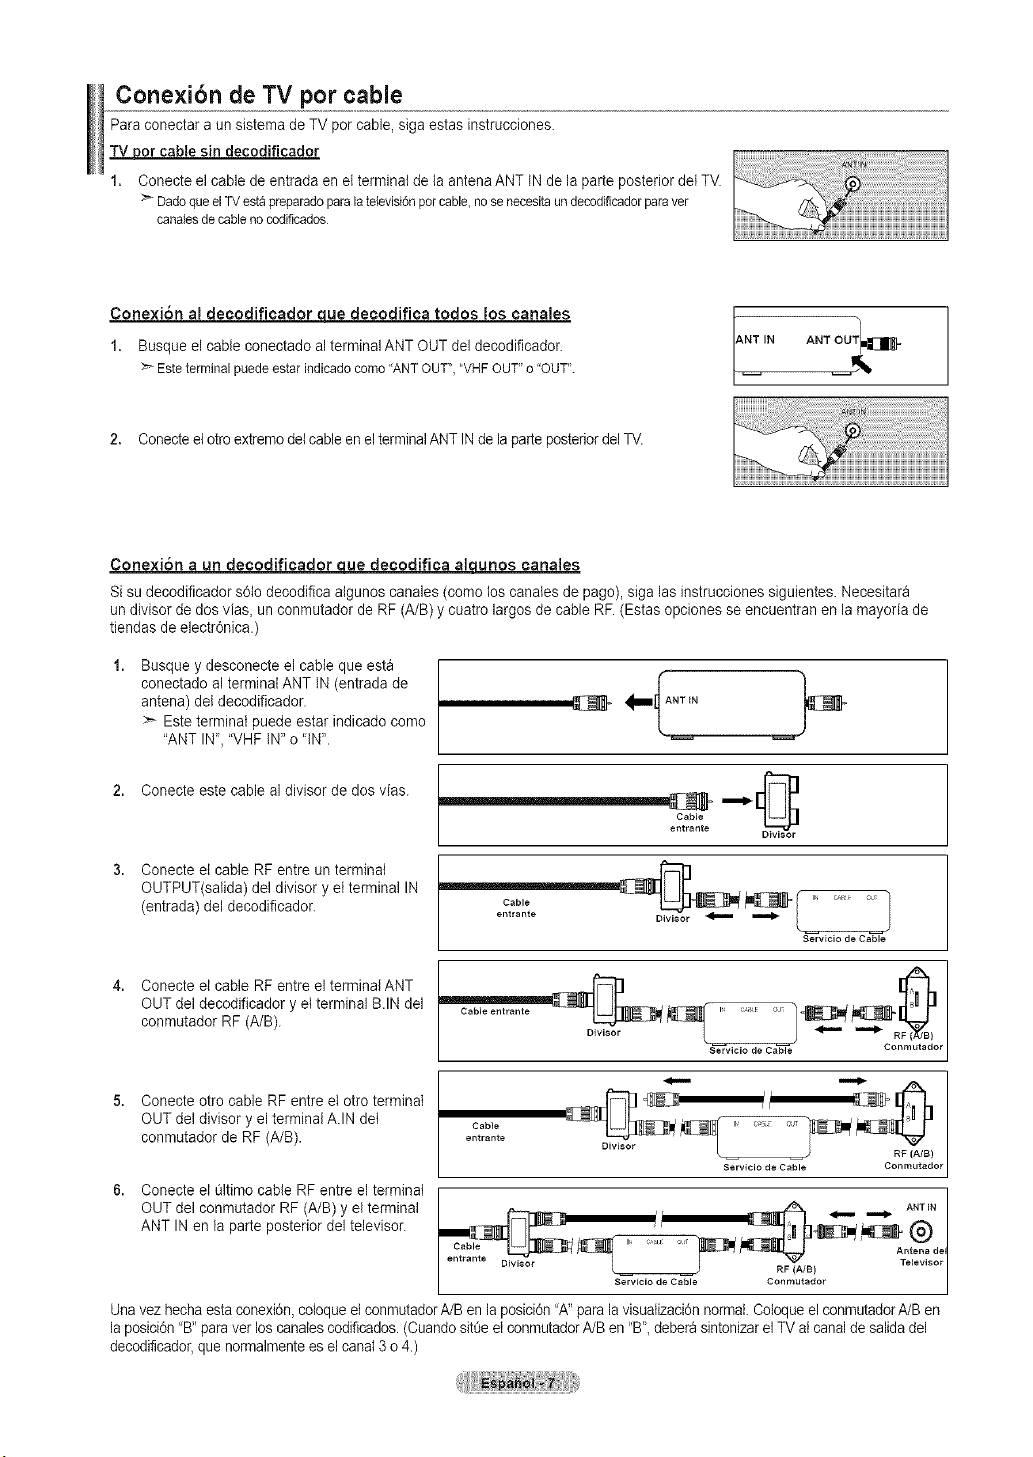
Conexibn de TV por cable
Para conectar a un sistema de TV percable, siga estas instrucciones.
_or cablesin decodificador
1. Conecteel cable de entrada en elterminat de ta antena ANT INde la parteposterior deiTV.
:>DadoqueelTVestapreparadoparalatelevisidnporcable,nosenecesitaundecodificadorparaver
canalesde cableno codificados
Cone×i6n al decodificador cLuedecodifica todos los canales
1. Busque el cable conectado al terminalANT OUT del decodificador.
Esteterminalpuedeestarindicadocomo'ANTOUT",'VHF OUT"o"OUT".
NTIN ANTOUT_]=
2. Conecteelotro extremedetcable enelterminalANTINde la parteposteriordelTV.
Conexi6n a un decodificador cluedecodifica alqunoscanales
Sisu decodificador s6to decodifica algunos canales (como los canales de pago), sigalas instrucciones siguientes. Necesitara
un divisorde dos vias_unconmutador de RF(A/B)y cuatro largosde cable RF.(Estasopciones seencuentran en la mayoria de
tiendas de electr6nica.)
Busque y desconecte el cable que esta
conectado al terminal ANT IN(entrada de
antena) de{decodificador.
> Esteterminal puede estar indicado come
"ANT IN", "VHF IN" o'IN".
2. Conecte este cable al divisor dedos vias. _e_tra,,teC_b_e ,i_ _..
Conecte el cable RF entre un terminat
OUTPUT(safda) deldivisor y el terminal IN
(entrada) del decodificador.
Cable
entrante
Divisor
J
Servicio de Cable
Conecte el cable RF entre el terminalANT
OUT del decodificador y el terminal B.IN del
conmutador RF(A/B).
Cable entrante
Ser=_vicio d_ Cabl_- Conmutador
Conecte otto cable RF entre et otro terminal
OUT del divisor y el terminalA.IN del
conmutador de RF (A/B).
Cable
entrante
RF (A/B)
Servicio de Cable Conmutador
6. Conecte el 01timecable RF entre el terminal _/
OUT del conmutador RF (A/B)y elterminal _ _ Am-_,
ANT INen la parle posterior del televisor. _ M_-q_ _)
Cable Antena del
/ _ RF (A/B) I
| Servicio de Cable Conmutador I
Unavez hechaestaconexidn,cotoqueel conmutadorA/Benlaposici6n'A" paralavisualizaci6nnormal Cotoque el conmutadorA/Ben
la posicidn "B" paraver loscanalescodificados.(Cuando sitt3eel conmutadorA/Ben"B'_deberasintonizarelTVatcanal de salidadel
decodi%ador, que normalmente es el canal 3 o4.)
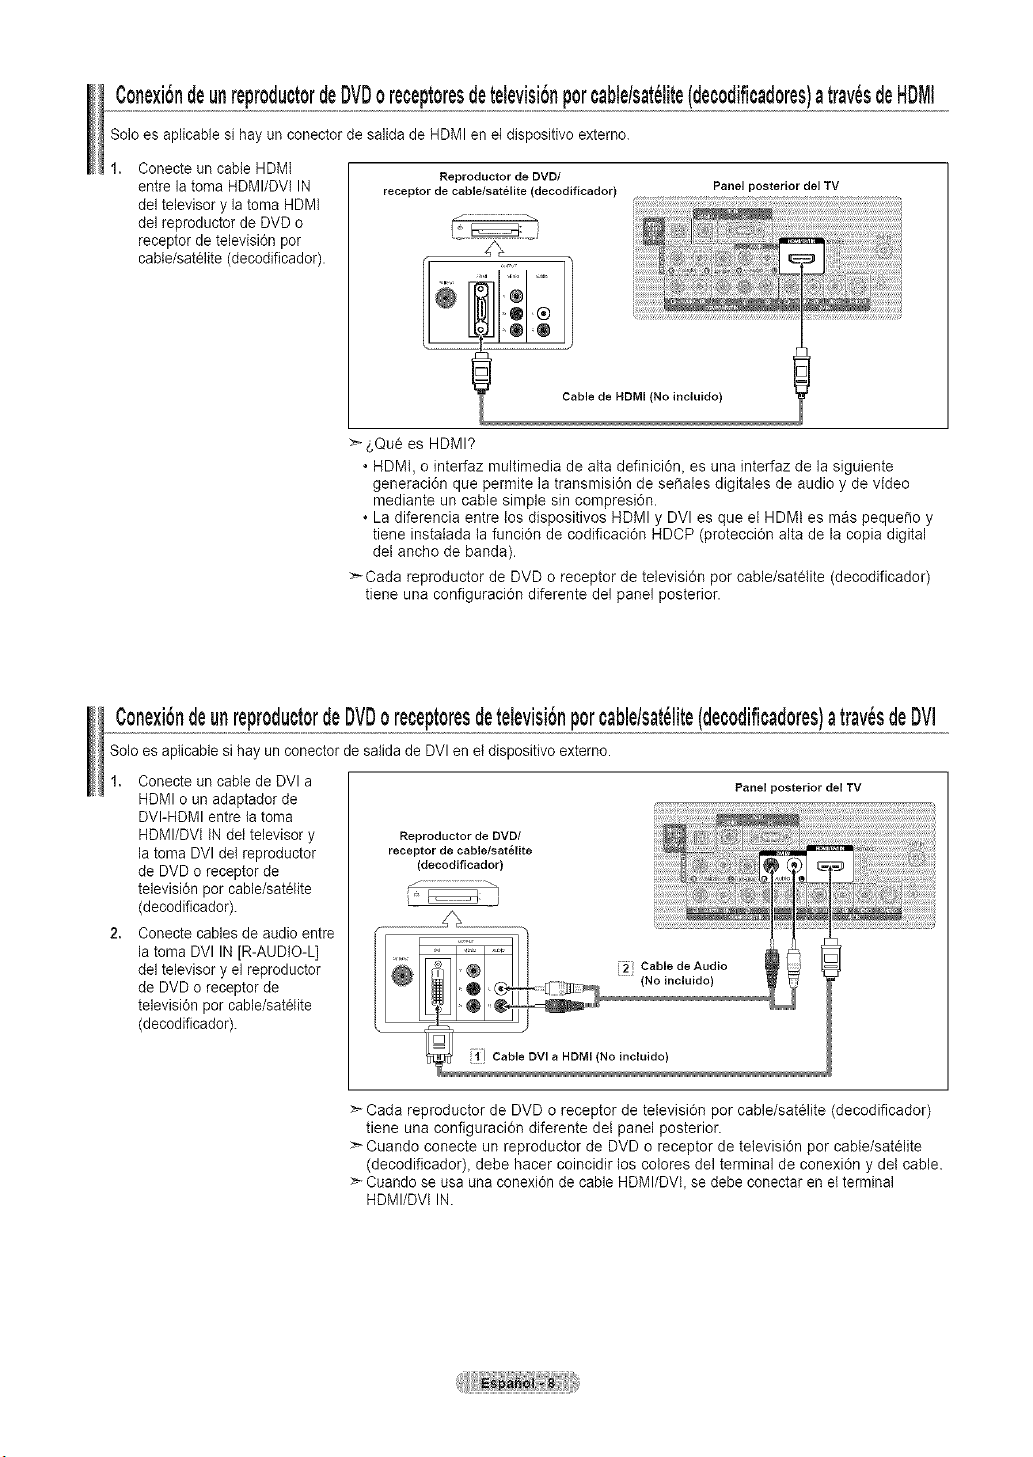
Cone×ibndeunreproductordeDVDoreceptoresdetelevisionporcable/sat_lite(decodificadores)atray,sdeHDMI
Soloes aplicable sihay un conector de salida de HDMI en et dispositivo externo.
Conecte an cable HDMI
entre latoma HDMI/DVl IN
del televisor y la toma HDMI
del reproductor de DVD o
receptor de television por
cabIe/satelite (decodificador).
Reproductor de DVD/
receptor de cable/satelite (decodificador)
Panel posterior del TV
>- _,Qu¢es HDMI?
• HDMt, o interfaz multimedia de alta definici6n, es una interfaz de la siguiente
generaciOn que permite la transmisi6n de se_ales digitales de audio y de video
mediante un cable simple sin compresiOn.
• La diferencia entre los dispositivos HDMI y DVl es que el HDMt es mas peque_o y
tiene instalada la funciOn de codificaciOn HDCP (protecciOn alta de la copia digital
del ancho de banda).
Cada reproductor de DVD o receptor de televisiOn por cable/satetite (decodificador)
tiene una configuraciOn diferente del panel posterior.
C0nexiOndeunrepr0duct0rdeDVD0 recept0resdetelevisionp0rcable/sat_lite(dec0dificad0res)atray,sdeDVI
Soloes aplicable sihay un conector de satida de DVI enet dispositivo externo.
1. Conecte uncable de DVI a
HDMIo an adaptador de
DVI-HDMI entrela toma
HDMI/DVi INdet televisor y
la toma DVI del reprodactor
de DVD o receptor de
television por cable/satOlite
(decodificador).
2. Conecte cables de audio entre
la toma DVI IN [R-AUDIO-L]
del televisor y el reproductor
de DVD o receptor de
television por cable/satOlite
(decodificador).
Reproductor de DVD/
receptor de cable/sat_lJte
(decodificador)
Panel posterior del TV
Cada reproductor de DVD oreceptor de tetevisiOn por cable/sat¢lite (decodificador)
tiene una configuraciOn diferente del panel posterior.
Cuando conecte un reproductor de DVD oreceptor de televisi6n por cable/sat_lite
(decodificador), debe hacer coincidir los colores del terminal de conexi6n y del cable.
:_Cuando se usa una conexi6n de cable HDMI/DVI, se debe conectar en et terminal
HDMI/DVl IN.
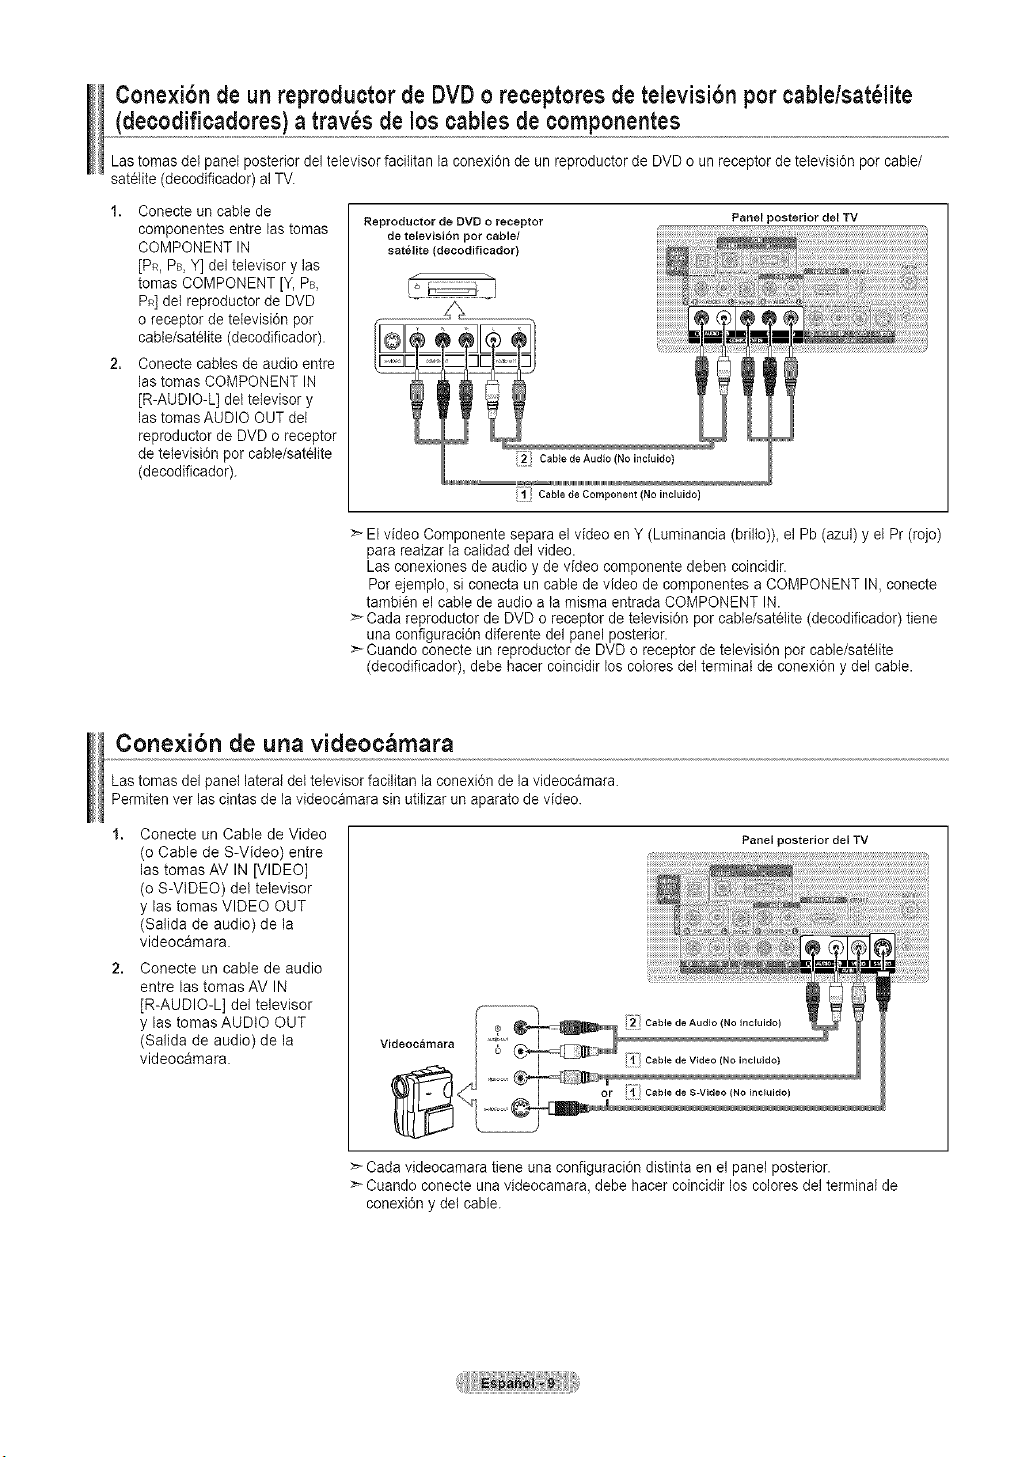
Conexi6n de un reproductorde DVDo receptores detelevisibn por cable/sat61ite
(decodificadores)a trav6s de loscables de componentes
LastomasdeI panel posterior deitelevisorfacititan iaconexi0n de un reproductor de DVD o un receptor de televisidn per cable/
satelite (decodificador) al TV.
1. Conecte uncable de
componentes entre lastomas
COMPONENT IN
[PR,PB,Y] del televisor y las
tomas COMPONENT [Y, PB,
PR]del reproductor de DVD
oreceptor de televisi6n per
cable/sat61ite(decodificador).
2. Conecte cables de audio entre
lastomas COMPONENT IN
[R-AUDIO-L] det televisor y
lastomasAUDIO OUT del
reproductor de DVD o receptor
de televisi6n por cabte/satelite
(decodificador).
Reproductor de DVD o receptor
de televisi6n pot cable/
satelite (decodificador)
Panel posterior del TV
i;l" Cable de Component (No incluido}
:_El video Cornponente separa el video en Y (Luminancia (brilto))_el Pb (azul) y el Pr(rojo)
para reatzar la calidad delvideo.
Las conexiones de audioy de video componente deben coincidir.
Porejemplo, si conecta un cable de video de componentes a COMPONENT IN,conecte
tambien el cable de audio ala misma entrada COMPONENT IN.
Cada reproductor de DVD o receptor de television porcabte/satelite (decodificador) tiene
una configuraci6n diferente del panel posterior.
> Cuando conecte un reproductor de DVD o receptor de televisi6n por cable/satelite
(decodificador), debe hacer coincidir los colores del terminal de conexi6ny del cable.
Cone×ibn de una videoc_mara
Las tomas del panel lateraldet televisor facilitan la conexi6n de la videocamara.
Permitenvet las cintas de la videocamara sin utitizar un aparato de video.
Conecte un Cable de Video
(o Cable de S-Video) entre
las tomas AV IN [VIDEO]
(o S-VIDEO) del televisor
y las tomas VIDEO OUT
(Salida de audio) de la
videocamara.
Conecte un cable de audio
entre las tomas AV IN
[R-AUDIO-L] del televisor
y las tomas AUDIO OUT
(Salida de audio) de la
videocamara.
Videoc&mara
Panel posterior del TV
:_Cada videocamara tiene una configuraci0n distinta en el panel posterior.
Cuando conecte unavideocamara, debe hacer coincidir los colores del terminal de
conexi0n y del cable.
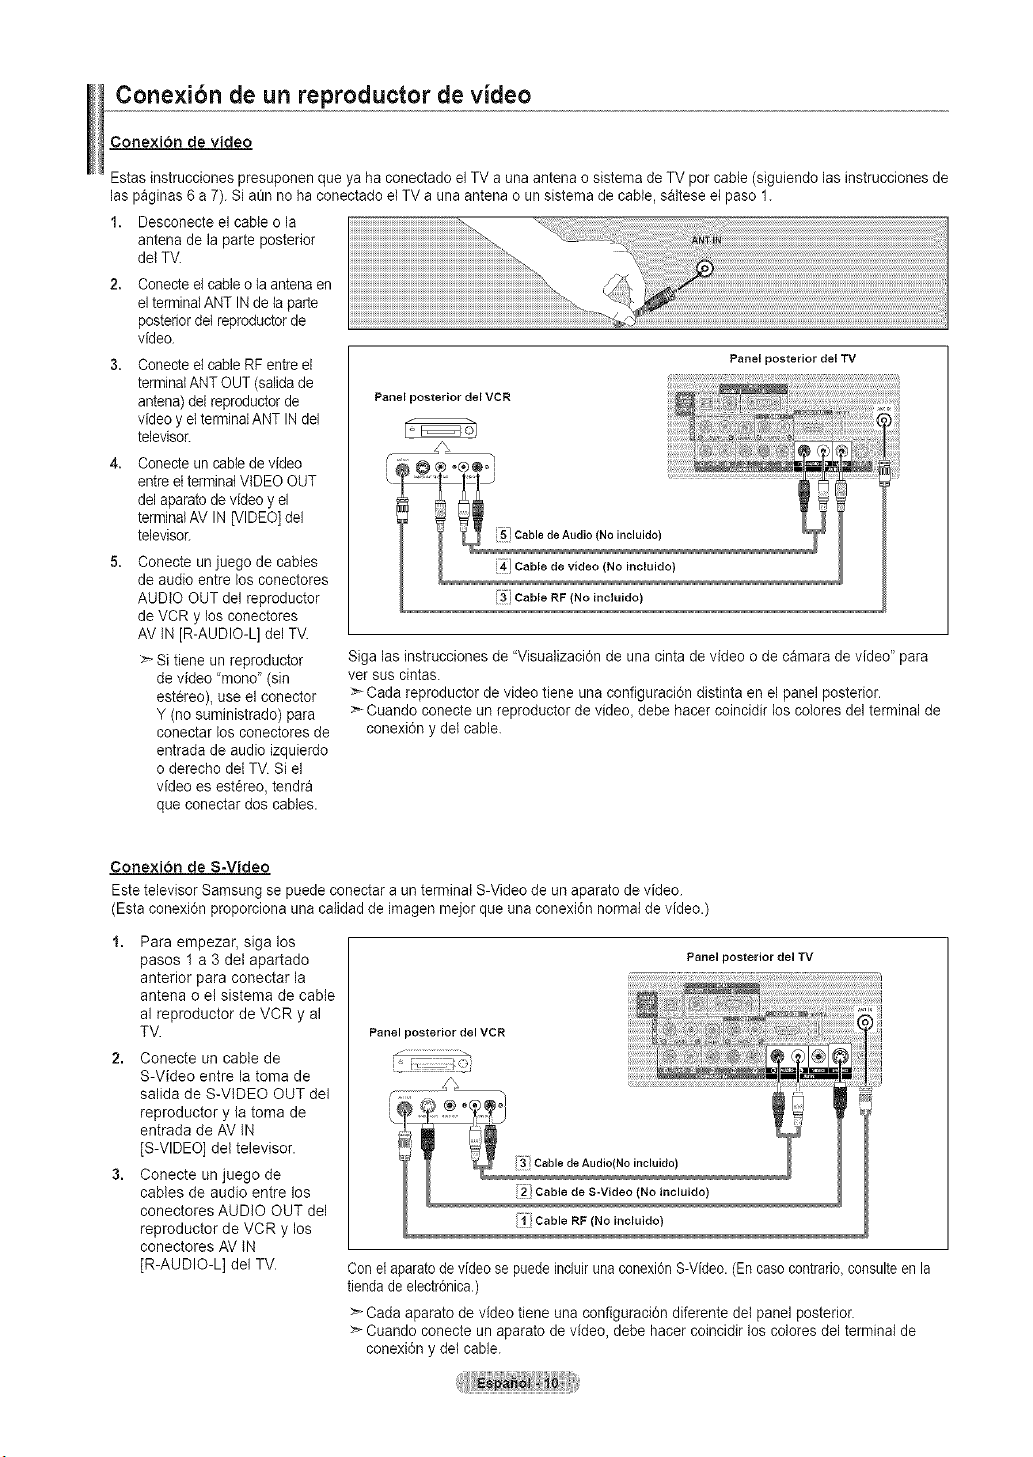
Cone×ibn de un reproductor de video
Conexion de video
Estas instrucciones presuponenque yahaconectado el TVauna antena osistema de TV per cable (sigaiendo las instracciones de
laspaginas 6a 7). SiaQnno ha conectado el TV auna antena oun sistema de cable, saltese et paso 1.
1. Desconecte el cable o la
antena de la parte posterior
dei TV.
2,
4,
Conecteel cable ota antena en
el terminalANT INde taparte
posteriordei reprodactorde
video.
Conecteel cable RF entreel
terminalANTOUT (salida de
antena) delreprodactorde
video y el terminalANTIN del
televisor.
Conecteun cable devideo
entreel terminal VIDEO OUT
del aparato de video y el
terminalAV IN[VIDEO] del
televisor.
Conecte un juego de cables
de audio entre los conectores
AUDIO OUTdel reproductor
de VCR y los conectores
AV IN[R-AUDIO-L] del TV.
Sitiene un reproductor
de video "mono" (sin
est6reo), use el conector
Y (nosuministrado) para
conectar losconectores de
entrada de audio izquierdo
oderecho del TV. Siel
video esestereo, tendra
qae conectar dos cables.
Panel posterior del VCR
Panel posterior de[ TV
i5_ Cable de Audio (No incluido)
!4 Cable de video (No incluido)
!3 Cable RF INo incluido)
Sigalas instrucciones de "Visaalizaci6n de una cinta de video o de camara de video" para
ver sascintas.
Cada reproductor de video tiene una configuraci6n distinta en el panel posterior.
Cuando conecte an rc 9rodactor de video_ debe hacer coincidir los colores del terminal de
conexi0n y det cable.
Conexion de S-Video
Estetelevisor Samsung se puede conectar aan terminal S-Video de un aparato de video.
(Esta conexi6n proporciona una calidad de imagen meier qae ana conexi0n normal de video.)
1. Para empezar, siga los
pasos 1 a3 det apartado
anterior para conectar la
antena o el sistema de cable
al reproductor de VCR y al
TV.
2. Conecte un cable de
S-Video entre la toma de
salida de S-VtDEO OUT del
reproductor y la toma de
entrada de AV IN
[S-VIDEO] del televisor.
3. Conecte un juego de
cables de audio entre los
conectores AUDIO OUT del
reproductor de VCR y los
conectores AV IN
[R-AUDIO-L] del TV.
Panel posterior del TV
Panel posterior del VCR
J
Conet aparatodevideo se puede incluiruna conexi6nS-Video.(En caso contrario,consulteenla
tiendade electr6nica.)
>_Cada aparato de video tiene una configuraci6n diferente del panel posterior.
:'*-Cuando conecte un aparato de video, debe hacer coincidir loscolores del terminal de
conexi0n y del cable.
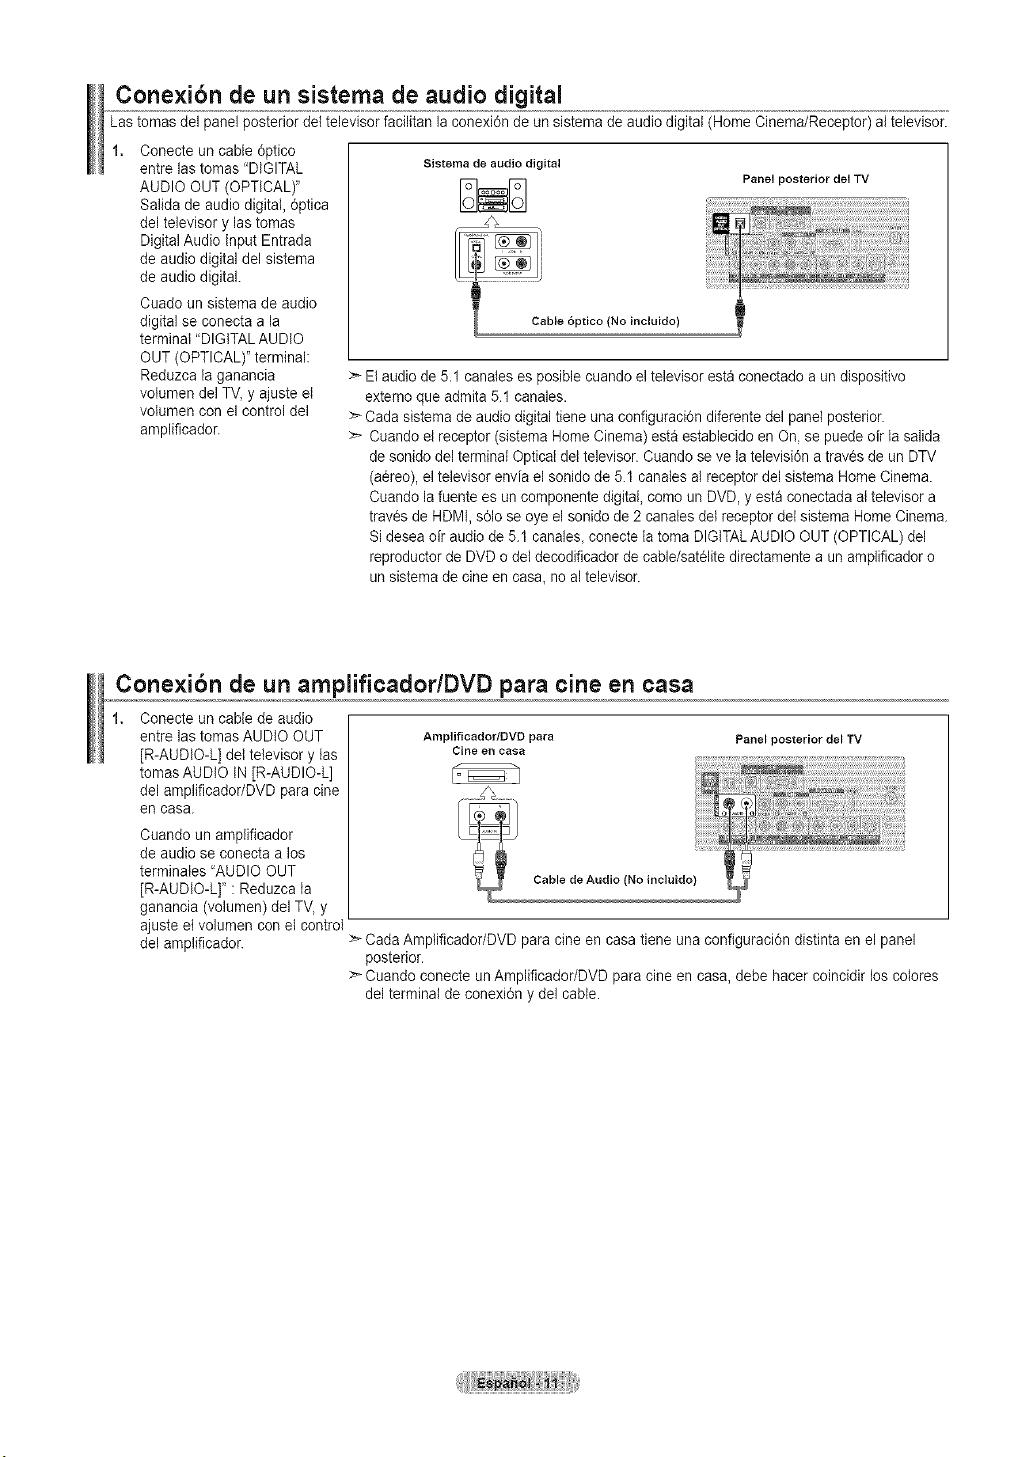
Cone×ibn de un sistema de audio digital
Lastomas delpanel posterior del televisorfacilitan la conexi6nde an sistema de audio digital (HomeCinema/Receptor) altelevisor.
Conecte un cable 6ptico
entre las tomas "DIGITAL
AUDIO OUT(OPTICAL)"
Salida de audio digital, 6ptica
del televisor y las tomas
Digital Audio Input Entrada
de audio digital del sistema
de audio digital.
Cuado un sistema de audio
digital se conecta a la
terminal "DIGITAL AUDIO
OUT (OPTICAL)" terminal:
Reduzca la ganancia
volumen del TV, y ajuste el
voIumen con el control del
amplificador.
aistema de audio digital
DND
Panel posterior del TV
> El audiode5.1 canates es posiblecuando el televisoresta conectado aan dispositivo
externo que admita5.1 canales.
> Cada sistema de audiodigital tiene una configuraci6n diferentedel panelposterior.
> Cuando el receptor (sistema Home Cinema) estaestablecido en On,se puede oir la salida
de sonido delterminal Optical del televisor.Cuando se ve latelevisi6n a traves de anDTV
(a6reo), el televisor envia el sonido de 5.1 canalesal receptor delsistema Home Cinema.
Cuando la fuente esuncomponente digital, comeun DVD, y estaconectada at televisor a
traves de HDMI, s61ose oye el sonido de 2 canatesdel receptor del sistema Home Cinema.
Si deseaoir audio de 5.1 canales,conecte {atoma DIGITALAUDIO OUT (OPTICAL) del
reproductor de DVD o det decodificador de cable/sat_lite directamente aun amplificador o
un sistema de cineen casa, no al televisor.
Conexibn de un amplificador/DVD para cine en casa
Conecte un cable de audio
entre las tomas AUDIO OUT
[R-AUDIO-L] det televisor y tas
tomas AUDIO IN [R-AUDIO-L]
del amplificador/DVD paracine
en casa.
Cuando un amplificador
de audio se conecta a los
terminates "AUDIO OUT
[R-AUDIO-L]' :Reduzca ta
ganancia (volumen) del TV,y
ajuste et volumen con et control
del amplificador.
AmplificadodOVO para
eine en casa
Panel posterior del TV
Cable de Audio (No incluido)
Cada Amptificador/DVD para cine en casa tiene una configuraci6n distinta en el panel
posterior.
> Cuando conecte un Amplificador/DVD para cine en casa, debe hacer coincidir loscolores
del terminal de conexi6n y del cable.
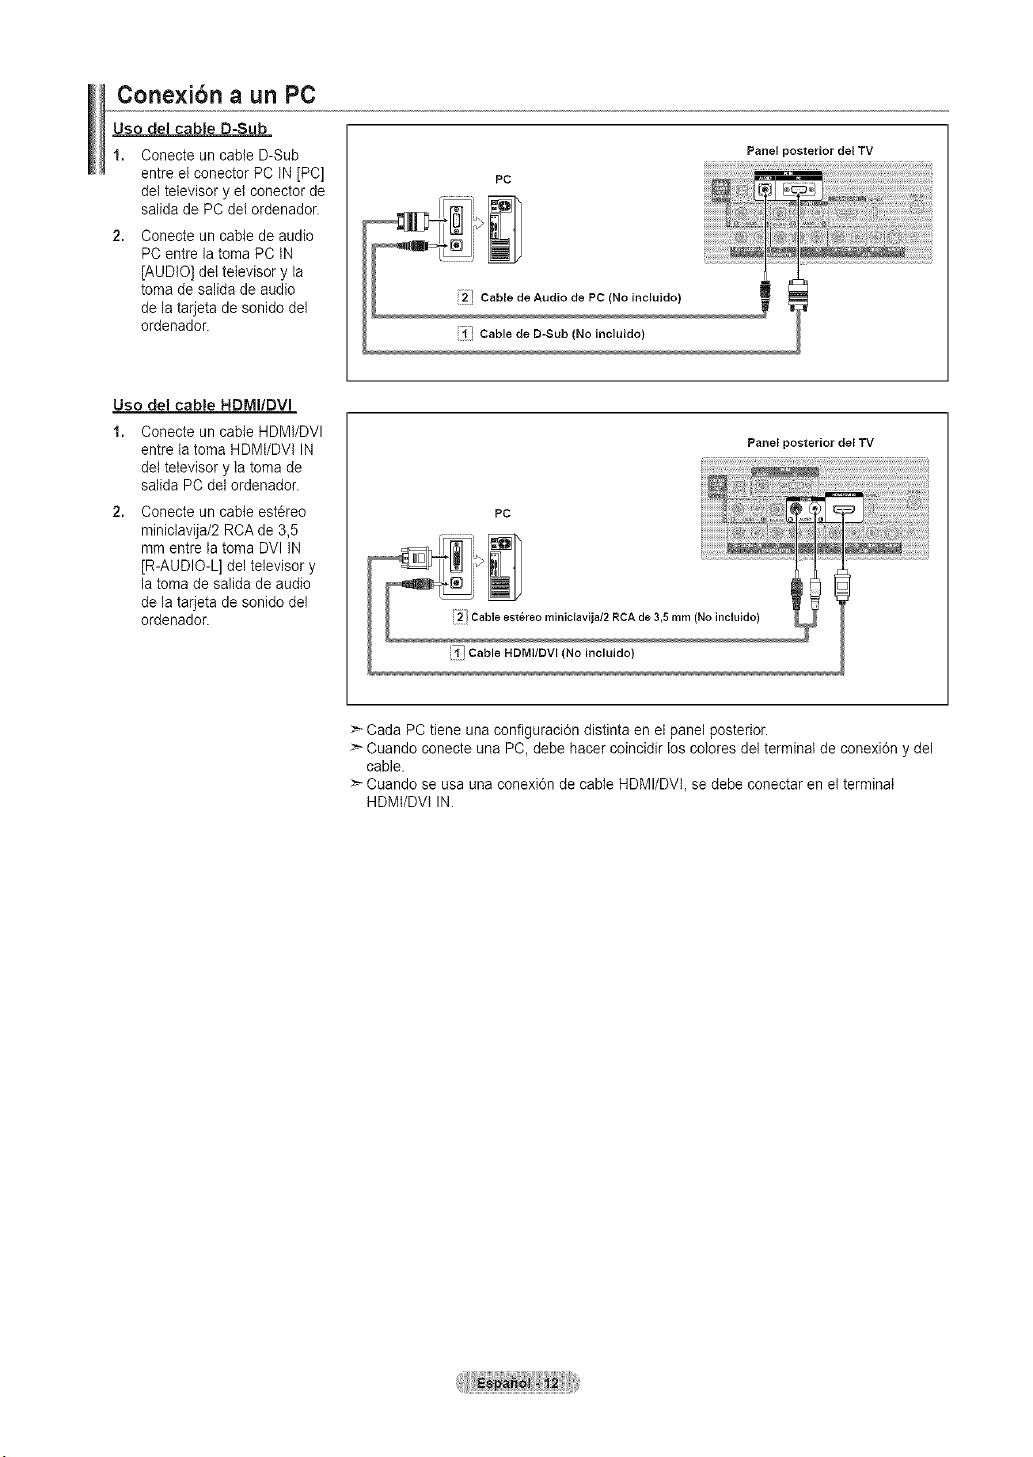
Conexibn a un PC
Uso del cable D-Sub
1. Oonecte un cable D-Sub
entre et conector PC IN[PC]
deI televisor y el conector de
salida de PC del ordenador.
Conecte un cable de audio
PC entre la toma PC IN
[AUDIO] deetelevisor y la
toma de salida de audio
de la tarjeta de sonido del
ordenador.
PC
!2! Cable de Audio de PC (No incluido)
;I" Cable de D-Sub (No incluido)
Panel posterior del TV
Uso del cable HDMIIDVI
1. Conecte un cable HDMI/DVI
entre Ia toma HDMI/DVI IN
dei televisor y ta toma de
salida PC del ordenador.
2. Conecte un cable est_reo
miniclavija/2 RCA de 3,5
mm entre la toma DVl IN
[R-AUDIO-L] del televisor y
la toma de salida de audio
de la tarjeta de sonido del
ordenador.
Panel posterior del TV
PC
!2! Cable est6reo miniclavija/2 RCA de 3,5 mm (No incluido)
i¥i Cable HDMI/DVI (No incluido)
Cada PC tiene una configuraci6n distinta en el panel posterior.
Cuando conecte una PC, debe hacer coincidir loscolores del terminal de conexi6n y del
cable.
>--Cuando se usa una conexi6n de cable HDMI/DVI, se debe conectar en el terminal
HDMI/DVI IN.
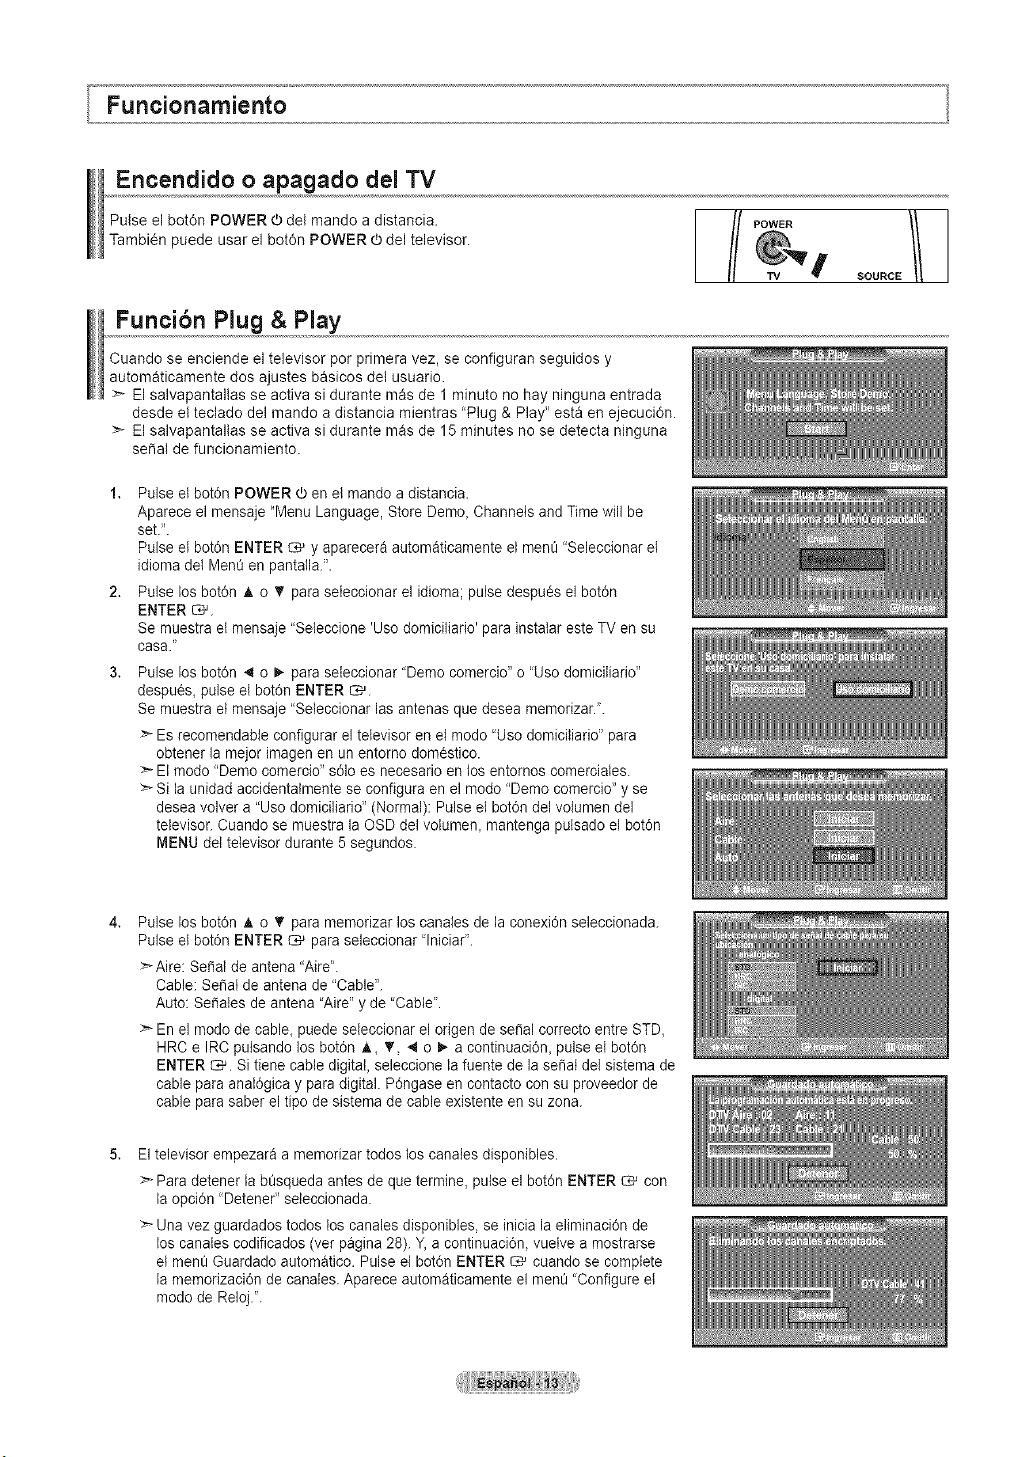
Encendido oapagado del TV
Pulse el bot6n POWER _)del mando adistancia.
Tambi_n puede usar el bot6n POWER O del televisor.
l/ POWER
SOURCE
Funci6n Plug & Play
Cuando se enciende el televisor por primera vez, se configuran seguidos y
automaticamente dos ajustes basicos del usuario.
>- El salvapantallas se activa si durante mas de 1minuto no hay ninguna entrada
desde el teclado del mando a distancia mientras "Plug & Play" esta en ejecuciOn.
El salvapantallas se activa si durante mas de 15 minutes no se detecta ninguna
sepal de funcionamiento.
1. Pulse et bot6n POWER (ben el mando adistancia.
Aparece el mensaje "Menu Language, Store Demo_ Channels and Time will be
set.".
Pulse et bot6n ENTER _ y aparecera automaticamente el menQ"Seleccionar et
idioma dei MenOen pantaila.'.
2. Pulse losbot6n A o _' paraseleccionar el idioma; pulse despu_s el bot6n
ENTER _.
Se muestra et rnensaje "Seieccione 'Usodomiciliario' para instalar esteTV en su
casa."
3,
Pulse los bot6n _ o _-para seleccionar "Democomercio" o 'Use domiciIiario"
despues, pulse el bot6n ENTER _.
Se muestra et rnensaje "Seleccionar las antenas que desea memorizar.".
>- Esrecomendabte configurar el televisor en el mode "Usodomiciliario" para
obtener la mejor imagen en un entorno domestico.
>*Elmodo "Demo comercio" s61oes necesario en los entornos comerciales.
>-Si la unidadaccidentalmente se configura en el modo "Demo comercio" y se
desea volver a "Uso domiciliario" (Normal): Pulse el bot6n delvolumen del
televisor. Cuando se muestra la OSDdel volumen, mantenga pulsado el bot0n
MENU del televisor durante 5 segundos.
4,
Pulse los bot6n _, o _' paramemorizar los canaies de la conexi0nseleccionada.
Pulse et bot0n ENTER _ para seleccionar 'lniciar".
:_Aire: SePal deantena "Aire'.
Cable: Se_atde antena de"Cable".
Auto: Se_ates de antena "Aire" y de "Cable'.
>'- En el modo de cable_ puede seleccionar el origen de sepal correcto entre STD,
HRC eIRCputsando losbot0n _._ T, 4 o I_ acontinuaci6n_pulse el bot6n
ENTER _. Si tiene cable digital, seleccione la fuente de la se_at delsistema de
cable para anat6gica y para digital. P6ngase en contacto con su proveedor de
cable para saber el tipo de sistema de cable existente en su zona.
5,
Eltelevisor empezara a memorizar todos los canates disponibles.
Para detener la b_squeda antesde que termine, pulseel bot0n ENTER _ con
la opci6n 'Detener" seleccionada.
>- Una vez guardados todos loscanales disponibles, se inicia la eliminaci6n de
loscanales codificados (vet pagina 28).Y, a continuaci6n, vueive a rnostrarse
etmen_ Guardado automatico. Pulse el bot6n ENTER _ cuando se complete
la memorizaci6n de canales.Aparece automaticamente el men_ 'Configure et
mode de Reloj.".

PulseelbotOnENTER_.
Pulsetosbot6nAoT paraseleccionar'Auto_despu0s_pulseetbotOn
ENTER_.
Sernuestraelmensaje"Configurarlaheradeverano.".
Siselecciona'Manuat"_semuestra'Escribalafechaylahora.'.
(ConsuiteFaspaginas37)
7. PulselosbotdnAoVparaseleccionar'Apagado"o'Encendido"despues,pulse
elbotOnENTERC#.
Semuestraelmensaje"Seleccionarlazonahorariaenlaquevive.".
8. Pulselosbot6nAo• pararesaltarlazonahorariadeIarealocal.PulseelbotOn
ENTER_. Siharecibidounaserialdigital,seajustaralaheraautomaticamente.
Encasenegative,consultelapagina37paraajustaretreloj.
9. Apareceelmensaje"Disfrutarsuvisi6n.'.
Cuandotermine,pulseetbotdnENTER_.
Si desea reiniciar esta funcion...
1. Pulse el botOnMENU paraver el menQ.
Pulse los botOnA o V para seteccionar "Configuraci0n" despu0s, pulse el bot0n
ENTER _.
2. Pulse de nuevo et bot6n ENTER _ paraseleccionar "Plug & Play".
Sidesea mas detalles sobre lasopciones de configuraciOn,consulte laspaginas
13~14.
>- La funciOn"Plug & Play"esta disponible s01oen el modo TV.
Cambio de canales
Mediante los botones de canal
Pulse los botdnes CH(_,o CH(_) para cambiar loscanales.
:_ Cuando pulse los botdnes CH(_) o CH(_) el TVcambiara los canates perorden.
Vera todos loscanaies que ha memorizado el TV (El TVdebera haber
mernorizado comeminimo tres canales). No vera los canates borrados o no
memorizados. Consulte las paginas 16para la memorizaciOnde loscanales.
Utilizaci6n de los botones num_ricos
Utitice losbotones numericos para ir directamente a un canal. Porejemplo, para
seleccionar el canal 27, pulse 2 y luego 7. Eltelevisor cambiera de canal cuando
pulse el segundo n0mero.
Pulse los botones numericos y despu0s el botdn ENTER C_'paracambiar
rapidamente de canal.
VOL # CH _
®
MUTE
®®®
®®®
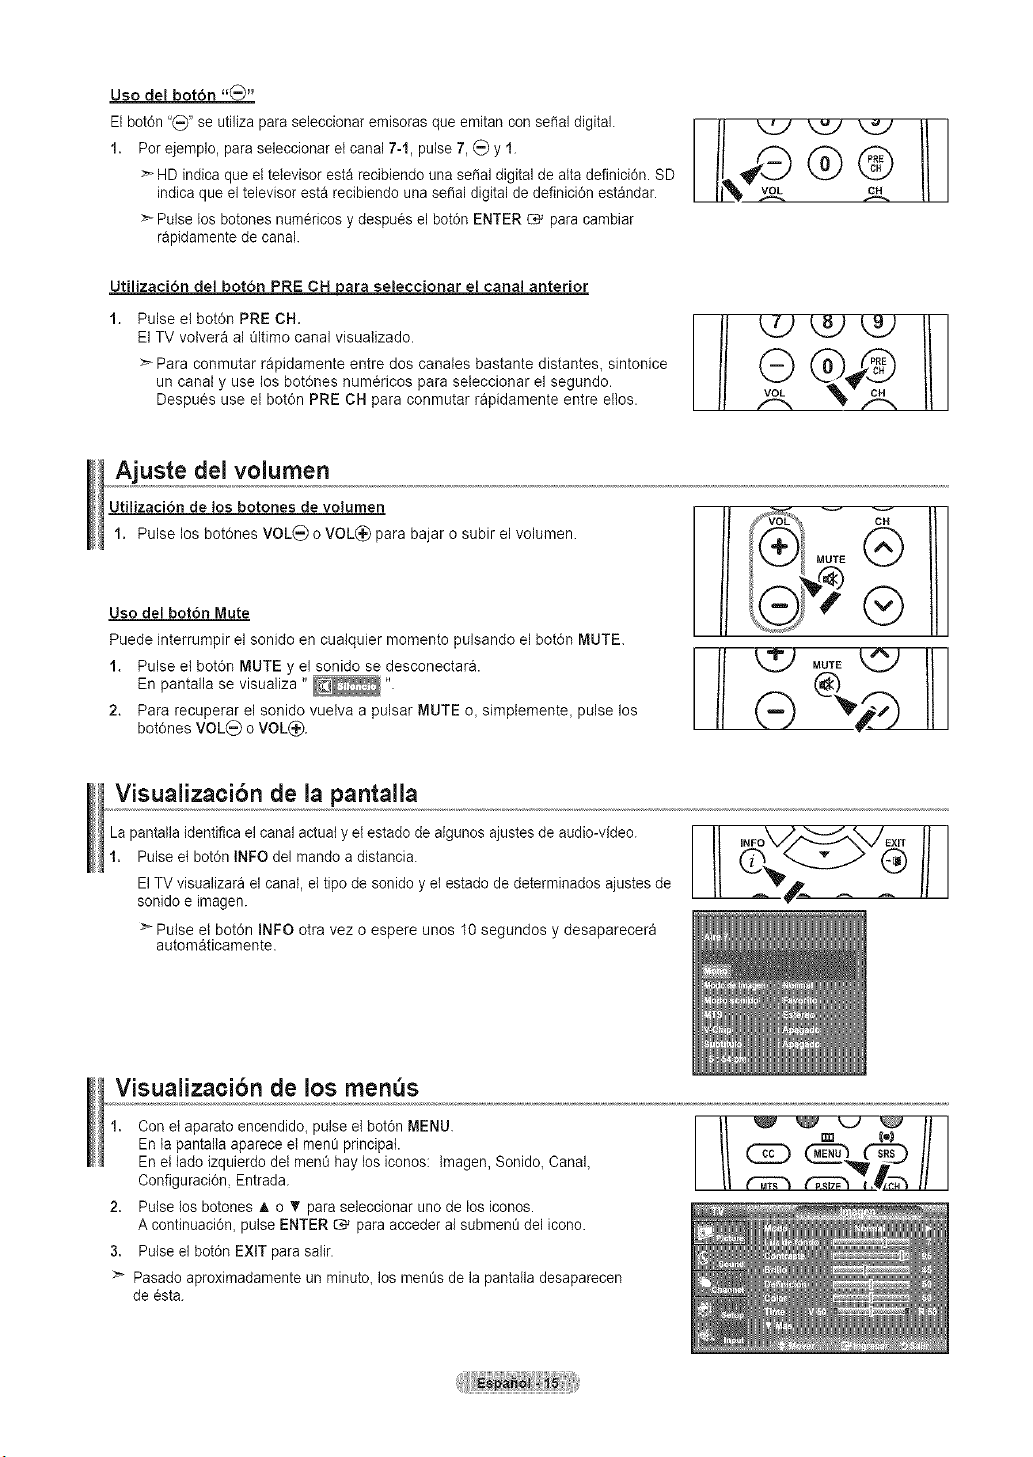
Uso del bot6n "_"
Elbotdn "_" seutiliza para seleccionar emisoras que emitan conseSal digital.
1. Per ejemplo, paraseleccionar etcanal 7-1, pulse 7, (_) y 1.
>- HD indica que el televisor esta recibiendo una seSaldigital de atta definici0n. SD
indica que el televisor esta recibiendo una seSal digital de definicidn estandar.
Pulse los botones numericos y despu_s el bot0n ENTER C,_ paracambiar
rapidamente de canal.
Utilizaci6n del boton PRE CH Dara seleccionar el canal anterior
1. Pulse el botdn PRE CH.
ElTV volvera al Oltimo canal visualizado.
Para conmutar rapidamente entre dos canates bastante distantes, sintonice
un canal y use los botOnes num_ricos para seleccionar el segundo.
Despues use el bot6n PRE CH para conmutar rapidamente entre etlos.
Ajuste del volurnen
Utilizad6n de los botones de volumen
1. Pulse los bot0nes VOL(_) o VOL(_) para bajar o subir el volumen.
Uso del bot6n Mute
Puede interrumpir el sonido en cualquier momento pulsando el bot6n MUTE.
1. Pulse el bot6n MUTE y el sonido se desconectara.
En pantalla se visualiza " _ ".
2. Para recuperar el sonido vuetva a pulsar MUTE o, simplemente, pulse los
bot0nes VOL(_) oVOL(_).
ooTE®
Visualizaci6n de la pantalla
La pantalla identifica el canal actual y el estado de algunos ajustes de audio-video.
1. Pulse ei bot6n INFO del mando adistancia.
ElTVvisualizara el canal, el tipo de sonido y ei estado de determinados ajustes de
sonido eimagen.
_" Pulse el bot6n INFO otra vez o espere unos 10segundos y desaparecera
autom_ticamente.
Visualizacibn de los rnen s
1. Con et aparato encendido, pulse el bot6n MENU.
En ta pantaltaaparece el mene principal.
En el ladoizquierdo del men_ hay losiconos: lmagen, Sonido, Canal,
Configuraci6n, Entrada.
2. Pulse los botones A o _' para seleccionar uno de losiconos.
A continuacidn, pulse ENTER C,_ paraacceder al submene del icono.
3. Pulse el botdn EXIT para salir.
>" Pasado aproximadamente un minuto, losmenes de la pantalla desaparecen
de esta.
_GD II I
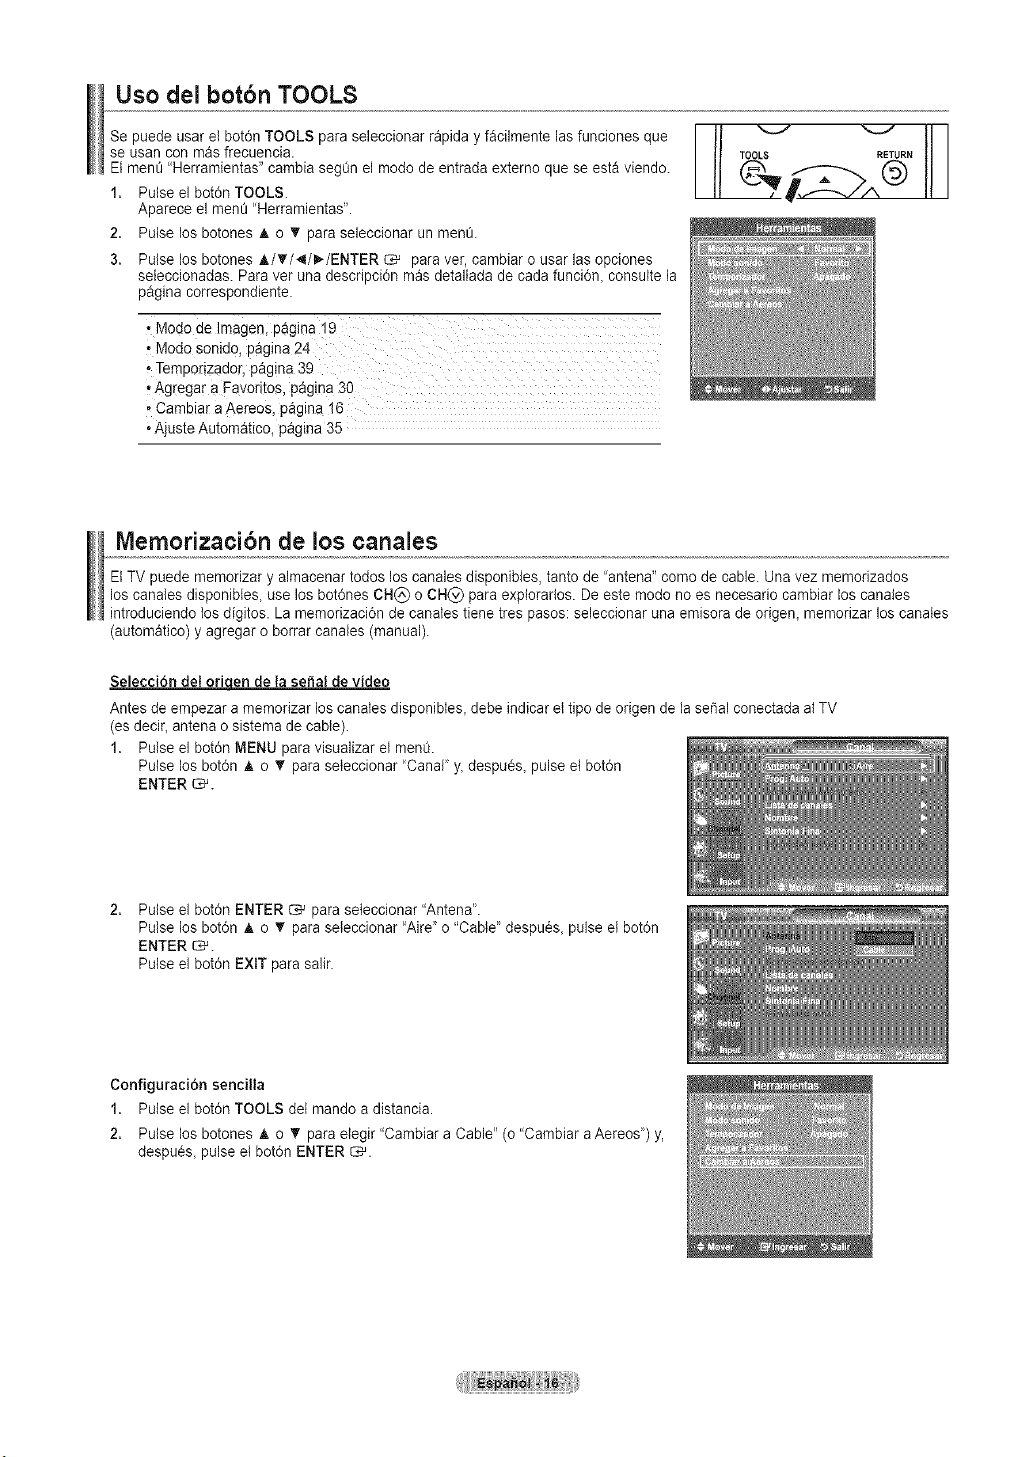
Uso del botbn TOOLS
Se puede usar el bot6n TOOLS paraseleccionar rapida y facilmente lasfunciones que
se usancon mas frecuencia.
Elmen_ 'Herramientas" cambia seg0n el mode de entrada externo que se esta viendo.
1. Pulse el bot6n TOOLS.
Aparece el men_ "Herramientas'.
2. Pulse los botones A o T para seleccionar unmen_.
3. Pulse los botones _./T/_/_,-/ENTER _ para ver, cambiar o usar lasopciones
seteccionadas. Para ver una descripci6n mas detaltada de cadafunci6n_ consulte la
pagina correspondiente.
• Modo de ]m
• Modo sonid0, p_gina 24
,,Temporizador,pagina 39
,,Ag(egar aFavoritos, pagina 30
• Cambiar aAe_eos, pagina 16
Ajuste Automatico, pagina 35
TO LS RETURN
Memorizacibn de los canales
Et TV puede memorizar y almacenar todos los canales disponibles, tanto de 'antena" como de cable. Unavez memorizados
loscanales disponibles, use losbot6nes CH(_) o CH_) paraexplorarlos. Deeste mode no es necesario cambiar loscanales
introduciendo los digitos. La memorizaci6n de canales tiene tres pasos: seleccionar unaemisora de origen, memorizar loscanates
(automatico) y agregar oborrar canales (manual).
Selecci6n det oriqen de la sepal devideo
Antesde empezar amemorizar loscanales disponibtes, debe indicar ettipo de origen dela sei_alconectada at TV
(es decir_antena osistema de cable).
1. Pulse el bot6n MENU paravisualizar el menO.
Pulse los bot6n A o _' paraseleccionar 'Canal" y_despu_s_pulse et bot6n
ENTER _.
2,
Pulse el bot6n ENTER _ paraseleccionar "Antena".
Pulse los bot6n A o _' paraseteccionar "Aire"o "Cable' despu6s_pulseet bot6n
ENTER _.
Pulse el bot6n EXIT para salir.
Configuraci6n sencilla
1. Pulse el bot6n TOOLS del mando a distancia.
2. Pulse los botones A o 'I' para elegir "Cambiara Cable" (o "Cambiar aAereos') y,
despu_s, pulse et bot6n ENTER _.

Atmacenamiento de los canales en la memoria (metodo autom&tico}
Pulse el bot6n MENU paravisuaiizar el menO.
Pulse los bot6n A o _' paraseteccionar 'Canal" y,despaes, pulse et bot6n
ENTER _.
Pulse los bot6n A o _' para seleccionar "Prog.Auto" y, despa_s, pulseet bot6n
ENTER _.
Pulse los bot6n A o T para seleccionar la conexi6n de la antena, despues pulse
ENTER _.
:_Aire: Serial de antena "Aire.'.
Cable: Serial de antena de "Cable'.
Auto: Seriales de antena "Aire" y de "Cable".
Ai seleccionar el sistema de TV decable:
Pulse el bot6n ENTERC_'parainiciar el programa automatico.
Pulse los botones 4 o _ y, acontinaaci6n, pulse losbotones A o _' para
seleccionar lafaente del sistemade cable de seSatanat6gica correcta entre "STD",
"HRC" e"IRC", pulse el bot6n ENTER _. Sitiene un televisor de cable digital,
seleccione la fuente de la sei_aldel sistema de cable anat6gica y digital.
:_ STD,HRC e IRC identifican los distintos tipos de sistemas de TVpor cable.
P6ngase en contacto con su proveedor de cable para averiguar el tipo de
sistemade cable existente en su zona. En este momento ya se ha seleccionado
etorigen de la serial.
Eltelevisor empieza a rnemorizar todas lasernisoras disponibtes.
Unavez gaardados todos los canalesdisponibles, se iniciala etiminaci6n de los
canales codificados (verpagina 28).
>-Si desea detener la programaci6n automatica_pulseel bot0n ENTER_.
Aparece el mensaje '2,Detener programaci6n automatica?". Seleccione "Si' con
losbotones 4 o _,-y, a continuaci0n, pulse el bot0n ENTER C,-L
Pulse el bot0n EXIT parasalir.
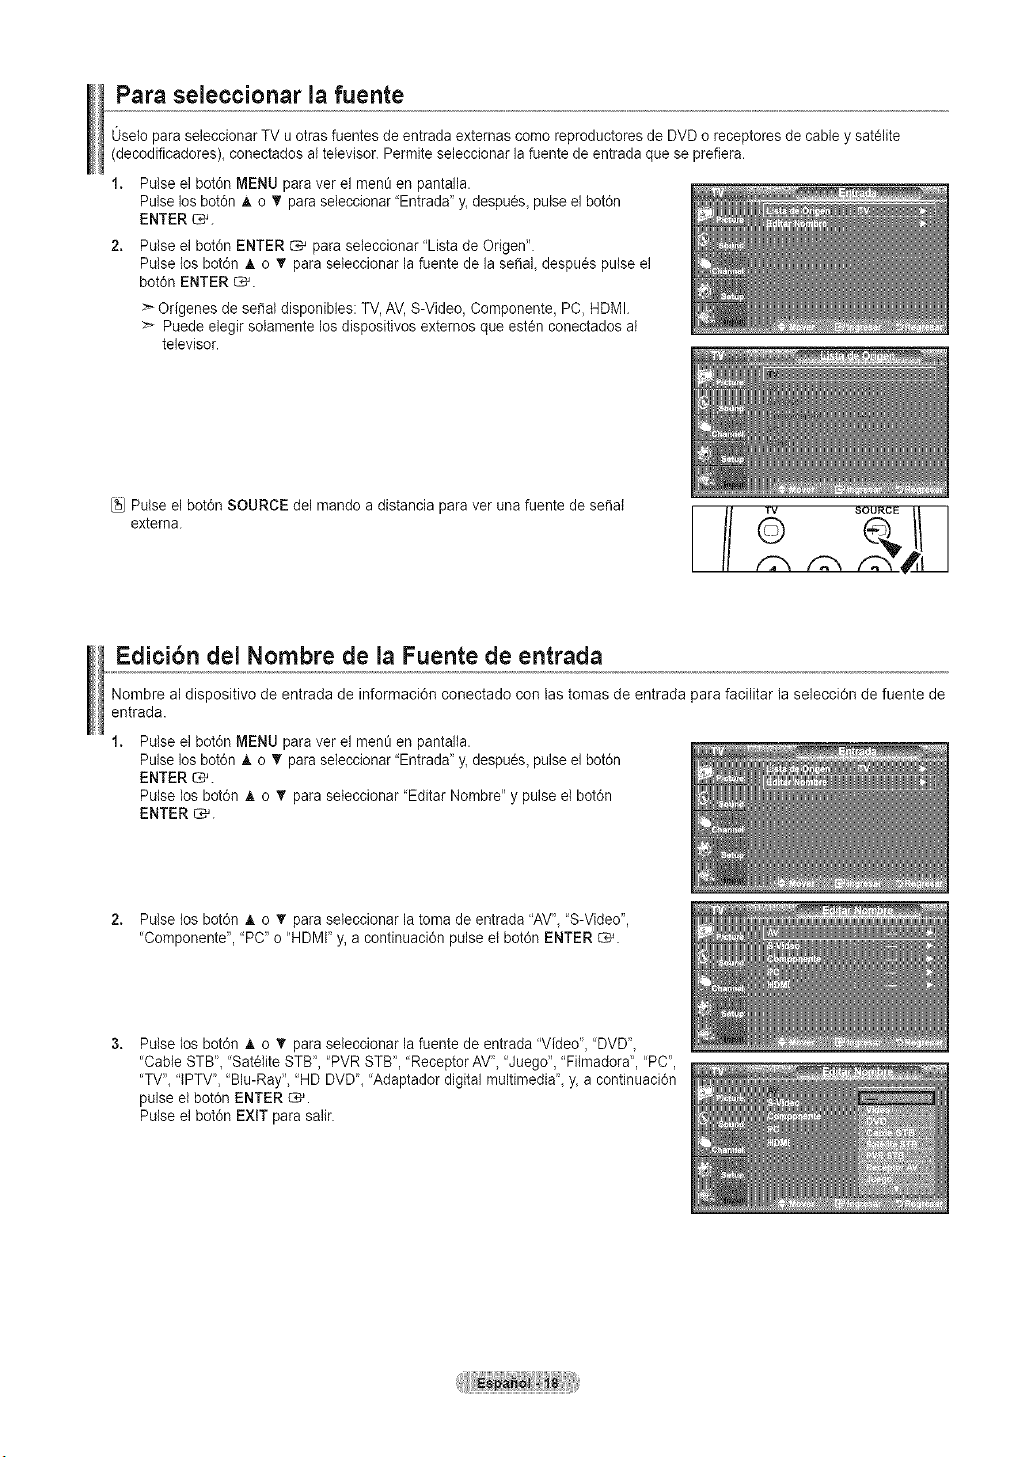
Para seleccionar la fuente
0selo paraseleccionar TV u otras fuentes de entrada externas como reproductores de DVD o receptoresde cable y sat_lite
(decodificadores)_ conectados attelevisor. Permiteseleccionar lafuente de entrada que se prefiera.
1. Pulse el bot6n MENU para ver el men_ en pantalla.
Pulse losbot6n A o _r para seleccionar"Entrada" y_despu6s_pulse el bot6n
ENTER _.
2. Pulse el botdn ENTER _ paraseteccionar "Lista de Origen".
Pulse los bot6n A o _' para seleccionar la fuente de laserial despues pulse el
botdn ENTER _.
>-Origenes de sepal disponibles: TV,AV,S-Video, Componente, PC, HDMI.
>* Puede elegir solamente los dispositivos externos que esten conectados at
televisor.
Pulse el bot0n SOURCE del mando adistancia para ver una fuente de serial
extema.
,,':',, fq_
Edicibn del Nombre de la Fuente de entrada
Nombre al dispositivo de entrada de informaci6n conectado con las tomas de entrada para facilitar la selecciOn de fuente de
entrada.
Pulse elbotdn MENU para ver el men_ en pantalta.
Pulse losbotdn A o T paraseleccionar "Entrada" y_despu6s_pulse el botdn
ENTER _.
Pulse los bot6n A o _' para seleccionar 'Editar Nombre" y pulse el bot6n
ENTER _.
2. Pulse tos bot6n A o T para seleccionar la toma de entrada "AV', "S-Video",
"Componente', "PC" o"HDMF y,a continuaci6n pulse et bot6n ENTER _.
Pulse los bot6n _, o • para seleccionar la fuente de entrada "Video", "DVD"_
'Cable STB'_ "Satelite STB', "PVR STB', "ReceptorAV", "Juego", "Fitmadora', "PC",
"TV"_"IPTV', "Blu-Ray", "HD DVD"_"Adaptador digital multimedia"_y_acontinuaci6n
pulse et bot6n ENTER _.
Pulse elbot0n EXIT parasalir.
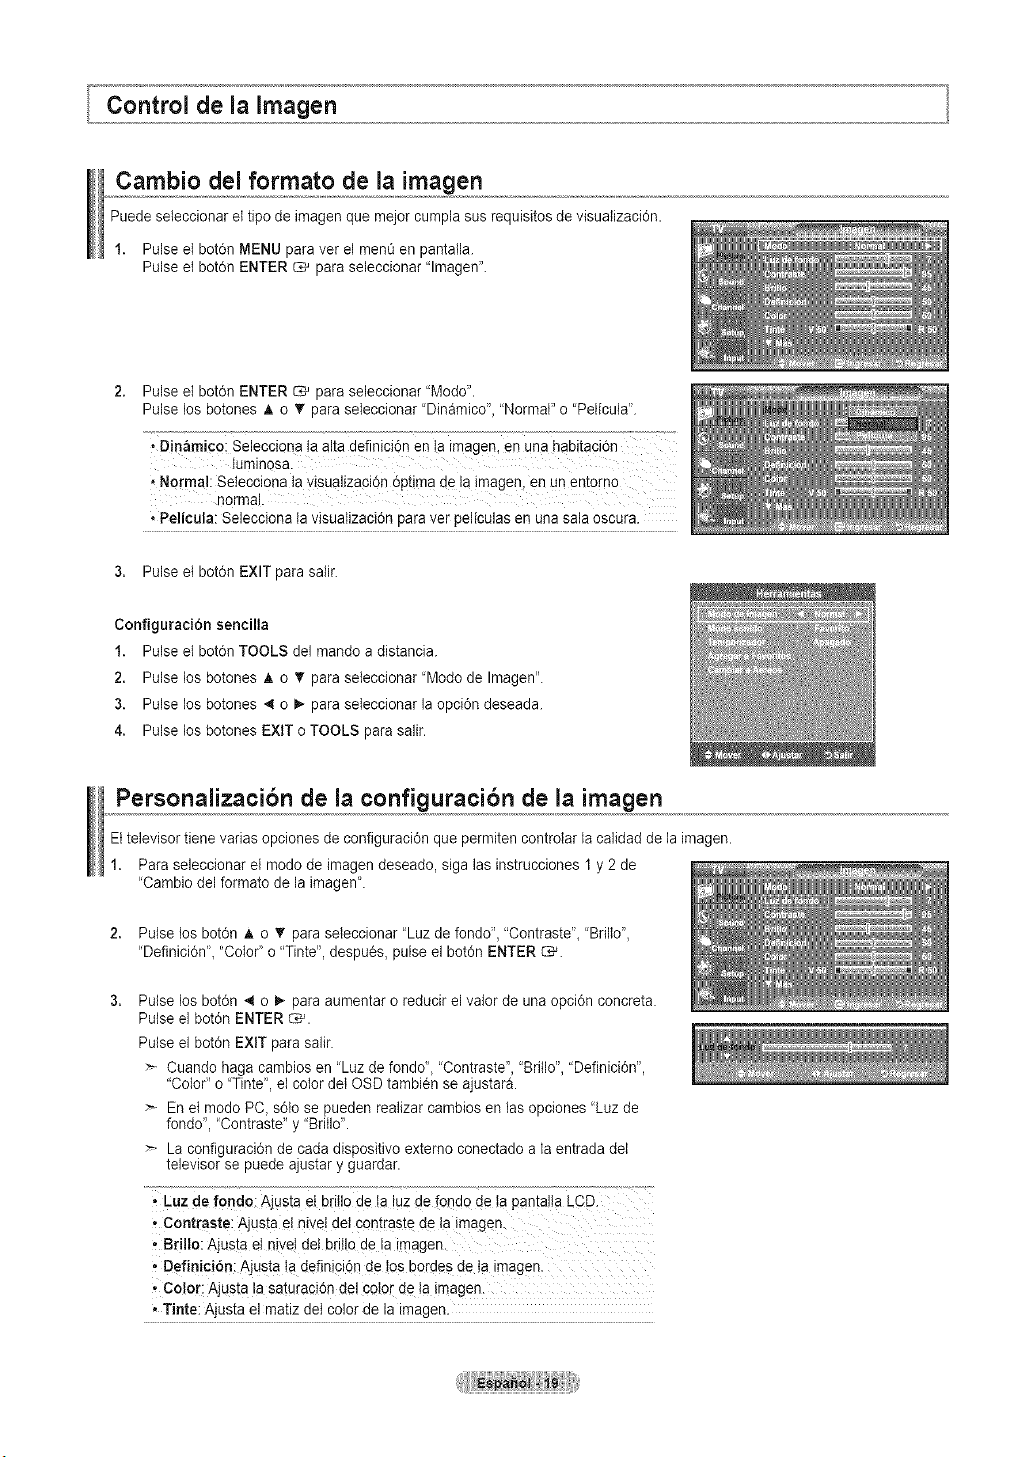
Cambio del formato de la imagen
Puede seleccionar el tipo de imagen que me!orcumpla sus requisitos de visualizacien.
1. Pulse el bot6n MENU paravet el menOen pantalla.
Pulse el botdn ENTER _ paraseleccionar "lmagen'.
2.
Pulse eI boten ENTER _ paraseleccionar "Modo".
Pulse los botones A o • para seleccionar "Dinamico","Normal" o "Pelicula".
• Din_micQi Selecciona ta alta definicidn en !a imagen, en una habitacien
IuminQsa.
,Norma!: Setecciona tavisualjzaciOn6ptima de la imagen, en un entorno
norma!.
• Pelicula: Selecciona ta visualizacidn paraver peiiculas en una sala oscura.
3. Pulse et boten EXIT para satir.
Configuracien sencilla
1. Pulse et bot6n TOOLS del mando a distancia.
2. Pulse los botones A o T para seieccionar 'Modo de Imagen'.
3. Pulse los botones 4 o _-para seleccionar la opcidn deseada.
4. Pulse los botones EXIT o TOOLS parasalir.
Personalizacibn de la configuracibn de la imagen
Eltelevisor tiene varias opcionesde configuracien que permiten controlar la calidad de la imagen.
1. Para seleccionar etmodo de imagen deseado, siga lasinstrucciones 1 y 2de
"Cambio del formato de la imagen'.
2. Pulse los boten A o _' paraseleccionar "Luz de fondo", "Contraste", "Brilto",
"Definici6n'_ "Color' o "Tinte', despues, pulse el boten ENTER C*_.
Pulse los botch _ o _,-paraaumentar oreducir el valor de una opcien concreta.
Putseel boten ENTER _.
Pulse el boten EXIT para salir.
Cuando haga cambios en "Luz de fondd, "Contraste', "Britlo", "Definicien",
"Color" o "Tinte', el color delOSD tambien se ajustara.
En et modo PC, seto se pueden realizarcambios en Insopciones 'Luz de
fondo", 'Contraste" y "Britlo'.
La configuracien de cada dispositivo externo conectado ala entrada dei
televisor se puede ajustar y guardar.
' Luz de rondo: Ajusta el bri!lode !a !uzdefondo de la pantalta LCD.
, Contraste: Ajusta eI niveI deI €ont[aste de ta imagen.
, Brilto: Ajusta el hive! det bril!ade!a imagen.
' Definicien: Ajustata deflnicidn de !osbordes de !a imagen.
, co!or: Ajusta la saturacidn de! CetO[deta imagen.
, Tinte: Ajusta el matiz deI color de la imagen.
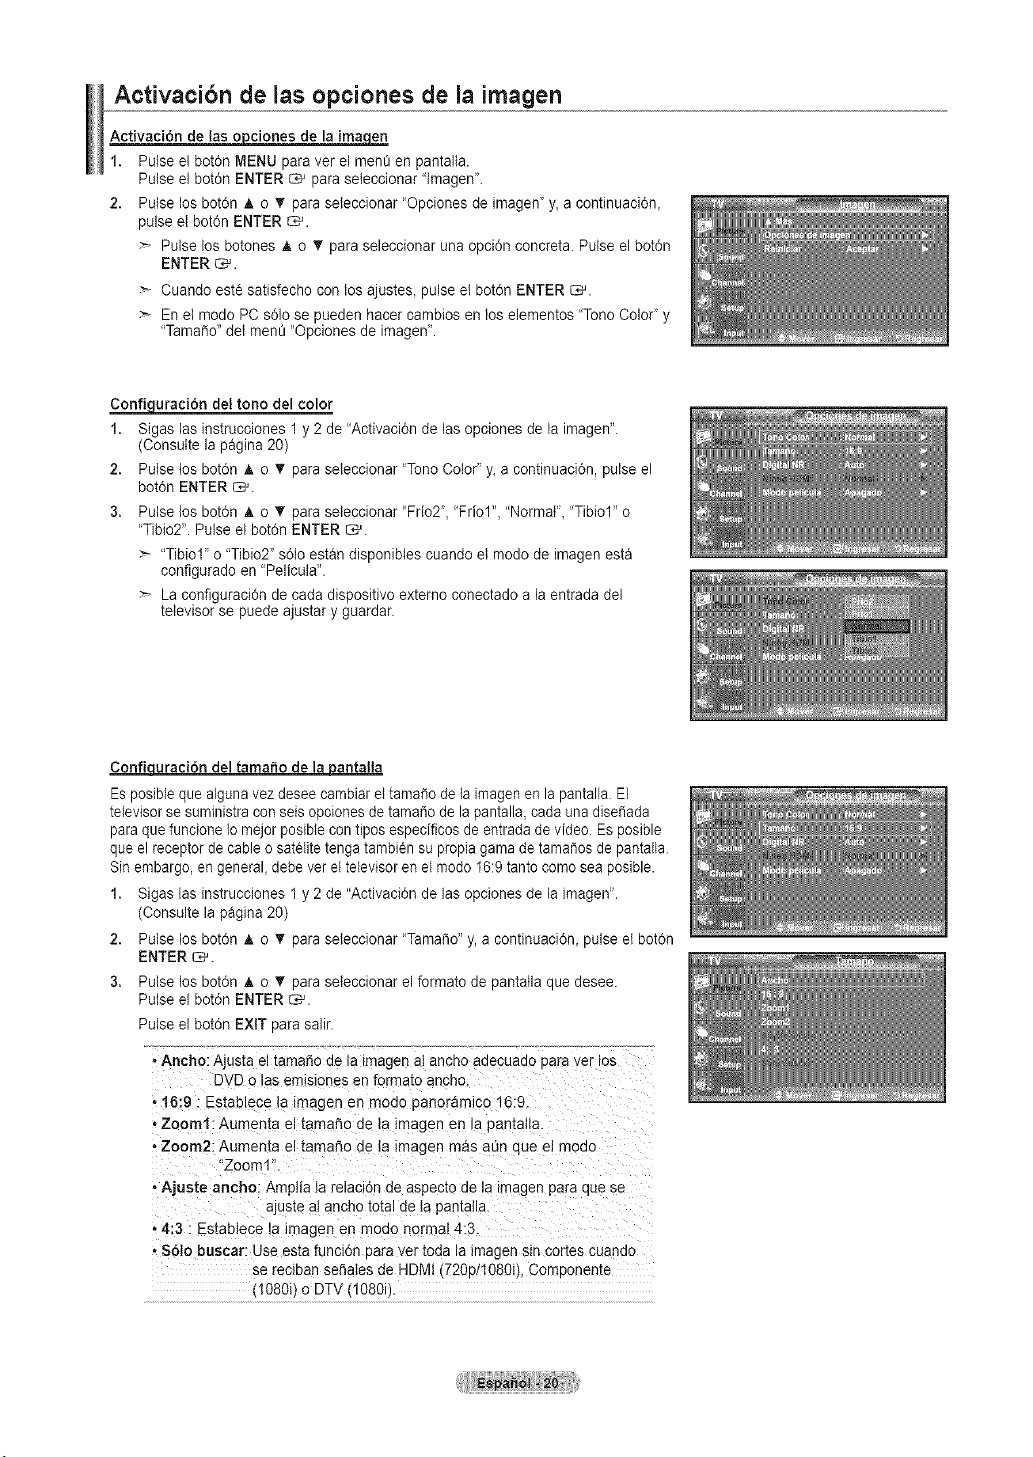
Activacibn de las opciones de la imagen
Activaci6n de las o_pcionesde la imaeCLe_
1. Pulse el bot0n MENU paraver el men_ en pantalta.
Pulse el bot0n ENTER _ paraseleccionar "lmagen".
2. Pulse los botdn A o T paraseleccionar "Opciones de imagen" y, a continuaci6n_
pulse el bot6n ENTER _.
Pulse losbotones A o _' paraseleccionar una opcidn concreta. Pulse el bot0n
ENTER C,_.
Cuando est_ satisfecho con losajustes, pulse et bot6n ENTER _.
En el modo PC s61ose pueden hacer cambios en los elementos 'Tono Color" y
"Tama_o" dei men_ "Opciones de imagenL
Co_uraci6n del tono del color
1. Sigas las instrucciones 1y2 de "Activaci6n de los opciones de laimagen'.
(Consulte la pagina 20)
2. Pulse tos bot6n A o _' paraseleccionar "ToneColor' y_a continuaci6n, pulseel
bot0n ENTER _.
3. Pulse los bot6n A o _' paraseieccionar "Frio2", "Friol", "Normal", "Tibiol" o
'Tibio2". Pulse etbot6n ENTER_.
"Tibiol' o "Tibio2"s6Ioestan disponibIes cuandoetmode de imagen esta
configurado en "Pelicula'.
La configuraci0n de cadadispositivo externo conectado ala entrada del
televisor se puede ajustar y guardar.
Confiquraci6n del tomato de_antalla
2,
3.
Esposiblequealgunavez deseecambiareltamafio de laimagenenlapantalla El
televisorse suministraconseis opcionesde tama_odela pantalla_coda una disei_ada
paraque funcione Io mejor posiblecon tipos especMcos de entrada de video Es posible
que el receptor de cable o satelitetenga tambi_n supropia gama de tama_osde pantalla
Sinembargo_en general_debe ver el televisor en el mode 16:9 tanto comeseaposible.
1. Sigas losinstrucciones 1 y 2 de "Activaci6n de lasopciones de la imogen'.
(Consulte la pagina 20)
Pulse los bot6n A o _' paraseteccionar "Tamale" y, a continuaci6n_pulseet bot6n
ENTER _.
Pulse los bot6n A o _' paraseleccionar elformate depantalla quedesee.
Puise el bot0n ENTER _.
Pulse el bot6n EXIT para salir.
• Ancho: Ajus[a eltamai% de aimagen at ancno aaeouaao Doraver !os
DVD o lasemlslones en formato ancho.
• 16:9 : Establece la lmagen en moao panoramico 16:9
• Zoom1: Aumenta el tama_o de la lmagen en }apamalta.
• Zoom2: Aumenta el tama_o de la lmagen mas a_n que el moao
"Zoom"
• Ajuste ancho: Amptia tarelacion de aspec_oae la _magenpara aue se
ajus[e at ancno [o[alde tapamaila.
• 4:3 : Estabtece la imagen en moao normal 4:3.
• 861o buscar: Use estafunci6n oara ver toaa la imagen sin cortes cuaneo
se reclbanse_ates oe HDIV (720D/I080iL ComDoneme
_I080i_o DTV11080i/.
Puede producirse una retenci6n temporal de imagen cuando se ve una
imagen estatica durante masdedos horas.
Despues de seleccionar "Zooml', "Zoom2" o"Ajuste ancho':
Pulse los botones 4 oI_ para seleccionar "Posici6n" y, a continuaci6n, pulse
el bot6n ENTER _. Utilicelos botones A o _' para desplazar la imagen
hacia arriba ohacia abajo.
Reiniciar: Pulse los botones 4 o _ paraseieccionar "Reiniciar" y, a
continuaci6n, pulseet bot6n ENTER _.
Despu6s de seleccionar "$61o buscar" en los modos HDMI(1080i) o
Component (1080i): Pulse losbotones A o T para seleccionar "H-Posici6n"
o"V-Posici6n" y,a continuaci6n, pulse elbot6n ENTER _.
Pulse los botones 4 oI_ para ajustar la posici6n de la pantalta.
Pulse et bot6n ENTER _.
Reiniciar: Pulse tosbotones h, o T para seleccionar 'Reiniciar" y, a
continuaci6n_pulseel bot6n ENTER _.
HD (High Definition)
16:9 - 1O8Oi(1920x1080), 720p (1280x720)
La configuraci6n de cada dispositivo externo conectado ala entrada del televisor se puede ajustar y guardar.
Fuente entrada
TV,Video, S-Video, Componente (480i, 480p) An@o, 16:9, Zoom1, Zoom2, 4:3
DTV(1O8Oi),Componente (1O8Oi),HDMI(720p,t080i) An@e, 16:9, 4:3, Ajuste ancho, $61o buscar
PC Ancho, 16:9, 4:3
AIternativo, pulse el bot6n RSIZE del mando a distancia de forrna repetida para
seleccionar uno de los ajustes de tama_o de imagen.
Ancho
Ajustael tamat]ode ta imagenaiancno
aaecuauoparaverlosDVDotas
emisionesen formateanono
16:c_
-staulece ta imagen en moao
panoramico 16:9.
Zoom_
Aumenta el tamano de a tmagen en ta
oamatla.
Zoom2 _ 4:3
Aumenta eI tamaSode la imagen mas Amatfa la relaclon de asoecto de laim- EstaDleceta imagen en moao normal
a_n que eI modo"Zoom1 agen paraque seajusre al ancnototal 4:3
ae la bantalla.
S61obusca
Use esta funci6n oara ver toda ta
magen sincores cuando se reciDan
set]alesde HDMI(720p/1080i),
Componente (1080i) o DTV(!O8Oi).

Confi_uracidn de lareduccidn digital deruido
Sila serial deemisidn que recibe eltelevisor es ddbit, puede activarse la funcidn
de reduccidn digital del ruido (Digital Noise Reduction) parareducir la estatica y las
imagenes superpuestas que pueden aparecer enla pantalla.
1. Sigas las instrucciones 1y2 de "Activacidn de las opciones de la imagen".
(Consulte la pagina 20)
2. Pulse los botdn A o _' paraseteccionar "Digital NR" y_a continuacidn, pulseel
botdn ENTER _.
3. Pulse los botdn A o _' paraseleccionar "Apagado", "Bajo", "Medio", "Alto"o "Auto".
Pulse el botdn ENTER _.
• Apagado: APaga lafuncidn de la reduccidn del ruido de la pantalla
• Bajo: Reduce el ruido de tapantalla a un nivel bajo.
• Medio: Reduce el ruido de la pantalla aun nivetmedio.
• Alto: Reduce el ruido de la pantalla aun nivel alto.
,Auto: Reconoce y reduce el ruido de la pantaila automaticamente.
Pulse el botdn EXiT para salir.
_uracidn detnivel de_ro HDMI
Se puede seleccionar el nivet de negroen la pantatla paraajustar la profundidad de
esta.
1,
2.
3.
Sigas las instrucciones 1 y 2 de "Activaci6n de lasopciones de la imagen'.
(Consulte la pagina 20)
Putselos bot6n A o _' paraseteccionar "N.neg HDMI"y, acontinuacidn, pulse el
botdn ENTER _.
Pulse los bot6n A o _' paraseleccionar "Normal" o "Bajo"y, acontinuacidn, pulse
el botdn ENTER _.
'Normal: La pantalta adql
, Bajo: La pantaltase oscurece.
Esta funcidn sdlo esta activa cuandoun dispositivo externo esta conectado a
HDMI. La funcidn "N. neg HDMI" puede que nosea compatible condispositivos
externos.
Pulse el botdn EXIT para salir.
_uracidn del modo _elicula
Eltelevisor se puede configurar para detectar automaticamente y procesar lasseriales
de taspeliculas procedentes de todas las fuentes y ajustar la imagenpara conseguir
una catidad 6ptima.
1. Sigas las instrucciones 1y2 de 'Activaci6n de lasopciones dela imagen'.
(Consulte la pagina 20)
2. Pulse tos bot6n _,o _' paraseleccionar 'Mode pelicula" y, acontinuacidn, pulse el
botdn ENTER _.
Pulse los bot6n a, o T paraseteccionar "Apagado" o"Auto"y, acontinuacidn,
pulse el bot6n ENTER _.
Pulse el botdn EXiT para salir.
"Mode pelicula" es compatible conTV,VIDEO, S-VIDEO,
COMPONENTE(480i / 1080i) y HDMI(480i / 1080i).
Reajuste de valores de la imagen a los valores predefinidos de f_brica
1. Pulse el bot0n MENU para ver el men_ en pantalla.
Pulse elbet0n ENTER _ para seleccionar 'lmagen'.
2. Pulse losbot6n A o _' para seteccionar "Reiniciar" y, despues, pulse el bot6n
ENTER _. Pulse los bet6n A o _' paraseteccionar 'Aceptar" o 'Cancetar".
Pulse elbot0n ENTER _.
Pulse elbot6n EXIT parasalir.
>_Se puede restaurar cada mode.

Cambio del est ndar de sonido
Puedeseteccionar et mode de son!do que mejor seajuste at programa que estaviendo.
1. Pulse el bot6n MENU para vet el menO enpantatla.
Pulse los bot6n A o V para seleccionar "Son!do" y, despues, pulse el bot6n
ENTER _.
2. Pulse el bot6n ENTER _ para seleccionar "Mode".
Pulse los bot6n A o _' para seleccionar el ajuste de son!do "Normal", "MOsica",
"Pelicula", "Diatogo" o "Favorite" y pulse el bot6n ENTER _.
Pulse el bot6n EXIT para salir.
oNormal: Se!ecciona ei rood0de sonido normal, .................................
• MQsica: Realza la mQsica respecto de tas voces, :
• Pelicu!a: Proporciona e!meier s0nido paraver peliculas.
,,Di_!ogo: Realza tas voces respected e !osson!dos.
• Favorite: Recupera la configuraci6n de son!dopersonalizada,
(vea "Personalizaci0n del sonido'_)
Configuraci6n sencilla
1. Pulse el bot6n TOOLS det mando adistancia.
2. Pulse los botones _, o • para seleccionar "Mode son!do".
3. Pulse los botones ,,I o I_ para seleccionar la opci6n deseada.
4. Pulse los botones EXIT oTOOLS para salin
Personalizacibn del sonido
Es posible ajustar los parametros del son!do seg0n sus preferencias personales.
2,
Pulse el botdn MENU paraver el men_ en pantalta.
Pulse los bot6n A o _' paraseteccionar "Son!do"y, despues, pulse el botdn
ENTER _.
Pulse los bot6n A o _' paraseteccionar "Ecualizador' y, despues, pulse et bot6n
ENTER _.
Pulse los bot6n _ o 1_ paraseleccionar una frecuencia determinada conel fin de
ajustarla.
Pulse los bot6n A o _' paraaumentar oreducir el nivel de una frecuencia
concreta.
Pulse el bot6n ENTER _.
Pulse el bot6n EXIT para salir.
' Ajuste de balance de son!do l/D: para austar et balance deson!dode los
altavoces lID.
oAjuste del ancho debaada (100Hz, 300Hz, 1KHz, 3KHz, 10KHz)
Para ajustar el nivel de Iasdiferentes frecuencias de ancho de banda.
Sireatiza cambiosen losvalores de "Ecuatizador", et mode de sonido cambiara
automaticamente al mode "Favorite".
Configuracibn del TruSurround XT (SRS TS XT)
TruSurround XT es una tecnologia SRS patentada que solventa el problema de reproducir contenido multicanat 5.1 en dos
altavoces. Trusurround proporciona una experiencia de sonido virtual convincente atravesde cualquier sistemade reproducci6n
condos attavoces. Estotaimente compatible con todoslosformatos multicanal.
1. Pulse el bot6n MENU paraver el men0 en pantalta.
Pulse los bot6n A o _' paraseleccionar 'Sonido" y,despues, pulse el bot0n
ENTER _.
2. Pulse los bot6n A o _' paraseteccionar "Trusurround SRS XT" y,despues, pulse
el bot6n ENTER C,-_.
Pulse los bot6n _, o T paraseleccionar 'Apagado" o 'Encendido" y,despu_s,
pulse el bot6n ENTER _.
Pulse el bot0n EXIT para salir.
TruSurround XT, SRSy el simbolo (e) son marcas
SRS(_O_ comerciales de SRS Labs_Inc.
La tecnologia TruSurround XTesta incorporada bajo
licencia de SRS Labs,Inc.
Pulse et botdn SRS del mando adistancia paraseleccionar 'Apagadd o
"Encendido"
I-!/ " "fl
Seleccibn de una pista de sonido multicanal (MTS) - Digital
Elsistema de transmisidn de TV digital permitetransmitir simultaneamente rnuchaspistas de audio (por ejemplo, traducciones
simultaneas del programa en otros idiomas). La disponibitidadde estas "multipistas" adicionates depende det programa.
"Opc. Multi-track" s61oesta disponible en et modo TV.
Idioma preferido
1. Pulse el bot6n MENU para ver el menOen pantalla.
Pulse los botdn _. o _' para seleccionar "Sonido" y, despu_s, pulse el botdn
ENTER _.
> Forma rapida de acceder at mene MTS: Pulse el bot6n "MTS' del mando a
distancia. Puedeescuchar en un idioma distinto del elegido pulsando et botdn
MTS.
2. Pulse losbotdn A o _' paraseleccionar "Opc.Multi-track"y, despues, pulse el bot6n
ENTER _.
3. Pulselosbot6nes ENTER _ para seleccionar"ldiomapreferido'.
Pulselosbotdn A o T paraetegirel idioma que desee
(English_Espa_ol,Fran9ais)y pulse el botdn ENTER _.
Pulseel bot6n EXIT parasalir.
:_ "ldiomapreferido"estadisponibies61oenel modo de televisi6ndigital.
S61osepuede seleccionar uno de los idiomasque ofrece laemisora.
['8/ Puede escuchar enun idioma distinto deI configurado como 'ldioma preferido"
pulsando el botdn MTS det mando a distancia.

Seleccibn de una pista de sonido multicanal (MTS) - Analbgico
Sonido multi=track
Pulse el bot0n MENU paravet el men_ en pantalta.
Pulse los bot6n A o T para seleccionar 'Sonido" y_despues_ pulse el bot6n
ENTER _.
Pulse los bot6n A o • para seleccionar "Opc.Multi-track' y,despu_s, pulse el
bot6n ENTER _.
Pulse los bot6n A o T para seleccionar "Sonido Multi-track' y, despu_s, pulse el
bot6n ENTER _.
Pulse los bot6n A o 'Vpara seleccionar unaconfiguraci0n que desee; pulse
despu_s el bot6n ENTER _.
Pulse el bot6n EXIT parasatir.
Mono: Elijapara canates que emiten en monoaural ositiene dificultades con
la recepci6n de seSatesestereo
, Est_reo! EIija paracanates que emitenen est_reo.
• SAP: Elijaesta opci6n para escuchar el programa deaudio independiente, que
normatmente es una traduccidn deotto idioma.
>_'Sonido Multi-track" esta disponible s61oen el modo de televisi6n anal0gica.
Segen el programa concreto emitido, puede escuchar en 'Mono", 'Estereo" o
"SAP".
[_} Pulse varias veces losbot0nes MTS del mando a distancia para seleccionar "Mono",
"Estereo" o"SAP".
Control autom; tico de volumen
Reducelas diferencias en el nivel de volumen entre las emisoras.
1. Pulse el bot6n MENU paraver et men0 en pantalla.
Pulse los botdn A o T paraseleccionar "Sonido"y,despu_s, pulse et botdn
ENTER _.
2. Pulse losbot0n A o T paraseleccionar "Vol. Auto"y, despues, pulse el bot0n
ENTER _.
3. Pulse los bot6n _, o T paraseleccionar "Apagado' o "Encendido' y, despues,
putseel bot0n ENTER_.
Pulse el botdn EXIT parasalir.
Encendidolapagado del altavoz del televisor
Se silencia la salida de sonido desde losaltavoces del televisor.
1. Pulse el bot6n MENU paravet el men0 en pantatla.
Pulse los botdn A o T paraseleccionar "Sonido' y_despu6s_ pulse el botdn
ENTER _.
2. Pulse losbot6n A o T paraseleccionar "Altavoz TV" y_despues, pulseel bot6n
ENTER _.
Pulse los botdn A o T paraseleccionar "Apagado"y_despues, pulse et botdn
ENTER _.
Pulse el bot6n EXIT parasalir.
_- Cuando "Altavoz TV" se ajusta en "Apagado', el _nico men_ de sonido que se
puede ajustares "Opc. Multi-track".
Losbot6nes VOL(_:),VOL_) y MUTE no funcionan si "AltavozTV" esta
establecido en "Apagado'.
AJtavoz TV Salida de Salida de Salida de
Salida de sonido Salida de sonido Salida de sonido
Encendido altavoces altavoces altavoces
AltavozTV
Silencio Silencio Sitencio Salida de sonido Salidadesonido Salida de sonido
Apagado
Sin eel_al deJ ........ i ....
Sllencto Sllencto Slienclo Sllenclo ; Sllencto Stlenclo
video
DD _"_ Fabricado bajolicencia de Dolby Laboratories. "Dolby" y el simbolo de la dobte Dson marcas
D I G II T A L registradas de Dolby Laboratories.
Conexibn de los auriculares (se vende pot separado)
Puedeconectar unosauriculares al equipo sideseaver un programade televisi6n sinmolestar alas personas que estan en la
mJsmahabitacidn.
PanellateraldelTV
:_Cuando se inserta el enchufe de un auricular enel terminal delauricular, no se
puede usar la opci6n 'Altavoz TV" de{ men0 Sound.
>- El uso continOode auriculares a un volumen elevado puede da_arla capacidad
auditiva.
No recibira sonido de los altavoces cuando conecte los auriculares at televisor.
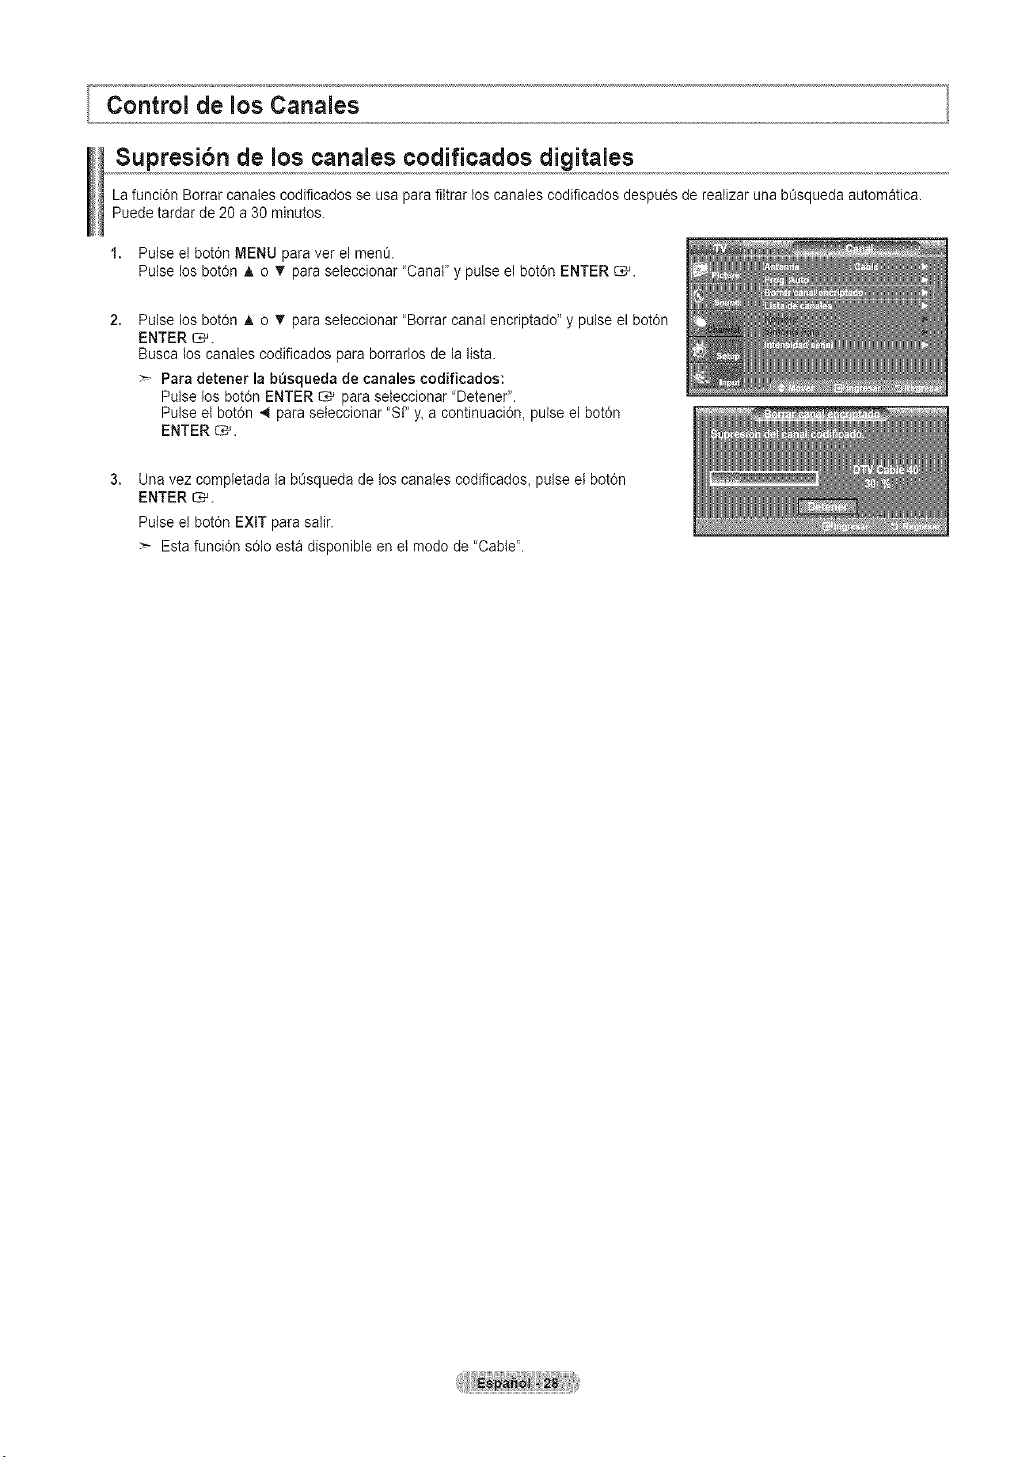
Supresibn de los canales codificados digitales
La funci6n Borrar canates codificados se usa parafittrar los canates codificados despues de reatizar una b%queda automatica.
Puedetardar de 20 a 30 minutes.
1. Pulse el bot6n MENU paraver el men_.
Pulse los bot6n A o _' paraseteccionar "Canal"y pulse el bot0n ENTER _.
2,
Pulse los bot6n A o _' paraseleccionar 'Borrar canal encriptado" y pulse el bot6n
ENTER _.
Busca los canalescodificados paraborrarlos de la lista.
Para detener la bQsqueda decanalea codificados:
Pulse losbot6n ENTER O,_ paraseleccionar "Detener".
Pulse et bot6n 4 paraseteccionar 'SF y_acontinuaci6n, pulse el bot0n
ENTER _.
Unavez completada la bt3squeda delos canales codificados_pulse et bot6n
ENTER _.
Pulse el bot6n EXIT para salir.
Esta funci6n s01oesta disponible en et modo de "Cable'.
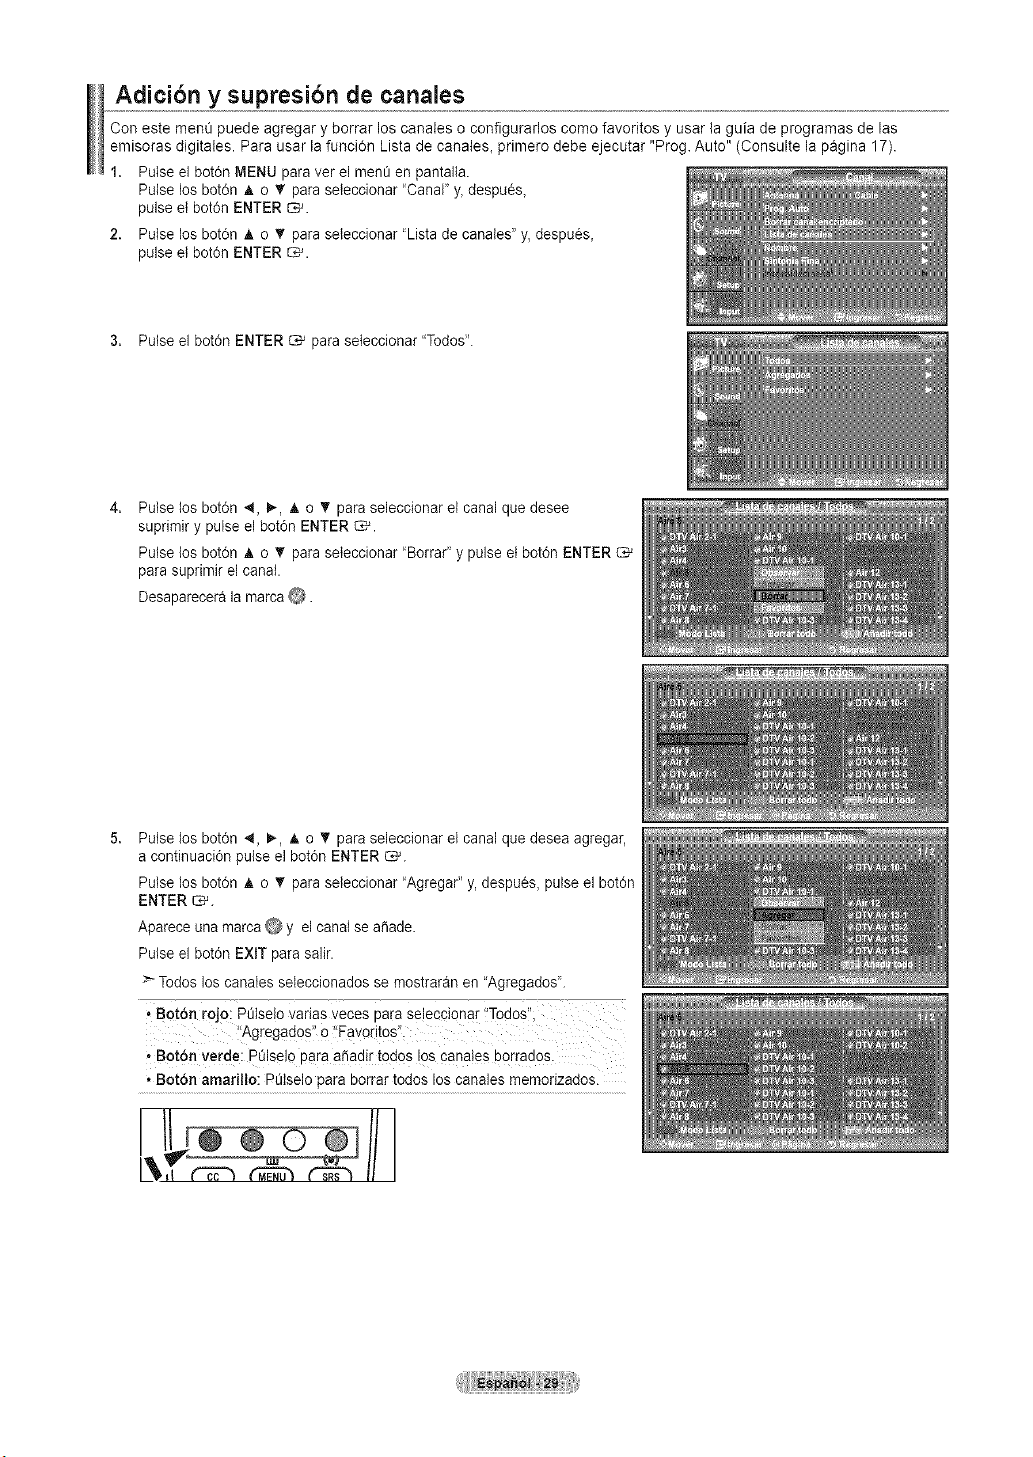
Adicibn y supresibn de canales
Con este menOpuede agregar y borrar los canales o configurarios como favoritos y usar la guia de programas de las
emisoras digitales. Para usar la funci0n Lista de canates_ primero debe ejecutar "Prog. Auto" (Consulte la pagina 17).
1. Pulse el botOnMENU paraver el men_ en pantalta.
Pulse los bot6n _. o • para seleccionar 'Canal" y_despu0s_
pulse etbot6n ENTER _.
2. Pulse los bot6n A o T paraseteccionar 'Lista de canates"y,despu0s_
pulse etbot6n ENTER _.
3. Pulse el bot0n ENTER _ paraseleccionar "Todos".
4,
Pulse los bot6n 4, _, A o T para seleccionar el canal que desee
suprimir y pulse el baton ENTER C*_.
Pulse los bot6n A o _' paraseleccionar 'Borrar" y pulse etbotdn ENTER
parasuprimir el canal.
Desaparecerala marca _.
Pulse los bot6n 4, 1_, A o T para seleccionar el canal que desea agregar,
acontinuaciOn pulse el baton ENTER C,_.
Pulse los botdn A o _' paraseieccionar "Agregar" y, despues, pulse el baton
ENTER _.
Apareceuna rnarca @ y el canal sea_ade.
Pulse el botdn EXIT para salir.
> Todos loscanates seteccionados semostraran en"Agregados'.
• BotOn rojo IPt)tselo varias veces parase!eccionar !'Todos"_
,,BotOn verde: ptJlselo para aSadirtodos !os cana!es borrad0s.
* Botbn amarillo: PStselo para borrar todos loscanales memorizados.
H
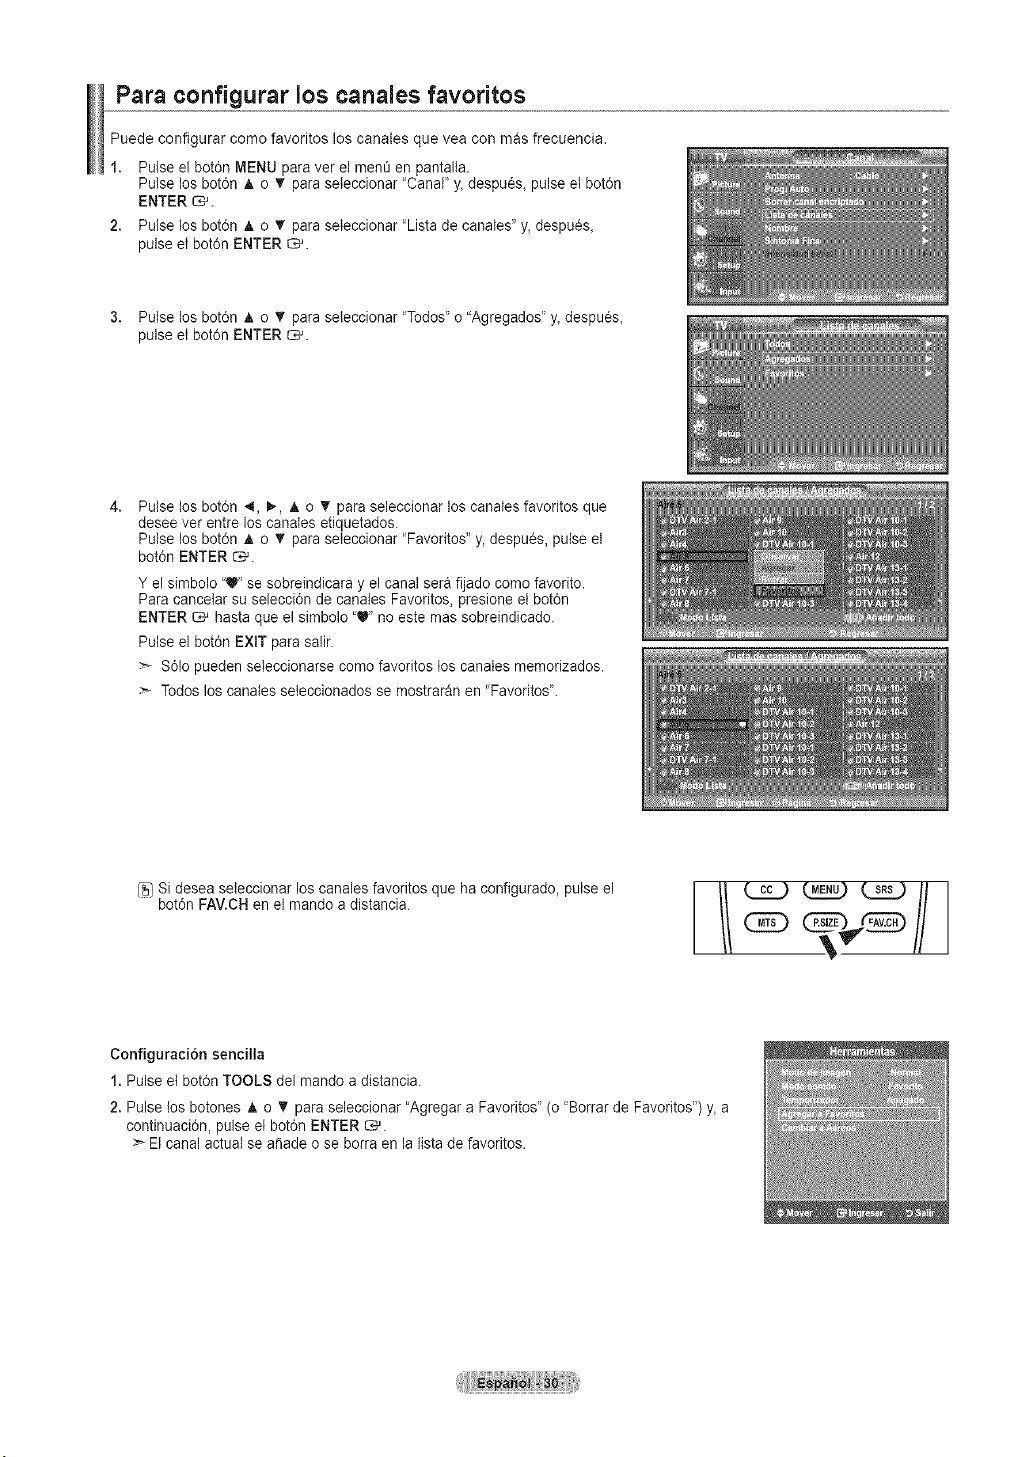
Para configurar los canales favoritos
Puede configurar como favoritos los canales que vea con mas frecuencia.
1. Pulse ei botdn MENU paraver el men_ en pantalta.
Pulse los bot6n A o _' paraseteccionar "Canal' y_despu6s_pulse et botdn
ENTER _.
2. Pulse los bot6n h, o T paraseleccionar 'Lista de canates"y,despu_s_
pulse el botdn ENTER _.
3. Pulse los bot6n A o T paraseteccionar "Todos" o"Agregados' y_despu6s_
pulse el botdn ENTER _.
4.
Pulse los bot6n .,_, 1_,A o T para seleccionar loscanates favoritos que
desee vet entre los canates etiquetados.
Pulse los bot6n J, o T paraseleccionar 'Favorites" y, despues, pulse el
botdn ENTER _.
Y el simbolo "U' se sobreindicara y el canal sera fijado como favorito.
Para cancetar su selecci6n decanales Favorites, presione etbot6n
ENTER _ hasta que el simbolo '_ no este massobreindicado.
Pulse el bot6n EXIT para salir.
S61opueden seleccionarse come favorites los canates memorizados.
Todos loscanates seleccionados se mostraran en 'Favoritos'.
Sidesea seteccionar loscanales favorites que ha configurado, pulse el
bot0n FAV.CH en el mando adistancia.
Configuracidn sencilla
1.Pulse et bot6n TOOLS del mando adistancia.
2.Pulse los botones A o _' para seleccionar "Agregar aFavoritos" (o "Borrarde Favoritos') y_a
continuacidn, pulseet botdn ENTER _.
>_El canal actual se a_ade o se borraen la listadefavorites.

Visualizacibn de la lista decanales
Puede mostrar una lista de todos los canales_de los agregados ofavoritos.
1. Pulse el bot6n MENU paraver el men_ en pantalta.
Pulse los bot6n A o _' paraseieccionar "Canal' y_despu6s_pulse e{bot6n
ENTER _.
2. Pulse los bot6n _, o _' paraseteccionar "Listade canates"y,despu6s_ pulse
el bot6n ENTER C*_.
3. Pulse los bot6n & o V' paraseleccionar 'Todos"_'Agregados" o 'Favorites'
y, despues, pulse el bot6n ENTER _.
4,
Pulse los bot6n A o • para seteccionar 'Canal' y_despu6s_pulse et bot6n
ENTER _.
Para atternar entretodos los canales, los agregados olos favoritos pulse el
bot6n Rojo del mando a distancia.
,.Botbn R0]o: PStseto varias veces para seleccionar "Todos",
'Agregados'_o 'fFavoritos'_
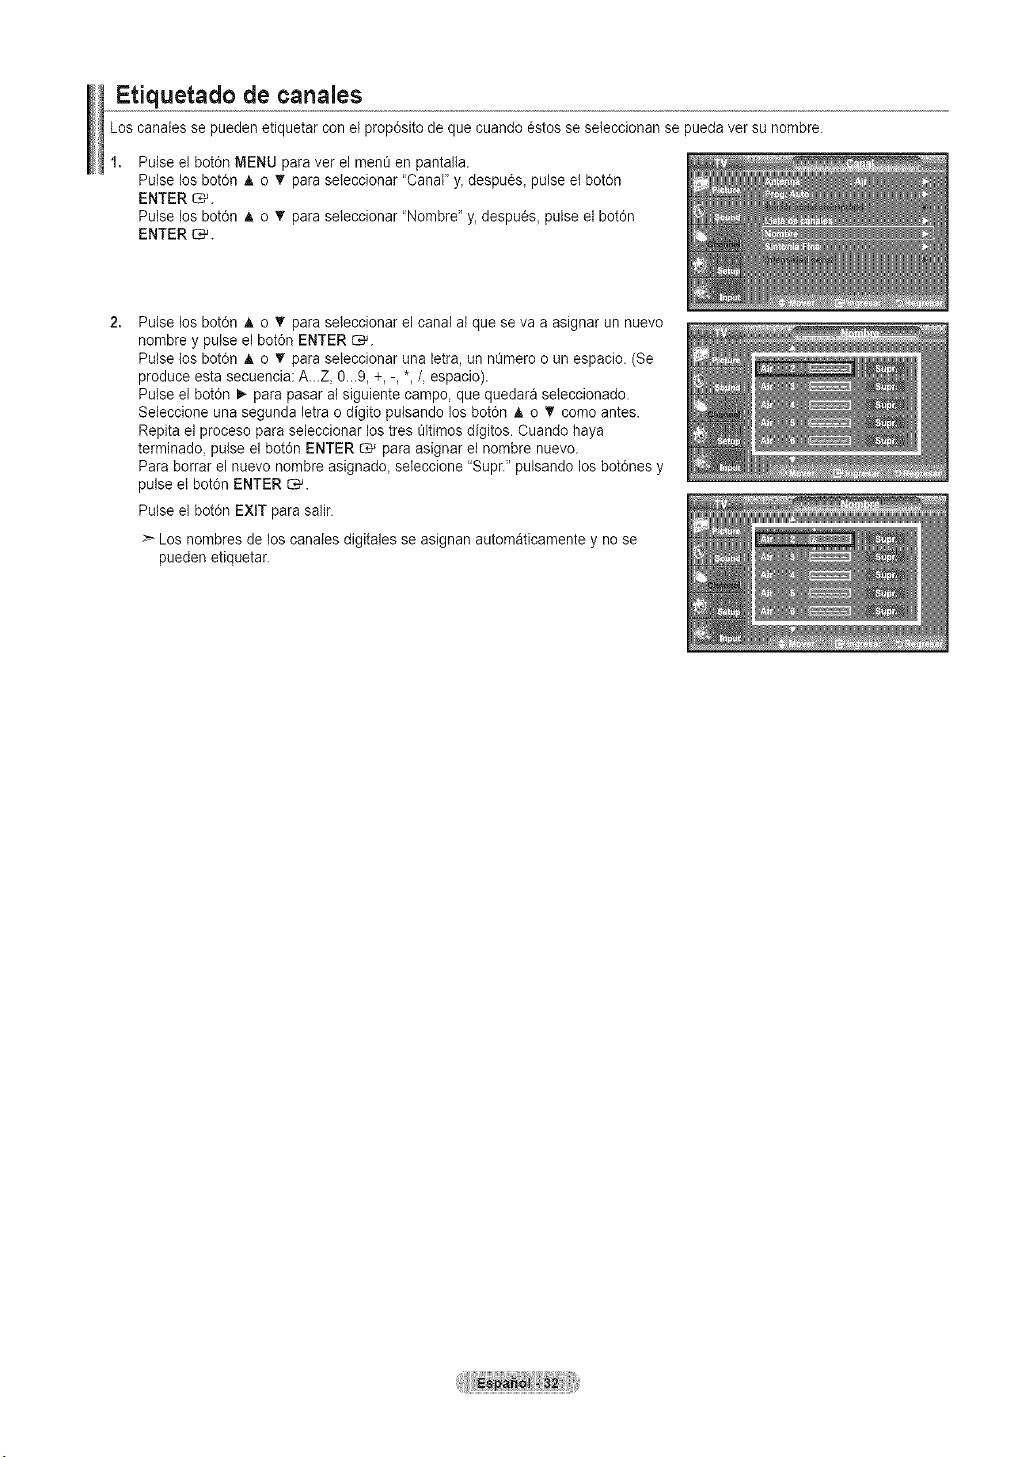
Etiquetado de canales
Loscanales se pueden etiquetar conetprop0sito de que cuando6stos se seleccionan se pueda vet su nombre.
Pulse el botdn MENU paraver el men_ en pantalta.
Pulse los bot6n A o _' paraseteccionar 'Canal' y, despu6s, pulse et bot6n
ENTER _.
Pulse los bot6n A o _' paraseleccionar 'Nombre" y, despues, pulse el botdn
ENTER _.
2,
Pulse los bot6n A o 'I' paraseleccionar el canal al que se va aasignar un nuevo
nombre y pulse el botdn ENTER C_.
Pulse los bot6n A o T paraseleccionar una letra, un nOmerooun espacio. (Se
produce esta secuencia: A...Z, 0...9, +,-, *,/, espacio).
Pulse el botdn I_ parapasar al siguiente campo, que quedara seleccionado.
Seleccione una segunda letra odigito pulsando losbotdn A o _' comoantes.
Repita el proceso para seleccionar lostres _ltimosdigitos. Cuando haya
terminado, pulse el botdn ENTER _ paraasignar el nornbre nuevo.
Para borrar el nuevonornbre asignado, seleccione "Supr." pulsando losbot0nes y
pulse etbot6n ENTER _.
Pulse el bot0n EXIT para salir.
:_Los nombres de los canalesdigitales se asignan automaticamente y no se
pueden etiquetar.
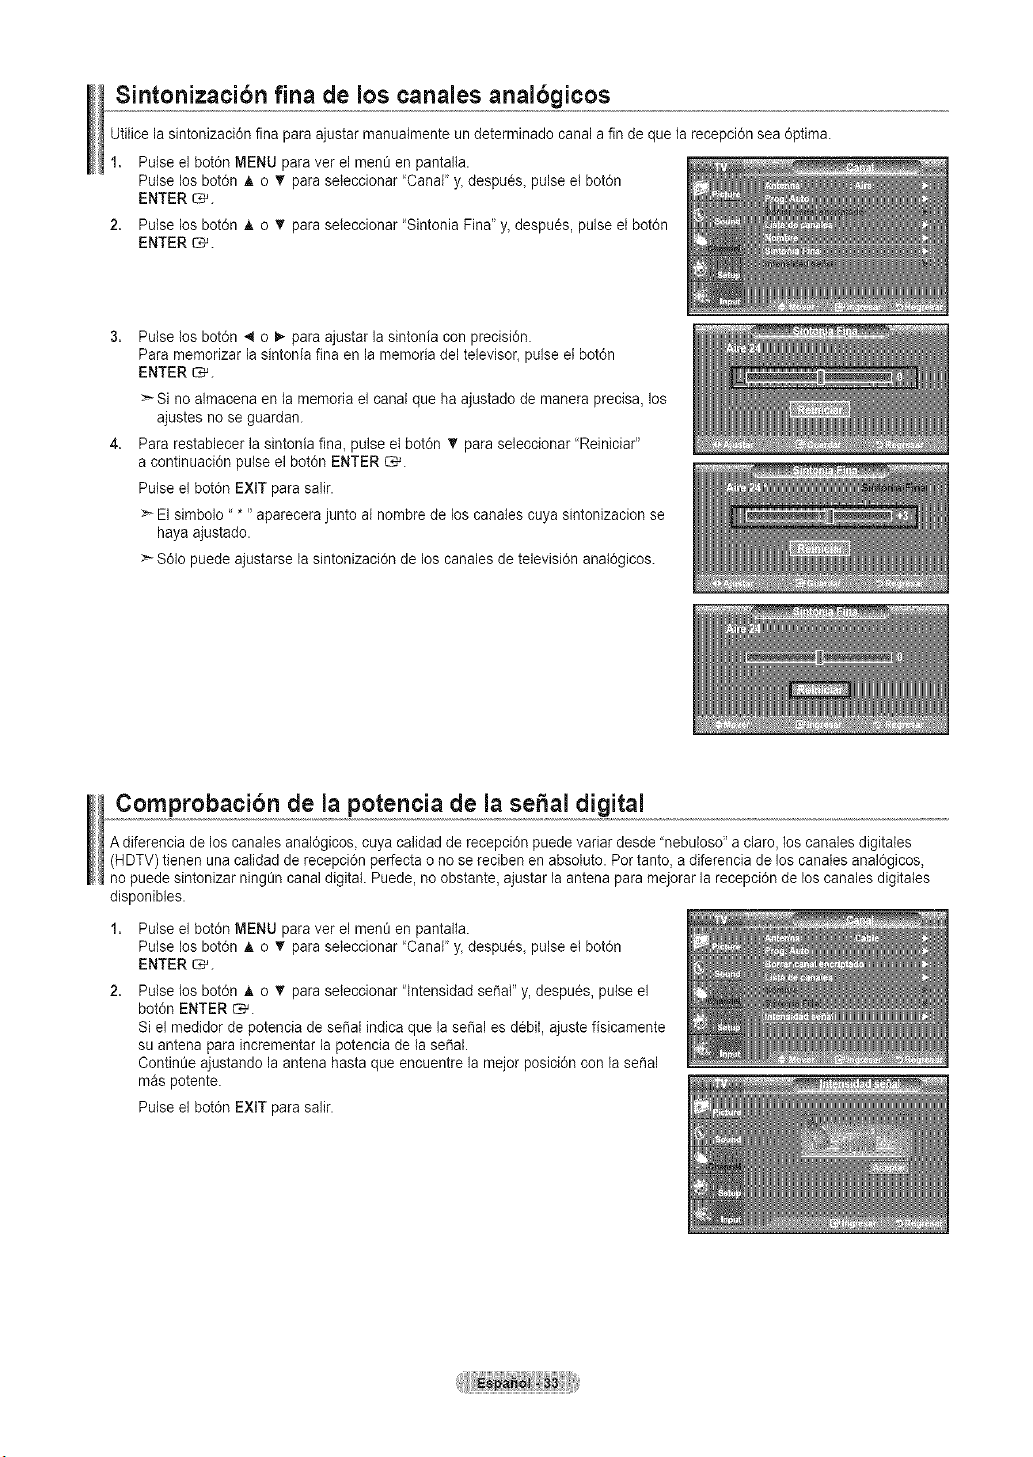
Sintonizacibn fina de los canales analbgicos
Utitice la sintonizaci0n fina para ajustarmanuatmente un determinado canal a finde que la recepci6n sea 6ptima.
1. Pulse el bot0n MENU paraver el men_ en pantalta.
Putselos bot6n A o _' paraseleccionar 'Canal" y_despu0s_pulse et bot6n
ENTER _.
2. Pulse los bot6n A o _' paraseteccionar "Sintonia Find' y_despues, pulse et bot6n
ENTER _.
4,
Pulse los bot6n 4 o _- paraajustar la sintonia con precision.
Para memorizar la sintonia fina en la memoria del televisor_pulse el bot6n
ENTER _.
:_Si no almacena en la rnemorie el canal que ha ajustado demanera precisa, los
ajustes no se guardan.
Para restablecer la sintonia fina_pulse et bot6n _' paraseleccionar 'Reiniciar"
acontinuaciOn pulse el bot0n ENTER C_.
Putseel bot0n EXIT para salir.
_* El simbolo ..... aparecera junto al nombre de los canales cuya sintonizacion se
haya ajustado.
> S01opuede ajustarse la sintonizaci6n de los canales de televisi6n anatOgicos.
Comprobacibn de la potencia de la sepal digital
A diferencia de los canalesanal6gicos, cuya calidad de recepciOn puede variar desde "nebuloso" a claro,los canales digitales
(HDTV) tienen una catidad de recepci6n perfecta o nosereciben en absolute. Pot tanto, adiferencia delos canates anal6gicos,
no puedesintonizar ning_ncanal digital. Puede,noobstante, ajustar la antena para mejorar la recepciOnde loscanalesdigitates
disponibles.
1. Pulse el botOnMENU paraver el men_ en pantalta.
Pulse los bot6n A o _' paraseleccionar 'Canal" y_despu0s_pulse et bot6n
ENTER _.
2,
Pulse los bot6n A o _' paraseleccionar "lntensidad sepal"y, despues, pulse el
botOnENTER _.
Siel medidor de potencia de serial indica que la serial es debit, ajuste fisicamente
su antena para incrementar lapotencia de la sepal.
Contint_eajustando la antena hasta que encuentre la mejor posiciOncon la sepal
mas potente.
Pulse el botOnEXIT para salir.
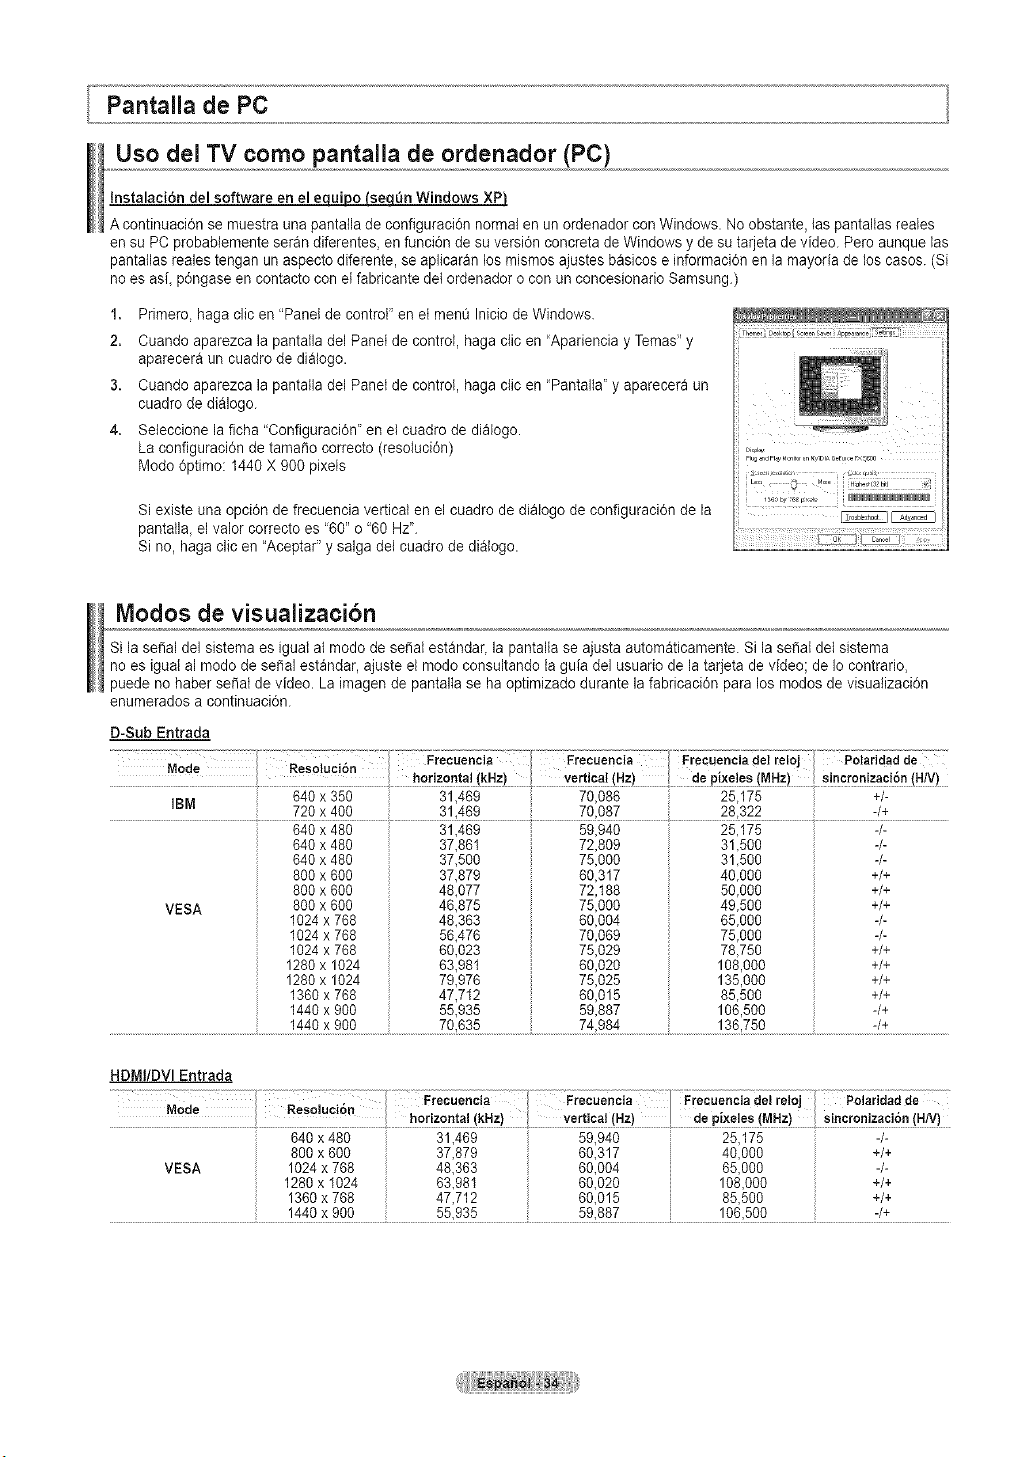
Uso dei TV como pantalla de ordenador (PC)
Instalaci6n del software en el __
A continuaci6n se muestra una pantaila de conflguraci6n normal en un ordenador conWindows. Noobstante, las pantaltas reales
en suPCprobablemente seran diferentes, en funci6n de su versi6n concreta de Windows ydesu tarjeta de video. Pero aunque las
pantallas realestengan un aspecto diferente, se aplicaran los mismos ajustes basicos einformaci6n en la mayoria de loscases. (Si
no esasi, p6ngase en contacto conel fabricante del ordenador ocon un concesionario Samsung.)
1. Primero, haga clic en "Panel de control" en et menQInicio de Windows.
2. Cuando aparezca la pantatla del Panel de control, haga cfic en 'Apariencia y Temas" y
aparecera un cuadro de dialogo.
3. Cuando aparezca la pantatla del Panel de control, haga ctic en "Pantalta" y aparecera un
cuadro de dialogo.
4. Seleccione la ficha "Configuraci6n' en el cuadro de dialogo.
La configuraci6n de tamaSocorrecto (resoluci6n)
Mode 6ptimo: 1440 X 900 pixets
Siexiste una opci6n de frecuencia vertical en el cuadro de dialogo de configuraci6n de la
pantatla_el valor correcto es '60" o "60 Hz".
Si no, haga clicen "Aceptar" y salga del cuadro dedialogo.
Modos de visuaiizacibn
Sila serial del sistema es iguatal mode de se_atestandar, la pantalta se ajusta automaticamente. Si la sepal del sistema
no es igual al modo de sepal estandar, ajuste el mode consultando taguia del usuario de latarjeta de video; de Iocontrario,
puede no haber se_at de video. Laimagen de pantalta se ha optimizado durante lafabricaci6n paralos modes de visuafizaci6n
enumerados acontinuaci6n.
D-Sub Entrada
IBM +/-
720 x 400 31469 7&087 28,322 -/+
VESA
640 x 480
640 x 480
640 x 480
800 x 600
800 x 600
800 x 600
1024x 768
1024x 768
1024x 768
1280x 1024
1280x 1024
1360x 788
1440x 900
31,469
37,861
37,500
37,879
48,077
46,875
48,363
56,476
60,023
63,98t
79,976
47,712
55,935
59,940
72,809
75,000
60,317
72,188
75,000
60,004
70,069
75,029
60,020
75,025
60,015
59,887
25,175
31,500
31,500
40,000
50,000
49,500
65,000
75,000
78,750
108,000
135,000
85,500
106,500
-/-
+/+
+/+
+/+
-/-
-/-
+/+
+/+
+/+
+/+
-/+
HDMI/DVl Entrada
Freeuencia - 1 Frecue.ciadelrel4! _olarid_dde T
vertical(Hz) ! depixeles(MHz) ! Sincronizaci&n(H/V)
60 317 i 40 000 i +/+
60,004 i 65,000 i -/-
60,020 i 108,000 i +/+
60,015 i 85,500 i +/+
59,887 i 106,500 i -/+
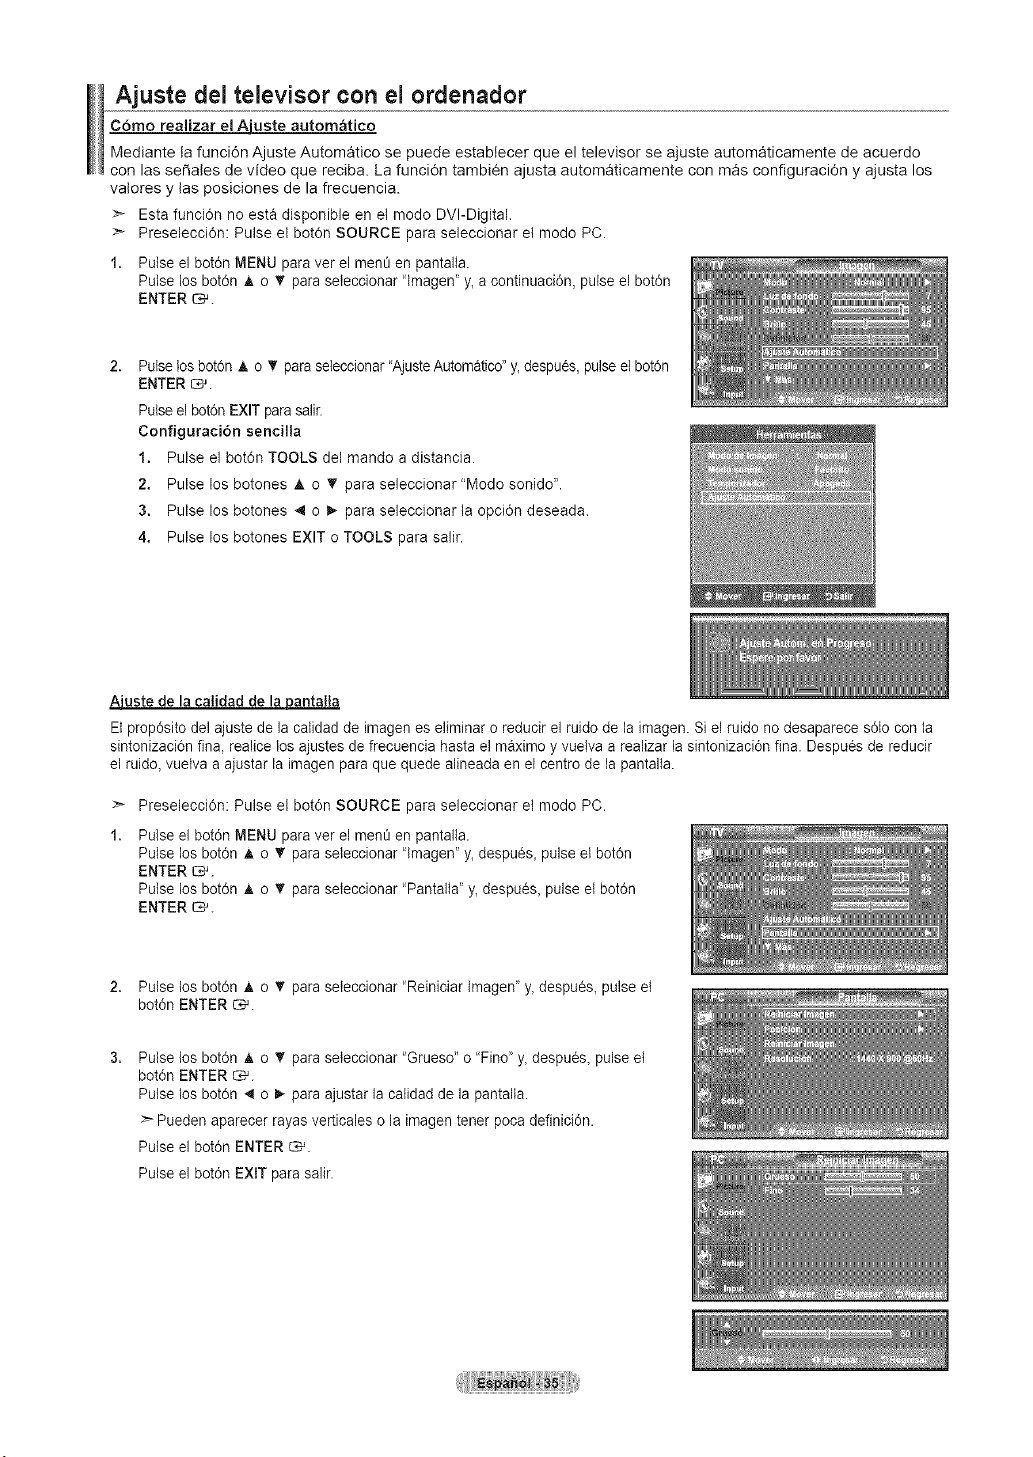
Ajuste del televisor con el ordenador
C6mo realizar el Ajuste automatieo
Mediante la funci6n Ajuste Automatico se puede establecer que el televisor se ajuste automaticamente de acuerdo
con las se_ales de video que reciba. La funci6n tambi_n ajusta automaticamente con mas configuracidn y ajusta los
valores y tas posiciones de la frecuencia.
>_ Esta funcidn no esta disponible en el modo DVI-Digital.
:_ Preselecci6n: Pulse el bot0n SOURCE para seleccionar et modo PC.
1. Pulse el bot6n MENU paraver el men_ en pantalta.
Pulse los bot6n A o _' paraseleccionar 'lmagen" y_acontinuaci6n, pulse el bot0n
ENTER _.
2,
Pulse losbot6n A o _' paraseleccionar "AjusteAutomatico" y_despu6s, pulse el bot6n
ENTER _.
Pulse el bot6n EXIT parasalir.
Configuracibn sencilla
1. Pulse el bot6n TOOLS del mando adistancia.
2. Pulse los botones A o V para seleccionar "Modo sonido _'.
3. Pulse los botones 4 o i_ para seleccionar la opci6n deseada.
4. Pulse los botones EXIT o TOOLS para salir.
Aiuste dela calidad de la pantalla
Et prop6sito del ajuste de lacatidad de imagenes eliminar oreducir el ruido de la imagen. Siel ruido no desaparece s61ocon la
sintonizaci6n fina, realice los ajustes de frecuencia hastael maximo y vuetva a realizar la sintonizaci6n fina. Despues dereducir
el ruido, vuelva aajustar la imagen para que quede alineada enet centro de la pantalta.
>- Preselecci6n: Pulse el bot6n SOURCE para seleccionar et modo PC.
Pulse el bot6n MENU paraver el men_ en pantalta.
Pulse los bot6n A o T paraseleccionar 'lmagen" y_despu_s_ pulse et bot6n
ENTER _.
Pulse los bot6n A o _' paraseleccionar 'Pantalta' y_despu_s_ pulse et bot6n
ENTER _.
2. Pulse tos bot6n A o _' paraseleccionar 'Reiniciar lmagen" y_despu_s_ pulse et
bot6n ENTER _.
Pulse los bot6n A o T paraseleccionar "Grueso" o 'Fino" y_despu6s_ pulse et
bot6n ENTER _.
Pulse los bot6n 4 o _ paraajustar la calidad de la pantalta.
>- Pueden aparecer rayas verticales o la imagen tenet pocadefinici6n.
Pulse el bot6n ENTER _.
Pulse el bot6n EXIT para salir.
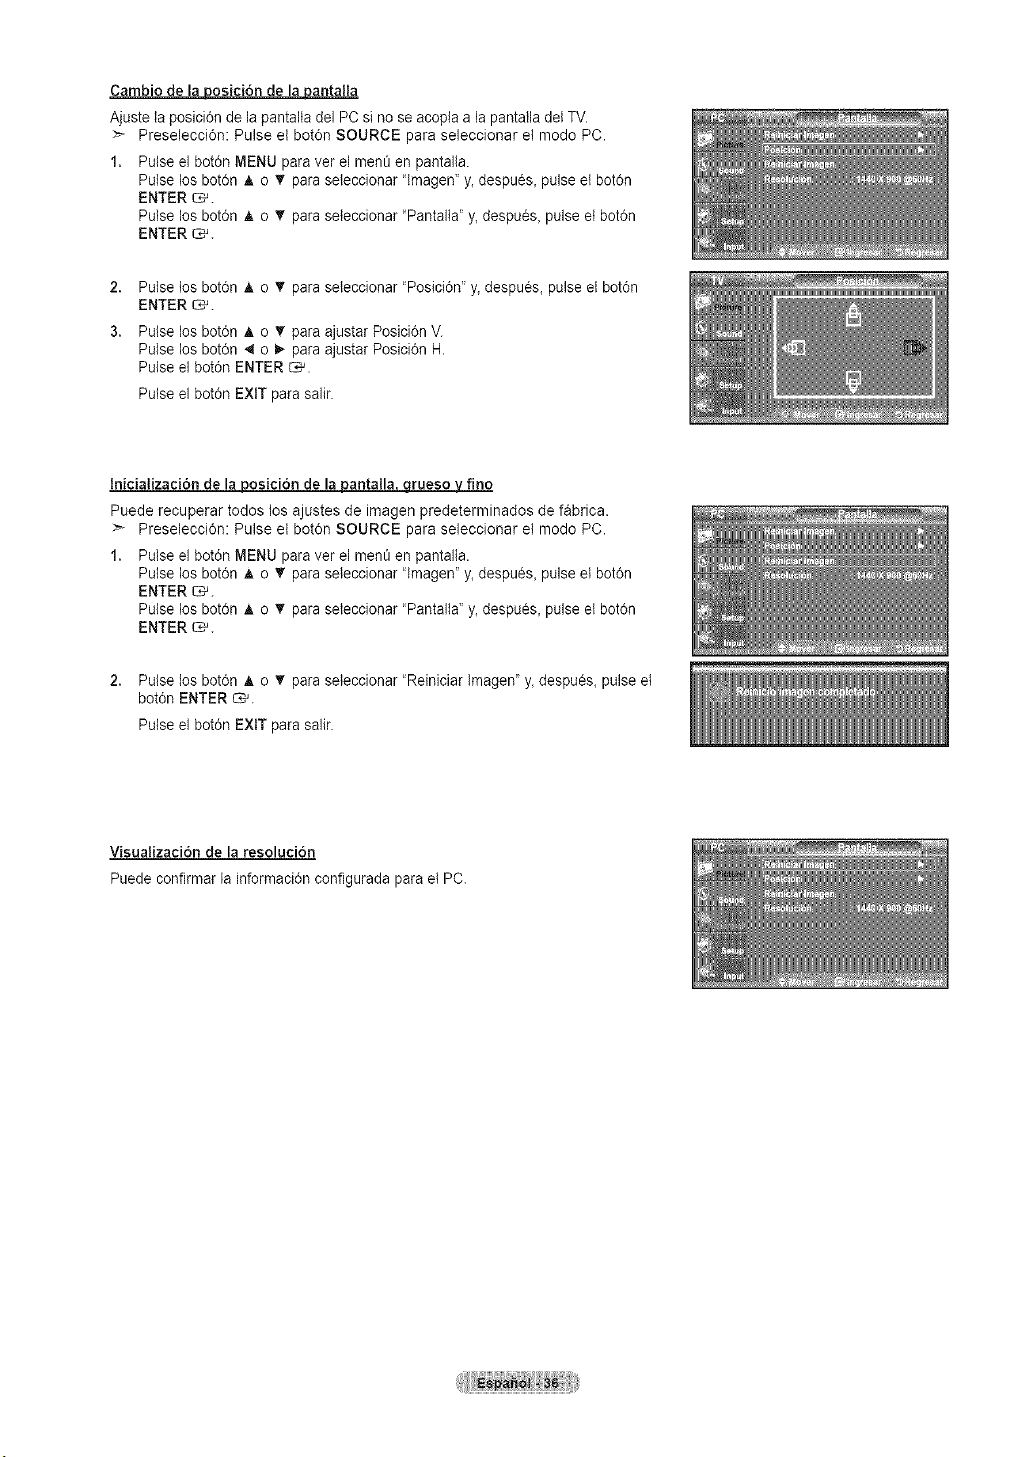
Cambio de la posici6n de la pantaHa
Ajuste la posici6n de la pantalta del PC sino seacopla a la pantatladelTV.
Preselecci6n: Pulse el bot6n SOURCE para seleccionar et mode PC.
1. Pulse el bot6n MENU paraver el ment_en pantalla.
Pulse los bot6n A o _' paraseteccionar "Imagen' y_despu6s_pulseet bot6n
ENTER _.
Pulse los bot6n A o _' paraseteccionar "Pantalia" y, despues, pulse et bot6n
ENTER _.
2,
3.
Pulse tos bot6n A o _' paraseteccionar "Posici6n" y, despues, pulse et bot6n
ENTER _.
Pulse los bot6n A o _' paraajustar Posici6n V.
Pulse los bot6n 4 o _ paraajustar Posici6n H.
Pulse ei bot6n ENTER _.
Pulse el bot6n EXIT para salir.
InicializaciOn de laposici6n de la antalla rueso fvfino
Puede recuperar todos los ajustes de imagen predeterminados de f_brica.
:_ Preselecci6r_: Pulse el bot6r_SOURCE para seleccionar et mode PC.
1. Pulse el bot6n MENU paraver el ment_en pantalta.
Pulse los bot6n A o T paraseleccionar 'lmagen" y,despu_s, pulse etbot6n
ENTER _.
Pulse los bot6n A o _' paraseleccionar 'Pantalta' y, despu_s, pulse et bot6n
ENTER _.
2. Pulse los bot6n A o _' paraseleccionar "Reiniciar lmagen" y,despu_s, pulse et
bot6n ENTER _.
Pulse el bot6n EXIT para salir.
Visualizaci6n de la resolucion
Puede confirmar la informaci6n configurada para et PC.

Configuracibn del Reloj
Establecer el reIoj es necesario parausar lasdistintas caracteristicas de temporizador del TV.
Ademas_puede comprobar la hera mientras esta viendo et TV.(Simplemente pulse INFO.)
O_uste manual del retoi
Pulse el bot6n MENU para ver el menO en pantatla.
Pulse los bot6n _t, o '_" para seleccionar "Configuraci6n" y, despu_s, pulse et
bot6n ENTER _.
Pulse los bot6n A o V para seleccionar "Tiempo" y, despues, pulse el bot6n
ENTER _.
2. Pulse el bot6n ENTER _ para seieccionar "Reloj".
3. Pulse el bot6n ENTER _ para seleccionar "Modo Reloj".
Pulse los bot6n Jt,o V para seleccionar "Manual" y, despu6s, pulse el bot6n
ENTER _.
4. Pulse los bot6n A o V para seleccionar "Config. Reloj" y, despu_s, pulse et
bot6n ENTER _.
Pulse los bot6n 4 o 1_ para desplazarse a "Mes", "Dia", "A_o", "Hora",
"Minuto" o "amlpm". Seleccione la fecha y la hora que desee pulsando los
bot6nes _t, o _', pulse despuCs el bot6n ENTER _.
Pulse el botSn EXIT para salir.
La hera actual aparecera siempre que se pulse el bot6n INFO.
>- Puede ajustar el mes, etdia, et a_o, la hora y el minuto directamente pul-
sando los bot6nes num_ricos del mando adistancia.
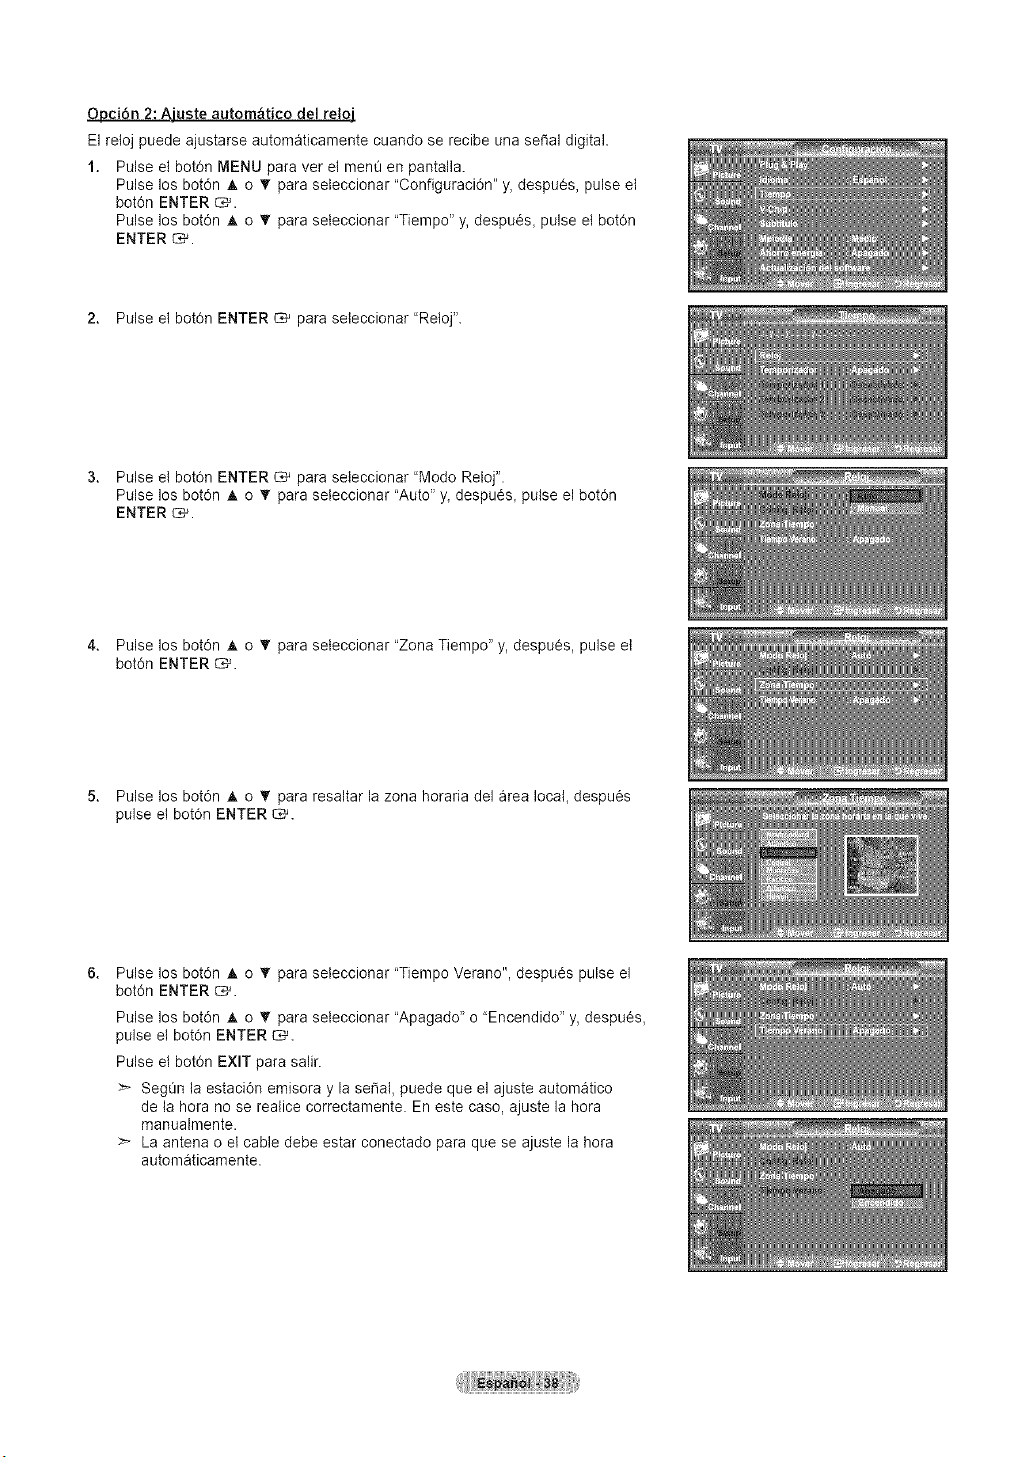
Opci6n 2:Ajuste autom&tico del reloj
Elretoj puede ajustarse automaticamente cuando se recibe una seral digital.
1. Pulse el bot6n MENU para ver el menQen pantalla.
Pulse los bot6n _, o _' para seteccionar "Configuraci6n" y, despues, pulse et
bot6n ENTER _.
Pulse los bot6n A o _' para seteccionar "Tiempo" y, despu_s, pulse et bot0n
ENTER C*_.
2. Pulse el bot0n ENTER _ para seleccionar "Retoj".
3. Pulse et bot0n ENTER _ para seleccionar "Modo Reloj".
Pulse los bot6n A o _' para seleccionar "Auto" y,despu_s, pulse el bot6n
ENTER C,-_.
4. Pulse los bot6n • o _' para seteccionar "Zona Tiempo" y,despues, pulse et
bot6n ENTER _.
5. Pulse los bot6n A o '_ para resaltar la zona horaria del area local, despu_s
pulse el bot0n ENTER _.
Pulse los bot6n _, o _' para seleccionar "Tiempo Verano", despu6s pulse el
bot6n ENTER _.
Pulse los bot6n _, o T para seteccionar "Apagado" o "Encendido" y, despues,
pulse el bot0n ENTER _.
Pulse et bot6n EXIT para salir.
>- SegOn la estaci6n emisora y la serial, puede que el ajuste automatico
de la hera no se realice correctamente. En este case, ajuste la hera
manualmente.
La antena o el cable debe estar conectado para que se ajuste la hera
automaticamente.
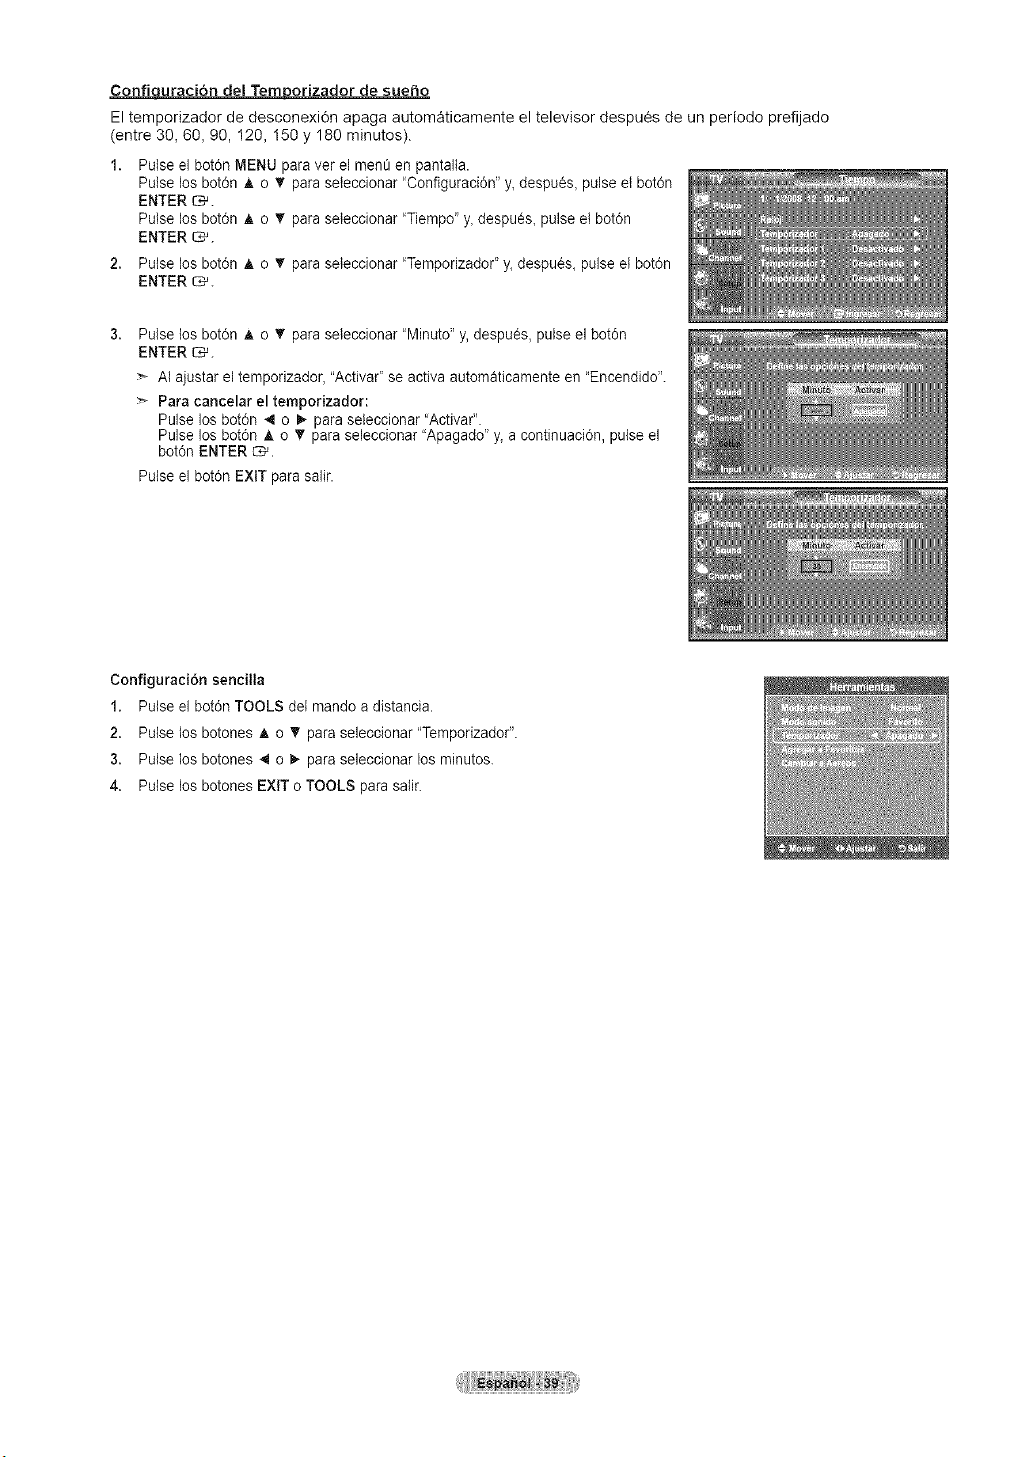
Confiquraci6n de! Temporizador de sueho
El temporizador de desconexi6n apaga automaticamente el televisor despu_s de un periodo prefijado
(entre 30, 60, 90, I20, 150 y 180 minutes).
Pulse el bot6n MENU paraver el men_ en pantalta.
Pulse los bot6n A o T paraseleccionar 'Configuraci6n" y, despu_s, pulse et bot6n
ENTER _.
Pulse los bot6n A o _' paraseleccionar 'Tiempo" y, despu_s, pulse et bot6n
ENTER _.
2. Putse los bot6n A o _' paraseleccionar "Temporizador"y, despues, pulse et bot6n
ENTER _.
Pulse los bot6n A o _' paraseteccionar "Minuto"y, despu_s, pulse el bot6n
ENTER _.
Al ajustar el temporizador, "Activar" se activa automaticamente en "Encendido'.
Para cancelar el temporizador:
Pulse los bot6n 4 o _ paraseleccionar "Activar".
Pulse los bot6n A o T paraseleccionar "Apagado"y, a continuaci6n, pulseel
bot6n ENTER _.
Pulse el bot6n EXIT para salir.
Configuraci6n sencilla
1. Pulse el bot0n TOOLS det mando adistancia.
2. Pulse los botones A o _' para seleccionar "Temporizador".
3. Pulse los botones 4 o _,-para seleccionar los minutos.
4. Pulse los botones EXIT o TOOLS parasatir.
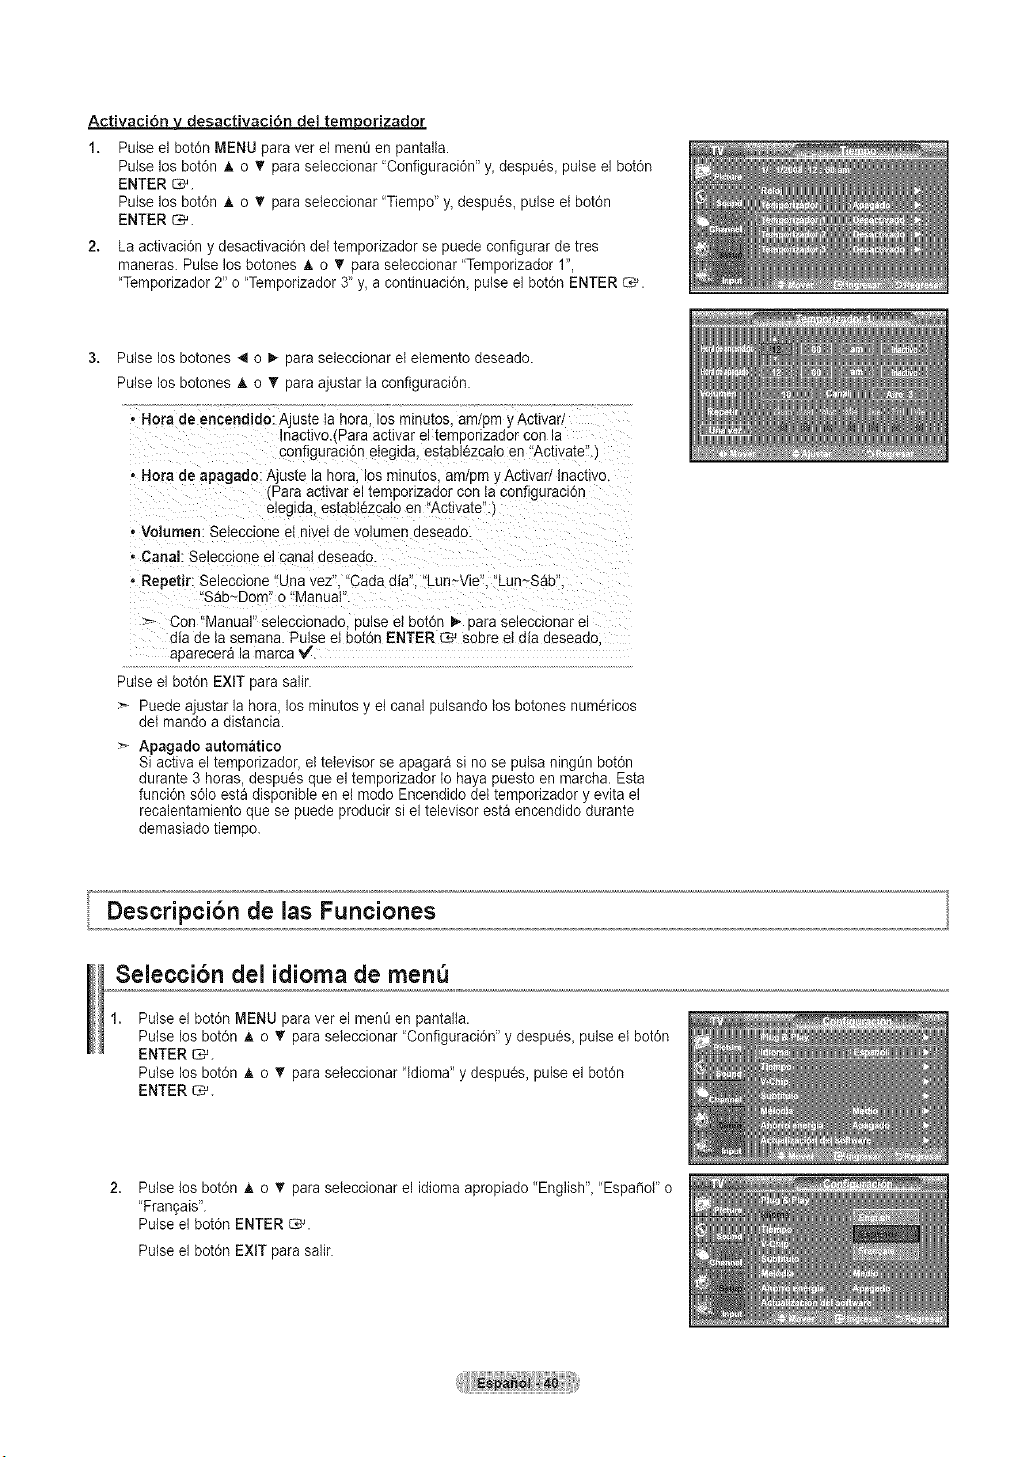
Activaci6n y desactivaci6n del tem_orizador
Pulse el botdn MENU para ver el men_ en pantalta.
Pulse los botdn A o _' paraseteccionar 'Configuraci0n" y_despu6s_ pulse el bot0n
ENTER _.
Pulse los botdn A o _' paraseteccionar 'Tiempo' y_despu6s_ pulseet botdn
ENTER _.
2. La activacidn y desactivaci0n deI temporizador se puede configurar de tres
maneras. Pulse los botones ,t, o T para sebccionar "Temporizador 1",
"Temporizador 2" o "Temporizador 3' y, acontinuaci6n, pulse el bot0n ENTER _.
Pulse los botones 4 o1,-para seleccionar el etemento deseado.
Pulse los botones A o T para ajustar laconfiguraci0n.
- Hora de eacendJdo: A)uste tahera tos mmutos, am,3m _Actlvad
nactivo/Para activar el terroorlzaaor con la
aonfigure.:,idneIegida, establ6zcalo en "Activate".)
* Hora deapagado: Ajus[e la nora. losmmutos, am Dmy Activad Inacttvo
Para activar el temaonzaaor con taconfiguraclon
eleglaa, estabI¢zcato en "Activate"
- Volumen: Seleccione et niveI de volumen aeseaao
* Canal: Seieccione el canal aeseaao.
- Repetir: Seleccione 'Una vez". "Cada dia". "Lun~Vie'. "Lun~Sab'
"Sab-Dom" o "Manual".
> Con "Manual" seleccionado pulseeI baton !_ oara selecclonar e
dia de ta semana. Pulse et bot6n ENTER _ sabre et dia deseado
aparecera la marca _/'.
Pulse el bot6n EXIT para salir.
:'- Puede ajustar la hora, los minutos y et canal pulsando losbotones num6ricos
del mando a distancia.
Apagado automatico
Si activa el temporizador, el televisor se apagara sino se pulsa ning_nbot6n
durante 3 horas, despues que eltemporizador tohayapuesto en marcha. Esta
funci6n s61oesta disponible en el mode Encendido det temporizador y evita el
recalentamiento que se puede producir siel televisor esta encendido durante
demasiado tiempo.
Seleccibn del idioma de men
Pulse el bot6n MENU paraver el mene en pantalta.
Pulse los bot6n A o T paraseleccionar 'Configuraci6n" y despu_s, pulse et bot6n
ENTER _.
Pulse los bot6n A o _' paraseteccionar "Idioma"y despu_s, pulseel bot0n
ENTER _.
2,
Pulse los bot6n A o _' paraseteccionar el idioma apropiado "English', "Espa_ol" o
"Fran9ais".
Pulse el bot0n ENTER _.
Pulse el bot0n EXIT para salir.
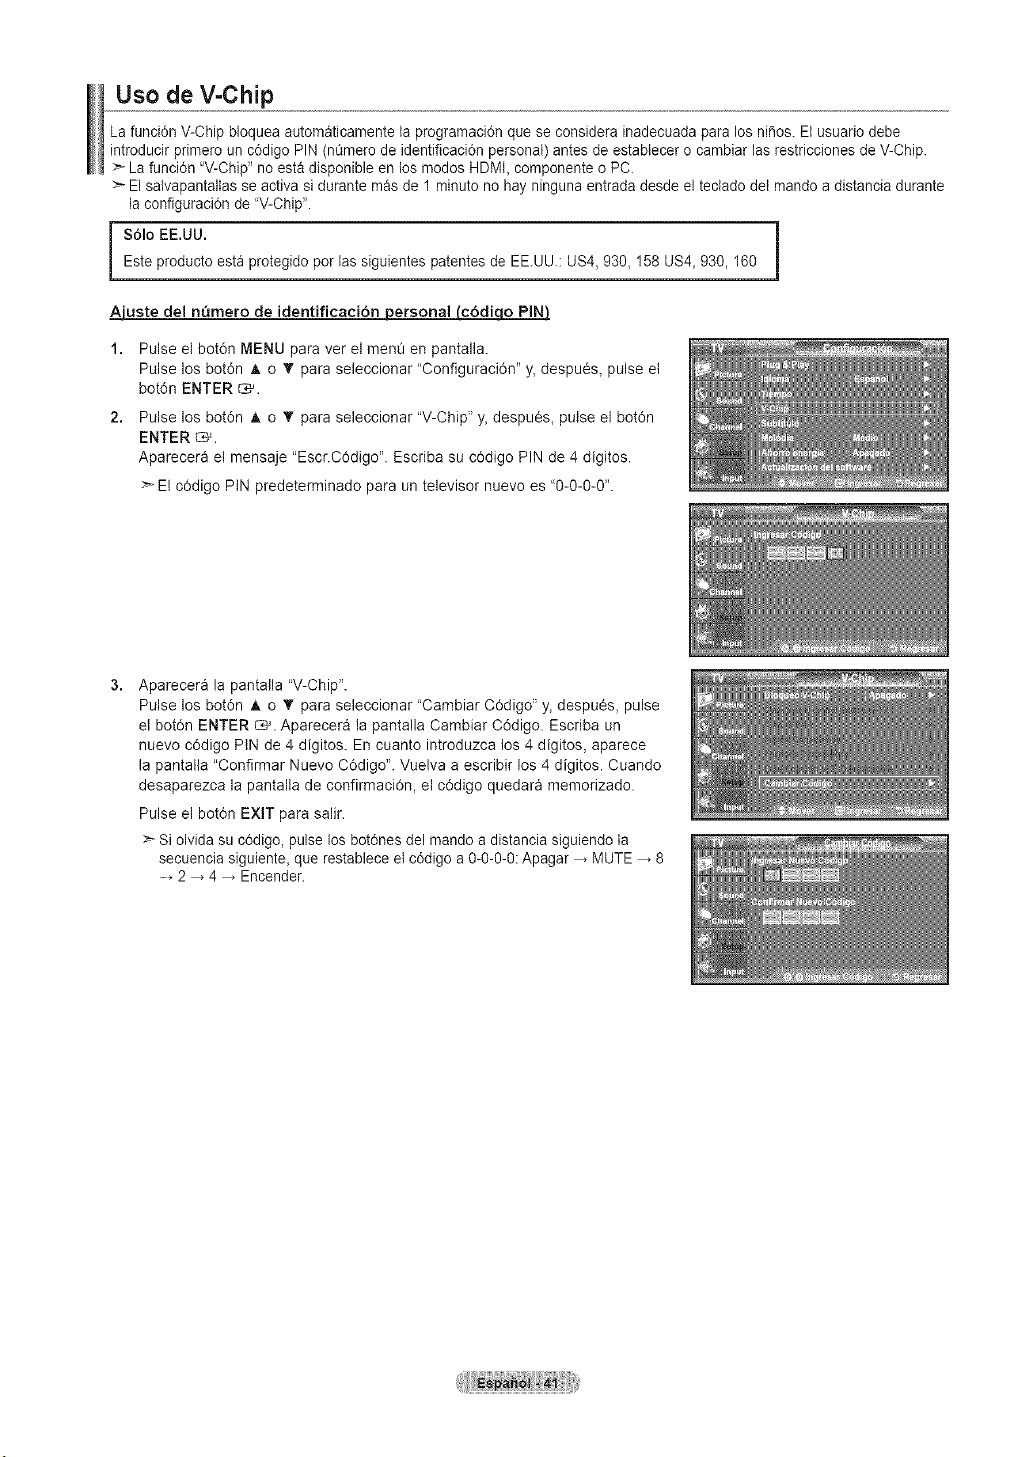
Uso de V-CMp
La funci6n V-Chip bloquea automaticamente taprogramaci6n que seconsidera inadecuadapara los nifios. Elusuario debe
introducir primero un c6digo PIN (nt_merode identificaci6n personal) antes de estabtecer o cambiar las restricciones de V-Chip.
:_La funci6n "V-Chip" noesta disponible en los modos HDMI,componente oPC.
Elsalvapantallas se activa sidurante masde 1minuto no hay ningunaentrada desdeel tectado de{mando a distancia durante
la configuraci6n de'V-Chip'.
$61o EE.UU.Esteproducto esta protegido por lassiguientes patentes de EE.UU.: US4,930, 158 US4, 930, 160
Ajuste de1n_lmero de identificaci6n__
1. Pulse el bot6n MENU para ver el menQ en pantalla.
Pulse los bot6n A o V para seleccionar "Configuraci6n" y, despu_s, pulse et
bot6n ENTER _.
2. Pulse los bot6n ,& o V para seleccionar "V-Chip" y, despues, pulse el bot6n
ENTER _.
Aparecera et mensaje "Escr.C6digo". Escriba su c6digo PIN de 4 digitos.
> El c0digo PIN predeterminado para un televisor nuevo es "0-0-0-0".
Aparecera la pantalla "V-Chip".
Pulse los bot6n A o V para seleccionar "Cambiar C0digo" y, despues, pulse
el bot0n ENTER _. Aparecera la pantalla Cambiar C6digo. Escriba un
nuevo cOdigo PtN de4 digitos. En cuanto introduzca los 4digitos, aparece
la pantalla "Confirmar Nuevo C0digo'. Vuelva a escribir los 4 digitos. Cuando
desaparezca la pantalia de confirmaci0n, el c6digo quedara memorizado.
Pulse el bot6n EXIT para salir.
> Si olvida su c6digo, pulse losbot6nes del mando a distancia siguiendo ta
secuencia siguiente, que restablece el c6digo a 0-0-0-0: Apagar MUTE 8
.........2 4 Encender.
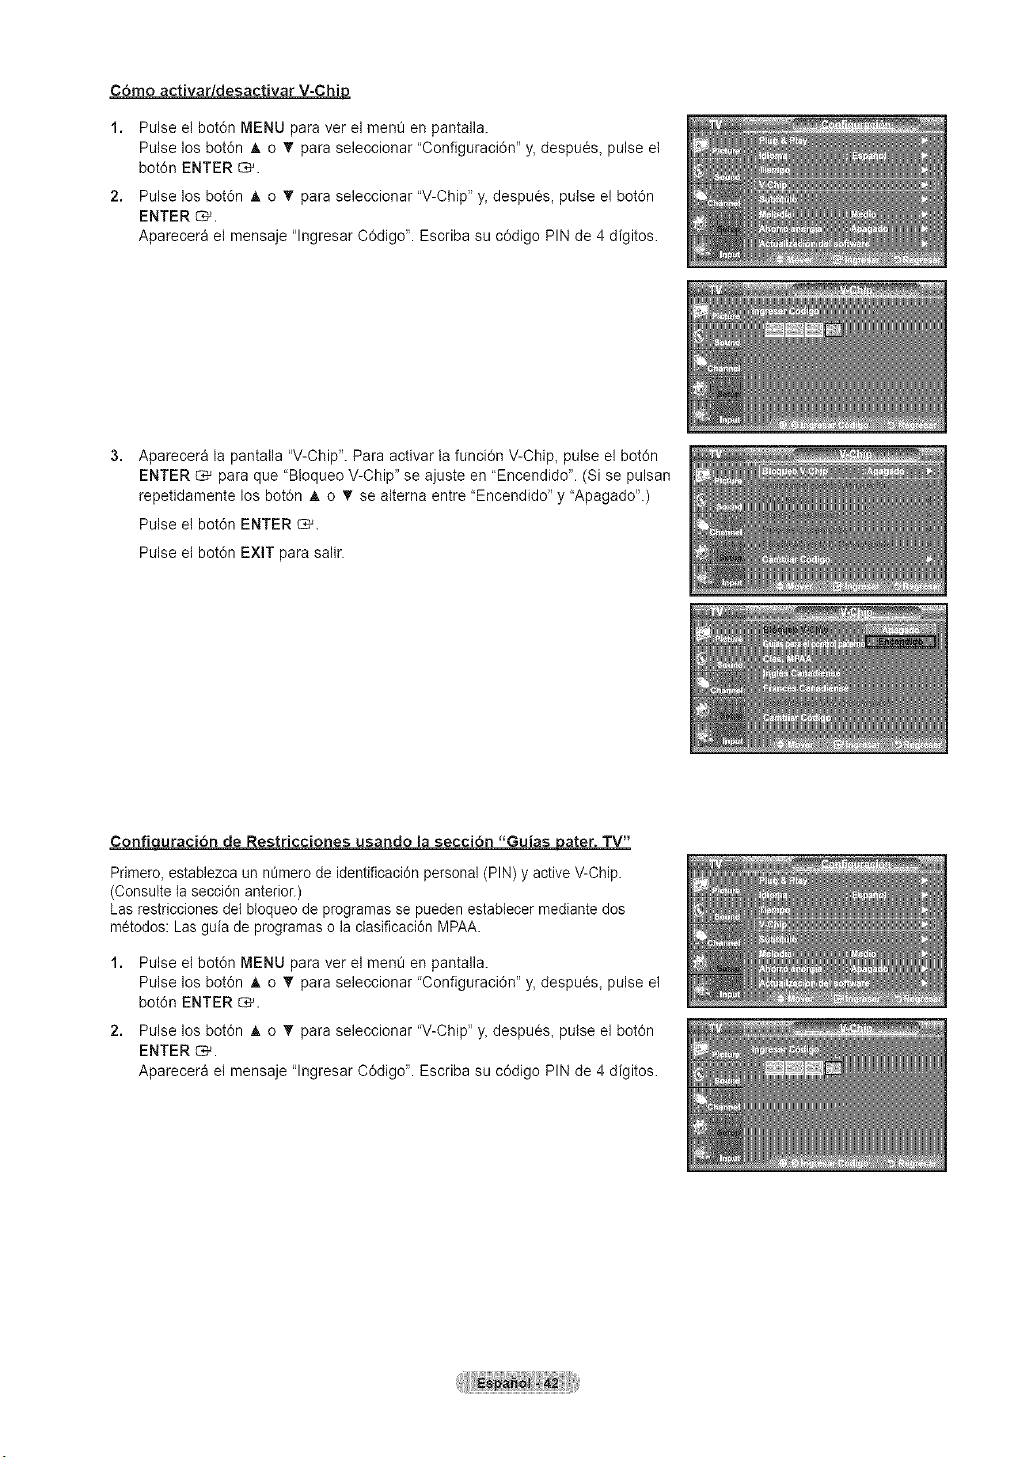
C6mo activar/desactivar V-Chip
1. Pulse el bot6n MENU para ver el menO en pantalla.
Pulse los bot6n _t,o T para seleccionar "Configuraci6n" y, despu_s, pulse et
bot6n ENTER _.
2. Pulse los bot6n A o T para seleccionar "V-Chip" y, despues, pulse el bot6n
ENTER _.
Aparecera el mensaje "lngresar C0digo". Escriba su c0digo PIN de 4 digitos.
Aparecera la pantalla "V-Chip". Para activar la funciOn V-Chip, pulse el bot6n
ENTER _ para que "BIoqueo V-Chip" se ajuste en "Encendido". (Si se pulsan
repetidamente los bot0n A o • se alterna entre "Encendido" y "Apagado".)
Pulse el bot6n ENTER C_.
Pulse et bot6n EXIT para salir.
Confiquraci6n de Restricciones usando la secd6n "GuiasJ_ater. TV"
Primero, establezca un n_mero de identificaci6n personal(PIN) y active V-Chip.
(Consulte lasecci6n anterior.)
Las restricciones del bloqueo de programas se pueden estabtecer mediante dos
metodos: Lasguia de programas o lactasificaci6n MPAA.
1. Pulse el bot6n MENU para ver el menO en pantalla.
Pulse los bot6n A o "_' para seleccionar "Configuraci6n" y, despu_s, pulse el
bot6n ENTER _.
2. Pulse los bot6n Jt,o "_' para seleccionar "V-Chip" y, despues, pulse el bot6n
ENTER _.
Aparecera et mensaje "lngresar C0digo". Escriba su c0digo PIN de 4 digitos.
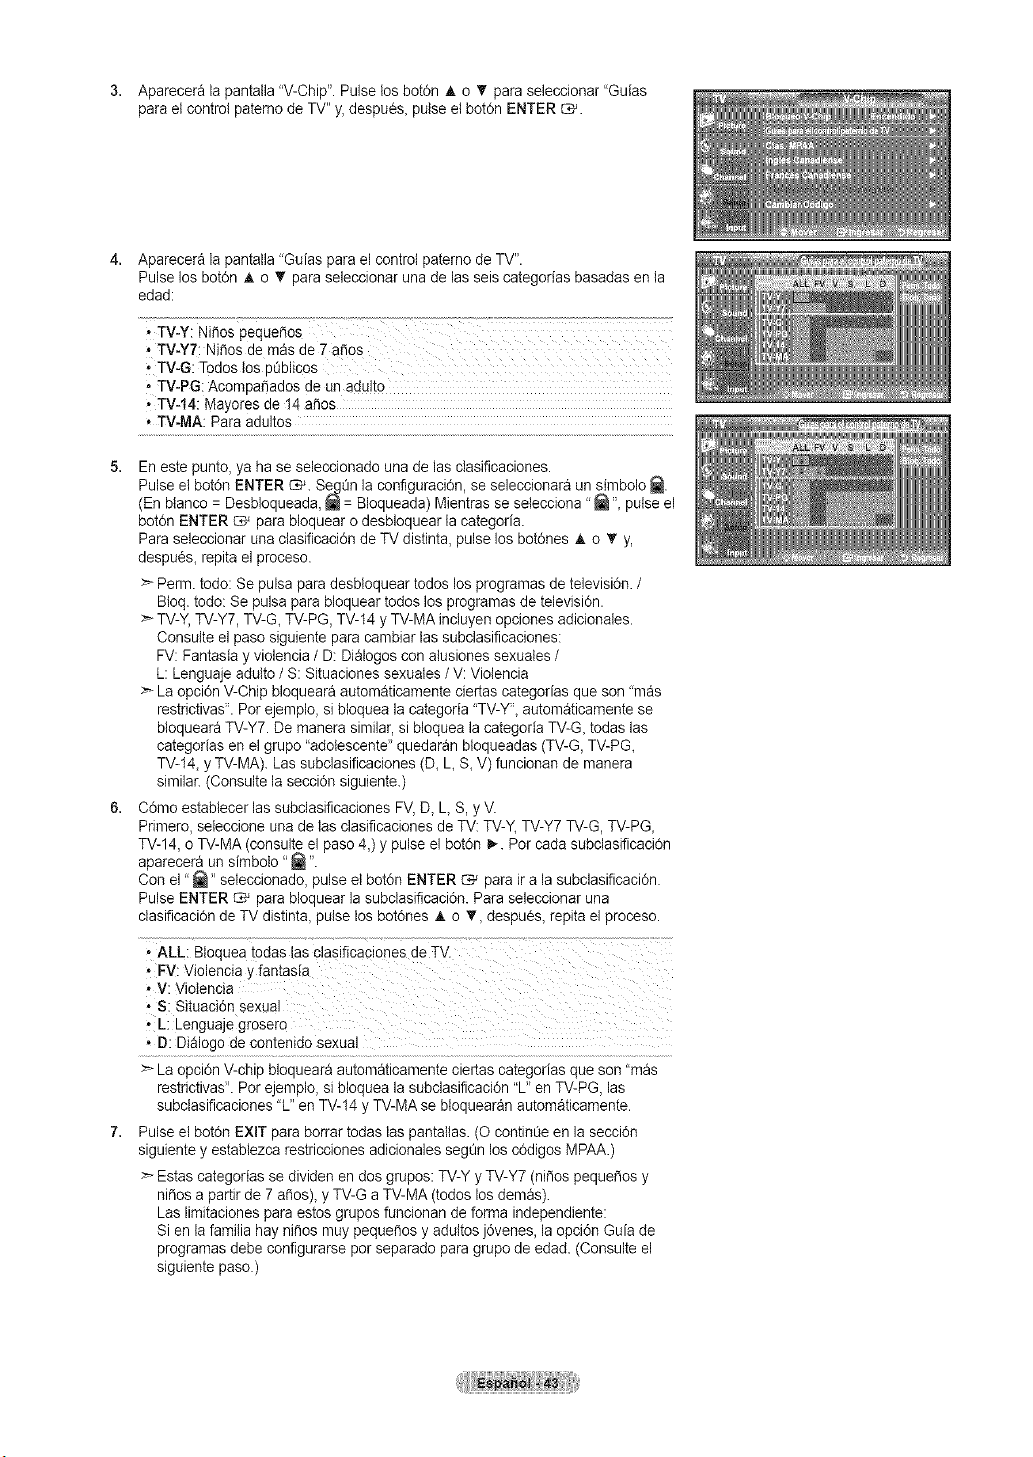
3. Apareceralapantatla"V-Chip". Pulse losbot0n A o _' paraseleccionar "Guias
parael control paterno de TV" y,despues, pulse el botOnENTER _.
4.
Aparecera la pantalla "Guias para el control paterno de TV".
Pulse los bot6n A o "f"paraseleccionar una de las seis categorias basadas en la
edad:
_TV-Y: Nifios pequefios 7:
* TV-Y7; Nifios de mas de 7 afios
- TV-G: Todos losptJblicos
, TV-PG:Acompafiados de unada!to
* TV-14: Mayores de t4 aries
* TV-MA: Para adultos
5. En este punto, ya ha se seleccionado una de las clasificaciones.
Pulse el botOnENTER _. SegQn laconfiguraci0n, se seleccionara un simbolo _.
(Enbtanco =Desbloqueada, _ =Bloqueada) Mientras se selecciona "_ "_pulseel
botOnENTER _ para bloquear o desbloquear la categoria.
Para seleccionar una clasificaciOndeTVdistinta, pulse los bot0nes Jt,o _' y,
despu_s, repita el proceso.
:_Perrn.todo: Se pulsa para desbloquear todoslos programas de television. /
Bloq. todo: Se pulsa para bloquear todos los programas detelevision.
>_TV-Y,TV-Y7, TV-G, TV-PG, TV-14y TV-MA incluyen opciones adicionales.
Consulte el paso siguiente para cambiar las subclasificaciones:
FV:Fantasia y violencia/ D: Di_logoscon atusiones sexuates/
L:Lenguaje adulto/ S: Situaciones sexuales /V: Violencia
>- La opciOnV-Chip bloqueara automaticamente ciertas categodas que son 'mas
restrictivas'. Por ejemplo, si bloqueala categoria "TV-Y', automaticamente se
bloqueara TV-Y7. Demanera similar,sibloquea la categoria TV-G, todas las
categorias enel grupo "adotescente" quedaran bloqueadas (TV-G,TV-PG,
TV-14,y TV-MA). Las subclasificaciones (D, L S, V)funcionan de manera
similar. (Consultela secciOnsiguiente.)
6. C6mo establecer las subclasificaciones FV, D,L S, y V.
Primero, seteccione una de lasclasificaciones de TV: TV-Y_TV-Y7 TV-G, TV-PG_
TV-14,oTV-MA (consulte el paso 4,)y pulse elbotOnI_. Per cada subclasificaciOn
aparecera un simbolo "_ ".
Conel "_" seteccionado, pulse el botOnENTER _ paraira lasubclasificaciOn.
Pulse ENTER _ parabloquear la subclasificaciOn. Para seleccionar una
clasificaci6n de TV distint& pulse losbotOnes A o T, despuOs,repita el proceso.
' ALL: Btoqaeatodas lasclasificaoiones de TV.
i PV: Violencia y fantasia
V: Violencia
, S: SituaciOn Sexual
' L: Lenguaje grosero
, D: Dialogo de contenido sexual
:_La opciOnV-chip bloqueara automaticamente ciertas categorias que son "mas
restrictivas'. Por ejemplo, si bloqueala subclasificaciOn "U' en TV-PG, las
subclasificaciones "L" en TV-14y TV-MA se btoquearan automaticamente.
Pulse el botOnEXiT para borrar todas las pantallas. (O continOeen la secciOn
siguientey establezca restricciones adicionales segQn los cOdigos MPAA.)
> Estas categorias se dividen en dos grupos: TV-YyTV-Y7 (nifios pequefios y
nifios a partirde 7 aries), y TV-G a TV-MA (todos los demas).
Las limitaciones paraestos grupos funcionan de forma independiente:
Si en lafamilia hay nifios muypequefios y adultos jOvenes, la opci6n Guia de
programas debe configurarse per separado paragrupo de edad. (Consulteel
siguiente paso.)
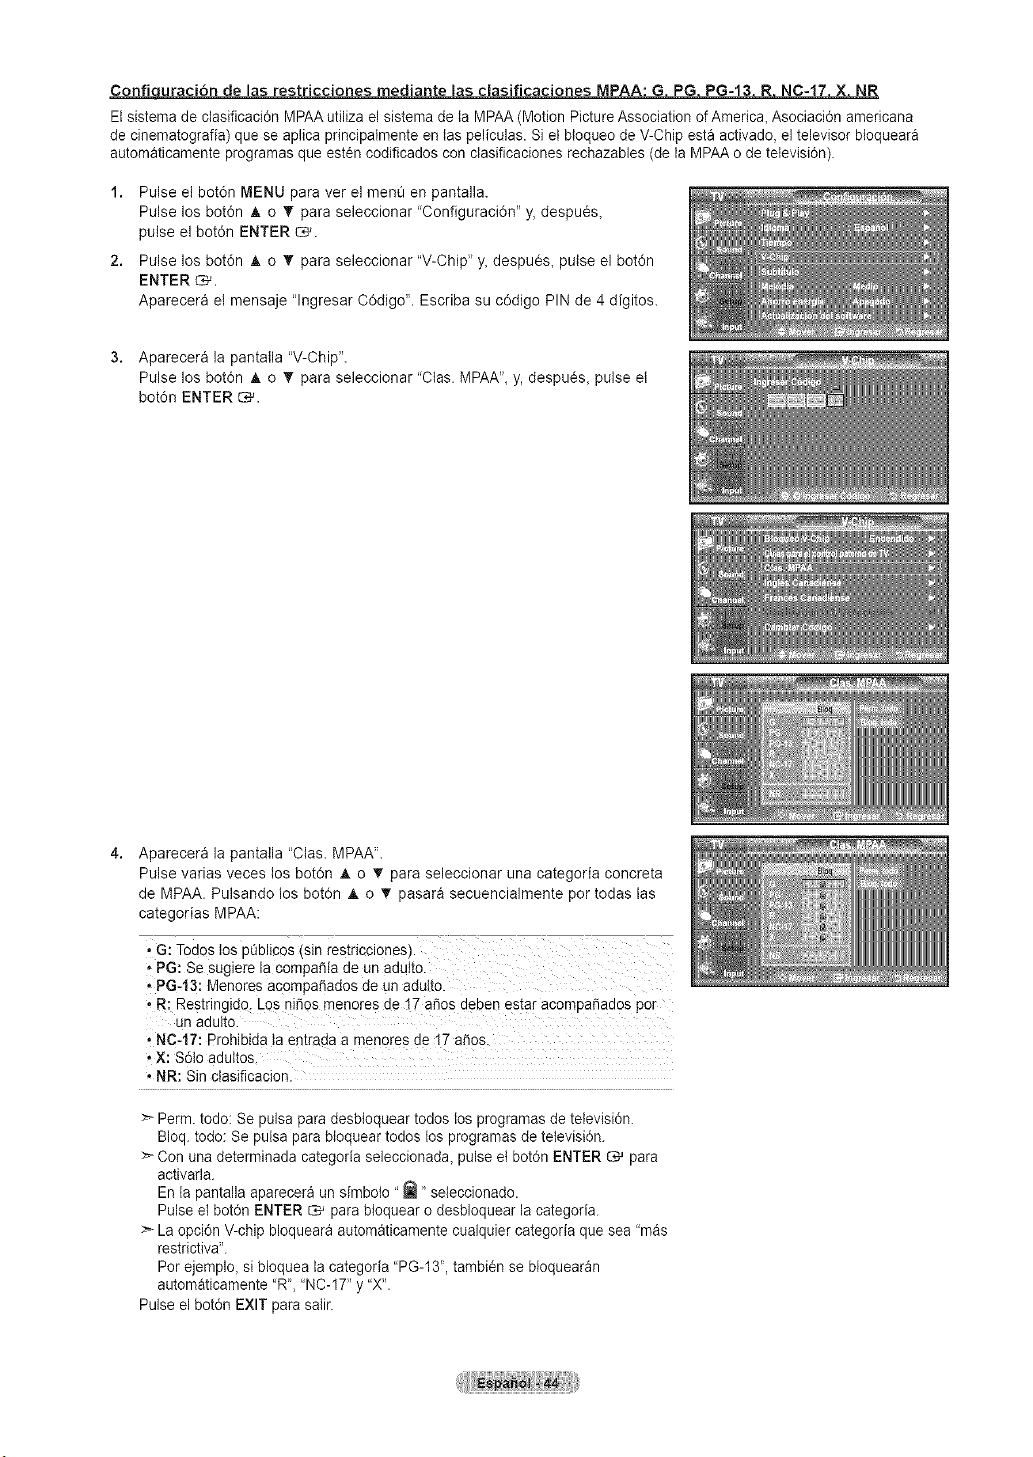
Confi _ MPAA: G PG PG-13 R NC-17 X NR
Elsistema de ciasificaci6n MPAA utiliza el sistemade la MPAA (Motion PictureAssociation of America, Asociaci6n americana
de cinematografia) que se aplica principatmente en las peliculas. Si et bioqueode V-Chip esta activado,el televisor btoqueara
automaticamente programas queest6n codificados con clasificaciones rechazables (dela MPAA o de teievisi6n).
1. Pulse el bot6n MENU para ver el menO en pantalla.
Pulse los bot6n A o '_' para seleccionar "Configuraci6n" y, despu_s,
pulse el bot6n ENTER _.
2. Pulse los bot6n A o T para seleccionar "V-Chip" y, despues, pulse el bot6n
ENTER _.
Aparecera et mensaje "lngresar C0digo". Escriba su c0digo PIN de 4 digitos.
3. Aparecera la pantatla "V-Chip".
Pulse los botdn _, o V para seleccionar "Clas. MPAA",y, despu_s, pulse et
bot6n ENTER _.
Aparecera la pantalla "Clas. MPAA".
Pulse varias veces tos botOn _, o _I'para seleccionar una categoria concreta
de MPAA. Pulsando los bot6n A o _' pasara secuencialmente por todas las
categorias MPAA:
* G: Todos tos p0blicos (sin restricciones).
, PG: Se sugiere la compa_ia de un adutto.
. PG-13: Menores ac0mpa_ados de un adulto.
, R: Restringido: Los ni_os menore s de t7 a_os deben estar acompa_ados por
un adutto.
, NC-17: Prohibida ta entrada a menores de 17 afios.
_X: S6to aduttos.
* NR: Sinctasificacion.
:_ Perm. todo: Se pulsa para desbioquear todos los programas detelevisi6n.
Bloq.todo: Se pulsa parabloquear todos los programas de tetevisidn.
>- Con una determinada categoria seleccionada, pulse et bot6n ENTER _ para
activarla.
En la pantalla aparecera un simboto "_ ' seleccionado.
Pulse elbot6n ENTER _ para bioquear odesbloquear la categoria.
:_ La opci6n V-chipbloqueara automaticamente cualquier categoria que sea "mas
restrictiva'.
Porejemplo, si bloqueala categoria "PG-13", tambi_n se bloquearan
automaticamente "R', "NC-17" y '%'.
Pulse el botdn EXIT parasalir.
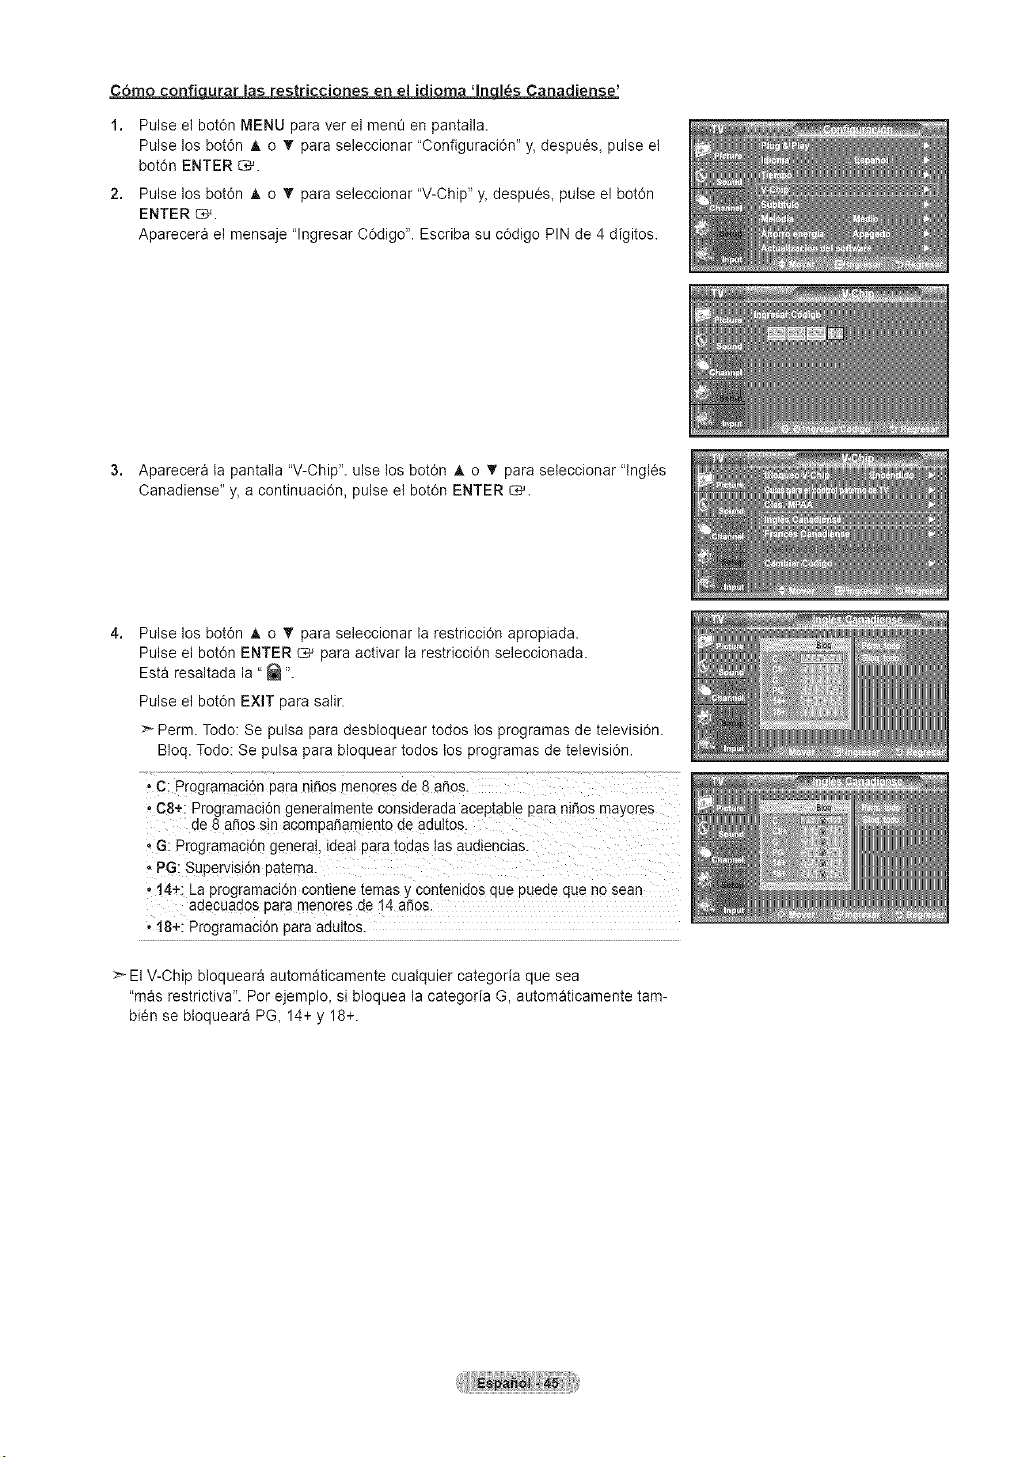
C6mo confiqurar las restricciones en el idioma _ Canadiense'
1. Pulse el bot6n MENU para ver el menO en pantalla.
Pulse los bot6n A o T para seleccionar "Configuraci6n" y, despu6s, pulse et
bot6n ENTER _.
2. Pulse los bot6n A o T para seleccionar "V-Chip" y, despu6s, pulse el bot6n
ENTER _.
Aparecera et mensaje "lngresar C6digo". Escriba su c6digo PIN de 4digitos.
3. Aparecera la pantatla "V-Chip". ulse los botOn _, o _" para seleccionar "lngl6s
Canadiense" y, a continuaci0n, pulse el bot6n ENTER _.
Pulse los bot6n A o "_ para seleccionar la restricci0n apropiada.
Pulse et bot6n ENTER C,_ para activar la restricci0n seleccionada.
Esta resaltada la "_ ".
Pulse et bot6n EXIT para salir.
>- Perm. Todo: Se pulsa para desbloquear todos los programas de tetevisi6n.
BIoq. Todo: Se pulsa para bloquear todos los programas de televisi6n.
• C:Programaclon Darantlios menores de 8 e_os.
• 08+: Programacl6n generaimeme constaeraaa acep_aDleDaranl_os mayores
de 8 ariossln acompa_am_entode adultos.
• G: Programacion general, ideatDatatoaas tasaualenclas.
, PG:Superv slon Daterna.
• 14+:ha programacton comlene temas y contenlaos que pueae que no sear
adecuados Daramenores de 14 aSos.
. !8+: Programaclon para aaultos
> ElV-Chip bloqueara automaticamente cualquier categoria que sea
"mas restrictiva". Per ejemplo, si bloquea la categoria G, automaticamente tam-
bi6n se btoqueara PG, 14+ y 18+.
C6mo confiqurar las restrict{ones en el idioma 'Franc_s Canadiense'
1. Pulse el bot6n MENU para ver el menO en pantalla.
Pulse los bot6n A o T para seleccionar "Configuraci6n" y, despu_s, pulse et
bot6n ENTER _.
2. Pulse los bot6n A o T para seleccionar "V-Chip" y, despues, pulse el bot6n
ENTER _.
Aparecera el mensaje "lngresar C0digo". Escriba su c0digo PIN de 4 digitos.
3. Aparecera la pantalla "V-Chip". Pulse los bot0n _ o 'Y' para seleccionar
"Frances Canadiense" y, despu6s, pulse et botdn ENTER _.
Pulse los bot6n A o "_ para seleccionar la restricci0n apropiada.
Pulse et bot6n ENTER C,# para activar la restricci0n seleccionada.
Esta resaltada la "_ ".
Pulse et bot6n EXIT para salir.
Perm. Todo: Se pulsa para desbloquear todos los programas de tetevisi6n.
BIoq. Todo: Se pulsa para bloquear todos los programas de televisi6n.
,,8 ans+: No recomendada para ni_os pequeSos.
• 13 arts÷: Esposible que la programaci6n no sea adecuada Para ni_os
menores de 13 aSos.
• 16 arts+: Esp0sible queta programacidn no sea adecuada para niSos
menores de 16 aSos.
• 18 arts+: Programacidn restringida para adultos.
:_ ElV-Chip bloqueara automaticamente cualquier categoria que sea
"mas restrictiva". Por ejemplo, si bloquea la categoria 8 arts+, tambi_n se
bloquearan automaticamente 13 ans+, 16ans+ y 18arts+.
Use de V-Chip con los canales diqitales
La informacien de la restriccidn de bloqueose puede usar mientras seven los canales DTV.
1. Pulse el bot6n MENU para ver el menO en pantalla.
Pulse los bot6n A o T para seleccionar "Configuracien" y, despues, pulse et
botdn ENTER _.
2. Pulse los bot6n A o '_" para seleccionar "V-Chip" y, despues, pulse el bot6n
ENTER _.
Aparecera et mensaje "lngresar COdigo". Escriba su cOdigo PIN de 4 digitos.
Pulse los bot6n A o '_' para seleccionar "Clasificaci0n U.S. Descargable" y,
despues, pulse el botdn ENTER _.
:_Si la informaci6n no se descarga desde la emisora, el ment_
"Clasificaci6n U.S. Descargable" esta desactivado.
>- La informaci0n de la restricciOn de bloqueo se puede descargar
autom_ticamente mientras se ven loscanales DTV. Esto puede tardar
algunos segundos.
>- El menO"Clasificaci6n U.S. Descargable" esta disponible despues de que la
informaci6n se haya descargado desde la emisora. Sin embargo, segOn el
tipo de informaci6n de la emisora, el menO podria no estar disponible para
SU use.
Pulse los bot6n A o T para seleccionar la restricci0n apropiada.
Pulse et botdn ENTER C,_'para activar la restricci0n seleccionada.
Esta resaltada la "_ ".
Pulse el botdn EXIT para salir.
Permitir todo (Perm. Todo): Se pulsa para desbloquear todos los programas
de televisi6n.
BIoquear todo (BIoq. Todo): Se pulsa para bloquear todos los programas de
televisien.
>- Los niveles de restricci6n de bloqueo difieren segOn la emisora.
> El nombre de menOpredeterminado y "Clasificacien U.S. Descargable"
cambian segOn la informacien descargada.
>-Aunque configure la visualizaci0n en pantalla en su propio idiom& el menO
"Clasificacien U.S. Descargable" siempre Iovera en ingles.
> La clasificacien bloqueara automaticamente ciertas categorias que son "m_s
restrictivas".
:_ Los titulos de clasificacidn (per ejemplo: Nivel humor, etc) y las
clasificaciones de televisidn (per ejemplo: DH, MH, H,etc) pueden
diferir segOn la emisora.
E}numefo del ttulo de
Titulode casificac6n clasificacinnactual
C6mo reiniciar el televisor despues de que V-Chip bloquee un canal ("Salida de emergencia")
Si eltelevisor sintoniza un canal restringido, el V-Chip Io bloquear&
La pantalta quedara en blanco y aparecera el siguiente mensaje:
2,
3.
4.
Escriba su cedigo PtN.
Para votver al mode de visualizaci6n normal, sintonice un canal diferente
con los botones CH(_) o CH(_). En ciertas condiciones (segt_n la clasificaci6n
de los programas de televisi6n locales) la funciOn V-Chip puede bloquear
todos los canates. En este caso_ utllice la funci6n V-Chip come "salida de
emergencia":
Pulse el botOn MENU. Pulse los botones _, o T para seleccionar
"Configuracien" y, acontinuacien, pulse ENTER _.
Pulse los botones A o T para seteccionar "V-Chip" y_acontinuaciOn_ pulse el
bot6n ENTER _.
Escriba su cOdigoPtN, pulse ENTER _ y,a continuaci6n, los botones _t,o T
para desactivar temporalmente la funci6n BIoqueo V-Chip.
>*Si olvida el PIN_ pulse los botones del mando a distancia en la siguiente
secuencia para reiniciar el cedigo a 0-0-0-0 :Apagar MUTE 8 2 4
Encender.
ElnOmeo de redesos
titubs de clasificacir31}
Visibn desubtitulos (mensajes de te×to en pantalla) - Analbgico
La funci6n de subtitulo anal6gico funciona tanto en ei mode de canal de televisi6n anal6gica comecuando el televisor recibe una
se_ai de un dispositivo extemo. (Dependiendo de la sepal de transmisi6n_ puede funcionar en canaies digitales.)
2,
Pulse el bot6n MENU paraver el men_ en pantalta.
Pulse los bot6n A e _' paraseleccionar 'Cenfiguraci6n" y, despues, pulse et bot6n
ENTER _.
Pulse los bot6n A o _' paraseleccionar 'Subtitulo' y, despues, pulse el bot6n
ENTER _.
3. Pulse el bot6n ENTER _ para seleccionar "Subtitulo".
Pulse los bot6n A o _' paraseleccionar 'Encendido" y,despu_s, pulse el bot6n
ENTER _.
4,
Pulse los bot6n _t,o T paraseleccionar "Modede Subtitulo" y, despu_s, pulse el
bot6n ENTER _.
Pulse los bot6n A o _' paraseleccionar el subment_que desee (Programado,
CC1~CC4, o Textol~Texto4), pulse despu6s el bot6n ENTER _.
Pulse el bot6n EXIT para salir.
- El valor predeterminado es "CCl".
• CCl: EI servlclo Dnmano desubtituIos sincronizados. Son subtffutos
en el dJoma pnqolDal clue debe estar stnoronlzado con e sonldo
preferibIemente que comcldacon ta secuencla especifica.
• CC2: Subtituios esoeclaies ae use no sincronizado. Estecana [ranspor[a
]a[os uue es[an aestmados aam_ arIainformaci6n deiprograma.
• CC3: Se[ icio de subtitulos secundanos slncronlzados. Datosal[ernauvos
ae subtituios relac3nados conel programa, tipicamente subtituIos ael
segunao lalonta
• gC4: Subtitulos esoeclaies ae uso no sincronizaao. Similar aCC2
. Textol: Primer servicJo de texto. Se puede tratar de vanos datosno
relaclonaaos con programa atguno.
• Texto2: Segundo servicio de texto. Datosadicionates, normalmeme sin
retaci6ncot programa aJguno.
• Texto3/Texto4: Tercer ,,cualto serviclos ae [exto. Es[os canales de dates s6to
se aeDen usar si Textol y Texto2noson suficientes.
:_La funci6n Subtitulo no esta disponible en los modos Componente, HDMIni PC.
>- La disponibitidad de lossubtitulos depende de{programa que se est6ernitiendo.
[5}Pulse el bot6n CCdel monde a distancia varias veces paraseleccionar "Encendido"
u"ApagadoL
Visibn de subtitulos (mensajes de texto en pantalla) - Digital
La funci6n Subtitulo digital funciona en canates digitales.
1. Pulse el bot6n MENU paraver el men_ en pantalla.
Pulse los bot6n A o _' paraseleccionar "Configuraci6n" y_despu6s_ pulseel bot6n
ENTER _.
2. Pulse los bot6n A o _' paraseleccionar 'Subtitulo' y, despues, pulse el bot6n
ENTER _.
3. Pulse el bot6n ENTER _ paraseleccionar "Subtitulo".
Pulse los bot6n A o _' paraseleccionar "Encendido" y_despu6s_pulseel bot6n
ENTER _.
4,
Pulse los bot6n A o T paraseleccionar 'Modo de Subtitulo" y_despu_s_pulse el
bot6n ENTER _.
Pulse los bot6n A o •para seteccionar el subment_ (Programado,
Serviciol~Servicio& CC1~CC4o Textol~Texto4) que desee; pulse despu_s el bot6n
ENTER _.
5. Pulse los bot6n _, o _' paraseteccionar "Opciones -Subtitulo" y, despues, pulse el
bot6n ENTER _.
> Las "Opciones- Subtituld' s6lo estan disponibies cuando "Programado" y "Service
1~Service 6" sepueden seleccionar en "Modode Subtitulo".
> Los modos de subtitulaci6n Servicio 1-6pueden no estar disponibles segOn eltipo
de emisi6n.
Pulse los bot6n A o T paraseleccionar "Tama_o" y, despues, pulse el botdn
ENTER _.
Pulse los botdn A o _r paraseleccionar la opcidn deseada para et Subtitulo;
despu_s pulse el botdn ENTER _.
Pulse los botdn A o _' paraseleccionar las opciones de subment_ que desee
(vea lasopciones en la paginasiguiente) y pulse et botdn ENTER _.
Pulse el botdn EXIT para satin
:_La disponibitidad de los subtitulos depende dei programa que se est6emitiendo.
>*La opci6n 'Programado _significa que se sigue et estandar establecido peret
emisor.
Las opciones Opec. Primer Pianoy Opac. de Fondo no se pueden ajustarcon el
mismo color.
>*"Opacidad de primer piano" y"Opacidad de fondo" no pueden ajustarse ala vez
en Transparent.
• TamaSo:Estaoeci6nconstade"Programaao"Peque_o","Normal"y"Grande".Eivalor
preee[ermlnaaoes"Normal'
- Estilofuente:Estaoeci6nconstade"Programaeo.EstiloO-Estilo7".Puedecambiarel
eeooele[ra auedesee.Elvalorpreaezerrrnadoes"Est[o0"
- Color de primer plane:Estaouci6nconstade "Programaao."Blanco"."Negro","Rojo.
verae. "Azur'."Amarillo"."Magenta,_"Cian".Puedecamblaret
COlOr ael [ex[o. El valor eredeterminaao es Btanec
• Color de Fondo: Estaoecionconstade "Programado"."Btanco"."Negro","Rojd',"Verde",
"AzuF."Amarillo" Magenta",y Clan". Puedecambiare_co_ordetfonao
oe lOS suDn[utos. El valor preaetermlRado es "Negro
- Opacidadde primer piano:Estaopcioeconsl:ade "Programado"."Transuaren'Ee
TraslQcido""S61ido"e"{ntermitente".Puedecamb_arla
oe_;tdaaae ia le[ra.
• Opaeidadde fondo: Estaopcioncons[ade "Programado"."Transparente"."Traslt]cido"
"S61iaoe'm[erml[ente'LPuedecamularla 3oacloaa oelfondode
lOS SUDe[UIOS.
• Regresaral Predeter: Estaopc_onreajus[a_asopciones"TamaSo"."Tipode tetra
'Colorpnmerplane"."Cotordefondo" "Opacidadprim.ptano"
'Oeacidaddetfondo"asusvatorespredeterm}naaos.
Pulse el bot6n CCdel mando
adistancia varies veces pare
seleccionar "Encendido" u
'Apagado'.
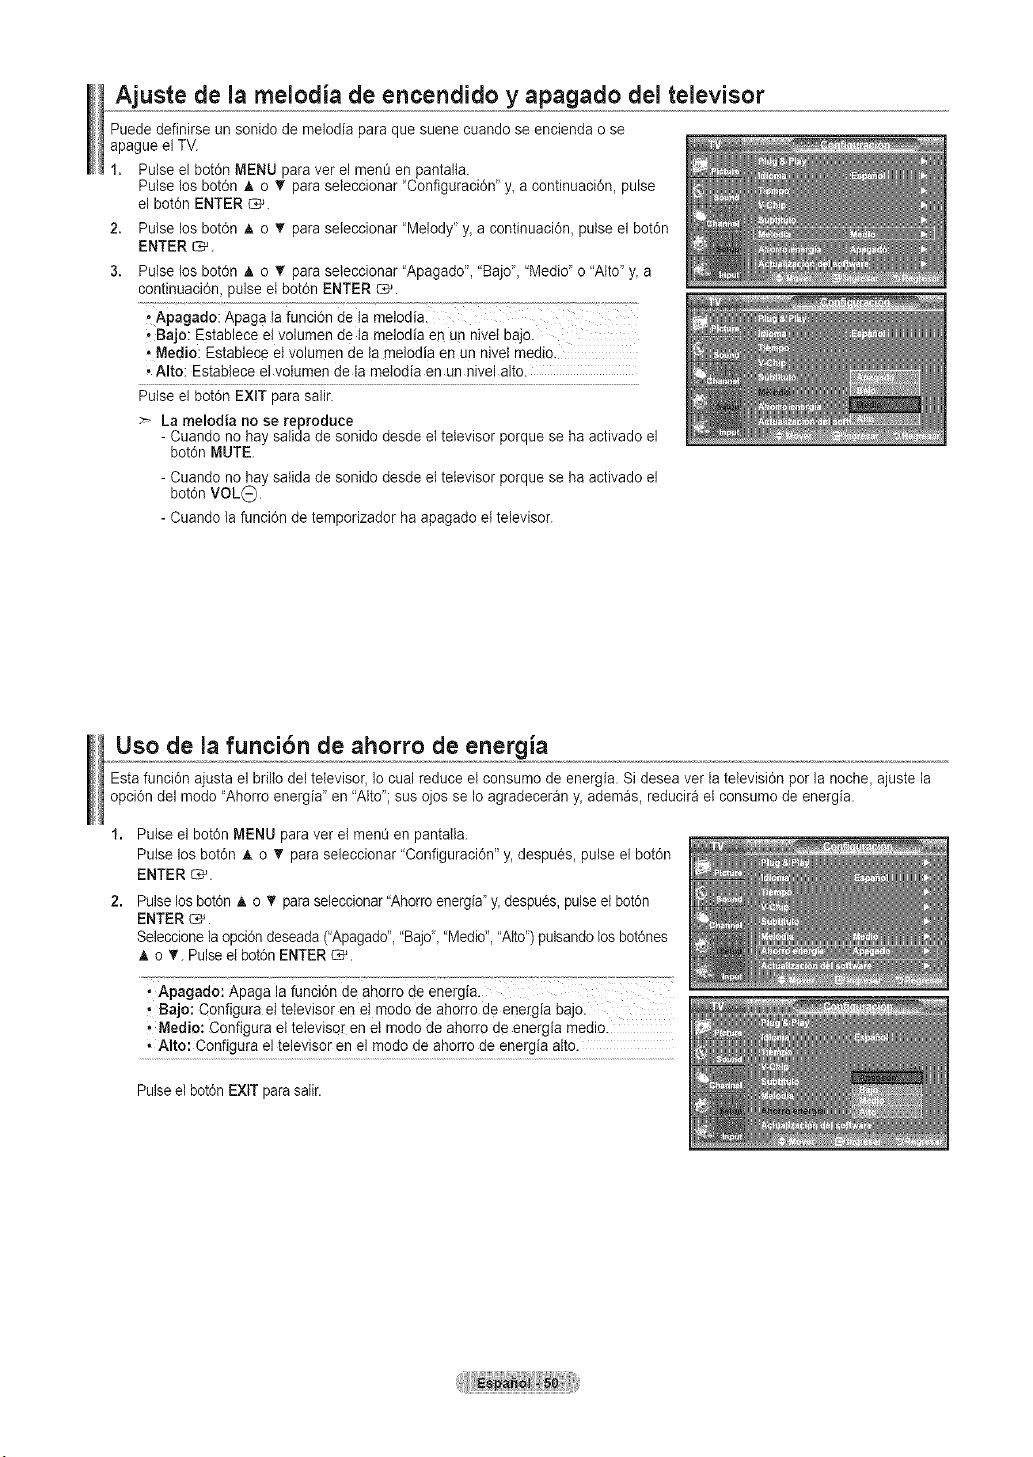
Ajuste de la melodia de encendido y apagado del televisor
Puede definirse un sonido de melodia paraque suene cuando se encienda ose
apague el TV.
1. Pulse el bot6n MENU paraver el men_ en pantalta.
Pulse los bot6n A o '_ paraseleccionar "Configuraci0n" y_acontinuaci0n, pulse
el bot6n ENTER C_'.
2. Pulse los bot6n A o _' paraseleccionar "Melody" y, a continuaci6n, pulse el bot6n
ENTER _.
Pulse los bot6n A o _' paraseteccionar "Apagado", "Bajo', "Medio"o "Alto"y,a
continuaci6n, pulseet bot6n ENTER _.
-Apagado: Apagala funcion dela melodia.
, Bajo: Establece eI volumen de lamelodia en un nivetbajo.
• Medio: Establece et volumen de ta melodia en un niveI medio.
• Alto: Establece el votumen de Ia melodia en un nivel alto.
Pulse el bot6n EXIT para salir.
La melodia no se reproduce
- Cuando no hay salida de sonido desde el televisor porque se ha activado el
bot6n MUTE.
- Cuando no hay satida de sonido desde eltelevisor porquese ha activado el
bot6n VOL_.
- Cuando la funci6n de temporizador ha apagado el televisor.
Uso de la funcibn de ahorro deenergia
Estafunci6n ajusta el brilto det televisor, Io cual reduce el consumo deenergia. Si desea vet ta tetevisi6n por la noche,ajuste la
opci6n del modo "Ahorro energia" en "Alto";sus ojos se Ioagradeceran y, ademas, reducirael consumo de energia.
1. Pulse el bot6n MENU paravet el ment_en pantatla.
Pulse los bot6n _, o T paraseleccionar "Configuraci6n" y, despues, pulse el bot6n
ENTER _.
2. Pulse los botdn _. o _' paraseleccionar "Ahorro energia"y_despu_s, pulse etbotdn
ENTER _.
Seleccionela opcidn deseada("Apagado","Bajd, "Medio","Alto") pulsandolos bot6nes
A o T. Pulse el botdn ENTER _.
' Apagado:Apaga la funci6n de ahorro de energia.
, Bajo: Configura el televisor en el modo de ahorro de energia bajo.
, Medio: Configura el televisor en el modo de ahorro de energia medio.
, Alto: Configura el televisor en el modo de ahorro de energia alto.
Pulse el botdnEXITpara salir.
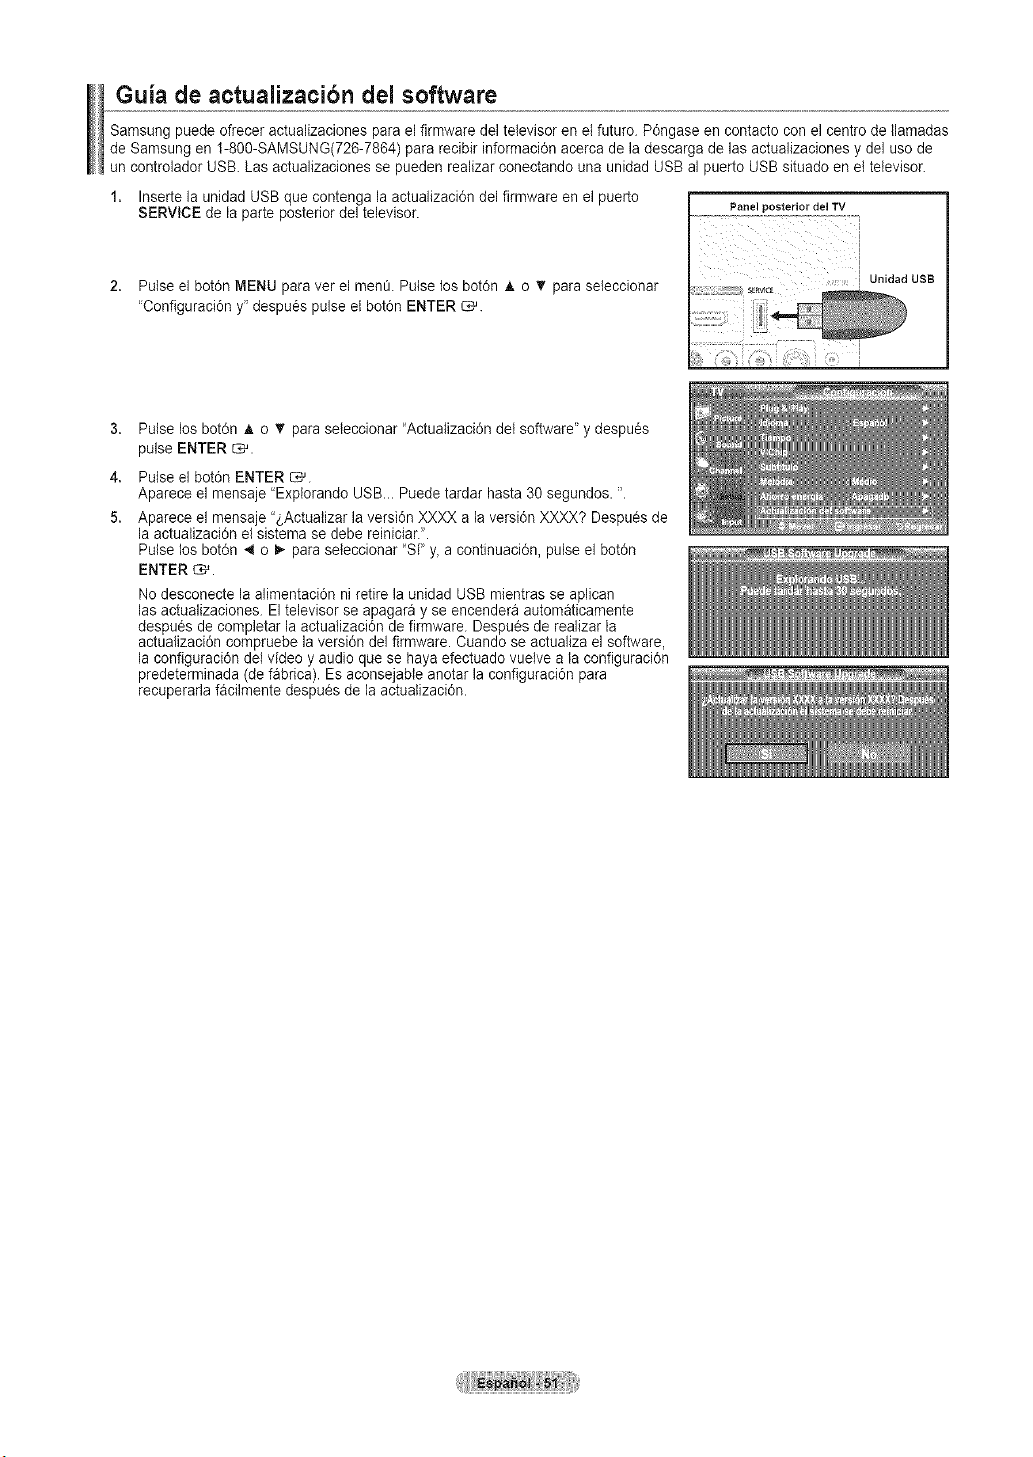
Guia de actualizacibn del software
Samsung puede ofreceractualizaciones parael firmware deltelevisoren elfuturo. P6ngase en contacto con el centre de llamadas
de Samsung en 1-800-SAMSUNG(726-7864) para recibir informaci6n acerca de la descarga de lasactualizaciones y deluso de
un controlador USB. Las actualizaciones se pueden realizarconectando una unidad USB al puertoUSB situado en ettelevisor.
1. Inserte la unidad USBque contenga la actualizaci6n del firmware en el puerto
Panel posterior del TV
SERVICE de la parteposterior del televisor.
2. Pulse el bot0n MENU paraver el mene. Pulse los bot6n A o _' para seteccionar
'Configuraci6n y"despu6s pulse et bot6n ENTER _.
3,
4.
5.
Pulse los bot6n A o _' paraseteccionar "Actuatizaci6n det software" y despues
pulse ENTER _.
Pulse el bot6n ENTER _.
Aparece el mensaje 'Explorando USB... Puede tardar hasta 30 segundos. ".
Aparece el mensaje "_,Actuatizar la versi6n XXXX a laversion XXXX? Despu_s de
la actualizaci6n el sistema se debe reiniciar.'.
Pulse los bot6n 4 o _ paraseteccionar "Si' y, acontinuaci6n, pulse el bot6n
ENTER _.
Nodesconecte la alimentaci6n ni retire la unidad USB mientras seaplican
lasactualizaciones. Eltelevisor se apagara y se encendera automaticamente
despues de completar la actuatizaci6n de firmware. Despues de realizarla
actualizaci6n compruebe la versi6n del firmware. Cuando se actualiza elsoftware,
la configuraci0n delvideo y audio que se haya efectuado vuetve a la configuraci6n
predeterminada (defabrica). Esaconsejable anotar la configuraci0n para
recuperarla facilmente despu_s de la actuatizaci6n.
Identificacibn de problemas
Si parece que el TV no funciona correctamente, en primer lugar compruebe esta lista de posibles problemas y soluciones.
Si no funciona ninguno de estos consejos, Ilame al centre de servicio mas cercano.
7
Pr0blema Posible Soluci6n
tmagen deficiente. Intente sintonizar otto canal.
Ajuste la antena.
Compruebe las conexiones de todos Ios cables.
Catidad de sonido deficiente. Intente sintonizar otto canal.
Ajuste la antena.
No hay imageno sonido. ........................................................................................................................................................................................................................................
Pulse el bot6n SOURCE.
Compruebe que el TV este conectado.
Compruebe las conexiones de laantena.
Nose percibe ningQnsonido, Primero, compruebe el volumen de losaparatos conectados at TV(por ejemplo, un
o muy baje con el votumenal receptor digital, DTV,DVD, receptor de cable_ VCR, etc.). A continuaci6n, ajuste el
maximo, voIumen del TVsegSn sea mas conveniente.
La imagenrueda verticalmente. Compruebe todas lasconexiones de cable.
ElTVfunciona de fofma irregular, Desconecte el TV durante 30 segundos y, despues, intente que funcione otra vez.
EI televisor no se enciende. Compruebe que la toma de la paredfunciona.
Anomalias del mando a Remptacelas pilas del mando a distancia.
distancia. Limpie el borde superior det mando adistancia (ventana de transmisi6n).
Compruebe los terminales de ta pila.
Mensaje "Verificarcable SesaI": Compruebe que et cable de selial este conectado firmernente con tasfuentes deI PC.
Mensaje !'Modo no compatible". Compruebe la resoluci6n maxima y lafrecuencia de video deidispositivo
conectado.
........c_n}l_[e ts!Rs }{a!°!es _0_ I°! d_tC_Sdt a .................................................................................................
ProbIema en Pantatla con la Compruebe tapotencia dela se_atdigital y la antena de entrada.
emisi6n digital.
La imagenes demasiado clara 0 Ajuste Luminos. y Contraste.
demasiado oscura. Ajuste lafunci6n Fino.
Bar[as neg[as entapantalta. Compruebe que la emisi6n que se esta recibiendo es de alta definici6n (HD).
Loscanales HDen ocasiones emiten una programaci6n en SD (definici6nestandar) que
puede darlugar ala aparici6n de barras negras.
Para eliminar las barras configure el decodificador de cable o satelite enlos modes
Alargar oPanoramica.
Las imagenes tienen un tono Compruebe que loscables de los componentes esten conectados en losterminales
rojo-verde orosa. correctos.
Los subtitulos parasordos no Cuando se usa undecodificador de cable o sat6lite, laopci6n de lossubtitulos para
funcionan. ....... .....................................................................................
Las imagenes se yen con nieve Quizasse necesite actuatizar el firmware. P6ngase en contacto con el proveedor de
cable.
Seyen im_genes superpuestas Quizas haya probtemas decompatibilidad con el decodificador de cable.
Intente conectarse atraves de loscables de loscomponentes.
Problema
Ajus[e la funci6n Gruesoy despu_s ajustela funci6n Fino.
Unas uarras norlzon[aies
parpaaean, tiemblan u osclian en
taJmager
Unas uarras venloates
parpaaean, [lemelan u oscitan en
talmager
La pamatla es[a negra y
el lndloador tumlnoso de
aiimentacidn parpadea
constamememe.
La imagen no es es[aDle y
parece vlerar cuanaose conecta
el oraenador en la emraaa ae
PC
Ajus_e la funci6n Gruesoy despues ajuste la funci6n FJno.
Comuruebe Iosiguiente en el equipo:Alimentaci0n, Cablede sepal.
-I TV utiliza su sistemade gesti6n de energia.
Viueva el rat6ndel equJpoopulse una tectadel teclado.
Si et ajuste no es correcto, usela utilidad del ordenador para cambiar los ajustes de
)an][alia.
Eltelevisor admite funciones de visualizacJ6n muitiscan dentro det siguiente rangode
frecuenoias:
Frecuencia horizonta [kHz) 30~60
Frecuencia vertical (Hz) 60~75
nalce ae barrido maximo (60 Hz)
La tmagen no esta oentrada en
la pamaHa.
La tmagenaparecealS[OrSlonaaaen
esqulnaae lapamalla
Ajuste la posicJ6n horizontal y vertical.
_a Dosici6n ae la pantalla sedebe ajustar respecto a la fuente de satJda (porejemplo, STB)
con una sepal digital.
Si "S61obuscar esta seleccionado en atgOndispositivo externo, la imagen puede aparecer
als_orslonaaa en la esquina de la pantalta. Este sintoma se origina en los dispositivos
externos noen el televisor.
ADarecee mensae "Resets a Aoarece cuando el bot6n EXIT se mantJene pulsado durante unos momentos.
se_ungsto the defautt values.'_ _a configuraci6n deI producto se restablece con los ajustes predeterminados de fabrica.
Elpanel LCD TFT utiliza un panel que consta de muchos pixeles de infimo tama_o (3888 O00) que requieren de una
tecnologia altamente sofisticada para su fabricaci6n. Sin embargo, pueden haber unos pocos pixeles poco iluminados u
oscuros en pantalla. Estos pixeles nosuponen una anomalia en etfuncionamiento del producto.
Cbmo ajustar el soporte
(1) (2)
C6mo ajustar el _ngulo del televisor
Botdn
1.Coloqueelfrontal deltelevisorsabre un paso
suave o una almohadilIaencima de una mesatal
comose muestraen lafigura (1).
- Alinee la parteinferiordel televisorcon el borde
de la mesa.
2.Presioneel centro de la parteposteriordel
televisor.
Ajuste el soporte comose indicaenla figara (2)
mientraspulsa el botdn que seencuentraenla
parteposteriordet soporte.
3.Coloqueeltelevisorsobre la rues& de manera
que seasiente firmemente.
( 1 )Ajustedel&ngulodeltelevisor
sobreel soporte.
( 2)Ajuste del &ngulo cuandopase del
sopo_e al montaje en la pared(1 4, 3,1)
( 3) Ajuste del _ngulo cuandoel televisor
LCDest6montadoen la pared,
>- Caando ajuste el soporte, pulse el bot6n qae se encaentra en la parteposterior del soporte.
1. La Figura (1) muestra el angulode ajuste (-2°~14°)cuando utiliza ta pantalla LCD en su soporte.
Una inclinacidn excesiva puede hacer que elTV LCDvuelque y que se produzcan da_os.
2. La Figura (2) muestra el angulode ajuste (14°~80°) cuando lapantalla LCDpase del soporte almontaje en lapared.
3. La Figura (3) muestra el angulode ajuste (0°~10°) cuando monta la pantalta LCD en una pared.
_Oira un 'clic" caando cambie el angulo de 1a 2o de 3 a2.
Instalaci6n delequipo de montaje en la pared
Loselementos del montaje en la pared (se venden por separado) permiten instalar eltelevisor en una pared. Sidesea mas
inforrnacidn sobre la instalaciOn delos componentes para montaje en lapared, consulte las instrucciones que se facilitan con
dichos elementos. Para la instalacidn del soporte mural, p6ngase en contacto con un t_cnico. Samsung Electronics no se hace
responsable de losda_os causados al producto o al usuario sieste ha efectuado la instalaci6n deltelevisor.
Instalacibn de dispositivos de montaje conformecon VESA
(1) (2)
1. Sitt_eel televisor boca abajo sobre un paso suave
o un cojin_ encima de una mesa.
2.Ajuste el soporte presionando el botOnde la parte
posterior.
3.Alinee el adaptador de montaje (no suministrado)
con los orificios de la parte inferior del soporte
y suj_telo con los cuatro tomillos que se
suministran con el brazo basculante, el soporte
de montaje en pared o cualquier otro mecanismo
de soporte (no suministrado).
Uso de las tapetas decorativas
(2)
1. Cuando instale el televisor en una pared sin
utilizar etsoporte, inserte las tapetas decorativas
como se describe en la ilustracidn (1).
2. Una vez insertadas, afirmelas con los cuatro
tornillos como se describe en la ilustracidn (2).
Instalacibn del soporte
1. Acople el TV LCD al soporte.
Eltelevisor Iodeben transportardos omas personas.
Cuando monte etsoporte debe distinguir entre la partefrontal y la posterior del soporte.
Para asegurarse deque instala el televisor en etsoporte at nivet adecuado_ no aplique una presi6nexcesiva en la parte
superior izquierda y derecha deI televisor.
2. Apriete dos tornillos en la posiciOn O Y, a continuaci0n_ apriete dos en la posicidn _.
Levante el producto y apriete los tornillos. Si aprieta los tornillos con el TV LCD tumbado, _ste se puede inctinar
hacia un lade.
Desconexibn del soporte
1. Desmonte los 4 tornillos de la parte posterior del TV.
2. Separe el soporte del TV.
Eltelevisor Iodeben transportar dos o m_s personas.
Especificaciones del equipo de montaje en la pared (VESA)
tnstale el montaje mural en una pared solid& perpendicular al suelo.
Para colocarlo en otros materiales de construcci0n, pOngase en contacto con el distribuidor mas cercano.
Si se instala enel techo o en una pared inclinada, puede caerse y causar graves lesiones personales.
46 ~52 600 * 400
LCD-TV
700 * 400
57
(NoVESA)
57 ~70 800 * 400
80 ~ 1400 * 800
PDP-TV
M6
4
M8
6
4
M8
:_ Las dimensiones estandar delos equipos demontaje mural se muestran en la tabta anterior.
> AI adquirir etequipo de montaje en la pare& tambien se distribuye un manual de instalaci6n detaflado y todas las piezas
necesarias parael montaje.
>- Nousetorniltos con un tamafio superior atestandar,ya que pueden causar dafios en el interiordel televisor.
Para rnontajes murates que no cumplen las especificaciones de torniflos estandar VESA, la Iongitudde _stos puede variar
dependiendo de lasespecificaciones.
>* Nousetornitlos que no cumplan lasespecificaciones detorniflosestandar VESA.
Noaprieteexcesivamente lostorniltos, ya que podria da_ar elproducto oprovocar la caida de 6stecon riesgode causar
lesiones personates. Samsung no se haceresponsable de este tipode accidentes.
Samsung no se hace responsabte de dafios olesiones personales cuando se usa un rnontaje mural que no cumple las
especificaciones VESA osi el cliente no sigue las instrucciones de instalaci6n del producto.
Nosupere los 15 grados deinclinaci6n cuando monte estetelevisor.
,L_ Noinstale el equipo de montaje mural mientras et televisor esta encendido. ]
Se podria producir una descarga electrica con riesgo de causar lesiones personates.
1
Uso del cierre antirrobo kensington
Elbloqueo Kensington es un dispositivo que se usa para fijar fisicamente el sistema cuando se usa en un lugar p0blico.
Et dispositivo de bloqueo debe adquirirse potseparado. La apariencia y el m_todo de bloqueo pueden diferir dela
ilustraci6n seg0n losfabricantes. Consulte el manual que acompa_a al bloqueo Kensington para utitizarlo correctamente. El
dispositivo de bloqueo debe adquirirse por separado.
Cable l
Figura 2
Figura 1
<Opcional>
La ubicaciOn del "Bloqueo Kensington" puede vadar seg_n el modelo
1. lnserte el dispositivo de bloqueo en la ranura Kensington del TV LCD (Figura 1)y girelo en el sentido det bloqueo
(Figura 2).
2.Conecte el cable del bloqueo Kensington.
3. Fije el bloqueo Kensington a un mueble o a un objeto pesado que no se mueva.
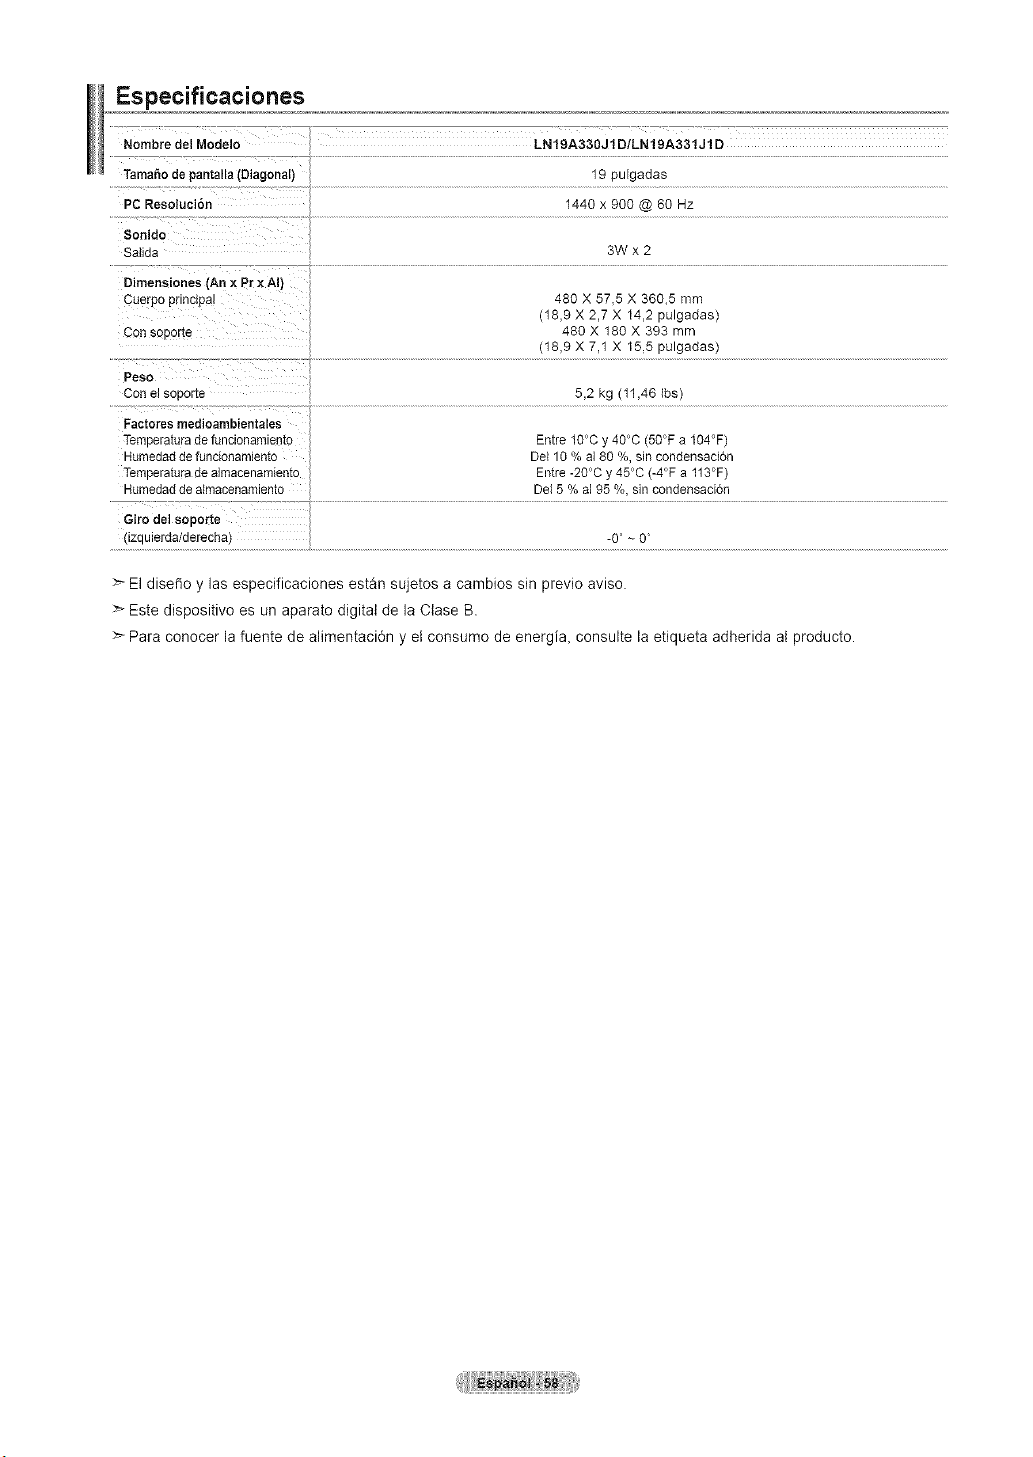
Especificaciones
Nombre del Modelo LN19A330J1D/LN19A331J1D
TamaSode pantalla(Diagonal)
PCResoluci6n
19 puFgadas
1440 x 900 @ 60 Hz
Sonido
Salida
3Wx2
Dimensiones (An × Pr xAIi
Cue-po pnnciea
Con sopor[e
480 X 57,5 X 360,5 mm
(18,9 X 2,7 X 14,2 pulgadas)
480 X 180 X 393 mm
(18,9 X 7,1 X 15,5 pulgadas)
Peso
Con e!sooor[e
5,2 kg (11,46 Ibs)
Factores medioambientales
TemDelaturadefuncionamiemc
Humedadde funcionamiento
]-emDera_uradealmacenarniento
Humedadde aimacenamlento
Entre 10°Cy 40°C (50°F a 104°F)
De110 % a180 %, sin condensacion
Entre -20°Cy 45°C (-4°F a 113°F)
Det5% a195 %, sin condensaci6n
Giro de] soporte
ZaUleraa/aerecn_ -0" ~ 0
>_El disedo y las especificaciones estan sujetos a cambios sin previo aviso.
:_Este dispositivo es un aparato digital de la Clase B.
>- Para conocer la fuente de alimentaci6n y etconsumo de energi& consulte la etiqueta adherida al producto.