For your safety and continued enjoyment of this product, always read the instruction booklet carefully before using.
Instruction Booklet
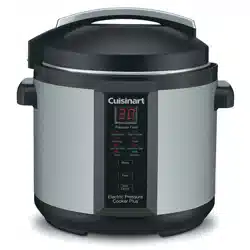
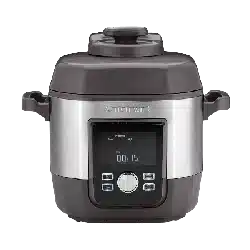
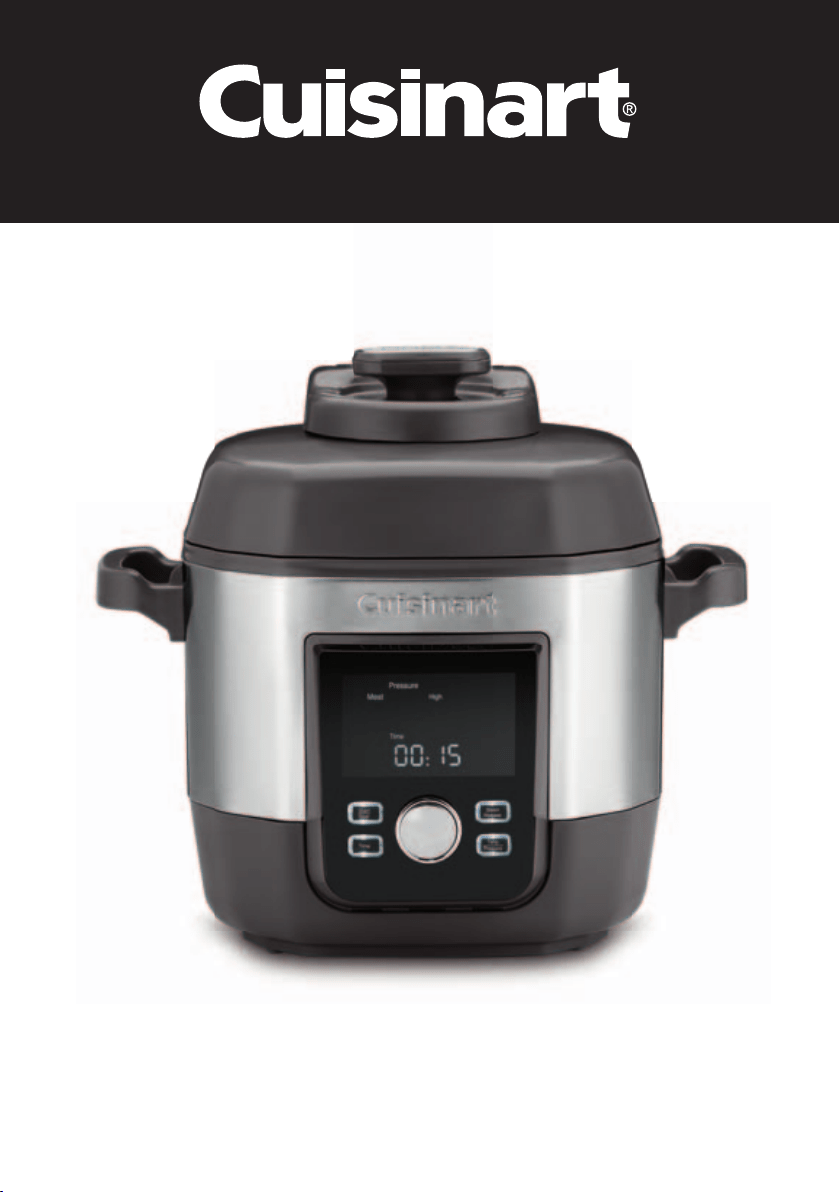
Meal Maker Multi-cooker - CPC-900XA

2
IMPORTANT
SAFEGUARDS
READ ALL INSTRUCTIONS BEFORE USING.
When using any electrical appliance,
especially when children are present, basic
safety precautions should always be taken
to reduce the risk of fire, electric shock and/
or injury, including the following:
•
This appliance is intended for
HOUSEHOLD USE ONLY.
•
Always attach plug to appliance first,
before plugging into wall outlet. To
disconnect, turn unit off, then remove
plug from outlet.
•
Never move the multi-cooker whilst the
unit is under pressure, do not place the
multi-cooker in a heated oven or on any
stovetop.
•
Do not touch hot surfaces of multi-cooker.
Use handles only.
•
This appliance is not intended for use by
persons (including children) with reduced
physical, sensory, or mental capabilities, or
lack of experience and knowledge unless,
they have been given instruction and or
guidance concerning use of the appliance
by a person responsible for their safety.
•
Children should be supervised to ensure
that they do not play with the appliance.
•
NEVER ATTEMPT TO OPEN LID WHILE
THE UNIT IS OPERATING. Do not open
the multi-cooker until the unit has cooled
and all internal pressure has been released.
If lid is difficult to rotate (open), this
indicates that the cooker is still
pressurized. Wait a few minutes and try
again. Do not force it to open. Any
pressure in the multi-cooker can be
hazardous. See Instructions for Use, page 7.
•
Extreme caution must be used when
moving a multi-cooker containing hot
liquids or foods.
•
Do not use the multi-cooker for other than
its intended use.
•
Do not place food or liquid directly into
stainless steel base. Only the removable
cooking bowl is designed to contain food
or liquid.
•
This appliance cooks under pressure.
Improper use may result in scalding injury.
When using this appliance for any function
other than saute, ensure the lid is properly
assembled and locked into position before
use.
•
Do not fill unit over the Max Fill line (15
cups). When cooking foods that expand
during cooking, such as dried vegetables,
do not fill the unit more than 12 cups.
NOTE: This includes legumes, beans, and
grains. Overfilling may cause a risk of
clogging the pressure limit valve and
developing excess pressure.
•
The ducts in the pressure regulator
allowing the escape of steam should be
checked regularly to ensure that they are
not blocked.
•
To protect against electric shock, do not
immerse cord, plug, connector, or outer
vessel in water or other liquids.
•
Unplug from outlet when not in use and
before cleaning. Allow to cool before
putting on or removing parts.
•
Do not operate any appliance with a
damaged cord or plug or after the
appliance malfunctions or has been
damaged in any manner. e
•
Do not let cord hang over edge of table
or counter, or touch hot surfaces.
•
The use of attachments not recommended
by Cuisinart may be hazardous.
•
Do not use outdoors.
•
Do not use under hanging cabinets; or in
a confined space. Steam from pressure
release may cause damage.

3
•
Be aware that certain foods, such as apple
sauce, cranberries, pearl barley, oatmeal
and other cereals, split peas, noodles,
macaroni, rhubarb, or spaghetti can foam,
froth and sputter, and clog the pressure
release devices. These foods should not be
cooked on their own in the multi-cooker.
NOTE: Your Instruction Booklet may contain
recipes that use the above ingredients. You
must follow recipe exactly as written.
•
Always check the pressure release devices
for clogging before use.
•
Do not use this multi-cooker for pressure
frying oil.
•
When storing, always unplug the unit
from the electrical outlet. Not doing so
could create a risk of fire.
•
To prevent risk of explosion and injury,
replace seal ring as recommended by the
manufacturer. See Operating Instructions.
•
Intended for countertop use only.
•
CAUTION: To prevent damage to the
appliance do not use alkaline cleaning
agents when cleaning, use a soft cloth and
a mild detergent.
•
Appliances are not intended to be
operated by means of an external timer or
separate remote-control system.
WARNING:
Spilled food can cause serious burns. Keep
appliance and cord away from children. Never
drape cord over edge of benchtop, never use
outlet below benchtop. Do not use an
extension cord when children are present. .
RELEASING PRESSURE
Never place your hands, arms or face over the
pressure release valve when cooker is in use.
SAVE THESE
INSTRUCTIONS
SPECIAL CORD SET
INSTRUCTIONS
A short power-supply cord is used to
reduce the risk resulting from it being
grabbed by children, becoming entangled
in, or tripping over a longer cord.
Extension cords may be used if care is
exercised in their use.
If an extension cord is used, the marked
electrical rating of the extension cord must
be at least as great as the electrical rating of
the appliance, and the longer cord should
be arranged so that it will not drape over
the countertop or tabletop where it can be
pulled on by children or tripped over.
CONTENTS
Important Safeguards ...........................2
Special Cord Set Instructions ...............3
Parts and Features ................................4
Getting to Know Your Control Panel ....5
Start-Up Screen ....................................6
Preparing the Pressure Cooker for
First Use ................................................7
Operating Instructions ..........................7
Selecting the Cooking Function,
Temperature & Time.............................8
Multicooker Functions ..........................9
Pressure Release .................................11
Non-Pressure Cooking Functions .......12
Changing Settings throughout Use ....12
Keep Warm.........................................13
Safety Features ...................................13
Cleaning and Maintenance ................14
Tips and Hints ....................................15
Cooking Guide ...................................16
Troubleshooting .................................20
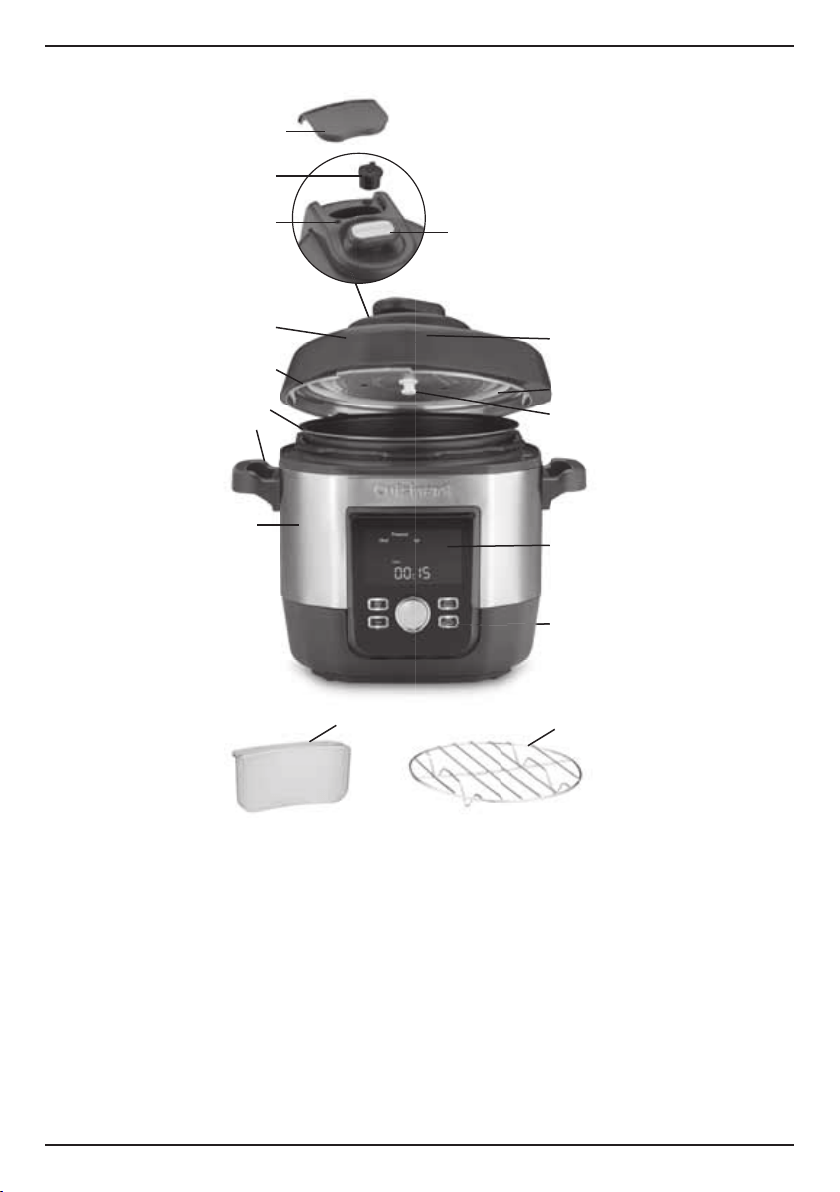
A
B
I
C
D
E
G
F
K
J
M
L
N
H
O
E
A. Pressure Limit Valve
B. Red Float Valve (Pressure Indicator)
C. Silicon sealing ring
D. Removable Stainless Steel Cooking Pot
E. Condensation Collector
F. Cool touch handles
G. Outer Body
H. Removable Power Cord (not shown)
I. Steam Cover
J. Lid Handle
K. Lid
L. Rubber Grommet
M. Upper Ring
N. Control Panel
O. Trivet/Rack
4
PARTS AND FEATURES
5
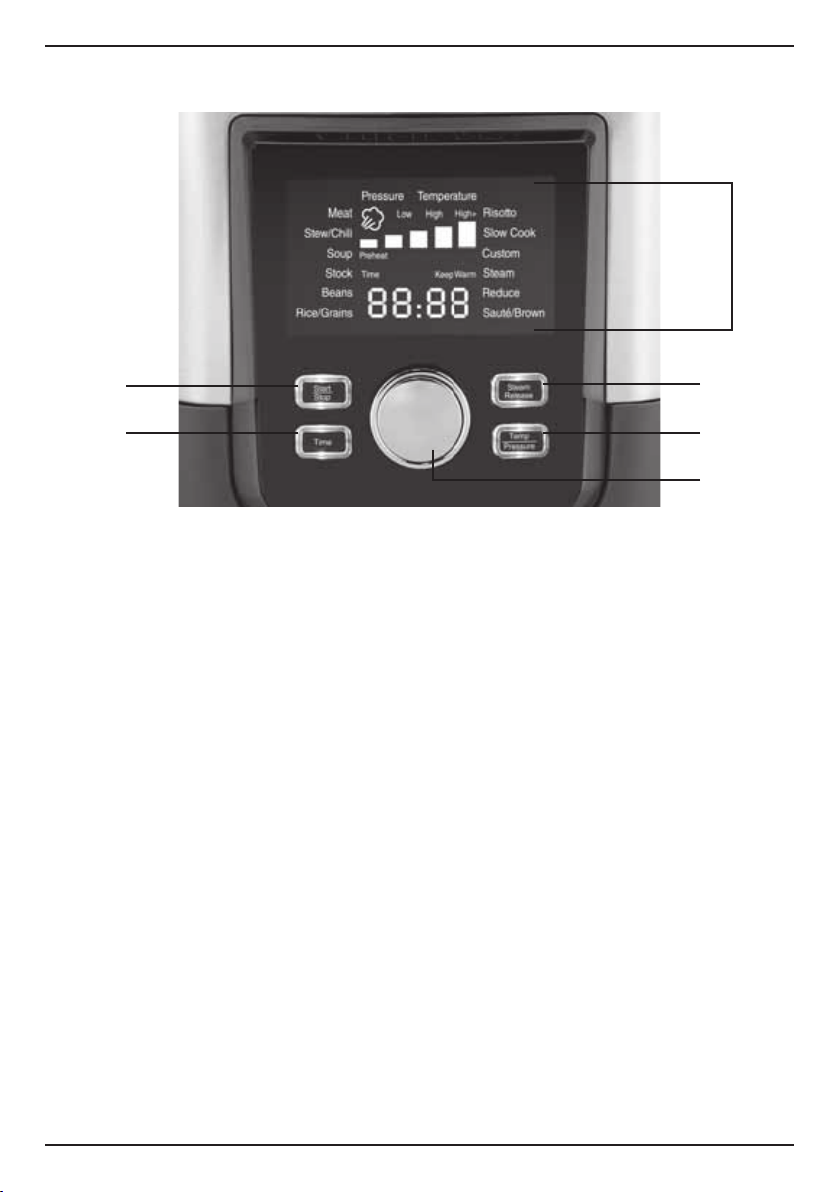
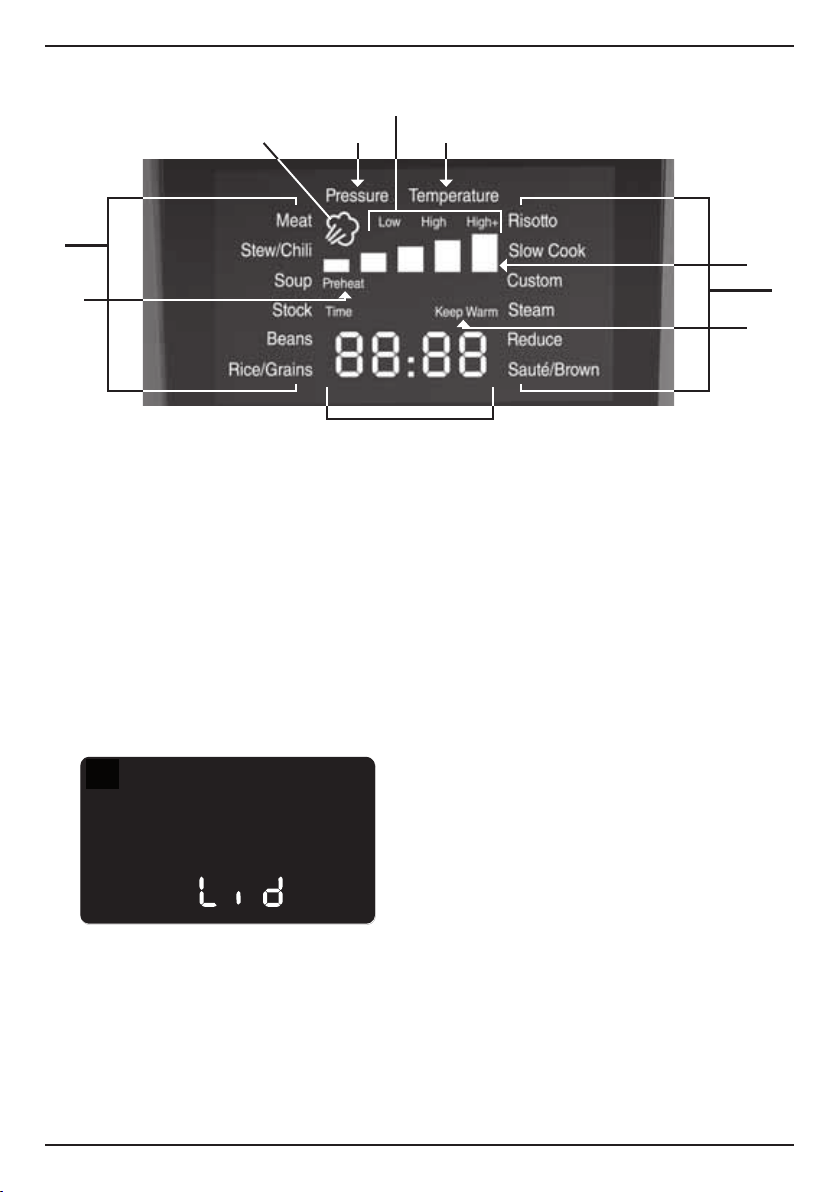
GETTING TO KNOW YOUR CONTROL PANEL
A. START/STOP Button
Press to start and stop cooking, and press
and hold to return to the functions menu.
B. Time Button
Press to change the cooking time.
C. Steam Release Button
Press and hold to automatically open
the pressure release valve and release
steam. (Quick steam release)
D. Temp/Pressure
Press to change the cooking temperature
or pressure setting.
E. Select and Confirm Dial
Use to select cooking function. Set the
temperature and the timer. Use dial to
increase temperature or pressure setting
and time, then press dial to confirm your
settings.
F. Large LCD
The backlit LCD screen is easy to read; it
displays the Cooking Function(s),
Temperature, Pressure Setting, Timer,
Preheat, the Preheat Bars, Keep Warm,
and Steam Release icon.
A. C.
F.
B. D.
E.
1.
6
START-UP SCREEN
A. Cooking Functions
Pressure cooking functions: Meat, Stew/
Chili, Soup, Stock, Beans, Rice/Grains,
Risotto, Custom.
Non-Pressure cooking functions: Slow
Cook, Reduce, Sauté/Brown, Keem Warm
& Steam.
B. Time Display
Timer keeps track of your cooking time.
The time display will also indicate when
the lid is open or closed incorrectly by
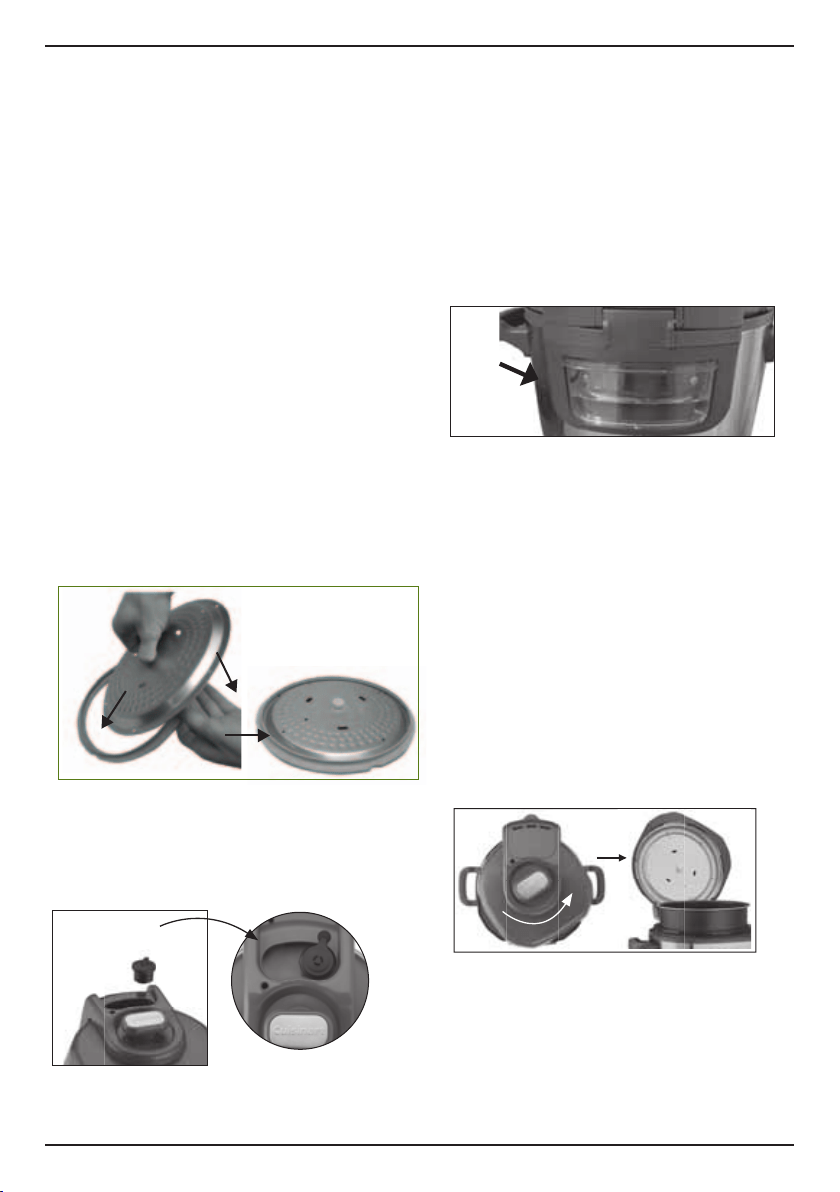
displaying the word LID (see figure 1).
C. Pressure/Temperature Settings
Low, High, and High+ pressure settings.
Low and High temperature settings.
D. Pressure
Indicates you are cooking with
a pressure cooking function.
E. Temperature
Indicates you are cooking with a
non-pressure cooking function.
F. Preheat
Appears in the LCD when the unit is
preheating.
G. Preheat Bars
Appear when, in temperature mode, to
show heat-up progress. When pressure
cooking, the preheat bars appear to show
progress as pressure builds, and decrease
as pressure is being released.
NOTE: On occasions when pressure
cooking the last preheat bar may still be
visible after steam has been released.
The unit may also go into Keep Warm
function. Press Steam Release button
again and rotate lid to open.
H. Keep Warm
Appears when the cooking time is
complete, on most functions, and the unit
has entered Keep Warm mode. Can also
be used to keep cooked food warm for
serving.
I. Steam Release Icon
Appears when the Steam Release button
is pressed and steam is being released
from the unit.
A.
B.
A.
H.
G.
F.
C.
D.
E.
I.
2.
3.
4.
1.
7
PREPARING THE PRESSURE
COOKER FOR FIRST USE
1. Remove any promotional material or labels.
2. Remove the lid by turning the handle anti-
clockwise and lifting the lid upwards.
3. Wash the removable cooking bowl, stainless
steel lid and silicone sealing ring in hot, soapy
water, then rinse and dry.
4.
Attach the silicone sealing ring onto the
metal plate with the following method as
directed in figure 1. Holding the knob on
the metal plate, place the assembly over
the centre post of the inner lid and press
down firmly to secure. BE SURE KNOB
FACES OUTWARDS. See note on metal
plate.
IMPORTANT:
If the silicone sealing ring is
not fitted properly, the unit may not seal
and steam or hot liquid may escape.
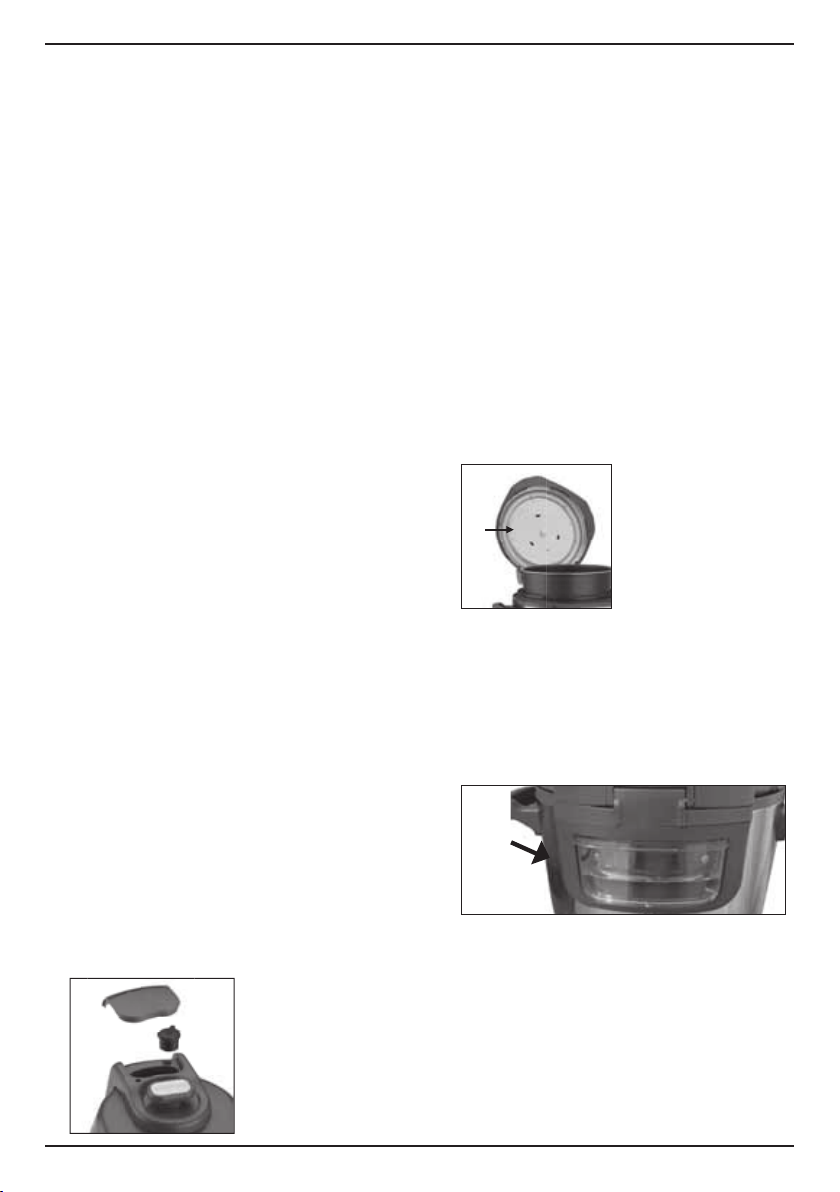
5. Position the pressure limit valve (located on
hinge area of the lid) as directed in figure 2.
The float in handle area must be fully down
to properly seal the pot before cooking.
OPERATING INSTRUCTIONS
1
.
Place the multi-cooker on a clean, flat
surface.
2
.
Plug your multi-cooker into a 230/240V
power outlet. The LCD screen will
illuminate.
3.
Ensure the condensation collector is in
place at the rear of the unit as shown in
figure 3.
4.
Remove the Steam Cover and ensure the
pressure limit valve on the hinge area of
the lid is in place, as shown in figure
3.
NOTE: The pressure limit valve does not
click or lock into place. Even though it will
have a loose fit, it is safely secured. Once
the pressure limit valve is in place,
replace the steam cover.
5.
To open lid, grasp the handle and turn anti-
clockwise. Lift to open the lid. For safety do
not have your face to close to the lid when
opening. The unit will beep two times when
turning the handle and two times when the
lid is raised
.
6.
Add food and liquids to the cooking pot as
the recipe directs. The cooking pot may
move if you are stirring food in it, so use a
heatproof cloth to hold it still if required
.
NOTE: The total volume of food and
liquid must not exceed 15cups/Max Fill
8
line of the cooking pot. For foods such as
dried vegetables and beans, or rice and
grains, the total volume must not exceed
12 cups.
NOTE:
Overfilling may clog the pressure
limit valve, which can cause excess pressure
to develop.
IMPORTANT: Always use at least 1 cup
of liquid when pressure cooking.
7.
If the sealing ring assembly
has been
removed from lid, check to ensure flexible
sealing ring is securely in place on the
metal plate. Then, holding the knob on
the metal plate, place the assembly over
the centre post of inner lid and press
down firmly to secure. BE SURE KNOB
FACES OUTWARDS. See note on metal
plate.
8.
To close the lid, remove any food residue
from upper rim of cooking pot to ensure
a proper seal. Lower the lid, then turn the
lid handle clockwise to close into place.
The unit will beep two times when
turning the handle and two times when
the lid is lowered.
NOTE: If the lid is not closed correctly,
scalding may result. LID will appear
flashing in the LCD and the unit will beep.
SELECTING THE COOKING
FUNCTION, TEMPERATURE &
TIME
Select Cooking Function (see page 9 for
explanation of cooking functions):
With the unit turned on and the LCD
displayed, rotate the Select and Confirm
dial to select the desired cooking function.
The function will flash. To confirm the
cooking function, press the Select and
Confirm dial. The selected function is now
confirmed and no longer flashing.
Once the cooking function is confirmed, the
START/ STOP, TIME and TEMP/PRESSURE
buttons will flash. At this time you can start
cooking by pressing the START/ STOP
button or change the default temperature
and time.
Setting the Temperature
Each cooking function has a default cooking
temperature (Low, High) or pressure setting
(Low, High, and High+). To change the
default temperature or pressure setting,
press the TEMP/PRESSURE button. The
default temperature will flash. Rotate the
Select and Confirm dial to the desired
temperature / pressure setting. To confirm
the temperature / pressure setting, press
the Select and Confirm dial.
The High + Pressure Setting
High pressure + cooks food under higher
pressure and assists in reducing cooking
time a little more.
Setting the Time
Each cooking function has a default cooking
time. To change the default time, press the
TIME button. The default time will flash.
Rotate the Select and Confirm dial to
increase or decrease the time. To confirm
the time, press the Select and Confirm dial.
5.
15 Cups
6.
12 Cups

9
Once you have confirmed the cooking
function, temperature and time, press the
START/STOP button to begin cooking. The
first preheat bar and the word Preheat will
appear in the LCD.
NOTE: Preheat and the preheat bars will
not appear for Slow Cook, Steam, Reduce
or Sauté/Brown. They may occasionally
appear after steaming (cooking) if pressure
has built up in the cooking pot. Press the
Steam release button then open the lid.
MULTICOOKER FUNCTIONS
Pressure Cooking Functions
1. Meat –This preset is programmed for large
cuts of meat such as beef brisket or pork
shoulder, as well as the perfect setting for
cooking a whole chicken. The default is
High+ pressure for 35 minutes, but High and
Low pressures are available as well. The time
is adjustable from 1 minute to 4 hours.
Natural Pressure Release is recommended to
retain more flavour (if time permits). Or use a
combination of Natural and Quick Pressure
Release as recommended in our recipe
book. For best results the Sauté/Brown
function is recommended to brown meats
prior to cooking to add more flavour. Refer
to cooking chart on page 17 as a guide for
pressure cooking different meat cuts.
Selecting & Preparing Cuts of Meat
Pressure cooking allows more affordable and
less tender cuts of meat to be cooked
quickly with a tender, juicy result.
For best results, trim excess fat from the
meat as this will form excess liquid as the
meat cooks.
TIP:
Be sure to add at least 1 cup of liquid
when pressure cooking meats for 45 minutes
or less, and 1½ cups if cooking for longer
amounts of time. Be sure to add vegetables,
such as chopped onions, carrots and celery,
and aromatic herbs such as garlic, parsley,
thyme, etc., for added flavour. Cooking
times will vary slightly due to individual size
of pieces and starting temperatures.
The reduce function can be used to simmer
the cooking liquid into a flavourful sauce
after removing the meat from cooking pot.
2. Stew/Chili/Casserole – Whether cooking a
hearty beef or lamb stew, a casserole or a
chili, this is the best setting to use. Be sure
to use the Sauté/Brown function to brown
the meat prior to cooking, especially if using
mince meat. The default is High pressure for
30 minutes, but High+ and Low are available
as well. The time is adjustable from 1 minute
to 4 hours.
Use Natural Pressure Release to achieve best
results when time permits. Or use a
combination of Natural and Quick Pressure
Release as recommended in our recipe book.
3. Soup – This preset can be used to prepare
soups in a fraction of the time it takes to
cook on the stovetop. Place the meat (if
using), vegetables and other ingredients into
the cooking pot, add enough liquid to cover.
Most recipes will require High pressure, but
Low and High+ are also available. The
default cooking time is 10 minutes
4. Stock – When preparing richer, longer-
cooking stocks, use the Stock preset. This is
for poultry, meat, and vegetable stocks.
Expert Tip: Save vegetable scraps
throughout the week (or month), wrap well
and store in the freezer. When you’re ready
to make a stock, take out those scraps that
would otherwise be headed for the garbage
or compost, and instead use them to flavour
a delicious stock. Add ingredients (bones,
meat, vegetables, herbs) plus enough water
to cover, being sure not to exceed the
maximum fill line.

10
The default is High pressure for 30 minutes,
but both Low and High+ pressure are
available. For richer stocks, cook for 1 hour
30 minutes. Use Natural Pressure Release to
achieve best results when time permits. Or
use a combination of Natural and Quick
Pressure Release as recommended in our
recipe book.
5. Beans – This preset can be used to prepare
dried beans quicker and tastier than on the
stovetop or in the oven.
Preparing Dried Pulses (Beans and Peas)
• Before cooking dried beans, pick over and
discard any broken or shriveled beans or
bits of dirt and debris. Rinse beans and
drain.
• Beans may be soaked overnight, but the
multi-cooker allows you to cook beans
without presoaking. They will require
longer cooking time.
• Onions, garlic, celery, sprigs of fresh herbs
or a bay leaf may be added for additional
flavour. Do not salt before cooking, as salt
inhibits cooking.
• Add 2 teaspoons oil per cup of beans to
prevent foaming.
• After cooking beans, clean lid, gasket,
pressure limit valve, and red float valve
carefully.
• When cooking unsoaked beans use high
pressure and Natural Pressure Release
when time permits.
• When cooking soaked beans, use High
pressure and a combination of Natural
Pressure Release for 10 minutes and then
Quick Pressure Release.
• If beans are not completely cooked (this is
partially dependent on the age of the
dried beans, something you will have no
control over), select Reduce and allow the
beans to simmer until cooked tender. As
with vegetables, it is better to undercook
and allow to simmer to complete cooking.
Add beans and other ingredients to
cooking pot. Add enough liquid to cover
beans by about 5cm. The default is High
pressure for 30 minutes (this is for
presoaked beans), but be sure to use our
Cooking Guide to select the best cooking
time for the specific beans that are being
prepared.
After cooking drain away any excess liquid
and use the pulses / beans in recipes.
IMPORTANT: Never fill multi-cooker more
than half full when cooking beans.
6. Rice/Grains – Cook a variety of rice and
grains using this preset. Use the Cooking
Guide on page 19 to determine the
appropriate amount of water, as well as
cooking pressure and time. Most items use
High pressure and Quick Pressure Release.
The default is High pressure for 5 minutes.
NOTE: To speed up pressure building when
cooking rice, boiling water or stock can be
used. Cooking times vary according to the
nature of foods – times provided are a guide
only.
Do not exceed 12 cups of combined liquid and
foodl when pressure cooking foods that expand
such as rice, beans, grains and legumes.
IMPORTANT: Do not use the multi-cooker
to cook instant rice.
7. Risotto – This preset offers a (mostly) hands-
off approach to risotto. After using the
Sauté/Brown function to sauté aromatics and
toast the rice, the liquid is added, the lid is
closed and, once under pressure, it is only 5
minutes to achieve perfect risotto. Use the
Steam Release button to quickly release
pressure to ensure the risotto stays nice
and creamy. The default is High pressure and
the time is 5 minutes.

11
8. Custom – This preset is to allow full
flexibility when pressure cooking. This is
perfect for foods that do not fit within the
preset programs, such as vegetables,
desserts, and other dishes. The default is
Low pressure for 1 minute.
NOTE: For all pressure cooking functions the
unit will switch to Keep Warm function after
cooking time elapses. If there are any
preheat bars still visible after cooking time is
complete and the unit switches to Keep
Warm press the Steam Release button then
open the lid.
PRESSURE RELEASE
To Open the Lid
When pressure cooking cycle is finished, the
unit will automatically switch to the Keep
Warm mode. At this point, you may choose
to release pressure in one of three ways –
Natural Pressure Release, Quick Pressure
Release, or a combination of both. The
choice will be dictated by the particular
food being cooked and indications in the
recipe. If adapting your own recipe for
pressure cooking, find a similar recipe in our
recipe booklet and use that as a guide.
1. Natural Pressure Release
Allow the unit to remain on Keep Warm. The
pressure will begin to drop. Time for
pressure to drop will depend on the amount
of liquid and food in the multicooker and the
length of time that pressure was maintained.
As pressure is being released, the preheat
bars will count down. Natural Pressure
Release could take from 20 to 80 minutes.
During this time, cooking continues, so it is
not recommended for certain cuts of meats
and some desserts. When pressure is fully
released, the unit will beep once, all preheat
bars will disappear from the screen and the
lid will unlock to open.
2. Quick Pressure Release
Following pressure cooking you will hear 4
beeps indicating the process is finished.
Press and hold the Steam Release button.
The Steam Release icon will appear in the
LCD and steam will immediately begin to
release through the hinge area at the back of
the lid. Keep face and hands away from
steam as it is released. Do not release
pressure under wall cabinets, which can be
damaged by steam.
As pressure is being released, the preheat
bars will count down. When pressure is fully
released, the unit will beep once and all
preheat bars will disappear from the screen,
the pressure indicator will drop and the lid
will unlock to open. Using Quick Pressure
Release stops the pressure cooking
immediately. If further cooking is necessary,
the unit may be re programmed to return to
Pressure Cooking.
3. Combination Natural Pressure Release
and Quick Pressure Release
Some recipes use a combination of Natural
Pressure Release and Quick Pressure
Release. Allow Natural Pressure Release for
the time indicated in the recipe (food will
continue to cook slightly), followed by Quick
Pressure Release. This is a good time saving
method.
NOTE: This program does NOT go into
Keep Warm after cooking is complete.

12
NON-PRESSURE COOKING
FUNCTIONS
1. Slow Cook – Treat this program like you
would any slow cook. It has the option to
cook with a Low or High slow-cook
temperature, with a timing of 30 minutes to
20 hours. When using the Low temperature,
cooking times will usually be on the higher
side, 8 to 20 hours often preferred for
deeper flavour.
When using the High temperature, cooking
times are shorter, usually 2 to 6 hours. The
default for this program is High for 4 hours.
When slow cooking place a minimum of 1
litre of combined food and liquid into the
removable cooking bowl
IMPORTANT: Never use slow cook without
food and liquids in the bowl. Always have the
lid closed when slow cook is in operation.
Use a pot holder to remove the pot from the
bowl when it is hot.
NOTE:
In some rare cases, pressure can
build in the unit while using the Slow Cook
function. If pressure does build during Slow
Cook, simply press the Steam Release button
to release pressure. Pressure present will be
indicated by the preheat bars being visible.
2. Reduce – This program is primarily used at
the end of a pressure cooking or slow
cooking task to thicken sauces and reduce
liquids. It can also be used to thicken a
soup. There is only one temperature and it is
not adjustable. The default time is 10
minutes, but is adjustable from 1 minute up
to 2 hours.
NOTE: This program is to be used without
closing the lid.
3. Sauté/Brown – Sometimes recipes call for
sautéing vegetables and aromatics before
cooking, and other times you may want to
brown meat before pressure cooking. This
program has both of those options. There
are two temperatures, Low for sautéing and
High for browning. Use the Time button, to
set time required for this function.
When Sautéing/Browning function is used it
will reduce the time it takes for full pressure
to build and pressure cooking to begin as
the bowl is already hot
NOTE: This program is to be used
without closing the lid. Use a wooden
spoon to scrape up brown bits. DO NOT
use metal utensils.
4. Steam – This setting only has one
temperature, so it is not adjustable. The
default time is 20 minutes, but it is
adjustable from 1 minute to 2 hours. If food
requires further cooking simply set steam
function and add a few more minutes.
NOTE: In some rare cases, pressure can build
in the unit while using the Steam function. If
pressure does build during steaming, simply
press the Steam Release button to release
pressure. Pressure present will be indicated
by the preheat bars being visible.
CHANGING SETTINGS
THROUGHOUT USE
To change any of your settings (cooking
function, temperature and time) at any time
during use, follow these instructions.
To change the Cooking Function
– Press
and hold the START/STOP button for approx 3
sec and the LCD will return to the main menu.
Rotate the Select and Confirm dial to select
the desired cooking function. The function
will flash. To confirm the cooking function,
press the Select and Confirm dial. The
selected function is now confirmed and no
longer flashing. Press the START/STOP
button to continue cooking.
To change the Temperature
–
Press and
hold the TEMP/PRESSURE button until the
current temperature begins to flash. Rotate
the Select and Confirm dial to the desired

13
temperature / pressure setting. The
temperature will flash. To confirm the
temperature / pressure setting, press the
Select and Confirm dial, and the unit will
continue cooking.
To change the Time
–
Press and hold the
TIME button until the current time begins to
flash. Rotate the Select and Confirm dial to
the desired time setting. The time will flash.
To confirm the time setting, press the Select
and Confirm dial, and the unit will continue
cooking. To stop cooking and return to the
start-up screen, press and hold the START/
STOP button.
YOU SHOULD NEVER ATTEMPT TO
OPEN THE LID WHILE PRESSURE
COOKING.
NOTE: During pressure cooking, when the
unit has reached full pressure, it is normal to
see a small gap between the lid and the
housing. And possibly a little steam.
KEEP WARM
Automatic Keep Warm Feature
When timer reaches 00:00, the multicooker
automatically shifts to Keep Warm mode.
Keep Warm will appear in the LCD and unit
will beep 4 times to indicate cooking is
complete. The timer will count up to show
how long the unit has been in Keep Warm.
Independent Keep Warm Feature
Use to keep cooked food warm for serving.
1. Open the lid and place prepared hot
ingredients into the cooking pot to be kept
warm.
2. Close the lid. NOTE: There is no need to
rotate lid to the closed position.
3. Power on the unit.
4. Rotate the Select and Confirm dial until
Keep Warm is flashing. Press the Select and
Confirm dial to confirm, then press the
START/STOP button to start Keep Warm.
5.
To adjust the 2-hour default Keep Warm
time, press the TIME button and use the
Select and Confirm dial to adjust time from
30 minutes up to 4 hours. Press the Select
and Confirm dial to confirm the desired time,
then press the START/STOP button to start
Keep Warm. Timer will begin counting down.
NOTE: Keep Warm time can be adjusted
at any time by repeating step 5.
NOTE: The Keep Warm setting should not
be used for more than 12 hours. The quality
or texture of the food will begin to change
after 1 hour on Keep Warm. In the Keep
Warm setting, a little condensation in the
upper ring is normal.
SAFETY FEATURES
There are six safety devices installed in the
multicooker to assure its reliability.
1. Open-and-Close Lid Safety Device
The appliance will not start pressurizing
until the lid is closed and locked properly.
The lid cannot be opened if the appliance
is filled with pressure.
2. Pressure Control Device
The correct pressure level is automatically
maintained during the cooking cycle.
3. Pressure Limit Valve
The pressure limit valve will release air
automatically when the pressure inside
exceeds the preset temperature.
NOTE: Overfilling the multicooker (see
Instructions for Use) may clog the pressure
limit valve, which can cause excess pressure
to develop.
4. Pressure Relief Device
When the multicooker reaches the
maximum allowable pressure and
temperature, the cooking pot will move
down until lid separates from the sealing
ring, releasing air pressure.
8.
7.
9.
14
5. Thermal Control
The power will automatically shut off when
the cooking pot temperature reaches the
preset value, or the multicooker is heating
without any food inside.
6. Thermal Fuse
The circuit will be opened when the multi-
cooker reaches the maximum temperature.
Power loss protection – in the event
there is a power outage while using your
multicooker,the following will occur:
- Power loss for less than 3 minutes: Unit
will turn on and cooking will resume.
- Power loss for more than 3 minutes: Unit
will turn on and Steam Release button will
flash, indicating the unit is still under
pressure. Press the Steam Release button
to release pressure and follow operating
instructions to finish cooking.
CLEANING AND
MAINTENANCE
1. Unplug the power cord before cleaning.
2. Clean the outer body with a soft cloth, such
as a paper towel or microfiber cloth. Do not
immerse the outer body in water or pour
water into it.
3. Remove the sealing ring assembly from the
inside of the lid by grasping the knob and
pulling. Set aside.
4. Ensure red float valve is clean and moves
freely.
5. Remove the Steam Cover and then the
pressure limit valve (figure 7) by gripping
and pulling firmly upward. Rinse with warm
water and dry.
6. Clean the upper and underside of the lid
with a cloth and warm water, including all
areas on the underside. Dry completely,
and replace pressure limit valve.
7. To clean sealing ring assembly, carefully
remove flexible sealing ring and clean in the
dishwasher or with a dampened cloth or
microfiber cloth. Do not use chemical
cleaners. Wash metal plate in the
dishwasher or with warm water, dry
thoroughly and replace sealing ring.
8. To clean the rubber grommet in center of
sealing ring assembly, carefully remove it,
clean it, and replace it.
9. Replace sealing ring assembly in lid. BE
SURE KNOB FACES OUT (figure 8).
10. Cooking pot is dishwasher safe. To hand-
clean the pot, use a soft cloth or sponge
and wipe.
11. To clean the condensation collector,
remove and clean it with warm, soapy
water, then reinstall it (figure 9).
12. Any other servicing should be performed
by an authorized service representative.
NOTE: If scouring is necessary, use a
nonabrasive cleaner or liquid detergent
with nylon pad or brush.

15
TIPS AND HINTS
• Many family favourites can be easily adapted for preparation in your Cuisinart
®
Meal
Maker – soups, stews, side dishes and more.
• The amount of liquid needed when pressure cooking is much less than for traditional
cooking methods.
• More nutrients are preserved during pressure cooking than with traditional cooking
methods, as less liquid is used and thus fewer nutrients are lost to evaporation.
• To adapt your own recipes, find a similar one in our recipe booklet and use it as a guide.
In general, cooking time will be at least one-third to one-half of the traditional cooking
time. Reduce your cooking liquid by at least half (but ensure you have a minimum of 1 cup
liquid)– you may need to “play” with your recipe to get it right. You may wish to add
vegetables or cooked beans at the end of cooking to avoid overcooking. You can also use
the cooking charts provided as a guide.

16
COOKING GUIDES
Poultry and Meats.....................................................................................................17
Vegetables..............................................................................................18
Rice and Grains..........................................................................................................19
Dried Beans...............................................................................................................19
Trouble Shooting........................................................................................................20
PRESSURE HEAT-UP TIMES
When pressure cooking, remember that it will take approximately 5 to 40 minutes
(depending on the starting temperature and recipe) for pressure to build and pressure
cooking to begin.
17
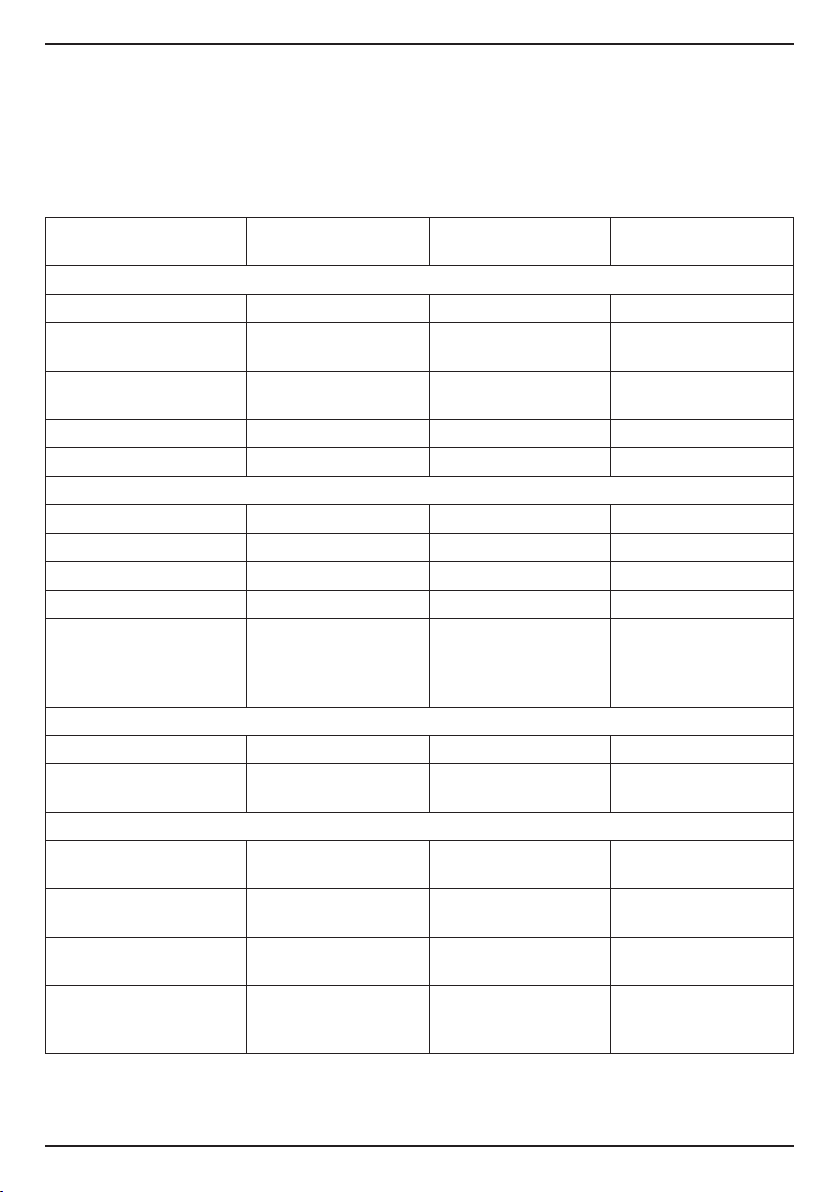
FOOD SETTING COOKING TIME
PRESSURE RELEASE
METHOD
CHICKEN
Whole, up to 2kg
High + Pressure
25 to 30 minutes
Quick Pressure Release
Chicken Breast, bone in,
1.3kg
Custom, High Pressure 8 to 10 minutes Quick Pressure Release
Boneless Chicken Breast,
1kg
Custom, High Pressure 5 to 6 minutes Quick Pressure Release
Thighs/Legs, bone in
Custom,
High + Pressure
9 to 12 minutes Quick Pressure Release
Thighs/Legs, boneless Custom, High Pressure 8 to 10 minutes Quick Pressure Release
BEEF
Pot Roast, 1.3 – 1.5kg
Meat,
High + Pressure
60 to 90 minutes Natural Pressure Release
Brisket, 500g – 1kg
Meat,
High + Pressure
55 minutes Natural Pressure Release
Corned Beef
Meat,
High + Pressure
60 to 90 minutes Natural Pressure Release
Short Ribs, 5-8cm thick
High + Pressure
50 minutes Natural Pressure Release
Stew – 3-5cm cubes
Meat,
High + Pressure
20 to 30 minutes
Natural Pressure Release
(see recipe for Beef Stew
for times with
vegetables)
LAMB
Shanks, four, 350g each
Meat,
High + Pressure
40 minutes Natural Pressure Release
Shoulder cubes for stew,
about 4cm
Meat, High Pressure 20 to 25 minutes Natural Pressure Release
PORK
Chops, Loin, bone in,
2-3cm thick
Brown Meat / High
Pressure
4 to 5 minutes, brown
first
Quick Pressure Release
Boneless Shoulder Roast,
about 1.5kg
Meat,
High + Pressure
70 minutes
Natural Pressure Release
or Combined
Spareribs, cut into 2 to
3 rib pieces
Meat,
High + Pressure
20 minutes Quick Pressure Release
Cubes for stew, 5-7cm 15 to 20 minutes
Natural Pressure Release
10 minutes, then Quick
Pressure Release
POULTRY AND MEAT COOKING GUIDE
Be sure to add at least 1 cup of liquid when pressure cooking meats for 45 minutes or less,
and 1½ cups if cooking for longer amounts of time. Most items are cooked on High
pressure or High Pressure + unless otherwise indicated. For best results and flavour, most
poultry and meats benefit from browning first. Cooking times will vary slightly due to
individual size of pieces and starting temperatures.
18
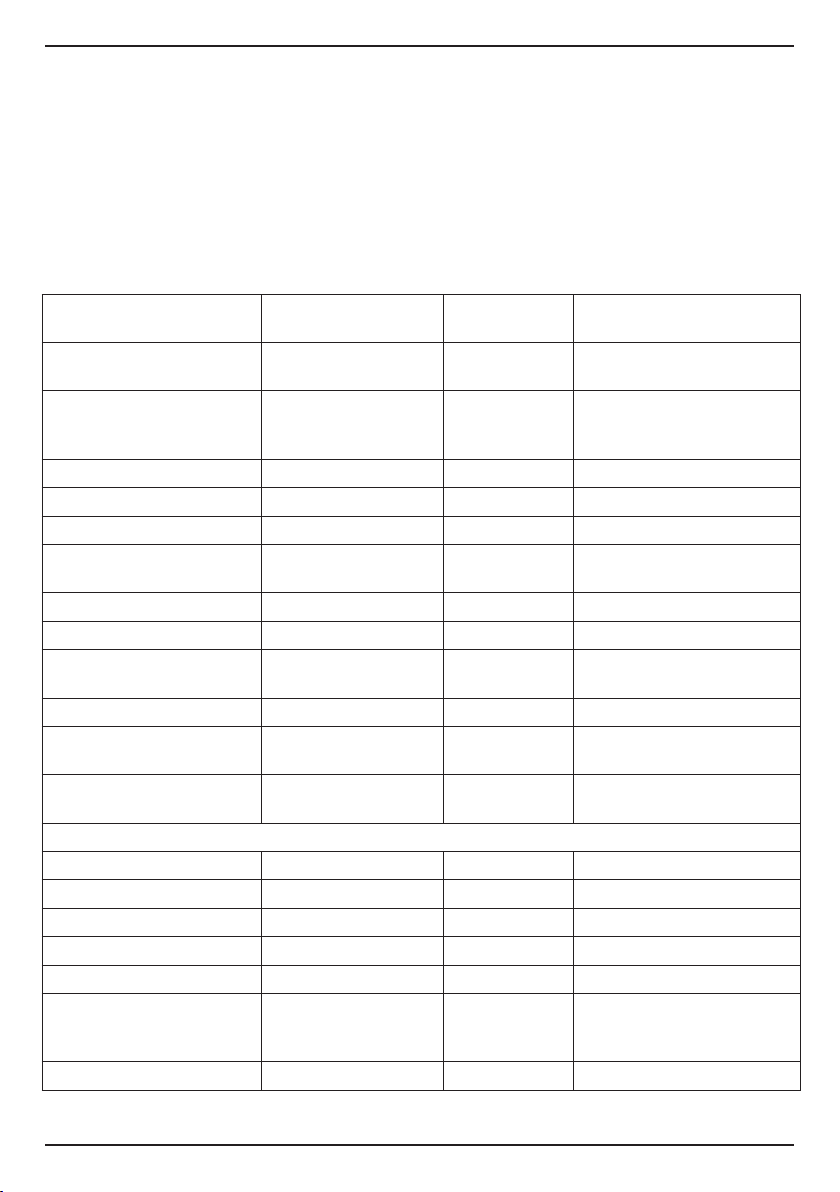
FOOD SETTING COOKING TIME
PRESSURE RELEASE
METHOD
Artichokes, 4 medium/large,
225 – 300g each
Custom, High Pressure 10 to 12 minutes Quick Pressure Release
Beans, Green or Yellow
Waxy, 500g, cut into 6cm
lengths
Custom, High Pressure 1 to 2 minutes Quick Pressure Release
Beets, medium-large Custom, High Pressure 15 minutes Quick Pressure Release
Broccoli, cut into large florets Custom, High Pressure 2 to 3 minutes Quick Pressure Release
Cauliflower, cut into large florets Custom, High Pressure +
2 to 3 minutes Quick Pressure Release
Carrots, cut into 6cm lengths
– or “baby cut”
Custom, High Pressure 8-10 minutes Quick Pressure Release
Carrots, 2cm slices Custom, High Pressure + 5 minutes Quick Pressure Release
Corn, 4 to 6 ears (use trivet/rack) Custom, High Pressure
4 minutes Quick Pressure Release
Greens, collards, kale, cut into
3cm strips
Custom, High Pressure 1-2 minutes Quick Pressure Release
Onions, baby, peeled Custom, High Pressure 2 to 4 minutes Quick Pressure Release
Parsnips, peeled, cut into
2-inch pieces
Custom, High Pressure 5 minutes Quick Pressure Release
Pumpkin peeled, cut into 2cm
wide pieces
Custom, High Pressure 5 minutes Quick Pressure Release
POTATOES
White, medium, quartered Custom, High Pressure 5 to 7 minutes Quick Pressure Release
Red, new (60 – 75g each) Custom, High Pressure 5 to 8 minutes Quick Pressure Release
Sweet, 6cm cubes Custom, High Pressure 4 to 5 minutes Quick Pressure Release
Acorn, halved and seeded Custom, High Pressure 5 minutes Quick Pressure Release
Butternut, peeled and sliced Custom, High Pressure 5 minutes Quick Pressure Release
Squash, Yellow Crookneck
or Zucchini, cut into 2cm
slices
Custom, High Pressure 2 minutes Quick Pressure Release
Brussel Sprouts, halved Custom, High Pressure 5 minutes Quick Pressure Release
VEGETABLE COOKING GUIDE
Vegetables should be well washed and peeled if necessary. Vegetables cook very quickly –
be sure to press STOP and use Quick Pressure Release immediately after audible beep
sounds. If vegetables require more cooking, turn multicooker off, and cover to steam the
vegetables until preferred texture is reached. Add ½ cup water or liquid for cooking. If
pressure cooking frozen vegetables, 1 to 2 minutes additional cooking time and longer
steaming time may be needed. When cooking vegetables, it is always best to undercook,
then allow additional time to steam – to avoid overcooking. All cooking is on High pressure
unless otherwise indicated.
19
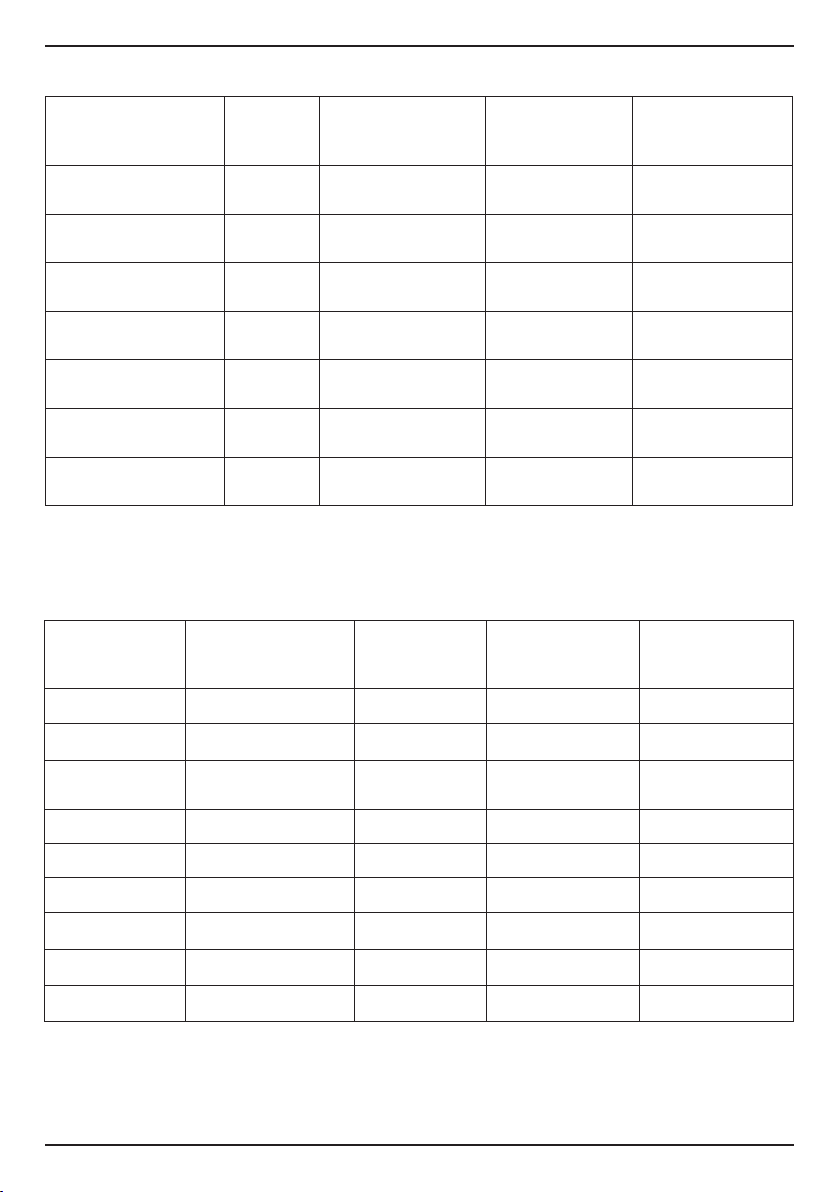
GRAINS (1 CUP) SETTING
COOKING TIME
MINUTES
(HIGH PRESSURE)
LIQUID NEEDED
PRESSURE RELEASE
METHOD
Barley (pearl) Rice / Grain 25 minutes 3 cups
Quick Pressure
Release
Brown Rice Rice / Grain 25 minutes 2 cups
Quick Pressure
Release
Bulgur Rice / Grain 20 minutes 2 cups
Quick Pressure
Release
Farro (whole grain) Rice / Grain 25 minutes 3 cups
Quick Pressure
Release
Quinoa Rice / Grain 25 minutes 1½ cups
Quick Pressure
Release
White Rice (long grain) Rice / Grain 25 minutes 1½ cups
Quick Pressure
Release
Wild Rice Rice / Grain 25 minutes 3 to 4 cups
Quick Pressure
Release
BEANS (1 CUP)
(+ 8 CUPS
WATER)
SETTING
COOKING TIME
(SOAKED
OVERNIGHT)
COOKING TIME
(UNSOAKED)
YIELD
Black Beans Beans, High Pressure 5 minutes 45 minutes 2 cups
Cannellini Beans, High Pressure 4 minutes 50 minutes 2 cups
Chickpeas
(Garbanzo Beans)
Beans, High Pressure 5 minutes 50 minutes 2½ cups
Great Northern Beans, High Pressure 4 minutes 50 minutes 2¼ cups
Lentils Beans, High Pressure N/A N/A N/A
Pinto Beans, High Pressure 5 minutes 50 minutes 2¼ cups
Navy Beans Beans, High Pressure 30 minutes 50 minutes 2 cups
Red Beans Beans, High Pressure 5 minutes 50 minutes 2 cups
Split Peas Beans, High Pressure N/A N/A N/A
GRAIN COOKING GUIDE
BEANS COOKING GUIDE
Note: All Bean Cooking is with Quick Pressure Release.
20
TROUBLESHOOTING
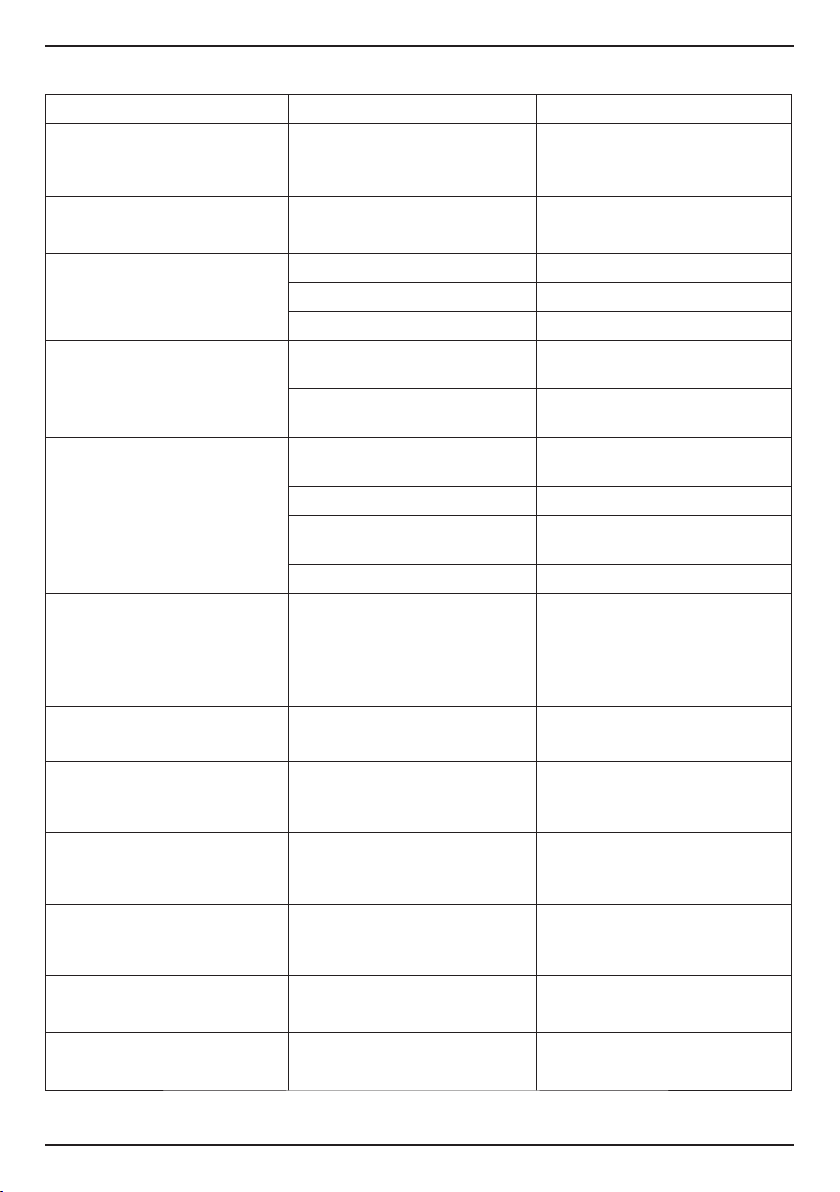
SYMPTOM POSSIBLE REASONS SOLUTIONS
Lid does not lock.
The sealing ring assembly is not
properly installed in lid.
Re-install the sealing ring assembly
as instructed in INSTRUCTIONS FOR
USE, page 7.
Cannot open the lid after
releasing the pressure.
The red float valve is still up.
Press the steam release
button again.
Air escapes from the
rim of the lid.
No sealing ring was installed. Install the sealing ring.
Food residue on sealing ring. Clean sealing ring.
Sealing ring is worn out. Replace the sealing ring.
Air continuously escapes from
the red float valve.
Food stuck on the sealing ring of
the red float valve.
Clean the sealing ring.
The sealing ring on the float valve
is worn out.
Replace the sealing ring.
The red float valve will not rise.
The pressure limit valve is not
placed properly.
See Before First Use, #2, page 7.
Not enough liquid. Check recipe for proper quantities.
Air escaping from the rim of the
lid and/or the pressure limit valve.
Email customer service on
aus_cuisinart@conair.com.
The red float valve could be stuck. Clean the sealing ring.
Unit shuts off when
START is pressed to begin
pressure cooking.
Sauté/Brown function was
just used and temperature in
unit is higher than pressure
cooking temperature, so safety
shutoff occurs.
After Sauté/Brown, let unit cool
down for 2 or 3 minutes before you
start pressure cooking, or add 1
cup or more of liquid to the unit.
The word LID appears in LCD. The lid is not closed properly.
Turn the lid handle clockwise to
close the lid into place.
The Steam Release
icon is flashing.
There is still pressure
inside the unit.
Press the steam release button and
hold for 3 seconds until pressure is
released from the unit.
It is difficult to close the lid.
The cooking pot is still hot,
causing steam to push the
lid open.
Allow contents to cool down for
several minutes before fully
engaging the lid.
Air is escaping from
the steam cover.
The pressure limit valve is
not properly positioned.
Remove the steam cover and
ensure the pressure limit valve is
properly installed.
LCD displays “E1”
and beeps 10 times.
Thermal control malfunction
Email customer service on
aus_cuisinart@conair.com.
LCD displays “E2”
and beeps 10 times.
Thermal control malfunction
Email customer service on
aus_cuisinart@conair.com..

21
NOTES:

22
NOTES:
Recipe Booklet
Recipe Booklet
Meal Maker Multicooker
Meal Maker Multicooker
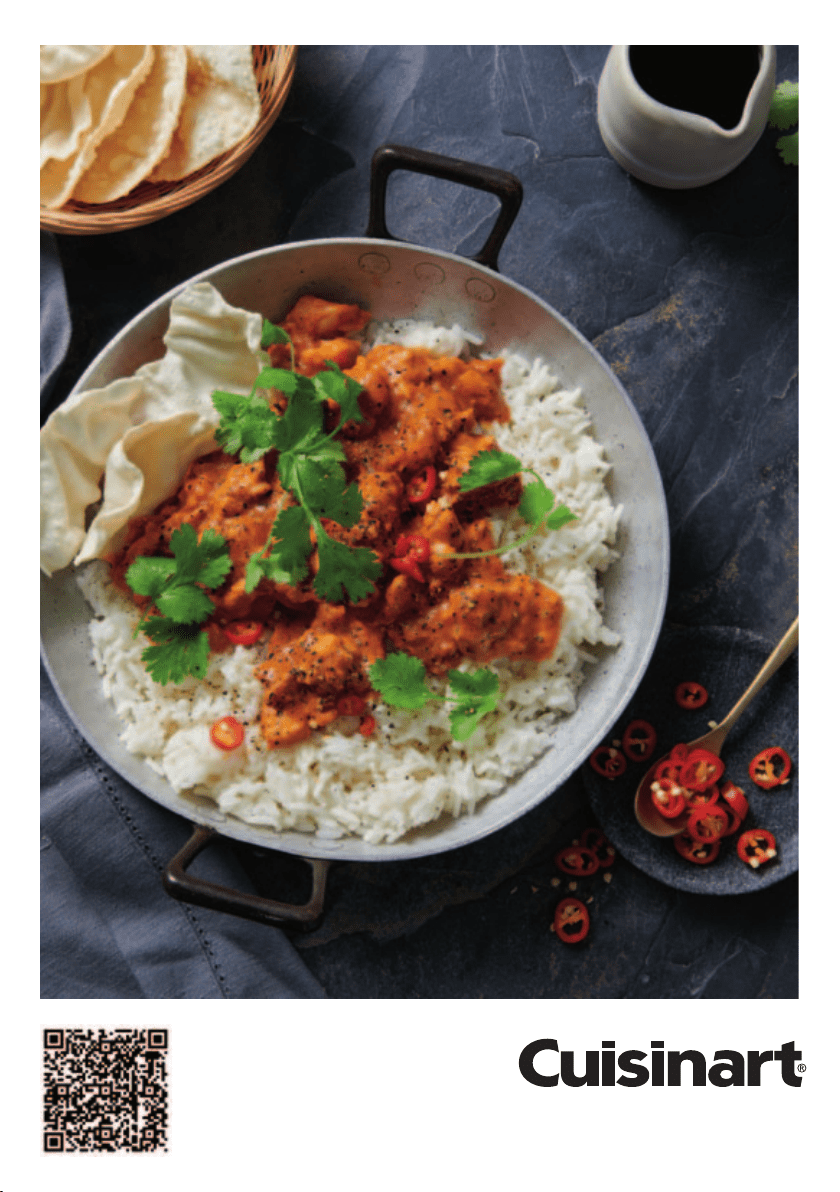
Scan to access 25 mouth
watering recipes you can
create in the Cuisinart Meal Maker.

F IB-21/274A
©2022 Cuisinart
Suite 101 Ground Floor
18 Rodborough Rd
Frenchs Forest NSW, 2086
Australia
Visit our Website:
www.cuisinart.com.au
Printed in China
Trademarks or service marks of third parties referred Printed in China to
herein are the trademarks or service marks of their respective owners.
cuisinart.com.au

25
B C M Y
100 95 90 85 80 75 70 65 60 55 50 45 40
100 95 90 85 80 75 70 65 60 55 50 45 40
100 95 90 85 80 75 70 65 60 55 50 45 40
100 95 90 85 80 75 70 65 60 55 50 45 40
50 45 4095 90 85 80 75 70 65 60 55
100
Tel:
E-MAIL: [email protected]
liao
Version no.: CPC900XA IB-21/274A
NEW
IB Size:
Die Cut:
Operator: Revise Ver:
Date:MAY/6/2022
Co-ordinator:
F
CPC900XA IB-21/274A
(0.0)
Astor You / Scias Liu
148mm(W) x 210mm(H)
Material: 105gsm gloss art paper for whole book
Coating: gloss varnishing in cover
Colors(Cover): 4C+4C
(Inside): 1C+1C(black)
0769-8919 6622 Fax: 0769-8919 6271