Loading ...
Loading ...
Loading ...
Page 9
Groove 1
Groove 2
Groove 3
Anti-Skate Weight
Anti-Skate Wire Loop
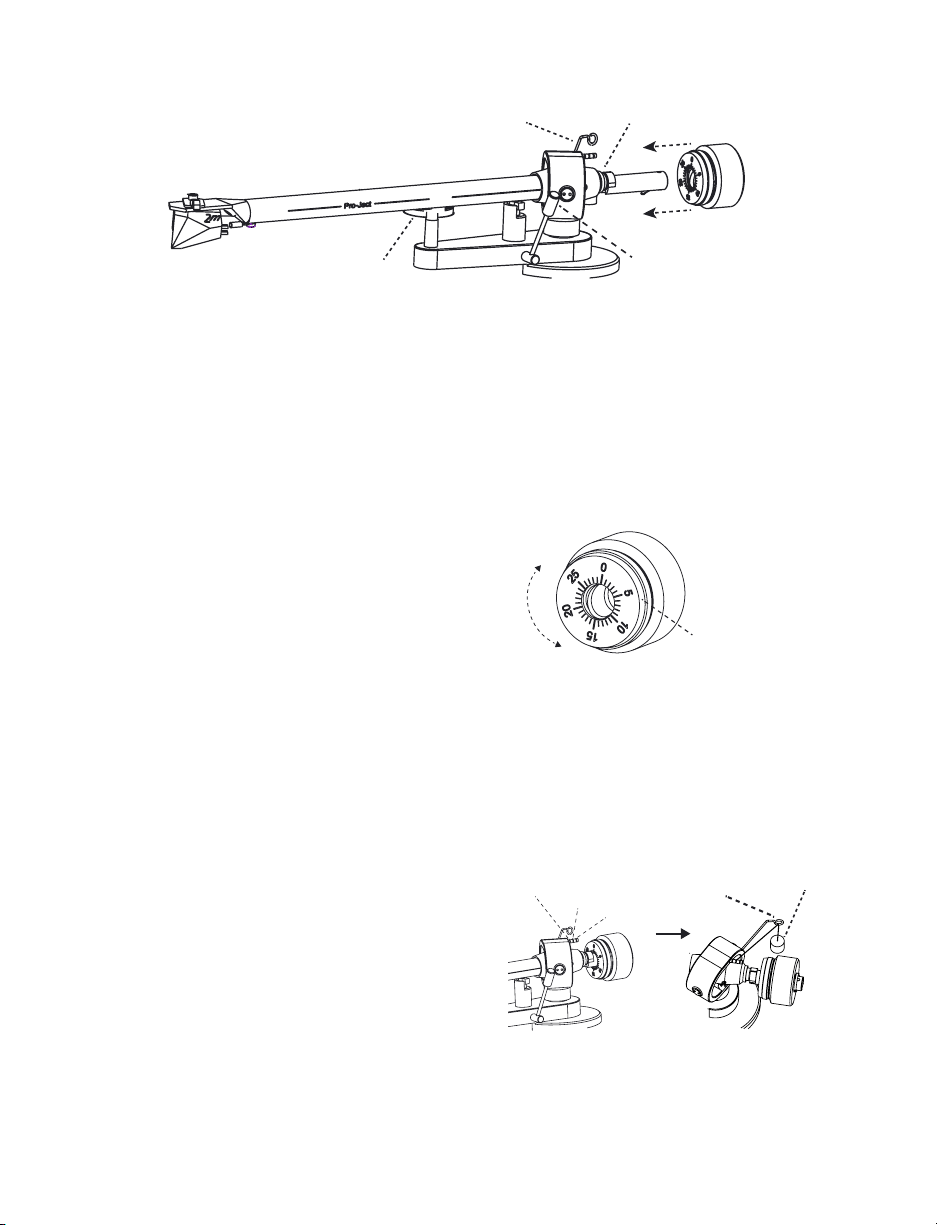
STEP 4 - Balance the Tonearm
• Install the counterweight by pushing it carefully onto the rear of the tonearm until the
threaded section clicks lightly into place.
• Remove the stylus guard from the cartridge.
• With the tonearm lift lever in the lowered position, move the tonearm from its rest to
a position where it can move freely.
• Rotate the counterweight until the tonearm tube balances such that it oats level.
• Once the tonearm is correctly balanced, return it to the tonearm rest position.
STEP 5 - Set the Tracking Force
• Use one hand to hold the counterweight in position to keep it from moving.
• Use your other hand to gently revolve the downforce scale ring until the zero (0mg) is
vertical at the 12 o’clock position.
• Next, rotate the counterweight and downforce scale ring together as one, counter-
clockwise (as seen from the front) to adjust the downforce according to the cartridge
manufacturer’s recommendations using the numbers on the downforce scale ring.
• Set the counterweight scale to 18mN (1.8g) for the supplied Ortofon 2M Silver.
STEP 6 - Set the Anti Skate force
• Carefully hang the anti-skate weight
over the wire loop and attach the string
to the appropriate groove on the anti-skating stub.
• For the supplied 2M silver, set the string in the middle groove (Groove 2, shown in
example above). Important note: If you should change to a different cartridge in the
future, refer to the recommendations of the new cartridge for optimum tracking force
and anti-skate setting.
-Downforce
+Downforce
Back of counterweight
Downforce scale ring
Tonearm
Anti-Skate Wire Loop
Tonearm Rest
Counterweight
Cartridge
Stylus Guard
Tonearm Lift Lever (in high position)
Anti-Skating Stub (white line)
Loading ...
Loading ...
Loading ...