
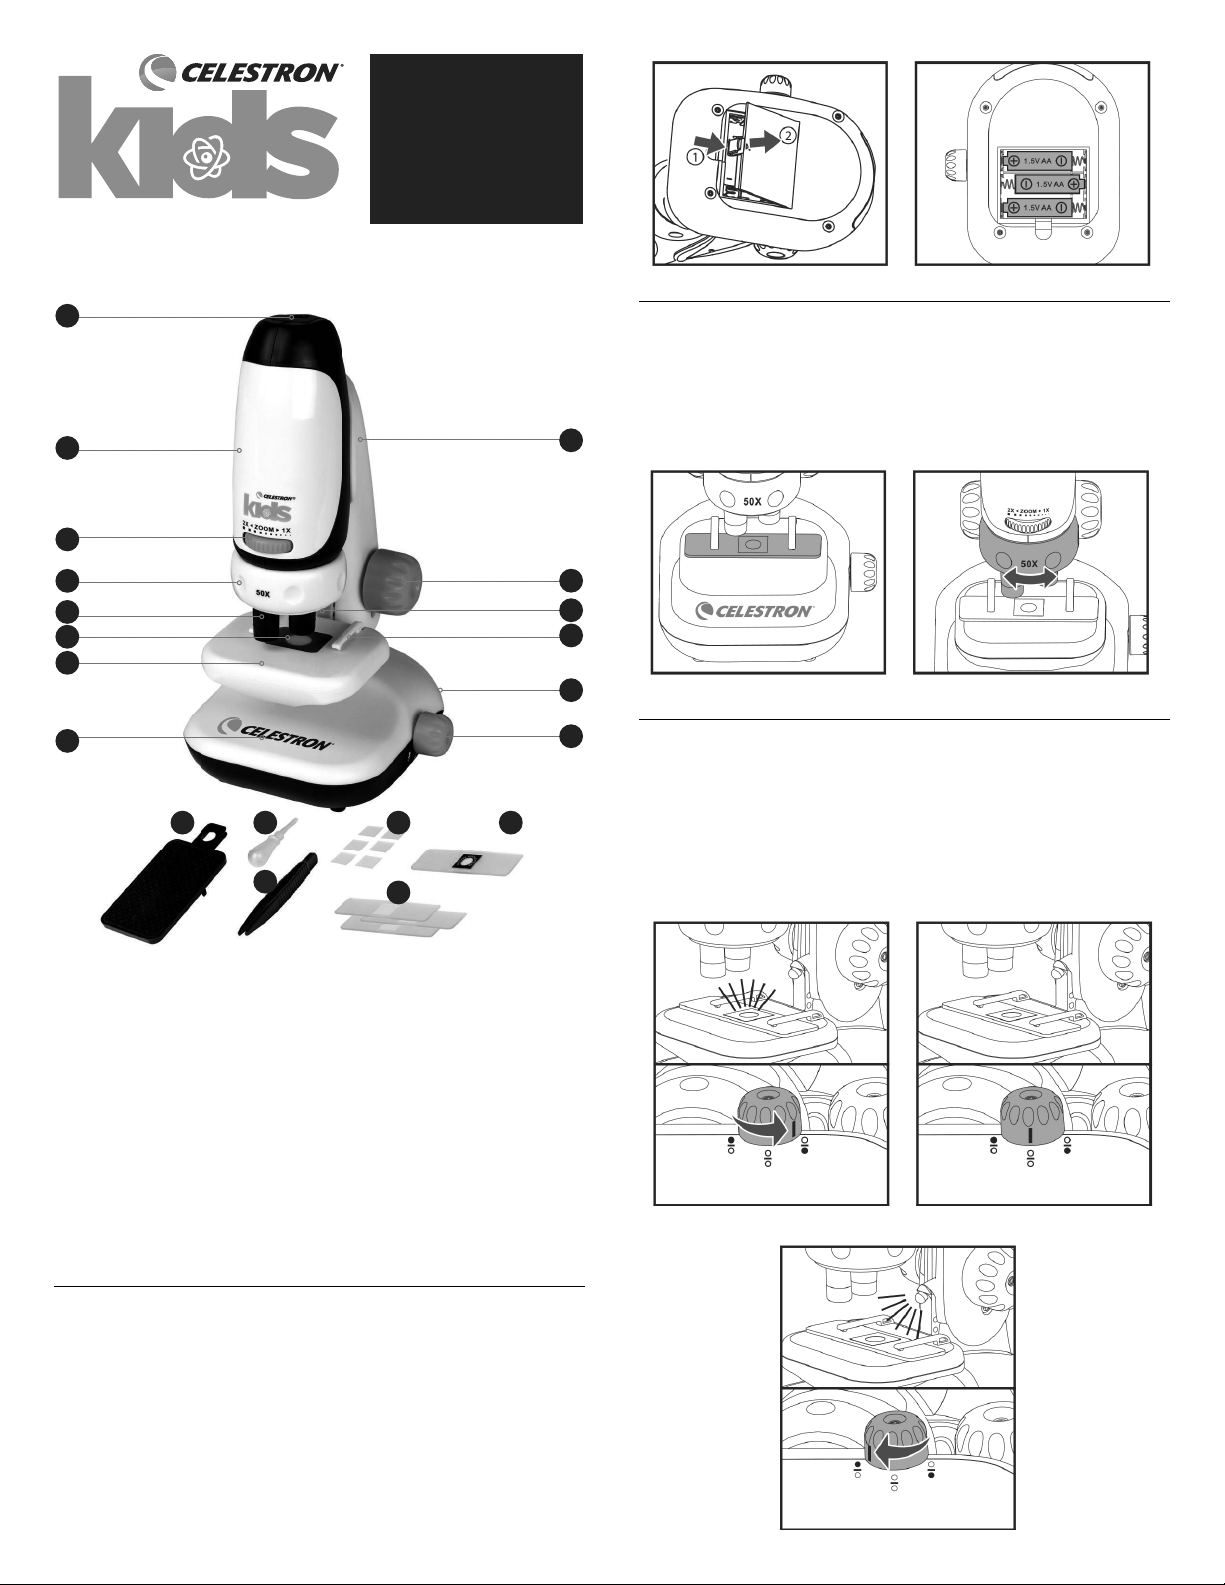
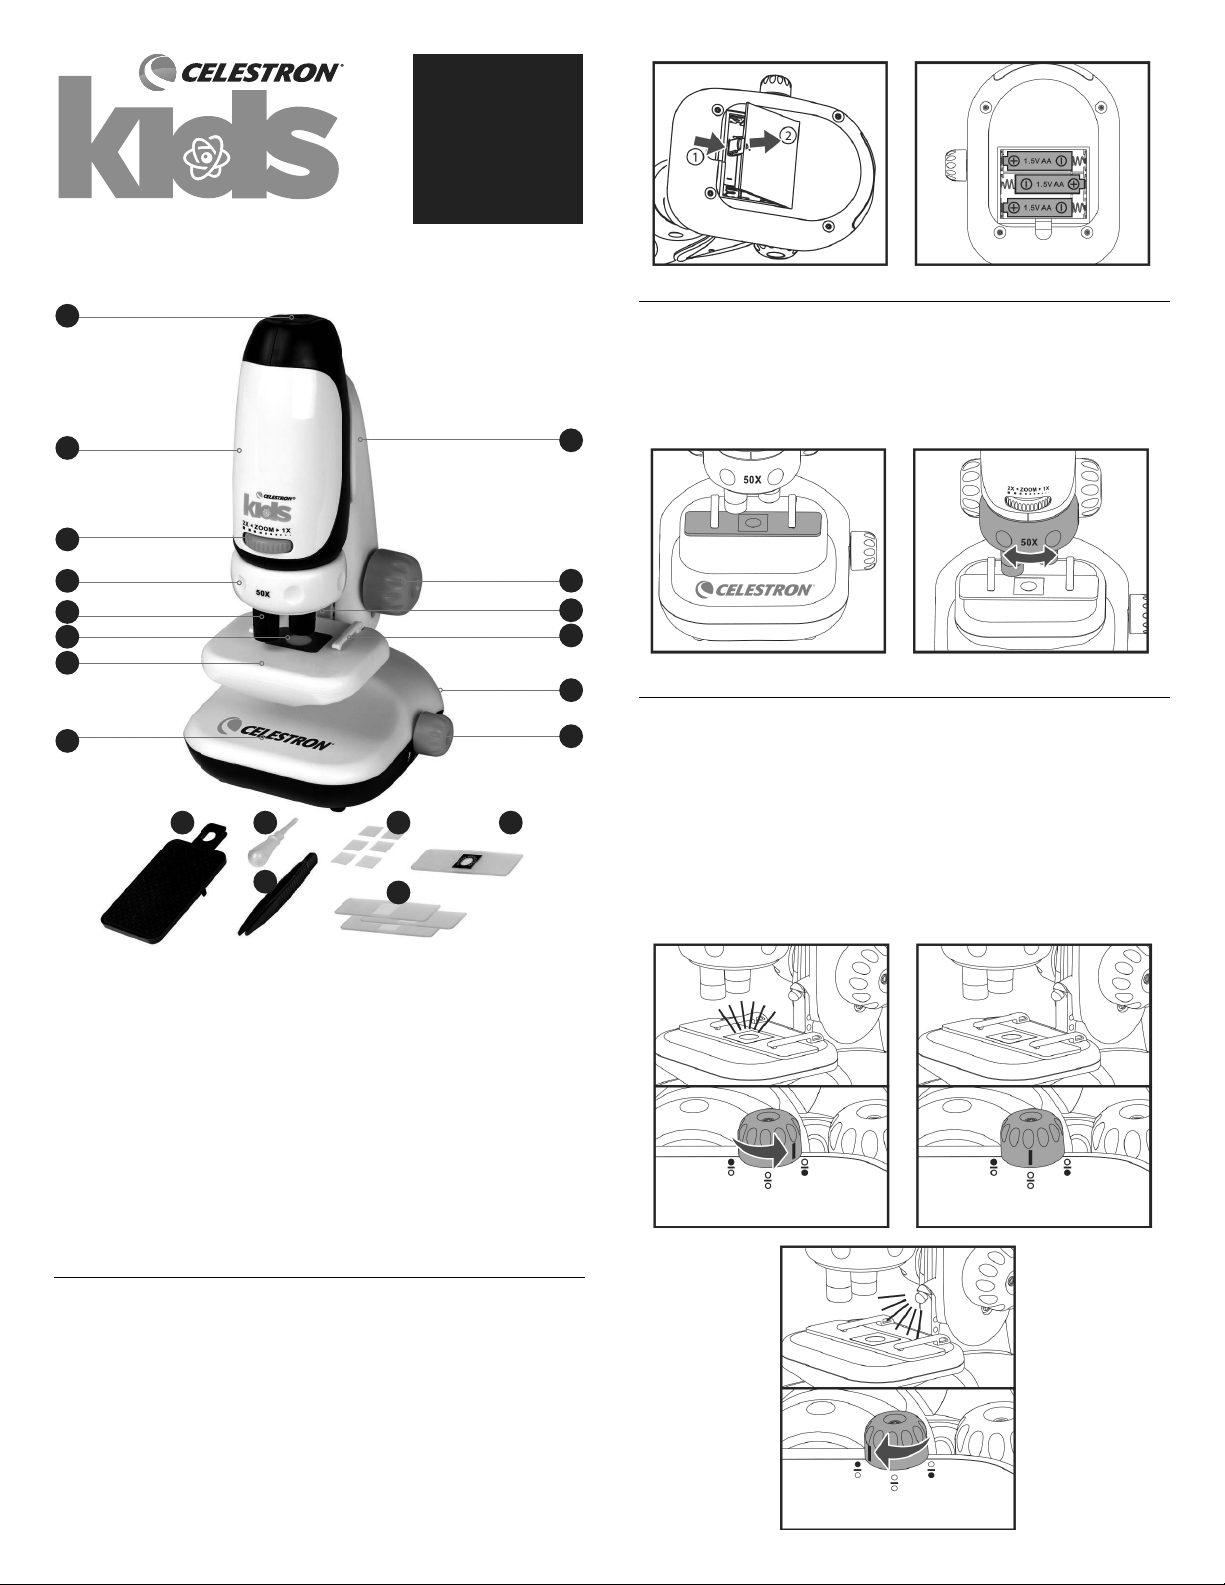
1. Eyepiece / Adapter Slot
2. Handheld Microscope
3. Zoom Dial
4. Turret
5. Objective Lens
6. Transmissive LED Cover
7. Specimen Stage
8. Microscope Base
9. Microscope Arm
10. Focusing Dial
Installing the Battery
1. Open the Battery Compartment Door at the bottom of the
Microscope Base (8) by lifting it up while pressing the
Compartment Door Latch in the direction shown in the following
diagram.
2. Install 3 fresh AA batteries with their positive (+) and negative (-)
poles correctly positioned.
3. Replace the Battery Compartment Door. The microscope is now
ready for use. Be sure to remove the batteries before storing the
Microscope for any length of time.
11. Refl ective LED Light
12. Specimen Slide Clips
13. Mini Storage Drawer
14. LED On/Off Switch
15. Smartphone Adapter
16. Dropper
17. Tweezers
18. 6 Blank specimen slide covers
19. 3 Blank specimen slides
20. Prepared slide with cotton
swatch
ILLUMINATION FROM BELOW LED OFF
ILLUMINATION FROM ABOVE
Using the Microscope
1. Place the Specimen Slide on the Specimen Stage (7) and secure
with the Specimen Slide Clips (12).
2. Turn the Turret (4) to the desired magnifi cation. (We recommend
starting with 50x and increasing the magnifi cation as needed.)
Illumination
1. Turn the LED ON/OFF Switch (14) to the right to turn on the
Transmissive LED to illuminate transparent specimens.
2. Turn the LED ON/OFF Switch to the middle to turn off all LEDs
3. Turn the LED ON/OFF Switch to the left to turn on the Refl ective
LED (11) to illuminate non-transparent specimens.
Microscope
with Smartphone Adapter
1
9
10
11
12
14
15 16 18
19
20
17
13
2
3
4
5
6
7
8
QUICK
SET-UP
GUIDE
ENGLISH
#44119

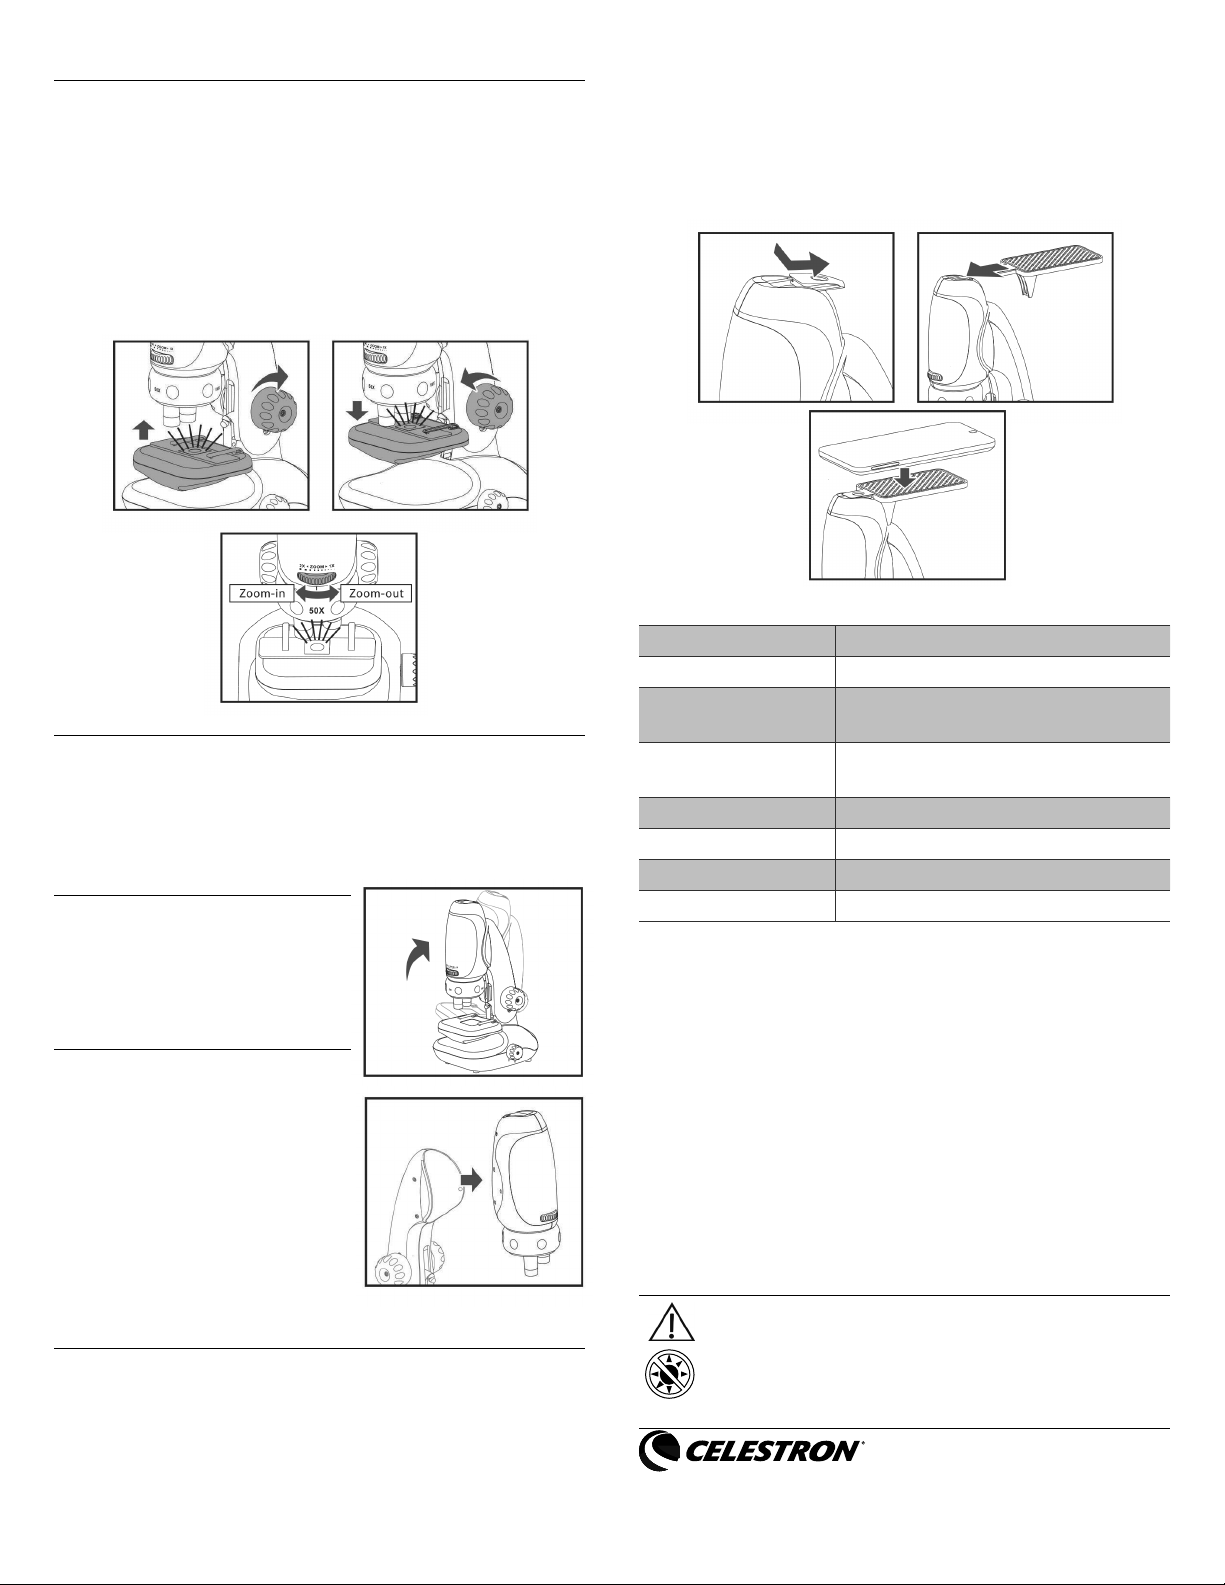
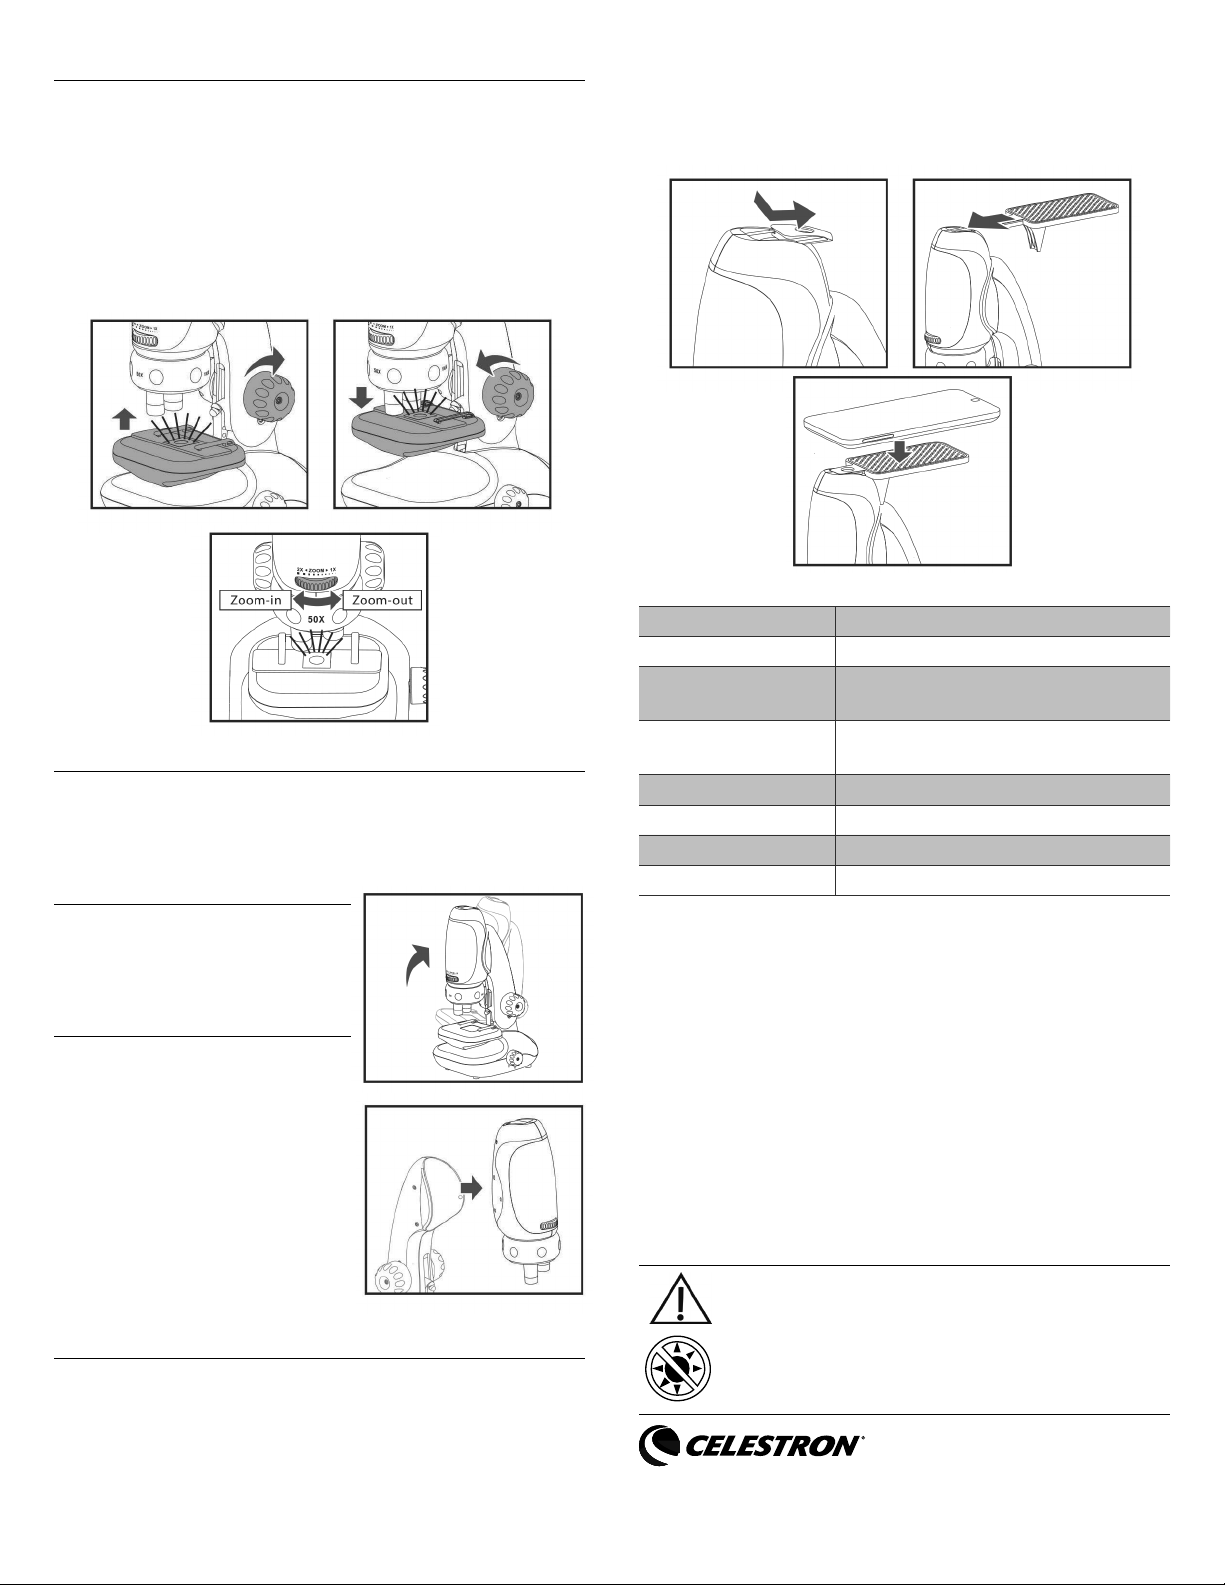
Focusing
Turn the Focusing Dial (10) clockwise to rise the Specimen
Stage (7) to the highest position toward the Objective Lens
(5). Take caution to ensure that the Specimen Slide does not
touch the Objective Lens.
View through the eyepiece and lower the Specimen Stage
gradually by turning the Focusing Dial counter-clockwise
until the image is sharp and clear. You may need to move
the Specimen Slide to locate the desired area of specimen
examination.
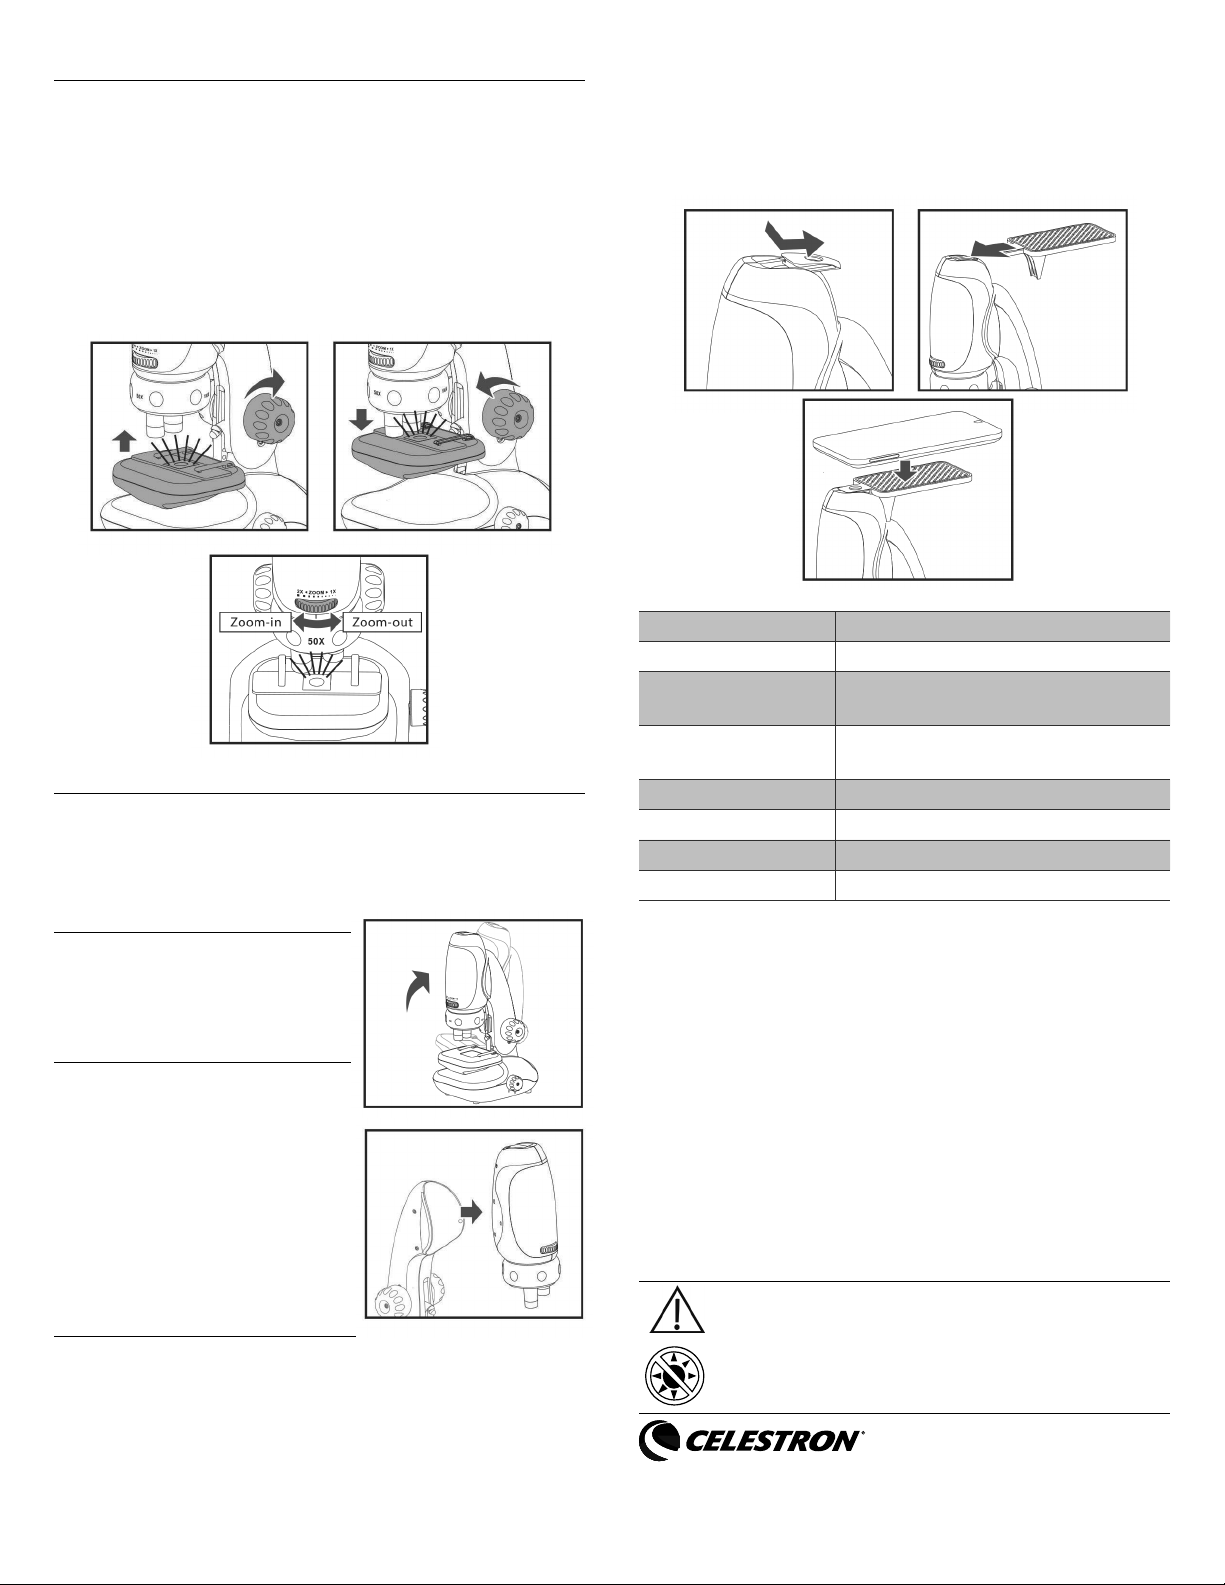
Zoom Dial
The Zoom Dial (3) may be used to zoom in on the image.
Zoom Magnification: 50x-100x, 100x-200x, 200-400x
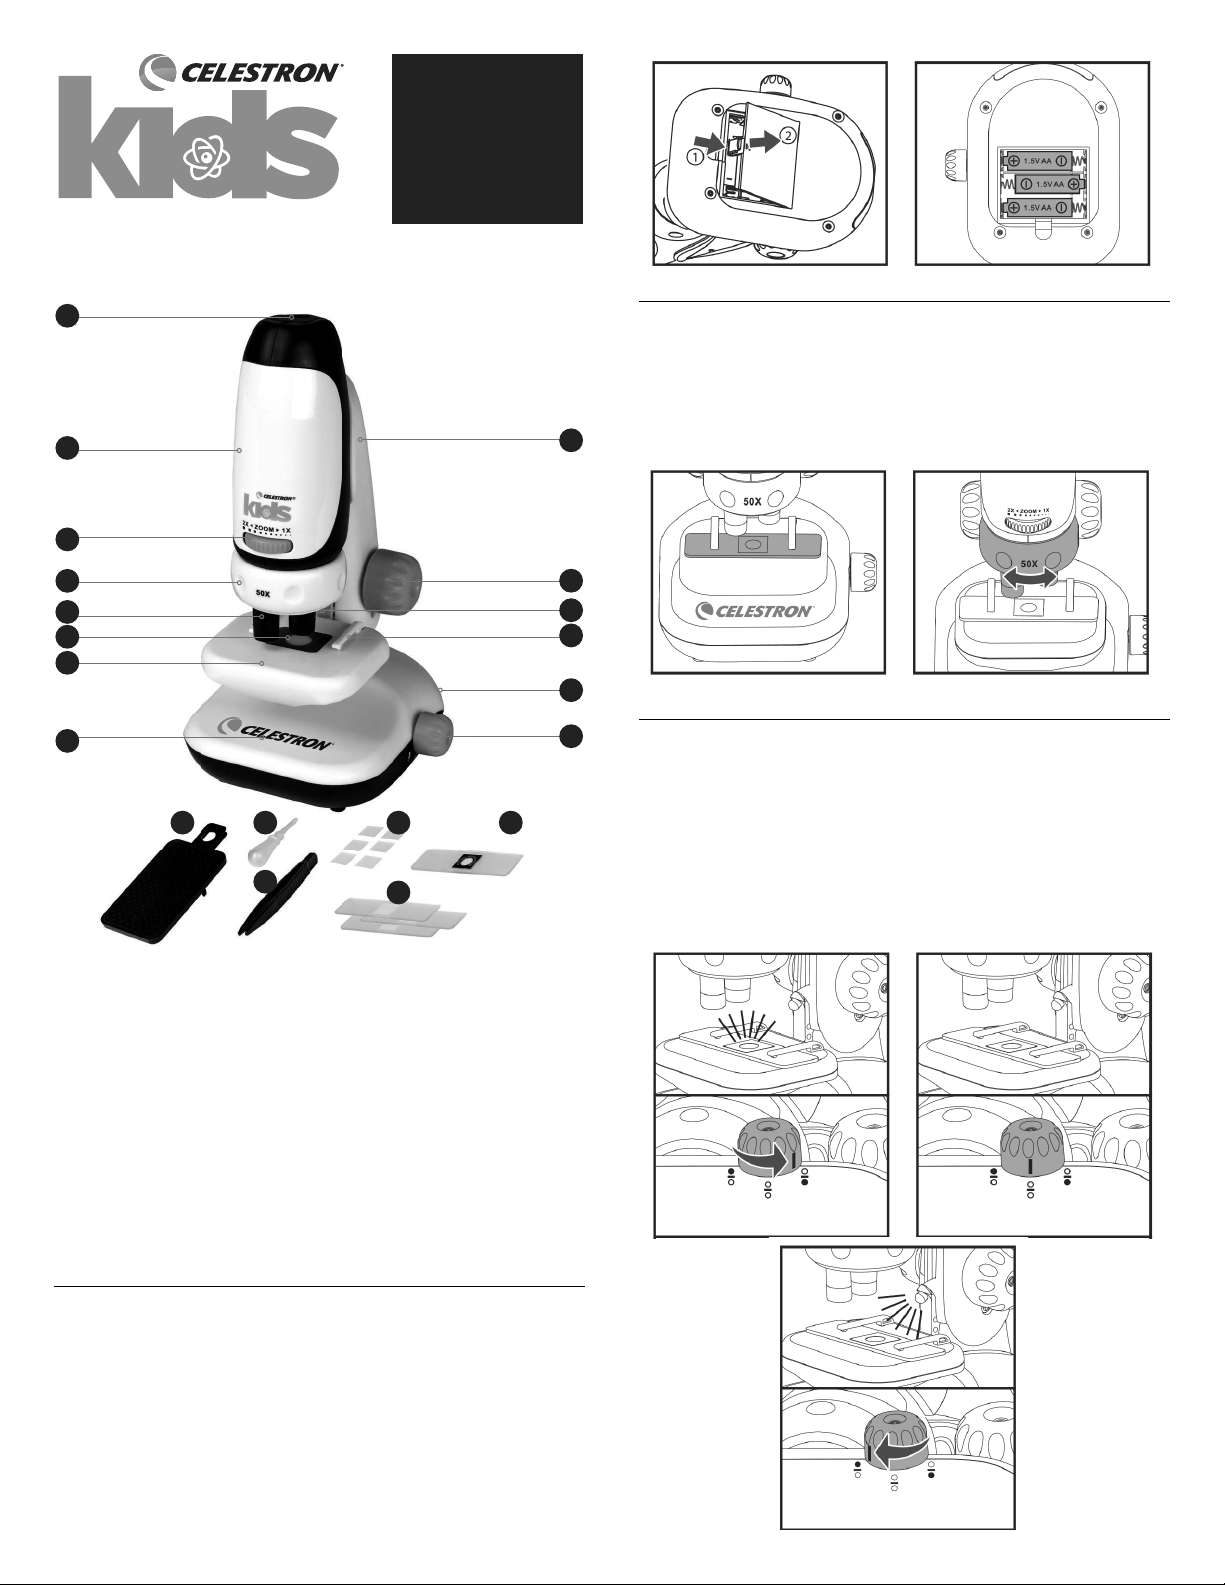
Microscope Arm
Pull back on the Microscope Arm
(9) to adjust viewing angle.
Handheld
Remove the microscope from
the Microscope Arm for handheld
use. Sufficient lighting is required
to view image with Handheld
Microscope (Not recommended
for indoor use.) Always start at 50x
magnification before zooming in or
turning to a higher magnification.
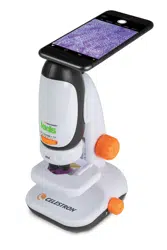
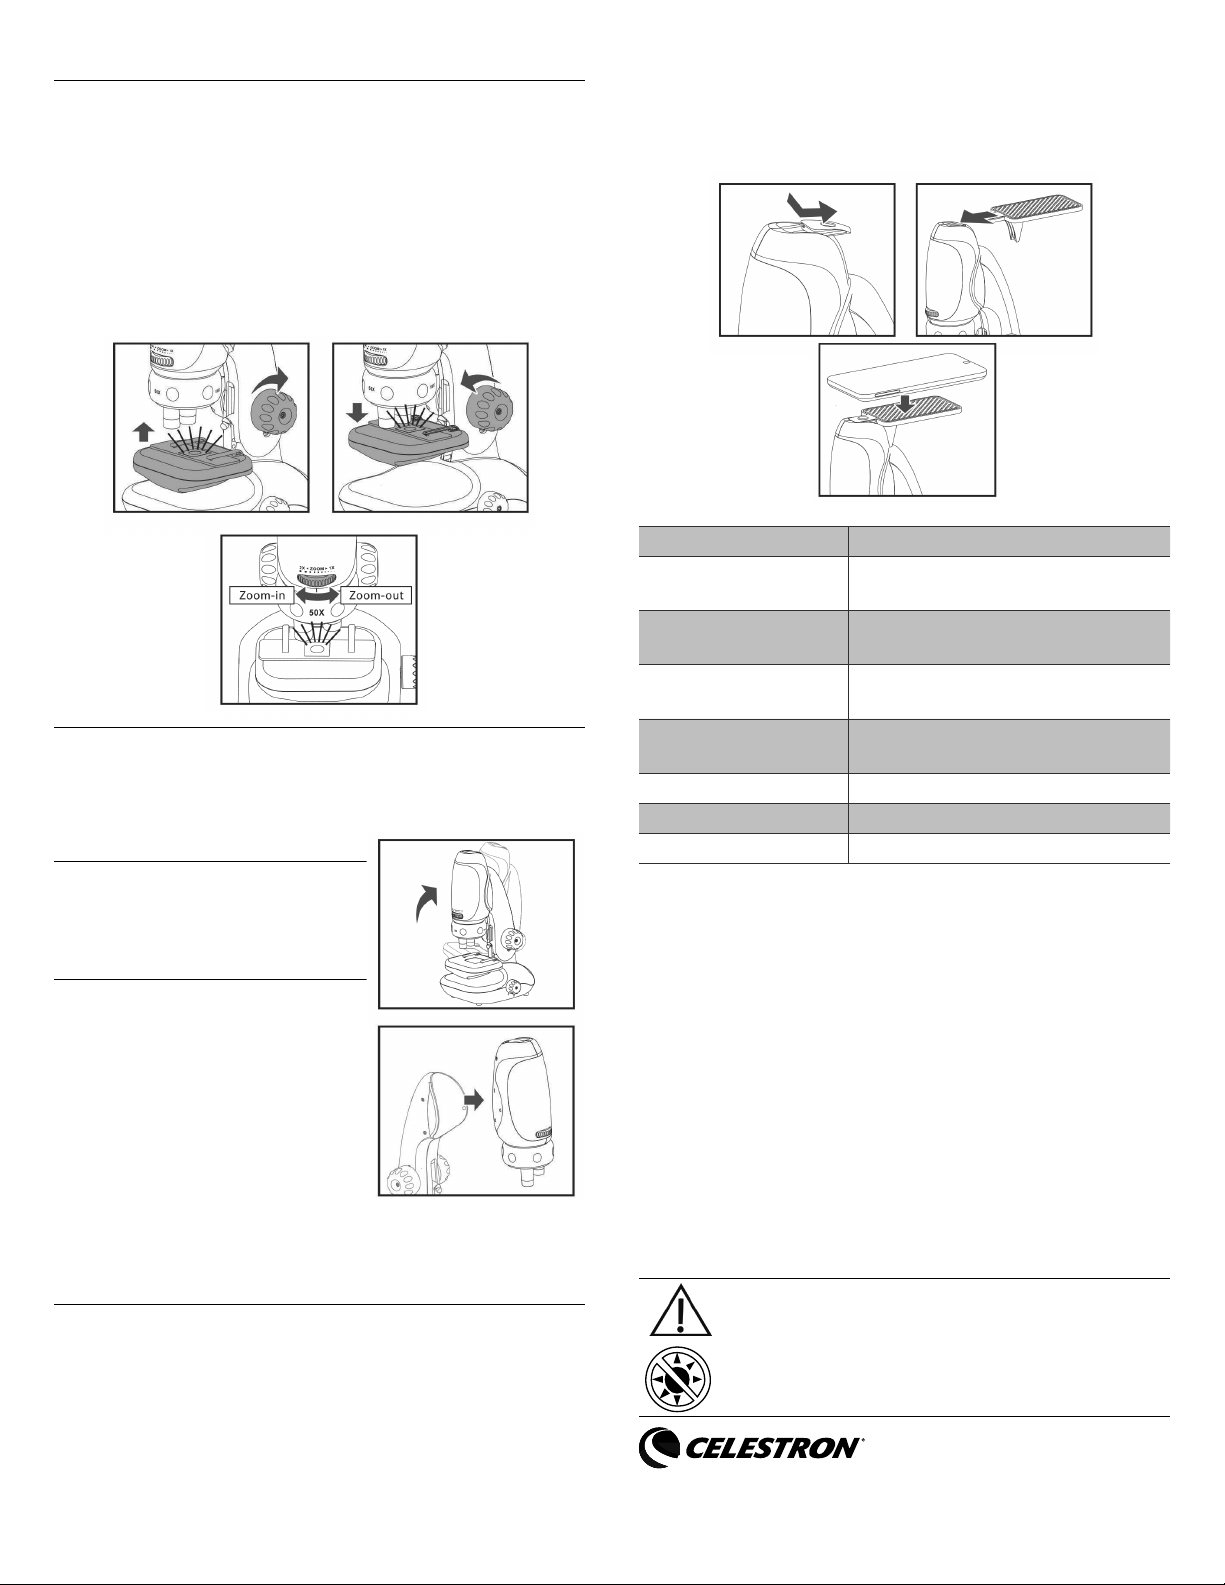
Smartphone Adapter
CAUTION: Before placing a smartphone on the smartphone
adapter, check to ensure that Microscope Arm is in the
upright position and that the Handheld Microscope is
securely attached to the Microscope Arm to prevent it from
slipping and the smartphone being damaged. Do not use the
Smartphone Adapter with the Microscope Arm in any position
other than upright.
1. Remove the Adapter Slot (1) cover from the microscope.
2. Slide the Smartphone Adapter (15) into the Adapter Slot (1).
3. Align the camera of the smartphone to the Eyepiece (1) and
rest the smartphone on the Smartphone Adapter (15).
Specifications
Magnifications 50x-100x, 100x-200x, 200x-400x
Optical 3-Objective Turret, 2x optical zoom
Effective Observation area
(without Zoom)
2.3mm (50x), 1.2mm (100x), 0.56mm (200x)
Effective Observation area
(with max zoom)
1.2mm (100x), 0.6mm (200x), 0.28mm (400x)
Power 3 x 1.5V AA alkaline batteries (not included)
Illumination Two LEDs
Size 112mm x 137mm x 224mm
Weight Approx. 335 grams (excluding batteries)
Safety Information
1. To avoid possible permanent eye damage, do not look at the Sun
or bright objects with the microscope.
2. To avoid possible permanent eye damage, do not place the lighted
microscope directly upon the human eye.
3. Remove the battery before storing the microscope for an extended
period.
4. Do not short-circuit the supply terminals.
5. Do not mix different types of batteries or new and used batteries.
6. Do not recharge nonchargeable batteries.
7. Remove rechargeable batteries from the device before being
charged.
8. Only charge rechargeable batteries under adult supervision.
9. Remove exhausted batteries from the device.
10. Please retain the packaging and instruction manual for future
reference.
© 2020 Celestron • All rights reserved • celestron.com/pages/technical-support
2835 Columbia Street, Torrance, CA 90503 U.S.A. • Made in China • This product is designed
and intended for use by those 8 years of age and older.
WARNING: Never point your Microscope at the Sun. It will cause
serious damage. Always use your Microscope under adult supervision.
CHOKING HAZARD!: This kit contains small parts. Not suitable for
children under 3 years.
1. Logement pour oculaire/
adaptateur
2. Microscope portatif
3. Molette de zoom
4. Tourelle
5. Lentille d’objectif
6. Cache de lampe LED par
transmission
7. Platine de spécimen
8. Pied du microscope
9. Potence du microscope
10. Molette de mise au point
Installer les piles
1. Ouvrez la porte du compartiment des piles au-dessous du pied du
microscope (8) en la soulevant tout en appuyant sur le loquet du
compartiment dans le sens indiqué dans l’illustration.
2. Installez 3 piles AA neuves en orientant correctement leurs pôles
positifs (+) et négatifs (-).
3. Remettez la porte du compartiment à piles en place. Le
microscope est maintenant prêt à l'emploi. Veillez à retirer les piles
avant de ranger le microscope pour une longue durée.
11. Lampe LED à réfl échissement
12. Valets de lames de spécimens
13. Mini tiroir de rangement
14. Interrupteur Marche/Arrêt
15. Adaptateur pour téléphone
intelligent
16. Compte-gouttes
17. Brucelles
18. 6 lamelles de spécimen vierges
19. 3 lames de spécimen vierges
20. Lame préparée avec tampon
de coton
ILLUMINATION PAR LE DESSOUS LED ÉTEINTE
ILLUMINATION PAR LE DESSUS
Utilisation du microscope
1. Placez la lame de spécimen sur la platine de spécimen (7) et
sécurisez-la à l’aide des valets de lame de spécimen (12).
2. Faites tourner la tourelle (4) sur la puissance de grossissement
désirée. (Nous vous recommandons de commencer avec 50x et
d’augmenter le grossissement si nécessaire).
Éclairage
1. Faites tourner le sélecteur LED ON/OFF (14) vers la droite pour
allumer la lampe LED par transmission et illuminer les spécimens
transparents.
2. Faites tourner le sélecteur LED ON/OFF pour éteindre toutes les
lampes LED.
3. Faites tourner le sélecteur LED ON/OFF vers la gauche pour
allumer la lampe LED à réfl échissement (11) et illuminer les
spécimens non transparents.
1
9
10
11
12
14
15 16 18
19
20
17
13
2
3
4
5
6
7
8
GUIDE DE
CONFIGURATION
RAPIDE
FRANÇAIS
#44119
avec adaptateur pour
téléphone intelligent
Microscope
Mise au point
Faites tourner la molette de mise au point (10) dans le sens
horaire pour élever la Platine de spécimen (7) au maximum
vers la lentille de l’objectif (5). Assurez-vous de ne pas mettre
en contact la lame à spécimen avec la lentille de l’objectif.
Regardez dans l’oculaire et abaissez la platine graduellement
en faisant tourner la molette de mise au point jusqu’à ce
que l’image soit nette et claire. Il se pourrait que vous deviez
déplacer la lame pour localiser la zone exacte du spécimen
que vous souhaitez examiner.
Molette de zoom
La molette de zoom (3) peut être utilisée pour effectuer un
zoom avant sur l’image.
Grossissements de zoom: 50x-100x, 100x-200x, 200-400x
Potence du microscope
Tirez la potence du microscope (9)
pour ajuster l’angle d’observation.
Mode portatif
Retirez le microscope de la
potence du microscope pour
l’utiliser en mode portatif. Un
éclairage suffisant est nécessaire
pour visualiser l’image en mode
portatif (non recommandé pour une
utilisation en intérieur). Commencez
toujours au grossissement 50x
avant d’augmenter le niveau de
zoom à une plus haute puissance.
Adaptateur pour téléphone intelligent
ATTENTION: Avant de placer un téléphone intelligent sur
l’adaptateur pour téléphone intelligent, assurez-vous que
la potence du microscope est en position haute et que le
microscope portatif est fermement attaché à la potence
pour l’empêcher de glisser et d’endommager le téléphone
intelligent. N’utilisez pas le téléphone intelligent si la potence
du microscope est autrement qu’en position haute.
1. Retirez le cache du logement pour adaptateur (1) du
microscope.
2. Faites glisser l’adaptateur pour téléphone intelligent (15)
dans le logement pour adaptateur (1).
3. Alignez la caméra du téléphone intelligent sur l’oculaire (1)
et faites reposer le téléphone intelligent sur l’adaptateur
pour téléphone intelligent (15).
Caractéristiques techniques
Grossissements 50x-100x, 100x-200x, 200x-400x
Système optique Tourelle à 3 objectifs, zoom optique 2x
Surface d’observation
efficace (sans zoom)
2,3mm (50x), 1,2mm (100x), 0,56mm (200x)
Surface d’observation
efficace (avec zoom max.)
1,2mm (100x), 0,6mm (200x), 0,28mm (400x)
Alimentation 3 piles alcalines AA 1,5 V (non incluses)
Éclairage Deux LED
Dimensions 112 mm x 137 mm x 224 mm
Poids Approx. 335 grammes (piles non comprises)
Informations de sécurité
1. Pour éviter les risques de lésions oculaires permanentes, ne
regardez pas vers le soleil ni vers des objets lumineux avec le
microscope.
2. Pour éviter les risques de lésions oculaires permanentes, n’orientez
pas directement le microscope éclairé vers l’œil humain.
3. Retirez les piles avant de ranger le télescope pour une durée
prolongée.
4. Ne mettez pas les terminaux d’alimentation en court-circuit.
5. Ne mélangez pas différents types de piles, ni de piles neuves ou
usagées.
6. Ne rechargez pas les piles non rechargeables.
7. Retirez les piles rechargeables de l’appareil avant de les charger.
8. Ne rechargez des piles que sous la surveillance d’un adulte.
9. Retirez les piles usées de l’appareil.
10. Conservez l’emballage et le mode d’emploi pour référence future.
© 2020 Celestron • Tous droits réservés • celestron.com/pages/technical-support
2835 Columbia Street • Torrance, CA 90503 É.-U. • Fabriqué en Chine • Ce produit est conçu et
prévu pour être utilisé par des personnes âgées de 8 ans et plus.
AVERTISSEMENT: Ne pointez jamais votre microscope vers le Soleil! Cela
entraînera de graves dommages. Utilisez toujours votre télescope sous la
surveillance d’un adulte seulement.
DANGER D'ÉTOUFFEMENT! Ce coffret comporte de petites pièces. Le
produit n'est pas prévu pour les enfants de moins de 3 ans.
1. Okular / Adaptersteckplatz
2. Tragbares Mikroskop
3. Zoom-Rad
4. Revolver
5. Objektivlinse
6. Durchlicht-LED-Abdeckung
7. Proben-Objekttisch
8. Mikroskopbasis
9. Mikroskoparm
10. Fokussier-Rad
Batterien einsetzen
1. Öffnen Sie die Batteriefachklappe unten an der Mikroskopbasis
(8), indem Sie sie anheben und dabei ihre Verriegelung in die in
der untenstehenden Abbildung dargestellte Richtung drücken.
2. Setzen Sie 3 frische AA-Batterien so ein, dass ihre positiven (+)
und negativen (-) Pole richtig herum ausgerichtet sind.
3. Schließen Sie den Batteriefachdeckel wieder. Das Mikroskop ist
nun betriebsbereit. Achten Sie darauf, die Batterien zu entfernen,
bevor Sie das Mikroskop für längere Zeit aufbewahren.
11. Aufl icht-LED
12. Objektträgerklammern
13. Mini-Schublade
14. LED Ein-/Aus-Schalter
15. Smartphone-Adapter
16. Pipette
17. Pinzette
18. 6 Leere Objektträger-
Abdeckungen
19. 3 Leere Objektträger
20. Präparierter Objektträger mit
Baumwollmuster
BELEUCHTUNG VON UNTEN LED AN
BELEUCHTUNG VON OBEN
Mikroskop verwenden
1. Legen Sie den Objektträger auf den Probentisch (7) und sichern
Sie ihn mit den Objektträgerklammern (12).
2. Drehen Sie den Revolver (4) auf die gewünschte Vergrößerung.
(Wir empfehlen, mit 50x zu beginnen und die Vergrößerung nach
Bedarf zu erhöhen).
Beleuchtung
1. Drehen Sie den LED Ein-/Aus-Schalter (14) nach rechts, um
die Durchlicht-LED zur Beleuchtung transparenter Proben
einzuschalten.
2. Drehen Sie den LED Ein-/Aus-Schalter in die mittlere Position, um
alle LEDs auszuschalten
3. Drehen Sie den LED Ein-/Aus-Schalter nach links, um die Aufl icht-
LED (11) zur Beleuchtung nicht-transparenter Proben einzuschalten.
1
9
10
11
12
14
15 16 18
19
20
17
13
2
3
4
5
6
7
8
KURZANLEITUNG
ZUR
EINRICHTUNG
DEUTSCH
Nr. 44119
Mikroskop
mit Smartphone-Adapter
Fokussierung
Drehen Sie das Fokussier-Rad (10) im Uhrzeigersinn, um den
Probentisch (7) in die höchste Position in Richtung Objektiv
(5) zu bringen. Achten Sie darauf, dass der Objektträger nicht
die Objektivlinse berührt.
Schauen Sie durch das Okular und senken Sie den
Objekttisch allmählich ab, indem Sie das Fokussier-Rad gegen
den Uhrzeigersinn drehen, bis das Bild scharf und deutlich
ist. Möglicherweise müssen Sie den Objektträger bewegen,
um den gewünschten Untersuchungsbereich der Probe zu
suchen.
Zoom-Rad
Das Zoom-Rad (3) kann zum Vergrößern des Bildes erwendet
werden.
Vergrößerungen: 50x-100x, 100x-200x, 200-400x
Mikroskoparm
Ziehen Sie den Mikroskoparm (9)
zurück, um den Betrachtungswinkel
einzustellen.
Tragbare Verwendung
Nehmen Sie das Mikroskop
für die tragbare Verwendung
vom Mikroskoparm ab. Für die
Bildbetrachtung mit dem tragbaren
Mikroskop ist eine ausreichende
Beleuchtung erforderlich (nicht
für den Gebrauch in Innenräumen
empfohlen). Beginnen Sie stets
mit einer 50-fachen Vergrößerung,
bevor Sie heranzoomen oder zu einer
höheren Vergrößerung wechseln.
Smartphone-Adapter
VORSICHT: Bevor Sie ein Smartphone auf den Smartphone-
Adapter befestigen, prüfen Sie, ob sich der Mikroskoparm in
senkrechter Position befindet und das tragbare Mikroskop
sicher am Mikroskoparm befestigt ist, damit es nicht verrutscht
und das Smartphone nicht beschädigt wird. Verwenden Sie
den Smartphone-Adapter nicht mit dem Mikroskoparm in einer
anderen als der senkrechten Position.
1. Entfernen Sie die Abdeckung des Adaptersteckplatzes (1)
vom Mikroskop.
2. Schieben Sie den Smartphone-Adapter (15) in den
Adaptersteckplatz (1).
3. Richten Sie die Kamera des Smartphones auf das Okular
(1) aus und platzieren Sie das Smartphone auf den
Smartphone-Adapter (15).
Technische Daten
Vergrößerungen 50X-100x, 100x-200x, 200x-400x
Optik
3-facher Objektiv-Revolver, 2-fache optische
Vergrößerung
Effektiver Beobachtungsbereich
(ohne Vergrößerung)
2,3mm (50x), 1,2mm (100x), 0,56mm (200x)
Effektiver Beobachtungsbereich
(mit max. Vergrößerung)
1,2mm (100x), 0,6mm (200x), 0,28mm (400x)
Stromversorgung
3 x 1,5 V AA-Alkalibatterien (nicht im
Lieferumfang enthalten)
Beleuchtung Zwei LEDs
Abmessungen 112 mm x 137 mm x 224 mm
Gewicht ca. 335 Gramm (ohne Batterien)
Sicherheitshinweise
1. Um mögliche bleibende Augenschäden zu vermeiden, schauen Sie
nicht mit dem Mikroskop in die Sonne oder helle Objekte.
2. Um mögliche bleibende Augenschäden zu vermeiden, platzieren
Sie das beleuchtete Mikroskop nicht direkt auf menschli-
chen Augen.
3. Die Batterien entfernen, bevor Sie das Mikroskop über einen län-
geren Zeitraum aufbewahren.
4. Die Batteriepole nicht kurzschließen.
5. Verschiedene Batterietypen oder gebrauchte und neue Batterien
nicht miteinander mischen.
6. Keine nicht-wiederaufladbaren Batterien aufladen.
7. Wiederaufladbare Batterien vor dem Aufladen aus dem Gerät
entfernen.
8. Wiederaufladbare Batterien nur unter Aufsicht von Erwachsenen
aufladen.
9. Leere Batterien aus dem Gerät entfernen.
10. Die Verpackung und die Bedienungsanleitung für künftige Ver-
wendung aufbewahren.
© 2020 Celestron • Alle Rechte vorbehalten • celestron.com/pages/technical-support
2835 Columbia Street • Torrance, CA 90503 USA. • Gedruckt in China • Dieses Produkt wurde
für den Gebrauch durch Personen von 8 Jahren oder älter entworfen und bestimmt.
ACHTUNG: Das Mikroskop niemals direkt auf die Sonne richten. Das
kann zu schweren Schäden führen. Dieses Produkt darf nur unter
Aufsicht von Erwachsenen benutzt werden.
ERSTICKUNGSGEFAHR! Dieser Bausatz enthält Kleinteile. Nicht für
Kinder unter 3 Jahren geeignet!

1. Vano oculare / adattatore
2. Microscopio portatile
3. Rotellina zoom
4. Torretta portaobiettivi
5. Obiettivo
6. Copertura luce trasmessa
(LED)
7. Tavolino portaoggetti
8. Base del microscopio
9. Braccio del microscopio
Installazione della batteria
1. Aprire lo sportellino del vano batterie sul fondo della base del
microscopio (8) sollevandolo mentre si preme il fermo dello
sportellino nella direzione mostrata nella fi gura seguente.
2. Inserire 3 batterie AA nuove con i poli positivo (+) e negativo (-)
posizionati correttamente.
3. Posizionare nuovamente lo sportellino del vano batterie. Il
microscopio è ora pronto per l’uso. Assicurarsi di rimuovere
le batterie prima di conservare il microscopio per un periodo
prolungato.
10. Manopola di messa a fuoco
11. Luce rifl essa (LED)
12. Pinze per vetrini
13. Cassettino portaoggetti
14. Interruttore ON/OFF LED
15. Adattatore per smartphone
16. Contagocce
17. Pinzette
18. 6 coprivetrini vuoti
19. 3 vetrini vuoti
20. Vetrino preparato con pezzo di
cotone
ILLUMINAZIONE DAL BASSO LED SPENTO
ILLUMINAZIONE DALL’ALTO
Utilizzo del microscopio
1. Sistemare il vetrino con il campione sul tavolino portaoggetti (7) e
fi ssarlo con le apposite pinze (12).
2. Ruotare la torretta portaobiettivi (4) fi no all’ingrandimento
desiderato (si consiglia di iniziare con un ingrandimento 50x e
aumentare l’ingrandimento come desiderato).
Illuminazione
1. Ruotare verso destra l’interruttore ON/OFF LED (14) per
accendere il LED (luce trasmessa) per illuminare campioni
trasparenti.
2. Ruotare verso il centro l’interruttore ON/OFF LED per spegnere i
LED.
3. Ruotare verso sinistra l’interruttore ON/OFF LED per accendere il
LED (luce rifl essa) (11) per illuminare campioni opachi.
1
9
10
11
12
14
15 16 18
19
20
17
13
2
3
4
5
6
7
8
GUIDA
RAPIDA
ITALIANO
#44119
con adattatore smartphone
Microscopio
Messa a fuoco
Ruotare la manopola di messa a fuoco (10) in senso orario per
sollevare il tavolino portaoggetti (7) nella posizione più elevata
verso l’obiettivo (5). Prestare attenzione ad assicurarsi che il
vetrino non entri in contatto con l’obiettivo.
Osservare attraverso l’obiettivo e abbassare il tavolino
portaoggetti gradualmente ruotando la manopola di messa a
fuoco in senso antiorario fino a ottenere un’immagine chiara
e nitida. Potrebbe essere necessario spostare il vetrino per
localizzare la zona desiderata per l’esame del campione.
Rotellina zoom
La rotellina zoom (3) può essere utilizzata per ingrandire
l’immagine.
Ingrandimento zoom: 50x-100x, 100x-200x, 200-400x
Braccio del microscopio
Spostare all’indietro il braccio
del microscopio (9) per regolare
l’angolo di visualizzazione.
Uso portatile
Rimuovere il microscopio dal
braccio per un utilizzo portatile. È
necessario avere un’illuminazione
sufficiente per vedere immagini
tramite il microscopio portatile
(non consigliato per un uso in
interni). Iniziare sempre con
un ingrandimento di 50x prima
di ingrandire ulteriormente o
di ruotare a un ingrandimento
maggiore.
Adattatore per smartphone
ATTENZIONE: Prima di sistemare lo smartphone
sull’apposito adattatore, verificare che il braccio del
microscopio sia in posizione verticale e che il microscopio
portatile sia fissato saldamente al braccio per evitare che
lo smartphone scivoli e possa subire danni. Non utilizzare
l’adattatore per smartphone con il braccio in una posizione
diversa da quella verticale.
1. Rimuovere il coperchio del vano adattatore (1) dal
microscopio.
2. Far scorrere l’adattatore per smartphone (15) nel vano (1).
3. Allineare la fotocamera dello smartphone all’oculare (1) e
sistemare lo smartphone sull’adattatore (15).
Specifiche
Ingrandimenti 50x-100x, 100x-200x, 200x-400x
Ottiche Torretta con 3 obiettivi, zoom ottico 2x
Area effettiva di osservazione
(senza zoom)
2,3mm (50x), 1,2mm (100x), 0,56mm (200x)
Area effettiva di osservazione
(con zoom massimo)
1,2mm (100x), 0,6mm (200x), 0,28mm (400x)
Alimentazione 3 batterie alcaline AA da 1,5 V (non incluse)
Illuminazione Due LED
Dimensioni 112 mm x 137 mm x 224 mm
Peso Circa 335 grammi (escluse batterie)
Informazioni di sicurezza
1. Per evitare possibili danni permanenti agli occhi, non osservare il
Sole o altri oggetti luminosi con il microscopio.
2. Per evitare possibili danni permanenti agli occhi, non poggiare il
microscopio illuminato direttamente sull’occhio umano.
3. Rimuovere la batterie prima di conservare il microscopio per un
periodo di tempo prolungato.
4. Non sottoporre a corto circuiti i terminali di alimentazione.
5. Non mischiare diversi tipi di batterie o batterie nuove e usate.
6. Non ricaricare batterie non ricaricabili.
7. Rimuovere le batterie ricaricabili dal dispositivo prima di ricaricarle.
8. Caricare le batterie ricaricabili esclusivamente sotto la supervisione
di un adulto.
9. Rimuovere le batterie esauste dal dispositivo.
10. Conservare la confezione e il manuale di istruzioni per riferimento
futuro.
© 2020 Celestron • Tutti i diritti riservati • celestron.com/pages/technical-support
2835 Columbia Street, Torrance, CA 90503 Stati Uniti • Fabbricato in Cina • Questo prodotto è
progettato per essere utilizzato da persone di età pari o superiore ai 8 anni.
AVVERTENZA: Non puntare mai il microscopio verso il Sole. Possibili
lesioni gravi. Utilizzare sempre il microscopio sotto la supervisione di
un adulto.
PERICOLO DI SOFFOCAMENTO! Il kit contiene componenti di piccole
dimensioni. Non adatto a bambini di età inferiore a 3 anni.
1. Ranura de ocular / adaptador
2. Microscopio manual
3. Dial de zoom
4. Torreta
5. Lente de objetivo
6. Cubierta de LED transmisivo
7. Soporte de espécimen
8. Base del microscopio
9. Brazo del microscopio
10. Dial de enfoque
11. Luz LED refl ectora
INTALACIÓN DE LA BATERÍA
1. Abra la tapa del compartimiento de batería en la parte inferior
de la base del microscopio (8) levantando mientras presiona la
pestaña de la tapa del compartimiento en la dirección indicada en
el diagrama siguiente.
2. Instale 3 baterías AA nuevas con los polos positivo (+) y negativo
(-) correctamente posicionados.
3. Vuelva a colocar la tapa del compartimiento de baterías. El
microscopio estará listo para usarse. Asegúrese de sacar las
baterías antes de guardar el microscopio durante un tiempo.
12. Clips de portamuestras
13. Mini cajón de almacenamiento
14. Interruptor de encendido/apa-
gado de LED
15. Adaptador de teléfono
16. Cuentagotas
17. Pinzas
18. 6 Cubiertas de especímenes
vacías
19. 3 Portamuestras vacíos
20. Portamuestras preparado con
retal de algodón
ILUMINACIÓN DESDE ABAJO LED APAGADO
ILUMINACIÓN DESDE ARRIBA
Uso del microscopio
1. Coloque el portamuestras sobre el soporte de especímenes (7) y
asegúrelo con los clips del portamuestras (12).
2. Gire la torreta (4) al aumento deseado. (Recomendamos comenzar
con 50 y aumentar el aumento según sea necesario).
Iluminación
1. Gire el interruptor de ENCENDIDO/APAGADO LED (14)
a la derecha para encender el LED transmisor para iluminar
especímenes transparentes.
2. Gire el interruptor de ENCENDIDO/APAGADO LED al centro
para apagar todos los LED.
3. Gire el interruptor de ENCENDIDO/APAGADO LED a la izquierda
para encender el LED refl ector (11) para iluminar especímenes no
transparentes.
1
9
10
11
12
14
15 16 18
19
20
17
13
2
3
4
5
6
7
8
GUÍA DE
CONFIGURACIÓN
RÁPIDA
ESPAÑOL
#44119
Microscopio
con adaptador de teléfono
Enfoque
Gire el dial de enfoque (10) en sentido de las agujas del
reloj para elevar el soporte del espécimen (7) a la posición
más alta hacia la lente del objetivo (5). Asegúrese de que el
portamuestras no toque la lente del objetivo.
Observe por el ocular y baje el soporte del espécimen
gradualmente girando el dial de enfoque en sentido contrario
a las agujas del reloj hasta que la imagen esté definida y clara.
Puede tener que mover el portamuestras para localizar el área
deseada del espécimen para examinarla.
Dial de zoom
El dial de zoom (3) puede usarse para aumentar la imagen.
Aumento de zoom: 50x-100x, 100x-200x, 200-400x
Brazo del microscopio
Tire del brazo del microscopio
(9) para ajustar el ángulo de
observación.
Manual
Saque el microscopio del brazo
del microscopio para uso manual.
Es necesaria una iluminación
suficiente para ver la imagen con
el microscopio manual (no se
recomienda para uso en interiores).
Comience siempre con aumento
50x antes de hacer zoom o pasar a
un aumento superior.
Adaptador de teléfono
PRECAUCIÓN: Antes de poner
un teléfono en el adaptador de teléfono, asegúrese de que
el brazo del microscopio esté derecho y que el microscopio
manual esté firmemente fijado al brazo del microscopio
para evitar que se deslice y se dañe el teléfono. No use
el adaptador de teléfono con el brazo del microscopio en
ninguna posición que no sea recta.
1. Saque la cubierta de la ranura del adaptador (1) del
microscopio.
2. Deslice el adaptador de teléfono (15) en la ranura del
adaptador (1).
3. Alinee la cámara del teléfono con el ocular (1) y deje
reposar el teléfono en el adaptador de teléfono (15).
Especificaciones
Aumentos 50x-100x, 100x-200x, 200x-400x
Óptico Torreta de 3 objetivos, zoom óptico 2x
Área de observación efectiva
(sin zoom)
2,3mm (50x), 1,2mm (100x), 0,56mm (200x)
Área de observación efectiva
(con zoom máximo)
1,2mm (100x), 0,6mm (200x), 0,28mm (400x)
Alimentación 3 baterías alcalinas AA de 1,5V (no incluidas)
Iluminación Dos LED
Tamaño 112mm x 137mm x 224mm
Peso Aproximadamente 335 gramos (sin baterías)
Información de seguridad
1. Para evitar posibles daños oculares permanentes, no mire al Sol ni
a objetos brillantes con el microscopio.
2. Para evitar posibles daños oculares permanentes, no ponga el
microscopio iluminado directamente sobre el ojo humano.
3. Saque la batería antes de guardar el microscopio durante un
tiempo prolongado.
4. No cortocircuite los terminales de alimentación.
5. No mezcle distintos tipos de baterías o baterías nuevas con usa-
das.
6. No recargue baterías no recargables.
7. Saque las baterías recargables del dispositivo antes de cargarlas.
8. Cargue baterías recargables exclusivamente bajo la supervisión de
un adulto.
9. Saque las baterías gastadas del dispositivo.
10. Conserve el embalaje y el manual de instrucciones como referen-
cia en el futuro.
© 2020 Celestron • Todos los derechos reservados • celestron.com/pages/technical-support
2835 Columbia Street, Torrance, CA 90503 EE.UU. • Hecho en China • Este producto ha sido
diseñado y está pensado para ser usado por personas de 8 años o más de edad.
ADVERTENCIA: No apunte nunca su microscopio al Sol. Causaría graves
daños. Use siempre su microscopio bajo la supervisión de un adulto.
¡RIESGO DE ASFIXIA! Este kit contiene piezas pequeñas. No adecuado
para niños menores de 3 años.