• No opere el láser con niños alrededor ni permita que los niños operen el láser.
•
ADVERTENCIA: NO DESARME EL LÁSER. No contiene elementos a los que el
usuario pueda hacerles mantenimiento. Desarmar el Láser anulará todas las garantías
del producto. No modifique el producto de ninguna manera. La modificación de la
herramienta podría provocar exposición a radiación láser peligrosa.
ADVERTENCIA: El uso de controles o ajustes o la realización de procedimientos dife-
rentes a aquéllos especificados en este manual puede provocar exposición a radiación
láser peligrosa.
• No opere la herramienta en atmósferas explosivas, como ambientes donde se
encuentran líquidos, gases o polvo inflamables.
• Utilice únicamente con las baterías recomendadas específicamente. El uso de
cualquier otra fuente de energía puede producir riesgo de incendio.
• Guarde el producto que no está en uso fuera del alcance de los niños y de personas no
entrenadas. El láser es peligroso en las manos de usuarios no entrenados.
• Utilice sólo accesorios recomendados por el fabricante para el modelo que posee. Los
accesorios correctos para un láser pueden provocar riesgo de lesiones si se utilizan con
otro láser.
• Las reparaciones y el mantenimiento DEBEN ser realizados por un centro de
reparaciones calificado. Las reparaciones realizadas por personal no calificado pueden
provocar lesiones graves.
• No retire ni borre las etiquetas de advertencia. El retiro de las etiquetas aumenta el
riesgo de exposición a radiación.
• Apague el láser cuando no esté en uso. Dejar encendido el láser aumenta el riesgo de
fijar la vista en el rayo láser.
• Coloque el láser de forma segura. Si el láser se cae, puede dañarse o provocar lesiones.
• Únicamente para uso en interiores.
• Este producto está diseñado para utilizarse con temperaturas entre 10ºC (50°F) y 40°
(104°F).
PRECAUCIÓN: Tenga precaución al taladrar, clavar o cortar paredes, pisos y techos
que
puedan contener cableado eléctrico o tuberías. Siempre desconecte la energía al traba-
jar cerca de cableado eléctrico.
Medidas de Primeros Auxilios para el Contenido de Nivel de Burbuja
En caso de contacto con la piel, enjuague con jabón y agua. En caso de contacto con los
ojos, enjuague con abundante agua.
En caso de ingestión, busque atención médica. Si necesita la Hoja de datos de seguridad
del material (MSDS, por sus siglas en inglés), llame al 1-800-262-2161.
La etiqueta de su herramienta puede incluir los siguientes símbolos:
V……………………voltios ...mW ……………………milivatios
nm …………………longitud de ondas en nanómetros Clase2 …………………Láser de Clase 2
Instalación de las baterías
Asegúrese de que el interruptor de encendido/apagado del láser (C) esté en la posición
de apagado girando el actuador del interruptor a la posición “Off”. Retire la tapa del
compartimiento de las baterías (D). Inserte 2 baterías alcalinas AA de 1,5 voltios o bat-
erías para trabajos pesados nuevas y asegúrese de que los terminales (+) y (-) coincidan
correctamente. Vuelva a colocar la tapa del compartimiento de las baterías.
ADVERTENCIA: Las baterías pueden explotar o perder, y pueden provocar lesiones
o incendios.
Para disminuir este riesgo:
• Siga cuidadosamente todas las instrucciones y las advertencias de la etiqueta y el
envase de la batería.
• Inserte siempre la batería correctamente respetando la polaridad (+ y -) indicada en la
batería y en el equipo.
• No mezcle baterías viejas y nuevas.
• No mezcle pilas alcalinas, estándar o recargables.
• No haga puente con los terminales de la batería.
• No cargue la batería.
• Retire todas las baterías agotadas inmediatamente y elimínelas de acuerdo con los
códigos locales.
• No arroje la batería al fuego.
• Mantenga las baterías fuera del alcance de los niños.
• Retire las baterías si el aparato no se va a usar durante varios meses.
“Transportar baterías puede provocar incendios si los terminales de la batería
entran en contacto accidentalmente con materiales conductores como llaves,
monedas,
herramientas de mano u objetos similares. Las Normas para Materiales Peligrosos
del Departamento de Transporte de Estados Unidos (HMR) en realidad prohíben
transportar baterías comercialmente o en aeroplanos (es decir, empacadas en
valijas y equipaje de mano) A MENOS que estén protegidas correctamente de
cortocircuitos. Por lo tanto, cuando transporte baterías individuales, asegúrese de
que los terminales de la batería están protegidos y bien aislados de materiales que
puedan hacer contacto y causar un cortocircuito”.
Instrucciones de operación
Clavija para madera contrachapada
PRECAUCIÓN: La clavija es filosa y debe sujetarse con precaución.
NOTA: La clavija para madera contrachapada (A) sólo puede utilizar para madera
contrachapada, NO en otras superficies, incluido el yeso enlucido.
• Para presionar la clavija en la madera contrachapada, exponga primero la clavija
girando su base desde el lado opuesto.
• Manteniendo la presión en la base de la clavija, insértela directamente y asiéntela con
firmeza contra la superficie de madera contrachapada como se muestra en la Figura
1. La clavija para madera contrachapada siempre debe presionarse hacia adentro
manualmente y nunca con un martillo.
• Para retirar la clavija para madera contrachapada de la pared, tírela hacia afuera
directamente.
PRECAUCIÓN: Asegúrese siempre de que la clavija para madera contrachapada esté
cerrada cuando no se utilice.
PROYECCIÓN DE LÍNEA HORIZONTAL O VERTICAL EN UNA PARED
1). Operación sin manos del láser:
• Adjunte la clavija para madera contrachapada a la pared según las instrucciones
incluidas en la sección “Clavija para madera contrachapada”. Asegúrese siempre de
que la clavija para madera contrachapada esté anexa firmemente a la pared.
• Adjunte la base magnética (E) del láser a la clavija para madera contrachapada.
• Mueva el actuador del interruptor de encendido/apagado (C) a la posición “On” para
proyectar la línea de láser.
• Gire el láser para centrar los niveles de burbuja horizontal (G) o vertical (F). Asegúrese
de que el láser esté bien sujeto a la clavija para madera contrachapada antes de retirar
el soporte.
Installing the Batteries
Ensure laser on/off switch (C) is in the full off position by moving switch actuator to “Off”
position. Remove the battery compartment cover (D). Insert 2 fresh 1.5 volt AA alkaline
or heavy duty batteries making sure to match (+) and (-) terminals correctly. Replace
battery compartment cover.
WARNING: Batteries can explode, or leak, and can cause injury or fire.
To reduce this risk:
• Carefully follow all instructions and warnings on the battery label and package.
• Always insert battery correctly with regard to polarity (+ and -), marked on the battery
and the equipment.
• Do not mix old and new batteries.
• Do not mix Alkaline, Standard, or rechargeable batteries.
• Do not short battery terminals.
• Do not charge battery.
• Remove dead battery immediately and dispose of per local codes.
• Do not dispose of battery in fire.
• Keep batteries out of reach of children.
• Remove battery if the device will not be used for several months.
“Transporting batteries can possibly cause fires if the battery terminals inadvertent-
ly come in contact with conductive materials such as keys, coins, hand tools and the
like. The US Department of Transportation Hazardous Material Regulations (HMR)
actually prohibit transporting batteries in commerce or on airplanes (i.e. packed in
suitcases and carryon luggage) UNLESS they are properly protected from short
circuits. So when transporting individual batteries, make sure that the battery ter-
minals are protected and well insulated from materials that could contact them and
cause a short circuit.”
Operating Instructions
Drywall Pin
CAUTION: Pin is sharp and should be handled with care.
NOTE: The drywall pin (A) can only be used for drywall, NOT other surfaces including
plaster.
• To press pin into drywall, first expose pin by rotating pin base from opposite side.
• While maintaining pressure on pin base, insert pin straight and seat firmly against
drywall surface as shown in Figure 1. The drywall pin should always be pushed in by
hand and never driven by a hammer.
• To remove drywall pin from the wall, pull out straight.
CAUTION: Always be sure drywall pin is closed when not in use.
HORIZONTAL OR VERTICAL LINE PROJECTION ON A WALL
1). Hands free operation of the laser:
•Attach drywall pin to the wall per instructions under “Drywall Pin” section. Always make
sure drywall pin is securely attached to the wall.
• Attach the magnetic base (E) of the laser to drywall pin.
• Move on/ off switch (C) actuator to the “On” position to project the laser line.
• Rotate the laser to center horizontal (G) or vertical (F) bubble vials. Be sure the laser is
firmly attached to the drywall pin before removing support.
2). Operation of the laser:
• Hold the laser firmly against the wall.
• Move on/ off switch (C) actuator to the “On” position to project the laser lines.
• Align laser line with appropriate mark on your work surface, rotate the laser to center
horizontal (G) or vertical (F) bubble vials. Realign laser with mark if necessary.
• Figure 2 illustrates a typical application for the Laser Level when it is wall mounted.
ANGULAR LINE PROJECTION ON A WALL
Operation of the laser:
• Attach drywall pin to the wall per instructions under “Drywall Pin” section. Always
make sure drywall pin is securely attached to the wall.
• Attach the magnetic base (E) of the laser to drywall pin.
• Rotate the laser to center horizontal (G) or vertical (F) bubble vials.
• Turn protractor ring to align “0” mark with Alignment Indicator (I).
BDL220S
Laser Level · Nivel Láser · Niveau Laser
ENGLISH
SAVE THIS INSTRUCTION MANUAL FOR FUTURE REFERENCE.
www.BLACKANDDECKER.com
N517712
WARNING: Read and understand all instructions. Failure to follow all instructions listed
below may result in electric shock, fire and/or serious personal injury.
SAVE THESE INSTRUCTIONS
Safety Instructions
DANGER: Laser Radiation, avoid direct eye exposure, serious eye injury can result.
• Do not use optical tools such as a telescope or transit to view the laser beam.
• Do not place the laser in a position which may cause anyone to intentionally or
unintentionally stare into the laser beam. Serious eye injury could result
• Do not operate the laser around children or allow children to operate the laser.
•
WARNING: DO NOT DISASSEMBLE THE LASER. There are no user serviceable parts
inside. Disassembling the Laser will void all warranties on the product. Do not modify
the product in any way. Modifying the tool may result in Hazardous Laser Radiation
Exposure.
WARNING: Use of controls or adjustments or performance of procedures other than
those specified in this manual may result in hazardous laser radiation exposure.
• Do not operate in explosive atmospheres, such as in the presence of flammable liquids,
gases, or dust.
• Use only with the specifically designated batteries. Use of any other batteries may
create a risk of fire.
• Store idle product out of reach of children and other untrained persons. Lasers are
dangerous in the hands of untrained users.
• Use only accessories that are recommended by the manufacturer for your model.
Accessories that may be suitable for one laser, may create a risk of injury when used on
another laser.
• Repairs and servicing MUST be performed by a qualified repair facility. Repairs
performed by unqualified personnel could result in serious injury.
• Do not remove or deface warning labels. Removing labels increases the risk of
exposure to radiation.
• Turn the laser off when it is not in use. Leaving the laser on increases the risk of staring
into the laser beam.
• Position the laser securely. Damage to the laser or injury could result if the laser falls.
• For indoor use only.
• This product is intended for use in a temperature range of 50° F (10° C) - 104° F (40°
C).”
CAUTION: Use caution when drilling, nailing or cutting into walls, floors and ceilings
which may contain electrical wiring or pipes. Always turn off the power when working
near electrical wires.
First Aid Measures for Bubble Vial Content
In case of skin contact, flush with soap and water. In case of eye contact, flush with
flowing water. If swallowed, get medical help. Material Safety Data Sheet (MSDS)
available from 1-800-262-2161.
The label on your tool may include the following symbols:
V……………………volts ....... mW ……………………milliwatts
nm …………………wavelength in nanometers Class2 …………………Class 2 Laser
• Rotate laser until indicator (I) is at desired angle.
• Move on/ off switch (C) actuator to the “On” position to project the laser line.
STRAIGHT LINE PROJECTION ON ANY FLAT SURFACE
Free hand operation of the laser:
• Hold the laser firmly against a flat surface.
• Move on/off switch (C) actuator to the “On” position to project the laser line.
• Align laser line with appropriate marks on your work surface (common use is laying
tiles or marking plywood for cutting purpose).
DANGER: Laser Radiation, avoid direct eye exposure.
Helpful Hints
• If the laser light becomes dim or is no longer visible when the switch is in the on
position check or change the battery.
• The laser lines are only level on the wall against which the unit is held or hung. The short
line visible on any adjacent wall is not level. The same is true for straight line projection
on a floor or wall, the short line on any adjacent wall is not level.
• The laser unit should never be used as a spirit (bubble) level. The levels are
only calibrated to the laser line when held or hung against a vertical surface.
•The laser unit only generates level lines when held or hung against a vertical surface.
•Make sure laser is as square as possible to flat surface to ensure proper line projection.
Storage
Always store the laser level indoors.
Maintenance
Use only mild soap and damp cloth to clean the tool. Never let any liquid get inside the
tool; never immerse any part of the tool into a liquid.
IMPORTANT: To assure product SAFETY and RELIABILITY, repairs, maintenance and
adjustment (other than those listed in this manual) should be performed by authorized
service centers or other qualified service organizations, always using identical
replacement parts.
Accessories
WARNING: The use of any accessory not recommended for use with this tool could be
hazardous.
SERVICE INFORMATION
All black & decker service centers are staffed with trained personnel to provide customers
with efficient and reliable power tool service. Whether you need technical advice, repair,
or genuine factory replacement parts, contact the black & decker location nearest you. To
find your local service location, refer to the yellow page directory under “tools—electric”
or call: 1-800-544-6986 OR VISIT WWW.BLACKANDDECKER.COM
FULL TWO-YEAR HOME USE WARRANTY
Black & Decker (U.S.) Inc. warrants this product for two years against any defects in
material or workmanship. The defective product will be replaced or repaired at no charge
in either of two ways.
The first, which will result in exchanges only, is to return the product to the retailer from
whom it was purchased (provided that the store is a participating retailer). Returns
should be made within the time period of the retailer’s policy for exchanges (usually
30 to 90 days after the sale). Proof of purchase may be required. Please check with the
retailer for their specific return policy regarding returns that are beyond the time set for
exchanges.
The second option is to take or send the product (prepaid) to a Black & Decker owned
or authorized Service Center for repair or replacement at our option. Proof of purchase
may be required.Black & Decker owned and authorized Service Centers are listed under
“Tools-Electric” in the yellow pages of the phone directory.
This warranty does not apply to accessories. This warranty gives you specific legal rights
and you may have other rights which vary from state to state or province to province.
Should you have any questions, contact the manager of your nearest Black & Decker
Service Center. This product is not intended for commercial use.
LATIN AMERICA: This warranty does not apply to products sold in Latin America. For
products sold in Latin America, check country specific warranty information contained in
the packaging, call the local company or see the website for warranty information.
NOTE:
The customer is responsible for the correct use and care of the instrument. Moreover, the
customer is completely responsible for periodically checking the accuracy of the laser
unit, and therefore for the calibration of the instrument.
Subject to change without notice
TECHNICAL SPECIFICATIONS OF LASER LEVEL:
Laser diode wavelength: 630 - 680 nm (red color)
Laser output type: Continuous wave (CW)
Laser output power: < 2.2mW
Laser Class: Class 2
Working range: Up to 15 feet (depends on light conditions)
Leveling accuracy:
Projecting right ±1/8 inch (3 mm) @ 10 feet (3 m)
Projecting up ±1/8 inch (3 mm) @ 10 feet (3 m)
Projecting left ±1/4 inch (6 mm) @ 10 feet (3 m)
Batteries: 2 AA (included)
Voltage: 3 Volts
Operating temperature: 50°F (10°C)- 104° F (40°C)
Complies with 21 CFR 1040.10 and 1040.11 except for deviations pursuant to Laser Notice
No. 50, dated June 24, 2007
Avoid exposure-Laser radiation emitted from this aperture.
ESPAÑOL
CONSERVE ESTE MANUAL PARA FUTURAS CONSULTAS.
Evite la exposición - Por este orificio se emite la radiación láser.
CARACTERÍSTICAS
A.) Clavija para madera contrachapada F.) Nivel de burbuja vertical
B.) Anillo transportador G.) Nivel de burbuja horizontal
C.) Interruptor de encendido/apagado del láser H.) Línea de láser
D.) Tapa del compartimiento de las baterías I.) Indicador de alineación
E.) Base magnética
Imported by Black & Decker (U.S.) Inc.,
701 E. Joppa Rd. Towson, MD 21286 U.S.A.
2.2
3
1
2
Made in China
BDL220s
Complies with 21 CFR
1040.10
and 1040.11 except for
deviations pursuant to Laser
Notice No.
50,
dated June
24,
2007
www.blackanddecker.com
2014
ADVERTENCIA: Lea y comprenda todas las instrucciones. El incumplimiento de todas
y cada una de las instrucciones enumeradas debajo puede provocar descarga eléctrica,
incendio o daños personales serios.
CONSERVE ESTAS INSTRUCCIONES
Instrucciones de seguridad
PELIGRO: Radiación láser, evite la exposición directa de los ojos, pueden producirse
lesiones oculares graves.
• No utilice herramientas ópticas, como por ejemplo un telescopio o un teodolito para
ver el rayo láser.
• No ubique el láser en una posición que pueda provocar que alguien intencional o no
intencionalmente fije su vista en el rayo láser. Podría provocar lesiones oculares graves
H
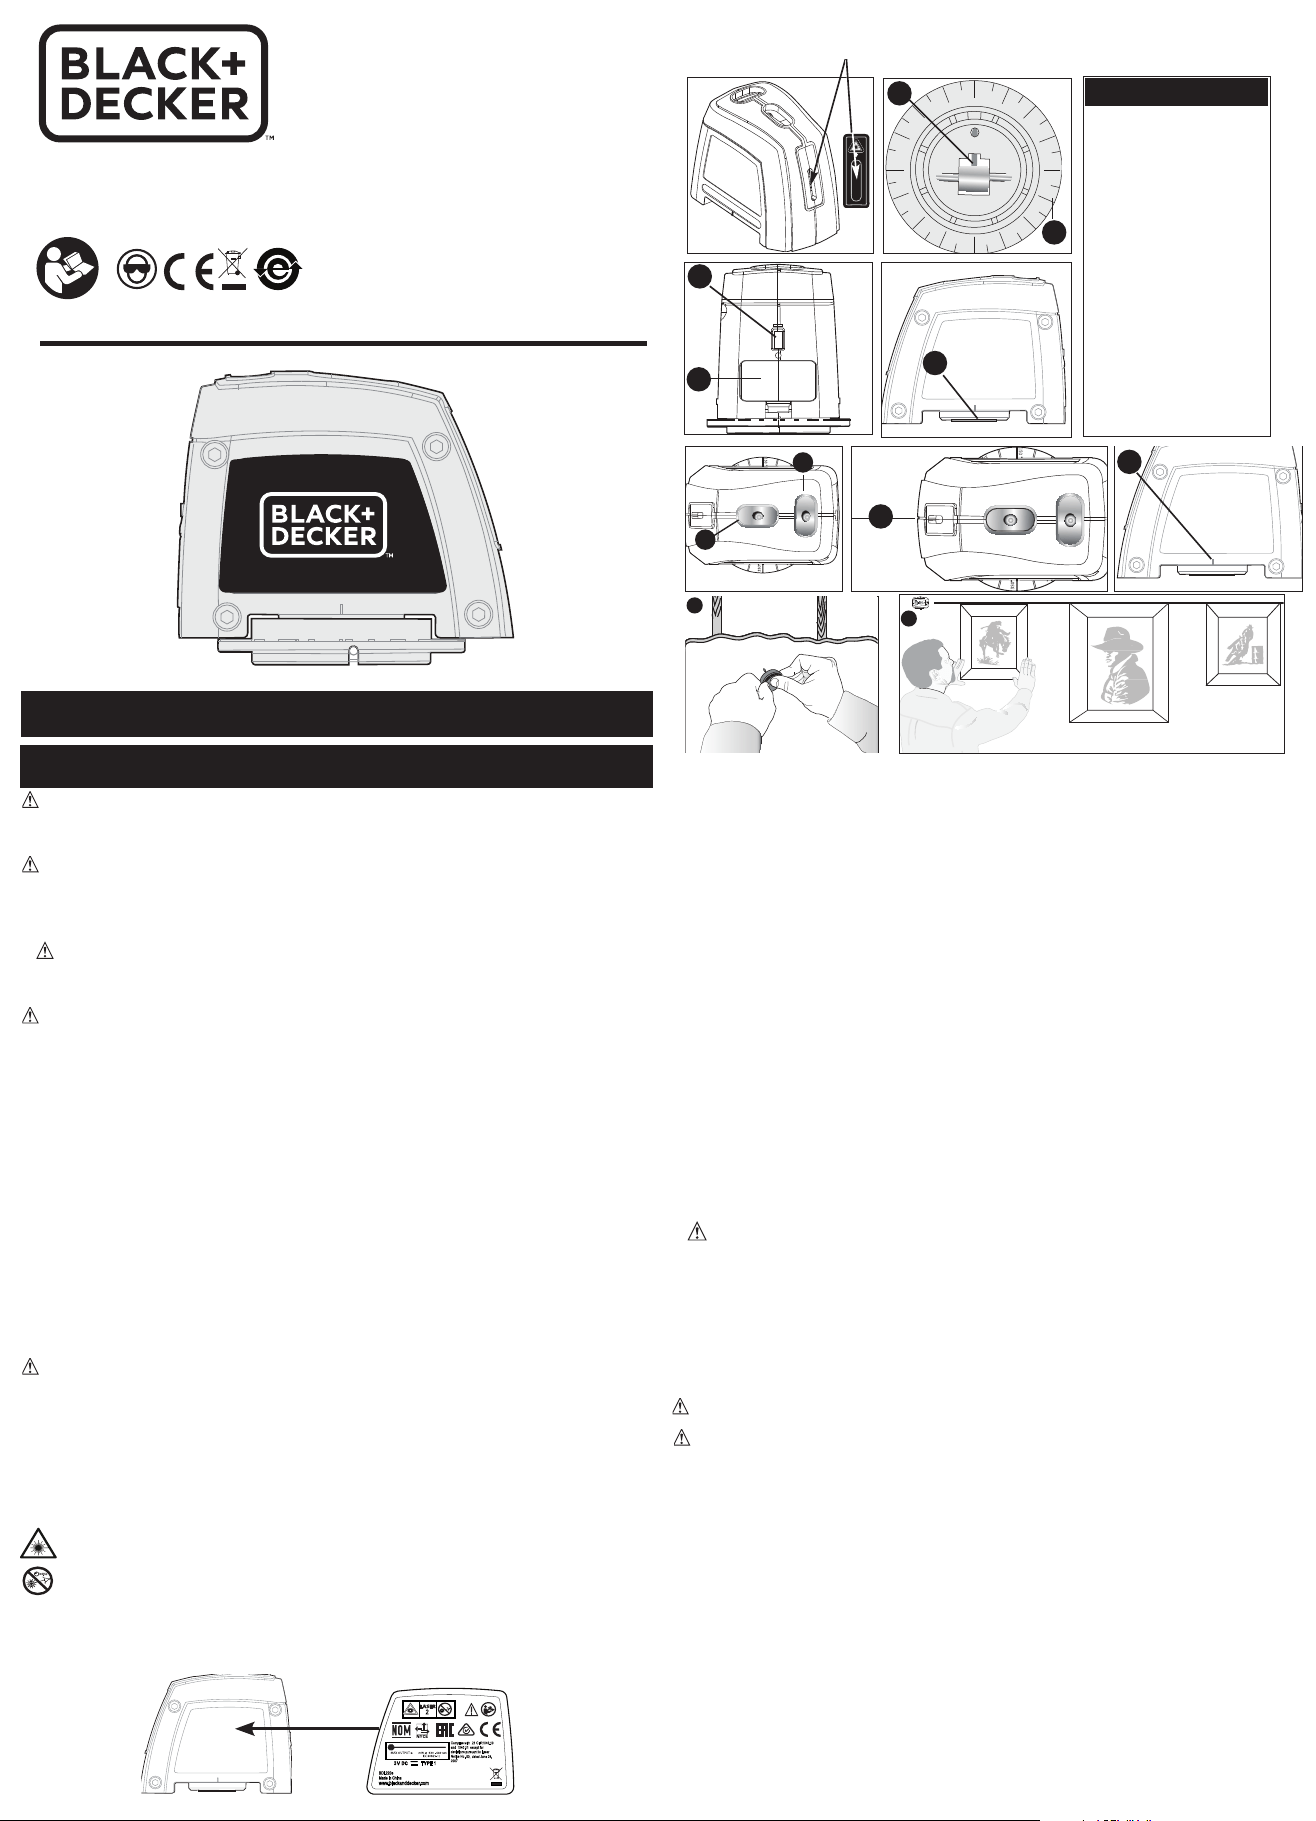
FEATURES
A.) Drywall Pin
B.) Protractor Ring
C.) Laser On/Off Switch
D.) Battery Compartment
Cover
E.) Magnetic Base
F.) Vertical Bubble Vial
G.) Horizontal Bubble
Vial
H.) Laser Line
I.) Alignment Indicator
A
G
B
Avoid exposure-Laser radiation
emitted from this aperture.
2
C
D
E
F
Éviter toute exposition au
rayonnement laser émis par cette
ouverture.
Evite la exposición - Por este
orificio se emite la radiación
láser.
I
1
RADIACIÓN LÁSER. NO
FIJE SU VISTA EN EL RAYO.
CLASE 2 PRODUCTO LÁSER.
PER IEC60825+A1+A2:2007
Do not stare directly into the laser beam.
NOTE: For your convenience and safety, the following labels are on your laser.
Pour plus de commodité et de sécurité, les étiquettes suivantes sont apposées
sur votre laser. Para su comodidad y seguridad, el láser incluye las siguientes
etiquetas:
No mire directamente al rayo láser.
• No opere el láser con niños alrededor ni permita que los niños operen el láser.
•
ADVERTENCIA: NO DESARME EL LÁSER. No contiene elementos a los que el
usuario pueda hacerles mantenimiento. Desarmar el Láser anulará todas las garantías
del producto. No modifique el producto de ninguna manera. La modificación de la
herramienta podría provocar exposición a radiación láser peligrosa.
ADVERTENCIA: El uso de controles o ajustes o la realización de procedimientos dife-
rentes a aquéllos especificados en este manual puede provocar exposición a radiación
láser peligrosa.
• No opere la herramienta en atmósferas explosivas, como ambientes donde se
encuentran líquidos, gases o polvo inflamables.
• Utilice únicamente con las baterías recomendadas específicamente. El uso de
cualquier otra fuente de energía puede producir riesgo de incendio.
• Guarde el producto que no está en uso fuera del alcance de los niños y de personas no
entrenadas. El láser es peligroso en las manos de usuarios no entrenados.
• Utilice sólo accesorios recomendados por el fabricante para el modelo que posee. Los
accesorios correctos para un láser pueden provocar riesgo de lesiones si se utilizan con
otro láser.
• Las reparaciones y el mantenimiento DEBEN ser realizados por un centro de
reparaciones calificado. Las reparaciones realizadas por personal no calificado pueden
provocar lesiones graves.
• No retire ni borre las etiquetas de advertencia. El retiro de las etiquetas aumenta el
riesgo de exposición a radiación.
• Apague el láser cuando no esté en uso. Dejar encendido el láser aumenta el riesgo de
fijar la vista en el rayo láser.
• Coloque el láser de forma segura. Si el láser se cae, puede dañarse o provocar lesiones.
• Únicamente para uso en interiores.
• Este producto está diseñado para utilizarse con temperaturas entre 10ºC (50°F) y 40°
(104°F).
PRECAUCIÓN: Tenga precaución al taladrar, clavar o cortar paredes, pisos y techos
que
puedan contener cableado eléctrico o tuberías. Siempre desconecte la energía al traba-
jar cerca de cableado eléctrico.
Medidas de Primeros Auxilios para el Contenido de Nivel de Burbuja
En caso de contacto con la piel, enjuague con jabón y agua. En caso de contacto con los
ojos, enjuague con abundante agua.
En caso de ingestión, busque atención médica. Si necesita la Hoja de datos de seguridad
del material (MSDS, por sus siglas en inglés), llame al 1-800-262-2161.
La etiqueta de su herramienta puede incluir los siguientes símbolos:
V……………………voltios ...mW ……………………milivatios
nm …………………longitud de ondas en nanómetros Clase2 …………………Láser de Clase 2
Instalación de las baterías
Asegúrese de que el interruptor de encendido/apagado del láser (C) esté en la posición
de apagado girando el actuador del interruptor a la posición “Off”. Retire la tapa del
compartimiento de las baterías (D). Inserte 2 baterías alcalinas AA de 1,5 voltios o bat-
erías para trabajos pesados nuevas y asegúrese de que los terminales (+) y (-) coincidan
correctamente. Vuelva a colocar la tapa del compartimiento de las baterías.
ADVERTENCIA: Las baterías pueden explotar o perder, y pueden provocar lesiones
o incendios.
Para disminuir este riesgo:
• Siga cuidadosamente todas las instrucciones y las advertencias de la etiqueta y el
envase de la batería.
• Inserte siempre la batería correctamente respetando la polaridad (+ y -) indicada en la
batería y en el equipo.
• No mezcle baterías viejas y nuevas.
• No mezcle pilas alcalinas, estándar o recargables.
• No haga puente con los terminales de la batería.
• No cargue la batería.
• Retire todas las baterías agotadas inmediatamente y elimínelas de acuerdo con los
códigos locales.
• No arroje la batería al fuego.
• Mantenga las baterías fuera del alcance de los niños.
• Retire las baterías si el aparato no se va a usar durante varios meses.
“Transportar baterías puede provocar incendios si los terminales de la batería
entran en contacto accidentalmente con materiales conductores como llaves,
monedas,
herramientas de mano u objetos similares. Las Normas para Materiales Peligrosos
del Departamento de Transporte de Estados Unidos (HMR) en realidad prohíben
transportar baterías comercialmente o en aeroplanos (es decir, empacadas en
valijas y equipaje de mano) A MENOS que estén protegidas correctamente de
cortocircuitos. Por lo tanto, cuando transporte baterías individuales, asegúrese de
que los terminales de la batería están protegidos y bien aislados de materiales que
puedan hacer contacto y causar un cortocircuito”.
Instrucciones de operación
Clavija para madera contrachapada
PRECAUCIÓN: La clavija es filosa y debe sujetarse con precaución.
NOTA: La clavija para madera contrachapada (A) sólo puede utilizar para madera
contrachapada, NO en otras superficies, incluido el yeso enlucido.
• Para presionar la clavija en la madera contrachapada, exponga primero la clavija
girando su base desde el lado opuesto.
• Manteniendo la presión en la base de la clavija, insértela directamente y asiéntela con
firmeza contra la superficie de madera contrachapada como se muestra en la Figura
1. La clavija para madera contrachapada siempre debe presionarse hacia adentro
manualmente y nunca con un martillo.
• Para retirar la clavija para madera contrachapada de la pared, tírela hacia afuera
directamente.
PRECAUCIÓN: Asegúrese siempre de que la clavija para madera contrachapada esté
cerrada cuando no se utilice.
PROYECCIÓN DE LÍNEA HORIZONTAL O VERTICAL EN UNA PARED
1). Operación sin manos del láser:
• Adjunte la clavija para madera contrachapada a la pared según las instrucciones
incluidas en la sección “Clavija para madera contrachapada”. Asegúrese siempre de
que la clavija para madera contrachapada esté anexa firmemente a la pared.
• Adjunte la base magnética (E) del láser a la clavija para madera contrachapada.
• Mueva el actuador del interruptor de encendido/apagado (C) a la posición “On” para
proyectar la línea de láser.
• Gire el láser para centrar los niveles de burbuja horizontal (G) o vertical (F). Asegúrese
de que el láser esté bien sujeto a la clavija para madera contrachapada antes de retirar
el soporte.
Installing the Batteries
Ensure laser on/off switch (C) is in the full off position by moving switch actuator to “Off”
position. Remove the battery compartment cover (D). Insert 2 fresh 1.5 volt AA alkaline
or heavy duty batteries making sure to match (+) and (-) terminals correctly. Replace
battery compartment cover.
WARNING: Batteries can explode, or leak, and can cause injury or fire.
To reduce this risk:
• Carefully follow all instructions and warnings on the battery label and package.
• Always insert battery correctly with regard to polarity (+ and -), marked on the battery
and the equipment.
• Do not mix old and new batteries.
• Do not mix Alkaline, Standard, or rechargeable batteries.
• Do not short battery terminals.
• Do not charge battery.
• Remove dead battery immediately and dispose of per local codes.
• Do not dispose of battery in fire.
• Keep batteries out of reach of children.
• Remove battery if the device will not be used for several months.
“Transporting batteries can possibly cause fires if the battery terminals inadvertent-
ly come in contact with conductive materials such as keys, coins, hand tools and the
like. The US Department of Transportation Hazardous Material Regulations (HMR)
actually prohibit transporting batteries in commerce or on airplanes (i.e. packed in
suitcases and carryon luggage) UNLESS they are properly protected from short
circuits. So when transporting individual batteries, make sure that the battery ter-
minals are protected and well insulated from materials that could contact them and
cause a short circuit.”
Operating Instructions
Drywall Pin
CAUTION: Pin is sharp and should be handled with care.
NOTE: The drywall pin (A) can only be used for drywall, NOT other surfaces including
plaster.
• To press pin into drywall, first expose pin by rotating pin base from opposite side.
• While maintaining pressure on pin base, insert pin straight and seat firmly against
drywall surface as shown in Figure 1. The drywall pin should always be pushed in by
hand and never driven by a hammer.
• To remove drywall pin from the wall, pull out straight.
CAUTION: Always be sure drywall pin is closed when not in use.
HORIZONTAL OR VERTICAL LINE PROJECTION ON A WALL
1). Hands free operation of the laser:
•Attach drywall pin to the wall per instructions under “Drywall Pin” section. Always make
sure drywall pin is securely attached to the wall.
• Attach the magnetic base (E) of the laser to drywall pin.
• Move on/ off switch (C) actuator to the “On” position to project the laser line.
• Rotate the laser to center horizontal (G) or vertical (F) bubble vials. Be sure the laser is
firmly attached to the drywall pin before removing support.
2). Operation of the laser:
• Hold the laser firmly against the wall.
• Move on/ off switch (C) actuator to the “On” position to project the laser lines.
• Align laser line with appropriate mark on your work surface, rotate the laser to center
horizontal (G) or vertical (F) bubble vials. Realign laser with mark if necessary.
• Figure 2 illustrates a typical application for the Laser Level when it is wall mounted.
ANGULAR LINE PROJECTION ON A WALL
Operation of the laser:
• Attach drywall pin to the wall per instructions under “Drywall Pin” section. Always
make sure drywall pin is securely attached to the wall.
• Attach the magnetic base (E) of the laser to drywall pin.
• Rotate the laser to center horizontal (G) or vertical (F) bubble vials.
• Turn protractor ring to align “0” mark with Alignment Indicator (I).
BDL220S
Laser Level · Nivel Láser · Niveau Laser
ENGLISH
SAVE THIS INSTRUCTION MANUAL FOR FUTURE REFERENCE.
www.BLACKANDDECKER.com
N517712
WARNING: Read and understand all instructions. Failure to follow all instructions listed
below may result in electric shock, fire and/or serious personal injury.
SAVE THESE INSTRUCTIONS
Safety Instructions
DANGER: Laser Radiation, avoid direct eye exposure, serious eye injury can result.
• Do not use optical tools such as a telescope or transit to view the laser beam.
• Do not place the laser in a position which may cause anyone to intentionally or
unintentionally stare into the laser beam. Serious eye injury could result
• Do not operate the laser around children or allow children to operate the laser.
•
WARNING: DO NOT DISASSEMBLE THE LASER. There are no user serviceable parts
inside. Disassembling the Laser will void all warranties on the product. Do not modify
the product in any way. Modifying the tool may result in Hazardous Laser Radiation
Exposure.
WARNING: Use of controls or adjustments or performance of procedures other than
those specified in this manual may result in hazardous laser radiation exposure.
• Do not operate in explosive atmospheres, such as in the presence of flammable liquids,
gases, or dust.
• Use only with the specifically designated batteries. Use of any other batteries may
create a risk of fire.
• Store idle product out of reach of children and other untrained persons. Lasers are
dangerous in the hands of untrained users.
• Use only accessories that are recommended by the manufacturer for your model.
Accessories that may be suitable for one laser, may create a risk of injury when used on
another laser.
• Repairs and servicing MUST be performed by a qualified repair facility. Repairs
performed by unqualified personnel could result in serious injury.
• Do not remove or deface warning labels. Removing labels increases the risk of
exposure to radiation.
• Turn the laser off when it is not in use. Leaving the laser on increases the risk of staring
into the laser beam.
• Position the laser securely. Damage to the laser or injury could result if the laser falls.
• For indoor use only.
• This product is intended for use in a temperature range of 50° F (10° C) - 104° F (40°
C).”
CAUTION: Use caution when drilling, nailing or cutting into walls, floors and ceilings
which may contain electrical wiring or pipes. Always turn off the power when working
near electrical wires.
First Aid Measures for Bubble Vial Content
In case of skin contact, flush with soap and water. In case of eye contact, flush with
flowing water. If swallowed, get medical help. Material Safety Data Sheet (MSDS)
available from 1-800-262-2161.
The label on your tool may include the following symbols:
V……………………volts ....... mW ……………………milliwatts
nm …………………wavelength in nanometers Class2 …………………Class 2 Laser
• Rotate laser until indicator (I) is at desired angle.
• Move on/ off switch (C) actuator to the “On” position to project the laser line.
STRAIGHT LINE PROJECTION ON ANY FLAT SURFACE
Free hand operation of the laser:
• Hold the laser firmly against a flat surface.
• Move on/off switch (C) actuator to the “On” position to project the laser line.
• Align laser line with appropriate marks on your work surface (common use is laying
tiles or marking plywood for cutting purpose).
DANGER: Laser Radiation, avoid direct eye exposure.
Helpful Hints
• If the laser light becomes dim or is no longer visible when the switch is in the on
position check or change the battery.
• The laser lines are only level on the wall against which the unit is held or hung. The short
line visible on any adjacent wall is not level. The same is true for straight line projection
on a floor or wall, the short line on any adjacent wall is not level.
• The laser unit should never be used as a spirit (bubble) level. The levels are
only calibrated to the laser line when held or hung against a vertical surface.
•The laser unit only generates level lines when held or hung against a vertical surface.
•Make sure laser is as square as possible to flat surface to ensure proper line projection.
Storage
Always store the laser level indoors.
Maintenance
Use only mild soap and damp cloth to clean the tool. Never let any liquid get inside the
tool; never immerse any part of the tool into a liquid.
IMPORTANT: To assure product SAFETY and RELIABILITY, repairs, maintenance and
adjustment (other than those listed in this manual) should be performed by authorized
service centers or other qualified service organizations, always using identical
replacement parts.
Accessories
WARNING: The use of any accessory not recommended for use with this tool could be
hazardous.
SERVICE INFORMATION
All black & decker service centers are staffed with trained personnel to provide customers
with efficient and reliable power tool service. Whether you need technical advice, repair,
or genuine factory replacement parts, contact the black & decker location nearest you. To
find your local service location, refer to the yellow page directory under “tools—electric”
or call: 1-800-544-6986 OR VISIT WWW.BLACKANDDECKER.COM
FULL TWO-YEAR HOME USE WARRANTY
Black & Decker (U.S.) Inc. warrants this product for two years against any defects in
material or workmanship. The defective product will be replaced or repaired at no charge
in either of two ways.
The first, which will result in exchanges only, is to return the product to the retailer from
whom it was purchased (provided that the store is a participating retailer). Returns
should be made within the time period of the retailer’s policy for exchanges (usually
30 to 90 days after the sale). Proof of purchase may be required. Please check with the
retailer for their specific return policy regarding returns that are beyond the time set for
exchanges.
The second option is to take or send the product (prepaid) to a Black & Decker owned
or authorized Service Center for repair or replacement at our option. Proof of purchase
may be required.Black & Decker owned and authorized Service Centers are listed under
“Tools-Electric” in the yellow pages of the phone directory.
This warranty does not apply to accessories. This warranty gives you specific legal rights
and you may have other rights which vary from state to state or province to province.
Should you have any questions, contact the manager of your nearest Black & Decker
Service Center. This product is not intended for commercial use.
LATIN AMERICA: This warranty does not apply to products sold in Latin America. For
products sold in Latin America, check country specific warranty information contained in
the packaging, call the local company or see the website for warranty information.
NOTE:
The customer is responsible for the correct use and care of the instrument. Moreover, the
customer is completely responsible for periodically checking the accuracy of the laser
unit, and therefore for the calibration of the instrument.
Subject to change without notice
TECHNICAL SPECIFICATIONS OF LASER LEVEL:
Laser diode wavelength: 630 - 680 nm (red color)
Laser output type: Continuous wave (CW)
Laser output power: < 2.2mW
Laser Class: Class 2
Working range: Up to 15 feet (depends on light conditions)
Leveling accuracy:
Projecting right ±1/8 inch (3 mm) @ 10 feet (3 m)
Projecting up ±1/8 inch (3 mm) @ 10 feet (3 m)
Projecting left ±1/4 inch (6 mm) @ 10 feet (3 m)
Batteries: 2 AA (included)
Voltage: 3 Volts
Operating temperature: 50°F (10°C)- 104° F (40°C)
Complies with 21 CFR 1040.10 and 1040.11 except for deviations pursuant to Laser Notice
No. 50, dated June 24, 2007
Avoid exposure-Laser radiation emitted from this aperture.
ESPAÑOL
CONSERVE ESTE MANUAL PARA FUTURAS CONSULTAS.
Evite la exposición - Por este orificio se emite la radiación láser.
CARACTERÍSTICAS
A.) Clavija para madera contrachapada F.) Nivel de burbuja vertical
B.) Anillo transportador G.) Nivel de burbuja horizontal
C.) Interruptor de encendido/apagado del láser H.) Línea de láser
D.) Tapa del compartimiento de las baterías I.) Indicador de alineación
E.) Base magnética
Imported by Black & Decker (U.S.) Inc.,
701 E. Joppa Rd. Towson, MD 21286 U.S.A.
2.2
3
1
2
Made in China
BDL220s
Complies with 21 CFR
1040.10
and 1040.11 except for
deviations pursuant to Laser
Notice No.
50,
dated June
24,
2007
www.blackanddecker.com
2014
ADVERTENCIA: Lea y comprenda todas las instrucciones. El incumplimiento de todas
y cada una de las instrucciones enumeradas debajo puede provocar descarga eléctrica,
incendio o daños personales serios.
CONSERVE ESTAS INSTRUCCIONES
Instrucciones de seguridad
PELIGRO: Radiación láser, evite la exposición directa de los ojos, pueden producirse
lesiones oculares graves.
• No utilice herramientas ópticas, como por ejemplo un telescopio o un teodolito para
ver el rayo láser.
• No ubique el láser en una posición que pueda provocar que alguien intencional o no
intencionalmente fije su vista en el rayo láser. Podría provocar lesiones oculares graves
H
FEATURES
A.) Drywall Pin
B.) Protractor Ring
C.) Laser On/Off Switch
D.) Battery Compartment
Cover
E.) Magnetic Base
F.) Vertical Bubble Vial
G.) Horizontal Bubble
Vial
H.) Laser Line
I.) Alignment Indicator
A
G
B
Avoid exposure-Laser radiation
emitted from this aperture.
2
C
D
E
F
Éviter toute exposition au
rayonnement laser émis par cette
ouverture.
Evite la exposición - Por este
orificio se emite la radiación
láser.
I
1
RADIACIÓN LÁSER. NO
FIJE SU VISTA EN EL RAYO.
CLASE 2 PRODUCTO LÁSER.
PER IEC60825+A1+A2:2007
Do not stare directly into the laser beam.
NOTE: For your convenience and safety, the following labels are on your laser.
Pour plus de commodité et de sécurité, les étiquettes suivantes sont apposées
sur votre laser. Para su comodidad y seguridad, el láser incluye las siguientes
etiquetas:
No mire directamente al rayo láser.

Les accessoires adaptés à un laser donné peuvent être dangereux lorsqu’ils sont
utilisés avec un autre laser.
• Les réparations et l’entretien de l’outil DOIVENT uniquement être effectués par un
établissement de réparation professionnel. Toute réparation réalisée par du personnel
non qualifié pourrait entraîner des blessures graves.
• Ne pas enlever ni altérer les étiquettes de mises en garde. Enlever les étiquettes accroît
le risque d’exposition au rayonnement.
• Éteindre le laser lorsqu’il n’est pas utilisé. Laisser le laser allumé augmente le risque de
fixer du regard le faisceau laser.
• Bien positionner le laser. Le laser risque d’être endommagé ou de causer des blessures
en cas de chute.
• Pour un usage intérieur seulement.
• L’utilisation de ce produit est prévue pour une gamme de températures variant de 10
°C (50 °F) – 40 °C (104 °F).
MISE EN GARDE : Être prudent pour le perçage, le clouage ou la coupe dans les murs,
les planchers et les plafonds pouvant dissimuler des câblages électriques ou des tuyaux.
Toujours effectuer une mise hors tension au moment de travailler près des fils
électriques.
Premiers soins pour le contenu des fioles à bulles
En cas de contact cutané, laver abondamment à l’eau et au savon. En cas de contact avec
les yeux, rincer à l’eau courante.
En cas d’ingestion, obtenir des soins médicaux. Il est possible d’obtenir une fiche santé-
sécurité (MSDS) en composant le 1-800-262-2161.
L’étiquette apposée sur votre outil peut comprendre les symboles suivants :
V……………………voltios ...mW ……………………milliwatts
nm …………………longueur d’onde en nanomètre Class2 …………………Laser classe 2
Pose des piles
S’assurer que l’interrupteur marche/arrêt (C) est à la position d’arrêt en déplaçant
l’actionneur de l’interrupteur à la position (Off). Enlever le couvercle du logement des
piles (D). Insérer 2 piles alcalines AA neuves de 1,5 V ou des piles grande capacité et
s’assurer de bien faire correspondre les bornes (+) et (-). Remettre le couvercle du
logement des piles.
AVERTISSEMENT : Les piles peuvent exploser ou couler et causer blessures ou
incendie.
Pour réduire ce risque :
• Suivre attentivement toutes les instructions et avertissements figurant sur l’étiquette et
l’emballage des piles.
• Toujours insérer les piles en tenant compte de la polarité (+ et -) telle qu’elle est
indiquée sur les piles et le matériel.
• Ne pas mélanger piles neuves et usagées.
• Ne mélangez pas des piles alcalines, standards ou rechargeables.
• Ne pas créer de court-circuit avec les bornes des piles.
• Ne pas recharger les piles.
• Retirer immédiatement les piles mortes et les éliminer en fonction de la réglementation
locale.
• Ne pas jeter de pile au feu.
• Tenir les piles hors de la portée des enfants.
• Retirer les piles si l’appareil n’est pas utilisé pendant plusieurs mois.
“Le transport des piles peut causer un incendie si les bornes des piles entrent en
contact involontairement avec des matières conductrices comme des clés, de la
monnaie, des outils manuels et d’autres éléments semblables. La Hazardous
Material Regulation du département américain des transports interdit en fait le
transport des piles pour le commerce et dans les avions (ex. : piles emballées dans
des valises et des bagages à main) À MOINS qu’elles ne soient bien protégées con-
tre les
courts-circuits. Pour le transport de piles individuelles, s’assurer que les bornes sont
protégées et bien isolées contre toute matière pouvant entrer en contact avec elles
et causer un court-circuit.”
Mode d’emploi
Broche de cloison sèche
MISE EN GARDE : La broche est tranchante et doit être manipulée avec soin.
REMARQUE : La broche de cloison sèche (A) ne peut être utilisée que pour les cloisons
sèches et non pour d’autres surfaces comme le plâtre.
• Pour enfoncer la broche dans la cloison sèche, exposer d’abord la tige en tournant sa
base du côté opposé.
• Tout en appliquant une pression sur la base de la broche, insérer directement la tige et
l’asseoir fermement contre la surface de la cloison sèche comme le montre la figure
1.
La broche de cloison sèche doit toujours être enfoncée manuellement plutôt qu’au
moyen d’un marteau.
• Pour retirer la broche du mur, tirer dessus en ligne droite.
MISE EN GARDE : Toujours s’assurer que la broche de cloison sèche est fermée
lorsqu’elle n’est pas utilisée.
PROJECTION D’UNE RAIE HORIZONTALE OU VERTICALE SUR UN MUR
1). Utilisation du laser mains libres :
• Fixer au mur la broche de cloison sèche conformément aux directives figurant à la
section « Broche de cloison sèche ». Toujours s’assurer que la broche de cloison sèche
est bien fixée au mur.
• Fixer la base magnétique (E) du laser à la broche de cloison sèche.
• Déplacer l’actionneur de l’interrupteur marche/arrêt (C) à la position « On » pour
projeter la
raie laser.
• Tourner le laser pour centrer les fioles à bulles horizontales (G) ou verticales (F).
S’assurer que le laser est bien fixé à la broche de cloison sèche avant de retirer le
support.
2). Fonctionnement du laser :
• Tenir fermement le laser contre le mur.
• Déplacer l’actionneur de l’interrupteur marche/arrêt (C) à la position « I » pour projeter
les
raies lasers.
• Aligner la raie laser avec le repère approprié sur la surface de travail, puis tourner le
laser
2). Operación del láser:
• Sujete el láser firmemente contra la pared.
• Mueva el actuador del interruptor de encendido/apagado (C) a la posición “On” para
proyectar las líneas de láser.
• Alinee la línea de láser con la marca adecuada en su superficie de trabajo, gire el láser
para centrar los niveles de burbuja horizontal (G) o vertical (F). Vuelva a alinear el láser
con la marca, en caso de ser necesario.
• La Figura 3 describe una aplicación típica para el Nivel de láser cuando éste está
montado en la pared.
PROYECCIÓN DE LÍNEA ANGULAR SOBRE UNA PARED
Operación del láser:
• Adjunte la clavija para madera contrachapada a la pared según las instrucciones
incluidas en la sección “Clavija para madera contrachapada”. Asegúrese siempre de
que la clavija para madera contrachapada esté anexa firmemente a la pared.
• Adjunte la base magnética (F) del láser a la clavija para madera contrachapada.
• Gire el láser para centrar los niveles de burbuja horizontal (G) o vertical (F).
• Gire el anillo transportador para alinear la marca “0” con el Indicador de alineación (I).
• Gire el láser hasta que el indicador (I) esté en el ángulo deseado.
• Mueva el actuador del interruptor de encendido/apagado (C) a la posición “On” para
proyectar la línea de láser.
PROYECCIÓN EN LÍNEA RECTA SOBRE CUALQUIER SUPERFICIE PLANA
Operación sin manos del láser:
• Sujete el láser firmemente contra una superficie plana.
• Mueva el actuador del interruptor de encendido/apagado (C) a la posición “On” para
proyectar la línea de láser.
• Alinee la línea de láser con las marcas adecuadas en su superficie de trabajo (se
usa frecuentemente en baldosas colocadas en posición plana o al marcar madera
contrachapada para realizar cortes).
PELIGRO: Radiación del láser: evite la exposición directa con los ojos.
Consejos útiles
• Si la luz del láser se atenúa o ya no está visible cuando el interruptor está en la posición
de encendido, compruebe o cambie la batería.
• Las líneas de láser sólo se nivelan en la pared contra la que se sujeta o cuelga la unidad.
La línea corta visible en cualquier pared adyacente no se nivela. De igual manera para
la proyección de línea recta en un piso o pared, la línea corta sobre cualquier pared
adyacente no se nivela.
• La unidad del láser nunca debe utilizarse como una balanza de agua (nivel de burbuja).
Los niveles sólo se calibran a la línea de láser cuando éste se sujeta o cuelga contra una
superficie vertical.
• La unidad de láser sólo genera líneas de nivel al sujetarse o colgarse contra una
superficie vertical.
• Asegúrese de que el láser esté en ángulo recto en la medida de lo posible con la
superficie plana para garantizar una proyección de la línea correcta.
Almacenamiento
Guarde siempre el nivel de láser en un lugar cubierto.
Mantenimiento
Para limpiar la herramienta, sólo utilice jabón suave y un paño húmedo. Nunca permita
que penetre líquido dentro de la herramienta y nunca sumerja ninguna de las piezas en un
líquido.
IMPORTANTE: Para garantizar la SEGURIDAD y CONFIABILIDAD del producto, las
reparaciones, el mantenimiento y los ajustes (los que no estén enumerados en este
manual) se deben realizar en los centros de mantenimiento autorizados o en otras
organizaciones de mantenimiento calificadas, utilizando siempre piezas de repuesto
idénticas.
Accesorios
ADVERTENCIA: El uso de accesorios no recomendados para utilizar con esta
herramienta puede resultar peligroso.
INFORMACIÓN DE MANTENIMIENTO
Todos los Centros de servicio de Black & Decker cuentan con personal
altamentecapacitado dispuesto a brindar a todos los clientes un servicio eficiente
y confiable en lareparación de herramientas eléctricas. Si necesita consejo técnico,
reparaciones o piezasde repuesto originales de fábrica, póngase en contacto con el
centro de servicio de Black &Decker más cercano a su domicilio. Para ubicar su centro de
servicio local, consulte lasección “Herramientas eléctricas” (Tools-Electric) de las páginas
amarillas, llame al 1-800-544-6986 o visite nuestro sitio www.blackanddecker.com.
GARANTÍA COMPLETA DE DOS AÑOS PARA USO EN EL HOGAR
Black & Decker (Estados Unidos) Inc. ofrece una garantía de dos años por
cualquierdefecto del material o de fabricación de este producto. El producto defectuoso
se reparará oreemplazará sin costo alguno de dos maneras.La primera opción, el
reemplazo, es devolver el producto al comercio donde seadquirió(siempre y cuando
se trate de un comercio participante). Las devoluciones deben realizarseconforme a la
política de devolución del comercio (generalmente, entre 30 y 90 díasposteriores a la
venta). Le pueden solicitar comprobante de compra. Consulte en elcomercio acerca de
la política especial sobre devoluciones una vez excedido el plazoestablecido.La segunda
opción es llevar o enviar el producto (con flete pago) a un Centro de serviciopropio o
autorizado de Black & Decker para su reparación o reemplazo según nuestrocriterio. Le
pueden solicitar el comprobante de compra. Los Centros de servicio autorizadosy de
propiedad de Black & Decker se detallan en la sección“Herramientas eléctricas” (Tools-
Electric) de las páginas amarillas de la guía telefónica.Esta garantía no se extiende a los
accesorios. Esta garantía le concede derechos legalesespecíficos; usted puede tener
otros derechos que pueden variar según el estado o laprovincia. Si tiene alguna
pregunta, comuníquese con el gerente del Centro de servicio deBlack & Decker de
su zona. Este producto no está diseñado para uso comercial.
AMÉRICA LATINA: esta garantía no se aplica a los productos que se venden en
AméricaLatina. Para los productos que se venden en América Latina, debe consultar
la informaciónde la garantía específica del país que viene en el empaque, llamar a la
compañía local ovisitar el sitio Web a fin de obtener esa información.
NOTA IMPORTANTE:
• El cliente se hace responsable de la utilización y mantenimiento correctos
de la herramienta. Además, el cliente será íntegramente responsable dela
comprobación periódica de la unidad láser y, por consiguiente, de la calibración
del instrumento. La calibración y el cuidado no estáncubiertos por la garantía.
Sujeto a cambios sin previo aviso
ESPECIFICACIONES TÉCNICAS DEL NIVEL DE LÁSER:
Longitud de ondas de diodo del láser: 630 - 680 nm (color rojo)
Tipo de salida de láser: Onda continua (CW)
Laser de potencia de salida: < 2.2mW
Clase de láser: Clase 2
Rango de funcionamiento: Hasta 15 pies (depende de las condiciones
de luz)
Precisión de la nivelación:
Proyección recta 3 mm (±1/8 pulgada) a 3 m (10 pies)
Proyección hacia arriba 3 mm (±1/8 pulgada) a 3 m (10 pies)
Proyección a la izquierda 6 mm (±1/4 pulgada) a 3 m (10 pies)
Baterías: 2 baterías AA (incluidas)
Voltaje: 3 voltios
Temperatura de funcionamiento: 10°C (50°F) - 40°C (104°F)
Esta herramienta produce radiación láser de clase II y cumple con las normas 21 CFR
1040.10 y
1040.11, excepto por las desviaciones conformes al Aviso sobre láser No. 50, de fecha 24
de junio de 2007.
GARANTÍA BLACK & DECKER · BLACK & DECKER WARRANTY. SOLAMENTE PARA
PROPOSITOS DE MEXICO
Distributor Name · Sello firma del distribuidor
Date of purchase · Fecha de compra Invoice No. · No. de factura
PRODUCT INFOMATION · IDENTIFICACIÓN DEL PRODUCTO
Cat. No. · Catalogo ó Modelo Serial Number · No. de serie
Name · Nombre Last Name · Apellido
Address · Dirección City · Ciudad
State · Estado Postal Code · Código Postal
Country · País Telephone · No. Teléfono
2 AÑOS DE GARANTIA
Este producto cuenta con dos años de garantía a partir de la fecha de compra
contracualquier defecto de su funcionamiento, así como cualquier falla debido a
materialesempleados para su fabricación ó mano de obra defectuosa.Nuestra garantía
incluye la reparación o reposición del producto y/o componentes sincargo alguno para
el cliente incluyendo la mano de obra, esta incluye los gastos detrasportación erogados
para lograr cumplimiento de esta garantía en los domicilios diversos señalados.Para
hacer efectiva esta garantía deberá presentar su herramienta y esta póliza selladapor
el establecimiento comercial donde se adquirió el producto.Nos comprometemos a
entregar el producto en un lapso no mayor a 30 días hábiles contados a partir de la fecha
de recepción del mismo en nuestros talleres de servicio autorizados.
ESTA GARANTIA NO APLICA CUANDO: El producto se hubiese utilizado en condiciones
distintas a las normales.El producto no hubiese sido operado de acuerdo con el
instructivo de uso que se acompaña.El producto hubiese sido alterado o reparado por
personas no autorizadas por nosotrosImportador:
Black & Decker S.A. de .C.V
Bosque de Cidros Acceso Radiatas No.42
3ra.Seccion de Bosques de las lomas
C.P.05120, Mexico, D.F. Tel: (01 55) 5326 7100
FRANÇAIS
CONSERVER CE MANUEL POUR UN USAGE ULTÉRIEUR.
pour centrer les fioles à bulles horizontales (G) ou verticales (F). Aligner de nouveau le
laser avec le repère au besoin.
• La figure 3 illustre une application courante du niveau laser fixé au mur.
PROJECTION MURALE D’UNE RAIE ANGULAIRE
Fonctionnement du laser :
• Fixer au mur la broche de cloison sèche conformément aux directives figurant à la
section « Broche de cloison sèche ». Toujours s’assurer que la tige de cloison sèche est
bien fixée au mur.
• Fixer la base magnétique (E) du laser à la broche de cloison sèche.
• Tourner le laser pour centrer les fioles à bulles horizontales (G) ou verticales (F).
• Tourner l’anneau du rapporteur d’angles pour aligner le repère « 0 » avec l’indicateur
d’alignement (I).
• Tourner le laser de manière à ce que l’indicateur (I) se trouve à l’angle voulu.
• Déplacer l’actionneur de l’interrupteur marche/arrêt (C) à la position « I » pour projeter
la raie laser.
PROJECTION D’UNE RAIE DROITE SUR TOUTE SURFACE PLANE
Utilisation du laser mains libres :
• Tenir fermement le laser contre une surface plane.
• Déplacer l’actionneur de l’interrupteur marche/arrêt (C) à la position « I » pour projeter
la raie laser.
• Aligner la raie laser avec les repères appropriés sur la surface de travail (par exemple
pour un usage courant comme la pose de carreaux ou le marquage de contreplaqué
pour le couper).
DANGER : Rayonnement laser, éviter toute exposition directe avec les yeux.
Conseils utiles
• Si la lumière du laser réduit ou n’est plus visible lorsque l’interrupteur est à la position
de marche, vérifier la pile ou la remplacer.
• Les raies lasers ne sont au niveau qu’avec le mur contre lequel l’appareil est tenu ou
accroché. La courte raie visible sur tout mur adjacent n’est pas au niveau. Cela est
aussi vrai pour la projection d’une raie droite sur un plancher ou un mur, la courte raie
apparaissant sur un mur adjacent n’est pas au niveau.
• Le laser ne doit jamais être utilisé comme niveau à alcool (à bulle). Les niveaux sont
uniquement étalonnés à la raie laser lorsqu’ils sont tenus contre une surface verticale
ou accrochés à celle-ci.
• Le laser ne produit des raies au niveau que s’il est tenu contre une surface verticale ou
accrochée à celle-ci.
• S’assurer que le laser est aussi à l’équerre que possible avec la surface plane pour
assurer une projection adéquate de la raie.
Rangement
Toujours ranger le niveau au laser à l’intérieur.
Entretien
N’utiliser qu’un détergent doux et un chiffon humide pour nettoyer l’outil. Ne jamais
laisser de liquide pénétrer dans l’outil et n’immerger aucune partie de l’outil dans un
liquide.
IMPORTANT : Pour garantir la SÉCURITÉ et la FIABILITÉ du produit, les réparations,
l’entretien et le réglage (autre que ceux énumérés dans ce manuel) doivent être réalisés
par un centre de réparation autorisé ou tout autre centre de réparation professionnel, et
les des pièces de rechange identiques doivent être utilisées.
Accessoires
AVERTISSEMENT : L’utilisation de tout accessoire non recommandé avec cet outil
pourrait s’avérer dangereuse.
INFORMATION SUR LES RÉPARATIONS
Tous les centres de réparation Black & Decker sont dotés de personnel qualifié en
matière d’outillage électrique; ils sont donc en mesure d’orir à leur clientèle un service
ecace etfiable. Que ce soit pour un avis technique, une réparation ou des pièces de
rechangeauthentiques installées en usine, communiquer avec l’établissement Black &
Decker leplus près de chez vous. Pour trouver l’établissement de réparation de votre
région,consulter le répertoire des Pages jaunes à la rubrique « Outils électriques » ou
composerle numéro suivant : 1-800-544-6986ou consulter le site www.blackanddecker.
com
GARANTIE COMPLÈTE DE DEUX ANS POUR UNE UTILISATION DOMESTIQUE
Black & Decker (É.-U.) Inc. garantit ce produit pour une durée de deux ans contre tout-
défaut de matériau ou de fabrication. Le produit défectueux sera remplacé ou réparé
sansfrais de l’une des deux façons suivantes :La première façon consiste en un simple
échange chez le détaillant qui l’a vendu (pourvuqu’il s’agisse d’un détaillant participant).
Tout retour doit se faire durant la périodecorrespondant à la politique d’échange du
détaillant (habituellement, de 30 à 90 joursaprès l’achat). Une preuve d’achat peut être
requise. Vérifier auprès du détaillant pourconnaître sa politique concernant les retours
hors de la période définie pour les échanges.La deuxième option est d’apporter ou
d’envoyer le produit (transport payé d’avance) à uncentre de réparation autorisé ou à un
centre de réparation de Black & Decker pour faireréparer ou échanger le produit, à notre
discrétion. Une preuve d’achat peut être requise.Les centres Black & Decker et les centres
de service autorisés sont répertoriés dans lespages jaunes, sous la rubrique « Outils élec-
triques ».Cette garantie ne s’applique pas aux accessoires. Cette garantie vous accorde
des droitslégaux spécifiques et vous pourriez avoir d’autres droits qui varient d’un État
ou d’uneprovince à l’autre. Pour toute question, communiquer avec le directeur du centre
deréparation Black & Decker le plus près de chez vous. Ce produit n’est pas destiné à
unusage commercial.
CARACTÉRISTIQUES TECHNIQUES DU NIVEAU LASER :
Longueur d’onde de la diode du laser : 630 - 680 nm (couleur rouge)
Type de sortie laser : Onde continue (CW)
Puissance de sortie laser : < 2.2mW
Classe du laser : classe 2
Plage de fonctionnement : Jusqu’à 4,6 m (15 pi) (selon l’éclairage)
Précision de la mise à niveau :
Projection droite ± 3 mm (1/8 po ) @ 3 m (10 pi)
Projection vers le haut ± 3 mm (1/8 po) @ 3 m (10 pi)
Projection à gauche ± 6 mm (1/4 po) @ 3 m (10 pi)
Piles : 2 AA (incluses)
Tension : 3 V
Température de fonctionnement : 10 °C (50 °F) – 40 °C (104 °F)
Cet instrument produit des rayonnements laser de classe II et est conforme aux normes
21 CFR 1040.10 et 1040.11, à l’exception des deviations en vertu de l’Avis relatif au laser N°
50 daté du 24 juin 2007.
AVERTISSEMENT : S’assurer de lire et de comprendre toutes les directives. Ne pas
suivre les directives figurant ci-après peut causer un choc électrique, un incendie et des
blessures corporelles graves.
CONSERVER CES DIRECTIVES
Directives de sécurité
DANGER : Radiation laser ; éviter tout contact direct avec les yeux ; des lésions ocu-
laires sérieuses pourraient en résulter.
• Ne pas utiliser d’outils optiques comme un télescope ou un théodolite pour regarder le
faisceau laser.
• Ne pas mettre le laser dans une position où une personne pourrait fixer du regard le
faisceau laser, intentionnellement ou non. Il peut en résulter des blessures graves aux
yeux.
• Ne pas utiliser le laser près des enfants et ne pas laisser les enfants utiliser le laser.
• AVERTISSEMENT : NE PAS DÉMONTER LE LASER. Aucune pièce à l’intérieur ne peut
être réparée par l’utilisateur. Le démontage du laser annulera toutes les garanties du
produit. Ne modifier le produit en aucun cas. Le fait de modifier l’outil peut causer une
exposition dangereuse au rayonnement laser.
AVERTISSEMENT : L’utilisation d’autres commandes ou réglages ou l’exécution de
procédures autres que celles décrites dans le présent mode d’emploi peut causer une
exposition dangereuse au rayonnement laser.
• Ne pas faire fonctionner l’outil dans un environnement explosif, soit en présence de
liquides inflammables, de gaz ou de poussière.
• Utiliser uniquement l’outil avec les piles spécifiquement conçues à cet effet. L’utilisation
de tout autre bloc-piles risque de causer un incendie.
• Ranger le produit inutilisé hors de la portée des enfants et des personnes sans
expérience. Les lasers sont dangereux entre les mains d’utilisateurs inexpérimentés.
• N’utiliser que les accessoires conseillés par le fabricant pour le modèle de votre outil.
Éviter toute exposition au rayonnement laser émis par cette ouverture.
CARACTÉRISTIQUES
A.) Broche à cloison sèche F.) Fiole à bulles verticale
B.) Anneau de rapporteur d’angles G.) Fiole à bulles horizontale
C.) Interrupteur marche/arrêt du laser H.) Trait laser
D.) Couvercle du logement des piles I.) Indicateur d’alignement
E.) Base magnétique
SOLAMENTE PARA PROPOSITOS DE MEXICO
Grupo Realsa en herramientas,
S.A. de C.V.
Súper Manzana 69 MZ.01 Lote 30
(Av. Torcasita)
Col. Puerto Juárez
Cancún, Quintana Roo
Tel. 01 998 884 72 27
Ferre Pat de Puebla, S.A. de C.V.
16 de Septiembre No. 6149
Col. El Cerrito
Puebla, Puebla
Tel. 01 222 264 12 12
Servicio de Fabrica Black & Decker,
S.A. de C.V.
Lázaro Cardenas No. 18
Col. ObreraDistrito Federal
Tel. 55 88 95 02
Representaciones Industriales Robles,
S.A. de C.V.
Tezozomoc No. 89
Col. La Preciosa
Distrito Federal
Tel. 55 61 86 82
Gpo. Comercial de Htas. y Refacciones
de Occidente, S.A. de C.V.
Av. La Paz No. 1779
Col. Americana, S. Juaréz
Guadalajara, Jalisco
Tel. 01 33 38 25 69 78
PARA OTRAS LOCALIDADES LLAME AL 01 800 847 2309 O 01 800 847 2312.
Herramientas y Equipos Profesionales
Av. Colón 2915 Ote.
Col. Francisco I. Madero
Monterrey, Nvo. León
Tel. 01 81 83 54 60 06
Htas. Portátiles de Chihuahua,
S.A. de C.V.
Av. Universidad No. 2903
Col. Fracc. Universidad
Chihuahua, Chihuahua
Tel. 01 614 413 64 04
Fernando González Armenta
Bolivia No. 605
Col. Felipe Carrillo Puerto
Cd. Madero, Tampico
Tel. 01 833 221 34 50
Perfiles y Herramientas de Morelia
Gertrudis Bocanegra No. 898
Col. Ventura Puente
Morelia, Michoacán
Tel. 01 443 313 85 50
Enrique Robles
Av. de la Solidaridad No. 12713
Col. La Pradera
Irapuato, Guanajuato
Tel. 01 462 626 67 39
Hernández Martinez Jeanette
Prolongación Corregidora Nte. No. 1104
Col. Arboledas
Queretaro, Qro.
Tel. 01 442 245 25 80
Ne pas regarder directement le faisceau laser.