0 BIACK ,DECKERo
INSTRUCTION MANUAL
Catalog No. BDL100S
IFYOU SHOULD EXPERIENCE A PROBLEM
WITH YOUR BLACK & DECKER PRODUC'I.,
CALL 1-800-54-HOW-TO (544-6986)
B_=ORE_R_LICALL.HAVEIHE FOLLOWINGINF_ AVStLABLE,CATALOGNO.,TYPENO.,AND
DATECODE(e.g.2_ooc_30M).iNMOSTCASES,ABLACK& DECKI_ REPRESENT,KnVECAN
RESO--VE'tOL_ _ OV_:ITHE_E. IFYOUPIAVEASUGGESTIONOR(_, GNE US
ACALLYOURFEEDBACKISVITALTOBLAL;K&DEQ_L
SAVE THIS MANUAL FOR FUTURE REFERENCE
VEA EL ESPA_IOLEN LA CONTRAPORTADA.
INSTRUCTIVe DEOPERACI(_N CENTROSDE SERVICIOY PeUZA DE GARANT)A,
ADVERTENCA: L_.ABEESTE INSTRUCTIVe ANTESDEUSARELPRODUC3"O,
Cat NO BDL100S Form # 611195-00 (NOV02-CD-1) Copyright O 2002 Black & Decker Printed in LISA
_.WARNING; Read and understandaLLinstructions. Failuretofellowall iostructtonsfi_eff
belowmayresultinelectric shock,tire and/orseriouspersenalinjury.
SAVE THESE INSTRUCTIONS
Safety Instructions
• Do notoperatethe laser inexplosiveatmospheres,suchas inthepresenceofflammable
liquids,gases,ordust.
• Usethelaseronlywiththespecif_altydesignatedbatteries.Useef anyotherbatteriesmay
createa riskoffill.
• Storeidle faseroutof reachofchildrenandutheruntrainedpersons.Lasersaredangerous
inthehandsef untrainedusers.
• Use only accesseries that are recommended by the manufacturer forry_ourmodel.
Accessoriesthat may be suifabJefor ene laser,may createa riskof injurywhen used on
anotherlaser
• De notuseopticaltoolssuchas a tslaSCOp_ortransittoviewthe laserbeam.Sedouseye
in/ury couldresult,
• De not place the laser in a position which may cause enlyoneto intentionally er
unintentionallystareintothe laserbeam.Seriouseye injuryoeuldresuti
• Turnthe laseroff whenifisnetin use.Leavingthe laseron increasestheriskof staringinte
the laser beam.
• Repairs and servicingMUST beperformedbya qualifiedrepairfacility.Repairsperformed
I_ ungualifiedpersonnelcouldresultin seriousinjury.
• WARNING: DO NOT DISASSEMBLE THE LASER,There are no user serviceable
partsinside.DisassemblingtheLaserwillvoidallwarrantiesentheproduct,Donot modify
the productin any way Modifyingthe tool may result in Hazardous Laser Radiation
Exposure.
• Donotoperatethelaseraroundchildrenorallowchildrentooperatethefaser,Seriouseye
injurymayresult.
• Denotremoveordefacewarninglabels.Removinglabelsincreasesthe riskofexposureto
radiation.
• Positionthelaser securely.Damagetothe laserorseriousinjurycouldresultifthe laser
fRIl_
• _-CAUTION: Usecautionwhen drilling,nailingor cuttingintowalls floors and ceilings
whichmay containelectricalwiringorpipes.These itemsmay bedetectedbytheBullseye
StudFinderin thesame mannerinwhichstudsare detected.Becausestudsare normally
spaced16 inchesor 24 inches apartand are 1-1/2incheswide,bewareof anythingcloser
tegetber or efa differentwidth.AJwayaturn offthe power when working near electrical
_r_.
CAUTION: Use of controlsor adjustmentsor performanceef procedures otherthan
thosespecifiedinthismanualmay resultinhazardouslaserradiationexposure.
The labelon yourtoolmay includethefollowingsymbols.
V ..........................volts mW......................milliwaffs
nm ........................wavelengthin nanometers Ilia ......................Class Ilia Laser
Foryourconvenienceandsafety,thefollowinglabelsare onyourlaser.
manual.
To reduce the risk ut injury, user must read and understand thstructien
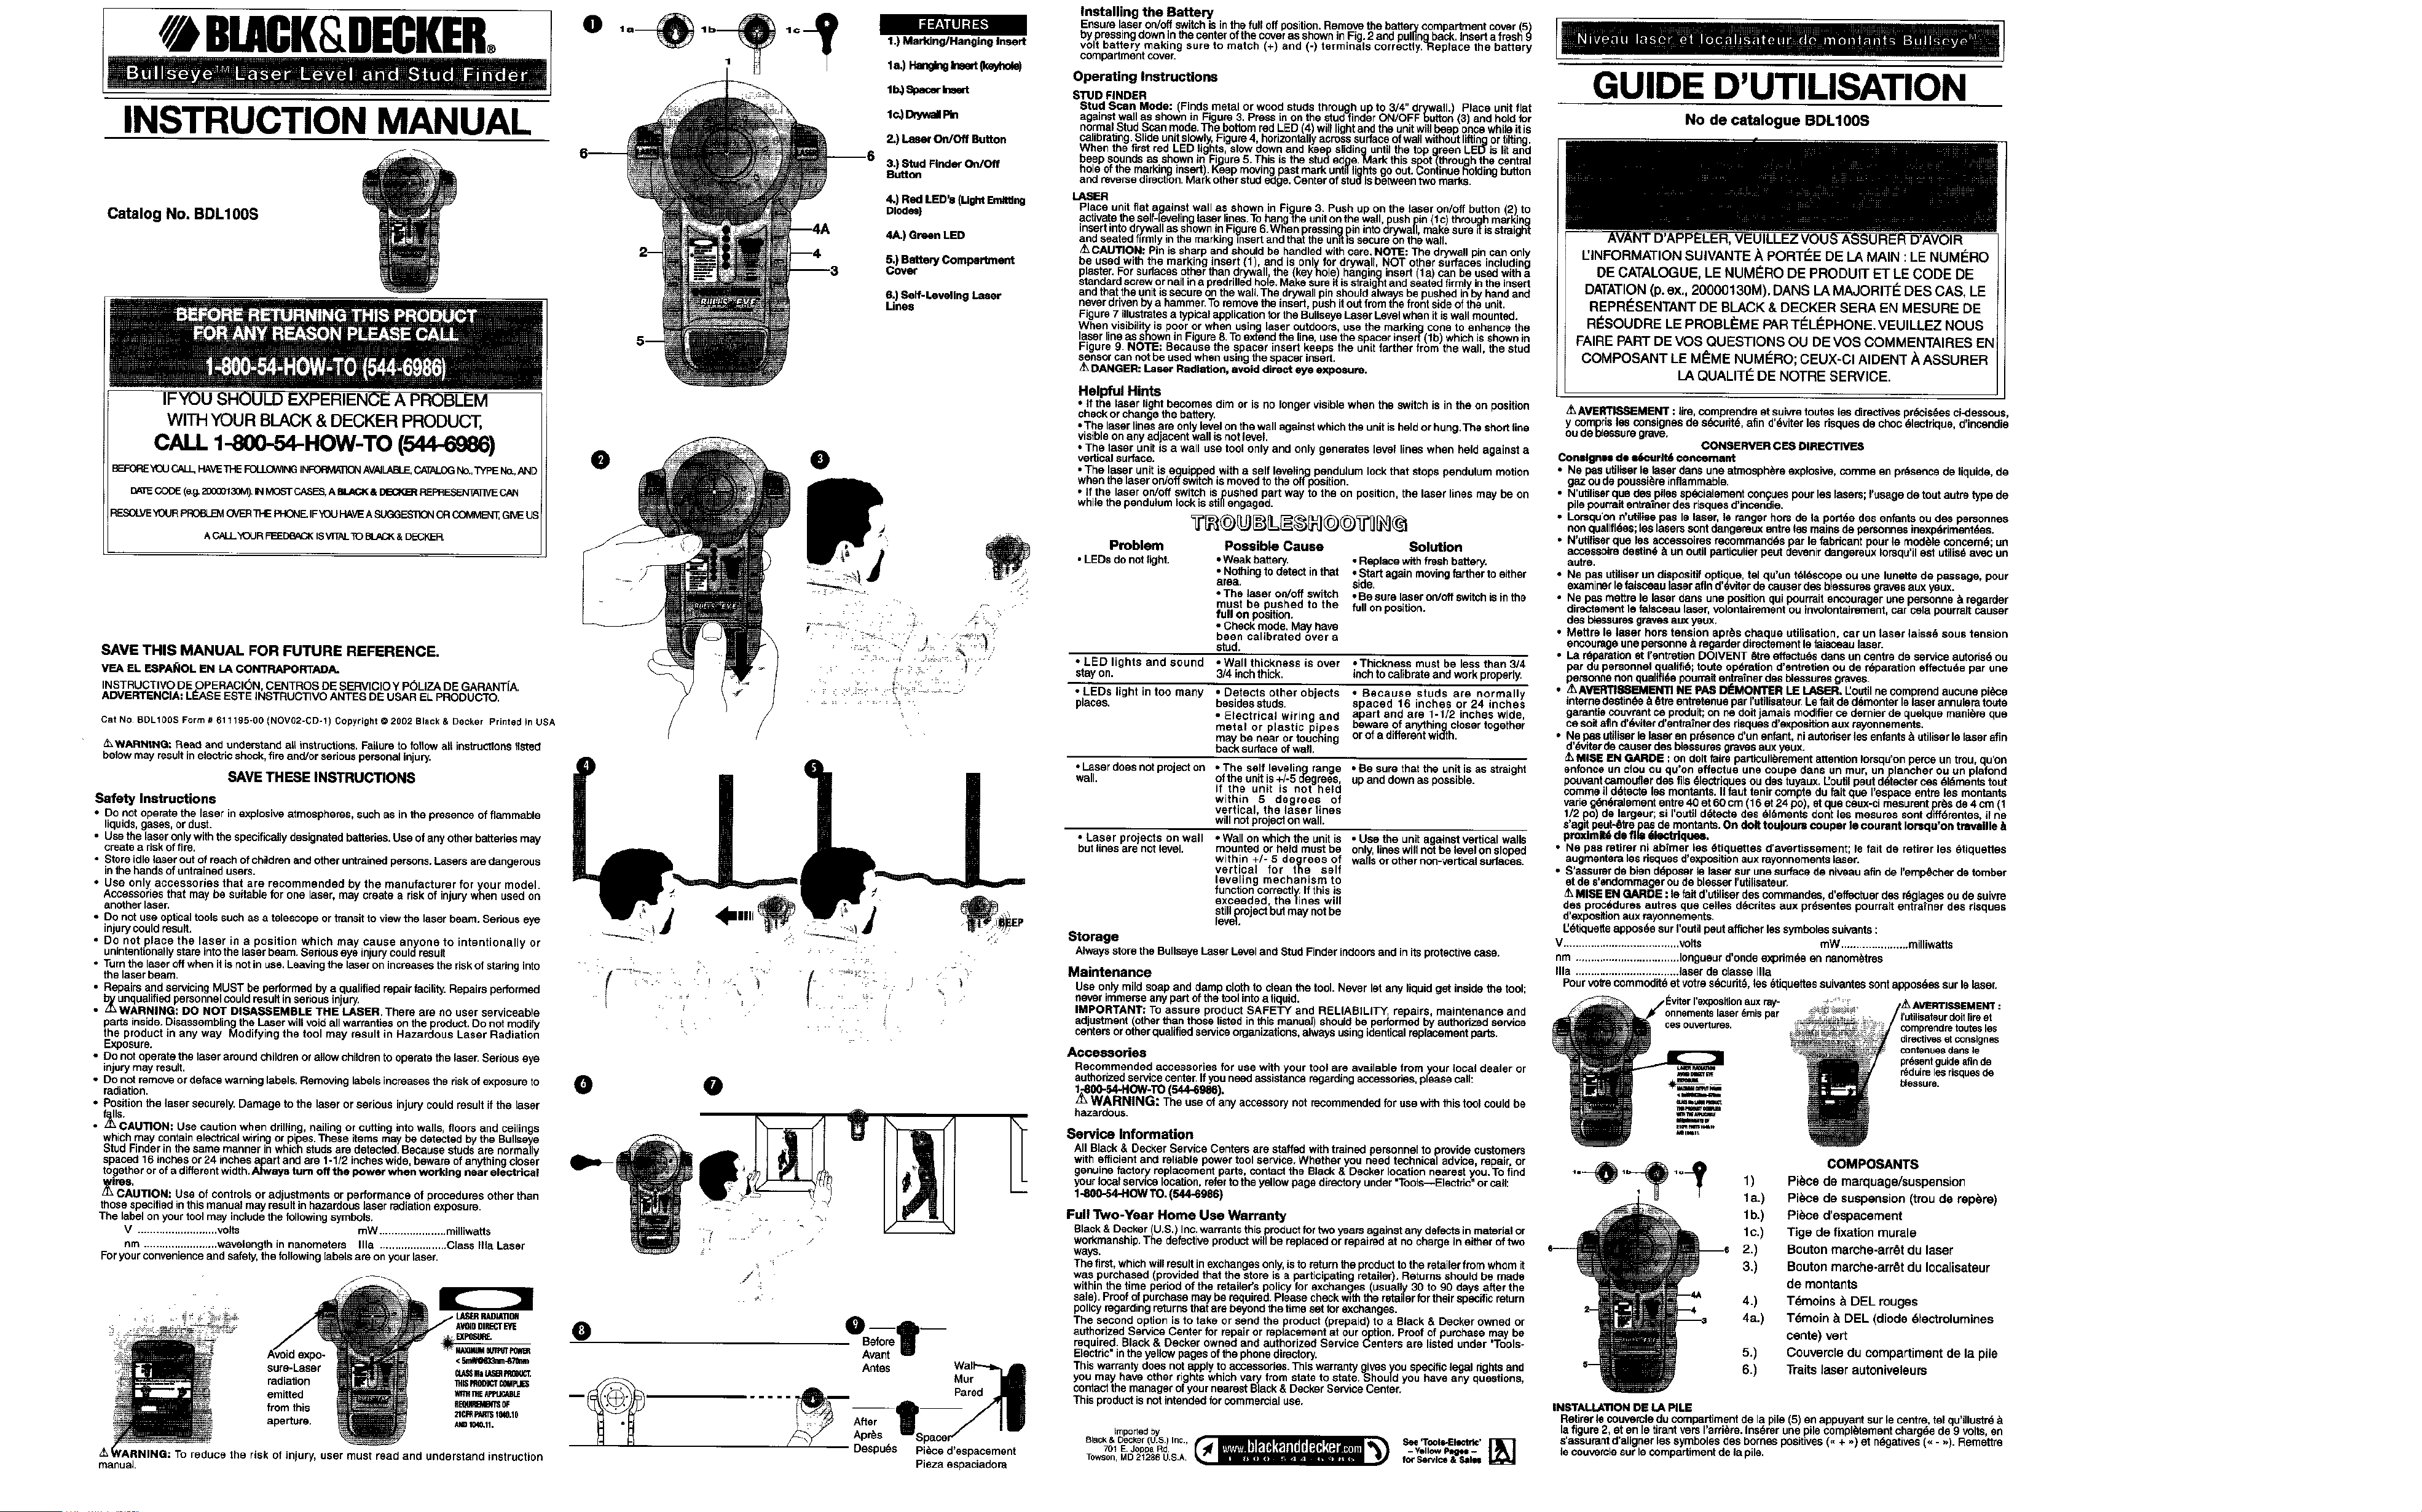
1.) Marking/Hangidg Insert
la.) I-fangk_Insett_ayhde)
lb.) SpacerIneed
lc.) Dryv_l Rn
2.)Laser On/Off Button
3.1Stud FinderOn/Off
Button
4.) Red LED's (UghtEmfftlng
Dlode_}
4A.) Green LED
5.) Battery Compartment
Cover
6.) Serf-Leveling Laser
Unes
O
• i • =_
1 :• i ! •
:: • •
O O
o %tt
Antes Wet
Mur
Pared
A"erI
Apr_s Spacer/ --
-- Despu_s Piece dlaspacement
Plaza espacladera
Installing the Battery
Ensure laser on/off switch is inthe full elf position. Remove the battery compartment cover (5)
bypress_ngdownlathecentarofthecoverasshowninFig.2aedpulfingbeck nsert a f esh 9
volt battery making sure to match (+) and (-) terminals correcfiy.Repface the battery
oempartment cover.
Operating Instructions
STUD FINDER
Stu(I Scan Mode: (Findsmetal er woodstuds throughup to 3/4"drywa ) P ace unit :at
againstwallas shownin Figure3. Pressin on thestud finderON/OFF button(3) and bed for
normalStudScanmede.ThebettomredLED 4 wiIHightaedtheuaitwillbeeponeewh e s
calibrstdeg.Slideualtslowly,Figure4 horizoctallyacrosssurfaoeofwaHwtihoutliginor lung
Whenthe firstred LED lights, slowdown and keepslidinguntil thetop greenLE_la litand
beepsoundsas shownfoFi ure5.Thisisthestuded e.Markthiss t throu hthecenra
holeofthemarking insert. _eep movingpastmarkuntl_lightsgoout._e_nlinue_orldiogbutton
andreversedirec_on.Markotherstudedge.Centerofstudisbetweentwomarks.
LASER
Place unitflat againstwallas shownin Figure3. Push upon the laser on/offbutton(2) to
activatethesalf-lavefinglaserlines.Tobengthe unitonthewail,pushp n(tc) hroughmarkng
insertintodrywallas showninFigure6.When pressingpinintodrywall,makesure_ isstraight
and seatedfirmlyinthe marking insert andthattheun_msecureonthewall.
• CAUTION: Pinis sharpandshouldbe handledwithcare.NOllE: The drywallpincanonly
be usedwith the markinginsert (1 and is onlyfor drywall NOT othersurfacesincladng
plaster.Forsurfacesother than drywall,the (keyhole) haeginginsert(1a) can beusedwitha
standardscrewernailina predrilledhole.Makesuretiis straightandseatedfirmlyintheinse
andthatthe unitissecureonthewall.The drywallpinshouldalwaysbepushedinbyhandand
neverdrivenbya hammer•Toremovethe insert,pushitoutfrom thefront sideoftbe unit.
Figure7 illustratesa typicalapplication fortheBullseyeLaserLevelwhen itiswallmounted.
Whenvisibi[dyis pooror when usinglaser outdoors,use the mark nQcone o enhance he
laserlineasshownin Figure8.Toextendthe line,usethespacerloser[(1 b) whichisshownin
Figure 9. NOTE: Because the spacer insertkeeps the unitfarther fromthe wall, thestud
sensorcannotbe usedwhenusingthespacerinsert.
DANGER:Laser Radiation,avoiddirect eye exposure.
Helpful Hints
• ff the laser lightbecomesdim or isno longer visiblewhen the switchis in the on position
checkorchangethebattery.
• The laserlinesare onlylevelonthewallagainstwhichtheunitisheldor hungThe short ne
visibleonany adjacentwallisnotlevel.
• The laser unitis a wall usetoolonlyand onlygenerateslevstlineswhen heldagainsta
verticalsurface.
• The laser unitis equippedwitha selflevelingpendulumlockthat stopspendulummotion
whenthelaseron/offswifch ismovedtotheoffposifion.
• If the laseron/offswitchispusbed partway to the on position,the laser linesmay be on
whilethependulumlock isstillengeged.
Problem Possible Cause
• LEDsdonotfight. • Weakbattery,
• Nuththgtodetectinthat
area.
• The laser on/effswitch
must be pushed to the
full on position.
• Checkmode.Mayhave
been calibrated over a
stud.
• LED lights and sound - Wall thickness is over • Thickness mustbe lessthan 3/4
stayan. 3/4 inchthick, inchtocalibrate andworkproperly,
• LEDs tight in too many • Detects other objects • Because studs are normally
places, besidesstuds, spaced 16 inches or 24 inches
• ElectricaJ wiring and apart and are 1-1/2 inches wide,
metal or plastic pipes bewareofanythingcloser together
may be near or touching orofa diberentwidth.
backsudace efwall,
• Laserdoesnotpreeuton ofthe unitis+/.5 _qegrees
wall. • The self favelin range • Be sure thatthe unitisas straight
the un t s not held upanddownas possible.
within 5 degrees of
vertical, the laser lines
willnotprojestonwall.
• Laser projects on wall • Wallonwhichthe unitis • Use the unitagainstverticalwalls
butlinesare notlevel, mountedor heldmust be only,lineswit notbelevelon sleped
within +/- 5 de_rees ot
wallsorotber non-verfisaisurfeces.
vertical tar t[_e self
leveling mechanism to
function correctly.Itthisis
exceeded, the lines will
still rojestbutmay notbe
Solution
•Replacewithfreshbattery.
•Startagainmovingfarthertoeither
side.
•Besurelaserodioffswitchisinthe
full onposition.
Storage
Alwaysstorethe BullseyeLaserLeveland StudFinderindoorsand initsprotectivecase.
Maintenance
Useonly mildsoapand dampclothtocleanthe tool.Never letany liquidget insidethetool;
never immerseanypartofthetoolintoa liquid.
IMPORTANT: Toassure productSAFETY and RELIABILITY repairs maintenance and
adjustmentotherthan thoselistedinthis manual shouldbe performedbyauthorized service
centersorsther qua edservceorganzatons.stwayeusingidenticahegfacementparts.
Accessories
Recommended accessories for use with your tool are available from y_eurlecal dealer or
authohzed service center. Ifyou need assistance regarding accessories, p[ease call:
_00-S4-NOW-TO 544-6_6).
WARN NG: The use of any accessory not recommended for use with this tool could be
hazardous.
Service Information
All Black& DeckerServiceCentersarestaffedwithtrainedpersennaite providecustomers
with efficient and reliablepowertoolservice.Whetheryou needtechnicaladvice,repair,or
genuinefactory replacementparts,centactthe Black& Deckerlocationnearest you.TOfind
yourfocalservicelocation,refertotheyellowpage directoryunder"Tools--Electric"or call:
_-eO0-S4-HOWTO.(S44-S_S)
Full Two-Year Home Use Warranty
Black&Decker U,S.)Inc.warrantsthisproductfor two yearsagainst anydehtotsin msterialor
workmanshp.The defectiveproductwillbe replacedor repairedat no changeIneitheroftwo
ways.
Thefirst, whichwillresultinexchangesonly,istoreturntheproducttotheretailerfrom whomit
was purchased providedthatthe store isa participatingretailer. Returnsshouldbe made
withinthetime periodof the retailer'spolicyfor exchanges (usually30 to90 daysafterthe
sale).Proofofpurchasemayberequired.Pleasecheckw_ththe retailerfor theirspecificreturn
policyregardingreturnsthatam beyondthetimeset forexchanges.
The secondoptionisto take or send the product(prepaid to a Black& Deckerowned or
autherizedServiceCenterfor repairor replacementat eureop_tien.Prootofpumbesemaybe
required•Black& Decker ownedand authorizedService Centers ere listedunder "Tools-
Electric"intheyellowpagesofthephonedirectory.
Thiswarrantydoes notapplytoaccessodes.Thiswarrantygivesyouspecificlegaldghfaand
youmay haveother rightswhichvarLryfromstate tostate.Should you haveany questions
cohtasthemanagere yournearestBlack& DeckerServiceCenter.
Thisproductisnutintendedfor commercialuse.
Impo_edby
_lack&DeCker(U.S)lnc.,
701EJopp_ Rd
TOWSOn,MD 2_286 U.S.A
See 'T_ole-Ell_'k:' []
- Yellow Page_ -
for SeP4ce & _du
GUIDE D'UTILISATION
No de catalogue BDL100S
D'A P LER, VEUILLEZVOU A UR D'AV IR
I'INFORMATION SUIVANTE ,_ PORTEE DE LA MAIN : LE NUM#RO
DE CATALOGUE, LE NUM_RO DE PRODUIT ET LE CODE DE
DATATION (p. ex., 20000130M). DANS LA MAJORITY DES CAS, LE
REPR¢SENTANT DE BLACK & DECKER SERA EN MESURE DE
R_SOUDRE LE PROBL_ME PAR TEL.=:PHONE. VEUILLEZ NOUS
FAIRE PART DE VOS QUESTIONS OU DE VOS COMMENTAIRES EN
COMPOSANT LE M[_ME NUMERO; CEUX-CI AIDENT _ ASSURER
LA QUALITE_ DE NOTRE SERVICE.
_ AVERll,_dEMENT : lira,comprendreetsuivretoutes:as directh/espr_cla_esci_essous,
y corn rla:as consignesde st_.urite,afin d'eviterles risquesde cbec_lectrique, d'incendie
oude_essure grave.
CONSERVER CES DIRECTIVES
Conldgnu de m_urlt6 concernant
• Nepas utltiserla laser dam; une atmoegh(_m explosive, comma en presence de liquide, de
gaz ou de pousal_m inflammable
• N Lr_llaerqua dampiles speciaiement congues pour les lasers rusage de tout autre type de
pile pourrati entraTner des risques dlincendla
• Larsquon nfafillae pesle laser, la ranger hers de fa pattie des enfants ou des personnes
non qu_llflees;lee lasers sent dengemux entre lee mains de petsonnes inexp_riment_es
• Nfaifllaer qua las accessoires recomrnandes par le fabdcant pour fa modele concernS; un
accessoim destio_, _ un outil parficulier peut devenir dangereux ioregu'il eat ufilisdavec un
autte
• Nepas utillaer un dispasifif opt!_vtierUe,tel qu'un t_les_scop_eou une lunette de passage, pour
examiner la lalaceau laser afln d de causer des btsssure_; graves aux yeux.
• Nepas meffre le laser dens une position qui beurrait encourager une bersonne & regarder
directernent fa talaceau laser, volontaimment ou involontairement, car cela pourraif causer
des btessures grave_ aux yeux.
• Meffre la laser hers tension aprt_s cheque utillaation, car un laser laiss_ sous tension
encourage une personne t=regarder directement le taisceau laser.
• La r_parafion st I'entrstien DOIVENT t_treeffectuatedens un centre de service autods_ ou
par du personnel c[uaiifi_; route op_redon d'entrotfan ou de r_paration effectuab par une
personne non paaliflae pourraif entrafner des blassures gra.yes.
• _ AVL_qrT18815_EN11NE PAS DI_MONTER LIELASER. I_outil ne comprend aucune piede
interne destth_e _ _tre entrstenue par rufilissteur. Le fatide demonter la laser annulara touta
garanfie couvrant ce predult; on ne dotijamais modifier ce dernlar de quelque maalere qua
ce soit afln d'evifer d'entrafner des degues d'exposifion aux rayonnemeuts.
• Nepas utiliser fa laser en presence d'un enfant, ni autodser les enfants & utiliserle laser afin
d _vber de causer des bfassures graves aux yeux.
MISE EN GARDE : on dolt talre parficufi_rement attention iorsqalon perce un trou, qu'on
enfonce un alog ou qu on effeutue une coupe dana un mur, un lancher ou url plafond
pouvantcamoufler des ills _lactriques ou des tuyaux. Eoutil paut d_er ces 61dmeuts tout
comma il d_ecfa lea montanta, ti fact tanir compta du _dt qua Ilaspace entre les montants
varla g_neralement an!re 40 et 60 cm (16 ut 24 pc), st que ceux-ci mesurent pros de 4 cm (1
1/2 pc de la_geur; si I outil d_tecta des 61_ments dent les mesures sent differentas, ti ne
s'agti peut_t_e pas de montants. On dolt touJoum coupar le courant Iorsqu'on travallle
proxlrnlt_ de flla itlactrlque_,
• Ne paa retirer ni abimer fas 6fiquettes d'avertlasement; le tait de retirer :as _fiquettes
augmentera kis dsques d'exposition aux rayonnements laser.
• B'assumr de blan ddpeser la laser sur une surface de alveau afin de I'emp_.-her de tomber
et de s'mdommager ou de blaeser rultlissteur.
MISE EN GARDE : le fatid ufiliserdes commandes, d'effeutuer des r_gleges ou de suivre
des procedures autres qua caries decrifas aux prdsentes pourrait entrafner des riegues
dlaxpokitionaux rayonnemenfa.
Uetiquelte apposee sur routil peut afflcber les aymbeles sue:ants :
V ...................................... volts mW ...................... milliwatts
nm .................................. iongueur d'onde expdm_e en nanometres
Ilfa .................................. laser de classe Ilta
Pour vutte commedit_ et votre st_cudt_, :as 6gqueffes suivantes sent appos_es sur le laser.
directives et consignes
conte_u_s darls ]e
present guide afln de
r_duire lea risques de
bio88ut_.
COMPOSANTS
1) Piece de marquage/suspension
le.) Piece de suspension (trou de repbre)
lb.) Pierce d'espacement
1c.) Tige de fixation rnurale
2.) Bouton marche-atr_t du laser
3.) Bouton marche-arr_t du Iocaliseteur
de montants
4.) Tdrnoins _ DEL rouges
4a.) T_moin _ DEL (diode 61ectrolumines
cents) vert
5.) Couvercle du compartiment de la pile
6.) Traits laser autoniveleurs
INSTALLATION DE LA PILE
Rstirer is couvercle du compartiment de la pile (5) en appuyant sur la centre, tel qu'fllustr_
la figure 2, st en la ltrant vers I'arri_m InsUrer une pile compl_tament charg_e de 9 volts en
sassura_t d'aligner las aymbolas des homes positives _ + _ et nt_jstives (_ _) Remettre
fa couvercfasur la comparfiment de a p e
Mode d'emploi
LOCALISATEUR DE MONTANTS
Balayage des montanta : placer I'outi__ plat centre le mur, tel qu'illustr_ _ la figure 3;
appuyer surle beulah marche_arrAt du Iocalisateur de moctants (3) et le maintenir entonc6
pour actionner le mode de baiayage normal. Le t_moin _ DEL rouge inferieur (4) s'allumera
ot rouitl Amottra un signal sonorapouurindiquer'qu'il s'0talonne. Fairs glisser lectemeot routil
hodzontalement le long du tour (figure 4) sans le soulaver ni I'inclinar. DOS que le premier
t0moin & DEL rouge s'ailume, ralentir le mouvement de baiayage. Le t0main _ DEL vert
sup0rieur s'allumera et routil 0mettra un signal sonore (figure 5) dos qua I'outil attaindra le
borg d'un montant. Tracer une marque &set endroif (dans le trou central de la piece de
marquage) ot poursuivre le balayaga jusqu'_ ca qua tous leet0moins s'_teignent. Maintenir le
bouton enfonc_ ot reprendre [e mouvement en sens inverse. Tracer une deuxi0me marque
pour indiquar I'aotre bord du montant. Le centre de ce darnier est situ0 entre cos deux
rep0res.
LASER
Placer routil 0 plat centre un tour, tel qu'illustr_ _tla figure 3, et enfancer le bouton marche-
arrAt du laser verb le haut 2) pour actionner les traits laser autoniveleurs. Pour suspendre
rootil au tour, ins0rer la tige dens fe cane de repute, puls dens ]a ale(son s0che (figure 6). La
tige doltAtre drofie ot bien anGr0e dens la pi0ce de marquage, ot dolt tenir eel(dement I'unlid
au tour.
MISE EN GARDE : la tiga est poictue et dolt Atre manipai0e prudemmect. REMARQUE :
la tige de fixation murale ne paut Atre utiiisAequ'avec la pi0ce de marquage (1), et que Bur
une cloison s0che (et non sur d'aotres surfaces comme le plAtre). En pr0sence d'un autre
type de surface, on poet otillser le trou de rep_re de la piece de suspension 1a avec une vis
ou un clou ordinaire ayant 6tA ins0r6 dens un trou perc_ & ]'avance. S'assurer que le clou (ou
la vis) est droit etbien ancre dans la pi_e de suspension, et qu'il fiect solidamect run(t0 au
tour. Si on otilise la tige feurnie, cello-el dofi 0tre ins6r0e & la main ot non au reopen d'un
marteau. Pour la refirer, la pousser hers du trou, par I'avant de I'unfi0.
La figure 7 illustre ror(liBation type du niveau laser BullseyeMC fix0 au tour.
Lorsque la vlsibilifeest mauvalse ou Iorsqu'on utitisefe laser _ I'ext0rieur, on dait se servir du
edne de rep_re pour concentrer davantage letrait laser, tel qu'iilustr0 _ lafigure 8.
On peotprolonger le trait au moyen de la pi0ce d'espacemanf (lb) illustrAe & la figure 9.
REMARQUE : pulsque la pi_e d'aspacemeot 01aigneI'unit0 du tour, on ne paot pas I'utillser
avec le Iocaiisateur de montants.
CONSEILS
• Sile faisceau laser s'affaiblitou day(oct presque invisible Iorsque le bouton est an positionde
marehe, vAdfier ou remplacer la pile.
•Les traits laser indiquent le niveau seulement pour le mur sur lequel eat fixes ou
susdenduel'und_; si los traits rejoignent aussi d'autres tours edjacents, ilsne seront pas
n0cessairement de niveau.
• Cetfe unfi_ laser est un outilnivaieur pour lee murs seulement, ot lee traits laser qu'il 0mot ne
peuvect 0tre utills0sque pourdes surfaces verticaies.
• Uunit0 laser eat munie d'un bloqueur de pendule autoniveleur qui freine le mouvement
oscillate(re Iorsque le booton de runfi0 eat mls en position d'arr0t
• On_peut allumer les traits laser et actionner le bloqueur de pendule en d_plagant
parfiellement le boLdon vers la position de marche (sans le pousser jusqu'au fond).
Probl_me
•Les otmoins_ DELne
s'allumentpas
Cause probable
• Lapiles'estaffeiblie,
• Uoufil no d_otcteaucun
montant,
• Lebouton marche-arr0t
dog 0tre compl_tement
pouss0 0 la position de
marche pour lib_rer le
bloqueur de pendule
aotoaiveleur.
• L'outil s'est 0talonnd
alorsqu'il 0tait devant un
Solution
• Remplacer la pile par une pile
compl_tement chargde.
• Recommencer le balayage an se
deplaeant plus loin pour couvrir une
plusgrande surface.
• S'assurer que la bouton marche-
arr_t est compl_tement poussd & la
position de marche.
• Los t0moins 0 DEL
s'allumenttropsouvent
montant; v_rifier le rnqd6
depalayage.
•Uoutild0tecte d'autres
_ldments aotres que des
montants.
• Eoutil balaye trop pros
de fils dlectrinquesou de
tuyaux en m_tal ou en
plastique,ouCaBdarn(ere
touchent la face arri_re
dutour.
• II faut tenir compte du fag qua
respace entre les montants vade
gen0ralement entre 40 ef 60 cm (16
ot 24 po), et que ceux-ci mesurent
pros de 4 cm 1 1/2 po de largaur;
si I'outil detecte des 010meets dent
les mesures sent diff0rentes, il ne
s'agff peut-_tre pas de moctacts.
•Les traits laser • La port0a de I'untt0 est• S'assurer qua I'unit_ est plac0e le
n'apparaissent pas surle de +/- 5 degrAs; s'il esf plus possible & la verticale.
tour maintonu _ plus de 5
degr0s de la verticale,
see traits ne se
projetteront pas surle
tour.
•Lee traits laser • Le tour sur lequel est • S'assurer qua runlet est places Is
apparalssent sur le tour, fix0e ou maintenue I'unit0 plus possible & la verticale.
mais ne sent pas droits doltpresenter une
verticals de +/- 5 degr0s.
sans quoile mOcanisme
autoniveleur ne
fanotionnera pas
correctement; si
i'inclinaison est
sup_rleure _cotfa
mesure, lee traits ne
seront pas de niveau.
RANGEMENT
Leniveau laseret IocalisateurdemontantsBullseye_ dolt0tre rang0& I'int_rieur,dan_son
0taide protection.
ENTRETIEN
NottoyerI'outil&I'aide d'unsavon douxet 0lsn chiffonhumide. Ne laisseraucunliquide
s'infifirmdensi'outUetnejamals r!mmerg_r.
IMPORTANT : Pour assurerla SECURITED'EMPLOI et la FIABILITt_de I'oufil,n'en confier
la r0parafion, I'entrefienetles rajustemenlsqu'au personneld'un centre de service ou & un
atelierd'entrefienautoris_ n'utilisantqua despi_ces derechangeidentiques.
ACCESSOIRES
Los detaillants ou le centre de service surer(s6de la rag(onvendent des accessoires
recommandespourroutil.Pourtrouverunaccessoire,il suffitdecomposerle
1 _800)544-6986.
AVERTISSEMENT : L'utillsationde toutaccessoirenonrecommend0pourI'outilpout
0tredangereuse.
RENSEIGNEMENTSRELATIFSAU SERVICE
Black& Decker explode un r_seaucompletde centres de service_t d'ateliersd'entretien
surer(sospartoutsrAmeriquede Nord, Lepersonnelde tousloscentresdeserviceBlack&
Decker a re_u la formationVOUlUepourassurer I'entredenefficace et liable des outils
_lectriques.
Pourobtenirdesrenseignementsd'etre technique,des conseUsre]atifsaux r_parationsou
des pi_cesde rechanged'origine, communiqueraveclecentrede serviceBlack& Deckerde
la r_gion. On paot trouverI'edressedu centrede servicede lar0giondens I'annuairedes
PagesJaunes0 larubrique,,Oufiis 01actriques_ouencomposantlenumArosuivant:
I (800)544-6986.
GARANTIE COMPL_rE DE DEUX ANS POUR UTIUSATION DOMESTIQUE
Black & Decker garantfi le predufi pour une I_dede de deux ans centre les vices de moti0re
ou de fabrication. Le predait dAfeotueux sam r_par0 ou remplac0 sans finis con;orm0ment
Ilsne des conditions saivactes.
Pour _changar rootd, il sotfit de le retourner au d0taillant (.'sile dAtaillant participa au
programme d'0change rapids Black & Decker). Le retour dolt 0tre effectuer dane sis d_lais
impartis par la politique de retour du d_t ailiant (habituellement entre 30 et 90 (ours suivant la
date d'achat). Le detaillant peut exi_]erune preuve d'achot. Pri0re de v0rifier la polgique de
retour du d0faiUactau-dai0 des deltas imparits.
On pout _galement retourner I'outtl(port pay0) & un centre de service Black & Decker ou
tout aufre afelier d'entrotien acor_ditO pour y 0tre template ou r0parA, & notre gr0. On pout
exiger une preuve d'achat. Los adresses des cectres de service Black & Decker se trouvent
la rubfique _Outits 01ectriques,, des Pages Jaunes.
La prasente garande ne vaut pas pour les acoessoires. Les meda]it0s de la prAsente
garantie donnent des droits Idgaux sp(_cifiques. L'ufilisateur paot _galement se pr0vaioir
d'autres droits selon retat ou la province qu'il habite. Pour obtenir de plus amples
renseignements, communiquer avec le directeur du centre de service Black & Decker de la
rAg(on. Le preduit n'estdes congu pour un usage commercial.
Imported by / Irnport_ par
Black & Decker Canada Inc.
! 00 Central Ave
Brockville (Ontario) KaV 5W6
Volr fa rUbrlque "Outl]s 61octrlques" n_
des Page_ Jaunem
pour le servi_e et km ver_tes.
MANUAL DE INSTRUCCIONES
Catdlogo No. BDL100S
DE TENER ALGUN PROBLEMA CON SU PRODUCTO BLACK &
DECKER, FAVOR LLAMAR AL 1-800-54-HOW-TO (544-6986)
ANTES DE LLAMAR, TENGA LA SIGUIENTE INFORMACI(_N
DISPONIBLE. No. de CATALOGO, TIPO No., Y CODIGO DE FECHA (p.ej.
20006130M). EN LA MAYOR{A DE LOS CASES, UN REPRESENTANTE
DE BLACK & DECKER LE PUEDE RESOLVER SU PROBLEMA
TELEFONICAMENTE. SI TIENE UNA SUGERENClA O COMENTARIO,
LLAMENOS. SU APORTE ES VITAL PARA BLACK & DECKER.
ADVERTENCIA: Lea y aseggrese que ha comprendido redes las instrucciones. El no
hacerlo puede originar riosgos de aiectrochoque, incendio, y lesiones personales de gravedad.
GUARDE ESTAS INSTRUCCIONES
INSTRUCCIONES DESEGURIDAD
• No utiliceharramientasel0clricasen otmAsferas explosives,tales come an presanciade
Ilquidos,gases o pelves infiamables.
• Useel loser paica y especgicamente con las bater{asdesignedas. El usede cuaiqaier otra
bater{apuedecrearundesgode incendio.
•Guarde el loserfeera del aicance de los niOosy de cualquierotra persona no entreneda
cuandonoIootiliza Loslaserasson paligro_osen manes depersonassinentrenamieoto.
• Utilice solamanteaquellosaccesoriosrecomendedosper el fabricanfapara el modeloqua
ustedposes.Losaccesoriosadecuadospare un10serpuedenresultar paligrosos cuandose
useRenotto.
• NOuseherramientas6pticascomeeltelescopiooteodolitoparaobeervarelhaz derayoI(iser.
Podr{aresultaren laB(anocular.
• .N°c°l°_uaell_serenunap°siciAnguspuedahacer. qua. al_uien, mireadredeo
_nvoluntar_amenfadentro del hazde myoslaser. Estopodna ocaslonar lesldeoculargrave.
• Apagueel I_ser cuandono Ioufiliza.Mantenedoencendidoaumentael riesgo demirardentro
delhazde rayosI_lser.
•Las reparacionesy serviciosSE DEBEN efectuar en un centre de reparaciAncalificado.
Reparacionesefectuadas perunpersonalno caifiicadopuedenresultarenlee(onesgraves.
• ,_ ADVENTENCIA: NO DESMONTE EL I.ASER. No cent(erieningunaparts interna qua
necesite servicio Desmontaje del loserinvalidar& todes las garanflas del producto.No
medifique el preductoenmedoaiguno. Mediflsarlaherramientapeddaresultaren Expos(clAn
Peligrosaa RediacionesI__ser.
• No useel Idsercercade los nifiosni deje qua los nir_osoperenel Idser.Puede resultaren
lesiAnoculargrave.
• No quitenidefadorelasetiq_uotasde edvertencia. Quitarlasetiquetasaumenta el desgo de
explosiona labradiacionesIdser.
• Coloqueel Idserfirmementesobreuna superficienivaiade De eaerse elIdser,esto pedria
resultaren dafiosalaparatoograveslesionespersonales.
ATENClaN: Sea precavidoai taladrar,clavaro cortaren parades,pisosy cietorrasosque
peedan contener cableado el_otricoo tuberias. Esfosobores podrian percibirse per el
detector de entramado Bu seye de a msma orma come se detectan os postes de
entramado. Dad(doa que satesvienennormalmente espaciedos ceda 16 6 24 pulgadas,y
tienenunanchode 1- pulgeda,desconffede seOalesdemanor distanciaode unaanchura
diferente.Apague siempre la electrieided cuaedo realiza trabajos ceres del cableado
el0ctrico.
ATENCION: Elusedecontroleso a usfasoprocedimientosdistintosa losespecificedosen
esfamanua puedenresutarenexposcAnpal(grossa a red(acids.
Lael(quotade suherramientapuedeincluirlosaiguiectes simbolos.
V re(ties mW milivatios
nm Iongituddeondaen nanometros Ilia LdserClass Ilia
Parasuconvenienciay seguridedsuI_L_erportalassiguientesat(quotas.
de lee(ones, el usuario
debe leery
comprender este
manual de
instrucc_one_
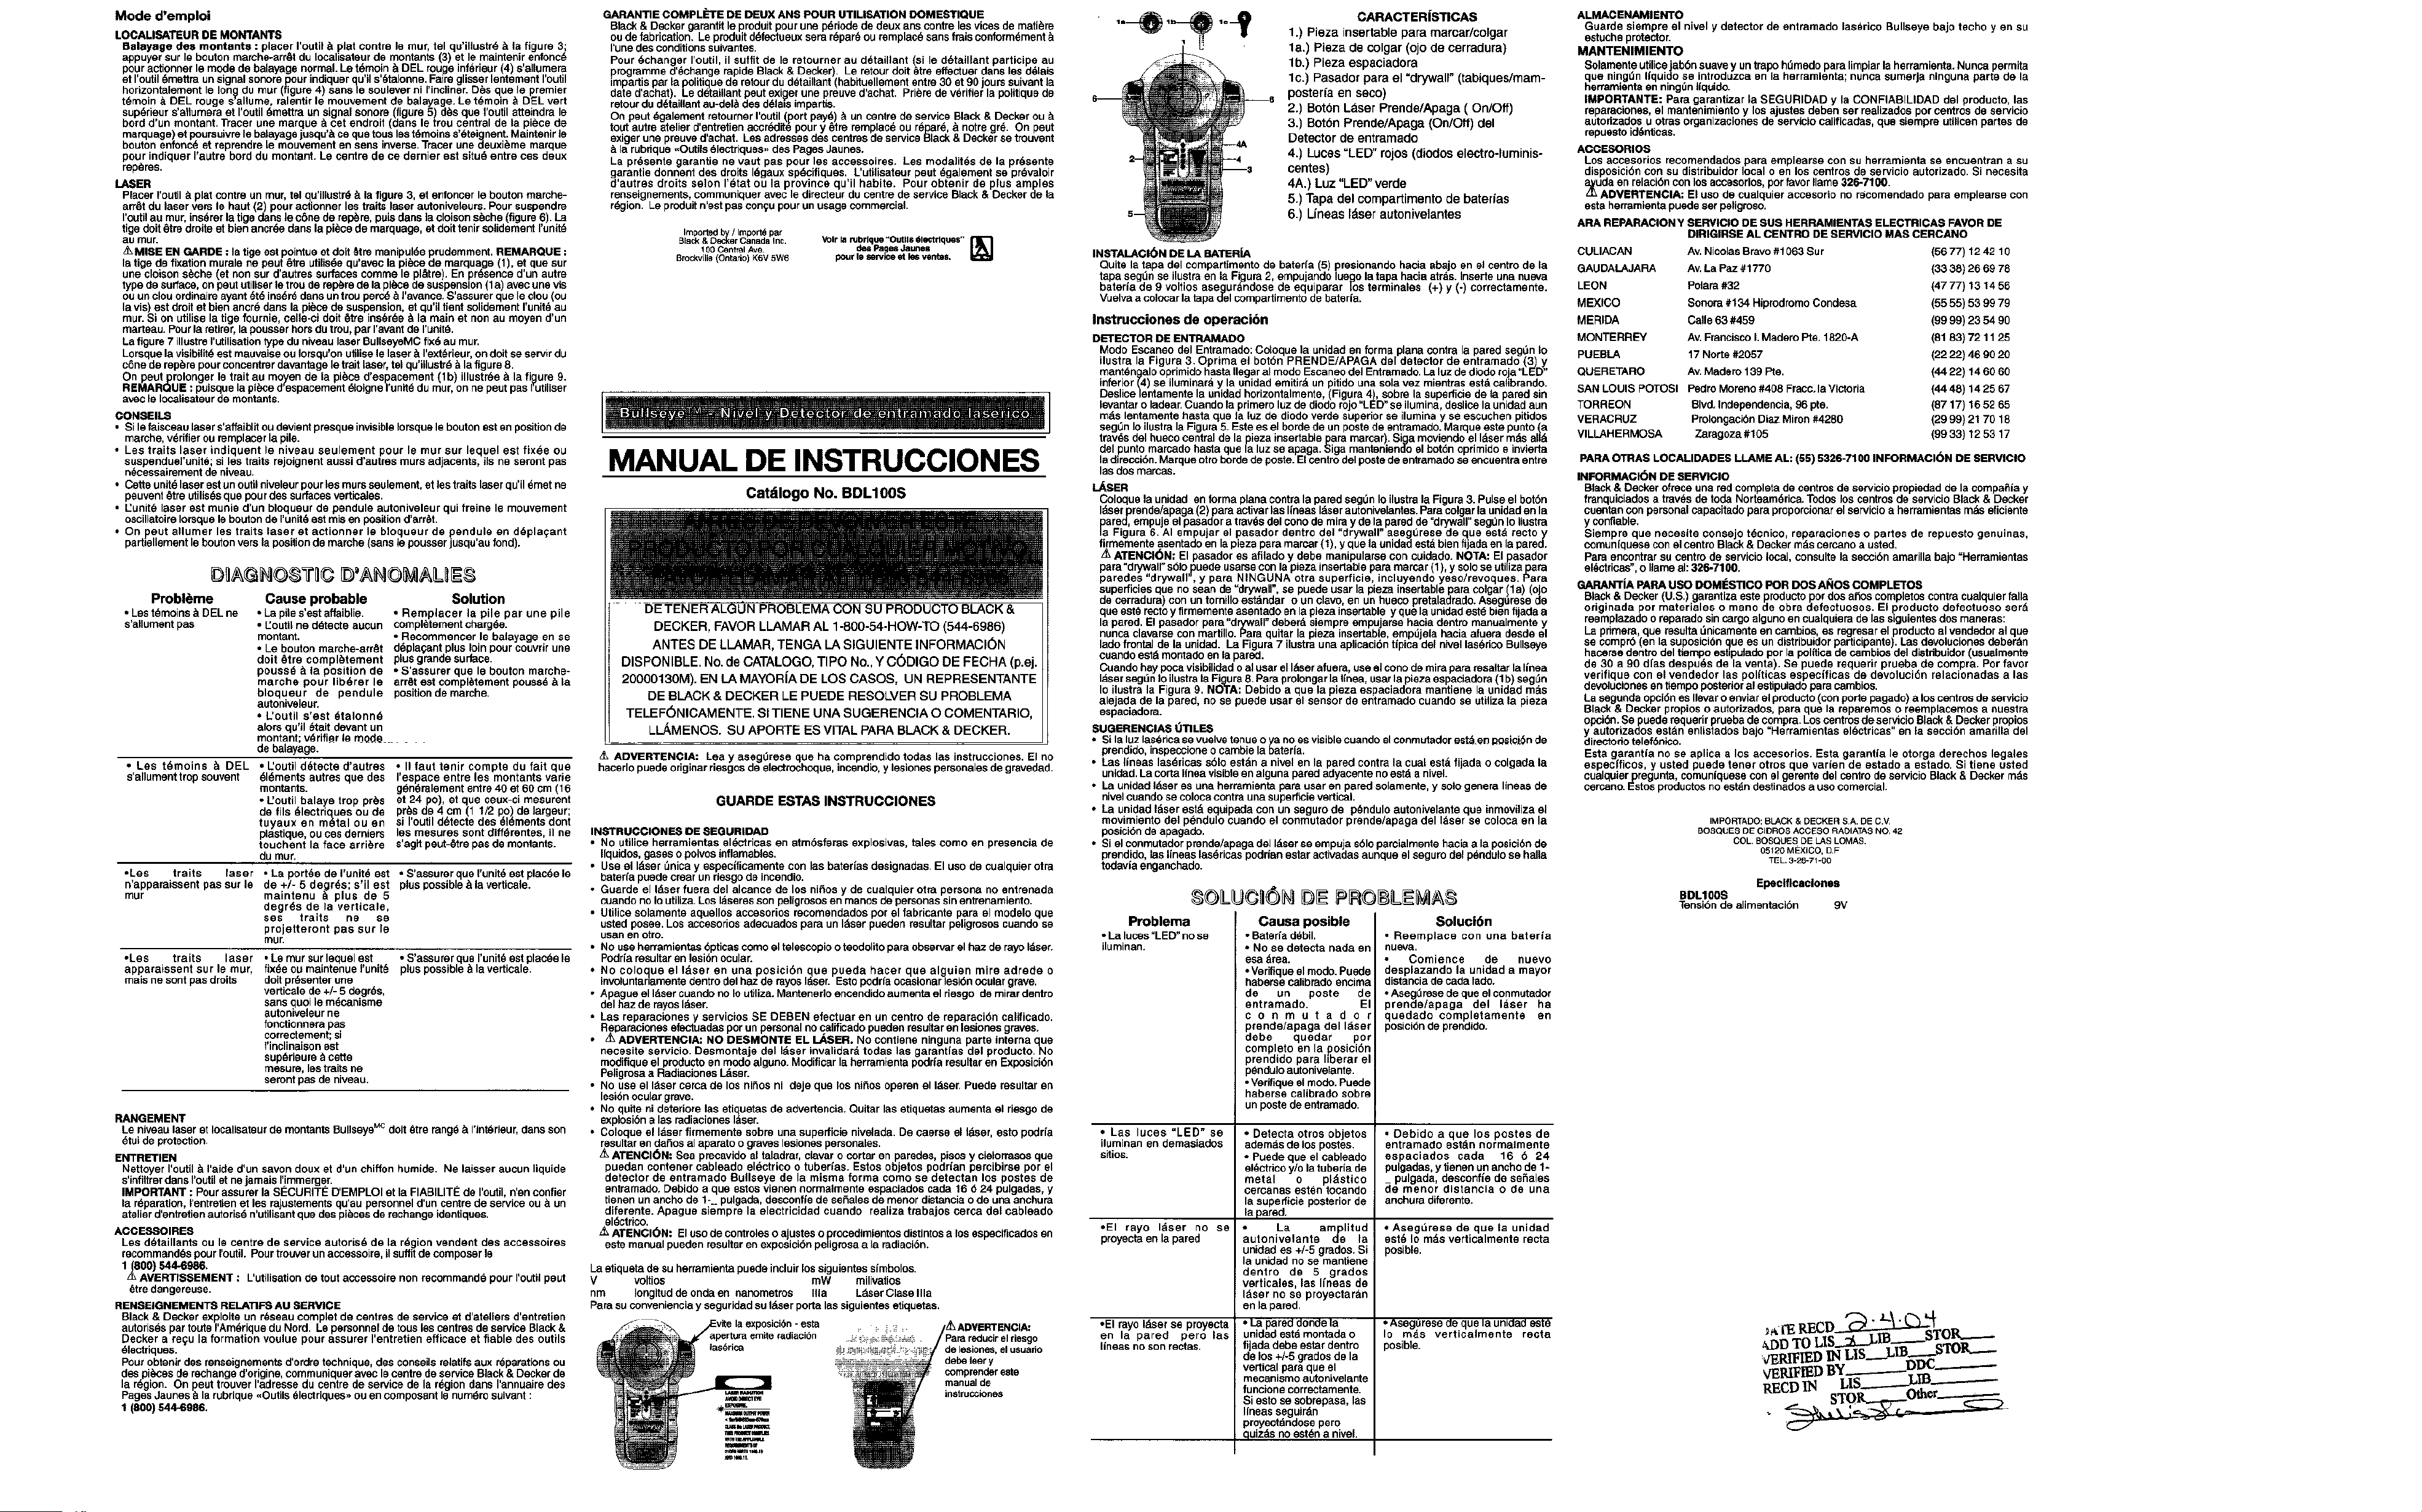
CARACTER|STICAS
1.) Plaza insertable para marcar/colgar
la.) Plaza de colgar (ojo de cerradura)
lb,) Plaza espaciadora
lc.) Pasador pare el =drywall" (tabiques/mam-
poster{a en seco)
2.) Botbn Ldser Prende/Apaga (On/Off)
3.) Botbn Prende/Apaga (On/Off) del
Detector de entramado
4.) Luces "LED" rojos (diodes electro-luminis-
centes)
4A,) Luz "LED" verde
5.) Tapa del compartimento de baterias
6.) Lineas Idser autonivelantes
INSTALACI6N DE LA BA_IERJA
Quite la tapa del comparfimento de baterfa (5) presionando haeia abajo en el centrede ta
tapesegLinse ilustraen la Figura2, empujandolueg(olatapehaciaatrds.Insertsuna nueva
bateria de 9 volfiosasegur0ndosede eduiparar los terminales (+) y (-) correctamente.
Vuelvaa colocarlatapadel compartimenfade baferia.
Instrucciones de operacion
DETECTOR DEENTRAMADO
Mode Escaneodel Entramado: Coloquela unidaden forma planecentrela pared seg_nIo
dustra la Figure 30prima el bot0n PRENDEJAPAGAdel detectorde entramado (3) y
manta)he,aleoprimidohasteIlegaral modeEscaneodel EntmmadeLaluzdedioderoja "LED"
inferior(4) se iluminar0y la unidademit(tOun pit(douna solavez mientras est_lcalibrando.
Deslicelentamectela unided horizontalmente,Figura4), sobrelasupediciede la paredsin
evantar o edear.Duende a prmere uzde dode reo"LED"se ilumina,deslicelaunidedaun
rods lenfamenfahastaqua la luz de diodeverde superiorse iluminay se escuchenpit(des
seg0nIoilustralaFigura5. Esfaes el hordede unpostsde entramedo.Marqueeste pucto(a
travdsdelhuecocentraldela piezainsert_ble para marcar).Sigamoviendo el10setm&sall&
del puctomarcado basraquela luzseapaga. Sigamanteniendo elbofanoprimido e invierta
ladireccian.Marqueotrobordedeposte.Elcentredelposfadeentramado seencuentra entre
las dOS marcas.
LASER
Coloque launidad en formaplanacentrela pared seg0n Io(lustrelaFigure3. Pulseel botbn
loserprende/apaga(2) paraactivarlas IfnoesI_serautonivelactes.Parecolgarla unidaden la
ared, empujeelpasadora trav0sdelconede mirayde laparedde=dwwail"segunIo (lustre
_ Figura 6 AI smpejar el pasador dentro del "dryWall_aseg_3resede _ue est_ recloy
firmemecte asectadeenlapiezaparamarcar(t), y quela unidadesfebienftjapaenlapared.
ATENCI_IN: El pasadores el(ladey debe manipaiarse con cuidado.NOTA: Elpasador
para"drywall"salepuedeusarseconlaplazainsertableparemarcar 1, y soloseotilizapara
parades "drywall", y para NINGUNA otra superficie, incluyendoyeso/revoques Pare
superficiesque no seande"drywall', se puedeuser laplazainsertablepara colgar 1a) (oo
de cerradura)con untorn(lieest_ndar o unclave,en unhuecopretaladredo.Aseg_lresede
que est_rectoy firmaments asentedoen la ptezainsertable ydee la unidedest_bien itiadaa
la pared.Elpasedorpara"drywa_all"deder8siempreempuarse haciadentremanualmentey
nuneaclavarseconmartillo.Parequitarlapieza insertable,empdela haciaafueradesde el
ladefrontal de la unidad.La Figura7 ilustrauna aplicaciOntip(cadel nivallasAdcoBullseye
cuandoestdmontado enla pared.
Cuandohaypocavlsibilidedoai usarelloserafuera,useel conedemirapararesafiarlagnea
lasersegl_nIo(lustrelaFigura8.Paraprolongarlafinea, usarlapiezaespaciadora I b segpa
Io (lustrela Figura9. NOTA: Debidoa qua la pieza espaciedora mantiene la unidedmas
alejeda de la pared, no se puede user el sensorde entramado cuandose utilizela plaza
espaciedora.
SUGERENCIAS0"riLES
•Sila luzlast_ricasevuelvetenueoya noesvisible cuandoelconmutadorest_ en posici.ande
preedido,inspeccioneo cambie la bateda.
•Las lineas las0ricas soloest&nanivel en la paredcontrala cual est&fijada ocolgeda la
unload.Lacortalinea visibleen alguna paredadyacentenoest_ a nivel.
• La unidadIdser esuna herramientapareuseren paredsolamente,y sologeneralineasde
nivelcuandosecolocacentreunasuperficievertical.
• La unided10serest& equipeda con un segurode p_nduloautonivelantequa inmovilizael
movimientogel p_)ndulocuando el conmutedorprende/apaga gel I_lserse colocaen la
posicibnde apagado.
• Sielconmotaderprende/apagadelIdserse empuja saleparcialmanfahaciaa lapoe(clande
prendide,lablineas las0ricas poddanestar activadasaunqueel sogurodel p_ndulose halle
tedaviaenganchado.
Problema
•La lutes =LED'no s8
(lure(nan.
•Las lutes "LED" se
iluminanen demasiades
sitios.
• El rayo I_ser no se
proyectaenlapared
• El rayo Idser se proyecta
en la pared pore las
fineas no son recfas
Cause posible
•Baterfa d_bil.
• No se detecfa nada en
esa _lrea.
*Verifique el medo. Puede
haderse calibrado encima
de un poste de
entramado. El
c o n m u t a d o r
prende/apaga del I_ser
debe quedar per
complete en la posici6n
prendido para Iiberar el
p0ndulo autonivelanfa
• Vedfique el mode. Puede
haberse calibrado sobre
un posts de entramedo,
•Detecta otros objetos
edem0s de los posies
• Puede que el cableade
eldctricoyfe latuberfade
metal o pldstico
ceroanas eston tocando
la superficieposteriorde
lapared.
• La am litud
autonivelante dPe la
unloades +/-5 grades.Si
la unidadno se mentions
dentro de 5 grades
verticales, las Ifnoes de
loser no se proyectardn
enlapared.
• Lapared dondela
unidedest&montada o
fijada depeestar dentro
delos +/-5 gradesdela
verticalparaque el
reaGan(sineautonivelanfa
funcionecorrectamente.
Siesto sesobrepasa,las
IIneassegairdn
proyectandoseper{)
qaiz_sno est0naniveL
Soluci6n
• Reemplace con una bateria
nueva.
• Comience de nuevo
desplazando la unidad a mayor
distanciade cadslade.
•Aseg[Irosede quaelconmotador
prende/apaga del loser ha
]uedado eompletamente en
)osicibndeprendide.
• Debido a qua los postes de
entramado estAn normalmente
espaciados cada 16 6 24
pulgadas, y tienen un ancho de f-
pulgada, desconfie de se5ales
de menor distancia o de una
anchura diferenfa.
•Asegurese de que la unidad
estA Io m0s verticalmente recta
)osible.
• Aseg_rese de qua la unidad este
Io rods verticalmente recta
_osible.
ALMACENAMIENTO
Guarde siempreel nivel y detector de entramado las_rieo Bullseyebajo techo yen su
estucheprotector.
MANTENIMIENTO
Solamenteuitlice_abAnsuavey untropeh_medoparalimpiarlaherramienta.Nuncapermita
qua ning0ngquido se introduzcaen la harramienta;nuneasumerjaninguna parts de la
herramlenfaenning_nfiqaide.
IMPORTANTE: Para garantizar la SEGURIDAD y la CONFIABILIDAD del preducto,las
reparaciones,el mantenimiecto y losajustesdeben serrealizadesper centrosde servicio
autodzados uotraso_ganizacionesde serviciocalificedas,qua siempreutittcenpartes de
repuesto idecticas.
ACCE$ORIOS
Losaecesorios recomendados para emplearsecon su herramientase encuentran a su
disposicibncon su distribuidorlocal o en loscentrosde servicioautorizado Si necesita
udeen relacideconlosaccesorlos,perfavor Ilame326-7100
_l ADVERTENCIA: Eluse de cualquieraccesedo no reeomendadopare emplearsecon
estaherramientapuedeserpeligroso.
ARAREPARACIONY SERVlCIODE SUB HERRAMIENTASELECTRICASFAVORDE
DIRIGIRSEAL CENTRe DESERVIClOMAS CERCANO
CULIACAN Av. Nicolas Bravo #1063 Bur (56 77) 12 42 10
GAUDALAJARA Av. La Paz #1770 (33 38) 26 69 78
LEON Polara #32 (47 77) 13 t4 56
MEXICO Sonora #134 Hiprodromo Condesa (55 55) 53 99 79
MERIDA CaNe63 #459 (99 99) 23 54 90
MONTERREY Av,Francisco I.Medero Pte, 1820-A (81 83) 72 11 25
PUEBLA 17 Norte #2057 (22 22) 46 g0 20
QUERETARO Av Madero 139 POt. (44 22) f 4 60 60
SAN LOUIS POTOSI PodroMoreno#408Fracc.laVictoda (44 48) f4 25 67
TORREON Sled.lndependencia, 96 pte. (87 17) f6 52 65
VERACRUZ Proloogaci0n Diaz Miron #4280 (29 99) 21 70 18
VILLAHERMOSA Zaragoza #f05 (99 33) 12 53 17
PARA OTRAS LOCALIDADES LLAME AL: (55) 532617100 INFORMACI6N DE SERVICIO
INFORMACION DE SERVICIO
Black& Deckerefface unaredcompletadecentrosdeserviciopropiedadde la compai_iay
franquiciedos a trav0sdetode NorteamArica.Todosloscentrosde servicioBlac_& Decker
cuentancon personal capackadoparapropercionarel servicioa herramiectasm0s eficiente
y confiable.
Siempre qua necesfie conse o t_cnieo, reparaeiones o partes de repuesto genuinas,
comun{quos8 con elcentreBlack& Deckerrodscercano a usted.
Pareencontrarsuceotrode serviciolocal,consultsla secci6namarillaba}o"Herramiectas
elactricas', o Ilameel:326-7100.
GARANTiAPARAUSe DOMI_STICOPeR DOSA_IOSCOMPLETes
Black& Decker(U.S.)garantizaesteproducfeperdosaOoscompletescontracualquierfaila
originada per mater(ales o mane de obra defectuosos. El produoto defactuoso serd
reemplazadooreparadosincargoalgunoancualqaierade labs_gaientesdesmaneras:
Laprimers, qua resulta_nicamenteen cambios,es rsgresarelproduotoalvendedoral que
se compr5(on lasupesicide_ue es un distribuidorparticipacte).Lasdevoluclonesdeber_ln
hacersedentrodelUempoesbpuladoperla pelf(icede cambiosdel distdbuidorusuaimenfe
de 30 a 90 dfas despuds de la venta. Se puede requedr pruede de compra. Perfavor
verifique con el vendedor las polgicas especgicas de devoluci0n relacionades alas
devolucionesen(tempoposterioralestipaiadepareeatables.
Laseguedaopclanes Ilevaroenviarelproducfa(conportepagedo)a loscectrosdeservicio
Black& Decker propiosoauforizedos,pare qua la reparemoso reemplacemosa nuestra
opcibn.Se puederequerirpruepadecompraLoscentrosdeservicioSlack &Deckerpropios
_ autorizedosest_n enlistedos bajo=Herramientas el_ctricas" en la seccian amarilla del
irectodotelef6n_'o.
Esta garantla no se splice a los accesorios.Esta garantla le oforga derechos legales
especfficos, y usted puede tenor otrosque varten de estado a estado Bi tiene usted
cualquierp_regunta,comuniqueseconai gerentedel centrede servicioBlack&Deckerrods
ceEano.EstosproductosnoestAndestinadesa usecomercial
IMPORTADO: BLACK & DECKER SA. DE CIV
BOSQ{JES DE CiDROS ACCESO RAOIATAS NO 42
COL BOSQUES DE LAS LOMAS.
051_0 MEXICO, D F
TEL, 3-26-71-(}O
Epeclficaclones
BDL1OOS
Tens(an do alimentacibn gV