Warning ! Important
Safety Instructions
CAUTION
CAUTION: TO REDUCE THE RISK OF ELECTRIC SHOCK, DO NOT
REMOVE COVER (OR BACK). NO USER SERVICEABLE PARTS INSIDE.
REFER SERVICING TO QUALIFIED SERVICE PERSONNEL.
This symbol indicates high voltage is present inside. It is
dangerous to make any kind of contact with any inside part of
this product.
This symbol alerts you that important literature concerning
operation and maintenance has been included with this product.
Note to CATV system installer: This reminder is provided to call CATV system
installer's attention to Arti< le 820 40 of the National Electrical Code (Section 54 of
Canadian Electrical Code, Part I), that provides guidelines for proper grounding
and, in particular, specifies that the cable ground shall be connected to the
grounding system of the building as close to the point of cable entry as practical.
Caution: FCC/CSA regulations state that any unauthorized changes or modifica-
tions to this equipment may void the user's authority to operate it.
Caution: To prevent electric shock, match the wide blade of plug to the wide slot,
and fidly insert the plug.
Attention: poor eviter les chocs electriques, introduire la lame le plus large de la
fiche dans la borne correspondante de la prise et pousser jusqu'au fond.
Important: One Federal Court has held that unauthorized recording of
copyrighted TV programs is an infringement of U.S. copyright laws.
Certain Canadian programs may also be copyrighted and any unauthorized
recording in whole or in part may be in violation of these rights.
To prevent damage which may result in fire or electric shock
hazard, do not expose this appliance to rain or moisture.
Thank You for Choosing Samsung
Thank you fbr choosing Samsung! Your new Samsung Prqjection TVrepresents the latest in
television technology We designed it with easy-to-llse on-screen menlls and closed captioning
capabilities, making it one of the best products in its class. We are proud to offer you a product
that will provide convenient, dependable service and e*_joyment fbr years to come.
Important Safety Information
_ Always be careful when using your TV receiver. To reduce the risk of fire, electrical shock,
and other injuries, keep these safety precautions ii] mind when installing, using, and
maintaining yollr machine.
• Read all safbty and operating instructions before operating your TV
• Keep the sa%ty and operating instn rations for flltllre re%rence.
• Heed all warnings on the TV receiver and in the operating instnlctions.
• Follow all operating and use instnlctions.
• Unplug the TV receiver fl'om the wall outlet be%re cleaning. Use a damp cloth; do not use
liqllid or aerosol cleaners.
• Never add any attachments and/or equipment without approval of the manufacturer. Such
additions can increase the risk of fire, electric shock, or other personal iil,jllry.
• Do not use the TV receiver where contact with or immersion in water is a possibility, such as
near bath tubs, sinks, washing machines, swimming pools, etc.
• Do not place the TVon an unstable cart, stand, tripod, bracket, or
table where it can fall. Afalling TV can cause serious iil,jlli'y to a
child or adult, and serious damage to the appliance. Use only with
a cart, stand, tripod, bracket, or table recommended by the manu-
facturer or sold with the TV Follow the manufacturer_ instruc-
tions when mounting the unit, and use a mounting accessory rec-
ommended by the manufacturer. Move the TV and cart with care.
Quick stops, excessive fbrce, and uneven surfaces can make the
unit and cart unsteady and likely to ovem wn.
• Provide ventilation for the TV receiver. The unit is designed with slots in the cabinet for
ventilation to protect it fl'om overheating. Do not block these openings with any ot_ject,and
do not place the TV receiver on a bed, sofa, rug, or other similar surface. Do not place it near
a radiator or heat register. If you place the TVreceiver on a rack or bookcase, ensllre that
there is adequate ventilation and that you've followed the manufactureI'_ instructions fbr
mol mting.
• Operate your TV receiver only fl'om the type of power source indicated on the marking label.
If you are not sure of the type of power supplied to your home, consult your appliance dealer
or local power compan3_
• Use only a grol reded or polarized ol Met. For yollr safbty, this TV is eclllipped with a polarized
alternating current line plug having one blade wider than the other. This plug will fit into the
power outlet only one wa3_ If you are unable to insert the plug flllly into the outlet, try
reversing the ph lg. If the ph lg still does not fit, contact yollr electrician to replace yollr olMet.
• Protectthepowercord.Powersupplycordsshouldberoutedsothattheywon'tbewalkedon
orpinchedbyotqjectsplacedonoragainstthem.Payparticularattentiontocordsatplugs,con-
veniencereceptacles,andthepointwheretheyexitfl'omtheunit.
• UnphlgtheTVfl'omthewallolltletanddisconnecttheantennaorcablesystemduringalight-
ningstormorwhenleftunattendedandunusedforlongperiodsoftime.Thiswillpreventdam-
agetotheunitdlletolightningandpowePlinesllrges.
• Avoidoverheadpowerlines.Anolltsideantennasystemshollldnotbeplacedin thevicinityof
overheadpowerlinesorotherelectriclightorpowercircldtsorwhereit canfallintosuch
powerlinesorcircldts.Wheninstallinganoutsideantennasystem,beextremelycarefultokeep
fromtouchingthepowerlinesorcircuits.Contactwithsuchlinescanbefatal.
• Do not overload the wall o11tlet or extension cords. Overloading can reslllt in fire or electric
shock.
• Do not insert anything thi'ollgh the openings in the 11nit, where they can tolmh dangei'olls volt-
age points or damage parts. Never spill liqldd of any kind on the TV
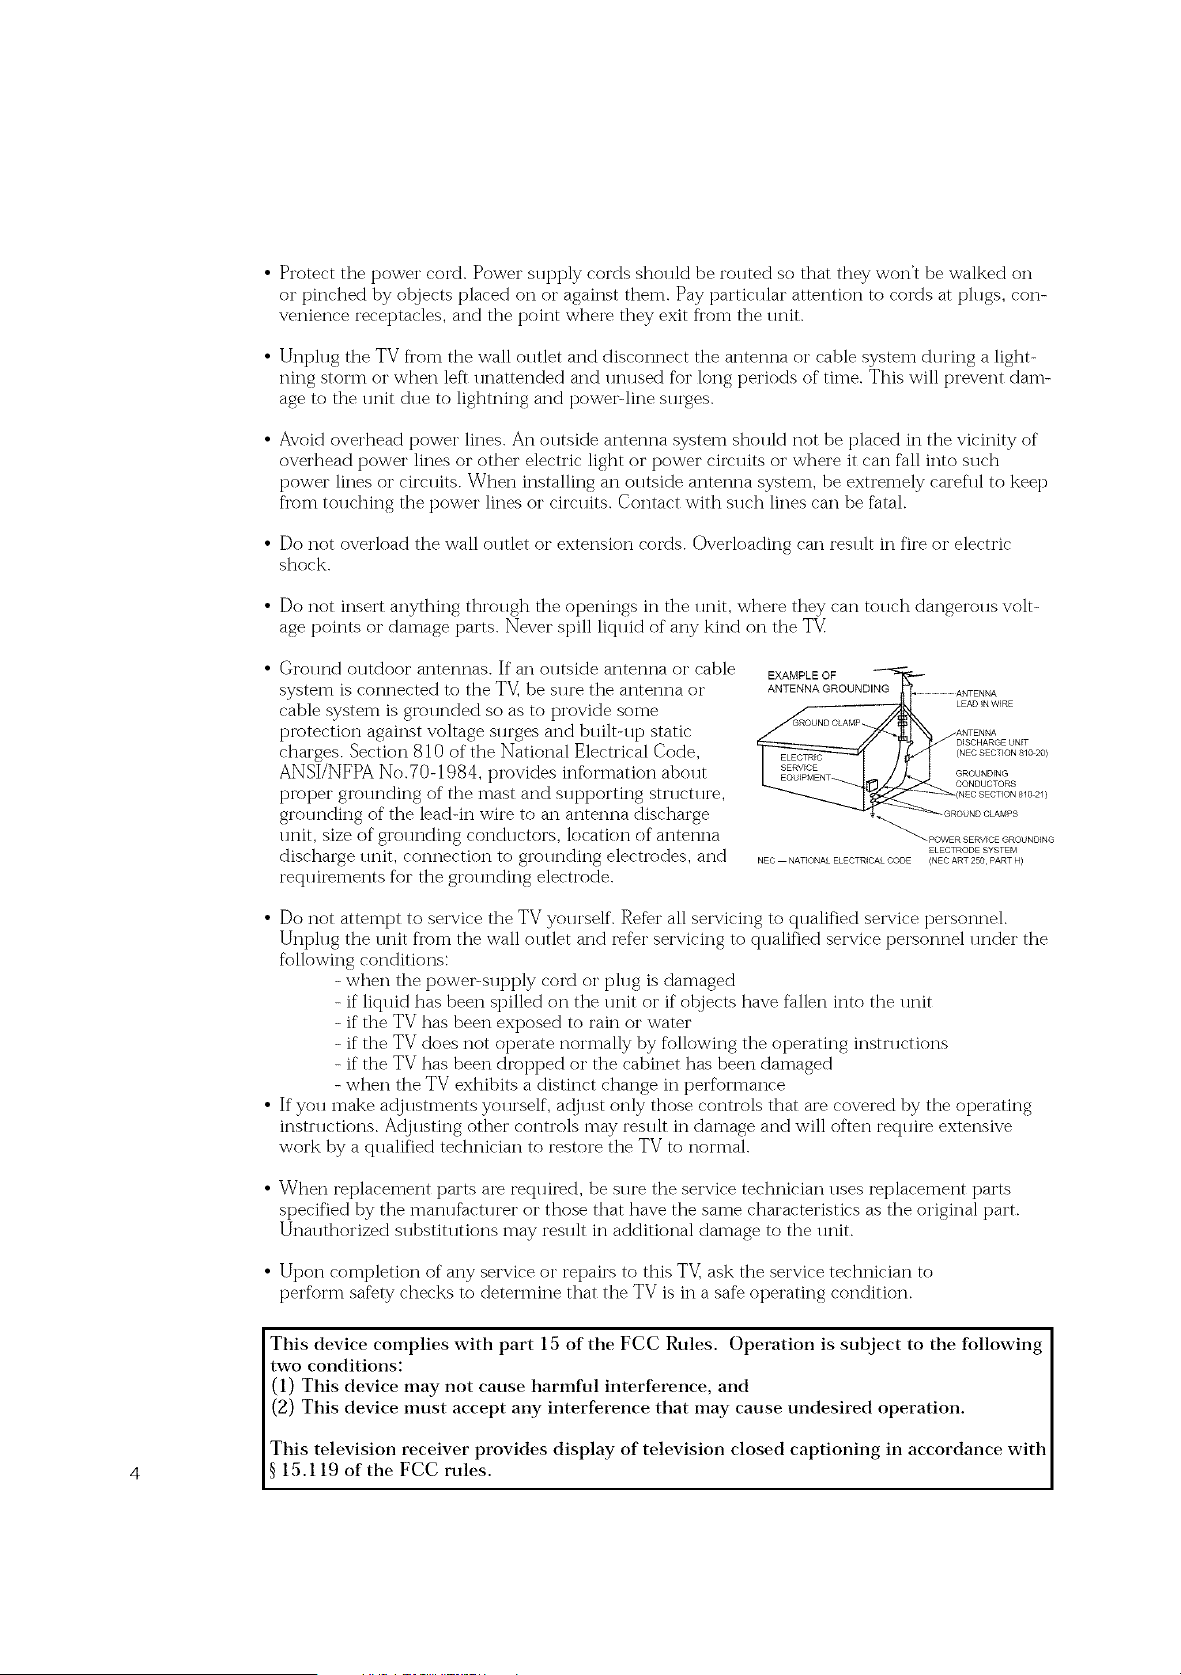
• Ground outdoor antennas. If an outside antenna or cable
system is connected to the TV_be sure the antenna or
cable system is gir)unded so as to provide some
piv_tection against voltage surges and bldlt-11t_ static
charges. Section 810 of the National Electrical Code,
ANSI/NFPA No.70-1984, provides information abollt
piv)per giv)lmding of the mast and sl q?porting sm lctl we,
grounding of the leadqn wire to an antenna discharge
lmit, size of grol mding conch lctors, location of antenna
discharge lmit, connection to grollnding electrodes, and
reqldrements for the grolmding electrode.
EXAMPLE OF I_
ANTENNA GROUNDING ...................................ANTENNA
.... LEAD N WIRE
ND CLAMP
ANTENNA
DISCHARGE UNiT
(NEC SECTION 810 20)
GROUNDING
CONDUCTORS
(NEC SECTION 810 2/)
OUND CLAMPS
_ POWER SERVICE GROUNDING
ELECTRODE SYSTEM
NEC NATIONAL ELECTR CAL CODE (NEC ANT 250 PART H)
• Do not attempt to service the TV yollrself. Refer all servicing to qualified service personnel.
Unplug the unit from the wall outlet and refer servicing to qualified service personnel under the
following conditions:
- when the powePsupt)ly cord or plug is damaged
- if liquid has been spilled on the unit or if otqjects have fallen into the unit
- if the TV has been exposed to raiii or water
- if the TV does not operate normally by following the operating instructions
- if the TV has been drot_ped or the cabinet has been damaged
- when the TV exhibits a distinct change iii performance
• If you make adjustments yourself, a@ust only those controls that are covered by the operating
insm lctions. AdjlBting other controls may rein llt iii damage and will often recp 1ire extensive
work by a qualified technician to restore the TV to normal.
• When i'eplacement parts are recpdred, be sllre the service technician 11ses replacement parts
specified by the manufacturer or those that have the same characteristics as the original part.
Unauthorized substitutions may result in additional damage to the unit.
• Upon completion of any service or i'epairs to this TV_ask the service technician to
perform safety checks to determine that the TV is in a safe operating condition.
This device complies with part 15 of the FCC Rules. Operation is subject to the following
two conditions:
(1) This device may not cause harmful interference, and
(2) This device must accept any interference that may cause undesired operation.
This television receiver provides display of television closed captioning in accordance with
4 15.119 of the FCC rules.
Important Warranty Information
Regarding Television Format
Viewing
Standard screen format televisions (4:3, the aspect ratio of the screen width to height) are
[_i'imai'ily designed to view standard format fllll-motion video. The images displayed on
them shollld t_rimai'ily be in the standard 4:3 ratio format and constantly moving.
Displaying stationary graphics and images on screen, sllch as the dark top and bottom
letterbox bars (wide screen pictlu'es), shollld be limited to no more than 15% of the total
television viewing per week.
Wide screen format televisions (16:9, the aspect ratio of the screen width to height) are
[_rimarily designed to view wide screen f_)i'mat flill-motion video. The images displayed
on them shollld t_rimarily be in the wide screen 16:9 ratio f_mnat, or expanded to fill the
screen if yolJi" model oft_i's this feat1 u'e, and constantly moving. Displaying stationaly
graphics and images on screen, sllch as the dark side-bars on non-ext_anded standard
format television video and [_rogramming, sholfld be limited to no more than 15% of the
total television viewing per week.
Additionally, viewing other stationary images and text sllch as stock market reports,
video game displays, station logos, web sites or compllter graphics and t_attei'ns, shollld
be limited as described above for all televisions. Displaying albv stationary images that
exceed the above guidelines can cause uneven aging of picture tubes (CRT_) that leave subtle,
but permanent bu17_ed-in _host images in the television picture. Toavoid this, Val_y the program-
ming and images, and primarily display full screen moving images, not stationary patterns or
dark bars. On television models that offer picture sizing features, 11se these controls to
view the different formats as a fllll screen t?icuu'e.
Be cai'eflll in the selection and dlu'ation of television formats 11sed for viewing. Uneven
Ct_ aging as a restllt of f_)I'mat selection and 11se, as well as other blu'ned-in images, is
not covered by yo11i" Samsl mg limited wari'ant)_

A Guide to Digital TV
What is Digital Television?
Digital television (DTV) is a new way of transmitting high qtlality video and alldio to
yoln" TV set. Using DTV_bir_adcasters can transmit high definition TV (HDTV) images,
Do lby digital sln'rol md alldio, and new services sllch as mltlticasting (transmitting more
than one program on the same TV channel) and datacasting (providing electronic pro-
gram gllides and interactive television). Several of these services can be combined into a
single digital broadcast.
Digital Television Services
Digital Picture Quality
DTV programs are transmitted in two different formats. The first is Standard Definition
Television (SDTV) and the second is High Definition Television (HDTV).
SDTV program formats incl.de 480dine interlaced (480i) and 480-line progressive
(480p) video. 480i programs are essentially a digital version of olu" clu'rent analog TV
programs, while the 480p fi_rmat offers improved image detail over 480i. Some 480p
programs are broadcast in widescreen and are comparable to progressive-scan DVD
movies in image % lality
HDTV program fi)rmats inclHde 1080dine interlaced (1080i) and 720dine progressive
(720p). Both HDTV formats are always broadcast in widescreen, and offer milch higher
picn u'e % lality than SDTM
Dolby Surround Sound
With DTV_yo. can listen to a variety of Dolby digital a.dio formats fl'om Dolby
S.rro.nd 2.0 to Dolby Digital 5.1 s.rro.nd, Hsing yoHr home a.dio system. Many
HDTV programs are now broadcast with DD 5.1 so.ndtracks.
Interactive Communications and Datacasting
DTV will allow yo. to interact with yo.r television; choosing programs fi'om a detailed
program glfide, ordering prodllcts on-line while watching TV_and accessing ancillary
data abo.t a program.

How to View Digital Television
There are three ways to watch DTV The first is to use an integrated digital TV; one with
a blJilt-in digital television timer. The second is to connect an external DTV set-top
receiver to a DTVlready television or monitor. This type of TV or monitor will have
wideband component video and stereo andio inpnts. Yon can also watch DTV signals
with personal complltei" (PC) tllner cards and complltei" monitors.
1. Integrated TVs versus DTV-ready TVs and monitors
The advantage of an integrated DTV set is that it can time both analog and digital TV
channels at the same time. All yon'll need to do is add an external antenna and yon are
ready to watch DTV
However, integrated DTV sets are not as common as DTVhready TVs and monitors.
If yon already own a DTV-ready TV with comt3onent video inputs, you can eI_joy DTV
broadcasts by simply adding a low-cost DTV set-top receiver and antenna.
2. Using a personal computer and monitor
There are phlg-in cards available that will receive and display DTV broadcasts on yollr
cornplltei" monitor. In addition, many complltei" monitors will display one or more of
the DTV program formats directly< The most compatible format is 480p, which is similar
to the VGA (640x480 pixel) compnter display standard. Yon may be able to watch DTV
broadcasts by connecting a completer monitor to the 15-pin jack on the rear of the set-
top DTV receiver.
NOTE
This television receiver supports the copy protection system regulated by DTLA (Digital
Transmission Licensing Administrator). It should be noted that copy protected content may
not be viewable depending on your particular connections.

Q&A
1. Is the antenna I use for existing TV reception good enough for DTV?
Over-the-air (OTA) digital TV broadcasting uses the same channels as analog TV and
works well with many existing TV antennas. However, DTV broadcast channel assign-
merits are different than analog channels. You should find out whether your local DTV
broadcasts are on VHF (channels 2-13) or UHF (channels 14-69) to see if'you need a
different antenna.
If yolu" DTV channels are on UHF and you ah'eady get good UHF reception, yolu" pre-
sent antenna may work fine. The same holds true for VHF DTV reception. Note that
in some markets, both VHF and UHF channels are used fbr DTV broadcasts.
You can find out the latest DTV channel assignments %r your area by browsing selected
Internet web sites such as www.titant_com, www. 10000watts.corn, and ww_tfi'c.go_
2. How difficult is it to receive DTV signals indoors?
This depends on whether your local DTV stations are running flfll power or not and
how close your location is to the transmission tower. DTV receivers do not require as
much signal as analog TV receivers to produce high-quality images and sound.
Once the DTVsignal level exceeds a certain threshold at the receiver, the digital video
and audio data is decoded at the same q.ality it was originally encoded for broadcast.
This is a big artvantage fbr DTV over analog TV - there is no noise, ghosting, static, or
scratchy alldio.
3. How can I connect an antenna in my townhouse, co-operative
apartment, condominium, or apartment?
The Federal Comm.nications Commission's OTARD R.le (part of the
Telecommlu_ications Act of 1996) allows residents of condominilm_s, townhollse, or
members of neighborhood associations to put .p outside antennas for reception of
broadcast TV signals as long as those antennas are not located in common areas and
are no more than 12' in height.
Residents of rental units (apartments, etc) are not covered by the OTARD rules and
will have to use indoor antennas to receive DTV broadcasts. It is possible that the
landlord of an apartment complex can provide broadcast DTVsignals via a master TV
antenna system to each at_artment.
4. Can I connect my DTV set-top receiver to my cable TV service?
Cable TV systems Hse a different method %r transmitting digital TV pit)grams that is
currently incompatible with broadcast DTV set-top receivers. So you will still need to
llse an olltdooi" or indoor antenna to receive OTA broadcast DTV t_I'ogI'ams.
The good news is that yoH won't have to pay a monthly or pei_program charge to
watch OTA DTV and HDTV programs. They're fl'ee, Hnlike sHbscription satellite TV or
premium cable TV All yo. need is an antenna and a DTV set-top receiver to et!joy
clear, sharp widescreen images and high-quality audio.
CONTENTS ]
Chapter 1: Your New TV ............... 11
Lift of Features .......................................... 11
Accessories ............................................. 11
Fal_]i l'ari_:_]yTUl);s_IfB:vitthlY_)111" 7Z T7 "" ::::::::::::::::::::::::::
Side Pand Jacks .................................. 13
Remote Control .................................. 15
Chapter 2: Installation ................. 17
Connecting VHF and UHF Antennas ......................... 17
Antennas with 300-ohm Flat Twin Leads ............... 17
Antennas with 75-ohm Round Leads .................. 18
Separate VHF and UHF Antennas ..................... 18
_°nnect%_t_Lta_:a_;l_:::::::::::::::::::::::::::::::::
Connecting to a Cable Box lh_t Descmmbles
All Channels ..................................... 19
Connecting to a Cable Box lh_t Descrambles
some Channels ................................... 19
Connecting a Camcorder .................................. 22
Installing Batleries in the Remote Control ...................... 26
Chapter 3: Operation .................. 27
Turning the TV (-)n and Off ................................. 27
Viewing tf_JM_l_:;I}_el;;_71; [);;t;lays" : : : : : : : : : : : : : : : : : : : "'<<).,<<)12
Viewing the Menus ................................ 32
_wi,,__iiii:: iiiiiiiiiiiiiiiiiiiiiiiiiiiiii,_)_
Memorizing the Channels .................................. 34
To View Your Favorite Channels ...................... 37
_,i:,_,&_l;?.,?_::::::::::::::::::::::::::::::::::::::::.?:?_
Customizing the Picture ............................ 39
Using Automatic Picmt> Settings ..................... 40
Selecting the Color Tone ............................ 41
Sound Comml .......................................... 42
_Aj(_7;;_t_l_lff2-17 7i()!l:l?_e : : : : : : : : : : : : : : : : : : : : : : : : : : : : :'4.422
Customizing the Sound ............................ 42
CONTENTS ]
lo
Using A*Jtomatic So*md Settings ...................... 43
Chapter 3: Operation (Cont.} ............ 44
Setting the Clock ......................................... 44
Option 1: Setting the Clock Manually .................. 44
Option 2: Setting the Clock Automatically .............. 45
Viewing an External Signal Source ........................... 46
Setting the Signal Source ........................... 46
Assigning Names to External input mode ............... 46
Chapter 4: Special Features ............. 48
Fine • ruing Analog Channels ............................... 48
Checking the Digital-Signal Strength .......................... 49
Changing the Screen Size .................................. 50
DNIe (Digital Natllral Image engine) .......................... 51
Viewing Pictllre-in-Pictllre ................................. 52
Activating Picu u'e-in-Pictl u'e ......................... 52
Selecting a Signal Sol u'ce (External A/V) fin" PIP .......... 53
Swapping the Contents of the PIP Image and Main Image . .54
Changing the Size of the PIP Window ................. 55
Changing the Position of the PIP ..................... 56
Changing the PIP Channel .......................... 57
Extra solmd settings (Auto Volume. BBE) ......................... 58
Auto Volume ..................................... 58
BBE ............................................ 59
Choosing a Mlllti-Channel Solu]d (MTS)
Sol u]dtrack ............................................. 60
When a Digital Signal is received ..................... 60
When an Analog .)ignal is received .................... 61
Setting the On/Off Timer . ................................. 62
Setting the Sleep_Timer . ................................... 64
Rating Control Mere 1 ..................................... 65
How to Chan[e Your Password ....................... 65
How to Set up KestrictionsUsingthe "TVParental Guidelines" . . .66
How to Set up Restrictions using the Movie Ratings:
G, PG, PG-13, R, NC-17, X ......................... 67
Important Notes Abollt Parental Locks ................. 68
Viewing Closed Caption ................................... 69
Setting Up Digital Caption (Oi'l-Sci'eei'l Text Messages) ..... 69
Setting Up Analog Caption (On-Screen Text Messages) ..... 71
Menu Transh mency Level .................................. 72
Setting the F1u_ction Helt) .................................. 73
Electronic Program Ollide .................................. 74
Using the Electronic Program Guide ................... 75
Viewing Information about a Single Channel ............ 76
Viewing Information about Channels .................. 77
Reminder List ........................................... 78
Reminded Viewing List ............................. 78
Toview the Reminder List .......................... 79
Cllstomizing Yolu"Remote Control ........................... 80
%tting UpYourRemoteControlto OperateYourVCR(or DVD) .... 80
SettingUpYourRemoteControltoOperateYourCableBox ....... 81
Chapter 5: Troubleshooting ............. 83
Identif}/ing Problems ...................................... 83
Appendix ............................ 84
Cleaning and Maintaining Your TV ........................... 84
Using YollrTV in Another Colretry ........................... 84
Specifications ........................................... 84
Your NEw TV
List of Features
Your Samsung TV was designed with the latest technology This TV is a high-perfbrmance
unit that inchldes the following special featllres:
• Easy-to-llse remote control
• Easy-to-use oil-screen lrlei]ll system
• Automatic timer to turn the TV on and off
• Ac{justable picture and sound settings that can be stored in the TV_ memory
• A special filter to reduce or eliminate reception problems
• Pine t, ruing control for the sharpest pict*ne possible
• A built-in multi-channel sound decoder for stereo and bilingual listening
• Built-in, dual channel speakers
• A special sleep timer
• Picture-in-Picture
• Component Video Int>ltjacks to obtain a sharper image from external sources
• Perfect Focus
• DNIe( Digital Natural Image engine) ; Samsung' s New Technology
• DIGITAL INPUT (Digital Vis*lal Interface),jack
• COAXIAL OUTPUT
• OPTICAL OUTPUT
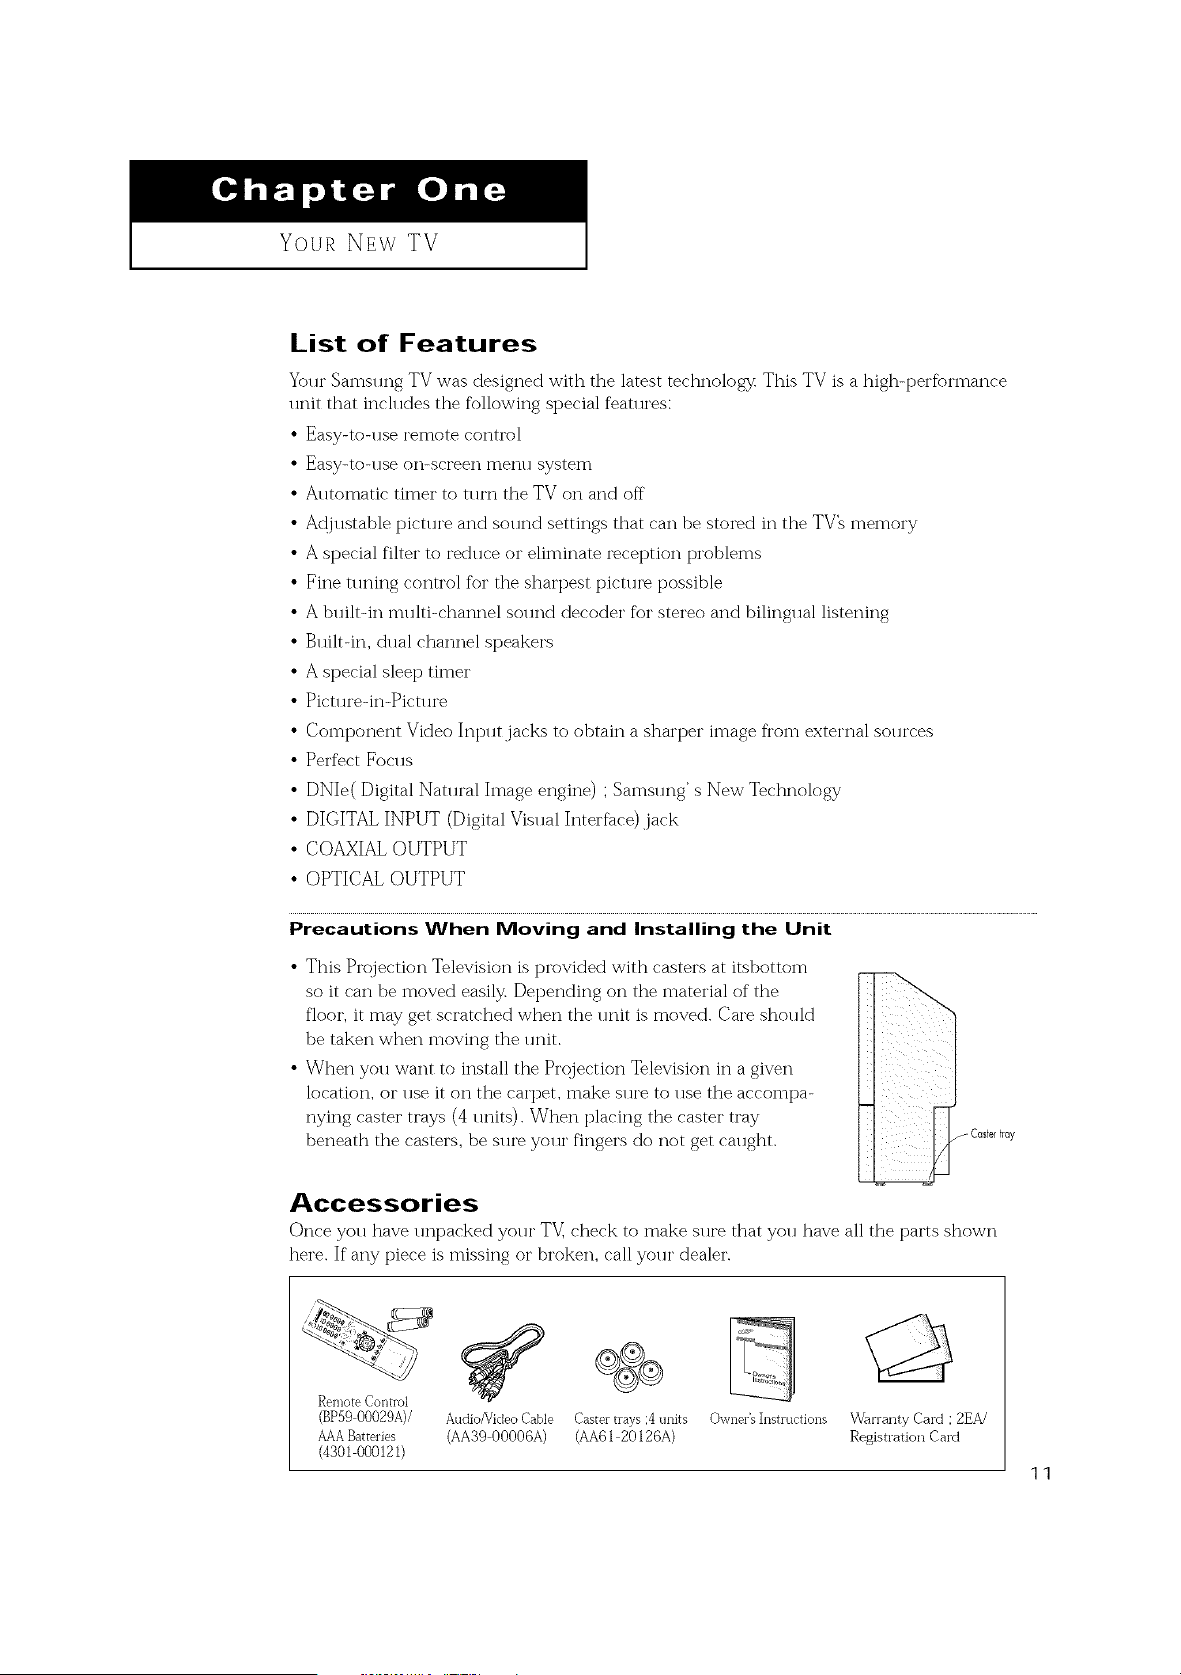
Precautions When Moving and Installing the Unit
• This Projection Television is provided with casters at itsbottom
so it can be moved easily. Depending on the material of the
floor, it may get scratched when the unit is moved. Care should
be taken when moving the unit.
• When you want to install the Projection Television in a given
location, or use it on the carpet, make sure to use the accompa-
nying caster trays (4 units). When placing the caster tray
beneath the casters, be sln'e yollr fingers do not get callght.
Accessories
Once you have unpacked your TV_ check to make sure that you have all the parts shown
here. If any piece is missing or broken, call your dealer.
RemoteControl
(BP590002%)/ Audio/VideoCable Castertrays;4units
AAABatteries (AA3900006A) (AA6120126A)
(430I 000121)
Owner's Instructions
Warranty Card : 2EA/
Registration Card
11
I Your NEw TV I
Familiarizing Yourself with Your New TV
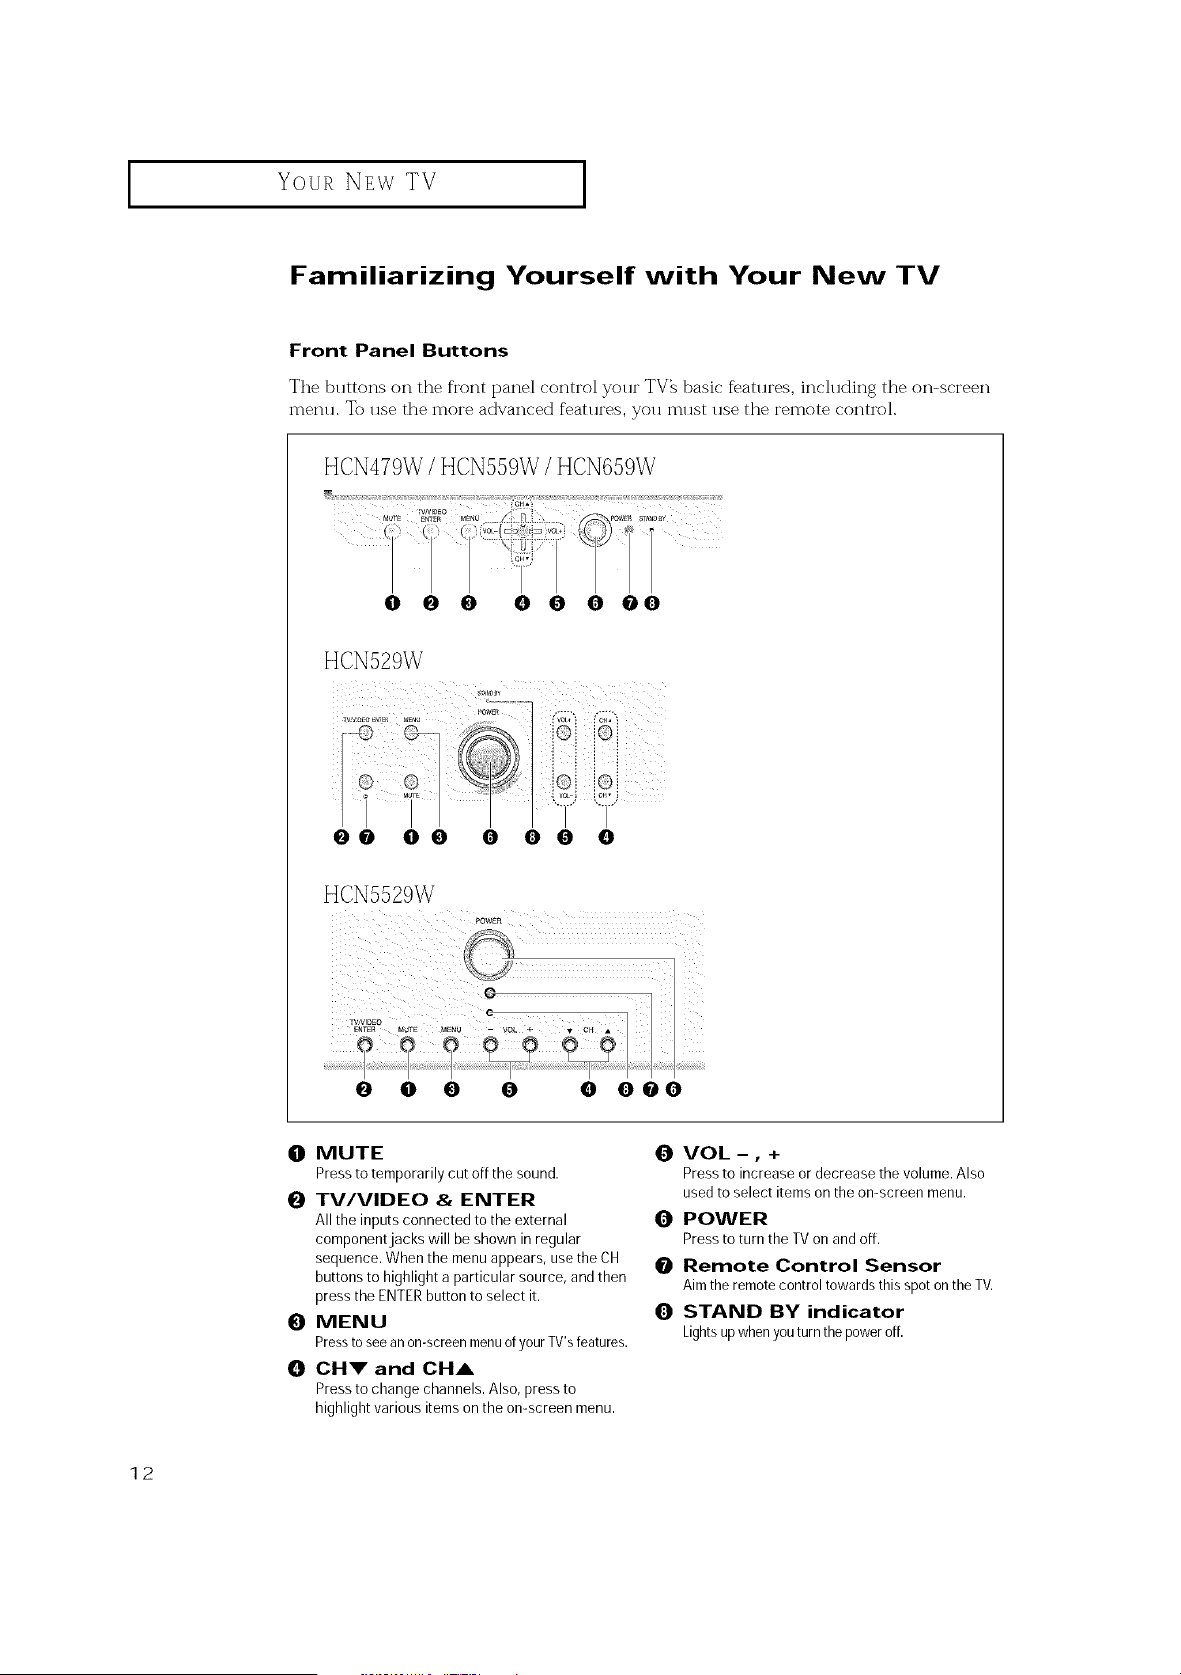
Front Panel Buttons
The buttons on the front panel control your TV_ basic fbatures, including the on-screen
menu. To use the more advanced features, you must use the remote control.
HCN529W
@@ 00 0 00 0
HCN5529W
0 0 O O 0 O@O
0 MUTE
Pressto temporarily cut off the sound.
0 TV/VIDEO & ENTER
All the inputsconnected to the external
component jacks will be shown in regular
sequence. When the menuappears, usetheCH
buttons to highlight aparticular source, and then
press theENTERbuttonto select it.
0 MENU
Pressto seean on-screenmenuofyourTV's features.
0 CHV and CHA
Pressto change channels. Also, pressto
highlight various itemson the on-screen menu.
0 VOL-, +
Pressto increase or decrease thevolume. Also
usedtoselect items on the on-screen menu.
0 POWER
Pressto turnthe TV on and off.
0 Remote Control Sensor
Aimthe remote controltowards thisspoton the TV.
0 STAND BY indicator
Lightsupwhen youturnthe poweroff:
12
Your NEw TV
I
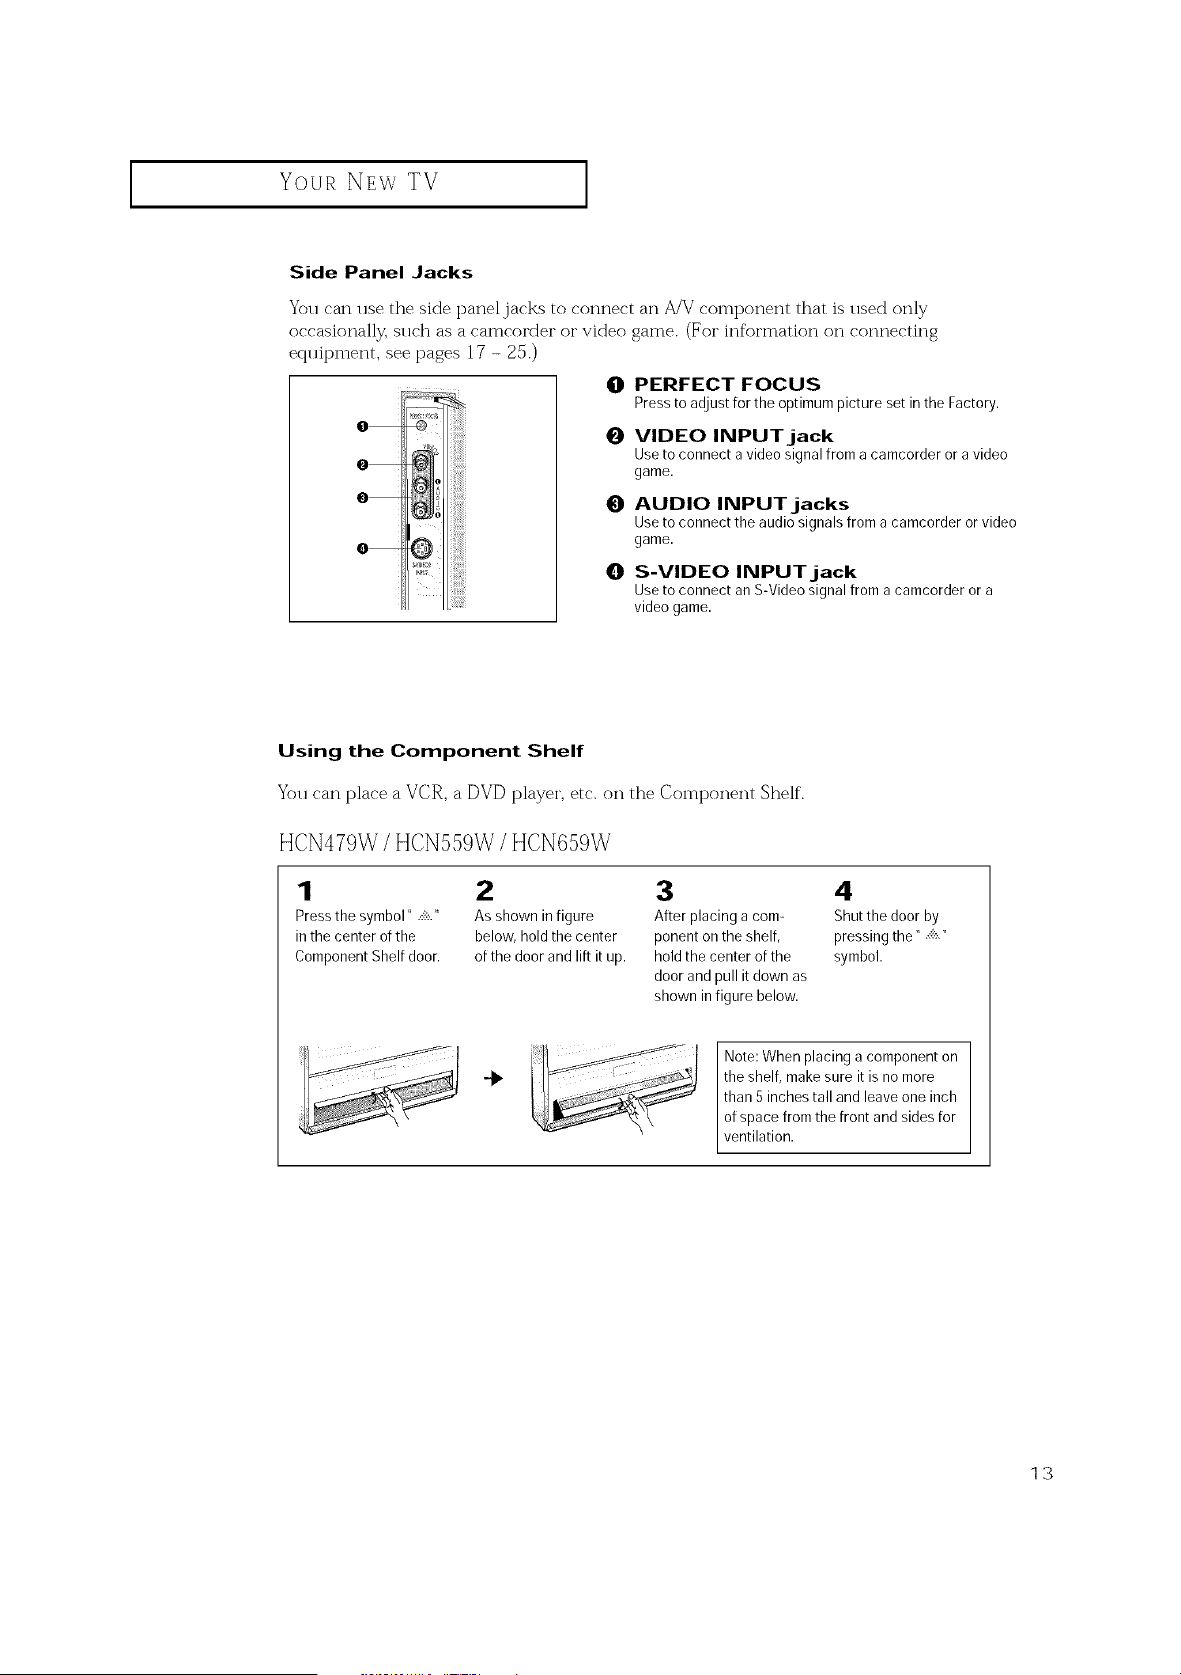
Side Panel Jacks
You can use the side panel.jacks to connect an A/V component that is used only
occasionally, such as a camcorder or video game. (For information on connecting
equipment, see pages 17 - 25.)
O PERFECT FOCUS
Pressto adjustforthe optimumpicture set inthe Factory.
o iiii_!iiiii
0
o
0
o
0
VIDEO INPUT jack
Use toconnect a video signal from acamcorder oravideo
game.
AUDIO INPUT jacks
Use toconnect the audiosignals froma camcorder orvideo
game.
S-VIDEO INPUT jack
Use toconnect an S-Video signal from acamcorder ora
video game.
Using the Component Shelf
You can place a VCR, a DVD player, etc. on the Component Shelf.
HCN479W / HCN559W / HCN659W
1 2 3 4
Pressthe symbol" /!::.." Asshown infigure After placing acorn- Shutthe doorby
inthe center of the below, hold the center ponent on the shelf, pressing the" ..::!::."
Component Shelfdoor. ofthe doorand liftit up. holdthecenter of the symbol.
doorand pull it down as
shown in figure below.
Note: When placing a component on
the shelf, makesureit isno more
than 5 inches talland leave one inch
ofspace fromthe front and sides for
ventilation.
13
Your NEw TV
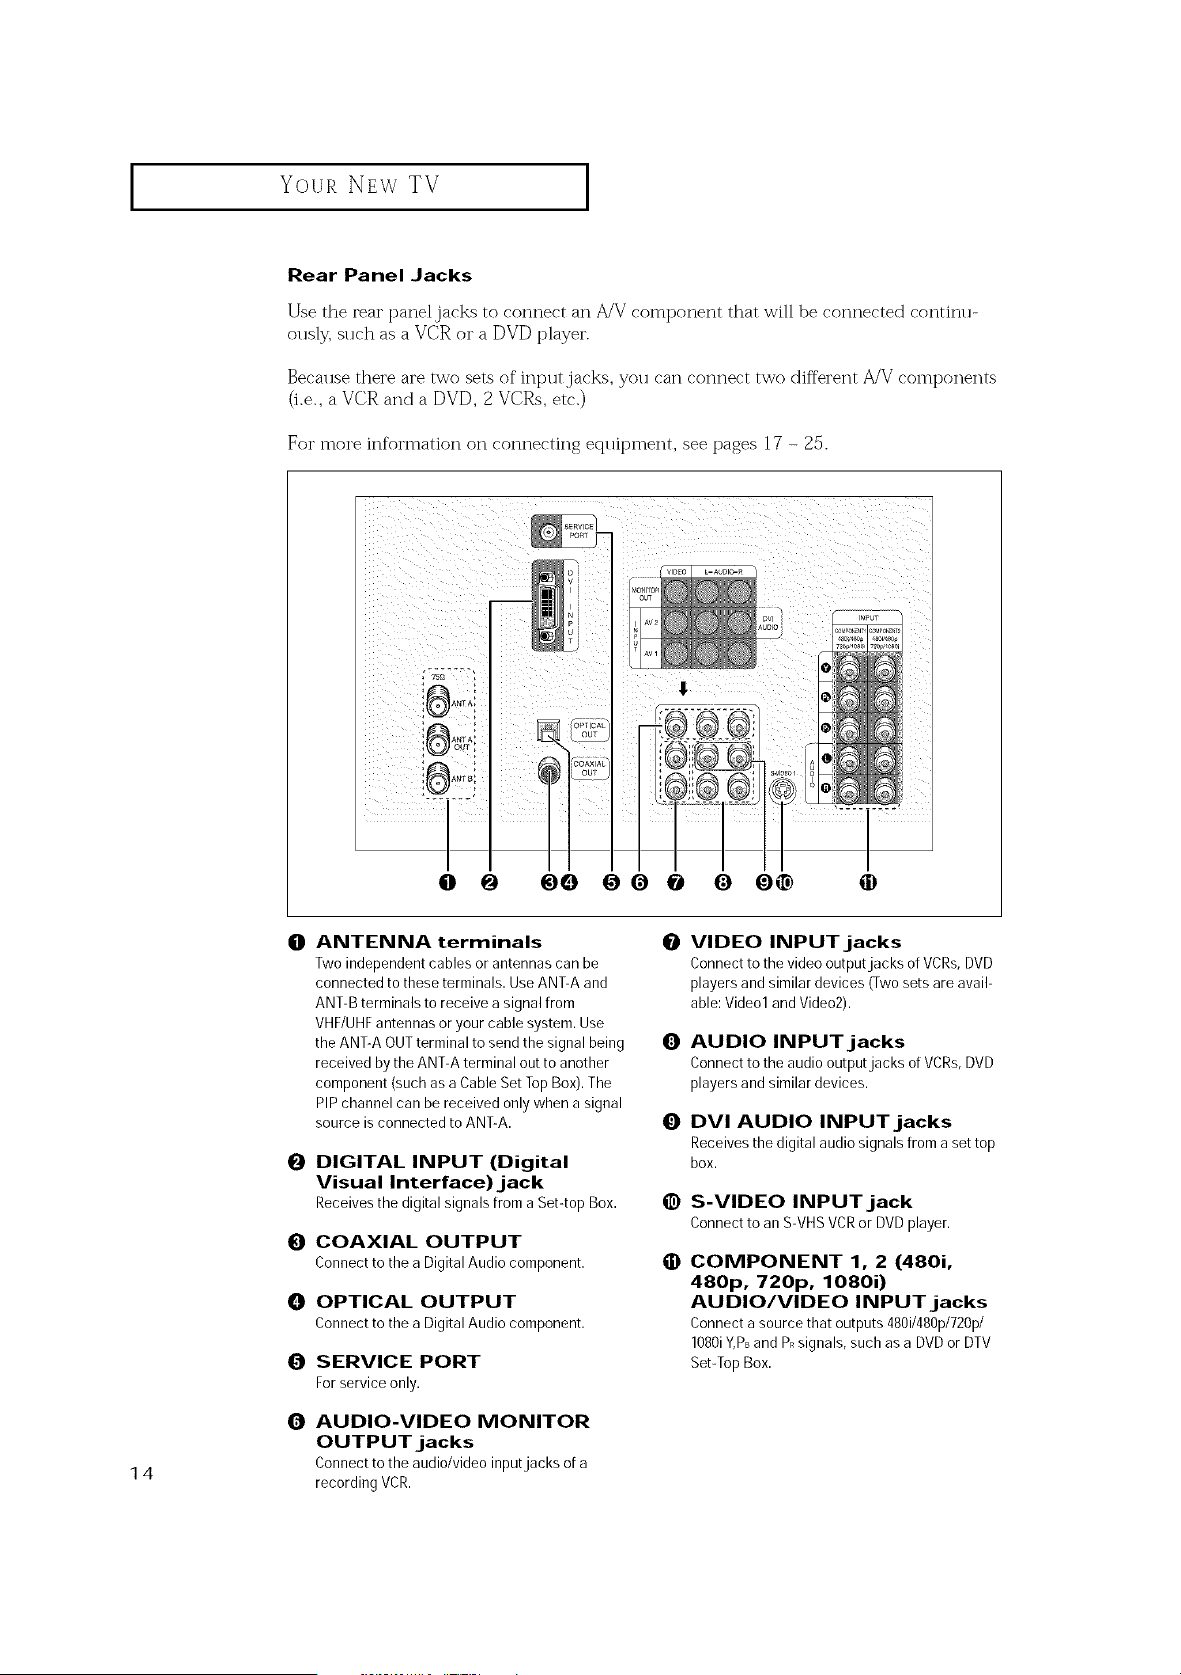
Rear Panel Jacks
Use the rear panel jacks to connect an A/V component that will be connected continu-
ously, such as a VCR or a DVD player.
Because there are two sets of input.jacks, you can connect two different A!V components
(i.e., a VCR and a DVD, 2 VCRs, etc.)
For more information on connecting eqllipment, see pages 1? - 25.
@0 O0 @ 0
14
0
@
0
0
0
0
ANTENNA terminals O
Twoindependentcables or antennas can be
connected to these terminals. UseANT-Aand
ANT-Bterminals to receive asignal from
VHF/UHFantennas oryour cable system. Use
the ANT-AOUTterminal to send the signal being O
received by the ANT-Aterminal outto another
component (such as a CableSet TopBox).The
PIPchannel can bereceived only when asignal
source isconnected to ANT-A. O
DIGITAL INPUT (Digital
Visual Interface)jack
Receivesthe digital signals from aSet-top Box.
COAXIAL OUTPUT
Connectto thea DigitalAudiocomponent.
OPTICAL OUTPUT
Connectto thea DigitalAudiocomponent.
SERVICE PORT
Forserviceonly.
AUDIO-VIDEO MONITOR
OUTPUT jacks
Connecttotheaudio/videoinputjacks of a
recordingVCR.
@
O
VIDEO INPUTjacks
Connecttothe video output jacks of VCRs,DVD
players and similar devices (Two sets areavail-
able:Video1and Video2).
AUDIO INPUT jacks
Connecttothe audio output jacks of VCRs,DVD
players and similar devices.
DVI AUDIO INPUTjacks
Receives the digital audio signals from a set top
box.
S-VIDEO INPUT jack
Connecttoan S-VHSVCRor DVDplayer.
COMPONENT 1, 2 (480i,
480p, 720p, 1080i)
AUDIO/VIDEO INPUTjacks
Connecta sourcethatoutputs480i/480p/720p/
1080iY,PsandPRsignals,suchasa DVDorDTV
Set-TopBox.
I
Your NEw TV [
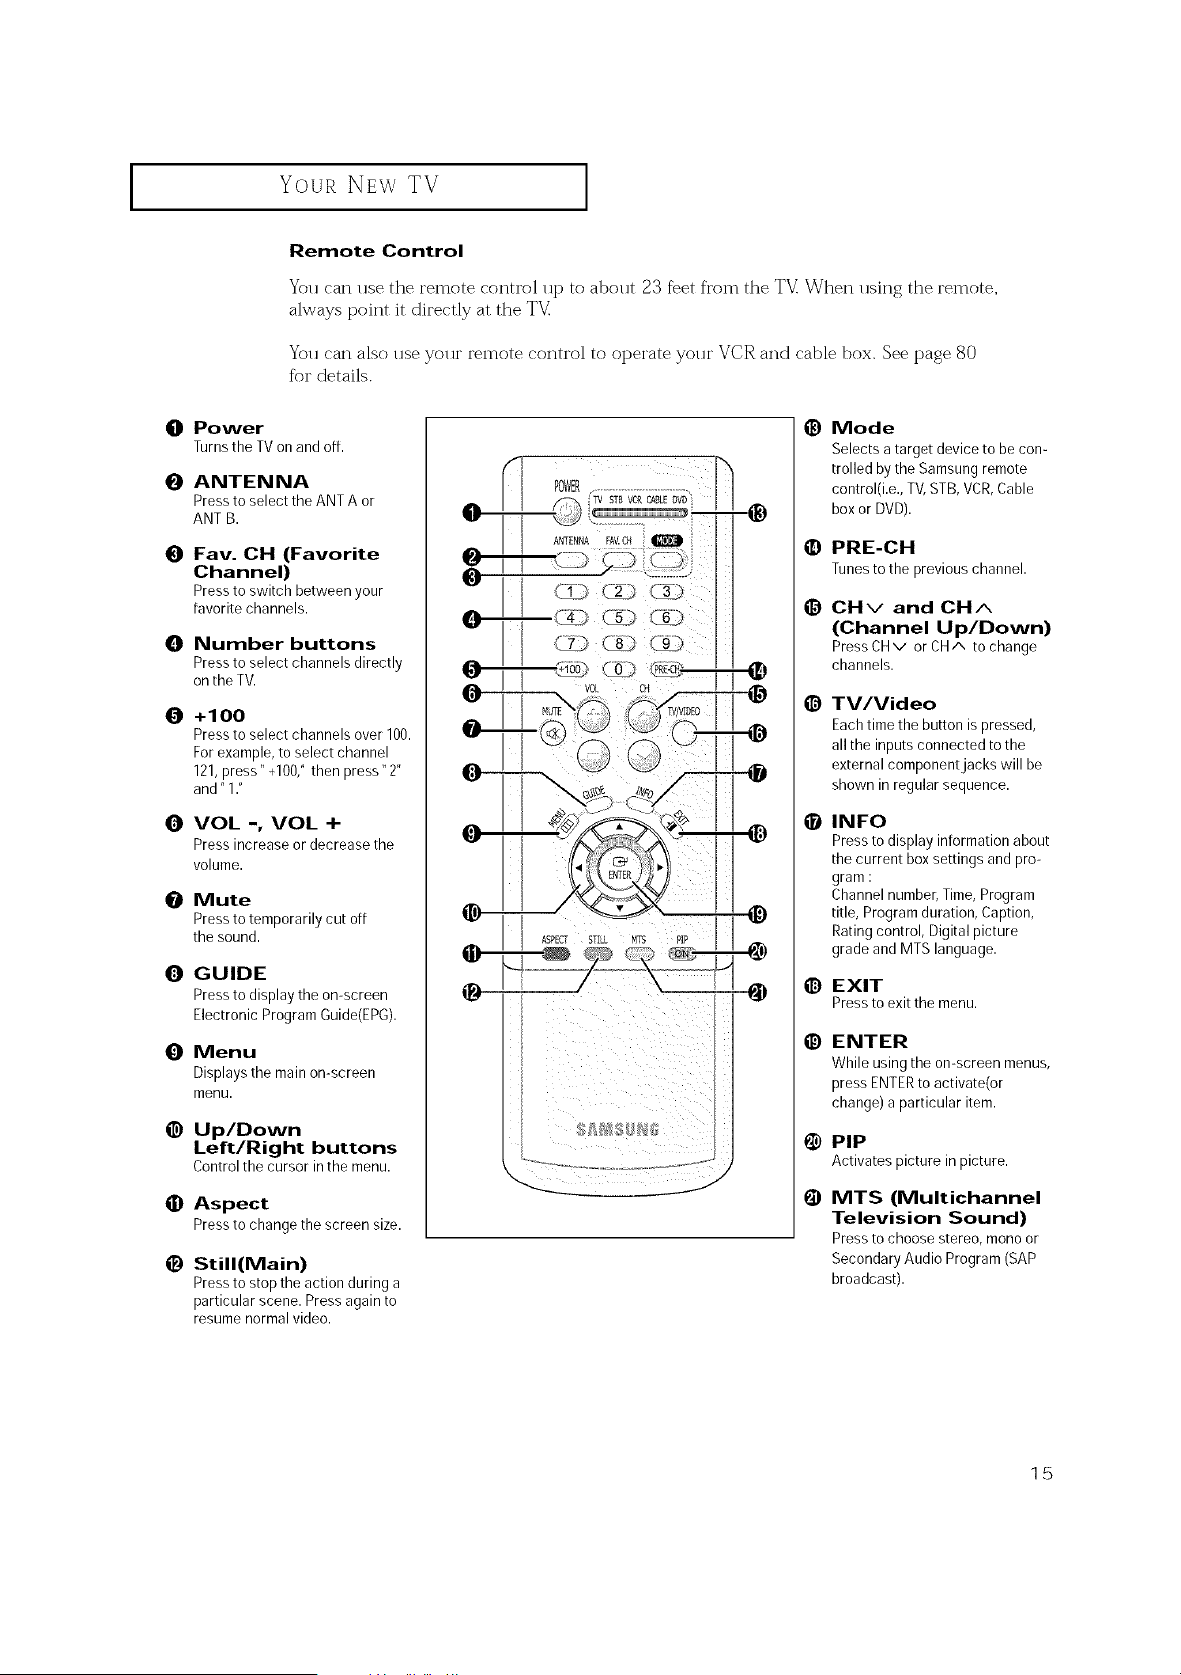
Remote Control
You can use the remote control up to about 23 f_et from the TV: When using the remote,
always point it directly at the TV:
You can also use your remote control to operate your VCR and cable box. See page 80
fbr details.
O Power
TurnstheTVonandoff.
O ANTENNA
Pressto select theANTA or
ANT B.
O Fay. CH (Favorite
Channel)
Pressto switch betweenyour
favoritechannels.
0 Number buttons
Pressto select channels directly
on the TV.
O +100
Pressto select channels over 100.
Forexample, toselect channel
121,press" +100,"then press" 2"
and" 1."
O VOL-,VOL +
Pressincrease ordecrease the
volume.
O Mute
Pressto temporarily cut off
the sound.
O GUIDE
Pressto display the on-screen
Electronic ProgramGuide(EPG).
0 Menu
Displays the mainon-screen
menu.
@ Up/Down
Left/Right buttons
Controlthecursorinthemenu.
• Aspect
Pressto changethescreensize.
0 Still(Main)
Pressto stopthe action during a
particular scene. Press again to
resume normal video.
@
@
@
@
O
@
@
@
@
Mode
Selects atarget device to be con-
trolled bythe Samsung remote
control(i.e., TV,STB, VCR,Cable
box orDVD).
PRE-CH
Tunesto thepreviouschannel.
CH v and CH ^
(Channel Up/Down)
PressCHv or CH/', tochange
channels.
TV/Video
Eachtimethe button ispressed,
allthe inputs connected to the
external component jacks will be
shown in regular sequence.
INFO
Pressto display information about
the current box settings andpro-
gram :
Channelnumber, Time, Program
title, Program duration, Caption,
Ratingcontrol, Digital picture
grade and MTS language.
EXIT
Pressto exit the menu.
ENTER
While using the on=screen menus,
press ENTERto activate(or
change) a particular item.
PIP
Activatespictureinpicture.
MTS (Multichannel
Television Sound)
Pressto choose stereo, mono or
Secondary Audio Program (SAP
broadcast).
15

I Your NEw TV I
Remote Control (continued)
@
6)
6)
S.Mode
Adjust the TVsoundbyselecting
one of the preset factory settings
(or select your personal, cus-
tomized soundsettings).
P.Mode
Adjust the TVpicture byselect-
ing one of the preset factory set-
tings (or select your personal,
customized picture settings).
DNle
Activates DNle (Digital Natural
Image engine).
BBE
BBEisabuilt-in effectthat adds
clarity, punch and dynamics to
the sound.
VCR controls
Controls VCRtape functions:
Rewind,Play,Fast Forward, Stop,
Pause.
REW (Rewind)
Pressto rewind a tape in your
VCR.
Pressthis button to stop atape
during play, record, rewind or
fast forward. If the button is
pressedduring Full-Automatic
play,the function will be can-
celled.
_/Pause
Pressthe Play/Pausebutton to
playback prerecorded tapes or
pausethe tape.
LF
Pressto fast forward the tape in
your VCR.
SET
Usedduring setupof this
Samsung remote control, so that
it will work compatibly with other
devices (VCR,cable box,DVD.)
J
J
@
@
6)
Sleep
Pressto select apresettime
interval for automatic shutoff.
PIP Controls
CH
Displaystheavailablechannels
insequence.(Thesebuttons
changechannelsinthePIPwin-
dowonly).
Caption
Controlsthe caption decoder.
Reset
Ifyour remote control isnot
functioning properly,take out
the batteries and pressthe reset
button forabout 2-3seconds.
Re-insert the batteries and try
using the remote control again.
16

INSTALLATION
Connecting VHF and UHF Antennas
If yollr antenna has a set of leads that
look like this, see "Antennas with
300-ohm Flat Twin Leads," below.
If yo_r antenna has one lead that looks
like this, see "Antennas with 75-ohm
Round Leads," on page 18.
If you have two antennas, see "Separate
VHF and UHF Antennas," on page 18.
Antennas with 300-ohm Flat Twin Leads
If"you are using an off-air antenna (sllch as a roof antenna or "rabbit ears") that has 300-
ohm twin flat leads, follow the directions below.
Place the wires from the
twin leads Underthe
SCrewsOnthe 300-75
ohm adaptor (notSup_
plied).Use ascrewdriver
totightenthe%tews.
2
Plugm_ adaptor intothe
ANT-AorANT-Btermina
onthe rear panel.
76g
ANTA
A_ITA
o_Jr
17
I INSTALLATION I
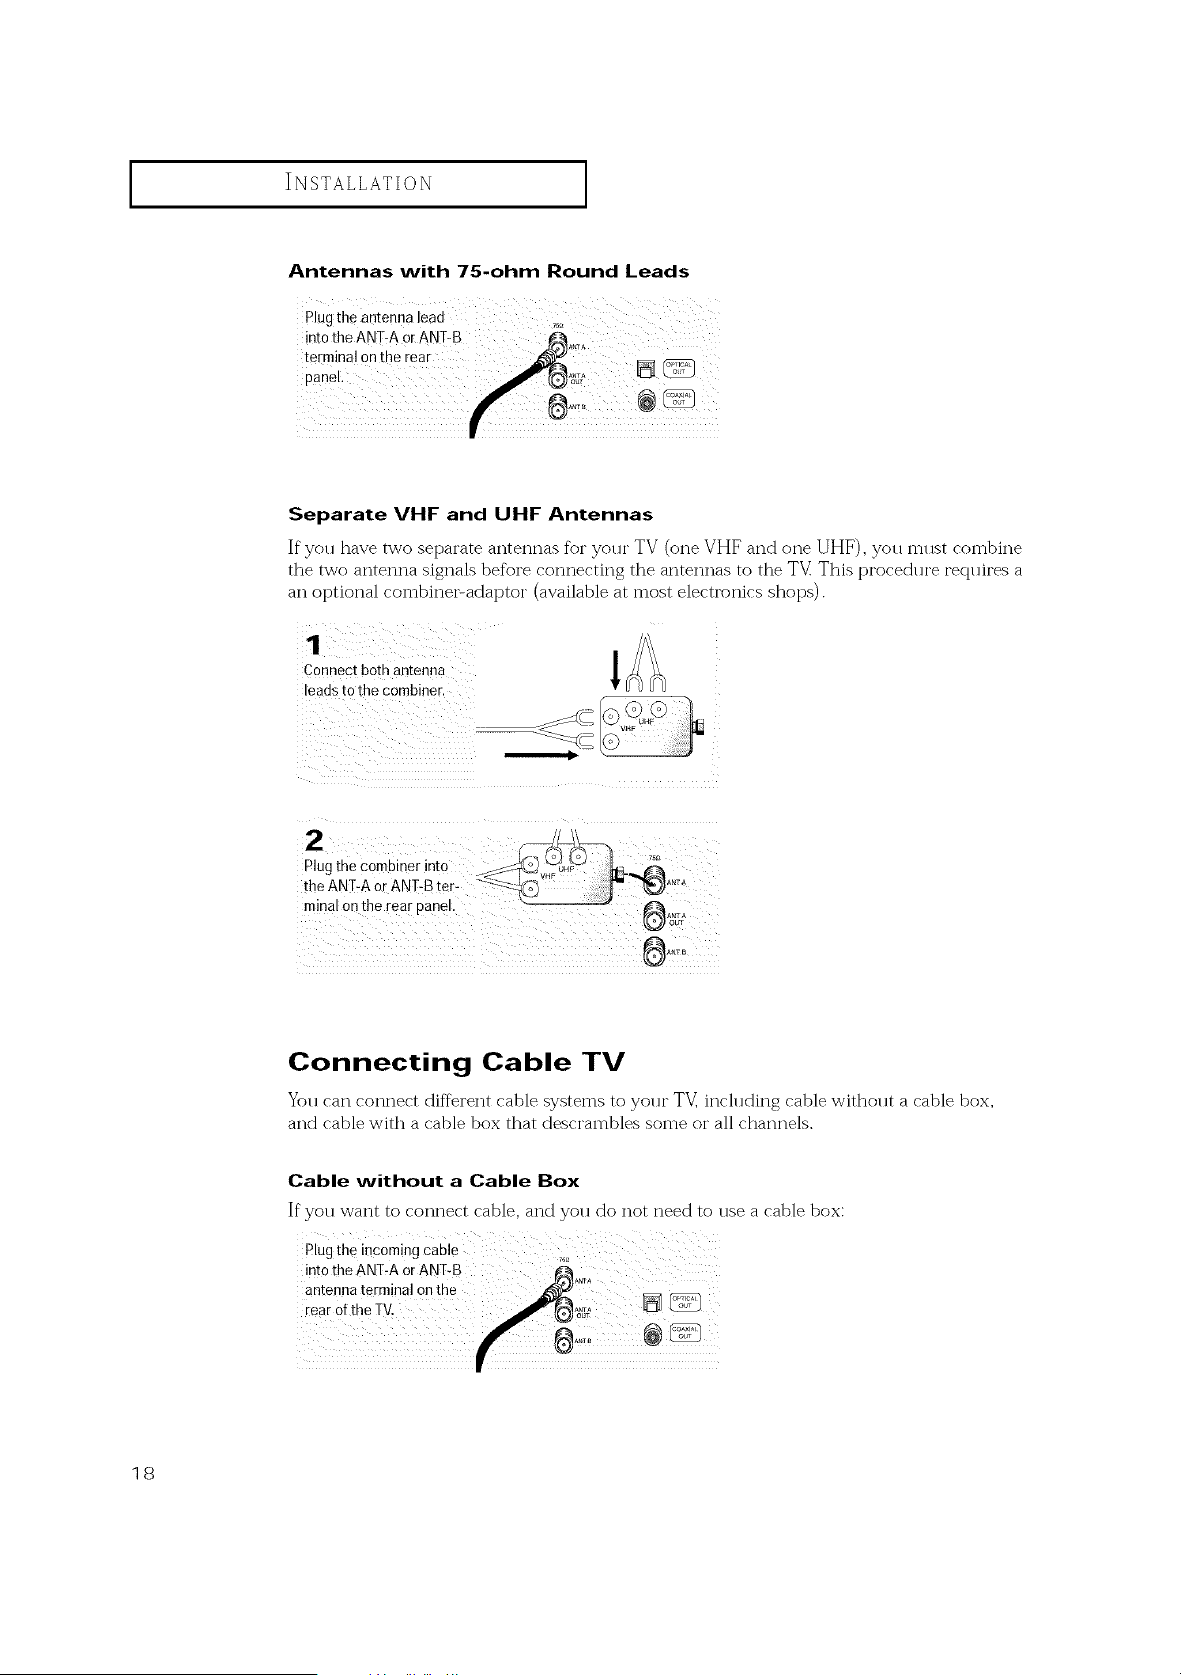
Antennas with 75-ohm Round Leads
Separate VHF and UHF Antennas
If yon have two separate antennas for yonr TV (one VHF and one UHF), yon mnst combine
the two antenna signals before connecting the antennas to the TV This procednre reqnires a
an optional combinei_adaptor (available at most electronics shops).
Connectbothantenna
leads to the combiner.
C
Connecting Cable TV
Yon can connect different cable systems to yonr TV_ inclnding cable withont a cable box,
and cable with a cable box that descrambles some or all channels.
Cable without a Cable Box
If you want to connect cable, and you do not need to use a cable box:
Plugth_incomingcable ;,_;i
18
INSTALLATION [
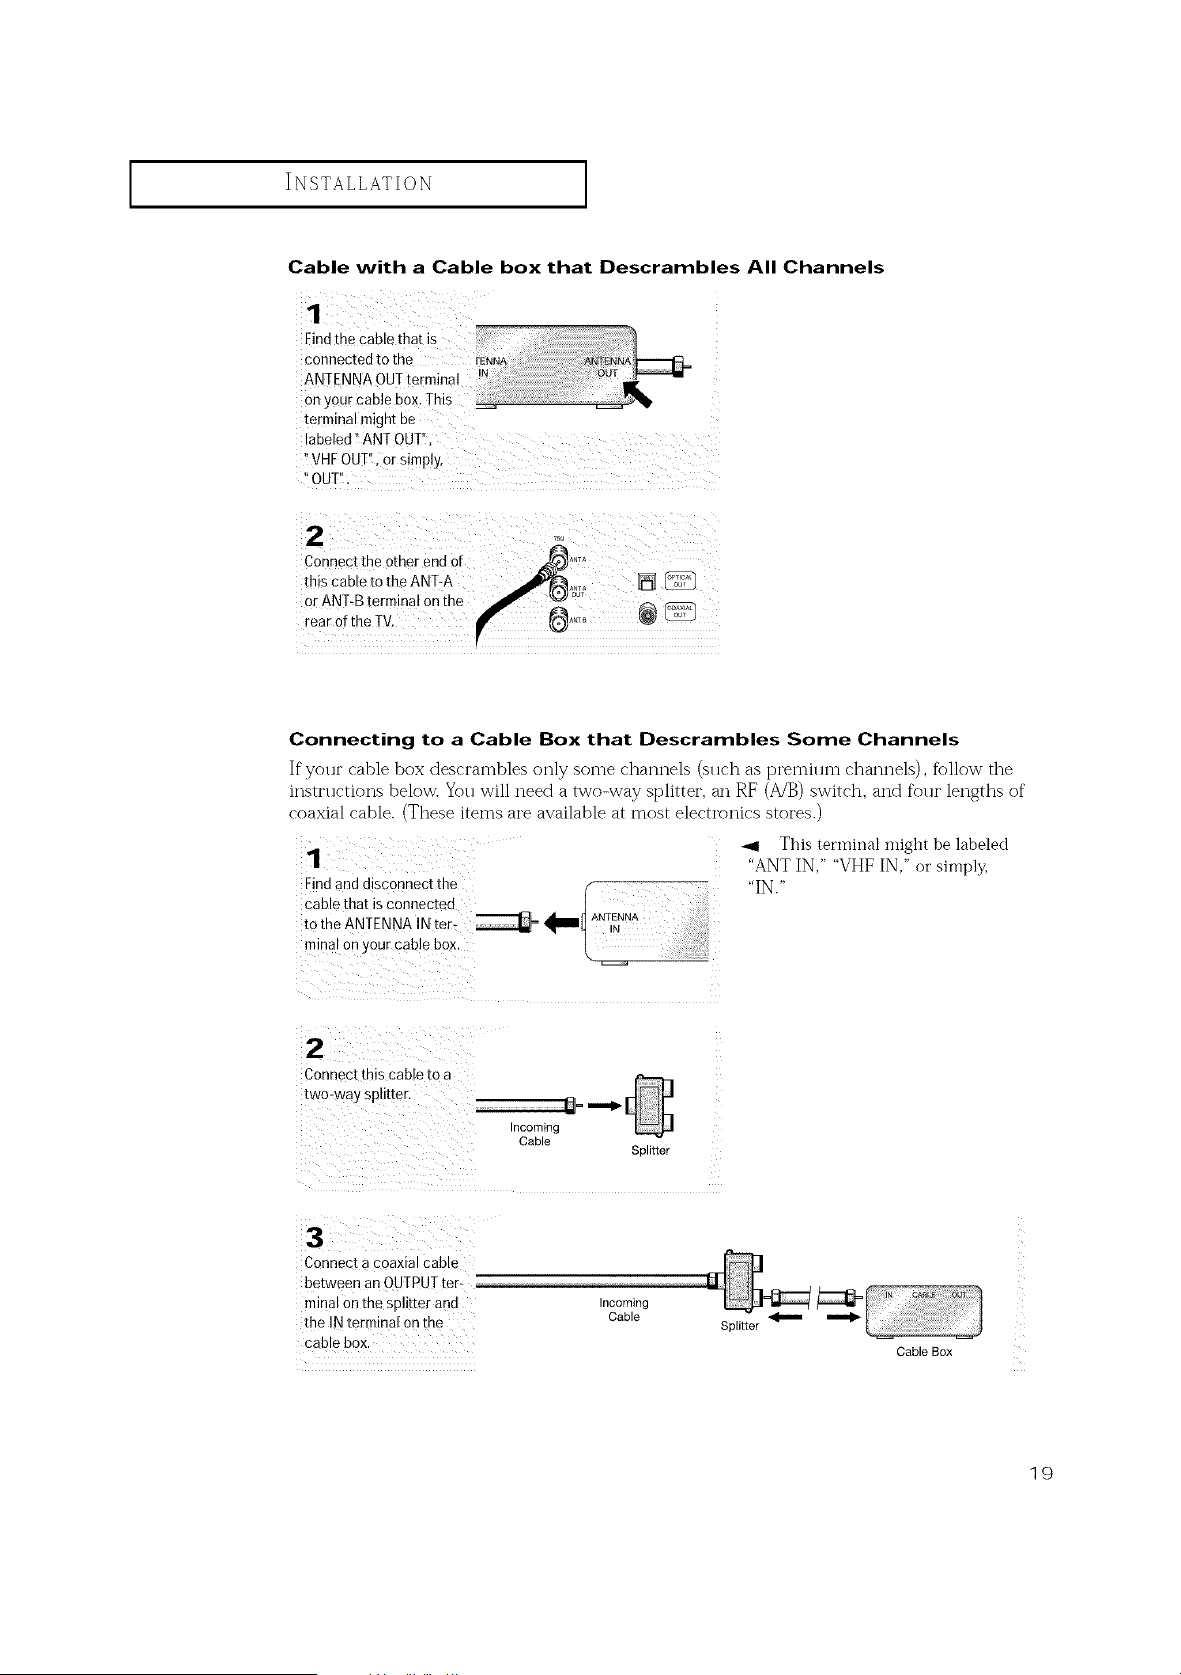
Cable with a Cable box that Descrambles All Channels
Eind the cable that is
connected to the
ANTENNA 0UTtermina! :
onyour cable box,This
termina! might be
abeled !'ANTOUI'I
WHFOUT'!IOrSimply,
"0UTI_i
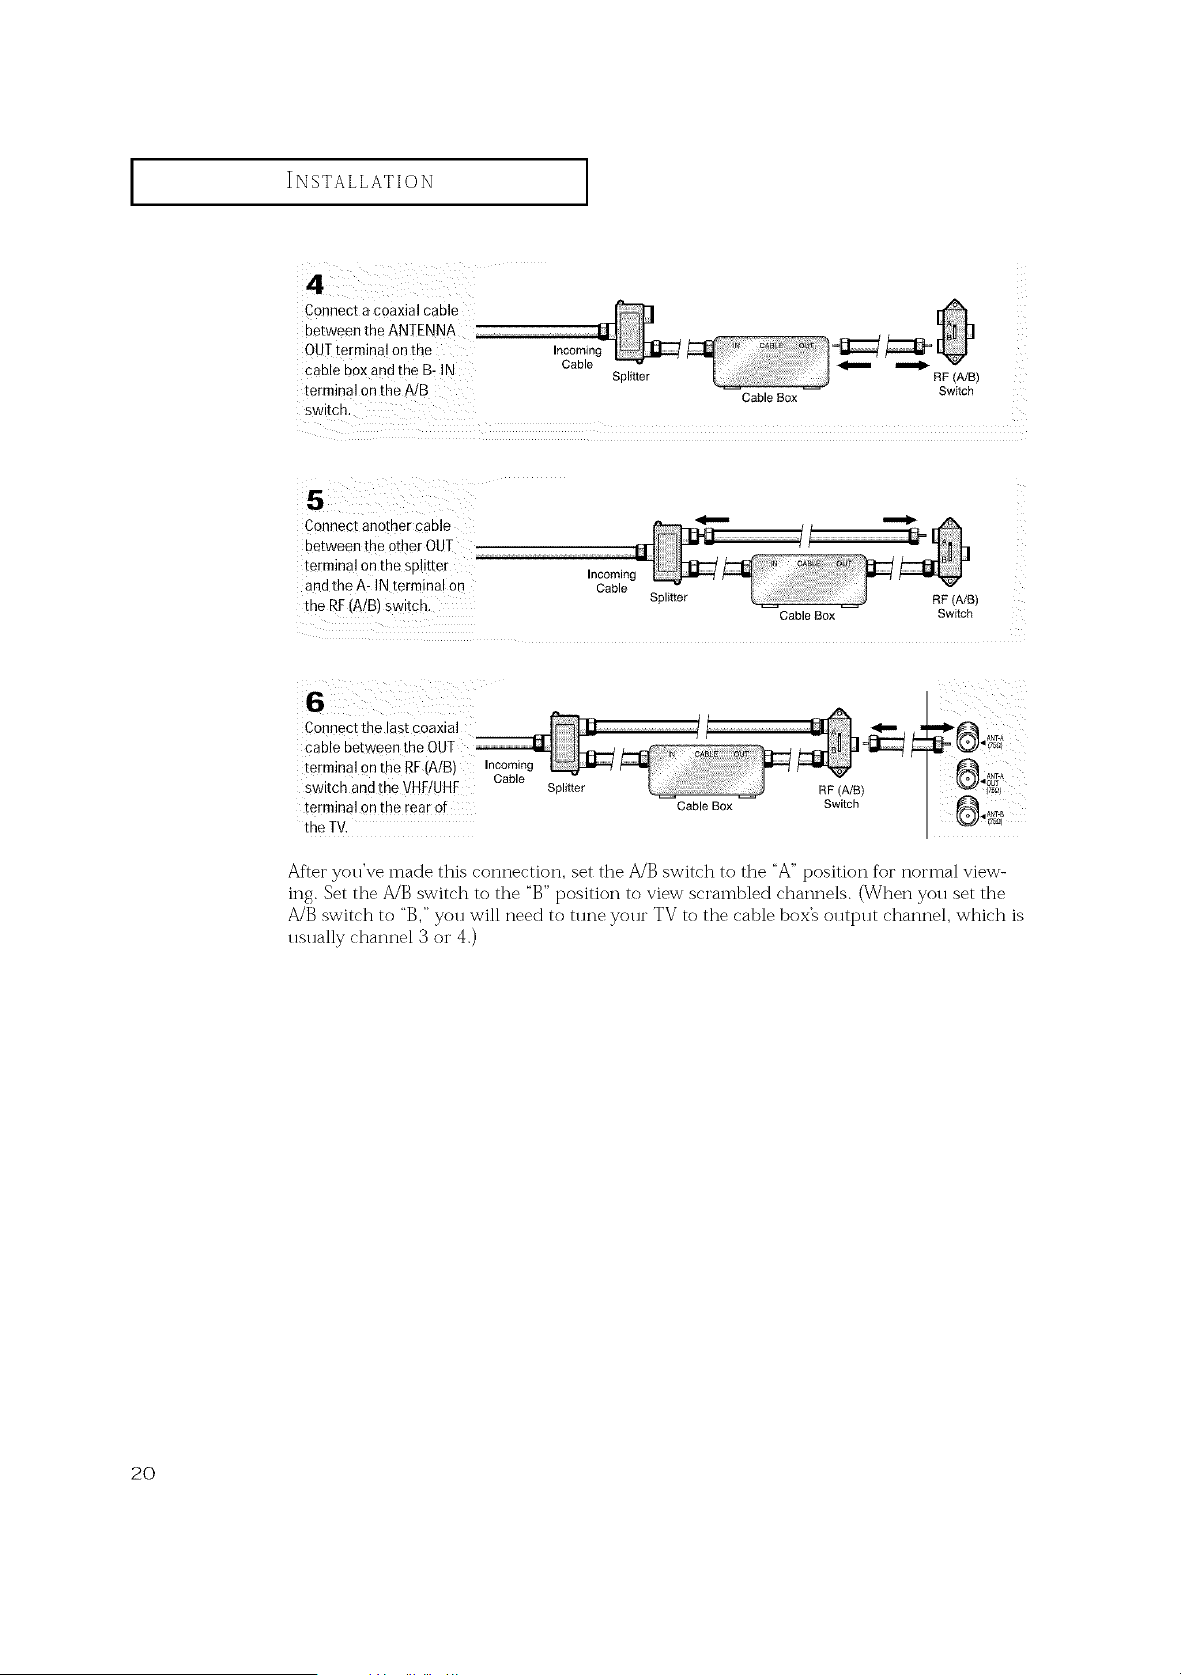
Connecting to a Cable Box that Descrambles Some Channels
If yollr cable box descrambles only some channels (sllc'h as premillm channels), follow the
instructions below. You will need a two-way splitter, an RE (A/B) switch, and four lengths of
coaxial cable. (These items are available at most electronics stores.)
Find and disconnect the
cable that isconnecmn
tothe ANTENNA INter-
minal on !,our cable box,
SOllIIe[
This tet'miilalmight be labeled
"ANTIN," "VHF IN," or simply,
"IN."
2
ConnectThiscable to a
two-wa y spu[[er,
_= ,,,,,_ [
ncommg
Cable
3
Connect a coaxial cable
between an OUTPUT [er-
minal on the splitter ana
the IN mrmmal on the
cable box.
qcommg
Cable
Splitter
Cable Box
19
INSTALLATION
terminal on the A/B CableBox Switch
switch.
Connectanother cable
between the otherOUT
terminal on the splitter
and the A: INtermina[on
the RF(A!B)switch.
Incoming
Cable
Splitter RF (A/S)
Cable Box Switch
ConnEctthe !astcoaxial
cable between the OUT
terminal on the RF(AIB) Incoming
switch and the VHF/UHF Cable
terminal 9n the rear of
the TV.
Splitter
RF (A/B)
Cable Box Switch
After you've made this connection, set the A/B switch to the "A" position %r normal view-
ing. Set the A/B switch to the "B" position to view scrambled channels. (When yott set the
A/B switch to "B," you will need to tune your TV to the cable box_ output channel, which is
usually channel 3 or 4.)
2O
INSTALLATION [
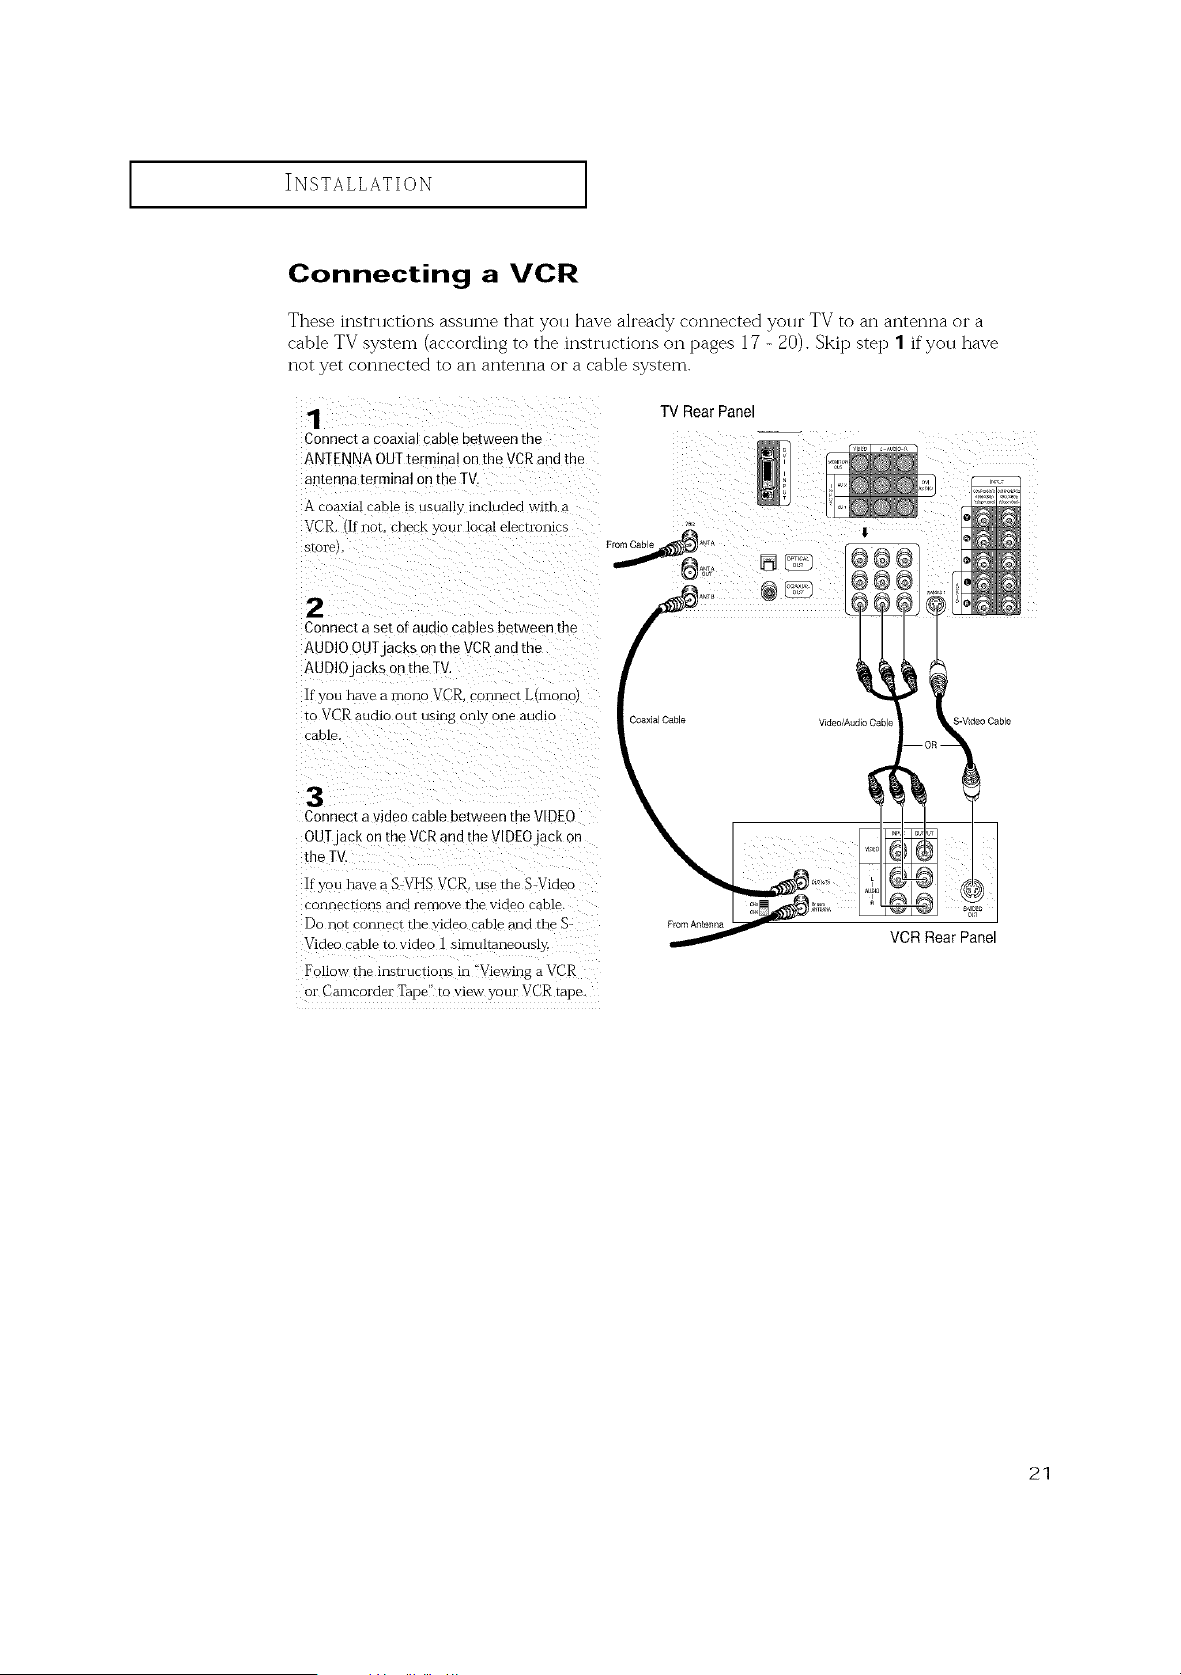
Connecting a VCR
These instrllctions asslnne that you have ah'eady connected yolu" TV to an antenna or a
cable TV system (according to the instructions on pages 17 - 20). Skip step 1 if you have
not yet connected to an antenna OI"a cable system.
Connectacoaxial cable between me
ANTENNA OUTterminal onthe VCRand the
an[enna terminal on the TV.
A coaxial cable is usually- included with a
VCR. Ifnot. check your !ocal electlomCS
bIOl'e L
2
Connec[ a se_ or audio cables bet Neen the
AUDIO OUTjacks on the VCR and the
AUDIO jacks on the TV.
If you nave a mono VCR. cormecr Lhnon(
to VCR aumo our using only one audio
cable.
TV Rear Panel
S-Vdeo Cable
3
Connect a video cable between the VIDEO
OUT jack on the VCR and the VIDEO jaCK on
the IV
If you have a S VHS VCR use the S Video
connecHolls aria remove the viaeo cable
Do not connect the video cable and the S
Video cable ro waeo 1 simultaneously.
Follow the instructions in "Viewing a VCR
or Camcorder Tape" to view your VCR tape.
From Antenna
VCR Rear Panel
21
INSTALLATION [
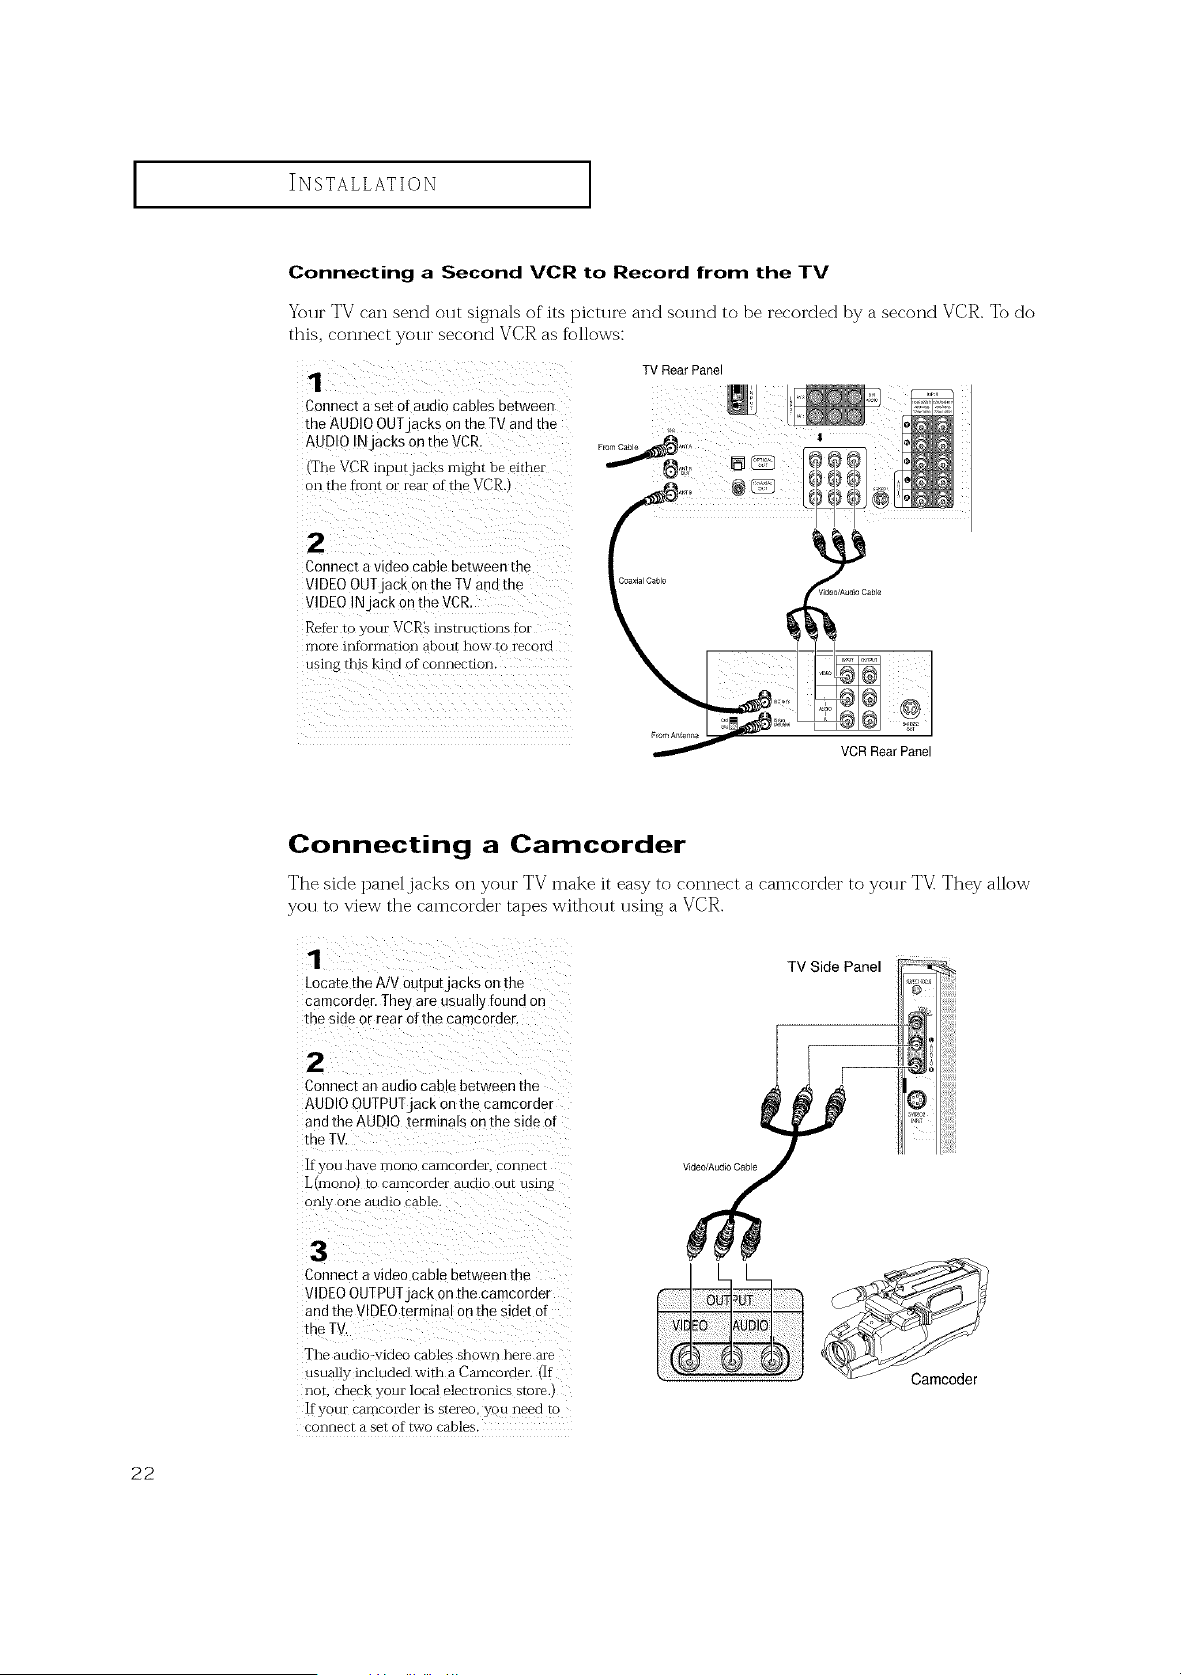
Connecting a Second VCR to Record from the TV
Your TV can send out signals of its picture and sound to be recorded by a second VCR. To do
this, connect your second VCR as follows:
1
Connect aset of audio cables between
the AUDIO OUT acks on the TV and the
AUDIO IN acks on the VCR.
{Tile VCR inputjacks might be eithe*
on the tk'cnt or rear of the VCR.
TVRearPanel
2
Connect avideo canle between the
VIDEOOUTjack on the TVand the
VIDEOIN ackontheVCR
Refel"t )vouI VCR'sinstructions fb[
more lnt}ormation about how- to recolVl
using this kind of connection.
VCR Rear Panel
Connecting a Camcorder
The sMe panel jacks on your TV make it easy to connect a camcorder to your TV They allow
you to view the camcorder tapes without using a VCR.
Locatethe A/V 0Utputjacks Onthe
camcorder. They are usually found on
the sideor rear of the camcorder.
TV Side Panel
Connect an audio cable between the
AUDIO OUTPUTjack on the camcorder
and the AUDIO terminals on the side of
the TV.
If you have mono camcorder, connect
L(mono) to camcorder audio OUtusing
only one audio cable.
VideO/Audio Cable
Connect a video cable between the
VIDEO OUTPUT jack on the camcorder
and the VIDEO terminal oBthe sidet of
the TV.
The audio-video cables shown here are
usua!ly included with a Camcorder. (If
not, check your local electronics store.)
If your camcorder is stereo, you need to
connect a set of two cables.
22
INSTALLATION [
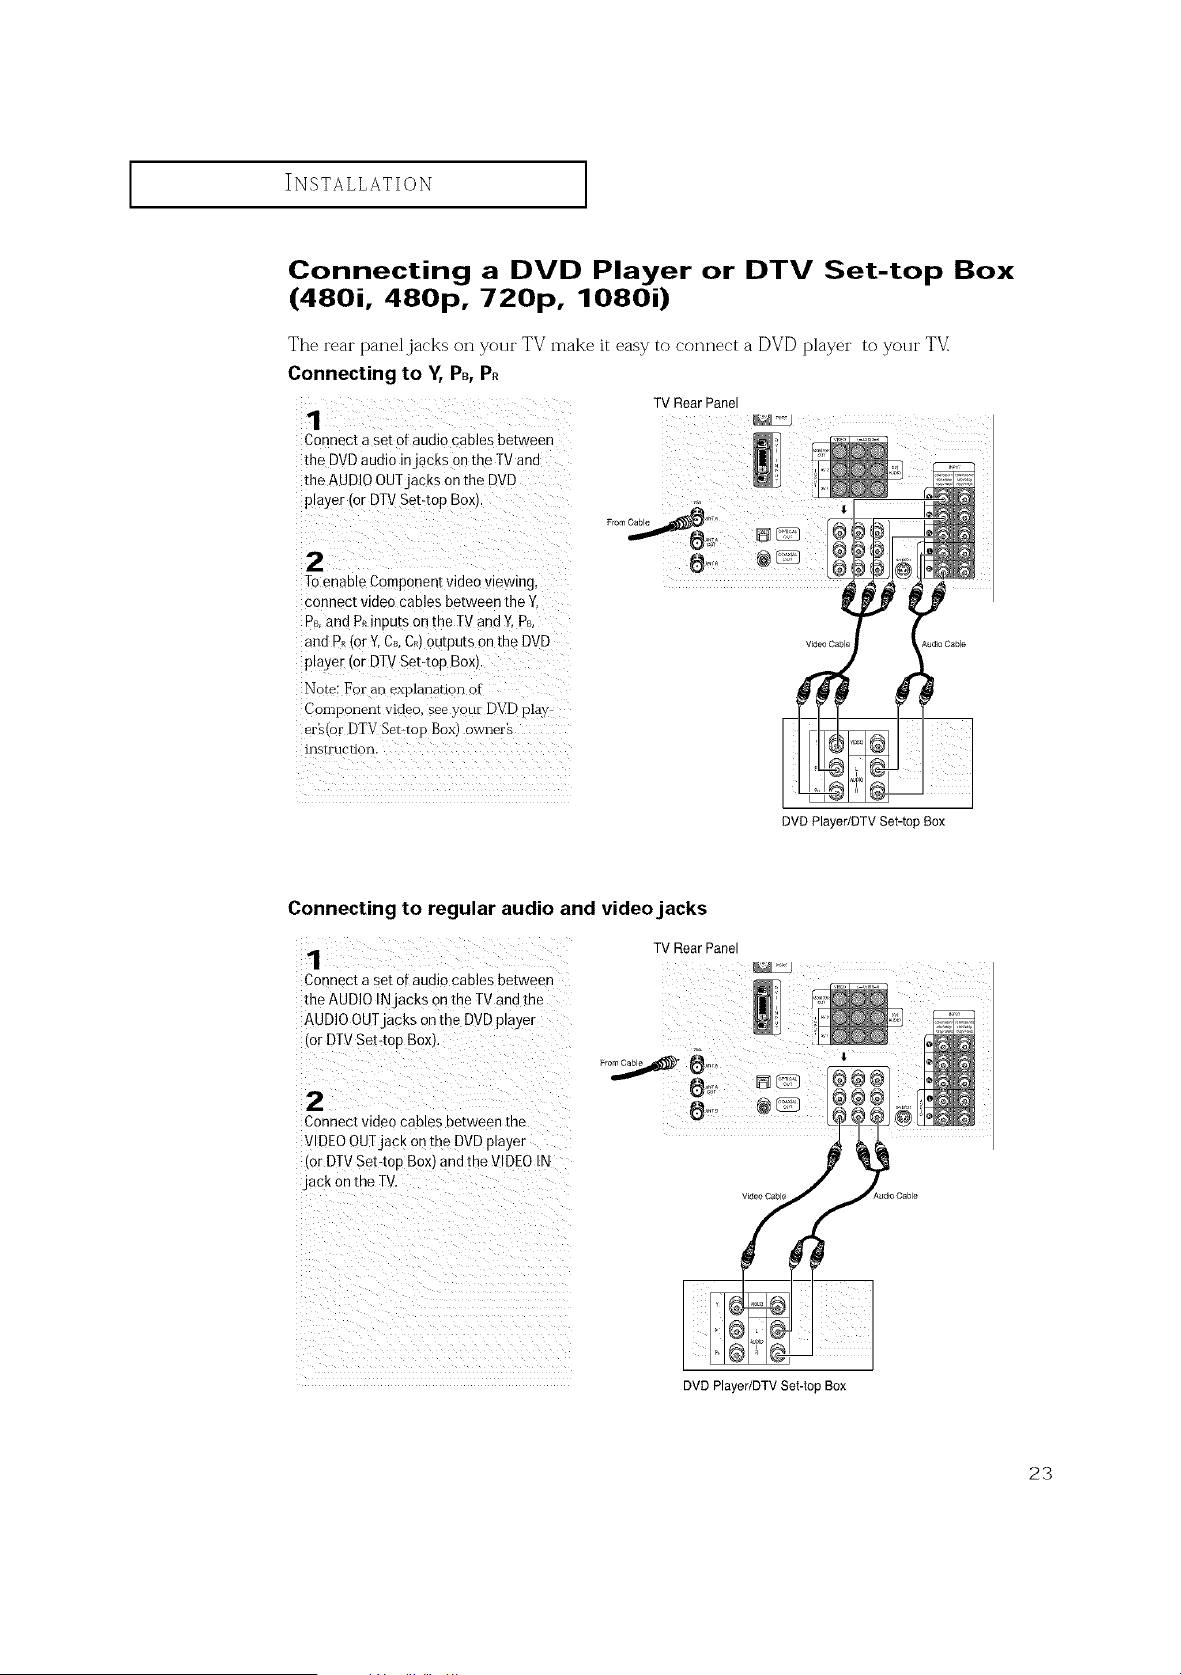
Connecting a DVD Player or DTV Set-top Box
(480i, 480p, 720p, 1080i)
The rear panel jacks on your TV make it easy to connect a DVD player to your TV
Connecting to V, PB,P_
TVRearPanel
1
Connect a setofaudio cables between
the DVD audio injacks onthe TVand ....................................
the AUDIOOUTjacks on the DVD
Toenable Componentvideo viewing,
conrlect video cables between the ¥,
P_,and P_inputs on the TVand Y, P_,
and P_(or Y,Ca,C_)outputs on the DVD
player or DIV Set-top Box.
Notel For anexplanation of
Conlporlent video, see your DVD play
era(or DTV Set,top Box) owner2
irlstl uctiorl.
DVD Player/DTV Set-top Box
Connecting to regular audio and video jacks
Connec[ase[ oTaudiocables between
the AUDIOIN acksonthe TV and tne
AUDIOOUT acks onthe DVDplayer
for DTVSet-tog Boxl,
TVRearPanel
2
Connectvideo cables oetween the
VIDEOOUTjack on the DVD player
for DT£ Set40o Box) and the VIDEO IN
jack on the TV.
DVD Player/DTV Set-top Box
23
INSTALLATION [
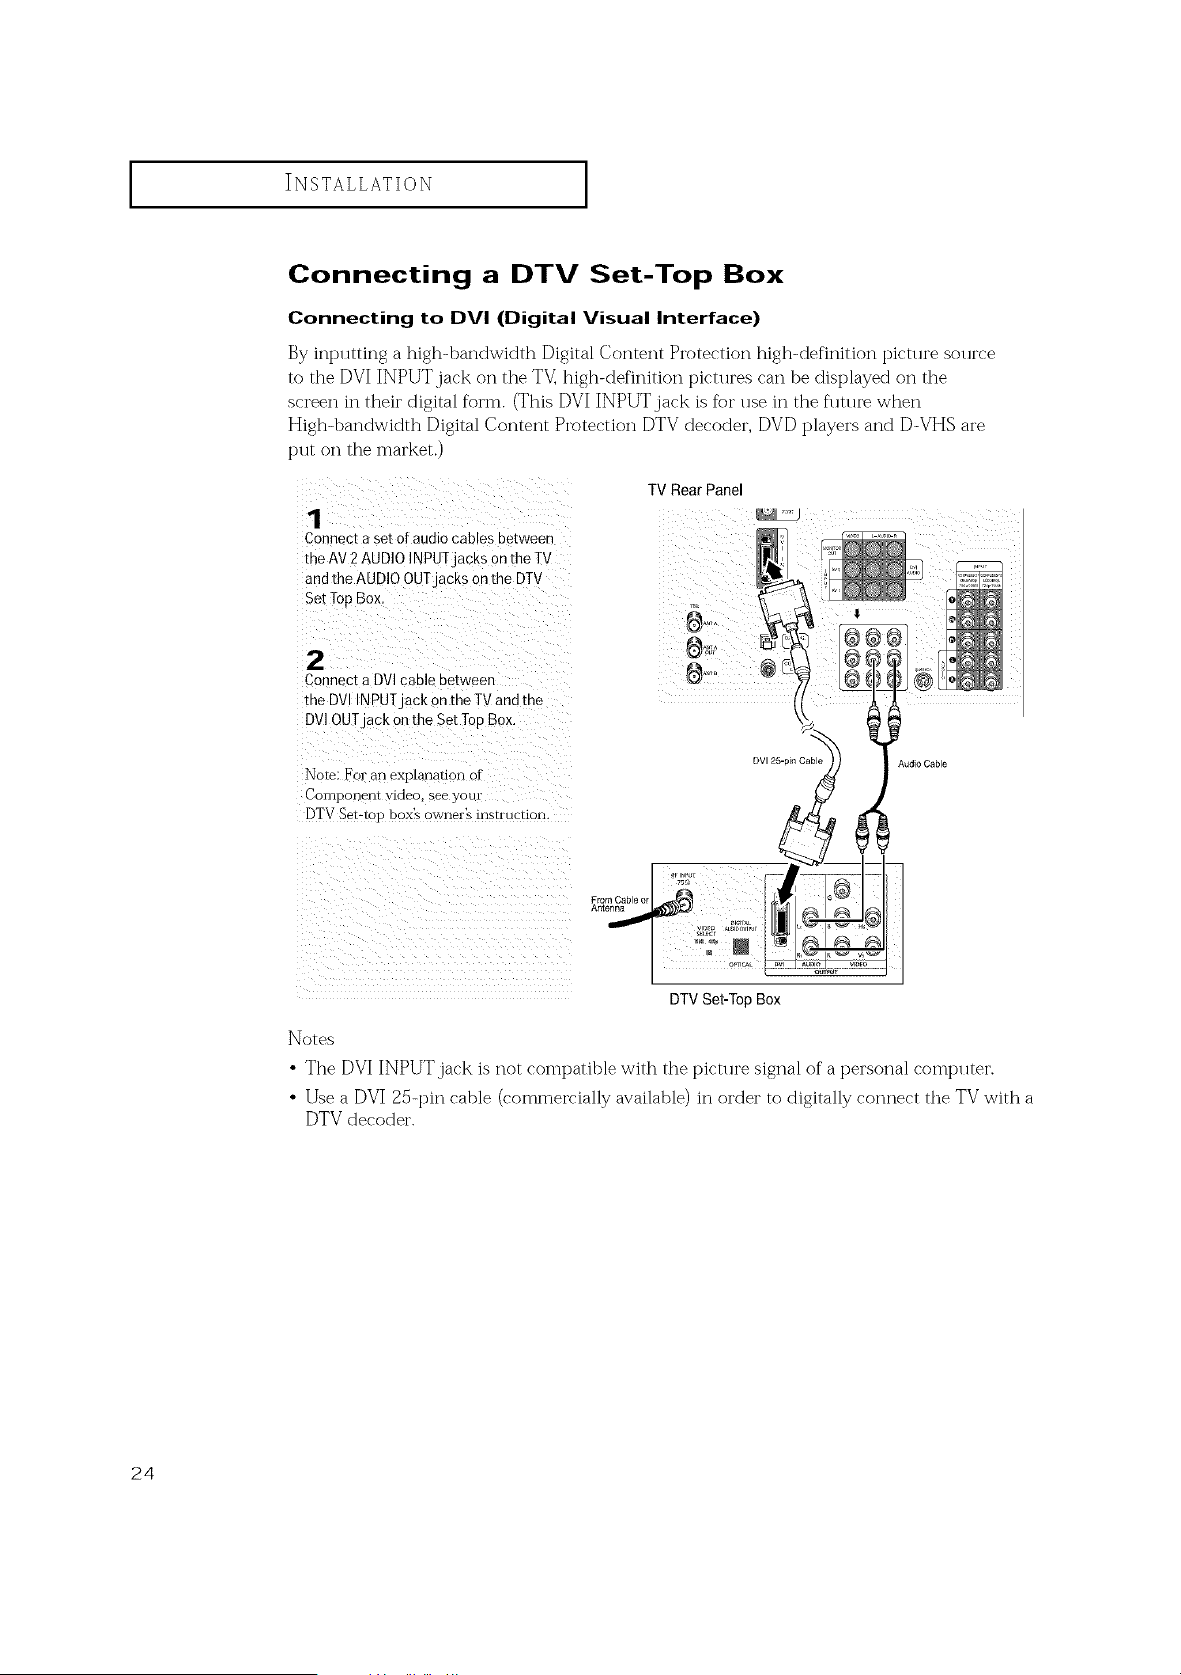
Connecting a DTV Set-Top Box
Connecting to DVI (Digital Visual Interface)
By inplltting a high-bandwidth Digital Content Protection high-definition pictl u'e sol u'ce
to the DVI INPUT jack on the TV_ high-definition pictures can be displayed on the
screen in their digital form. (This DVI INPUTjack is ft)r use in the flmue when
Nigh-bandwidth Digital Content Protection DTV decoder, DVD players and D-VHS are
put on the market.)
1
Connect aset of audiocables be[ween
me AV2 AUDIOINPUTjaCKSon the TV
and the AU NO OUTjacKs on the DT_
Set TopBox,
2
ConnectaDVI cable between
the DVI INPUTjack on the TVand the
DVI OUTjack on the Set TopBox.
Nore. For an exi)lanauon oi
Corrlpolaerll VlCleo. see yOUl
DTV %t-to F box's owners instruction
TV RearPanel
From Cable or
Antenna
DV125-pin Cable Audio Cable
DTVSet-Top Box
Notes
• The DVI INPUT,jack is not compatible with the picture signal of a personal comt_uter.
• Use a DVI 25-pin cable (commelrially available) in order to digitally connect the TV with a
DTV decoder.
24
i INSTALLATION i
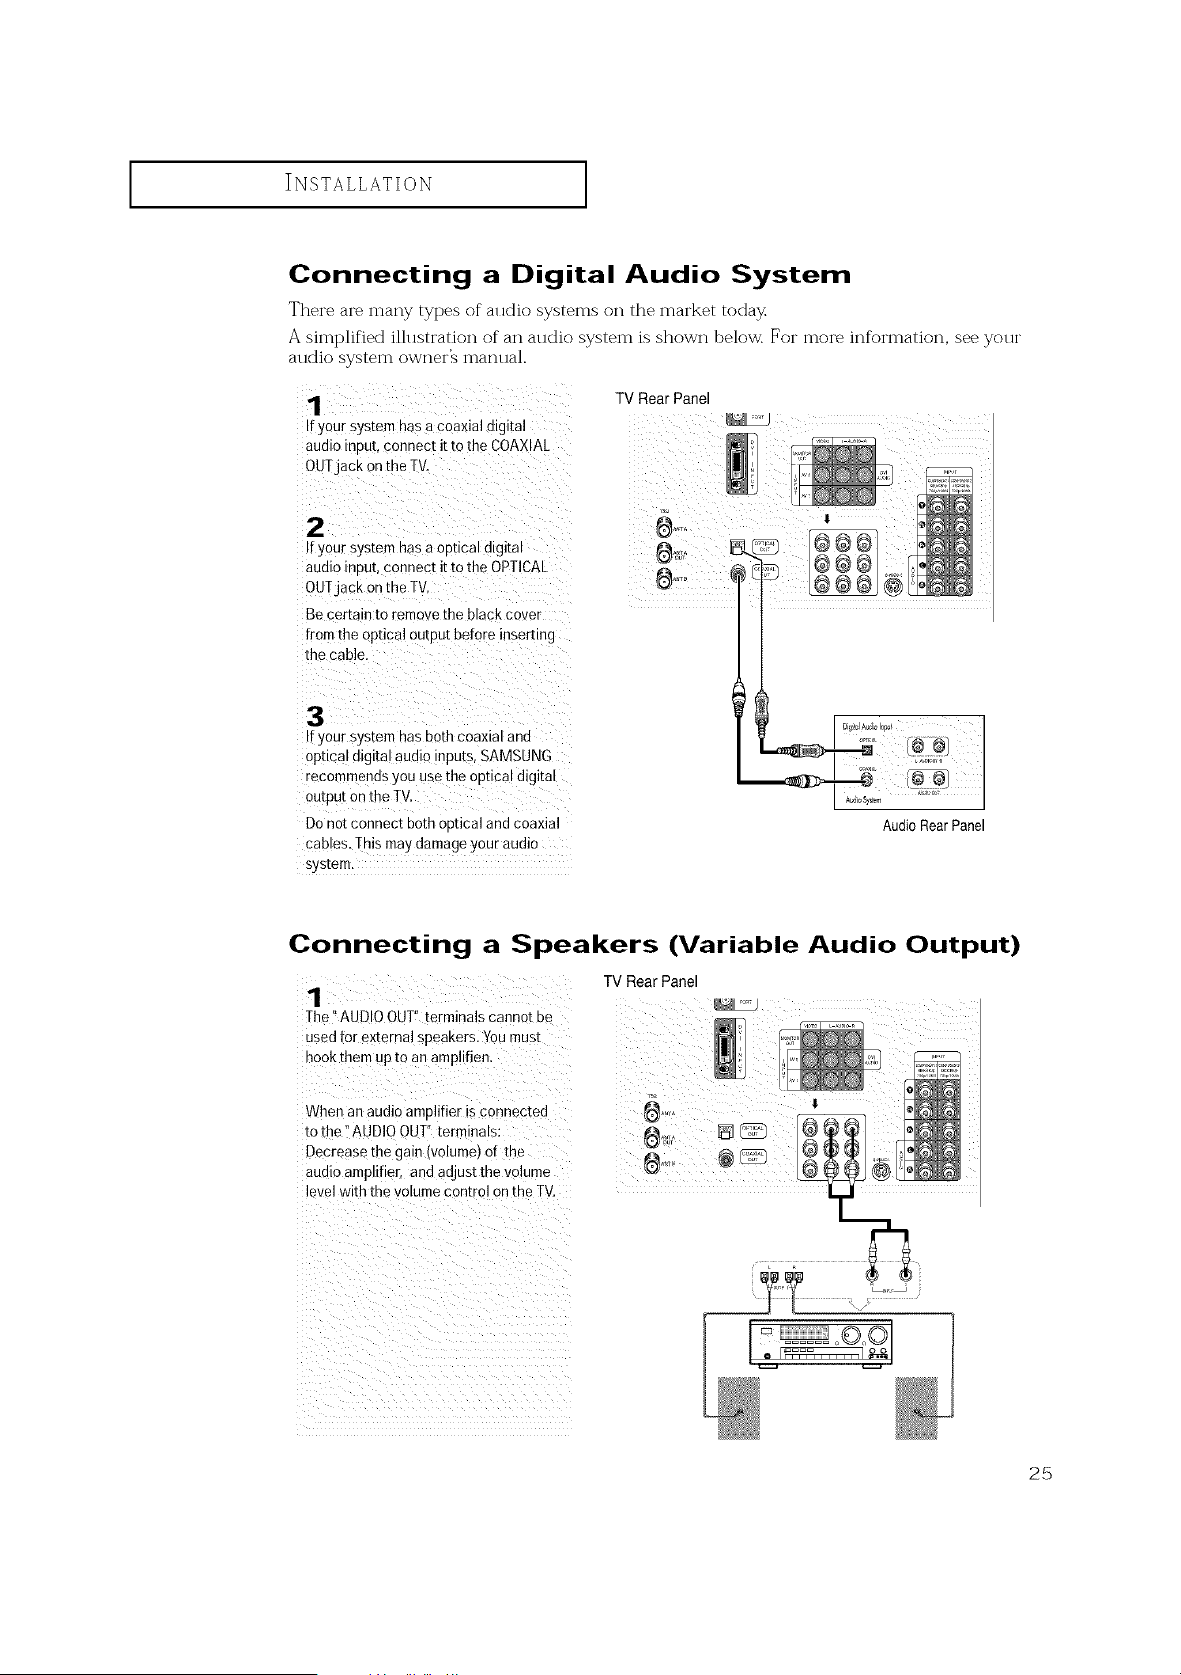
Connecting a Digital Audio System
There are many types of alldio systems on the market today
A simplified ilhlstration of an audio system is shown below. For more information, see your
audio system owner's manual.
IfYOUrSystemhas a coaxial digital
audio input,connect it tothe CQAX!AL
oUTjack qn the TK
!fyour system has aoptical digital
audio input,connect i! tothe QPTICAk
OUTjack on the TV.
Be certain to remove theblack cover
fromthe optical output before inserting
the Cable.
TV RearPanel
Ifyour system has both coaxiat and
optica!digital audio !nputs,SAMSUNG
recommends you use the optical digital
ou!put on the TV. : :
Donot connect both optical andcoaxial
cables,Thismay damage#ur audio
system.
Connecting a Speakers (Variable Audio Output)
1
The" AUD0 OUT"terminals canno[ De
used for external speakers. Youmusl
hookthem up to an ampliflen.
TV Rear Panel
When an audio amnlifier is connected
[o the "AUDID OUT" termmaB:
Decrease the ga n (volume) of the
au(][o amplifier, and adjust the volume
level with the VOlume control on the TV
25

INSTALLATION ]
Installing Batteries in the Remote Control
il ¸ ::
Slide the back Cover all
the way out to open the
battery c0mpattment of
the [em0te control. L_//
2¸¸¸¸ (;: /
Installtwo AAA size
batteries,
Make sure to match the "+" and
"-" ends of the batteries with the
diagram inside the conlpartirlent.
_11 Remove the batteries and store
them in a cool, dry place if you won't
be using the remote control fi)r a
long time.
The remote control can be used up
to about 23 feet fl'om the T'_
(Assuming typical TV usage, the
Batteries last fi)r about one year.)
26

OPERATION
Turning the TV On and Off
You can a!so use the P©WER button on the front panel
Plug & Play Feature
When the TV is initially powered On, basic customer settings proceed
al]tomatically and sl]bsecp ]ently: Setting the langl]age, Antenna inpl]t
check, Channel Memorize and Time Setting.
Note " The Plug & Play function operates after plugging in the TV
fox"the first time.
Pressthe Power ouEonon
the remote control,
]-hemessage" Menu lan-
guage channels and time
will be set." isdisplayed
Pressthe ENTERBUt[On
then 'Setting _anguageof
OSD' menu isautomatically
displayea
2
Press the ENTERbutton to
emer the anguage.
Pressthe • button to
select language, then
the ENTERbutton.
Ant. inEJXcheck' menu is
automatically displayed.
Press the • button to
memorize the channels or
the selecteo connection
Press the ENTER button to
select" Start'
;elect the antenna _onnection
ANT A :Air
ANT A : Cable
ANT A :Air, ANT B : Cable
ANT A : Cable,ANT B:Air
WhenselectingCableTV:
Pressthe • button to
select"Cable men press
the ENTERbutton.
Pressthe • button to
cycle through these
choices:
STD"
Start
HRC" or" IRe".
conthmed... 27
OPERATION ]
28
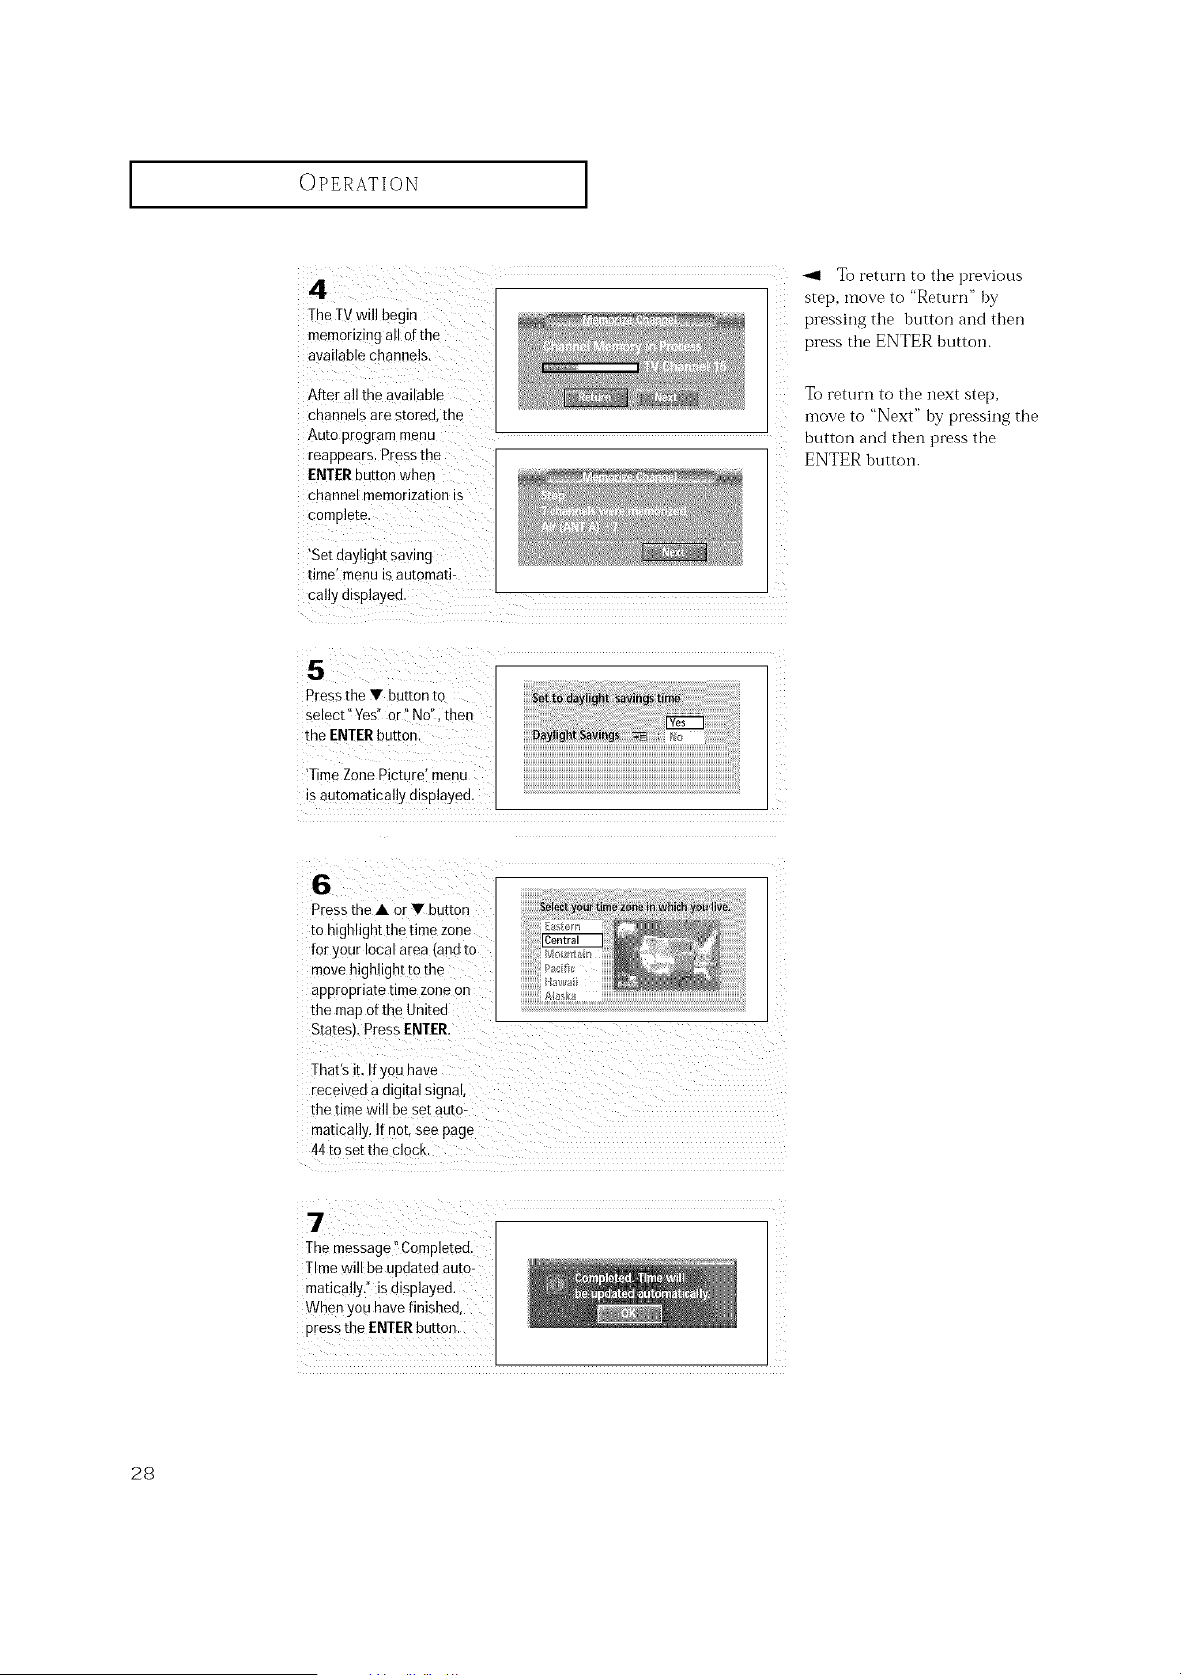
4
]-heTVwill begin
memonzmg all ofthe
avatlablechannels.
After allthe ava able
cnannels are storeu, the
Auto programmenu
reappears. Pressme
ENTERbutton when
cnannel memorizationis
complete
'Setdaylight saving
time menu IS au[omati-
callydisplayed.
5
Pressthe V button tc
select" Yes" or No". ther
the ENTERbuttor
Time Zone Picture _qenu
isautomatically displayed.
6
Pressthe • or • button
[onighlight the time zone
foryour tocalarea landto
movehighlight tothe
appropriate time zoneon
the map otthe United
Sta[esJ Press ENTER.
That's it. Ifyou have
received adtgltal signal,
the time will be set autc
mancs ly. If not, see page
44 to set the clocK.
7
Themessage CornDleted
Time will be updated auto-
matically." isdisplayed.
When you havefinished,
pressthe ENTERbutton.
_91 To return to the previous
step, move to "Return" by
pressing the button and then
press tile ENTER button.
To return to the next step,
move to "Next" by pressing the
button and then press the
ENTER buttoiL
OPERATION ]
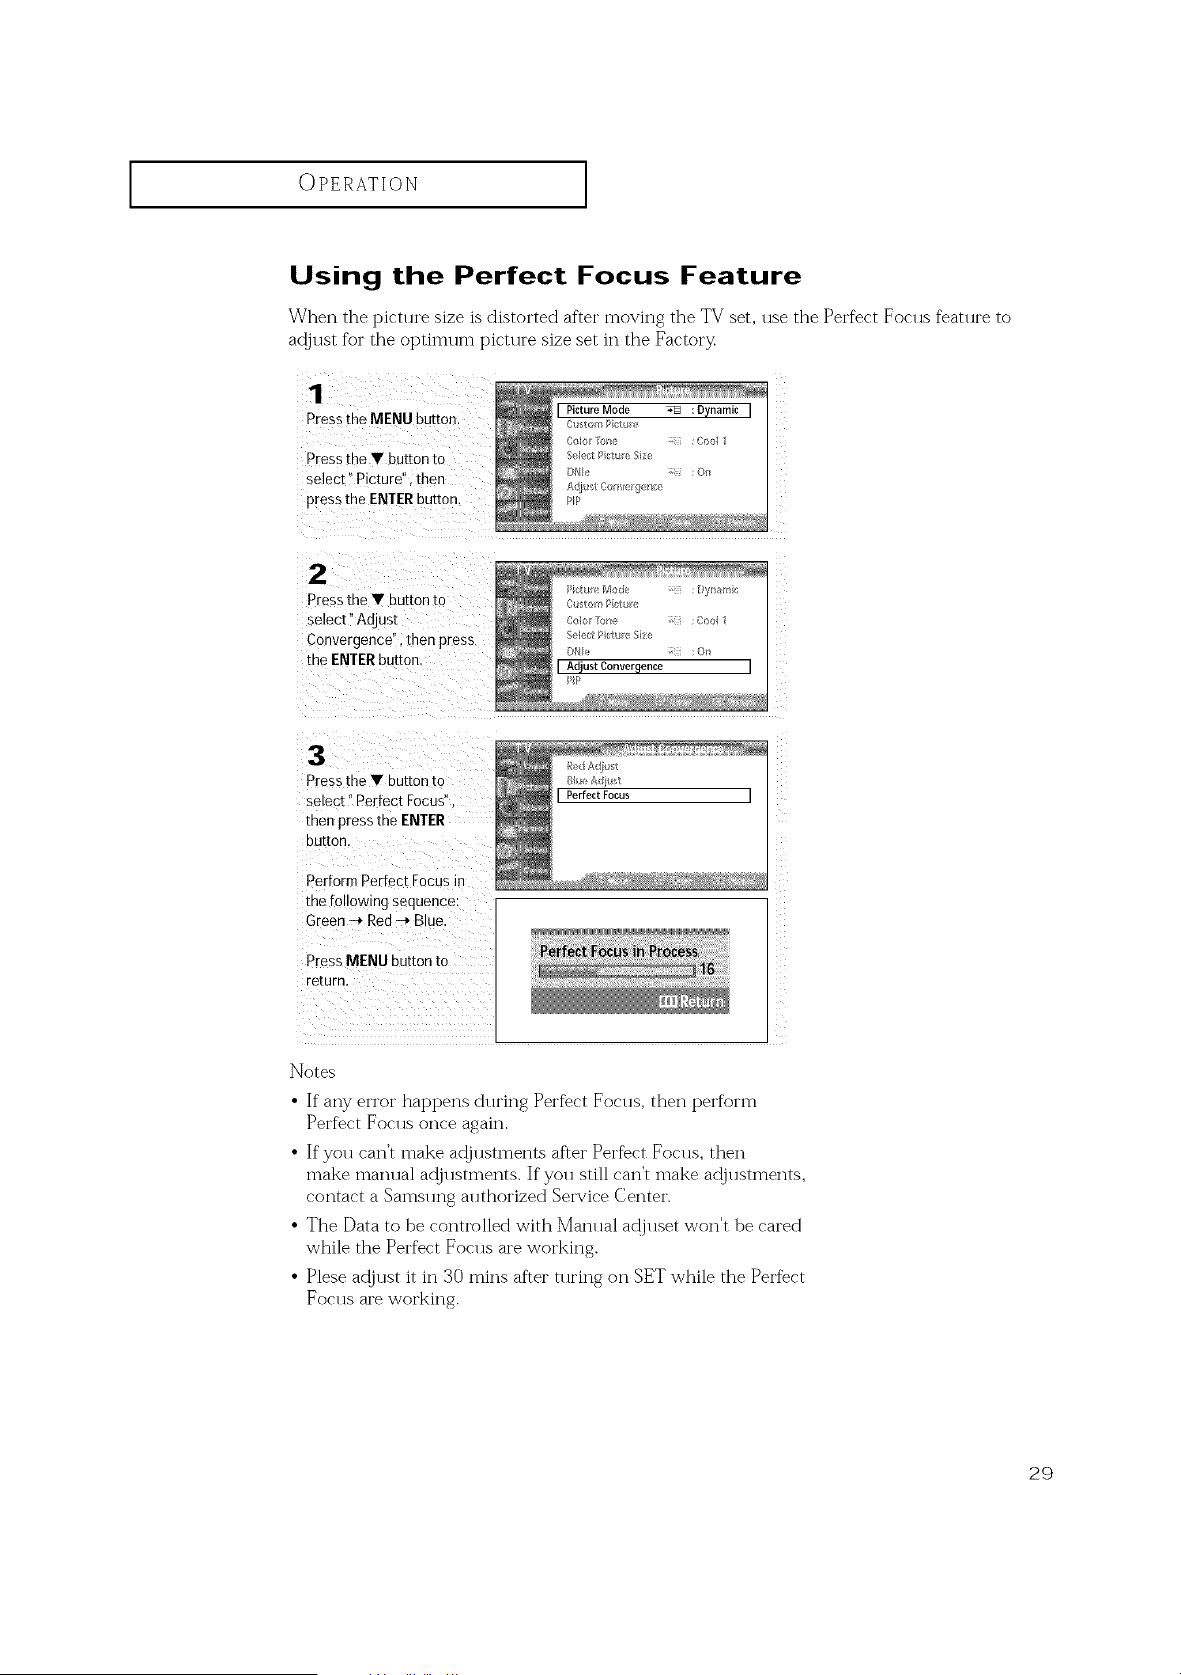
Using the Perfect Focus Feature
When the picture size is distorted after moving the TV set, use the Perfect Focus feature to
adjust for the optimum picture size set inthe Facto:'3<
Pressthe MENU button
Press me • button to
select" Picture", then
press the ENTER button.
I Picture Mode _ :Dynamic I
f t(_rl I_i tu _'
S(fl/!/;t/ <tu (' Size
DNM :Or}
A [1_ ;t ('o_i/tel (/ r//;e
PIP
2
Pressthe • button to
select ° Adjust
Convergence", then press
me ENTERbutton
3
Pressthe • button1o
select" Perfect Focus"
:net pressthe ENTER
uur[on.
PerformPerfect Focusin
me tohowmg sequence:
Green --* Red --* B ue
PressMENU button to
return.
Notes
• If any error hat:pens during Perfbct Focus, then perform
Perfect Foc:ls once again.
• If you can't make adjustments after Perfect Focus, then
make manual a@llstments. If you still can't make a@llstments,
contact a Samsung authorized Service Center.
• The Data to be controlled with Manual ac!juset won't be cared
while the Perfect Focus are working.
• Plese a@ust it it:30 rainsare:" tut'ing on SET while the Perf%ct
Foclls are working.
29
OPERATION ]
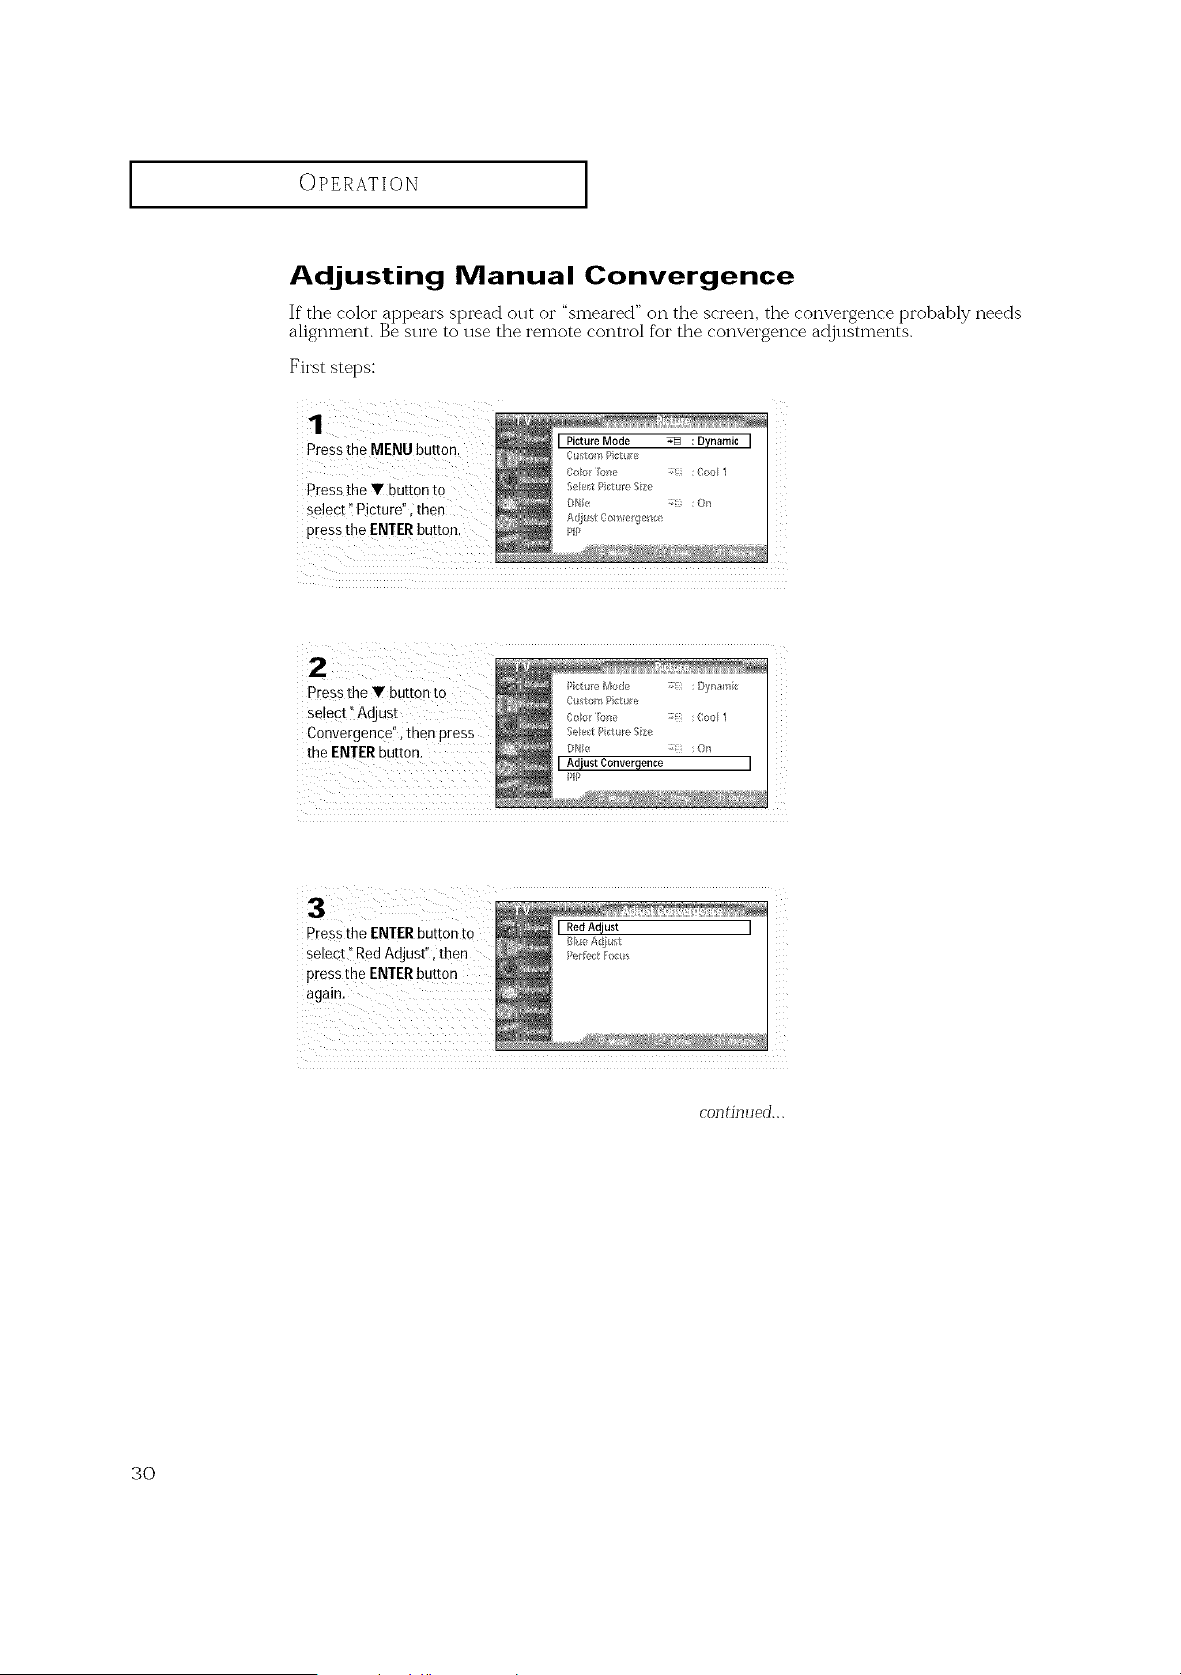
Adjusting Manual Convergence
If" the coloi" at)peai's spread out or "smeared" on the screen, the convergence t)robably needs
alignment. Be sure to use the remote control for the convergence adjustments.
First steps:
Press the MENU button.
Press the T button to
select 'IPicture", then
press the ENTERbutt°n`
J Picture Mode _ : Dynamic J
See_;t:_ctll/; ze
b_le ÷ :On
PP
select :_Adjust
Couvergencei', then press
the ENTERbutton.
_Z
P[ess the ENTERbutton to [ RedAdjust I
Bt_ A l/ust
Select i'Red Adjust", then uru>_:._:_
pressthe ENTER button
contin ued...
3O
OPERATION ]
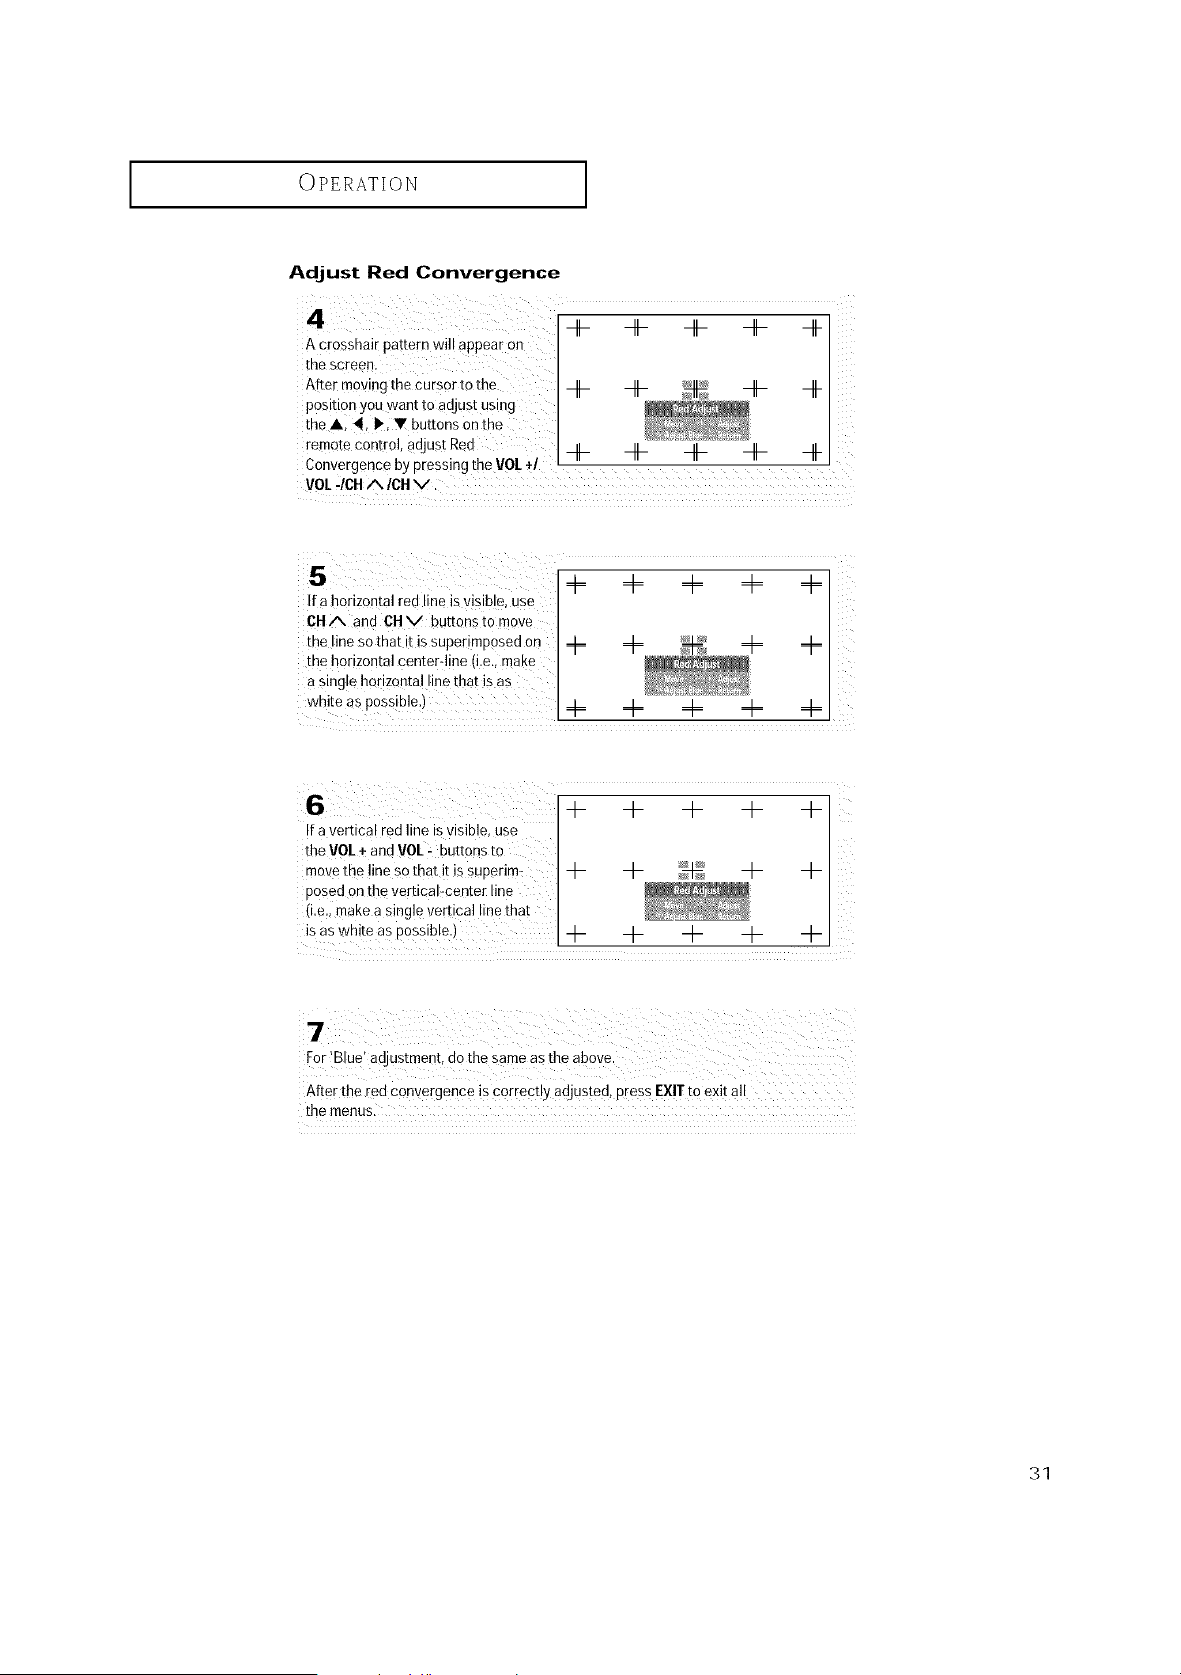
AdJust Red Convergence
A cresshair pattern will @pea[ On
the screen.
After moving the cursor tothe -H- Jr]- -H- -It-
position you want to adjust using
theA, 4, I%Y buttons onthe
remote control' adjust Red Jr]- Jr]- roll- Jr]- 4-
• + -- --
Convergenc ebyp[essmg the V0L / _ m _ m
VOL -_CH/N_/CA V,
4= d= d= 4= 4=
[fa horizontal redline isvisib!#, use
611A and OHy buttonsto move
the lineso thatit issuperimposed on 4= 4= 4= 4=
the horizontal center-lin e (i.e., make
asingle horizonta!line that isas
6 + + + + +
Ifa vertical red lineisvisible, use
the VOL÷and VOL_ buttonsto
movethe !ineso that it issuperim: -1- -1- -1- -l-
PoSedon the verflca!Tcenter line
(i.e,imakeasingle vertical line that
isas white as possible.)-I- -I- -I- -I-
4-
After the red convergence iscorrect!y adjusted, pressEX!Ttoexit a!I
the menus.
31
OPERATION ]
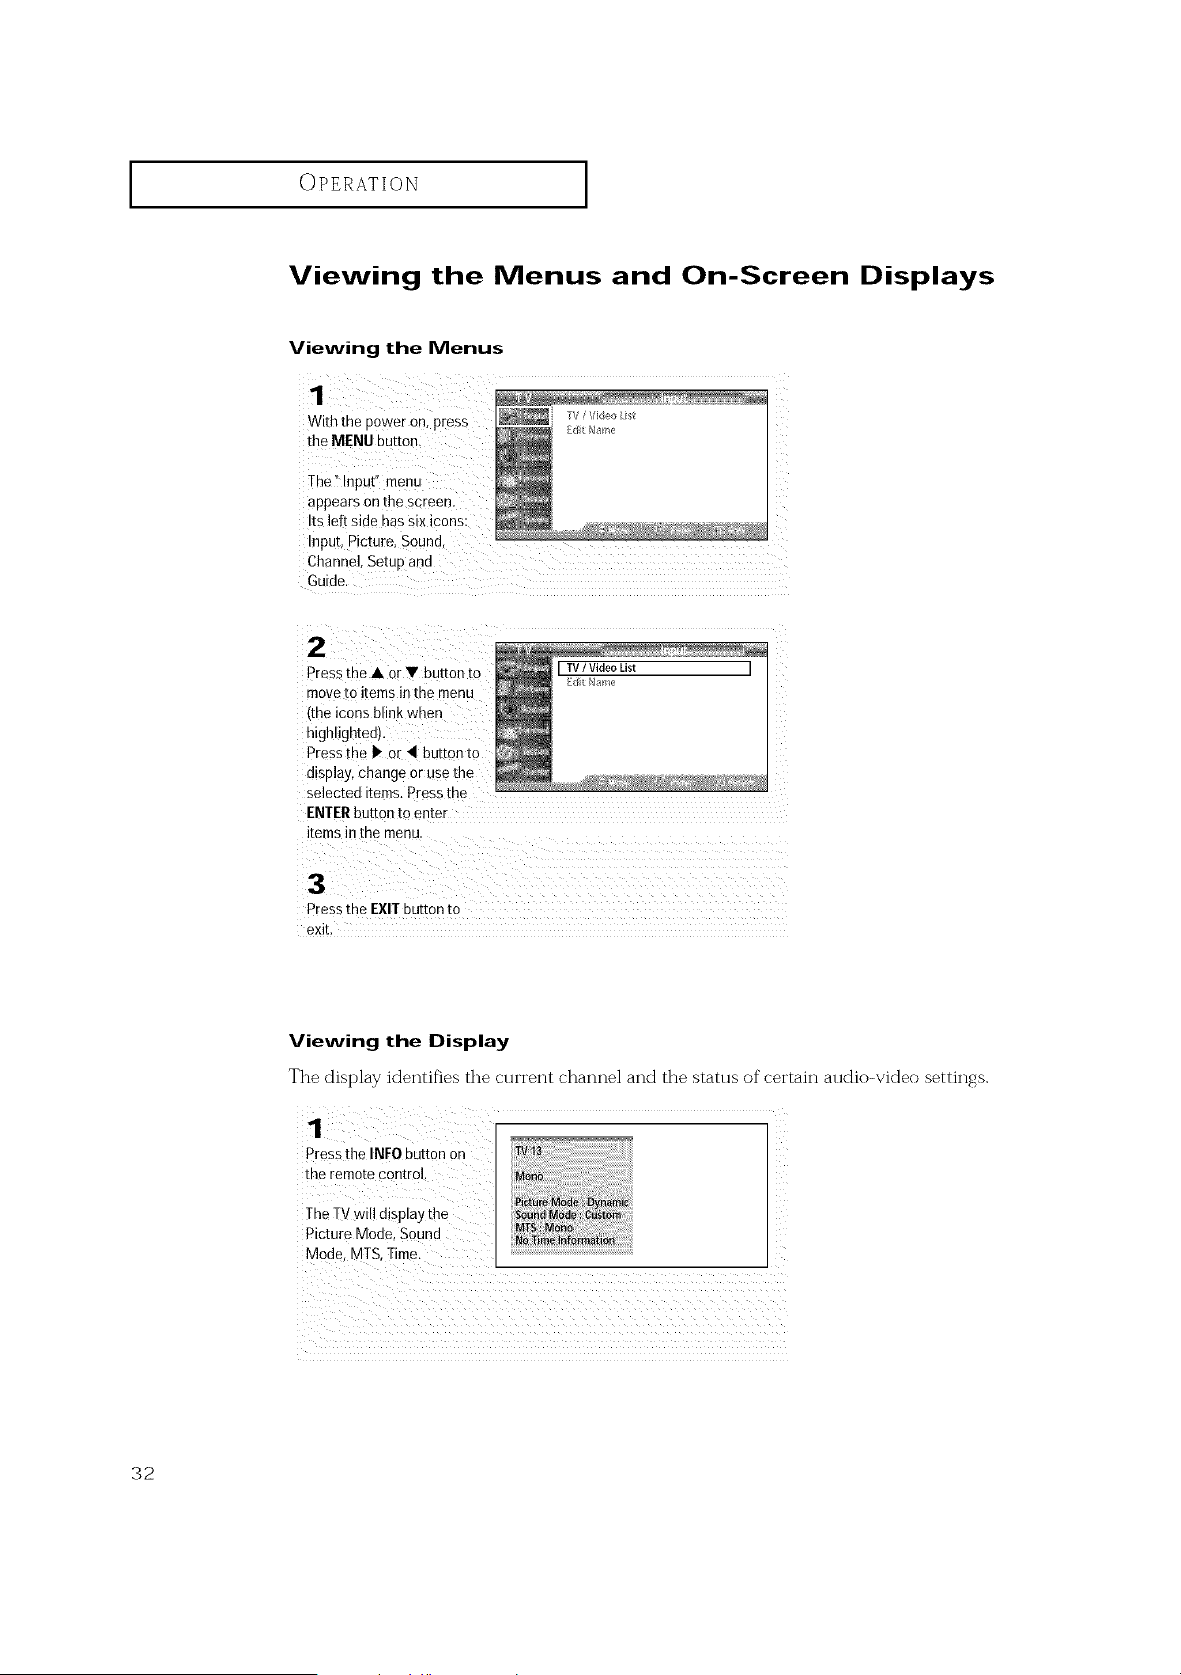
Viewing the Menus and On-Screen Displays
Viewing the Menus
1
W_ththe Dower on,press
the MENU button
The"lnput menu
appears on the screen.
Its left side hassix icons:
Input, Picture. Sound
Channel.Setup and
Guide
2
Press me • or • button to
move tc items in the menu
ime icons blink when
nlghlighteoL
Pressme I, or _ button to
display, change or use the
selected items. Press tne
ENTER button to enter
items in the menu
3
Pressthe EXITbutton to
exit.
Viewing the Display
The display identifies the ctli'i'ei-_t channel and the stattls of certain audio-video settings.
Pressthe INFO button on
the remotecontrol
The TV wil! displaythe
Picture Mode, Sound
Mode, MTS, Time. ...........................................................................................................................................
32
OPERATION ]
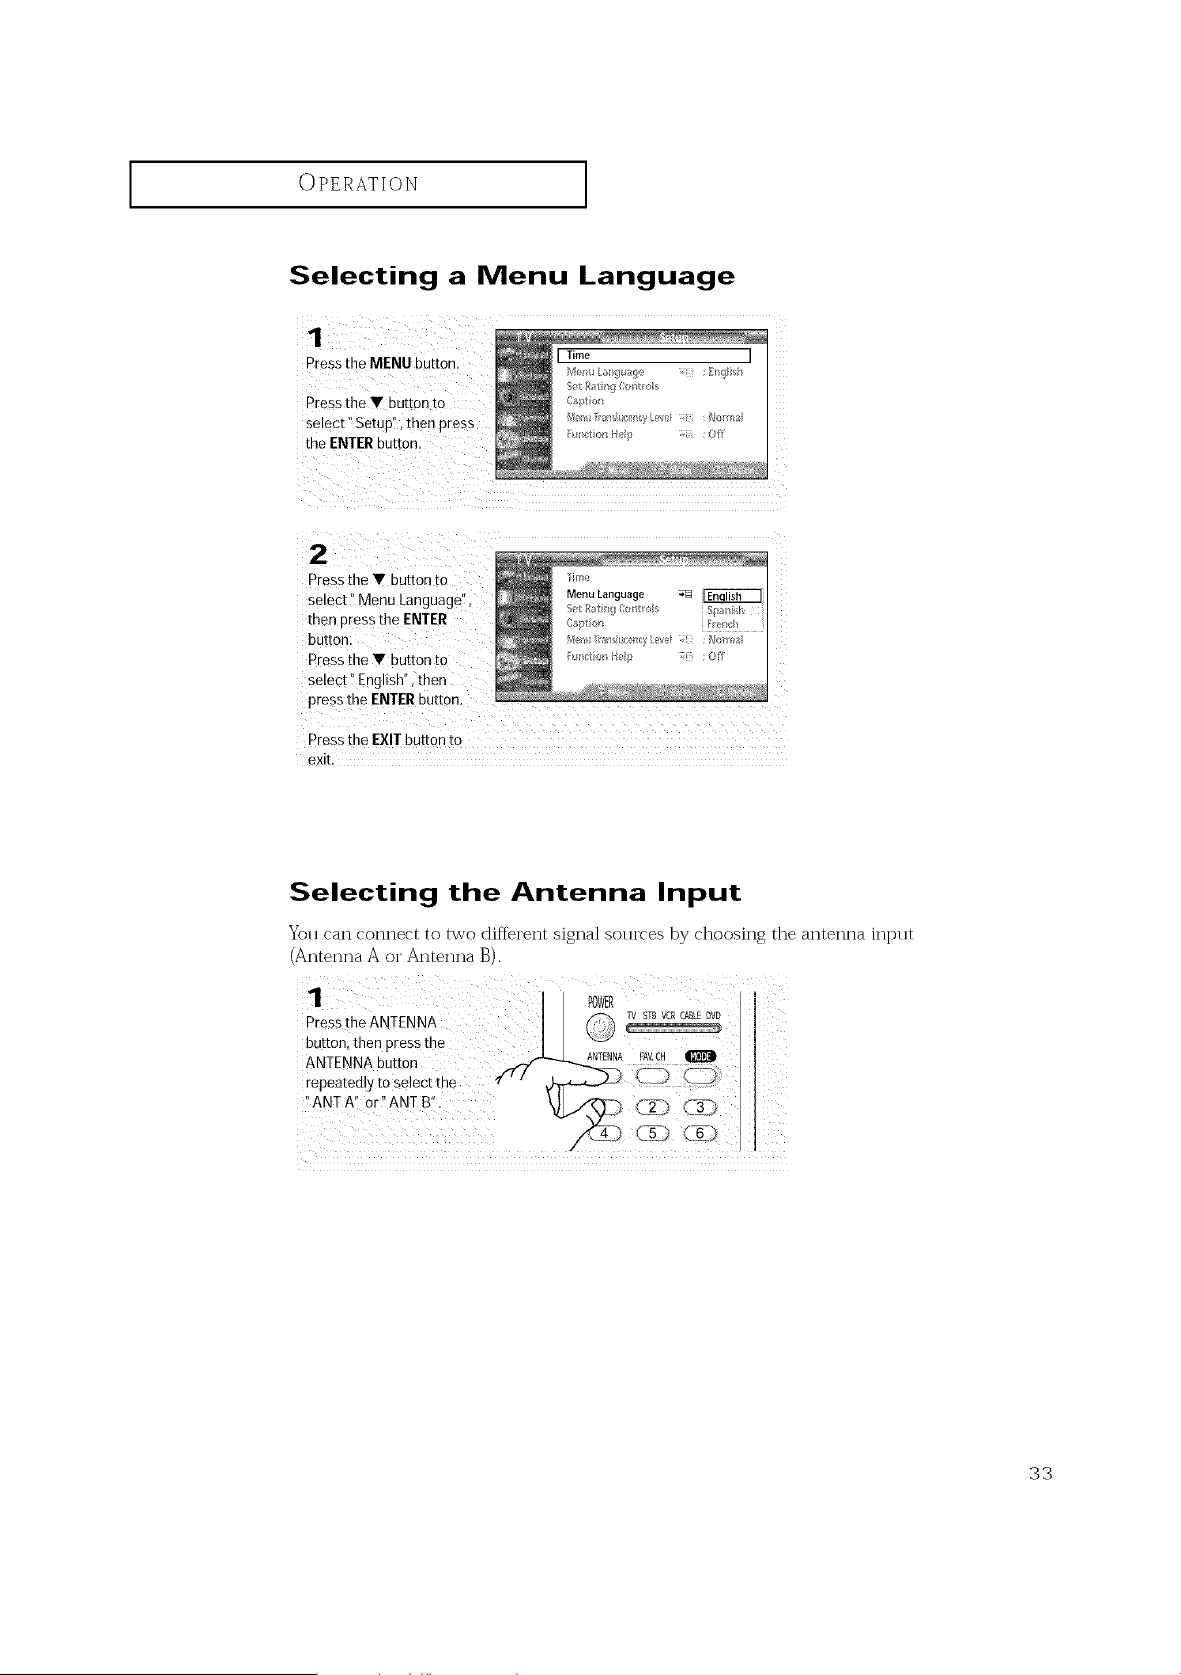
Selecting a Menu Language
1
Pressthe MENU button,
Pressthe • button to
select" Setup", then press
the ENTERbutton,
2
Pressthe • bur[on To
select" Menu Language"
then Dressthe ENTER
button
Pressthe • buttonto
select" Eng sh', then
pressthe ENTERhuE[on,
Press the EXIT button to
exit
Selecting the Antenna Input
You can connect to two different signal sotlI'ces by choosing the antenna input
(Antenna A or Antenna B).
33

OPERATION ]
Memorizing the Channels
Your TV can memorize and store all of the available channels %r both "ofLair"
(antenna) and cable channels. After the available channels are memorized, rise the
(;HA and CHV bnttons to scan throngh the channels. This eliminates the need
to change channels by entering the channel digits. There are three steps for memo-
rizing channels: selecting a broadcast solu'ce, memorizing the channels (alltomatic)
and adding and deleting channels (mare ml).
Selecting the Video Signal-source
Before yonr television can begin memorizing the available channels, yon mnst
specify the type of signal source that is connected to the TV (i.e., an antenna or
a cable system).
Pressthe MENU button.
Press the T button to
select" Channel!',then
Pressthe ENTERbutten,
[ SelectAntenna _ :Air
Seert [:;iv<rite Cbal_I_e_;
A_d & Delete_;h;_l_el_
Pressthe ENTERbutton
toselect" Select
Antenna", then pressthe
EN!ER button,
Press the Y button to
se!ect"Air" or" Cable";
Z
Press the Y button to
select" Memorize
Channels", then press
the ENTERbuttonl
Z
34
OPERATION ]
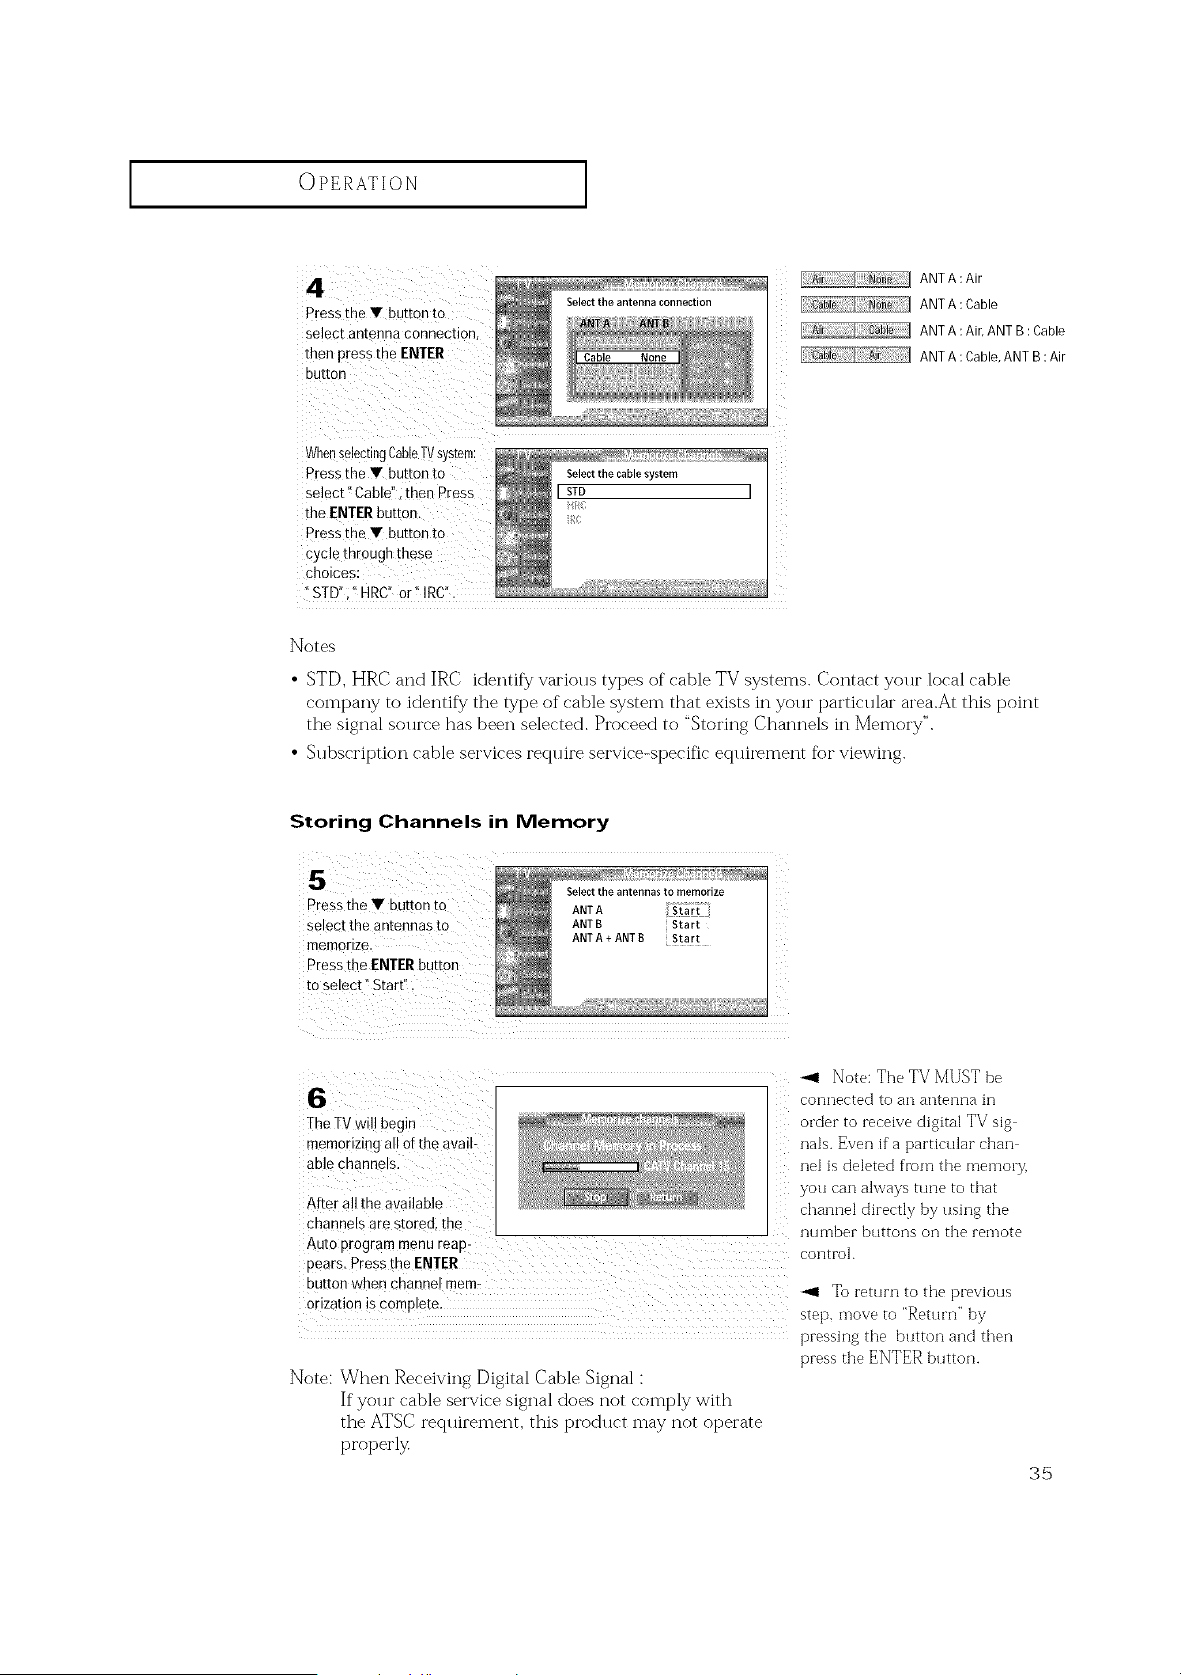
Pressthe • button to
select antennaconnection,
then presstho ENTER
button
Select the antenna connection
Cable None
[ ANT A :Air
ANT A: Cable
[ ANT A :Air,ANT B :Cable
ANT A : Cable,ANT B:Air
WhenselectingCableTVsystem;
Pressthe • button to
select" Cable": then PreSS
the ENTERbutton.
Pressthe • button to
cycle through these
choices:
Selectthe cablesystem
ISTD I
iil¢
Notes
• STD, HRC and IRC identif}/various types of cable TV systems. Contact your local cable
company to identif}/the type of cable system that exists ii-_your particular area.At this point
the signal sollrce has been selected. Proceed to "Storing Channels in Memory".
• SubscI'it)tion cable services require service-specific equirement fi)i"viewing.
Storing Channels in Memory
Selectthe antennasto memorize
Press the • button to ANTA
select the antennas to ANTB Start
memorize. ANTA + ANTB Start
Pressthe ENTERbutton
to select" Start'_.
!he TVwil! begin
memorizing allof the avail
able channels.
After all the available
_1 Note: The TV MUST be
connected to an antenna in
order to receive digital TV sig
nals. Even if aparticular chan
ne] is deleted from the memo W,
you can always tune to that
channel directly by using the
channels are stored, the number buttons on the remote
Auto program menu reap
pears. Press the ENTER control.
button when channe! mem_ _ To return to the previous
orizati0n is complete, step, move to "Return" by
pressing the button and then
press the ENTER button.
Note: When Receiving Digital Cable Signal :
If your cable service signal does not comply with
the ATSC requirement, this product may not operate
properly
35
OPERATION ]
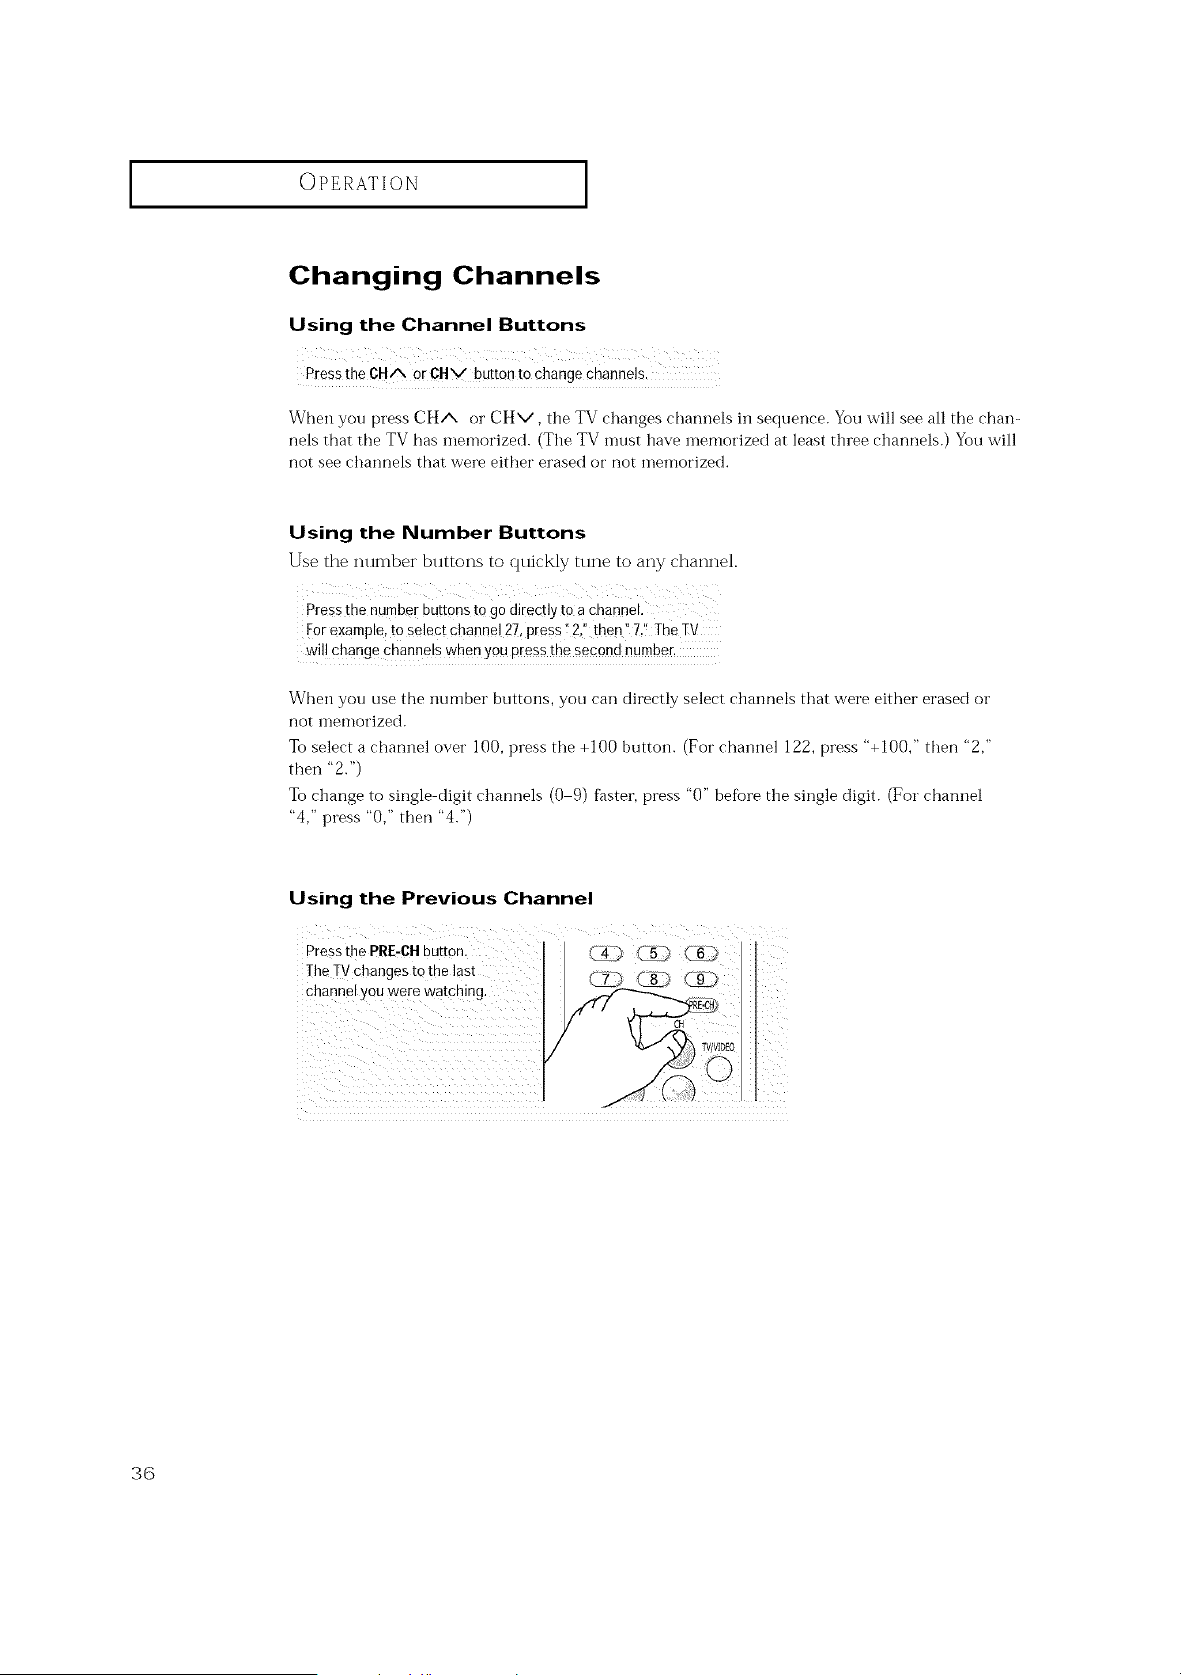
Changing Channels
Using the Channel Buttons
PresstheCHA orCHV buttonto changechannes.
When you press CHA or CHv, tile TV changes channels in sequence. You will see all the chan-
nels that the TV has memorized. (Tile TV must have memorized at least three channels.) You will
not see channels that were either erased or not memorized.
Using the Number Buttons
Use the number buttons to qtfickly tune to any channel
Pressthe number buttons to go directly to a channel,
]:orexample, to select channe! 27, presst!2,1'then" 7,'_TheTV
will change channels when you pressthe second n#mber,
When you use the number buttons, you can directly select channels that were either erased or
not memorized.
To select a channel over 100, press the +100 button. (For channel 122, press "+I00," then "2,"
then "2.")
To change to single digit channels (0 9) F_ster, press "0" before the single digit. (For channel
"4," press "0," then "4.")
Using the Previous Channel
Pressthe PRE-CHbutton,
TheTVchanges to the last
chann_, youwere watching,
/
./
(4_ _ _6_
CE3 8L_ _
36
OPERATION ]
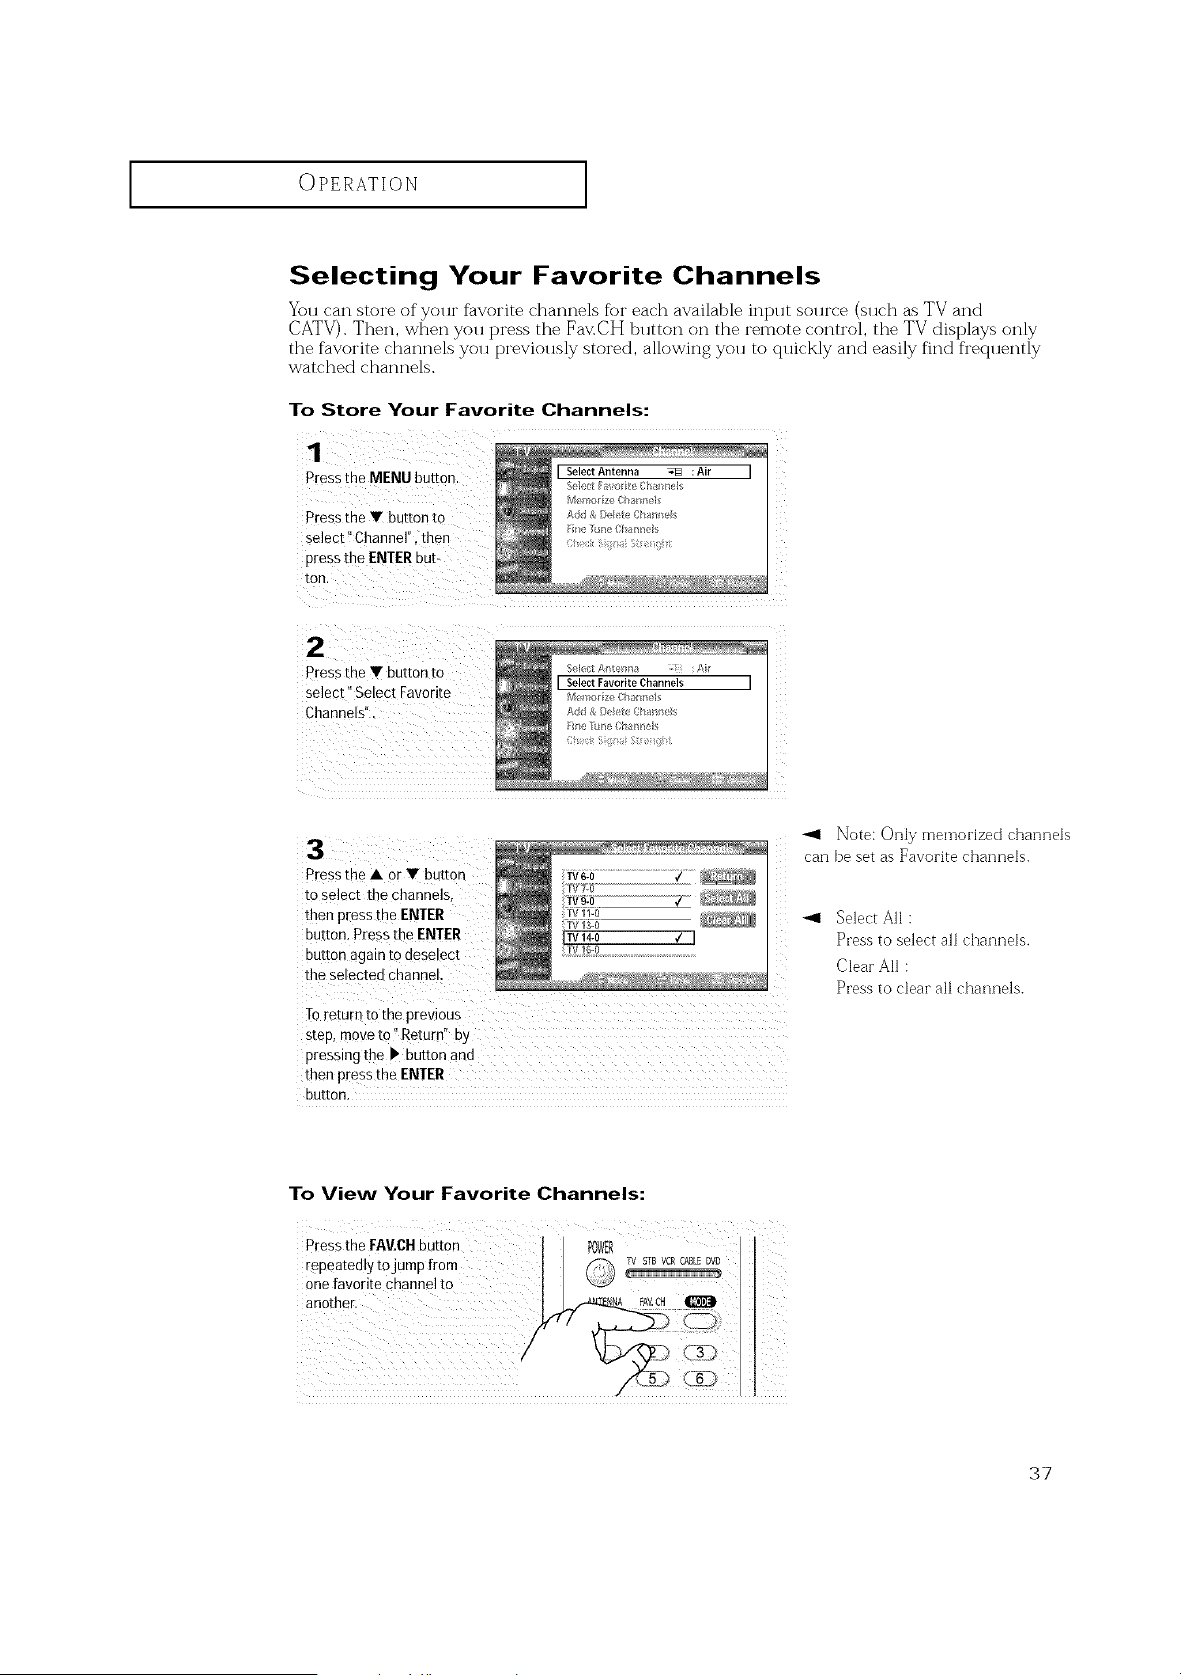
Selecting Your Favorite Channels
You can store of yollr favorite channels for each available int> it sollrc'e (sllc'h as TV and
CATV). Then, when you press the Fa>CH button on the remote control, the TV displays only
the favorite channels you previously stored, allowing you to quickly and easily find frequently
watched channels.
To Store Your Favorite Channels:
1
PresstheMENUbutton. I SelectAntenna _ :Air I
Sol(ct_a o_te (la _ I
M_n/or z_!Chrmnt I
Press the Y button to Add&I) bteChan_ s
select !'Channel", then ir_ uneCha_n_s
! t:,,
press the EI\IIERbub
Pressthe Y button to
select" Select Favorite
Channels".
Pressthe • OrY button
toselect the channels,
then pressthe ENTER
button. Press the ENTER
button again todeselect
the selected channel.
fv g0........................7....
TV 11-{)
TV 13-0
]TV 14-0 € I
Note: Only memorized channels
can be set as Favorite channels.
Toreturn tOthe previous
step, moveto" Returnllby
pressing the Ib button and
then press the ENTER
button.
Select All :
Press to select all channels.
Clear All :
Press to clear all channels.
To View Your Favorite Channels:
PresstheFAV,CHbutton POWER
repeatedly to jump from
one favorite Channelto
another.
37
OPERATION ]
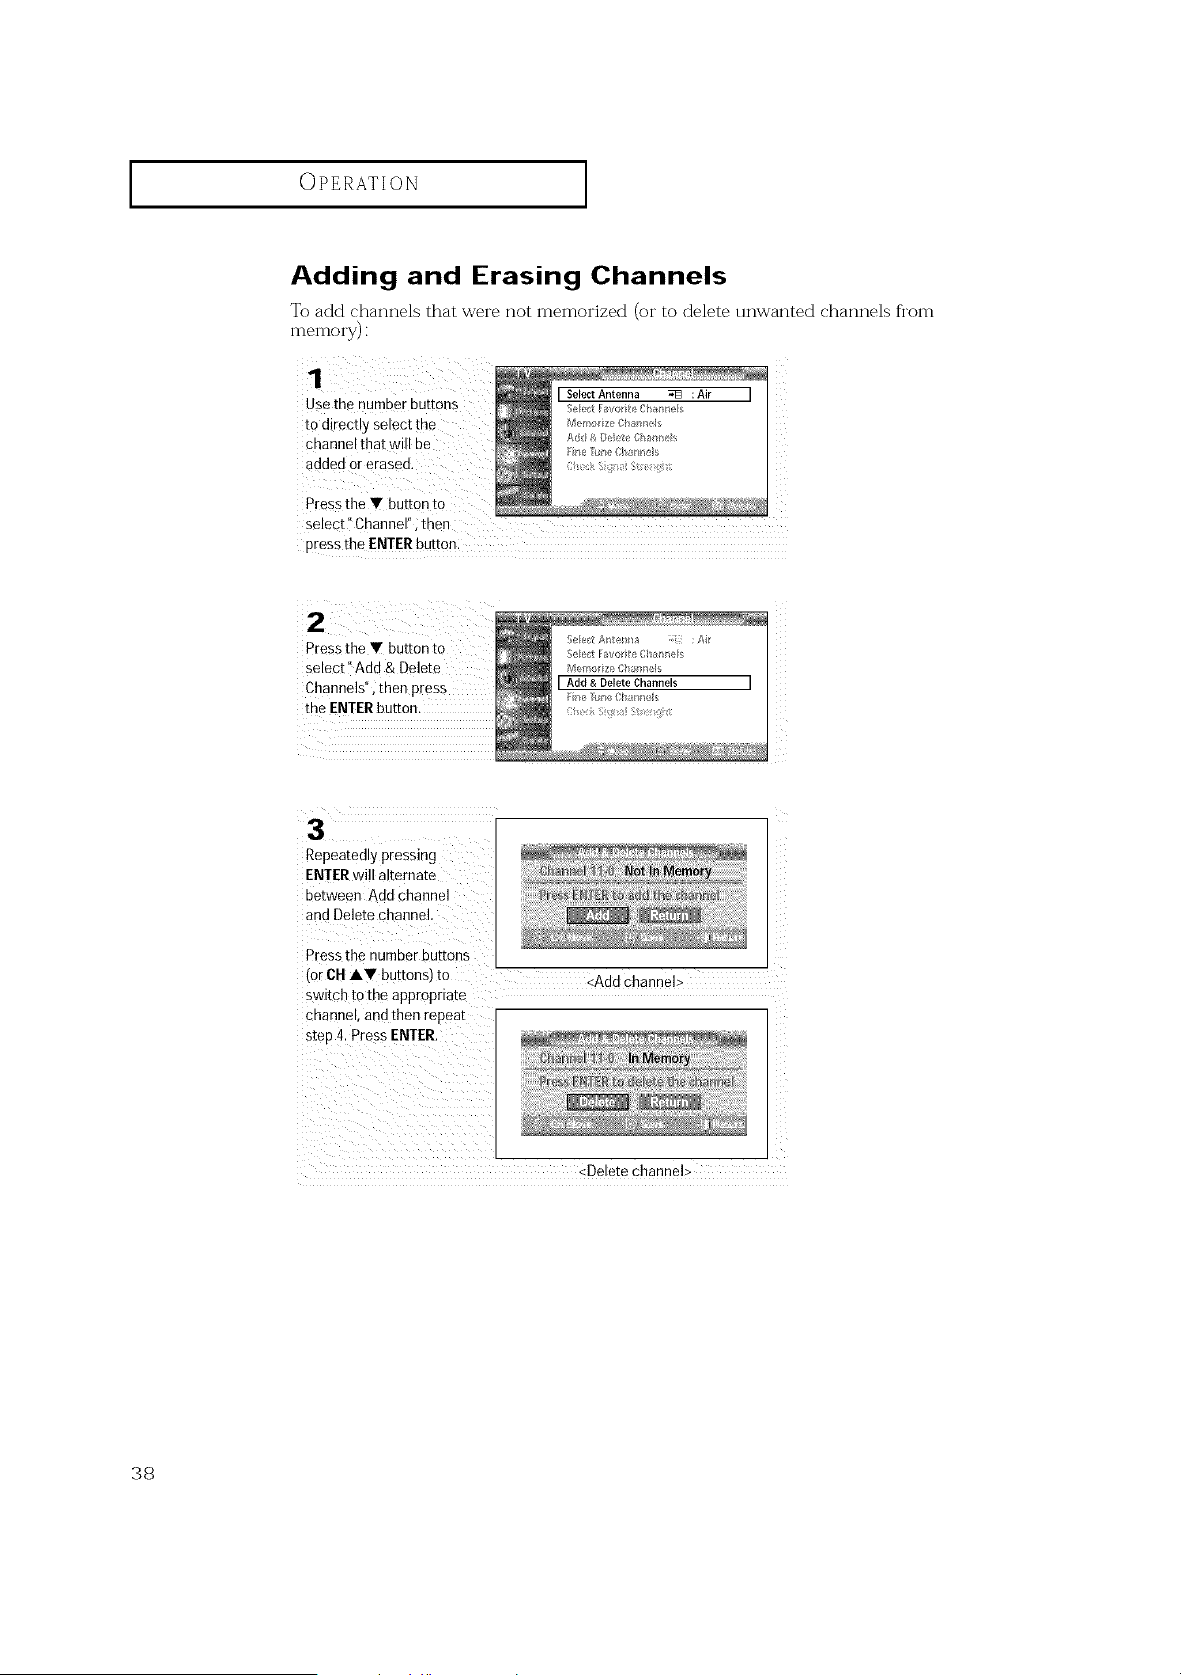
Adding and Erasing Channels
To add channels that were not memorized (or to delete unwanted channels fl'om
memory):
Use the number buttons
tOdirect!y Selectthe
Channelthat wi!l be
added orerased.
Pressthe T button to
select" Channel" ;then
pEessthe ENTERbutten:
Pressthe Y button to
select i' Add & Delete
Channels", then press
the ENTERbutton.
5e[e/;tA¢_teb_a : :Ai
Seed Fay(rite CI/a/_;e s
M;,t_o} ze ba snels
IAdd &Delete Channels I
Fine_l_e Cha_nels
Repeatedly pressing
ENTER will alternate
between Aua channe
and Delete channel,
Pressthe number DuEons
('orCH&V buttonsl to
swltcl _to me appropriate
enanneL and then repeal
steD 4. PressENTER.
<Add channel>
<Delete channel>
38
I OPERATION
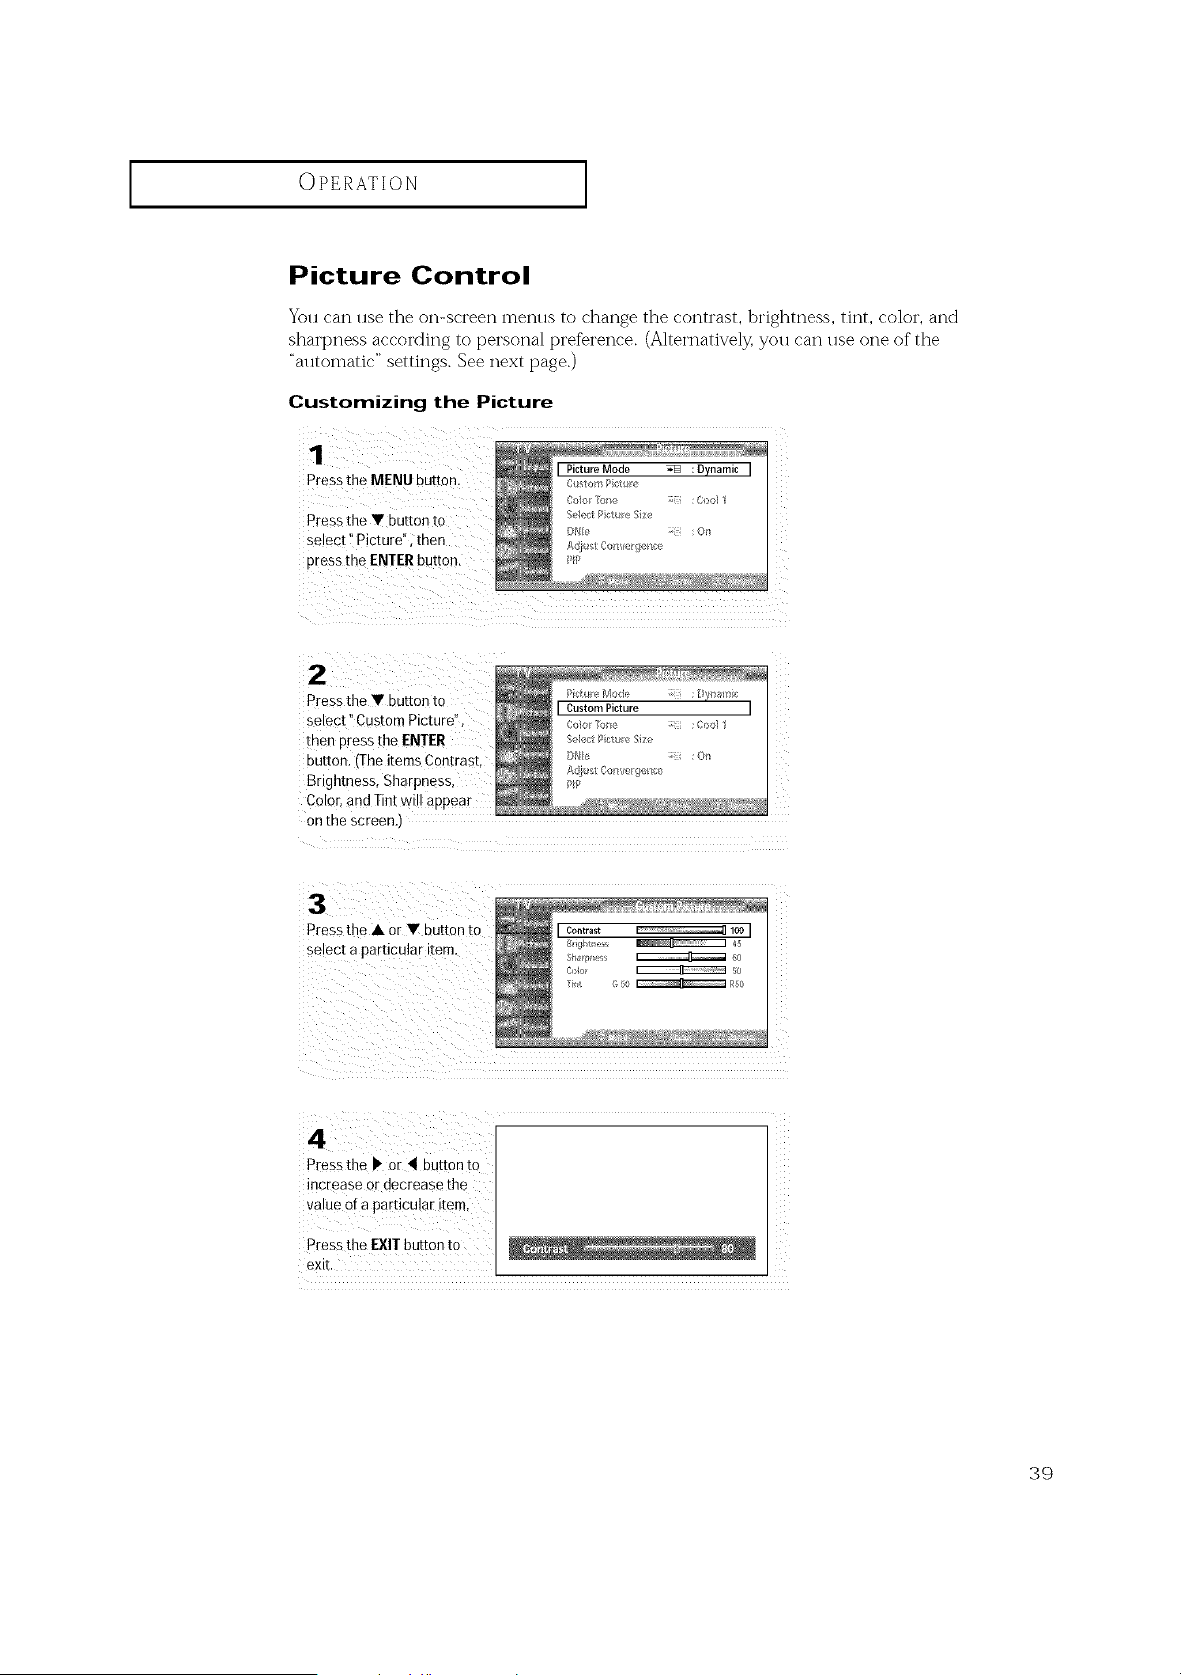
Picture Control
You can use the on-screen menus to chan_e the contrast, brightness, tint, co]or, and
sharpness accordinf4 to personal preference. (Alternatively. you can use one of the
"automatic" settings. See next [)age.)
Customizing the Picture
1
Pressthe MENU button.
Press the • button to
select Picture" then
cress the ENTER button.
2
Pressthe • button to
select CustomPicture",
men Dressthe ENTER
Out[on,'Theitems Con[ras[.
Brghtness, Sharpness,
Color,and Tint will appear
onERescreenJ
3
Pressthe • or • button re
select a particular item
4
Pressthe I' or 4 button [o
increase ordecreasethe
va,ueorapardcular item
Pressthe EXIT button to
BXIL
39
OPERATION ]
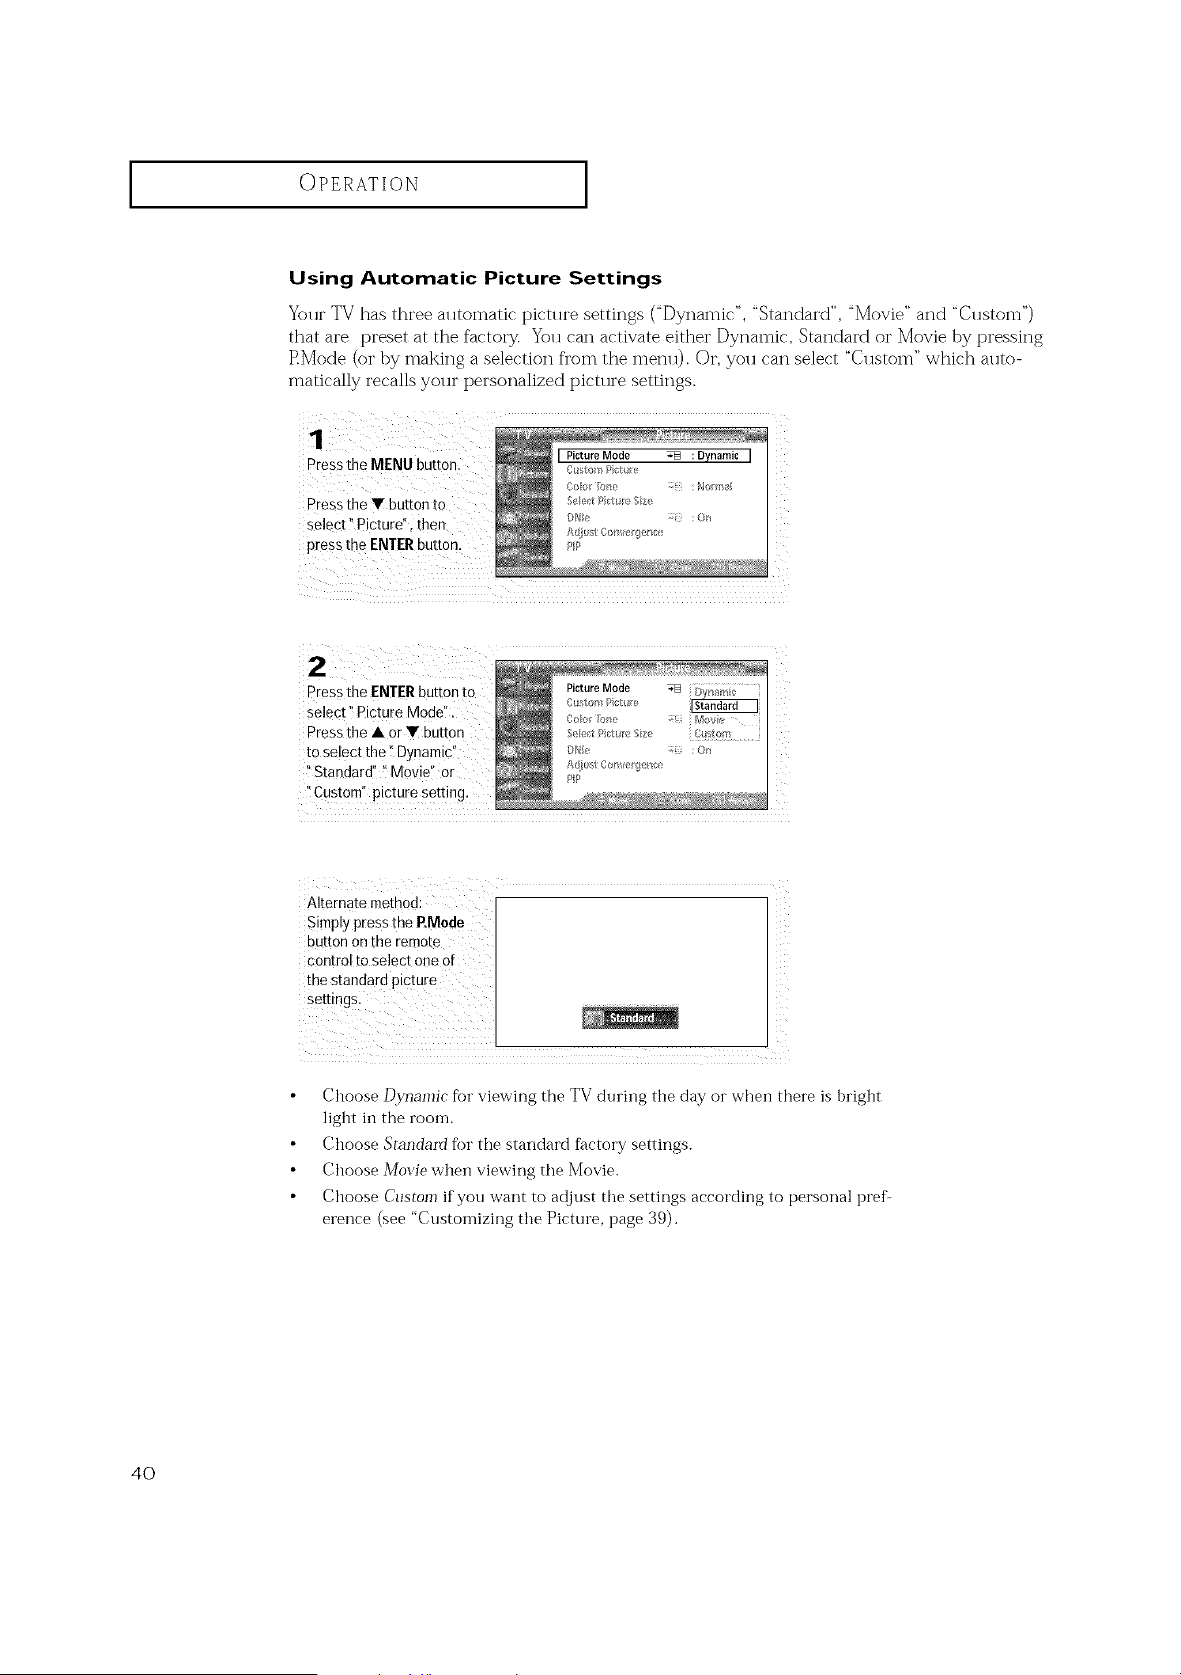
Using Automatic Picture Settings
Yt)I u"TV has three al ltomatic pictl u'e settings ("Dynamic ", "Standard", "Movie" and "(;11store")
that are preset at the factory. You can activate either Dynamic, Standard oi" Movie by pressing
RMode (or by making a selection fl'om the menu). Or, you can select "Custom" which auto-
matically recalls your personalized picture settings.
Pressthe MENU button.
Pressthe V button to
select !'Picture", then
pressthe ENTERbutton,
Pressthe ENTERbuttonto PictureMode:_/; _ FY_-'_!nz'.....
select i!Picture Mode". .....
(orr l_e Movir:_
Pressthe A orY button eet :_t/e ze C__/r_
tOselect the !!Dynamic!' I_l_ :o_
i'Standard" _!Movie" or it_ _ o ,, ;:>_
PIP
'ICustom" picture settin(
Alternate method:
Simplypressthe P.Mode
button on the remote
control to select one of
the standard pictur e
Settingsl
Choose D_]anlic for viewing the TV during the day or when there is bright
light in the room.
Choose Standmfl for the standard ff_ctory settings.
Choose Movie when viewing the Movie.
Choose Custom if you want to adjust the settings according to personal pref-
erence (see "Customizing the Picture, page 39).
4O
OPERATION ]
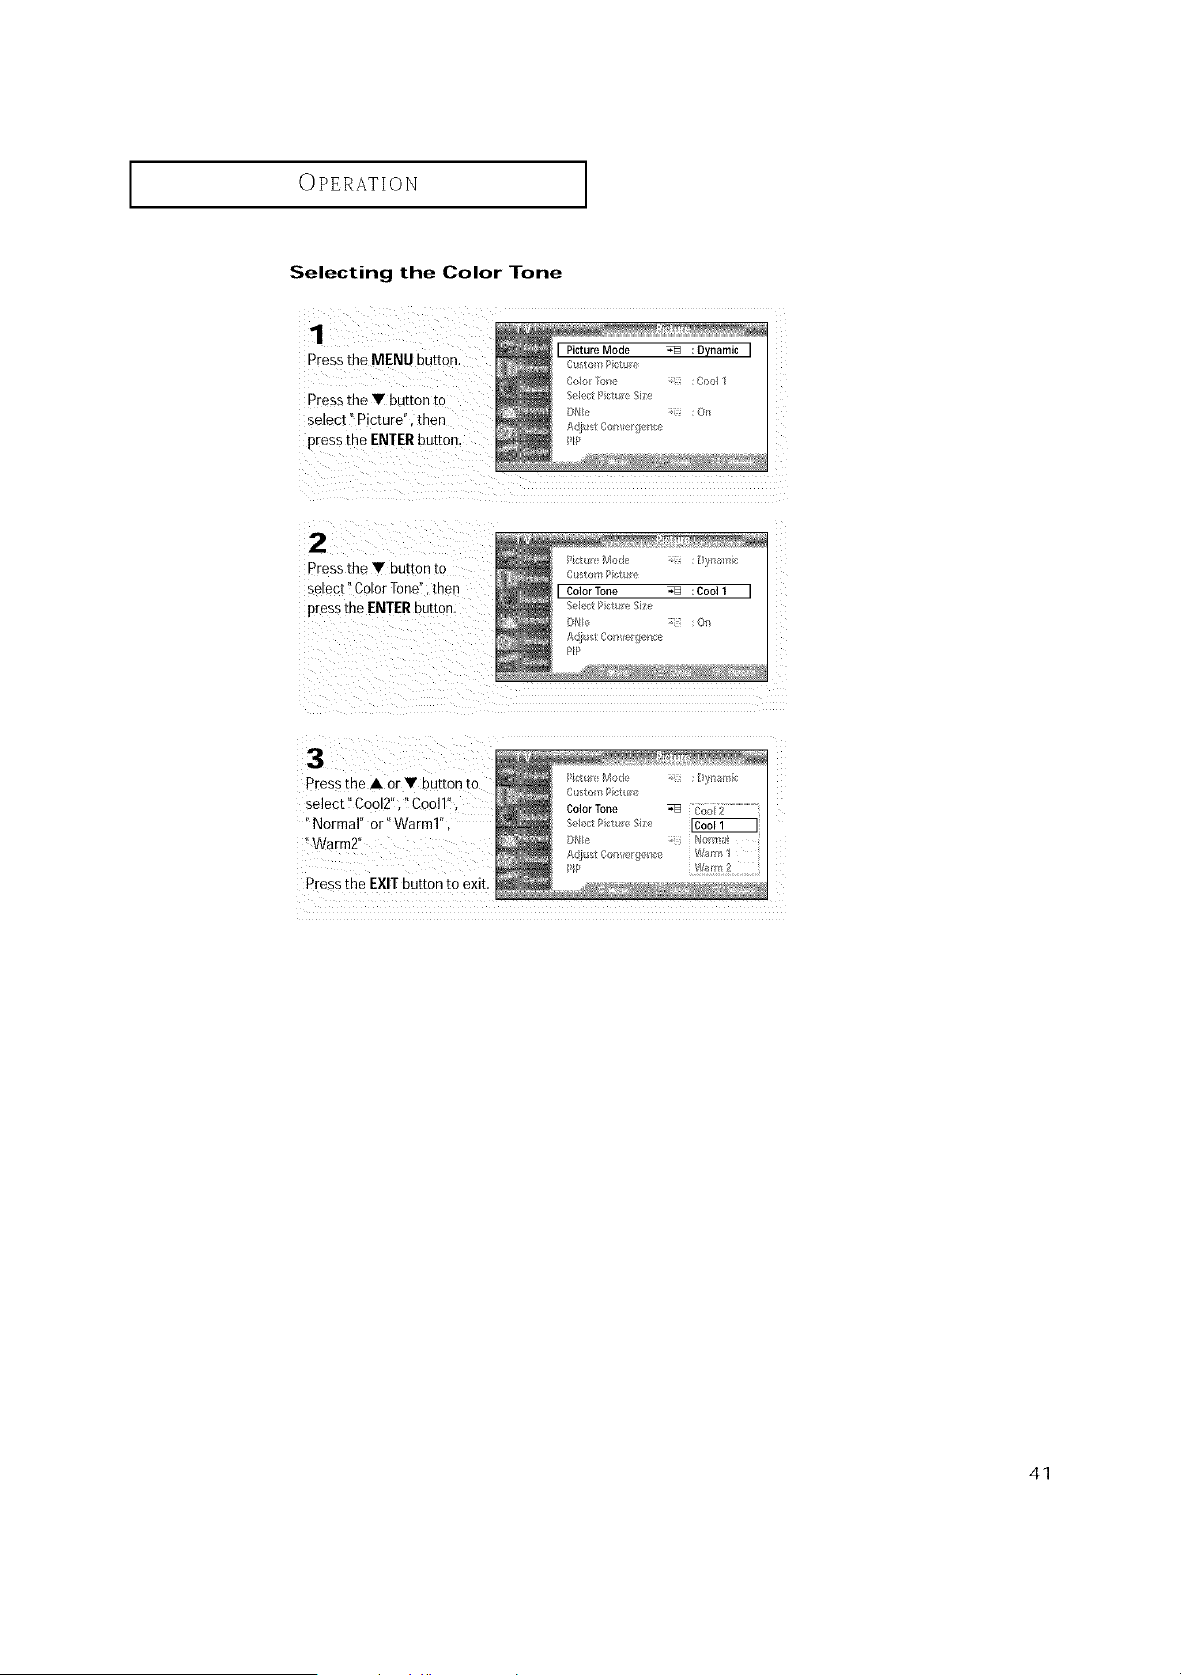
Selecting the Color Tone
Pressthe MENU button.
Press the V buEon [c
select" Picture", then
press the ENTER button
2
D'essthe• 3utton[o
select" ColorTone" [nen
presstheENTERbuttor
I Picture Mode _ :Dynamic I
Cf toY_#iotu
SelectI _tu eSiz
#N_e :Or/
A/_u',t C n _er!}e_ce
_E
PittU _Mode : [ _!b_l//ic
Cl%om Pklue
[ ColorTone _ :Cool1 [
$el/ct __;tureSize
/)Nk, :Orl
PIP
3
Press the • or • button to
select" Cool2". "Coo11".
Normal" or" Warm1"
Warm2'
Pressthe EXIT button to exit
/icte _Mode ; [}y} ami8
Color Tone -q_ .......................
Adiu'_t toni/err# _<,e Warm I
41
OPERATION ]
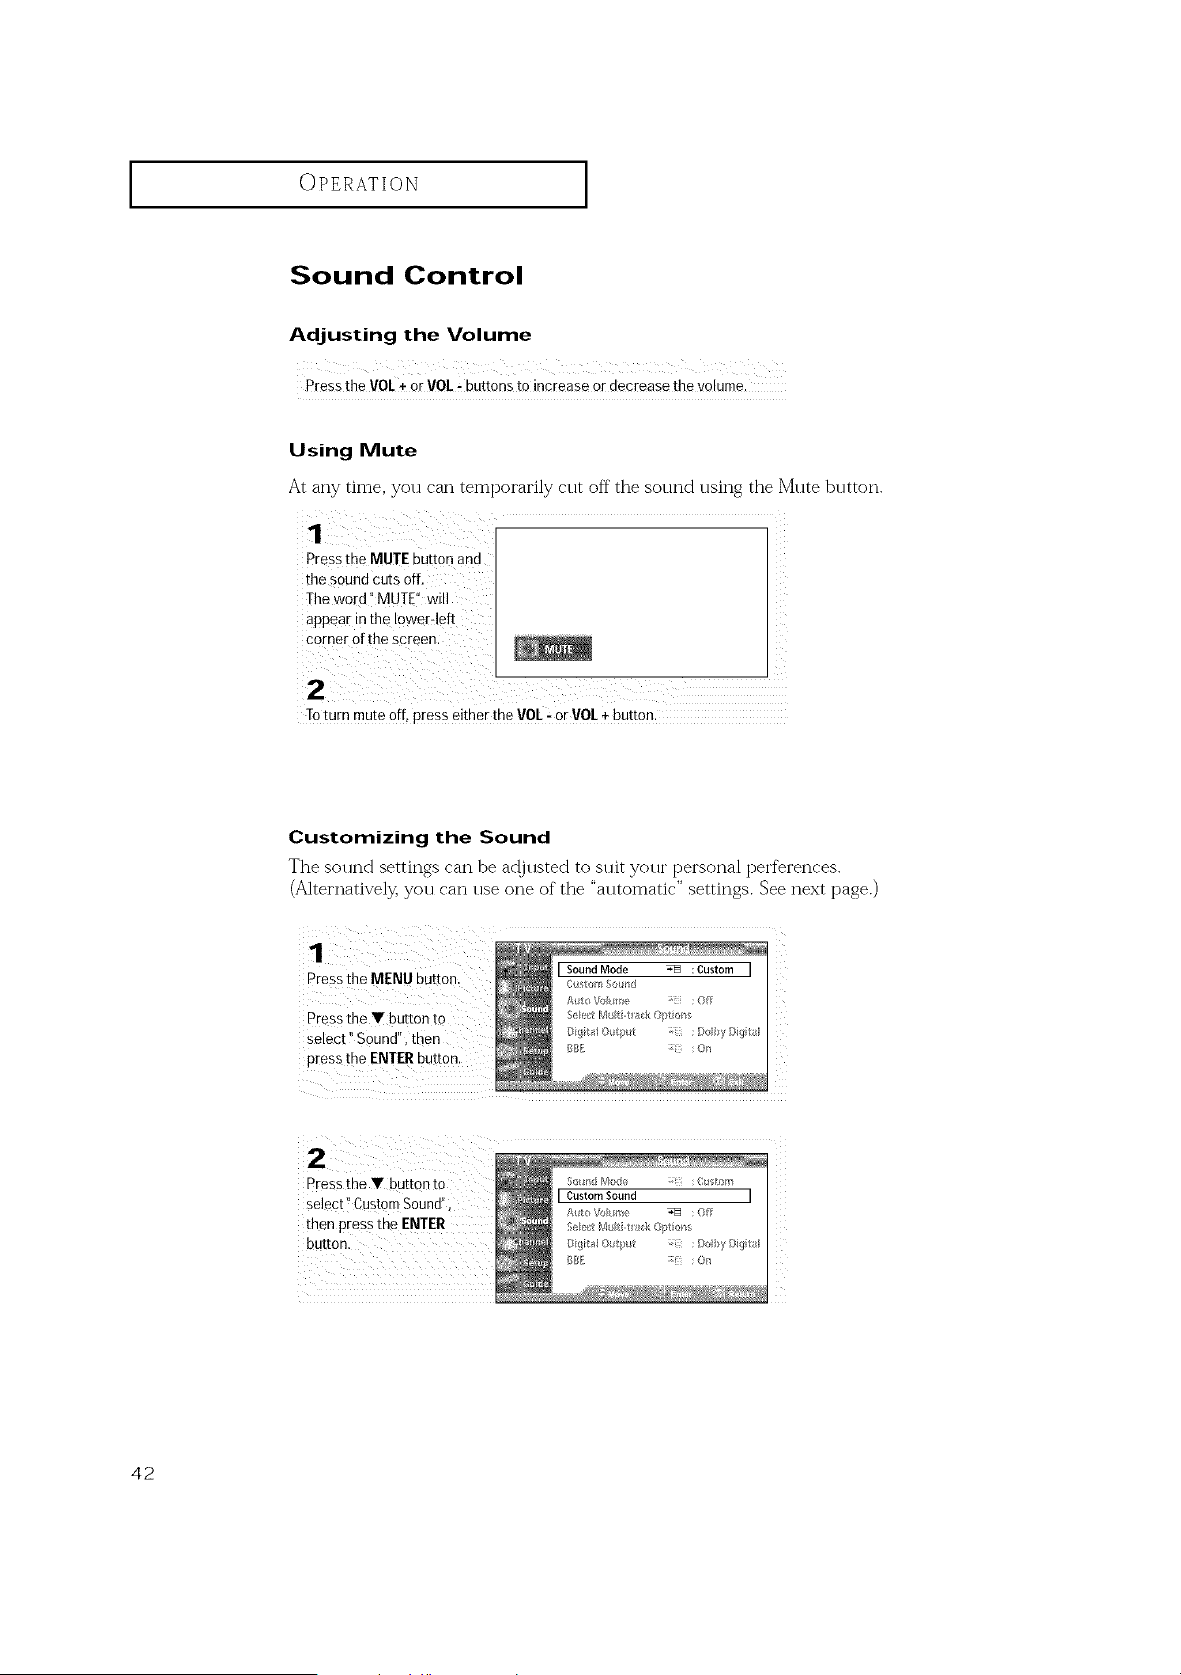
Sound Control
AdJusting the Volume
PresstheVOL+ orVOL÷buttonsto increaseordecreasethe_olume.
Using Mute
At any time, you can tempoi'ai'ily cut off the sound using the Mute button.
pressthe MUTE button aid
the soundcutsoff. [
Theword MUTE w
appear inthe Iower4eft
corner of the screen.
Toturn mute off, Press either the VOL! OrVOL+button.
Customizing the Sound
The sol]rid settings can be ar!jl]sted to stilt yol][" personal perferences.
(A]ternative]_ you can use one of the "automatic" settings. See next page.)
Pressthe MENU button,
Press the V button to
select !'Sound", then
pressthe ENTERbutton.
Pressthe Y button to
Select"CustomSound",
then pressthe ENTER
button.
42
OPERATION ]
Pressthe b Or _ button to
highlight a particular itemto
be changed.
Pressthe A orV button to
increase ordecrease the
Pressthe EXiTbutton to exit.
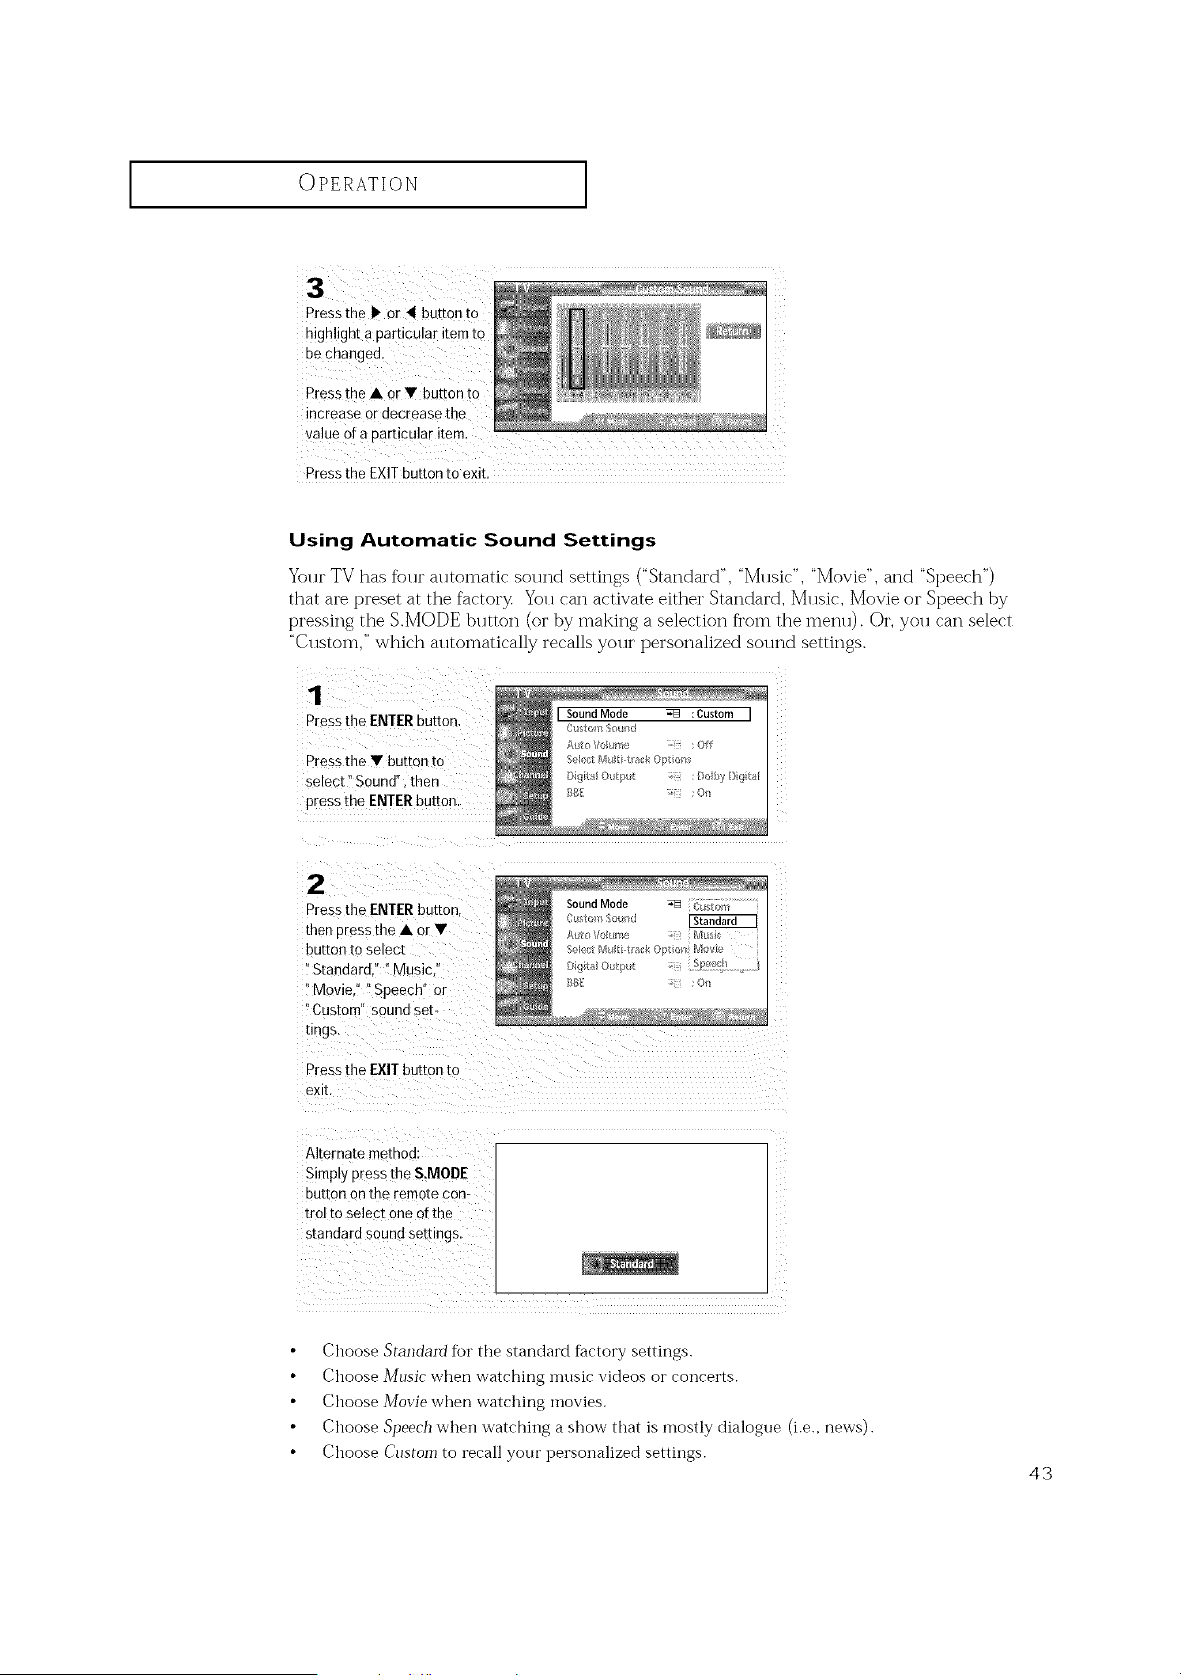
Using Automatic Sound Settings
Your TV has %ur automatic sound settings ("Standard", "Music", "Movie", and "Speech")
that are preset at the factory You can activate either Standard, Mllsic, Movie oi" Speech by
pressing the S.MODE button (or by making a selection fi'om the menu). Oi', you can select
"Custom," which automatically recalls your personalized sound settings.
1
Press the ENTERbutton.
Pressthe • button to
se_ect"Sound" then
pressme ENTERbutton
2
Pressthe ENTERbutton
then Dressthe • or•
button to select
"Stannaro, Music
Movie. Speech or
EL _tom" souna se/-
tings.
Press the EXIT button to
exll
Alternate method
SimDy pressrhe S.MODE
button on the remote con-
tro/to select one ot the
smnoaro souno semngs.
Choose Standard for the standard factory settings.
Choose Music when watching inosic videos or concerts.
Choose _!ovie when watching movies.
Choose Speech whei] watching a show that is mostly dialogue (i.e., news).
Choose Custom to recall your personalized settings.
43
OPERATION ]
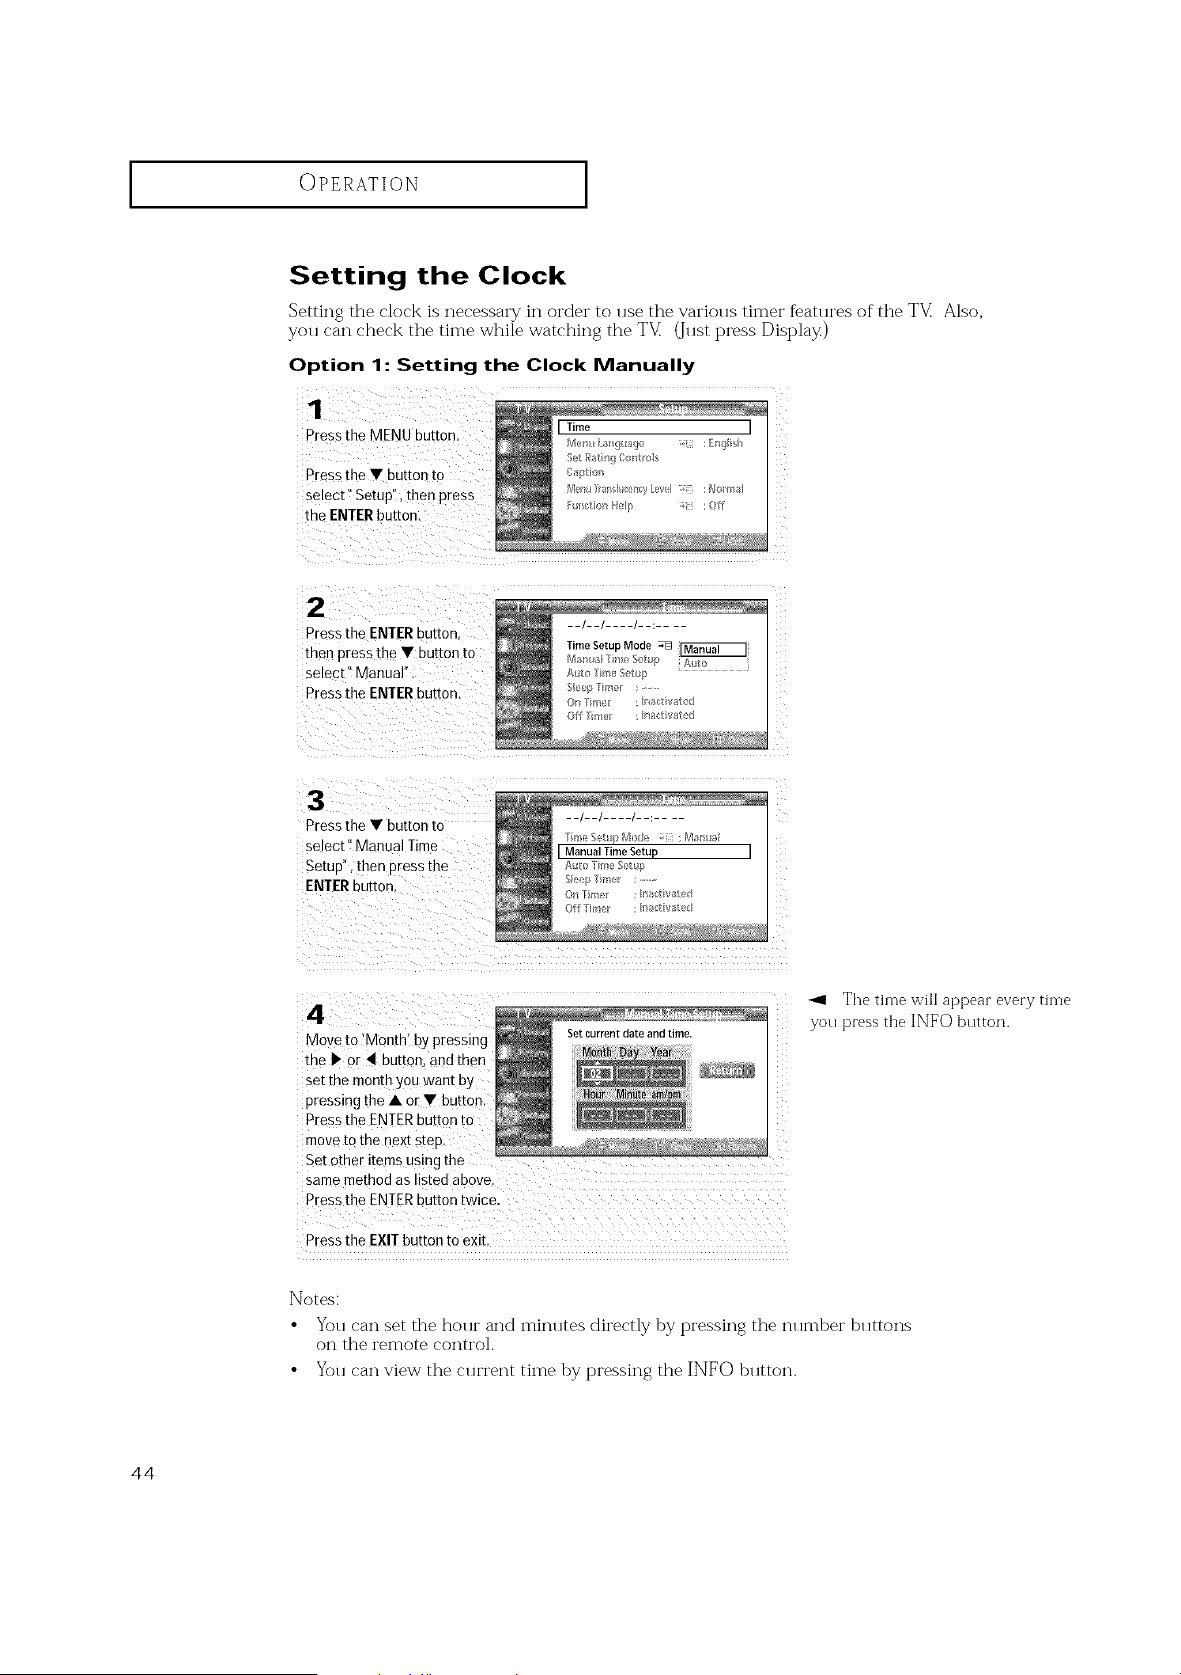
Setting the Clock
Setting the clock is necessary in OIT:leI" to llse the vaI'iolls timer f_atlu'es of the T'V_ Also,
you can check the time while watching the TV_ (Just press Display)
Option 1: Setting the Clock Manually
1
Pressthe MENU button.
Pressthe • ougon to
select" Setup", then press
me ENTERbuttor
2
Pressthe ENTERbuRon
men presstheVbu_onto
se,ect" Manual"
Pressthe ENTERbuKon
3
Pressthe • button to
select" Manual Time
SetuP', then pressthe
ENTERbutton,
4
Move to'Month Bypressing
me • or • button, andthen
set the month you want by
pressing the • or• buttor
Pressthe ENTERbutton to
movetothe nextsrep
Set other items using
samemethod as steo above.
Pressthe ENTERbutton twice
Pressthe EXIT button to exit
The time will appear every time
you press the INFO button.
Notes:
• You can set the hour and minutes directly by pressing the nllmber buttons
on the remote control.
• You can view the cllrrent time by pressing the INFO button.
44
OPERATION ]
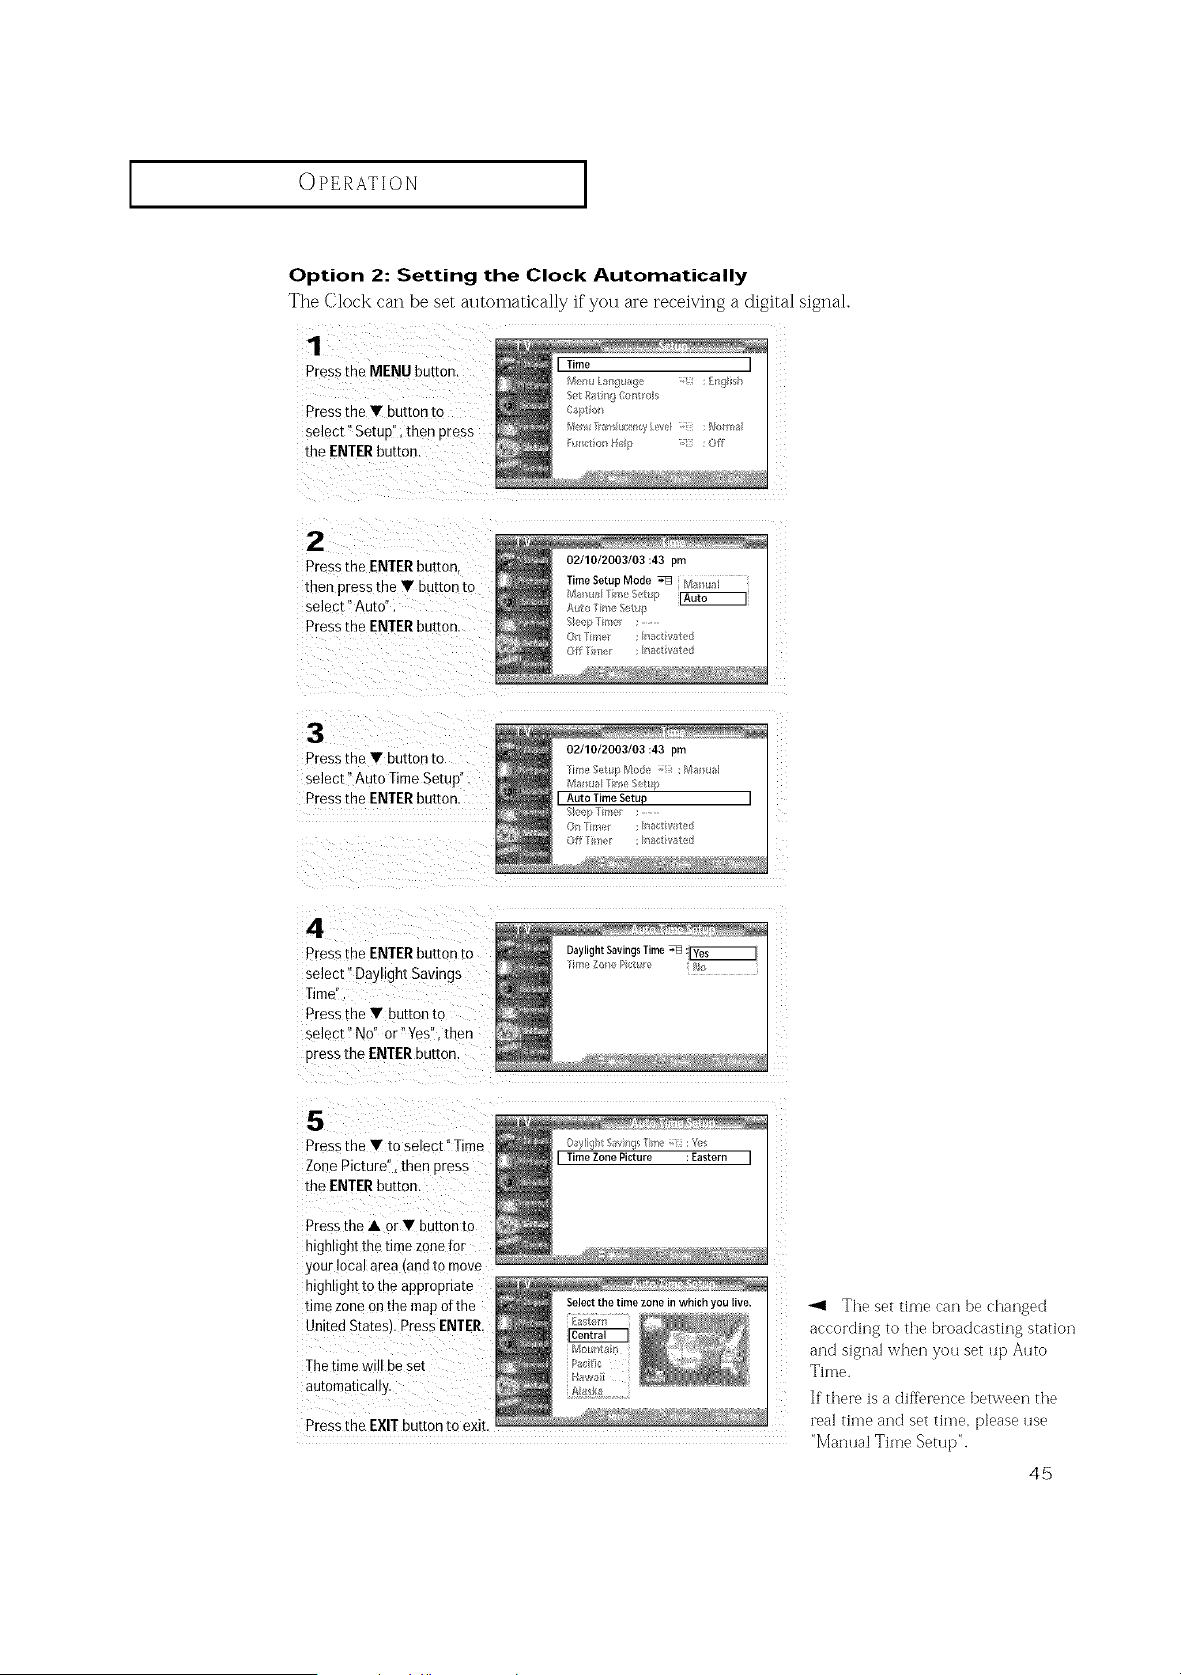
Option 2: Setting the Clock Automatically
The Clock can be set automatically if you are receiving a digital signal.
1
Pressthe MENU button.
Press me • button to
select" SetuD". then Dress
the ENTER buttor
2
Pressthe ENTERbutton
then pressthe • buttonto
select" Auto'
Pres _the ENTERbutton
02/10/2003/03:43 pm
TimeSetupMode _ M;_ _al
_'_ _i_r_eS0t_r
Auto Trl}_ S_ltp
S_e(pT_/e : .........
Oil I _tse/ : n:_cti//ate/}
Off Tm<_ : na_stitat_
3
Pressthe • button [o
select Auto Time Setup
Pressthe ENTERbutton.
4
Pressthe ENTER button to
select" Daylight Savings
Time
Pressthe • button to
select" No" or" Yes", then
pressthe ENTERbutton.
5
Pressthe • toselect" Time
ZonePicture", then Dress
the ENTERbutton.
Pressthe • or • button to
highlightthe timezonefnr
your localarea (andto move
highlighttothe appropnate
timezone on the map otthe
UnitedStates_Press ENTER.
Thetime w Dese[
automatically.
02/10/2003/03:43 pm
Th/'/e r, LpMod_ ;" :M_II
M_mu_/_Ti/_e S_t_p
I Auto TimeSetup
_ep me : ........
(I/$/'_
Daylight SavingsTime_ :_
Til//e ZobePtt{ re ;I/O
Daylight _vin T,Tile ;ii :%s
[ Time ZonePicture :Eastern [
ii
_1 The set time can be changed
according to the broadcasting station
and signal when you set up Auto
Time.
]f there isa difference between the
real time and set time, please use
"Manual Time Setup".
45
OPERATION ]
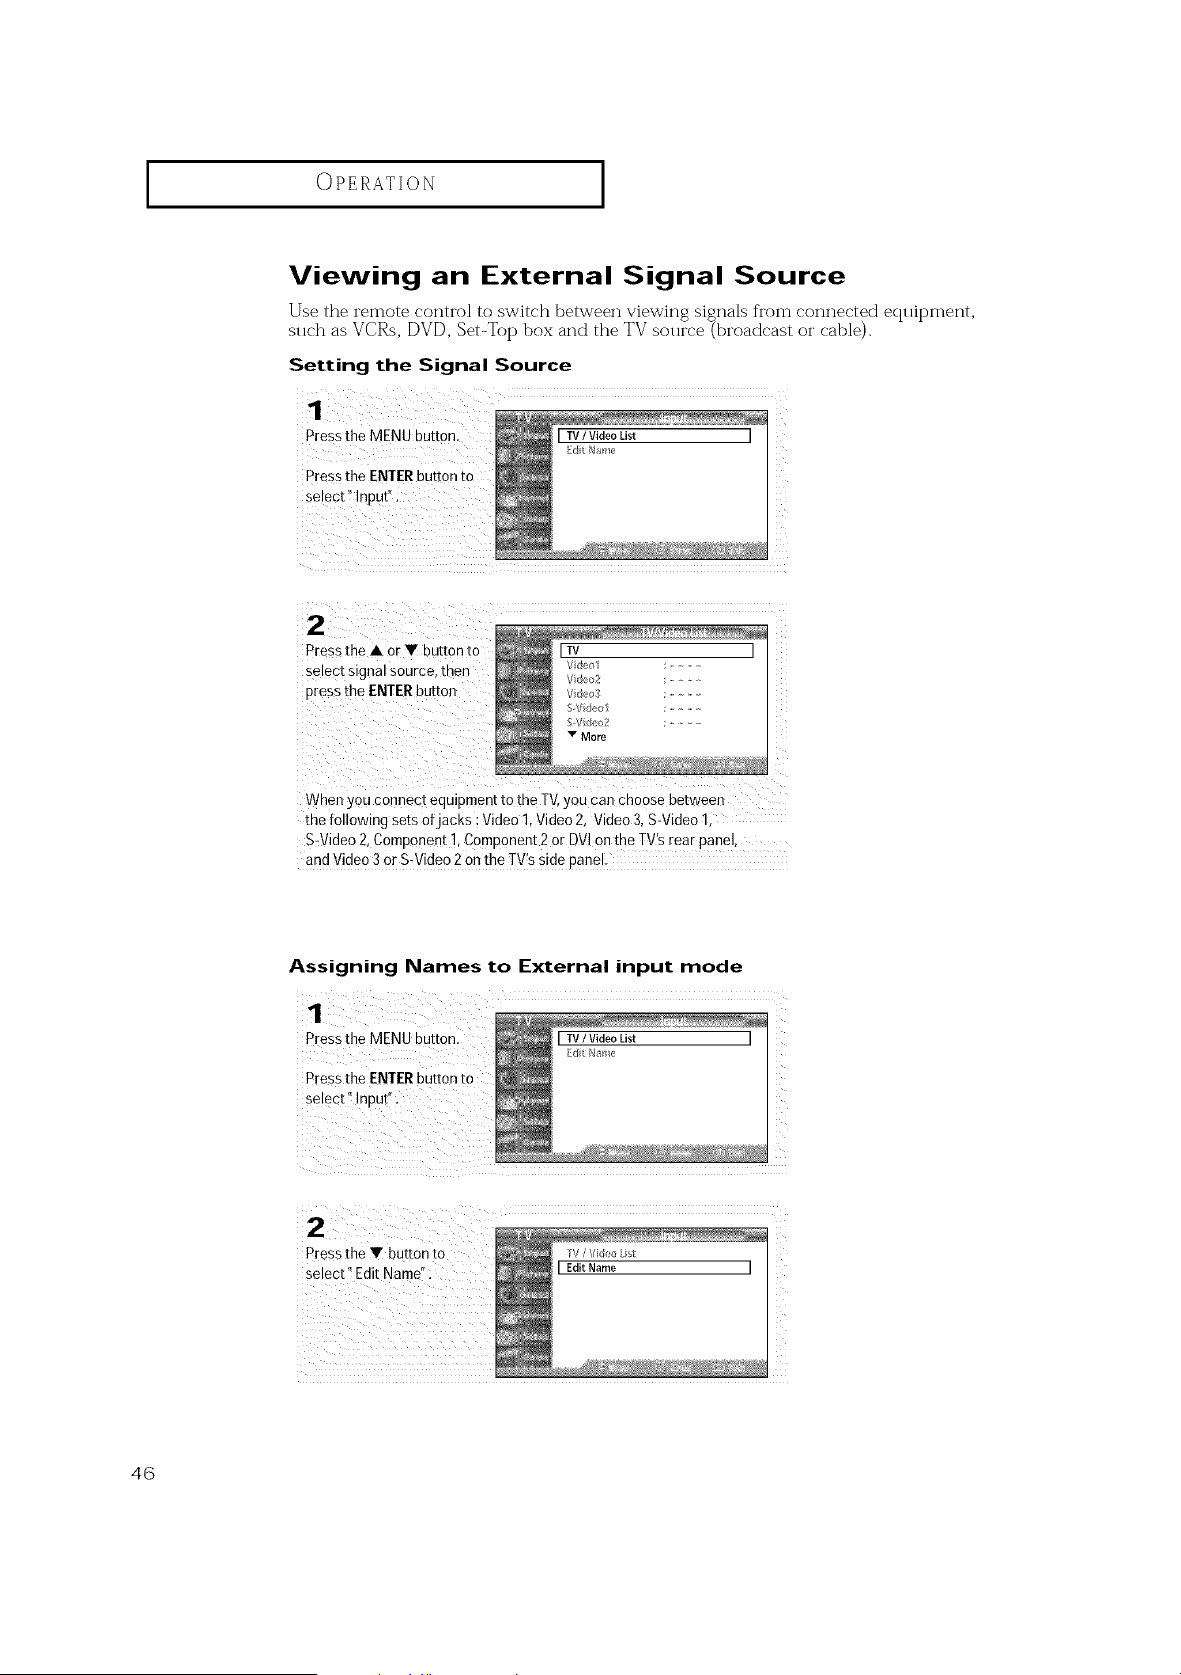
Viewing an External Signal Source
Use the remote control to switch between viewing signals from connected ecpfipment,
such as VCRs, DVD, Set-Top box and the TV source (broadcast or cable).
Setting the Signal Source
1
Pressthe MENU button,
Pressthe ENTER buEon[o
select" Inpu[ .
2
Press the • or • button to
select signal source, men
Dress the ENTER button
When youconnect equipment to the TV,you can choose between
the following sets ofjacks :Video" Video2. Video 3.S-Video 1
S-Video2. Comuonent 1.Component 2or DVIon the TV'srear panel,
and Video 3or S-Video2on the TV's sideoane
Assigning Names to External input mode
Pressthe MENU button.
Pressthe ENTERbutton to
select i!!nputl' •
[ TV/ Video List [
i ii i i i i i i i i i _ zzz
Press the Y button to
46
I
OPERATION
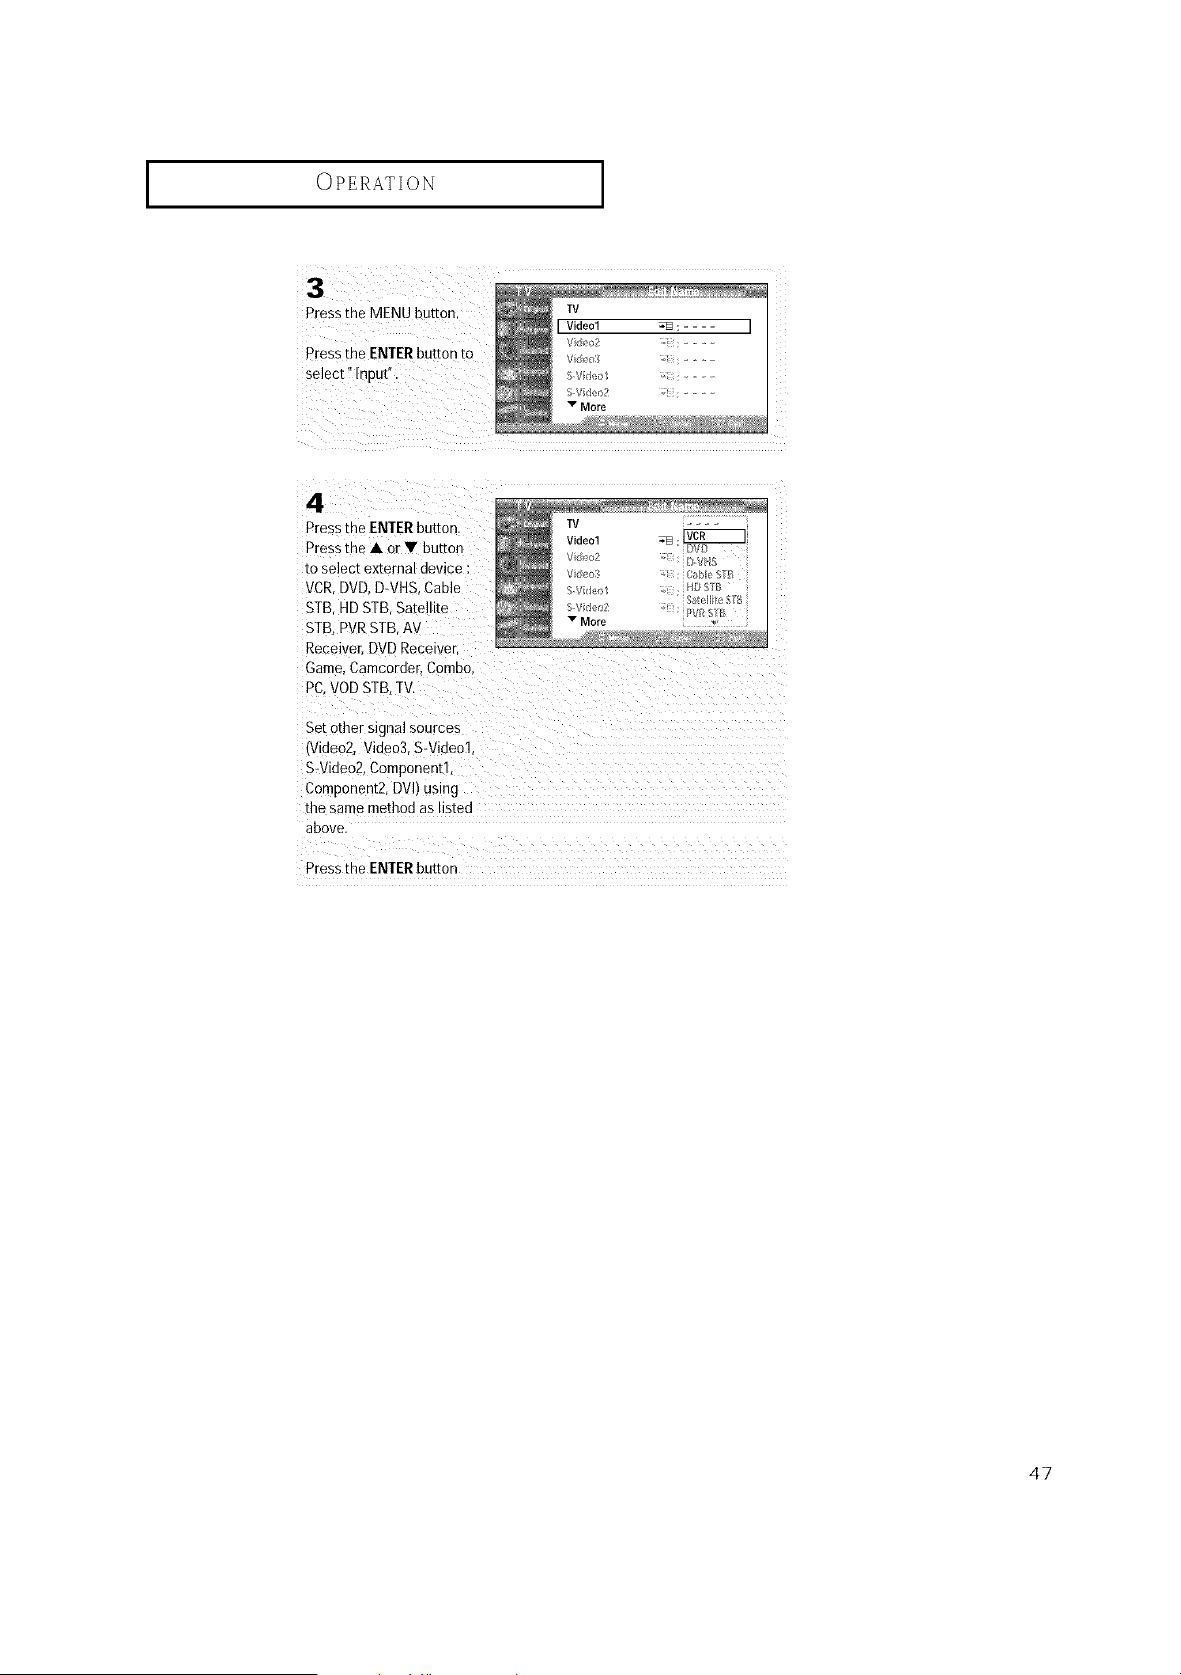
Pressthe ME tv
I Videol "q_ :.... I
Vde_ :...........
Pressthe ENTER button to V _,: ...........
S fi4 ol ;..........
S fk/_o2 : .......
v More
4
Pressthe ENTERbutton
Press[ne • or • butto-
toselect external device :
VCR 3VD, D-VHS,Cable
STB 4DSTB. Satellite
STB, PVRSTB. AV
Receiver, DVD Receiver
Game,Camcorder, COmDO
PC. VODSTB,TV.
Set othersignal sources
tvldeo2. Video3. S-Video].
S-Video2. Component1
Component2.DVh ustng
the same method as istec
above
Pressthe ENTERbutton
47
SPECIAL FEATURES
[Analoq---I
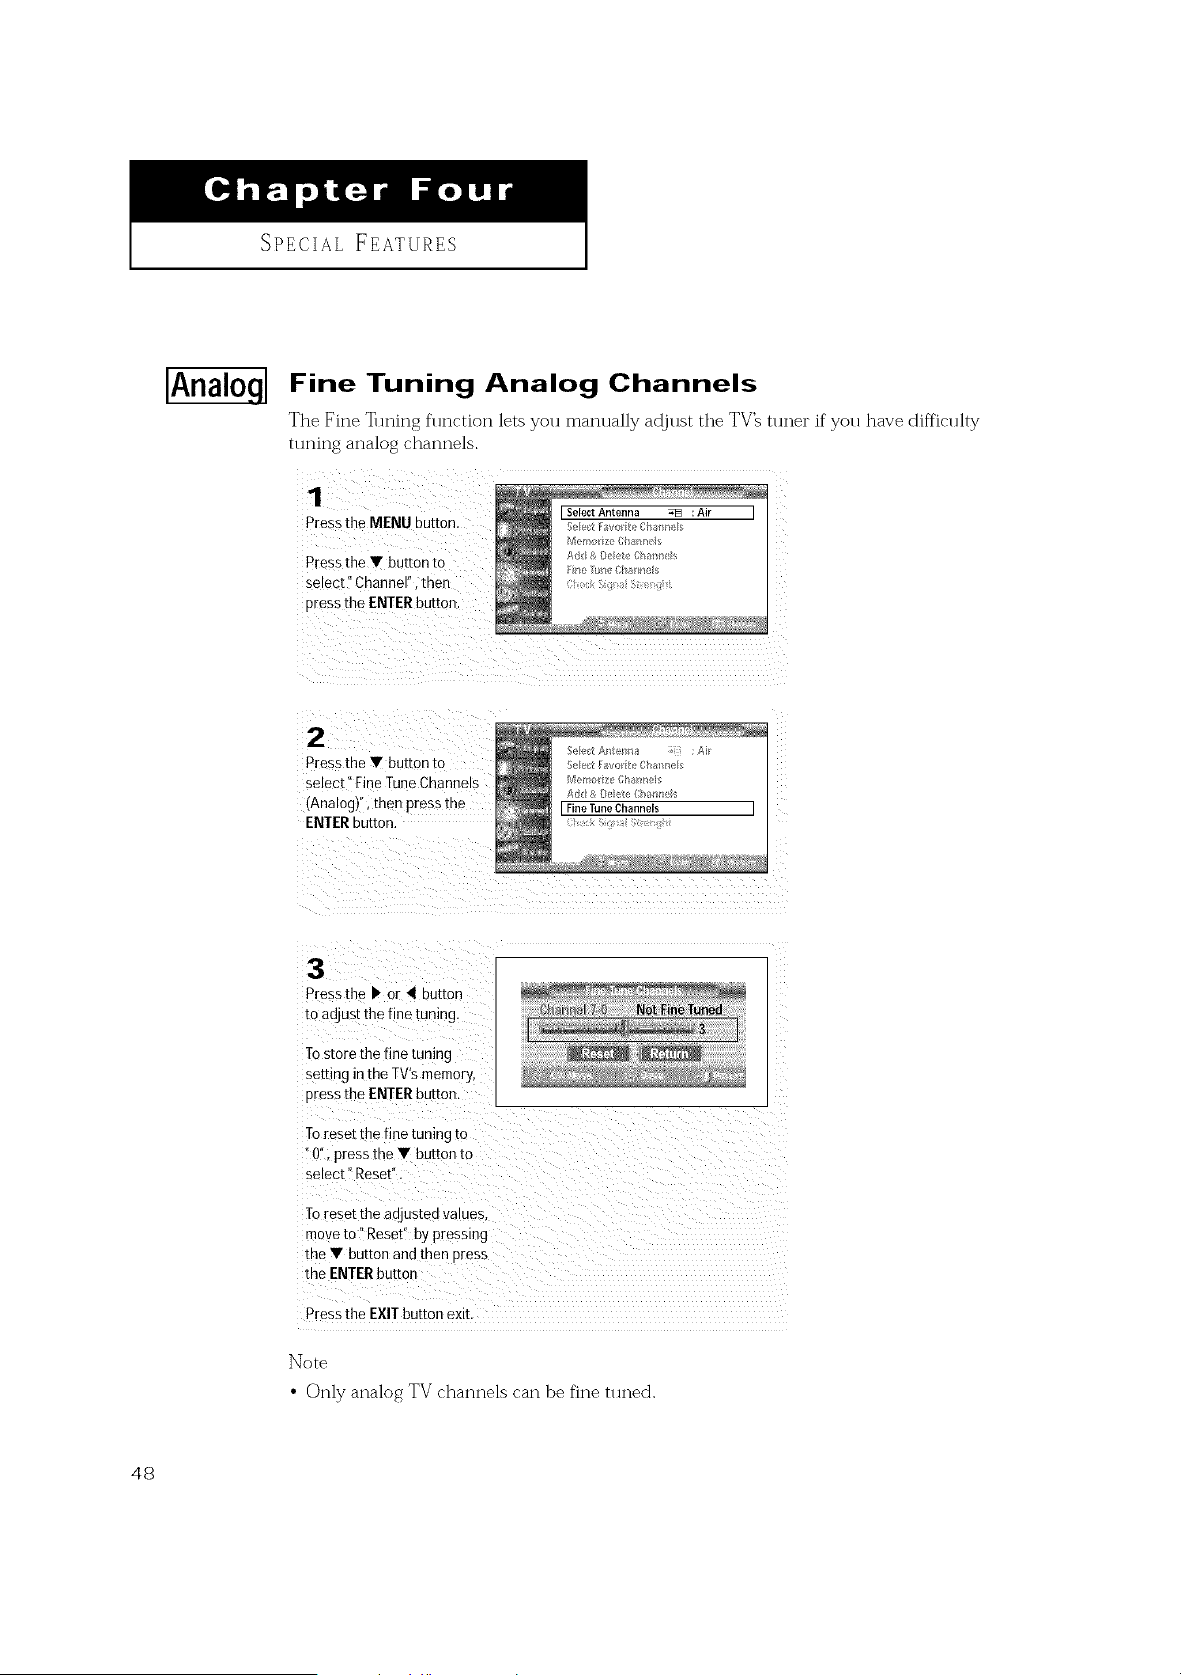
Fine Tuning Analog Channels
The Fine _lning function lets you manually ad.just the TV_ tuner if"you have difficulty
tuning analog channels.
1
Press the MENU Duuon.
Press the • button [o
select" Channel", then
press the ENTER button
Pressthe • button to
select" Fine TuneChanneis
(Analog) then pressthe
ENTERbutton.
Pressthe • or 4 button
to adjust the fine tuning.
Tostore the fine tuning
setting intheTV's memory,
pressthe ENTERbutton.
Toreset the fine tuning to
0", pressthe • button to
select" Reset
Toreset the anjested values
moveto" Reset" bypressing
the • button and then Dress
the ENTERbuttor
Pressthe EXIT button exit
Note
• Only analog TV channels can be fine tuned.
48
SPECIAL FEATURES ]
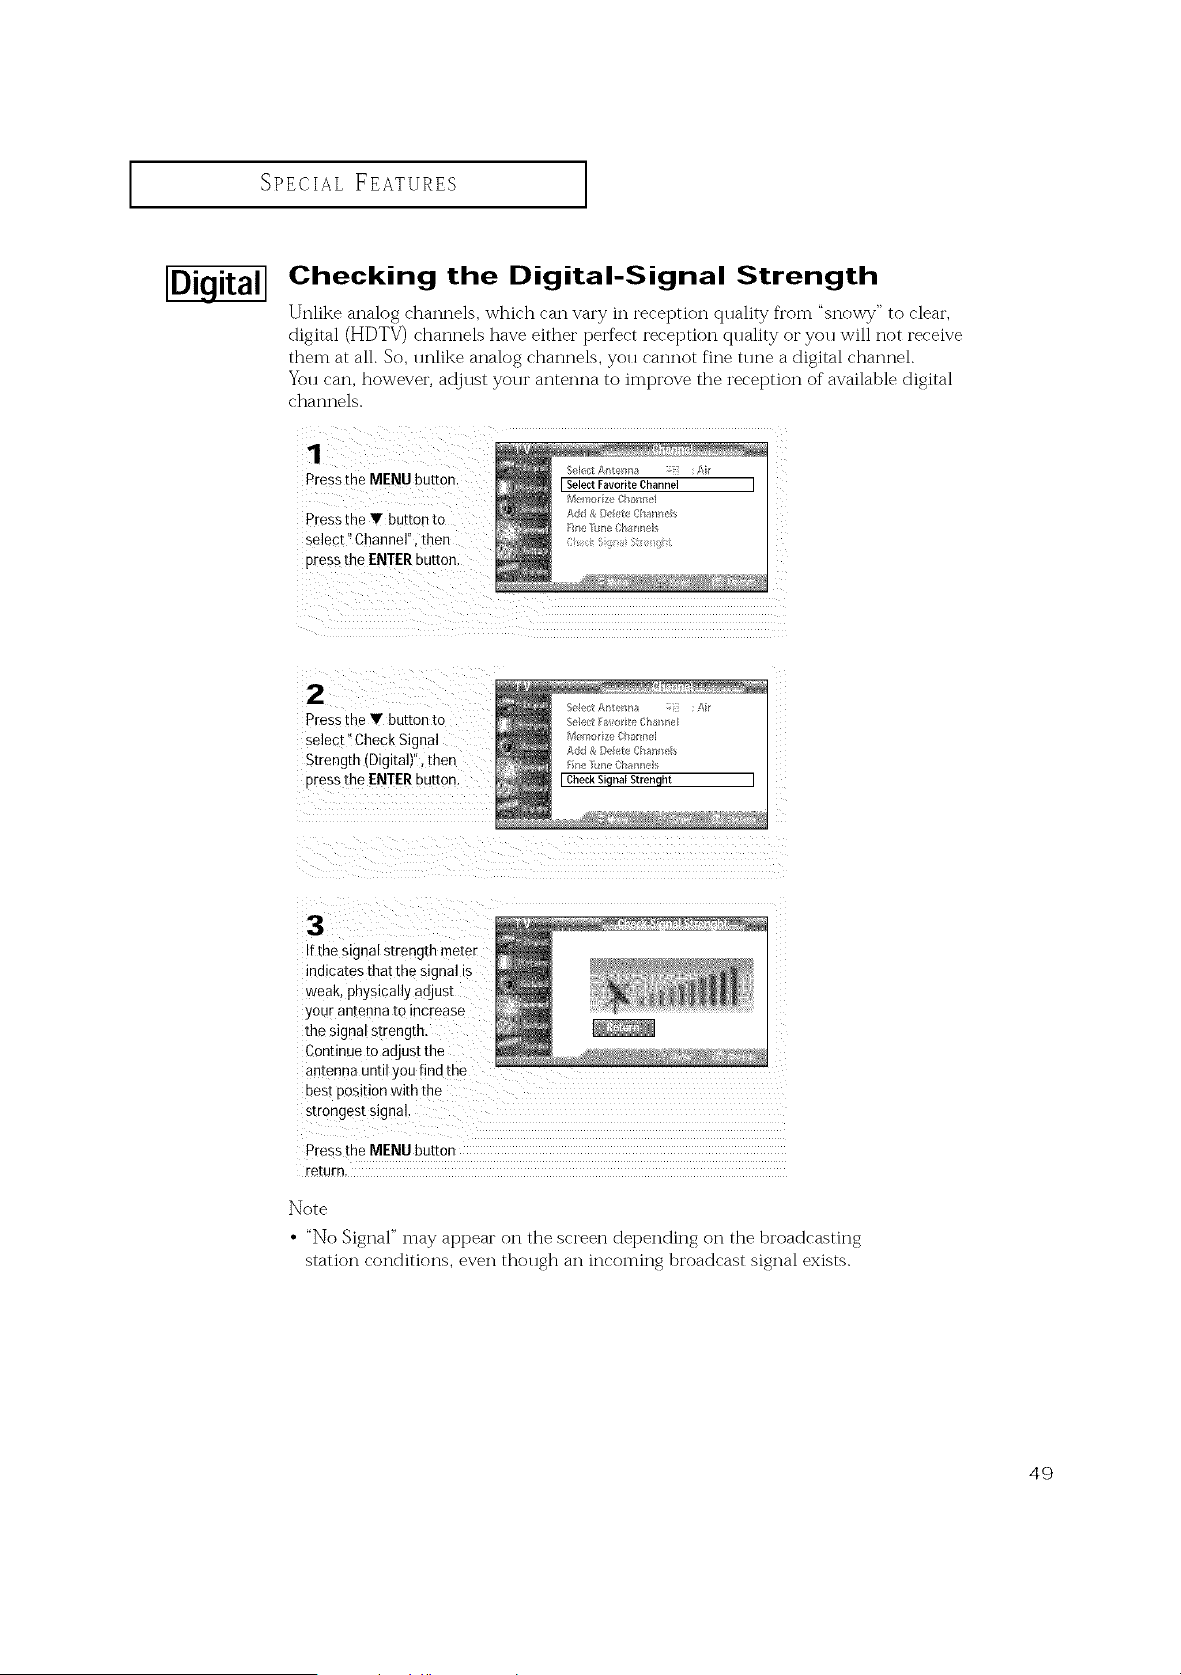
Checking the Digital-Signal Strength
Unlike analog channels, which can vary in reception quality fl'om "snowy" to clear,
digital (HDTV) channels have either perfect reception qllality or you will not receive
them at all. So, unlike analog channels, you cannot fine tune a digital channel.
You can, however, adjust your antenna to improve the i'eception of available digital
channels.
1
Pressthe MENU button
Press the • button to
select" Channel". then
press the ENTER button
2
Press[ne • button to
select" Check Signal
Strength (Dic talY',then
oressthe ENTERbutton.
t the signal strength meter
indicates that the signal s
weak physically adjust
your antenna to increase
the signal streng[h.
Continue [o aa ust the
antenna unn/you find the
Best Oosition with the
srronges_ signal.
Pre.<_theMENU button
return,
Note
• "No Signal" may appear on the screen depending on the broadcasting
station conditions, even thollgh an incoming broadcast signal exists.
49
SPECIAL FEATURES ]
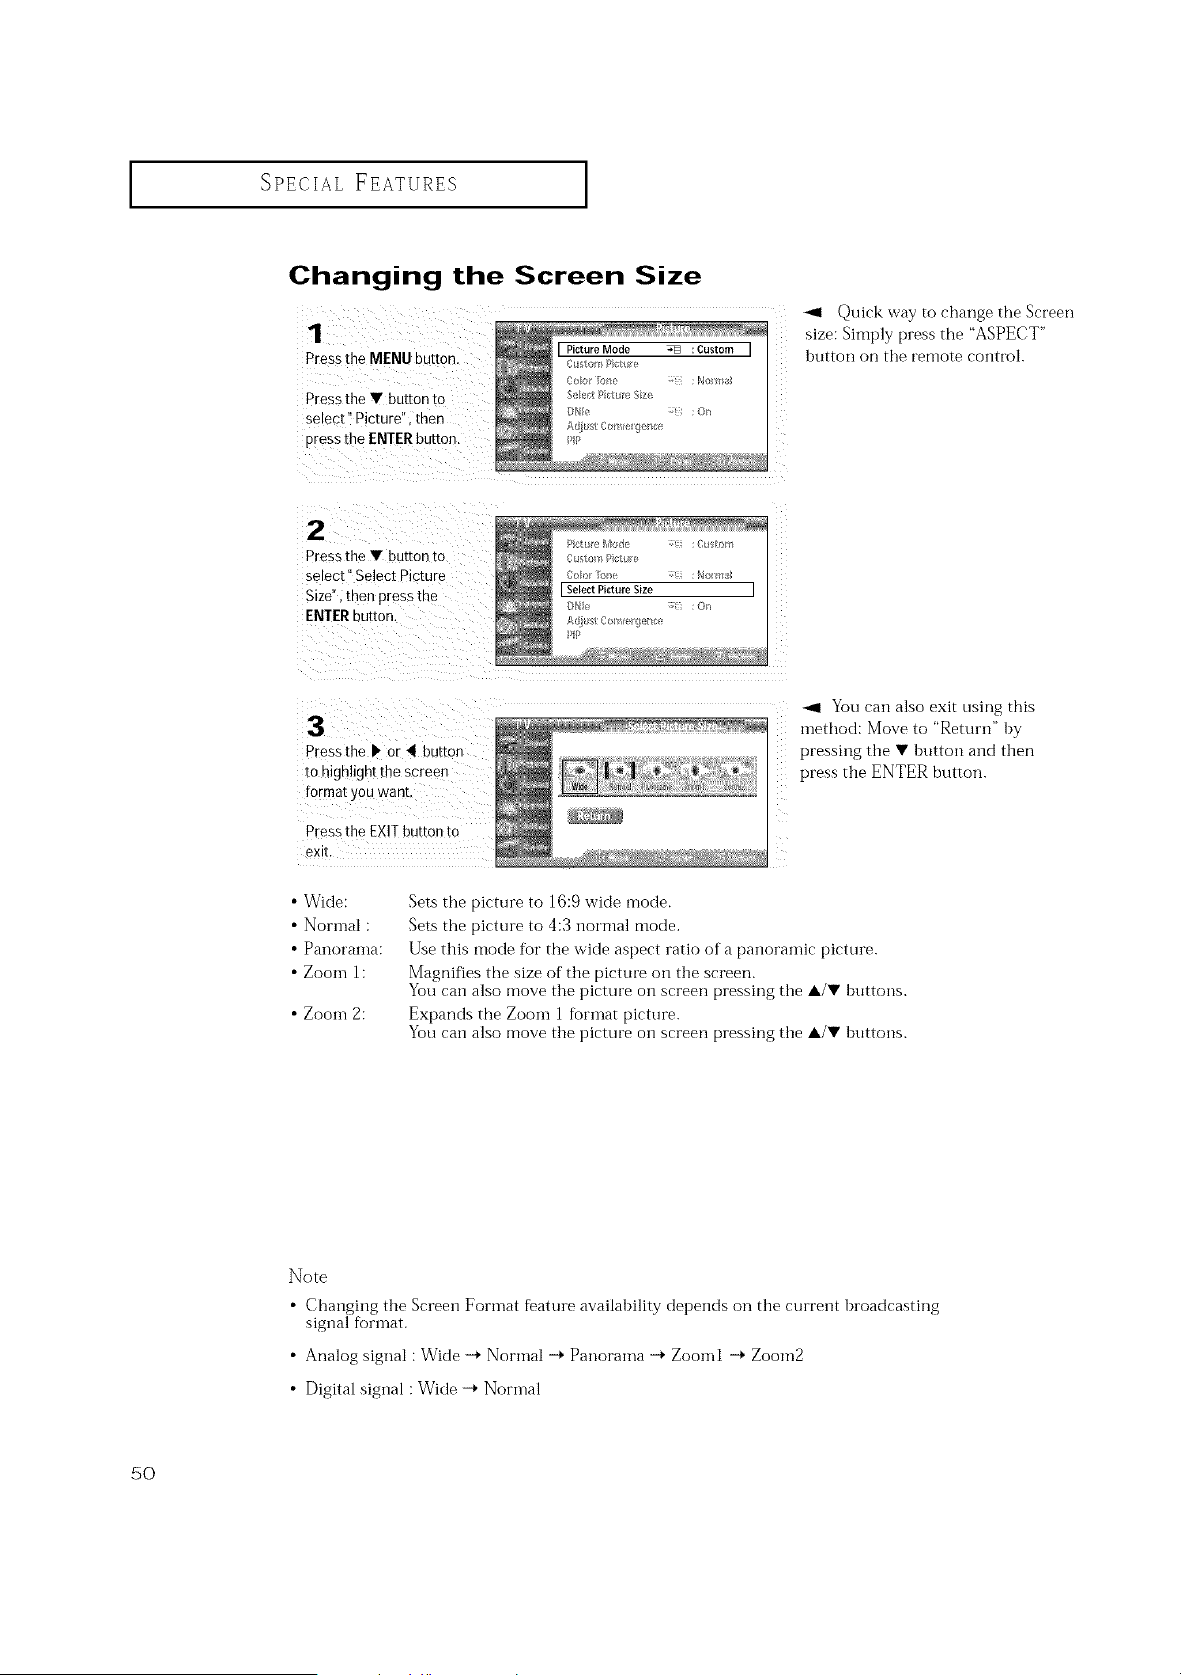
Changing the Screen Size
1
Pressthe MENU button.
Pressthe • button to
select" Picture" then
pressthe ENTERbutton.
2
Pressthe • button 1o
select" Select Picture
Size" men pressthe
ENTERbu[mn.
Quick way to change the Screen
size: Simply press the "ASPECT"
button on the remote control.
3
Pressthe b' or 41buttor
tohighlight the screen
format youwant
Press the EXIT button tc
exit
_1 You can also exit using this
method: Move to "Return" hy
pressing the • hutton and then
press the ENTER button.
• Wide:
• Normal :
• Panoranla:
• Zoom h
•Zoom 2:
Sets the picture to 16:9 wide mode.
Sets the picture to 4:3 nornml mode.
Use this mode for the wide aspect ratio of a panoramic picture.
Magnifies the size of tile picture oil the screen.
You can also move tile picture on screen pressing the A/• buttons.
Expands the Zoom 1 fin'mat picture.
You can also move the picture on screen pressing the A/• huttons.
Note
• Changing tile Screen Forinat featuie availability depends on the current hroadcasting
siglml R)rmat.
• Analog signal : Wide -_ Nornml -_ Panoralna --_ Zoolnl --_ Zoom2
• Digital siglml : Wide -_ Norlnal
50
SPECIALFEATURES
I
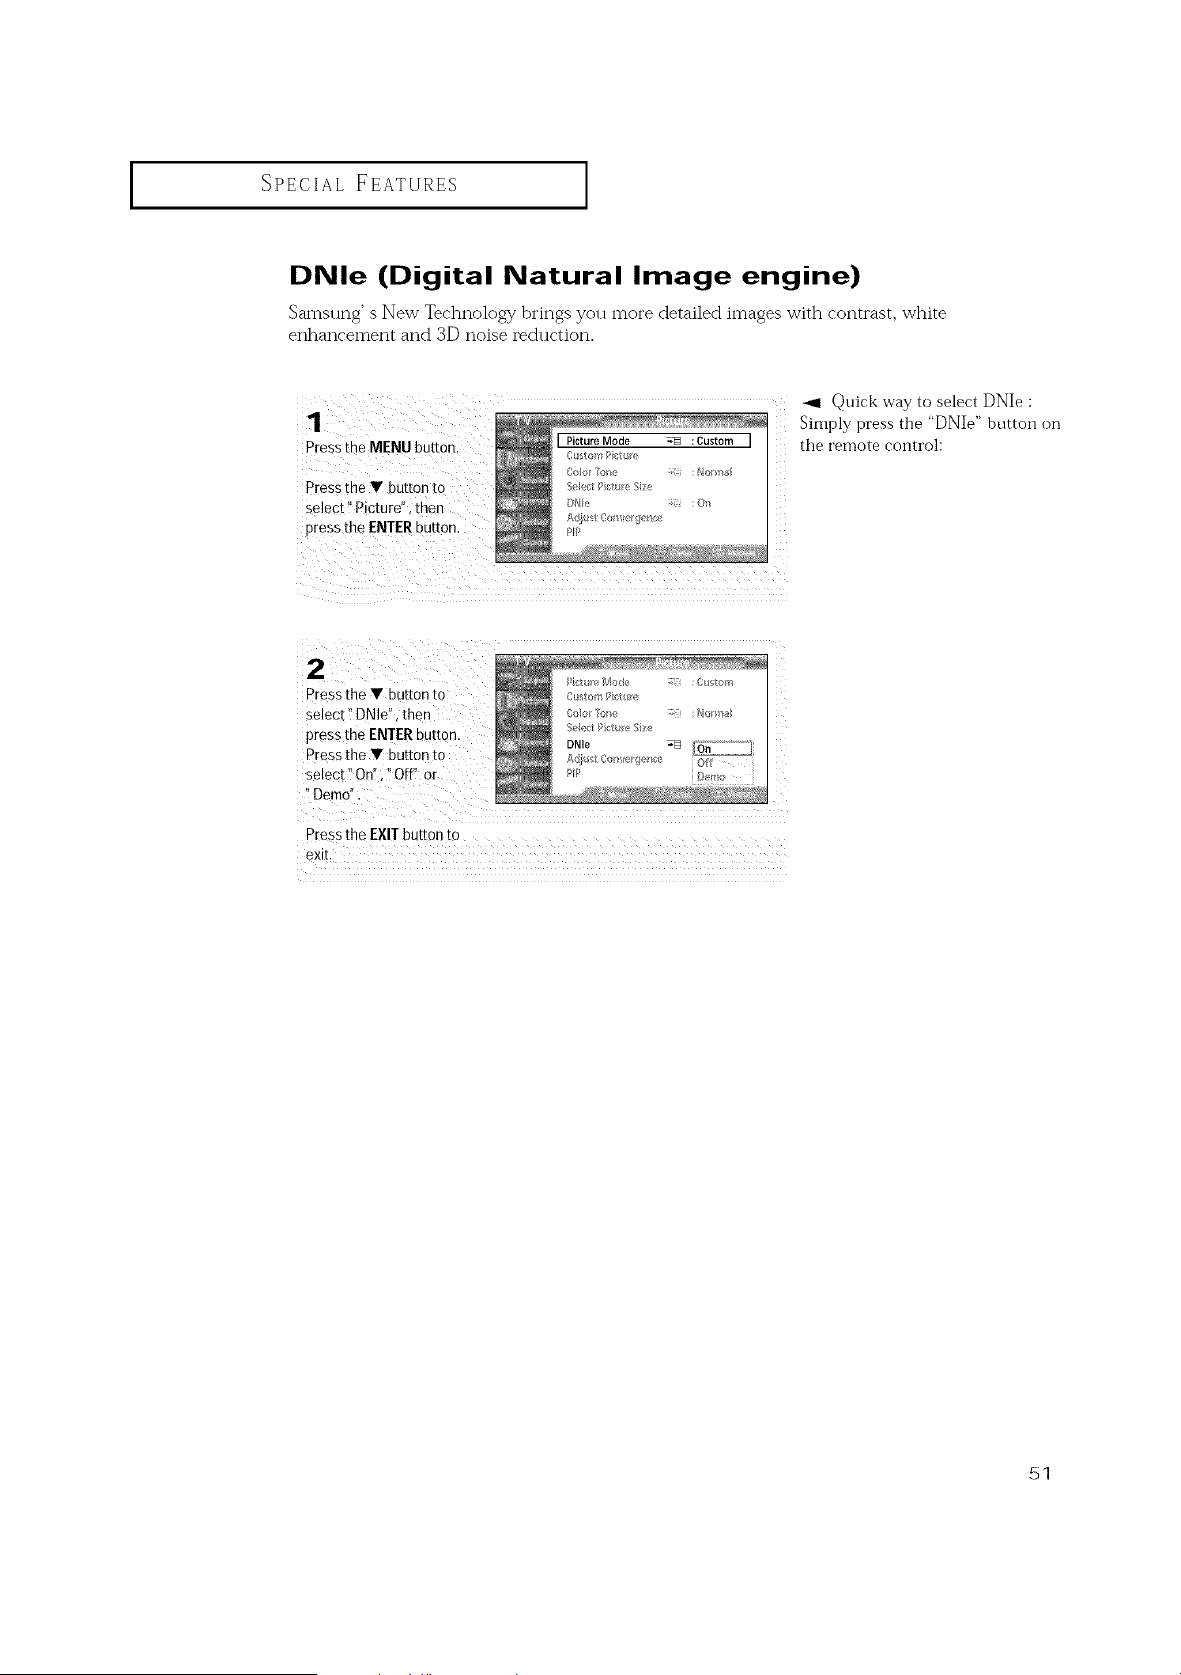
DNle (Digital Natural Image engine)
Samsung' s New Technok)gy brings you more detailed images with contrast, white
enhancement and 3D noise reduction.
1
Press the MENU button
Press the V button to
select" P cture", then
Dress the ENTER button,
Quick way to select DNIe :
Simply press the "DNIe" button on
the remote control:
Pressthe V buttonto
select '!DNle" ithen
press the ENIER button.
Press the V button to
select 'i On'!;'!Off! or
'tDemo,
/b:te eMode : :Custo;/_
Sek_t Poue S{e
DNIe _ _'-""""I
Pressthe EXIT button to
exit.
51
SPECIAL FEATURES
I
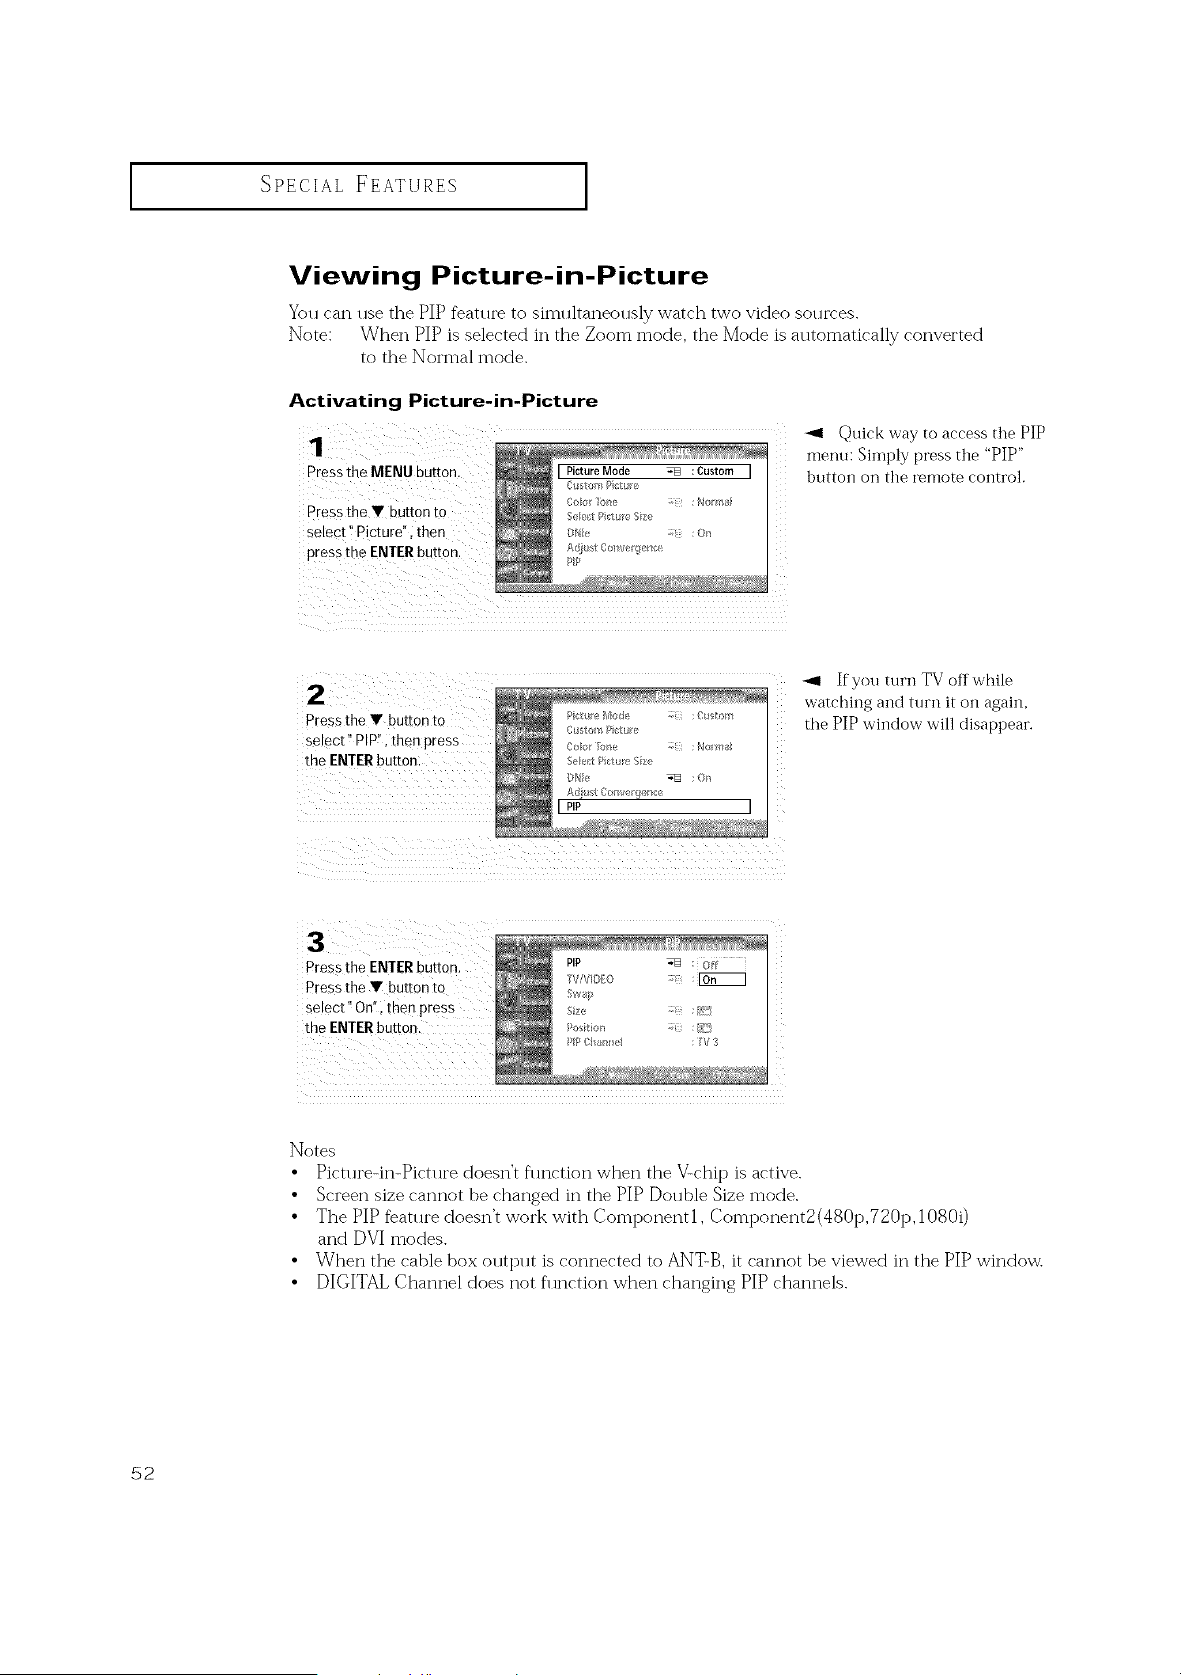
Viewing Picture-in-Picture
You can use the PIP feature to simultaneously watch two video sources.
Note: When PIP is selected in the Zoom mode, the Mode is automatically converted
to the Normal mode.
Activating Picture-in-Picture
1
PresstheMENUbutton.
Press the V button tO
select" Picture",then
press the ENTERbutton.
-_1 Quick way to access the PIP
menu: Simply press the "PIP"
button on the remote control.
-_1 If you turn TV offwhile
watching and turn it on again,
Press the V buttonto the PIP window will disappear.
Select!'PIP:';ihenpress
the ENTERbutton:
Press the ENTER button.
Press the Y button t0
select" On", then press
the ENTERbutton.
Notes
• Pict*lre-in-Pictllre doesn't fln_ction when the Vtchip is active.
• Screen size cannot be changed in the PIP Double Size mode.
• The PIP feature doesn't work with Componentl, Component2(480p,720p, 1080i)
and DVI modes.
• When the cable box output is connected to ANT-B,it cannot be viewed in the PIP window.
• DIGITAL Channel does not flu_ction when changing PIP channels.
52
SPECIAL FEATURES ]
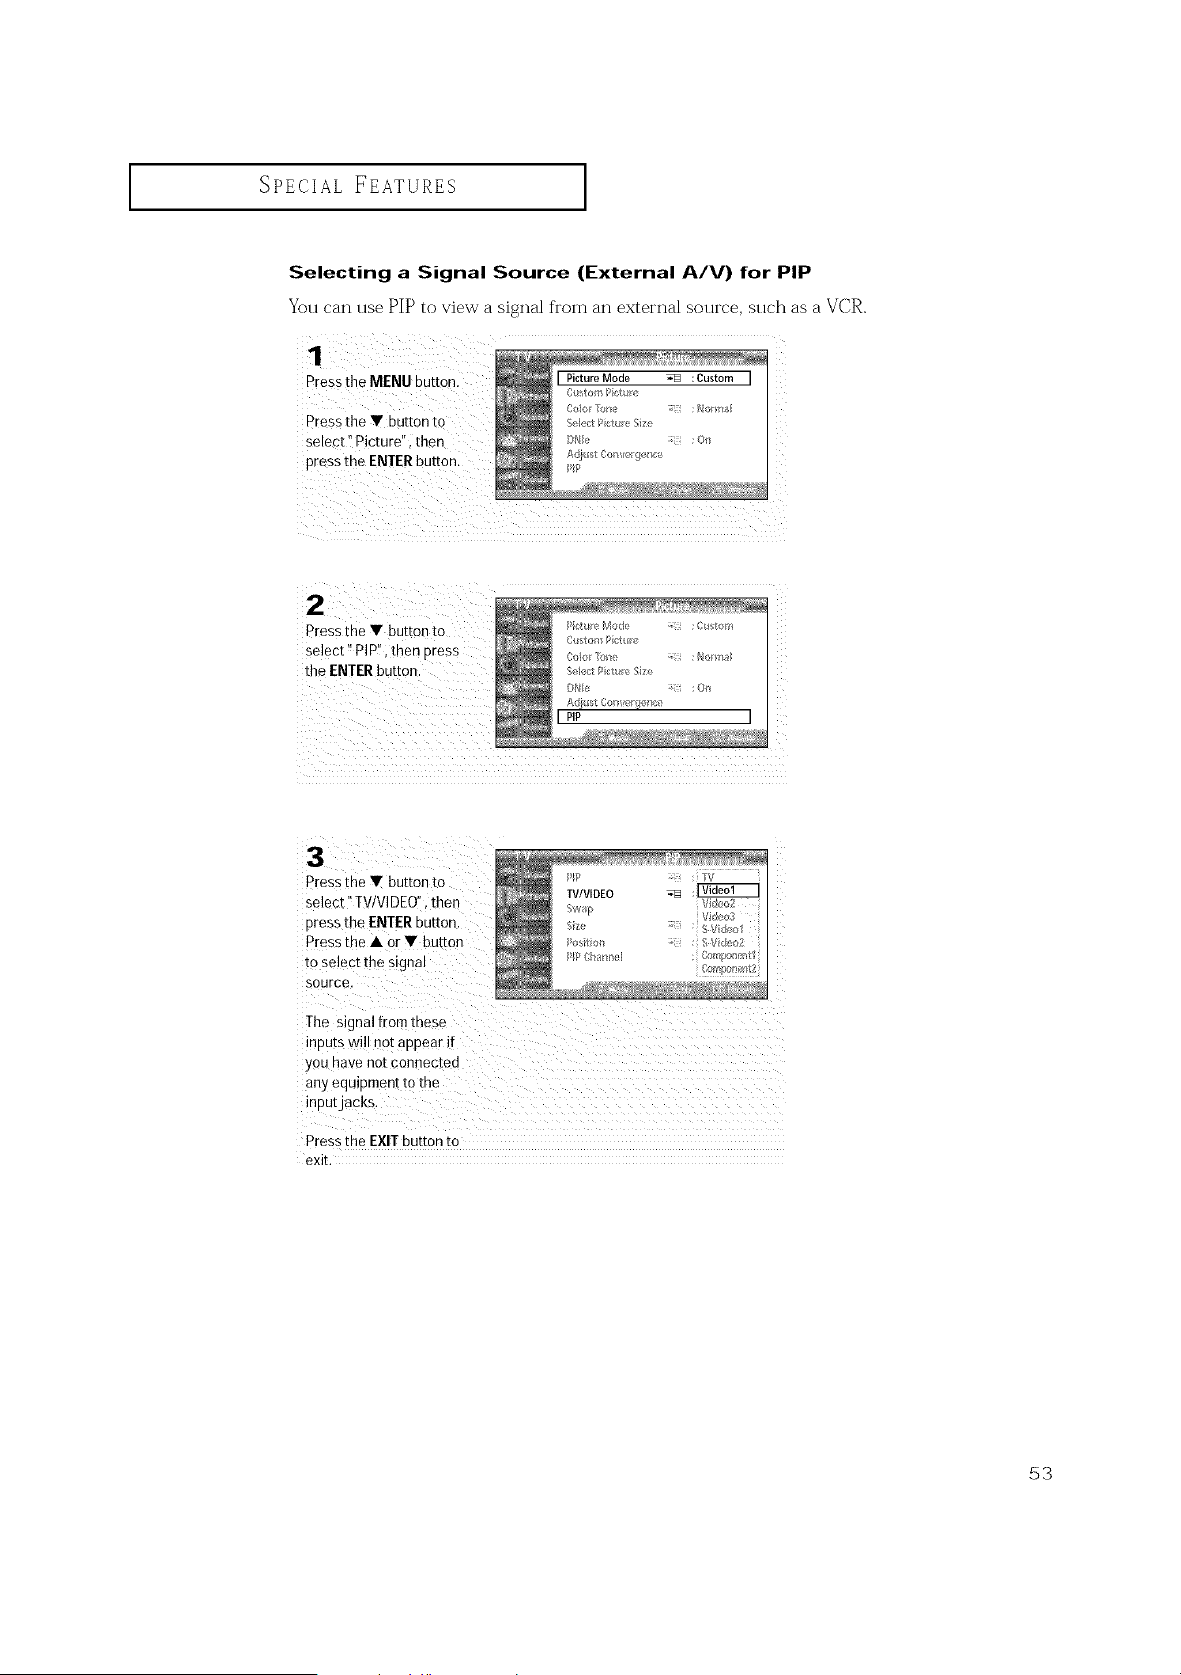
Selecting a Signal Source (External A/V) for PIP
You can use PIP to view a signal from an external source, such as a VCR.
1
Pressthe MENU button.
Pressthe Y button to
select '!Picture" i then
pressthe ENTERbutton.
Pressthe V button to
select _PIP"; then press
the ENTERbutton.
/i_:tu vMode : Custo//_
C_s_omP ct _/;!
Sele<:lP_:t_ eSize
D//I_ , ;O/_
Adi_t Con er_el_/;e
[ pip
Press the Y button to
select"TV/VlDEO",then "q_ _i4_o_
pressthe ENTERbutton. : s v d_<,i
Pressthe • or V button : s//de_2
toSe!ect the Signal : /;o,w_o_,_,tl
Co@o_telLt2
source.
The signal[rorn these
inPuts wi!lnot apPear if
you have not connected
Pressthe EXIT button to
exit,
53
SPECIAL FEATURES
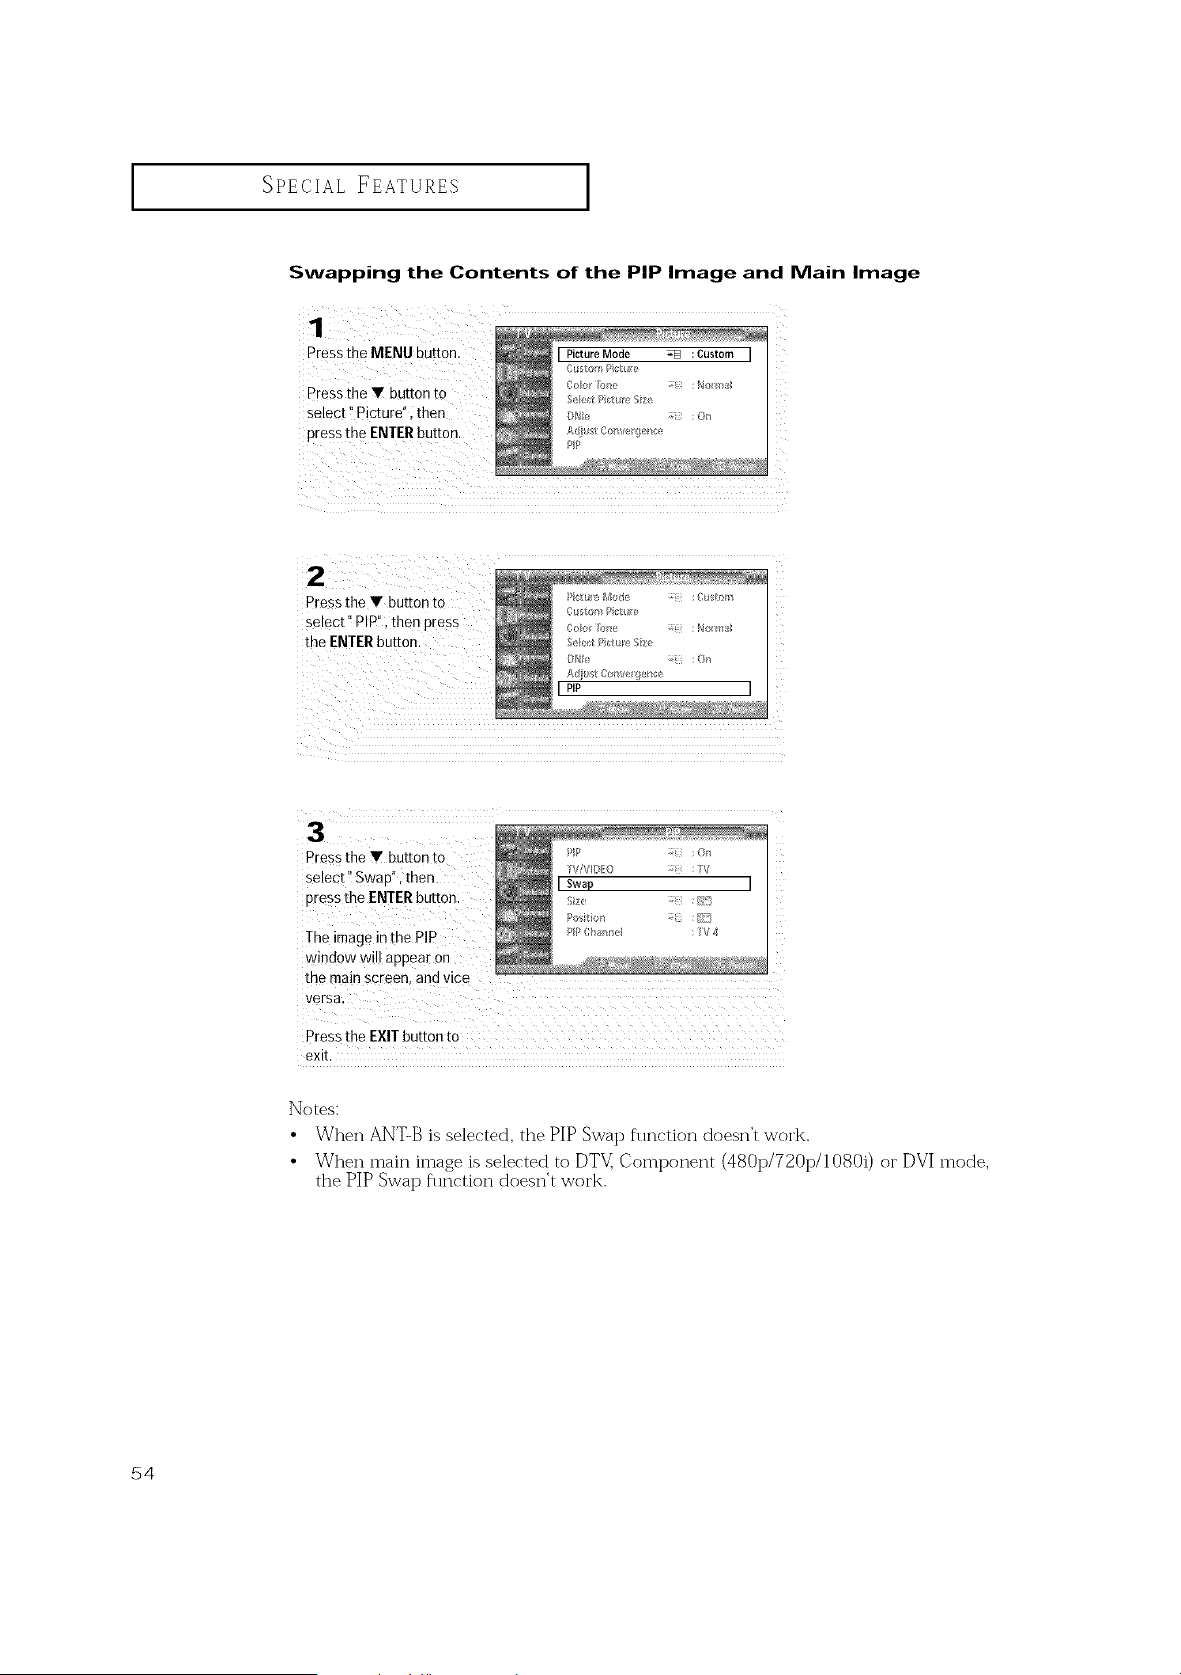
Swapping the Contents of the PIP Image and Main Image
Pressthe MENU button,
Pressthe T button to
select !'Picture" i then
pressthe ENTERbutto n.
I Picture Mode -_ :Custom I
e ;t :% /e ge
P_t_
Press the Y button to
select" PIPI',thenpress
the ENTERbutton.
Pressthe Y button to
select 'i Swap", then
pressthe ENTERbutton:
The image inthe PIP
window wil!appear on
the main screen, and vice
Pressthe EXIT button to
exit.
Notes:
• When ANTS is selected, the PIll->Swap flu_ction doesn't work.
• When main image is selected to DTV: Component (480p/720p/1080i) or DVI mode,
the PIP Swap flu_ction doesn't work.
54
I
SPEOIAL FEATURES
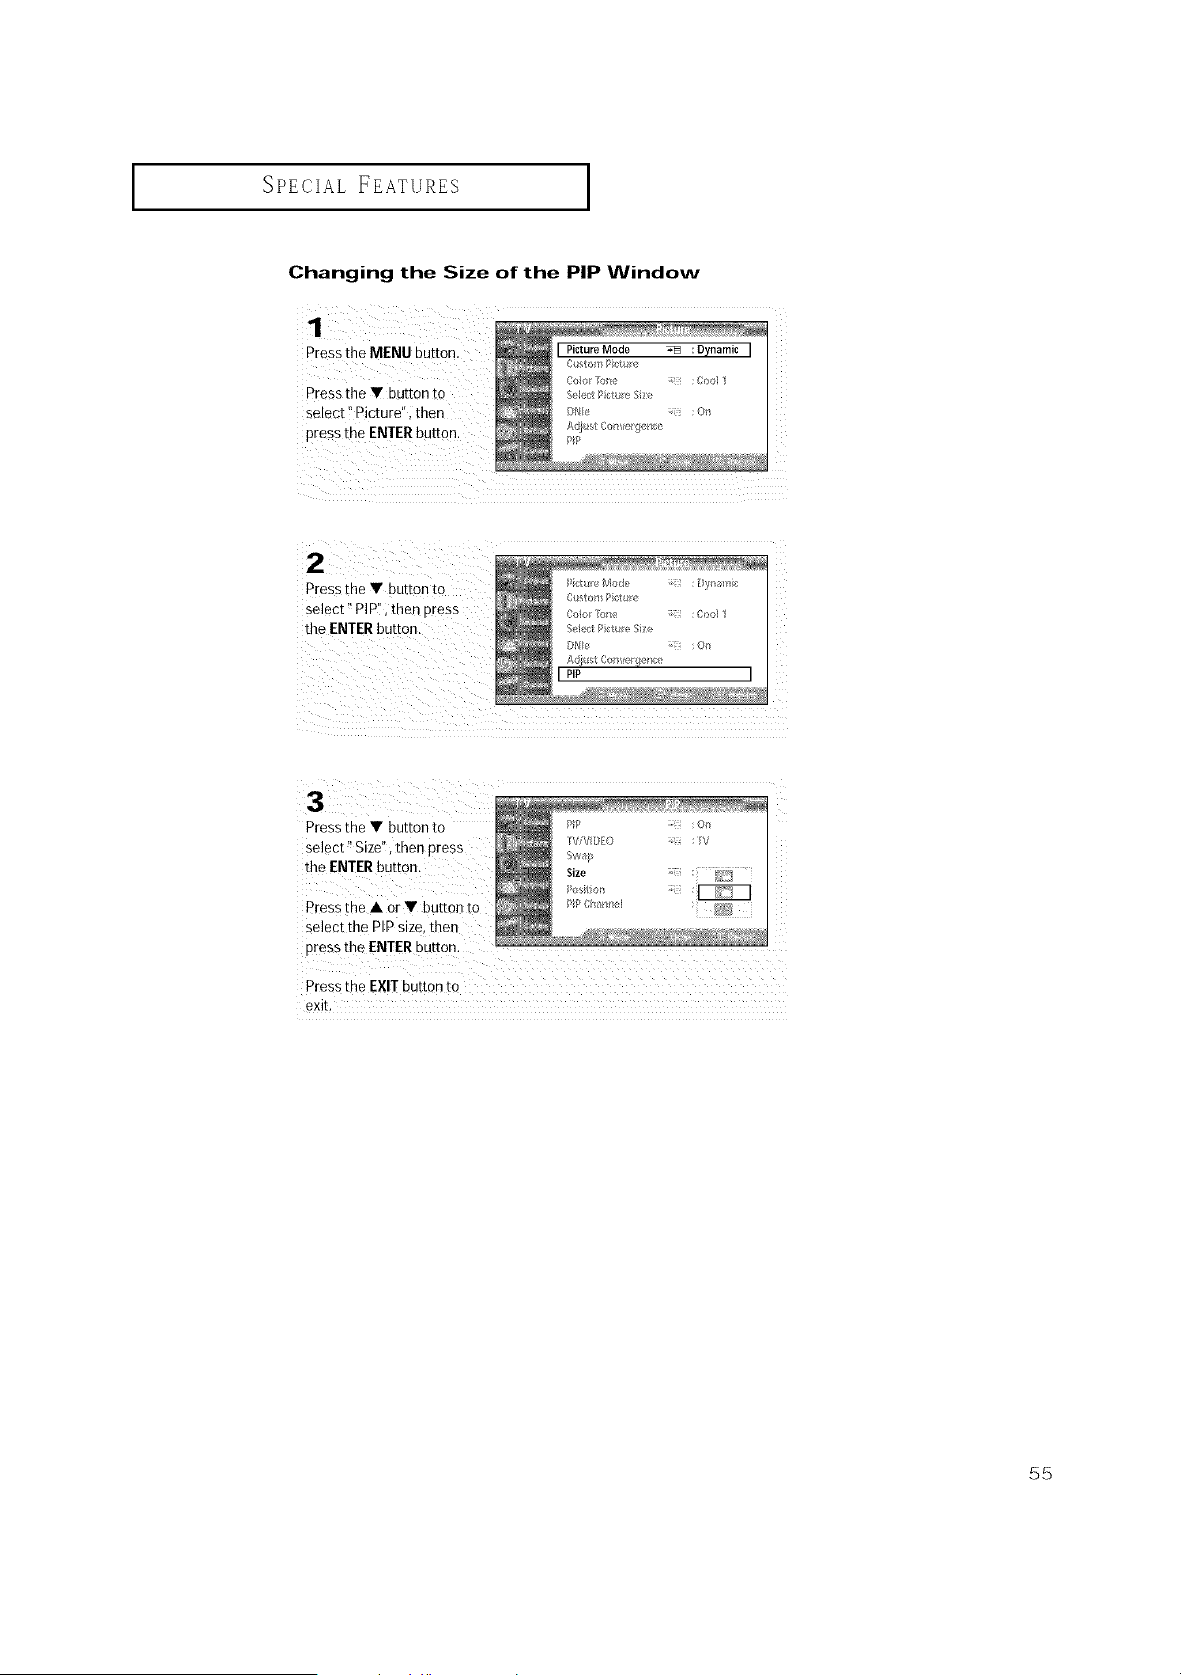
Changing the Size of the PIP Window
Pressthe MENU button. I PictureMode _ :Dynamic I
Pressthe Y button to
select _PIP", then pres s
the ENTERbutton.
/iStUr/}Mode : [:y_al//}_
C_store P/:t //!
Colo /_/lle :Co<l 1
Se_e_Picture Size
D_k! _-i ;On
Adi{_t Com!e_el_e
I PIP
Pressthe • button to
select _Size'!;then press
the ENTERbutton.
Pressthe • or • button to
select the PiP size,then
pressthe ENTERbutton.
Pressthe EXIT button to
exit.
55
I
SPECIAL FEATURES
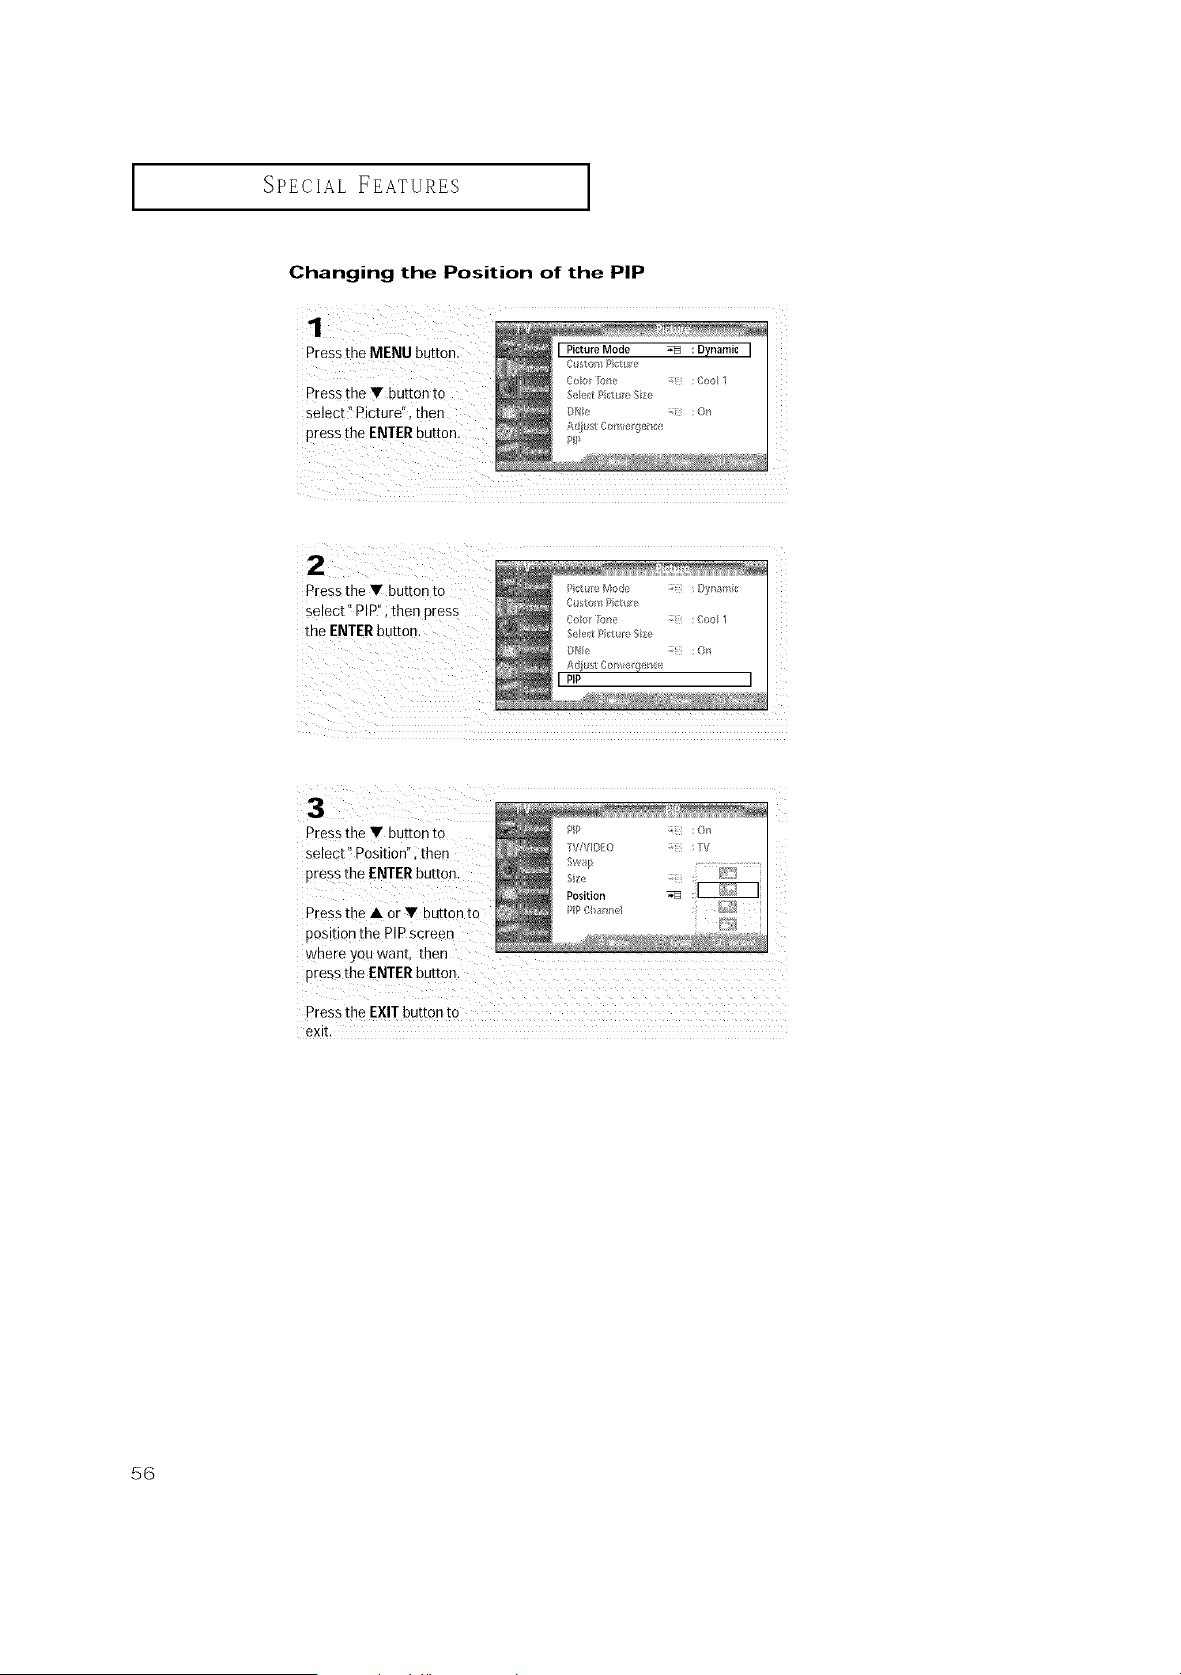
Changing the Position of the PIP
Pressthe • button to
Select '_Position": then
pres sthe ENTERbutt0 n.
Pressthe A or • button to
position the PIPscreen
where you want, then
pressthe ENTERbutton.
Pressthe EXIT button to
exit.
56
SPECIAL FEATURES
I
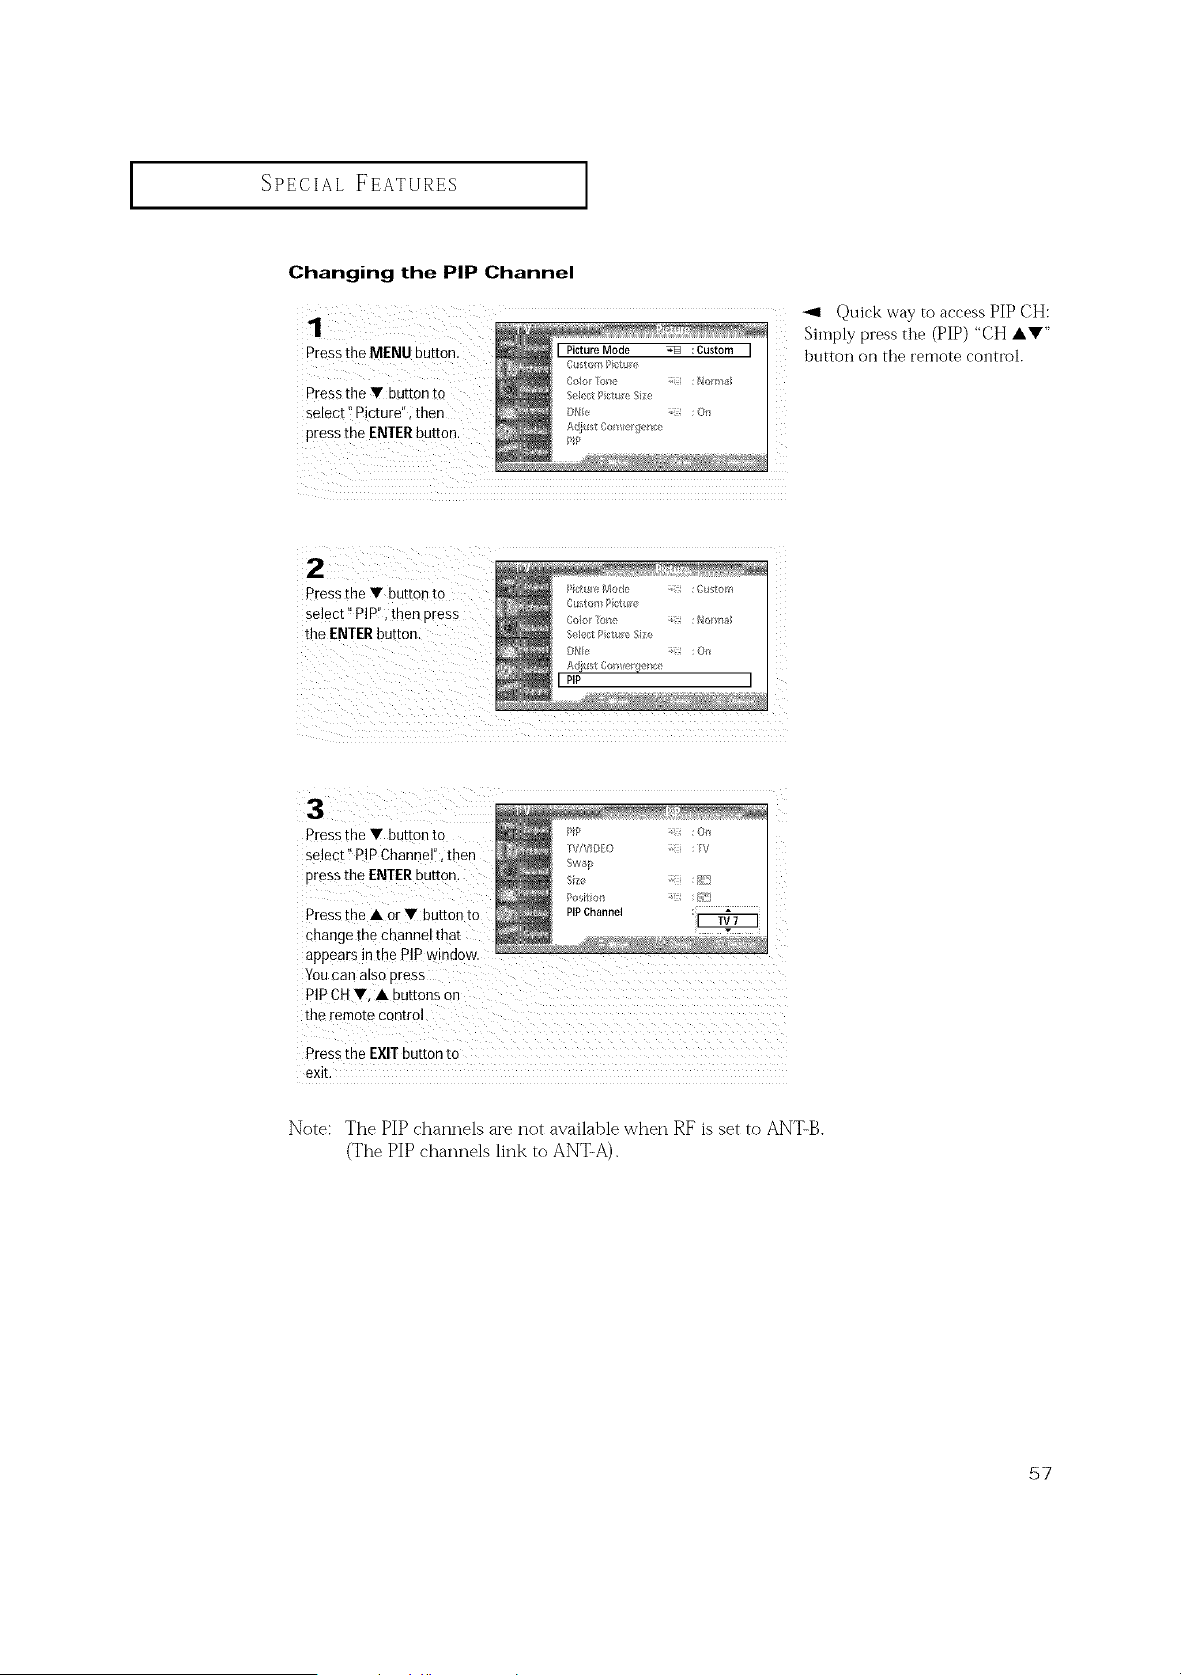
Changing the PIP Channel
Pressthe MENU button.
Pressthe Y button to
select '!Picture"; then
pressthe ENTERbutton.
_1 Quick way to access PIP CH:
Simply press the (PIP) "CH AV"
button on the remote control.
Pressthe V button to
select _PlP!', then press
the ENTERbutton.
/i/tu eMode :Custo/}_
CI_,tomP ct _//!
_olo_¸_/_e i_ :_or/_a_
Se_e_Pi_t_ Size
Adiu_t Com!e_el_e
I PIP
Pressthe V button to
select _iPIPChannel", then
press the ENTERbUtton:
Pressthe • or V button to
change the channel that
PIPCHY, A buttons on
Pressthe EXIT button to
exit.
Note: The PIP channels are not available when RE is set to ANT-B.
(The PIP channels link to ANT-A).
57
SPECIAL FEATURES ]
Extra sound settings (Auto Volume, BBE)
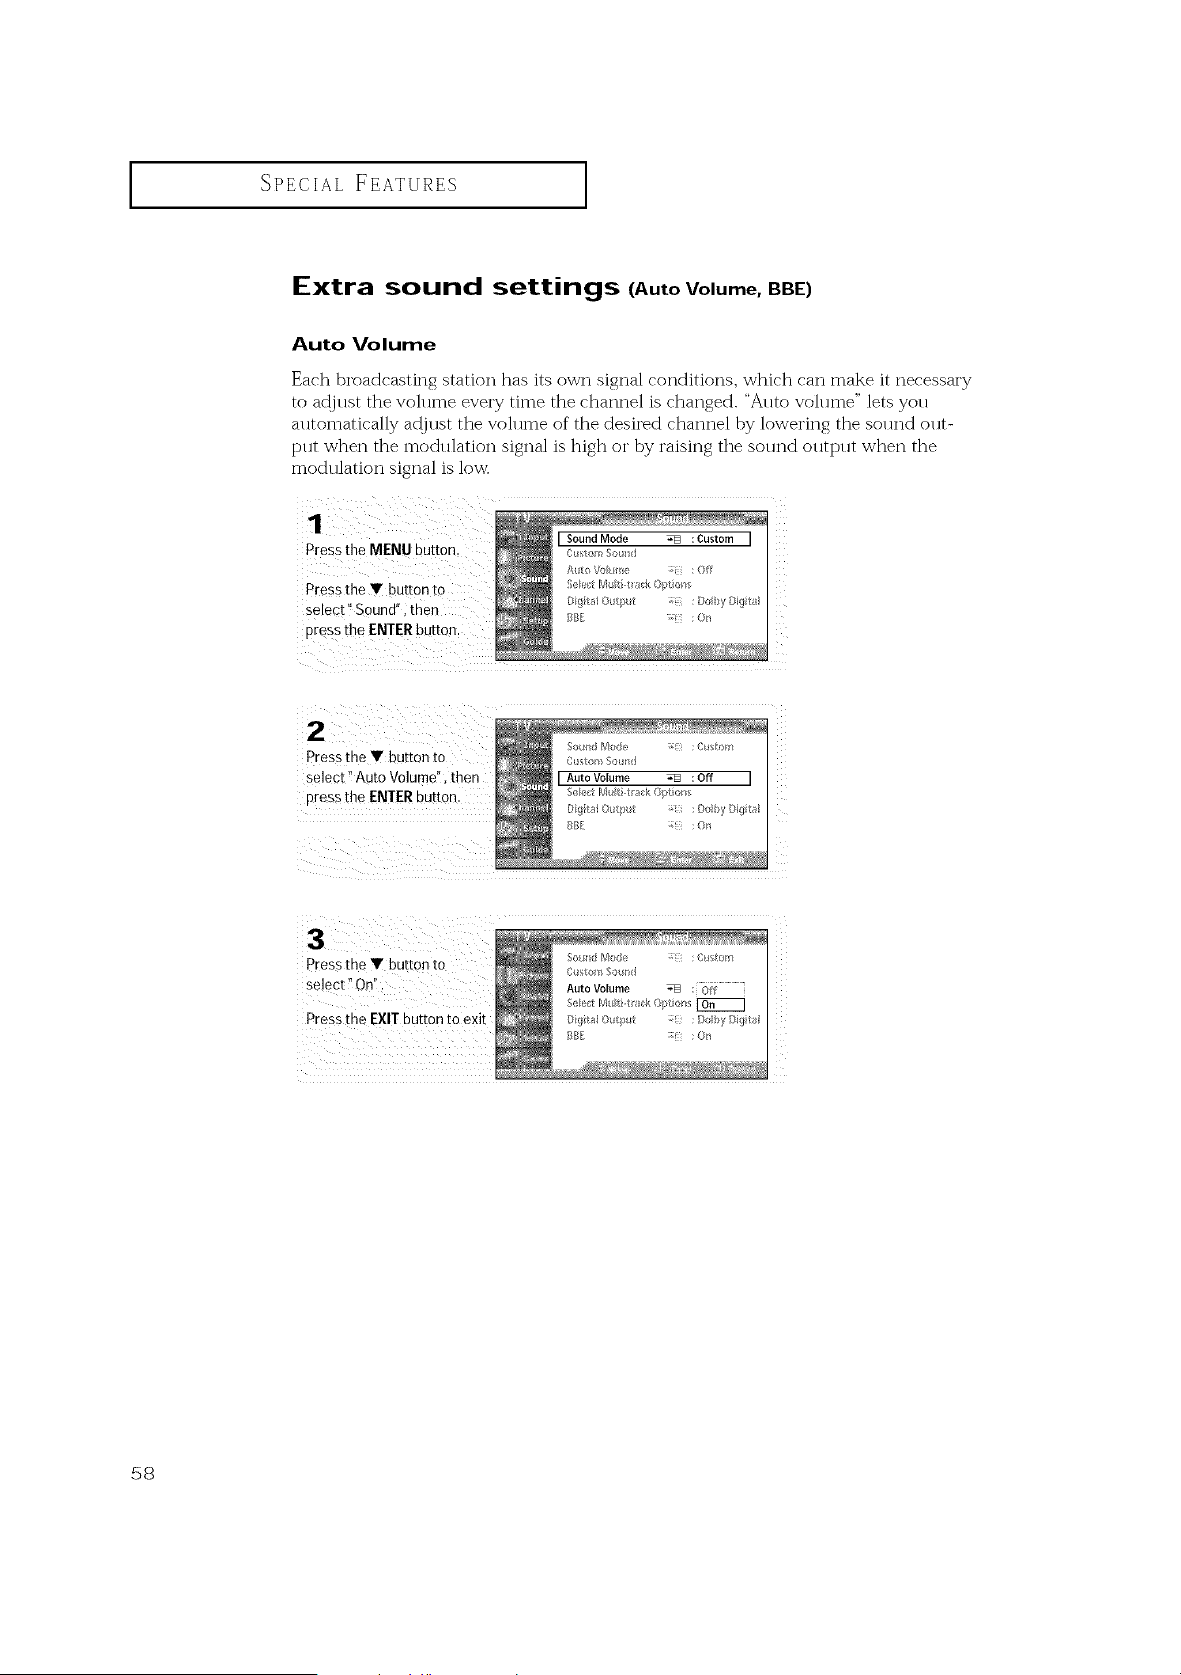
Auto Volume
Each broadcasting station has its own signal conditions, which can make it necessary
to at!just the volume every time the channel is changed. "Auto volume" lets you
automatically at!just the volume of the desired channel by lowering the sound out-
pHt when the modHlation signal is high or by raising the sound outpHt when the
modulation signal is low.
Pressthe MENU button.
Pressthe Y button to
select '_Sound!'i then
pres sthe ENTERbutton_
I SoundMode _ :Custom I
S/?('_;t[VI_ti askOpt obs
[: (_it_ Otput :[}_ )'I}iq tr/
Press the • button to
select _!Auto Volume", then
press the ENTER button,
:Doby Dig tz_
So_sld/_/k _e ;( :Custom
C_SO_XSOiled
AutoVolume _ :Off
eect M Iti t_ ck(_pt/r_
Pressthe EXITbutton to exit o it_l@put :; : D_by[}i<_t
Bill: : On
58
SPECIALFEATURES [
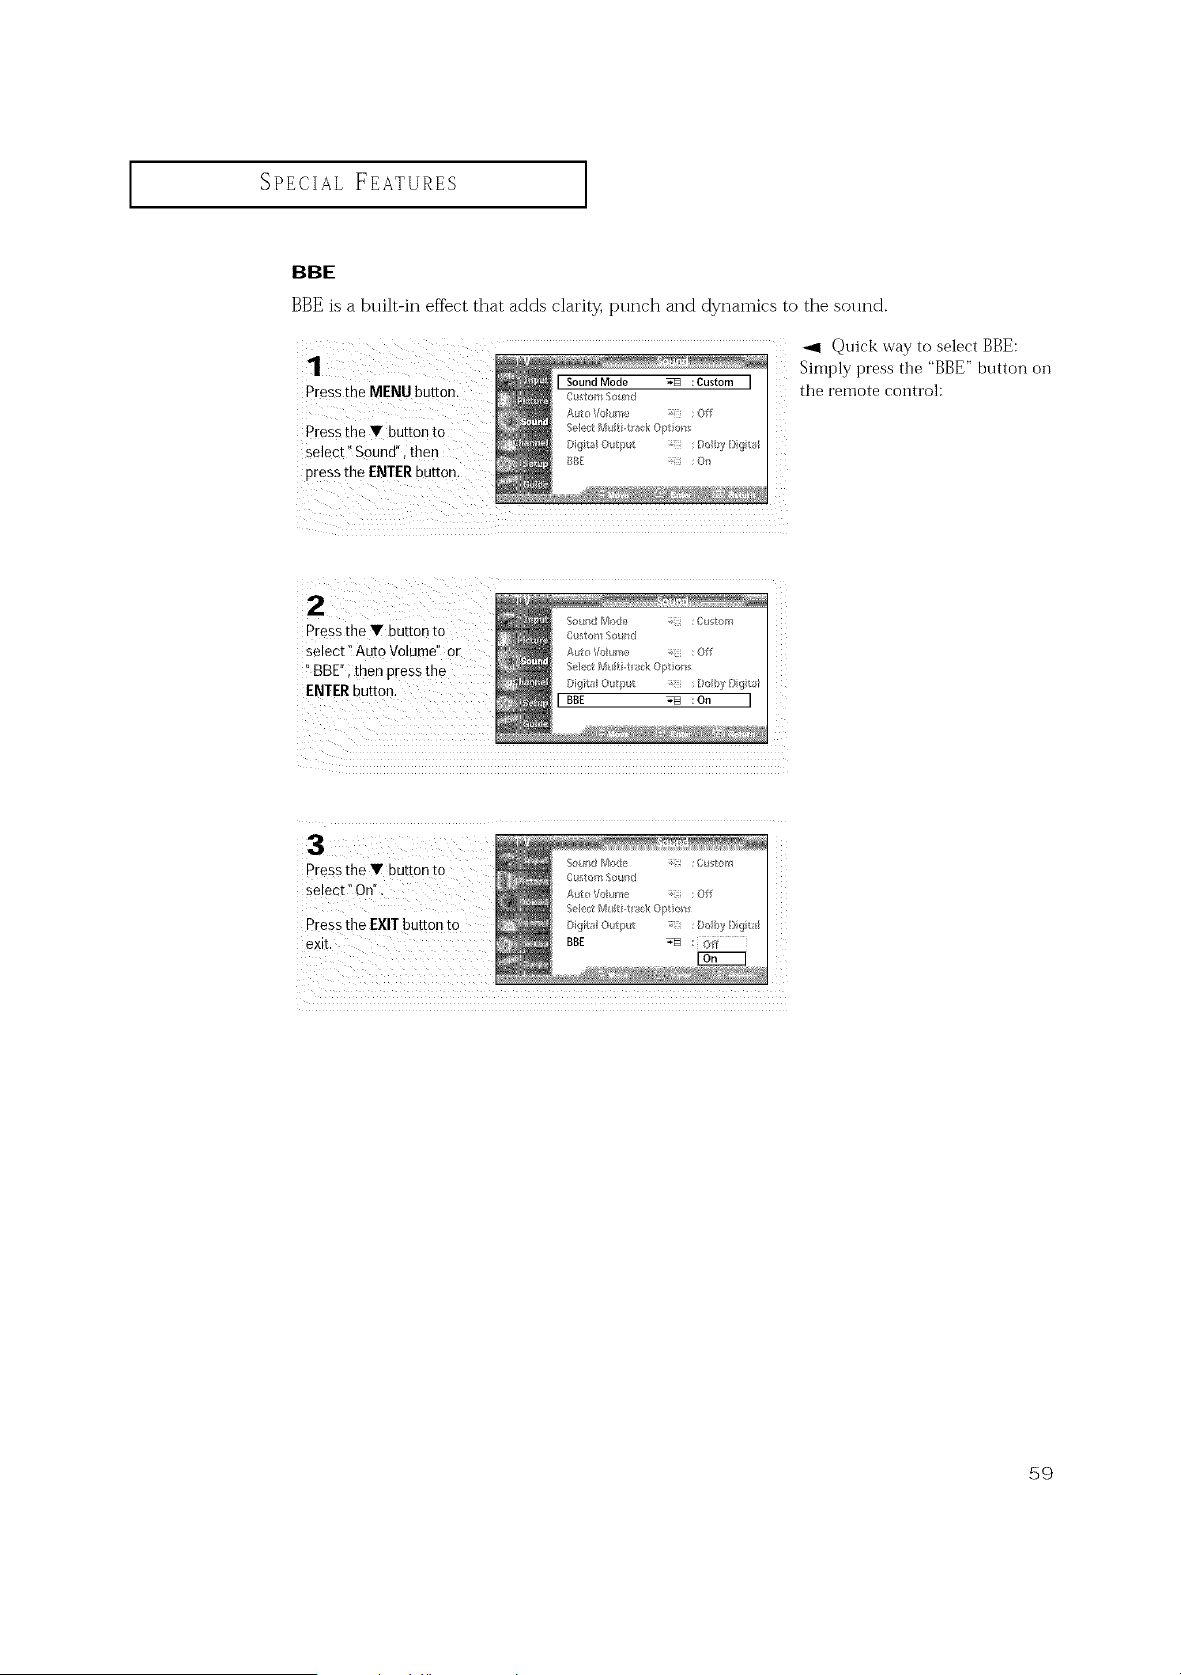
BBE
BBE is a built-in efiect that adds clarity, punch and dynamics to the sollnd.
Press the MENU button.
Pressthe• buttonto
Select '_Sound!', then
pressthe ENTER button.
_1 Quick way to select BBE:
Simply press the "BBE" button on
the remote control:
Press the • button to
Select 'TAuto Volumd' Or
"BBE" then press the
ENTERbutton.
Pressthe • button to
select" On",
Pressthe EXITbutton to
59
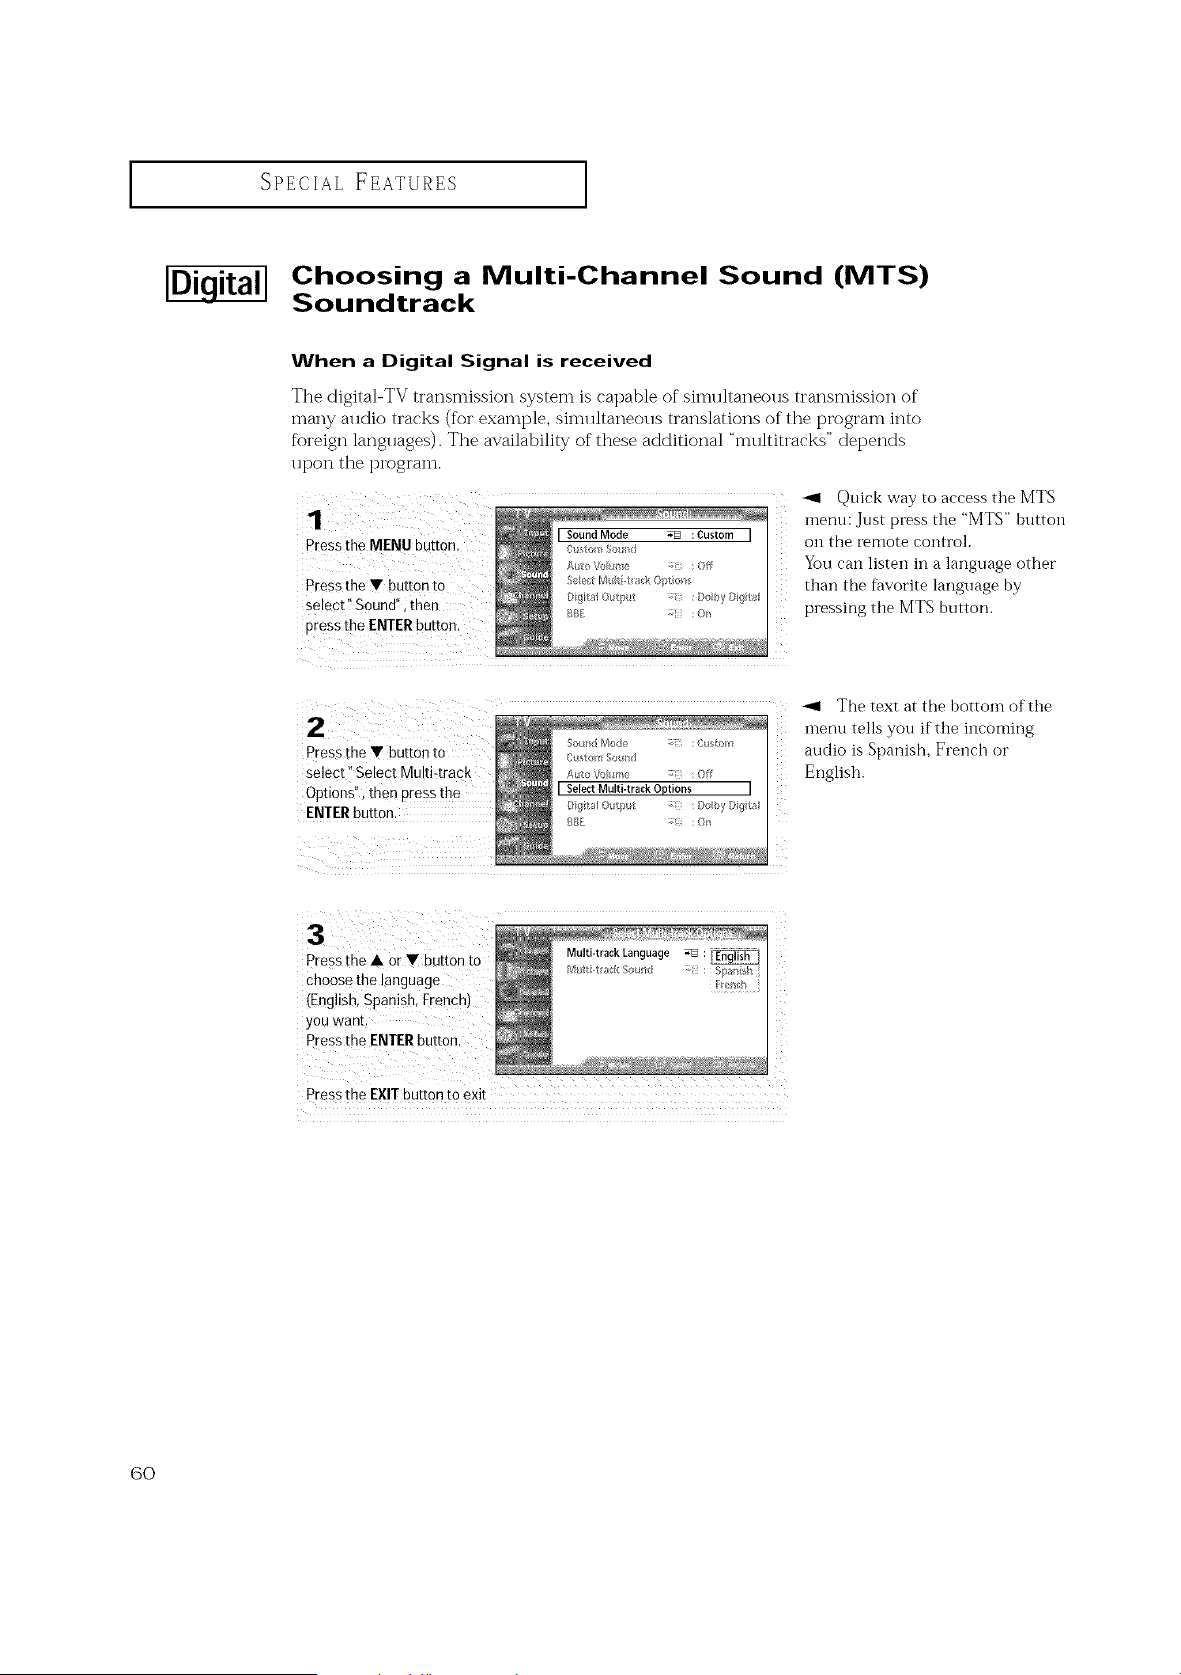
SPECIAL FEATURES ]
Choosing a Multi-Channel Sound (MTS)
Soundtrack
When a Digital Signal is received
The digital-TV transmission system is capable of simllltaneolJs transmission of
many alldio tracks (for example, simllltaneolls translations of the program into
foreign langllages). The availability of these additional "multitracks" depends
upon the program.
Pressthe MENU bUtton.
Pressthe V button to
Select'! Sound';then
pressthe ENTERbutton.
-ql Quick way to access the MTS
inenu: Just press the "MTS" button
on the remote control.
You can listen in a language other
than the favorite language by
pressing the MTS button.
Pressthe Y button to
select" Select Mu!ti:track
Options", then pressthe
ENTERbutton.
SOFXld Mode :Cu to/_
A_lto\_l_me _-i :Off
I SelectMulti-track Options
Digital O_t#ut _-i ; Dolby Digita_
IL
The text at the bottom of the
menu tells you if the incoming
audio is Spanish, French or
English.
Pressthe • Orv button to
choos# the language
(English,-<
you want.
Pressthe ENTERbutton,
Multi-trackLanguage _ :_
/V[_tit_a [ 5ound : Sp:ll_i_h
Pressthe EXITbutton to exit
6O
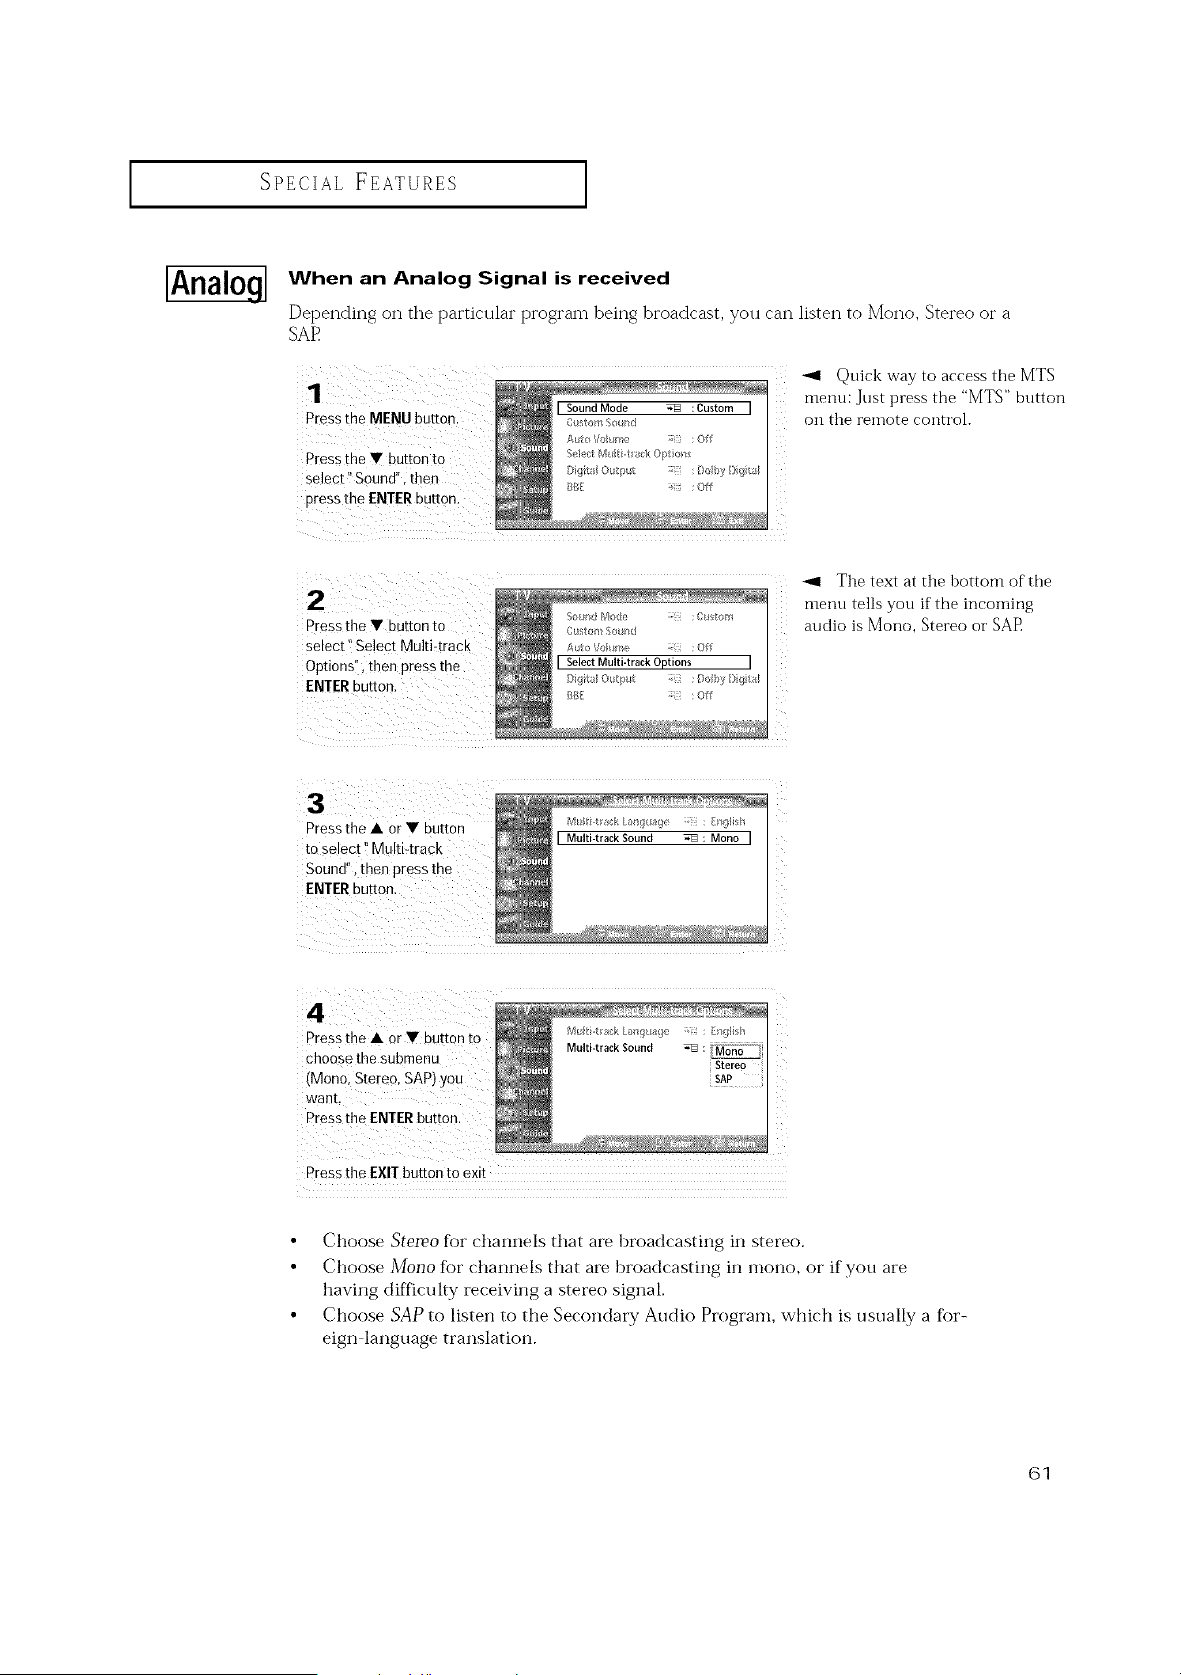
SPECIAL FEATURES ]
[Analo.q-I
When an Analog Signal is received
Depending on the particular program being broadcast, you can listen to Mono, Stereo or a
SAE
1 : / /
Press the MENU button:
_,4 Quick way to access the MTS
menu: Just press the "MTS" button
on the reinote control.
Press the • button to
pressthe • button to
select" Select Multi:track
Options:) then pressthe
ENTERbutt0n,
S>*nd Mo_e : C_stod_
O_tom Sound
A_to Vohme :Off
[ SelectMulti-track Options [
Digita_Ol_tput _i : Dolby Digita_
_BE _ii_ :Off
-_1 The text at the bottom of the
rllenu tells you if the incoming
audio is Mono, Stere() or SAP
Press the • or • button MIititr,%kL;mg£a9 ;;ii : _nq{bh
to select !:Multi4rack I Multi-trackSound _: Mono I
Sound/', then Pt#Ss the
4
Pressthe • or• buttor
choose the submenu
(Mono; Stereo, SAP)you
want.
Press the ENTERbutton.
Press the EX!Tbutton to exit
• Choose SteIPo for channels that are broadcasting in stereo.
• Choose Mono for channels that are broadcasting in mono, or if you are
having difficulty receiving a stereo signal.
• Choose SAP to listen to the Secondary Audio Program, which is usually a for-
eign language translation.
61
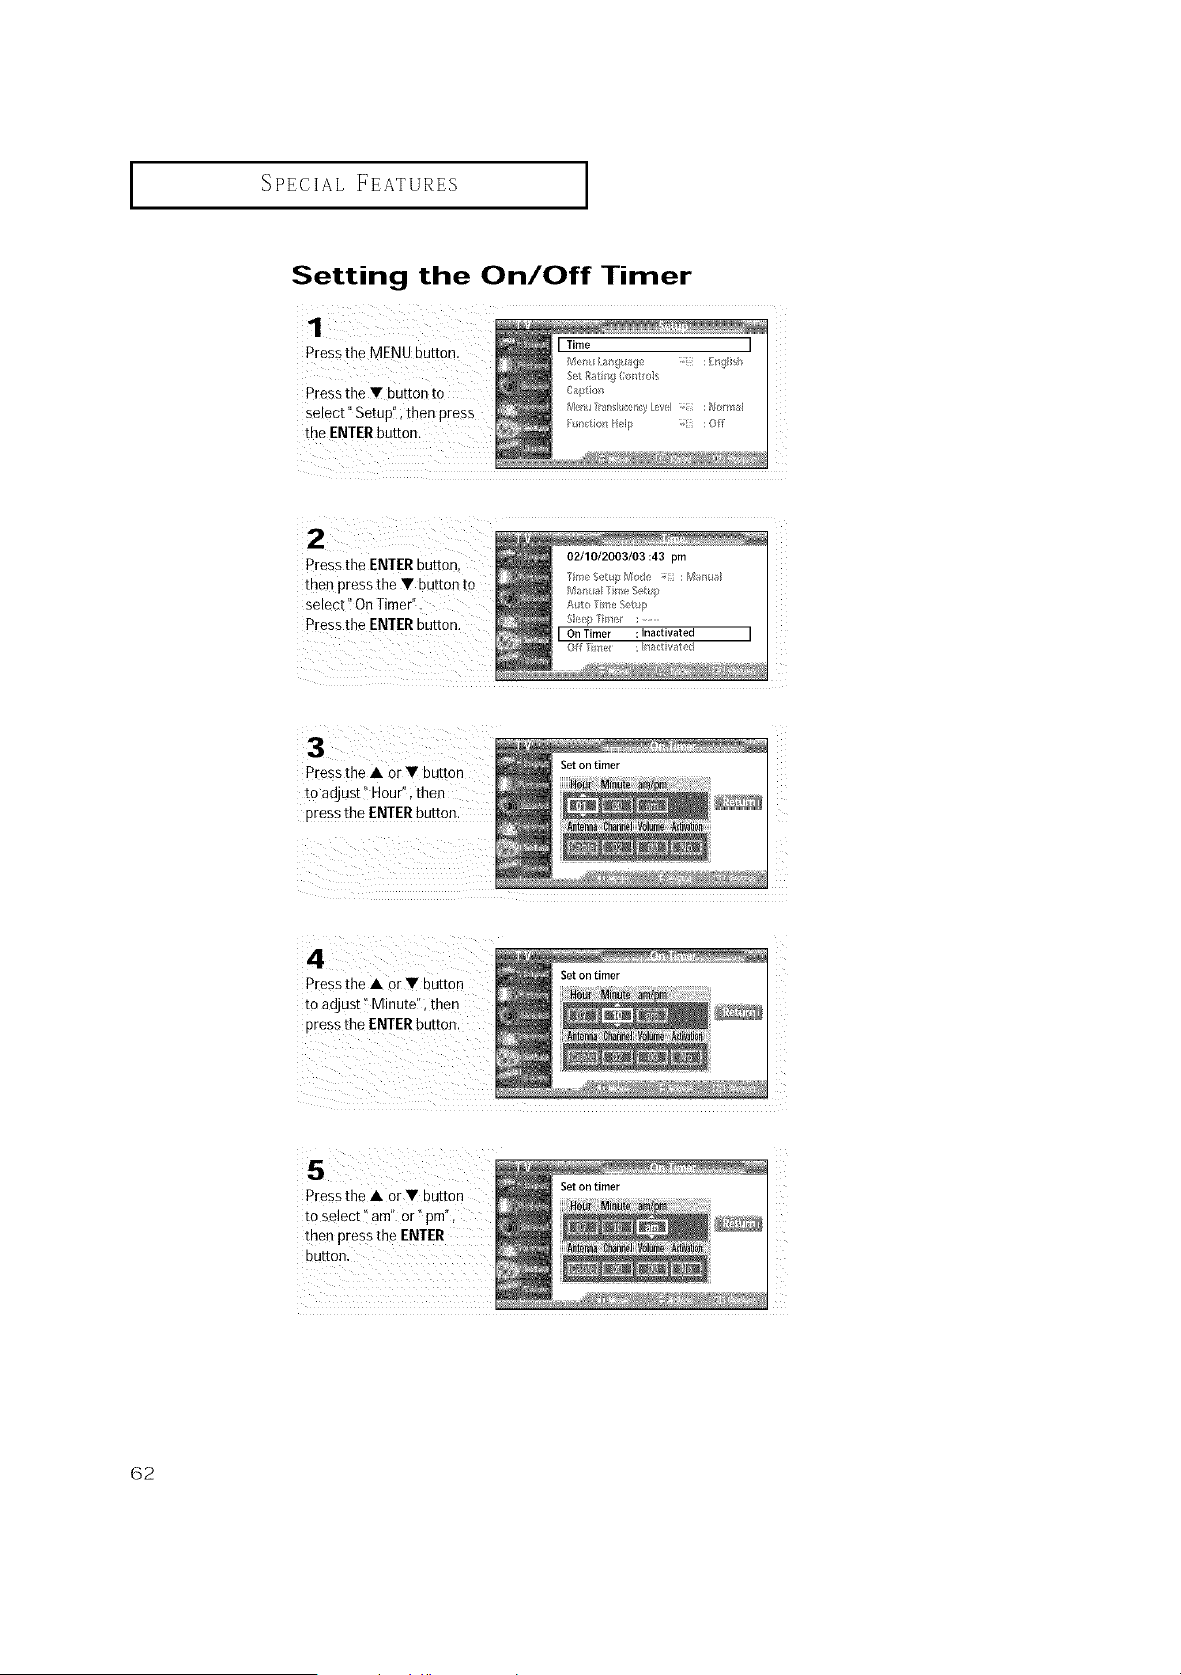
SPECIALFEATURES
I
Setting the On/Off Timer
Pressthe MENU button. I Time I
/'4el 1_/9 age :/ng_ish
Press the • button to c_, i_n
Select" Setup!', then press rv'_,r_umr I__,r,cy_:1 _or_r_
the ENTERbutton. _: i_,__ll_ :off
02/10/2003/03:43 pm
Pressthe ENTERbutton,
then press the • button to _ '_t_puk_4 :/_l_n_
Select _iOnTimer'_. l_, _u,t@
Pressthe ENTERbUttonl _'_'l__ir_*_,:......
IOnTimer :Inactivated I
Off me/ : [rlr_ctvat_;,d
Pressthe • Or• button
toadjust" Hour";then
pressthe ENTERbutton.
! :: )/:7
Setontimer
Pressthe • or• button
to adjust!'Minutd'i then
pressthe ENTERbutton.
Setontimer
Pressthe • Or• button
toselect' am" or t'pm"'
then press the ENTER
button,
Setontimer
62
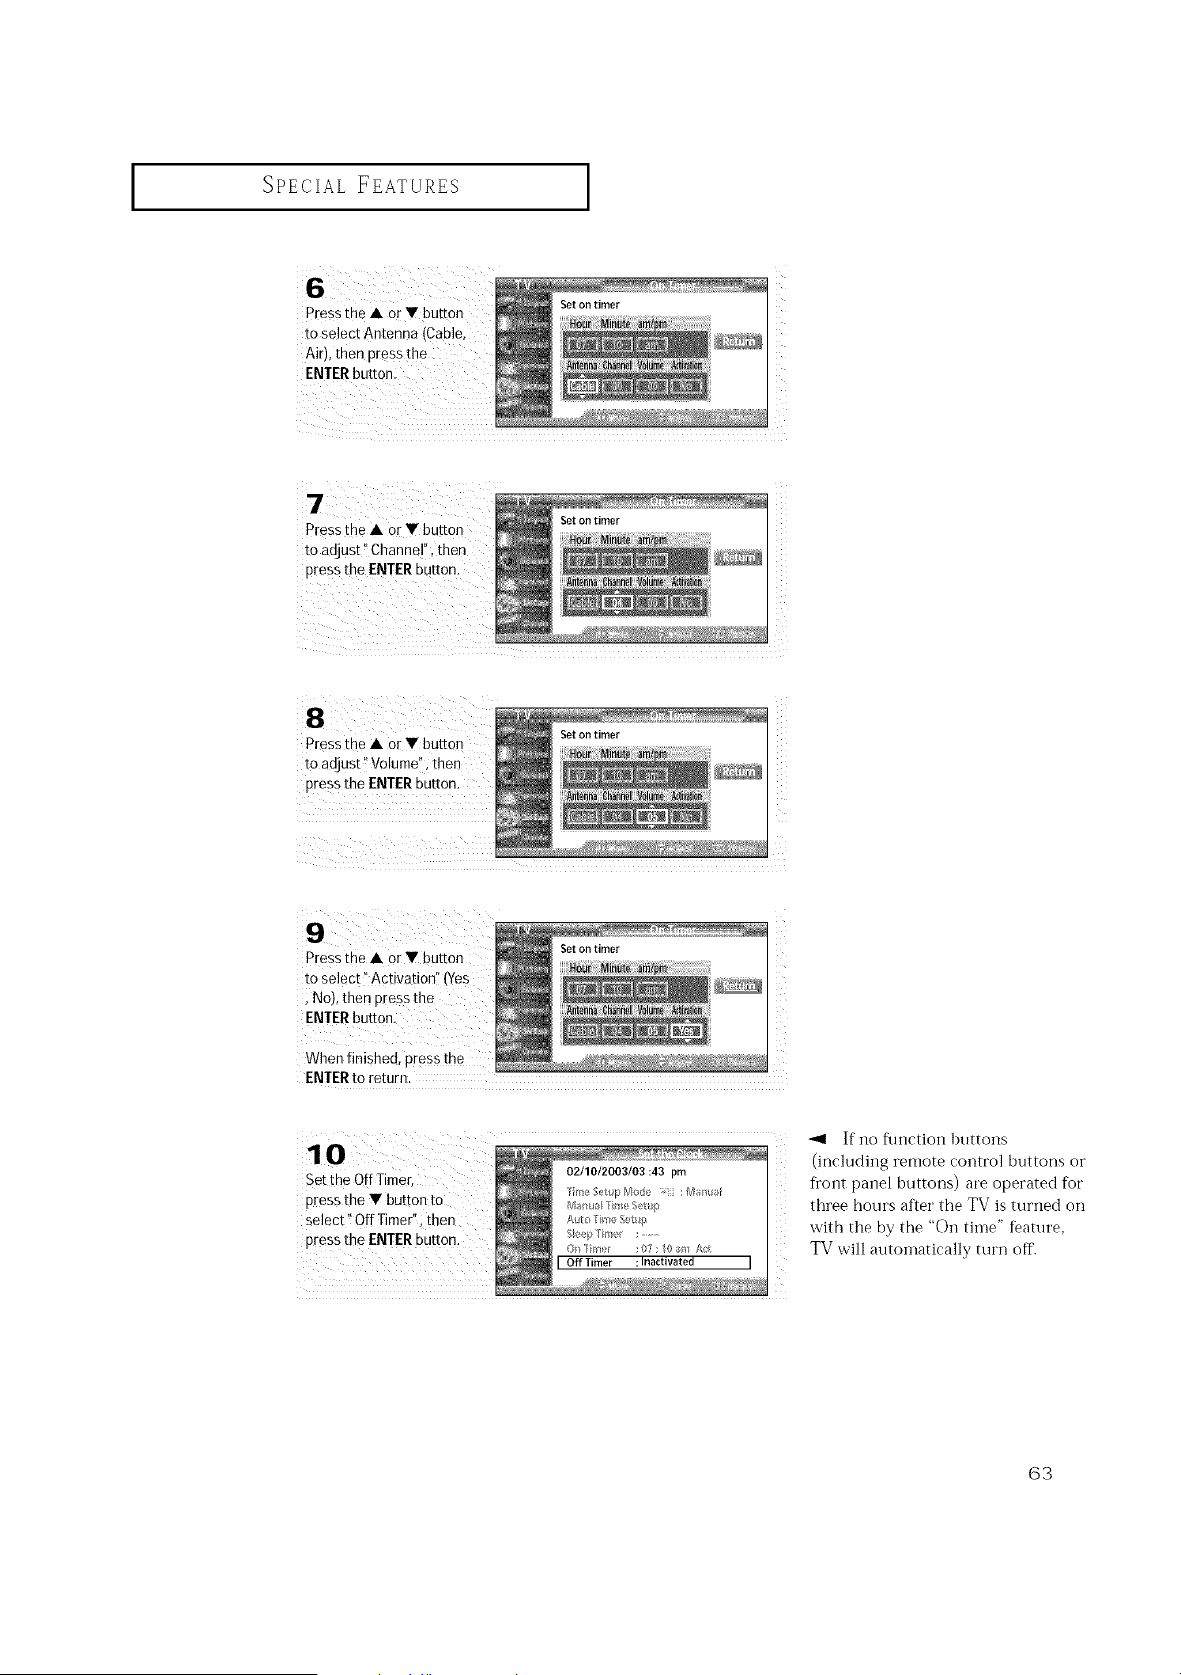
I
SPECIAL FEATURES
to select Antenna !
Air),then pressthe
ENTERbuttonl
Setontimer
Press the • or • button
to adjust" Channel", then
pressthe ENTERbutton.
Setontimer
Press the • or• button
toadjust !iVolume",then
press the ENTERBUtton.
Setontimer
Pressthe • Or• button
to select i'Activationll (Yes
; No),then pressthe
When finished, pressthe
Setontimer
z
z
ENTERto return.
10
Set the OffTimer
pressthe • button to
select _!OffTimer";then
press the ENTERbUtton.
02/10/2003/03:43 pm
Marius/li_'_le f_etu/_
k_eFme : ........
COff Timer : Inaetwated J
If no flmction httttons
(inchlding remote control buttons or
front panel buttons) are operated for
three hours af_et" the TV is turned on
with the by the "_)i} tithe" feature,
TV will autolnatically turn off.
63
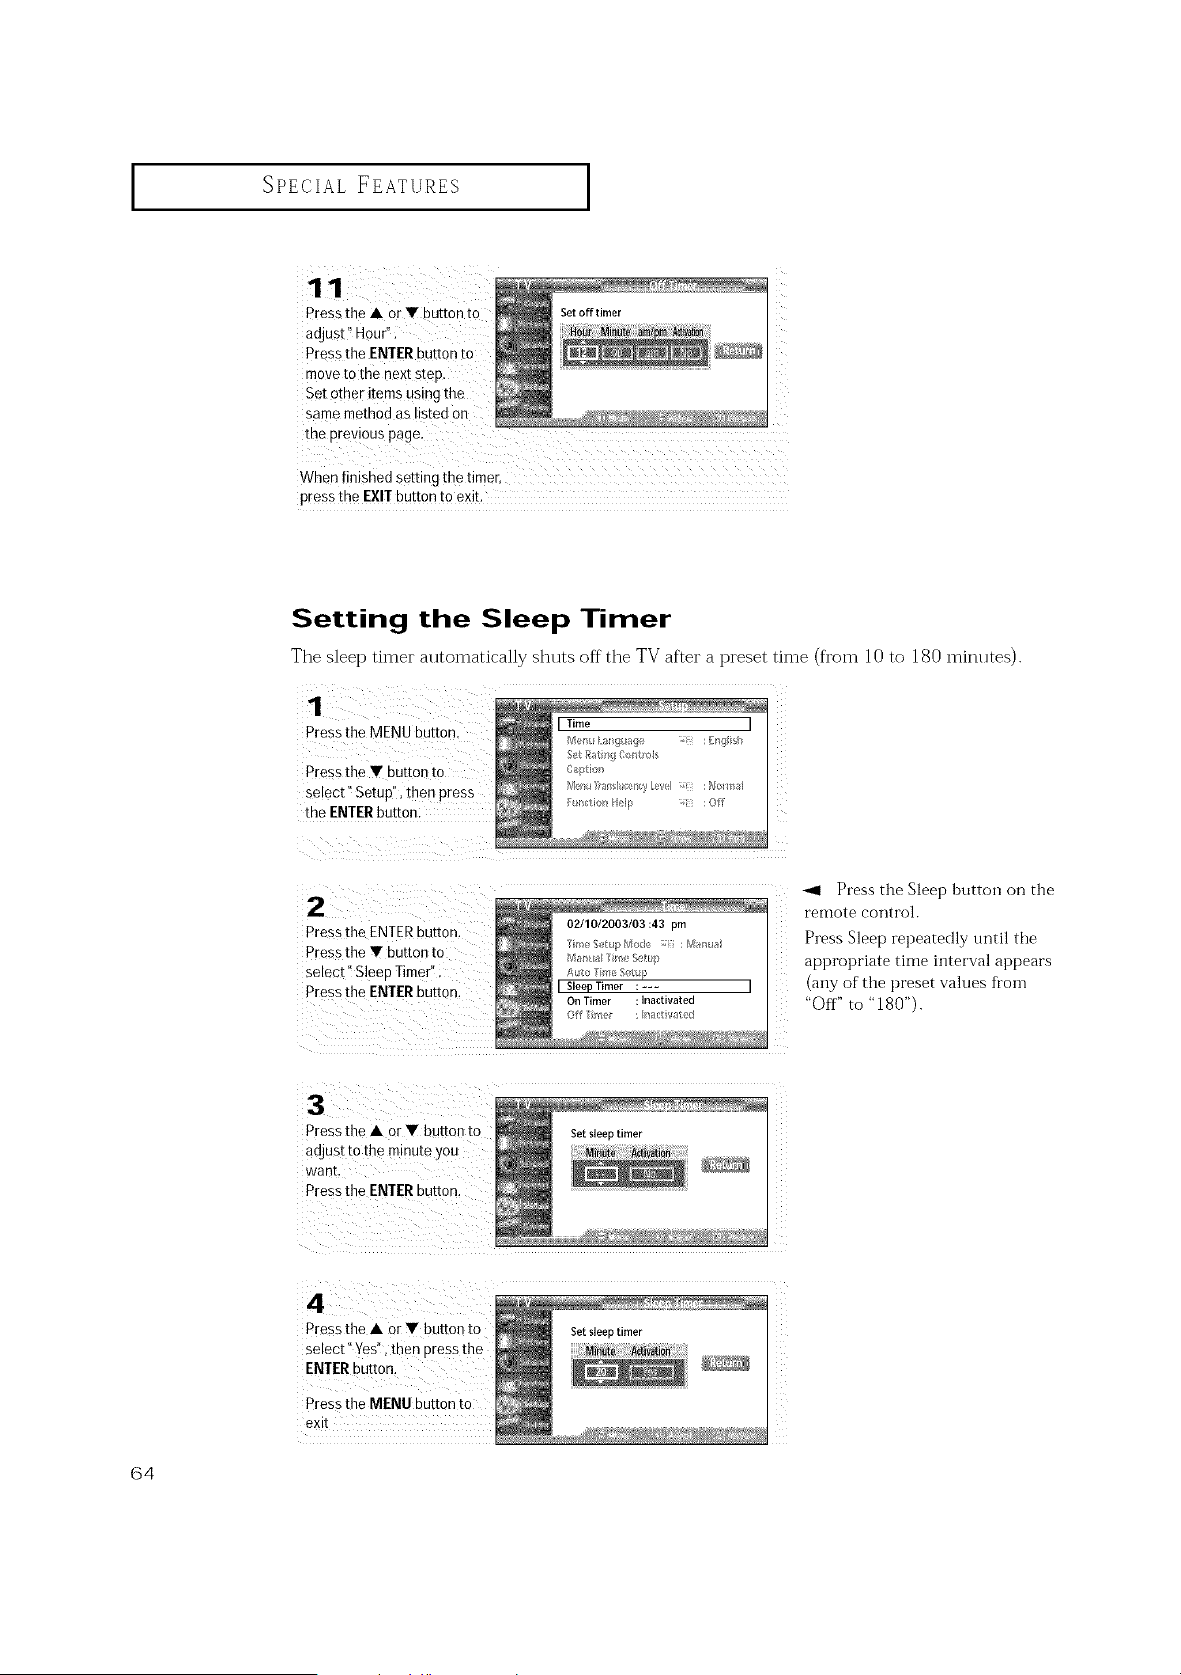
I
SPECIAL FEATURES
Pressthe • orV button to
adjust" Hour":
PreSStheENIER button to
movetothe nextstep.
Set other items using the
samemethod as Listedon
When finished setting the timer,
press the EX!Tbutton to exit.
Setting the Sleep Timer
The sleep timer automatically shuts off the TV after a preset time (from 10 to 180 minlltes).
1
Pressthe MENU button.
Pressthe • button to
select" Setup", then press
the ENTERbuttor
2
Pressthe ENTERbutton.
Pressthe • button to
se,ect" SleeoTimer".
Pressthe ENTERbutton.
-ql Press the Sleep button on the
remote control.
Press Sleep repeatedly until the
appropriate time interval appears
(any of the preset values Ibom
"Off" to "180").
3
Pressthe • or• button to
adJst tothe minuteyou
wan[
Pressthe ENTERbutton,
4
Pressthe • or• button to
select" Yes' then pressthe
ENIER button.
Press the MENU button to
eXll
64

SPECIAL FEATURES ]
Rating Control Menu
Access to channels and programs is controlled by a password (i.e., a 4-digit secret code
that is defined by the user).The on-screen menu will instruct you to assign a password
(and you can change it later, if necessary).
How to Change Your Password
Press the MENU button,
Press the Y button to
select '_Setup!', then press
the ENTERbutton:
Pressthe • button to
select ``Set Rating
Controls" i then press the
ENTERbutton:
Press the Y button to
select" Enter New PIN";
then pressthe ENTER
_nt;r yoL PP¢
[ Enter New PIN [
:/)(:/)) ((
Press the number buttons
(0 _ 9) on the remote
control to enter your
current password.
Pressthe number buttons
(0_9)to enter a new
(
Enter Current PIN
Enter New PIN
Confirm New PIN
Re_enterthe new pass=
word toconfirm.
-41 Password Error:
• If yon forget the password, re-do
steins 1_3.
At step 4, when the display asks
yon to enter the current password,
press the master btlttoi]s (INFO, 1,
8, and 2). Enter a new password
and proceed with steps 5_6.
The master buttons are available
only in the Rating Control n]entl
and cannot be operated during
normal viewing. (If the display
asks you to enter the password
while blocked, the master btlttons
cannot be operated.)
The Rating Control feature doesn't
operate with D VHS recordings.
• The factory default password is
'0000'.
65
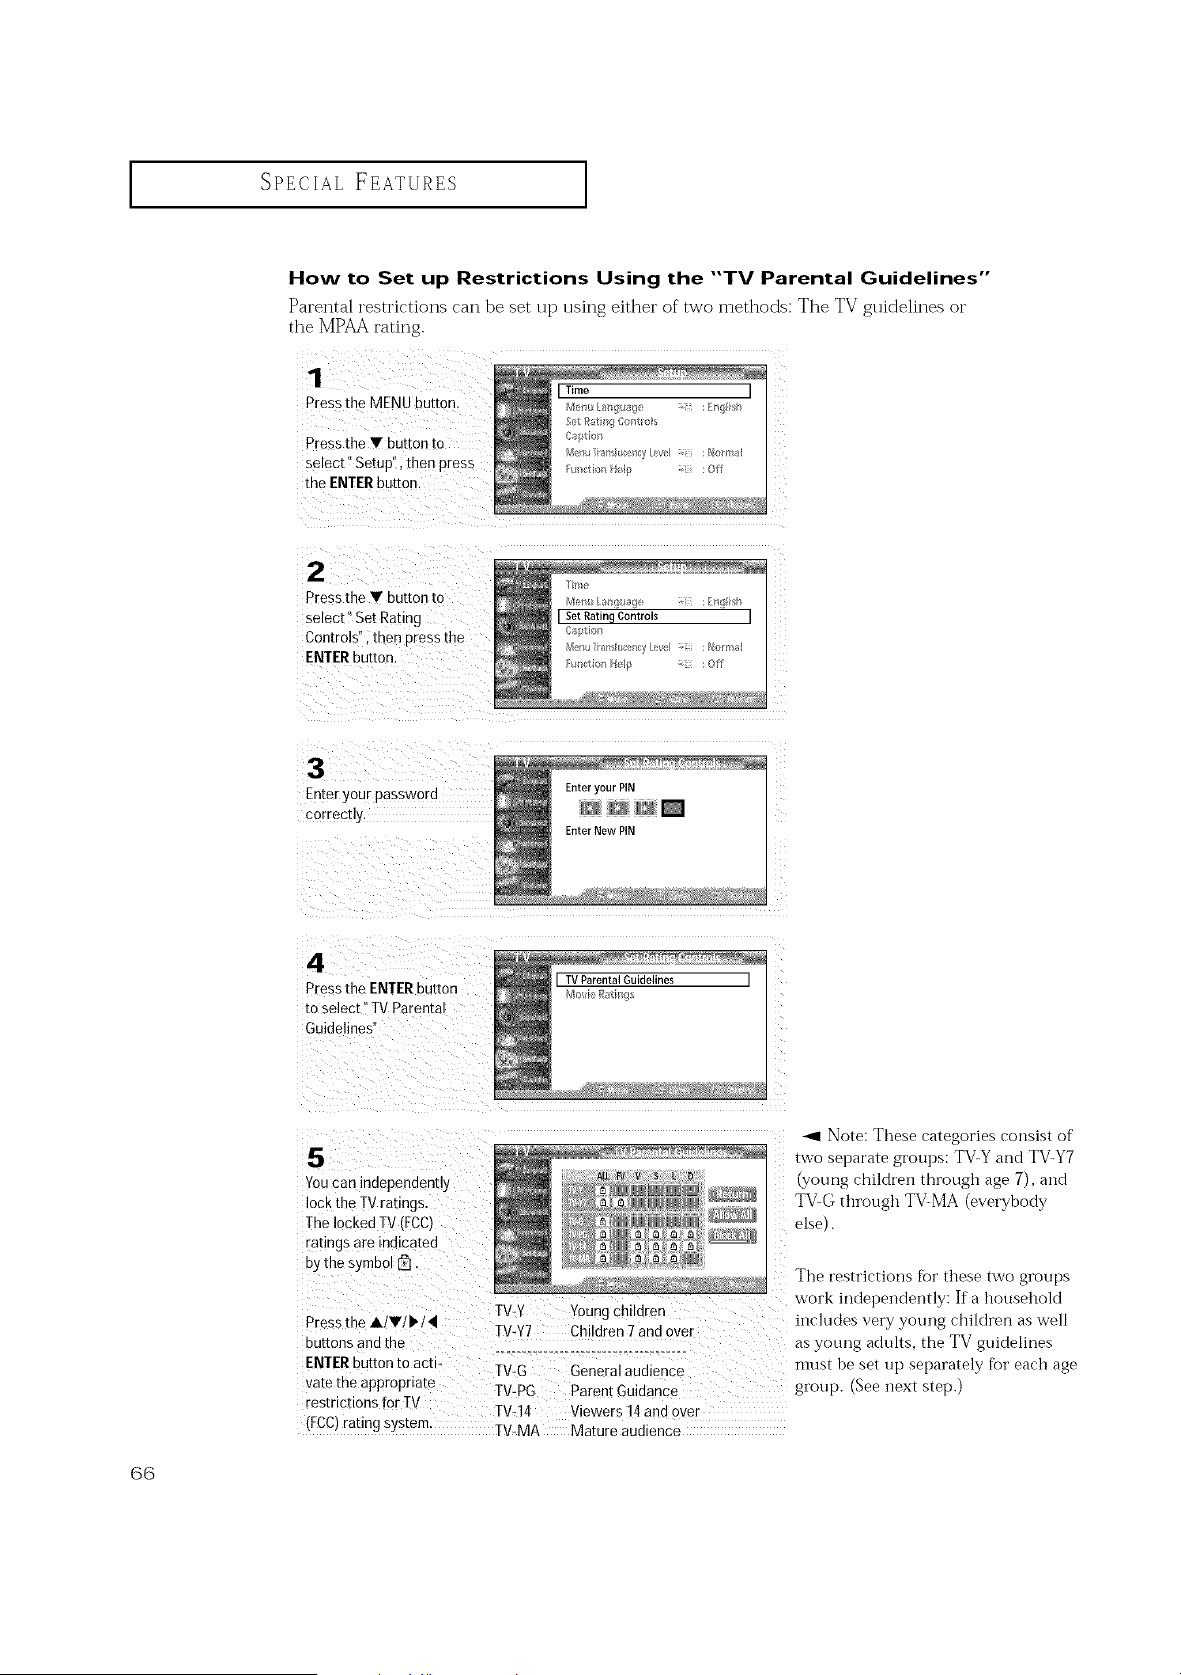
SPECIAL FEATURES ]
How to Set up Restrictions Using the "'TV Parental Guidelines'"
Parental restrictions can be set up using either of two methods: The TV guidelines or
the MPAA ratit'_g.
1
Press the MENu button,
Pressthe • button to
select" getup", thenpress
the ENTER buttor
[ Time [
2
Press the • button to
select" Set Rating
Controls", then press the
ENTER button.
[ SetRatin9Controls [
Enter your password
correct]
Enter your PIN
-nter New PIN
4
Pressthe ENTER button
toselect TVParenEa
Guidelines
TVParental Guidelines ]
Youcan independently
lock the TVratings.
TheIockec TV(FCC)
ratings are matca[ed
by the symbol _.
Pressthe A/•/P,/4 TV-Y Youngchildren
TV-Y7 Children7and over
ouEons ana the
ENTERbutton toact TV-G Generalaudienc
vare the appropnare TV-PG Parent Guidance
restrictions for TV
TV-14 Viewers 14ann over
I'FCC/ratingSysEem. TV-MA Mature audience
_1 Note: These categories consist of
two separate grot_ps: TV-Y and TV-Y7
(young children through age 7), and
TV-G through TV-MA (everybody
else).
The restrictions fk_rthese two groups
work indepei_dei_tly: If a household
includes very young children as well
as young adults, the TV guidelines
must be set up separately for each age
group. (See next step.)
GG
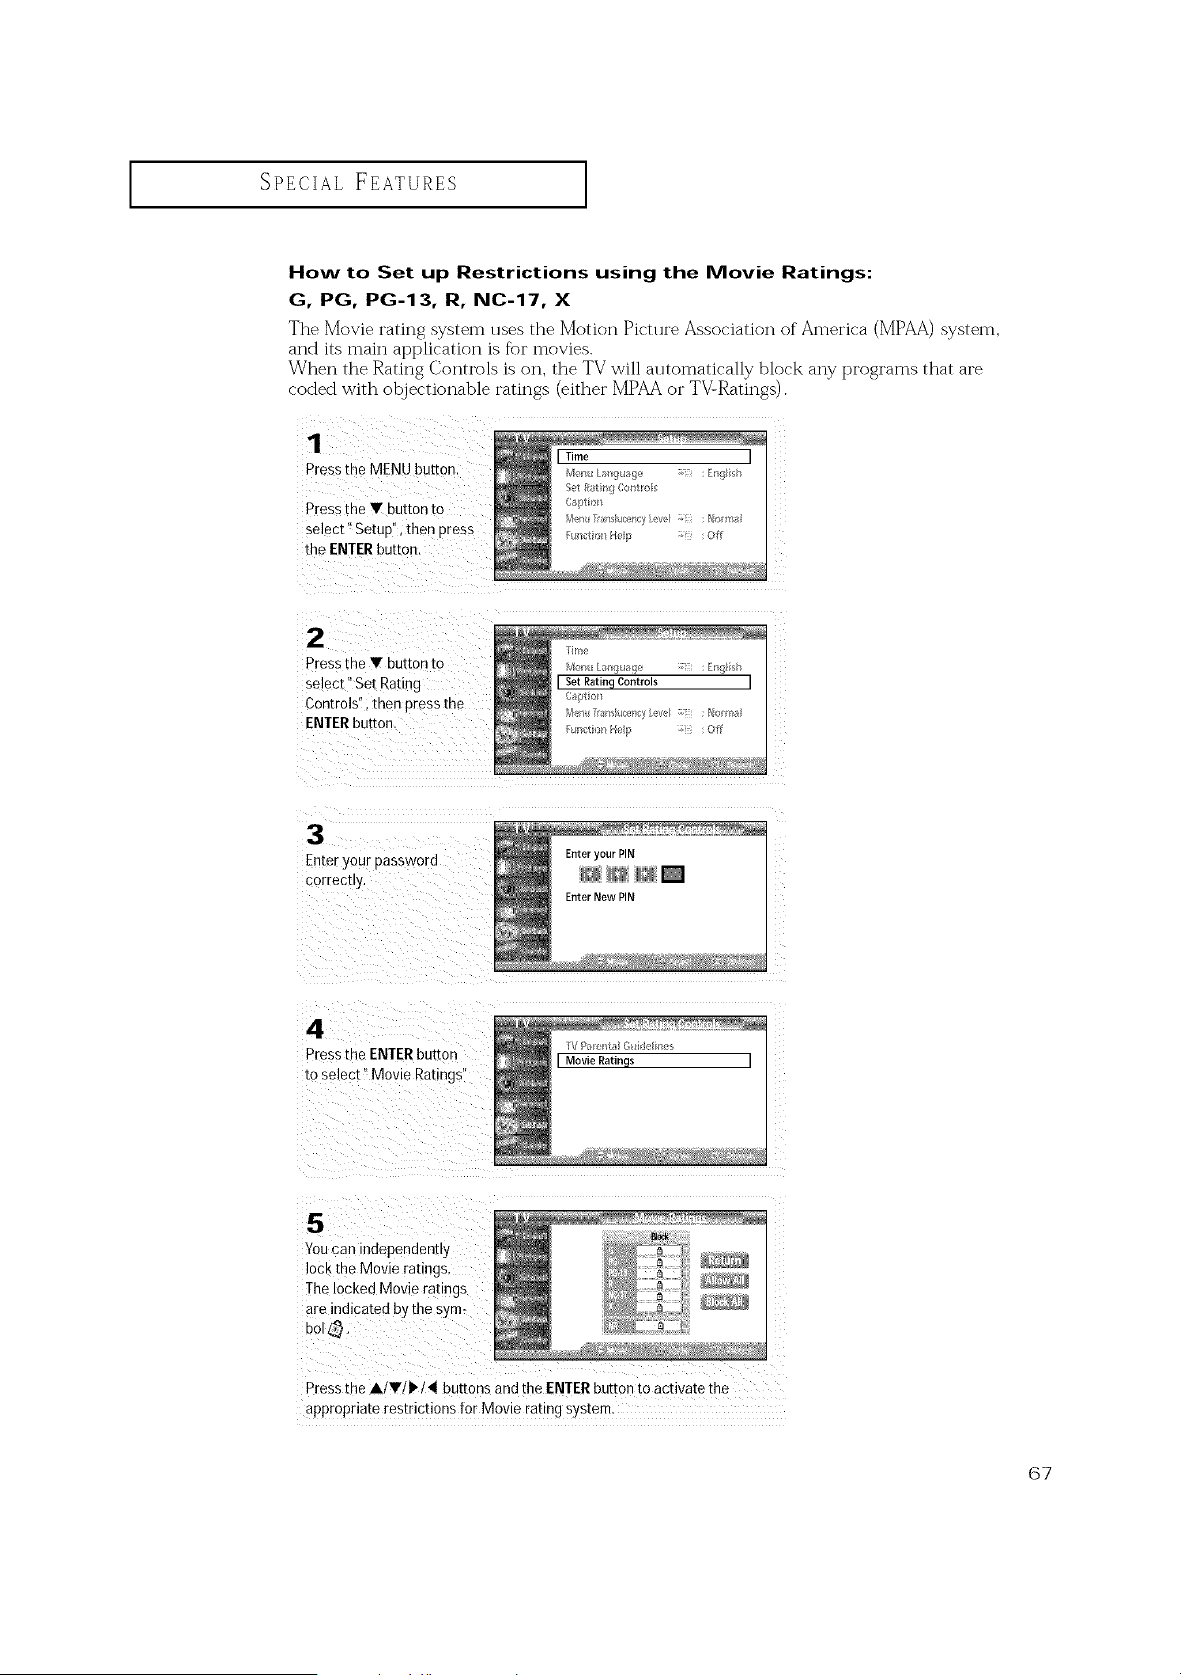
SPECIAL FEATURES ]
How to Set up Restrictions using the Movie Ratings:
G, PG, PG-13, R, NC-17, X
The Movie rating system uses the Motion Picture Association of America (MPAA)system,
and its main application is f_)I"movies.
When the Rating Controls is on, the TV will automatically block any programs that are
coded with objectionable ratings (either MPAA or TV:Ratings).
1
Presstne MENU button
Pressthe • button [o
select" SetuD". then press
the ENTERbutton.
2
Press[he • button to
select" Set Rating
Controls', men pressthe
ENTERbutton
[irr_e
I Set Rating Controls I
R_ctio_ He_p _i_! : Off
Enter your password
correcu_
Enter your PiN
Enter New PIN
4
Pressthe ENTER bur[on
roselect" Movie Ratings"
[\f I/_ __t_ G ile bes
I Movie Ratin£s I
5
Youcan nnependently
lock the Movie ratings
-he locked Movie ra[,ngs
are indicated by the sym-
DOI _.
Pressthe A/•II_/4t buttons and the ENTER button to activate the
appropriate restrictions for Movie rating system.
67
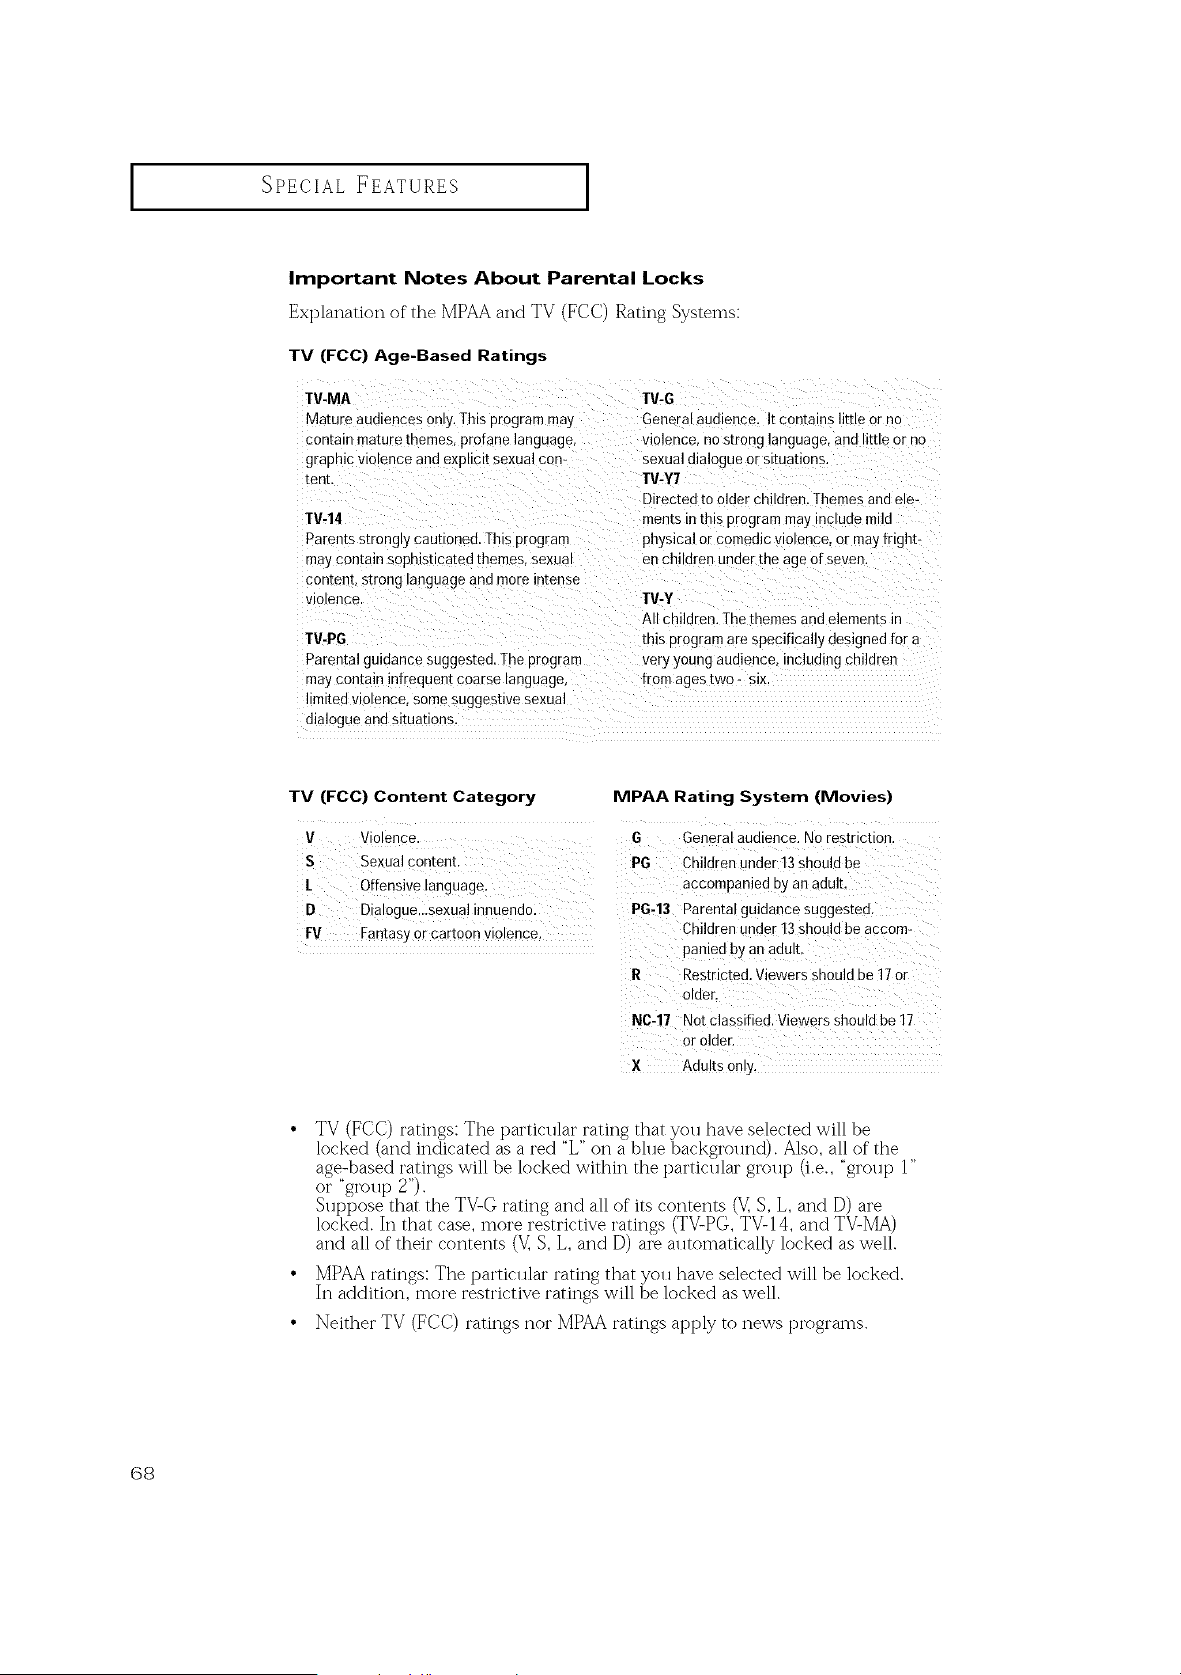
SPECIAL ]FEATURES
Important Notes About Parental Locks
Explanation of the MPAA and TV (FCC) Rating Systems:
TV (FCC) Age-Based Ratings
TV-MA
Mature audiences only. This program may
contain mature themes, profane language
graphic violence and exphctt sexual con-
[en[
TV-14
Paren[s strongty cautioned. This prograrr
TV-G
Genera[aumence. Itcontains little orno
violence, no strong language, ano tt[ueor no
sexualdialogue or situations.
TV-Y7
Directed toolder children. Themesand ele-
mentsin this program maymctuuemtlc
physical orcomedic violence, or mayfright-
maycontain sophisticated themes, sexuat enchildren under the age of seven.
content, strong tanguageand more intense
vtolence TV-Y
All children. Thethemes andelements in
TV-PG this program arespecifically designed for a
Parental guidance suggested. The program very youngaudience including children
maycontain infrequen[ coarse language, from ages two - six
limiteu vtotence, somesuggestive sexual
dialogue and situations.
TV (FCC) Content Category MPAA Rating System (Movies)
V Violence. G Generalaudience. Norestriction.
S Sexual content. PG Childrenunder 13should be
/ Offensive !anguage, acc0mpan!ed by an adu!t,
D Dial0guelLsexual innuendo: PG-13 Parental guidahce suggested.
OnViOlence Children under 13should be accom-
FV Fantasyor cart0
paniedby an adult,
R Restricted. Viewersshould be t7 or
NC-17 Notclassified. Viewers should be17
orolder.
X Adults only;
• TV (FCC) ratings: The particlflar rating that you have selected will be
locked (and indicated as ared "L" on a blue background). Also, all of"the
age-based ratings will be locked within the particular gir)up (i.e., "group 1"
or "group 2").
SHppose that the TVLG rating and all of its contents (V] S, L,and [)) aI'e
locked. It] that case, more restrictive ratings (TVLPG, TV-14, and TV-MA)
and all of their contents (V_S, L, and D) ai_ aHtomatically locked as well.
• MPAA ratings: The particular rating that you have selected will be locked.
In addition, more restrictive ratings will be locked as well.
• ]XTeither TV (FCC) ratings nor MPAAratings apply to news t3i'ogi'al_ls.
68
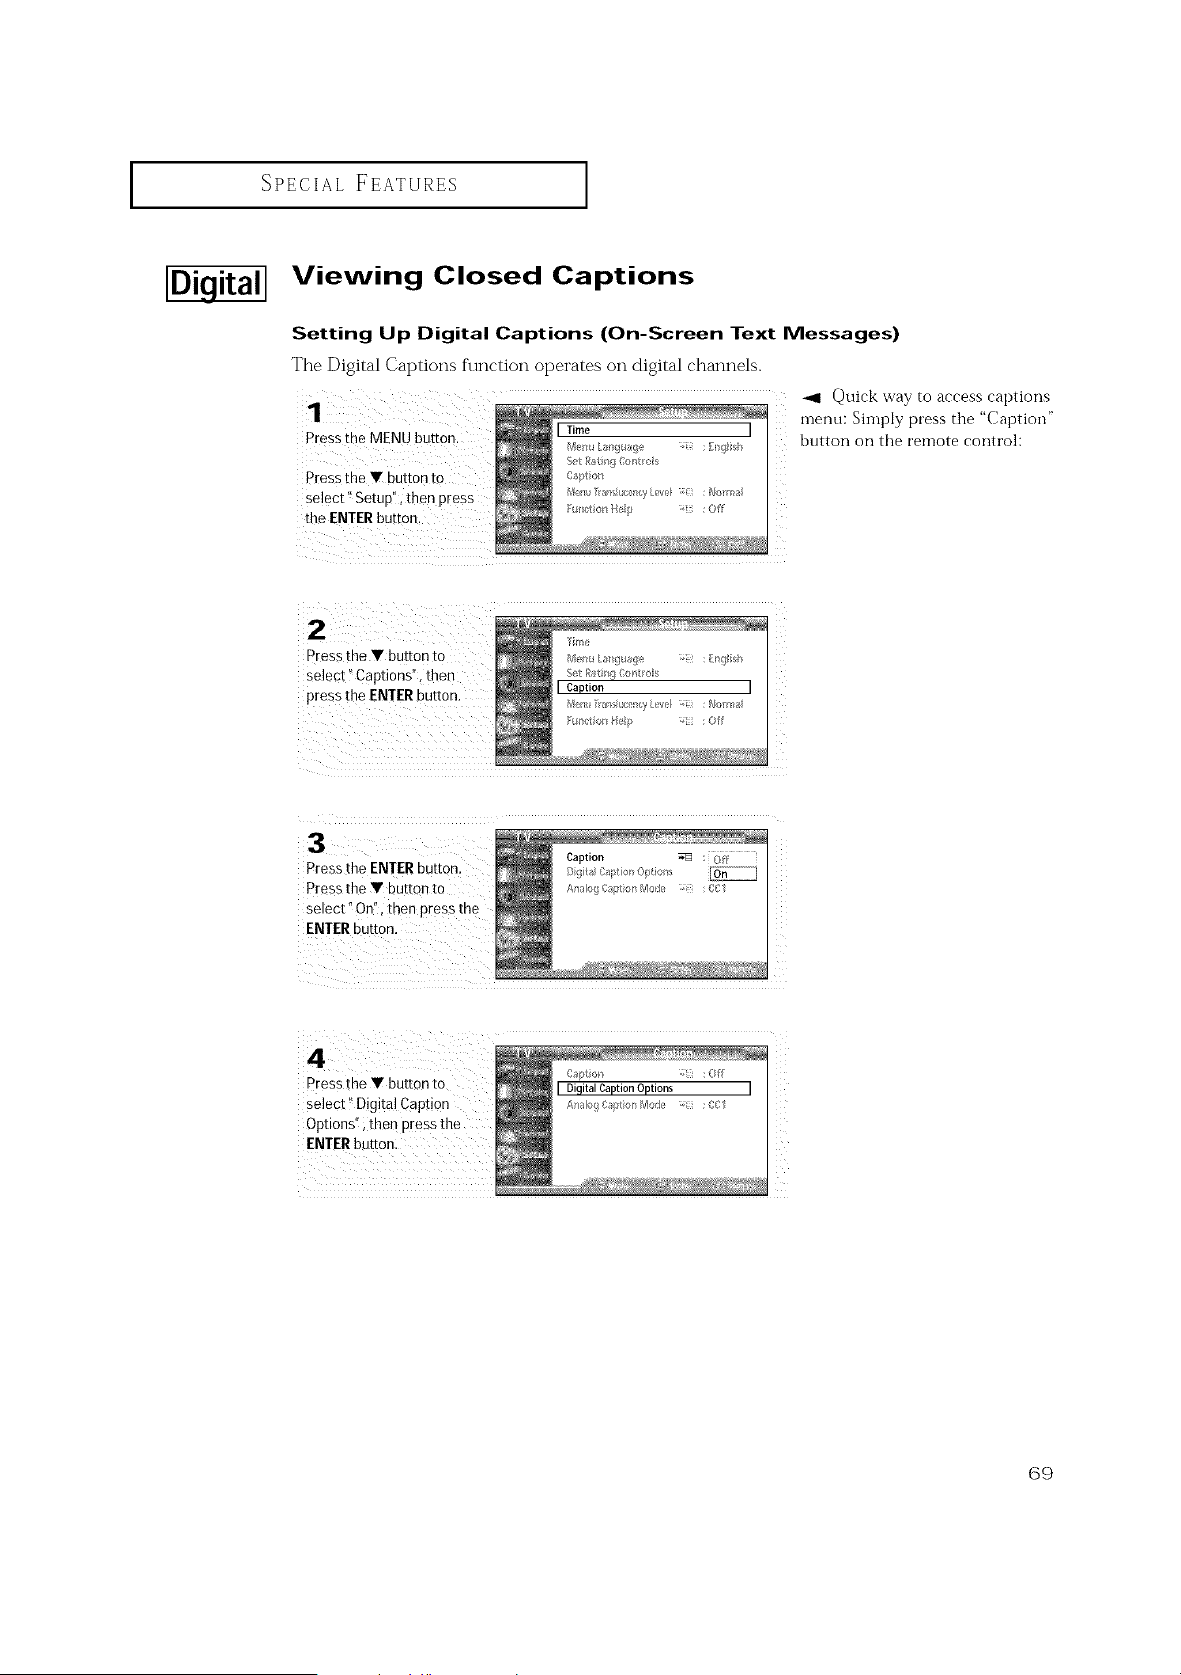
SPECIAL FEATURES
I
Viewing Closed Captions
Setting Up Digital Captions (On-Screen Text Messages)
The Digital Captions function operates on digital channels.
Press the MENU button.
Press the Y button tO
select _Setup':, then press
the ENTERbutton,
ITime
Men_ Dmgua!}e : D_glish
S_tR_tr/_]Io_t_o :_
Iaptk>ii
Mel_u_n_luce_yLevel _i_i :Normal
Fu_tio/_ Help _ii_ :Off
Z
Quick way to access captions
menu: Siinply press tile "Calotion"
button on tile remote control:
Pressthe V button to
select !'Captions", then
pressthe ENIER button.
Z
ii
Pressthe ENTER button.
Pressthe Y buttonto
select" On", then press tl
C_pto/_ :Off
pressthe V buttonto Di italia tionO tions
select" Digita! Caption Ar,_l_,,_I;_pio_r,._'o_,_ :1_,1
Options" ithen Pressthe
ENIER button:
G9
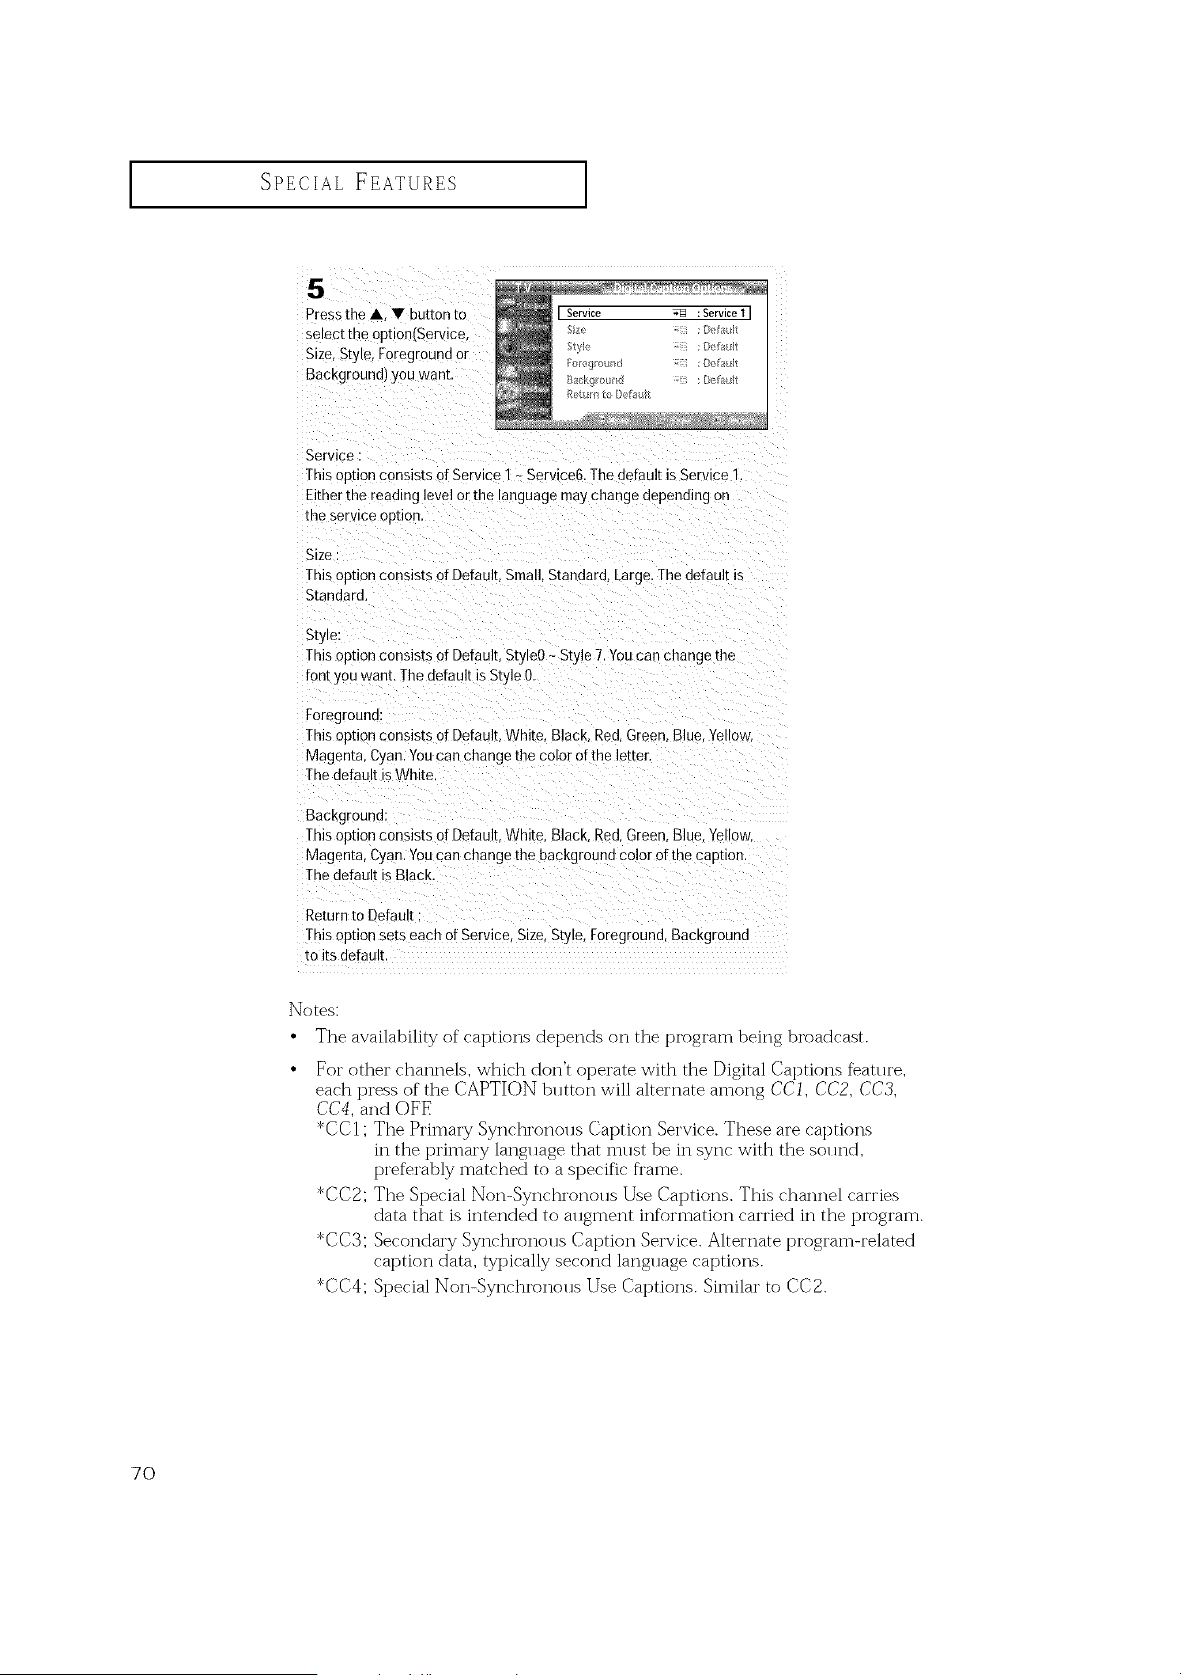
SPECIAL FEATURES ]
5
Pressthe • • button to
selec[ me option/Service
Size, Style, Foregroundor
Background) you wanr
Service :
This optionconsists ofService I - Service& Thenefault isService 1.
Eitherrne reading level orthe language maychange depennmgon
me ser_ ce option.
Size :
Thisoption consists ofDefauk Small Standard. large. Thedefault is
Standard.
Style:
This optionconsists ofDefault.StyleO- Style 7.Youcan changethe
font )ou want. Thedefault isSt) e O.
Foregrouna:
Thisoption consists ofDefault.White. Black. Red. Green. Blue.Yellow,
Magenta, Cyan.Youcan change the color otthe letter,
Thedefault isWhite
Background:
Thisoption consists ofDefault.White. Black. Red. Green Blue.Ye low.
Magenta, Cyan.Youcan change the background color ofthe caouon
Thedefault isBlack,
Returnto Defau [
This optionsetseach ofService Size. Style, Foreground.Backg-ounc
toits defaull
Notes:
• The availability of captions depends on the program being broadcast.
For other channels, which don't operate with the Digital Captions f_ature,
each press of the CAPTION button will alternate among CCI, CC2, CC3,
CC4, and OFF
*CCI; The Primary Synchronous Caption Service. These are captions
in the primary language that must be in sync with the sound,
preferably matched to a specific fi'ame.
*CC2; The Special Non-Synchronolls Use Captions. This channel carries
data that is intended to allgment information carried in the program.
*CC3; Secondary Synchronolls Caption Service. Alternate program-related
caption data, typically second langllage captions.
*CC4; Special Non-Synchronous Use Captions. Similar to CC2.
7O
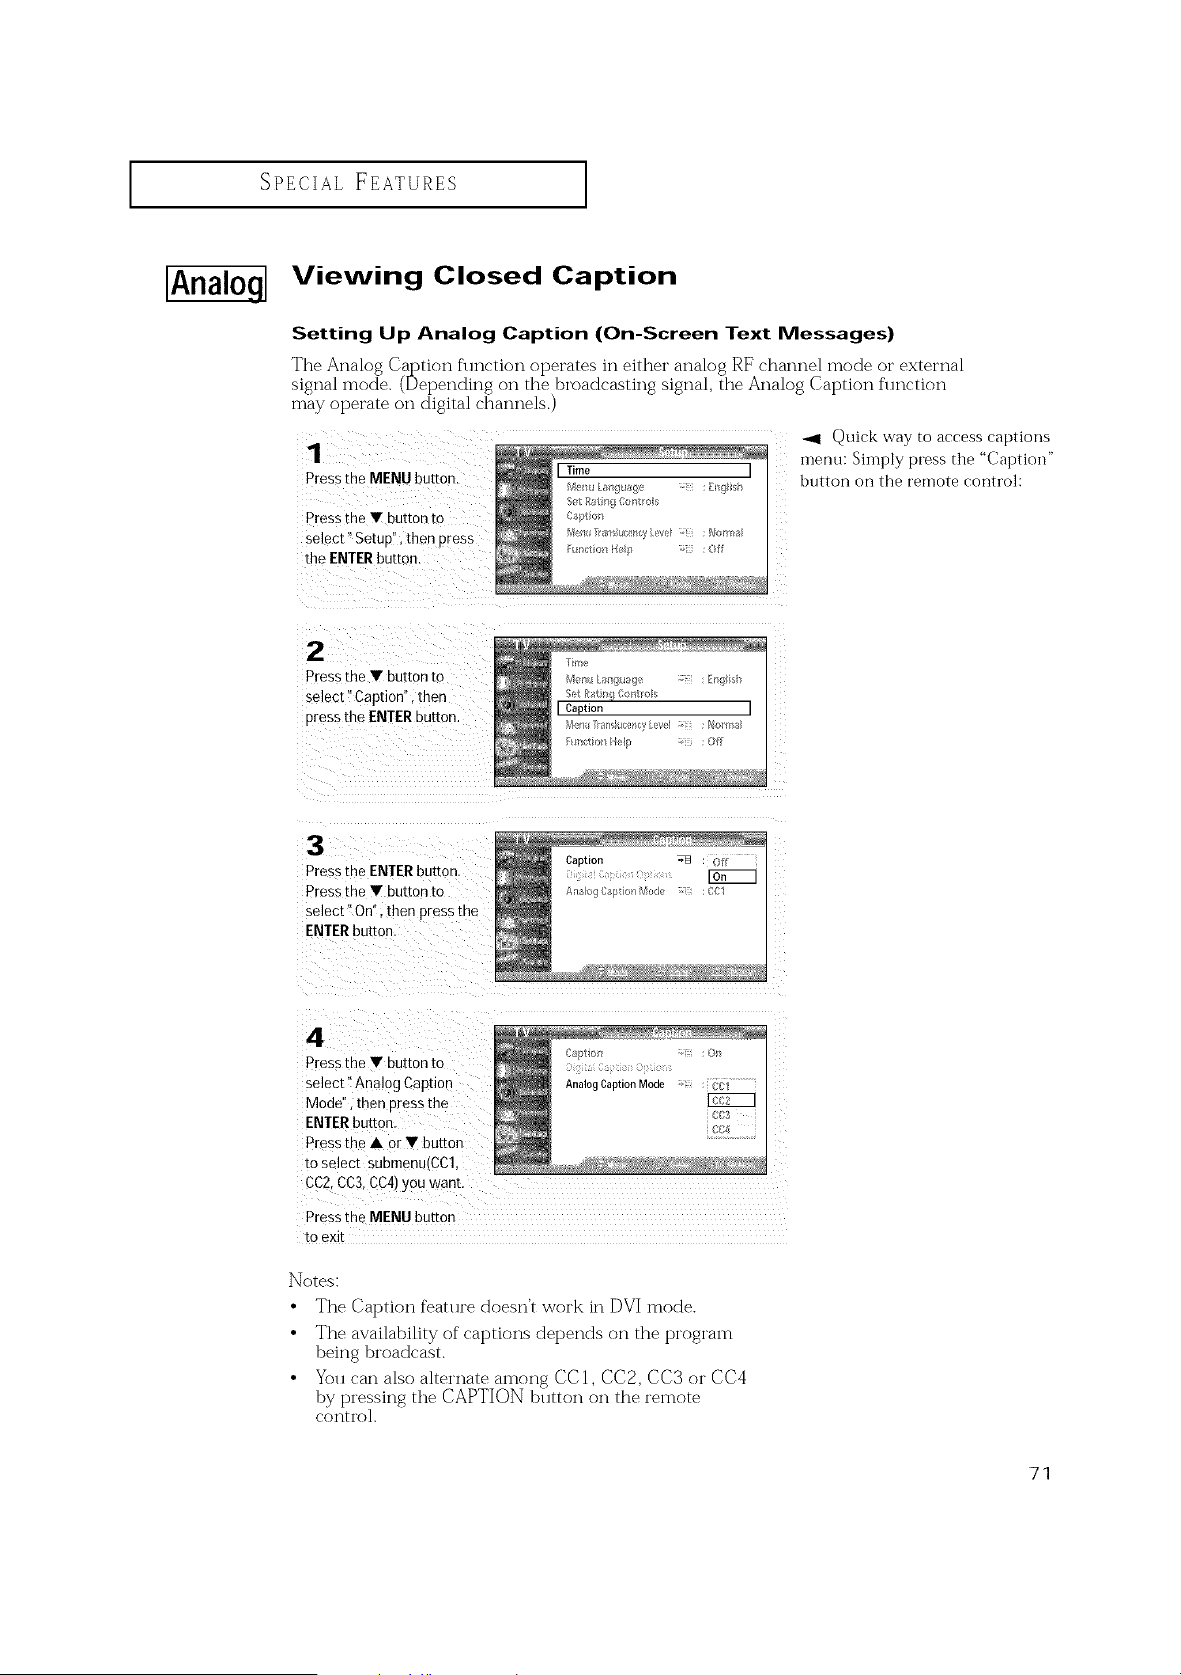
SPECIAL FEATURES ]
[Analoq--I
Viewing Closed Caption
Setting Up Analog Caption (On-Screen Text Messages)
The Analog Caption function operates in either analog RF channel mode or external
signal mode. (Det_ending on the broadcasting signal, the Analog Caption function
may operate on digital channels.)
1
Pressthe MENU button.
Pressthe • button to
select" SetuD". then Dress
the ENTERbutton.
-',11 Quick way to access captions
inenu: Shnply press the "Captioi]"
button on the remote control:
2
Pressme • button to
select" Caption", then
pressthe ENTERbutton.
Press the ENTER button
Press the • button to
select" On"= then press me
ENTER button
Caption _ : Off
ArLa}ogCaption Mode :COl
4
Press the • button to
select" Analog Caption
Mode" then nress the
ENTER button
Press me • or • buttor
to select submenu/CC"
(CC2,0(::3, (::(::4)you Wahl
Ca_/tion ;z : 0_
Analog Caption Mode ; ...........
:C]3
z
Pressthe MENU button
toexit
Notes:
• The Caption feature doesn't work in DVI mode.
• The availability of captions depends on the t)i'ogi'am
being broadcast.
• You can also alternate among CC1, CC2, CC3 or CC4
by t)i'essing the CAPTION button on the remote
contro].
71
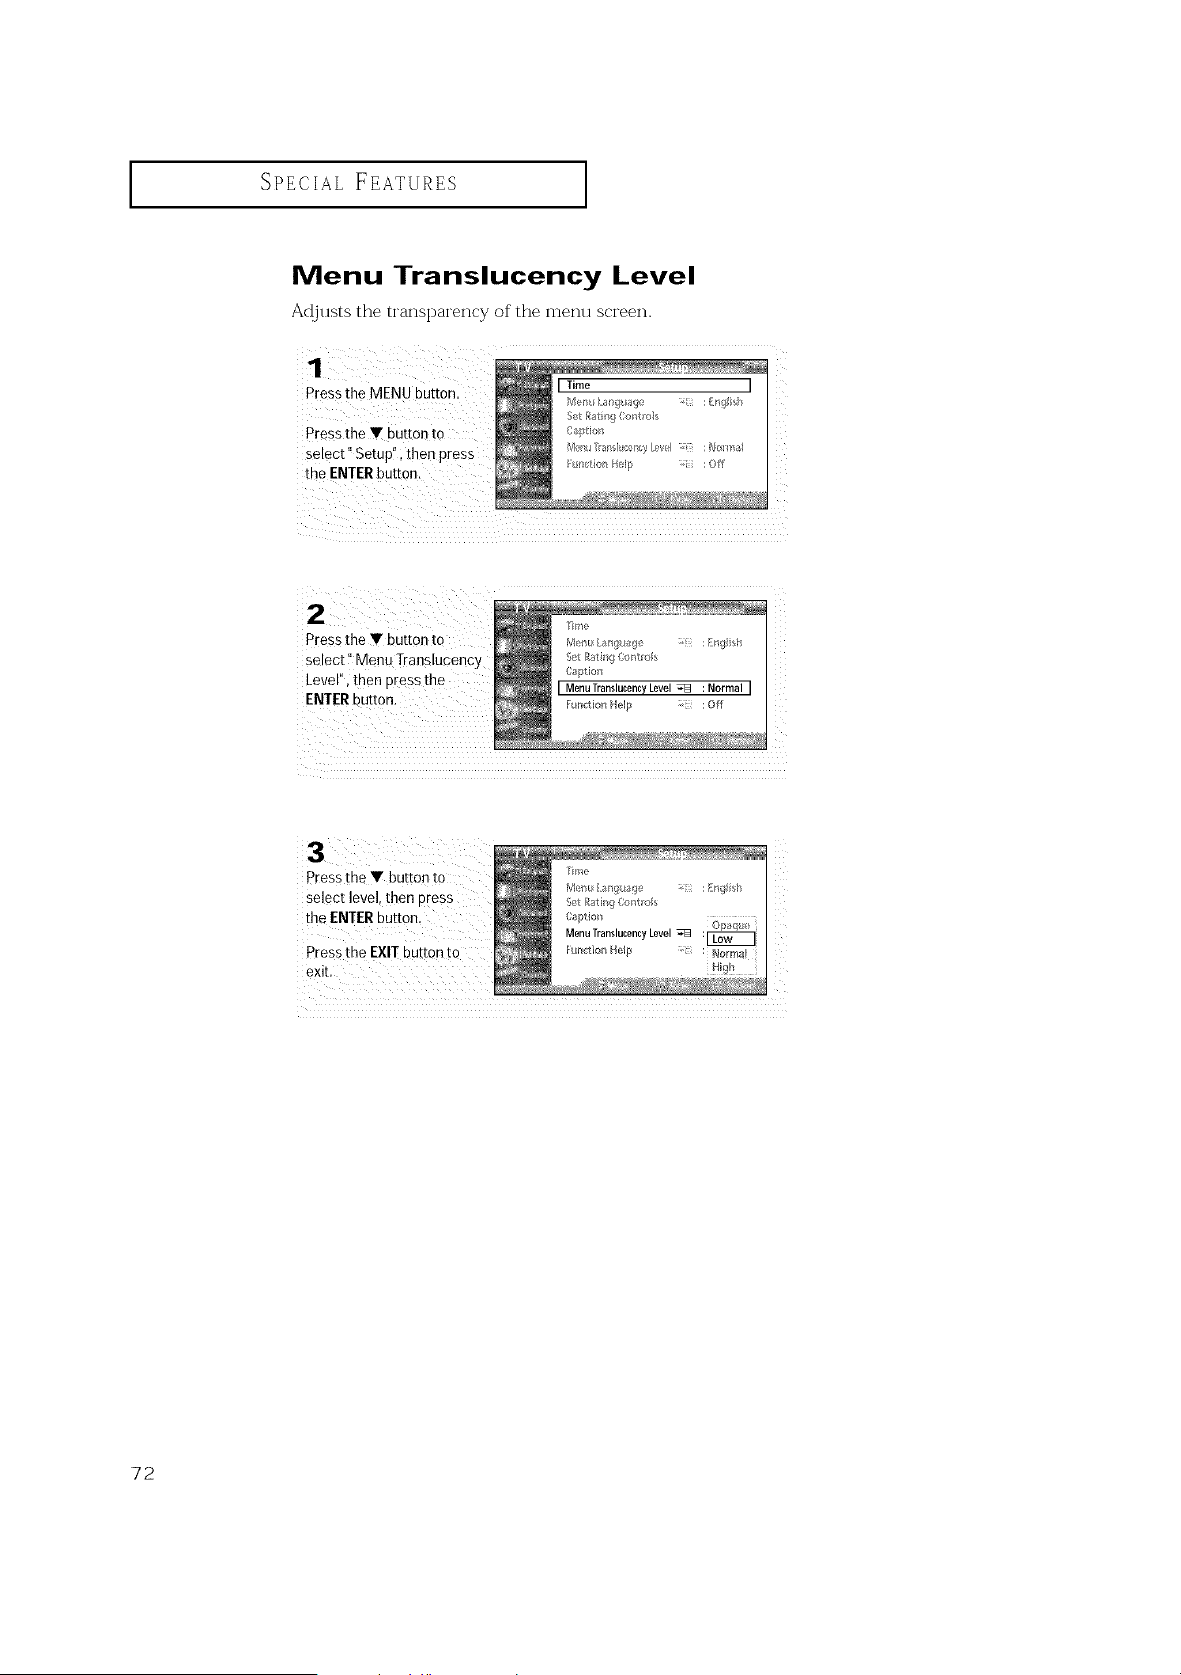
SPECIAL FEATURES ]
Menu Translucency Level
Adjusts the transparency of"the menu screen.
Pressthe MENU button.
Pressthe Y button to
select" Setup!'; then press
the ENTERbutton.
ii2 ¸ : ¸¸ : :
Pressthe Y button to
Level", then p[ess the
ENTERbutton.
Pressthe '
select level,then press
the ENTERbutton.
Pressthe EXITbutton to
Tn/e
MetL [an!p_aqe _ : ng h
Set Rati¢_gCo{t I
Caption :2
MenuTranslucencyLevel
Funtion Help : NollTpal
72
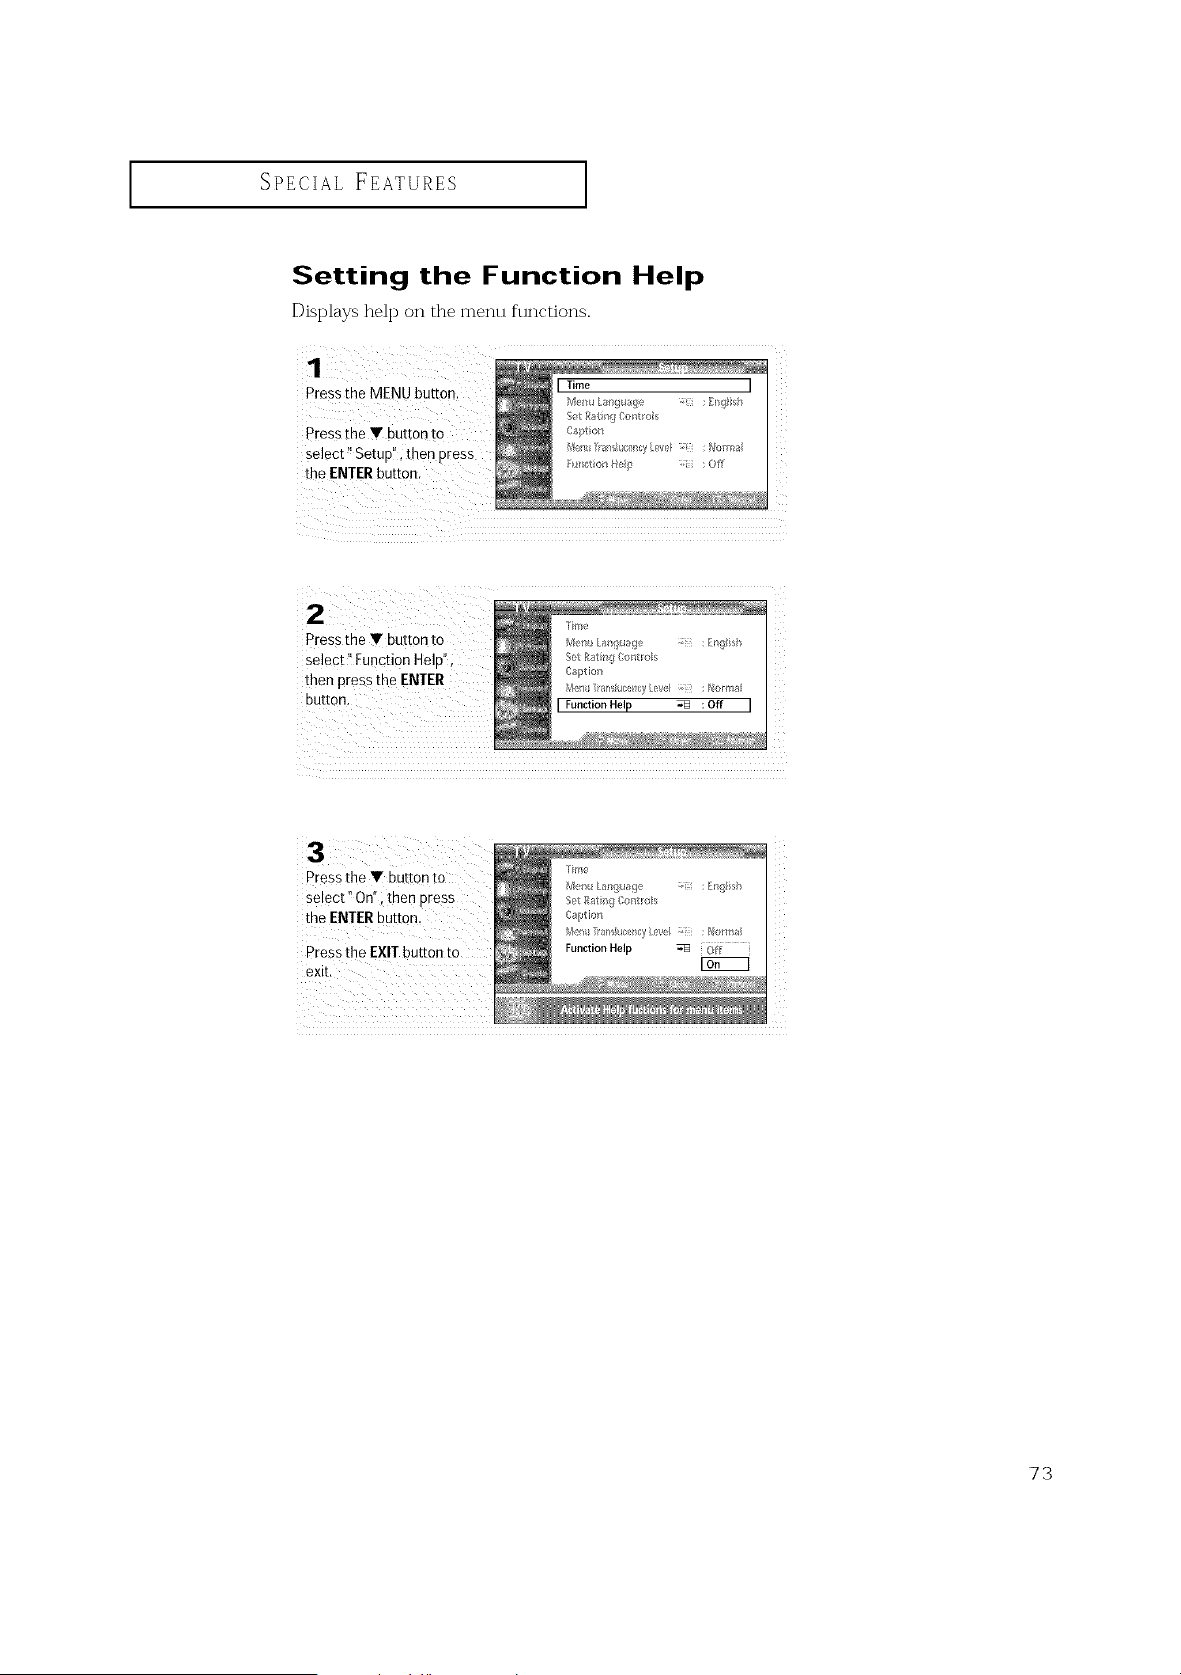
SPECIAL FEATURES ]
Setting the Function Help
Displays help on the menu functions.
Press the MENU button.
Press the y button to
select _Setupi', then press
the ENTER button.
I Time
e_F_ Laz/gua()e : Ew#li_>h
_t I#atr/_!Contro _i
Captioll
R_l_tioI_ Hel_ _;i_ :OfT
Pressthe • button to
select '_On"i then press
the ENTERbutton.
Pressthe EXIT button to
exit,
73
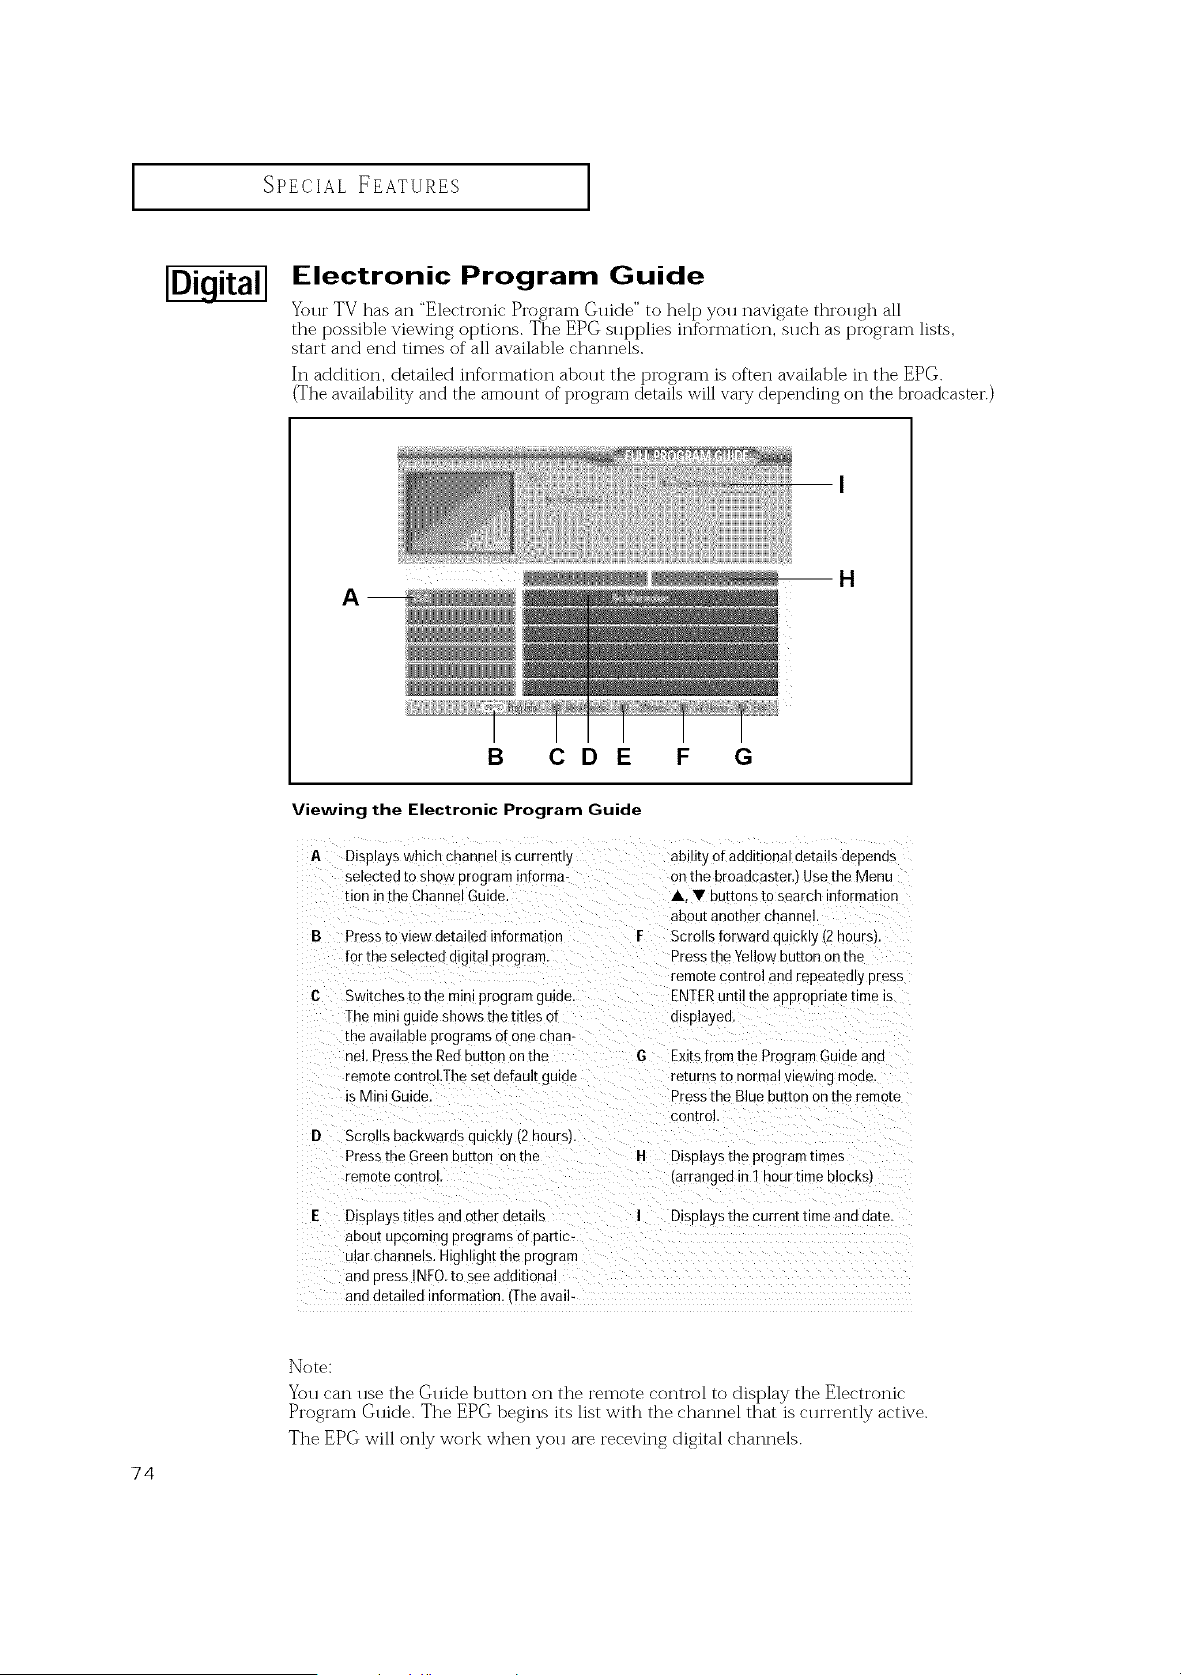
I
SPECIAL FEATURES
Electronic Program Guide
Your TV has an "Electronic Program Guide" to help you navigate through all
the possible viewing options. The EPG supplies information, such as t?i'ogi'am lists,
start and end times of all available channels.
In addition, detailed information about the t?i'ogi'am is often available in the EPG.
(The availability and the amount of program details will vary depending on the broadcaster.)
H
A __
B CD E F G
Viewing the Electronic Program Guide
A Disp,ays which cnannel iscurrenr,y
selected toshow program informa-
tion intheChanne Guide.
B Press to viewdetai eamrorma[ion
forthe selected digital program.
Switches tothe mintprogram gmoe
Theminiguideshows the titles or
me available programs orone cnan-
nel. Press the Red button on the
remote control .Thesetdefault guide
is MiniGuioe.
D Scrm s backwards quickly (2hoursl.
Pressthe Green ouEon on the
remote control
abilit_of add,t 3naldetails depenos
onthe broadcaster. Use the Menu
A. •butl )ns tosearch mrormation
about another channel
F Scrolls forward quickly (2 hoursl.
Pressthe Yellow button on the
remote control and "epeatea,y press
ENTERuntil the appropriate time is
osplayed.
Exitsfromthe ProgramGuide ano
returns to normalviewing moae.
Pressthe Bluebutton onthe remote
control.
H Displaysthe programumes
(arranged in 1 hourtime blocks)
Displays titles and other deta,ls
aoou[ upcoming programs of pamc-
dlar channels. Hg]" ghtthe program
and DressINFO.to seeaoditional
and detailed information. 'The avail-
I Displays the current time anddate
74
Note:
You can use the Guide button on the remote control to display the Electronic
Program Guide. The EPG begins its list with the channel that is currently active.
The EPG will only work when you are receving digital channels.

SPECIAL FEATURES ]
Using the Electronic Program Guide
1
Press the MENU button.
Press the Y button to
select" Guide'!; then press
the ENTERbutton.
Press the Y button to
select" Default Guide"
then press the ENTER
button.
6o tq _v_I/i _u_e
_}ot R w@lder lil
[Default Guide _ :Mini Guide ]
Mini Guide:
press the• button to
select" Mini Guide" or
"Fu!l Guide",then press
the ENTERbutton.
Got<tM;i Gude
Goto Ftl Oude
Got_ Remit;l_:riist
Default Guide _ :i MiniG_ide i
Displays the guide fi)r one channel.
Full Guide:
Displays the guide for all channels.
Pressthe EXIT button to
exit.
75
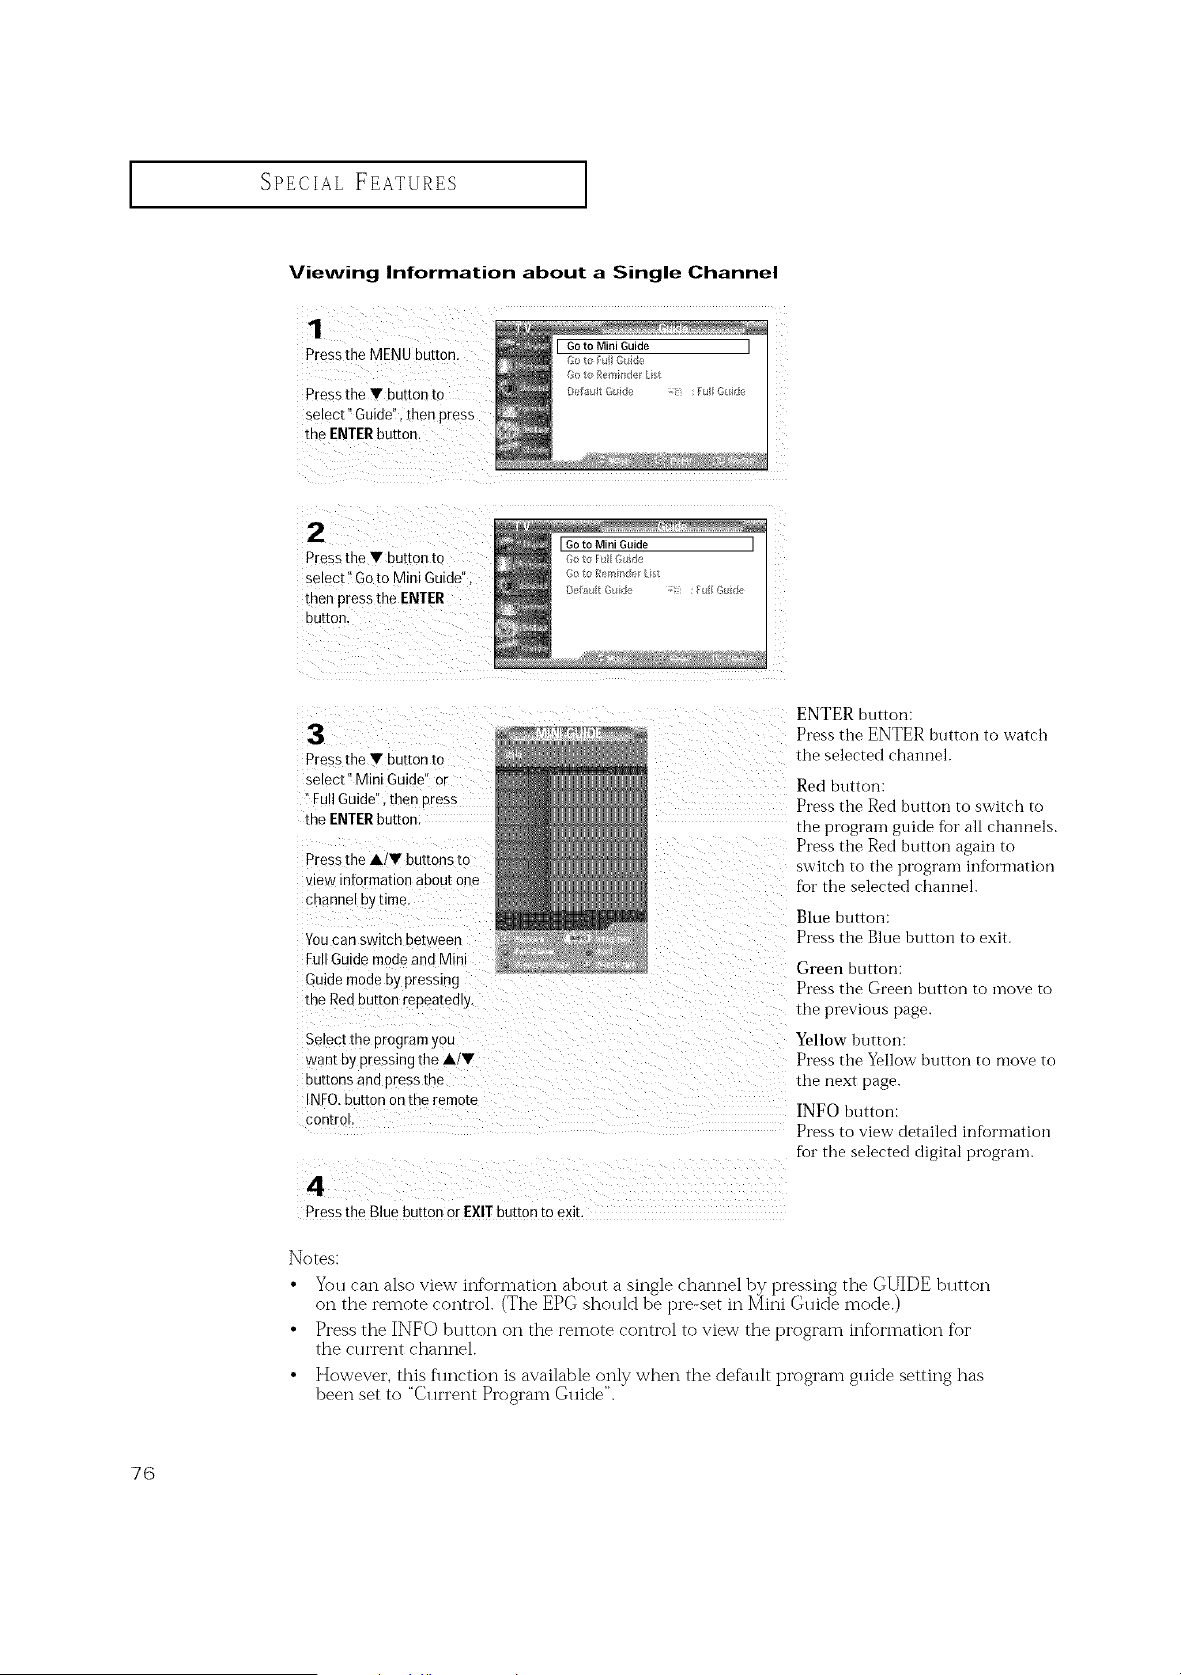
SPECIAL FEATURES ]
Viewing Information about a Single Channel
1
Pressthe MENU button.
Press the • button to
select" Guide" lhen press
the ENTER buttor
2
Press the • button to
select" Go to Mini Guide"
men press the ENTER
DUEOR,
[Goto Mini Guide ]
Pressthe • button to
select" Mini Guide" or
"Full Guide",then Dress
the ENTERbuttor
Press the A/• buttons to
vie N nformation about one
channel D) time
Youcan switch ue[ween
FullGuidemode and Mini
Guide mode by pressing
the Redbutton repeateoly.
Select the program you
wan_ Dy pressing the A/•
buttons aria press the
IX:0. button on the remote
con[rol,
4
Pressthe Blue button or EXIT button toexit.
ENTER button:
Presstile ENTER button to watch
the selected channel.
Red button:
Press the Red button to switch to
the prograln guide for all channels.
Press the Red button again to
switch to the prograln information
for the selected channel.
Blue button:
Press the Blue button to exit.
Green button:
Press the Green button to inove to
tile previous page.
Yellow button:
Press tile Yellow button to move to
tile next [)age.
INFO button:
Press to view detailed inforination
for tile selected digital program.
Notes:
• Yo. can also view information about a single channel by pressing the GUIDE button
on the remote control. (The EPG should be pro-set in Mini Guide mode.)
• Press the INFO button on the remote control to view the program information for
the rio'rent channel.
• However, this flmction is available only when the default program guide setting has
been set to "Current Program Guide".
76
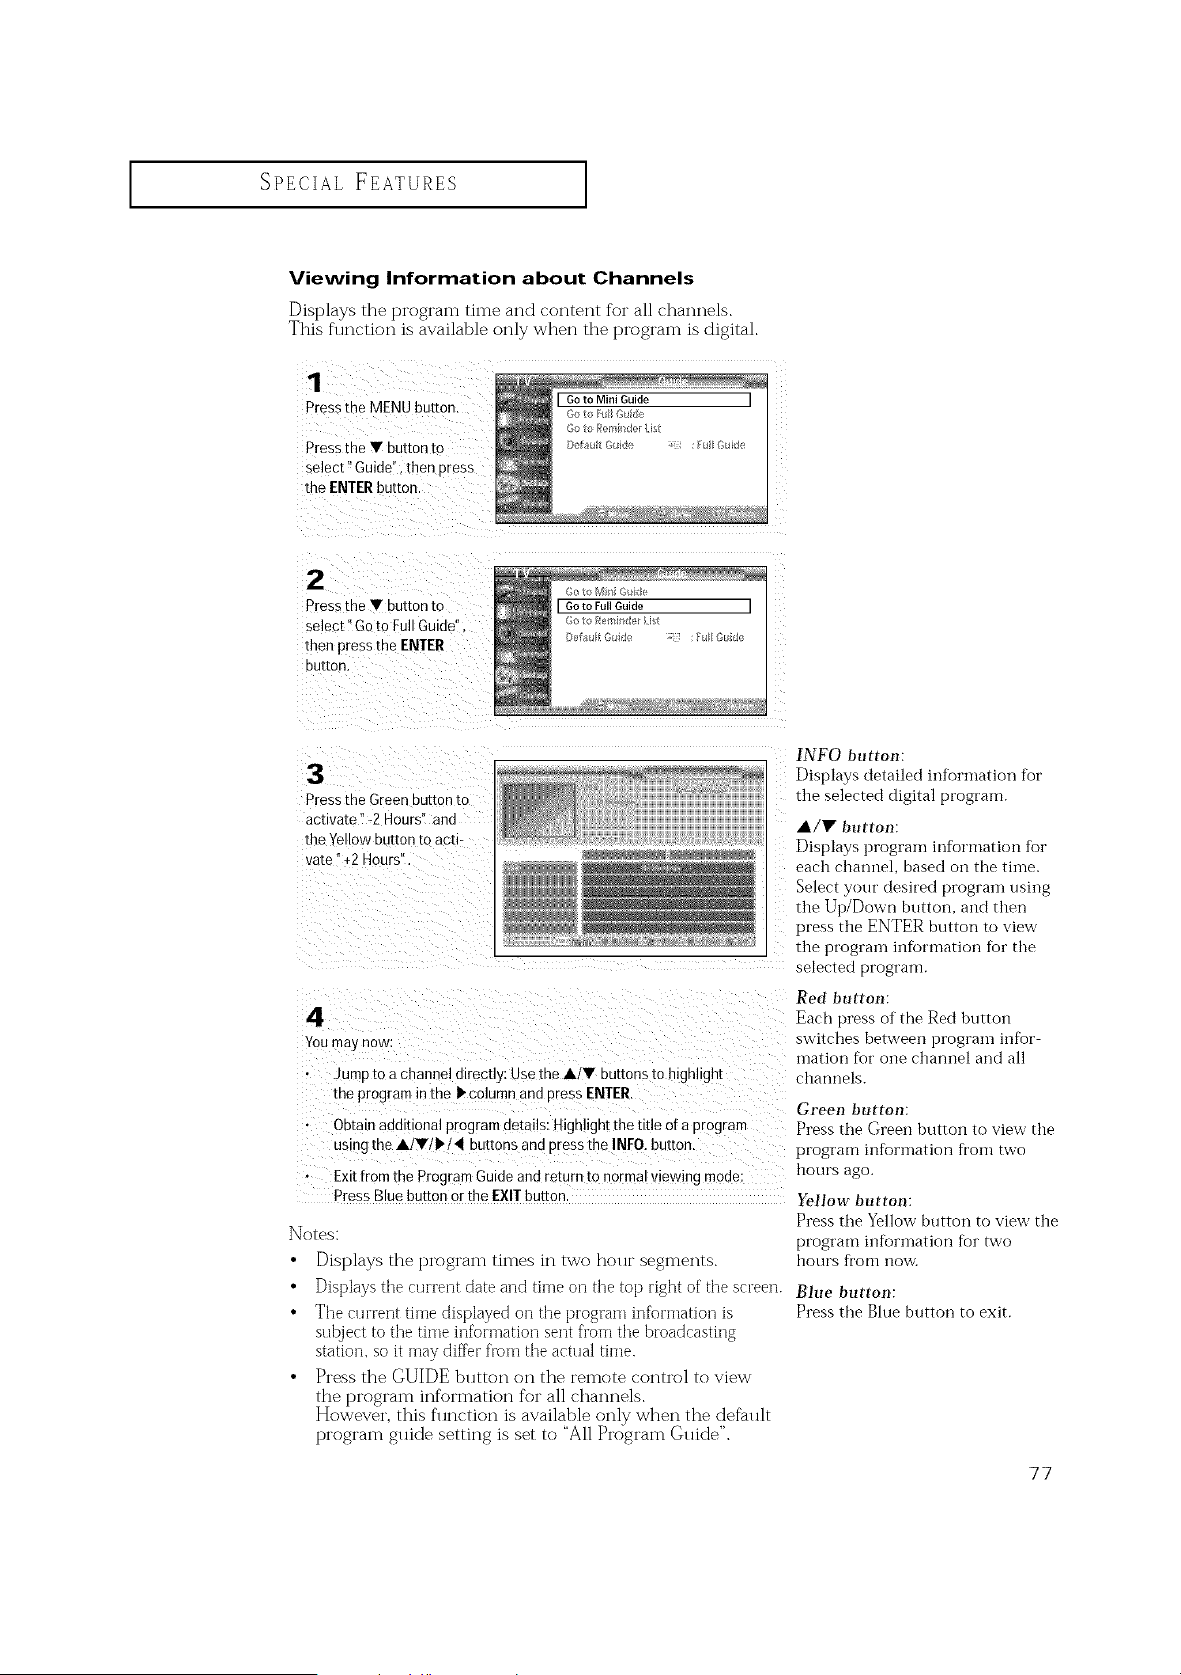
SPECIAL FEATURES ]
Viewing Information about Channels
Displays the program time and content for all channels.
This function is available only when the program is digital.
1
Press the MENU button
PresstheYbuttonto
select" Guide".then press
the ENTERbutton.
2
Pressthe • button to
select"Go to FullGuide'
then pressrne ENTER
Du[ron,
Goto Full Guide I
Press the Green DU[fOn/[O
ac[iva[e "-2 Hours" and
the Yellow button to acti-
vate" +2 Hours".
4
Youma3 now:
Jumo toa channel directly: Use the A/• buttonsto highlight
me program in the • column and oress ENTER.
Obtain additional programdetails: Highligh! thetitle ofa orogram
using the A/r/•/4 buttonsand pressthe INFO. button.
Exit fromthe Program Guide and retort to normal viewing mode:
PressBluebutton orthe EXIT button
Notes:
• Displays the t)I'OgI'am times in two hour segments.
• Displays the currerlt date and tirne orl the top right of the screen.
• The current time displayed on the program information is
subject to the time information sent from the broadcasting
station, so it may differ from the actual time.
• Press the GUIDE button on the remote control to view
the t_i'ogi'am ii-ffoi'matioi-_ for all chai-_i-_els.
However, this function is available only when the default
program guide setting is set to '%11Program Guide".
F_qFO button:
Displays detailed iifformation [br
the selected digital program.
A,/Y button:
Displays prograin information for
each charmel, based on the tiine.
Select your desired program using
the Up/Down button, and then
press the ENTER button to view
the prograin infbrmation fbr the
selected program.
Red button:
Each press of the Red button
switches between program iiffor
mation fbr one channel and all
channels.
Green button:
Press the Green button to view' the
program information fi'om two
hours ago.
Yellow button:
Press the Yellow button to view the
program inforination fbr two
hotlrs fi'om I10\_A
Blue button:
Press the Blue button to exit.
77
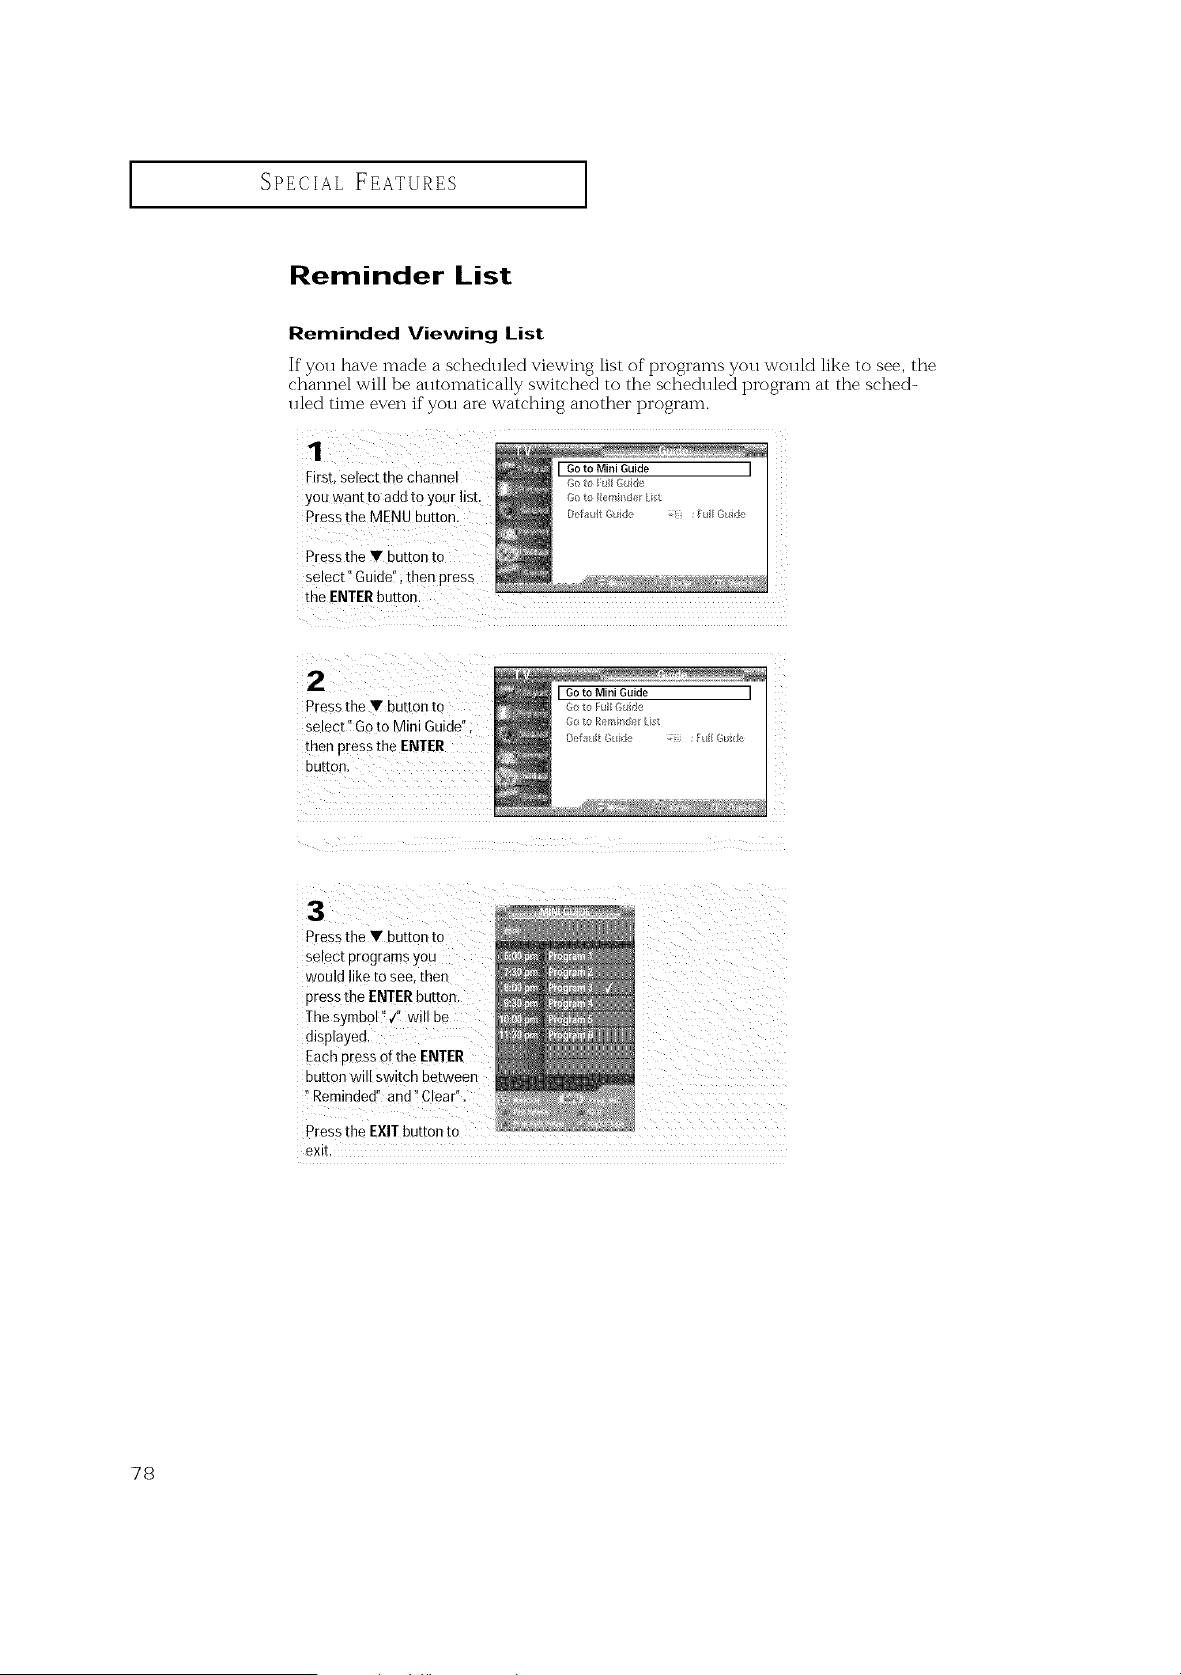
SPECIAL FEATURES ]
Reminder List
Reminded Viewing List
Ifyou [lave made a scheduled viewing list of programs you would like to see, the
channel will be automatically switched to the scheduled program at the sched-
uled time even if you are watching another program.
First, select the channe!
you want to add toyour list.
Pressthe MENU button.
Pressthe V button to
select !'Guidd!, then Press
the ENTERbutton:
LGoto Mini Guide j
Pressthe Y button to _o to Fu euide
select'iGo to Mini Guide"; _,ot, I:er,__:_ .,t
ee_ It :_:II Gie
then press theEN!ER
button.
Pressthe V button to
select programs you
would liketosee.then
Dressthe ENTERbutton
Thesymbol" ,/' will be
displayec
EachDressofthe ENTER
DU[fOn Will swEcn De[ween
"Reminded" and" Clear",
Press the EXITbutton to
9Xll
78
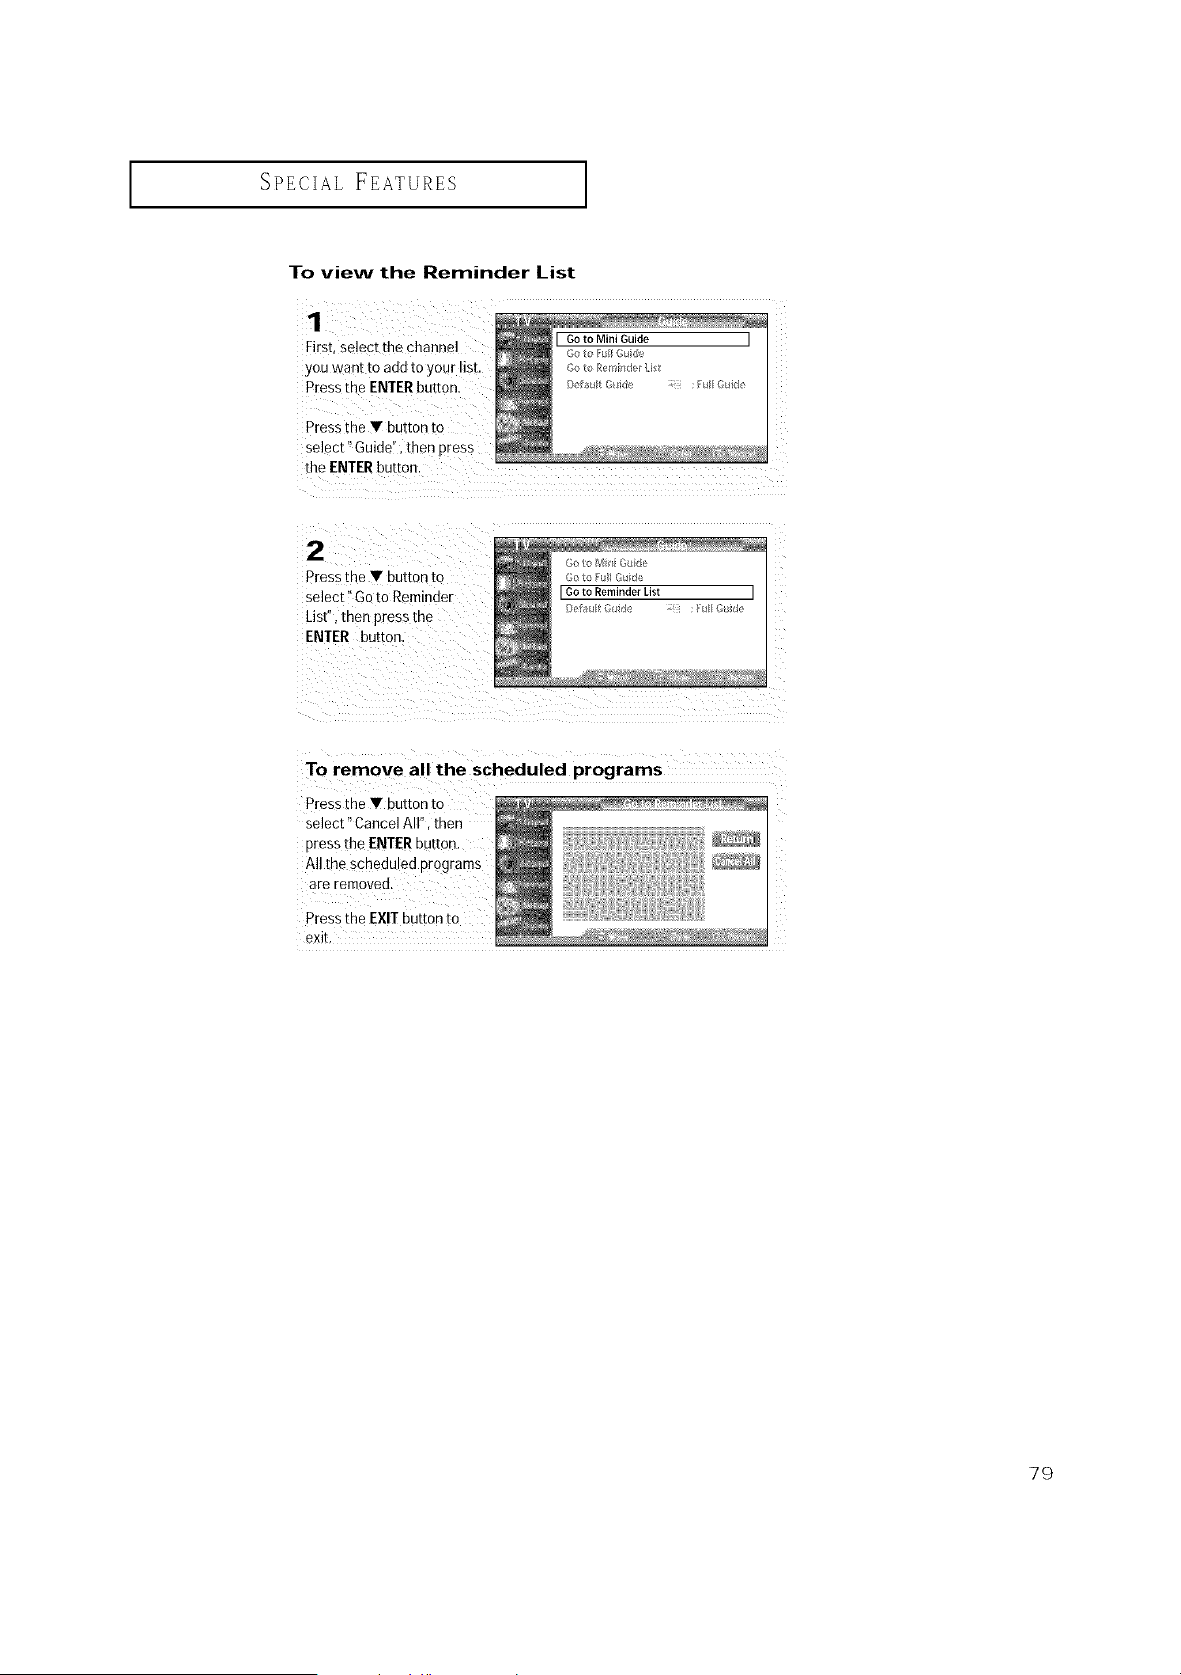
SPECIAL FEATURES ]
To view the Reminder List
1
First, select the channel
you want to add to your ist,
Press the ENTER button,
Press the • button to
select" Guide'. then Dress
the ENTER put[on.
2
Press the • button 1o
select" Go to Remmder
List". men press the
ENTER button
[Goto Reminder List
To remove all the scheduled programs
Press the • bu_[on 1o
select"CancelAI then
Dress the ENTER button.
All tne schedu ed Drograms
are relTioveu.
Press the EXIT button to
exit.
79
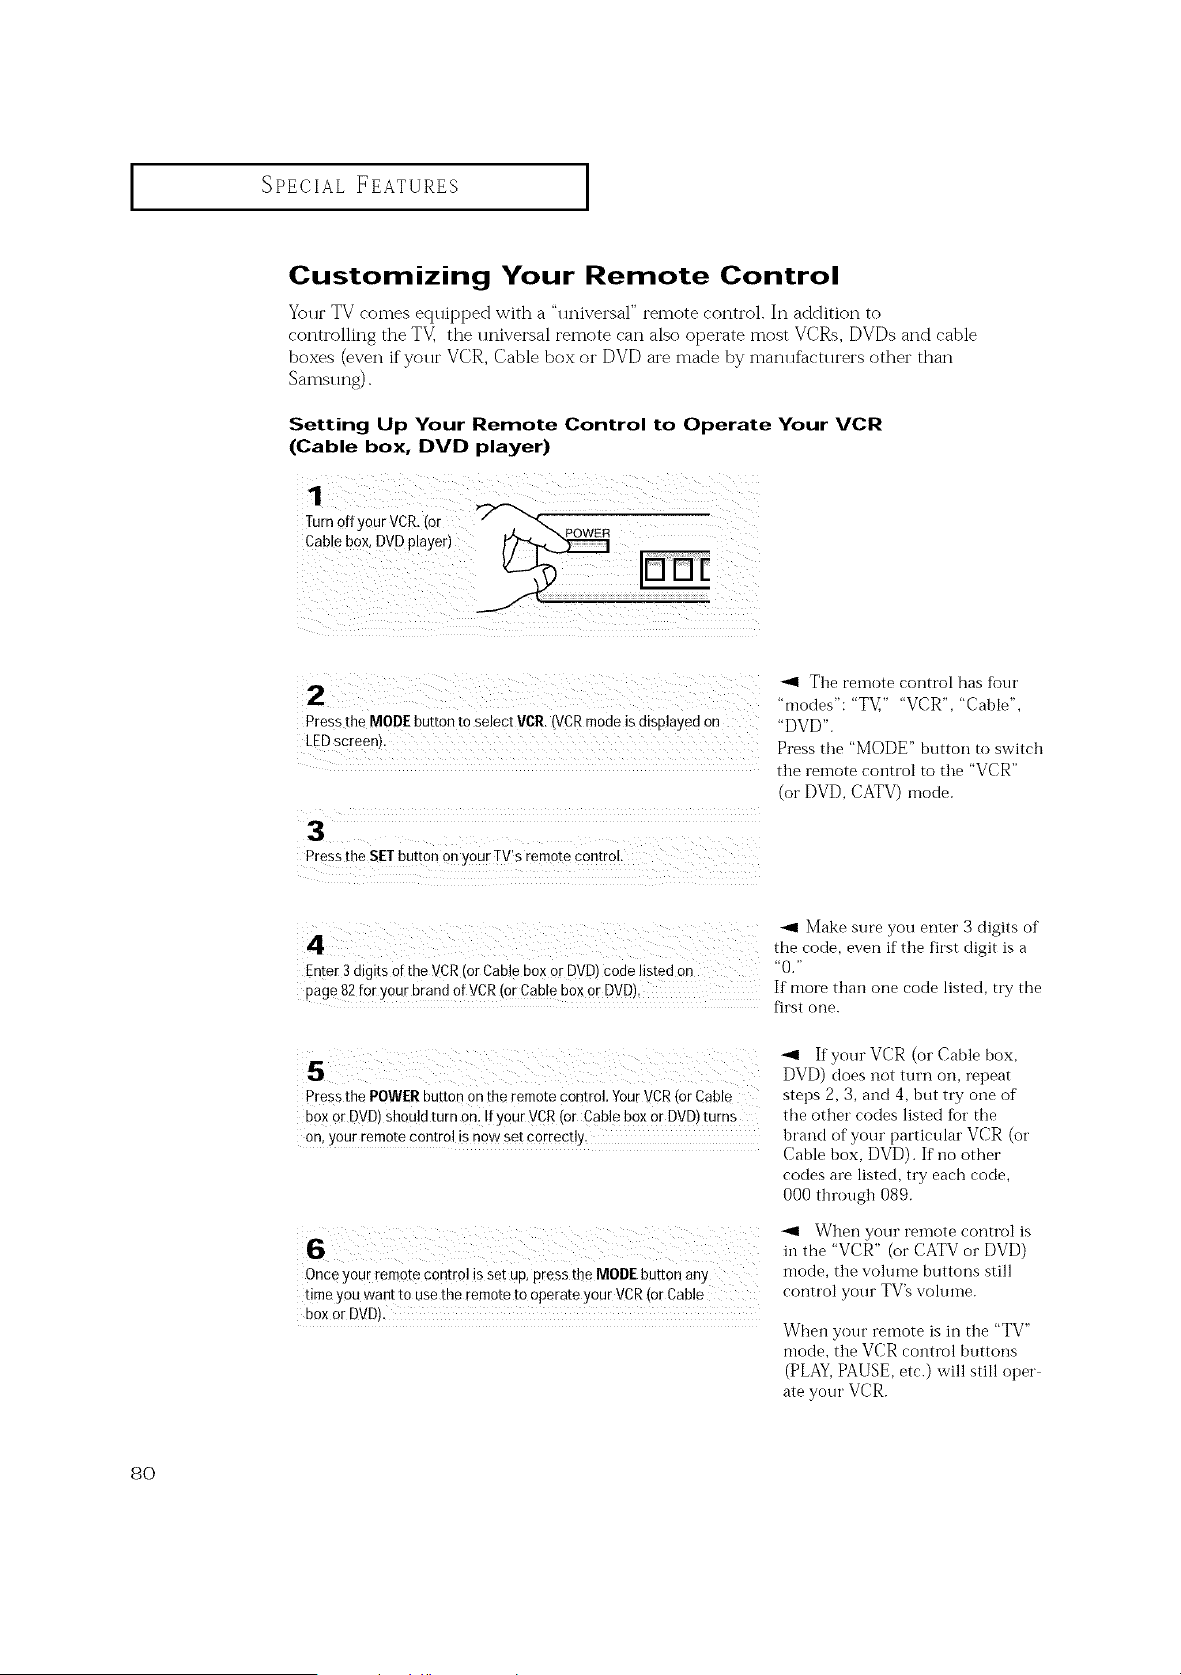
SPECIAL FEATURES
Customizing Your Remote Control
Your TV comes equipped with a "universal" remote control. In addition to
controlling the TV] the universal remote can also operate most VCRs, DVDs and cable
boxes (even ifyolu" VCR, Cable box or DVD are made by mamlfactlu'ers other than
Samsllng).
Setting Up Your Remote Control to Operate Your VCR
(Cable box, DVD player)
2 'n'_]oT_e "eT_ te c°ntr°l has fbur
" ":" ," "VCR","Cable",
Press the MODEbuttonto select VCR{VCRmode isdisplayedon "DVD'.
LEDscreen): Press the "MODE" button to switch
tile remote coi]trol to tile "VCR"
(or DVD, CATV) mode.
4 _ Make sure you enter 3 digits of
the code, even if the first digit is o
Enter 3digits Ofthe VCR (or Cable50x OrDVD)code iisted on "0."
page 82 foryour brandof VCR(or Cab!e boxOrDVD)' If more than one code listed, try the
first one.
_1 If your VCR (or Cable box,
DVD) does not turn oil, repeat
press the POWERbutton onthe remotecontrol. YourVCR(orCable steps 2 3, and 4, but try one of
boxOrDVD)shouldturnon: IfyourVCR(or Cable boxor DVD)turns the other codes listed for the
on,your remotecontrolisn0wset correct!y, brand of your particular VCR (or
Cable box, DVD). If no other
codes are listed, try each code,
000 through 089.
_1 When your reinote control is
in the "VCR" (or CATV or DVD)
Onceyour remotecontrol issetup,press the MODEbutton any mode, the volume buttons still
t!meyouwant to use the remoteto operateyour VCR(or Cable control your TV'sw)lume.
boxor DVO).
When your remote is in the "TV"
mode, tile VCR control buttons
(PLAY,PAUSE, etc.) will still oper
ate your VCR.
8O
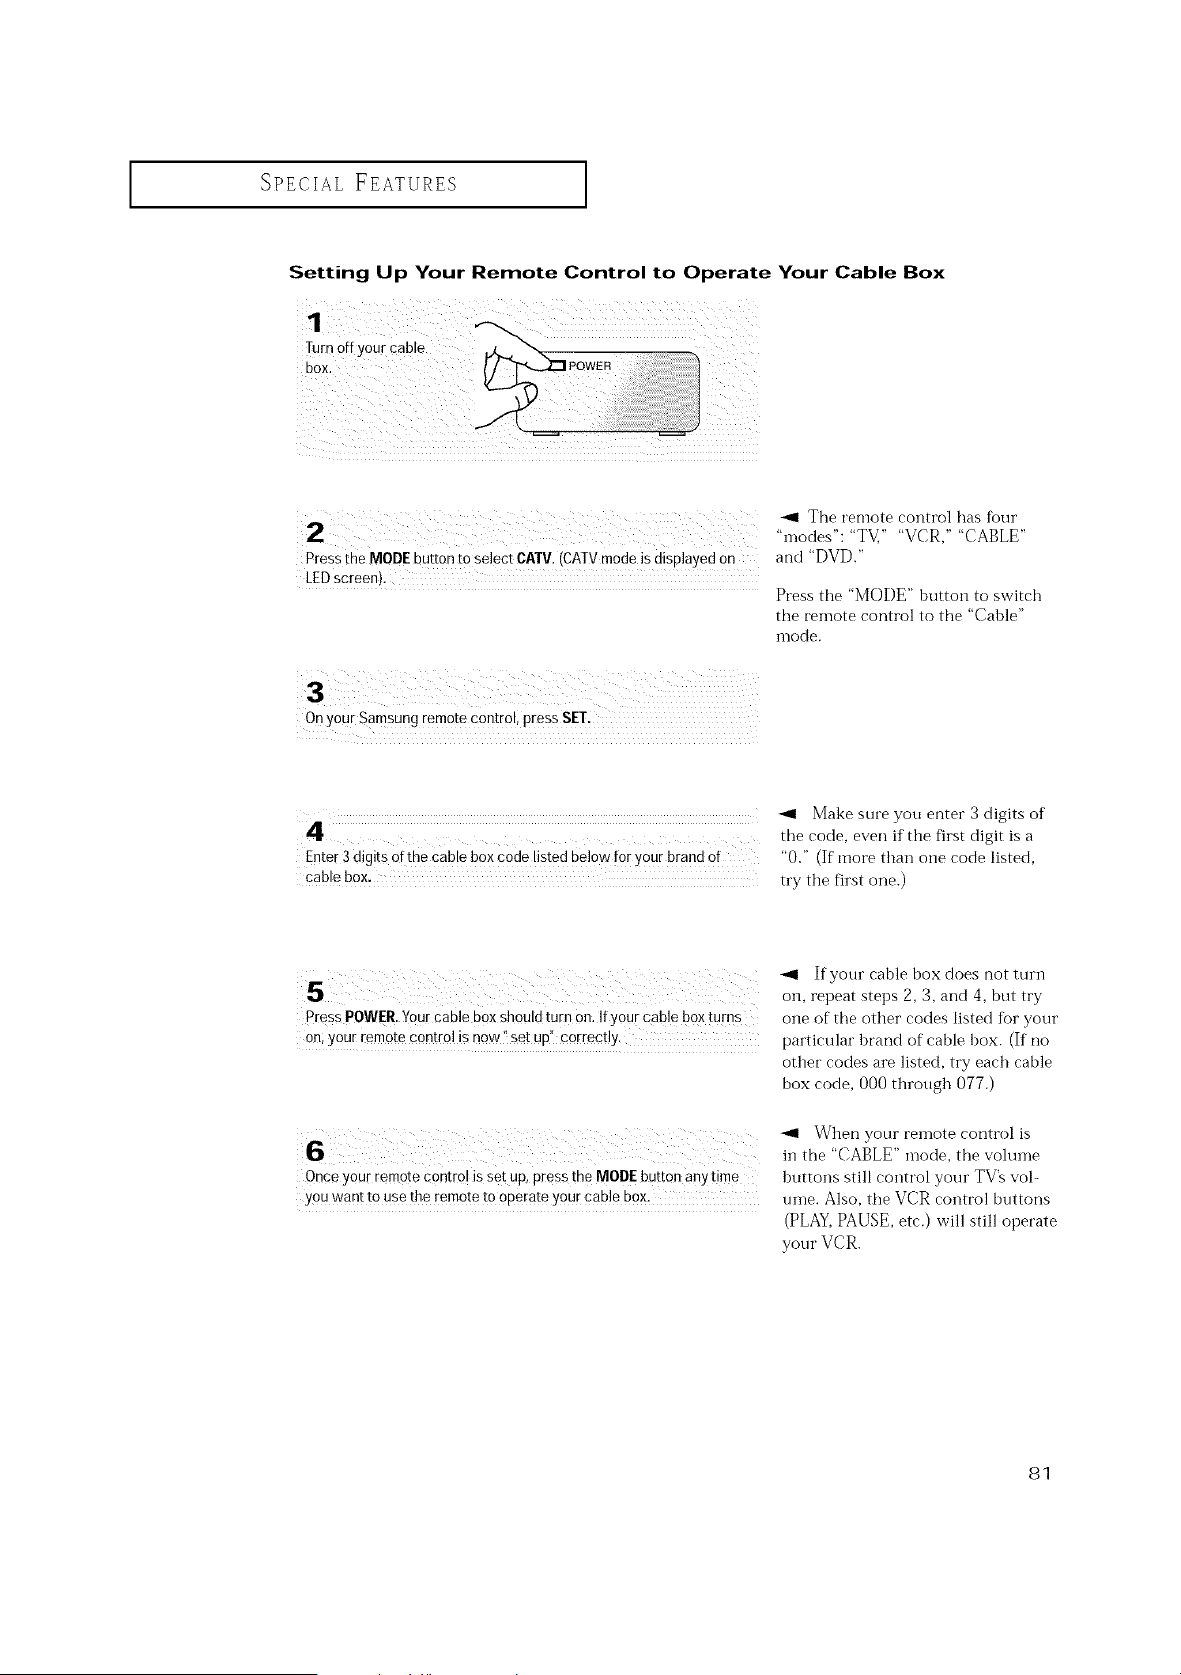
SPECIAL FEATURES ]
Setting Up Your Remote Control to Operate Your Cable Box
",11The remote control has four
"inodes": "TV," "VCR," "CABLE"
Press the MODEbuttonto select CATV,(CMVmodeisdisplayedon and "DVD."
LEDscreen).
Press the "MODE" button to switch
the relnote control to the "Cable"
n-lode.
On your Samsung remote control, press SET.
-'4 Make sure you enter 3 digits of
4. the code, even ifthe first digit is a
Enter 3digits of thecable boxcode listed bel0w i:0rYourbrandof "0." (Ifmore than one code listed,
cable box. try tile first one.)
s " f>nrcab,eboxdoes,lotturn
Oil, repeat steps 2, 3, and 4, but try
Press POW[R.Y0urcable boxshouldturnon.Ify0ur cableboxturns one of the other codes listed for your
on;your remotecontrolisnow'_setup" correctly, particular brand of cable box. (If no
other codes are listed, try each cable
box code, 000 through 077.)
When your reinote control is
hi the "CABLE" mode, tim volume
Once your remotecontrol issetup,press theMODEbutton any time buttons still control your TV's vol-
youwant tousetheremotetooperate yourcab!e box: nine. Also, the VCR control buttons
(PLAY,PAUSE, etc.) will still operate
your VCR.
81
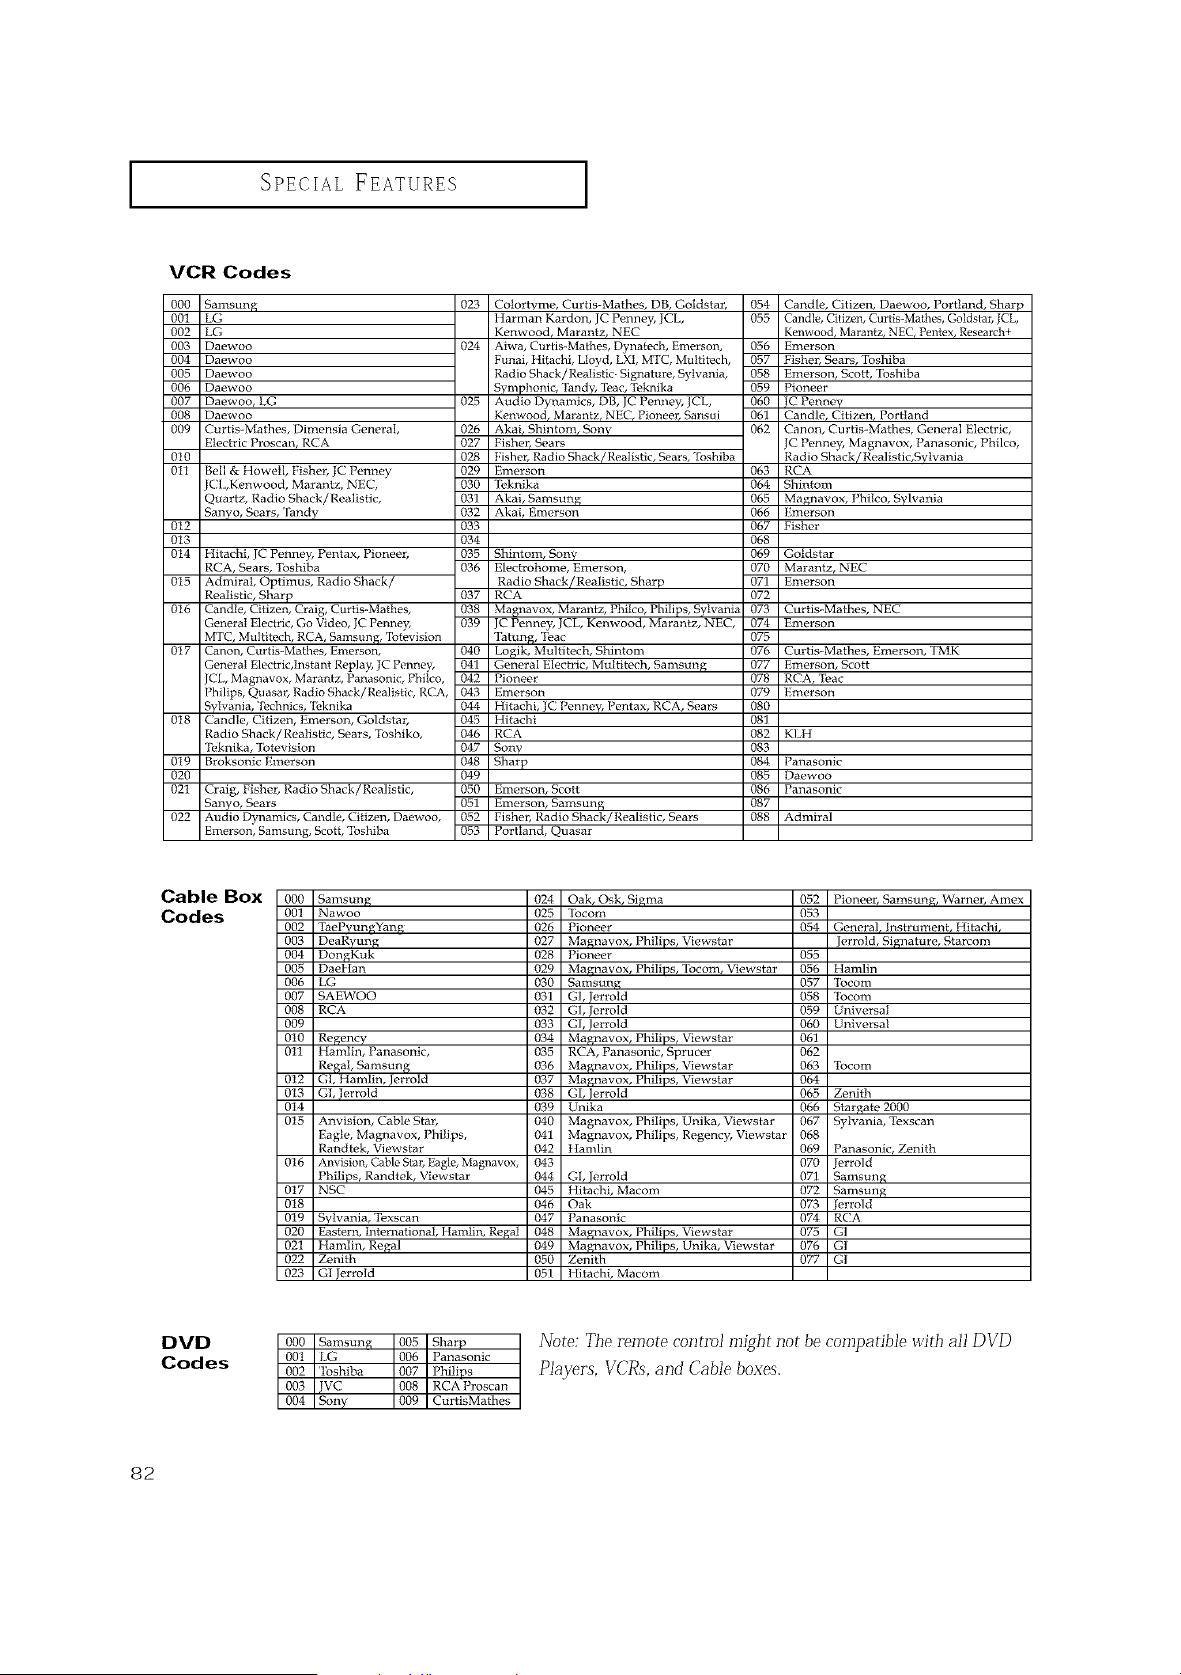
SPECIAL FEATURES ]
VCR Codes
000 San, sung
001 LG
002 LG
003 Daewoo
004 Daewoo
005 Daewoo
006 Daewoo
007 Daewoo, LG
008 Daewoo
009 Curtis-Mathes, Dimensia General,
Electric Proscan, RCA
0t0
011 Bell & Howell, Fisher, JC Penney
CL,Kenwood, Marantz, NEC,
Quartz, Radio Shack/Realistic,
Sanvo, Sears, '[hndy
012
013
014 Hitachi, JC Penney, Pentax, Pioneer,
RCA, Sears, Toshiba
015 Admiral, Optimus, Radio Shack/
Realistic, Sharp
016 Candle, Citizen, Craig, Curtis-Mathes,
General Electric, Go Video, JC Penney,
MTC, Multitecb, RCA, Samsung, Totevision
0t7 Canon, Curtis-Mathes, Emerson,
General Ek_'trk',lnstant Replay, JC Penney,
JCL, Magnavox, Marantz, Panasonic, Philco,
Philips, Quasar, Radio Shack/Realistic, RCA,
Svlvania, "Ii!chnics, %,knika
018 Candle, Citizen, Emerson, Goldstar,
Radio Shack/Realistic, _ars, 'Ibshiko,
'Ii,knika, "lbtevision
0t9 Broksonic Emerson
020
021
022
Craig, Fisher, Radio Shack/Realistic,
Sanyo, Sears
Audio Dynamics, Candle, Citizen, Daewoo,
Emerson, Samsung, Scott, Toshiba
023
024
025
Colortvme, Curtis-Mathes, DB, Goldstar, 054 Candle, Citizen, Daewoo, Portland, Sharp
IIarman Kardon, JC Penney, JCL, 055 Candle, Citizen, Curtis-Malhes, Goldstar, JCL,
Kenwood r Marantz, NEC Kenwoodt Marantzt NECt Penlex, Research+
Aiwa, Curtis-Mathes, Dynatech, Emerson, 056 Emerson
Funai, Hitachi, Lloyd, LXt, MTC, Multitech, 057 Fisher, Sears, Toshiba
Radio Shack/Realistic. Signature, Sylvania, 058 Emerson, Scott, Toshiba
Symphonic, Tandg, Teac, Teknika 059 Pioneer
Audio Dynamics, DB, JC Penney, JCL, 060 tC Penney
Kenwood, Marantz_ NEC_ Pioneer_ Sansui 061 Candler Citizen_ Portland
026 Akai, Bbintorn, Sony 062 Canon, Curtis-Mathes, General Electric,
027 Fisher, Sears JC Penney, Magnavox, Panasonic, Philco,
028 Fisher, Radio Shack/Realistic, Sears,'foshiba Radio Shack/Realistic,Sylvania
029 Emerson 063 RCA
030 "li,knika 064 Sbintom
031 Akai, Samsung 065 Magnavox, Pbilco, Svlvania
032 Akai, Emerson 066 Emerson
033 067 Fisher
034 068
035 Shintom, Sony 069 Goldstar
036 Electrohome, Emerson, 070 Marantz, NEC
Radio Shack/Realistic, Sharp 071 Emerson
037 RCA 072
038 Magnavox, Marantz, Pbilco, Philips, Sylvania 073 Curtis-Mathes, NEC
039 JC Penney3 JCL, Kenwood, Marantz, NEC, 074 Emerson
Tatung, Teac 075
040 Logik, Multitech, Sbintom 076 Curtis-Mathes, Ernerson, TMK
041 General Electric, Multitech, Samsung 077 Emerson, Scott
042 Pioneer 078 RCA, 'Ieac
043 Emerson 079 Emerson
044 Hitachi, JC Penner, Pentax, RCA, _,ars 080
045 Hitachi 081
046 RCA 082 KhH
047 Sony 083
048 Sharp 084 Panasonic
049 085 Daewoo
050 Emerson, Scott 086 Panasonic
051 Emerson, Samsung 087
052 Fisher, Radio Shack/Realistic, Sears 088 Admiral
053 Portland, Quasar
Cable Box
Codes
00O Samsung 024 Oak, Osk, Sigma 052 Pioneer, Samsung, Warner, Amex
001 Nawoo 025 Ibcom 053
002 TaePyun_Yang 026 Pioneer 054 General, Instrument, Hitachir
003 DeaRvm_g 027 Magnavox, Philips, Viewstar Jerrotd, Signature, Starcom
004 DongKuk 028 Pioneer 055
005 DaeIIan 029 Magnavox, Philips,locom, Viewstar 056 Ham]in
006 LG 030 Samsung 057 "Ibcom
007 SAEWOO 031 GI, Jerrold 058 "Ibcom
008 RCA 032 GI, Jerrold 059 Uniw, rsat
009 033 GI, Jerrold 060 Universal
010 Regency 034 Magnavox, Philips, Viewstar 061
011 Hamlin, Panasonic, 035 RCA, Panasonic, Sprucer 062
Regal, Samsung 036 Magnavox, Philips, Viewstar 063 Tocom
012 GI, Hamlin, Jerrold 037 Magnavox, Philips, Viewstar 064
013 GL Jerrold 038 GI, lerrold 065 Zenith
0t4 039 Unika 066 Stargate 2000
015 Anvision, Cable Star, 040 Magnavox, Philips, Unika, Viewstar 067 Sylvania, Texscan
Eagle, Mabmavox, Pbilips, 041 Magnavox, Philips, Regency, Viewstar 068
Randtek, Viewstar 042 t tamlin 069 Panasonic, Zenith
016 Anvision, Cable Sta_ Eagk,, Magnavox, 043 070 Jerrold
Philips, Randtek, Viewstar 044 GI, lerrold 07! Samsung
017 NSC 045 Hitachi, Macom 072 Samsung
018 B46 Oak 073 Jerro/d
019 Sylvania, Toxscan 047 Panasonic 074 RCA
020 Eastern, International, Hamlin, Regal 048 Magnavox, Philips, Viewstar 075 G/
021 Hmnlin, Regal 049 Magnavox, Philips, Unika, Viewstar 076 GI
022 Zenith 050 Zenith 077 GI
023 GI Jerrold 051 Ilitachi, Macom
DVD
Codes
000 Samsung 005 Sharp
001 LG 006 Panasonic
002 '_bshiba 007 Philips
003 VC 008 RCA Proscan
004 Sony 009 CurtisMathes
Note: Tile remote control might not be compatible with all DVD
Players, VCRs, and Cable boxes.
82
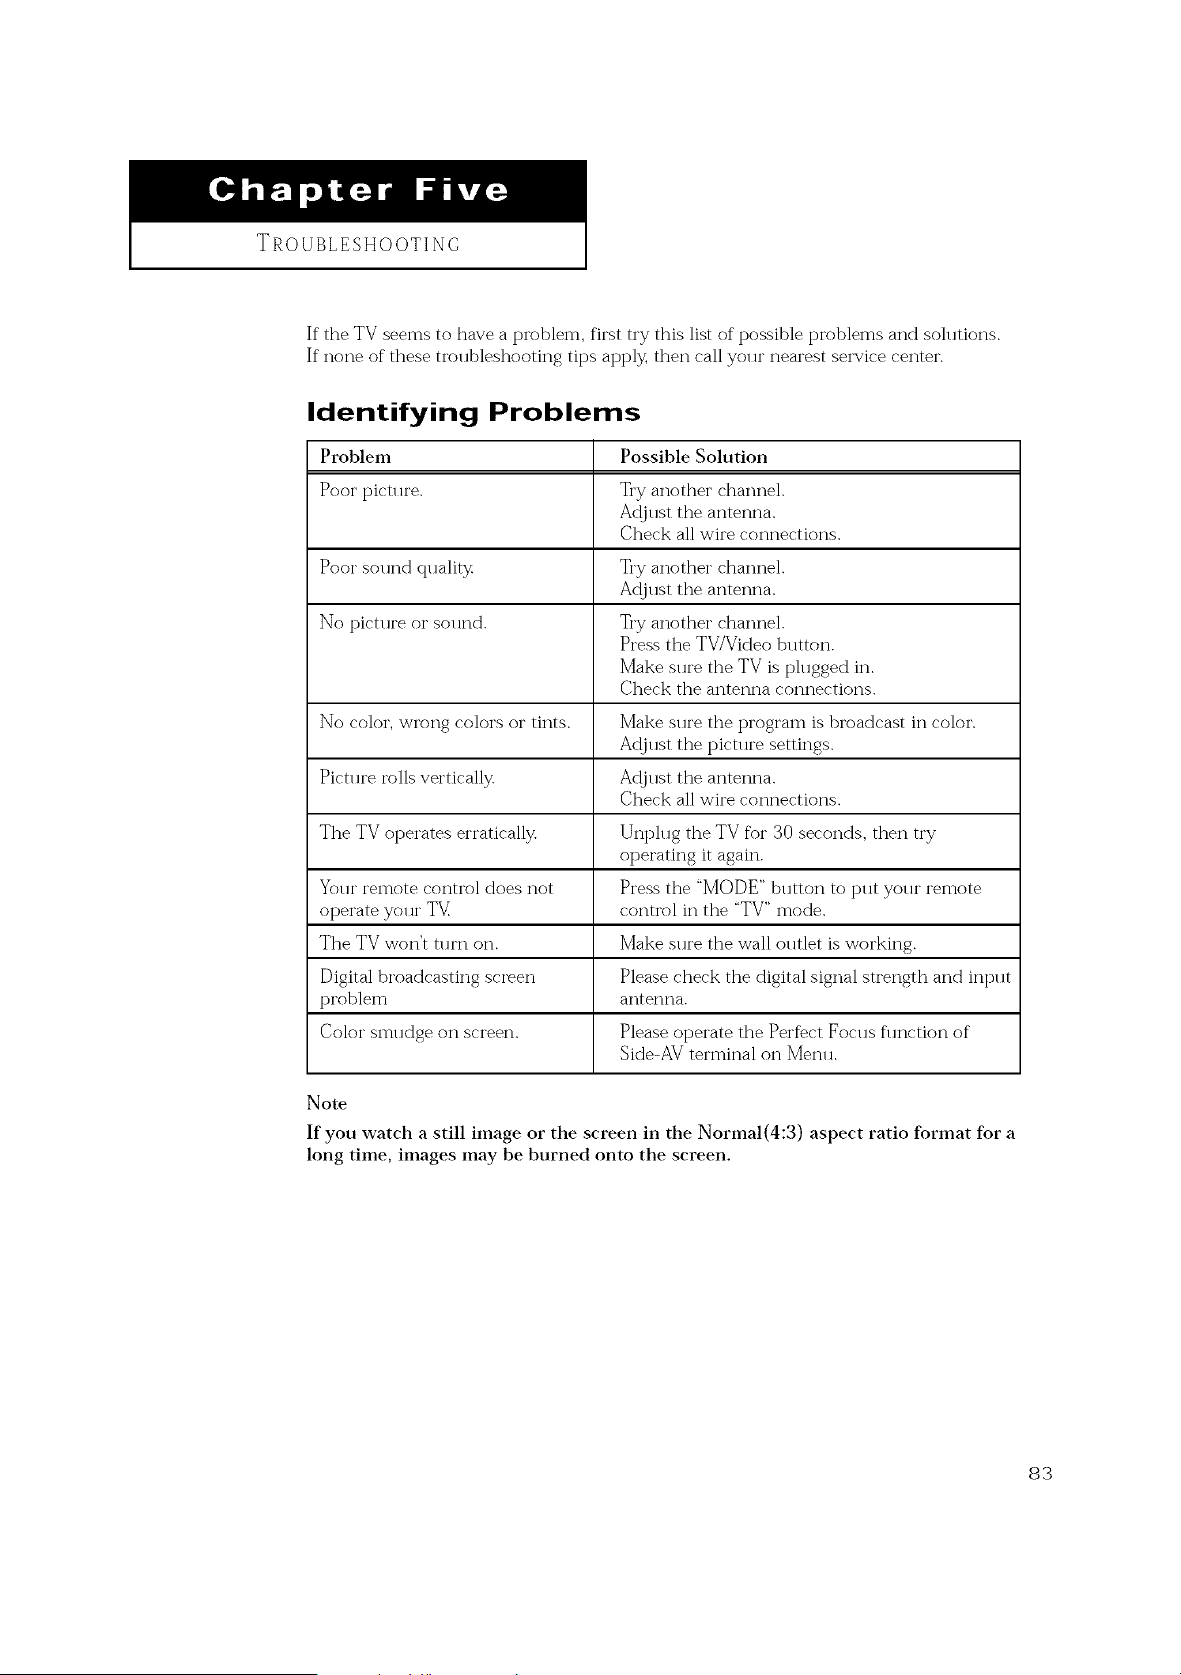
TROUBLESHOOTING
Ifthe TV seems to have a problem, first try this list of possible t)i'oblems and solutions.
If none of these tro*lbleshooting tips apply, then call yo*lt" nearest service center.
Identifying Problems
Problem Possible Solution
Poor pictlu'e. Try another channel.
A@lst the antenna.
Check all wire connections.
Poor so*u_d ci*lality Try another channel.
A@lst the antenna.
No picu u'e or sol u_d. Try another channel.
Press the TV/Video blltton.
Make sure the TV is plugged in.
Check the antenna connections.
No color, wrong colors or tints. Make sure the program is broadcast in color.
Ac{jllst the pictl u'e settings.
Pitt1 u'e rolls vertically. Ac{jllst the antenna.
Check all wire connections.
The TV operates erratically. Unphlg the TV for 30 seconds, then try
operating it again.
Your remote control does not Press the "MODE" button to put your remote
operate your TV control in the "TV" mode.
The TV won't turn on. Make sure the wall outlet is working.
Digital broadcasting screen Please check the digital signal strength and int>lt
problem antenna.
Color smudge on screen. Please operate the Perfbct Focus flmction of
Side-AV terminal on Metal.
Note
If you watch a still image or the screen in the Normal(4:3) aspect ratio format for a
long time, images may be burned onto the screen.
83
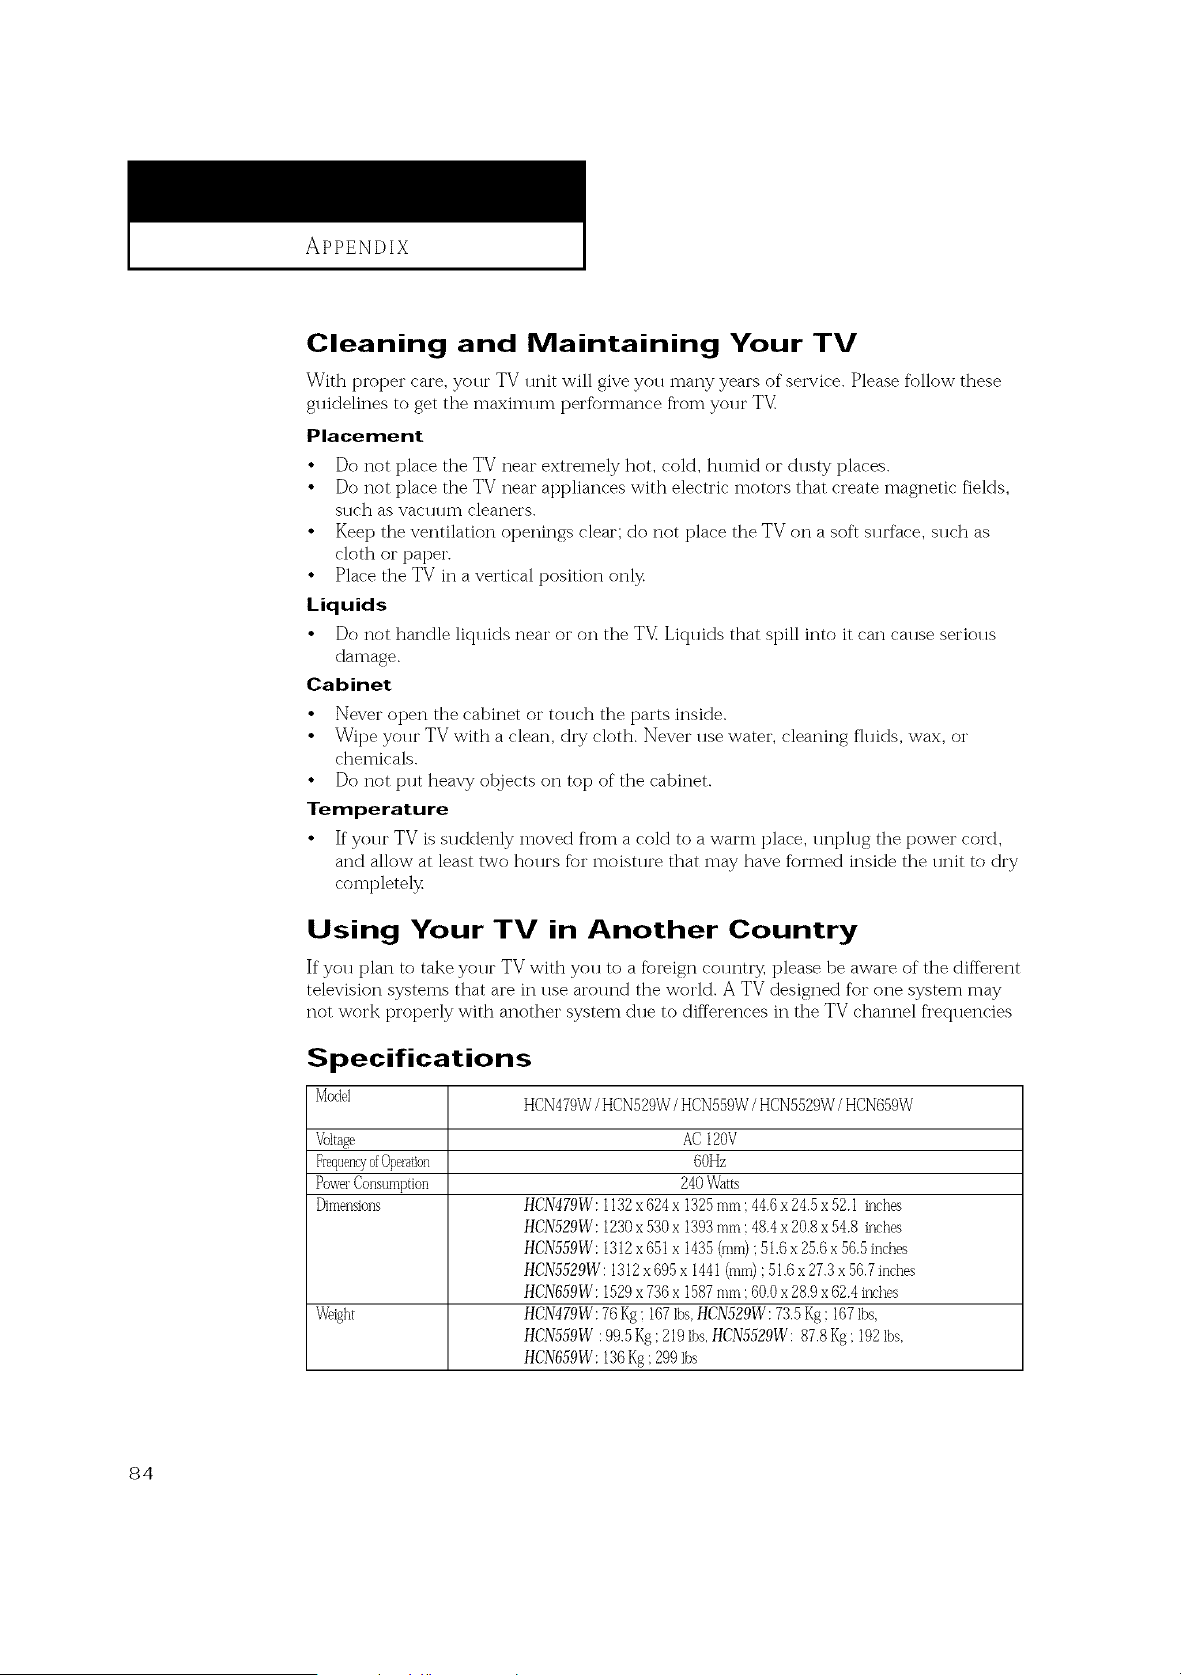
APPENDIX
Cleaning and Maintaining Your TV
With pIoper care, your TV unit will give you many years of service. Please fi)llow these
guidelines to get the maximum t_ei'fbi'mance fl'om your TV
Placement
• Do not place the TV near extremely hot, coM, humid or dusty places.
• Do not place the TV near appliances with electric motors that create magnetic fields,
sllch as vacllllU] cleaners.
• Keep the ventilation openings clear; do not place the TV on a soft surface, such as
cloth or paper.
• Place the TV in a vertical position only
Liquids
• Do not handle liquids near orOIlthe TV Liquids that spill into it can cause serious
damage.
Cabinet
• Never open the cabinet or touch the parts inside.
• Wipe yolu" TV with a clean, dry cloth. Never use water, cleaning fllrids, wax, or
chemicals.
• Do not put heavy otqjects on top of the cabinet.
Temperature
• If"your TV is suddenly moved fi'om a cold to a warm place, unt_lug the power cord,
and allow at least two hours fbr moisture that may have fbrmed inside the unit to dry
completely
Using Your TV in Another Country
If you plan to take your TV with you to a foreign country, please be aware of the different
television systems that are in llse around the world. A TV designed for one system may
not work properly with another system due to differences in the TV channel frequencies
Specifications
Model
HCN479W/HCN529W/HCN559W/HCN5529W/HCN659W
_oltage AC I20V
60Hz
Po_x_rConsumption 240Watts
_mensi0ns HCN479W:1132x624x I325 mm: 44.6x24.5x52.I inches
HCN529W:I230 x530x I393 mm: 48.4x20.8x54.8 inches
HCN559W:I312 x651x I435 (ram);51.6x25.6x56.5 inches
HCN5529W:1312x 695x I44I (ram):51.6x27.3x56.7inches
HCN659W":1529x736x1587rnm :60.0x28.9x62.4inches
Weight HCN479W: 76Kg;I67Ibs,HCN529W: 73.5Kg; I67 Ibs,
HCN559W :99.5Kg;219Ibs.HCN5529W: 87.8 Kg;I92 Ibs.
HCN659VV": 136Kg ;299Ibs
84

£L£CTRON_CS
SERVICE DI'_'ISION
400 Vallev Road. Suite 201
Mount Arlington, NJ 07856
TEL : 1-800-SAMSUNG (1-800-726-7864)
VV_VW'. Sarflsun gu sa. c o nl
BP68-00137A-00