Loading ...
Loading ...
Loading ...
Every 25 Hours (Twice a Mowing Season)
I, Brake Adjustment
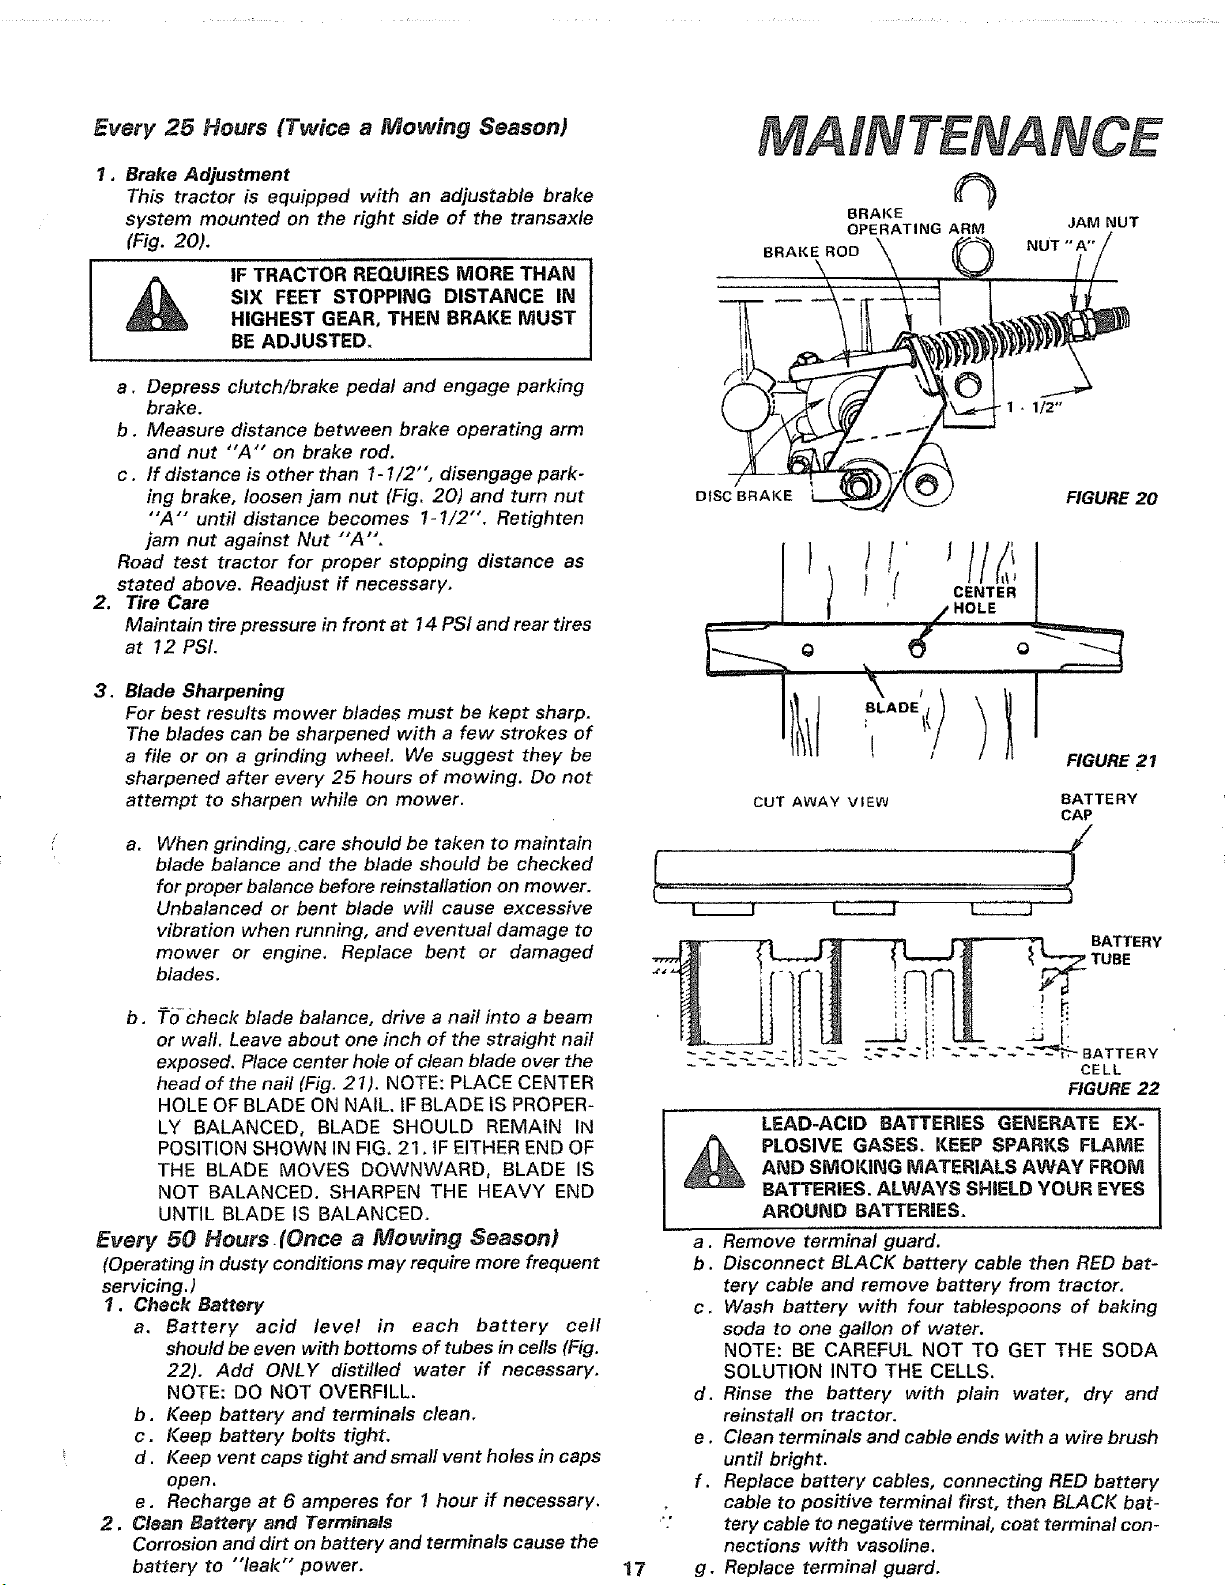
This tractor is equipped with an adjustable brake
system mounted on the right side of the transaxle
(Fig. 20).
IF TRACTOR REQUIRES MORE THAN
SIX FEET STOPPING DISTANCE IN
HIGHEST GEAR, THEN BRAKE MUST
BE ADJUSTED.
o
a. Depress clutch/brake pedal and engage parking
brake.
b. Measure distance between brake operating arm
and nut "A'" on brake rod.
c. tf distance is other than 1-1/2", disengage park-
ing brake, loosen jam nut (Fig. 20) and turn nut
"A'" until distance becomes 1-1/2"'. Retighten
jam nut against Nut "'A'.
Road test tractor for proper stopping distance as
stated above. Readjust if necessary.
Tire Care
Maintain tire pressure in front at 14 PSi and rear tires
at 12 PSI.
.
Blade Sharpening
For best results mower blades must be kept sharp.
The blades can be sharpened with a few strokes of
a file or on a grinding wheel, We suggest they be
sharpened after every 25 hours of mowing. Do not
attempt to sharpen while on mower.
a.
When grinding, care should be taken to maintain
blade balance and the blade should be checked
for proper balance before reinstallation on mower.
Unbalanced or bent blade will cause excessive
vibration when running, and eventual damage to
mower or engine, Replace bent or damaged
blades.
b, To check blade balance, drive a nail into a beam
or wall. Leave about one inch of the straight nail
exposed. Place center hole of clean blade over the
head of the nail (Fig. 21). NOTE: PLACE CENTER
HOLE OF BLADE ON NAIL. IF BLADE IS PROPER-
LY BALANCED, BLADE SHOULD REMAIN IN
POSITION SHOWN IN FIG, 21, IF EITHER END OF
THE BLADE MOVES DOWNWARD, BLADE IS
NOT BALANCED, SHARPEN THE HEAVY END
UNTIL BLADE IS BALANCED,
Every 50 Hours(Once a Mowing Season)
(Operating in dusty conditions may require more frequent
servicing. )
1. Check Battery
a. Battery acid level in each battery cell
should be even with bottoms of tubes in cells (Fig.
22). Add ONLY distilled water if necessary,
NOTE: DO NOT OVERFILL.
b. Keep battery and terminals clean,
c. Keep battery bolts tight.
d . Keep vent caps tight and small vent holes in caps
open.
e. Recharge at 6 amperes for 1 hour if necessary.
2. Clean Battery and Terminals
Corrosion and dirt on battery and terminals cause the
battery to "'leak'" power. 17
MAINTENANCE
BRAKE
OPERATING ARM JAM NUT
BRAKE ROD NUT "'A'"
DISC BRAKE
FIGURE 20
I
/ "OLE I
_'" I \
I FIGURE 21
CUT AWAY VIEW
BATTERY
CAP
BATTERY
a.
b.
c.
d.
e.
f.
g_
LEAD-ACID BATTERIES GENERATE EX-
PLOSIVE GASES. KEEP SPARKS FLAME
AND SMOKING MATERIALS AWAY FROM
BATTERIES. ALWAYS SHSELD YOUR EYES
AROUND BATTERIES.
Remove terminal guard.
Disconnect BLACK battery cable then RED bat-
tery cable and remove battery from tractor.
Wash battery with four tablespoons of baking
soda to one gallon of water.
NOTE: BE CAREFUL NOT TO GET THE SODA
SOLUTION INTO THE CELLS.
Rinse the battery with plain water, dry and
reinstall on tractor.
Clean terminals and cable ends with a wire brush
until bright.
Replace battery cables, connecting RED battery
cable to positive terminal first, then BLACK bat-
tery cable to negative terminal, coat terminal con-
nections with vasoline.
Replace terminal guard.
Loading ...
Loading ...
Loading ...