
1
PDUNV
Universal Rackmount
Power Distribution Unit (PDU)
Important Safety Instructions 2
Important Warnings 2
Installation 3
Features 4
Warranty & Warranty Registration 5
Español 6
Français 11
Owner’s Manual
1111 W. 35th Street, Chicago, IL 60609 USA • www.tripplite.com/support
Copyright © 2014 Tripp Lite. All rights reserved.
14-02-336-932537.indb 1 4/24/2014 12:22:40 PM

2
Important Safety Instructions
SAVE THESE INSTRUCTIONS
This manual contains instructions and warnings that should be
followed during the installation, operation, and storage of this
product. Failure to heed these instructions and warnings will void the
product warranty.
Important Warnings
• ThePDUprovidesconvenientmultipleoutlets,butitDOESNOTprovidesurgeorlinenoise
protectionforconnectedequipment.
• ThePDUisdesignedforindooruseonlyinacontrolledenvironmentawayfromexcessmoisture,
temperatureextremes,conductivecontaminants,dustordirectsunlight.
• DonotconnectthePDUtoanungroundedoutletortoextensioncordsoradaptersthat
eliminatetheconnectiontoground.
• ThepowerrequirementforeachpieceofequipmentconnectedtothePDUmustnotexceedthe
individualoutlet’sloadrating.
• ThetotalpowerrequirementforequipmentconnectedtothePDUmustnotexceedthe
maximumloadratingforthePDU.
• DonotdrillintoorattempttoopenanypartofthePDUhousing.Therearenouser-serviceable
partsinside.
• DonotattempttomodifythePDU,includingtheinputplugsandpowercables.
• DonotattempttousethePDUifanypartofitbecomesdamaged.
• DonotattempttomountthePDUtoaninsecureorunstablesurface.
• Neverattempttoinstallelectricalequipmentduringathunderstorm.
14-02-336-932537.indb 2 4/24/2014 12:22:41 PM

3
Installation
Step 1: Determine Installation
Configuration.ThePDUsupportsfourprimary
installationconfigurations:1URack,0URack,
WallandUnder-Counter.Choosea
configurationandfollowtheinstallation
instructionsintheappropriatesectionofStep
1beforeproceedingtoStep2.
Note: Regardless of installation configuration,
the user must determine the fitness of
hardware and procedures before mounting. The
PDU and included hardware are designed for
common rack and rack enclosure types and
may not be appropriate for all applications.
Exact mounting configurations may vary.
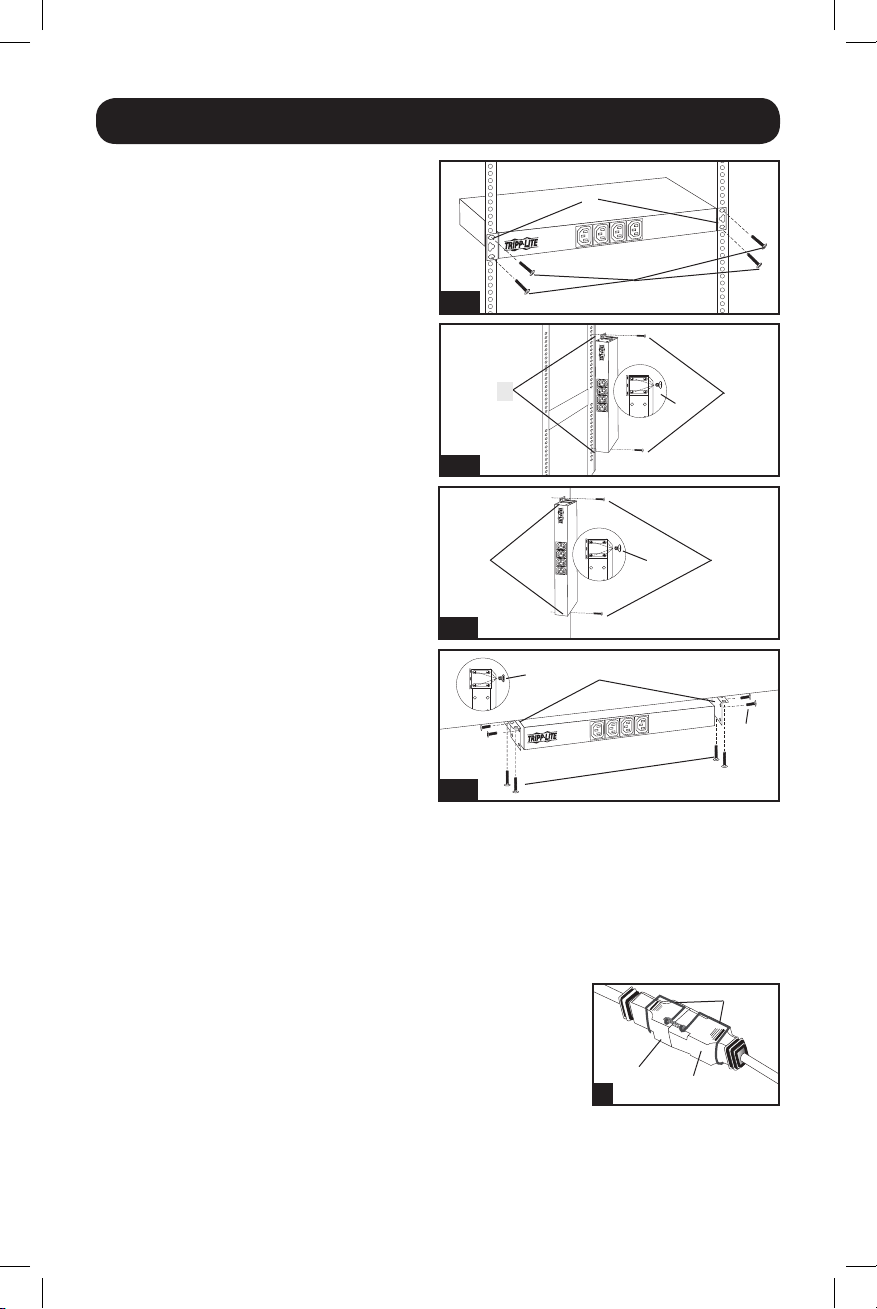
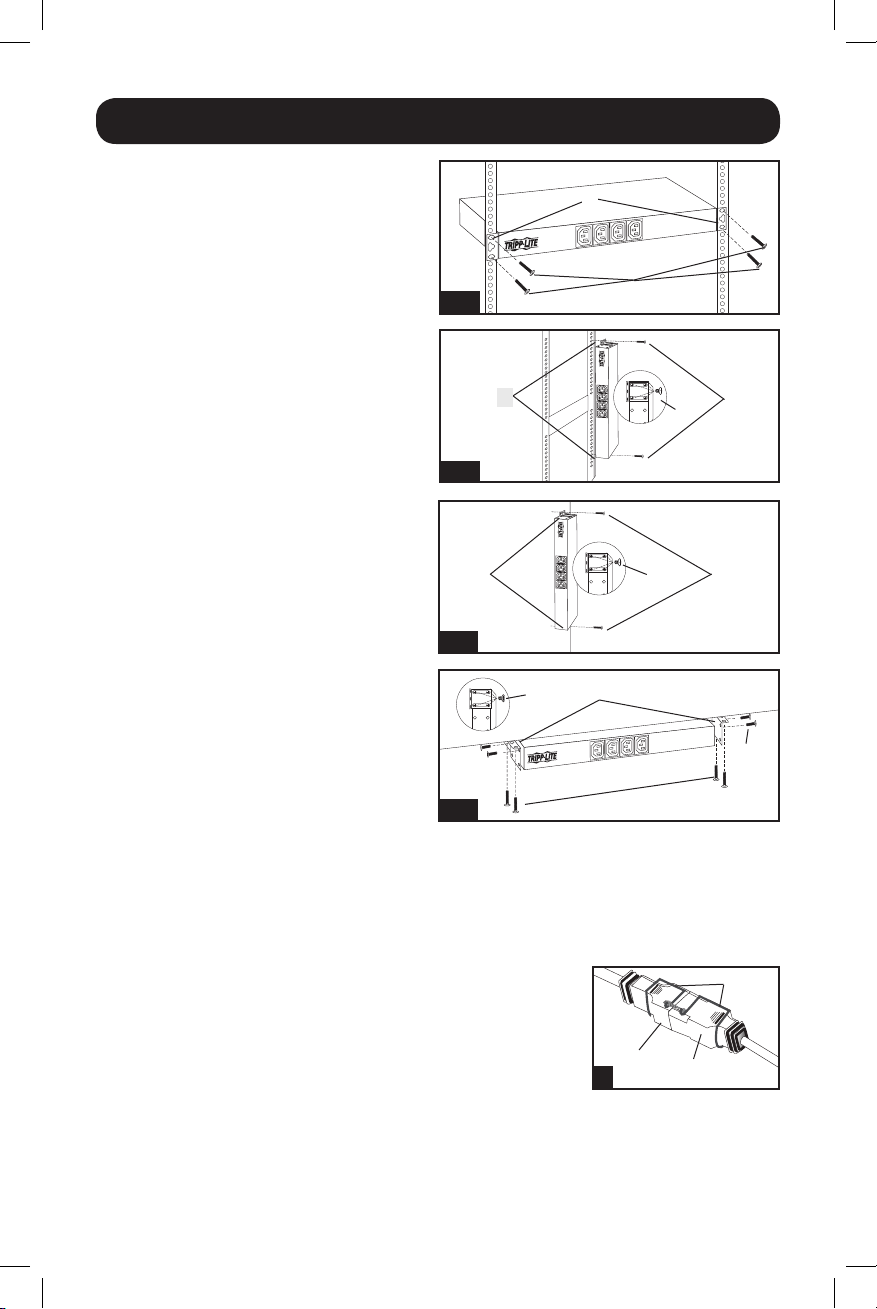
Step 1-1: 1U Rack Installation.Attachthe
PDUtotherackbyinsertingfouruser-supplied
screws(A)throughthePDUmountingbrackets
(B)andintothemountingholesoftherackrail
asshown.
Step 1-2: 0U Rack Installation. Part 1:
Removethescrews(C)attachingthemounting
bracketstothePDU,changetheorientationof
thebracketsasshownandreattachthe
brackets.Useonlythescrewssuppliedbythe
manufacturerortheirexactequivalent(#6-32,
1/4”flathead).Part 2: AttachthePDU
verticallybyinsertingtwoormoreuser-supplied
screws(A)throughthePDUmountingbrackets
(B)andintomountingpointsintherackor
rackenclosure.
Step 1-3: Wall Installation. Afterrepeating
Part1above,attachthePDUtoastable
mountingsurfacebyinsertingtwoormore
user-suppliedscrews(A)throughthePDU
mountingbrackets(B)andintosecure
mountingpointsonthemountingsurface.
1-1
1-2
1-3
1-4
A
B
B
A
C
A
B
C
B
C
A
C
D
2
E
F
Step 1-4: Under-Counter Installation. AfterrepeatingPart1above,attachthePDUtoastable
mountingsurfacebyinsertingfouruser-suppliedscrews(A)throughthePDUmountingbrackets(B)
andintosecuremountingpointsonthemountingsurface.
Step 2: Connect PDU to Grounded Outlet.ThePDUincludes
severalplugadapterswhichallowthePDUtoconnecttovarious
outlettypes.Afterchoosingtheappropriateplugadapterforthe
requiredapplication,inserttheIEC-320-C19connector(D)ofthe
adapterintotheIEC-320-C20connector(E)oftheinputcable.
SecuretheconnectionwiththeCordRetentionBracket(F)byusing
theincludedboltstofastenthetwohalvesofthebracketaroundthe
connectionasshown.Inserttheplugdirectlyintoaproperlygrounded
ACoutletthatdoesnotshareacircuitwithaheavyelectricalload
(suchasanairconditionerorrefrigerator).Caution: The Line (L1)
conductor includes an over-current protective device for safety. To
avoid the risk of electric shock, ensure that the Neutral (L2)
conductor has been identified before connecting the PDU.
14-02-336-932537.indb 3 4/24/2014 12:22:42 PM
4
Features
Installation
3
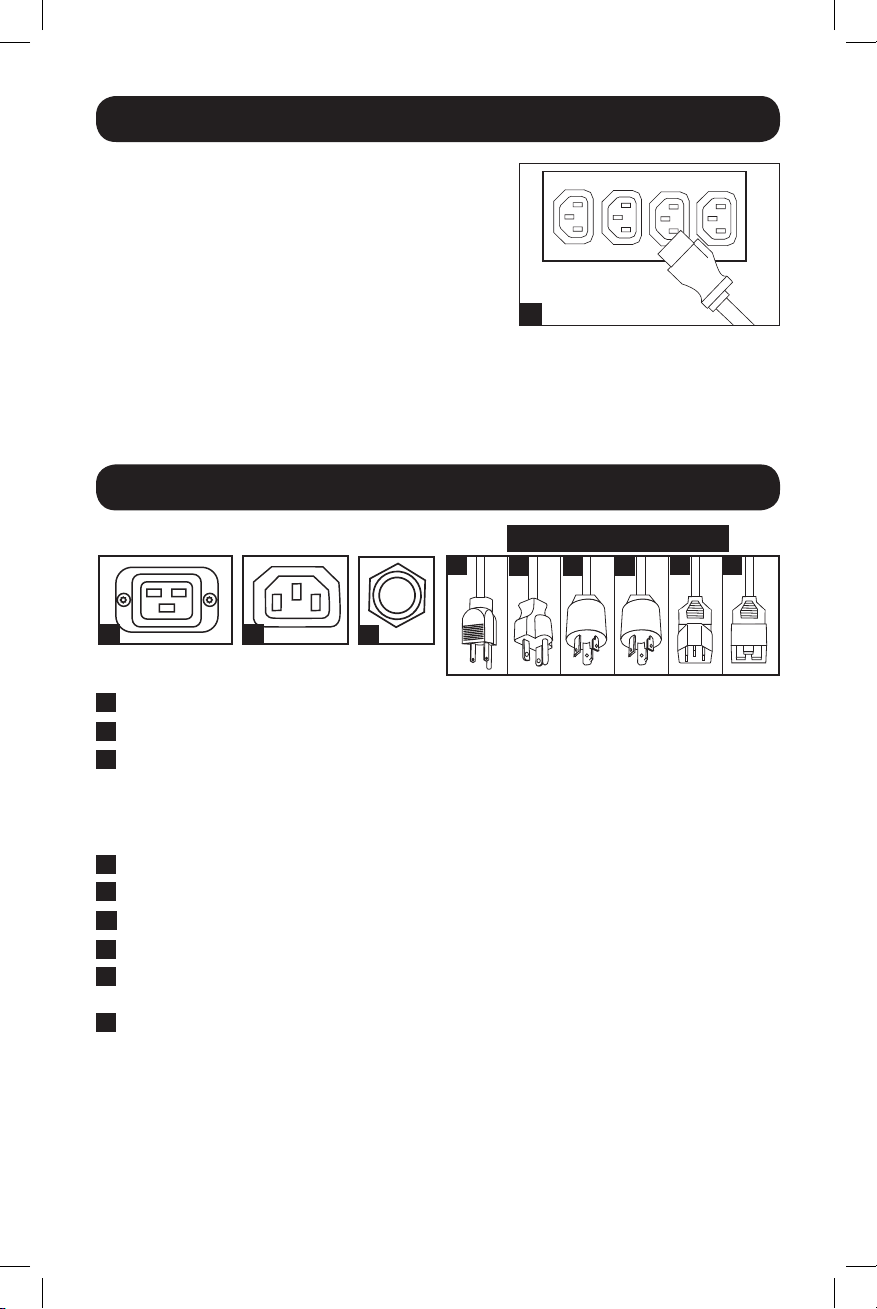
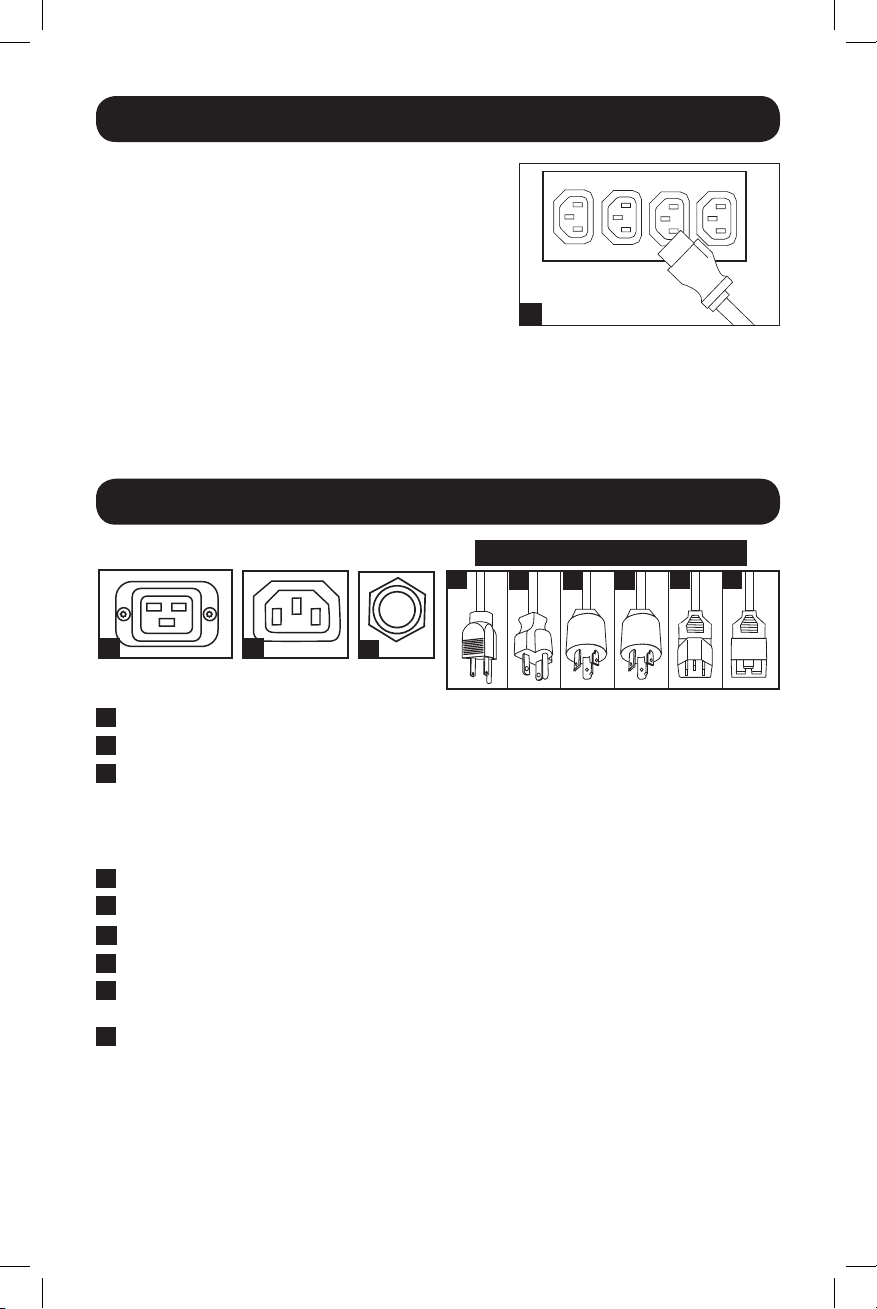
Step 3: Connect Equipment to PDU. Connectequipment
tothePDUwithuser-suppliedIEC-320interconnection
cords.Becarefulnottoexceedtheloadratingforeach
outletnorthetotalloadratingforthePDU.Note:
Interconnection cords (IEC-320-C13 to IEC-320-C14) are
available from Tripp Lite. Call 773-869-1234 (Part #
P004-006).
Step 4: Optional Installation (Not Shown).Theinput
powercord’sIEC-320-C20connectorandtheIEC-
320-C14adaptercaneachconnecttouser-supplied
powercordswithplugsappropriatefortheinstallation
site’sutilityoutlets.Thiscapabilityisusefulforconnecting
thePDUtovariousinternationaloutlettypes.
IEC-320-C19 Outlets
IEC-320-C13 Outlets
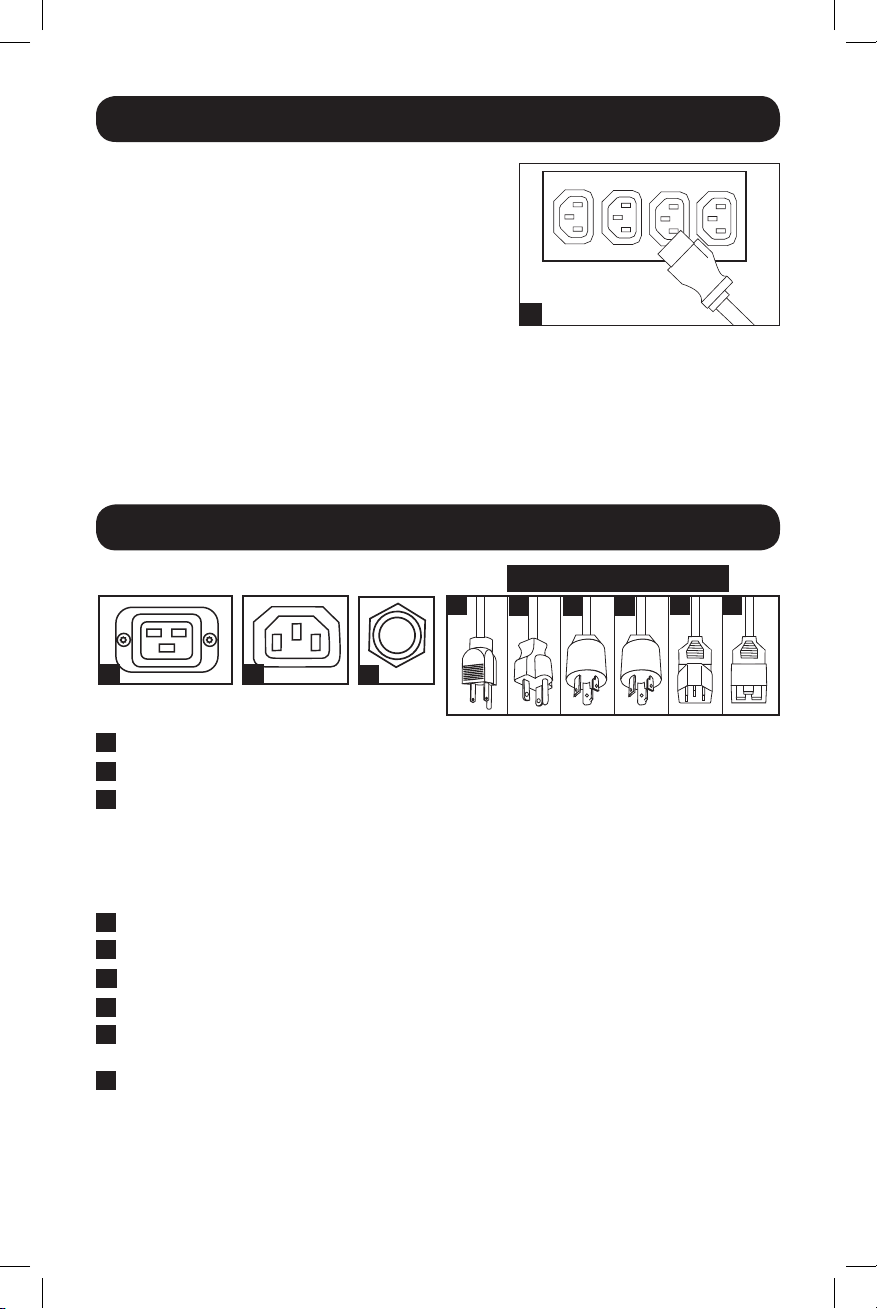
Circuit Breaker: IfthecurrentdrawnbytheequipmentconnectedtothePDUexceedsthe
MaximumLoadRatingforlongerthanafewseconds,thecircuitbreakerwillactivateand
interruptACpowertopreventpossibledamage.Whenthecircuitbreakeractivates,itsplunger
willpopup.DisconnectexcessequipmentfromthePDUandallowthebreakertocoolone
minutebeforedepressingtheplungertoresetthebreaker.
NEMA 5-15PconnectstoNEMA5-15Routlet.
NEMA 5-20PconnectstoNEMA5-20Routlet.
NEMA L5-20PconnectstoNEMAL5-20Routlet.
NEMA L6-20PconnectstoNEMAL6-20Routlet.
IEC-320-C14 connectstouser-suppliedpowercordwithIEC-320-C13ortoaUPS/power
supply.
IEC-320-C20connectstouser-suppliedpowercordwithIEC-320-C19,toaninputadapteror
toaUPS/powersupply.
A
B
C
D
E F G
H I
A
B
C
D
E
F
G
H
I
INPUT PLUG ADAPTERS
14-02-336-932537.indb 4 4/24/2014 12:22:43 PM

5
Warranty & Warranty Registration
LIMITED WARRANTY
Sellerwarrantsthisproduct,ifusedinaccordancewithallapplicableinstructions,tobefreefromoriginaldefectsinmaterialand
workmanshipforaperiodof5years(exceptinternalUPSsystembatteriesoutsideUSAandCanada,1year)fromthedateofinitial
purchase.Iftheproductshouldprovedefectiveinmaterialorworkmanshipwithinthatperiod,Sellerwillrepairorreplacethe
product,initssolediscretion.ServiceunderthisWarrantycanonlybeobtainedbyyourdeliveringorshippingtheproduct(withall
shippingordeliverychargesprepaid)to:TrippLite,1111W.35thStreet,Chicago,IL60609USA.Sellerwillpayreturnshipping
charges.Visitwww.tripplite.com/supportbeforesendinganyequipmentbackforrepair.
THISWARRANTYDOESNOTAPPLYTONORMALWEARORTODAMAGERESULTINGFROMACCIDENT,MISUSE,ABUSEORNEGLECT.
SELLERMAKESNOEXPRESSWARRANTIESOTHERTHANTHEWARRANTYEXPRESSLYSETFORTHHEREIN.EXCEPTTOTHEEXTENT
PROHIBITEDBYAPPLICABLELAW,ALLIMPLIEDWARRANTIES,INCLUDINGALLWARRANTIESOFMERCHANTABILITYORFITNESS,
ARELIMITEDINDURATIONTOTHEWARRANTYPERIODSETFORTHABOVE;THISWARRANTYEXPRESSLYEXCLUDESALL
INCIDENTALANDCONSEQUENTIALDAMAGES.(Somestatesdonotallowlimitationsonhowlonganimpliedwarrantylasts,and
somestatesdonotallowtheexclusionorlimitationofincidentalorconsequentialdamages,sotheabovelimitationsorexclusions
maynotapplytoyou.ThisWarrantygivesyouspecificlegalrights,andyoumayhaveotherrightswhichvaryfromjurisdictionto
jurisdiction).
WARNING:Theindividualusershouldtakecaretodeterminepriortousewhetherthisdeviceissuitable,adequateorsafeforthe
useintended.Sinceindividualapplicationsaresubjecttogreatvariation,themanufacturermakesnorepresentationorwarrantyas
tothesuitabilityorfitnessofthesedevicesforanyspecificapplication.
ThepolicyofTrippLiteisoneofcontinuousimprovement.Specificationsaresubjecttochangewithoutnotice.
WARRANTY REGISTRATION
Visitwww.tripplite.com/warrantytodaytoregisterthewarrantyforyournewTrippLiteproduct.You’llbeautomaticallyenteredintoa
drawingforachancetowinaFREETrippLiteproduct!*
*Nopurchasenecessary.Voidwhereprohibited.Somerestrictionsapply.Seewebsitefordetails.
Regulatory Compliance Identification Numbers
Forthepurposeofregulatorycompliancecertificationsandidentification,yourTrippLiteproducthasbeenassignedauniqueseries
number.Theseriesnumbercanbefoundontheproductnameplatelabel,alongwithallrequiredapprovalmarkingsand
information.Whenrequestingcomplianceinformationforthisproduct,alwaysrefertotheseriesnumber.Theseriesnumbershould
notbeconfusedwiththemarkingnameormodelnumberoftheproduct.
1111 W. 35th Street, Chicago, IL 60609 USA • www.tripplite.com/support
14-02-336-932537.indb 5 4/24/2014 12:22:43 PM

6
PDUNV
Montaje en bastidor
Unidad universal de distribución de potencia (PDU)
Instrucciones de seguridad 7
importantes
Advertencias importantes 7
Instalación 8
Características 9
Garantía 10
English 1
Français 11
Manual del propietario
1111 W. 35th Street, Chicago, IL 60609 USA • www.tripplite.com/support
©2014TrippLite.Todoslosderechosreservados.
14-02-336-932537.indb 6 4/24/2014 12:22:44 PM

7
Instrucciones de seguridad importantes
GUARDE ESTAS INSTRUCCIONES
Este manual contiene instrucciones y advertencias que deben
seguirse durante la instalación, operación y almacenamiento de este
producto. De no seguirlas, se anulará la garantía del producto.
Advertencias importantes
• LaPDUproporcionacómodassalidasmúltiples,peroNOproporcionaproteccióncontra
sobretensiónoruidoenlalíneaalequipoconectado.
• LaPDUestádiseñadasóloparaempleoeninterioresenunambientecontrolado,lejosdel
excesodehumedad,temperaturasextremas,contaminantesconductores,polvooluzsolar
directa.
• NoconectelaPDUaunasalidasinconexiónatierraniacablesdeextensiónoadaptadores
queeliminenlaconexiónatierra.
• ElrequisitodepotenciadecadaequipoconectadoalaPDUnodebeexcederlacapacidadde
cargaindividualdelasalida.
• ElrequisitodepotenciatotalparaelequipoconectadolaPDUnodebeexcederlamáxima
capacidaddecargaparalaPDU.
• NotaladrenitratedeabrirningunapartedelacubiertadelaPDU.Nohaypartesensuinterior
querequieranmantenimientoporpartedelusuario.
• NointentemodificarlaPDU,incluyendolosenchufesdeentradayloscablesdealimentación.
• NointenteusarlaPDUsialgunodesuscomponentesestádañado.
• NointentemontarlaPDUenunasuperficieinseguraoinestable.
• Nuncaintenteinstalarequiposeléctricosduranteunatormentaeléctrica.
14-02-336-932537.indb 7 4/24/2014 12:22:44 PM
8
Instalación
Paso 1: Determine la configuración de la
instalación.LaPDUsoportacuatro
configuracionesbásicasdeinstalación:Bastidor
de1U,bastidorde0U,deparedydebajode
mostrador.Elijaunaconfiguraciónysigalas
instruccionesdeinstalaciónenlasección
apropiadadelPaso1antesdecontinuaral
Paso2.
Nota: Independientemente de la configuración,
el usuario debe determinar la idoneidad de los
materiales y accesorios así como de los
procedimientos antes del montaje. La PDU y el
material incluido están diseñados para racks
(bastidores) y cajas de rack (bastidor) comunes,
y pueden no ser apropiados para todas las
aplicaciones.
Paso 1-1: Instalación en bastidor de 1U.Fije
laPDUalbastidorinsertandocuatrotornillos
suministradosporelusuario(A)atravésdelos
soportesdemontaje(B)delaPDUenlos
agujerosdemontajedelrieldelbastidorcomo
semuestra.
Paso 1-2: Instalación en bastidor de 0U.
Parte 1: Retirelostornillos(C)quefijanlos
soportesdemontajealaPDU,cambiela
orientacióndelossoportescomosemuestray
fíjelosnuevamente.Usesololostornillos
incluidososusequivalentesexactos(#6-32,
1/4”decabezaplana).Parte 2:FijelaPDU
verticalmenteinsertandodosomástornillos
suministradosporelusuario(A)atravésdelos
soportesdemontaje(B)delaPDUenlospuntos
demontajeenelbastidorolacajadelbastidor.
1-1
1-2
1-3
1-4
A
B
B
A
C
A
B
C
B
C
A
C
D
2
E
F
Paso 1-3: Instalación en la pared: DespuésderepetirlaParte1anterior,fijeelPDUenuna
superficieestableparasuinstalacióninsertandodosomástornillossuministradosporelusuario
(A)atravésdelossoportesdeinstalacióndelPDU(B)enlospuntossegurosparasuinstalación
enlasuperficiedeinstalación.
Paso 1-4: Instalación debajo de mostrador: DespuésderepetirlaParte1anterior,fijeelPDU
enunasuperficieestableparasuinstalacióninsertandoquatrotornillossuministradosporel
usuario(A)atravésdelossoportesdeinstalacióndelPDU(B)enlospuntossegurosparasu
instalaciónenlasuperficiedeinstalación.
Paso 2: Conecte la PDU a una toma colocada a tierra.LaPDU
incluyevariosadaptadoresdeenchufequelepermitenconectarsea
variostiposdesalida.Despuésdeelegireladaptadordeenchufe
apropiadoparalaaplicaciónrequerida,inserteelconectorIEC-
320-C19(D)deladaptadorenelconectorIEC-320-C20(E)delcable
deentrada.Asegurelaconexiónconelsoporteparasujeciónde
cordón(F)usandolospernosincluidosparaasegurarlasdosmitades
alrededordelaconexióncomosemuestra.Inserteelenchufedirectamenteenunatomade
corrientealternaconectadaatierraquenocompartaelcircuitoconalgunacargaeléctricapesada
(comounaireacondicionadoounarefrigeradora).Precaución: El conductor de línea (L1) incluye
un dispositivo de seguridad de protección contra sobrecorriente. Para evitar el riesgo de choque
eléctrico, asegúrese que el conductor neutro (L2) haya sido identificado antes de conectar la PDU.
14-02-336-932537.indb 8 4/24/2014 12:22:45 PM
9
Características
Instalación
3
Paso 3: Conecte el equipo a la PDU. Conecteelequipo
alaPDUconcordonesdeconexiónIEC-320suministrados
porelusuario.Tengacuidadodenoexcederlacapacidad
decargaparacadacontactonilacapacidadtotalparala
PDU.Nota: Hay cordones de conexión (IEC-320-C13 a
IEC-320-C14) disponibles de Tripp Lite. Llame al 773-
869-1234 (Componente # P004-006)
Paso 4: Instalación opcional (No mostrada).El
conectorIEC-320-C20delcordóndealimentaciónde
entradayeladaptadorIEC-320-C14puedenconectarsea
cordonesdealimentaciónsuministradosporelusuariocon
enchufesapropiadosparalastomasderedlocales.Esta
capacidadesútilparaconectarlaPDUavariostiposde
tomasdecorrienteinternacionales.
Contactos IEC-320-C19
Contactos IEC-320-C13
Breaker:SilacorrienteconsumidaporelequipoconectadoalaPDUexcedelamáxima
capacidaddecargapormásdeunoscuantossegundos,elbreakerseactivaráeinterrumpirá
laalimentacióndeCAparaevitarposiblesdaños.Cuandounbreakerdispara,suémbolose
extiende.DesconecteelequipoenexcesodelaPDUypermitaqueelbreakerseenfríeun
minutoantesdepresionarelémbolopararestablecerelbreaker.
NEMA 5-15PseconectaauncontactoNEMA5-15R.
NEMA 5-20PseconectaauncontactoNEMA5-20R.
NEMA L5-20PseconectaauncontactoNEMAL5-20R.
NEMA L6-20PseconectaauncontactoNEMAL6-20R.
IEC-320-C14seconectaauncordóndealimentaciónsuministradoporelusuariocon
IEC-320-C13,oaunsistemaUPSounafuentedealimentación.
IEC-320-C20seconectaauncordóndealimentaciónsuministradoporelusuariocon
IEC-320-C19,oalosadaptadoresdeentrada,unsistemaUPSounafuentedealimentación.
A
B
C
D
E F G
H I
A
B
C
D
E
F
G
H
I
ADAPTADORES DE ENTRADA
14-02-336-932537.indb 9 4/24/2014 12:22:45 PM

10
Garantía
GARANTÍA LIMITADA
Elvendedorgarantizaqueesteproducto,siseempleadeacuerdocontodaslasinstruccionesaplicables,notendrádefectosen
materialesnimanodeobraporunperíodode5años(salvoparabateríasinternasdelUPSfueradeEE.UU.yCanadá,1año)a
partirdelafechadecompra.Siseverificaqueelproductotienedefectosenlosmaterialesoenlamanodeobradentrodedicho
período,elvendedorrepararáoreemplazaráelproducto,asusoladiscreción.Sólopuedeobtenerseserviciobajoestagarantía,
entregandoodespachandoelproducto(contodosloscargosdedespachooentregapagadosporadelantado)a:TrippLite,1111
W.35thStreet,Chicago,IL60609USA.Elvendedorpagaráloscargosdedespachodelretorno.Visitewww.tripplite.com/support
antesdeenviaralgúnequipoparareparación.
ESTAGARANTÍANOSEAPLICAALDESGASTENORMALOADAÑOSRESULTANTESDEUNACCIDENTE,USOINADECUADO,
MALTRATOONEGLIGENCIA.ELVENDEDORNOEXPRESANINGUNAOTRAGARANTÍADISTINTADELAESTABLECIDAENESTE
DOCUMENTOENFORMAEXPLÍCITA.EXCEPTOHASTAELGRADOPROHIBIDOPORLASLEYESAPLICABLES,TODASLASGARANTÍAS
IMPLÍCITAS,INCLUYENDOTODASLASGARANTÍASDECOMERCIABILIDADOIDONEIDAD,ESTÁNLIMITADASENDURACIÓNAL
PERÍODODEGARANTÍAESTABLECIDOMÁSARRIBA;YESTAGARANTÍAEXCLUYEEXPRESAMENTETODOSLOSDAÑOS
INCIDENTALESEINDIRECTOS.(Algunosestadosnopermitenlimitacionessobreladuracióndeunagarantíaimplícita,yalgunos
estadosnopermitenlaexclusiónolimitacióndedañosincidentalesoemergentes,demodoquelaslimitacionesoexclusionesde
arribapuedennoaplicarseausted.Estagarantíaledaderechoslegalesespecíficos,peroustedpuedetenerotrosderechosque
varíandejurisdicciónajurisdicción.)
ADVERTENCIA:Elusuarioindividualdebeencargarsededeterminarantesdeusarlo,siestedispositivoesapropiado,adecuadoo
seguroparaelusoproyectado.Yaquelasaplicacionesindividualesestánsujetasagranvariación,elfabricantenodeclarani
garantizaenloqueserefierealaidoneidadoaptituddeestosdispositivosparaningunaaplicaciónespecífica.
TrippLitetieneunapolíticademejoramientocontinuo.Lasespecificacionesestánsujetasacambiosinprevioaviso.
Cumplimiento de las normas de los números de identificación
Parafinesdeidentificaciónycertificacióndelcumplimientodelasnormas,suproductoTrippLitetieneasignadounnúmerode
serieúnico.Puedeencontrarelnúmerodeserieenlaetiquetadelaplacadeidentificacióndelproducto,juntoconlossímbolos
deaprobacióneinformaciónrequeridos.Alsolicitarinformaciónsobreelcumplimientodelasnormasparaesteproducto,siempre
mencioneelnúmerodeserie.Elnúmerodeserienodebeserconfundidoconelnombredeidentificaciónniconelnúmerode
modelodelproducto.
1111 W. 35th Street, Chicago, IL 60609 USA • www.tripplite.com/support
14-02-336-932537.indb 10 4/24/2014 12:22:46 PM

11
PDUNV
Unité universelle de distribution d’alimentation (PDU)
Importantes consignes 12
de sécurité
Importantes mises en garde 12
Installation 13
Caractéristiques 14
Garantie 15
English 1
Español 6
Manuel du propriétaire
1111 W. 35th Street, Chicago, IL 60609 USA • www.tripplite.com/support
Copyright2014TrippLite.Tousdroitsréservés.
14-02-336-932537.indb 11 4/24/2014 12:22:48 PM

12
Importantes consignes de sécurité
CONSERVER CES DIRECTIVES
Ce manuel contient des instructions et des mises en garde que vous
devez respecter durant l’installation, l’utilisation et l’entreposage de
ce produit. Le non-respect de ces instructions et mises en garde
annulera la garantie du produit.
Importantes mises en garde
• L’unitéPDUoffredenombreusesprisespratiquesmaiselleN’offrePASdeprotectioncontreles
surtensionstransitoiresetlesparasitesàl’équipementconnecté.
• L’unitéPDUestconçuepourunusageenenvironnementcontrôlé,àl’abridel’humidité
excessive,destempératuresextrêmes,descontaminantsconducteurs,delapoussièreoudela
lumièredirectedusoleil.
• Nepasconnecterl’unitéPDUàuneprisesansmiseàlaterreouàdescordonsprolongateurs
oudesadaptateursquiéliminentlamiseàlaterre.
• Lademanded’alimentationpourchaquepièced’équipementconnectéeàl’unitéPDUnedoit
pasdépasserlachargenominaled’unepriseindividuelle.
• Lademandetotaled’alimentationpourl’équipementconnectéeàl’unitéPDUnedoitpas
dépasserlachargenominalemaximalepourl’unitéPDU.
• Nejamaispercerouessayerd’ouvrirunequelconquepartieduboîtierdel’unitéPDU.Aucune
pièceinternenepeutêtreréparéeparl’utilisateur.
• Nepasessayerdemodifierl’unitéPDU,ycomprislesfichesd’entréeetlescâbles
d’alimentation.
• Nepasessayerd’utiliserl’unitéPDU,siunedesespiècesestendommagée.
• Nepasessayerdemonterl’unitéPDUsurunesurfacepeusûreouinstable.
• Nejamaisessayerded’installerunéquipementélectriquependantunorage.
14-02-336-932537.indb 12 4/24/2014 12:22:48 PM
13
Installation
Étape 1 : Définir la configuration de
l’installation.L’unitépeutêtreinstalléselon
quatreconfigurations.Baie1U,Baie0U,contre
unmurousousuncomptoir.Choisirune
configurationetsuivrelesconsignes
d’installationdanslasectionappropriéede
l’étape1avantdeprocéderàl’étape2.
Nota : Sans tenir compte de la configuration,
l’utilisateur doit déterminer la compatibilité de
la quincaillerie et les procédures avant
d’effectuer l’installation. L’unité PDU et la
quincaillerie incluse sont conçues pour des
types de bâti et boîtier courants et peuvent ne
pas convenir à toutes les applications.
Étape 1-1 : Installation en baie 1U. Fixerla
PDUàlabaieeninsérantquatrevis(A)fournies
parl’utilisateurdanslesbridesdesfixation(B)
del’unitéetdanslestrousdefixationdela
glissièredelabaiecommeindiqué.
Étape 1-2 : Installation en baie 0U. 1e
partie : Retirerlesvis(C)fixantlesbridesde
fixationàlaPDU,changerl’orientationdes
bridescommeindiquéetlesfixerànouveau.
Utiliserseulementlesvisjointesouleur
équivalentexact(N°6-32,têteplate1/4po
[6,4mm])2e partie : FixerlaPDU
verticalementeninsérantdeuxvisouplus(A),
fourniesparl’utilisateurdanslesbridesde
fixation(B)del’unitéetdanslespointsde
fixationdelabaieoudesonboîtier.
Étape 1-3 : Installation murale : Aprèsavoir
effectuélapartie1ci-dessus,fixerlaPDUsur
unesurfacedefixationstableeninsérantdeux
visouplus(A)fourniesparl’utilisateurdansles
supportsdemontage(B)delaPDUetdansdes
pointsdefixationsûrsdelasurfacedemontage.
1-1
1-2
1-3
1-4
A
B
B
A
C
A
B
C
B
C
A
C
D
2
E
F
Étape 1-4 : Installation sous un comptoir : Aprèsavoireffectuélapartie1ci-dessus,fixerla
PDUsurunesurfacedefixationstableeninsérantquatrevis(A)fourniesparl’utilisateurdansles
supportsdemontage(B)delaPDUetdansdespointsdefixationsûrsdelasurfacedemontage.
Étape 2 : Brancher la PDU à une prise mise à la terre.L’unité
disposedeplusieursadaptateursenfichablesquiluipermettentd’être
branchéàdiverstypesdeprises.Aprèsavoirchoisil’adaptateur
enfichableadéquatpourl’applicationrequise,insérerleconnecteur
IEC-320-C19(D)del’adaptateurdansleconnecteurIEC-320-C20
(E)ducâbled’entréeVerrouillerlaconnexionenassemblantlesdeux
moitiésdelabridederetenueducordon(F)autourdecelle-ciàl’aide
desboulonsjoints.InsérerlafichedirectementdansunepriseCAcorrectementmiseàlaterre,qui
nepartagepasdecircuitsupportantunelourdechargeélectrique(commeunclimatiseurouun
réfrigérateur).Attention : Le conducteur vivant (L1) est équipé d’un dispositif de sécurité protecteur
de surintensité. Pour éviter le risque de choc électrique, assurez-vous d’avoir identifié le
conducteur neutre (L2) avant de brancher l’unité.
14-02-336-932537.indb 13 4/24/2014 12:22:48 PM
14
Caractéristiques
Installation
3
Étape 3 : Connecter l’équipement à la PDU.Connecter
l’équipementàlaPDUàl’aidedecordonsde
branchementIEC-320fournitparl’utilisateur.Faire
attentiondenepasdépasserlachargernominalede
chaqueprisenilachargenominaletotaledel’unité.Nota :
Les cordons de branchement (IEC-320-C13 à IEC-
320-C14) sont en vente chez Tripp Lite. Appeler le 1-773-
869-1234 (Pièce N° P004-006).
Étape 4 : Installation optionnelle (non montrée). Le
connecteurIEC-320-C20ducordond’alimentation
d’entréeetl’adaptateurIEC-320-C14peuventtousles
deuxêtreconnectésauxcordonsd’alimentationfournispar
l’utilisateuraveclesfichesadéquatespourlesprisesde
courantdusitedel’installation.Cettepossibilitéestutile
pourbrancherlaPDUàdiverstypesdeprises
internationales.
Prises IEC-320-C19
Prises IEC-320-C13
Disjoncteur : Silecouranttiréparl’équipementconnectéàlaPDUexcèdelacharge
nominalemaximalependantplusdequelquessecondes,ledisjoncteurducircuitse
déclencheraetcouperalecourantCApourempêcherdepossiblesdommages.Quandun
disjoncteursedéclenche,lepoussoirserelève.Déconnecterl’équipemententropdelaPDU
etlaisserledisjoncteurrefroidiruneminuteavantderabaisserlepoussoirpourréarmerle
disjoncteur.
NEMA 5-15PseconnecteàlapriseNEMA5-15R.
NEMA 5-20PseconnecteàlapriseNEMA5-20R.
NEMA L5-20P seconnecteàlapriseNEMAL5-20R.
NEMA L6-20PseconnecteàlapriseNEMAL6-20R.
IEC-320-C14seconnecteaucordond’alimentationfourniparl’utilisateuràl’aidedu
IEC-320-C13,ouàunsystèmed’UPSouunealimentationd’énergie.
IEC-320-C20seconnecteaucordond’alimentationfourniparl’utilisateuràl’aidedu
IEC-320-C19,ouauxadapteursd’entrée,unsystèmed’UPSouunealimentationd’énergie.
A
B
C
D
E F G
H I
A
B
C
D
E
F
G
H
I
ADAPTEURS D’ENTRÉE
14-02-336-932537.indb 14 4/24/2014 12:22:49 PM

15
Garantie
GARANTIE LIMITÉE
Levendeurgarantitqueceproduit,s’ilestutiliséselontouteslesdirectivesapplicables,estexemptdedéfautsd’originede
matérieletdemain-d’oeuvrepourunepériodede5ans(àl’exceptiondesbatteriesinternedusystèmeUPShorsdesÉ.U.etdu
Canada,1an)àpartirdeladateinitialed’achat.Sileproduits’avèredéfectueuxenmatérielouenmain-d’oeuvredurantcette
période,levendeurrépareraouremplaceraleproduitàsadiscrétion.Vouspouvezobtenirunserviceseloncettegarantie
seulementenlivrantouenexpédiantleproduit(aveclesfraisd’expéditionetdelivraisonprépayés)à:TrippLite,1111W.35th
Street,Chicago,IL60609USA.Levendeurpaierailesfraisd’expéditionderetour.Visitezwww.tripplite.com/supportavant
d’envoyerunéquipementpourréparations.
CETTEGARANTIENES’APPLIQUEPASAUNEUSURENORMALEOUUNENDOMMAGEMENTRESULTANTD’ACCIDENT,UTILISATION
ERRONEE,ABUSOUNEGLIGENCE.LEVENDEURN’OFFREAUCUNEGARANTIEEXPRESSEAUTREQUELAGARANTIE
EXPRESSEMENTETABLIEDANSLAPRESENTE.SAUFDANSLAMESUREPROHIBEEPARLALOIAPPLICABLE,TOUTESLES
GARANTIESIMPLICITES,INCLUANTTOUTESLESGARANTIESDECOMMERCIALISATIONOUADAPTATION,SONTLIMITEESALA
DUREEDELAPERIODEDEGARANTIEINDIQUEECI-DESSUS;ETCETTEGARANTIEEXCLUTEXPRESSEMENTTOUSLESDOMMAGES
ACCIDENTELSOUPROVOQUES.(CertainsEtatsnepermettentpasdelimitationpourladuréedegarantieimplicite,etcertains
Etatsnepermettentpasl’exclusionoulalimitationdedommagesaccidentelsouprovoqués,enconséquenceleslimitationsou
exclusionsci-dessuspeuventnepasêtreapplicablespourvous.CetteGarantievousdonnedesdroitslégauxspécifiques,etvous
pouvezavoird’autresdroitsvariantsuivantlesjuridictions).
AVERTISSEMENT:L’utilisateurindividueldoitprendretoutesmesurespourdétermineravantutilisationsicetappareilestapproprié,
adéquatouoffretoutesécuritépourl’utilisationprévue.Dufaitquelesapplicationsindividuellessontsujettesàdegrandes
variations,lefabricantn’assureaucunedescriptionougarantieconcernantl’aptitudeoul’adaptationdecesappareilspourtoute
applicationspécifique.
LapolitiquedeTrippLiteestcelled’uneaméliorationcontinuelle.Lesspécificationspeuventêtremodifiéessanspréavis.
Numéros d’identification de conformité aux règlements
Àdesfinsdecertificationetd’identificationdeconformitéauxrèglements,votreproduitTrippLiteareçuunnumérodesérie
unique.Cenuméroseretrouvesurlaplaquesignalétiqueduproduit,aveclesinscriptionsetinformationsd’approbationrequises.
Lorsd’unedemanded’informationdeconformitépourceproduit,utiliseztoujourslenumérodesérie.Ilnedoitpasêtreconfondu
aveclenomdelamarqueoulenumérodemodèleduproduit.
14-02-336-932537.indb 15 4/24/2014 12:22:49 PM

16
1111 W. 35th Street, Chicago, IL 60609 USA • www.tripplite.com/support
14-02-336•93-2537_revB
14-02-336-932537.indb 16 4/24/2014 12:22:49 PM