Read this booklet thoroughly before using this coffee machine for the quick use.
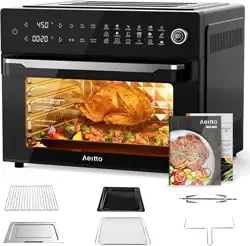
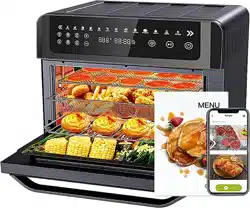
Smart Air Fryer Toaster Oven
LED Control Panel
All-in-One 13 Cooking Functions
GETOE725-U
INSTRUCTION BOOKLET
Please read all the owner’s instruction booklet before use.

1. Important Safeguards
2. Know Your New Machine
3. More Details
4. Before First Use
5. The Tips For Perfect Cooking
6. Operation Guide
7. Using the Accessories
8. Other Functions
8.1 Memory Function
8.2 Sleep Mode
9. Cleaning & Maintenance
10. Troubleshooting
11. Warranty
. . . . . . . . . . . . . . . . . . . . . . . . . . . . . . . . . . . . . . . . . . . . . . . . . . . . . 32
Table of Contents
. . . . . . . . . . . . . . . . . . . . . . . . . . . . . . . . . . . . . . . . . 01
. . . . . . . . . . . . . . . . . . . . . . . . . . . . . . . . . . . . . . . . . 22
. . . . . . . . . . . . . . . . . . . . . . . . . . . . . . . . . . . . . . 05
. . . . . . . . . . . . . . . . . . . . . . . . . . . . . . . . . . . . . . . . . . . . . . . . . . . 08
. . . . . . . . . . . . . . . . . . . . . . . . . . . . . . . . . . . . . . . . . . . . . . . 10
. . . . . . . . . . . . . . . . . . . . . . . . . . . . . . . . . . . . . . . . . . . . . . . 17
. . . . . . . . . . . . . . . . . . . . . . . . . . . . . . . . . . . . . . . . . . . . . . . . . 25
. . . . . . . . . . . . . . . . . . . . . . . . . . . . . . . . . . . . . . . . . . . . 25
. . . . . . . . . . . . . . . . . . . . . . . . . . . . . . . . . . . . . . . . . . . . . . . . . 25
. . . . . . . . . . . . . . . . . . . . . . . . . . . . . . . . . . . . . . . . . . . . . 30
. . . . . . . . . . . . . . . . . . . . . . . . . . . . . . . . . . . . . . 26
. . . . . . . . . . . . . . . . . . . . . . . . . . . . . . . . . 11
1
1. Important Safeguards
When using electrical machines, basic safety precautions should
always be followed to reduce the risk of fire, electric shock, and/
or injury to persons including the following:
1. Read all instructions, product labels and warnings before using
the air fryer oven.
2. Do not touch the hot surfaces. The temperature of the door or the
outer surface could be hot when the air fryer oven is operating.
Always use oven mitts when handling hot materials, and allow
metal parts to cool down before cleaning. Allow the units to tho-
roughly cool before putting in or taking off any parts. Always use
the handle when opening or closing the cooking compartment
or the door.
3. Unplug the air fryer oven from the wall outlet, when the unit is
not used and before cleaning.
4. To protect against the risk of electrical shock, do not immerse the
unit in water or other liquid.
5. Do not operate any appliance when the plug or cord is damaged
or when the appliance malfunctions or got broken in any manner.
Return the appliance to the nearest authorized service facility for
examination, repair or adjustment.
6.
The use of accessory that is not recommended by the manufacturer
may cause injury to the user or may damage the appliance.
7.
Do not store or use anything in the air fryer oven especially if it is
not recommended by the manufacturer.
8. Do not use outdoors or for commercial purposes. Do not use this

1. Important Safeguards
2. Know Your New Machine
3. More Details
4. Before First Use
5. The Tips For Perfect Cooking
6. Operation Guide
7. Using the Accessories
8. Other Functions
8.1 Memory Function
8.2 Sleep Mode
9. Cleaning & Maintenance
10. Troubleshooting
11. Warranty
. . . . . . . . . . . . . . . . . . . . . . . . . . . . . . . . . . . . . . . . . . . . . . . . . . . . . 32
Table of Contents
. . . . . . . . . . . . . . . . . . . . . . . . . . . . . . . . . . . . . . . . . 01
. . . . . . . . . . . . . . . . . . . . . . . . . . . . . . . . . . . . . . . . . 22
. . . . . . . . . . . . . . . . . . . . . . . . . . . . . . . . . . . . . . 05
. . . . . . . . . . . . . . . . . . . . . . . . . . . . . . . . . . . . . . . . . . . . . . . . . . . 08
. . . . . . . . . . . . . . . . . . . . . . . . . . . . . . . . . . . . . . . . . . . . . . . 10
. . . . . . . . . . . . . . . . . . . . . . . . . . . . . . . . . . . . . . . . . . . . . . . 17
. . . . . . . . . . . . . . . . . . . . . . . . . . . . . . . . . . . . . . . . . . . . . . . . . 25
. . . . . . . . . . . . . . . . . . . . . . . . . . . . . . . . . . . . . . . . . . . . 25
. . . . . . . . . . . . . . . . . . . . . . . . . . . . . . . . . . . . . . . . . . . . . . . . . 25
. . . . . . . . . . . . . . . . . . . . . . . . . . . . . . . . . . . . . . . . . . . . . 30
. . . . . . . . . . . . . . . . . . . . . . . . . . . . . . . . . . . . . . 26
. . . . . . . . . . . . . . . . . . . . . . . . . . . . . . . . . 11
1
1. Important Safeguards
When using electrical machines, basic safety precautions should
always be followed to reduce the risk of fire, electric shock, and/
or injury to persons including the following:
1. Read all instructions, product labels and warnings before using
the air fryer oven.
2. Do not touch the hot surfaces. The temperature of the door or the
outer surface could be hot when the air fryer oven is operating.
Always use oven mitts when handling hot materials, and allow
metal parts to cool down before cleaning. Allow the units to tho-
roughly cool before putting in or taking off any parts. Always use
the handle when opening or closing the cooking compartment
or the door.
3. Unplug the air fryer oven from the wall outlet, when the unit is
not used and before cleaning.
4. To protect against the risk of electrical shock, do not immerse the
unit in water or other liquid.
5. Do not operate any appliance when the plug or cord is damaged
or when the appliance malfunctions or got broken in any manner.
Return the appliance to the nearest authorized service facility for
examination, repair or adjustment.
6.
The use of accessory that is not recommended by the manufacturer
may cause injury to the user or may damage the appliance.
7.
Do not store or use anything in the air fryer oven especially if it is
not recommended by the manufacturer.
8. Do not use outdoors or for commercial purposes. Do not use this

32
1. Important Safeguards
air fryer oven for other functions except the intended purposes.
9. Do not let the cord hang over the edge of table or counter. Store
it properly.
10. Do not place the appliance near any stove top, hot gas, electronic
burner, near other toaster oven or hot equipment for this may
cause damage to the unit or fire.
11. A fire may occur if the air fryer oven gets near flammable liquid
or materials. Avoid positioning it near curtains, draperies, walls
and the like when in operation. Do not put any items on top of
the appliance during operation.
12. Do not place any flammable materials such as paper, cardboard,
plastic or other things near or inside the unit as these may easily
catch fire in the air fryer oven.
13. Do not cover the crumb tray or any part of the air fryer oven with
metal foil for it will cause overheating.
14. Avoid putting oversize food into the cooking compartment for it
will cause fire or electronic shock on the air fryer oven.
15. Extreme caution is necessary when disposing hot grease after
broiling. Let the unit cool down first.
16. Do not clean with metal scouring pad. Pieces may break off from
the pad and may get in contact with other electrical parts which
may cause electrical shock or electronic issues.
17. To turn this appliance off, switch or set all the controls to “OFF”.
18. To prevent burn, do not touch the tab of the crumb tray unless the
unit cools down completely.
1. Important Safeguards
19. The appliance can be used by children aged 8 years and above.
Persons with reduced physical, sensory or mental capabilities or
lack of experience and knowledge may be able to use it if they will
be properly assisted or supervised while using the appliance. Safe
practice and safety measures must be observed. Children should
not play with the appliance. Cleaning and user maintenance shall
not be made by children unless they are older than 8 and if they
are properly assisted or supervised.
20. Keep the appliance and its cord out of children.
21. The appliance is not intended to be operated by means of an
external timer or separate remote-control system.
For machines with service panels:
WARNING
To reduce the risk of fire or electric shock, do not remove this cover.
No user‒serviceable parts inside. Repair should be done by author-
ized service personnel only.
NOTE
For electronic instruction manual, please contact Gevi support team.

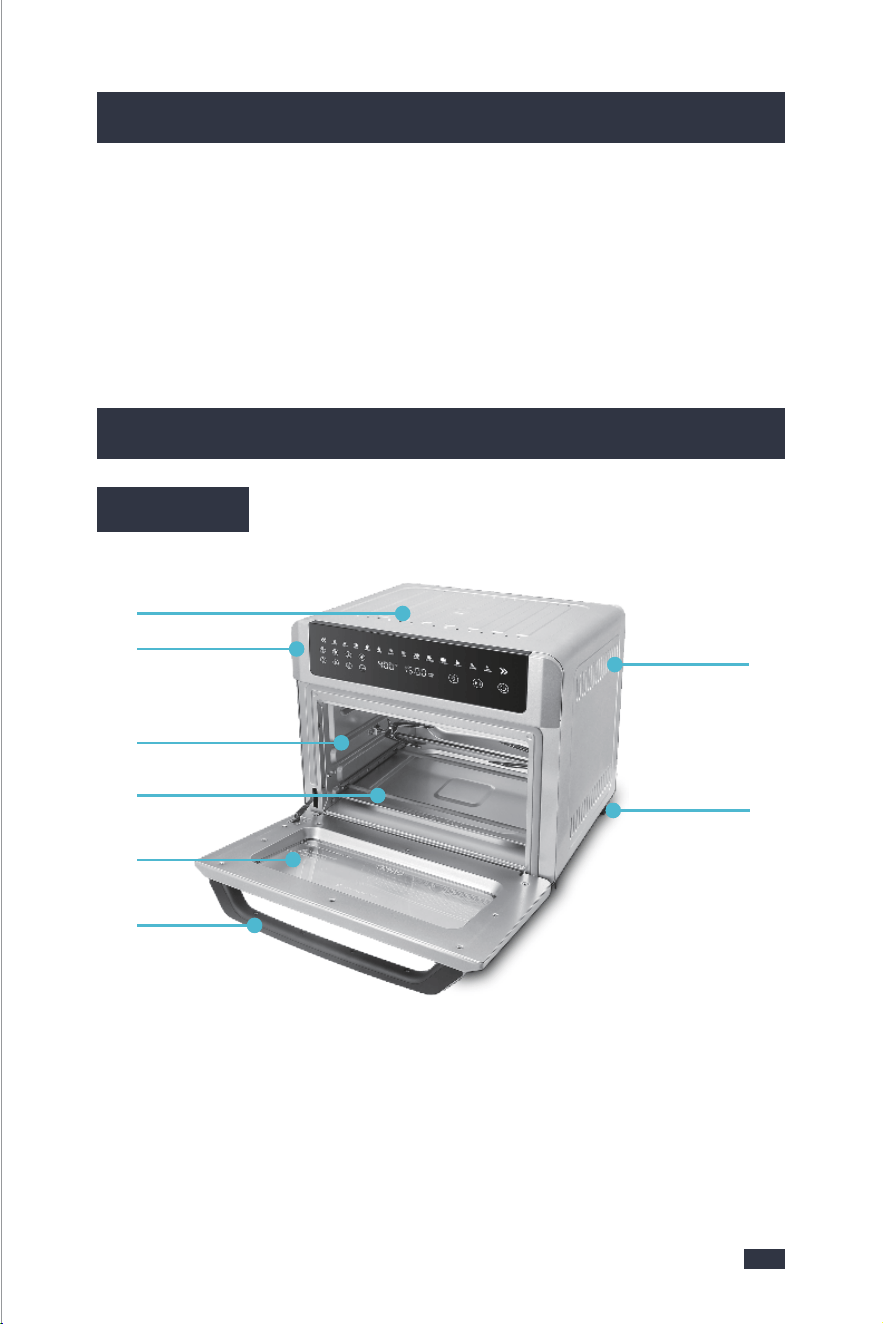
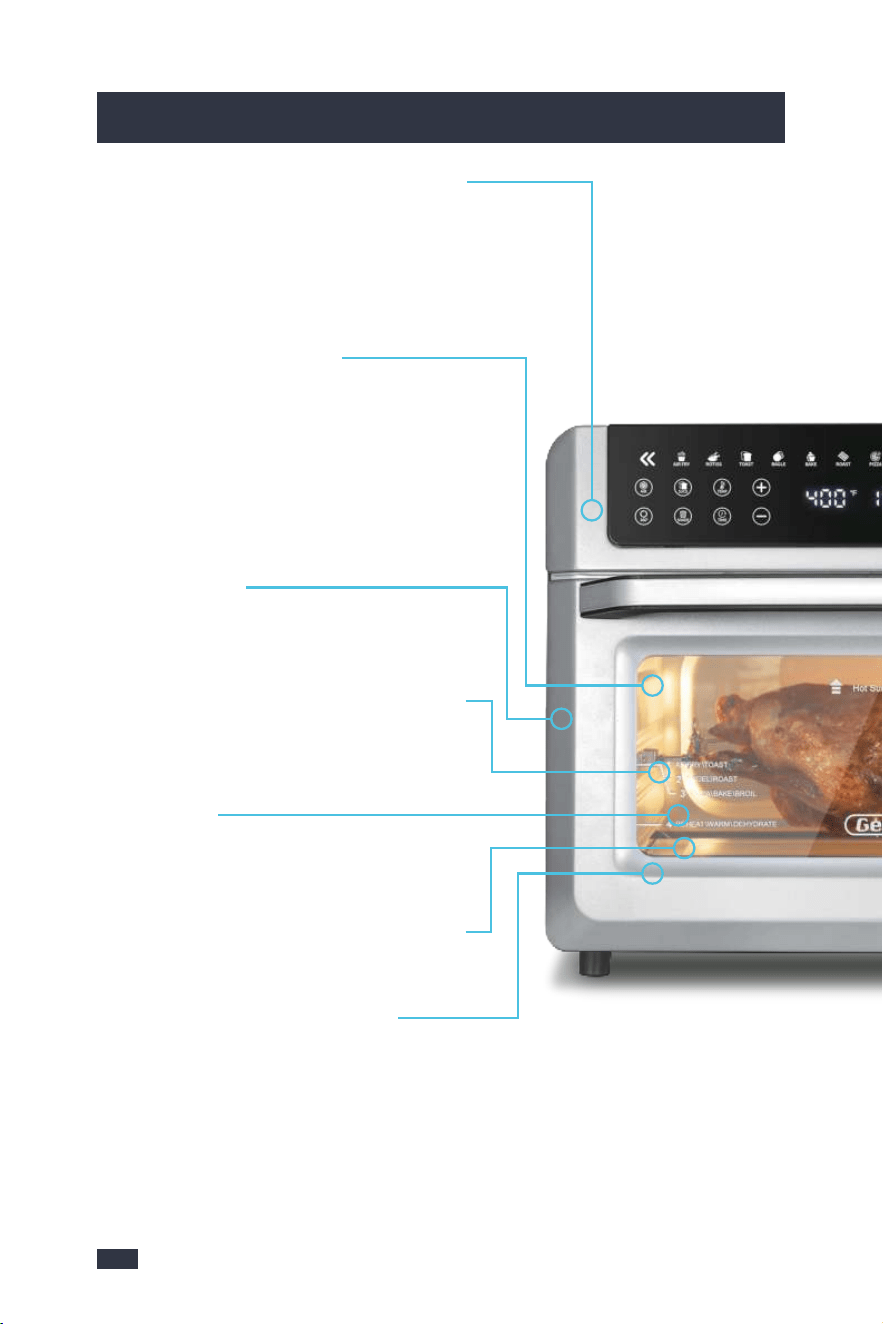
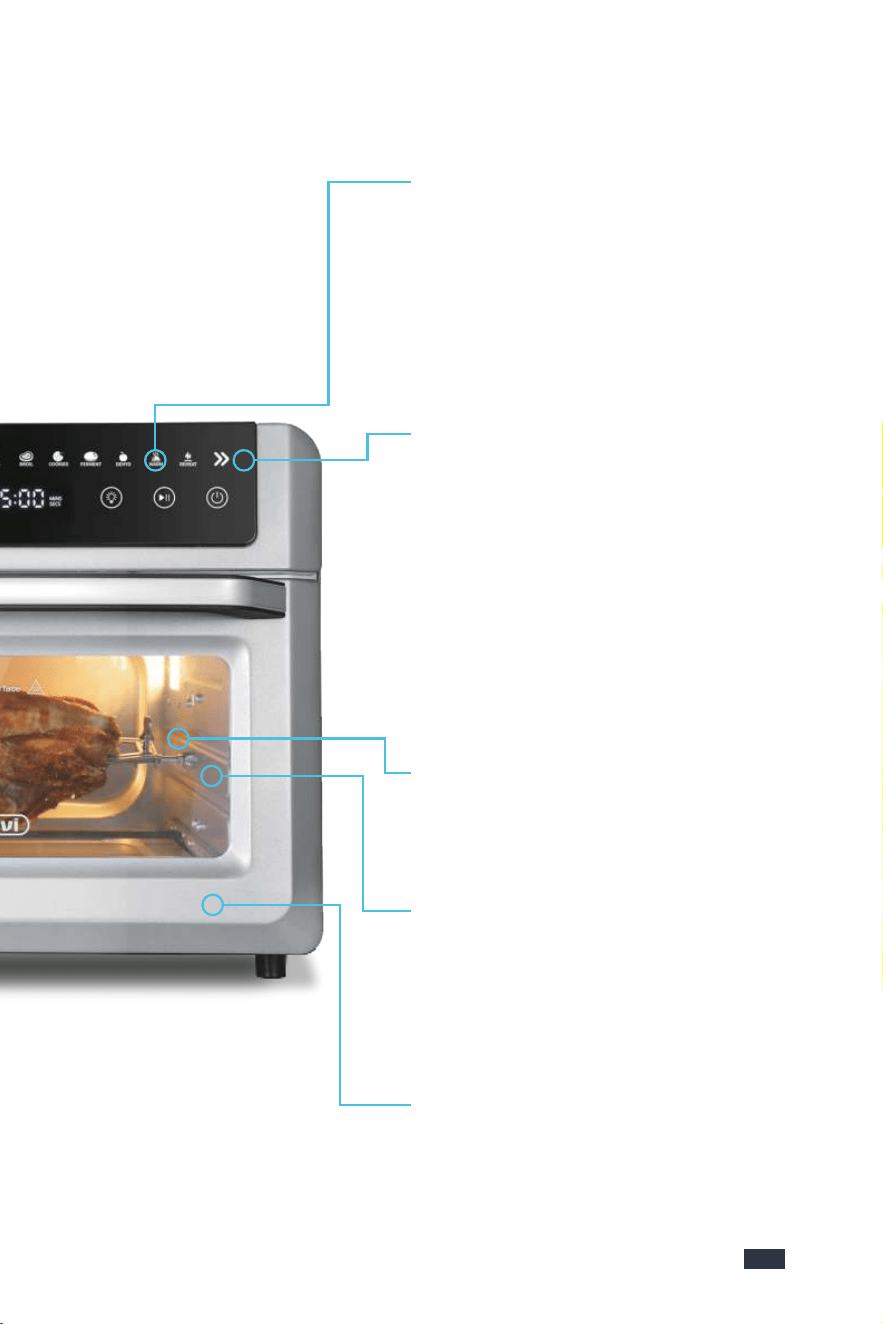
2. Know Your New Machine
Electrical parameters: 120V~ 60Hz 1700W
2.1 Parts
❺
❹
❻
❶
❷
❸
❹
Top and Bottom Heating
Elements
❶ Housing
❸ Rack/Tray Fixing Slots
❷ LED Control Panel❻ Door Handle
❺ Door with Viewing Window
❼ Ventilation Slots
❽ Anti-slip Feet
❼
❽
54
1. Important Safeguards
1. Important Safeguards
North American models with grounded plugs:
This machine has a polarized plug, (one blade is
wider than the other). As a safety feature to reduce
the risk of electrical shock, this plug is intended to fit in a polarized outlet only
one way. If the plug does not fit fully in the outlet, reverse the plug. If it still does
not fit, contact a qualified electrician. Do not attempt to defeat this safety feature
or modify the plug in any way. If the plug fits loosely into the AC outlet or if the
AC outlet feels warm do not use that outlet.
POLARIZED PLUG
A short power-supply cord (or detachable power-supply cord) may
be provided to reduce risks resulting from becoming entangled in or
tripping over a longer cord. Longer detachable power- supply cords
or extension cords are available and may be used if care is exercised
in their use. If a long detachable power-supply cord or extension cord
is used:
POWER CORD INSTRUCTIONS:
1. Place the machine on a hard, flat, level surface to avoid interru-
ption of airflow underneath the espresso maker.
2. Do not operate the machine with an empty water tank.
PRODUCT NOTICES
a. The marked electrical rating of the detachable power-supply cord
or extension cord should be at least as great as the electrical rating
of the machine;
b. If the machine is of the grounded type, the extension cord should
be a grounding type 3-wire cord;
c. The longer cord should be arranged so that it will not drape over
the counter top or table top where it can be pulled on by children
or tripped over unintentionally.
Do not pull, twist or otherwise abuse the power cord.
76
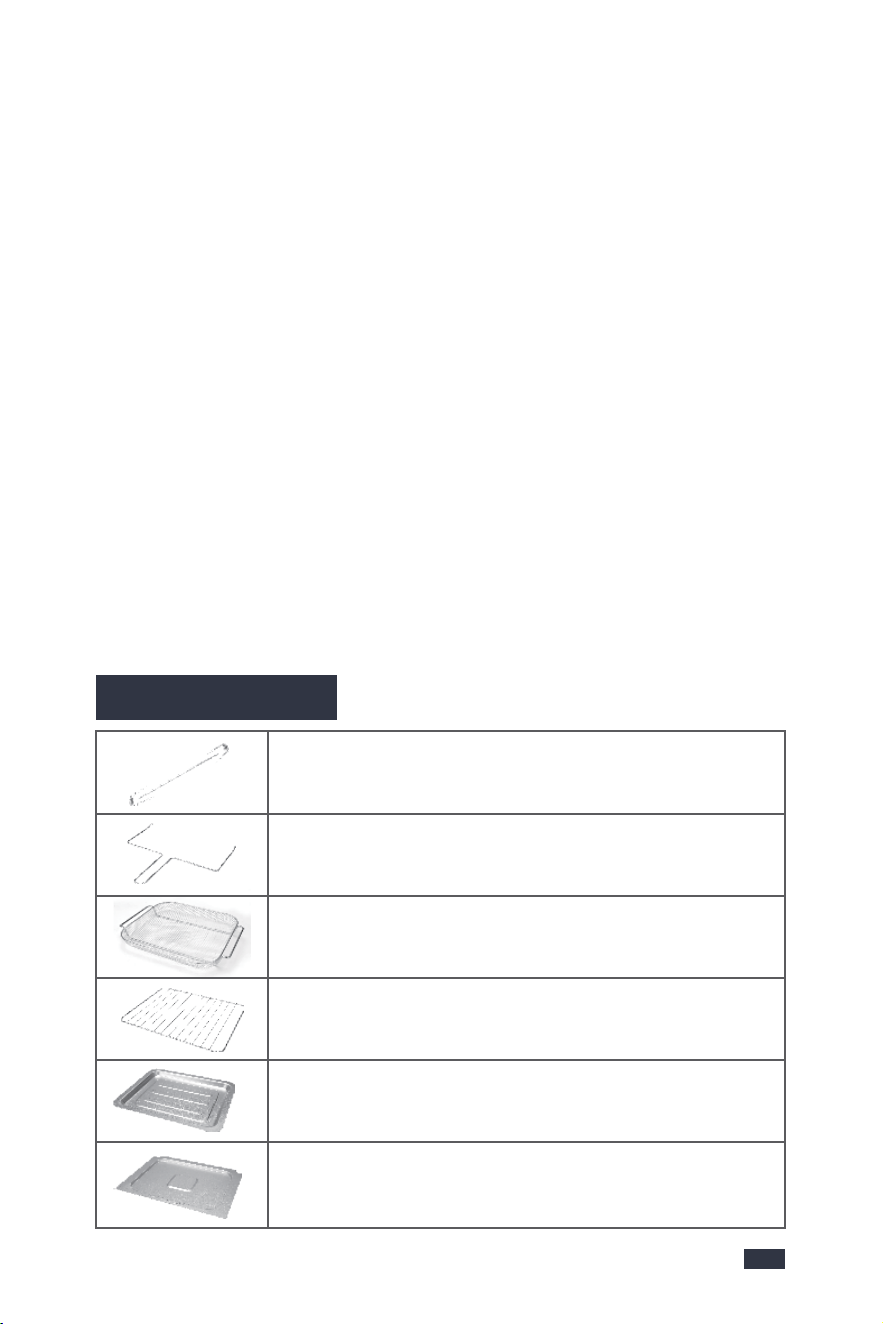
Rotisserie Fork
Holding chicken or turkeys for rotisserie cooking under
roast mode.
Rotisserie Tong
Remove the rotisserie forks rack safely and avoid accide-
ntal burns.
Basket
Perfect for making French fries, bread,etc.
Wire Rack
Perfect for baking a pizza or pie or dafyderate.
Food Tray
Perfect for dehydrating food or grilling meat, veggies, and
more.
Crumb Tray
Gather the oil or crisp. Makes cleaning easier and faster.
2.3 Accessories
2. Know Your New Machine
❺❹❻❼❽
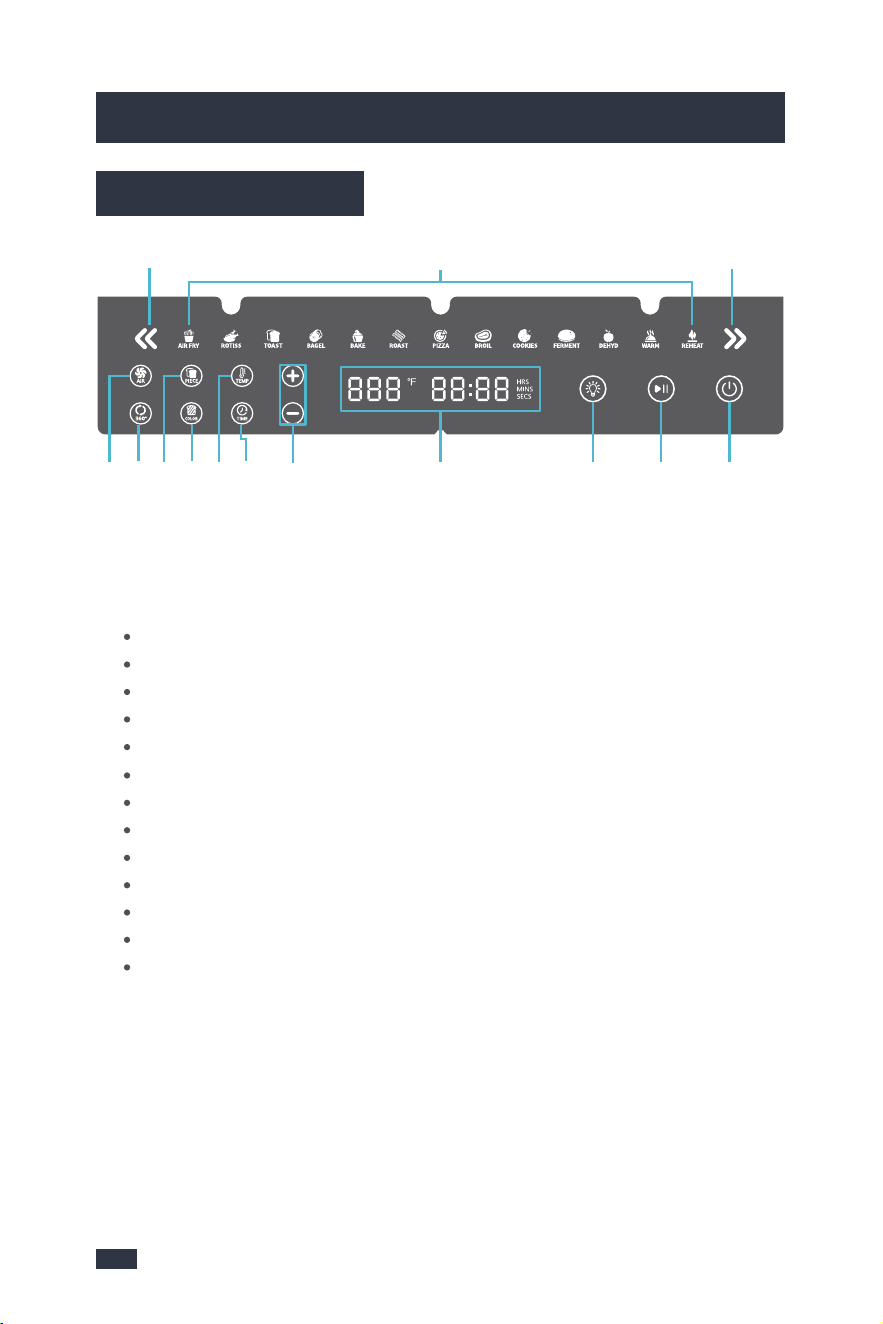
2.2 Control Panel
❶ Cooking Functions
Thirteen smart functions cycled thr-
ough the Menu Preset Buttons.
❷ Menu Preset Buttons
Menu select arrows, with left and
right directions.
❸ LED Display
- Display cooking temperature(°F),
cooking time(Hrs/Mins/Secs), bread
pieces(P), bread colors(C) and error
messages.
- When preheating,the time display
will blinks.
- Display reads OFF when the oven
is in Standby mode.
❹ Light Button
- Touch Light to turn the oven light
on or off.
- A lighting cycle is 30 seconds.
❺ Start/Pause Button
- Start or pause a cooking function.
- When preheating, press to cancel
preheating then press again to start
the cooking function.
❻ Power Button
Power on or off the unit.
❼ Fan Button
- Start the fan function.
- When choosing Air fry and Dehyd-
rate mode, the fan button is exting-
uished as it is the default function
and could NOT be canceled.
- If this button is semi-lit, it means
the fan function is available to select.
Selected with fully-lit and not selec-
ted with semi-lit.
❽ 360°Rotate Button
- It is designed for rotate the foods.
- If this button is semi-lit, it means
the 360° function is available to se-
lect. Selected with fully-lit and not
selected with semi-lit.
⓬ Temp Button
Adjust the temperature of menu pre-
sets.
⓭ Up & Down Arrow Buttons
Increase or decrease TIME & TEMP
functions.
⓫ Time Button
Adjust the time of menu presets.
❿ Bread Color Button
Select the brown color of bread you
want, from 1 to 6.
❾ Bread Piece Button
Select the pieces of bread you want,
from 1 to 6.
❾❿⓬⓭⓫❸
❶❷❷
AIR FRY (Air fry function)
TOAST (Toast function)
BAKE (Bake function)
PIZZA (Pizza function)
COOKIES (Cookies function)
DEHYD (Dehydrate function)
ROTISS (Rotisserie function)
BAGEL (Bagel function)
ROAST (Roast function)
BROIL (Broil function)
FERMENT (Ferment function)
WARM (Warm function)
REHEAT (Reheat function)
76
Rotisserie Fork
Holding chicken or turkeys for rotisserie cooking under
roast mode.
Rotisserie Tong
Remove the rotisserie forks rack safely and avoid accide-
ntal burns.
Basket
Perfect for making French fries, bread,etc.
Wire Rack
Perfect for baking a pizza or pie or dafyderate.
Food Tray
Perfect for dehydrating food or grilling meat, veggies, and
more.
Crumb Tray
Gather the oil or crisp. Makes cleaning easier and faster.
2.3 Accessories
2. Know Your New Machine
❺❹❻❼❽
2.2 Control Panel
❶ Cooking Functions
Thirteen smart functions cycled thr-
ough the Menu Preset Buttons.
❷ Menu Preset Buttons
Menu select arrows, with left and
right directions.
❸ LED Display
- Display cooking temperature(°F),
cooking time(Hrs/Mins/Secs), bread
pieces(P), bread colors(C) and error
messages.
- When preheating,the time display
will blinks.
- Display reads OFF when the oven
is in Standby mode.
❹ Light Button
- Touch Light to turn the oven light
on or off.
- A lighting cycle is 30 seconds.
❺ Start/Pause Button
- Start or pause a cooking function.
- When preheating, press to cancel
preheating then press again to start
the cooking function.
❻ Power Button
Power on or off the unit.
❼ Fan Button
- Start the fan function.
- When choosing Air fry and Dehyd-
rate mode, the fan button is exting-
uished as it is the default function
and could NOT be canceled.
- If this button is semi-lit, it means
the fan function is available to select.
Selected with fully-lit and not selec-
ted with semi-lit.
❽ 360°Rotate Button
- It is designed for rotate the foods.
- If this button is semi-lit, it means
the 360° function is available to se-
lect. Selected with fully-lit and not
selected with semi-lit.
⓬ Temp Button
Adjust the temperature of menu pre-
sets.
⓭ Up & Down Arrow Buttons
Increase or decrease TIME & TEMP
functions.
⓫ Time Button
Adjust the time of menu presets.
❿ Bread Color Button
Select the brown color of bread you
want, from 1 to 6.
❾ Bread Piece Button
Select the pieces of bread you want,
from 1 to 6.
❾❿⓬⓭⓫❸
❶❷❷
AIR FRY (Air fry function)
TOAST (Toast function)
BAKE (Bake function)
PIZZA (Pizza function)
COOKIES (Cookies function)
DEHYD (Dehydrate function)
ROTISS (Rotisserie function)
BAGEL (Bagel function)
ROAST (Roast function)
BROIL (Broil function)
FERMENT (Ferment function)
WARM (Warm function)
REHEAT (Reheat function)
Multifunction All-in-One Air Frying
Oven
Thirteen smart functions cycled through
the Menu Preset buttons.
LED Touch Screen
LED digital icon is clearly visible.The 13 preset
cooking menu make any kitchen task so easy
with just the press of a button.You can also
manually adjust time, temperature and the
speed of fans for different kind of delicious,
which is also easy to use!
Rotisserie Function
It can bake the Food evenly by 360°Rotation
above the botton of the air fryer.
Dehydrate
Compare with the mechanicol control, our
electonic system can dehydrate coffee beans,
dried fruits, peanuts, and others for up to 48
hours with advanced drying technology.
Perfect Gift
This stunning Gevi Air Fryer Oven combinat-
ion is the perfect gift for mom, dad, grandpa-
rents and friends on any occasion!
Family Sized Large Air Fryer
- The model takes up little space in the kitch-
en and is suitable for families of 4 to 5 people.
- Large Interior Capacity allows variety of coo-
king options and meeting various scenarios.
It can carry 3LB Whole Chicke/6 slices of
Toast/12 In Pizza/20 Chiken.
13 Food Function Presets
13 one-touch preset functions meet all of
your daily cooking needs, including air fry,
rotiss, toast, bagel, bake, roast, broil, coo-
kies, perment, reheat, dehydrator,warm,
ect. Everyone can be a Chef and cook good
food.
Easy: Choose the food function and just wait.
Customized: Personalized adjust the temp
and time.
360° High-speed Air Circulation Fan
& Six Heating Elements
It adopts new technology of cooking food by
360°hot air circulation, which can offer you
crunchy food with little or no oil.Built with six
heating elements and thermal circulation
fans, designed to heat faster, evenly and cut
your cooking time.
Metal Surface
Modern and durable the bady inside easy to
clean.
Visible Glass & Double Layer Door
Conventient to observe the food during ope-
ration. Safe and durable. Avoid burning.
Oven Light
Conventient to install the accessories and
observe the oven inside.
Cavity with the Reflective Structure
Make the temperature more uniform.
98
3. More Details
1110
4.Before First Use
4.Before First Use
5.The Tips For Perfect Cooking
1 - Thaw frozen food before cooking, do not put frozen food directly into the oven.
2 - The food size cannot exceed that of the food tray, basket, wire rack, or rotisserie
fork. The capacity of the oven is 19Qt.
5.1 Cooking Preparation
Ensure all packaging has been removed. Before first use, check the product for
any transport damage.
4.1 Remove Packaging
Ensure the toaster oven is always positioned onto a dry, stable, flat horizontal
counter top.
4.2 Position Machine
Wash the accessories listed below in warm water:
- Rotisserie Forks
- Rotisserie Tong
- Basket
- Wire Rack
- Food Tray
- Crumb Tray
Rinse & allow thorough air drying. All accessories are dishwasher safe.
4.3 Wash & Dry Parts
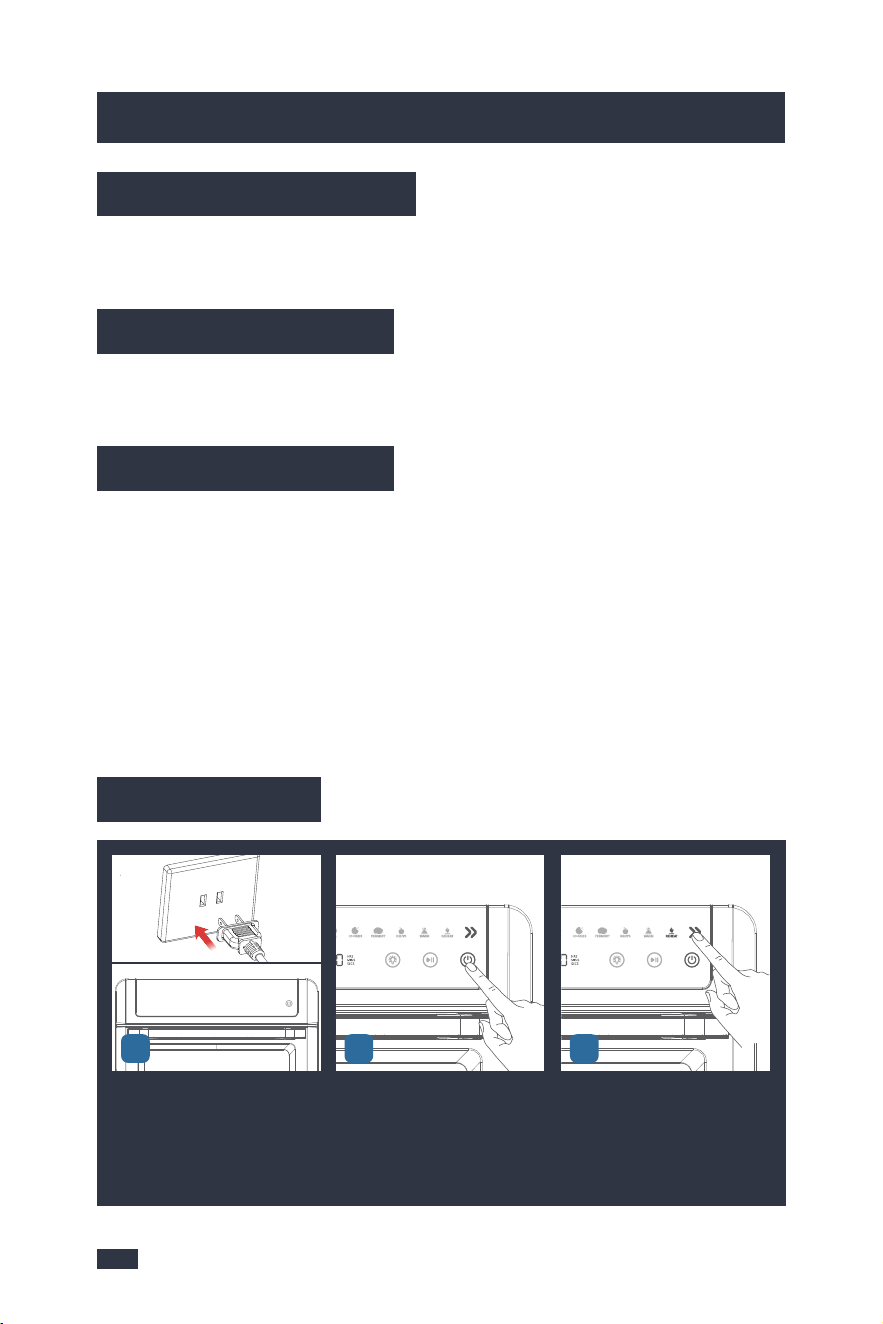
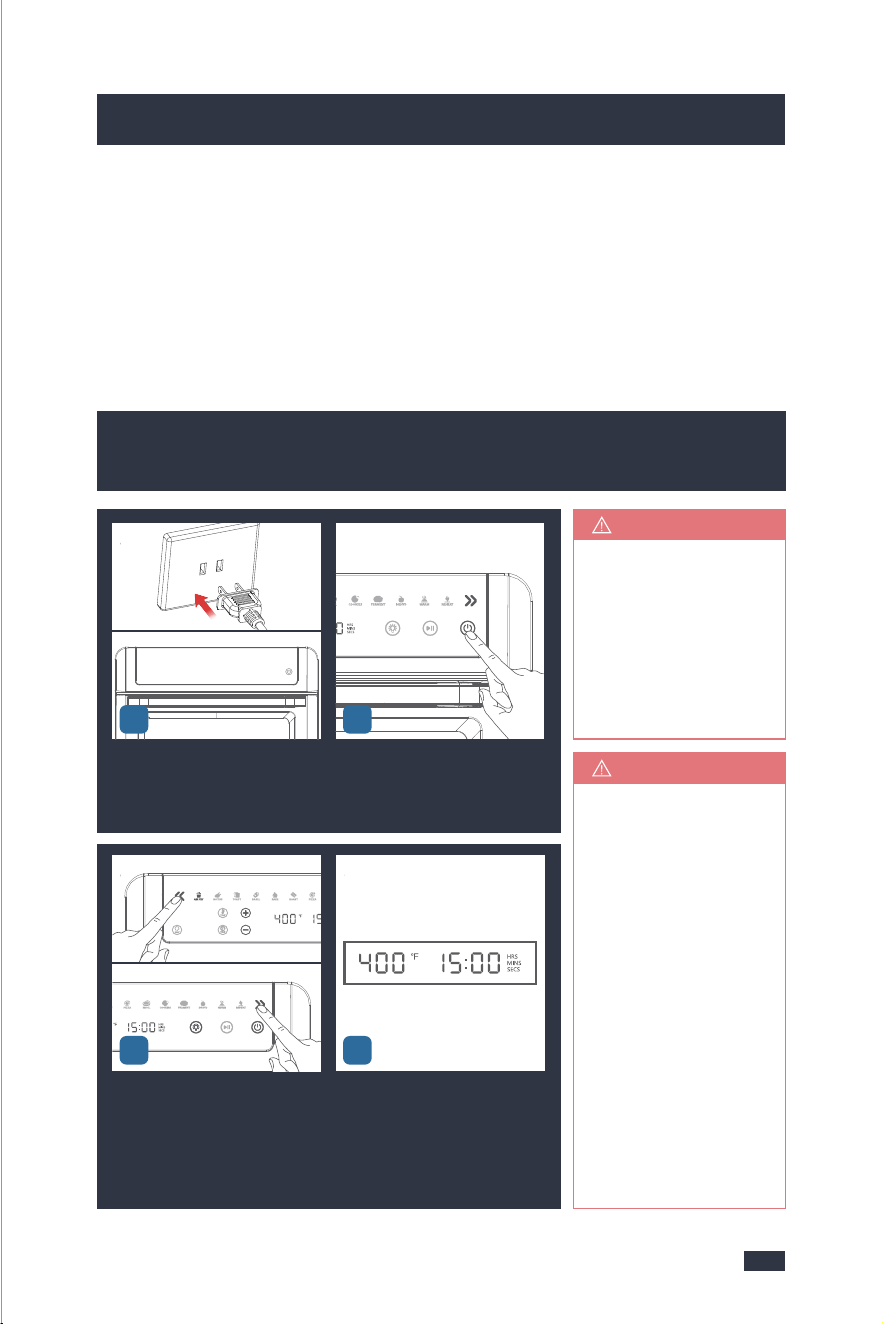
4.4 Initial Test
Insert the Power Plug into a 120V
AC power outlet. Wait for 1 seco-
nd, the LED Display will become
black for shutdown status, Power
button is semi-lit.
Press the ON/OFF button to turn
on the machine.
Press Menu Preset button to ch-
oose the REHEAT function.
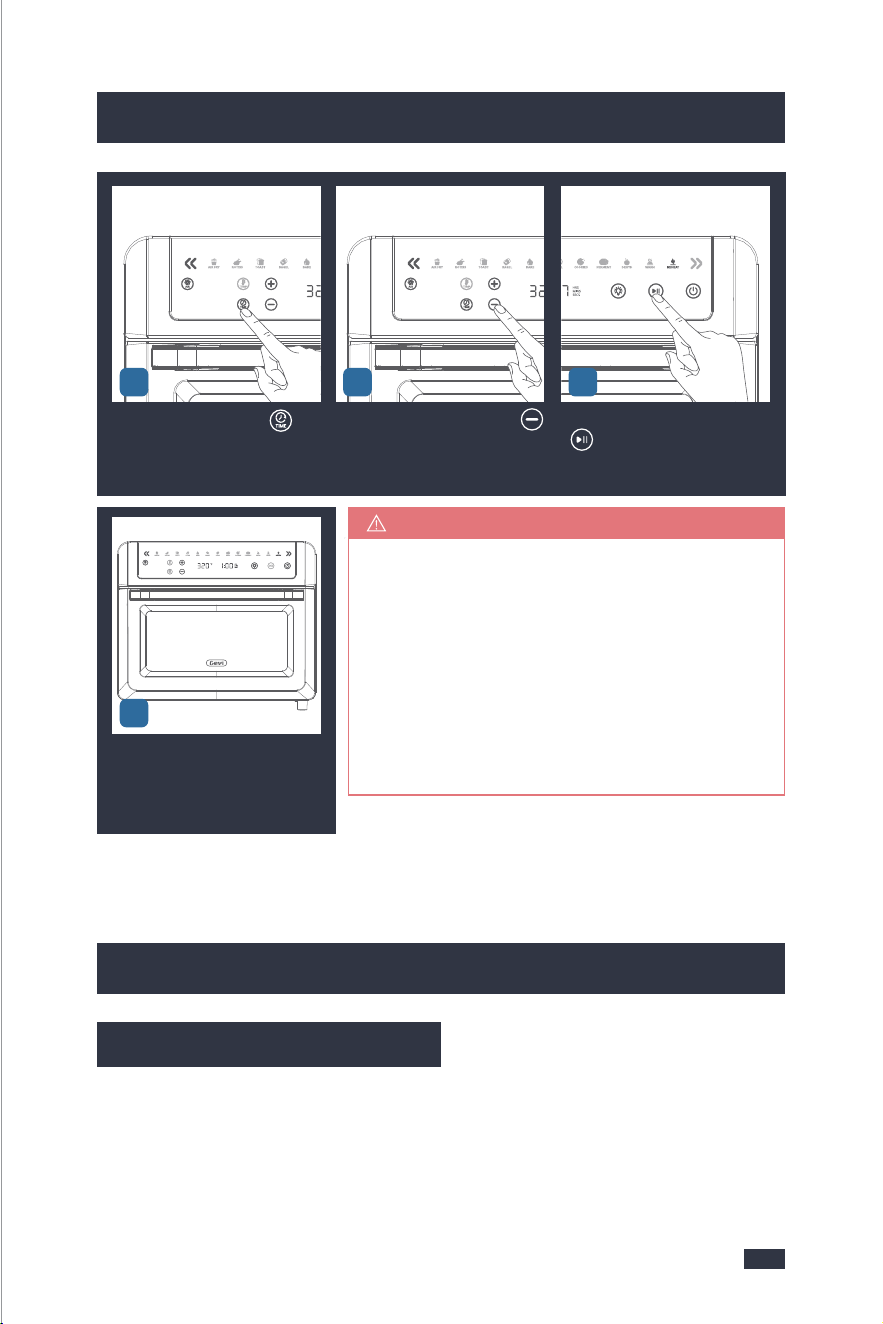
1-Initial start-up operation may result in min-
imal smell and smoke. This is normal and will
dissipate. It is due to the protective substance
on heating elements which protect them from
salt effects during shipping from the factory.
Keep the air draught in good condition during
the initial use.
2-Never put the accessories directly in contact
with the heating elements.
NOTE
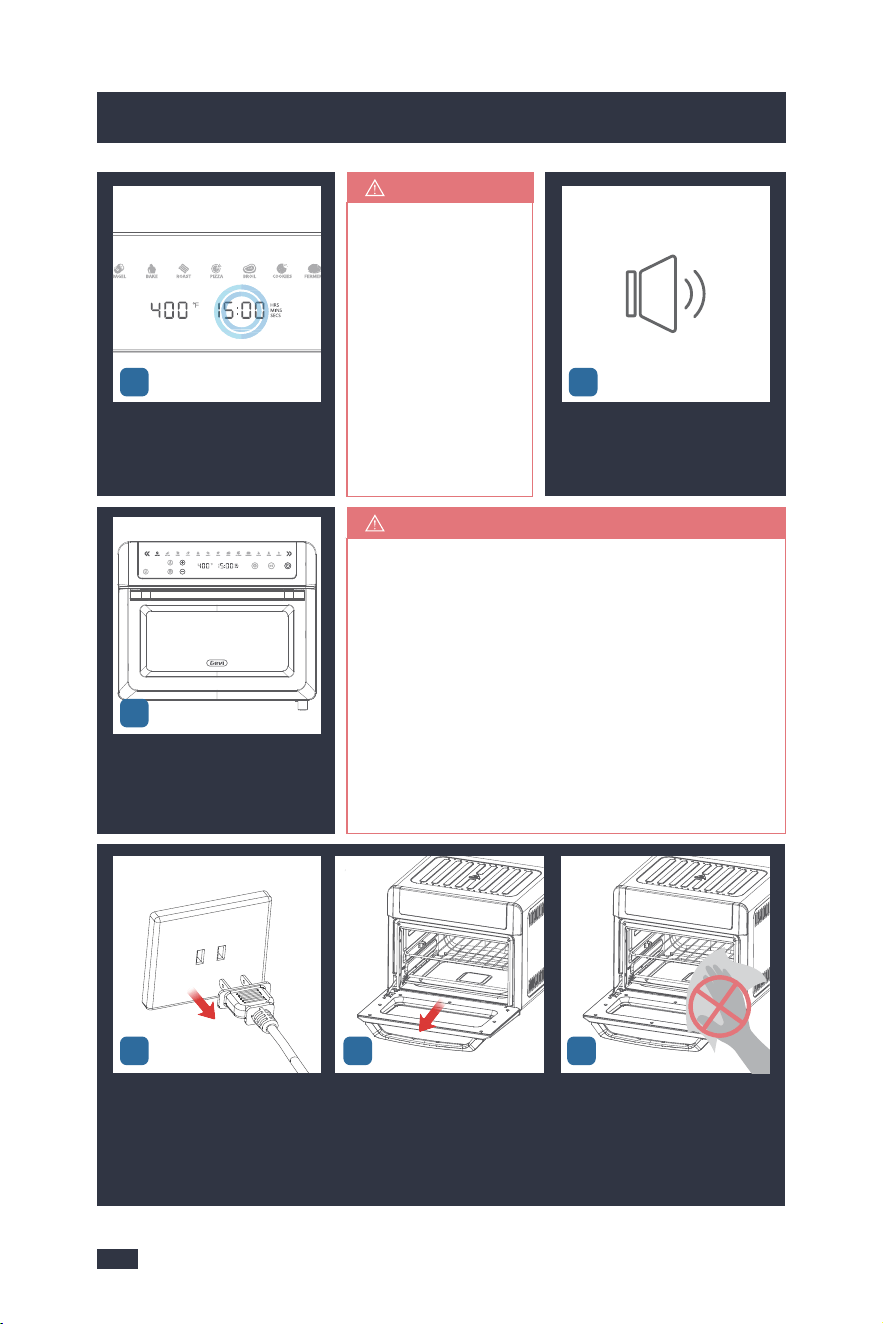
Press the time button" " to
set the time.
Press the down arrow icon" "
to select the time for 5 minutes.
Press the Start/Pause button
" " to test.
When the time is done, There
will be a beep sound to remind
and return to the default state of
the selected function.
123
654
7
1110
4.Before First Use
4.Before First Use
5.The Tips For Perfect Cooking
1 - Thaw frozen food before cooking, do not put frozen food directly into the oven.
2 - The food size cannot exceed that of the food tray, basket, wire rack, or rotisserie
fork. The capacity of the oven is 19Qt.
5.1 Cooking Preparation
Ensure all packaging has been removed. Before first use, check the product for
any transport damage.
4.1 Remove Packaging
Ensure the toaster oven is always positioned onto a dry, stable, flat horizontal
counter top.
4.2 Position Machine
Wash the accessories listed below in warm water:
- Rotisserie Forks
- Rotisserie Tong
- Basket
- Wire Rack
- Food Tray
- Crumb Tray
Rinse & allow thorough air drying. All accessories are dishwasher safe.
4.3 Wash & Dry Parts
4.4 Initial Test
Insert the Power Plug into a 120V
AC power outlet. Wait for 1 seco-
nd, the LED Display will become
black for shutdown status, Power
button is semi-lit.
Press the ON/OFF button to turn
on the machine.
Press Menu Preset button to ch-
oose the REHEAT function.
1-Initial start-up operation may result in min-
imal smell and smoke. This is normal and will
dissipate. It is due to the protective substance
on heating elements which protect them from
salt effects during shipping from the factory.
Keep the air draught in good condition during
the initial use.
2-Never put the accessories directly in contact
with the heating elements.
NOTE
Press the time button" " to
set the time.
Press the down arrow icon" "
to select the time for 5 minutes.
Press the Start/Pause button
" " to test.
When the time is done, There
will be a beep sound to remind
and return to the default state of
the selected function.
123
654
7

1312
5.The Tips For Perfect Cooking
1 - The oven should not be placed close to the wall, and space for heat dissipation
needs to be reserved.
2 - Do not block the ventilation holes on the housing.
3 - Thick meat will take longer to cook. Add cooking time if necessary.
4 - Ensure the control panel and your fingers are free of grease/foreign objects
before use. Finger touches shall be accurately on the icons to avoid no response
from the oven due to loss of signal.
5 - Flammable materials should not be put under the food during cooking to avoid
fire risks.
5.2 Tips of Operation
Cooking time for whole roasted chicken will vary with weight. Use meat thermo-
meter to check internal temperature as per chart below.
5.3 Cooking Function Quick Reference Chart
5.The Tips For Perfect Cooking
The capacity for cooking French fries is 450g, and the fries need to be laid flat on
the frying basket for cooking.
AIR FRY
To ensure the best flavor of the food, do not turn off the hot air function.
AIR FRY
To ensure the best flavor of the food, do not turn off the 360-degree roasting
function.
ROTISS
- To avoid uneven roasting and undercooking, the chicken shall not exceed 1.5kg.
- The chicken needs to be secured by the rotisserie fork, and its legs and wings
shall be tied with clean iron wires.
ROTISS
Large-sized toast slices shall not exceed 4 slices at a time. Large-sized food is more
likely to get burnt.
TOAST
Cut each into equal halves to ensure even heating before cooking.
BAGEL
The pizza size shall not exceed 10 inches, otherwise, it will be too large to fit into
the oven.
PIZZA
AIR FRY
ROTISSERIE
BAKE
ROAST
PIZZA
15mins
(1-45mins)
40mins
(1-120mins)
30mins
(1-120mins)
40mins
(1-120mins)
20mins
(1-60mins)
Used for cooking food such as French fries or chicken wings
Used for rotating roasts. Ideal for a whole chicken
Used for cooking foods.evenly throughout. Ideal for cakes, muffins, and pastries.
Used for melting and browning cheese and toppings while crisping the crust.
Used for cooking a variety of meats and poultry. Food will be tender and juicy on the inside and
well-roasted on the outside.
400°F
(120-400°F)
350°F
(120-450°F)
350°F
(120-450°F)
350°F
(120-450°F)
375°F
(120-400°F)
Add/Cancel
Options
Add/Cancel
Options
Add/Cancel
Options
Add/Cancel
Options
Add/Cancel
Options
Add/Cancel
Options
Add/Cancel
Options
Default
function,can
NOT canceled
Basket
Crumb Tray
Rotisserie Forks
Crumb Tray
Food Tray
Wire Rack
Crumb Tray
Wire Rack
Rotisserie Forks
Crumb Tray
Food Tray
Wire Rack
Crumb Tray
/
/
Smart Menus
Default Time
& Range
Default Temp
& Range
360°Rotate
Function
Fan Function
Suggested
Accessory
3 - Special Notes for Each Function:6 - Special Notes for Each Function:

Smart Menus
Default Time
& Range
Default Temp
& Range
360°Rotate
Function
Fan Function
Suggested
Accessory
1514
5.The Tips For Perfect Cooking
5.The Tips For Perfect Cooking
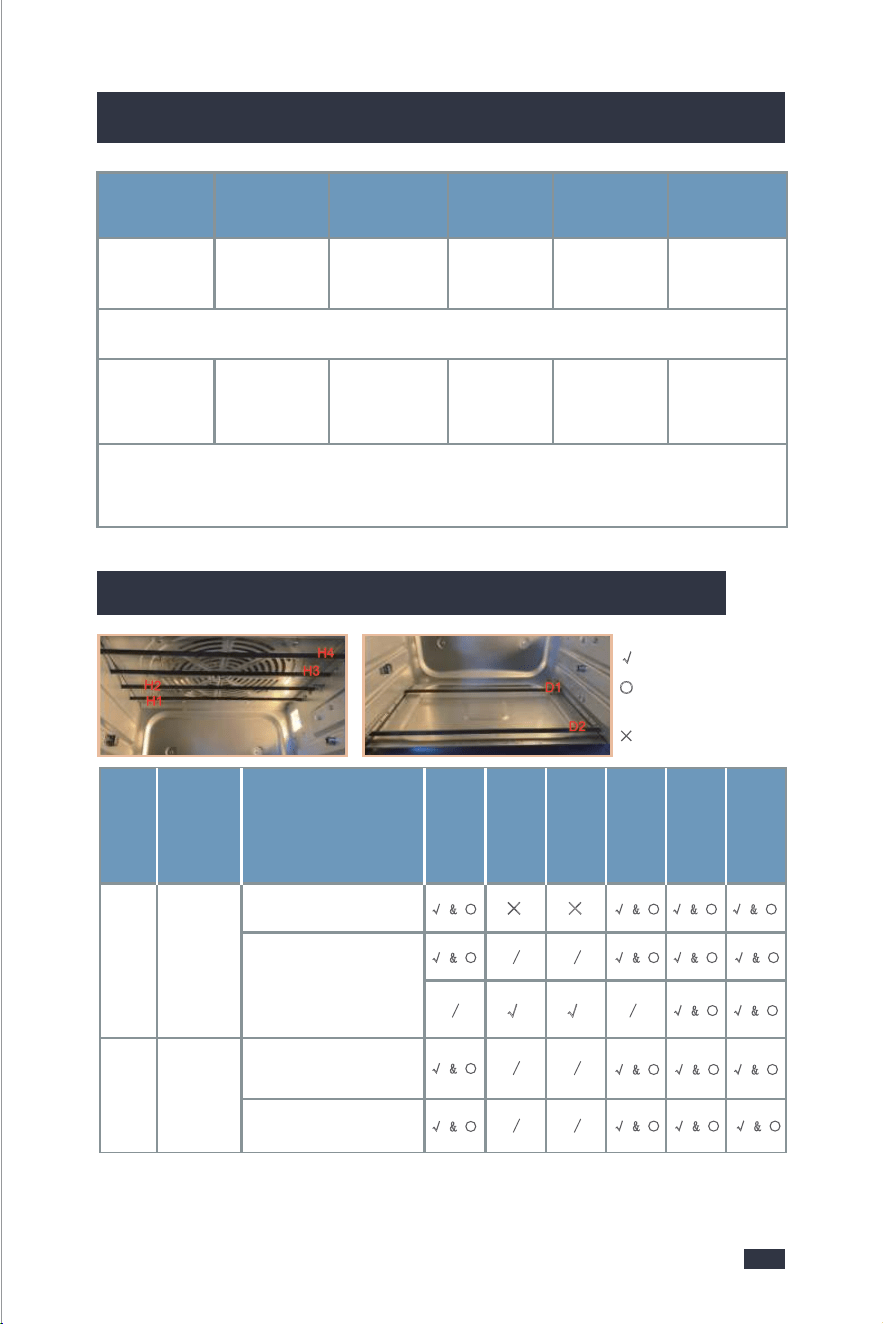
5.4 The Heating Principles of the Heating Tube
BROIL
COOKIES
FERMENT
DEHYDRATE
WARM
REHEAT
15mins
(1-20mins)
11mins
(1-90mins)
60mins
(30mins-4hrs)
6hours
(30mins-24hrs)
1hour
(1min-2hrs)
15mins
(1mins-2hrs)
Used for cooking open-faced sandwiches,thin cuts of meat(such as bacon),poultry,fish,sausages,and
vegetables.Can also be used to brown the tops of casseroles,gratins,and desserts.
Used for baking cookies and other baked treats
Used to evenly dry out foods without cooking. Ideal for drying fruit or vegetable chips.
Reheat leftovers without overcooking or drying out.
Used to precisely hold low temperatures, providing an ideal environment for proofing bread, rolls, pizza,
and dough
Used to keep food warm. Maintains food at the recommended temperature to prevent bacterial growth
(160°F or above).
400°F
(150-400°F)
350°F
(150-400°F)
97°F
(80-110°F)
120°F
(100-175°F)
160°F
(140-200°F)
320°F
(120-450°F)
Add/Cancel
Options
Add/Cancel
Options
Default
function,can
NOT canceled
Add/Cancel
Options
Food Tray
Crumb Tray
Food Tray
Wire Rack
Crumb Tray
Food Tray
Wire Rack
Crumb Tray
Basket
Food Tray
Wire Rack
Food Tray
Wire Rack
/
/
//
/
/
/
/
TOAST
BAGEL
4 Pieces
(1-6P)
4 Colors
(1-6c)
Food Tray
Wire Rack
Crumb Tray
Food Tray
Wire Rack
Crumb Tray
//
//
4 Colors
(1-6c)
4 Pieces
(1-6P)
Used for toasting or browning bread.
Used for crisping the inside of a cut bagel while lightly toasting the outside.Also ideal for toasting
crumpets of thick-sliced specialty breads which raquire one side to be more toasted than the other.
Time Range:2:45-6:30mins
Time Range:2:45-6:30mins
Smart
Program
Default Piece
& Range
Default Brown
Color & Range
360°Rotate
Function
Fan Function
Suggested
Accessory
√: Heating when working;
○: The tube can be seen
turning red;
×
: Not working;
AIR FRYNO
Started to warm up
√
& ○ √ & ○
√ & ○
√ & ○ √ & ○
√ & ○ √ & ○
√ & ○
√ & ○
√ & ○
√ & ○ √ & ○
√ & ○
√ & ○ √ & ○
√ & ○
√ & ○
√ & ○
× ×
/
/
/
/
/
/
/
/
√ √
Rotisse-
rie
YES
Menu
State
H1H2H3H4D1D2
Started to warm up
Preheating completed
After the preheating is
completed, it will cycle
alternately when the
temperature is reached!
Cancel
Air
Function
or not
Smart Menus
Default Time
& Range
Default Temp
& Range
360°Rotate
Function
Fan Function
Suggested
Accessory
1514
5.The Tips For Perfect Cooking
5.The Tips For Perfect Cooking
5.4 The Heating Principles of the Heating Tube
BROIL
COOKIES
FERMENT
DEHYDRATE
WARM
REHEAT
15mins
(1-20mins)
11mins
(1-90mins)
60mins
(30mins-4hrs)
6hours
(30mins-24hrs)
1hour
(1min-2hrs)
15mins
(1mins-2hrs)
Used for cooking open-faced sandwiches,thin cuts of meat(such as bacon),poultry,fish,sausages,and
vegetables.Can also be used to brown the tops of casseroles,gratins,and desserts.
Used for baking cookies and other baked treats
Used to evenly dry out foods without cooking. Ideal for drying fruit or vegetable chips.
Reheat leftovers without overcooking or drying out.
Used to precisely hold low temperatures, providing an ideal environment for proofing bread, rolls, pizza,
and dough
Used to keep food warm. Maintains food at the recommended temperature to prevent bacterial growth
(160°F or above).
400°F
(150-400°F)
350°F
(150-400°F)
97°F
(80-110°F)
120°F
(100-175°F)
160°F
(140-200°F)
320°F
(120-450°F)
Add/Cancel
Options
Add/Cancel
Options
Default
function,can
NOT canceled
Add/Cancel
Options
Food Tray
Crumb Tray
Food Tray
Wire Rack
Crumb Tray
Food Tray
Wire Rack
Crumb Tray
Basket
Food Tray
Wire Rack
Food Tray
Wire Rack
/
/
//
/
/
/
/
TOAST
BAGEL
4 Pieces
(1-6P)
4 Colors
(1-6c)
Food Tray
Wire Rack
Crumb Tray
Food Tray
Wire Rack
Crumb Tray
//
//
4 Colors
(1-6c)
4 Pieces
(1-6P)
Used for toasting or browning bread.
Used for crisping the inside of a cut bagel while lightly toasting the outside.Also ideal for toasting
crumpets of thick-sliced specialty breads which raquire one side to be more toasted than the other.
Time Range:2:45-6:30mins
Time Range:2:45-6:30mins
Smart
Program
Default Piece
& Range
Default Brown
Color & Range
360°Rotate
Function
Fan Function
Suggested
Accessory
√: Heating when working;
○: The tube can be seen
turning red;
×
: Not working;
AIR FRYNO
Started to warm up
√
& ○ √ & ○
√ & ○
√ & ○ √ & ○
√ & ○ √ & ○
√ & ○
√ & ○
√ & ○
√ & ○ √ & ○
√ & ○
√ & ○ √ & ○
√ & ○
√ & ○
√ & ○
× ×
/
/
/
/
/
/
/
/
√ √
Rotisse-
rie
YES
Menu
State
H1H2H3H4D1D2
Started to warm up
Preheating completed
After the preheating is
completed, it will cycle
alternately when the
temperature is reached!
Cancel
Air
Function
or not
1716
5.The Tips For Perfect Cooking
6.1 Operation(Air Fry, Rotiss, Bake, Roast, Pizza,
Broil, Cookies, Ferment, Dehyd, Warm, Reheat)
1 - To prevent the countertop from any damage, the air fryer oven must be operat-
ed with the crumb tray properly in place, securely closed and free of any excess
food or grease.
2 - Never operate your air fryer oven with the opened oven door. Never put the
crumb tray (or any other accessory) directly on any of the heating components.
Use the tracks or the slots and observe proper spacing of the attachments and
the food inside.
6. Operation Guide
4
Plug in the power cord. Wait for
1 second, the LED Display will
become black for shutdown sta-
tus, Power button is semi-lit.
Press the Power button, the LED
display will light up. The default
cooking function is AIR FRY.
To set up the cooking functions
you want by pressing Menu Pre-
set buttons.
When you choose Air Fry, Rotiss,
Bake, Roast, Pizza, Broil, Cookies,
Ferment, Dehyd, Warm or Rehe-
at, the LCD will display the temp-
erature(°F) and time (Hrs/Mins/
Secs) with default setting.
All the semi-lit icons
can be selected, and
will be fully lit when
selected. If the icons
are extinguished, it
means they can not
be selected.
NOTE
1-If there is Fan butt-
on or 360°Rotate bu-
tton semi-lit, it means
you can add it before
the operation. If the
button is fully-lit, you
can press to cancel
and it will become
semi-lit.
2-If you want to adj-
ust the preset time
or temperature, for
detailed guide, refer
to the "6.3 Customi-
zing Cooking Functi-
ons", page 21.
TIPS
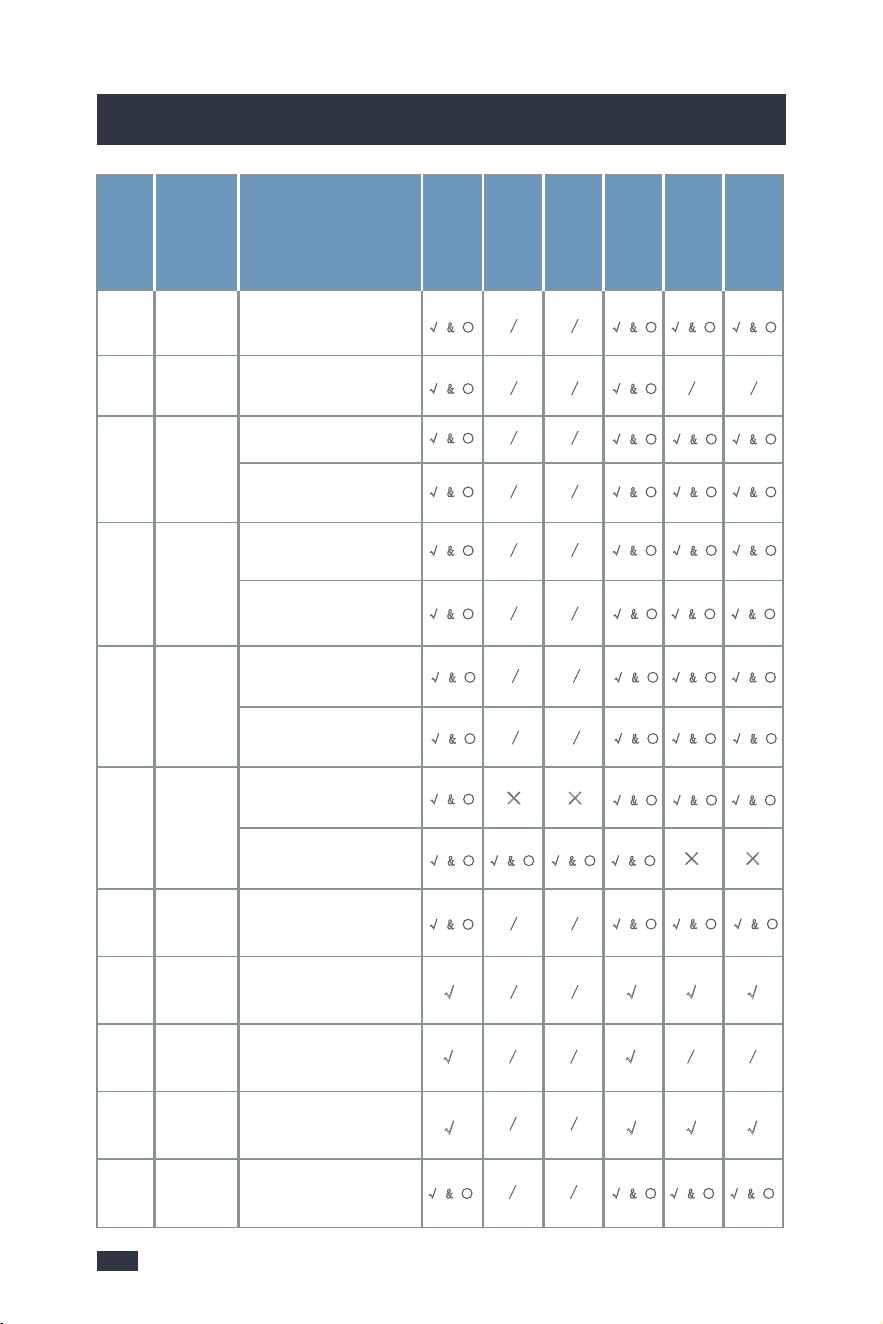
Pizza
Preheating completed
No warm up, countdown
to Work
No warm up, countdown
to Work
No warm up, countdown
to Work
No warm up, countdown
to Work
No warm up, countdown
to Work
Preheating completed
NO
NO
NO
√ & ○
√ & ○
√ & ○√ & ○√ & ○
√ & ○√
&
○√ & ○
√ & ○ √ & ○√ & ○
√ & ○
√ & ○
√ & ○
/
/
/
/
√ & ○ √ & ○ √ & ○
√ & ○
/
/
/
/
/
/
√ & ○ √ & ○ √ & ○ √ & ○
/
/
/ /
√
√ √
√ √ √
√ √ √ √
YES
YES
Toast
Bagel
Bake
Roast
Menu
StateH1H2H3H4D1D2
Started to warm up
Preheating completed
Started to warm up
Preheating completed
No warming up,
countdown to work
No warming up,
countdown to work
Cancel
Air
Function
or not
Will not start
Air function
Will not start
Air function
Started to warm up
× ×
√ & ○ √ & ○ √ & ○
√ & ○
× ×
√ & ○ √ & ○ √ & ○ √ & ○
√ & ○ √ & ○ √ & ○ √ & ○
√ & ○ √ & ○ √ & ○ √ & ○
/
/
√ & ○
√ & ○ √ & ○ √ & ○
/
/
√ & ○ √ & ○√ & ○
√ & ○
/
/
/
/
/
/
/
/
/
/
/ /
Broil
Cookies
YES
YES
YES
YES
Ferme-
nt
Dehydr-
ate
Warm
Reheat
Started to warm up
21
3
1716
5.The Tips For Perfect Cooking
6.1 Operation(Air Fry, Rotiss, Bake, Roast, Pizza,
Broil, Cookies, Ferment, Dehyd, Warm, Reheat)
1 - To prevent the countertop from any damage, the air fryer oven must be operat-
ed with the crumb tray properly in place, securely closed and free of any excess
food or grease.
2 - Never operate your air fryer oven with the opened oven door. Never put the
crumb tray (or any other accessory) directly on any of the heating components.
Use the tracks or the slots and observe proper spacing of the attachments and
the food inside.
6. Operation Guide
4
Plug in the power cord. Wait for
1 second, the LED Display will
become black for shutdown sta-
tus, Power button is semi-lit.
Press the Power button, the LED
display will light up. The default
cooking function is AIR FRY.
To set up the cooking functions
you want by pressing Menu Pre-
set buttons.
When you choose Air Fry, Rotiss,
Bake, Roast, Pizza, Broil, Cookies,
Ferment, Dehyd, Warm or Rehe-
at, the LCD will display the temp-
erature(°F) and time (Hrs/Mins/
Secs) with default setting.
All the semi-lit icons
can be selected, and
will be fully lit when
selected. If the icons
are extinguished, it
means they can not
be selected.
NOTE
1-If there is Fan butt-
on or 360°Rotate bu-
tton semi-lit, it means
you can add it before
the operation. If the
button is fully-lit, you
can press to cancel
and it will become
semi-lit.
2-If you want to adj-
ust the preset time
or temperature, for
detailed guide, refer
to the "6.3 Customi-
zing Cooking Functi-
ons", page 21.
TIPS
Pizza
Preheating completed
No warm up, countdown
to Work
No warm up, countdown
to Work
No warm up, countdown
to Work
No warm up, countdown
to Work
No warm up, countdown
to Work
Preheating completed
NO
NO
NO
√ & ○
√ & ○
√ & ○√ & ○√ & ○
√ & ○√
&
○√ & ○
√ & ○ √ & ○√ & ○
√ & ○
√ & ○
√ & ○
/
/
/
/
√ & ○ √ & ○ √ & ○
√ & ○
/
/
/
/
/
/
√ & ○ √ & ○ √ & ○ √ & ○
/
/
/ /
√
√ √
√ √ √
√ √ √ √
YES
YES
Toast
Bagel
Bake
Roast
Menu
StateH1H2H3H4D1D2
Started to warm up
Preheating completed
Started to warm up
Preheating completed
No warming up,
countdown to work
No warming up,
countdown to work
Cancel
Air
Function
or not
Will not start
Air function
Will not start
Air function
Started to warm up
× ×
√ & ○ √ & ○ √ & ○
√ & ○
× ×
√ & ○ √ & ○ √ & ○ √ & ○
√ & ○ √ & ○ √ & ○ √ & ○
√ & ○ √ & ○ √ & ○ √ & ○
/
/
√ & ○
√ & ○ √ & ○ √ & ○
/
/
√ & ○ √ & ○√ & ○
√ & ○
/
/
/
/
/
/
/
/
/
/
/ /
Broil
Cookies
YES
YES
YES
YES
Ferme-
nt
Dehydr-
ate
Warm
Reheat
Started to warm up
21
3
1918
6. Operation Guide
6. Operation Guide
6
Press the Start/Pause button will
get into preheat mode, the Time
display will blink during preheat-
ing.
After finish preheating, there will
be "Beep Beep" sound to remind,
the unit will get into Menu opera-
tion without pressing any button.
After finish cooking, there will be
"Beep Beep Beep" sound to re-
mind and return to the default
state of the selected function.
Power off the oven and unplug.The oven is particularly hot after
cooking. Open the door to let
the oven cool down for 10-30min.
Do not touch any metal parts to
avoid scalding.
5
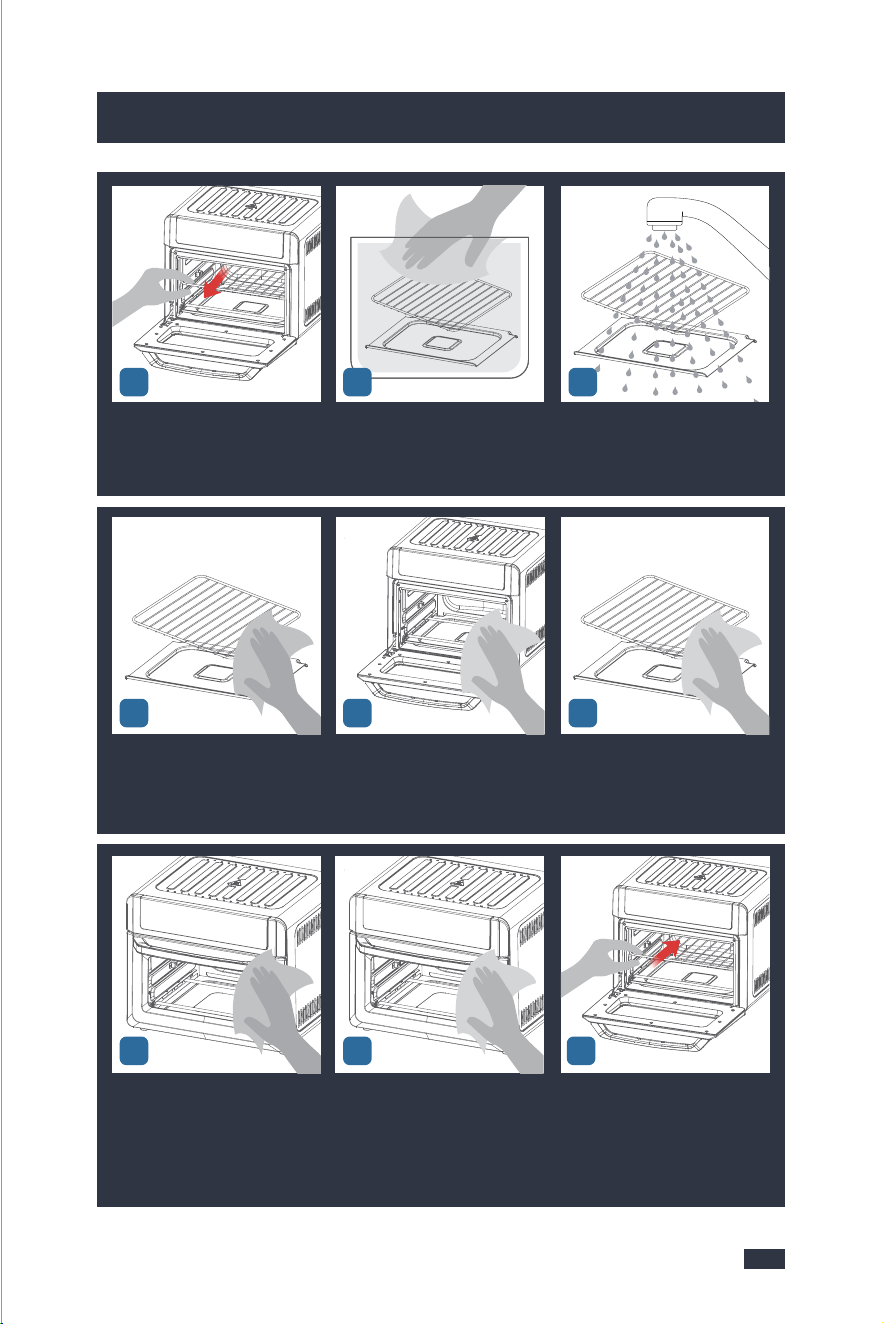
8910
141516
After the temperature of the ma-
chine is lowered, take out the
used accessories .
Wash the accessories in a contai-
ner with water and descaling
solution mixed evenly or in a
dishwasher.
Rinse the accessories with clean
water until there is no descaling
solution to avoid corrosion.
Use a soft cloth with descaling
solution and wrung out to clean
the inner and door, please do
not touch the heating elements.
Use a soft cloth soaked in water
and wrung out to clean the inner
and door, please do not touch
the heating elements.
Wipe the accessories with a dry
cloth.
Wipe the control panel, door and
outside with a cloth which wrung
out with descaling solution and
water.
Use a clean cloth soaked in clean
water and wrung out to wipe the
control panel, door and outside
to avoid corrosion.
Load the accessories into the
machine for next use.
11
171819
1-Do not touch the oven while it’s cooking food
to avoid scalding.
2-Pat moist food items dry before cooking to
prevent smoke, splatter and excess steam.
3-Turn on the stove light to observe the cooking
effect if needed.
4-Keep your face away from the door when you
are going to change the food item to avoid scal-
ding.
5-When changing the food items, use anti-sca-
lding gloves or handles to avoid scalding.
NOTE
You can press the
Start/Pause button
to cancel the preh-
eating, the Time
display will stop
blinking. Then pr-
ess Start/Pause
button again, the
unit will get into
the Menu operat-
ion immediately.
TIPS
7
1312
1918
6. Operation Guide
6. Operation Guide
6
Press the Start/Pause button will
get into preheat mode, the Time
display will blink during preheat-
ing.
After finish preheating, there will
be "Beep Beep" sound to remind,
the unit will get into Menu opera-
tion without pressing any button.
After finish cooking, there will be
"Beep Beep Beep" sound to re-
mind and return to the default
state of the selected function.
Power off the oven and unplug.The oven is particularly hot after
cooking. Open the door to let
the oven cool down for 10-30min.
Do not touch any metal parts to
avoid scalding.
5
8910
141516
After the temperature of the ma-
chine is lowered, take out the
used accessories .
Wash the accessories in a contai-
ner with water and descaling
solution mixed evenly or in a
dishwasher.
Rinse the accessories with clean
water until there is no descaling
solution to avoid corrosion.
Use a soft cloth with descaling
solution and wrung out to clean
the inner and door, please do
not touch the heating elements.
Use a soft cloth soaked in water
and wrung out to clean the inner
and door, please do not touch
the heating elements.
Wipe the accessories with a dry
cloth.
Wipe the control panel, door and
outside with a cloth which wrung
out with descaling solution and
water.
Use a clean cloth soaked in clean
water and wrung out to wipe the
control panel, door and outside
to avoid corrosion.
Load the accessories into the
machine for next use.
11
171819
1-Do not touch the oven while it’s cooking food
to avoid scalding.
2-Pat moist food items dry before cooking to
prevent smoke, splatter and excess steam.
3-Turn on the stove light to observe the cooking
effect if needed.
4-Keep your face away from the door when you
are going to change the food item to avoid scal-
ding.
5-When changing the food items, use anti-sca-
lding gloves or handles to avoid scalding.
NOTE
You can press the
Start/Pause button
to cancel the preh-
eating, the Time
display will stop
blinking. Then pr-
ess Start/Pause
button again, the
unit will get into
the Menu operat-
ion immediately.
TIPS
7
1312

6.2 Operation(Toast or Bagel)
2120
6. Operation Guide
6. Operation Guide
Plug in the power cord. Wait for
1 second, the LED Display will
become black for shutdown sta-
tus, Power button is semi-lit.
Press the Power button, the LCD
display will light up. The default
cooking functions is AIR FRY.
4
All the semi-lit icons
can be selected, and
will be fully lit when
selected. If the icons
are extinguished me-
ans could not be sel-
ected.
NOTE
If you want to adjust
the preset bread pie-
ce or color, for detail-
ed guide, refer to the
"6.3 Customizing Co-
oking Functions",
page 21.
TIPS
Cleaning after every
use guarantees the
flavors, refer to "6.1
Operation(Air Fry,
Rotiss, Bake, Roast,
Pizza, Broil, Cookies,
Ferment, Dehyd, Wa-
rm, Reheat)", steps
8-19, on page 18.
NOTE
You can customize a cooking function’s default settings, including time, temper-
ature, bread piece and color.
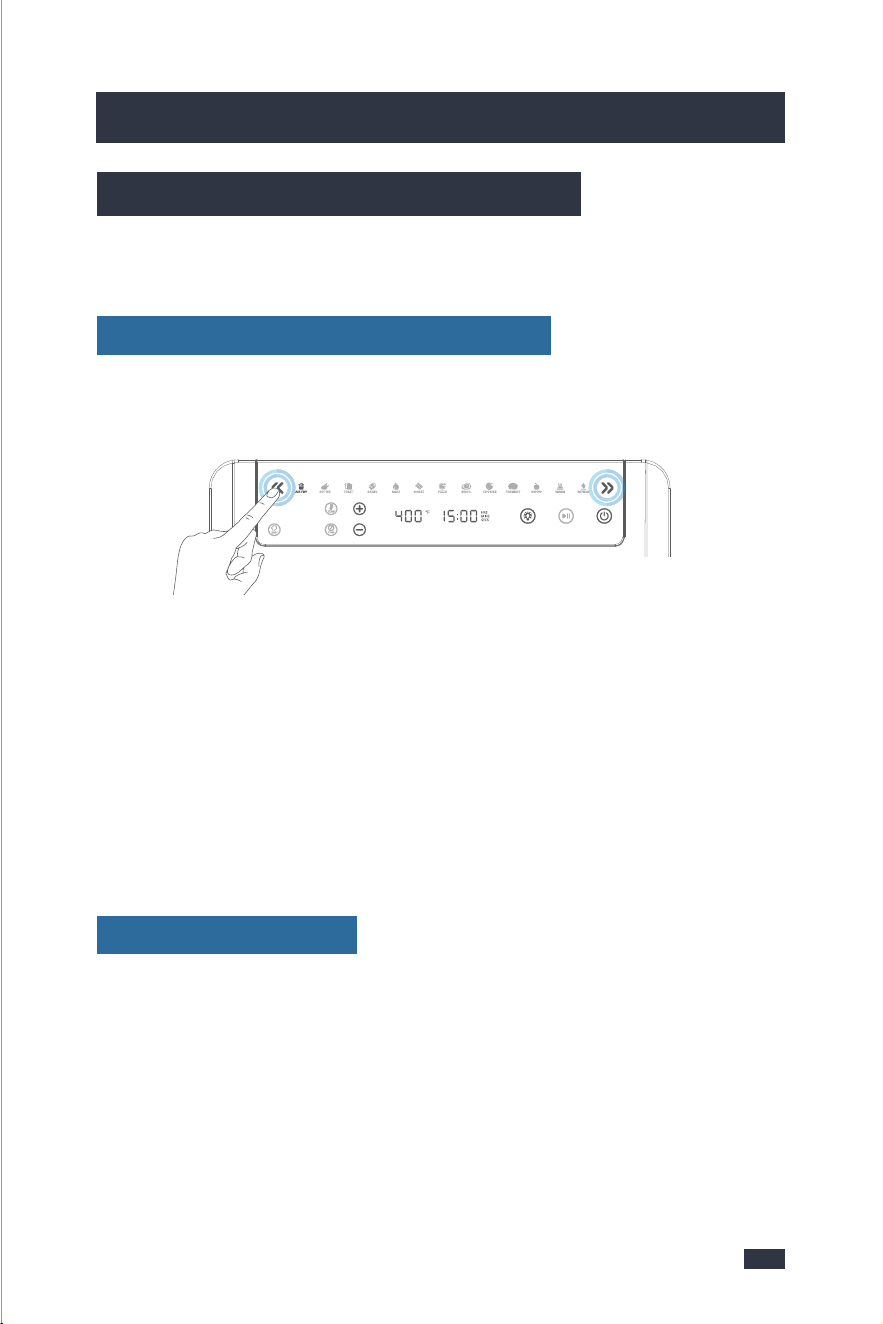
6.3 Customizing Cooking Functions
Step 1 - When the air fryer oven is not cooking or is paused, press Menu Preset but-
tons to select the function you want to change.
Step 2 - Select the settings.
1 - For Toast and Bagel, change the darkness level by preset Bread Piece button or
Bread Color button then press the + & - button to increase or decrease. Long press
to speed up the adjustment.
2 - For other functions, set temperature and time by press the Temp button or
Time button then press the + & - button to increase or decrease. Long press to
speed up the adjustment.
To change a function’s default settings:
When press the Power button to turn off or unplug, it will reset and return default
setting.
To reset all functions:
To set up the cooking functions
you want by pressing Menu Pre-
set buttons.
When you choose Toast or Bagel,
the LCD will display the bread
colors(C), bread pieces(P) with
default setting.
Press the Start/Pause button to
start, the Time display will count
down.
After finish cooking, there will be
"Beep Beep Beep" sound to rem-
ind and return to the default state
of the selected function.
3
56
Step 3 - Press the Start/Pause button to start cooking.
21
6.2 Operation(Toast or Bagel)
2120
6. Operation Guide
6. Operation Guide
Plug in the power cord. Wait for
1 second, the LED Display will
become black for shutdown sta-
tus, Power button is semi-lit.
Press the Power button, the LCD
display will light up. The default
cooking functions is AIR FRY.
4
All the semi-lit icons
can be selected, and
will be fully lit when
selected. If the icons
are extinguished me-
ans could not be sel-
ected.
NOTE
If you want to adjust
the preset bread pie-
ce or color, for detail-
ed guide, refer to the
"6.3 Customizing Co-
oking Functions",
page 21.
TIPS
Cleaning after every
use guarantees the
flavors, refer to "6.1
Operation(Air Fry,
Rotiss, Bake, Roast,
Pizza, Broil, Cookies,
Ferment, Dehyd, Wa-
rm, Reheat)", steps
8-19, on page 18.
NOTE
You can customize a cooking function’s default settings, including time, temper-
ature, bread piece and color.
6.3 Customizing Cooking Functions
Step 1 - When the air fryer oven is not cooking or is paused, press Menu Preset but-
tons to select the function you want to change.
Step 2 - Select the settings.
1 - For Toast and Bagel, change the darkness level by preset Bread Piece button or
Bread Color button then press the + & - button to increase or decrease. Long press
to speed up the adjustment.
2 - For other functions, set temperature and time by press the Temp button or
Time button then press the + & - button to increase or decrease. Long press to
speed up the adjustment.
To change a function’s default settings:
When press the Power button to turn off or unplug, it will reset and return default
setting.
To reset all functions:
To set up the cooking functions
you want by pressing Menu Pre-
set buttons.
When you choose Toast or Bagel,
the LCD will display the bread
colors(C), bread pieces(P) with
default setting.
Press the Start/Pause button to
start, the Time display will count
down.
After finish cooking, there will be
"Beep Beep Beep" sound to rem-
ind and return to the default state
of the selected function.
3
56
Step 3 - Press the Start/Pause button to start cooking.
21
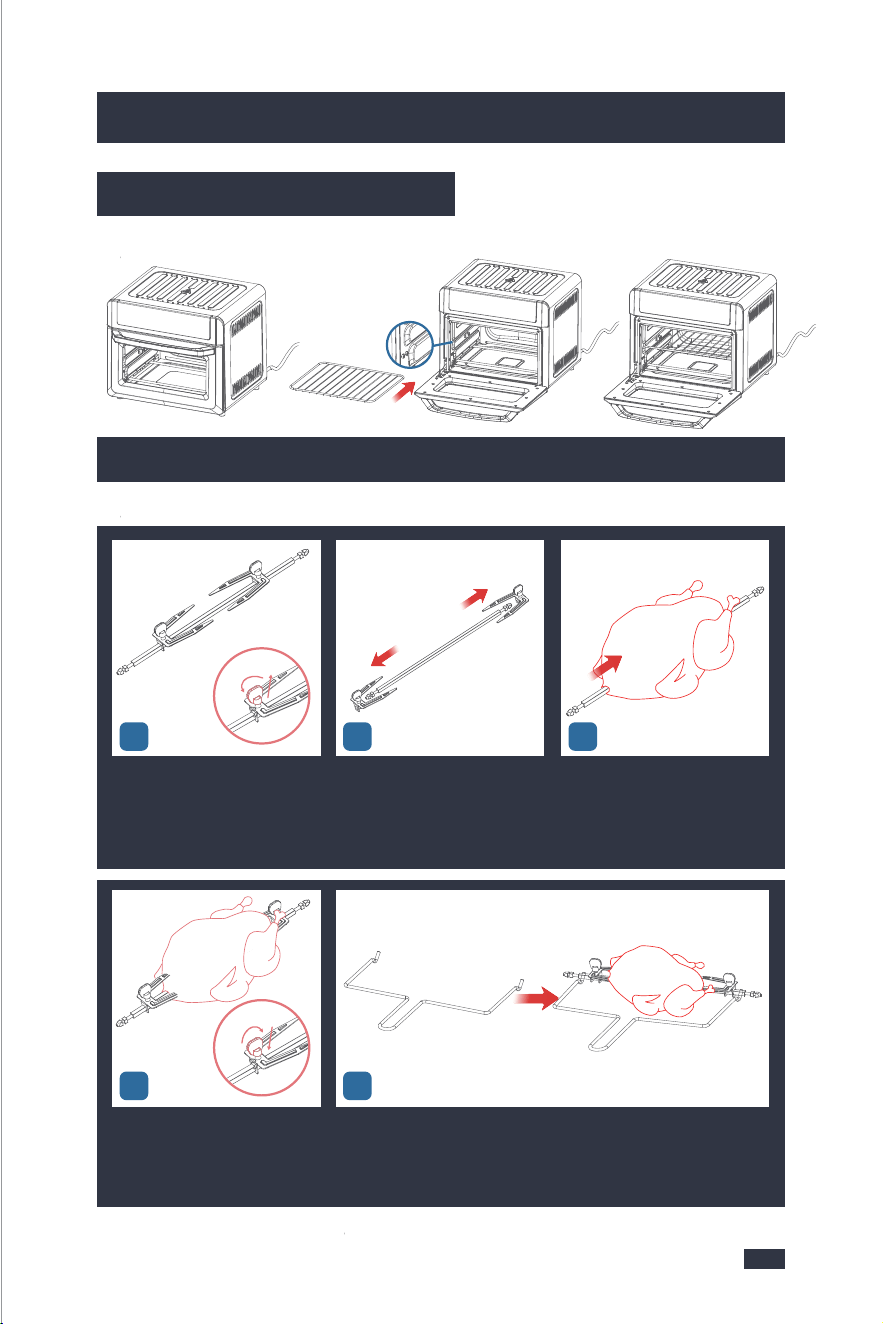
45
Slide the forks onto both ends of
the spit, ensuring the prongs are
inserted into the food item.Tigh-
ten the setting screws to secure
the forks.
Use the rotisserie tong to insert the rotisserie forks.
3
Unscrew the 2 setting screws.Remove the forks from the spit.Push the food item onto the spit.
(It is suitable for 1.25Kg chicken,
for detail guide, refer to "Tips ab-
out Trussing a Whole Chicken",
page 24)
12
2322
7. Using the Accessories
7. Using the Accessories
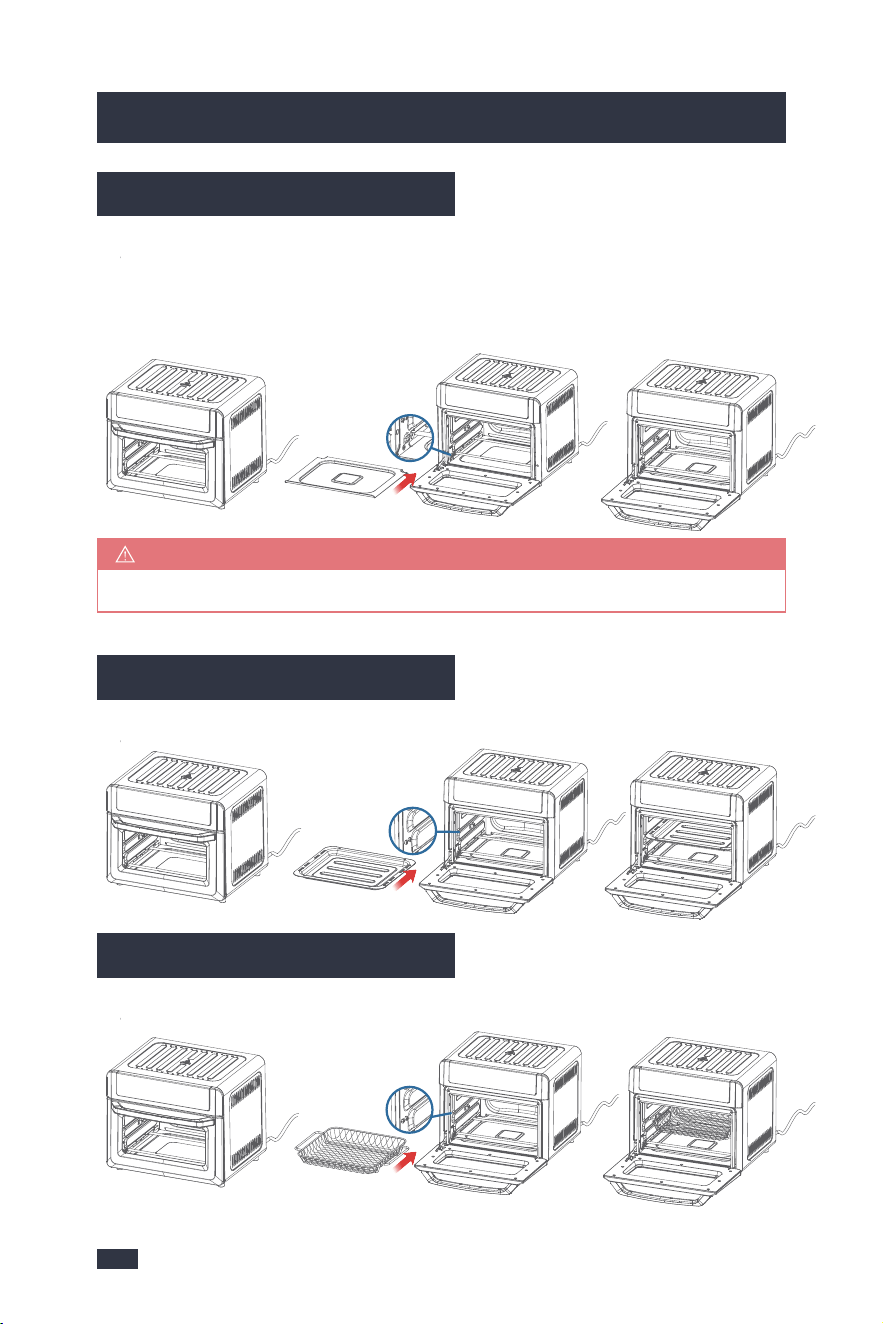
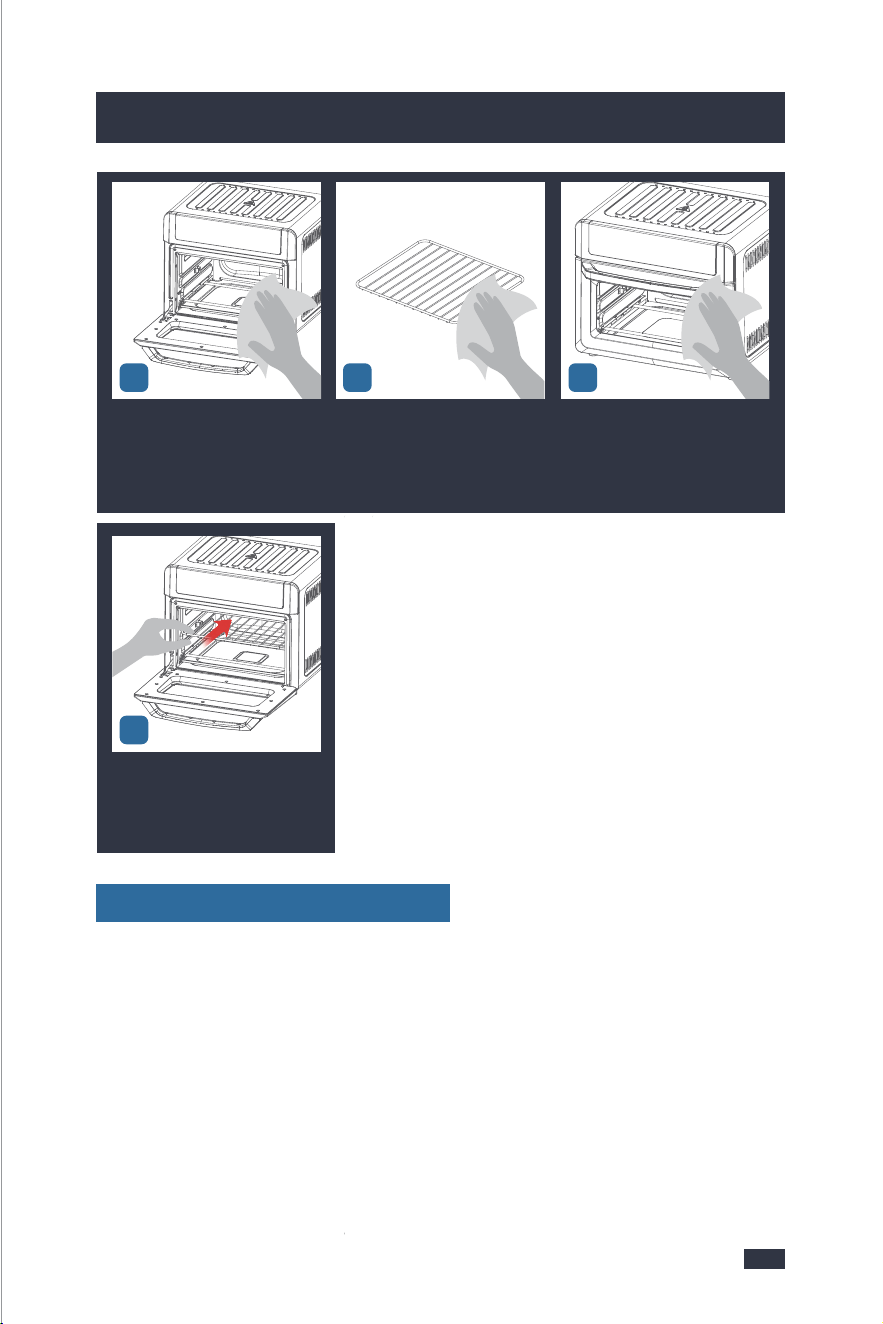
7.1 Using the Crumb Tray
Use the crumb tray to catch oils and juices as you rotisserie roast or grill, or to
collect the crumbs that fall off while air frying or baking.
Open the front door; put the crumb tray into the unit according to the direction
shown below:
7.2 Using the Food Tray
Insert the food tray according to the direction shown below:
Make sure that the crumb tray is inserted below the bottom heating element.
NOTE
7.3 Using the Basket
Insert the basket according to the direction shown below:
7.4 Using the Wire Rack
Insert the wire rack according to the direction shown below:
7.5 Using the Rotisserie Forks And Rotisserie Tong
Cooking a whole chicken according to the direction shown below:
45
Slide the forks onto both ends of
the spit, ensuring the prongs are
inserted into the food item.Tigh-
ten the setting screws to secure
the forks.
Use the rotisserie tong to insert the rotisserie forks.
3
Unscrew the 2 setting screws.Remove the forks from the spit.Push the food item onto the spit.
(It is suitable for 1.25Kg chicken,
for detail guide, refer to "Tips ab-
out Trussing a Whole Chicken",
page 24)
12
2322
7. Using the Accessories
7. Using the Accessories
7.1 Using the Crumb Tray
Use the crumb tray to catch oils and juices as you rotisserie roast or grill, or to
collect the crumbs that fall off while air frying or baking.
Open the front door; put the crumb tray into the unit according to the direction
shown below:
7.2 Using the Food Tray
Insert the food tray according to the direction shown below:
Make sure that the crumb tray is inserted below the bottom heating element.
NOTE
7.3 Using the Basket
Insert the basket according to the direction shown below:
7.4 Using the Wire Rack
Insert the wire rack according to the direction shown below:
7.5 Using the Rotisserie Forks And Rotisserie Tong
Cooking a whole chicken according to the direction shown below:
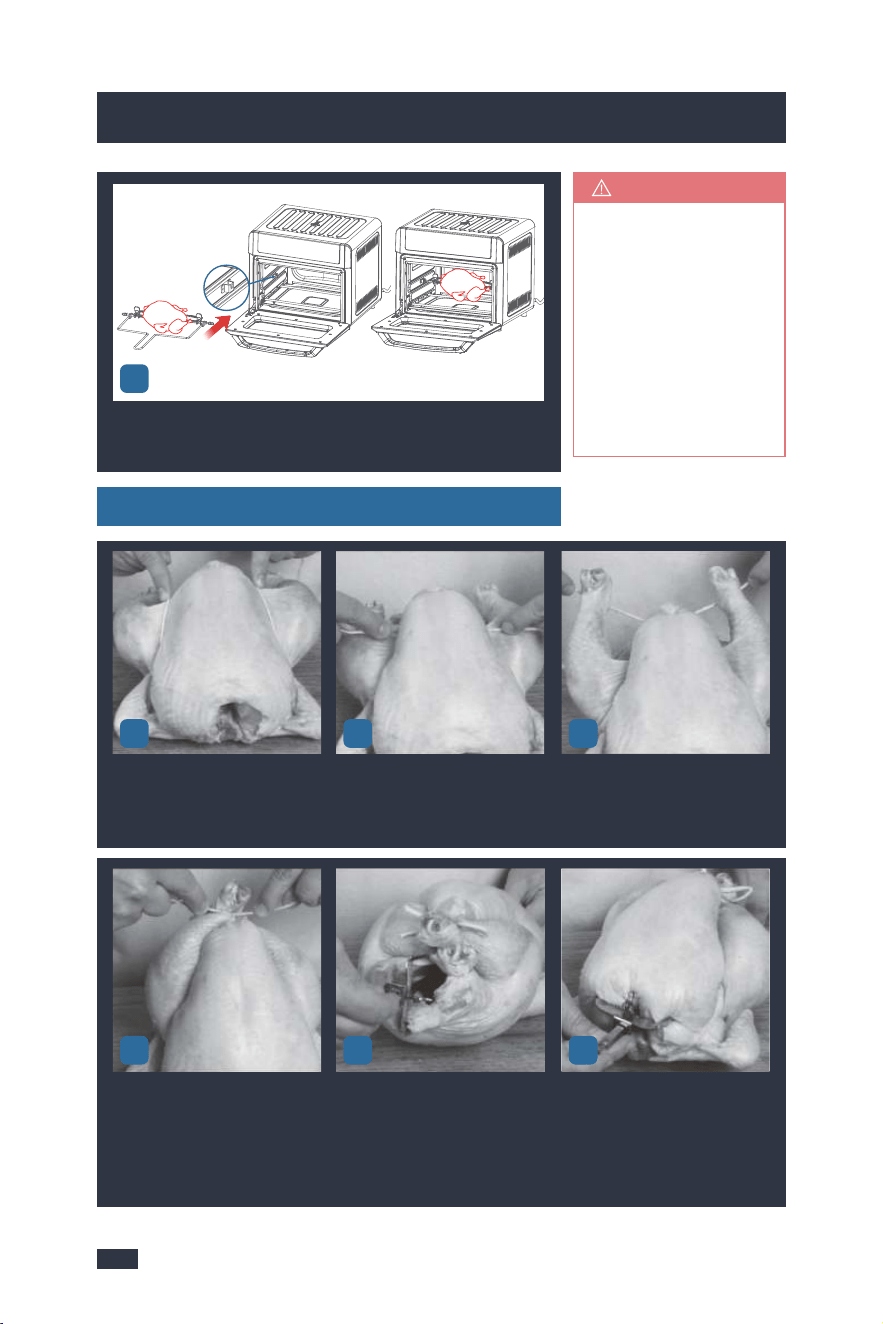
Tips about Trussing a Whole Chicken
With the oven door open, slide the rotisserie spit into the guides
in the cooking chamber. Align the rotisserie forks to the setting
holes.
6
2524
7. Using the Accessories
8. Other Functions
8.1 Memory Function
The machine have the memory function to remember the time and temperature
you have selected.
1 - After adjusting the time and temperature of any Menu mode, if you skip to
other mode and then skip back, the last time and temperature you selected will
still be remembered.
(e.g. When you adjust the 20min and 375°F of Air Fryer mode, you skip to the Bagel
mode, and skip back to Air Fryer mode, the LED will display 20min and 375°F.)
2 - After waking up from the Sleep Mode, it will remember the last last setting you
have set.
3 - If you want to return to the default time and temperature and have started up
the machine, you can press the Power button. If you have NOT started up, you
should unwind the power cord and power-up again.
8.2 Sleep Mode
1 - When plug in the power cord and press the Power button, if there is no any
operation within 5 minutes, the appliance will get into standby mode autom-
atically and leaving the Power button is semi-lit.
2 - Press the Power button to wake it up from the Sleep Mode, it will display the
Menu mode, time and temperature you had selected last time, which is conven-
ient for you not to remember your choice. But after unwinding the power cord
and power-up again, the screen will return to the default Menu mode.
1-The rotisserie forks
is installed and rem-
oved the same way.
2-Always insert the
accessories and fo-
od items into the in-
ner chamber before
preheating or oper-
ation.
TIPS
3
Place the poultry on a cutting
board breast up. Place twine un-
der the wings then pull the twine
evenly between legs and breast.
Cross the twine.Run the twine under the end of
the legs.
12
456
Wrap the twine up and around
legs bring them together then
the twine into a knot and a bow
to secure.
Run rotisserie rod through the
cavity of the poultry. Secure the
rotisserie fork between the legs
and into the back of the poultry
then tighten down the screw on
the rotisserie fork.
Place the other rotisserie fork on
the rotisserie rod already insert-
ed. Slide down and secure the
rotisserie fork into both sides of
the breast. Tighten down the
screw on the rotisserie rod. Load
into the oven.

2726
9. Cleaning & Maintenance
9. Cleaning & Maintenance
9.1 Before Use
9.3 After Use
1 - Power off the oven and open the door.
2 - Take out the food with anti-scalding gloves or rotisserie tong. Do not touch
the food or oven to avoid scalding.
3 - Let the food cool down for 3-5 minutes before touching it to avoid scalding.
4 - Please strictly follow the instructions and requirements below to clean the
oven, otherwise, the cooking result will be affected or the lifespan of the oven
will be shortened.
- Thaw frozen food before cooking, do not put frozen food directly into the oven.
- The food size cannot exceed that of the food tray, basket, wire rack, or rotisserie
fork. The capacity of the oven is 19Qt.
1- Cooking Preparation
- The oven should not be placed close to the wall, and space for heat dissipation
needs to be reserved.
- Do not block the ventilation holes on the housing.
- Ensure the control panel and your fingers are free of grease/foreign objects
before use. Finger touches shall be accurately on the icons to avoid no response
from the oven due to loss of signal.
- Flammable materials should not be put under the food during cooking to avoid
fire risks.
2-Tips of Operation
The capacity for cooking French fries is 450g, and the fries need to be laid flat on
the frying basket for cooking.
3-Special Notes for Each Function
- AIR FRY
9.2 In use
1 - Do not touch the oven while it’s cooking food to avoid scalding.
2 - Pat moist food items dry before cooking to prevent smoke, splatter and excess
steam.
3 - Turn on the stove light to observe the cooking effect if needed.
4 - Keep your face away from the door when you are going to change the food
item to avoid scalding.
5 - To change the food items, use anti-scalding gloves or handles to avoid scalding.
6 - Special Notes for Each Function
To ensure the best flavor of the food, do not turn off the hot air function.
- AIR FRY
To ensure the best flavor of the food, do not turn off the 360-degree roasting
function.
- ROTISS
To avoid uneven roasting and undercooking, the chicken shall not exceed 1.5kg.
The chicken needs to be secured by the rotisserie fork, and its legs and wings shall
be tied with clean iron wires.
- ROTISS
Large-sized toast slices shall not exceed 4 slices at a time. Large-sized food is more
likely to get burnt.
- TOAST
Cut each into equal halves to ensure even heating before cooking.
- BAGEL
The pizza size shall not exceed 10 inches, otherwise, it will be too large to fit into
the oven.
- PIZZA
Make sure to clean the air fryer oven after each use to keep its performance. For
an operation guide, refer to "6.1 Operation(Air Fry, Rotiss, Bake, Roast, Pizza, Broil,
Cookies, Ferment, Dehyd, Warm, Reheat)", steps 8-19, on page 18.
After Each Use
2928
9. Cleaning & Maintenance
9. Cleaning & Maintenance
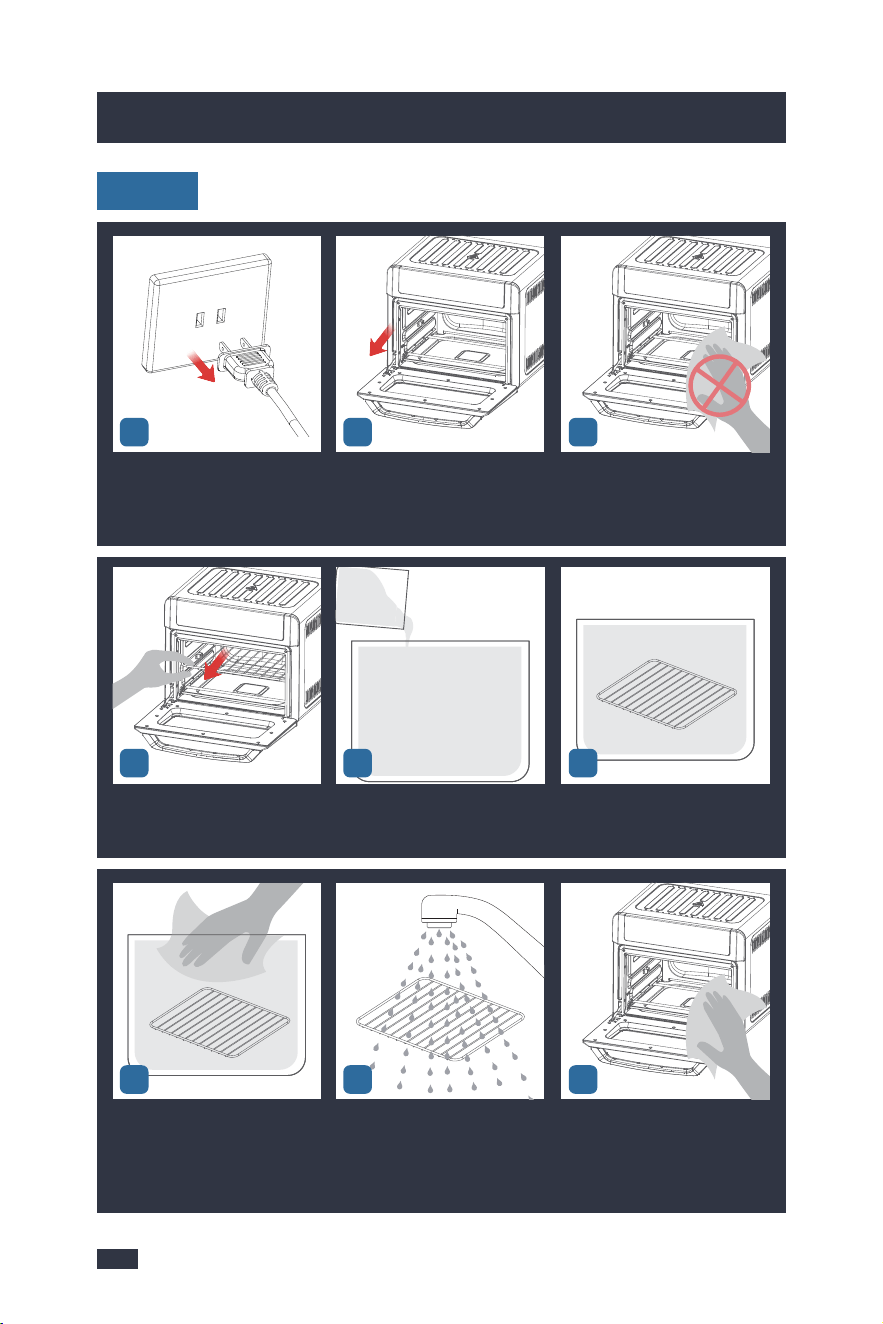
3
Power off the oven and unplug.The oven is particularly hot after
cooking. Open the door to let the
oven cool down for 10-30min.
Do not touch any metal parts to
avoid scalding.
12
After the temperature of the ma-
chine is lowered, take out the ac-
cessories.
Pour an appropriate amount of
water and descaler into a cont-
ainer, and mix them evenly.
Soak the accessories in the desc-
aling solution for 10 minutes.
Weekly
456
After 10 minutes wash the acce-
ssories in the container or in a
dishwasher.
Rinse the accessories with clean
water until there is no descaling
solution to avoid corrosion.
Wet a soft cloth with a descaling
solution and wring it out to clean
the inside and door of the oven.
Do not touch any heating eleme-
nts.
978
101112
Wet another soft cloth with clean
water and wring it out to clean
the inside and door of the oven.
Do not touch any heating elem-
ents.
Wipe the accessories with a dry
cloth.
Wet a soft cloth with a descaling
solution and wring it out to clean
the control panel and outside of
the oven.
Load the accessories into the
machine for next use.
13
If the accessories are hard for cleaning, follow the above cleaning steps but let
the descaling solution soak the accessories for 30 minutes instead in step 6.
Other steps are the same.
After 15 Days or After 100 Uses
2928
9. Cleaning & Maintenance
9. Cleaning & Maintenance
3
Power off the oven and unplug.The oven is particularly hot after
cooking. Open the door to let the
oven cool down for 10-30min.
Do not touch any metal parts to
avoid scalding.
12
After the temperature of the ma-
chine is lowered, take out the ac-
cessories.
Pour an appropriate amount of
water and descaler into a cont-
ainer, and mix them evenly.
Soak the accessories in the desc-
aling solution for 10 minutes.
Weekly
456
After 10 minutes wash the acce-
ssories in the container or in a
dishwasher.
Rinse the accessories with clean
water until there is no descaling
solution to avoid corrosion.
Wet a soft cloth with a descaling
solution and wring it out to clean
the inside and door of the oven.
Do not touch any heating eleme-
nts.
978
101112
Wet another soft cloth with clean
water and wring it out to clean
the inside and door of the oven.
Do not touch any heating elem-
ents.
Wipe the accessories with a dry
cloth.
Wet a soft cloth with a descaling
solution and wring it out to clean
the control panel and outside of
the oven.
Load the accessories into the
machine for next use.
13
If the accessories are hard for cleaning, follow the above cleaning steps but let
the descaling solution soak the accessories for 30 minutes instead in step 6.
Other steps are the same.
After 15 Days or After 100 Uses

3130
The air fryer
oven is plug-
ged in but
cannot be
turned on.
Black smoke
is coming out
from the oven.
Ensure the power cord is plugged into the power
outlet firmly.
It is not properly plug-
ged in.
The power outlet is not
powered.
Ensure the power outlet is powered, or try anot-
her power outlet.
Ensure the oven door is closed.The oven door is open.
Using a cooking oil with
a low smoke point.
Choose a neutral cooking oil with a higher smoke
point, such as Virgin or Extra Virgin Olive Oil, Av-
ocado, Canola, Soybean, Safflower, or Rice Bran.
Food residue on the
bottom of the cooking
chamber or accessories.
Remove all accessories from the cooking cham-
ber and clean the area as well as all accessories
thoroughly.
Faulty circuit or heating
element.
Contact the Gevi support team.
NOTE: Do not attempt to repair the oven by you-
rself.
CAUTION:Stop cooking immediately. Cancel the process, then unplug
the oven and allow it to cool to room temperature.
White smoke
is coming out
from the oven.
Water is vaporizing pr-
oducing thick steam.
Cooking foods with hi-
gh fat content, such as
bacon, sausage, and
hamburger.
Pat moist food items dry before air frying.
Avoid air frying foods with a high fat content.
Check the drip pan for excess oil or fat and care-
fully remove as needed.
Do not add water or other liquid to the cooking
chamber when air frying.
ProblemPossible CauseWhat To Do
White smoke
is coming out
from the oven.
The food is not
cooked all the
way / The food
doesn’t seem
crispy enough.
Be mindful when seasoning food.
Spray vegetables and meats before adding seas-
oning so they can adhere to the food.
The seasoning on food
has blown into eleme-
nts.
Your oven may be ove-
rfilled with food.
Cook in smaller batches for more even cooking.
You may have the tem-
perature set too low.
Increase the temperature and then continue
cooking.
Cooking with not en-
ough oil.
Your food was not flip-
ped or rotated.
For a crispier effect, brush with oil before air
frying.
Try flipping or rotating your food over midway
through the cooking cycle. This will ensure even
cooking.
Press the func-
tion button on
the screen but
it has no resp-
onse.
Broken circuit of the
thermal sensor.
E1
E2
Short circuit of the
thermal sensor.
Grease/foreign objects
on the screen or your
fingers.
Your didn't touch the
center of the function
button.
Bad fried food
quality.
All lights
flash and
a code ap-
pears on
the disp-
lay.
The cooking chamber
or accessories are dirty.
Clean the oven and its accessories.
Contact the Gevi support team.
Make sure the screen and your fingers are free
of grease/foreign objects before use.
Make sure to touch the center position of the
function button.
Contact the Gevi support team.
ProblemPossible CauseWhat To Do
10. Troubleshooting10. Troubleshooting

3332
11. Warranty
In order to make a claim under our warranty, you must have the original proof
of purchasing documentation for the product, including but not limited to Order
Number and QR Code, and present it when requested. This guarantee is valid
for the original retail purchaser from the date of initial retail purchase and is
not transferable.
Upon receipt of your claim, Gevi will seek to resolve your difficulties. Should
your product develop any defect within 12 months of purchase because of
faulty materials or workmanship, we will repair or replace this product or any
component of the product, at our discretion. Replacement will be made with
a refurbished product or component. Refurbished parts may be used to repair
the product.
Our replacement or repair warranty only applies where a defect arises as a
result of faulty material or workm anship during the warranty period. Your
warranty does not cover misuse or negligent handling (including damage caused
by failing to use the product in accordance with this instruction booklet),
accidental damage, normal wear and tear, or lack of maintenance. Do Not
attempt to repair or adjust any electrical or mechanical functions on this product.
Doing so will void this guarantee.
Your warranty does not:
cover freight or any other costs incurred in making a claim, consumable items,
accessories that by their nature and limited lifespan require periodic renewal
(such as filters and seals) or any consequential loss or damage; or
This Gevi product is covered by a 12-month
replacement or repair warranty after the order
is issued under normal use, and we will provide
customer service to answer technical questions
even after 12 months.
cover damage caused by:
- power surges, power dips, voltage supply problems, or use of the product on
incorrect voltage;
*
*
11. Warranty
- servicing or modification of the product other than by Gevi or an authorized
Gevi service center;
- use of the product with other accessories, attachments, product supplies,
parts or devices that do not confirm to Gevi specifications; or
- exposure of the product to abnormally corrosive condition.
extend beyond 3 months if the product is used in commercial, industrial,
educational or rental applications.
If your warranty claim is not accepted, we will inform you and if requested to
do so by you, repair the product provided you pay the usual charges for such
repair. You will also be responsible for all freight and other costs.
*
For any questions relating to Gevi branded products(coffee machines, grinders,
milk frothers, toasters, air fryers and related accessories), please contact us thr-
ough information below:
Web: https://www.gevilife.com
E-mail: gevi-home@gevi-home.com
Phone: 855-9922-888
FB: https://bit.ly/3qIgP5S
YT: https://bit.ly/3fxrFqq
Gevi headquarters
Web: www.gevi-tech.com
E-mail: service@gevi-tech.com
CONTACT INFORMATION

3332
11. Warranty
In order to make a claim under our warranty, you must have the original proof
of purchasing documentation for the product, including but not limited to Order
Number and QR Code, and present it when requested. This guarantee is valid
for the original retail purchaser from the date of initial retail purchase and is
not transferable.
Upon receipt of your claim, Gevi will seek to resolve your difficulties. Should
your product develop any defect within 12 months of purchase because of
faulty materials or workmanship, we will repair or replace this product or any
component of the product, at our discretion. Replacement will be made with
a refurbished product or component. Refurbished parts may be used to repair
the product.
Our replacement or repair warranty only applies where a defect arises as a
result of faulty material or workm anship during the warranty period. Your
warranty does not cover misuse or negligent handling (including damage caused
by failing to use the product in accordance with this instruction booklet),
accidental damage, normal wear and tear, or lack of maintenance. Do Not
attempt to repair or adjust any electrical or mechanical functions on this product.
Doing so will void this guarantee.
Your warranty does not:
cover freight or any other costs incurred in making a claim, consumable items,
accessories that by their nature and limited lifespan require periodic renewal
(such as filters and seals) or any consequential loss or damage; or
This Gevi product is covered by a 12-month
replacement or repair warranty after the order
is issued under normal use, and we will provide
customer service to answer technical questions
even after 12 months.
cover damage caused by:
- power surges, power dips, voltage supply problems, or use of the product on
incorrect voltage;
*
*
11. Warranty
- servicing or modification of the product other than by Gevi or an authorized
Gevi service center;
- use of the product with other accessories, attachments, product supplies,
parts or devices that do not confirm to Gevi specifications; or
- exposure of the product to abnormally corrosive condition.
extend beyond 3 months if the product is used in commercial, industrial,
educational or rental applications.
If your warranty claim is not accepted, we will inform you and if requested to
do so by you, repair the product provided you pay the usual charges for such
repair. You will also be responsible for all freight and other costs.
*
For any questions relating to Gevi branded products(coffee machines, grinders,
milk frothers, toasters, air fryers and related accessories), please contact us thr-
ough information below:
Web: https://www.gevilife.com
E-mail: [email protected]om
Phone: 855-9922-888
FB: https://bit.ly/3qIgP5S
YT: https://bit.ly/3fxrFqq
Gevi headquarters
Web: www.gevi-tech.com
E-mail: service@gevi-tech.com
CONTACT INFORMATION

Read this booklet thoroughly before using this coffee machine for the quick use.
Smart Air Fryer Toaster Oven
LED Control Panel
All-in-One 13 Cooking Functions
GETOE725-U
INSTRUCTION BOOKLET
Please read all the owner’s instruction booklet before use.