EN
Air Fryer Toaster Oven
User Manual for TA25C Series

Important Safeguards
Components
Display & Controls
Before rst use
Cooking Function
Care & Maintenance
Preparing the Oven
Cooking Setting Memory
Use of Cooking Functions
Cooking Function Quick Reference Chart
Warning
Cleaning the Accessories
Storage
Air Fry
Toast
Pizza
Bagel
Dehydrate
Roast
Broil
Bake
Reheat
Warm
04
07
08
10
10
11
11
12
14
14
15
16
17
18
19
20
21
22
23
24
24
25
25
26
27
28
CONTENTS
•
•
•
•
•
•
•
•
•
•
•
•
•
•
•
•
•
1 x Air Fryer Toaster Oven
1 x Oven Rack
1 x Broil Rack
1 x Enamel Baking pan
1 x Air Fryer Basket
1 x Crumb Tray
1 x User Manual
Power Supply
Rated Power
Capacity
Temperature
Range
Time Range
Weight
Dimensions
AC120V.60Hz
1650W
26qt/25L,12"Pizza,6-slice Toast
150-450°F/65-230°C
1min-24hr
18.1x1 . x10.8 in/46.0x40.4x27.5cm
SPECIFICATIONS
PACKAGE CONTENTS
Troubleshooting
Customer Support
Limited Warranty
17.6lbs./8kg
5 9

NEVER put baking or parchment paper
into the oven without food on top. Air
circulation can cause paper to move and
touch heating elements.
DO NOT cover crumb tray or any
part of the oven with metal foil. This will
cause overheating of the oven.
Caution should be exercised when
using pans and dishes constructed of
materials other than metal. Ensure pans
and dishes are oven safe before using in
the oven.
Caution should be exercised when
using lids in the oven, as pressure build
up in a covered pan or dish may cause
hot ingredients to expel or the dish to
crack. DO NOT place sealed or airtight
containers in the oven.
Oversized foods and metal utensils
MUST NOT be inserted in the oven as
they may create re or risk of electric
shock.
The use of accessories and attachments
not recommended or supplied with this
oven may cause injuries.
Immediately turn off and unplug your
oven if you see dark smoke coming out.
Food is burning. Wait for smoke to clear
before opening the oven door.
This appliance is not intended for use
by persons (including children) with
reduced physical, sensory or mental
capabilities, or lack of experience and
knowledge,unless they have been given
supervision or instruction concerning
the use of the appliance by a person
responsible for their safety.
Children should be supervised to
ensure that they DO NOT play with
the appliance.
It is recommended to regularly inspect
the appliance and power cord. DO
NOT use the appliance if there is
damage to the power cord or plug, or
after the appliance malfunctions or has
been damaged in any way. Immediately
stop use and call VAL CUCINA
Customer Service.
The appliance is not intended to be
operated by means of external timer or
separate remote-control system.
If the appliance is to be left unattended,
cleaned, moved, assembled or stored,
always switch the unit off and unplug
the cord from the power outlet and
allow to cool completely.
DO NOT clean with metal scouring
pads. Pieces can break off the pad and
touch electrical parts, creating a risk of
electric shock.
IMPORTANT SAFEGUARDS
READ ALL INSTRUCTIONS BEFORE USE AND SAVE FOR FUTURE REFERENCE
Key Safety Points While Cooking
Remove and safely discard any packing
materials and promotional labels before
using the oven for the rst time.
To AVOID choking hazard for young
children, remove and safely dispose the
protective cover tted on the power
plug.
DO NOT use the appliance near the
edge of a bench top or table. Ensure the
surface is stable, level, heat-resistant and
clean.
DO NOT use on a cloth-covered
surface, near curtains or other
ammable materials.
DO NOT use the appliance on (or
close to) a hot gas or electric burner, or
where it could touch a heated oven or
surface.
DO NOT let the power cord hang
over the edge of a table or counter or
touch hot surfaces.
To AVOID electric shock, do not
immerse the cord or plug in water (or
other liquids).
This appliance is for household use only.
DO NOT use in any type of moving
vehicles. DO NOT use the appliance
outdoors, or for anything other than its
intended use. Misuse can cause injury.
When operating the oven, keep a
minimum distance of 4 inch/10cm of
space on both sides of the appliance and
6 inch/15cm above.
The temperature of accessible surfaces
may be high when the appliance is
operating. DO NOT touch hot
surfaces.To AVOID burns, use extreme
caution when removing pans, dishes and
accessories such as the included oven
rack and baking pan, that contain hot oil
or other hot liquids.
DO NOT lay cooking utensils, baking
pans or dishes on the glass door.
DO NOT place cardboard, plastic,
paper, or other ammable materials in
the oven.
To AVOID overheating, DO NOT use
metal foil in the oven unless directed.
Use extreme caution when using
foil, and always t the foil as securely
as possible. If the foil contacts the
oven's heating elements, this can cause
overheating and risk of re.
•
•
• • •
•
•
•
•
•
•
•
•
•
•
•
•
•
•
•
•
•
•
•
•
•
04 05

Specic Instructions for TA-25C series
We recommend the oven is operated
on a dedicated circuit separated from
otherappliances. Consult a licensed and
qualied electrician if you are unsure.
To TURN OFF the oven, press and
hold the START/PAUSE button for 3
seconds on the control panel. The oven
is off when the display turns off and
beeps 3 times.
Press and hold LIGHT and CONV.
buttons for 3 seconds to switch
temperature unit between Fahrenheit
and Celsius.
Regularly clean the crumb tray. To clean
the crumb tray:
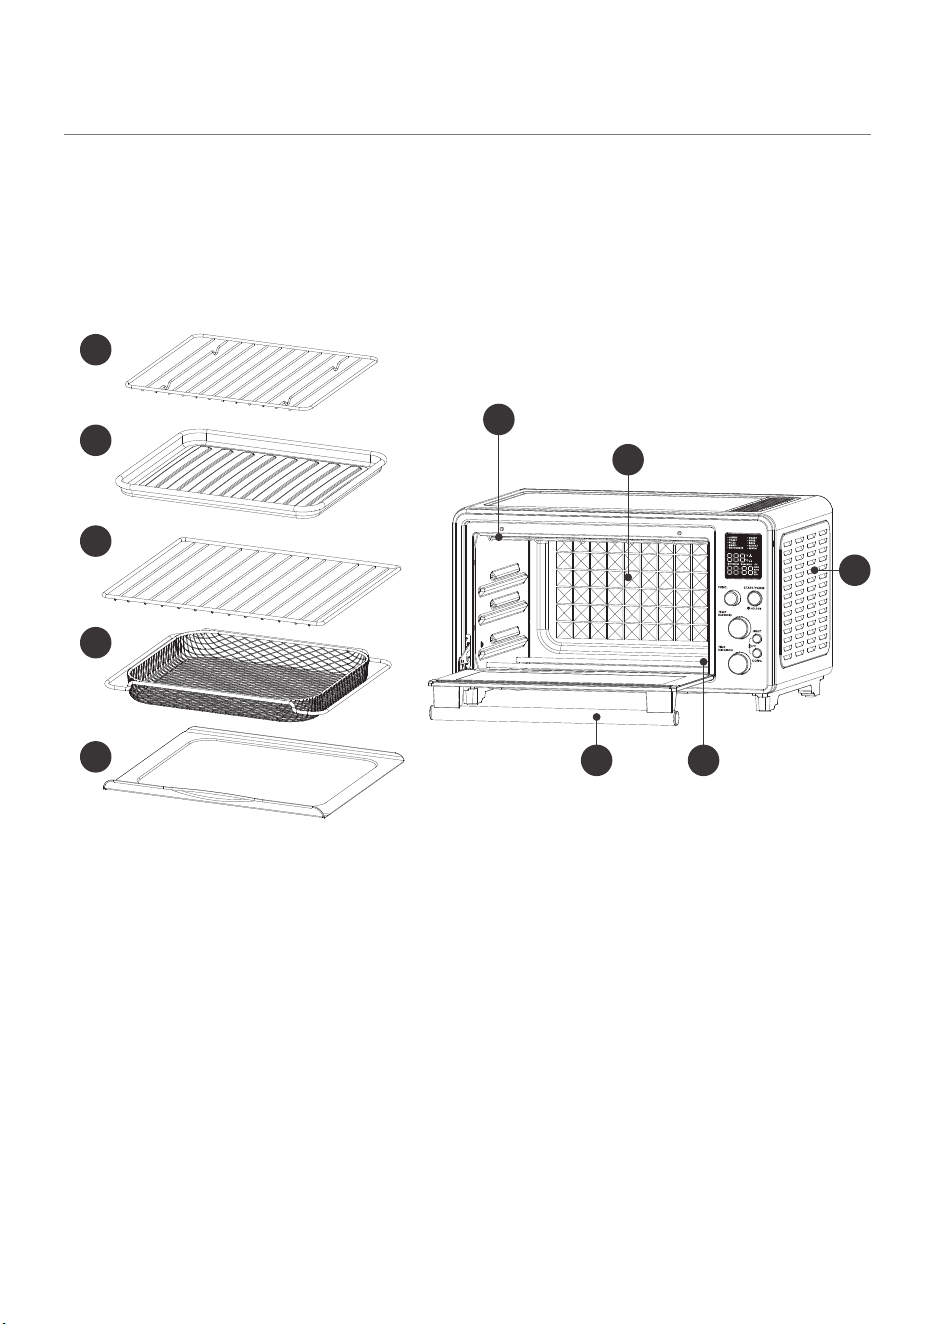
Broil Rack
Enamel Baking Pan
Oven Rack
Air Fry Basket
Crumb Tray
A.
B
.
C.
D.
E
.
F
.
G.
H.
I .
J .
A
B
C
D
E
F
H
G
J
I
Turn OFF the oven.
Allow the oven to cool completely and
then remove the power cord from the
power outlet.
Remove the crumb tray and clean with
warm soapy water.
Dry the tray completely before inserting
it securely back in place.
•
•
•
•
-
-
-
-
COMPONENTS
Infrared Heating Elements
Ventilation Slots
Enamel Cavity
Bottom Heating Elements
Door Handle
06 07
Specic Instructions for TA-25C series
We recommend the oven is operated
on a dedicated circuit separated from
otherappliances. Consult a licensed and
qualied electrician if you are unsure.
To TURN OFF the oven, press and
hold the START/PAUSE button for 3
seconds on the control panel. The oven
is off when the display turns off and
beeps 3 times.
Press and hold LIGHT and CONV.
buttons for 3 seconds to switch
temperature unit between Fahrenheit
and Celsius.
Regularly clean the crumb tray. To clean
the crumb tray:
Broil Rack
Enamel Baking Pan
Oven Rack
Air Fry Basket
Crumb Tray
A.
B
.
C.
D.
E
.
F
.
G.
H.
I .
J .
A
B
C
D
E
F
H
G
J
I
Turn OFF the oven.
Allow the oven to cool completely and
then remove the power cord from the
power outlet.
Remove the crumb tray and clean with
warm soapy water.
Dry the tray completely before inserting
it securely back in place.
•
•
•
•
-
-
-
-
COMPONENTS
Infrared Heating Elements
Ventilation Slots
Enamel Cavity
Bottom Heating Elements
Door Handle
06 07

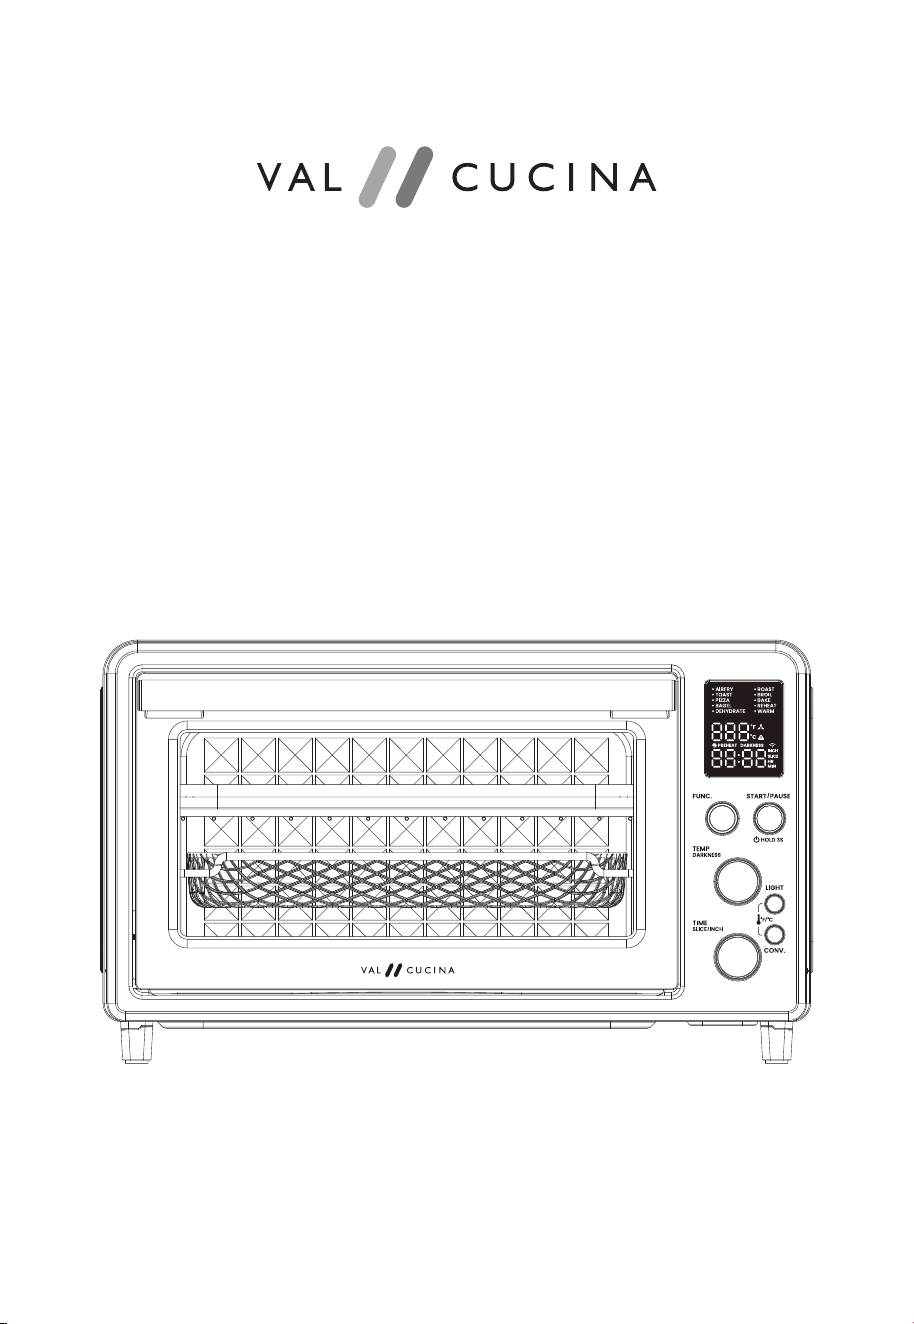
DISPLAY & CONTROLS
K. LED Display
L. FUNCTION Knob
M. TEMP/DARKNESS Knob
N. TIME/SLICE/INCH Knob
O. START/PAUSE Power Off Button
P. LIGHT Button
Q. CONVECTION Button
Indicated functions and its associated
temperatures, times, pizza inches, toast
slices and darkness. Shows cooking process
and fan/working status.
Press to turn the interior light on/off.
Turn the knob clockwise of
counterclockwise to set desired cooking
time, slices of your toast or inches of your
pizza.
K
P
Q
OL
M
N
LED Display
LIGHT Button
FUNCTION Knob
CONVECTION ButtonTEMPERATURE Knob
TEMP. UNIT Switching
TIME knob
START/PAUSE Button
Turn the knob to change cooking
functions.
The current function icon will illuminate
on the display.
Press to turn the convection fan on/off.
Convection can only work with certain
functions, refer to Cooking Function
Quick Reference Chart in Page 12 for
more details.
After FUNCTION, TEMPERATURE, and
TIME being set, press START/PAUSE
button to start or pause cooking.
When cooking paused, press and hold the
button for 3 seconds to cancel current
function and turn off the oven.
Turn the knob clockwise or
counterclockwise to set desired cooking
temperature or toasting darkness.
Unit of temperature can be switched
between Celsius and Fahrenheit. In the
oven standby state, press LIGHT and
CONV. at the same time for 3 seconds
and release, the temperature unit switch is
complete.
•
•
•
•
•
•
08 09

Turn the FUNCTION knob to BAKE
function.
Set temperature at 400°F/205°C and
time for 15 min.
Press the START/PAUSE button.
The LED display will indicate a
blinking"PREHEAT". Once the oven has
completed the preheating cycle, an alert
will sound. The timer will be displayed
and automatically begin to count down.
At the end of the cooking cycle, the
oven alert will sound.
The oven is now ready to use.
Any function, with changes to its default temperature, time, toast slices and darkness,
pizza size etc., as soon as being operated, those changes will be automatically
memorized and become the default of the function for next use.
Upon power on or revive from sleeping mode, the last time operated function will be
displayed as stand by.
To clear memories and reset all functions, unplug and plug it back in, PRESS and HOLD
simultaneously the START/PAUSE button and LIGHT button for 3 seconds until the
oven beeps 1 time and a'1'display on the screen.
Cooking functions are programmed with an ideal time and temperature for cooking
certain foods. For more information on each cooking function, see its individual section,or
the Cooking Function Quick Reference Chart.
BEFORE FIRST USE
PREPARING THE OVEN COOKING SETTING MEMORY
USE OF COOKING FUNCTIONS
Before rst use, please run the oven empty for 20 MINUTES to remove protective
substances from the heating elements. Ensure the area is well ventilated as the oven
may emit vapors. These vapors are safe and are not detrimental to the performance
of the oven.
Remove and safely discard any packing
material, promotional labels and tape
from the oven.
Remove the crumb tray, oven rack,
baking pan, air fry basket from the poly
foam packaging. Wash them with a soft
sponge in warm, soapy water then rinse
and dry thoroughly.
Wipe the interior of the oven with a
soft, damp sponge. Dry thoroughly.
Place the oven on a at, dry surface.
Ensure there is a minimum distance of
4 inch (10cm) of space on both sides of
the appliance and 6 inch (15cm) above.
Insert the crumb tray into the oven.
Unwind the power cord completely and
insert the power plug into a grounded
power outlet.
The oven alert will sound, and the LED
screen will illuminate. The function
options will appear with an indicator on
the Air Fry setting.
1.
1.
2.
2.
3.
3.
4.
5.
6.
7.
8.
9.
10.
11.
12.
10 11

Function Use Preset
Suggested
Accessory Position
Preheat
Preset/Optional
Convection
Preset/Optional
Temp/Time
Range
AIR FRY
Cooks using intense heat and
maximized airow. Cook food such as
french fries and chicken wings.
Middle
Middle
Middle
Bottom
Top/Middle
Top/Middle
Middle
Bottom
Bottom
Middle
No
No
No
No
Yes
No
No
Yes
No
No
Yes
Yes
No
No/Optional
Yes/Optional
No/Optional
No/Optional
No/Optional
No/Optional
No
400°F/205°C 15mins
Convection
150°F/65°C 4hrs
Convection
Darkness 4
Slice 4
9 Inch Preheat
400°F/205°C 1hr
450°F/230°C 10mins
350°F/175°C 30mins
Preheat
350°F/175°C 10mins
180°F/80°C 1hr
Darkness 4 Slice 4
200-450°F/95-230°C
1min-2hrs
90-200°F/30-95°C
1min-24hrs
Darkness 1-7
Slice 1-6
Darkness 1-7
Slice 2/4/6
Inches 6/9/12
200-450°F/95-230°C
1min-2hrs
400-450°F/205-230°C
1min-2hrs
150-450°F/65-230°C
1min-2hrs
150-450°F/65-230°C
1min-1hr
100-300°F/40-150°C
1min-4hrs
Melt and brown cheese and toppings
while crisping crust.
Perfectly toast the cut side of bagels
while gently warming the outer side.
Evenly dry out food without cooking.
Dry Fruit or vegetable chips.
Cook a variety of meats and poultry.
Food will be tender and juicy on the
inside and well-roasted on the outside.
Cook open-faced sandwiches, thin
cuts of meat (such as bacon), poulty,
shi, sausages and vegetables. Brown
the tops of casseroles, gratins and
desserts.
Cook food evenly throughout. Bake
cakes, mufns, pastries.
Gently reheat leftovers without
browning or drying them out.
Keep food warm at the recommended
temperature to prevent bacterial
growth.
Toast or brown bread.TOAST
PIZZA
BAGEL
ROAST
BROIL
BAKE
REHEAT
WARM
DEHYDRATE
COOKING FUNCTION QUICK REFERENCE CHART
BEFORE FIRST USE
12 13
400°F/205°C
150-450°F (65-230°C)
1 min ~30 min-

Insert the basket at middle or top
position.
Close the oven door and press START/
PAUSE button to begin cooking. The
button backlight will be steady on
during the cycle.
Place food in the air fry basket. Avoid
overlling the the basket, or food
may not be air fried correctly.When
air frying fatty foods (such as chicken
wings), insert the baking pan underneath
to catch oil drippings.
At the end of AIR FRY cycle, the oven
alert will sound. The START/PAUSE
button backlight will go out, and the
display reads "End".
Press PAUSE to stop cooking.
Take the fry basket out of the oven,
being careful of hot steam.
Shake or ip the food.
Put the basket back into the oven and
press START to resume cooking.
COOKING FUNCTION
AIR FRY TOAST
The AIR FRY function combines intense heat and maximized
air ow to cooking foods crispy and brown.
The TOAST function browns and crisps the outside of your
bread while keeping the inside soft and moist. It is also ideal
for English mufns and frozen wafes.
Heating Elements:
Top and bottom heating elements cycle on and off.
Accessory Position: Top/Middle
Heating Elements:
Top and bottom heating elements cycle on and off.
Accessory Position: Middle
NOTE
The temperature and time can be changed
anytime during cooking (except during
preheating), by turning corresponding
knobs.
NOTE
When setting the darkness level, consider
the type of thickness, and freshness of the
bread.
Use 1-21 for a light toast, 3-5 for a medium
and 6-7 for a dark toast.
Try lighter settings for raisin toast, white
bread and thinly sliced bread.
Try darker setting for rye, whole wheat,
heavier-textured bread and fresh bread.
NOTE
For better cooking result, a shake or ip of
the food during halfway is recommended.
Turn the FUNC. knob until the indicator
reaches the AIR FRY function. The top
gure on the display indicates the preset
temperature of 400°F/205°C, while the
bottom gure indicates the preset time
of 15 min.
Turn the TEMP. and Time knobs
to set your desired temperature
(200-450°F/95-230°C) and time (1min-
2hrs).
Place up to 6 slices of bread on the
wire rack. Insert the wire rack at middle
position and close the oven door.
Turn the FUNC. knob to TOAST, the
preset number of slices 4 blinks.
Turn the TIME knob to set the number
of slices.
Turn the TEMP. knob to set desired
darkness level between 1 to 7.
Close the oven door and press START/
PAUSE button to begin cooking. The
button backlight will be steady on
during the cycle.
At the end of TOAST cycle, the oven
alert will sound. The START/PAUSE
button backlight will go out, and the
display reads "End".
1.
1.
3.
4.
5.
6.
2.
2.
3.
4.
5.
6.
I.
II.
III.
IV.
Time and temperature are set
automatically. Time can be further changed
during toasting by turning TIME knob to
increase/decrease with darkness level.
14 15
After the PREHEAT alert has sounded,
the timer will automatically begin to
count down. The temperature and time
can be adjusted during the PIZZA cycle
by turning the corresponding TEMP and
TIME knob. The cycle can be be stopped
at any time by pressing the START/
PAUSE button.
At the end of the PIZZA cycle, the oven
alert will sound. The START/PUASE
button backlight will go out, and the
display reads "End".
cycle can be paused at any time by
pressing the START/PAUSE button.
At the end of BAGEL cycle, the oven
alert will sound. The START/PAUSE
button backlight will go out, and the
display reads "End".
Insert oven rack at middle position and
close the oven door.
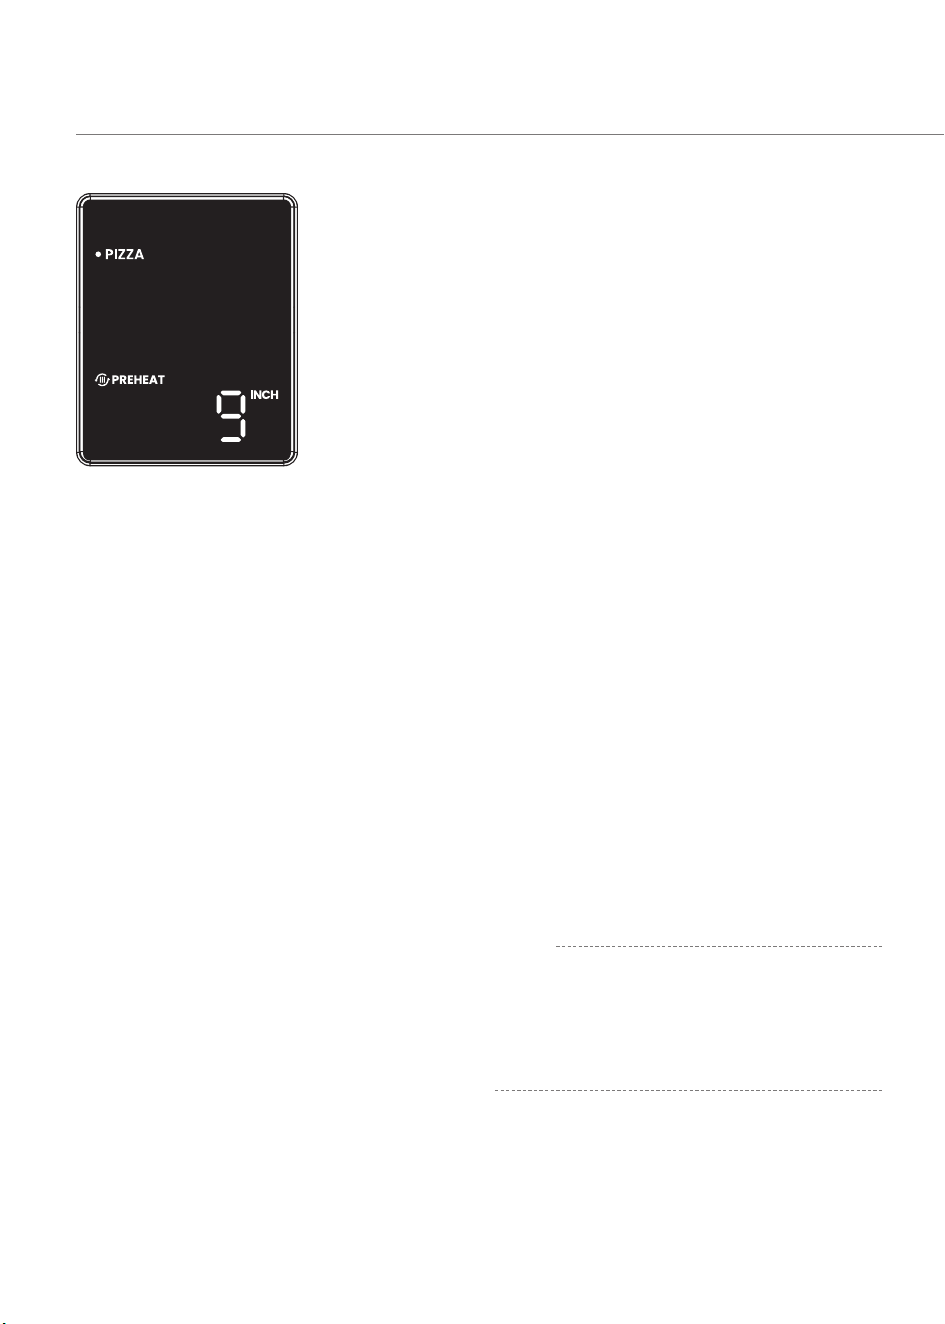
Turn the FUNC. knob to PIZZA, the
preset number of inches 9 blinks.
Turn the TIME knob to set desired
size between 6, 9 and 12. The cooking
temperature and time for each size are
preset to achieve cooking result.
Press START/PAUSE to begin reheating.
The display will indicate a blinking
PREHEAT.
Once the oven has reached the set
temperature, the alert will sound.
Open the oven door, place pizza on the
center of the wire rack so air will ow
around all sides of the pizza. Close the
oven door.
Insert oven rack at middle position.
Position bagel halves with cut side
facing upwards as close to the center of
the wire rack as possible for optimum
toasting results, and close the oven
door.
Turn the FUNC. knob until the indicator
reaches the BAGEL function. The top
gure on the display indicates the preset
darkness level 4, while the bottom
gure indicates the preset slices of 4.
Turn the TEMP. and TIME knob to set
your desired darkness level (1-7) and
number of slices(2-6).
Press START/PAUSE to begin. The timer
will count down. The button backlight
will be steady on during the cycle. The
time can be adjusted during the bagel
cycle by turning the TIME knob. The
PIZZA
The PIZZA function melts and browns cheese and toppings,
while crisping up the pizza crust.
Heating Elements:
Top and bottom heating elements cycle on and off.
Accessory Position: Middle
NOTE
If using a pizza pan or pizza stone, it is
necessary to preheat the pan or stone,
without a pizza, for optimum results.
NOTE
The inside (cut side) of the bagel must
always face upwards towards the top
heating elements. This allows the cut side
to get crisp while the crust is only lightly
toasted.
If you like you bagel halves equally crisp on
both the top and bottom, we recommend
using the TOAST function to toast you cut
bagel.
1. 1.7.
8.
4.
4.
5.
5.
6.
6.
2.
2.
3.
3.
BAGEL
The BAGEL function crisps the insides of your cut bagel
while only lightly toasting the outside. This function is also
ideal for toasting crumpets or think sliced specialty breads
which require one side be toasted more than other.
Heating Elements:
Top and bottom heating elements cycle on and off.
Accessory Position: Middle
COOKING FUNCTION
16 17

After the PREHEAT alert has sounded,
the timer will automatically begin to
count down. The temperature and time
can be adjusted during the PIZZA cycle
by turning the corresponding TEMP and
TIME knob. The cycle can be be stopped
at any time by pressing the START/
PAUSE button.
At the end of the PIZZA cycle, the oven
alert will sound. The START/PUASE
button backlight will go out, and the
display reads "End".
cycle can be paused at any time by
pressing the START/PAUSE button.
At the end of BAGEL cycle, the oven
alert will sound. The START/PAUSE
button backlight will go out, and the
display reads "End".
Insert oven rack at middle position and
close the oven door.
Turn the FUNC. knob to PIZZA, the
preset number of inches 9 blinks.
Turn the TIME knob to set desired
size between 6, 9 and 12. The cooking
temperature and time for each size are
preset to achieve cooking result.
Press START/PAUSE to begin reheating.
The display will indicate a blinking
PREHEAT.
Once the oven has reached the set
temperature, the alert will sound.
Open the oven door, place pizza on the
center of the wire rack so air will ow
around all sides of the pizza. Close the
oven door.
Insert oven rack at middle position.
Position bagel halves with cut side
facing upwards as close to the center of
the wire rack as possible for optimum
toasting results, and close the oven
door.
Turn the FUNC. knob until the indicator
reaches the BAGEL function. The top
gure on the display indicates the preset
darkness level 4, while the bottom
gure indicates the preset slices of 4.
Turn the TEMP. and TIME knob to set
your desired darkness level (1-7) and
number of slices(2-6).
Press START/PAUSE to begin. The timer
will count down. The button backlight
will be steady on during the cycle. The
time can be adjusted during the bagel
cycle by turning the TIME knob. The
PIZZA
The PIZZA function melts and browns cheese and toppings,
while crisping up the pizza crust.
Heating Elements:
Top and bottom heating elements cycle on and off.
Accessory Position: Middle
NOTE
If using a pizza pan or pizza stone, it is
necessary to preheat the pan or stone,
without a pizza, for optimum results.
NOTE
The inside (cut side) of the bagel must
always face upwards towards the top
heating elements. This allows the cut side
to get crisp while the crust is only lightly
toasted.
If you like you bagel halves equally crisp on
both the top and bottom, we recommend
using the TOAST function to toast you cut
bagel.
1. 1.7.
8.
4.
4.
5.
5.
6.
6.
2.
2.
3.
3.
BAGEL
The BAGEL function crisps the insides of your cut bagel
while only lightly toasting the outside. This function is also
ideal for toasting crumpets or think sliced specialty breads
which require one side be toasted more than other.
Heating Elements:
Top and bottom heating elements cycle on and off.
Accessory Position: Middle
COOKING FUNCTION
16 17

Insert air basket or rack at top position.
Close the oven door.
Turn the FUNC. knob until the indicator
reaches the DEHYDRATE function.
The top gure on the display indicates
the preset temperature of 150°F/65°C,
while the bottom gure indicates
the preset time of 4 hrs. The preset
CONVECTION setting will be also
displayed.
Turn the TEMP. and TIME knobs to set
your desired temperature (90-200°F/30-
95°C) and time (1 min-24 hrs. ).
Optionally, you can change them during
cooking.
Press START/PAUSE to begin. The timer
will count down. The button backlight
will be steady on during the cycle.
At the end of DEHYDRATE cycle, the
oven alert will sound. The START/PAUSE
button backlight will go out, and the
display reads "End".
Place the food on the air fry basket or
oven rack.
Turn the FUNC. knob until the indicator
reaches the ROAST function. The top
gure on the display indicates the preset
temperature of 400°F/205°C, while the
bottom gure indicates the preset time
of 1 hr.
Turn the TEMP. and TIME knobs
to set your desired temperature
(200-450°F/95-230°C) and time (1min-2
hrs ).
Place the food on the enamel baking
pan.
Insert the enamel baking pan at bottom
position.
Close the oven door and press START/
PAUSE to begin. The timer will count
down. The button backlight will be
steady on during the cycle.
At the end of ROAST cycle, the oven
alert will sound. The START/PAUSE
button backlight will go out, and the
display reads "End".
DEHYDRATE
The DEHYDRATE function combines low and stable heat
with steady airow to evenly dry out foods without cooking.
Idea for drying fruit or vegetable chips.
Heating Elements:
Top heating elements cycle on and off.
Accessory Position: To p
/
Middle
NOTE
When dehydrating foods that may drip,
such as marinated jerky, place the baking
pan in the bottom position to catch
drippings.
Optionally, to prevent staining when
dehydrating certain foods (such as beets
or marinated meats with dark sauces),
line the rack or basket with parchment
paper.
NEVER put parchment paper into oven
without food on top. Air circulation can
cause paper to move and touch heating
elements.
Optionally, lightly grease the enamel
baking pan or line with foil to prevent
food from sticking.
Use extreme caution when using foil
and always t foil as securely as possible.
To avoid overheating and risk of re,
make sure foil does not contact the
heating elements.
1. 1.
4.
4.
5.
5.
6.
6.
2.
2.
3.
3.
ROAST
The ROAST function is ideal for cooking a variety of meats
and poultry. Food will be tender and juicy on the inside and
roasted to perfection on the outside.
Heating Elements:
Top and bottom heating elements cycle on and off.
Accessory Position: Bottom
•
•
•
•
•
COOKING FUNCTION
18 19
can be adjusted during the BAKE cycle
by turning the corresponding TEMP and
TIME knob. The cycle can be be stopped
at any time by pressing the START/
PAUSE button.
At the end of the BAKE cycle, the oven
alert will sound. The START/PUASE
button backlight will go out, and the
display reads "End".
Insert the enamel baking pan at top
position. Insert at middle position
instead for:
Bulky food that may touch the top
heating elements
Thick food such as burger patties
Marinated food such as chicken wings
Food requiring a gentler broil
Close the oven door and press START/
PAUSE to begin. The timer will count
down. The button backlight will be
steady on during the cycle.
At the end of BROIL cycle, the oven
alert will sound. The START/PAUSE
button backlight will go out, and the
display reads "End".
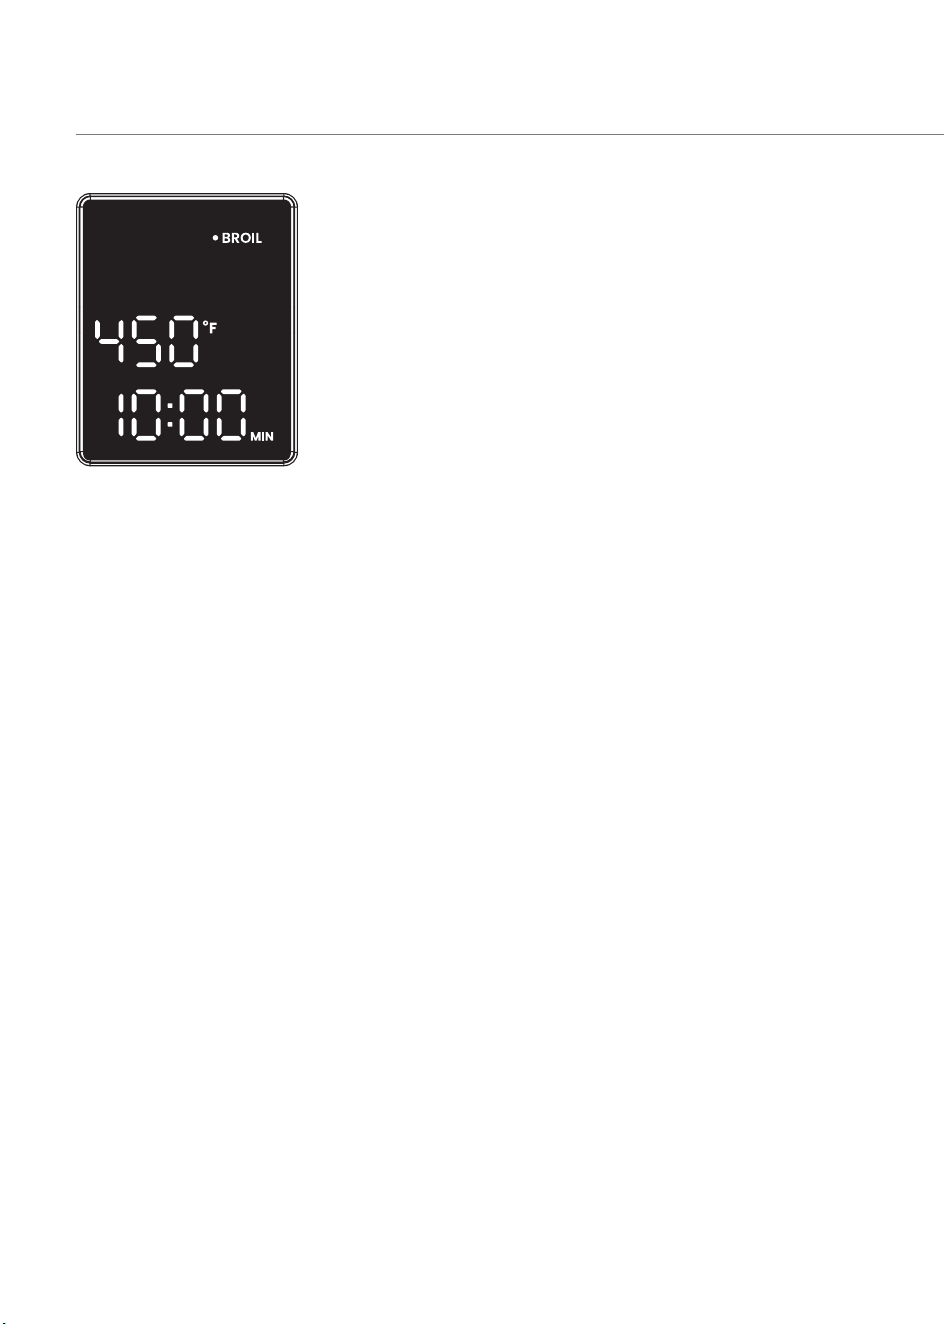
Turn the FUNC. knob until the indicator
reaches the BROIL function. The top
gure on the display indicates the preset
temperature of 450°F/230°C, while the
bottom gure indicates the preset time
of 10 mins.
Turn the TEMP. and TIME knobs
to set your desired temperature
(400-450°F/205-230°C) and time (1
min-2 hrs. ). Optionally, you can change
them during cooking.
Place the food on the baking pan.
Optionally, lightly grease the enamel
baking pan or line with foil to prevent
food from sticking.
Use extreme caution when using foil
and always t foil as securely as possible.
To avoid overheating and risk of re,
make sure foil does not contact the
heating elements.
If using the enamel baking pan, insert
at middle position and close the oven
door for preheating.
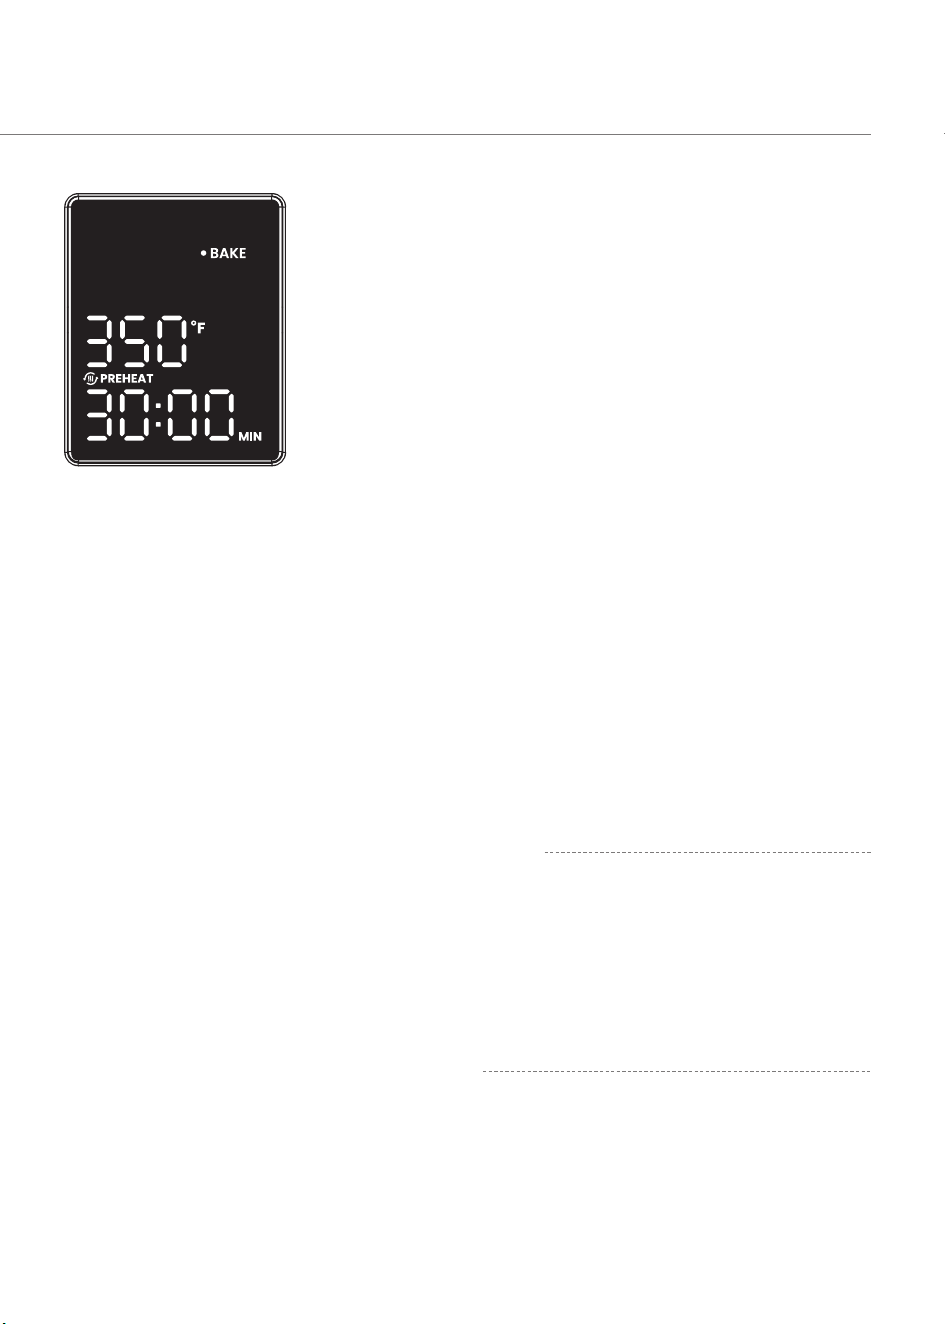
Turn the FUNC. knob until the indicator
reaches the BAKE function. The top
gure on the display indicates the preset
temperature of 350°F/175°C, while the
bottom gure indicates the preset time
of 30 mins.
Turn the TEMP. and TIME knobs
to set your desired temperature
(150-450°F/65-230°C) and time (1 min-
2 hrs. ).
Once the oven has reached the set
temperature, the alert will sound.
Open the oven door, place food inside
the oven with caution.
After the PREHEAT alert has sounded,
the timer will automatically begin to
count down. The temperature and time
BROIL
The BROIL function is ideal for cooking open-faced
sandwiches, thin cuts of meat, poultry and sh, sausages and
vegetables. Broiling can also be used to brown the tops of
casseroles, gratins and desserts.
Heating Elements:
Top and bottom heating elements cycle on and off.
Accessory Position: Top/Middle
1. 1.4.
4.
5.
5.
6.
6.
7.
2.
2.
3.
3.
BAKE
The BAKE function is to cook food evenly throughout. It is
ideal for baking cakes, mufns, brownies and pastries. Also
ideal for cooking pre-packaged frozen meals such as lasagna
and pot pies.
Heating Elements:
Top and bottom heating elements cycle on and off.
Accessory Position: Middle
•
•
•
•
•
•
NOTE
To prevent damaging to the enamel
pan when baking citric acid ingredients
(oranges, lemons), always line the pan with
foil or parchment paper. Use extremely
caution. Secure foil and make sure it does
not touch the heating elements.
COOKING FUNCTION
20 21
can be adjusted during the BAKE cycle
by turning the corresponding TEMP and
TIME knob. The cycle can be be stopped
at any time by pressing the START/
PAUSE button.
At the end of the BAKE cycle, the oven
alert will sound. The START/PUASE
button backlight will go out, and the
display reads "End".
Insert the enamel baking pan at top
position. Insert at middle position
instead for:
Bulky food that may touch the top
heating elements
Thick food such as burger patties
Marinated food such as chicken wings
Food requiring a gentler broil
Close the oven door and press START/
PAUSE to begin. The timer will count
down. The button backlight will be
steady on during the cycle.
At the end of BROIL cycle, the oven
alert will sound. The START/PAUSE
button backlight will go out, and the
display reads "End".
Turn the FUNC. knob until the indicator
reaches the BROIL function. The top
gure on the display indicates the preset
temperature of 450°F/230°C, while the
bottom gure indicates the preset time
of 10 mins.
Turn the TEMP. and TIME knobs
to set your desired temperature
(400-450°F/205-230°C) and time (1
min-2 hrs. ). Optionally, you can change
them during cooking.
Place the food on the baking pan.
Optionally, lightly grease the enamel
baking pan or line with foil to prevent
food from sticking.
Use extreme caution when using foil
and always t foil as securely as possible.
To avoid overheating and risk of re,
make sure foil does not contact the
heating elements.
If using the enamel baking pan, insert
at middle position and close the oven
door for preheating.
Turn the FUNC. knob until the indicator
reaches the BAKE function. The top
gure on the display indicates the preset
temperature of 350°F/175°C, while the
bottom gure indicates the preset time
of 30 mins.
Turn the TEMP. and TIME knobs
to set your desired temperature
(150-450°F/65-230°C) and time (1 min-
2 hrs. ).
Once the oven has reached the set
temperature, the alert will sound.
Open the oven door, place food inside
the oven with caution.
After the PREHEAT alert has sounded,
the timer will automatically begin to
count down. The temperature and time
BROIL
The BROIL function is ideal for cooking open-faced
sandwiches, thin cuts of meat, poultry and sh, sausages and
vegetables. Broiling can also be used to brown the tops of
casseroles, gratins and desserts.
Heating Elements:
Top and bottom heating elements cycle on and off.
Accessory Position: Top/Middle
1. 1.4.
4.
5.
5.
6.
6.
7.
2.
2.
3.
3.
BAKE
The BAKE function is to cook food evenly throughout. It is
ideal for baking cakes, mufns, brownies and pastries. Also
ideal for cooking pre-packaged frozen meals such as lasagna
and pot pies.
Heating Elements:
Top and bottom heating elements cycle on and off.
Accessory Position: Middle
•
•
•
•
•
•
NOTE
To prevent damaging to the enamel
pan when baking citric acid ingredients
(oranges, lemons), always line the pan with
foil or parchment paper. Use extremely
caution. Secure foil and make sure it does
not touch the heating elements.
COOKING FUNCTION
20 21

Turn the TEMP. and TIME knobs
to set your desired temperature
(100-300°F/40-150°C) and time (1 min-
4 hrs. ).
Press START/PAUSE to begin. The timer
will count down. The button backlight
will be steady on during the cycle.
At the end of WARM cycle, the oven
alert will sound. The START/PAUSE
button backlight will go out, and the
display reads "End".
Turn the TEMP. and TIME knobs
to set your desired temperature
(150-450°F/65-230°C) and time (1min-1
hr).
Press START/PAUSE to begin. The timer
will count down. The button backlight
will be steady on during the cycle.
At the end of REHEAT cycle, the oven
alert will sound. The START/PAUSE
button backlight will go out, and the
display reads "End".
Place food, positioned on the included
enamel baking pan or other oven-proof
dish, on the center of the wire rack.
Insert at bottom position.
Turn the FUNC. knob until the indicator
reaches the REHEAT function. The top
gure on the display indicates the preset
temperature of 350°F/175°C, while the
bottom gure indicates the preset time
of 10 mins.
Place food, positioned on the included
enamel baking pan or other oven-proof
dish, on the center of the wire rack.
Insert at bottom position.
Turn the FUNC. knob until the indicator
reaches the WARM function. The top
gure on the display indicates the preset
temperature of 180°F/80°C, while the
bottom gure indicates the preset time
of 1 hr.
REHEAT
The REHEAT function is ideal for gently reheating leftovers
without browning or drying them out.
Heating Elements:
Top and bottom heating elements cycle on and off.
Accessory Position: Bottom
1. 1.
4. 4.
5.
5.
2. 2.
3. 3.
WARM
The WARM function is designed to keep food warm at the
recommended temperature to prevent bacterial growth.
(160°F/70°C or above)
Heating Elements:
Top and bottom heating elements cycle on and off.
Accessory Position: Bottom
COOKING FUNCTION
22 23

Turn the TEMP. and TIME knobs
to set your desired temperature
(100-300°F/40-150°C) and time (1 min-
4 hrs. ).
Press START/PAUSE to begin. The timer
will count down. The button backlight
will be steady on during the cycle.
At the end of WARM cycle, the oven
alert will sound. The START/PAUSE
button backlight will go out, and the
display reads "End".
Turn the TEMP. and TIME knobs
to set your desired temperature
(150-450°F/65-230°C) and time (1min-1
hr).
Press START/PAUSE to begin. The timer
will count down. The button backlight
will be steady on during the cycle.
At the end of REHEAT cycle, the oven
alert will sound. The START/PAUSE
button backlight will go out, and the
display reads "End".
Place food, positioned on the included
enamel baking pan or other oven-proof
dish, on the center of the wire rack.
Insert at bottom position.
Turn the FUNC. knob until the indicator
reaches the REHEAT function. The top
gure on the display indicates the preset
temperature of 350°F/175°C, while the
bottom gure indicates the preset time
of 10 mins.
Place food, positioned on the included
enamel baking pan or other oven-proof
dish, on the center of the wire rack.
Insert at bottom position.
Turn the FUNC. knob until the indicator
reaches the WARM function. The top
gure on the display indicates the preset
temperature of 180°F/80°C, while the
bottom gure indicates the preset time
of 1 hr.
REHEAT
The REHEAT function is ideal for gently reheating leftovers
without browning or drying them out.
Heating Elements:
Top and bottom heating elements cycle on and off.
Accessory Position: Bottom
1. 1.
4. 4.
5.
5.
2. 2.
3. 3.
WARM
The WARM function is designed to keep food warm at the
recommended temperature to prevent bacterial growth.
(160°F/70°C or above)
Heating Elements:
Top and bottom heating elements cycle on and off.
Accessory Position: Bottom
COOKING FUNCTION
22 23

Apply non-abrasive liquid cleanser or
a mild spray solution to a soft, damp
sponge or soft, plastic scouring pad (not
the accessory surface). Wipe accessories
and soak in warm, soapy water if
necessary.
For stubborn grease:
In a small bowl, mix 2 US tbsp / 30 mL
of baking soda with 1 US tbsp / 15 mL
of water to form a spreadable paste.
Use a sponge to spread the paste on
the trays and scrub. Let the trays sit for
15 minutes before rinsing.
Wash trays with soap and water.
Dry thoroughly.
Replace the crumb tray into the oven
before plugging in or turning on the
oven.
Ensure the oven is turned off by
removing the power plug from the
power outlet.
Allow the oven and all accessories to
cool completely before disassembling
and cleaning.
Ensure the oven and all accessories are
clean and dry.
Insert the crumb tray into the oven.
Insert the rack at up position, fry basket
at middle and baking pan at bottom.
Ensure the door is closed.
Store the appliance in an upright
position standing level on its support
legs. Do not store anything on top.
CARE & MAINTENANCE
WARNING
CLEANING THE ACCESSORIES
STORAGE
Use extreme caution when cleaning the
quartz heating elements.
Allow the oven to cool completely, then
gently rub a soft, damp sponge or cloth
along the length of the heating element.
Do not use any type of cleanser or
cleaning agent.
Let all surface dry thoroughly prior to
inserting the power plug into a power
outlet and turning the oven on.
Clean oven accessories (including crumb
tray etc.) and oven interior after every use.
•
•
•
•
NOTE
NOTE
After each use, slide out the crumb tray
and discard crumbs.
Do not use abrasive cleaners, metal
scouring pads, or metal utensils on any
part of the oven, including trays and
other accessories. These will scratch or
damage their surfaces.
This oven contains no user-serviceable
parts. Any repairs should be performed
by an authorized service representative.
•
•
Before cleaning, turn off and unplug the
oven, and allow it to cool completely.
Open the door for faster cooling.
Apply non-abrasive liquid cleanser or a
mild spray solution to a soft, damp cloth
or sponge (not the oven surface) and
wipe all parts of the oven. Do not use
a dry cloth on the display screen, or it
may be scratched.
To clean the glass door, use a glass
cleaner or mild detergent and a soft,
damp sponge or soft,plastic scouring
pad.
Let all surfaces dry completely before
plugging in or turning onthe oven.
1.
1.
1.
2.
2.
2.
a.
b.
c.
3.
3.
3.
4.
4.
4.
5.
6.
24 25

TROUBLESHOOTING CUSTOMER SUPPORT
If you have any questions or concerns about your new product, please contact our helpful
customer support team.
The oven will not turn on.
Make sure the oven is plugged in. Insert the power
plug into an independent or different outlet.
Decrease cooking temperature or time. Make sure
food items are not too large and are not touching
the heating elements.
Some large pizzas may brown unevenly in compact
ovens. Open the oven door half way through the
cooking time and turn the pizza 90/180 degrees for
more even darkness.
Make sure food items are not too closely packed
into a tray, rack, or other container.
The oven may produce some white smoke or steam
during cooking. This is normal.
During rst use, dust from the packing process may
cause white smoke. This is normal for toaster ovens
and many other kitchen appliances. To eliminate any
dust, see Test Run (page 10).
Excess oil or fatty foods may produce white smoke.
Make sure the inside of the oven is cleaned properly
and isn't greasy.
Immediately press START/PAUSE button and unplug
your oven. Food is burning. Wait for smoke to clear
before opening the oven door.
This is normal. The door is vented to release steam
created from high moisture content foods such as
frozen breads. Be mindful that the steam can be hot.
Commonly used thermometers usually have low
sensitivity and take over 10 minutes to measure the
correct temperature. This will not affect cooking.
Note that the ‘Preheat’ alert sounds at 75% of the
target temperature.
NOTE : If the problem is not listed, please contact CUSTOMER SUPPORT
Increase cooking temperature or time.
Food is not completely cooked.
Food is overcooked or burned.
Food is cooked unevenly.
White smoke or steam is
coming out of the oven.
Dark smoke is coming out of
the oven.
Steam is coming out from the
oven door
A thermometer shows that the
oven temperature is different
from the oven setting.
VAL CUCINA USA LLC
4340 Von Karman Ave, Suite 330,
Newport Beach, CA 92660
Possible Problem Easy Solution
Tel:+1(949) 6682018
Email:ser[email protected]
www.valcucina.com
26 27

LIMITED WARRANTY
RETURN POLICY
OBTAINING WARRANTY SERVICE
WHAT THIS LIMITED WARRANTY COVERS / DOES NOT COVER
VAL CUCINA USA LLC, for itself and its related companies (collectively, “VAL CUCINA”),
warrants (the “Limited Warranty”) that your VAL CUCINA Products will be free from
defects in material or workmanship for one (1) year from the date of delivery provided
that you have replaced the spare parts and consumables with original VAL CUCINA brand
according to the manufacturer recommended schedule listed in the VAL CUCINA User
Manual. The date of delivery establishes the warranty period, should service be required
VAL CUCINA’s obligation and liability under this Limited Warranty is limited to repairing
or replacing, at VAL CUCINA’s sole discretion, a defective unit.
To extend the Limited Warranty from one year to two (2) years, simply complete and
return the product warranty registration to VAL CUCINA within 30 days from your
purchase.
Within the rst 30 days of delivery VAL CUCINA will replace a defective unit at no
charge to you and reimburse any shipping charges. In order to return a VAL CUCINA
product pursuant to this Limited Warranty, please contact VAL CUCINA Customer
Service at +1 949-668-2018 between 9:00 AM and 5:00PM, Monday through Friday, and
request a Return Authorization Number (RA#) with shipping instructions. After 30 days,
VAL CUCINA’s obligation and liability under this Limited Warranty is limited to repairing
or replacing (at its sole discretion) a defective unit and paying the freight cost of returning
the unit to you.
In the event of a malfunction or failure of your VAL CUCINA Products, please contact
VAL CUCINA directly at +1 949-668-2018or visit www.VALCUCINA.com for further
assistance.
Your Limited Warranty remains in effect only if your VAL CUCINA Products:
Is operated in accordance with the instructions provided.
Has had its spare parts and consumables changed with original VAL CUCINA brand
according to the manufacturer recommended schedule listed in the VAL CUCINA
User Manual.
Is connected to a proper power supply (see voltage label on machine).
Warranty provisions may vary from country to country. For details, please refer to
www.VALCUCINA.com for the detailed warranty conditions provided by the
VAL CUCINA distributor in your country of delivery.
This Limited Warranty is not assignable or transferable.
Please scan QR code or visit www.VALCUCINA.com for limited warranty registration.
LIMITATION OF LIABILITY AND REMEDIES
V
AL CUCINA assumes no warranty liability in connection with the VAL CUCINA
product other than specied herein. Any implied warranties under this Limited Warranty
are provided by VAL CUCINA for the duration of this Limited Warranty, after which
VAL CUCINA expressly disclaims all implied warranties, including any warranty of
merchantability or fitness for a particular purpose.
VAL CUCINA’S SOLE RESPONSIBILITY AND LIABILITY INCURRED AS A RESULT
OF THE SALE AND/OR USE OF THE VAL CUCINA PRODUCT, AND YOUR
EXCLUSIVE REMEDY AGAINST VAL CUCINA UNDER ANY WARRANTY SHALL
BE LIMITED TO THE REPAIR OR REPLACEMENT, AT VAL CUCINA’S OPTION, OF
THE VAL CUCINA PRODUCT NOT CONFORMING TO THE WARRANTY. THE
TOTAL LIABILITY OF VAL CUCINA SHALL IN NO EVENT EXCEED THE AMOUNT
ACTUALLY PAID TO VAL CUCINA FOR THE VAL CUCINA PRODUCT. THIS
LIMITATION OF REMEDIES IS INTENDED BY THE PARTIES TO SURVIVE EVEN IF
THE REMEDY IS CLAIMED TO HAVE FAILED OF ITS ESSENTIAL PURPOSE. IN NO
EVENT SHALL VAL CUCINA BE LIABLE TO YOU, OR YOUR ASSIGNS OR AGENTS,
FOR ECONOMIC LOSS, INCIDENTAL OR CONSEQUENTIAL DAMAGES, IN
CONTRACT OR IN TORT, INCLUDING BUT NOT LIMITED TO ANY DAMAGES
FOR LOST PROFITS.
OTHER CONDITIONS
If VAL CUCINA chooses to replace the unit, VAL CUCINA may replace it with a
reconditioned unit.
YOUR RIGHTS UNDER STATE LAW
This Limited Warranty gives you specific legal rights, and you may have other legal rights
which vary from state to state.
1.
2.
3.
There is no evidence of tampering, mishandling, neglect, accidental damage,
modication, and/or repair done to the VAL CUCINA Products by anyone other than
authorized VAL CUCINA service personnel.
4.
28 29


PN:16171000A21588