
1
Installation Guide
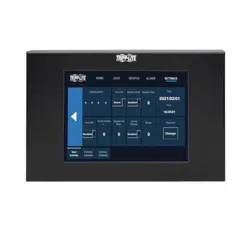
Display Bracket for
SRCOOL3KTP Cooling Units
Model: SRCOOL3KDISPBKT
1111 W. 35th Street, Chicago, IL 60609 USA • tripplite.com/support
Copyright © 2022 Tripp Lite. All rights reserved.
WARRANTY REGISTRATION
Register your product today and be
automatically entered to win an ISOBAR
®
surge protector in our monthly drawing!
tripplite.com/warranty
Español 4 • Français 7

2
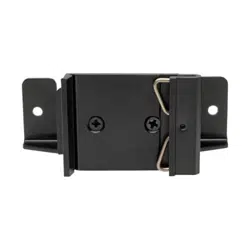
To Install the LCD
1
Place the LCD screen into the metal bezel to protect the glass edge of the LCD.
2
Place the LCD screen into the opening in the display bracket. Cable securing points should be at the bottom:
3
Place the supplied fasteners into the slots of the LCD panel.
4
Hand-tighten the screws until they make contact with the bracket.
5
Torquethescrewsto5in●lb(0.56N●m).Donotexceed6.17in●lb(0.7N●m).Otherwise,theglassmaycrack.
Installation
Bottom

3
1111 W. 35th Street, Chicago, IL 60609 USA • tripplite.com/support
22-03-04793-419B_RevA
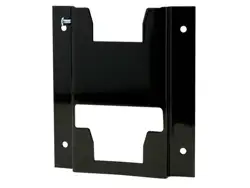
Installation
Attach the Cables to the LCD and Bracket
1
AttachthesuppliedrightangleDB9connectortotheLCDdisplayandtheDB9cablefromtheunittotherightangle
adapter. Then connect the power cable to the LCD display.
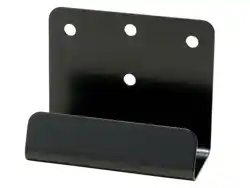
2
Securethecablestothedisplaybracketusingzipties(usersupplied).
3
Cable routing:
• It is up to the end user to determine the best routing method for the rack in use.
• Cables should be secured to the rack near the connection point on the SRCOOL3KTP to prevent accidental
disconnection.
• Ifcablesareroutedthroughexistingopeningsoropeningsaddedbytheuser,careshouldbetakentomakesure
there are no sharp edges that can damage the cables.
Bracket placement:
• The bracket uses magnets to attach to the surface of the rack.
• It is recommended to place the display in a place on the rack that it is easily visible.
TrippLitehasapolicyofcontinuousimprovement.Specicationsaresubjecttochangewithoutnotice.Photosand
illustrationsmaydierslightlyfromactualproducts.

4
Guía de Instalación
Soporte de Pantalla
para Unidades de
Enfriamiento SRCOOL3KTP
Modelo: SRCOOL3KDISPBKT
1111 W. 35th Street, Chicago, IL 60609 EE. UU. • tripplite.com/support
Copyright © 2022 Tripp Lite. Todos los derechos reservados.
English 1 • Français 7

5
Para Instalar el LCD
1
Coloque la pantalla LCD en el bisel metálico para proteger el borde de vidrio del LCD.
2
Coloque la pantalla LCD en la abertura del soporte de pantalla. Los puntos de sujeción del cable deben estar en la
parte inferior:
3
Coloque los sujetadores suministrados en las ranuras del panel LCD.
4
Apriete manualmente los tornillos hasta que hagan contacto con el soporte.
5
Aprietelostornillosa0.56N●m[5lbspulg●lb].Noexceda0.7N●m[6.17pulg●lb].Delocontrario,elvidriopuede
romperse.
Instalación
Parte inferior

6
1111 W. 35th Street, Chicago, IL 60609, EE. UU. • tripplite.com/support
22-03-04793-419B_RevA
Instalación
Fije los Cables al LCD y al Soporte
1
FijeelconectorDB9suministradoenángulorectoalapantallaLCDyelcableDB9delaunidadaladaptadoren
ángulo recto. Después conecte el cable de alimentación a la pantalla LCD.
2
Fije los cables al soporte de pantalla usando cintillos de amarre (suministrados por el usuario).
3
Conducción del cable:
• Dependedelusuarionaldeterminarelmejormétododeenrutamientoparaelrackenuso.
• LoscablesdebenjarsealrackcercadelpuntodeconexiónenelSRCOOL3KTPparaevitarunadesconexión
accidental.
• Siloscablessonconducidosatravésdeaberturasexistentesoaberturasagregadasporelusuario,debetenerse
cuidadodeasegurarquenohayabordesaladosquepuedandañarloscables.
Colocación del soporte:
• Elsoporteusaimanesparajarsealasuperciedelrack.
• Esrecomendablecolocarlapantallaenunlugarsobreelrackqueseafácilmentevisible.
TrippLitetieneunapolíticademejoracontinua.Lasespecicacionesestánsujetasacambiosinprevioaviso.Las
fotografías e ilustraciones pueden diferir ligeramente de los productos reales.

7
Guide d'installation
Support d'écran pour
les appareils
de refroidissement
SRCOOL3KTP
Modèle : SRCOOL3KDISPBKT
1111 W. 35th Street, Chicago, IL 60609 USA • tripplite.com/support
Droits d'auteur © 2022 Tripp Lite. Tous droits réservés.
English 1 • Español 4

8
Pour installer l'écran ACL
Installation
Bas
Fixer les câbles à l'écran ACL et au support.
1
Fixer le connecteur DB9 à angle droit fourni à l'écran ACL et le câble DB9 de l'appareil à l'adaptateur à angle droit.
Raccorder ensuite le câble d'alimentation à l'écran ACL.
2
Fixer les câbles au support d'écran en utilisant des attaches mono-usage (fournies par l'utilisateur).
3
Acheminement des câbles :
• Ilappartientàl'utilisateurnaldedéterminerlameilleureméthodederoutagepourlebâtiutilisé.
• LescâblesdoiventêtrexésaubâtiprèsdupointdeconnexionsurleSRCOOL3KTPpouréviterunedéconnexion
accidentelle.
• Silescâblessontacheminésàtraverslesouverturesexistantesoulesouverturesajoutéesparl'utilisateur,veillerà
ce qu'il n'y ait pas de bords tranchants susceptibles d'endommager les câbles.
Placementdusupport:
• Lesupportutilisedesaimantspoursexeràlasurfacedubâti.
• Il est recommandé de placer l'écran dans un endroit facilement visible sur le bâti.
LapolitiquedeTrippLiteenestuned'améliorationcontinue.Lescaractéristiquestechniquessontmodiablessans
préavis.Lesproduitsréelspeuventdiérerlégèrementdesphotosetdesillustrations.
1111 W. 35th Street, Chicago, IL 60609 USA • tripplite.com/support
22-03-04793-419B_RevA
1
Placerl'écranACLdanslecadremétalliquepour
protéger le bord en verre de l'écran ACL.
2
Placerl'écranACLdansl'ouverturedusupportd'écran.
Lespointsdexationdescâblesdoiventsetrouver
dans la partie inférieure :
3
Placerlesxationsfourniesuniquementdansles
fentes du panneau ACL.
4
Serrerlesvisàlamainjusqu'àcequ'ellesentrenten
contact avec le support.
5
Serrerlesvisà0,56N●m(5lb●po)Nepasexcéder0,7
N●m(6,17lb●po).Sinon,leverrepourraitsefendre.