Loading ...
Loading ...
Loading ...
a
e
b
d
c
6
Weekly Cleaning & Care
WARNING: Before cleaning always turn power OFF and unplug the unit from outlet.
WARNING: DO NOT rinse Base under faucet. To clean, wipe the Base with a paper towel.
WARNING: DO NOT use any solvents or aggressive cleaning agents. Keep water away
from the Air Outlet.
WARNING: DO NOT tamper with the Water Sensor.
About White Dust -Use of high-mineral content water may cause a white mineral residue to
accumulate on room surfaces near the humidier. The mineral residue is commonly referred to as
“White Dust”. The higher the mineral content (the harder your water is), the greater the potential for
White Dust. The White Dust is not caused by a defect in the humidier, but is due only to minerals
suspended in the water from your tap.
WARNING: If you have hard tap water STOP using tap
water and use ONLY ltered, distilled, cold boiled or bottled water to minimize the White Dust
residue.
Tank Cleaning - Remove the Directional Mist Nozzle from the top of the Left Water Tank then
remove the Water Tanks from the unit. Turn each tank upside down, unscrew the Tank Cap and
drain any water from the tanks. Wipe the tanks with a soft damp cloth then rinse it with warm
water inside and out.
Base Cleaning - Gently wipe the Base with a soft damp cloth.
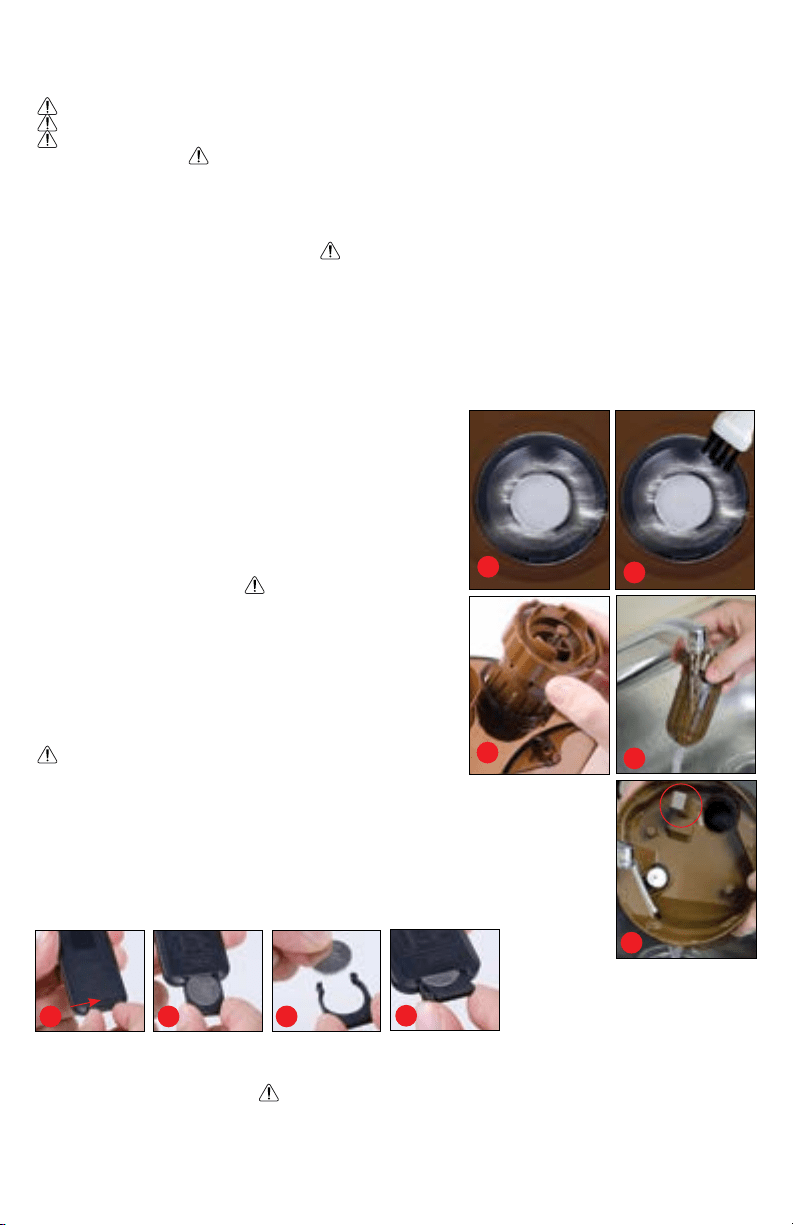
White Dust Cleaning - If mineral deposits
“White Dust” are evident around the Ultrasonic
Nebulizer and Water Sensor, clean these surfaces
with a soft cloth and a small amount of undiluted
white vinegar. If necessary, mix a solution of 50%
white vinegar and 50% water and ll the Base with
enough solution to cover the Ultrasonic Nebulizer (a).
Allow it to soak for an hour and then use the provided
brush to gently loosen buildup on the Ultrasonic
Nebulizer (b). Put 1 cup of water in the Base and
wipe clean with a soft cloth.
WARNING: DO NOT
rinse Base under faucet.
Ceramic Water Filter Cleaning - Remove the
Water Tanks from the humidier Base. Remove the
Tank Cap (c) and rinse Ceramic Filter thoroughly with
tap water (d), then replace on Water Tanks.
Surface Cleaning - Clean all surfaces of the unit with
a clean damp soft cloth.
WARNING: When emptying the Water Reservoir on
the Base, make sure that the water is poured away from
the Air Outlet (e). If water is poured into the outlet it
may damage the humidier.
1. Follow all cleaning instructions prior to storage.
2. Dry all parts, including the inside of the Water Tanks.
WARNING: NEVER
leave water inside the tanks for several days.
3. Leave the Tank Caps partially loosened to prolong the life
of the caps.
4. Preferably store in its original box, in a dry place away from
high temperatures.
5. Follow all cleaning instructions after long periods of storage.
Storage
f g h
Replacing The Remote Control Battery - Push the tab to the left of the
battery tray towards the right to unlock the tray. (f) While the the tab is pushed,
pull out the battery tray. (g) Remove the battery from the tray and replace it with
a new 3 volt lithium battery (CR2025) with the positive side facing up. (h) Insert
the tray back into the bottom of the remote contol until it locks in. (i)
i
Loading ...
Loading ...
Loading ...