
EN
PG.20
www.napoleon.com
N415-0705-AU REV - MAY 11.22
DANGER
IF YOU SMELL GAS:
• Shut o gas to the appliance.
• Exnguish any open ame.
• Open lid.
• If odor connues, keep away from the
appliance and immediately call your gas
supplier or re department.
APPLY SERIAL NUMBER LABEL FROM CARTON
Serial No.
XXXXXX000000
MODEL NO.
This gas grill must be used only outdoors in a well-venlated space and must not be used inside a
building, garage, screened-in porch, gazebo or any other enclosed area.
DO NOT DISCARD
Noce to Installer: Leave these instrucons with the grill owner for future reference.
Adults and especially children should be alerted to the hazards of high surface temperatures.
Young children should be supervised near the gas grill.
Wolf Steel Ltd.
214 Bayview Drive,
Barrie, Ontario, CANADA L4N 4Y8
WARNING
Do not try to light this appliance without
reading the “lighng” instrucons secon of
this manual.
Do not use or store gasoline or other
ammable liquids or vapors near this
appliance.
A ULPG cylinder not connected for use must
not be stored near this or any other appliance.
If the informaon in these instrucons is
not followed exactly, a re or explosion may
result, causing property damage, personal
injury or death.
IAPMO GMK10539
AS/NZS 5263.1.7
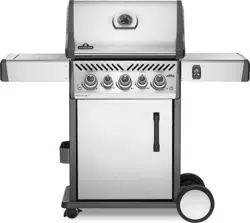
ROGUE-1
RXT425SB/SIB
RXT525SB/SIB
RXT625SB/SIB
!
!
2
www.napoleon.com
N415-0705-AU REV - MAy 11.22
Aluminum castings / stainless steel base
...........................................
15 years
Stainless steel lid
................................................................................
15 years
Porcelain enamel lid
...........................................................................
15 years
Stainless steel cooking grids
..............................................................
15 years
Stainless steel tube burners
...............................................................
10 years full coverage, plus 50% off until the 15th year
Stainless steel sear plates 5 years full coverage, plus 50% off until the 15th year
.....................................
5 years full coverage, plus 50% off until the 15th year
Ceramic infrared burners (excluding screen)
................................
5
years full coverage, plus 50% off until the 15th year
All other parts
www.napoleon.com
NNaappoolleeoonn PPrreessiiddeenntt’’ss 1155 YYeeaarr LLiimmiitteedd WWaarrrraannttyy
NAPOLEON products are designed with superior components and materials, and are assembled by trained
craftsmen who take great pride in their work. The burner and valve assembly are leak tested and test-fired at a
quality test station. This grill has been thoroughly inspected by a qualified technician before packaging and shipping
to ensure that you, the customer, receive the quality product you expect from NAPOLEON.
NAPOLEON warrants that components in your new NAPOLEON product will be free from defects in material and
workmanship from the date of purchase, for the following period:
...............................................................
2 years
................................................................................
Porcelain-enameled cast iron cooking grids
*Conditions and Limitations
This Limited Warranty creates a warranty period as specified in the
aforementioned table, for any product purchased through an authorized NAPOLEON
dealer, and entitles the original purchaser to the specified coverage in respect of
any component replaced within the warranty period, either by NAPOLEON or an
authorized NAPOLEON dealer, to replace a component of such product that has
failed in normal private use as a result of a manufacturing defect. The “50% off”
indicated in the table means the component is made available to the purchaser at
a 50% discount off the regular retail price of the component for the period
indicated. This Limited Warranty does not cover accessories or bonus items.
For greater certainty, “normal private use” of a product means that the product:
has been installed by a licensed, authorized service technician or contractor, in
accordance with the installation instructions included with the product and all
local and national building and fire codes; has been properly maintained; and has
not been used as a communal amenity or in a commercial application.
Similarly, “failure” does not include: over-firing, blow outs caused by
environmental conditions such as strong winds or inadequate ventilation,
scratches, dents, corrosion, deterioration of painted and plated finishes,
discoloration caused by heat, abrasive or chemical cleaners or UV exposure,
chipping of porcelain enameled parts, or damages caused by misuse, accident,
hail, grease fires, lack of maintenance, hostile environments such as salt or
chlorine, alterations, abuse, neglect or parts installed from other manufacturers.
Should deterioration of parts occur to the degree of non-performance (rusted
through or burnt through) within the duration of the warranted coverage, a
replacement part will be provided. The replacement component is the sole
responsibility of NAPOLEON defined by this Limited Warranty; in no event will
NAPOLEON be responsible for installation, labor or any other costs or expenses
related to the re-installation of a warranted part, for any incidental, consequential,
or indirect damages or for any transportation charges, labor costs or export duties.
This Limited Warranty is provided in addition to any rights afforded to you by local
laws. Accordingly, this Limited Warranty imposes no obligation upon NAPOLEON to
keep parts in stock. Based on the availability of parts, NAPOLEON may at its
discretion discharge all obligations by providing a customer a prorated credit
towards a new product. After the first year, with respect to this Limited Warranty
NAPOLEON may, at its discretion, fully discharge all obligations with respect to this
warranty by refunding to the original warranted purchaser the wholesale price of
any warranted but defective part(s).
The bill of sale or copy will be required together with a serial number and a
model number when making any warranty claims from NAPOLEON.
NAPOLEON reserves the right to have its representative inspect any product
or part prior to honoring any warranty claim. You must contact NAPOLEON
Customer Service or an authorized NAPOLEON dealer to obtain the benefit of
the warranty coverage.

3
www.napoleon.com
N415-0705-AU REV - MAY 11.22
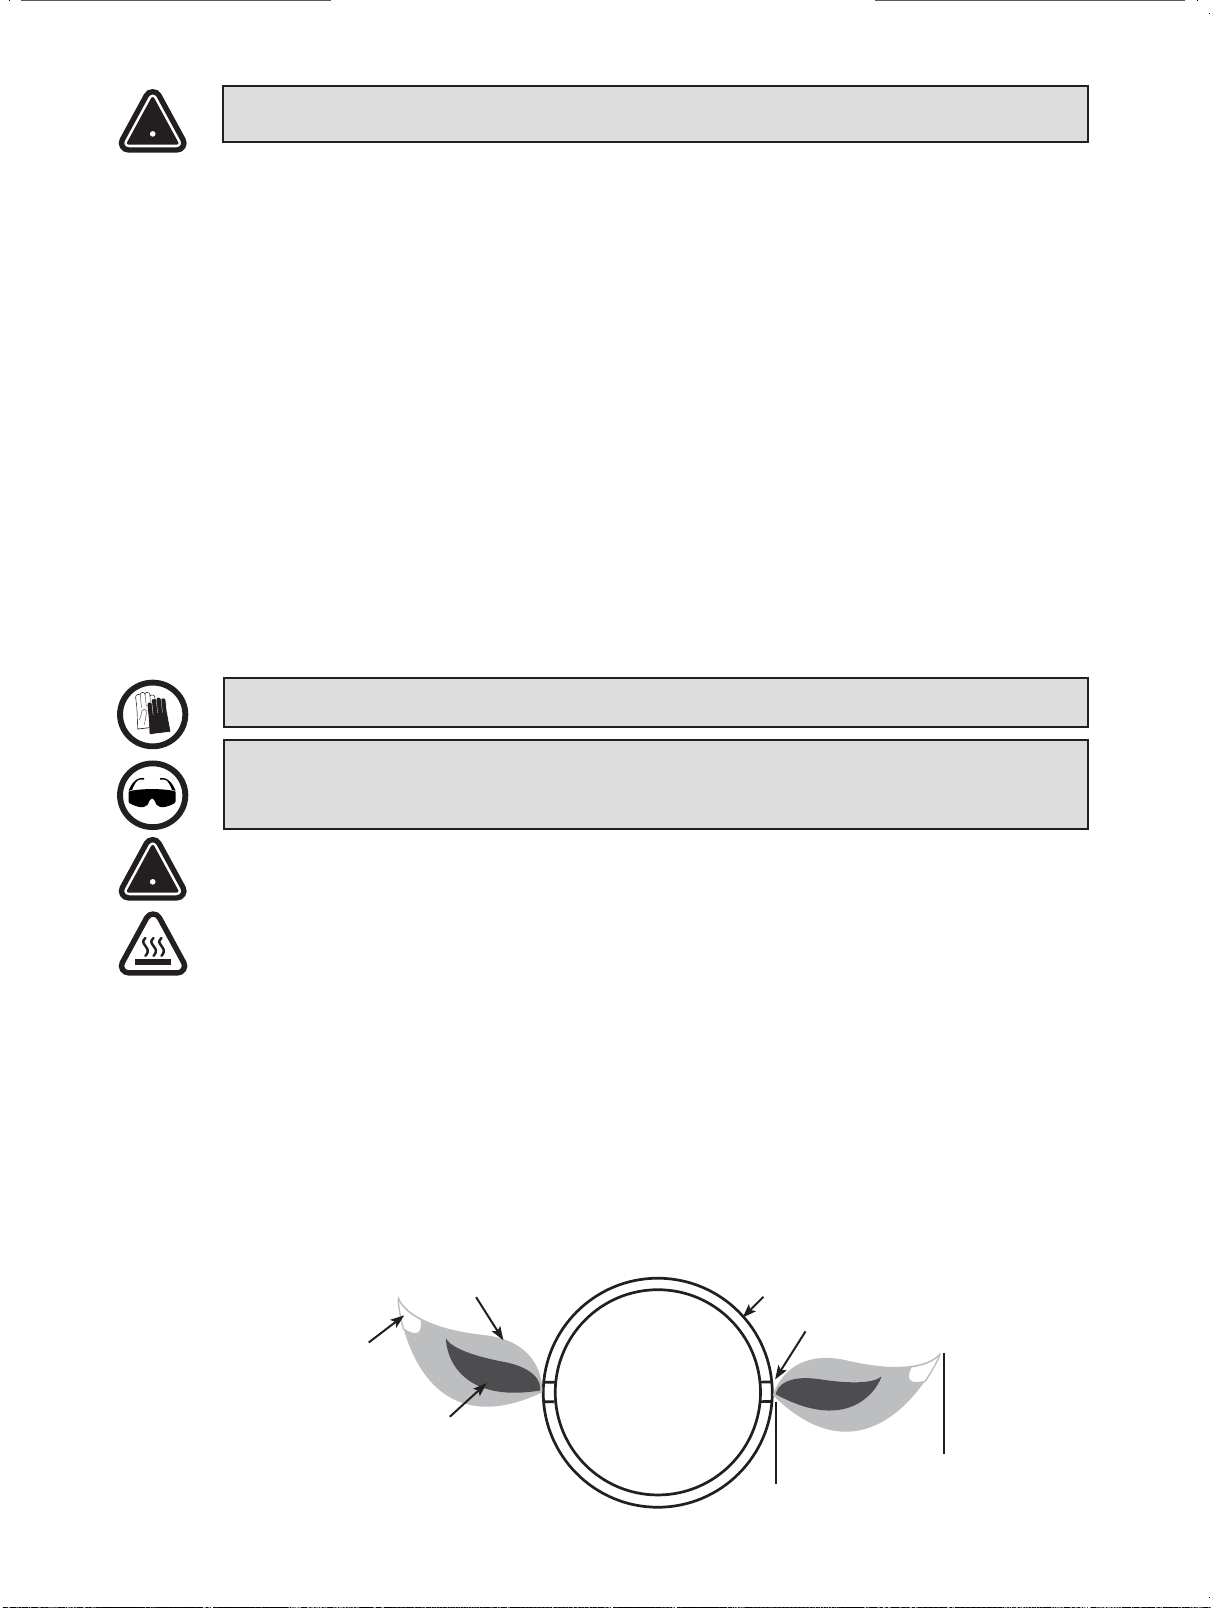
WARNING! Failure to follow these instrucons could result in property damage, personal injury or
death. Read and follow all warnings and instrucons in this manual prior to operang grill.
!
Safe Operang Pracces
• This gas grill must be assembled exactly according to the instrucons in the manual. If the grill was
store assembled, you must review the assembly instrucons to conrm correct assembly and perform
the required leak tests before operang the grill.
• Read the enre instrucon manual before operang the gas grill.
• Do not modify this appliance.
• Do not use an adaptor at the cylinder connecon.
• Follow lighng instrucons carefully when operang grill.
• Gas must be turned o at the Universal Liqueed Petroleum Gas cylinder or at the natural gas supply
valve when the gas grill is not in use.
• Keep children and pets away from hot grill, DO NOT allow children to climb inside cabinet.
• Do not leave the grill unaended while in use.
• Do not move grill when hot or operang.
• This gas grill must not be installed in or on recreaonal vehicles and/or boats.
• This gas grill must only be stored outdoors in a well-venlated area and must not be used inside a
building, garage, screened -in porch or any other enclosed area.
• Maintain proper clearance to combusbles: 26” (660mm) to rear of unit and 10” (254mm) to the
sides and 47” (1200mm) above. Addional clearance is recommended near vinyl siding or panes of
glass.
• It is not recommended to operate the unit under any combusble construcon in case of grease res.
• At all mes keep the venlaon openings of the cylinder enclosure free and clear from debris.
• Do not locate in windy sengs. High winds adversely aect the cooking performance of the gas grill.
• When the gas grill is stored indoors, the Universal Liqueed Petroleum Gas cylinder must be
disconnected from the grill and stored outdoors in a well-venlated area, disconnected cylinders must
not be stored in a building, garage or other enclosed area.Natural gas units must be disconnected
from the supply when being stored indoors.
• Do not use or store ammable materials in or near this appliance.
• Inspect the gas line hose before each use. If there is evidence of excessive abrasion or wear, it
must be replaced before using the gas grill, with a replacement hose assembly specied by the grill
manufacturer.
• Never store a spare ULPG gas cylinder under or near this grill.
• Never ll the cylinder beyond 80 % full.
• Do not aempt to use a cylinder, which is not equipped with the appropriate connecon.
• Periodically check the test date on the ULPG gas cylinder to ensure it is within its service life
specicaon. If required, contact an approved tesng facility or ULPG supplier for re-cercaon or
replacement.
• Leak test all connecons before inial use, even if the grill was purchased fully assembled, annually or
whenever any gas component has been replaced.
• Never use natural gas in a unit designed for Universal Liqueed Petroleum Gas.
• Never use lighter uid in a gas grill.
• Use charcoal briquees only with a Napoleon charcoal tray designed for this unit.
• Burner controls must be o when turning supply cylinder or natural gas supply valve on.
• Do not light burners with lid closed.
• Do not operate rear burner with main burners operang.
• Do not place arcles on or against this appliance.
• The lid is to be closed during the pre-heat period.
• Do not route hose underneath drip pan-proper hose clearance to boom of unit must be maintained.
• Clean grease tray and sear plates regularly to avoid build-up, which may lead to grease res.
• Remove warming rack before lighng rear burner. The extreme heat will damage the warming rack.
• Ensure sear plates are posioned properly according to sear plate installaon instrucons.
• Do not spray aerosols near this appliance while it is in operaon.
• Keep gas line away from heated surfaces
• Keep any electrical supply cord away from water or heated surfaces.
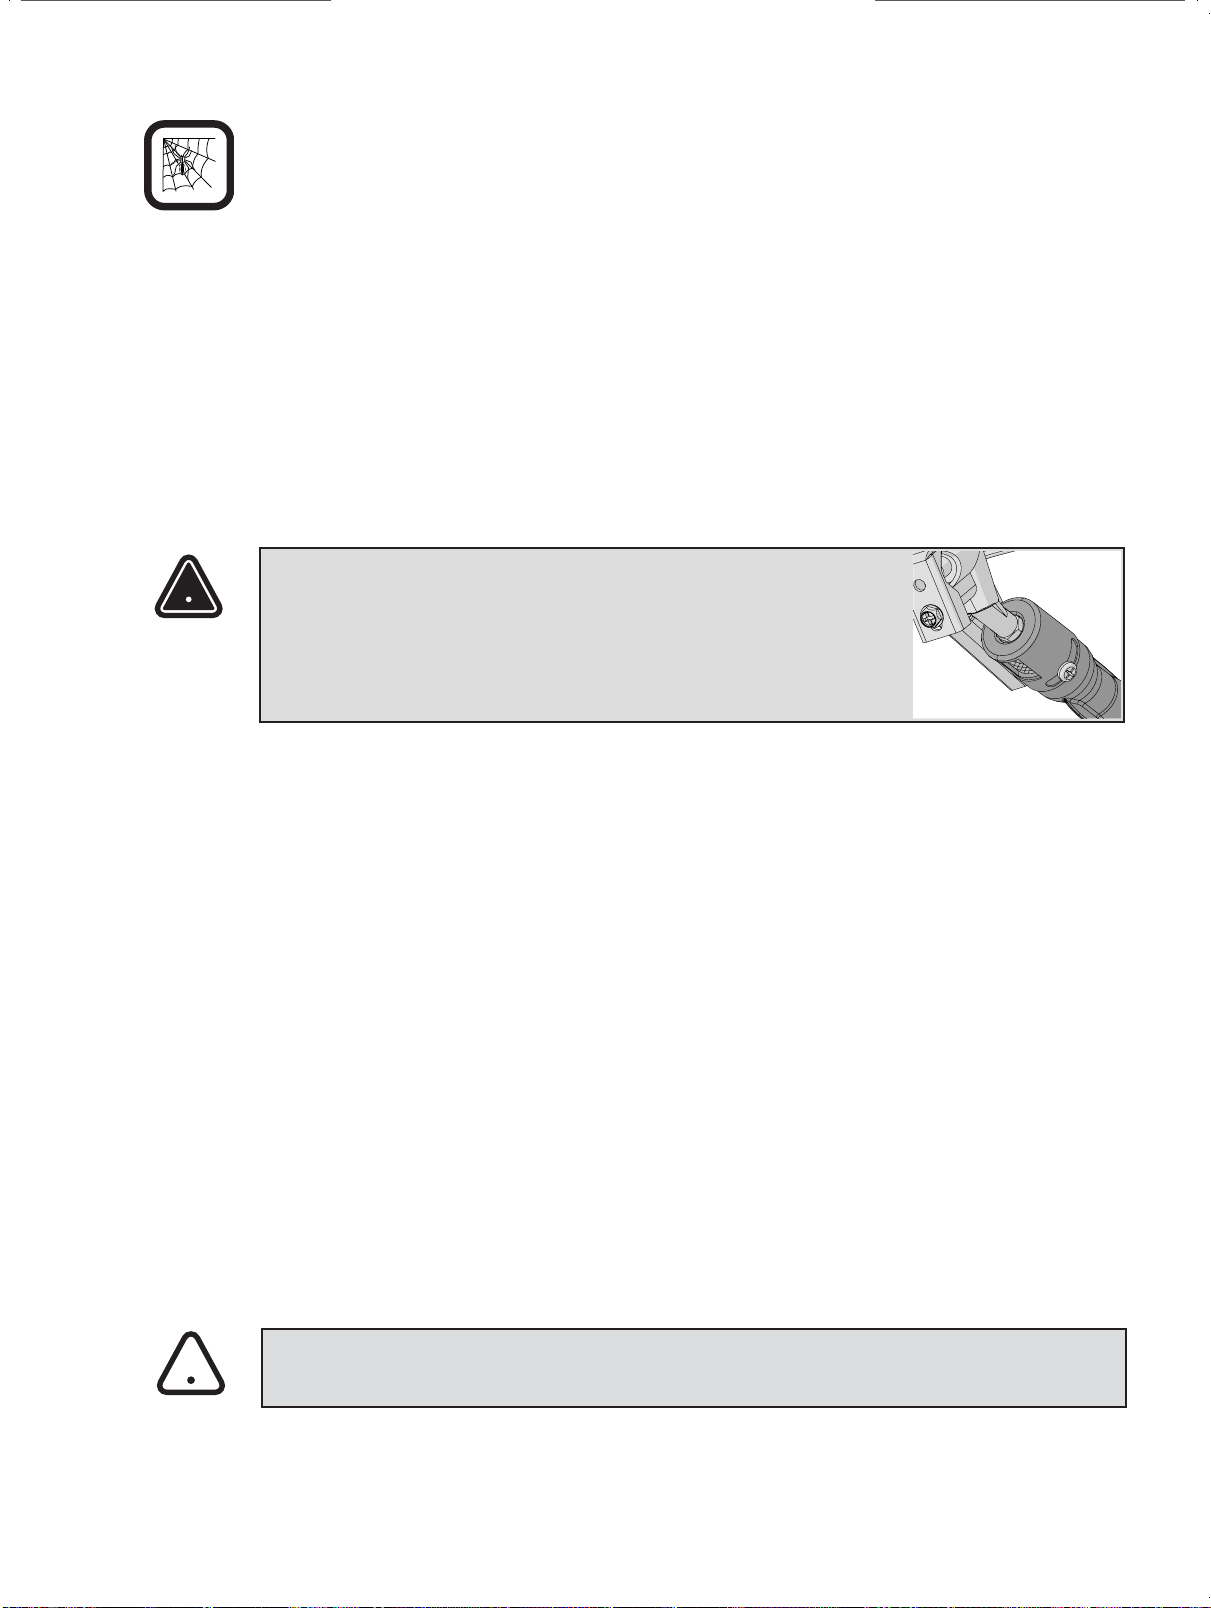
• Inspect infrared burner venturi tube for spider webs and other obstrucons periodically. Clean the
tubes completely if you nd any such obstrucons.
4
www.napoleon.com
N415-0705-AU REV - MAY 11.22
Locang Your Outdoor Gas Grill
It is important when selecng a locaon for your gas grill to ensure clearances to adjacent combusbles
are met. This appliance is intended for installaon on an outdoor pao or in your yard.
‘This appliance shall only be used in an above ground open-air situaon with natural venlaon, without
stagnant areas, where gas leakage and products of combuson are rapidly dispersed by wind and natural
convecon.’
Any enclosure in which the appliance is used shall comply with one of the following:
An enclosure with walls on all sides, but at least one permanent opening at ground level and no overhead
cov er.
Within a paral enclosure that includes an overhead cover and no more than two sidewalls. These
sidewalls may be parallel, as in a breezeway, or at right angles to each other.
Within a paral enclosure which includes an overhead cover and more than two walls, the following shall
apply:
a) at least 25% of the total wall area is completely open; and.
b) at least 30% of the remaining wall area is open and unrestricted.
In the case of balconies, at least 20% of the total of the side, back and front wall areas shall be and remain
open and unrestricted.
Locaon
Open both ends
Open side at
least 25% of
total wall area
30% or more in total of the
remaining wall area is open
and unrestricted
Open side at
least 25% of
total wall area
30% or more in total of the
remaining wall area is open
and unrestricted
5
www.napoleon.com
N415-0705-AU REV - MAy 11.22
DIMENSIONS
48 1/2”(123cm )
LID CLOSED
63”(160cm )
LID OPEN
12 1/2”
(31cm)
51” (130cm )
[NON FOLDED SIDE SHELF]
35” (89cm )
[FOLDED SHELVES]
36”(92cm)
GRILL HEIGHT
25”(64cm )
GRILL DEPTH
RXT425SB/SIB-1 AU GRILL
3 x 14.8 MJ/h MAIN BURNER
1 x 9.5 MJ/h SIDE BURNER (IF EQUIPPED)
1 x 14.8 MJ/h INFRARED SIDE BURNER (IF EQUIPPED)
GRILL SIZE: 18” X 23 3/4” = 425 in
2
WARMING RACK SIZE: 6 1/2” X 23 1/2” = 146 in
2
SIDE BURNER SIZE: 9.5” X 11.25 = 107 in
2
INFRARED SIDE BURNER SIZE: 9.5” X 11.25 = 107 in
2
ALL DIMENSIONS ARE APPROXIMATE
ORIFICE SIZES
LP ULPG NG
MAIN BURNER
#58 #58 1.79 mm
SIDE BURNER (INFRARED)
1.07 mm - -
REAR BURNER
1.15 mm 1.15 mm 1.85 mm
SIDE BURNER (FLAME)
#65 #65 1.45 mm
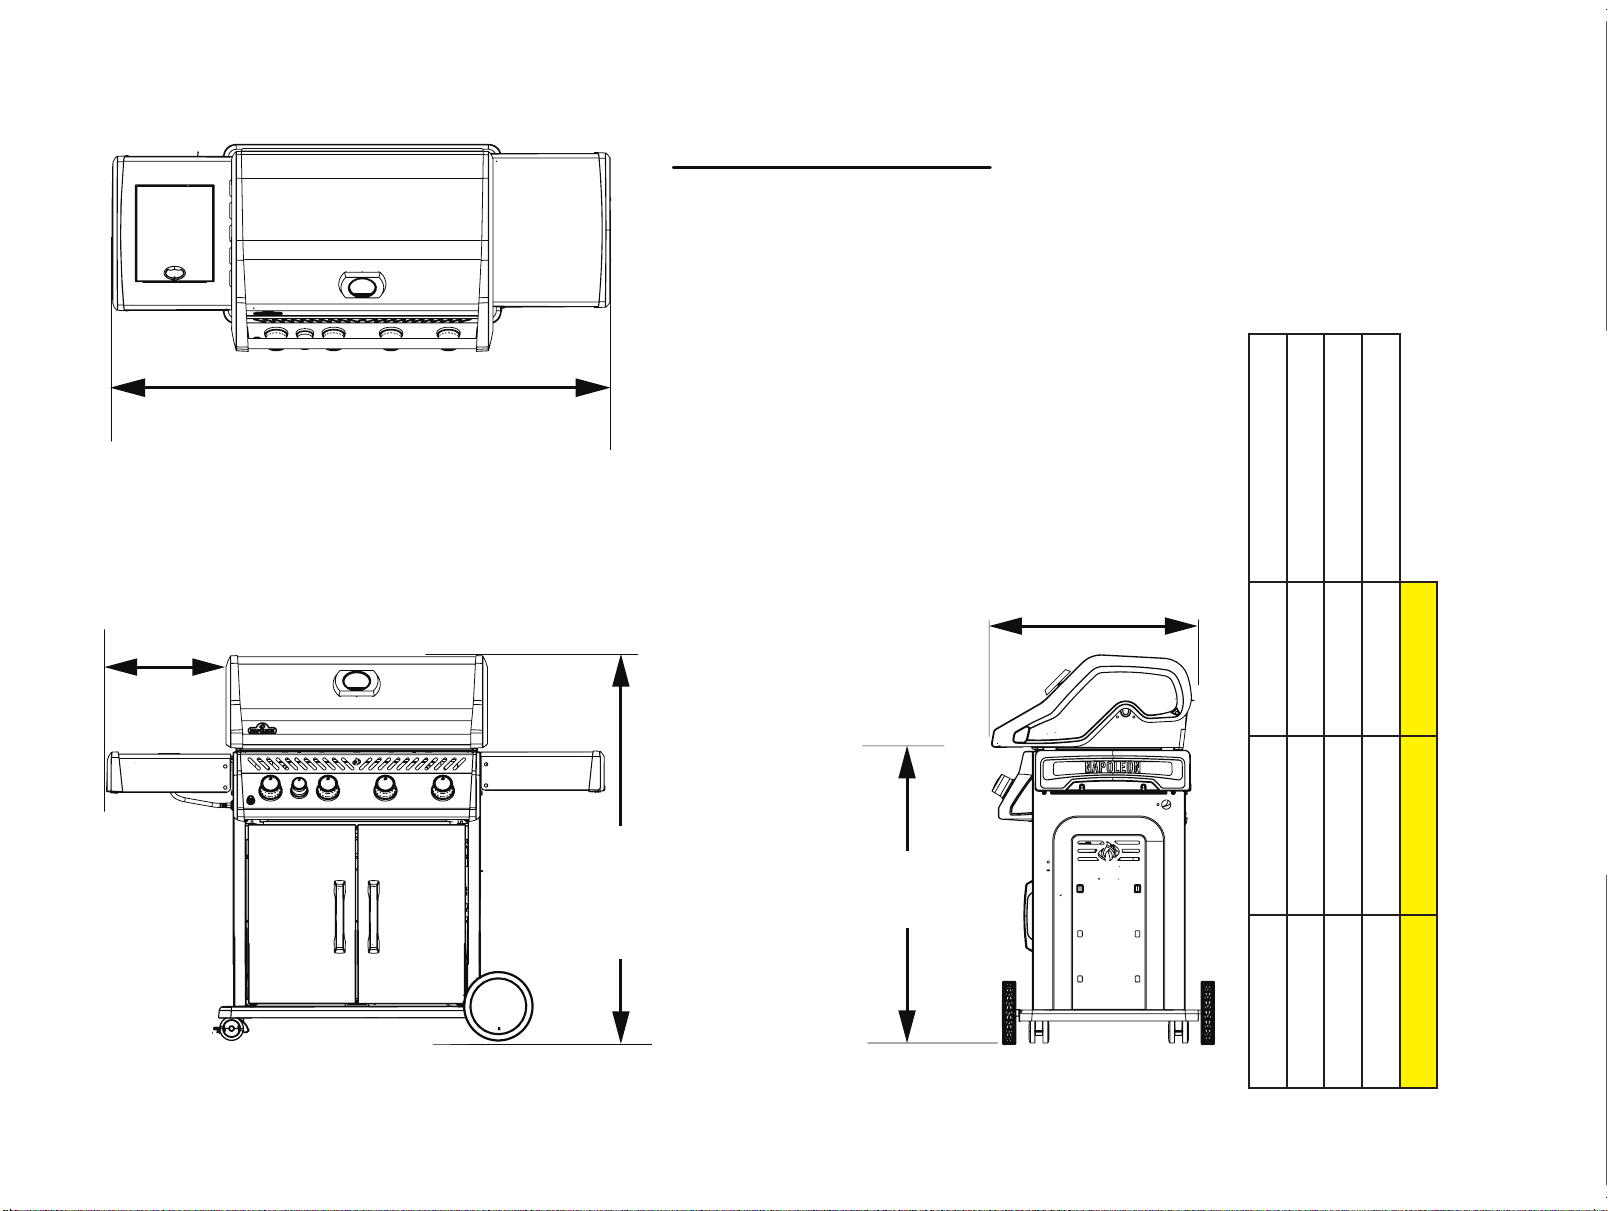
6
www.napoleon.com
N415-0705-AU REV - MAy 11.22
DIMENSIONS
123cm (48 1/2”)
LID CLOSED
160cm (63”)
LID OPEN
38cm
(15”)
154cm (60 1/2”)
[NON FOLDED SIDE SHELF]
103cm (40 1/2”)
[FOLDED SHELVES]
92cm (36”)
GRILL HEIGHT
64cm (25”)
GRILL DEPTH
RXT525SB/SIB-1 AU GRILL
4 x 12.7 MJ/h MAIN BURNER
1 x 9.5 MJ/h SIDE BURNER (IF EQUIPPED)
1 x 14.8 MJ/h INFRARED SIDE BURNER (IF EQUIPED)
GRILL SIZE: 18” X 28.75” = 525 in
2
WARMING RACK SIZE: 6.5” X 28.5” = 186 in
2
SIDE BURNER SIZE: 9.5” X 11.25 = 107 in
2
INFRARED SIDE BURNER SIZE: 9.5” X 11.25 = 107 in
2
ALL DIMENSIONS ARE APPROXIMATE
ORIFICE SIZES
LP ULPG NG
MAIN BURNER
#60 #60 1.65 mm
SIDE BURNER (INFRARED)
1.07 mm - -
REAR BURNER
1.15 mm 1.15 mm 1.85 mm
SIDE BURNER (FLAME)
#65 #65 1.45 mm
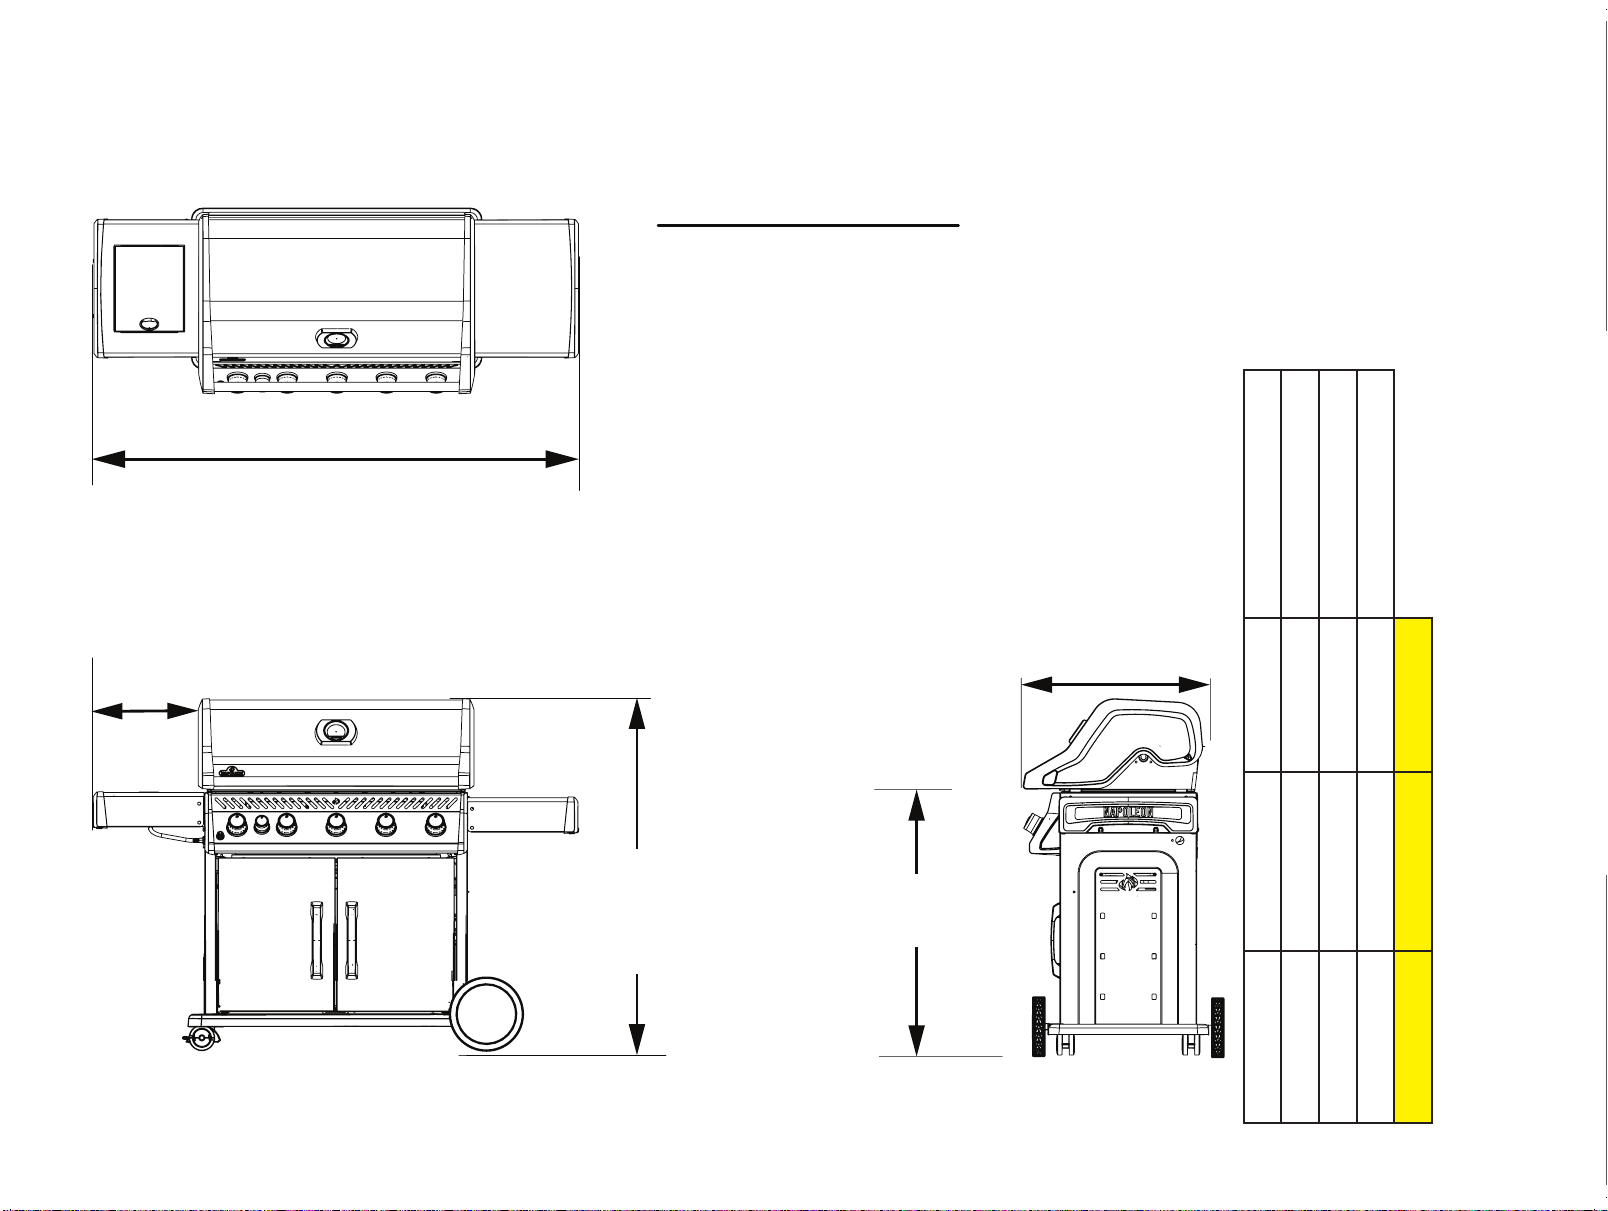
7
www.napoleon.com
N415-0705-AU REV - MAy 11.22
DIMENSIONS
123cm (48 1/2”)
LID CLOSED
160cm (63”)
LID OPEN
38cm
(15”)
168cm (66”)
[NON FOLDED SIDE SHELF]
117cm (46”)
[FOLDED SHELVES]
92cm (36”)
GRILL HEIGHT
64cm (25”)
GRILL DEPTH
RXT625SB/SIB-1 AU GRILL
5 x 12.7 MJ/h MAIN BURNER
1 x 9.5 MJ/h SIDE BURNER (IF EQUIPPED)
1 x 14.8 MJ/h INFRARED SIDE BURNER (IF EQUIPED)
GRILL SIZE: 18” X 34.75” = 625 in
2
WARMING RACK SIZE: 6.5” X 34.25” = 223 in
2
SIDE BURNER SIZE: 9.5” X 11.25 = 107 in
2
INFRARED SIDE BURNER SIZE: 9.5” X 11.25 = 107 in
2
ALL DIMENSIONS ARE APPROXIMATE
ORIFICE SIZES
LP ULPG NG
MAIN BURNER
#60 #60 1.65 mm
SIDE BURNER (INFRARED)
1.07 mm - -
REAR BURNER
1.15 mm 1.15 mm 1.85 mm
SIDE BURNER (FLAME)
#65 #65 1.45 mm

8
www.napoleon.com
N415-0705-AU REV - MAY 11.22
This unit includes an internal regulator which stabilizes the gas
pressure and improves grill performance. This regulator cannot
be adjusted. There is a pressure tap located on the side of the
regulator. It can be used by a qualied service person when
servicing the grill to determine if the regulator is funconing
properly. The screw within the pressure tap must always be
kept ght, except when performing a pressure test on the
regulator (qualied service personnel only).
A restraining tether of adequate strength shall be xed to the appliance and be suitable to be xed to
the wall with 50 mm of each connecon point. The length of the tether shall not exceed 80% of the
length of the hose assembly.
General Informaon
This gas grill is cered for outdoor use and should be installed to conform with AS/NZS 5601 and local
codes. Check gas type and specicaons located on the rang plate located on the back panel of the grill.
Natural Gas Hook-Up
The installaon must be performed by a licensed gas er in accordance with AS/NZS 5601, and all
connecons must be leak tested before operang the grill.
This natural gas grill is supplied with a 3000 mm supply hose with an inside diameter of 12 mm, complete
with bayonet ngs, designed for natural gas, and cered for outdoor use.
Aach the ex connector from the manifold assembly to the natural gas regulator supplied. Tighten using
two wrenches. (Do not use thread sealer/pipe dope.)
Note: The gas grill is designed to operate at a test point pressure of 1.00 kPA and must be checked aer
installaon by turning all burners on and measuring at the regulator outlet test point provided.
WARNING!
• Do not route hose underneath drip pan.
• Do not route hose over top of back panel.
• Ensure all hose connecons are ghtened using two wrenches. Do not use teon tape or pipe
dope on any hose connecon.
• Ensure the hose does not contact any high temperature surfaces, or it may melt and leak causing a
re.
• Do not use enclosure to store excess hose, as there is a greater chance of the hose contacng a hot
surface, it may melt and leak causing a re.
• Leak test all the connecons using a soap and water soluon, as per the leak tesng instrucons
found in this manual.
!
9
www.napoleon.com
N415-0705-AU REV - MAY 11.22
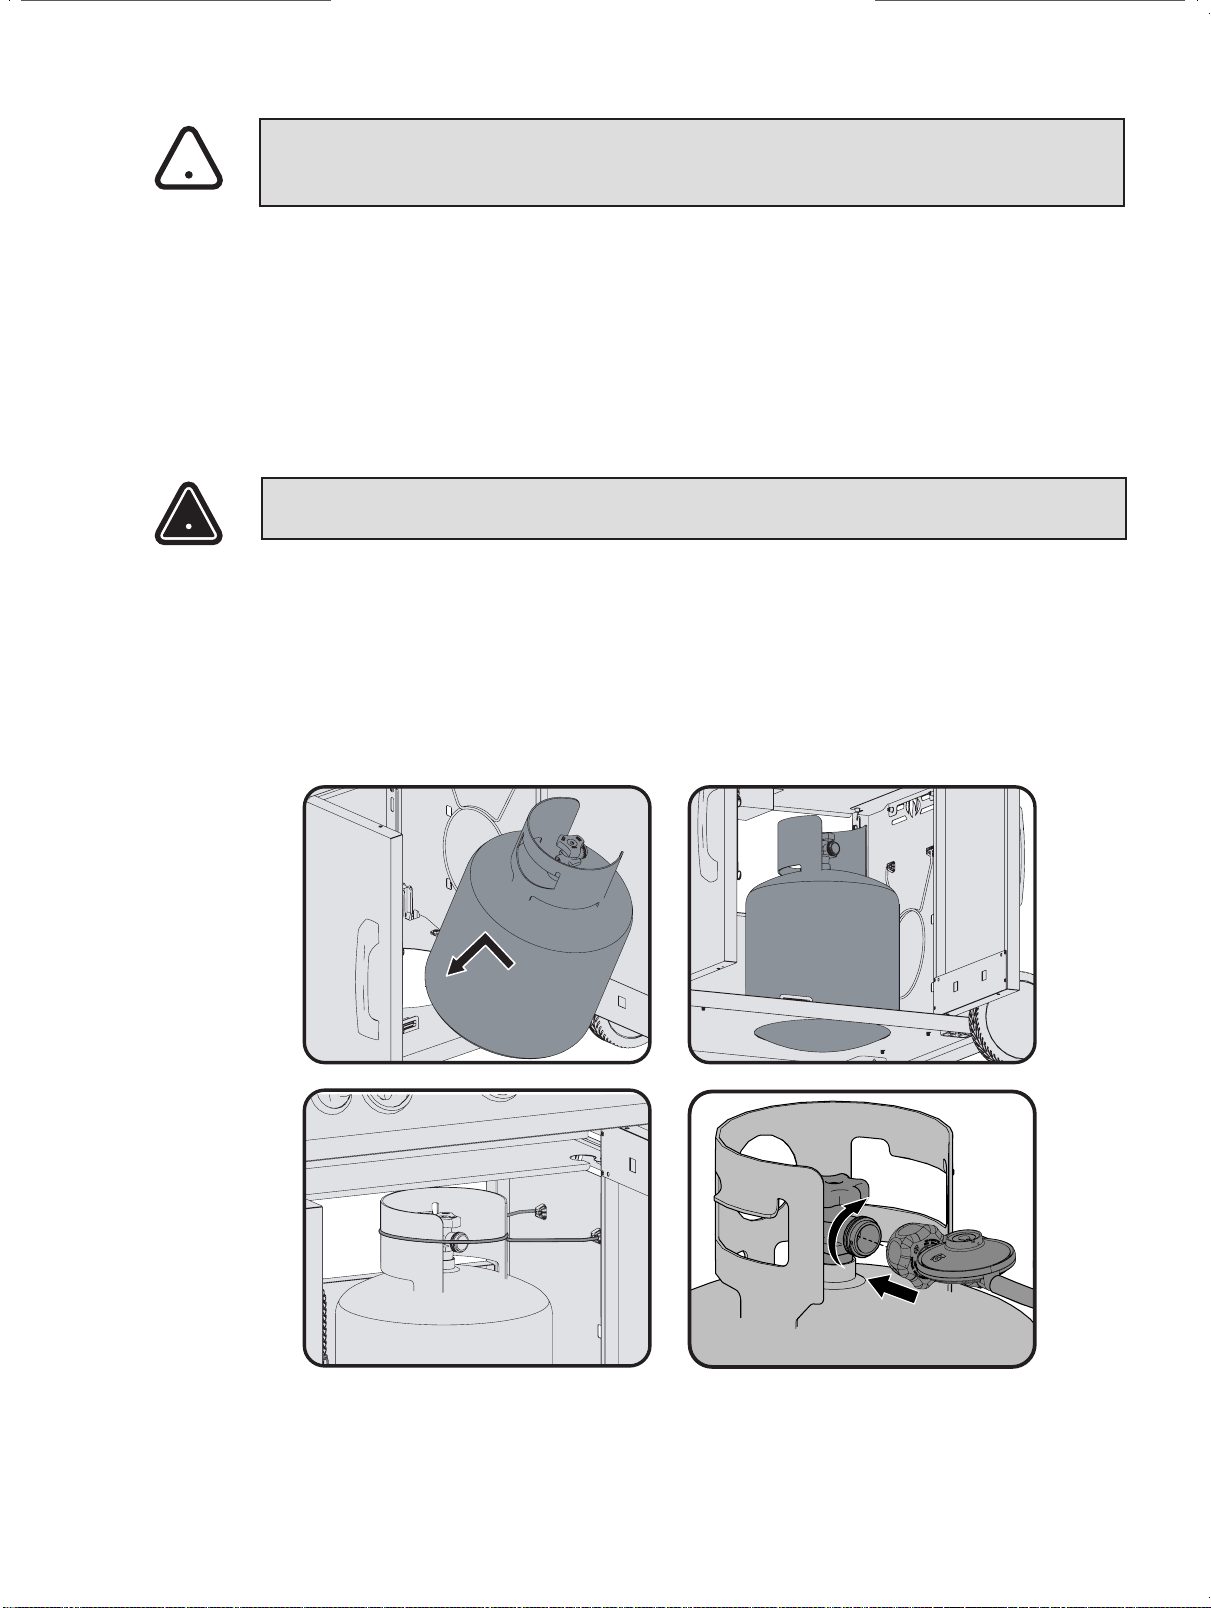
Gas Hook-Up Instrucons
WARNING! A re will result if the gas supply hose makes contact with the underside of the grill or
drip pan.
Cylinder Installaon: Check that the cylinder valve is closed by turning the knob clockwise. Check that
the grill’s burner knobs are in the o posion. Open cabinet doors. Set cylinder into hole in boom
shelf. Place the cylinder so that the valve faces toward the front of the grill. Other cylinders may be
acceptable provided they t properly into the tank retaining ring.
Cylinder Connecon (LLC27): Do not aempt to use a cylinder, which is not equipped with a LLC27 type
connecon. Do not use an adaptor at the cylinder connecon. Ensure the gas regulator hose is kink free.
Remove the cap or plug from the cylinder fuel valve. Insert the regulator onto the fuel valve. Hand ghten
clockwise. Do not use tools. Leak test all joints prior to using the grill. A leak test must be performed
annually and each me a cylinder is hooked up or if a part of the gas system is replaced.
!
!
Universal Liqueed Petroleum Gas Cylinder Specicaons
WARNING! If these instrucons are not followed exactly, a re causing death or serious injury may
occur.
WARNING! Do not store a spare ULPG cylinder on the shelf beneath the barbecue.
This gas grill has been designed for use with an approved 9 kg size Universal Liqueed Petroleum Gas
cylinder (not supplied). The Universal Liqueed Petroleum Gas cylinder must be equipped with a LLC27
tank valve connecon. Do not use an adaptor at the cylinder connecon. A dented or rusty cylinder may
be hazardous and should be checked by your Universal Liqueed Petroleum Gas supplier. Never use a
cylinder with a damaged valve. The cylinder supply system must be arranged for vapor withdrawal and the
cylinder shall include a dust cap to protect the cylinder valve. The cylinder shall incorporate a listed OPD
(overll protecon device). Do not store a spare Universal Liqueed Petroleum Gas cylinder under or near
this appliance. Never ll the cylinder beyond 80 percent full.
10
www.napoleon.com
N415-0705-AU REV - MAY 11.22
Leak Tesng Instrucons
WARNING! A leak test must be performed annually and each me a cylinder is hooked up or if a
part of the gas system is replaced.
WARNING! Never use an open ame to check for gas leaks. Be certain no sparks or open ames
are in the area while you check for leaks. Sparks or open ames will result in a re or explosion,
damage to property, serious bodily injury, or death.
Leak tesng: This must be done before inial use, annually, and whenever any gas components are
replaced or serviced. Do not smoke while performing this test, and remove all sources of ignion. See Leak
Tesng Diagram for areas to check. Turn all burner controls to the o posion. Turn gas supply valve on.
Brush a half-and-half soluon of liquid soap and water onto all joints and connecons of the regulator,
hose, manifolds and valves.
Bubbles will indicate a gas leak. Either ghten the loose joint or have the part replaced with one
recommended by the Napoleon Customer Soluons department and have the grill inspected by a cered
gas installer.
If the leak cannot be stopped, immediately shut o the gas supply, disconnect it, and have the grill
inspected by a cered gas installer or dealer. Do not use the grill unl the leak has been corrected.
STOP
!
!
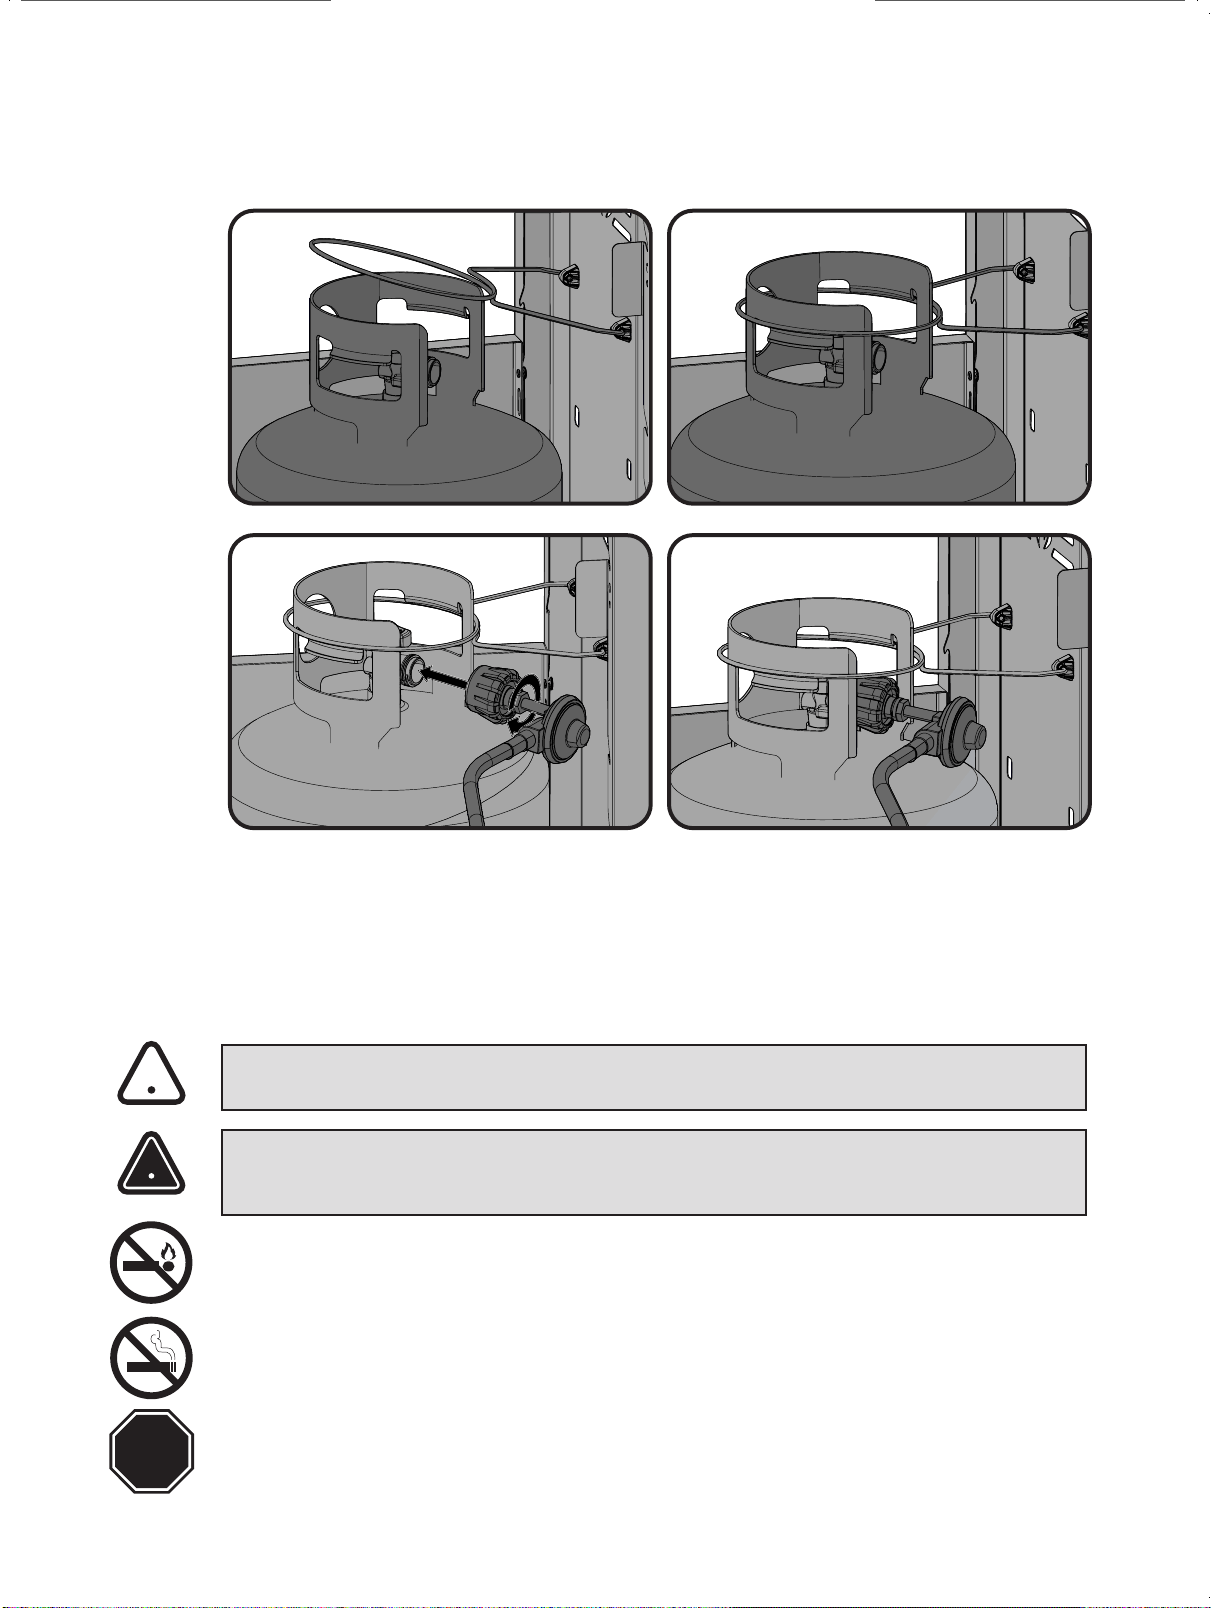
Cylinder Connecon QCC1: Do not use an adaptor at the cylinder connecon. Ensure the gas regulator
hose is kink free. Remove the cap or plug from the cylinder fuel valve. Insert the black QCC1 regulator
nipple onto the QCC1 fuel valve. Hand ghten clockwise. Do not use tools. Leak test all joints prior to using
the grill. A leak test must be performed annually and each me a cylinder is hooked up or if a part of the
gas system is replaced.
11
www.napoleon.com
N415-0705-AU REV - MAY 11.22
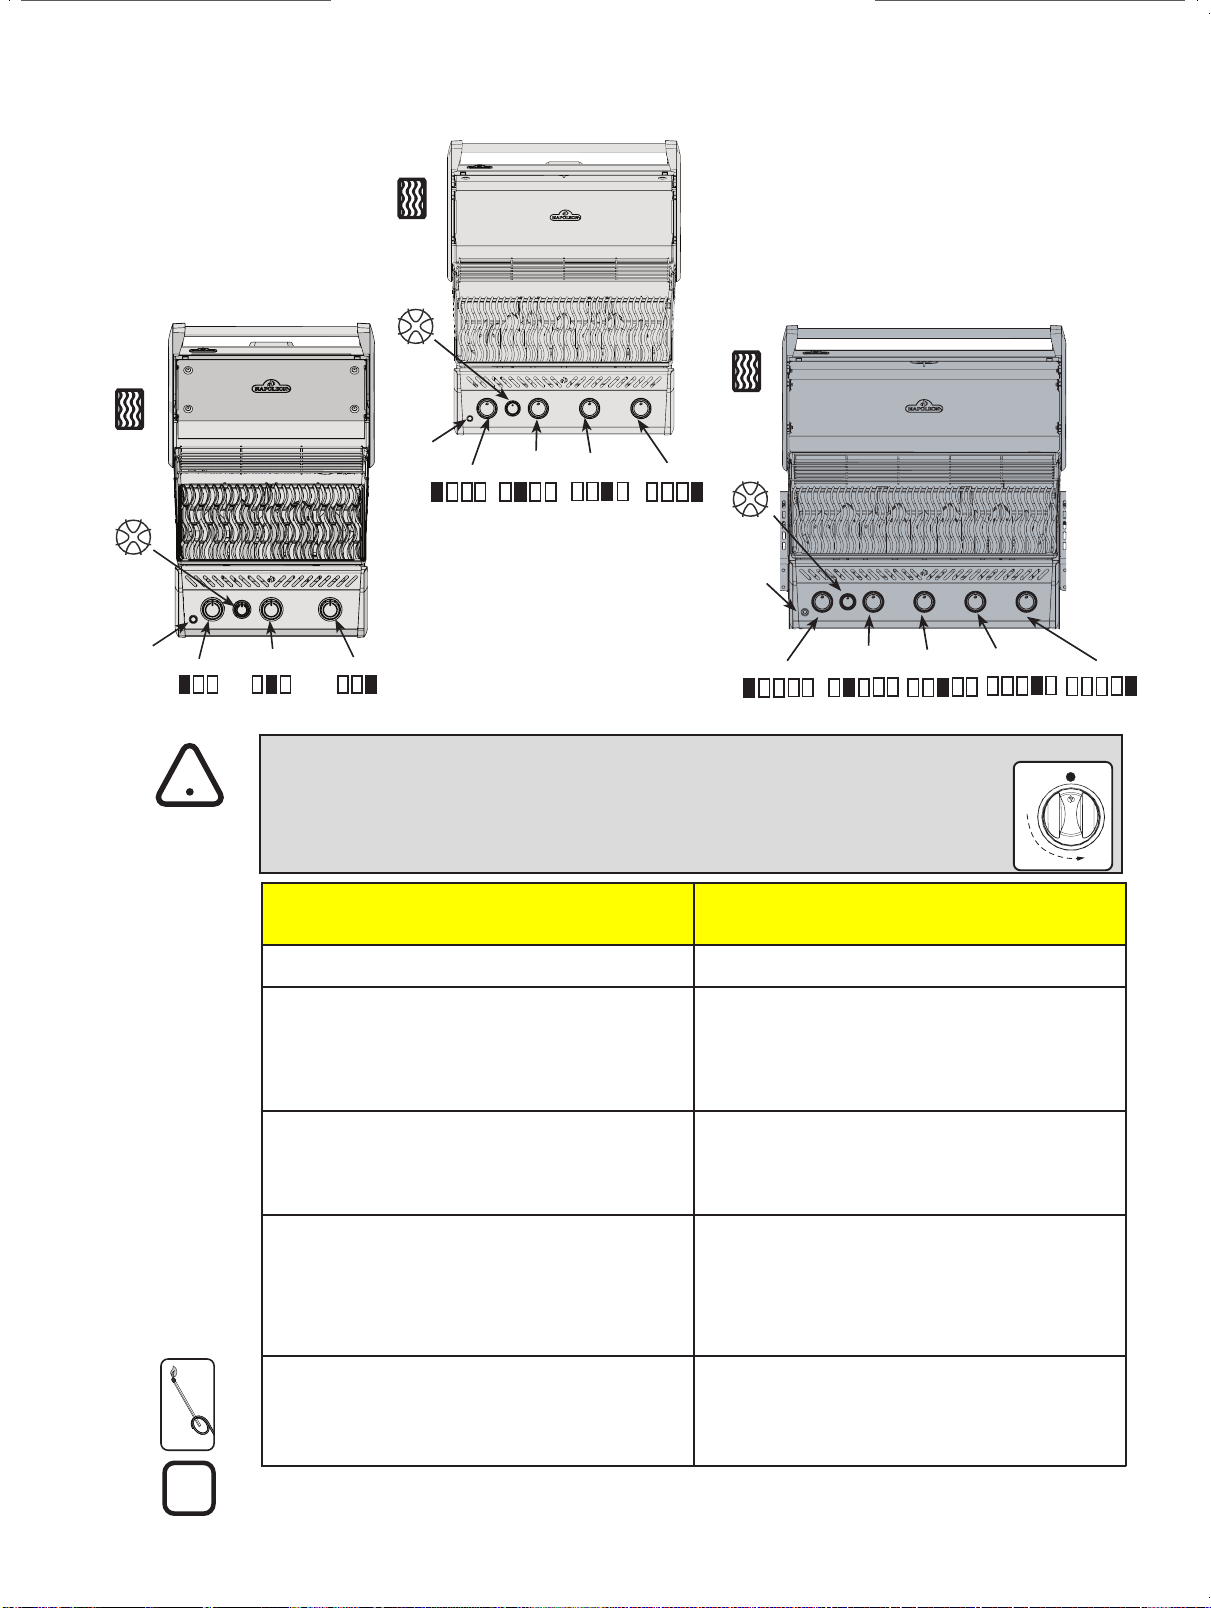
Lighng Instrucons
!
OFF
HIGH
LOW
O Posion
Right Burner
Right Centre
Burner
Le Centre
Burner
Le Burner
Igniter
Igniter
Right Centre
Burner
Le Centre
Burner
Le Burner
Right Burner
Centre
Burner
525
425
625
WARNING! Open lid
WARNING! Ensure all burner controls are in the o posion. Slowly turn on the gas
supply valve.
Main Burner
Lighng
Side Burner Lighng
(if equipped)
1. Open grill lid 1. Open burner cover.
2. Push and turn any main burner knob slowly to the
high posion. If the pilot lights, connue to push down
on the control knob unl the burner lights and then
release.
2. Turn side burner control to high posion.
3. If the pilot does not ignite, then immediately turn the
control knob back to the ‘o posion and repeat step 2
several mes.
3. Press and hold
igniter buon unl burner lights, or light by match.
4. If the pilot and burner will not ignite within 5
seconds, turn the control knob to the ‘o’ posion and
wait 5 minutes for any excess gas to dissipate. Either
repeat steps 2 and 3 or light with a match.
4. If ignion is not
immediate, turn burner control o. Wait 5 minutes.
Repeat.
5. If lighng the unit with a match, clip the match into
the supplied lighng rod. Hold the lit match down
through the grill and sear plate while turning the
corresponding burner valve to high.
5. When no longer in use, ensure side burner pilot
ame has exnguished before closing side burner lid
NOTE! Do not use rear burner while operang main burner.
!
Igniter
Right Burner
Centre
Burner
Le Burner
Infra Red
Side Burner
OR
Side Flame
Burner
Infra Red
Side Burner
OR
Side Flame
Burner
Infra Red
Side Burner
OR
Side Flame
Burner
12
www.napoleon.com
N415-0705-AU REV - MAY 11.22
Direct Cooking: Place food to be cooked on the grill directly over the heat. This method is generally used
for searing or for foods that do not require prolonged cooking mes such as hamburgers, steaks, chicken
pieces, or vegetables. The food is rst seared to trap-in the juices and avor, and then the temperature is
lowered to nish cooking the food to your preference.
Indirect Cooking: With one or more burners operang, place food to be cooked on the grill over a burner
that is not operang. The heat circulates around the food, cooking slowly and evenly. Cooking with this
method is much the same as cooking in your oven and is generally used for larger cuts of meats such
as roasts, chickens or turkeys, but can also be used for cooking foods that are prone to are-ups or for
smoking foods. Lower temperatures and slower cooking mes result in tender foods.
Cooking Instrucons
Inial Lighng: When lit for the rst me, the gas grill emits a slight odor. This is a normal temporary
condion caused by the “burn-in” of internal paints and lubricants used in the manufacturing process and
does not occur again. Simply run the main burners on high for approximately one-half hour.
Main Burner Use:
When searing foods, the lid must be kept open and the burners can be set to high. If
cooking with the lid closed, preheat grill on high for 10 minutes with the lid closed, and then turn the main
burners to low. Food cooked for short periods of me (sh, vegetables) can be grilled with the lid open.
Cooking with the lid closed will ensure higher, more even temperatures that can reduce cooking me
and cook meat more evenly. Food that has a cooking me longer than 30 minutes, such as roasts, can be
cooked indirectly (with the burner lit opposite to the food placement). When cooking very lean meats,
such as chicken breasts or lean pork, the grids can be oiled before pre-heang to reduce scking. Cooking
meat with a high degree of fat content can create are-ups. Either trim the fat or reduce temperatures to
inhibit this. Should a are-up occur, move food away from the ames and reduce the heat. Leave the lid
open. See Your All Season Grill cookbook by Napoleon for more detailed instrucons.
Flame Side Burner Use (if equipped): The side burner can be used like any stove top burner, for gravies,
soups etc. For best performance, the gas grill should be located with the side burner protected from the
wind. Select cookware that is between 16cm (6.3”) and 24cm (9.4”) in diameter. The cookware should be
placed over the centre of the burner, unless this posioning causes the handle to extend directly over the
ames. Always turn the handle to the side or back of the grill to reduce the risk of knocking the cookware
o the side shelf.
WARNING! Never grill food directly on the side burner grate. It is designed for use with pots and
pans only.
WARNING! Do not close the side burner lid while it is operang or hot.
WARNING! Do not use side burner to deep fry foods as cooking with oil can create a dangerous
situaon.
!
13
www.napoleon.com
N415-0705-AU REV - MAY 11.22
!
!
Infrared Heat
Most people don’t realize that the heat source we are most familiar with, our sun, warms the earth using
mainly infrared energy. This is a form of electro-magnec energy with a wavelength just greater than the
red end of the visible light spectrum but less than a radio wave. This energy was discovered in 1800 by Sir
William Herschel who dispersed sunlight into its component colors using a prism. He showed that most
of the heat in the beam fell into the spectral region just beyond the red end of the spectrum, where no
visible light existed. Most materials readily absorb infrared energy in a wide range of wavelengths, causing
an increase in its temperature. The same phenomenon causes us to feel warmth when we are exposed to
sunlight. The infrared rays from the sun travel through the vacuum of space, through the atmosphere, and
penetrate our skin. This causes increased molecular acvity in the skin, which creates internal fricon and
generates heat, allowing us to feel warmth.
Foods cooked over infrared heat sources are heated by the same principle. Charcoal grilling is our most
familiar choice for infrared cooking. The glowing briquees emit infrared energy to the food being cooked
with very lile drying eect. Any juices or oils that escape from the food drip onto the charcoal and
vaporize into smoke giving the food its delicious grilled taste. The Napoleon infrared burner cooks in the
same way. In each burner, 10,000 ports – each with its own ny ame – cause the surface of the ceramic
le to glow red. This glow emits the same type of infrared heat to the food as charcoal, without its hassle
or mess. Infrared burners also provide a more consistently heated area that is far easier to regulate than
a charcoal re. For instant searing, the burners can be set to high, yet they can also be turned down for
slower cooking. We all know how dicult that is on a charcoal re. Tradional gas burners heat the food in
a dierent way. The air surrounding the burner is heated by the combuson process and then rises to the
food being cooked. This generates lower grill temperatures that are ideal for more delicate cuisine such
as seafood or vegetables, whereas Napoleon’s infrared burners produce searing heat for juicier, taser
steaks, hamburgers and other meats. For cooking mes and ps refer to the Infrared Grilling Chart.
Infrared Side Burner Use (If Equipped): The gas grill should be located so that the side burner is protected
from the wind, because the wind will adversely aect its performance.
WARNING! Do not close the side burner lid while it is operang or hot.
WARNING! Do not adjust cooking grid while hot or operang.
WARNING! Do not use side burner to deep fry foods as cooking with oil can create a dangerous
situaon.
1. Follow the infrared side burner lighng instrucons and operate on high for 5 minutes with the lid
opened or unl the ceramic burners glow red.
2. Place food on grills and cook according to mes listed in the Infrared Grilling Chart.
3. Depending upon your taste, connue cooking over infrared burners on high, medium or low, turning
food frequently, or place food on the main burner area of the grill, close lid, and allow oven tempera-
ture to slowly nish cooking your food.
CAUTION! Due to the intense heat the infrared burners provide, food le unaended over burners
will burn quickly. Keep the lid open when cooking with the infrared burners.
Protecon Of Your Infra Red Burners: The infrared burners of your grill are designed to provide a long
service life. However, there are steps you must take to prevent cracking of their ceramic surfaces, which
will cause the burners to malfuncon.
• Never let water come in direct contact with your ceramic burner.
• Do not allow hard objects to impact the infra red burner.
• Do not allow cold water (rain, sprinkler, hose, etc.) to come in contact with hot ceramic burners. A
large temperature dierenal can cause cracking of the ceramic le.
• Keep the lid closed when the side burner is not in use.
• Aer cooking operate the burner on high for 5 minutes, to burn o any drippings and debris.
Damage caused by failure to follow these steps is not covered by your grill warranty.
14
www.napoleon.com
N415-0705-AU REV - MAY 11.22
Infrared Grilling Chart
Food Control Seng Cooking Time Helpful Suggesons
Steak
1 in. (2.54cm) thick
High seng 2 min. each side.
High seng 2 min. each side
then medium seng.
High seng 2 min. each side
then medium seng.
4 min. – Rare
6 min. – Medium
8 min. – Well done
When selecng meat for
grilling, ask for marbled fat
distribuon. The fat acts as
a natural tenderizer while
cooking and keeps it moist
and juicy.
Hamburger
1/2 in. (1.27cm) thick
High seng 2 min. each side.
High seng 2 1/2 min. each
side.
High seng 3 min. each side.
4 min. – Rare
5 min. – Medium
6 min. – Well done
Preparing hamburgers to
order is made easier by
varying the thickness of
your paes. To add an
exoc taste to your meat,
try adding hickory-avored
woodchips to Napoleon’s
woodchip smoker.
Chicken pieces High seng 2 min. each side.
then medium-low to low
seng.
20-25 min. The joint connecng the
thigh and the leg from
the skinless side should
be sliced 3/4 of the way
though for the meat to
lay aer on the grill.
This helps it to cook
faster and more evenly.
To add a trademark
taste to your cooking,
try adding mesquite-
avoured woodchips to
your Napoleon woodchip
smoker, oponal
accessory.
Pork chops Medium 6 min. per side Trim o the excess fat
before grilling. Choose
thicker chops for more
tender results.
Spare ribs High seng for 5 minutes
low to nish
20 min. per side
turn oen
Choose ribs that are lean
and meaty. Grill unl meat
easily pulls away from the
bone.
Lamb chops High seng for 5 minutes
medium to nish
15 min. per side Trim o the excess fat
before grilling. Choose
extra thick chops for more
tender results.
Hot dogs Medium - Low 4-6 min. Select the larger size
wieners. Slit the skin
lengthwise before grilling.
15
www.napoleon.com
N415-0705-AU REV - MAY 11.22
Infrared Grilling Chart
Food Control Seng Cooking Time Helpful Suggesons
1 in. (2.54cm) thick
High seng 2 min. each side.
High seng 2 min. each side
then medium seng.
High seng 2 min. each side
then medium seng.
When selecng meat for
distribuon. The fat acts as
and juicy.
Hamburger
1/2 in. (1.27cm) thick
High seng 2 min. each side.
High seng 2 1/2 min. each
High seng 3 min. each side.
your paes. To add an
exoc taste to your meat,
try adding hickory-avored
woodchips to Napoleon’s
High seng 2 min. each side.
seng.
The joint connecng the
lay aer on the grill.
avoured woodchips to
oponal
Trim o the excess fat
High seng for 5 minutes
low to nish turn oen and meaty. Grill unl meat
High seng for 5 minutes
medium to nish
Trim o the excess fat
Hot dogs
WARNING! Always wear protecve gloves and safety glasses when servicing your grill.
WARNING! To avoid the possibility of burns, maintenance should be done only when the grill is
cool. Avoid unprotected contact with hot surfaces. Ensure all burners are turned o. Clean grill in an
area where cleaning soluons will not harm decks, lawns, or paos. Do not use oven cleaner to clean
any part of this
gas grill. Do not use a self-cleaning oven to clean cooking grids or any other parts of the
gas grill. Barbe
cue sauce and salt can be corrosive and will cause rapid deterioraon of the gas grill
components unless cleaned regularly.
Cleaning Instrucons
Note: Stainless steel tends to oxidize or stain in the presence of chlorides and suldes, parcularly in
coastal areas and other harsh environments, such as the warm, highly humid atmosphere around pools
and hot tubs. These stains could be perceived as rust, but can be easily removed or prevented. To provide
stain prevenon and removal, wash all stainless steel and chrome surfaces every 3-4 weeks or as oen as
required with fresh water and/or stainless steel cleaner.
Control Panel: The control panel text is printed directly on the stainless steel and with proper
maintenance will remain dark and legible. To clean the panel, use only warm soapy water. Never apply
abrasive cleaners on any stainless surfaces, especially the printed poron of the control panel or the
prinng will gradually rub o.
Cleaning Inside The Gas Grill: Remove the cooking grids. Use a brass wire brush to clean loose debris from
the casng sides and underneath the lid. Scrape the sear plates with a puy knife or scraper, and use a
wire brush to remove the ash. Remove the sear plates and brush debris from the burners with the brass
wire brush. Sweep all debris from inside the gas grill into the drip pan.
Grids And Warming Rack: The grids and warming rack are best cleaned with a brass wire brush during
the pre-heang period. Steel wool can be used for stubborn stains. It is normal that stainless grids (if
equipped) will discolor permanently from regular usage due to the high temperature of the cooking
surface.
Cast Iron Cooking Grids: The cast iron cooking grids supplied with your new grill oer superior heat
retenon and distribuon. By regularly seasoning your grids you are adding a protecve coang, which
will aid in resisng corrosion and increase your grids non-sck capabilies.
First Time Use: Wash the cooking grids by hand with mild dish soap and water to remove any residue
from the manufacturing process (never wash in a dish washer). Rinse thoroughly with hot water and dry
completely with a so cloth. This is important to avoid moisture from entering the cast iron.
Seasoning: Using a so cloth, spread VEGETABLE SHORTENING over the enre grid surface ensuring
all grooves and corners are covered. Do not use salted fats such as buer or margarine. Pre-heat your
grill for 15 minutes, then place the seasoned cooking grids in the grill. Turn the burner control knobs to
medium with the lid closed. Allow the cooking grids to heat for approximately one-half hour. Turn all the
burners to the “OFF” posion and turn the gas o at the source. Let the cooking grids stand unl cool.
This procedure should be repeated several mes throughout the season, although it is not required for
daily use (follow daily usage procedure below).
Daily Usage: Before pre-heang, and cleaning with a brass wire grill brush, coat the enre top surface of
the cooking grids with VEGETABLE SHORTENING. Pre-heat the grill and then brush away any unwanted
residue with a brass wire brush.
Stainless Steel Cooking Grids: (upgrade kit available - see replacement parts list). Stainless steel cooking
grids are durable and corrosion resistant. They require less seasoning and maintenance than cast iron
cooking grids. It is recommended that you follow the daily usage procedure listed above although you
may nd pre-heang and cleaning your grids with a wire brush is sucient for your grilling needs.
!
16
www.napoleon.com
N415-0705-AU REV - MAY 11.22
Combuson Air Adjustment: (This must be done by a qualied gas installer.) The air shuer is factory set
and should not need adjusng under normal condions. Under extreme eld condions, adjustments
might be required. When the air shuer is adjusted correctly the ames will be dark blue, pped with
light blue and occasionally yellow.
With too lile air ow to the burner, the ames are lazy yellow and can produce soot.
With too much air ow, the ames li erracally and can cause dicules when lighng.
Adjusng the air shuer:
1. Remove cooking grids and sear plates and leave lid open. You may have to open the door or remove
the top drawer (if equipped) to access the air-shuer screw located at the mouth of the burner. The back
cover must be removed for rear tube burner air shuer adjustment.
2. Loosen air-shuer lock screw and open or close air shuer as required. The normal opening sengs
are:
Main Tube Burner ULPG 9/16” (14.3mm)
NG 3/8” (9.5mm)
3. Light the burners and set to high. Visually inspect burner ames. When the shuers are set correctly,
turn burners o, ghten locking screws, and replace removed parts. Ensure that the insect screens are
installed.
Cleaning The Outer Grill Surface: Do not use abrasive cleaners or steel wool on any painted, porcelain or
stain
less steel parts of your Napoleon Grill. Doing so will scratch the nish. Exterior grill surfaces should be
cleaned with warm soapy water while the metal is sll warm to the touch. To clean stainless surfaces, use
a stainless steel or a non-abrasive cleaner. Always wipe in the direcon of the grain. Over me, stainless
steel parts discolor when heated, usually to a golden or brown hue. This discoloraon is normal and does
not aect the performance of the grill. Porcelain enamel components must be handled with addional
care. The baked-on enamel nish is glass-like, and will chip if struck. Touch-up enamel is available from
your Napoleon Grill dealer.
WARNING! Always wear protecve gloves and safety glasses when cleaning your grill.
WARNING! Turn o the gas at the source and disconnect the unit before servicing. To avoid the
possibility of burns, maintenance should be done only when the grill is cool. A leak test must be
performed annually and whenever any component of the gas train is replaced or gas smell is present.
Maintenance Instrucons
We recommend this gas grill be thoroughly inspected and serviced annually by a qualied service person.
At all mes keep the gas grill area free from combusble materials, gasoline and other ammable vapors and
liquids. Do not obstruct the ow of venlaon and combuson air. Keep the cylinder enclosure venlaon
openings (located on the cart sides and at the front and back of the boom shelf) free and clear from debris.
Light Blue
Yellow Tipping
Dark Blue
Burner
Burner Port
Approximately
9/16” (14.3mm)
WARNING! Accumulated grease is a re hazard.
Drip Pan: Clean the drip pan frequently (every 4 – 5 uses or as oen as required) to avoid grease buildup.
Grease and excess drippings pass through to the drip pan, located beneath the gas grill and accumulate
in the disposable grease tray below the drip pan. To access the disposable grease tray or to clean the
drip pan, slide the drip pan free of the grill. Never line the drip pan with aluminum foil, sand or any other
material as this could prevent the grease from owing properly. The pan should be scraped out with a
puy knife or scraper. Replace the disposable grease tray every 2 – 4 weeks, depending on gas grill usage.
For supplies, see your Napoleon Grill dealer.
!
!
17
www.napoleon.com
N415-0705-AU REV - MAY 11.22
WARNING! When reinstalling the burner aer cleaning it is very
important that the valve/orice enters the burner tube before lighng your
gas grill. If the valve is not inside the burner tube a re or explosion could
occur.
!
CAUTION! Check for abrasions, melng, cuts, and cracks in the hose. If any of these condions
exist, do not use the gas grill. Have the part replaced by your Napoleon Grill dealer or qualied gas
installer.
Aluminum Casngs: Clean casngs periodically with warm soapy water. Aluminum will not rust, but high
temperatures and weathering can cause oxidaon to occur on aluminum surfaces. This appears as white
spots on the casngs. To renish these areas, clean rst and sand lightly with ne sandpaper. Wipe the
surface to remove any residue and paint with high temperature barbecue paint. Protect surrounding
areas from over-spray. Follow the manufacture’s direcons for curing.
!
Infrared Burners: Because of the high intensity of the infrared burner, most drippings and food parcles
that fall onto the burner surface are immediately incinerated. However, some debris and residue may
remain. To remove this residue aer cooking, operate the grill on high for 5-10 minutes. Do not clean the
ceramic le with a wire brush.
Protecon Of Infrared Burners: The infrared burners of your grill are designed to provide a long service
life, though care must taken to prevent cracking of their ceramic surfaces. Fractures will cause the burners
to malfuncon. The following provides a few of the causes of cracks and the steps you can take to avoid
them. Damage caused by failure to follow these steps is not covered by your grill warranty.
1. Impact with hard objects - Never allow hard objects to strike the ceramic. Take care when inserng or
removing cooking grates and accessories into or from the grill.
2. Contact with water or other liquids - Cold liquids contacng the hot ceramic surfaces can cause them
to break. Never throw water into the grill to douse a ame. If the ceramic or interior of a burner becomes
wet while not in use, later operaon of the burner can create steam, which can produce sucient
pressure to crack the ceramic. Repeated soaking of the ceramic can also cause it to swell and expand. This
expansion causes undue pressure on the ceramic that can cause it to crack and crumble.
i) Never throw water into the grill to control are-ups.
ii) Do not aempt to operate the infrared burners in open air while raining.
iii) If you nd standing water in your grill (because of exposure to rainfall, sprinklers, etc.), inspect
the ceramic for evidence of possible watersoaking. If the ceramic appears to be wet, remove the burner
from the grill. Turn it upside down to drain the excess water and bring indoors to dry thoroughly.
3. Impaired venlaon of hot air from the grill - For the burners to funcon properly, hot air must have a
way to escape the grill. If the hot air is not allowed to escape, the burners can become deprived of oxygen
causing them to back-ash. If this occurs repeatedly, the ceramic could crack. Never cover more than 75%
of the cooking surface with solid metal (i.e., griddle or large pan).
4. Incorrect cleaning - Do not clean the ceramic le with a wire brush. If debris is collecng on your
burner, light the burner and operate on high for 5 minutes with the lid open, allowing debris to burn o.
Burner: The burner is made from heavy wall 304 stainless steel, but extreme heat and a corrosive
environment can cause surface corrosion to occur. This can be removed with a brass wire brush.
CAUTION! Beware of Spiders.
Spiders and insects are aracted to the smell of Universal Liqueed Petroleum Gas (ULPG). The burner is
equipped with an insect screen on the air shuer, which reduces the likelihood of insects building nests
inside the burner but does not enrely eliminate the problem. A nest or web can cause the burner to burn
with a so yellow or orange ame or cause a re (ashback) at the air shuer underneath the control
panel. To clean the inside of the burner, it must be removed from the gas grill: Remove the screw (s)
that aaches the burner to the back wall. Slide the burner back and up wards to remove. Cleaning: Use
a exible venturi tube brush to clean the inside of the burner. Shake any loose debris from the burner
through the gas inlet. Check the burner ports and valve orices for blockages. Burner ports can close over
me due to cooking debris and corrosion, use an opened paperclip or the supplied port maintenance bit
to clean them. Drill out blocked ports using this drill bit in a small cordless drill. The ports are easier to
clean if the burner is removed from the grill, but it can also be done with the burner installed. Do not ex
the drill bit when drilling the ports, as this will cause the drill bit to break. This drill is for burner ports only,
not for the brass orices (jets) which regulate the ow into the burner. Take care not to enlarge the holes.
Ensure the insect screen is clean, ght, and free of any lint or other debris.
Reinstallaon: Reverse the procedure to reinstall the burner. Check that the valve enters the burner when
installing. Replace sear plate mount and / or ghten screws to complete reinstallaon.
18
www.napoleon.com
N415-0705-AU REV - MAY 11.22
Troubleshoong
Problem Possible Causes Soluon
Low heat / Low ame
when valve turned to
high.
For propane - improper lighng
procedure.
For natural gas - undersized supply
line.
For both gases - improper preheang.
Ensure lighng procedure is followed carefully.
All gas grill valves must be in the o posion
when the tank valve is turned on. Turn tank
on slowly to allow pressure to equalize. See
lighng instrucons.
Pipe must be sized according to installaon
code.
Preheat grill with both main burners on high
for 10 to 15 minutes.
Excessive are-ups/
uneven heat.
Sear plates installed incorrectly.
Improper preheang.
Excessive grease and ash build on sear
plates and in drip pan.
Ensure sear plates are installed with the holes
towards the front and the slots on the boom.
See assembly instrucons.
Preheat grill with both main burners on high
for 10 to 15 minutes.
Clean sear plates and drip pan regularly. Do not
line pan with aluminum foil. Refer to cleaning
instrucons.
Burners burn with
yellow ame,
accompanied by the
smell of gas.
Possible spider web or other debris, or
improper air shuer adjustment.
Thoroughly clean burner by removing. See
general maintenance instrucons.
Humming regulator. Normal occurrence on hot days. This is not a defect. It is caused by internal
vibraons in the regulator and does not aect
the performance or safety of the gas grill.
Humming regulators will not be replaced.
Burners will not cross
light each other.
Plugged ports at back of burner. Clean burner ports. See burner maintenance
instrucons.
“Paint” appears to be
peeling inside lid or
hood.
Grease build-up on inside surfaces. This is not a defect. The nish on the lid and
hood is porcelain, and will not peel. The
peeling is caused by hardened grease, which
dries into paint-like shards, that ake o.
Regular cleaning will prevent this. See cleaning
instrucons.
Infrared burner (if
equipped) ashes
back (during operaon
the burner abruptly
makes a loud “whoosh”
sound, followed by a
connuous blow-torch
type sound and grows
dim.)
Ceramic les overloaded with grease
drippings and build-up. Ports are
clogged.
Burner overheated due to inadequate
venlaon (too much grill surface
covered by griddle or pan.)
Cracked ceramic le.
Leaking gasket surrounding the
ceramic le, or a weld failure in the
burner housing.
Turn burner o and allow to cool for at least
two minutes. Relight burner and burn on high
for at least ve minutes or unl the ceramic
les are evenly glowing red.
Ensure that no more than 75% of the grill
surface is covered by objects or accessories.
Turn burner o and allow to cool for at least
two minutes, then relight.
Allow burner to cool and inspect very closely
for cracks. If any cracks are found, contact
your authorized Napoleon dealer to order a
replacement burner assembly.
Contact your authorized Napoleon dealer for
instrucons on ordering a replacement burner
assembly.

19
www.napoleon.com
N415-0705-AU REV - MAy 11.22
KEEP YOUR RECEIPT AS PROOF OF PURCHASE TO VALIDATE YOUR WARRANTY.
Ordering Replacement Parts
Warranty Informaon
MODEL:
DATE OF PURCHASE:
SERIAL NUMBER:
(Record informaon here for easy reference)
For replacement parts and warranty claims, contact the Napoleon dealer where the product was purchased.
Before contacting the dealer, check the Napoleon Grills Website for more extensive cleaning, maintenance,
troubleshooting and parts replacement instructions at www.napoleon.com.
To process a claim, the following informaon is required:
1. Model and serial number of the unit.
2. Part number and descripon.
3. A concise descripon of the problem (‘broken’ is not sucient).
4. Proof of purchase (photocopy of the invoice).
In some cases, Napoleon could request to have the parts returned to the factory for inspecon before
providing replacement parts.
Before contacng Napoleon dealer, please note that the following items are not covered by the warranty:
• Costs for transportaon, brokerage or export dues.
• Labour costs for removal and reinstallaon.
• Costs for service calls to diagnose problems.
• Discolouraon of stainless steel parts.
• Part failure due to lack of cleaning and maintenance, or use of improper cleaners (oven
cleaner or other harsh chemicals).
20
www.napoleon.com
N415-0705-AU REV - MAY 11.22
CAUTION! During unpacking and assembly we recommended you wear work gloves and safety
glasses for your protecon. Although we make every eort to make the assembly process as problem
free and safe as possible, it is characterisc of fabricated steel parts that the edges and corners might
be sharp and could cause cuts if handled incorrectly.
Geng Started
1. Remove all cart panels, hardware, and grill head from carton. Raise lid and remove any
components packed inside. Use the parts list to ensure all necessary parts are included.
2. Do not destroy packaging unl the grill has been fully assembled and operates to your sasfacon.
3. Assemble the grill where it is to be used, lay down cardboard or a towel to protect parts from being
lost or damaged while assembling.
4. Most stainless steel parts are supplied with a protecve plasc coang that must be removed
prior to using the grill. The protecve coang has been removed from some of the parts during the
manufacturing process and may have le behind a residue that can be perceived as scratches or
blemishes. To remove the residue, vigorously wipe the stainless steel in the same direcon as the
grain.
5. Follow all instrucons in the order that they are laid out in this manual.
6. Two people are required to li the grill head onto the assembled cart.
If you have any quesons about assembly or grill operaon, or if there are damaged or missing parts
please call our Customer Soluons Department at 1-866-820-8686 between 9 AM and 5 PM (Eastern
Standard Time).
TOOLS REQUIRED FOR ASSEMBLY (tools not included)
3/8” (10mm)
WARNING! Ensure the hose does not contact any high temperature surfaces, or it may melt and
leak causing a re.
ULPG – Proper Hose Connecon
!
!
x1
!
WARNING! Clip hose to cart heat
shield using bushing supplied. Failure
to follow these instrucons could result
in property damage, personal injury or
death.

21
www.napoleon.com
N415-0705-AU REV - MAy 11.22
WARNING – FIRE HAZARD
WARNING!
Do not route hose underneath drip pan.
WARNING! Ensure the hose does not contact any high temperature surfaces, or it may melt and
leak causing a re.
!
!
!

22
www.napoleon.com
N415-0705-AU REV - MAy 11.22
Leak Tesng Instrucons
WARNING! A leak test must be performed annually and each me a cylinder is hooked up or if a
part of the gas system is replaced.
WARNING! Never use an open ame to check for gas leaks. Be certain no sparks or open ames
are in the area while you check for leaks. Sparks or open ames will result in a re or explosion,
damage to property, serious bodily injury, or death.
Leak tesng: This must be done before inial use, annually, and whenever any gas components are
replaced or serviced. Do not smoke while performing this test, and remove all sources of ignion. See Leak
Tesng Diagram for areas to check. Turn all burner controls to the o posion. Turn gas supply valve on.
Brush a half-and-half soluon of liquid soap and water onto all joints and connecons of the regulator,
hose, manifolds and valves.
Bubbles will indicate a gas leak. Either ghten the loose joint or have the part replaced with one
recommended by the Napoleon Customer Soluons department and have the grill inspected by a cered
gas installer.
If the leak cannot be stopped, immediately shut o the gas supply, disconnect it, and have the grill
inspected by a certied gas installer or dealer. Do not use the grill until the leak has been corrected.
STOP
!
!
23
www.napoleon.com
N415-0705-AU REV - MAY 11.22
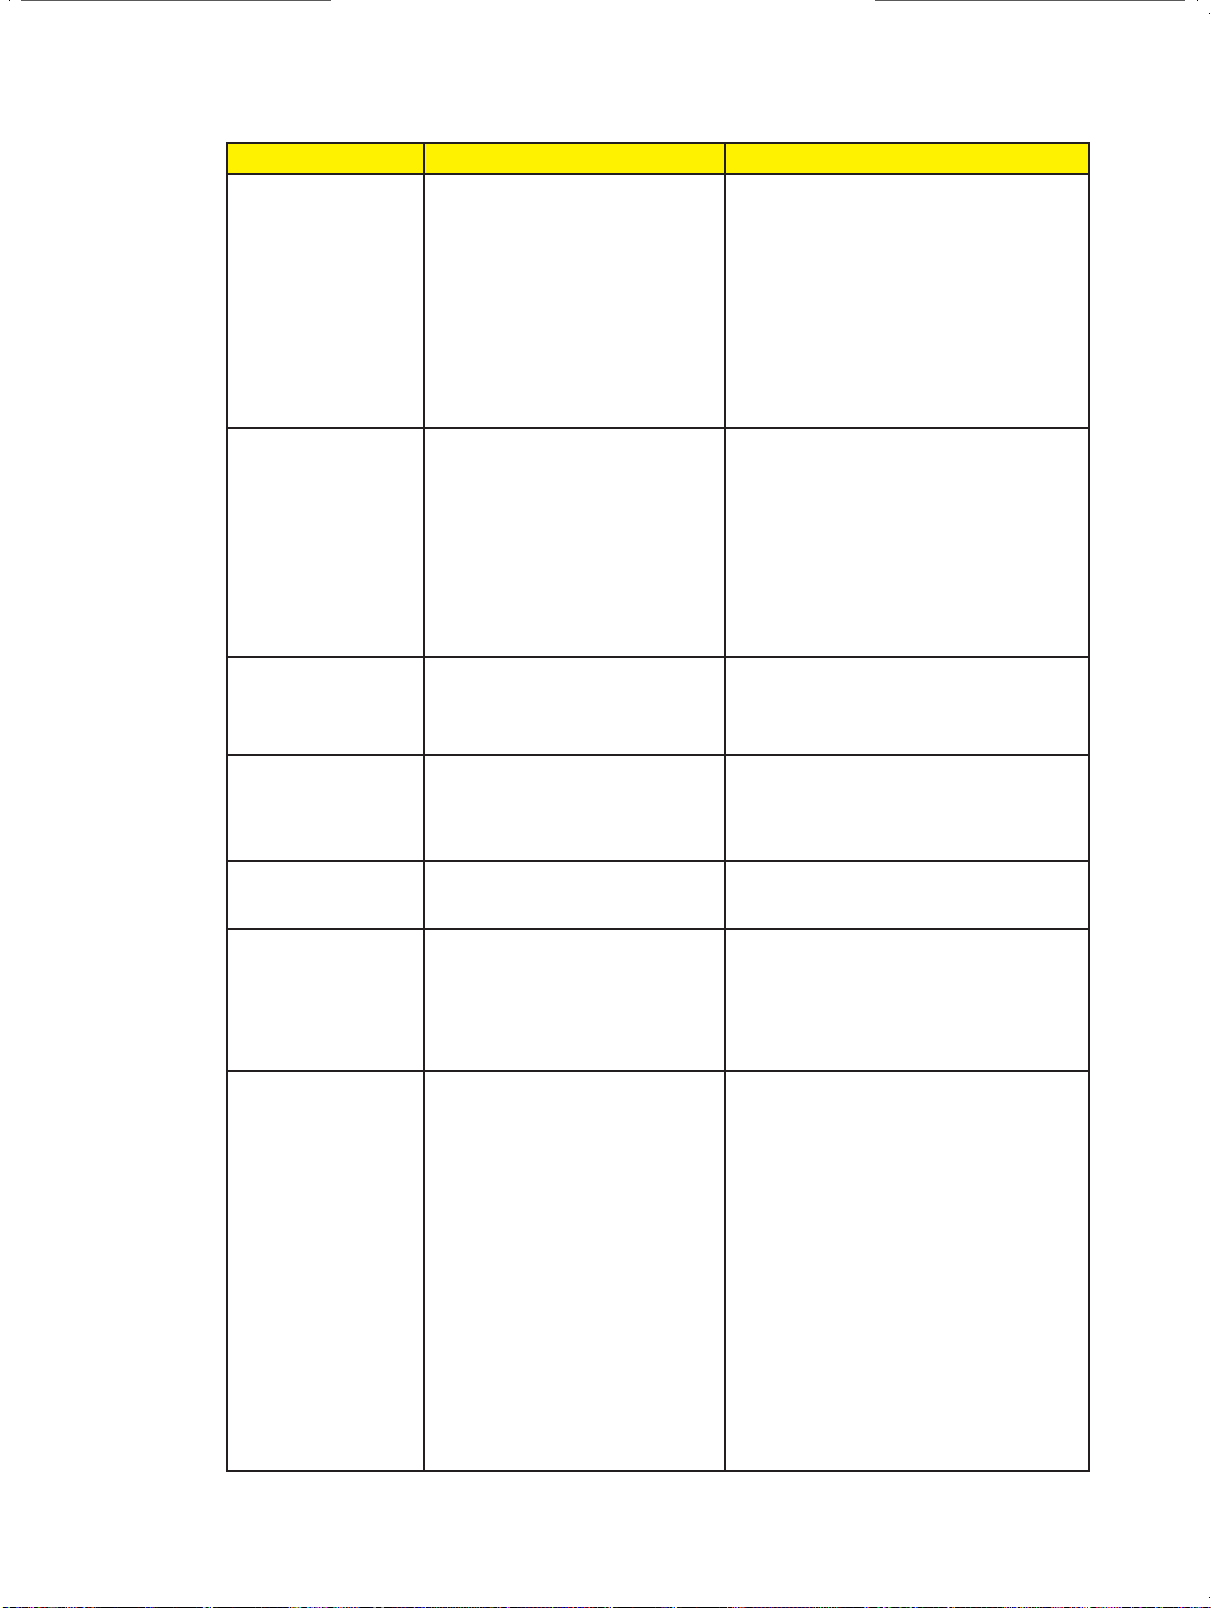
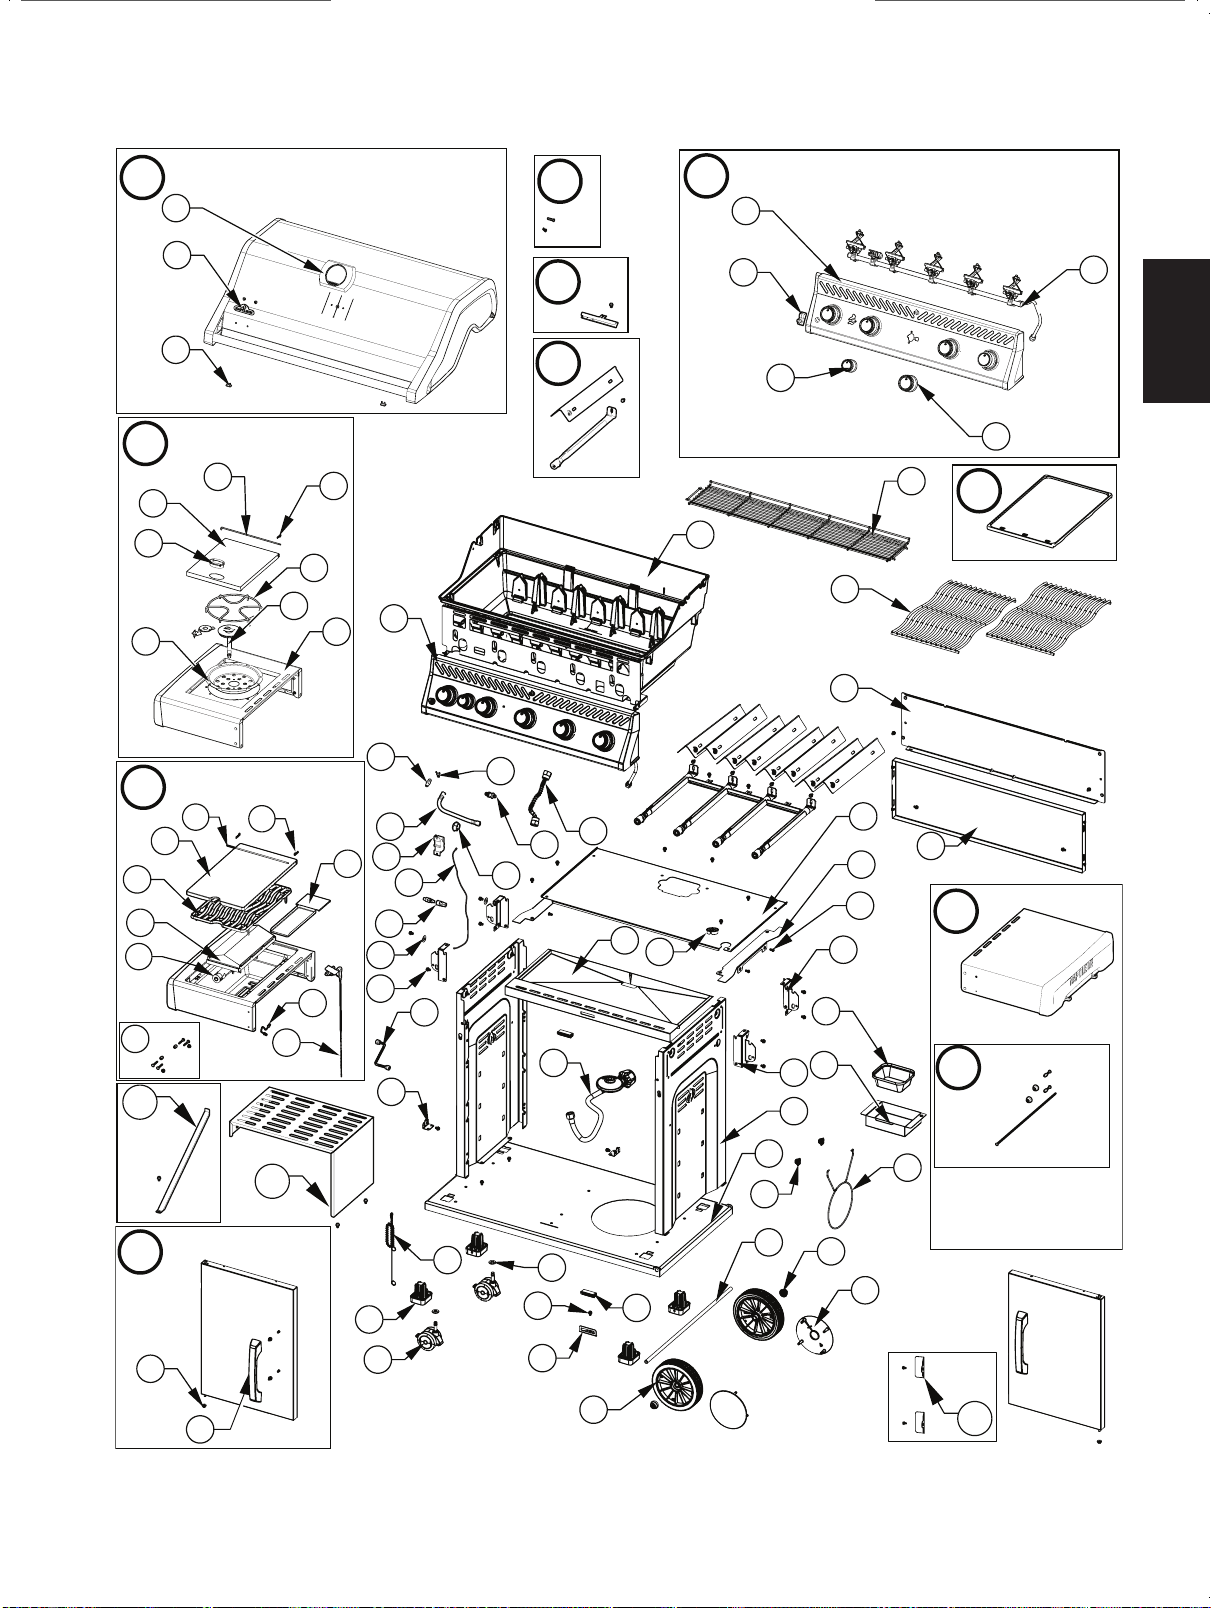
PARTS LIST
Part Number Descripon RXT425
SB
RXT425
SIB
RXT525
SB
RXT525
SIB
RXT625
SB
RXT625
SIB
1 N010-1031-BK lid assembly x x
N010-1034-BK lid assembly x x
N010-1233-BK lid assembly x x
2 S91003 temperature gauge x x x x x x
3 N385-0307-SER logo x x x x x x
4 N510-0013 lid bumper x x x x x x
5 S87014 lid pivot hardware x x x x x x
6 S87010 crosslight bracket x x
S87013 crosslight bracket x x
S87017 crosslight bracket x x
7 S87001 burner and sear plate x x x x x x
8 N010-1579-SER Cont panel assembly n
N010-1260-SER Cont panel assembly p
N010-1580-SER Cont panel assembly n
N010-1293-SER Cont panel assembly p
N010-1581-SER Cont panel assembly n
N010-1297-SER Cont panel assembly p
9 N475-0572-BK1GL control panel x x
N475-0585-BK1GL control panel x x
N475-0586-BK1GL control panel x x
10 S86002 1-spark igniter x x x x x x
11 N380-0044 small knob x x x x x x
12 N380-0043 large knob x x x x x x
13 N010-1184 manifold assembly p
N010-1596 manifold assembly n
N010-0982 manifold assembly p
N010-1597 manifold assembly n
N010-1215 manifold assembly p
N010-1598 manifold assembly n
14 N520-0050 warming rack x x
N520-0049 warming rack x x
N520-0048 warming rack x x
15 N010-1041-SER base assembly x x
N010-0999-SER base assembly x x
N010-1280-SER base assembly x x
16 N305-0096 stainless steel main
cooking grid
x x x x x x
N305-0113 stainless steel 525 center
cooking grid
x x
17 N200-0118-GY1SG base back cover x x
N200-0127-GY1SG base back cover x x
N200-0135-GY1SG base back cover x x
24
www.napoleon.com
N415-0705-AU REV - MAY 11.22
PARTS LIST
Part Number Descripon RXT425
SB
RXT425
SIB
RXT525
SB
RXT525
SIB
RXT625
SB
RXT625
SIB
18 N475-0363-GY1SG rear cart panel x x
N475-0449-GY1SG rear cart panel x x
N475-0499-GY1SG rear cart panel x x
19 N585-0138-GY1SG heat shield x x
N585-0139-GY1SG heat shield x x
N585-0140-GY1SG heat shield x x
20 N080-0437-GY1SG heat shield bracket le/
right
x x x x x x
21 N570-0126 1/4-20 x 1/2” screw x x x x x x
22 N080-0364 folding bracket “A” x x x x x x
23 N010-1526-SER side shelf assembly x x x x x x
24 N710-0062 grease tray x x x x x x
62007 grease tray liners (5pc) ac ac ac ac ac ac
25 N200-0134-GY1SG grease tray cover x x x x x x
26 N080-0365 folding bracket “B” x x x x x x
27 N370-0928-SER side shelf pivot hardware x x x x x x
28 N475-0356-GY1SG side panel le/right x x x x x x
29 N590-0318-GY1SG boom shelf x x
N590-0319-GY1SG boom shelf x x
N590-0320-GY1SG boom shelf x x
30 N160-0034-GY1SG propane tank retainer p p p p p p
31 N160-0035 retainer ring clip p p p p p p
32 N015-0012 axle x x x x x x
33 N450-0023 plasc cap nut x x x x x x
34 N120-0037 wheel hub cap x x x x x x
35 N745-0009 wheel x x x x x x
36 N430-0002 magnet x x x x x x
37 N080-0387-GY1SG magnet bracket x x x x
38 N570-0118 1/4-20 x 3/8” screw x x x x x x
39 N735-0027 washer 1/2” x x x x x x
40 S82001 caster x x x x x x
41 N510-0015 caster plug x x x x x x
42 N555-0097 lighng rod x x x x x x
43 N010-0869-BK-SER black door assembly x x
N010-0984-BK-SER black door assembly x x
N010-1221-BK-SER black door assembly x x
44 N105-0011 door bushing x x x x x x
45 N325-0094-SER door handle x x x x x x
46 N080-0380-GY1SG door magnet bracket x x
47 N080-0254G tank inhibitor bracket p p
48 N590-0327-GY1SG tank inhibitor shelf p p
49 N080-0378-GY1SG door pivot bracket x x x x x x
25
www.napoleon.com
N415-0705-AU REV - MAY 11.22
PARTS LIST
Part Number Descripon RXT425
SB
RXT425
SIB
RXT525
SB
RXT525
SIB
RXT625
SB
RXT625
SIB
50 N105-0020 ex line bushing x x x x x x
51 N450-0053 shelf lock nut x x x x x x
52 N750-0016 side burner electrode x x x x x x
53 N105-0017 side burner hose bushing x x x x x x
54 Z255-0002-1 side burner ng x x x x x x
55 N720-0079 ex hose x x x x x x
56 N160-0023 side burner orice clip x x x x x x
57 N345-0021 side burner supply hose x x x
N720-0092 7” side burner supply hose x x x
N720-0079 9.5” side burner supply
hose
x x x
58 N455-0085 side burner orice propane p p p
N455-0063 side burner orice natural
gas
n n n
59 N010-1527-SER ame side burner shelf
assembly
x x x
60 Z580-0003 lid pivot rod x x x
N555-0091 lid pivot rod x x x
61 Z485-0001 clevis pin x x x
N485-0021 clevis pin x x x
62 N335-0099-BK1HR side burner lid x x x
N335-0098-BK1HR side burner lid x x x
63 Z325-0013 side burner lid handle x x x
64 Z305-0008 side burner grate x x x
S83010 grid x x x
65 Z100-0002 side burner x x x
N010-1558 infrared side burner x x x
66 N010-1516-BK1HR side shelf x x x
67 Z710-0004 side burner plate x x x
68 N530-0058 regulator p p p p p p
N345-0018 natural gas hose n n n
N530-0003 QCC1 regulator p
p p p p p
69 N710-0094 drip pan x x
N710-0108 drip pan x x
N710-0120 drip pan x x
70 56425 cast iron griddle x x x x x x
71 N010-1592-SER side shelf assembly x x x
72 N240-0045 electrode x x x
73 N720-0073 pilot tube x x x
74 N455-0079 pilot orice p p p
75 N565-0014 infrared burner screen x x x
26
www.napoleon.com
N415-0705-AU REV - MAY 11.22
Part Number Descripon RXT425
SB
RXT425
SIB
RXT525
SB
RXT525
SIB
RXT625
SB
RXT625
SIB
76 N710-0063 infrared burner drip pan x x x
77 N255-0073 infrared side burner quick
disconnect
x x x
78
N455-0126
side burner orice p p p
62050 jeire and burner
maintenance kit
x x x
69914 rosserie kit ac ac ac ac ac ac
61427 425 cover ac ac
61527 525 cover ac ac
61627 625 cover ac ac
S82002 premium caster kit ac ac ac ac ac ac
67732 charcoal tray ac ac ac ac ac ac
62007 grease tray liners (5pc) ac ac ac ac ac ac
S83013 stainless steel cooking grids ac ac
S83008 cast iron cooking grids ac ac
S83023 stainless steel cooking grids ac ac
S83024 cast iron cooking grids ac ac
S83022 stainless steel cooking grids ac ac
S83021 cast iron cooking grids ac ac
x - standard p - propane units only n- natural gas units only
ac - accessory sp -special edion
27
www.napoleon.com
N415-0705-AU REV - MAy 11.22
17
39
40
42
44
45
22
33
37
38
36
49
34
26
8
32
29
69
15
28
35
30
31
21
19
20
24
25
14
4
3
2
5
1
10
11
9
12
13
8
58
56
43
23
27
7
6
59
66
67
65
64
62
63
60
61
68
38
18
46
47
52
57
53
41
50
51
55
54
70
16
48
76
77
75
72
62
71
60
73
74
61
27
79
78
79

www.napoleon.com
Napoleon products are protected
by one or more U.S. and Canadian
and/or foreign patents or patents
pending.
N415-0705-AU