
Please read this entire guide before beginning.
Installation Guide
PPA19-16145
Microchip Cat Flap
100
Series
Série
Serie
Serie
Serie
Serie
petsafe.com
2
Hereinafter Radio Systems Corporation, Radio Systems PetSafe Europe Ltd., Radio Systems
Australia Pty Ltd. and any other affiliate or Brand of Radio Systems Corporation may be referred to
collectively as “We” or “Us”.
IMPORTANT SAFETY INFORMATION
Explanation of Attention Words and Symbols used in this guide
This is the safety alert symbol. It is used to alert you to potential personal injury hazards.
Obey all safety messages that follow this symbol to avoid possible injury or death.
WARNING indicates a hazardous situation which, if not avoided, could
result in death or serious injury.
CAUTION, used without the safety alert symbol, indicates a hazardous
situation which, if not avoided, could result in harm to your pet.
NOTICE is used to address practices not related to personal injury.
When children are present in the home, it is important to consider the pet door during child proofing
activities, the pet door may be misused by a child resulting in the child accessing potential hazards
that may be on the other side of the pet door. Purchasers/Homeowners with swimming pools
should ensure that the pet door is monitored at all times and that the swimming pool has adequate
barriers to entry. If a new hazard is created inside or outside of your home, which may be accessed
through the pet door, Radio Systems Corporation recommends that you properly guard access
to the hazard or remove the pet door. The closing panel or lock, if applicable, is provided for
aesthetic and energy efficiency purposes and is not intended as a security device. Radio Systems
Corporation will not be liable for unintended use and the purchaser of this product accepts full
responsibility for oversight of the opening it creates.
• Power Tools. Risk of severe injury; follow all safety instructions for your power tools.
• Be sure to always wear your safety goggles.
The user, prior to installation, must become familiar with all building codes that may affect the
installation of the pet door and determine, along with a licensed contractor, its suitability in a given
installation. This pet door is not a fire door. It is important for the owner and contractor to consider
any risks that may be present inside or outside of the pet door, and any risks that may be created
by subsequent changes to your property and how they may relate to the existence and use-
including misuse-of the pet door.
• If cutting a metal surface, be aware of sharp edges to prevent injury.
• Keep these instructions with important papers; be sure to transfer these instructions to the new
owner of the property.
• Please read these instructions fully prior to forming or modifying an opening in your selected
door or wall. We strongly recommend that your microchip cat flap be programmed for your
cat and a check made that it works with the microchip in your cat first.
• This unit operates properly only when the outside temperatures are greater than -25° C and
less than 55° C.
• PetSafe
®
pet doors are suitable for most doors, walls or partitions although additional
materials may be required. This product is designed for the convenience of you and your
pet. It is not possible to fully guarantee the exclusion of all other animals in all circumstances.
Radio Systems Corporation will not accept liability for any damage or inconvenience
caused by unwanted animals who may gain access to your home. In keeping with accepted
standards of parental care, children should be supervised at all times.
SAVE THESE INSTRUCTIONS

3
Accessories available online
Microchip Cat Flap
Chatière avec puce électronique
Microchip kattenluik
Puerta con microchip
Porta per gatti con microchip
Mikrochip Katzenklappe
Please read this entire guide before beginning.
Veuillez lire ce manuel en entier avant de commencer.
Gelieve deze gids volledig door te lezen voordat u begint.
Por favor, lea detenidamente este manual antes de empezar.
Si prega di leggere attentamente la guida al uso prima di utilizzare il collare.
Bitte lesen Sie die gesamte Betriebsanleitung vor dem Train.
Quick Start Guide
Guide de démarrage rapide
Beknopte handleiding
Guía de inicio rápido
Guida rapida
Schnellstartanleitung
100
Series
Série
Serie
Serie
Serie
Serie
PPA19-16145
Thank you for choosing the PetSafe
®
Brand. You and your pet deserve a companionship
that includes memorable moments and a shared understanding together. Our products
and training tools enhance the relationship between pets and their owners. If you have
any questions about our products or training your pet, please visit our
website at www.petsafe.com or contact our Customer Care Centre. For a
listing of Customer Care Centre telephone numbers, visit our website at
www.petsafe.com.
To get the most protection out of your warranty, please register your product within 30 days
at www.petsafe.com. By registering and keeping your receipt, you will enjoy the product’s full
warranty and should you ever need to call the Customer Care Centre, we will be able to help you
faster. Most importantly, your valuable information will never be given or sold to anyone. Complete
warranty information is available online at www.petsafe.com.
Note: This product will have updates and additional accessories developed. You may want to
take advantage of these offerings. By registering your product, we will be able to alert you when
these updates become available.
TABLE OF CONTENTS
Box Components . . . . . . . . . . . . . . . . . . . . . . . . . . . . . . . . . . . . . . . . . . . . . . . . . . . . . . . . . . . . . . . . . . . . . . . . . . . . . . . . .3
Getting Started. . . . . . . . . . . . . . . . . . . . . . . . . . . . . . . . . . . . . . . . . . . . . . . . . . . . . . . . . . . . . . . . . . . . . . . . . . . . . . . . . . .4
How the PetSafe
®
Microchip Cat Flap Works . . . . . . . . . . . . . . . . . . . . . . . . . . . . . . . . . . . . . . . . . . . . . . . . . . . . . . . . .4
Programming Cats into the PetSafe
®
Microchip Cat Flap . . . . . . . . . . . . . . . . . . . . . . . . . . . . . . . . . . . . . . . . . . . . . . . .5
Installation . . . . . . . . . . . . . . . . . . . . . . . . . . . . . . . . . . . . . . . . . . . . . . . . . . . . . . . . . . . . . . . . . . . . . . . . . . . . . . . . . . . . . . .5
Installation – Measurement and Marking . . . . . . . . . . . . . . . . . . . . . . . . . . . . . . . . . . . . . . . . . . . . . . . . . . . . . . . . . . . . .6
Installation – Wooden, PVC, or uPVC Doors . . . . . . . . . . . . . . . . . . . . . . . . . . . . . . . . . . . . . . . . . . . . . . . . . . . . . . . . . .6
Training . . . . . . . . . . . . . . . . . . . . . . . . . . . . . . . . . . . . . . . . . . . . . . . . . . . . . . . . . . . . . . . . . . . . . . . . . . . . . . . . . . . . . . . . . .6
Installation – Glass Doors, Windows or Walls . . . . . . . . . . . . . . . . . . . . . . . . . . . . . . . . . . . . . . . . . . . . . . . . . . . . . . . . .6
Installation – Metal and Metal Core Doors . . . . . . . . . . . . . . . . . . . . . . . . . . . . . . . . . . . . . . . . . . . . . . . . . . . . . . . . . . .7
Basic Operation . . . . . . . . . . . . . . . . . . . . . . . . . . . . . . . . . . . . . . . . . . . . . . . . . . . . . . . . . . . . . . . . . . . . . . . . . . . . . . . . . .7
Basic Operation Guide . . . . . . . . . . . . . . . . . . . . . . . . . . . . . . . . . . . . . . . . . . . . . . . . . . . . . . . . . . . . . . . . . . . . . . . . . . . .7
Function Definitions . . . . . . . . . . . . . . . . . . . . . . . . . . . . . . . . . . . . . . . . . . . . . . . . . . . . . . . . . . . . . . . . . . . . . . . . . . . . . . . .7
4-Way Manual Lock . . . . . . . . . . . . . . . . . . . . . . . . . . . . . . . . . . . . . . . . . . . . . . . . . . . . . . . . . . . . . . . . . . . . . . . . . . . . . . .7
Maintenance . . . . . . . . . . . . . . . . . . . . . . . . . . . . . . . . . . . . . . . . . . . . . . . . . . . . . . . . . . . . . . . . . . . . . . . . . . . . . . . . . . . . .7
Additional Information . . . . . . . . . . . . . . . . . . . . . . . . . . . . . . . . . . . . . . . . . . . . . . . . . . . . . . . . . . . . . . . . . . . . . . . . . .8
Warranty . . . . . . . . . . . . . . . . . . . . . . . . . . . . . . . . . . . . . . . . . . . . . . . . . . . . . . . . . . . . . . . . . . . . . . . . . . . . . . . . . . . . . . . . .8
Terms of Use and Limitation of Liability . . . . . . . . . . . . . . . . . . . . . . . . . . . . . . . . . . . . . . . . . . . . . . . . . . . . . . . . . . . . . . . .9
Box Components
Interior Frame
Exterior Frame
Quick Start Guide
Cutting Template
Screw Plugs
Phillip head screws
M4 x 28
M4 x 50
M4 x 75
1
1
2
2
3
3
4
4
5
6
5
6
petsafe.com
4
Getting Started
How the PetSafe
®
Microchip Cat Flap Works
With its advanced selective entry technology, our PetSafe
®
Microchip Cat Flap has been designed
to allow your cat easy access to the outside world whilst keeping other troublesome cats and
animals out of your house. Using radio frequency identification (RFID) technology, the PetSafe
®
Microchip Cat Flap works by reading your cat’s unique microchip ID without the need for a collar
or accessory. When your cat approaches the Cat Flap, the flap will respond by allowing only your
cat to enter. The Cat Flap will remain locked and deny access to cats that are not programmed,
wild animals, pests, and strays. The Cat Flap is also designed with a convenient Manual 4-Way
lock that allows you to control the access of your programmed cats.
This model of the PetSafe
®
Microchip Cat Flap (PPA19-16145) reads the most common type of
microchip implanted in cats – FDX-B (15-digit). If you are not sure what type of microchip your
cat has, please either ask your veterinarian or visit www.petsafe.com and navigate to our Chip
Checker, microchip compatibility checker, and enter your cat’s microchip ID to verify that your
microchip is compatible. Occasionally a microchip migrates to a position within the cat that the
scanner cannot read reliably.
Batteries
The PetSafe
®
Microchip Cat Flap requires four alkaline batteries (LR6) for operation. Batteries are
not included with your cat flap. Please use new, non-rechargeable batteries for best results. To
install batteries, remove the battery cover from the top of the interior frame, remove the hardware
pack, and place the batteries in the proper direction. Once installed the green LED will quickly
flash 3 times and the cat flap will be ready for programming.
Note: With basic operation the batteries will typically last 12 months. The cat flap is designed
with a low battery indicator, explained in the Basic Operation Guide section.
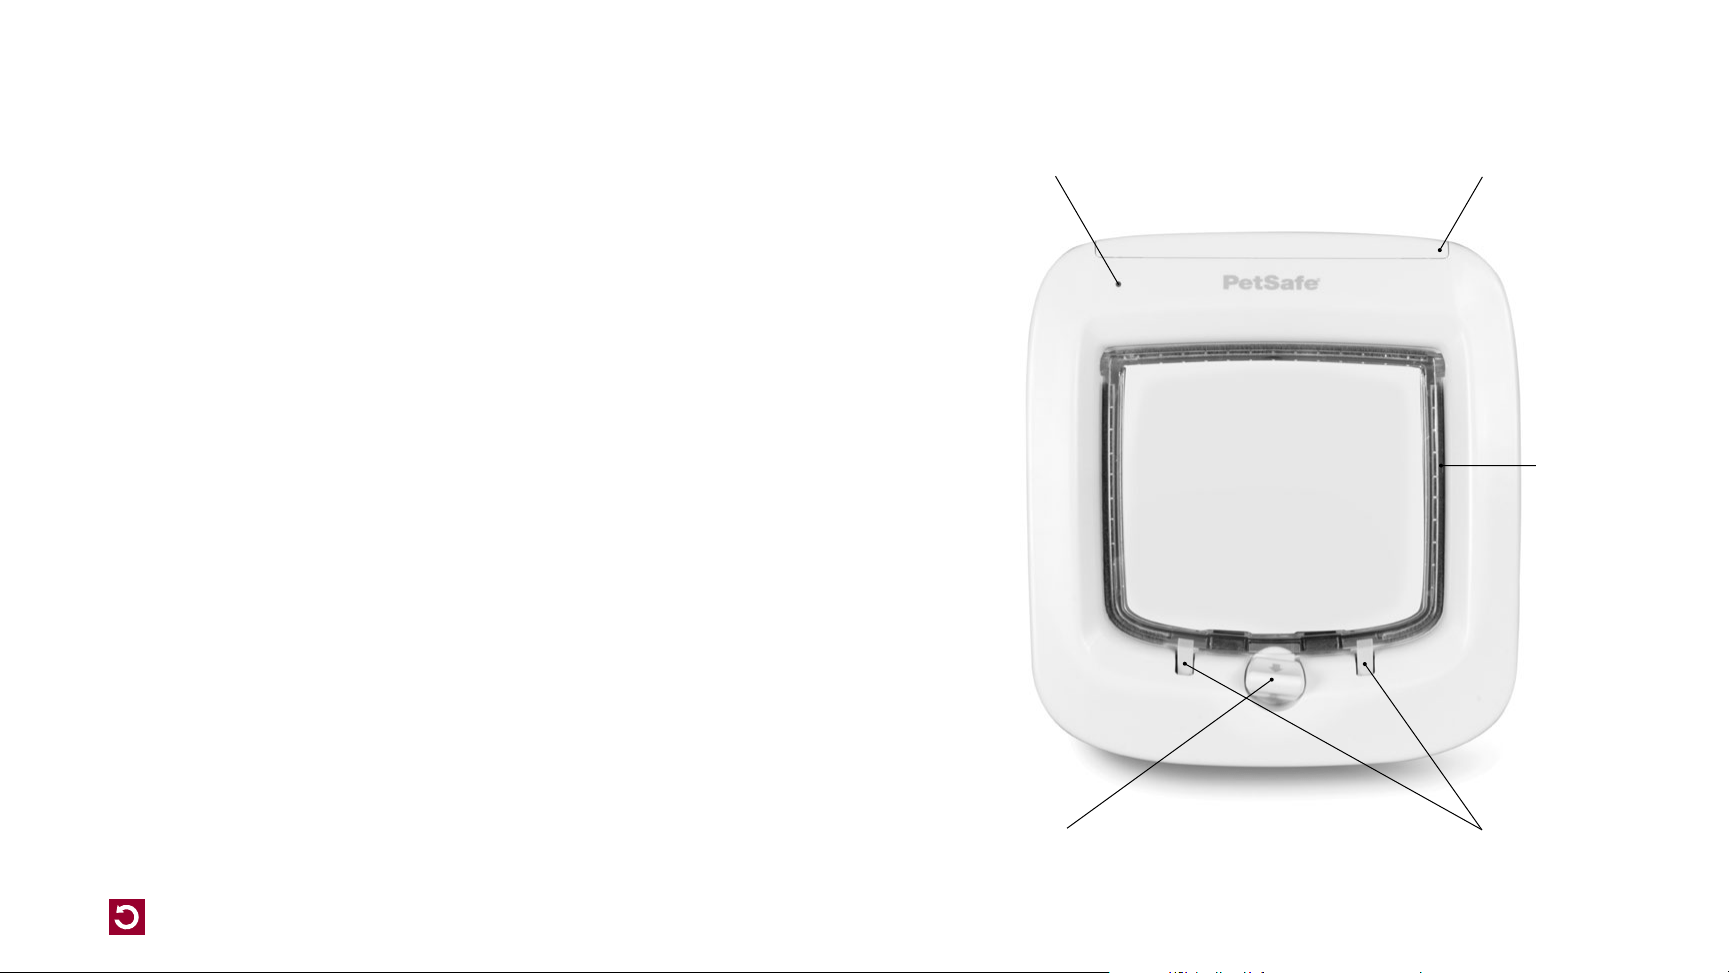
4-way manual lock
LED and low battery indicator
Reinforced, dual auto-latch
One button programming
Draught excluder
petsafe.com
5
Programming Cats into the PetSafe
®
Microchip Cat Flap
Your PetSafe
®
Microchip Cat Flap is designed to work with most 15-digit microchips (FDX-B) used
for pets. Before you begin setup or installation of the cat flap, please ensure your cat has the correct
type of microchip.
To begin operation, the cat flap must learn the unique microchip Identification Number (ID) of your
cat. Please follow the steps below to begin the setup of your cat flap:
1. The cat flap will be factory pre-set in the locked position. Ensure the manual lock is set to the
“In or Out” position. (See Fig.H).
2. Remove the battery cover, set aside the provided hardware pack, and install 4 alkaline AA
batteries (LR6). The green LED light will flash three (3) times which indicates that the cat flap is
in Automatic Mode.
3. To enter Learn Mode, press and hold the button until the red LED light appears (about 5
seconds). You will have 60 seconds to position the cat’s head in the tunnel to learn the
microchip ID. Once the cat flap has learned the microchip ID, it will unlatch and the red LED will
turn off. The cat flap will stay in Automatic Mode and will re-latch after 3 seconds.
4. After successfully learning the cat’s microchip ID, you will be ready to install the cat flap into
your door.
Note: To learn more than one cat, please follow the same steps starting with step No. 3. The
microchip cat flap can store up to 40 microchipped cats. Replace the battery cover when the
process is complete for all cats. Keeps away all other microchipped cats to ensure only 1 cat is
programmed at a time.
Helpful Tip: Program your cat’s microchip ID before installation to prevent
having to hold your cat in the cat flap once it is installed. If you are
having trouble programming your cat’s microchip ID, please
ensure that their head is extended into the tunnel or they
pass all the way through the cat flap. You should hear the cat
flap unlatch once it has learned your cat’s microchip ID.
Installation
The PetSafe
®
Microchip Cat Flap is suitable to fit most doors or partitions although additional
materials and competent DIY skills may be required. This cat flap is designed to adapt easily to
cut-out sizes for Staywell
®
200, 300, 400, 500, 900 and Petporte smart flap
®
series cat flaps.
Some simple DIY skills are required and minor adjustments to the cut-out or additional accessories
might be needed.
We strongly recommend that your microchip cat flap be programmed for your
cat and a check is made that it works with your cat’s microchip ID first.
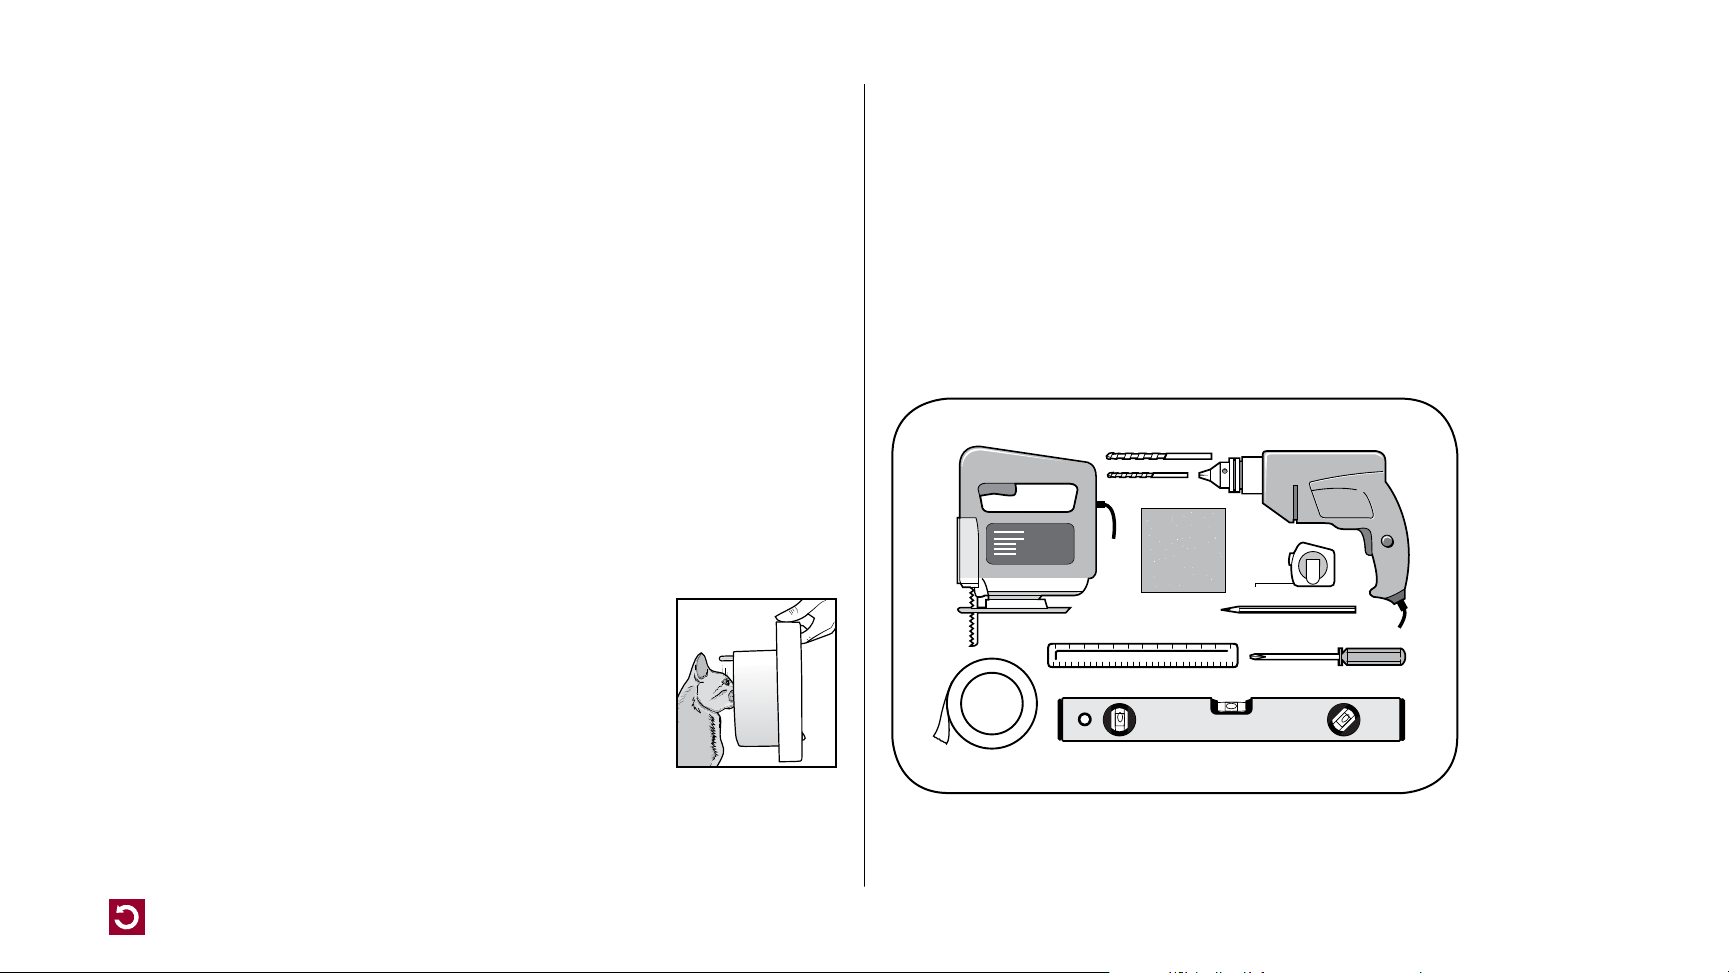
Tools Required
• Jigsaw
• Drill
• 12 mm drill bit
• 6 mm drill bit
• Tape measure
• Phillips screwdriver
• Sandpaper
• Masking tape
• Pencil
• Ruler
• Level
petsafe.com
6
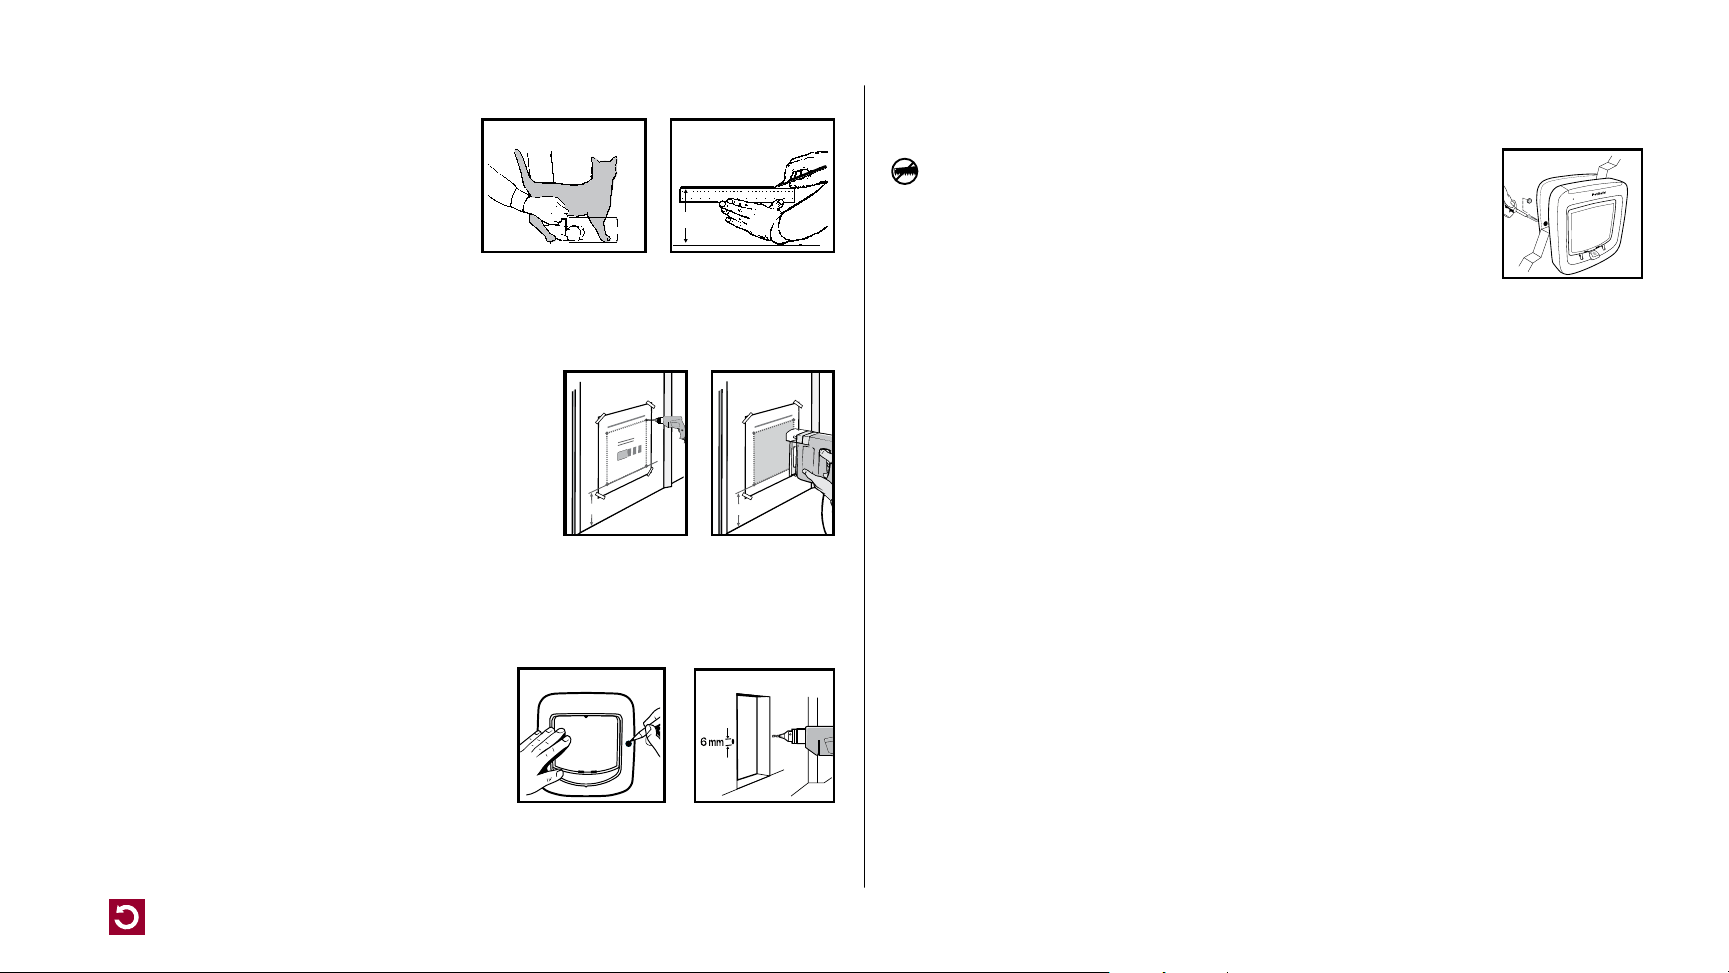
Installation – Measurement and Marking
Measure the belly height of your cat. This is usually
100 mm –150 mm (Fig. A).
Mark this measurement on the outside of your door
and draw a straight horizontal line 168 mm long
(Fig. B).
Please keep in mind that this horizontal line will
eventually be the bottom of the hole you will cut in your door. The frame of the cat flap will be 25
mm lower. If necessary, this line may have to be raised slightly to account for some door designs.
Installation – Wooden, PVC, or uPVC Doors
Before beginning, please check if your door has a metal
core. If a metal core or metal plate is found, please refer to
the Installation Metal and Metal Core Doors section of this
guide (on the next page).
1. Attach the supplied Cutting Template to the outside of
your door in the correct position ensuring that it is the
right way up and level (Fig. C).
2. Drill four corner holes through the door with a 12 mm
drill bit as marked on the Cutting Template through the door. Please ensure the drill remains
straight and level.
3. Using a jig or key-hole saw, cut along the dashed line as indicated on the Cutting
Template. (Fig. D).
4. Temporarily place both frames into the cutout.
Level the cat flap until it is in the proper position.
On the outside, use a pencil to mark screw holes
through the holes on the exterior frame (Fig. E).
Remove the cat flap and drill the screw holes with
a 6mm drill bit (Fig. F).
5. Clean the area from any dust, dirt or debris.
6. Place the interior frame (with attached tunnel) into the hole from the inside. Align the exterior
frame to the outside of the door. Three (3) different lengths of screws have been provided with
(x)
Fig. A
(x)
Fig. B
(X)
Fig. C
(X)
Fig. D
Fig. E
Fig. F
this cat flap. Select the appropriate length. Using a manual screw driver, screw the exterior
frame through, the holes in your door, to the interior frame.
Important: Do not cut the tunnel. Key components are contained within
the tunnel and any alteration to the tunnel will affect functionality.
When the installation of the cat flap is completed, place the two blanking plugs
over the screws on the exterior frame. The cat flap is ready to use (Fig. G).
Training
To train your cat to use the PetSafe
®
Microchip Cat Flap, set the Cat Flap to Manual Mode (see
Basic Operation Guide for mode settings). Lift or tape the flap open to the interior of the door to
help your cat become familiar with the Cat Flap. Try to encourage your cat to come through the Cat
Flap. DO NOT FORCE your cat through the flap or they may become freighted. A good motivator
is usually food. First feed your cat close to the Cat Flap on the inside. Once your cat is comfortable
approaching the flap, move food to the outside to try to get your cat to go through. After your cat
has used the Cat Flap a few times, lower the flap and hold it open with your hand. Encourage your
cat to go through the flap while gently lowering the flap so it touches your cat’s back. This will help
your cat become familiar with the flap.
Once your cat is comfortable entering and exiting through the closed flap in Manual Mode,
change the Cat Flap to Automatic Mode to operate with their microchip ID. Walk your cat to the
Cat Flap until it reads the microchip ID and unlatches. Encourage your cat to push through the flap
to the other side. Repeat a few times.
Note: It is recommend to use the “In or Out” position on the 4-Way Manual lock until your cat is
completely comfortable using the Cat Flap.
Installation – Glass Doors, Windows or Walls
A mounting adapter and wall extension tunnels are available to complete the installation of the cat
flap into glass doors, windows, or walls. Please visit www.petsafe.com to learn more about glass
and wall installation and to purchase these accessories.
Important: Working with glass is a skilled job and should be carried out by a professional
glazier. It is not possible to cut holes in toughened glass or double glazed units except at the time of
manufacture. Please consult a glazier. Ensure that a metal spacer is not used for a seal as this may
impact performance.
Fig. G
petsafe.com
7
Installation – Metal and Metal Core Doors
Installation of the cat flap into a metal door or a door with a metal core plate may require some
modifications. The presence of metal can interfere with the performance of the cat flap including
a reduction in read range of the microchip. If you experience poor performance you may need to
purchase and install a mounting adapter. Please visit www.petsafe.com for more information.
Basic Operation
Basic Operation Guide
FUNCTION BUTTON ACTIVATION LED INDICATOR ACTION
Manual Mode Press & Release Red - Solid for 5 seconds Latch will unlock. Use 4-Way Lock options
for pet access.
Automatic Mode Press & Release Green - Solid for 5
seconds
Latch will lock and will only be activated by
reading a “programmed” microchip ID.
Learn Mode Press & Hold for 5
Seconds until LED is
activated
Red – Solid for up to 60
seconds
Cat flap will exit Learn Mode once
microchip ID is programmed. Latch will
unlock after successful programming.
Repeat for additional cats.
Motion Sensor N/A Green - Solid for the
length of activation
Motion is detected outside and the cat flap
is looking for a microchip to read.
Low Battery N/A Red - Flashes every 10
seconds
Replace batteries soon.
Batteries
Replaced
N/A Green – 3 quick flashes Cat flap will enter Automatic mode.
Factory Reset Press & Hold 15
Seconds until LED is
activated
Red - 5 quick flashes Cat flap will enter back into Automatic
Mode and be locked. All programmed
microchip IDs will be erased from the
memory.
Error N/A Red – Continuous quick
flashing
Remove batteries, wait 30 seconds then
replace batteries. If Red light continues,
contact the Customer Care Centre. Latch
will attempt to unlock for cat flap to be used
in Manual Mode.
Function Definitions
• Manual Mode – Pet access setting that allows entry and exit for all. Cat Flap does not
operate using programmed microchip IDs. Typically used with 4-Way Manual Lock.
• Automatic Mode – Pet access selective entry setting which only allows programmed cats
to enter. Can be used in conjunction with 4-Way Manual Lock.
• Learn Mode - Mode used to program your cat’s unique microchip ID. The Cat Flap can
learn up to 40 microchipped cats.
• Motion Sensor – Indicated by a solid, green LED on the interior frame when the Cat Flap is
looking for a microchip ID to read.
• Low Battery Indicator – Indicates that batteries are running low and will need to be
replaced soon.
• Factory Reset – Can be used to erase all programmed microchip IDs in the Cat Flap.
• Error – Indicates that something is not operating normally in the Cat Flap. Contact our
Customer Care Centre for assistance. Please visit www.petsafe.com for a list of our Customer
Care Centre numbers.
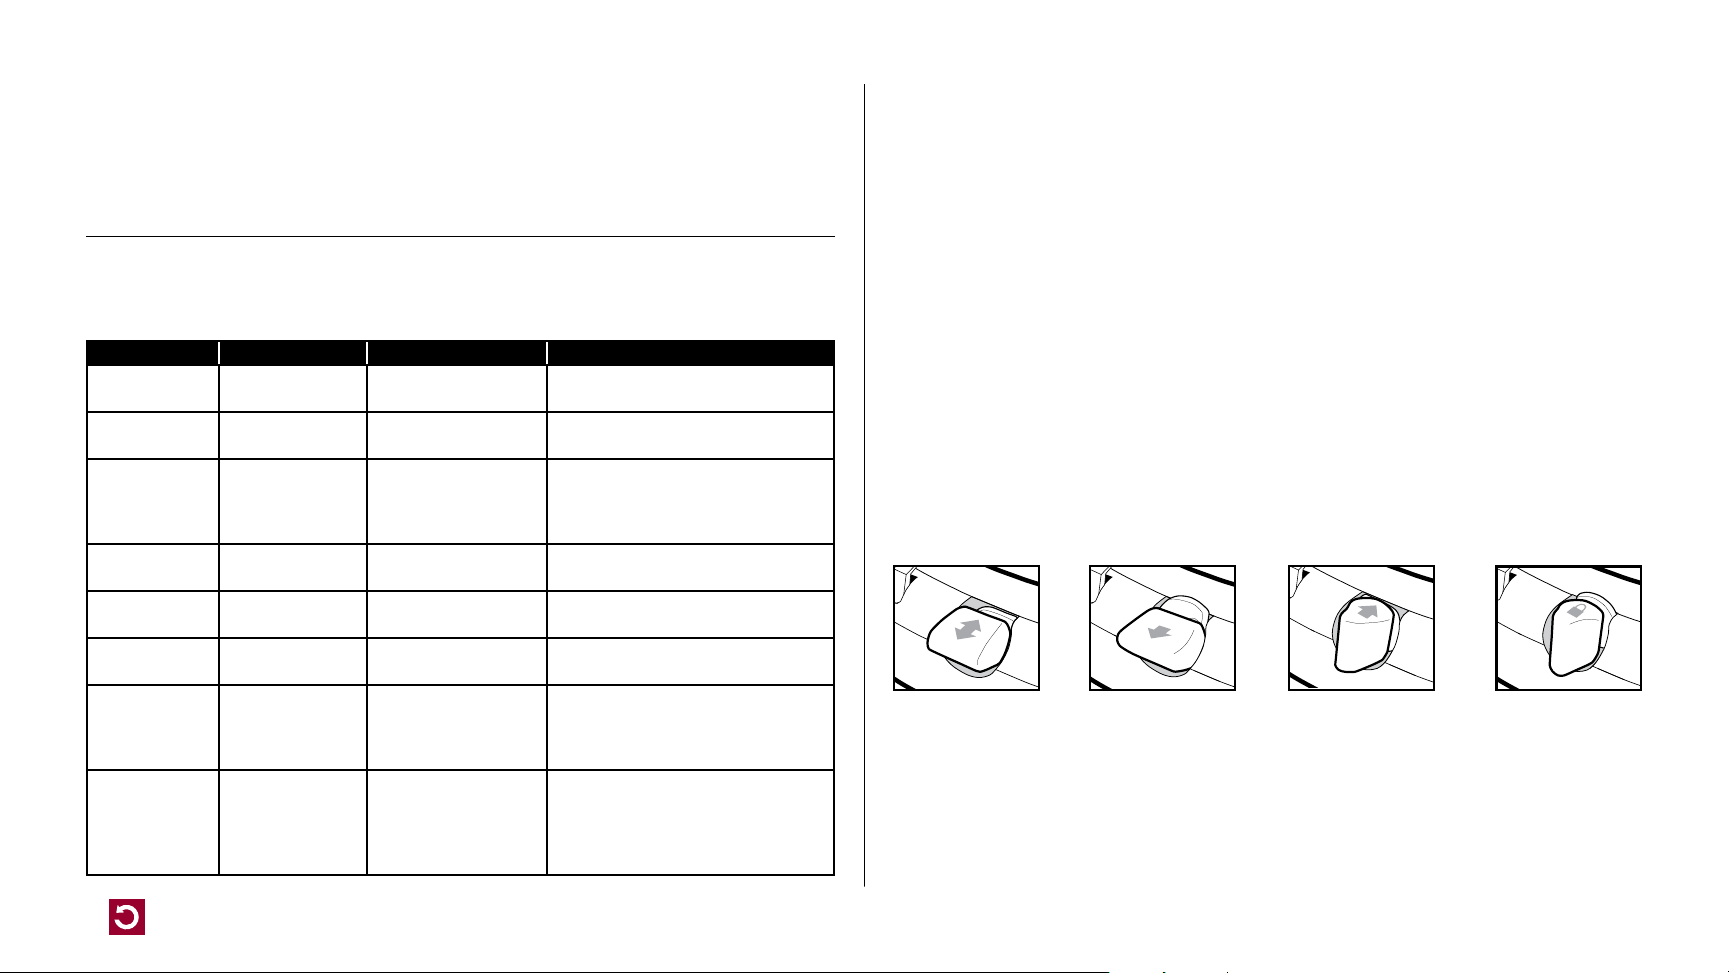
4-Way Manual Lock
The 4-Way Manual lock allows you to control your cat’s access in and out of your home in either
direction. Until your pet is thoroughly familiar with using the cat flap, it is a good idea to only use the
4-Way Manual lock in the “In or Out” position only (Fig. H).
Fig. H
Maintenance
Your cat flap is constructed in the highest quality material with a toughened flap and has been
designed to last for many years. To maintain its appearance, occasional wiping with a damp cloth
is all that is necessary.
Fully lockedIn or Out Out onlyIn only

petsafe.com
8
From time to time, the motion sensor in the inside of the tunnel may become covered with dirt and
may cause performance issues of the Cat Flap. Please wipe this area with a damp cloth as needed
to ensure proper usage. Also check for cart hair or debris in the dual-auto latches.
Additional Information
For extended information on your PetSafe
®
Microchip Cat Flap including glass and wall
installation, helpful training tips, and available accessories, please visit www.petsafe.com.
Important recycling advice
Please respect the Waste Electrical and Electrical Equipment regulations in your country. This
equipment must be recycled. If you no longer require this equipment, do not place it in the normal
municipal waste system. Please return it to where it was purchased in order that it can be placed
in our recycling system. If this is not possible, please contact PetSafe
®
Customer Care Centre for
further information.
Battery Disposal
Separate collection of spent batteries is required in many regions; check the regulations in your
area before discarding spent batteries. At the end of the product life, please contact one of our
Customer Care Centres to receive instructions on proper disposal of the battery. Please do not
dispose of the battery in household or municipal waste.
Compliance
Hereby, Radio Systems Corporation, declares that this Petsafe
®
Microchip Cat Flap is in
compliance with the essential requirements and other relevant provisions of Directive 1999/5/EC
(R&TTE). Unauthorised changes or modifications to the equipment that are not approved by Radio
Systems Corporation are in violation of EU regulations, could void the user’s authority to operate
the equipment, and void the warranty.
The Declaration of Conformity can be found at: www.petsafe.com/customercare/eu_docs.php.
Australia
This device complies with the applicable EMC requirements specified by the ACMA
(AustralianCommunications and Media Authority).
Warranty
Three Year Non-Transferrable Limited Warranty
This Product has the benefit of a limited manufacturer’s warranty. Complete details of the warranty
applicable to this Product and its terms can be found at www.petsafe.com and/or are available by
contacting your local Customer Care Centre.
Europe – Radio Systems PetSafe Europe Ltd., 2nd Floor, Elgee Building, Market Square, Dundalk,
Co. Louth, A91 YR9X Ireland
Australia/New Zealand – In compliance with the Australian Consumer Law, Warranties
Against Defects, effective January 1, 2012, warranty details of this Product are as follows: Radio
Systems Australia Pty Ltd. (hereinafter referred to as “Radio Systems”) warrants to the original retail
purchaser, and not any other purchaser or subsequent owner, that its Product, when subject to
normal and proper residential use, will be free from defects in material or workmanship for a period
of three (3) years from the purchase date. An “original retail consumer purchaser” is a person or
entity who originally purchases the Product, or a gift recipient of a new Product that is unopened
and in its original packaging. When serviced by Radio Systems Customer Service, Radio Systems
covers labour and parts for the first three years of ownership; after the first three years, a service or
upgrade charge will apply relative to replacement of the Product with new or refurbished items at
Radio Systems’ sole discretion.
The limited warranty is non-transferable and shall automatically terminate if the original retail
consumer purchaser resells the Radio Systems Product or transfers the property on which the Radio
Systems Product is installed. This Limited Warranty excludes accidental damage due to dog chews;
lightning damage; or neglect, alteration, and misuse. Consumers who purchase products outside
of Australia, New Zealand, or from an unauthorised dealer will need to return the Product to the
original place of purchase for any warranty issues.
Please note that Radio Systems does not provide refunds, replacements, or upgrades for change of
mind, or for any other reason outside of these Warranty terms.

petsafe.com
9
Claims Procedure: Any claim made under this Warranty should be made directly to Radio Systems
Australia Pty Ltd. Customer Care Centre at:
Radio Systems Australia Pty Ltd.
PO Box 7266, Gold Coast Mail Centre QLD 9726, Australia
Australia Residents: 1800 786 608
New Zealand Residents: 0800 543 054
Email: [email protected]
To file a claim, a proof of purchase must be provided. Without a proof of purchase, Radio Systems
will not repair or replace faulty components. Radio Systems requests the Consumer to contact the
Radio Systems Customer Care Centre to obtain a Warranty Return number, prior to sending the
Product. Failure to do so may delay in the repair or replacement of the Product.
If the Product is deemed to be faulty within 30 days from date of original purchase, Radio Systems
will organise for a replacement to be sent in advance of returning the faulty Product. A Post Bag
will be included with the replacement Product for the return of the faulty Product. The Product must
be returned within 7 days of receiving the replacement. If the Product is deemed to be faulty after
30 days from the date of original purchase, the consumer will be required to return the Product
to Radio Systems at the consumer’s own expense. Radio Systems will test and replace the faulty
unit or its components and return to the consumer free of charge, provided the Product is within its
said warranty period. This warranty is in addition to other rights and remedies available to you
under the law. Radio Systems goods come with guarantees that cannot be excluded under the
Australia Consumer Law. You are entitled to a replacement or refund for a major failure and for
compensation for any other reasonably foreseeable loss or damage. You are also entitled to have
the goods repaired or replaced if the goods fail to be of acceptable quality and the failure does
not amount to a major failure.
Should you have any queries or require any further information, please contact our Customer Care
Centre on 1800 786 608 (Australia) or 0800 543 054 (New Zealand).
Terms of Use and Limitation of Liability
1. Terms of Use
Use of this Product is subject to your acceptance without modification of the terms, conditions
and notices contained herein. Use of this Product implies acceptance of all such terms,
conditions and notices. If you do not wish to accept these terms, conditions, and notices,
please return the Product, unused, in its original packaging and at your own cost and risk to the
relevant Customer Care Centre together with proof of purchase for a full refund.
2. Proper Use
If you are unsure whether this Product is appropriate for your pet, please consult your
veterinarian or certified trainer prior to use. Proper use includes, without limitation, reviewing
the entire Operating Guide and any specific safety information statements.
3. No Unlawful or Prohibited Use
This Product is designed for use with pets only. Using this Product in a way that is not intended
could result in violation of Federal, State or local laws.
4. Limitation of Liability
In no event shall Radio Systems Corporation or any of its associated companies be liable for
(i) any indirect, punitive, incidental, special or consequential damage and/or (ii) any loss or
damages whatsoever arising out of or connected with the misuse of this Product. The Purchaser
assumes all risks and liability from the use of this Product to the fullest extent permissible by law.
5. Modification of Terms and Conditions
Radio Systems Corporation reserves the right to change the terms, conditions and notices
governing this Product from time to time. If such changes have been notified to you prior to your
use of this Product, they shall be binding on you as if incorporated herein.

petsafe.com
400-2164
©2017 Radio Systems Corporation
Radio Systems Corporation
10427 PetSafe Way
Knoxville, TN 37932 USA
+1 (865) 777-5404
Radio Systems PetSafe Europe Ltd.
2nd Floor, Elgee Building, Market Square
Dundalk, Co. Louth, A91 YR9X Ireland
+353 (0) 76 892 0427
All PetSafe
®
pet doors are suitable for most doors, walls or partitions although additional materials may be required. This product is designed for the convenience of you and your pet. It is not possible to fully guarantee the exclusion
of all other animals in all circumstances. Radio Systems
Corporation will not accept liability for any damage or inconvenience caused by unwanted animals who may gain access to your home. In keeping with accepted standards of
parental care, children should be supervised at all times.
Edition
Édition
Editie
Edición
Edizione
Edition1
ST
