Loading ...
Loading ...
Loading ...
ninjakitchen.com
ninjakitchen.com
FEATURES
Use the Power button to turn the unit on or o.
FREEZING TIPS
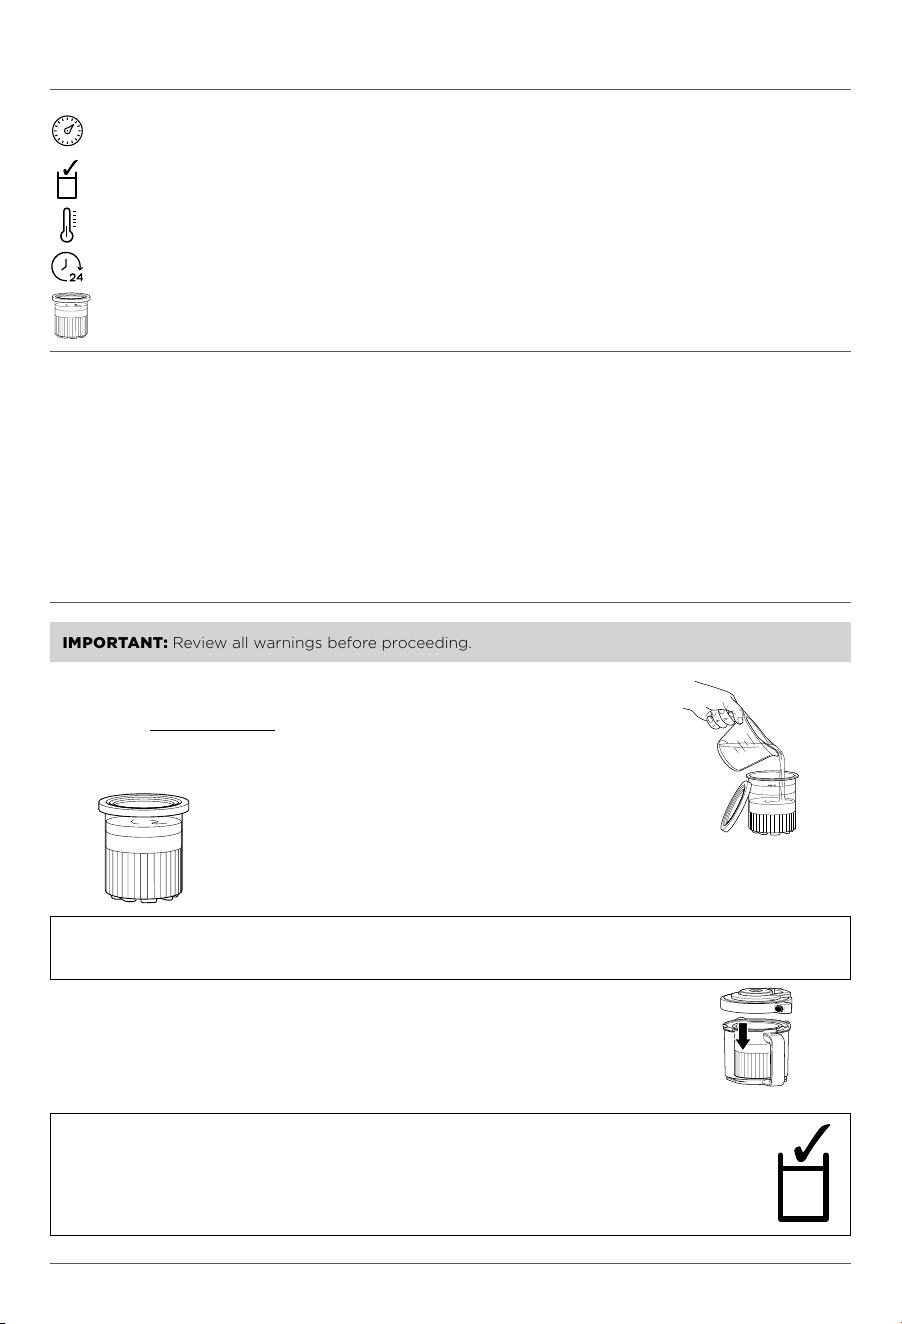
IMPORTANT: Review all warnings before proceeding.
1 Add ingredients to the CREAMi Deluxe Pint. DO NOT add ingredients
past the MAX FILL line. For recipe inspiration, choose from hundreds of
recipes at ninjacreami.com.
NOTE: The unit must be plugged in before assembly. The unit will not run if the outer bowl is installed
before the unit is plugged in.
2 If the recipe requires the ingredients to be frozen, snap the lid on the
Deluxe Pint and freeze for at least 24 hours.
3 Plug in the unit and place on a clean, dry, level surface such as a countertop
or table.
4 When the base is prepped or frozen, remove the Deluxe Pint lid and place
the Deluxe Pint in the outer bowl.
For best results, set your freezer between 9°F and -7°F. The CREAMi® Deluxe is designed to
process bases within this range. If your freezer is within this range, your pint should reach the
appropriate temperature.
DO NOT freeze the Deluxe Pint at angle. Place the Deluxe Pint on a level surface in the freezer.
Upright freezers work best. A chest freezer is not recommended, as they tend to reach extremely
cold temperatures.
Freeze the base for at least 24 hours. While it may be frozen, the base needs to reach an even
colder temperature before it can be processed.
Make the most of your time by prepping several CREAMi Deluxe Pints at once. Keep these Deluxe
Pints in your freezer to Creamify™ on demand whenever the craving strikes.
NOTE: DO NOT process the Deluxe Pint if ingredients have been frozen at an angle or if the
Deluxe Pint has been scooped out of and then refrozen unevenly.
Always smooth-out the surface of a processed treat before re-freezing. If frozen unevenly,
put the Deluxe Pint in the fridge to allow the ingredients to melt. Then whisk to combine
ingredients. Refreeze, ensuring to place the Deluxe Pint on a level surface in the freezer.
USING THE CREAMi DELUXE
ONE-TOUCH PROGRAMS
Each One-Touch Program is intelligently designed to whip up delicious creations. Programs vary in length
and speed depending on the optimal settings to get perfectly creamy results for that type of recipe.
INSTALL LIGHT
Light will illuminate when unit is not fully assembled for use. If light
is blinking, ensure the bowl is properly installed. If light is solid, check
that the paddle is installed.
COUNTDOWN TIMER
Countdowns remaining program time.
ENJOY LIGHT
When processing is complete, light will illuminate.
PROCESSING MODE
Select processing mode prior to selecting a program. To process the
whole Deluxe Pint, press FULL. To process just the top half, press TOP.
To process the remaining half of the Deluxe Pint, press BOTTOM.
NOTE: To stop an active program, press the dial again.
SCOOPABLE PROGRAMS
ICE CREAM
Designed for traditionally indulgent recipes. Great
for turning dairy and dairy-alternative recipes
into thick, creamy, and scoopable ice creams.
LITE ICE CREAM
Designed for health-conscious consumers to
make ice creams that are low in sugar or fat or
use sugar substitutes. Choose when processing
keto or paleo recipes.
SORBET
Transform fruit-based recipes with high water
and sugar content into creamy delights.
GELATO (not available on all models)
Creates custard bases for Italian-style ice cream.
FROZEN YOGURT
Easily transform your favorite store-bought
yogurts into healthy, creamy frozen treats with
the touch of a button. When making frozen
yogurt, ensure you are using full-fat yogurt with
added sugar. Do not process nonfat yogurt or
yogurt with no added sugar in the unit.
DRINKABLE PROGRAMS
CREAMICCINO™ (not available on all models)
Create coeehouse-quality frozen coee drinks
with your preferred coee and sugar, along with
any creamer, milk, or milk-alternative you desire.
FROZEN DRINK
Make thicker, smoother, slower-melting frozen
beverages that go beyond resort-style quality.
SLUSHI
Recreate a favorite childhood treat by turning
water and powdered drink mixes or syrups into
silky-smooth, sippable slushies.
MILKSHAKE
Designed to create quick and thick milkshakes by
combining your favorite ice cream (store-bought
or homemade), milk, and mix-ins.
ITALIAN ICE
Designed to transform water and your favorite
fruity flavors into refreshing scoops of Italian ice.
MIX-IN
Designed to fold in pieces of candies, cookies, nuts, cereal, or frozen fruit to customize a just processed
base or store-bought treat.
RE-SPIN
Designed to ensure a smooth texture after running one of the preset programs. RE-SPIN is often needed
when the base is very cold (below -7°F) and the texture is crumbly rather than creamy.
NOTE: Do not RE-SPIN before using the MIX-IN program.
NOTE: Mix-ins work best if they are added in the middle of the Deluxe Pint. After processing, use a spoon
to create a 1
1
/2-inch-wide hole that reaches the bottom of the processed portion of the Deluxe Pint.
Add chopped or broken mix-ins to the hole and process again using the MIX-IN program.
Don’t want to wait 24 hours? Customize store-bought ice cream with mix-ins or make a milkshake.
To customize store-bought ice cream, scoop the ice cream into a Deluxe Pint and skip to step 11a.
This is NOT a blender.
DO NOT process a solid block of ice or ice cubes.
DO NOT make a smoothie or process hard, loose ingredients.
Fruit must be crushed to release its juice or combined with other ingredients and frozen before processing.
NOTE: TOP and BOTTOM modes are not available with
DRINKABLE programs.
Loading ...
Loading ...
Loading ...