Loading ...
Loading ...
HOW YOUR PURIFIER WORKS
T_e Purifier distills and turns ordinary tap water into
clean, clear purified water. Uses for purified water in-
elude drinking, cooking, ice cubes, salt-restricted diets,
baby formulas, steam irons, photo processing, and
cleaning contact lenses.
By heating water to boiling, the water is changed to
steam, which rises. As the steam cools and turns back
into water, itiscollected in the carafe. Impurities are left
behind in the kettle.
Purified water will remain fresher-tasting if it is kept
tightly capped. Also shaking the carafe before pouring
win aerate the water and make it taste better.
Order extra carafes from Sears (see page 7) soyou can
chill one bottle of purified water while you make more,
STOPPING UNIT DURING OPERATION (MODEL 344800)
1. Remove Kettle. 2. Unplugunitfrom outlet.
OPTIONAL ELECTRONICS (MODEL 344810)
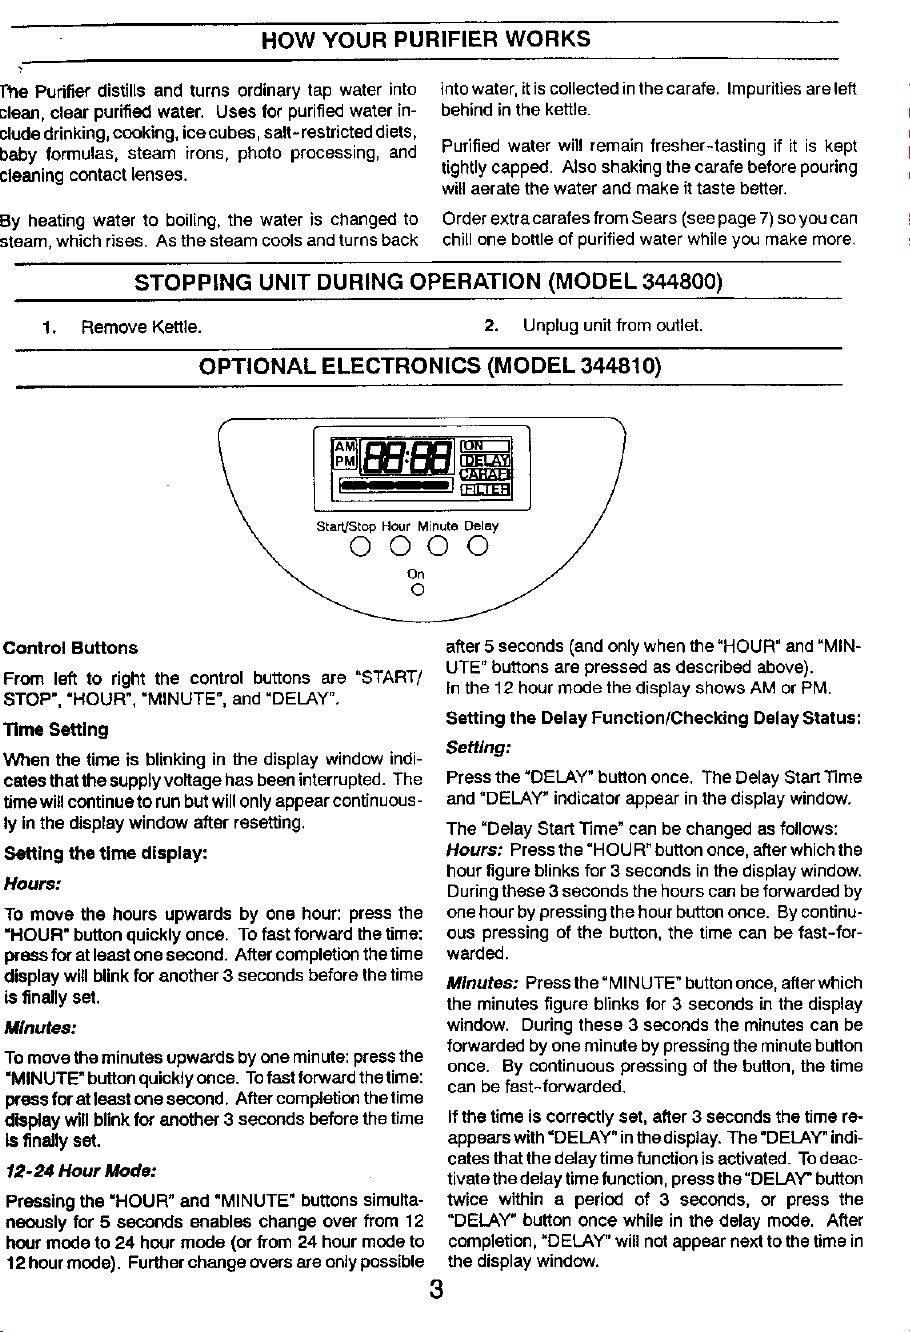
Control Buttons
From left to right the control buttons are "START/
STOP", "HOUR", "MINUTE", and "DELAY".
Time Setting
When the time is blinking in the display window indi-
catas that the supply voltage has been interrupted. The
time willcontinue to run butwill only appear continuous-
ly in the display window after resetting.
Setting the time display:
Hours:
To move the hours upwards by one hour: press the
=HOUR" button quickly once. To fast forward the time:
press for at least one second. After completion the time
display will blink far another 3 seconds before the time
is finally set.
Minutes:
To move the minutes upwards by one minute: pressthe
"MINUTE" buttonquickly once, Tofast forward the time:
prass for at least one second. After completion the time
display will blink for another 3 seconds before the time
is finally set.
12-24 Hour Mode:
Pressing the =HOUR" and "MINUTE" buttons simulta-
neously for 5 seconds enables change over from 12
hour mode to 24 hour mode (or from 24 hour mode to
12 hour mode). Further change overs are only possible
after 5 seconds (and only when the"HOUR" and "MIN-
UTE" buttons are pressed as described above).
In the 12 hour mode the display shows AM or PM.
Setting the Delay Function/Checking Delay Status:
Setting:
Press the "DELAY" button once, The Delay Start Time
and "DELAY" indicator appear in the display window.
The "Delay Start Time" can be changed as follows:
Hours: Press the "HOU R" button once, after whichthe
hour figure blinks for 3 seconds in the display window.
During these 3 seconds the hours can be forwarded by
one hour by pressing the hour button once. By continu-
ous pressing of the button, the time can be fast-for-
warded.
Minutes: Press the "MINUTE" button once, after which
the minutes figure blinks for 3 seconds in the display
window. During these 3 seconds the minutes can be
forwarded by one minute by pressing the minute button
once. By continuous pressing of the button, the time
can be fast-forwarded.
If the time is correctly set, after 3 seconds the time re-
appears with=DELAY" inthe display. The "DELAY" indi-
cetes that the delay time function is activated. To deac-
tivate the delay time function, press the "DELAY' button
twice within a period of 3 seconds, or press the
"DELAY" button once while in the delay mode. After
completion, "DELAY" will not appear next to the time in
the display window.
3
Loading ...
Loading ...
Loading ...