Loading ...
NOTE: Do not use sanding screen (e.g,, screen used for -_adiag a_'v2_tl_+CJiP_lT¢+55+tW_:'ff_k
and loop pad, The screen wiI nat held and wtt dan;age the books on t-_e pod. The hooks On the
pad Wil weal very rapidly t lelt is contact with the work sudace whte the tool is epe+'ating.
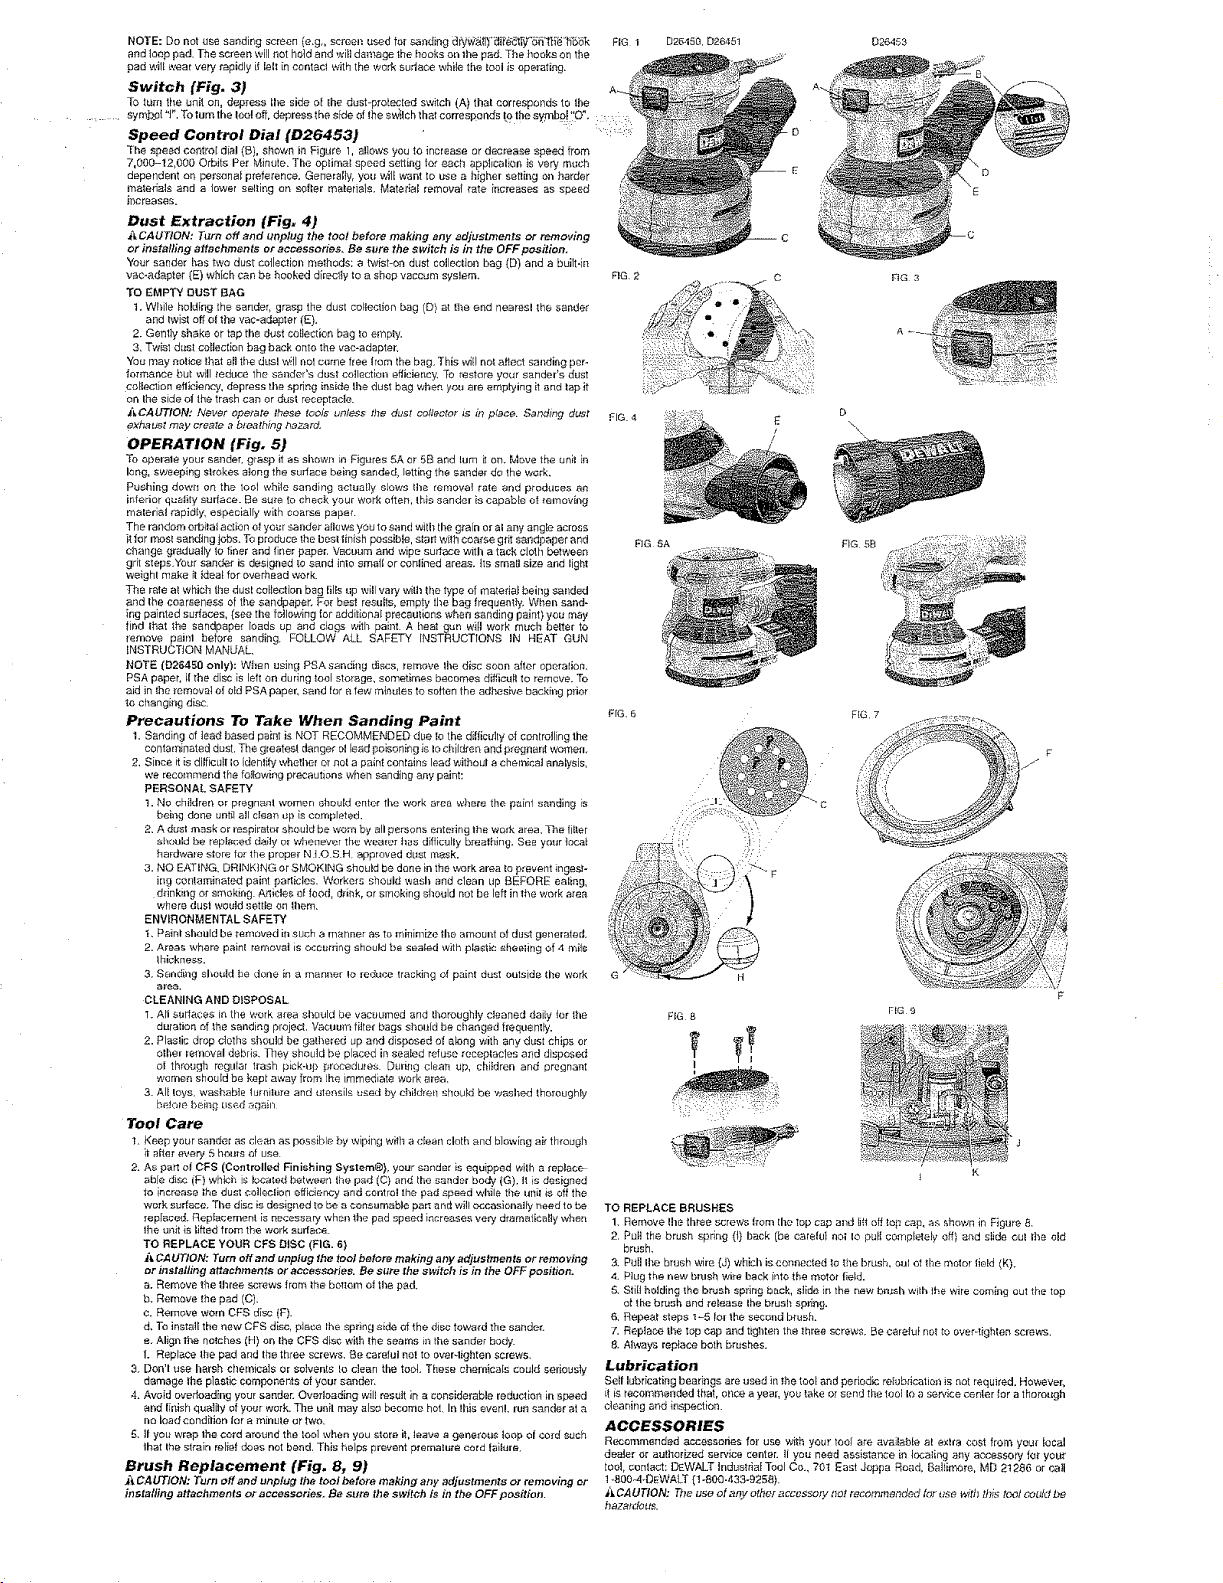
Switch (Fig, 31
To lure the unil on, depress lie side at the dust-protected switch (A) thai corresponds to lhe
sym_ot"F. To turn the toe! off depress the side d he sw_!ch thai corresponds [o the symbe "O",
- .... , .:_
Speed Control Dial (D26453)
The epeed control dial (B). shown in Figure 1, alows you to increase or decrease speed from
7.000-12,000 Orbits Per Minute, The optmaI speed setting tot each app]icalian is very mt;ch
dependent ee persana_ preference. Generuty, you wtf want to use a higher setting on harder
_'natedalu end a lowel poling on molter materials. Matedat removal rate increases as speed
increases.
Dust Extraction (Fig, 41
_CAUTION: Turn off and unplug the too! before making any adjustments or removing
or installing attachments or accessories, Be sure the switch is in the OFF position,
Year sander has two dust eclectics methods: a twist-on dast colecton bag (D) and a bull-in
sac-adapter (E) which can be hooked directly to a shop vaccum syeIem.
TO EMPTY OUST BAG
1. Whle holding the sandal', grasp the dust colecton bag (b) at the end neatesl the sunder
and twist off el the vae-arJepIer (E).
2. Gettly shake or tap the dust cotesdon bag to ernpbi.
3, Tw'ist dast colesgon bag back onto the sac-adapter.
Yo# may notice [hat ul the deal will oct come free from the bag. This _,.4[Ino[ a_ect sanding per-
"_o_mance but wl] ,'educe the sunder+s dust colection eftdency, To restore your sander's dust
selection efficiency, depress the spring inside the dust bag whee you are _mptying it and tap it
on the side ot the trash can or dust receptacle.
,&CAUTION: Never opelate these too& untees the dust coflector _s in place. Sanding duet
exhaust may create a bteathing hazard,
OPERATION (Fig. 5)
To operate you+" sander, grasp it as st:own in Eigures 5A or 5B and lure [t on, Move the unt in
long, uwueping sh'okes along the sudaca being sanded, letting the sander do the wsrk.
Pushing do',*,,;} on the roD1 v.,hite sanding actaaly slows Ire removal rate and prodaues an
inferior quafty sudace. Be sure to aheck your work often, [his sander ie capab, te oI _'ernoving
malaria+ rapidly, especially with coarse paper.
The random olt_,ital acton ol your sander alews you to sand witr Ire grain or ai any ang_. across
il for mosf sanding jobs, To produce the best finish possible, sial1 wth coarse grit sandpaper and
change gradua£y _o flour and fleer paper, Vacuum and wipe sudase with a tack cloth between
grit steps.Your sanc_r is designed to sand inlo stoat or centined areas, Its small size and light
we{phi make i[ idea_ far overhead work.
The rate at which t_e dual coteolion bug rills up will vary wth the type of matefiaf being sanded
and the coarsenesu of the sandpaper. For best resulta, empty the bag frequently. When sand-
ing painted sudases, (see the folaa,ing tot additional precealians when sanding paint) you may
lind that the sandpaper Ioads up and cogs with paint. A heat gun will work much belier to
remove paint before sanding, FOLLOW ALL SAFETY iNSTRUCTIONS IN HEAT GUN
INSTRUCTION MANUAL.
NOTE (D26458 only): When u£ing PSA sanding discs, remove Ibe disc soon after oparalon.
PSA paper, I the disc [s left on during tool storage, sometimes becc_rnes difficull to remsve. To
aid in the _emoval or old PSA paper, sand for a few minutes to sotten the adhesive backing pdor
to changing disc.
Precautions To Take When Sanding Past
1. Sanding of lead based paint is NOT RECOMMENDED due to the dtiiculy el sonlroling the
contaminated dust, The greatest danger ol lead _oisoning is Io chtdren old pregnant wo_ea.
2, Since it is di#icuf Io identi_ whelrer or nol a painl contr_ins lead withoal a ehemicet analysis,
we recommend the fotowing precautions when sandhg any paint:
PERSONAL SAFETY
3. No children or pregnanl women should enter tl_e work area where the paint sanding is
being done until all clean ap imcompleted.
2. A dust mask or respirator shooed be worn by all persons entering the WOrk area. The liar
should be repIeced daily or whenever the weare_ has difflculy breathing. Sea your Ioca_
hardwale store for the proper N t.O S H, approved dust mask.
3. NO EATING, DRINKING or SMOKING sheuid be dane in the work area to prevent ingest-
ing contaminated paint particles. Workers should wash and clean up BEFORE ealing,
ddnki]g o_ smoking A+li¢ieu et iood, drink, or smoking should not be left in the work area
where dual would settIe on tllem.
ENVIRONMENTAL SAFETY
i, PAint ShoUld be Temoved in such a manner as to minimizo ths amount of dust generated.
2. Areas whore painl removai is occurbng should be sealed with ptautic sheeting of 4 mitu
Ihickness.
3, Sandiug shaold he done in a manna+- !o reduce tracking ot paint dust outside fhe work
area.
CLEANING AND DISPOSAL
1. AI surfaces [n tire work area should be vacuumed and ll_oroughiy cleaned daily lot the
duration r_f Ihu sanding project, Vaeaat'a filer bags sboi]id be changed frequen y
2. Pleslic drop cloths should be galhe+ed up and disposed at along with any dust chips or
other removal debris. I_ley should be pl_ced in sealed refLtse mceplacles a_td dispoued
o[ through regular trash pick-t_p procedures During clean up, chtdren and pregnant
women should be kept away from the immediate work area.
3. At Ioys, washable lurnlure and utensils used by chidden should be washed thoroughly
be[ole t_eing used aoain
Tool Care
_+ Keep your uander as dean as _s£ibie by wiping wth a cban cloth _nd blowing a[_ fl3rough
it e_let every 5 hours of use,
2. As part o| CFS (Controlled Finishing System®}, your sander is eqaipped wiih a replac_
able disc (F) whk:h is Iocaled between the p_d (C} and the sander body (G). t Js designud
to increase the dust eoleclion efficiency and control the pad speed while the unil is oft the
work surface. The disc is designed to be a consumable pa_ and wit occasionalb+ need to be
replaced. Rep[acemen! is necessary when the pad speed kqcreases very dramaficuly when
lhe Qnit ]s lifted from the work sudace
TO REPLACE YOUR CFS DISC (FIG. 6)
_, CAUTION: Turn off and unplug the tool before making any adjustments or removing
_r installing attachments or acseesotiee. Be a_re the switch is in the OFF position.
a. Remove the three screws [ram |he 5ol_m or the pad.
b, Remove the pad (C).
¢. Remove worn CFS disc (F).
d, To instal the new CFS disc, p_ace Ihe spring aide of the disc toward the sonde+r,
e. Align lhe notches (H) on lhe CFS disc wilh the seams il'_the sander body.
L Replace Ihe pad and the lhree screws. Be carelul not to aver4ighten screws,
3. Don't use harsh chem+eals or solvenls to clee.rl +,he tool The_e chemicals could seriously
damage lhe plastic oemponentu of you[ sander,
4. Avoid overloading your sandal Overloading wJl resatt in a considerable reduction in speed
and Inish quaIily of your work. The unil may also be-come hot, In this event run sander at a
no Iced condilien tar a minute or two.
5. if you wrap the co+'d around the tool when you store iL leave a generous loop ol ¢o_d such
lhat the strain ruler does not bend, This helps prevent prema_tee cold lature.
Brush Replacement (Fig. 8, 9)
jLCAUTION: Turn off end unplug the tool before making any adjustments or removing or
installing attachments or aecesaeries. Be sure the switch is in the OFF position.
PIG 1 D26450, D26451 D26453
D
E
FIG. 2
PiG 4
F_G 3
PIG. 5B
FIG. s
FIG B
+ +,+
,/): :$
_+:5:1 ::r'
F
FIG 9
TO REPLACE BRUSHES
1. Remove Ihe three screws I[om tl_e top cap and lit off to]_ cap, as shown in Figure 8,
2, Pull the bruuh spring 0) back [be eare[ul no; IO pull completely off) and stda oul the old
brush.
3. Pul! Ihe brush wi_e {J) which is connected to tire brush, oat o[ the motol field (K).
4. Plug the new brush w#e beck into the motor field.
& Stil balding the btusb spdng back, slide in the new bn._sh wth thu wire coming out the top
of' the brush and release Ihe brush spring.
& Repeat steps 1_5 |Or the uecond brush.
7. Replace gie tap cap and tighter+ the three screws. Be careluf not to over tighten scre_,,,s,
8. Ah*.,ays reptace both brushes.
Lubrication
Sell lubricating bearings ate used in the tool and periodic retabfieatioa is nol required. However,
it iU recommended that, once a year, you lake or send the tool Io a service cenler for a thorough
cleaning and inspection.
ACCESSORIES
Recommended accessodes for use w_h your tool are available at extra COSt from yon+ local
denies or authorized ser,,]ce center. 11you need assistance in locating any accessory _or year
tool, son_ast: DEWALT Industrial Tool Co., 70t East Joppa Road. Batimore, MD 21286 or col
I -SO04-0EWALT {t-800-433-9258).
_CAUTION: The use of any other accessory act recommended lot use with this toot could be
hazardous.
Loading ...
Loading ...
Loading ...