INSTRUCTION MANUAL
MegaChef 45 Liter Electric French Door
Rotisserie Convection Counter Top Oven
Model: MCOV-5000
Spec.: 120V, 60Hz, 1800 Watts
Read this booklet and follow all the instructions carefully
IMPORTANT SAFETY INSTRUCTIONS
When using your Toaster Oven, basic safety precautions should always be observed,
including the following

Please Note: Initial start-up operation may result in minimal smell and smoke (about 60 minutes).
This is normal and harmless. It is due to burning of the protective substance
applied to the heating elements in the factory.
INSTRUCTION MANUAL
MegaChef 45 Liter Electric French Door
Rotisserie Convection Counter Top Oven
Read all the sections of this booklet and follow all the instructions carefully
IMPORTANT SAFETY INSTRUCTIONS
When using your Electric Oven, basic safety precautions should always be observed, including the following:
1. Read all instructions.
2. Do not touch hot surfaces. Always use handles or knobs.
3. To protect against electric shock, do not immerse cord, plug or any parts of the oven in water or any other liquids.
4. Do not let cord hang over edge of table or counter, or touch hot surfaces.
5. Do not operate appliance with damaged cord or plug or after the appliance malfunctions or has been damage in any
manner. Return appliance to the nearest authorized service facility for examination, repair or adjustment.
6. The use of accessory attachments not recommended by the appliance manufacturer may cause hazard or injury.
7. Do not place on or near a hot gas or electric burner.
8. Unplug from outlet when not in use and before cleaning. Allow to cool before putting on or taking off parts, and before
cleaning.
9. To disconnect, turn the time control to OFF, then remove the plug. Always hold the plug, and never pull the cord.
10. Extreme caution must be used when moving a drip pan containing hot oil or other hot liquids.
11. Do not cover crumb tray or any part of the oven with metal foil. This may cause the oven to overheat.
12. Use extreme caution when removing the tray, racks or disposing of hot grease or other hot liquids.
13. Do not clean the inside of the oven with metal scouring pads, pieces can break off the pad and touch electrical parts,
creating a risk of electric shock.
14. Oversized foods or metal utensils must not be inserted in a toaster oven as they may create a fire or risk of electric risk.
15. A fire may occur if the oven is covered or touching flammable material, including the curtains, draperies, walls, and the
like, when in operation. Do not store any item on top of the appliance when in operation.
16. Extreme cautions should be exercised when using cooking or baking containers constructed of anything other than metal
or ovenproof glass.
17. Be sure that nothing touches the top or bottom elements of the oven.
18. Do not place any of the following materials in the oven: cardboard, plastic, paper, or anything similar.
19. Do not store any materials other than manufacturer’s recommended accessories in this oven when not in use.
20. Always wear protective, insulated oven gloves or use a special handle when inserting or removing items from the hot oven
21. This appliance has a tempered, safety glass door. The glass in stronger than ordinary glass and more resistant to breakage.

1
Tempered glass can still break around edges. Avoid scratching door surface or nicking edges.
22. Do not use outdoors.
23. Do not use appliance for other than intended use.
24. The appliance can be used by children aged from 13 years and above and persons with reduced physical sensory or mental
capabilities or lack of experience and knowledge if they have been given supervision or instruction concerning use of the
appliance in a safe way and understand the hazards involved.
25. Children shall not play with the appliance.
26. Cleaning and user maintenance shall not be made by children unless they are old than 8 and supervised.
27. Keep the appliance and its cord out of reach of children less than 8 years.
28. If the supply cord is damaged, it must be replaced by the manufacturer, its service agent or similarly qualified persons in
order to avoid a hazard.
29. This appliance is not intended for use by persons (including children) with reduced physical sensory or mental capabilities,
or lack of experience and knowledge, unless they have been given supervision or instruction concerning use of the
appliance by a person responsible for their safety.
30. Children should be supervised to ensure that they do not play with the appliance.
31. The door or the outer surface may get hot when the appliance is operating.
32. The temperature of accessible surfaces may be high when the appliance is operating.
33. The appliances are not intended to be operated by means of an external timer or separate remote-control system.
SAVE THESE INSTRUCTIONS, FOR HOUSEHOLD USE ONLY.
2
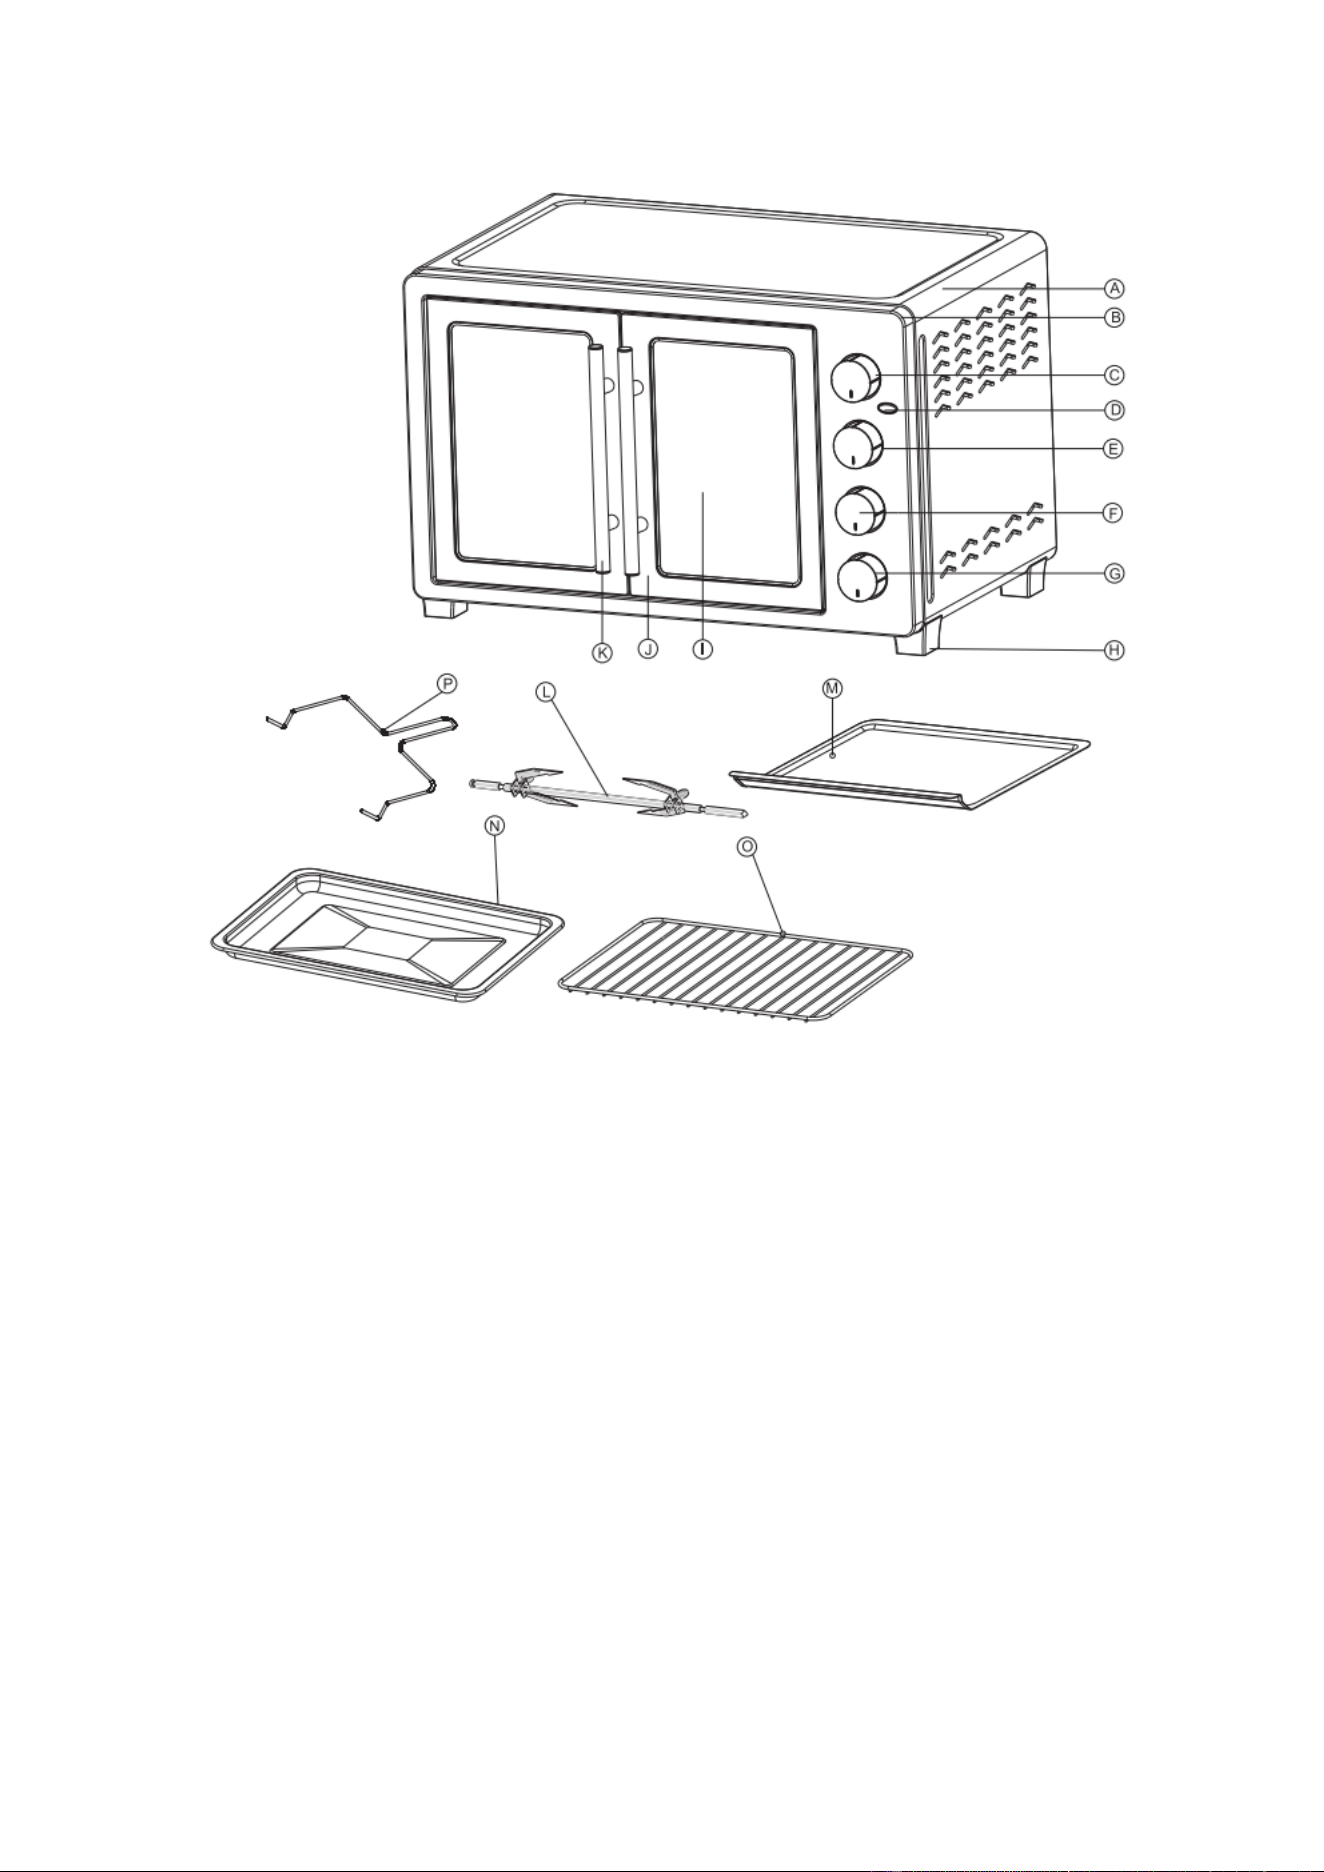
A: Housing B: Front plate
C: Rotisserie & Convection Control Knob D: Power Indicator Cover
E: Temperature Control Knob F: Function Control Knob
G: Timer Control Knob H: Feet
I: Glass J: Door Frame Handle
K: Handle L: Rotisserie Spit
M: Crumb Tray N: Bake Tray
O: Wire Rack P: Rotisserie Handle
3
Technical Specifications
Voltage: 120V .A.C., 60Hz.
Power: 1800 Watts
Before using your oven
▲Before using your electric oven with rotisserie & convection & hotplate for the first time, be sure to:
1. Read all of the instruction included in this manual.
2. Make sure that the oven is unplugged and the Time control is in the “OFF” position.
3. Wash all the accessories in hot, soapy water or in the dishwasher.
4. Thoroughly dry all accessories and re-assemble in oven, plug oven into outlet and you are ready to use your new
toaster oven.
5. After re–assembling your oven, we recommend that you run it at the highest temperature (450℉) on the toast
function for approximately 60 minutes to eliminate any packing residue that may remain after shipping. This will
also remove all traces of odor initially present.
Please Note: Initial start-up operation may result in minimal smell and smoke (about 60 minutes).
This is normal and harmless. It is due to burning of the protective substance
applied to the heating elements in the factory.
Please familiarize yourself with the following oven functions and accessories prior to first use:
Four Knobs:
● Rotisserie &Convection control knob (C): Off/Convection/Rotisserie/Convection & Rotisserie
● Temperature Control(E): choose the desired temperature from 0-200℉to 450℉ for cooking.
● Main Function Control(F): Off/Upper heater /Lower heater/Upper & Lower heater
● Time Control(G): 0-60Min
●Power Lamp(D): It will light when the heating element is turned on.
●Inside Lamp: It will work when the oven is turned on.
● This oven is equipped with four positions.
● Bake Tray(N): For use in broiling and roasting meat, poultry, fish and various other foods.
● Wire Rack(0): For toasting, baking, and general cooking in casserole dishes and standard pans.
● Rotisserie Set(L): For turning around the food during the cooking
● Rotisserie Handle(P): To pick up the rotisserie set when they are hot.
● Crumb tray(M): For cleaning the crumb.

4
WARNING: TO AVOID RISK OF INJURY OR BURNS, DO NOT TOUCH
HOT SURFACES WHEN OVEN IS IN USE.ALWAYS USE OVEN
MITTS.
CAUTION: Always use extreme care when removing bake tray, wire rack or a
any hot container from a hot oven. Always use the rack handle, or an
oven mitt when removing hot items from the oven.
HOW TO USE CONVECTION
Convection cooking combines hot air movement by means of a fan with the regular features (broil, bake and toast).
Convection cooking provides faster cooking in many cases than regular radiant types toaster oven. The fan gently
sends air to every area of the food, quickly browning, crisping and sealing in moisture and flavor. It produces more
even temperature all around the food by air movement, so that food cooks/bakes/broils evenly versus the normal ovens
hot and cold spots. The convection feature allows cooking/baking at lower temperatures, which saves energy and helps
keep the kitchen cooler. Convection air is superheated and it circulates around the food so it cooks food significantly
faster than conventional ovens.
The convection fan works automatically when the function knob on the heating element position. When the desired
temperature and Function is chosen, set the timer at the desired position. The convection fan will start operating.
HOW TO USE ROTISSERIE
We recommend that you do not cook a roast larger than 4-5 lbs. on the rotisserie skewer. Chicken should be bound in
a string to prevent the chicken legs or wings from unraveling during roasting and so that rotisserie assemble will rotate
smoothly. For best results we recommend that you preheat the oven for 60 minutes on 450℉.
Operation:
⚫ Set the temperature control to desired heat.
⚫ Insert the meat or poultry that you are going to cook onto the rotisserie skewer. Making sure that the meat or
poultry is secured tightly with the skewer clamps and thumbscrews. Make sure that the meat or poultry is centered
onto the skewer.
⚫ Insert the pointed end of the rotisserie skewer into the drive socket, located on the right-hand side of the oven
wall. Make sure that the square end of the rotisserie skewer rests on the rotisserie skewer support located on the
left-hand side of the oven wall.
⚫ Slide the bake tray onto the lowest position to catch the food drippings.
⚫ Turn function control to " Rotisserie".
⚫ Turn function control to " Upper heater” or Upper & Lower heater
⚫ Turn the time control to your desired cooking time.
⚫ When the cooking is completed, the oven bell will ring, turn the function control to "OFF".
⚫ Remove the rotisserie skewer from the oven by placing the hooks of the rotisserie handle under the grooves on
either side of the rotisserie skewer, lift the left side of the rotisserie skewer first by lifting it up and out. Then pull
the rotisserie skewer out of the drive socket and carefully remove the roast from the oven.
⚫ Take the meat or poultry off the rotisserie skewer and place on a cutting board or platter.

5
HOW TO BROIL
For best results, it is recommended that you preheat the oven for 60 minutes on 450℉.
Operation:
⚫ Place the wire rack in the oven at the upper position.
⚫ Place food to be cooked in any roasting pan. If you wish to use the bake tray (broil/drip pan), then you do not
need to insert the wire rack because the bake tray supports itself on the oven support guides.
⚫ Set the temperature control knob to the desired temperature.
⚫ Turn the time control to your desired cooking time.
⚫ Turn the function control to "Upper Heater".
⚫ To check or remove roast, use the tray handle provided to help you slide the roast in and out.
⚫ When broiling is complete, turn the function control to “OFF” position.
HOW TO TOAST
Please note that the TOAST function uses all the heating elements. Large capacity oven allows for toasting 4 to 6 slices
of bread,6 muffins, frozen waffles or frozen pancakes. When toasting only 1or 2 items, place food on the bake rack in
the center of the oven.
Operation:
⚫ Set the Temperature Control Knob to desired temperature.
⚫ Turn the function control to "Upper & Lower Heater"
⚫ Place food to be toasted on the wire rack.
⚫ Ensure Crumb tray is in place.
⚫ Turn the time control knob to your desired cooking time.
⚫ Bell will ring to signal the end of the toast cycle.
⚫ When toasting is complete, turn function control to "OFF".
Note: Wire Rack should be positioned in the middle of the oven with the indentations pointing down.
HOW TO BAKE
Please note that the BAKE function uses only the bottom heating elements. For best results, it is recommended that
you preheat the oven for 60 minutes on 450℉.
Operation:
⚫ Set temperature control to appropriate temperature.
⚫ Place the wire rack on the lowest or middle rack support guide.
⚫ Place food on the wire rack and slide into the rack.
⚫ Food should be placed as close as possible to the lower heating element without touching it.
⚫ Brush food with sauces or oil, as desired.
⚫ Turn time control to your desired cooking time.
⚫ Turn the function control to "Lower Heater"
⚫ It is advisable to leave the door slightly ajar
6
⚫ Turn food over midway through the prescribed cooking time.
⚫ When baking is complete, turn the function control to “OFF”.
Positioning of the Wire Racks
Cookies – Use bottom and middle Support Guides.
Layer Cakes – Use bottom Support Guide only (bake one at a time).
Pies – Use bottom and middle Support Guides.
Cleaning & Maintenance
Clean the appliance after each use.
1. Remove the plug from the wall socket and allow the appliance to cool down completely.
2.use warm water with a small amount of washing-up liquid to clean the baking tray ,the grille and the removal
tool.Rinse the items with plenty of water and dry them thoroughly
3.Use a damp cloth to clean the interior and exterior of the oven and the door. Dry them thoroughly.
4. Place all the items back in the oven and store the oven
⚫ make sure the plug has been removed from the plug socket before cleaning the appliance.
⚫ Never use corrosive or scouring cleaning agents or sharp objects (such as knives or hard
brushes) to clean the appliance.
⚫ never immerse the appliance, the power cord or the plug in water or any other fluid
MegaChef Provides a 90 Day Limited Manufacturer Warranty
For warranty information please:
Call: 424-543-1628
Email: support@megachef.com
Or Look us up: http://www.megachef.com
ENVIRONMENT PROTECTION
Dispose the appliance according to the local garbage regulations
Never throw away with trash, so you will help to the improvement of the
environment