© 2023 Brentwood Appliances, Inc.
12” CRÊPE MAKER & GRIDDLE
CRÊPERA Y PARRILLA ELÉCTRICA DE 30 CM
CRÊPIÈRE ET GRILLE DE 30 CM
ITEM NO.: TS-602BK (BLACK)
Operating and Safety Instructions
FOR INDOOR HOUSEHOLD USE ONLY
Instrucciones de Operación y Seguridad
SOLO PARA USO DOMESTICO
Consignes de Sécurité et de Fonctionnement
POUR USAGE DOMESTIQUE INTÉRIEUR SEULEMENT

2
IMPORTANT SAFEGUARDS
When using this or any other electrical appliance, always follow these basic safety
precautions, especially when children are present.
READ ALL INSTRUCTIONS
BEFORE USE
WARNING-To reduce the risk of fire, electric shock, serious personal injury and
property damage please note the following:
• This appliance is not intended for use by children. Keep the appliance out of reach
of children and pets. Extra caution is necessary when using this appliance near
children.
• Always ensure the appliance is unplugged from the electrical outlet and allowed
to cool before assembling, disassembling, relocating, or cleaning.
• Do not leave the appliance unattended while it is in use. Always unplug the
appliance from the electrical outlet when not in use.
• Do not immerse or expose the Crêpe Maker & Griddle, Power Cord, or Plug of this
appliance in water or other liquids.
• Do not touch hot surfaces. Use handles or knobs and protective oven mitts or
gloves when handling product to avoid burns or personal injury.
• This appliance generates heat and steam during use. Please take the proper
precautions to avoid burns, fire, and personal or property damage.
• Do not use attachments unless provided or sold by the manufacturer.
• Do not place appliance on or near a hot gas or electric burner, in a heated oven,
or other heated surfaces.
• Use extreme caution when moving an appliance containing food or liquids.
• Use the appliance in a well-ventilated area. Keep at least 4-6 inches of space on all
sides of the product to allow adequate air circulation.
• Use appliance on a table or sturdy flat surface. Keep the appliance away from
curtains, wall coverings, clothing, dishtowels, or other flammable materials.
• Do not plug or unplug the appliance from the electrical outlet with a wet hand.
• This appliance is intended solely for non-commercial, non-industrial, indoor
household use in cooking of food for human consumption.
• Do not operate the appliance empty.
• Do not let cord hang over edge of table or counter where it may be tripped over
or pulled. Do not allow cord to touch hot surfaces.

3
• Do not operate the appliance if it has a damaged power cord or plug, if wires are
exposed, if it malfunctions, if it is dropped or damaged, or if the motor housing is
dropped in or exposed to water.
• This product has no user-serviceable parts. Do not attempt to examine or repair
this product yourself.
Please review the Warranty Policy on Page 10.
• Do not overload wall outlet or extension cords as this can result in a fire or electric
shock.
• Do not put any stress on the power cord where it connects to the appliance, as
the power cord could fray and break.
SPECIAL INSTRUCTIONS:
• A short power supply cord is provided to reduce the risk of becoming entangled in
or tripping over a longer cord. An extension cord is not recommended for use
with this appliance, but if one must be used:
− The marked electrical rating must be at least as great as that of the appliance.
− If the appliance is of a 3-prong grounding type, the extension cord must be a
grounding-type 3-wire cord.
− Arrange the extension cord so that it will not drape over the countertop or
tabletop where it can be tripped over or pulled.
WARNING: This appliance is equipped with a polarized plug (one blade is wider than
the other blade) to reduce the risk of electrical shock. This is a safety feature. The
plug will fit into a polarized outlet only one way. If you are unable to insert the plug
into the electrical outlet, try reversing the plug. If the plug still does not fit, contact a
qualified electrician. Never use the plug with an extension cord unless you can fully
insert the plug into the extension cord. Do not alter the plug. Do not attempt to
defeat the safety purpose of the polarized plug.
Power Specifications: 120V~ 60Hz, 1000W
FOR HOUSEHOLD USE ONLY.
READ THESE INSTRUCTIONS AND
SAVE FOR FUTURE REFERENCE!
4
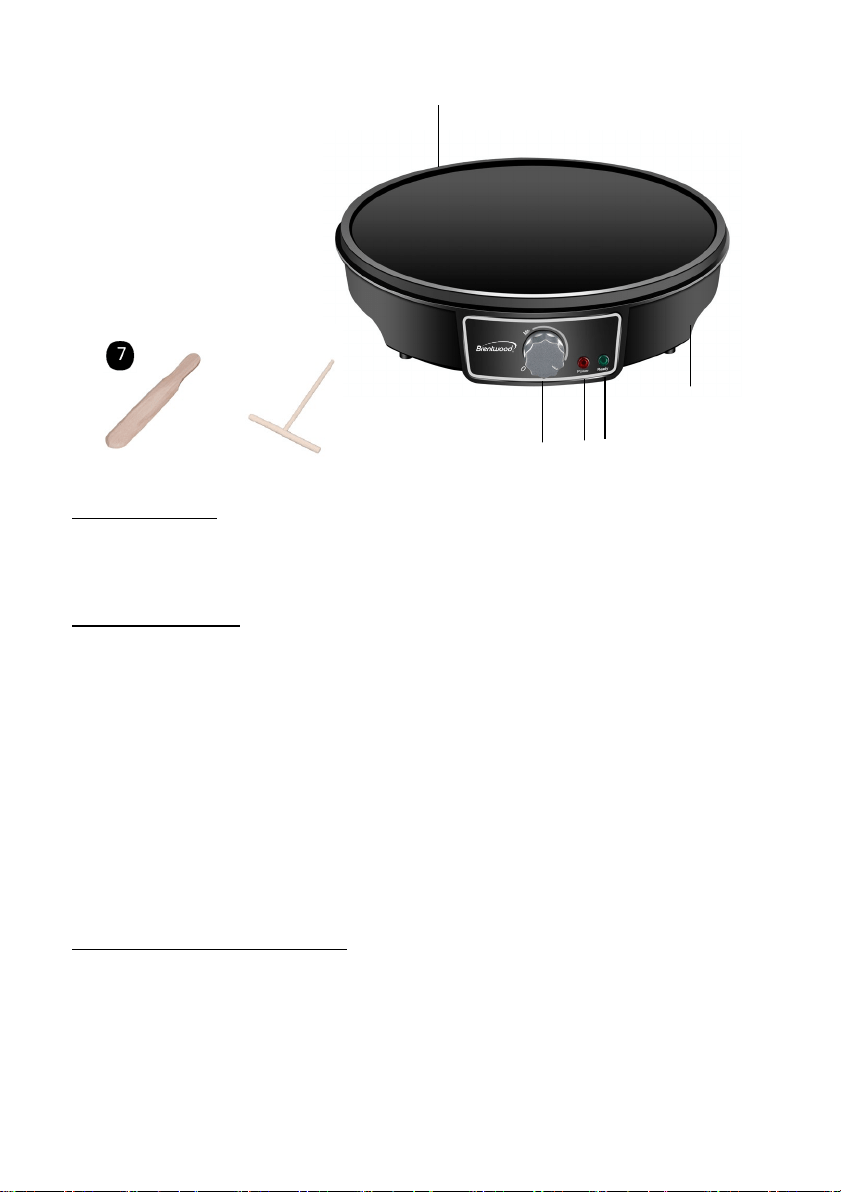
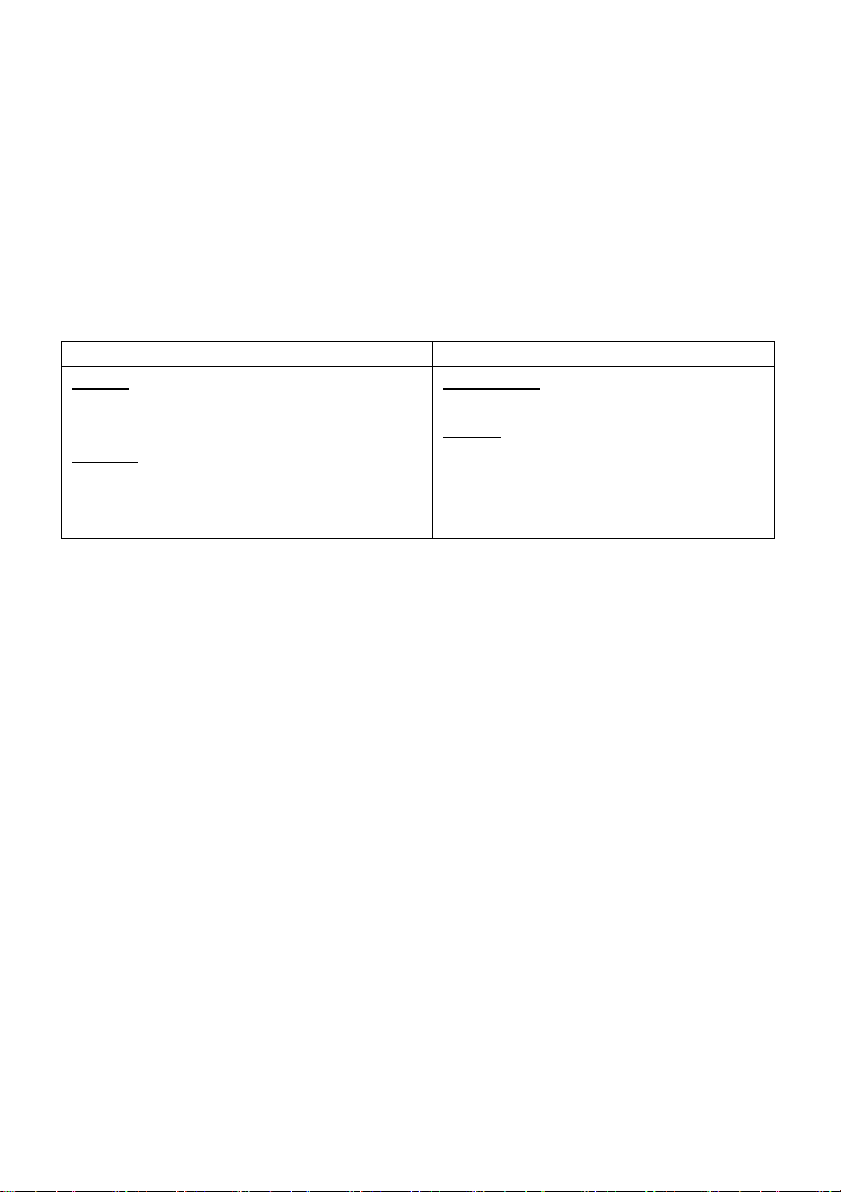
Parts:
1. Non-stick Plate
2. Knob
3. Power Light (Red)
4. Ready Light (Green)
5. Base
6. Spreader
7. Spatula
TEMPERATURE:
RANGE: 0°F - 392°F
Max Temperature: 392°F (±10)
BEFORE FIRST USE
IMPORTANT: Please check all packaging material carefully before discarding as there may
be accessory parts contained within the packaging material.
• Before your first use, clean the non-stick skillet using a damp cloth with non-abrasive
soap. Do not submerge the unit under water. Make sure to dry all parts thoroughly.
• For best results, slightly grease the baking plate, pour a teaspoon of vegetable oil on to
the non-stick plates. Spread over with an absorbent kitchen towel and wipe off any
excess oil.
• Take care to prevent water from running into the appliance.
• DO NOT overfill the appliance or operate when empty.
• Only use wood (Spreader & Spatula included), silicone, or plastic utensils to avoid
damaging the non-stick surfaces.
Using Your Crêpe Maker & Griddle:
ATTENTION
:
First and sometimes second use may cause a slight odor or small smoking upon
heating, it is normal. This is a result of the heating element being used for the first time. It
quickly goes away.
1. Place the Crêpe Maker & Griddle on a sturdy flat stable and dry surface.
2. Plug the Crêpe Maker & Griddle into the nearest Electric Outlet.
❶
❷
❸
❺
❹
❻

5
3. Never cut crêpes on the baking plate. Use only wooden, silicone, or plastic utensils to
avoid scratching the non-stick coating.
Note: DO NOT PRE-HEAT AN EMPTY COOKING PLATE. This should be done prior to
cooking food for first time. Let the oil pre-heat until the GREEN light illuminates
indicating it has reached its temperature. For best results, pre-heat with oiled plate for
1-2 minutes on medium to MAX heat until GREEN ready light is illuminated.
Let it pre-heat each time you use your Crêpe Maker & Griddle. This process will assist
in the removal of the crêpes after cooking.
4. Connect the appliance to an electrical outlet. The ‘RED’ power light and ‘GREEN’ ready
light will illuminate, letting you know the appliance is ready.
5. Turn the temperature knob to ‘MAX’, the GREEN ready light will turn off.
6. Allow your appliance to pre-heat until the GREEN ready light illuminates. This indicates
that the cooking plate has reached the set temperature for cooking.
7. Once the GREEN ready light illuminates the Crêpe Maker & Griddle is now ready to be
used for cooking.
8. Pour crêpe batter onto the baking plate spreading it with a circular movement using
the batter Spreader (included).
9. The GREEN ready light will continue to go on and off during the cooking process
indicating that the appliance is maintaining the heat temperature it was designated on
the Temperature Knob. The GREEN ready light will illuminate ON and OFF during your
cooking process. This indicates it is working correctly as it maintains the cooking
temperature.
10. Allow the crêpe to cook until the surface of the crêpe is no longer liquid but more solid
and can be moved slightly.
11. Using the spatula, lift and flip the crêpe completely.
12. Continue to cook on the other side until the underside is slightly browned and easily
lifted. Remove crêpe to a wire rack and allow for slight cooling before stacking on a
plate.
13. Adjust the temperature as needed after the first crêpe is done.
14. Repeat as needed, stacking crêpes on sheets of wax paper in layers. Cover stack with
foil and place in a 200℉ oven to keep warm.
WARNING: Steam may be released during cooking. Ensure hands and face are at a
safe distance from the unit to prevent accidental burns. Always use potholders or heat
resistant gloves when operating the unit.
15. Once done cooking, turn the temperature knob to ‘OFF’ and always unplug the Crêpe
Maker & Griddle from the electrical outlet. Allow to cool before cleaning and storing.
Cleaning Your Crêpe Maker & Griddle:
Warning: Always unplug the appliance and allow it to cool before cleaning or storing.
Notice: Never immerse any part of the Crêpe Maker & Griddle, plug or cord in water or in a
dishwasher.

6
• The cooking plate is coated with non-stick cooking surface, therefore little cleaning is
required. Simply wipe cooking plate over with a damp cloth.
• Wash the Crêpe Maker & Griddle by hand using non-abrasive cleaners and or soft cloth
with warm water.
• Do not use steel wood scrubbers or pads. These will damage the Non-Stick surfaces.
• Wipe dry inside and out. Store in a cool, dry place. Away from reach of children
.
RECIPES
Simple Breakfast Crêpes
Ingredients:
• 1 ½ Cups flour
• 1 Tbs sugar
• ½ tsp baking powder
• ½ tsp salt
• 2 Cups milk
• 2 eggs
• 1/2 tsp. vanilla
• 2 Tbs. melted butter plus additional
butter for cooking
Directions:
Combine all ingredients in a blender or whisk it. If blender, pulse until batter is smooth.
Scrape down any dry flour stuck to the sides of the blender to ensure ingredients are evenly
combined. Avoid over-running the blender as you do not want a lot of extra air in the batter.
Heat 1/8 tsp of butter in your Crêpe Maker (more will be needed during your cooking).
Pour ½ cup of batter from the blender, using your accessories that are included, spread the
batter into a thin layer across the Crêpe Maker. It takes some practice to get the hang of
pouring the batter into the Crêpe Maker with one hand while simultaneously spreading the
batter, spread the batter into a smooth, thin pancake.
Cook the batter over med-low heat and use the spatula (included) for flipping. Watch the
batter in the pan as it cooks. As soon as the wetness disappears from the top of the crêpe
(approx. 1-2 minutes), run a spatula around the edges and under to loosen it from the
Crêpe Maker.
Run the spatula (included) around the edges of the crepe, then flip the crepe and cook the
other side for 1-2 minutes, until golden brown and cooked through. Repeat until all batter
has been used. You can keep them warm in the oven while you cook up the rest or fill and
sprinkle with powdered sugar and top with fruit or any topping of your liking and eat while
you continue to cook.
You can fill the Crêpes with anything you heart desires. Butter and lemon, chocolate,
bananas, and cream, or savor it up with ham, cheese, and tomatoes.

7
Using a batch of the Simple Breakfast Crêpes Recipe above:
Boston Cream Pie Dessert Crêpes Filling:
Pastry Cream Filling Ingredients:
½ Cup granulated sugar
¼ Cup cornstarch
½ tsp. salt
4 egg yolks
1 tsp vanilla extract
½ cup heavy whipping cream
Chocolate Sauce Ingredients:
1 Cup chocolate chips
3 tbs butter
Splash of Cream or milk
Directions:
Small bowl, separate egg yolks and whisk gently. Set aside. Next, in a saucepan over
medium heat, whisk together sugar, cornstarch milk and salt. Stir and heat until it begins to
thicken (approx. 5 minutes). Pour about 1/3 of the sugar mixture into the whisked egg yoks
and stir. Then pour the entire egg yolk mixture back into the saucepan and continue
cooking over medium heat for 1 minute. Remove from heat and stir in the vanilla and
transfer to a larger bowl.
Press a piece of plastic wrap down onto the top of the custard mixture and place in the
refrigerator unit cooled (1-2 hours).
In a bowl, whisk ½ cup of whipping cream into a bowl until soft peaks appear and form. Use
a spatula to gently fold the whipped cream into the cooled custard mixture. Filling is ready.
Chocolate Sauce: in a saucepan, heat chocolate chips, butter, and milk over low to medium
heat until it is glossy and melty. Immediately drizzle sauce over prepared and filled crepes.
Reheat gently as needed to maintain a pourable thickness.
Assemble: Scoop 2 Tbsp into a Crêpe and roll. Top with hot chocolate sauce. Enjoy!
Sweet Cream Cheese filling and Strawberry Banana Topping (Makes 8-10)
Crêpe Mix Ingredients
:
1 ½ Cup Flour
1 Tbsp sugar
½ Tsp Baking Powder
½ Tsp salt
2 Cups Milk
2 Tbsp melted butter
1 Tsp vanilla extract
Additional Butter or oil
Filling and Topping Ingredients:
8 oz. Cream Cheese (soft)
¼ Cup powdered Sugar
1 Tsp. Vanilla extract
1 Tbsp. milk
1 Cup strawberry slices
1 Cup Banana Slices
Directions:

8
Combine flour, sugar, baking powder and salt in a bowl.
Whisk in milk, eggs, butter (melted), vanilla until smooth.
Set your Crêpe Maker & Griddle to medium heat and add a small pat of butter (or
cooking spray). Pour ½ Cup of batter into the pan and use the spreader (included) to spread
it evenly and thinly into a 6–8-inch diameter circle. Cook until the batter no long looks shiny
(1-2 min).
Run the spatula (included) around the edges of the crepe, then flip the crepe and cook the
other side for 1-2 minutes, until golden brown and cooked through. Repeat until all batter
has been used.
Filling: Beat the cream cheese and milk for 3-4 minutes then add the powdered sugar and
vanilla until well combined. If desired, mix the strawberries with 1-2 tsp. of sugar (optional,
only if strawberries need to be sweetened)
Spread about 2 Tbsp of the cream cheese filling, down the center of the crepe. Fold the
sides of the crepe over onto the center and top with banana and strawberry.
Savory Smoked Salmon and Cream Cheese Crêpe (Serves 8); Preheat 3-5 min.
Ingredient
•
1 ½ Cup milk
• ½ cup water
• 6 Tbls. butter (melted)
• 3 large eggs
• 1 ½ cups all-purpose flour
• ¾ tsp salt
• 8 oz. soft cream cheese
• 2 Tbls soft butter
• 2 Tbls lemon zest
• 1 shallot (medium size) minced
•
¼ cup capers (rinsed and
chopped)
• 1 Tbls dill (minced)
• Ground pepper (to your liking)
• 3 Cups spinach (baby)
• 1 Tsp EVOO (extra-virgin olive
oil)
• 1 Tsp balsamic vinegar
• ½ lb. thin sliced Smoked Salmon
• 2 tomatoes (thinly sliced)
Directions:
Mix flour and salt in a bowl and in a second bowl, whisk 3 eggs, milk, water, and melted
butter. Then combine both bowls into one and whisk. Strain the batter and refrigerate for
45-60 min.
Filling: blend the cream cheese with the butter, lemon zest, shallot, capers, dill, and season
with pepper. Refrigerate until Crêpes are ready. Combine and toss the spinach, olive oil,
and balsamic vinegar.
9
Spray your Crêpe Maker & Griddle with cooking spray. Heat Crêpe Maker over moderate
heat. Pour 1/3 cup of the Crêpe batter into the Crêpe Maker and swirl the pan to coat it
evenly. Cook the Crêpe until lightly golden on the bottom, about 1 minute. Flip the crêpe
and cook for about 30 seconds longer. Transfer the Crêpe to a plate and repeat with the
remaining batter.
Fold each Crêpe in half. Spread about 2 tablespoons of the cream cheese mixture down the
center of each Crêpe. Lay the salmon over the cream cheese. Top with the spinach salad
and tomatoes and season with pepper. Fold one side of the Crêpe over the cream cheese
filling, roll to close and serve.
Crêpe Ideas:
Griddle Ideas:
Sweet: all berries, Strawberries,
blueberries, cherries, blackberries
Bananas, Peaches, Cinnamon, Chocolate
Savory: Spinach, Basil, chicken, Beef,
Onion, Mushrooms
Vegetables: Tomatoes, asparagus,
onions
Meats:
Bacon, Steaks, Burgers,
Chicken, Ham, Hot Dogs
Eggs, Pancakes, Hash browns, French
Toast, Grill Cheese, Quesadillas, Potato
Pancakes

10
ONE YEAR LIMITED WARRANTY
Write down the following information about your appliance to better help you
obtain assistance or service if you ever need it.
CUSTOMER RECORD
Date of Purchase______________ Store/Dealer___________________________
Model/Item No: _______________________________
THIS WARRANTY APPLIES TO PRODUCTS PURCHASED AND USED IN THE CONTINENTAL
U.S. AND CANADA ONLY. This is the only express warranty for this product and is in
lieu of any other warranty or condition. This product is warranted to be free from
defects in material and workmanship for a period of one (1) year from the date of
original purchase. During this period, your exclusive remedy is repair or replacement
of this product, at our option; however, you are responsible for all costs associated
with returning the product to us and our returning a product or component under this
warranty to you. If the product or component is no longer available, we will replace
with a similar one of equal or greater value. This warranty does not cover glass, filters,
wear from normal use, use not in conformity with the printed directions, or damage
to the product resulting from accident, alteration, abuse, or misuse.
THIS WARRANTY EXTENDS ONLY TO THE ORIGINAL CONSUMER PURCHASER. KEEP
THE ORIGINAL SALES RECEIPT, AS PROOF OF PURCHASE IS REQUIRED TO MAKE A
WARRANTY CLAIM.
This warranty is void if the product is used for other than single-family household use
or subjected to any voltage and waveform other than what is specified on the rating
label (E.G., 120V~60Hz). We exclude all claims for special, incidental, and
consequential damages caused by breach of express or implied warranty. All liability is
limited to the amount of the purchase price. Every implied warranty, including any
statutory warranty or condition of merchantability or fitness for a particular purpose,
is disclaimed except to the extent prohibited by law, in which case such warranty or
condition is limited to the duration of this written warranty. This warranty gives you
specific legal rights. You may have other legal rights that vary depending on where you
live. Some states do not allow limitations on implied warranties or special, incidental,
or consequential damages, so the foregoing limitations may not apply to you. To make
a warranty claim do not return this appliance to the store.
TO OBTAIN WARRANTY SERVICE AND/OR TROUBLESHOOTING INFORMATION:
Call Customer Service at 1-888-903-0060 in the U.S.
Monday through Friday: 9:00 am – 5:00 pm PT
U.S. Customers Please Email: war[email protected]
Canadian Customers Please Email: [email protected]
Go online at www.brentwoodus.com

11
PRECAUCIONES IMPORTANTES
Al usar este o cualquier otro electrodoméstico, siga las precauciones básicas de
seguridad, especialmente cuando niños están presentes.
LEA TODAS LAS INSTRUCTIONES
ANTES DE USAR
ADVERTENCIA- Para reducir el riesgo de incendio, descarga eléctrica, lesiones
personales graves y daños a la propiedad, por favor tenga en cuenta lo siguiente:
• Este producto no está destinado para su uso por los niños. Mantenga el producto
fuera del alcance de los niños y las mascotas. Precaución adicional es necesario
cuando se utiliza este aparato cerca de niños.
• Asegúrese siempre de que el producto está desenchufado de la toma de corriente y
se deja enfriar antes de montar, desmontar, trasladar o limpiar.
• No deje el producto desatendido mientras está en uso. Siempre desenchufe el
producto de la toma de corriente cuando no esté en uso.
• No sumerja la base, el cable de alimentación o el enchufe de este producto ni
exponga el cable o el enchufe al agua u otros líquidos.
• No sumerja ni exponga el Crêpera y Parrilla, el cable de alimentación o el enchufe
de este aparato en agua u otros líquidos.
• No toque las superficies calientes. Utilice asas o pomos y guantes de protección
para el horno cuando manipule el producto para evitar quemaduras o lesiones
personales.
• Este aparato genera calor y vapor durante su uso. Tome las precauciones adecuadas
para evitar quemaduras, incendios y daños personales o materiales.
• No utilice accesorios que no hayan sido suministrados o vendidos por el fabricante.
• No coloque el aparato sobre o cerca de un quemador de gas o eléctrico caliente, en
un horno caliente o en otras superficies calientes.
• Extreme las precauciones al mover un aparato que contenga alimentos o líquidos.
• Utilice el aparato en una zona bien ventilada. Mantenga un espacio de al menos 4-6
pulgadas en todos los lados del producto para permitir una adecuada circulación de
aire.
• Utilice el aparato sobre una mesa o una superficie plana y resistente. Mantenga el
aparato alejado de cortinas, revestimientos de pared, ropa, paños de cocina u otros
materiales inflamables.
• No enchufe o desenchufe el aparato de la toma de corriente con las manos mojadas.
• Este aparato está destinado exclusivamente a un uso doméstico no comercial, no
industrial y en interiores para la cocción de alimentos para el consumo humano.
• No utilice el aparato vacío.
• No deje que el cable cuelgue del borde de la mesa o de la encimera donde pueda
tropezar o ser arrastrado. No permita que el cable toque superficies calientes.

12
• No utilice el aparato si el cable de alimentación o el enchufe están dañados, si los
cables están expuestos, si funciona mal, si se cae o se daña, o si la carcasa del motor
se cae o se expone al agua.
• Este producto no tiene piezas que puedan ser reparadas por el usuario. No intente
examinar o reparar este producto usted mismo.
Por favor, revise la política de
garantía en la Página 10.
• No sobrecargue la toma de corriente o los cables de extensión, ya que esto puede
provocar un incendio o una descarga eléctrica.
• No ejerza ninguna presión sobre el cable de alimentación donde se conecta al
aparato, ya que el cable de alimentación podría deshilacharse y romperse.
INSTRUCCIONES ESPECIALES:
Un cable de suministro eléctrico corto para reducir el riesgo de enredarse o
tropezarse con un cable más largo. Un cable de extensión no se recomienda para su
uso con este producto, pero si se debe utilizar:
− El voltaje eléctrico debe ser al menos tan grande como la del producto
− Si el producto es de un tipo de conexión a tierra de 3 patas, el cable de extensión
debe ser un cable de toma de tierra de 3 alambres
− Organice el cable de extensión de manera que no cuelgue del mostrador o de la
mesa donde alguien se pueda tropezar con él ni tirar.
ADVERTENCIA: Este producto está equipado con un enchufe polarizado (una pata es
más ancha que la otra) para reducir el riesgo de descarga eléctrica. Esta es una
característica de seguridad. El enchufe encajará en un tomacorriente polarizado de
una sola manera. Si no puede insertar el enchufe en la toma de corriente, intente
invertir el enchufe. Si aún así no encaja, comuníquese con un electricista calificado. No
utilice nunca el enchufe con un cable de extensión a menos que pueda insertar
completamente el enchufe en el cable de extensión. No altere el enchufe. No intente
anular la característica de seguridad del enchufe polarizado.
Especificaciones de potencia: 120V~ 60Hz, 1000W
¡SÓLO PARA USO DOMÉSTICO!
LEA ESTAS INSTRUCCIONES Y
GUÁRDELAS PARA FUTURAS CONSULTAS.
13
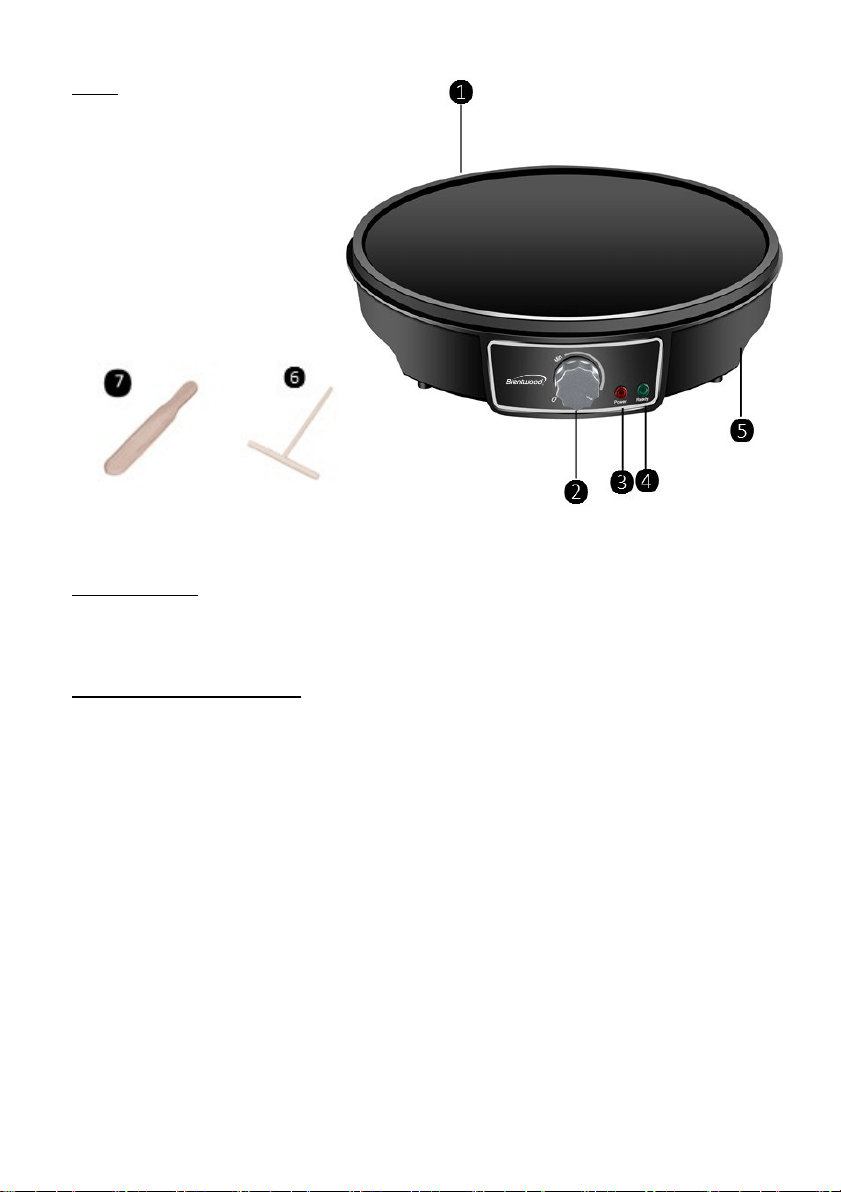
Parts:
1. Placa antiadherente
2. Pomo
3. Luz de encendido (roja)
4. Luz de preparado (verde)
5. Base
6. Esparcidor
7. Espátula
Temperatura:
INTERVALO: 0°- 392°F / 0°- 200°C
MAX: 392°F (±10) / 200°C (±10)
ANTES DEL PRIMER USO
IMPORTANTE: Por favor, compruebe todo el material de embalaje cuidadosamente antes
de desecharlo, ya que puede haber piezas accesorias dentro del material de embalaje.
• Antes de su primer uso, limpie la sartén antiadherente con un paño húmedo con
jabón no abrasivo. No sumerja la unidad bajo el agua. Asegúrese de secar bien todas
las piezas.
• Para obtener mejores resultados, engrase ligeramente la placa de cocción, vierta una
cucharadita de aceite vegetal sobre las placas antiadherentes. Extienda con un paño
de cocina absorbente y limpie el exceso de aceite.
• Tenga cuidado de evitar que el agua entre en el aparato.
• NO llene demasiado el aparato ni lo haga funcionar cuando esté vacío.
• Utilice únicamente utensilios de madera (espátula y espátula incluidas), silicona o
plástico para evitar dañar las superficies antiadherentes.

14
Uso de la Crêpera y Parrilla:
ATENCIÓN: El primer y a veces el segundo uso puede provocar un ligero olor o una
pequeña humareda al calentarse, es normal. Esto se debe a que la resistencia se utiliza
por primera vez. Desaparece rápidamente.
1. Coloque la Crêpe Maker & Griddle sobre una superficie firme, plana, estable y
seca.
2. Enchufe la Crêpe Maker & Griddle en la toma de corriente eléctrica más cercana.
3. Nunca corte crepes en la placa de cocción. Utilice únicamente utensilios de
madera, silicona o plástico para evitar rayar el revestimiento antiadherente.
Nota: NO PRECALIENTE UNA PLACA DE COCCIÓN VACÍA. Esto debe hacerse antes
de cocinar los alimentos por primera vez. Deje que el aceite se precaliente hasta
que la luz VERDE se ilumine indicando que ha alcanzado su temperatura. Para
obtener mejores resultados, precaliente con la placa aceitada durante 1-2
minutos a fuego medio hasta que se ilumine la luz VERDE de listo.
Deje que se precaliente cada vez que utilice su Crepera y Plancha. Este proceso
ayudará a retirar los crêpes después de la cocción.
4. Conecte el aparato a una toma de corriente. La luz 'ROJA' de encendido y la luz
'VERDE' de listo se iluminarán, indicándole que el aparato está listo.
5. Gire el botón de temperatura a "MAX", la luz VERDE de listo se apagará.
6. Deje que el aparato se precaliente hasta que se encienda el piloto VERDE. Esto
indica que la placa de cocción ha alcanzado la temperatura establecida para
cocinar.
7. Una vez que se encienda la luz VERDE de listo, la Crepera y Parrilla estará lista
para cocinar.
8. Vierta la masa de crêpes sobre la placa de cocción extendiéndola con un
movimiento circular utilizando el Esparcidor de masa (incluido).
9. La luz VERDE de listo continuará encendiéndose y apagándose durante el proceso
de cocción indicando que el aparato está manteniendo la temperatura de calor
que se le designó en el mando de temperatura. El encendido y apagado de la luz
VERDE significa que está funcionando correctamente, manteniendo la
temperatura.
10. Deje que la crepe se cocine hasta que la superficie de la crepe ya no esté líquida
sino más sólida y se pueda mover ligeramente.
11. Con la espátula, levante y dé la vuelta completa a la crêpe.
12. Continuar la cocción por el otro lado hasta que la parte inferior esté ligeramente
dorada y se levante con facilidad. Retire la crêpe a una rejilla y deje que se enfríe
ligeramente antes de apilarla en un plato.
13. Ajustar la temperatura según sea necesario una vez hecha la primera crêpe.
14. Repita según sea necesario, apilando los crepes en capas sobre hojas de papel
encerado. Cubra la pila con papel de aluminio y colóquela en un horno a 200℉
para mantenerla caliente.

15
ADVERTENCIA: Puede salir vapor durante la cocción. Asegúrese de que las manos
y la cara estén a una distancia segura del aparato para evitar quemaduras
accidentales. Siempre use agarraderas o guantes resistentes al calor cuando
opere la unidad.
15. Cuando termine de cocinar, gire el botón de temperatura a la posición "OFF" y
desenchufe siempre la crepera y plancha de la toma de corriente. Deje que se
enfríe antes de limpiarla y guardarla.
Como Limpiar su Crêpera y Parrilla:
Advertencia: Desenchufe siempre el aparato y deje que se enfríe antes de limpiarlo o
guardarlo.
Aviso: No sumerja nunca ninguna parte de la crepera y plancha, el enchufe o el cable en agua
o en el lavavajillas.
• La placa de cocción está recubierta con una superficie de cocción antiadherente, por lo
que requiere poca limpieza. Simplemente limpie la placa de cocción con un paño
húmedo.
• Lave la crepera y la plancha a mano utilizando limpiadores no abrasivos o un paño
suave con agua tibia.
• No utilice estropajos de acero ni almohadillas de madera. Estos dañarán las superficies
antiadherentes.
• Secar por dentro y por fuera. Guárdelo en un lugar fresco y seco. Fuera del alcance de
los niños.
Consulte la Página 6 para ver las recetas.

16
IMPORTANTES MESURES DE SÉCURITÉ
Lorsque vous utilisez cet appareil ou tout autre appareil électrique, suivez toujours
ces précautions de base, surtout en présence d’enfants.
LISEZ TOUTES LES
INSTRUCTIONS AVANT USAGE
AVERTISSEMENT-Pour réduire le risque d’incendie, d’électrocution, de blessures
graves ou de dommages matériels, veuillez noter ce qui suit:
• Ce produit n’est pas destiné à être utilisé par des enfants. Gardez-le hors de portée
des enfants et des animaux. Redoublez de prudence lorsque vous utilisez cet
appareil à proximité d’enfants.
• Assurez-vous que l’appareil est débranché de la prise électrique et laissez-le
refroidir avant de l’assembler, le démonter, le déplacer ou le nettoyer.
• Ne laissez pas le produit sans surveillance lorsqu’il est en fonction. Débranchez-le
toujours s’il n’est pas utilisé.
• N’immergez pas l’appareil, le cordon d’alimentation ou la fiche et n’exposez pas le
cordon ou la fiche à l’eau ou tout autre liquide.
• Ne pas immerger ou exposer crêpière & grille, le cordon d'alimentation ou la fiche
de cet appareil à l'eau ou à d'autres liquides.
• Ne pas toucher les surfaces chaudes. Utilisez des poignées ou des boutons et des
gants de cuisine pour manipuler le produit afin d'éviter les brûlures ou les blessures.
• Cet appareil génère de la chaleur et de la vapeur pendant son utilisation. Prenez les
précautions nécessaires pour éviter les brûlures, les incendies, les blessures ou les
dommages matériels.
• N'utilisez pas d'accessoires qui ne sont pas fournis ou vendus par le fabricant.
• Ne placez pas l'appareil sur ou près d'un brûleur électrique ou à gaz chaud, dans un
four chaud ou sur d'autres surfaces chaudes.
• Soyez extrêmement prudent lorsque vous déplacez un appareil contenant des
aliments ou des liquides.
• Utilisez l'appareil dans un endroit bien ventilé. Maintenez un dégagement d'au
moins 4-6 pouces de tous les côtés du produit pour permettre une circulation d'air
adéquate.
• Utilisez l'appareil sur une table ou une surface plane et solide. Tenez l'appareil
éloigné des rideaux, des revêtements muraux, des vêtements, des torchons ou de
tout autre matériau inflammable.
• Ne pas brancher ou débrancher l'appareil de la prise murale avec les mains
mouillées.
• Cet appareil est destiné à un usage domestique, non commercial, non industriel et
intérieur uniquement pour la cuisson d'aliments destinés à la consommation
humaine.

17
• N'utilisez pas l'appareil à vide.
• Ne laissez pas le cordon pendre sur le bord de la table ou du comptoir, où il pourrait
trébucher ou être traîné. Ne laissez pas le cordon toucher des surfaces chaudes.
• N'utilisez pas l'appareil si le cordon d'alimentation ou la fiche sont endommagés, si
les cordons sont exposés, s'il fonctionne mal, s'il est tombé ou endommagé, ou si le
boîtier du moteur est tombé ou exposé à l'eau.
• Ce produit ne comporte aucune pièce réparable par l'utilisateur. N'essayez pas
d'examiner ou de réparer ce produit vous-même.
Veuillez consulter la politique de
garantie à la page 10.
• Ne surchargez pas la prise de courant ou les rallonges, car cela pourrait provoquer
un incendie ou un choc électrique.
• N'exercez aucune pression sur le cordon d'alimentation à l'endroit où il est
connecté à l'appareil, car il pourrait s'effilocher et se rompre.
RECOMMANDATIONS ADDITIONNELLES:
Un court cordon d’alimentation est fourni afin de réduire les risques de s’enchevêtrer
ou de trébucher dans un cordon plus long. L’utilisation d’une rallonge n’est pas
recommandée avec ce produit, mais si elle doit être utilisée:
− La puissance nominale indiquée sur la corde doit être au moins aussi grande que
celle de l’appareil.
− Si le cordon de l’appareil est relié à la terre à 3 fils, la corde de rallonge doit aussi
être reliée à la terre à 3 fils.
− Installer la rallonge de façon à ce qu’elle ne pende pas du comptoir ou de la table
où l’on pourrait s’y accrocher ou trébucher.
AVERTISSEMENT: Cet appareil est muni d'une fiche d’alimentation polarisée (une
broche est plus large que l'autre). Il s'agit là d'une mesure de sécurité. Pour réduire le
risque d’électrocution, la fiche doit être insérée d’une seule façon dans une prise de
courant polarisée. Si le branchement n’est pas complet, inversez la fiche. Si la fiche ne
s’insère toujours pas, contactez un électricien qualifié. N'utilisez jamais la fiche avec
une rallonge, à moins de pouvoir l’insérer parfaitement dans la rallonge. Ne tentez pas
de modifier la fiche polarisée et respectez à la lettre cette mesure de sécurité.
Spécifications de puissance: 120V~ 60Hz, 1000W
POUR UN USAGE DOMESTIQUE UNIQUEMENT!
VEUILLEZ LIRE CES INSTRUCTIONS &
CONSERVER POUR RÉFÉRENCE ULTÉRIEURE.
18
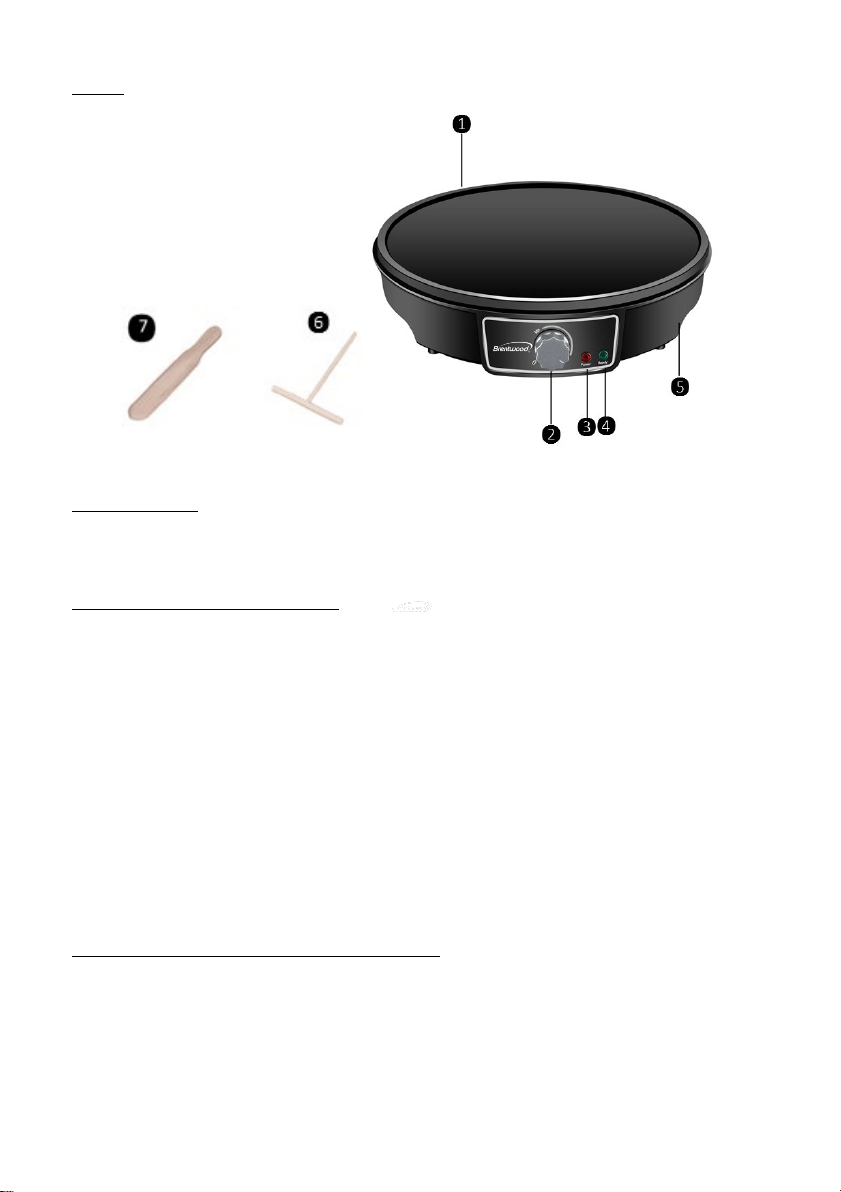
Partes:
1. Plaque antiadhésive
2. Poignée
3. Voyant d'alimentation (rouge)
4. Voyant Prêt (vert)
5. Base
6. Épandeur
7. Spatule
Température:
PLAGE: 0°- 200°C
MAX: 200°C (±10)
AVANT LA PREMIÈRE UTILISATION
IMPORTANT: Veuillez vérifier soigneusement tous les matériaux d'emballage avant de les
jeter car ils peuvent contenir des pièces accessoires.
• Avant votre première utilisation, nettoyez la poêle antiadhésive à l'aide d'un chiffon
humide et d'un savon non abrasif. Ne pas immerger l'appareil sous l'eau. Veillez à
bien sécher toutes les pièces.
• Pour de meilleurs résultats, graissez légèrement la plaque de cuisson, versez une
cuillère à café d'huile végétale sur les plaques antiadhésives. Étalez avec un torchon
de cuisine absorbant et essuyez l'excédent d'huile.
• Veillez à ce que l'eau ne coule pas dans l'appareil.
• Ne remplissez pas trop l'appareil et ne le faites pas fonctionner lorsqu'il est vide.
• N'utilisez que des ustensiles en bois (spatule incluse), en silicone ou en plastique
pour éviter d'endommager les surfaces antiadhésives.
Utilisation de votre crêpière et de votre grille:
ATTENTION: La première et parfois la deuxième utilisation peuvent provoquer une
légère odeur ou un léger dégagement de fumée lors du chauffage, c'est normal. C'est
le résultat de la première utilisation de l'élément chauffant. Cela disparaît rapidement.
1. Placez la Crêpière et le Gril sur une surface solide, plate, stable et sèche.
2. Branchez la Crêpière et le Gril sur la prise électrique la plus proche.

19
3. Ne jamais couper les crêpes sur la plaque de cuisson. Utilisez uniquement des
ustensiles en bois, en silicone ou en plastique pour éviter de rayer le revêtement
antiadhésif.
Remarque: NE PAS PRÉCHAUFFER UNE PLAQUE DE CUISSON VIDE. Cette
opération doit être effectuée avant la première cuisson des aliments. Laissez
l'huile préchauffer jusqu'à ce que le voyant VERT s'allume pour indiquer qu'elle a
atteint sa température. Pour de meilleurs résultats, préchauffez l'assiette huilée
pendant 1 à 2 minutes à feu moyen jusqu'à ce que le voyant vert s'allume.
Laissez préchauffer l'huile chaque fois que vous utilisez votre crêpière et votre
gril. Ce processus facilitera le retrait des crêpes après la cuisson.
4. Branchez l'appareil sur une prise électrique. Le voyant d'alimentation "ROUGE" et
le voyant "VERT" s'allument pour vous indiquer que l'appareil est prêt.
5. Tournez le bouton de température sur "MAX", le voyant vert s'éteint.
6. Laissez votre appareil préchauffer jusqu'à ce que le voyant vert s'allume. Cela
indique que la plaque de cuisson a atteint la température réglée pour la cuisson.
7. Une fois que le voyant VERT s'est allumé, la Crêpière & Gril est maintenant prête
à être utilisée pour la cuisson.
8. Versez la pâte à crêpes sur la plaque de cuisson en l'étalant d'un mouvement
circulaire à l'aide de l'étaleur de pâte (inclus).
9. Le voyant VERT de préparation continue à s'allumer et à s'éteindre pendant la
cuisson, indiquant que l'appareil maintient la température de cuisson indiquée
sur le bouton de température. L'allumage et l'extinction du voyant VERT
signifient que l'appareil fonctionne correctement et maintient la température.
10. Laissez la crêpe cuire jusqu'à ce que la surface de la crêpe ne soit plus liquide
mais plus solide et qu'elle puisse être légèrement déplacée.
11. À l'aide de la spatule, soulever et retourner complètement la crêpe.
12. Poursuivre la cuisson de l'autre côté jusqu'à ce que le dessous soit légèrement
doré et se soulève facilement. Déposer la crêpe sur une grille et la laisser refroidir
légèrement avant de l'empiler sur une assiette.
13. Ajuster la température si nécessaire après la cuisson de la première crêpe.
14. Répéter l'opération autant de fois que nécessaire, en empilant les crêpes sur des
feuilles de papier ciré. Couvrir la pile avec du papier d'aluminium et la placer dans
un four de 200℉ pour la garder au chaud.
AVERTISSEMENT: De la vapeur peut se dégager pendant la cuisson. Veillez à ce
que les mains et le visage soient à une distance sûre de l'appareil pour éviter les
brûlures accidentelles. Utilisez toujours des maniques ou des gants résistants à la
chaleur lorsque vous utilisez l'appareil.
15. Une fois la cuisson terminée, tournez le bouton de température sur "OFF" et
débranchez toujours la Crêpière & Gril de la prise électrique. Laissez refroidir
l'appareil avant de le nettoyer et de le ranger.

20
Nettoyage de Crêpière & Grille:
AVERTISSEMENT: oujours débrancher l'appareil et le laisser refroidir avant de le
nettoyer ou de le ranger.
Remarque: Ne plongez jamais aucune partie de la Crêpière & Griddle, la fiche ou le
cordon dans l'eau ou dans un lave-vaisselle.
• La plaque de cuisson est recouverte d'une surface de cuisson antiadhésive,
ce qui nécessite peu de nettoyage. Il suffit d'essuyer la plaque de cuisson
avec un chiffon humide.
• Lavez la Crêpière & Griddle à la main en utilisant des produits de nettoyage
non abrasifs ou un chiffon doux avec de l'eau chaude.
• N'utilisez pas de brosses à bois ou de tampons en acier. Ils endommageraient
les surfaces antiadhésives.
• Essuyez l'intérieur et l'extérieur. Rangez dans un endroit frais et sec. Tenir
hors de portée des enfants.
Veuillez consulter la page 6 pour les recettes.

21

22
© 2023 Brentwood Appliances, Inc.