

Questions? Elite's customer service team is ready to help.
For more Elite products, visit us at shopelitegourmet.com.
12” CREPE MAKER
AND GRIDDLE
INSTRUCTION MANUAL
Before operating your new appliance, please read all instructions carefully and keep for
future reference.
MODEL: ECP-126


TABLE OF CONTENTS
IMPORTANT SAFEGUARDS
SHORT CORD PURPOSE
POLARIZED PLUG
PARTS IDENTIFICATION
BEFORE FIRST USE
HOW TO USE
CLEANING AND MAINTENANCE
RECIPES
CREPE SERVING TIPS
WARRANTY POLICY
RETURN INSTRUCTIONS
2
3
3
4
4
5
6
6
13
14
15

2 Questions? We’re here to help!
Visit: shopelitegourmet.com for support on this product.
IMPORTANT SAFEGUARDS
The Elite Brand takes consumer safety very seriously. Products are designed and
manufactured with our valued consumers’ safety in mind. Additionally, we ask that
you exercise a level of caution when using any electrical appliance by following all
instructions and important safeguards.
READ ALL INSTRUCTIONS BEFORE USE AND SAVE FOR FUTURE
REFERENCE
WARNING: When using electrical appliances, basic safety precautions should
always be followed as below:
8. Avoid contact with moving parts.
9. Do not let the power cord hang over
the edge of a table or counter or
touch any hot surface.
10. Do not use outdoors.
11. Do not use the appliance for other
than intended use.
12. Do not place on or near a hot gas or
electric burner, or in a heated oven.
13. To disconnect, remove the plug
from the wall outlet.
14. Do not clean the appliance with
metal scouring pads. Pieces can
break off from the pad and touch
electrical parts, creating a risk of
electrical shock.
15. Some countertop and table
surfaces, such as Corian®, wood,
stone and /or laminates, are
not designed to withstand
prolonged heat generated by
certain appliances. It is strongly
recommended by countertop
manufacturers and Maxi-Matic that
a hot pad or trivet be placed under
your Elite buffet server to prevent
possible damage to the countertop
surface.
1. Do not touch hot surfaces. Use
handles or knobs.
2. To protect against electrical shock,
do not place any part of the toaster
in water or other liquid.
3. If the power cord is damaged,
the manufacturer (or a similarly
qualied person) must replace it in
order to avoid a hazard.
4. Close supervision is necessary when
any appliance is being used by or
near children.
5. The use of attachments not
recommended or sold by the
manufacturer may cause re,
electric shock or injury.
6. Unplug from outlet when not in
use and before cleaning. Allow
appliance to cool completely before
putting on or taking off parts.
7. Do not operate any appliance with
a damaged power cord or plug or
after the appliance malfunctions
or is dropped or damaged in
any manner. Return appliance to
manufacturer of its service agent for
examination, repair or electrical or
mechanical adjustment.
SAVE THESE INSTRUCTIONS.
THIS PRODUCT IS FOR
HOUSEHOLD USE ONLY.

3
Questions? We’re here to help!
Visit: shopelitegourmet.com for support on this product.
3
SHORT CORD PURPOSE
POLARIZED PLUG
If the plug still does not t, contact a
qualied electrician. Never use the plug
with an extension cord unless the plug
can be fully inserted into the extension
cord. Do not alter the plug of the
product or any extension cord being
used with this product. Do not attempt
to defeat the safety purpose of the
polarized plug.
If this appliance is equipped with a
polarized plug (one blade is wider than
the other), please follow the below
instructions:
To reduce the risk of electrical shock,
this plug is intended to t into a
polarized outlet only one way. If you
are unable to t the plug into the
electrical outlet, try reversing the plug.
If an extension cord is used: (1) the
marked electrical rating of the exten-
sion cord should be at least as great as
the electrical rating of the product; (2)
the extension cord should be arranged
so that it will not drape over the counter
top or tabletop where it can
unintentionally be pulled on or tripped
over by children or pets.
Note: A short power cord is provided
to reduce the risk of personal injury
resulting from becoming entangled in or
tripping over a long cord.
Longer power-supply cords or
extension cords may be used if care
is exercised in their use.
4 Questions? We’re here to help!
Visit: shopelitegourmet.com for support on this product.
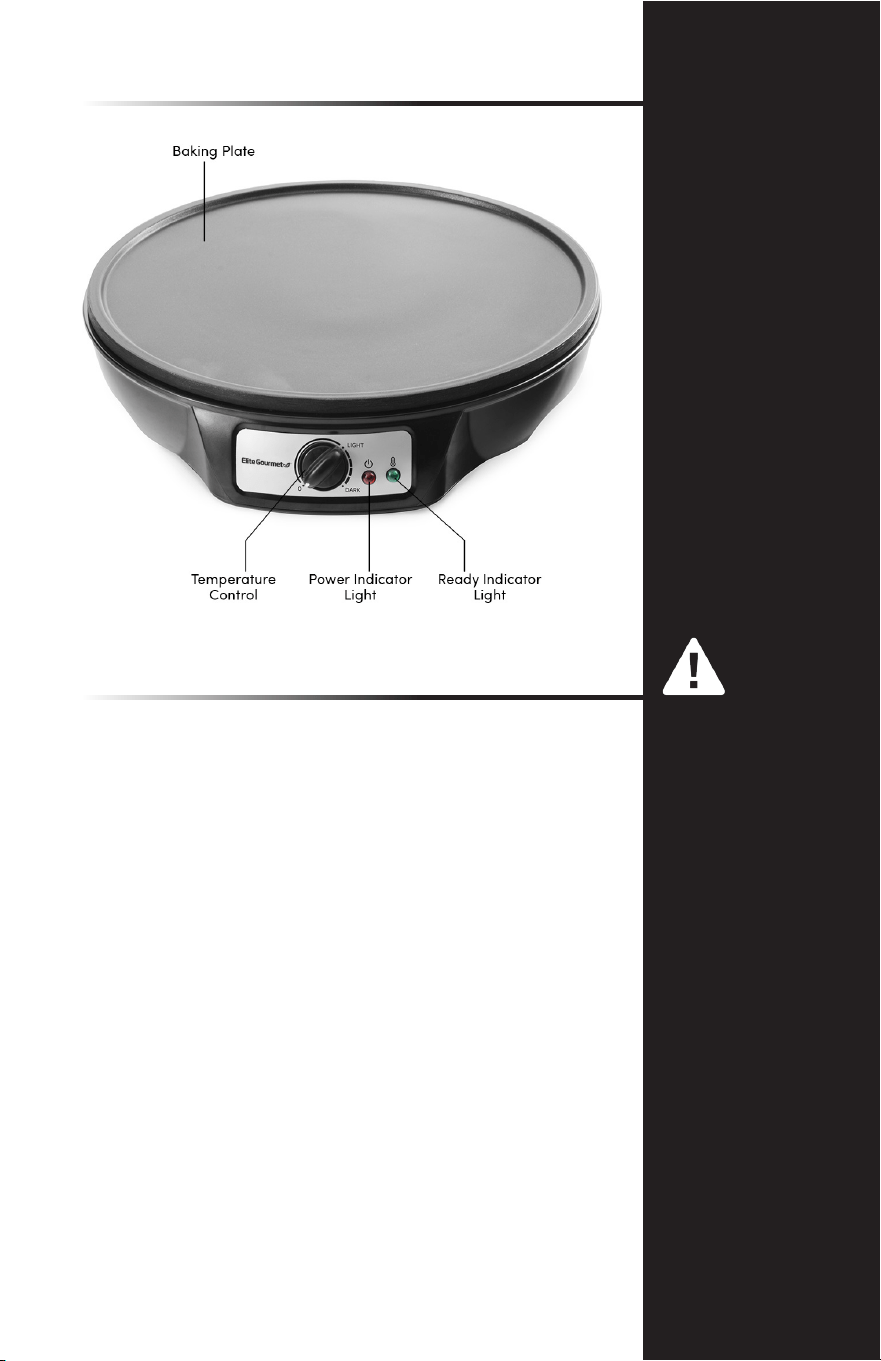
PARTS IDENTIFICATION
BEFORE FIRST USE
1. Remove the unit from box and properly dispose of packing
materials.
2. Wipe the unit with a damp cloth and let dry well.
3. Place the unit on a level surface, never against a wall or in
a corner or against curtains. It should be free-standing and
kept away from any ammable material.
4. Slightly grease the baking plate with a little cooking oil.
5. Insert the plug into a wall outlet. You’ll notice that the red
and green light will go on. Turn the temperature control
knob to DARK and the green ready light goes off. Indicat-
ing the unit is heating up.
6. Pre-heat the unit until the green indicator light comes on
and then unplug from outlet and let it cool.
7. The rst time the unit is used, a slight odor may develop.
This is entirely harmless. Please make sure that there is
adequate ventilation.
CAUTION:
The cooking
surface can become
extremely hot while
the appliance is in use.
Make sure that no one
touches the hot parts
of the unit during use
and the cooling down
period. Allow the unit
to cool down before
cleaning, transporting
or storing.
Never cut the crepes
on the baking plate!
Use only heatproof
plastic or wooden
utensils so as not to
scratch the non-stick
coating on the baking
plate.
-
-
5
Questions? We’re here to help!
Visit: shopelitegourmet.com for support on this product.
HOW TO USE
1. Set up the crepe maker as above and once it reaches
cooking temperature (green light comes on) pour some
crepe batter onto the baking plate, spreading it with a
circular movement using a batter spreader (not included).
2. When you pour the batter onto the hot baking plate,
you might hear some slight crackling noises caused by
differences in temperature and voltage. This does not
damage the appliance.
3. The green light will go on and off repeatedly during use.
This indicates when the unit is heating up in order to
maintain the required temperature.
4. Allow the crepe to cook until the surface is no longer liquid
and the crepe can be moved slightly.
5. Insert the spatula under a third of the crepe, lift the crepe
and turn it over.
6. Leave the crepe to cook briey until done. Lift it slightly
with the spatula to check. The crepe should be visibly
cooked through but not yet brown. Cooked this way, it can
be easily folded or rolled.
7. Remove the crepe from baking plate.
8. If you wish to cook another crepe and the last crepe was
too dark, turn the temperature down slightly.
9. When nished, remove the plug from the wall outlet and
let the appliance cool.
10. Spread or ll the crepe according to taste and fold it or roll
it.
CAUTION:
Never cut the crepes
on the baking plate!
Use only heatproof
plastic or wooden
utensils so as not to
scratch the non-stick
coating on the baking
plate.
5

6 Questions? We’re here to help!
Visit: shopelitegourmet.com for support on this product.
CLEANING & MAINTENANCE
1. 1. Remove the plug from the wall outlet.Remove the plug from the wall outlet.
2. 2. Always allow the crepe maker to cool down completely before handling and Always allow the crepe maker to cool down completely before handling and
cleaning.cleaning.
3. 3. Use a damp cloth to clean the surface and edges. Use a damp cloth to clean the surface and edges.
CAUTION: CAUTION: DO NOT IMMERSE THE CREPE MAKER IN WATER OR ANY OTHER DO NOT IMMERSE THE CREPE MAKER IN WATER OR ANY OTHER
LIQUID!LIQUID!
4. 4. Be sure all parts are clean and dry before storing. Store appliance in its box Be sure all parts are clean and dry before storing. Store appliance in its box
or in a clean, dry place. Never store it while it is hot or wet. Never wrap cord or in a clean, dry place. Never store it while it is hot or wet. Never wrap cord
tightly around the appliance; keep it loosely coiled.tightly around the appliance; keep it loosely coiled.
RECIPES - Crepes
BASIC CREPE BATTER
1. Combine all wet ingredients rst, then add the our, salt and other dry ingredients.
Whisk until smooth. (TIP: Combine ingredients in a blender.)
2. Strain the batter, to remove any lumps, into a quart size
measuring cup with a spout and let the batter rest at room temperature for 30 minutes.
3. Turn on the crepe maker and adjust level to 3 through 5. Melt the butter and use a pastry
brush to put a coating to the cooking plate before pouring and cooking. Pour batter
onto crepe maker and spread batter around the surface evenly. Cook for 3-5 minutes on
each side.
4. Transfer the crepe to a cooling rack. Proceed with the remaining batter. Once cool, stack
the crepes between sheets of waxed paper.
2 large eggs
1 ¼ cups whole milk
1 cup unbleached all-purpose our
¼ tsp salt
melted butter; for brushing the pan
WHOLE WHEAT CREPES yields about 8 (12-inch crepes)
1. Combine all wet ingredients rst, then add the our, salt and other dry ingredients.
Whisk until smooth. (TIP: Combine ingredients in a blender.)
2. Strain the batter, to remove any lumps, into a quart size
measuring cup with a spout and let the batter rest at room temperature for 30 minutes.
3. Turn on the crepe maker and adjust level to 3 through 5. Melt the butter and use a pastry
brush to put a coating to the cooking plate before pouring and cooking. Pour batter
onto crepe maker and spread batter around the surface evenly. Cook for 3-5 minutes on
each side.
4. Transfer the crepe to a cooling rack. Proceed with the remaining batter. Once cool, stack
the crepes between sheets of waxed paper.
1 cup whole wheat our
¼ tsp salt
1 cup almond milk
½ cup water
2 large eggs
melted butter, for brushing the pan

Questions? We’re here to help!
Visit: shopelitegourmet.com for support on this product.
7
RECIPES- Crepes (cont.)
DARK CHOCOLATE CREPES yields about 8 (12-inch crepes)
1. Combine all wet ingredients rst, then add the our, salt and other dry ingredients.
Whisk until smooth. (TIP: Combine ingredients in a blender.)
2. Strain the batter, to remove any lumps, into a quart size
measuring cup with a spout and let the batter rest at room temperature for 30 minutes.
3. Turn on the crepe maker and adjust level to 3 through 5. Melt the butter and use a pastry
brush to put a coating to the cooking plate before pouring. Pour batter onto crepe maker
and spread batter around the surface evenly. Cook for 3-5 minutes on each side.
4. Transfer the crepe to a cooling rack. Proceed with the remaining batter. Once cool, stack
the crepes between sheets of waxed paper.
¾ cup milk
2 eggs
¾ cup unbleached all-purpose our
2 tbsp unsweetened Dutch process cocoa powder
RED VELVET CREPES yields about 8 (12-inch crepes)
1. Combine all wet ingredients rst, then add the our, salt and other dry ingredients.
Whisk until smooth. (TIP: Combine ingredients in a blender.)
2. Strain the batter, to remove any lumps, into a quart size
measuring cup with a spout and let the batter rest at room temperature for 30 minutes.
3. Turn on the crepe maker and adjust level to 3 through 5. Melt the butter and use a pastry
brush to put a coating to the cooking plate before pouring. Pour batter onto crepe maker
and spread batter around the surface evenly. Cook for 3-5 minutes on each side.
4. Transfer the crepe to a cooling rack. Proceed with the remaining batter. Once cool, stack
the crepes between sheets of waxed paper.
2 eggs
1 cup milk
½ cup water
pinch of salt
1 tsp sugar
dash of vanilla extract
1 cup all-purpose our
½ tsp vanilla
¼ tsp salt
melted butter, for brushing the pan
2 tbsp granulated sugar
1 ½ tbsp cocoa powder
red food color
melted butter, for brushing the pan
BASIC SAVORY CREPES yields about 8 (12-inch crepes)
1. Begin by combining the eggs, our, milk, water, melted butter, parsley, basil, red pepper
akes, salt and pepper in a medium mixing bowl.
2. Whisk the ingredients until well blended, then add lemon zest and mix until combined.
3. Turn on the crepe maker and adjust level to 3 through 5. Melt the butter and use a pastry
brush to put a coating to the cooking plate before pouring. Pour batter onto crepe maker
and spread around the surface evenly. Cook for 3-5 minutes on each side.
4. Transfer the crepe to a cooling rack. Proceed with the remaining batter. Once cool, stack
the crepes between sheets of waxed paper.
5. Serve with desired savory lling or topping such as cheese, ham, mushrooms or spinach.
3 large eggs
1 cup all-purpose our
2/3 cup milk
2/3 cup water
3 tbsp melted butter
1 tbsp chopped fresh parsley
¼ tsp dry basil
¼ tsp red pepper akes
¼ tsp salt
1/8 tsp pepper
zest of one lemon

8 Questions? We’re here to help!
Visit: shopelitegourmet.com for support on this product.
RECIPES- Sweet Fillings & Toppings
BLUEBERRY BLINTZES
1. Combine ricotta, cream cheese, confectioners’ sugar, lemon zest and egg. Blend until
smooth then chill lling to rm it up so that it doesn’t spill out of the crepes.
2. Spoon about ¼ cup of the cheese lling along the lower third of the crepe.
3. Fold the bottom edge away from you to just cover the lling, then fold the 2 sides in
towards the center. Roll the crepe away from you a couple of times nishing with the
seam side down. Put on a plate seam side down until all your blintzes are done.
4. Then in a skillet over medium heat, brush with melted butter and pan-fry the blintzes a
few at a time until they brown and crisp quickly. Drain on paper towel and serve hot.
1 batch crepes (about 10)
1 ½ cups ricotta cheese
4 oz cream cheese
BLUEBERRY SAUCE
1. Combine the butter, blueberries, sugar, cornstarch and lemon juice in a small pot over
medium-high heat.
2. Bring up to a low boil and stir gently until the berries break down and release their juice.
The consistency should remain a bit chunky. As it cools down slightly, it will thicken up.
2 tbsp butter
2 pints blueberries, cleaned
¾ cups sugar
1 tsp sugar
1 tsp cornstarch
juice of 1 lemon
3 tbsp confectioner’s sugar
1 lemon, zested or nely grated
1 egg
BASIC SWEET CREAM CHEESE FILLING
1. Place cream cheese and sugar in a small bowl. With a handheld electric mixer, beat
on medium speed until creamed. Add lemon juice and continue beating until lling is
smooth and creamy.
2. Fold, roll or wrap lling into premade crepes.
3. Top with desired sauces such as berries, chocolate or other sweet toppings.
1 cup heavy whipping cream
8 oz cream cheese, softened
2 cups powdered sugar
½ tsp vanilla extract
½ tsp almond extract
SWEET MIXED BERRY SAUCE FILLING
1. Place all sauce ingredients in a medium saucepan.
2. Bring to a simmer over medium-high heat, then reduce to low and let simmer, stirring
occasionally until sauce is reduced and slightly thickened.
3. Remove from heat and set aside to cool before serving.
1 cup fresh or frozen raspberries
1 cup fresh or frozen blueberries
1 cup fresh or frozen sliced strawberries
½ cup sugar
½ cup water
¼ tsp ground cinnamon

9
Questions? We’re here to help!
Visit: shopelitegourmet.com for support on this product.
RECIPES- Sweet Fillings & Toppings
APPLE PIE FILLING OR TOPPING
1. Chop apples into small cubes, place cubed apple slices in a medium bowl, add brown
sugar and cinnamon, and toss everything together to coat chopped apples with brown
sugar and cinnamon. Let the juices do their work for about 20 minutes.
2. Right before serving, heat chopped apples on medium heat in a skillet, and warm the
premade crepes in a microwave for about 20 seconds. To serve, add chopped apples on
top of the open crepe. Fold, roll or wrap the crepes.
3. Sprinkle with powdered sugar right before serving, if desired.
3 large apples, cored and peeled
3 tbsp brown sugar
1 tsp cinnamon
BANANA FOSTERS FILLING OR TOPPING
1. In a pan or skillet, combine butter, sugar, and cinnamon. Cook over low heat, stirring
occasionally, until sugar dissolves.
2. Stir in liqueur and add banana slices; continue to cook until bananas soften.
3. Slowly add rum and cook until heated through.
4. Using a lighter, stand back and carefully light the rum. Shake the pan until the ames
subside. Remove from heat.
5. Let cool for a minute and serve with premade crepes.
6. Serve with whipped cream or vanilla ice cream.
4 tbsp butter
1 cup brown sugar
½ tsp cinnamon
¼ cup banana liqueur
4 bananas, sliced into 1/4-inch rounds
¼ cup dark rum (if desired)
3 tbsp confectioner’s sugar
1 lemon, zested or nely grated
1 egg
PEACHES & CREAM FILLING OR TOPPING
1. Melt the butter in a large skillet. Add the sugar and stir to combine, then add in the
peaches.
2. Cook until the peaches start to get soft and give up some of their juices and a syrupy
sauce is created, a few minutes. Turn the heat off and stir in the almond extract.
3. Best served over premade crepes wrapped with cream cheese lling.
¼ cup butter
1 cup brown sugar
6 cups peeled, sliced peaches
½ tsp almond extract

10 Questions? We’re here to help!
Visit: shopelitegourmet.com for support on this product.
RECIPES- Savory Fillings & Toppings
CHICKEN, MUSHROOM & SWISS FILLING
(Best served with Basic Savory Crepe or Whole Wheat Crepe Recipe)
1. In a pan, sauté the mushrooms with olive oil. Sprinkle with salt and pepper. Cook for 5
minutes until softened, browned Strain any liquids the mushrooms may have produced.
2. Add shredded chicken and thyme to the mushroom and heat for 3-minutes.
3. Set your Crepe Maker to low-medium setting. Working with one premade crepe at time
lay it at on the crepe maker.
4. Lay a few slices of swiss cheese on one quarter (basically make a triangle) of the crepe.
Layer on the chicken and mushroom lling and then top with more slices of cheese.
5. Fold over the bottom of the crepe and then fold it over again to make a triangle. Cook for
about 2-3 minutes, then ip and cook another 2-3 minutes or until the cheese is melted.
1 cup sliced mushrooms
1 tbsp olive oil
1-2 cup cooked shredded chicken
SPINACH ARTICHOKE & BRIE FILLING
1. Heat a skillet over medium heat and add in 1 tbsp. of olive oil and garlic.
2. Add the salt, pepper and crushed red pepper if using, cook for 2 minutes.
3. Stir in spinach and artichokes, cooking for 5-6 minutes until spinach is fully wilted.
4. Reduce heat to low and stir in parmesan cheese. Turn off heat and remove from skillet.
5. Set your Crepe Maker to low-medium setting. Working with one premade crepe at time
lay it at on the crepe maker.
6. Lay a few slices of brie on one quarter (basically make a triangle) of the crepe. Layer on
the spinach and artichoke lling and then top with a few more slices of brie.
7. Fold over the bottom of the crepe and then fold it over again to make a triangle. Cook for
about 2-3 minutes, then ip and cook another 2-3 minutes or until brie is melted.
8. Repeat with remaining crepes until the brie and lling are gone.
2 tbsp olive oil
2 cloves garlic minced
¼ tsp salt
½ tsp pepper
1 oz bag fresh spinach
1 oz jar marinated artichoke
hearts drained and chopped
½ tbsp freshly chopped thyme
6 slices of swiss cheese, sliced into strips
salt & pepper
FRESH MUSHROOM FILLING
(Best served with Basic Savory Crepe or Whole Wheat Crepe Recipe)
1. Slice mushrooms and sauté in melted butter in a skillet for about 4 minutes. Add salt,
pepper, seasoned salt, bouillon and wine. Cook over medium heat several minutes.
2. Stir in sour cream and chives. Heat, but do not boil.
3. Spoon about 4 tablespoons of mushrooms and sauce onto center of crepes, browned
side out and fold over.
1 lb fresh mushrooms
¼ cup butter
½ tsp salt
¼ tsp pepper
½ tsp seasoned salt
2 cubes beef bouillon
¼ cup parmesan cheese freshly
grated
1 oz brie wheel sliced into slices
½ tsp crushed red pepper optional
4 tbsp dry white wine
1 cup sour cream
2 tbsp minced chives

11
Questions? We’re here to help!
Visit: shopelitegourmet.com for support on this product.
RECIPES- Savory Fillings & Toppings
SHRIMP, MUSHROOM, ASPARAGUS WITH A TARRAGON CREAM SAUCE
(Best served with Basic Savory Crepe or Whole Wheat Crepe Recipe)
1. Cut asparagus into small spears; blanch for 2 min in boiling salted water.
2. Add 1 oz of olive oil to hot pan, add mushrooms, sauté for 1 min, add garlic and nutmeg,
butter and white wine, sauté for another 2 min, add salt and pepper.
3. Put juice of lemon on shrimp, add salt and pepper, sauté in hot pan till shrimp is cooked
through. Add asparagus and mushrooms to shrimp, let mixture cool. Roll crepes with
shrimp mixture and place each roll into an oven-safe baking dish. Bake all the rolled
crepes at 350°F for 5-8 minutes. Top with Tarragon Cream Sauce right before serving.
4. CREAM SAUCE DIRECTIONS: Sauté Garlic in Olive Oil till translucent, add white wine and
reduce by ½, add cream and Reduce by 1/3, add fresh Tarragon, and salt and pepper to
taste.
13 – 15 shrimp; peeled and deveined
1 bunch of green asparagus
½ lb assorted mushrooms; nely sliced
2 cloves garlic; nely chopped
salt and pepper to taste
MONTE CRISTO FILLING
(Best served with Basic Savory Crepe or Whole Wheat Crepe Recipe)
1. Set your Crepe Maker to low-medium setting. Working with one premade crepe at time
lay it at on the crepe maker.
2. Assemble the crepes by placing 1 slice of cheese, 1 slice of ham and 1 slice of turkey on
each premade crepe.
3. Roll the crepe and heat for about 2-3 minutes until the cheese is melted through.
4. Serve the lled crepes sprinkled with powdered sugar and drizzle with raspberry jam.
12 slices deli-sliced ham (about 8 oz)
12 slices deli-sliced turkey (about 8 oz)
12 slices swiss or muenster cheese (about 4 oz)
¼ cup raspberry jam
powdered sugar
2 oz olive oil
1 lemon juiced
pinch of nutmeg
1 oz white wine
2 oz butter
Tarragon Cream Sauce
2 garlic cloves minced
½ cup white wine
¾ cup 35% cream
½ oz olive oil
salt and pepper
3 tsp fresh tarragon
TURKEY PESTO FILLING
(Best served with Basic Savory Crepe or Whole Wheat Crepe Recipe)
1. Set your Crepe Maker to low-medium setting. Working with one premade crepe at time
lay it at on the crepe maker.
2. Assemble the crepes by spreading a thin layer of pesto sauce over the crepe. Place 1 slice
of cheese, 1 slice of turkey and chopped tomato over the pesto sauce on each premade
crepe.
3. Roll or fold the crepe and heat for about 2-3 minutes until the cheese is melted through.
1 lb sliced turkey
1 lb shredded mozzarella cheese
2 roma tomatoes, diced
2/3 cup pesto

12 Questions? We’re here to help!
Visit: shopelitegourmet.com for support on this product.
RECIPES- Savory Fillings & Toppings
SPRING VEGETABLE FILLING
(Best served with Basic Savory Crepe or Whole Wheat Crepe Recipe)
1. Stir sour cream, ¼ cup chives, milk, lemon juice and ¼ teaspoon salt in a small bowl until
combined. Set aside.
2. Heat oil in a large nonstick skillet over medium-high heat. Add zucchini, green beans and
corn and cook, stirring, until beginning to brown, 6 to 8 minutes.
3. Reduce heat to low; stir in ricotta, Monterey Jack, the remaining ¼ cup chives, the
remaining ½ teaspoon salt and pepper.
4. Cook, stirring gently, until the cheese is melted, 1 to 2 minutes. Remove from the heat.
5. Set your Crepe Maker to low-medium setting. Working with one premade crepe at time
lay it at on the crepe maker.
6. Assemble the crepes by placing vegetable mixture onto each premade crepe.
7. Roll or fold the crepe and heat for about 2-3 minutes.
8. Repeat with the remaining crepes and lling.
9. Serve each crepe with 2 tablespoons of the reserved sauce and more chives, if desired.
1/3 cup reduced-fat sour cream
½ cup chopped fresh chives, divided, plus
more for garnish
3 tbsp low-fat milk
2 tsp lemon juice
¾ tsp salt, divided
1 tbsp extra-virgin olive oil
2 cups chopped zucchini
1¼ cups chopped green beans
1 cup fresh corn kernels
1 cup part-skim ricotta cheese
½ cup shredded Monterey Jack cheese
¼ tsp freshly ground pepper

13
Questions? We’re here to help!
Visit: shopelitegourmet.com for support on this product.
CREPE SERVING TIPS
KEEPING CREPES WARM
If you want to serve crepes, warm without baking, broiling or frying them, cover the
stack of crepes as they are made using a cover made of foil.
FREEZE OR REFRIGERATE YOUR CREPES
Crepes will keep up to a month in the freezer, a week in the refrigerator. Stack a
batch on a sheet or foil or waxed paper, then insert into a large plastic food storage
bag and twist and fasten opening, pressing out as much air as possible. To use the
crepes, allow the crepes to warm up to room temperature. They will peel apart with
a gentle pull. If you are in a hurry, the stack can be warmed by covering them with
foil in a at pan in a low oven.
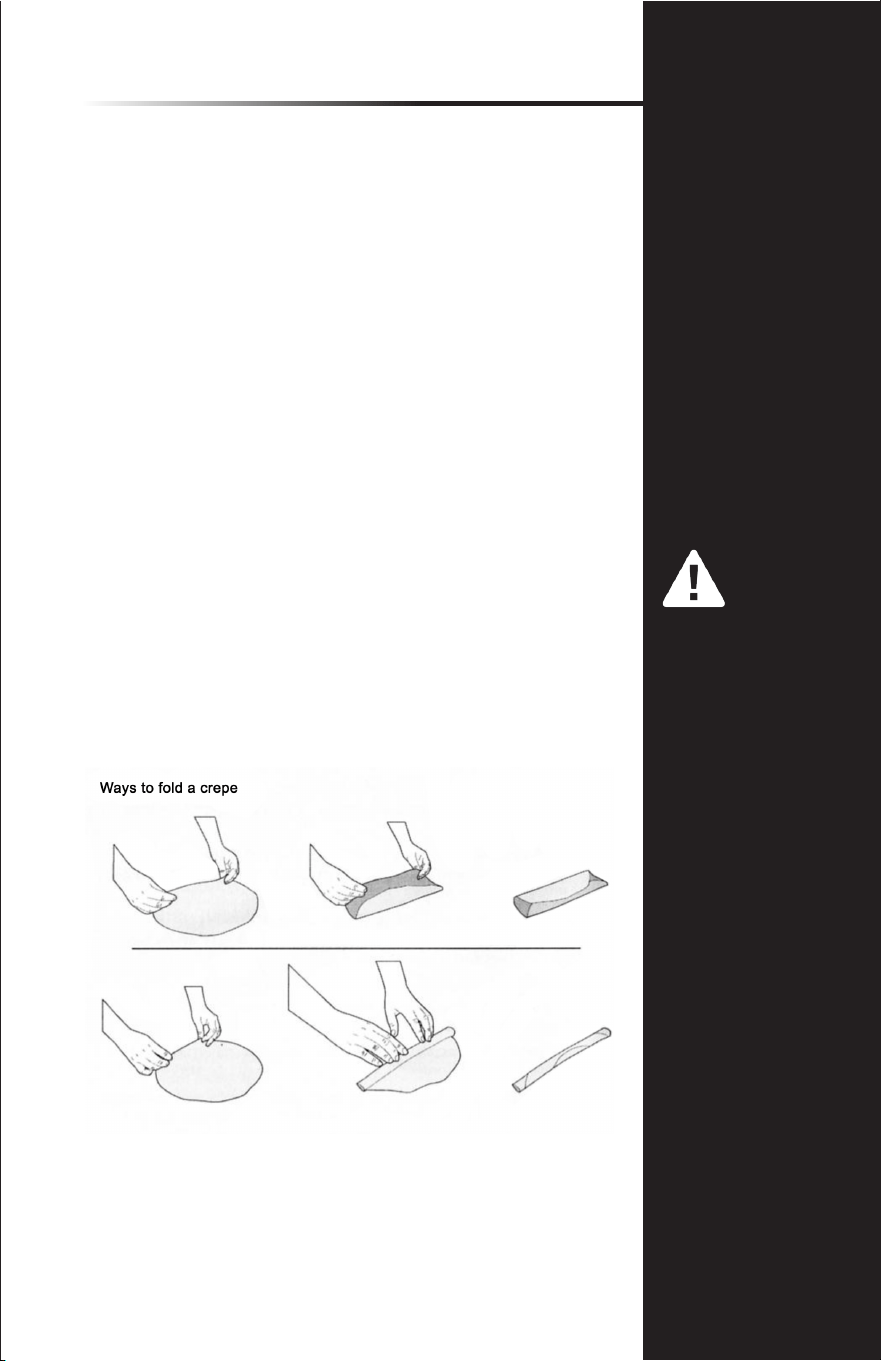
Starting with a pile of at crepes, you can use them in a number of ways,
depending on whether you want a simple crepe or a fancy lled crepe. They can be
served cold, warm or hot, baked, broiled or crisp-fried in oil. Here are some ideas on
handling crepes:
• Fold in quarters: when served plain (or spread with a thin lling) and
served in sauce, or used hot off the pan for dipping in an appetizer dip.
• Rolled: when lled with a few spoonfuls of an entrée or dessert mixture
and quickly baked or broiled, or lled with cold mousse, ice cream or
whipped cream.
• Stacked: to make a cake (gateau) or in a casserole dish, with
appropriate llings and toppings, served hot or cold.
CREATE YOUR OWN FILLINGS
Crepes welcome many kinds of llings. Make up your own lling or try some of
these suggestions:
• Try them hot off the griddle brushed with unsalted butter and jam.
• Fill with hunks of cooked crab meat and ripe avocado.
• Line with a shaved piece of ham and sprinkle with grated cheese. Fold in
half and heat until the cheese melts.
• Spread with cream cheese mixed with dill & chives. Layer some thinly
sliced smoked salmon. Roll and cut into slices.

14 Questions? We’re here to help!
Visit: shopelitegourmet.com for support on this product.
LIMITED WARRANTY* ONE (1) YEAR
WARRANTY IS ONLY VALID WITH A DATED PROOF OF PURCHASE
PLEASE DO NOT RETURN TO STORE OF PURCHASE.
If you have any problems with this unit, contact Customer Service for support.
1. Your small kitchen appliance is warranted to the original purchaser to be free from any
manufacturing defects under normal use and conditions for one (1) year, cord excluded.
This Warranty applies only to the original purchaser of this product.
2. Retail stores/merchants selling this product do not have the right to alter, modify, or in any
way revise the terms and conditions of the warranty.
3. If you use your appliance for household use and according to instructions, it should give
you years of satisfactory service.
4. At its sole discretion, Maxi-Matic USA will either repair or replace the product found to be
defective during the warranty period.
5. The repaired or replacement product will be in warranty for the remaining balance of the
one-year warranty period and an additional one-month period.
6. Consumer’s remorse is not an acceptable reason to return a product to our Service Center.
7. This limited warranty covers appliances purchased and used within the 50 U.S. states plus
the District of Columbia and does NOT cover normal wear of parts or:
- Damages caused by unreasonable use, neglect, normal wear and tear, commercial
use, improper assembly or installation of product.
- Damages caused in shipping.
- Damages caused by replacement or resetting of house fuses or circuit breakers.
- Defects other than manufacturing defects.
- Breakage caused by misuse, abuse, accident, alteration, lack of proper care
and maintenance, or incorrect current or voltage.
- Lost or missing parts of the product. Parts will need to be purchased separately.
- Damages of parts that are not electrical; i.e. cracked or broken plastic/glass,
scratched/dented inner pots.
- Damage from service or repair by unauthorized personnel.
- Extended warranties purchased via a separate company or reseller.
- Acts of nature such as re, oods, hurricanes, tornadoes, etc.
8. This warranty does not apply to re-manufactured merchandise.
Maxi-Matic, USA shall not be liable for any incidental or consequential damages caused by the
breach of any express or implied warranty. Apart from the extent prohibited by applicable law,
any implied warranty of merchantability or tness for a particular purpose is limited in time to
the duration of the warranty.
*One Year Limited Warranty valid only in the 50 U.S. states plus the District of Columbia,
excluding Puerto Rico and the Virgin Islands.
This warranty is effective only if the product is purchased and operated in the USA; product us-
age which is in violation of the written instructions provided with the unit will void this warranty.
For international warranty, please contact the local distributor.
This warranty gives you special legal rights and you may also have other rights to which you are
entitled which may vary by state, province, and/or jurisdiction.
**Any instruction or policy included in this manual may be subject to change at any time.
MAXI-MATIC, USA
18401 E. Arenth Ave. City of Industry, CA 91748
Visit: shopelitegourmet.com for Live Chat Support and Contact Us Form

15
Questions? We’re here to help!
Visit: shopelitegourmet.com for support on this product.
RETURN INSTRUCTIONS
RETURNS:
A. Any return of defective merchandise to the manufacturer must be
processed accordingly by rst contacting customer service (support@
maxi-matic.com) to obtain an RA # (Return Authorization Number). We
will not accept any returns of merchandise without an applicable RA #.
B. IMPORTANT RETURN INSTRUCTIONS. Your Warranty depends on your
following these instructions if you are returning the unit to Maxi-Matic,
USA:
1. Carefully pack the item in its original carton or other suitable
box with sufcient cushioning to avoid damage in shipping.
2. Before packing your unit for return, be sure to enclose:
a) Your name, full address with zip code, daytime telephone
number, and RA#,
b) A dated sales receipt or PROOF OF PURCHASE,
c) The model number of the unit and the problem you
are having (Enclose in an envelope and tape directly to
the unit before the box is sealed,) and
d) Any parts or accessories related to the problem.
3. Maxi-Matic, USA recommends that you ship the package via UPS
ground service for tracking purposes. We cannot assume
responsibility for lost or damaged products returned to us
during incoming shipment. For your protection, always carefully
package the product for shipment and insure it with the carrier.
C.O.D shipments cannot be accepted.
4. All return shipping charges must be prepaid by you.
5. Once your return has been received by our warehouse, Maxi-Matic,
USA will repair or replace the product if it is defective in material or
workmanship, subject to the conditions in paragraph B.
6. Maxi-Matic will pay the shipping charges to ship the repaired or
replacement product back to you.

Elite Customer Service Center
Elite is a registered trademark of Maxi-Matic, USA.
Copyright Elite by Maxi-Matic.
Actual product may vary from the images/illustrations in this manual due to continual product improvement.
Mail:
Website:
Maxi-Matic, USA
18401 E. Arenth Ave
City of Industry, CA
91748-1227
shopelitegourmet.com
Visit our website for Live Chat Support
& Contact Us Form
Register your product online
elitebymaximatic @elite_by_maximatic
We take pride in the fact that Elite Gourmet products are continuously
improving. To keep you well informed of these changes and to reduce
paper consumption, we’ve included this QR code for you to scan and
easily download the most recent updates to your product to your
mobile device.
It’s simple, just access your camera, point at the QR code & your mobile
device will do the rest.
MODEL: ECP-126
