INSTALLATION GUIDE
US CA
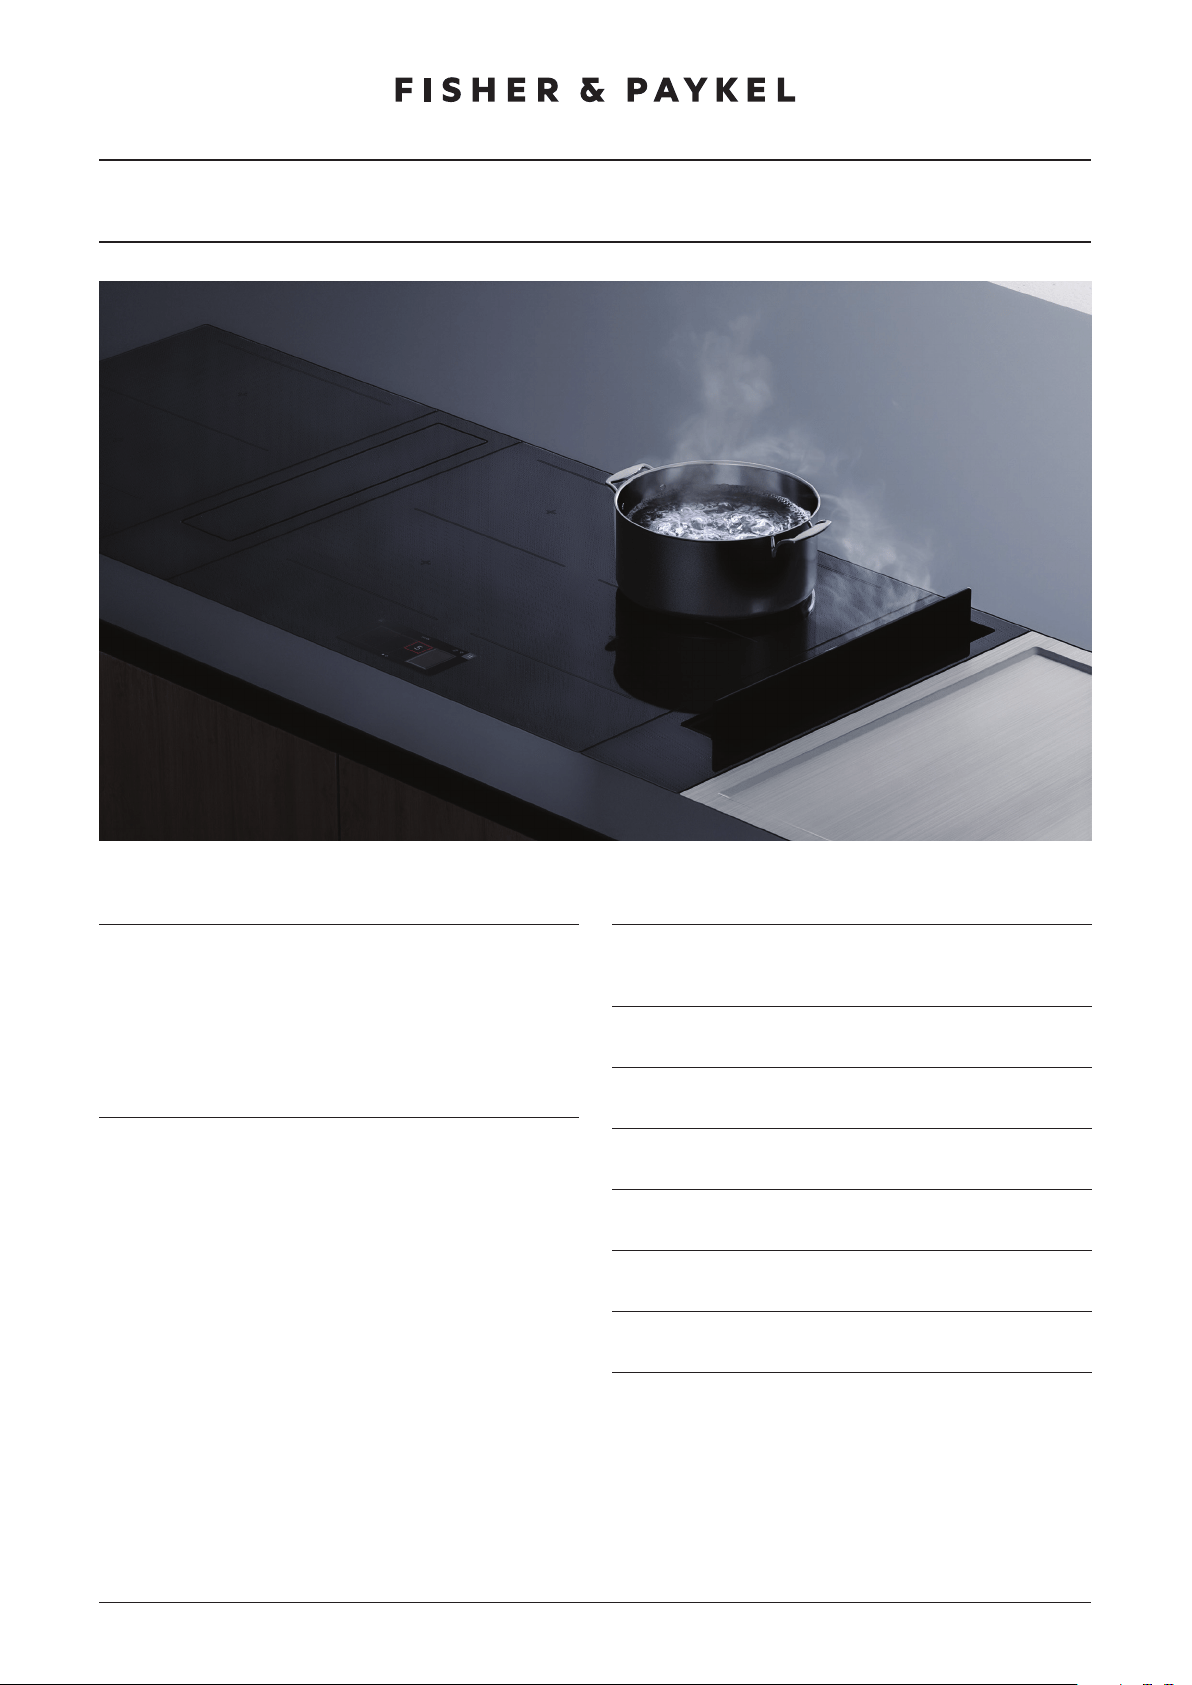
MODULAR COOKTOP
FLUSH AND PROUD INSTALLATION
MULTIPLE PRODUCT WITH DOWNDRAFT VENTILATION
CI365DTTB1, CI304DTTB1, CI244DTTB1, CI152DTTB1, CI152DB1,
CI122DB1, CIT122DX1, CIT152DX1, CD5DB1 models

2
!
WARNING!
Electric Shock Hazard
Failure to follow this advice may result in
electric shock or death.
• Do not cook on a broken or cracked cooktop.
If the cooktop surface should break or crack,
switch the appliance off immediately at the
mains power supply (wall switch) and contact a
qualified technician.
• Switch the cooktop off at the wall before
cleaning maintenance.
!
WARNING!
Fire Hazard
Failure to follow this advice may result in
serious burns or death.
• Unattended cooking on a hob with fat or oil can
be dangerous and may result in fire.
• NEVER try to extinguish a fire with water, but
switch off the appliance and cover flame, eg with
a lid or fire blanket, or use dry chemical or foam-
type extinguisher.
• Do not store items on cooking surfaces.
!
WARNING!
Cut Hazard
Failure to use caution could result in injury.
• The razor-sharp blade of a cooktop scraper is
exposed when the safety cover is retracted. Use
with extreme care and always store safely and out
of reach of children.
SAFETY AND WARNINGS
3
SAFETY AND WARNINGS
WARNING!
Hot Surface Hazard
Failure to follow this advice may result
in death.
• DO NOT TOUCH SURFACE UNITS OR AREAS
NEAR UNITS – Surface units may be hot even
though they are dark in color.
• During use, accessible parts of this appliance
will become hot enough to cause burns.
• Do not let body, clothing or any item other
than suitable cookware contact with the
ceramic glass until the surface is cool.
• Never leave metal objects (such as kitchen
utensils) or empty pans on the cooktop as
they can become hot very quickly.
• Beware: magnetisable metal objects worn on
the body may become hot in the vicinity of
the cooktop. Gold or silver jewellery will not
be affected.
• Keep children away.
• Handles of saucepans may be hot to touch.
Check saucepan handles do not overhang
other cooking zones that are on. Keep
handles out of reach of children.
• Failure to follow this advice could result in
burns and scalds.

4
READ AND SAVE THIS GUIDE
To reduce the risk of fire, injury to persons or damage when using the appliance,
follow the important safety instructions listed below. Read all the guidance before
using the appliance. Ensure your appliance is properly installed and grounded by a
qualified technician.
General Use
z
Never leave the appliance unattended when in use. Boilover causes smoking and greasy
spillovers that may ignite.
z
Never use your appliance as a work or storage surface.
z
Wear proper apparel — Loose-fitting or hanging garments should never be worn while
using the appliance.
z
Do not leave any magnetic item, e.g. cutlery, roast dish, etc. on your cooktop, including
the cooking zones and user interface.
z
Do not place or leave any magnetisable objects (eg credit cards, memory cards) or
electronic devices (eg computers, MP3 players) near the appliance, as they may be
affected by its electromagnetic field.
z
We recommend using plastic or wooden kitchen utensils for cooking with your
induction cooktop.
z
Storage in or on appliance — Flammable materials should not be stored in an oven or
near surface units.
z
Do not place metallic objects such as knives, forks, spoons and lids on the cooktop
surface since they can get hot.
z
Do not place or leave aluminium foil on the cooktop.
z
Never use your appliance for warming or heating the room.
z
Do not use water on grease fires – Smother fire or flame or use dry chemical or
foam-type extinguisher.
z
Use only dry potholders — Moist or damp potholders on hot surfaces may result in
burns from steam. Do not let potholder touch hot heating elements. Do not use a towel
or other bulky cloth.
!
WARNING!
Health Hazard
Failure to follow this advice may result in
death.
• This appliance complies with electromagnetic
safety standards. However, persons with cardiac
pacemakers or other electrical implants (such as
insulin pumps) must consult with their doctor or
implant manufacturer before using this appliance
to make sure that their implants will not be
affected by the electromagnetic field.
SAFETY AND WARNINGS

5
z
Use proper pan size — This appliance is equipped with one or more surface units of
different size. Always place small pans in the centre of the cooking zone. Select utensils
having flat bottoms large enough to cover the surface unit heating element. The use
of undersized utensils will expose a portion of the heating element to direct contact
and may result in ignition of clothing. Proper relationship of utensil to burner will also
improve efficiency.
z
After use, always turn off the cooking zones and the cooktop as described in this guide
(ie by using the touch controls). Do not rely on the pan detection feature to turn off the
cooking zones when you remove the pans.
z
Do not use a steam cleaner to clean your cooktop.
z
Do not place or drop heavy objects on your cooktop.
z
Do not stand on your cooktop.
z
Do not use pans with jagged edges or drag pans across the ceramic glass surface as this
can scratch the glass.
z
Do not use scourers or any other harsh/abrasive cleaning agents to clean your cooktop,
as these can scratch the ceramic glass.
z
Do not operate your cooktop by means of an external timer or separate remote-
control system.
z
Do not cook on broken cooktop — If cooktop should break, cleaning solutions and
spillovers may penetrate the broken cooktop and create a risk of electric shock. Contact
a qualified technician immediately.
Child Safety
z
Do not allow children to play with the appliance or sit, stand, or climb on it.
z
Do not store items of interest to children in cabinets above the appliance. Children
climbing on the cooktop could be seriously injured.
z
Do not leave children alone or unattended in the area where the appliance is in
use. Children of less than 8 years old must be kept away from the appliance unless
continuously supervised. This appliance can be used by children aged from 8 years and
above, and persons with reduced physical, sensory or mental capabilities or lack of
experience and knowledge, if they have been given supervision or instruction concerning
the use of the appliance in a safe way and they understand the hazards involved.
Cleaning and user maintenance shall not be done by children without supervision.
Cleaning
z
Clean cooktop with caution — If a wet sponge or cloth is used to wipe spills on a hot
cooking area, be careful to avoid steam burn. Some cleaners can produce noxious fumes
if applied to a hot surface.
Servicing
z
Do not repair or replace any part of the appliance unless specifically recommended in
the user guide. All other servicing should be undertaken be a Fisher & Paykel trained
and supported service technician or qualified person.
z
If the power supply cable is damaged, it must only be replaced by a qualified technician.
z
If the appliance is malfunctioning, then contact your Authorized Service Center
or Customer Care to arrange for service. Do not use your appliance until it has
been repaired by a Fisher & Paykel trained and supported service technician or
qualified person.
z
CAUTION: The cooking process has to be supervised. A short term cooking process has
to be supervised continuously.
SAFETY AND WARNINGS

6
Standard Requirements
z
This induction cooktop generates and uses ISM frequency energy that heats cookware
by using an electromagnetic field. It has been tested and complies with Part 18 of the
FCC Rules for ISM equipment. This induction cooktop meets the FCC requirements to
minimize interference with other devices in residential installation. Induction cooktops
may cause interference with television or radio reception. If interference occurs, the
user should try to correct the interference by:
z
Relocating the receiving antenna of the radio or television
z
Increasing the distance between the cooktop and the receiver
z
Connecting the receiver into an outlet different than the receiver.
SAFETY AND WARNINGS
All imagery shown in this guide is representative. Your product may differ.
Both flush and proud installations are possible. Refer to the planning guide for details.

7
COMPONENTS REQUIRED
F Backing plate
F Outlet to suit 2.25" x 12" metal
ducting*
F Nuts
F Washers
F Shims (6)
F T spacer (2)
F Securing brackets (4)
F Clamp screws (4)
F External blower
F Ducting*
F Silicone gun
F Phillips screwdriver
F Level
F Box cutter
F Router
F Hex key
F Spanner
F Masking tape
F Duct tape
F Black installations:
Black, matte finish silicone rated
to 210°F (100°C) or above**
F Grey installations:
Grey, matte finish silicone rated
to 210°F (100°C) or above***
Supplied: Downdraft Ventilation
Not supplied
*Ducting must be purchased separately. Downdraft outlet and external blower are designed
for 2.25" x 12" metal ducting. Optional accessories to allow for 3.25" x 12" metal ducting is
available to purchase separately via fisherpaykel.com (models: OAD325X12, OAB325X12).
**Recommendation: Maxisil N30 Matte Black | ***Recommendation: Maxisil A13 Anthracite
F Communication cable (1)
F Shims (6)
F T spacer (2)
F Securing brackets (4)
F Clamp screws (4)
F Joiner kit (supplied with auxiliary
modules only)
Supplied: Induction Cooktop and Teppanyaki
8
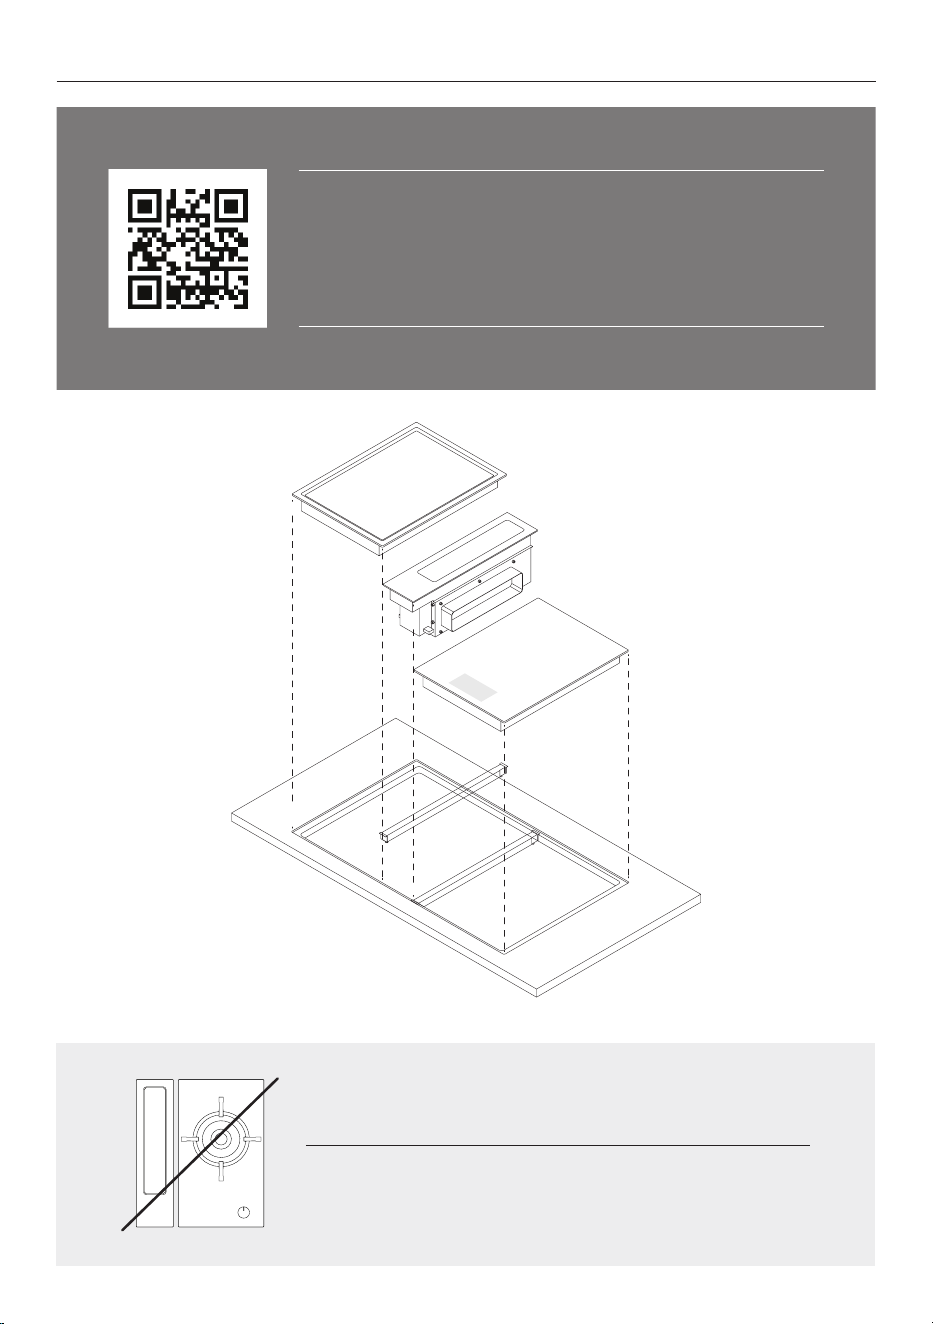
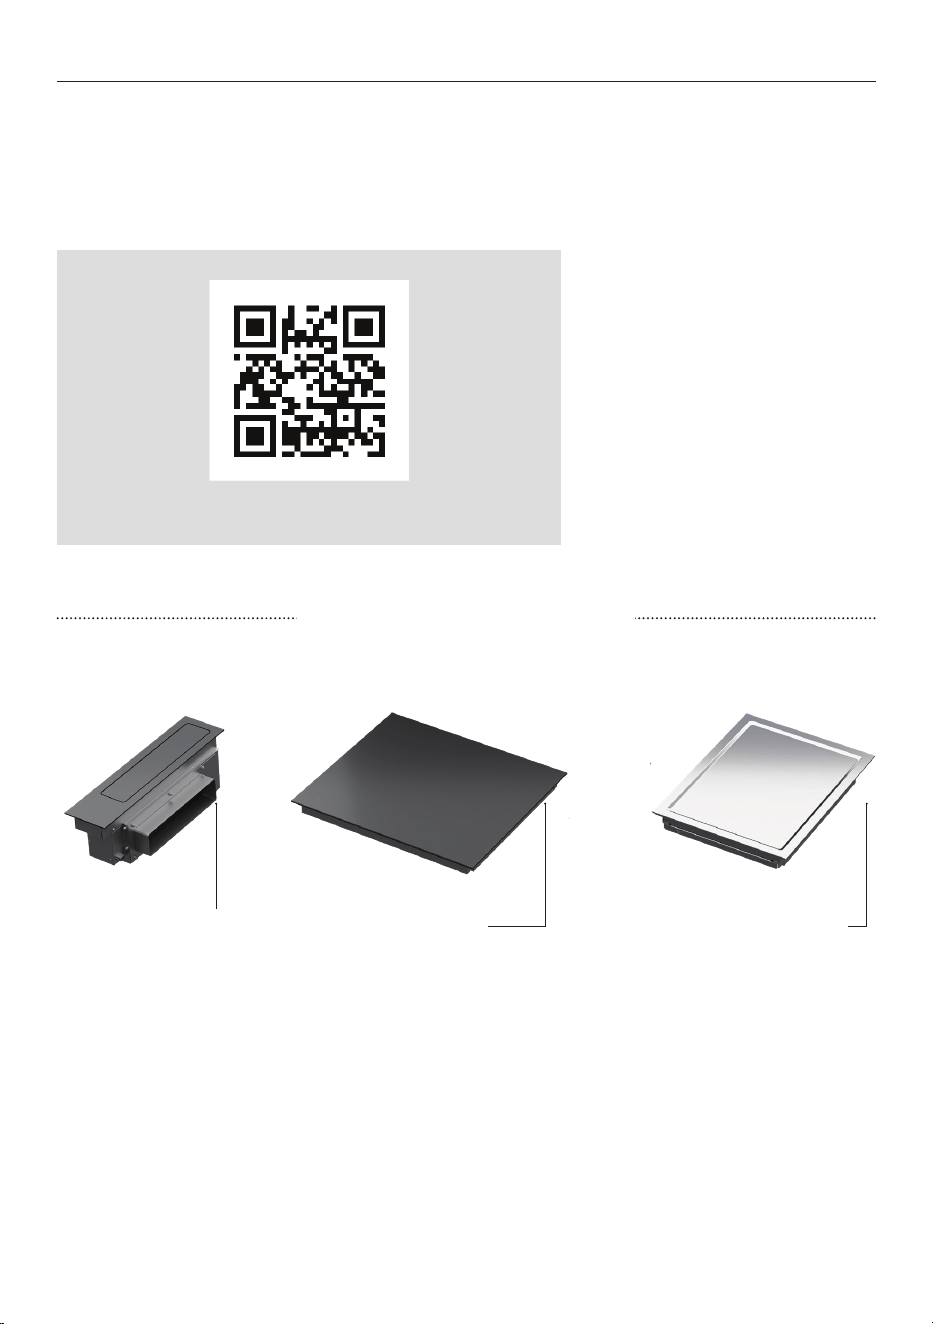
ACCESSING YOUR PRODUCT SPECIFICATIONS
For full product, cabinetry and service specifications, refer
to the Planning Guide. To access the Planning Guide, scan
the QR code or visit fisherpaykel.com/specify. Search by
appliance type, product name or model code.
IMPORTANT NOTE
Modular Ventilation cannot be used alongside a gas cooktop.
Refer to the planning guide for more information.

9
CHECK CLEARANCES
A
A
B
C D
E
F
CABINETRY CLEARANCE DIMENSIONS
INDUCTION AND
TEPPANYAKI MODELS
IN MM
A Minimum clearance from side edges of cutout to nearest combustible surface
1 3/16
29
B Minimum clearance from rear edge of cutout to nearest combustible surface 7/ 8 21
C Minimum clearance from countertop to:
Overhead cabinet centered above the cooktop (unprotected)
Overhead cabinet centered above the cooktop (protected)
Range hood
24
610
D Minimum clearance from countertop to overhead cabinet not directly above cooktop
18
457
E Maximum depth of overhead cabinetry 13 330
F Minimum distance between overhead cabinets (not centered above cooktop) combined cooktop width
IMPORTANT NOTE
Ensure clearances are achieved for the product with the greater clearance requirements.

10
PRIOR TO INSTALLATION
2. Create a 22 7/16" x 15 3/8"
(570 x 390mm) cutout in
the base of the cavity for the
external blower.
Ensure cutout is oriented
correctly for selected ducting
option*.
1. Ensure cabinetry and
servicing specifications have
been met and clearances have
been considered.
Refer to the Planning Guide for
details.
fisherpaykel.com/specify
22 7/16" (570mm)
15 3/8" (390mm)
*Ducting must be purchased separately. Downdraft outlet and external blower are designed
for 2.25" x 12" metal ducting. An optional accessory to allow for 3.25" x 12" metal ducting is
available to purchase separately via fisherpaykel.com (models: OAD325X12, OAB325X12).

11
1. Ensure all products and
accessories are present.
UNPACK ALL PRODUCTS
2. Carefully remove products
from cartons. Set aside on a
protected surface.
Dispose of packaging
responsibly.
3. Test electrical connections of
all products before proceeding
with installation.
12
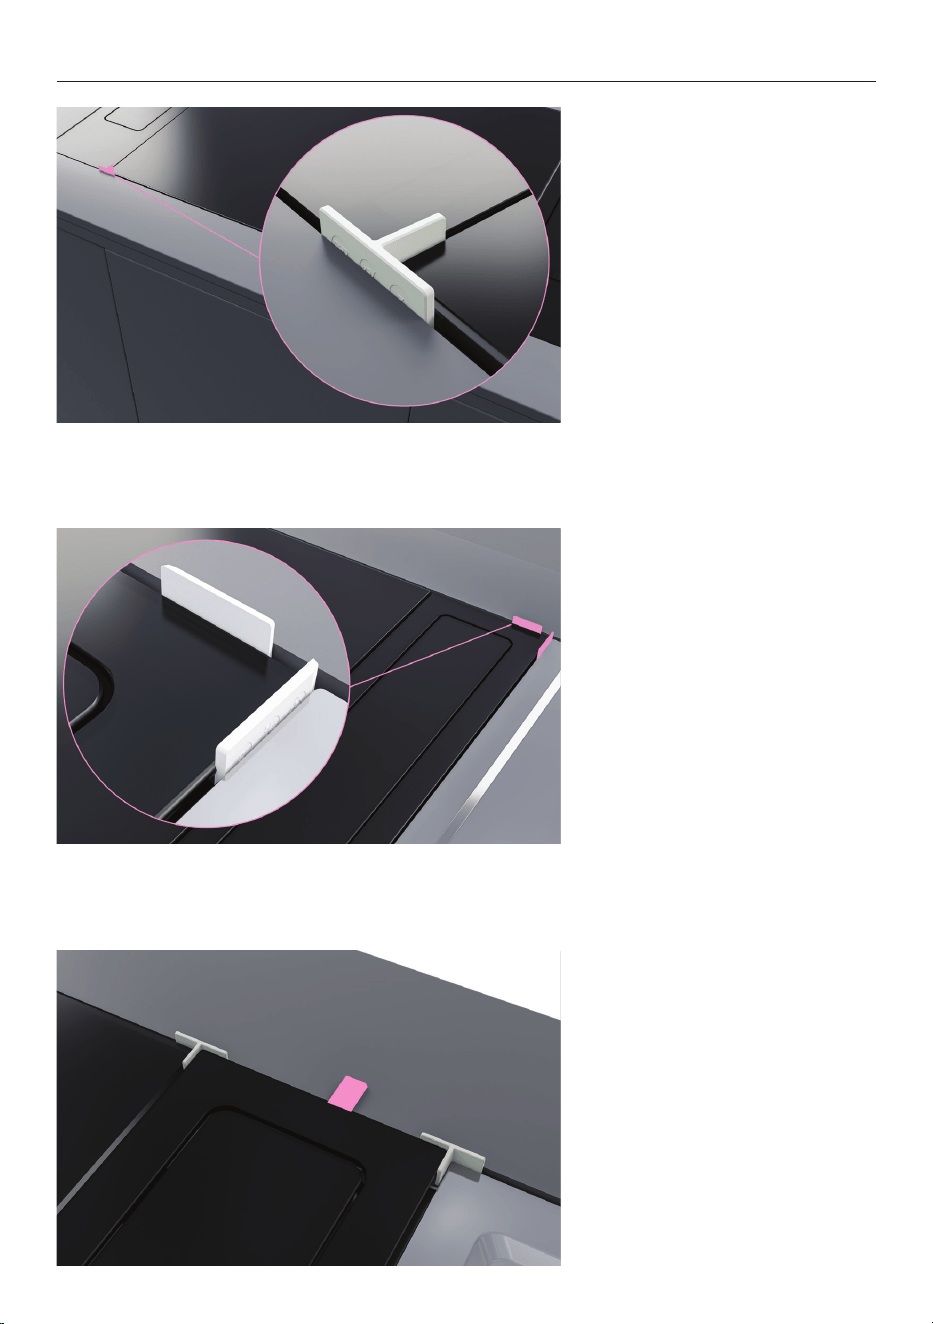
PREPARE PRODUCTS
1. Remove foam tape backing
before attaching the downdraft
outlet and backing plate using
the supplied nuts and washers.
Ensure ducting orientation has
been considered.
2. If required, lift the inner box
out of the chassis. Remove
both downdraft alignment
guides and refit on the
opposite side.
Ensure the grease filter faces
the outlet.
13
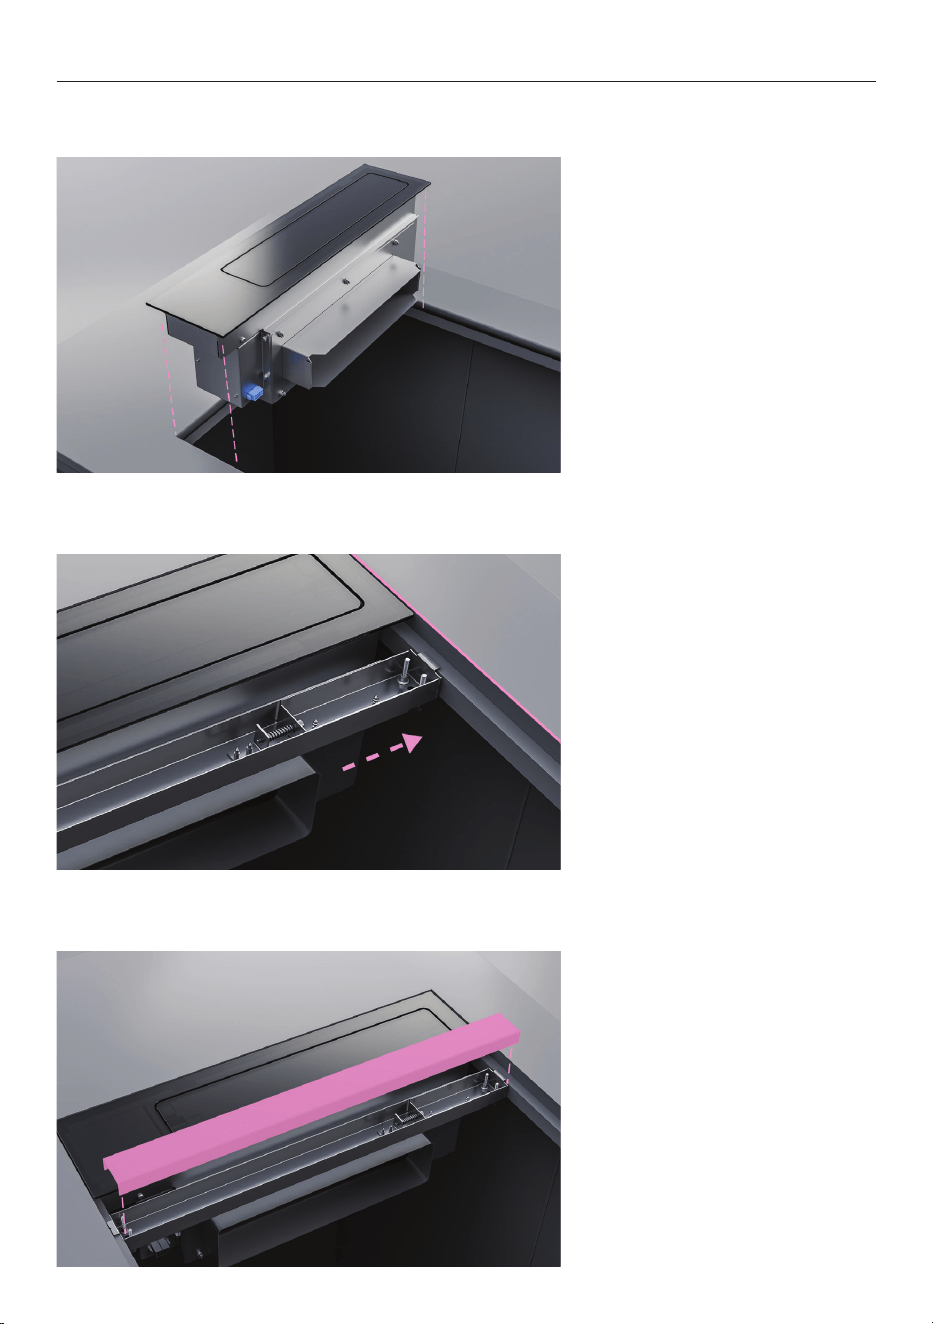
INSTALL IN CUTOUT
1. Gently lower the first product
into the cutout. If a downdraft
unit is being installed at
the edge of the cutout, we
recommend installing this first.
2. Align the rear of the joining
bracket to the back edge of the
cutout and slot into place..
3. Fit cover onto joining bracket
before sliding it under the
adjacent product.
Note: both flush and proud installations are possible. Refer to the planning guide for details.

14
4. Gently lower additional
products and joining strips into
cutout as required.
INSTALL IN CUTOUT
15
ALIGN PRODUCTS
1. Slot the T spacers between
the products. Adjust
positioning to ensure even
spacing between products is
achieved.
2. Flush installations:
Place the shims around the
outer edges of the cutout.
Adjust positioning to ensure
even spacing around the
product set is achieved.
3. Place the shims on top of
the product to gauge what
thickness is required to create a
level installation.
Slot the shims under the
products to raise as needed.
16
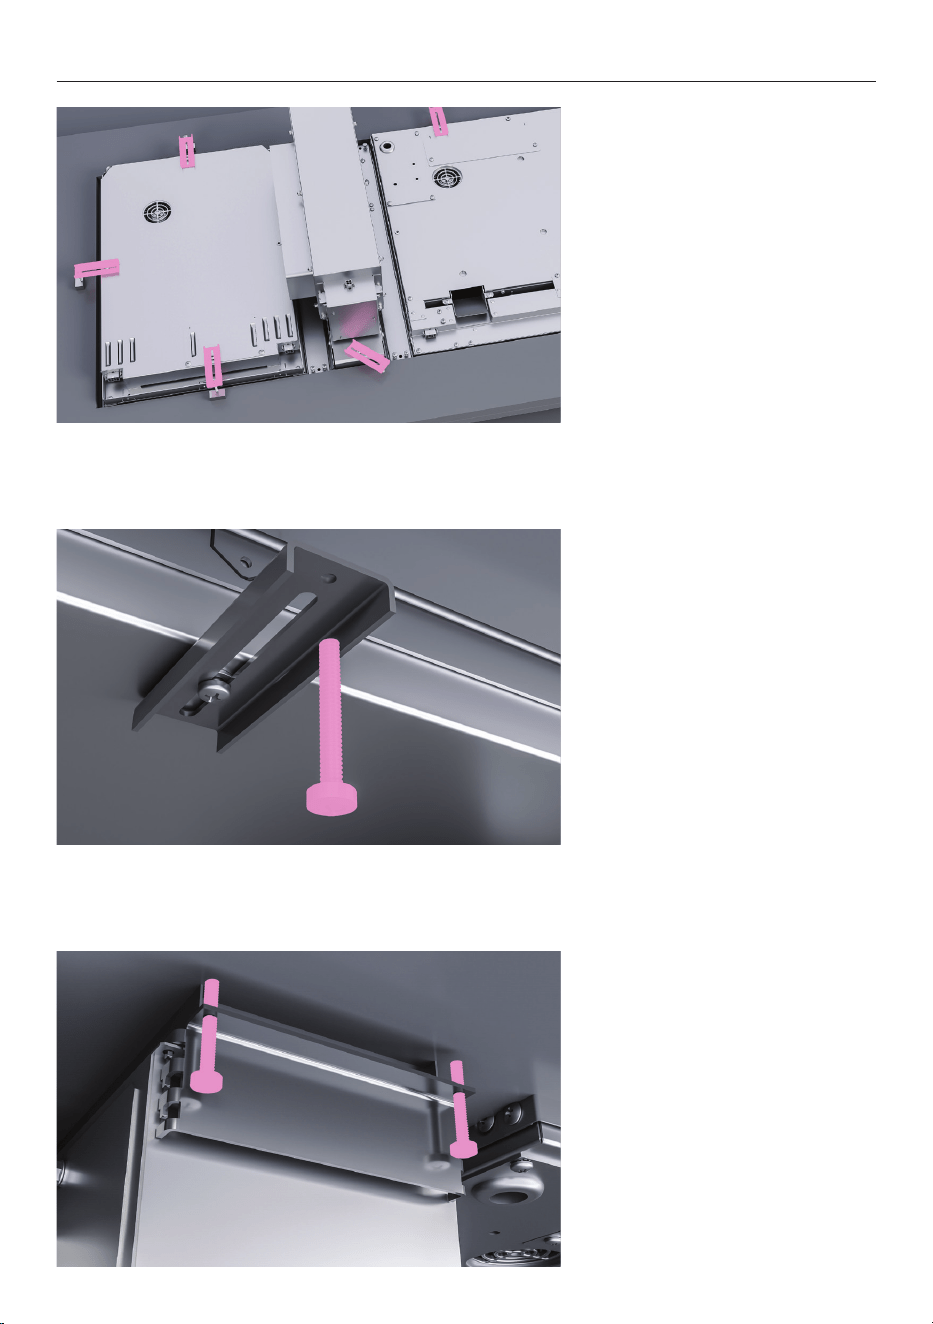
SECURE TO CUTOUT
1. Fit the securing brackets to
the base of each cooktop. A
minimum of two brackets per
cooktop is recommended.
2. Tighten all clamp screws
to secure the cooktops to the
cutout and joiner strips.
3. Tighten the front and rear
clamping bracket screws to
secure the downdraft to the
cutout.
17
CONNECT POWER
Before connecting to the mains power supply check that:
z
The domestic wiring system is suitable for the power drawn by the cooktop.
z
The voltage corresponds to the value given on the rating plate.
z
The power supply cable sections can withstand the load specified on the rating plate.
Refer to the Planning Guide for
full service information.
fisherpaykel.com/specify
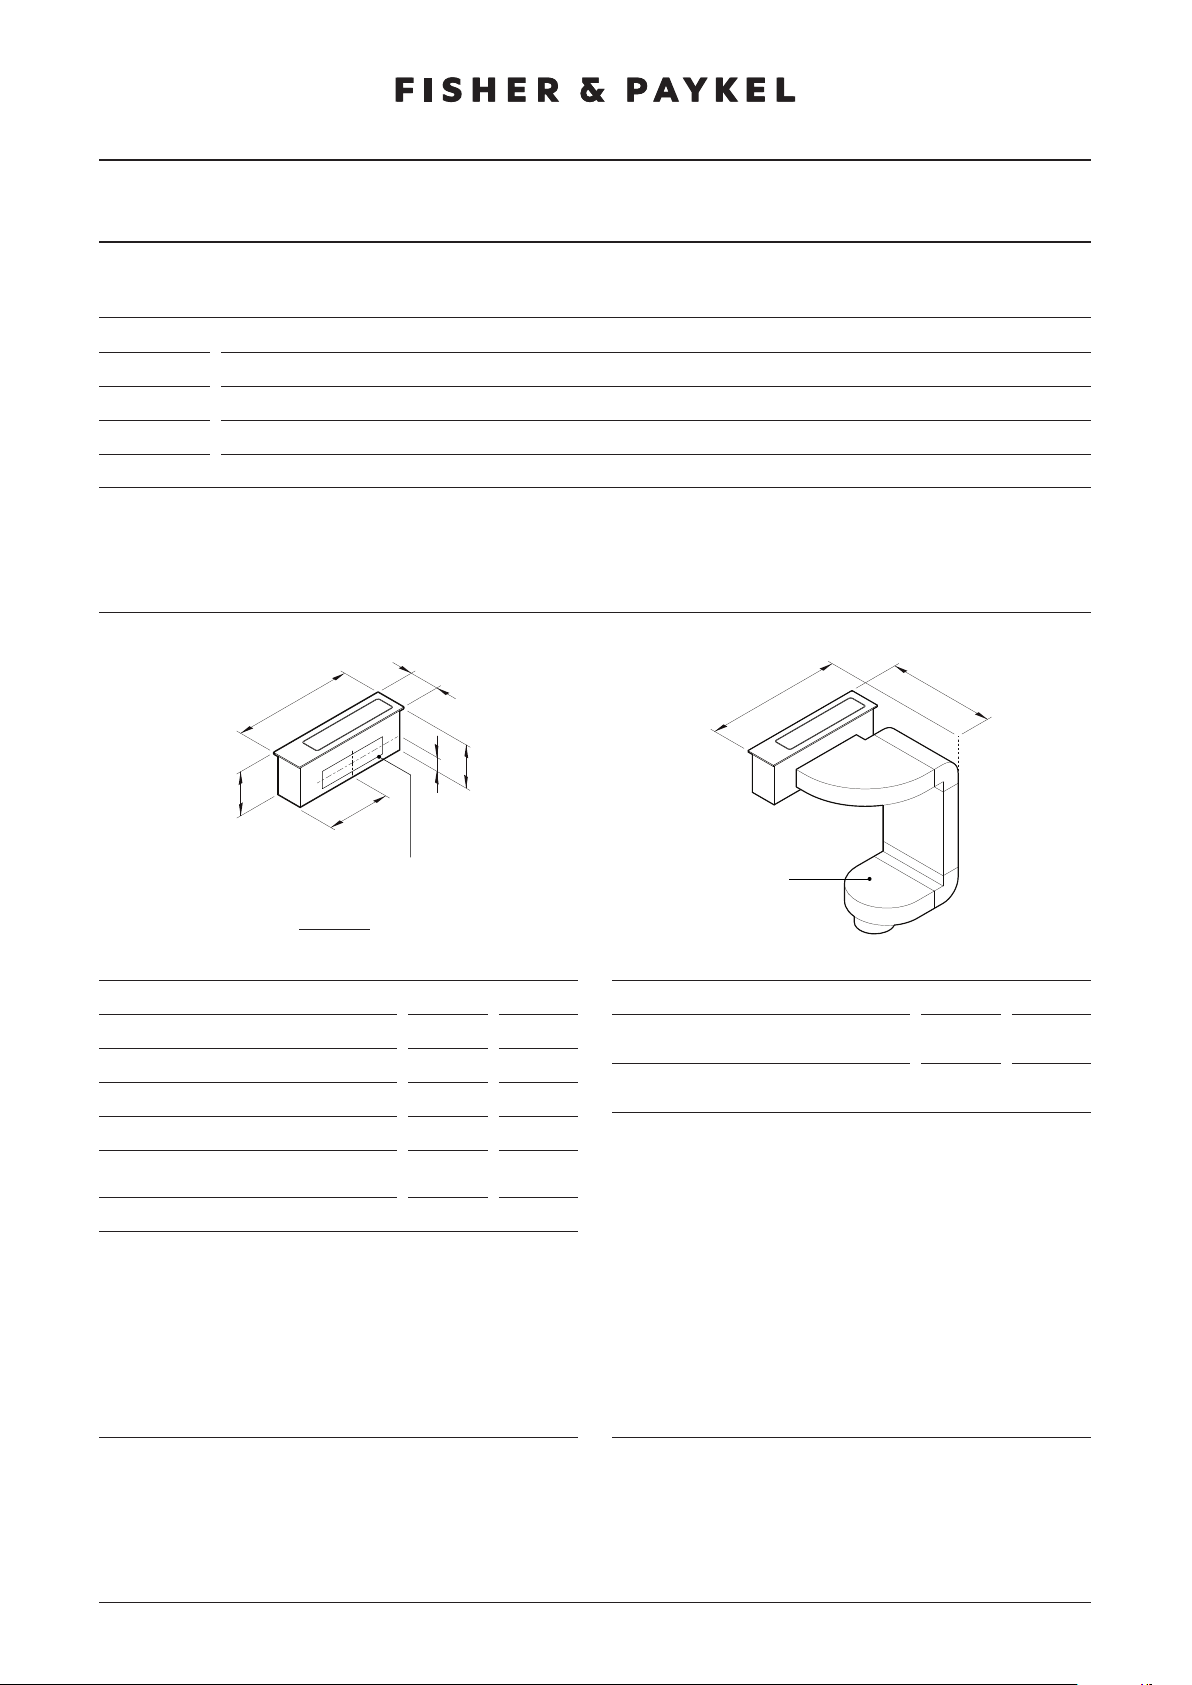
RATING PLATE LOCATIONS
Right rear of productRight rear of productRight rear of product
Induction Cooktops Teppanyaki CooktopsDowndraft Ventilation

18
CONNECT POWER
CI122D, CI152D, CIT122D, CIT152D MODELS
CD5DB1 MODELS
CI244D, CI304D, CI365D MODELS
3 wire cable from power supply
3 wire cable from power supply
4 wire cable from power supply
4 wire cable from power supply
These models are supplied with a power cable. The power cable should only be removed or
replaced by a Fisher & Paykel trained and supported service technician or qualified person.

19
1. Place the external blower into
the cutout and connect power
cord.
2. Prepare ducting* to required
lengths. Secure and seal as
required.
INSTALL DUCTING*
Ducting shown is for reference only. Ducting must be purchased separately.
20
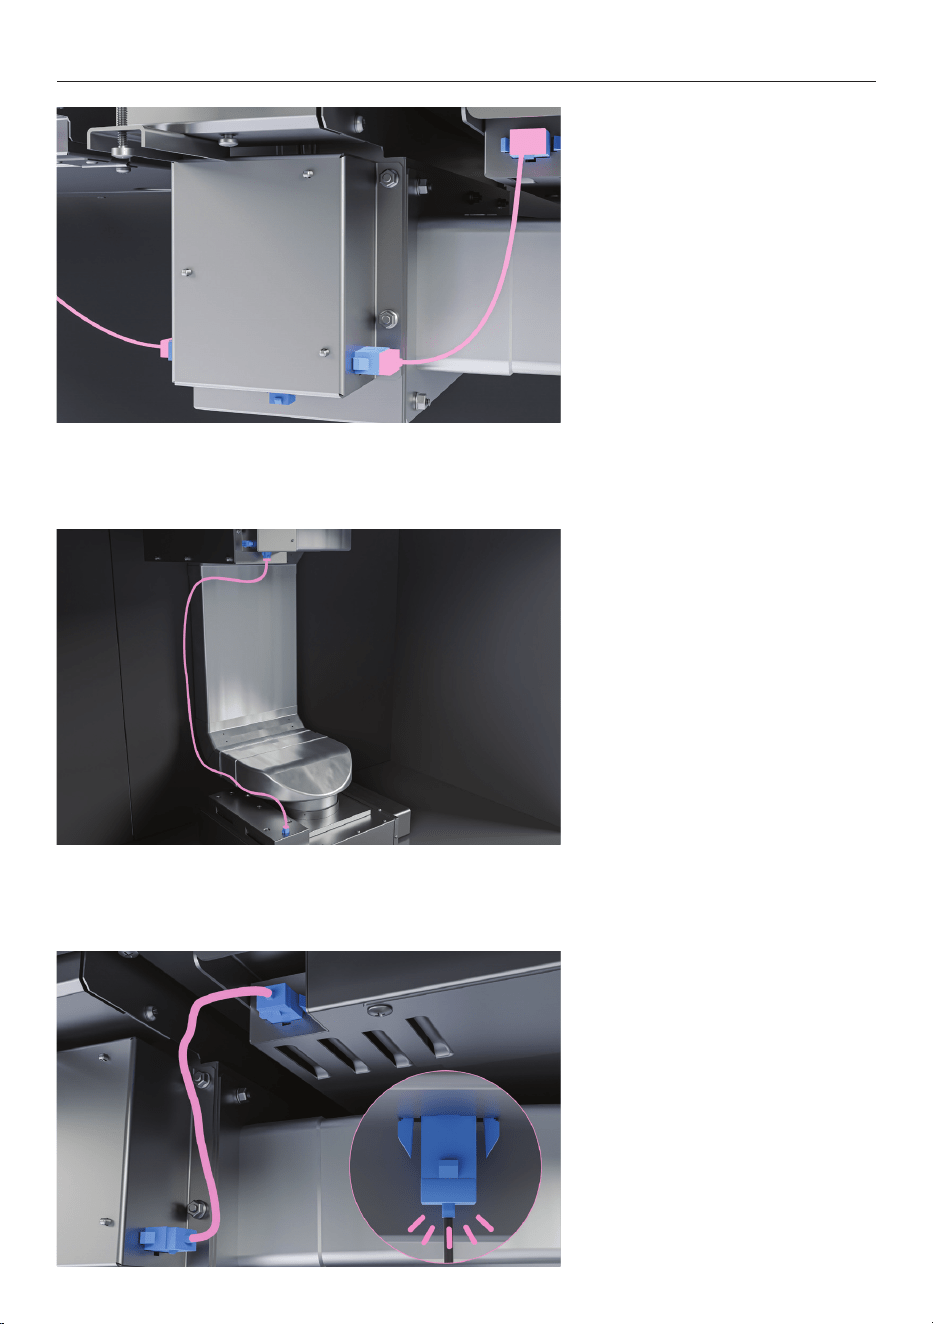
LINK PRODUCTS
1. Link each product to the
adjacent product using the
supplied communication cables.
Ensure 8-pin plugs are only
connected to 8-pin sockets and
6-pin plugs connected to 6-pin
sockets.
2. Connect the downdraft unit
to the external blower via the
central communication cable.
3. Ensure all cables click into
place and are routed away from
cooktop exhausts.
Secure to cabinetry using the
supplied harness retainers.
21
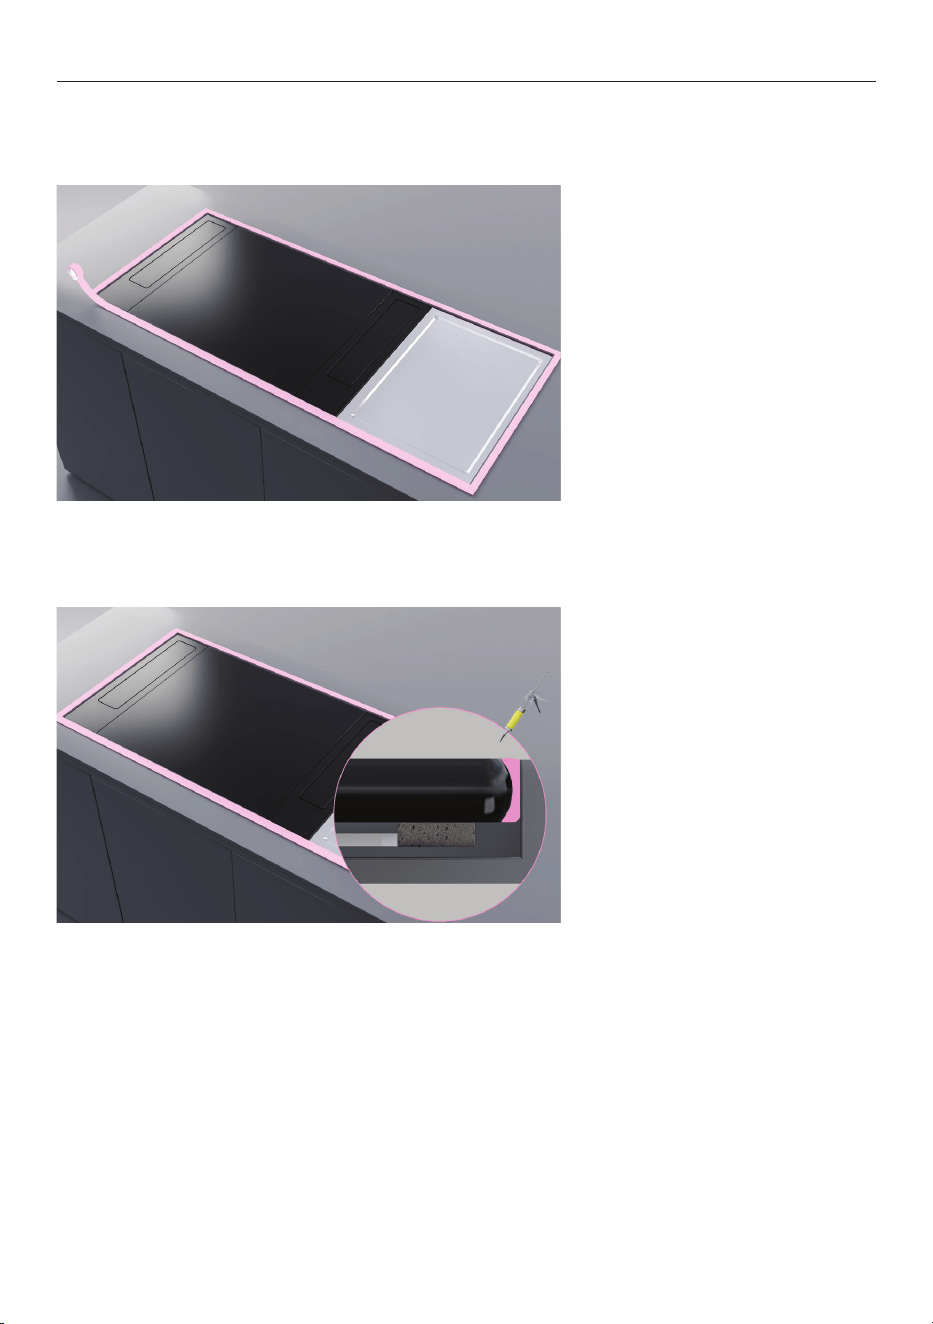
SEAL PRODUCTS INTO CAVITY (FLUSH INSTALLATIONS)
1. Mask the area to be siliconed
ensuring all products and the
countertop are protected.
Some silicone products may cause discoloration of the glass, in most cases this will fade as
the silicone cures. Avoid applying too much silicon during installation.
2. Carefully apply silicone in the
gaps between the countertop
and products.
Wipe away any excess silicone
and remove mask once silicone
has dried.

22
INSTALLER CHECKLIST
TO BE COMPLETED BY THE INSTALLER
GENERAL
Specified clearances have been maintained.
Products are level – front to back and side to side.
All packaging materials have been removed.
There is constant flow of cool air from the cabinetry to the base of the products.
Products have all been securely clamped.
Communication cables are routed away from cooktop exhausts, secured to cabinetry
and are unobstructed by drawers or other objects.
Module layout configuration has been checked and confirmed.
Touch controls and displays are functioning.
Ducting has been secured and taped into place
ELECTRICAL
Receptacle with correctly rated over-current protection is provided for service
cord connection.
Adequate ground connection established.
Power supply cable is accessible and is not touching the products.
431306B 07.24
FISHERPAYKEL.COM

TO BE COMPLETED BY THE INSTALLER
GENERAL
431306B 07.24
FISHERPAYKEL.COM
© Fisher & Paykel Appliances 2024. All rights reserved.
The models shown in this guide may not be available in all markets
and are subject to change at any time.
The product specifications in this guide apply to the specific products and
models described at the date of issue. Under our policy of continuous product
improvement, these specifications may change at any time.
For current details about model and specification availability in your country,
please go to our website or contact your local Fisher&Paykel dealer.