Loading ...
Loading ...
Loading ...
6
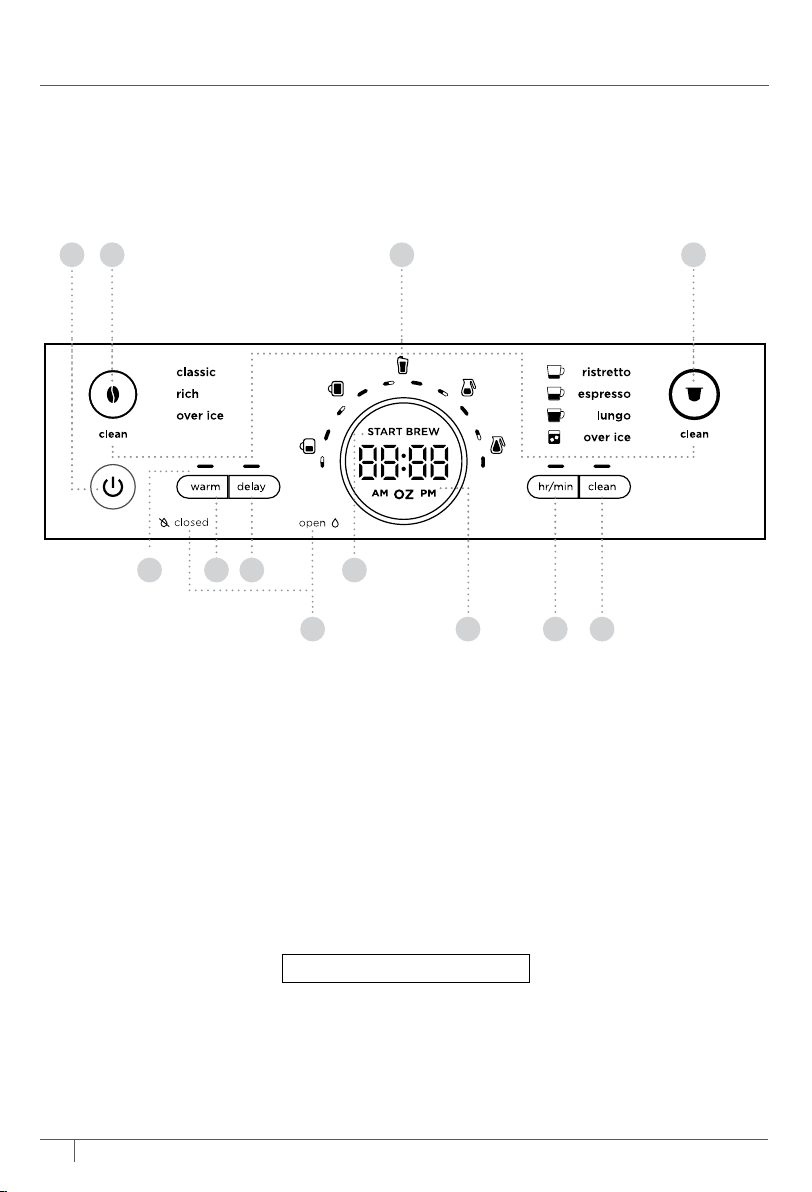
USING THE CONTROL PANEL PREPARING FOR USE
1 Power Button
2 Grounds Button
3 Capsule Button
4 Intelligent Clean Cycle Button
5 Intelligent Clean Cycle Indicator
6 Hour/Minute Button
7 Programmable Digital Clock
and ounce Display
8 Dial/Start Brew Button
9 Drip Stop Indicator
10 Delay Brew Button
11 Keep Warm Button
12 Keep Warm Indicator
7ninjakitchen.com
1-877-646-5288
NOTE: If you unplug the brewer or in the event of a power loss, you will need to reset the clock the
next time the brewer is plugged in.
NOTE: This calibration is permanently saved and will not be lost if power is lost or brew is unplugged.
Brewer can be recalibrated at any time if the altitude where it is being used changes.
NOTE: At any time, you can set the clock by pressing the HR/MIN button and following steps 2-3.
SETTING THE CLOCK
1 When the brewer is plugged in, the clock display and HR/MIN will begin to flash.
2 Use the Dial to select the correct hour. Then, press the HR/MIN button to toggle to minutes.
3 Use the dial again to select the correct minute, and press the HR/MIN button to set the clock at
the displayed time.
HIGH-ALTITUDE CALIBRATION BREW
Required for users in high-altitude areas. Not running the high-altitude calibration brew in a high-
altitude area will result in excessive steaming during brewing.
Because water boils at a lower temperature at higher altitudes, running a calibration cycle before
your first brew allows the brewer to detect the boiling point of water at your location. Running a
calibration cycle will help deliver a consistent brew each time.
1 Fill the water reservoir up to, but not exceeding, the Full line.
2 Insert the brew basket and close the flip-top lid, then place an empty carafe on the base.
3 Power on the unit and press the Grounds Button. Ensure the Drip Stop is set to the open position.
Next, press and hold both Grounds Button and HR/MIN until you hear a confirmation sound.
4 A calibration cycle will begin, and the display will count down until the altitude calibration is
complete. When complete, the brewer will beep and display “End” on the dial. Discard the
water in the carafe.
1 2 3
4
5
6
8
79
10
1112
NOTE: Functions vary by model.
Loading ...
Loading ...
Loading ...