Loading ...
Loading ...
Loading ...
10 11ninjakitchen.com
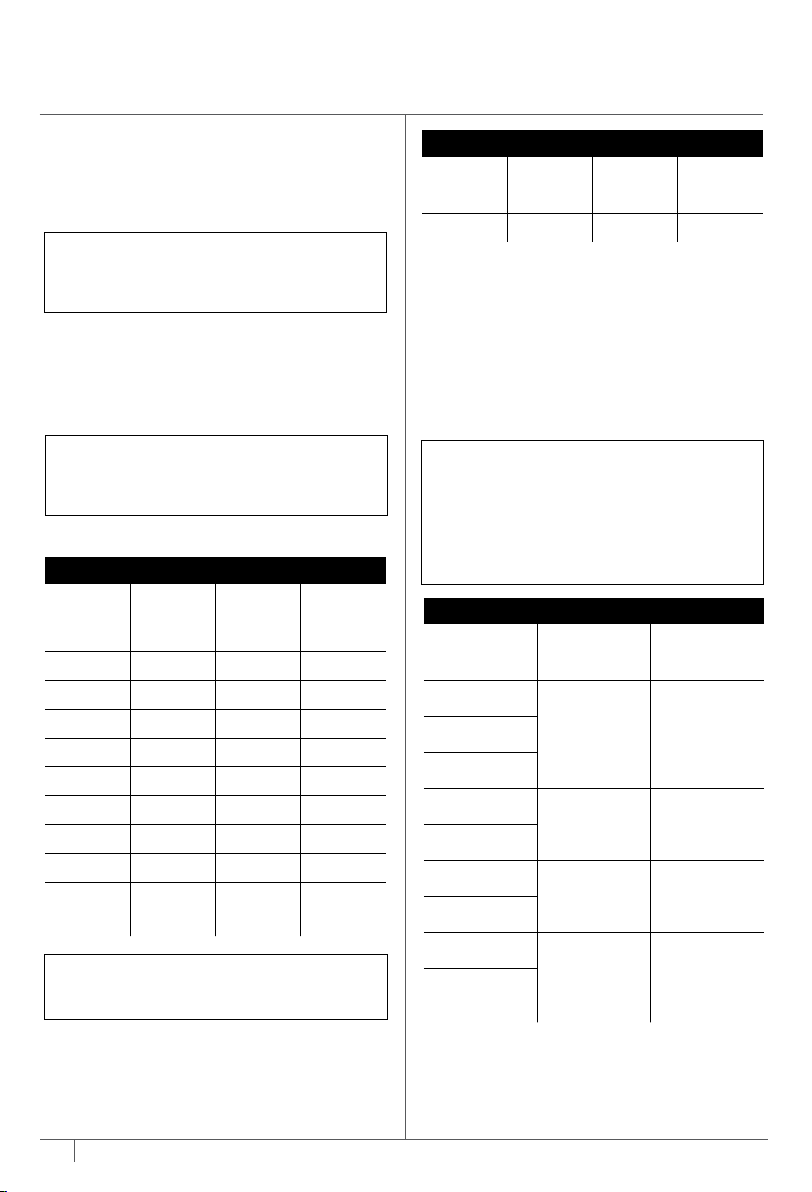
BREW VOLUMES AND MEASUREMENTS
Each size and brew style produces a dierent
amount of coee to optimize strength and flavor.
NOTE: Adjust to your preferred taste. More
scoops result in stronger coee but slightly
lower volumes, fewer scoops result in weaker
coee and slightly higher volumes. Use
fewer scoops of decaeinated coee to
prevent overflow. Use a medium-sized grind
if grinding whole beans. Grinding beans too
finely may cause the brew basket to overflow.
GROUNDS
Size Classic Rich
Over Ice
(filled
with ice)
Sm Cup 8 oz. 7 oz. 8 oz.
Cup 10 oz. 8oz. 10 oz.
XL Cup 12 oz. 10 oz. 12 oz.
Travel 15 oz. 12 oz. 15 oz.
XL Travel 18 oz. 16 oz. 18 oz.
1
/4 Carafe 28 oz. 26 oz. 28 oz.
1
/2 Carafe 37 oz. 33 oz. 37 oz.
3
/4 Carafe 46 oz. 41 oz. 46 oz.
Full
Carafe
55 oz. 47 oz. 55 oz.
APPROXIMATE BREW VOLUMES
MEASURING YOUR COFFEE GROUNDS
For best results, use the measurements on the
Ninja Smart Scoop™ or in the chart to determine
how much ground coee to use for each brew
size. Always use level scoops when measuring
ground coee. The amount of ground coee
for each size will remain the same for any brew
type you select. For example, if you select Cup
and Classic, you will use the same amount of
coee grounds as if you were to select Cup and
Over Ice.
COFFEE MEASUREMENT CHART
Serving Size
Ninja Smart
Scoop
Tablespoons
Sm Cup
2–3
small scoops
2–3
tablespoons
Cup
XL Cup
Travel
3–5
small scoops
3–5
tablespoons
XL Travel
1
/4 Carafe
3–5
big scoops
6–10
tablespoons
1
/2 Carafe
3
/4 Carafe
4–7
big scoops
8–14
tablespoonsFull
Carafe
USING THE NINJA® ESPRESSO &
COFFEE BARISTA SYSTEM – CONT.
NOTE: There may be some water left in the
reservoir after your brew. This is normal to
keep the brewer from running out of water.
CAPSULES
Ristretto Espresso Lungo Over Ice
25 mL 40 mL 110 mL 30 mL
1-877-646-5288
NOTE: The coee grounds will absorb some
of the water that is brewed; this will cause
slight variability in brew volumes than what
is stated below.
IMPORTANT: The light on the base
of the brewer will illuminate only when
the warming plate is hot and will remain
illuminated until the plate has cooled down.
TIME & TEMPERATURE ADJUSTMENT
You can adjust how long the Intelligent Warming
Plate remains on (up to 4 hours) and/or set the
temperature to Low, Medium, or High.
By default, the Intelligent Warming Plate is set
to remain on for 2 hours and is set to medium.
To change the time/temperature settings of the
warming plate, follow these instructions:
1 Press and hold WARM until the clock begins to
flash the current warming time.
2 Turn the dial to increase the time in 15-minute
increments up to 4 hours or decrease the time
to 0 hours. Press WARM or START BREW to
set the new time.
3. Next, the clock will display the current
warming plate temperature. To keep the same
temperature, press WARM or START BREW. To
change the temperature, turn the dial and press
WARM or START BREW for the temperature
to lock in. The unit will beep signifying that the
time and temperature has been set.
INTELLIGENT WARMING PLATE
The Intelligent Warming Plate will automatically
turn on during Classic or Rich brews when any
carafe size is selected. The Intelligent Warming
Plate is set to a specific temperature setpoint to
avoid burning the coee over time. To turn the
warming plate on at any time, press the Grounds
Button to select either Classic or Rich, turn the
dial to one of the carafe sizes, and press the
WARM button.
NOTE: If you set the warming time to
0 hours, Keep Warm will not automatically
activate during or after a carafe brew cycle,
but you can still turn it on manually by
pressing the WARM button.
NOTE: The time adjustment setting will be
saved and will not reset when the brewer is
unplugged or loses power.
NOTE: The brewer must remain on for
the Delay Brew function to work.
DO NOT power o or unplug after setting
Delay Brew. If the brewer is turned o or
unplugged, delay brew will need to be reset.
NOTE: When delay brew is set, a grounds
brew cannot be run until the delay brew has
finished or has been canceled. A capsule
brew may be run at any time up until
5 minutes before the preset brew time.
NOTE: The clock will remain on even if the
brewer is turned o. Ensure the brewer is
powered on to set Delay Brew.
SETTING THE DELAY BREW
(Grounds Mode Only)
1 Plug the brewer in and turn it on by pressing
the Power button.
2 After filling the water reservoir and adding
ground coee to the filter, place the
appropriate-size vessel under the brew basket.
3 Press the Grounds Button to enter grounds
mode. Press DELAY. The clock will begin to
flash “12:00” or the previous time set.
6 To start, press START BREW. The brewer
will beep to signal the brew has started. The
progress bar around the dial will illuminate to
indicate the status of the brew. When finished,
the brewer will beep again, and End will
appear on the display.
7 To cancel the brew at any time, press
START BREW again or press the Power Button.
NOTE: The brew cycle will begin, then pause
for a short period before resuming. This
process is used to evenly saturate the coee
grounds. This applies to all brew styles.
4 While the clock is flashing, turn the dial to
adjust the hour. The AM or PM indicator will
illuminate under the clock display as you are
setting the desired time. Press START BREW
to lock in the hour. Now, turn the dial to adjust
the minute. Press START BREW to lock in your
time.
5 Next, turn the dial to select the size that you
would like to brew.
6 Press the Grounds button to choose your brew
style.
7 Once the time, brew size, and brew style have
been set, press the dial to activate. When
activated, the brewer will beep and DELAY and
your selected options will remain illuminated.
To view your set delay brew time, press and
hold the DELAY button. To cancel, press the
DELAY button or power o the unit.
Loading ...
Loading ...
Loading ...