Loading ...
Loading ...
Loading ...

– 7
13 Mains cable compartment
14 Parking holder
15 EPA-filter
16 Lever for unhooking the HEPA filter
17 Water filter container
18 Handle for Water filter container
19 Water filter lid
20 Water filter inlay
21 Formed foam filter
22 Filter with micro-perforations
23 Pipe bender
Note
Regular tap water can be used.
As water naturally contains lime, which can lead to for-
mation of scale over time, it is recommended to use a
mixture that consists of 50% tap water and 50% distilled
water.
ATTENTION
Material damage due to incorrect filling of the water tank.
Do not use condensation water from the drier!
Do not fill with detergent or other additives (for ex-
ample fragrances)!
Do not use pure distilled water! Max. 50% distilled
water and 50% tap water.
Do not use collected rain water!
Illustration
Pull the filler neck of the water tank towards the outside.
Illustration
Illustration
Fill the water tank with approx. 0.5 litres of water
until the float, which indicates the maximum filling
level, can be seen.
Close the water tank.
Note
The steam boiler is automatically supplied with water
from the water tank. Prior to the initial start-up, the water
tank must be filled twice.
ATTENTION
Material damage due to empty water filter container.
Ensure that the water filter container is always filled
during operation.
Illustration
Lift the handle of the water container.
Pull out the water filter container.
Illustration
Turn the handle towards the back.
Illustration
Remove the water filter insert.
Illustration
Fill the water filter container with tap water until the
water level indicator MAX H
2
O is covered.
Add one cap full of the defoaming liquid (Foam-
Stop) to the water filter reservoir.
Illustration
Reinsert the water filter insert into the water filter
container.
Illustration
Move the handle to its original position until it locks
in place.
Illustration
Insert the water filter container into the appliance
using the handle.
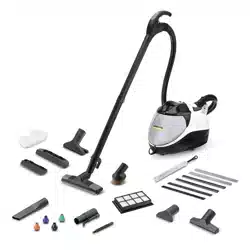
Accessories
Steam accessories
A Steam suction hose
A1 Accessory plug
A2 Unlocking button
A3 Steam button
A4 Suction button
A5 Handle
A6 Steam plug
A7 Steam plug lock
B Steam suction pipes
B1 Parking position
B2 Lock lever
C Floor nozzle
C1 Brush strip insert
C2 Rubber lip insert
C3 Hard rubber insert
C4 Locking of the inserts
D Steam suction hand nozzle
D1 Window cleaning insert (wide)
D2 Window cleaning insert (narrow)
D3 Brush insert
D4 Terry cloth cover
E Steam suction detail nozzle
E1 Extension piece
E3 Round brush
Vacuuming accessories
E2 Upholstery nozzle (small)
F Crevice nozzle
G Upholstery nozzle (large)
H Furniture brush
Other accessories
I Measuring cup
J Pipe cleaning brush for pipes and suction hose
K Accessory bag
L Spare seals (O-ring set)
M Defoamer liquid (FoamStop)
Preparing the Appliance
Filling the Water Reservoir
Filling the water filter container
15EN
Loading ...
Loading ...
Loading ...