
OPERATING INSTRUCTIONS
ENGLISH
1108/
1120/1400/1424/1530
1532/1538/1680/2500/2520
Omega
JAN
2628
Omega
Number of calibres:
2628, 8605, 8615, 8906
651
/2202
Omega
Number of calibres:
2200, 2201, 2202, 2211, 8804, 8805
Number of calibres:
8601, 8611, 8902, 8903
1108/
1120/1400/1424/1530
1532/1538/1680/2500/2520
Omega
Number of calibres:
1120, 1424, 1532, 1538, 2500, 2507, 2520,
2610, 4561, 4564, 8500, 8501, 8507, 8508,
8511, 8520, 8521, 8700, 8701, 8800, 8801,
8900, 8901, 8910
Number of calibres:
2627, 8810, 8811
1120
Omega
Number of calibres:
8400, 8401, 8912, 8913, 8928, 8929
Number of calibres:
8704, 8705
Contents
2403
Omega
Number of calibres:
2403, 8421, 8703, 8806, 8807
Number of calibres:
8938, 8939
Number of calibres:
8926, 8927
A A
A
2300
Omega
Number of calibres:
2300, 8802, 8803, 8916, 8917
2005
Omega
Number of calibres:
1376, 1456, 4061
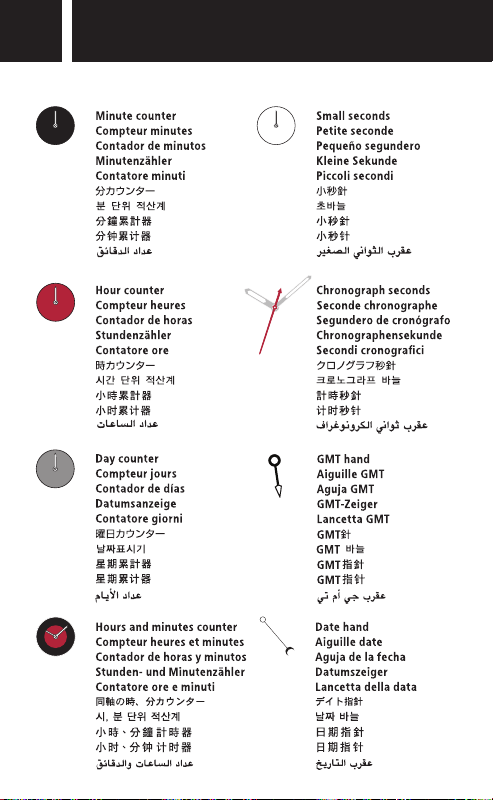
M
O
N
D
A
Y
Number of calibres:
8602, 8612
Fig. I - XV | Fig. I - XV | Fig. I - XV | Abb. I - X V | Fig. I - XV | I - XV | I - XV | I - XV | I - XV | I - XV |
II I VII
IV III
VIII XIII XIV
Number of calibres:
8934, 8935
XV
IX
VI XI
J
A
N
F
E
V
M
A
R
A
P
R
M
A
Y
J
U
N
J
U
L
A
U
G
S
E
P
O
C
T
N
O
V
D
E
C
Number of calibres:
8922, 8923
XIIV
X
Fig. I - X V
Fig. I - X V
Fig. I - X V
Abb. I - XV
Fig. I - X V
I - XV
I - XV
I - XV
I - XV
I - XV
1108/
1120/1400/1424/1530
1532/1538/1680/2500/2520
Omega
JAN
2628
Omega
Number of calibres:
2628, 8605, 8615, 8906
651
/2202
Omega
Number of calibres:
2200, 2201, 2202, 2211, 8804, 8805
Number of calibres:
8601, 8611, 8902, 8903
1108/
1120/1400/1424/1530
1532/1538/1680/2500/2520
Omega
Number of calibres:
1120, 1424, 1532, 1538, 2500, 2507, 2520,
2610, 4561, 4564, 8500, 8501, 8507, 8508,
8511, 8520, 8521, 8700, 8701, 8800, 8801,
8900, 8901, 8910
Number of calibres:
2627, 8810, 8811
1120
Omega
Number of calibres:
8400, 8401, 8912, 8913, 8928, 8929
Number of calibres:
8704, 8705
Contents
2403
Omega
Number of calibres:
2403, 8421, 8703, 8806, 8807
Number of calibres:
8938, 8939
Number of calibres:
8926, 8927
A A
A
2300
Omega
Number of calibres:
2300, 8802, 8803, 8916, 8917
2005
Omega
Number of calibres:
1376, 1456, 4061
M
O
N
D
A
Y
Number of calibres:
8602, 8612
Fig. I - XV | Fig. I - XV | Fig. I - XV | Abb. I - X V | Fig. I - XV | I - XV | I - XV | I - XV | I - XV | I - XV |
II I VII
IV III
VIII XIII XIV
Number of calibres:
8934, 8935
XV
IX
VI XI
J
A
N
F
E
V
M
A
R
A
P
R
M
A
Y
J
U
N
J
U
L
A
U
G
S
E
P
O
C
T
N
O
V
D
E
C
Number of calibres:
8922, 8923
XIIV
X
Fig. I - X V
Fig. I - X V
Fig. I - X V
Abb. I - XV
Fig. I - X V
I - XV
I - XV
I - XV
I - XV
I - XV
1151
Omega
1861
Omega
320
0
Omega
Number of calibres:
3304
Number of calibres:
1151, 3606
1152
Omega
Number of calibres:
1152, 1164
Number of calibres:
3313
Number of calibres:
321, 1861, 1863, 1865, 1869, 3201,
3202, 3861
1866
Omega
Number of calibres:
1866
Number of calibres:
3612
3312
Omega
Number of calibres:
3603
Number of calibres:
9904, 9905
B
B B
330
3
3313
Omega
Number of calibres:
3888, 3890
Number of calibres:
3203
330
4
Omega
333
0
Omega
Number of calibres:
3330
Number of calibres:
9605, 9615
9300/930
1
Omega
311
3
Omega
Number of calibres:
9300, 9301, 9900, 9901, 9906
Number of calibres:
3113
1143
Omega
Number of calibres:
3220
XVII
XXI XXVII
Number of calibres:
9908
XXXII
XXVIII
XXXI
XXIIXVI
XXIV
XXIII
XXIX
XVIII
XX XXVI
XIX
XXV XXX
Fig. X VI - XXXII
Fig. X VI - XXXII
Fig. X VI - XXXII
Abb. XVI - XX XII
Fig. X VI - XXXII
XVI - XXXII
XVI - XXXII
XVI - XXXII
XVI - XXXII
XVI - XXXII
Fig. XVI - X XXII | Fig. XVI - XXXII | Fig. XVI - X XXII | Abb. XVI - X XXII | Fig. XVI - XX XII | XVI - XXXII | XVI - X XXII | X VI - XXXII | XVI - X XXII | XVI - XXXII |

3
English
Introduction
– Special recommendations / Environmental protection .............. 4
– Leather straps / Anti-reflective treatment / Screw-down crown ........ 7
– OMEGA International Warranty ........................... 8
Operating instructions
–
Quartz watch
Calibres: 1376, 1456, 1532, 4061, 4561, 4564 .................. 16
1424, 1538 ................................... 17
– Manual & Self-winding watch
Calibres: 8400, 8401, 8500, 8501, 8507, 8508, 8511, 8900, 8901, 8910,
8912, 8913, 8916, 8917, 8926, 8927, 8928, 8929, 8934, 8935 ... 18
8601, 8611, 8902, 8903, 8922, 8923 ................... 20
8602, 8612 ................................... 21
1120, 2300, 2500, 2507, 2520, 2610, 2627, 8520, 8521, 8700,
8701, 8704, 8705, 8800, 8801, 8810, 8811 ............... 22
2200, 2201, 2202, 2211, 2403, 8421, 8703, 8802, 8803, 8804, 8805,
8806, 8807 .......................................... 23
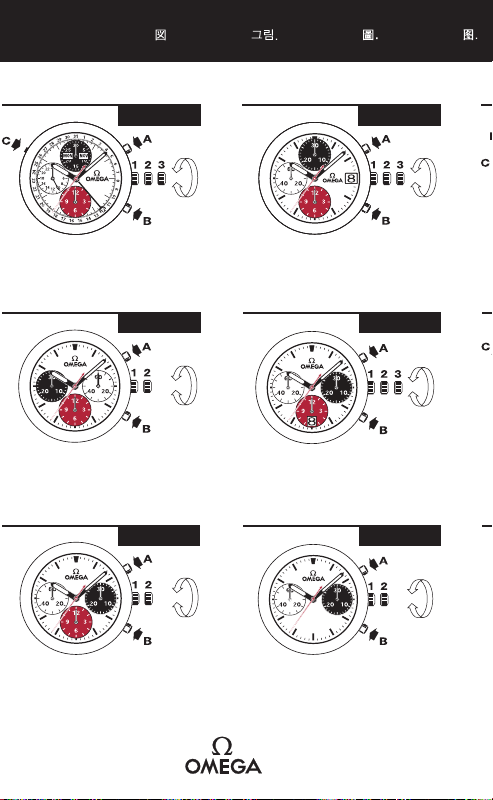
– Manual-winding chronograph
Calibres: 321, 1861, 1863, 1865, 1866, 1869, 3201, 3203, 3861, 9906, 9908 24
– Self-winding chronograph with or without date
Calibres: 3202, 3220, 3330 ............................... 27
– Self-winding chronograph with date
Calibres: 1151, 1152, 1164, 3113, 3304, 3313, 3606, 3888, 3890 ...... 28
9300, 9301, 9900, 9901 ........................... 30
– Automatic chronograph with moon phase
Calibres: 9904, 9905 ................................... 31
– Self-winding split-seconds chronograph
Calibre: 3612 ....................................... 33
– GMT, Worldtimer, GMT Chronograph
Calibres: 2628, 3603, 8605, 8615, 8906, 8938, 8939, 9605, 9615 ...... 31
Specific sections/general information
– Chronometer / Master Chronometer / 15,000 gauss ............... 38
– Thermocompensated quartz .............................. 39
– Helium escape valve ................................... 40
– Measurement scales ................................... 42
– Foldover clasps ...................................... 44
– Fine length adjustment clasps and diving clasp ................. 48
– Butterfly clasp with a built-in extension system ................. 49
– Ploprof bezel and crown ................................ 50
– Bullhead crown / Retractable crown ......................... 51
– Chrono Lock / Strap with quick interchangeable system ............. 52
– Pictograms ......................................... 54
Contents
Fabricant / Manufacturer / Hersteller
OMEGA SA
Rue Jakob-Stämpfli 96
CH-2502 Bienne
Switzerland
1
2
3

3
English
Introduction
– Special recommendations / Environmental protection .............. 4
– Leather straps / Anti-reflective treatment / Screw-down crown ........ 7
– OMEGA International Warranty ........................... 8
Operating instructions
–
Quartz watch
Calibres: 1376, 1456, 1532, 4061, 4561, 4564 .................. 16
1424, 1538 ................................... 17
– Manual & Self-winding watch
Calibres: 8400, 8401, 8500, 8501, 8507, 8508, 8511, 8900, 8901, 8910,
8912, 8913, 8916, 8917, 8926, 8927, 8928, 8929, 8934, 8935 ... 18
8601, 8611, 8902, 8903, 8922, 8923 ................... 20
8602, 8612 ................................... 21
1120, 2300, 2500, 2507, 2520, 2610, 2627, 8520, 8521, 8700,
8701, 8704, 8705, 8800, 8801, 8810, 8811 ............... 22
2200, 2201, 2202, 2211, 2403, 8421, 8703, 8802, 8803, 8804, 8805,
8806, 8807 .......................................... 23
– Manual-winding chronograph
Calibres: 321, 1861, 1863, 1865, 1866, 1869, 3201, 3203, 3861, 9906, 9908 24
– Self-winding chronograph with or without date
Calibres: 3202, 3220, 3330 ............................... 27
– Self-winding chronograph with date
Calibres: 1151, 1152, 1164, 3113, 3304, 3313, 3606, 3888, 3890 ...... 28
9300, 9301, 9900, 9901 ........................... 30
– Automatic chronograph with moon phase
Calibres: 9904, 9905 ................................... 31
– Self-winding split-seconds chronograph
Calibre: 3612 ....................................... 33
– GMT, Worldtimer, GMT Chronograph
Calibres: 2628, 3603, 8605, 8615, 8906, 8938, 8939, 9605, 9615 ...... 31
Specific sections/general information
– Chronometer / Master Chronometer / 15,000 gauss ............... 38
– Thermocompensated quartz .............................. 39
– Helium escape valve ................................... 40
– Measurement scales ................................... 42
– Foldover clasps ...................................... 44
– Fine length adjustment clasps and diving clasp ................. 48
– Butterfly clasp with a built-in extension system ................. 49
– Ploprof bezel and crown ................................ 50
– Bullhead crown / Retractable crown ......................... 51
– Chrono Lock / Strap with quick interchangeable system ............. 52
– Pictograms ......................................... 54
Contents
Fabricant / Manufacturer / Hersteller
OMEGA SA
Rue Jakob-Stämpfli 96
CH-2502 Bienne
Switzerland
1
2
3

5
4
English
Chronograph push-pieces: do not operate chronograph pushers
under water in order to prevent water entering the mechanism.
Exception: The Seamaster 300 m and 600 m Chronographs have
pushers which function under water.
What are the service intervals?
Like any precision instrument, a watch needs regular servicing to
ensure that it functions perfectly. We cannot indicate the frequency
of such work, since it depends entirely on the model, the climate and
the owner's individual care of the watch. As a general rule, a watch
should be serviced every 5 to 8 years, depending on the conditions
in which it is used.
Who should I contact for a maintenance service or battery
replacement?
Please contact an approved OMEGA service centre or authorised
OMEGA retailer. They are equipped with the tools and apparatus
required to carry out the work and the necessary checks in a profes-
sional manner. Furthermore, these entities can guarantee that their
work is carried out in accordance with OMEGA’s strict quality stand-
ards.
A worn-out battery should be replaced immediately in order to reduce
the risk of leakage and consequent damage to the movement. The type
of battery is defined on the guarantee card enclosed with your watch.
Important information about lithium and non-lithium but-
ton batteries:
WARNING
KEEP THE BATTERY OUT OF REACH OF CHILDREN
Swallowing can lead to chemical burns, perforation of soft tissue and
death. Severe burns can occur within two hours of ingestion. If swal-
lowed, seek medical attention immediately.
Special recommendations
1 Introduction
What must I do to ensure that my OMEGA watch provides
me with excellent service for many years?
Magnetic fields: avoid contact with magnets, or putting your watch
on top of loudspeakers, refrigerators or magnetic cases for iPads or
other tablets, since such objects generate magnetic fields which could
disturb the functions of your watch. Watches that include Master
Co-Axial or Master Chronometer in their name are unaffected by
magnetic fields up to 15,000 gauss (1.5 tesla).
Swimming in the sea: always rinse your watch with fresh water
afterwards.
Shocks: whether physical, thermal or other, avoid them.
Crown: always push the crown back into the case (position 1) to pre-
vent water from entering the mechanism. Do not operate the crown
under water.
Screw-down crown: always ensure that the crown is screwed back
in completely to prevent water from entering the mechanism. Do not
operate the crown under water.
Cleaning: for metal bracelets, rubber straps and water-resistant cases,
use a toothbrush and soapy water for cleaning and dry with a soft cloth.
Chemical products: avoid direct contact with solvents, detergents,
perfumes, cosmetics, insect repellents, etc., since they may damage
the bracelet, case or gaskets.
Temperature: avoid exposure to extreme temperatures (greater
than 60°C, or 140°F, less than 0°C, or 32°F) or extreme temperature
changes.
Water-resistance: a watch’s water-resistance cannot be perma-
nently guaranteed. It may notably be affected by the ageing of gaskets
or by an accidental shock to the crown. We recommend you have the
water resistance of your watch checked once a year by an authorised
OMEGA Service Centre.
Special recommendations
1 Introduction

7
6
English
Environmental protection
1 Introduction
Collection and treatment of end of life Quartz watches*
This symbol indicates that this product should not be
disposed with household waste. It has to be returned to a
local authorised collection system. By following this proce-
dure you will contribute to the protection of the environment
and human health. The recycling of the materials will help to
conserve natural resources.
* valid in EU member states and in any countries with corre-
sponding legislation.
Leather straps
OMEGA recommends that you follow the steps below in order
to preserve the condition of your leather strap for as long as
possible:
– avoid contact with water and dampness to prevent discolouration
and deformation.
– avoid prolonged exposure to sunlight to prevent the colour from
fading.
– do not forget that leather is permeable! Therefore avoid contact
with greasy substances and cosmetic products.
– if you have a problem with your leather strap, please contact your
nearest OMEGA retailer!
Anti-reflective treatment
1
1
Introduction
Introduction
The anti-reflective treatment on both sides of the sapphire crystal
improves the visibility of your watch’s dial. Wear and tear may cause
marks to appear. These are considered normal and are therefore not
covered by the warranty.
Screw-down crown
1 Introduction
Some watches are fitted with a screw-down crown which must be
unscrewed to alter the date and time. After use, push the crown into
position 1 then press and screw the crown back down. Failure to screw
the crown down will compromise water-resistance.

9
8
English
OMEGA International Warranty
Introduction1
(Valid for U.S.A. only)
OMEGA SA* GUARANTEES YOUR WATCH FOR SIXTY (60) MONTHS
UNDER THE TERMS AND CONDITIONS OF THIS WARRANTY, STARTING
FROM THE DATE OF PURCHASE, FOR ALL OMEGA* WATCHES
PURCHASED AS OF 1 JULY 2018.
The international OMEGA warranty covers material and manu-
facturing defects existing at the time of the purchase of the OMEGA
watch ("defects"). The warranty only comes into force if the warranty
certificate is dated, fully and correctly completed and stamped by
an official OMEGA dealer ("valid warranty certificate").
During the warranty period and by presenting the valid warranty
certificate, you will have the right to have any defect repaired free
of charge. In the event that repairs are improper to restore the
normal conditions of use of your OMEGA watch, OMEGA SA
guarantees its replacement by an OMEGA watch of identical or
similar characteristics. For all watches purchased as of 1 July 2018,
the warranty for the replacement watch ends sixty (60) months after
the date of purchase of the replaced watch.
This manufacturer’s warranty does not cover:
– the life of the battery.
– normal wear and tear and ageing (for example scratched crystal;
alteration of the colour and/or material of non metallic straps
and chains, such as leather, textile, rubber).
– any damage on any part of the watch resulting from abnormal/
abusive use, lack of care, negligence, accidents (knocks, dents,
crushing, broken crystal, etc.), incorrect use of the watch and non-
observance of the operating instructions provided by
OMEGA SA.
–
the OMEGA watch handled by non-authorized persons (for
example for battery replacement, service or repair) or which has
been altered in its original condition beyond
OMEGA SA’s control.
Introduction1
OMEGA International Warranty
ALL APPLICABLE IMPLIED WARRANTIES, INCLUDING THE IMPLIED
WARRANTY OF MERCHANTABILITY AND OF FITNESS FOR A
PARTICULAR PURPOSE GIVEN TO YOU BY LAW ARE HEREBY LIMITED
IN DURATION TO THE DURATION OF THIS WARRANTY. UNDER NO
CIRCUMSTANCES WILL OMEGA
SA BE LIABLE FOR ANY INDIRECT
OR CONSEQUENTIAL DAMAGES OF ANY KIND.
Some states do not allow limitations on how long implied warran-
ties last, or exclusions or limitations of incidental or consequential
damages, so exclusions or limitations mentioned may not apply to
you. This warranty gives you specific legal rights and you may also
have other rights which may vary from state to state.
OMEGA SA’s OBLIGATION IS STRICTLY LIMITED TO REPAIR OR
REPLACEMENT AS EXPRESSLY STATED IN THIS LIMITED WARRANTY.
YOUR AUTHORISED OMEGA RETAILER CARRIES SOLE RESPONSIBILITY
FOR ANY OTHER GUARANTEES.
The OMEGA customer service ensures the perfect working order
of your OMEGA watch. If your watch needs maintenance, rely on
an authorised OMEGA retailer or an authorized OMEGA Service
Center as set forth on the OMEGA website: they can guarantee
service according to
OMEGA SA’s standards.
* OMEGA SA
Rue Jakob-Stämpfli 96
CH-2502 Bienne
OMEGA
®
and
®
are registered trademarks

11
10
English
OMEGA International Warranty
Introduction
OMEGA SA* guarantees your watch for sixty (60) months under
the terms and conditions of this warranty, starting from the date of
purchase, for all OMEGA* watches purchased as of 1 July 2018.
The international OMEGA warranty covers material and manufac-
turing defects existing at the time of the purchase of the OMEGA
watch ("defects"). The warranty only comes into force if the warranty
certificate is dated, fully and correctly completed and stamped by an
official OMEGA dealer ("valid warranty certificate").
During the warranty period and by presenting the valid warranty
certificate, you will have the right to have any defect repaired free of
charge. In the event that repairs are improper to restore the normal
conditions of use of your OMEGA watch, OMEGA SA guarantees
its replacement by an OMEGA watch of identical or similar charac-
teristics. For all watches purchased as of 1 July 2018, the warranty
for the replacement watch ends sixty (60) months after the date of
purchase of the replaced watch.
This manufacturer’s warranty does not cover:
– the life of the battery.
– normal wear and tear and ageing (for example scratched crystal;
alteration of the colour and/or material of non metallic straps and
chains, such as leather, textile, rubber).
– any damage on any part of the watch resulting from abnormal/abu-
sive use, lack of care, negligence, accidents (knocks, dents, crushing,
broken crystal, etc.), incorrect use of the watch and non-observance
of the operating instructions provided by
OMEGA SA.
– any consequential or indirect damage resulting from the use, failure
to operate, defects or lack of precision of the OMEGA watch.
– the OMEGA watch handled by non-authorised persons (for exam-
ple for battery replacement, service or repair) or which has been
altered in its original condition beyond
OMEGA SA’s control.
1 Introduction
OMEGA International Warranty
Any further claim against OMEGA SA, for example for damages
additional to the above described warranty is expressly excluded,
except mandatory statutory rights the purchaser may have against
the manufacturer.
The above manufacturer’s warranty:
– is independent of any warranty that may be provided by the seller,
for which he carries sole responsibility;
– does not affect the purchaser’s rights against the seller nor any
other mandatory statutory rights the purchaser may have against
the seller.
The OMEGA customer service ensures the perfect maintenance
of your OMEGA watch. If your watch needs attention, rely on an
authorised OMEGA retailer or an authorised OMEGA Service
Centre as set forth in the enclosed list: they can guarantee service
according to
OMEGA SA’s standards.
* OMEGA SA
Rue Jakob-Stämpfli 96
CH-2502 Bienne
OMEGA
®
and
®
are registered trademarks
1

13
12
English
OMEGA International Warranty
Introduction
NOTE: If you purchased your OMEGA
®
watch in Australia or
New Zealand, the International OMEGA* Warranty contained in
the booklet provided with this watch and on the OMEGA website
(www.omegawatches.com) does NOT apply to you, and is replaced
by this Australian / New Zealand Warranty (referred to below as the
"Warranty").
IMPORTANT NOTICE REGARDING YOUR CONSUMER RIGHTS
The benefits given to you under this Warranty are additional to, and
do not detract from, other rights and remedies that you may have in
relation to your OMEGA watch and its purchase under Australian
or New Zealand laws, including consumer protection laws.
In Australia, OMEGA watches come with guarantees that cannot
be excluded under the Australian Consumer Law. You are entitled to
a replacement or refund for a major failure and compensation for any
other reasonably foreseeable loss or damage. You are also entitled
to have your OMEGA watch repaired or replaced if it fails to be of
acceptable quality and the failure does not amount to a major failure.
In New Zealand, OMEGA watches also come with guarantees that
cannot be excluded under the New Zealand Consumer Guarantees
Act.
This Warranty:
– Is not intended to change or exclude any statutory or consumer
rights that cannot be lawfully changed or excluded;
– Is independent of any warranty that may be provided by the seller,
for which he carries sole responsibility; and
– Does not affect your rights against the seller, including any man-
datory statutory rights you may have against the seller under local
consumer laws.
1 Introduction
OMEGA International Warranty
OUR WARRANTY TO YOU
This Warranty is provided by OMEGA SA of Rue Jakob-Stämpfli 96,
CH-2502 Bienne, Switzerland. Telephone +41 32 343 9211.
All OMEGA watches purchased as of 1 July 2018 are guaranteed
for 5 years from the date of purchase under the terms and conditions
of this warranty.
This Warranty covers material and manufacturing defects existing
at the time of delivery of the purchased OMEGA watch (“defects”).
Where such defects become apparent during the warranty period and
provided you present a valid warranty certificate,
OMEGA SA will:
– Repair your watch free of charge; or
– In the event that repairs are unable to restore the normal con-
ditions of use of your OMEGA watch, replace your watch with
an OMEGA watch of identical or similar characteristics. Such
replacement watch will have the benefit of this Warranty for
the remainder of the Warranty Period applicable to the original
(replaced) watch.
1

15
14
English
OMEGA International Warranty
Introduction
Please be aware that:
– Goods presented for repair may be replaced by refurbished goods
of the same type rather than being repaired. Refurbished parts may
be used to repair the goods;
– Any data you store in your watch may be lost in the course of a repair.
It is your responsibility to back up any data that may be stored in
your watch before presenting it for warranty service; and
– The Warranty is only valid if the warranty certificate enclosed with
your OMEGA watch upon purchase is dated, fully and correctly
completed and stamped and signed by authorised OMEGA retailer.
EXCLUSIONS AND LIMITATIONS
This Warranty does not cover:
– The lifetime of the battery;
– Normal wear and tear and aging (e.g. scratched crystal; alteration
of the colour and/or material of non-metallic straps and chains, such
as leather, textile, rubber; peeling of the plating);
– Any damage on any part of the watch resulting from abnormal/abu-
sive use, lack of care, negligence, accidents (knocks, dents, crushing,
broken crystal, etc.), incorrect use of the watch and non-observance
of the use directions provided by
OMEGA SA;
– Indirect or consequential damages of any kind resulting from e.g.
the use, the non-functioning, the defects or the inaccuracy of the
OMEGA watch; or
– Defects caused by the OMEGA watch being handled by non-
authorized persons (e.g. for battery replacement, services or repairs)
or altered in its original condition beyond
OMEGA SA’s control.
1 Introduction
OMEGA International Warranty
HOW TO MAKE A CLAIM UNDER THIS WARRANTY
To make a claim under this Warranty, we recommend that you wrap
your OMEGA watch carefully so as to avoid any damage and
send it by registered mail or drop it off in person to your nearest
authorised OMEGA retailer or an official OMEGA Service Centre.
To find current contact information for your nearest authorised
OMEGA retailer or official OMEGA Service Centre, please telephone
+61 3 8844 3300, email customer.service@swatchgroup.com.au
or go to www.omegawatches.com.
You will be responsible for paying the expenses associated with
making a claim under this Warranty, including postal or delivery
expenses and any relevant taxes.
OTHER CONDITIONS
No authorised OMEGA retailer or official OMEGA Service Centre
is authorised to make any modification, extension or addition to this
Warranty.
OMEGA SA provides no warranty against defects beyond
the rights and remedies given under this Warranty and which are
available under the Australian Consumer Law and the New Zealand
Consumer Guarantees Act 1993.
* OMEGA SA
Rue Jakob-Stämpfli 96
CH-2502 Bienne
OMEGA
®
and
®
are registered trademarks of OMEGA SA
1

17
16
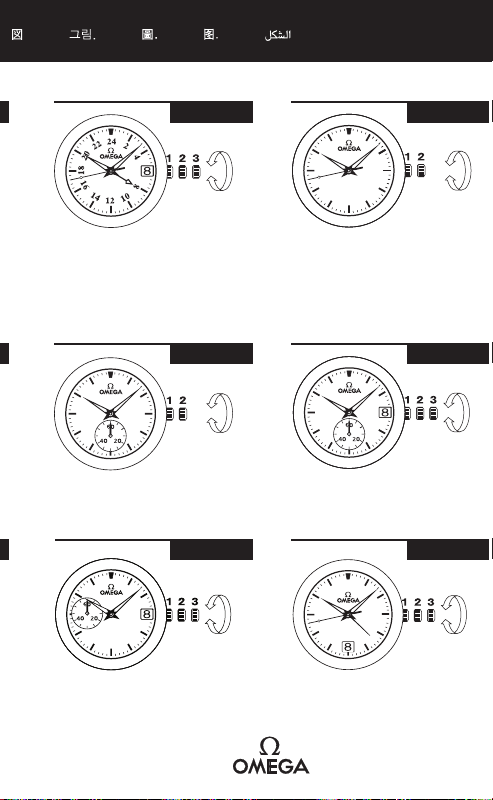
English
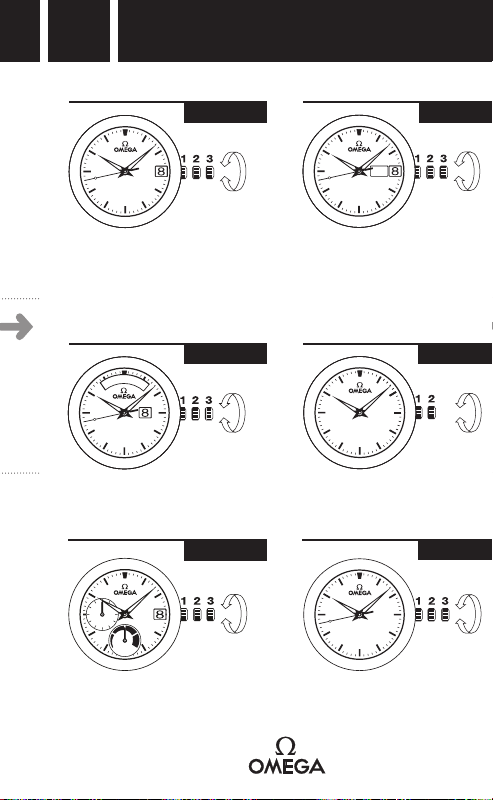
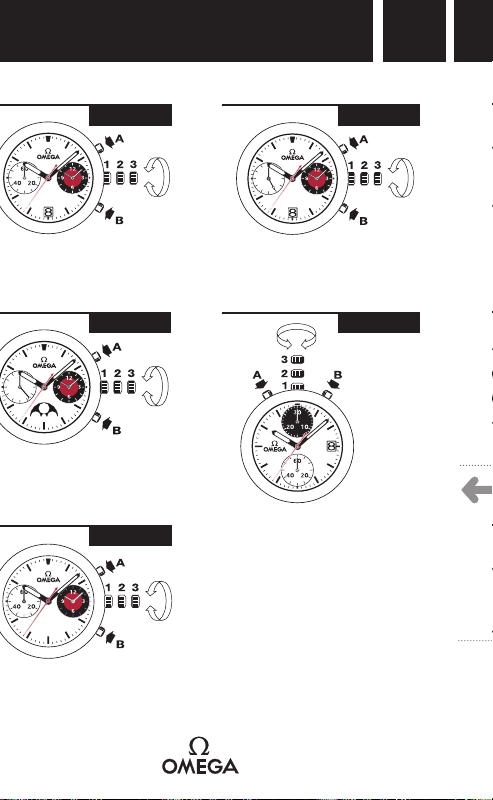
The crown has 3 positions:
1.
Normal position (wearing position): the crown pushed in against
the case guarantees water resistance.
2. Correcting the date: pull the crown out to position 2, turn the
crown forwards or backwards. Push the crown back to position 1.
3. Time setting: pull the crown out to position 3. The seconds hand
will stop. Turn the crown forwards or backwards. Synchronise the
seconds by pushing the crown back to position 1 to coincide with
a given time signal.
End of battery life indicator:
The end of battery life is indicated by the seconds hand making
4-second jumps. The watch will continue to function for several days,
but the battery must be removed and replaced by an authorised
OMEGA service agent as soon as possible.
2 Operating instructions
Quartz watch
CALIBRES 1376, 1456, 4061 (fig. IV)
The crown has 2 positions:
1. Normal position (wearing position): the crown pushed in
against the case guarantees water resistance.
2. Time setting: pull the crown out to position 2, turn the crown
forwards or backwards. Push the crown back to position 1.
CALIBRES 1532, 4561, 4564 (fig. I)
Quartz watch
Operating instructions2
The crown has 3 positions:
1.
Normal position (wearing position): the crown pushed in against
the case guarantees water resistance.
2. Time zone and
correcting the date
: pull the crown out to posi-
tion 2. Turn the crown forwards or backwards, the hour hand moves
forwards or backwards in one-hour jumps.
The date can be moved
forwards or backwards by moving the hour hand past midnight
accordingly. Push the crown back to position 1.
3. Time setting: pull the crown out to position 3. The seconds hand
will stop. Turn the crown forwards or backwards. Synchronise the
seconds by pushing the crown back to position 1 to coincide with
a given time signal.
End of battery life indicator:
The end of battery life is indicated by the seconds hand making
4-second jumps. The watch will continue to function for several days,
but the battery must be removed and replaced by an authorised
OMEGA service agent as soon as possible.
CALIBRES 1424, 1538 (fig. I)

17
16
English
The crown has 3 positions:
1.
Normal position (wearing position): the crown pushed in against
the case guarantees water resistance.
2. Correcting the date: pull the crown out to position 2, turn the
crown forwards or backwards. Push the crown back to position 1.
3. Time setting: pull the crown out to position 3. The seconds hand
will stop. Turn the crown forwards or backwards. Synchronise the
seconds by pushing the crown back to position 1 to coincide with
a given time signal.
End of battery life indicator:
The end of battery life is indicated by the seconds hand making
4-second jumps. The watch will continue to function for several days,
but the battery must be removed and replaced by an authorised
OMEGA service agent as soon as possible.
2 Operating instructions
Quartz watch
CALIBRES 1376, 1456, 4061 (fig. IV)
The crown has 2 positions:
1. Normal position (wearing position): the crown pushed in
against the case guarantees water resistance.
2. Time setting: pull the crown out to position 2, turn the crown
forwards or backwards. Push the crown back to position 1.
CALIBRES 1532, 4561, 4564 (fig. I)
Quartz watch
Operating instructions2
The crown has 3 positions:
1.
Normal position (wearing position): the crown pushed in against
the case guarantees water resistance.
2. Time zone and
correcting the date
: pull the crown out to posi-
tion 2. Turn the crown forwards or backwards, the hour hand moves
forwards or backwards in one-hour jumps.
The date can be moved
forwards or backwards by moving the hour hand past midnight
accordingly. Push the crown back to position 1.
3. Time setting: pull the crown out to position 3. The seconds hand
will stop. Turn the crown forwards or backwards. Synchronise the
seconds by pushing the crown back to position 1 to coincide with
a given time signal.
End of battery life indicator:
The end of battery life is indicated by the seconds hand making
4-second jumps. The watch will continue to function for several days,
but the battery must be removed and replaced by an authorised
OMEGA service agent as soon as possible.
CALIBRES 1424, 1538 (fig. I)

19
18
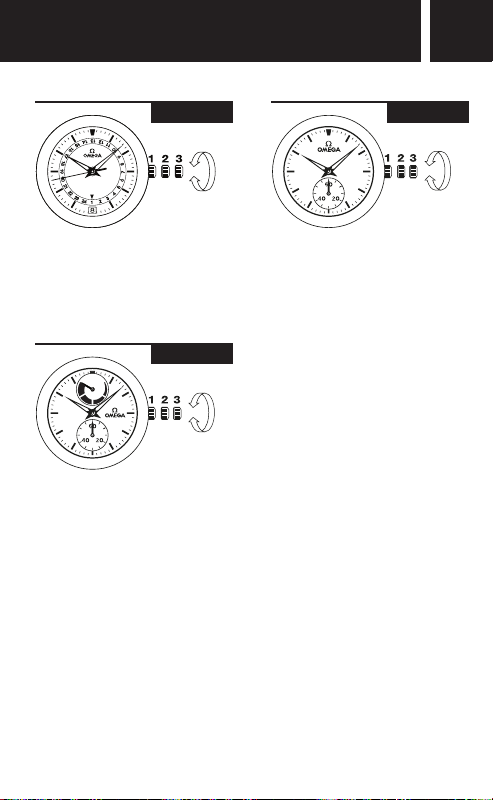
English
The crown has 3 positions:
1. Normal position (wearing position): the crown pushed in
against the case guarantees water resistance.
Occasional winding: if the watch has not been worn for
60 hours (72h: calibres 8910, 8928, 8929) or more, wind the watch
by turning the crown whilst in Position 1.
Calibres 8511, 8910, 8926, 8927, 8928 and 8929 - man-
ual winding: turn the crown forwards until it stops (DO NOT
OVERWIND).
Calibres 8934 and 8935 - manual winding: turn the crown
forwards until the power reserve indicator hand is at the maxi-
mum position.
2. Time zone and correcting the date: pull the crown out to
position 2. Turn the crown forwards or backwards; the hour hand
moves forwards or backwards in one-hour jumps. The date jumps
forwards or backwards each time the hour hand passes midnight.
Push the crown back to position 1.
Note: the calibres 8400, 8401, 8912, 8913, 8926, 8927, 8928, 8929,
8934 and 8935 have no date indicator.
NB: when changing the time zone backwards, it is necessary to
move the hour hand back past 7 pm to ensure the date changes.
Manual & self-winding watch
Operating instructions2
ê
Manual & self-winding watch
Operating instructions2
3. Time setting: hours – minutes – seconds. Pull the crown out to
position 3. The seconds hand will stop. Turn the crown forwards or
backwards. Synchronise the seconds by pushing the crown back to
position 1 to coincide with a given time signal.
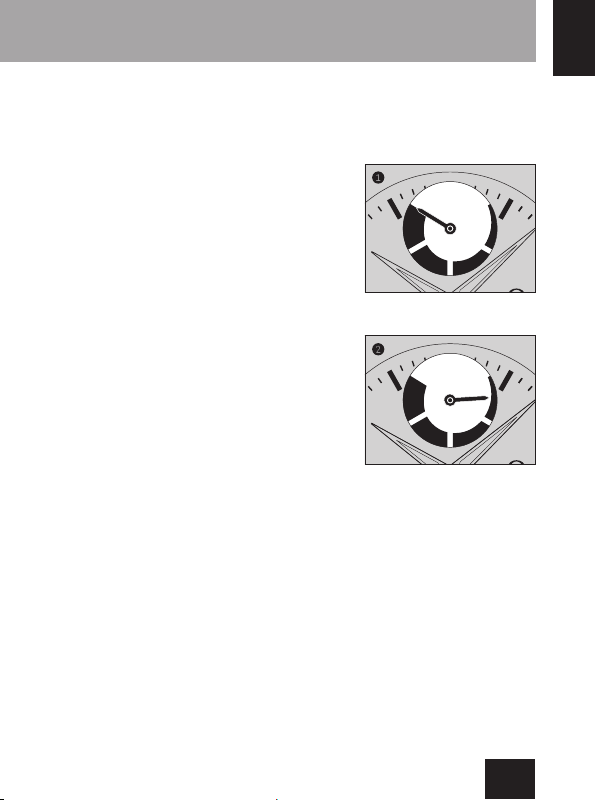
Calibres 8934 and 8935 - Power
reserve indicator hand:
(Indicator at 12 o’clock)
When the watch is fully wound, the
power reserve indicator hand is at the
maximum position (fig. 1).
Over time, the power reserve indicator
hand gradually moves anti-clockwise.
When the power reserve indicator hand
is in the last quarter (fig. 2), this means
that the watch’s power reserve is low.
In this case, the watch should be manu-
ally wound to prevent it from stopping.
During manual winding (crown in posi-
tion 1), the power reserve indicator hand
moves clockwise.
CALIBRES 8400, 8401, 8912, 8913, 8928, 8929 (fig. VI)
CALIBRES 8916, 8917 (fig. X)
CALIBRES 8926, 8927 (fig. XIV)
CALIBRES 8934, 8935 (fig. XV)
8901, 8910
CALIBRES 8500, 8501, 8507, 8508, 8511, 8900, (fig. I)
19
18
English
The crown has 3 positions:
1. Normal position (wearing position): the crown pushed in
against the case guarantees water resistance.
Occasional winding: if the watch has not been worn for
60 hours (72h: calibres 8910, 8928, 8929) or more, wind the watch
by turning the crown whilst in Position 1.
Calibres 8511, 8910, 8926, 8927, 8928 and 8929 - man-
ual winding: turn the crown forwards until it stops (DO NOT
OVERWIND).
Calibres 8934 and 8935 - manual winding: turn the crown
forwards until the power reserve indicator hand is at the maxi-
mum position.
2. Time zone and correcting the date: pull the crown out to
position 2. Turn the crown forwards or backwards; the hour hand
moves forwards or backwards in one-hour jumps. The date jumps
forwards or backwards each time the hour hand passes midnight.
Push the crown back to position 1.
Note: the calibres 8400, 8401, 8912, 8913, 8926, 8927, 8928, 8929,
8934 and 8935 have no date indicator.
NB: when changing the time zone backwards, it is necessary to
move the hour hand back past 7 pm to ensure the date changes.
Manual & self-winding watch
Operating instructions2
ê
Manual & self-winding watch
Operating instructions2
3. Time setting: hours – minutes – seconds. Pull the crown out to
position 3. The seconds hand will stop. Turn the crown forwards or
backwards. Synchronise the seconds by pushing the crown back to
position 1 to coincide with a given time signal.
Calibres 8934 and 8935 - Power
reserve indicator hand:
(Indicator at 12 o’clock)
When the watch is fully wound, the
power reserve indicator hand is at the
maximum position (fig. 1).
Over time, the power reserve indicator
hand gradually moves anti-clockwise.
When the power reserve indicator hand
is in the last quarter (fig. 2), this means
that the watch’s power reserve is low.
In this case, the watch should be manu-
ally wound to prevent it from stopping.
During manual winding (crown in posi-
tion 1), the power reserve indicator hand
moves clockwise.
CALIBRES 8400, 8401, 8912, 8913, 8928, 8929 (fig. VI)
CALIBRES 8916, 8917 (fig. X)
CALIBRES 8926, 8927 (fig. XIV)
CALIBRES 8934, 8935 (fig. XV)
8901, 8910
CALIBRES 8500, 8501, 8507, 8508, 8511, 8900, (fig. I)

21
20
English
Manual & self-winding watch
Operating instructions2
The crown has 3 positions:
1. Normal position (wearing position): the crown pushed in
against the case guarantees water resistance.
Occasional winding: if the watch has not been worn for 55 hours
or more, wind the watch by turning the crown whilst in Position 1.
2. Annual calendar: pull the crown out to position 2. Turn the
crown forwards to change the date or backwards to change the
month. Push the crown back to position 1.
Note: the day following 28 or 29 February (depending on
whether it is a leap year), the date needs to be adjusted by one
or two days (crown in position 2). Ideally, the date should be
adjusted after setting the time.
When correcting the date between
midnight and 10 am, the effort required for the first jump is
slightly greater than for the others.
NB: do not exit correction mode until the displays (date and
month) are centred in the aperture.
Calibres 8922 and 8923: do not switch out of correction mode
unless the date is centred in the window and the month hand cen-
tred in the month display.
3. Time setting: hours – minutes – seconds. Pull the crown out to
position 3, the seconds hand will stop. Turn the crown forwards or
backwards. Synchronise the seconds by pushing the crown back to
position 1 to coincide with a given time signal.
NB: when changing the date backwards in time setting mode, it
is necessary to wind the hands back to noon to ensure the date
changes.
Manual & self-winding watch
Operating instructions2
The crown has 3 positions:
1. Normal position (wearing position): the crown pushed in
against the case guarantees water resistance.
Occasional winding: if the watch has not been worn for 55 hours
or more, wind the watch by turning the crown whilst in Position 1.
2. Correcting the day and the date: pull the crown out to posi-
tion 2. Turn the crown forwards to change the date or backwards
to change the day. Push the crown back to position 1.
NB: do not quit setting mode if the displays (day and date) are not
properly centred in their windows.
3. Time setting: hours – minutes – seconds. Pull the crown out to
position 3. The seconds hand will stop. Turn the crown forwards or
backwards. Synchronise the seconds by pushing the crown back to
position 1 to coincide with a given time signal.
NB: when setting the day and date backwards in setting mode, it
is necessary to go back to 2 pm to ensure that the day and date
change at the right time.
ê
ê
ê
ê
CALIBRES 8601, 8611, 8902, 8903 (fig. II)
CALIBRES 8922, 8923 (fig. XII)
CALIBRES 8602, 8612 (fig. III)
23
22
English
The crown has 3 positions:
1. Normal position (wearing position): the crown pushed in
against the case guarantees water resistance.
Occasional winding: if the watch has not been worn for
48 hours (55h: calibres 8800, 8801, 8802, 8803, 8810, 8811; 50h:
calibres 8520, 8521, 8700, 8701, 8704, 8705; 44h: calibre 1120;
40h: calibre 2520) or more, wind the watch by turning the crown
whilst in Position 1.
2. Correcting the date: pull the crown out to position 2, turn the
crown backwards (forwards for calibres 2520, 8520, 8521, 8700,
8701, 8704 and 8705) and push it back to position 1.
NB: date-setting is not recommended between 8 pm and 2 am.
3. Time setting: hours – minutes – seconds. Pull the crown out to
position 3. The seconds hand will stop. Turn the crown forwards or
backwards. Synchronise the seconds by pushing the crown back
to position 1 to coincide with a given time signal.
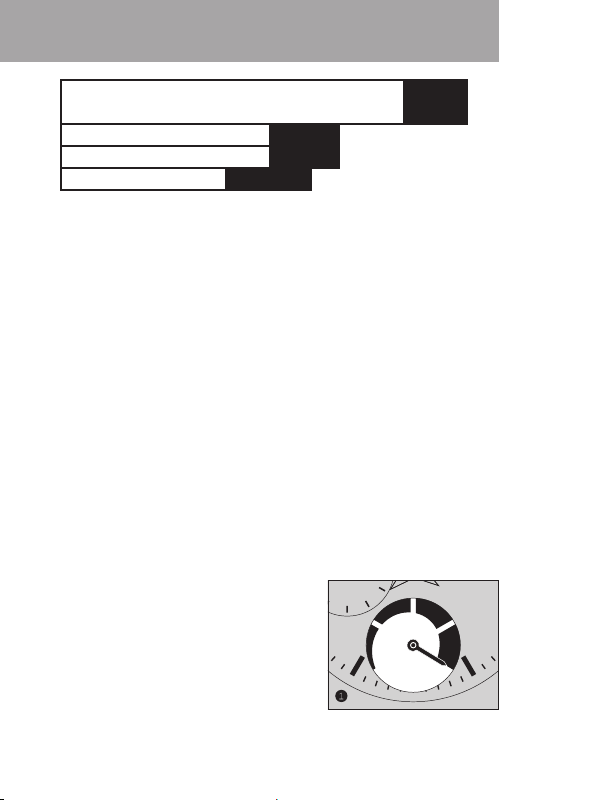
Calibr
es 2627, 8810 and 8811 - P
ower reserve indicator:
(Indicator at 6 o’clock)
When the watch is fully wound, the
power reserve indicator hand is at the
maximum position (fig. 1).
If the watch is not being worn, or during
periods of low activity, the power reserve
Manual & self-winding watch
2 Operating instructions
indicator hand gradually moves anti-clockwise.
When the power reserve indicator hand is in the last quarter (fig. 2),
this means that the watch’s power
reserve is low. In this case, the watch
should be worn or manually wound to
prevent it from stopping.
During manual winding (crown in posi-
tion 1) or when being worn (self-wind-
ing), the power reserve indicator hand
moves clockwise."
The crown has 2 positions:
1. Normal position (wearing position): the crown pushed in
against the case guarantees water resistance.
Occasional winding: if the watch has not been worn for 44
hours (50h; calibres 8421, 8703, 53h; calibres 2201, 2211 and 55h;
calibres 8804, 8805, 8806, 8807) or more, wind the watch by turn-
ing the crown whilst in Position 1.
Calibres 2201 and 2211 - manual winding: turn the crown
forwards until it stops (DO NOT OVERWIND).
2. Time setting: hours – minutes. Pull the crown out to position 2.
Turn the crown forwards or backwards. Push the crown back to
position 1.
For calibres 2200, 2202, 2403, 8421, 8703, 8804, 8805,
8806 and 8807: synchronise the seconds by pushing the crown
back to position 1 to coincide with a given time signal.
Manual & self-winding watch
Operating instructions2
CALIBRES 2403, 8421, 8703, 8806, 8807 (fig. VIII)
CALIBRES 2200, 2201, 2202, 2211, 8804, 8805 (fig. IX)
ê
CALIBRES 2300, 8802, 8803 (fig. X)
CALIBRES 2627, 8810, 8811 (fig. V)
CALIBRES 8704, 8705 (fig. XI)
8521, 8700, 8701, 8800, 8801
CALIBRES 1120, 2500, 2507, 2520, 2610, 8520, (fig. I)
200
200
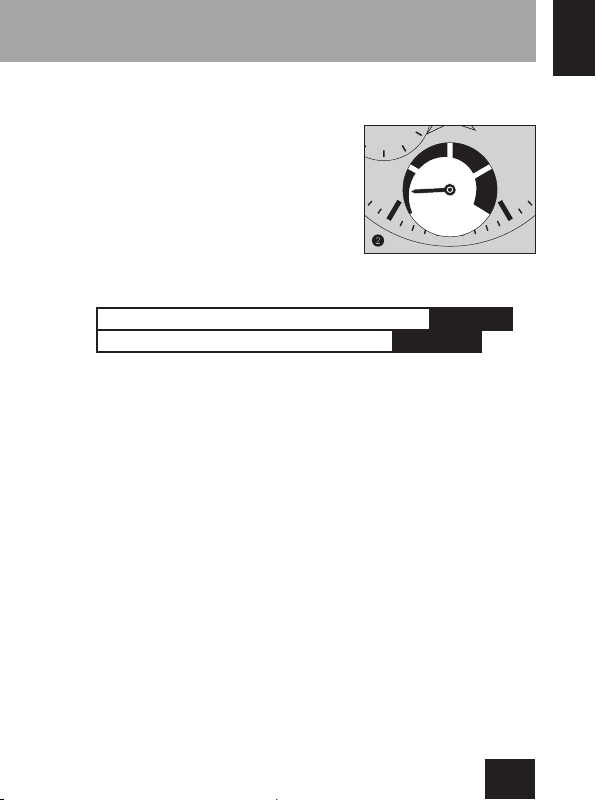
23
22
English
The crown has 3 positions:
1. Normal position (wearing position): the crown pushed in
against the case guarantees water resistance.
Occasional winding: if the watch has not been worn for
48 hours (55h: calibres 8800, 8801, 8802, 8803, 8810, 8811; 50h:
calibres 8520, 8521, 8700, 8701, 8704, 8705; 44h: calibre 1120;
40h: calibre 2520) or more, wind the watch by turning the crown
whilst in Position 1.
2. Correcting the date: pull the crown out to position 2, turn the
crown backwards (forwards for calibres 2520, 8520, 8521, 8700,
8701, 8704 and 8705) and push it back to position 1.
NB: date-setting is not recommended between 8 pm and 2 am.
3. Time setting: hours – minutes – seconds. Pull the crown out to
position 3. The seconds hand will stop. Turn the crown forwards or
backwards. Synchronise the seconds by pushing the crown back
to position 1 to coincide with a given time signal.
Calibr
es 2627, 8810 and 8811 - P
ower reserve indicator:
(Indicator at 6 o’clock)
When the watch is fully wound, the
power reserve indicator hand is at the
maximum position (fig. 1).
If the watch is not being worn, or during
periods of low activity, the power reserve
Manual & self-winding watch
2 Operating instructions
indicator hand gradually moves anti-clockwise.
When the power reserve indicator hand is in the last quarter (fig. 2),
this means that the watch’s power
reserve is low. In this case, the watch
should be worn or manually wound to
prevent it from stopping.
During manual winding (crown in posi-
tion 1) or when being worn (self-wind-
ing), the power reserve indicator hand
moves clockwise."
The crown has 2 positions:
1. Normal position (wearing position): the crown pushed in
against the case guarantees water resistance.
Occasional winding: if the watch has not been worn for 44
hours (50h; calibres 8421, 8703, 53h; calibres 2201, 2211 and 55h;
calibres 8804, 8805, 8806, 8807) or more, wind the watch by turn-
ing the crown whilst in Position 1.
Calibres 2201 and 2211 - manual winding: turn the crown
forwards until it stops (DO NOT OVERWIND).
2. Time setting: hours – minutes. Pull the crown out to position 2.
Turn the crown forwards or backwards. Push the crown back to
position 1.
For calibres 2200, 2202, 2403, 8421, 8703, 8804, 8805,
8806 and 8807: synchronise the seconds by pushing the crown
back to position 1 to coincide with a given time signal.
Manual & self-winding watch
Operating instructions2
CALIBRES 2403, 8421, 8703, 8806, 8807 (fig. VIII)
CALIBRES 2200, 2201, 2202, 2211, 8804, 8805 (fig. IX)
ê
CALIBRES 2300, 8802, 8803 (fig. X)
CALIBRES 2627, 8810, 8811 (fig. V)
CALIBRES 8704, 8705 (fig. XI)
8521, 8700, 8701, 8800, 8801
CALIBRES 1120, 2500, 2507, 2520, 2610, 8520, (fig. I)
200
200

25
24
English
Manual-winding chronograph
Operating instructions2
Watch functions:
The crown has 2 positions:
1.
Normal position (wearing position): the crown pushed in against
the case guarantees water resistance.
Winding:
turn the crown forwards until it stops (DO NOT OVERWIND).
Note:
do not wind the watch more often than is necessary. For
a watch that is worn all the time, a single winding each day will
ensure that it functions correctly.
2. Time setting: hours – minutes – seconds. Pull the crown out to
position 2. Turn the crown forwards or backwards. Synchronise the
seconds by pushing the crown back to position 1 to coincide with
a given time signal.
Note:
calibres 321, 1861, 1863, 1865, 1866, and 1869 do not have
a 'stop-second' mechanism.Therefore, it is not possible to synchro-
nise the watch to the pip.
Chronograph functions:
• Pusher A: start – stop, start – stop, etc.
Timekeeping with a resolution of 1/5 of a second up to 12 hours for
the calibre 321.
Timekeeping with a resolution of 1/6 of a second for up to 12 hours
for the calibres 1861, 1863, 1865, 1866, 1869 and 3861.
Timekeeping with a resolution of 1/8 of a second up to 30 minutes
for the calibre 3203.
Timekeeping with a resolution of 1/8 of a second up to 12 hours for
the calibre 3201.
• Pusher B: reset (after a stop).
Note: resetting/zeroing of the sub dials must only be carried out after
the chronograph has stopped. Never push the chronograph’s two
pushers (A and B) simultaneously (calibre 3201).
Calibre 1866 – date and moon phase correction
– Correcting the date (small counter at 12 o’clock): press
corrector (C).
– Correcting the moon phase: press corrector (D) to move the disc
into the full-moon position. Then determine how many days have
elapsed since the last full moon (consult a calendar) and press the
corrector the equivalent number of times.
When the watch is running, the date and moon phase move forward
automatically.
Important: avoid pressing correctors (C) and (D) (date and moon
phase) if the watch is displaying any time between 7 and 12 o’clock
(am or pm).
Do not set the date by moving the hour hand past midnight, since
this may desynchronise the date and moon phase indicators.
ê
1866
Omega
Manual-winding chronograph
Operating instructions2
CALIBRES 321, 1861, 1863, 1865, 1869, 3201, 3861 (fig. XX)
CALIBRE 3203 (fig. XXI)
CALIBRE 1866 (fig. XXII)
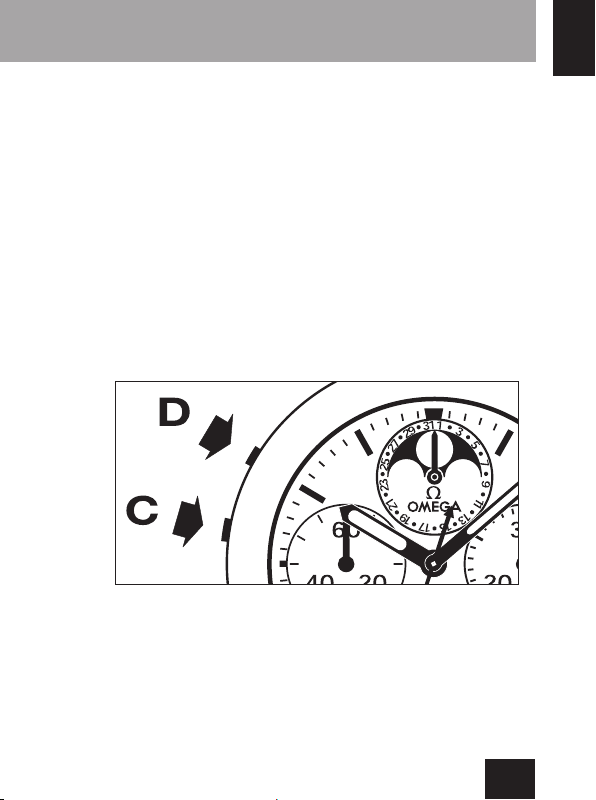

27
26
English
Manual-winding chronograph
Operating instructions2
CALIBRE 9908 (fig. XXXII)
CALIBRE 9906 (fig. XXVIII)
Watch functions:
The crown has 3 positions:
1. Normal position (wearing position): the crown pushed in
against the case guarantees water resistance.
Winding: turn the crown forwards until it stops DO NOT
OVERWIND).
Note:
do not wind the watch more often than is necessary. For
a watch that is worn all the time, a single winding each day will
ensure that it functions correctly.
2. Time zone and correcting the date: pull the crown out to
position 2. Turn the crown forwards or backwards; the hour hand
moves forwards or backwards in one-hour intervals. The date jumps
forwards or backwards each time the hour hand passes midnight.
Push the crown back to position 1.
Note:
the calibre 9908 has no date indicator.
NB: when changing the time zone or date backwards, you must
move the hour hand back past 7 pm to ensure the date changes.
3. Setting the time: hours – minutes – seconds. Pull the crown out
to position 3, the seconds hand will stop. Turn the crown forwards or
backwards. Synchronise the seconds by pushing the crown back to
position 1 to coincide with a given time signal.
Chronograph functions:
• Pusher A: start – stop, start – stop, etc.
Timekeeping with a resolution of 1/8 of a second for up to 12 hours.
• Pusher B: reset (after a sto)p.
ê
Self-winding chronograph with or without date
Operating instructions2
Watch functions:
The crown has 2 positions:
1. Normal position (wearing position): the crown pushed in
against the case guarantees water resistance.
Occasional winding: if the watch has not been worn for 40 hours
(52h; calibres 3202, 3330) or more, wind the watch by turning the
crown whilst in Position 1.
2. Time setting: hours – minutes – seconds. Pull the crown out to
position 2. The seconds hand will stop. Turn the crown forwards or
backwards. Synchronise the seconds by pushing the crown back to
position 1 to coincide with a given time signal.
Calibre 3330 (fig. XXVII)
Correcting the date: press the corrector (C) positioned at 10 o'clock.
NB: correcting is impossible between 8.30 pm and 11 pm.
Chronograph functions:
•
Pusher A: start – stop, start – stop, etc.
Timekeeping with a resolution of 1/8 of a second for up to 12 hours.
• Pusher B: reset (after a stop).
Note: never push the chronograph’s two pushers (A and B) simulta-
neously (calibre 3202). The reset function should only be done after
the chronograph has stopped.
ê
CALIBRE 3202 (fig. XX)
CALIBRE 3330 (fig. XXVII)
CALIBRE 3220 (fig. XVIII)

29
28
English
Self-winding chronograph with date
Operating instructions2
Watch functions:
The crown has 3 positions:
1. Normal position (wearing position): the crown pushed in
against the case guarantees water resistance.
Occasional winding: if the watch has not been worn for 44 hours
(48h; calibre 3304 and 52h; calibres 3113, 3313, 3888, 3890) or
more, wind the watch by turning the crown whilst in Position 1.
2. Correcting the date: pull the crown out to position 2, turn the
crown forwards (backwards for calibres 1151, 3606), then push the
crown back to position 1.
NB: the date cannot be corrected between 8.30 pm and 1 am. (9 pm
and 4 am for the calibres 1151 and 3606; see note below for the
calibres 3888 and 3890).
Calibre 3304 (fig. XXIV)
Correcting the date: press the corrector (C) at 10 o’clock.
Calibres 1151, 3606 (fig. XVI)
Correcting the day: press the corrector (C) at 10 o’clock.
Correcting the month: automatic each time the date hand
passes 31.
ê
CALIBRES 1151, 3606 (fig. XVI)
CALIBRE 3304 (fig. XXIV)
CALIBRE 3113 (fig. XXXI)
CALIBRES 1152, 1164 (fig. XVII)
CALIBRES 3888, 3890 (fig. XXVI)
CALIBRE 3313 (fig. XIX)
Calibres 3888, 3890 (fig. XXVI)
Correcting the day: pull the crown out to position 2, turn the
crown backwards, then push the crown back to position 1.
Note:
in the quick mode, the date is changed in two steps. Check
that the date hand (calibre 3888) or day disc plate (calibre 3890)
is centred after the change has been made.
Date-setting is not recommended between 10 pm and 2 am.
During this time lapse and under certain conditions, a safety ele-
ment can prevent these corrective functions from working.
3. Time setting: hours – minutes – seconds. Pull the crown out to
position 3. The seconds hand will stop. Turn the crown forwards or
backwards. Synchronise the seconds by pushing the crown back to
position 1 to coincide with a given time signal.
Chronograph functions:
• Pusher A: start – stop, start – stop, etc.
Timekeeping with a resolution of 1/8 of a second for up to 12 hours
or up to 7 days for calibres 3888 and 3890.
• Pusher B: reset (after a stop).
Note:
the chronograph must always be stopped before the zero
resetting function is used. Never push the chronograph’s two pushers
(A and B) simultaneously (calibre 3313).
Self-winding chronograph with date
Operating instructions2

31
30
English
Self-winding chronograph with date
Operating instructions2
Watch functions:
The crown has 3 positions:
1. Normal position (wearing position): the crown pushed in
against the case guarantees water resistance.
Occasional winding: if the watch has not been worn for 60 hours
or more, wind the watch by turning the crown whilst in position 1.
2. Time zone and correcting the date: pull the crown out to
position 2. Turn the crown forwards or backwards, the hour hand
moves forwards or backwards in one-hour jumps. The date can be
moved forwards or backwards by moving the hour hand past mid-
night accordingly. Push the crown back to position 1.
NB: when changing the time zone backwards, it is necessary to
move the hour hand back past 7 pm to ensure the date changes.
3. Time setting: hours – minutes – seconds. Pull the crown out to
position 3. The seconds hand will stop. Turn the crown forwards or
backwards. Synchronise the seconds by pushing the crown back to
position 1 to coincide with a given time signal.
Chronograph functions:
• Pusher A: start – stop, start – stop, etc.
Timekeeping with a resolution of 1/8 of a second for up to 12 hours.
• Pusher B: reset (after a stop).
ê
Watch functions:
The crown has 3 positions:
1. Normal position (wearing position): the crown pushed in
against the case guarantees water resistance.
Occasional winding: if the watch has not been worn for 60 hours
or more, wind the watch by turning the crown whilst in position 1.
2. Date and moon phase correction: Pull the crown out to
Position 2. Move the crown forward to correct the moon phase.
Shift the disc forward to "full moon" position, then turn the crown
past enough "notches" to get rid of the days since the last full moon
(consult a lunar calendar). Turn the crown backwards to correct the
date. Return the crown to Position 1.
3. Time setting: hour – minute – seconds. As you pull the crown out
to Position 3, the seconds hand will stop. Move the crown forward
or backwards as needed. Synchronise seconds by pushing the crown
back to Position 1 at the stroke of the hour.
Chronograph functions:
• Pusher A: start – stop, start – stop, etc.
Timekeeping with a resolution of 1/8 of a second for up to
12 hours.
• Pusher B: reset to zero (after a stop).
Automatic chronograph with moon phase
Operating instructions2
CALIBRES 9300, 9301, 9900, 9901 (fig. XXVIII)
CALIBRES 9904, 9905 (fig. XXX)

33
English
Watch functions:
The crown has 3 positions:
1. Normal position (wearing position): the crown pushed in
against the case guarantees water resistance.
Occasional winding: if the watch has not been worn for 52 hours
or more, wind the watch by turning the crown whilst in Position 1.
2. Correcting the date: pull the crown out to position 2, turn the
crown backwards, then push the crown back to position 1.
NB: the date cannot be corrected between 9 pm and 12.30 am.
3. Time setting: hours – minutes – seconds. Pull the crown out to
position 3. The seconds hand will stop. Turn the crown forwards or
backwards. Synchronise the seconds by pushing the crown back to
position 1 to coincide with a given time signal.
Chronograph functions:
• Pusher A: start – stop, start – stop, etc.
Timekeeping with a resolution of 1/8 of a second for up to 12 hours.
• Pusher B: reset (after a stop).
Note: the chronograph must always be stopped before the zero
resetting function is used. Never push the chronograph’s two pushers
(A and B) simultaneously.
CALIBRE 3612 (fig. XXIII)
Self-winding split-seconds chronograph
Operating instructions2
ê

35
34
English
Chronograph functions with split-seconds:
The split-seconds function allows split times to be recorded whilst
the chronograph is running.
1. Start the chronograph by pressing pusher (A) (start).
2. To record a split time, press pusher (C). The split-seconds hand (D)
stops, indicating the split time, whilst the chronograph continues
running.
NB: the split time should be read immediately, since the chrono-
graph totalisers for hours (G), minutes (E) and seconds (F) continue
to measure the elapsed time.
3. Press pusher (C) for the split-seconds hand (D) to catch up with the
chronograph seconds hand (F).
4. To record a new split time, start from step 2 above.
5. Press pusher (A) to stop the chronograph.
6. Press pusher (B) to reset.
NB: the split-seconds hand (D) must have caught up with the
chronograph seconds hand (F) as explained in step 3 before the
chronograph mechanism is reset/zeroed.
ê
ê
Self-winding split-seconds chronograph
Operating instructions2 Operating instructions2
GMT, Worldtimer, GMT Chronograph
People travelling East, for example from London to Hong Kong, should pull
the crown out to position 2 and move the hour hand forwards (in this case
by 8 hours). The table above can be used to calculate any time difference.
People travelling West, for example from London to New York, should
pull the crown out to position 2 and move the hour hand backwards
(in this case by 5 hours). The table above can be used to calculate any
time difference.
In both cases, the ’24-hour’ hand or disc allows travellers to read the
time back home – London, in our example – at a glance, using the
24-hour scale on the dial. The second time zone – in this case Hong
Kong or New York – is read off the dial in the usual way. Each time the
hour hand crosses midnight, the date jumps forwards or backwards,
depending on whether the hour hand is moved forwards or backwards.
Watch functions:
The crown has 3 positions:
1.
Normal position (wearing position): the crown pushed in against
the case guarantees water resistance.
CALIBRE 3603 (fig. XXV)
CALIBRES 2628, 8605, 8615, 8906 (fig. VII)
CALIBRES 8938, 8939 (fig. XIII)
CALIBRES 9605, 9615 (fig. XXIX)
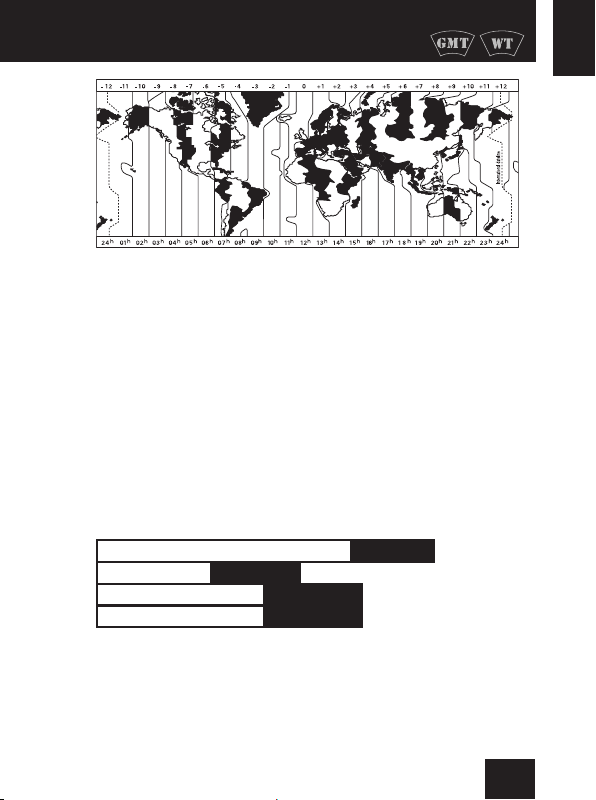

37
36
English
GMT, Worldtimer, GMT Chronograph
Operating instructions2
GMT, Worldtimer, GMT Chronograph
Operating instructions2
Setting the time and the date:
Pull the crown out to position 3. By turning the crown, move the
minutes hand and the 24-hour universal time disc forwards until they
indicate the UTC (Coordinated Universal Time) time. The display of
the 24-hour universal time must be set in such a way that the time
corresponding to the different time zones (represented by cities or
geographic areas on the dial) is correct.
Push the crown back to position 1 to start the movement.
Pull the crown out to position 2. By turning the crown, move the hour
hand forwards or backwards in one-hour increments to set the date,
then position this hand on the time that corresponds to the time zone
selected. As the date will change at midnight, make sure you set the
hour hand in the correct half of the day!
For cities/geographic areas with summer time, add an additional hour
to the hour indicated on the watch when summer time is in effect.
Chronograph functions:
(calibres 3603, 9605 and 9615)
• Pusher A: start – stop, start – stop, etc.
Timekeeping with a resolution of 1/8 of a second for up to 12 hours.
• Pusher B: reset (after a stop).
Note: the chronograph function must always be stopped before the
zero resetting function is used. Never push the chronograph’s two
pushers (A and B) simultaneously (calibre 3603).
Occasional winding: if the watch has not been worn for 60 hours
(48h: calibre 2628; 52h: calibre 3603) or more, wind the watch by
turning the crown whilst in Position 1.
2. Setting the time zone and correcting the date: pull the crown
out to position 2. Turn the crown forwards or backwards, and only
the hour hand will move forwards or backwards by 1-hour intervals.
By passing the hour hand over midnight, the date can be changed
forwards or backwards. Push the crown back to position 1.
3. Time setting: 24 hours – hours – minutes – seconds. Pull the
crown to position 3. The seconds hand will stop. Turn the crown
forwards or backwards. Synchronise the seconds by pushing the
crown back to position 1 to coincide with a given time signal.
SECOND ‘GMT’ TIME ZONE
(calibres 2628, 8605, 8615, 8906, 3603, 9605, 9615)
Thanks to the ‘24-hour’ hand with its triangular point, travellers can
read the time back home at a glance on the 24-hour scale on the dial.
Synchronisation of the hour hand with the ‘24-hour’ hand:
Pull the crown out to position 2 and turn it to synchronise the hour
hand with the time indicated by the ‘24-hour’ hand on the 24-hour
scale. Make sure you set the hour hand in the correct half of the day!
After synchronising the hour hand with the ‘24-hour’ hand, you must
set the time on your watch.
24-HOUR ‘WORLDTIMER’ DISC
(calibres 8938-8939)
Thanks to the ‘24-hour’ disc, travellers can read the time in different
time zones symbolised by cities or geographic areas on the dial.

39
38
English
Chronometer/Master Chronometer
Specific sections/general information3
OMEGA watches with a chronometer-certified movement
A chronometer is a high-precision watch whose movement has been
individually tested, for 15 days in 5 positions and at 3 temperatures,
by a neutral official body (COSC) in accordance with the ISO 3159
(NIHS 95-11) Standard. Each chronometer is unique, and identified by
a number engraved on its movement.
COSC: Official Swiss Chronometer Testing Institute
NIHS: Swiss Watchmaking Industry Standard
Master Chronometer OMEGA certified watches
In addition to the COSC movement certification, Master Chronometer
watches are individually tested at OMEGA for 10 days before they
are delivered to the end customer. Test trials, based on a simulation
of wear of the finished watch, aim to ensure the precision, resis-
tance to magnetic fields (1.5 tesla / 15,000 gauss), power reserve
and water-resistance of Master Chronometer watches. The process,
measurement equipment, and results obtained for each watch are
certified by METAS.
METAS: Federal Institute of Metrology (Switzerland)
15,000 gauss
Specific sections/general information 3
Your OMEGA watch is designed to resist a magnetic field of
15,000 gauss. This is an intensity higher than any to which it will be
exposed in everyday use (for example, the magnet in a handbag clasp
may attain 2,000 gauss). Not only will your watch not stop in the pre-
sence of a magnetic field, it will not even suffer any loss of accuracy
after being exposed to such a field.
Thermocompensated quartz
Specific sections/general information3
Watches with thermocompensated quartz
This movement is equipped with an electronic module that balances
out the influences of temperature on the precision of the quartz.
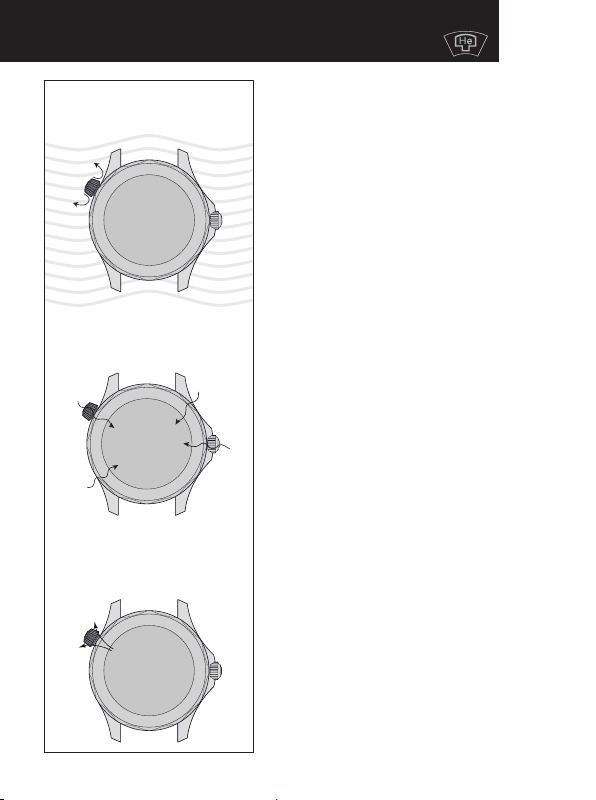
41
40
English
H2O
He
He
He
He
He
Helium escape valve
Specific sections/general information3
In-dive
Screwed-in escape valve
Hyperbaric chamber
Screwed-in escape valve
During decompression phase
Unscrewed escape valve
OMEGA
Seamaster watches
equipped with a helium escape
valve, also known as a helium
release valve, have been developed
for professional or amateur divers
who practise saturation diving. This
type of technical diving is essen-
tially used for under-water work car-
ried out at great depths. Between
two interventions, the diver is kept
in a hyperbaric chamber at a pres-
sure equivalent to the diving depth.
He or she is exposed to a complex
gaseous mix containing oxygen,
hydrogen and helium, among other
gases. This technique allows for very
long diving times while reducing
the risk of accidental decompres-
sion. Once the work is finished, the
decompression phase begins, with
the diver progressively returned to
atmospheric pressure levels in the
hyperbaric chamber.
During a long stay inside a hyper-
baric chamber or under-water sta-
tion, helium is diffused through all
the water-resistant materials and
penetrates the interior of the watch.
During the decompression phase,
the infiltrated helium generates
excessive pressure in the watch,
which can cause it to deteriorate.
The function of the escape valve
is to evacuate this high pressure
during the decompression phase.
Helium escape valve
Specific sections/general information3
How to use the helium escape valve
Manual helium escape valve:
If your watch features a manual helium escape valve, the escape valve
must always be screwed-in when diving so as to ensure perfect secu-
rity against potential water entry.
The escape valve must only be unscrewed during the decompression
phase (when the diver is returned to atmospheric pressure levels)
inside a hyperbaric chamber.
NB: Even though the escape valve is unscrewed, the watch remains
water resistant to a pressure of 5 bar (50 metres / 167 feet).
Nevertheless, it is recommended that you always swim or dive with
the escape valve screwed-in.
Variation with position indicator: the
escape valve is equipped with a red
indicator (A) that is visible in the uns-
crewed position.
Variation with corrector: the escape
valve is equipped with an integrated
date corrector. The corrector (B) posi-
tioned in the centre of the escape valve
is functional when the escape valve is
fully screwed-in.
Automatic helium escape valve:
if your watch possesses an automatic
helium escape valve (C), no manipula-
tion is necessary.
A
B
C
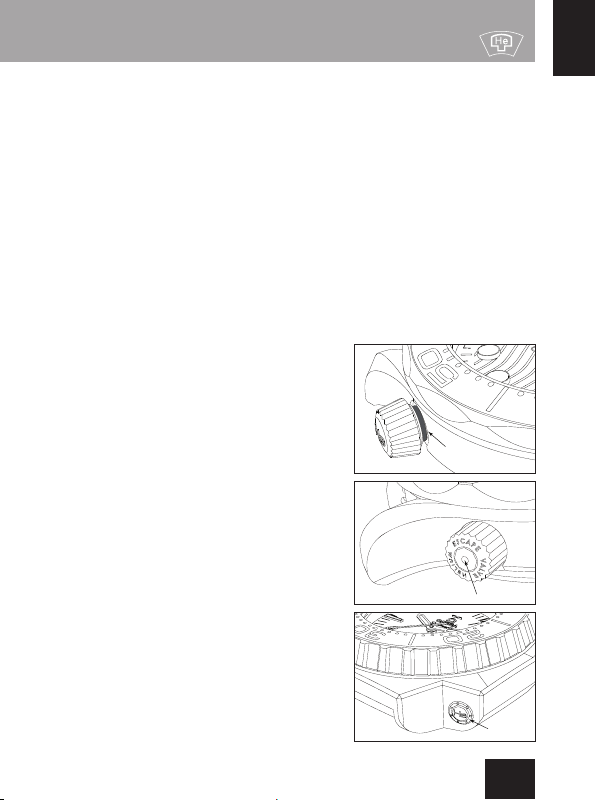
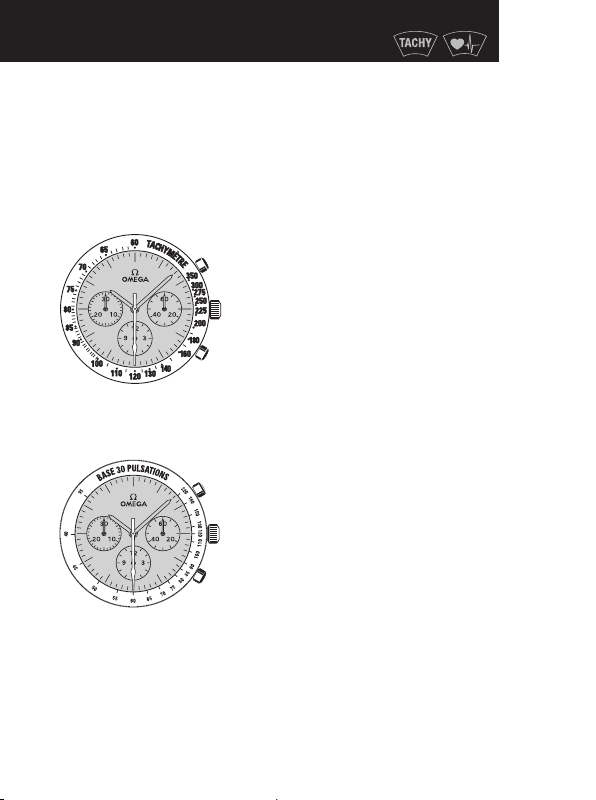
43
42
English
The desired information (tachometer; pulsimeter) is read off between
the central seconds hand of the chronograph and the correspond-
ing scale, over a maximum duration of 60 seconds. For the telemeter,
it is possible to make use of the minutes counter by adding 20 km
to the distance indicated by the central seconds hand for each
minute elapsed.
Using the tachymetric scale
Example: calculating the speed of a car.
Record the time the car takes to cover
a distance of 1 kilometre. Read off the
tachymetric scale the speed indicated by
the central seconds hand. In this case,
the car is travelling at 120 km/h.
Using the pulsimetric scale
Example: calculating the number of
heart-beats per minute.
Start the chronograph, count the heart-
beats and stop it at the beat correspon-
ding to the scale graduations of your
chronograph (here to the 30
th
beat).
Read the number of beats per minute
off the pulsimetric scale: here, 60 beats/
minute.
Measurement scales
Specific sections/general information3
Measurement scales
Specific sections/general information3
Using the telemetric scale
Example: calculate the distance between
your position and an event producing
light and sound simultaneously (e.g.
a storm).
The chronograph is set off by the detec-
tion of light, for example a lightning
strike. Then it stops on detection of the
sound, the clap of thunder. Here, the
storm is 9.9 km away.
T
É
L
É
M
È
T
R
E
1
K
m
2
3
4
5
1
5
1
6
1
7
1
8
1
9
1
4
1
3
1
2
1
1
1
0
9
8
7
6
Reading the chronograph minute counter
(Seamaster Diver 300M, ETNZ 2015)
Example: counting down the time before
the start of a regatta.
3H counter:
The inside timer displays the minutes of
the chronograph using the white part
of the Regatta needle.
The outside timer displays the 5-minute
countdown before the start of the regatta.
The chronograph is started at the first
horn blast, 5 minutes before the start of
the regatta, to allow the yachtsman to
position his boat closer to the starting
line.
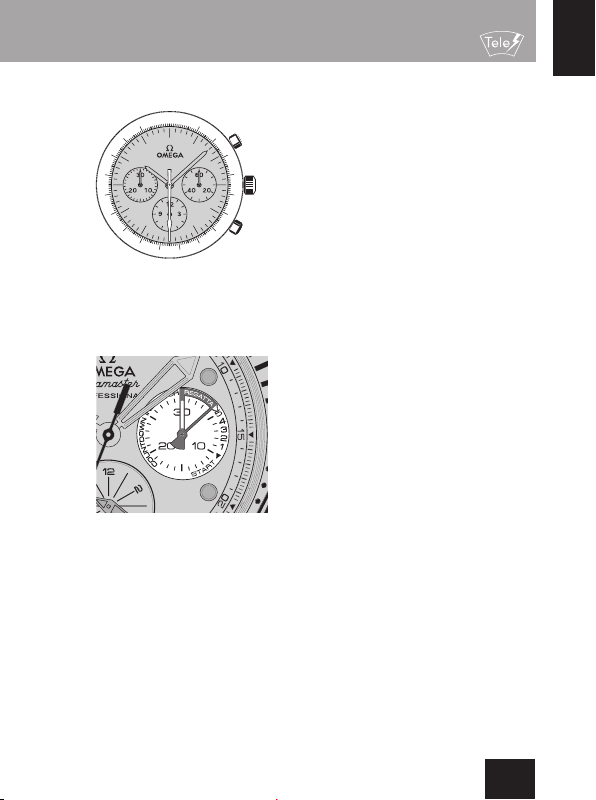
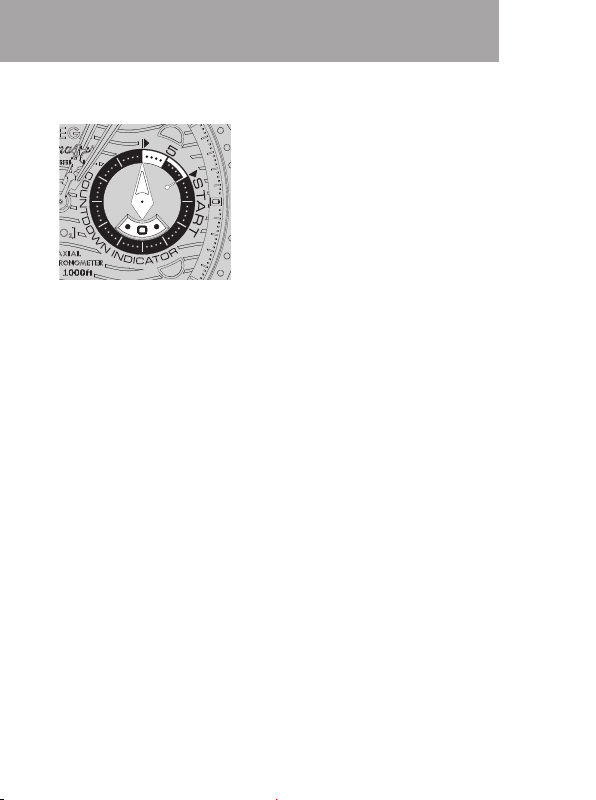
45
44
English
Measurement scales
Specific sections/general information3
Reading the chronograph minute counter
(Seamaster Diver 300M, 36th America's Cup)
Example: counting down the time before
the start of a regatta.
3H counter:
The counter has a minute hand and
an hour window. The white part of the
indicator represents the 10-minute
countdown to the start of the regatta.
The pre-regatta phase is divided into 2
parts, the first 5 minutes are allocated
to preparing the boat and crew and the
other 5 minutes to the positioning of the
boat.
The chronograph is started at the first
signal, 10 minutes before the start of
the regatta.
Adjusting the length (fig. 3):
free the longer section from the two
slideways (A) and from the catch (B).
Adjust the bracelet in the required
direction and reinsert in the catch
and the two slideways. Try the watch
for size and readjust if necessary.
fig. 1
fig. 2
Only
OMEGA
straps, specially designed for these folding clasps,
should be used. For your own peace of mind and convenience, we
recommend that you have your new clasp fitted by an authorised
OMEGA
service centre. You can always adjust the length of the
bracelet yourself.
Opening (fig. 1): to open the clasp, press the two pushers on either
side of the
OMEGA
buckle and pull upwards.
Closing (fig. 2): put the watch on your wrist and close the buckle
by pushing on it with your thumb until you hear a click. (fig. 2).
fig. 3
Foldover clasps
Specific sections/general information3
B
A
A
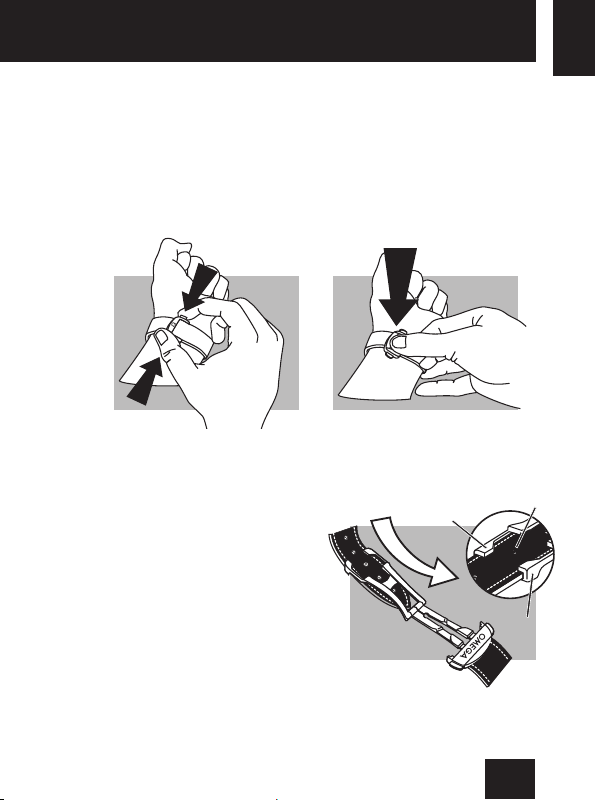
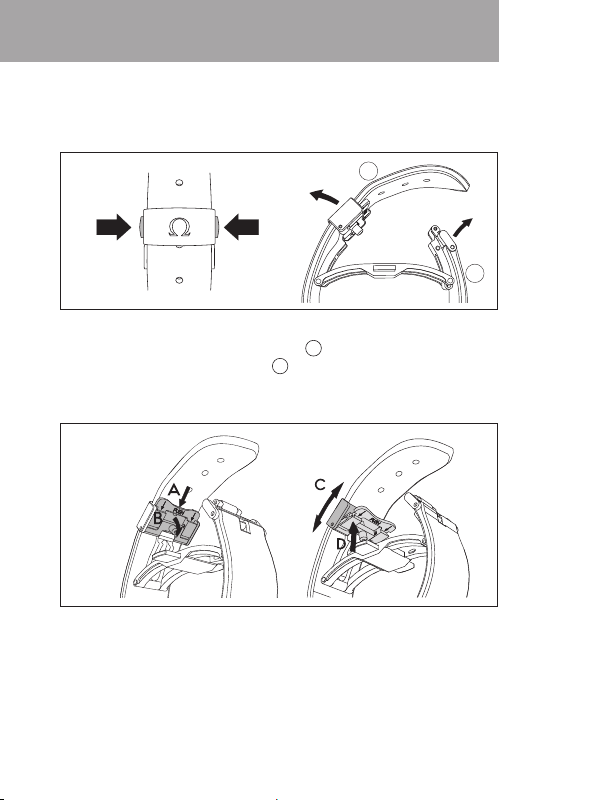
47
46
English
2
1
Foldover clasps
Specific sections/general information3
Triple-blade folding clasp:
Opening (fig. 1): to open your clasp, press the two pushers on either
side of the
OMEGA
buckle and pull upwards.
Closing:
put the
OMEGA
watch on your wrist and press down the
tab located at the 12 o'clock position
1
. Insert the end of the strap
located at the 6 o'clock position
2
into the leather loop, then close
the tab located at the 6 o'clock position by pushing it down until you
hear a click.
Adjusting the length (fig. 2):
press down on the pusher labeled
"PUSH" in the direction of arrow (A) and loosen the strap end (B). Slide
the strap within the cover to place it in the desired setting position (C).
Press down on the mobile system to lock it, ensuring that the hole is
placed over the stud so that you do not damage the strap end (D).
Try the watch for size and readjust if necessary.
fig. 1
fig. 2
Foldover clasp for metal mesh bracelet:
Opening (fig. 1): press the two pushers on the sides of the clasp and
pull upwards.
Closing (fig. 2): put your OMEGA watch on your wrist and fasten
the clasp until you hear a click.
Adjusting the length of the bracelet (fig. 3): lift the locking tab
to release the strap end. Slide the strap to your desired length and lock
it in position with the locking tab until it clicks.
fig. 1
fig. 3
fig. 2
Foldover clasps
Specific sections/general information3
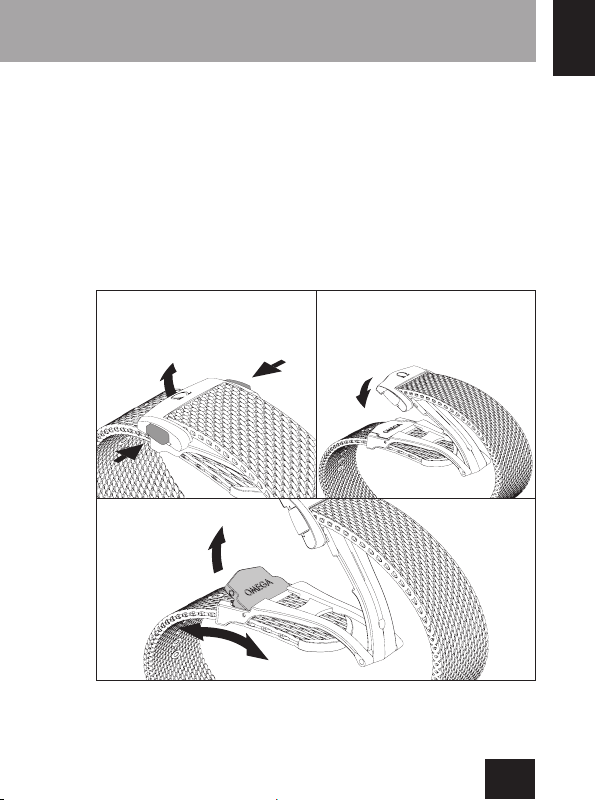

49
48
English
Fine length adjustment clasps and diving clasp
Specific sections/general information3
Butterfly clasp with a built-in extension system
Specific sections/general information3
Using the fine length adjuster:
Using the fine length adjuster:
Using the fine length adjuster:
Using the diving extension:
Using the diving extension:
Rack-and-pusher clasps:
Ploprof clasps:
Note: to fold the diving extension away, repeat the steps in reverse
order.
Extendable foldover rack-and-pusher clasps:
A
C
B
A
D
E
G
F
S = short position L = long position
Built-in extension system adjustment:
To open your clasp, press the two
pushers (A) on either side of the
cover and pull upwards (B).
Unfold the strap end (C) while
pressing the pusher (D) located
on the base and slide the tab (E)
to the desired position.
Release the pusher once in the
correct position and close the
strap end located at 6 o’clock (F)
then 12h (G).
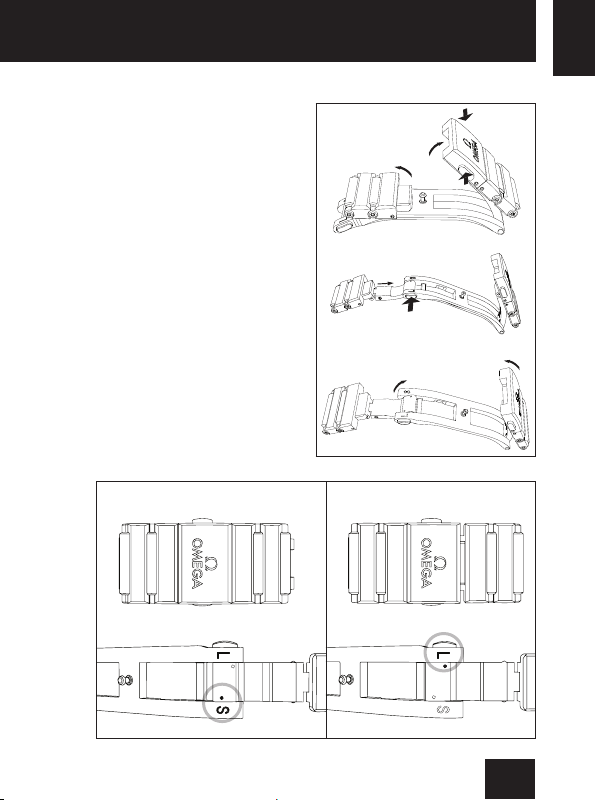
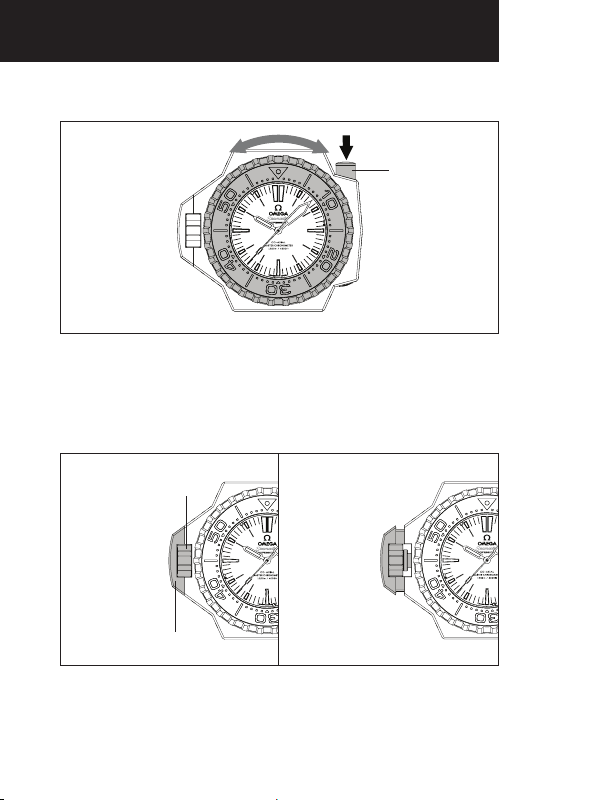
51
50
English
Ploprof bezel and crown
Specific sections/general information3
Bullhead crown
Specific sections/general information3
How to use the rotating bezel: press down on the pusher (A) to
rotate the bezel.
Retractable crown
Specific sections/general information3
Screwing down the Bullhead crown: to screw down the Bullhead
crown, position the crown so that the black mark is against the top (fig. 1),
then press and turn the crown clockwise by 90° (fig. 2).
fig. 1 fig. 2
Note: the crown is at 9 o'clock, but the functions are the same.
How to use the crown: to use the crown (B), unscrew it beforehand,
the crown-protection (C) will then slide without rotating. After use,
push the crown to position 1, then press and screw down the crown
(to ensure the case remains waterproof).
A
B
C
How to use the retractable crown: press on the crown, then
release it to move it to position 1. By pulling on the crown, you can
move it to positions 2 and 3. To return to a lower position, you must
retract the crown to position 0 (normal wearing position) before retur-
ning it to position 1 or 2.
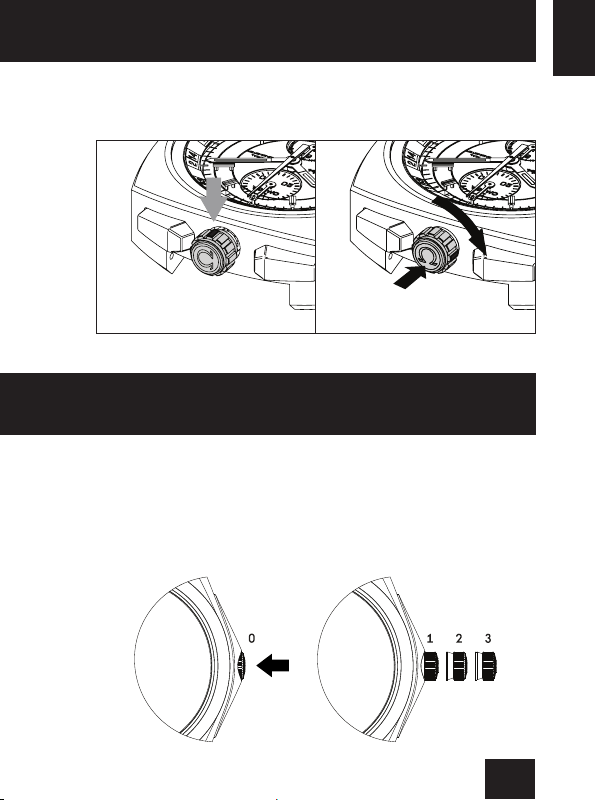
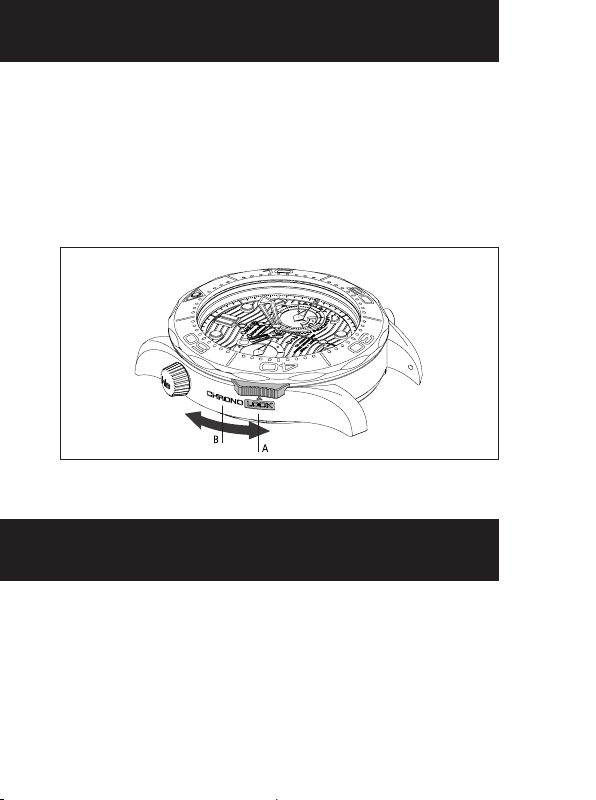
53
52
English
Chrono Lock
Specific sections/general information3
Strap with quick interchangeable system
Specific sections/general information3
How to use the Strap with quick interchangeable system:
To take off a rubber strap (fig. 1): slide the button downwards
then release the bracelet from between the lugs to remove it from
the watch case.
To put on a rubber strap (fig. 1-3): slide the button downwards to
retract the pivots. Insert the strap between the lugs on the watch case.
Chrono Lock is a system which blocks the chronograph pushers to
prevent involuntary action and secure your timekeeping.
How to use the Chrono Lock: when the locking ring is in Lock
position (A), the pushers are locked.
To unlock, push the locking ring to Chrono position (B), the pushers
can then be activated.
Strap with quick interchangeable system
Specific sections/general information3
ê
12H
6H
fig. 2
6H
12H
fig. 3
12H
6H
fig. 1
Release the button then delicately manoeuvre the strap between the
lugs until the pivots are in place.
To take off a steel strap (fig. 2): press on the button then release
the bracelet from between the lugs to remove it from the watch case.
To put on a steel strap (fig. 2-3): press on the button to retract the
pivots. Insert the strap between the lugs on the watch case. Release
the button then delicately manoeuvre the strap between the lugs until
the pivots are in place.
Visually check that your strap or bracelet is correctly inser-
ted between the lugs and ensure that both parts of the
strap or bracelet are securely fastened to the watch case by
pulling gently on the strap or bracelet.
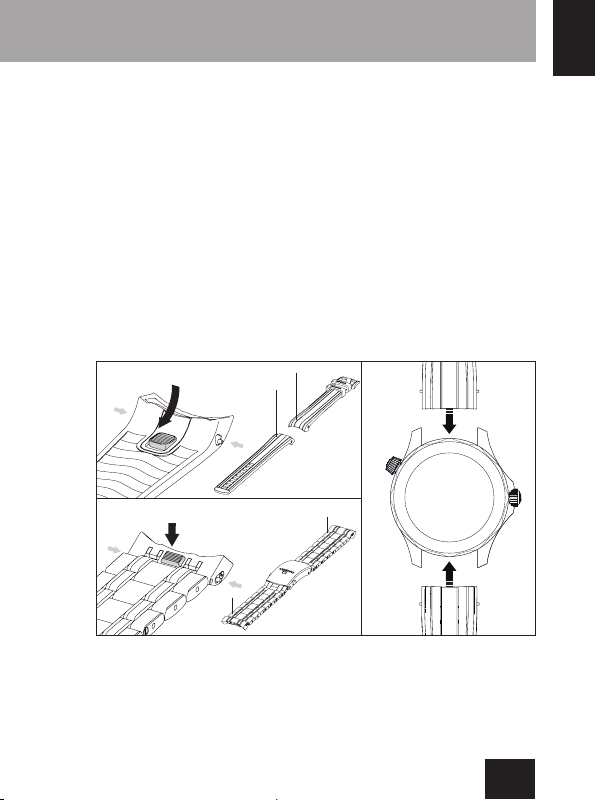
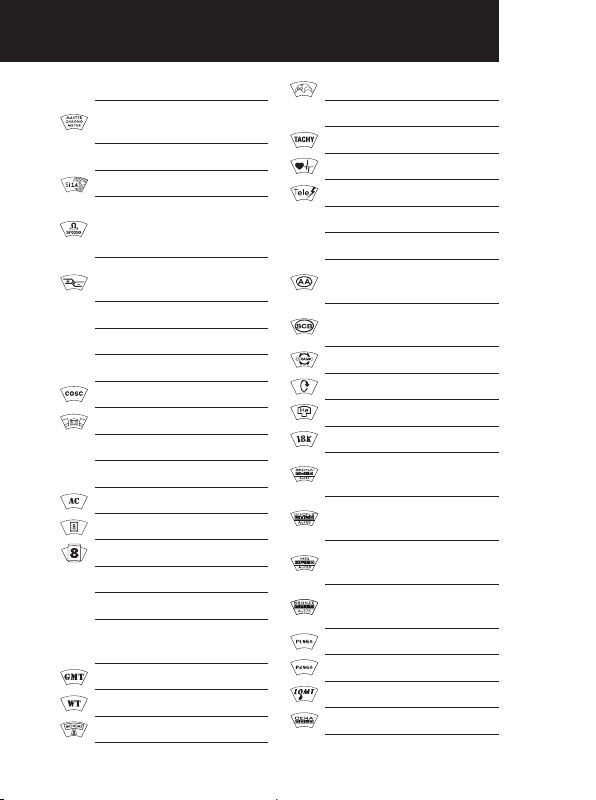
55
54
English
Pictograms
Specific sections/general information3
Calibre number
Certification Master
Chronometer
Co-Axial escapement
Si14 silicon balance-spring
Resistant magnetic
field = 15,000 gauss
(1.5 tesla)
Thermocompensated
quartz movement
Quartz
Self-winding
Manual-winding
Chronometer
Chronograph
Time zone function
Jump hour
Annual calendar
Date
Big date
Perpetual calendar
Split-seconds
Power reserve indicator
hand
Second time zone
Worldtimer (WT)
Day-date
Moon phase
End of battery life indicator
Tachymeter
Pulsimeter
Telemeter
Sapphire crystal
Anti-reflective treatment
Double-sided anti-
reflective treatment
Sapphire crystal
case back
Ceramic case
Screw-down crown
Helium escape valve
Gold 750‰
Sedna™ Gold
Gold 750‰
Canopus Gold™
Gold 750‰
Moonshine™ Gold
Gold 750‰
Bronze Gold
Gold 375‰
950‰ platinum
950‰ palladium
Liquidmetal™
OMEGA CERAGOLD™
h
o
r
Gamma Titanium
Titanium
Ceramic bezel
Watch with diamond(s)
Limited edition
Numbered edition
5-year international
guarantee
WEEE regulation
Button-type zinc-silver
oxide primary battery cell
Button-type lithium-
manganese dioxide
primary battery cell
Russian customs
Not water-resistant
Water-resistant to a
relative pressure of 3 bar
(30 metres/100 feet)
Water-resistant to a
relative pressure of 5 bar
(50 metres/167 feet)
Water-resistant to a
relative pressure of 6 bar
(60 metres/200 feet)
Water-resistant to a
relative pressure of 10 bar
(100 metres/330 feet)
Water-resistant to a
relative pressure of 12 bar
(120 metres/390 feet)
Water-resistant to a
relative pressure of 13.5 bar
(135 metres/440 feet)
Water-resistant to a
relative pressure of 15 bar
(150 metres/500 feet)
Water-resistant to a
relative pressure of 20 bar
(200 metres/660 feet)
Water-resistant to a
relative pressure of 30 bar
(300 metres/1000 feet)
Water-resistant to a
relative pressure of 60 bar
(600 metres/2000 feet)
Water-resistant to a relative
pressure of 100 bar
(1000 metres/3300 feet
)
Water-resistant to a
relative pressure of
120 bar (1200 metres/
4000 feet)
Water-resistant to a
relative pressure of
600 bar (6000 metres/
20000 feet)
Diver’s watch for
saturation diving in
accordance with the ISO
6425:2018 standardd
Pictograms
Specific sections/general information3
b
V
l
c
a
i
S
:
k
R
O
xxxx

OMEGA boutiques
Please visit www.omegawatches.com/stores for a list of our OMEGA agents
请前往 www.omegawatches.cn/stores/zh 欧米茄销售点列表
English
中文

OMEGA authorized service centres
Please visit www.omegawatches.com/service-centres for a list of OMEGA
authorized service centres
请前往 www.omegawatches.cn/cn/customer-service 欧米茄特约维修中心列表
English
中文

OMEGA boutiques
Importers of OMEGA products into the European Union, the United
Kingdom and Norway
Importateurs des produits OMEGA pour l’Union Européenne, le Royaume-
Uni et la Norvège
Importeure von OMEGA Produkten für die Europäische Union, das
Vereinigte Königreich und Norwegen
OMEGA EU Importers
Country
Importer according to the
customs documentation
Address for information
in case of need
Austria
Österreich
The Swatch Group (Österreich) GmbH
Ares Tower
Donau-City-Strasse 11
1220 Wien
Austria
The Swatch Group (Österreich) GmbH
Ares Tower
Donau-City-Strasse 11
1220 Wien
Austria
Belgium
België
Belgien
Belgique
The Swatch Group (Belgium) SA/NV
Chaussée de Mons 1424
1070 Bruxelles
Belgium
The Swatch Group (Belgium) SA/NV
Chaussée de Mons 1424
1070 Bruxelles
Belgium
Bulgaria
Република
България
GIULIAN LTD.
11 Paris str., Office #2, floor #1
1000 Sofia
Bulgaria
GIULIAN LTD.
11 Paris str., Office #2, floor #1
1000 Sofia
Bulgaria
Cyprus
Κύπρος
Kibris
The Swatch Group
(
Greece) S.A.
Sygrou Ave. & 3, Mantzagriotaki
Str. Kallithea
17672 Athens
Greece
The Swatch Group
(
Greece) S.A.
Sygrou Ave. & 3, Mantzagriotaki
Str. Kallithea
17672 Athens
Greece
Croatia
Hrvatska
SLOWATCH D.O.O.
Produtiska Cesta 152
1000 Ljubljana
Slovenia
SLOWATCH D.O.O.
Produtiska Cesta 152
1000 Ljubljana
Slovenia
Czech Republic
Česká Republika
KVEDU Praha S.R.O.
Na Prikope 17
110 00 Praha 1
Czech Republic
KVEDU Praha S.R.O.
Na Prikope 17
110 00 Praha 1
Czech Republic

OMEGA EU Importers OMEGA EU Importers
Denmark
Danmark
The Swatch Group (Nordic)
Helleruphus
Strandvejen 102 B, 4th. floor
2900 Hellerup
Denmark
The Swatch Group (Nordic)
Helleruphus
Strandvejen 102 B, 4th. floor
2900 Hellerup
Denmark
Finland
Suomi
The Swatch Group (Nordic)
Äyritie 12 B
01510 Vantaa
Finland
The Swatch Group (Nordic)
Äyritie 12 B
01510 Vantaa
Finland
France The Swatch Group (France) S.A.S.
112-114, avenue Kléber
75116 Paris
France
The Swatch Group (France) S.A.S.
112-114, avenue Kléber
75116 Paris
France
Germany
Deutschland
The Swatch Group (Deutschland)
GmbH
Frankfurter Straße 20
65760 Eschborn
Germany
The Swatch Group (Deutschland)
GmbH
Frankfurter Straße 20
65760 Eschborn
Germany
Greece
Ελλάδα
The Swatch Group Greece S.M.S.A.
Sygrou & 3 Mantzagriotaki Str.
Kallithea
17672 Athens
Greece
The Swatch Group Greece S.M.S.A.
Sygrou & 3 Mantzagriotaki Str.
Kallithea
17672 Athens
Greece
Hungary
Magyarország
KZM
Király utca 52 I.em 8
1065 Budapest
Hungary
KZM
Király utca 52 I.em 8
1065 Budapest
Hungary
Ireland
Ireland
Éire
The Swatch Group (UK) Limited
Building 1000, 2nd Floor East
Wing
The Royals Business Park
Dockside Road
London
E16 2QU
United Kingdom
The Swatch Group (UK) Limited
Building 1000, 2nd Floor East
Wing
The Royals Business Park
Dockside Road
London
E16 2QU
United Kingdom
Italy
Italia
The Swatch Group (Italia) S.p.A.
Via Washington 70
20146 Milano
Italy
The Swatch Group (Italia) S.p.A.
Via Washington 70
20146 Milano
Italy
Latvia
Latvija
DIMAX SIA
1 - 1 Valnu
1050 Riga
Latvia
"DIMAX SIA
1 - 1 Valnu
1050 Riga
Latvia
Lithuania
Lietuva
BEGALYBES VALDYMAS
Antano Tumeno G. 4-10
01009 Vilnius
Lithuania
BEGALYBES VALDYMAS
Antano Tumeno G. 4-10
01009 Vilnius
Lithuania
Luxembourg
Letzebuerg
The Swatch Group (Belgium)
SA/NV
Chaussée de Mons 1424
1070 Bruxelles
Belgium
The Swatch Group (Belgium)
SA/NV
Chaussée de Mons 1424
1070 Bruxelles
Belgium
Malta RJM Diffusion S.A.
Avenue de la Gare 1
1003 Lausanne
Switzerland
RJM Diffusion S.A.
Avenue de la Gare 1
1003 Lausanne
Switzerland
Netherlands
Nederland
The Swatch Group (Netherlands) B.V.
Kennedyplein 8
5611 ZS Eindhoven
Netherlands
The Swatch Group (Netherlands) B.V.
Kennedyplein 8
5611 ZS Eindhoven
Netherlands
Norway
Noreg
Norge
The Swatch Group (Nordic) nuf
Stalfjaera 26
Box 143, Kalbakken
0902 OSLO
NORWAY
The Swatch Group (Nordic) nuf
Stalfjaera 26
Box 143, Kalbakken
0902 OSLO
NORWAY
Poland
Polska
The Swatch Group (Polska) Sp. z o.o.
Ul. Marynarska 15
New City, pietro 9
02-674 Warszawa
Poland
The Swatch Group (Polska) Sp. z o.o.
Ul. Marynarska 15
New City, pietro 9
02-674 Warszawa
Poland

OMEGA EU Importers
Portugal Tempus Internacional S.A.
Av. Infante D. Henrique
Lote 1679, R/C Dto. CLJ.
1950 - 420 Lisboa
Portugal
Tempus Internacional S.A.
Av. Infante D. Henrique
Lote 1679, R/C Dto. CLJ.
1950 - 420 Lisboa
Portugal
Romania
România
CHRONOSTYLE
INTERNATIONAL SRL
5 Sofia street, Sector 1
011837 Bucharest
Romania
CHRONOSTYLE
INTERNATIONAL SRL
5 Sofia street, Sector 1
011837 Bucharest
Romania
Slovenia
Slovenija
SLOWATCH D.O.O.
Produtiska Cesta 152
1000 Ljubljana
Slovenia
SLOWATCH D.O.O.
Produtiska Cesta 152
1000 Ljubljana
Slovenia
Slovakia KVEDU Praha S.R.O.
Na Prikope 17
110 00 Praha 1
Czech Rep
KVEDU Praha S.R.O.
Na Prikope 17
110 00 Praha 1
Czech Rep
Spain
España
The Swatch Group (España) S.A.
Edificio C Miniparc 1
Calle Yuca, 2
Urbanizatión el Soto de la Moraleja
28109 Alcobendas
Madrid
Spain
The Swatch Group (España) S.A.
Edificio C Miniparc 1
Calle Yuca, 2
Urbanizatión el Soto de la Moraleja
28109 Alcobendas
Madrid
Spain
Sweden
Sverige
The Swatch Group (Nordic) AB
Sankt Eriksgatan 47
102 34 Stockholm
Sweden
The Swatch Group (Nordic) AB
Sankt Eriksgatan 47
102 34 Stockholm
Sweden
United
Kingdom
The Swatch Group (UK) Limited
Building 1000, 2nd Floor East Wing
The Royals Business Park
Dockside Road
London
E16 2QU
United Kingdom
The Swatch Group (UK) Limited
Building 1000, 2nd Floor East Wing
The Royals Business Park
Dockside Road
London
E16 2QU
United Kingdom

05/2022 - V25 bis
www.omegawatches.com
