4219-450-08061 MANUAL GAG. CAD. PRESTIGE EN-FR 120US.indd 1
GAGGIA CADORNA
PRESTIGE
RI9604 (SUP 049EU)
Operating instructions
Mode d’emploi
ENGLISH
FRANÇAIS
4219-450-08061 MANUAL GAG. CAD. PRESTIGE EN-FR 120US.indd 2
23/04/2020 09:49:24
Beverage menu / Menu
des boissons
Ristretto
Coffee / Café 30 ml
Espresso Coffee /
Café 40 ml
Flat white
Coffee / Café 40x2 ml
Milk / Lait 80 ml
Espresso lungoCafé au lait
Coffee / Café 80 mlCoffee / Café 90 ml
Milk / Lait 90 ml
Coffee / Café
Coffee / Café 120 ml
Latte macchiato
Milk / Lait 240 ml
Coffee / Café 40 ml
AmericanoLatte macchiato XL
Coffee / Café 40 mlMilk / Lait 300 ml
Water / Eau 110
mlCoffee / Café 50 ml
Cappuccino
Milk / Lait 120 ml
Coffee / Café 40 ml
Frothed milk / Lait émulsionné Milk /
Lait 180 ml
ESPRESSO
CAPPUCCINO
LATTE MACCHIATO
COFFEE
Control panel
/
Bandeau de commande

4219-450-08061 MANUAL GAG. CAD. PRESTIGE EN-FR 120US.indd 3
Cappuccino XLHot water / Eau chaude
Milk / Lait 180 ml Water / Eau 150 ml
Coffee / Café 70 ml
23/04/2020 09:49:29
4219-450-08061 MANUAL GAG. CAD. PRESTIGE EN-FR 120US.indd 4
4219-450-08061 MANUAL GAG. CAD. PRESTIGE EN-FR 120US.indd 5
23/04/2020
09:49:30
4219-450-08061 MANUAL GAG. CAD. PRESTIGE EN-FR 120US.indd 6
23/04/2020
09:49:39
English 6
Français 39

4219-450-08061 MANUAL GAG. CAD. PRESTIGE EN-FR 120US.indd 7
23/04/2020 09:49:39

English
4219-450-08061 MANUAL GAG. CAD. PRESTIGE EN-FR 120US.indd 8
6
Table of Contents
Important safety information ..................................................................................................................................................................................................................................................................................................................................................................................................................................................................................9
Machine Overview (Fig.2) ..........................................................................................................................................................................................................................................................................................................................................................................................................................................................................................12
Control Panel and Display .......................................................................................................................................................................................................................................................................................................................................................................................................................................................................................13
Control panel overview (Fig. 1) ....................................................................................................................................................................................................................................................................................................................................................................................................................................................................13
Multifunction buttons ....................................................................................................................................................................................................................................................................................................................................................................................................................................................................................................................................13
First Installation .........................................................................................................................................................................................................................................................................................................................................................................................................................................................................................................................................................................14
Manual rinse cycle .................................................................................................................................................................................................................................................................................................................................................................................................................................................................................................................................................14
Measuring water hardness ..............................................................................................................................................................................................................................................................................................................................................................................................................................................................................................15
INTENZA+ Water Filter ..............................................................................................................................................................................................................................................................................................................................................................................................................................................................................................................15
Installing the INTENZA+ water filter .......................................................................................................................................................................................................................................................................................................................................................................................................................................16
Replacing the INTENZA+ water filter ................................................................................................................................................................................................................................................................................................................................................................................................................................16
Types of Beverage .................................................................................................................................................................................................................................................................................................................................................................................................................................................................................................................................................17
Espresso tray .........................................................................................................................................................................................................................................................................................................................................................................................................................................................................................................................................................................................18
Brewing Coffee ............................................................................................................................................................................................................................................................................................................................................................................................................................................................................................................................................................................18
Brewing coffee from whole coffee beans ........................................................................................................................................................................................................................................................................................................................................................................................................18
Brewing coffee using pre-ground coffee ............................................................................................................................. ................................................................................................................................................................................................................................................................................19
Dispensing Frothed Milk-based Coffee Beverages ..........................................................................................................................................................................................................................................................................................19
Filling the milk carafe .................................................................................................................................................................................................................................................................................................................................................................................................................................................................................................................................19
Inserting the milk carafe ...............................................................................................................................................................................................................................................................................................................................................................................................................................................................................................................20
Removing the milk carafe ......................................................................................................................................................................................................................................................................................................................................................................................................................................................................................................20
Dispensing frothed milk-based coffee beverages ....................................................................................................................................................................................................................................................................................................................................................21
Dispensing Hot Water ........................................................................................................................................................................................................................................................................................................................................................................................................................................................................................................................21
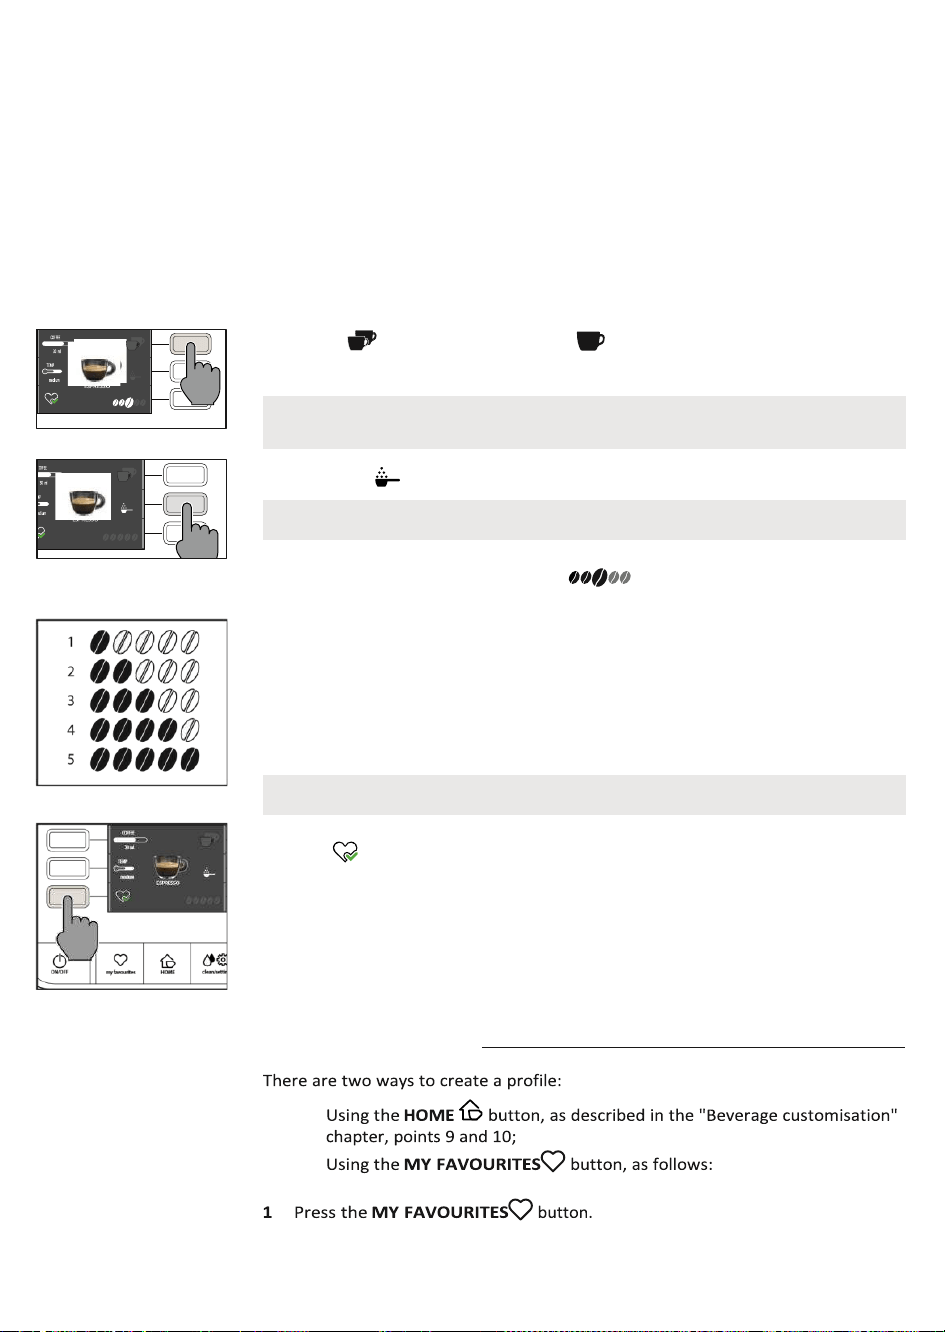
Beverage Customisation and Profile Creation ...............................................................................................................................................................................................................................................................................................................................22
Customisation .............................................................................................................................................................................................................................................................................................................................................................................................................................................................................................................................................................................22
Creating a profile ..........................................................................................................................................................................................................................................................................................................................................................................................................................................................................................................................................................23
Coffee Grind Settings ...........................................................................................................................................................................................................................................................................................................................................................................................................................................................................................................................24
Cleaning and Maintenance ............................................................................................................................................................................................................................................................................................................................................................................. ....................................................................................................25
Cleaning table ............................................................................................................................................................................................................................................................................................................................................................................................................................................................................................................................................................................25
Cleaning the milk carafe ........................................................................................................................................................................................................................................................................................................................................................................................................................................................................................................26
Cleaning the brew group .....................................................................................................................................................................................................................................................................................................................................................................................................................................................................................................27
Lubricating the brew group .....................................................................................................................................................................................................................................................................................................................................................................................................................................................................................30

English
4219-450-08061 MANUAL GAG. CAD. PRESTIGE EN-FR 120US.indd 9 23/04/2020 09:49:41
Descaling ..............................................................................................................................................................................................................................................................................................................................................................................................................................................................................................................................................................................................................31
Descaling procedure ....................................................................................................................................................................................................................................................................................................................................................................................................................................................................................................................................31
What to do if the descaling process is interrupted ......................................................................................................................................................................................................................................................... ........................................................................................32
Various Settings ................................................................................................................................................................................................................................................................................................................................................................................................................................................................................................................................................ .....................32
Language ........................................................................................................................................................................................................................................................................................................................................................................................................................................................................................................................................................................................................32
Water filter ...................................................................................................................................................................................................................................................................................................................................................................................................................................................................................................................................................................................................33
Timer stand-by ........................................................................................................................................................................................................................................................................................................................................................................................................................................................................................................................................................................33
Water hardness ...................................................................................................................................................................................................................................................................................................................................................................................................................................................................................................................................................................33
Measurement units ..............................................................................................................................................................................................................................................................................................................................................................................................................................................................................................................................................33
Beverages counter ...............................................................................................................................................................................................................................................................................................................................................................................................................................................................................................................................................33
Restore factory settings ............................................................................................................................................................................................................................................... ................................................................................................................................................................................................................................................................ ..33
Error Code Key ...........................................................................................................................................................................................................................................................................................................................................................................................................................................................................................................................................................................34
Troubleshooting ......................................................................................................................................................................................................................................................................................................................................................................................................................................................................................................................................................................35
GAGGIA Accessories ............................................................................................................................................................................................................................................................................................................................................................................................................................................................................................................................37
Technical Specifications ........................................................................................................................................................................................................................................................................................................................................................................................................................................................................................................38
23/04/2020 09:49:40
7
IMPORTANT SAFEGUARDS
When using electrical appliances, basic safety precautions should always be
followed, including the following:
1. Read all instructions.
2. Do not touch hot surfaces. Use handles or knobs.
3. To protect against fire, electric shock and injury to persons do not immerse
cord, plugs, or appliance in water or other liquid.
4. Close supervision is necessary when the appliance is used by or near children.
5. Unplug from outlet when not in use and before cleaning. Allow to cool before
putting on or taking off parts, and before cleaning the appliance.
6. Do not operate any appliance with a damaged cord or plug or after the
appliance malfunctions, or has been damaged in any manner. Return

English
4219-450-08061 MANUAL GAG. CAD. PRESTIGE EN-FR 120US.indd 10 23/04/2020 09:49:41
appliance to the nearest authorized service facility for examination, repair or
adjustment.
7. The use of accessory attachments not recommended by the appliance
manufacturer may result in fire, electric shock or injury to persons.
8. Do not use outdoors.
9. Do not let cord hang over edge of table or counter, or touch hot surfaces.
10. Do not place on or near a hot gas or electric burner, or in a heated oven.
11. Always attach plug to appliance first, then plug cord into wall outlet. To
disconnect, turn any control to “off”, then remove plug from wall outlet.
12. Do not use appliance for other than intended use.
13. Save these instructions.
SAVE THESE INSTRUCTIONS
8
CAUTION
This appliance is for household use only. Any servicing, other than cleaning and
user maintenance, should be performed by an authorized service center. Do not
immerse machine in water. To reduce the risk of fire or electric shock, do not
disassemble the machine. There are no parts inside the machine serviceable by
the user. Repair should be done by authorized service personnel only.
1. Check voltage to be sure that the voltage indicated on the nameplate
corresponds with your voltage.
2. Never use warm or hot water to fill the water tank. Use cold water only.
3. Keep your hands and the cord away from hot parts of the appliance during
operation.
4. Never clean with scrubbing powders or harsh cleaners. Simply use a soft cloth
dampened with water.
5. For optimal taste of your coffee, use purified or bottled water. Periodic
descaling is still recommended every 2-3 months.

English
4219-450-08061 MANUAL GAG. CAD. PRESTIGE EN-FR 120US.indd 11 23/04/2020 09:49:41
6. Do not use caramelized or flavored coffee beans.
INSTRUCTIONS FOR THE POWER
SUPPLY CORD
A. A short power-supply cord (or detachable power-supply cord) is to be
provided to reduce risks resulting from becoming entangled in or tripping
over a longer cord.
B. Longer detachable power-supply cords or extension cords are available and
may used if care is exercised in their use.
C. If a long detachable power-supply cord or extension cord is used,
1. The marked electrical rating of the detachable power-supply cord or
extension cord should be at least as great as the electrical rating of the
appliance
2. If the appliance is of the grounded type, the extension cord should be a
grounding-type 3-wire cord, and
3. The longer cord should be arranged so that it will not drape over the counter
top or table top where it can be pulled on by children or tripped over.
9
Important safety information
This machine is equipped with safety features. Nevertheless, read and follow the
safety instructions carefully and only use the machine as described in these
instructions, to avoid accidental injury or damage due to improper use of the
machine. Keep this safety booklet for future reference.
Warning
General
- Check if the voltage indicated on the machine corresponds to the local mains voltage
before you connect the appliance.
- Connect the machine to an earthed wall socket.

English
4219-450-08061 MANUAL GAG. CAD. PRESTIGE EN-FR 120US.indd 12 23/04/2020 09:49:41
- Do not let the power cord hang over the edge of a table or worktop and do not let it
touch hot surfaces.
- To avoid the danger of electric shock, never immerse the machine, mains plug or
power cord in water or any other liquid.
- Do not pour liquids on the power cord connector.
- To avoid the danger of burns, keep body parts away from hot water jets produced by
the machine.
- Do not touch hot surfaces. Use handles and knobs.
- Switch off the machine with the main switch located on the back (if present) and
remove the mains plug from the wall socket:
• If a malfunction occurs.
• If you are not going to use the appliance for a long time.
• Before you clean the machine.
- Pull at the plug, not at the power cord.
- Do not touch the mains plug with wet hands.
- Do not use the machine if the mains plug, the power cord or the machine itself is
damaged.
- Do not make any modifications to the machine or its power cord.
- Only have repairs carried out by a service center authorized by Gaggia to avoid a
hazard.
- The machine should not be used by children younger than 8 years old.
- This machine can be used by children aged from 8 years and above and by persons
with reduced physical, sensory or mental capabilities or lack of experience and
knowledge if they have been given supervision or instruction concerning use of the
machine in a safe way and if they understand the hazards involved.
- Cleaning and user maintenance shall not be made by children unless they are older
than 8 and supervised.
- Keep the machine and its cord out of the reach of children aged less than 8 years.
- Children should be supervised to ensure that they do not play with the machine.
- Never insert fingers or other objects into the coffee grinder.
- Be careful when you dispense hot water.
10
Dispensing may be preceded by small jets of hot water. Wait until the end of the
dispensing cycle before you remove the hot water dispensing spout.
Caution
General
- This machine is intended for normal household use only. It is not intended for use in
environments such as staff kitchens of shops, offices, farms or other work
environments.
- Always put the machine on a flat and stable surface. Keep it in upright position, also
during transport.

English
4219-450-08061 MANUAL GAG. CAD. PRESTIGE EN-FR 120US.indd 13 23/04/2020 09:49:41
- Do not place the machine on a hotplate or directly next to a hot oven, heater or similar
source of heat.
- Only put roasted coffee beans in the bean hopper. Putting ground coffee, instant
coffee, raw coffee beans or any other substance in the coffee bean hopper may cause
damage to the machine.
- Let the machine cool down before you insert or remove any parts. The heating
surfaces may retain residual heat after use.
- Never fill the water tank with warm, hot or sparkling water, as this may cause damage
to the water tank and the machine.
- Never use souring pads, abrasive cleaning agents or aggressive liquids such as petrol or
acetone to clean the machine. Simply use a soft cloth dampened with water.
- Descale your machine regularly. The machine indicates when descaling is needed. Not
doing this will make your appliance stop working properly. In this case repair is not
covered by your warranty.
- Do not keep the machine at temperatures below 0°C/32°F. Water left in the heating
system may freeze and cause damage.
- Do not leave water in the water tank when you are not going to use the machine for a
long period of time. The water can become contaminated. Use fresh water every time
you use the machine.
- Never use any accessories or parts from other manufacturers or that Gaggia does not
specifically recommend. If you use such accessories or parts, your warranty becomes
invalid.
- Regular cleaning and maintenance prolongs the lifetime of your machine and ensures
optimum quality and taste of your coffee.
- The machine is exposed continuously to moisture, coffee and scale. Therefore it is very
important to regularly clean and maintain the machine as described in the user manual
and shown on the website. If you do not perform these cleaning and maintenance
procedures, your machine eventually may stop working. In this case repair is not
covered by warranty.
- Do not clean the brew group in the dishwasher and do not use washing-up liquid or a
cleaning agent to clean it. This may cause the brew group to malfunction and may have
a negative effect on the coffee taste.
- Do not dry the brew group with a cloth to prevent fibers from collecting inside the
brew group.
- Never drink the solution dispensed during the descaling process.
English
4219-450-08061 MANUAL GAG. CAD. PRESTIGE EN-FR 120US.indd 14
11
- Only put preground coffee into the preground coffee compartment. Other substances
and objects may cause severe damage to the machine. In this case, repair is not
covered by your warranty.
- The machine shall not be placed in a cabinet when in use.
Machines with milk
carafe
Warning
- To avoid the danger of burns, be aware that dispensing may be preceded by jets of milk
and steam. Wait until the end of the cycle before you remove the milk carafe.
Caution
- Make sure that the milk carafe is installed and the milk dispensing spout is open before
you select a milk-based coffee beverage or milk froth.
- Do not put any other liquids in the milk jug/carafe than water (for cleaning) or milk.
- Do not clean the milk carafe in the dishwasher.
Electromagnetic fields (EMF)
This machine complies with all applicable standards and regulations regarding exposure
to electromagnetic fields.
Recycling
- This symbol means that this product shall not be disposed of with normal household
waste (2012/19/EU).
- Follow your country’s rules for the separate collection of electrical and electronic
products. Correct disposal helps prevent negative consequences for the environment
and human health.
Warranty and support
For service or support, contact your local dealer or an authorized service center.
Contact details are included in the warranty booklet supplied separately or visit
www.gaggia.com or www.gaggia.it.

English
4219-450-08061 MANUAL GAG. CAD. PRESTIGE EN-FR 120US.indd 15
23/04/2020 09:49:43
12
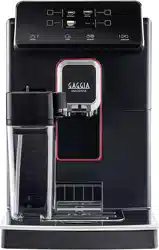
Congratulations on purchasing the Gaggia Cadorna Prestige!
This easy-to-use machine guarantees excellent coffee drinks, every day. With its intuitive
interface, you can choose from among 14 beverages, customise them and save them to
the 4 available profiles, where they can be instantly brought up whenever you want.
Before being packed, each of our high-quality machines undergoes rigorous testing in
our laboratories to ensure it works perfectly. Because real coffee is used during testing,
some residue may remain. This does not compromise the integrity of the product: it is a
brand new machine.
Please read the whole manual carefully before you instal, use or clean your machine.
Before using it for the first time, please read carefully the safety manual provided
separately and store it for future use.
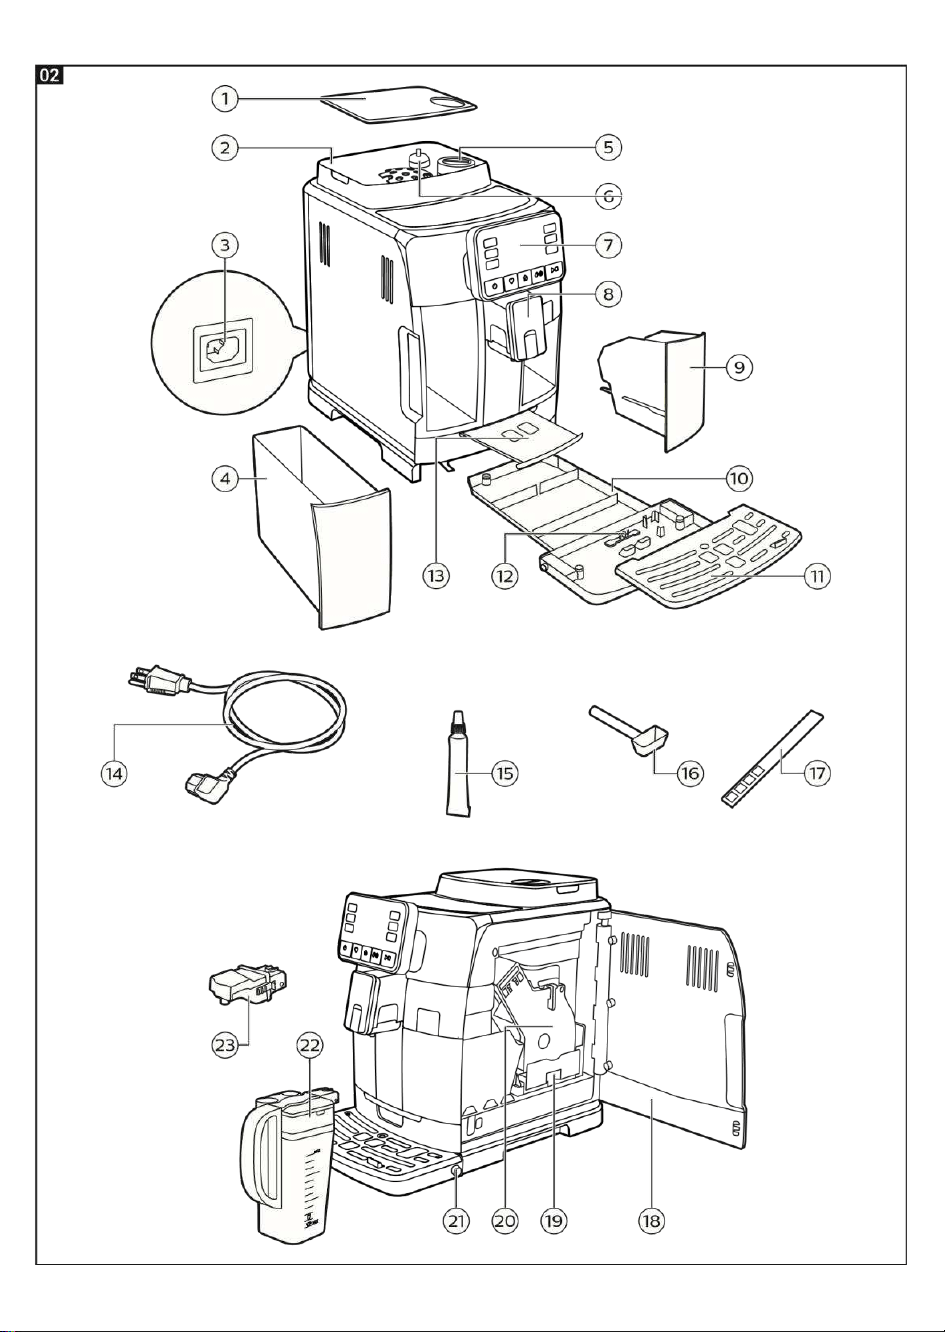
Machine Overview (Fig.2)
1 Coffee bean container lid 13 Espresso tray
2 Coffee bean container 14
Power cord
3 Power cord socket 15
Lubricant
4 Water tank 16
Pre-ground coffee measuring scoop
5 Pre-ground coffee compartment 17
Water hardness tester
6 Coffee grinder adjustment knob 18
Service door
7 Control panel 19
Coffee residues drawer
8 Adjustable coffee dispensing spout 20
Brew group
9 Coffee pucks container 21
Drip tray release buttons
10 Drip tray 22
Milk carafe
11 Drip tray grid 23
Water dispensing spout
12 “Full drip tray” indicator
23/04/2020 09:49:43
13
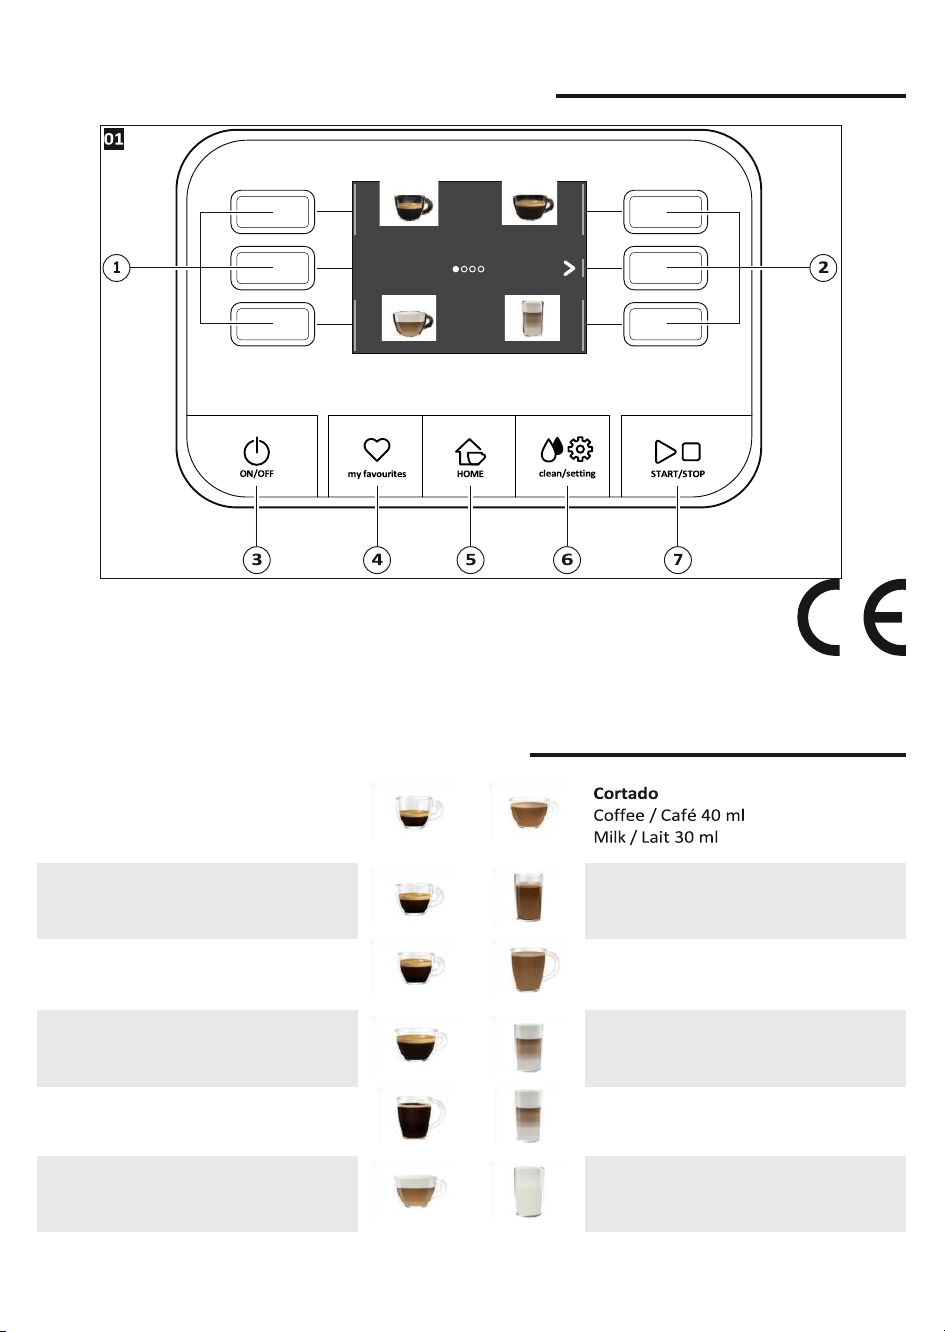
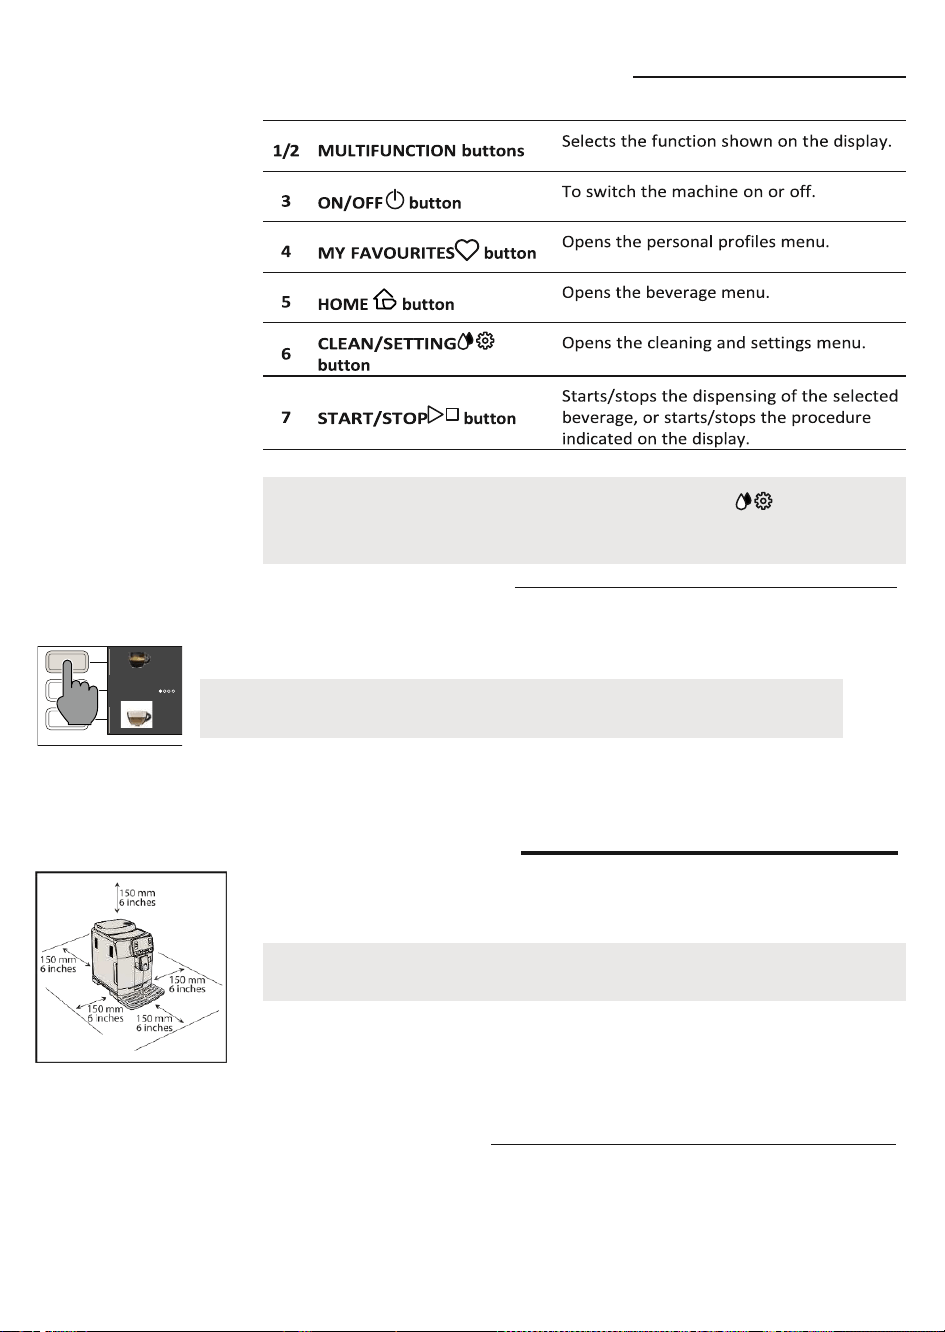
Control Panel and Display
This coffee machine features an easy-to-use, intuitive display. Please see below for an in-
depth explanation of each button.
English
4219-450-08061 MANUAL GAG. CAD. PRESTIGE EN-FR 120US.indd 16
Note: the MY FAVOURITES , HOME , CLEAN/SETTING buttons are
also ESC buttons. You can exit any screen shown on the display at any time by pressing
one of these buttons, which will then bring you back to their initial menu.
Multifunction buttons
Use the multifunction buttons at the sides of the display to select the feature or
beverage indicated on the screen.
Note: To make the reading of this manual easier, <<press the button " ">> means
<<press the button related to " ">>.
23/04/2020 09:49:45
14
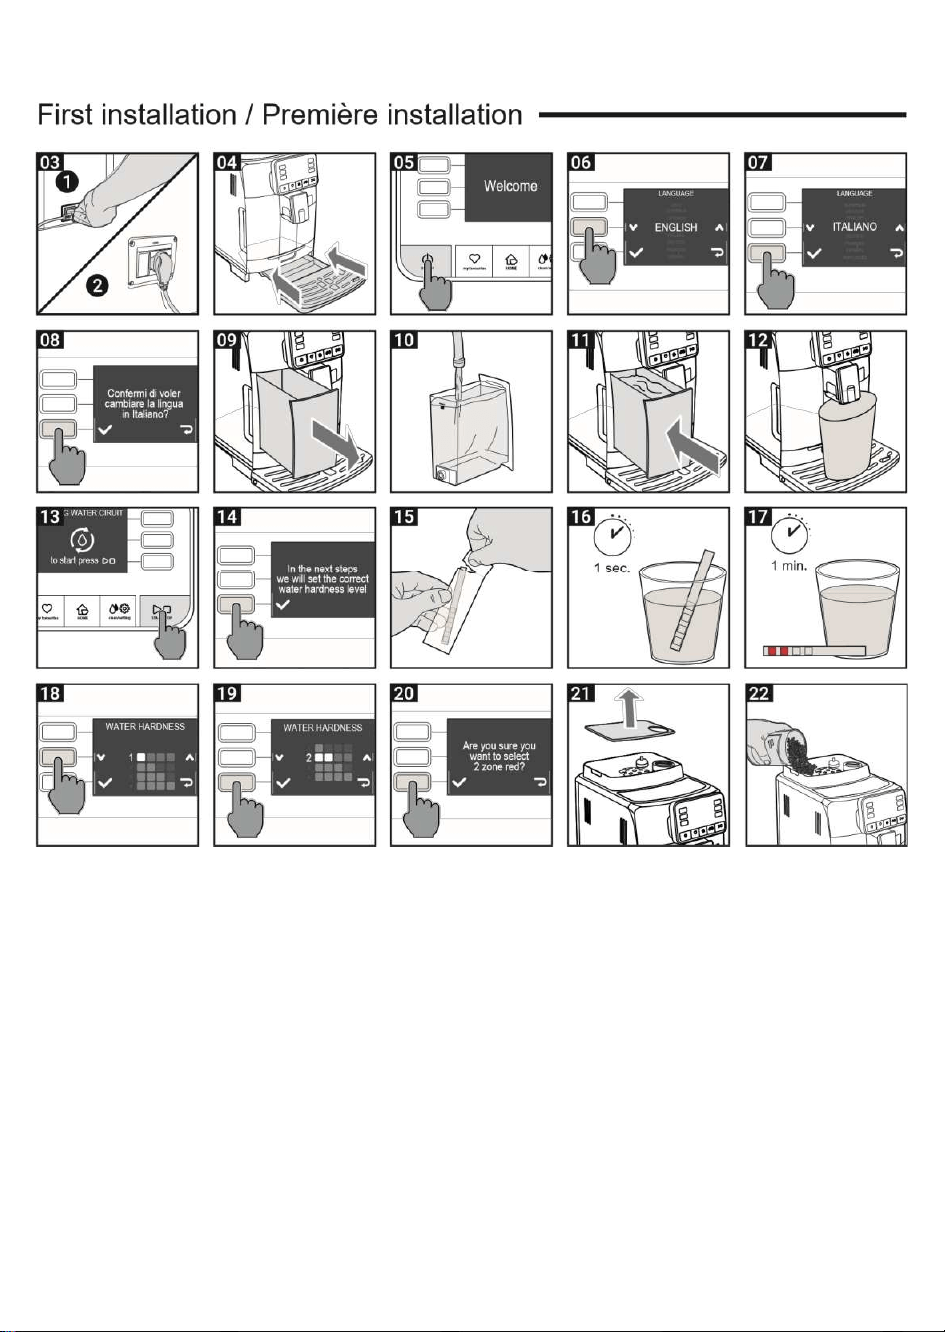
First Installation
Before using the machine, it is essential to follow a few simple steps, clearly described in
the explanatory drawings found in the quick guide at the beginning of this instruction
manual.
Manual rinse cycle
When first installing the machine or after a long period of its inactivity, it is necessary to
prime the water circuit through the manual rinse cycle.
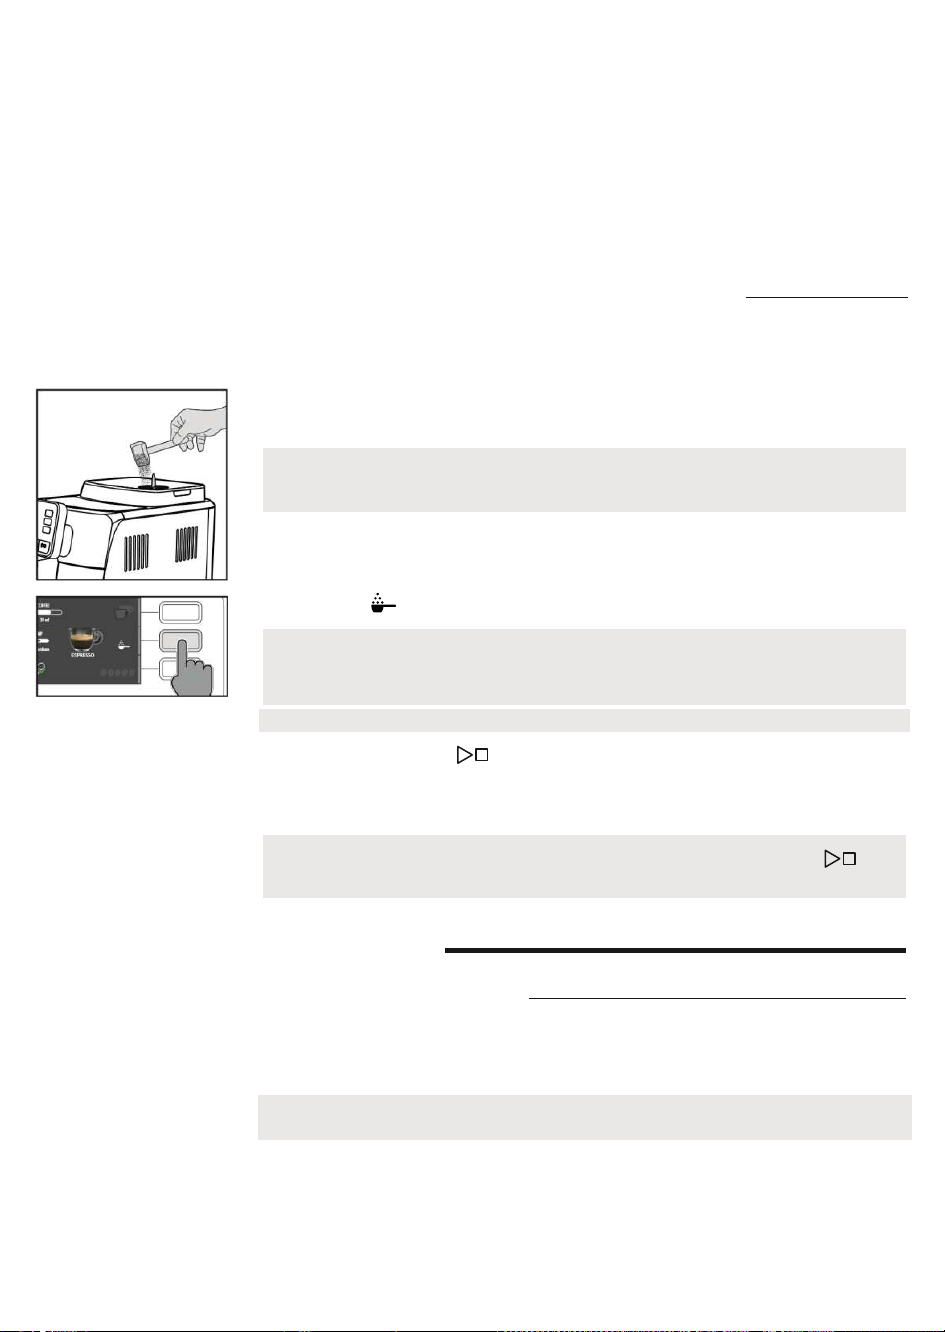
Note: To make the best-tasting coffee, you should brew 5 coffees initially to allow the
machine to complete its self-adjustment.
ESPRESSO
CAPPUCCINO
LA
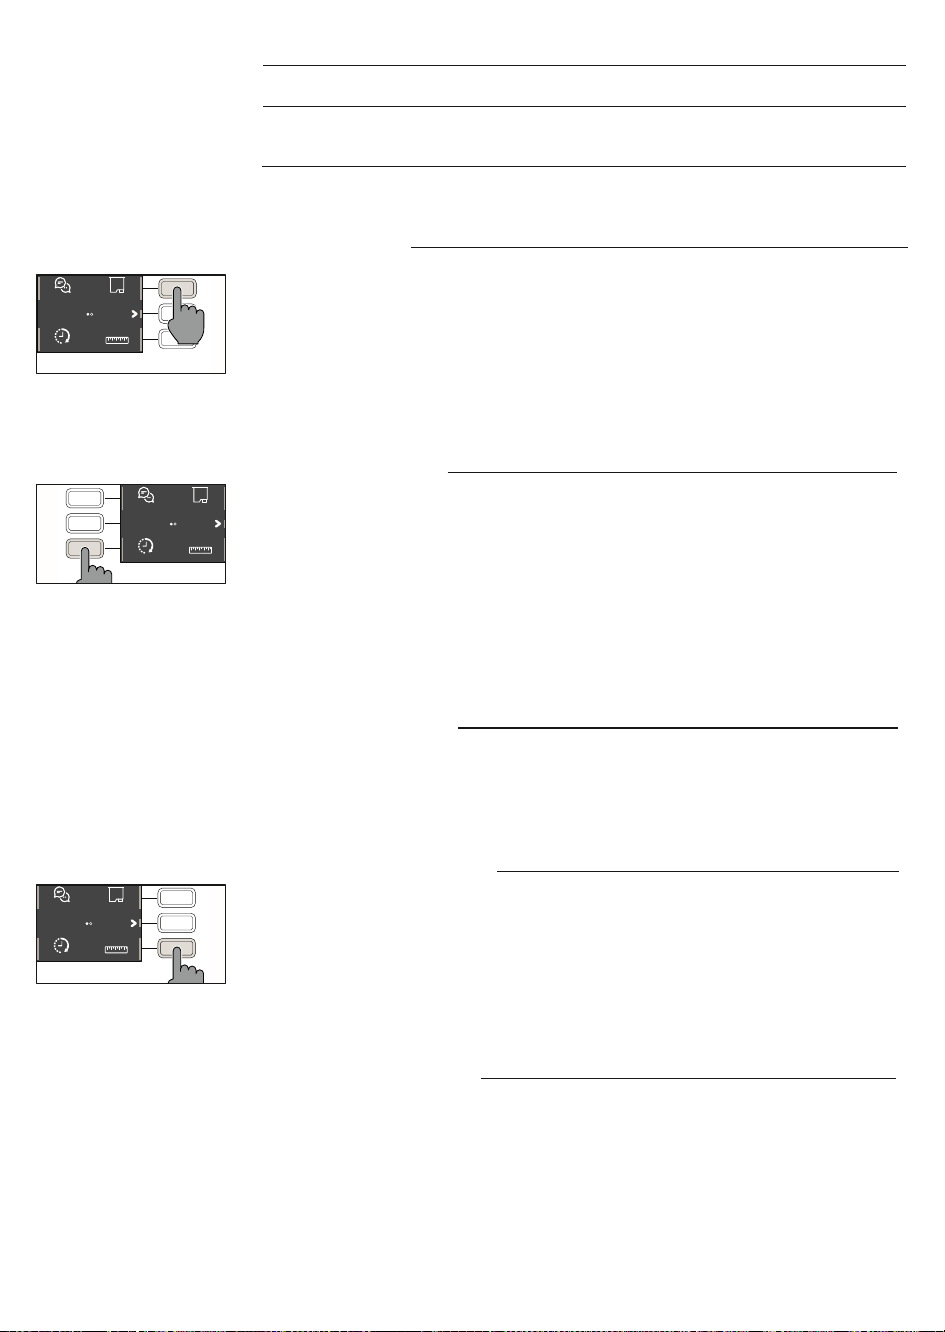
Control panel overview (fig. 1)
English
4219-450-08061 MANUAL GAG. CAD. PRESTIGE EN-FR 120US.indd 17
1 Place a container under the coffee dispensing spout, browse through the pages and
select "ESPRESSO LUNGO".
2 Press the " "button without adding pre-ground coffee.
3 Press the START/STOP button to start dispensing, the machine will dispense hot
water.
4 Empty the container and make sure the water dispensing spout is installed.
5 Place the container under the water dispensing spout and select the " HOT WATER "
beverage.
6 Press the START/STOP button to commence dispensing.
7 Empty the container and repeat steps 6 to 7, until the water tank is empty.
8 At the end of this operation, fill the water tank again up to the MAX level. The
machine is now ready for use.
23/04/2020 09:49:48
15
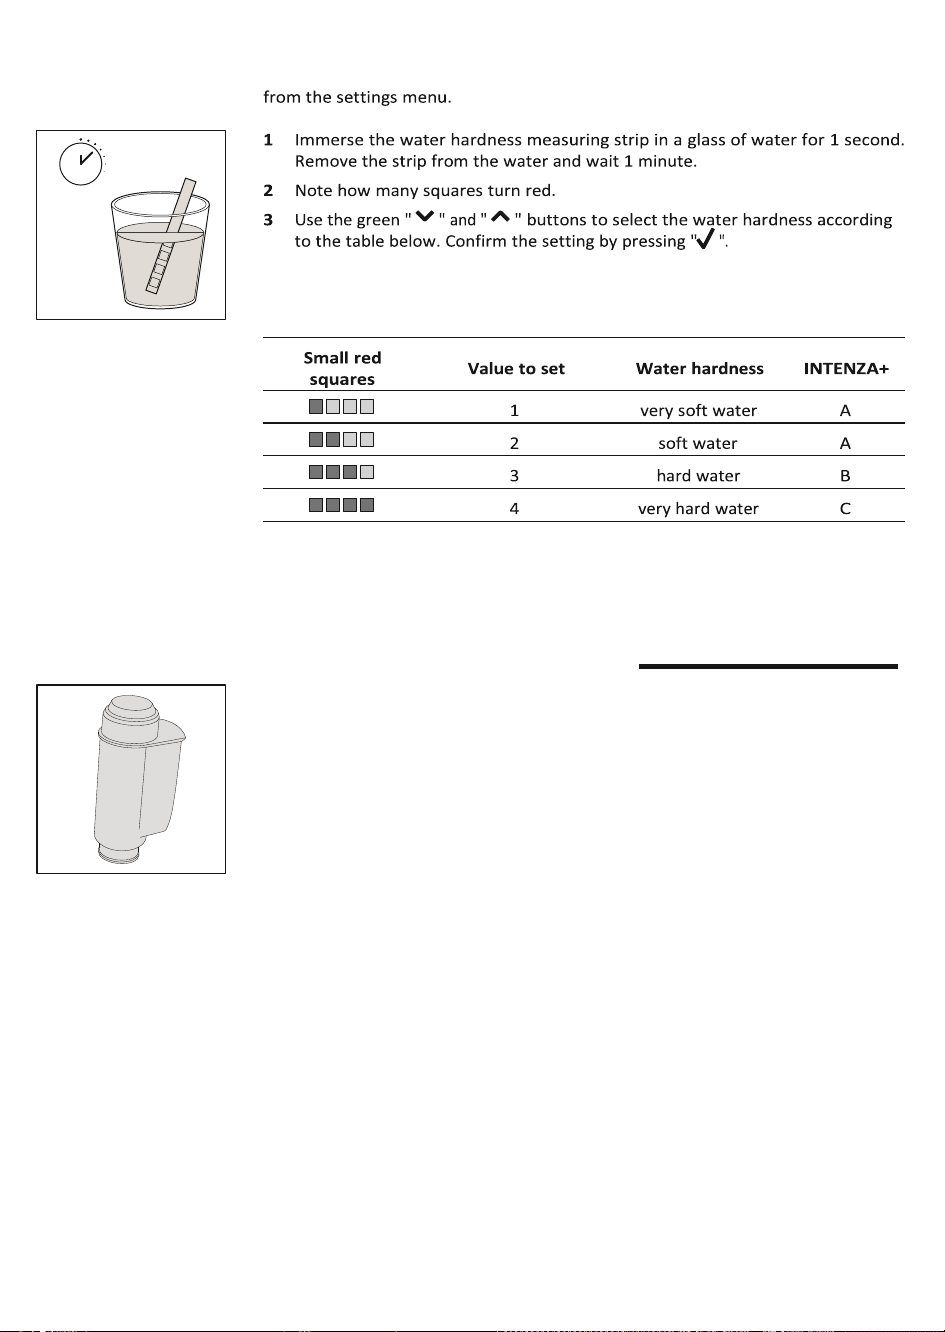
Measuring water hardness
You’ll need to set the water hardness when you install your machine. Take the water
hardness measuring strip that you find in the box and follow the steps shown on the
display during installation. To adjust the water hardness setting later, press the
CLEAN/SETTING button, select " SETTINGS ", and then
English
4219-450-08061 MANUAL GAG. CAD. PRESTIGE EN-FR 120US.indd 18
" WATER HARDNESS "
INTENZA+ Water Filter
We recommend using the INTENZA+ water filter to limit the formation of limescale. This
ensures the machine will last longer and the aroma of your coffee will be better.
Water is an essential element in brewing coffee: it is therefore extremely important to
ensure it is always filtered adequately.
The INTENZA+ water filter prevents the formation of mineral deposits, improving the
quality of the water.
23/04/2020 09:49:49
16
sec.
1

English
4219-450-08061 MANUAL GAG. CAD. PRESTIGE EN-FR 120US.indd 19
Installing the INTENZA+ water filter
Remove the small white filter from the water tank and store it in a dry place.
Immerse the INTENZA+ water filter vertically (with the opening pointing up) in cold
water and gently press its sides to let any air bubbles out.
Remove the INTENZA+ water filter from the water. Set the machine according to the
detected water hardness (see the "Measuring water hardness" chapter) and the letters
found on the filter base:
A = soft water – 1 or 2 small squares
B = hard water (standard) – 3 small squaresC = very hard water – 4
small squares
Place the INTENZA+ filter in the water tank, ensuring it is correctly in place. Refill the
water tank and place it in its compartment.
Follow the instructions shown on the display to activate the filter.
Note: you can pause the filter activation procedure by pressing the START/STOP
button. To resume the procedure, press the START/STOP button again.
Replacing the INTENZA+ water filter
When the INTENZA+ water filter runs out, the display will show a warning message.
1 Replace or disable by pressing the CLEAN/SETTING button, and then the "
SETTINGS " button.
2 Select the " WATER FILTER " button.
3 Select " REPLACE " to change the filter or " DISABLE " if you do not intend to use the
filter. Confirm with the " " button.
Follow the instructions shown on the display to activate the filter correctly.
Note: If you do not want to replace the filter, select "DISABLE" to disable it.
WATER FILTER
REPLACE
ACTIVATE
DISABLE

English
4219-450-08061 MANUAL GAG. CAD. PRESTIGE EN-FR 120US.indd 20
23/04/2020 09:49:51
17
Types of Beverage
Beverage name Description
Ristretto
A ristretto, served in a small cup, is an espresso whose brewing time is shorter than
a regular espresso. As such, a ristretto is a shorter shot and lower in caffeine.
Espresso
The espresso is known around the globe as true "Italian coffee". Served in a
small cup, its unmistakeable characteristics are a full and intense aroma and a
top layer of compact, natural crema. It is the result of the hot-water pressurised
extraction process invented by Achille Gaggia in 1938.
Espresso lungo
An espresso lungo is an espresso shot with a longer extraction time. It is more
diluted, with a different aromatic intensity and a higher caffeine content. It is served
in a medium-sized cup.
Coffee
Coffee is a beverage prepared with a greater quantity of water than an espresso
shot. It has a lighter aroma and is served in a medium-large cup.
Americano
An Americano is a long, less intense coffee drink prepared by combining hot water
and espresso.
Cappuccino
The cappuccino is an Italian classic, among the most loved in the world. It is
prepared with espresso, milk and a milk froth, which must be no less than 1 cm
thick. It is served in a large cup.
XL Cappuccino
An XL cappuccino is a cappuccino prepared with a greater quantity of espresso and
milk.
Cortado
The cortado is an Argentinian beverage, consisting of an espresso shot with a small
quantity of milk. It is usually served in a small glass and is popular in Spain,
Portugal, and Latin America.
Flat white
A flat white is a beverage of Australian origin which has a strong, dominant coffee
flavour. It is composed of a double espresso and milk, toped with a light layer of
velvety foam.
Café au lait
A café au lait is a beverage composed of equal parts coffee and milk. This can even
be enriched by a thin layer of milk froth. It is served in a large cup.
Latte macchiato
A latte macchiato is prepared with hot milk, one part milk froth and a small quantity
of espresso. It is served in a tall, transparent glass to allow the separation of the
three different layers to be seen.
XL latte macchiato
An XL latte macchiato is a latte macchiato prepared with a greater quantity of milk.
It is served in a tall, transparent glass.
Frothed milk
Frothed milk is used to make cappuccinos, latte macchiatos and several other
beverages. The result is a compact, homogeneous layer of milk froth.
Hot water
Hot water can be used to prepare hot teas, infusions and instant beverages.
English
4219-450-08061 MANUAL GAG. CAD. PRESTIGE EN-FR 120US.indd 21
23/04/2020 09:49:51
18
Espresso tray
This machine was designed to guarantee flawless results, from a traditional espresso to a
number of different beverages. If you wish to try a traditional Italian espresso, with a
delicious layer of natural crema on the surface, we recommend using the "Espresso
Tray", which has been specifically designed for and integrated into the machine. This
tray makes it possible to use traditional espresso cups, ensuring the perfect height from
the spout for compact, homogeneous crema and dispensation without messy splashes.
Brewing coffee
Brewing coffee from whole coffee beans
Warning: always use whole coffee beans when making espresso. Do not put any pre-
ground, unroasted, freeze-dried or instant coffee in the coffee bean container, as they
may damage the machine.
Tip: Preheat the cups with hot water to enjoy a hotter coffee.
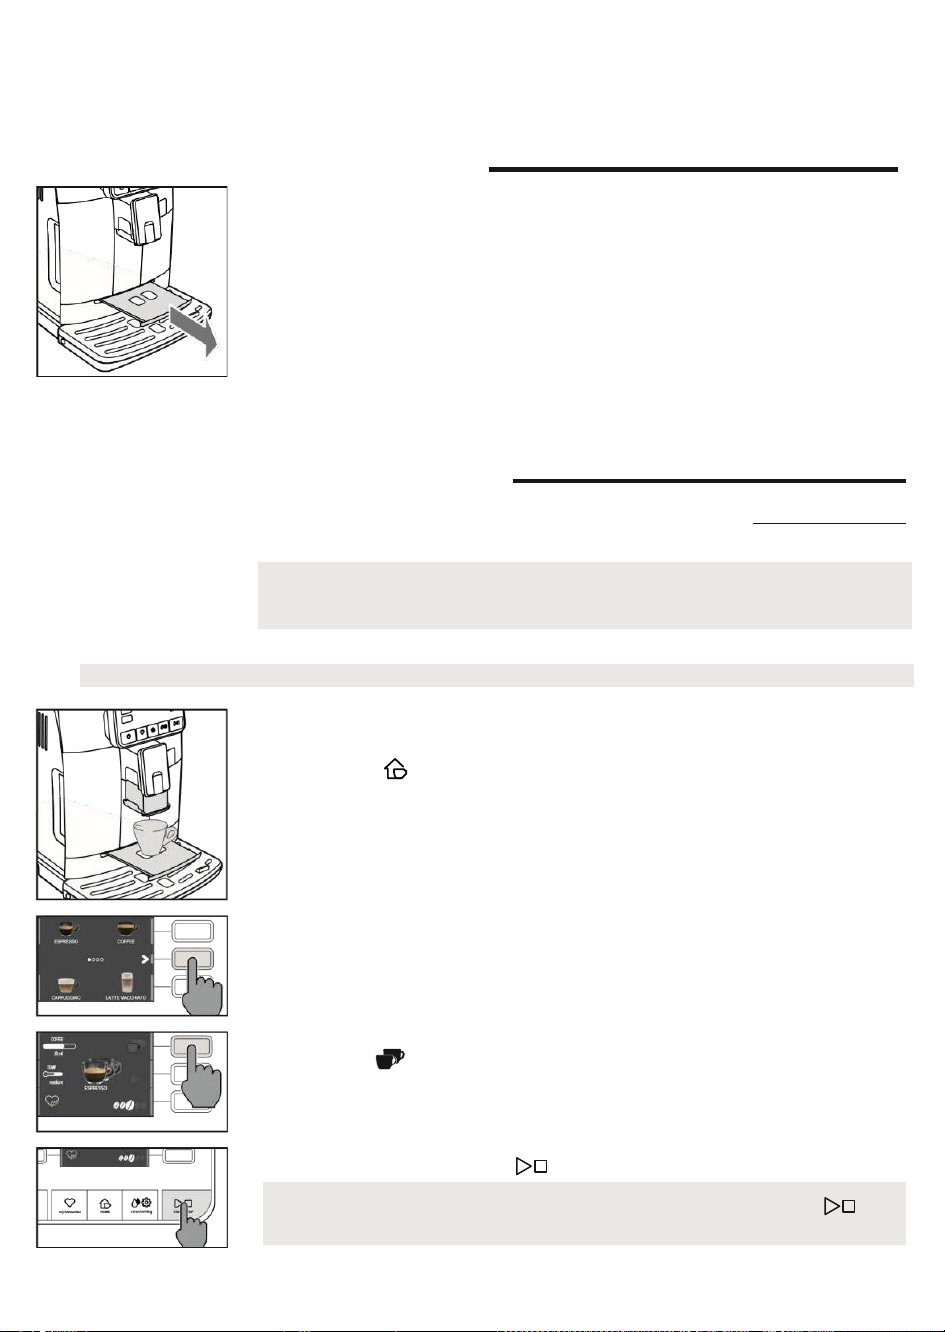
1 Remove the espresso tray, place an espresso cup beneath the coffee dispensing
spout, raising or lowering it according to the size of the cup being used.
Press the HOME button to bring up the beverage menu.
2 Browse the various pages to find and select the desired beverage.
3 Once the beverage is selected, it is possible to prepare two cups at the same time
using the " " button, except the "AMERICANO".
4 Finally, press the START/STOP button to begin dispensing the coffee.
Note: you can interrupt the brewing at any time by pressing the START/STOP
button.
English
4219-450-08061 MANUAL GAG. CAD. PRESTIGE EN-FR 120US.indd 22
If you wish to customise the settings of a specific beverage, please refer to the "Beverage
customisation" chapter.
23/04/2020 09:49:54
19
Brewing coffee using pre-ground coffee
Use the measuring scoop provided to insert the correct dose in the pre-ground coffee
compartment.
1 Lift the lid of the pre-ground coffee compartment and add one level measuring
scoop of pre-ground coffee.
2 Place a cup under the coffee dispensing spout and select the desired beverage.
3 Press the " " button.
Note: this function is not available for FLAT WHITE
4 Press the START/STOP button to start dispensing the coffee.
If you wish to customise the settings of a specific beverage, please refer to the "Beverage
customisation" chapter.
Note: you can interrupt the brewing at any time by pressing the START/STOP
button.
Preparation of frothed-milk based coffee
beverages
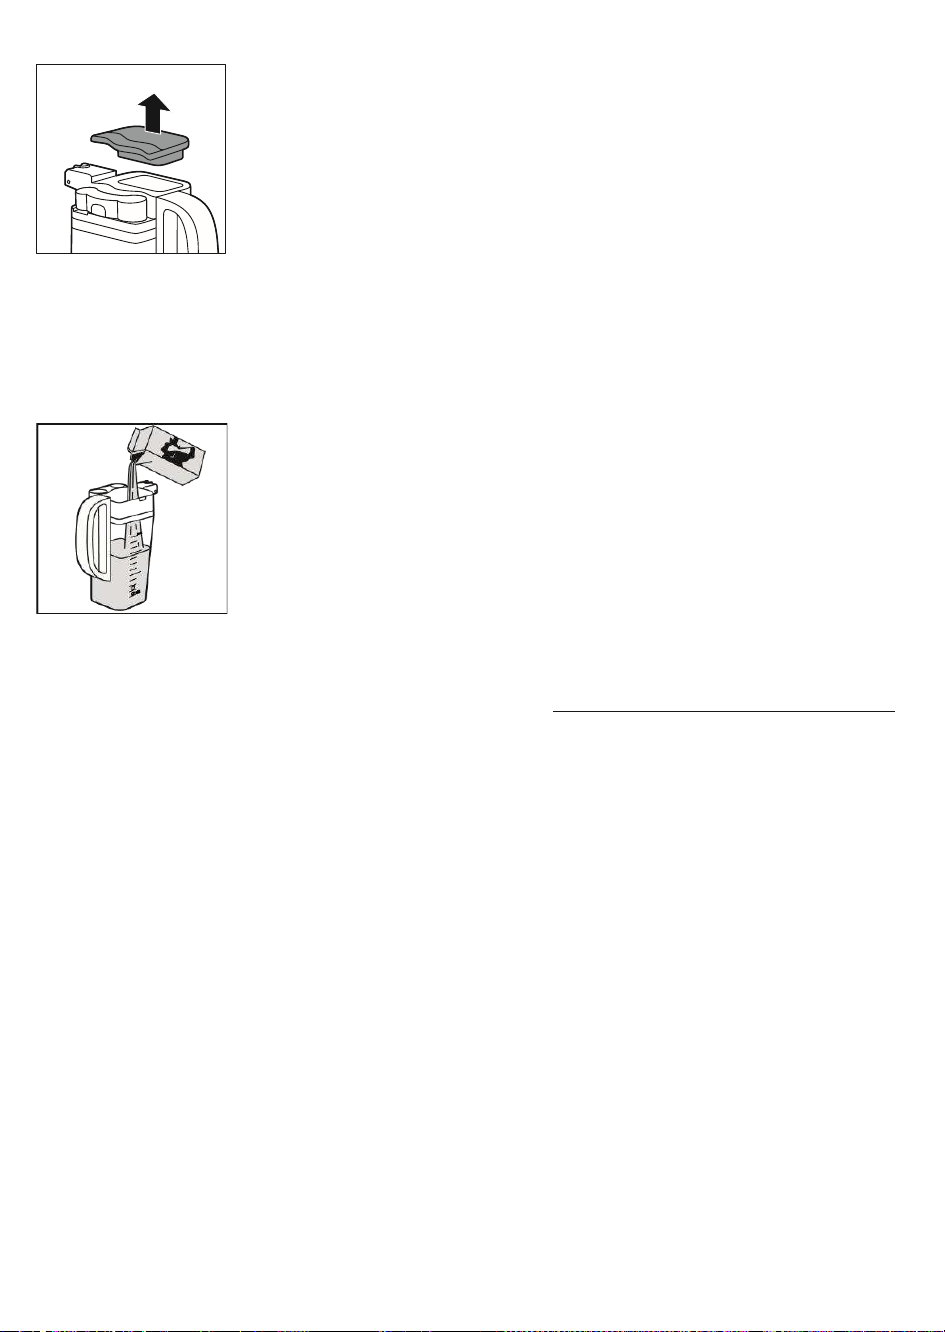
Filling the milk carafe
Note: Before using the milk carafe, clean it thoroughly as described under the "Cleaning
the milk carafe" chapter.
The milk carafe can be filled before or during use.
Warning: do not insert anything other than pre-ground coffee in the pre-ground coffee
compartment, for not damage the machine.
Note: the "pre-ground coffee" function cannot dispense two cups of coffee at the
same time, and it disables the aroma setting, both of which are possible with coffee
beans only.
English
4219-450-08061 MANUAL GAG. CAD. PRESTIGE EN-FR 120US.indd 23
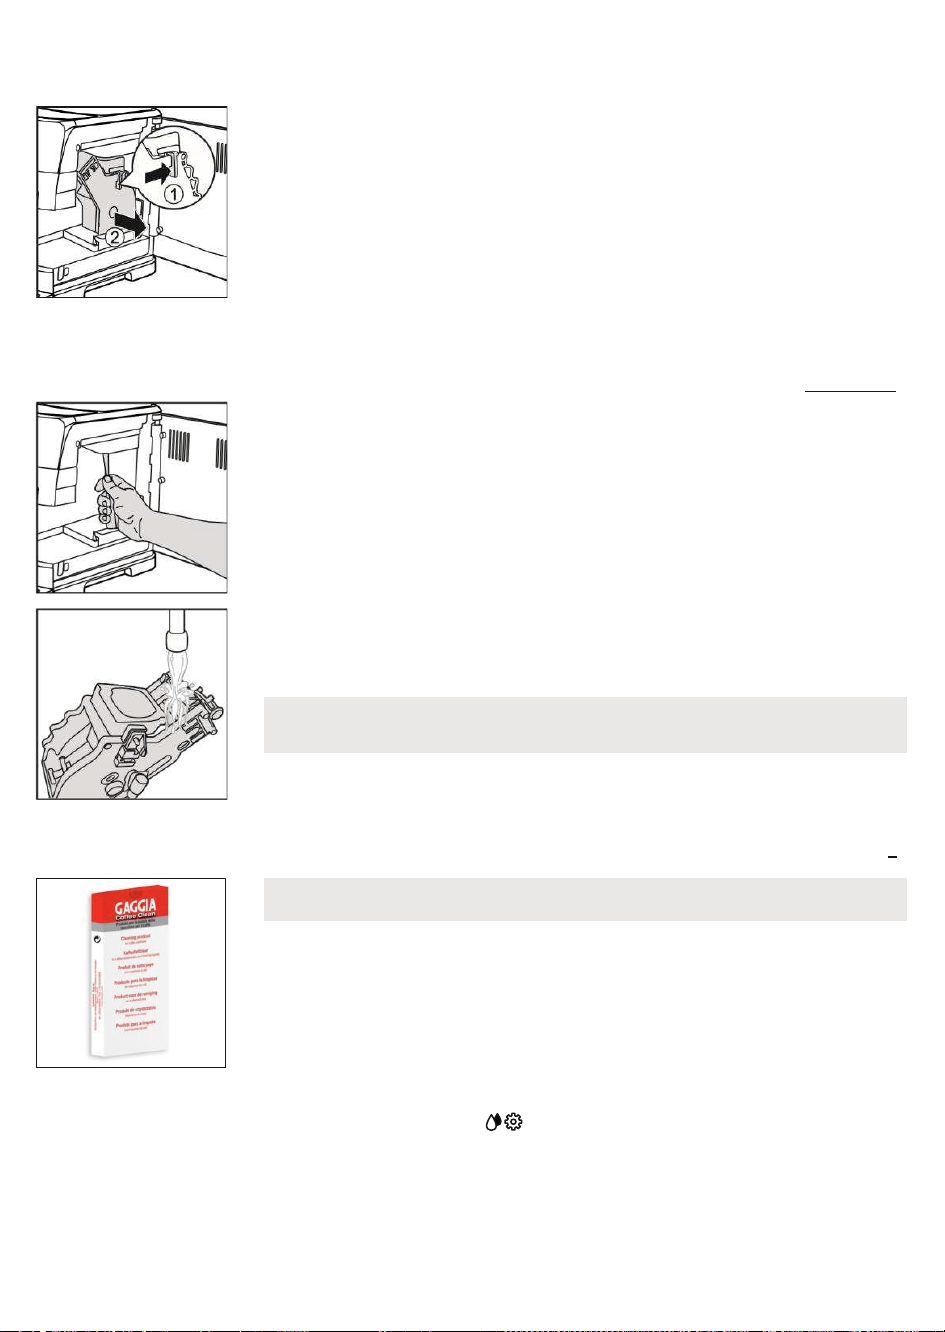
1 Lift the lid like in the figure (milk carafe).
23/04/2020 09:49:56
20
2 Pour the milk into the carafe. The milk level must be between the minimum (MIN) and the
maximum (MAX) notches on the carafe. Replace the lid.
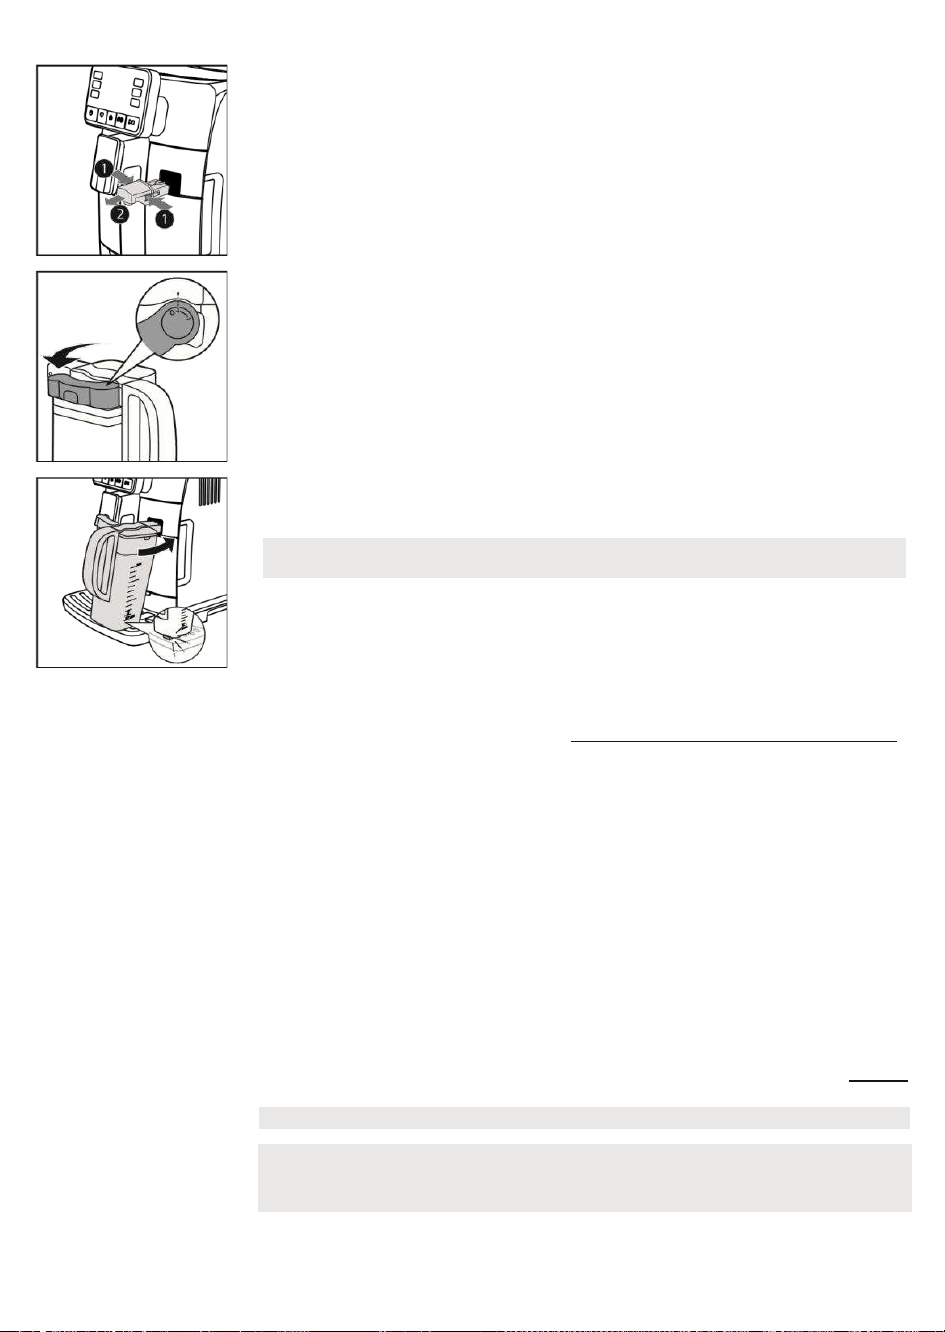
Inserting the milk carafe
Remove the water dispensing spout (if installed):
English
4219-450-08061 MANUAL GAG. CAD. PRESTIGE EN-FR 120US.indd 24
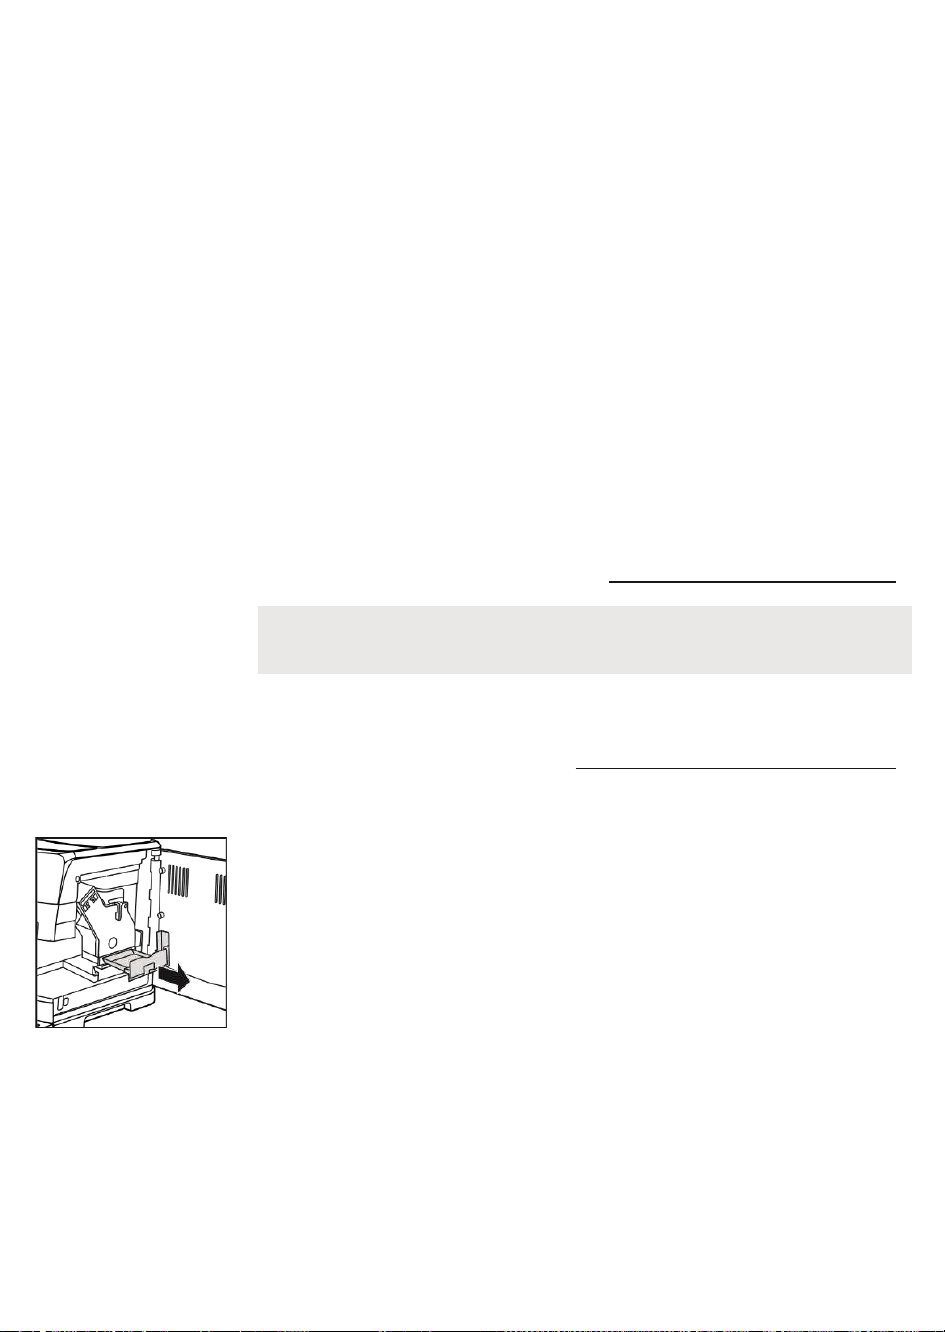
1 Press the two side buttons to unlock the dispensing spout (1) and lift it slightly. Pull
the water dispensing spout to remove it (2).
2 Position the milk carafe’s dispensing spout in the "I" position.
3 Tilt it slightly and slide it completely into the machine’s guides until it hooks onto the
drip tray.
Removing the milk carafe
Rotate the carafe upwards until it is naturally released from the insert in the drip tray.
Then remove it.
23/04/2020 09:49:58
21
Dispensing frothed milk-based coffee beverages
Tip: Preheat the cups with hot water to enjoy a hotter beverage.
Tip: use cold milk (at a temperature of around 5 °C) with a protein content of at least 3%
to ensure optimum results for the froth. You can use either whole milk or semi-skimmed
milk. You can also use skimmed milk, soy milk or lactose-free milk.
Note: do not force the carafe while inserting it.
English
4219-450-08061 MANUAL GAG. CAD. PRESTIGE EN-FR 120US.indd 25
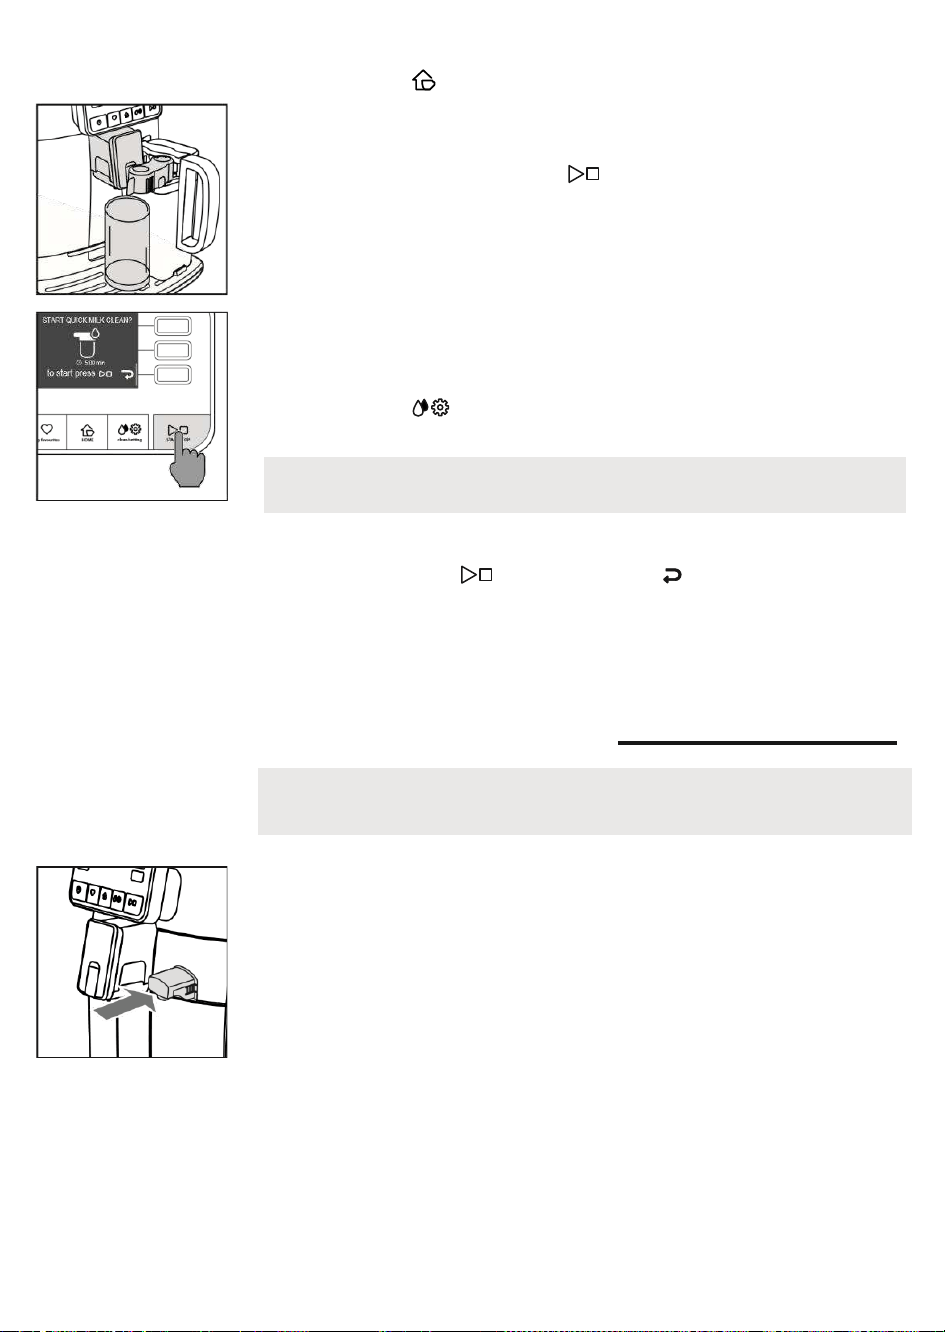
1 Press the HOME button and choose the desired beverage from the menu.
- Press the button for the beverage desired and place a suitable cup or glass
beneath the coffee dispensing spout and the carafe dispensing spout.
- Press the START/STOP button to start brewing the selected beverage.
2 The machine will dispense a predefined amount of frothed milk into the cup or glass.
The coffee or the frothed milk may be dispensed first, depending on the beverage
selected.
If you wish to customise the beverage before dispensing, refer to the “Beverage
customisation” chapter.
3 After dispensing your frothed milk-based coffee beverages, it is best to complete the
quick cleaning procedure of the carafe within 10 seconds. However, the procedure
can also be carried out at a later time by opening the cleaning menu via the
CLEAN/SETTING button. Follow the instructions shown on the display. The
cleaning procedure can be carried out with milk in the carafe.
Press the START/STOP button to confirm, or " " to carry out the procedure at
a later time.
Dispensing Hot Water
Warning: when the machine starts preparing hot water, the hot water dispensing spout
may spray steam and hot water. Wait until the end of the preparation before removing
the hot water dispensing spout.
1 Insert the hot water dispensing spout.
23/04/2020 09:50:00
22
Note: We recommend cleaning the machine via the quick clean procedure at least once
a day.

English
4219-450-08061 MANUAL GAG. CAD. PRESTIGE EN-FR 120US.indd 26
2 Press the HOME button and browse the various screens using the green " "
and " " and select "HOT WATER".
3 Press the " HOT WATER " button. Finally, press the START/STOP button to
commence dispensing.
If you wish to customise the volume of water before you begin, please refer to the
"Beverage customisation" chapter.
Beverage Customisation and Profile
Creation
This machine makes it possible to modify the settings of a beverage according to your
preferences and save it to one of four available profiles.
Customisation
1 Press the HOME
2 Select your beverage.
3 All the settings that can be adjusted and/or selected are displayed on the screen.
Based on the type of beverage, you can adjust and/or select: - the amount of
coffee and milk;
- the temperature of the coffee;
- the dispensing of two cups at the same time;
- the use of pre-ground coffee;
- the intensity of the aroma (only when using coffee beans);
4 Once the " COFFEE " or " MILK " button has been pressed, use the green "
" and " " buttons to select the desired amount. Press " " to
confirm and return to the previous screen, where the new quantity will be
displayed.
5 Press the " TEMP " button several times to adjust the temperature of the
beverage from among the following options:
- low;
- medium;
Warning: only select " HOT WATER " from the HOME screen when the hot water
dispensing spout is installed.
Note: you can interrupt the brewing at any time by pressing the START/STOP
button.
ESPRESSO
CAPPUCCINO
LATTE MACCHIATO
COFFEE
ESPRESSO LUNGO
CAFÈ AU LAIT
ACQUA CALDA
AMERICANO
English
4219-450-08061 MANUAL GAG. CAD. PRESTIGE EN-FR 120US.indd 27
- high;
23/04/2020 09:50:04
23
6 Press " " to prepare two cups, or " " to prepare a single cup. The picture of
the beverage in the centre of the display will indicate the number of cups selected.
7 Press the " " button to activate the use of pre-ground coffee.
8 To adjust the aroma intensity, press " ". Each time you press the button,
the aroma intensity changes by one degree. The display shows the chosen intensity.
1 Very light
2 Light
3 Normal
4 Strong
5 Very strong
9 Once the drink has been customised, you can save it in a specific profile by pressing
the " " button.
10 Choose the profile where you wish to save the beverage from the 4 available.
Note: this function is not available for beverages with milk, AMERICANO and HOT
WATER.
Note: this function only allows the dispensing of one coffee at a time.
Note: this function is not available for pre-ground coffee.
Creating a profile
-
-

English
4219-450-08061 MANUAL GAG. CAD. PRESTIGE EN-FR 120US.indd 28
2 Select your preferred profile colour.
3 Press the " ADD DRINK " button.
4 The beverage screens will be displayed. Select the beverage that you want to save to
your profile and customise it by following steps 3 to 8 in the "Beverage
customisation" chapter.
23/04/2020 09:50:06
24
5 Press " " to save the customised beverage to your profile. At this point, you can
dispense the beverage or exit the menu by pressing one of the ESC buttons (HOME
, MY FAVOURITES , CLEAN/SETTING ).
The saved beverage is now present in the list of your preferences and marked with a
small heart in the same colour as the selected profile.
6 The beverage saved in the profile can be modified using the " EDIT " button, or
deleted using the " DELETE " button.
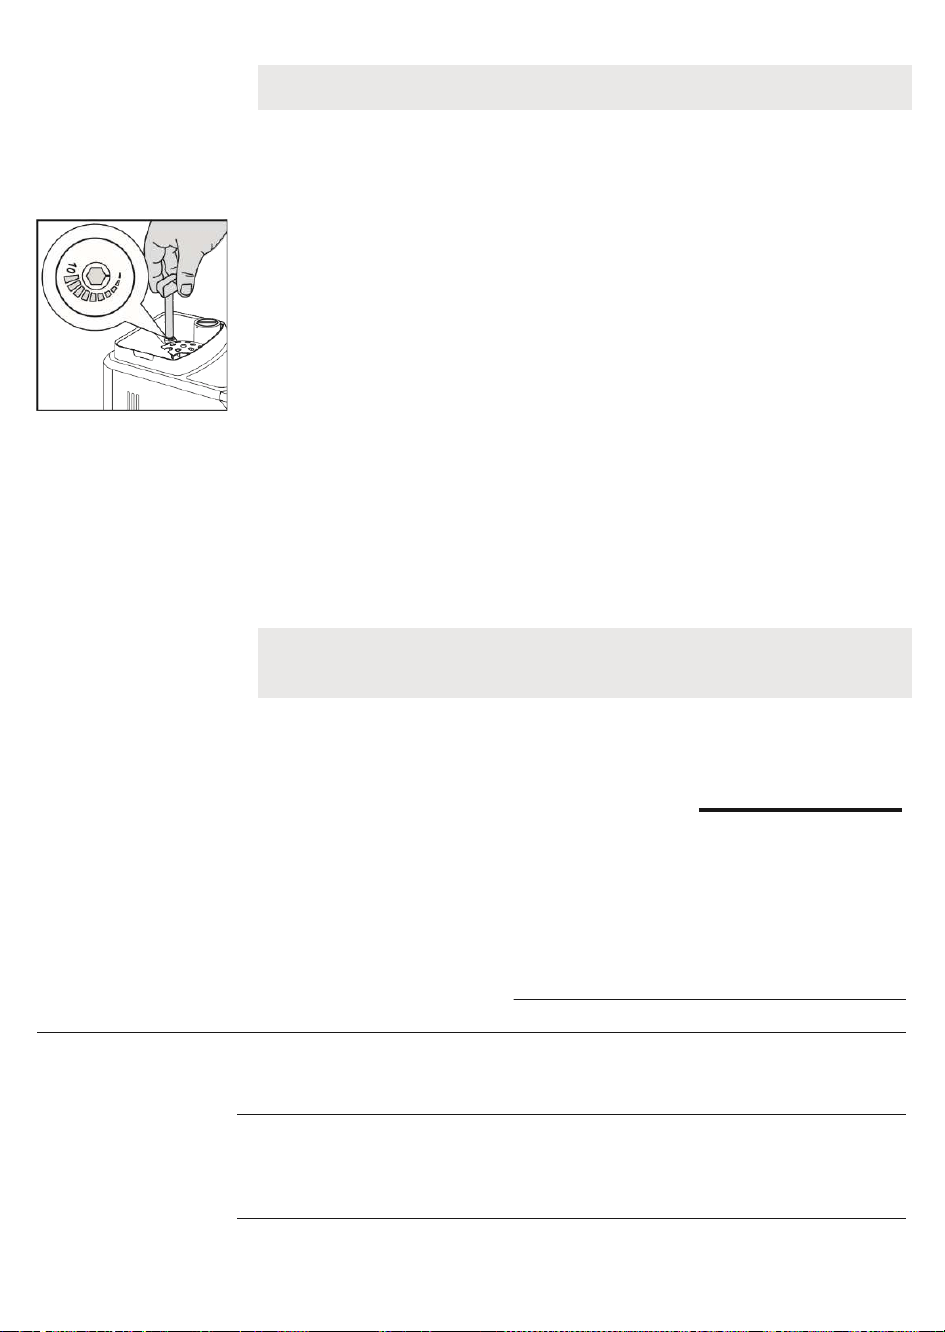
Coffee Grind Settings
You can adjust the grind setting using the grinder adjustment knob on the coffee bean
container. The ceramic coffee grinder guarantees perfect, even grinding for the
preparation of every cup of coffee. The aroma is thus preserved, ensuring the perfect
flavour every time.
Note: you can only adjust the grind setting while the machine is grinding the coffee
beans. The difference in flavour will be noticeable after 2-3 cups of coffee have been
brewed.
Note: Once used, the "
" profile icon will change colour.
Note: It is not possible to save the beverage from the HOME menu via the MY
FAVOURITES button. Instead, use the " " button, otherwise you will lose the
settings you have just applied.
CHOOSE YOUR
PROFILE
ADD DRINK
English
4219-450-08061 MANUAL GAG. CAD. PRESTIGE EN-FR 120US.indd 29
Warning: to avoid damaging the coffee grinder, do not rotate the grinder adjustment
knob more than one notch at a time.
1 Place a cup under the coffee dispensing spout.
2 Remove the lid of the coffee bean container.
3 Prepare an espresso as described in the "Brewing coffee from coffee beans" chapter.
4 While the machine is grinding the coffee, place the end of the handle of the pre-
ground coffee measuring scoop on the coffee grinder adjustment knob, located in
the coffee bean container. Use the handle of the measuring scoop to press and
rotate the knob to the left or right, one notch at a time.
23/04/2020 09:50:09
25
5 You can select from 10 grinding settings, from fine to course. The smaller the notch,
the stronger and richer the coffee.
Note:
- Coarse grind: lighter taste, for dark roasted coffee blends (5-10);
- Fine grind: stronger taste, for light roasted coffee blends (1-5);
Cleaning and Maintenance
Regular cleaning and maintenance keep the machine in perfect condition and ensure
perfect coffee flavour, a constant coffee flow and excellent milk froth. Please refer to
the following table to know when and how to clean the removable parts of the machine.
For more detailed information, please read the relevant chapters.
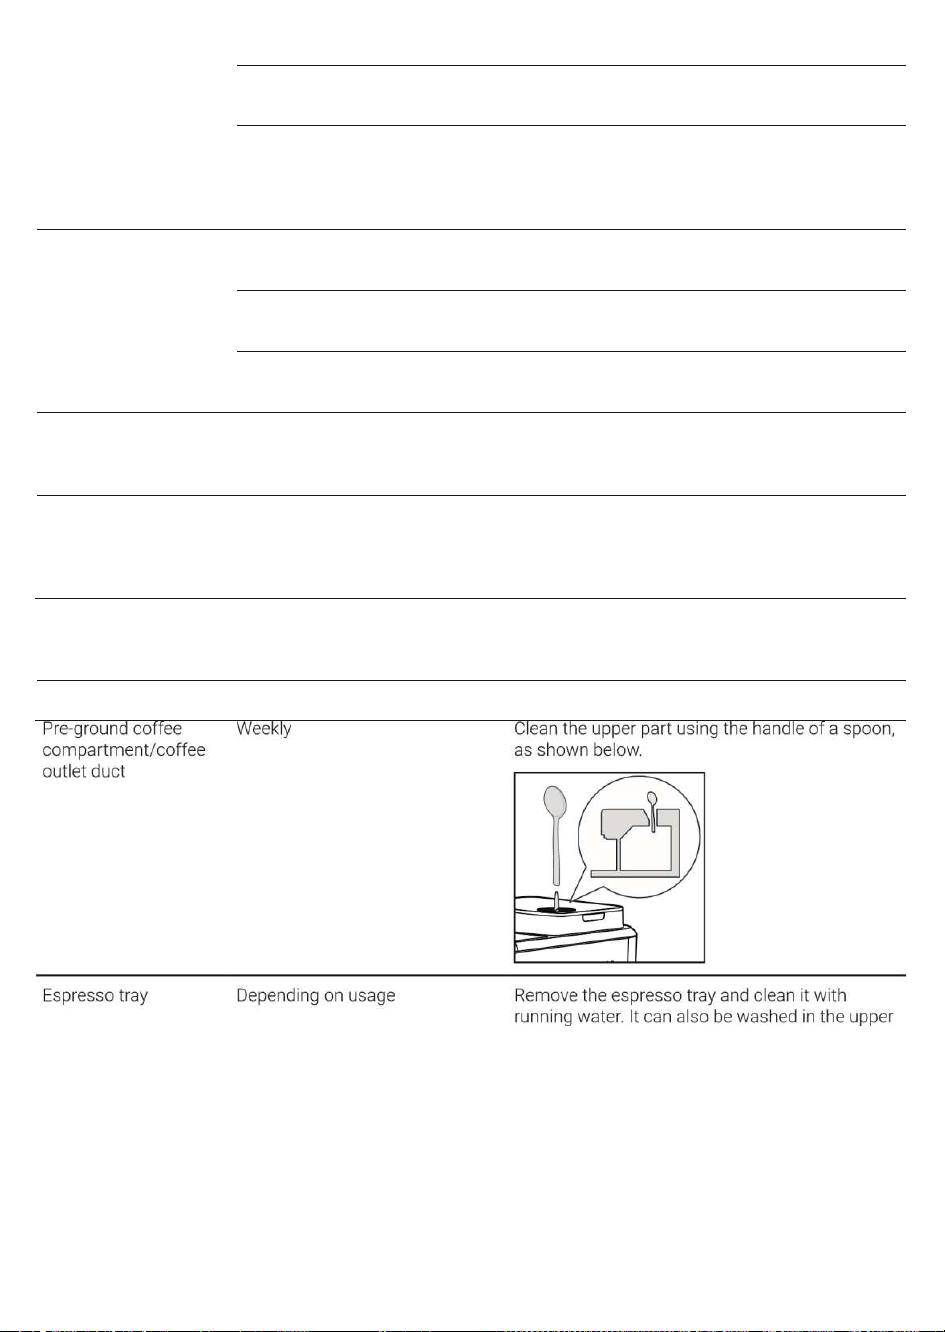
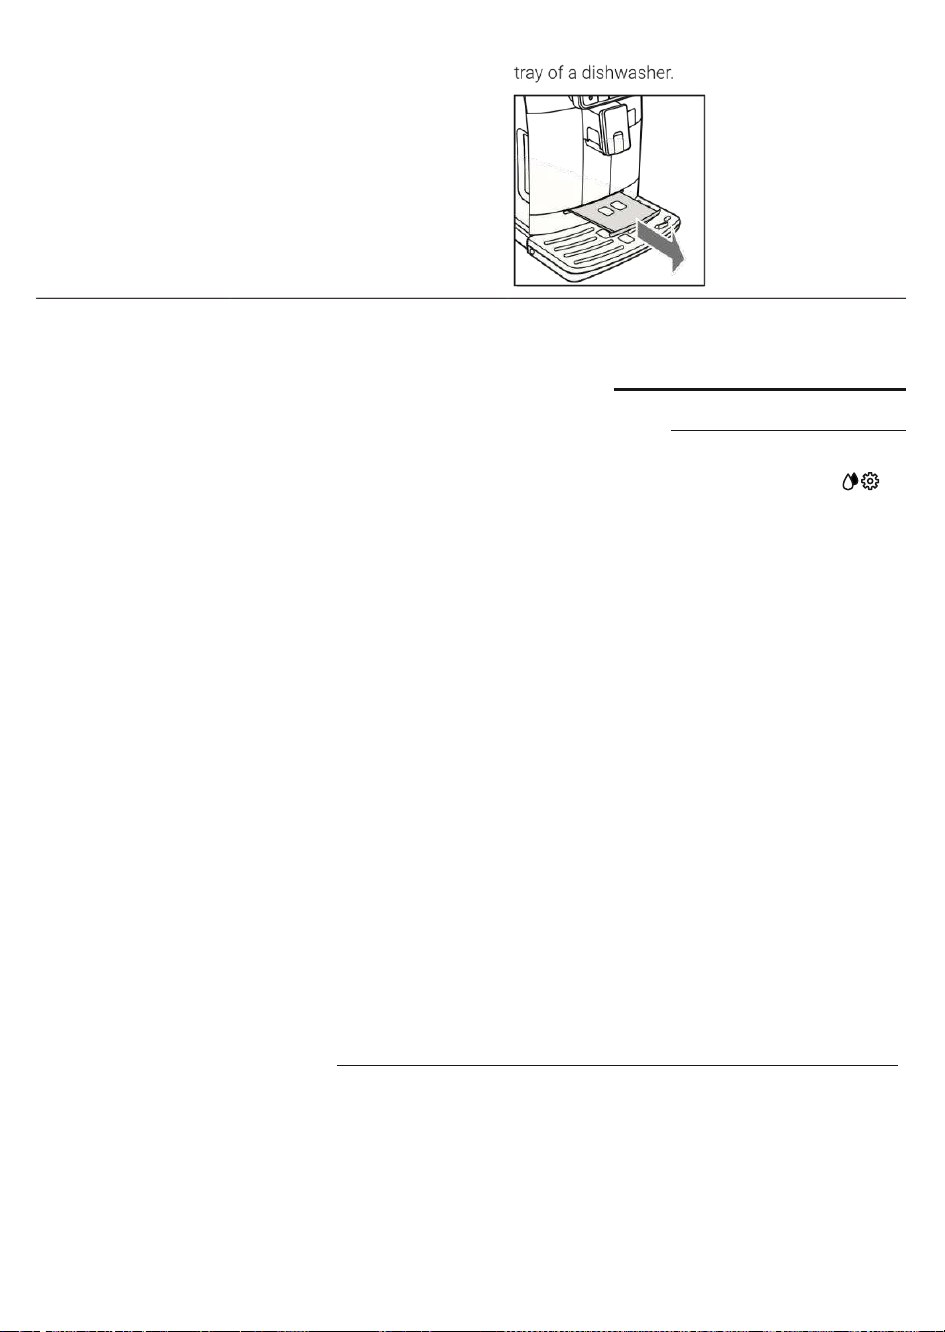
Cleaning table
Part description
When to clean
How to clean the cycle
Milk carafe
After use
After preparing a milk-based beverage, start the "
QUICK CLEAN " process as indicated on the machine.
Daily
Clean the milk container and the milk suction tube as
described in the "Cleaning the milk carafe under
running water" chapter, following the first 4 points
and point 11.
English
4219-450-08061 MANUAL GAG. CAD. PRESTIGE EN-FR 120US.indd 30
Weekly
Disassemble the milk carafe and clean all its parts
under running water.
Monthly
Start the " DEEP CLEANING " process as indicated on
the machine. For this cleaning cycle, use the Philips
"Milk circuit cleaner" to clean the milk circuits.
Brew group
Weekly
Remove the brew group and clean it under running
water.
Depending on usage
See the "Cleaning and lubricating the brew group"
chapter.
Monthly
Clean the brew group with the Gaggia coffee oil
remover to remove any oily coffee residue
Drip tray full
When the red indicator emerges from
the grid of the drip tray
Empty the drip tray and clean it under running water.
Coffee pucks container
Whenever the machine requires it
Empty the coffee pucks container and clean it under
running water. Ensure that the machine is switched
on during this procedure, or the coffee pucks
container will not reset.
23/04/2020 09:50:10
26
Part description
When to clean
How to clean the cycle
Water tank
Weekly
Clean it under running water.
English
4219-450-08061 MANUAL GAG. CAD. PRESTIGE EN-FR 120US.indd 31
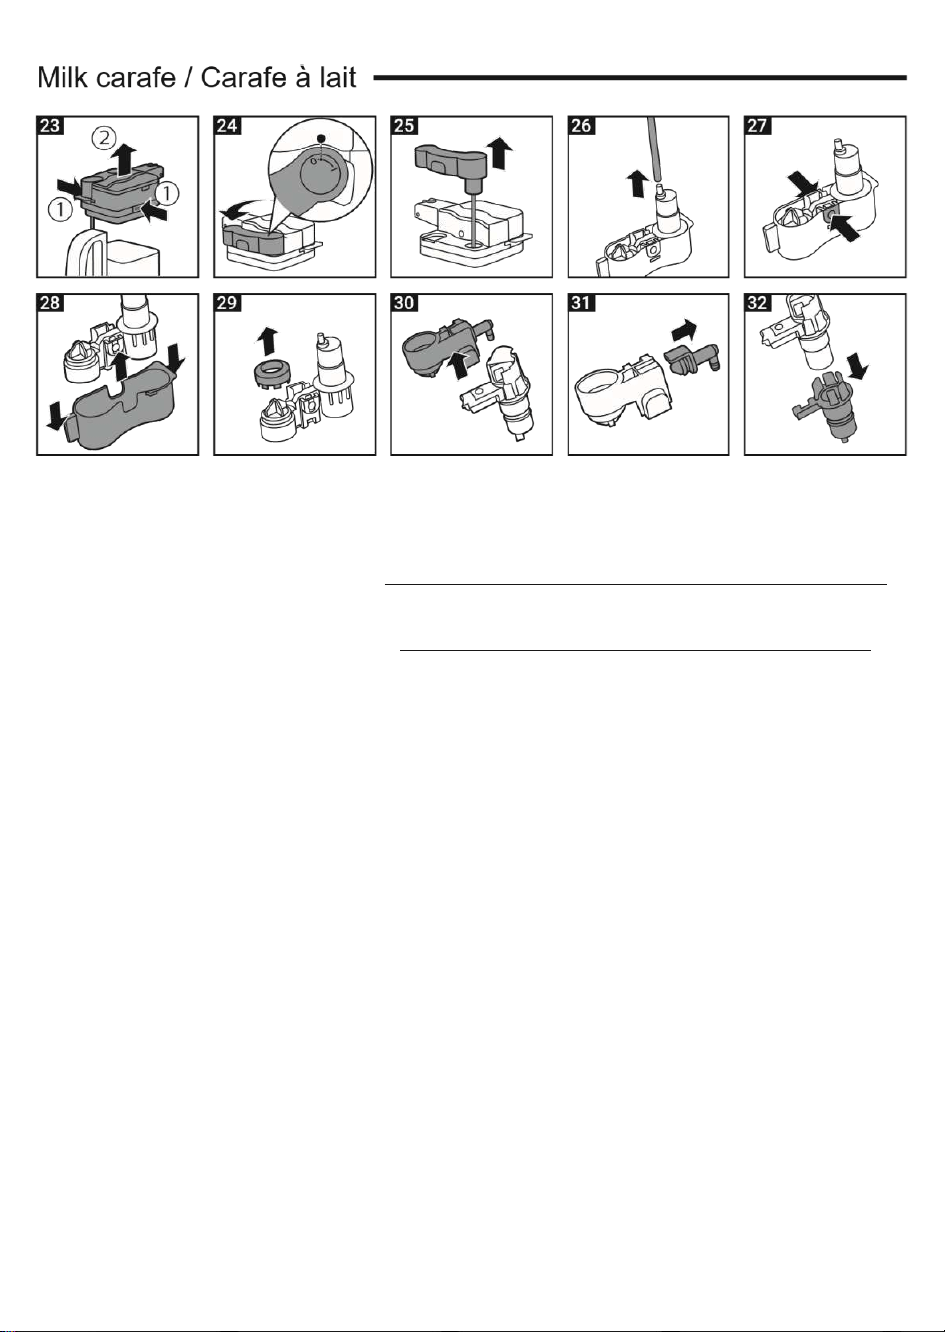
Cleaning the milk carafe
Milk carafe cleaning programmes
The machine has two programmes for cleaning the milk carafe: quick clean and deep
clean. Both programmes can be selected using the CLEAN/SETTING button then
pressing the " CLEAN " button.
Quick clean is also proposed after dispensing a milk-based beverage. For both
programmes, follow the instructions shown on the display.
- Quick clean programme
The quick clean programme includes the cleaning of the milk dispensing spout. The
cleaning procedure can be carried out with milk in the carafe.
- Deep clean programme for the carafe
The deep clean programme for the carafe includes the careful cleaning of the whole
milk circuit using the Philips "Milk circuit cleaner" product.
23/04/2020 09:50:11
27
Accurate cleaning of the milk carafe under running
water
To carefully clean the milk carafe, you must disassemble it completely and wash it under
running water, following these steps:
1 Press the release buttons to remove the lid (fig. 23).
English
4219-450-08061 MANUAL GAG. CAD. PRESTIGE EN-FR 120US.indd 32
2 Rotate the milk carafe’s dispensing spout to the "." position (fig. 24).
3 Lift the milk dispensing spout from the lid (fig. 25).
4 Remove the milk suction tube (fig. 26).
5 Press the button indicated by an arrow to unblock the cover of the milk dispensing
spout (fig. 27).
6 To remove the cover, press lightly on the sides of the dispenser and pull the cover
upwards to remove it from the dispenser (fig. 28).
7 Remove the ring from the milk carafe dispenser (fig. 29).
8 Pull the milk froth unit upwards (fig. 30).
9 Pull the support away from the milk froth unit (fig. 31).
10 Pull the support outwards and separate it from the remaining part (fig. 32).
11 Clean all parts with warm water.
12 Reassemble all the parts in the reverse order.
Cleaning the brew group
Warning: do not wash the brew group in the dishwasher and do not use dishwashing
detergents, since they may cause the malfunctioning of the brew group and alter the
coffee flavour.
Removing the brew group
1 Turn off the machine and disconnect the power cord.
2 Remove the coffee pucks container and open the service door.
3 Remove the coffee residues drawer.
23/04/2020 09:50:11
English
4219-450-08061 MANUAL GAG. CAD. PRESTIGE EN-FR 120US.indd 33
28
4 Press the PUSH lever (1) and pull the handle of the brew group (2) to remove it from
the machine.
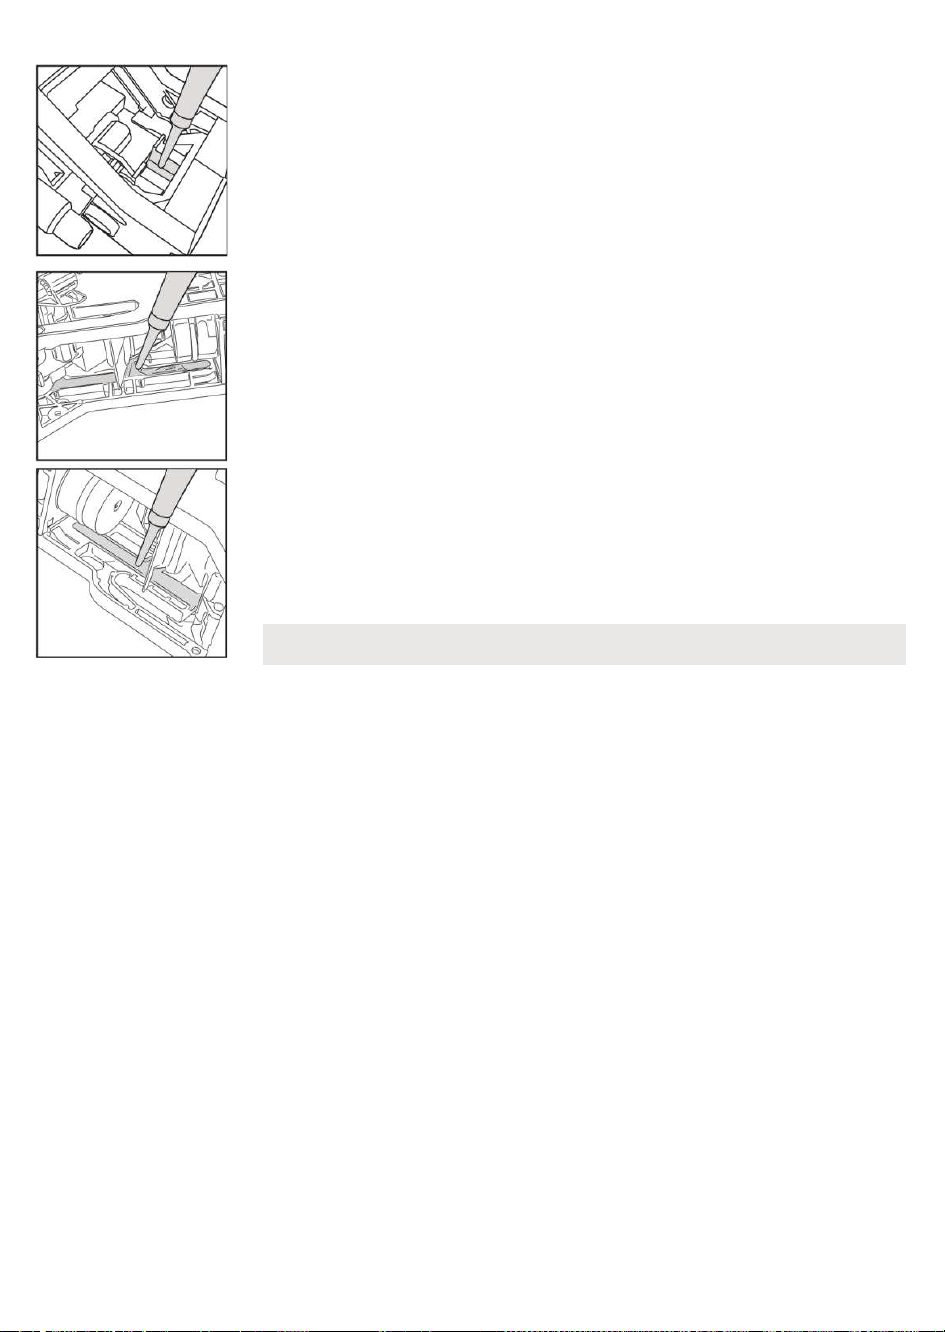
Cleaning the brew group under running water
1 Clean the coffee outlet duct thoroughly with a spoon handle or with another round-
tipped kitchen utensil.
2 Thoroughly rinse the brew group using lukewarm water. Carefully wash the upper
filter.
3 Let the brew group air dry.
Cleaning the brew group with coffee cleaning tablets
1 Place a container under the coffee dispensing spout.
2 Press the CLEAN/SETTING button and select the " CLEAN " button shown on
the display.
Note: to avoid the build-up of fibres in its interior, do not dry the brew group with
cloth.
Warning: use only Gaggia tablets for removing oily coffee residue.

English
4219-450-08061 MANUAL GAG. CAD. PRESTIGE EN-FR 120US.indd 34
3 Select " BREW GROUP CLEANING " and press the START/STOP button to launch
the cleaning procedure.
4 Follow the instructions shown on the display to correctly clean the brew group.
5 The procedure will take approximately 5 minutes. The START/STOP button
can be used to suspend and then resume the procedure.
23/04/2020 09:50:13
29 Reinserting the brew group
1 Before reinserting the brew group into the machine, ensure that the two yellow
reference indicators on the side coincide. If this is not the case, perform the
following step:
Make sure that the lever is in contact with the base of the brew group.
2 Make sure that the yellow locking hook of the brew group is in the right position.
To correctly position the hook, push it upwards to the highest possible position.
If the hook is still in the lower position, this means it has not been correctly positioned.
3 Reinsert the brew group in the machine along the side guides until it locks in the
right position with a click.
DEEP MILK CLEAN
QUICK MILK CLEAN
BREW GROUP CLEAN
DESCLING

English
4219-450-08061 MANUAL GAG. CAD. PRESTIGE EN-FR 120US.indd 35
Warning: do not press the PUSH lever.
4 Close the service door.
23/04/2020 09:50:14
30
Lubricating the brew group
In order to ensure the perfect performance of the machine, it is necessary to
lubricate the brew group. Refer to the following table for the frequency of
lubrication.
Frequency of use
Number of beverages prepared
daily
Frequency of
lubrication
Low
1-5
Every 4 months
Regular
6-10
Every 2 months
High
>10
Every month
1 Turn off the appliance and disconnect the power cord.
2 Remove the brew group and rinse it using lukewarm water (see the "Cleaning the
brew group under running water" chapter).
English
4219-450-08061 MANUAL GAG. CAD. PRESTIGE EN-FR 120US.indd 36
3 Apply a thin layer of the lubricant provided around the inserting pin on the lower
part of the brew group.
4 Apply a thin layer of lubricant to the guides, on both sides (see figure).
5 Reinsert the brew group (see the "Reinserting the brew group" chapter).
23/04/2020 09:50:15
31
Note: you can use the lubricant tube multiple times.
English
4219-450-08061 MANUAL GAG. CAD. PRESTIGE EN-FR 120US.indd 37
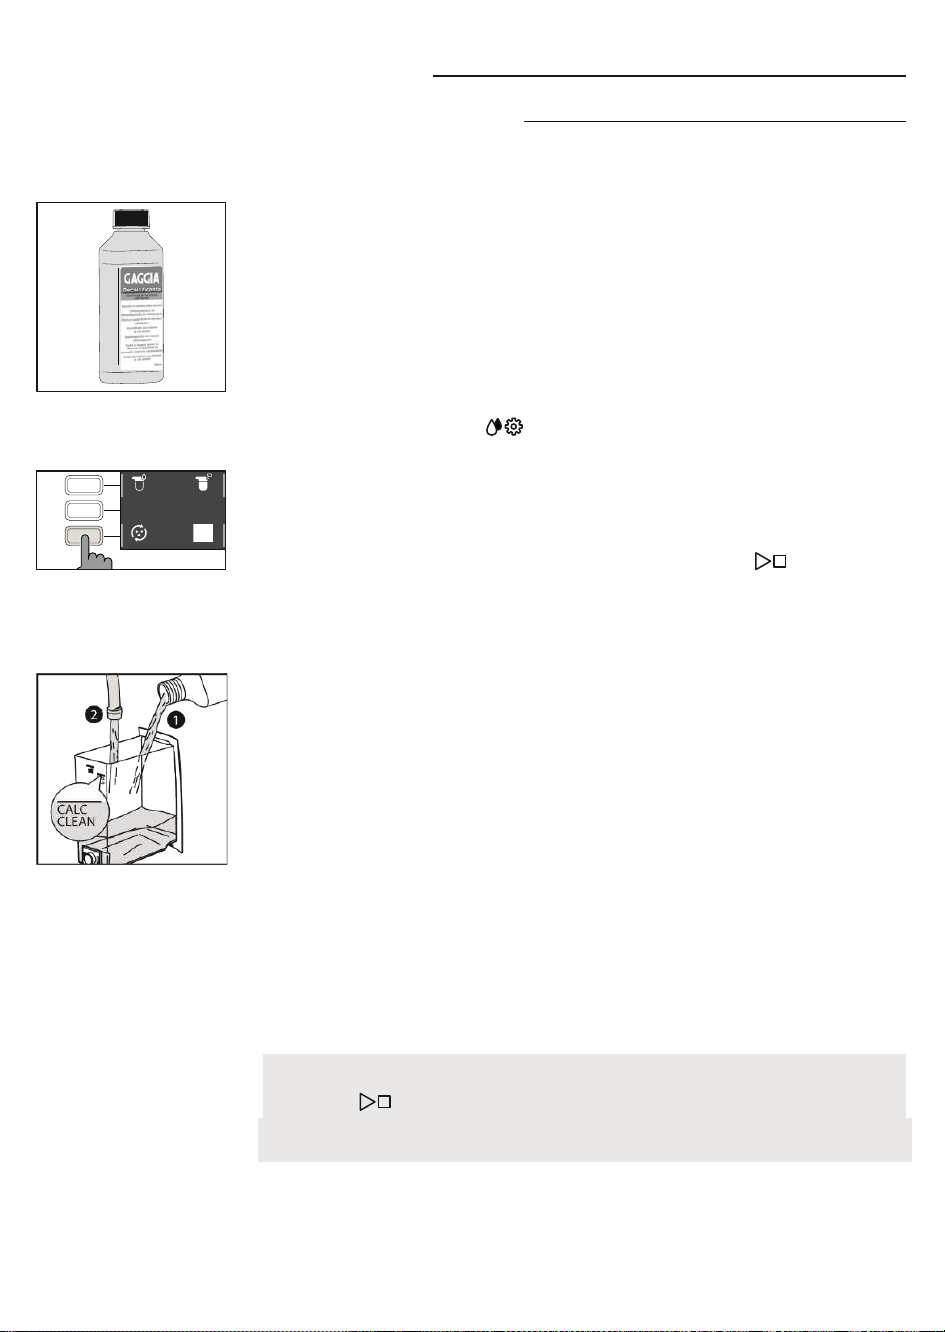
Descaling
Descaling procedure
Descaling needs to be carried out when the machine signals it.
Use only the Gaggia descaling solution designed to guarantee the machine’s excellent
performance. The use of other products could damage the machine and leave residue in
the water. Failure to descale the machine will void the warranty.
1 Press the CLEAN/SETTING button and select the " CLEAN " button shown on
the display.
- Press the " DESCALING " button, then press the START/STOP button.
2 Remove the drip tray and the coffee pucks container, empty them, and insert them
in the machine again.
3 Remove the water tank and empty it. Remove the INTENZA+ filter, if present.
4 Empty the entire bottle of Gaggia descaling solution into the water tank and fill the
tank with water up to the CALC CLEAN notch. Reinsert it in the machine.
5 Fill the milk carafe halfway with water and insert it in the machine.
6 Follow the instructions shown on the display to launch the descaling procedure. This
procedure lasts approximately 25 minutes and consists of a descaling cycle and a
rinse cycle, carried out with dispensing at regular intervals.
7 Once the descaling cycle is complete, rinse the water tank, carafe and water circuit,
following the instructions shown on the display.
8 Replace the INTENZA+ filter into the water tank.
Note: it is possible to pause and resume the procedure at any time by pressing the
START/STOP button.
Warning: when the descaling procedure is active, the brew group cannot be removed.
Wait for the descaling process to end, then remove the brew group.
DEEP MILK CLEAN
QUICK MILK CLEAN
BREW GROUP CLEAN
DESCLING
English
4219-450-08061 MANUAL GAG. CAD. PRESTIGE EN-FR 120US.indd 38
23/04/2020 09:50:16
32
What to do if the descaling process is interrupted
You can exit the descaling procedure by pressing the ON/OFF button on the control
panel. If the descaling procedure is interrupted before its completion, proceed as
follows:
1 Empty the water tank and wash it thoroughly.
2 Fill the water tank with fresh water up to the CALC CLEAN notch and switch the
machine on again. The machine will warm up and perform an automatic rinse cycle.
3 Before preparing any beverage, perform a manual rinsing cycle as described in the
specific chapter.
Note: if the procedure has not been completed, it will be necessary to carry out another
descaling procedure as soon as possible.
Various Settings
By pressing the CLEAN/SETTING button and selecting " SETTINGS " on the display, it is
possible to reset or modify several machine parameters including:
- Language
- Water filter
- Timer stand-by
- Water hardness
- Measurement units
- Beverage counter
- Restore factory settings
Language
When the language setting icon is selected, the list of available languages will be
displayed.
Languages available
ITALIAN
DUTCH
HUNGARIAN
ENGLISH
DANISH
BULGARIAN
GERMAN
GREEK
CZECH
FRENCH
POLISH
SLOVAK
English
4219-450-08061 MANUAL GAG. CAD. PRESTIGE EN-FR 120US.indd 39
SPANISH
RUSSIAN
LITHUANIAN
PORTUGUESE
ROMANIAN
23/04/2020 09:50:17
33
Water filter
When " WATER FILTER " is selected, follow the instructions on the display and those
described under the "Installing the INTENZA+ water filter" and "Replacing the INTENZA+
water filter" chapters.
Timer stand-by
When " TIMER STAND-BY " is selected, the timer can be set to:
- 15 min
- 30 min
- 60 min
- 180 min
Water hardness
With " WATER HARDNESS " selected, follow the instructions on the display and those
described under the "Measuring water hardness" chapter.
Measurement units
By selecting " MEASUREMENT UNITS ":
it is possible to set the measurement units to "ml" or "oz".
Beverage counter
It is possible to display the number of cups of each beverage that have been dispensed
since the first operation of the machine. These numbers cannot be reset.
LANGUAGE
TIMER STAND-BY
WATER FILTER
UNITS
LANGUAGE
TIMER STAND-BY
WATER FILTER
UNITS
LANGUAGE
TIMER STAND-BY
WATER FILTER
UNITS
English
4219-450-08061 MANUAL GAG. CAD. PRESTIGE EN-FR 120US.indd 40
Restore factory settings
It is possible to restore the machine to the default factory settings. The machine will
require a secondary confirmation before proceeding. All the parameters will be reset
except those relating to the profiles (MY FAVOURITES ) and the beverage counter.
23/04/2020 09:50:18
34
Error Code Key
The list below reports the error codes that the display can show, their meanings and how
to solve the problem. If the indicated solutions are ineffective (the display keeps
showing the error code icon and the machine does not function correctly), or if further
error codes are displayed, please contact an authorised service centre or a distributor
center or yur local vendor.
The contact info is listed on www.gaggia.com and www.gaggia.it.
Error code Problem Cause Possible solution
01
The coffee grinder is
clogged.
The coffee outlet duct is
clogged.
Remove the power cord and remove the
brew group. Clean the coffee outlet duct
thoroughly using a spoon handle. Switch the
appliance on again.
03 - 04
A problem occurred in the
brew group.
The brew group is dirty or
not well lubricated.
Switch off the machine using the power
button. Remove the brew group and clean it
thoroughly. (Refer to the "Cleaning the
Brew Group" chapter)
The brew group is not
positioned correctly.
Switch off the machine using the power
button. Remove the brew group and reinsert
it. Ensure that the brew group is in the
correct position before inserting it. Refer to
the "Reinserting the brew group" chapter.
05 A problem occurred in the There is air in the water Remove and reinsert the tank in the
water circuit. circuit. machine a couple of times. Make sure you
insert the tank correctly in the machine. Check
that the water tank seat is clean.
If you use an "INTENZA+" filter: pull out the
filter from the water tank and shake it to
remove all air from the filter. Then reinsert
the "INTENZA+" filter into the water tank.
English
4219-450-08061 MANUAL GAG. CAD. PRESTIGE EN-FR 120US.indd 41
14
The machine is overheated.
There may be multiple
causes.
Switch off the machine and switch it on
again after 30 minutes. Perform this
operation 2 or 3 times.
23/04/2020 09:50:18
35
Troubleshooting
This chapter summarises the most common problems you may encounter while using
the machine. If you are unable to resolve the problem using the information given
below, visit the FAQ sections on www.gaggia.com or www.gaggia.it or contact the
Customer Service Centre in your country.
Problem
Cause
Solution
The machine does not The machine is not connected. Check that the power cord has been inserted switch
on. correctly.
The drip tray fills quickly.
This is normal. The machine uses
water to rinse the internal circuit and
the brew group. Part of the water
flows through the internal system
directly into the drip tray.
Empty the drip tray when the red indicator
emerges from the grid of the drip tray.
Tip: Place a cup under the dispensing spout to
gather the rinse water.
The display continuously
shows the "coffee pucks
container full" icon.
The coffee pucks container has been
emptied when the machine was off.
Always empty the coffee pucks container when the
machine is on. If you empty the coffee pucks
container when the machine is off, the coffee cycle
counter does not reset. In this case, the display
shows the icon even if the container is not full.
The coffee pucks container has been
put back too quickly.
Always wait about 5 seconds when you replace the
coffee pucks container. This way, the counter will
reset to zero.
The machine says to empty
the coffee pucks container
even if the container is not
full.
The machine has not reset the counter
last time the coffee pucks container has
been emptied.
Always wait about 5 seconds when you replace
the coffee pucks container. This way, the coffee
grounds counter will reset to zero.
Always empty the coffee pucks container when the
machine is on. If you empty the coffee pucks
container when the machine is off, the coffee cycle
counter does not reset.
Impossible to remove The brew group is not in the correct Close the service door. Switch the machine off
the brew group. position. and then back on. Wait for the display to show
the ready message, then remove the brew group.
The coffee pucks container has not Remove the coffee pucks container before been
removed. removing the brew group.
English
4219-450-08061 MANUAL GAG. CAD. PRESTIGE EN-FR 120US.indd 42
23/04/2020 09:50:19
36
Problem
Cause
Solution
The brew group cannot The brew group is not in the correct The brew group has not been positioned
be inserted. position. correctly before being placed back. Ensure that
the lever is in contact with the base of the brew
group and that the hook of the brew group is in
its correct position. See the "Reinserting the brew
group" chapter.
To reset the machine: put the coffee pucks
container back in place. Do not insert the brew
group. Close the service door with the coffee pucks
container inserted, then unplug and plug in the
power cord. Then try to reinsert the brew group
and switch on the machine.
The espresso does not The coffee grinder is set
to a have enough crema or it coarse grinding. is watery.
Adjust the coffee grinder to a finer setting.
The machine is performing the
selfadjustment.
Dispense several cups of coffee so that the
machine regulates itself automatically.
The coffee outlet duct is clogged.
Clean the coffee outlet duct with a spoon as
described in the "Cleaning the brew group under
running water" chapter.
The coffee dispensed is The set temperature is too low. Set the menu temperature to "MAX". not
hot enough. Check the menu settings.
The machine grinds the
coffee beans, but the
coffee is not dispensed.
The coffee grinder is set to a too fine
grinding.
Adjust the coffee grinder to a coarser setting.
The coffee dispensing spout is blocked.
Dispense a long coffee from pre-ground coffee
but without actually adding pre-ground coffee.
The nozzles of the coffee dispensing
spout are blocked.
Clean the nozzles of the coffee dispensing spout
with a small bottlebrush.
Coffee is dispensed slowly
or by drips.
The coffee grinder is set to a too fine
grinding.
Adjust the coffee grinder to a coarser setting.
The nozzles of the coffee Clean the nozzles of the coffee dispensing
dispensing spout are blocked. spout with a small bottlebrush.
The machine circuit is clogged by Descale the machine.
limescale.
The milk does not froth.
The milk dispensing spout is dirty or
the carafe has not been inserted
correctly, or the milk carafe has not
been assembled with all its parts.
Clean the carafe according to the "Accurate
cleaning of the milk carafe under running water"
chapter and ensure that it is positioned and
inserted correctly.
Ensure that all components have been correctly
assembled.

English
4219-450-08061 MANUAL GAG. CAD. PRESTIGE EN-FR 120US.indd 43
The type of milk used is not suitable
for foaming.
The amount and the quality of froth vary
depending on the type of milk.
23/04/2020 09:50:19
37
Problem
Cause
Solution
The "INTENZA+" filter
cannot be inserted.
Remove the air from the filter.
Let the air bubbles flow out of the filter.
The tank still contains some water.
Empty the water tank before installing the filter.
The rubber seal is not inserted on Check the packaging and insert the seal on the the
"INTENZA+" filter. "INTENZA+" filter.
There is some water
under the machine.
The drip tray is too full and has spilled
over.
Empty the drip tray when red indicator emerges
from the grid of the drip tray. Always empty the
drip tray before starting the descaling procedure.
GAGGIA Accessories
Coffee and accessories are available through authorised centres (Italy), or
distributors in your country.
(Philips)
Range of coffee available in beans and pre-ground: 100% Arabica / Intense / Decaffeinated

English
4219-450-08061 MANUAL GAG. CAD. PRESTIGE EN-FR 120US.indd 44
23/04/2020 09:50:20
38
Technical Specifications
Nominal voltage - Power rating -
Power supply
See data plate on the inside of the
service door
Housing material
Thermoplastic type
Dimensions
221 x 340 x 430 mm
Weight
7.5 kg
Power cord length
1200 mm
Control panel
Front panel
Cup size
Up to 150 mm
Water tank
1.8 litres - Removable type
Coffee bean container capacity
250 g
Coffee pucks container capacity
10
Pump pressure
15 bar
Boiler
Stainless steel boiler
Safety devices
Thermal Fuse
23/04/2020 09:50:20

Français
4219-450-08061 MANUAL GAG. CAD. PRESTIGE EN-FR 120US.indd 45
39
Table des matières
Informations de sécurité importantes ....................................................................................................................................................................................................................................................................................................................................................................................................43
Vue d’ensemble de la machine (Fig. 2) ...................................................................................................................................................................................................................................................................................................................................................................... .............46
Bandeau de commande et afficheur ..........................................................................................................................................................................................................................................................................................................................................................................................................47
Vue d’ensemble du bandeau de commande (fig. 1) .....................................................................................................................................................................................................................................................................................................................................47
Touches multifonction ..............................................................................................................................................................................................................................................................................................................................................................................................................................................................................................................................47
Première installation ............................................................................................................................. .......................................................................................................................................................................................................................................................................................................................................................................................................48
Cycle de rinçage manuel ..........................................................................................................................................................................................................................................................................................................................................................................................................................................................................................................48
Mesure de la dureté de l’eau .................................................................................................................................................................................................................................................................................................................................................................................................................................................................................49
Filtre à eau INTENZA+ ................................................................................................................................................................................................................................................................................................................................................................................................................................................................................................................49
Installation du filtre à eau INTENZA+ ..............................................................................................................................................................................................................................................................................................................................................................................................................................50
Remplacement du filtre à eau INTENZA+ ..................................................................................................................................................................................................................................................................................................................................................................................................50
Types de boisson ............................................................................................................................................................................................................................................................................................................................................................................................................................................................................................................................................... ............51
Espresso tray .........................................................................................................................................................................................................................................................................................................................................................................................................................................................................................................................................................................................52
Distribution du café .............................................................................................................................................................................................................................................................................................................................................................................................................................................................................................................................................52
Distribution de café avec du café en grains ........................................................................................................................................................................................................................................................................................................................................................................................52
Distribution de café avec du café prémoulu .......................................................................................................................................................................................................................................................................................................................................................................................53
Préparation de boissons à base de café et de lait émulsionné ...............................................................................................................................................................................................53
Remplissage de la carafe à lait .......................................................................................................................................................................................................................................................................................................................................................................................... .........................................................................53
Introduction de la carafe à lait ...........................................................................................................................................................................................................................................................................................................................................................................................................................................................................54
Enlèvement de la carafe à lait ..........................................................................................................................................................................................................................................................................................................................................................................................................................................................................54
Distribution des boissons à base de café et de lait émulsionné .............................................................................................................................................................................................................................................................55
Distribution d’eau chaude ............................................................................................................................................................................................................................................................................................................................................................................................................................................................................................56
Personnalisation des boissons et création des profils ....................................................................................................................................................................................................................................................................57
Personnalisation des boissons .....................................................................................................................................................................................................................................................................................................................................................................................................................................................................57
Création d'un profil .......................................................................................................................................................................................................................................................................................................................................... ......................................................................................................................................................................................................58
Réglage du degré de mouture ........................................................................................................................................................................................................................................................................................................................................................................................................................................................59
Nettoyage et entretien ............................................................................................................................. .........................................................................................................................................................................................................................................................................................................................................................................................60
Tableau des opérations de nettoyage ............................................................................................................................................................................................................................................................................................................................................................................................................................60
Nettoyage de la carafe à lait ............................................................................................................................................................................................................................................................................................................................................................................................................................................................................61
Nettoyage du groupe de distribution .....................................................................................................................................................................................................................................................................................................................................................................................................................62
Lubrification du groupe de distribution .......................................................................................................................................................................................................................................................................................................................................................................................................65
Détartrage .................................................................................................................................................................................................................................................................................................................................................................................................................................................................................................................. .......................................................................................66

Français
4219-450-08061 MANUAL GAG. CAD. PRESTIGE EN-FR 120US.indd 46 23/04/2020 09:50:22
Procédure de détartrage ............................................................................................................................................................................................................................................................................................................................................................................................................................................................................................................66
Que faire en cas d’interruption de la procédure de détartrage .....................................................................................................................................................................................................................................................................67
Réglages divers ......................................................................................................................................................................................................................................................................................................................................................................................................................................................................................................................................................................67
Langue ........................................................................................................................................................................................................................................................................................................................................................................................................................................................................................................................................................................................................................67
Filtre à eau ................................................................................................................................................................................................................................................................................................................................................................................................................................................................................................................................................................................................68
Minuteur stand-by ................................................................................................................................................................................................................................................................................................................................................................................................................................................................................................................. ....................................68
Dureté de l’eau ......................................................................................................................................................................................................................................................................................................................................................................................................................................................................................................................................................................68
Unité de mesure ................................................................................................................................................................................................................................................................................................................................................................................................................................................................................................................................................. .............68
Compteur de boissons ........................................................................................................................................................................................................................................................................................................................................................................................................................................................................................................................68
Rétablir les réglages d’usine ............................................................................................................................................................................................................................................................................................................................................................................................ .......................................................................................68
Signification des codes d'erreur ............................................................................................................................................................................................................................................................................................................................................................................................................................................69
Dépannage ..........................................................................................................................................................................................................................................................................................................................................................................................................................................................................................................................................................................................................70
Accessoires GAGGIA ...........................................................................................................................................................................................................................................................................................................................................................................................................................................................................................................................72
Données techniques ...................................................................................................................................................................................................................................................................................................................................................................................................................................................................................................................................73
23/04/2020 09:50:21
40
IMPORTANT
Lors de l’utilisation d’appareils électriques, il est indispensable de respecter
toujours les précautions de sécurité principales, y compris les suivantes:
1. Lire toutes les instructions.
2. Ne pas toucher les surfaces chaudes. Utiliser les poignées ou les boutons.
3. Afin d’éviter tout incendie, choc électrique et blessure, ne pas plonger le
cordon, la fiche ou l’appareil dans l’eau ou dans n’importe quel liquide.
4. Il est nécessaire de contrôler attentivement lorsque l’appareil est utilisé par
des enfants ou à leur proximité.
5. Débrancher de la prise de courant lorsque l’appareil n’est pas en service et
avant son nettoyage. Laisser refroidir l’appareil aussi bien avant de retirer et
de mettre en place ses accessoires qu’avant de le nettoyer.
6. Ne pas utiliser l’appareil avec un cordon ou une fiche détériorés, après un
mauvais fonctionnement de l’appareil ou son endommagement de n’importe

Français
4219-450-08061 MANUAL GAG. CAD. PRESTIGE EN-FR 120US.indd 47 23/04/2020 09:50:22
quelle manière. Renvoyer l’appareil au centre d’assistance agréé le plus
proche pour tout contrôle, réparation et réglage.
7. L’utilisation d’accessoires non recommandés par le constructeur de l’appareil
pourrait engendrer des incendies, des chocs électriques et des blessures.
8. Ne pas utiliser à l’extérieur.
9. Ne pas laisser les cordons pendre des bords de la table ou du plan de travail,
ni toucher les surfaces chaudes.
10. Ne pas placer près du feu ou sur une cuisinière, électrique et à gaz, ou dans
un four chaud.
11. Toujours brancher le cordon d’alimentation à la machine d’abord et ensuite
à la prise de courant sur le mur. Pour débrancher, éteindre toute commande
en appuyant sur « OFF » et ensuite enlever la fiche de la prise de courant sur
le mur.
12. Ne pas utiliser l’appareil pour toute autre utilisation non prévue.
13. Garder ces instructions.
CONSERVER CES
INSTRUCTIONS
41
PRÉCAUTIONS
La machine est réservée à un usage domestique. Tout entretien, en dehors du
nettoyage et de l’entretien usuel par l’usager, doit être fait par un service
aprèsvente autorisé. Ne pas plonger la base dans l’eau. Pour éviter les courts-
circuits et les décharges électriques, ne pas démonter la base. Elle ne contient
aucune pièce qui demande un entretien de la part de l’usager. Toute réparation
doit être effectuée par le personnel d’un service après-vente autorisé.
1. Vérifier si le voltage correspond bien aux spécifications apparaissant sur la
plaque signalétique.

Français
4219-450-08061 MANUAL GAG. CAD. PRESTIGE EN-FR 120US.indd 48 23/04/2020 09:50:22
2. Ne jamais mettre de l’eau tiède ou chaude dans le réservoir; mais toujours
de l’eau froide.
3. Ne pas toucher les surfaces chaudes de l’appareil pendant le fonctionnement
et en écarter le cordon électrique.
4. Ne pas utiliser d’alcool éthylique, de solvants, d’essences, de poudre à
récurer et/ou d’objets abrasifs pour le nettoyage de la machine.
5. Utiliser de l’eau purifiée ou en bouteille pour assurer le bon goût du café. Il
sera toutefois nécessaire de procéder au détartrage de votre machine tous
les 2-3 mois.
6. Ne pas utiliser du café au préparation à base de sucre (ex: caramel) ou
mélangé avec toute autre recette.
42
INSTRUCTIONS SUR LE CORDON
ÉLECTRIQUE
A. Votre appareil est muni d’un cordon électrique court ou d’un cordon
d’alimentation détachable, afin d’éviter de trébucher ou de s’emmêler avec
un câble plus long.
B. Des cordons détachables plus longs ou bien des rallonges sont disponibles et
ne peuvent être utilisés que si l’on prend toutes les précautions d’usage.
C. En cas d’utilisation d’un long cordon d‘alimentation détachable ou d’une
rallonge,
1. La tension électrique de fonctionnement marquée sur le cordon
d’alimentation détachable ou sur la rallonge doit être au moins égale à celle
de l’appareil.
2. Si la fiche de l’appareil a une connexion de terre, la rallonge devrait être une
rallonge de terre à 3 fils et
3. La rallonge ne devra pas encombrer le plan de travail ou le dessus de table,
afin d’éviter que les enfants la tirent ou trébuchent accidentellement.

Français
4219-450-08061 MANUAL GAG. CAD. PRESTIGE EN-FR 120US.indd 49 23/04/2020 09:50:23
43
Informations de sécurité importantes
Cette machine est équipée de fonctions de sécurité. Veuillez néanmoins lire et suivre
attentivement les consignes de sécurité et utiliser la machine uniquement tel
qu’indiqué dans ces instructions, afin d’éviter toute blessure ou tout dommage
accidentels dus à une mauvaise utilisation. Conservez cette brochure de sécurité pour
toute consultation ultérieure.
Avertissement
Informations d’ordre général
- Avant de brancher la machine, vérifiez que la tension indiquée sur la machine
correspond à la tension secteur.
- Branchez la machine sur une prise murale mise à la terre.
- Ne laissez pas le cordon pendre de la table ou du plan de travail ni entrer en contact
avec des surfaces chaudes.
- Pour éviter le risque d’électrocution, ne plongez jamais la machine, le cordon ou le
câble d’alimentation dans l’eau ou dans tout autre liquide.
- Ne versez pas de liquides sur le connecteur du cordon d’alimentation.
- Pour éviter le risque de brûlure, évitez tout contact avec les jets d’eau chaude émis
par l’appareil.
- Évitez de toucher les surfaces chaudes. Utilisez les poignées et boutons.
- Éteignez la machine au moyen de l’interrupteur principal situé à l’arrière (le cas
échéant) et retirez le cordon d’alimentation de la prise murale :
• En cas de dysfonctionnement.
• Si vous ne comptez pas utiliser l’appareil pendant une période prolongée.
• Avant de nettoyer la machine.
- Tirez sur la prise et non sur le cordon d’alimentation.
- Ne touchez pas la prise secteur avec les mains humides.
- N’utilisez jamais l’appareil si la fiche, le cordon d’alimentation ou l’appareil luimême
est endommagé.
- Évitez d’effectuer toute modification de la machine ou de son cordon d’alimentation.
- Effectuez uniquement les réparations auprès d’un centre de service autorisé par
Gaggia pour éviter tout risque.
- La machine ne peut être utilisée par des enfants âgés de moins de 8 ans.
- Cette machine peut être utilisée par des enfants âgés de 8 ans ou plus, des personnes
dont les capacités physiques, sensorielles ou intellectuelles sont réduites ou des
personnes manquant d’expérience et de connaissances, à condition que ces enfants
ou personnes soient sous surveillance ou qu’ils aient reçu des instructions quant à
l’utilisation sécurisée de la machine et qu’ils aient pris connaissance des dangers
encourus.

Français
4219-450-08061 MANUAL GAG. CAD. PRESTIGE EN-FR 120US.indd 50 23/04/2020 09:50:23
- Le nettoyage et l’entretien ne peuvent pas être réalisés par des enfants sauf s’ils sont
âgés de plus de 8 ans et sous surveillance.
- Tenez la machine et son cordon hors de portée des enfants de moins de 8 ans.
- Veillez à ce que les enfants ne jouent pas avec l’appareil.
44
- N’insérez jamais les doigts ni d’autres objets dans le moulin à café.
- Soyez prudent lorsque vous versez de l’eau chaude. De petits jets d’eau chaude
peuvent précéder l’écoulement de l’eau. Attendez la fin du cycle de distribution avant
de retirer la buse de distribution de l’eau chaude.
Attention
Informations d’ordre général
- Cette machine est uniquement destinée à un usage domestique normal. Elle ne peut
être utilisée dans des environnements tels que des cuisines réservées aux employés
dans les entreprises, magasins, fermes et autres environnements de travail.
- Placez toujours l’appareil sur une surface stable et plane. Maintenez-le en position
verticale, également pendant le transport.
- Ne placez pas la machine sur une plaque chauffante ou directement à côté d’un four
chaud, d’un appareil de chauffage ou d’une source similaire de chaleur.
- Veillez à placer uniquement des grains de café torréfiés dans le bac à grains. Placer du
café moulu, du café soluble, des grains de café bruts ou toute autre substance dans le
bac à grains risquerait d’endommager la machine.
- Laissez refroidir la machine avant d’insérer ou de retirer tout composant. Les surfaces
de chauffe risquent de retenir la chaleur après leur utilisation.
- Ne remplissez jamais le réservoir d’eau avec de l’eau chaude, tiède ou gazeuse car
vous risqueriez de l’endommager ou d’endommager la machine.
- N’utilisez jamais des tampons à récurer, des produits abrasifs ou des détergents
agressifs tels que de l’essence ou de l’acétone pour nettoyer la machine. Utilisez
uniquement un chiffon doux humidifié avec de l’eau.
- Détartrez votre machine régulièrement. La machine indiquera lorsqu’un détartrage
sera nécessaire. Sans détartrage, votre appareil cessera de fonctionner correctement,
Dans ce cas, la réparation n’est pas couverte par la garantie.
- Ne conservez pas la machine à une température inférieure à 0 °C. L’eau laissée dans le
système de chauffe peut geler et provoquer des dommages.
- Veillez à ne pas laisser d’eau dans le réservoir lorsque la machine est inutilisée
pendant une période prolongée. Il est possible que l’eau soit contaminée. Utilisez de
l’eau fraîche à chaque utilisation de la machine.
- N’utilisez jamais d’accessoires ou de pièces d’un autre fabricant ou n’ayant pas été
spécifiquement recommandés par Gaggia. Votre garantie n’est plus valable en cas
d’utilisation de tels accessoires ou pièces.
- Un nettoyage et un entretien réguliers prolongent la durée de vie de votre machine et
assurent la qualité et le goût de votre café.

Français
4219-450-08061 MANUAL GAG. CAD. PRESTIGE EN-FR 120US.indd 51 23/04/2020 09:50:23
- La machine est constamment exposée à de l’humidité, du café et du tartre. Il est donc
très important de nettoyer et d’entretenir régulièrement la machine comme décrit
dans le manuel d’utilisation et illustré sur le site Web. Si vous n’accomplissez pas ces
opérations de nettoyage et d’entretien, il est possible que votre machine cesse de
fonctionner. Dans ce cas, la réparation n’est pas couverte par la garantie.
45
- Ne nettoyez pas le groupe café dans le lave- vaisselle et n’utilisez pas de liquide
vaisselle ou de détergent pour le nettoyer. Cela peut causer un mauvais
fonctionnement du groupe de percolation et avoir un effet nuisible sur le goût du
café.
- Évitez de sécher le groupe de percolation avec un chiffon, afin d’empêcher que des
fibres ne tombent dedans.
- Ne buvez jamais la solution versée pendant l’étape de détartrage.
- Placez uniquement du café prémoulu dans le compartiment du café prémoulu.
D’autres substances et objets peuvent fortement endommager la machine. Dans ce
cas, la réparation n’est pas couverte par la garantie.
- La machine ne doit pas être placée dans une armoire pendant son utilisation.
Machines avec carafe à lait
Avertissement
- Pour éviter le risque de brûlure, vous devez tenir compte du fait que la distribution
peut être précédée par l’émission de jets de lait et de vapeur. Attendez la fin du cycle
avant de retirer la carafe à lait.
Attention
- Assurez-vous que la carafe à lait est installée et que la buse de distribution de lait est
ouverte avant de sélectionner un café à base de lait ou de la mousse de lait.
- Ne placez aucun autre liquide que du lait ou de l’eau (à des fins de nettoyage) dans la
carafe à lait.
- Ne passez pas la carafe à lait au lave-vaisselle.
Champs électromagnétiques (CEM)
Cette machine est conforme à toutes les normes et à tous les règlements applicables
relatifs à l’exposition aux champs électromagnétiques.
Français
4219-450-08061 MANUAL GAG. CAD. PRESTIGE EN-FR 120US.indd 52 23/04/2020 09:50:23
Recyclage
- Ce symbole signifie que ce produit ne doit pas être jetées avec les déchets ménagèrs
(2012/19/EU).
- Respectez les réglementations de votre pays concernant la collecte séparée des
appareils électriques et électroniques. La mise au rebut appropriée des piles permet
de protéger l’environnement et la santé.
Garantie et assistance
Si vous avez besoin d’assistance, contactez un point de vente local ou un centre
d’assistance agrée.
Nos contacts sont indiqués dans le dépliant de garantie fourni séparamment ou sur les
sites www.gaggia.com ou www.gaggia.it.
46
Félicitations pour l’achat de Gaggia Cadorna Prestige !
Cette machine garantit une grande facilité d’utilisation et toujours d’excellents
résultats. Grâce à son interface intuitive, l’utilisateur pourra choisir parmi 14 boissons
différentes, les personnaliser et les sauvegarder dans les 4 profils disponibles, afin de
les retrouver à chaque utilisation.
Avant d’être emballée, chaque machine est soumise à des essais rigoureux dans nos
laboratoires, qui doivent assurer la haute qualité et le bon fonctionnement du produit.
Certains essais sont faits avec du café, il est donc possible que quelques résidus soient
restés à l’intérieur. Ceci ne compromet pas l’intégrité du produit : il s’agit d’une
machine complètement neuve.
Ce manuel fournit toutes les informations nécessaires pour l'installation, l'utilisation, le
nettoyage et le détartrage de votre machine. Avant de l'utiliser pour la première fois,
lire attentivement le livret de sécurité fourni séparément et le conserver pour toute
référence future.
Vue d’ensemble de la machine (Fig. 2)
1 Couvercle du réservoir à café en grains 13
Espresso tray
2 Réservoir à café en grains 14
Câble d’alimentation
3 Prise cordon d’alimentation 15
Lubrifiant
4 Réservoir à eau 16
Mesure à café prémoulu
5 Compartiment café prémoulu 17
Testeur de la dureté de l’eau
6 Bouton de réglage du moulin à café 18
Volet d’entretien
7 Bandeau de commande 19
Tiroir à résidus de café
8 Buse de distribution du café réglable 20
Groupe de distribution
9 Réservoir à marc de café 21
Touches de décrochage du bac d’égouttement

Français
4219-450-08061 MANUAL GAG. CAD. PRESTIGE EN-FR 120US.indd 53 23/04/2020 09:50:23
10 Bac d'égouttement 22
Carafe à lait
11 Couvercle du bac d’égouttement 23
Buse de distribution de l'eau
12 Indicateur bac d’égouttement plein
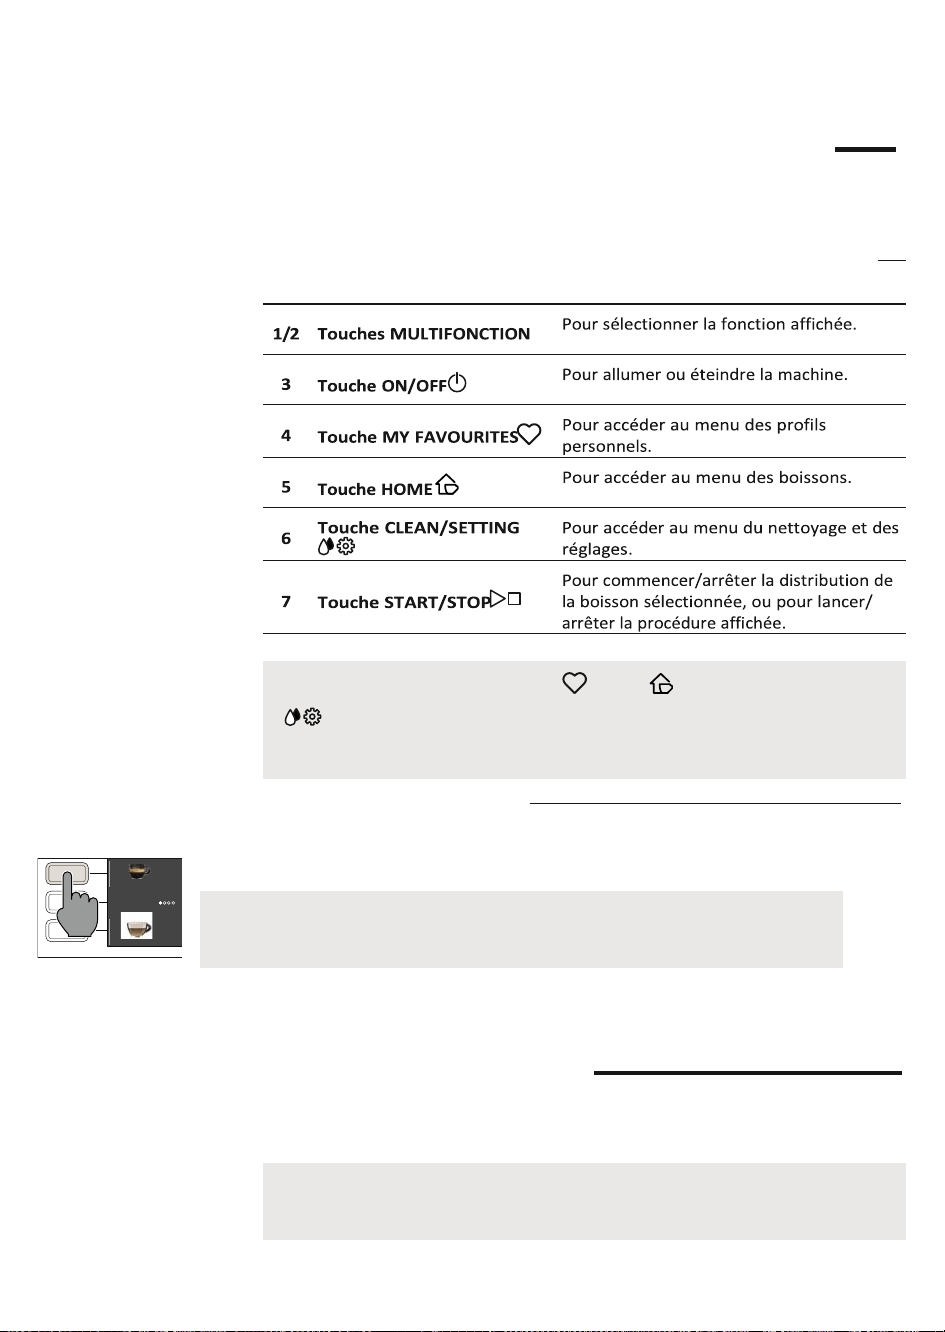
Français
4219-450-08061 MANUAL GAG. CAD. PRESTIGE EN-FR 120US.indd 54
47
Bandeau de commande et afficheur
Cette machine à café est pourvue d’un afficheur intuitif et convivial. Lire les sections
suivantes pour mieux comprendre l’utilisation des touches.
Remarque : les touches MY FAVOURITES , HOME , CLEAN/SETTING
sont également des touches ESC. À tout moment il est possible de quitter
la page affichée en appuyant sur l’une de ces touches, pour revenir au menu initial
correspondant.
Touches multifonction
Les touches multifonction situées des deux côtés de l’afficheur permettent de
sélectionner la fonction ou la boisson à laquelle elles se réfèrent au moment spécifique.
Remarque : pour faciliter la lecture de ce manuel, chaque fois que l’on retrouve
l’expression <<appuyer sur la touche « »>> il faut comprendre <<appuyer sur la touche
relative à « »>>.
23/04/2020 09:50:25
48
Première installation
Remarque : pour avoir un café plus savoureux, il est conseillé de commencer par
distribuer 5 tasses de café pour permettre à la machine d’effectuer le réglage
automatique.
ESPRESSO
CAPPUCCINO
LA
Vue d’ensemble du bandeau de commande (fig. 1)
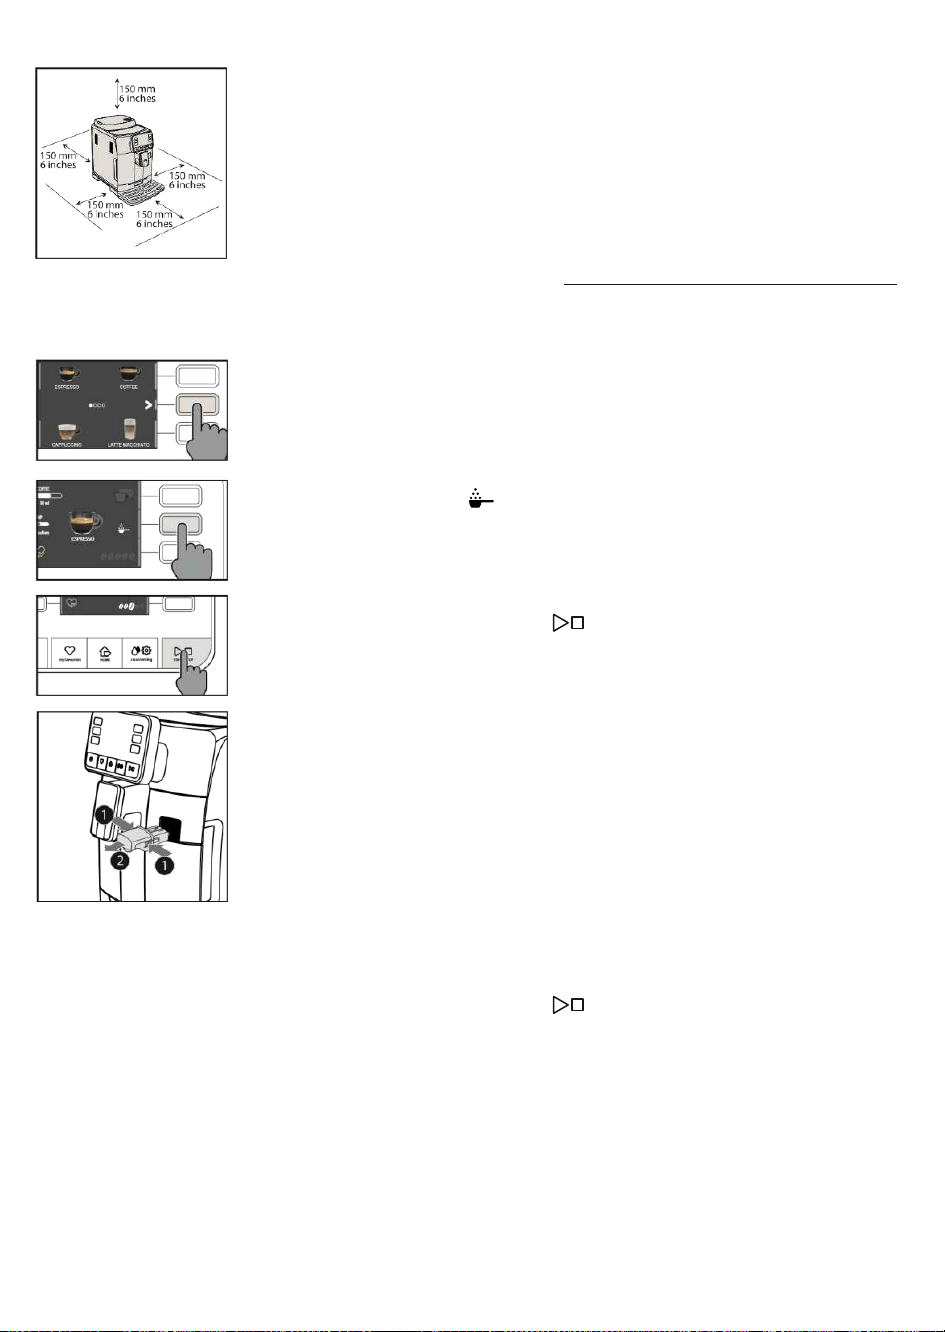
Français
4219-450-08061 MANUAL GAG. CAD. PRESTIGE EN-FR 120US.indd 55
Avant d’utiliser la machine, il est essentiel d’effectuer quelques simples opérations,
celles-ci étant décrites clairement dans le guide rapide par dessins explicatifs figurant au
début de ce mode d’emploi.
Cycle de rinçage manuel
Lors de la première installation ou si la machine n’a pas été utilisée pendant longtemps,
effectuer un cycle de rinçage manuel.
1 Mettre un récipient sous la buse de distribution du café, faire défiler les pages et
sélectionner un « ESPRESSO LUNGO ».
2 Appuyer sur la touche « », sans ajouter de café prémoulu.
3 Appuyer sur la touche START/STOP pour commencer la distribution, la machine
va distribuer de l’eau chaude.
4 Vider le récipient et s’assurer que la buse de distribution de l’eau chaude est
installée.
5 Mettre le récipient sous la buse de distribution de l’eau chaude et sélectionner la
boisson « HOT WATER ».
6 Appuyer sur la touche START/STOP pour commencer la distribution.
7 Vider le récipient et répéter les passages de 5 à 7, jusqu’à ce que le réservoir à eau
soit vide.
8 À la fin de cette opération, remplir de nouveau le réservoir à eau jusqu'au niveau
maxi. La machine est maintenant prête à l’emploi.
Français
4219-450-08061 MANUAL GAG. CAD. PRESTIGE EN-FR 120US.indd 56
23/04/2020 09:50:27
49
Mesure de la dureté de l’eau
Lors de la première installation, il faut saisir la valeur correspondante à la dureté de
l’eau.
Prendre la bande de mesure la dureté de l’eau qu’on peut trouver dans l’emballage et
suivre les instructions affichées pendant la phase d’installation. Pour modifier la dureté
de l’eau à une date ultérieure, appuyer sur la touche CLEAN/SETTING
, sélectionner « RÉGLAGES » et, après avoir accédé au menu des réglages,
sélectionner « DURETÉ EAU ».
sec.
1
Français
4219-450-08061 MANUAL GAG. CAD. PRESTIGE EN-FR 120US.indd 57
Filtre à eau INTENZA+
Pour limiter la formation de calcaire, il est conseillé d’installer le filtre à eau INTENZA+.
Grâce à ce filtre, la durée de vie de la machine sera plus longue et l’arôme du café n’en
sera que meilleur pendant plus de temps.
L'eau est un élément fondamental dans la préparation du café : il est donc très important
de la filtrer toujours de manière professionnelle.
Le filtre à eau INTENZA+ prévient la formation de dépôts de minéraux et améliorer la
qualité de l'eau.
23/04/2020 09:50:29
50
Installation du filtre à eau INTENZA+
Enlever le petit filtre blanc à l’intérieur du réservoir à eau et le conserver dans un endroit
sec.
Plonger le filtre à eau INTENZA+ verticalement dans l'eau froide (l'ouverture vers le haut)
en le poussant délicatement sur les côtés pour permettre aux bulles d'air de sortir.
Retirer le filtre à eau INTENZA+ de l’eau, le régler d’après la dureté de l’eau mesurée
(voir le chapitre « Mesure de la dureté de l’eau ») en spécifiant à sa base :
A = eau douce – correspond à 1 ou 2 carrés
B = eau dure (standard) – correspond à 3 carrésC = eau très dure –
correspond à 4 carrés
Français
4219-450-08061 MANUAL GAG. CAD. PRESTIGE EN-FR 120US.indd 58
Installer le filtre INTENZA+ dans le réservoir à eau, en s’assurant qu’il soit correctement
inséré. Remplir le réservoir à eau et le réinsérer dans son logement.
Suivre les instructions affichées pour activer correctement le filtre.
Remarque : il est possible de mettre en pause la procédure d’activation du filtre en
appuyant sur la touche START/STOP . Pour redémarrer la procédure d’activation
du filtre, appuyer de nouveau sur la touche START/STOP .
Remplacement du filtre à eau INTENZA+
Lorsque le filtre à eau INTENZA+ est épuisé, un message d’avertissement est affiché.
1 Pour remplacer ou désactiver le filtre, appuyer sur la touche CLEAN/SETTING
puis sur la touche « RÉGLAGES ».
2 Sélectionner « FILTRE À EAU ».
3 Sélectionner REMPLACER ou DÉSACTIVER et confirmer avec la touche « ».
Suivre les instructions affichées pour activer correctement le filtre.
23/04/2020 09:50:30
51
Types de boisson
Nom de la boisson Description
Ristretto
Le ristretto, servi dans une petite tasse, est un expresso dont le temps de
distribution est réduit par rapport à l’expresso classique ; le café sera donc plus
serré et moins riche en caféine.
Espresso
L’expresso est reconnu dans le monde entier comme étant le véritable « café italien
». Servi dans une petite tasse, ses caractéristiques uniques sont un arôme rond et
intense et une couche supérieure de crème naturelle compacte. Le résultat dans la
tasse est le fruit d’un processus d’extraction par pression avec l’utilisation d’eau
chaude, inventé par Achille Gaggia en 1938.
Espresso lungo
L’expresso allongé est un expresso ayant un temps d’extraction plus long. C’est un
café plus dilué, ayant une intensité aromatique différente et une teneur en caféine
plus élevée. Il est servi dans une tasse de taille moyenne.
Café
Le café est une boisson préparée avec une quantité d’eau plus grande par rapport à
l’expresso. Son arôme est plus léger et il est servi dans une tasse de taille moyenne
à grande.
Remarque : Si l’on ne remplace pas le filtre, sélectionner « DÉSACTIVER » pour
désactiver le filtre.
WATER FILTER
REPLACE
ACTIVATE
DISABLE
Français
4219-450-08061 MANUAL GAG. CAD. PRESTIGE EN-FR 120US.indd 59
Americano
L’americano est un café allongé moins intense préparé avec un expresso auquel on
ajoute de l’eau chaude.
Cappuccino
Grand classique italien, le cappuccino fait partie des boissons chaudes les plus
appréciées du monde. Il est préparé avec un café expresso, du lait et de la mousse
de lait, qui doit être d’au moins 1 cm. Il est servi dans une grande tasse.
Cappuccino XL
Le cappuccino XL est cappuccino préparé avec une plus grande quantité d’expresso
et de lait.
Cortado
Boisson originaire d’Argentine, le cortado est un expresso auquel on ajoute une
petite quantité de lait. Habituellement servie dans un petit verre en verre, cette
boisson est très populaire en Espagne et au Portugal, tout comme en
Amérique latine.
Flat white
Boisson d’origine australienne, le flat white a une forte prédominance de café. Il est
préparé avec deux cafés expresso et du lait, avec une légère couche de mousse
veloutée.
Café au lait
Le café au lait est une boisson préparée à base de café et de lait en parts égales. Il
peut désormais être enrichi d’une légère couche de mousse de lait. Il est servi dans
une grande tasse.
Latte macchiato
Le latte macchiato est une boisson qui se prépare avec du lait chaud, une part de
mousse de lait et une petite quantité d’expresso. Il est servi dans un verre en verre,
haut et transparent, qui permet de distinguer les trois différentes couches qui se
forment.
Latte macchiato XL
Le latte macchiato XL est un latte macchiato préparé avec une plus grande quantité
de lait. Il est servi dans un verre en verre, haut et transparent.
Lait émulsionné
Le lait émulsionné est utilisé pour la préparation du cappuccino, latte macchiato et
nombre d’autres boissons. Le résultat consiste en une couche de mousse de lait
compacte et homogène.
Eau chaude
L’eau chaude peut être utilisée pour préparer du thé, des tisanes et des boissons
solubles.
23/04/2020 09:50:30
52
Espresso tray
Cette machine a été conçue pour garantir la préparation de boissons impeccables, qu’il
s’agisse de l’expresso traditionnel ou de beaucoup d’autres boissons disponibles. Si
vous souhaitez déguster un expresso italien comme le veut la tradition, avec une
délicieuse couche de crème naturelle en surface, nous vous conseillons d’utiliser l’«
Espresso tray », spécifiquement conçu et intégré dans la machine. Cette plaque permet
d’utiliser les petites tasses traditionnelles pour expresso, parce qu’elle garantit la
hauteur parfaite pour obtenir une crème compacte et homogène de même qu’une
distribution sans éclaboussures.
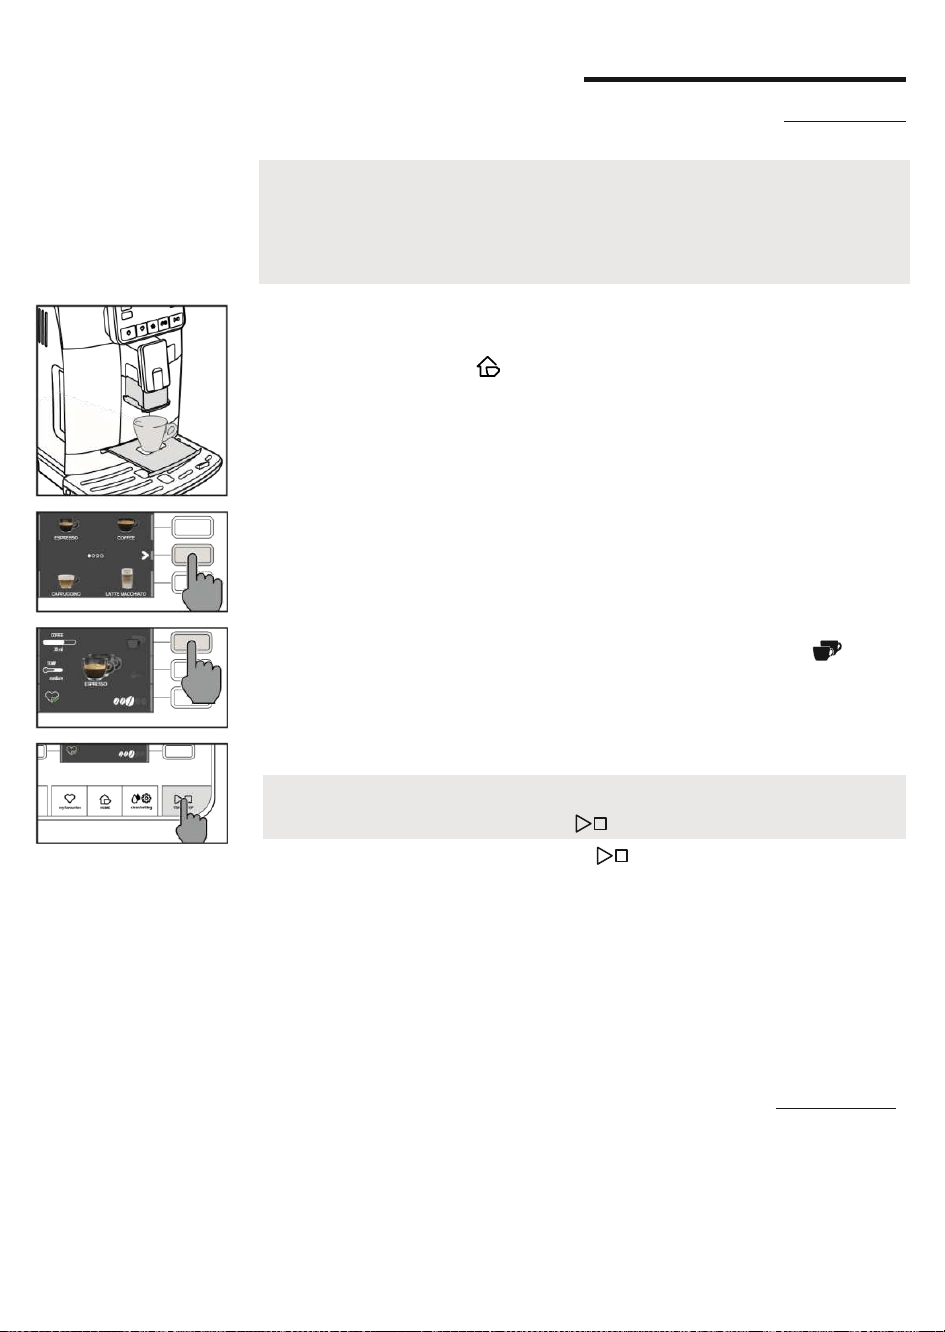
Français
4219-450-08061 MANUAL GAG. CAD. PRESTIGE EN-FR 120US.indd 60
Distribution du café
Distribution de café avec du café en grains
Attention : utiliser uniquement du café en grains pour café expresso. Ne pas mettre de
café moulu, de café non torréfié ni de café lyophilisé ou soluble dans le réservoir à café
en grains, car ils risqueraient d’endommager la machine.
Conseil : pour obtenir un café plus chaud, préchauffer les tasses avec de l’eau chaude.
1 Extraire l’espresso tray, mettre une petite tasse sous la buse de distribution du café,
lever ou baisser cette dernière selon la taille de la tasse utilisée.
Appuyer sur la touche HOME pour accéder au menu des boissons.
2 Faire défiler les pages pour trouver et sélectionner le café souhaité.
3 Une fois que le café souhaité a été sélectionné, appuyer sur la touche « » pour
distribuer deux tasses simultanément (sauf pour l’AMERICANO).
4 Enfin, appuyer sur la touche START/STOP pour commencer la distribution.
Pour personnaliser les réglages de la boisson, se référer au chapitre «
Personnalisation des boissons ».
23/04/2020 09:50:32
53
Distribution de café avec du café prémoulu
Utiliser la mesure fournie en dotation pour verser la dose correcte dans le compartiment
du café prémoulu.
Remarque : il est possible d’interrompre la distribution à tout moment. Pour ce faire, il
suffit d’appuyer sur la touche START/STOP .
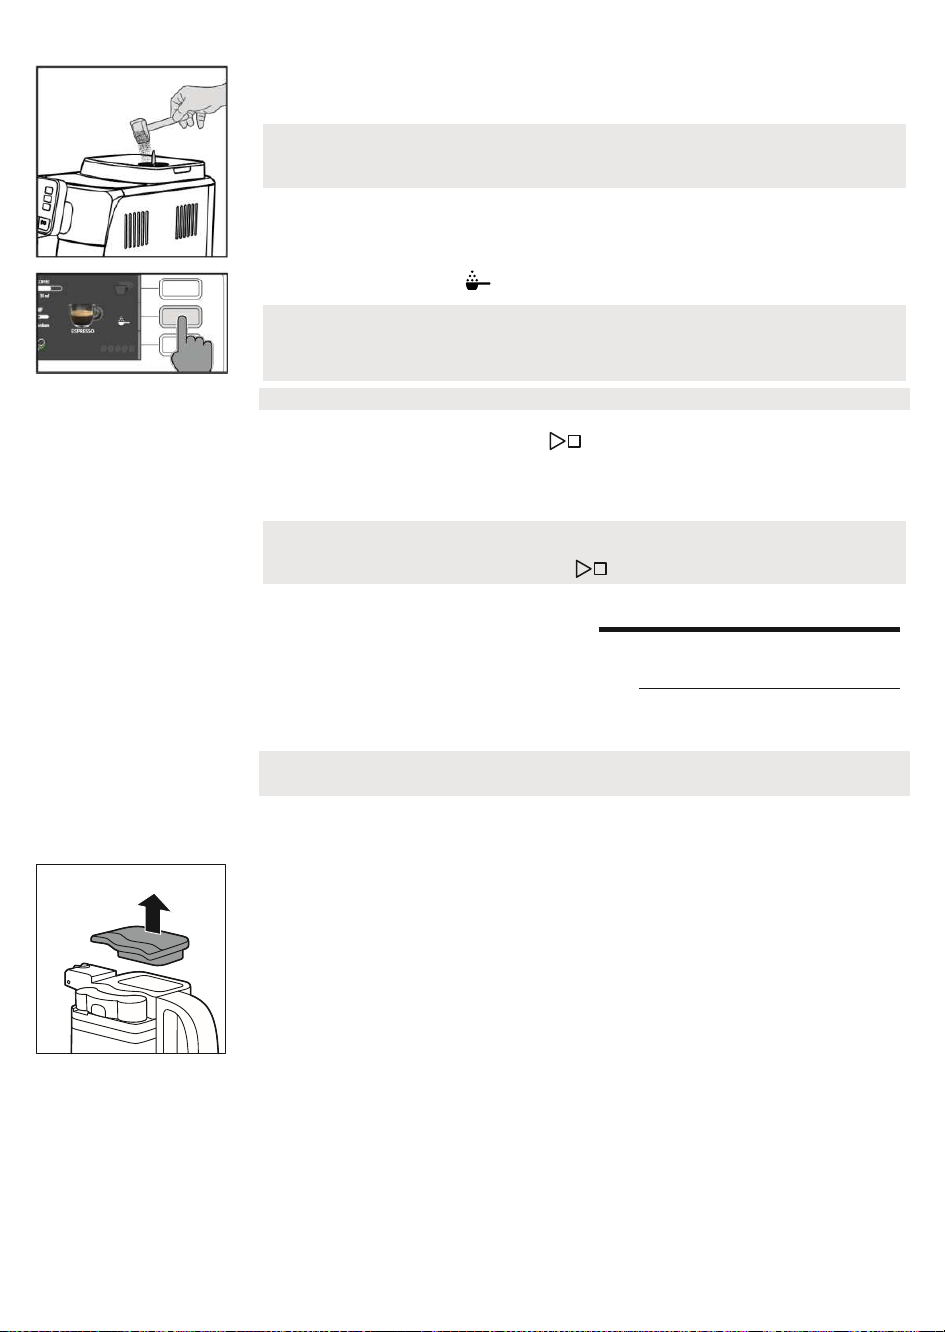
Français
4219-450-08061 MANUAL GAG. CAD. PRESTIGE EN-FR 120US.indd 61
1 Ouvrir le couvercle du compartiment du café prémoulu et ajouter une mesure rase
de café prémoulu.
2 Mettre une tasse sous la buse de distribution du café et sélectionner la boisson
souhaitée.
3 Appuyer sur la touche « ».
Remarque : cette fonction n’est pas disponible pour FLAT WHITE.
4 Appuyer sur la touche START/STOP pour commencer la distribution du café.
Pour personnaliser les réglages de la boisson, se référer au chapitre «
Personnalisation des boissons ».
Remarque : il est possible d’interrompre la distribution à tout moment. Pour ce faire, il
suffit d’appuyer sur la touche START/STOP .
Préparation de boissons à base de café
et de lait émulsionné
Remplissage de la carafe à lait
Remarque : Avant d'utiliser la carafe à lait, la nettoyer soigneusement comme l’indique
le chapitre « Nettoyage de la carafe à lait ».
La carafe à lait peut être remplie avant ou pendant l'utilisation.
1 Soulever le couvercle de l'unité de distribution du lait.
23/04/2020 09:50:34
54
Attention : ne pas verser de substances autres que du café prémoulu pour ne pas
endommager la machine.
Remarque : la fonction « café prémoulu » exclut la possibilité de distribuer deux tasses
de café simultanément de même que le réglage de l’arôme, qui ne sont possibles
qu’avec du café en grains.
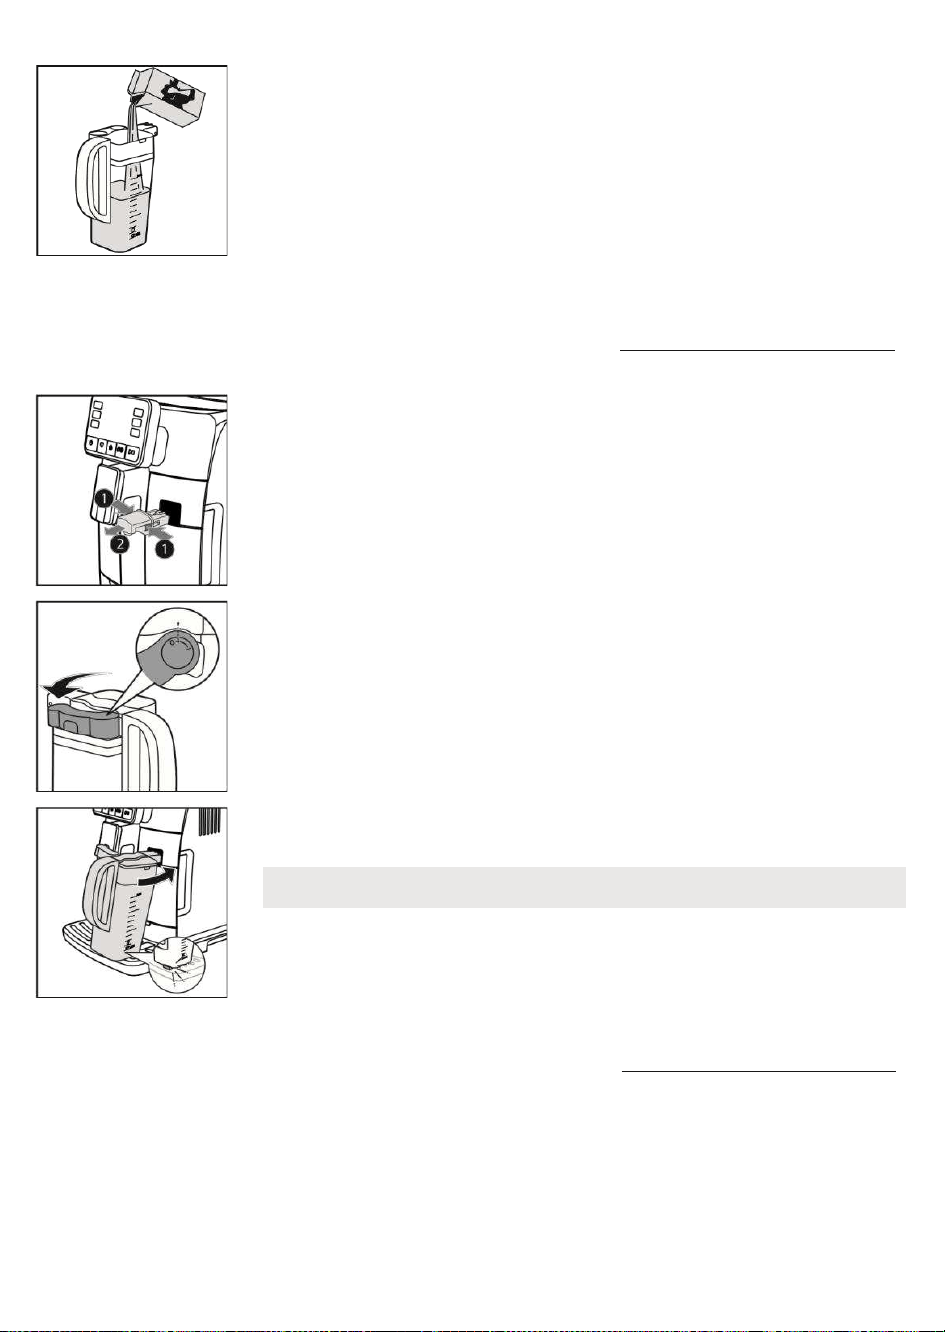
Français
4219-450-08061 MANUAL GAG. CAD. PRESTIGE EN-FR 120US.indd 62
2 Verser le lait dans la carafe : le lait doit être compris entre les niveaux minimum
(MIN) et maximum (MAX) indiqués sur la carafe. Replacer le couvercle.
Introduction de la carafe à lait
Si elle est installée, retirer la buse de distribution d'eau :
1 Appuyer sur les deux boutons latéraux pour décrocher la buse de distribution (1) et
la soulever légèrement. Tirer la buse de distribution de l’eau pour l'enlever (2).
2 Placer la buse de distribution de la carafe à lait en position « I ».
3 L’incliner légèrement et l’introduire complètement dans les glissières de la machine,
jusqu’à ce qu’elle s’accroche au bac d'égouttement.
Enlèvement de la carafe à lait
Tourner la carafe vers le haut jusqu'à ce que la plaquette située dans le bac
d'égouttement se décroche. Ensuite la retirer.
Remarque : ne pas introduire la carafe avec force.
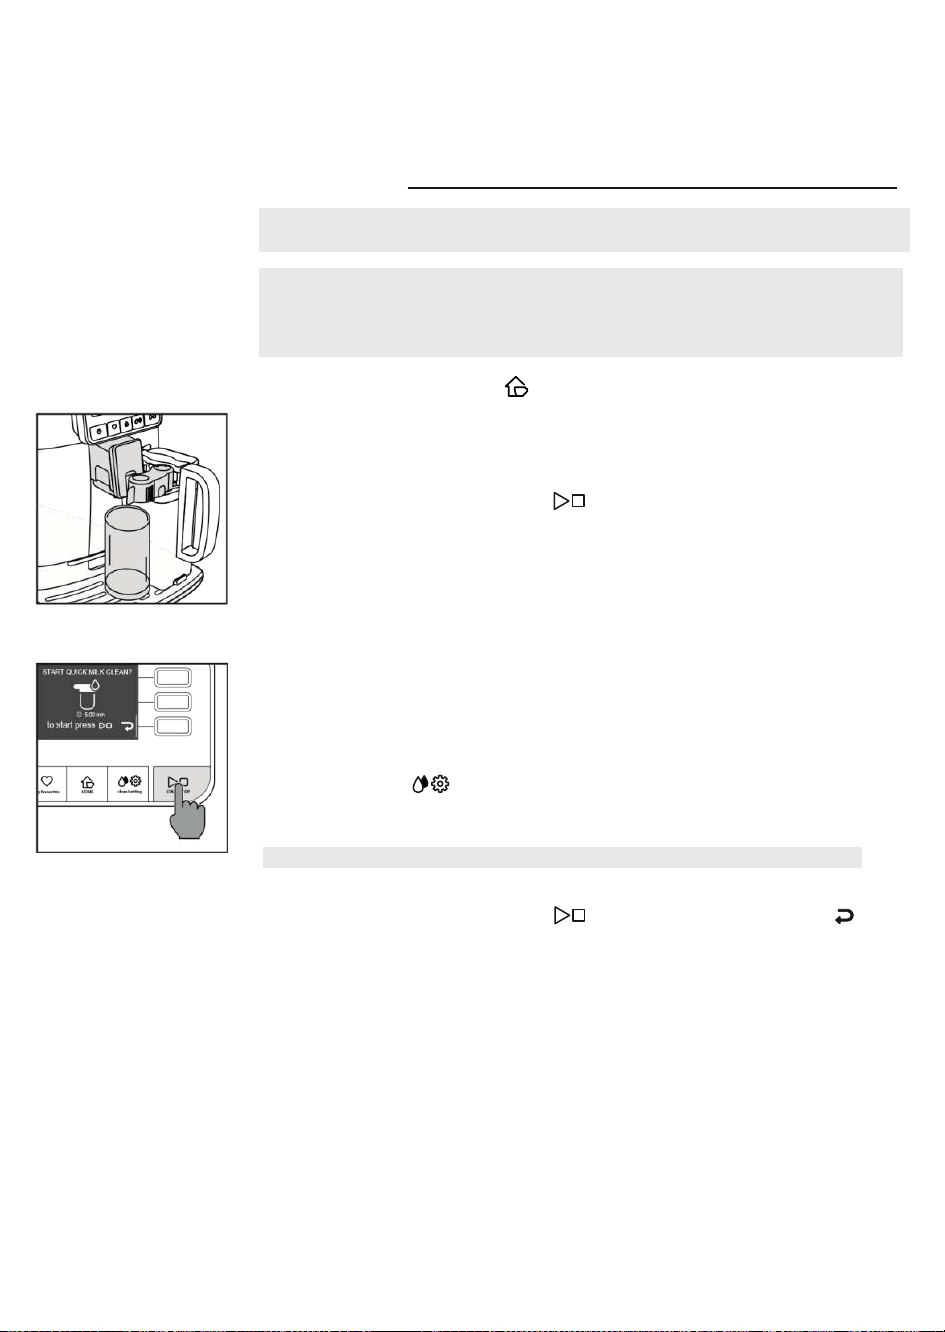
Français
4219-450-08061 MANUAL GAG. CAD. PRESTIGE EN-FR 120US.indd 63
23/04/2020 09:50:36
55
Distribution des boissons à base de café et de lait
émulsionné
Conseil : pour obtenir un produit plus chaud, préchauffer les tasses avec de l’eau
chaude.
Conseil : utiliser du lait froid (à une température de 5°C environ) ayant une teneur en
protéines de 3 % au moins, pour garantir un résultat optimale pour la mousse. Il est
possible d’utiliser aussi bien du lait entier que demi-écrémé. De plus, il est possible
d’utiliser du lait écrémé, du lait de soja et du lait sans lactose.
1 Appuyer sur la touche HOME et choisir la boisson que l’on désire dans le menu.
- Appuyer sur la touche de la boisson désirée et placer une tasse ou un verre ayant les
bonnes dimensions sous la buse de distribution du café et la buse de distribution de
la carafe.
- Appuyer sur la touche START/STOP pour commencer la distribution de la
boisson sélectionnée.
2 La machine distribue un volume prédéfini de lait émulsionné et de café dans la tasse
ou le verre. Selon la boisson choisie, la machine distribuera d’abord le café ou le lait
émulsionné.
Pour personnaliser la boisson avant la distribution, se référer au chapitre «
Personnalisation des boissons ».
3 Après chaque préparation de boissons à base de café et de lait émulsionné, on
pourra effectuer la procédure de nettoyage rapide de la carafe dans un délai de 10
secondes. La procédure pourra dans tous les cas être effectuée à un moment
ultérieur, en accédant au menu du nettoyage par l’intermédiaire de la touche
CLEAN/SETTING . Suivre les instructions indiquées sur l’afficheur. La procédure
de nettoyage pourra également être effectuée avec le lait dans la carafe.
Remarque : effectuer la procédure de nettoyage rapide au moins une fois par jour.
Appuyer sur la touche START/STOP pour confirmer ou sur la touche « » pour
l’effectuer à un moment ultérieur.
Français
4219-450-08061 MANUAL GAG. CAD. PRESTIGE EN-FR 120US.indd 64
23/04/2020 09:50:38
56
Distribution d’eau chaude
Attention : au début de la préparation, la buse de distribution d'eau chaude risque de
vaporiser de la vapeur et de l'eau chaude. Avant d'enlever la buse de distribution de l’eau
chaude, attendre la fin de la préparation.
1 Introduire la buse de distribution de l'eau chaude.
2 Appuyer sur la touche HOME , faire défiler les différentes pages-écran au moyen
des touches vertes « » et « » et sélectionner « EAU CHAUDE ».
3 Appuyer sur la touche de l’« EAU CHAUDE ». Appuyer ensuite sur la touche
START/STOP pour commencer la distribution.
Pour personnaliser le volume de l’eau avant la distribution, se référer au chapitre «
Personnalisation des boissons ».
Attention : sélectionner la boisson « EAU CHAUDE » sur la page-écran HOME
uniquement lorsque la buse de distribution d’eau chaude est installée.
Remarque : il est possible d’interrompre la distribution à tout moment. Pour ce faire, il
suffit d’appuyer sur la touche START/STOP .
Français
4219-450-08061 MANUAL GAG. CAD. PRESTIGE EN-FR 120US.indd 65
23/04/2020 09:50:40
57
Personnalisation des boissons et
création des profils
Cette machine permet de modifier les réglages d’une boisson selon les préférences et de
mémoriser la boisson telle que modifiée dans l’un des 4 profils disponibles.
Personnalisation des boissons
1 Appuyer sur la touche HOME .
2 Sélectionner la boisson.
3 L’afficheur montre toutes les options pouvant être réglées et/ou sélectionnées selon
les préférences de l’utilisateur. En fonction du type de boisson, il est possible de
régler et/ou de sélectionner : - la quantité de café et de lait ;
- la température du café ;
- la distribution de deux tasses à la fois ;
- l’utilisation de café prémoulu ;
- l’intensité de l’arôme (seulement si le café en grains est utilisé) ;
4 Après avoir appuyé sur la touche « CAFÉ » ou « LAIT », utiliser les touches
vertes « » et « », pour régler la quantité souhaitée. Appuyer ensuite sur la
touche « » pour confirmer et revenir à la page précédente, où la nouvelle
quantité réglée sera affichée.
5 Appuyer plusieurs fois de suite la touche « TEMP » pour modifier la
température de la boisson, en choisissant une des options suivantes :
- faible ;
- moyen ;
- élevé ;
6 Appuyer sur la touche « » pour préparer deux tasses, ou la touche « » pour
préparer une seule tasse. L’image de la boisson au centre de l’afficheur indiquera le
nombre de tasses sélectionné.
7 Appuyer sur la touche « » pour activer l’utilisation du café prémoulu.
Remarque : cette fonction n’est pas disponible pour l’AMERICANO, les boissons avec
du lait et l’eau chaude.
Remarque : cette fonction ne permet de distribuer qu'un seul café à la fois.
Français
4219-450-08061 MANUAL GAG. CAD. PRESTIGE EN-FR 120US.indd 66
23/04/2020 09:50:43
58
8 Pour modifier l’intensité de l’arôme, appuyer sur la touche « ». À chaque
pression, l'intensité de l'arôme change d'un degré. L'afficheur montre l’intensité
sélectionnée.
1 Très léger
2 Léger
3 Normal
4 Fort
5 Très fort
9 Une fois que la boisson a été personnalisée selon son propre goût, elle peut être
mémorisée dans l’un des profils en appuyant sur la touche « ».
10 Sélectionner ensuite l’un des 4 profils disponibles dans lequel on souhaite
mémoriser la boisson.
3 Appuyer sur la touche « AJOUTER BOISSON ».
4 Les pages-écrans des boissons seront affichées. Sélectionner la boisson à mémoriser
dans le profil et la personnaliser en suivant la procédure décrite au chapitre «
Personnalisation des boissons », du point 3 au point 8.
5 Appuyer sur la touche « » pour mémoriser la boisson personnalisée dans le
profil. On peut maintenant distribuer la boisson ou, alternativement, appuyer sur
une des touches ESC (HOME , MY FAVOURITES , CLEAN/SETTING
) pour quitter.
La boisson mémorisée est maintenant disponible dans la liste de ses boissons préférées,
et indiquée par le petit cœur de la couleur correspondante au profil sélectionné.
Remarque : cette fonction n’est pas disponible avec le café prémoulu.
Création d'un profil
-
-
Français
4219-450-08061 MANUAL GAG. CAD. PRESTIGE EN-FR 120US.indd 67
23/04/2020 09:50:46
59
6 La boisson mémorisée dans son propre profil pourra être modifiée en sélectionnant
la touche « ÉDITER » ou éliminée en appuyant sur la touche « ÉLIMINER ».
Réglage du degré de mouture
Le bouton de réglage du degré de mouture, situé dans le réservoir à café en grains,
permet de régler le degré de mouture. Le moulin à café en céramique garantit une
mouture parfaite et homogène pour la préparation de chaque tasse de café. L’arôme
sera ainsi préservé, ce qui garantit un goût toujours parfait.
Remarque : le degré de mouture ne peut être réglé que lorsque la machine moud le café
en grains. La différence de goût sera perçue après la distribution de 2-3 tasses de café.
Attention : pour éviter d’abîmer le moulin à café, ne pas tourner le bouton de sélection
de la mouture de plus d’un cran à la fois.
1 Mettre une tasse sous la buse de distribution du café.
2 Ouvrir le couvercle du réservoir à café en grains.
3 Distribuer un expresso selon la procédure décrite au chapitre « Distribution de café
avec du café en grains ».
4 Pendant que la machine moud le café, insérer l’extrémité de la poignée de la
mesure à café prémoulu dans le bouton de réglage du moulin à café, qui se trouve
dans le réservoir à café en grains. Utiliser la poignée de la mesure pour presser et
tourner le bouton à gauche ou à droite d’un cran à la fois.
5 On peut choisir parmi 10 degrés de mouture différents. Plus le cran est petit, plus le
café est fort et corsé.
Remarque :
Remarque : Dès que le profil est utilisé, son icone «
» va se colorer.
Remarque : Lorsqu’on est dans le menu HOME il est impossible de mémoriser la
boisson en appuyant sur la touche MY FAVOURITES , mais uniquement sur la
touche « », sans quoi les réglages qu’on vient de faire seront perdus.
DELET
EDIT
CHOOSE YOUR
PROFILE

Français
4219-450-08061 MANUAL GAG. CAD. PRESTIGE EN-FR 120US.indd 68
- Mouture grosse : goût plus léger, pour des mélanges à torréfaction foncée (5-10) ; -
Mouture fine : goût plus intense, pour des mélanges à torréfaction claire (1-5).
23/04/2020 09:50:48
60
Nettoyage et entretien
Un nettoyage et un entretien réguliers maintiennent la machine dans des conditions
optimales et garantissent un café excellent, un débit constant et une excellente
mousse de lait. Consulter le tableau ci-dessous pour savoir quand et comment
nettoyer toutes les pièces amovibles de la machine. Pour plus d'informations, lire les
chapitres correspondants.
Description de la pièce
Quand nettoyer
Comment nettoyer
Carafe à lait
Après l’utilisation
Après la préparation d'une boisson à base de lait,
lancer le cycle de « NETT. RAP. » en suivant les
instructions de la machine.
Tous les jours
Nettoyer le récipient et le tuyau d'aspiration du lait
comme le décrit le chapitre « Nettoyage minutieux
de la carafe à lait sous l’eau courante », en suivant
les 4 premiers points et le point 11.
Une fois par semaine
Démonter la carafe à lait et nettoyer toutes les
pièces sous l'eau courante.
Mensuellement
Lancer le cycle de « NETT. PROFOND » en suivant les
instructions décrites au chapitre « Nettoyage
minutieux de la carafe à lait sous l’eau courante ».
Pour ce cycle de nettoyage, utiliser le produit pour le
nettoyage des circuits du lait « Milk Circuit cleaner »
di Philips.
Groupe de distribution
Une fois par semaine
Retirer le groupe de distribution et le laver à l’eau
courante.

Français
4219-450-08061 MANUAL GAG. CAD. PRESTIGE EN-FR 120US.indd 69
Selon le type d'utilisation
Voir le chapitre « Nettoyage et lubrification du
groupe de distribution ».
Mensuellement
Nettoyer le groupe de distribution avec les
tablettes de dégraissage Gaggia pour
l’élimination des résidus huileux du café
Bac d'égouttement plein
Dès que l'indicateur rouge dépasse la
grille du bac d'égouttement
Vider le bac d'égouttement et le nettoyer sous l'eau
courante.
Réservoir à marc de café
Dès que la machine le requiert
Vider le réservoir à marc de café et le nettoyer sous
l'eau courante. S’assurer que la machine est allumée
pendant cette opération, sans quoi le réservoir à
marc ne se remet pas à zéro.
Réservoir à eau
Une fois par semaine
Le laver à l'eau courante.

Français
4219-450-08061 MANUAL GAG. CAD. PRESTIGE EN-FR 120US.indd 70
Tableau des opérations de nettoyage
23/04/2020 09:50:48
61
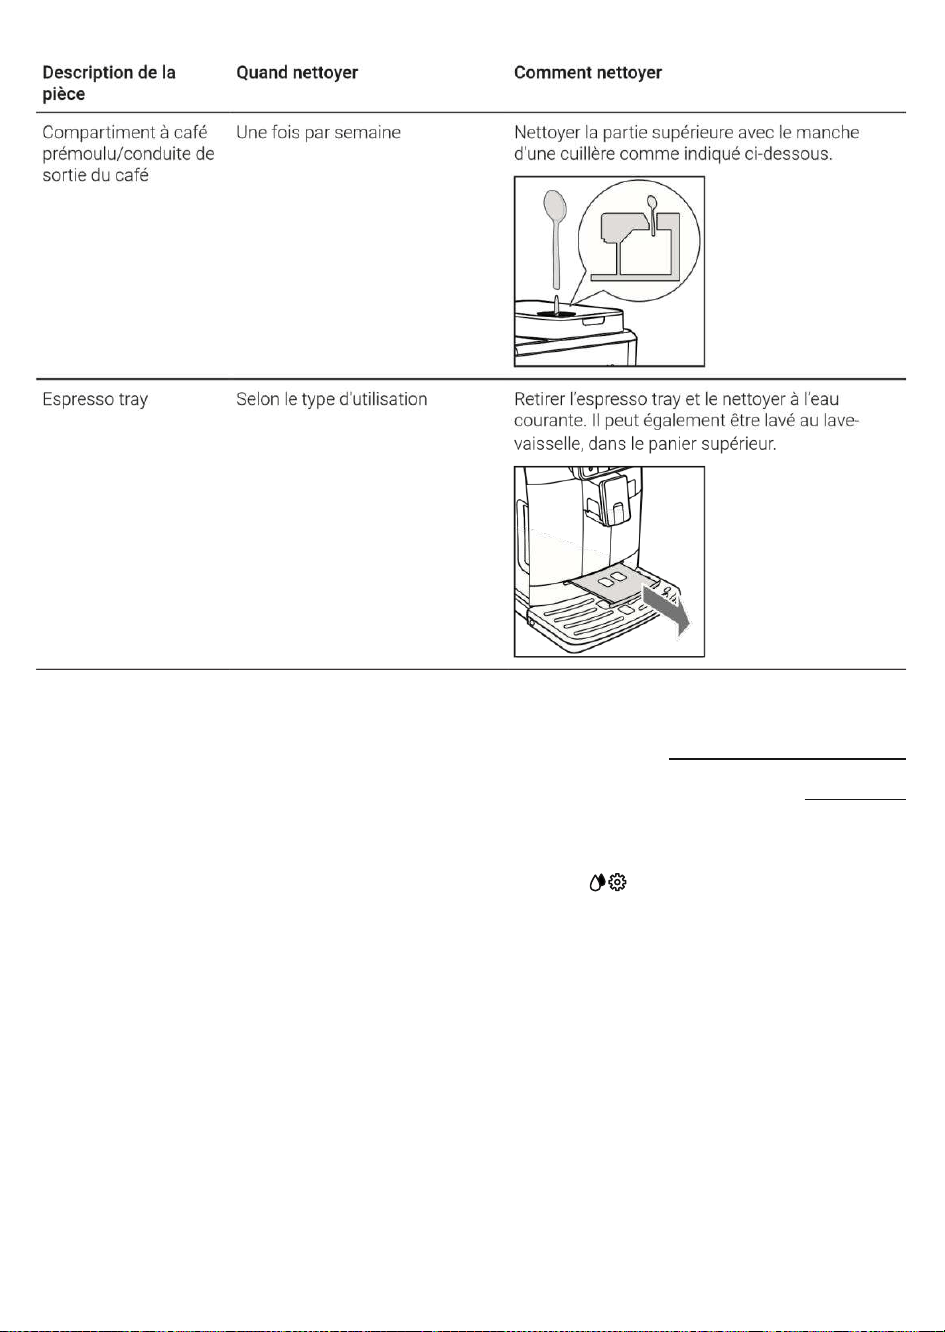
Français
4219-450-08061 MANUAL GAG. CAD. PRESTIGE EN-FR 120US.indd 71
Nettoyage de la carafe à lait
Programmes de nettoyage de la carafe à lait
La machine dispose de deux programmes pour nettoyer la carafe à lait : le nettoyage
rapide et le nettoyage approfondi. Les deux programmes peuvent être sélectionnés par
l’intermédiaire de la touche CLEAN/SETTING , en appuyant ensuite sur la touche «
NETTOYAGE ».
Le nettoyage rapide est également proposé à la fin de la distribution des boissons à base
de lait. Suivre les instructions apparaissant sur l’afficheur pour les deux programmes.
- Programme pour le nettoyage rapide
Le programme pour le nettoyage rapide prévoit le nettoyage de la buse de
distribution du lait. Durant la procédure de nettoyage, il sera également possible de
laisser le lait dans la carafe.
- Programme pour le nettoyage approfondi de la carafe
Le programme de nettoyage approfondi de la carafe consiste en un nettoyage
minutieux de tout le circuit du lait à l’aide du produit pour le nettoyage des circuits
du lait « Milk Circuit Cleaner » de Philips.

Français
4219-450-08061 MANUAL GAG. CAD. PRESTIGE EN-FR 120US.indd 72
23/04/2020 09:50:49
62
Nettoyage minutieux de la carafe à lait sous l’eau
courante
Pour nettoyer minutieusement la carafe à lait, il faut démonter toutes ses parties et la
nettoyer sous l’eau courante, en suivant les passages ci-après :
1 Appuyer sur les touches de décrochage pour retirer le couvercle (Fig. 23).
2 Tourner la buse de distribution de la carafe à lait en position « . » (fig. 24).
3 Soulever la buse de distribution du lait du couvercle (fig. 25).
4 Enlever le tuyau d'aspiration du lait (fig. 26).
5 Appuyer sur le bouton marqué par une flèche pour débloquer le couvercle de la
buse de distribution du lait (fig. 27).
6 Pour retirer le couvercle, presser légèrement sur les côtés de la buse de distribution
et tirer le couvercle vers le haut pour le retirer de la buse de distribution (fig. 28).
7 Enlever la bague de la buse de distribution de la carafe à lait (fig. 29).
8 Tirer l’unité de la mousse de lait vers le haut (fig. 30).
9 Tirer le support vers l’extérieur par rapport à l’unité de la mousse de lait (fig. 31).
10 Tirer le support vers l’extérieur et le séparer de la partie restante (fig. 32).
11 Nettoyer toutes les parties à l’eau tiède.
12 Réassembler toutes les parties en appliquant les opérations dans le sens inverse.
Nettoyage du groupe de distribution
Attention : ne pas laver le groupe de distribution au lave-vaisselle et ne pas utiliser de
produits vaisselle ou autres détergents, car cela risquerait de provoquer un
dysfonctionnement du groupe de distribution et de nuire au goût du café.
Retrait du groupe de distribution
1 Éteindre la machine et débrancher le cordon d'alimentation.
2 Enlever le réservoir à marc de café et ouvrir le volet de service.

Français
4219-450-08061 MANUAL GAG. CAD. PRESTIGE EN-FR 120US.indd 73
3 Extraire le tiroir à café.
23/04/2020 09:50:50
63
4 Appuyer sur le levier PUSH (pousser) (1) et tirer la poignée du groupe de distribution
(2) pour le retirer de la machine.
Nettoyage du groupe de distribution à l'eau courante
1 Nettoyer en profondeur la conduite de sortie du café avec le manche d'une petite
cuillère ou avec un autre outil de cuisine à la pointe arrondie.
2 Rincer soigneusement le groupe de distribution avec de l'eau tiède. Nettoyer
soigneusement le filtre supérieur.
3 Laisser sécher le groupe de distribution à l’air libre.
Remarque : ne pas sécher le groupe de distribution avec des chiffons pour éviter
l'accumulation de fibres à l'intérieur.
Français
4219-450-08061 MANUAL GAG. CAD. PRESTIGE EN-FR 120US.indd 74
Nettoyage du groupe de distribution avec des tablettes
pour l’élimination des résidus huileux du café
1 Mettre un récipient sous la buse de distribution du café.
2 Appuyer sur la touche CLEAN/SETTING et sélectionner la touche « NETTOYAGE
» affichée.
3 Sélectionner « NETTOYER GROUPE DE DISTRIBUTION » et appuyer sur la touche
START/STOP pour lancer la procédure de nettoyage.
4 Suivre les instructions affichées pour nettoyer correctement le groupe de
distribution.
5 La procédure durera 5 minutes environ. Pour l’interrompre et la faire redémarrer,
utiliser la touche START/STOP .
23/04/2020 09:50:51
64
Attention : pour le nettoyage n’utiliser que des tablettes Gaggia pour l’élimination des
résidus huileux du café.
DEEP MILK CLEAN
QUICK MILK CLEAN
BREW GROUP CLEAN
DESCLING
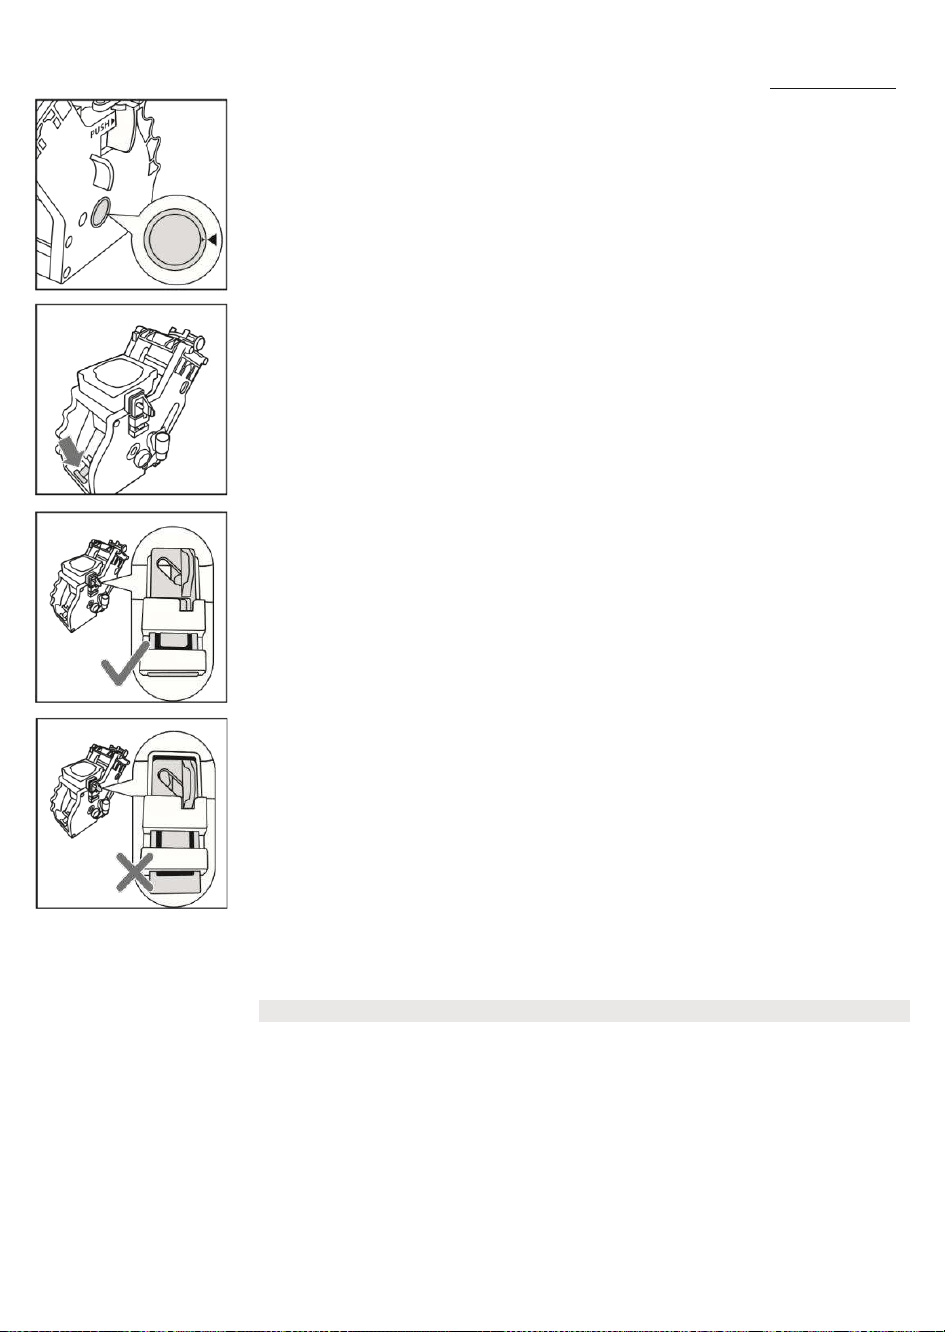
Français
4219-450-08061 MANUAL GAG. CAD. PRESTIGE EN-FR 120US.indd 75
Remise en place du groupe de distribution
1 Avant de réinstaller le groupe de distribution dans la machine, s’assurer que les deux
repères jaunes sur le côté coïncident. Dans le cas contraire, effectuer l’étape
suivante :
Vérifier que le levier est en contact avec la base du groupe de distribution.
2 Vérifier que le crochet jaune de blocage du groupe de distribution est dans la bonne
position.
Pour positionner correctement le crochet, le pousser vers le haut jusqu’à la position
maximale pouvant être atteinte.
Si le crochet est toujours en bas, il n'est pas correctement positionné.
3 Réinstaller le groupe de distribution dans la machine, le long des glissières latérales
jusqu’à ce qu’un clic de blocage confirme qu’il est correctement positionné.
Attention : ne pas appuyer sur le levier PUSH.
4 Fermer le volet d’entretien.
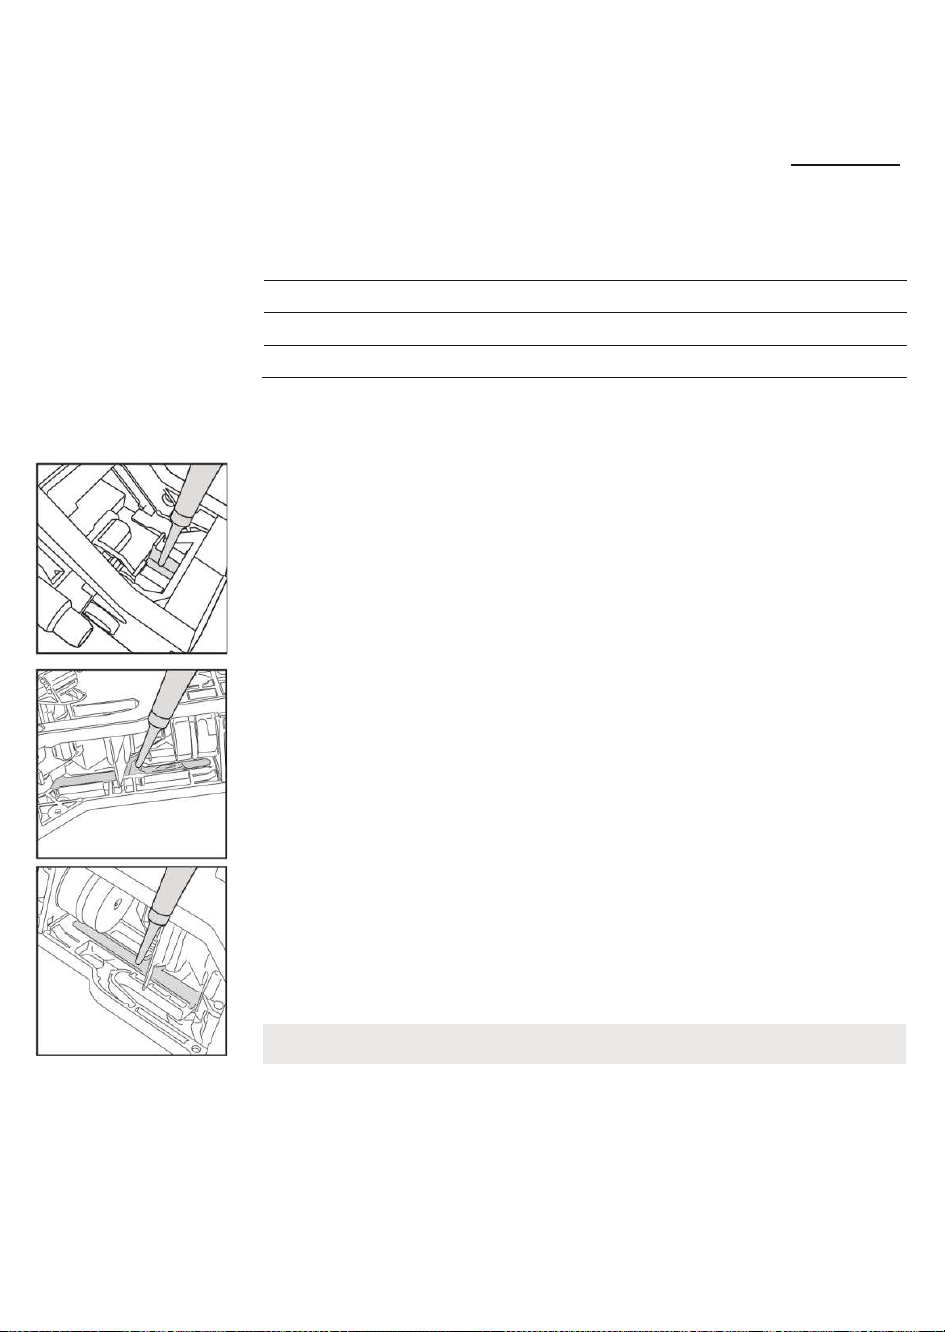
Français
4219-450-08061 MANUAL GAG. CAD. PRESTIGE EN-FR 120US.indd 76
23/04/2020 09:50:52
65
Lubrification du groupe de distribution
Pour garantir un rendement optimal de la machine, il faut lubrifier le groupe de
distribution. Consulter le tableau suivant au sujet de la fréquence de lubrification.
Fréquence d’utilisation
Nombre de boissons préparées
quotidiennement
Fréquence de
lubrification
Basse
1-5
Tous les 4 mois
Normale
6-10
Tous les 2 mois
Élevée
>10
Tous les mois
1 Éteindre l’appareil et débrancher le cordon d'alimentation.
2 Retirer le groupe de distribution et le rincer avec de l'eau tiède (voir le chapitre «
Nettoyage du groupe de distribution à l'eau courante »).
3 Appliquer une fine couche du lubrifiant fourni de série autour de la broche
d'insertion, située dans la partie inférieure du groupe de distribution.
4 Appliquer une fine couche de lubrifiant sur les glissières, des deux côtés (voir la
figure).
5 Remettre le groupe de distribution en place (voir le chapitre « Remise en place du
groupe de distribution »).
Remarque : le tube de lubrifiant peut être utilisé plusieurs fois.
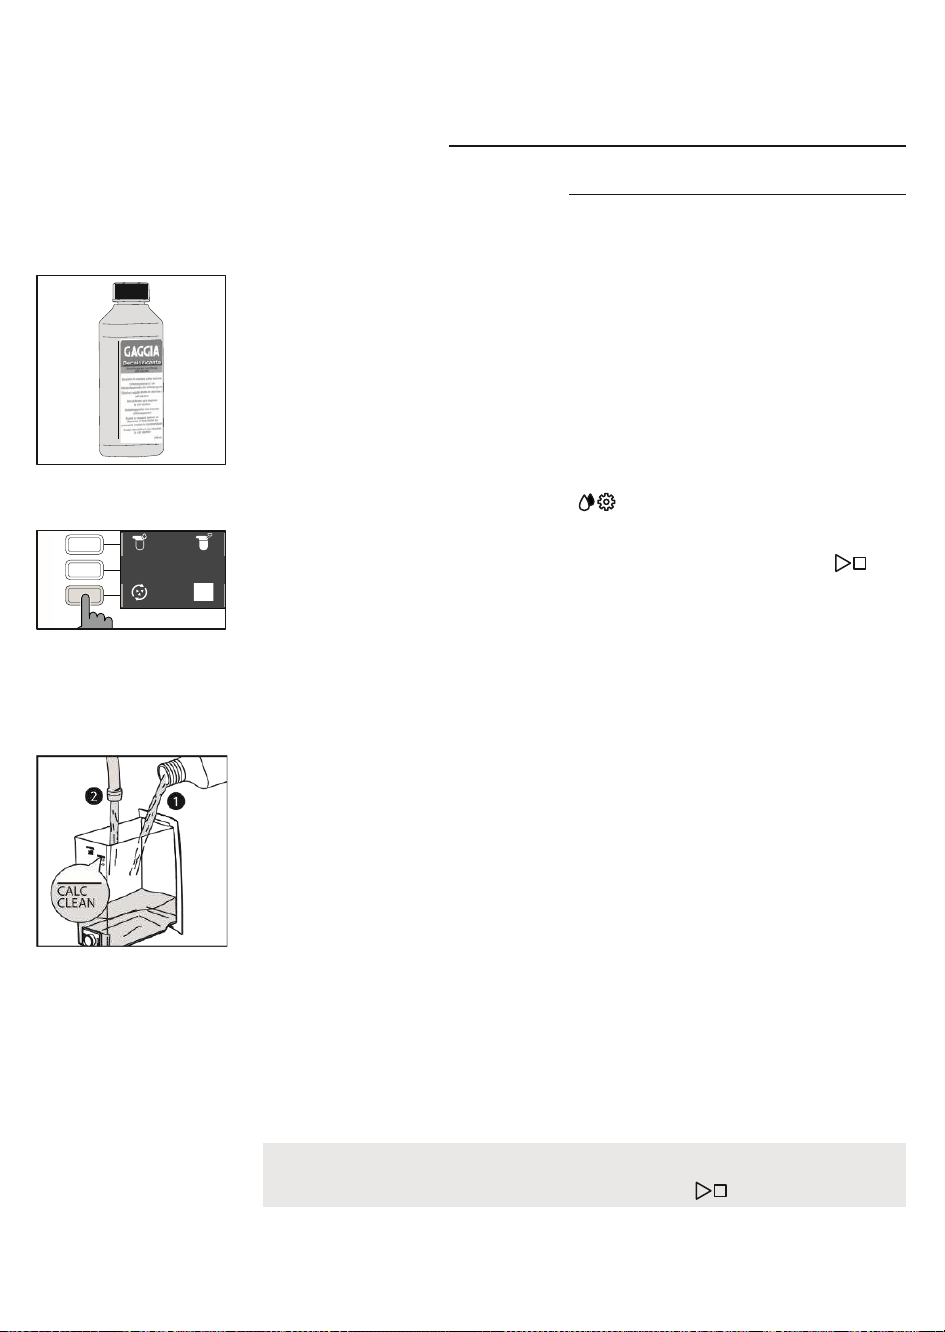
Français
4219-450-08061 MANUAL GAG. CAD. PRESTIGE EN-FR 120US.indd 77
23/04/2020 09:50:53
66
Détartrage
Procédure de détartrage
Le détartrage est à effectuer dès que la machine le requiert.
Utiliser uniquement la solution détartrante Gaggia, qui a été étudiée pour garantir le
rendement optimal de la machine. L'utilisation d'autres produits risque d’endommager
la machine et de laisser des résidus dans l'eau. Si aucun détartrage de la machine n’est
effectué, la garantie sera invalidée.
1 Appuyer sur la touche CLEAN/SETTING et sélectionner la touche «
NETTOYAGE » affichée.
- Appuyer sur la touche « DÉTARTRAGE » puis sur la touche START/STOP .
2 Retirer le bac d'égouttement et le réservoir à marc de café, les vider et les remettre
en place dans la machine.
3 Retirer et vider le réservoir à eau. Enlever ensuite le filtre INTENZA+, si présent.
4 Verser le flacon complet de solution détartrante Gaggia dans le réservoir à eau et
ajouter de l’eau jusqu’au niveau de CALC CLEAN. Réinstaller donc le réservoir dans la
machine.
5 Remplir d’eau la moitié de la carafe à lait et l’introduire dans la machine.
6 Suivre les instructions affichées pour lancer la procédure de détartrage. Cette
procédure dure environ 25 minutes et comprend un cycle de détartrage suivi d’un
cycle de rinçage, qui prévoient des distributions à intervalles réguliers.
7 Dès que le cycle de détartrage est terminé, il faudra rincer le réservoir, la carafe et le
circuit de l’eau, en suivant les instructions affichées.
8 Installer de nouveau le filtre INTENZA+ dans le réservoir à eau.
Remarque : il est possible de mettre en pause et de redémarrer la procédure à tout
moment ; pour ce faire, appuyer sur la touche START/STOP .
DEEP MILK CLEAN
QUICK MILK CLEAN
BREW GROUP CLEAN
DESCLING
Français
4219-450-08061 MANUAL GAG. CAD. PRESTIGE EN-FR 120US.indd 78
Attention : pendant que la procédure de détartrage est en cours, il n’est pas possible de
retirer le groupe de distribution. Attendre la fin du processus de détartrage, après quoi
retirer le groupe de distribution.
23/04/2020 09:50:54
67
Que faire en cas d’interruption de la procédure de
détartrage
Il est possible de quitter la procédure de détartrage en appuyant sur la touche ON/ OFF
du bandeau de commande. Si la procédure de détartrage s'interrompt avant d’être
terminée, procéder comme suit :
1 Vider le réservoir à eau et le rincer soigneusement.
2 Remplir le réservoir à eau avec de l’eau fraîche jusqu'au niveau CALC CLEAN et
rallumer la machine. La machine se réchauffe et effectue un cycle de rinçage
automatique.
3 Avant de préparer une boisson quelconque, effectuer un cycle de rinçage manuel
comme le décrit le chapitre correspondant.
Remarque: si la procédure n'a pas été terminée, dès que possible il faudra effectuer une
nouvelle procédure de détartrage.
Réglages divers
Appuyer sur la touche CLEAN/SETTING et sélectionner l’option « RÉGLAGES » sur
l’afficheur pour rétablir ou modifier certains paramètres de la machine, tels que :
- Langue
- Filtre à eau
- Minuteur stand-by
- Dureté de l’eau
- Unité de mesure
- Compteur de boissons
- Rétablir les réglages d’usine
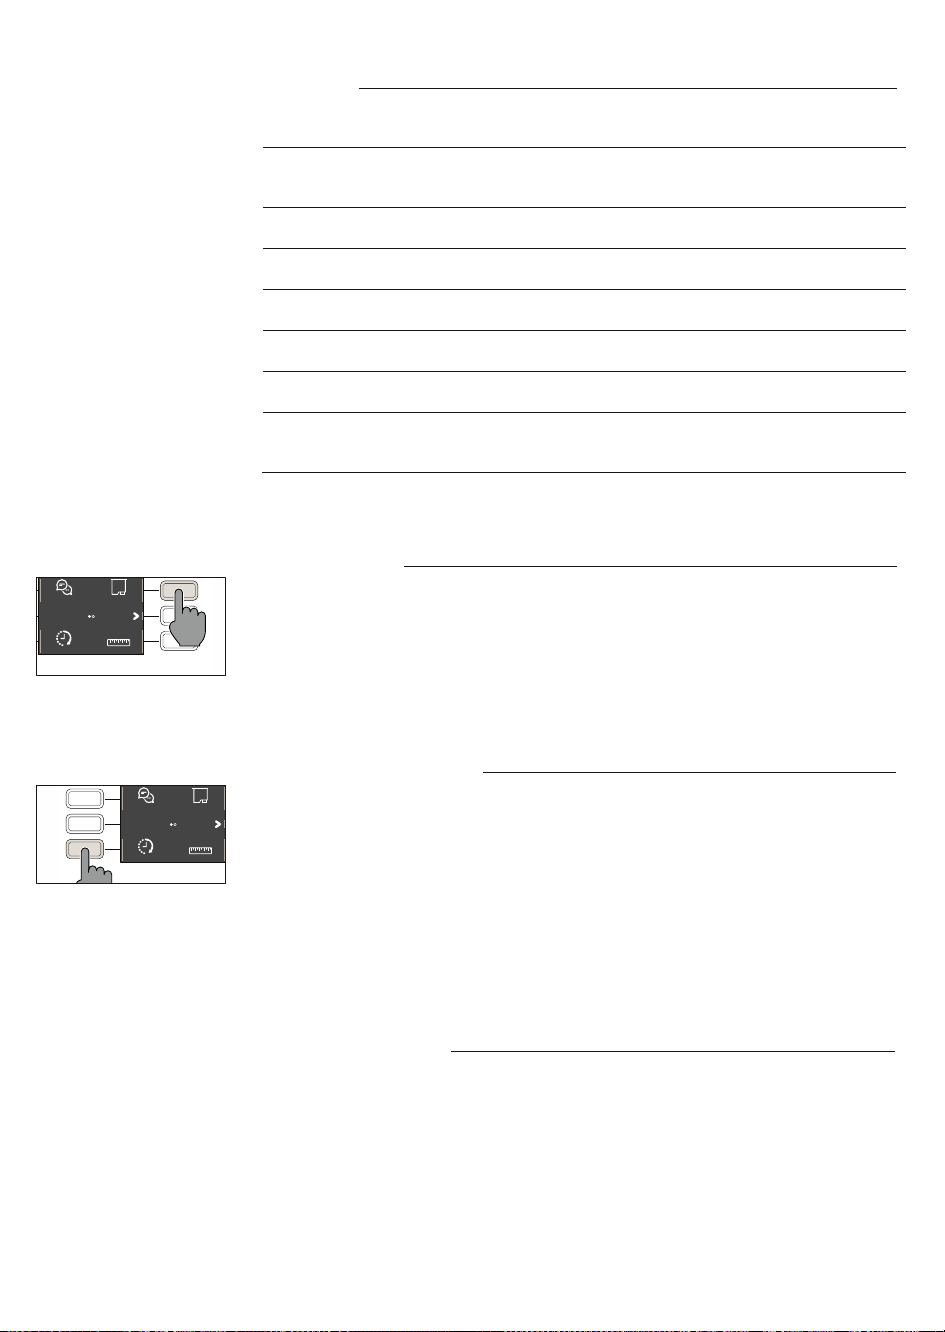
Français
4219-450-08061 MANUAL GAG. CAD. PRESTIGE EN-FR 120US.indd 79
Langue
Dès que l’icône du réglage de la langue est sélectionnée, la liste des langues disponibles
apparaît.
Langues disponibles
ITALIEN
NÉERLANDAIS
HONGROIS
ANGLAIS
DANOIS
BULGARE
ALLEMAND
GREC
TCHÈQUE
FRANÇAIS
POLONAIS
SLOVAQUE
ESPAGNOL
RUSSE
LITUANIEN
PORTUGAIS
ROUMAIN
23/04/2020 09:50:55
68
Filtre à eau
Après avoir sélectionné le « FILTRE À EAU », suivre les instructions affichées de même
que les indications des chapitres « Installation du filtre à eau INTENZA+ » et «
Remplacement du filtre à eau INTENZA+ ».
Minuteur stand-by
Après avoir sélectionné « MINUTEUR STAND-BY », on peut régler le minuteur sur une des
options suivantes :
- 15 min
- 30 min
- 60 min
- 180 min
Dureté de l’eau
Après avoir sélectionné « DURETÉ EAU » suivre les instructions affichées ainsi que les
indications du chapitre « Mesure de la dureté de l’eau ».
LANGUAGE
TIMER STAND-BY
WATER FILTER
UNITS
LANGUAGE
TIMER STAND-BY
WATER FILTER
UNITS
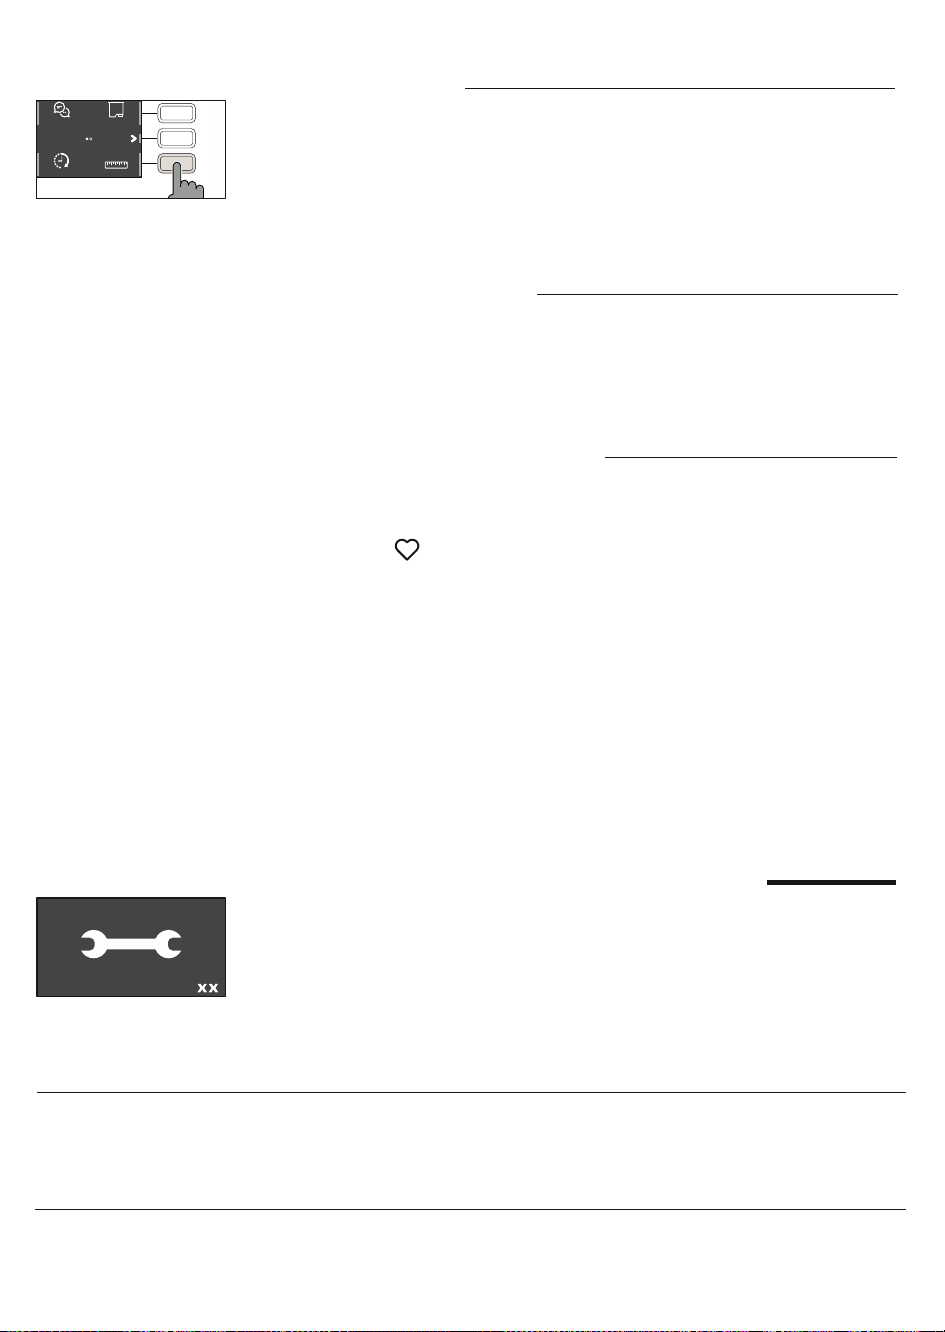
Français
4219-450-08061 MANUAL GAG. CAD. PRESTIGE EN-FR 120US.indd 80
Unité de mesure
Sélectionner « UNITÉ DE MESURE » :
pour régler l’unité de mesure sur « ml » ou sur « oz ».
Compteur de boissons
Pour chacune des boissons, il est possible d’afficher le nombre de tasses qui ont été
distribuées depuis la première mise en service de la machine. Ces données ne peuvent
pas être remises à zéro.
Rétablir les réglages d’usine
Il est possible de reconfigurer la machine avec les valeurs réglées en usine. La machine
demandera une double confirmation avant d’effectuer la procédure. Tous les
paramètres reviendront aux valeurs réglées en usine, sauf ceux qui concernent les profils
(MY FAVOURITES ) et le compteur de boissons.
23/04/2020 09:50:56
69
Signification des codes d'erreur
Certains codes d’erreur susceptibles d’apparaître sur l’afficheur sont cités ciaprès, avec
leur signification et la solution au problème. Si les solutions indiquées sont inefficaces
(l'icône du code d'erreur reste affichée et la machine continue à ne pas fonctionner
correctement), ou d’autres codes d’erreur apparaissent, il faudra contacter un centre
d’assistance agréé ou les revendeurs dans le pays de l’utilisateur.
Les coordonnées sont disponibles sur le site www.gaggia.com ou www.gaggia.it.
Code
d’erreur
Problème
Cause Solution possible
01
Le moulin à café est bloqué
La conduite de sortie du
café est bloquée.
Débrancher le cordon d’alimentation et
retirer le groupe de distribution. Nettoyer
soigneusement la conduite de sortie du
café avec le manche d'une cuillère.
Rallumer l’appareil.
LANGUAGE
TIMER STAND-BY
WATER FILTER
UNITS

Français
4219-450-08061 MANUAL GAG. CAD. PRESTIGE EN-FR 120US.indd 81
03 - 04
Un problème est survenu
avec le groupe de
distribution.
Le groupe de distribution
est sale ou il n’est pas
bien lubrifié.
Éteindre la machine en utilisant l’interrupteur
principal. Retirer le groupe de distribution et
le nettoyer soigneusement. (Consulter le
chapitre « Nettoyage du groupe de
distribution »)
Le groupe de distribution
n’est pas placé
correctement.
Éteindre la machine en utilisant
l’interrupteur principal. Retirer le groupe de
distribution et le remettre en place.
S’assurer que le groupe de distribution se
trouve dans la bonne position avant de le
remettre en place. Consulter le chapitre «
Remise en place du groupe de distribution
».
05 Le circuit de l’eau Il y a de l’air dans le Retirer et replacer plusieurs fois le réservoir
présente un problème. circuit de l'eau. dans la machine. Veiller à l’introduire
correctement dans la machine. Vérifier que le
compartiment du réservoir à eau est propre.
En présence d’un filtre « INTENZA+ » :
extraire le filtre du réservoir à eau et le
secouer pour éliminer tout l’air du filtre.
Ensuite, installer à nouveau le filtre
« INTENZA+ » dans le réservoir à eau.
14
Surchauffe de la machine.
Les causes peuvent être
multiples.
Éteindre la machine et la rallumer après 30
minutes. Effectuer cette opération 2 ou 3
fois.
23/04/2020 09:50:57
70
Dépannage
Ce chapitre résume les problèmes les plus courants susceptibles de se produire sur la
machine. Si les informations ci-dessous ne permettent pas de résoudre le problème,
visiter le site www.gaggia.com ou www.gaggia.it. pour obtenir une liste des questions
fréquentes ou contacter le Centre d’assistance après-vente ou un revendeur local.
Problème
Cause
Solution
La machine ne s’allume La machine n’est pas branchée. Vérifier que le cordon d'alimentation est pas.
correctement branché.
Le bac d'égouttement se
remplit rapidement.
Il s’agit d’un phénomène tout à fait
normal. La machine utilise de l'eau
pour rincer le circuit interne et le
groupe de distribution. Une partie
de l'eau s’écoule à travers le
système interne directement dans le
bac d'égouttement.
Vider le bac d’égouttement lorsque l’indicateur
rouge apparaît à travers la grille (nous conseillons
de placer une tasse sous la buse de distribution
pour collecter l’eau de rinçage).

Français
4219-450-08061 MANUAL GAG. CAD. PRESTIGE EN-FR 120US.indd 82
L'afficheur indique
constamment l'icône «
Réservoir à marc de
café plein ».
Le réservoir à marc de café a été
vidé lorsque la machine était
éteinte.
Toujours vider le réservoir à marc de café lorsque
la machine est allumée. Si le réservoir à marc de
café est vidé lorsque la machine est éteinte, le
compteur des cycles de café ne se remet pas à
zéro. Dans ce cas, l'afficheur visualise l'icône
même si le réservoir n'est pas plein.
Le réservoir à marc de café a été remis
en place trop rapidement.
Toujours attendre environ 5 secondes avant de
remettre en place le réservoir à marc de café.
Ceci permet au compteur de revenir à zéro.
La machine demande
de vider le réservoir à
marc de café, même
si le réservoir n'est pas
plein.
La machine n'a pas remis le compteur
à zéro la dernière fois que le réservoir
à marc de café a été vidé.
Toujours attendre environ 5 secondes avant de
remettre en place le réservoir à marc de café. Ceci
permet au compteur des marcs de café de se
remettre à zéro.
Toujours vider le réservoir à marc de café lorsque
la machine est allumée. Si le réservoir à marc de
café est vidé lorsque la machine est éteinte, le
compteur des cycles de café ne se remet pas à
zéro.
Impossible de retirer le Le groupe de distribution ne se Fermer le volet d’entretien. Éteindre et rallumer
groupe de distribution. trouve pas dans la bonne position. la machine. Attendre que l’afficheur
indique
le message prêt, puis retirer le groupe de
distribution.
Le réservoir à marc de café n'a pas Retirer le réservoir à marc de café avant de été
retiré. retirer le groupe de distribution.
23/04/2020 09:50:57
71
Problème
Cause
Solution
Impossible d'introduire Le groupe de distribution ne se Le groupe de distribution n’a pas été mis en le
groupe de trouve pas dans la bonne position. place avant d'être repositionné. S’assurer que
distribution. le levier est en contact avec la base du groupe
de distribution et que le crochet du groupe de
distribution se trouve dans la bonne position. Voir
le chapitre « Remise en place du groupe de
distribution ».
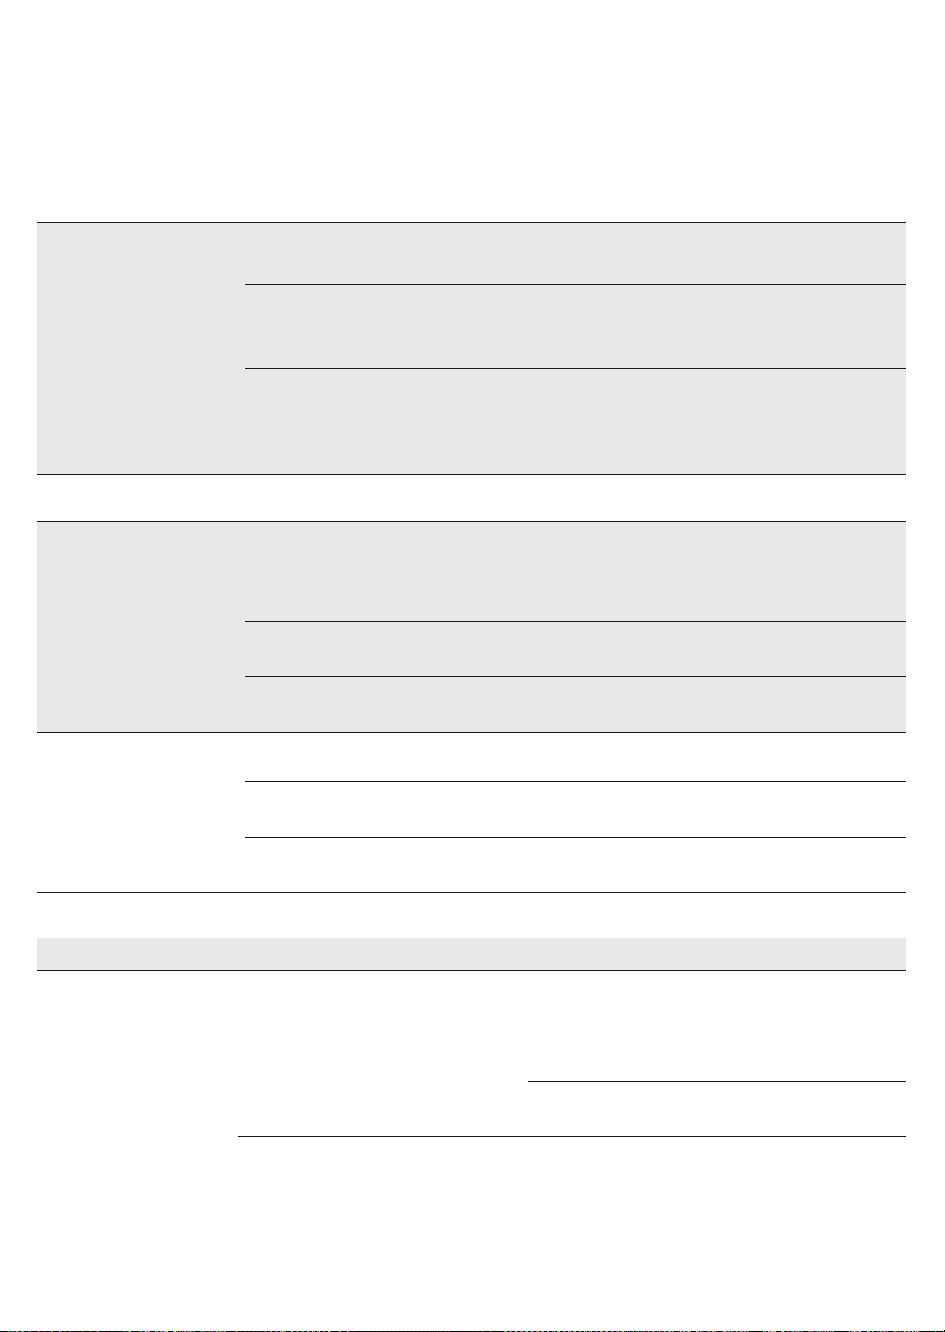
Français
4219-450-08061 MANUAL GAG. CAD. PRESTIGE EN-FR 120US.indd 83
Pour régler à nouveau la machine : réinstaller le
réservoir à marc de café. Ne pas introduire le
groupe de distribution. Fermer le volet de
service alors que le réservoir à marc de café est
installé, puis débrancher et rebrancher le cordon
d’alimentation. Ensuite essayer de réinstaller le
groupe de distribution et rallumer la machine.
Le café ne mousse pas ou
est aqueux.
Le moulin à café est réglé sur une
mouture grosse.
Régler le moulin à café sur une mouture plus fine.
La machine est en train d’effectuer la
procédure de réglage automatique.
Distribuer quelques tasses de café pour que la
machine se règle automatiquement.
La conduite de sortie du café est
bloquée.
Nettoyer la conduite de sortie du café avec une
petite cuillère, comme le décrit le chapitre «
Nettoyage du groupe de distribution à l'eau
courante ».
Le café n'est pas assez La température réglée est trop Régler la température du menu sur « MAX ».
chaud. basse. Vérifier les réglages du menu.
La machine moud le café
en grains, mais celui-ci
n’est pas distribué.
Le moulin à café est réglé sur une
mouture trop fine.
Régler le moulin à café sur une mouture plus
grosse.
La buse de distribution du café est
bouchée.
Distribuer un café allongé prémoulu sans ajouter
le café prémoulu.
Les embouts de la buse de distribution
du café sont bouchés.
Nettoyer les embouts de la buse de distribution du
café avec un petit écouvillon.
Le café coule lentement ou
goutte à goutte.
Le moulin à café est réglé sur une
mouture trop fine.
Régler le moulin à café sur une mouture plus
grosse.
Les embouts de la buse de distribution
du café sont bouchés.
Nettoyer les embouts de la buse de distribution du
café avec un petit écouvillon.
Le circuit de la machine est bouché par
des dépôts de calcaire.
Faire un cycle de détartrage.
23/04/2020 09:50:57
72
Problème
Cause
Solution
Le lait ne mousse pas.
La buse de distribution du lait est sale
ou la carafe n’est pas bien introduite. Il
se pourrait également que toutes les
parties de la carafe
Nettoyer la carafe en suivant les indications du
chapitre « Nettoyage minutieux de la carafe à lait
sous l’eau courante » et s’assurer de la
positionner et l’introduire correctement.
du lait n’ait pas été assemblées.
Vérifier que tous les composants ont été
correctement assemblés.
Le type de lait utilisé ne convient pas
pour faire de la mousse.
Selon le type de lait, la quantité et la qualité de
la mousse produite diffèrent.

Français
4219-450-08061 MANUAL GAG. CAD. PRESTIGE EN-FR 120US.indd 84
Il n’est pas possible
d’introduire le filtre
« INTENZA+ ».
Il faut faire sortir l'air du filtre.
Laisser les bulles d'air s'échapper du filtre.
Le réservoir contient encore de l'eau.
Vider le réservoir à eau avant d'installer le filtre.
Il n’y a pas de joint en caoutchouc
dans le filtre « INTENZA+ ».
Vérifier l’emballage et installer le joint dans le
filtre « INTENZA+ ».
Il y a de l’eau sous la Le bac d'égouttement est trop plein Vider le bac d'égouttement dès que l'indicateur
machine. et a débordé. est visible à travers le bac. Toujours vider
le bac d'égouttement avant de lancer la procédure
de détartrage.
Accessoires GAGGIA
Le café et les accessoires sont en vente dans les centres agréés (Italie) ou chez
les revendeurs du pays de l’utilisateur.
dégraissage (Philips)
Gamme des cafés disponibles en grains et en poudre : 100 % Arabica / Intense / Décaféiné
23/04/2020 09:50:58
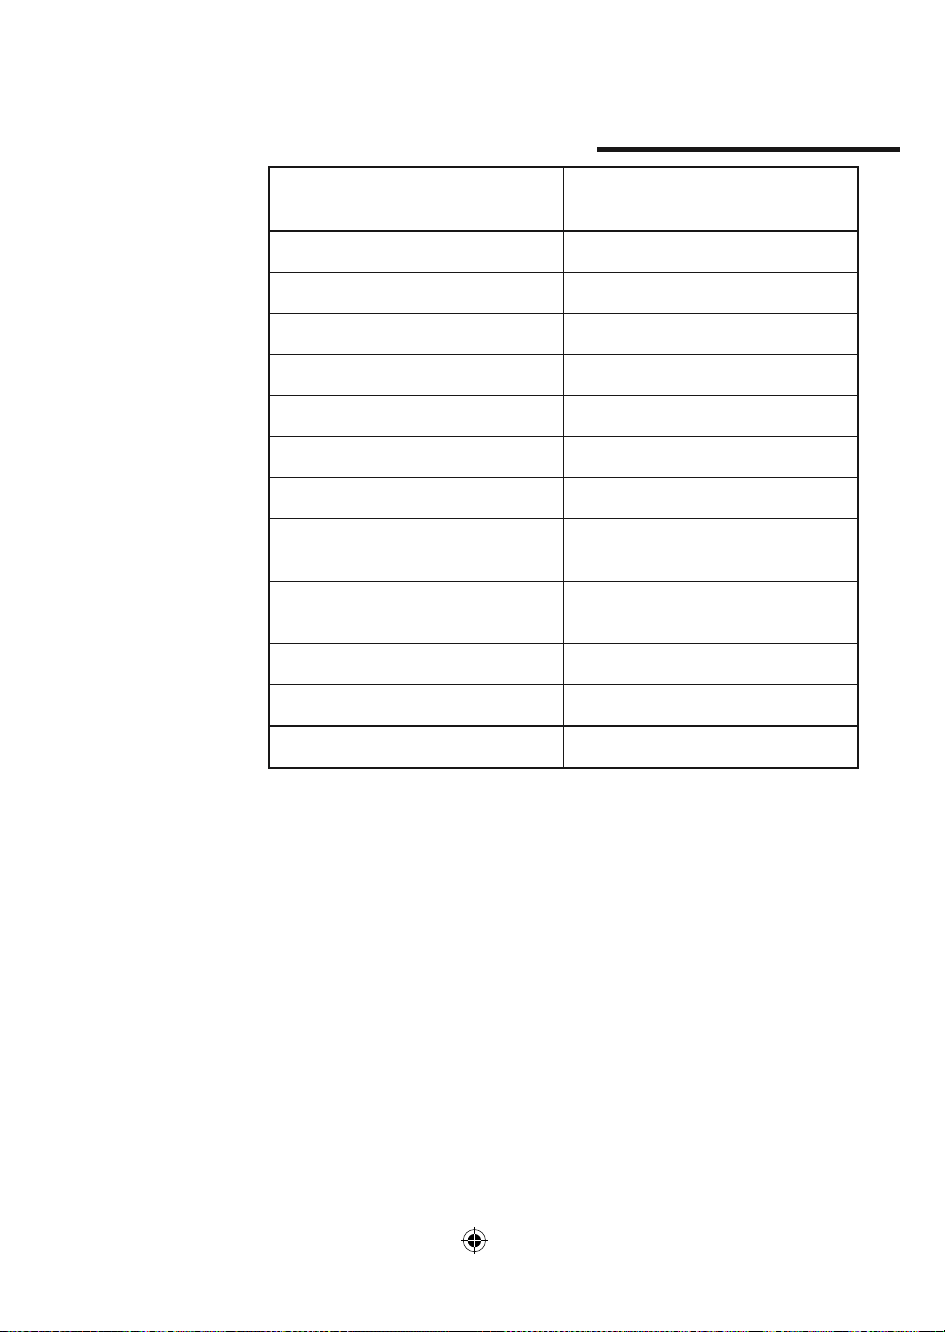
Français
4219-450-08061 MANUAL GAG. CAD. PRESTIGE EN-FR 120US.indd 85 23/04/2020 09:50:59
73
Données techniques
Tension nominale - Puissance
nominale - Alimentation
Voir la plaquette signalétique dans le
volet de service
Matériau du corps
Thermoplastique
Dimensions
221 x 340 x 430 mm
Poids
7,5 kg
Longueur du câble
1 200 mm
Bandeau de commande
En façade
Dimensions des tasses
Jusqu’à 150 mm
Réservoir à eau
1,8 litres - Amovible
Capacité du réservoir à café en grains
250 g
Capacité du réservoir à marc de café
10
Pression de la pompe
15 bars
Chaudière
Chaudière Inox
Dispositifs de sécurité
Coupe-circuit thermique

4219-450-08061 MANUAL GAG. CAD. PRESTIGE EN-FR 120US.indd 86 23/04/2020 09:50:59

4219-450-08061 MANUAL GAG. CAD. PRESTIGE EN-FR 120US.indd 87 23/04/2020 09:50:59

4219-450-08061 MANUAL GAG. CAD. PRESTIGE EN-FR 120US.indd 88 23/04/2020 09:50:59
GAGGIA S.p.A. reserves the right to make any necessary modification.
GAGGIA S.p.A. se réserve le droit d’apporter toute modification jugée nécessaire.

4219-450-08061 MANUAL GAG. CAD. PRESTIGE EN-FR 120US.indd 89 23/04/2020 09:50:59
GAGGIA S.p.A.
Società soggetta a direzione e coordinamento di Philips Innovations S.p.A.
Sede Amministrativa/Administrative Office
Via Torretta, 240
40041 Gaggio Montano - Bologna - Italia +39 0534 771111 /
Fax +39 0534 31025
Sede Legale/Registered Office
Piazza A. Diaz, 1
20123 Milano - Italia
Capitale Sociale Euro 104.000 i.v.
REA MI1387376 - R.I. Cod.Fisc. 02069680367 Part. IVA : IT-
13054780153
www.gaggia.it www.gaggia.com