
MSF15AH6LB
USER MANUAL
Warning notices: Before using this product, please read this manual carefully and keep it for future reference.
The design and specifications are subject to change without prior notice for product improvement.
Consult with your dealer or manufacturer for details.
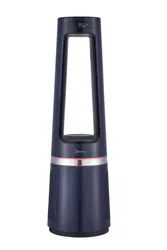
The diagram above is just for reference. Please take the appearance of the actual product as the standard.
3 IN 1 FAN+HEATER+AIR PURIFIER
THANK YOU LETTER
Thank you for choosing Midea! Before using your new Midea product, please read
this manual thoroughly to ensure that you know how to operate the features and
functions that your new appliance offers in a safe way.
CONTENTS
01
0
02
1
05
06
07
09
1 5
1 4
1 6
1 2
THANK YOU LETTER
SAFETY INSTRUCTIONS
SPECIFICATIONS
PRODUCT OVERVIEW
PRODUCT INSTALLATION
OPERATION INSTRUCTIONS
CLEANING AND MAINTENANCE
TROUBLESHOOTING
TRADEMARKS, COPYRIGHTS AND LEGAL STATEMENT
DATA PROTECTION NOTICE
EN
02
Danger
This symbol indicates that there are dangers to the life and health of
persons due to extremely flammable gas.
Warning of electrical voltage
This symbol indicates that there is a danger to life and health of
persons due to voltage.
Warning
The signal word indicates a hazard with a medium level of risk which, if
not avoided, may result in death or serious injury.
Caution
The signal word indicates a hazard with a low degree of risk which, if
not avoided, may result in minor or moderate injury.
Attention
The signal word indicates important information (e.g. damage to
property), but not danger.
Observe instructions
This symbol indicates that a service technician should only operate and
maintain this appliance in accordance with the operating instructions.
The following safety guidelines are intended to prevent unforeseen risks or damage from
unsafe or incorrect operation of the appliance. Please check the packaging and appliance
on arrival to make sure everything is intact to ensure safe operation. If you find any
damage, please contact the retailer or dealer. Please note modifications or alterations to
the appliance are not allowed for your safety concern. Unintended use may cause
hazards and loss of warranty claims.
Read these operating instructions carefully and attentively before using/commissioning the
unit and keep them in the immediate vicinity of the installation site or unit for later use!
Intended Use
Explanation of Symbols
SAFETY INSTRUCTIONS
EN

03
READ AND SAVE THESE INSTRUCTIONS
IMPORTANT INSTRUCTIONS
When using electrical appliances, basic precautions
should always be followed to reduce the risk of fire,
electric shock, injury to persons, and hyperthermia,
including the following:
Read all instructions before using this heater.
CAUTION
●
●
●
●
●
●
●
●
This heater is hot when in use. To avoid burns, do not let
bare skin touch hot surfaces. If provided, use handles
when moving this heater. Keep combustible materials,
such as furniture, pillows, bedding, papers, clothes, and
curtains at least 3 feet (0.9 m) from the front of the
heater and keep them away from the sides and rear.
Extreme caution is necessary when any heater is used
by or near children or invalids and whenever the heater
is left operating and unattended.
Always unplug heater when not in use.
Do not operate any heater with a damaged cord or plug
or after the heater malfunctions, has been dropped or
damaged in any manner. Discard heater, or return to
authorized service facility for examination and/or repair.
Do not use outdoors.
This heater is not intended for use in bathrooms, laundry
areas and similar indoor locations. Never locate heater
where it may fall into a bathtub or other water container.
Do not run cord under carpeting. Do not cover cord with
throw rugs, runners, or similar coverings. Do not route
cord under furniture or appliances. Arrange cord away
from traffic area and where it will not be tripped over.
WARNING
EN
04
●
●
●
●
●
●
●
●
To disconnect heater, turn controls to off, then remove
plug from outlet.
Do not insert or allow foreign objects to enter any venti-
lation or exhaust opening as this may cause an electric
shock or fire, or damage the heater.
To prevent a possible fire, do not block air intakes or
exhaust in any manner. Do not use on soft surfaces, like a
bed, where openings may become blocked.
A heater has hot and arcing or sparking parts inside. Do
not use it in areas where
gasoline, paint, or flammable liquids are used or stored.
Use this heater only as described in this manual. Any
other use not recommended by the manufacturer may
cause fire, electric shock, or injury to persons.
Always plug heaters directly into a wall outlet/receptacle.
Never use with an extension cord or relocatable power
tap (outlet/power strip).
Hyperthermia can result in death. Symptoms of
hyperthermia include high body temperature, headache,
nausea, vomiting, tiredness, dizziness, fainting, and rapid
pulse. If you begin to experience symptoms related to
hyperthermia, turn off the heater and seek medical
attention.
To avoid excessive room temperatures which can cause
hyperthermia: DO NOT leave product running
unattended in a confined space around infants, or
individuals with reduced physical, sensory, or mental
capabilities.
SAVE THESE INSTRUCTIONS
WARNING
EN

05
SPECIFICATIONS
MSF15AH6LB Product Model
Voltage
Frequency
Fan Power
120V~
60Hz
Heater Power 1500W
Noise ≤62dB
40W
EN
PRODUCT OVERVIEW
06
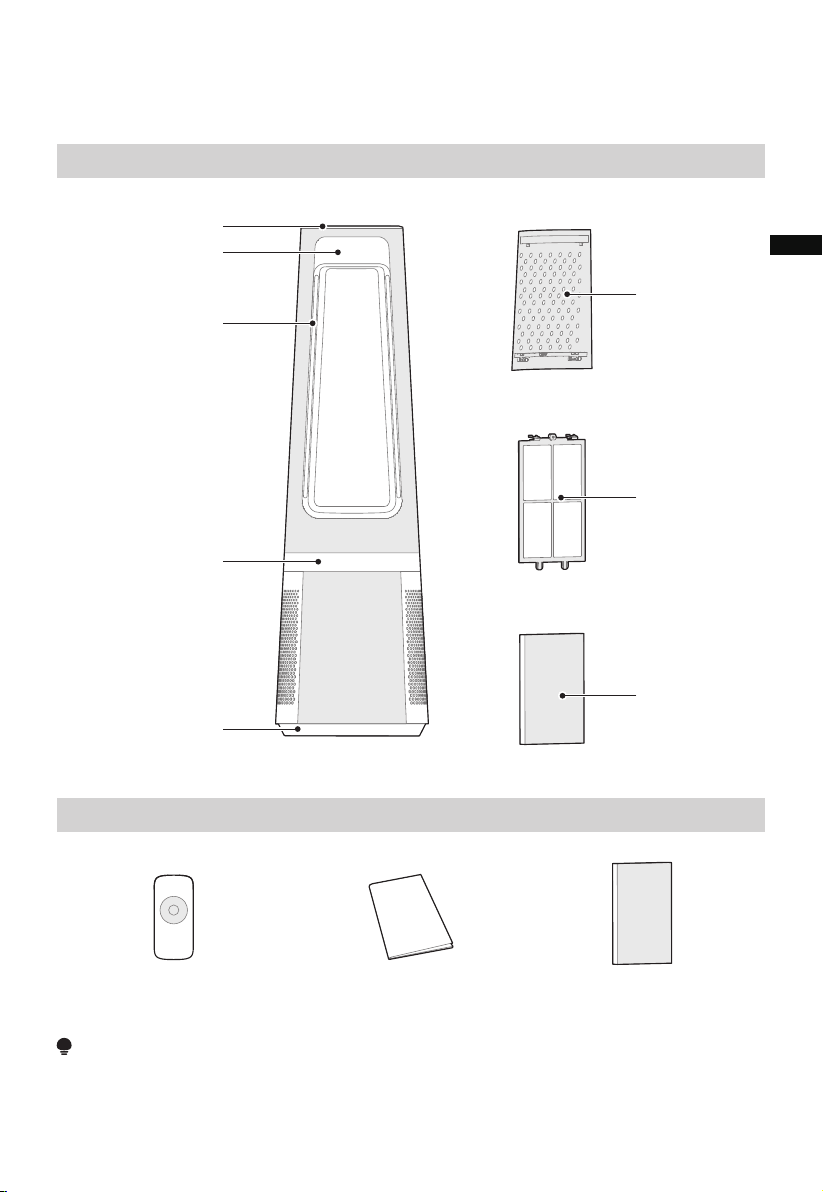
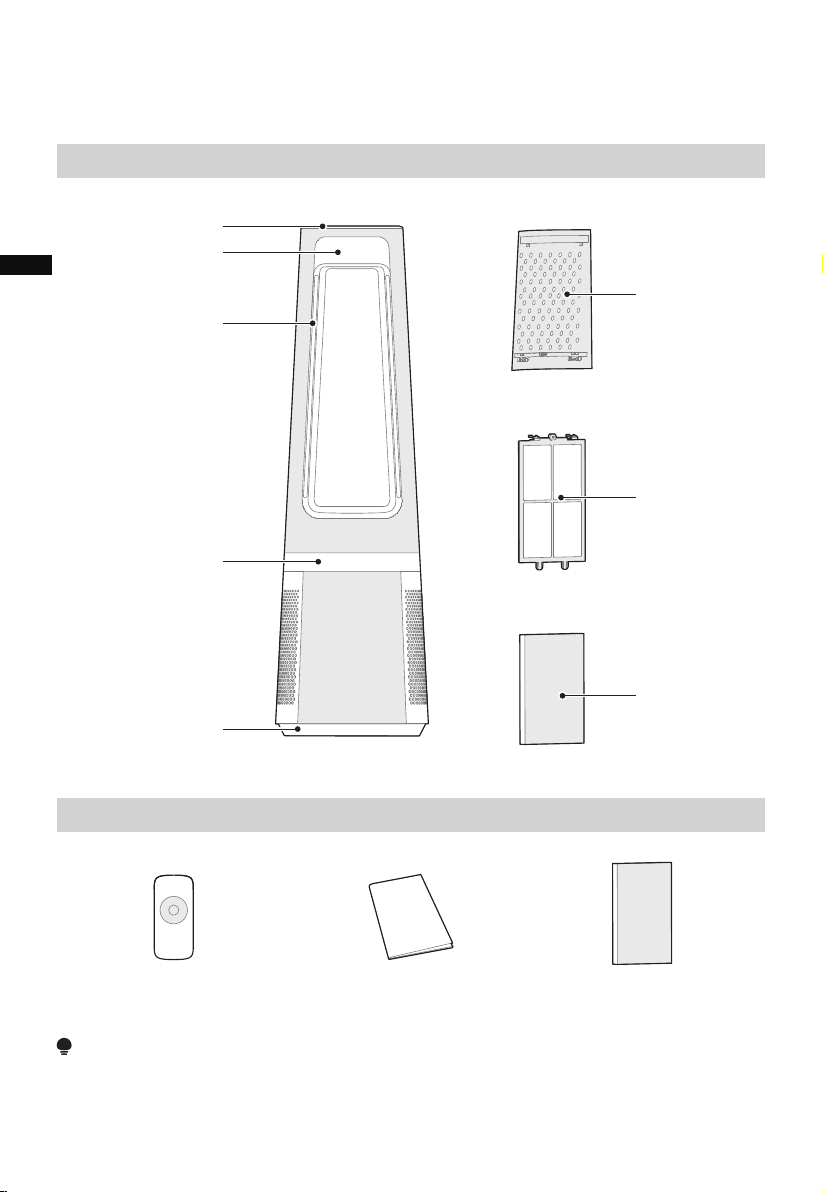
Part Name
Part List
NOTE
All the pictures in this manual are for explanation purpose only. Any discrepancy between
the real object and the illustration in the drawing shall defer to the real product.
Remote Controller ×1 Manual × 1 HEPA Filter x2
Control Panel
Display Panel
Air Outlet
Heater (red)/Fan (blue)
Mode indicator light
Base
Air Inlet Grille
Pre-filter
Hepa Filter
EN
07
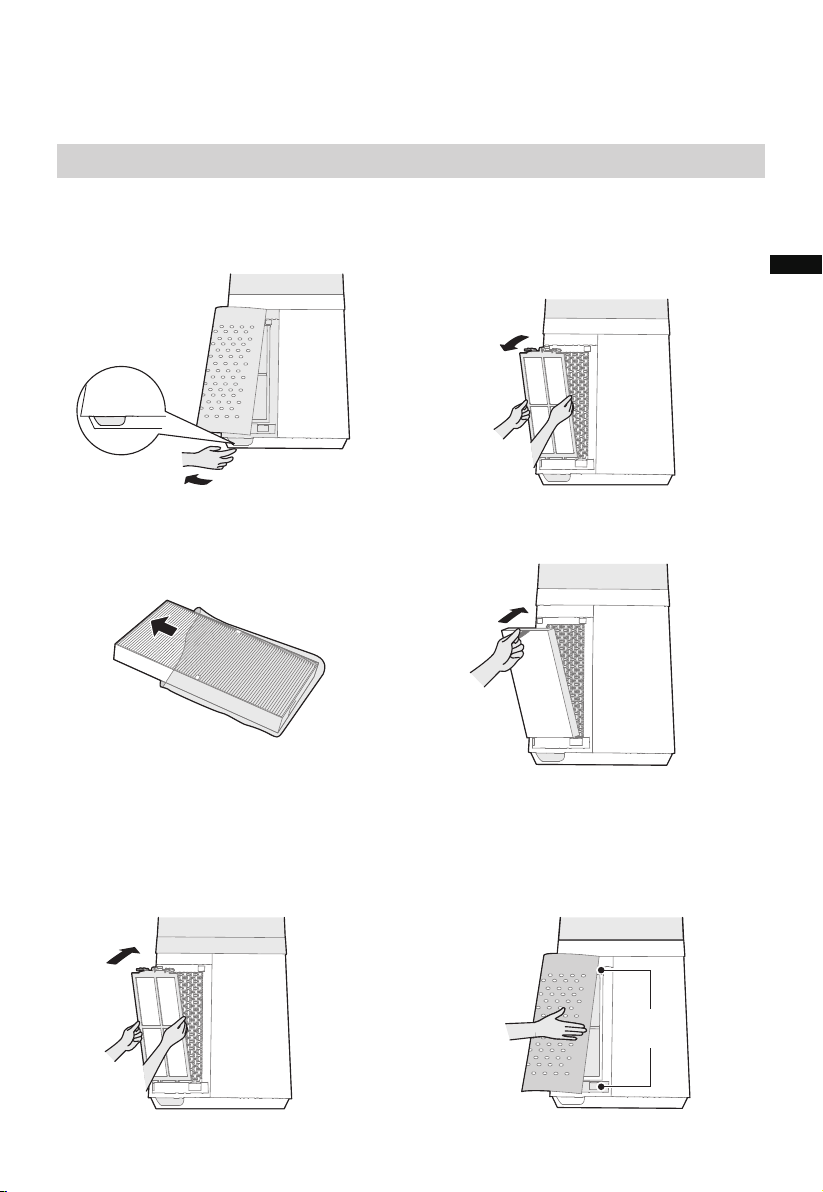
PRODUCT INSTALLATION
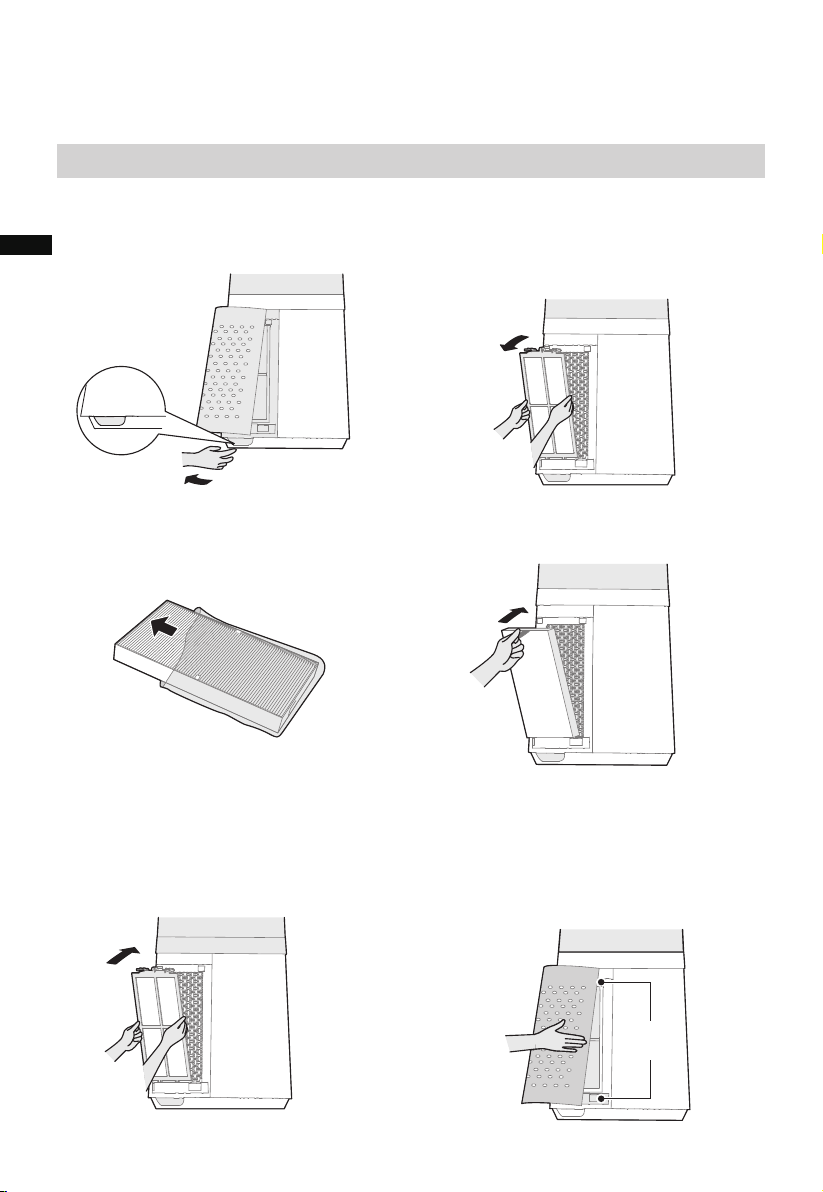
Installation Procedures
1 Remove the air inlet grille.
3 Remove the protective film of the
filter.
2 Take out the pre-filter.
Press the raised part on both sides to
pull it outwards, and take out the
pre-filter.
4 Install the HEPA filter.
6 Install the air inlet grille.
Align the upper two snap fit joints and
press them tightly together to fasten,
then press the two sides together at the
bottom, slowly and gently snap fit the
air inlet grille into place.
5 Install the pre-filter.
Align the slot position at the bottom,
and snap fit the upper U-Shaped joint to
install.
Snap fit
position
Snap fit
release
EN
08
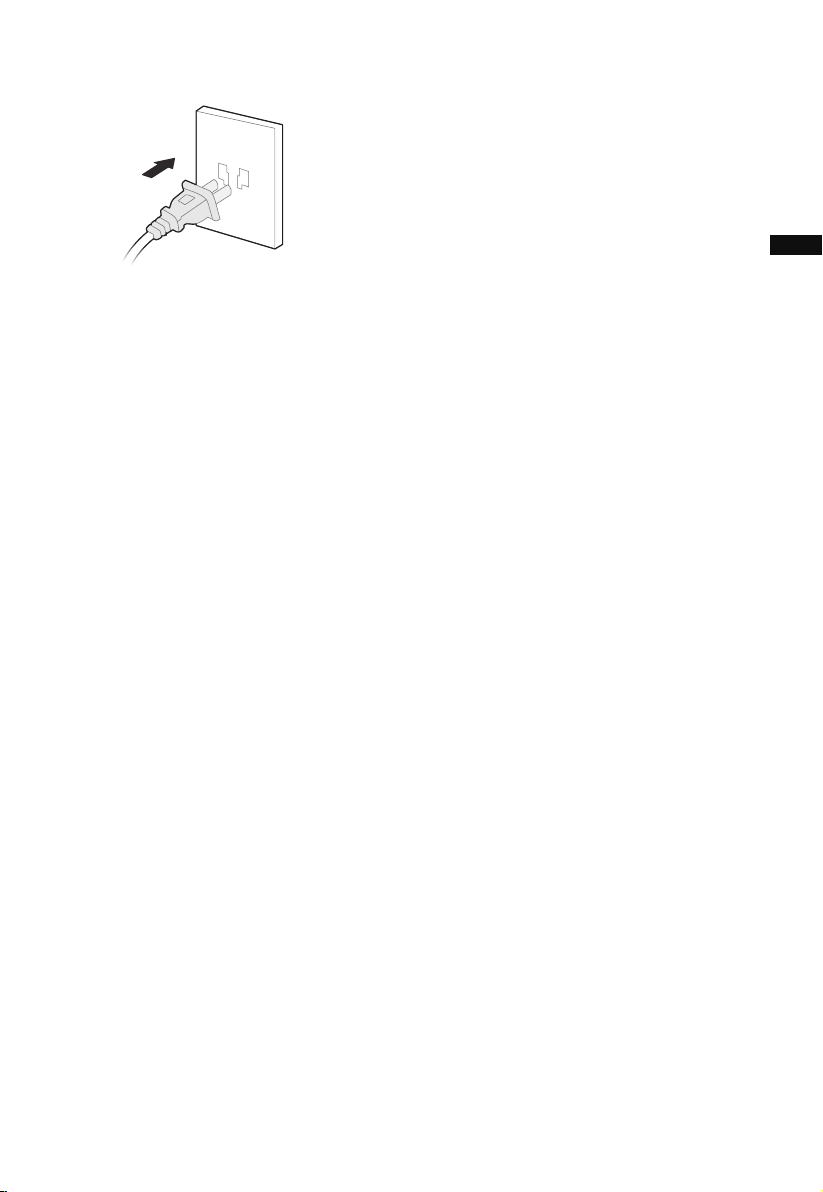
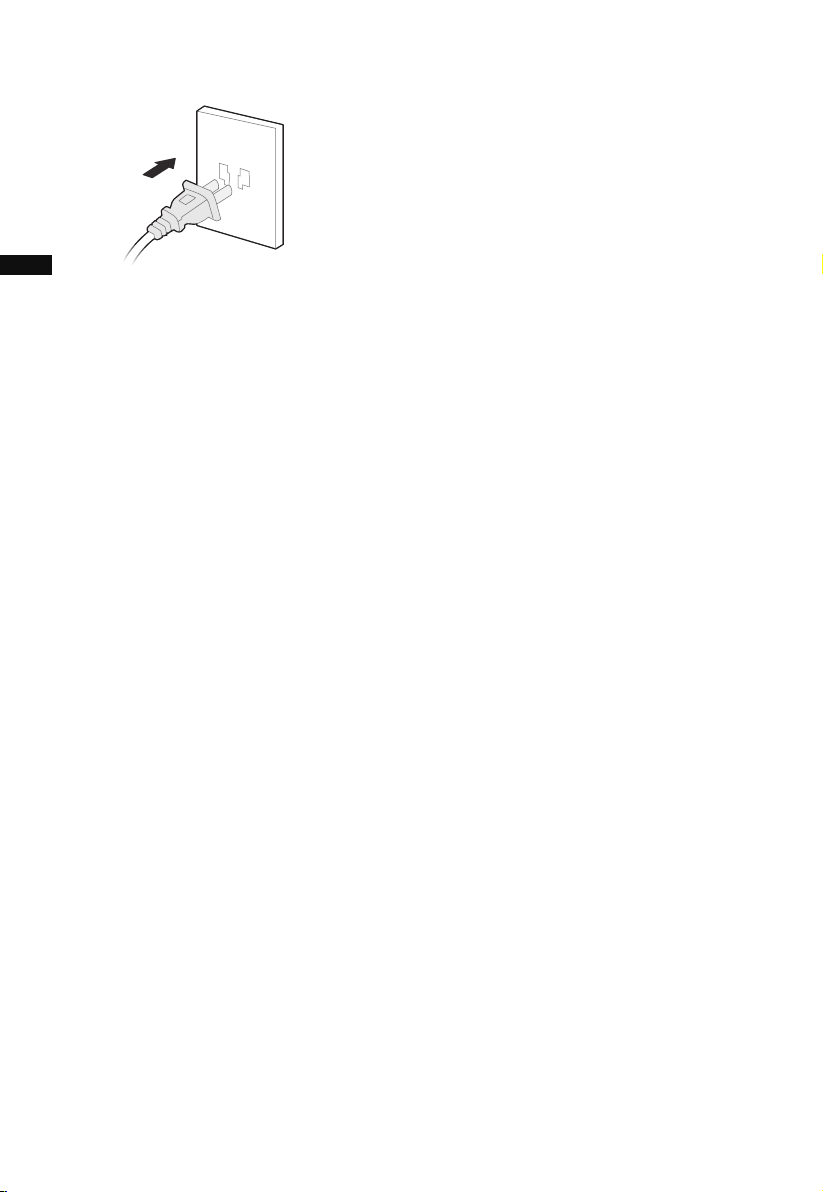
7 Plug power supply.
• It is recommended to clean the pre-filter every two weeks and replace the pre-filter
every six months (The cleaning and replacement cycle can be adjusted according to
the use environment).
EN
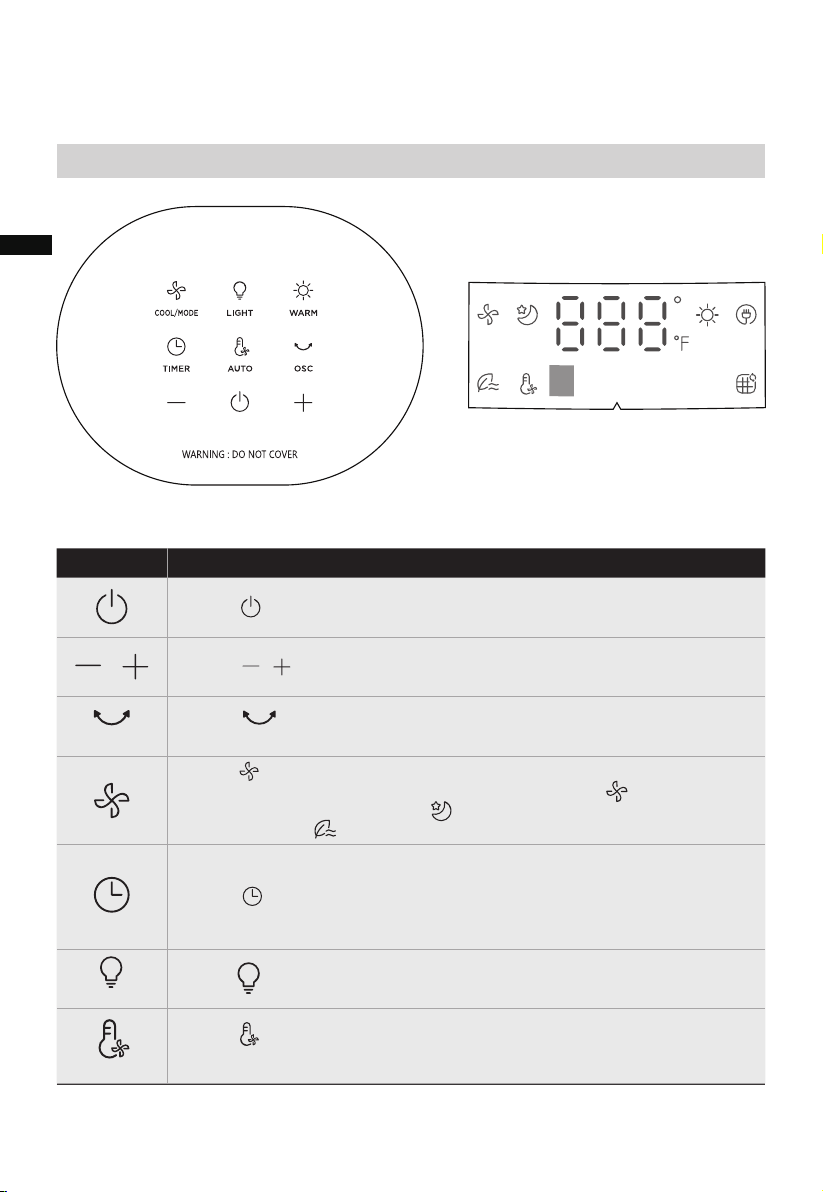
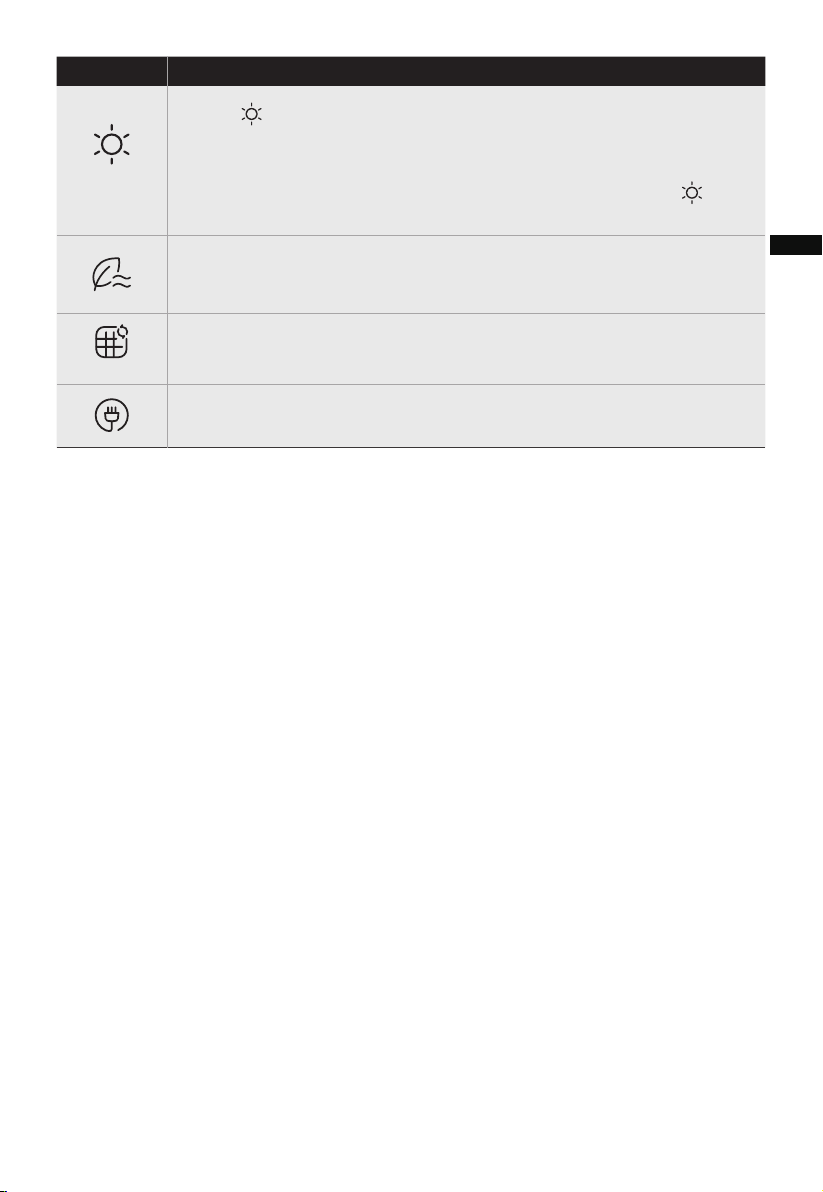
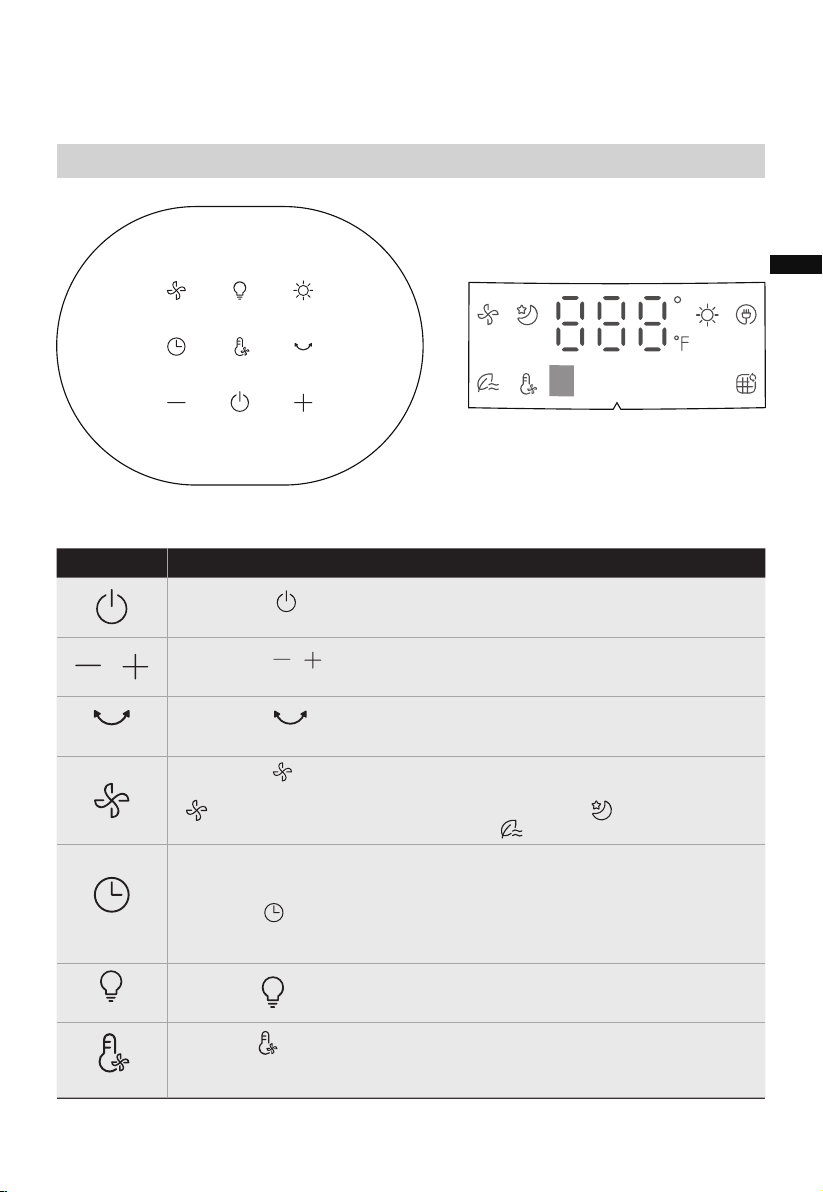
Function descriptionICON
• Touch to enter Startup/Standby, the appliance startup or stop.
• Touch to set cool wind speed and desired timer.
• Touch to set the desired oscillation angel of 30°,55°, or 0°(Stop
oscillation)
• Touch to turn on/off the ambient light.
• Touch to set the cool wind mode. Touch this button to switch the
wind mode among Normal wind (12 speeds settings, lights up),
Sleep wind ( 3 speed settings, lights up), and Natural wind (3
speed settings, light up) .
• Schedule to stop working automatically in the power-on state, and
schedule to start working automatically in the standby state;
• Touch and press +/- to set the timer in one hour intervals up to 12
hours (the display cycles among 0-1-2-...-12-0h); 0h means the set
timer is canceled.
/
/
• Touch to enter Auto wind mode, and the wind power is
automatically adjusted according to changes in ambient temperature.
09
OPERATION INSTRUCTIONS
Panel Control & Display
Control Panel Display Panel
OSC
COOL/MODE
TIMER
LIGHT
AUTO
EN
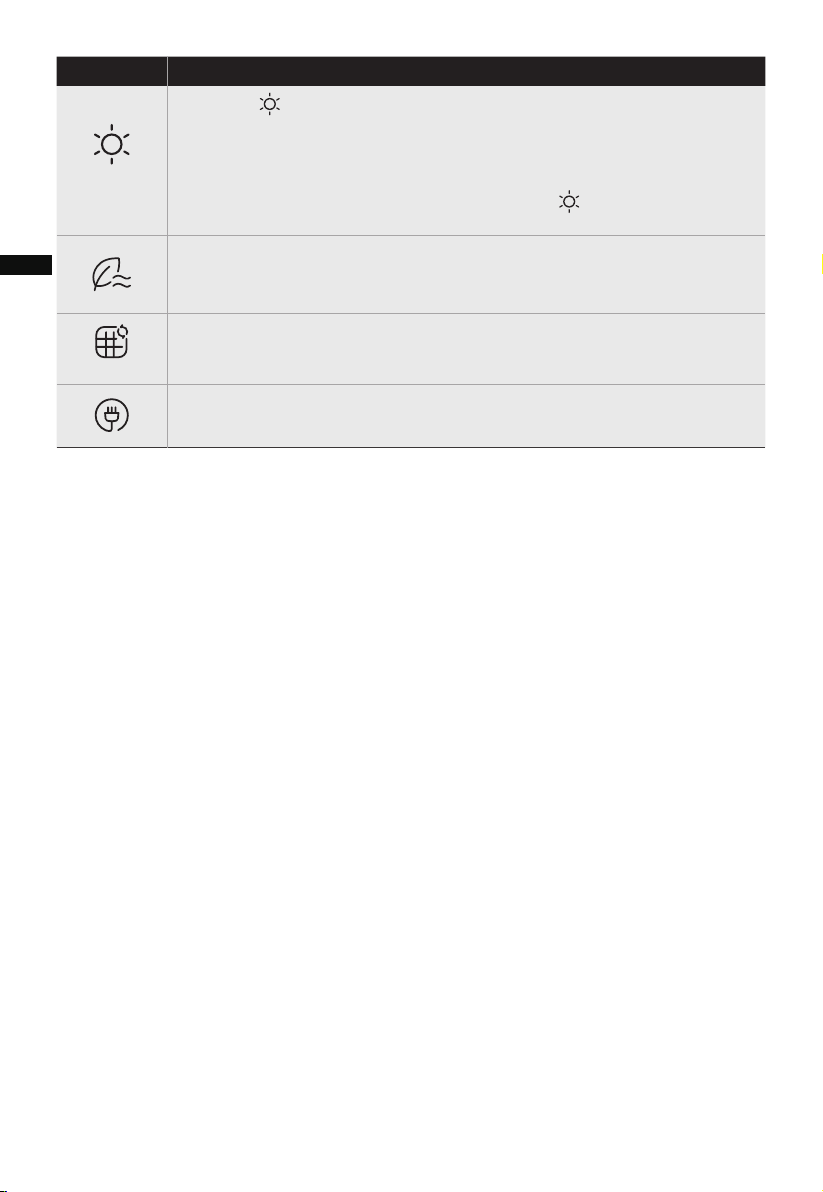
• Touch to active heating mode, touch +/- to set target temperature.
“--” indicates target temperature is not set. If the target temperature is
set and the appliance does not reach the set temperature, the
appliance will continue to work until the actual temperature exceeds
the set temperature, and then, the machine will stop. The icon on
the display flashes for 15 seconds and then stays on.
• In the natural wind mode, this indicator light turns on.
• You can switch the wind speed between 1 - 2 - 3 speeds by touching
the speed button.
• When this indicator light stays on, it serves as a reminder to replace
the filter.
• The indicator light turns on indicating that the power plug is
plugged in.
10
Function descriptionICON
WARM
EN
11
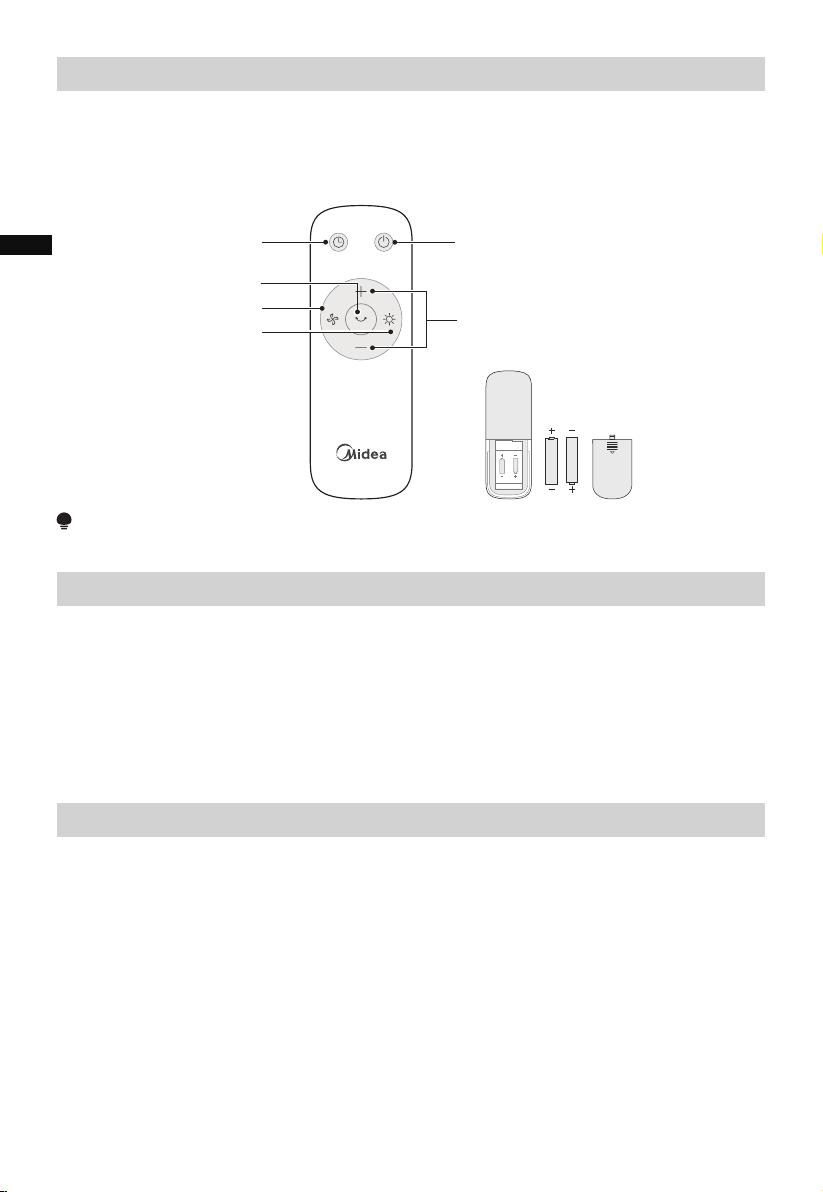
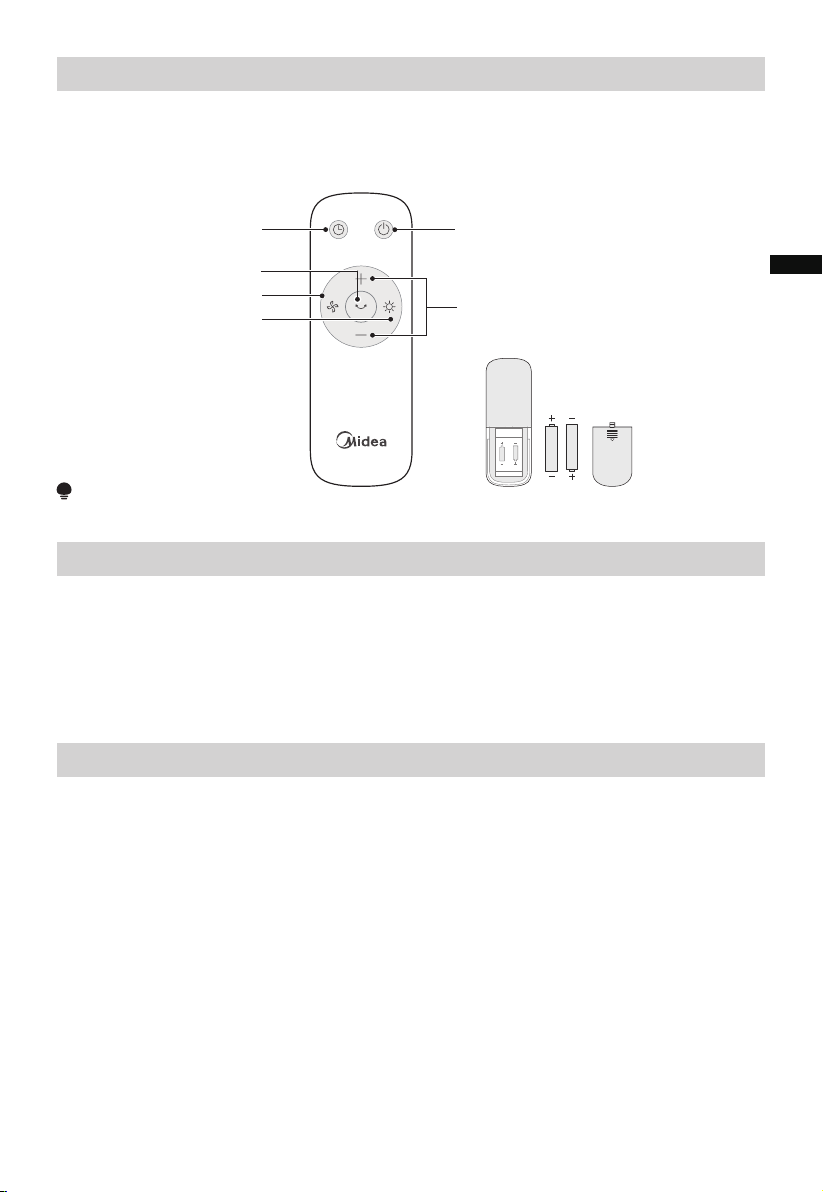
Remote Control
Batteries Warning As Below
NOTE
Use manganese or alkaline batteries of type “AAA”. DO NOT use rechargeable batteries.
• The remote control should be normally used within 16 ft (5m) of the front of the
product and 30 degrees of the deviation angle.
• The battery contains many heavy metals, acids and bases, etc., which may threaten
human’s health. Waste batteries should be recycled separately.
Additional Features and Maintenance
• Forced shutdown
Please note that as a safety measure, the fan will automatically shut down after 15
hours of continuous operation if no additional actions or operations are performed.
This ensures the unit's optimal performance and prevents any potential overheating or
damage.
• Intelligent memory
When the fan is turned off or powered off, it will run in the same state before turning
off or power off when the power is powered on again (the timing function is not
memorized).
• Screen-off function
The screen display will automatically shut-off after 30 seconds if no additional actions
or operations are performed. To turn on the screen you can touch any button other
than ON/OFF to restore the display.
NOTE: When the screen is off, touching the ON/OFF button will turn the appliance off.
Startup/Standby
Warm mode
Press "+,-" to set the wind
speed or set timer
TIMER
Desired oscillation
angel setting
Wind mode
AAA Battery. 1.5V
Battery
Do not dispose of batteries in fire, batteries may explode or leak.
Do not mix old and new batteries.
Do not mix alkaline, standard (carbon-zinc) or rechargeable (nickel-cadmium)
batteries.
Non-rechargeable batteries are not to be recharged.
Batteries are to be inserted with the correct polarity.
Exhausted batteries are to be removed from the product.
The batteries must be removed from the remote controller before it is scrapped and
that they are disposed of safely.
●
●
●
●
●
●
●
EN
CLEANING AND MAINTENANCE
12
1. Before cleaning and assembling, appliance must be unplugged.
2. To ensure adequate air circulation to the motor, keep vents at the rear of the motor
free of dust. Do not disassemble the appliance to remove dust.
3. Please clean external parts using a soft clean cloth moistened with a mild detergent.
thoroughly remove soap film with dry cloth.
4. Do not use any abrasive detergent or solvents to avoid scratching the surface.
Do not use any of the following as a cleaner: gasoline, thinner.
5. Do not allow water or any other liquid into the motor housing or interior parts.
It is recommended that the appliance be cleaned at least one time during the operating
season in order to provide the optimum level of performance. ALWAYS TURN THE
POWER SWITCH OFF AND UNPLUG THE APPLIANCE BEFORE CLEANING. Be sure to
save the box for storage. If the appliance is broken or damaged, do not try to fix it by
yourself. Refer it to an authorized service representative if service is needed.
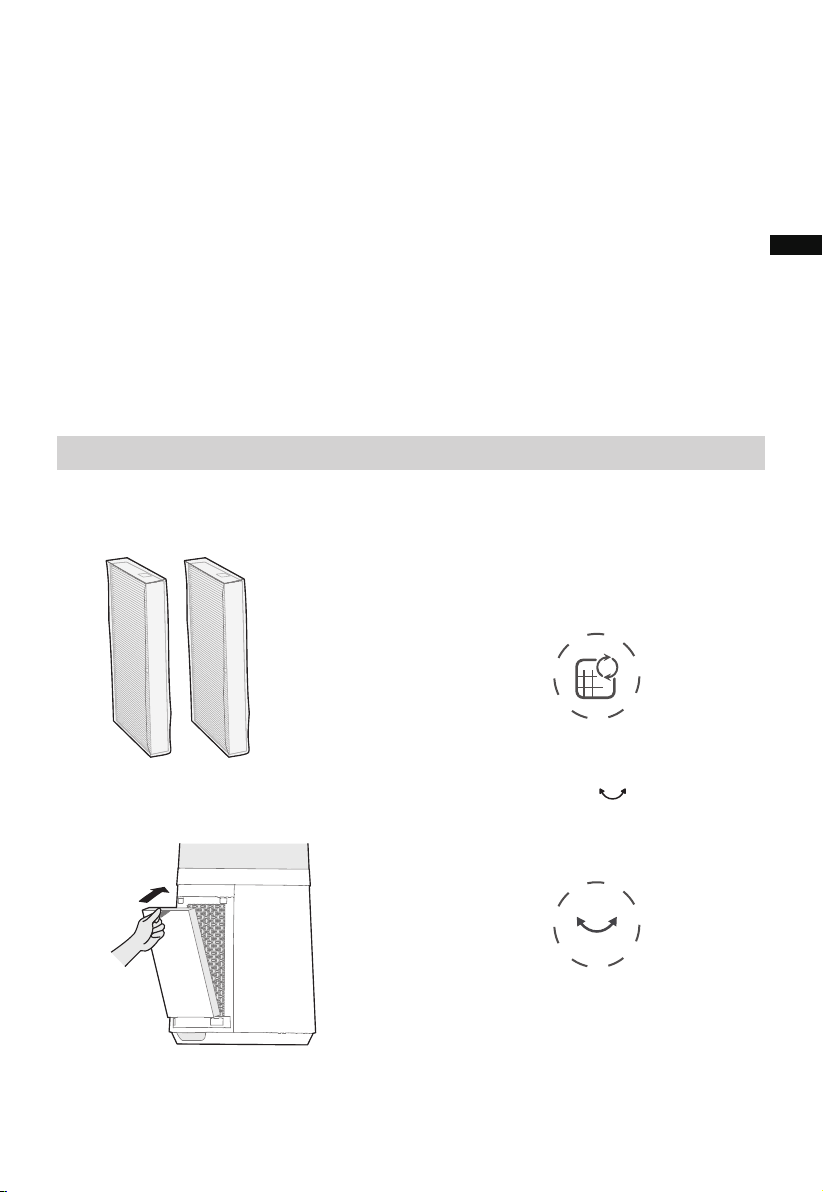
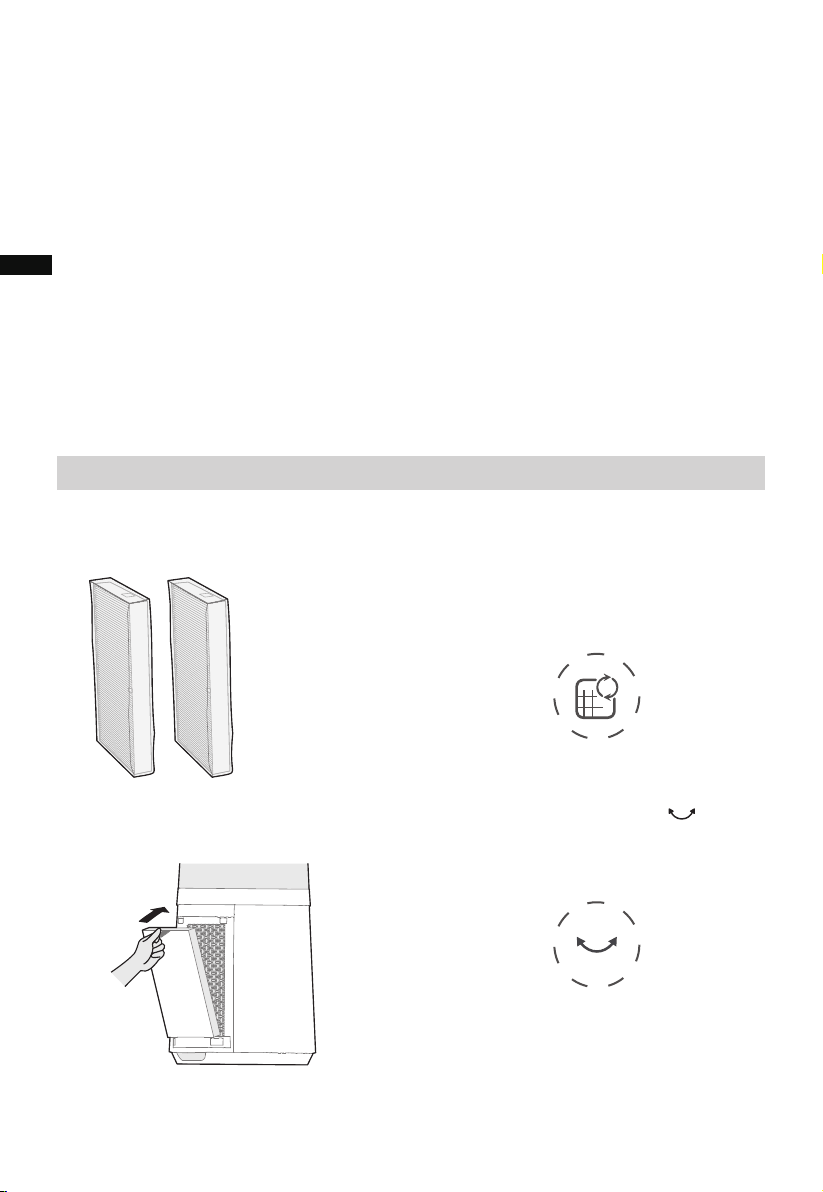
Filter Replacement
2
When the indicator light for filter
replacement is on, it serves as a
reminder to replace the filter. Failure
to do so will result in the indicator
light remaining illuminated when the
appliance is powered on.
1 Filter model:FQ150CJ-2
(including 2 pieces).
4
Press and hold the button for 3
seconds to turn off the indicator light
for filter replacement.
3
Replace with a new filter.
EN
13
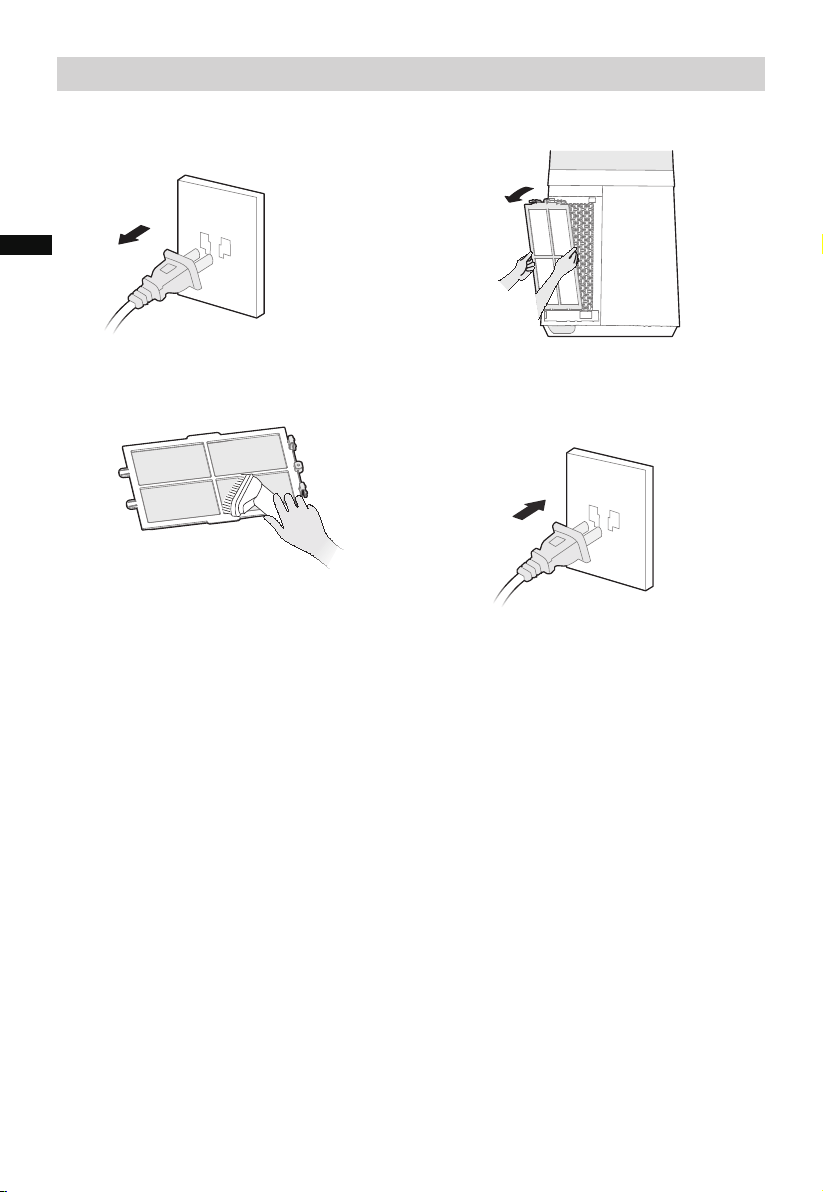
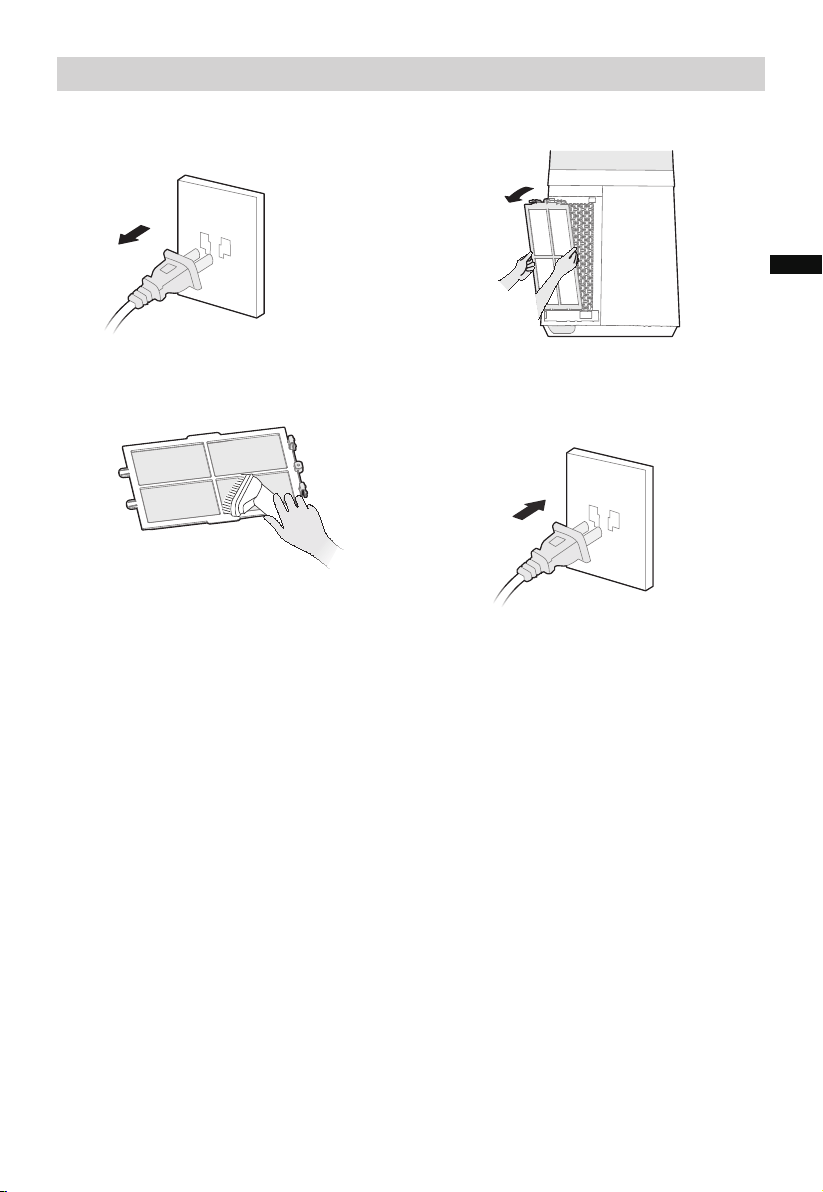
Pre-Filter Cleaning
2
Take out the filter.
1 Unplug the power cord.
4
Reinstall the pre-filter in reverse order
and then plug-in the power supply.
3 Remove the dust with vacuum cleaner.
EN
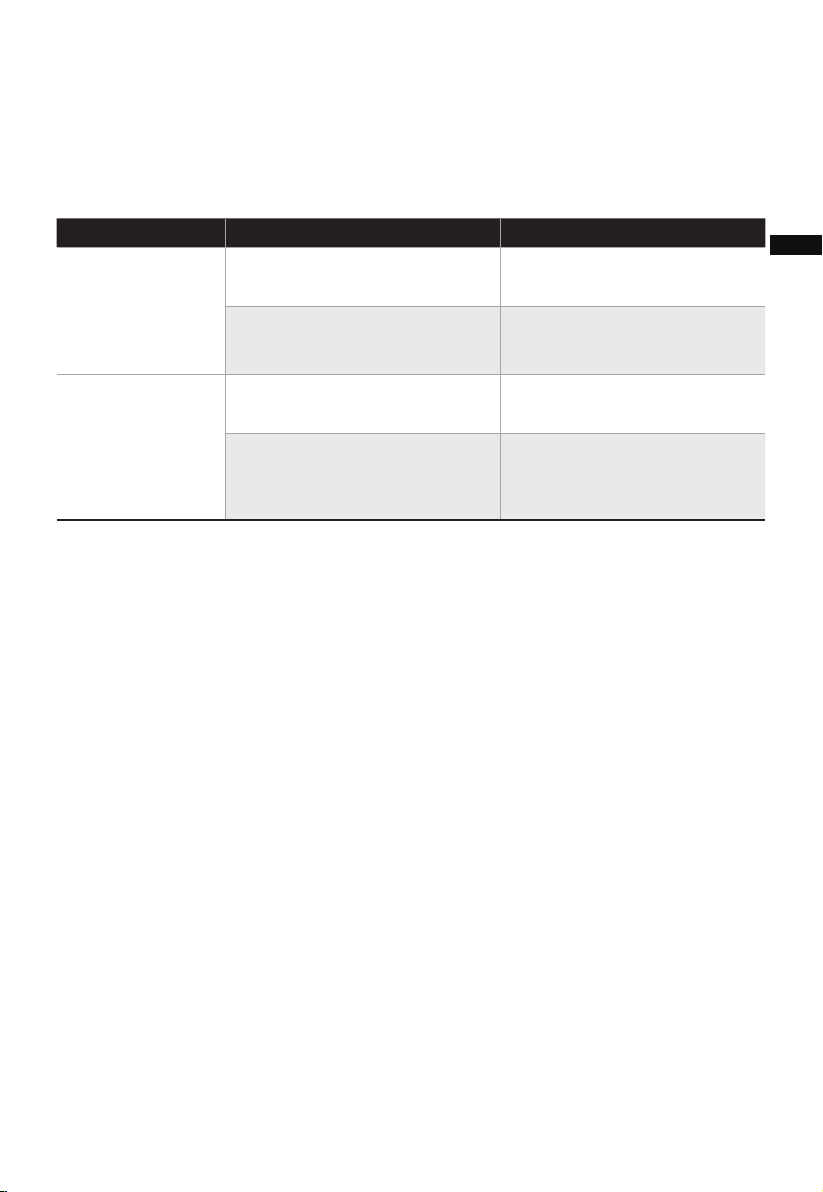
TROUBLESHOOTING
14
The appliances may encounters some errors and malfunctions, the following tables
contain possible causes and notes for resolving an error or malfunction.
Solution
Cause SolutionProblem
The power cable is not
plugged in or has poor contact.
Make sure the plug is properly
inserted into the socket.
The power on/off button is not
activated.
Press the power on/off button
to turn on the appliance.
The battery is out of power. Replace with new battery.
●
●
●
The remote is being used more
than 16 ft (5m) away from the
appliance.
●
The unit does
• The machine stops when the temperature exceeds the threshold of the thermal cut- off,
you should manually unplug the appliance, and then insert it into the receptacle again
when the appliance is cooled.
• When you are not using the appliance, store it in a cool, dry place with ambient
conditions and no dust, to avoid clogging the filters.
not work properly
after assembled
The remote does
not work
Use the remote closer to the
appliance and make sure it is
pointing directly at the display
panel.
EN
15
logo, word marks, trade name, trade dress and all versions there of are
trademarks, copyrights and other intellectual property rights, and all goodwill derived
valuable assets of Midea Group and/or its affiliates (“Midea”), to which Midea owns
from using any part of an Midea trademark. Use of Midea trademark for commercial
purposes without the prior written consent of Midea may constitute trademark
infringement or unfair competition in violation of relevant laws.
This manual is created by Midea and Midea reserves all copyrights thereof. No entity or
individual may use, duplicate, modify, distribute in whole or in part this manual, or
bundle or sell with other products without the prior written consent of Midea.
All the described functions and instructions were up to date at the time of printing this
manual. However, the actual product may vary due to improved functions and designs.
TRADEMARKS, COPYRIGHTS
AND LEGAL STATEMENT
EN

16
DATA PROTECTION NOTICE
For the provision of the services agreed with the customer,
we agree to comply without restriction with all stipulations of applicable data protection
law, in line with agreed countries within which services to the customer will be delivered,
as well as, where applicable, the EU General Data Protection Regulation (GDPR).
Generally, our data processing is to fulfil our obligation under contract with you and for
product safety reasons, to safeguard your rights in connection with warranty and
product registration questions. In some cases, but only if appropriate data protection is
ensured, personal data might be transferred to recipients located outside of the
European Economic Area.
Further information is provided by request. You can contact our Data Protection
Officer via [email protected]. To exercise your rights, such as your right to refrain
your personal data being processed for marketing purposes, please contact us via
[email protected]. To find further information, please follow the QR Code.
EN

CONTENIDO
AGRADECIMIENTOS
¡Gracias por elegir Midea! Antes de utilizar su nuevo dispositivo Midea, lea
atentamente este manual para asegurarse de que sabe cómo manejar las
características y funciones que le ofrece su nuevo electrodoméstico de forma
segura.
---------------------------------------------------------------
-------------------------------------
---------------------------------------------------------------
-----------------------------------------
-----------------------------------------
-----------------------
-------------------------------------------
------------------------------------------------
-----------------
01
0
02
1
06
07
08
AGRADECIMIENTOS
INSTRUCCIONES DE SEGURIDAD
ESPECIFICACIONES
DESCRIPCIÓN DEL PRODUCTO
INSTALACIÓN DEL PRODUCTO
INSTRUCCIONES DE FUNCIONAMIENTO
LIMPIEZA Y MANTENIMIENTO
MARCAS, DERECHOS DE AUTOR Y DECLARACIÓN LEGAL
AVISO SOBRE LA PROTECCIÓN DE DATOS
17
16
13
SOLUCIÓN DE PROBLEMAS
15
10
ES
02
Peligro
Advertencia de tensión eléctrica
Advertencia
Precaución
Atención
Respetar las instrucciones
Uso Adecuado
Simbología
INSTRUCCIONES DE SEGURIDAD
Las siguientes directrices de seguridad tienen por objeto evitar riesgos imprevistos o
daños derivados de un funcionamiento inseguro o incorrecto del dispositivo.
Compruebe el embalaje y el aparato a su llegada para asegurarse de que todo está
intacto para garantizar un funcionamiento seguro. Si encuentra algún daño, póngase en
contacto con el vendedor o distribuidor. Por favor, tenga en cuenta que las
modificaciones o alteraciones en el aparato no están permitidas por su seguridad.
El uso inadecuado puede causar peligros y la pérdida de los derechos de garantía.
ES
Lea atentamente este manual de instrucciones antes de utilizar/poner en marcha el
dispositivo y guárdelo en las inmediaciones del lugar de instalación o del dispositivo
para su uso posterior.
Este símbolo indica que existe peligro para la vida y la salud de las personas
debido a la existencia de gas extremadamente inflammable.
Este símbolo indica que existe un peligro para la vida y la salud de las personas
debido a la tensión
Este símbolo representa un peligro con un nivel de riesgo medio que, si no se
evita, puede provocar la muerte o lesiones graves.
Este símbolo indica un peligro con un grado de riesgo bajo que, si no se evita,
puede provocar lesiones leves o moderadas.
Este símbolo indica información importante (por ejemplo, daños materiales), pero
no peligro.
Este símbolo indica que un técnico de servicio sólo debe operar y mantener este
aparato de acuerdo con las instrucciones de funcionamiento.
03
PRECAUCIÓN
LEA Y CONSERVE ESTAS
INSTRUCCIONES
INSTRUCCIONES IMPORTANTES
Cuando se utilicen aparatos eléctricos, deben seguirse
siempre las precauciones básicas para reducir el riesgo de
incendio, electrocución y lesiones a las personas o
hipertermia, incluyendo las siguientes:
• Lea todas las instrucciones antes de utilizar el calefactor.
• Este calefactor se calienta cuando está en uso. Para
evitar quemaduras, no deje que la piel desnuda toque la
superficie caliente. Si el aparato está provisto de asas,
utilícelas siempre para desplazar el calefactor. Mantenga
los materiales combustibles como muebles, almohadas,
ropa de cama, papeles, ropa y cortinas a una distancia
mínima de 0,9 m (3 pies) de la parte delantera del
calefactor y manténgalos alejados de los laterales y la
parte trasera.
• Es necesario extremar las precauciones cuando cualquier
calefactor sea utilizado por o cerca de niños o inválidos y
siempre que el aparato se deje en funcionamiento y sin
vigilancia.
• Siempre desconecte el dispositivo si no está en uso.
• No haga funcionar ningún calefactor con un cable o
enchufe dañado o después de que el aparato funcione
mal, se haya caído o dañado de alguna manera. Deseche
el calefactor o devuélvalo a un servicio técnico
autorizado para que lo examinen, lo ajusten eléctrica o
mecánicamente o lo reparen.
• No use el aparato al aire libre.
ADVERTENCIA
ES
04
ADVERTENCIA
• Este calefactor no está diseñado para ser utilizado en
cuartos de baño, lavanderías y lugares interiores húmedos
similares. Nunca coloque el calefactor donde pueda caer
en una bañera u otro recipiente con agua.
• No pase el cable por debajo de alfombras. No cubra el
cable con alfombras, correderas o revestimientos
similares. No pase el cable por debajo de muebles o
electrodomésticos. Coloque el cable lejos de zonas de
tránsito y donde no se pueda tropezar con él.
• Para desconectar el calefactor, gire primero los mandos a
la posición de apagado y, a continuación, desenchúfelo de
la toma de corriente.
• No introduzca ni permita que entren objetos extraños en
ninguna abertura de ventilación o escape, ya que podría
provocar una electrocución o un incendio, o dañar el
calefactor.
• Para evitar un posible incendio, no bloquee de ninguna
manera las entradas o salidas de aire. No lo utilice sobre
una superficie blanda, como una cama, donde las
aberturas podrían bloquearse.
• Un calefactor tiene en su interior piezas calientes y que
producen arcos o chispas.
No lo utilice en zonas donde se utilice o almacene
gasolina, pintura o líquidos inflamables.
• Utilice este calefactor sólo como se describe en este
manual. Cualquier otro uso no recomendado por el
fabricante puede causar incendios, descargas eléctricas o
lesiones a las personas.
• Enchufe siempre los calefactores directamente a la toma
de corriente de la pared. No los utilice nunca con un
alargador o una toma de corriente reubicable
(toma/regleta).
ES

05
CONSERVE ESTAS INSTRUCCIONES
• La hipertermia puede provocar la muerte. Los síntomas
de hipertermia incluyen temperatura corporal elevada,
dolor de cabeza, náuseas, vómitos, cansancio, mareos,
desmayos y pulso acelerado. Si comienza a experimentar
síntomas relacionados con la hipertermia, apague el
calefactor y busque atención médica.
• Para evitar temperaturas ambiente excesivas que puedan
causar hipertermia: NO deje el producto funcionando sin
vigilancia en un espacio cerrado cerca de bebés o
personas con capacidades físicas, sensoriales o mentales
reducidas.
ES

06
ESPECIFICACIONES
MSF15AH6LB Modelo del producto
Voltaje
Frecuencia
Potencia del ventilador
120V~
60Hz
Potencia del calefactor 1500W
Ruido ≤62dB
40W
ES
DESCRIPCIÓN DEL PRODUCTO
07
Nombre de las piezas
Lista de piezas
NOTA
Control remoto x1 Manual x1 Filtro HEPA x2
Base
Prefiltro
Filtro Hepa
Panel de control
Panel de
visualización
Salida de aire
Rejilla de
entrada de
aire
Calefactor
(rojo)/Ventilador
(azul) Indicador
luminoso de
funcionamiento
Todas las ilustraciones de este manual son meramente explicativas. Cualquier discrepan-
cia entre el objeto real y la ilustración en el dibujo se remitirá al producto real.
ES
08
INSTALACIÓN DEL PRODUCTO
Procedimientos de instalación
2 Saque el prefiltro.
4 Instale el filtro HEPA.
6 Instale la rejilla de entrada de aire.5 Instale el prefiltro.
Seguro
1 Desmonte la rejilla de
entrada de aire.
3 Retire la película protectora del
filtro.
Presione la parte elevada a
ambos lados para extraer el
prefiltro y sáquelo.
Alinee la posición de la ranura
en la parte inferior y asegure la
parte superior con el broche en
forma de U.
Alinee los dos broches superiores y
apriételos firmemente, luego apriete
los dos lados en la parte inferior,
lenta y suavemente asegure la rejilla
de entrada de aire.
Posición de
aseguramiento
ES
09
• Se recomienda limpiar el prefiltro cada dos semanas y sustituirlo cada
seis meses (el ciclo de limpieza y sustitución puede ajustarse en función
del entorno de uso).
7 Enchufe la fuente de alimentación.
ES
Descripción de la función ÍCONO
/
10
Panel de control y visualización
Panel de control Panel de visualización
OSC
FRÍO/MODO
LUZ
AUTO
INSTRUCCIONES DE FUNCIONA-
MIENTO
FRÍO/ MODO LUZ CA LO R
TEMPORI-
ZA DOR
A UTO
A DV ERTEN CIA : NO CUBRIR
OSC
TEMPORIZADOR
• Pulse aquí para acceder a Iniciar/Espera, el aparato se inicia o se
detiene.
• Pulse aquí para ajustar la velocidad del viento frío y el tempori-
zador deseado.
• Pulse aquí para ajustar el ángulo de oscilación deseado de
30°,55°, o 0°(detener la oscilación)
• Pulse aquí para ajustar el modo de viento frío. Presione este botón
para cambiar el modo de viento entre Viento normal (12 velocidades,
se enciende), Viento en reposo (3 velocidades, se enciende), y
Viento natural (3 ajustes de velocidad, se enciende) .
• Presione para encender o apagar la luz ambiente.
• Presione para entrar en el modo de viento automático, la potencia
del viento se ajustará automáticamente en función de los cambios de la
temperatura ambiente.
• Pulse este botón para programar que el sistema deje de funcionar
automáticamente al encenderse y que comience a funcionar automáti-
camente en modo de espera;
• Presione y pulse +/- para ajustar el temporizador (la pantalla
muestra un ciclo entre 0-1-2-----12-0h); 0h significa que el tiempo
ajustado se cancela.
/
ES
11
CALOR
Descripción de la función
ÍCONO
• Presione para activar el modo de calefacción, toque +/- para
ajustar la temperatura objetivo. "--" indica que la temperatura objetivo
no está ajustada. Si la temperatura objetivo está ajustada y el aparato
no alcanza la temperatura ajustada, el aparato seguirá funcionando
hasta que la temperatura real supere la temperatura ajustada y, a
continuación, el aparato se detendrá. El icono en la pantalla
parpadeará durante 15 segundos y luego permanecerá encendido.
• En el modo de viento natural, esta luz indicadora se encenderá.
• Puede cambiar la velocidad del viento entre 1 - 2 - 3 velocidades
pulsando el botón de velocidad.
• Cuando este indicador luminoso permanece encendido, le recuerda
que debe sustituir el filtro.
• El indicador luminoso se encenderá para indicar que la clavija de
alimentación está enchufada.
ES
12
Control remoto
Advertencia sobre las baterías
NOTA
Utilice baterías de manganeso o alcalinas del tipo "AAA". NO utilice baterías recargables.
Características adicionales y mantenimiento
• Apagado forzado
• Memoria inteligente
• Función de apagado de pantalla
• El control remoto debe utilizarse normalmente a menos de 5 metros de la parte
frontal del producto y a 30 grados del ángulo de desviación.
• La batería contiene muchos metales pesados, ácidos y bases, etc., que pueden poner
en peligro la salud humana. Las baterías usadas deben reciclarse por separado.
• No arroje las baterías al fuego, ya que podrían explotar o tener fugas.
• No mezcle baterías viejas y nuevas.
• No mezcle baterías alcalinas, estándar (carbono-zinc) o recargables (níquel-cadmio).
• Las baterías no recargables no deben recargarse.
• Las baterías deben colocarse con la polaridad correcta.
• Las baterías agotadas deben retirarse del producto.
• Las baterías deben retirarse del mando a distancia antes de desecharlo y que se
eliminen de forma segura.
Tenga en cuenta que, como medida de seguridad, el ventilador se apagará automáti-
camente tras 15 horas de funcionamiento continuo si no se realiza ninguna acción u
operación adicional.
De este modo se garantiza el rendimiento óptimo de la unidad y se evita cualquier
posible sobrecalentamiento o daño.
La pantalla se apagará automáticamente después de 30 segundos si no se realiza
ninguna acción u operación adicional. Para encender la pantalla, simplemente toque
cualquier botón, excepto el botón de encendido/apagado (ON/OFF), para restablecer
la visualización.
NOTA: Si la pantalla está apagada, al tocar el botón de encendido/apagado
(ON/OFF), el aparato se apagará.
Cuando el ventilador se apaga o se desconecta, funcionará en el mismo estado en que
estaba antes de apagarse o desconectarse cuando se vuelva a conectar la
alimentación (la función de temporización no se memoriza).
ES
Batería AAA, 1,5 V
Batería
TEMPORIZADOR
Ángulo de oscilación
deseado
Modo viento
Modo calor
Iniciar/En Espera
Pulse "+", "-" para ajustar la
velocidad del viento o el
tiempo de temporización.
LIMPIEZA Y MANTENIMIENTO
13
Sustitución del filtro
2 1
4 3
Se recomienda limpiar el calefactor al menos una vez durante la temporada de
funcionamiento para obtener un nivel óptimo de rendimiento. APAGUE Y DESEN-
CHUFE SIEMPRE EL CALEFACTOR ANTES DE LIMPIARLO. Asegúrese de guardar la
caja para su almacenamiento. No intente repararlo usted mismo. Remítalo a un
representante de servicio autorizado si necesita mantenimiento.
1. Antes de la limpieza y el montaje, el calefactor debe estar desenchufado.
2. Para garantizar una circulación de aire adecuada hacia el motor, mantenga libres de
polvo las rejillas de ventilación situadas en la parte trasera del motor. No desmonte
el calefactor para quitar el polvo.
3. Limpie las partes exteriores con un paño suave empapado en un detergente suave.
4. No utilice detergentes abrasivos ni disolventes para evitar rayar la superficie.
No utilice como limpiador: gasolina, diluyente.
5. No permita que entre agua o cualquier otro líquido en la carcasa del motor o en las
partes interiores.
Modelo de filtro:
FQ150CJ-2 (incluye 2
piezas).
Cuando la luz indicadora de
sustitución del filtro está encendi-
da, le recordará la sustitución del
filtro.
Si no se sustituye a tiempo, el
indicador se encenderá cada vez
que se encienda la máquina.
Sustituya el filtro.
Mantenga pulsado el botón du-
rante 3 segundos para apagar la luz
indicadora de sustitución del filtro.
ES
14
Limpieza del prefiltro
2
Extraiga el filtro.
1 Desenchufe el cable de alimentación.
4 3 Elimine el polvo con una aspiradora.
Instale la máquina en orden
inverso y enchufe la fuente de
alimentación.
ES

SolutionCausa Solución Problema
La unidad no
funciona
correctamente
una vez armada.
• El cable de alimentación no
está enchufado o tiene mal
contacto.
• El botón de encendido/apaga-
do no está activado.
• La batería está descargada.
• El control remoto se está
utilizando a más de 5 m del
aparato.
Asegúrese de que la clavija
está correctamente insertada
en la toma de corriente.
Pulse el icono para encender la
unidad.
Sustitúyala por una batería
nueva.
Utilice el control remoto más
cerca del ventilador y
asegúrese de que apunta
directamente al panel de
visualización.
El control remoto
no funciona
• La máquina se detendrá cuando la temperatura supere el umbral de desconexión
térmica, deberá desconectar el enchufe manualmente y volver a introducirlo en el
tomacorriente cuando la máquina se enfríe.
• Cuando no utilice el aparato, guárdelo en un lugar fresco y seco, con condiciones
ambientales y sin polvo, para evitar que se obstruyan los filtros.
15
SOLUCIÓN DE PROBLEMAS
Los aparatos pueden encontrar algunos errores y fallos de funcionamiento, las
siguientes tablas contienen las posibles causas e indicaciones para resolver un error o
fallo.
ES
16
MARCAS, DERECHOS DE AUTOR
Y DECLARACIÓN LEGAL
El logotipo de , las marcas denominativas, el nombre comercial, la imagen
comercial y todas las versiones de los mismos son activos valiosos del Grupo Midea y/o
sus asociados ("Midea"), de los que Midea es titular de marcas comerciales, derechos de
autor y otros derechos de propiedad intelectual, así como de todo el fondo de comercio
derivado del uso de cualquier parte de una marca comercial de Midea. El uso de la
marca Midea con fines comerciales sin el consentimiento previo por escrito de Midea
puede constituir una infracción de la marca o de la competencia desleal en violación de
las leyes pertinentes.
Este manual ha sido creado por Midea y Midea se reserva todos los derechos de autor
del mismo. Ninguna entidad o individuo puede utilizar, duplicar, modificar, distribuir en
todo o en parte este manual, ni agrupar o vender con otros productos sin el
consentimiento previo por escrito de Midea.
Todas las funciones e instrucciones descritas estaban actualizadas en el momento de
imprimir este manual. Sin embargo, el producto real puede variar debido a la mejora de
sus funciones y diseños.
ES

17
Para la prestación de los servicios acordados con el cliente, nos comprometemos a
cumplir sin restricciones todas las estipulaciones de la legislación aplicable en materia
de protección de datos, en consonancia con los países acordados en los que se
prestarán los servicios al cliente, así como, en su caso, el Reglamento General de
Protección de Datos de la UE (GDPR).
Por lo general, nuestro tratamiento de datos tiene por objeto cumplir nuestra
obligación contractual con usted y, por razones de seguridad del producto,
salvaguardar sus derechos en relación con la garantía y las cuestiones de registro del
producto. En algunos casos, pero sólo si se garantiza una protección adecuada de los
datos, los datos personales podrían transferirse a destinatarios situados fuera del
Espacio Económico Europeo.
Puede solicitar más información al respecto. Puede ponerse en contacto con nuestro
encargado de la protección de datos a través de [email protected]. Para ejercer
sus derechos, como el de oponerse al tratamiento de sus datos personales con fines de
marketing directo, póngase en contacto con nosotros a través de
[email protected]. Para obtener más información, siga el código QR.
AVISO SOBRE LA PROTECCIÓN
DE DATOS
ES