HCE160N/1,HCE160X/1
Cooker Hood
Instruction Manual
ENGLISH(EN)--------------------------------------------------------------------------------page 001
PORTUGUESE (PT)------------------------------------------------------------------------page 012
1
Cooker Hood
Instruction Manual

2
Content
1…………………………………..………………………………Safety instructions
2…………………………………..………………………………Installation
3…………………………………..………………………………Start using your cooker hood
4…………………………………..………………………………Troubleshooting
5…………………………………..………………………………Maintenance and cleaning
6…………………………………..………………………………Environment protection
3
SAFETY INSTRUCTIONS
This manual explains the proper installation and use of your cooker hood,
please read it carefully before using even if you are familiar with the product.
The manual should be kept in a safe place for future reference.
Never to do:
● Do not try to use the cooker hood
without the grease filters or if the filters
are excessively greasy!
●
Do not install above a cooker with a
high level grill.
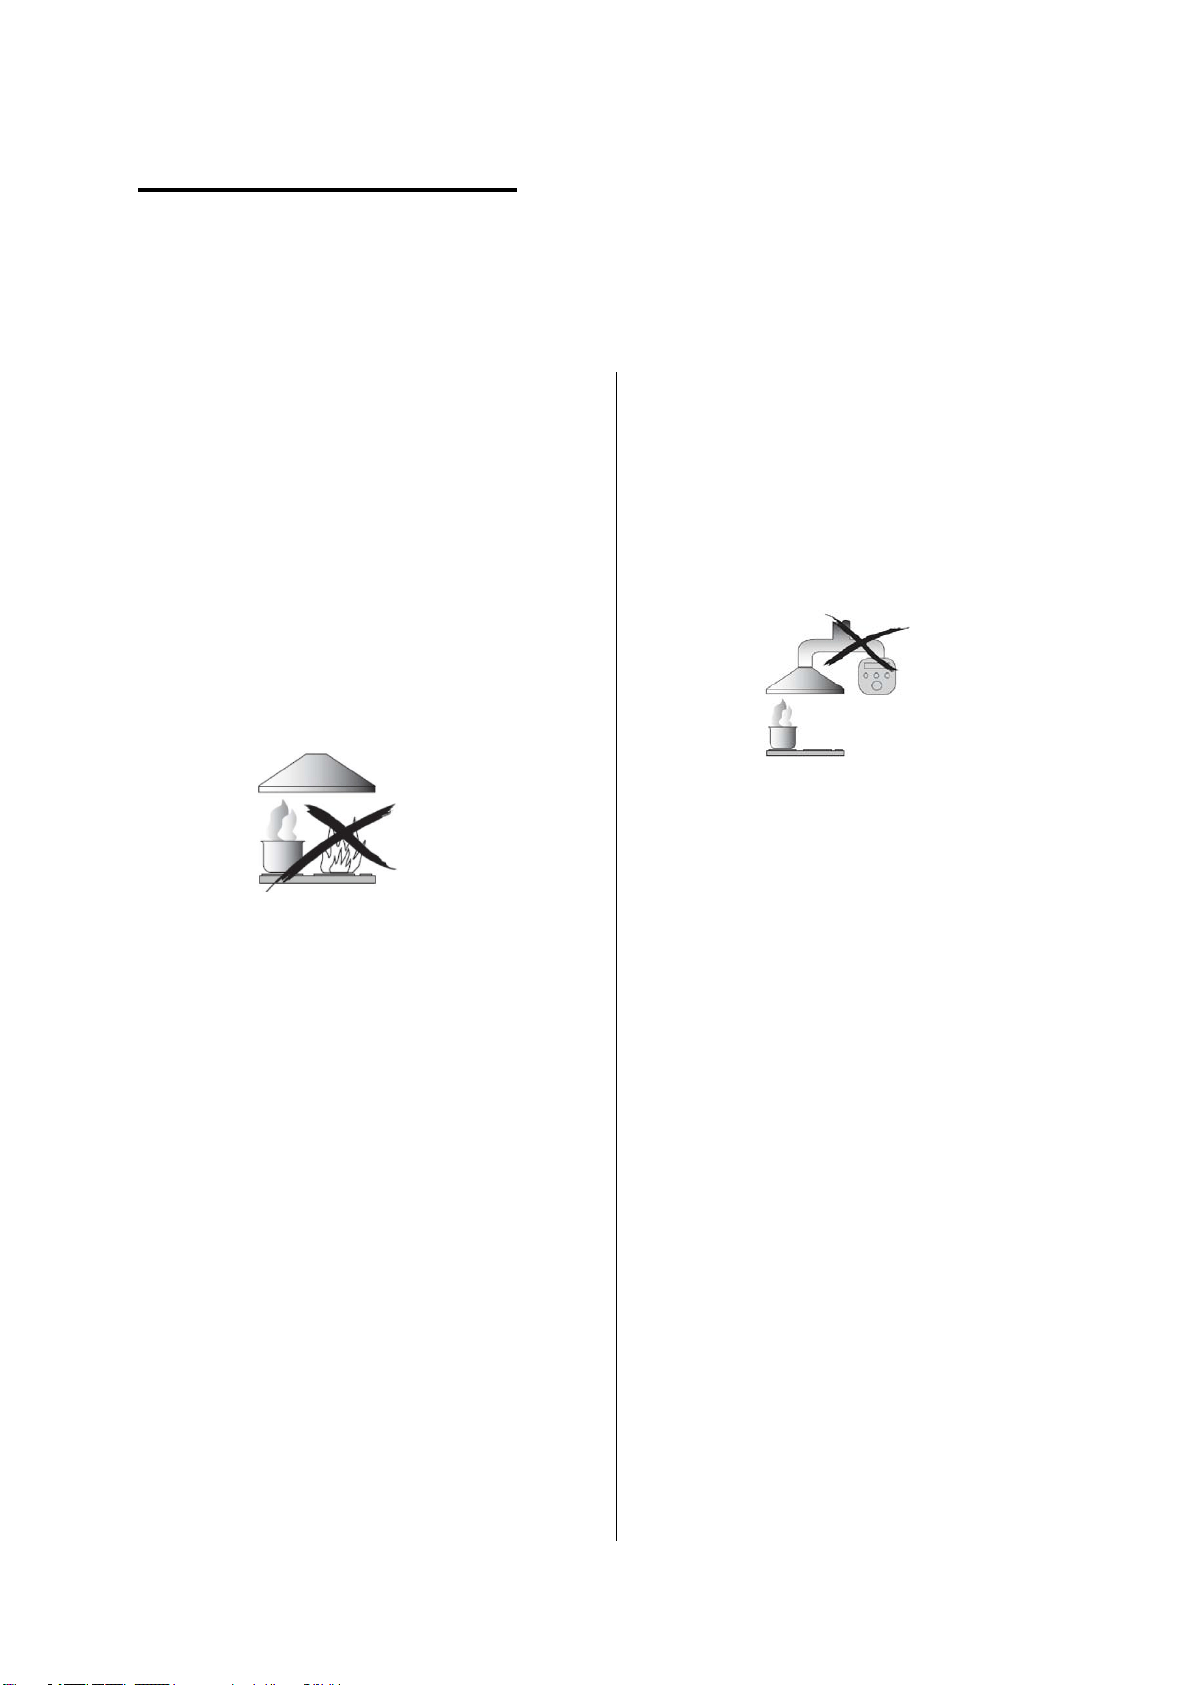
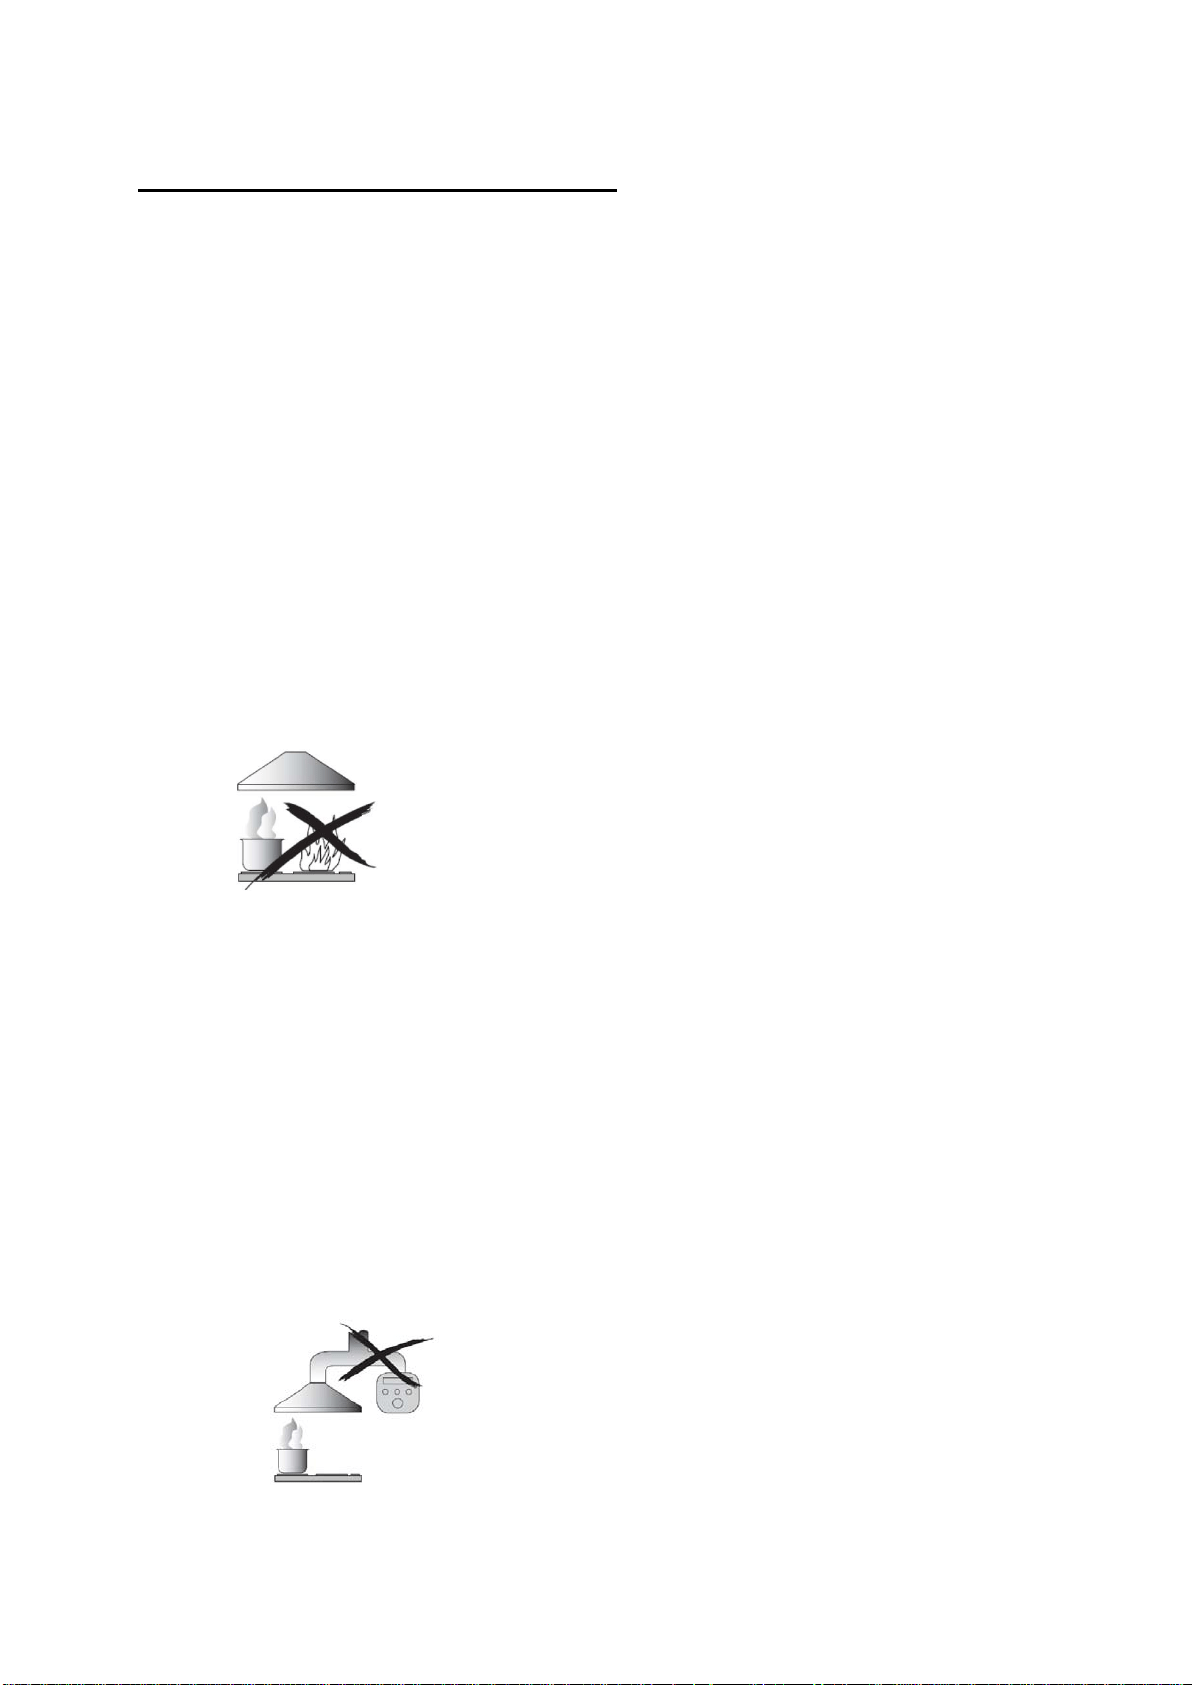
●Do not leave frying pans unattended
during use because overheated fats or
oils might catch fire.
●
Never leave naked flames under the
cooker hood.
●
If the cooker hood is damaged, do not
attempt to use.
●
Do not flambé under the cooker hood.
●
CAUTION: Accessible parts may
become hot when used with cooking
appliances.
●The minimum distance between the
supporting surface for the cooking
vessels on the hob and the lowest part
of the cooker hood. (When the cooker
hood is located above a gas appliance,
this distance shall be at least 65 cm)
●
The air must not be discharged into a
flue that is used for exhausting fumes
from appliances burning gas or other
fuels. Range hoods and other cooking
fume extractors may adversely affect
the safe operation of appliances
burning gas or other fuels (including
those in other rooms) due to back flow
of combustion gases. These gases
can potentially result in carbon
monoxide poisoning. After installation
of a range hood or other cooking fume
extractor, the operation of open flued
gas appliances should be tested by a
competent person to ensure that back
flow of combustion gases does not
occur.
Always to do:
● Important! Always switch off the
electricity supply at the mains during
installation and maintenance such as
light bulb replacement.
●
The cooker hood must be installed in
accordance with the installation
instructions and all measurements
followed.
●
All installation work must be carried
out by a competent person or qualified
electrician.
●
Please dispose of the packing material
carefully. Children are vulnerable to it.
● Pay attention to the sharp edges
inside the cooker hood especially
during installation and cleaning.
●
Make sure the ducting has no bends
sharper than 90 degrees as this will
reduce the efficiency of the cooker
hood.
●Warning: Failure to install the screws
or fixing device in accordance with
these instructions may result in
electrical hazards
4
●Warning: Before obtaining access to
terminals, all supply circuits must be
disconnected.
Always to do:
●Always put lids on pots and pans
when cooking on a gas cooker.
●
When in extraction mode, air in the
room is being removed by the cooker
hood. Please make sure that proper
ventilation measures are being
observed. The cooker hood removes
odours from room but not steam.
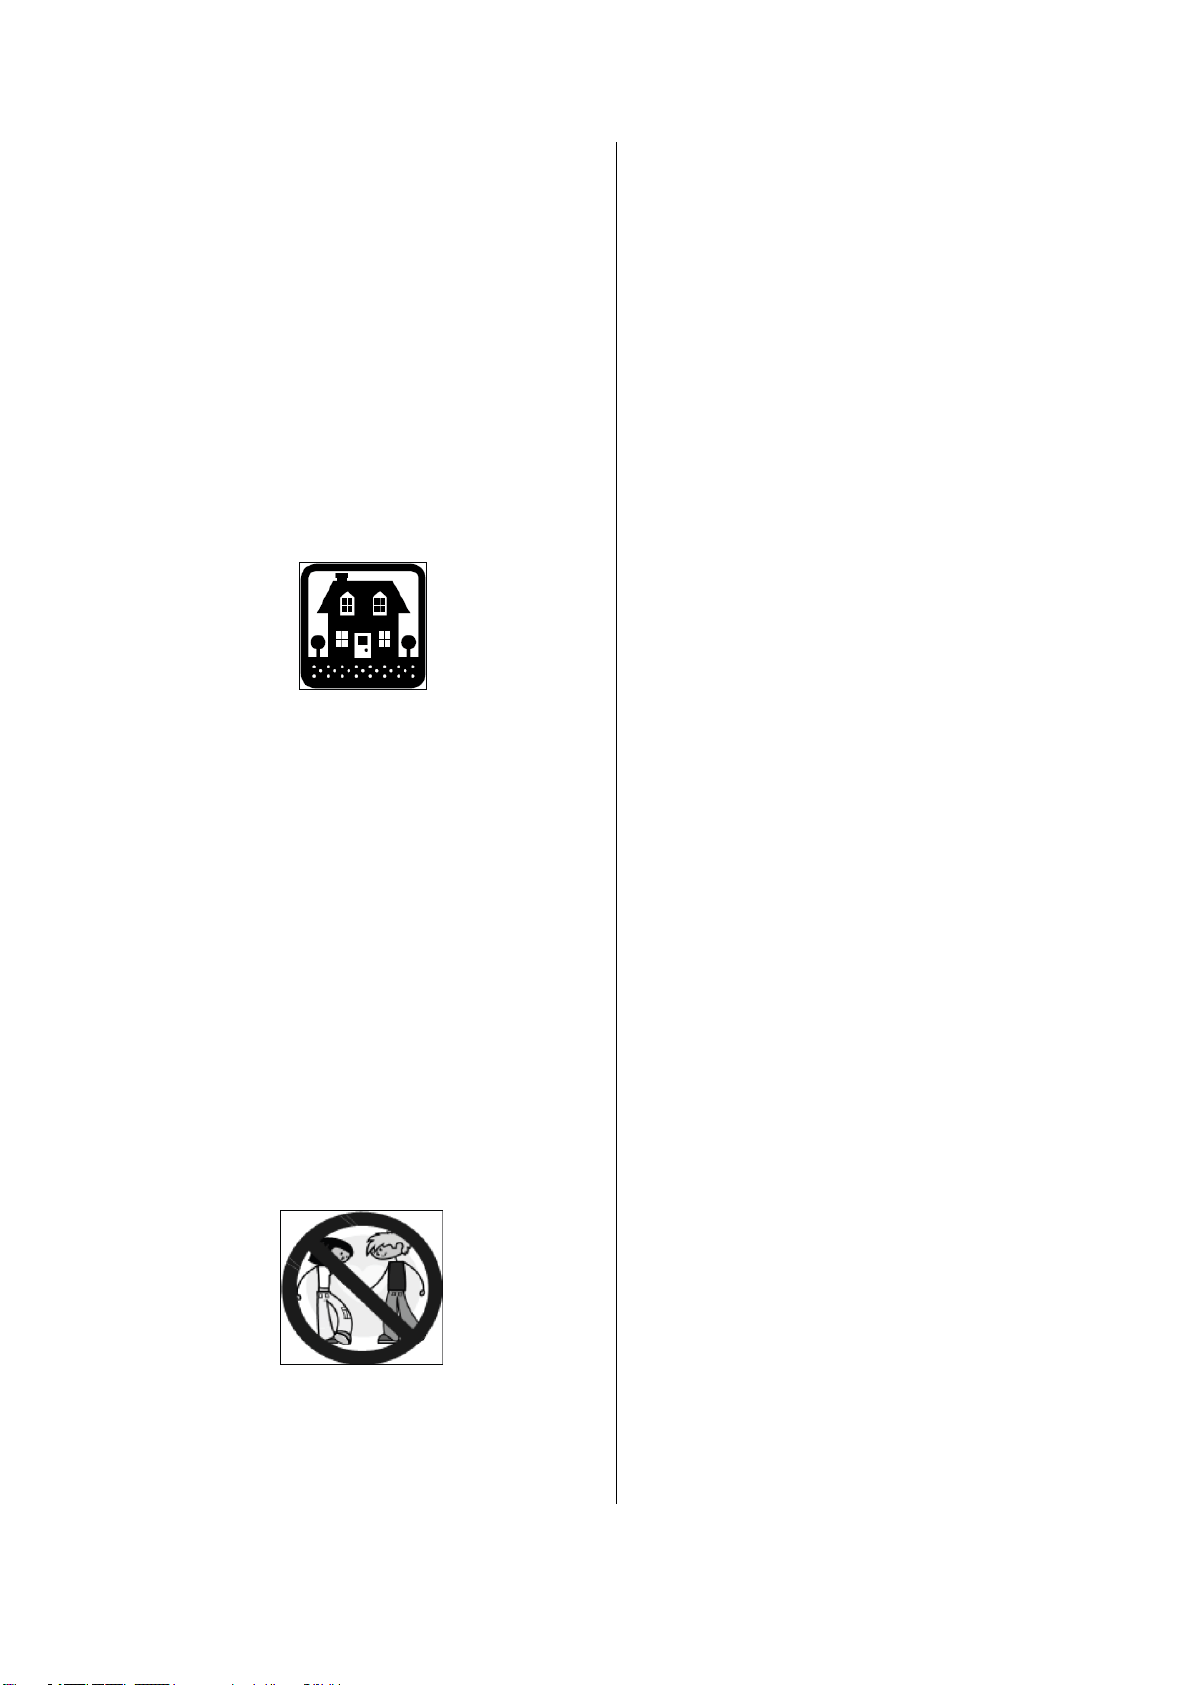
●Cooker hood is for domestic use only.
●
If the supply cord is damaged, it must
be replaced by the manufacturer, its
service agent or similarly qualified
persons in order to avoid a hazard.
●This appliance can be used by
children aged from 8 years and above
and persons with reduced physical,
sensory or mental capabilities or lack
of experience and knowledge if they
have been given supervision or
instruction concerning use of the
appliance in a safe way and
understand the hazards involved.
Children shall not play with the
appliance. Cleaning and user
maintenance shall not be made by
children without supervision.
●Warning: Before obtaining access to
terminals, all supply circuits must be
disconnected.
Always to do:
●
Caution: The appliance and its
accessible parts can become hot
during operation. Be careful to avoid
touching the heating elements.
Children younger than 8 years old
should stay away unless they are
under permanent supervision.
●
There shall be adequate ventilation of
the room when the cooker hood is
used at the same time as appliances
burning gas or other fuels.
●There is a fire risk if cleaning is not
carried out in accordance with the
instructions
●Regulations concerning the discharge
of air have to be fulfilled.
●
Clean your appliance periodically by
following the method given in the
chapter MAINTENANCE.
●
For safety reason, please use only the
same size of fixing or mounting screw
which are recommended in this
instruction manual.
●Regarding the details about the
method and frequency of cleaning,
please refer to maintenance and
cleaning section in the instruction
manual.
●
Cleaning and user maintenance shall
not be made by children without
supervision.
●
When the cooker hood and
appliances supplied with energy other
than electricity are simultaneously in
operation, the negative pressure in the
room must not exceed 4 Pa (4 x 10⁻⁵
bar).
●WARNING: Danger of fire: do not
store items on the cooking surfaces.
●
A steam cleaner is not to be used.
●
NEVER try to extinguish a fire with
water, but switch off the appliance and
then cover flame e.g. with a lid or a
fire blanket.

5
INSTALLATION (VENT OUTSIDE)
MOUNTING OF THE V-FLAP
If the cooker hood does not have an assembled V-flap 1, you should mount the half-
parts to its body.The images only show an example of how to mount the V-
flap,because the outlet may vary according to different models and configurations.
To mount the V-flap 1 you should:
• Mount two half-parts 2 into the body 6
• the pin 3 should be top oriented;
• the axis 4 should be inserted into the holes 5 on the body;
• repeat all the operations for the 2nd half-part
INSTALLATION
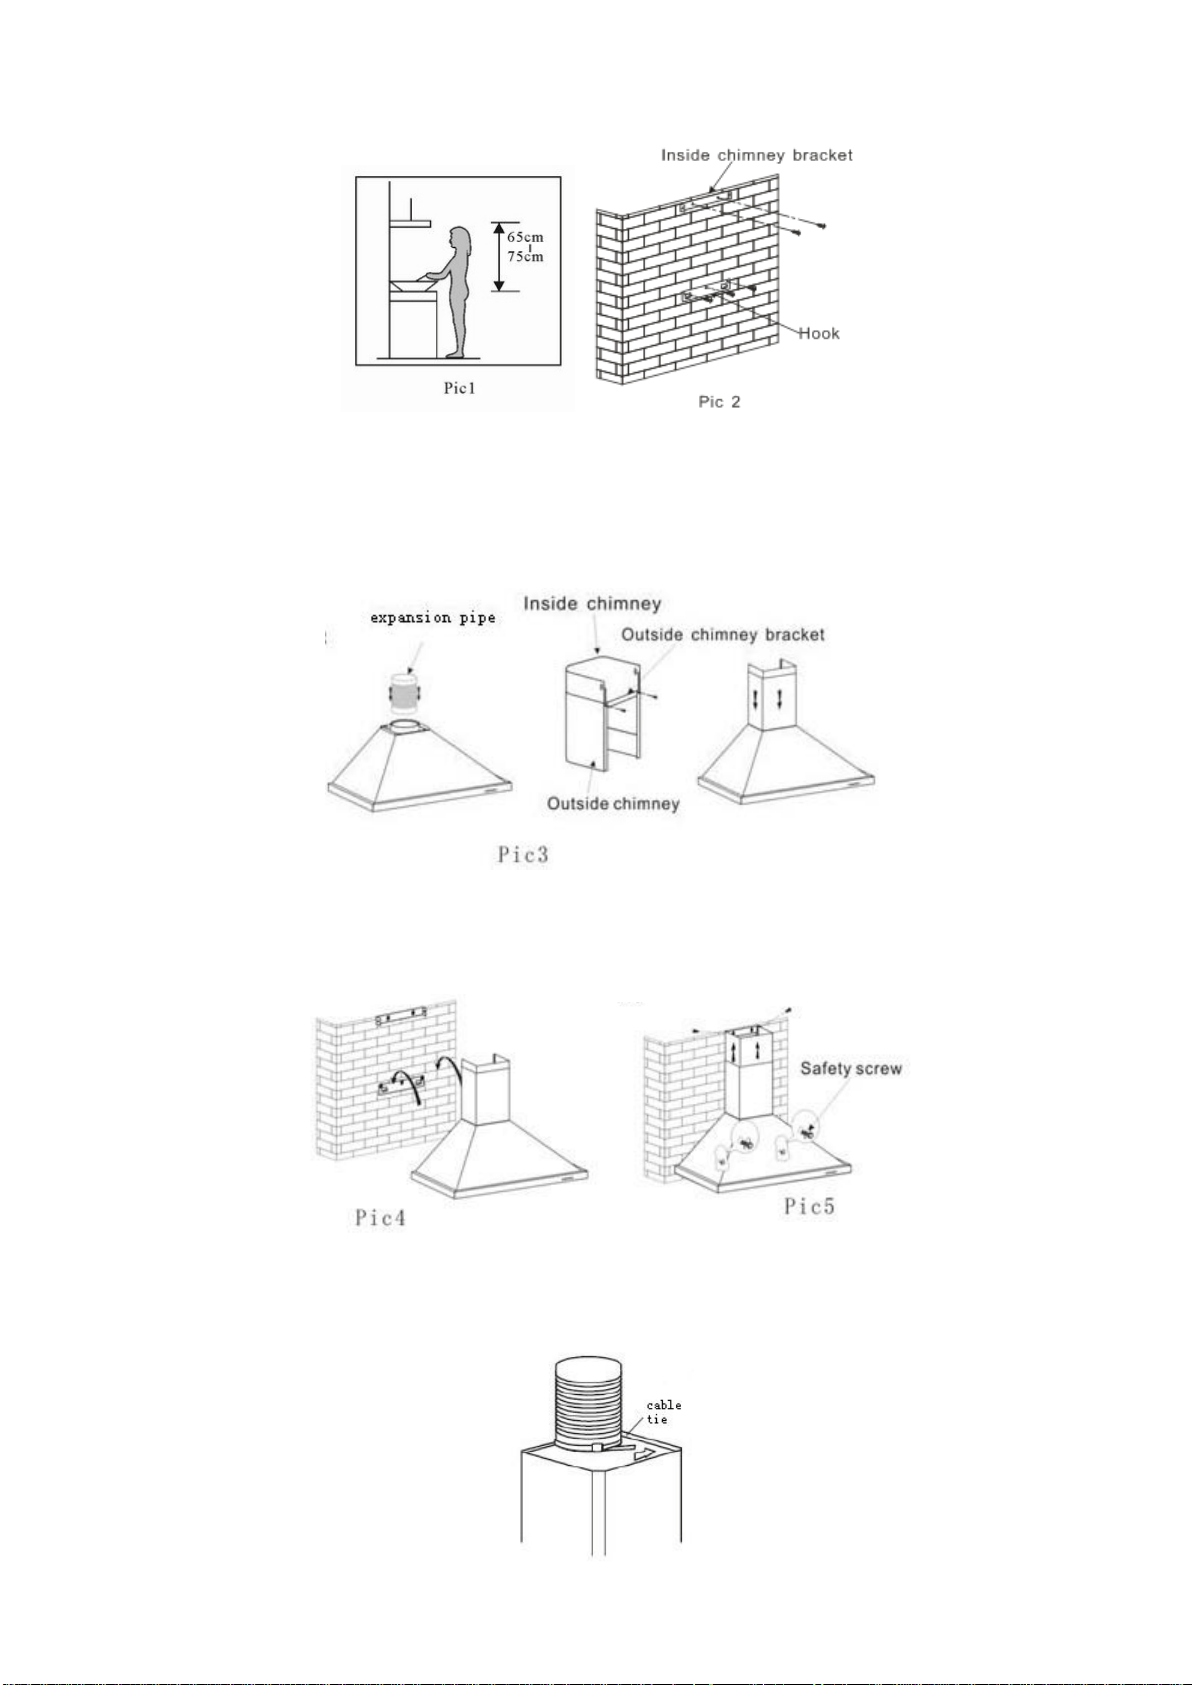
If you have an outlet to the outside, your cooker hood can be connected as below
picture by means of an extraction duct (enamel, aluminum, flexible pipe or non-
flammable material with an interior diameter of 150mm)
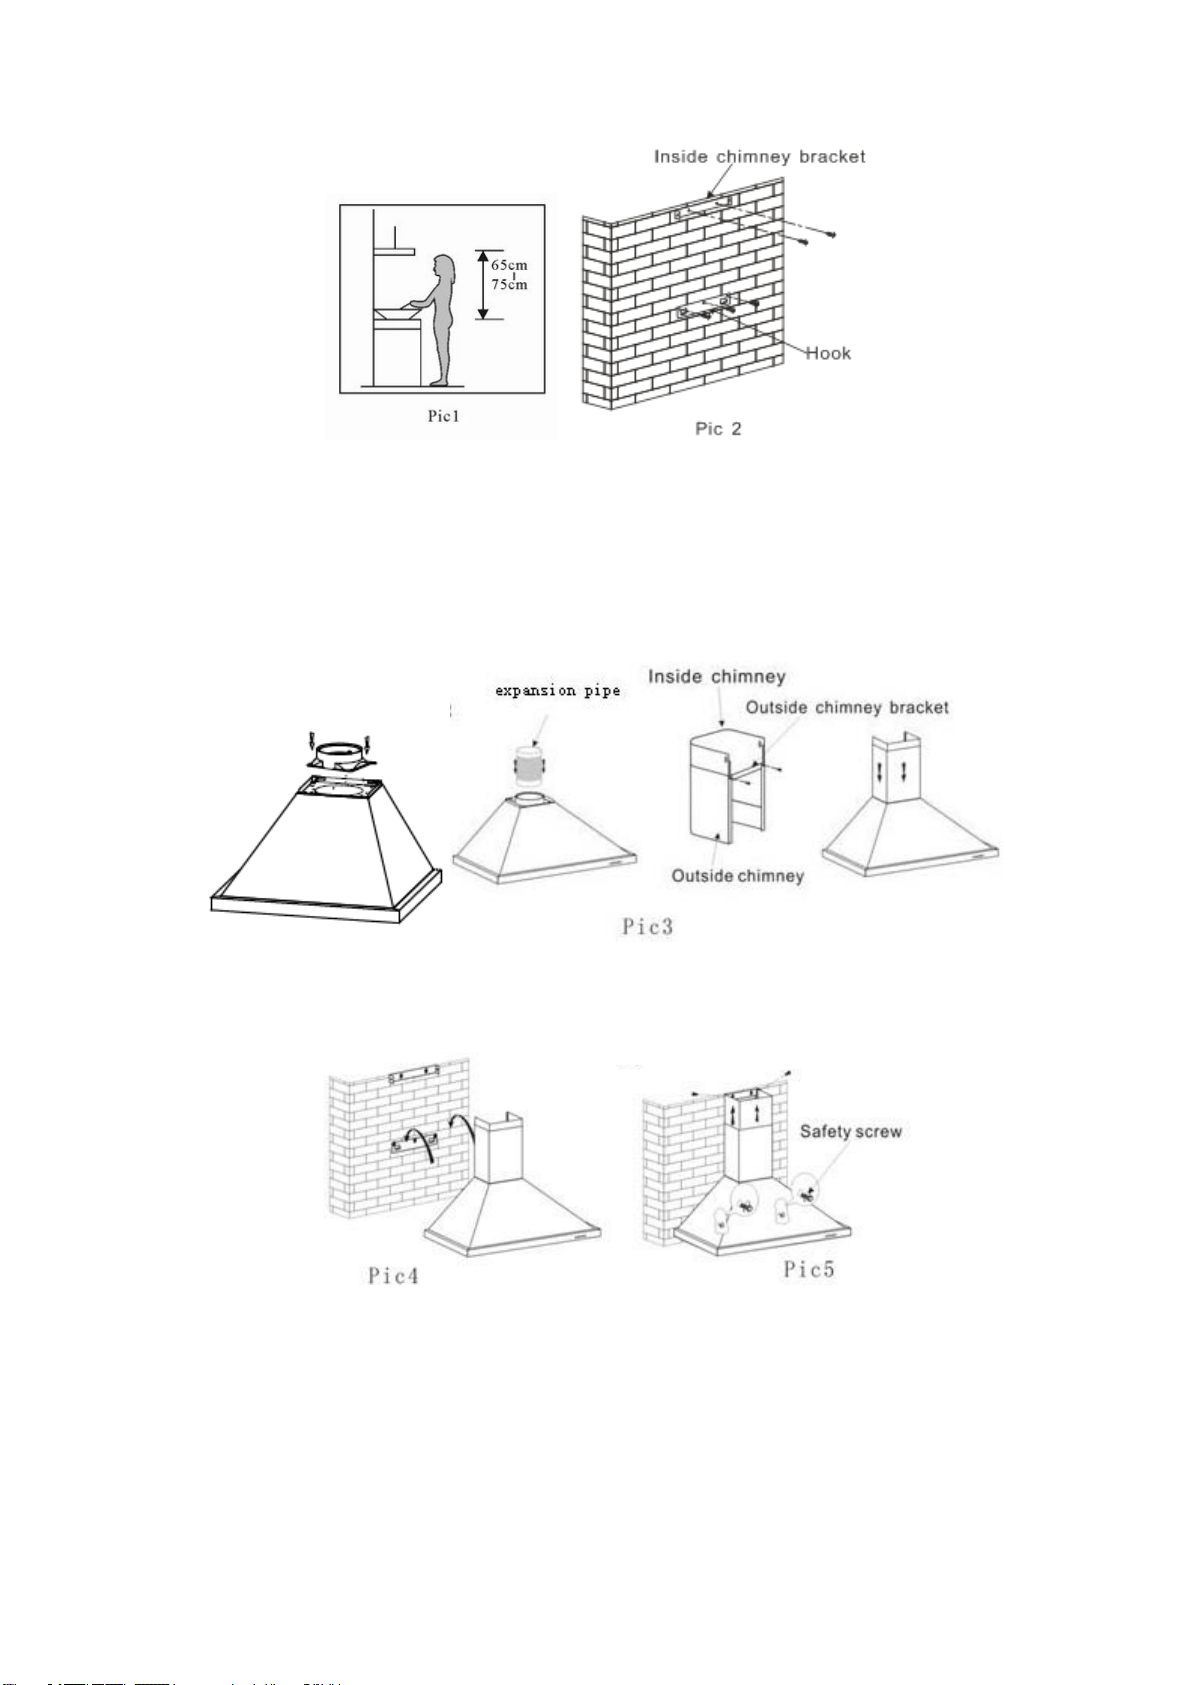
1. Before installation, turn the unit off .
2. The cooker hood should be placed at a distance of 65~75cm above the cooking
surface for best effect.
6
3. Install the hook on a suitable place once the installation height is fixed, and keep it
in line. The fixed position of the inside chimney bracket is the place of chimney. See
pic 2.
4. Install the outlet on the cooker hood with 4pcs screws.Fix the outside chimney
bracket on the outside chimney, and be sure that the inside chimney can be adjusted
the height in it freely as well as fixing the expansion pipe. Afterwards,fix the outlet with
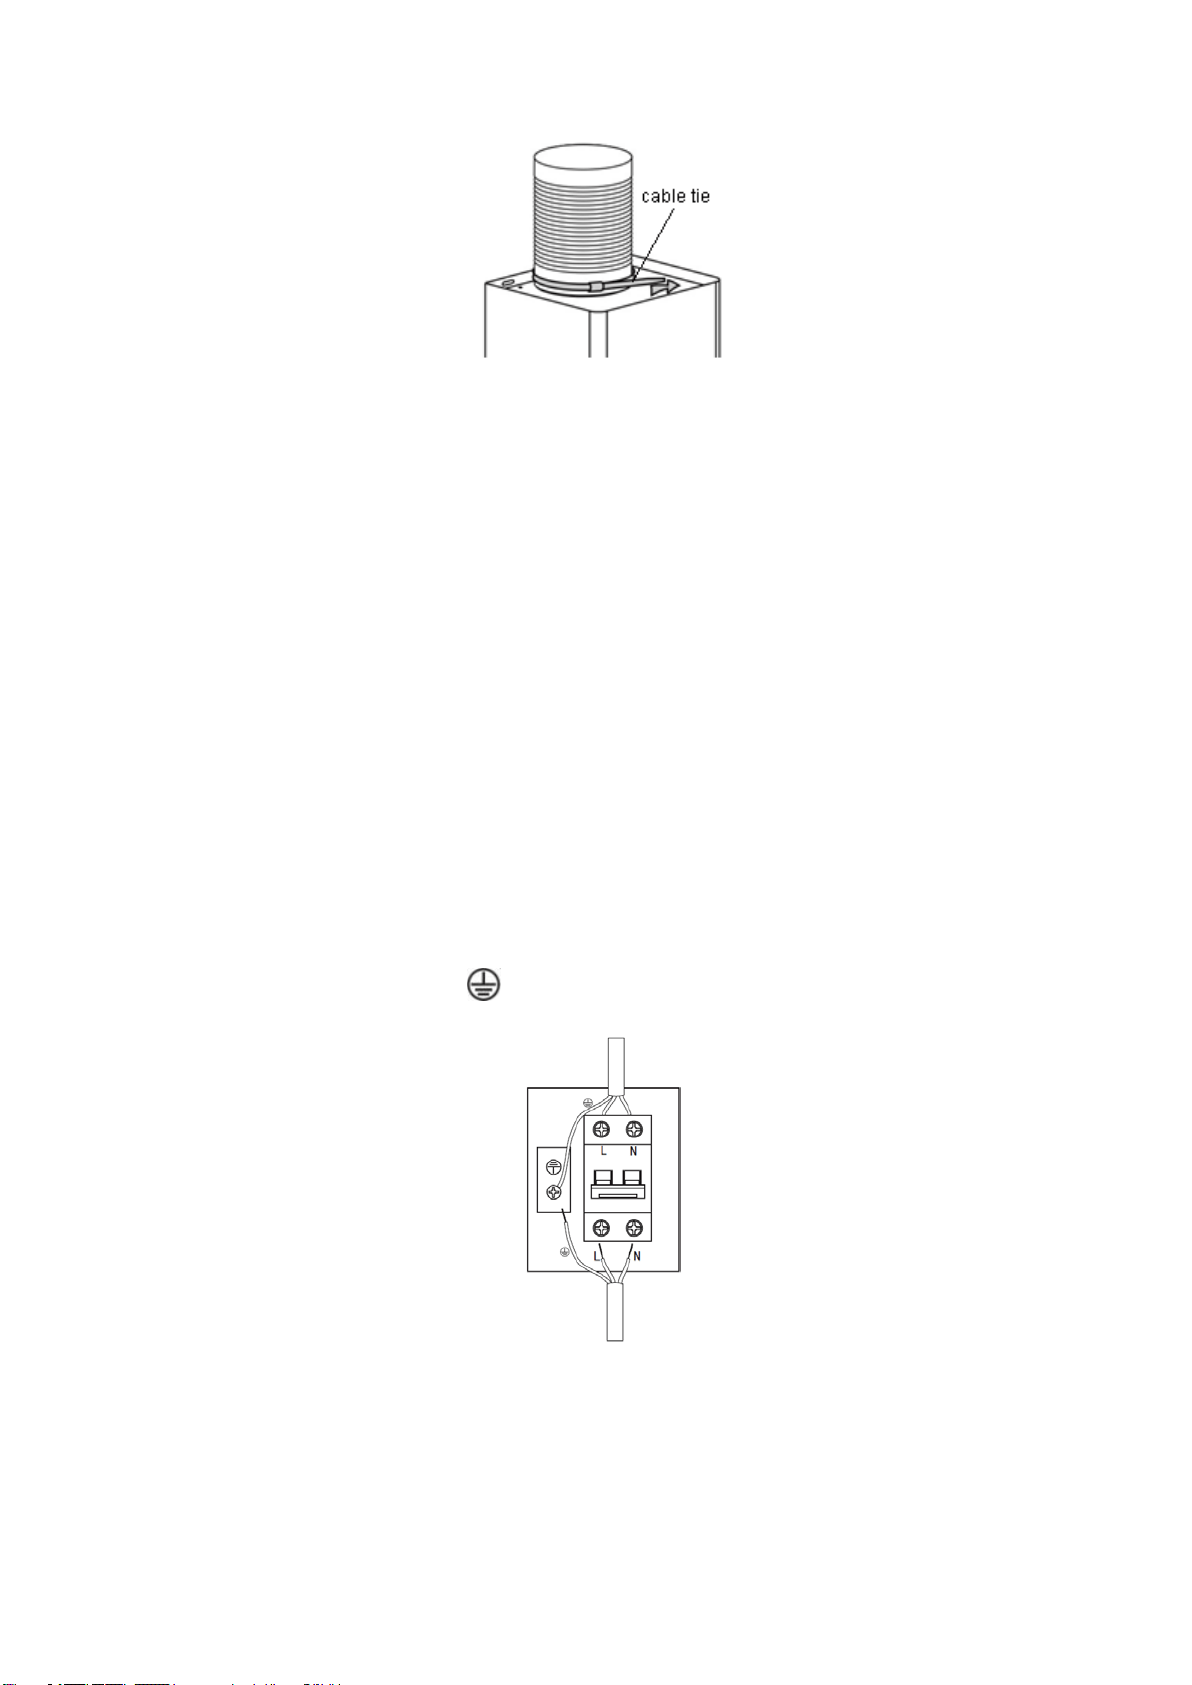
screws and put the expansion pipe with the cable tie on the outlet.Then install the
chimneys on the cooker hood. See Pic 3.
5. Put the cooker hood on the hook. See Pic 4.
6. Adjust the height of the inside chimney to the position of the inside chimney bracket
and fix on it by screw, after adjusting the position, fix the body with safety screw. See
Pic 5. Note:the expansion pipe is not included in the product.
Note: The two safety vents are positioned on the back housing, with diameter of 6mm.
Lay the expansion pipe to the wall outlet. Fix the expansion pipe with a cable tie.
7
Electrical Installation
All installation must be carried out by a competent person or qualified electrician.
Before connecting the mains supply ensure that the mains voltage corresponds to the
voltage on the rating plate.
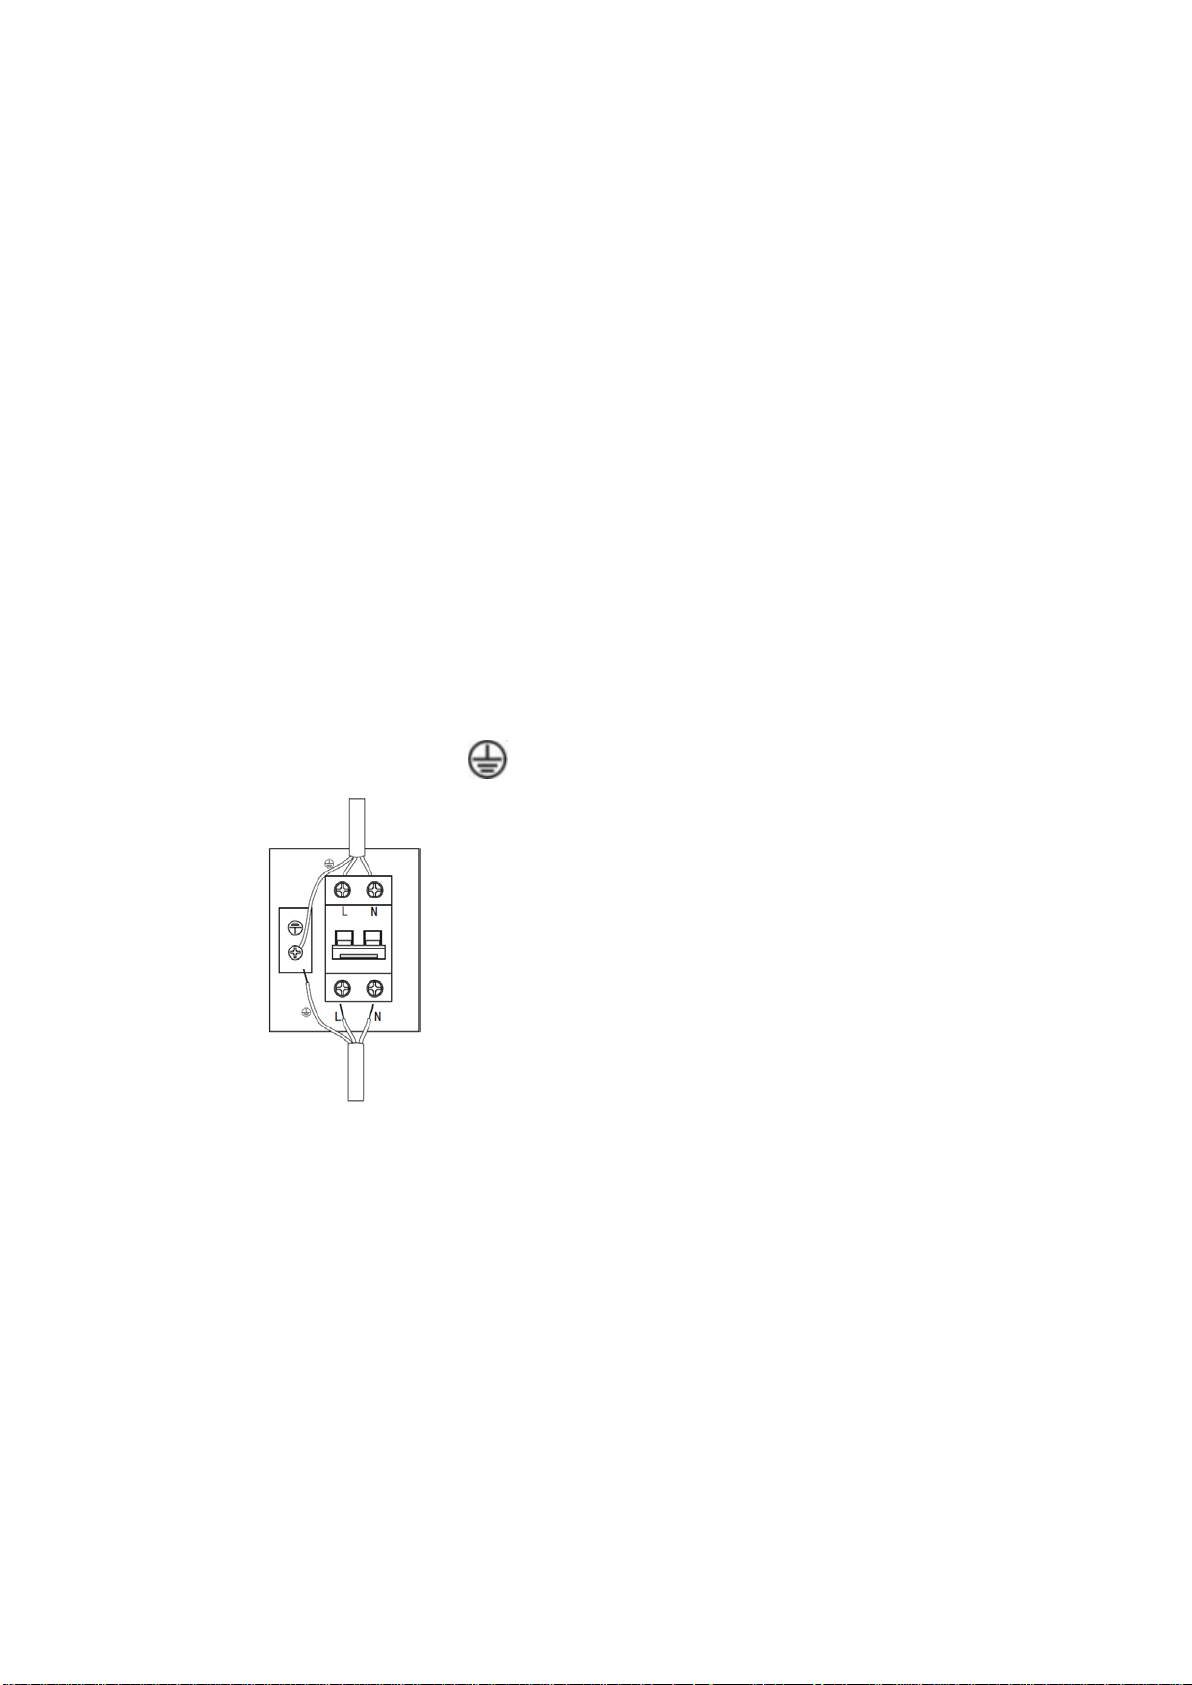
Direct Connection
The appliance must be connected directly to the mains using an omnipolar circuit
breaker with a
minimum opening of 3mm between the contacts.
The installer must ensure that the correct electrical connection has been made and
that it complies with the wiring diagram.
The cable must not be bent or compressed.
Regularly check the power plug and power cord for damage. If the supply cord is
damaged, it must be replaced by a special cord or assembly available from the
manufacturer or its service agent.
WARNING: This is a Class I appliance and MUST be earthed
This appliance is supplied with a 3 core mains cable coloured as follows:
Brown = L or Live
Blue = N or Neutral
Green and Yellow = E or Earth
HINTS FOR EXHAUST DUCT INSTALLATION
The following rules must be strictly followed to obtain optimal air extraction:
• Keep expansion pipe short and straight.
• Do not reduce the size or restrict expansion pipe.
• When using expansion pipe always install the pipe pulled taut to minimize pressure
loss.
8
• Failure to observe these basic instructions will reduce the performance and increase
noise levels of the cooker hood.
• Any installation work must be carried out by a qualified electrician or competent
person.
•Do not connect the ducting system of the hood to any existing ventilation system
which is being used for any other appliance ,such as warmer tube, gas tube , hot wind
tube.
•The angle of the bend of the expansion pipe should not be less than 120º; you must
direct the pipe horizontally, or, alternatively, the pipe should go up from the initial point
and should be led to an outer wall.
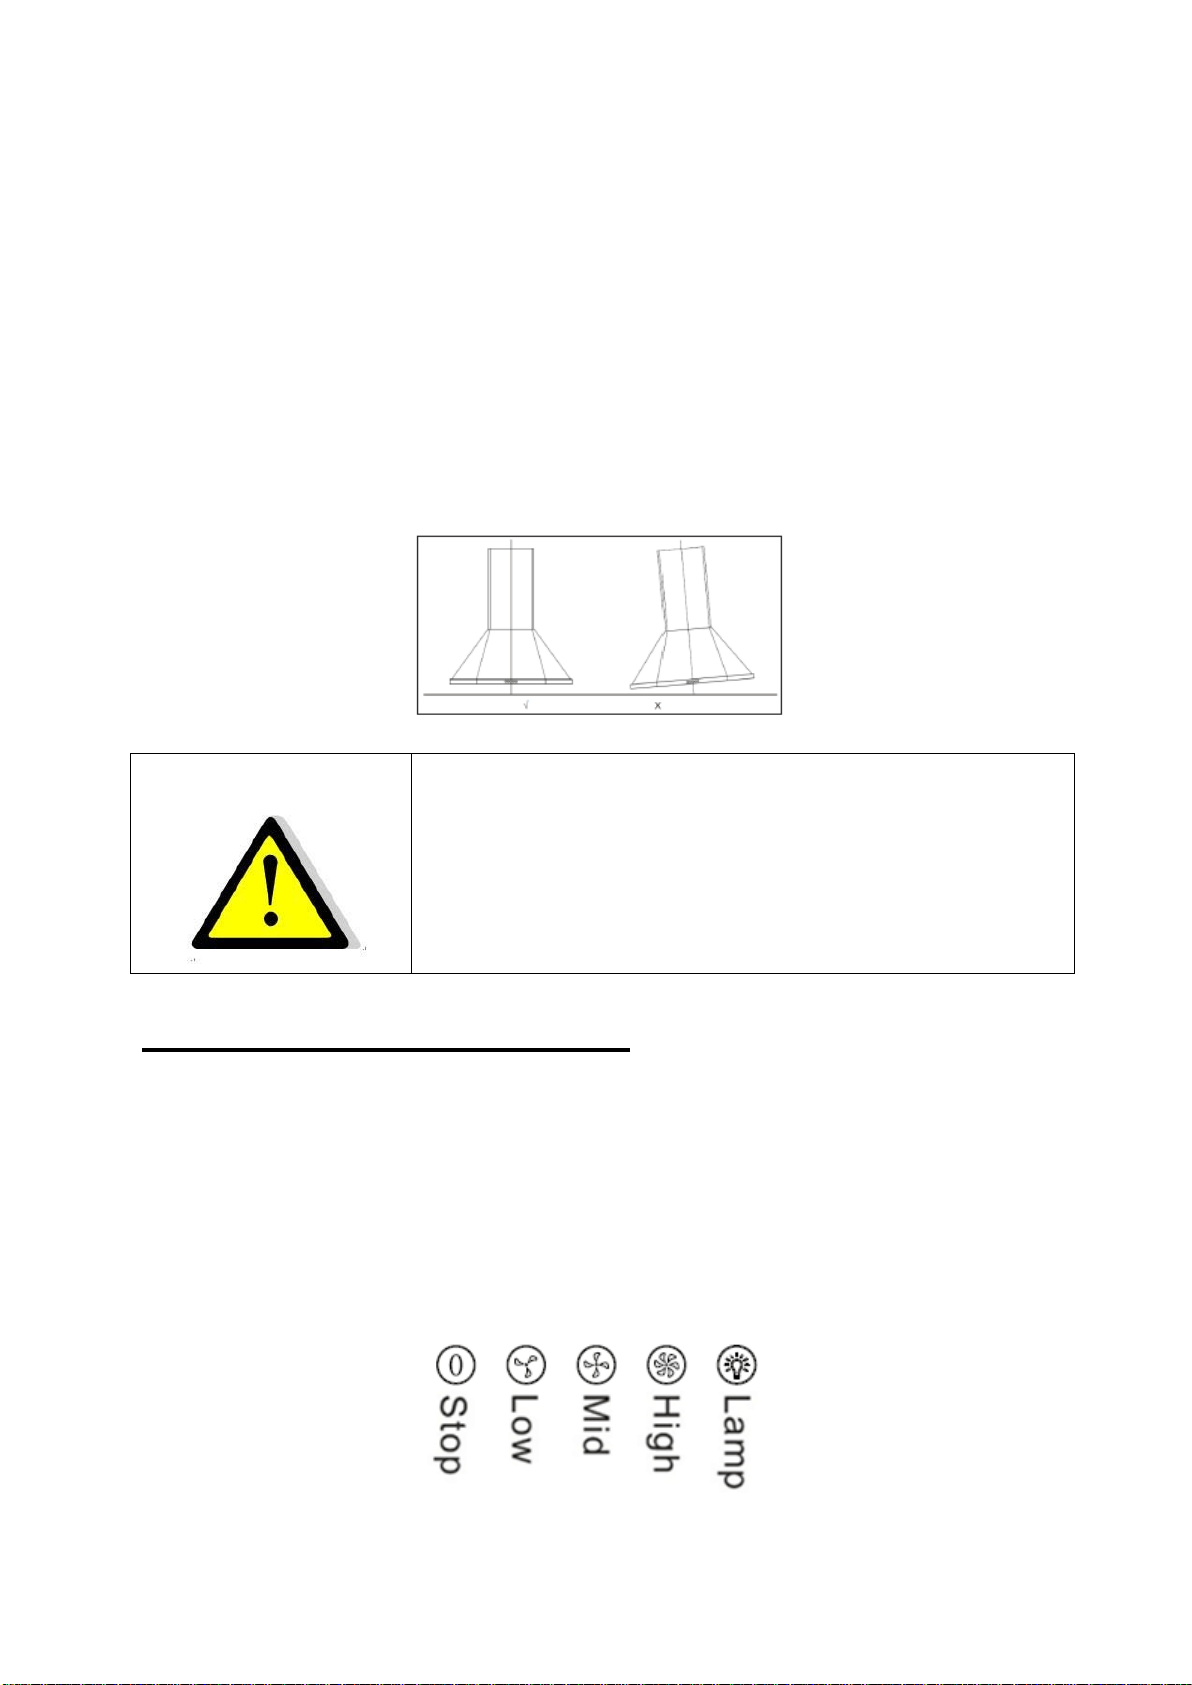
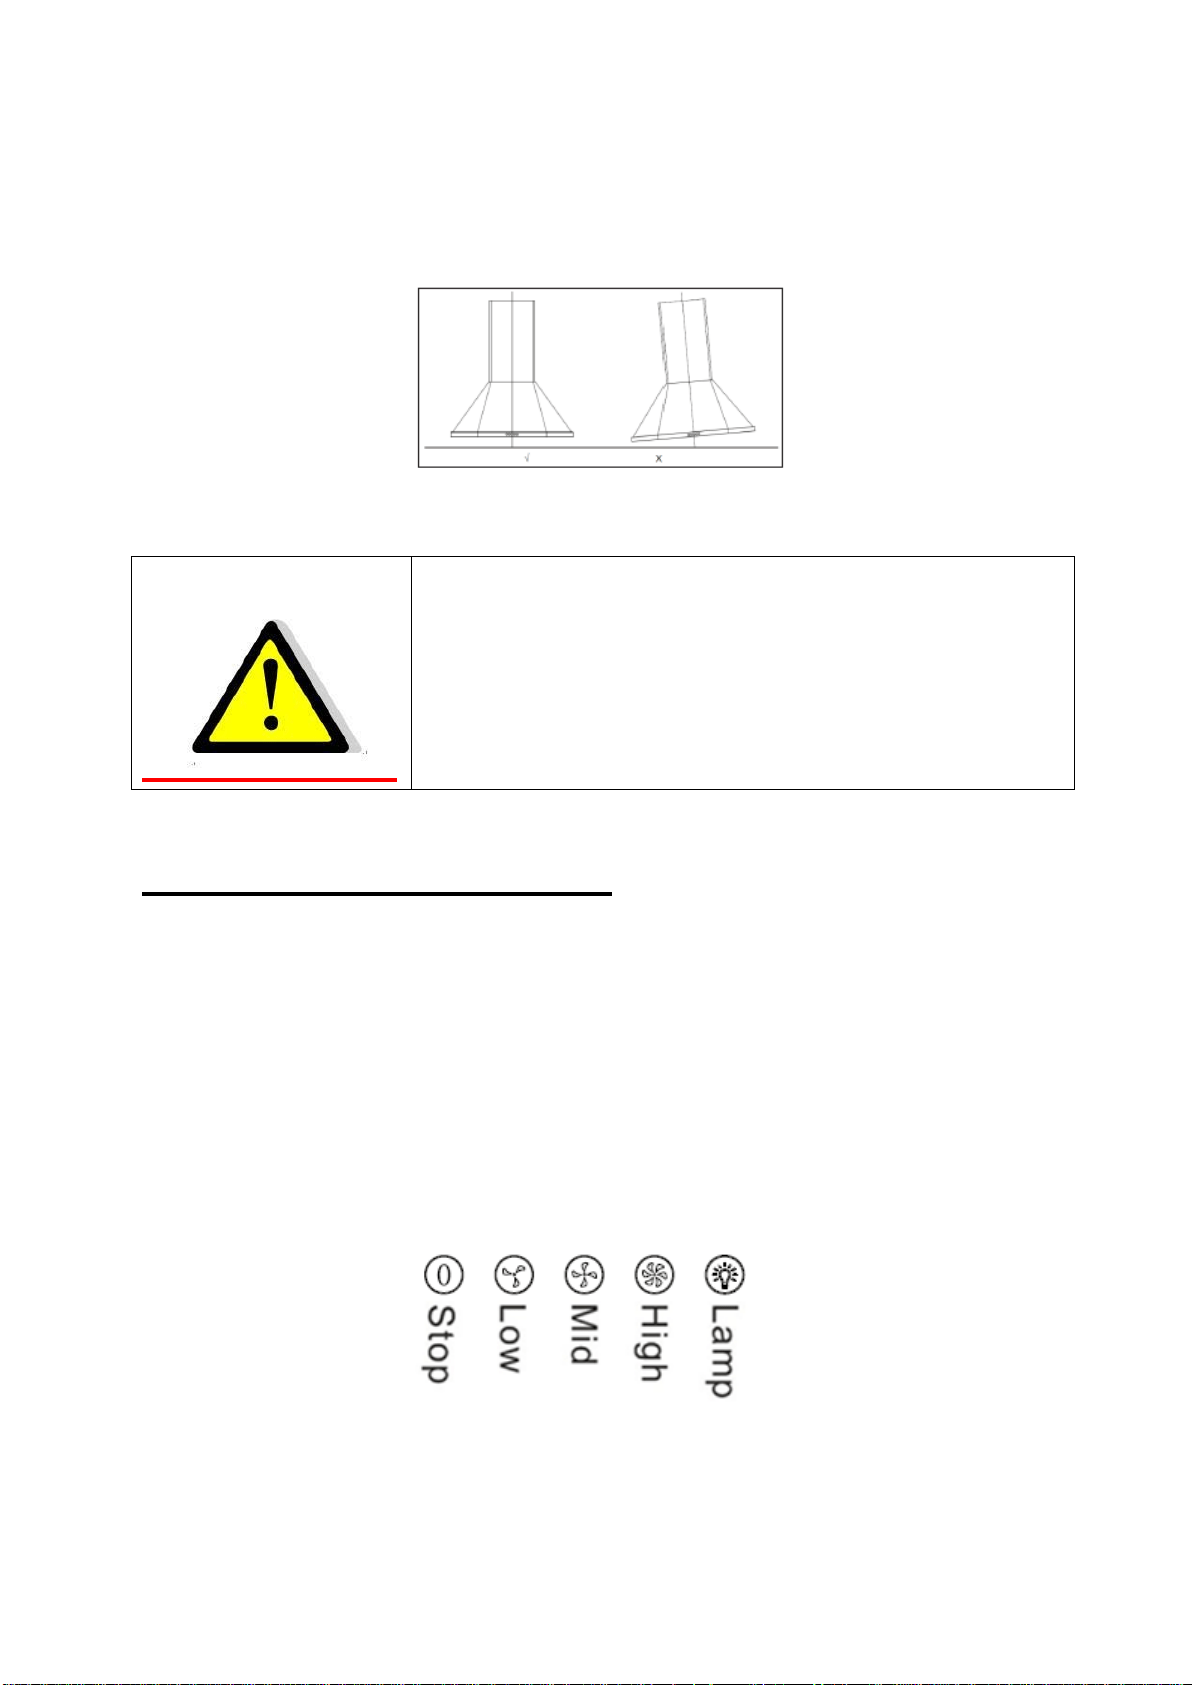
•After the installation ,make sure that the cooker hood is level to avoid grease
collection at on end.
•Ensure the expansion pipe selected for installation complies with relevant standards
and is fire retardant.
WARNING:
For safety reason, please use only the same
size of f ixing or m ounting sc rew which ar e
recommended in this instruction manual.
Failure t o i nstall t
he scr ews or fixing devi ce i n
accordance with these instructions may result in
electrical hazards.
Start Using Your Cooker Hood
Push button
1) Push the stop button, and the motor will stop.
2) Push the low button, and the motor will run at low speed.
3) Push the middle button, and the motor will run at mid speed.
4) Push the high button, and the motor will run at high speed.
5) Push the light button and the two lights will illuminate. Push it again and the light
will turn off.
9
TROUBLESHOOTING
Fault Possible Cause Solution
Light on, but motor
does not work
Fan switch turned off Select a fan switch position.
Fan switch failed Contact service center.
Motor failed Contact service center.
Light does not
work, motor does
not work
House fuses blown Reset/Replace fuses.
Power cord loose or
disconnected
Refit cord to power outlet.
Switch power outlet on.
Oil leakage
One way valve and the outlet
are not tightly sealed
Take down the one way valve
and seal with sealant.
Leakage from the connection of
chimney and cover
Take chimney down and seal.
Lights not working Broken/Faulty globes
Replace globes as per this
instruction.
Insufficient suction
The distance between the
cooker hood and the gas top is
too far
Refit the cooker hood to the
correct distance.
The Cooker hood
inclines
The fixing screw not tight
enough
Tighten the hanging screw and
make it horizontal.
NOTE:
Any electrical repairs to this appliance must conform to your local, state and
federal laws.Please contact the service centre if in any doubt before
undertaking any of the above.Always disconnect the unit from the power source when
opening the unit.
MAINTENANCE AND CLEANING
Caution:
• Before maintenance or cleaning is carried out, the cooker hood should be
disconnected from the main power supply. Ensure that the cooker hood is switched
off at the wall socket.
•
External surfaces are susceptible to scratches and abrasions, so please follow the
cleaning instructions to ensure the best possible result is achieved without damage.
GENERAL
Cleaning and maintenance should be carried out with the appliance cold especially
when cleaning.Avoid leaving alkaline or acid substances (lemon juice, vinegar etc.) on
the surfaces.
10
STAINLESS STEEL
The stainless steel must be cleaned regularly (e.g.weekly) to ensure a long life
expectancy.Dry with a clean soft cloth. A specialized stainless steel cleaning fluid may
be used.
NOTE:
Ensure that wiping is done along with the grain of the stainless steel to prevent any
unsightly crisscross scratching patterns from appearing.
CONTROL PANEL SURFACE
The inlay control panel can be cleaned using warm soapy water. Ensure the cloth is
clean and well wrung before cleaning. Use a dry soft cloth to remove any excess
moisture left after cleaning.
Important
Using neutral detergents and avoid using harsh cleaning chemicals, strong household
detergents or products containing abrasives,as this will affect the appliance of the
appearance and potentially remove any printing of artwork on the control panel and
will void manufactures warrantee.
GREASE MESH FILTERS
The mesh filters can be cleaned by hand. Soak them for about 3 minutes in water with
a mild detergent and then brush it gently with a soft brush. Do not apply too much
pressureso as to avoid any damage to it . (Leave to dry naturally out of direct sun light)
Filters should be washed separately to crockery and kitchen utensils. It is advisable
not to use rinse aid.
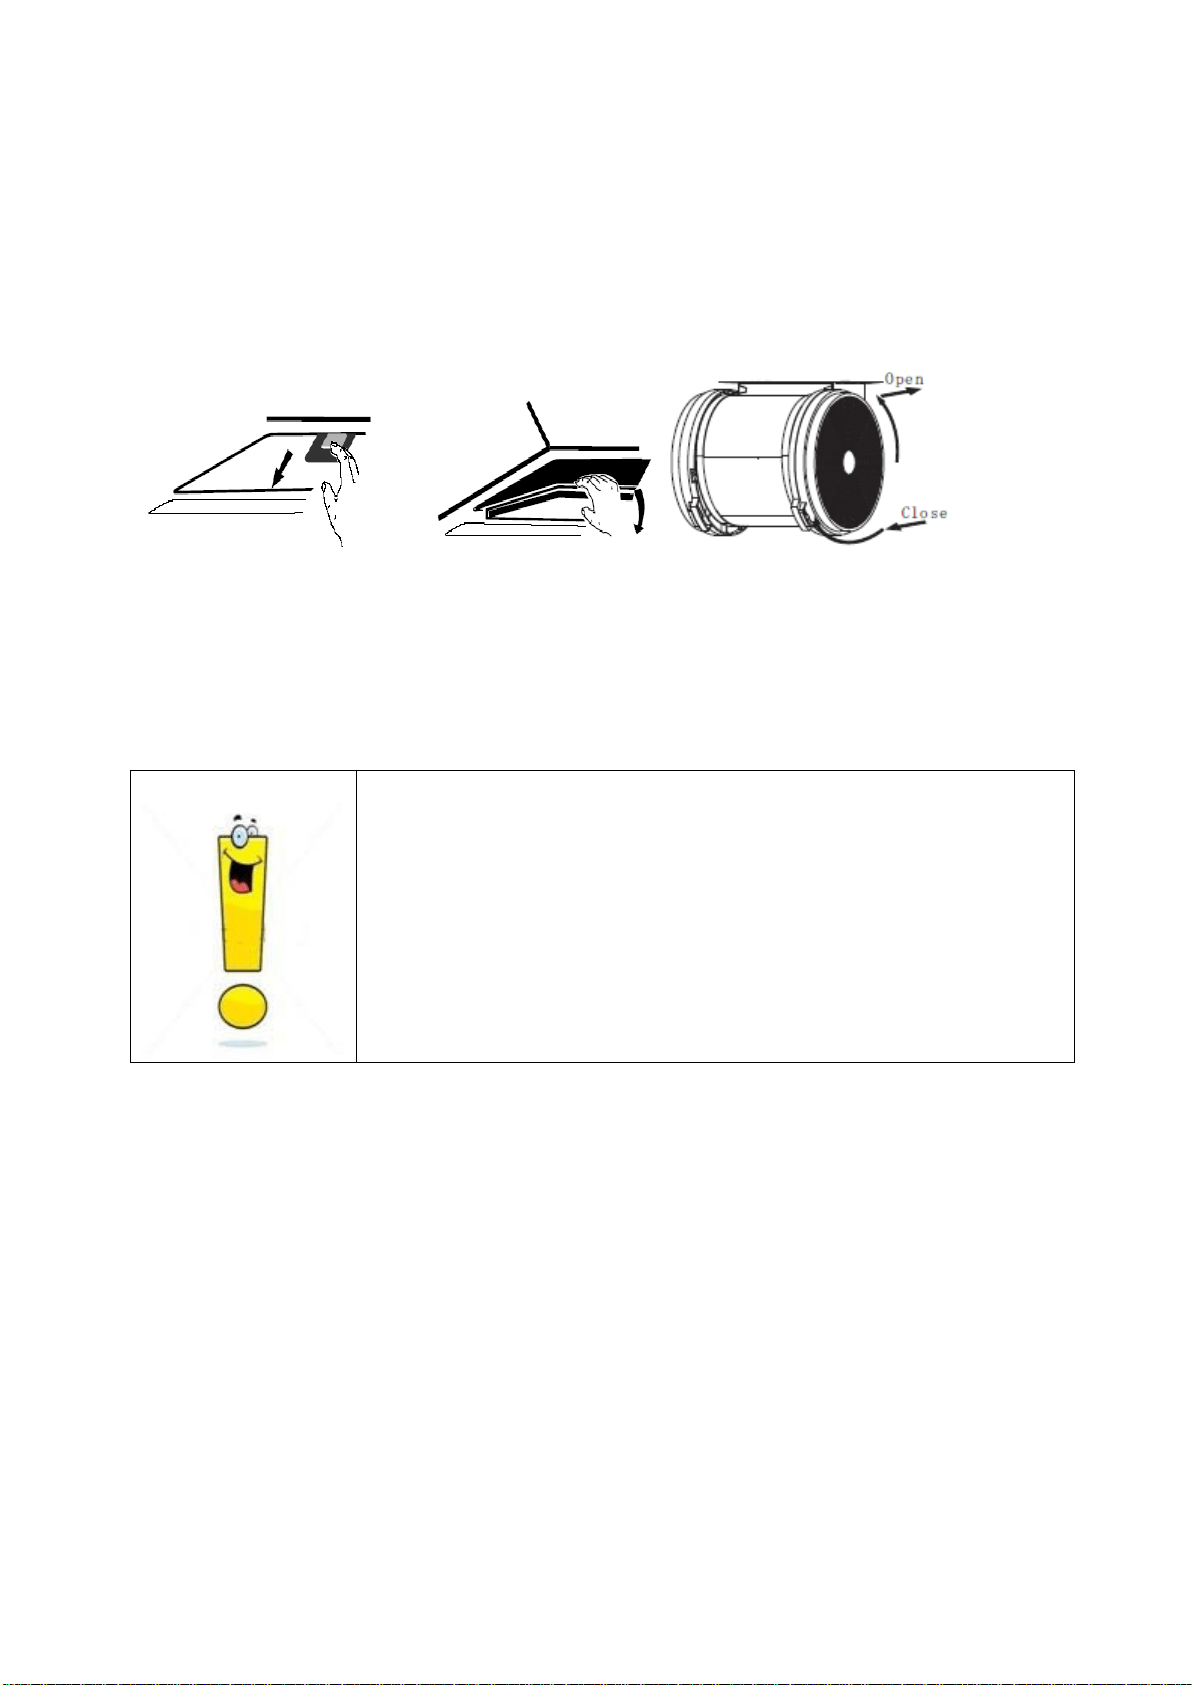
INSTALLING GREASE MESH FILTERS
• To install filters for the following four steps:
- Angle the filter into slots at the back of the hood.
- Push the button on handle of the filter.
- Release the handle once the filter fits into a resting position.
- Repeat to install all filters
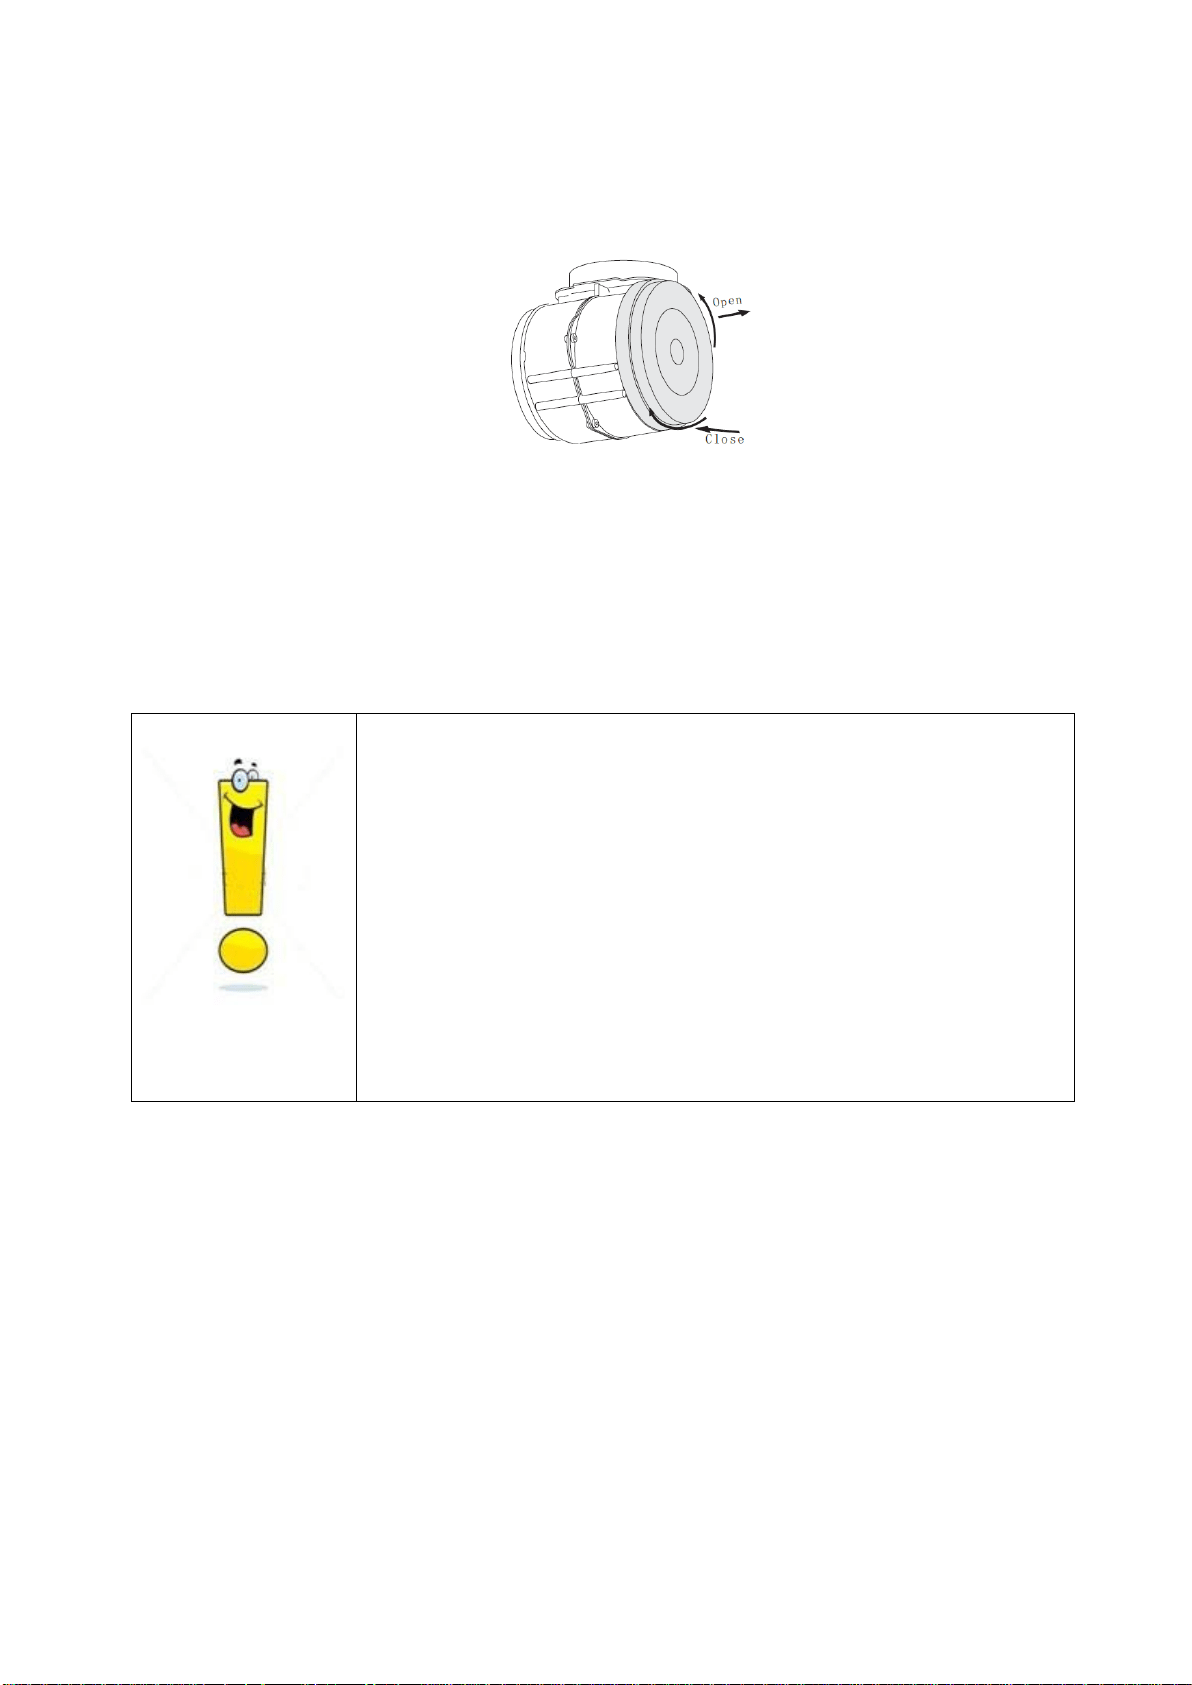
CARBON FILTER-not supplied
Activated carbon filter can be used to trap odors. Normally the activated carbon filter
should be changed at three or six months according to your cooking habit. The
installation procedure of activated carbon filter is as below.
11
1. Before installing or replacing the carbon filters, disconnect the mains power to the
unit.
2. Press the filter lock and remove the mesh filter.
3. Turn the carbon filter on both sides of the motor anti-clockwise. Replace the
carbon filters with the new carbon filters.
4. Place the mesh filter.
5. Connect the power supply to the wall socket.
NOTE:
• Make sure the filter is securely locked. Otherwise, it would loosen and cause
danger.
• When activated carbon filter attached, the suction power will be lowered.
BULB REPLACEMENT
Important :
The bulb must be replaced by the manufacturer, its
service agent or similarly qualified persons.
Always switch of f t he el ectricity su pply bef ore
carrying out any operations on the appliance
. When
handling bulb, make sure it is completely cool down
before any direct contact to hands.
When handling globes hold with a cloth or gloves to
ensur
e perspiration does not come in contact with
the globe as this can reduce the life of the globe.
Note:
Before r eplacing l ight t hat t he co oker hood ca n be i solated f rom t he supply
mains by means of a plug or an all-pole switch.
Protect against danger when changing lights, such as wearing gloves.
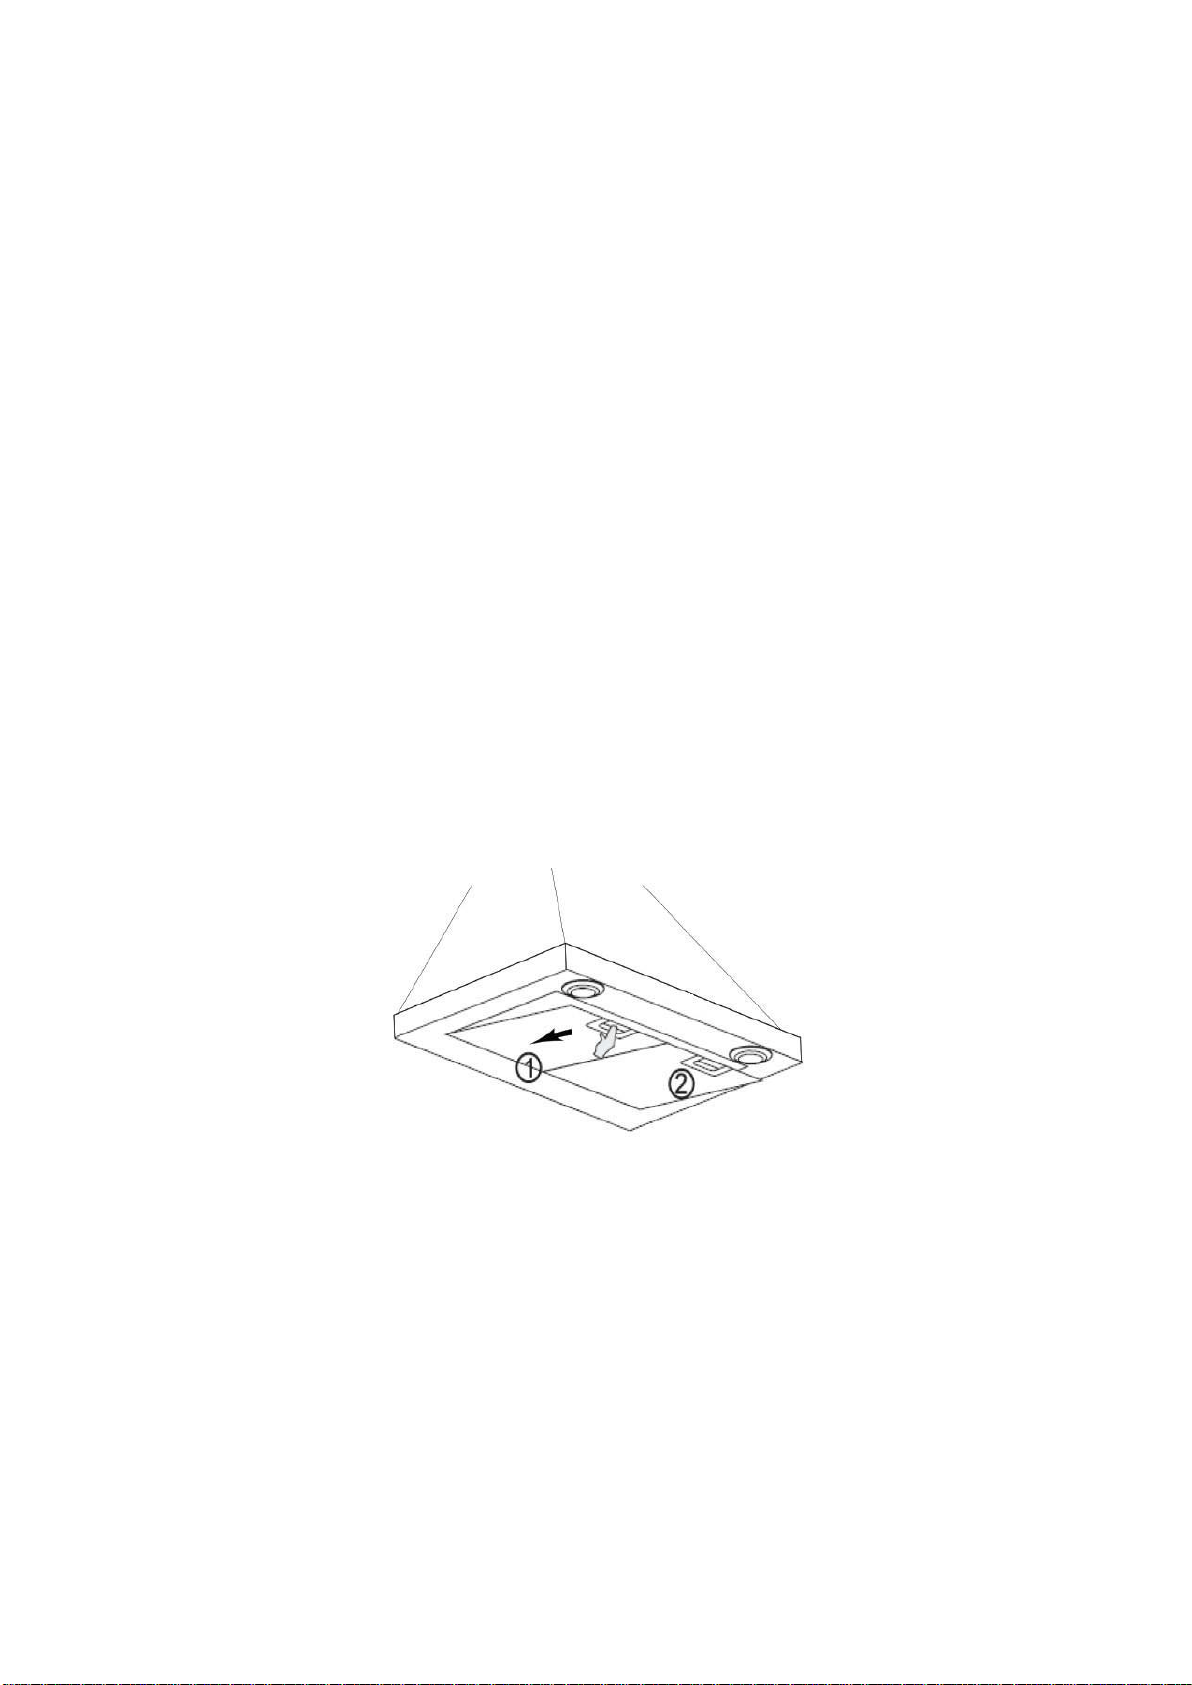
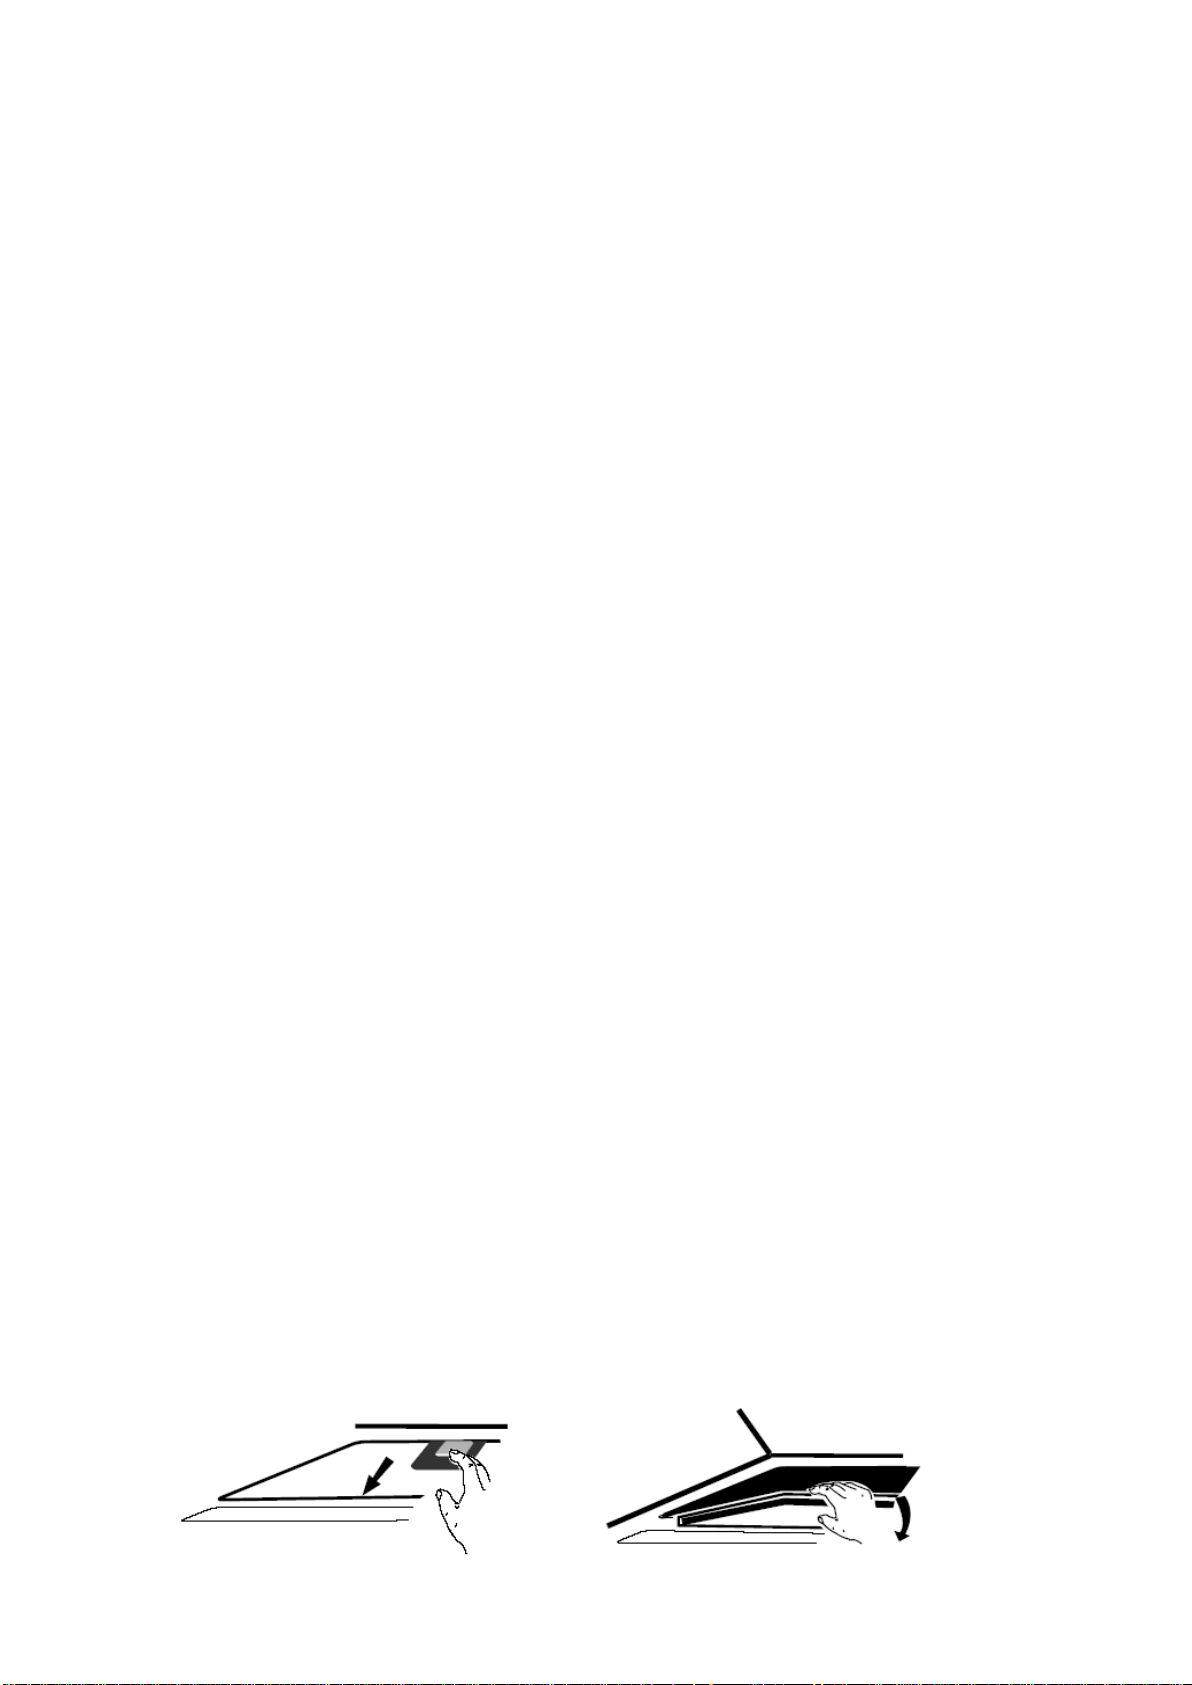
Changing the lights:
Remove the grease filter.
Way 1. Use a tool or the hand to press the spring splinterof both sides of LED light
to the inside, until the light is pressed out, see pic 1.Then slightly pull the light
connecting wire out, and dismantle the terminal of the light connecting wire. See
pic 2.
Way 2.Use straight screwdriver to prize up the LED light bottom edge, see pic 3,
then slightly pull out the LED light and light connecting wire. See pic 2.
Apply the reverse procedure to install the light back.
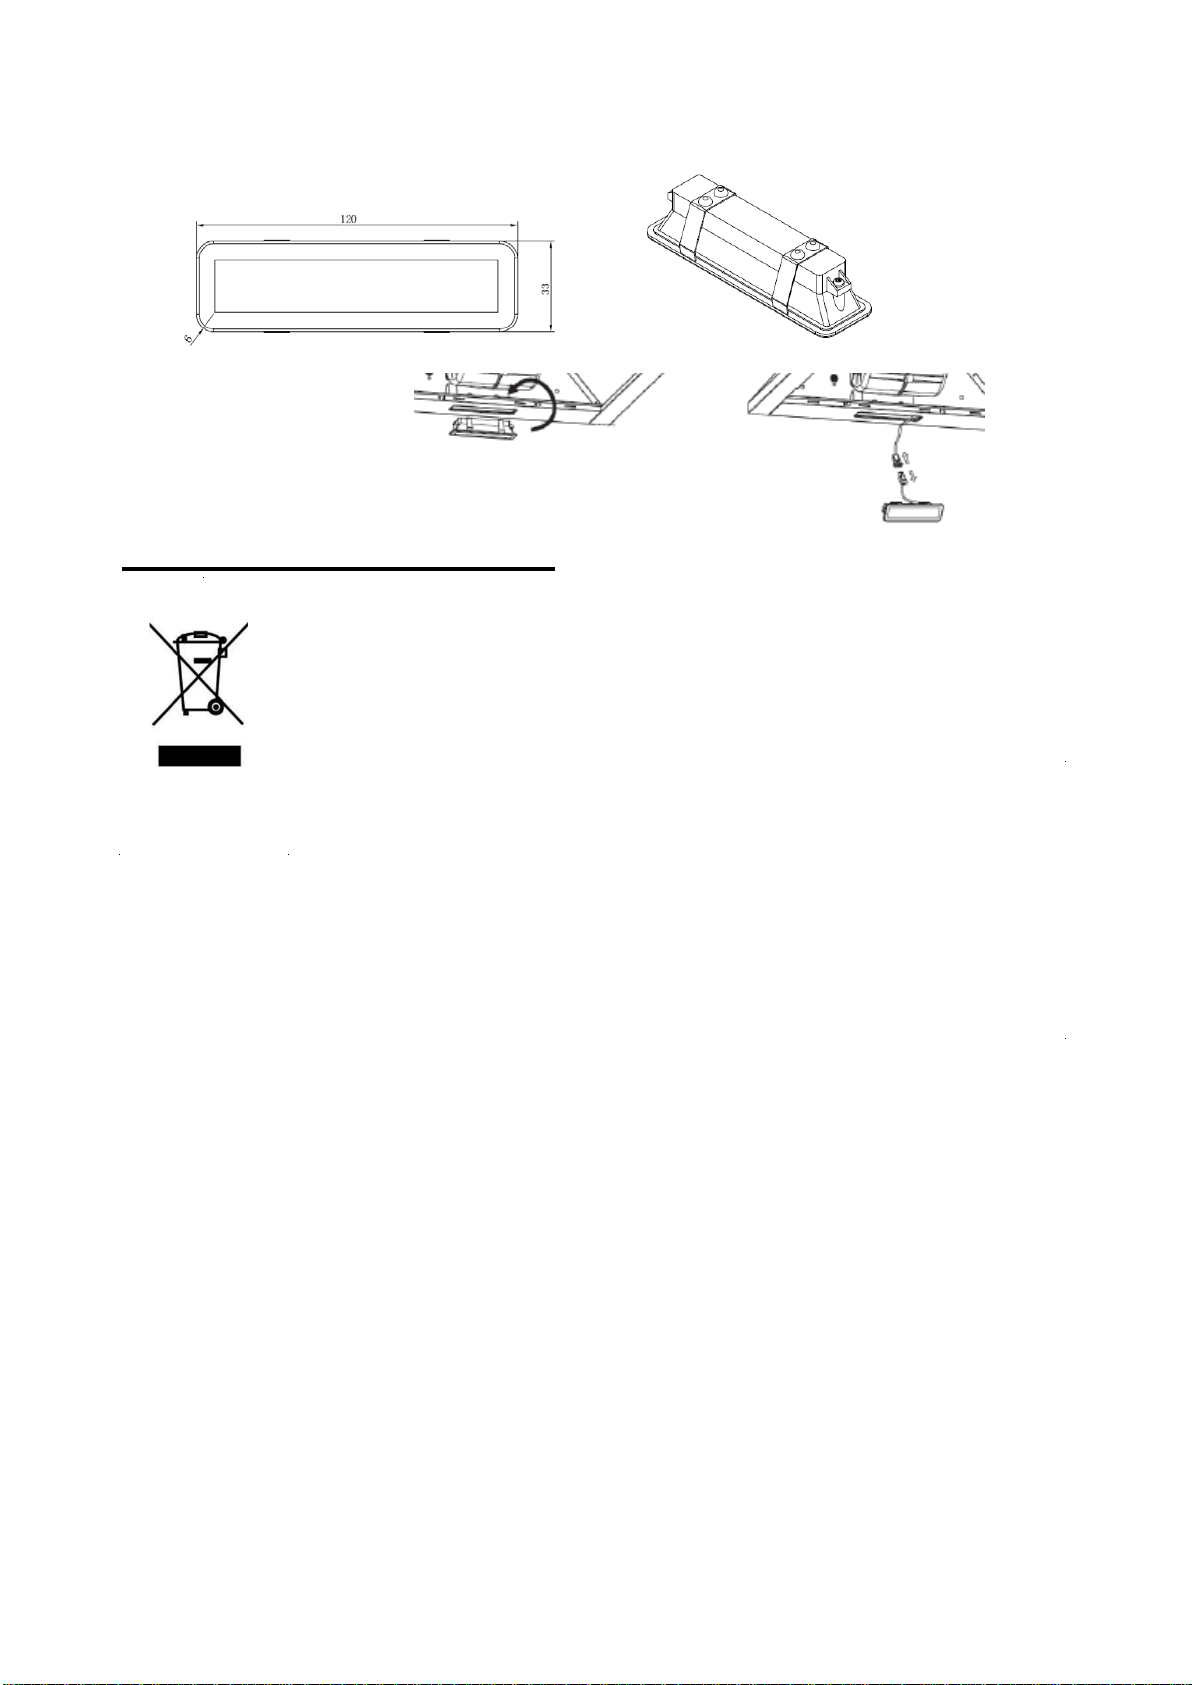
• ILCOS D code for this lamp is: DBS-2/65-H-120/33
LED modules –rectangle lamp
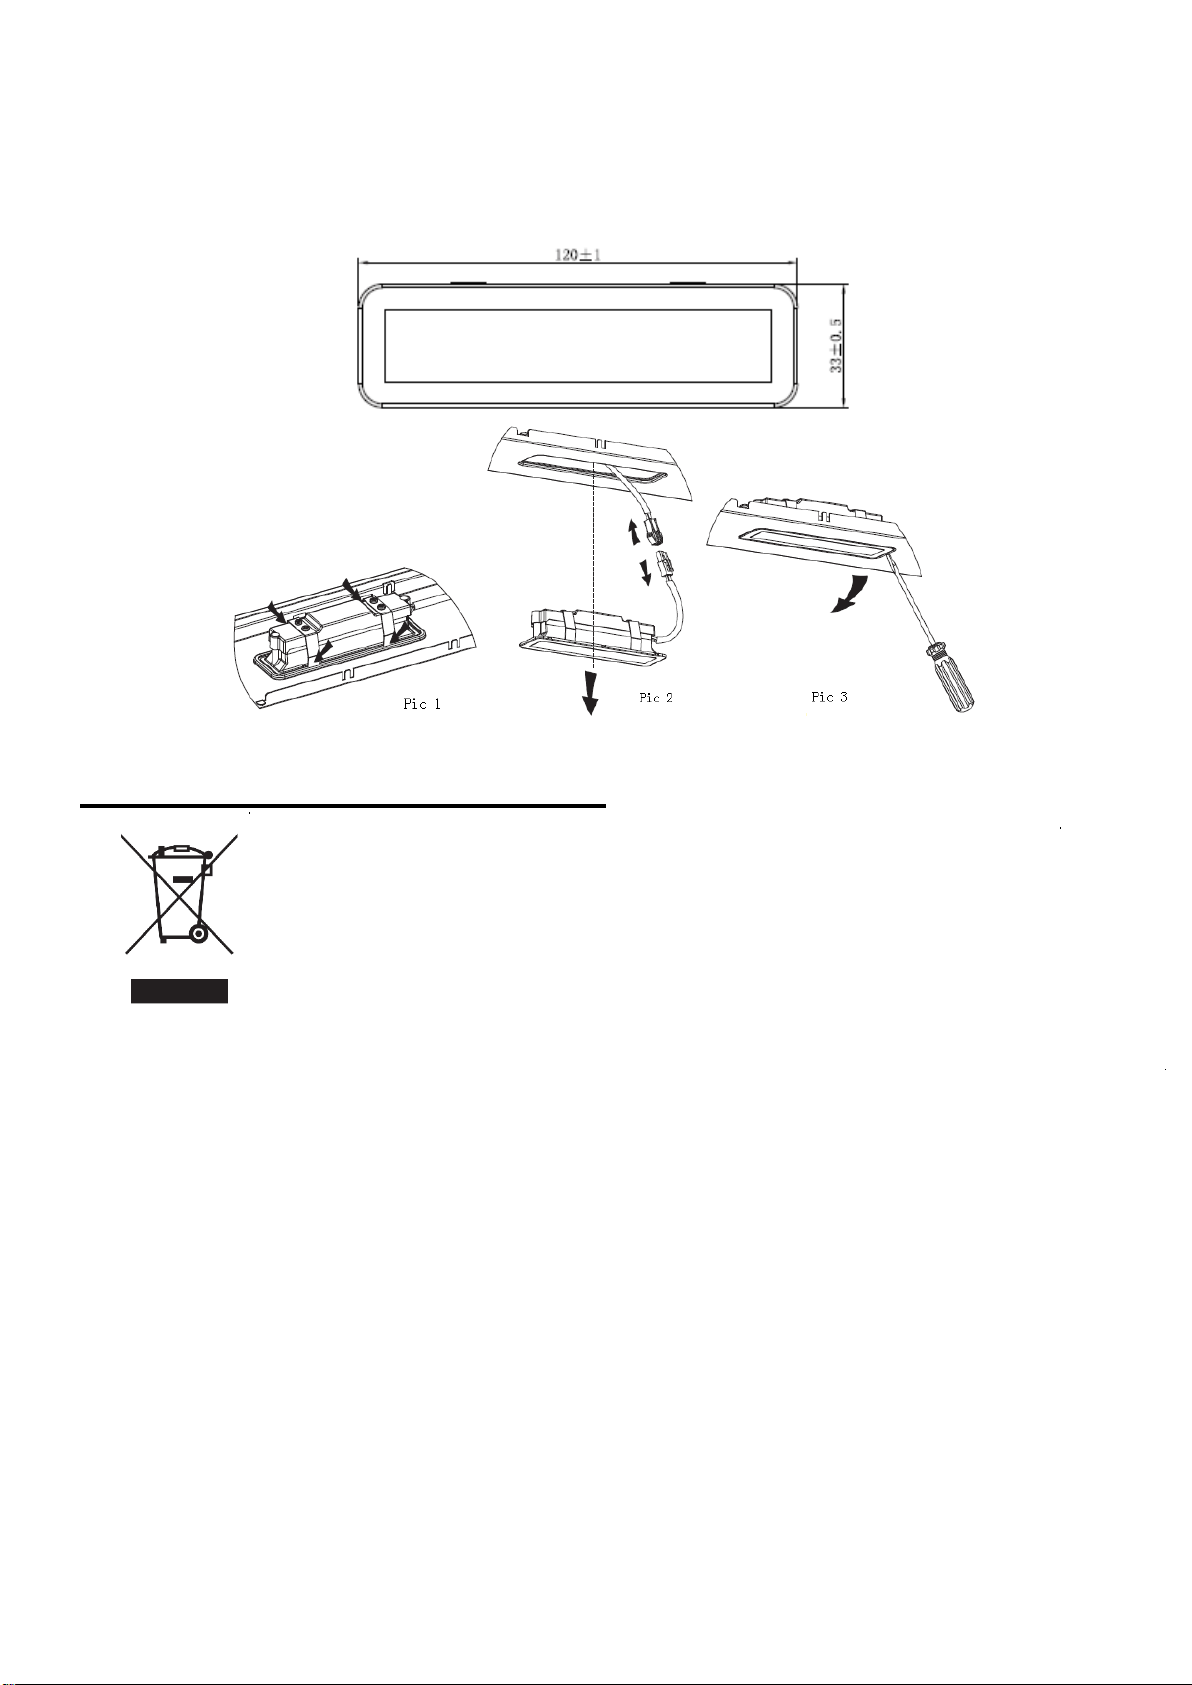
12
– Max wattage: 1×2 W
– Voltage range: AC110-240V
– Dimensions:
ENVIRONMENTAL PROTECTION:
NOTE:
The following shows how to reduce total environmental impact (e.g. energy use) of the
cooking process).
(1) Install the cooker hood in a proper place where there is efficient ventilation.
(2) Clean the cooker hood regularly so as not to block the airway.
(3) Remember to switch off the cooker hood light after cooking.
(4) Remember to switch off the cooker hood after cooking.
INFORMATION FOR DISMANTLING
Do not dismantle the appliance in a way which is not shown in the user manual. The
appliance could not be dismantled by user. At the end of life, the appliance should
not be disposed of with household waste. Check with you Local Authority or retainer
for recycling advice.
This appliance is labelled in accordance with European Directive 2012/19/EU on Waste Electrical
and Electronic Equipment Regulations 2013 regarding electric and electronic appliances (WEEE).
The WEEE contain both polluting substances (that can have a negative effect on the environment)
and base elements (that can be reused). It is important that the WEEE undergo specific treatments
to correctly remove and dispose of the pollutants and recover all the materials. Individuals can
play an important role in ensuring that the WEEE do not become an environmental problem; it is
essential to follow a few basic rules:
- the WEEE should not be treated as domestic waste;
- the WEEE should be taken to dedicated collection areas managed by the town council or a registered
company.
ln many countries, domestic collections may be available for large WEEEs. When you buy a new appliance, the
old one can be returned to the vendor who must accept it free of charge as a one-off, as long as the appliance
is of an equivalent type and has the same functions as the purchased appliance.
Exaustor
Manual de Instruções
12

Índice
1…………………………………..………………………………Instruções de segurança
2…………………………………..………………………………Instalação
3…………………………………..………………………………Começar a usar o seu exaustor
4…………………………………..………………………………Resolução de problemas
5…………………………………..………………………………Manutenção e limpeza
6…………………………………..………………………………Proteção ambiente
13
INSTRUÇÕES DE SEGURANÇA
Este manual explica a instalação e a utilização correta do seu exaustor, leia-o
atentamente antes de usar o produto, mesmo que já esteja familiarizado com o
mesmo. O manual deve ser mantido num local seguro para referência futura.
Estas instruções deverão estar sempre disponíveis num formato alternativo, por
exemplo, num website ou a pedido, por parte do utilizador num formato como DVD.
O que nunca deve fazer:
● Nunca tente usar o exaustor sem os filtros
de gordura ou se os filtros estiverem
demasiado engordurados!
●Não instale sobre um fogão com um
grelhador muito elevado.
●Não deixe frigideiras em uso sem supervisão
porque gorduras ou óleos sobreaquecidos
podem incendiar-se.
●Nunca deixe chamas desprotegidas debaixo
do exaustor.
●Se o exaustor estiver danificado, não tente
utilizá-lo.
●Não faça pratos flambé debaixo do exaustor.
●CUIDADO: As peças acessíveis podem
tornar-se quentes quando usadas com
aparelhos para cozinhar.
●Adistância mínima entre a superfície de
suporte e os recipientes para cozinhar no
fogão e na parte mais baixa do exaustor.
(Quando o exaustor estiver localizado
sobre um aparelho a gás, esta distância
deve ser de pelo menos 65 cm.)
●O ar não deve ser descarregado num cano
de chaminé usado para evacuar fumos de
eletrodomésticos que utilizem gás ou
outros combustíveis.
O que deve fazer sempre:
● Importante Desligue sempre a fonte de
alimentação na fonte durante instalação e
manutenção como, por exemplo, quando
troca uma lâmpada.
●Oexaustor tem de ser instalado em
conformidade com as instruções de
instalação e deve cumprir todas as
medições indicadas.
●Todo o trabalho de instalação tem de ser
realizado por uma pessoa competente ou
por um eletricista qualificado.
●Elimine o material da embalagem
cuidadosamente. As crianças são
vulneráveis a este material.
● Preste atenção às extremidades aguçadas
no interior do exaustor durante a instalação
e limpeza.
●Quando o exaustor estiver colocado por
cima de um aparelho a gás, a distância
mínima entre a superfície de apoio para os
recipientes para cozinhar no fogão e a
parte mais baixa do exaustor tem de ser:
Fogões a gás: 75 cm
Fogões elétricos: 65 cm
Fogões a óleo ou carvão: 75 cm
●Certifique-se de que a canalização não tem
dobras com um ângulo mais apertado que
90 graus uma vez que isto reduz a
eficiência do exaustor.
●Aviso: Se os parafusos ou o dispositivo de
fixação não forem montados de acordo
com estas instruções, podem ocorrer riscos
elétricos.
●Aviso: Antes de obter acesso a terminais,
todos os circuitos de alimentação elétrica
têm de estar desligados.
14
O que deve fazer sempre:
●Coloque sempre tampas nos tachos e
panelas quando estiver a cozinhar num
fogão a gás.
●Quando no modo de extração, o ar na
divisão está a ser removido pelo exaustor.
Certifique-se de que estão a ser cumpridas
as medidas de ventilação apropriadas. O
exaustor remove odores da divisão mas
não o vapor.
●O exaustor destina-se apenas a uso
doméstico.
●Se o cabo de alimentação estiver danificado,
este tem de ser substituído pelo fabricante,
pelo agente de serviço ou por pessoas
igualmente qualificadas de forma a evitar o
perigo.
●Este aparelho pode ser utilizado por
crianças de idade igual ou superior a 8
anos e por pessoas com capacidades
físicas, sensoriais ou mentais reduzidas ou
falta de experiência e conhecimento, caso
lhes tenha sido fornecida supervisão ou
instruções relativas à utilização do aparelho
de forma segura e desde que
compreendam os perigos envolvidos. As
crianças não devem brincar com o
aparelho. A limpeza e manutenção pelo
utilizador não deve ser realizada por
crianças sem supervisão.
●Aviso: Antes de obter acesso a terminais,
todos os circuitos de alimentação elétrica
têm de estar desligados.
O que deve fazer sempre:
●CUIDADO: O aparelho e as suas peças
acessíveis podem ficar quentes durante o
funcionamento. Tenha o cuidado de evitar
tocar nos elementos de aquecimento.
Crianças com menos de 8 anos devem
manter-se afastadas a menos que estejam
sob constante supervisão.
● Deverá existir uma ventilação adequada da
divisão quando o exaustor estiver a ser
usado ao mesmo tempo que aparelhos que
funcionam a gás ou outros combustíveis.
●Existe o risco de incêndio se a limpeza não
for realizada de acordo com as instruções
●Osregulamentos referentes à descarga de ar
têm de ser acatados.
●Limpe o seu aparelho periodicamente
seguindo o método fornecido no capítulo
MANUTENÇÃO.
●Por motivos de segurança, use apenas o
mesmo tamanho de parafuso de montagem
ou fixação recomendado neste manual de
instruções.
●Erelação a dados sobre o método e sobre a
frequência de limpeza, consulte a secção
de manutenção e limpeza no manual de
instruções.
●A limpeza e a manutenção pelo utilizador
não devem ser realizadas por crianças sem
supervisão.
●Quando o exaustor e aparelhos com
fornecimento de energia que não
eletricidade estiverem simultaneamente em
funcionamento, a pressão negativa na
divisão não deve exceder 4 Pa (4 x 10⁻⁵
bar).
●AVISO: Perigo de incêndio: não guarde
artigos em cima das superfícies para
cozinhar.
●Não deve nunca utilizar um aparelho de
limpeza a vapor.
●NUNCA tente extinguir um incêndio com
água, em vez disso desligue o aparelho e,
em seguida, cubra a chama com, por
exemplo, uma tampa ou um cobertor
antifogo.
15

INSTALAÇÃO (VENTILAÇÃO EXTERIOR)
MONTAGEM DA UNIDADE DE ALETAS
Se o exaustor não tiver uma unidade de aletas 1 montada, deve montar as metades na sua
estrutura. As imagens apenas mostram um exemplo de como montar a unidade de aletas, a
saída pode ser diferente de acordo com os diferentes modelos e configuração.
Para montar a unidade de aletas 1 deverá:
• montar duas metades 2 na armação 6
• um pino 3 deve estar orientado para o topo;
• o eixo 4 deve ser inserido nos orifícios 5 na armação;
• repetir todas as operações para a 2ª metade
INSTALAÇÃO
Se tiver uma saída para o exterior, o seu exaustor pode ser ligado como apresentado na
imagem a seguir através de um tubo de extração (tubo flexível ou material não inflamável,
esmalte ou alumínio com um diâmetro interior de 150 mm)
1. Antes de realizar a instalação.
2. O exaustor deve ser colocado a uma distância de 65~75 cm acima da superfície para
cozi
nhar para obter um melhor resultado.
16
3. Instale o fogão num local adequando logo que esteja determinada a altura de instalação e
mantenha-o alinhado. A posição fixa no suporte da chaminé do lado de dentro é o local da
chaminé. Ver Fig. 2
4. Prenda o suporte do exterior da chaminé no lado de fora da chaminé e certifique-se de que
o interior da chaminé pode ser ajustado em altura livremente bem como a fixação do tubo de
extensão. Depois disso, instale o tubo de expansão e a chaminé no exaustor do fogão. Ver
Fig. 3.
5. Ponha o exaustor do fogão no gancho. Ver Fig. 4.
6. Ajuste a altura da chaminé interior para a posição do suporte da chaminé interior e prenda
com o parafuso, depois de ajustar a posição, fixe a armação com o parafuso de segurança.
Ver Fig. 5.
Nota.O tubo telescópico não está incluído no produto
Nota: As duas ventilações de segurança estão posicionadas no alojamento traseiro com um
diâmetr
o de 6 mm. Ponha o tubo de expansão na saída da parede. Fixe o tubo de expansão
com o tensor de cabos na tomada de parede.
17
Instalação elétrica
Toda a instalação deve ser realizada por uma pessoa competente ou por um eletricista
qualificado Antes de conectar a rede, certifique-se de que a tensão da rede corresponda
à indicada na placa de identificação.
Conexão direta
O aparelho deve ser conectado diretamente à rede elétrica usando um disjuntor omnipolar
com um abertura mínima de 3mm entre os contatos.
O instalador deve garantir que a conexão elétrica correta foi feita e que está em
conformidade com o diagrama de fiação.
O cabo não deve ser dobrado ou comprimido.
Verifique regularmente se o plugue e o cabo de alimentação
estão danificados. Se o cabo de alimentação estiver danificado,
deve ser substituído por um cabo ou conjunto especial disponível
no fabricante ou em seu agente de serviço.
AVISO: Este é um aparelho de Classe I e DEVE ser aterrado
Este aparelho é fornecido com um cabo de alimentação de 3 núcleos nas cores a seguir:
Brown = L ou Live
Azul = N ou neutro
Verde e Amarelo = E ou Terra
DICAS PARA INSTALAÇÃO DA CONDUTA DE EXAUSTÃO
As seguintes regras devem ser estritamente seguidas para obter uma extração de ar ideal:
• Mantenha o tubo de expansão curto e direito.
• Não reduza o tamanho nem restrinja o tubo de expansão.
• Quando utilizar o tubo de expansão instale sempre o tubo esticado para minimizar perdas de
pressão.
• O não cumprimento destas instruções básicas irá reduzir o desempenho e aumentar os
níveis de ruído do exaustor.
• Qualquer trabalho de instalação deve ser efetuado por um eletricista qualificado ou pessoa
competente.
•Não ligue o sistema de condutas do exaustor a qualquer sistema de ventilação existente que
esteja a ser utilizado para qualquer outro aparelho, tal como um tubo de aquecimento, tubo de
gás, tubo de vento quente.
•O ângulo de curvatura do tubo de expansão não pode ser inferior a 120º; deve orientar o
tubo horizontalmente ou, em alternativa, o tubo deve ir desde o ponto inicial e deve estar
dirigido para uma parede externa.
•Depois da instalação, certifique-se de que o exaustor está nivelado para evitar a recolha de
gordura no final.
•Certifique-se de que o tubo de expansão selecionado para instalação está em conformidade
com as normas relevantes e é anti-incendio.
AVISO:
Por motivos de segurança, use apenas o
mesmo tamanho de parafuso de montagem ou
f
ixação recom endado nest e m anual de
instruções.
Se os parafusos ou o dispositivo de fixação não
forem m ontados de acordo com es tas
instruções, podem ocorrer riscos elétricos.
Começar a utilizar o exaustor
Botão de pressão
1) Prima o botão "stop" (parar) e o motor para.
2)Prima o botão "low" (baixo) e o motor funciona a baixa velocidade.
3)Prima o botão "middle" (médio) e o motor funciona a velocidade média.
4)Prima o botão "high" (alto) e o motor funciona a velocidade elevada.
5)Prima o bot ão "light" (luz) e as duas luzes acendem-se. Prima novamente e a l uz
apaga-se.
18

RESOLUÇÃO DE PROBLEMAS
Problema Causa possível Solução
Luz acesa, mas o
motor não funciona
Interruptor de ventoinha desligado
Selecione uma posição do
interruptor da ventoinha
Falha do interruptor da ventoinha Contacte o centro de serviço.
Falha do motor Contacte o centro de serviço.
A luz não acende, o
motor não funciona
Fusíveis domésticos fundidos Volte a ligar/substitua os fusíveis.
Cabo de alimentação solto ou
desligado
Volte a ligar o cabo à tomada.
Ligue a alimentação.
Fuga de óleo
A válvula unidirecional e a saída
não estão bem vedadas
Retire a válvula unidirecional e
vede com vedante.
Fuga na ligação da chaminé e
cobertura.
Retire a chaminé e vede.
As luzes não
funcionam
Globos quebrados/defeituosos
Substitua os globos de acordo com
esta
instrução.
Aspiração
insuficiente
A distância entre o exaustor e a
boca a gás é demasiado grande
Volte a posicionar o exaustor de
acordo com uma distância correta.
O exaustor está
inclinado
O parafuso de fixação não está
suficientemente apertado
Aperte o parafuso de pendurar e
certifique-se de que fica na
horizontal.
NOTA:
Quaisquer reparações elétricas a este aparelho devem estar em conformidade com as
suas leis locais, estatais e federais. Contacte o centro de assistência se tiver alguma
dúvida antes de efetuar alguma das operações acima. Desligue sempre a unidade da
rede quando abrir a unidade.
MANUTENÇÃO E LIMPEZA
Cuidado:
• Antes de realizar a manutenção ou limpeza, o exaustor deve ser
desligado da fonte de alimentação. Certifique-se de que o exaustor
está desligado da tomada.
.
19
RESOLUÇÃO DE PROBLEMAS
• As superfícies externas são suscetíveis a riscos e abrasões, por isso siga as instruções de
limpeza para se certificar de que obtém o melhor resultado possível sem ocorrência de
danos.
ASPETOS GERAIS
A limpeza e manutenção deverão ser efetuadas com o aparelho frio especialmente quando se
limpa. Evite deixar substâncias alcalinas ou ácidas (sumo de limão, vinagre, etc.) nas
superfícies.
AÇO INOXIDÁVEL
O aço inoxidável deve ser limpo regularmente (ou seja, semanalmente) para garantir uma
longa esperança de vida. Seque com um pano macio e limpo. Pode utilizar um líquido de
limpeza especializado para aço inoxidável.
NOTA:
Certifique-se de que a limpeza é realizada ao longo do grão do aço inoxidável para impedir a
formação de padrões cruzados antiestéticos.
SUPERFÍCIE DO PAINEL DE CONTROLO
O painel de controlo incorporado pode ser limpo usando água com sabão. Certifique-se de
que o pano está limpo e bem espremido antes de realizar a limpeza. Utilize um pano macio
seco para remover humidade em excesso existente após a limpeza.
Importante
Use detergentes neutros e evite o uso de químicos de limpeza abrasivos, detergentes
domésticos fortes ou produtos com abrasivos, uma vez que estes afetarão a aparência do
aparelho e potencialmente removerão qualquer impressão de ilustrações do painel de
controlo e invalidarão a garantia do fabricante.
FILTROS DE REDE DE GORDURA
Os filtros de rede podem ser limpos manualmente. Mergulhe-os durante cerca de três minutos
em água com um detergente de libertação de gordura e, em seguida, escove-os suavemente
com uma escova suave. Não aplique muita pressão, para evitar danificar os filtros. (Deixe
secar naturalmente sem exposição direta à luz solar.)
Os filtros devem ser limpos separadamente de utensílios de cozinha e louça. É aconselhável
que não use abrilhantador.
INSTALAR OS FILTROS DE REDE DE GORDURA
• Siga os quatro passos a seguir para instalar os filtros:
- Oriente o filtro de acordo com as ranhuras na parte traseira do exaustor.
- Pressione o botão na pega do filtro.
- Liberte a pega assim que o filtro encaixar numa posição de repouso.
- Repita a ação para instalar todos os filtros.
FILTRO DE CARVÃO - não fornecido
É possível usar um filtro de carvão ativado para captar odores. Normalmente o filtro de carvão
ativado deve ser substituído a cada três ou seis meses consoante os seus hábitos de
cozinhar. O procedimento de instalação do filtro de carvão ativado é indicado a seguir.
20
1. Antes de instalar ou substituir os filtros de carvão, remova a energia da unidade.
2. Prima o bloqueio do filtro e remova o filtro de rede.
1. Antes de instalar ou substituir os filtros de carvão, remova a energia da unidade.
2. Prima o bloqueio do filtro e remova o filtro de rede.
1. Antes de instalar ou substituir os filtros de carvão, remova a energia da unidade.
2. Prima o bloqueio do filtro e remova o filtro de rede.
NOTA:
• Certifique-se de que o filtro está bem preso. Caso contrário, este pode soltar-se e
pode constituir um perigo.
• Com um filtro de carvão ativado instalado, o poder de aspiração será reduzido.
SUBSTITUIÇÃO DA LÂMPADA
Importante:
A l âmpada t em de ser substituída p elo f abricante,
pelo seu age nte de serviço o u por p essoas
igualmente qualificadas.
Desligue sempre a f onte d e al imentação an tes de
realizar quaisquer oper ações no aparelho. A o
manusear a lâmpada, certifique-se de que esta está
completamente fria antes de qualquer contacto com
as mãos.
Ao manusear os globos segure-os com um pano ou
com l uvas p ara se ce rtificar qu e t ranspiração não
entra em contacto com os mesmos uma vez que
isso pode reduzir a vida útil do globo.
21
3. Rode o f iltro de ca rvão em ambos os lados do motor no se ntido dos ponteiros
do relógio. Substitua os filtros de carvão pelos novos filtros de carvão.
4. Ponha o filtro de rede.
5. Ligue a alimentação à tomada.
Mudando as luzes:
Remova o filtro de gordura.
Maneira 1. Use uma ferramenta ou a mão para pressionar a lasca da mola
de ambos os lados da luz LED para dentro, até que a luz seja pressionada
para fora, ver foto 1. Em seguida, puxe levemente o fio de conexão da luz para
fora e desmonte o terminal do fio de conexão leve Ver foto 2.
Maneira 2. Use uma chave de fenda reta para levantar a borda inferior da luz
LED, veja a figura 3, a seguir puxe levemente a luz LED e o fio de conexão da
luz. Veja a figura 2.
Aplique o procedimento inverso para instalar a luz de volta.
Nota:
Antes de substituir luz que a coifa pode ser isolado a partir da rede de
fornecimento por meio de uma ficha ou de um comutador de todos os
polos).
Proteja-se contra o perigo ao trocar as luzes, como usar luvas.
PROTEÇÃO DO AMBIENTE:
NOTA:
A seguir indicamos como reduzir o impacto ambiental total (por ex. uso energético) do
processo de cozinhar.
(1) Instale o exaustor num local adequado onde exista uma ventilação eficiente.
(2) Limpe o exaustor regularmente de modo a não bloquear as vias aéreas.
(3) Lembre-se de desligar a luz do exaustor depois de cozinhar.
(4) Lembre-se de desligar o exaustor depois de cozinhar.
INFORMAÇÃO SOBRE DESMANTELAMENTO
Não desmantele o aparelho de um modo não indicado no manual de instruções. O
aparelho não pode ser desmantelado pelo utilizador. No final da sua vida útil, o
aparelho não deve ser eliminado juntamente com os resíduos domésticos. Consulte
a sua autoridade local ou retentor em relação a conselhos de reciclagem.
22
• O código ILCOS D para esta lâmpada é: DBS-2,5/65-H-120/33
– Módulos LED –lâmpada retangular
– Tensão máx.: 1×2 W
– Gama de tensão: CA 110-240 V
– Dimensões:
Este aparelho está rotulado em conformidade com a Diretiva
Europeia 2012/19/UE relativa aos resíduos de equipamentos
elétricos e eletrónicos (REEE) 2013 em relação aos aparelhos
elétricos e eletrónicos. Os REEE contêm substâncias poluentes
(que podem ter um efeito negativo no meio ambiente) e elementos
base (que podem ser reutilizados). É importante que os REEE
sejam submetidos a tratamentos específicos para remover e
eliminar os poluentes e recuperar todos os materiais. As pessoas
podem desempenhar um papel importante para garantir que os
REEE não representem um problema ambiental; é essencial que
sejam cumpridas algumas normas básicas:
- Os REEE não devem ser tratados como lixo doméstico;
- Os REEE devem ser levados para áreas de recolha dedicadas
administradas pelo município ou por uma empresa registada.
Em muitos países, as recolhas domésticas podem estar disponíveis para
grandes REEEs. Quando compra um aparelho novo, o antigo pode ser
devolvido ao revendedor, que deve aceitar tratar da recolha gratuitamente,
desde que o aparelho seja de um tipo equivalente e tenha as mesmas
funções do aparelho fornecido.