
Loading ...
Loading ...
Loading ...
ENGLISH
3
batteries may exhibit unpredictable behavior resulting
in fire, explosion or risk ofinjury.
d ) Do not expose a battery pack or appliance
to fire or excessive temperature. Exposure to
fire or temperature above 266°F (130°C) may
causeexplosion.
e ) Have servicing performed by a qualified repair
person using only identical replacement parts.
This will ensure that the safety of the product
ismaintained.
f ) Only for use with HSVB420 : JOD-S-180050A1 /
BLJ15L180050P-U, HSVB520: JOD-S-220050A1 /
BLJ15L220050P-Uchargers.
SAVE THESE
INSTRUCTIONS
SYMBOLS
The label on your tool may include the following symbols. The
symbols and their definitions are as follows:
V ..............................volts
A .................................. amperes
Hz ................................hertz
W .................................watts
min .............................minutes
or AC ................ alternating current
or DC .......... direct current
n
o ............................... no load speed
..............................Class I Construction
(grounded)
...............................earthing terminal
.............................safety alert symbol
.............................. Class II Construction
(double insulated)
../min or rpm. revolutions or reciprocation
per minute
Wh ..............................Watt Hours
ASSEMBLY
WARNING: Do not attempt to modify or
repair theappliance.
Intended use
Your BLACK+DECKER lithium ion cordless 2 in 1 stick
vacuum cleaner has been designed for light, dry vacuum
cleaning purposes. This appliance is intended for household
useonly.
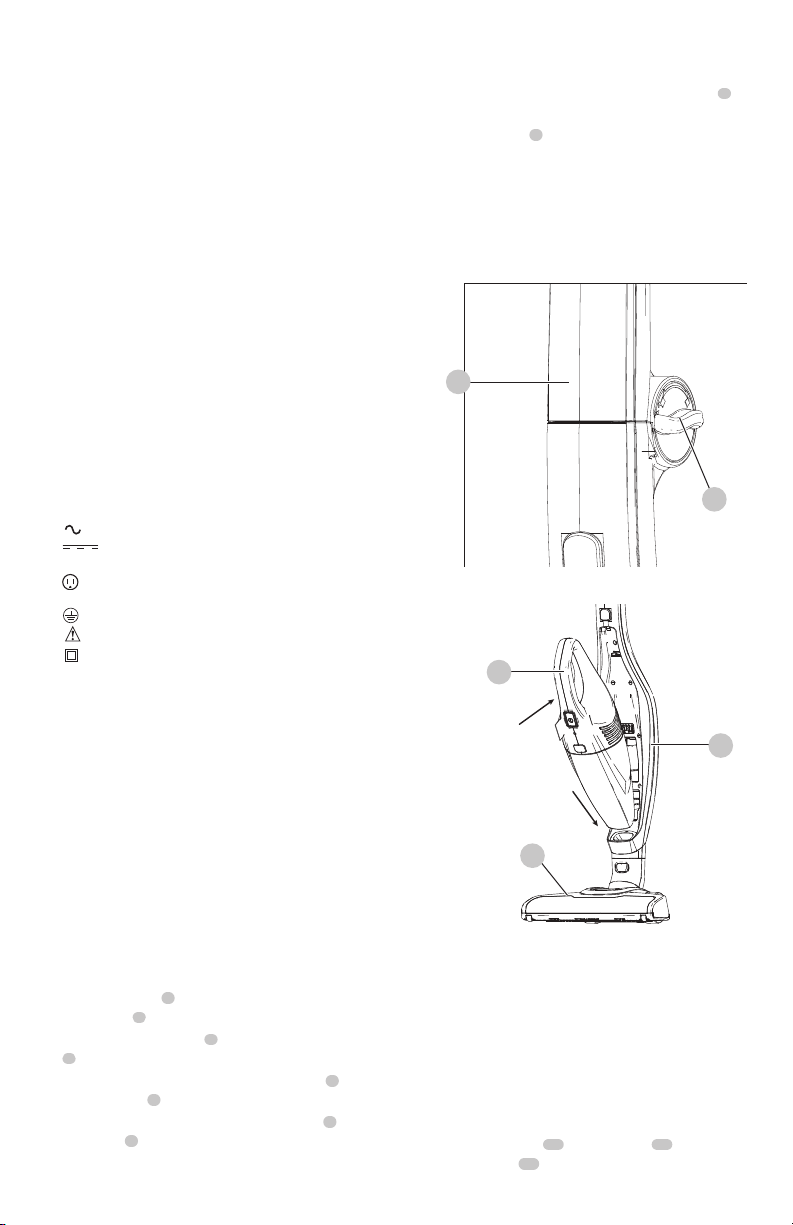
Assembly (Fig. B, C)
1. Raise the handle
7
until it locks in place and twist the
handle lock
8
to the locked position as shown in Fig. B
2. Insert the hand vacuum
1
into the stick vacuum chassis
9
as shown in Fig. C, ensuring it clicks firmly into place.
3. Align the bottom of the stick vacuum chassis
9
with
the floor head
6
.
4. Push the bottom of the stick vacuum chassis
9
onto the
floor head
6
so it locks into position as shown in Fig.C.
5. To remove an accessory, first remove the hand vacuum
from the stick vacuum chassis.
6. Pull the accessory from the stick vacuum chassis
9
.
7. To store an accessory, press the accessory into the stick
vacuum chassis
9
.
WARNING: When not in use position the
unit with the rear of the vacuum facing a wall so that
any inadvertent fall of the unit would contact a wall
and not people orpets.
Fig. B
7
8
Fig. C
1
9
6
Charging the battery (Fig. D)
WARNING: For use only with the
suppliedcharger.
From new, the rechargeable cells of the product need a
minimum charge time of 5 hours to ensure fullpower.
1. Fig. D - Ensure the hand vacuum is docked securely into
the stick vacuum chassis.
2. Plug the jack plug
16
of the charger
13
into the
charging port
17
located on the stick vacuum chassis.
Loading ...
Loading ...
Loading ...