Owner's Manual
®
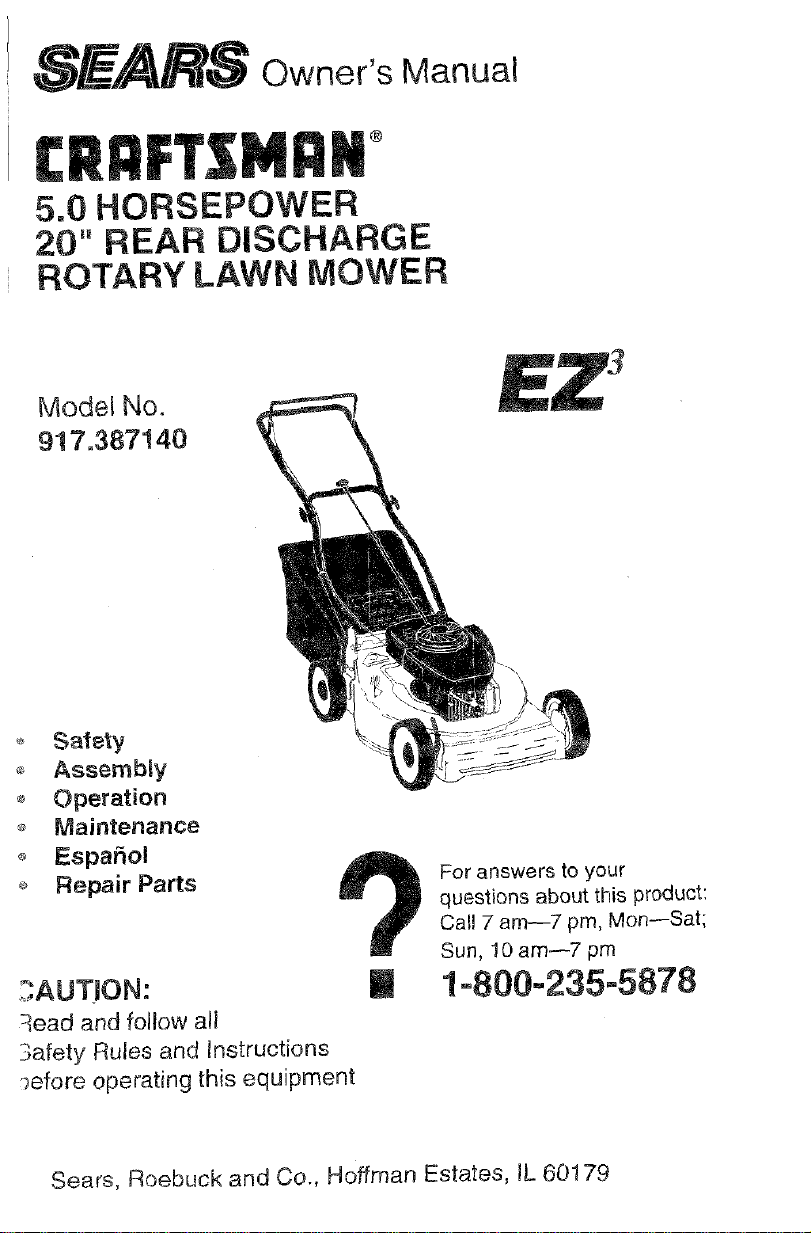
5.0 HORSEPOWER
20" REAR DISCHARGE
ROTARY LAWN MOWER
Model No,
917.387140
Safety
,_ Assembly
o Operation
® Maintenance
Espa_ol
,, Repair Parts
_'% _ I
,ALtTION.
7ead and follow all
/Safety Rules and Instructions
">efore operating this equipment
i
For answers to your
questions about this product:
Call 7 am--7 pro, Men--Sat;
Sun, 10 am--7 pm
1°800-235-5878
Sears, Roebuck and Co., Hoffman Estates, IL 60179
Warranty 2 Product Specifications 11
Safety Rules 2 Service and Adjustments 15
Assembly 4 Storage 14
Operation 6 Troubleshooting 15
Maintenance Schedule I0 Repair Parts 32
Maintenance 10 Parts Ordering Back Cover
UMITED 'RNQ YEAR WARRANTY ON CRAFTSMAN POWER MOWER
For two years from date of purchase, when this Craftsman Lawn Mower is maintained,
lubricated, and tuned up according to the operating and maintenar_ce instructions in the
owner's manual, Sears will repair free of charge any defect in material or workmanship.
If this Craftsman Lawn Mower is used for commercial or rental purposes, this warranty
applies for only 90 days from the date of purchase.
This Warranty does not cover:
,, Expendable items which become worn during normal use, such as rotary mower
blades, blade adapters, belts, air cleaners and spark plug.
o Repairs necessary because of operator abuse or negligence, including bent crank-
shafts and the failure to maintain the equipment according to the instructions con-
tained in the owner's manual.
Warranty service is available by returning the craftsman power mower to the nearest
sears service center/department in the united states. This warranty' applies only while
this product is in use in the united states.
This Warranty gives you specific legal rights, and you may also have other rights which
vary from state to state.
SEARS, ROEBUCKAND CO,, D/817 WA. HOFFMAN ESTATES, ILLINOIS 60179
TRAINING:
o Read this operator's manual carefully.
Become familiar with the controls and
know how to operate your mower
properly. Learn how to quickly stop
mower.
,, Do not allow children to use your mower.
Never allow adu]ts to use mower without
proper instructions.
Keep the area of operation clear of a!!
persons, especially small children and
pets.
_, Use mower only as the manufacturer
intended and as described in this manual
- Do not operate mower if it has been
dropped or damaged in any manner.
Always have damage repaired before
using your mower.
Do not use accessory attachments that
are not recommended by the manufac-
turer. Use of such attachments may be
hazardous.
• The blade turns when the engine is
running.
PREPARATION:
, Always thoroughly check the area to be
mowed and clear it of all stones, sticks,
wires, bones, and other foreign objects.
These objects will be thrown by the blade
and can cause severe injury.
- Always wear safety glasses or eye
shields when starting and while using
your mower.
_, Dress properly. Do not operate mower
when barefoot or wearing open sandals.
Wear only solid shoes with good traction
when mowing.
, Check fuel tank before starting engine.
Do not fill gas tank indoors, when the
engine is running or when the engine is
hot. Allow the engine to cool for several

minutesbeforefillingthegastank.Clean
offanyspilledgasolinebeforestarlingthe
engine.
Alwaysmakewheelheightadjustments
beforestadingyourmower.Never
attempttodothiswhiletheengineis
running.
Mowonlyindaylightorgoodadificiat
light.
OPERATION:
Keepyoureyesandmindonyourmower
andtheareabeingcut.Donotletother
interestsdistractyou.
Donotmowwetorslipperygrass.Never
runwhileoperatingyourmower.Always
besureofyourfooting-- keepafirm
holdonthehandlesandwalk.
, Do r_otput hands or feet near or under
rotating parts. Keep clear of the discharge
opening at a_ltimes.
._-Always stop the engine whenever you
leave or are not using your mower, or
before crossing driveways, walks, roads,
and any grave!--covered areas.
Never direct discharge of material toward
bystanders nor allow anyone near the
mower while you are operating it.
o Before cleaning, inspecting, or repairing
your mower, stop the engine and make
absolutely sure the blade and all moving
parts have stopped. Then disconnect the
spark plug wire and keep it away from the
spark plug to prevent accidental starting.
Do not continue to run your mower if you
hit a foreign object. Follow the procedure
outlined above, then repair any damage
bdore restarting and operating you
mower.
*_ Do not change the governor settings or
overspeed the engine. Engine damage or
personal injury may result.
,_ Do not operate your mower if it vibrates
abnormally. Excessive vibration is an
indication of damage; stop the engine,
safely check for the cause of vibration
and repair as required.
Do not run the engine indoors. Exhaust
fumes are dangerous.
Never cut grass by pulling the mower
towards you. Mow across the face of
slopes, never up and down or you might
lose your footing. Do not mow exces-
sively steep slopes. Use caution when
operating the mower on uneven terrain or
when changing directions -- maintain
good footing.
,, Never operate your mower without
proper guards, plates, grass catcher or
other safety devices in place.
MAINTENANCE AND STORAGE:
, Check the blade and the engine mount-
ing bolts often to be sure they are
tightened properly.
• Check all bolts, nuts and screws at
frequent intervals for proper tightness tq
be sure mower is in safe working
condition.
,, Keep all safety devices in place and
working.
® To reduce fire hazard, keep the engine
free of grass, leaves or excessive grease
and oil.
o Check grass catcher often for deteriora-
tion and wear and replace worn bags.
Use only replacement bags that are
recommended by and comply with
specifications of the manufacturer of your
mower.
• Always keep a sharp blade on your
mower.
• Allow engine to cool before storing in any
enclosure.
,, Never store mower with fuel in the tank
inside a building where fumes may reach
an open flame or an ignition source such
as a hot water heater, space heater.
clothes dryer etc.
Look for this symbol to point out important
safety precautions. It means
CAUTION!!! BECOME ALERT!!! YOUR
SAFETY tS INVOLVED.
CAUTION: Always disconnect spark piug
wire and place wire where it cannot contact
spark plug in order to prevent accidental
sfading when setting up, transporting,
adjusting or making repairs.
WARNING
The engine exhaust from this product
contains chemicals known to the State
of California to cause cancer, birth
defects, or other reproductive harm.
3
TheseaccessorieswereavaiJablewhenthis
lawnmowerwasproduced.Theyareatso
availableatmostSearsretailoutletsand
servicecenters.MostSearsstorescanalso toyourlawnmower.
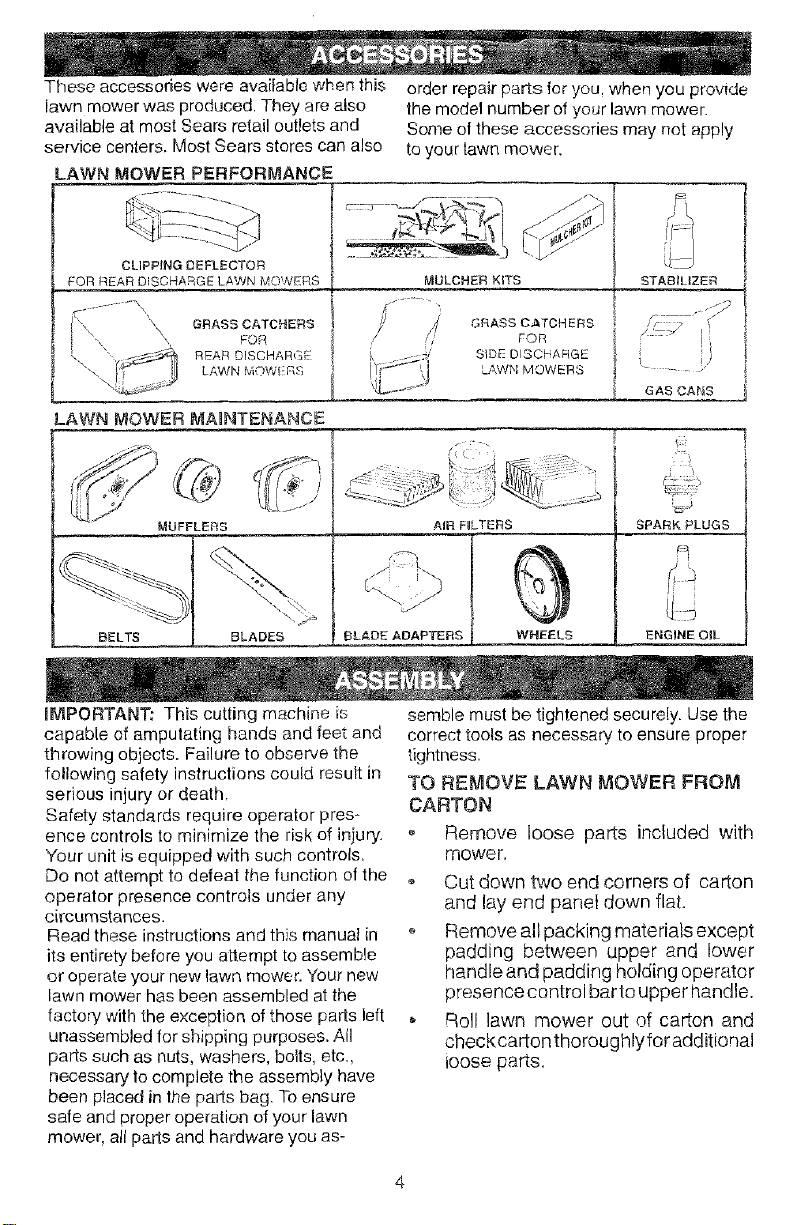
LAWN MOWER PERFORMANCE
CLIPPING DEFLECTOR
FOR REAR DISCHARGE LAWN MOWERS
order repair parts for you, when you provide
the model number of your lawn mower.
Some of these accessories may not apply
_ _ MULCHEB _TS _
LAWN MOWER _,'IA_NTENANCE
BELTS
@
MUFFLERS
BLADES
GRASS CATCHERS
FOR
SiDE DISCF ARGE
L_1,WN MOWERS
STABILIZER
GAS CANS
SPARK PLUGS
ENGINE OIL
IrdPORTANT: This cutting machine _s
capable of amputating hands and feet and
throwing objects. Failure to observe the
following safety instructions could result in
serious injury or death.
Safety standards require operator preso
ence controls to minimize the risk of injury.
Your unit is equipped with such controls.
Do not attempt to defeat the function of the
operator presence controls under any
circumstances.
Read these instructions and this manual in
its entirety before you attempt to assemble
or operate your new lawn mower. Your new
lawn mower has been assembled at the
factory with the exception of those parts left
unassembled for shipping purposes. All
parts such as nuts, washers, bolls, etc.,
necessary 1ocomplete the assembly have
been placed in the parts bag. To ensure
safe and proper operation of your lawn
mower, all parts and hardware you as-
semble must be tightened securely. Use the
correct tools as necessary to ensure proper
tightness.
TO REMOVE LAWN MOWER FROM
CARTON
o Remove loose parts included with
mower.
Cut down two end corners of carton
and lay end panel down flat.
o Remove all packing materials except
padding between upper and lower
handle and padding holding operator
presence control bar to upper handle.
Roll lawn mower out of carton and
checkcartonthoroughlyfor additional
ioose parts.
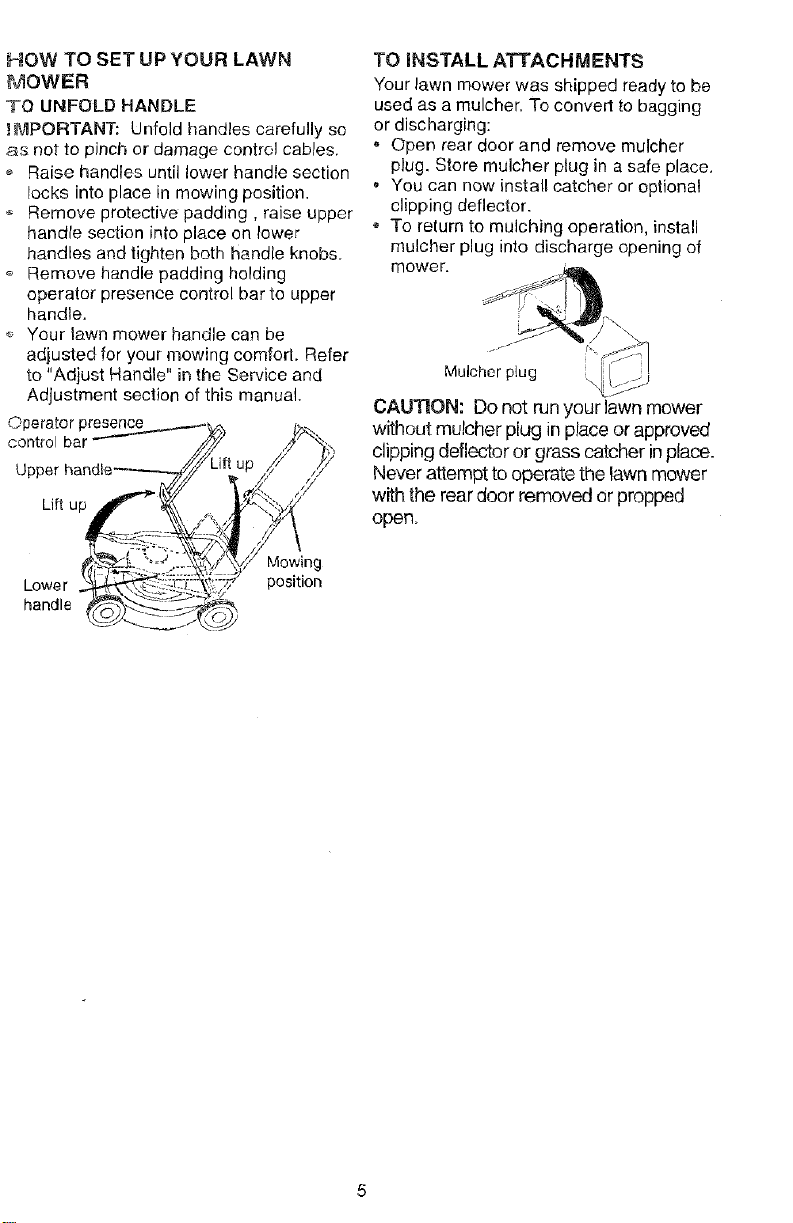
HOW TO SET UP YOUR LAWN
_d_OWER
TO UNFOLD HANDLE
t_'_PORTANT: Unfold handles carefully so
_s not to pinch or damage control cables.
o Raise handles until lower handle section
locks into place in mowing position.
Remove protective padding, raise upper
handte section into place on lower
handles and tighten both handle knobs
Remove handle padding holding
operator presence control bar to upper
handle.
,_ Your lawn mower handle can be
adjusted for your mowing comfod. Refer
to "Adjust Handle" in the Service and
Adjustment section of this manual.
Operator presence _
control bar
Upper
Lift up
Lower
handle
Mowing
position
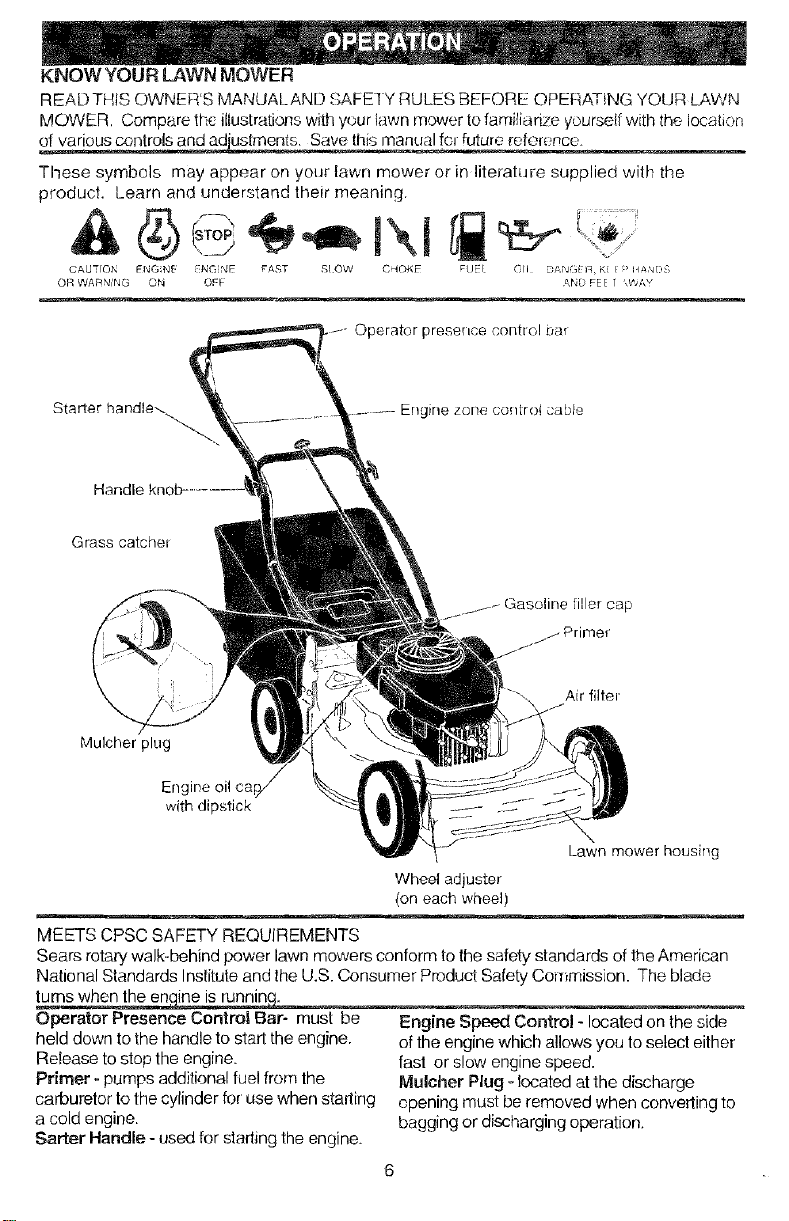
TO iNSTALL ATTACHMENTS
Your lawn mower was shipped ready to be
used as a mulcher. To convert to bagging
or discharging:
, Open rear door and remove mulcher
plug. Store mulcher plug in a safe place.
• You can now install catcher or optional
clipping deflector.
To return to mulching operation, install
mulcher plug into discharge opening of
mower. _¢_/_"_
Muleher plug ][ ;
CAUTION: Do not run your lawn mower
without mulcher plug in place or approved
clipping deflector or grass catcher in place.
Never attempt to operate the lawn mower
with the rear door removed or propped
open.
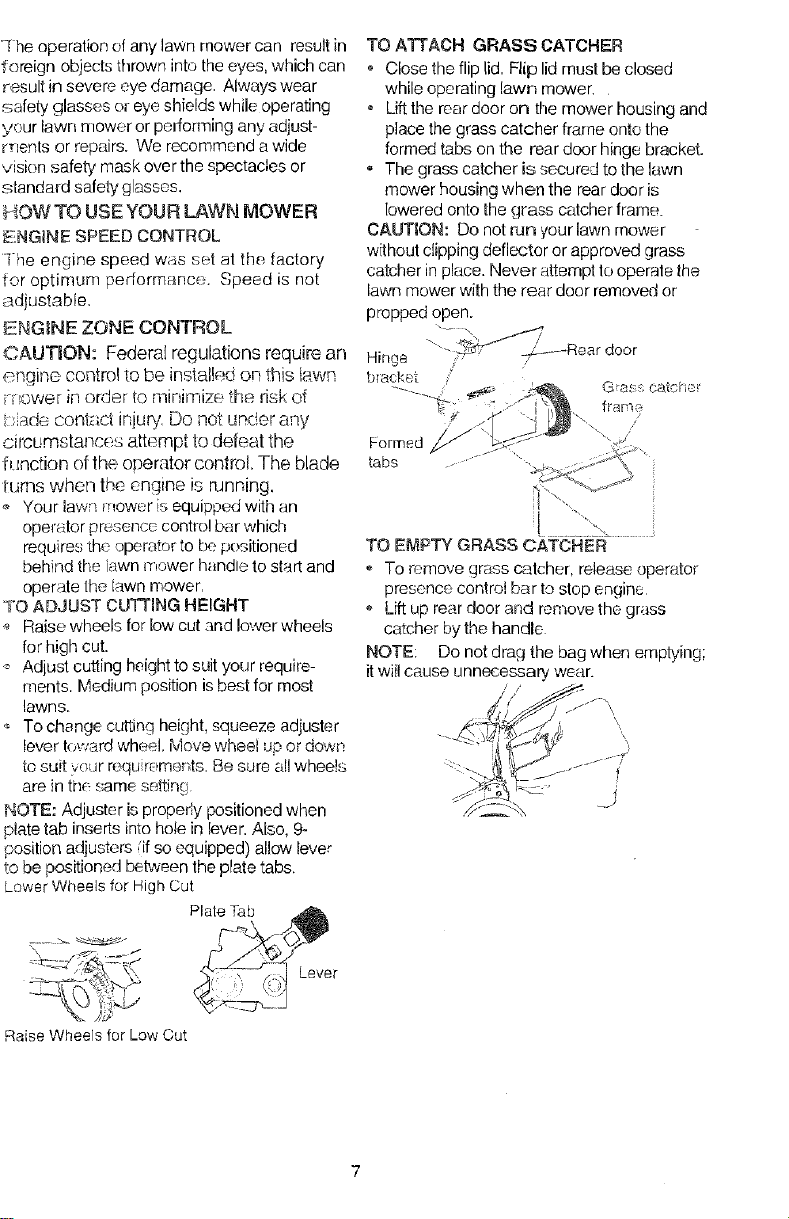
Kr'_OWYOUR LAWN MOWER
READTHtS OWNER'S MANUALAND SAFE1 Y RULES BEFORE OPERATING YOUR LAWN
MOWER, Compare th_ ilJustrations with your lawn mower to familiarize yourself with the location
of various controls and adiustmentm. Save this manual foJ future reference
These symbols may appear on your tawn mower or in literature supplied with the
product. Learn and understand their meaning.
\_j,' ,t_
CAUT[OJX ENGNE ENG '_E FAST S! OW CHOKE _U;-I ©If D,_.N _1 _q K [ _ i lAN[ S
OR WAR'qlNG ON OFF AND FEE T '_WA v
p_- Operator presence coaho! bar
Engine zone conLr(.1 cable
Handle kn
Grass catcher
Air filter
Mulcher plug
Engine oil ca
with dipstick
Lawn mower housing
Wheel adjuster
(on each wheel)
MEETS CPSC SAFETY REQUIREMENTS
Sears rotary walk.,behind power lawn mowers conform to the safety standards of the American
National Standards Institute and the U.S. Consumer Product Safety Commission. The blade
Operator Presence Control Bar- must be
held down to the handle to start the engine.
Release to stop the engine.
Primer - pumps additional fuel from the
carburetor to the cylinder bf use when starting
a cold engine.
Salter Handle - used for starling the engine.
Engine Speed Control - located on the side
of the engine which allows you to select either
fast or slow engine speed.
Muicher Plug - located atthe discharge
opening must be removed when converting to
bagging or discharging operation.
] heoperationofanylawnmowercanresultin
foreignobjectsthrownintotheeyes,whichcan
resultinsevereeyedamage.Alwayswear
safetyglassesoreyeshieldswhileoperating
yourlawnmowerorperforminganyadjust-
rTLentsorrepairs,Werecommendawide
visionsafetymaskoverthespectaclesor
standardsafetyglasses.
_4OW3"OUSEYOURLAWNMOWER
_NGINESPEEDCONTROL
Tileenginespeedw_-_ssutatthe_actory
foroptimumperformance.Speedisnot
adjustable.
ENGINEZONECONTROL
CAUTION:Federalregulationsrequirean
enqinecontroltobeinslal!edonthis_awn
_owerinordertominimizetheriskd
:lade conl_Ct iniury Do not under any
circumstances attempt to defeat the
fl_nction of the operator conlrol. The blade
turns when the engine is running.
_, Your lawn mower is equipped with an
operator pr_¢sencecontrol bar which
requires the operator to be positioned
behind the iawn mower handle to slart and
operate the lawn mower.
I"O ADJUST CUTTING HEIGHT
Raise wheels for low cut and lower wheels
for high cut.
-_ Adjust cutting heightto suityour require-
ments. Medium position isbest for most
lawns.
To change cutting height, squeeze adjuster
lever toward wheel. Move wheel up or down
to suit your requ r_merts. Be sure _[Iwheels
are in tne same seftin(_
NOTE: Adjuster is propedy positioned when
platetab inserts into hole in lever.Also, 9-
position adjusters if so equipped) allow lever
to be positioned between the plate tabs.
LowerWheels forHigh Cut
PlateTab
Lever
TO ATTACH GRASS CATCHER
o Close the flip lid, Flip lid must be closed
while operating lawn mower.
o Liftthe rear door on the mower housing and
place the grass catcher frarne onto the
formed tabs on the rear door hinge bracket.
• The grass catcher is secured to the lawn
mower housing when the rear door is
lowered onto the grass catcher frame.
CAUTION: Do not run your lawn mower
without dipping deflector or approved grass
catcher in place. Never attempt to operate the
lawn mower with the rear door removed or
propped open.
Hinge
bracket
Formed
_bs
TO EMPTY GRASS CATCHER
" To remove grass catcher, release operator
presence control bar to stop engine
o Lift up rear door and remove the grass
catcher by the handle
NOTE: Do not drag the bag when emptying;
itwilt cause unnecessary wear.
Raise Wheels for Low Cut
BEFORE STARTING ENGINE
OIL
Your lawn mower is shipped without oil inthe
engine.
,, Be sure mower islevel and area around oil
fill is dean
o Remove engine oil cap w/dipstick and fillto
the fuji line on the dipstick.
,, Use 20 ozs. of oil. For type andgrade of oil
to use. see "ENGINE" in Customer
Responsibilities section of this manual
,, Pouroil slowly. Do not overfill.
* Check oil levelbefore each use. Add oil if
needed. Fillto futl lineon dipstick.
- To read proper level, tighten engine el!cap
eachtime.
,, Reinstall engine oil cap and tighten.
_, Change the oil after every 25 hours of
operation or each season. You may need
tochange the oil more often under dusty,
di_1 conditions.
GAS
,' Fill fuet tank. Use fresh, clean, regular
unleaded gasoline with a minimum of87
octane Do not mix oil with gasoline.
Purchase fuel inquantities that can be used
within 30 days to assure fuel freshness.
WARNING: Experience indicates that
alcohol blended fue!s (called ga_ho! or
using ethanol or methanol) can attract
moisture which leads to separation and
formation of acids during storage. Acidic
gas can damage the fuel system of an
engine while in storage. To avoid engine
problems, the rue! system should be
emptied before storage of 30 days or
longer. Drain the fuel tank, start the engine
and let it run until fuel lines and carburetor
are empty. Use fresh fuel next season.
See Storage Instructions for additiona!
information. Never use engine or carbure-
tor cleaner products in fuel tank or
permanent damage may occur.
TO START ENGINE
• To start a cold engine, push primer five (5)
times before t_ing to start. Use a firm push.
This step is not usually necessary when
starting an engine which has already run for
afew minutes
• Push engine speed control lever to fast
position
Holdoperator presence centre! bar down to
the handle and pullstarter handle quickly.
Do not allow starter rope to snap back.
o To stop engine, release operator presence
control bar.
NOTE: In cooler weather it may be necessary
to repeat priming steps. Inwarmer weather
over priming may cause flooding and engine
will not start. Ifyou do flood engine, wait a few
minutes before aHemptingto start and do not
repeat priming steps.
MOWING TIPS
- Under certain conditions, such as very tal!
grass, it may be necessary to raisethe
height of cut to reduce pushin9 effort and to
keep from overloading the engine and
leaving clurr_psof grass clippings.
• For extremely heavy culling, reduce the
width of cut and raise the rear of the lawn
mower housing one (!) wheel adjuster
setting higher than the front for better
discharge of grass.
• For betl:ergrass bagging and most cutling
conditions, the engine speed should be set
in the fast position.
• When using a rear discharge lawn mower in
moist, heavy grass, clumps of cut grass
may not enter the grass catcher. Reduce
ground speed (pushing speed) and/or run
the lawn mower over the area a second
time.
ifatrail of grass clippings is lefton the right
side of a rear discharge lawn mower, mew
in aclockwise direction with a small overlap
to collect the clippings on the nex! pass.
,, Keep top ofengine around starter clear and
clean of grass clippings and chaff. This will
help engine air flow and extend engine fife.
o Pores in cloth grass catchers can become
filled with dirt and dust with use and
catchers will collect tessgrass. To prevent
this, regularly hose catchers off with water
and let dry before using.
_%_ULCHINGMOWING TIPS
_APORTANT: For best performance, keep
T_ower housing free of buitl-up grass and trash.
Olean UNDERSIDE OF MOWER HOUSING
after each use. See "C)eaning' in CUSTOMER
RESPONSIBILITIES section ofthis manual.
The special mulching blade willrecur the
grass clippings many times and reduce
them in size so that asthey fall onto the
lawn they will disperse into thegrass and
not be noticed. Also; the mulched grass will
biodegrade quickly _oprovide nutrients for
the lawn. Always mulch with your highest
engine (blade) speed asthis will provide the
best recutting action of the blades.
Avoid cutting your lawn when it is wet. Wet
grass tends to form clumps and interferes
with the mulching action. The best time to
mow your lawn is the early attemoon. At this
time [he grass has dried and the newly cut
area will not be exposed to the direct sun.
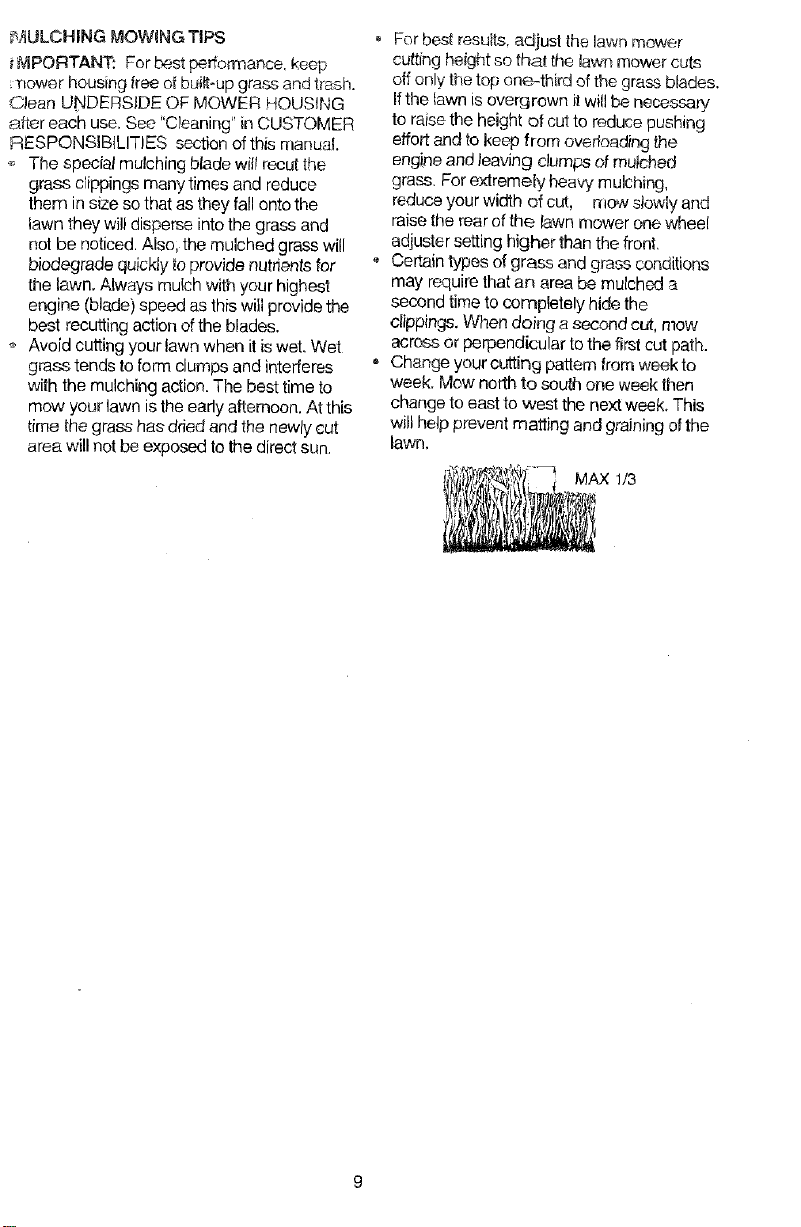
For best resuIts, adjust the lawn mower
cutting height so that the lawn mower cuts
off only the top one-third ofthe grassMades.
Ifthe fawn is overgrown it wil!be necessary
to raise the height of cut to reduce pushing
effort and to keep from overloading the
engine and leaving clumps of mulched
grass. For extremely, heavy mulching,
reduce your width of cut, mow slowly and
raisethe rear of the lawn mower one wheel
adjuster setting higher than the front.
,, Certain types of grass and grass conditions
may require that an area be mulched a
second time to completely hide the
clippings. When doing a second cut, mow
across or perpendicular to the first cut path.
, Change your cutting pattern from week to
week. Mow north to south one week then
change to east to west the next week. This
will help prevent mailing and graining ofthe
lawn.
MAX 1/3
2 - 5,e[,_ice mere ( _le_ _hen a,uer_tlr g in '_irly or dusty condiUon_
3 - Replace b_ade._ _*re o_ten wt_ mc_r_g in _*,ndy soil¸
4 - Charge 48 h_urs a_ end of s_,
GENERAL RECOMmENDATiONS
The warranty on this lawn mower does not
cover items that have been subjected te
operator abuse or negligence.To receive _u_l
value from the warranty, operator must maintain
mower as instrdcted in this manual.
Some adjustments will need to be made
periodically to properly maintain your unit,
All adjustments in the Service and
Adjustments section of this manual sheuM be
checked at least once each season.
• Once ayear, replace the spark plug, replace
air filter element and check bladefor wear. A
new spark plug and clean/new air filter
element assures proper air-fuel mixture and
helps your engine run better and lastlonger.
, Follow the maintenance schedule inthis
manual.
BEFORE EACH USE
, Check engine oil level.
Check for loose fasteners.
LUBRICATION
Keep unit well lubricated (See "LUBRICATION
CHART").
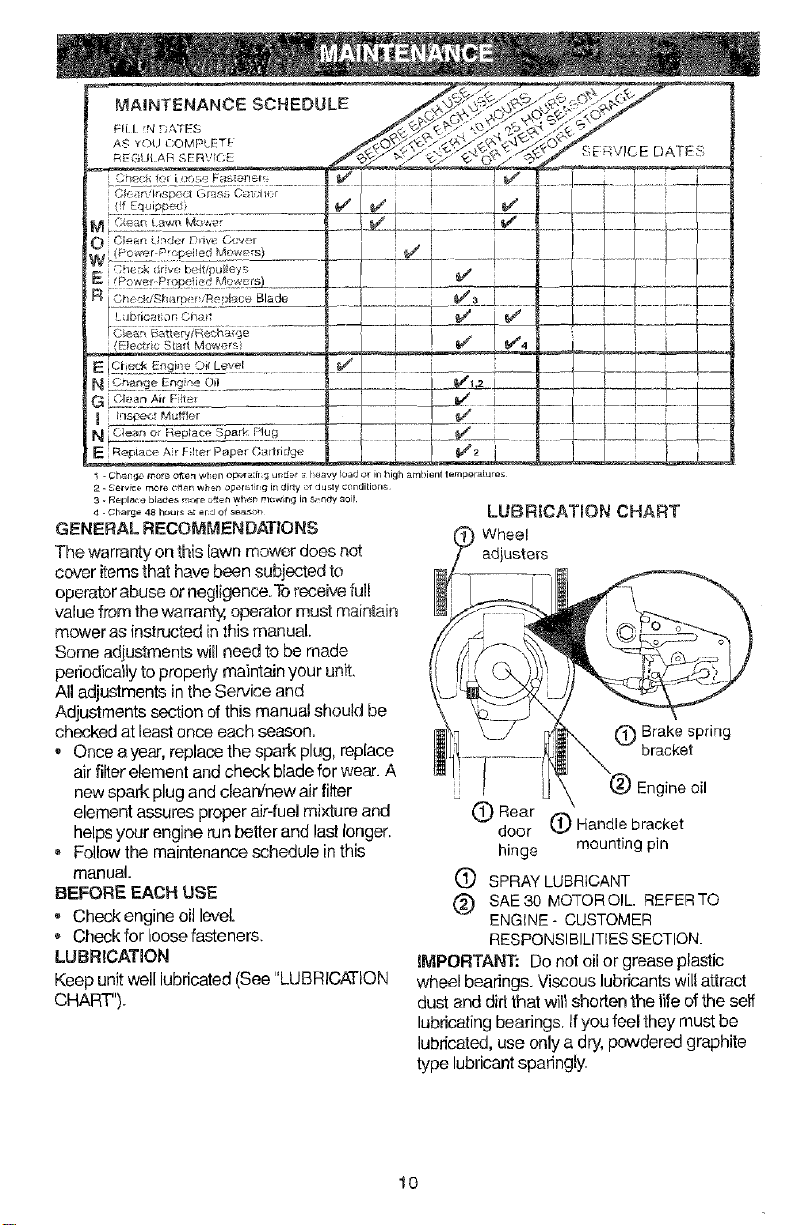
LUBRICATION CHART
Wheel
adjusters
(_ Brake spring
bracket
Engine oil
(_ Rear (_) Handle bracket
door
hinge mounting pin
(_ SPRAY LUBRICANT
(_) SAE30 MQTOROIL REFERTQ
ENGINE- CUSTOMER
RESPONSIBILITIES SECTION.
_PORTANT: Do not oil or grease plastic
wheel bearings. Viscous lubricants will attract
dust and dirt that will shorten the life of the self
lubricating bearings Ifyou feel they must be
lubricated, use only a dry, powdered graphite
type lubricant sparingly.
10
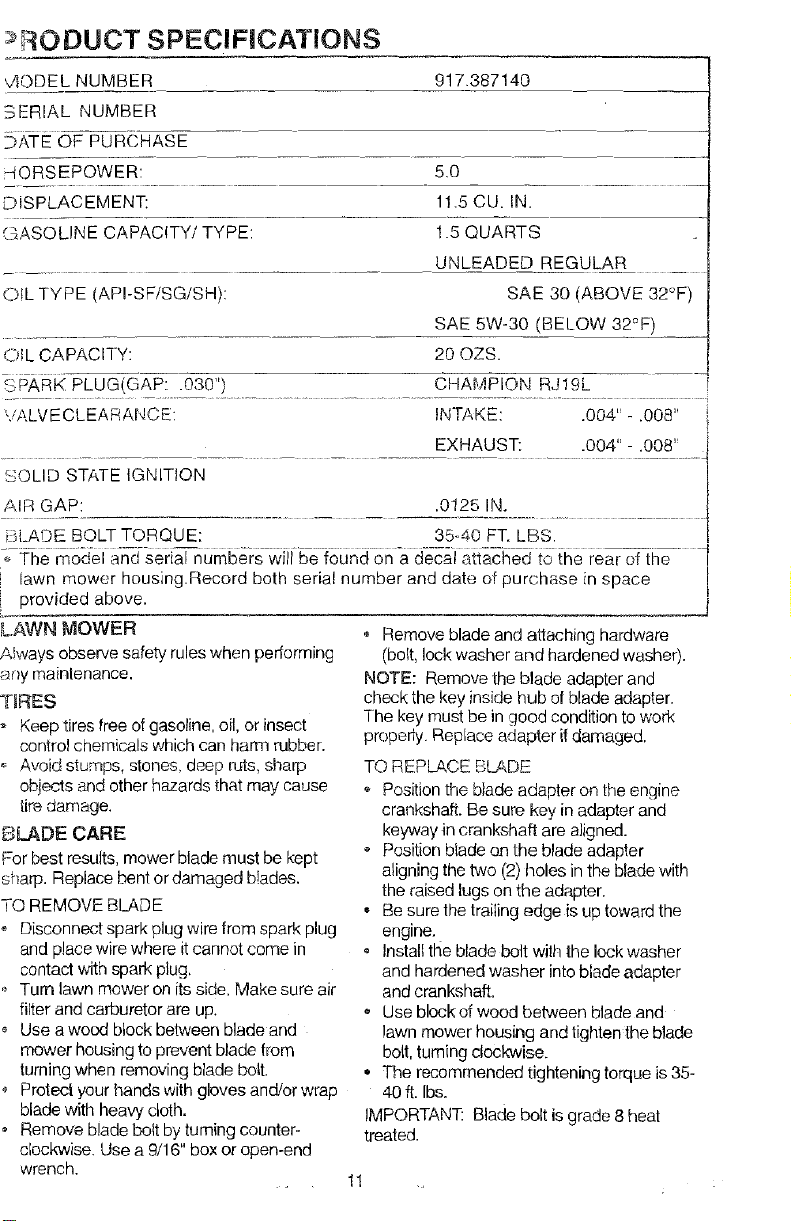
ODUCT SPECIFICATIONS
,.4ODE L NUMBER 917.387140
BERIAL NUMBER
_ATE OF PURCHASE
HORSEPOWER: 5.0
DISPLACEMENT: 11.5 CU. IN.
_.SASOLINE CAPACITY! TYPE: 1.5 QUARTS
UNLEADED REGULAR
OiL TYPE (API-SFtSG/SH): SAE 30 (ABOVE 32°F)
SAE 5W-30 (BELOW 32°F)
OIL CAPACITY: 20 OZS.
CHAMPIONRJ gL
SPAR K ..........................................
'v'ALVECLEARANCE: INTAKE: .004" - ,008"
EXHAUST: .004" - ,008"
c,(o DLID STATE iGNITION
AIR GAP: ,0125 IN.
}LADE BOLT TORQUE: 35-40 FT. LBS, . .......
7%e model an-d-seria_num6ers will be:foun8 on a dec-aiattached to ihe rear o--fqhe
lawn mower housing.Record both serial number and date of purchase in space
L provided above.
LAWN MOWER
AIways observe sdety rules when pedorming
any maintenance,
T_RES
,, Keep tires tree of gasoline, oil, or insect
control chemicals which can harm rubber.
,, Avoid stumps, stones, deep ruts, sharp
obiects and other hazards that may cause
tire damage.
BLADE CARE
_or best results, mower blade must be kept
sharp. Replace bent or damaged blades.
TO REMOVE BLADE
Disconnect spark plug wire from spark plug
and place wire where itcannot come in
contact with spark plug,
Turn lawn mower on its side, Make sure air
filter and carburetor are up.
Use a wood block between blade and
mower housing to prevent blade (tom
turning when removing blade bolt.
• Protect your hands with gloves and!or wrap
blade with heavy cloth.
• Remove blade bolt by tuming counter-
clockwise. Use a 9/16" box or open-end
wrench.
Remove blade and attaching hardware
(bolt, bck washer and hardened washer).
NOTE: Remove the blade adapter and
check the key inside hub of blade adapter.
The key must be in good condition to work
properly. Replace adapter it damaged,
TQ REPLACE BLADE
_. Position the blade adapter o{_the engine
crankshaft. Be sure key in adapter and
keyway Jncrankshaft are aligned.
Position biade on the blade adapter
aligning the two (2) holes in the blade with
the raised lugs on the adapter,
• Be sure the trailing edge is up toward the
engine.
• Install the Made bo_twith the lock washer
and hardened washer into blade adapter
and crankshait.
Use block of wood belween blade and
lawn mower housing and tighten the Made
bo_t,tuming dock'wise.
• The recommended tightening torque is 35-
40 ft. Ibs.
IMPORTANT: Blade bolt is grade 8 heat
treated.
1!
NOTE:Wedonotrecommendsharpening
b_ade-butifyou do, be sure the blade is
balanced.
TO SHARPEN BLADE
Care should be taken to keep the blade
balanced. An unbalanced blade wilt cause
eventual damage to lawn mower orengine
,, The blade can be sharpened with a file or
on a grinding wheel. Do not attempt to
sharpen while on the mower.
• To check blade balance, drive a nail intoa
beam or wall. Leave about one inchof the
straight nail exposed° Place center hole of
blade overthe head of the nail. If blade is
balanced, it should remain in a horizontal
position. Ifeither end of the blade moves
downward, sharpen the heavy end until the
blade is balanced.
GRASS CATCHER
• The grass catcher may be hosed with
water, but must be dry when used.
,, Check your grass catcher often for damage
or deterioration. Through normal use itwill
wear. Ifcatcher needs replacing, replace
only with a manufacturer approved
replacement catcher. Give the lawn mower
model number when ordering.
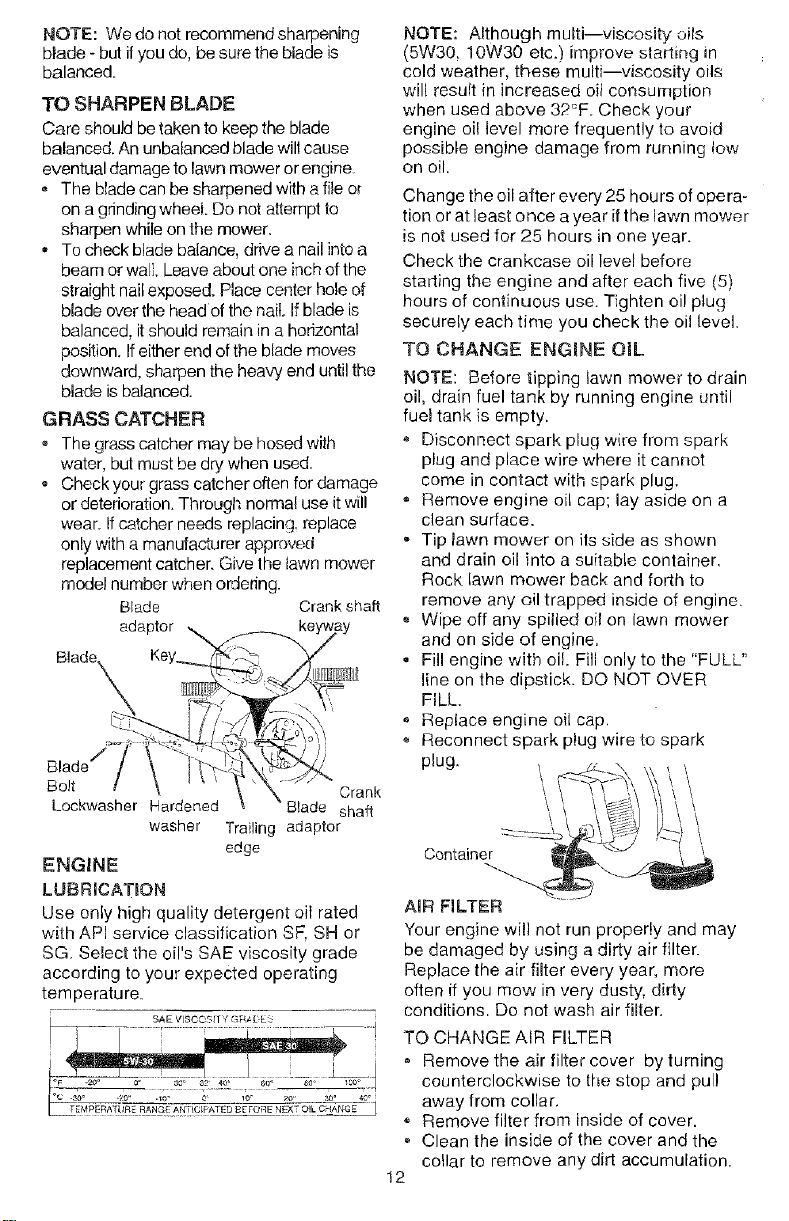
Blade Crank shaft
adaptor ,, keyway
\
\ ®
,ado
Bolt / \ I'ki _'_,'_.._-sg/_,
-- \ \ Crank
Lockwasher Hardened Blade shaft
washer Trailing adaptor
edge
ENGINE
LUBRICATION
Use only high quality detergent oit rated
with API service classification SF, SH or
SG Select the oil's SAE viscosity grade
according to your expected operating
temperature.
L-- SAE VISC ©r-t T'/" GR,L[ E: =
NOTE: Although multi--viscosity oils
(5W30 10W30 etc.) improve slatting m
cold weather, these multi--viscosity oils
will result in increased oil consumption
when used above 32°F. Check your
engine oil level more frequently to avoid
possible engine damage from running tow
on oil.
Change the oil after every 25 hours of opera-
tion or at least once ayear if the lawn mower
is not used for 25 hours in one year.
Check the crankcase oil level before
starting the engine and after each five (5)
hours of continuous use. Tighten oil plug
securely each time you check the oil level.
TO CHANGE ENGINE OIL
NOTE: Before tipping lawn mower to drain
oil, drain fuel tank by running engine until
fuel tank is empty.
• Disconnect spark plug wire from spark
plug and place wire where it cannot
come in contact with spark plug.
Remove engine oil cap; lay aside on a
clean surface.
, Tip lawn mower on its side as shown
and drain oil into a suitable container.
Rock lawn mower back and forth to
remove any oil trapped inside of engine.
Wipe off any spilled oil on lawn mower
and on side of engine.
• Fill engine with oil. Fill only to the "FULL"
line on the dipstick. DO NOT OVER
FILL.
Replace engine oil cap,
Reconnect spark ptug wire to spark
plug.
\
\
\
\
Container
AIR FILTER
Your engine will not run properly and may
be damaged by using a dirty air filter.
Replace the air filter every year, more
often if you mow in very dusty, dirty
conditions. Do not wash air filter.
TO CHANGE AIR FILTER
= Remove the air filter cover by turning
counterclockwise to the stop and pull
away from collar.
Remove filter from inside of cover.
Clean the inside of the cover and the
collar to remove any dirt accumulation.
12
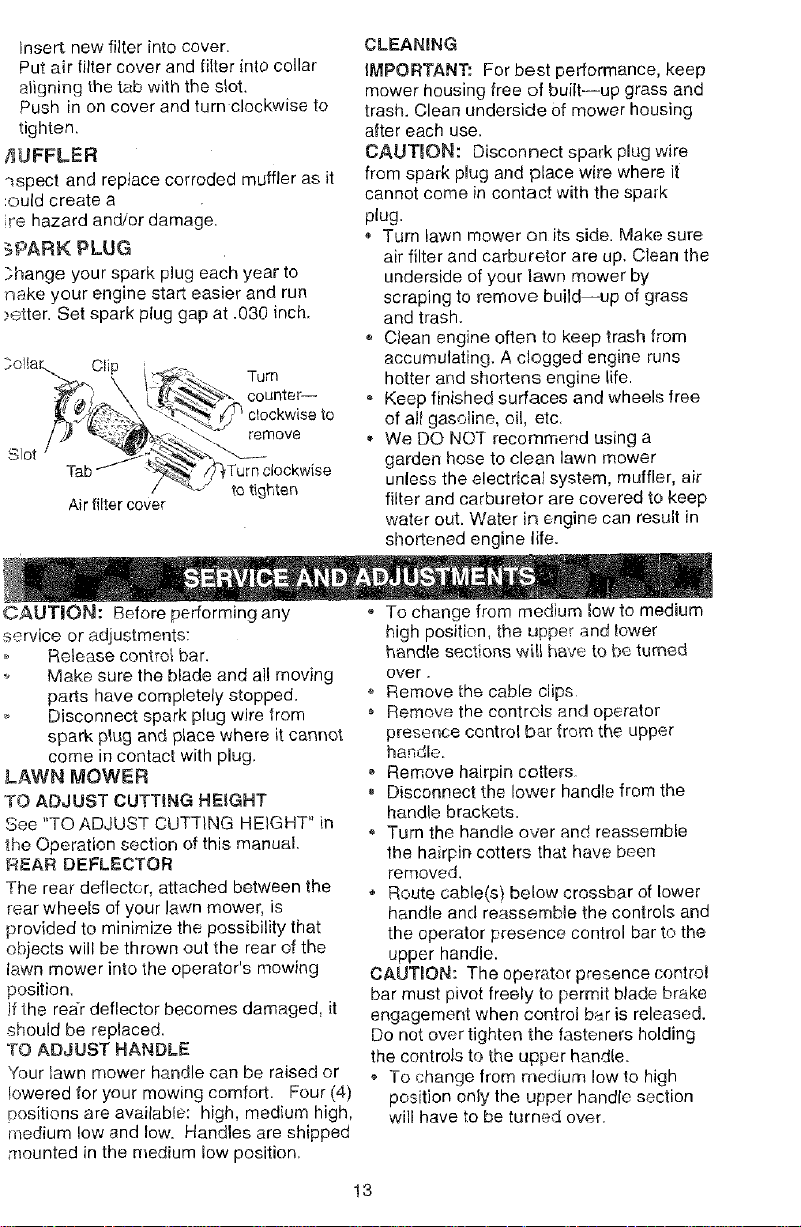
insertnewfilterintocover.
Putairtiltercoverandiilter into collar
aligning the tab with the slot,
Push in on cover and turn clockwise to
tighten,
13UFFLER
qspect and reptace corroded muffler as it
:ould create a
re hazard and/or damage.
-}PARK PLUG
_,hange your spark plug each year to
hake your engine start easier and run
)attar. Set spark plug gap at .030 inch.
Clip _-- m
Tu
. oouoter--
/ /f '"4_:_':imX_-:.-"--. remove
Tab_ '_! /Y}Turn clockwise
/ "_J to tighten
Air tilter cover
CLEANING
IMPORTANT." For best performance, keep
mower housing free of built--up grass and
trash. Clean underside Ofmower housing
after each use.
CAUTUON: Disconnect spark plug wire
from spark plug and place wire where it
cannot come in contact with the spark
plug.
Turn lawn mower on its side. Make sure
air filter and carburetor are up. Clean the
underside of your lawn mower by
scraping to remove build--up of grass
and trash.
o Clean engine often to keep trash from
accumulating. A clogged engine runs
hotter and shortens engine life.
Keep finished surfaces and wheels free
of all gasoline, oil, etc,
• We DO NOT recommend using a
garden hose to clean lawn mower
unless the electrical system, muffler, air
filter and carburetor are covered to keep
water out. Water ir_engine can result in
shortened engine life.
CAUTION: Before performing any
service or adjustments:
Release control bar.
Make sure the blade and atl moving
parts have completely stopped.
Disconnect spark plug wire from
spark plug and place where it cannot
come in contact with plug.
LAWN IVIOWER
TO ADJUST CUTTING HEIGHT
See "TO ADJUST CUTTING HEIGHT" in
the Operation section of this manual,
RE:AR DEFLECTOR
The rear deflector, attached between the
rear wheels of your lawn mower, is
provided to minimize the possibility that
objects will be thrown out the rear of the
lawn mower into the operator's mowing
position.
]fthe rear deflector becomes damaged, it
should be replaced.
TO ADJUST HANDLE
Your lawn mower handle can be raised or
lowered for your mowing comfort. Four (4)
Positions are available: high, medium high,
medium tow and low. Handles are shipped
mounted in the medium low position.
To change from medium low to medium
high position, the upper and lower
handle sections wilt ha_e to be turned
over,
Remove the cable clips
Remove the controls and operator
presence control bar from the upper
handle.
Remove hairpin cotters
Disconnect the lower handle from the
handle brackets.
o Turn the handle over and reassemble
the hairpin cotters that have been
removed.
Route cable(s} below crossbar of lower
handle and reassembie the controls and
the operator presence control bar to the
upper handle.
CAUTION: The operator presence control
bar must pivot freely to permit blade brake
engagement when control b_r is released.
Do not over tighten the fasteners holding
the controls to the upper handle.
To change from medium low to high
position only the upper handle section
will have to be turned over.
!3
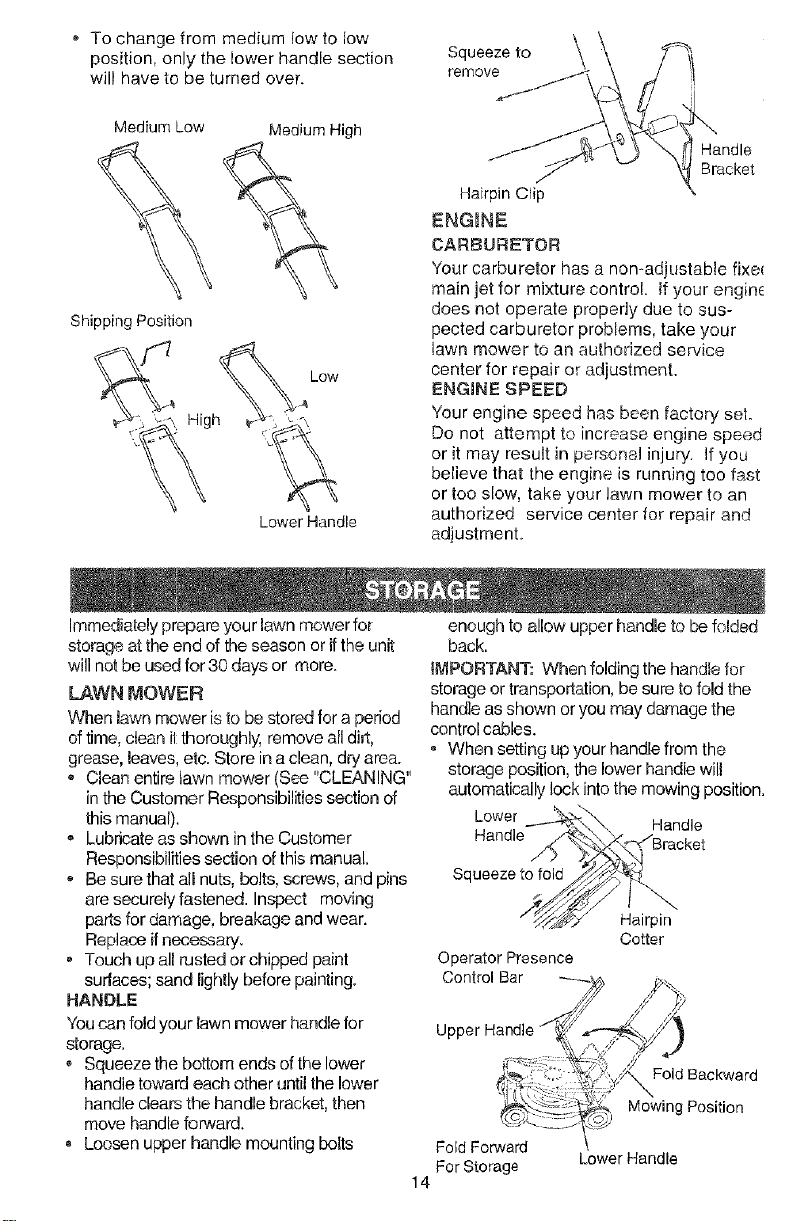
To change from medium low to low
position, only the lower handle section
will have to be turned over.
Medium Low
Shipping Position
Medium High
Low
High
Lower Handle
Squeeze to \\
remove
Handle
Bracket
Hairpin Clip
ENGINE
CARBURETOR
Your carburetor has a non-adiustabie fixe_
main jet for mixture control. If your engin_
does not operate properly due to sus-
pected carburetor problems, take your
lawn mower to an authorized service
center for repair or adjustment.
ENGINE SPEED
Your engine speed has been factory set.
Do not attempt to increase engine speed
or it may result in persona] injury. If you
believe that the engine is running too fast
or too slow, take your lawn mower to an
authorized service center for repair and
adjustment.
Immediately prepare your lawn mower for
storage at the end of the season or if the unit
will not be used for30 days or more.
LAWN MOWER
When lawn mower [sto be stored for a period
of time, clean i1:thorougH},; remove all dirt,
grease, leaves, etc. Store in a clean, dry area.
,, Clean entire tawn mower (See "CLEANING"
in the Customer Responsibilities section of
this manual).
® Lubricate as shown in the Customer
Responsibilities section of this manual,
o Be sure that all nuts, bolts, screws, and pins
are securely fastened. Inspect moving
parts for damage, breakage and wear.
Replace if necessary.
Touch up all rusted or chipped paint
sudaces; sand tightlybefore painting.
HANOLE
You can fold your lawn mower handle for
storage.
Squeeze the bottom ends ofthe lower
handle toward each other until the lower
handle clears the handle bracket, then
move handle forward.
Loosen upper handle mounting bolts
enough to allow upper handle to be folded
back.
IMPORTANT: When folding the handle for
storage or transportation, be sure to fold the
handle as shown or you may damage the
control cables.
When setting up your handle from the
storage position, the lower handle will
automatically lock into the mowing position.
Lower ".,
.and,e
Handle /'%,_,,<b,._-_"_ ' .
_,, _racKe[
Squeeze to told Z_-/_:_4
/ "_/_2_..:/ Hairpin
Cotter
Operator Presence
Control Bar
Upper Handle
Fold Forward
For Storage
14
Fold Backward
Mowing Position
Lower Handle
_ENGINE
FUEL SYSTEM
IIMPORTANT: Itis important to prevent bum
deposits from forming in essential juel system
3arts such ascarburetor, fuel filter fuel hose,
or iank during storabe, Also, experience
indicates that alcolol blinded fuels (called
#asoho[ or using ethanol or meth_nol} can
:_tlracf moisture which leads te separation and
_ormation cf acids during storagc ,Acidicgas
can damage the fuel system of an engine
while in storage.
Drain the fuel tank
Start the engine and letit run until the fuel
lines and carburetor are emply.
Never use engine or carburetor cleaner
products inthe,fuel tank or permanent
damage may _ccur.
_, Use fresh fu,.I next season
b4OTE: Fuel slabiiizer isan acr-eptable
a_ternative in minimizinq the formation of fuel
gum deposits du_in9storage, Add stabilizer to
gasoline in fuel tank or .,_foragecontainer.
Always follow the mix ratio found on stabilizer
_:onlainer. Run engine at least 10 minuies
after adding stabilizer to a!low the stabilizer to
reach the carburetor. Do nor drain the gas
Lankand carburetor if using fuel stabilizer.
P_NGINEOIL
Drain oil (with engine warm) and replace with
dean engine oil. (See "ENGINE' in the
Customer Responsibilities section of this
manual).
TROUBLESHOOTING CHART
CYLINDER
- Remove spark plug.
Pour one ounce (29 ml) of oil through spark
plug hole into cylinder.
• Pullstarter handle slowly afew times to
distribute of!,
,, Replace with new spark plug,
OTHER
. Do not store gasoline from one season to
another,
Replace },our gasoline can ifyour can starts
to rust Rust an(for dirt in your gasoline will
cause problems.
o Ifpos_sible,store your unit indoors and cover
itto give protection from dust and dirt.
,, Cover yoer unit with a suitable protective
cover that does not retain moisture, Do not
use pia:;tic. Pk_.sticcannot breatJqewhich
allows condensation to form and will cause
your unit to rust.
IMPORTANT: Never cover mower while
engine &nde×haust areas are stillwarm.
CAUTION: Nevet store lhe lawn mower with
gasoline in the tank inside a building where
fumes may reach an open flame or spark,
Allow the engitle to coot before stoffng in any
enclosure.
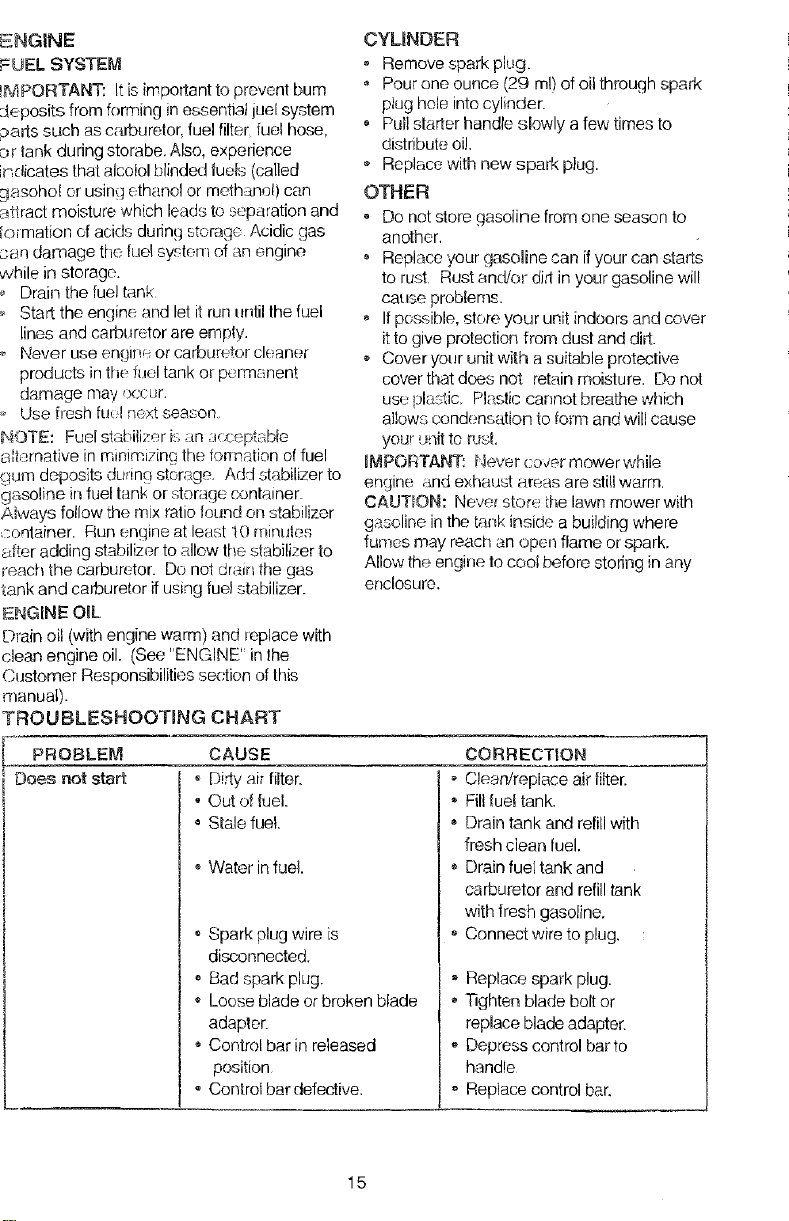
PROBLEM CAUSE
Does not start • Di_y aft filter.
, Out of fuel.
,, Stale fuel.
®Water infuel
• Spark plug wire is
dic_onnected,
Bad spark plug.
Loose blade or broken blade
adapter.
,, Confrol bar in released
position
- Control bar defective.
CORRECTION
o C!eaWreplace air filter.
- Fillfuel tank,
• Drain tank and refillwith
fresh clean fuel,
® Drain fuel tank and
carburetor and refilltank
with fresh gasoline.
,, Connect wire to plug,
, Replace spark plug.
, q_ghtenblade bolt or
replace blade adapter.
,, Depress control barto
handle
o Replace control bar.
15
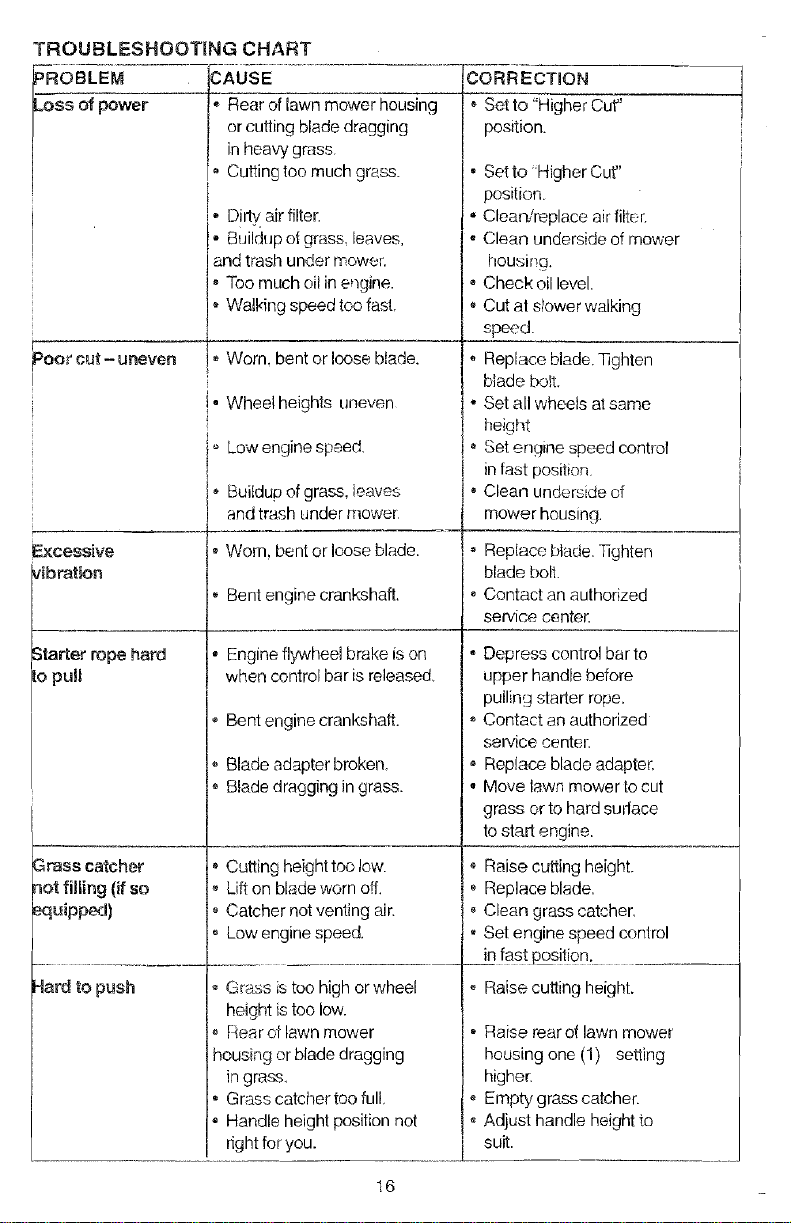
TROUBLESHOOTMNGCHART
, EM............... AUSE..............................
ofpaw I" Rearoflawn hous
! I or cutting blade dragging
| | in heavy grass,
/ I'_Cutting too much grass.
:_00_ cut --unGve_
Starlet rope hard
to pu!l
Grass catcher
not lilting (if so
_uipped)
_. Dirtyair filter.
!" Buiidup o| grass leaves,
and trash under mower.
• Too much oi n eng ne.
, Walking speed too fast,
_Wom, bent or loose blade.
!, Wheelheights uneven
i° Low engine speed
Buildup of grass, leaves
and trash under mower
i
_ Worn, bent or loose blade.
Bent engine crankshaft,
Engine flywheel brake is on
when control bar is released
• Bent engine crankshaft.
Blade adapter broken
Blade dragging in grass.
Cutting height too low.
Lift on blade worn off,
Catcher not venting air.
Low engine speed,
CORRECTION
• Set to "Higher Cut"
position.
• Set to 'Higher Cut"
position.
" CleaNreplace air filter.
• Clean underside of mower
housing.
• Check oil level,
Cut al stower walking
spee.d
• Replace blade,qqghten
blade bolt.
- Set all wheels at same
height
Set engine speed control
in fast position
• Clean underside of
mower housing.
• Replace blade. Tighten
blade bolt.
, Contact an authorized
service centeK
Depress control barto
upper handle before
pulling starter rope.
,, Contact an authorized
service center.
. Replace blade adapter.
. Move lawn mower to cut
grass or to hard subtace
to start engine.
Raise cutting height.
• Replace blade.
oClean grass catcher,
• Set engine speed control
........................................ in[a#t pos!ti_n..........
Hard to push
i
Grass istoo high or wheel
height istoo low.
o Rearof lawn mower
housing or blade dragging
in grass.
Grass catcher too full,
i
• Handle height position not
right for you.
, Raise cutting height.
- Raise reard lawn mower
housing one (1) setting
higher.
Empty grass catcher.
Adjust handle height to
suit.
16
_iRAFTSMAN Model No. 917.387140
_arantia 17 Especificaciones del Producte 25
',oglas de Seguridad 17 Servicio y Adjustes 27
4,ontaje 19 Almacenamiento 28
)peraci6n 20 Identificacion de problema_: 30
_ntenirniento 24 PaRes de repues_o Vea el manual
'rograma de Mar tenimiento 24 ingles del rJueflo
Orden de ParSes Cor;tratapa
:_ARANTiA LiMITADf-', DE-"DOS A_IOS PARA LA SEGADORAA MOTOR CRAFTSMAN
_or dos (2) a_os, a partir de la feoha de compra, cuando esta Segadora Craftsman se mantenga lubdque
_ztinesegQn las inst[ucciones pare !a operaci(_qy el n_ntenimiento en el manual del dLef_o,Sears
eparara, gratis rode defecto er_elmaterial y la mane de obra.
:;i !a Segadora Craftsman se usa pare fines cornerdales o de arriendo, esta garant[a s6!o se aplica per
_oventa (90) diae a partir de la techa de compra.
:/eta Garantia no cubre:
Articulos qua se desgastan durante el use normal talescome las cuchillas segadoras rotatorias, los
adaptadores de la cucnitia, las correas, los filtros de aire y las bujias.
Reparaciones neceearias debido al abuse o ala negiigencia dei operador, incluy_ndose a los
ciggeSales doblados y ala faita de mantenimiento (:letequipo segt_nlas instrucciones que se induyen
en e! manual del due5o.
_L SERVICiQ DE GARANTiA ESTA DISPONIBLE al devoiver la segadpra a motor Craftsman aJcentre/
Jepar_rnento de servicio Sears mas cercano en los estados unidos. Esta garantla se aplica sotamente
_]ientras el producto este en use en los estados unidos.
_:_staGarantia le otorga derechos iegales especificos, y puede que tambien tenga otros derechos que
zarian de estado a estado
_;ears, Roebuck and Co., D/8I ,%_/AHoftman Estates IL 60179 USA
_es estandrares de seguridad exigen la presencia
:]el operator en los controles para reducir a un
_inimo el riesgo de lesionarse. S u unidad viene
aquipada con dichos centroles. Per ningun motive
:ratedel eliminar la tuncion de los controies que
axigen la presencia del operador.
ENTRENAM|ENTO:
o Lea este manual del eperador
cuidadosamel_le Familiaricese con los
contloles y aprenda a opemr su segadora en
[orma adecuad& Aprenda a parar su
segadora _apidamente.
No permita qua los niecesusen su se_adora.
Nunca peF,-qitaque los adultos operen la
segadora sinc_n[ar con las instrucciones
adecuada&
_, Mantenga el _rea de operaci6n despejada
de gente, especialmente de nihos peque_os
y de an]males dom_stioos.
._ Use la segadora soiamente pare los
lines propuestos per el labricante y
segun las explicaniones descritas en
este manual.
No opere Iasegado'a si se ha ca[do o da_ado
en cualquiera :loire& Siempre repare los daSos
antes de ue_rta.
o No use accesorios que no hayan side
recomendados per el fabric,ante. El use de
diehos accesorios puede ser peligroso.
- La cuchilla gira cuando el motor estA
funcionando.
PREPARAC!ON:
• Siempre revise cuidadosamente el Area que
se vaa segar y desp6jela de todas las piedras,
palos, alambres, huesos y otros
obietos extraSos. Estos objetos
saran lanzados con la cuchitla y pueden
prcducir lesiones graves.
o Siempre usa anteojos de segufidad o
protectores de ojos cuando arranque y dlJ-
rante el tiempo que use la segadora.
Vfstase en forma adecuada. No opere la
segadora sin zapatos o con sandalias
abiertas. Use solamente zapatos s61idoscon
buena _acci6n cuando siegue.
t7
Reviseelestanquedecombustibleantesde
bacerarrancarelmotor.Noliensetestanque
degasotinaenrecintoscerrados,
nieuandoeimotorestafuncionandoocuando
estacaliente.Permitaqueetmotorseenffie
pervariesminutesantesdetlenafeiestanque
degasolina.Limpietodalagasolina
derramadaantesdehacerarrancarelmeier.
Siemprehagalosajustesdeaturadelas
ruedasantesdehacerarrancarsu
segadoraNuncatratedehaceresto
mientrasquaelmotorestafuncionando.
Siegues!empreduranteeld[ao_:onbuena
luzartificial.
OPERACI6N:
- Mantengasusojosysumenreenla
segadorayenelareaqueseestAcortando,
Nopermitaqueotrosinteresestodistraigan.
• Nocortecespedmojadooresba!oeo.Nunca
corramientrasest6operandosusegadora.
SiempreasegOresedemantenerelequilibrio
-mantengaelmangoagarradofirmementey
camine.
• Nopongalasmanesolospisscercaodebajo
delaspartesrotatorias.Mantengase
alejadodelaaberturadedescargaentodo
memento.
• Siempre pare e! motor cuando se vaya
oeuando no est_ usando su segadora, o
antes de atravesar las entradas para autos,
los senderos, caminos y Areas cubiertas de
ripio.
Nunca dirija la descarga del material hacia
los espectadoree ni permita a nadie cerca de
la segadora mientras la esta operando,
• Antes de limpiar, inspescionar o de reparar I
a segadora, pare ei motor y este
completamente seguro de que la cuchilla y
qua todas las partes qua se mueven se
hayan detenido Luego, desconecte el
alambre de la bujia y mantengalo a!ejado de
esta para evitar el arranque per accidents.
• No contlnL3ehaciendo funcionar su segadora
si le pega a un objeto extra_o. Siga el
procedimiento descrito antefiormente, luego
rapare cualquier dafio antes de volver a
arrancar y de operar su segadora
• No cambie los ajustes del regulador o
hagaque el motor ands a una velocidad
excesiva. Se pueden producir daSos en el
motor y I esiones personates.
• No opere su segadora si vibra fuera de Io
normal. La vibraci6n exeesiva es una
indieaci6n de daf_o; pare el motor, revise en
forma segura la causa de la vibraci6n y haga
las reparaciones segOn sea necesario.
No haga funcionar el motor en
recintoseerrados. Los gases de escape son
peligrosos.
- Nunca corte et c_sped tirando la segadora
hacia usted, Siegue a traves de lu cara de
]as pendientes, nunca ha_Ja arfiba o hacia
abate pues puede perder el equi!ibrio No
siegue pendientes demasiado em_oinadas
Tonga euidado cuando opera la segadora en
terreno disparate e cuando cambie de
airecci6n mantenga un buen equflibbo.
o J'4uncaopere la segadora sin las
protecdones adecuadas, las planchas, el
recogedor de eesped y otros dispositivos de
seguridad en su lugar.
MANTENIMIENTO Y ALMACENAM]EN-
TO:
Revise ta cuchilla y los pen_os de montaje
del motor a menudo para asegurarse qua
estan apretados en la forma adecuada.
. Revise todos los pernos, tuercas y tornillos a
intervalos frecuentes, para vedficar si estAn
apretados er_ forma adscuada, y
asegurarseque la segadora se encuentra en
condiciones de funcionamiento seguro.
. Mantenga redes los dispositivos de seguridad
en su lugar y listos para funcionar.
• Para reducir el peligro de incendio,
mantenga el motor sin c_;sped, hojas y grasa
o aceite en exceso.
Revise el reoogedor de c_sped a menudo
para verificar si hay deterioro y desgaste y
cambie las bolsas desgastadas. Use
solamente las botsas de repueeto
recomendadas per el fabricante de su
segadora o que cumplen con las
especificaciones de _.ste.
Siempre mantenga LJnacuchilla afilada en su
segadora
Siempre permita que el motor se enfrie
antes de guardarla en cualquier recinto
eerrado.
o Nunca guards la segadora con combustible
en el estanque dentro de un edificio endonde
los gases pueden alcanzar una llama
expuesta o una fuente de ignici6n, tal come el
calentador de agua, la estula de
calefacci6n, la seeadora de ropa, etc.
PREOAUCl6N: Siempre desconecte el
alambre de la bujia y #6ngalo donde no
pueda entrar en contacto con ta bujia, para
evitar el arranque per accidente, durante la
preparaciSn, el transporte, el ajuste o
cuando se hacen reparaciones.
PRECAUC!6N; Es conocido per ei Estado de
California que los gases de escape del motor de
este produetor contienen quimicos los cuales a
ciertos niveles, pueden ocaeionar, cancer,
defectos de nacimiento, y otros dahos al sistema
reproductive,
18
Estos accesorios estaban dispor _ibles cuat _do
se produjo la eegado_'a Tambien eslal
dispenibles on la m_:_yor{ade las tiendas de
Sears yen!oscent_osdeselvic_o lamay_r(a
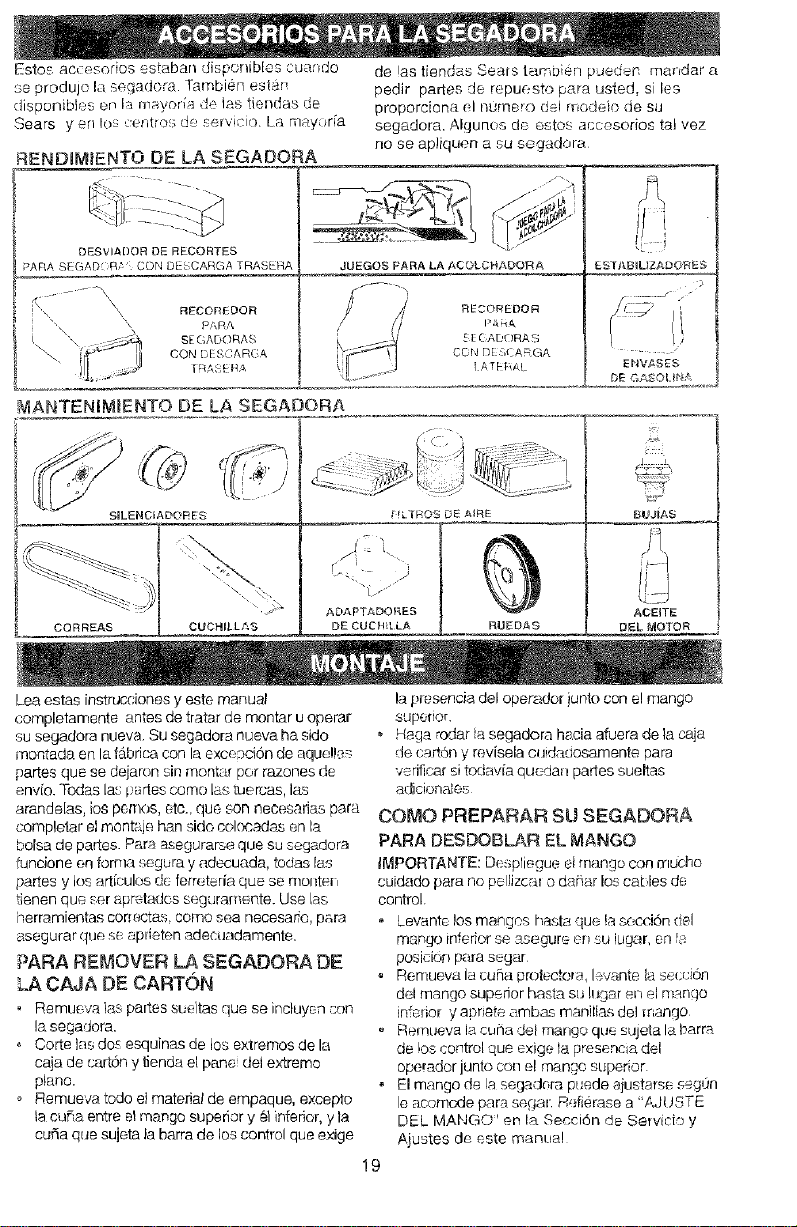
RENDmMtENTO DE LA SEGADORA
DESVli_DOR DE RECORTES
PARA SEGAD :R_' CON DESCARGA TRASERA
RECOR£DOR
PARA
SE GADORAS
CON [3ESCAR( A
TRAS_RA
de !as tiendas Sears l_4rnbien pdeden ma_dar a
pedir partes de repuesto pars usted, si lea
proporciona el nt_'rnero del modeio de su
segadora. Algunos do estos acoosorios tel vez
no se apliquen a su segadora
=:=,--,--d_-_ ,-
JUEGOS PARA LA ACOLCaAL_ORA
RECOREDOR
_E GADORAS
CON DE SCARGA
I A rE_AL
I£S] AIBILIL/'.DONE S
I,,
i!
Ei'_VASES
Lea estas instrucciones y este manual
completameate antes de tratar de montar uoperar
su segadora nueva. Su segadora nueva ha side
montada en la fC.bricacon la exceacion de sque!Iss
partes qua se dejaE)n sin montar per razones de
env[o. Todas las _ertes come las _uercas, I_£s
arande[as, ios pemos, _4c. qua son necesarias pars
complelar el mont_je hen side colocadas en la
bolsa de partes. Pars asegurarse que su segasdora
funcione en fom_a sogera y adecuada, todas las
[_artesy los art[culos de ferreteria qua se molite[i
flenen qua ser apretados segursmente. Use Las
herramientas cor_ectas conqo sea necesar_o, pars
asegurar gee s_ apdeten adecuadamente.
PARA RE_OVER LA SEGADORA BE
LA CAJA DE CARTON
Remu_ws ;as partes s[_eltas que se incluyen con
la segadora.
Corte las do_ esquinas de los e_tremos de la
caja de cartCny tienda el pans del extremo
piano.
o Remueva todo el material de empaque, excep_o
ta curia entre el mango superior y al inferior, y la
curia qua sujeta la barra de los control que e×ige
la p_._senciadel operador )unto con e! mango
superior,
• Hags rodar la segadora hecia afuera de la caja
do ca_Cn y revisela cuidadosamente pars
verifica[ si todavia quedan partes sueltas
adicion_les
COMO PREPARAR SU SEGADORA
PARA DESDOBLAR EL MANGO
KvIPOR]'ANTE: Desprieg,ue etmango c_Jntouche
cuidado para no pellizcal o darter los caL los de
control.
- Levante los mangos haste qua !aseeciCn del
mango infedor so ssegure en su iugar, er_la
posici0n para sager
Rernueva la cu[_a#rotecfora, I÷vante la secd0n
del mango superior hasla su I_gar en el mango
inferior y apr;eto ambas maniiias del mango
Remueva la cuiia def mango qua <ujeia la barrs
de !os control que exige la preseneia del
operador junto con el mango superior
, El mango de la eegadera puede ajustmse eegun
le acomode pars sogar Refi#.rase a 'AJIJS_'E
DEL MANGO' en la SecciCn de Servicio y
Ajustes do este manua!
!9
Barra de control que e×ige la
presencia del operador
Mango
/w
Levantar
Posici6n
pars sager
PAFtA INSTALAR LOS ACCESORIOS
Su segadora rue enviads lists p2,rausarse come
una acolchadera _ caps vegetal Pars convertiria
de m_]o que pueda ensacar o descargar:
- Abr__.la puerta trasera y remueva la tapon
acn._r'hadora Gu_rclela en un iugar seguro.
Aho_a puede instalar el recogedor o el desviador
de recoil:as optional
° Pars velvet ala operacion de acotchamiento con
capa vegetal instale la tapon acolchadora erl la
abertura de descarga de la segadora.
PR_CAUCl0N: No hagafuncionar su
segadora sin la tapon acolchadora aprobada en su
lugar, o sin el desviador de re=codes,o sin el
recogeder de cesped, aprobados, en su lugar.
Nunca irate de operar la segadora cuando se ha
removido la puerta trasera o nuance3asia un poco
abierta.
I
"i
Tapon alcolchadora
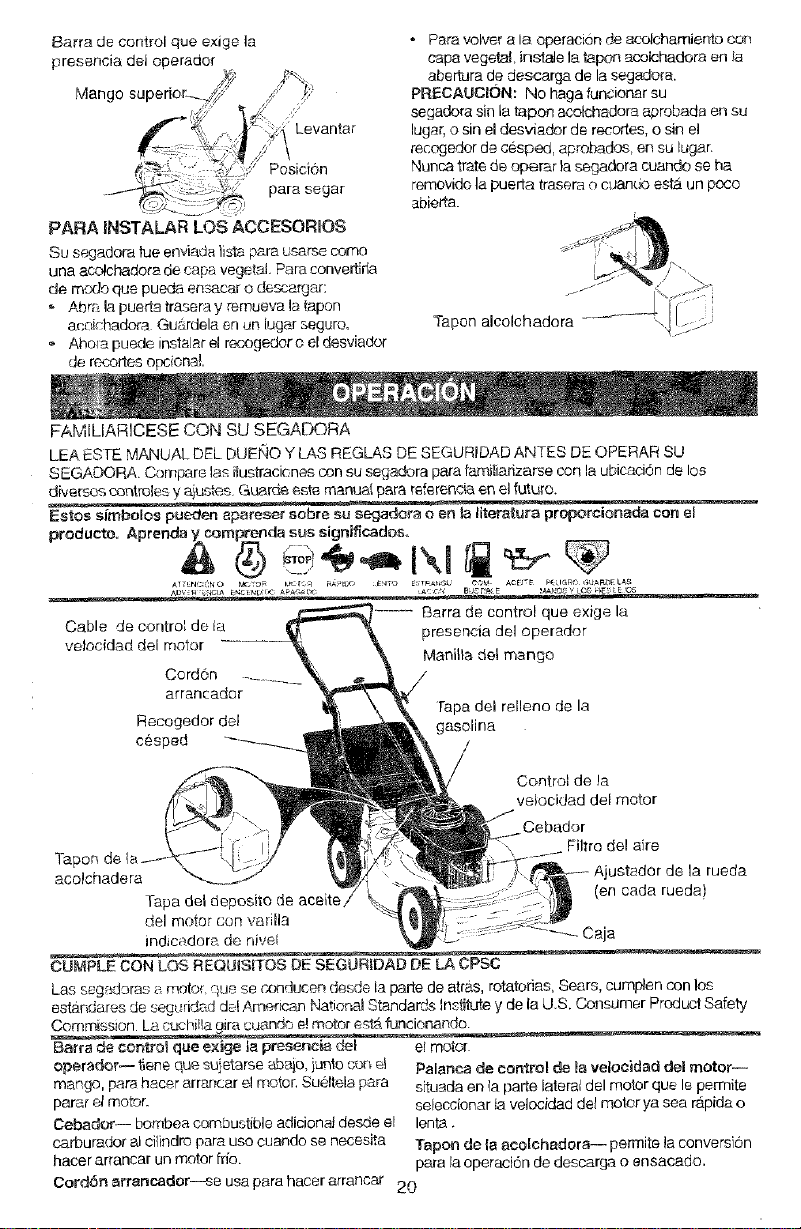
FAMILIARICESE CON SU SEGADORA
LEA ESTE MANUAL DEL DUENO Y GASREGLAS DE SEGURIDAD ANTES DE OPERAR SU
SEGADORA Compare las ilustracinnes con su segadera pars familiarizarse con la ubic.,'idrande los
diversos tentacles y aiu.stes.Guarde e._lemanuat pars referencia en el future,
Estos simbolos pueden aparesef sobre su segadora o en la litera_ura proporcionada con el
producto. Aprenda y comprer, da sue signi_cados.
Cable de control de ia
vetocidad del motor
CordOn .......
arrancador
Recogedor del
cespad
....... Barra de control que exige la
presencia del operador
Manil_a de! mango
Taps del relleno de la
gasoline
Control de la
vetocidad del motor
Cebador
Filtro del sire
Tape
acolcnadera Jstedorde la rueda
Tapa del deposito de aeeite (on cada rueda}
del motor con vadlla
indicadom de nivel Caja
CUMPLE CON LOS REQUISITES DE SEGURiDAD DE L.A CPSC
Las seg_doras _,moto_,hue se _'z_clucendesde la parte de atras, rotatofias, Sears, cumplen con los
estarcJares de seg_.,rideddelAmerican Natior_:qlStandards Ins#tute y de la U.S. Consamer Product Safety
Commission La ct_chilla9ira uuando e! motor e£tAfunnier'shale
Barfs de control que exige la presences del el motor
operador-- f_eneque sujetarse abajo, }unio _.,_at_el
mango, pars hacer arrancar e! motor. Sueltela p£ra
parer el motor.
CebadOr-- bombea combustible adicionst desde el
carburador ai cilindro pars use cuando se necesita
hacer arrancar un motor fdo.
Palanca de control de la velocidad del motor--
situada en (aparte lateral del motor qua le pemdte
seleecionar tavelocidad del motor ya sea rapids o
lent_'_.
Tapon de {a acolehadera-- permits la conversion
para la operaci6n de deecarga o ensacado.
Cord6n arrancador---se usa para hacer arrancar 20
Laoperad6ndecualquiersegadorapuede
hacerquasaltenobietosextrahosdentrodesus
ojos,Ioquepuedeproducirdadosgravesenestos.
Siempreuseanieojosdeseguridadoproteccion
paralosojosmientrasoperasusegadoraocuando
hagaajustesoreparaciones.Recomendamosuna
mascaradeseguridaddeVisi6n amp/ia, pare use
espejuetos o anteojos de saguridad estandarte.
come USAR SU SEGADORA
CONTROL DE LA VELOCIDAD DEL
MOTOR
La velocidad det motor se estabiecio en ia
fAbrica para un rendimiento 8primo. La
velocidad no se puede ajustar.
CONTROL DE ZONA DEL MOTOR
PRECAUTION: Las regulaciones federaJes exigen
que se instale un control pare el motor en esta
segadora para reducir a un minimo el riesgo de
lesionarse debido al con_cto con la cuchilla, Per
ning0n m,r_t;voIrate de elimin_r la f__n_i6ndel control
del operador_ La cuchilla gira cuando el motor astA
funcion_do
o Su e.egadora viene equipada con una barra de
control que exige la presencia del operador, Io
qua requiere que el operador este detrb,s del
mango de la segadora para hacerla arrancar y
9Perarla.
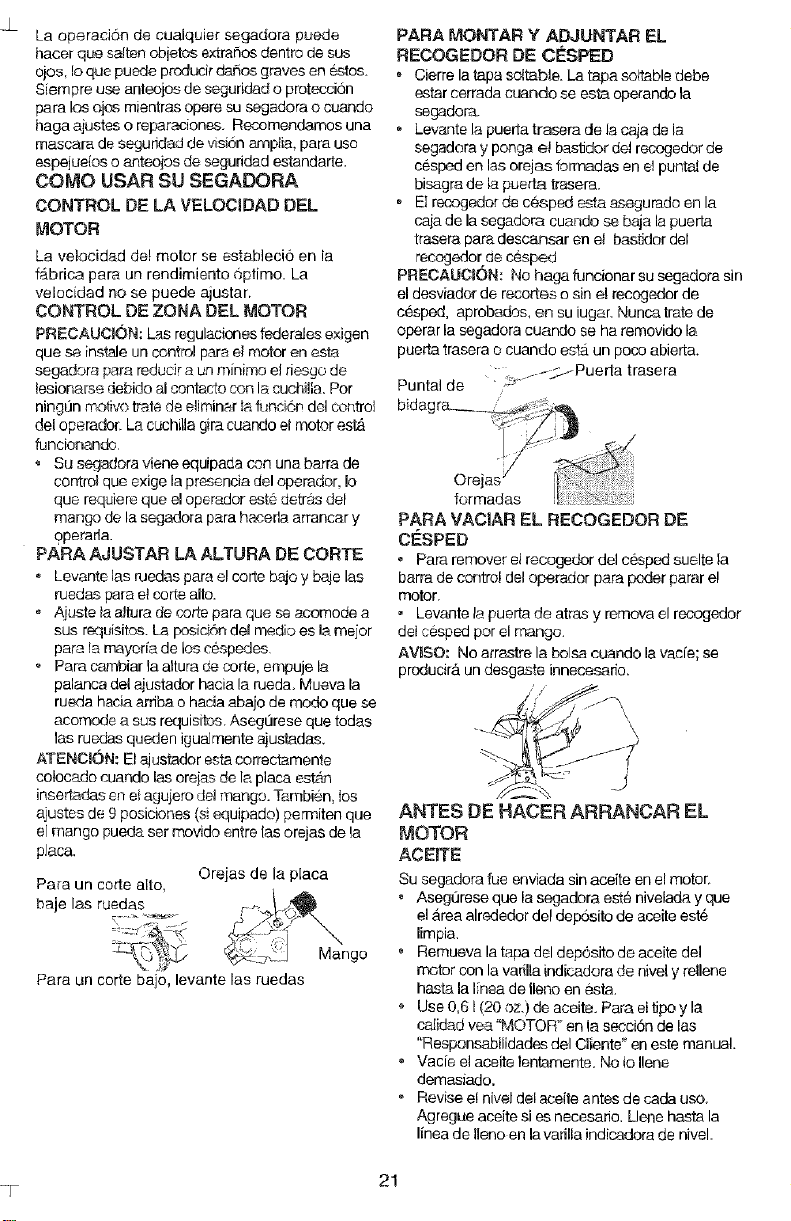
PARA AJUSTAR LA ALTURA DE CORTE
• Levante las ruedas pare el corte bajo y baje las
ruedas pare et corte aiD.
o Ajuste taaJ_ra de corte para que se acomode a
sus r._quisitoe.La F,osic;,'Sndel medio es la major
pare la mayoria de loscespedes.
Pare camb_arla altura oe co[to, empuje la
palanca del ajustador hacia la rueda. Mueva la
rueda hada arriba o hacia abajo de mode qua se
acomode a sus requisd_Ts,Asegt]rese que todas
las ruedas queden igua]mente a_usiadas.
ATENCION: El ajustador esta correctamente
cotocado cuando las oreja.sde ]aplaca estaJq
inseftadas en e_agujero del mango. Tambien, tos
ajustes de 9 posiciones (si equipado) permiten que
el mango pueda set movido entre las erejas de la
pJaca.
Orejas de laplaca
Para un corte alto,
baie r eeae
_," g
Pare un corte bajo, levante las ruedas
PARA MONTAR Y ADJUNTAR EL
RECOGEDOR DE CESPED
, Cierre la tape soitable. La taq3as.oltabledebe
ester cerrada cuando se esta operando la
segador&
, Levante la pueda trasera de la caja de la
segadora y ponga el bae'ddorde! recogedor de
eesped en las orejas formadas en el punta_de
bisagra de la puer[a tresera.
EIrecogedor de cesped esta asegurado en la
caja de la segadora cuando se baja la puerta
trasera pare descansar en el basfldor del
recogedorde cesped
PRECALICION: No haga funcionar su segadora sin
el desviador de recortee o sin el recogedor de
c@sped, aprobados, en su iugar. Nuncatrate de
operar la segadora cuando se ha rernovido la
pue¢Latrasera o cuando eslb. un poco abierta.
. _.- Puerta trasera
Puntal de " _""
bid_
Orejas /
formadas
PARA VAClAR EL RECOGEDOR DE
CESPED
• Para remover etrecogedor del cespedsuelte la
barra de cc_ltrol del operador pare poder parer el
moron
, Levante la puertade atras y remora el recogedor
del cesped per el mango.
AVBSO: No arrastre la bolsa euando la vac[e; se
producira undesgaste innecesano.
ANTES DE HACER ARRANCAR EL
MOTOR
ACEITE
Su segadora rue enviada sin aceite en el motor_
o Asegurese que la segadora est# nivelada y que
el Area alrc-dedor del deposito de aceite est6
limpia,
Remueva la tapa del deposito de aceite del
motor con la vadlla indicadora de nivel y rellene
hasta la linea de llano en esta.
o Use 0,61 (20 oz.) de aceite. Para eltipo y la
calidad yea "MOTOR' en ia secci6n de las
"Responsabilidades del Cliente_en este manual.
Vac[e el aceite Ientamenta. No to Ilene
demasiado.
o Revise el nivel del aceite antes de cada use.
Agregue aceite si es necesado. Uene haste la
I[nea de llano en la vafilla indicadora de nivel
21

Pareleere!niveladecuado._,fietelatapadel o
depositodeaceitedelmetercarlavez.
®Vuelvaainstaisrletapede!de,©sitedelaceitey
apfietela. •
o Cambieelace_tedespuesde25horasde
operacionounavezpertemporada.Puede
necesitarramblerelaceitema.samenudo
cuandoiascondicionessonpolvorosasosucias.
GASOUNA
LleneelestanquedecombustibleUsegasolina
regular,sinp!omo,nuevaylimpiaconelminimo
de87octane&Nomezcteelaceiteconla
gasolina.Pareasegurarquelagasolineutilizada
sea #esca compre estanques !ns cuales puedan °
ser utilizados durante los pnmeros 30 dies.
ADVERTENCIA: Laexpelqencia he indicedo que
Ins combustibles mezclados con alcohol (conocidos
coma gasohol, o el use de etanol o metanol)
pueden atraer la humedad, ia que conduce ala °
separaci6n y formaci0n de acidos durante el
atmacenamiento. La ;_.,_ ina acidity, puede dadar
el sistema de[ combustive de un meier durante el
almacenamienro. Pare or;tar !os pr_:>blemascon el
motor, se debe vaciar el sistema del combustible
antes de guanJade per un periodo de 30 dies o
m&s. Vacie el estanque del combustible, haga
arrancar el motor y hb,galo funcionar hasta que [as
Ifneas del oombustJbie y el carburadar queden
vacJ'os.La proxima temporada use combustible
nuevo. Vea !as[nslrucciones Pare El
Aimacenamiento para rnas intormacion Nunca use
productos de limpieza para el motel opara el
carburador en el estanque del c@mbustible pues se
pueden producir davies permanentes.
PARA HAOER ARRANCAR EL MOTOR
• Pare hacer arrancar un motor fria. empuie el
cebador cinco (5) veces antes de tratarlo. Use un
empuie firmemente. Este paso normalmente no
es necesario cuando se hace arrancar un motor
que ya ha estado funcionando per unos cuantos
minutes.
Mueva la palanca de control de velocidad a la
posicion de r,_pido.
• Suiete la barra de control que exige la presencia
del operador abajo en ei mango y tire el mango
del arrancador rapidamente. No pen"ni[a que el
cordon del arrancador se devuelva
abruptamente.
Pare parer e! motor, sueffe la barra de control
qua exige la presencia del operador.
AWSO: En climas mas fries puede que sea
necesano repetir los pasos del cebado. En clirnas
m_.s calurosos el cebar dernasiado puede producir
el ahogo y ei motor no vaa anancar. Si se ahoga el
motor espere unos cuantos minutes antes de tratar
de hacerlo arrancar y no repita los pasos del °
cebado.
CONSEJOS PARA SEGAR
o Bajo ciedas coodiciones, tatcome cesped muy
alto, puede ser necesario el etevar la aLturaeel
corte para reducir el esfuerzo necesa[io pare
empujar la segadora y para evitar sobrecargar el
motor, delando montones de recortes de cesped.
22
Par_,un code muy pesade, reduzca e!ancho del
corte pasando parcfatmente #×)rel!rime del lugar
anteriOnTlente cortado y siegue lantamente
Pare.un meier ensacado del c#:spedy pare la
maycria de [as condicinnes de cod'n, la velr_:idad
del motor debe ajustarse ala posicicn de rapido.
Cuando L._.euna segadora con d_scarga trasera
an cesped hornedo y pesado, losmontanes del
cesped corlado pu_Je qua no enrren en e!
recogeder de cesped Reduzca la velocidad dot
recorrido (veiocidad de empuje) Jio haga
funcionar la segadora cobra el &rea per segulida
vez,
Si queda una huella de cortes en el lade derecho
de una segadora con descarga trasera, siegue
en la direction en qua gllan las manillas del reloj,
solapando un poco para recaudar Ins recortes en
ia pr0xirna pasada.
Los _x}rosen los r_._;agedoresd'_c_;spr;dde tela
pueden i!enarse con mugre y pe',,,'ocon Eluse y
los [ (:Dge{% s ca_d_ron rre_os_:esped.
Pc*reevi_e.rst_ r('_;_cel _ecogedor con la
ma,nguera de agJa r_-gr_larment(y d(_.ielo
secarse antes de usarlo.
Mantenga taparte superior del motor, alrededar
dei arrancador desp_jada v _;nr,::COlleSde
reaped y paia Esto ayLldar__,el th_jodel a[re del
motor y ex'_ender_:_faduration estc._
CONSEJOS PARA SEGAR Y
ACOLCHAR
IMPORTANTE: Pare obtener el mejor
rend]miento mantenga la caia de ia segaciora
sin acumuiacion de cesped y basura Yea
"lirnpieza" en la seccion de
'RESPONSABILIDADES DEL CLIENTE' de
este man(_al
• La cuehilla acolchadora a:;pecia{ vaa volve_ a
cotter los recortes de c#sped touches veees,
y los reduce en tamario de mode qua sise
caen en et cesped se van a disposer entre
#stey no se van a notar. Tambion, e[ cesped
aeolchado se vaa deshacer rapidameute
entregando substaocias nutritivas pare el
cesped. Siempre acolche con !a velocidad del
motor (cuchilla) m_s alta, pues asi se
obtendra, la meier acciOn de recorte de las
cuchillas.
• Evite cortar el c_sped cuando est6 mojado. El
c6sped mojado tiende a formar montones e
interfiere con la acci6n de acolchado. La
meier hera para segar el cesped es ternprano
en la tarde_ A esa hera este se ha secede y el
Area reciOn codada no quedarA expuesta al
sol directo.
Pare obtener los mejores resultados, ajuste la
altura del corte de la segadora de mode que
_sta code solamente el tercio superior de las
hojas de c_sped. En el case de que el
cesped haya crecido demasiado, puede set
necesario el elevar la altura de[ corte pare
redueir el esfuerzo neeesario para ernpujar la
segadoraypareevilersobrecargarelmotor.
dejandomontonesderecorlesdecesped
Pareunacelchemienlomuypesado,reduzca
elanchodelcoriepasandoperencimadel
lugarantedormentecortadeysiegue
lentamente.
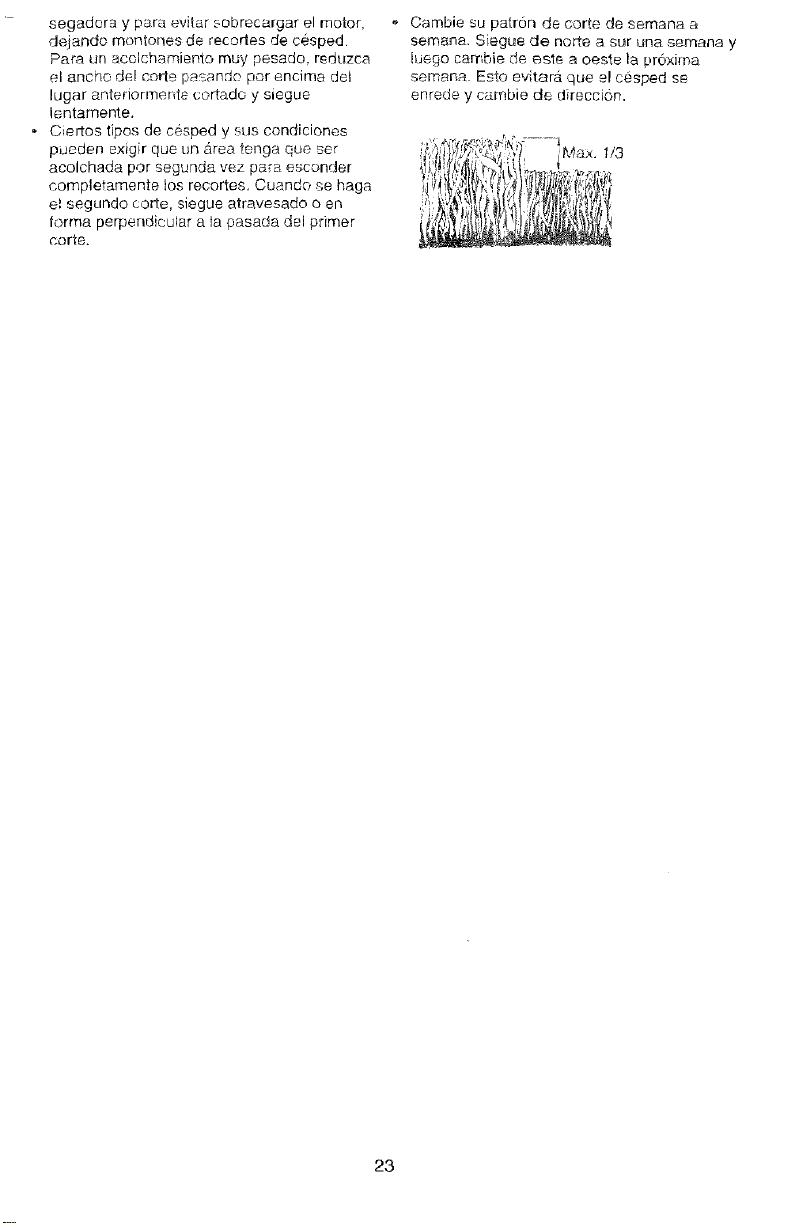
• Ciertostiposdecespedysuscondiciones
puedenexigirqueun_.reatengaqueset
acolchadapersegundavezpareesconder
completamenteiosrecories.Cuandosehaga
elsegundocorte, siegue atravesado o en
forma perpendicular aia pasada del primer
corte.
Cambie su patron de corte de semana a
semana. Siegue de no_e a sur una semana y
[uego cambie de asle a oeste la proxima
semana Esto ev tara. que el cesped se
enrede y cambie de direccion.
23
J_
RECOMENDACIONES GENERALES
La garantia de esta segadora no cubre _osarticdos
que han estado eqetos al abuso o ala eegligencia
del operador. Para recibir todo el valor de la
garantia, el operador flene que mantener la
segadora seg0n las inst,_cciones descritas en este
manual.
Hay algunos ajustes que se tienen que hacer en
fom_a pen6dica para poder mantener su unidad
adecuadamente_
Todos los ajustes en la secci6n de Servicio y
Ajustes de este manual tienen que ser revisados
por Io mends un vez per cada temporada.
• Una vez al a_o, cambie la bujia, limpie o cambie
el elemento del flltro de aire y revise si la cuchilla
est_ desgastada. Una bujia nueva y un elemento
de! filtro de aJrelimpio/nuevo aseguran la mezcla
de aire-combustible adecuada y ayudan a que su
motor funcione mejor y que dure m_.s.
Siga el programa de mantenimiento en este
manual.
ANTES DE CADA USQ
Revise el nivet del aceite del motor.
- Revise si hay sujetadores sueltos
LUBRICACION
Mantenga Ja unidad bien lubdcada
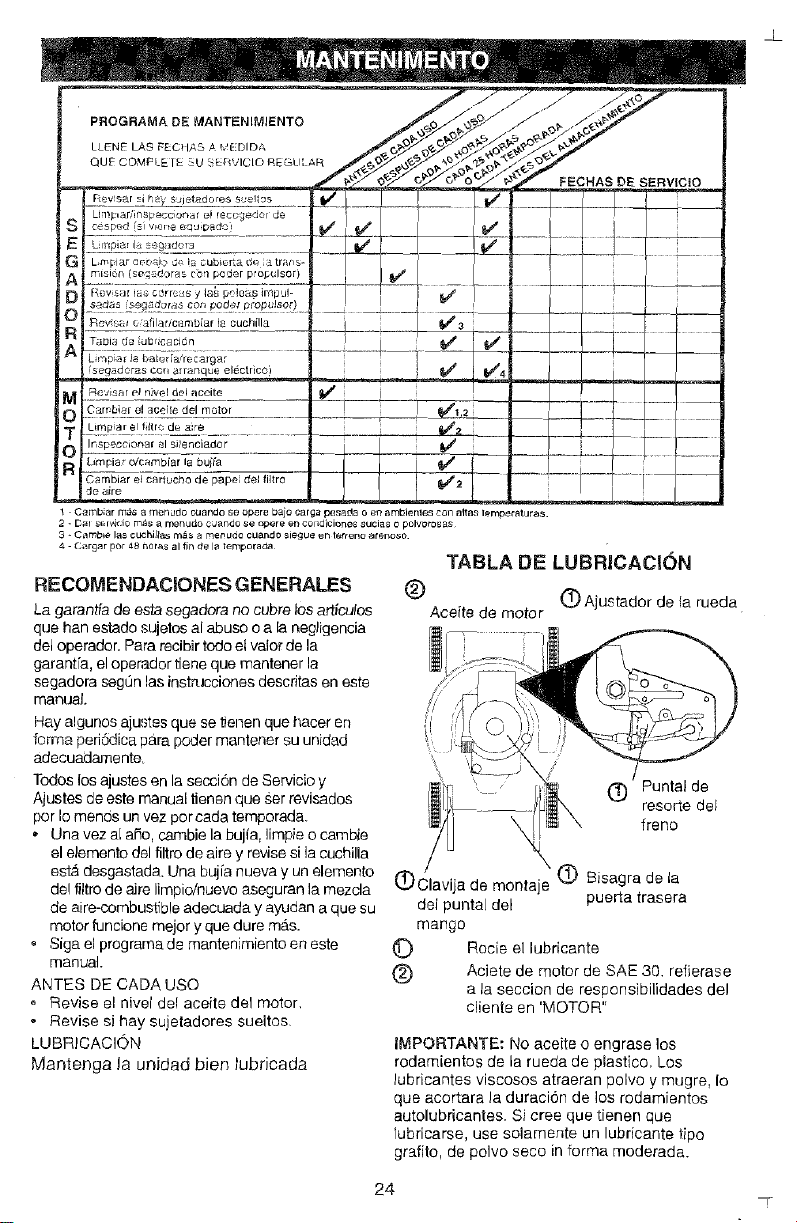
TABLA DE LUBRICACION
(_) 1_1Ajustador de la rueda
Acei/e de motor
C) Puntal de
resorte del
trend
(_)Clavija de monlaje (_ Bisagra de la
del puntal del puerta trasera
mango
C) Rocie el lubricante
(_) Aciete de motor de SAE 30. refierase
ala seccion de responsibilidades del
cliente en 'MOTOR"
IMPORTANTE: No aceite o engrase los
rodamientos de la rueda de plastico. Los
lubricantss viscosos atraeran polvo y mugre, Io
que acortara ]a duraci6n de los rodamientos
autolubricantes. Si cree que tienen que
fubrisarse, use solamente un lubricante tipo
grafito, de polvo seco in forma moderada.
24
ESPECJFICACIONES DEL PRODUCTO
NOMERO DE MODELO 917.387140
NOMERO DE SERIE
FECHA DE COMPRA
CABALLOS DE FUERZA: 5.0
DESPLAZAMIENTO: 11.5 CU. IN.
I CAPACiDAD Y TIPO 1.5 Cuartos
i DE G/_SOLII,'A: REGULAR SIN PLOMO
_TE: SAE 30 (sobre 32"F)
_F-SG/_H_ SAE 5W_30 (debaio 32°F)
_,OAPACIDAD DE ACEITE: .......................... 20 oz. de capac!dad "..........................................
! i OLEmAN(.IA DE VALVULA: ADMtS!ON: .( 04" - .008"
DESCARGA: .004" - .008"
ISENCENDIDO DE ESTADO
SOLiDO ABERFURA DE Aff:tE: .0125 IN.
iTORSION DEL PERNO
DE LA CUCHILLA: 35-40 FT. LBS.
E! numero deJ nodeJo y el de serie se encuentran en Ja calcornania adjunta a [a parte
trasera de la caja de la segr_dora. Debe registrar tanto el numero de serie come la
fecha de compra y manlengaios en un lugar seguro para refencia en el fiJturo
SEGADORA el sen!ido cof/irario en que gian ta:, m_nilias
Siempre observe las regis;rede seguridad
cuancio hr_ga el mantenimier_to.
LLANTAS
Man_er ga la._Ilantas sin g_lsolina aceite o
substanr.ias quimicas para control de
insectos que pu_d_;r_dahar la gorna
Evite Io._ tocones las piedras, las grietas
pro%nd_ s, los obje[os afilados y otros
peligros que pueden daSar a ias Ilantas.
CUIDADO DE LA CUCHILLA
Para obtener !esmejores resullados, la cuchi!Ja
de la segadora tiE,r_ que mantenerse afilada
Cambie la cuchill,_ dobiada o danada
PARA REMOVER LA CUCHtLLA
Desconecte el alambre de la buj[a y p6nga[o
en donde no pueda entrar en contacto con
esta.
Haga descansar la segadora en su lade.
Aseg/]rese que el filtro de aire y que el
carburador queden mbando hacia arriba.
Use un bloque de madera entre la cuchilla y
la caja de la segadera para evitar que la
cuchilla gim cuande se le quite el perno
Ploteja sus malloS con 9uantes y/o envuelva
la cuchil',a con uT_at_..lagruesa.
o Remueva el peme de la cuchilla gir_mdoio en
del _eloj.
- RemL'.eva la cueh)iia y los arti utos de
ferreteria adjL_ntado_es (el pemo [a arandela
de seguddad y la araT;deta e_durecida).
AVJSO: Rernueva el adap[ador de la cu(hilla y
revise ei cube interior d_a[a ranura d_fl
adaptador de la cuehi!la, ta ranura tiel_e que
estar en buerlas condiciones para que funcione
en forma adecuada. Cambie el adaptador si
est,. d_ffado.
25
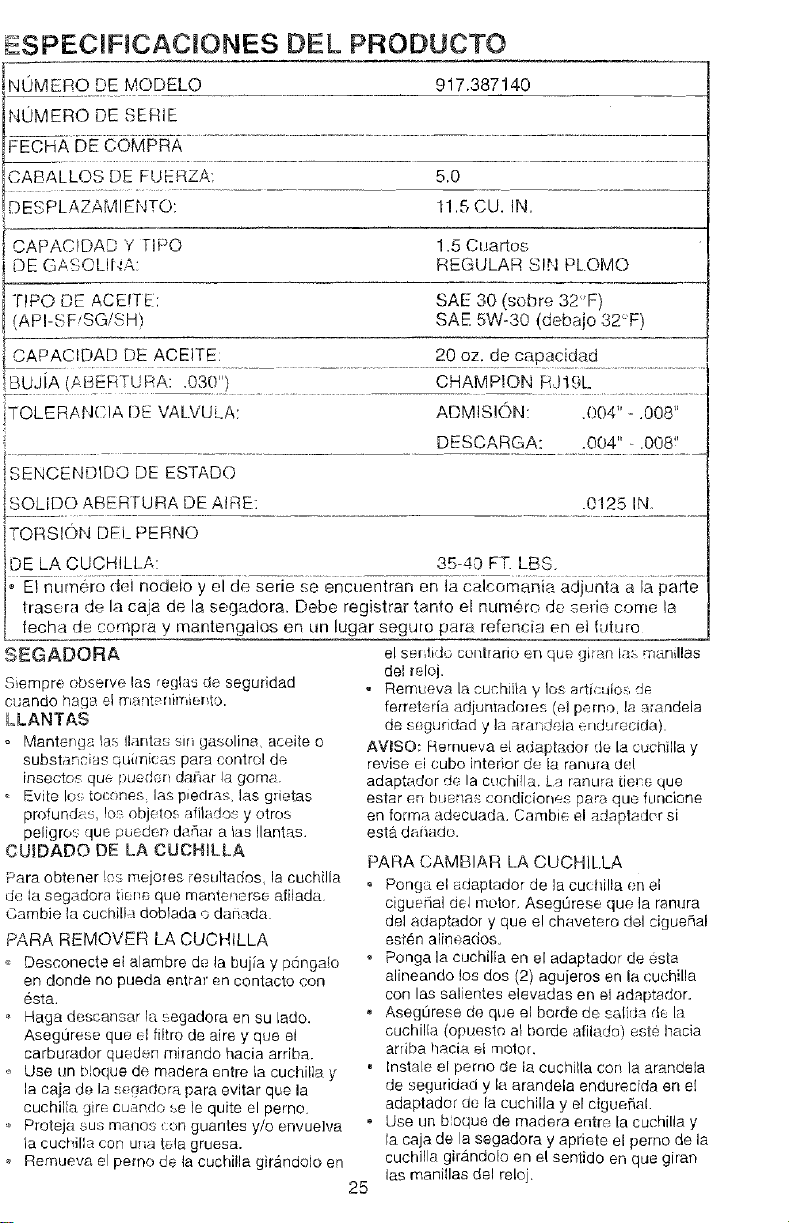
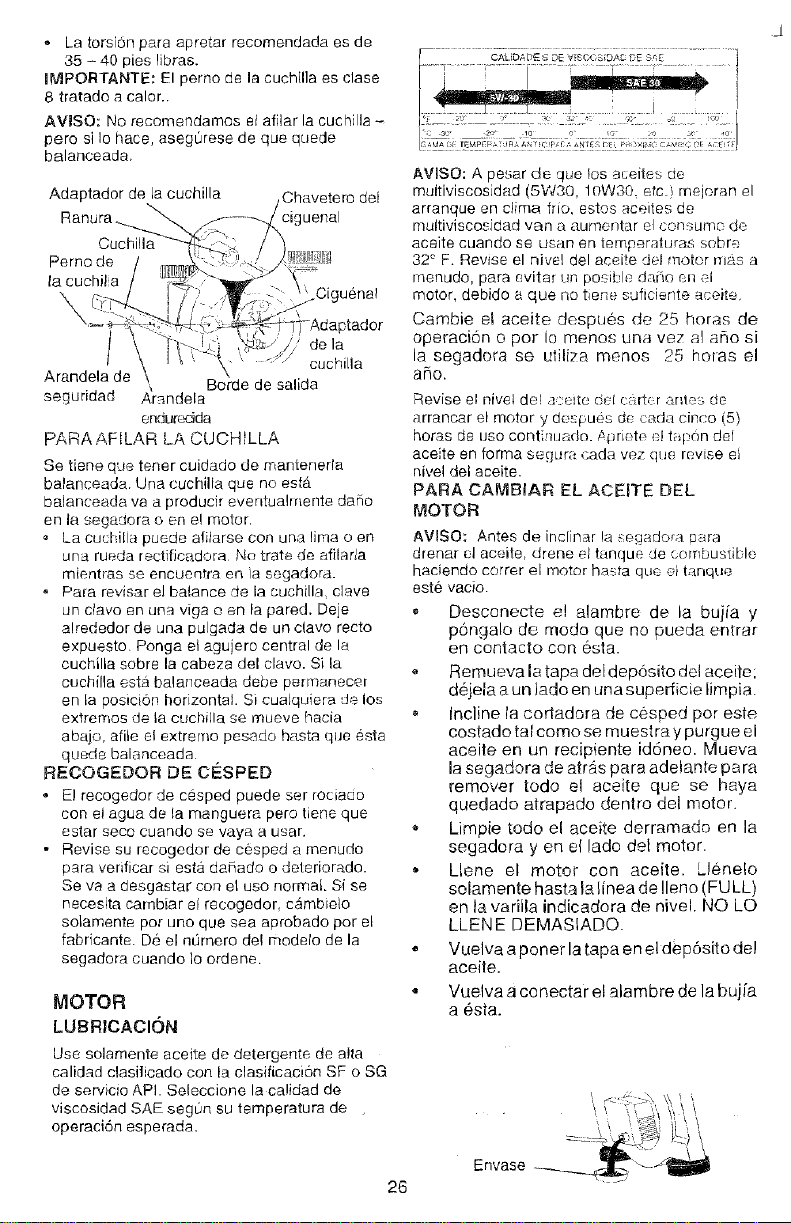
PARA CAME'_IAR LA CUCHIL.LA
o Ponga el _:daplador de la cuchilla en el
ciguerial clel meter. Aseg_rese que la ranura
del adaptador y que e! chavetero del cigue5al
est_n aiineados.
o Ponga la cuchilia en el adaptador de esta
alineando los dos (2) agujeros en la cuchilla
con las salientes elevadas en ei adaptador.
, Asegurese de que el borde de s&lida de la
cuchilia (opuesto at horde afiladn) e,ste hacia
arriba hacia et motel
• Instale e! pemo de la cuchilla con la arandela
de seguddad y la arandela endurecida en el
adaptador de la euchilla y el ciguefia[.
, Use un boque de madera entre [a cuchilla y
la caja de la segadora y apriete el perno de la
cuchilla girando[o en el sentido en que giran
las manillas del reloj.
- La torsion para apretar recomendada es de
35 - 40 pies Nbras.
IMPORTANTE: El perno de la cuchilla es clase
8 tratado a caler_
AVISO: No recomendamos el afilar la cuchilla -
pero si la hace, aseg0rese de qua quade
balanceada.
Adaptador de la cuchilla
Ranura.__ t Chavetero del
Cuchll@ - ""/_:X_iguenal
Perno de / .m:r_i,_._ _/ }'l:li{!_}!J_)[!il
_4qT-Adaptador
\ s;,de
l _\ H\ .'<t ' _£/ cuchilla
Arandela de \
I Borde de salida
seguridad Arande a
el _ljL_c,cida
PARAAFILAR LA CUCHILLA
Se tiene que tenet cuidado de mantenerla
balanceada. Una cuchilla que no asia.
balancead8 va a producir eventualmente daeo
en la segadora o en e! motor.
La cuchilia puede atilaree con una lima o en
una rueda rectfficadora No trate de afilarla
mientras se encuentra en ia segadora.
o Pafa revi._ar el balance de la cuchilla clave
un clave en una viga o en la pared. Deje
alrededor de una pulgada de un clave recto
expuesto Ponga et agujero central de la
cuchilla sabre la cabeza del clave. Si la
cuchilla esta balarTceada debe permanecer
en la posicion horizontal. Si cualquiera de los
extremes de ta cuchilla ee mueve hacia
abajo, afite el extreme pesado h_sta que esta
queda balanceada
RECOGEDOR DE CESPED
- El recogedor de cesped puede set focia{uo
con el agua de la manguera pare tiene que
estar seco cuando se vaya a usar.
• Revise su recogedor de cesped a menudo
para verificar si esta da[iado o deteriorado.
Se va a desgastar con el usa normal. Sise
necesita eambiar el recogedor c&mbielo
solamente par uno qua sea aprobado par el
fabricante. De el nlJmero de! modeto de la
segadora cuando Io ordene.
MOTOR
LUBRICACION
Use solamente aceite de detergente de alia
calidad dasilicado con la clasificaci6n SF o SG
de sePJicio API Seleccione la calidad de
viscosidad SAE seg0n su temperatura de
operaci6n esperada.
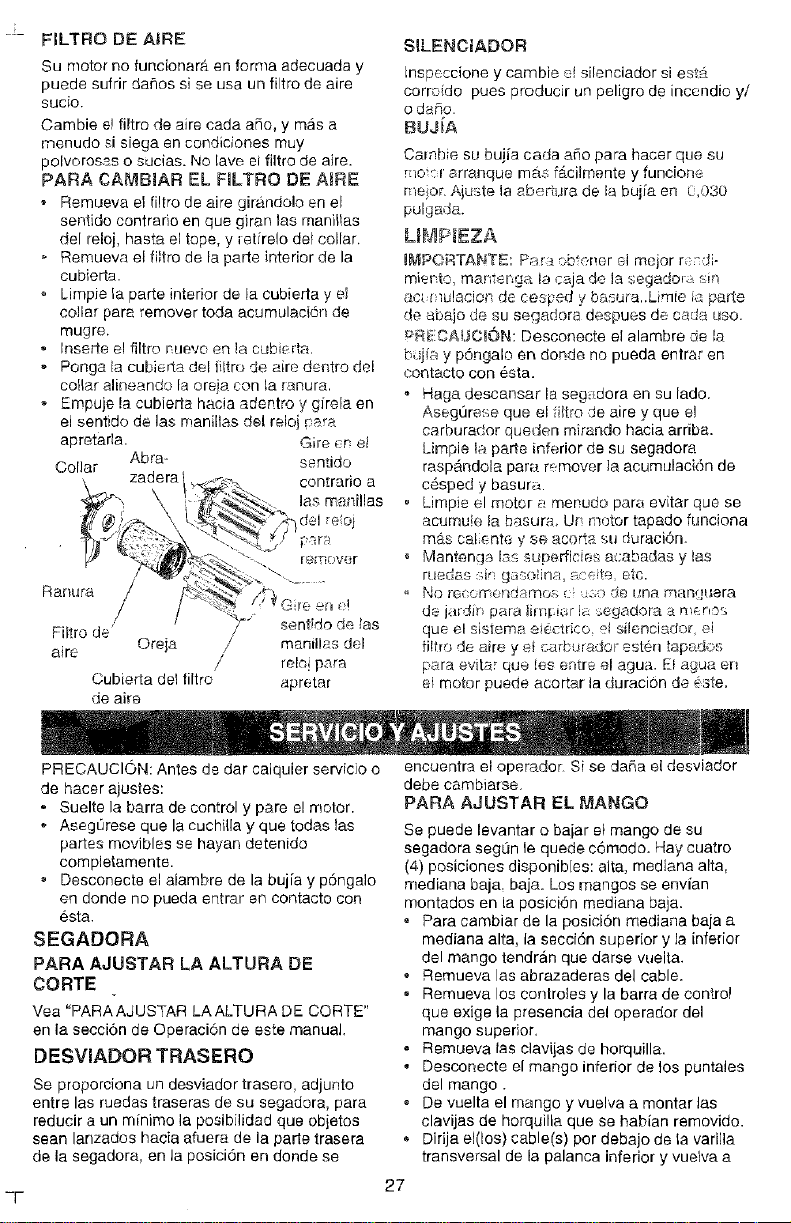
AVISO: A pesar de que los aceites de
multiviscos[dad (5W30, 10W30, etc.) mejoran el
arranque an clima trio, estos aceiles de
muftiviscosidad van a aumentar el consume dR
acaite cuando se usan en temperaluras sabre
32° F. Revise el nivel del aceite del motor mac a
menudo, para evitar un posible .dafio en el
motor, debido a que no tiena suficiente aeeite.
Cambie el aceite despues de 25 horas de
operacion o per io menos una vez al a_o si
la segadora se ufilfza manes 25 hotas el
aPio.
26
Revfse el nivel de! at;eite dt:l c_[t, r antes de
arrancar el motor y desi:>ues d_ carla cinco (5)
horns de lisa contir_uado. Apriete el tapon del
aceite en forma segL_'mcada wTzqua revise ei
nivel del aceite.
PARA CAMBIAR EL ACEITE DEL
MOTOR
AVISO: Antes de incfinar la _'egarlora Dara
drenar el aceite, drene el tanque de ( embustible
haciendo eorrer el motor hasta que ei tanque
este vacio.
,, Desconecte e! alambre de la bujfa y
pongalo de mode qua no pueda entrar
en contacto con asia.
,, Remueva la tapa del dep6sito del aceite;
d4jela a un lade en una superficie limpia.
Incline la coMadora de cesped par este
costado tal coma se muestra y purgue el
aceite en un recipiente id6neo. Mueva
la segadora de atr_s para adeiante para
remover rode el aceite que se haya
quedado atrapado dentro del motor.
Limpie rode el aceite derramado en la
segadora yen el lade del motor.
,, Llene el motor con aceite. Llene!o
solamente hasta lalfnea de !lena (FU LL)
en ta variila indicadora de nivel. NO LO
LLENE DEMASlADO.
, Vuelva a poner la tapa en eldep6sito del
aceite.
• Vuelva a co nectar el alambre de la buj[a
a _sta.
Envase
\
\
\
FILTRO DE A_RE
Su motor no funcionar_ en forma adecuada y
puede sufrir 5aRos sise usa un filtro de aire
sucio,
Cambie el filtro de aJre cada aSo, y mas a
menudo si siega en condidones muy
polvoroe£s o suciae. No lave ei filtro de aire.
PARA CA_,_BIAR EL HLTRO DE A_RE
• Remueva el filtro de aire girandolo en ei
sentido contrario en que giran las maniJlas
de[ reloj, hasta el tope, y iettrelo del cotlar.
Remueva el filtro de la parte interior de la
cubierta.
o Limpie la parte interior de ia cubierta y el
collar para remover toda acumulaciBn de
mugre.
o Inseile e! filtro ntlevo e,qla cubierta.
Ponga la cubierta del ill!n} de aire dentro del
coIlar alineando la oreia con la tenure,
- Empuje !a cubierta hacia adentro y gfrela en
el sentido de las manillas del reloj papa
apretarla. Gire _met
Abra- sentJdo
Collar
zadera contrario a
las menillas
del reoj
remover
R a_qu,rs_
Fiftro de
aire Oreja
Cubierta del filtro
de aire
Green e!
sentido de !as
manillae del
relei para
apretar
SILENCtADOR
Insp_:ccione y cambie e! silenciador si est¢{
corroido pues producir un peligro de incendie y/
o da_o.
BUJiA
Cambie su buiia cada ado para hacer qua su
mosqr arranque m:J_sf£cilmente y funcione
meier. Aiuste la aber[ura de la buj[a en ,030
putgada.
LIMPfEZA
mMPORTANTE: P_,r_ ob!c,ner el mejor r di-
miento, man_er.ga la caja de la segado_ in
ao _l_'lacior de cesved y basu_a,.Limie i parte
de abajo de su segadora despues de cada uso.
#R_S:CA!JC_ON: Desconecte el alambre de _a
b4j[a y p6ngalo en donde no pueda entrar en
contacto con 6eta.
• Haga descansar la seg=_dora en su lado,
Asegurese que el fittro de aire y que el
carburador queden mirando hacia arriba.
Limpie la parte inferior de su segadora
rasp_ndola pare remover Ia acumulacien de
cesped y basura.
• Limpie el motor e menudo pare evitar qua se
acumu!e ia basura Un motor tapado funciona
m_%cal ante y se acorta su duraciOn.
o Mantenga las superficies acabadas y !as
ruedae sir ga';olina, ecete etc.
NO recomon.damos c 20 rje una rrlan_!uera
de jardi[ p_ra _impi_r !&,segador_ a menos
qua el sis[eme e;e_trico, el silenciador cfi
filtro de aire y ei carburador est_-n tap_.doe
pare evitar qua leg entre el ague. El ague en
ei motor puede acortar la duracion de @ste.
PRECAUCION: Antes de dar caiquier servicio o
de hacer ajustes:
- Suelte la barra de control y pare e! motor.
Aseg0rese qua la cuchilla y que todas las
pares movibles se hayan detenido
completamente.
• Desconecte el alambre de la buj[a y p6ngalo
en donde no pueda entrar en contacto con
6eta.
SEGADORA
PARA AJUSTAR LA ALTURA DE
CORTE
Vea "PARAAJUSTAR LAALTURA DE CORTE"
en la seccion de Operacien de este manual.
DESVlADOR TRASERO
Se proporciona un desviador trasero, adjunto
entre las ruedas traseras de su segadora, para
reducir a un minimo la posibilidad que objetos
sean lanzados haeia afuera de la parle trasera
de la segadora, en la posici6n en donde se
e
o
27
encuentra el operador Si se daF_ael desviador
debe cambiaree.
PARA AJUSTAR EL MANGO
Se puede levantar o bajar el mango de su
segadora seg[an le quede c6modo. Hay cuatro
(4) posiciones disponib[es: alta, mediana alta,
mediana baja baja_ Los mangos se envian
montados en la posicien mediana baja.
•Para cambiar de la posici6n mediana baja a
mediana alta, la secci6n superior y la inferior
del mango tendran que darse vuelta.
• Remueva las abrazaderas del cable.
• Remueva los controles y la barra de control
que exige la presencia del operador del
mango superior.
Remueva las clavijas de horquilla.
Desconecte el mango inferior de los puntales
del mango.
De vuelta el mango y vuelva a montar las
clavijas de horquilla que se habian removido.
Dirija el(los) cable(s) por debajo de la varilla
transversal de la palanca inferior y vuelva a
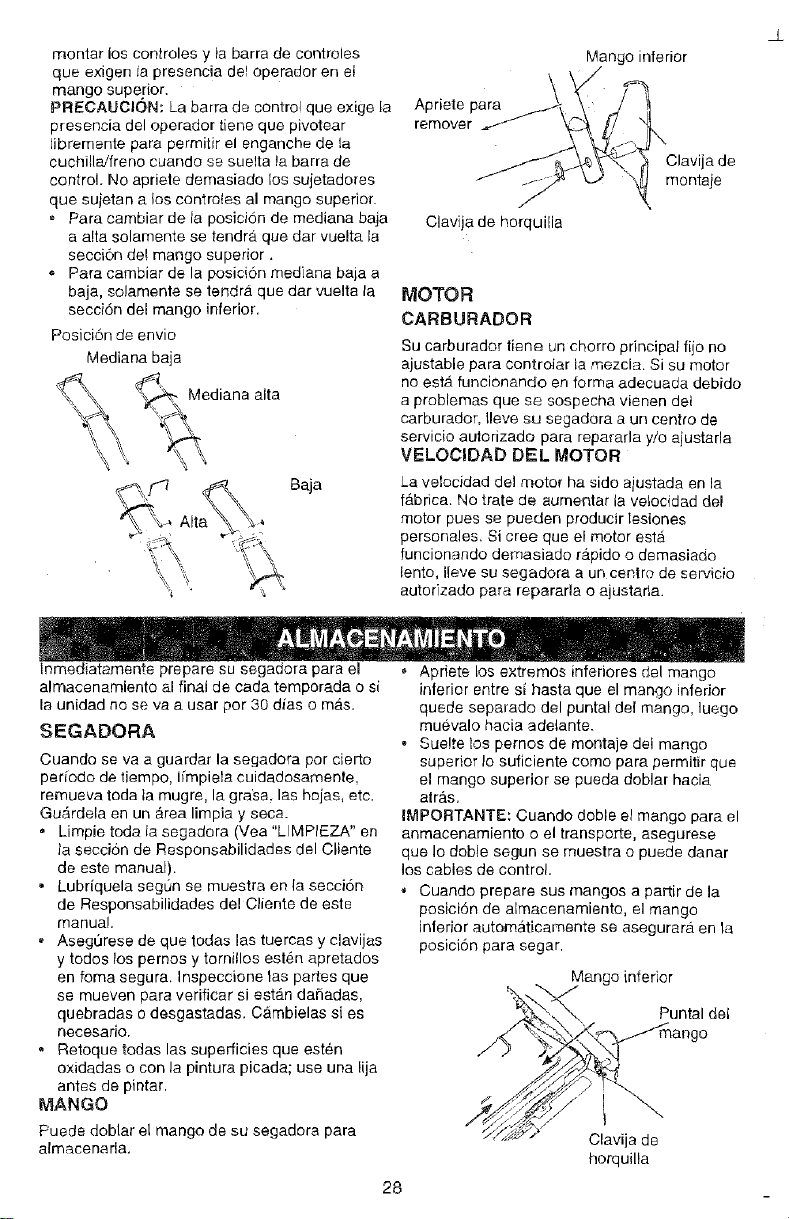
montarloscontrolesylabarradecontroles
queexigeniapresenciadeloperadorenet
mangosuperior.
PRECALICION:Labarradecentre!queexigela
presenciadeloperadortienequepivotear
Libremente para permitir el enganche de la
cuchi/la!freno cuando se suelta la barra de
control. No apriete demasiado los sujetadores
que sujetan atos contretes al mango superior.
Para cambiar de la posicion de mediana baja
aalta solamente se tendra, que dar vuelta la
seccion deq mango superior.
* Para cambiar de la posiciSn mediana baja a
baja, solamenta se tendra, que dar vuelta la
secci6n dei mango inferior.
Posici6n de envio
Mediana baja
x_ Mediana alta
_ ,
_fJi Baja
Apriete para
remover
\
Clavija de horquilla
Mango inferior
Clavija de
montaje
MOTOR
CARBUFIADOR
Su carburador tiene un chorro principal fijo no
ajustable para controlar ia mezcla. Si su motor
no esta funcionando en forma adecuada debido
a problemas que se sospecha vienen det
carburador, Ileve su segadora a un centre de
servicio autorizado para repararla y/o ajustafla
VELOCIDAD DEL MOTOR
La velocidad del motor ha side ajustada en la
f_.brica. No trate de aumentar ia vetoddad del
motor pues se pueden producir lesiones
personales. Si cree que el motor esta
funcionando demasiado rapido o demasiado
lento, lleve su segadora a un centre de servieio
autorizado para reparafla o ajustarla.
Inmediatamente prepare su segadora para el
almacenamiento al final de cada temporada osi
la unidad no se va a usar per 30 dims o mas
SEGADORA
Cuando se va a guardar la segadora per cierto
per[ode de tiempo, Ifmpiela cuidadosamente,
remueva toda la mugre, la grasa, las hojas, etc.
Gu_rdela en un _rea limpia y seca.
• Limpie toda la segadora (Vea "LIMPIEZA" en
la seccion de Responsabilidades del Cliente
de este manual).
• Lubriquela segun se muestra en la secci6n
de Responsabilidades del Cliente de este
manual.
• Asegt)rese de que todas las tuercas y clavijas
y todos los pemos y tomillos est6n apretados
en foma segura. Inspeccione tas partes que
se mueven para verificar si est_.n dafiadas,
quebradas o desgastadas. Cambielas si es
necesario.
. Retoque todas las superficies que est_n
oxidadas o con la pintura picada; use una lija
antes de pintar.
MANGO
Puede doblar el mango de su segadora para
alm_,cenada,
28
Apfiete los extremes inferiores del mango
inlerior entre s[ hasta que el mango inferior
quede separado del puntal de{ mango, luego
muevalo hacia adelante.
• Sue!re los pernos de montaje del mango
superior Io suficiente come para permitir que
el mango superior se pueda doblar hacia
alr;&s.
IMPORTANTE: Cuando doble el mango para el
anmacenamiento o el transporte, asegurese
que Io doble segun se muestra o puede danar
los cables de control.
• Cuando prepare sus mangos a partir de la
posici6n de aimacenamiento, el mango
interior automaticamente se asegurarb, en la
poeici6n para segar.
Mango inferior
Pun_ldel
Clavija de
horquilla
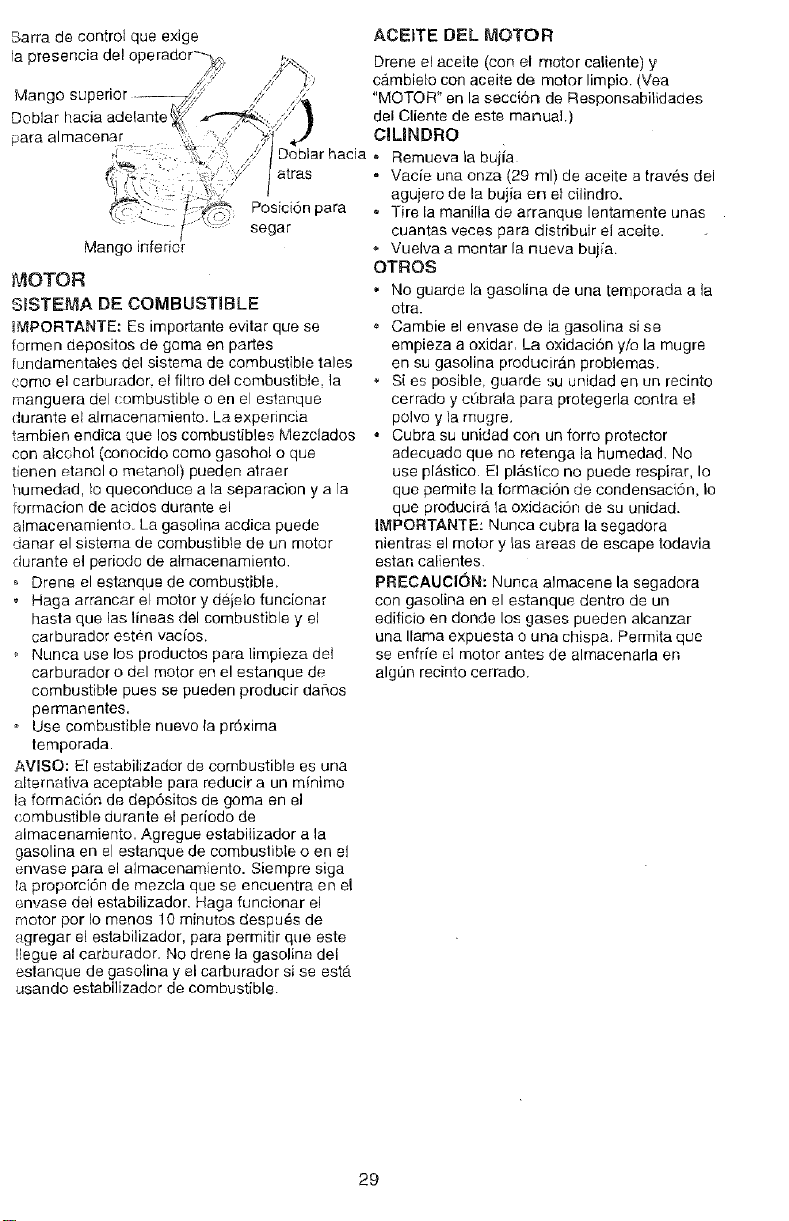
Barradecontrolqueexige
lapresenciadel
MangosuF
Doblarhaciaadelante
paraalmacenar
Mangoinferie_
MOTOR
SISTEMA DE COMBUSTIBLE
IMPORTANTE: Es importante evitar que se
formen depositos de goma en partes
tundamentales del sistema de combustible tales
come el carburador, el filtro del combustible, la
manguera del combustible o en el estaRque
durante el almacenamiento. La experincia
tambien endica que los combustibles Mezclados
con alcohol (conocido come gasohol o que
tienen e.tanol o metanol) pueden alraer
humedad, Io queconduce ala separacion y ala
formacion de acidos durante el
almacenamiento. La gasoline acdica puede
danar el sistema de combustible de un motor
durante el periodo de almacenamiento.
o Drene el estanque de combustible.
Haga arrancar el motor y dejelo tuncionar
haste que las lineas del combustible y el
carburador esten vacios.
Nunca use los productos para lirnpieza deI
carburador o del motor en el estanque de
combustible pues se pueden producir dafios
permanentes.
Use combustible nuevo la pr6xima
temporada.
AVISO: El estabilizador de combustible es una
alternativa aceptable pare reducir a un mfnimo
!a formaci6n de dep6sitos de goma en el
combustible durante el periodo de
almacenamiento. Agregue estabitizador ala
gasoline en el estanque de combustible o eo el
envase para el almacenamiento. Siempre siga
Ia proporci6n de mezcla que se encuentra en el
envase dei estabilizador. Haga funcionar el
rr'otor per Io menos 10 minutes despu_s de
agregar el estabilizador, pare permitir que este
!legue al carburador, No drene la gasoline del
eslanque de gasolina y el carburador si se ester
usando estabilizador de combustible.
ACEITE DEL MOTOR
_.. Drene el aceite (con el motor ca{iente) y
// ',
/p "_, cambielo con aceite de motor limpio. (Yea
,/ "MOTOR' en la seccion de Responsabilidades
del Cliente de este manual.)
ClUNDRO
Doblar hacia o Remueva la bujia
atras - Vacie una onza (29 ml) de aceite a trav_s del
agujero de la bujia en et cilindro.
Posici6n para - Tire la manilla de arranque lentamente unas
segar cuantas veces para distribuir el aceite.
o Vuelva a montar la nueva bujia.
OTROS
• No guarde la gasolina de una temporada a ia
otra.
• Cambie el envase de la gasolina si se
empieza a oxidar, La oxidaci6n y/o la mugre
en su gasoiina producir_.n problemas.
Si es posible, guarde _u unidad en un recinto
cerrado y cQbrala para protegerla contra el
polvo y la mugre,
• Cubra su unidad con un forro protector
adecuado que no retenga ia humedad. No
use plastico El pl_stico no puede respirar, Io
que permite la formacion de condensaciSn, Io
que producirdL [a oxidacion de su unidad.
IMPORTAN]E: Nunca cubra la segadora
nientras el motor y las areas de escape todavia
estan calientes.
PRECALICION: Nunca almacene la segadora
con gasoline en el estanque dentro de un
edificio en donde los gases pueden alcanzar
una llama expuesta o una chispa, Permita que
se enfr[e el motor antes de almacenarla en
algun recinto cerrado.
29
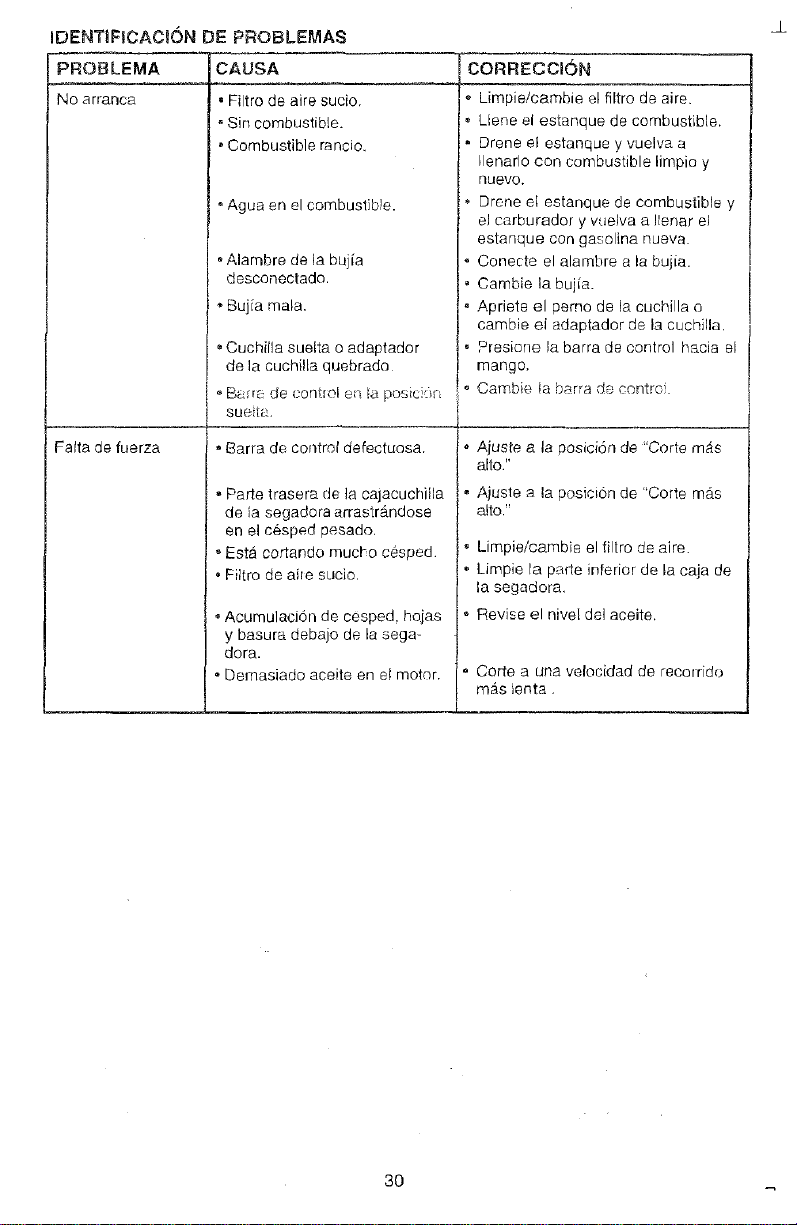
iDENTJFICAC_ON DE PROBLEMAS J
_'ROBLEMA
No arranca
Falta de fuerza
CAUSA
. Filtro de aire sucio.
- Sin combustible.
. Combustible rancio.
Agua en el combustib!e.
Alambre de la bujia
desconectado.
*Buj[amala.
Cuchifla suelta o adaptador
de la cuchilla quebrado
- B_ _r_:de control e_ la posicit,r
sue ta.
* Barra de control defectuosa.
• Parte trasera de la cajacuchilla
de ia segadora arrastrandose
en el cesped pesado,
• Esta cortando mucl-o cesped.
• Filtro de aire sucio.
oAcumulaci6n de cesped, hojas
y basura debajo de la sega-
dora.
• bemasiado aceite en el motor.
CORRECCION
Limpie/cambie el filtro de aire.
Llene el estanque de combustible.
Drene el estanque y vuelva a
Ilenarlo con combustible limpio y
rlLlevo,
Drene et estanque de combustible y
el carburador y vue!va a Ilenar el
estanque con gasolina nueva.
Conecte el alambre a la bujia.
Cambie la bujia.
Apriete el perno de la cuchilla o
cambie el adaptador de la cuchilla.
Presione la barra do control hacia el
mango.
Cambie ia barra de contro.
L
Ajuste ala posicion de "Corte mAs
alto."
Aiuste a la posieion de "Corte rn_.e
a!to."
Limpie/cambie el filtro de aire.
Limpie la parte inferior de la caja de
la segadora,
Revise el hive[ del aceite,
Corte a una velocidad de recorrido
m_s ienta.
3O
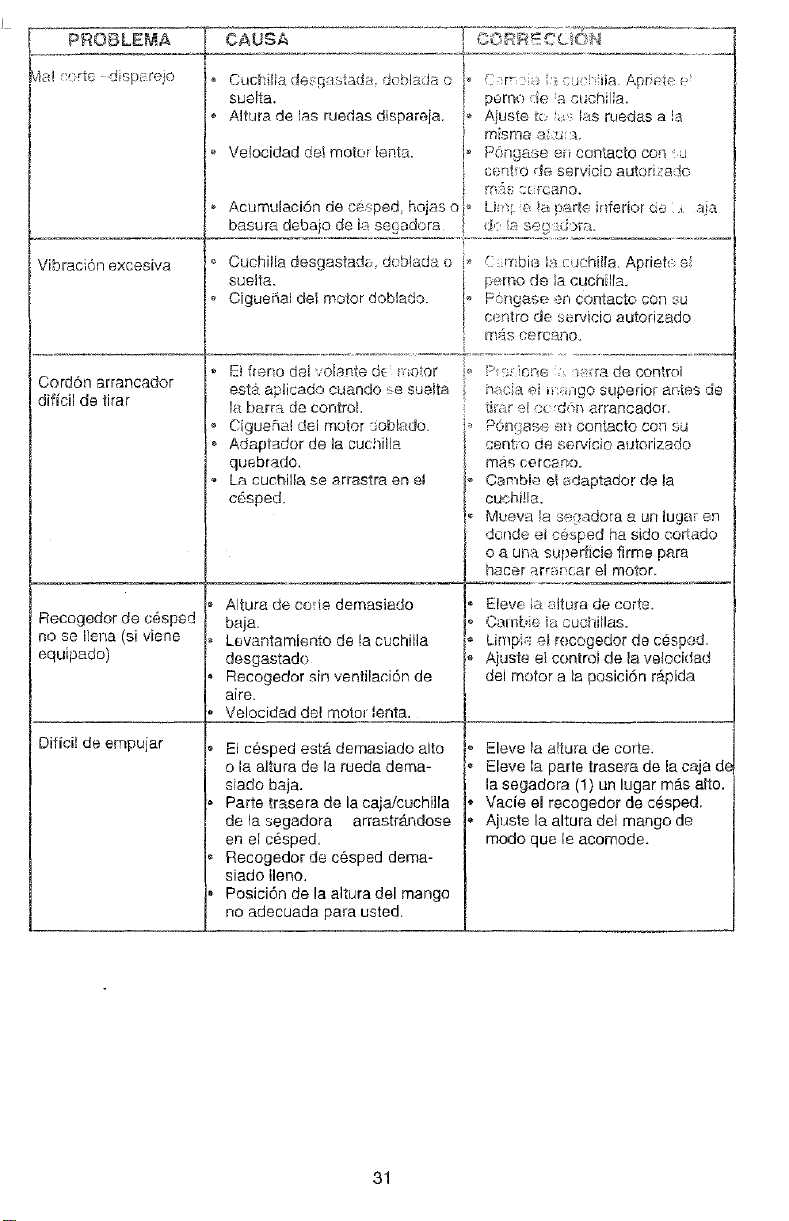
Iii_i_PROBLEMA
_rte Jisp_:rejo
1
Vibracien excesiva
Cord6n arrancador
dificil de tirar
Recogedor de c#sped
no se Irene (st viene
equipado)
Dificit de empujar
CAUSA
j:
I
Cuchiiia desBastada doblaJa o i_
sueka, I
A]tiJra de las ruedas dispareia. 1_
!
Vetocidad del mote_ bnts., to
I
i
Acumulaci6n de c_} ped, hojas o
basura debajo de b se9adora
Cuchii!a desgastadu, deblada o
suelta.
Ciguefial dei motor doblsdo.
EJflepo del volante d_ _'_oor
esta aplicado cuando se sueita
la bert;* de control,
Cigueflal dei motor :_oblado.
Adaptador de la cuchil!a
qoebrado.
La cuchilJa se arrastra en el
cesped,
Altura de corie demasiado
baja.
Levantamiento de !a cuchilla
desgastado
Recogedor sin ventilacien de
aire.
Velocidad del motor lenta.
El cesped esta. demasiado alto
o la altura de la rueda dema-
siado baja.
Parte trasera de la caja/cechilla
en el cesped,
Recogedor de cesped dema-
siado lleno.
Posici6n de la altura del mango
no adecuada para usted.
C r'-::; '/cJ,"iie AproN,,.
perne te a cucnilla.
Aiust_ to _; l_ts ruedas a !a
ttqisma :_:u: :_,
P6ngase en conLacto col} J
cenbo de servicio autori;cado
.m_s s_ rcano.
Li Y;',,'.: ia pa_'te i,,fferior de :., aja
_Je i2_S÷,_ Ldg,rr4.
P ,'::mbia ia c £'hilla, Apriet_: el
p;:,mo de ,a cucnDIL.
Pongas_; en contacto con u
cehtro de servicio autorizado
I m;].s cercano.
_. !s_: Gne s;sre de control
h ,,eia ei _'._-_gosuperior antes de
ti_r )t ccrden arrancador.
i'_ P6ngase e_tcontacto con su
centro de servfcio au_orizedo
ma_ cercanr_.
Cambie el {_daptador de la
cuchi!le.
Mueva la sPc',adora a un luga_ en
donde ei c_.s_'ed ha sido cor_ado
o a una superficie firme pare
hacer armncar ei motor.
Eleve ia attura de corte.
Carat., e ia cuchNlas.
Limpi,:: el recogedor de cesp,ad.
Ajuste el control de la velocidad
del motor ale posicien r_pida
Eleve la a!tula de corte,
Eleve la parle trase_a de la caja de
la segadora (1) un lugar m_.s alto.
Vacie el recogedor de cesped,
Ajuste la altura del mango de
modo que le aeomode.
31
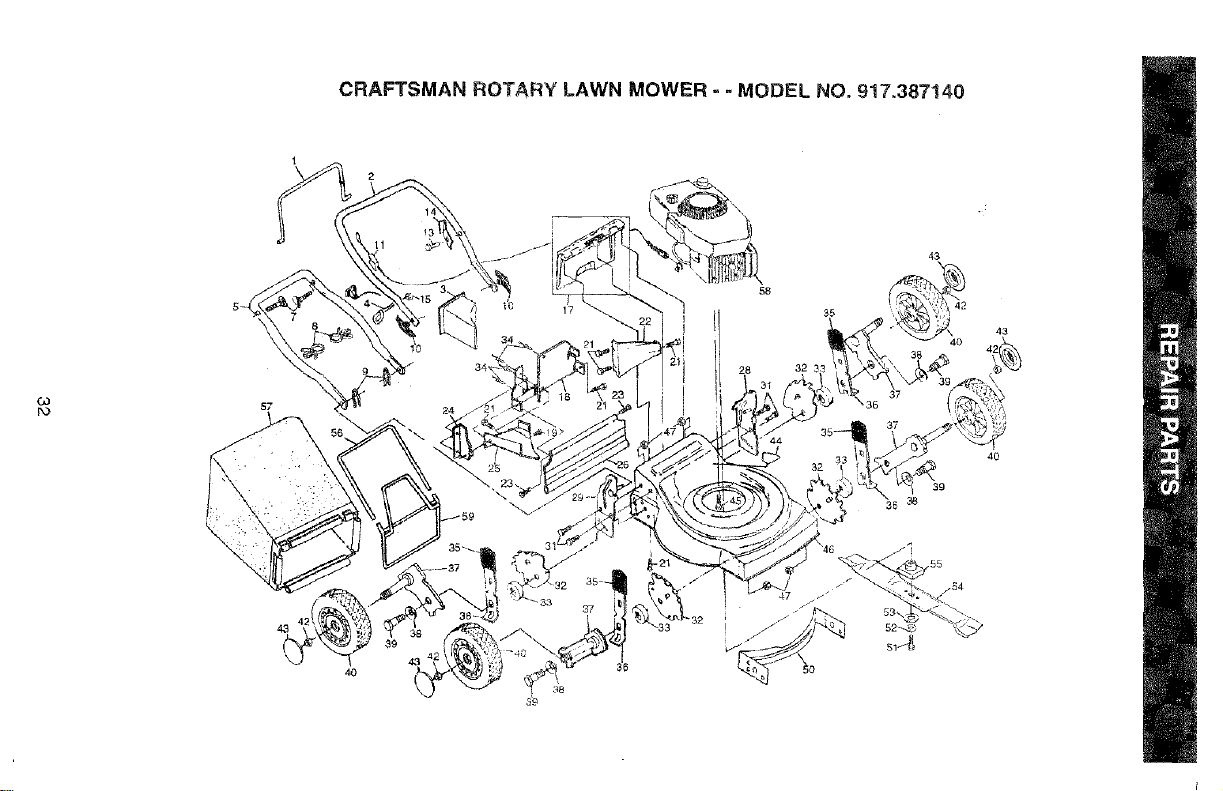
CRAFTSMAN ROTARY LAWN MOWER =- MODEL NO, 917.387140
42
43
\
4O
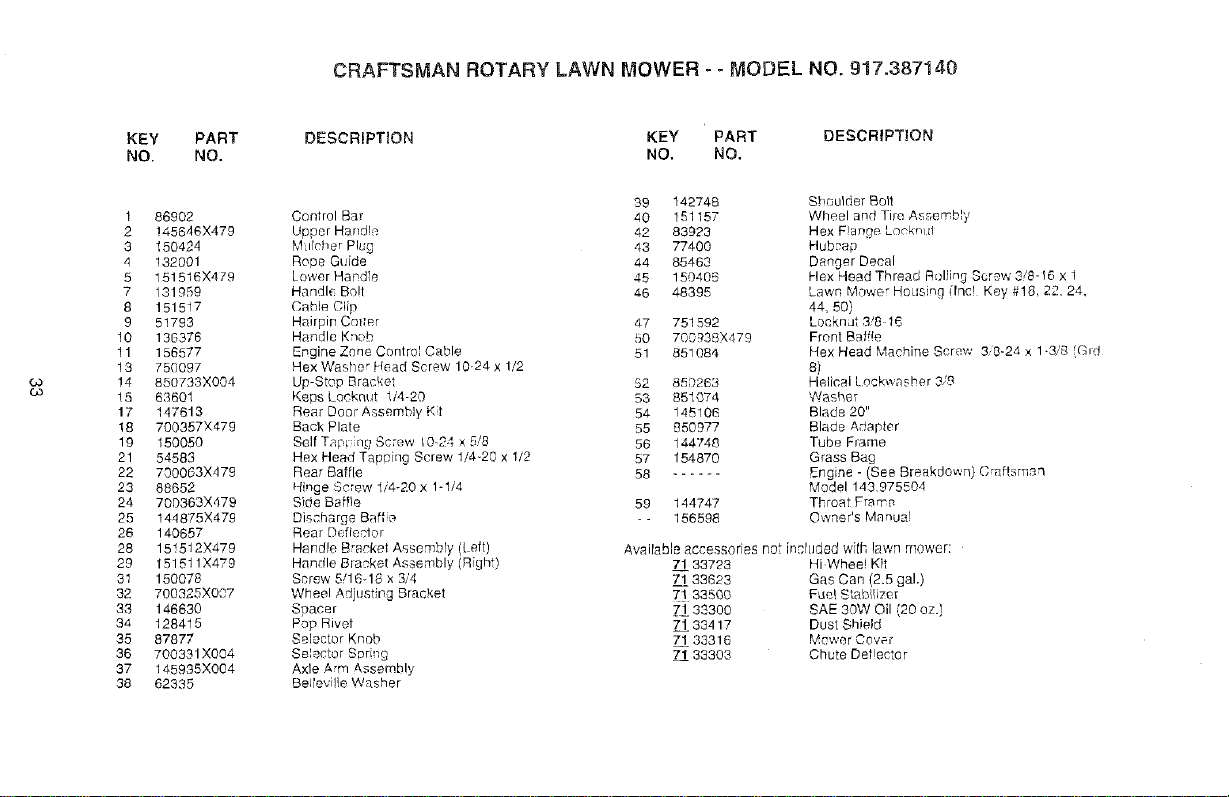
CRAFTSMAN ROTARY LAWN MOWER - - MODEL NO. 917.387140
KEY PART
NO. NO.
DESCRiPTiON KEY PART DESCRIPTION
NO. NO,
05
O3
1
2
3
4
5
7
6
9
10
11
13
!4
15
17
18
19
21
22
23
24
25
28
28
29
31
32
33
34
35
36
37
38
86902
!45646X479
150424
132001
151516X479
131959
151517
51783
136376
156577
750097
850733X004
63601
147613
700357X479
15005O
54583
700063X479
88652
700363X479
144875X479
140657
151512X479
151511X479
150078
700325X007
146630
128415
87877
700331X004
145935X004
62335
39 142746
Control Bar 40 151157
Upper Hand!, _. 42 83923
M irchar Pkg 43 77400
Rope GLJide 44 85466
Lower Handte 45 150406
Handle Bo!t 46 48395
Cable Clip
Hairpin Cr)i_er 47 751592
Handle K_ob 50 709938X479
Engine Zone Control Cable 51 851084
Hex Washer Head Screw 1024 x 1/2
Up-Stop Bracket 52 850263
Keps Locknut 1/4-20 53 851074
Rear Doer Assembly Kt 54 145108
Back Plate 55 850977
Self T;_p n9 Screw t0-24 x 8/8 56 144748
Hex Head Tapeing Screw 1/4-20 x 1/2 57 154870
Rear Baffle 58
Hinge Screw 1/4-20 x 1-1/4
Side Baffle 59 144747
Discharge Beff :_ - - 156598
Rear Dr;fiecter
Handle Bracket Assembly ([ eft)
Handle Bracket Assembly (Right)
Screw 5/16-18 x 3/4
Wheel AdiustiEqg Bracket
Spacer
Pop Rivet
Selector Knob
Selector Spring
Axle Arm Assembly
Beltevi!ie Washer
S_ guider Bolt
Wheel and Tire Assembly
Hex Flange. Loekntll
Hub:_ap
Danger Decal
Hex Head Thread Rc311ingScrew 38-I6 x 1
Lawn Mowe" blousing (Inc! Key #18, 22.24,
44, 50)
Locknut 3/8 18
Front Baffle
Hex Head Machine Screw 3/8-24 x 1 3/'8 (G_d
8}
Helical Lockwasher 3/9
V_.fasher
Blade 20"
Blade Adapter
Tube Frame
Grass Bag
Engine - (See Breakdown) Craftsrr_aq
Model 143975804
Throat Fmm_
Owner's Manual
Avairable accessories not incruded with lawn mower:
71 33723 Hi Whee! K?t
71 33623 Gas Can (2.5 gal.)
71 33500 Fue_ Stahilizo_
_1 38300 SAE 30W O (20 oz )
71 33417 Dust Shield
71 33316 Mower Cover
71 33303 Chute Deflector
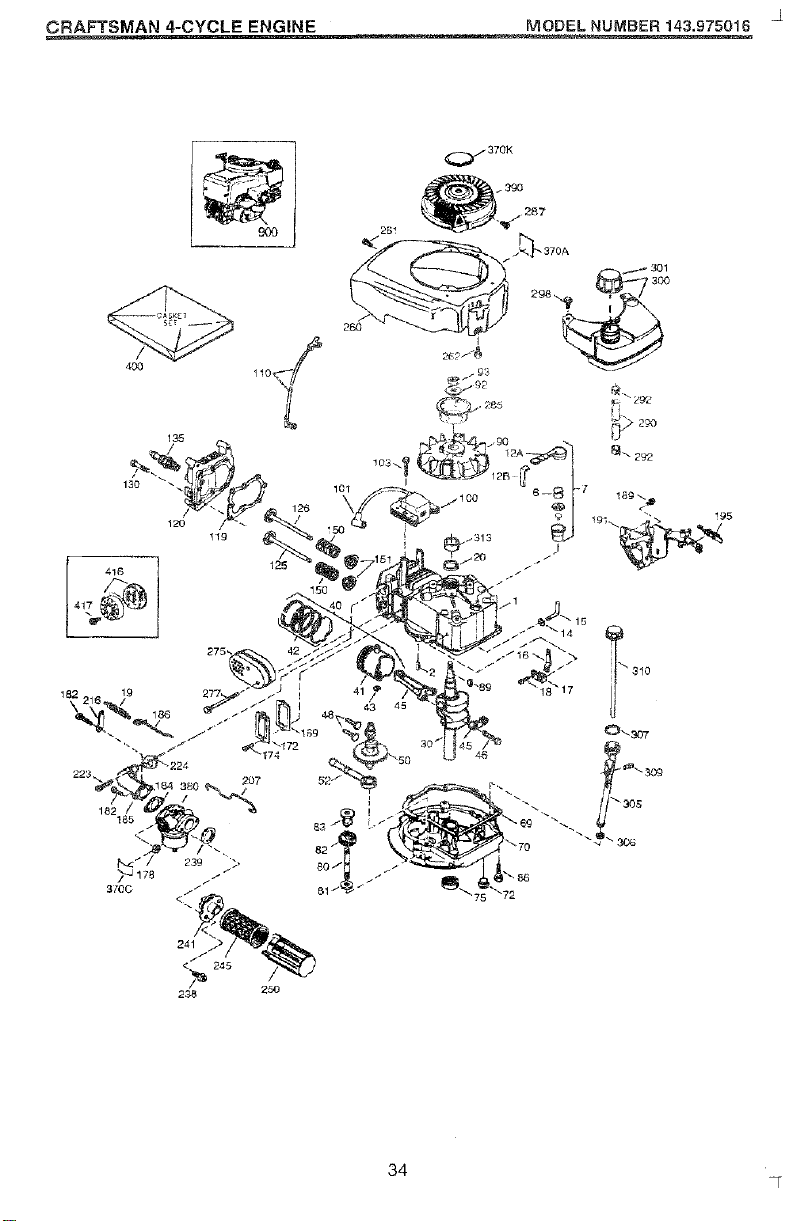
J
CRAFTSMAN 4-CYCLE ENGINE MODEL NUMBER 143.975016
34
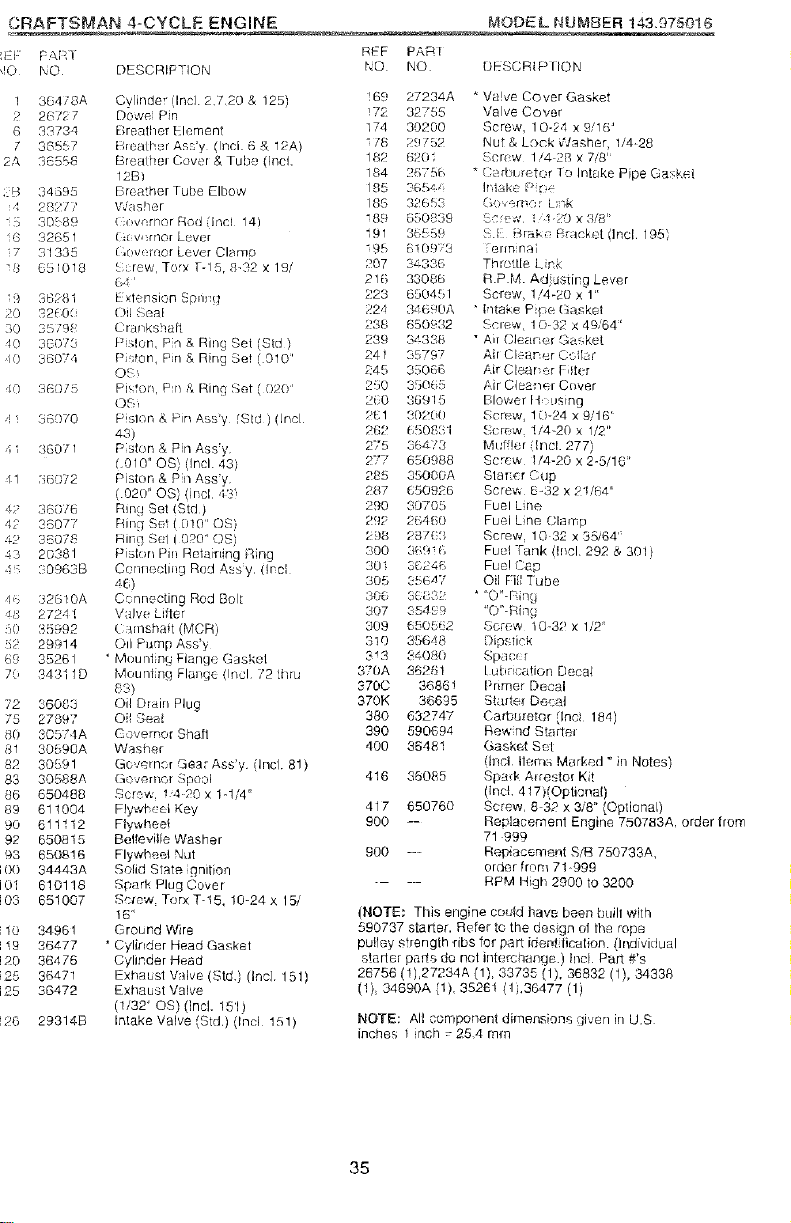
EENGINE
',El:" PART
40 NO DESCRIPTION
t 36478A Cyrinder (Incl. 2,7,20 & 125)
2 26727 Dowe Pfn
6 3373,1 Breather Element
7 36557 15reatl ,'.r Ass'y (Incl iS .8. 12A)
2A 36558 B_eathel Cover & Tube dnd.
126/
;B 34595 Breather Tube Elbow
4 28217 Washer
!_ 30{89 ( _wernor Rod lnci 14)
19 32651 (_/v, rnor Lever
17 51335 (;nwm_of Lever Clams
8 651018 ,%;raw, Torx P15, 8-32 x 191
(4'
ill 38281 E ×I_:nsion Sprmfl
20 _260{J ()il Seal
30 35/9. _ Cranks _afl
40 56073 Pslon, Pn & Ring Set (Std }
(] 36074 P ;ton, Pn & Ring Set 1010'
OS_
86075 Pbfon, Pn ,'_Ring Set ( 020'
OS_
86070 PslOn & Pirl Assy !Sld ) tinct
43)
:36071 Pslon & Pin Ass'y
6019" OS) (Incl. 43)
86")72 Piston & P_ Assy
(020" OS) (incl. ,13,
42 36076 Ring Set (Std)
4P .'36077 Ring Set ( 010" OS)
42 36078 Rinq Sel( 0P0" (:)S)
43 20381 Piston Pin Relairfing Ring
1 : 09636 Conncclinq Rod Ass:y. (incl
_6)
/h., 32610A Connecting Rod Bolt
q8 27241 V_dve Lifter
_0 35992 ( "_mshaft (MCR)
52 29914 Off Pump Ass'y
69 35261 " Mounl ng Flange Gaskel
70 34311D Mountfng Flange (Incl 72 ttfu
8S)
72 36083 O11 Drain Plug
75 27897 0i_ Sea!
81) 30574A Governor Shall
81 30690A Washer
92 30591 G(vem.'r Gear Ass>y (Inch 81)
83 30588A Governor Spo)l
86 650488 Screw 1,4-20 x 1-1/4"
89 61 i004 Flywheel Key
90 611112 Flywhee!
92 650815 Belfeville '+_/ashe r
93 650816 Flywheel Nut
100 34443A Solid State gnilion
i0t 610118 Spark Plug Cover
03 651007 Srxew, Torx T-t5, 10-24 x 15/
i0 34961 Ground Wire
i 19 36477 * Cylioder Head Gasket
!20 36476 Cylinder Head
25 36471 Exhausl V_lve (Std.) (Incl. 151)
i25 36472 Exhaust Valve
11/32' 0% (Incl. 15'1)
29314B Inlake Valve (Std.) (Incl 151)
MODEL NUMBER 143,975016
REF PAR I
NO NO DESCR]P lION
169 27234A * Va!ve Cover Gasket
!72 32755 Valve Cover
174 30200 Screw, 10-2,1 x 9/16"
178 ;9%2 Nut & Look,/Aseher> 1i4.28
182 6201 Scnw 1/4 28 × 7/8'
184 26756 * Cart [ retor _e Intake Pipe Gasket
165 S62_': If lake [J.re
186 326!.3 G_.vemo_ L_]k
199 650839 8c_,¢, , ! ii -0 x 818"
i91 36f5, _ S.E +ar_k B_cket (Ip,el 195',
96 _! 0973 erm nai
207 34336 Throttle Lnk
216 31}O86 R.PM. Adiu:_dT_g Lever
22,i} 680451 Screw, 1/4-20 x 1"
224 34690A " Intake Ppe Gasket
238 B50932 s,¢_e.-_ 10 32 x 49/64"
239 3,:336 " Air Cleat',at Gasket
24 i 35797 Ah CI _ener Ccilr
245 38066 Ai_ Cl_;a!;er Filer
290 3g065 /Jr Clea;ler C(_ver
210 36915 Blower 1t,: using
261 8{1200 Screw, 1 D-24 x 9/16'
262 _908:1 Scr(w !i420 x 1!2"
275 ,'}6zW3 Muffler {biol. 277)
277 650958 Screw !f4-20 x 2-5/10"
285 35000A Starer Cup
287 650926 Scre_*_ 6_32 x 2!/64"
290 90709 Fuel Line
29" 26460 Fuel Lne Clamp
288 287_9 Screw 10 32 x 35164':
300 3h9! 6 Fuel Tank {libel 292 _, 301i
901 36246 Fue! Cap
305 3f647 Oil Fiil ]'ube
30_ St i t_P • "O"4::,in.c_
307 854[9 "O"-[019
309 650562 Screw 16-3,:! × 1/2'
310 36646 Dipstick
3_3 84080 Spa'.:_ i
370A 36281 labrcatiorl Decal
57042, tEs66 ! I_rirl/ef D e.eai
370K 36895 "4!a_ter Denat
380 632747 Carbr_retor {leg 184)
390 590_394 Rewnd St_rte_
400 36481 Gasket Set
(lnet items MarRed * hi Notes)
416 36085 Spe_ Ar_esto_ Kit
(Incl. 417)(Optional) "
417 650760 Screw, 8 32 x 3/8" (Optional)
900 -- Replacement Er_gine 750783A, order from
71 999
900 - Repiaeeme_)t S!B 750733A_
or4er from 71_99cJ
RPM High 2900 to 3200
(tlOT_: This engine could have been built wkh
590737 starter. Refer to the design ot the rope
puNey strength ,ribs for _rt idet_t fiealion. (h_dividual
starter pa_ts do not ilste,_er_ange.} Incl P_rt #'s
26756 (1),27234A (1), 33735 (1), 36832 (1), 34338
(I)_ 34690A 11), 35261 11),36477 (1)
NOTE: Ali component dimensions given in U,S
inches 1 ir_ch _ 25,4 mm
35
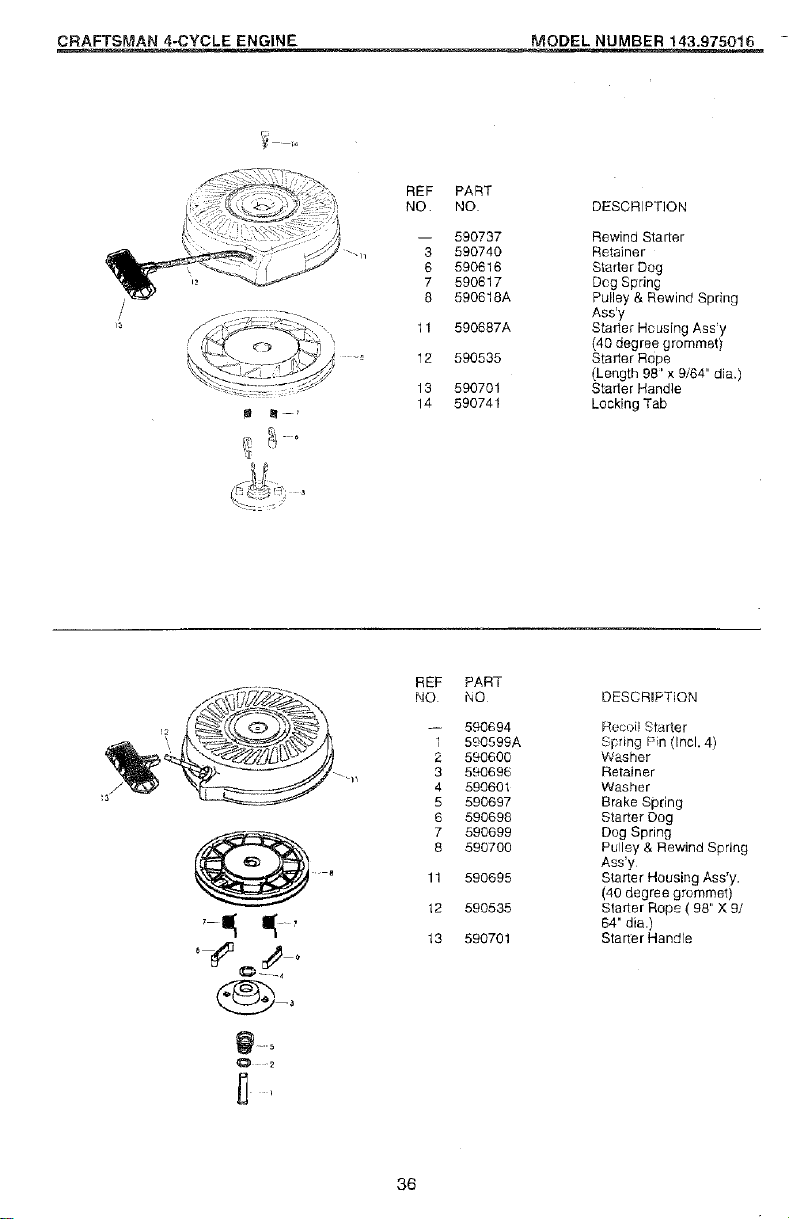
CRAFTSMAN 4-CYCLE ENGINE MODEL NUMBER 143.975016 -
REF PART
NO. NO
-- 590737
3 590740
6 59O616
7 590617
8 590618A
11 590687A
12 590535
13 590701
14 590741
DESCRIPTION
Rewind Starter
Retainer
Starter Dog
Beg Spring
Pulley & Rewind Spring
Ass'y
Starter Housing Ass'y
(40 degree grommet}
Starter Rope
(Length 98' x 9/64" alia.)
Stader Handle
Locking Tab
_-"5
O 2
REF
NO
2
3
4
5
6
7
8
11
12
13
PART
NO
590694
590599A
590600
590696
590601
590697
590698
590699
590700
590695
590535
590701
DESCRIPTION
Recoii Starter
Spring Pn (incl. 4)
Washer
Retainer
Washer
Brake Spdng
Starter Dog
Dog Spring
Pulley & Rewind Spring
Ass'y
S_arter Housing Ass'y.
(40 degree grommet)
Slarter Rope ( 98"X 9/
64' dia.)
Starter Handle
36
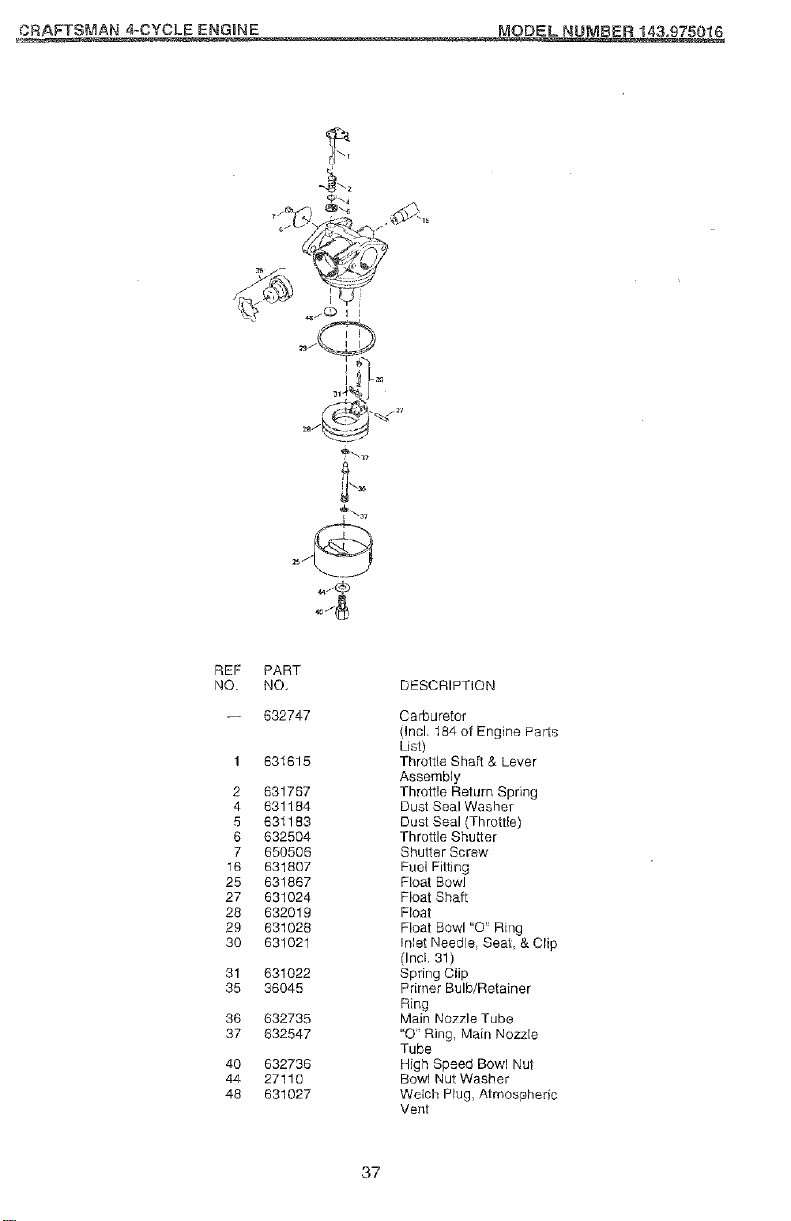
ORAFTSMAN 4-CYCLE ENGINE _R143,9750"IG
REF
NO.
2
4
5
6
7
16
25
27
28
29
30
31
35
36
37
40
44
48
PART
NO.
632747
631615
631767
631184
631183
632504
650506
631807
631867
631024
632019
631028
631021
631022
36045
632735
632547
632736
27116
631027
DESCRIPTION
Carburetor
(Incl. 184 of Engine Parts
List)
Throttle Shaft & Lever
Assembly
Throttle Return Spring
Dust Seal Washer
Dust Seal (Throttle)
Throttle Shutter
Shutter Screw
Fuel Fitting
Float Bowl
Float Shaft
Float
Float Bowl "O' Ring
Inlet Needle, Seat, & Clip
(Incl. 31)
Spring Clip
Primer Bulb/Retainer
Ring
Main Nozzle Tube
"Q Ring, Main Nozzle
Tube
High Speed Bowl Nut
Bowl Nut Washer
Welch Plug, Atmospheric
Vent
37

38

39
Fortherepairorreplacementparsyouneed
delivereddirectlytoyourhome
Call7amo7pro,7daysaweek
1=800-366-PART
(1_800-366-7278)
Para ordenar piezas con entrega a
domicilio - 1o800o659=2084
For in=house major brand repair service
Cal! 24 hours a day, 7 days a week
1-800=4=FIEPAIR
(1-800-473-7274)
Rata pedir servicio de reparaci6n a
domicilio = 1-800o676-5811
For the location of a Sears Parts and
Repair Center in your area
Call 24 hours a day, 7 days a week
1=800o488=1222
For information on purchasing a Sears
Maintenance Agreement or to inquire
about an existing Agreement
Call 9 am - 5 pro, Monday-Saturday
1-800=827-6655
When requesting service or ordering
parts, always provide the following
information:
Product Type * Part Number
Model Number . Part Description
Amer_c_-?'sRepair Special_,_ts
156598 05.20.97 REV.3 VBLiBW Printed in U.S.A.