
- 2 -
PRECAUTIONS
TO AVOID POSSIBLE EXPOSURE
TO EXCESSIVE MICROWAVE ENERGY
(a) Do not attempt to operate this oven with the door open since open-door operation can result
in harmful exposure to microwave energy. It is important not to defeat or tamper with the
safety interlocks. Under normal conditions, the oven will not operate with the door open.
(b) Do not place any object between the oven front face and the door, or allow soil or cleaner
residue to accumulate on sealing surfaces.
(c) Do not operate the oven if it is damaged. It is particularly important that the oven door close
properly and that there is no damage to the following:
(1) door (bent)
(2) hinges and latches (broken or loosened)
(3) door seals and sealing surfaces.
(d) The oven should not be adjusted or repaired, by anyone except properly qualified service
personnel.
The serial number of this product may be found on Model No.
the right side of the oven door opening. You
should note the model number and the serial Serial No.
number of this oven in the space provided and
retain this book as a permanent record of your Date of Purchase
purchase for future reference.
© Copyrighted by Matsushita Electric Industrial Co., Ltd. 2003
CONTENTS
Important Safety Instructions . . . . . . . . . . . . . . . 3
Installation and Grounding Instructions . . . . . . . 4
Outline Diagram . . . . . . . . . . . . . . . . . . . . . . . . . 6
Cooking Modes . . . . . . . . . . . . . . . . . . . . . . . . . 6
Control Panel . . . . . . . . . . . . . . . . . . . . . . . . . . . 7
Functions . . . . . . . . . . . . . . . . . . . . . . . . . . . . . . 8
To Use Child Safety Lock. . . . . . . . . . . . . . . . . . 8
Clock Setting . . . . . . . . . . . . . . . . . . . . . . . . . . . 9
Quick Min Function . . . . . . . . . . . . . . . . . . . . . . 9
To Set Popcorn Function . . . . . . . . . . . . . . . . . . 9
To Set Inverter Turbo Defrost . . . . . . . . . . . . . 10
Microwave Power & Time Selection. . . . . . . . . 10
To Use Keep Warm . . . . . . . . . . . . . . . . . . . . . 10
Bake with Time Selection. . . . . . . . . . . . . . . . . 11
Broiling with Time Selection . . . . . . . . . . . . . . . 12
Combination Cooking with Time Selection. . . . 12
To Use Sensor Reheat (by Microwave) . . . . . . 13
Sensor Cooking
(by Microwave/Combination) . . . . . . 13
Auto Convection (by Combination) . . . 14
Auto Convection (by Bake) . . . . . . . . . 14
To Set Timer (To use as a kitchen timer). . . . . 15
Care of Your Microwave/Convection Oven . . . 15
Technical Specifications. . . . . . . . . . . . . . . . . . 15
Warranty & Service . . . . . . . . . . . . . . . . . . . . . 16

- 3 -
Important Safety Instructions
When using electrical appliances, basic safety
precautions should be followed, including the
following:
WARNING—To reduce the risk of burns, electric
shock, fire, injury to persons or exposure to
excessive microwave energy:
1. Read all instructions before using the appliance.
2. Read and follow “PRECAUTIONS TO AVOID
POSSIBLE EXPOSURE TO EXCESSIVE
MICROWAVE ENERGY”, found on page 2.
3. This appliance must be grounded. Connect only
to a properly grounded outlet. See
“GROUNDING INSTRUCTIONS” found on
page 4.
4. Install or locate this appliance only in accordance
with the provided installation instructions.
5. Some products such as whole eggs and sealed
containers (for example, closed glass jars) may
explode and should not be heated in this oven.
6. Use this appliance only for its intended use as
described in this manual. Do not use corrosive
chemicals or vapours in this appliance. This type
of oven is specifically designed to heat, or cook
food. It is not designed for industrial or laboratory
use.
7. As with any appliance, close supervision is
necessary when used by children.
Do not allow children to use this appliance,
unless closely supervised by an adult.
8. Do not operate this appliance if it has a damaged
cord or plug, if it is not working properly, or if it
has been damaged or dropped.
9. This appliance should be serviced only by
qualified service personnel. Contact the nearest
authorized Panasonic Servicentre for
examination, repair or adjustment.
10. Do not cover or block any openings on this
appliance.
11. Do not store, or use, this appliance outdoors. Do
not use this product near water—for example,
near a kitchen sink, in a wet basement, or near a
swimming pool, etc.
12. Do not immerse cord or plug in water.
13. Keep cord away from heated surfaces.
14. Do not let cord hang over edge of table or
counter.
15. When cleaning surfaces of door and oven that
come together on closing the door, use only
nonabrasive soaps or detergents applied with a
sponge or soft cloth.
16. To reduce the risk of fire in the oven cavity:
(a) Do not overcook food. Carefully attend
appliance if paper, plastic, or other
combustible materials are placed inside the
oven to facilitate cooking.
(b) Remove wire twist-ties from paper or plastic
bags before placing bag in oven.
(c) If materials inside the oven should ignite,
keep oven door closed, turn oven off, and
disconnect the power cord, or shut off power
at the fuse or circuit breaker panel.
(d) Do not use the cavity for storage purposes.
Do not leave paper products, cooking
utensils, or food in the cavity when not in use.
17. To avoid the possible risk of a burn, the
appliance must not be used in areas such as
island-type countertops where the rear surfaces
would be exposed to user contact and the
appliance must be placed more than 92 cm
above the floor.
General Use
1. DO NOT tamper with, or make any adjustments
or repairs to, the door, control panel housing,
safety interlock switches or any other part of the
oven.
DO NOT remove outer panel from oven. Repairs
should only be done by qualified service
personnel.
2. DO NOT use the microwave function when the
oven is empty. The microwave energy will reflect
continuously throughout the oven causing
overheating, if no food or water is present to
absorb energy.
3. DO NOT use this oven to heat chemicals or other
non-food products.
4. DO NOT dry clothes, newspapers or other
materials in the oven. They may catch on fire.
5. DO NOT use recycled paper products unless the
paper product is labelled as safe for microwave
oven use. Recycled paper products may contain
impurities which may cause sparks and/or fires
when used.
6. DO NOT use newspapers or paper bags for
cooking.
7. DO NOT hit or strike the control panel. Damage
to the controls may occur.
8. DO NOT store flammable materials next to, on
top of, or in the oven. These could be fire
hazards.
9. POT HOLDERS may be needed when handling
dishes. Heat is transferred from the hot food to
the cooking container and from the cooking
container to the Ceramic Tray. Ceramic Tray can
be very hot after removing cooking container
from oven.
10. Before using the BAKE, COMBINATION or
BROIL functions for the first time, wash the
interior with a soapy cloth, then operate the
oven without food, on BAKE, for 20 minutes
at 230°C (450°F). This will allow the oil that is
used for rust protection to be burned off.
11. Door and exterior will get hot during BAKE,
COMBINATION and BROIL. Please handle door
carefully.
12. Use extreme caution when removing oven
accessories or cooking containers from oven or
disposing of hot grease.
SAVE THESE INSTRUCTIONS

Examine Your Oven
Unpack the oven, remove all packing material, and
examine the oven for any damage such as dents,
broken door latches or cracks in the door. Notify
dealer immediately if oven is damaged. DO NOT
install if the oven is damaged.
Placement of Your Oven
1. Oven must be placed on a flat, stable surface.
For proper operation, the oven must have
sufficient air flow. Allow 8 cm (3") of space on
both sides of the oven and 15 cm (6") of space
on top of the oven.
a. DO NOT block air vents. If they are blocked
during operation, the oven may overheat. If
the oven overheats, a thermal safety device
will turn the oven off. The oven will remain
inoperable until it has cooled.
b. DO NOT place the oven near a hot, damp
surface such as a gas or electric range, or
dishwasher.
c. DO NOT operate the oven when room
humidity is too high.
2. This oven was manufactured for household use
only.
3. This oven may be built into a wall cabinet, if
desired, by using the proper trim kit, which may
be purchased from a local dealer.
Follow all installation instructions packed with kit.
(Trim Kit Model No. see page 15)
Grounding Instructions
This appliance must be grounded. In the event of an
electrical short circuit, grounding reduces the risk of
electric shock by providing an escape wire for the
electric current. This appliance is equipped with a
cord having a grounding wire with a grounding plug.
The plug must be plugged into an outlet that is
properly installed and grounded.
WARNING
Improper use of the grounding plug
can result in a risk of electric shock.
Consult a qualified electrician or service person if the
grounding instructions are not completely
understood, or if it is uncertain whether the appliance
is properly grounded or not.
If it is necessary to use an extension cord, use only a
three-wire extension cord that has a three blade
grounding plug, and a three-slot receptacle that will
accept the plug on the appliance. The marked rating
of the extension cord should be equal to, or greater
than, the electrical rating of the appliance.
Fan Motor Operation
After using the oven the fan motor rotates to cool the
electric components. This is perfectly normal, and
you can take the food out of the oven while the fan
operates.
Wiring Requirements
1. The oven must be on a SEPARATE CIRCUIT.
No other appliance should share the circuit with
the microwave oven. If it does, the branch circuit
fuse may blow or the circuit breaker may trip, or
the food may cook slower than recommended in
this manual.
2. The VOLTAGE used must be the same as
specified on this microwave oven (120 V, 60 Hz).
Using a higher voltage is dangerous and may
result in a fire or other accident causing oven
damage. Using a lower voltage will cause slow
cooking. Panasonic is NOT responsible for
damage resulting from the use of the oven with
other than specified voltage.
3. The oven must be plugged into at least a 15
AMP, 120 VOLT, 60 Hz GROUNDED OUTLET.
Where a standard two-prong outlet is
encountered, it is the personal responsibility and
obligation of the consumer
to have it replaced with
a properly grounded
three-prong outlet.
Ceramic Tray
1. DO NOT operate the oven without the Roller
Ring and Ceramic Tray in place.
2. Only use the Ceramic Tray specifically designed
for this oven. Do not substitute any other
Ceramic Tray.
3. If the Ceramic Tray is hot, allow it to cool before
cleaning or placing it in the water.
4. DO NOT cook directly on the Ceramic Tray.
Always place food in a microwave-safe dish, or
on a rack set in a microwave-safe dish.
5. If food or utensils on the Ceramic Tray touch the
oven walls, causing the turntable to stop moving,
the turntable will automatically rotate in the
opposite direction. This is normal.
6. The Ceramic Tray can turn in either direction.
Roller Ring
1. The Roller Ring and oven floor should be
cleaned frequently to prevent excessive noise.
2. The Roller Ring must always be used with the
Ceramic Tray.
3. Always replace the Roller Ring and Ceramic Tray
in their proper positions.
Oven Racks
Use these racks for Bake, Broil or Combination
cooking to elevate food for proper heating.
May also be used during Microwave cooking. Arcing
may occur if a metal container is used. If this occurs,
stop the cooking, change the container and re-start
the program.
- 4 -
Installation and Grounding Instructions

- 5 -
Utensils
1. MICROWAVE BROWNING DISHES or GRILLS
are designed for microwave cooking only. Do not
use on browning cycle or on rack. Preheating
times vary depending on the size of the browning
dish and food being cooked. Always follow
instructions provided by the browning dish or grill
manufacturer. DO NOT PREHEAT THE
BROWNING DISH FOR MORE THAN
6 MINUTES in the microwave.
2. METAL CONTAINERS or dishes with metallic
trim should not be used during Microwave or
Combination cooking. Arcing (sparking) may
occur.
3. METAL TWIST-TIES should not be used for
Microwave or Combination cooking, Arcing will
occur.
4. DO NOT use SEALED JARS or NARROW NECK
bottles for cooking or reheating. They may
shatter.
5. DO NOT use CONVENTIONAL
THERMOMETERS for Microwave or
Combination cooking. They may cause arcing.
DO NOT use a Microwave meat thermometer for
Combination cooking or Bake cooking. It may
melt.
6. Remove PLASTIC WRAPS, before cooking or
defrosting in the oven.
7. If an oven cooking bag is used, prepare
according to the package directions. Do not use
a wire twist-tie to close bag. Instead, use a
plastic tie, a piece of cotton string or a strip cut
from the open end of the bag. Make six 1 cm
(
1
Ú
2
") slits by the closure. Place oven cooking bag
in a dish slightly larger than the food being
cooked.
8. When using foil, skewers, racks or utensils made
of metal in the oven for Microwave or
Combination cooking, allow at least 2.5 cm (1")
of space between the metal material and interior
oven walls. If arcing occurs, remove the metal
material (skewers, etc.) and/or transfer to a
nonmetallic container. Do not use with rack.
9. Do not use paper bags or recycled paper
products in the microwave oven.
10. Do not use paper towels or cloths which contain
a synthetic fiber woven into them, such as nylon.
The synthetic fiber may cause the towel or cloth
to ignite. Use paper towels with caution.
11. The oven door and interior walls will get hot
during cooking.
12. Cooking utensils get hot during cooking. Use
potholders when removing utensils from the oven
or when removing lids or plastic wrap covers
from cooking utensils to avoid burns.
13. The Ceramic Tray will get hot during cooking. It
should be allowed to cool before handling or
before using paper products, such as paper
plates, napkins or microwave cooking.
14. Utensils for Combination setting, should be heat-
safe, microwaveable dishes.
Food
1. Do not use your oven for home canning or the
heating of any closed jar. Pressure will build up
and the jar may explode. In addition, the
microwave oven cannot maintain the food at the
proper canning temperature. Improperly canned
food may spoil and be dangerous to consume.
2. Small quantities of food or foods with low
moisture content can dry out, burn or catch on
fire when overheated. If a fire occurs, turn the
oven off and leave the oven door closed.
Disconnect the power cord or shut off the power
at the fuse or circuit breaker panel.
3. Popcorn can be popped in a suitable,
microwaveable cornpopper using the
manufacturer’s directions OR prepackaged bags
of Microwave popcorn can be used with the
preset “Popcorn” Pad program. Always follow the
package directions.
4. Do not attempt to deep fry in your microwave
oven. Temperature cannot be controlled and fat
will erupt. Many microwave utensils cannot
withstand the temperatures of heated oil,
resulting in shattering or melting.
5. Do not boil eggs in their shell in a microwave
oven. Pressure will build up and the eggs will
explode.
6. Potatoes, apples, egg yolks and whites, whole
squash and sausages are examples of foods
with nonporous skins. This type of food must be
pierced before cooking, to prevent bursting.
7. Use fresh potatoes, and cook until just done. The
potatoes will still feel soft to the touch, but firm
when pierced with a fork. Overcooking causes
dehydration and may cause a fire.
8. Heated liquids can erupt if not mixed with air. Do
not heat liquids in your microwave oven without
first stirring. Over-heated liquids will erupt.
9. Heat only 1 frozen dinner or entree in the oven at
a time. If the dinner or entree is heated in a foil
tray, leave at least 2.5 cm (1") of space between
the foil tray and the oven walls.
10. Drying meats, fruits, vegetables and herbs is not
recommended.
11. Do not use the oven for any reason other than
the preparation of food.
12. Do not leave the oven unattended when in use.

- 6 -
Outline Diagram
Cooking Modes
MICROWAVE
BAKE
The following is the recommended use of the oven racks, unless otherwise indicated in the Cookbook.
BROIL
COMBINATION
MICROWAVE
CERAMIC TRAY
HEAT
LOW RACK
CERAMIC TRAY
HEAT
LOW RACK
CERAMIC TRAY
MICROWAVE
HEAT
CERAMIC TRAY
1
Door Release Button
Opening the door during cooking will stop the
cooking process without cancelling the program.
Cooking resumes as soon as the door is closed
and START Pad is pressed. The oven light will
turn on, and remain on, whenever the door is
opened.
2
Door Safety Lock System
3
Oven Air Vent
4
Control Panel
5
Ceramic Tray
6
Roller Ring
7
Identification Plate (model number)
8
Oven Rack
2
3
4
5
6
1
7
8
High Rack Low Rack
- 7 -
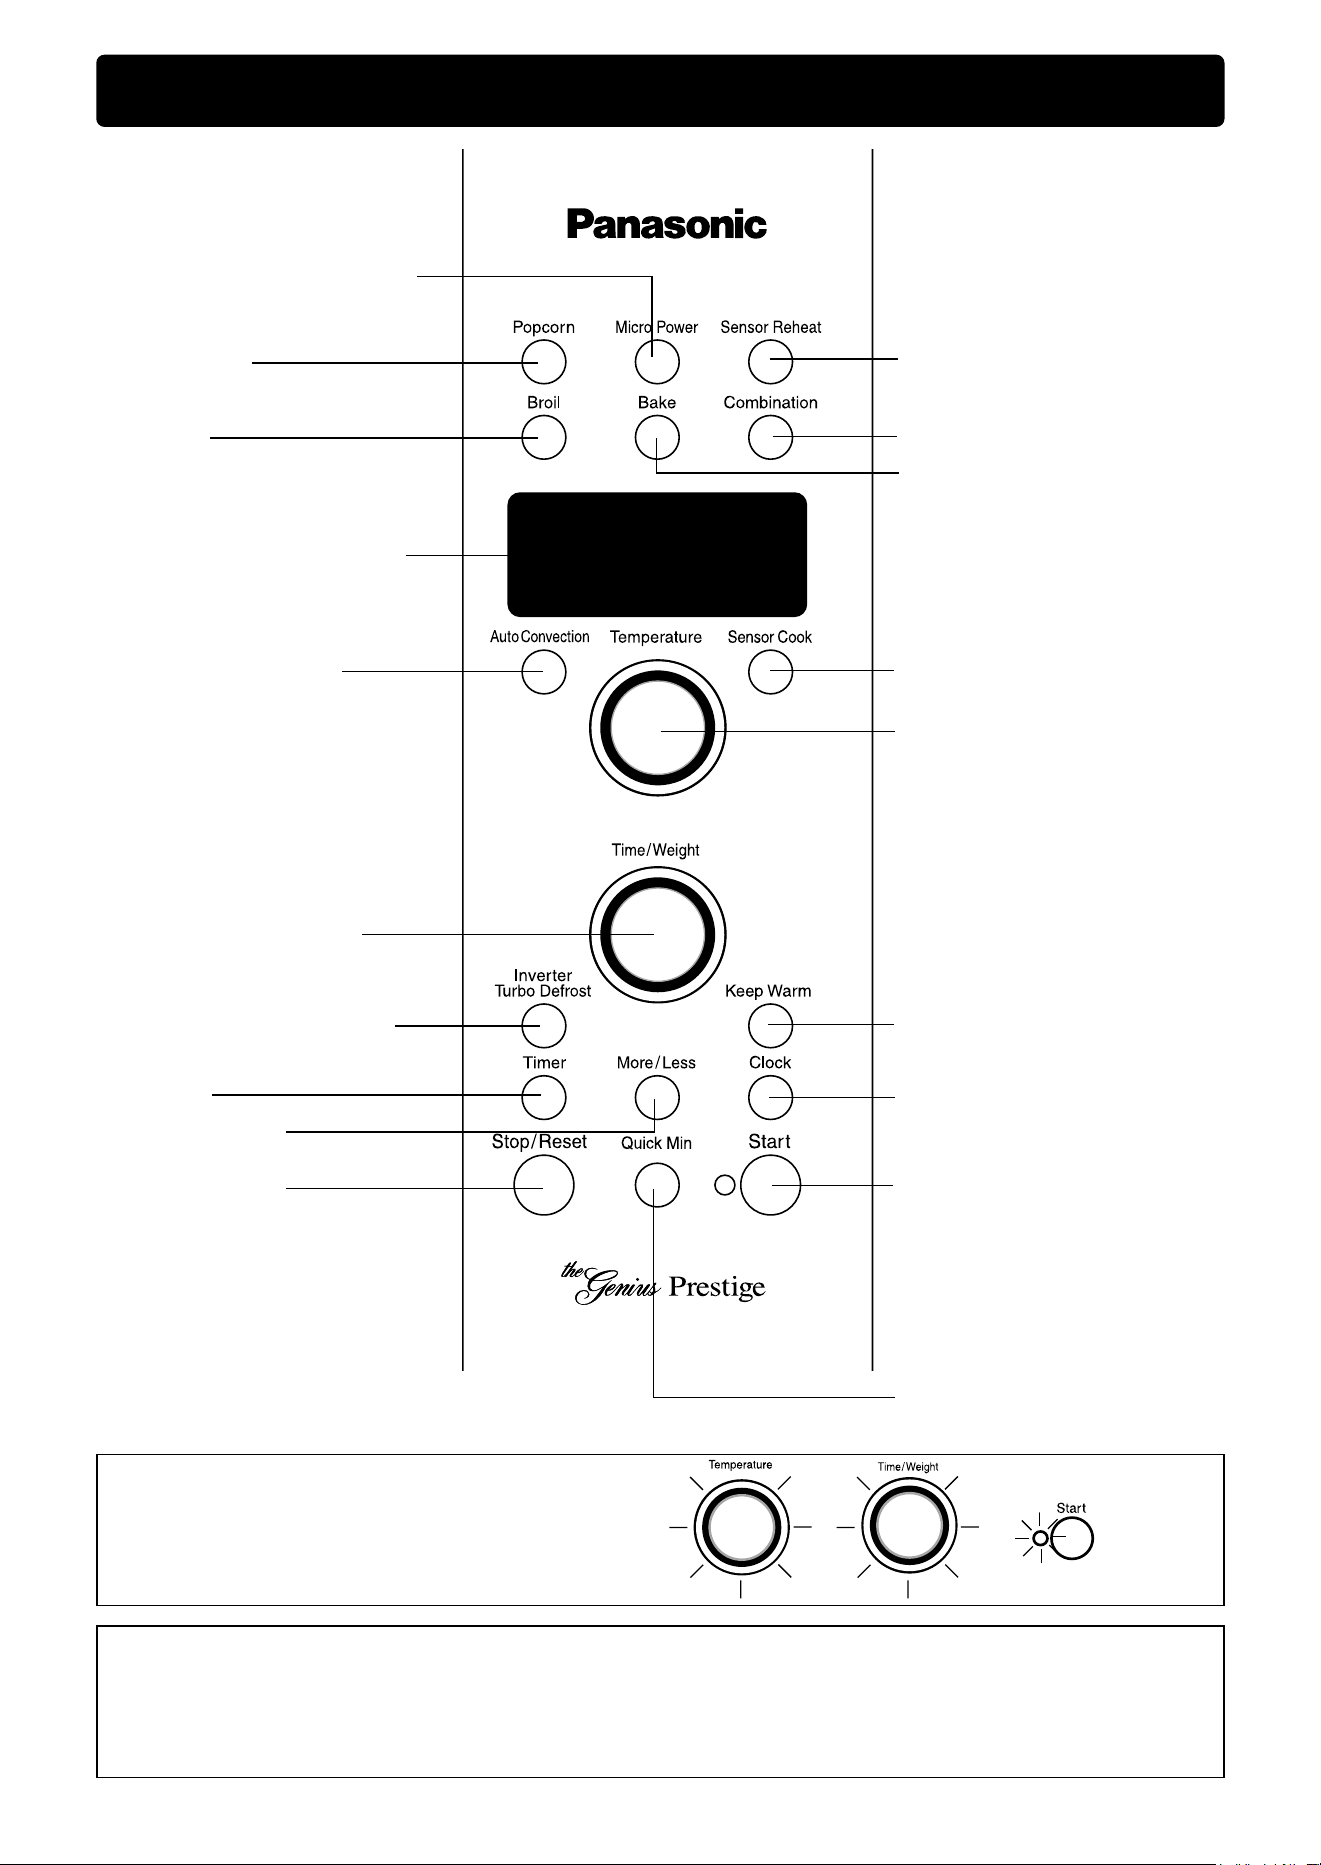
Control Panel
Stop/Reset Pad
Before cooking: One tap clears
your instructions.
During cooking: One tap
temporarily stops the cooking
process. Another tap cancels your
instructions and time of day
appears in the display window.
Start Pad
One tap allows oven to begin
functioning. If the door is
opened or the Stop/Reset Pad
is tapped once during oven
operation, Start Pad must be
pressed again to restart the
oven.
Beep Sound:
When a pad is pressed correctly, a beep will be heard. If a pad is pressed and no beep is heard, the unit
has not, or cannot, accept the instruction. The oven will beep twice between programmed stages. At the
end of any complete program, the oven will also beep 5 times. When the preheating cycle is complete,
the oven will beep 3 times.
Menu Action Screen Display
Auto Convection Pad
Bake Pad
Microwave Power Select Pad
Inverter Turbo Defrost Pad
Time/Weight Select Dial
Quick Min Pad
Popcorn Pad
Timer Pad
Sensor Cooking Pad
Combination Pad
Broil Pad
Sensor Reheat Pad
More/Less Pads
Temperature Select Dial
Clock Pad
Keep Warm Pad
Cook Navigator:
The flashing indicator signals the next step.
- 8 -
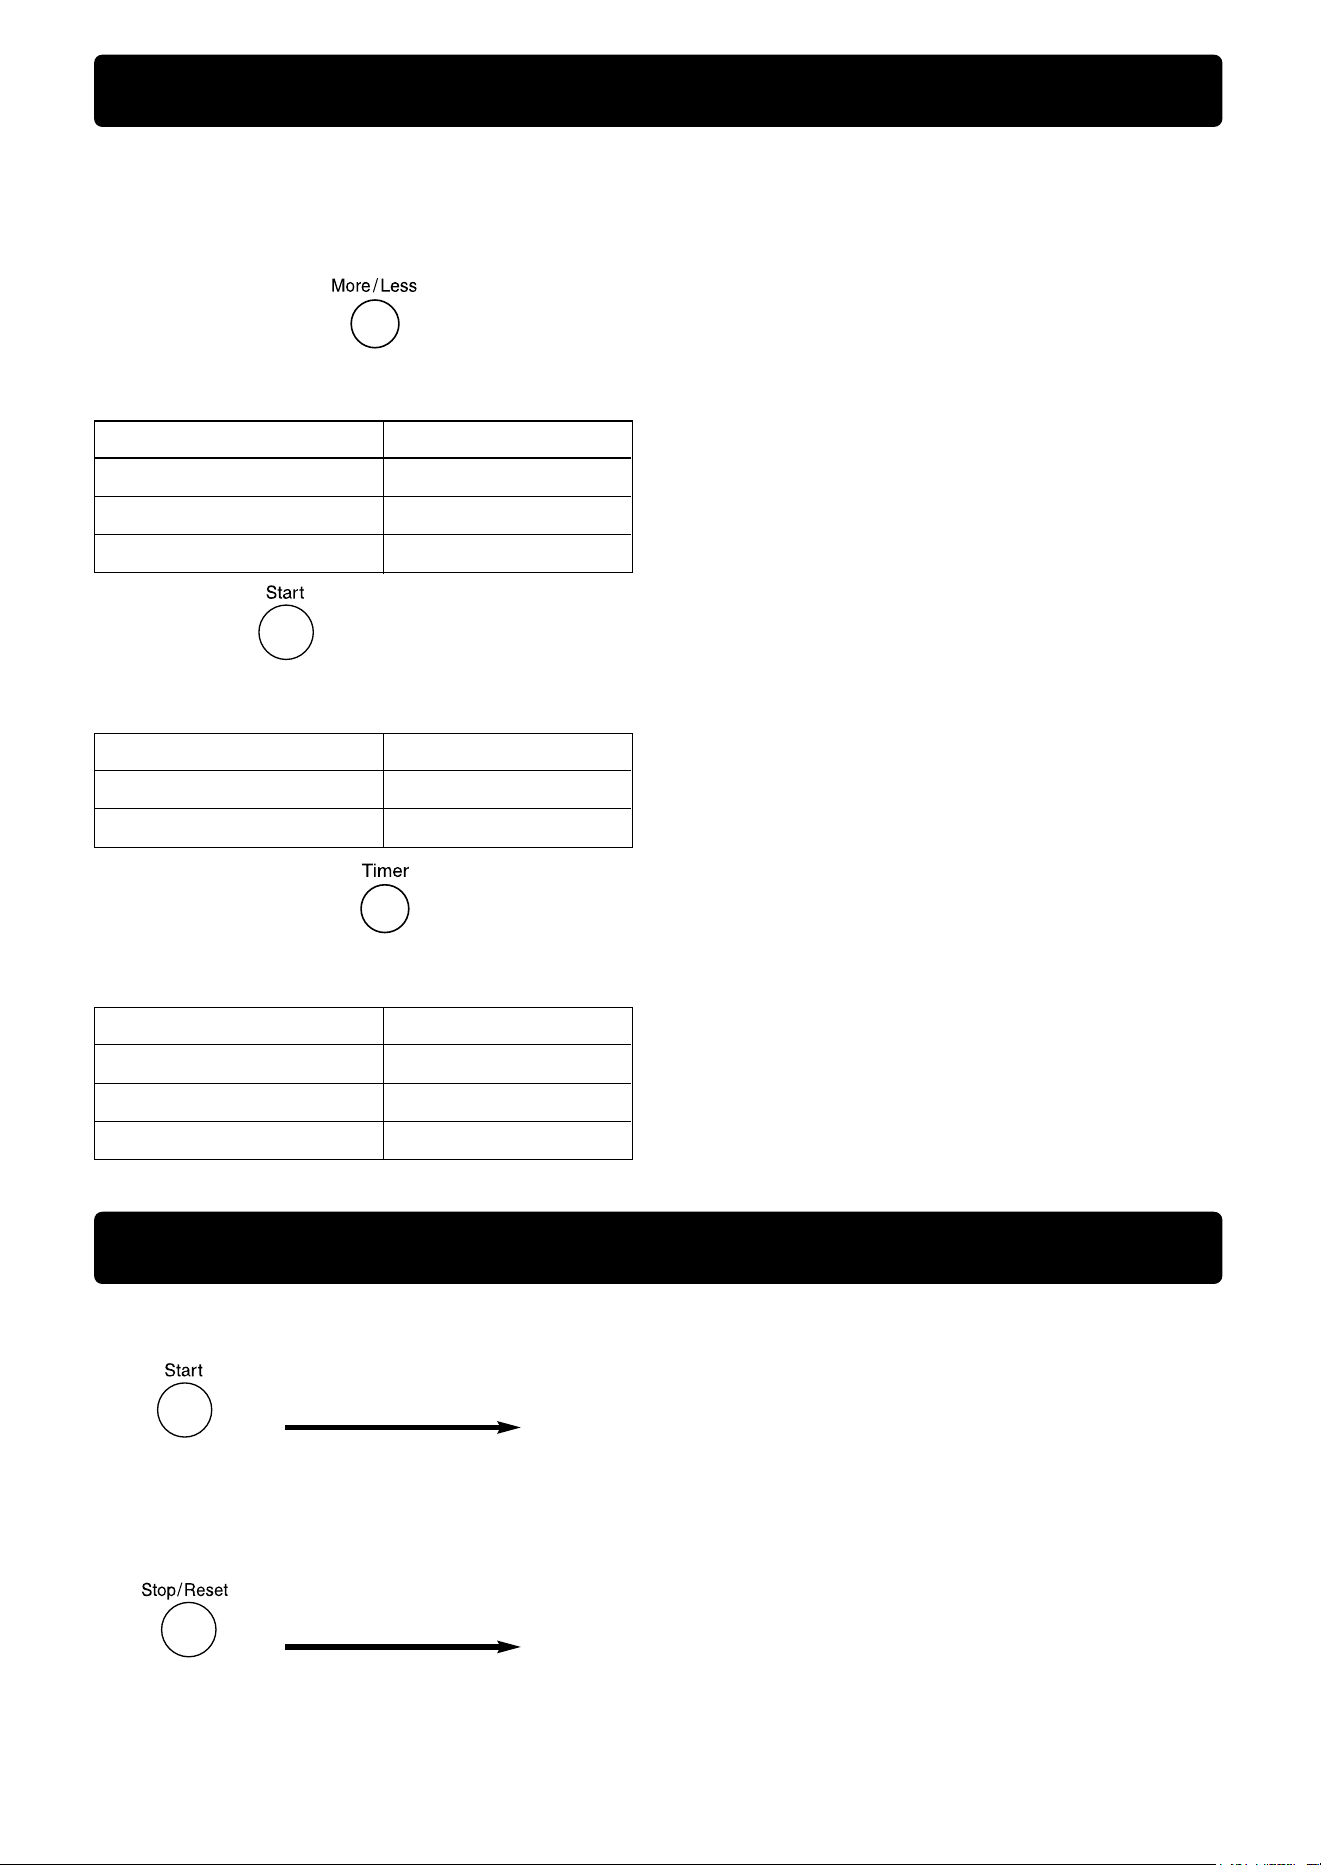
Functions
The unique function feature of your PANASONIC microwave oven allows you to set the non-cooking features
of your oven, such as LANGUAGE CHOICE (ENGLISH, SPANISH OR FRENCH) MENU ACTION ON/OFF,
Lb/kg CHOICE. (see below)
The functions should be programmed directly after plugging the oven in.
LANGUAGE CHOICE
The oven has English, French and Spanish displays.
The default setting is English.
Press More/Less Pad Convert into
— ENGLISH
once FRANCAIS
twice ESPANOL
Press Timer Pad Convert into
— ON
3 times OFF
3 times ON
Press Start Pad Convert into
— LB-F
once KG-C
Lb/kg CHOICE
The oven has both imperial and metric weight measurements.
The default setting displays the weight in imperial measurements.
MENU ACTION ON/OFF
MENU ACTION SCREEN helps you program your oven by prompting you with the next step.
When you become familiar with your oven, the Prompting Guide can be turned off.
To Use Child Safety Lock
Using this system will make the oven controls inoperable; however, the door will open.
Press Start Pad
three times.
Time of day will disappear and “LOCK” will appear on
the screen. Actual time will not be lost.
Press Stop/Reset Pad
three times.
Time of day will reappear on the screen.
To cancel “LOCK”:
- 9 -
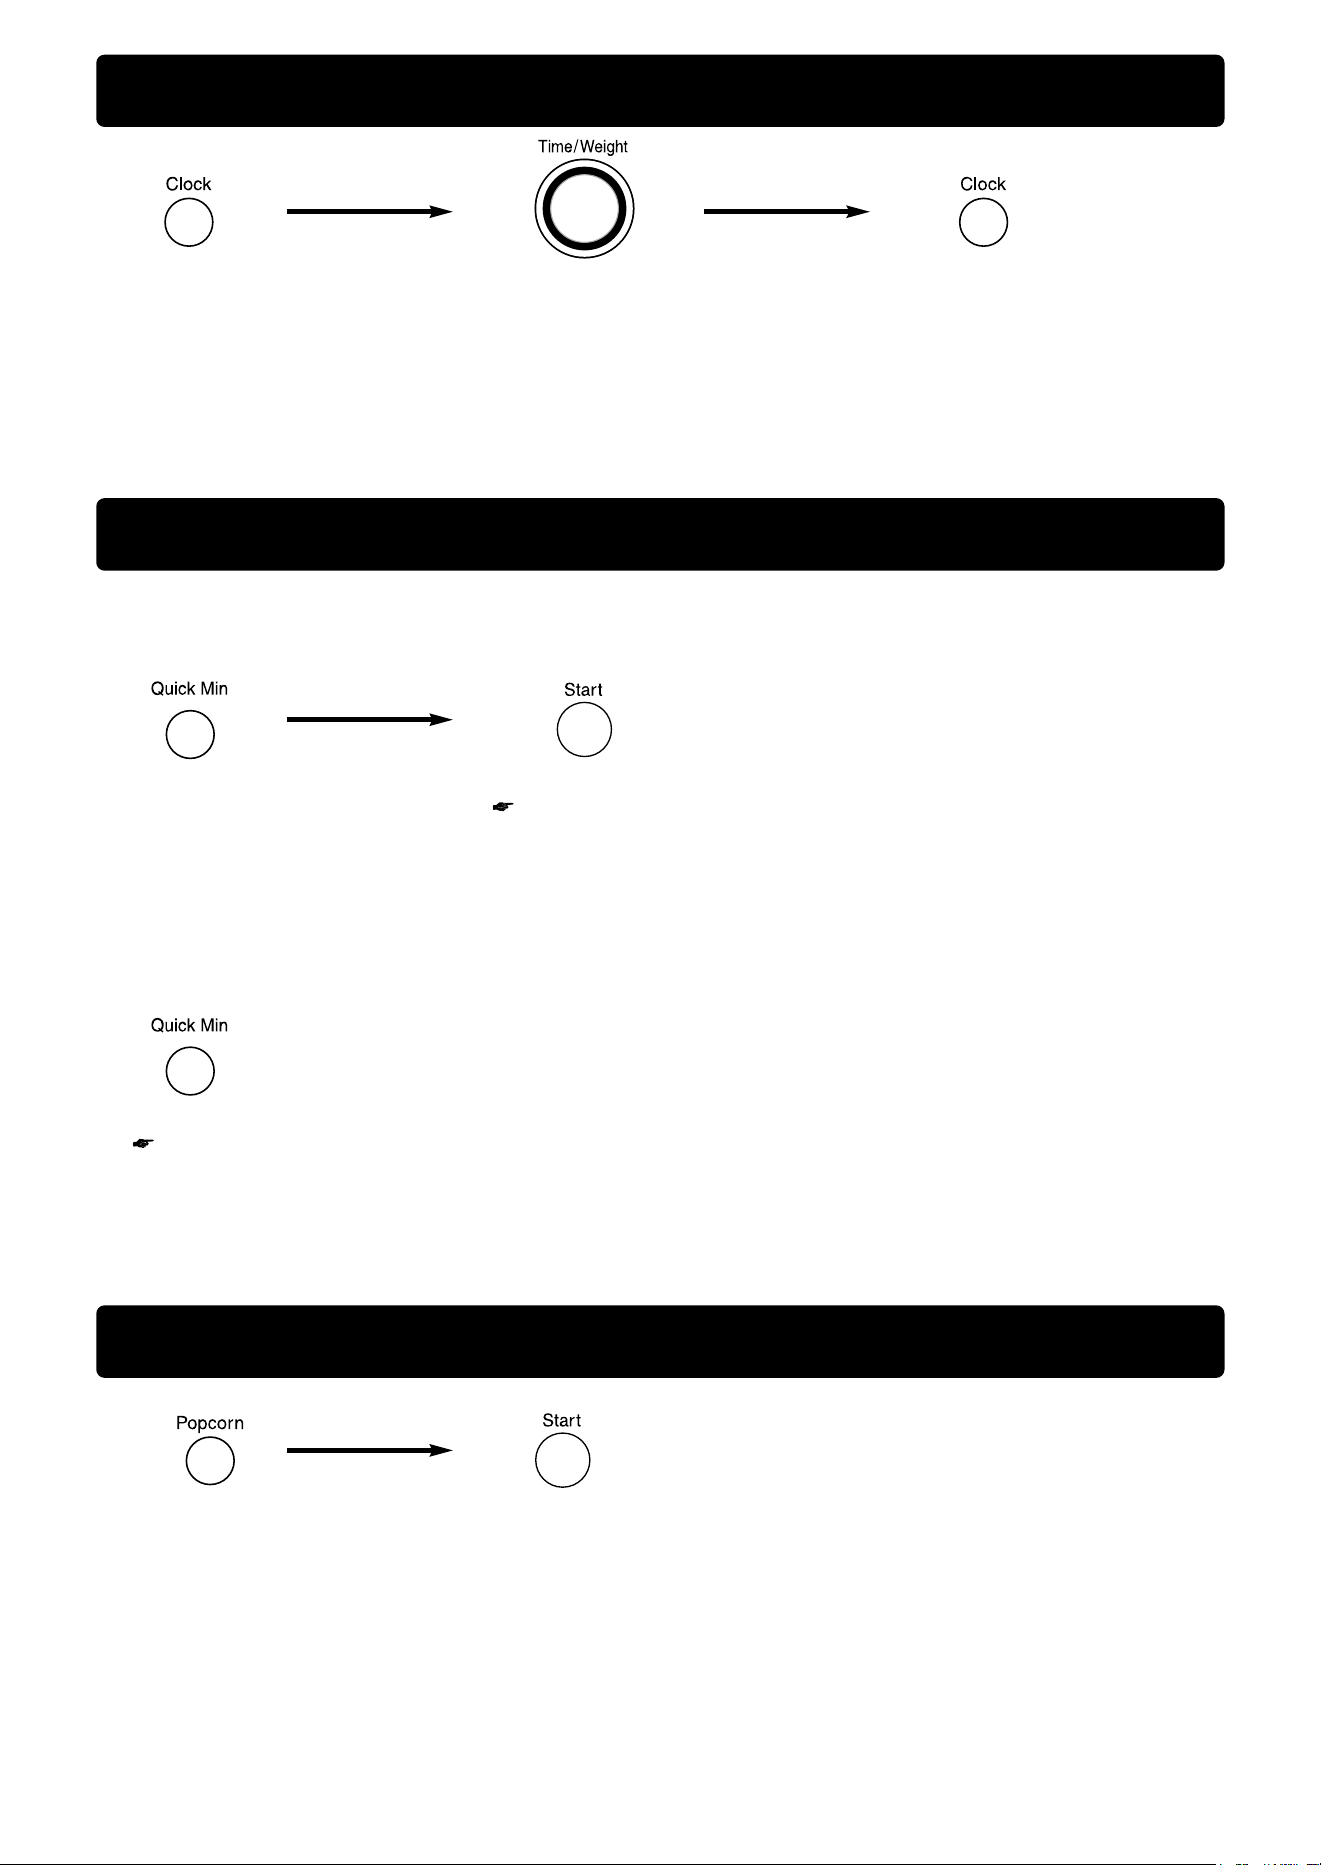
Clock Setting
Quick Min Function
To Set Popcorn Function
1. Press Clock Pad. 2. Enter the time of day by
Time/Weight Select Dial.
3. Press Clock Pad.
1. Press to set cooking
time (up to 10 minutes).
Press Quick Min Pad to add extra cooking time (up to 10 taps) during cooking.
Cooking time changes to include extra time and continues to count down in the display.
• To use other power levels, select the desired power level before setting the cooking time.
• If you use Quick Min Pad to set your cooking time, you cannot use Number Pads to set more time or to
change the cooking time.
2. Press Start Pad.
Cooking will start on P10 power.
1. Press Popcorn Pad until
the actual weight
appears in the screen.
2. Press Start Pad.
Notes:
1. You can use the oven without setting the clock.
2. The oven uses a 12-hour clock.
3. To reset the time of day, repeat steps 1 to 3 above.
4. The clock will keep the time of day as long as the oven is plugged in and electricity is supplied.
This feature allows you to set cooking time easily instead of using Number Pads or add extra cooking time.
To Set Cooking Time:
• To use another power level or cooking mode, select the desired power level/cooking mode before setting the
cooking time.
• If you use Quick Min Pad to set your cooking time, you cannot use the Time/Weight Select Dial to set more
time or to change the cooking time. However, you can add more time with the Quick Min Pad during cooking.
To Add Extra Cooking Time During Cooking:
• Prepackaged microwave popcorn comes in 99 g (3.5 oz), 85 g (3.0 oz) and 50 g (1.75 oz) bags.
• Place the bag in the oven according to the manufacturers’ directions.
• Pop only one bag at a time.
• When popping multiple bags one right after the other, the cooking times may vary slightly.
This does not affect the popcorn results.
• After popping, open the bag carefully. Popcorn and steam are extremely hot.
• Do not reheat unpopped kernels or reuse bag.
• Use only the package weight, or results will be unsatisfactory and popcorn may scorch.
- 10 -
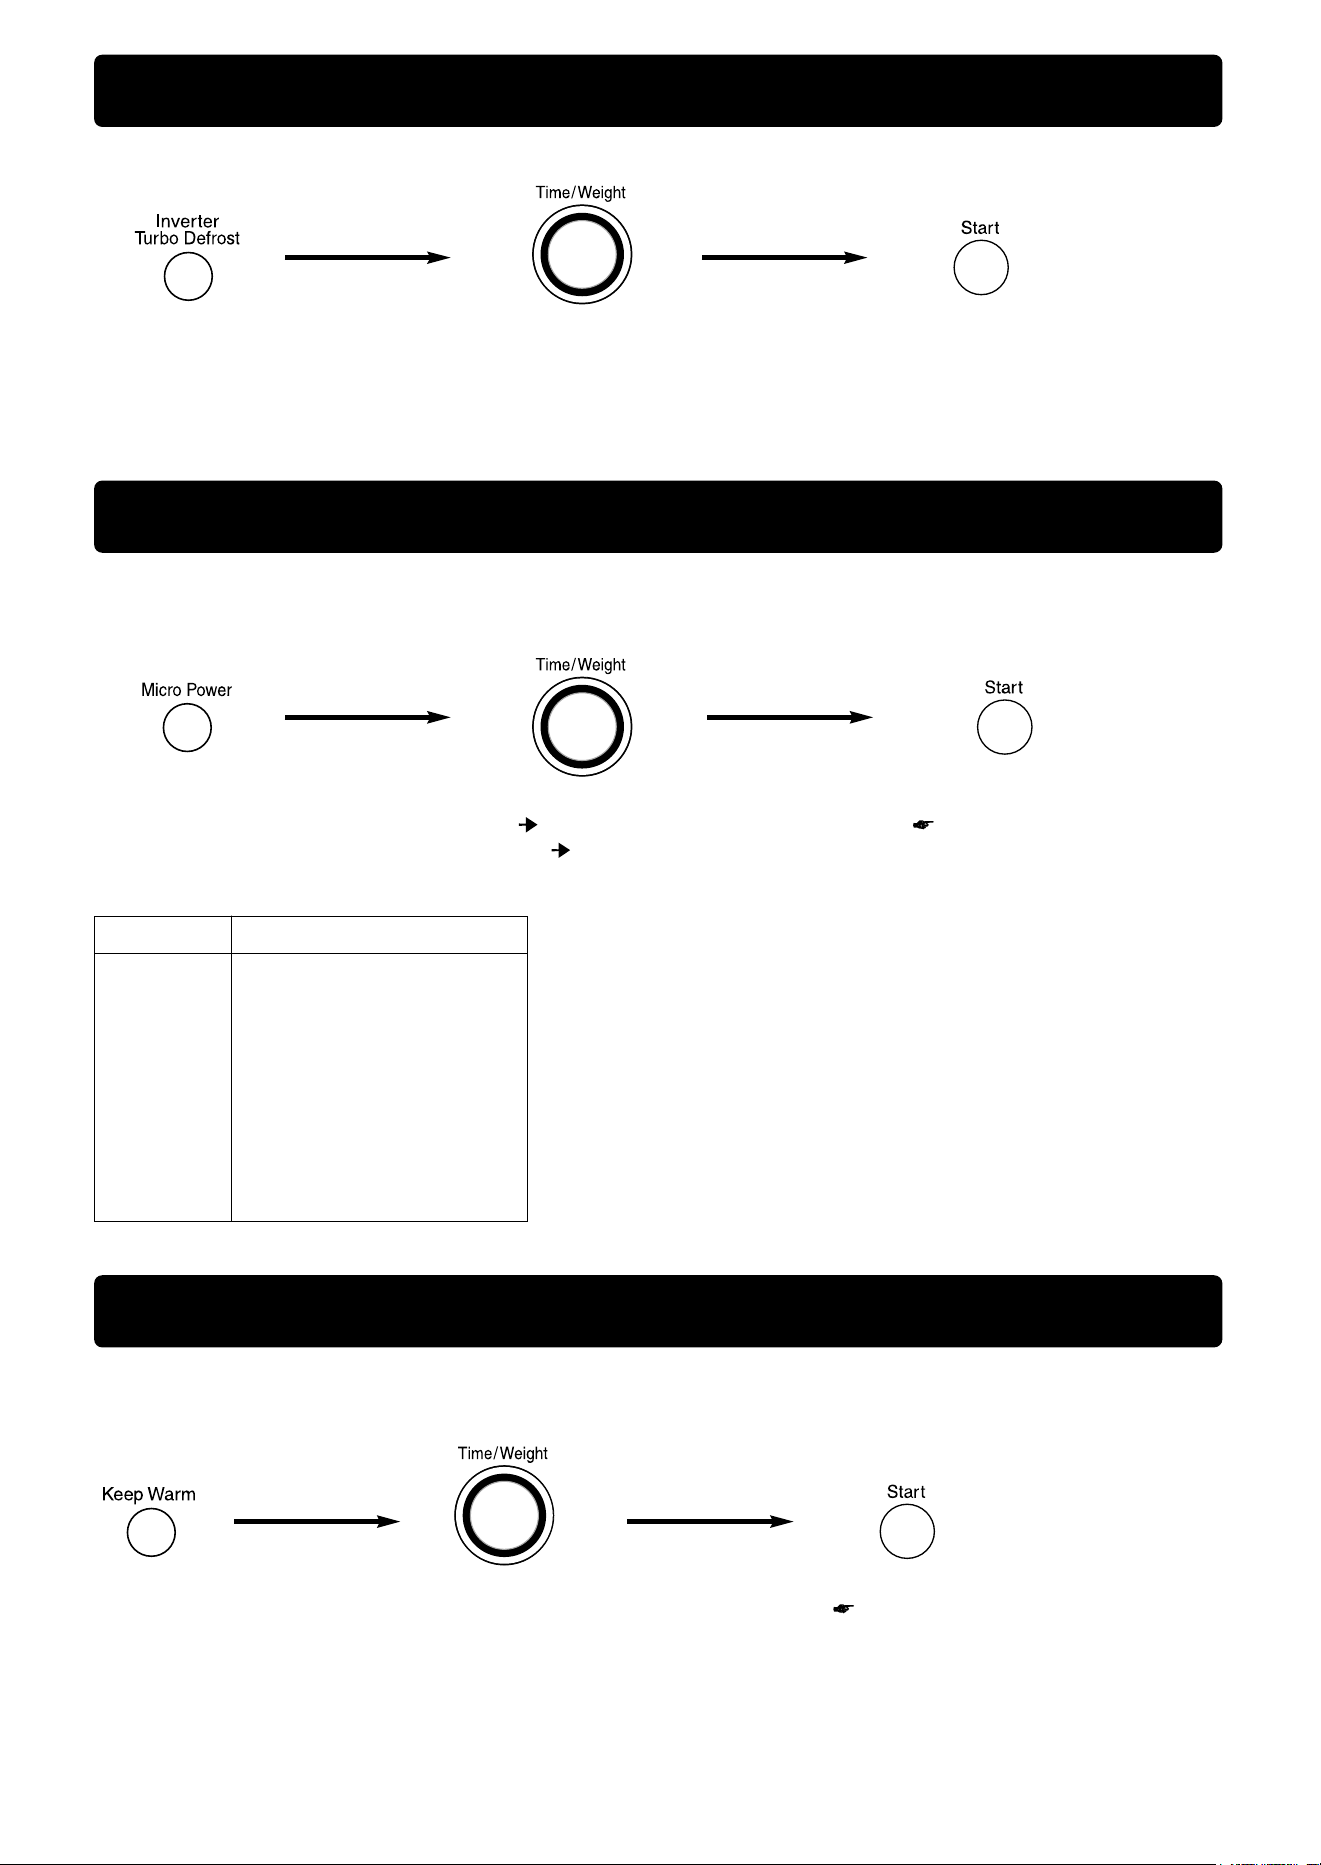
To Set Inverter Turbo Defrost
Microwave Power & Time Selection
To Use Keep Warm
1. Press Inverter Turbo
Defrost Pad.
2. Set the weight of food. 3. Press Start Pad.
1. Select the Power Level.
(according to the chart
below)
Notes:
1. For 2 or 3 stage cooking, repeat steps 1 and 2 above before
pressing Start Pad.
2. When selecting P10 for the first stage, start from step 2.
2. Set the cooking time.
(P10 up to 30 minutes
Others up to 1 hour 30 minutes)
2. Press Start Pad.
Cooking will start.
The time in the screen
will begin to count down.
• The recommended maximum weight for meat is 1.8 kg (4 lb); poultry, 2.7 kg (6 lb) and seafood, 1.4 kg (3 lb).
• The weight for Inverter Turbo Defrost can be programmed to up to 3.0 kg (6 lb).
How do I program Power and Time?
How to program Reheating/Cooking:
Press Microwave Power Level
once P10 (HIGH)
twice P9
3 times P8
4 times P7 (MEDIUM-HIGH)
5 times P6 (MEDIUM)
6 times P5
7 times P4
8 times P3 (MEDIUM-LOW)
9 times P2
10 times P1 (LOW)
Use to Defrost meat, poultry or seafood by using the weight on the package.
1. Press. 2. Set Time.
(up to 30 minutes)
3. Press Start Pad.
Keep Warm time appears in the
Screen and begins to count down.
At the end of cooking, five beeps
sound and “ENJOY YOUR MEAL”
appears in the Screen.
This feature helps you to keep a certain selection of foods warm for up to 30 minutes after cooking. (Pie,
Gravy, Stew, Casserole or Mashed Potatoes)
- 11 -
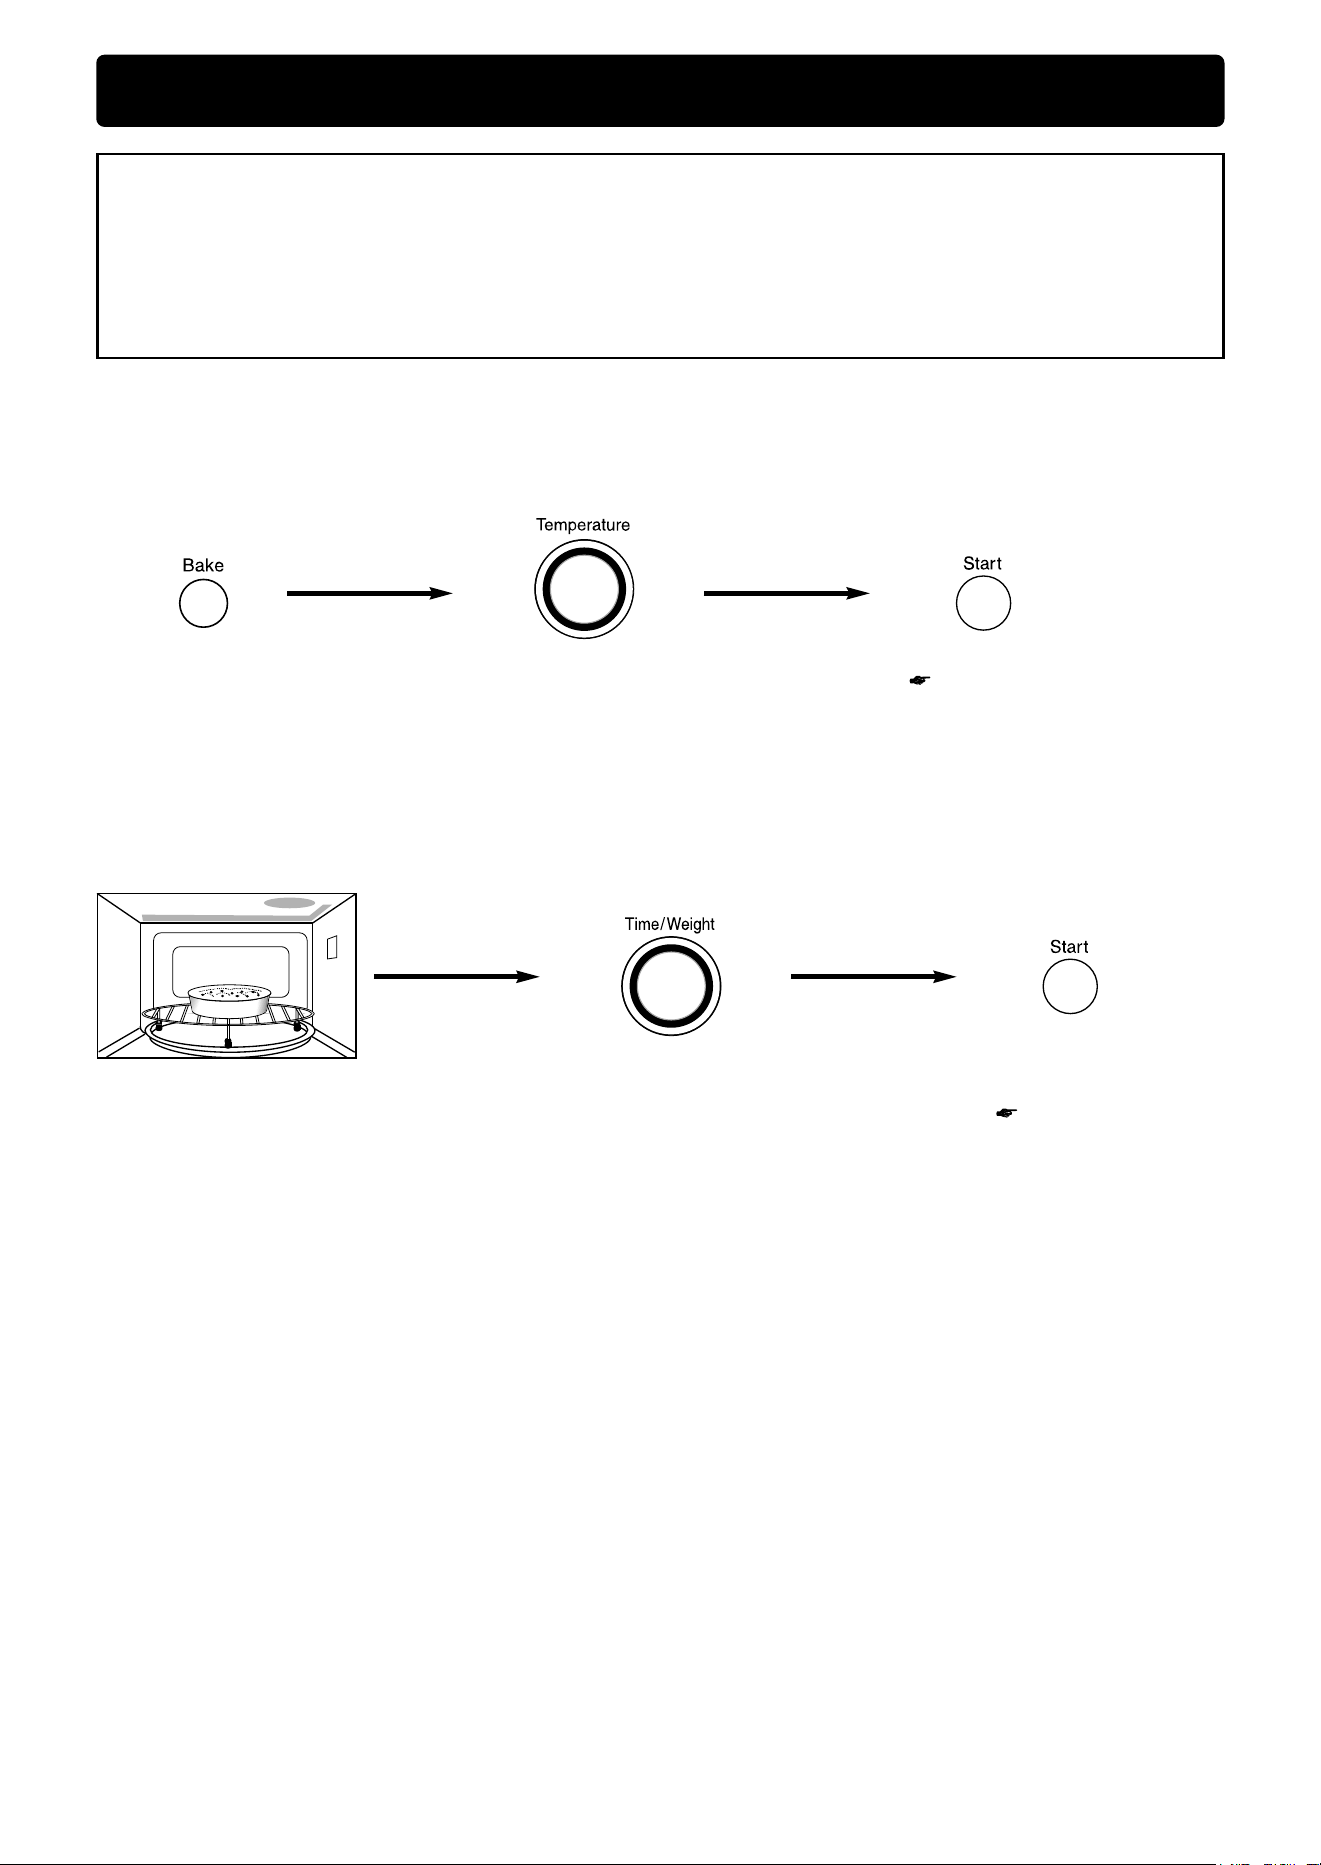
Bake with Time Selection
4. After preheating, place
food in the oven.
5. Set the baking time
(up to 9 hours 59 minutes).
6. Press Start Pad.
Baking will start.
1. Press Bake Pad. 2. Set Temperature. 3. Press Start Pad.
Preheating will start.
This feature offers a choice of bake temperatures from 100°C to 230°C in 10°C increments (or from 200°F to
450°F in 25°F increments).
Most baked items require preheating the oven.
Place the Oven Rack on the Ceramic Tray. Follow these steps.
Note:
Before using the BAKE, COMBINATION or BROIL functions for the first time, wash the interior
with a soapy cloth, then operate the oven without food on BAKE for 20 minutes at 230°C (450°F).
This will allow the oil that is used for rust protection to be burned off.
The oven door and exterior will become hot during BAKE, COMBINATION and BROIL. Please
handle the door carefully.
• During preheating, “P” appears in the display. Do not open the door.
• When preheating is completed, the oven will beep three times and “P END” will appear on the screen.
• If the oven door is not opened after preheating, the selected temperature will be maintained for 30 minutes.
After 30 minutes, the oven will shut off automatically and beep five times.
• For recipes that do not require preheating, eliminate steps 3–4.
• When the selected cooking time is less than one hour, the time counts down second by second.
• When the selected cooking time is over one hour, the time counts down minute by minute until 1 hour
remains. The timer will then count down second by second.
• Press Bake Pad during preheating or baking to display the temperature you programmed.
- 12 -
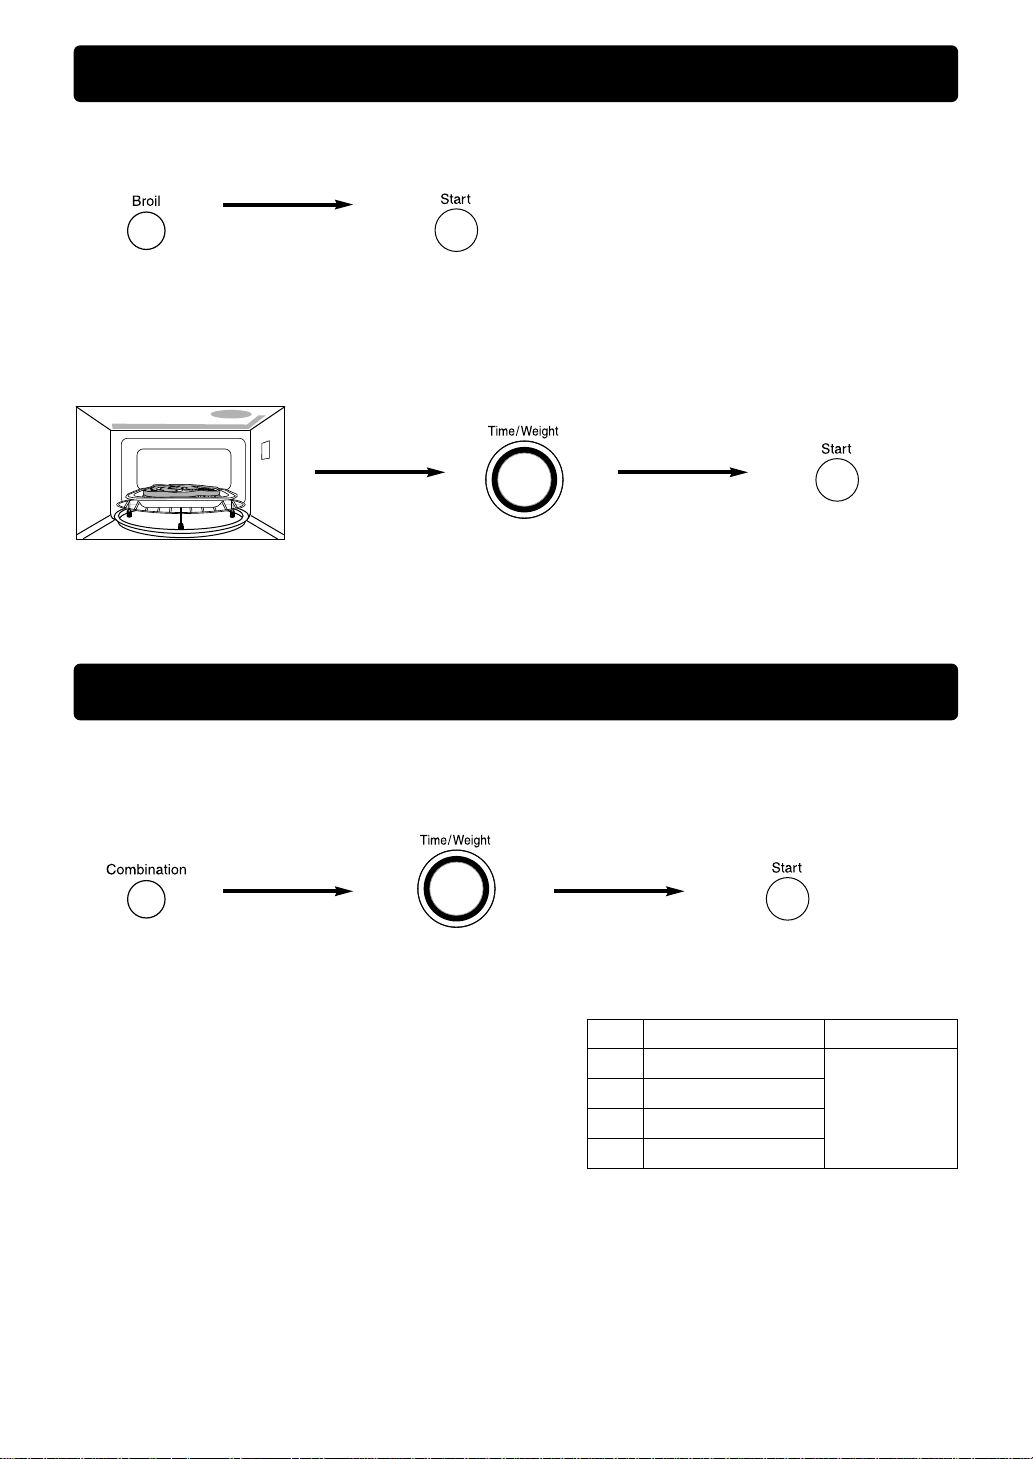
Broiling with Time Selection
Combination Cooking with Time Selection
1. Press Broil Pad. 2. Press Start Pad.
Preheating will start.
1. Select the desired
combination setting (1-4).
• When the selected cooking time is less than one hour, the
time counts down second by second.
• When the selected cooking time is more than one hour, the
time counts down minute by minute until 1 hour remains.
The timer will then count down second by second.
• Use microwaveable and heat-safe dishes.
• Do not use plastic wrap or waxed paper.
2. Set the cooking time
(up to 9 hours 59 minutes).
2. Press Start Pad.
Cooking will start.
There are 4 combination settings. These settings are automatic; there is no need to set the oven temperature
or microwave power level.
Some Combination recipes require preheating. For instructions, follow steps 1 and 2 of the “Bake with Time
Selection” section.
Most broil items require preheating the oven. Place the Oven Rack on the Ceramic Tray.
Follow these steps.
Oven Temperature Microwave
1 130°C (275°F)
2 150°C (300°F)
30% power
3 160°C (325°F)
4 190°C (375°F)
• During preheating, “P” appears in the screen. Do not open the door.
• When preheating is completed, the oven will beep three times and “P END” will appear in the screen.
• If the oven door is not opened after preheating, the temperature will be maintained for 30 minutes.
After 30 minutes, the oven will shut off automatically and beep five times.
3. After preheating, place
food in the oven.
4. Set the broiling time
(up to 1 hour 30 minutes).
6. Press Start Pad.
Cooking will start.
• For recipes that do not require preheating, eliminate step 2.
- 13 -
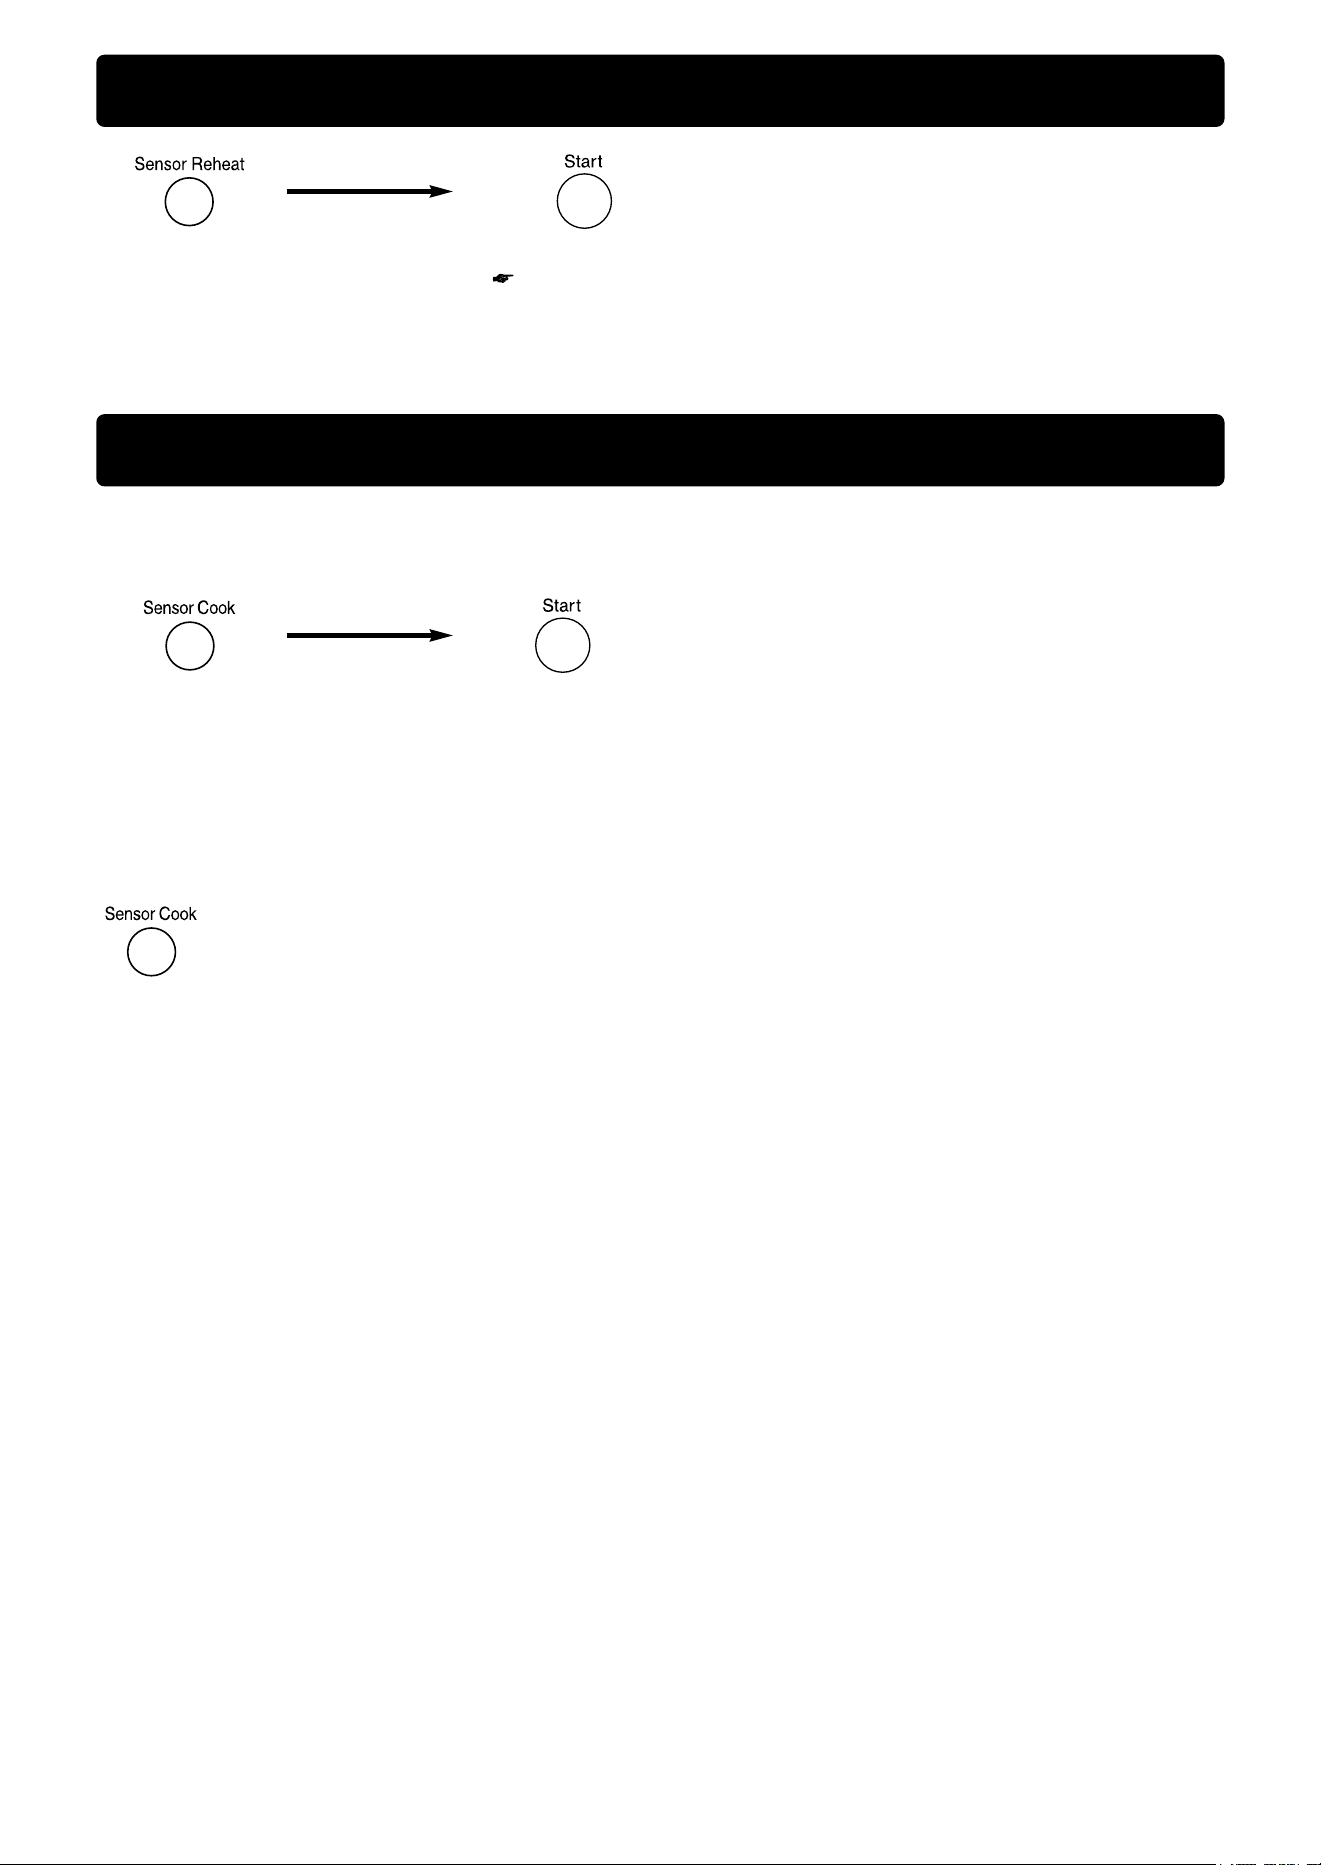
To Use Sensor Reheat
(by Microwave)
To Use Sensor Cooking
(by Microwave/Combination)
1. Press Sensor Reheat
Pad.
2. Press Start Pad.
Reheating will start.
1. Select the desired
Category.
2. Press Start Pad.
• Stand time or a power level can be programmed after Sensor Reheat, selected.
• Sensor Reheat is not suitable for pastry, bread, soup or beverages.
• Press Category Pad until desired food appears in the screen.
• The charts and recipes in the Cookbook provide directions for Sensor Cooking: “To Cook by Sensor
Cooking:”
• The following categories are further divided as follows:
1st tap POTATOES for root vegetables, such as potatoes, carrots, squash
2nd tap FRESH VEGETABLES for other vegetables, such as broccoli, peas, beans, cauliflower
3rd tap CANNED VEGETABLES
4th tap FROZEN VEGETABLES
5th tap WHITE RICE
6th tap BROWN RICE
7th tap PASTA
8th tap CASSEROLE 1 for foods such as gratin and lasagna
9th tap CASSEROLE 2 for foods such as stew
CASSEROLE will be cooked by Combination. Do NOT use plastic wrap, as the heater could melt
the wrap.
NOTE ON SENSOR REHEAT AND SENSOR COOKING:
• The Sensor system works by detecting a burst of steam on the steam sensor. As food cooks in a microwave
oven, steam is produced. Once steam is detected by the sensor, the oven automatically calculates the
remaining cooking time.
• When a Sensor Category is selected, category will appear in the screen. The oven door should not be
opened for longer than one minute while “AUTO” appears in the screen. Opening the door may cause
inaccurate cooking results. Once the two beep signal is heard, the remaining cooking time immediately
appears in the screen and begins to count-down. At this time, the oven door may be opened to stir, turn or
add foods.
• Cover foods loosely, but completely, with plastic wrap or place foods in a casserole dish with a proper fitting
lid.
• Foods less than 120 g (4 oz) should be cooked by power and time, not by Sensor Cook.
• All foods for Sensor should be at their normal storage temperature.
• Before using Sensor, make sure Ceramic Tray in the oven is dry to ensure best results.
• If one of the Sensor programs is selected, while the oven is still hot from heater operation, “HOT” will appear
in the screen. After cooling the oven cavity, colon or time of day reappears in the screen.
• If you wish to adjust the cooking time, press More/Less Pad before pressing Start Pad (see next page).
This feature allows you to cook most of your favourite foods without knowing the quantity or having to select
cooking time and power. The oven does it all automatically.
- 14 -
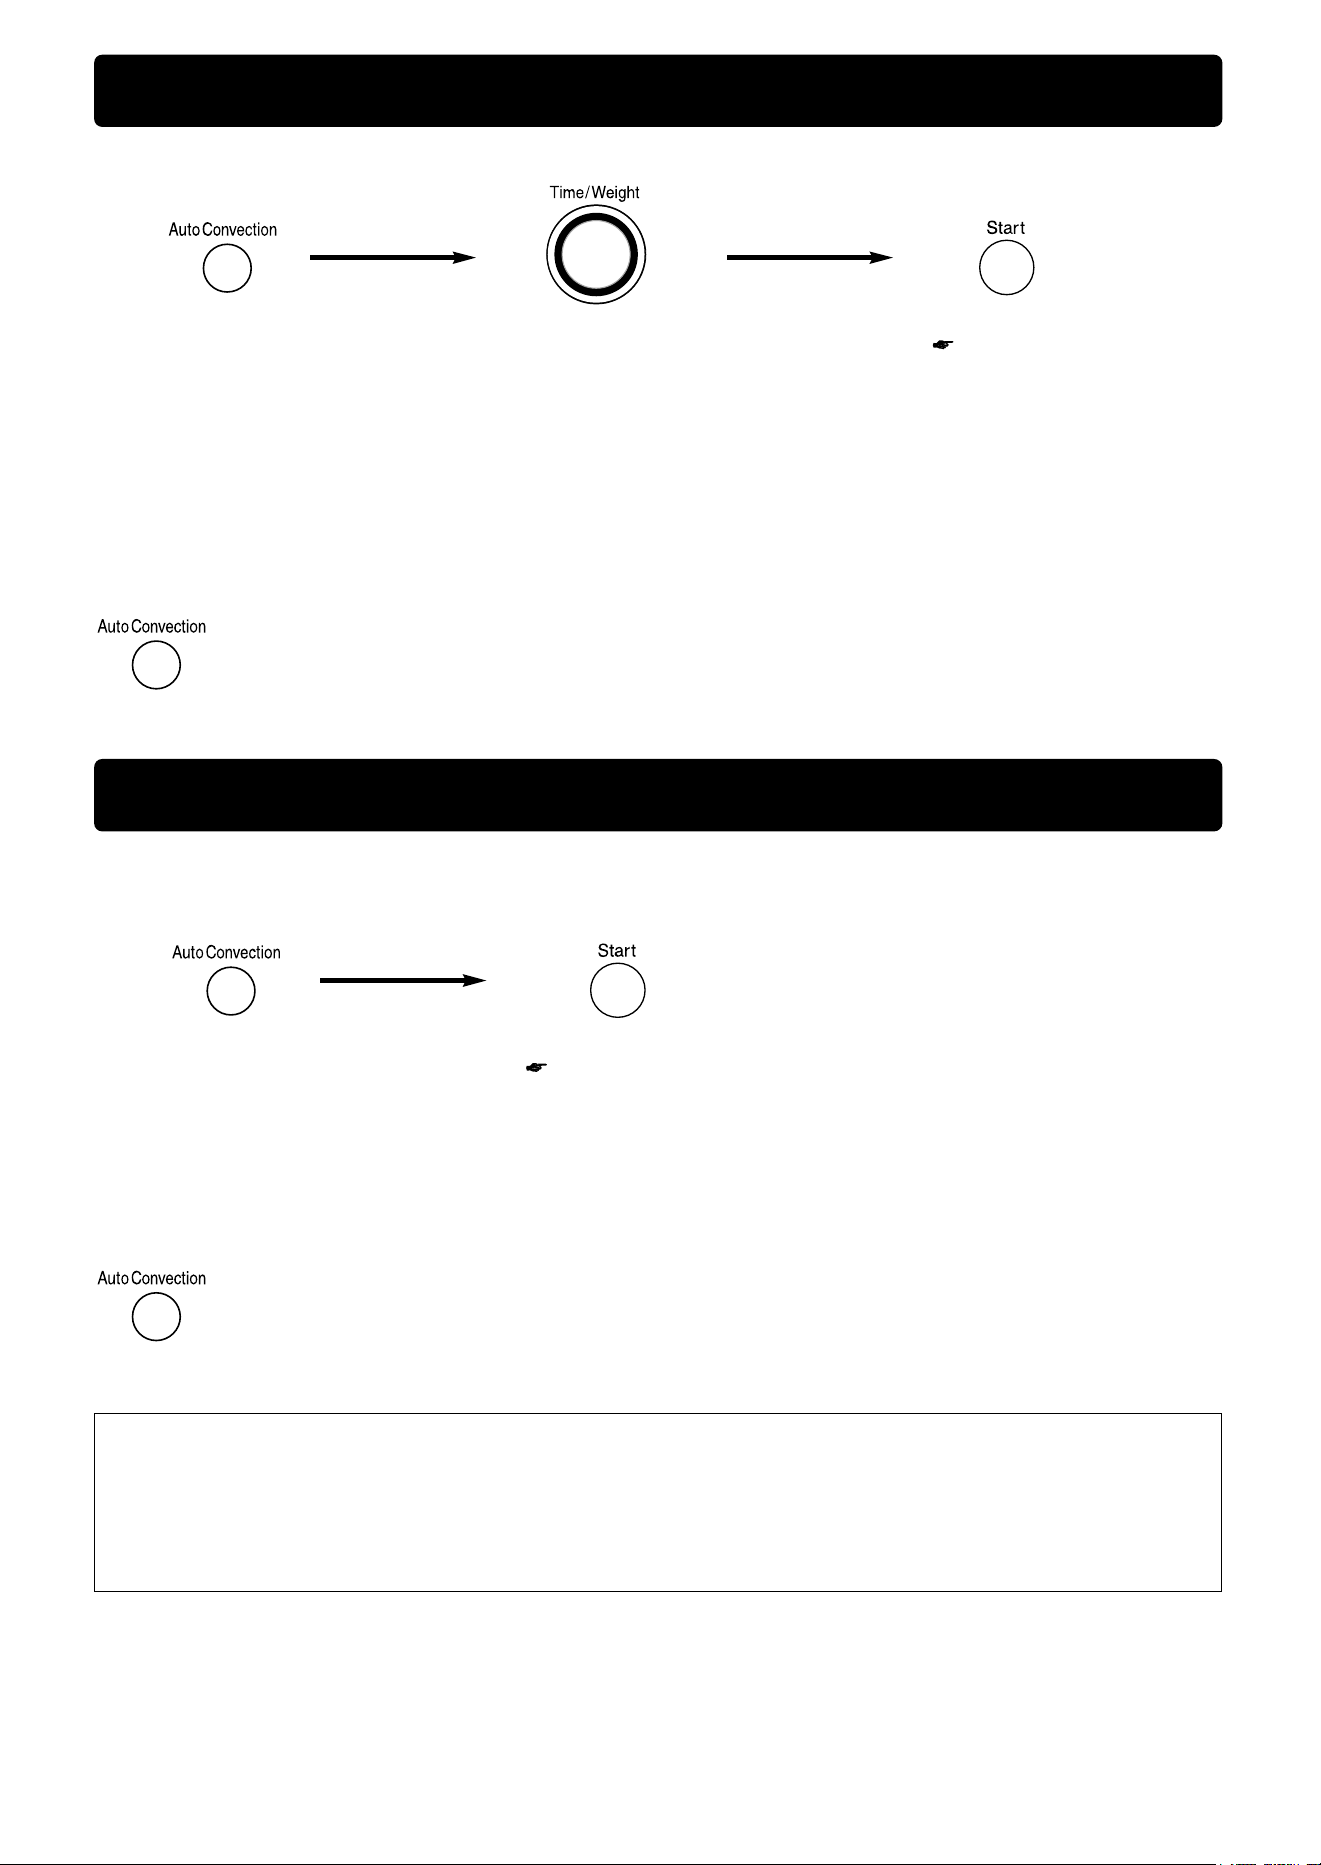
Auto Convection
(by Combination)
Auto Convection
(by Bake)
1. Select desired category. 2. Set the weight. 3. Press Start Pad.
Cooking will start.
1. Select desired category. 2. Press Start Pad.
Cooking will start.
• When the weight has been entered, the cooking time will be automatically determined.
• The maximum weight that can be programmed is Chicken Pieces 1 kg (2.0 lb)
Whole Chicken - 3.0 kg (6 lb)
Beef/Pork - 2.0 kg (4 lb)
• Roasts weighing above the recommended weights should be cooked by manual combination.
• Stand time or micro power can be programmed after Weight Cooking.
• If you wish to adjust the cooking time, press More/Less Pad before pressing Start Pad (see below).
• The category is further divided as follows:
1st tap CHICKEN PIECES
2nd tap WHOLE CHICKEN
3rd tap BEEF MEDIUM
4th tap PORK
This feature allows you to bake cake or pie without having to select oven temperature and baking time.
This feature allows you to cook beef, pork and whole chicken by setting the weight.
• If you wish to adjust the baking time, press More/Less Pad before pressing Start Pad (see below).
• Will not bake chocolate fudge, brownies or fruit cake recipes.
• Do not use frozen pie crust.
• Place frozen pies on a small cookie sheet.
• The categories are further divided as follows:
5th tap CAKE 1 for Cake recipe that conventionally bakes in less than 35 minutes
6th tap CAKE 2 for Cake recipe that conventionally bakes in more than 45 minutes
7th tap FRESH PIE for Double-crust pies with fresh fillings
8th tap FROZEN PIE for Double-crust pies that are frozen
9th tap PRECOOKED PIE for Double crust pies with pre-cooked or canned pie filling
To Use More/Less Pad:
After having used One Touch Cooking a few times, you may prefer your food cooked to a different
degree. By using More/Less Pad, programs can be adjusted to cook food for a longer or shorter time. If
you are satisfied with the result of the programs, you don’t need to use More/Less Pad.
Press More/Less Pad before pressing Start Pad. The words “MORE” or “LESS” will appear in the screen
when More/Less Pad is pressed.
- 15 -
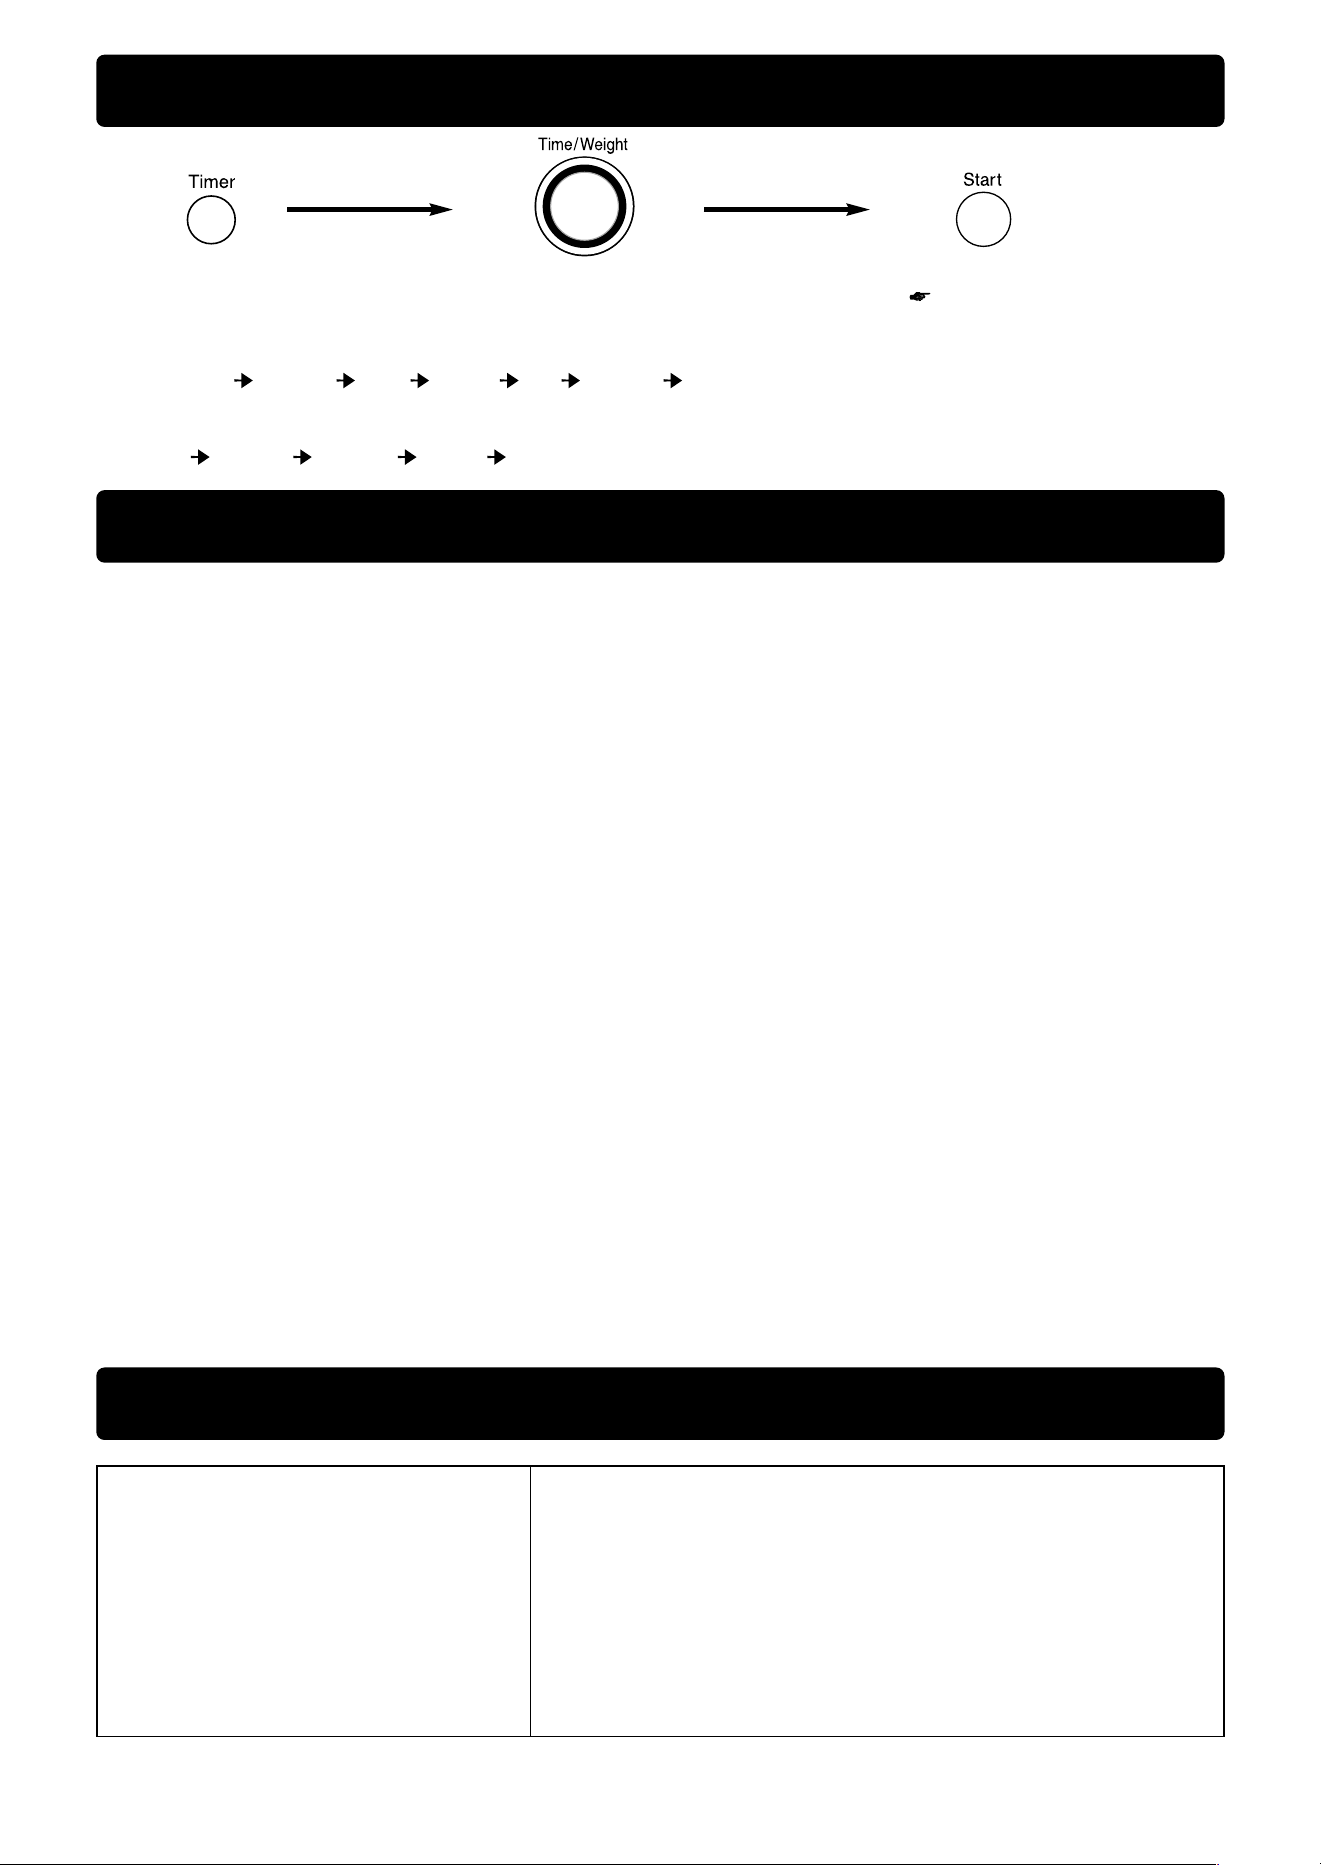
To Set Timer
(To use as a kitchen timer)
Technical Specifications
Power Source: 120 V, 60 HZ
Power Consumption: Microwave 1,450 W
Heater 1,500 W
Output: microwave* 1,100 W
heater 1,400 W
Outside Dimensions (H
k
W
k
D): 376 mm
k
606 mm
k
491 mm (14
13
Ú
16
"
k
23
7
Ú
8
"
k
19
5
Ú
16
")
Oven Cavity Dimensions (H
k
W
k
D): 242 mm
k
412 mm
k
426 mm (9
1
Ú
2
"
k
16
1
Ú
4
"
k
16
13
Ú
16
")
Operating Frequency: 2,450 MHz
Trim Kit (Optional):
NN-TK903S [686 mm (W)] (27")/NN-TK913S [762 mm (W)] (30")
Uncrated Weight: Approx. 22 kg (48 lbs)
Care of Your Microwave/Convection Oven
1. Turn the oven off before cleaning. Make sure
parts are cool.
2. Keep the inside of the oven clean. When food
spatters or spilled liquids adhere to oven
walls,wipe with a damp cloth. Mild detergent or
liquid cleansers may be used if the oven gets
very dirty. The use of harsh detergent or
abrasives is not recommended.
3. The interior of the oven is stainless steel. To
prevent baked-on soil, clean food spatters or
spilled liquids as they occur. For hard to remove
soil, use a mild detergent, a non-abrasive
cleanser or spray with an all purpose cleaner and
wipe dry. DO NOT use harsh detergents or
abrasive cleaners on any oven surface. Plastic
scouring pads may be used.
To help loosen soil before cleaning, heat 500 ml
(2 cups) of water in a 1 L (4 cups) glass heat-
resistant container at HIGH power for 5 minutes
or until boiling.
Note: Do not use oven cleaners on the top of the
oven.
4. The outside oven surfaces should be cleaned
with a damp cloth. To prevent damage to the
operating parts inside the oven, water should not
be allowed to seep into the ventilation openings.
5. Clean the Control Panel with a soft, dry cloth.
Do not use harsh detergents, abrasives or paper
toweling. When cleaning the Control Panel, leave
the oven door open to prevent the oven from
accidentally turning on. After cleaning, press
Stop/Reset Pad to return to time-of-day.
6. Steam will be given off cooking food and collect
on the oven walls and door. During conditions of
high humidity, steam may occur on the outside of
the oven and in no way indicates a malfunction.
Wipe dry with a soft cloth.
7. It is occasionally necessary to remove the
Ceramic Tray for cleaning. Wash the tray in
warm sudsy water or in a dishwasher.
8. The roller ring and oven cavity floor should be
cleaned regularly to avoid excessive noise.
Simply wipe the bottom surface of the oven with
mild detergent, water or window cleaner and dry.
The roller ring may be washed in mild sudsy
water or in a dishwasher. Cooking vapours
collect during repeated use, but in no way affect
the bottom surface or roller ring wheels. When
removing the roller ring from the cavity floor for
cleaning, be sure to replace in the proper
position.
9. Oven accessories may be washed in warm
sudsy water, in a dishwasher, or scrubbed with
plastic pads.
10. Daily cleaning will prevent the accumulation of
odours and soil.
1. Press Timer Pad. 2. Enter the length of time
to be counted down
(up to 1 hour 30 minutes).
3. Press Start Pad.
The time will count down
without oven operating.
• For delayed start (2 or 3 programs):
e.g. TIMER 80 min P10 5 min P6 20 min START
• For standing time (2 or 3 programs):
e.g. P3 25 min TIMER 7 min START
*IEC Test Procedure used
Specifications subject to change without notice.