Loading ...
Loading ...
Loading ...
25
10. Touch START to begin preheating oven or DELAY START to
use the converted setting when the delay time expires. See
“Delay Start” section for additional information.
11. Place food in oven when preheat signal sounds. Screen will
also prompt you when to insert food.
12. When the cook timer ends, you can start the Keep Warm
cycle if not preset, Add More Time or Cancel the timer.
13. Touch CANCEL (CANCEL UPPER or CANCEL LOWER on
double models) to turn off the oven.
Proof
The Proof cycle prepares dough for baking by activating the
yeast. Follow recipe or package for number of times to proof
dough.
To Use Proof:
Before first proofing, place dough in a lightly greased bowl and
cover. Place bowl on rack position 3. See “Positioning Racks and
Bakeware” section for tips. Close door.
1. Place food in oven.
2. Touch MODES to move to the Modes menu.
3. From the Modes menu, touch PROOF.
4. Touch the Temperature tab to move to the Temperature
screen. The temperature is set at 100ºF (38ºC) and cannot be
changed.
5. Press START to begin proofing.
OR
6. If a Cook Time, Keep Warm or Delay Start function is desired,
touch TIMER NOT SET to enter the Cook Time screen.
Enter a cooking length using the on-screen number keyboard
to set a timer to be alerted when cooking ends. The time
length may not exceed 12:00:00.
7. (Optional) To keep food warm after cooking ends, turn Keep
Warm ON. See the “Keep Warm” section for additional
information.
8. (Optional) To set delayed start, touch DELAY START and set
desired time. See “Delay Start” section for additional
information.
9. Touch START to begin cooking.
10. When the cook timer ends, you can start the Keep Warm
cycle if not preset, Add More Time or Cancel the timer.
11. When the cycle is complete, touch CANCEL (CANCEL
UPPER or CANCEL LOWER, on double models) to turn off
the oven.
Before second proofing, shape dough, place in baking pan(s) and
cover loosely and coat with cooking spray. Follow same
placement, and control steps above. Before baking, remove
cover.
Rapid Proof
Rapid Proof is used to proof frozen or formed dough. The Rapid
Proof mode requires the oven be preheated.
To Use Rapid Proof:
1. From the Home Tab, touch CULINARY CENTER.
2. Select Bread category then scroll to Rapid Proof on right-
hand side of the screen. Touch RAPID PROOF then select
Next.
3. Select the cookware you are using and select Next
4. Touch the Temperature tab to move to the Temperature
screen.
Use the slider to enter a desired cooking temperature or
touch the -5°F (-1°C) or +5°F (+1°C) buttons. The temperature
must be between 170°F (77°C) and 200°F (93°C), then select
Next.
5. Enter the proofing length using the on-screen number
keyboard. The time length may not exceed 12:00:00.
6. Touch Next and review settings and see additional
information. Follow instructions on screen for additional
guidance.
7. Place food in oven when preheat signal sounds. Screen will
also prompt you when to insert food.
8. When the cycle is complete, touch CANCEL (CANCEL
UPPER or CANCEL LOWER on double models) to turn off the
oven.
Cook Timer
The Cook Timer allows the oven to cook for a programmed
length of time. The Cook Timer can be accessed by touching
COOK TIMER or TIMER NOT SET whenever available. The Cook
Timer can be started 3 ways; by touching START TIMER, by
opening and closing the oven door or the timer will automatically
start 2 minutes after the preheat signal has sounded.
To Use Cook Timer:
1. Touch COOK TIMER from the Home screen or touch TIMER
NOT SET whenever available.
NOTE: Setting the Cook Timer from the Home screen will
automatically program the Bake Mode at 350°F (177°C).
2. Select the Cook Timer or Timer Not Set tab.
3. Select desired cook time by using the on-screen number
keyboard. The time length may not exceed 12:00:00.
4. Touch START to begin preheating oven.
5. (Optional) To keep food warm after cooking ends, turn Keep
Warm ON. See the “Keep Warm” section for additional
information.
6. (Optional) To set delayed start, touch DELAY START and set
desired time. See “Delay Start” section for additional
information.
Place food in oven when preheat signal sounds. The screen will
also prompt you when to insert food.
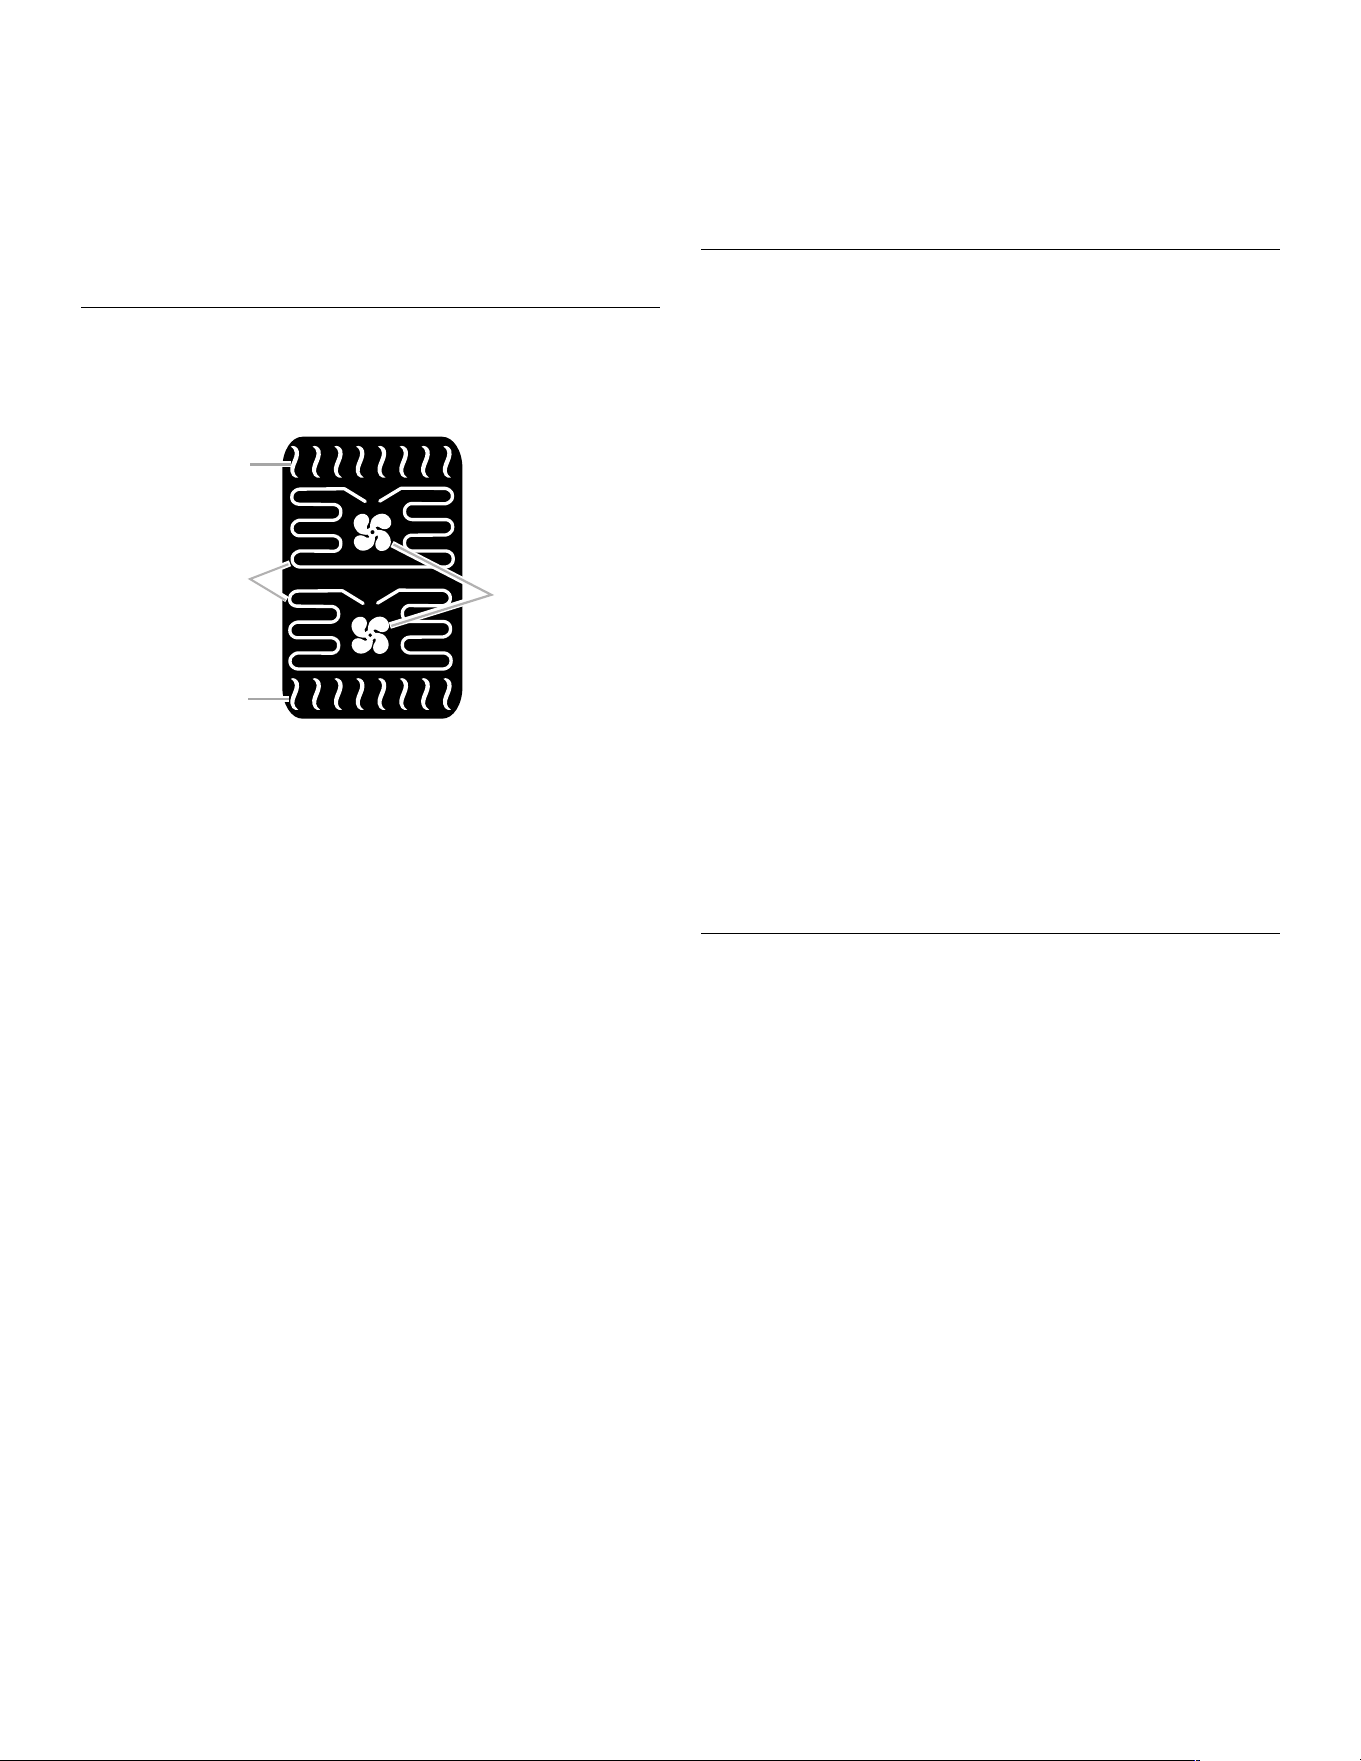
A. Broil element
B. Convection elements
C. Convection fans
D. Bake element
A
B
C
D
Loading ...
Loading ...
Loading ...