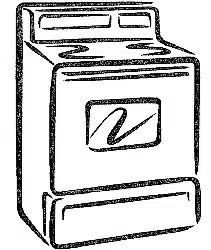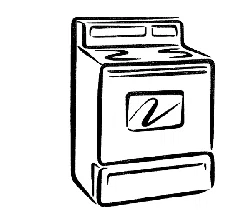
30" Self=Cleaning
Electric Free=Standing Range
Estufa Ei_ctrica
30" Tipo "independiente" de Autolimpieza
Models, Modelos 911o92401, 92408, 92481, 92488, 92502,
92507, 93211, 93218, 933t0, 9331 t,
93400, 93401,93402, 93404, 93407,
93408, 93410, 93411, 93412, 93417,
93418, 93481,93488, 93491, 93498,
935I2, 93514, 93612, 93614, 94492,
94494, 94497, 94499
m
Z
63
r"
i
{n
x
m
cn
z_
O
I=.
22904020P207-10 Sears, Roebuck and Co.,
(SR-10442) Hoffman Estates, IL 60t79 U.S.A. www=sears.com
SELF=CLEANING
FREE=STANDINGRANGE
Table of Contents
Range Safety ..... 3-7
Anti-Tip Bracket 3, 4
Element Cycling !5
Oven Racks ....................... 15
Oven Control 16
Broiling t7-18
Features of Your Range ........ 8
Removal of Packaging Tape 8
Cooking Elements 9
Control Settings 9
Home Canning Tips 9
Hour/Minute Arrow Pad 10
Temp Recall t0
Display ......... t0
Oven Light Switch ............ 10
Indicator Lights ......... 10
To Black Out The Display 10
F-Codes .... 10
PF Code ................ 11
Automatic Oven Shutoff 11
To Set the Clock . 12
To Set the Timer t2
To Reset the Timer 12
To Cancel the Timer I2
Baking I3
Oven Cooking Tips I4-16
Strong Smell or Odor t4
Aluminum Foil 14
Oven Vent 14
Peeking 14
Preheating ........... 14
Oven Light .... 14
Baking With Margarine . t4
Bakeware Placement. 15
Bakeware ..... 15
Self-Cleaning Cycle ........ 19-20
Preparing Your Oven ..... 19
Oven Door Gasket 19
To Set A Clean Cycle 20
To Stop A Cycle ................... 20
After The Cycle 20
Control Panel 21
Broiler Pan and Grid ................ 21
Walls Of The Oven ..... 21
Cooktop and Area Under
Cooktop 21
Drawer and Sides of Range 2I
Oven Door Glass ....... 21
Door Vent Trim 2!
Removable Parts 22-27
Lift-Up Cooktop ....... 22
Control Knobs 23
Oven Light Bulb 23
Cooktop Unit 24
Oven Racks .... 25
Oven Door 25-26
Storage Drawer 27
Before Calling for
Service .......................... 28-30
Temperature Adjustment 16, 31
Warranty ..................... 34
Consumer Service Numbers 68
For your convenience and future reference, please write down your model
and serial numbers in the space provided. They are located on the front
frame behind the storage drawer.
MODELNUMBER: SERIAL NUMBER:
© Sears, Roebuck and Co
2
IMPORTANTSAFETY
INSTRUCTIONS
SAVE THESE INSTRUCTIONS
Read all instructions before using this appliance. When using gas
or electrical appliances, basic safety precautions should be followed,
including the following:
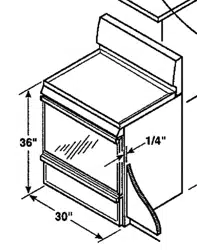
B. Use the bracket as a template
and mark 2 hole positions on the
wal! and 2 hole positions on the
floor Use either the wood or
concrete floor set of positions,
depending on your floor type
See Fig, 1
Device Packed
: With Range
: .... ,oSee Installation
Instructions
These ANTI-TIP bracket installation
instructions are for wood or concrete
floors and walls Any other type of
construction may require specia!
installation techniques to provide
adequate fastening of the ANTI-TIP
bracket to the floor and wall
The use of this bracket does not
prevent tipping of the range when
bracket is not properly installed
NOTE: The installation of the
ANTI-TIP bracket must meet all local
codes for securing appliance
Step 1
Locating the bracket
A. Locate the bracket against the rear
wall and either the right or left
cabinet If the countertop
overhangs the cabinet, offset the
bracket from the cabinet by the
amount of overhang If there is no
adjacent cabinet, position the edge
of the bracket at the desired
location of the range side panel
Adjacent Cabinet or
Final Location of Range
Side Panel
Wood
Floor Holes
Bracket
Side ::
Wall
Holes
b
Rear
Leveling Leg
:::::: :: Concrete
: Floor
Holes
Fig, 1
3
continued on next page
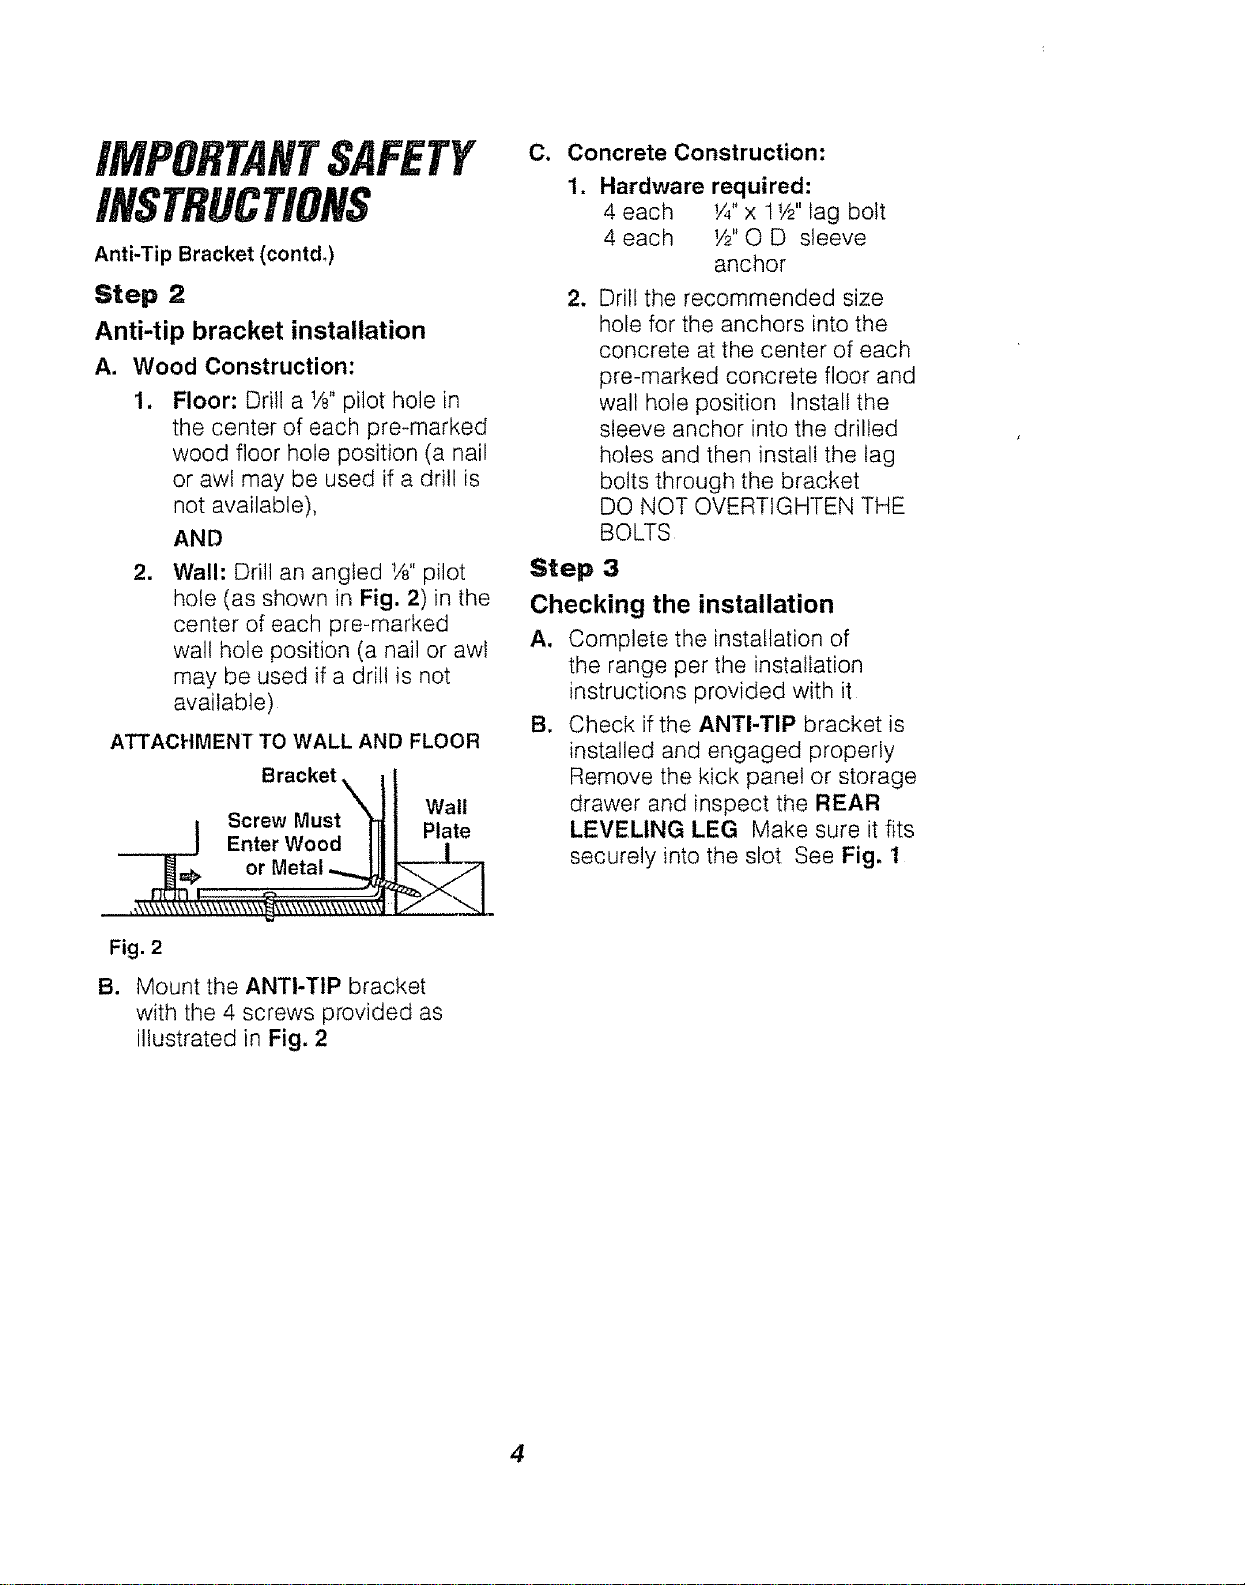
Anti-Tip Bracket (cent&)
Step 2
Anti-tip bracket installation
A. Wood Construction:
Floor: Drill a 1/8"pilot hole in
the center of each pre-marked
wood floor hole position (a nail
or awl may be used if a drill is
not available),
AND
=
Wall: Drill an angled t/8"pilot
hole (as shown in Fig. 2)in the
center of each pre-marked
wall hole position (a nail or awl
may be used if a drill is not
available)
ATTACHMENT TO WALL AND FLOOR
Bracket _
i Screw Musty
Enter Wood|
_j_L=F or Metal
Fig. 2
B.
Wall
Plate
Mount the ANTI-TIP bracket
with the 4 screws provided as
illustrated in Fig, 2
C. Concrete Construction:
=
Hardware required:
4 each I/4"x 1t/2"lag bolt
4 each W'O D sleeve
anchor
w Drill the recommended size
hole for the anchors into the
concrete at the center of each
pre-marked concrete floor and
wall hole position Install the
sleeve anchor into the drilled
holes and then install the lag
bolts through the bracket
DO NOT OVERTtGHTEN THE
BOLTS
Step 3
Checking the installation
A. Complete the installation of
the range per the installation
instructions provided with it
B. Check if the ANTI-TIP bracket is
installed and engaged properly
Remove the kick panel or storage
drawer and inspect the REAR
LEVELING LEG Make sure it fits
securely into the slot See Fig. 1
4
iMPORTANTSAFETY
iNSTRUCTiONS
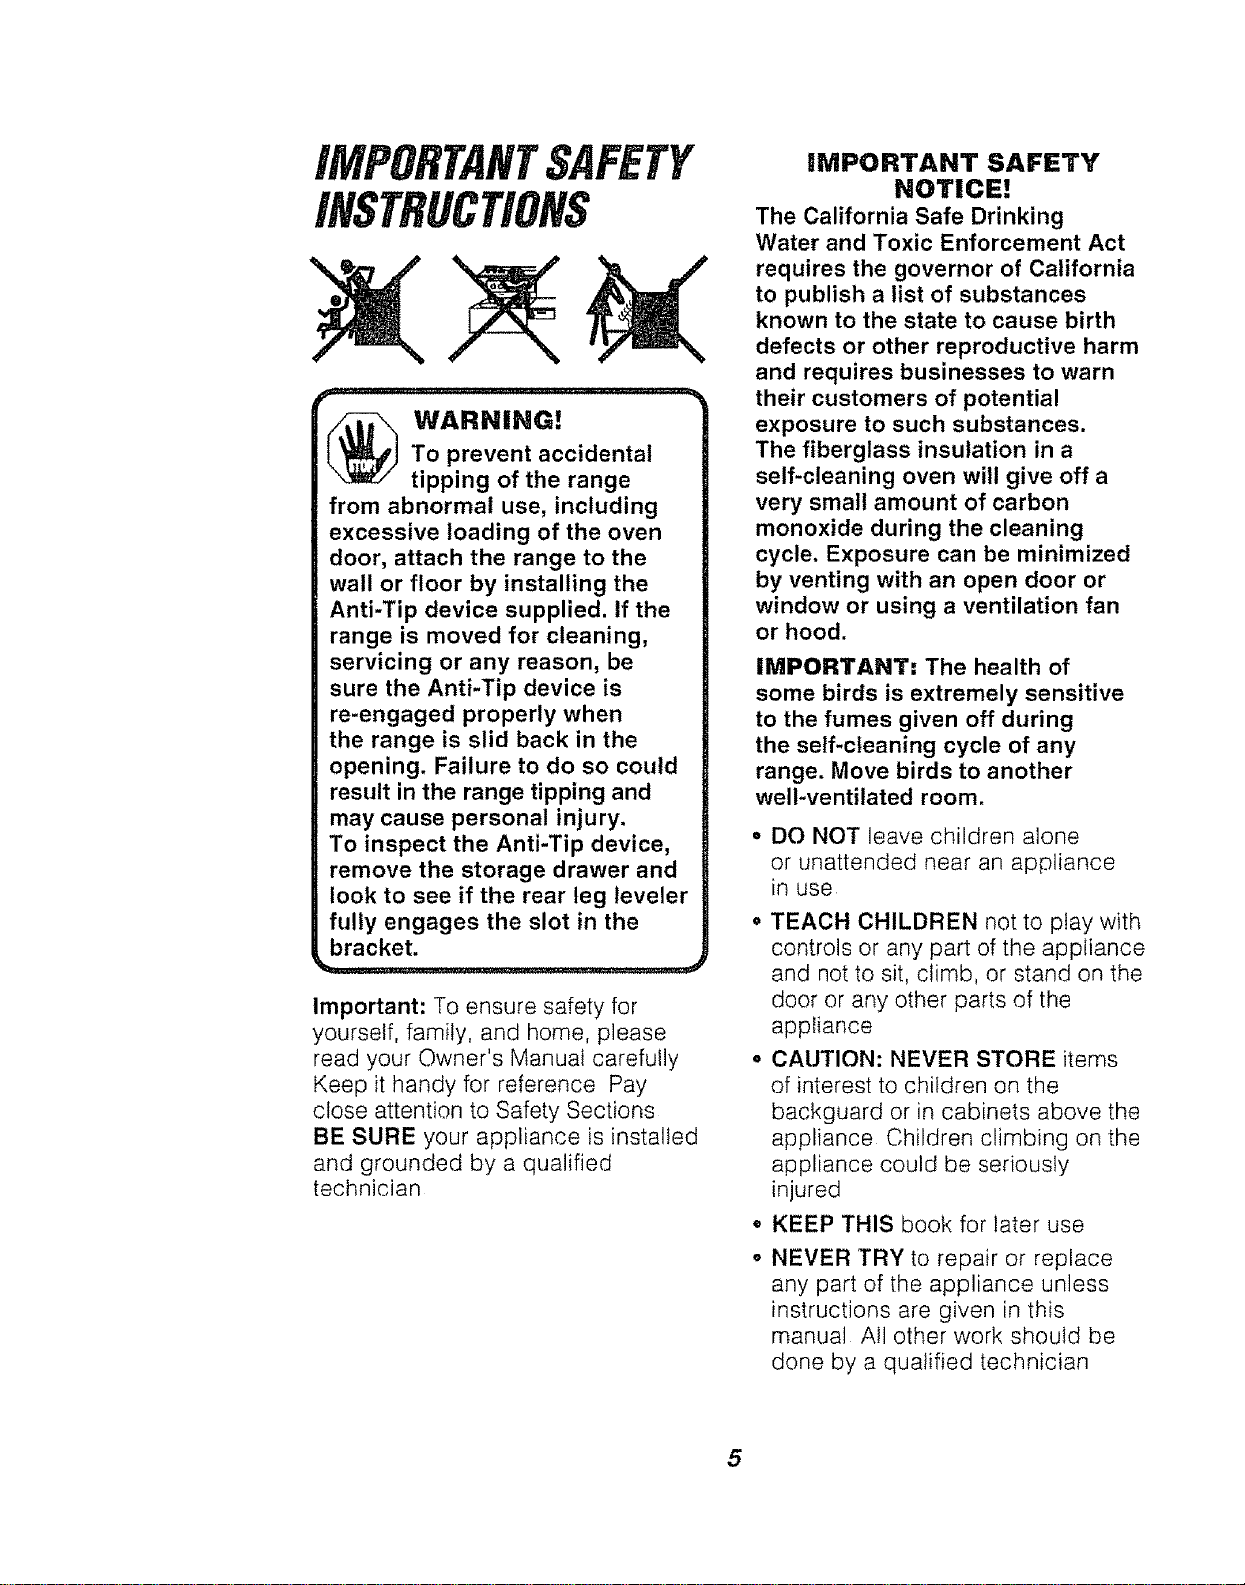
_ WARNING!
To prevent accidental
tipping of the range
from abnormal use, including
excessive loading of the oven
door, attach the range to the
wall or floor by installing the
Anti-Tip device supplied. If the
range is moved for cleaning,
servicing or any reason, be
sure the Anti-Tip device is
re-engaged properly when
the range is slid back in the
opening. Failure to do so could
result in the range tipping and
may cause personal injury.
To inspect the Anti-Tip device,
remove the storage drawer and
look to see if the rear leg leveler
fully engages the slot in the
bracket.
Important: To ensure safety for
yourself, family, and home, please
read your Owner's Manual carefully
Keep it handy for reference Pay
close attention to Safety Sections
BE SURE your appliance is installed
and grounded by a qualified
technician
iMPORTANT SAFETY
NOTICE!
The California Safe Drinking
Water and Toxic Enforcement Act
requires the governor of California
to publish a list of substances
known to the state to cause birth
defects or other reproductive harm
and requires businesses to warn
their customers of potential
exposure to such substances.
The fiberglass insulation in a
self-cleaning oven will give off a
very small amount of carbon
monoxide during the cleaning
cycle. Exposure can be minimized
by venting with an open door or
window or using a ventilation fan
or hood.
IMPORTANT: The health of
some birds is extremely sensitive
to the fumes given off during
the self-cleaning cycle of any
range. Move birds to another
well-ventilated room.
o
@
DO NOT leave children alone
or unattended near an appliance
in use
TEACH CHILDREN not to play with
controls or any part of the appliance
and not to sit, climb, or stand on the
door or any other parts of the
appliance
CAUTION: NEVER STORE items
of interest to children on the
backguard or in cabinets above the
appliance Children climbing on the
appliance could be seriously
injured
KEEP THIS book for later use
NEVER TRY to repair or replace
any part of the appliance unless
instructions are given in this
manual All other work should be
done by a qualified technician
5
iMPORTANTSAFETY
INSTRUCTIONS
• NEVER USE your appliance for
warming or heating the room
• ALWAYS KEEP combustible wall
coverings, curtains, dishcloths, towels,
pothotders and other linens a safe
distance from the appliance
° NEVER HEAT unopened food
containers Pressure buildup can cause
the container to burst and cause injury
• NEVER LEAVE containers of fat or
drippings in your oven
. ALWAYS KEEP the appliance
area free from things that wilt burn
Food, wooden utensils, and grease
buildup could catch fire Plastic
utensils could melt and canned foods
could explode Your appliance should
never be used as a storage area
. ALWAYS KEEP your appliance clear
of things that wift burn (gasoline and
other flammable vapors or liquids)
o NEVER TRY to clean hot surfaces
Some cleaners produce noxious fumes
° NEVER WEAR loose fitting clothing
when using your appliance
o NEVER USE a towel or other bulky cloth
as a potholder Make sure the potholder
is dry Moist potholders and wet cloths
or sponges could cause steam burns
DO NOT let potholders touch hot
heating elements
° DO NOT touch heating elements,
surfaces near them, or interior oven
surfaces These may be hot enough to
cause burns even though they are dark
in color During and after use, do not
touch or let clothing or flammable
material contact the elements or hot
surfaces until they have had time to
cool Other surfaces near the oven vent
openings, oven door and window, and
cooktop surfaces may also be hot
enough to cause burns
6
• ONLY CERTAIN kinds of glass or
ceramic cookware can be used for
cooktop cooking, Make sure the
cookware you choose to use is
designed for cooktop cooking
without breaking due to the sudden
temperature changes
• ALWAYS USE care when touching
cooktop elements They will retain heat
after the range has been turned off
° NEVER BLOCK the oven air vent under
the right rear element
o COOKWARE USED for cooktop
cooking should be flat on the bottom
and large enough to cover the heating
area being used Undersized utensils
expose the heating element and may
result in direct contact or ignition of
clothing. The proper size utensil witl also
improve efficiency
• ALWAYS USE drip bowls to prevent
wiring and component damage DO
NOT use aluminum liners or foil in drip
bowls tmproper use may result in risk of
electric shock or fire
NEVER LEAVE surface units
unattended at high settings Boilovers
result in smoking or greasy spills which
could catch fire
• ALWAYS TURN utensil handles inward
and away from other surface units to
reduce the risk o[ burns, ignition,
unintended contact, and spillage
• NEVER put heating elements in water
• WHEN PREPARING flaming
foods under the vent hood, turn
the fan on
iMPORTANTSAFETY
INSTRUCTIONS
o PLACE OVEN RACKS in the
desired position while the oven is
coot If racks must be moved while
oven is hot, do not let pothotder
contact the hot oven element
o AFTER BROILING, always take the
broiler pan and grid out of the oven
and clean them Leftover grease in
the broiler pan could catch fire the
next time you use your oven
o ALWAYS USE care when opening
the oven door Let hot air and steam
escape before moving foods
• NEVER USE aluminum foil to line the
oven bottom Improper use of foil
could start a fire, or electrical shock
could result
° CLEAN ONLY the parts listed
in this manual Follow all cleaning
instructions Be sure to remove
the broiler pan and grid before
self-cleaning
° NEVER RUB, move, clean, or
damage the door gasket on
self-cleaning ranges It is
essential for a good seal
• NEVER "TRY to clean utensils,
cookware, removable parts, or
broiler pan and grid in the
self-clean cycle
• DO NOT USE oven cleaners -
No commercial oven cleaner or
protective coating of any kind
should be used in or around any
part of the oven
° IF THE SELF-CLEANING mode
malfunctions, turn the oven off and
disconnect the power supply Have
it serviced by a qualified technician
r
(_ CAUTION:
Never line the drip bowls
with aluminum foil. Foil
can block the normal heat flow
and damage the range. Always
use cookware and woks that
are flat on the bottom and
the same size as the cooking
element being used. Cookware
should not extend more than 1"
beyond the edge of the cooking
element.
J
READ AND UNDERSTAND
THIS iNFORMATiON NOW!
Be sure everyone in your home
knows what to do in case of fire.
Never use water on a grease fire;
it will only spread the flames.
COOKTOP GREASE FIRE:
Never pick up a flaming pan...
1. Turn off the surface elements
.
Smother the flame with a tightly
fitting lid, use baking soda, or
use a dry chemical, foam, or
halon-type extinguisher
OVEN FIRE:
Do not try to move the pan!
1. Close the oven door and turn
controls off
2_
tf fire continues, carefully open
the door, throw baking soda on
the fire, or use a dry chemical,
foam, or haton-type extinguisher
7
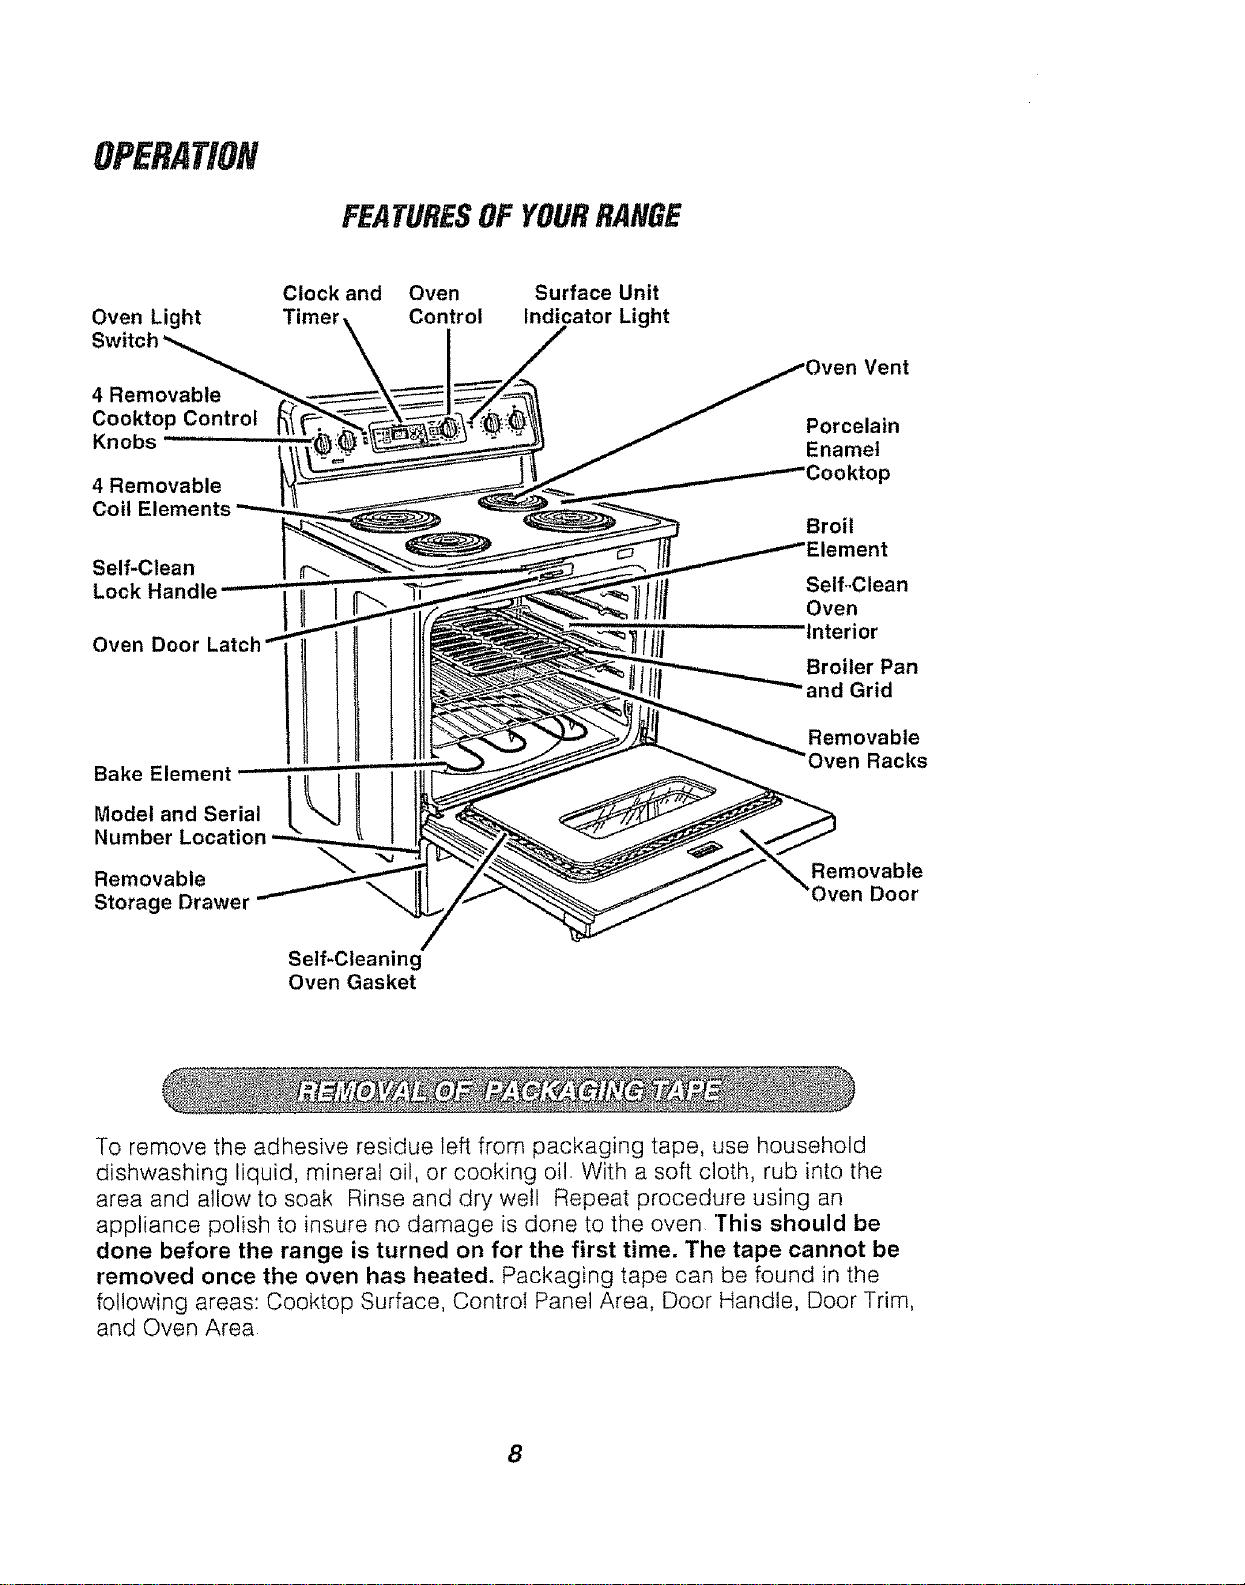
OPERATION
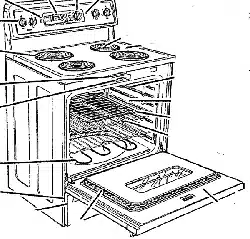
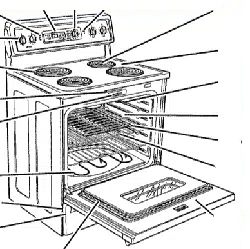
FEATURESOFYOURRANGE
Oven Light
4 Removable
Cooktop Control
Knobs
4 Removable
Coil Elements
Self-Clean
Lock Handle
Oven Door
Bake Element
Model and Serial
Number
Removable
Storage Drawer
Clock and Oven Surface Unit
Control Indicator Light
Vent
Porcelain
Enamel
3ooktop
Broil
._nt
Self-Clean
Oven
Interior
Broiler Pan
and Grid
Removable
Oven Racks
Removable
Oven Door
Self-Cleaning
Oven Gasket
To remove the adhesive residue left from packaging tape, use household
dishwashing liquid, mineral oil, or cooking oil With a soft cloth, rub into the
area and allow to soak Rinse and dry well Repeat procedure using an
appliance polish to insure no damage is done to the oven This should be
done before the range is turned on for the first time. The tape cannot be
removed once the oven has heated. Packaging tape can be found in the
following areas: Cooktop Surface, Control Panel Area, Door Handle, Door Trim,
and Oven Area
8
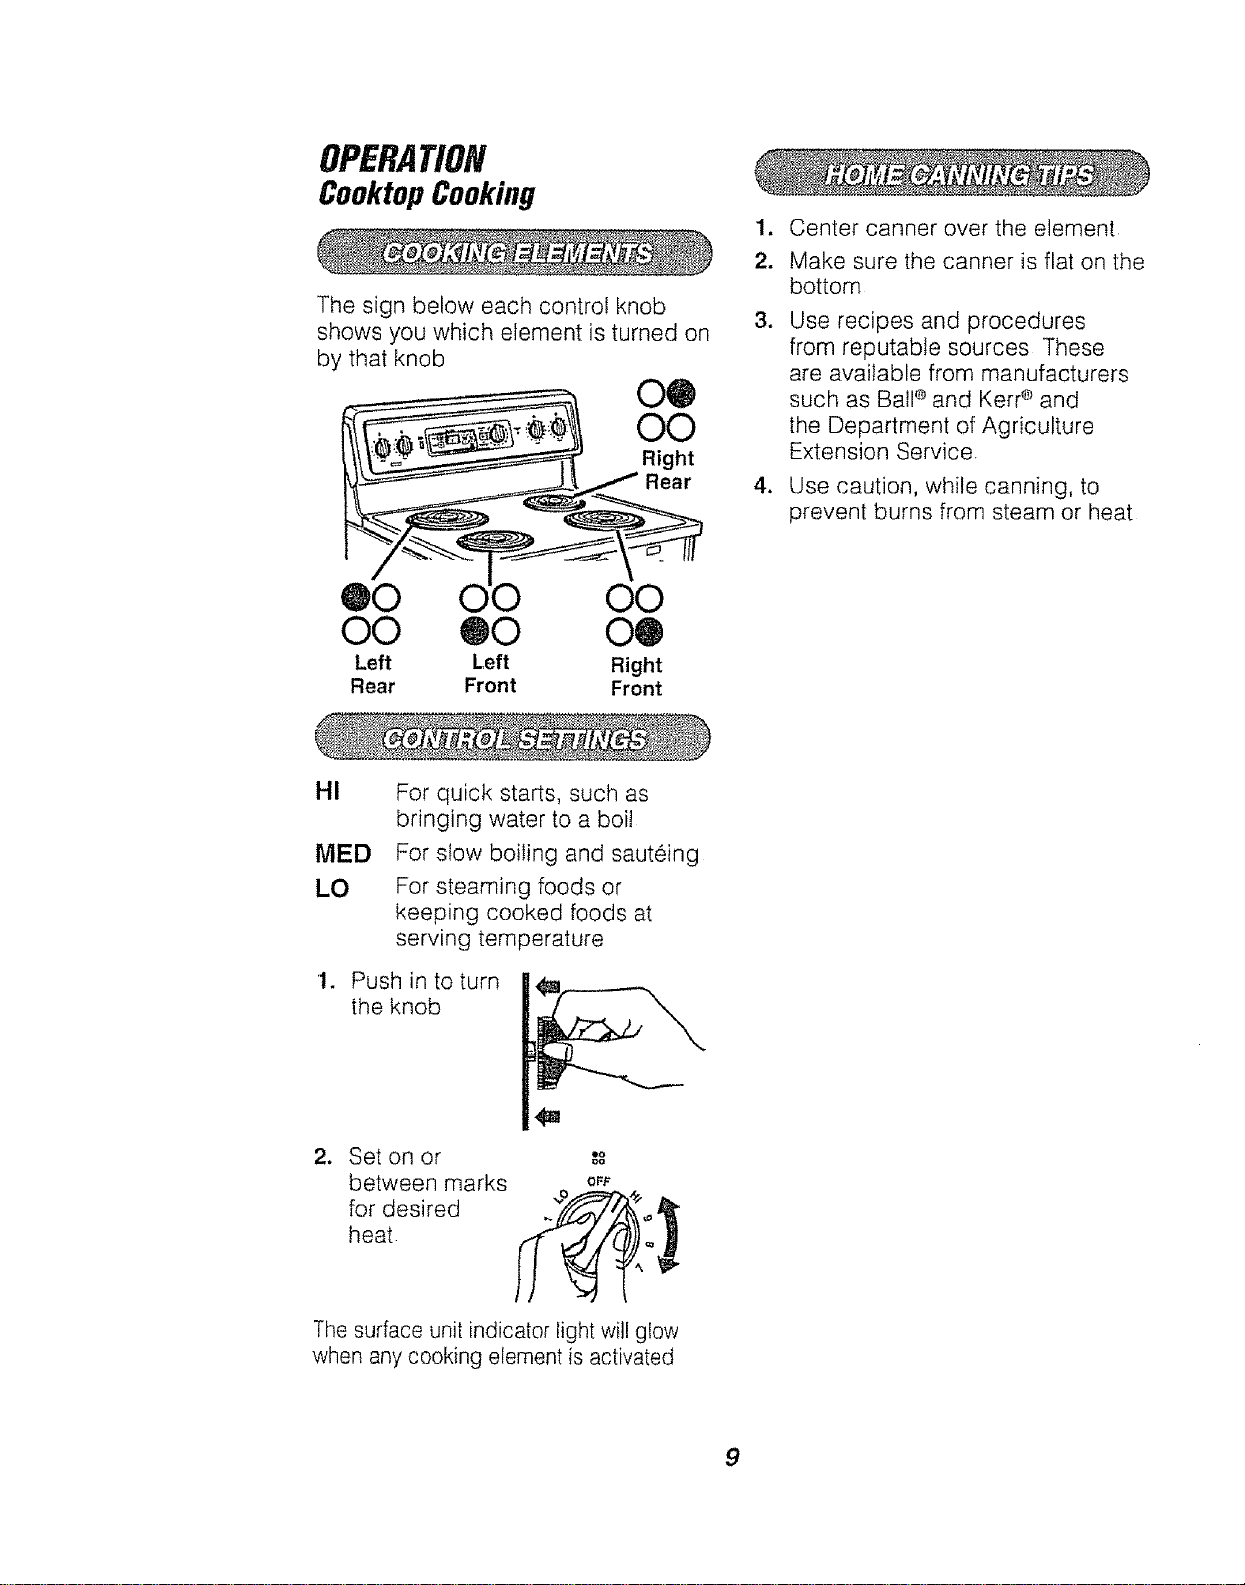
OPERATION
CooktopCooking
The sign below each control knob
shows you which element is turned on
by that knob
00
O0
Right
Rear
1.
2.
Center canner over the element
Make sure the canner is flat on the
bottom
Use recipes and procedures
from reputable sources These
are available from manufacturers
such as Ball ®and Kerr ®and
the Department of Agriculture
Extension Service.
Use caution, while canning, to
prevent burns from steam or heat
@0 O0
O0 ®0 O@
Left Left Right
Rear Front Front
HI
MED
LO
1.
2_
For quick starts, such as
bringing water to a boi!
For slow boiling and sauteing
For steaming foods or
keeping cooked foods at
serving temperature
Push in to turn
the knob
Set on or
between marks oft
for desired ."_ _"
heat ,__"_
The surface unit indicator light will glow
when any cooking element is activated
9
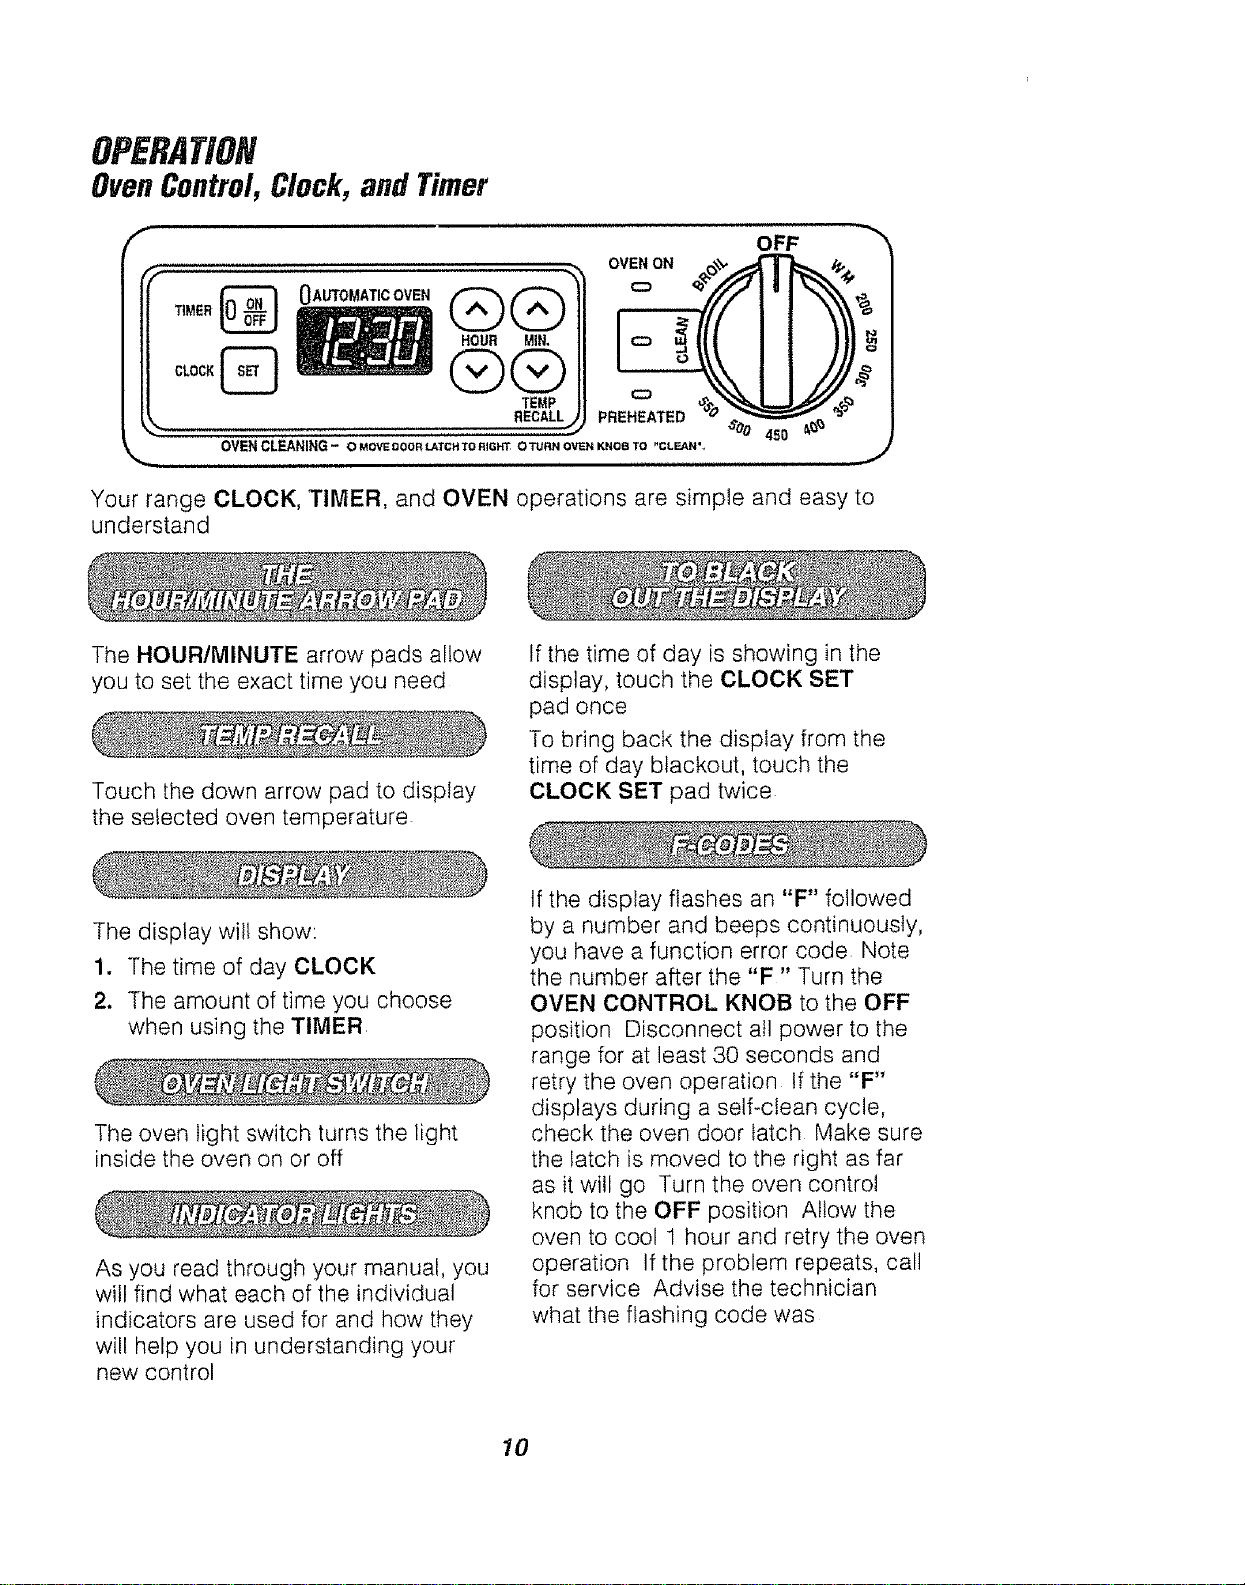
OPERATION
OvenControl,Clock, and Timer
F
f
%_
',,..,,.
OVEN ON _..
PREHEATED
RECALLj
OVENCLFJ_NING- OMO_OOORU,TCH'rO_IGhTOTU_NOWNKNOBTO.CLEAN%
OFF
450 _
J
Your range CLOCK, TIMER, and OVEN operations are simple and easy to
understand
The HOUR/MINUTE arrow pads allow
you to set the exact time you need
Touch the down arrow pad to display
the selected oven temperature
If the time of day is showing in the
display, touch the CLOCK SET
pad once
To bring back the display from the
time of day blackout, touch the
CLOCK SET pad twice
The display will show:
1. The time of day CLOCK
2. The amount of time you choose
when using the TIMER
The oven light switch turns the light
inside the oven on or off
As you read through your manual, you
will find what each of the individual
indicators are used for and how they
will help you in understanding your
new control
If the display flashes an "F" followed
by a number and beeps continuously,
you have a function error code Note
the number after the "F" Turn the
OVEN CONTROL KNOB to the OFF
position Disconnect all power to the
range for at least 30 seconds and
retry the oven operation If the "F"
displays during a self-clean cycle,
check the oven door latch Make sure
the latch is moved to the right as far
as it will go Turn the oven control
knob to the OFF position Allow the
oven to cool 1 hour and retry the oven
operation If the problem repeats, call
for service Advise the technician
what the flashing code was
10
OPERATION
OvenControl,Clock,
and Timer(cont.)
When the power to your range is
turned on for the first time, or if you
experience a power failure, the
display will flash "PF" By touching
the CLOCK SET pad, the display will
flash "12:00" Touch the CLOCK SET
pad again and follow the instructions
to set the clock Any operation set
before a power failure wilt need to be
reset
The oven wi!l automatically shut off
if it has been left on for more than
12 hours
To deactivate or reactivate the
automatic shutoff, touch and hold the
MIN UP and DOWN arrow pads for
about 4 seconds
11
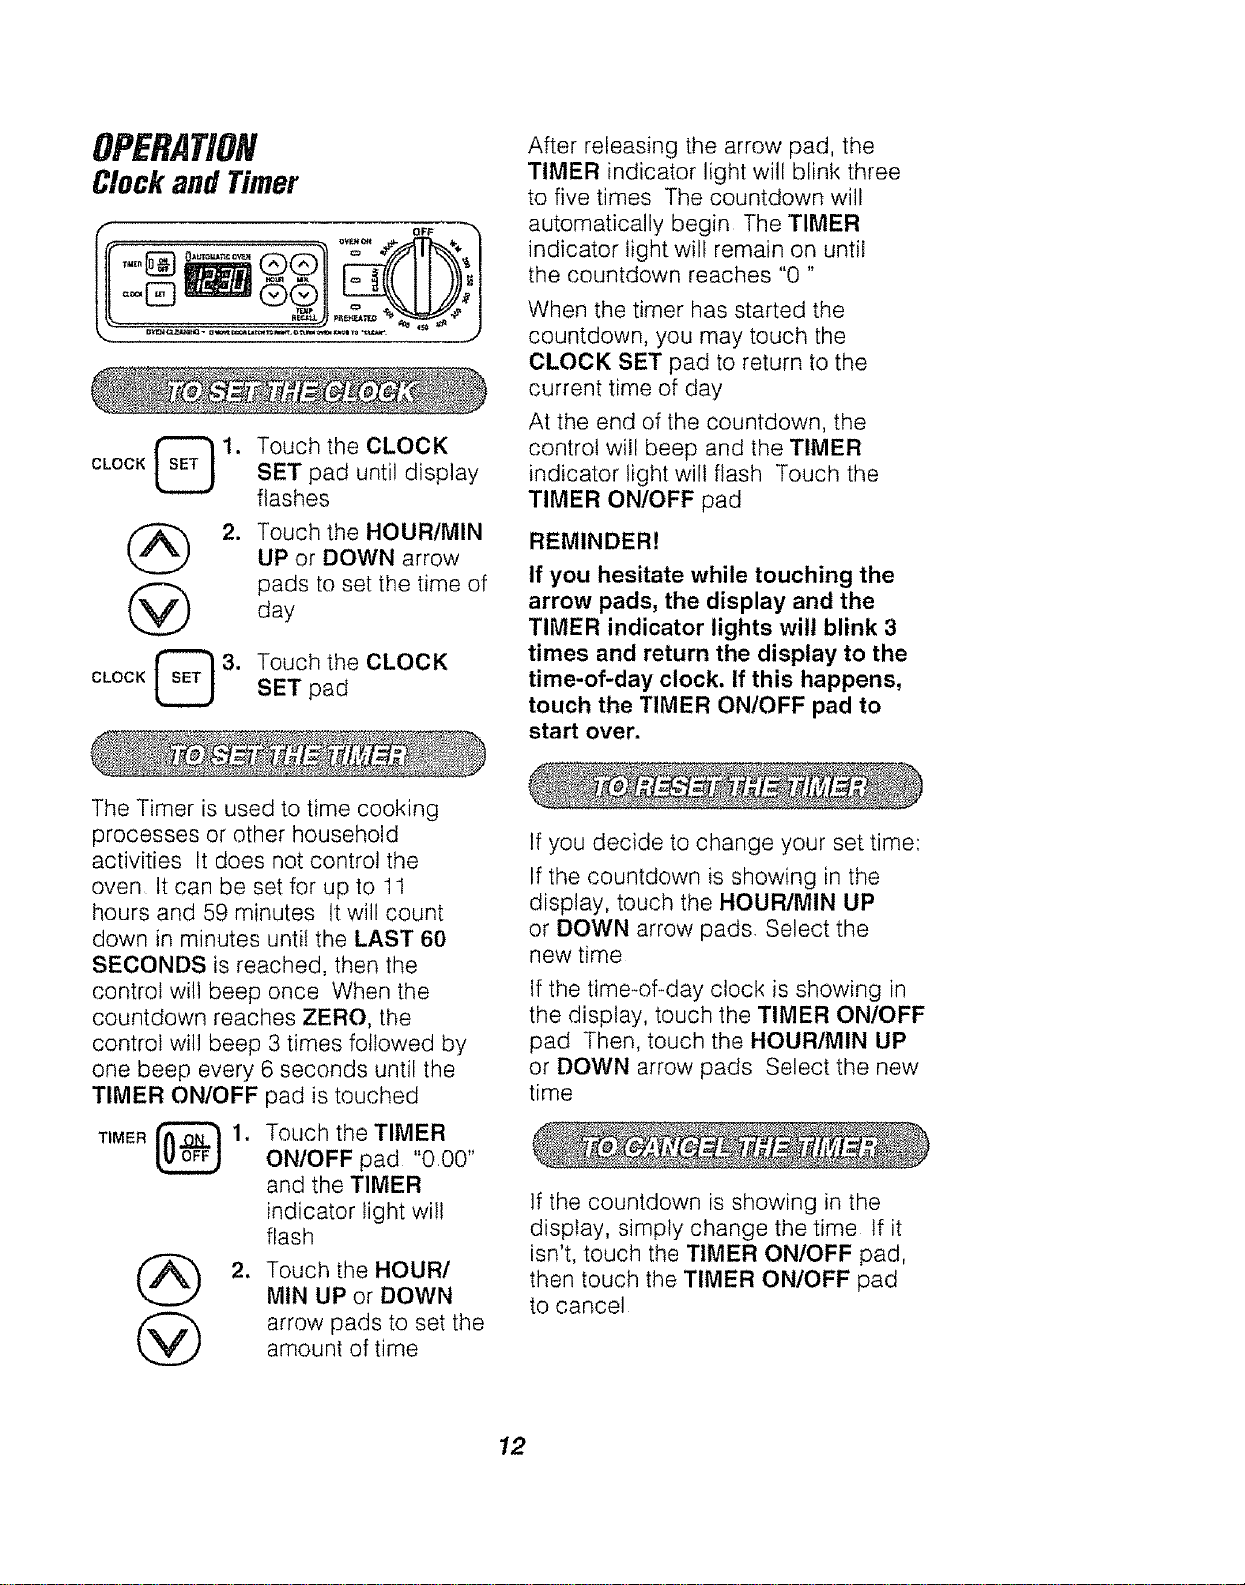
OPERATION
Clockand Timer
i OFF
CLOCK [_ 1,
@
CLOCK _ 3.
Touch the CLOCK
SET pad until display
flashes
Touch the HOUR/MIN
UP or DOWN arrow
pads to set the time of
day
Touch the CLOCK
SET pad
After releasing the arrow pad, the
TIMER indicator light will blink three
to five times The countdown will
automatically begin The 'TIMER
indicator light will remain on until
the countdown reaches % "
When the timer has started the
countdown, you may touch the
CLOCK SET pad to return to the
current time of day
At the end of the countdown, the
control will beep and the TIMER
indicator light will flash Touch the
TIMER ON/OFF pad
REMINDER!
If you hesitate while touching the
arrow pads, the display and the
TIMER indicator lights wilt blink 3
times and return the display to the
time-of-day clock. If this happens,
touch the TIMER ON/OFF pad to
start over.
The Timer is used to time cooking
processes or other household
activities It does not control the
oven It can be set for up to 11
hours and 59 minutes tt will count
down in minutes untiI the LAST 60
SECONDS is reached, then the
control wi!1 beep once When the
countdown reaches ZERO, the
control will beep 3 times followed by
one beep every 6 seconds until the
TIMER ONIOFF pad is touched
TIMER _ 1.
@
Touch the TIMER
ON/OFF pad "0.00"
and the TIMER
indicator light will
flash
Touch the HOURI
MtN UP or DOWN
arrow pads to set the
amount of time
If you decide to change your set time:
If the countdown is showing in the
display, touch the HOUR/MIN UP
or DOWN arrow pads, Select the
new time
If the time-of-day clock is showing in
the display, touch the TIMER ON/OFF
pad Then, touch the HOURtMIN UP
or DOWN arrow pads Select the new
time
If the countdown is showing in the
display, simply change the time tf it
isn't, touch the TIMER ON/OFF pad,
then touch the TIMER ON/OFF pad
to cancel
12
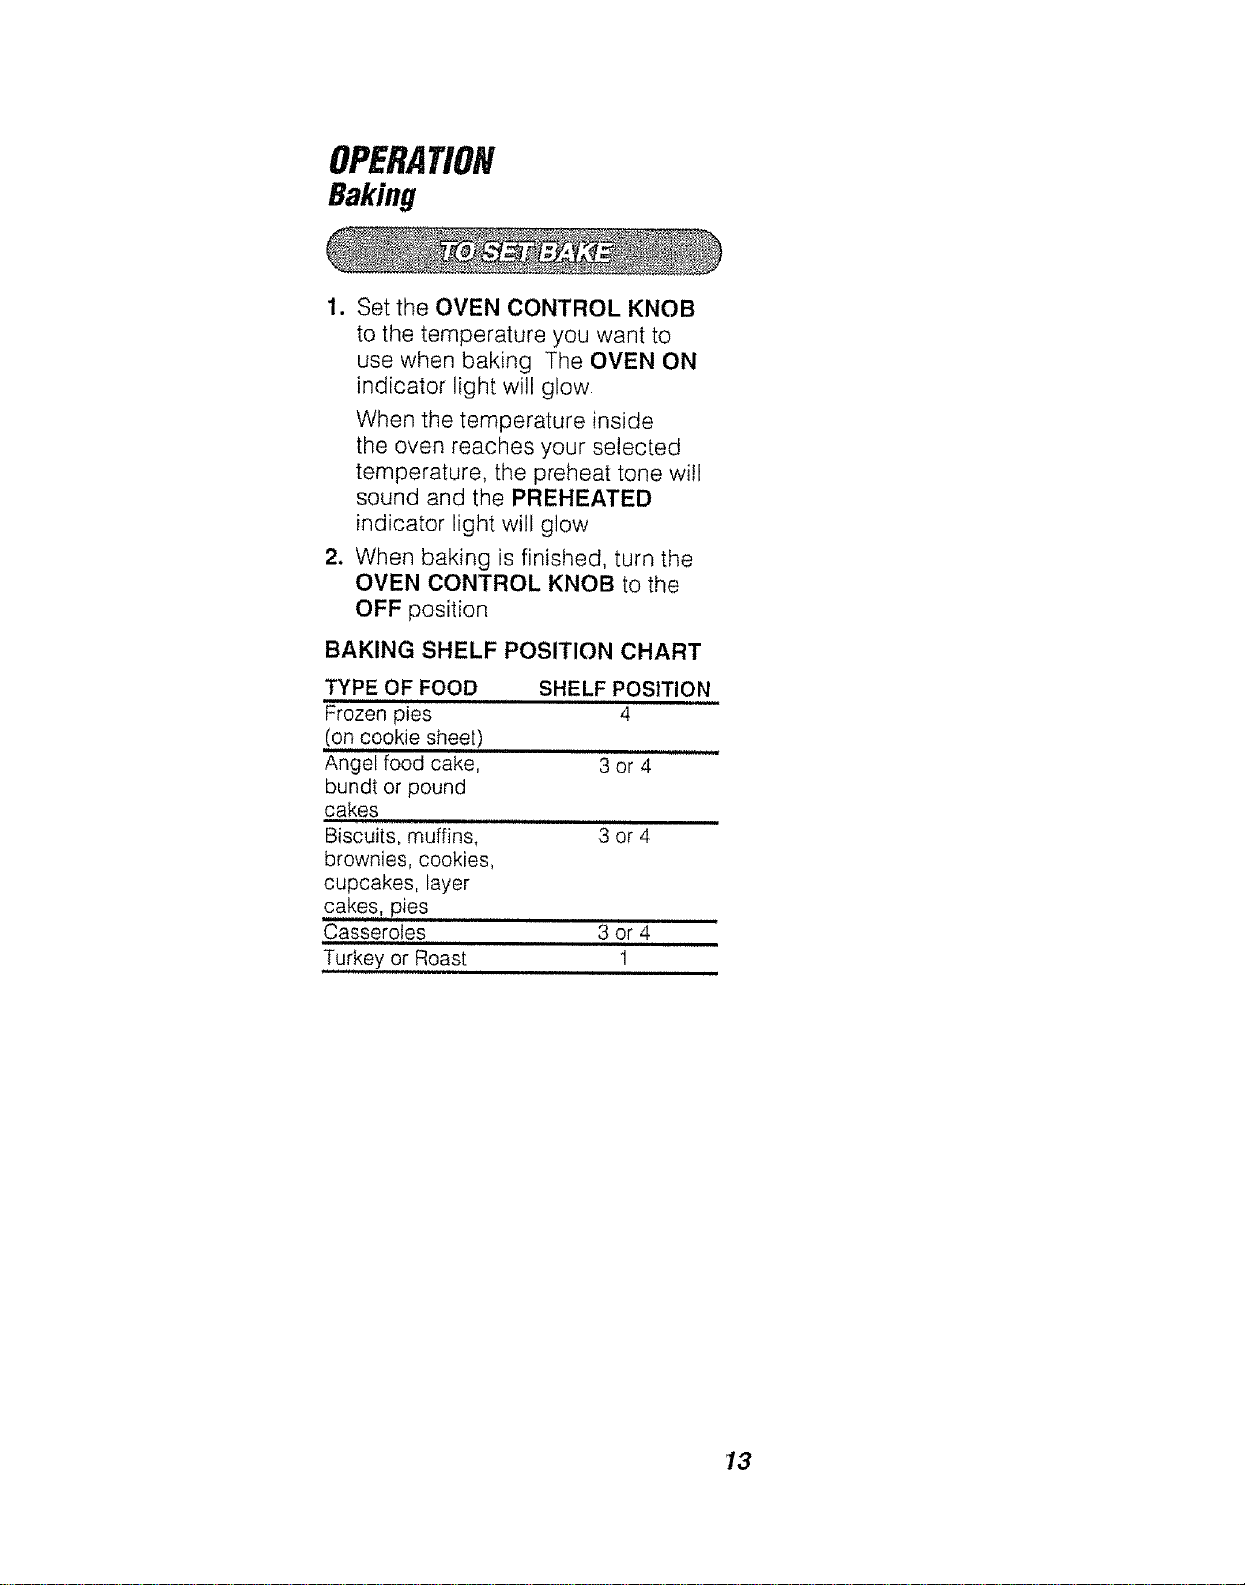
OPERATION
Baking
1. Set the OVEN CONTROL KNOB
to the temperature you want to
use when baking The OVEN ON
indicator light will glow
When the temperature inside
the oven reaches your selected
temperature, the preheat tone will
sound and the PREHEATED
indicator light will glow
2. When baking is finished, turn the
OVEN CONTROL KNOB to the
OFF position
BAKING SHELF POSITION CHART
TYPE OF FOOD
Frozen pies
(on cookie sheet)
Angel food cake, 3 or 4
bundt or pound
cakes
,rim i,, ill
Biscuits, muffins, 3 or 4
brownies, cookies,
cupcakes, layer
cakes, pies
Casseroles 3 or 4
Turkey or Roast 1
SHELF POSITION
4
13
OPERATION
OvenCookingTips
it is normal to have some odor when
using your oven for the first time To
help eliminate this odor, ventilate the
room by opening a window or using
a vent hood,
Opening the door often to check foods will
cause heat loss and poor baking results
Preheating is bringing the oven
temperature up to the temperature you will
be using during baking Let the oven
preheat when recipes call for preheating
IMPORTANT: Never cover the oven
bottom or oven rack with aluminum
foil improper use can cause poor
heat flow, poor baking results, and
may damage the oven finish To
prevent staining from spillovers, you
may place a piece of aluminum foil or
a cookie sheet on the rack below the
food which may spill over.
To prolong the life of your oven light bulb,
follow this helpful tip: Always turn the light
off when the oven is not in use or during a
self-clean cycle tf your appliance does
nothave a window in the door, you will
need to open the door to make sure the
oven light is off If your oven light is left
on for an extended period of time, the
oven wil! be warm when the door is
opened due to the heat generated from
the oven light bulb
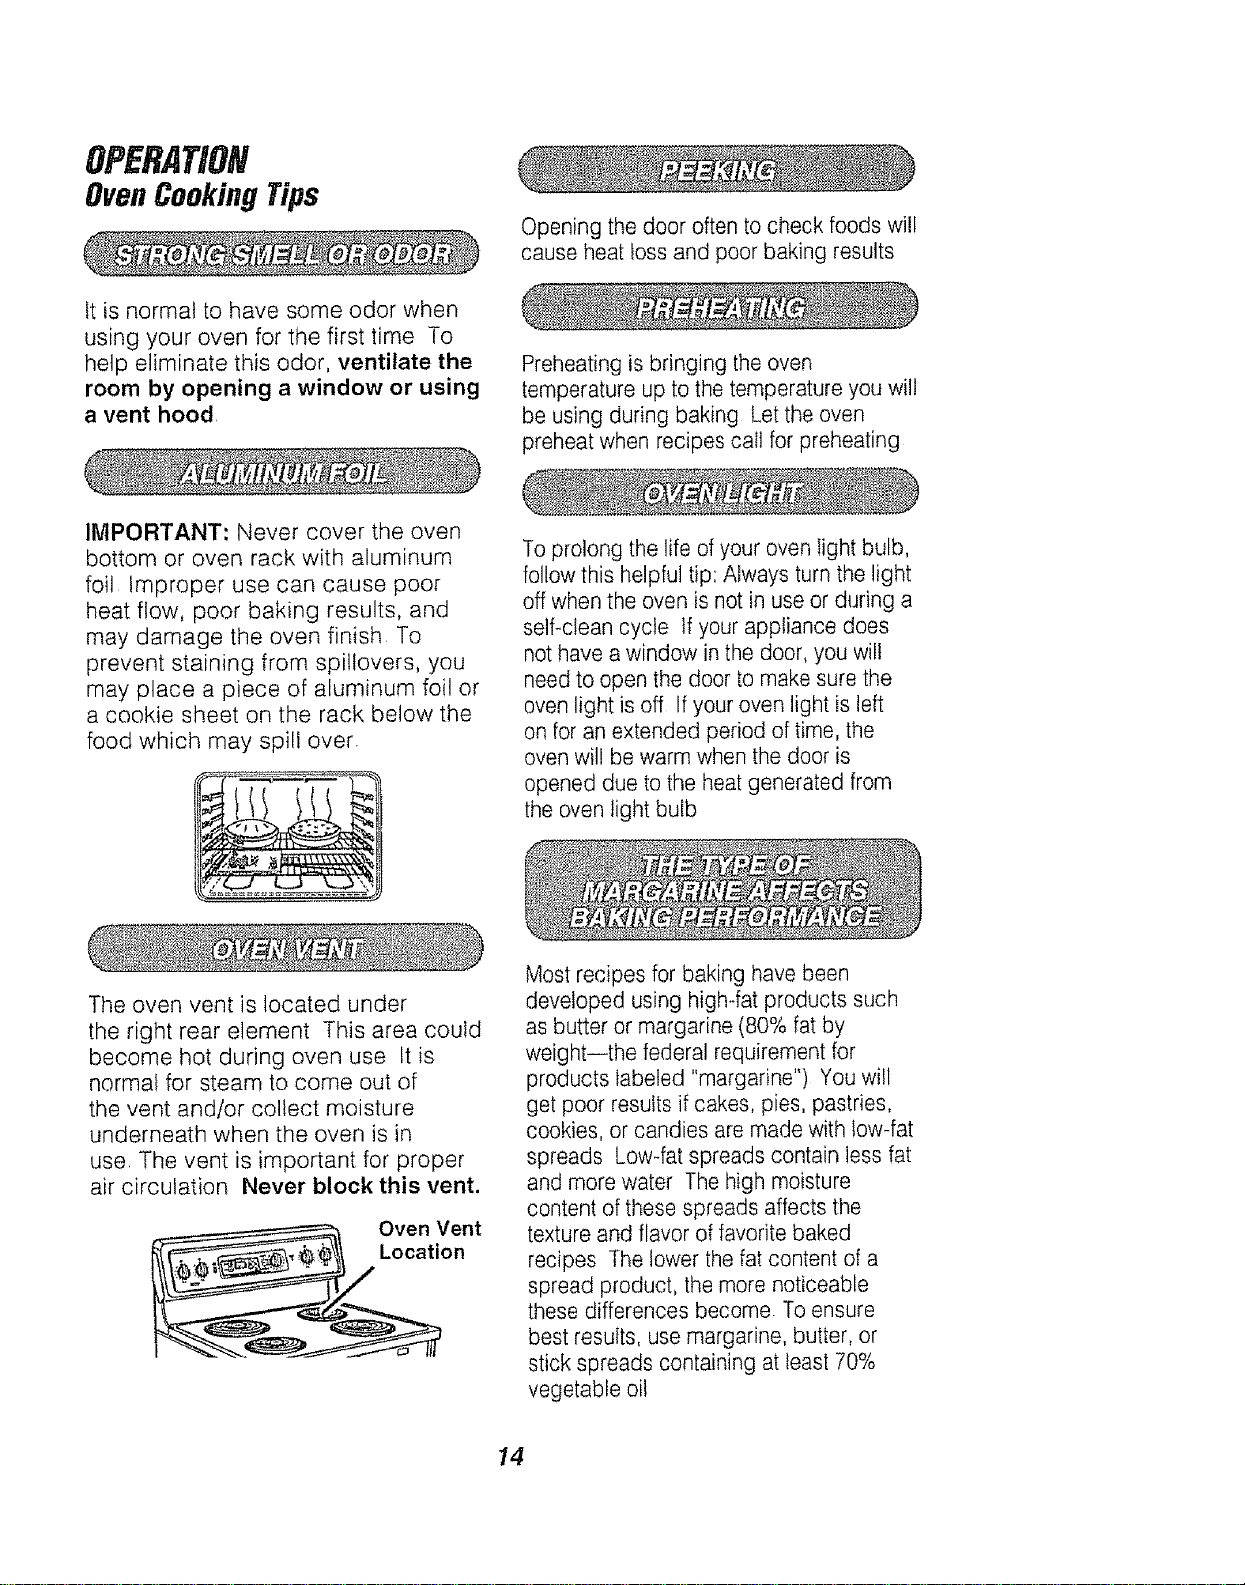
The oven vent is located under
the right rear element This area could
become hot during oven use tt is
normaf for steam to come out of
the vent and/or collect moisture
underneath when the oven is in
use. The vent is important for proper
air circulation Never block this vent.
Oven Vent
Location
Most recipes for baking have been
developed using high-fat products such
as butter or margarine (80% fat by
weight--the federal requirement for
products labeled "margarine") You will
get poor results if cakes, pies, pastries,
cookies, or candies are made with low-fat
spreads Low-fat spreads contain less fat
and more water The high moisture
content of these spreads affects the
texture and flavor of favorite baked
recipes The lower the fat content of a
spread product, the more noticeable
these differences become To ensure
best results, use margarine, butter, or
stick spreads containing at least 70%
vegetable oil
14
OPERATION
OvenCookingTips(cont.)
Baking results will be better if baking
pans are centered in the oven as
much as possible If baking with
more than one pan, place the pans so
each has at !east 1 to 11/2"of air space
around it If baking four cake layers at
the same time, place two layers on
rack 2 and two layers on rack 4
Stagger pans on the rack so one
is not directly above the other
The Oven Temperature Sensor
continuously senses and controls the
temperature inside the oven To keep a
constant set temperature, the elements
will cycle (turn on and off during cooking),
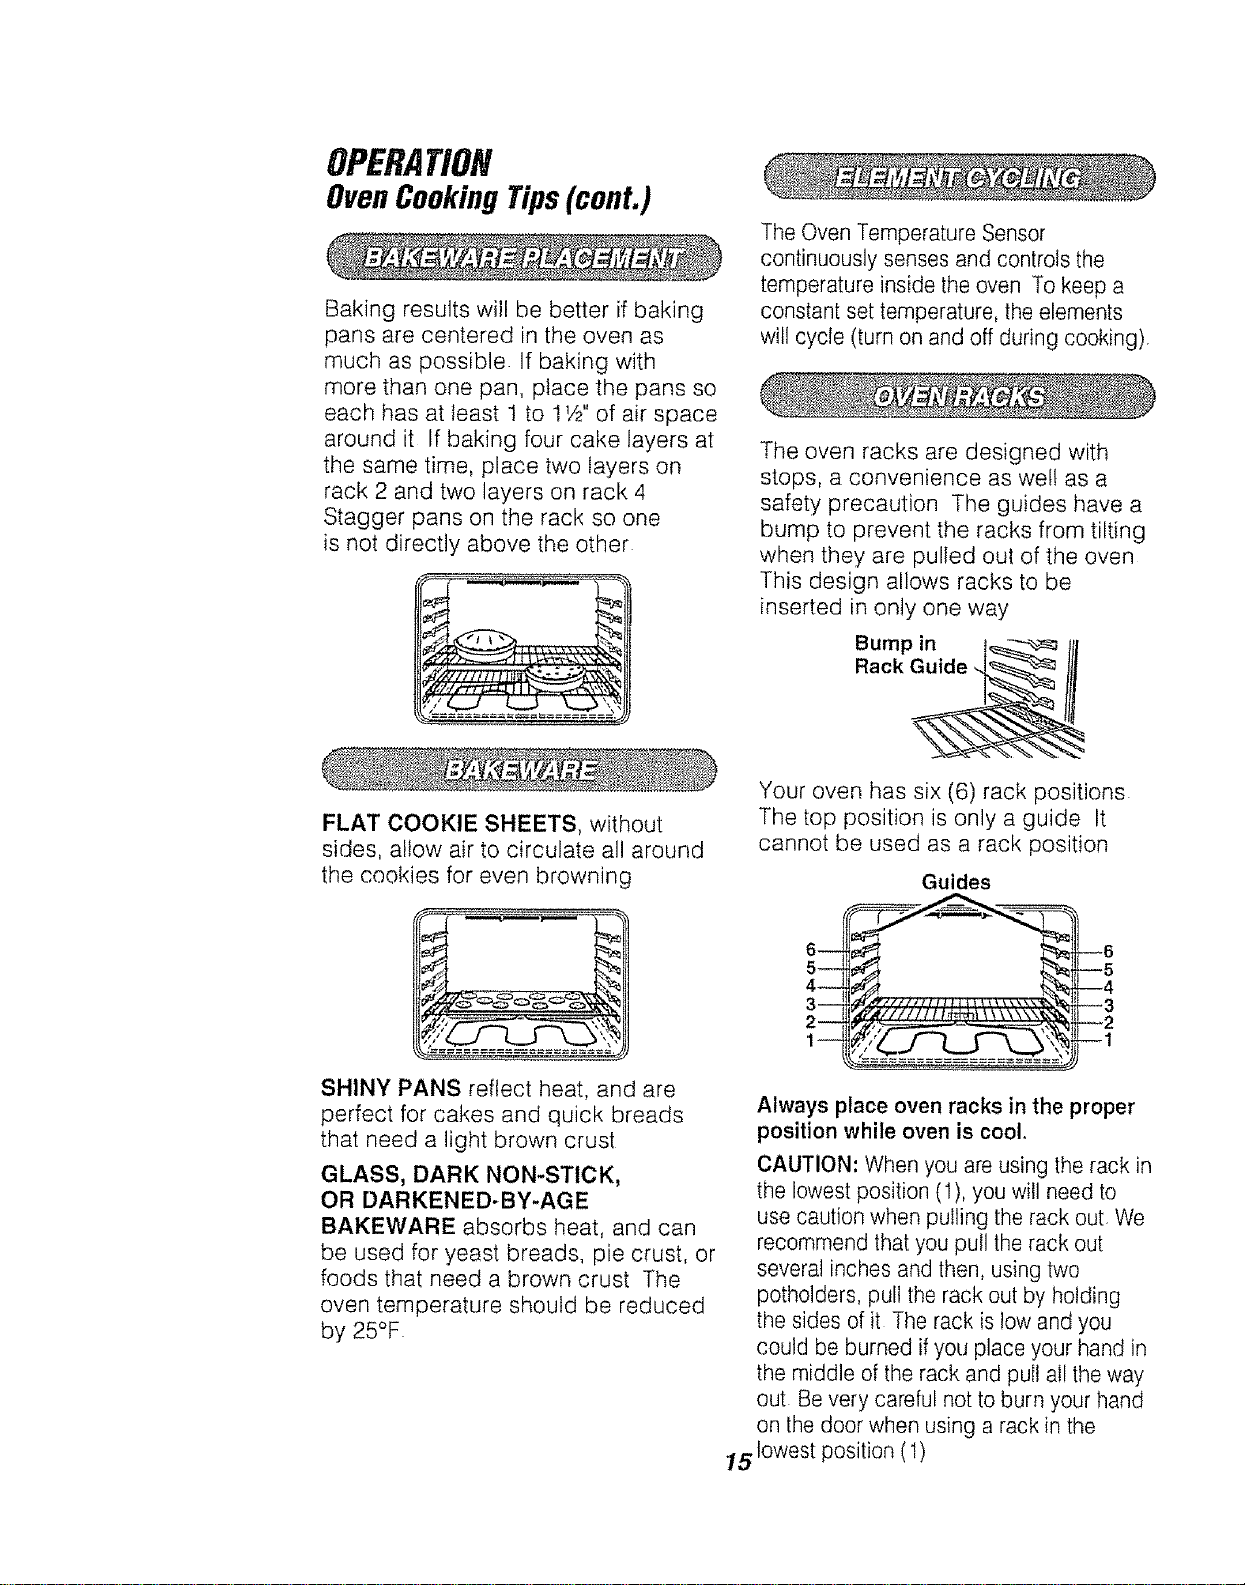
The oven racks are designed with
stops, a convenience as we!! as a
safety precaution The guides have a
bump to prevent the racks from tilting
when they are pulled out of the oven
This design allows racks to be
inserted in only one way
Bump in [_ tf[
Rack Guide
FLAT COOKIE SHEETS, without
sides, allow air to circulate all around
the cookies for even browning
SHINY PANS reflect heat, and are
perfect for cakes and quick breads
that need a light brown crust
GLASS, DARK NON-STICK,
OR DARKENED-BY-AGE
BAKEWARE absorbs heat, and can
be used for yeast breads, pie crust, or
foods that need a brown crust The
oven temperature should be reduced
by 25°F
Your oven has six (6) rack positions
The top position is only a guide It
cannot be used as a rack position
Guides
Always place oven racks in the proper
position while oven is cool,
CAUTION: When you are using the rack in
the lowest position (1),you will need to
use caution when pulling the rack out. We
recommend that you pull the rack out
several inches and then, using two
potholders, pull the rack out by holding
the sides of it The rack is low and you
could be burned ifyou place your hand in
the middle of the rack and pull all the way
out Bevery careful not to burn your hand
on the door when using a rack in the
15 lowest position (1)
OPERATION
OvenCookingTips(cont.)
You may feet that your new oven
cooks differently than the oven it
replaced We recommend that you
use your new oven a few weeks
to become more familiar with it,
following the times given in your
recipes as a guide tf you feel
your oven is too hot or too cool
for your cooking preference, see
Do-k-Yourself Adjustment in the
back of this manual to make the
adjustment
• OVEN ON indicator light - turns on
and stays on when a Bake, Broil, or
Clean function has been chosen
• CLEAN indicator light - turns on
and stays on for self-clean If the
CLEAN indicator light flashes,
you should check for one of the
following.
1. The latch handle is locked during
a baking function
2. The latch handle is not locked
during a self-clean function
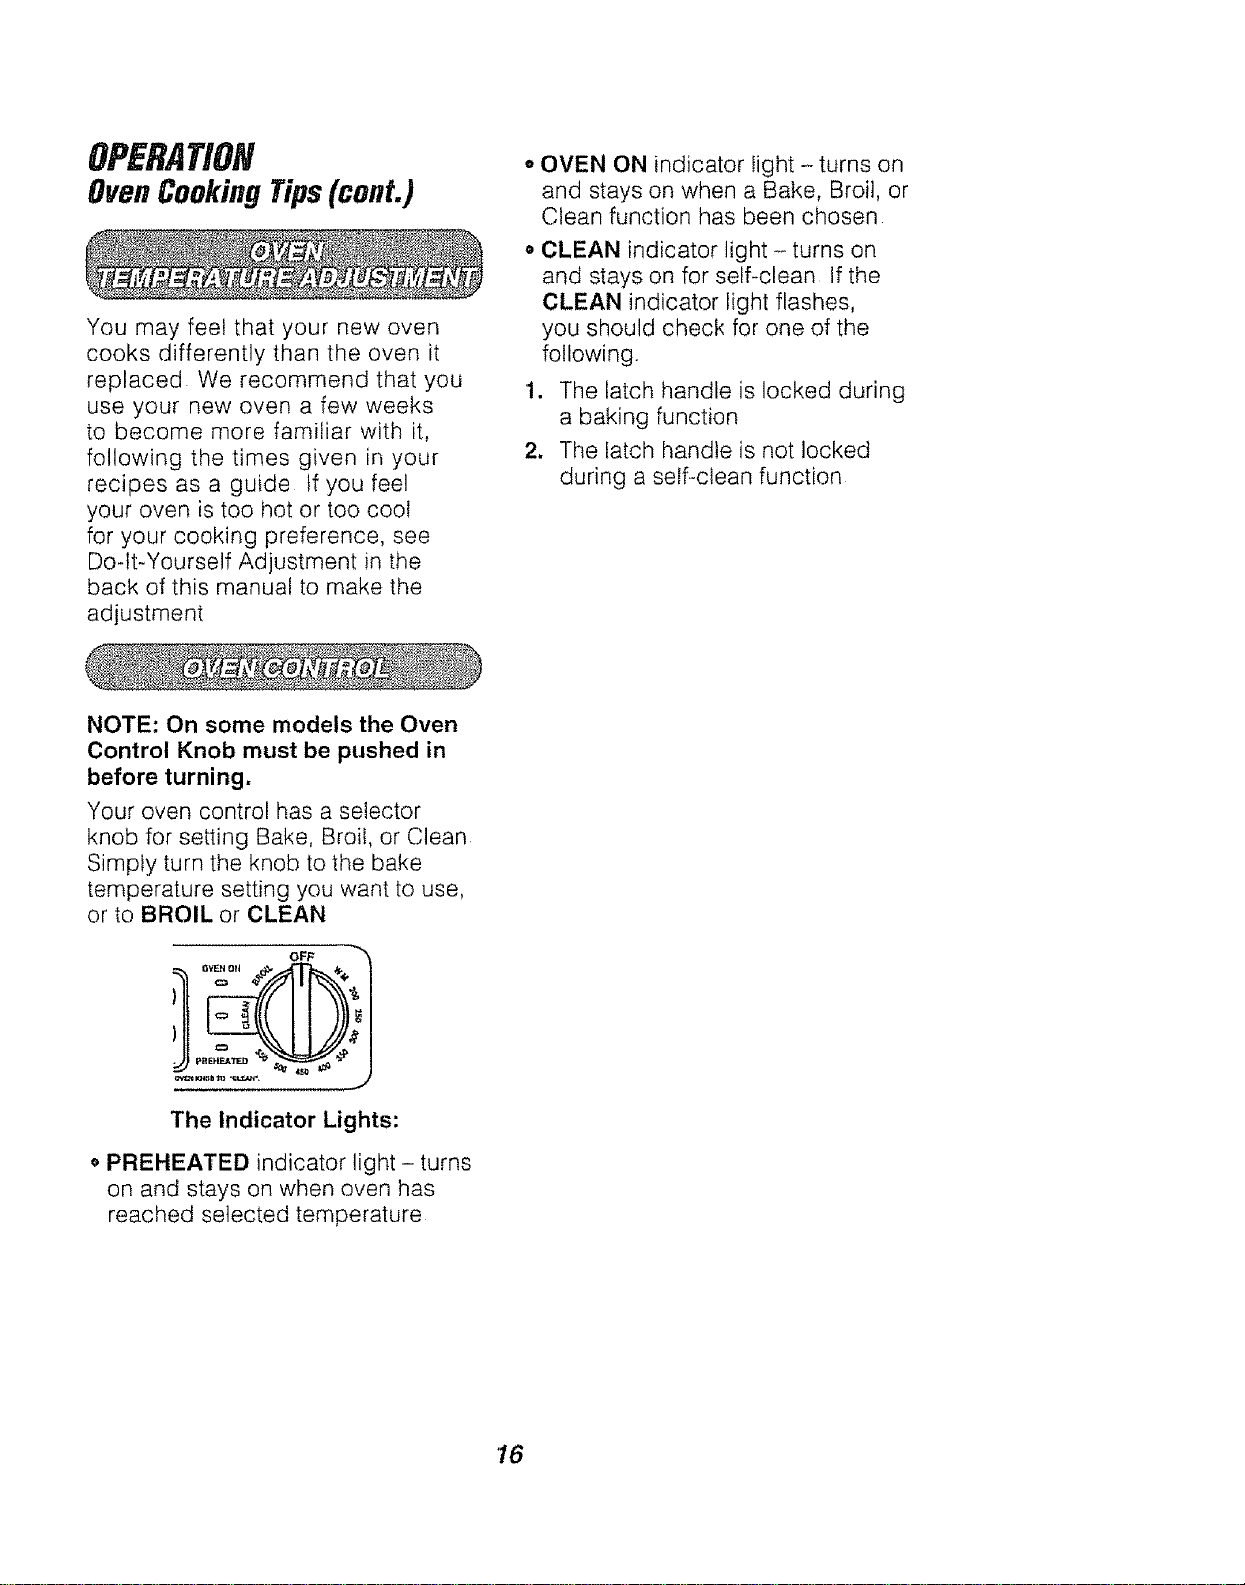
NOTE: On some models the Oven
Control Knob must be pushed in
before turning.
Your oven control has a selector
knob for setting Bake, Broil, or Clean
Simply turn the knob to the bake
temperature setting you want to use,
or to BROIL or CLEAN
OF_
The Indicator Lights:
o PREHEATED indicator light - turns
on and stays on when oven has
reached selected temperature
16
OPERATION
Broiling
Broiling is cooking by direct heat
from the upper element The oven
door should remain opened to the
broil stop position during broiling
It is not necessary to preheat the oven
when broiling Use the broiler pan and
grid that came with your range Both
are designed for proper drainage of
fat and liquids
'_lf foil is used, it must be
molded tightly to the grid
and slits cut into the foil
to match those of the grid. This
allows fats and liquids to drain
into the broiler pan, preventing
fire and excessive smoke.
Always remove the
pan and grid from zl
the oven. Storing
or forgetting a
soiled broiler pan
in the oven is a potential smoke
or fire hazard°
The U S Department of Agriculture
recommends to cook meat and
poultry thoroughly--meat to at least
an INTERNAL temperature of 160°F
and poultry to at least an INTERNAL
temperature of 180°F Cooking to
these temperatures usuatly protects
against food-borne illness
The closer you place foods to the
broil element, the faster foods brown
on the outside yet remain red to pink
in the center
Moving meats away from the element
will allow the meat to cook to the
center while browning on the outside
Using this positioning, cook side 1 at
least 2 minutes longer than side 2 If
your oven is connected to 208 volts,
you may want to use a higher rack
position and/or broil foods longer
The size, weight, thickness, starting
temperature, and your preference of
the doneness of the meat will affect
broiling The chart on the next page
is based on meats at refrigerator
temperature
1. Set the OVEN CONTROL KNOB
to BROIL
2. When broiling is finished, turn the
OVEN CONTROL KNOB to the
OFF position
17
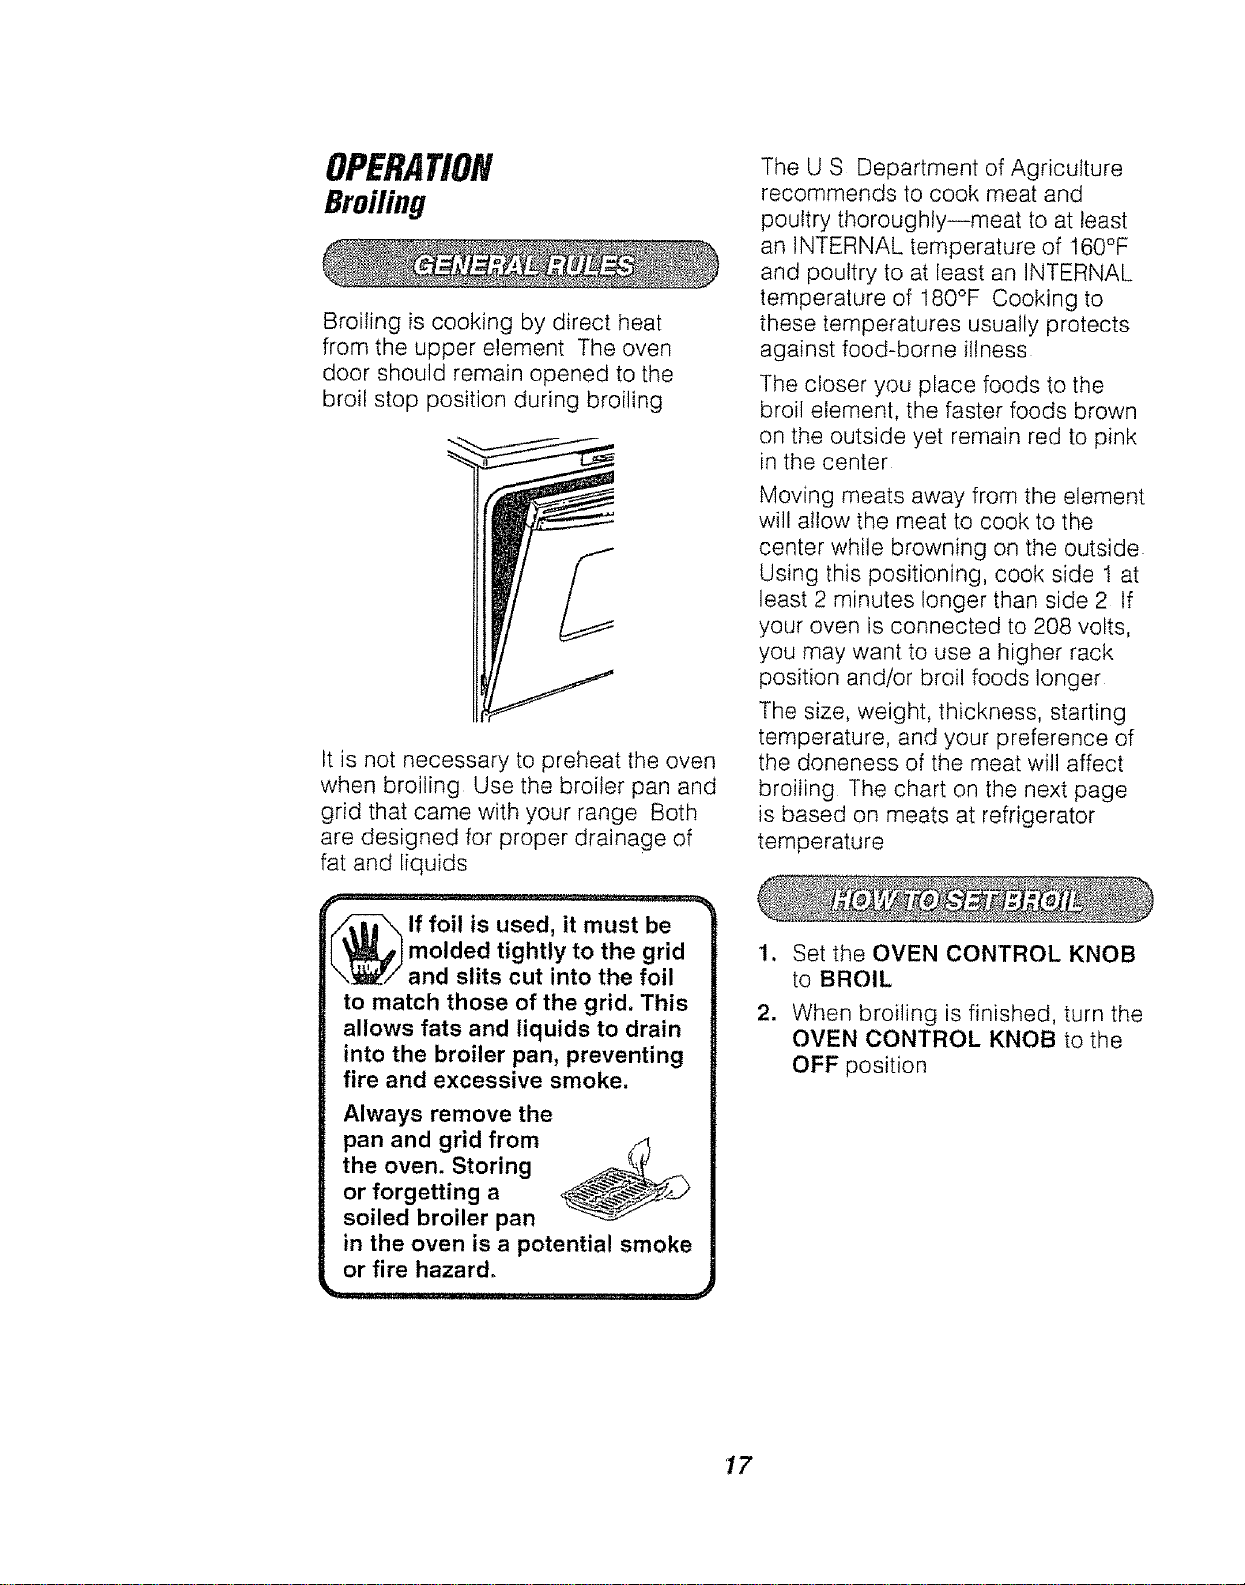
BROILING GUIDE (Hi Broil)
,it
QUANTITY AND/OR
FOOD THICKNESS
GroundBeef 1Ib(4patties)
WellDone '/2"toJi4"thick
41bs.(12pat!ies,!......
BeefSteaks
Rarel 3/4"to1"thick
Medium (1to1V2Ibs)
WellDone
RaW 1V2"Ihiek
Medium (2Io2V2Ibs)
WellDone
i ,
Chicken t whole,cutup(2to2Y_lbs),
splitlengthwise
Breast
Bakery
Products
Bread(Toast) 2to4slices
orEnglish 2(split)
Muffins
t im,
Lobster 2to4
Tails (6to8oz each)
Fish 1Ib fitlets_A"toV£thick
Salmon
Steaks 2(t" thick)
Fillets 2(Y£to3Allthick)
HamSlices Yz"thick
(precooked) 1"thick
PorkChops 2 (I/2"thick)
WellDone 2 (1"thick)about1lb.
LambChops
Medium 2(1"_ick),aboult0to12oz
WellDone
Medium 2(lY_"thick)aboutt lb
WellDone
SHELF
POSITION
8
5
5
4
4
5
i it ii,i.,,.,,,
3
5
6
5
5
4
4
i inl ,,,,n
4
...... ......
5
5
5
5
SECOND
FIRST SIDE SIDE TIME
"riME(MIN.)
13 8
15 tl
6 4
8 6
10 8
10 8
15 10-12
20 20
25 25
25 15
lU,
3 t
3-4
, Hl l, Hm,
18-20 Donot
turnover
5 5
.......... J , J ,,,,
t0 5
10
i i , ,,,,,n m,
6 6
8 8
t0 10
15 15
7 4
t0 9
9 6
14 10
COMMENTS
Spaceevenly
Steaksleesthan3/_,,thickare
difficulttocookrare.
Slashfat
Brusheachsidewithmelted
butterBroilskin-sidedown
first
SpaceevenlyPlaceEnglish
muffinscut-side-upandbrush
wilh butter,il desired.
i1,1
Cut throughbackd shell
iSpreadopen.Brushwith
meitedbutlerbeforebroiling
andafterhalfofbroilingtime
Handleandturnverycareiulty
Brushwilhlemonbutterbeiore
anddudngcooking,i{desired.
TurncarefullyDenetturn
skin-sidedown,
Slashfat
Slash{at
t The U,S, Department of Agriculture says "Rare beef is popular, but you should know
that cooking it to only 140°F means some food poisoning organisms may survive,"
(Source: Safe Food Book Your Kitchen Guide. USDA Rev. June 1985.)
18
CAREANDCLEANING
Self-CleaningCycle
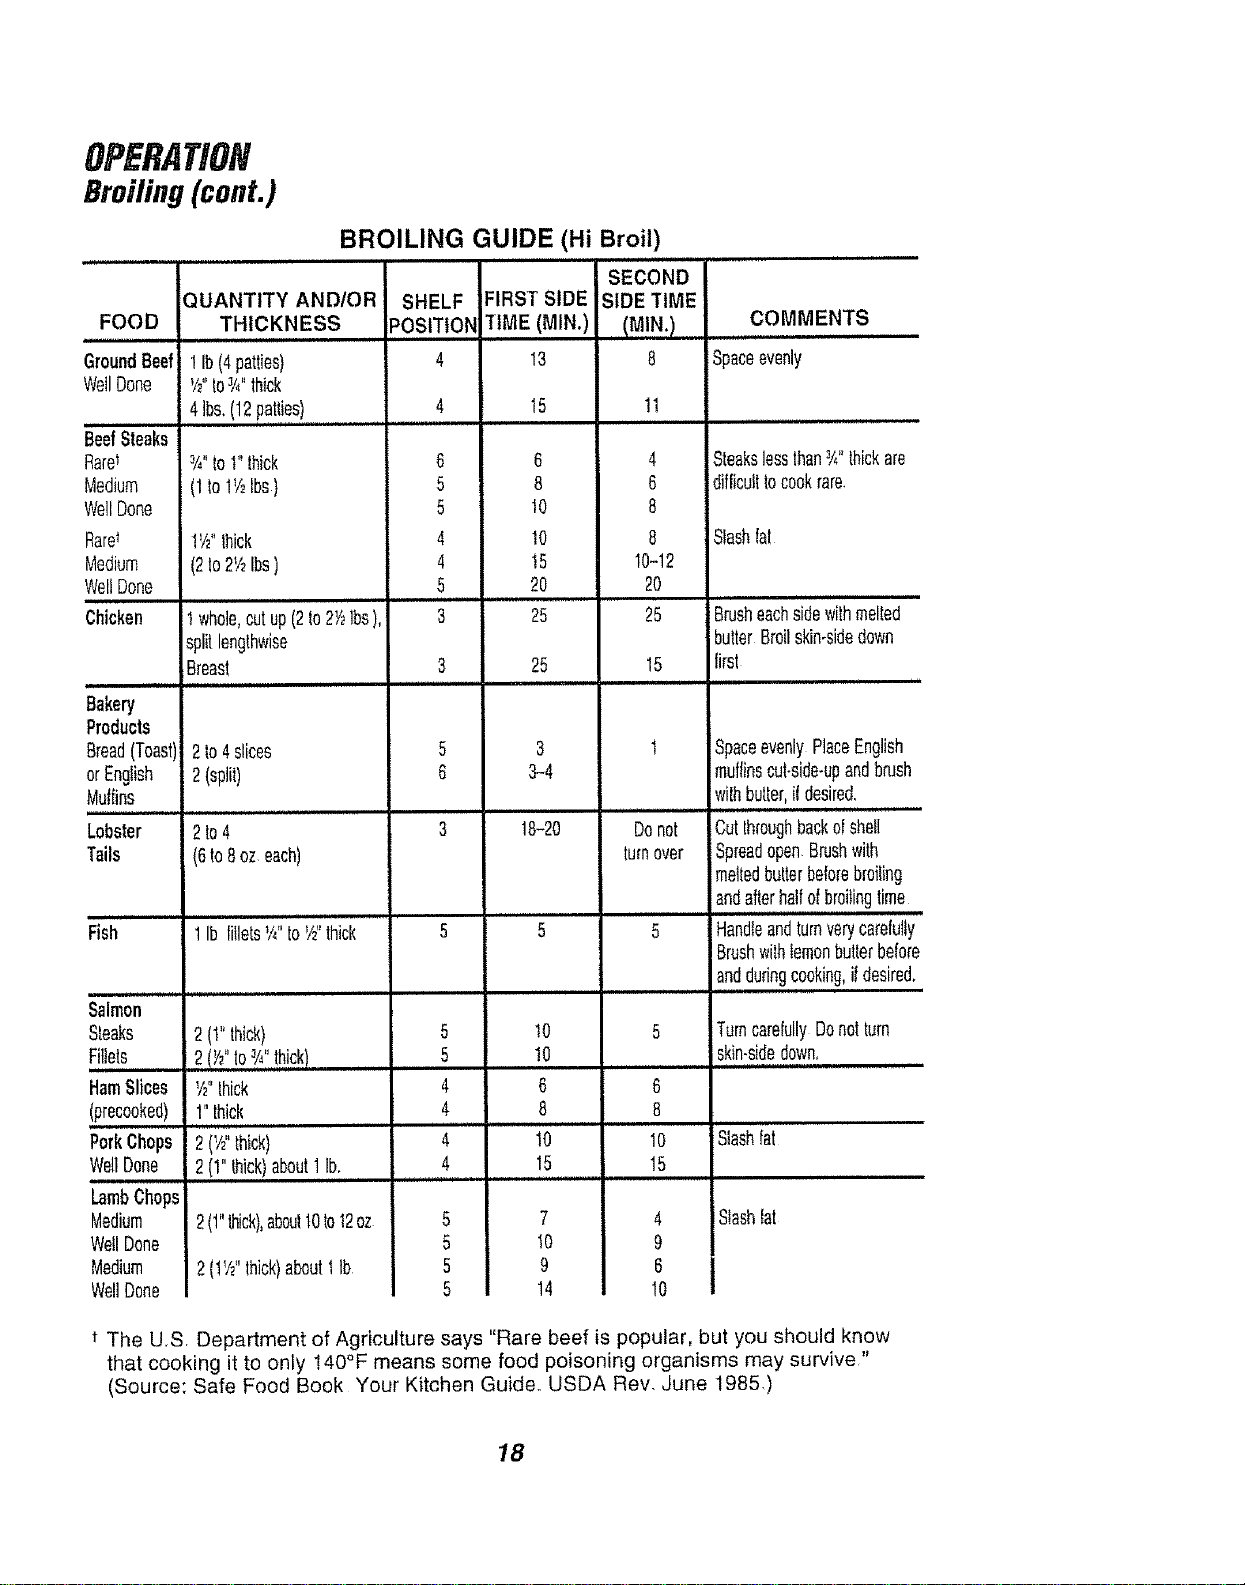
1. Remove the broiler pan and grid,
oven racks, utensils, and any foil
that may be in the oven
2. Soil on the front frame and outside
the gasket on the door liner will
need to be cleaned by hand
/4
Front Frame
_._aOO_ Door _'{
e, Uner
Clean these areas with hot water,
soap-filled steel-wool pads, or
cleansers such as Soft Scrub 'eto
remove any soil Rinse well with clean
water and dry
3. Wipe up any heavy spillovers on
the oven bottom
4_
Do not clean the gasket The
fiberglass material of the oven
door gasket cannot withstand
abrasion It is essential for the
gasket to remain intact If you
notice it becoming worn or frayed,
it should be replaced
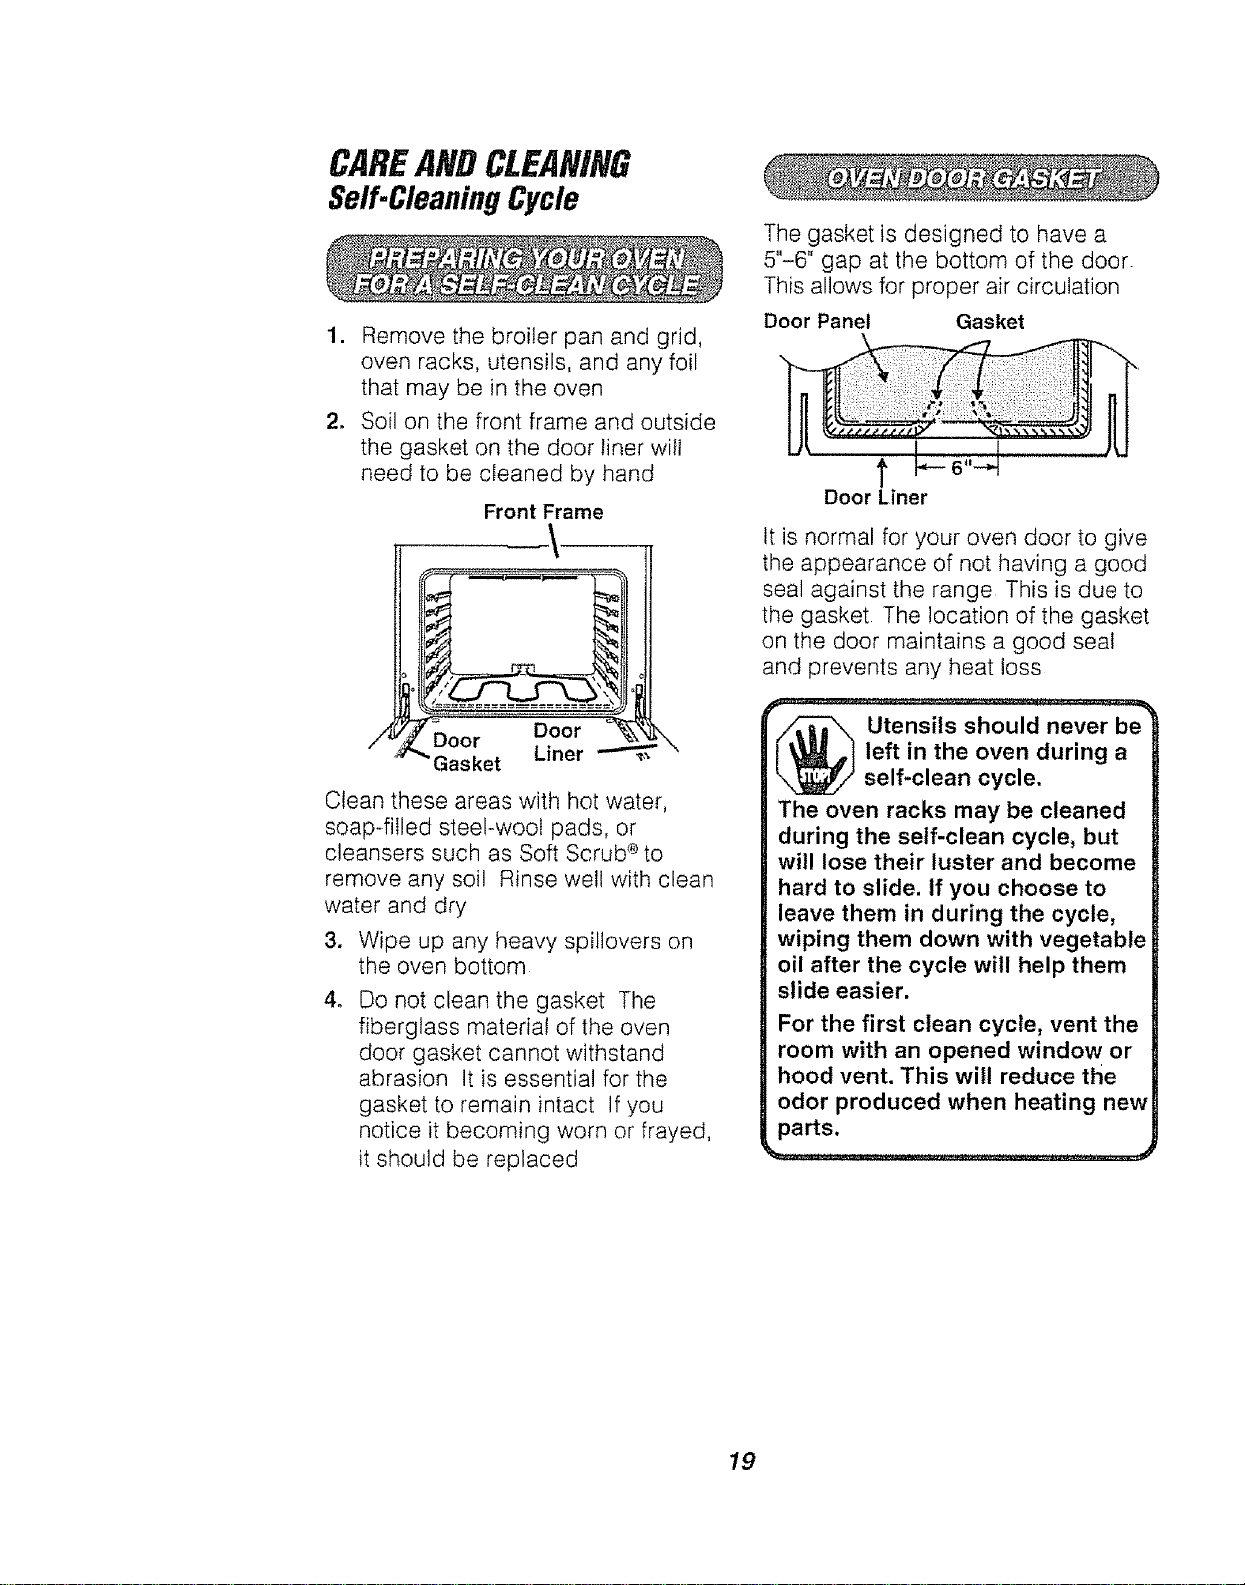
The gasket is designed to have a
5"-6" gap at the bottom of the door.
This allows for proper air circulation
Door Panel Gasket
t !.-o,,-J
Door Liner
It is normal for your oven door to give
the appearance of not having a good
seal against the range This is due to
the gasket The location of the gasket
on the door maintains a good seal
and prevents any heat loss
_ tensils should never be
left in the oven during a
self-clean cycle.
The oven racks may be cleaned
during the self-clean cycle, but
will lose their luster and become
hard to slide, if you choose to
leave them in during the cycle,
wiping them down with vegetable
oil after the cycle will help them
slide easier.
For the first clean cycle, vent the
room with an opened window or
hood vent. This will reduce the
odor produced when heating new
parts.
19
CAREANDCLEANING
Self.CleaningCycle(cont.)
1. For best results, follow the steps
in PREPARING YOUR OVEN
2. Slide the self-clean lock handle to
the right as far as it will go Do not
force the handle
3. Turn the OVEN CONTROL KNOB
to CLEAN The CLEAN and OVEN
ON indicator lights will glow
If the CLEAN indicator flashes,
the door is not closed completely
Simply push the handle to the lock
position
4. The self-clean cycle lasts 4 hours
and 20 minutes This includes a
cooldown time
When the door locks, the CLEAN
and OVEN ON indicator lights
will glow The oven temperature
must drop below the locking
temperature before the door can
be opened The CLEAN and
OVEN ON indicators will blink at
the end of the cycle
5. Turn the OVEN CONTROL KNOB
to the OFF position and unlock the
door
Turn the OVEN CONTROL KNOB to
the OFF position Wait (approx I
hour) before attempting to open the
door The indicator light wilt not blink if
the cycle is stopped
After the cycle, you may notice some
white ash in the oven Just wipe it up
with a damp cloth or sponge
tf white spots remain, scrub them
with a soap-filled steel-wool pad Be
sure to rinse thoroughly These are
usually deposits of salt that cannot be
removed during the cycle
If for any reason you are not
satisfied with the cleaning
results, just repeat the cycle,
20
CAREANDCLEANING
Cleaning
CLEANING MATERIALS
o Dishwashing detergent
o Warm water
o Soft cloth
Do not use abrasive cleaners,
industrial cleaners, or bleach.
CLEANING MATERIALS
e Dishwashing detergent
o Warm water
• Soap-filled steel-wool pad
• Commercial oven cleaner
TO CLEAN
Allow the pan to soak Sprinkle the
grid with dishwashing detergent and
cover with a damp cloth or paper
towel and let stand Scour as needed
Wash, rinse, and dry well You may
also place both the pan and grid in
the dishwasher
Clean only as touch-up between
clean cycles Use dishwashing
liquid, warm water, or soap_filled
steel-wool pad Rinse welt after
cleaning and dry
NEVER USE OVEN CLEANERS IN
OR AROUND ANY PART OF THE
OVEN.
When cleaning, be sure not to bend
or displace the temperature sensor,
located on the back walt of the oven
CLEANING MATERIALS
* Dishwashing detergent
Warm water
Paper towel
o Ammonia
= Abrasive cleaner
. Scouring pad
TO CLEAN
Clean after each use If acidic foods
(hot fruit filling, tomatoes, sauerkraut, or
sauces with vinegar or lemon juice) spill,
use a dry paper towel to wipe up as much
as possible When surface has cooled,
thoroughly clean cooktop
CLEANING MATERIALS
• Dishwashing detergent
= Warm water
• Paper towels
TO CLEAN
Do not useoven cleaners, cleansing
powder or harsh abrasives If
marinades, tomato sauce, basting
materials, etc should spill, wipe up
as much as possible When surfaces have
cooled, thoroughly clean painted areas
TO CLEAN
For everyday cleaning, use glass
cleaner and a paper towel. For
stubborn soil, use paste of baking
soda and water Rinse thoroughly
21
CLEANING MATERIALS
° Soft abrasive cleaner
o Sponge scrubber
Do not use hard, abrasive cleaners,
industrial cleaners, or bleach.
CAREANDCLEANING
RemovableParts
(on some models)
Some models have a cooktop that
can be lifted up for easier cleaning
The entire cooktop may be lifted up
and supported in the up position
The surface units do not need to be
removed; however, you may remove
one to make raising the cooktop
easier There are two side supports
that lock into position when the
cooktop is lifted up
f"
/"
Be sure all surface units are turned off
before raising the cooktop.
After cleaning under the cooktop with
hot, mild soapy water and a clean
cloth, lower the cooktop Be careful
not to pinch your fingers
To lower the cooktop, push the rods
back and gently lower the cooktop
until it rests in place
(_ CAILltTIOIN= When working
in this area, be careful not to
bump into the support rod(s). The
porcelain enamel surface of the
cooktop can chip if dropped,
22
CAREANDCLEANING
RemovableParts(cont.)
CLEANING MATERIALS
o Dishwashing detergent
o Warm water
° Soft cloth
Clear
Groove in
Molded Rib Stem
Spring Clip
TO REMOVE
1o
2.
Be sure the control knob is in the
OFF position
Pull straight off the stem Using a
piece of string can make removing
the knob easier Slip the string
under and around the knob,
pulling straight out
TO CLEAN
Wash the knob thoroughly with
soapy water Dry completely with
a soft cloth DO NOT let the
knob soak.
TO REPLACE
1. Check the back of the knob
2. The molded rib of the knob is
designed to fit perfectly onto the
knob stem
3. Align the molded rib to the clear
groove in the knob stem Push the
knob back as far as it will go
,,A..-,o., .....
Disconnect electrical
power to the oven at |
the main circuit breaker"
or fuse box before
attempting to replace the oven
light bulb. Do not touch a hot
light bulb with wet hands or a
wet cloth. Wait until the bulb
has cooled and use a dry cloth.
Live
Bail Collar
Light :=:_._.
Bulb -_J_ _-/-_
Bulb __
Cover
TO REPLACE
1. Hold your hand under the bulb
cover and firmly push back the
bail wire, until it clears and
releases the bulb cover
2. Unscrew the light bulb
3. Replace the bulb with a 31/2"
40-watt appliance bulb
4. Place the bulb cover into the
grooves of the socket and pull the
bail wire forward until it rests in the
indentation on top of the bulb
cover
23
CAREANDCLEANING
RemovableParts(cont.)
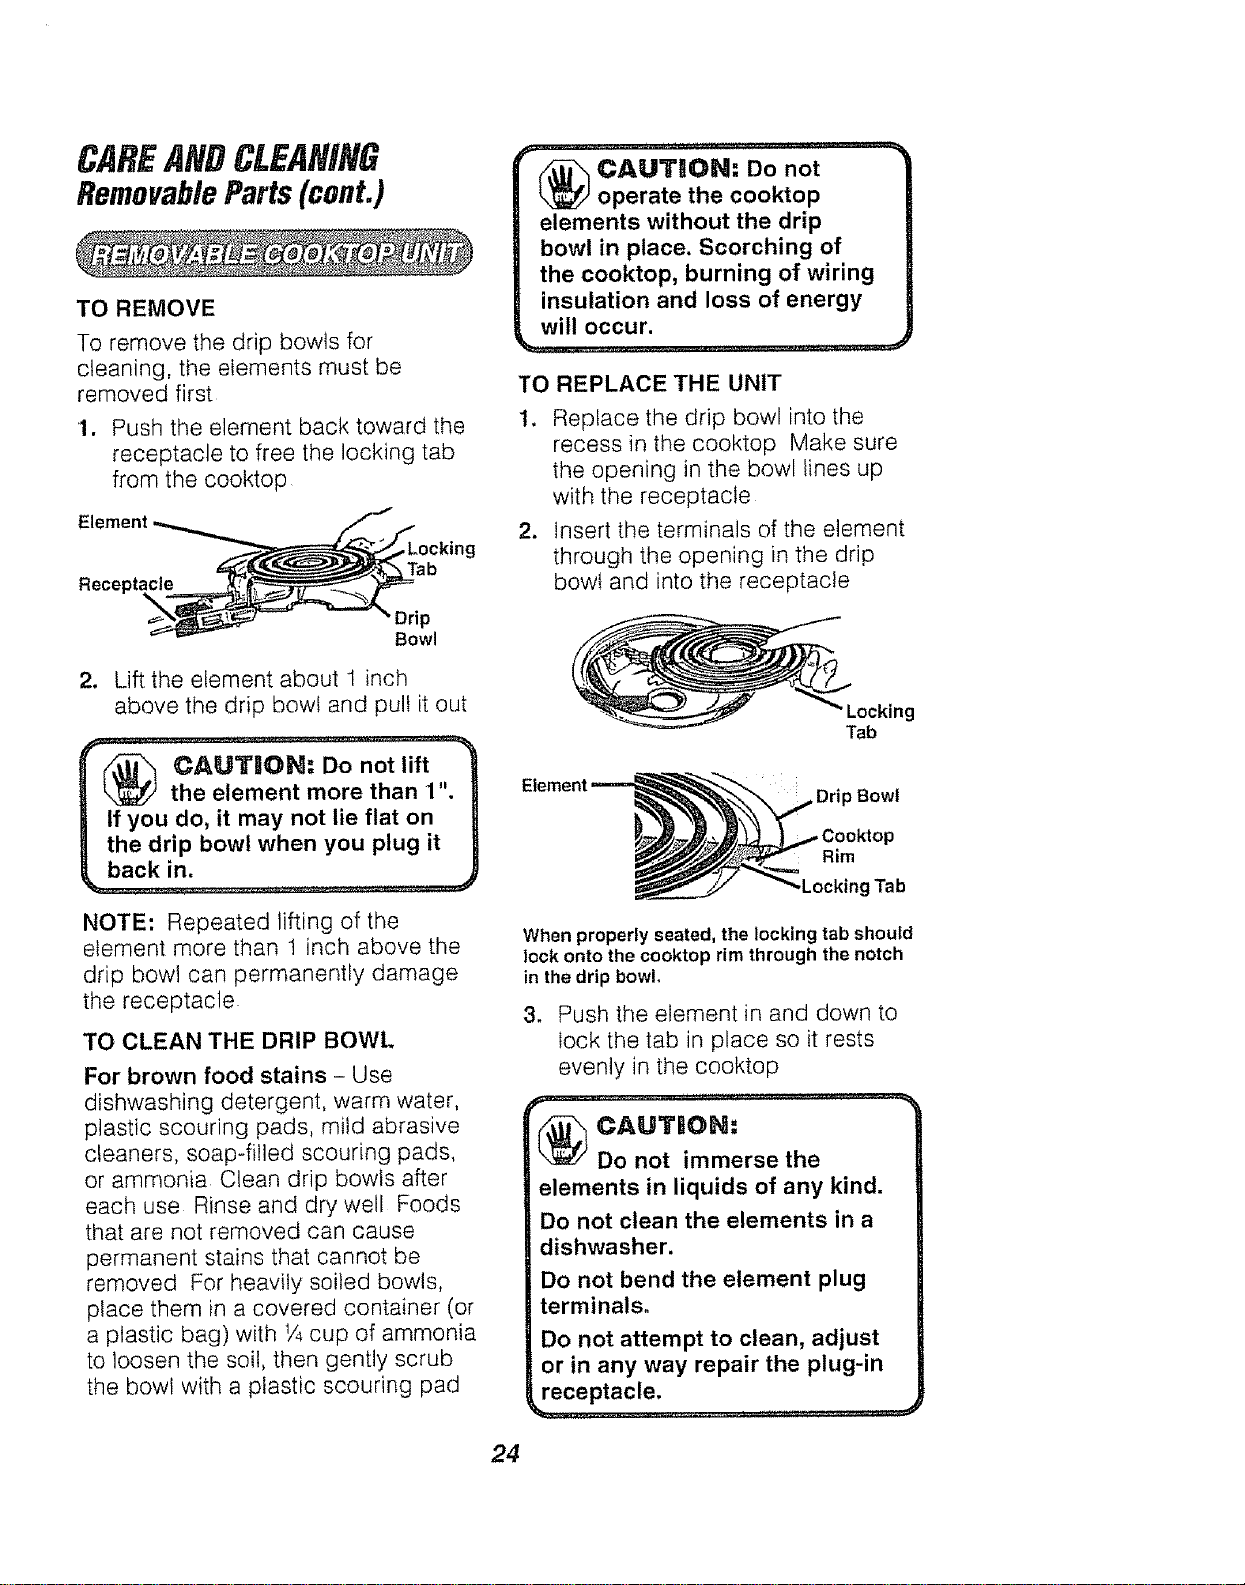
TO REMOVE
To remove the drip bowls for
cleaning the elements must be
removed first
1 Push the element back toward the
receptacle to free the locking tab
from the cooktop
cAuT,oN:- Oonot............
operate the cooktop |
elements without the drip
bowl in place. Scorching of |
the cooktop, burning of wiring |
insulation and loss of energy |
, W!!!OCcur" ............................ J
TO REPLACE THE UNIT
I Replace the drip bowl into the
recess in the cooktop Make sure
the opening in the bowl lines up
with the receptacle
2 Insert the terminals of the element
through the opening in the drip
bowl and into the receptacle
Bowl
2 Lift the element about 1 inch
above the drip bowl and pull it out
r(f_,_ ¢AUTU{}N: Do not lift "_
the element more than 1". |
If you do, it may not lie flat on
the drip bowl when you plug it
NOTE: Repeated tifting of the
element more than 1 inch above the
drip bowl can permanently damage
the receptacle
TO CLEAN THE DRIP BOWL
For brown food stains Use
dishwashing detergent warm water
plastic scouring pads mild abrasive
cleaners soap filled scouring pads
or ammonia Clean drip bowls after
each use Rinse and dry well Foods
that are not removed can cause
permanent stains that cannot be
removed For heavity soiled bowls
place them in a covered container (or
a plastic bag) with 1/4cup of ammonia
to loosen the soil then gently scrub
the bowl with a plastic scouring pad
•Locking
Tab
, Drip Bowl
Rim
,Locking Tab
When properly seated, the locking tab should
lock onto the cooktop rim through the notch
in the drip bowl,
3 Push the element in and down to
lock the tab in place so it rests
eveniy in the cooktop
CAUTION:
Do not immerse the
elements in liquids of any kind.
Do not clean the elements in a
dishwasher.
Do not bend the element plug
terminals_
Do not attempt to clean, adjust
or in any way repair the plug-in
receptacle,
24
CAREANDCLEANING
RemovableParts(cont.)
CLEANING MATERIALS
. Dishwashing detergent
• Warm water
° Scouring pad or soap-filled
steel-wool pad
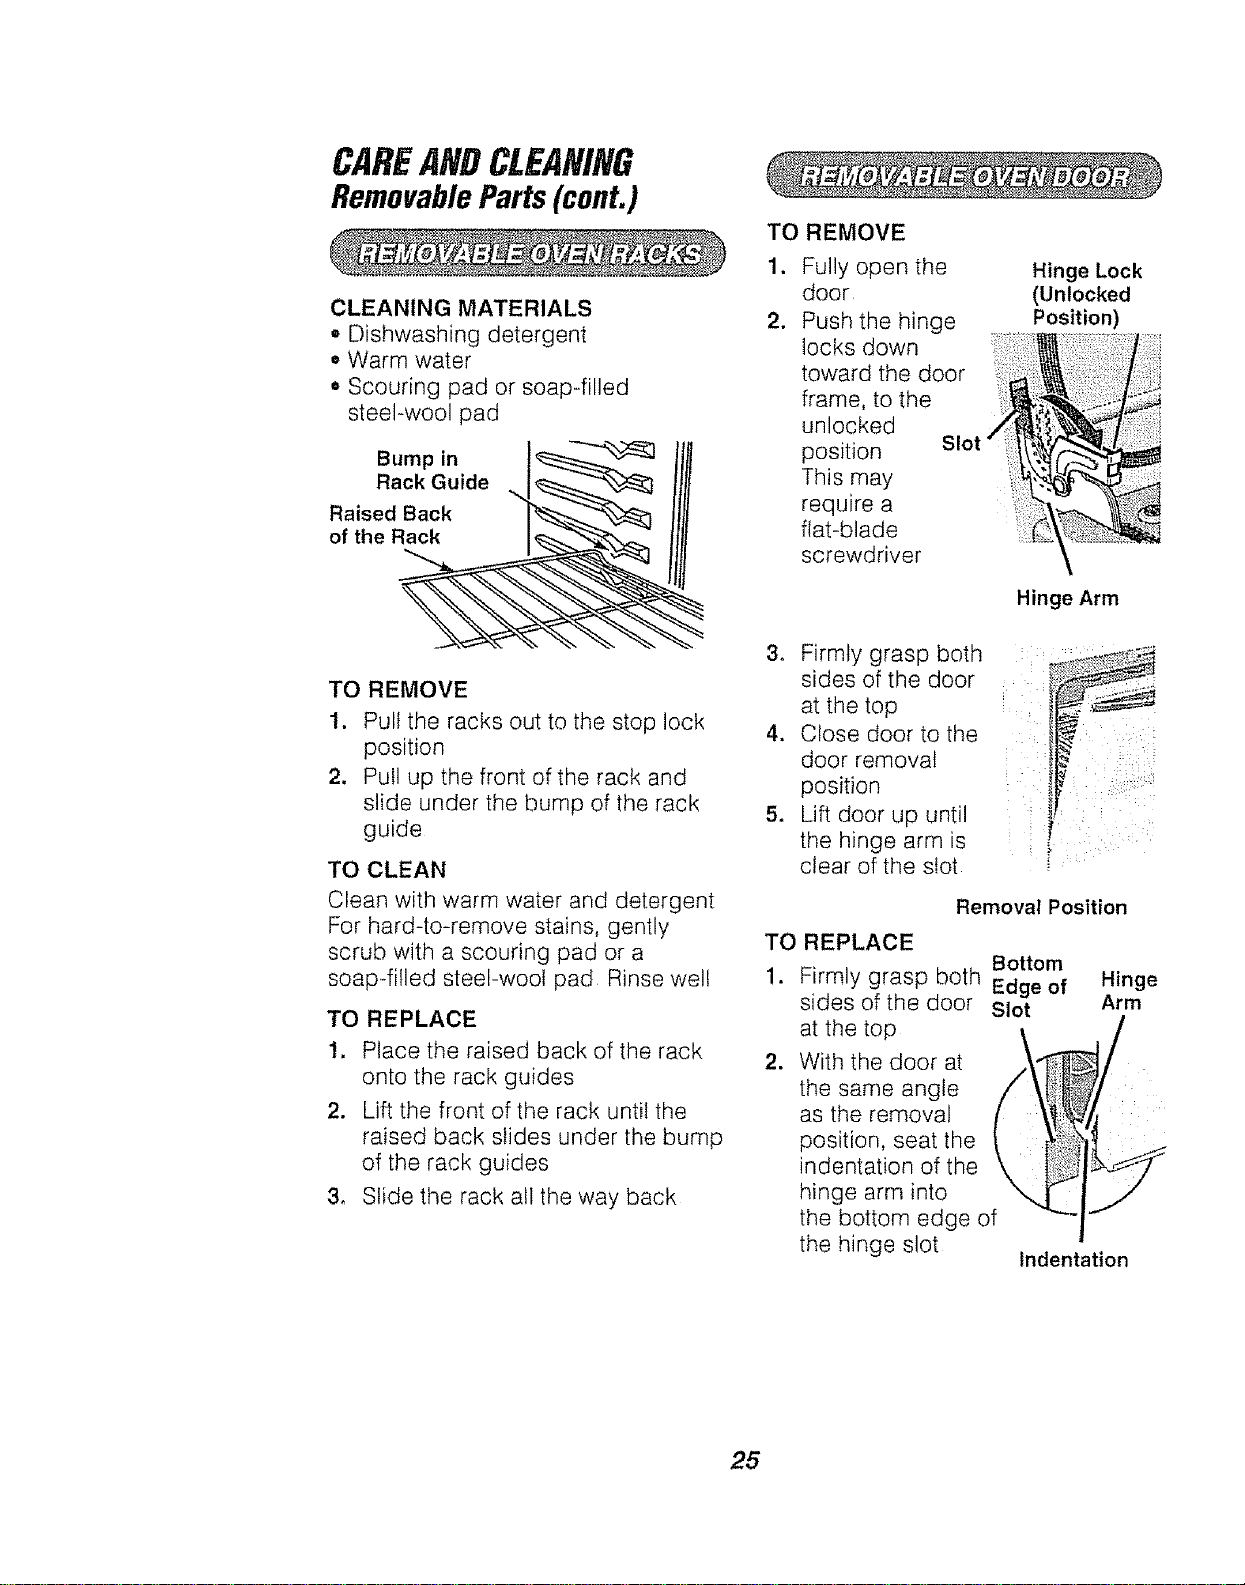
Bump in I_ --%-,_
of the Ra.._ I_'_:_
i
TO REMOVE
1. Pull the racks out to the stop lock
position
2. Pull up the front of the rack and
slide under the bump of the rack
guide
TO CLEAN
Clean with warm water and detergent
For hard-to-remove stains, gently
scrub with a scouring pad or a
soap-filled steel-wool pad Rinse welt
TO REPLACE
1. Place the raised back of the rack
onto the rack guides
2. Lift the front of the rack until the
raised back slides under the bump
of the rack guides
3, Slide the rack all the way back
TO REMOVE
1. Fully open the
door
2. Push the hinge
locks down
toward the door
frame, to the
unlocked
position Slot
This may
require a
flat-blade
screwdriver
Hinge Lock
(Unlocked
Position)
Hinge Arm
3. Firmly grasp both
sides of the door
at the top
4. Close door to the
door removal
position
5. Lift door up until
the hinge arm is
clear of the slot
Removal Position
TO REPLACE
Bottom
1. Firmly grasp both Edge of
sides of the door Slot
,
at the top
With the door at
the same angle
as the removal
position, seat the
indentation of the
hinge arm into
the bottom edge of
the hinge slot
Indentation
Hinge
Arm
/
25
CAREANOCLEANING
RemovableParts (cont.)
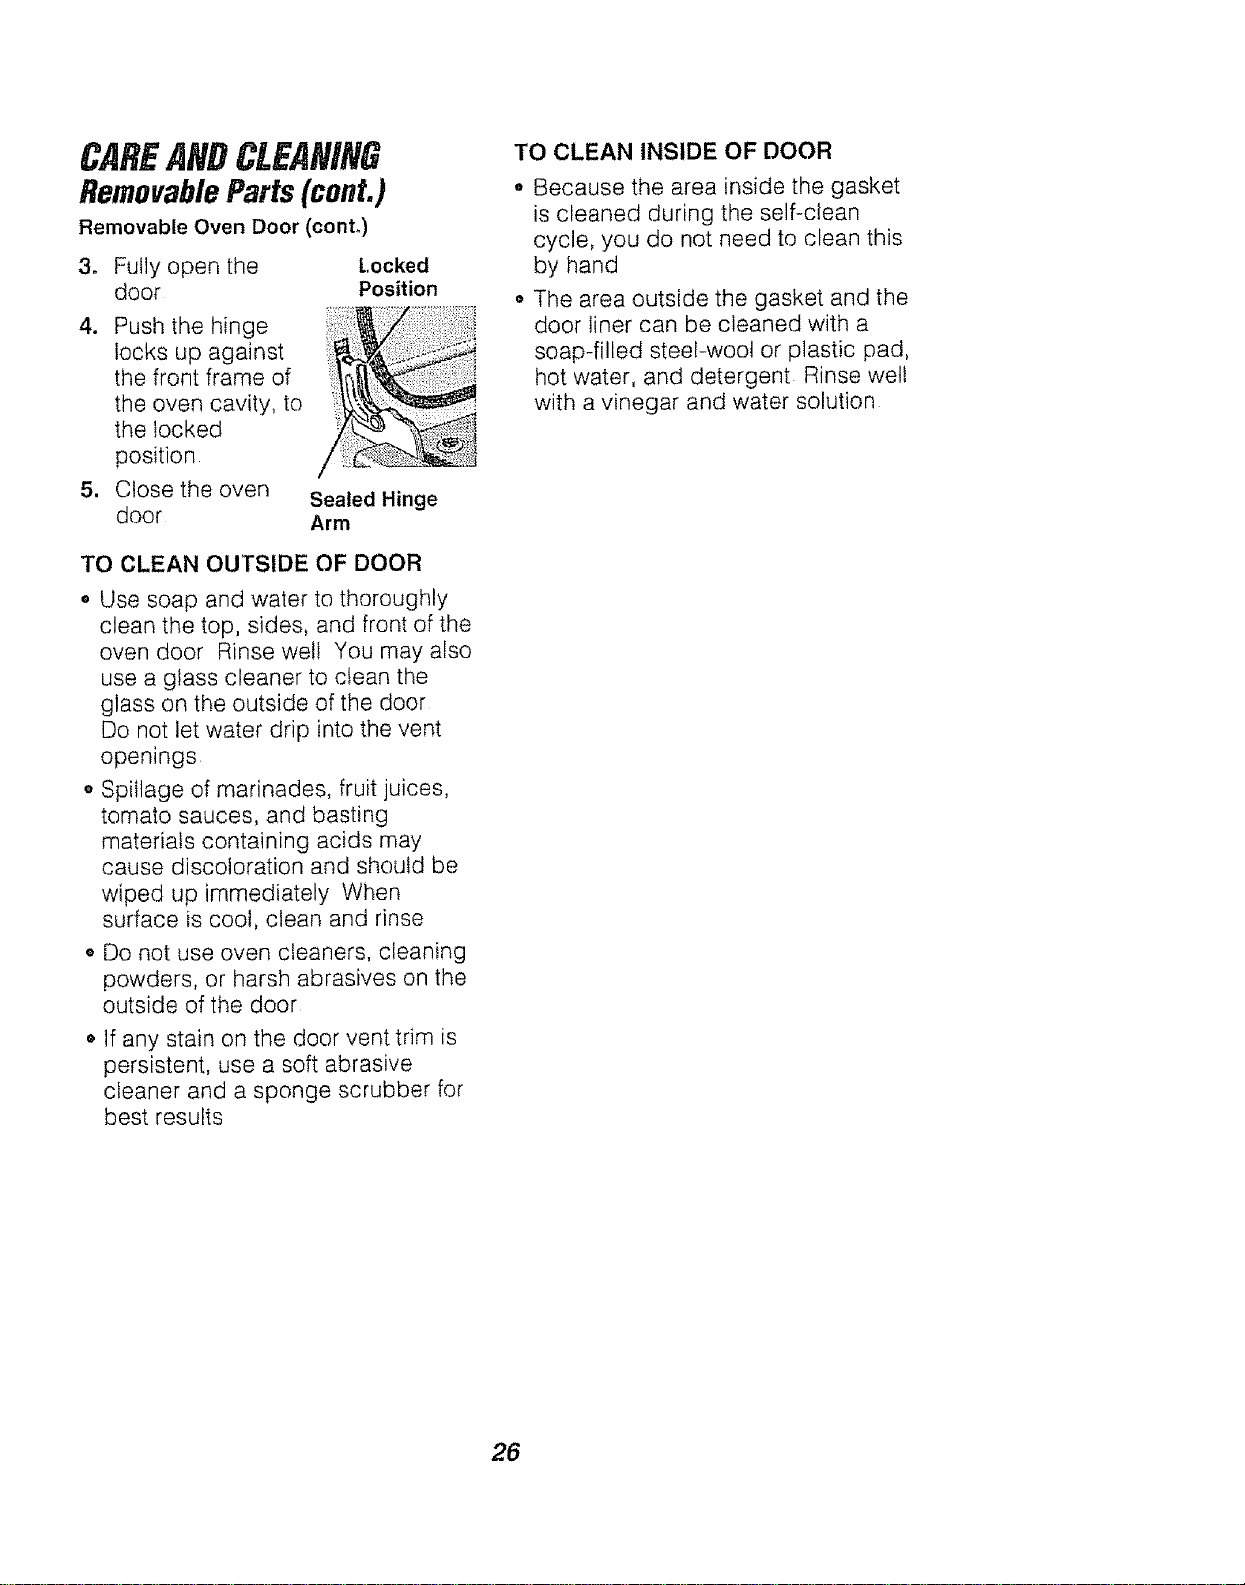
Removable Oven Door (conto)
3. Fully open the Locked
door Position
4.
1
Push the hinge
locks up against
the front frame of
the oven cavity, to
the locked
position
Close the oven
door
Sealed Hinge
Arm
TO CLEAN OUTSIDE OF DOOR
o Use soap and water to thoroughly
clean the top, sides, and front of the
oven door Rinse well You may also
use a glass cleaner to clean the
glass on the outside of the door
Do not let water drip into the vent
openings
o Spillage of marinades, fruit juices,
tomato sauces, and basting
materials containing acids may
cause discoloration and should be
wiped up immediately When
surface is cool, clean and rinse
• Do not use oven cleaners, cleaning
powders, or harsh abrasives on the
outside of the door
• If any stain on the door vent trim is
persistent, use a soft abrasive
cleaner and a sponge scrubber for
best results
TO CLEAN INSIDE OF DOOR
° Because the area inside the gasket
is cleaned during the self-clean
cycle, you do not need to clean this
by hand
• The area outside the gasket and the
door liner can be cleaned with a
soap-filled steeFwool or plastic pad,
hot water, and detergent Rinse well
with a vinegar and water solution
26
CAREANDCLEANING
RemovableParts (cont.)
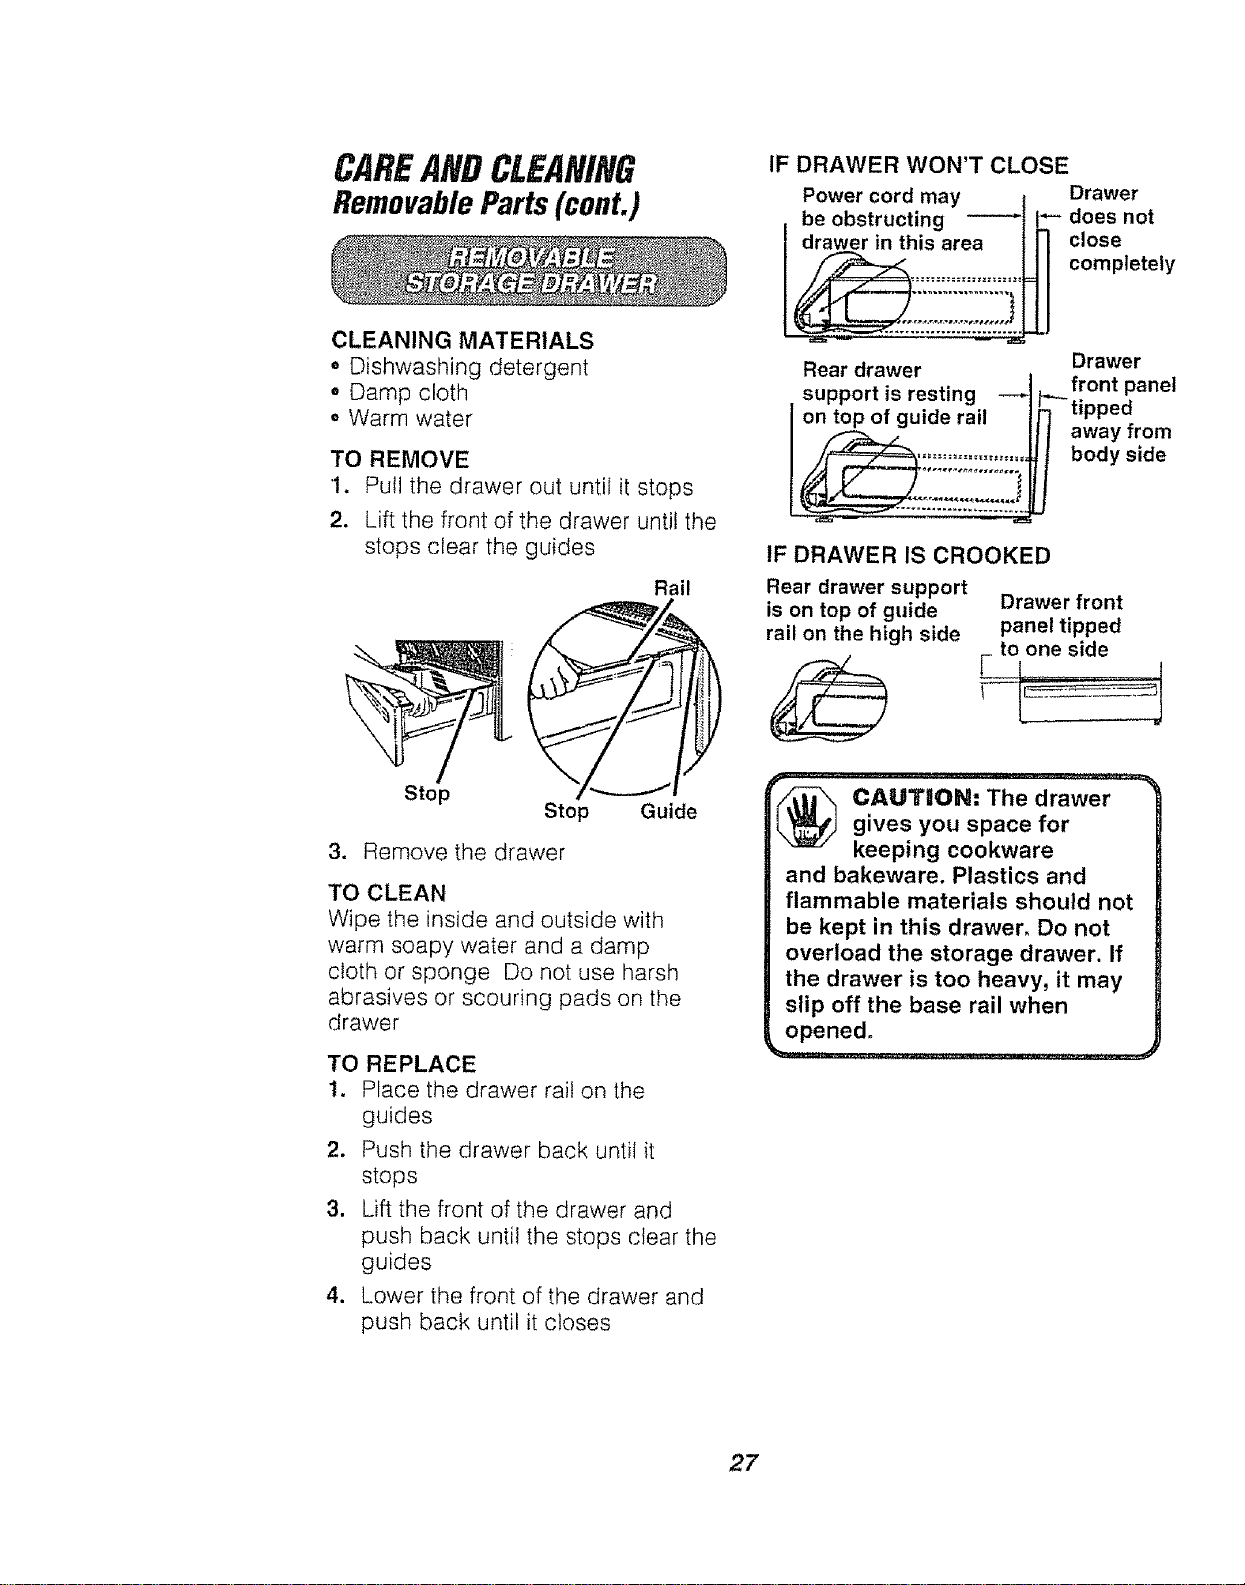
CLEANING MATERIALS
• Dishwashing detergent
• Damp cloth
o Warm water
TO REMOVE
1. Pull the drawer out until it stops
2. Lift the front of the drawer until the
stops clear the guides
Rail
Stop
Stop Guide
3. Remove the drawer
TO CLEAN
Wipe the inside and outside with
warm soapy water and a damp
cloth or sponge Do not use harsh
abrasives or scouring pads on the
drawer
TO REPLACE
1. Place the drawer rail on the
guides
2. Push the drawer back until it
stops
3, Lift the front of the drawer and
push back until the stops clear the
guides
4. Lower the front of the drawer and
push back until it closes
IF DRAWER WON'T CLOSE
Power cord may
be obstructing
I drawer in this area
_ ,,_
Rear drawer
support is resting --_
I ontopof g_ide rail
Drawer
I`_- does not
close
completely
Drawer
front panel
_tipped
away from
body side
IF DRAWER IS CROOKED
Rear drawer support
is on top of guide
rail on the high side
Drawer front
panel tipped
_ to one side
(_ CAUT!IOIN: The drawergives you space for
keeping cookware
and bakeware. Plastics and
flammable materials should not
be kept in this drawer. Do not
overload the storage drawer. If
the drawer is too heavy, it may
slip off the base rail when
opened.
27

BEFORECALLINGFORSERVICE
To save you time and money, before making a service call, check the list
below for any problem you may feet you have with the performance of your
range If the problem is something you cannot repair, use the Consumer Service
Numbers located at the back of this manual When making any calls, have the
Model No., Serial No., Repair Parts List, Use and Care Manual, and the Date
of Purchase available.
PROBLEM POSSIBLE CAUSE POSSIBLE SOLUTION
Range will not No power to range a. Check the household circuit
work; totally breaker or fuse box
inoperative, b. Check to make sure the range is
plugged in
Cooktop will Elements Check the elements, make sure
not work, unplugged they are properly plugged into the
oven is ok. receptacle
Check the control and check
baking and broiling sections
Oven will Control set
not work, improperly
cooktop
okay.
Foods do not a. Oven is not
bake properly, preheated
b. Improper rack or
pan placement
a. Be sure to preheat until the tone
sounds
b. Maintain uniform air space
around pans and utensils See
oven cooking tips section
c. Keep vent clear
c. Oven vent
blocked or
covered with foil
d. Racks should not be covered
during baking
e. Reduce temperature 25 degrees
for glass or dull/darkened pans
d. Improper use
of foil
e. Improper
temperature
setting for
utensil used
f, Check the temperature
adjustment following this
section
g. Check the installation
instructions for leveling
h. See the baking section
f. Oven
temperature
needs
adjustment
g. Range and oven
rack not level
h. Oven controls
improperly set
28
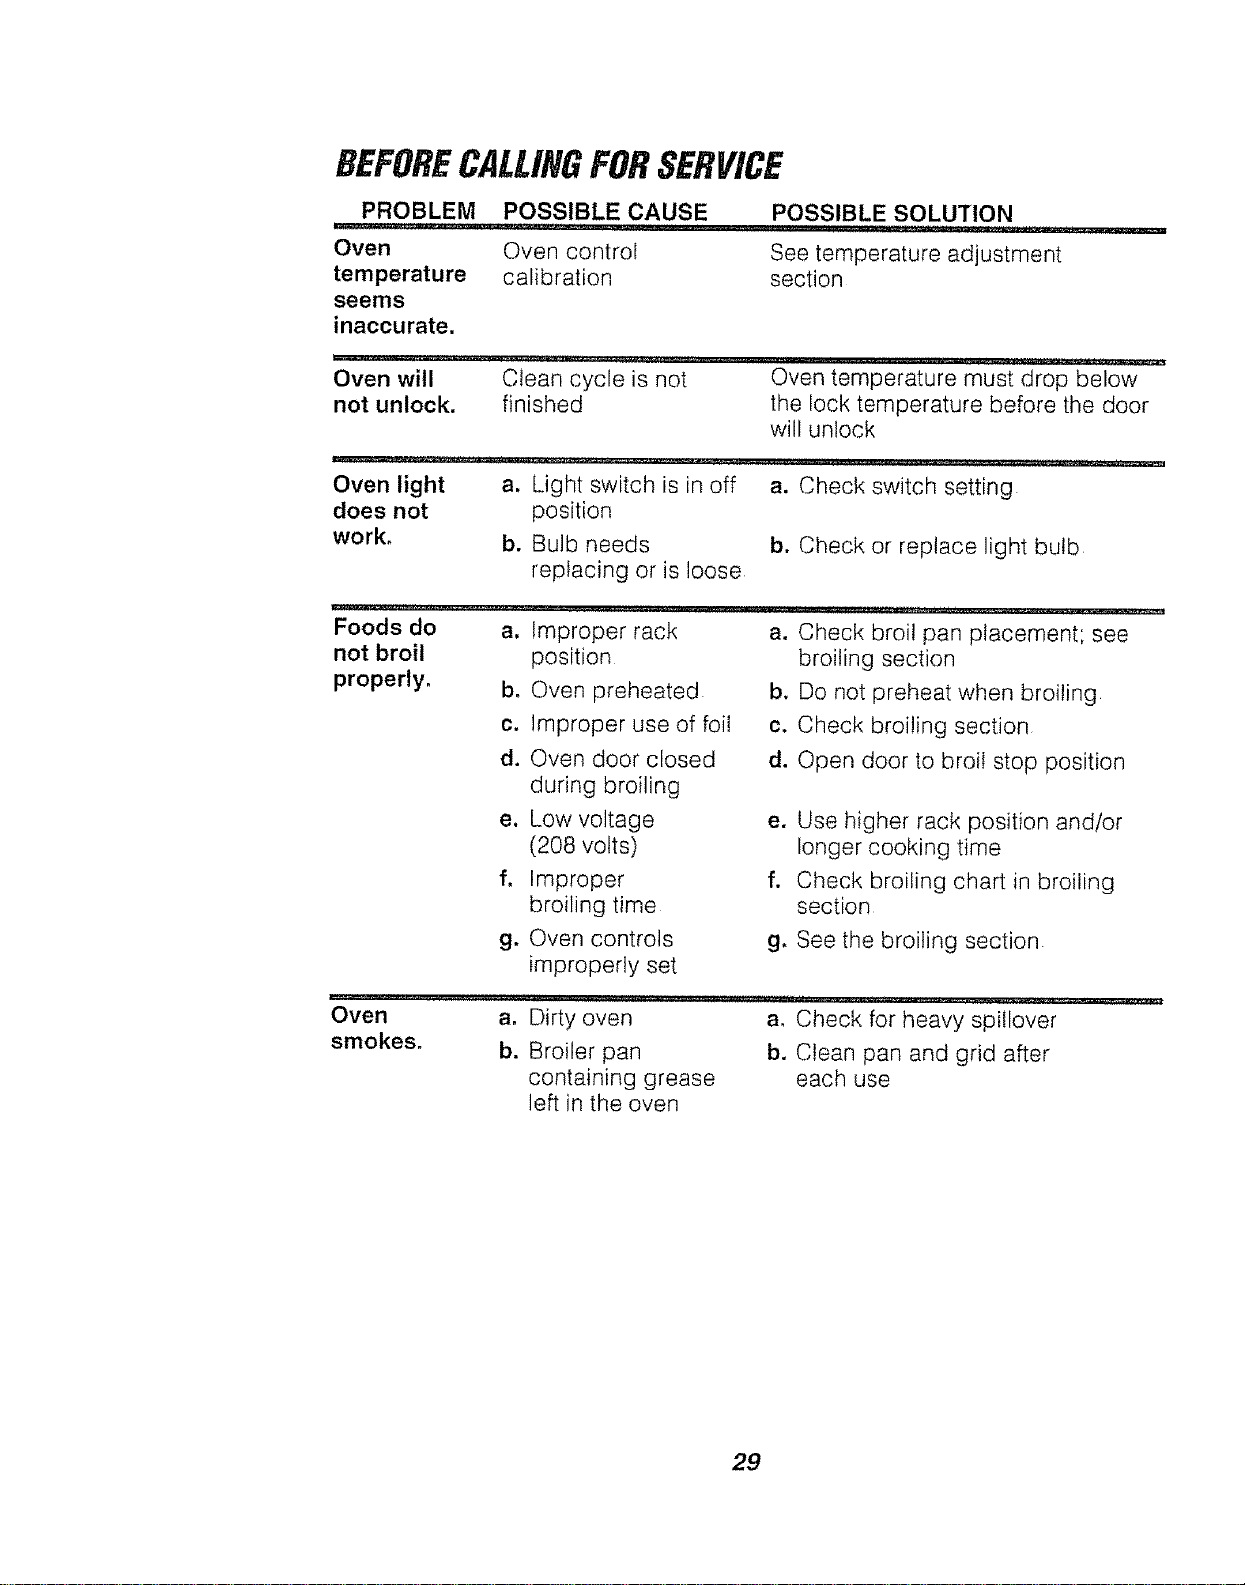
BEFORECALLINGFORSERVICE
PROBLEM POSSIBLE CAUSE
...... :: :: ..... J_,L_JUL__L L___
Oven Oven control
temperature calibration
seems
inaccurate.
POSSIBLE SOLUTION
See temperature adjustment
section
Oven will clean cycle is not Oven temperature must drop below
not unlock, finished the lock temperature before the door
will unlock
Oven light a, Light switch is in off a. Check switch setting
does not position
work, b. Bulb needs b. Check or replace light bulb
replacing or is loose
Foods do a,
not broil
properly, b,
Improper rack a. Check broil pan placement; see
position
Oven preheated
c. Improper use of foil
d. Oven door closed
during broiling
e. Low voltage
(208 volts)
f, Improper
broiling time
g. Oven controls
improperly set
broiling section
b. Do not preheat when broiling
c. Check broiling section
d. Open door to broil stop position
e. Use higher rack position and/or
longer cooking time
f. Check broiling chart in broiling
section
g, See the broiling section
Oven a0 Dirty oven a. Check for heavy spiIIover
smokes, b. Broiler pan b. Clean pan and grid after
containing grease each use
left in the oven
29
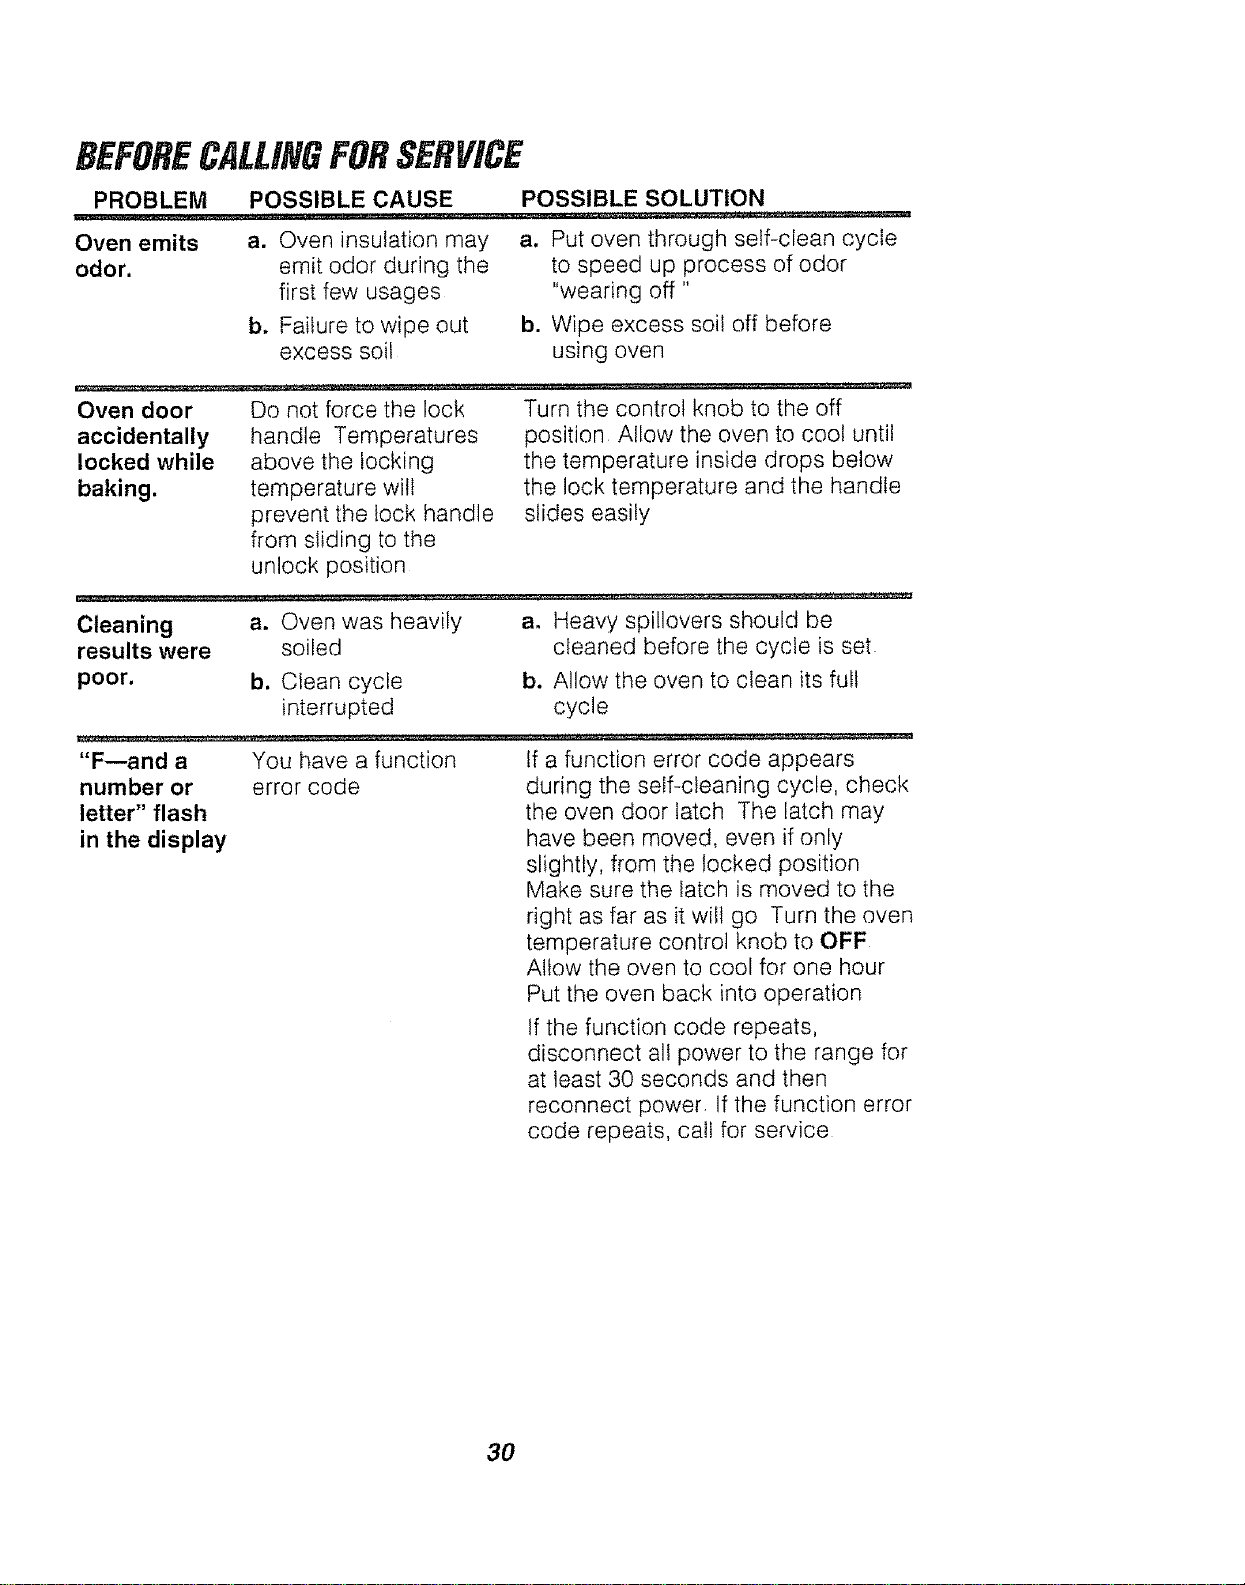
BEFORECALLINGFORSERVICE
PROBLEM POSSIBLE CAUSE POSSIBLE SOLUTION
Oven emits
odor.
a. Oven insulation may
emit odor during the
first few usages
b. Failure to wipe out
excess soil
a. Put oven through self-clean cycle
to speed up process of odor
"wearing off"
b. Wipe excess soil off before
using oven
Oven door
accidentally
locked while
baking.
Do not force the lock
handle Temperatures
above the locking
temperature will
prevent the lock handle
from sliding to the
unlock position
Turn the control knob to the off
position Allow the oven to cool until
the temperature inside drops below
the lock temperature and the handle
slides easily
Cleaning a. Oven was heavily
results were soiled
poor. b. Clean cycle
interrupted
ao Heavy spillovers should be
cleaned before the cycte is set
b. Allow the oven to clean its ful!
cycle
"F--and a You have a function If a function error code appears
number or error code during the self-cleaning cycle, check
letter" flash the oven door latch The latch may
in the display have been moved, even if only
slightly, from the locked position
Make sure the latch is moved to the
right as far as it will go Turn the oven
temperature control knob to OFF
Allow the oven to cool for one hour
Put the oven back into operation
If the function code repeats,
disconnect all power to the range for
at least 30 seconds and then
reconnect power If the function error
code repeats, calf for service
3O
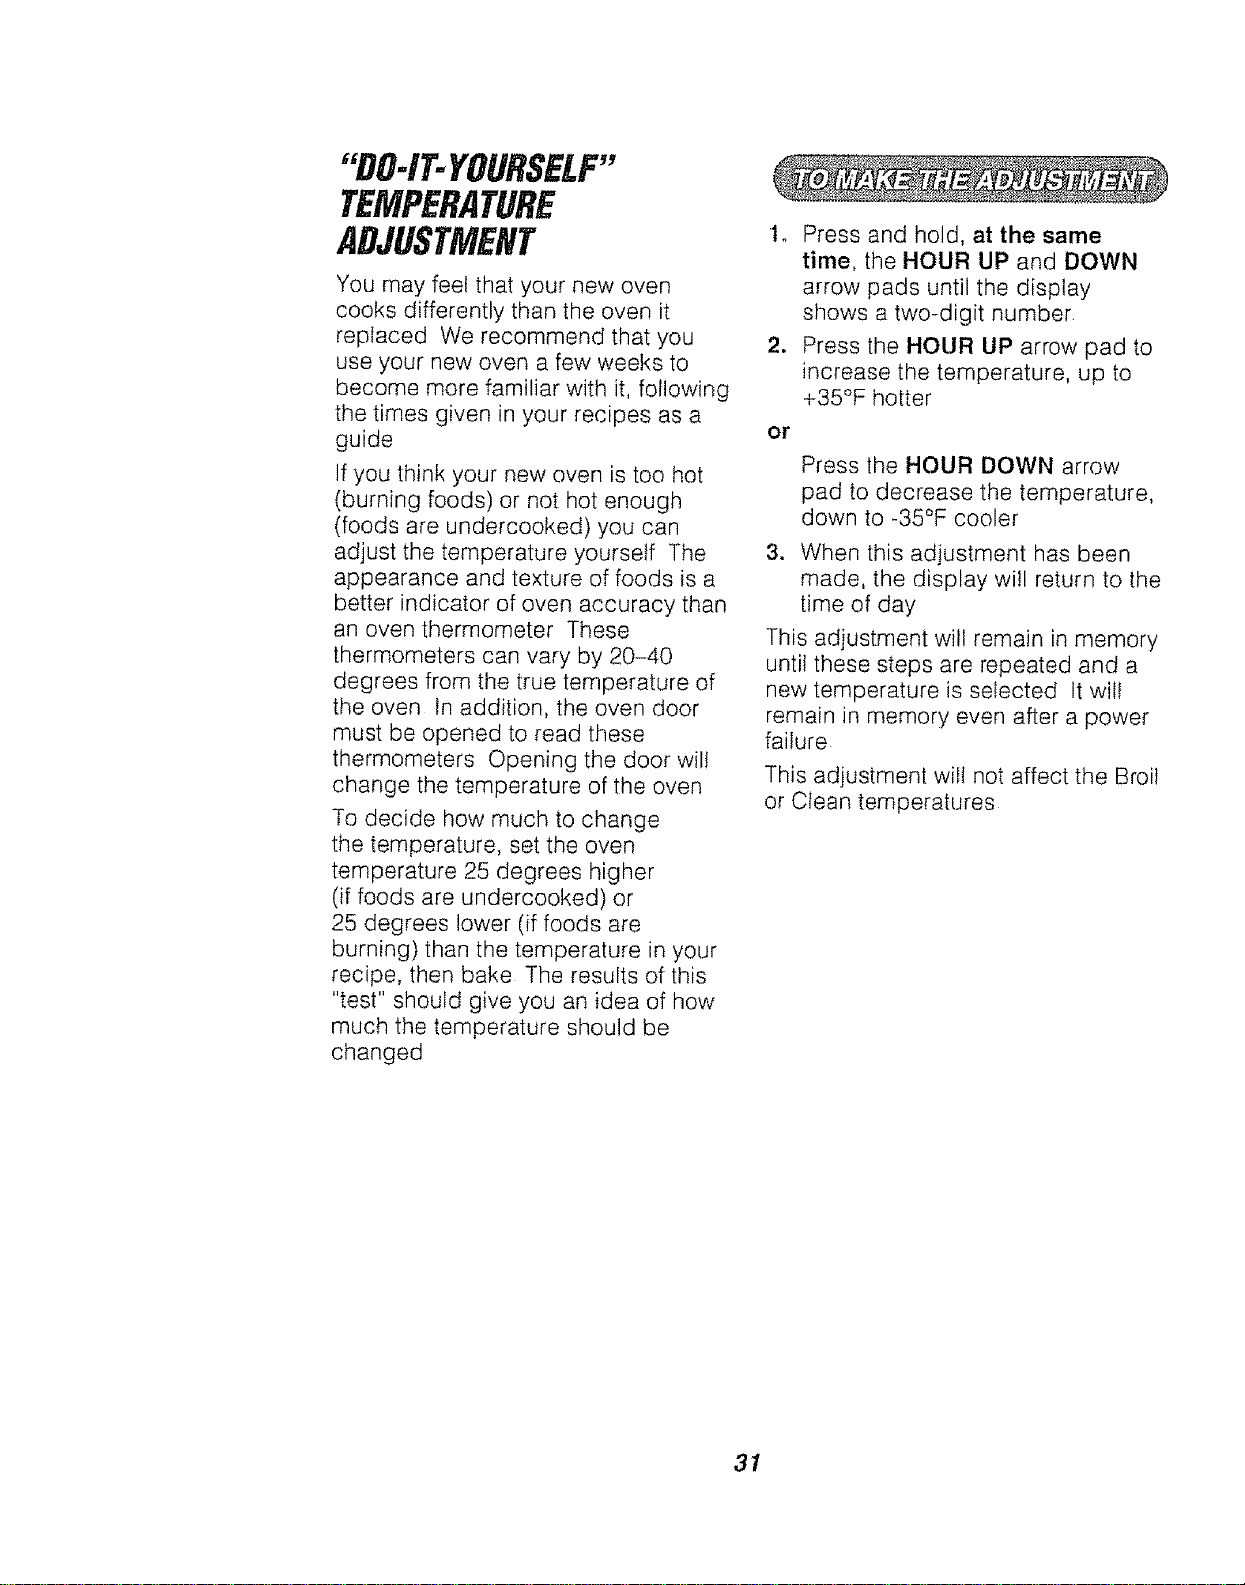
"DO-IT-YOURSELF"
TEMPERATURE
ADJUSTMENT
You may feet that your new oven
cooks differently than the oven it
replaced We recommend that you
use your new oven a few weeks to
become more familiar with it, following
the times given in your recipes as a
guide
If you think your new oven is too hot
(burning foods) or not hot enough
(foods are undercooked) you can
adjust the temperature yourself The
appearance and texture of foods is a
better indicator of oven accuracy than
an oven thermometer These
thermometers can vary by 20-40
degrees from the true temperature of
the oven In addition, the oven door
must be opened to read these
thermometers Opening the door will
change the temperature of the oven
To decide how much to change
the temperature, set the oven
temperature 25 degrees higher
(if foods are undercooked) or
25 degrees lower (if foods are
burning) than the temperature in your
recipe, then bake The results of this
"test" should give you an idea of how
much the temperature should be
changed
1. Press and hold, at the same
time, the HOUR UP and DOWN
arrow pads until the display
shows a two-digit number
2. Press the HOUR UP arrow pad to
increase the temperature, up to
+35°F hotter
or
Press the HOUR DOWN arrow
pad to decrease the temperature,
down to -35°F cooler
3. When this adjustment has been
made, the display will return to the
time of day
This adjustment will remain in memory
until these steps are repeated and a
new temperature is selected It wilt
remain in memory even after a power
failure
This adjustment will not affect the Broil
or Clean temperatures
31

NOTES
32

NOTES
33
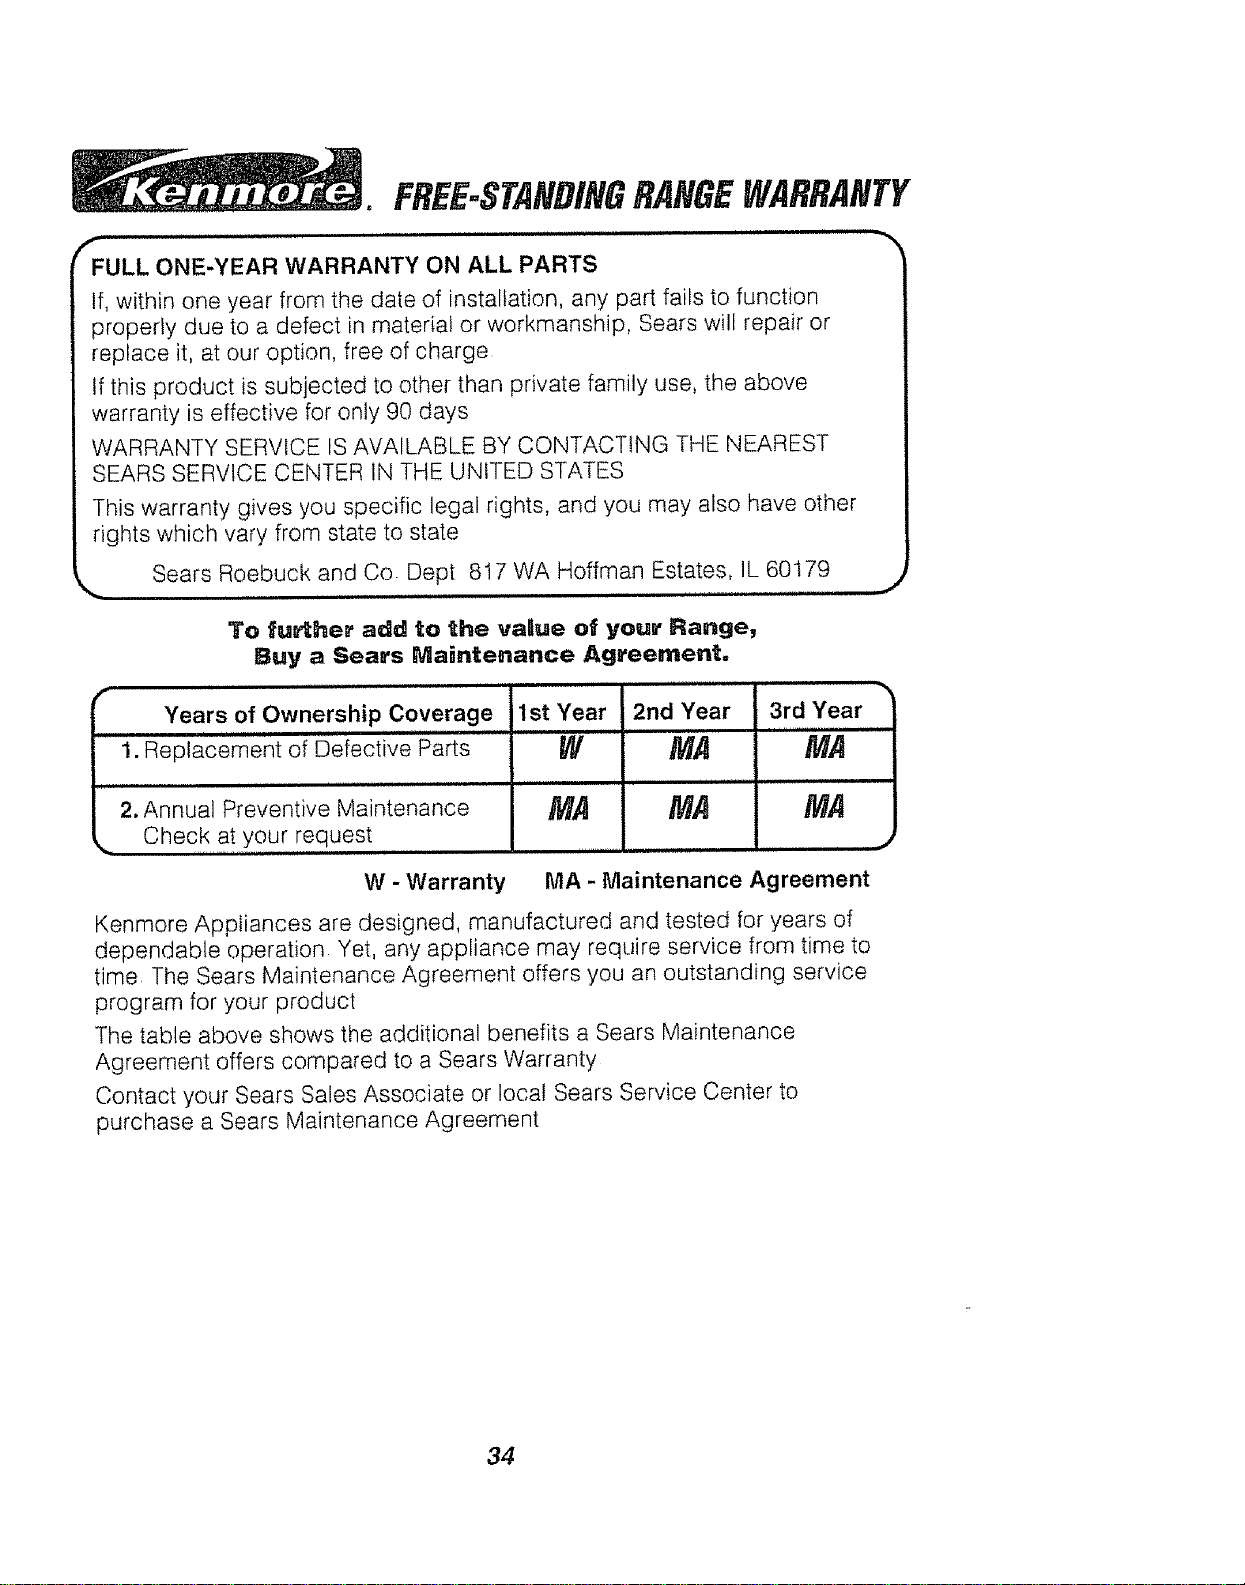
FREE-STA#DINGRANGEWARRANTY
ii ii,i ,i,i
_FULL ONE-YEAR WARRANTY ON ALL PARTS
If, within one year from the date of installation, any part fails to function
properly due to a defect in material or workmanship, Sears will repair or
replace it, at our option, free of charge
tf this product is subjected to other than private family use, the above
warranty is effective for only 90 days
WARRANTY SERVICE IS AVAILABLE BY CONTACTING THE NEAREST
SEARS SERVICE CENTER IN THE UNITED STATES
This warranty gives you specific legal rights, and you may also have other
rights which vary from state to state
Sears Roebuck and Co Dept 817 WA Hoffman Estates, IL 60179
To fu_her add to the valtue of your Range,
Buy a Sears Maintenance Agreement.
f
Years of Ownership Coverage 1st Year
i i ll,ll,,,i i ill,,,i
1. Replacement of Defective Parts
i ,,,H, , i1,,
2. Annual Preventive Maintenance
Check at your request
W
MA
2nd Year
MA
,, i, i,i ,H,
MA
3rd Year
MA
,i
MA
W - Warranty MA - Maintenance Agreement
Kenmore Appliances are designed, manufactured and tested for years of
dependable operation Yet, any appliance may require service from time to
time The Sears Maintenance Agreement offers you an outstanding service
program for your product
The table above shows the additional benefits a Sears Maintenance
Agreement offers compared to a Sears Warranty
Contact your Sears Sales Associate or local Sears Service Center to
purchase a Sears Maintenance Agreement
34