Eeotr o R nc e
user manual
the possibilities
Thank you f@"purchasing this Samsung
product. To receive more complete
sewice, please registek"your product at
www.samsung.com/register
1-800-SAMSUNG C726-7864)
ENGLISH
Read and follow all instructions before using your oven to prevent the
risk of fire, electric shock, personal injury, or damage when using the
range. This guide does not cover all possible conditions that may occur. Always
contact your service agent or manufacturer about problems that you do not
understand.
WHAT YOU NEED TO KNOW ABOUT SAFETY
iNSTRUCTiONS
Warnings and Important Safety instructions in this manual do not cover aii
possible conditions and situations that may occur, it is your responsibility to use
common sense, caution, and care when installing, maintaining, and operating
your oven.
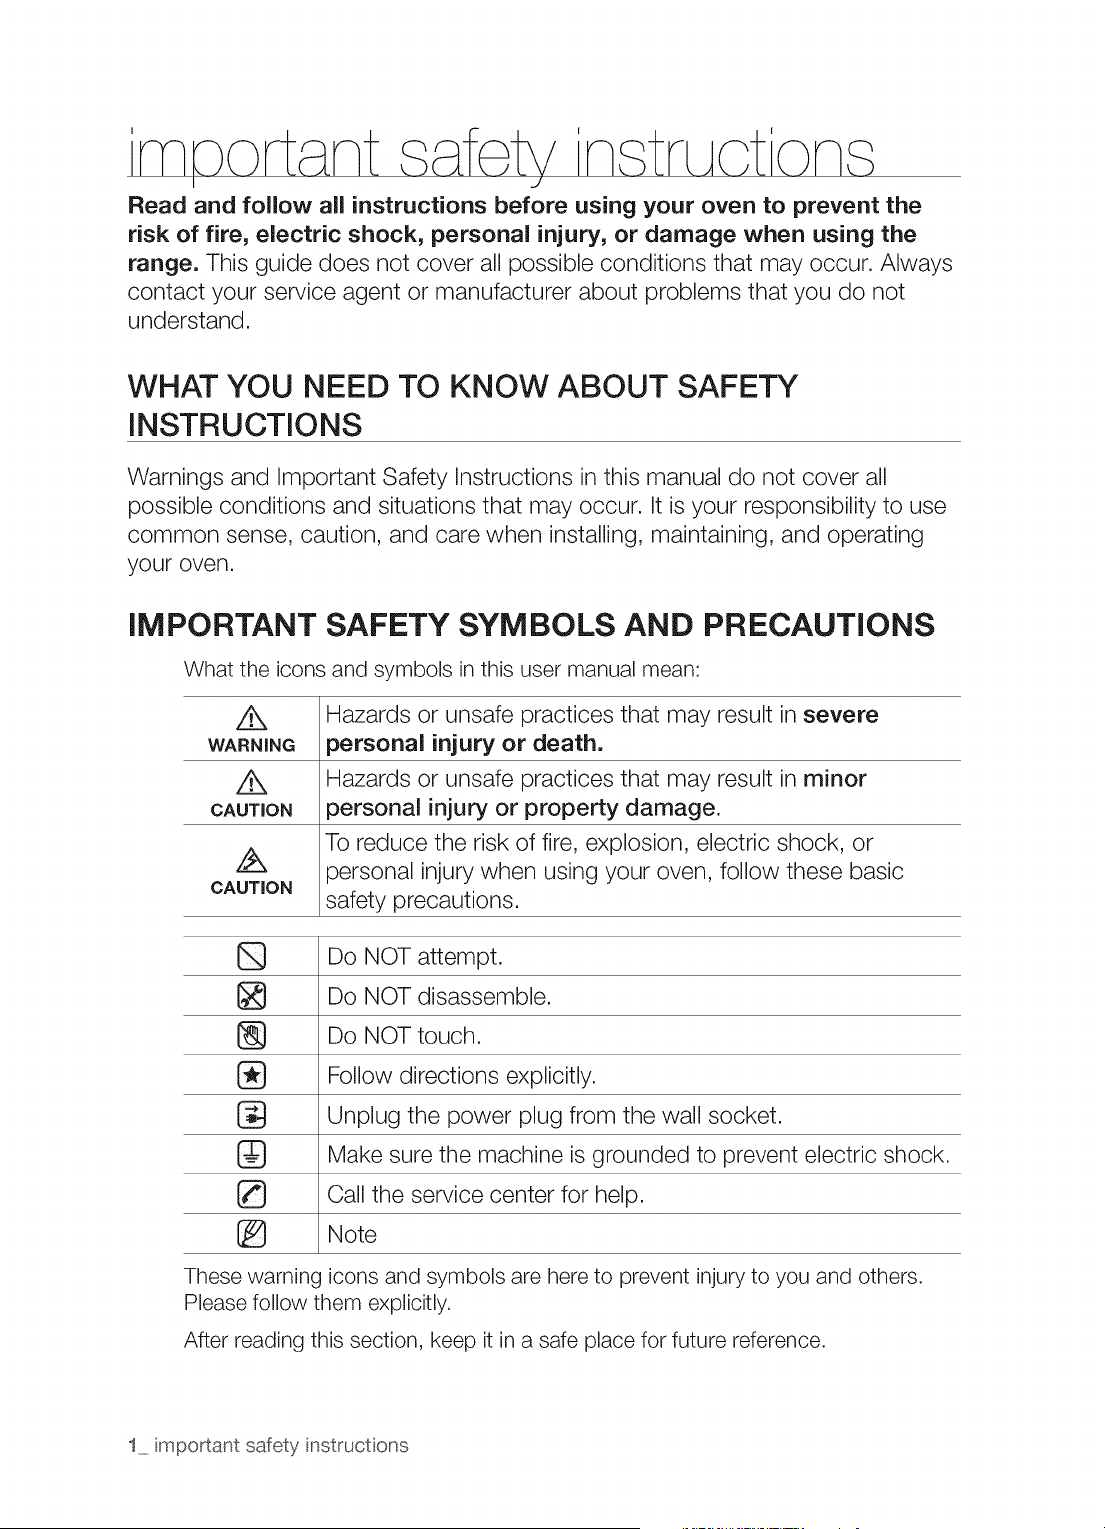
iMPORTANT SAFETY SYMBOLS AND PRECAUTIONS
What the icons and symbols in this user manual mean:
Z_ Hazards or unsafe practices that may result in severe
WARNING _ersonal injury or death.
Hazards or unsafe practices that may result in minor
CAUTION :_ersonal injury or property damage.
To reduce the risk of fire, explosion, electric shock, or
/_X }ersonal injury when using your oven, follow these basic
CAUTION
safety precautions.
Do NOT attempt.
Do NOT disassemble.
[_ Do NOT touch.
Follow directions explicitly.
Unplug the power plug from the wail socket.
Make sure the machine is grounded to prevent electric shock,
Caii the service center for help.
Note
These warning icons and symbols are here to prevent injury to you and others.
Please follow them explicitly.
After reading this section, keep it in a safe place for future reference.
1 important safety instructons
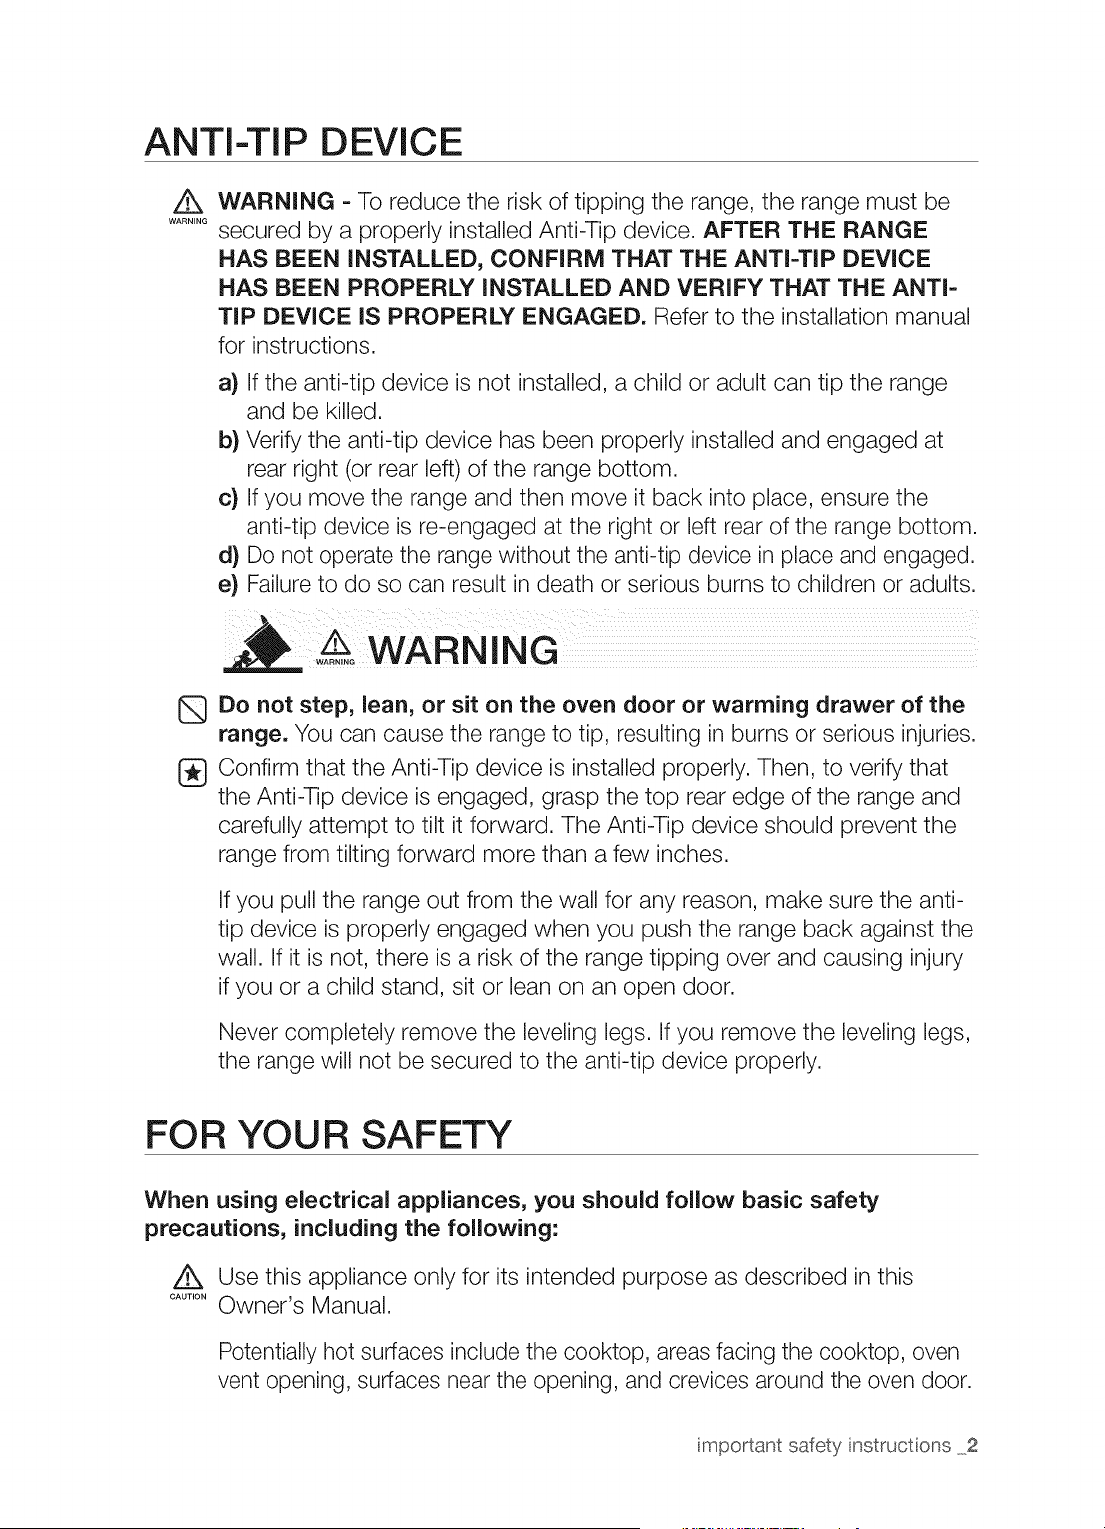
ANTI-TIP DEVICE
/t,,
WARNING
WARNING =To reduce the risk of tipping the range, the range must be
secured by a properly installed Anti-Tip device. AFTER THE RANGE
HAS BEEN INSTALLED, CONFIRM THAT THE ANTI=TIP DEVICE
HAS BEEN PROPERLY iNSTALLED AND VERIFY THAT THE ANTi=
TIP DEVICE IS PROPERLY ENGAGED. Refer to the installation manual
for instructions.
a) If the anti-tip device is not installed, a child or adult can tip the range
and be killed.
b) Verify the anti-tip device has been properly installed and engaged at
rear right (or rear left) of the range bottom.
c) If you move the range and then move it back into place, ensure the
anti-tip device is re-engaged at the right or left rear of the range bottom.
d) Do not operate the range without the anti-tip device in place and engaged.
e} Failure to do so can result in death or serious burns to children or adults.
.......WARN !NG
Do not step, lean, or sit on the oven door or warming drawer of the
range. You can cause the range to tip, resulting in burns or serious injuries.
[_ Confirm that the Anti-Tip device is installed properly. Then, to verify that
the Anti-Tip device is engaged, grasp the top rear edge of the range and
carefully attempt to tilt it forward. The Anti-Tip device should prevent the
range from tilting forward more than a few inches.
If you pull the range out from the wall for any reason, make sure the anti-
tip device is properly engaged when you push the range back against the
wall. If it is not, there is a risk of the range tipping over and causing injury
if you or a child stand, sit or lean on an open door.
Never completely remove the leveling legs. If you remove the leveling legs,
the range will not be secured to the anti-tip device properly.
FOR YOUR SAFETY
When using electrical appliances, you should follow basic safety
precautions, including the following:
Use this appliance only for its intended purpose as described in this
....... Owner's Manual.
Potentially hot surfaces include the cooktop, areas facing the cooktop, oven
vent opening, surfaces near the opening, and crevices around the oven door.
important safety instructons 2
@
@
G
Be sure your appliance is properly installed and grounded by a qualified
technician.
User servicing = Do not repair or replace any part of the appliance
unless specifically recommended in the manual. All other servicing should
be referred to a qualified technician.
Always disconnect the power to the appliance before servicing by
removing the fuse or switching off the circuit breaker.
Do not enter the oven.
Do not store items of interest to children in cabinets above a
range or on the back guard of a range. Children climbing on the range
to reach items could be seriously injured.
Do not leave children alone. Never leave children alone or unattended
in an area where this appliance is in use. They should never be allowed to
sit or stand on any part of the appliance.
Never use your appliance for warming or heating the room.
Do not use water on grease fires. Turn off the oven to avoid spreading
the flame. Smother the fire or flame by closing the door or use a dry
chemical, baking soda, or foam-type extinguisher.
Avoid scratching or impacting glass doors, cooktops or control panels.
Doing so may lead to glass breakage. Do not cook on a product with
broken glass. Shock, fire or cuts may occur.
If there is a fire in the oven during baking, smother the fire by closing
the oven door and turning the oven off or by using a multi-purpose dry
chemical or foam-type fire extinguisher.
If there is a fire in the oven during self-clean, turn the oven off and wait
for the fire to go out. Do not force the door open. Introduction of fresh
air at self-clean temperatures may lead to a burst of flame from the oven.
Failure to follow this instruction may result in severe burns.
If the oven is heavily soiled with oil, self clean the oven before using the
oven again. Leaving the oil in place creates a risk of fire.
Wipe up heavy soil on the oven bottom with a paper tower or rag before
self cleaning. Self cleaning the oven when there is heavy soil on the oven
bottom requires longer cleaning cycles and produces more smoke.
Storage in or on appliance. Do not store flammable materials in the
oven or near the surface units. Be sure all packing materials are removed
from the appliance before operating it. Keep plastics, clothes, and paper
away from parts of the appliance that may become hot.
Wear proper apparel. Never wear loose-fitting or hanging garments
while using the appliance.
3 important safety instructons
Use only dry potholders. Placing moist or damp potholders on hot
surfaces may result in burns from steam. Do not let the potholder touch
hot heating elements. Do not use a towel or other bulky cloth on or near
the range.
Teach children not to play with the controls or any other part of the range.
For your safety, do not use high-pressure water cleaners or steam jet cleaners
to clean the any part of the range.
If the power cord is damaged, it must be replaced by the manufacturer,
its service agent or similarly qualified persons to avoid creating a hazard.
The appliance is not intended for use by persons (including children) with
reduced physical, sensory or mental capabilities, or lack of experience
and knowledge, unless they have been given supervision or instruction
concerning use of the appliance by a person responsible for their safety.
SURFACE COOKING UNITS
Never leave surface units unattended at high heat settings.
Boilovers cause smoking and greasy spillovers that may ignite.
®
To avoid oil spillover and fire, use a minimum amount of oil when shallow
pan-frying and avoid cooking frozen foods with excessive amounts of ice.
Do not lift the cooktop. Lifting the cooktop can damage the range and
cause the range to malfunction.
Do not operate the cooktop without cookware. If you operate the
cooktop without cookware, the control knobs will become hot.
Never use the glass cooktop surface as a cutting board.
Use care when touching the cooktop. The glass surface of the
cooktop will retain heat after the controls have been turned off.
Be careful when placing spoons or other stirring utensils on the
glass cooktop surface when it is in use. They may become hot and
could cause burns.
Use proper pan sizes, This appliance is equipped with surface units of
different sizes. Select pots and pans that have flat bottoms large enough
to cover the surface area of the heating element. Using undersized
cookware will expose a portion of the heating element to direct contact
and may result in the ignition of clothing. Matching the size of the pot or
pan to the burner will also improve efficiency.
important safety instructons 4
®
Utensil Handles Should Be Turned Inward and Not Extend Over
Adjacent Surface Units - To reduce the risk of burns, ignition of
flammable materials, and spillage due to unintentional contact with
utensils, position utensil handles so that they are turned inward, and do
not extend over adjacent surface units.
Glazed cooking utensils. Only certain types of glass, glass/ceramic,
ceramic,earthenware, or other glazed cookware are suitable for range-top
service without breaking due to sudden change in temperature.
Cookware handles should be turned outward and not extend
over adjacent surface units. To reduce the risk of burns, ignition
of flammable materials, and spillage due to unintentional contact with
cookware, position cookware handles so that they are turned outward,
and do not extend over adjacent surface units.
Cleaning. Read and follow all instructions and warnings on the cleaning
cream labels.
Be sure you know which control knob operates each surface unit. Always
make sure you have turned on the correct surface unit.
Always turn the surface units off before removing cookware.
When preparing flaming foods under the hood, turn the fan on.
Keep an eye on foods being fried at high or medium high heat settings.
DO NOT store heavy items above the cooktop surface that could
fall and damage it.
Do Not Use Decorative Surface Element Covers - If an element is
accidentally turned on, the decorative cover will become hot and possibly
melt. Burns will occur ifthe hot covers are touched. Damage may also be
done to the cooktop.
ELECTRICAL SAFETY
Proper Installation- Be sure your appliance is properly installed and
grounded by a qualified technician.
The appliance should be serviced only by qualified service personnel.
Repairs carried out by unqualified individuals may cause injury or a
serious malfunction. If your appliance is in need of repair, contact a
Samsung authorized service center. Failure to follow these instructions
may result in damage and void the warranty.
5 important safety instructons

A
WARNING
/k
WARNING
Flush - mounted appliances may be operated only after they have been
installed in cabinets and workplaces that conform to the relevant electrical
and building codes. This ensures that the appliances are installed in
compliance with the appropriate safety standards.
If your appliance malfunctions or if fractures, cracks or splits appear:
switch off all cooking zones.
unplug the range from the AC wall outlet.
contact your local service center.
WARNING- If the surface is cracked, switch off and unplug the appliance
to avoid the possibility of electrical shock. Do not use your cooktop until
the glass surface has been replaced.
WARNING- Ensure that the appliance is switched off before replacing
the lamp to avoid the possibility of electric shock.
The range should not be placed on a base.
CHI
WARNING
WARNING
LD SAFETY
WARNING- This appliance is not intended for use by young children or
infirm persons without the adequate supervision of a responsible adult.
Young children should be supervised to ensure that they do not play with
the appliance.
Keep children away from the oven when you open or close the door.
They could be struck by the door when you open it or catch their fingers
in the door when you close it.
The cooking zones will become hot when you cook. To keep small
children from being burned, always keep them away from the appliance
while you are cooking.
During self-cleaning, the range's surfaces may get hotter than usual. To
prevent children from being burned, make sure that you keep them away
from the range when it is in the self-cleaning mode.
WARNING- Accessible parts may become hot during use. To avoid
burns, young children should be kept away.
important safety instructons 6

OVEN
Q
®
G
G
DO NOT TOUCH THE HEATING ELEMENTS OR INTERIOR
SURFACES OF THE OVEN. Heating elements may be hot even though
they are dark in color. Interior surfaces of an oven become hot enough to
cause burns. During and after use, do not touch or let clothing or other
flammable materials contact the heating elements or interior surfaces
of the oven until they have had sufficient time to cool. Other surfaces of
the appliance may become hot enough to cause burns. Among these
surfaces are oven vent openings and surfaces near these openings, the
oven door, and the window of the oven door.
Do not heat unopened food containers. The build-up of pressure may
cause the container to burst and result in injury.
Do not use the oven to dry newspapers. If overheated, newspapers
can catch on fire.
Do not use the oven for a storage area, Items stored in an oven can
ignite.
Use care when opening the door. Let hot air or steam escape before
you remove food from or put food into the oven.
Protective liners, Do not use aluminum foil to line the oven bottoms,
except as suggested in the manual. Improper installation of these liners
may result in a risk of electric shock or fire.
Keep oven vent ducts unobstructed. The oven vent is located below
the control box. This area could become hot during oven use. Never
block this vent or place plastic or heat-sensitive items on it.
Placement of oven racks, Always place oven racks in the desired
location while the oven is cool. If the rack must be moved while the oven
is hot, use potholders. Do not let the potholders come in contact with the
hot heating element in the oven.
Do not allow aluminum foil or a temp probe to contact the heating elements.
During use, the appliance becomes hot, Care should be taken to
avoid touching heating elements inside the oven.
Do not use harsh abrasive cleaners or sharp metal scrapers to clean the
oven door glass. They can scratch the surface which may result in the
glass shattering.
If there is a fire in the oven during baking, smother the fire by closing
the oven door and turning the oven off or by using a multi-purpose dry
chemical or foam-type fire extinguisher.
7 important safety instructons
z£
CAUTION
Do not attempt to operate the oven during a power failure, if the
power fails, always turn the oven off. If the oven is not turned off and
the power resumes, the oven may begin to operate again. Food left
unattended could catch fire or spoil.
WARMING DRAWER
DO NOT TOUCH THE HEATING ELEMENT OR THE INTERIOR
SURFACE OF THE DRAWER. These surfaces may be hot enough to
burn.
REMEMBER: The inside surface of the drawer may be hot when you
open the drawer.
The purpose of the warming drawer is to hold hot cooked foods at
serving temperature. Always start with hot food. Cold food cannot be
heated or cooked in the warming drawer.
Use care when opening the drawer. Open the drawer a crack and
let hot air or steam escape before removing or replacing food. Hot air or
steam which escapes can cause burns to hands, face and/or eyes.
Do not use the drawer to dry newspapers. If overheated, newspapers
can catch on fire.
Do not use aluminum foil to line the drawer. Foil is an excellent heat
insulator and will trap heat beneath it. This will upset the performance of
the drawer and it could damage the interior finish.
Do not leave paper products, plastics, canned food or combustible
materials in the drawer.
Never leave jars or cans of fat drippings in or near your drawer.
Do not warm food in the drawer for more than three hours.
SELF-CLEANING OVENS
Do not clean the door gasket. The door gasket is essential for a good
seal. Care should be taken not to rub, damage, or move the gasket.
Never keep pet birds in the kitchen. Birds are extremely sensitive
to the fumes released during an oven self-clean cycle. Fumes may be
harmful or fatal to birds. Move birds to a well-ventilated room.
®
Clean only the parts listed in this manual in the self=clean cycle.
Before self-cleaning the oven, remove the partition, rack, utensils, and
food.
important safety instructons 8
Before operating the self-clean cycle, wipe grease and food soils from the
oven. Excessive amount of grease may ignite, leading to smoke damage
to your home.
Do not use any commercial oven cleaner or oven liner protective coating
of any kind in or on the outside of the oven. Use only a ceramic cooktop
cleaner.
Remove the nickel oven shelves from the oven before you begin the self-
cleaning cycle, or they may discolor.
If the self-clean mode malfunctions, turn the oven off and disconnect the
power supply. Have it serviced by a qualified technician.
Excess spillage must be removed before cleaning.
VENTILATING HOOD
Clean ventilating hoods frequently. Do not let grease accumulate on
the hood or filter.
When flaming foods under the hood, turn the fan on.
GLASS/CERAMIC COOKING SURFACES
Q
®
DO NOT TOUCH SURFACE UNITS OR AREAS NEAR THE UNITS.
Surface units may be hot even though they are dark in color. Areas near
surface units may become hot enough to cause burns. During and after
use, do not touch, or let clothing or other flammable materials contact the
surface units or areas near the units until they have had sufficient time to
cool. Among these areas are the cook-top and the facing of the cook-top.
Do not cook on a broken cooktop. If the cooktop should break,
cleaning solutions and spillovers may penetrate the broken cook-top and
create a risk of electric shock. Contact a qualified technician immediately.
Clean the cooktop with caution. If you use a wet sponge or cloth to
wipe up spills on a hot cooking area, be careful to avoid steam burns.
Some cleaners can produce noxious fumes if applied to a hot surface.
9 important safety instructons
CRITICAL iNSTALLATiONWARNINGS
[_ This appliance must be installed by a qualified technician or service company.
Failing to have a qualified technician install the range may result in electric
shock, fire, an explosion, problems with the product, or injury.
Unpack the oven. remove all packaging material and examine the oven for
any damage such as dents on the interior or exterior of the oven, broken door
latches, cracks in the door, or a door that is not lined up correctly. If there is any
damage, do not install or operate the oven and notify your dealer immediately.
Plug the power cord into a properly grounded outlet with the proper
configuration. Your oven should be the only item connected to this circuit.
Keep all packaging materials out of the reach of children. Children may use them
for play and injure themselves.
Install your appliance on a hard, level floor that can support its weight.
Failing to do so may result in abnormal vibrations, noise, or problems with the
product.
This appliance must be properly grounded.
Do not ground the appliance to a gas pipe, plastic water pipe, or telephone line.
This may result in electric shock, fire, an explosion, or problems with the
product.
Do not cut or remove the ground prong from the power cord under any
circumstances.
Connect the oven to a circuit that provides the correct amperage.
Do not install this appliance in a humid, oily or dusty location, or in a location
exposed to direct sunlight or water (rain drops).
This may result in electric shock or fire.
Do not use a damaged power cord or loose wall socket.
This may result in electric shock or fire.
Do not pull or excessively bend the power cord.
Do not twist or tie the power cord.
Do not hook the power cord over a metal object, place a heavy object on the
power cord, or insert the power cord between objects.
This may result in electric shock or fire.
If the power cord is damaged, contact your nearest service center.
important safety instructions 10
CRiTiCAL USAGE WARNINGS
If the appliance is flooded by any liquid, please contact your nearest service
center. Failing to do so may result in electric shock or fire.
If the appliance produces a strange noise, a burning smell, or smoke, unplug the
power plug immediately and contact your nearest service center.
Failing to do so may result in electric shock or fire.
In the event of a gas leak (such as propane gas, LP gas, etc.), ventilate the area
immediately. Do not touch the power cord. Do not touch the appliance.
A spark can cause an explosion or fire.
Take care not to contact the oven door, heating elements, or any of the other
hot parts with your body while cooking or just after cooking.
Failing to do so may result in burns.
If materials inside the oven should ignite, keep the oven door closed, turn the
oven off and disconnect the power cord, or shut off power at the fuse or circuit
breaker panel. If the door is opened, the fire may spread.
Always observe safety precautions when using your oven. Never try to repair the
oven on your own - there is dangerous voltage inside. If the oven needs to be
repaired, contact an authorized service center near you.
If you use the appliance when it is contaminated by foreign substances such as
food waste, it may result in a problem with the appliance.
Take care when removing the wrapping from food taken out of the appliance.
If the food is hot, hot steam may be emitted abruptly when you remove the
wrapping and this may result in burns.
Q Do not attempt to repair, disassemble, or modify the appliance yourself.
Since a high voltage current enters the product chassis, it may result in
electric shock or fire.
When a repair is needed, contact your nearest service center.
If any foreign substance such as water has entered the appliance, contact your
nearest service center.
Failing to do so may result in electric shock or fire.
Do not touch the power cord with wet hands.
This may result in electric shock.
Do not turn the appliance off while an operation is in progress.
This may cause a spark and result in electric shock or fire.
Keep all packaging materials well out of the reach of children, as packaging
materials can be dangerous to children.
If a child places a plastic bag over its head, the child can suffocate.
Do not let children or any person with reduced physical, sensory or mental
capabilities use this appliance unsupervised.
11 important safety instructions
@
Make sure that the appliance's controls and cooking areas are out of the reach
of children.
Failing to do so may result in electric shock, burns or injury.
Do not touch the inside of the appliance immediately after cooking. The inside of
the appliance will be hot.
Failing to do so may result in burns.
Do not use or place flammable sprays or objects near the oven.
Flammable items or sprays can cause fires or an explosion.
Do not insert fingers, foreign substances, or metal objects such as pins or
needles into inlets, outlets, or holes. If foreign substances are inserted into any
of these holes, contact your product provider or nearest service center.
Do not tamper with or make any adjustments or repairs to the door. Under no
circumstances should you remove the door or outer shell of the oven.
Do not store or use the oven outdoors.
Never use this appliance for purposes other than cooking.
Using the appliance for any purpose other than cooking may result in fire.
Open the cap or stopper of sealed containers (herb tonic tea bottles, baby
bottles, milk bottles, etc.) before heating them. Make a hole in food items that
have shells (eggs, chestnuts, etc.) with a knife before cooking them.
Failing to do so may result in burns or injury.
Never heat plastic or paper containers and do not use them for cooking.
Failing to do so may result in fire.
Do not heat food wrapped in paper from magazines, newspapers, etc.
This may result in fire.
Do not open the door if food in the oven is burning.
If you open the door, it causes an inflow of oxygen and may cause the food
to ignite.
Do not apply excessive pressure to the door or the inside of the appliance. Do
not strike the door or the inside or the appliance.
Hanging on to the door may result in the product falling and cause serious
injury.
If the door is damaged, do not use the appliance. Contact a service center.
Do not hold food in your bare hands during or immediately after cooking.
Use cooking gloves. The food may be very hot and you could burn yourself.
Use cooking glove or gloves, Handle and oven surfaces may be hot enough
to cause burns after cooking.
important safety instructions 12
USAGE CAUTIONS
If the surface is cracked, turn the appliance off.
Failing to do so may result in electric shock.
Dishes and containers can become hot. Handle with care.
Hot foods and steam can cause burns. Carefully remove container coverings,
directing the steam away from hands and face.
Remove lids from baby food jars before heating. After heating baby food, stir
well to distribute the heat evenly. Always test the temperature by tasting before
feeding the baby. The glass jar or the surface of the food may appear to be
cooler than the interior, which can be hot enough to burn an infant's mouth.
Take care as beverages or food may be very hot after heating.
Especially when feeding a child. Check that it has cooled sufficiently.
Take care when heating liquids such as water or other beverages.
Make sure to stir during or after cooking.
Avoid using a slippery container with a narrow neck.
Wait at least 30 seconds after heating before removing the heated liquid.
Failing to do so may result in an abrupt overflow of the contents and cause
burns.
Do not stand on top of the appliance or place objects (such as laundry, an oven
cover, lighted candles, lighted cigarettes, dishes, chemicals, metal objects, etc.)
on the appliance.
Items, such as a cloth, may be caught in the door.
This may result in electric shock, fire, problems with the product, or injury.
Do not operate the appliance with wet hands.
This may result in electric shock.
Do not spray volatile substances such as insecticide onto the surface of the
appliance.
As well as being harmful to humans, it may also result in electric shock, fire or
problems with the product.
Do not put your face or body close to the appliance while cooking or when
opening the oven door just after cooking.
Take care that children do not come too close to the appliance.
Failing to do so may result in children burning themselves.
Do not place food or heavy objects over the edge of the oven door.
If you open the door, the food or object may fall and this may result in burns
or injury.
Do not abruptly cool the door, the inside of the appliance, or a dish by pouring
water over it during or just after cooking.
This may result in damage to the appliance. The steam or water spray may
result in burns or injury.
13 important safety instructions
Do not operate while empty except for self-cleaning.
Do not use the oven or cooktop to defrost frozen beverages in narrow-necked
bottles. The containers can break.
Do not
This
Do not
scratch the glass of the oven door with a sharp object.
may result in the glass being damaged or broken.
store anything directly on top of the appliance when it is in operation.
Do not use sealed containers. Remove seals and lids before cooking. Sealed
containers can explode due to buildup of pressure even after the oven has been
turned off.
Take care that food you are cooking in the oven does not come into contact
with the heating element.
This may result in fire.
Do not over-heat food.
Overheating food may result in fire.
CRITICAL CLEANING WARNINGS
®
Do not clean the appliance by spraying water directly onto it.
Do not use benzene, thinner or alcohol to clean the appliance.
This may result in discoloration, deformation, damage, electric shock or fire.
Take care not to hurt yourself when cleaning the appliance (external/internal).
You may hurt yourself on the sharp edges of the appliance.
Do not clean the appliance with a steam cleaner.
This may result in corrosion.
Keep the inside of the oven clean. Food particles or spattered oils stuck to the
oven walls or floor can cause paint damage and reduce the efficiency of the oven.
CAUTION
STATEOF CALIFORNIAPROPOSITION
65WARNINGS:
The California Safe Drinking Water and Toxic Enforcement Act requires the
Governor of California to publish a list of substances known to the State of
California to cause cancer, birth defects, or other reproductive harm, and
requires businesses to warn of potential exposure to such substances.
This product contains a chemical known to the State of California to cause
cancer, birth defects, or other reproductive harm. This appliance can cause
low-level exposure to some of the substances listed, including benzene,
formaldehyde, carbon monoxide, and toluene.
important safety instructions 14
cont nt
INSTALLING THE OVEN
i¸ :
2
17 About this section
17 For your safety
PREPARING TO INSTALL THE RANGE 18 Remove packaging
18 Prepare tools & Parts
19 Checking the installation site
CONNECTING THE POWER 20 Step 1. Meeting electrical connection
requirements
21 Step 2. Accessing the power cord
connection
22 Step 3. Installing the power cord
24 Step 4. Installing the conduit
25 Step 5. Replacing the access cover
INSTALLING THE RANGE
26 Installing the anti-tip device
27 Finalizing the installation
28 Optional rear filler kit
INTRODUCING YOUR NEW RANGE
29 Overview
29 What's included with your range
BEFORE YOU BEGIN 30 Before you begin
GETTING STARTED
....._ i_i_
.... J
30 Setting the clock
30 Control panel display modes
31 Turning the oven light on and off
31 Control lockout
31 Setting the kitchen timer
15 contents
content
SURFACE COOKING
_,(ii ,,
OPERATING THE OVEN
USING THE WARMING DRAWER
i
MAINTAINING YOUR APPLIANCE
TROUBLESHOOTING
}ii¸ /
/
WARRANTY
.....
32 About surface cooking
34 How to set the appliance for surface cooking
36 Using the proper cookware
36 Choosing the proper cookware
37 Protecting the cooktop surface
38 The oven control panel
39 Using the oven racks
41 Using the gliding rack
42 Using the partition
43 Twin cooking mode temperature setting
ranges
44 Minimum and maximum settings
44 Baking
45 Convection baking
47 Convection roasting
48 Timed cooking
49 Delay start
50 Broiling
51 Using the favorite cook feature
52 Using the healthy cook feature
55 Using the keep warm function
55 Using the bread proof function
55 Using the options function
58 Using the temp probe
60 Setting the sabbath feature
61 About the warming drawer
61 Turning the warming drawer on or off
62 Self-cleaning
64 Steam-cleaning
65 Care and cleaning of the oven
67 Care and cleaning of the glass cooktop
69 Removing and replacing the oven door
70 Removing and replacing the warming drawer
71 Changing the oven light
72 Troubleshooting
76 Warranty (U.S)
76 Warranty (CANADA)
contents 16
n ta ncj the oven
ABOUT THIS SECTION
READ THESE INSTRUCTIONS COMPLETELY AND CAREFULLY.
Important note to the installer
Read all instructions contained in these installation instructions before installing the range.
Remove all packing materials from the oven compartments before connecting the electrical
supply to the range.
Observe all governing codes and ordinances.
Be sure to leave these instructions with the consumer.
Important note to the consumer
Keep these instructions for the local electrical inspector's use.
As when using any appliance generating heat, there are certain safety precautions you should
follow.
Be sure your range is installed and grounded properly by a qualified installer or service
technician.
Make sure the wall coverings around the range can withstand the heat generated by the range.
To eliminate the need to reach over the surface elements, avoid having cabinet storage space
above the cooktop.
The range should not be placed on a base.
FOR YOUR SAFETY
WARNING ,f the information inthis manual is not followed exactly, afire or electrical
shock may result causing property damage, personal injury or death.
Aw=WARNINGBefore beginning the installation, switch the power off at the service panel
and lock the service disconnecting switch to prevent power from being switched on accidentally. When
the service disconnecting switch cannot be locked, securely fasten a prominent warning device, such
as a tag, to the service panel.
w oWARNINGThis appliance must be properly grounded.
17 instal ing the oven
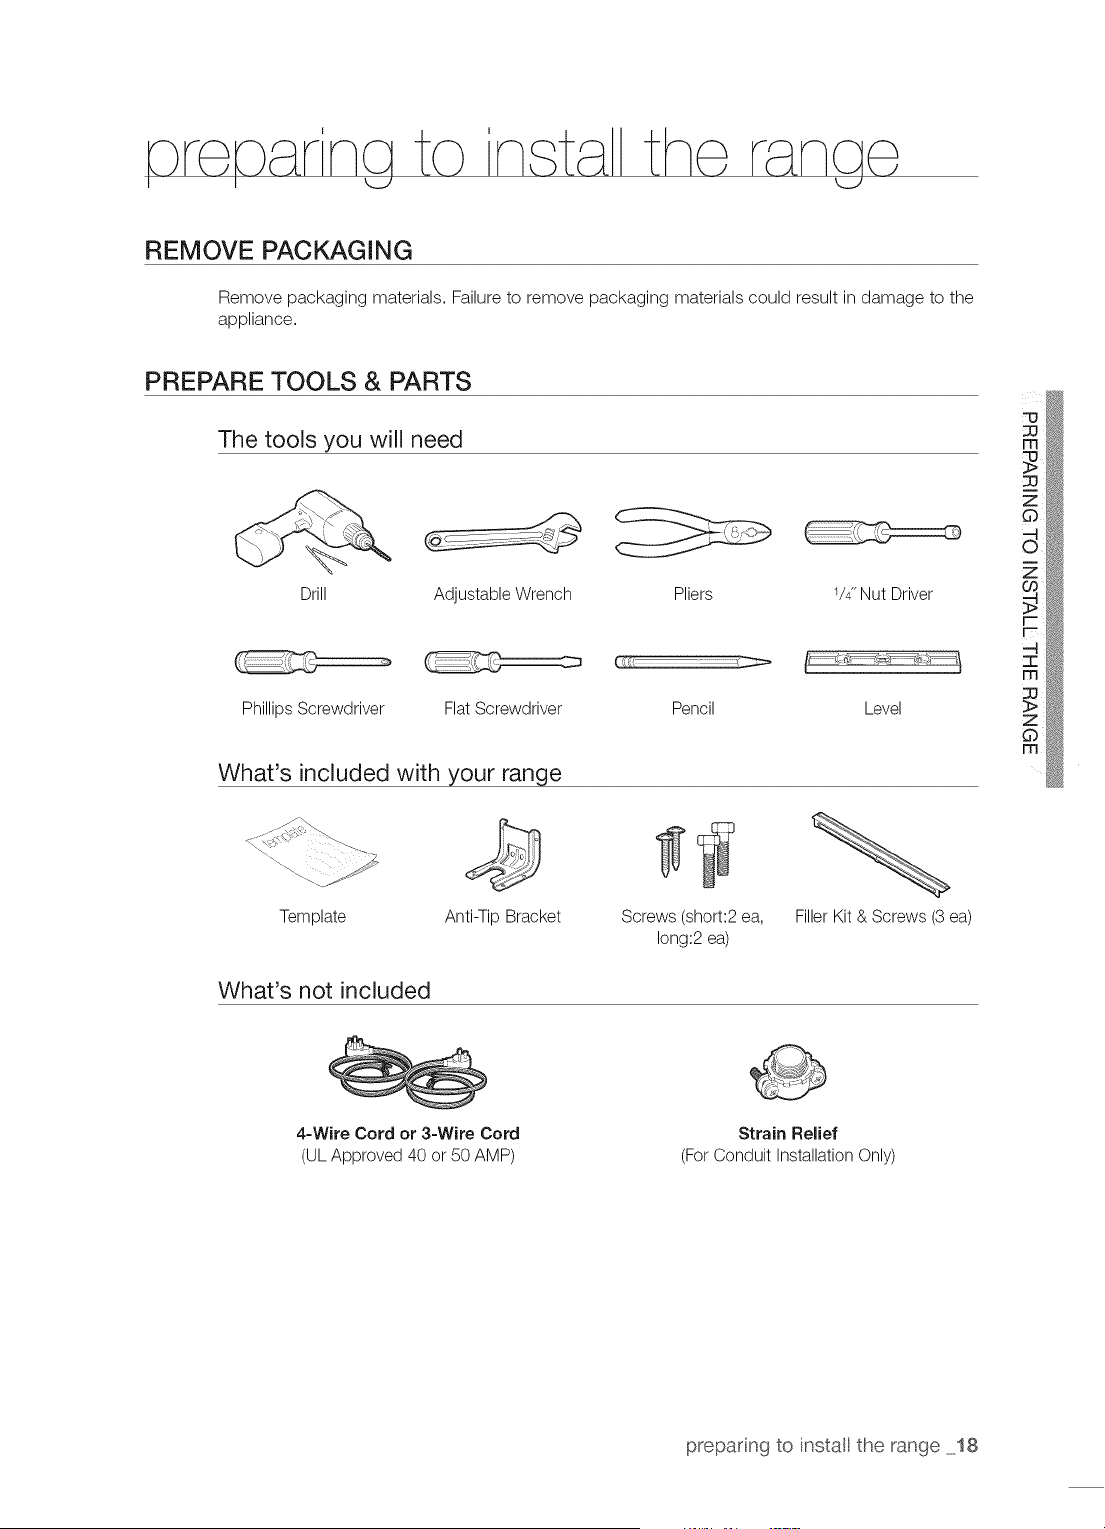
REMOVE PACKAGING
Remove packaging materials. Failure to remove packaging materials could result in damage to the
appliance.
PREPARE TOOLS & PARTS
The tools you will need
Drill
Adjustable Wrench Pliers 1/4"Nut Driver
Phillips Screwdriver
Ct _
Flat Screwdriver Pencil Level
What's included with your range
@
Template Anti-Tip Bracket Screws (short:2 ea,
long:2 ea)
Filler Kit & Screws (3 ea)
What's not included
4-Wire Cord or 3-Wire Cord
(UL Approved 40 or 50 AMP)
Strain ReJief
(For Conduit Installation Only)
preparing to install the range 18
CHECKING THE INSTALLATION SITE
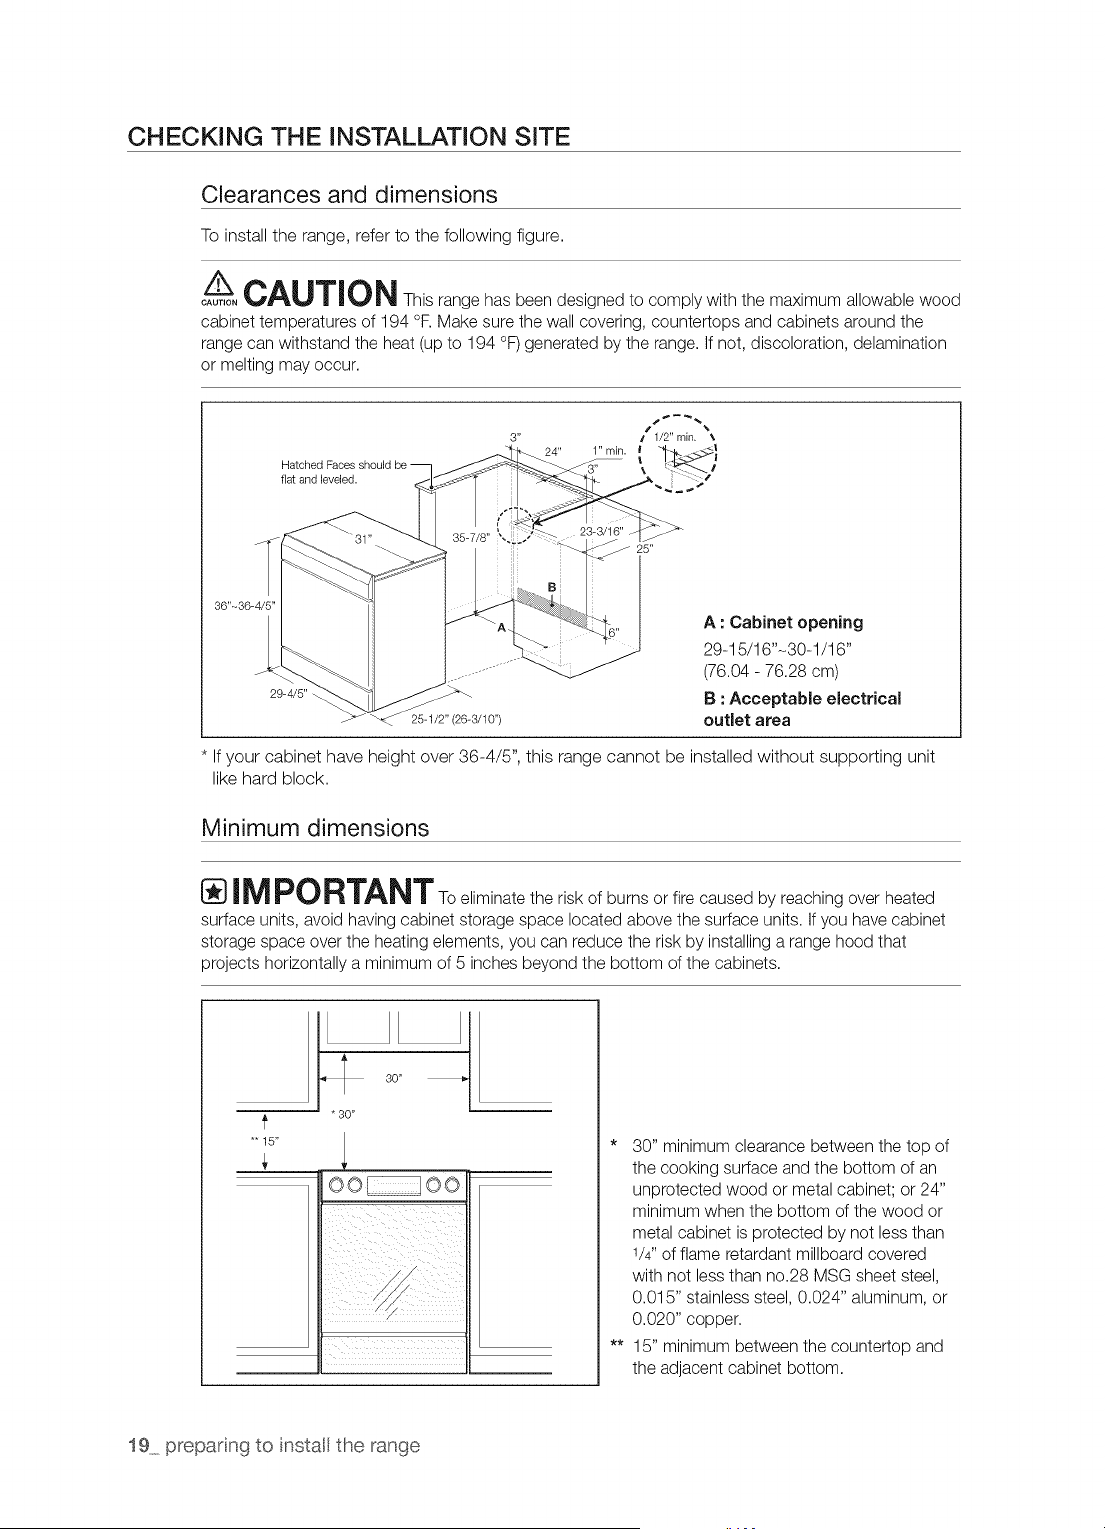
Clearances and dimensions
To install the range, refer to the following figure.
/_-- CAU'r_ON This range has been designed to comply with the maximum allowable wood
CAUTION
cabinet temperatures of 194 °F.Make sure the wall covering, countertops and cabinets around the
range can withstand the heat (up to 194 °F) generated by the range, if not, discoloration, delamination
or melting may occur.
3" f 1/2" rain. _,
24" 1" min. I <l
Hatched I ....
flat and leveled.
36"-36-
A : Cabinet opening
29-15/16"-30-1/16"
(76.04 - 76.28 cm)
B : Acceptable electrical
outlet area
If your cabinet have height over 36-4/5", this range cannot be installed without supporting unit
like hard block.
Minimum dimensions
n,-_rv RTANT To eliminate the risk of burns or fire caused by reaching over heated
surface units, avoid having cabinet storage space located above the surface units, if you have cabinet
storage space over the heating elements, you can reduce the risk by installing a range hood that
projects horizontally a minimum of 5 inches beyond the bottom of the cabinets.
*'15"
30"
* 30"
oo oo
* 30" minimum clearance between the top of
the cooking surface and the bottom of an
unprotected wood or metal cabinet; or 24"
minimum when the bottom of the wood or
metal cabinet is protected by not less than
1/4"of flame retardant millboard covered
with not less than no.28 MSG sheet steel,
0.015" stainless steel, 0.024" aluminum, or
0.020" copper.
** 15" minimum between the countertop and
the adjacent cabinet bottom.
19 prepar ng to install the range
connect na
<_J I
STEP 1. MEETING ELECTRICAL CONNECTION REQUIREMENTS
A CAUTION persona,safo, ,,donotuseanextensioncordwiththis
CAUTION
appliance, Remove house fuse or open circuit breaker before beginning installation,
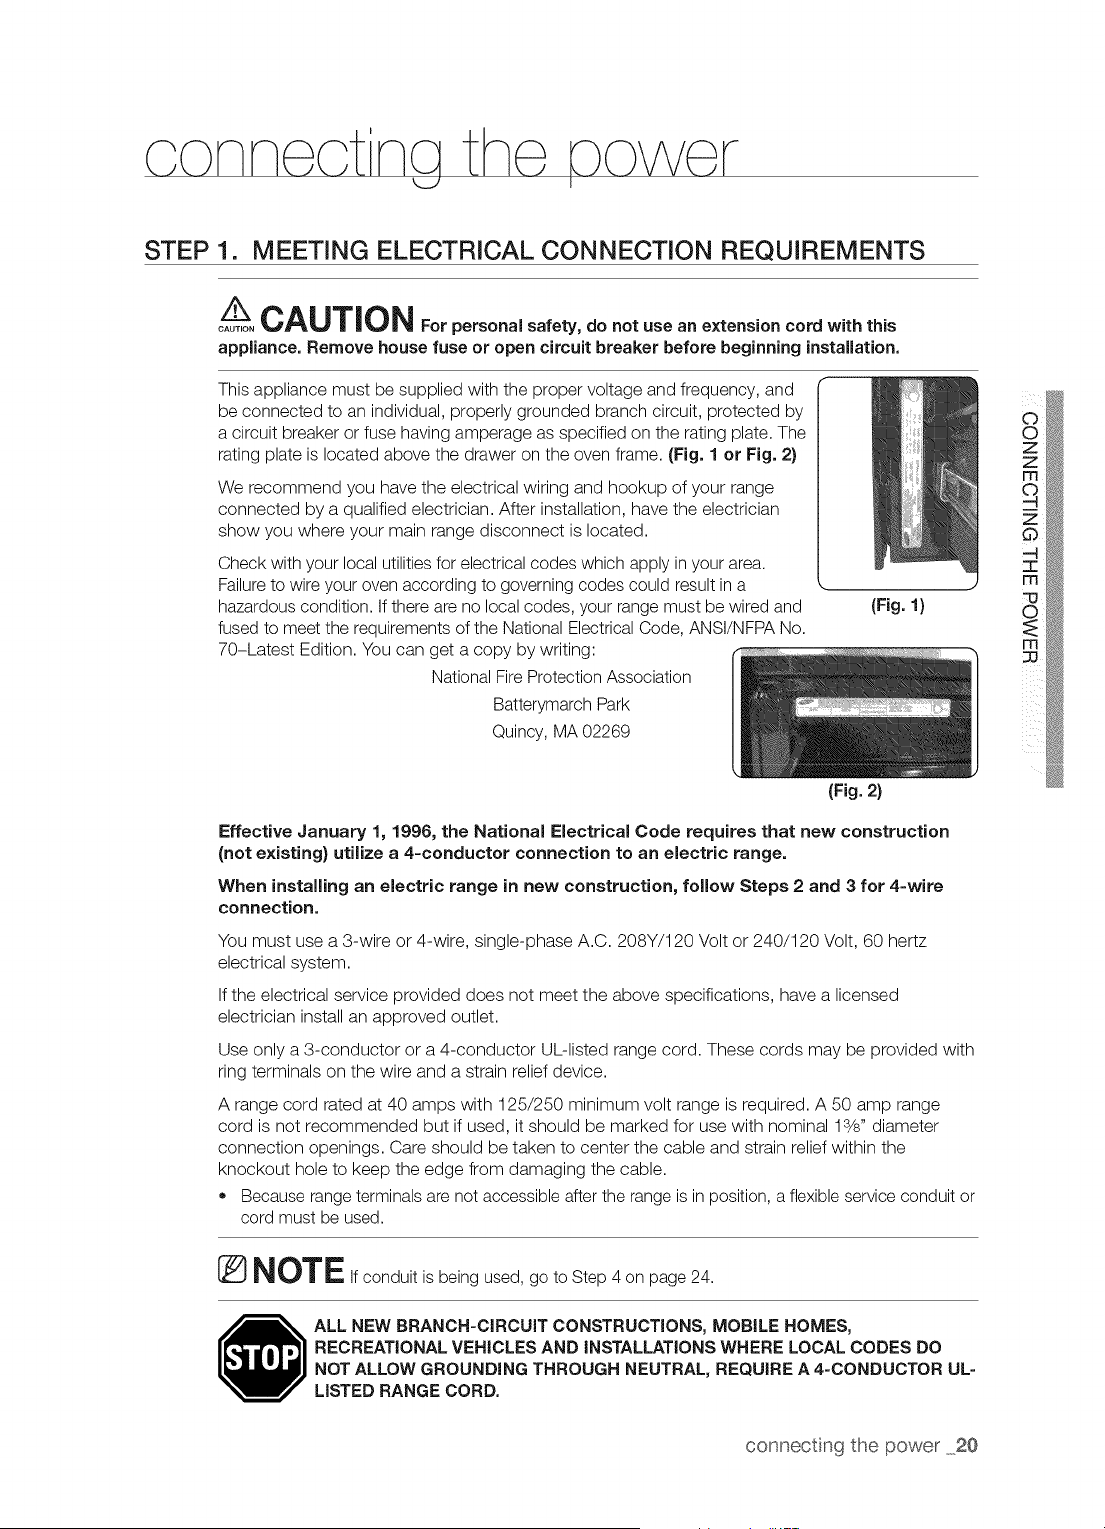
This appliance must be supplied with the proper voltage and frequency, and
be connected to an individual, properly grounded branch circuit, protected by
a circuit breaker or fuse having amperage as specified on the rating plate. The
rating plate is located above the drawer on the oven frame. (Fig. 1 or Fig. 2)
We recommend you have the electrical wiring and hookup of your range
connected by a qualified electrician. After installation, have the electrician
show you where your main range disconnect is located.
Check with your local utilities for electrical codes which apply in your area.
Failure to wire your oven according to governing codes could result in a
hazardous condition. If there are no local codes, your range must be wired and
fused to meet the requirements of the National Electrical Code, ANSI/NFPA No.
70-Latest Edition. You can get a copy by writing:
National Fire Protection Association
Batterymarch Park
(Fig. 1}
Quincy, MA 02269
(Fig. 2}
Effective January 1, 1996, the National Electrical Code requires that new construction
(not existing) utilize a 4-conductor connection to an electric range.
When installing an electric range in new construction, follow Steps 2 and 3 for 4-wire
connection.
You must use a 3-wire or 4-wire, single-phase A.C. 208Y/120 Volt or 240/120 Volt, 60 hertz
electrical system.
If the electrical service provided does not meet the above specifications, have a licensed
electrician install an approved outlet.
Use only a 3-conductor or a 4-conductor UL-listed range cord. These cords may be provided with
ring terminals on the wire and a strain relief device.
A range cord rated at 40 amps with 125/250 minimum volt range is required. A 50 amp range
cord is not recommended but if used, it should be marked for use with nominal lS/s" diameter
connection openings. Care should be taken to center the cable and strain relief within the
knockout hole to keep the edge from damaging the cable.
• Because range terminals are not accessible after the range is in position, a flexible service conduit or
cord must be used.
® NOTEIf conduit is being used, go to Step 4 on page 24.
ALL NEW BRANCH=CIRCUIT CONSTRUCTIONS, MOBILE HOMES,
RECREATIONAL VEHICLES AND INSTALLATIONS WHERE LOCAL CODES DO
NOT ALLOW GROUNDING THROUGH NEUTRAL, REQUIRE A 4=CONDUCTOR UL=
LISTED RANGE CORD,
connecting the power 20
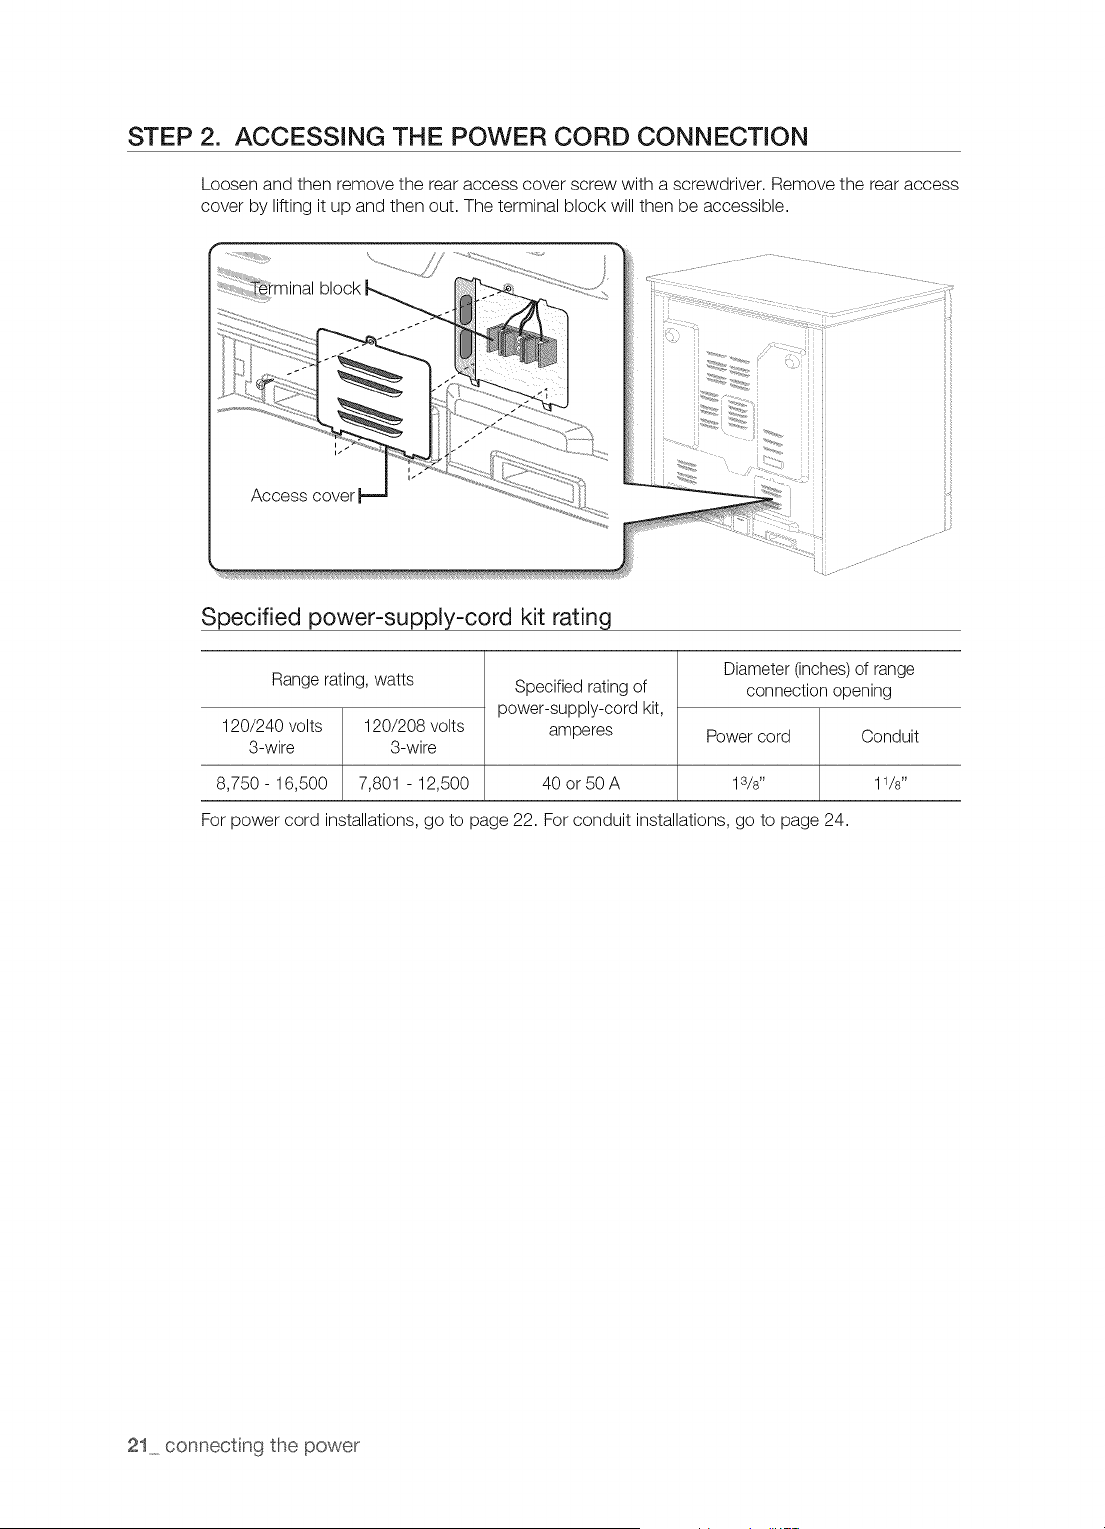
STEP 2. ACCESSING THE POWER CORD CONNECTION
Loosen and then remove the rear access cover screw with a screwdriver. Remove the rear access
cover by lifting it up and then out. The terminal block will then be accessible.
r
block
Access cover
Specified power-supply-cord kit rating
Range rating, watts
120/240 volts 120/208 volts
3-wire 3-wire
8,750- 16,500 7,801 - 12,500
Specified rating of
power-supply-cord kit,
amperes
40 or 50 A
Diameter (inches) of range
connection opening
Power cord
13/8"
For power cord installations, go to page 22. For conduit installations, go to page 24.
21 connecting the power
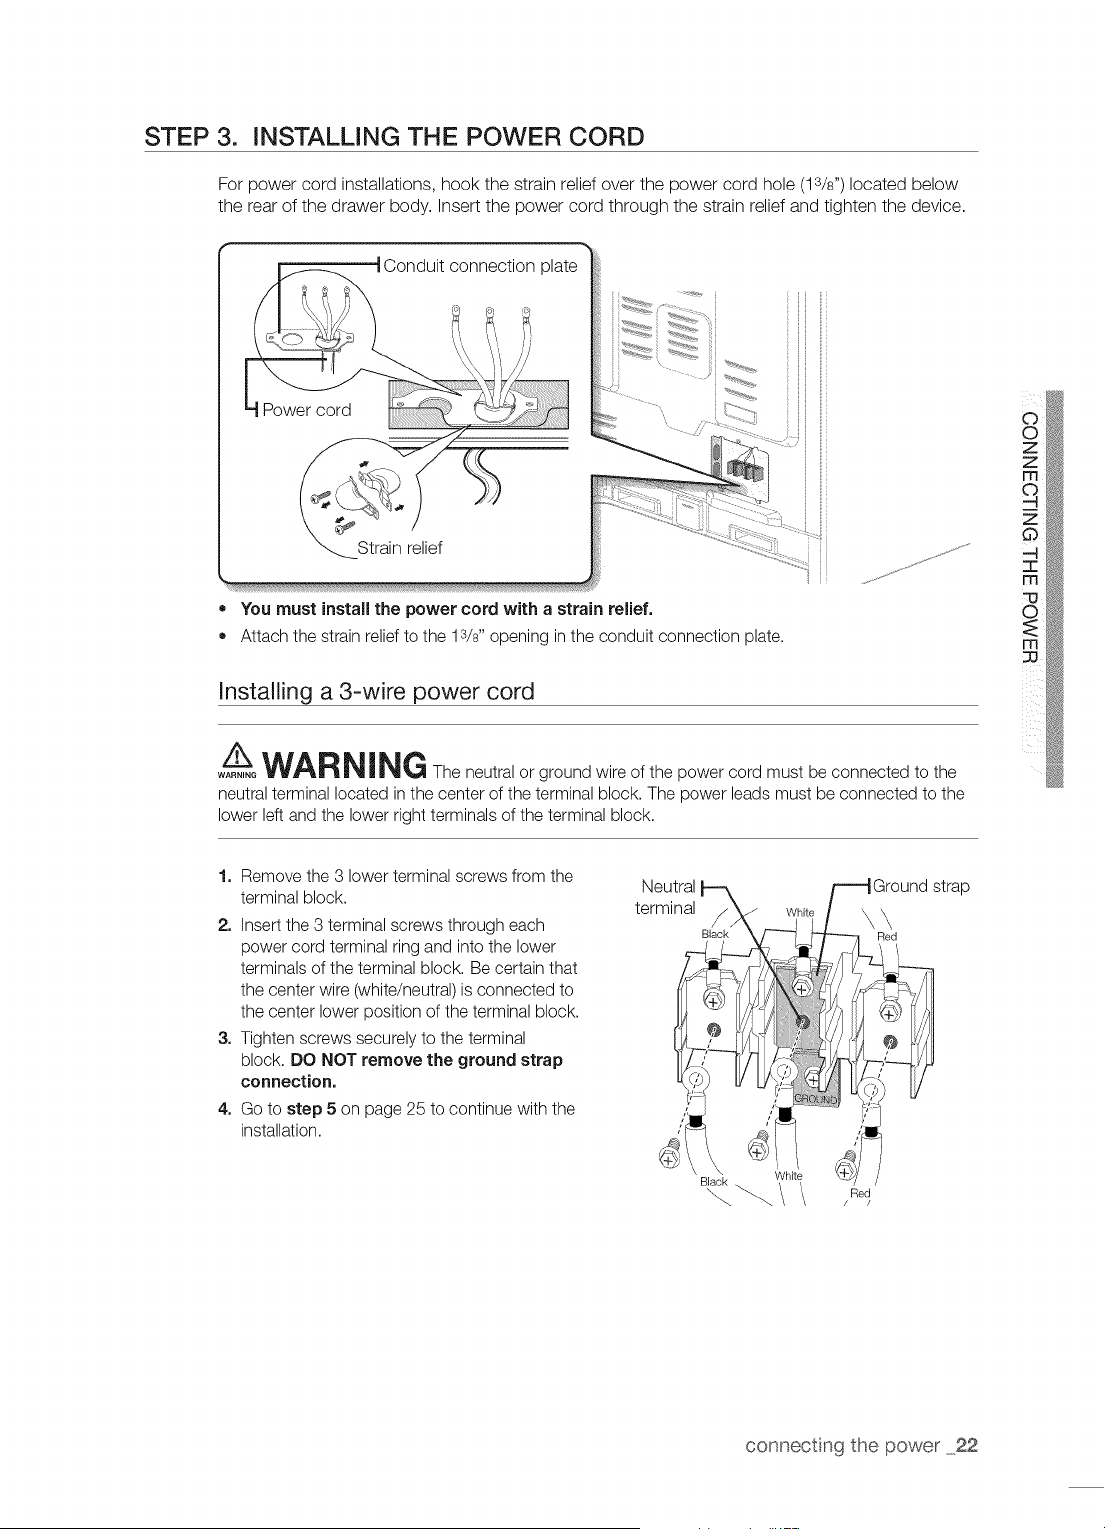
STEP 3. INSTALLING THE POWER CORD
For power cord installations, hook the strain relief over the power cord hole (lS/s") located below
the rear of the drawer body. Insert the power cord through the strain relief and tighten the device.
= You must install the power cord with a strain relief.
= Attach the strain relief to the 13/8"opening in the conduit connection plate.
Installing a 3-wire power cord
A__WARNING The neutral or ground wire of the power cord must be connected to the
WARNING
neutral terminal located inthe center of the terminal block. The power leads must be connected to the
lower left and the lower right terminals of the terminal block.
1. Remove the 3 lower terminal screws from the
terminal block.
2. Insert the 3 terminal screws through each
power cord terminal ring and into the lower
terminals of the terminal block. Be certain that
the center wire (white/neutral) is connected to
the center lower position of the terminal block.
3. Tighten screws securely to the terminal
block. DO NOT remove the ground strap
connection.
4. Go to step 5 on page 25 to continue with the
installation.
Black .
"_ _/ /Red
connecting the power 22
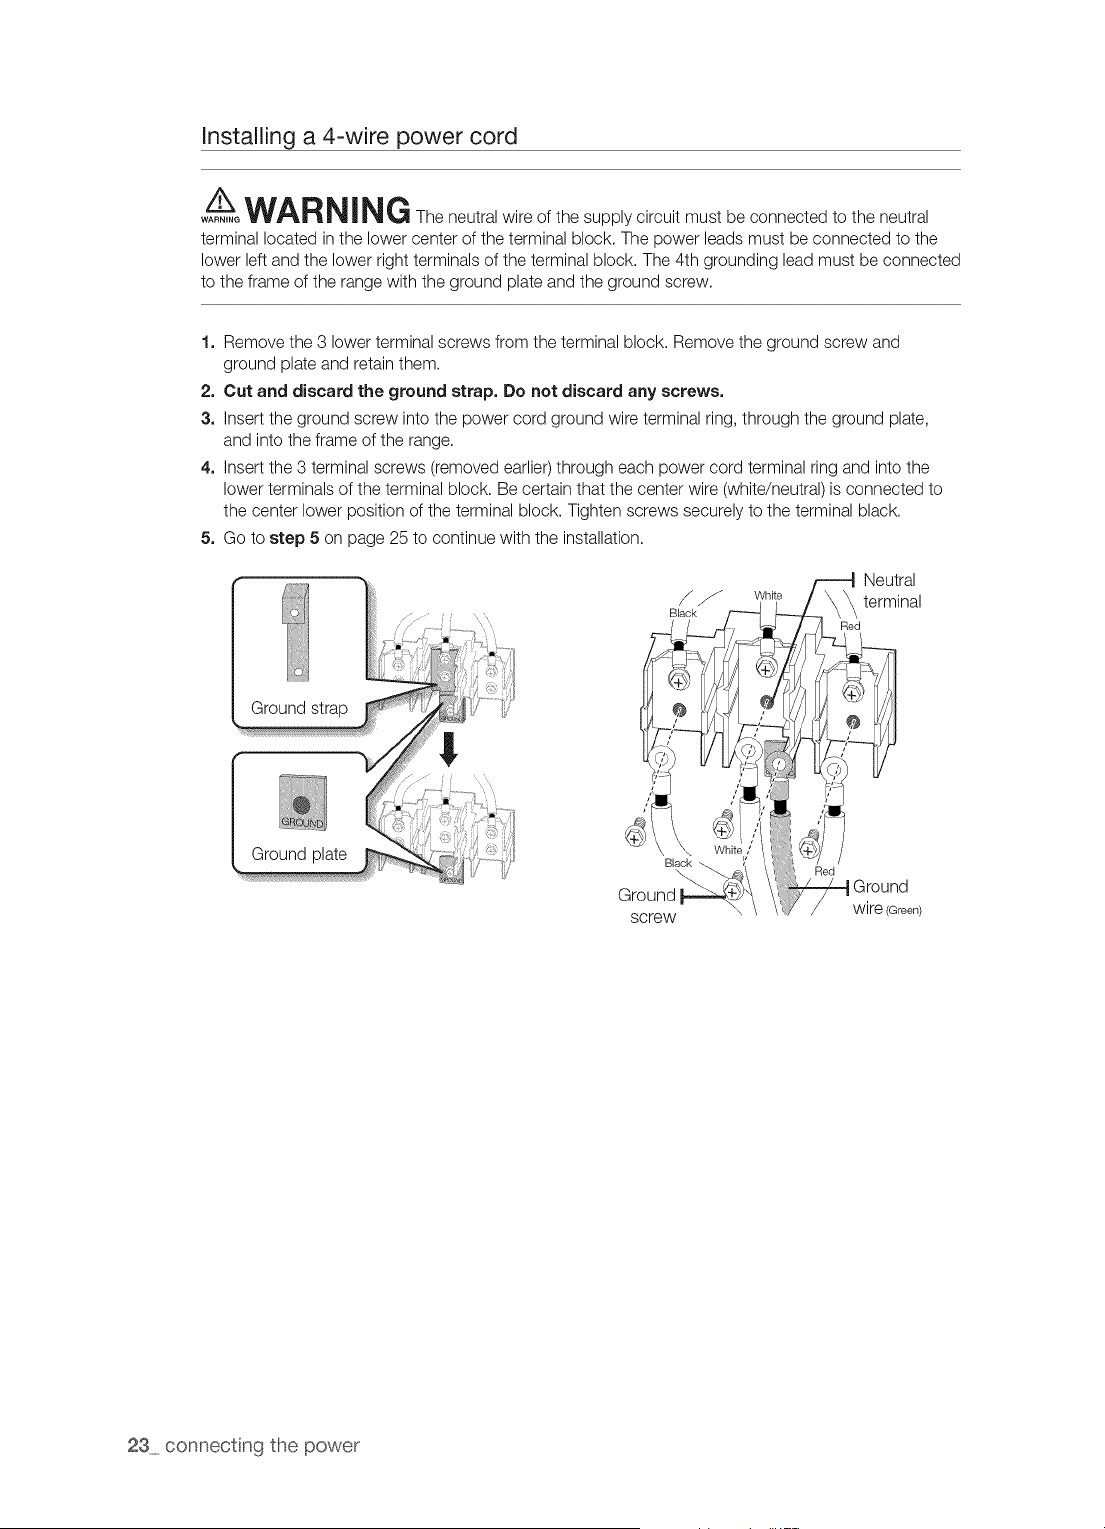
Installing a 4-wire power cord
Aw=oWARNING The neutral wire of the supply circuit must be connected to the neutral
terminal located in the lower center of the terminal block. The power leads must be connected to the
lower left and the lower right terminals of the terminal block. The 4th grounding lead must be connected
to the frame of the range with the ground plate and the ground screw.
1. Remove the 3 lower terminal screws from the terminal block. Remove the ground screw and
ground plate and retain them.
2. Cut and discard the ground strap. Do not discard any screws.
3. Insert the ground screw into the power cord ground wire terminal ring, through the ground plate,
and into the frame of the range.
4. Insert the 3 terminal screws (removed earlier)through each power cord terminal ring and into the
lower terminals of the terminal block. Be certain that the center wire (white/neutral) is connected to
the center lower position of the terminal block. Tighten screws securely to the terminal black.
5. Go to step 5 on page 25 to continue with the installation.
Ground
Ground plate
screw
23 connecting the power
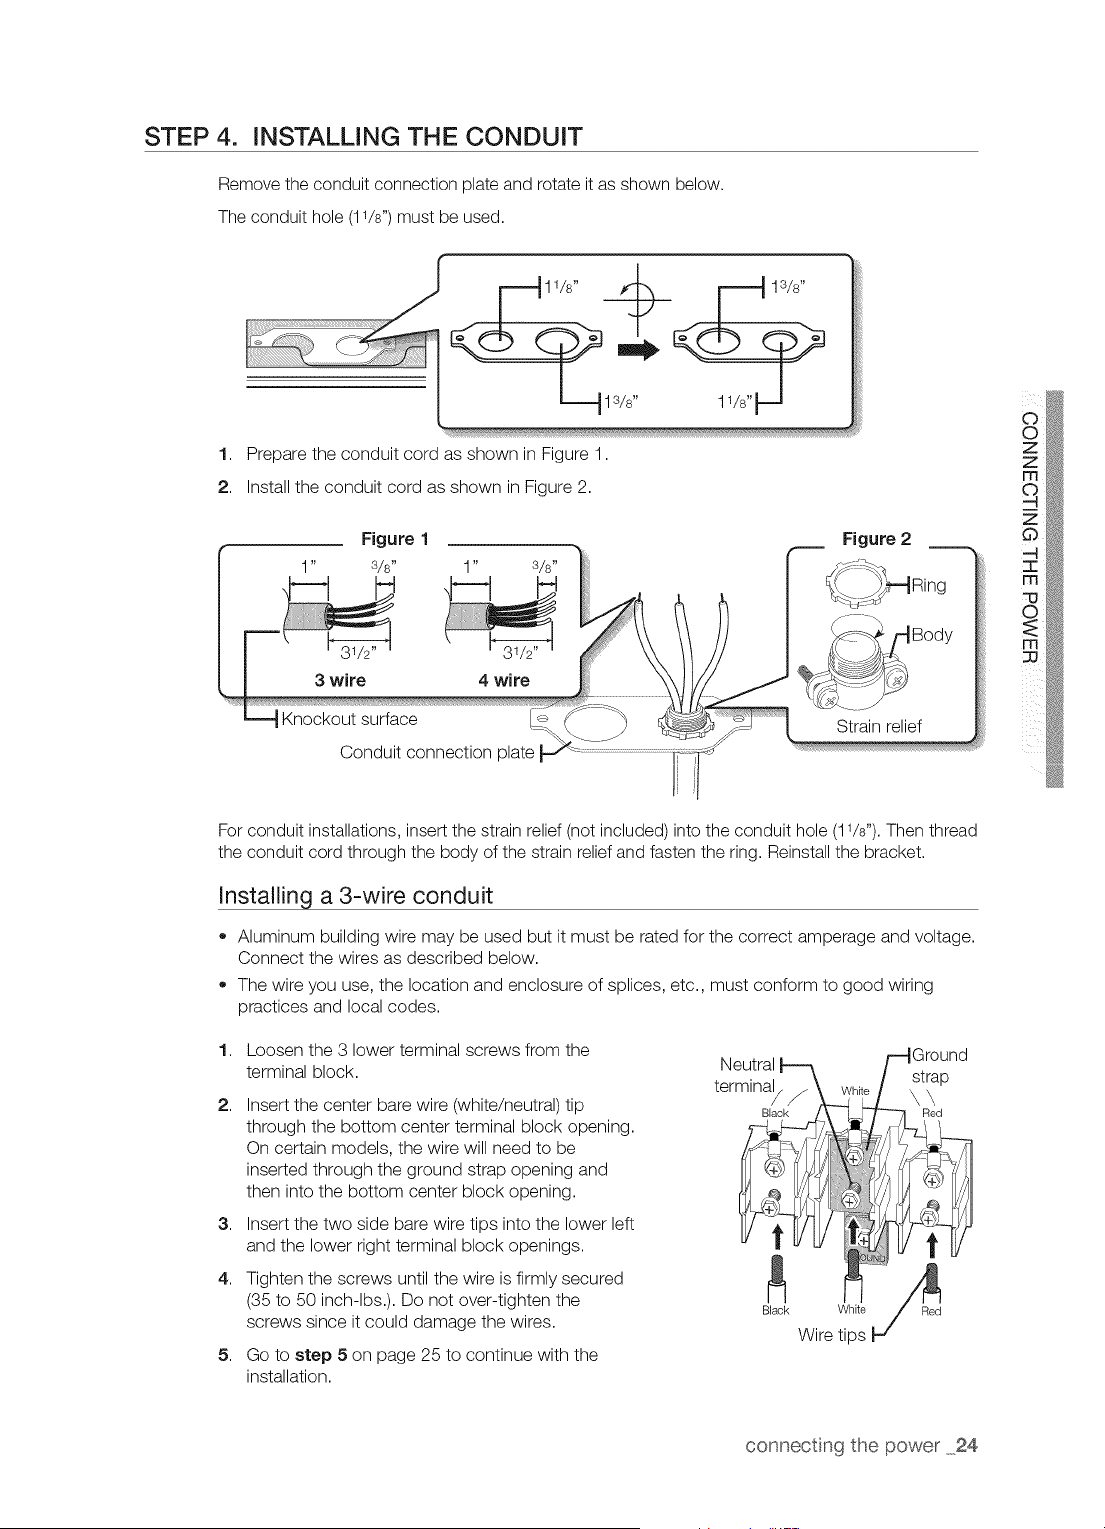
STEP 4. INSTALLING THE CONDUIT
Remove the conduit connection plate and rotate it as shown below.
The conduit hole (11/8")must be used.
1. Prepare the conduit cord as shown in Figure 1.
2. Install the conduit cord as shown in Figure 2.
Figure 1 Figure 2
1" S/s" 1" 3/8"
3 wire 4 wire
Knockout surface
Conduit connection plate
Strain relief
For conduit installations, insert the strain relief (not included) into the conduit hole (11/8").Then thread
the conduit cord through the body of the strain relief and fasten the ring. Reinstall the bracket.
Installing a 3-wire conduit
• Aluminum building wire may be used but it must be rated for the correct amperage and voltage.
Connect the wires as described below.
The wire you use, the location and enclosure of splices, etc., must conform to good wiring
practices and local codes.
1,
2,
3,
4,
5,
Loosen the 3 lower terminal screws from the
terminal block.
Insert the center bare wire (white/neutral) tip
through the bottom center terminal block opening.
On certain models, the wire will need to be
inserted through the ground strap opening and
then into the bottom center block opening.
Insert the two side bare wire tips into the lower left
and the lower right terminal block openings.
Tighten the screws until the wire is firmly secured
(35 to 50 inch-lbs.). Do not over-tighten the
screws since it could damage the wires.
Go to step 5 on page 25 to continue with the
installation.
connecting the power 24
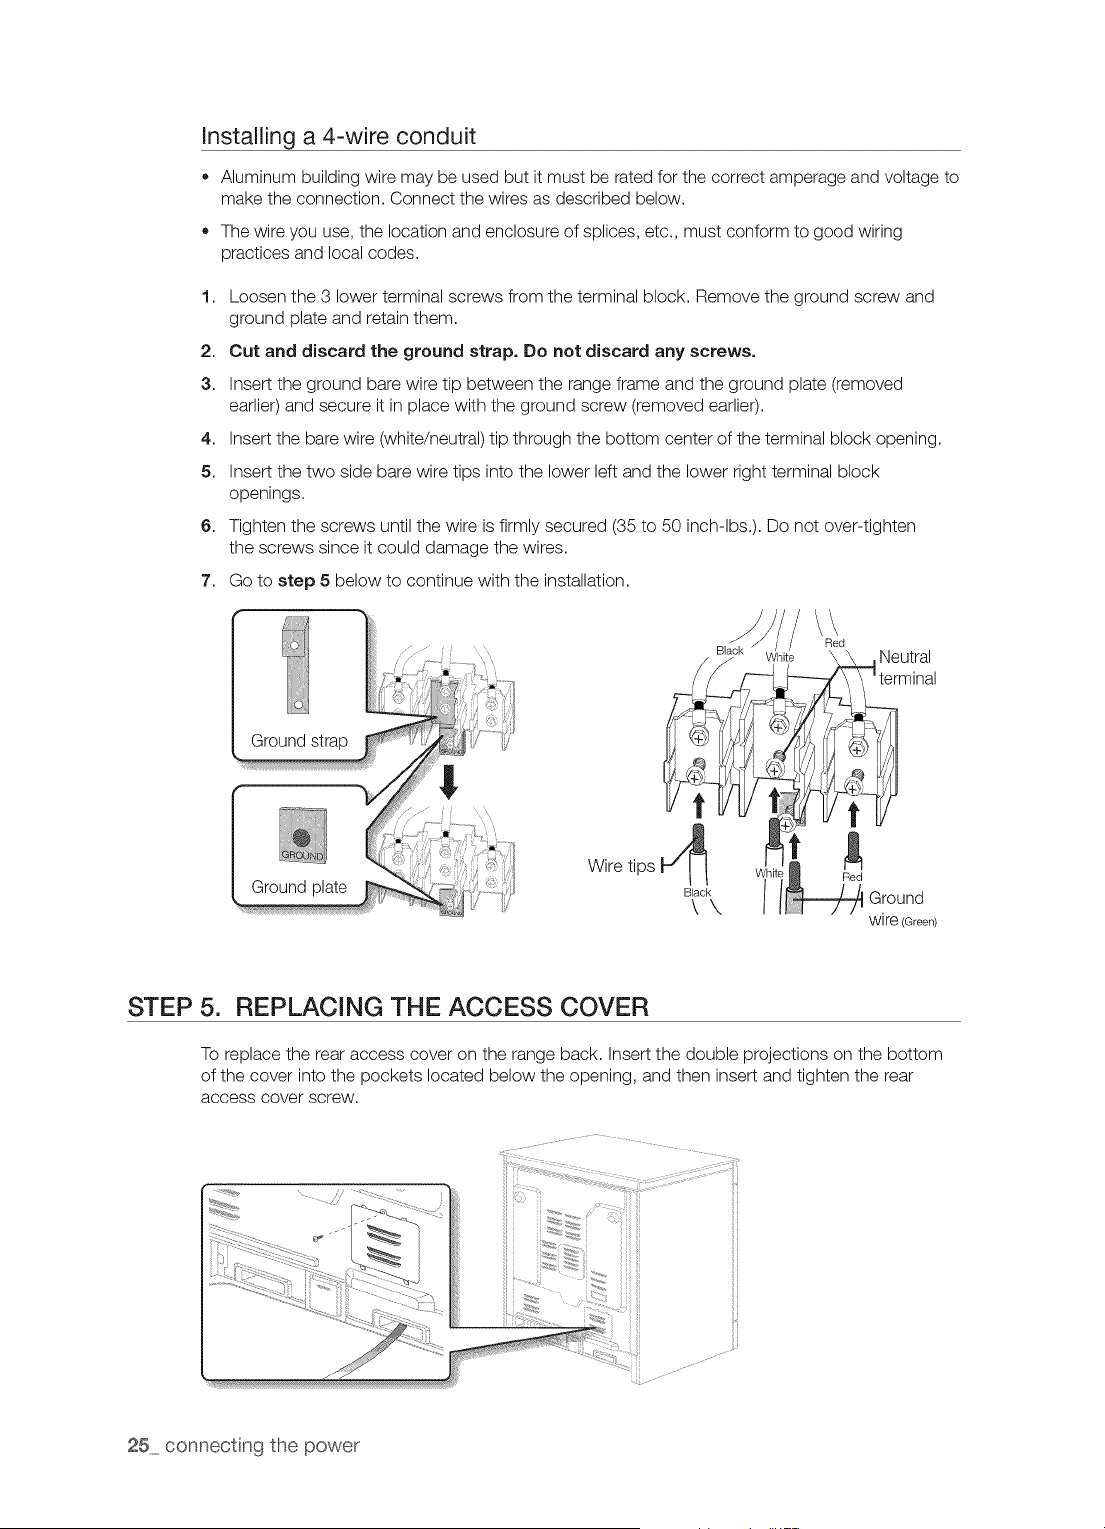
Installing a 4-wire conduit
• Aluminum building wire may be used but it must be rated for the correct amperage and voltage to
make the connection. Connect the wires as described below.
The wire you use, the location and enclosure of splices, etc., must conform to good wiring
practices and local codes.
1. Loosen the 3 lower terminal screws from the terminal block. Remove the ground screw and
ground plate and retain them.
2. Cut and discard the ground strap. Do not discard any screws.
3. Insert the ground bare wire tip between the range frame and the ground plate (removed
earlier) and secure it in place with the ground screw (removed earlier).
4. Insert the bare wire (white/neutral) tip through the bottom center of the terminal block opening.
5. Insert the two side bare wire tips into the lower left and the lower right terminal block
openings.
6. Tighten the screws until the wire is firmly secured (35 to 50 inch-lbs.). Do not over-tighten
the screws since it could damage the wires.
7. Go to step 5 below to continue with the installation.
Ground
Ground plate
/\\
Red
k White \ \ ,Neutral
terminal
Wire tips Red
o c\ Ill-/e ouo0
wire (Green)
STEP 5. REPLACING THE ACCESS COVER
To replace the rear access cover on the range back. Insert the double projections on the bottom
of the cover into the pockets located below the opening, and then insert and tighten the rear
access cover screw.
25 connecting the power
I
i s:L na r nge
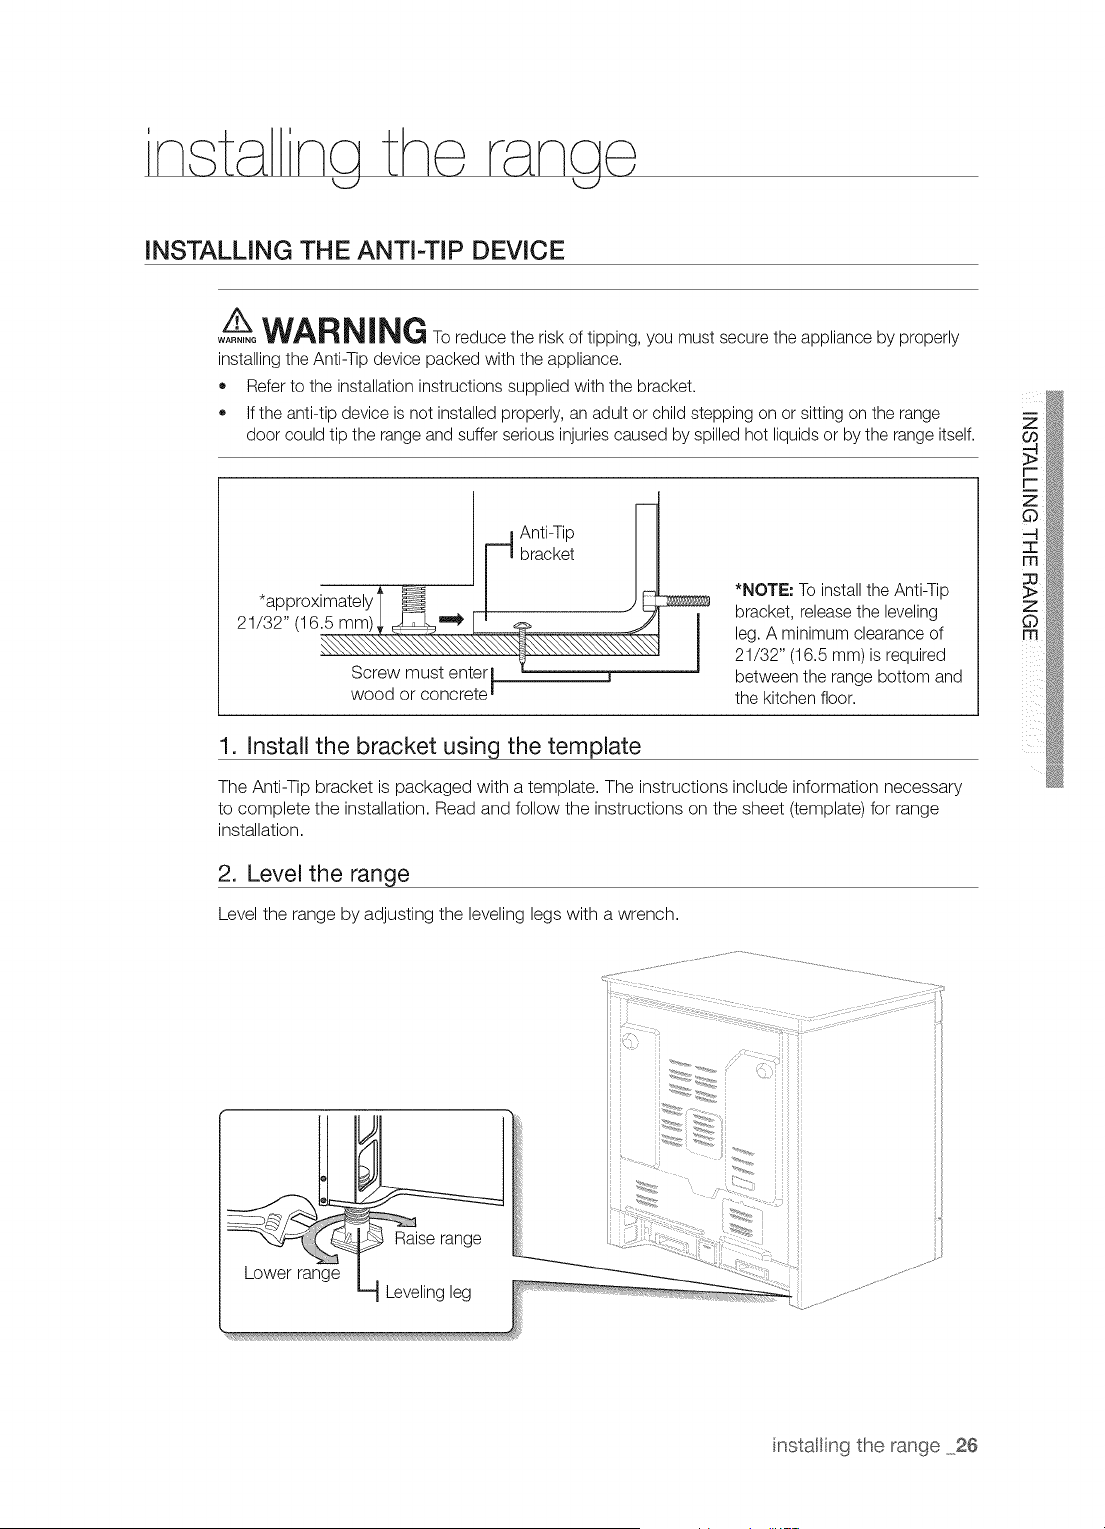
INSTALLING THE ANTI-TIP DEVICE
A__WARNING To reduce the risk of tipping, you must secure the appliance by properly
WARNING
installing the Anti-Tip device packed with the appliance.
• Refer to the installation instructions supplied with the bracket.
If the anti-tip device is not installed properly, an adult or child stepping on or sitting on the range
door could tip the range and suffer serious injuries caused by spilled hot liquids or by the range itself.
*approximately
21/32" (16.5 mm)
Screw must enterl
wood or concrete I
Anti-Tip
bracket
*NOTE: To install the Anti-Tip
bracket, releasethe leveling
leg. A minimum clearance of
21/32" (16.5 mm)is required
between the range bottom and
the kitchen floor.
1. Install the bracket usinct the template
The Anti-Tip bracket is packaged with a template. The instructions include information necessary
to complete the installation. Read and follow the instructions on the sheet (template) for range
installation.
2. Level the range
Level the range by adjusting the leveling legs with a wrench.
Lower range
iii ii
i iii ii
...... i ii ii
nstalling the range 26
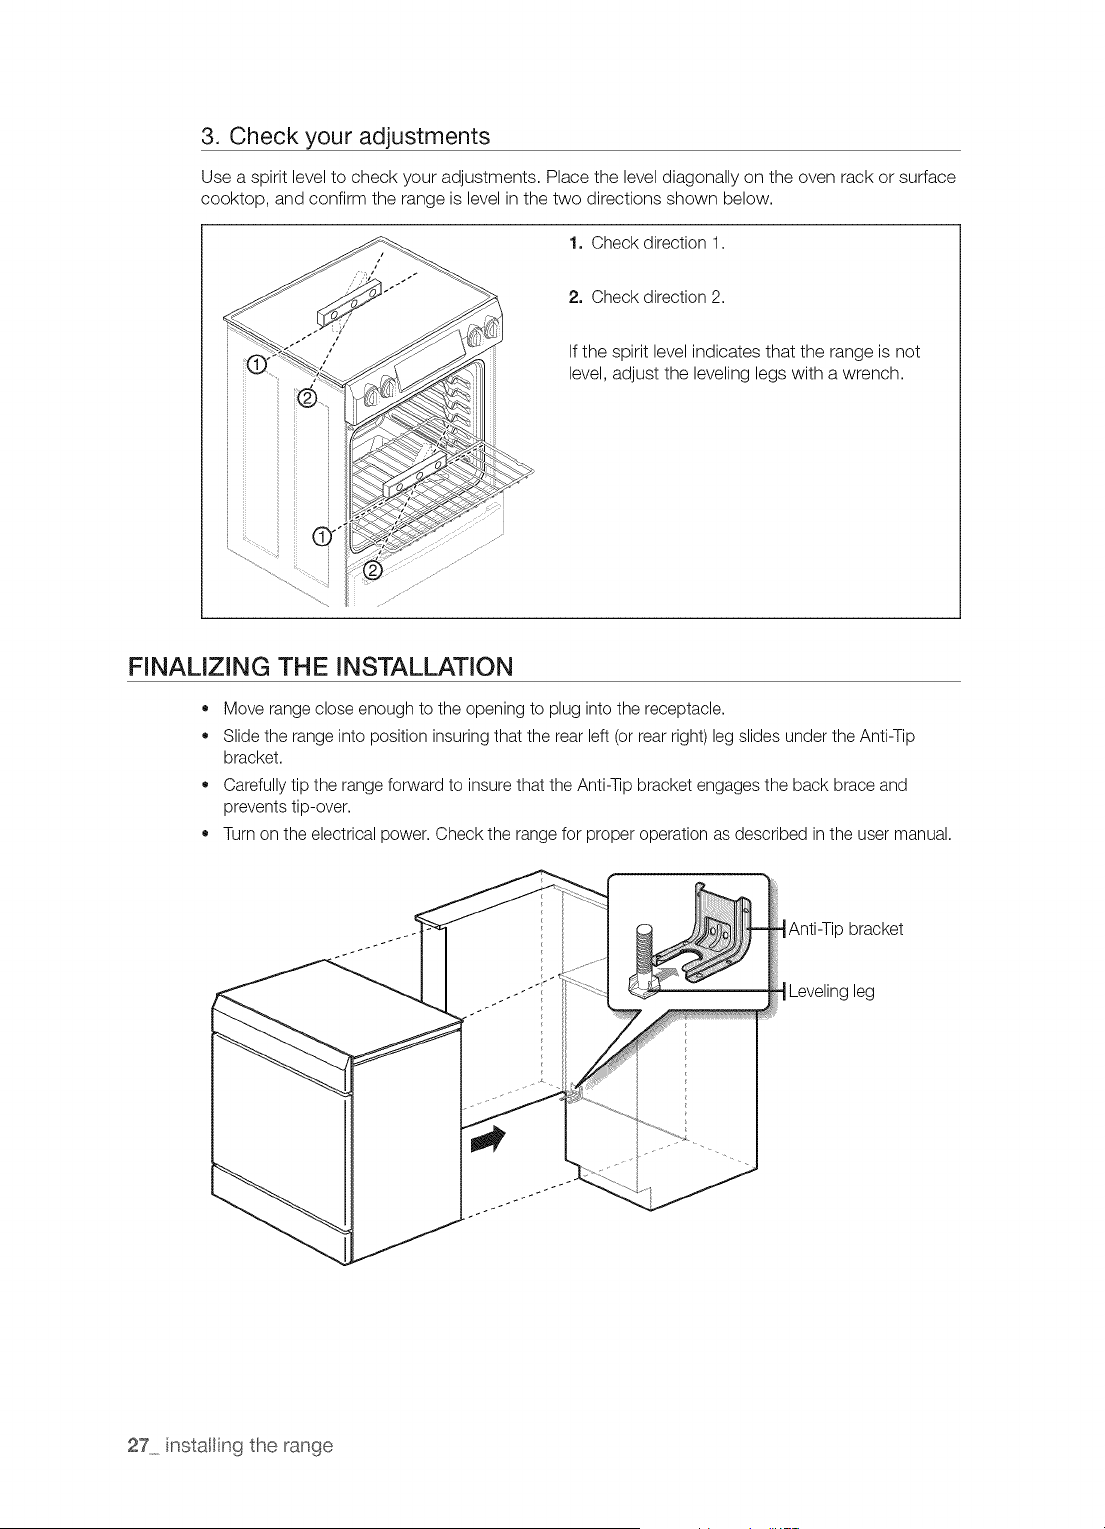
3. Check your adjustments
Use a spirit level to check your adjustments. Place the level diagonally on the oven rack or surface
cooktop, and confirm the range is level in the two directions shown below.
1. Check direction 1.
2. Check direction 2.
If the spirit level indicates that the range is not
level, adjust the leveling legs with a wrench.
FINALIZING THE INSTALLATION
• Move range close enough to the opening to plug into the receptacle.
Slide the range into position insuring that the rear left (or rear right) leg slides under the Anti-Tip
bracket.
Carefully tip the range forward to insure that the Anti-qip bracket engages the back brace and
prevents tip-over.
Turn on the electrical power. Check the range for proper operation as described in the user manual.
-_Anti-Tip bracket
-_Leveling leg
27 nstalling the range
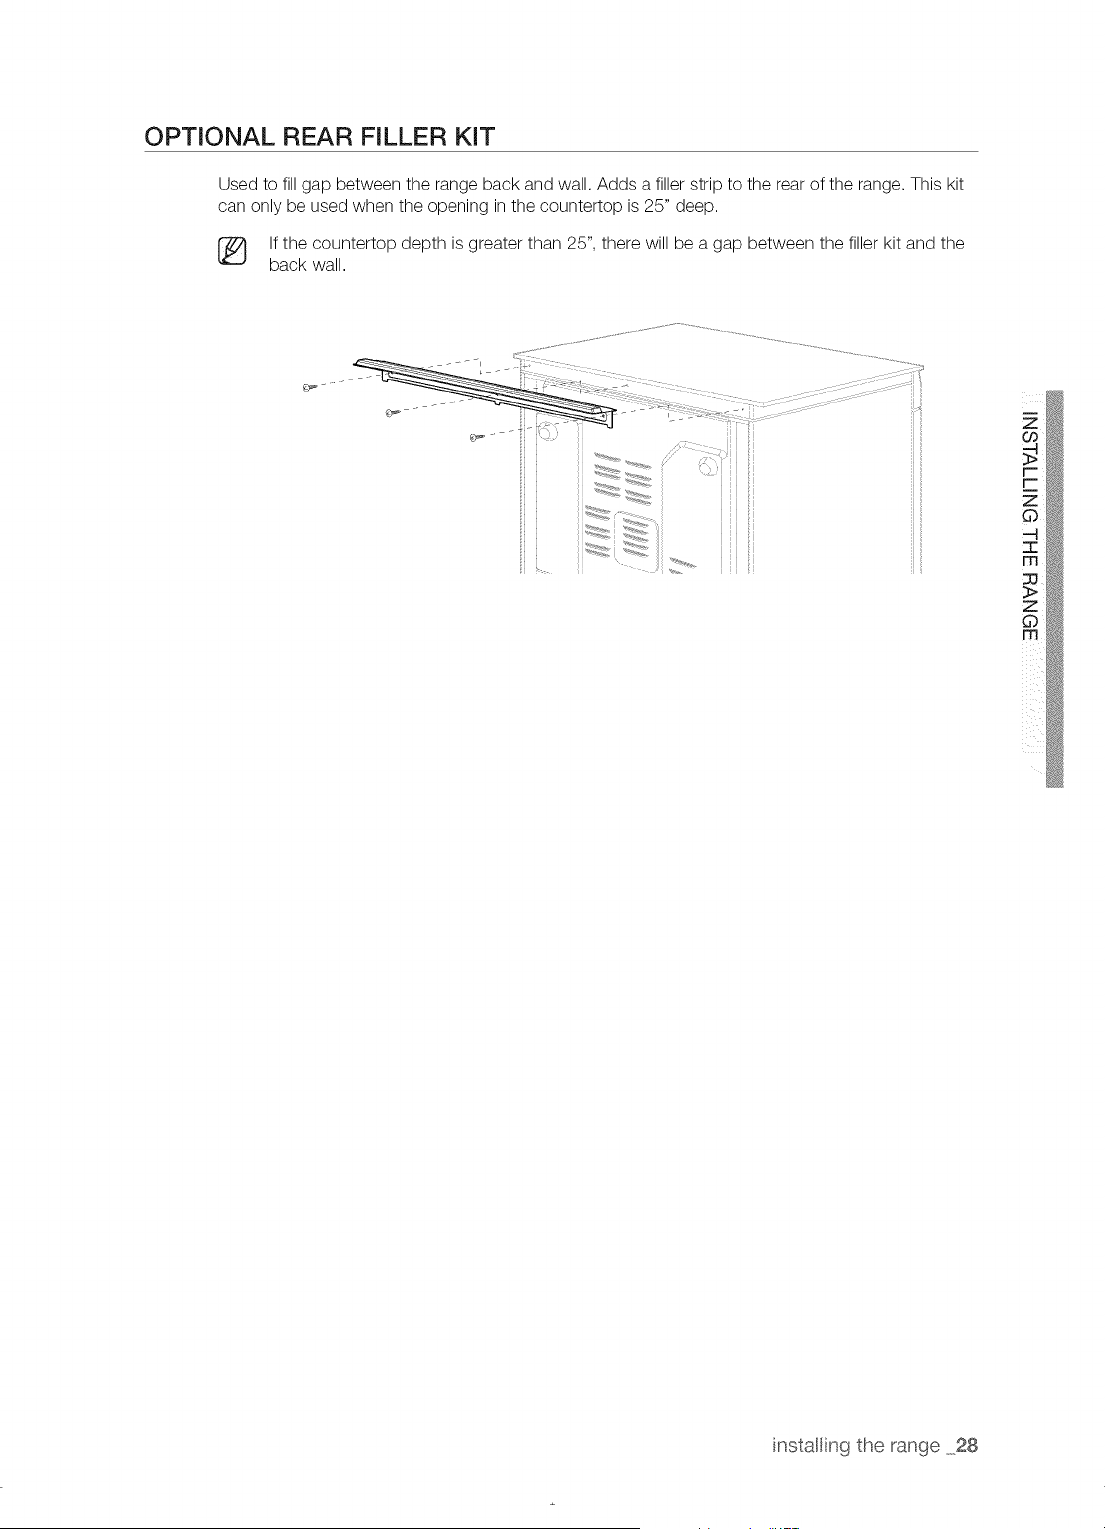
OPTIONAL REAR FILLER KIT
Used to fill gap between the range back and wall. Adds a filler strip to the rear of the range. This kit
can only be used when the opening in the countertop is 25" deep.
[_ If the countertop depth is greater than 25", there will be a gap between the filler kit and the
back wall.
Z
instaling the range 28
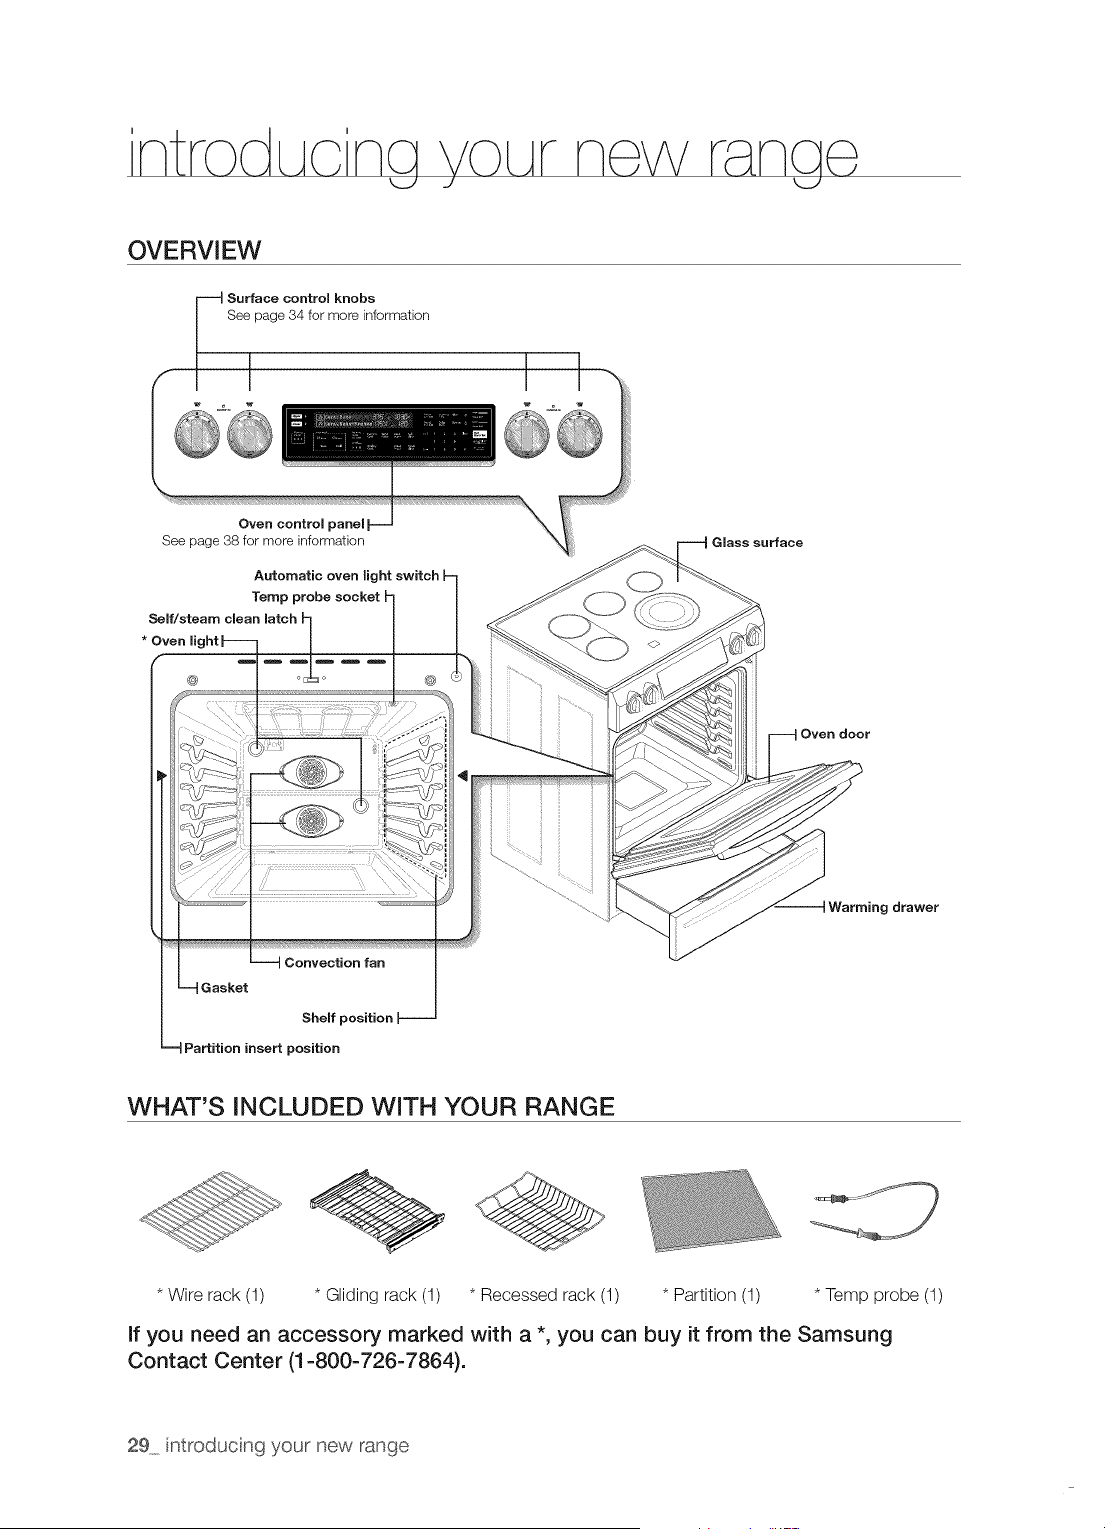
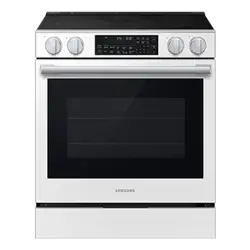
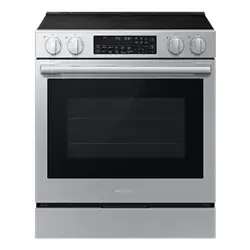
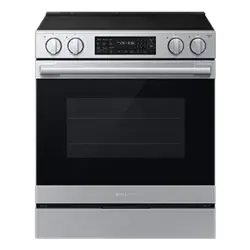
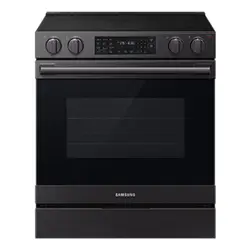
OVERVIEW
Surface control knobs
See page 34 for more information
Oven control
See page 38 for more information
Automatic oven light switch h
Temp probe socket _- /
Self/steam clean latch h /
* Oven light | J J
--4 G asker
Shelf position [--
--4 Partition insert position
Glass surface
Oven door
9 drawer
WHAT'S INCLUDED WITH YOUR RANGE
* Wire rack (1) * Gliding rack (1) * Recessed rack (1) * Partition (1) * Temp probe (1)
If you need an accessory marked with a *, you can buy it from the Samsung
Contact Center (1-800-726-7864).
29 ntroducing your new range
Clean the oven thoroughly before using it for the first time. Remove the accessories, set the oven to bake,
and then run the oven at 400 °F for 1 hour before using. There will be a distinctive odor. This is normal.
Ensure your kitchen is well ventilated during this conditioning period.
aett na arted
k_../ k_../
SETTING THE CLOCK
The clock must be set to the correct time of day for the automatic oven timing functions to work properly.
• The time of day cannot be changed during a timed cooking, a delay-timed cooking, or a self-
cleaning cycle.
You can choose between a 12-hour or 24-hour display. The default is 12-hour.
Flow to set the clock
1. Start the set up.
Press CLOCK.
2. Press CLOCK to select AM or PM.
(Skip this step on 24 hour display setting)
3. Enter the current time in hours and minutes on the number pad.
eg. 1,3,0 for 1:30
4. Press CLOCK or OVEN START/SET to save the changes.
CONTROL PANEL DISPLAY MODES
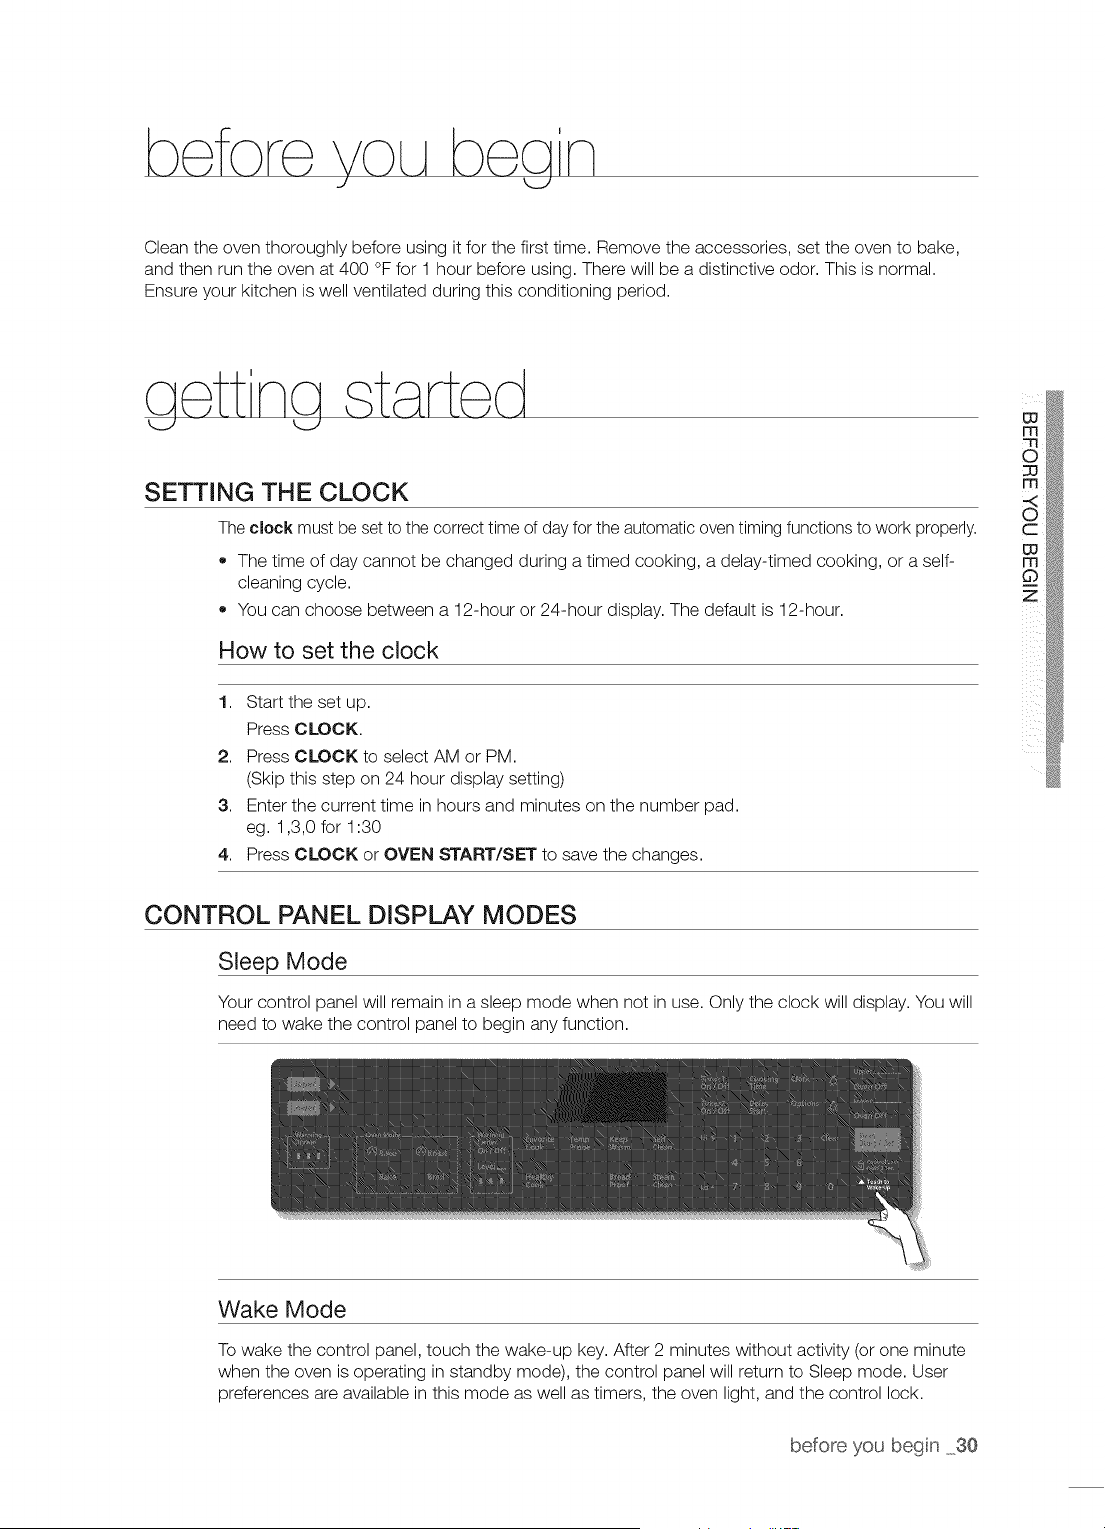
Sleep Mode
Your control panel will remain in a sleep mode when not in use. Only the clock will display. You will
need to wake the control panel to begin any function.
Wake Mode
To wake the control panel, touch the wake-up key. After 2 minutes without activity (or one minute
when the oven is operating in standby mode), the control panel will return to Sleep mode. User
preferences are available in this mode as well as timers, the oven light, and the control lock.
before you begin 30
TURNING THE OVEN LIGHT ON AND OFF
,, The oven light turns on automatically when the door is opened.
,, The oven light turns off automatically when the door is closed.
,, You can turn the oven light on and off manually by pressing OVEN LIGHT.
CONTROL LOCKOUT
Control lockout lets you lock the buttons on the touch pad so they cannot be activated accidentally.
Control lockout is only activated in standby mode.
How to activate the control lockout feature
1. Press Control Lock Hold 3 See. for 3 seconds.
The display will show "Loc" and Lock icon continuously, as well as the current time.
All functions must be cancelled before Control lockout is activated.
This function is available only when the oven temperature is under 400 °F.
How to unlock the controls
1. Press Control Lock Hold 3 See. for 3 seconds.
"Loc" and the Lock icon will disappear from the display.
SETTING THE KITCHEN TIMER
The timer counts down elapsed time and will beep when the time you set has elapsed. It does not
start or stop cooking functions. You can use the kitchen timer with any of the other oven functions.
How to set the timer
1. Turn the timer on.
Press TIMER1 ON/OFF (TIMER2 ON/OFF).
2. Enter the amount of time you want.
Enter the amount of time you want using the number pad, eg. 1,5. The timer can be set for
any amount of time from 1 minute to 9 hours and 99 minutes. If you make a mistake, press
CLEAR and enter the amount of time again.
3. Start the timer.
Press TIMER1 ON/OFF (TIMER2 ON/OFF) or OVEN START/SET.
4. When the set time has elapsed, the oven will beep and the display will show End until you
press the pad. You can cancel the timer at any time by pressing TIMER1 ON/OFF (TIMER2
ON/OFF).
31 getting started
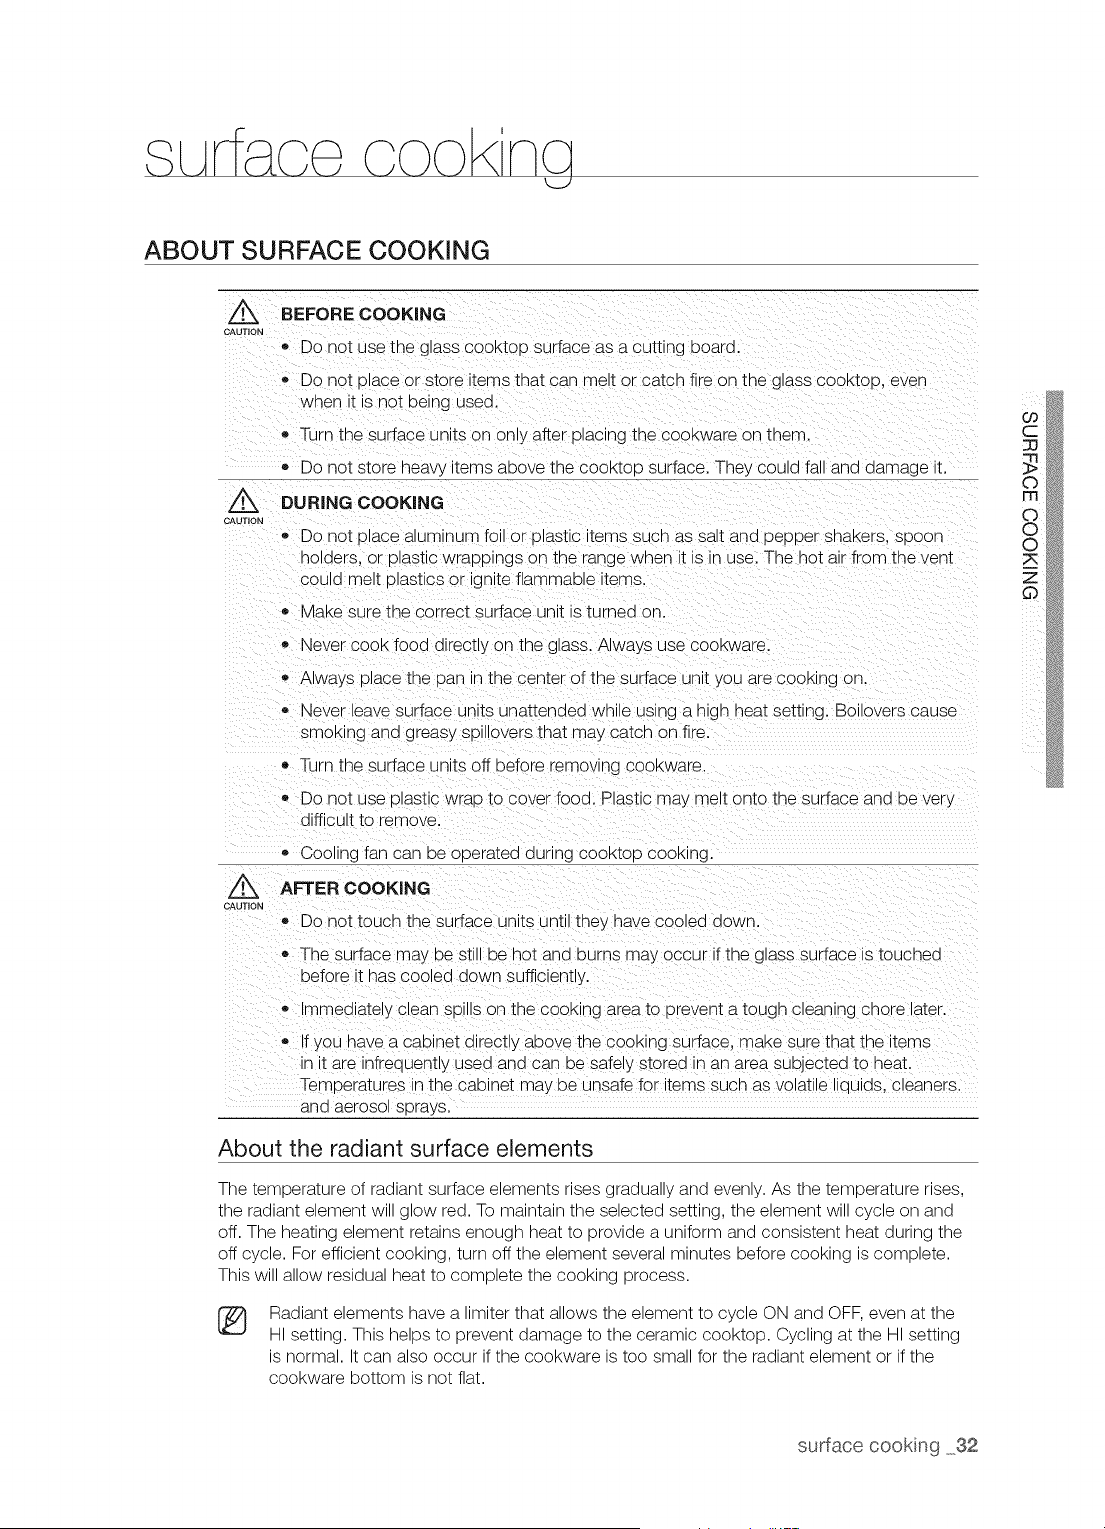
ABOUT SURFACE COOKING
Z_ BEFORE COOKING
CAUTION
,, Do not use the glass cooktoo surface as a cutting board.
o Do not place or store terns that can melt or catch fire on the g ass cooktco, even
when t is not being used.
,, Turn the surface units on only after placing the cookware on them.
,, Do not store heavy terns above the cool<too surface. The_ could fall and damage _t.
Z_ DURING COOKING
CAUTION
e Do not dlace aluminum fo or olastJc items SUChas salt and DeDDer snaKers, spoon
holders, or plastic wrappings on the "ange when it s in use. The hot air from the vent
could melt ulastlcs or gnite flammable items.
MaKe sure the correct surface unit s turned on.
,, Never cook food al'ectly on the glass. Always use COOKware.
,, Always place the Dan n the center of the surface un t you are COOKingon.
Never lea ie surface units unattenaea wnue using a n_gn heat sett_nc. Boilovers cause
smoKing and greasy sDJllovers that may catch on fire.
• lijrn the surface units off before removing COOKware.
,, Do not use Dlastic wrap b cover food. Plastic may melt onto the surface and De ver!.
diffic JIt to remove.
Cooling fan can De oderated during COOKIODCOOKing.
Z_ AFTER COOKING
CAUTION
,, Do not touch the surface units unt they nave coo_ea aown.
o The surface may be still be hot and burns may occur if the glass s Jrface is touched
before it nas cooled down suficiently.
Immediatey aean sDu_son the cool<_ngarea to prevent a tough clean_ng chore later.
,, If you nave a cabinet directly above the cooking surface, make sure that the items
n _tare infrequently used and can be safely storea _nan area subjected to heat.
Temperatures in the cabinet may De Jnsafe for items such as volatile liaulas, cleaners.
aria aerosol sprays.
About the radiant surface elements
The temperature of radiant surface elements rises gradually and evenly. As the temperature rises,
the radiant element will glow red. To maintain the selected setting, the element will cycle on and
off. The heating element retains enough heat to provide a uniform and consistent heat during the
off cycle. For efficient cooking, turn off the element several minutes before cooking is complete.
This will allow residual heat to complete the cooking process.
®
Radiant elements have a limiter that allows the element to cycle ON and OFF, even at the
HI setting. This helps to prevent damage to the ceramic cooktop. Cycling at the HI setting
is normal. It can also occur if the cookware is too small for the radiant element or if the
cookware bottom is not flat.
surface cookng 32
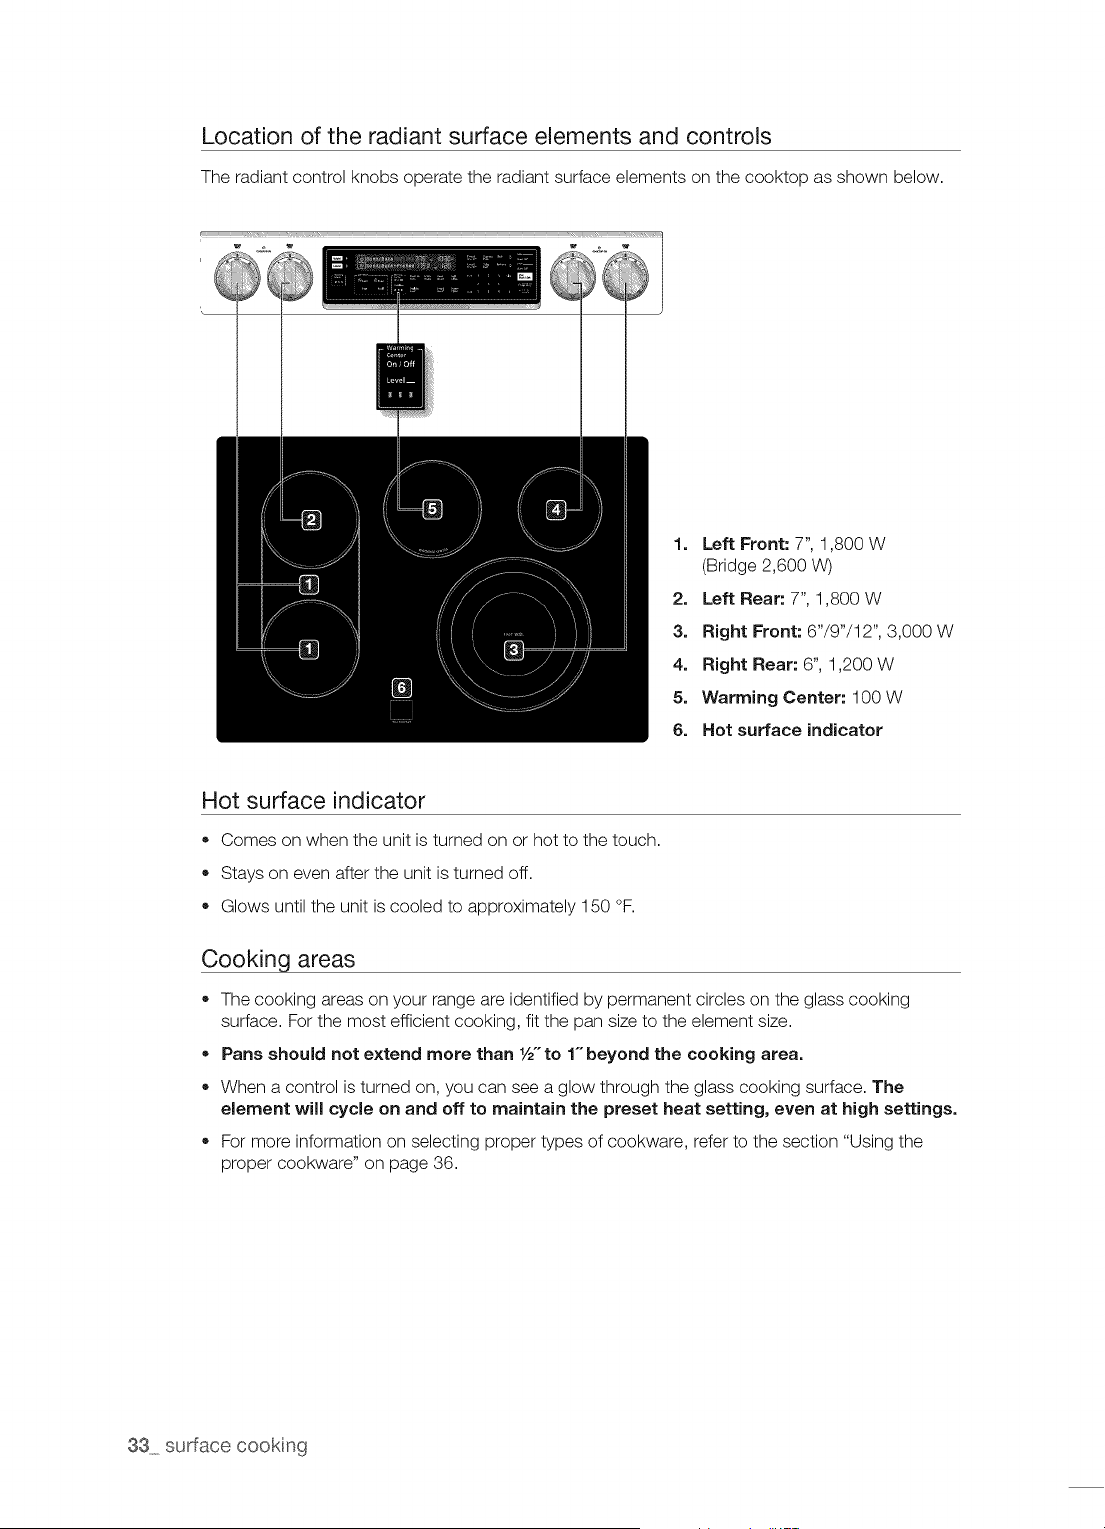
Location of the radiant surface elements and controls
The radiant control knobs operate the radiant surface elements on the cooktop as shown below.
1. Left Front: 7", 1,800 W
(Bridge 2,600 W)
2. Left Rear: 7", 1,800 W
3. Right Front: 6"/9"/12", 3,000 W
4. Right Rear: 6", 1,200 W
5. Warming Center: 100 W
6. Hot surface indicator
Hot surface indicator
• Comes on when the unit is turned on or hot to the touch.
Stays on even after the unit is turned off.
Glows until the unit is cooled to approximately 150 °F.
Cooking areas
The cooking areas on your range are identified by permanent circles on the glass cooking
surface. For the most efficient cooking, fit the pan size to the element size.
Pans should not extend more than 1/2"to 1-beyond the cooking area.
When a control is turned on, you can see a glow through the glass cooking surface. The
Nement wiJJcycle on and off to maintain the preset heat setting, even at high settings.
• For more information on selecting proper types of cookware, refer to the section "Using the
proper cookware" on page 36.
33 surface cooking
HOW TO SET THE APPLIANCE FOR SURFACE COOKING
"The surface elements may be hot eve n when off and bums can OCCUr:DO not touch
_uT,oN the surface elements until they have cooled down Sufficiently,
O At high or medium:high settings, never !eave food unattended, Boilovers cause
smoking and greasy Spillovers may catch on firel
! Be sure you turn the control knob to OFF when you finish cooking:
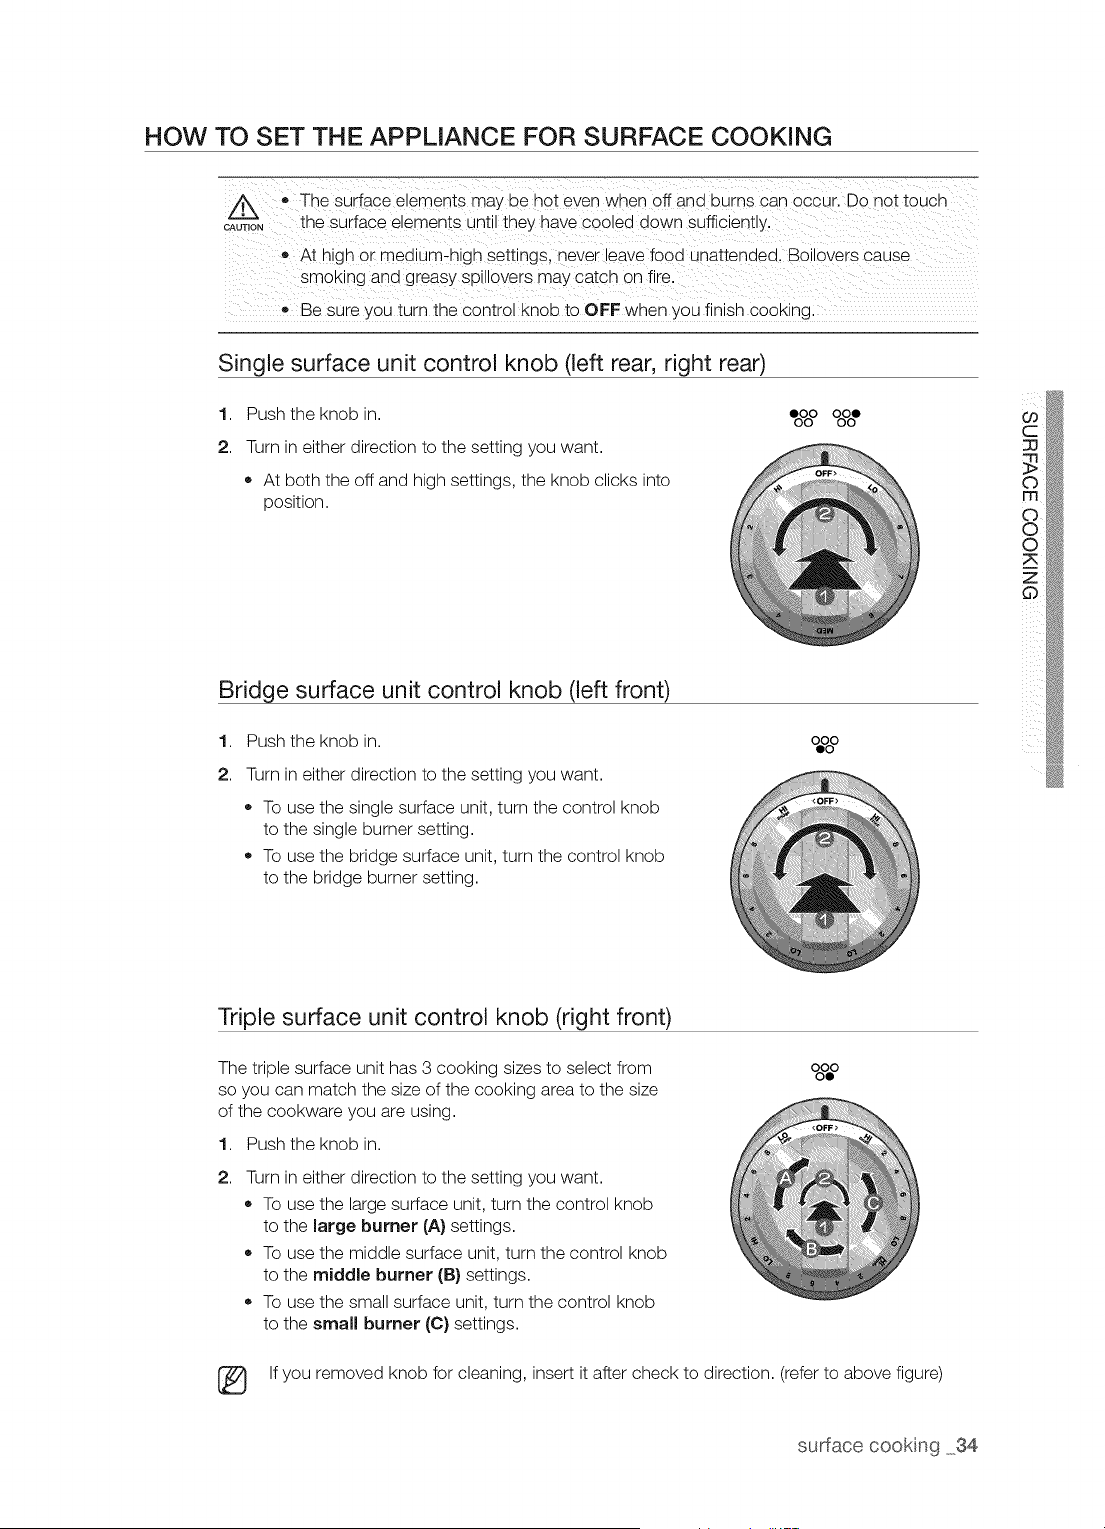
Single surface unit control knob (left rear, right rear)
1. Push the knob in. eoOoOOoOoO
2. Turn in either direction to the setting you want.
• At both the off and high settings, the knob clicks into
position.
Bridge surface unit control knob (left front)
1. Push the knob in. o=%o
2.
Turn in either direction to the setting you want.
To use the single surface unit, turn the control knob
to the single burner setting.
To use the bridge surface unit, turn the control knob
to the bridge burner setting.
Triple surface unit control knob (right front)
The triple surface unit has 3 cooking sizes to select from
so you can match the size of the cooking area to the size
of the cookware you are using.
1. Push the knob in.
2,
Turn in either direction to the setting you want.
To use the large surface unit, turn the control knob
to the large burner (A} settings.
To use the middle surface unit, turn the control knob
to the middle burner (B} settings.
To use the small surface unit, turn the control knob
to the small burner (C) settings.
%%0
[_ If you removed knob for cleaning, insert it after check to direction. (refer to above figure)
surface cooking 34
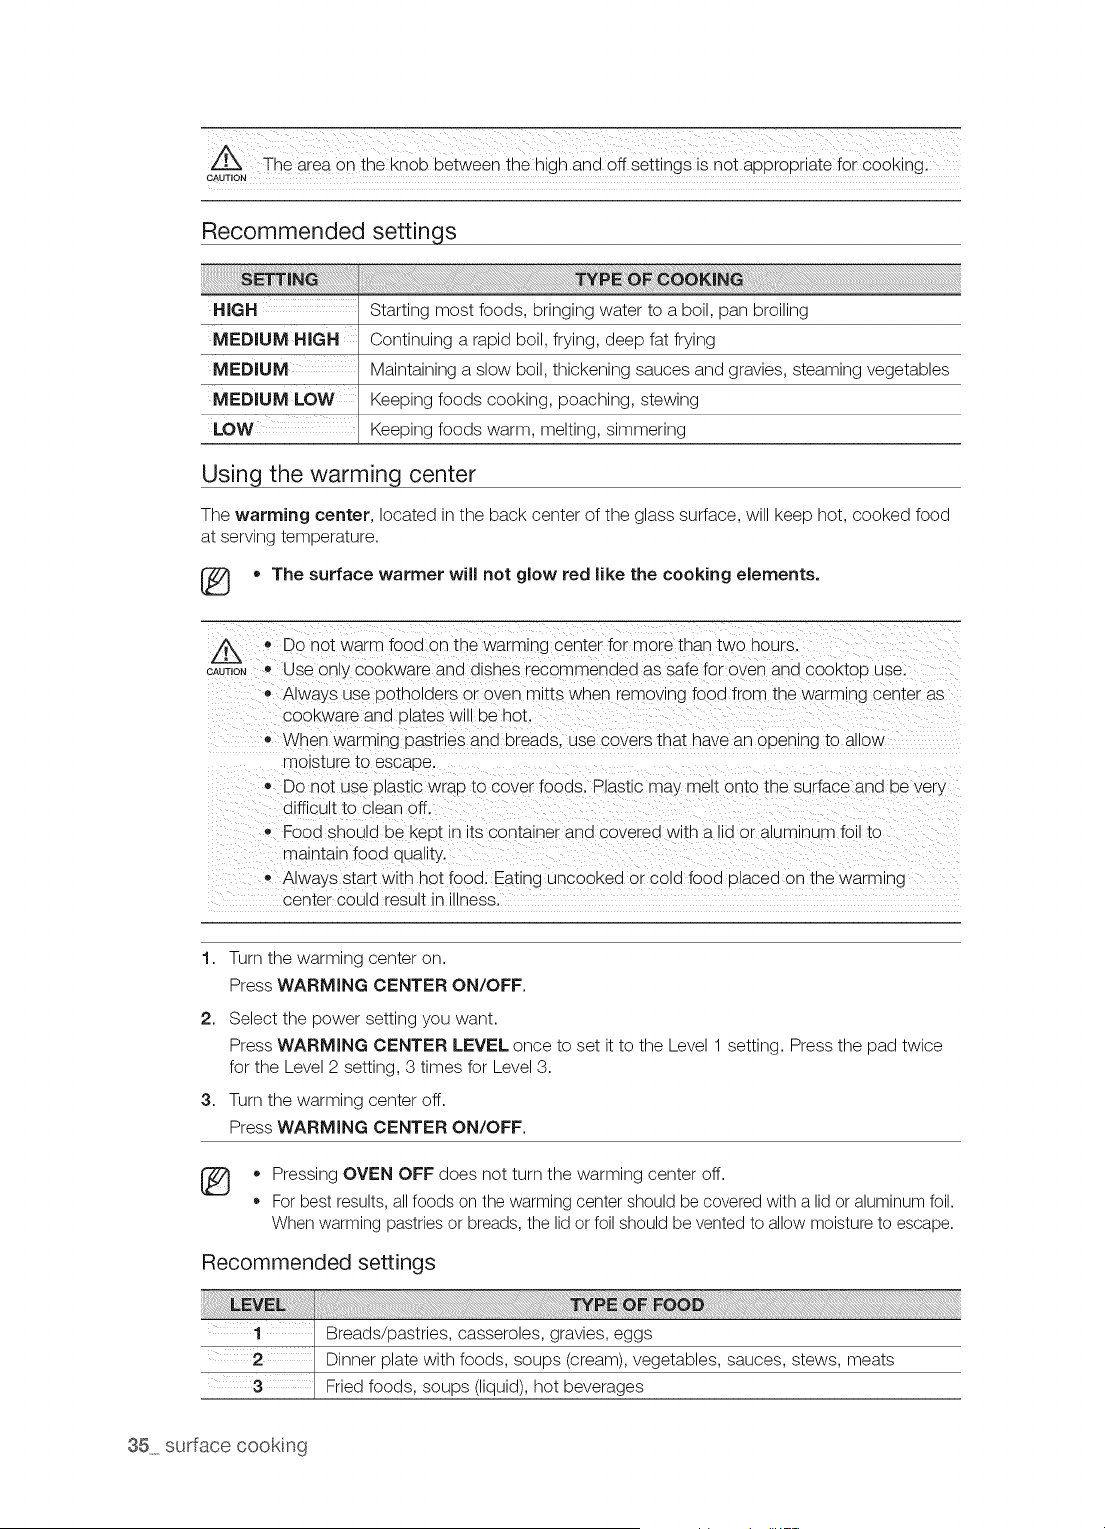
The area on the KnOb between the high andoff settings isnot appropriate foi Cooking:
CAUTION
Recommended settings
HiGH
MEDIUM HiGH
MEDIUM
MEDIUM LOW
LOW
Starting most foods, bringing water to a boil, pan broiling
Continuing a rapid boil, frying, deep fat frying
Maintaining a slow boil, thickening sauces and gravies, steaming vegetables
Keeping foods cooking, poaching, stewing
Keeping foods warm, melting, simmering
Using the warming center
The warming center, located in the back center of the glass surface, will keep hot, cooked food
at serving temperature.
[_ * The surface warmer will not glow red like the cooking elements.
CAU_T,ONO DO not warm food on the warming center for more than two hours.
Use on y cookware and dishes recommended as safe for oven and cooktca use.
o Always use potholders or oven mitts wnen removing food from the warming center as
COOKwareand olates will be hot.
When warming pastries and breads, use covers that have an open_ng to allow
moisture to escape.
Do not use Dlastlc wraD to cover foods. Plastic may melt onto the surface an a De very
difficult to clean off.
Food should De KeDt in ts container and covered wltn a lid or aluminum fc to
maintain food duality.
Always start with hot food. Eat ng uncooked or cold food olaced on the warming
center could result _nIllness.
1. Turn the warming center on.
Press WARMING CENTER ON/OFF.
2. Select the power setting you want.
Press WARMING CENTER LEVEL once to set it to the Level 1 setting. Press the pad twice
for the Level 2 setting, 3 times for Level 3.
3. Turn the warming center off.
Press WARMING CENTER ON/OFF.
* Pressing OVEN OFF does not turn the warming center off.
For best results, all foods on the warming center should be covered with a lid or aluminum foil.
When warming pastries or breads, the lid or foil should be vented to allow moisture to escape.
Recommended settings
35 surface cookng
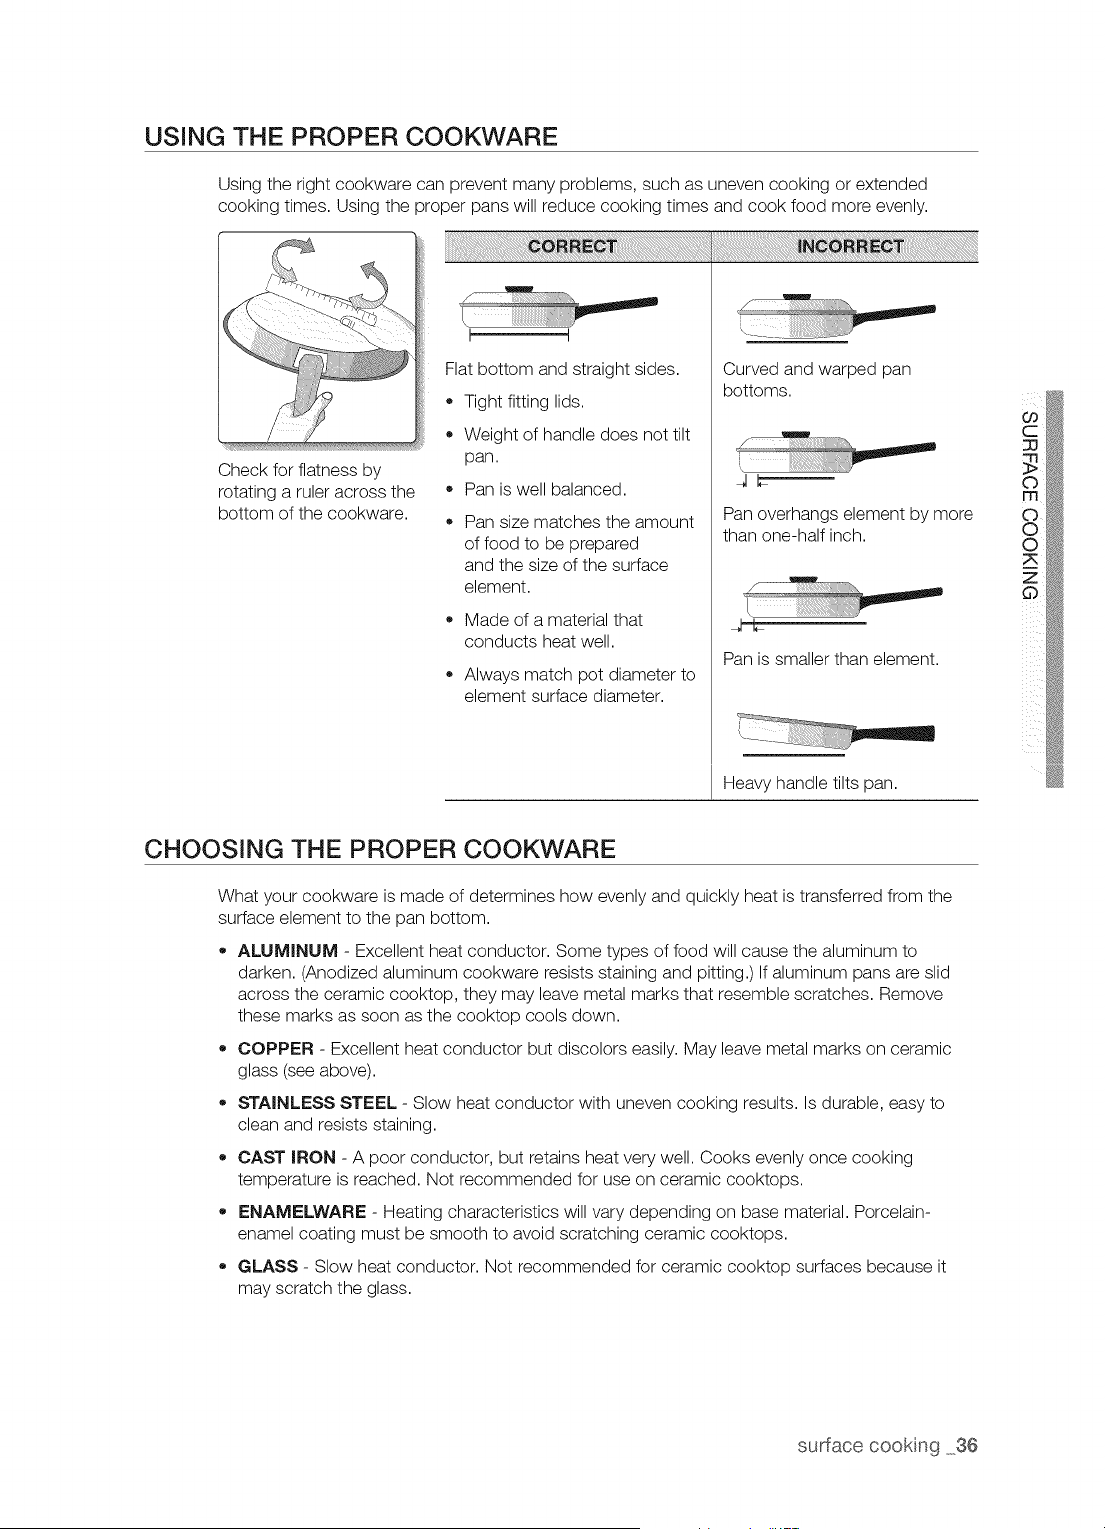
USING THE PROPER COOKWARE
Using the right cookware can prevent many problems, such as uneven cooking or extended
cooking times. Using the proper pans will reduce cooking times and cook food more evenly.
Check for flatness by
rotating a ruler across the
bottom of the cookware.
Flat bottom and straight sides.
Tight fitting lids.
Weight of handle does not tilt
pan.
Pan is well balanced.
Pan size matches the amount
of food to be prepared
and the size of the surface
element.
Made of a material that
conducts heat well.
Always match pot diameter to
element surface diameter.
Curved and warped pan
bottoms.
Pan overhangs element by more
than one-half inch.
Pan is smaller than element.
Heavy handle tilts pan.
CHOOSING THE PROPER COOKWARE
What your cookware is made of determines how evenly and quickly heat is transferred from the
surface element to the pan bottom.
ALUMINUM - Excellent heat conductor. Some types of food will cause the aluminum to
darken. (Anodized aluminum cookware resists staining and pitting.) If aluminum pans are slid
across the ceramic cooktop, they may leave metal marks that resemble scratches. Remove
these marks as soon as the cooktop cools down.
COPPER - Excellent heat conductor but discolors easily. May leave metal marks on ceramic
glass (see above).
STAINLESS STEEL - Slow heat conductor with uneven cooking results. Is durable, easy to
clean and resists staining.
CAST IRON - A poor conductor, but retains heat very well. Cooks evenly once cooking
temperature is reached. Not recommended for use on ceramic cooktops.
ENAMELWARE - Heating characteristics will vary depending on base material. Porcelain-
enamel coating must be smooth to avoid scratching ceramic cooktops.
GLASS - Slow heat conductor. Not recommended for ceramic cooktop surfaces because it
may scratch the glass.
surface cooking 36
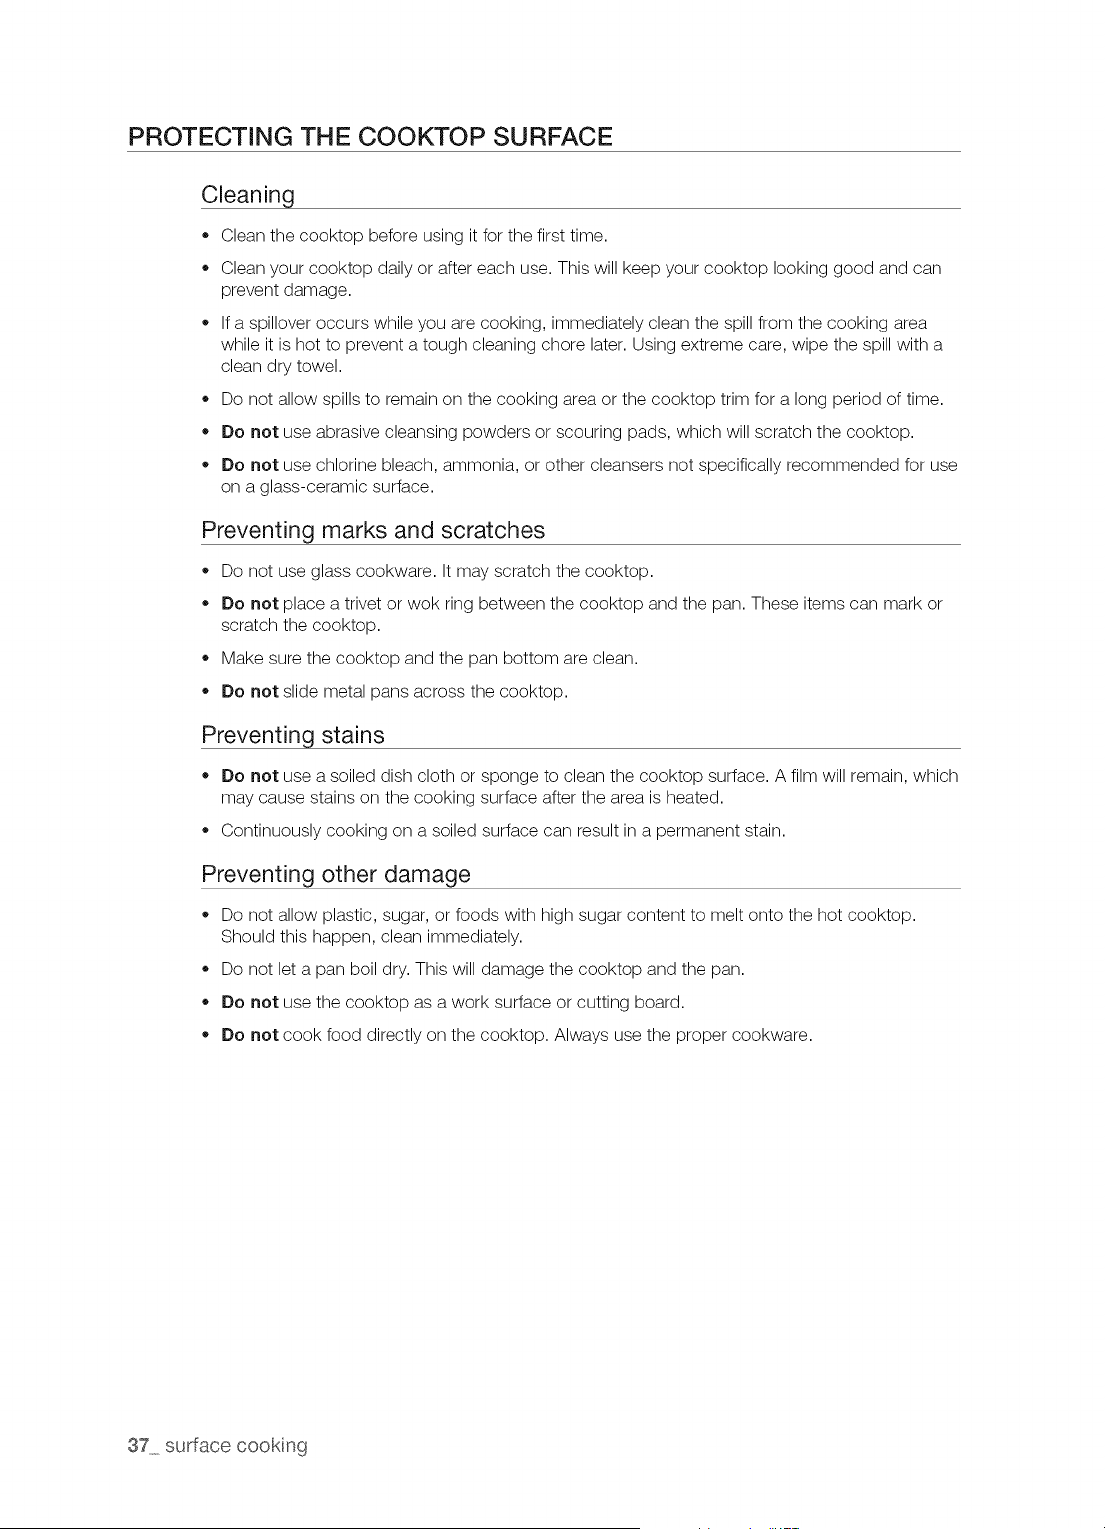
PROTECTING THE COOKTOP SURFACE
Cleaning
,, Clean the cooktop before using it for the first time.
* Clean your cooktop daily or after each use. This will keep your cooktop looking good and can
prevent damage.
,, If a spillover occurs while you are cooking, immediately clean the spill from the cooking area
while it is hot to prevent a tough cleaning chore later. Using extreme care, wipe the spill with a
clean dry towel.
,, Do not allow spills to remain on the cooking area or the cooktop trim for a long period of time.
* Do not use abrasive cleansing powders or scouring pads, which will scratch the cooktop.
* Do not use chlorine bleach, ammonia, or other cleansers not specifically recommended for use
on a glass-ceramic surface.
Preventing marks and scratches
,, Do not use glass cookware. It may scratch the cooktop.
,, Do not place a trivet or wok ring between the cooktop and the pan. These items can mark or
scratch the cooktop.
,, Make sure the cooktop and the pan bottom are clean.
* Do not slide metal pans across the cooktop.
Preventing stains
* Do not use a soiled dish cloth or sponge to clean the cooktop surface. A film will remain, which
may cause stains on the cooking surface after the area is heated.
,, Continuously cooking on a soiled surface can result in a permanent stain.
Preventing other damage
,, Do not allow plastic, sugar, or foods with high sugar content to melt onto the hot cooktop.
Should this happen, clean immediately.
,, Do not let a pan boil dry. This will damage the cooktop and the pan.
,, Do not use the cooktop as a work surface or cutting board.
* Do not cook food directly on the cooktop. Always use the proper cookware.
37 surface cookng
op r t ncj the oven
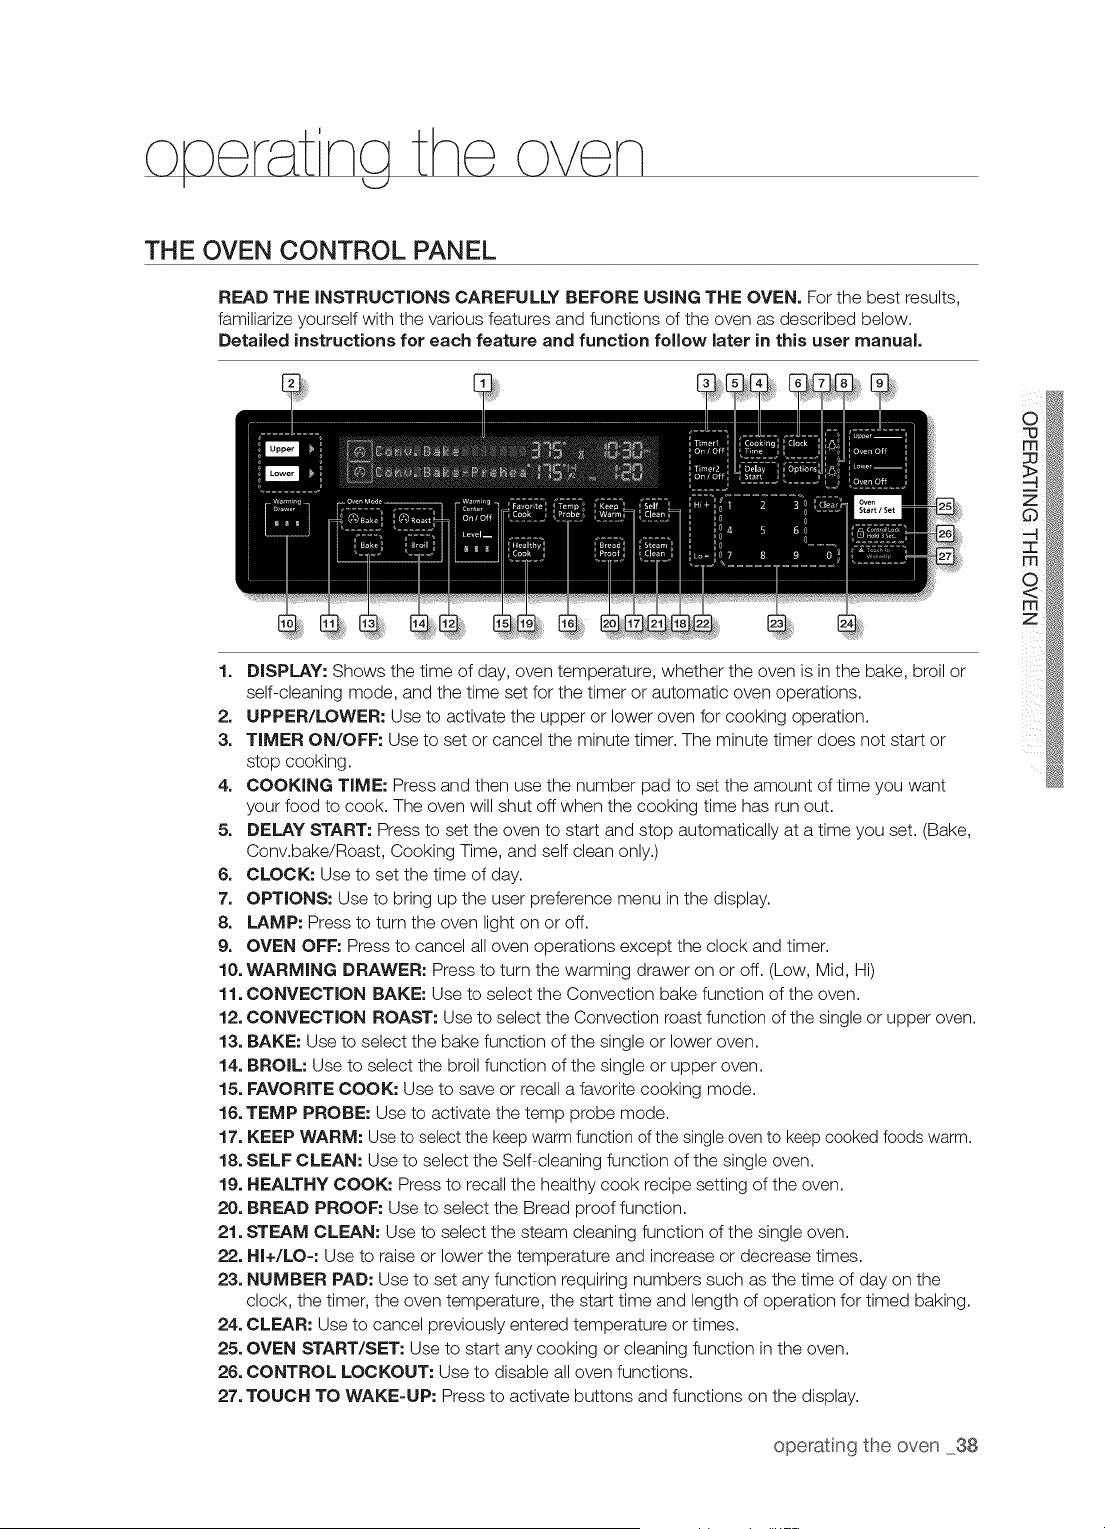
THE OVEN CONTROL PANEL
READ THE INSTRUCTIONS CAREFULLY BEFORE USING THE OVEN. For the best results,
familiarize yourself with the various features and functions of the oven as described below.
Detailed instructions for each feature and function follow later in this user manual.
1. DISPLAY: Shows the time of day, oven temperature, whether the oven is in the bake, broil or
self-cleaning mode, and the time set for the timer or automatic oven operations.
2. UPPER/LOWER: Use to activate the upper or lower oven for cooking operation.
3, TIMER ON/OFF: Use to set or cancel the minute timer. The minute timer does not start or
stop cooking.
4. COOKING TIME: Press and then use the number pad to set the amount of time you want
your food to cook. The oven will shut off when the cooking time has run out.
5. DELAY START: Press to set the oven to start and stop automatically at a time you set. (Bake,
Conv.bake/Roast, Cooking Time, and self clean only.)
6. CLOCK: Use to set the time of day.
7. OPTIONS: Use to bring up the user preference menu in the display.
8. LAMP: Press to turn the oven light on or off.
9. OVEN OFF: Press to cancel all oven operations except the clock and timer.
10. WARMING DRAWER: Press to turn the warming drawer on or off. (Low, Mid, Hi)
11. CONVECTION BAKE: Use to select the Convection bake function of the oven.
12. CONVECTION ROAST: Use to select the Convection roast function of the single or upper oven.
13. BAKE: Use to select the bake function of the single or lower oven.
14. BROIL: Use to select the broil function of the single or upper oven.
15. FAVORITE COOK: Use to save or recall a favorite cooking mode.
16. TEMP PROBE: Use to activate the temp probe mode.
17. KEEP WARM: Use to select the keep warm function of the single oven to keep cooked foods warm.
18. SELF CLEAN: Use to select the Self-cleaning function of the single oven.
19. HEALTHY COOK: Press to recall the healthy cook recipe setting of the oven.
20. BREAD PROOF: Use to select the Bread proof function.
21. STEAM CLEAN: Use to select the steam cleaning function of the single oven.
22. HI+/LO-: Use to raise or lower the temperature and increase or decrease times.
23. NUMBER PAD: Use to set any function requiring numbers such as the time of day on the
clock, the timer, the oven temperature, the start time and length of operation for timed baking.
24. CLEAR: Use to cancel previously entered temperature or times.
25. OVEN START/SET: Use to start any cooking or cleaning function in the oven.
26. CONTROL LOCKOUT: Use to disable all oven functions.
27. TOUCH TO WAKE-UP: Press to activate buttons and functions on the display.
operatng the oven 38
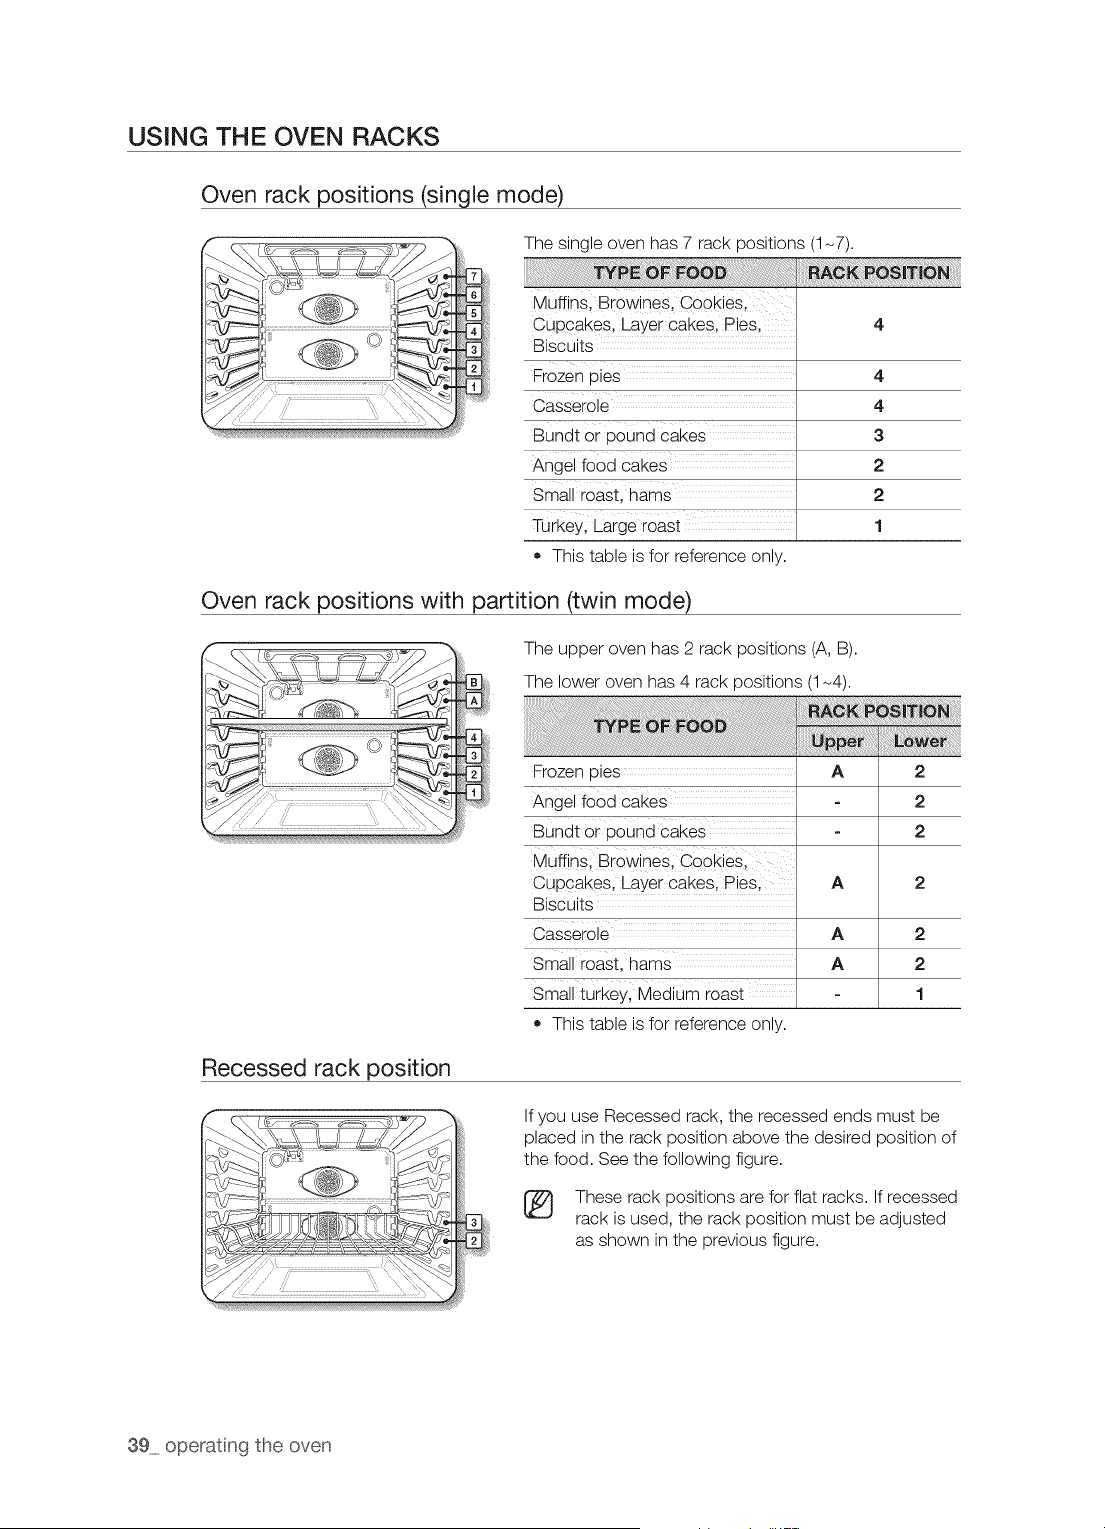
USING THE OVEN RACKS
Oven rack positions (single mode)
The single oven has 7 rack positions (1-7).
Muffins Browines Cookies
cupCakes, Layer cakesl piesl
Biscuits
Frozen pies
Casserole
BUndt or pound cakes ......
Angel fo0d cakes .........
Small roast, hams
Turkey, Large roast
• This table is for reference only.
4
4
3
2
2
1
Oven rack positions with partition (twin mode)
The upper oven has 2 rack positions (A, B).
The lower oven has 4 rack positions (1-4).
Frozen pies
Angel food cakes
Bundt or pound cakes ......
Muffinsl BrowineS; Cookiesl
Cupcakes, Layer cakesl Piesl
Biscuits
Casserole
Small roast, hams
Small turkey, Medium roast
o This table is for reference only.
2
2
2
2
2
2
1
Recessed rack position
If you use Recessed rack, the recessed ends must be
placed in the rack position above the desired position of
the food. See the following figure.
These rack positions are for flat racks. If recessed
rack is used, the rack position must be adjusted
as shown in the previous figure.
39 operatng the oven
÷
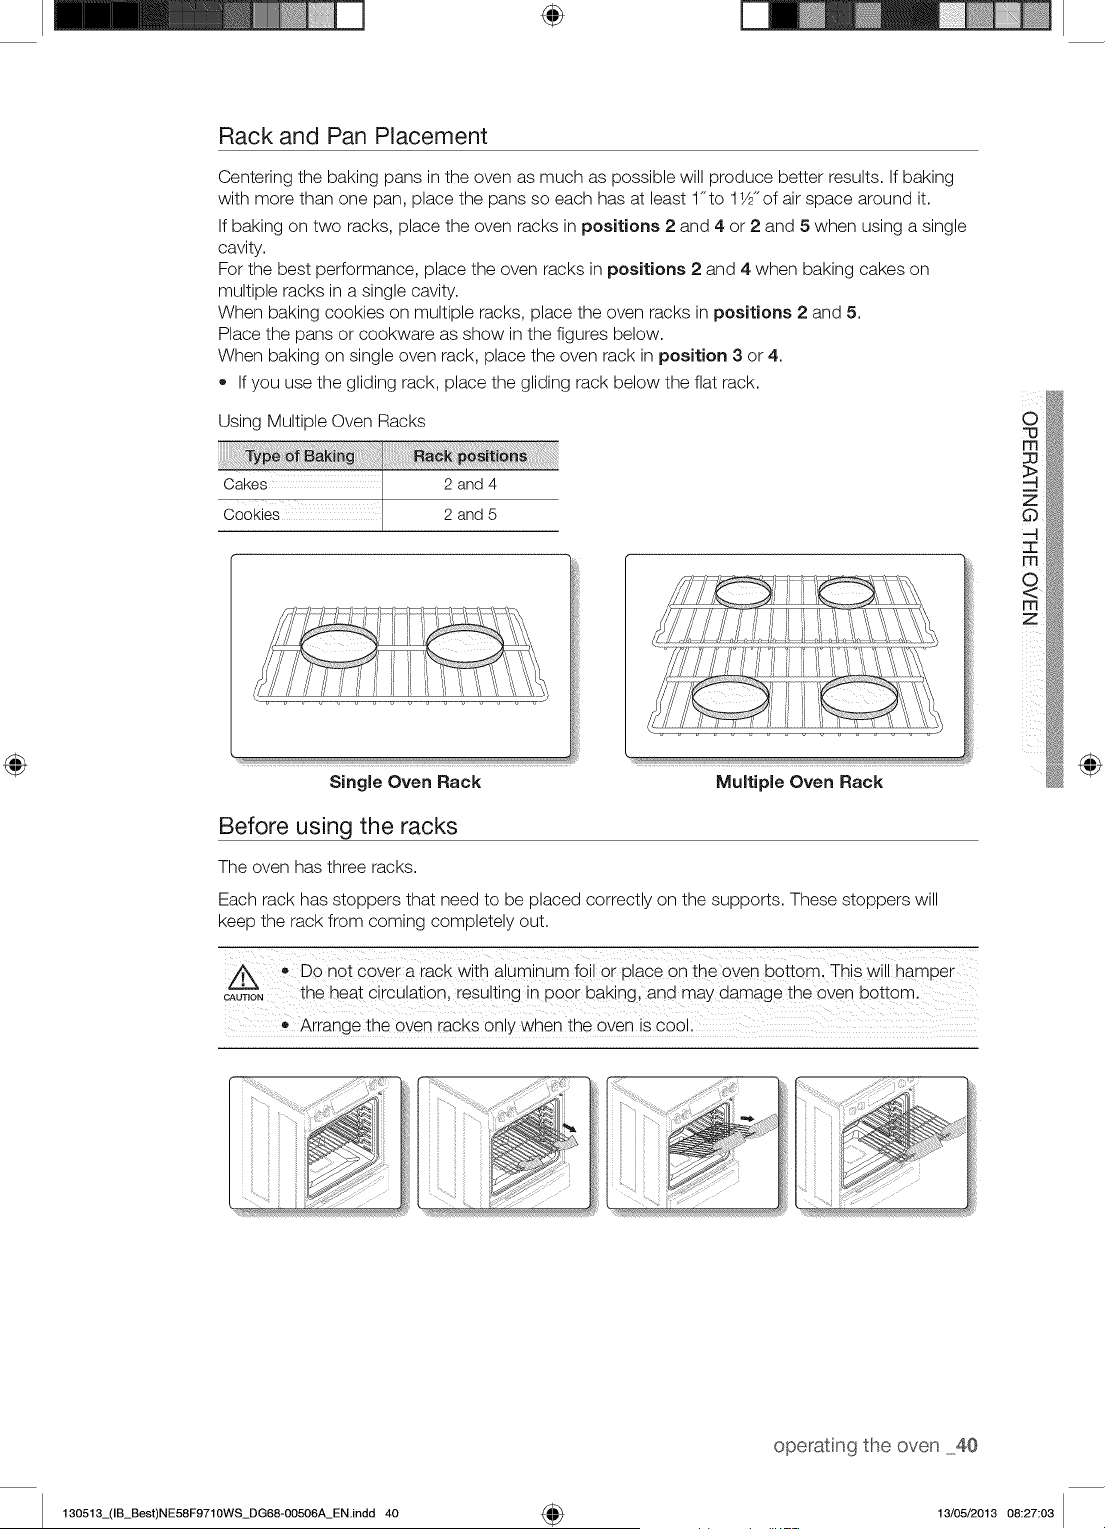
Rack and Pan Placement
Centering the baking pans in the oven as much as possible will produce better results. If baking
with more than one pan, place the pans so each has at least 1"to 11/2"of air space around it.
If baking on two racks, place the oven racks in positions 2 and 4 or 2 and 5 when using a single
cavity.
For the best performance, place the oven racks in positions 2 and 4 when baking cakes on
multiple racks in a single cavity.
When baking cookies on multiple racks, place the oven racks in positions 2 and 5.
Place the pans or cookware as show in the figures below.
When baking on single oven rack, place the oven rack in position 3 or 4.
• If you use the gliding rack, place the gliding rack below the flat rack.
Using Multiple Oven Racks
Cakes 2 and 4
Cookies 2 and 5
Single Oven Rack
!ill
Before using the racks
The oven has three racks.
Each rack has stoppers that need to be placed correctly on the supports. These stoppers will
keep the rack from coming completely out.
• DO nOt cove r a rack with aluminum f0il 0r place on the oven bottom, This will hamper
c_uToN the heat circulation resulting in poor baking and may damage the oven bottom.
o
Arrange the oven racks on!y when the oven is cool:
@
operatng the oven 40
130513_(IB_Best)NE58F9710WS_DG68-00506A_EN.indd 40 4_ 13/05/2013 08:27:03
÷
USING THE GLIDING RACK
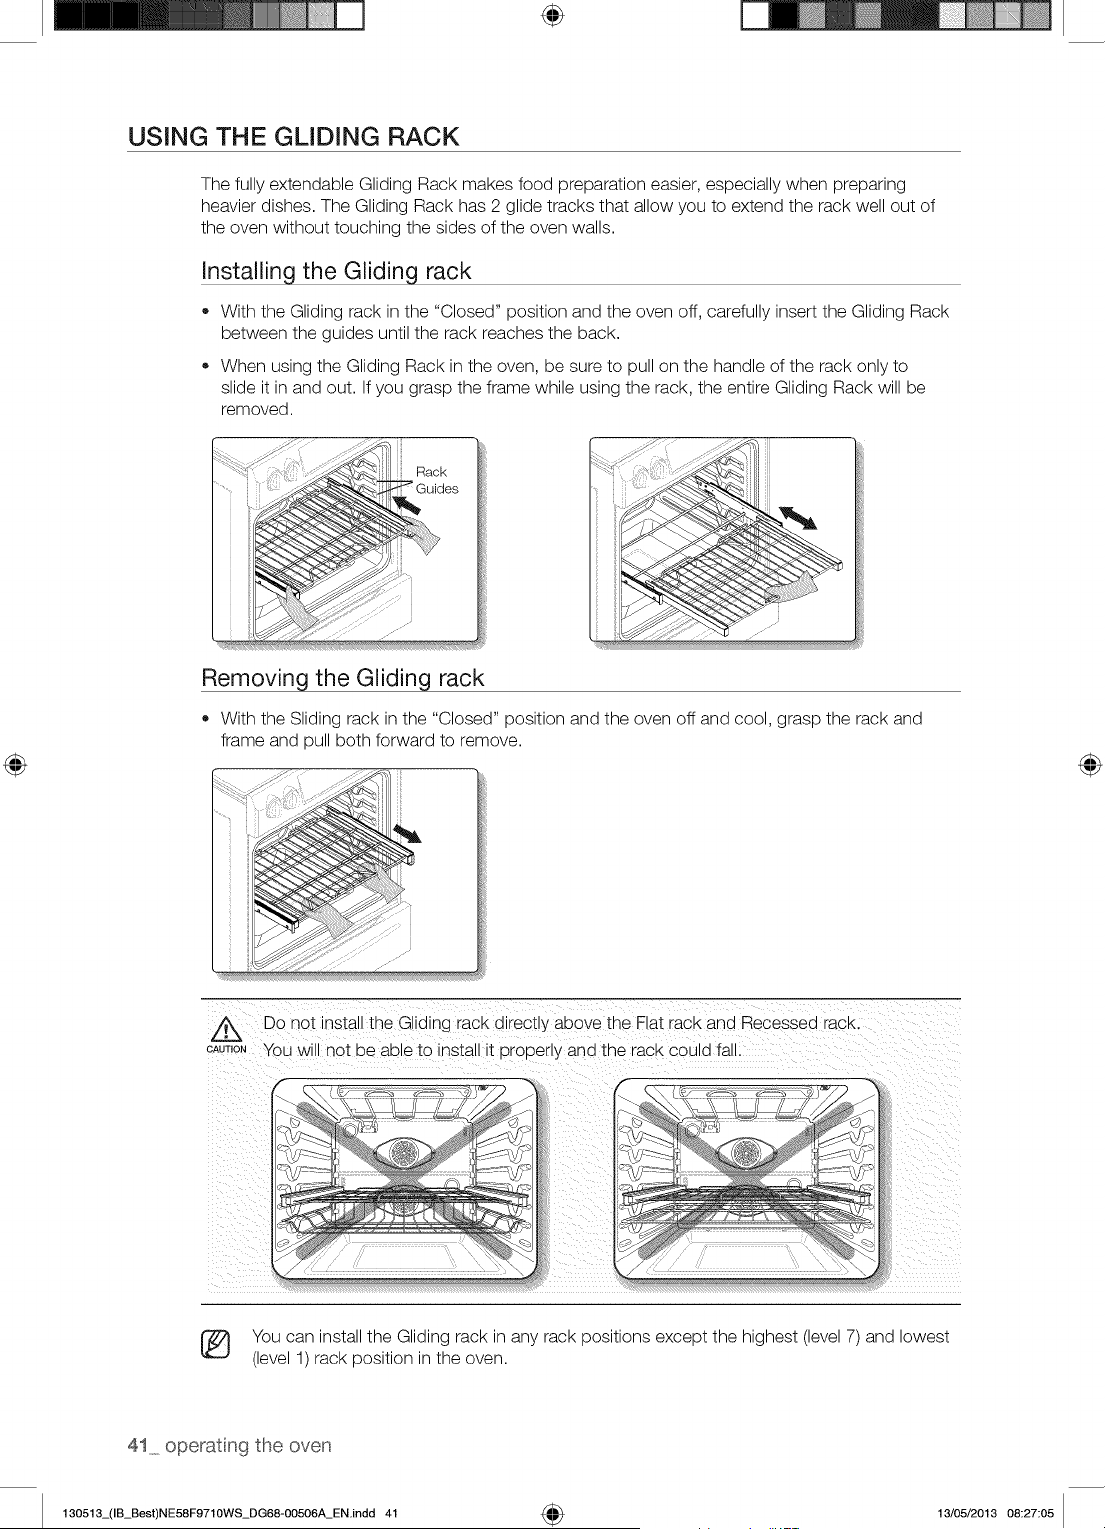
The fully extendable Gliding Rack makes food preparation easier, especially when preparing
heavier dishes. The Gliding Rack has 2 glide tracks that allow you to extend the rack well out of
the oven without touching the sides of the oven walls.
Installing the Gliding rack
• With the Gliding rack in the "Closed" position and the oven off, carefully insert the Gliding Rack
between the guides until the rack reaches the back.
When using the Gliding Rack in the oven, be sure to pull on the handle of the rack only to
slide it in and out. If you grasp the frame while using the rack, the entire Gliding Rack will be
removed.
Removing the Gliding rack
With the Sliding rack in the "Closed" position and the oven off and cool, grasp the rack and
frame and pull both forward to remove.
Z_ Do not install the Gliding rack directly above the Flat racK ana Recessed racK.
CAUTIONYOUwill not be able to install it Dropeny and the rack could fall.
You can install the Gliding rack in any rack positions except the highest (level 7) and lowest
(level 1) rack position in the oven.
41_ operat ng the oven
130513_(IB_Best)NE58F9710WS_DG68-00506A_EN.indd 41 4_ 13/05/2013 08:27:05
÷
USING THE PARTITION
• To use twin mode operation, insert the partition.
You cannot use the Self-Clean or Steam-Clean functions when the partition is installed in the
oven cavity.
Handle the partition with both hands.
Use oven gloves when inserting or removing the partition.
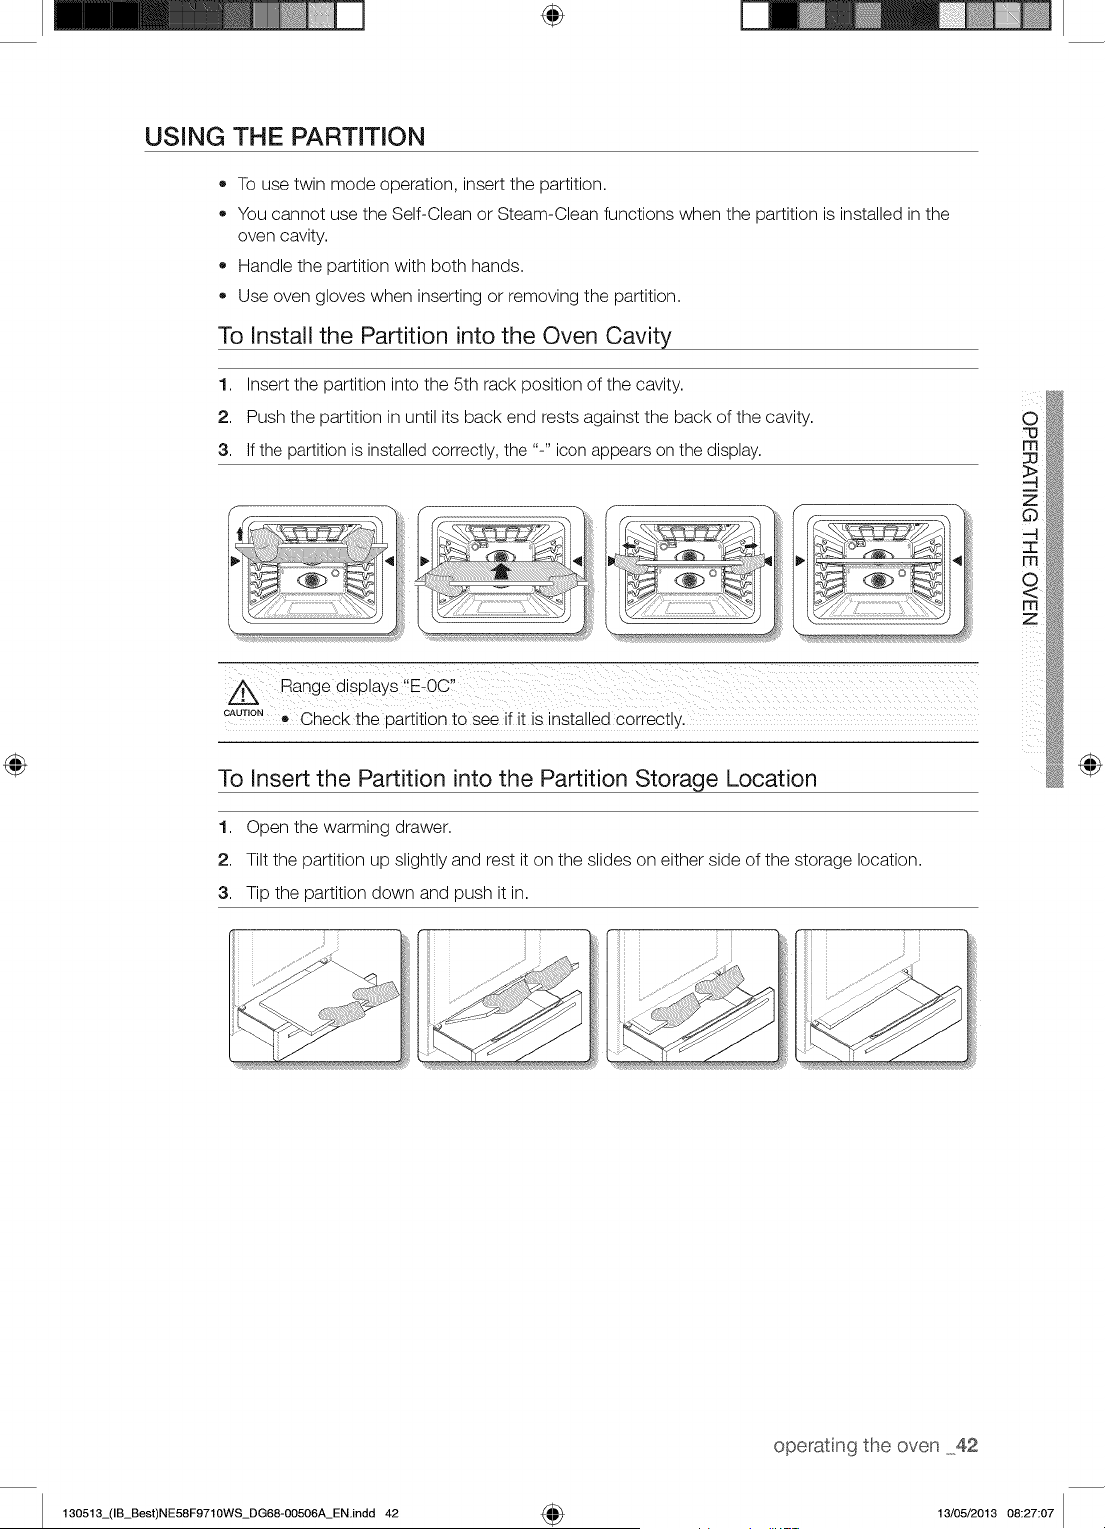
To Install the Partition into the Oven Cavity
1. Insert the partition into the 5th rack position of the cavity.
2. Push the partition in until its back end rests against the back of the cavity.
3. If the partition is installed correctly, the "-" icon appears on the display.
4,111_i_ ......
CAUTION! Check the partition to see if it is installed correctly.
To Insert the Partition into the Partition Storage Location
1. Open the warming drawer.
2. Tilt the partition up slightly and rest it on the slides on either side of the storage location.
3. Tip the partition down and push it in.
o
m
@
operatng the oven 42
130513_(IB_Best)NE58F9710WS_DG68-00506A_EN.indd 42 4_ 13/05/2013 08:27:07
TWiN COOKING MODE TEMPERATURE SETTING RANGES
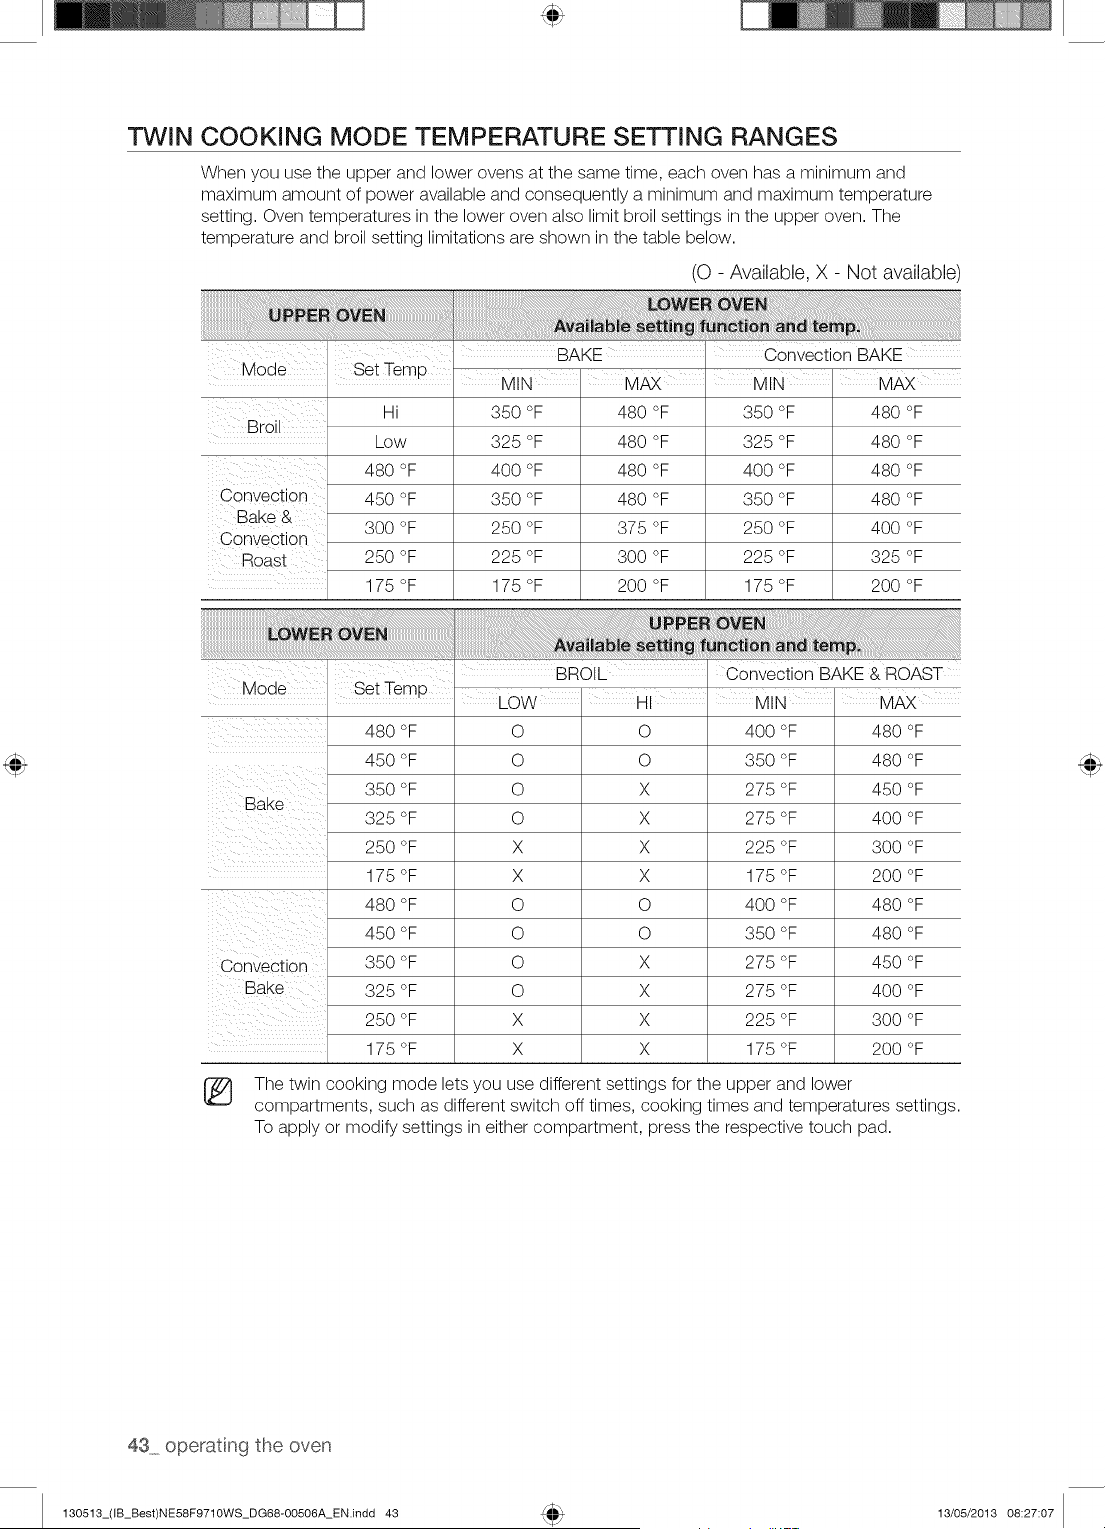
When you use the upper and lower ovens at the same time, each oven has a minimum and
maximum amount of power available and consequently a minimum and maximum temperature
setting. Oven temperatures in the lower oven also limit broil settings in the upper oven. The
temperature and broil setting limitations are shown in the table below.
(O - Available, X - Not available)
,, BAKE . convection BAKE
Mode
BrOil
Set Temp MIN' MAX I MIN' MAX
Hi 350 °F 480 °F 350 °F 480 °F
Low 325 °F 480 °F 325 °F 480 °F
480 °F 400 °F 480 °F 400 °F 480 °F
Convection 450 °F 350 °F 480 °F 350 °F 480 °F
Bake & 300 °F 250 °F 375 °F 250 °F 400 °F
Convection
Roast 250 °F 225 °F 300 °F 225 °F 325 °F
175 °F 175 °F 200 °F 175 °F 200 °F
BROL ConveCt on BAKE & ROAST
Mode Set Temp I I I
LOW HI MIN MAX
480 °F O O 400 °F 480 °F
450 °F O O 350 °F 480 °F
350 °F O X 275 °F 450 °F
Bake
325 °F O X 275 °F 400 °F
250 °F X X 225 °F 300 °F
175 °F X X 175 °F 200 °F
480 °F O O 400 °F 480 °F
450 °F O O 350 °F 480 °F
Convection 350 °F O X 275 °F 450 °F
Bake 325 °F O X 275 °F 400 °F
250 °F X X 225 °F 300 °F
175 °F X X 175 °F 200 °F
The twin cooking mode lets you use different settings for the upper and lower
compartments, such as different switch off times, cooking times and temperatures settings.
To apply or modify settings in either compartment, press the respective touch pad.
43 operatng the oven
130513_(IB_Best)NE58F9710WS_DG68-00506A_EN.indd 43 13/05/2013 08:27:07
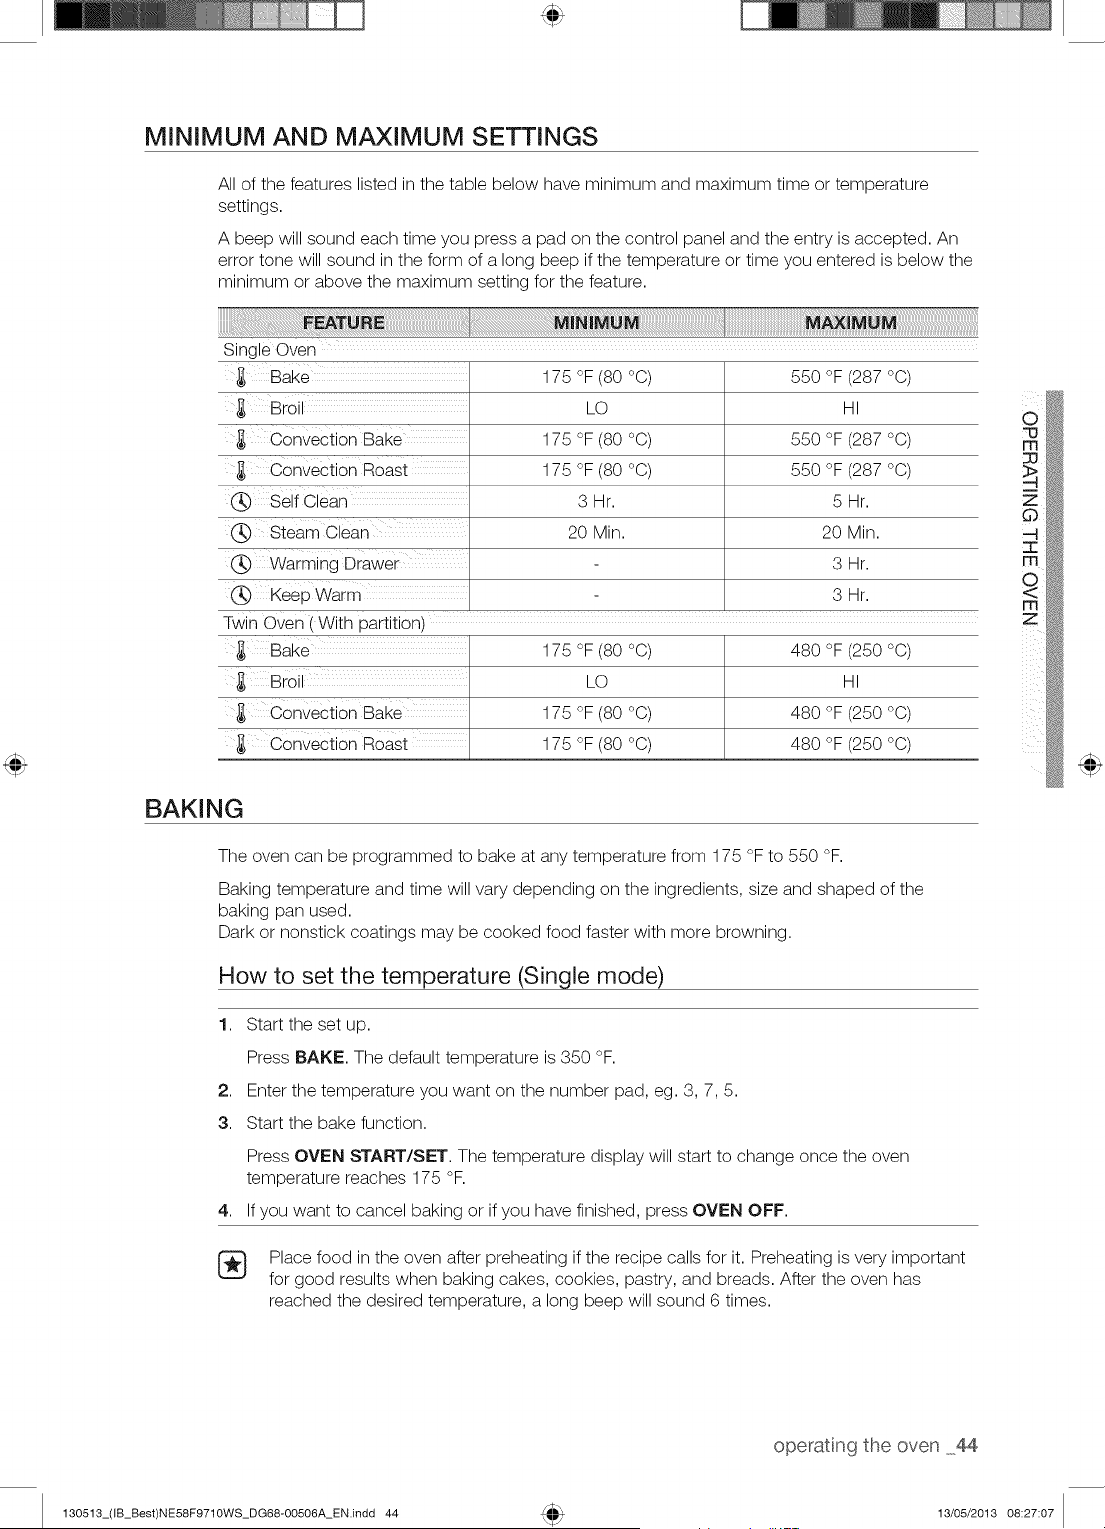
MINIMUM AND MAXIMUM SETTINGS
All of the features listed in the table below have minimum and maximum time or temperature
settings.
A beep will sound each time you press a pad on the control panel and the entry is accepted. An
error tone will sound in the form of a long beep if the temperature or time you entered is below the
minimum or above the maximum setting for the feature.
Sing e Oven
,_ Bake
,_ Broi
Convection Bake
,_ Convection Roast
Self Clean
(_ Steam Clean
Warming Drawer
Keep Warm
Twin Oven [ With partition1
,_ Bake
,_ Broi
,_ Convection Bake
Convection Roast
175 °F (80 °C)
LO
175 °F (80 °C)
175 °F (80 °C)
3Hr.
20 Min.
175 °F (80 °C)
LO
175 °F (80 °C)
175 °F (80 °C)
550 °F (287 °C)
HI
550 °F (287 °C)
550 °F (287 °C)
5Hr.
20 Min.
3Hr.
3Hr.
480 °F (250 °C)
HI
480 °F (250 °C)
480 °F (250 °C)
m
z
BAKING
The oven can be programmed to bake at any temperature from 175 °F to 550 °F.
Baking temperature and time will vary depending on the ingredients, size and shaped of the
baking pan used.
Dark or nonstick coatings may be cooked food faster with more browning.
How to set the temperature (Single mode)
1. Start the set up.
Press BAKE. The default temperature is 350 °F.
2. Enter the temperature you want on the number pad, eg. 3, 7, 5.
3. Start the bake function.
Press OVEN START/SET. The temperature display will start to change once the oven
temperature reaches 175 °F.
4. If you want to cancel baking or if you have finished, press OVEN OFF.
Place food in the oven after preheating if the recipe calls for it. Preheating is very important
for good results when baking cakes, cookies, pastry, and breads. After the oven has
reached the desired temperature, a long beep will sound 6 times.
operatng the oven 44
130513_(IB_Best)NE58F9710WS_DG68-00506A_EN.indd 44 13/05/2013 08:27:07
÷
How to set the temperature (Twin mode)
1. Insert the Partition.
2. Start the set up.
Press LOWER. (You can't use this mode on the UPPER oven).
3. Press BAKE. The default temperature is 350 °R
4. Enter the temperature you want to on the number pad eg. 3, 7, 5.
5. Start the bake function.
Press OVEN START/SET. The temperature display will start to change once the oven
temperature reaches 175 °F.
6. If you want to cancel baking or if you have finished, press LOWER OVEN OFF.
Place food in the oven after preheating if the recipe calls for it. Preheating is very important
for good results when baking cakes, cookies, pastry, and breads. After the oven has
reached the desired temperature, a long beep will sound 6 times.
Flow to adjust the temperature while cookinq
1. Start the set up.
Press BAKE. The display will show the present temperature, eg. 375 °F.
2. Enter the temperature you want, eg. 425 °F, using the number pad.
3. Complete the entry by pressing OVEN START/SET.
The process is the same in twin mode.
®
®
If you leave the oven door open for more than 2 minutes when the oven is on, all heating
elements will shut off automatically.
When you have finished cooking, the cooling fan will continue to run until the oven has
cooled down.
CONVECTION BAKING
By using the convection bake feature, you will be able to cook faster. You can program the oven
for convection baking at any temperature between 175 °F and 550 °F.
When operating in twin mode, you can program the oven for convection baking at any
temperature between 175 °F and 480 °R This improved heat distribution allows for even cooking
and excellent results using multiple racks at the same time. Foods cooked on a single oven rack
will generally cook faster and more evenly with convection baking. Multiple oven rack cooking
may slightly increase cook times for some foods, but the overall result is time saved. Breads and
pastries brown more evenly.
45 operatng the oven
130513_(IB_Best)NE58F9710WS_DG68-00506A_EN.indd 45 4_ 13/05/2013 08:27:08
Tip for convection baking (single mode)
The amount of time you save will vary depending on the amount and type of food you are
cooking. When baking cookies or biscuits, you should use pans with no sides or very low sides
to allow the heated air to circulate around the food. Using a pan with a dark finish will allow faster
cooking times.
When using convection baking with a single rack, place the oven rack in position 4. If cooking on
multiple racks, place the oven racks in positions 2 and 5 (when baking cookies) or 2 and 4 (when
baking cakes).
How to set the oven for convection baking (single mode)
1,
2,
3.
4,
How to set the oven for convection baking (twin mode)
Start the convection baking mode.
Press k_ Bake. The default temperature is 350 °F.
Enter the temperature you want, eg. 400 °F, using the number pad. Set the temperature that is
called for in the recipe.
Press OVEN START/SET to begin convection baking.
The Conv.Bake icon and the adjusted oven temperature, eg. 400 °F, will appear in the display
for 2 seconds.
The temperature display will start to change once the oven temperature reaches 175 °F.
A beep will sound 6 times when the oven reaches the adjusted oven temperature.
To turn off or cancel convection baking, press OVEN OFF.
Insert the partition into the cavity.
1. Start the Convection baking mode.
Press UPPER or LOWER to select the partition in which you intend to cook.
2. Press (2:)Bake. The default temperature is 350 °F.
3. Enter the temperature you want, eg. 400 °F, using number pads.
You can select a temperature from 175 °F to 480 °F.
4. Press OVEN START/SET to begin convection baking.
The Conv.Bake icon and the adjusted oven temperature, eg. 400 °F, will appear in the display
for 2 seconds.
The temperature display will start to change once the oven temperature reaches 175 °F.
A beep will sound 6 times when the oven reaches the adjusted oven temperature.
5. To turn off or cancel convection baking, press UPPER OVEN OFF or LOWER OVEN OFF
depending on the partition you want to turn OFF.
®
®
The convection oven fan shuts off when the oven door is opened.
DO NOT leave the door open for long periods of time while using convection cooking or you
may shorten the life of the convection heating element.
If you leave the oven door open for more than 2 minutes when the oven is on, all heating
elements will shut off automatically.
When you have finished cooking, the cooling fan will continue to run until the oven has
cooled down.
m
z
130513_(IB_Best)NE58F9710WS_DG68-00506A_EN.indd 46
operatng the oven 46
13/05/2013 08:27:09
CONVECTION ROASTING
Convection roasting is good for cooking large tender cuts of meat, uncovered.
Heat comes from the top heating element. The convection fan circulates the heated air evenly
over and around the food. Meat and poultry are browned on all sides as if they were cooked on a
rotisserie. The heated air seals in juices quickly for a moist and tender product while, at the same
time, creating a rich golden brown exterior.
How to set the oven for convection roasting (single mode)
1. Start the convection roasting mode.
Press _ Roast. The default temperature is 350 °F.
2. Enter the temperature you want, eg. 400 °F, using the number pads.
3. Press OVEN START/SET to begin convection roasting.
The Conv.Roast icon and the adjusted oven temperature, eg. 400 °F, will appear in the display
for 2 seconds.
The temperature display will start to change once the oven temperature reaches 175 °F.
A beep will sound 6 times when the oven reaches the adjusted oven temperature.
4. Turn off or cancel convection roasting by pressing OVEN OFF.
How to set the oven for convection roasting (twin mode)
1. Insert the partition in the cavity.
2. Start the convection roasting mode.
Press UPPER.
3. Press (Z) Roast.
The default temperature is 350 °F.
4. Press OVEN START/SET to begin convection roasting.
5. To turn off or cancel convection roasting, press UPPER OVEN OFF.
The convection oven fan shuts off when the oven door is opened.
DO NOT leave the door open for long periods of time while using convection cooking or you
may shorten the life of the convection heating element.
[_ If you leave the oven door open for more than 2 minutes when the oven is on, all heating
elements will shut off automatically.
When you have finished cooking, the cooling fan will continue to run until the oven has
cooled down.
47 operatng the oven
130513_(IB_Best)NE58F9710WS_DG68-00506A_EN.indd 47 13/05/2013 08:27:09
TIMED COOKING
In timed cooking, the oven turns on immediately and cooks for the length of time you select. At
the end of the cooking time, the oven turns off automatically.
You can use the cooking time feature only with another cooking operation (Bake, Convection
Bake, Convection Roast, Healthy Cook, or Favorite Cook).
How to set the oven for timed cooking (single mode)
1. Enter the set up.
Press the pad for the cooking operation you want, eg. OONV.BAKE. The default temperature
is 350 °F.
2. Enter the temperature you want, eg. 375 °F, using the number pad.
3. Press COOKING TIME.
4. Enter the cooking time you want, eg. 45 min, using the number pad.
You can set the cooking time for any amount of time from 1 minute to 9 hours and 99 minutes.
5. Press OVEN START/SET to begin cooking.
The temperature display will start to change once the oven temperature reaches 175 °F.
The oven will continue to cook until the set amount of time has elapsed, then turn off
automatically unless the keep warm feature was set. (Refer to the section on the keep warm
function on page 55.)
You can cancel a cook time at any time by pressing OVEN OFF.
6,
How to set the oven for timed cooking (twin mode)
Insert the partition into the cavity.
1. Enter the set up.
Press UPPER or LOWER for the cooking mode you want.
2. Press pad for the cooking operation you want, eg. OONV.BAKE. The default temperature is
350 °F.
3. Enter the temperature you want, eg. 375 °F, using the number pad.
4. Press COOKING TIME.
5. Enter the cooking time you want, eg. 45 minutes, using the number pad.
You can set the cooking time for any amount from 1 minute to 9 hours and 99 minutes.
6. Press OVEN START/SET to begin cooking.
7. You can cancel a timed cooking at any time by pressing OVEN OFF.
Place food in the oven after preheating if the recipe calls for it. Preheating is important for
good results when baking cakes, cookies, pastry, and breads. After the oven has reached
the desired temperature, a long beep will sound 6 times.
/_.\ Use caution with the cooking time or delay start features. Use these features when
&u, €00king Cuied 0i frozen meats and most fruits and _egetabiesl Foods that can easiiy
spoil, such as milk, eggsl fish, meat or poultry, should be chilled in the refrigerator
first. Even when Chilled; they shou!d not stand in the oven for more than f hour before
Cooking begins, and shou!d be remove d promptly when c°oking is completed. Eating ......
spoiled food can result in sickness from food poisoning:
m
m
z
operatng the oven 48
130513_(IB_Best)NE58F9710WS_DG68-00506A_EN.indd 48 13/05/2013 08:27:09
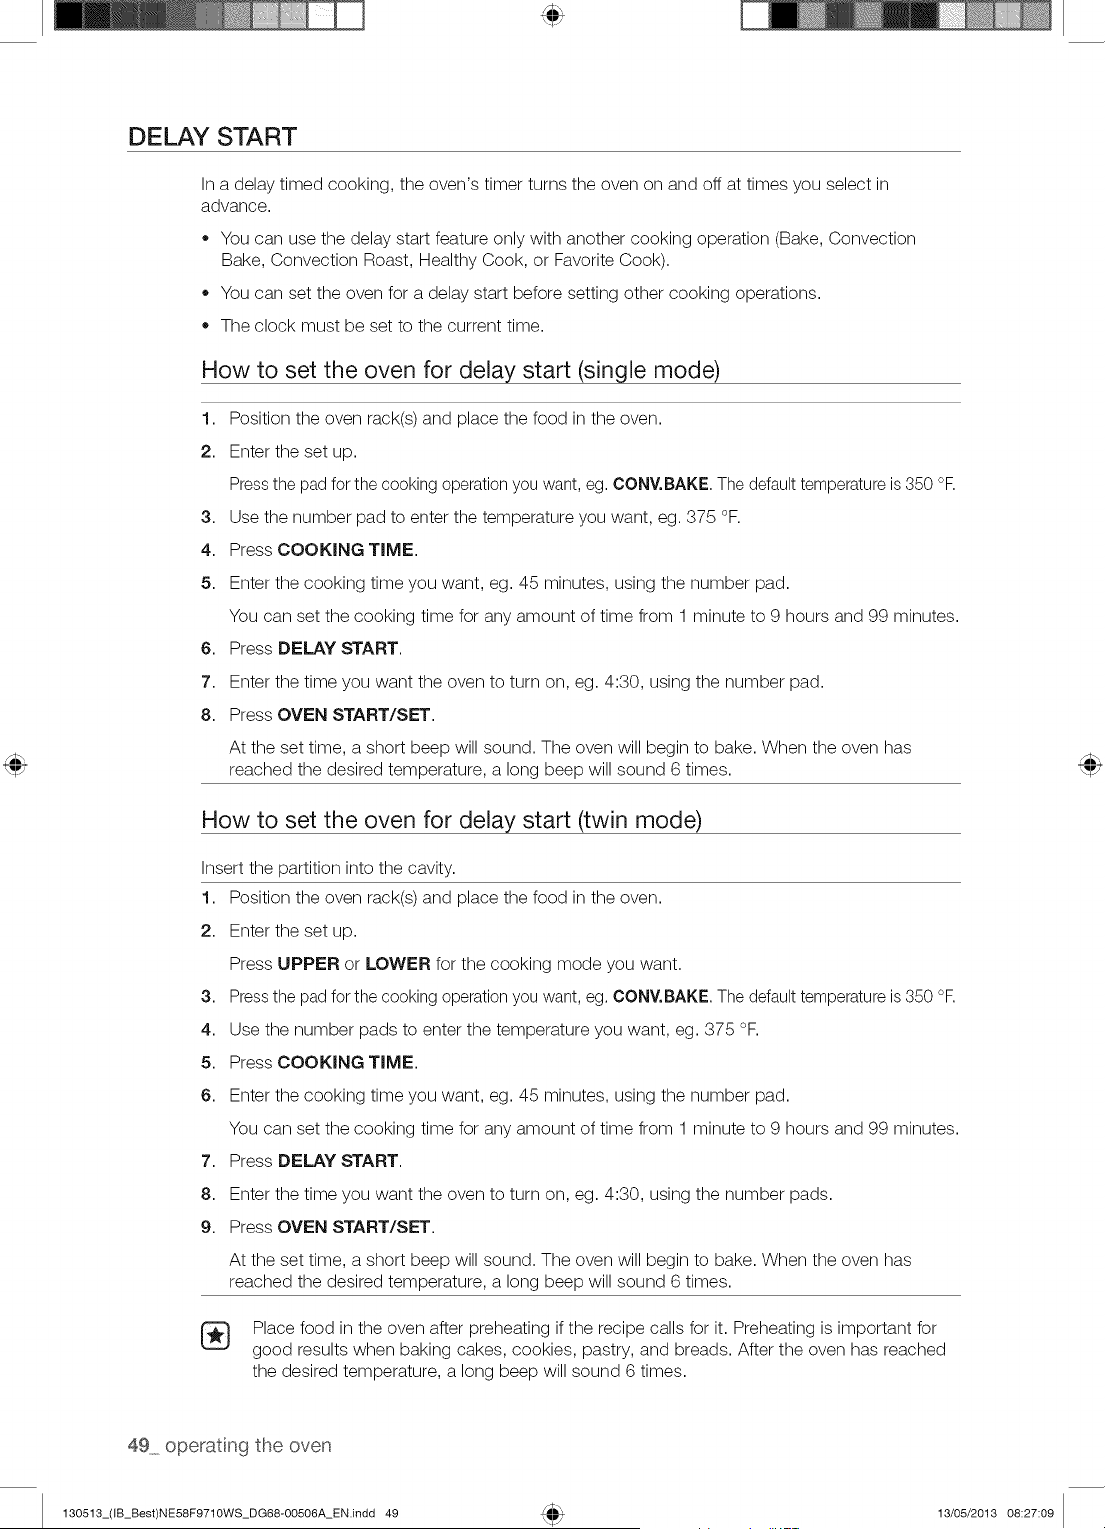
DELAY START
In a delay timed cooking, the oven's timer turns the oven on and off at times you select in
advance.
You can use the delay start feature only with another cooking operation (Bake, Convection
Bake, Convection Roast, Healthy Cook, or Favorite Cook).
You can set the oven for a delay start before setting other cooking operations.
The clock must be set to the current time.
How to set the oven for delay start (single mode)
1. Position the oven rack(s) and place the food in the oven.
2. Enter the set up.
Pressthe pad for the cooking operation you want, eg. CONY.BAKE The default temperature is 350 °R
3. Use the number pad to enter the temperature you want, eg. 375 °F.
4. Press COOKING TIME.
5. Enter the cooking time you want, eg. 45 minutes, using the number pad.
You can set the cooking time for any amount of time from 1 minute to 9 hours and 99 minutes.
6. Press DELAY START.
7. Enter the time you want the oven to turn on, eg. 4:30, using the number pad.
8. Press OVEN START/SET.
At the set time, a short beep will sound. The oven will begin to bake. When the oven has
reached the desired temperature, a long beep will sound 6 times.
How to set the oven for delay start (twin mode)
Insert the partition into the cavity.
1. Position the oven rack(s) and place the food in the oven.
2. Enter the set up.
Press UPPER or LOWER for the cooking mode you want.
3. Pressthe pad for the cooking operation you want, eg, CONY.BAKE The default temperature is 350 °R
4. Use the number pads to enter the temperature you want, eg. 375 °F.
5. Press COOKING TIME.
6. Enter the cooking time you want, eg. 45 minutes, using the number pad.
You can set the cooking time for any amount of time from 1 minute to 9 hours and 99 minutes.
7. Press DELAY START.
8. Enter the time you want the oven to turn on, eg. 4:30, using the number pads.
9. Press OVEN START/SET.
At the set time, a short beep will sound. The oven will begin to bake. When the oven has
reached the desired temperature, a long beep will sound 6 times.
Place food in the oven after preheating if the recipe calls for it. Preheating is important for
good results when baking cakes, cookies, pastry, and breads. After the oven has reached
the desired temperature, a long beep will sound 6 times.
49 operatng the oven
130513_(IB_Best)NE58F9710WS_DG68-00506A_EN.indd 49 13/05/2013 08:27:09
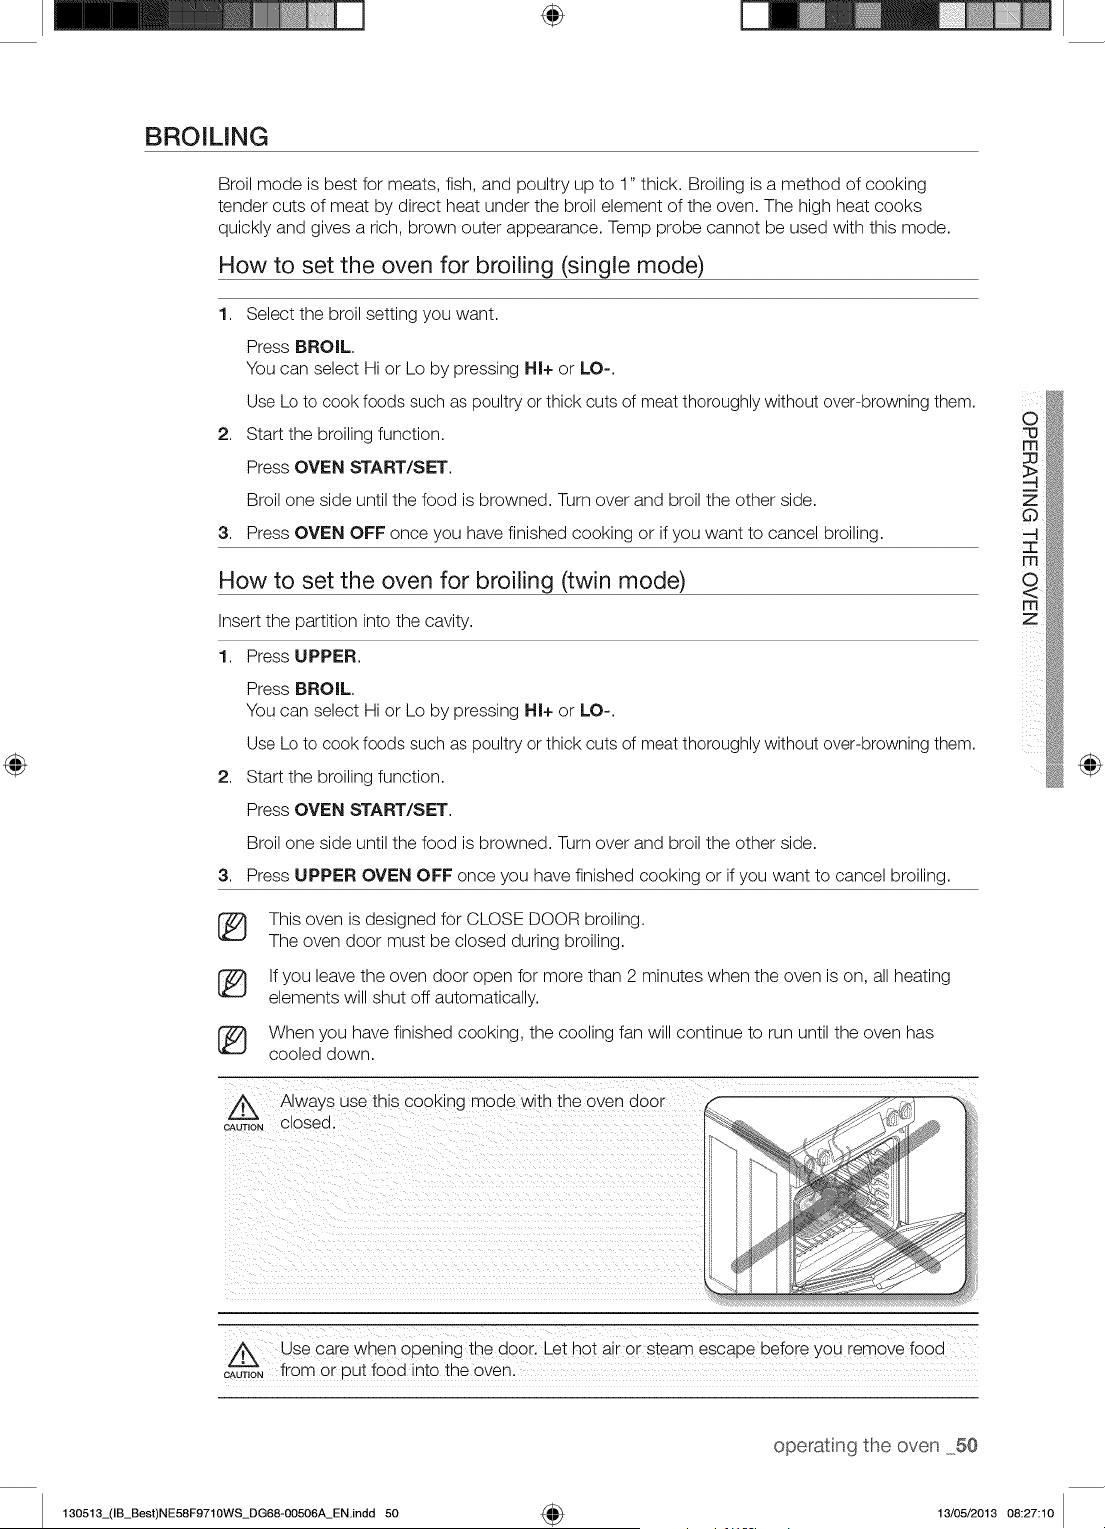
÷
BROILING
Broil mode is best for meats, fish, and poultry up to 1" thick. Broiling is a method of cooking
tender cuts of meat by direct heat under the broil element of the oven. The high heat cooks
quickly and gives a rich, brown outer appearance. Temp probe cannot be used with this mode.
How to set the oven for broiling (single mode)
1. Select the broil setting you want.
Press BROIL.
You can select Hi or Lo by pressing HI+ or LO-.
Use Lo to cook foods such as poultry or thick cuts of meat thoroughly without over-browning them.
2. Start the broiling function.
Press OVEN START/SET.
Broil one side until the food is browned. Turn over and broil the other side.
3. Press OVEN OFF once you have finished cooking or if you want to cancel broiling.
How to set the oven for broiling (twin mode)
Insert the partition into the cavity.
1. Press UPPER.
Press BROIL.
You can select Hi or Lo by pressing HI+ or LO-.
Use Lo to cook foods such as poultry or thick cuts of meat thoroughly without over-browning them.
2. Start the broiling function.
Press OVEN START/SET.
Broil one side until the food is browned. Turn over and broil the other side.
3. Press UPPER OVEN OFF once you have finished cooking or if you want to cancel broiling.
(_ This oven is designed for CLOSE DOOR broiling.
The oven door must be closed during broiling.
(_ If you leave the oven door open for more than 2 minutes when the oven is on, all heating
elements will shut off automatically.
(_ When you have finished cooking, the cooling fan will continue to run until the oven has
cooled down.
@
A Always use th_sCOOKingmode w_th the oven door
CAUTION Olosea,
A Use care when opening the ooor. Let hot air or steam escape before you "emove food
CAUT'--_--'N,Ofrom or Dut food into the oven.
operatng the oven 50
130513_(IB_Best)NE58F9710WS_DG68-00506A_ENindd 50 4_ 13/05/2013 08:27:10
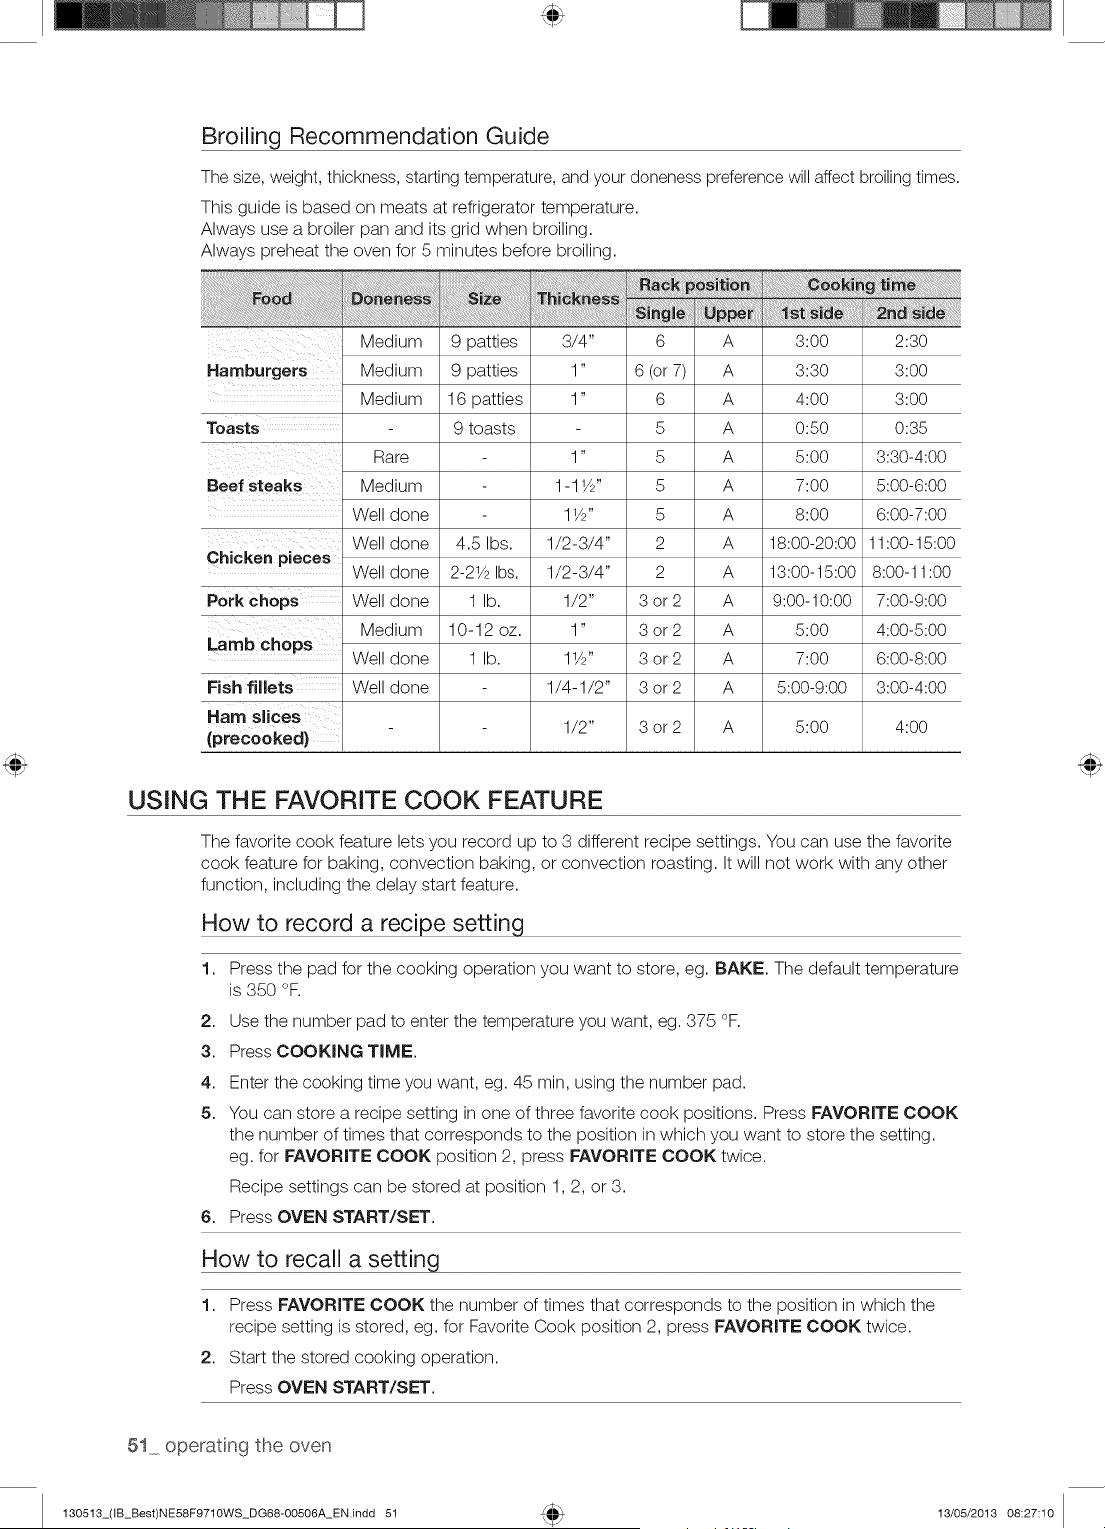
Broiling Recommendation Guide
The size, weight, thickness, starting temperature, and your doneness preference will affect broiling times.
This guide is based on meats at refrigerator temperature.
Always use a broiler pan and its grid when broiling.
Always preheat the oven for 5 minutes before broiling.
!iiiiiiiil;ii!iiiiiiiiiiiiiiiiiiiiiiiiiiliiiiiliiiiiiiiiiliii_i_i_iiiiiiiiiiiiiiiiiiiiiiiliiiiiiiiiiiiiiiiiiiiiiiiiiiiiiiii!_q_;;!!!!_!_,i,,_!_!i_iBi_iiiiii:i'_"=_' _ ,,,,,,,_,,,,,,,_H_
Medium
Hamburgers Medium
Medium
Toasts
Rare
Beef steaks Medium
Well done
Chicken pieces
Porkch ps
Lamb chops
Fish fillets
Ham slices
(precooked)
9 patties 3/4"
9 patties 1"
16 patties 1"
9 toasts
1"
1-1W'
1W'
6 A 3:00 2:30
6 (or 7) A 3:30 3:00
6 A 4:00 3:00
5 A 0:80 0:38
5 A 8:00 3:30-4:00
5 A 7:00 5:00-6:00
5 A 8:00 6:00-7:00
Well done
Well done
Well done
Medium
Well done
Well done
4.5 Ibs.
2-214_Ibs.
1 lb.
10-12 oz.
1 lb.
1/2-3/4" 2 A 18:00-20:00 11:00-15:00
1/2-3/4" 2 A 13:00-15:00 8:00-11:00
1/2" 3 or 2 A 9:00-10:00 7:00-9:00
1" 3 or 2 A 8:00 4:00-5:00
1W' 3 or 2 A 7:00 6:00-8:00
1/4-1/2" 3 or 2 A 5:00-9:00 3:00-4:00
1/2" 3 or 2 A 8:00 4:00
USING THE FAVORITE COOK FEATURE
The favorite cook feature lets you record up to 3 different recipe settings. You can use the favorite
cook feature for baking, convection baking, or convection roasting. It will not work with any other
function, including the delay start feature.
How to record a recipe setting
1. Press the pad for the cooking operation you want to store, eg. BAKE. The default temperature
is 350 °F.
2. Use the number pad to enter the temperature you want, eg. 375 °F.
3. Press COOKING TIME.
4. Enter the cooking time you want, eg. 45 rain, using the number pad.
5. You can store a recipe setting in one of three favorite cook positions. Press FAVORITE COOK
the number of times that corresponds to the position in which you want to store the setting.
eg. for FAVORITE COOK position 2, press FAVORITE COOK twice.
Recipe settings can be stored at position 1,2, or 3.
6. Press OVEN START/SET.
How to recall a setting
1. Press FAVORITE COOK the number of times that corresponds to the position in which the
recipe setting is stored, eg. for Favorite Cook position 2, press FAVORITE COOK twice.
2. Start the stored cooking operation.
Press OVEN START/SET.
51_ operat ng the oven
130513_(IB_Best)NE58F9710WS_DG68-00506A_EN.indd 51 13/05/2013 08:27:10
USING THE HEALTHY COOK FEATURE
You can use the Healthy Cook feature in both the single and twin cooking modes. To use the
Healthy Cook feature in the single cooking mode, follow the directions below. To use the Healthy
Cook feature in the twin cooking mode, insert the partition, select the cavity you want to use by
pressing upper or lower, and then follow the directions below.
1, Rice casserole
The Rice casserole feature provides a healthier cooking method for cooking rice casseroles
containing vegetables, herbs, chicken breasts, etc.
When using this function, you do not need to preheat the oven prior to cooking. The cooking
temperature and cooking time depends on the quantity and material.
How to set the Rice casserole function
1. Press HEALTHY COOK. The default temperature is 375 °F.
2. Press 1 (Rice casserole) on the number pad.
Enter the temperature you want on the number pad.
3. Press OVEN START/SET to begin rice casserole cooking.
For the best results, cook rice casseroles with toppings uncovered, and stews and braised
meats covered to prevent evaporation.
2. Baked potato
Baked potato mode is specially designed to bake potatoes or sweet potatoes.
When using this function, you do not need to preheat the oven prior to cooking.
rfl
z
How to set the Baked potato function
1. Press HEALTHY COOK. The default temperature is 375 °F.
2. Press 2 (Baked potato) on the number pad.
Enter the temperature you want on the number pad.
3. Press OVEN START/SET.
3. Grilled chicken
Grilled chicken mode is specially designed to cook chicken pieces or chicken breasts.
When using this function, you do not need to preheat the oven prior to cooking.
If you want to prevent over browning and drying of the skin, cover the breast with foil.
How to set the Grilled chicken function
1. Press HEALTHY COOK. The default temperature is 350 °F.
2. Press 3 (Grilled chicken) on the number pad.
Enter the temperature you want on the number pad.
operatng the oven 52
130513_(IB_Best)NE58F9710WS_DG68-00506A_EN.indd 52 13/05/2013 08:27:10

4. Salmon steak
This feature is specially designed to cook Salmon steaks.
When using this function, you do not need to preheat the oven prior to cooking.
The temperature and cooking time depend on the quantity and thickness.
How to set the Salmon steak function
1. Press HEALTHY COOK. The default temperature is 350 °F.
2. Press 4 (Salmon steak) on the number pad.
Enter the temperature you want on the number pad.
3. Press OVEN START/SET.
5. White fish fillet
This feature is specially designed to cook white fish fillets.
When using this function, you do not need to preheat the oven prior to cooking.
The temperature and cooking time depend on the quantity and thickness.
How to set the White fish fillet function
1,
2.
3,
Healthy Cook Recommendation Guide
Press HEALTHY COOK. The default temperature is 375 °F.
Press 5 0Nhite fish fillet) on the number pad.
Enter the temperature you want on the number pad.
Press OVEN START/SET.
The guide below contains recommendations for using the Healthy Cook feature. This chart is for
reference only.
When using this function, you do not need to preheat the oven prior to cooking.
Rice 17.5 oz
casserole (500 g)
A 375
375 to
40-50
425
Put a cup of
instant rice, some
vegetables (carrot,
onion, zucchini,
eggplant, etc.) and
chicken breasts into
a baking dish.
Pour a cup of hot
consomme into the
baking dish and
cover it with a lid
or foil.
To prevent the
bottom from over
cooking, do not use
an enamel or iron
baking dish.
53 operatng the oven
130513_(IB_Best)NE58F9710WS_DG68-00506A_EN.indd 53 13/05/2013 08:27:10
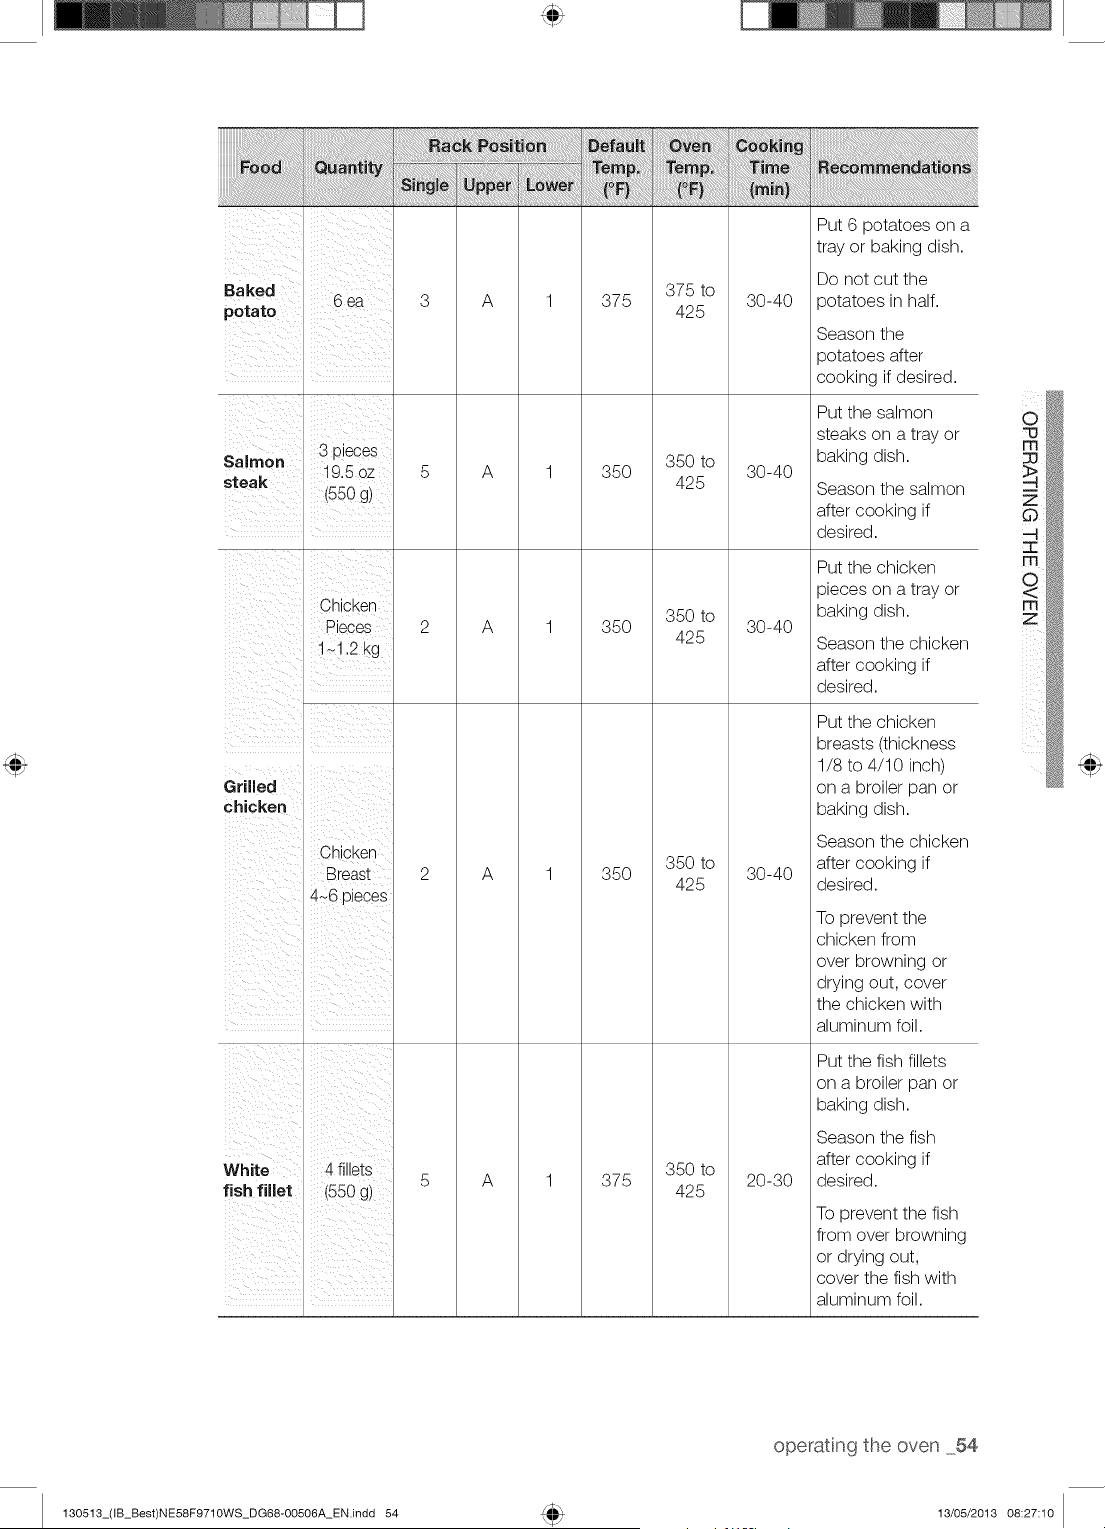
Put 6 potatoes on a
tray or baking dish.
Baked 6 ea
potato
Salmon 3 pieces
steak 19.5 oz
(550 g)
Chicken
Pieces
1_1.2 kg
Grilled
chicken
Chicken
Breast
4_6 pieces
A
A
A
A
375
35O
35O
35O
375 to
425
350 to
425
350 to
425
350 to
425
30-40
30-40
30-40
30-40
Do not cut the
potatoes in half.
Season the
potatoes after
cooking if desired.
Put the salmon
steaks on a tray or
baking dish.
Season the salmon
after cooking if
desired.
Put the chicken
pieces on a tray or
baking dish.
Season the chicken
after cooking if
desired.
Put the chicken
breasts (thickness
1/8 to 4/10 inch)
on a broiler pan or
baking dish.
Season the chicken
after cooking if
desired.
To prevent the
chicken from
over browning or
drying out, cover
the chicken with
aluminum foil.
Put the fish fillets
on a broiler pan or
baking dish.
White 4 fillets
fish fillet (550 g)
A 375
350 to
425
20-30
Season the fish
after cooking if
desired.
To prevent the fish
from over browning
or drying out,
cover the fish with
aluminum foil.
m
z
operatng the oven 54
130513_(IB_Best)NE58F9710WS_DG68-OO506A_EN.indd 54 13/05/2013 08:27:10
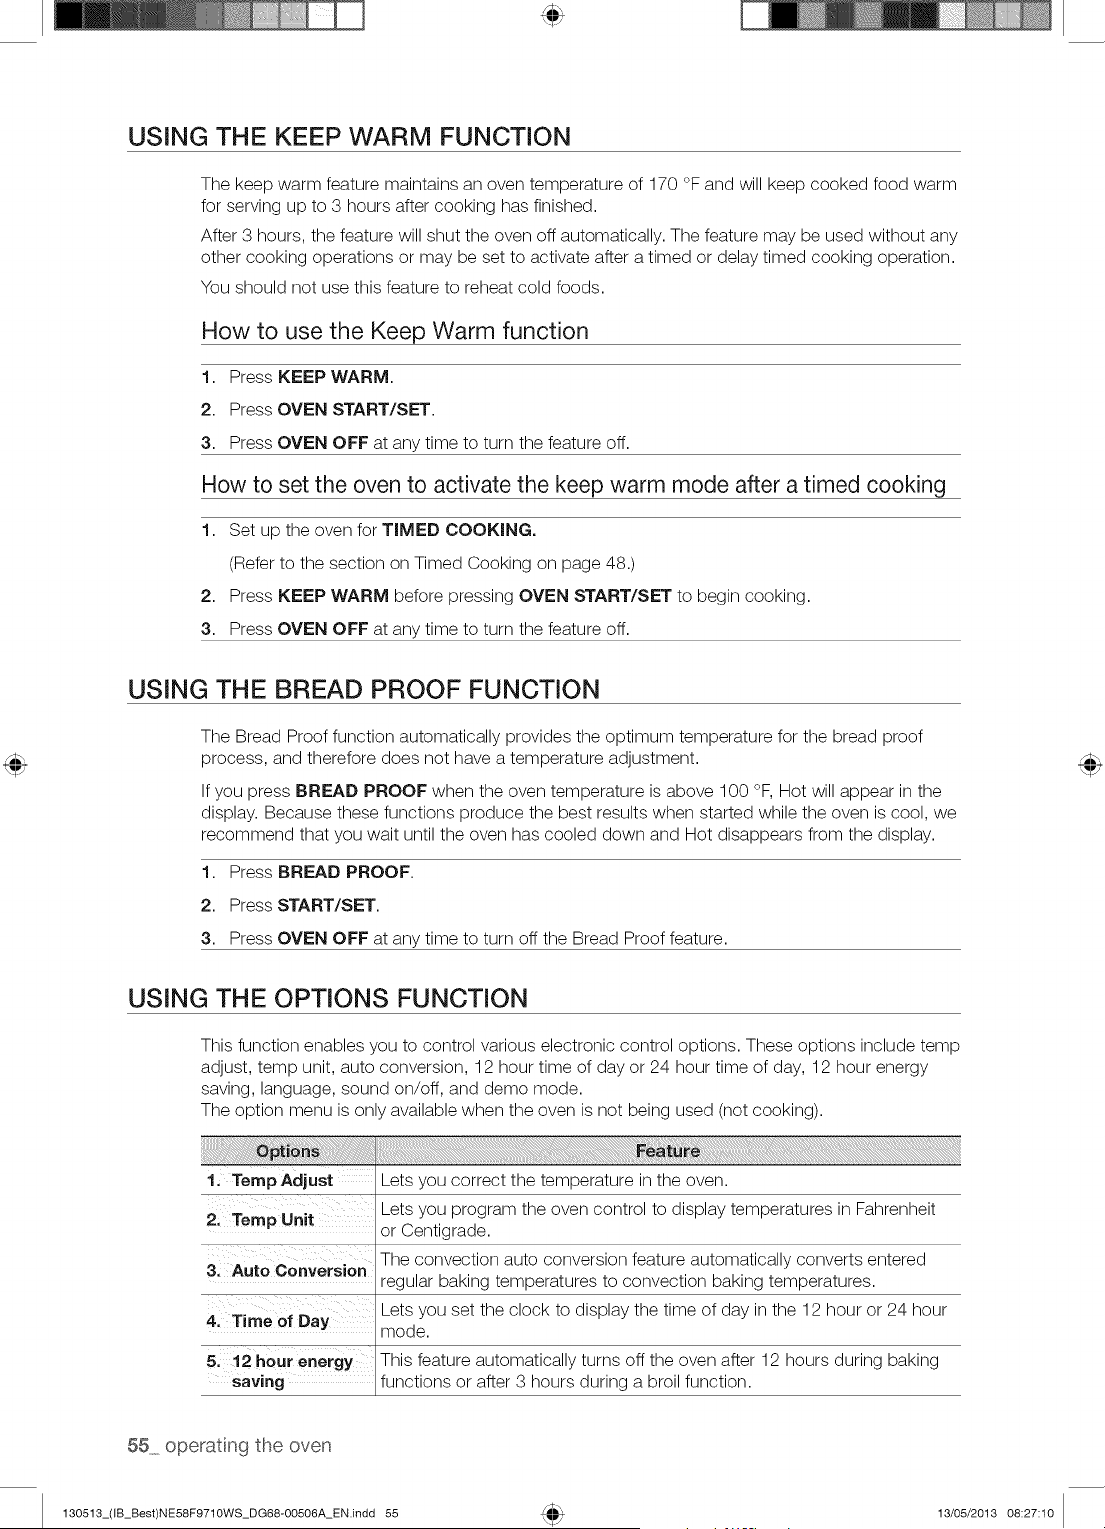
USING THE KEEP WARM FUNCTION
The keep warm feature maintains an oven temperature of 170 °F and will keep cooked food warm
for serving up to 3 hours after cooking has finished.
After 3 hours, the feature will shut the oven off automatically. The feature may be used without any
other cooking operations or may be set to activate after a timed or delay timed cooking operation.
You should not use this feature to reheat cold foods.
How to use the Keep Warm function
1. Press KEEP WARM.
2. Press OVEN START/SET.
3. Press OVEN OFF at any time to turn the feature off.
How to set the oven to activate the keep warm mode after a timed cooking
1. Set up the oven for TIMED COOKING.
(Refer to the section on Timed Cooking on page 48.)
2. Press KEEP WARM before pressing OVEN START/SET to begin cooking.
3. Press OVEN OFF at any time to turn the feature off.
USING THE BREAD PROOF FUNCTION
The Bread Proof function automatically provides the optimum temperature for the bread proof
process, and therefore does not have a temperature adjustment.
If you press BREAD PROOF when the oven temperature is above 100 °F, Hot will appear in the
display. Because these functions produce the best results when started while the oven is cool, we
recommend that you wait until the oven has cooled down and Hot disappears from the display.
1. Press BREAD PROOF.
2. Press START/SET.
3. Press OVEN OFF at any time to turn off the Bread Proof feature.
USING THE OPTIONS FUNCTION
This function enables you to control various electronic control options. These options include temp
adjust, temp unit, auto conversion, 12 hour time of day or 24 hour time of day, 12 hour energy
saving, language, sound on/off, and demo mode.
The option menu is only available when the oven is not being used (not cooking).
1, Temp Adjust Lets you correct the temperature in the oven.
Lets you program the oven control to display temperatures in Fahrenheit
2, Temp Unit
or Centigrade.
3' Auto conversien The convection auto conversion feature automatically converts entered
regular baking temperatures to convection baking temperatures.
4: Time of Day Lets you set the clock to display the time of day in the 12 hour or 24 hour
mode.
5. 12 hour energy This feature automatically turns off the oven after 12 hours during baking
saving functions or after 3 hours during a broil function.
55 operatng the oven
130513_(IB_Best)NE58F9710WS_DG68-00506A_EN.indd 55 13/05/2013 08:27:10
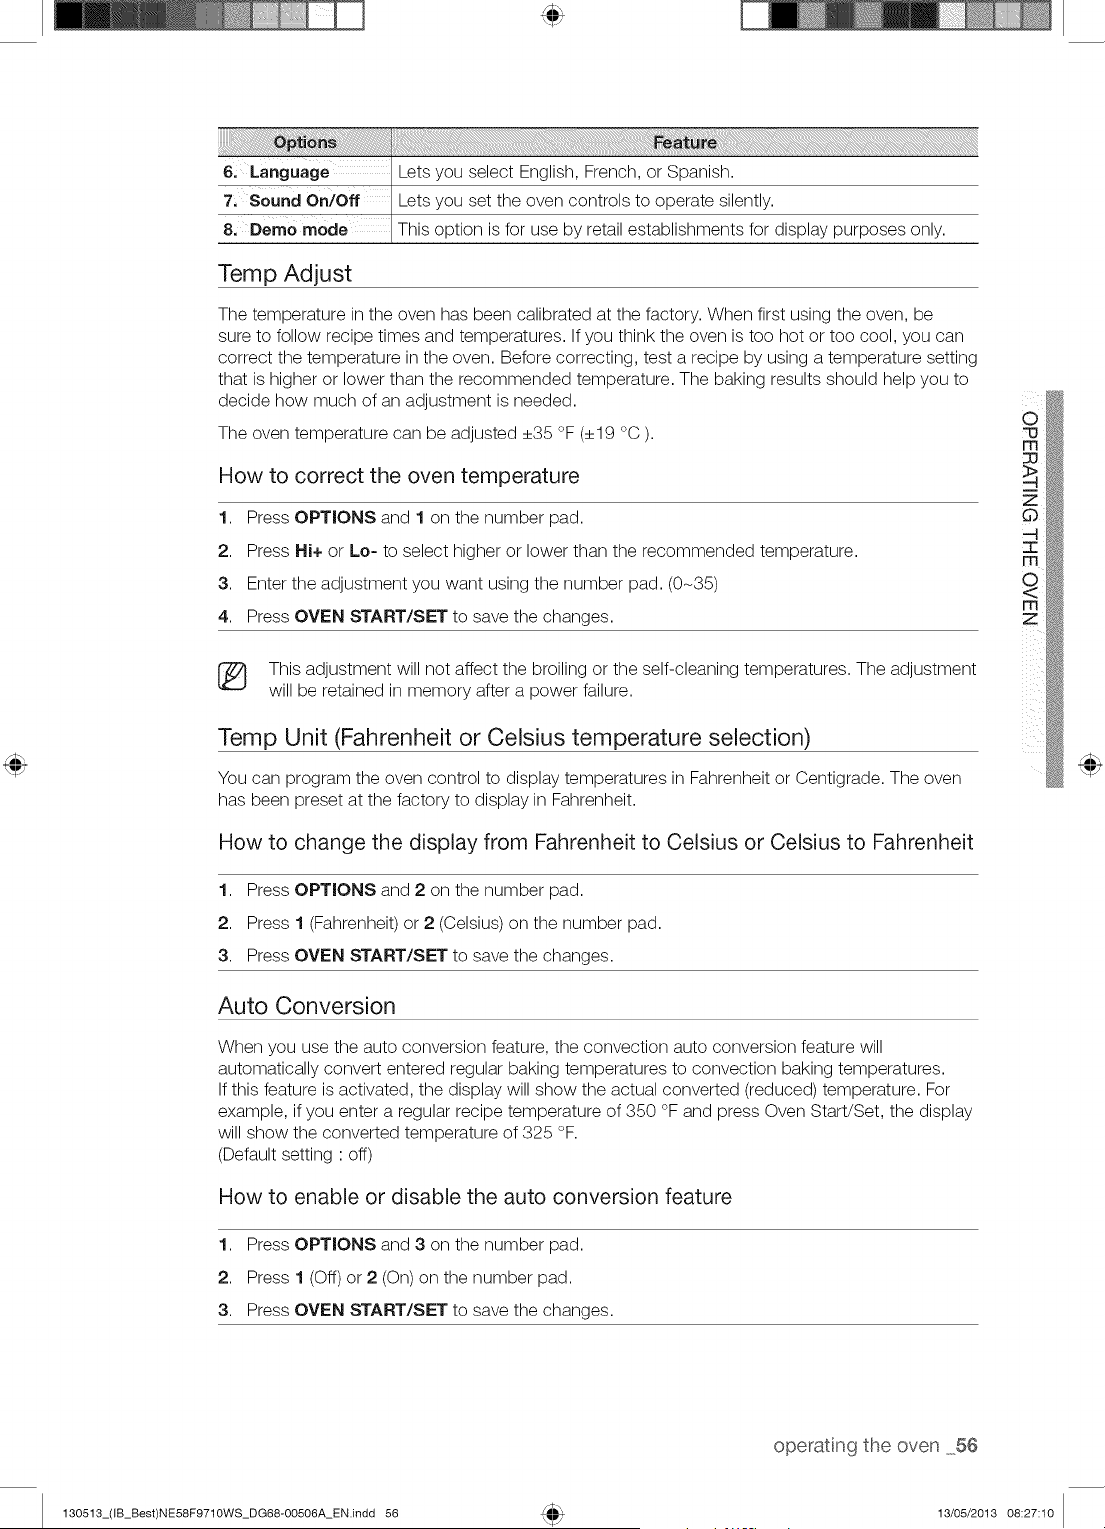
Temp Adjust
The temperature in the oven has been calibrated at the factory. When first using the oven, be
sure to follow recipe times and temperatures. If you think the oven is too hot or too cool, you can
correct the temperature in the oven. Before correcting, test a recipe by using a temperature setting
that is higher or lower than the recommended temperature. The baking results should help you to
decide how much of an adjustment is needed.
The oven temperature can be adjusted +35 °F (+19 °C ).
How to correct the oven temperature
1. Press OPTIONS and 1 on the number pad.
2. Press Hi+ or Lo= to select higher or lower than the recommended temperature.
3. Enter the adjustment you want using the number pad. (0-35)
4. Press OVEN START/SET to save the changes.
(_
73
177
177
Z
(_ This adjustment will not affect the broiling or the self-cleaning temperatures. The adjustment
will be retained in memory after a power failure.
Temp Unit (Fahrenheit or Celsius temperature selection)
You can program the oven control to display temperatures in Fahrenheit or Centigrade. The oven
has been preset at the factory to display in Fahrenheit.
How to change the display from Fahrenheit to Celsius or Celsius to Fahrenheit
1. Press OPTIONS and 2 on the number pad.
2. Press 1 (Fahrenheit) or 2 (Celsius) on the number pad.
3. Press OVEN START/SET to save the changes.
Auto Conversion
When you use the auto conversion feature, the convection auto conversion feature will
automatically convert entered regular baking temperatures to convection baking temperatures.
If this feature is activated, the display will show the actual converted (reduced) temperature. For
example, if you enter a regular recipe temperature of 350 °F and press Oven Start/Set, the display
will show the converted temperature of 325 °F.
(Default setting : off)
How to enable or disable the auto conversion feature
1. Press OPTIONS and 3 on the number pad.
2. Press 1 (Off) or 2 (On) on the number pad.
3. Press OVEN START/SET to save the changes.
operatng the oven 56
130513_(IB_Best)NE58F9710WS_DG68-00506A_EN.indd 56 13/05/2013 08:27:10
Time of Day (12hr/24hr)
The oven control can be programmed to display time of day in the 12 hour or 24 hour mode.
The oven has been preset at the factory to display in the 12 hour mode.
How to change between the 12 and 24 hour time of day display
1. Press OPTIONS and 4 on the number pad.
2. Press 1 (12h0 or 2 (24hr) on the number pad.
3. Press OVEN START/SET to save the changes.
12 hour enerqy saving
If you accidently leave the oven on, this feature will automatically turn off the oven after 12 hours
during baking functions or after 3 hours during a broil function.
How to turn the 12 hour energy saving feature on or off
1. Press OPTIONS and 5 on the number pad.
2. Press 1 (Off) or 2 (On) on the number pad.
3. Press OVEN START/SET to save the changes.
Language
You can select English, French, or Spanish. The default setting is English.
How to change the language on the display
1. Press OPTIONS and 6 on the number pad.
2. Press 1 (EN), 2 (FR) or 3 (SP) on the number pad.
3. Press OVEN START/SET to save the changes.
Sound On/Off
Using Sound On/OFF, you can set the oven controls to operate silently.
How to turn the sound on or off
1. Press OPTIONS and 7 on the number pad.
2. Press 1 (Off) or 2 (On) on the number pad.
3. Press OVEN START/SET to save the changes.
Demo mode
This option is for use by retail establishments for display purposes only. (The heating element does
not operate.)
How to enable or disable the demo mode
1. Press OPTIONS and 8 on the number pad.
2. Press 1 (Off) or 2 (On) on the number pad.
3. Press OVEN START/SET to save the changes.
57 operatng the oven
130513_(IB_Best)NE58F9710WS_DG68-00506A_EN.indd 57 13/05/2013 08:27:10
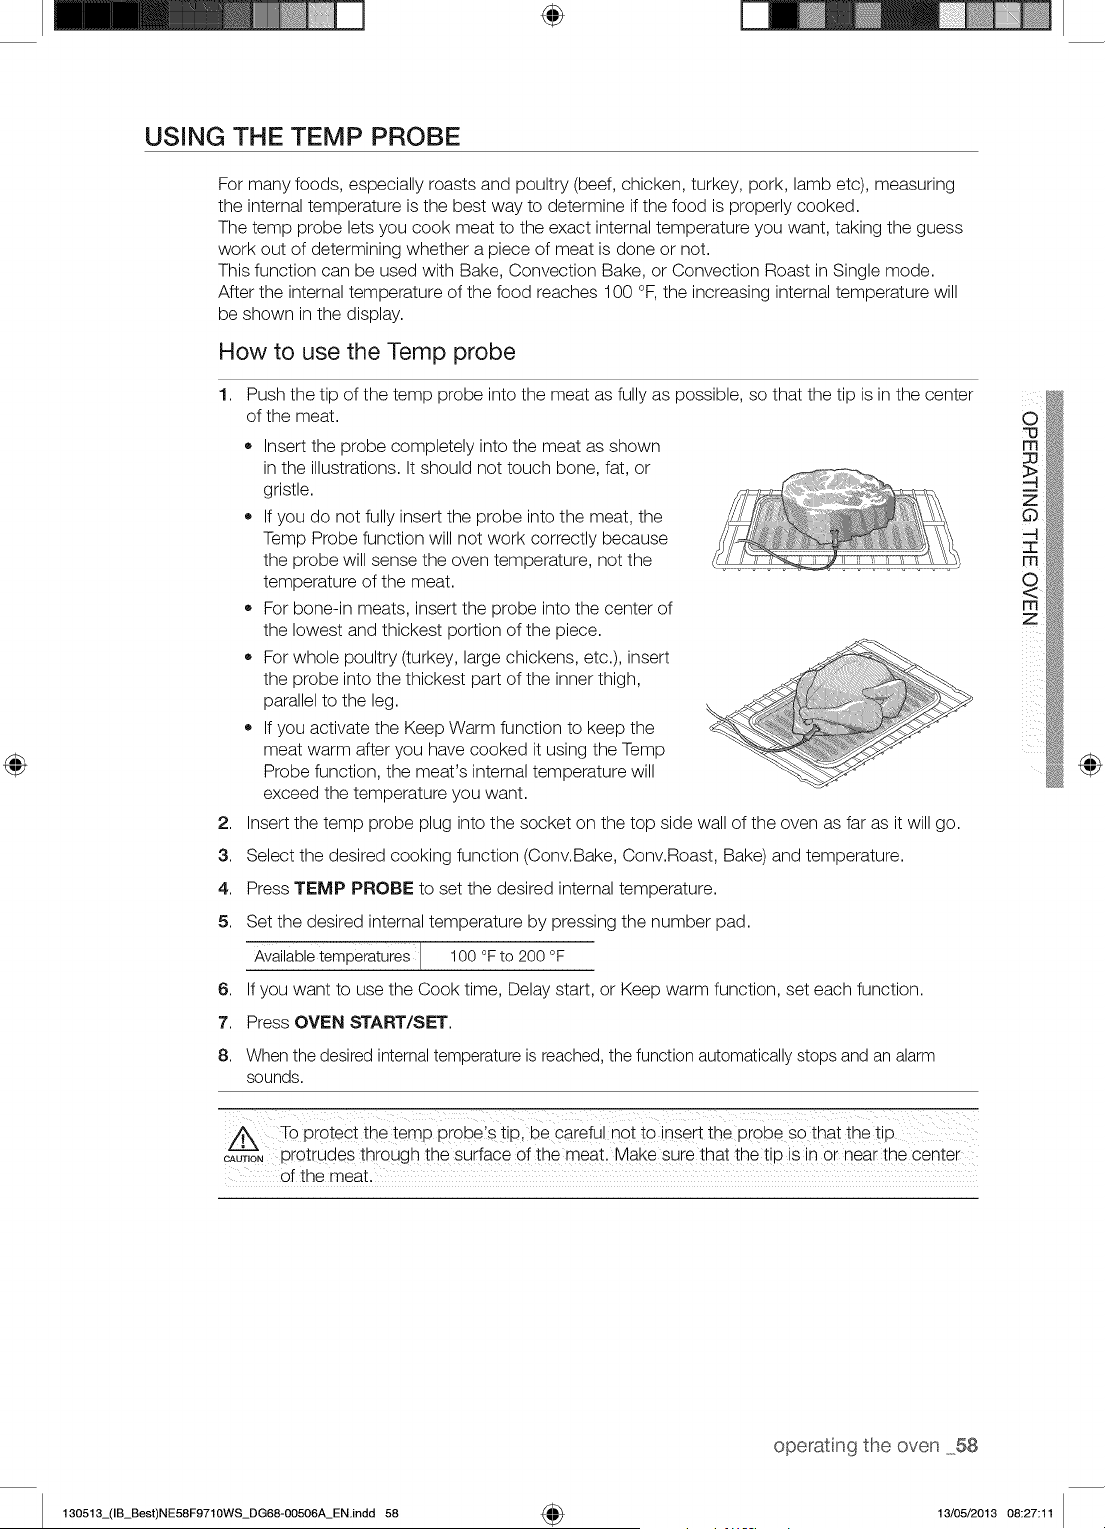
÷
USING THE TEMP PROBE
For many foods, especially roasts and poultry (beef, chicken, turkey, pork, lamb etc), measuring
the internal temperature is the best way to determine if the food is properly cooked.
The temp probe lets you cook meat to the exact internal temperature you want, taking the guess
work out of determining whether a piece of meat is done or not.
This function can be used with Bake, Convection Bake, or Convection Roast in Single mode.
After the internal temperature of the food reaches 100 °F, the increasing internal temperature will
be shown in the display.
How to use the Temp probe
1,
2,
3.
4.
5.
6,
7.
8.
Push the tip of the temp probe into the meat as fully as possible, so that the tip is in the center
of the meat.
• Insert the probe completely into the meat as shown
in the illustrations. It should not touch bone, fat, or
gristle.
If you do not fully insert the probe into the meat, the
Temp Probe function will not work correctly because
the probe will sense the oven temperature, not the
temperature of the meat.
For bone-in meats, insert the probe into the center of
the lowest and thickest portion of the piece.
For whole poultry (turkey, large chickens, etc.), insert
the probe into the thickest part of the inner thigh,
parallel to the leg.
If you activate the Keep Warm function to keep the
meat warm after you have cooked it using the Temp
Probe function, the meat's internal temperature will
exceed the temperature you want.
Insert the temp probe plug into the socket on the top side wall of the oven as far as it will go.
Select the desired cooking function (Conv.Bake, Conv.Roast, Bake) and temperature.
Press TEMP PROBE to set the desired internal temperature.
Set the desired internal temperature by pressing the number pad.
Availabletemperatures J 100 °F to 200 °F
If you want to use the Cook time, Delay start, or Keep warm function, set each function.
Press OVEN START/SET.
When the desired internaltemperature is reached, the function automatically stops and an alarm
sounds.
To Protect the tern p Probe's tip, be careful not tO insert the pr0be so that the tip
_uT,oN protrudes through the surface of the meat, Make sure that thet p s n or near the center
of the meat.
@
operatng the oven 58
130513_(IB_Best)NE58F9710WS_DG68-00506A_EN.indd 58 4_ 13/05/2013 08:27:11
A
CAUTION
• Do not store the DroP÷ n the oven.
Do not leave the probe inside the oven during a Self-Cleaing or Broiling c_cle. You can
oermanently damage the probe and it wn_no longer WORK.
o To avoid breaKing the probe's tip. defrost your food completely.
Dc not use tongs wnen nsert_ng or remowng the probe. Tongs can damage the probe
Use the temp probe for Temp probe function cooking only. Do not use the ter_ a
orobe for any pther purpose.
If you remove the temp probe while the Temp probe function is operating or insert the temp
probe while baking or cooking normally, cooking will stop after 1 minute.
If you use the probe to cook frozen food, there are times when it cannot be detected.
(Temp probe icon doesn't show in display.)
Temp probe table
Beef/Lamb lMediurn
Pork
Poultry
140-150 °F
160-170 °F
175-185 °F
175-185 °F
185-195 °F
If you cover the meat with aluminum foil and allow it to stand for 10 minutes after cooking,
the Internal temperature will rise 5-10 degrees.
Removing the Temp probe
Remove the temp probe plug from the socket.
After cooking; the temp probe is hot enough to cause burns
CAUTION
59 operatng the oven
130513_(IB_Best)NE58F9710WS_DG68-00506A_EN.indd 59 13/05/2013 08:27:11
SETTING THE SABBATH FEATURE
(For use on the Jewish Sabbath & Holidays)
For further assistance, guidelines for proper usage and a complete list of
models with the Sabbath feature, please visit the web at http:\\www.star-k.org.
You can use the Sabbath feature for baking only. The oven temperature may be set higher or
lower after you have set the Sabbath feature (the oven temperature adjustment feature should be
used only during Jewish holidays). The display, however, will not change and tones will not sound
when a change occurs. Once the oven is properly set for baking with the Sabbath feature active,
the oven will remain continuously on until the Sabbath feature is cancelled. This will override the
factory preset 12 hour energy saving feature. If the oven light is needed during the Sabbath, press
OVEN MGHT before activating the Sabbath feature. Once the oven light is turned on and the
Sabbath feature is active, the oven light will remain on until the Sabbath feature is turned off. If the
oven light needs to be off, be sure to turn the oven light off before activating the Sabbath feature.
How to use the Sabbath feature
1. Press BAKE.
The default temperature is 350 °F.
2. Enter the temperature you want, eg. 375 °F, by using the number pad.
3. Press OVEN START/SET.
The temperature display will start to change once the overs temperature reaches 175 °F.
4. Press BAKE and TOUCH TO WAKE-UP at the same time for 3 seconds.
The display will show SAb.
Once SAb appears in the display, the oven control will no longer beep or display any further changes.
You may change the oven temperature once baking has started. Remember that the oven
control will no longer beep or display any further changes once the Sabbath feature is active.
5. You can turn the oven off at any time by pressing OVEN OFF. This will turn only the oven off.
If you want to deactivate the Sabbath feature, hold down BAKE and TOUCH TO WAKE=UP
at the same time for 3 seconds, Sab will disappear from the display,
Do not attempt to activate any other program feature except BAKE while the Sabbath
feature is active. ONLY the following key pads will function correctly with the Sabbath
feature: NUMBER PAD, BAKE, OVEN START/SET and OVEN OFF. ALL OTHER
KEYPADS should not be used once the Sabbath feature is activated.
(_ You cars change the overs temperature, but the display will not change and tones will not
sound when a change occurs. (the overs temperature adjustment feature should be used
only Jewish holidays) After changing the temperature while the unit is in Sabbath mode
there is a 15 seconds delay before the unit will recognize the change.
You cars set the Cook time function before activating the Sabbath feature.
®
®
®
Should you experience a power failure or interruption, the oven will shut off. When power
is returned the oven will not turn back on automatically. SAb will be displayed in the oven
control display, but the oven will not operate. The food may be safely removed from the
oven while the oven is still in the Sabbath mode, however the oven cannot be turned back
on until after the Sabbath/Holidays. After the Sabbath observance turn OFF the Sabbath
mode. Press and hold both BAKE and TOUCH TO WAKE-UP for at least 3 seconds
simultaneously to turn the Sabbath mode off. The oven may be used normally.
Do not open the oven door or change the oven temperature for about 30 minutes after you
have started Sabbath mode to allow the oven to reach the set temperature. Note that, for
best performance, the oven fan operates only when the oven temperature is rising.
Do not use the cooktop when the range is in the Sabbath MODE.
m
z
130513_(IB_Best)NE58F9710WS_DG68-00506A_EN.indd 60
operatn9 the oven 60
13/05/2013 08:27:11
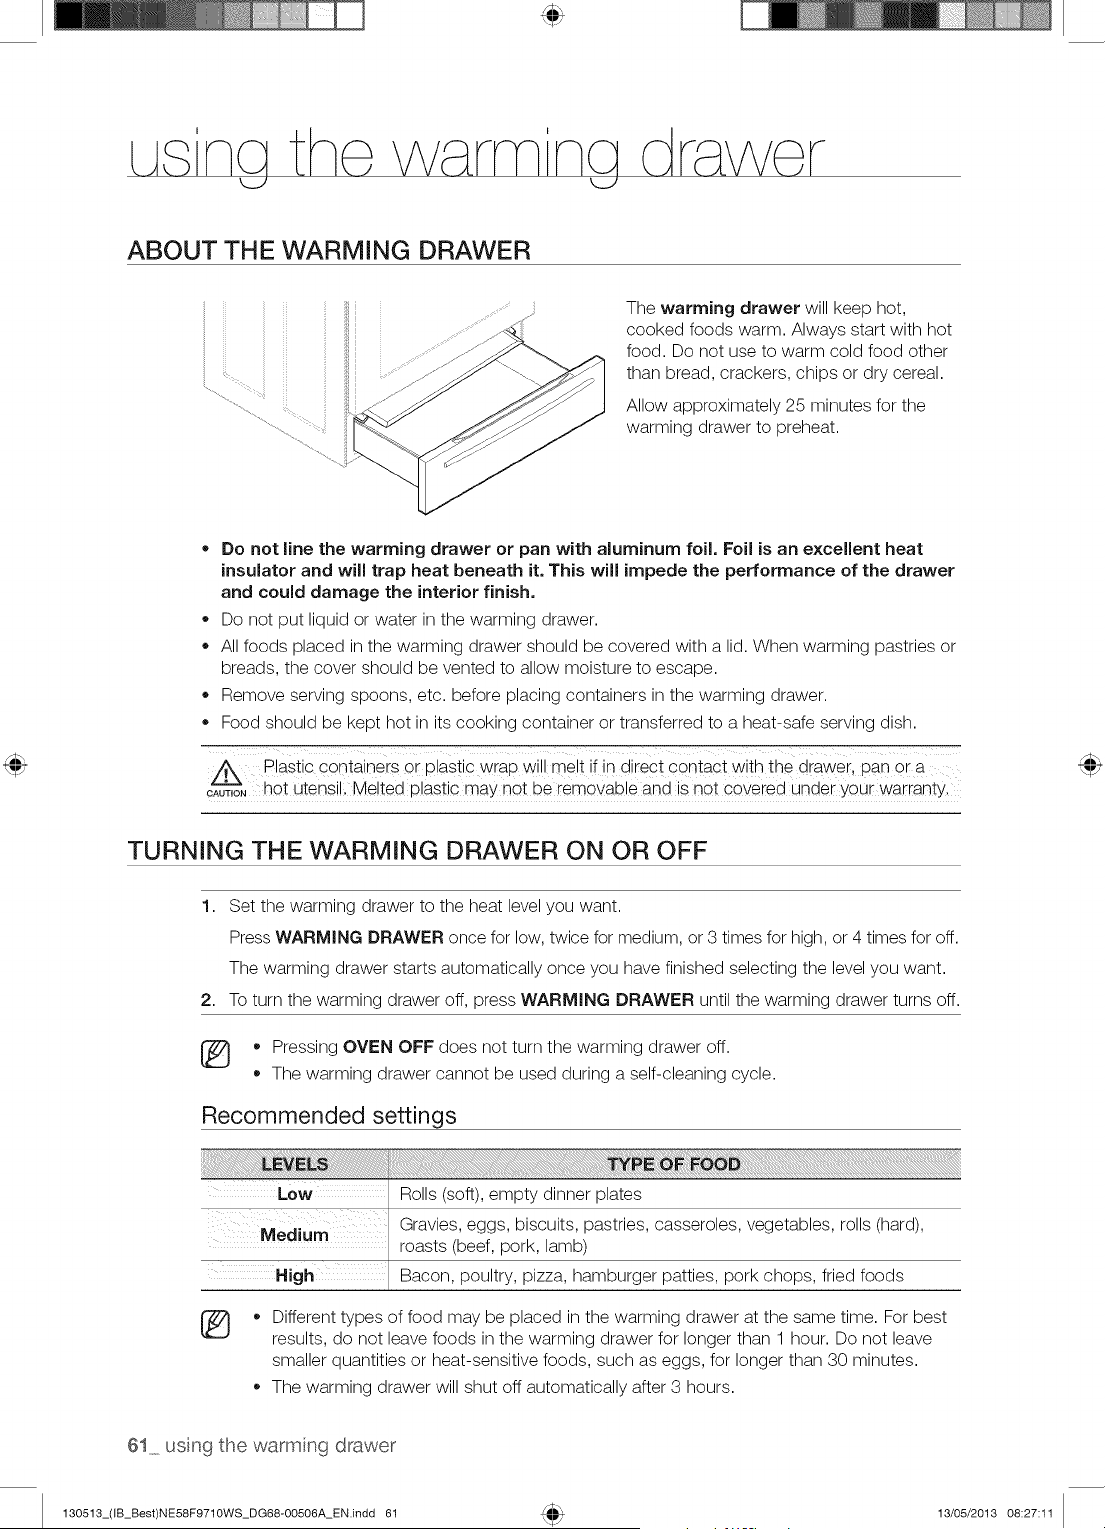
ABOUT THE WARMING DRAWER
The warming drawer will keep hot,
cooked foods warm. Always start with hot
food. Do not use to warm cold food other
than bread, crackers, chips or dry cereal.
Allow approximately 25 minutes for the
warming drawer to preheat.
Do not line the warming drawer or pan with aluminum foil. Foil is an excellent heat
insulator and will trap heat beneath it. This will impede the performance of the drawer
and could damage the interior finish.
* Do not put liquid or water in the warming drawer.
All foods placed in the warming drawer should be covered with a lid. When warming pastries or
breads, the cover should be vented to allow moisture to escape.
* Remove serving spoons, etc. before placing containers in the warming drawer.
* Food should be kept hot in its cooking container or transferred to a heat-safe serving dish.
plastic Containers or plastic wrap wil! melt if in direc t contact with the drawer, pan or a
c'Zu_,o,hot utensil. Melted plastic may not be removable and is not covered under your warranty.
TURNING THE WARMING DRAWER ON OR OFF
1. Set the warming drawer to the heat level you want.
Press WARMING DRAWER once for low, twice for medium, or 3 times for high, or 4 times for off.
The warming drawer starts automatically once you have finished selecting the level you want.
2. To turn the warming drawer off, press WARMING DRAWER until the warming drawer turns off.
[_ * Pressing OVEN OFF does not turn the warming drawer off.
The warming drawer cannot be used during a self-cleaning cycle.
Recommended settings
Low Roils (soft), empty dinner plates
Medium Gravies, eggs, biscuits, pastries, casseroles, vegetables, rolls (hard),
roasts (beef, pork, lamb)
High Bacon, poultry, pizza, hamburger patties, pork chops, fried foods
®
Different types of food may be placed in the warming drawer at the same time. For best
results, do not leave foods in the warming drawer for longer than 1 hour. Do not leave
smaller quantities or heat-sensitive foods, such as eggs, for longer than 30 minutes.
The warming drawer will shut off automatically after 3 hours.
61 us ng the warm ng drawer
130513_(IB_Best)NE58F9710WS_DG68-00506A_EN.indd 61 13/05/2013 08:27:11
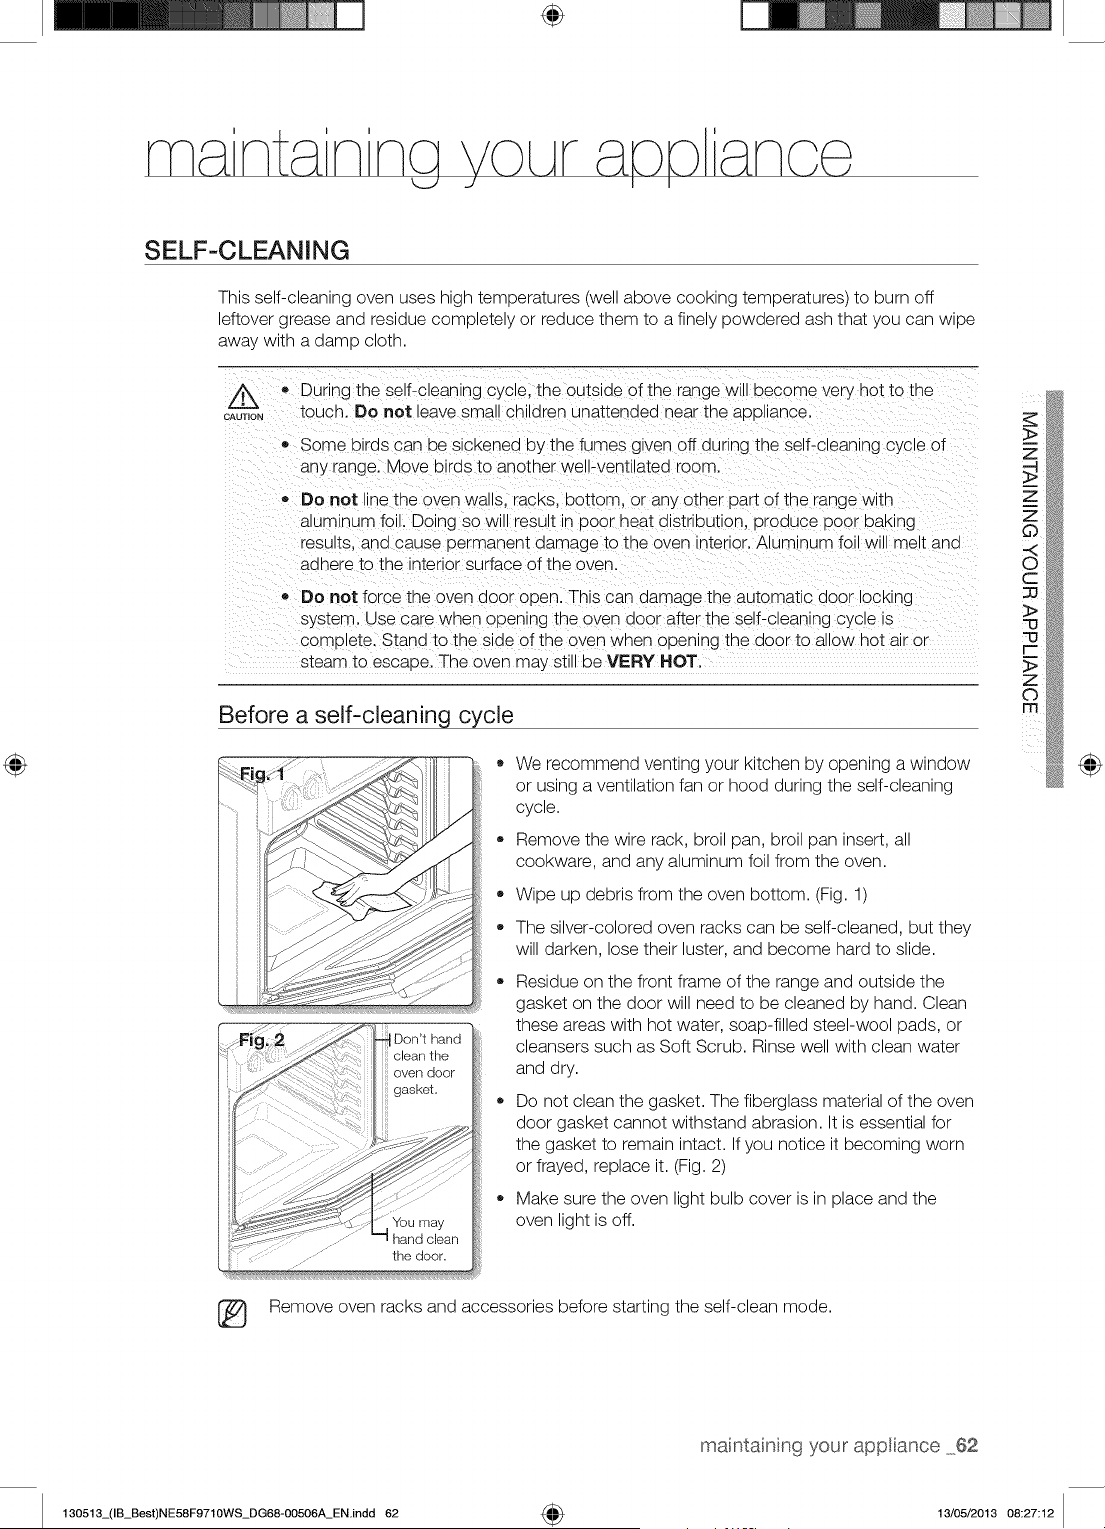
÷
SELF-CLEANING
This self-cleaning oven uses high temperatures (well above cooking temperatures) to burn off
leftover grease and residue completely or reduce them to a finely powdered ash that you can wipe
away with a damp cloth.
/k
CAUTION
,, During the self-cleaning cycle, the outside of the range w_ _)ecome very hot to the
touch. Do not leave sma, cn_dren unattenaed near the appl ance.
Some birds can De SlcKenea uy the fumes given off dur ng the self-c eanlng cycle of
any range. Move birds to another well-ventilated room
Do not ne the oven wa,s. racks, bottom, or any other part of the range w_th
a_um_numfoil. Doing so will result in Door heat distribution, uroauce Door DaK_ng
results, ana cause uermanent damage to the oveq _nteHor.Aluminum foil will me t and
aonera to the _nter_orsurface of the oven.
Do not force the oven door open. Ths can damage the automatic door lOCKing
system. Use care wnen ouenlng the oven door after the self-cleaning CyCle is
com_)_ete.Stand to the side of the oven wnen opening the door to allow hot air or
steam to esc_.oe. The oven may still be VERY HOT.
Before a self-cleaning cycle
o
o
We recommend venting your kitchen by opening a window
or using a ventilation fan or hood during the self-cleaning
cycle.
Remove the wire rack, broil pan, broil pan insert, all
cookware, and any aluminum foil from the oven.
Wipe up debris from the oven bottom. (Fig. 1)
The silver-colored oven racks can be self-cleaned, but they
will darken, lose their luster, and become hard to slide.
Residue on the front frame of the range and outside the
gasket on the door will need to be cleaned by hand. Clean
these areas with hot water, soap-filled steel-wool pads, or
cleansers such as Soft Scrub. Rinse well with clean water
and dry.
Do not clean the gasket. The fiberglass material of the oven
door gasket cannot withstand abrasion. It is essential for
the gasket to remain intact. If you notice it becoming worn
or frayed, replace it. (Fig. 2)
Make sure the oven light bulb cover is in place and the
oven light is off.
@
Remove oven racks and accessories before starting the self-clean mode.
maintaining your appliance 62
130513_(IB_Best)NE58F9710WS_DG68-00506A_EN.indd 62 4_ 13/05/2013 08:27:12
How to run a self-cleaning cycle
1. Select the length of time for the self-cleaning operation, eg. 3 hours.
Press SELF CLEAN once for a 3 hour clean time, twice for a 4 hour clean time, or 3 times for
a 5 hour clean time.
The default setting is 3 hours.
2. Start the self-cleaning cycle.
Press OVEN START/SET. The motor-driven door lock will engage automatically.
3. When the self-cleaning cycle is done, End will show in the display and a beep will sound 6 times.
• You will not be able to start a self-cleaning cycle if the control lockout feature is activated
or if the oven's temperature is too hot.
,, The oven door locks automatically. The display will show the cleaning time remaining.
It is not be possible to open the oven door until the temperature drops to a safe/cool
temperature.
,, The self-cleaning feature will not operate when the warming drawer is on.
How to delay the start of self-cleaninq
1. Press SELF CLEAN.
Select the desired self-clean time by pressing SELF CLEAN.
2. Press DELAY START.
3. Enter the time you want the clean cycle to start.
4. Press OVEN START/SET.
The display will show delay start, self clean, and the Lock icon. The motor-driven door lock will
engage automatically.
5. The Self-Cleaning cycle will turn on automatically at the set time.
How to turn off the self-cleaning feature
You may find it necessary to stop or interrupt a self-cleaning cycle due to smoke in the oven.
1. Press OVEN OFF.
2. You will be able to open the oven door once the oven has cooled down for approximately
1 hour.
After a self-cleaning cycle
,, You may notice some white ash in the oven. Wipe it up with a damp cloth after the oven cools.
(If white spots remain, remove them with a soap-filled steel wool pad and rinse thoroughly with
a vinegar and water mixture.)
,, If the oven is not clean after one cycle, repeat the cycle.
,, You cannot set the oven for cooking until the oven is cool enough for the door to unlock.
63 maintainng your'appliance
130513_(IB_Best)NE58F9710WS_DG68-00506A_EN.indd 63 13/05/2013 08:27:12
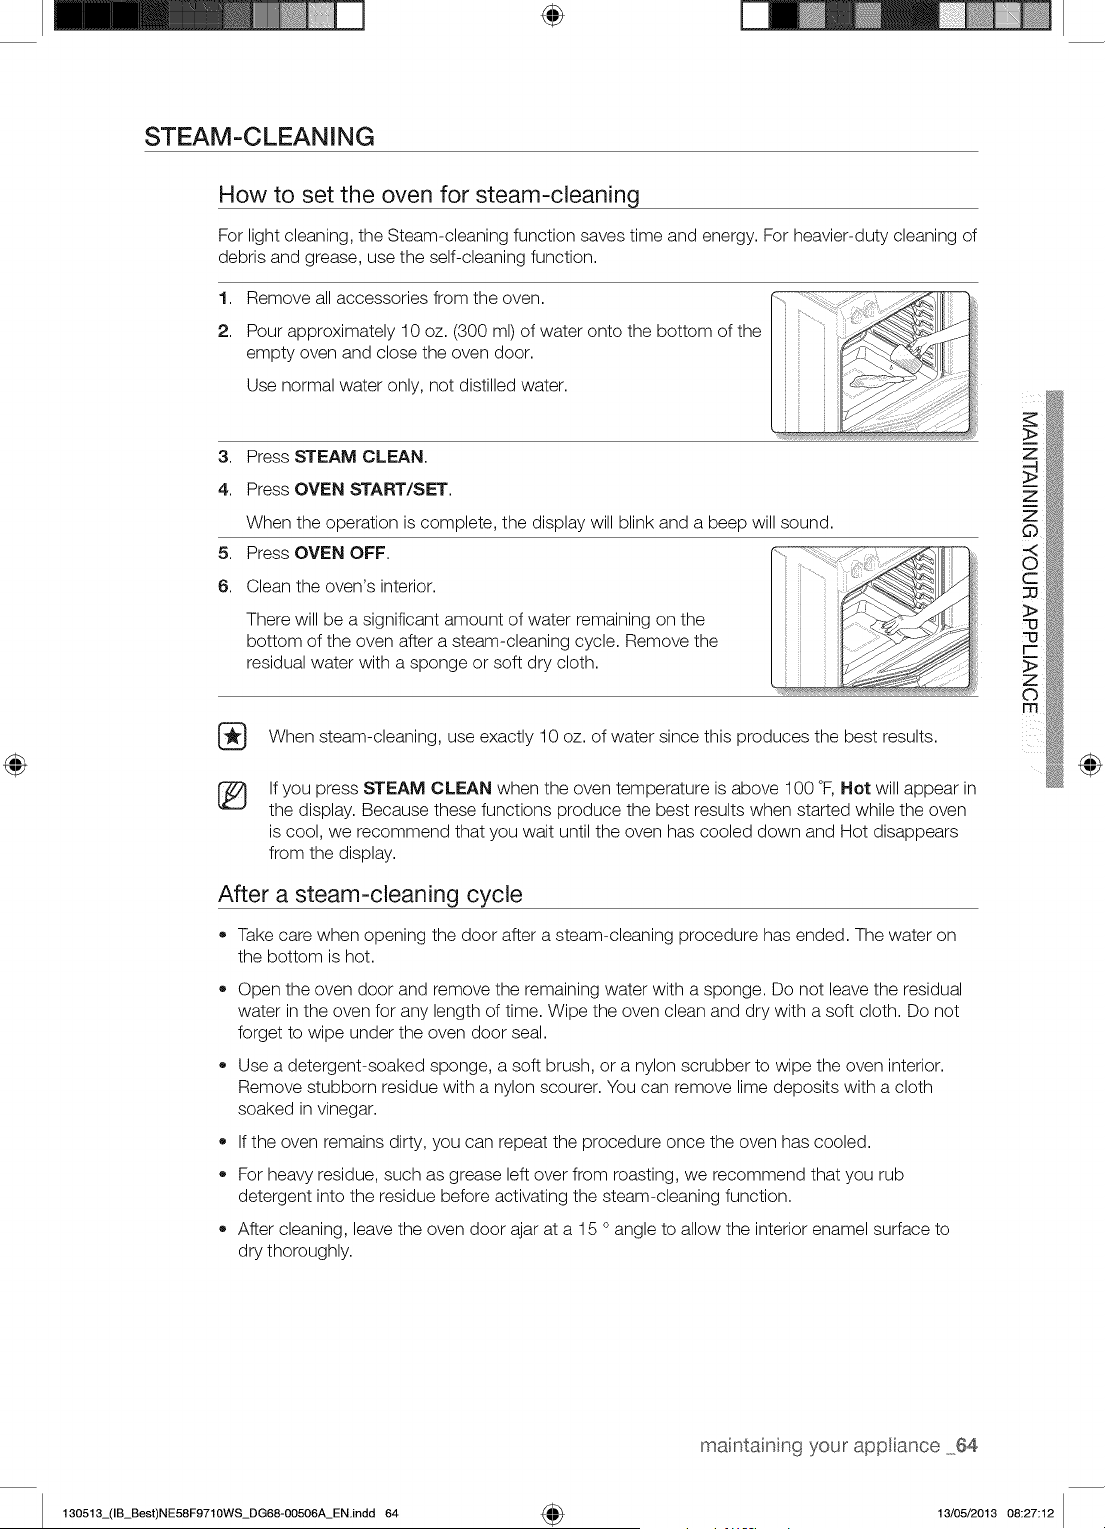
÷
STEAM-CLEANING
How to set the oven for steam-cleaning
For light cleaning, the Steam-cleaning function saves time and energy. For heavier-duty cleaning of
debris and grease, use the self-cleaning function.
1,
2.
Remove all accessories from the oven.
Pour approximately 10 oz. (300 ml) of water onto the bottom of the
empty oven and close the oven door.
Use normal water only, not distilled water.
3. Press STEAM CLEAN.
4. Press OVEN START/SET.
5,
6.
When the operation is complete, the display will blink and a beep will sound.
Press OVEN OFF.
Clean the oven's interior.
There will be a significant amount of water remaining on the
bottom of the oven after a steam-cleaning cycle. Remove the
residual water with a sponge or soft dry cloth.
When steam-cleaning, use exactly 10 oz. of water since this produces the best results.
®
If you press STEAM CLEAN when the oven temperature is above 100 °F, Hot will appear in
the display. Because these functions produce the best results when started while the oven
is cool, we recommend that you wait until the oven has cooled down and Hot disappears
from the display.
After a steam-cleaning cycle
• Take care when opening the door after a steam-cleaning procedure has ended. The water on
the bottom is hot.
®
®
Open the oven door and remove the remaining water with a sponge. Do not leave the residual
water in the oven for any length of time. Wipe the oven clean and dry with a soft cloth. Do not
forget to wipe under the oven door seal.
Use a detergent-soaked sponge, a soft brush, or a nylon scrubber to wipe the oven interior.
Remove stubborn residue with a nylon scourer. You can remove lime deposits with a cloth
soaked in vinegar.
If the oven remains dirty, you can repeat the procedure once the oven has cooled.
For heavy residue, such as grease left over from roasting, we recommend that you rub
detergent into the residue before activating the steam-cleaning function.
After cleaning, leave the oven door ajar at a 15 ° angle to allow the interior enamel surface to
dry thoroughly.
@
maintaining your appliance 64
130513_(IB_Best)NE58F9710WS_DG68-00506A_EN.indd 64 4_ 13/05/2013 08:27:12
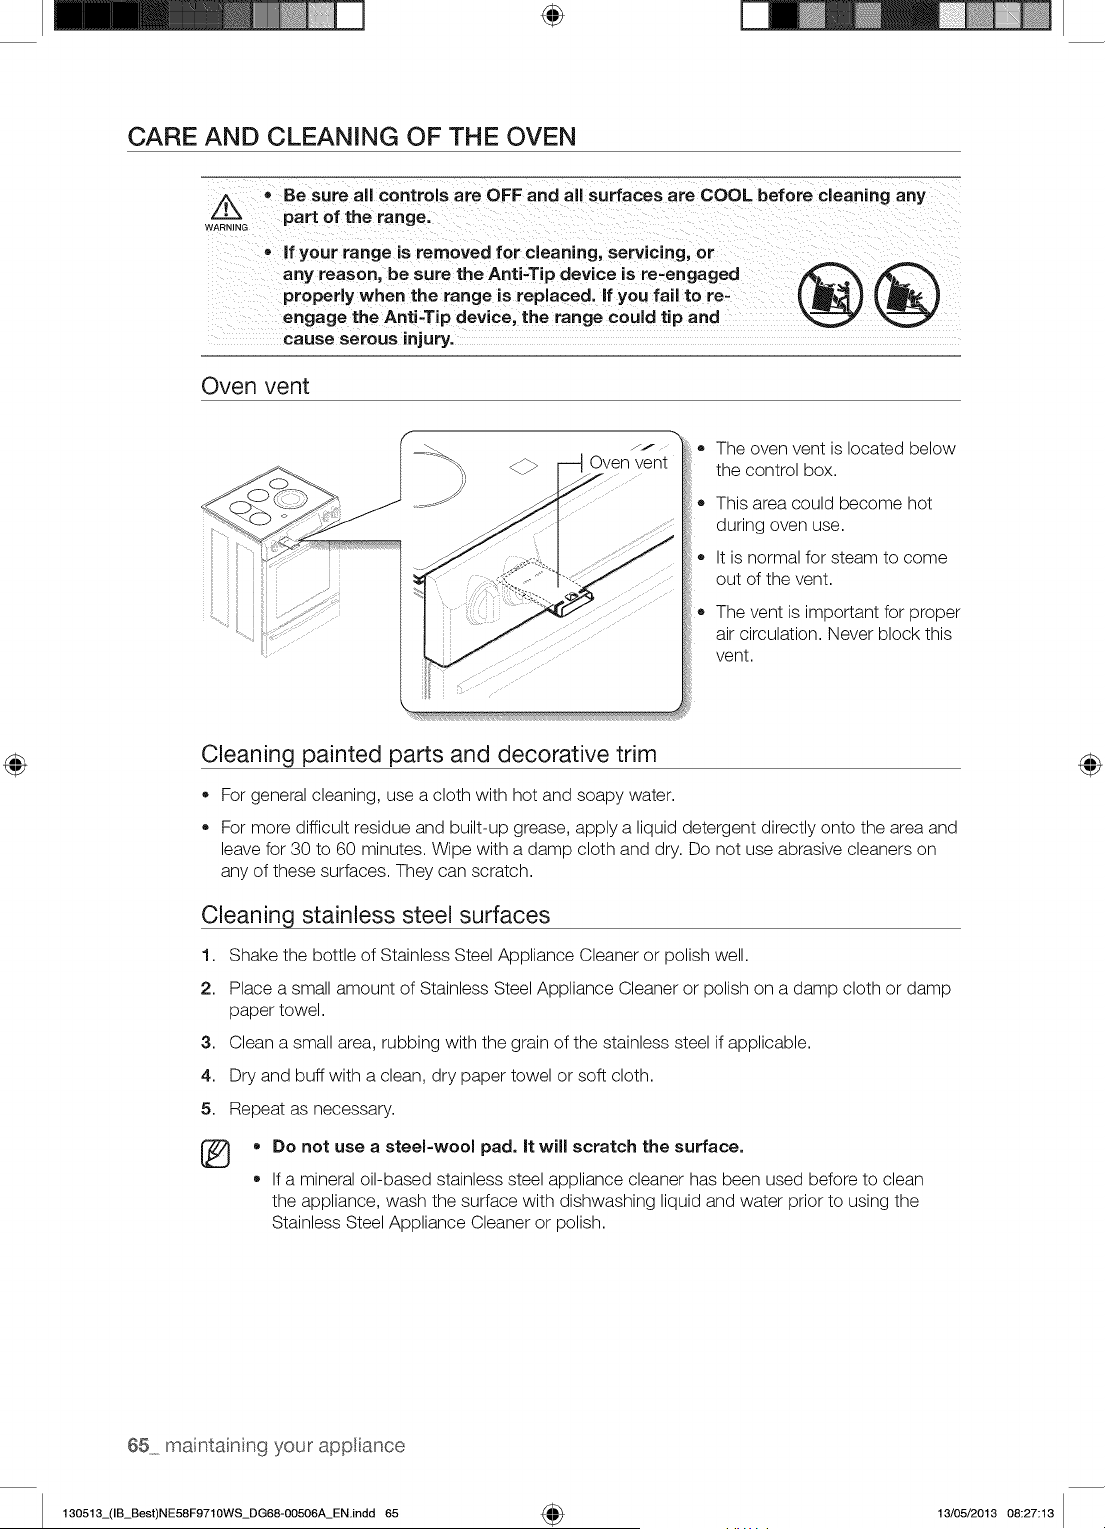
÷
CARE AND CLEANING OF THE OVEN
Z_ • Be sure all controls are OFF and all surfaces are COOL before cleaning any
WA_RNING part of the range.
• if your range is removed for cleaning, servicing, or
any reason, be sure the Anti-Tip device is re=engaged
properly when the range is replaced, if you fail to re=
engage the Anti-Tip device, the range could tip and
cause serous injury.
®®
Oven vent
JJ
O Oven vent
®
®
The oven vent is located below
the control box.
This area could become hot
during oven use.
It is normal for steam to come
out of the vent.
The vent is important for proper
air circulation. Never block this
vent.
Cleaning painted parts and decorative trim
• For general cleaning, use a cloth with hot and soapy water.
For more difficult residue and built-up grease, apply a liquid detergent directly onto the area and
leave for 30 to 60 minutes. Wipe with a damp cloth and dry. Do not use abrasive cleaners on
any of these surfaces. They can scratch.
Cleaning stainless steel surfaces
1. Shake the bottle of Stainless Steel Appliance Cleaner or polish well.
2. Place a small amount of Stainless Steel Appliance Cleaner or polish on a damp cloth or damp
paper towel.
3. Clean a small area, rubbing with the grain of the stainless steel if applicable.
4. Dry and buff with a clean, dry paper towel or soft cloth.
5. Repeat as necessary.
• Do not use a steel-wool pad. It will scratch the surface.
If a mineral oil-based stainless steel appliance cleaner has been used before to clean
the appliance, wash the surface with dishwashing liquid and water prior to using the
Stainless Steel Appliance Cleaner or polish.
65 maintainng your appliance
130513_(IB_Best)NE58F9710WS_DG68-00506A_EN.indd 65 4_ 13/05/2013 08:27:13
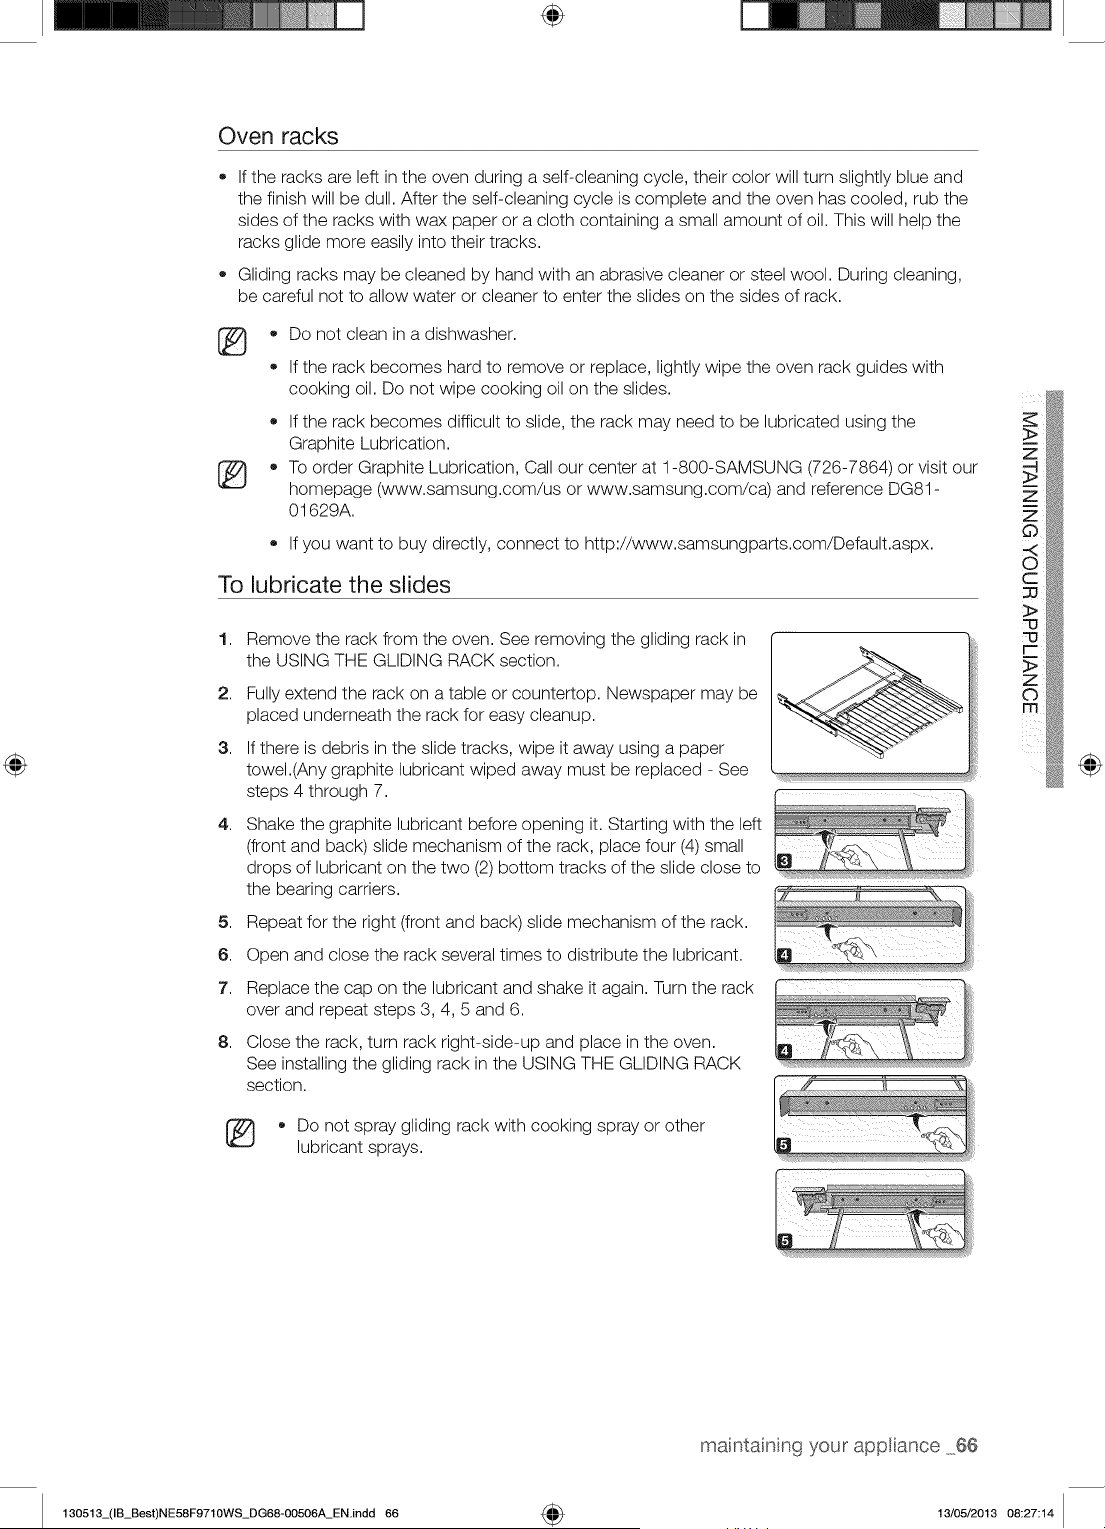
÷
Oven racks
If the racks are left in the oven during a self-cleaning cycle, their color will turn slightly blue and
the finish will be dull. After the self-cleaning cycle is complete and the oven has cooled, rub the
sides of the racks with wax paper or a cloth containing a small amount of oil. This will help the
racks glide more easily into their tracks.
Gliding racks may be cleaned by hand with an abrasive cleaner or steel wool. During cleaning,
be careful not to allow water or cleaner to enter the slides on the sides of rack.
®
®
®
®
Do not clean in a dishwasher.
If the rack becomes hard to remove or replace, lightly wipe the oven rack guides with
cooking oil. Do not wipe cooking oil on the slides.
• If the rack becomes difficult to slide, the rack may need to be lubricated using the
Graphite Lubrication.
To order Graphite Lubrication, Call our center at 1-800-SAMSUNG (726-7864) or visit our
homepage (www.samsung.com/us or www.samsung.com/ca) and reference DG81 -
01629A.
If you want to buy directly, connect to http://www.samsungparts.com/Default.aspx.
To lubricate the slides
1,
2.
3.
4,
5,
6.
7.
8.
Remove the rack from the oven. See removing the gliding rack in
the USING THE GLIDING RACK section.
Fully extend the rack on a table or countertop. Newspaper may be
placed underneath the rack for easy cleanup.
If there is debris in the slide tracks, wipe it away using a paper
towel.(Any graphite lubricant wiped away must be replaced - See
steps 4 through 7.
Shake the graphite lubricant before opening it. Starting with the left
(front and back) slide mechanism of the rack, place four (4) small
drops of lubricant on the two (2) bottom tracks of the slide close to
the bearing carriers.
Repeat for the right (front and back) slide mechanism of the rack.
Open and close the rack several times to distribute the lubricant.
Replace the cap on the lubricant and shake it again. Turn the rack
over and repeat steps 3, 4, 5 and 6.
Close the rack, turn rack right-side-up and place in the oven.
See installing the gliding rack in the USING THE GLIDING RACK _"_,
section.
* Do not spray gliding rack with cooking spray or other
lubricant sprays.
@
maintaining your appliance 66
130513_(IB_Best)NE58F9710WS_DG68-00506A_EN.indd 66 4_ 13/05/2013 08:27:14
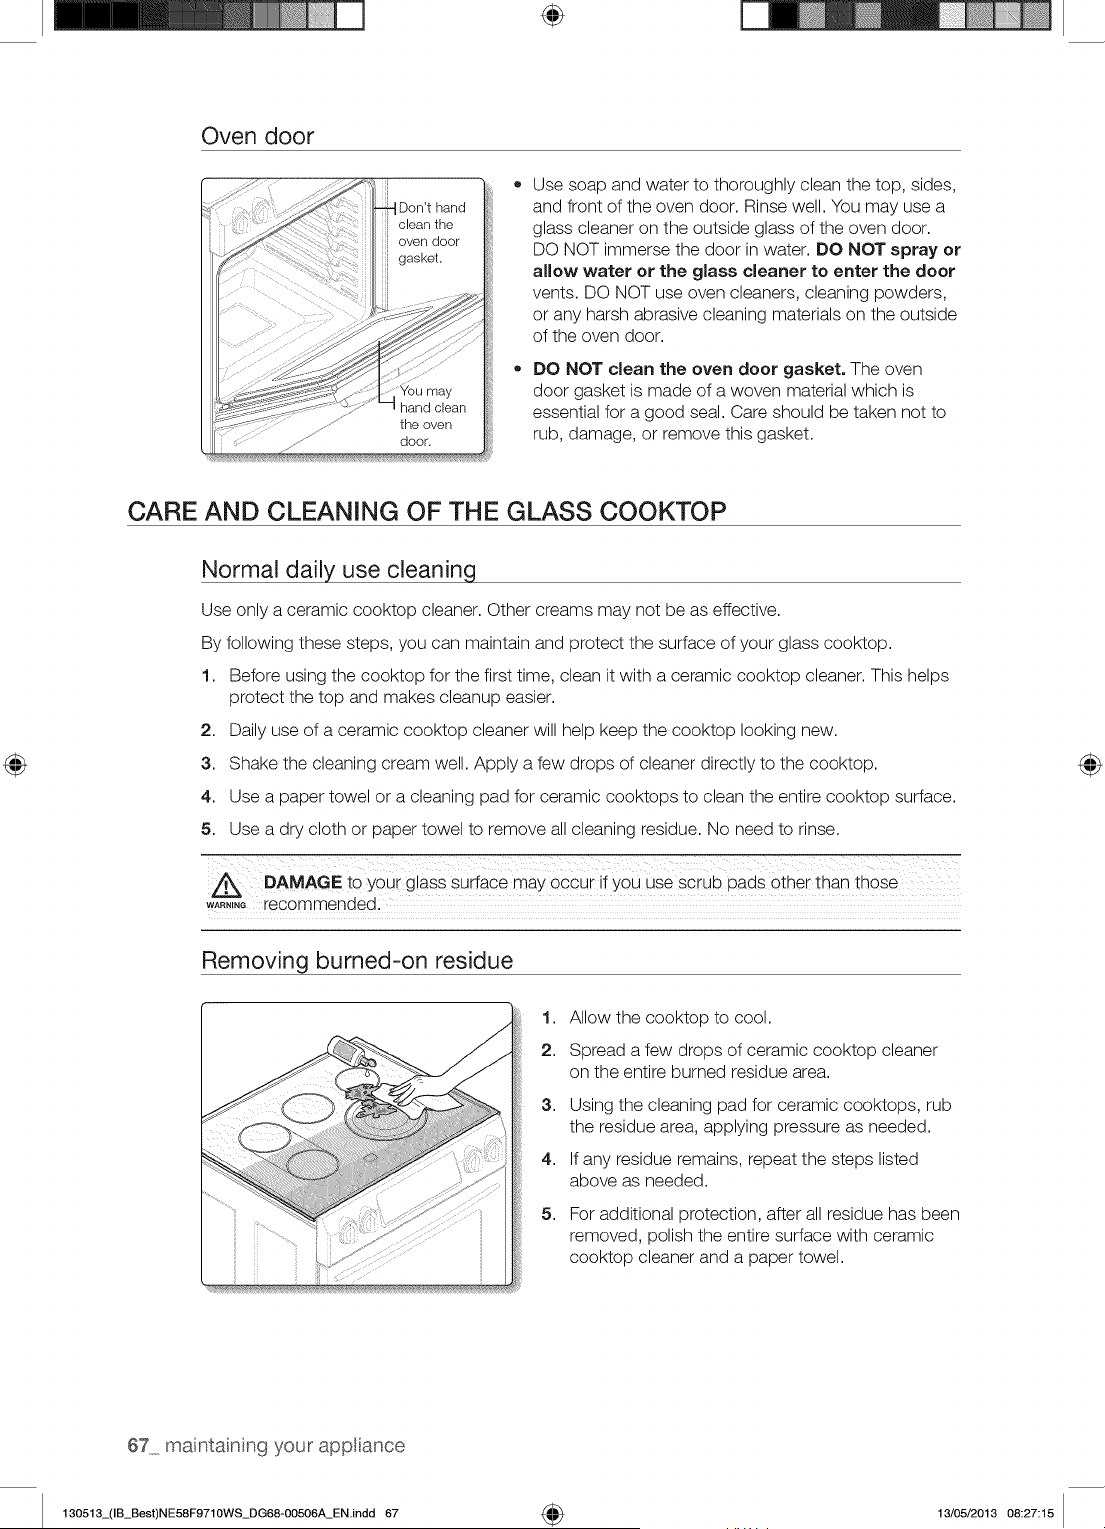
÷
Oven door
Don'thand
door.
Use soap and water to thoroughly clean the top, sides,
and front of the oven door. Rinse well. You may use a
glass cleaner on the outside glass of the oven door.
DO NOT immerse the door in water. DO NOT spray or
allow water or the glass cleaner to enter the door
vents. DO NOT use oven cleaners, cleaning powders,
or any harsh abrasive cleaning materials on the outside
of the oven door.
DO NOT clean the oven door gasket. The oven
door gasket is made of a woven material which is
essential for a good seal. Care should be taken not to
rub, damage, or remove this gasket.
CARE AND CLEANING OF THE GLASS COOKTOP
Normal daily use cleaninq
Use only a ceramic cooktop cleaner. Other creams may not be as effective.
By following these steps, you can maintain and protect the surface of your glass cooktop.
1. Before using the cooktop for the first time, clean it with a ceramic cooktop cleaner. This helps
protect the top and makes cleanup easier.
2. Daily use of a ceramic cooktop cleaner will help keep the cooktop looking new.
3. Shake the cleaning cream well. Apply a few drops of cleaner directly to the cooktop.
4. Use a paper towel or a cleaning pad for ceramic cooktops to clean the entire cooktop surface.
5. Use a dry cloth or paper towel to remove all cleaning residue. No need to rinse.
DAMAGE to you i glass Suiia_e may occui ii y0u uSe Sciub pads Othei than thoSe
w_,,,e recommended:
Removing burned-on residue
1. Allow the cooktop to cool.
2. Spread a few drops of ceramic cooktop cleaner
on the entire burned residue area.
3,
4,
5,
Using the cleaning pad for ceramic cooktops, rub
the residue area, applying pressure as needed.
If any residue remains, repeat the steps listed
above as needed.
For additional protection, after all residue has been
removed, polish the entire surface with ceramic
cooktop cleaner and a paper towel.
67 maintainng your appliance
130513_(IB_Best)NE58F9710WS_DG68-00506A_ENindd 67 _ 13/05/2013 08:27:15
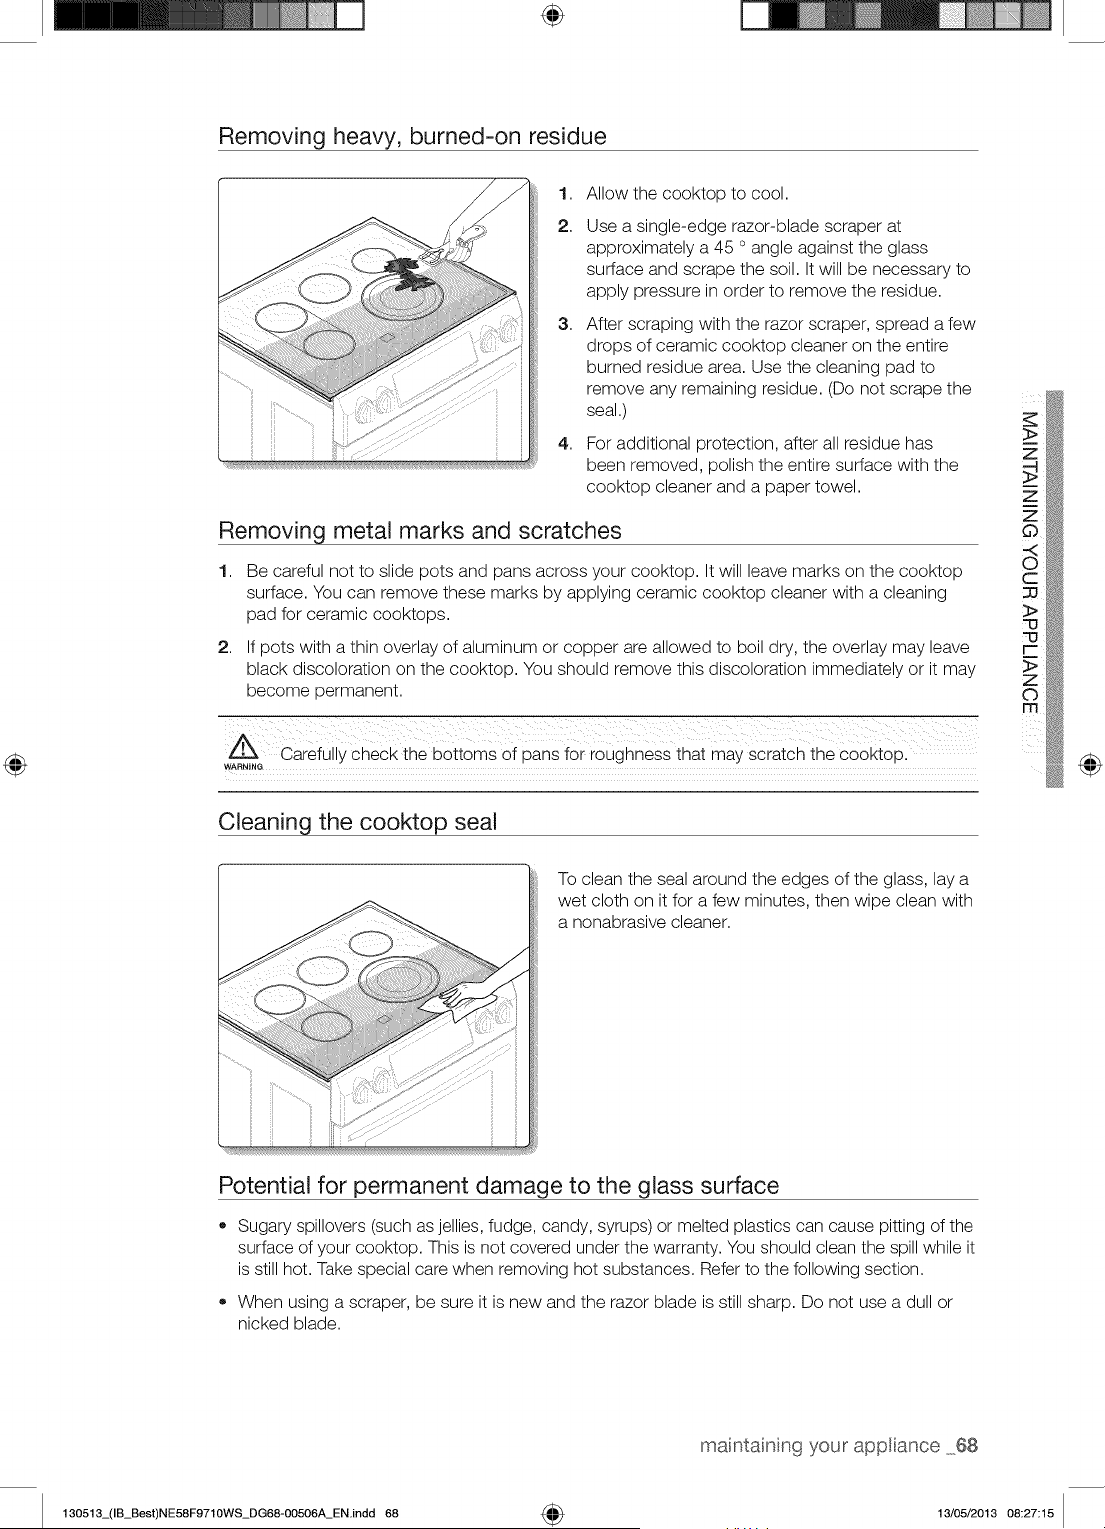
÷
Removing heavy, burned-on residue
1,
2.
3,
4,
Allow the cooktop to cool.
Use a single-edge razor-blade scraper at
approximately a 45 ° angle against the glass
surface and scrape the soil. It will be necessary to
apply pressure in order to remove the residue.
After scraping with the razor scraper, spread a few
drops of ceramic cooktop cleaner on the entire
burned residue area. Use the cleaning pad to
remove any remaining residue. (Do not scrape the
seal.)
For additional protection, after all residue has
been removed, polish the entire surface with the
cooktop cleaner and a paper towel.
Removing metal marks and scratches
1,
2,
Be careful not to slide pots and pans across your cooktop. It will leave marks on the cooktop
surface. You can remove these marks by applying ceramic cooktop cleaner with a cleaning
pad for ceramic cooktops.
If pots with a thin overlay of aluminum or copper are allowed to boil dry, the overlay may leave
black discoloration on the cooktop. You should remove this discoloration immediately or it may
become permanent.
Cleaning the cooktop seal
@
To clean the seal around the edges of the glass, lay a
wet cloth on it for a few minutes, then wipe clean with
a nonabrasive cleaner.
Potential for permanent damage to the glass surface
• Sugary spillovers (such as jellies, fudge, candy, syrups) or melted plastics can cause pitting of the
surface of your cooktop. This is not covered under the warranty. You should clean the spill while it
is still hot. Take special care when removing hot substances. Refer to the following section.
• When using a scraper, be sure it is new and the razor blade is still sharp. Do not use a dull or
nicked blade.
your appliance 68
130513_(IB_Best)NE58F9710WS_DG68-00506A_EN.indd 68 4_ 13/05/2013 08:27:15
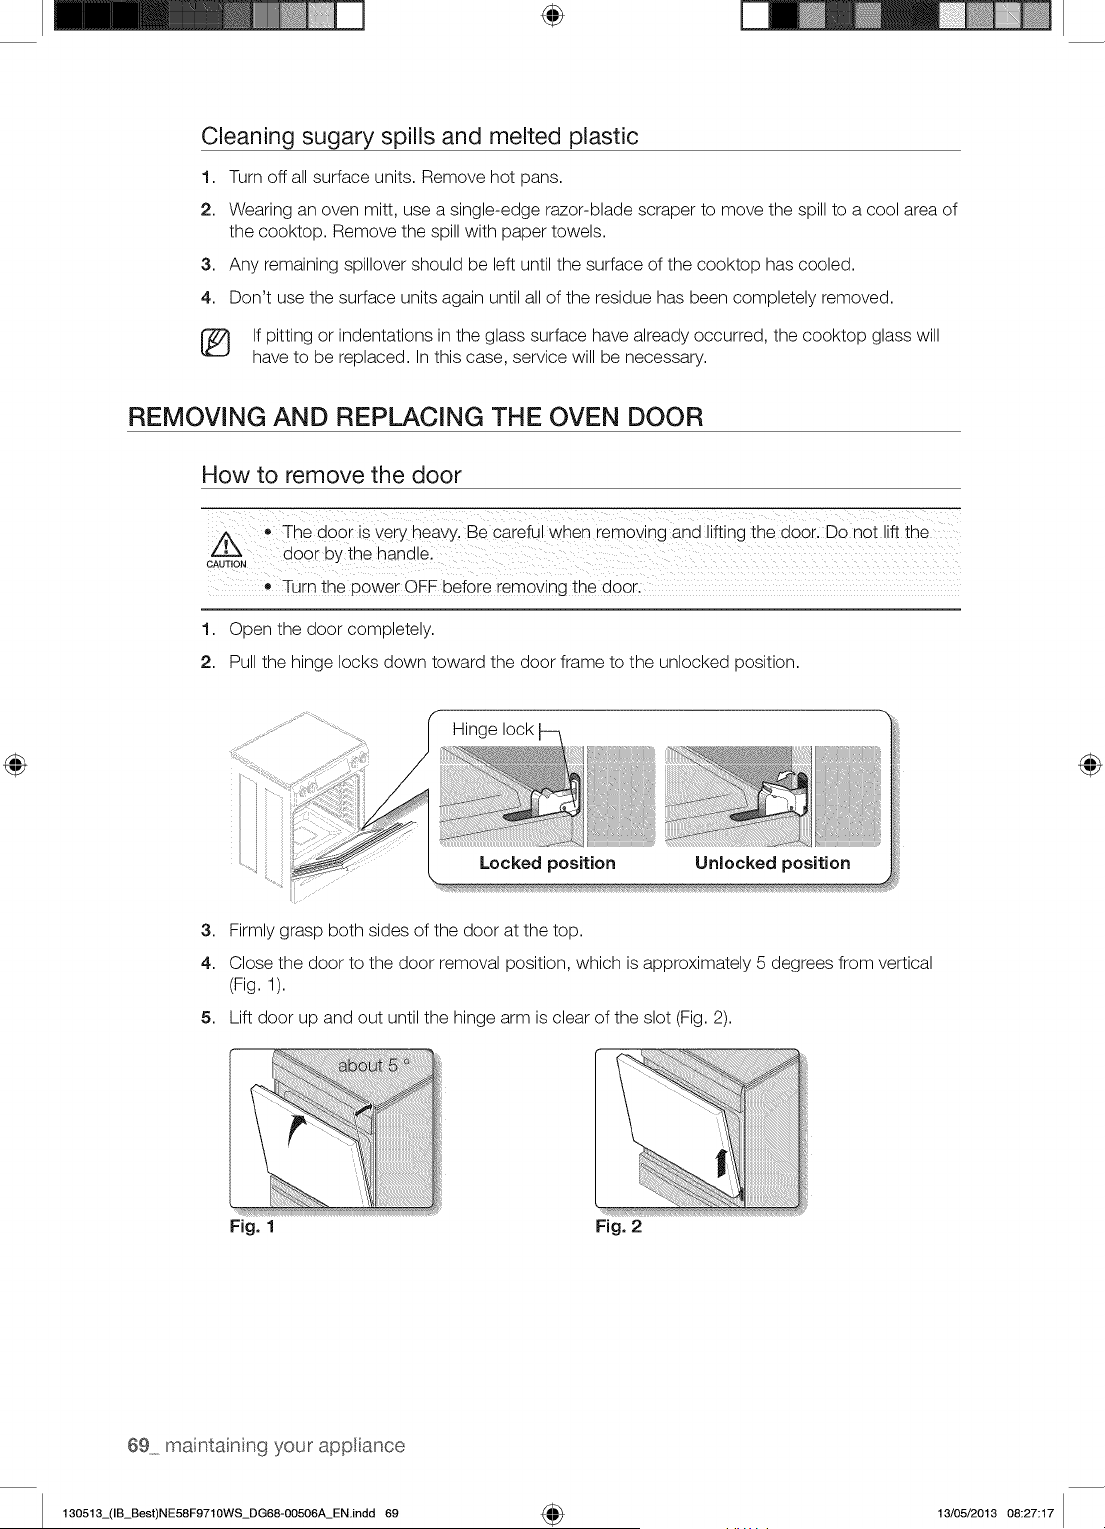
÷
Cleaning sugary spills and melted plastic
1. Turn off all surface units. Remove hot pans.
2. Wearing an oven mitt, use a single-edge razor-blade scraper to move the spill to a cool area of
the cooktop. Remove the spill with paper towels.
3. Any remaining spillover should be left until the surface of the cooktop has cooled.
4. Don't use the surface units again until all of the residue has been completely removed.
[_ If pitting or indentations in the glass surface have already occurred, the cooktop glass will
have to be replaced. In this case, service will be necessary.
REMOVING AND REPLACING THE OVEN DOOR
How to remove the door
The door is very heavy Be careful when removing and lifting the door. Donot lift the
door bY the handle:
CAUTION
®
Turn the p0wer ©FF before removing the
1. Open the door completely.
2. Pull the hinge locks down toward the door frame to the unlocked position.
" Hinge lock
Locked position Unlocked position
3. Firmly grasp both sides of the door at the top.
4. Close the door to the door removal position, which is approximately 5 degrees from vertical
(Fig. 1).
5. Lift door up and out until the hinge arm is clear of the slot (Fig. 2).
Fig. 1 Fig. 2
69 maintainng your appliance
130513_(IB_Best)NE58F9710WS_DG68-00506A_EN.indd 69 4_ 13/05/2013 08:27:17
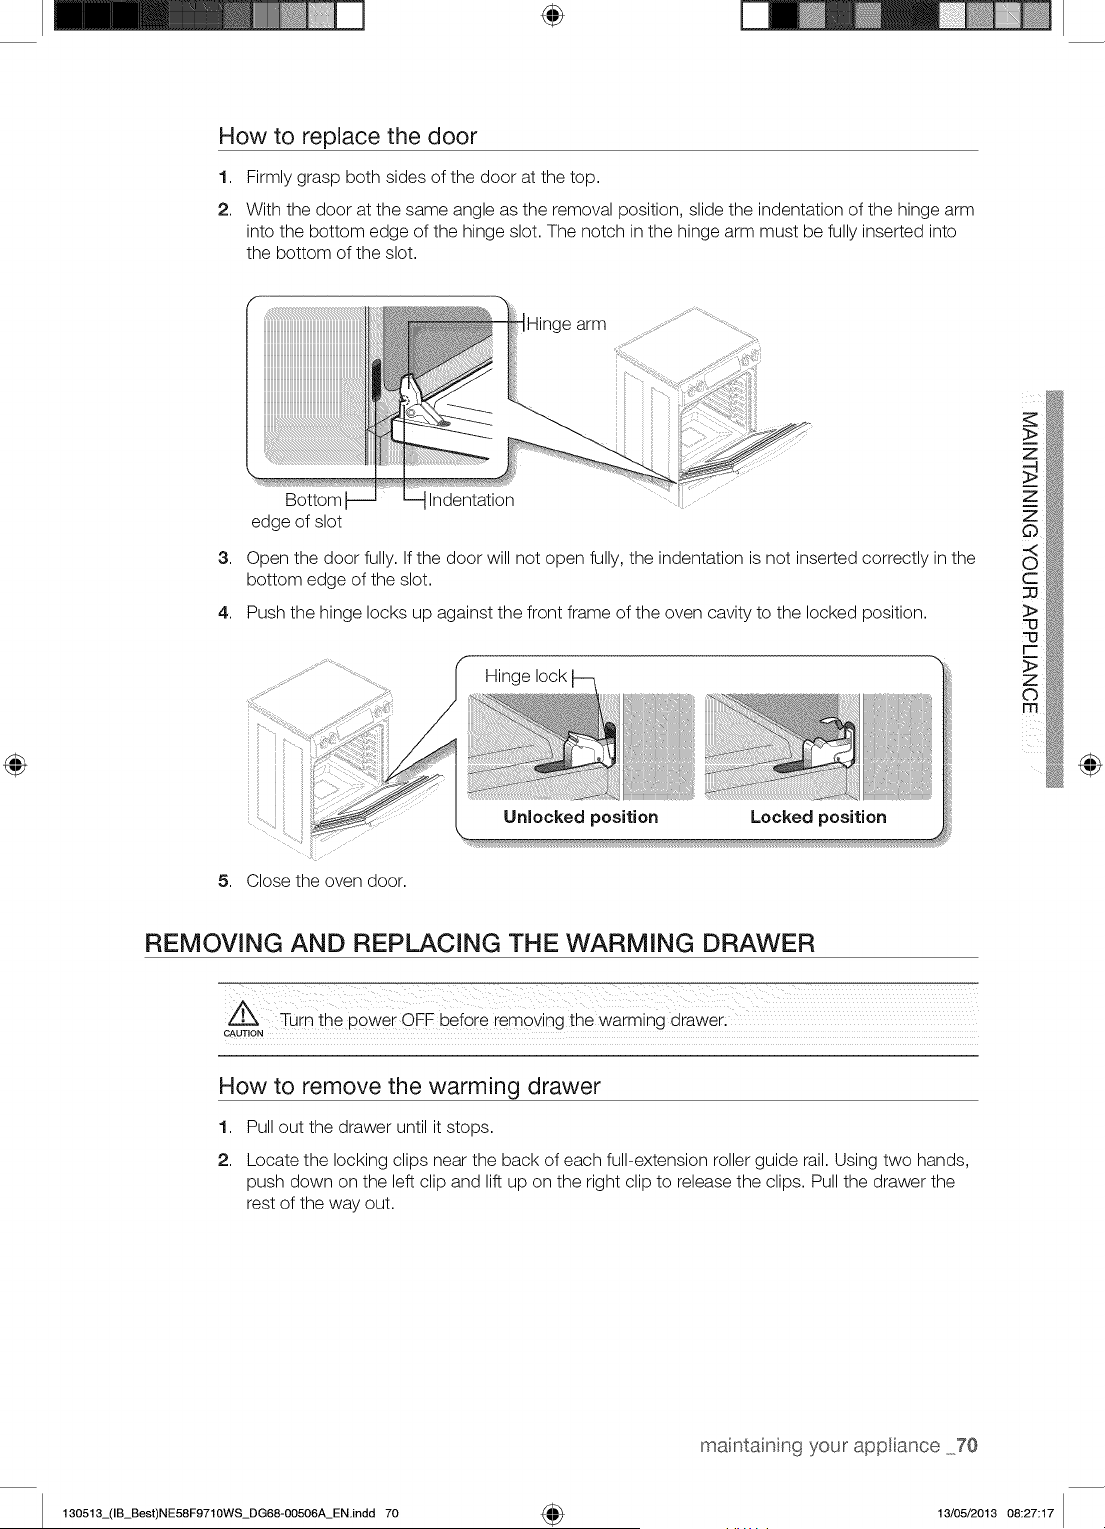
÷
How to replace the door
1,
2.
Firmly grasp both sides of the door at the top.
With the door at the same angle as the removal position, slide the indentation of the hinge arm
into the bottom edge of the hinge slot. The notch in the hinge arm must be fully inserted into
the bottom of the slot.
IHinge arm
3,
Bottom Indentation
edge of slot
Open the door fully. If the door will not open fully, the indentation is not inserted correctly in the
bottom edge of the slot.
4. Push the hinge locks up against the front frame of the oven cavity to the locked position.
Hinge lock
Unlocked position Locked position
5. Close the oven door.
@
REMOVING AND REPLACING THE WARMING DRAWER
CAUTION
How to remove the warming drawer
1,
2.
Pull out the drawer until it stops.
Locate the locking clips near the back of each full-extension roller guide rail. Using two hands,
push down on the left clip and lift up on the right clip to release the clips. Pull the drawer the
rest of the way out.
your appliance 70
130513_(IB_Best)NE58F9710WS_DG68-00506A_EN.indd 70 4_ 13/05/2013 08:27:17
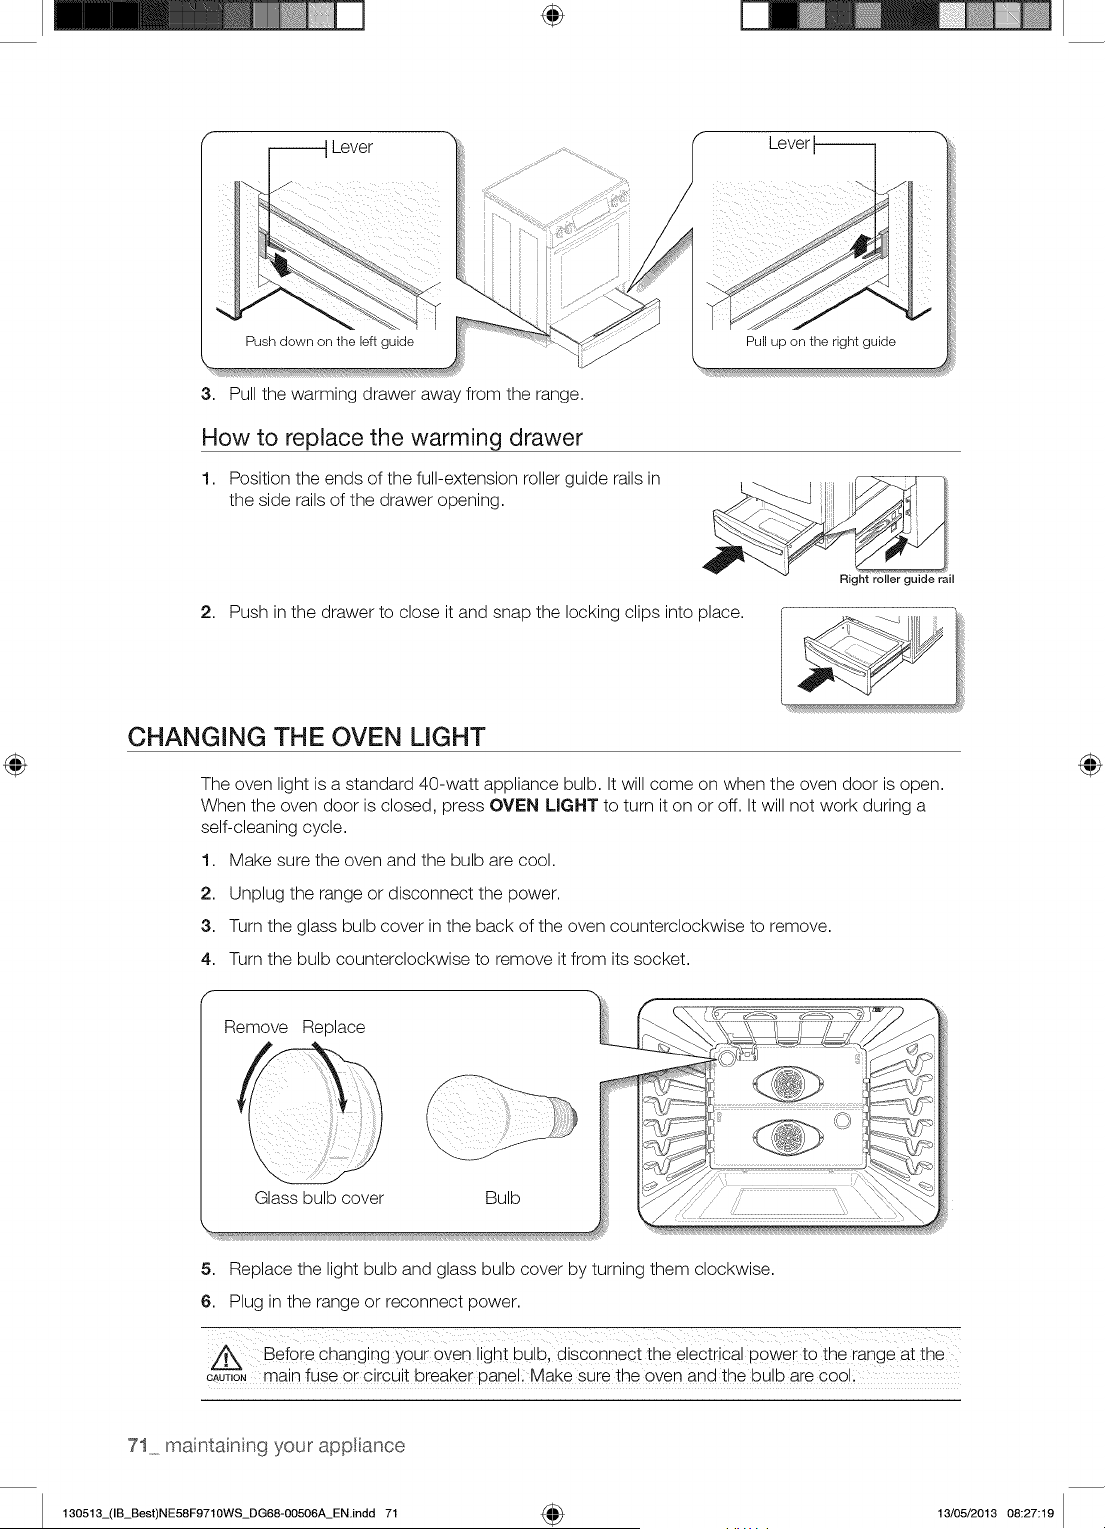
÷
Lever
Push down on the left guide
3.
Pull the warming drawer away from the range.
Lever
Pull up on the right guide
Flow to replace the warming drawer
1. Position the ends of the full-extension roller guide rails in
the side rails of the drawer opening.
2. Push in the drawer to close it and snap the locking clips into place.
Right roller guide rail
CHANGING THE OVEN LIGHT
The oven light is a standard 40-watt appliance bulb. It will come on when the oven door is open.
When the oven door is closed, press OVEN LIGHT to turn it on or off. It will not work during a
self-cleaning cycle.
1. Make sure the oven and the bulb are cool.
2. Unplug the range or disconnect the power.
3. Turn the glass bulb cover in the back of the oven counterclockwise to remove.
4. Turn the bulb counterclockwise to remove it from its socket.
f
Remove Replace
Glass bulb cover Bulb
5. Replace the light bulb and glass bulb cover by turning them clockwise.
6. Plug in the range or reconnect power.
Before changing your 0yen light bulb, disconnect the electrical power to the range at the
CAUT,ONmain fuse or circuit breaker pane!i Make sure the oven and the bulb are cool
71 maintainng your appliance
130513_(IB_Best)NE58F9710WS_DG68-00506A_ENindd 71 _ 13/05/2013 08:27:19
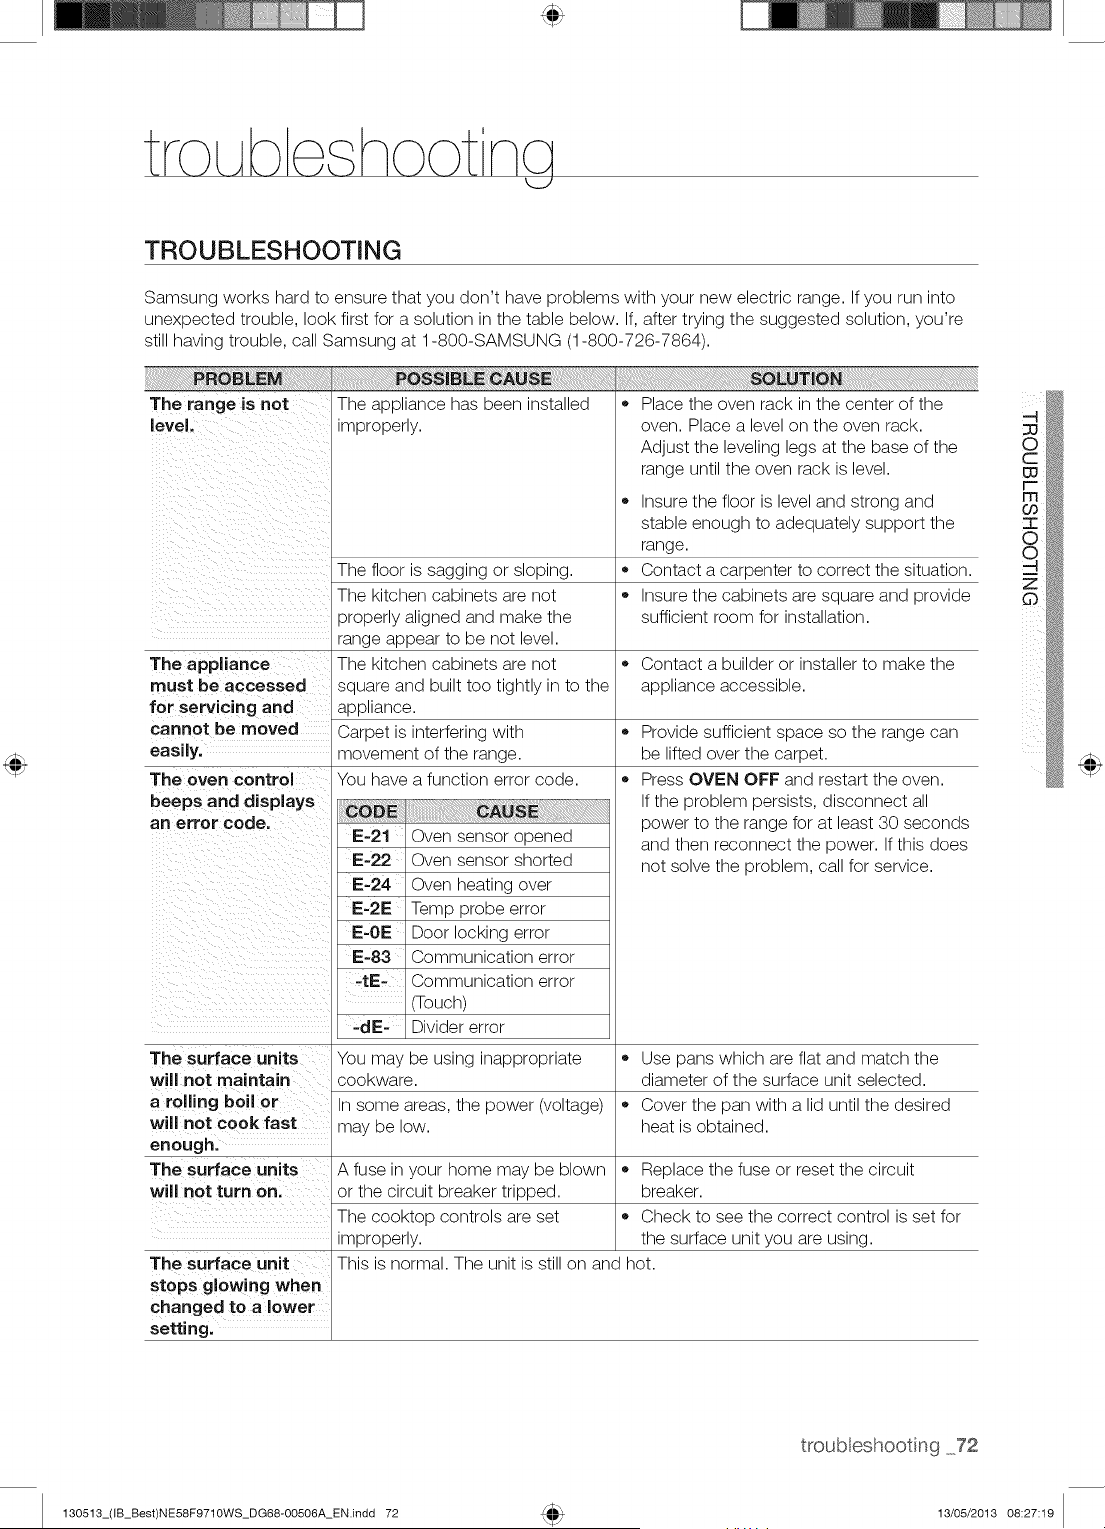
tro Abe hoot ncj
TROUBLESHOOTING
Samsung works hard to ensure that you don't have problems with your new electric range. If you run into
unexpected trouble, look first for a solution in the table below. If, after trying the suggested solution, you're
still having trouble, call Samsung at 1-800-SAMSUNG (1-800-726-7864).
PROBLEM POSS=BLIECAUSIE
The range is not The appliance has been installed
level, improperly.
The floor is sagging or sloping.
The kitchen cabinets are not
properly aligned and make the
range appear to be not level.
The appliance The kitchen cabinets are not
must be accessed square and built too tightly in to the
for servicing and appliance.
cannot be moved Carpet is interfering with
easily, movement of the range.
The oven control You have a function error code.
beeps and displays
art error code.
IE-21 Oven sensor opened
IE-22 Oven sensor shorted
IE-24 Oven heating over
i:-21: Temp probe error
IE-giE Door locking error
IE-83 Communication error
-tiE- Communication error
(Touch)
-dE- Divider error
The surface units You may be using inappropriate
will not maintain
a rolling boil or
will not cook fast
enough.
The surface units A fuse in your home may be blown
will not turn on. or the circuit breaker tripped.
The eooktop controls are set
improperly.
The surface unit
stops glowing when
changed to a lower
setting.
,, Place the oven rack in the center of the
oven. Place a level on the oven rack.
Adjust the leveling legs at the base of the
range until the oven rack is level.
• Insure the floor is level and strong and
stable enough to adequately support the
range.
,, Contact a carpenter to correct the situation.
• Insure the cabinets are square and provide
sufficient room for installation.
,, Contact a builder or installer to make the
appliance accessible.
®
®
Provide sufficient space so the range can
be lifted over the carpet.
Press OVEN OFF and restart the oven.
If the problem persists, disconnect all
power to the range for at least 30 seconds
and then reconnect the power. If this does
not solve the problem, call for service.
,, Use pans which are flat and match the
cookware, diameter of the surface unit selected.
In some areas, the power (voltage) • Cover the pan with a lid until the desired
may be low. heat is obtained.
,, Replace the fuse or reset the circuit
breaker.
,, Check to see the correct control is set for
the surface unit you are using.
This is normal. The unit is still on and hot.
troubleshooting 72
130513_(IB_Best)NE58F9710WS_DG68-00506A_EN.indd 72 13/05/2013 08:27:19
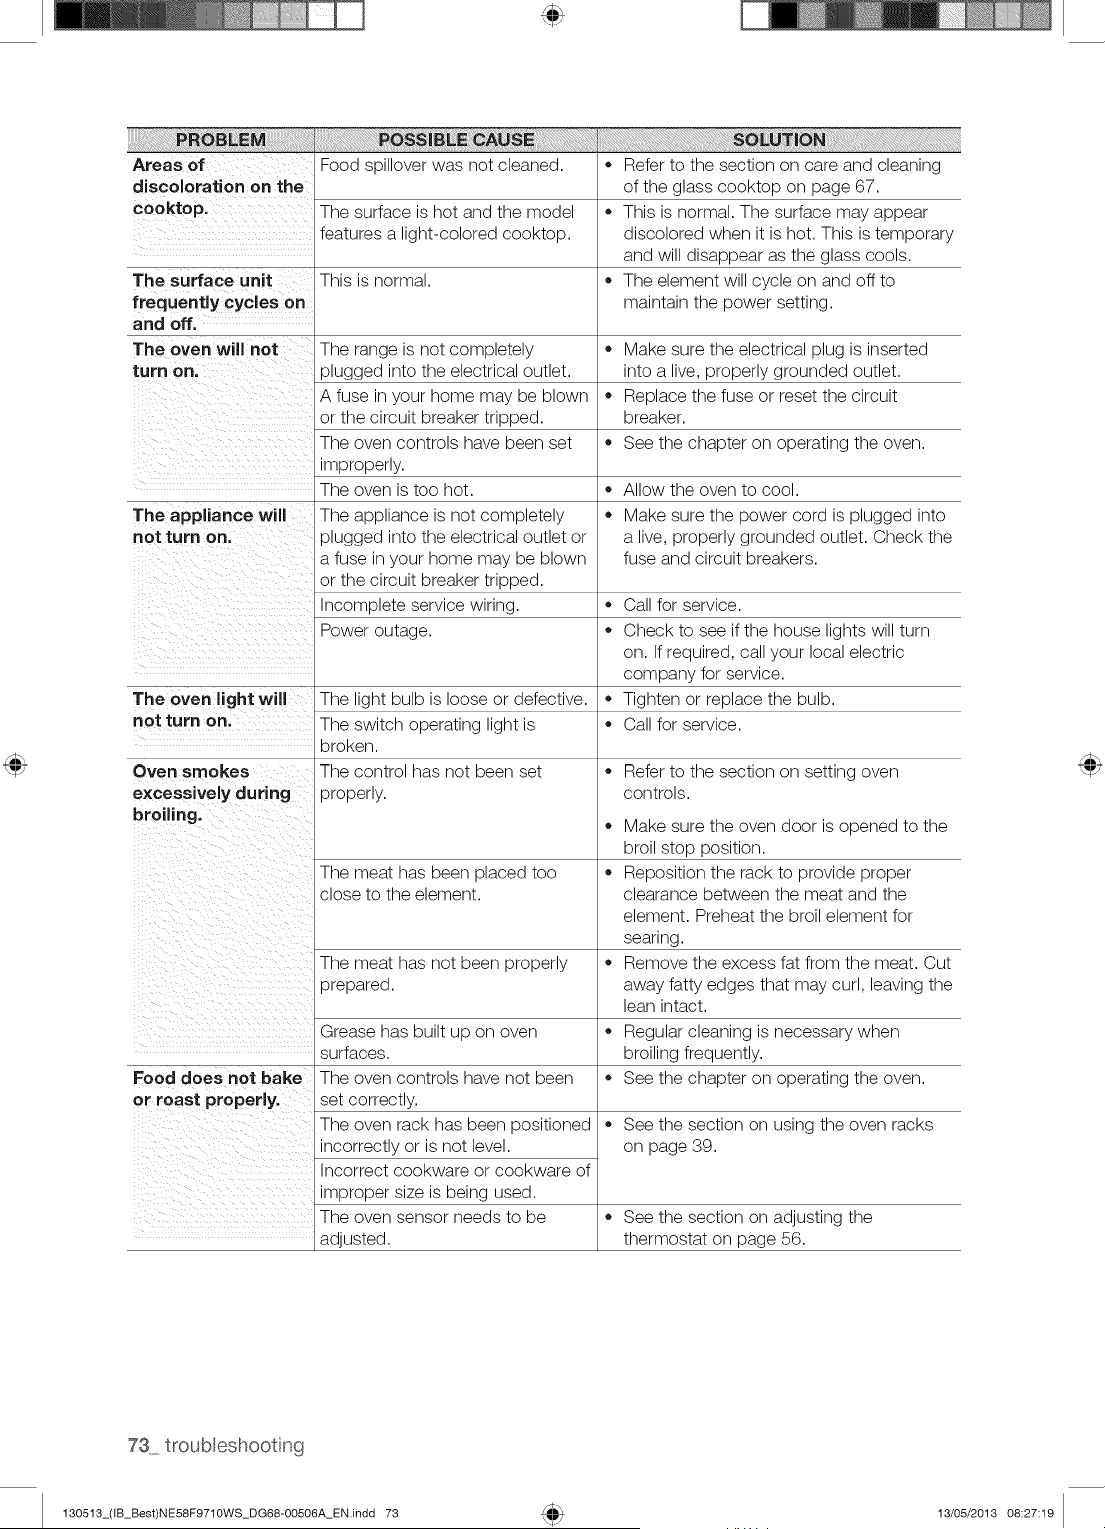
Areas of Food spillover was not cleaned.
discoloration on the
cooktop. The surface is hot and the model
features a light-colored cooktop.
The surface unit This is normal.
frequently cycles on
and off.
The oven will not The range is not completely
turn on. plugged into the electrical outlet.
A fuse in your home may be blown
or the circuit breaker tripped.
The oven controls have been set
improperly.
The oven is too hot.
The appliance will The appliance is not completely
not turn on. plugged into the electrical outlet or
a fuse in your home may be blown
or the circuit breaker tripped.
Incomplete service wiring.
Power outage.
The oven light will The light bulb is loose or defective.
not turn on. The switch operating light is
broken.
Oven smokes The control has not been set
excessively during properly.
broiling.
The meat has been placed too
close to the element.
The meat has not been properly
prepared.
Food does not bake
or roast properly.
adjusted.
Grease has built up on oven
surfaces.
The oven controls have not been
set correctly.
The oven rack has been positioned
incorrectly or is not level.
Incorrect cookware or cookware of
improper size is being used.
The oven sensor needs to be
Refer to the section on care and cleaning
of the glass cooktop on page 67.
This is normal. The surface may appear
discolored when it is hot. This is temporary
and will disappear as the glass cools.
The element will cycle on and off to
maintain the power setting.
Make sure the electrical plug is inserted
into a live, properly grounded outlet.
Replace the fuse or reset the circuit
breaker.
See the chapter on operating the oven.
Allow the oven to cool.
Make sure the power cord is plugged into
a live, properly grounded outlet. Check the
fuse and circuit breakers.
Call for service.
Check to see if the house lights will turn
on. If required, call your local electric
company for service.
Tighten or replace the bulb.
Call for service.
Refer to the section on setting oven
controls.
®
®
Make sure the oven door is opened to the
broil stop position.
Reposition the rack to provide proper
clearance between the meat and the
element. Preheat the broil element for
searing.
Remove the excess fat from the meat. Cut
away fatty edges that may curl, leaving the
lean intact.
Regular cleaning is necessary when
broiling frequently.
See the chapter on operating the oven.
See the section on using the oven racks
on page 39.
See the section on adjusting the
thermostat on page 56.
130513_(IB_Best)NE58F9710WS_DG68-00506A_EN.indd 73 13/05/2013 08:27:19
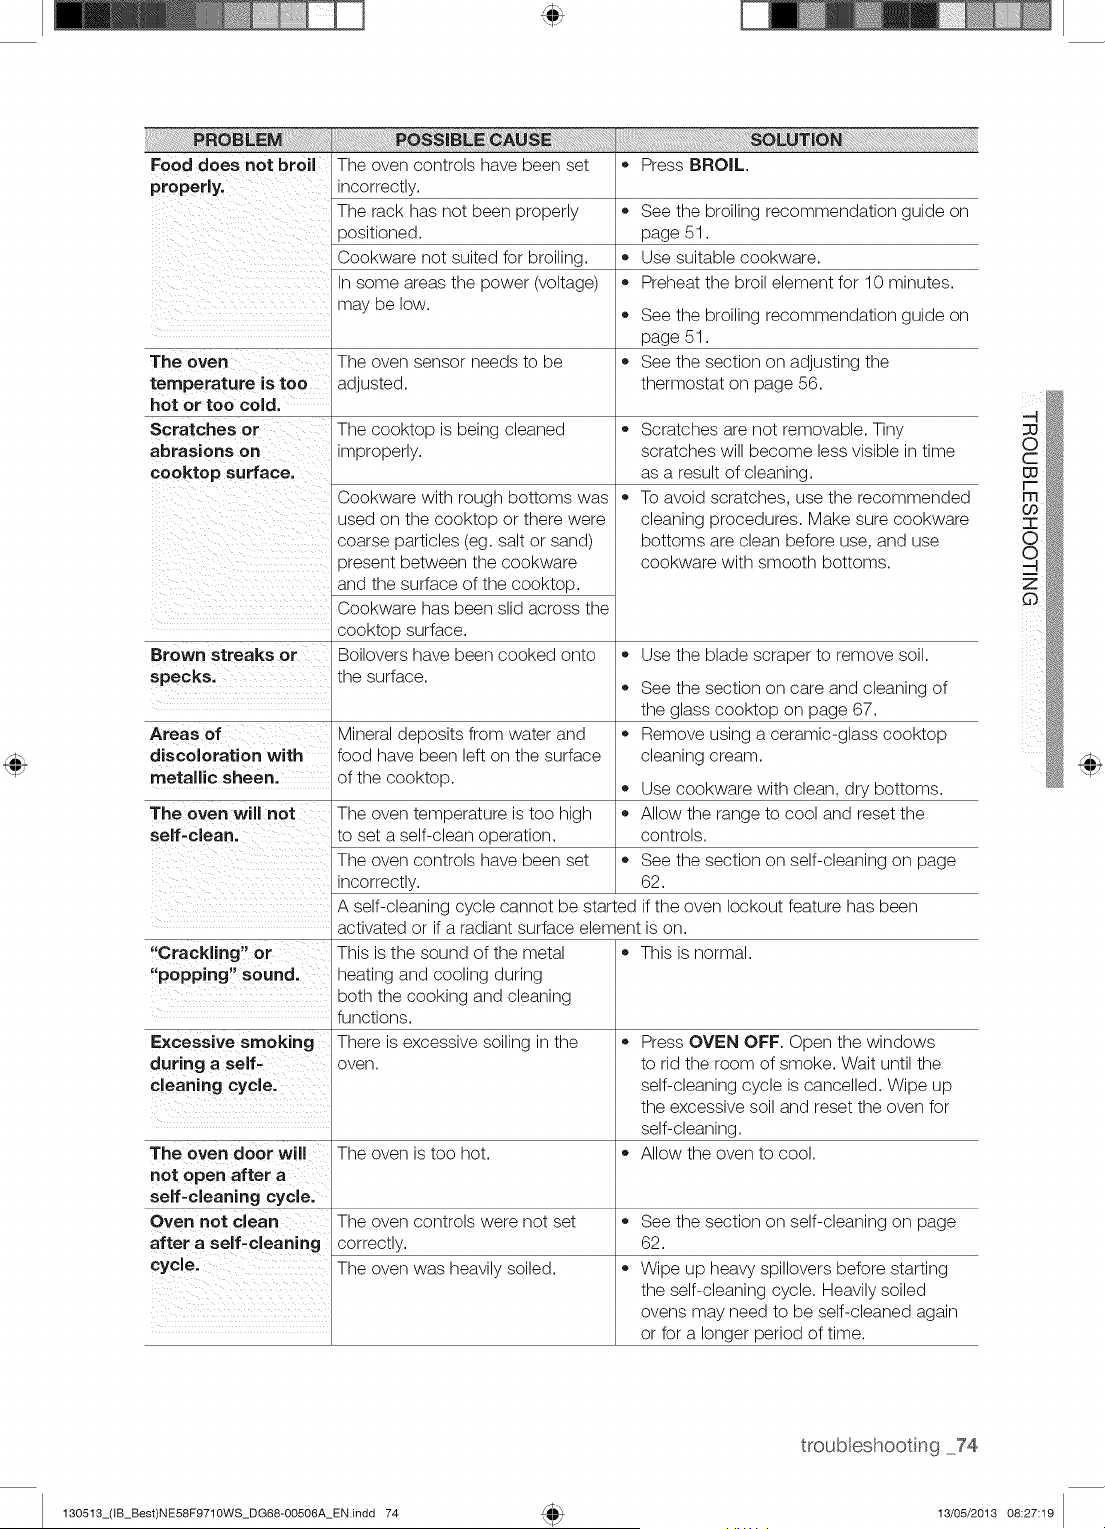
Food does not broil The oven controls have been set • Press BROIL.
properly, incorrectly.
The rack has not been properly • See the broiling recommendation guide on
)ositioned. page 51.
Cookware not suited for broiling. • Use suitable cookware.
In some areas the power (voltage) • Preheat the broil element for 10 minutes.
may be low.
See the broiling recommendation guide on
page 51.
The oven The oven sensor needs to be • See the section on adjusting the
temperature is too adjusted, thermostat on page 56.
hot or too cold.
Scratches or The cooktop is being cleaned •
abrasions on improperly.
cooktop surface.
®
Cookware with rough bottoms was
used on the cooktop or there were
coarse particles (eg. salt or sand)
)resent between the cookware
and the surface of the cooktop.
Cookware has been slid across the
cooktop surface.
Boilovers have been cooked onto
the surface.
Scratches are not removable. Tiny
scratches will become less visible in time
as a result of cleaning.
To avoid scratches, use the recommended
cleaning procedures. Make sure cookware
bottoms are clean before use, and use
cookware with smooth bottoms.
Brown streaks or • Use the blade scraper to remove soil.
specks. • See the section on care and cleaning of
the glass cooktop on page 67.
Areas of Mineral deposits from water and • Remove using a ceramic-glass cooktop
discoloration with food have been left on the surface cleaning cream.
metallic sheen, of the cooktop. • Use cookware with clean, dry bottoms.
The oven will not The oven temperature is too high • Allow the range to cool and reset the
self-clean, to set a self-clean operation, controls.
The oven controls have been set • See the section on self-cleaning on page
incorrectly. 62.
A self-cleaning cycle cannot be started if the oven lockout feature has been
activated or if a radiant surface element is on.
"Crackling" or • This is normal.
"popping" sound.
Excessive smoking
during a self-
cleaning cycle.
This is the sound of the metal
heating and cooling during
both the cooking and cleaning
functions.
There is excessive soiling in the
oveR.
Press OVEN OFF. Open the windows
to rid the room of smoke. Wait until the
self-cleaning cycle is cancelled. Wipe up
the excessive soil and reset the oven for
self-cleaning.
Allow the oven to cool.The oven door will The oven is too hot.
not o pen after a
self-cleaning cycle.
Oven not clean The overs controls were not set • See the section ors self-cleaning ors page
after a self-cleaning correctly. 62.
cycle, The oven was heavily soiled. • Wipe up heavy spillovers before starting
the self-cleaning cycle. Heavily soiled
ovens may need to be self-cleaned again
or for a longer period of time.
130513_(IB_Best)NE58F9710WS_DG68-00506A_EN.indd 74
troub eshooting 74
13/05/2013 08:27:19
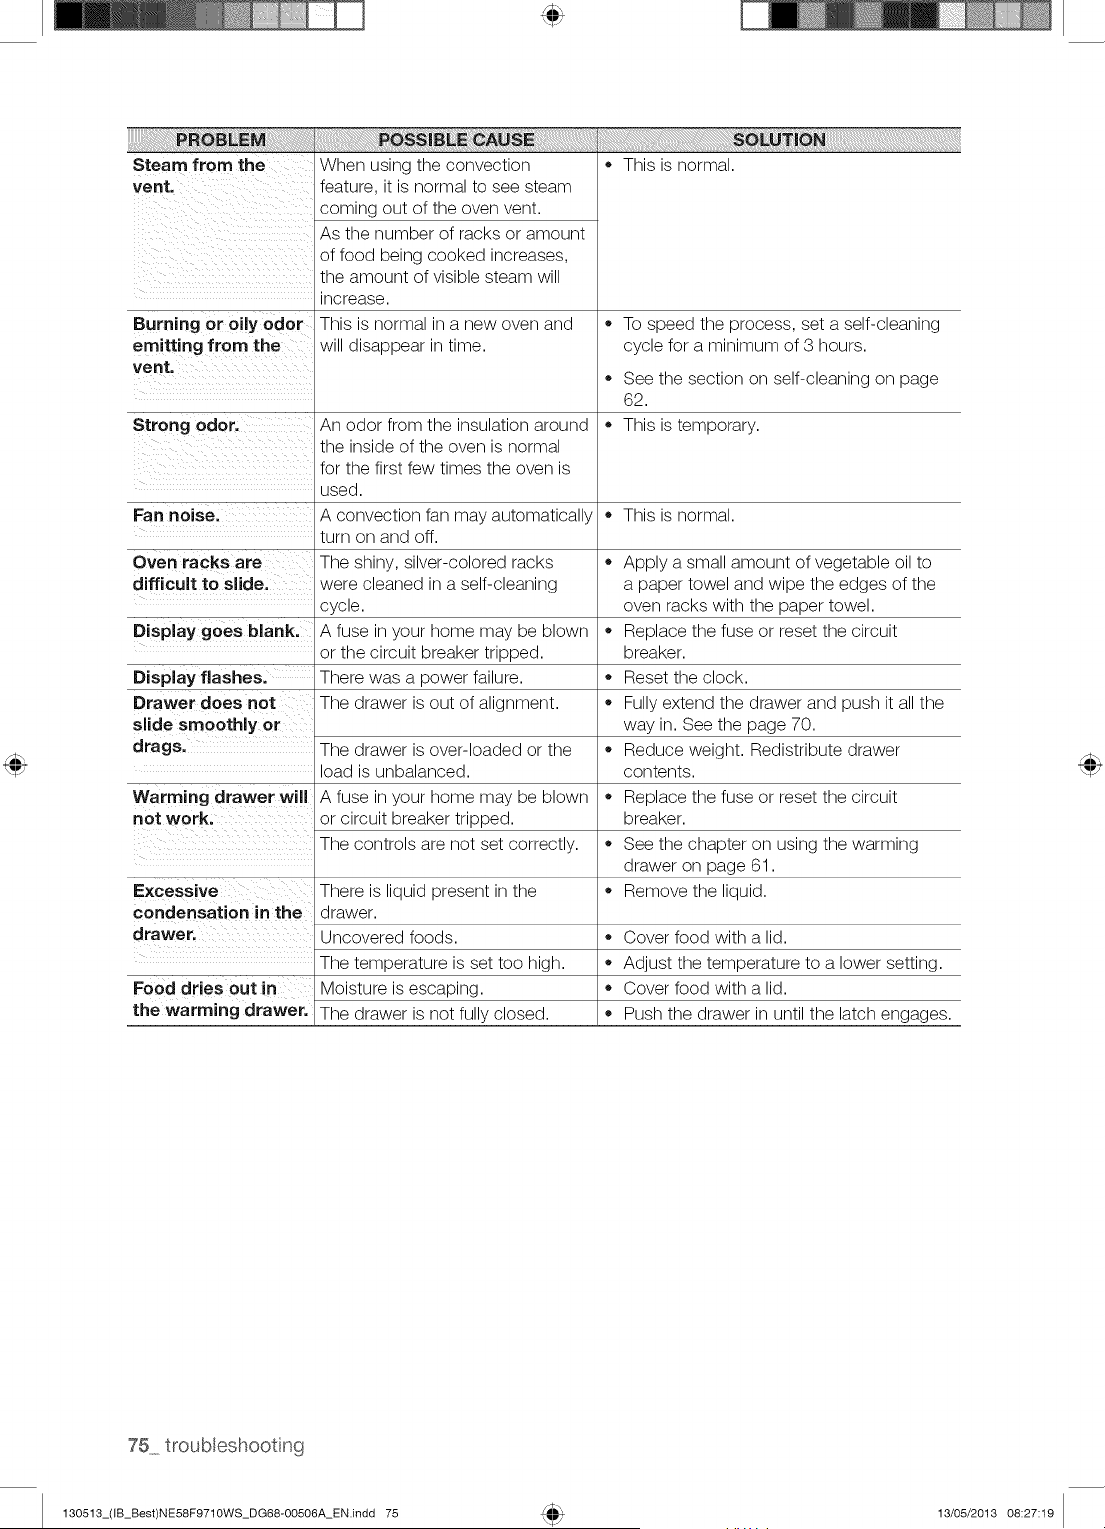
Steam from the
vent.
i!!iiiiiiiii!iiiii!!ii!ii!iii!iil !i!ii!ii!iiiiiiiiiiiiiiiiiiiiii!i!i!i!i!iliiii!i iiii !ii iiiiiiii Eiiiiiiiiiiiiiiiilililiiii!i!i!i!i!i!!!iiiiiii!iiiiiiilililiiiiiiiiii!iiiiii
When using the convection
feature, it is normal to see steam
coming out of the oven vent.
As the number of racks or amount
of food being cooked increases,
the amount of visible steam will
increase.
This is normal in a new oven and
will disappear in time.
This is normal.
Burning or oily odor • To speed the process, set a self-cleaning
emitting from the cycle for a minimum of 3 hours.
vent,
See the section on self-cleaning on page
62.
Strong odor, An odor from the insulation around • This is temporary.
the inside of the oven is normal
for the first few times the oven is
used.
Fan noise. A convection fan may automatically • This is normal.
turn on and off.
Oven racks are The shiny, silver-colored racks
difficult to sEde. were cleaned in a self-cleaning
cycle.
Display goes blank. A fuse in your home may be blown
or the circuit breaker tripped.
Display flashes. There was a power failure.
Drawer does not The drawer is out of alignment.
slide smoothly or
drags.
Warming drawer will
not work.
Excessive
condensation in the
drawer.
The drawer is over-loaded or the
load is unbalanced.
A fuse in your home may be blown
or circuit breaker tripped.
The controls are not set correctly.
There is liquid present in the
drawer.
Uncovered foods.
The temperature is set too high.
Moisture is escaping.
The drawer is not fully closed.
Food dries out in
the warming drawer.
Apply a small amount of vegetable oil to
a paper towel and wipe the edges of the
oven racks with the paper towel.
Replace the fuse or reset the circuit
breaker.
Reset the clock.
Fully extend the drawer and push it all the
way in. See the page 70.
Reduce weight. Redistribute drawer
contents.
Replace the fuse or reset the circuit
breaker.
See the chapter on using the warming
drawer on page 61.
Remove the liquid.
Cover food with a lid.
Adjust the temperature to a lower setting.
Cover food with a lid.
Push the drawer in until the latch engages.
130513_(IB_Best)NE58F9710WS_DG68-00506A_EN.indd 75 13/05/2013 08:27:19
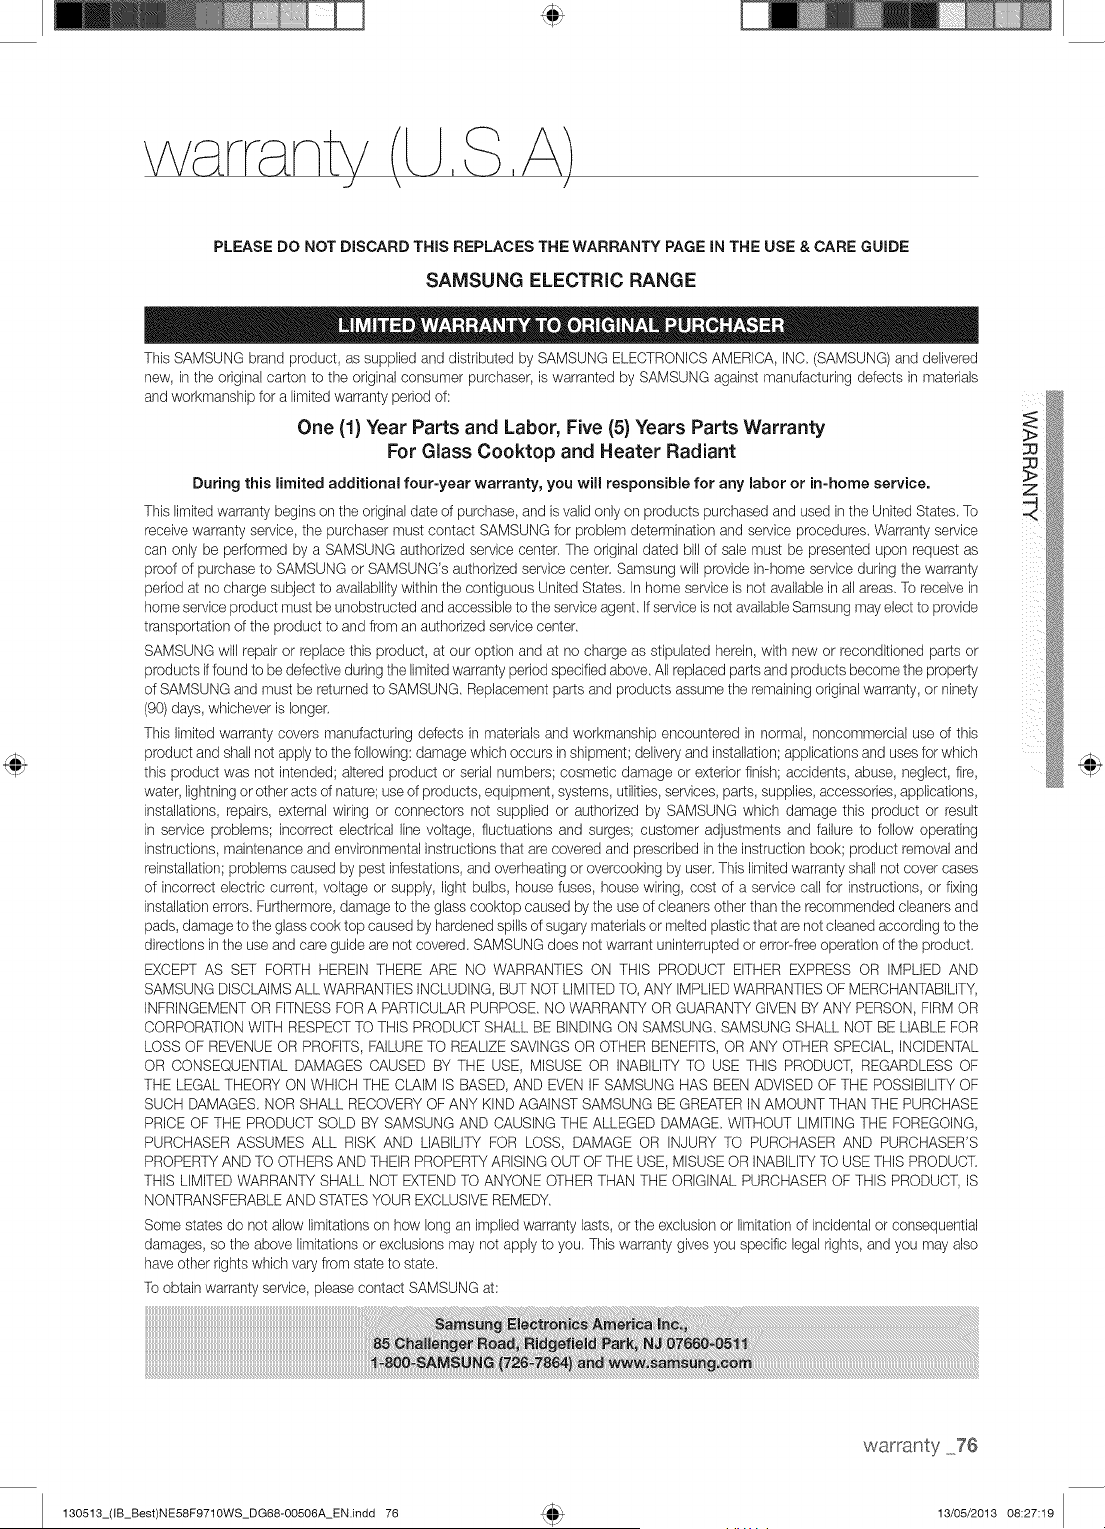
\
PLEASE DO NOT DISCARD THiS REPLACES THE WARRANTY PAGE iN THE USE & CARE GUIDE
SAMSUNG ELECTRIC RANGE
This SAMSUNG brand product, as supplied and distributed by SAMSUNG ELECTRONICSAMERICA, INC. (SAMSUNG) and delivered
new, in the original carton to the original consumer purchaser, is warranted by SAMSUNG against manufacturing defects in materials
and workmanship for a limited warranty period of:
One (1) Year Parts and Labor, Five (5) Years Parts Warranty
For Glass Cooktop and Heater Radiant
During this limited additional four-year warranty, you will responsible for any labor or in-home service.
This limitedwarranty begins on the original date of purchase, and is valid only on products purchased and used in the United States. To
receive warranty service, the purchaser must contact SAMSUNGfor problem determination and service procedures. Warranty service
can only be performed by a SAMSUNG authorized service center. The original dated bill of sale must be presented upon request as
proof of purchase to SAMSUNG or SAMSUNG's authorized service center. Samsung will provide in-home service during the warranty
period at no charge subject to availabilitywithin the contiguous United States. In home service is not availablein all areas. To receive in
home service product must be unobstructed and accessible to the service agent. If service is not available Samsung may elect to provide
transportation of the product to and from an authorized service center.
SAMSUNG will repair or replace this product, at our option and at no charge as stipulated herein, with new or reconditioned parts or
products if found to be defective during the limited warranty period specified above. All replaced parts and products become the property
of SAMSUNG and must be returned to SAMSUNG. Replacement parts and products assume the remaining original warranty, or ninety
(90)days, whichever is longer.
This limited warranty covers manufacturing defects in materials and workmanship encountered in normal, noncommercial use of this
product and shall not apply to the following: damagewhich occurs inshipment; delivery and installation; applications and uses for which
this product was not intended; altered product or serial numbers; cosmetic damage or exterior finish; accidents, abuse, neglect, fire,
water, lightning or other acts of nature; use of products, equipment, systems, utilities,services, parts, supplies, accessories, applications,
installations, repairs, external wiring or connectors not supplied or authorized by SAMSUNG which damage this product or result
in service problems; incorrect electrical line voltage, fluctuations and surges; customer adjustments and failure to follow operating
instructions, maintenance and environmental instructions that are covered and prescribed in the instruction book; product removal and
reinstallation;problems caused by pest infestations, and overheating or overcooking by user. This limitedwarranty shall not cover cases
of incorrect electric current, voltage or supply, light bulbs, house fuses, house wiring, cost of a service call for instructions, or fixing
installation errors. Furthermore, damage to the glass cooktop caused by the use of cleanersother than the recommended cleaners and
pads, damage to the glass cook top caused by hardened spills of sugary materialsor melted plastic that are not cleaned according to the
directions in the use and care guide are not covered. SAMSUNG does not warrant uninterrupted or error-free operation of the product.
EXCEPT AS SET FORTH HEREIN THERE ARE NO WARRANTIES ON THIS PRODUCT EITHER EXPRESS OR IMPLIED AND
SAMSUNG DISCLAIMSALL WARRANTIESINCLUDING,BUT NOT LIMITEDTO,ANY IMPLIEDWARRANTIESOF MERCHANTABILITY,
INFRINGEMENTOR FITNESSFORA PARTICULARPURPOSE.NO WARRANTY OR GUARANTY GIVEN BY ANY PERSON, FIRM OR
CORPORATIONWITH RESPECTTO THIS PRODUCT SHALL BE BINDING ON SAMSUNG. SAMSUNG SHALL NOT BE LIABLE FOR
LOSS OF REVENUEOR PROFITS, FAILURETO REALIZESAVINGSOR OTHER BENEFITS, OR ANY OTHERSPECIAL, INCIDENTAL
OR CONSEQUENTIAL DAMAGES CAUSED BY THE USE, MISUSE OR INABILITYTO USE THIS PRODUCT, REGARDLESS OF
THE LEGAL THEORYON WHICH THE CLAIM IS BASED, AND EVEN IF SAMSUNG HAS BEEN ADVISEDOF THE POSSIBILITYOF
SUCH DAMAGES. NOR SHALL RECOVERYOF ANY KIND AGAINST SAMSUNG BE GREATERIN AMOUNT THAN THE PURCHASE
PRICE OF THE PRODUCT SOLD BY SAMSUNG AND CAUSING THE ALLEGED DAMAGE.WITHOUT LIMITING THE FOREGOING,
PURCHASER ASSUMES ALL RISK AND LIABILITY FOR LOSS, DAMAGE OR INJURY TO PURCHASER AND PURCHASER'S
PROPERTYAND TO OTHERSAND THEIR PROPERTYARISING OUT OF THE USE, MISUSE OR INABILITYTO USETHIS PRODUCT.
THIS LIMITEDWARRANTY SHALL NOT EXTENDTO ANYONE OTHERTHAN THE ORIGINAL PURCHASEROF THIS PRODUCT, IS
NONTRANSFERABLEAND STATESYOUREXCLUSIVEREMEDY.
Some states do not allow limitationson how long an implied warranty lasts, or the exclusion or limitation of incidental or consequential
damages, so the above limitations or exclusions may not apply to you, This warranty gives you specific legal rights, and you may also
haveother rights which vary from state to state.
Toobtain warranty service, please contact SAMSUNG at:
130513_(IB_Best)NE58F9710WS_DG68-OO506A_EN.indd 76
warranty _76
13/05/2013 08:27:19
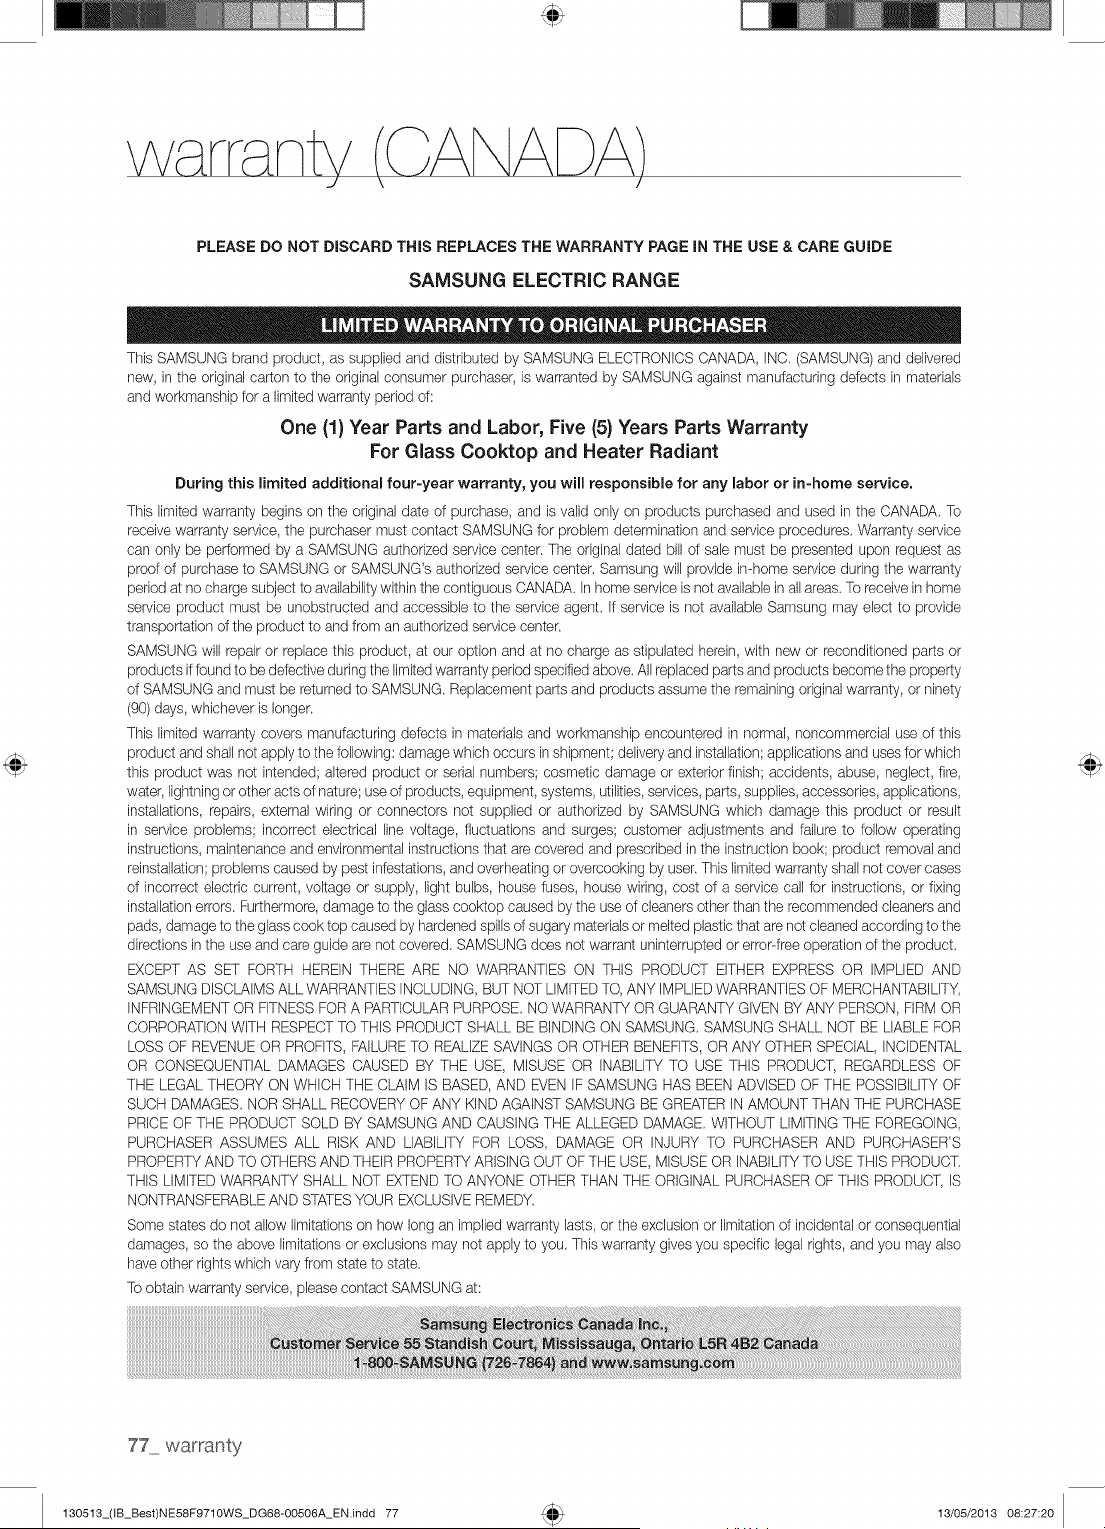
PLEASE DO NOT DISCARD THIS REPLACES THE WARRANTY PAGE iN THE USE & CARE GUIDE
SAMSUNG ELECTRIC RANGE
This SAMSUNG brand product, as supplied and distributed by SAMSUNG ELECTRONICSCANADA, INC. (SAMSUNG)and delivered
new, in the original carton to the original consumer purchaser, is warranted by SAMSUNG against manufacturing defects in materials
and workmanship for a limited warranty period of:
One (1) Year Parts and Labor, Five (5) Years Parts Warranty
For Glass Cooktop and Heater Radiant
During this limited additional four-year warranty, you will responsible for any labor or in-home service.
This limited warranty begins on the original date of purchase, and is valid only on products purchased and used in the CANADA,To
receive warranty service, the purchaser must contact SAMSUNG for problem determination and service procedures. Warranty service
can only be performed by a SAMSUNG authorized service center. The original dated bill d sab must be presented upon request as
proof of purchase to SAMSUNG or SAMSUNG's authorized service center. Samsung will provide in-homeservice during the warranty
period at no charge subject to availabilitywithin the contiguous CANADA, In home service is not availabb in all areas.To receive inhome
service product must be unobstructed and accessible to the service agent. If service is not available Samsung may elect to provide
transportation of the product to and from an authorized servicecenter.
SAMSUNG will repair or replace this product, at our option and at no charge as stipulated herein, with new or reconditioned parts or
products iffound to be defective during the limitedwarranty period specified above. All replaced parts and products become the property
of SAMSUNG and must be returnedto SAMSUNG. Replacement parts and products assume the remaining originalwarranty, or ninety
(90) days, whichever is longer.
This limited warranty covers manufacturing defects in materials and workmanship encountered innormal, noncommercial use of this
product and shall not apply to the following: damage which occurs in shipment; delivery and installation;applications and usesfor which
this product was not intended; altered product or serial numbers; cosmetic damage or exterior finish; accidents, abuse, neglect, fire,
water, lightning or other acts of nature; use of products, equipment, systems, utilities,services, parts, supplies, accessories, applications,
installations,repairs, external wiring or connectors not supplied or authorized by SAMSUNG which damage this product or result
in service problems; incorrectelectrical line voltage, fluctuations and surges; customer adjustments and failure to follow operating
instructions,maintenance and environmental instructionsthat are covered and prescribed inthe instructionbook; product removal and
reinstallation; problems caused by pest infestations,and overheating or overcooking by user,This limited warranty shall not cover cases
of incorrectelectric current, voltage or supply, light bulbs, house fuses, house wiring, cost of a service call for instructions, or fixing
installationerrors. Furthermore,damage to the glass cooktop caused by the useof cleaners other than the recommended cleaners and
pads, damageto the glass cook top caused by hardened spillsd sugary materialsor melted plastic that are not cleaned according to the
directions in the use and care guide are not covered. SAMSUNG does not warrant uninterrupted or error-free operation of the product.
EXCEPT AS SET FORTH HEREIN THERE ARE NO WARRANTIES ON THiS PRODUCT EITHER EXPRESS OR iMPLIED AND
SAMSUNG DiSCLAiMS ALL WARRANTIESINCLUDING,BUT NOT LIMITEDTO, ANY iMPLIEDWARRANTIESOF MERCHANTABILITY,
INFRINGEMENTOR FITNESSFOR A PARTICULARPURPOSE. NOWARRANTY OR GUARANTY GIVEN BYANY PERSON, FIRM OR
CORPORATIONWITH RESPECTTO THIS PRODUCTSHALL BE BiNDiNG ON SAMSUNG. SAMSUNG SHALL NOT BE LIABLE FOR
LOSS OF REVENUEOR PROFITS,FAILURETO REALIZESAVINGSOR OTHER BENEFITS,OR ANY OTHER SPECIAL, INCIDENTAL
OR CONSEQUENTIAL DAMAGES CAUSED BY THE USE, MISUSE OR INABILITYTO USE THiS PRODUCT, REGARDLESS OF
THE LEGAL THEORY ON WHICH THE CLAIM iS BASED,AND EVEN IF SAMSUNG HAS BEEN ADVISED OF THE POSSIBILITYOF
SUCH DAMAGES. NOR SHALL RECOVERYOF ANY KIND AGAINST SAMSUNG BE GREATERIN AMOUNT THAN THE PURCHASE
PRICEOF THE PRODUCT SOLD BY SAMSUNG AND CAUSING THE ALLEGED DAMAGE. WITHOUT LIMITINGTHE FOREGOING,
PURCHASER ASSUMES ALL RiSK AND LIABILITY FOR LOSS, DAMAGE OR INJURY TO PURCHASER AND PURCHASER'S
PROPERTYAND TO OTHERSAND THEIR PROPERTYARiSiNG OUT OF THE USE, MISUSEOR INABILITYTO USE THISPRODUCT.
THIS LIMITED WARRANTY SHALL NOT EXTENDTO ANYONE OTHER THAN THE ORIGINAL PURCHASER OF THIS PRODUCT,IS
NONTRANSFERABLEAND STATESYOUR EXCLUSIVEREMEDY.
Some states do not allow limitations on how long an implbdwarranty lasts, or the exclusion or limitation of incidentalor consequential
damages, so the above limitations or exclusions may not apply to you. This warranty gives you specific legal rights, and you may also
have other rights which vary from state to state.
Toobtain warranty service, phase contact SAMSUNGat:
77 warranty
130513_(IB_Best)NE58F9710WS_DG68-OO506A_EN.indd 77 13/05/2013 08:27:20

Rq_Rq©
130513_(IB_Best)NE58F9710WS_DG68-00506A_EN.indd 78 13/05/2013 08:27:20
Scan this with your smartphone
Scan the QR code* or visit
www.samsung.com/spsn
to view our helpful
How-to Videos and Live Shows
"Requires reader to be installed on your smartphone
Please be advised that the Samsung warranty does NOT cover service calls to explain product
operation, correct improper installation, or perform normal cleaning or maintenance.
QUESTIONS OR COMMENTS
www.samsung.com/ca (English)
CANADA www.samsung.com/ca fr (French)
MEXICO
U.S.A
Consumer Electronics
U.S.A
Mobile Phones
1-800-SAMSUNG (726-7864)
01-800-SAMSUNG (726-7864)
1-800-SAMSUNG (726-7864)
1-800-SAMSUNG (726-7864)
www.samsung.com
Code No, ' DG68-00506A
130513_(IB_Best)NE58F9710WS_DG68-00506A_EN.indd 79 13/05/2013 08:27:21
100%
Recycled Paper
ji
LJelest en papier recycJ6 & 100 %.
' " '#W;_/£¢#_@7£@...................................................
.... r,_4--,,'w, ,##P_;,X:X_@,u
de possibiiites
NOLISVOLISremercions d'avoir choisi ce
produit SalT_SLIBg. Afin de b@q6ficierdLI
meilleur du service apres-vente, enregistrez
votre appareil sur le site suivant :
www.samsung.com/register
1-800-SAMSUNG (726-7864)
FRANCAIS CANADIEN
130513_[IB_BesbNE58F9710WS_DG68-00506A_CFR todd 1 13 05 2013 08 31 22
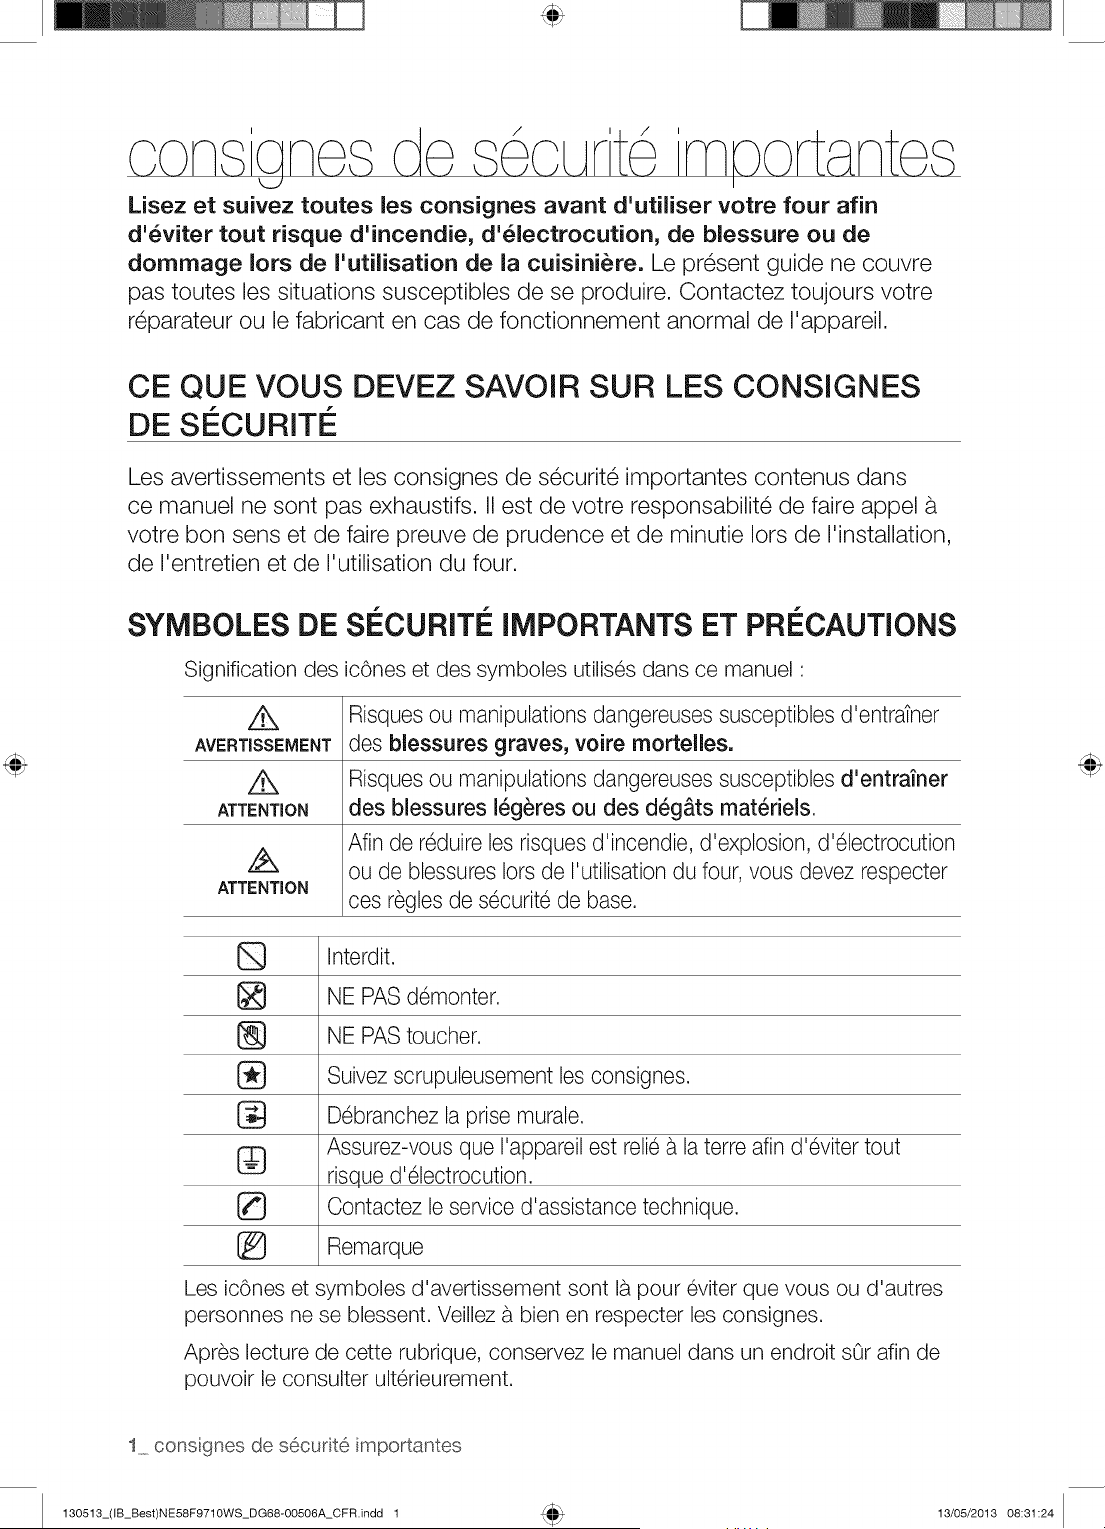
I
Lisez el suivez toutes les consignes avant d'utiliser votre four afin
d'_viter tout risque d'incendie, d'_lectrocution, de blessure ou de
dommage Iors de I'utilisation de la cuisiniere. Le present guide ne couvre
pas toutes les situations susceptibles de se produire. Contactez toujours votre
reparateur ou le fabricant en cas de fonctionnement anormal de I'appareil.
CE QUE VOUS DEVEZ SAVOIFI SUR LES CONSIGNES
DE SI CURITI
Les avertissements et les consignes de securit6 importantes contenus dans
ce manuel ne sont pas exhaustifs. II est de votre responsabilite de faire appel _t
votre bon sens et de faire preuve de prudence et de minutie Iors de I'installation,
de I'entretien et de I'utilisation du four.
SYMBOLES DE SI CUFIITI IMPOFITANTS ET PFII CAUTIONS
Signification des ic6nes et des symboles utilis6s dans ce manuel '
A Risques ou manipulations dangereuses susceptibles d'entratner
AVERTISSEMENTdes blessures graves, voire mortelles.
Risques ou manipulations dangereuses susceptibles d'entrafner
ATTENTION des blessures 16g_res ou des d6g_.ts mat6riels.
Afin de r6duire les risques d'incendie, d'explosion, d'61ectrocution
ou de blessures Iors de I'utilisation du four, vous devez respecter
ATTENTION
ces r6gles de s@urit6 de base.
Interdit.
NE PAS d6monter.
[_ NE PAS toucher.
Suivez scrupuleusement les consignes.
D6branchez la prise murale.
Assurez-vous que I'appareil est relie a la terre afin d'6viter tout
risque d'61ectrocution.
Contactez le service d'assistance technique.
Remarque
Les ic6nes et symboles d'avertissement sont la pour eviter que vous ou d'autres
personnes ne se blessent. Veillez a bien en respecter les consignes.
Apres lecture de cette rubrique, conservez le manuel dans un endroit sOr afin de
pouvoir le consulter ult6rieurement.
1 consgnes de secudt6 mportantes
130513_(IB_Best)NE58F9710WS_DG68-00506A_CFR.indd 1 13/05/2013 08:31:24
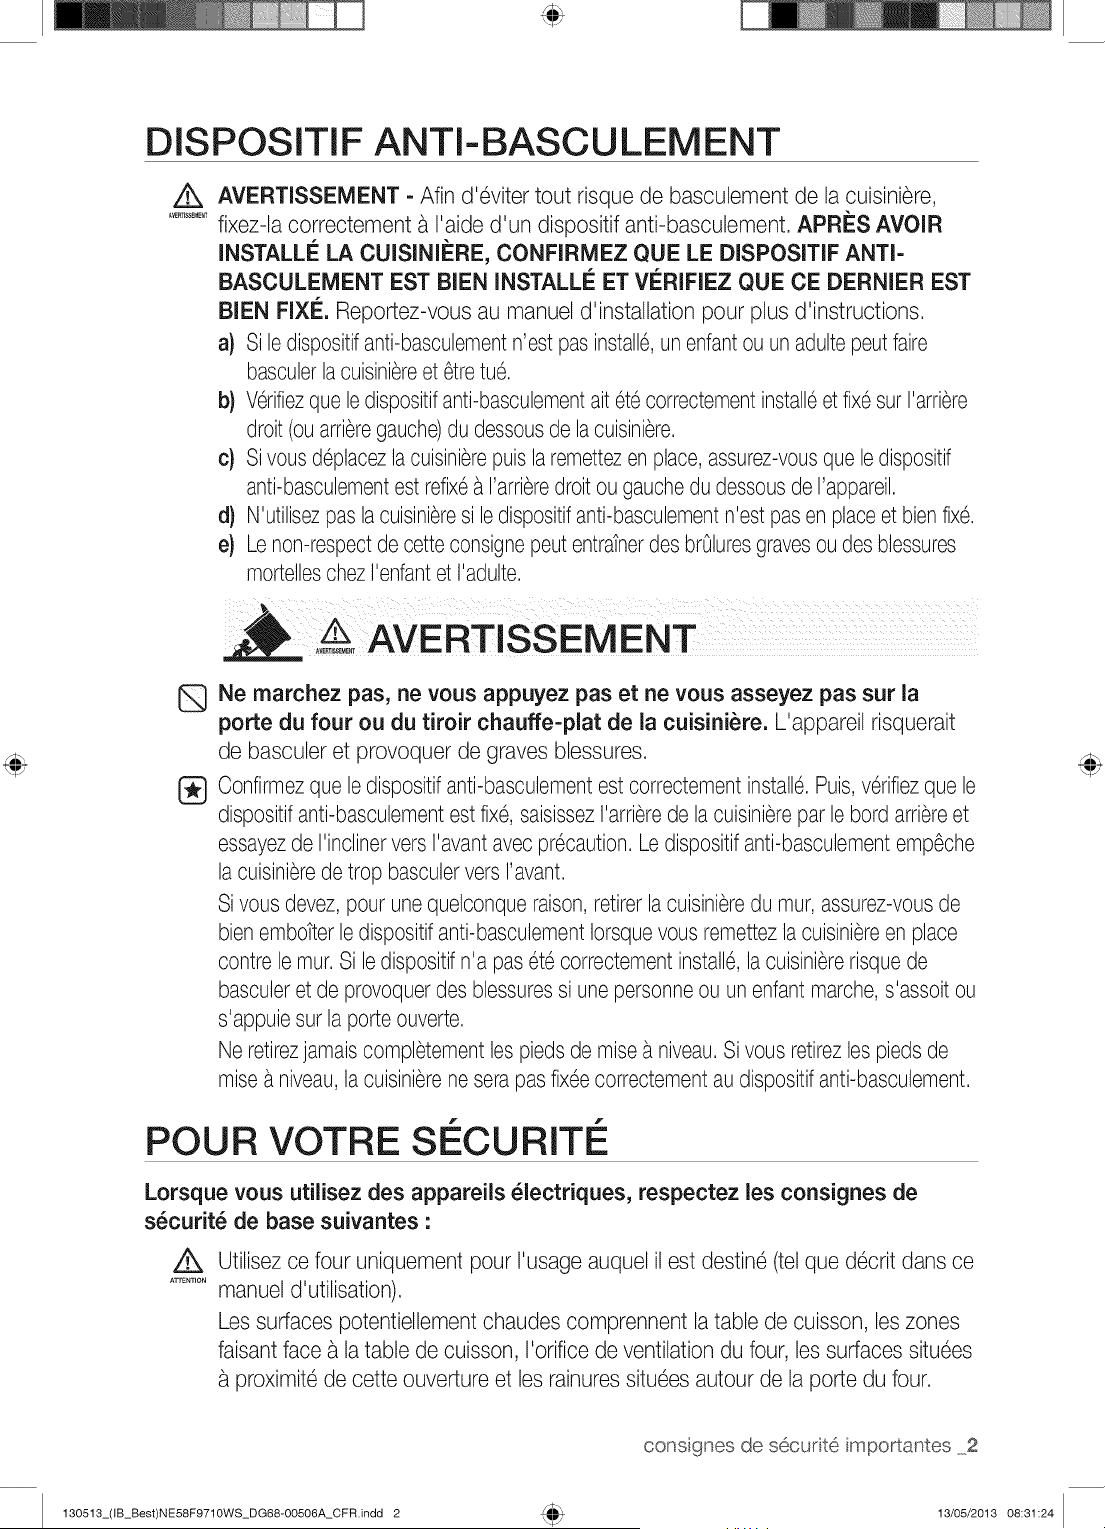
DISPOSITIF ANTI-BASCULEMENT
/k
A_RT]SSEMEt_T
AVERTISSEMENT = Afin d'6viter tout risque de basculement de la cuisiniere,
fixez-la correctement a I'aide d'un dispositif anti-basculement. APRilS AVOIR
INSTALLI_ LA CUISINII_RE, CONFIRMEZ QUE LE DISPOSITIF ANTi=
BASCULEMENT EST BIEN INSTALLI_ ET Vi_RIFIEZ QUE CE DERNIER EST
BIEN FIXI£. Reportez-vous au manuel d'installation pour plus d'instructions.
a) Si ledispositifanti-basculementn'est pas install6,un enfantou un adultepeut faire
basculerla cuisini_reet 6tretu6.
b) V6rifiezque ledispositifanti-basculementait 6t6 correctementinstall6et fix6 surI'arri_re
droit (ou arri_regauche)du dessousde lacuisini_re.
c) Si vous deplacezla cuisini_repuisla remettezen place, assurez-vousque ledispositif
anti-basculementest refix6_ I'arri_redroit ou gauchedu dessousde rappareil.
d) N'utilisezpas la cuisini_resi le dispositifanti-basculementn'est pasen placeet bienfix6.
e) Le non-respectde cette consignepeut entratnerdes brOluresgravesoudes blessures
mortelleschezI'enfantet I'adulte.
.....AVERTISSEMENT
Q
®
Ne marchez pas, ne vous appuyez pas et ne vous asseyez pas sur la
porte du four ou du tiroir chauffe=plat de la cuisiniere. L'appareil risquerait
de basculer et provoquer de graves blessures.
Confirmezque ledispositifanti-basculementest correctementinstall6. Puis,v6rifiezque le
dispositifanti-basculementest fix6, saisissezI'arrierede la cuisinierepar le bord arriereet
essayezde I'inclinervers I'avantavec pr6caution.Le dispositifanti-basculementemp6che
la cuisinierede trop basculerversI'avant.
Sivous devez, pour une quelconque raison,retirerla cu_sini_redu mur,assurez-vousde
bienembotter le dispositifanti-basculementIorsquevous remettezla cuisini_reen place
contre le tour.Si ledispositif n'a pas 6t6 correctementinstall6,la cuisiniererisquede
basculeret de provoquerdes blessuressi une personneou un enfant marche,s'assoit ou
s'appuie sur la porteouverte.
Ne retirezjamaiscompletementlespieds de raise_ niveau.Si vous retirezles piedsde
raise _ niveau,la cuisinierene serapas fix6ecorrectementau dispositifanti-basculement.
POUR VOTRE SI CURITI
Lorsque vous utilisez des appareils _lectriques, respectez les consignes de
s_curit_ de base suivantes :
/k
ATTENTION
Utilisez ce four uniquement pour I'usage auquel il est destin6 (tel que d6crit dans ce
manuel d'utilisation).
Les surfaces potentiellement chaudes comprennent la table de cuisson, les zones
faisant face a la table de cuisson, I'orifice de ventilation du four, les surfaces situ6es
proximit6 de cette ouverture et les rainures situ6es autour de la porte du four.
130513_(IB_Best)NE58F9710WS_DG68-OO506A_CFR.indd 2
consgnes de securit6 mportantes 2
13/05/2013 08:31:24
Assurez-vous que votre appareil est correctement install6et mis a la terre par un
technicien qualifi6.
D_pannage utilisateur Ne r6parez nine remplacez jamais les pi_ces de I'appareil
vous-m6me, sauf si le pr6sent manuel vous y autorise. Toute autre r6paration devra
6tre effectu6e par un technicien qualifi6.
Eteigneztoujours I'appareil avant de proc6der a une r6paration, en retirant le fusible
ou en coupant le disjoncteur.
Ne p_n_trez pas a I'int_rieur du four.
Ne rangez pas d'objets susceptibles d'_veiller I'int_r6t des enfants darts les
placards situ_s au=dessus de la cuisiniere ou sur le dosseret de la cuisiniere
Les enfants risquent, en grimpant sur la cuisini_re pour les atteindre, de se blesser
gravement.
Ne laissez pas les enfants seuls. Ne laissezjamais un enfant sans surveillance
dans la piece cO est install6 I'appareil. Ne les autorisez jamais a monter sur une
quelconque pattie de I'appareil.
N'utilisez jamais I'appareil pour chauffer une piece.
N'utilisez pas d'eau pour _teindre les flamrnes de friture. Eteignez le four
pour 6viter leur propagation. Etouffez lefeu en fermant la porte ou en utilisant un
extincteur a poudre, a mousse ou a dioxyde de carbone.
Evitezde rayer ou de heurter les portes en verre, les surfaces de cuisson ou les
tableaux de commande. Le verre pourrait se briser. N'effectuez pas de cuisson avec
un verre bris6. Vous risquez une 61ectrocution,un incendie ou des coupures.
Darts le cas d'un incendie dans le four pendant la cuisson, 6touffez le feu en fermant
la porte du four et en coupant I'alimentation du four ou en utilisant un produit
chimique sec multi-usage ou un extincteur de type a mousse.
S'il se produit un incendie pendant I'auto-nettoyage du four, coupez I'alimentation et
attendez que le feu s'6teigne. Ne forcez jamais I'ouverture de la porte. L'introduction
d'air frais a des temp6ratures d'auto-nettoyage peut provoquer un embrasement du
four. Le non-respect de cette consigne risque d'entratner de graves brOlures.
En cas de taches de graisse importantes, activez la fonction d'auto-nettoyage
avant d'utiliser le four a nouveau. Laisser de I'huile a I'int6rieur g6n_re un risque
d'incendie. Essuyez les 6claboussures importantes sur le fond du four avec un
papier d'essuyage ou un chiffon avant de d6marrer le cycle d'auto-nettoyage.
L'auto-nettoyage du four Iorsqu'il y a des taches de graisse importantes sur le fond
n6cessite des cycles de nettoyage plus longs et produit plus de fum6e.
Stockage a I'int_rieur ou sur le dessus de I'appareil. N'entreposez aucun
mat6riau inflammable dans ou a proximit6 du four. Retirez bus les 616merits
d'emballage de I'appareil avant de I'utiliser. Maintenez tout objet en plastique,
v6tement et papier a distance des pi_ces susceptibles d'6tre chaudes.
Portez les v_tements appropri_s. Ne portez jamais de v_tements amples Iorsque
vous utilisez cet appareil.
3 consgnes de secudt6 mportantes
130513_(IB_Best)NE58F9710WS_DG68-OO506A_CFR.indd 3 13/05/2013 08:31:24
Utilisez uniquement des maniques seches. L'utilisation de maniques humides ou
mouill6essur les surfaceschaudes peut entratnerdes brOluresen raison de la vapeur
qui se d6gage a ce moment-I_. Les maniques ne doivent pas entrer en contact avec
les 616mentschauffants. N'utilisez pas de serviette ou de chiffon de grande taille sur ou
proximit6 de la cuisiniere.
Apprenez aux enfants _ ne pas jouer avec les commandes ou les autres 616mentsde
la cuisiniere.
Pour votre s6curit6, n'utilisez pas de nettoyeurs haute pression, eau ou vapeur, sur
aucune pattie de la cuisiniere.
Si le cordon d'alimentation de I'appareil est endommag6, il devra 6tre remplac6 par le
fabricant, son r6parateur agr66 ou par toute personne qualifi6e afin d'6viter de cr6er un
danger.
Cet appareil n'est pas congu pour 6tre utilis6 par des personnes (ycompris les
enfants)inexp6riment6esou dont les capacit6s physiques, sensoriellesou mentales
sont r6duites, sauf si celles-ci sont sous la surveillanceou ont regules instructions
d'utilisation appropri6es de la personne responsable de leur s6curit6.
TABLES DE CUISSON
Ne laissez jamais la table de cuisson sans surveillance Iorsqu'un foyer
fonctionne _ puissance _lev_e. En cas de d6bordement, les particules graisseuses
provenant des aliments risquent de s'enflammer.
Pour 6viter le d6bordement d'huile et un incendie, employez une quantit6 minimale
d'huile dans une po61epeu profonde et 6vitez de faire cuire les aliments surgel6s avec
des quantit6s excessives de glace.
Ne soulevez pas la table de cuisson. Vous risqueriezde I'endommager et de
provoquer des dysfonctionnements.
Ne faites jamais fonctionner la table de cuisson sans r_cipient. Si vous utilisez
la surface de cuisson sans r6cipient, les boutons de commande deviendront brOlants.
N'utilisez jamais la table de cuisson vitr6e comme planche a d6couper.
Soyez prudent Iorsque vous touchez la table de cuisson. La surface vitr6e
resterachaude quelques minutes m6me apres I'arr6t de la cuisson.
Posez les ustensiles de cuisine sur la table de cuisson avec precaution, surtout
Iorsque celle-ci fonctionne. IIs pourraient devenir chauds et provoquer des brOlures.
Utilisez des plats de taille appropri_e. La cuisiniereest dot6e de foyers de
diff6rentes tallies. Utilisezdes casseroles et des po61esa fond plat, suffisamment
larges pour recouvrir toute la surface de chauffe. L'utilisation d'ustensiles de taille
trop petite exposerait une pattie de 1'616mentchauffant _ un risque de contact
et d'inflammation (ex. : tissu). Des casseroleset des po61esde taille ad6quate
augmenteront en outre I'efficacit6de la cuisson.
130513_(IB_Best)NE58F9710WS_DG68-OO506A_CFR.indd 4
consgnes de secur[t6 mportantes 4
13/05/2013 08:31:24
Le manche des ustensiles dolt _tre dirig_ vers I'int_rieur et non
au=dessus des foyers adjacents - Afin de reduire tout risque de
br01ure, d'inflammation et de projections d0 a un contact accidentel avec
les ustensiles, dirigez leur manche vers I'interieur et non au-dessus des
foyers adjacents.
Ustensiles de cuisson en fa'|'ence. Afin d'eviter tout risque de f61ure
lie au brusque changement de temperature, seuls certains recipients
en verre, vitroceramique, ceramique, terre cuite ou fd=ence peuvent 6tre
utilises sur cette table de cuisson.
Orientez toujours le manche des ustensiles vers I'ext_rieur et non
au=dessus des foyers voisins. Afin de reduire tout risque de br01ure,
d'inflammation et de projections dO a un contact accidentel avec les
ustensiles, dirigez toujours le manche du recipient vers I'exterieur et non
au-dessus des foyers voisins.
Nettoyage. Suivez les consignes et avertissements figurant sur les
etiquettes des produits nettoyants.
Assurez-vous que vous savez quel bouton de commande correspond
chaque foyer. Assurez-vous toujours d'avoir allume le bon foyer.
Eteignez toujours le foyer avant de retirer la casserole.
Si vous preparez des aliments qui s'enflamment sous la hotte, activez la
ventilation.
Surveillez les aliments flits a temperature elev6e ou moyenne.
NE stockez PAS d'objets Iourds au=dessus de la table de cuisson
qui pourraient tomber et I'endornmager.
N'utilisez PAS de caches d_coratifs sur les _l_ments de la table
- Si un 61ement est allume accidentellement, le couvercle decoratif
peut devenir chaud ou fondre. Des br01ures peuvent se produire si les
caches chauds sont manipules. La table de cuisson peut egalement 6tre
endommagee.
SI CURITI I LECTRIQUE
Installation correcte • assurez-vous que votre appareil est correctement
install6 et mis a la terre par un technicien qualifi6.
L'entretien de cet appareil doit imp6rativement 6tre effectu6 par une main
d'oeuvre qualifi6e. Des r6parations effectu6es par des personnes non
qualifi6es peuvent causer des blessures corporelles ou des d6g_ts mat6riels
graves. Si votre cuisini_re n6cessite des r6parations, contactez un service
d'assistance technique agr66 Samsung. Le non respect de ces instructions
peut provoquer des dommages et entratner I'annulation de la garantie.
5 consgnes de secudt6 mportantes
130513_(IB_Best)NE58F9710WS_DG68-00506A_CFR.indd 5 13/05/2013 08:31:24
A
A_R'nSSEMEt_T
A_R'nSSEMEt_T
Les appareils encastr6s ne doivent 6tre mis en marche qu'apr_s avoir 6t6
install6s dans un meuble ou un lieu de travail conforme aux codes 61ectriques
et de construction en vigueur, Cela garantit une installation des appareils
conforme aux normes de s6curit6 appropri6es,
En cas de dysfonctionnement ou de d6t6rioration (cassure, f61ure)de
I'appareil •
6teignez toutes les zones de cuisson,
d6branchez la cuisini_re de la prise murale CA
contactez le service d'assistance technique le plus proche,
AVERTISSEMENT- Si la surface est fendue, 6teignez et d6branchez
I'appareil afin d'6viter tout risque d'61ectrocution, N'utilisez pas la table de
cuisson tant que la surface vitr6e n'a pas 6t6 remplac6e,
AVERTISSEMENT • afin d'6viter tout risque d'61ectrocution, veillez ace que
I'appareil soit hors tension avant de proc6der au remplacement de I'ampoule,
La cuisini_re ne doit pas 6tre plac6e sur un socle,
SI CURIT¢: EN FANTS
A_TISS_ME_T
A_RT]SSEMEI_T
AVERTISSEMENT : cet appareil n'est pas con_u pour 6tre utilis6 par
des jeunes enfants ou des personnes invalides non assist6s par un adulte
responsable,
Les jeunes enfants ne doivent pas utiliser I'appareil sans la surveillance d'un
adulte,
Maintenez les enfants 61oign6s du four Iorsque vous ouvrez ou fermez la
porte, IIs pourraient 6tre heurt6s par la porte Iorsque vous I'ouvrez ou se
pincer les doigts dans la porte Iorsque vous la fermez,
Les zones de cuisson chauffent Iorsque vous cuisinez, Pour 6viter aux jeunes
enfants d'6tre br016s, maintenez-les toujours 61oign6s de I'appareil Iorsque
vous cuisinez,
Pendant I'auto-nettoyage, les surfaces de la cuisini_re peuvent d6passer
leur temp6rature habituelle, Pour 6viter aux jeunes enfants d'6tre br016s,
maintenez-les toujours 61oign6s de la cuisini_re Iorsqu'elle est en mode
d'auto-nettoyage,
AVERTISSEMENT : les parties accessibles peuvent devenir tr_s chaudes
pendant I'utilisation, Les enfants en bas age doivent 6tre tenus a 1'6cart de
I'appareil afin d'6viter toute br01ure,
130513_(IB_Best)NE58F9710WS_DG68-OO506A_CFR.indd 6
consgnes de securit6 mportantes 6
13/05/2013 08:31:24
FOUR
NE TOUCHEZ PAS LES ELEMENTS CHAUFFANTS OU LES SURFACES
INTERNES DU FOUR. Les 6Bments chauffants peuvent 6tre chauds m_me
s'ils sont noirs. Les surfaces internes d'un four deviennent suffisamment chaudes
pour provoquer des brOlures. Pendant et ap@s le fonctionnement, ne touchez
pas les 6Bments chauffants et les surfaces internes du four et ne laissez aucun
v6tement ou produit inflammable entrer en contact avec ces derniers tant qu'ils
n'ont pas refroidis. Certaines autres surfaces du four peuvent devenir chaudes
au point de provoquer des brOlures. II s'agit des orifices de ventilation du four et
surfaces situees a proximit6 de ces orifices, de la porte du four et de la vitre de la
porte du four.
Ne faites pas chauffer des aliments contenus darts des contenants
ferm_s. L'accumulation de pression pourrait faire exploser le contenant et
provoquer des blessures.
N'utilisez pas le four pour faire s_cher des journaux. S'ils sont surchauff6s,
ils risque@ de s'enflammer.
N'utilisez pas le four comme espace de rangement. Les 6Bments ranges
dans le four peuvent s'enflammer.
Soyez prudent Iorsque vous ouvrez la porte. Laissez Fairchaud ou la vapeur
s'6chapper avant de retirer les aliments du four ou de les placer a I'int6rieur.
Couches protectrices. N'utilisez pas de papier d'aluminium pour recouvrir la
sole du four, sauf si les instructions le suggerent. Une installation inappropriee de
ces couches protectrices est susceptible de provoquer une d6charge 61ectrique
ou un incendie.
@
@
N'obstruez pas les conduits de ventilation du four. La ventilation du four
se situe sous le bottler de commande. Pendant le fonctionnement du four, cette
zone peut devenir extr6mement chaude. N'obstruez jamais cette ouverture et n'y
placez pas de matiere plastique ou d'6Bments sensibles a la chaleur.
Insertion des grilles du four. Placez to@ours les grilles du four a la hauteur
appropriee tant que le four est encore froid. Si vous devez d@lacer une grille
alors que le four est chaud, utilisez des maniques. Les poignees des @cipients ne
doivent jamais toucher les 6Bments chauffants du four.
L'aluminium ou la sonde thermique ne dolt pas toucher les 6Bments chauffants.
Cet appareil devient tres chaud pendant son utilisation. Prenez garde a ne
pas toucher les 6Bments chauffants situes a I'int6rieur du four.
N'utilisez pas de nettoyants fortement abrasifs ou de grattoirs metalliques pointus
pour nettoyer le verre de la porte de four. IIs sont susceptibles de rayer la surface
et avoir comme consequence 1'6clatement en verre.
Dans le cas d'un incendie dans le four pendant la cuisson, 6touffez le feu en
fermant la porte du four et en coupant I'alimentation du four ou en utilisant un
produit chimique sec multi-usage ou un extincteur de type a mousse.
7 consgnes de securit6 mportantes
130513_(IB_Best)NE58F9710WS_DG68-00506A_CFR.indd 7 13/05/2013 08:31:24
ATTENTION
N'essayez pas d'utiliser le four pendant une panne de courant. En cas
de panne de courant, arr_tez toujours le four. Si le four n'est pas arr_t6 et que
I'alimentation est retablie, le four peut commencer a fonctionner a nouveau. Les
aliments laisses sans surveillance peuvent s'enflammer ou s'alt6rer.
TIROIR CHAUFFE-PLAT
Q
NE TOUCHEZ PAS L'ELEMENT CHAUFFANT OU LA SURFACE INTERNE DU
TIROIR. Ces surfaces peuvent _tre chaudes au point de provoquer des br01ures.
ATTENTION :il est possible que la surface interne du tiroir soit chaude a son
ouverture.
Le tiroir chauffe-plat permet de maintenir des aliments cults
temperature de service. Les aliments doivent 6tre d6ja chauds. Le tiroir
chauffe-plat ne permet pas de faire r6chauffer ou de cuire des aliments.
Soyez prudent a I'ouverture du tiroir. Entrouvrez le tiroir et laissez I'air chaud
ou la vapeur s'6chapper avant de retirer ou replacer les aliments. L'air chaud ou
la vapeur qui s'6chappe peut provoquer des brOluresaux mains, au visage et/ou
aux yeux.
N'utilisez pas le tiroir pour faire s_cher des journaux. S'ils sont surchauff6s,
ils risquent de s'enflammer.
N'utilisez pas de papier d'aluminium pour tapisser le tiroir. Le papier
d'aluminium est un excellent isolant thermique et aurait pour cons6quence
d'emprisonner la chaleur. Son utilisation est susceptible de perturber le
fonctionnement du tiroir et d'endommager la finition interieure.
Ne placez pas de papier, plastique, conserves ou mat6riaux combustibles dans le
tiroir.
Ne laissez jamais de pot ou de botte contenant de la graisse dans le tiroir ou
proximit6.
Ne faites pas r6chauffer les aliments dans le tiroir plus de trois heures.
FOURS AUTO-N ETTOYANTS
Ne nettoyez jamais le joint de la porte. Le joint de la porte est indispensable
pour assurer une bonne 6tanch6it6. Veillez a ne pas frotter, endommager ni
d6placer le joint.
Ne laissez jamais vos oiseaux de compagnie darts la cuisine. Les oiseaux
sont extr6mement sensibles a lafumee 6mise durant les cycles d'auto-nettoyage
du four. La fumee peut 6tre dangereuse, voire mortelle pour les oiseaux. D6placez
les oiseaux dans une piece bien aer6e.
Proc_dez uniquement au cycle d'auto=nettoyage des _l_ments
mentionn_s darts le manuel. Avant de proceder a I'auto-nettoyage du four,
retirez la plaque de separation, la grille, les ustensiles et les aliments.
130513_(IB_Best)NE58F9710WS_DG68-00506A_CFR.indd 8
consgnes de securit6 mportantes 8
13/05/2013 08:31:24
Avant d'actionner le cycle d'auto-nettoyage, essuyez la graisse et les r6sidus
alimentaires dans le four. Une quantit6 excessive de graisse peut s'enflammer,
provoquant de la fumee dommageable pour votre int6rieur.
Aucun nettoyant ou rev6tement de protection pour four disponible dans le
commerce ne dolt 6tre utilise pour I'int6rieur ou I'ext6rieur du four. Utilisez
uniquement un nettoyant ceramique pour la table de cuisson.
Retirez les grilles en nickel avant de d6marrer le cycle d'auto-nettoyage du four
afin d'6viter qu'elles ne se d6colorent.
Si le mode d'auto-nettoyage ne fonctionne pas, 6teignez le four et d6branchez-le
de la prise d'alimentation. Faites-le reparer par un technicien qualifi6.
Nettoyez les projections les plus importantes avant le nettoyage.
HOTTE D'ASPIRATION
Nettoyez fr_quemment la hotte d'aspiration. Ne laissez pas la graisse
s'accumuler sur la hotte ou le filtre.
Si les aliments situ_s sur la cuisiniere s'enflamment, activez la ventilation.
TABLE DE CUISSON EN VITROCI RAMIQUE
Q
NE TOUCHEZ PAS LES FOYERS OU LES ZONES SITUi_ES A PROXIMITi_.
La surface des foyers peut rester chaude m_me si ces derniers n'apparaissent
pas rouges. Les zones situ6es a proximite de ces 616mentspeuvent devenir
chaudes au point de provoquer des brOlures. Pendant et apr6s le fonctionnement
de la cuisiniere, ne touchez pas les foyers ou les zones situees a proximit6 des
foyers et 6vitez que des v6tements ou produits inflammables n'entrent en contact
avec ces derniers tant qu'ils n'ont pas entierement refroidi. Ces zones incluent
notamment la table de cuisson et les zones situees face a la table de cuisson.
®
Ne faites rien cuire sur une table de cuisson bris_e. Si la table de cuisson
est cassee, vous risquez de vous 61ectrocuter en la nettoyant ou en cuisinant
dessus. Contactez immediatement un technicien qualifi6.
Nettoyez la table de cuisson avec precaution. Si vous utilisez une 6ponge ou
un chiffon humide pour essuyer la table de cuisson encore chaude, veillez a ne
pas vous brOleravec la vapeur. Certains nettoyants peuvent former des fumees
toxiques s'ils sont appliques sur une surface chaude.
9 consgnes de secudt6 mportantes
130513_(IB_Best)NE58F9710WS_DG68-00506A_CFR.indd 9 13/05/2013 08:31:24
AVERTISSEMENTS
AVERTISSEMENT
L'INSTALLATION
IMPORTANTS RELATIFS A
[_} Cet appareil doit 6tre install6par un technicien qualifi6 ou une soci6t6 de d@annage.
Le non-respect de cette consigne peut provoquer une 61ectrocution,un incendie,
une explosion, un dysfonctionnement de I'appareil ou des blessures.
D6ballezI'appareil. Retireztousles 616mentsd'emballage et v6rifiez que lefour n'est
pas endommag6 (traces de choc _ I'int6rieurou a I'ext6rieur,Ioquetscass6s, fissures
au niveaude la porte ou porte real align@). En cas de dommages, n'installez pas ni
n'utilisez pas le four et contactez imm6diatement votre revendeur.
Branchez le cordon d'alimentation sur une prise adapt@ correctement reli@ a la terre.
Ne branchez aucun autre appareil 61ectriquesur ce m6me circuit.
Gardeztousles 616mentsd'emballage hors de la port@ des enfants. Oeux-ci
risqueraientde les utiliser pour jouer et se blesser.
Installezvotre appareil sur un rev6tementplat et dur, capable de supporter son poids.
Le non-respect de cette consigne risque d'entratner des vibrations anormales, des
bruits ou d'autres problemes avec I'appareil.
Cet appareil doit 6tre correctement reli6a la terre.
Ne reliez jamais cet appareil a une conduite de gaz, _ un tuyau d'eau en plastique ou
une ligne t61@honique.
Cela pourrait entratnerun risque d'61ectrocution,d'incendie, d'explosion ou de
d6faillancede I'appareil.
Ne coupez nine retirez JAMAIS la broche de raisea la terre de la fiche du cordon
d'alimentation.
Assurez-vous que I'amp6ragede la prise sur laquelleest branch6 I'appareil est adapt&
N'installez pas cet appareil dans un endroit humide, graisseuxou poussi6reux et veillez
ace qu'il ne soit pas expos6 directement _ la lumieredu soleil ou a une source d'eau
(eaude pluie).
Cela pourrait entratnerun risque d'61ectrocutionou d'incendie.
N'utilisez jamais un cordon d'alimentation endommag6 ou une prise murale real fix@.
Cela pourrait entratnerun risque d'61ectrocutionou d'incendie.
Ne tirez jamais sur le cordon d'alimentation et ne le pliez pas de fagon excessive.
Ne vrillezet ne serrez pas le cordon d'alimentation.
N'accrochez pas le cordon d'alimentation sur un objet m6tallique ; ne placez pas
d'objet Iourd sur le cordon d'alimentation ; n'ins6rez pas le cordon d'alimentation entre
des objets.
Cela pourrait entratnerun risque d'61ectrocutionou d'incendie.
Si le cordon d'alimentation est endommag6, contactez le centre de d@annage le plus
proche.
130513_(IB_Best)NE58F9710WS_DG68-OOSO6A_CFR.indd 10
consgnes de secudt6 mportantes 10
13/05/2013 08:31:24
AVERTISSEMENTS IMPORTANTS
RELATIFS A L'UTILISATION
Encas d'inondation,si votre appareila 6t6 en contactavecI'eau,veuillezcontacterle centre
de depannagele plus proche.Le non-respectde cette consignepeut entratnerun risque
d'61ectrocutionou d'incendie.
Si I'appareilg6n_reun bruit anormal,une odeur de br016ou de la fum6e, d6branchez
imm6diatementla prise et contactezle servicede depannagele plus proche.
Lenon-respectde cette consignepeut entratnerun risqued'61ectrocutionou d'incendie.
Encas de fuite de gaz (propane,GPL,etc.),a6rezimm6diatementla piece. Ne touchezpas
non plusI'appareil.Netouchezpas non plusI'appareil.
Une 6tincellepeut provoquerune explosionou un incendie.
Prenezgarde _ ne pas toucherla porte du four,les 616mentschauffantsou toute autre
partiede I'appareilsusceptibled'avoir chauff6.
Lenon-respectde cette consignerisqued'entratnerdes br@lures.
Encas de d6part de feu _ I'interieurdu four,laissezsa porteferm6e,6teignezI'appareil
et d6branchezla priseou coupezI'alimentationau niveaudu tableaude fusiblesou du
disjoncteur.Sivous ouvrezla porte du four, I'incendierisquede se propager.
Respectezsystematiquementlesconsignesde s6curit6Iorsquevous utilisezvotre four.Ne
tentezjamaisde r6parervous-m6meI'appareil; le courant61ectriquecirculant_ I'interieur
est tr_s 61ev6.Si le four n6cessitedes r6parations,contactezun centrede d6pannageagr66
prochede chezvous.
Sivous utilisezI'appareilalorsqu'il estcontamin6par dessubstances6trang_res(ex.:
r6sidusd'aliments),vous risquezde I'endommager.
RetirezI'emballagedesalimentsavecpr6cautionIorsquevous sortezces demiersdu four.
Si les alimentssontchauds,de lavapeurchaude peut s'6chappersoudainement
Iorsquevous en retirezI'emballage,et vous risquezde vousbr@ler.
Netentezpas de r6parer,d6monterou modifiervous-m6meI'appareil.
Lechassisde I'appareil6tanttravers6par un courant_ hautetension,il existeun risque
d'61ectrocutionou d'incendie.
Si le four n6cessitedes r6parations,contactezle centrede d6pannagele plusproche de
chezvous.
@
@
Si une substance6trang_retellequede I'eau p6n_tredansI'appareil,contactezle centrede
d6pannageleplus proche.
Lenon-respectde cette consignepeut entratnerun risqued'61ectrocutionou d'incendie.
Nemanipulezpas le cordon d'alimentationavecles mainsmouill6es.
Cela pourraitentratnerun risqued'61ectrocution.
N'6teignezpasI'appareils'il est encours de fonctionnement.
Cela pourraitprovoquerune6tincelleet entratnerunrisqued'61ectrocutionou d'incendie.
Conserveztousles materiauxd'emballagehors de porteedesenfants :les materiaux
d'emballagepr6sententun dangerpourlesenfants.
Risqued'asphyxieavec lessacs plastiquenotamment.
Nelaissezpas les enfantsou toute personne_ capacitesphysiques,sensoriellesou
mentalesr6duitesutilisercet appareilsanssurveillance.
11 consgnes de securit6 mportantes
130513_(IB_Best)NE58F971OWS_DG68-OO506A_CFR.indd 11 13/O5/2013 O8:31:24
Q
Veillez_ ce que les commandes et leszones de cuisson du four soient hors de port6e
des enfants.
Le non-respect de cette consigne peut entratnerun risque d'61ectrocution,
d'incendie ou de blessures.
Ne touchez pas I'int6rieur du four juste apres son fonctionnement ; les 616mentssont
encore brOlants.
Le non-respect de cette consigne risque d'entratner des brOlures.
N'utilisez et n'entreposez pas d'a6rosols ou d'objets inflammables_ proximit6 du four.
Les mat6riaux inflammableset les a6rosols peuvent cr6er un incendie ou une
explosion.
N'ins6rez pas vos doigts, de substances 6trangeresou d'objets m6talliques tels que
des 6pingles ou des aiguillesdans I'entr6e, la sortie et les orifices de I'appareil. Encas
d'insertion de substances 6trangeres darts I'une de ces ouvertures, contactez votre
fournisseur ou le centre de d6pannage le plus proche.
N'essayez pas de modifier,d'ajuster ou de r6parer la porte. NE retirez JAMAIS la porte
ou I'habillagedu four.
N'entreposez et n'utilisez jamais le four en ext6rieur.
Cet appareil ne dolt jamais 6tre utilis6 a d'autres fins que lacuisson.
Si vous vous servez de I'appareil pour un autre usage que celui auquel il est
destin6, vous risquez de provoquer un incendie.
Otez le couvercle ou le bouchon des r6cipients ferm6s (bouteillesde th6 aux herbes,
biberons, bouteilles de lait, etc.) avant de les r6chauffer.Faitesun trou avec un
couteau dans les aliments contenant des coquilles (oeufs,ch_taignes, etc.) avant de
lescuisiner.
Le non-respect de cette consigne risque d'entratner des brOluresou des blessures.
Ne faites jamais chauffer des r6cipients en plastique ou en papier et ne les utilisezpas
pour la cuisson.
Le non-respect de cette consigne risque d'entratner un incendie.
Ne faites pas chauffer d'aliments emball6s dans du papier tel que des pages de
magazine ou du journal, etc.
Oelapourrait provoquer un incendie.
N'ouvrez pas la porte si les aliments _ I'int6rieurdu four sont en flammes.
Si vous ouvrez la porte, de I'oxygene p6n6treraa I'int6rieuret cela risque de
provoquer un incendie.
N'exercez pas de pression excessivesur la porte ou a I'int6rieurde I'appareil. Evitez
tout choc sur la porte ou a I'int6rieurde I'appareil.
S'accrocher a la porte de I'appareil risque de le faire basculer et de provoquer de
graves blessures.
Si la porte du four est endommag6e, ne vous servez pas de I'appareil.Contactez
un centre d'assistance technique.
Ne touchez pas les aliments pendant ou imm6diatement apres la cuisson.
Utilisezdes maniques afin d'6viter toute brOlure.
Utilisezune manique ou des gants, les surfacesdes poign6es et du four peuvent
6tre suffisamment chaudes pour provoquer des brOluresapres cuisson.
130513_(IB_Best)NE58F9710WS_DG68-OO506A_CFR.indd 12
consgnes de secudt6 mportantes 12
13/05/2013 08:31:24
AVERTISSEMENTS RELATIFS A, L'UTILISATION
Si la surfacedu four estfissur@,n'utilisezpasI'appareil.
- Lenon-respectde cette consignerisqued'entratnerune61ectrocution.
Lesplatset r@ipientspeuventdevenirextr6mementchauds.Manipulez-lesavecpr@aution.
Lesplatschaudset la vapeurpeuventprovoquerdesbr01ures.Retirezle couvercledes
r@ipientsavecpr@autionenveillanta 61oignerces derniersdevotrevisageet de vos mains
afind'@iter que led6gagementdevapeur nevousbr01e.
Retirezles couverclesdes petits potspour b6b6avantde lesfairechauffer.Lorsquevous
r@hauffezdesalimentspourb6b6,remuez-lesbienpour r@artirla chaleuruniform6ment.
Testeztoujoursla temp6raturedes alimentsavantde les donnera un b6b6Contrairement
ce qu'il paratt,ler@ipientenverreou la surfacedes alimentspeuvent6trechaudsau point
de brOlerla bouchedu b6b6.
Soyezprudentcar les boissonsou alimentspeuvent6tretr_s chaud(e)sapr_savoir6t6
r@hauff6(e)s.
- V6rifiezque les alimentsontsuffisammentrefroidiavantde les donnerauxjeunesenfants.
Montrez-vousparticulierementvigilantIorsquevousfaiteschaufferdesliquides(ex. : eauou
autresboissons).
- Veilleza remuerpendantou apr_slacuisson.
- @itezd'utiliserdes r6cipientsglissantsa goulot6troit.
- Attendezau moins30 secondesapr_slacuissonavantde retirerle liquidequivientd'@e
chauff6.
- Lenon-respectde cette consignerisquede provoquerun soudaind6bordementde son
contenuet d'entratnerdes brOlures.
Nemontezpas surI'appareilet ne placezpas d'objets(ex. ' linge,couverclede four,bougies
allure@s,cigarettesallure@s,plats,produitschimiques,objets m6talliques,etc.) dessus.
- Desarticlespeuventrestercoinc6sdansla porte.
- Celapourraitentratnerun risqued'61ectrocution,d'incendie,de d6faillancede I'appareil
ou des blessures.
N'utilisezpas I'appareilavecles mainsmouill6es.
- Cela pourraitentratnerun risqued'61ectrocution.
Nevaporisezpasde substancesvolatiles(ex. :insecticide)sur la surfacede I'appareil.
- Cessubstancessont nonseulementnocivespourlasant6,maisellespeuvent6galement
entratnerune61ectrocution,un incendieou une d6faillancede I'appareil.
N'approchezpas votrevisageou votrecorps de I'appareilpendantla cuissonou Iorsde
I'ouverturede la portedu fourjusteapr_sla cuisson.
- Veilleza ce queles enfantsne s'approchentpas trop pros de I'appareil.
- Lenon-respectde cette consignerisqued'entratnerdesbrOlurespourles enfants.
Neposezpasd'alimentsou d'objetsIourdssur la porte Iorsquecelle-ciest ouverte.
- Vousrisqueriezdevous brOlerou de vous blessersi les objetschutaient.
Necr6ezpas de chocthermiquebrutalau niveaude la porte,de I'int6rieurde I'appareilou du
plat(ex.: enversantde I'eaudessuspendantoujuste apr_sla cuisson).
- Cela risqued'endommagerI'appareil.Lavapeurou les projectionsd'eau pourraient
entratnerdes br01uresou des blessures.
13 consgnes de secudt6 mportantes
130513_(IB_Best)NE58F9710WS_DG68-OO506A_CFR.indd 13 13/05/2013 08:31:24
NefaitesjamaisfonctionnerI'appareila vide,saufenmoded'auto-nettoyage.
N'utilisezpasle four ou la table de cuissonpourd6congelerdes boissonssurgel6es
contenuesdans desbouteillesa col 6troit.Celles-cirisqueraientd'6clater.
Nerayezpas la surfacevit@ede la porte du foura I'aided'un objettranchant.
Celapour@itendommager,voire briserlavitre.
Neposezriensur I'appareilIorsquecelui-cifonctionne.
N'utilisezpasde @cipientsferm6s herm6tiquement.Retirezlesoperculeset les couvercles
avantla cuisson.Les@cipientsferm6sherm6tiquementpeuventexploseren raisonde
I'accumulationde pression,m6meap@sI'ar@du four.
Veilleza ce que les alimentsnetouchentpasles616mentschauffantsdu four.
Celapour@itprovoquerun incendie.
Nefaites passurchaufferlesaliments.
Celapour@itprovoquerun incendie.
ATTENTION
AU
AVERTISSEMENTS
NETTOYAGE
IMPORTANTS RELATIFS
®
NenettoyezpasI'appareilenpulv6risantdirectementde I'eaudessus.
N'utilisezpasde benzene,dediluantoud'alcoolpournettoyerI'appareil.
Celapour@itentratneruned6coloration,uned6formation,desdommagessurI'appareilainsi
qu'unrisqued'61ectrocutionou d'incendie.
Prenezgardea nepasvousblesserennettoyantI'appareil(ext6rieur/int6rieur).
Lesa@esdecelui-cipeuventse @v61ert@stranchantes.
NenettoyezpasI'appareila I'aided'un nettoyeurvapeur.
Celapour@itentratnerunph6nomenede corrosion.
Veillez_ maintenirI'int6rieurdufourto@ourspropre.Lesparticulesd'alimentsou lesprojections
d'huileadh6rantauxparoisrisque@d'abfmerlefouroud'en @duiresonefficacit6.
AVERTISSEMENTS DE LA PROPOSITION
65 ADOPTIVE PAR L'I TAT DE LA CALIFORNIE
Conform6menta laCaliforniaSafeDrinkingWaterandToxicEnforcementAct (Loicalifomienne
relativeauxproduitstoxiqueset a I'eaupotable),legouvemeurdelaCalifomieesttenude publier
unelistedessubstancesreconnuesparI'@atdela Califomiecommepouvantcauserle cancer,
desmalformationscongenitalesoup@sentantd'autresdangerspourlareproductionet pour
lesquelleslesentreprisesdoiventave@d'une6ventuelleexpositiona detellessubstances.
CeproduitcontientunesubstancechimiquereconnueparI'@tatde laCalifomiecommepouvant
causerle cancer,desmalformationscong6nitalesoup@sentantd'autresdangerspourla
reproduction.Cetappareilpeutcauseruneexpositiona faibleniveaua certainessubstances
@pertori6es,y comprisle benzene,laformald6hyde,lemonoxydedeca@oneet le tol@ne.
130513_(IB_Best)NE58F9710WS_DG68-OO506A_CFR.indd 14
consgnes de secur[t6 mportantes 14
13/05/2013 08:31:25
iNSTALLATiON DU FOUR 17 Apropos de cette section
17 Pour votre s_curit_
PREPARATION AVANT L'INSTALLATION
DE LA CUISINIF;RE
!
18 Retirer I'emballage
18 Preparation des outils et des pi_ces
19 Wrification du site d'installation
MISE SOUS TENSION
!
20 Etape 1 : respect des exigences en
mati_re de raccordements
_lectriques
21 Etape 2 : acces au branchement du
cordon d'alimentation
22 Etape 3 : installation du cordon
d'alimentation
24 Etape 4 : installation de la gaine
25 Etape 5 : remise en place du panneau
d'acces
INSTALLATION DE LA CUISINIERE 26 Installation du dispositif anti-basculement
27 Finalisation de I'installation
28 Kit de calage arri_re en option
PRC:SENTATION DE VOTRE NOUVELLE
CUISINIERE
29 Presentation
29 Accessoires fournis
AVANT DE COMMENCER
i
30 Avant de commencer
15 sommaire
DC:MARRAGE
i
30 R_glage de I'horloge
30 Modes d'affichage du panneau de
commande
31 Activation et d_sactivation de I'_clairage du
four
31 Verrouillage des commandes
31 R_glage de la minuterie
130513_(IB_Best)NE58F9710WS_DG68-00506A_CFR.indd 15 13/05/2013 08:31:25
TABLE DE CUISSON
i
.... _ f
UTILISATION DU FOUR
UTILISATION DU TIROIR CHAUFFE-PLAT
32 A propos de la table de cuisson
34 Comment r_gler la cuisini_re pour utiliser la
table de cuisson ?
36 Utilisation des ustensiles de cuisine
appropri_s
36 Choix des ustensiles de cuisine appropri_s
37 Protection de la surface lisse
38 Tableau de commande du four
39 Utilisation des grilles du four
41 Utilisation de la grille coulissante
42 Utilisation de la plaque de s_paration
43 Plages de r_glage de la temperature en mode
de cuisson double
44 R_glages minimum et maximum
44 Faire cuire
45 Cuisson par convection
47 R6tissage par convection
48 Cuisson minut_e
49 D_part diff_r_
50 Cuisson au gril
51 Utilisation de la fonction cuisson favorite
52 Utilisation de la fonction cuisson saine
55 Utilisation de la fonction de maintien au chaud
55 Utilisation de la fonction de Pain pr_cuit
55 Utilisation de la fonction des options
58 Utilisation de la sonde thermique
60 R_glage de la fonction shabbat
61 Apropos du tiroir chauffe-plat
61 Activation ou d_sactivation du tiroir chauffe-
plat
ENTRETIEN DE VOTRE APPAREIL
DC:PANNAGE
62 Auto-nettoyage
64 Nettoyage vapeur
65 Entretien et nettoyage du four
67 Entretien et nettoyage de la table de cuisson
vitr_e
69 Retrait et remise en place de la porte du four
70 Retrait et remise en place du tiroir chauffe-plat
71 Remplacement de I'ampoule du four
72 D_pannage
GARANTIE (€:TATS-UNIS}
130513_(IB_Best)NE58F9710WS_DG68-00506A_CFR.indd 16
76 Garantie (Fttats-Unis)
77 Garantie (CANADA)
sommaire 16
13/05/2013 08:31:25
A PROPOS DE CETTE SECTION
MSEZ ENTI#REMENT ET ATTENTIVEMENT CES INSTRUCTIONS.
Note importante destin_e & I'installateur
Lisez I'int_gralit_ des consignes d'installation avant d'installer la cuisini_re.
Retirez tousles _l_ments d'emballage des compartiments du four avant de raccorder la
cuisini_re b. I'alimentation _lectrique.
Respectez tousles codes et reglements en vigueur.
Assurez-vous de laisser ces instructions a I'utilisateur.
Note importante destin_e & I'utilisateur
Conservez pr_cieusement ces instructions afin que la personne charg_e du contr61e
_lectrique puisse s'y reporter.
Comme pour tout appareil g_n_rant de la chaleur, certaines consignes de s_curit_ sent b.
respecter.
Assurez-vous que votre appareil est correctement install_ et mis b. la terre par un installateur
qualifi_ ou un technicien sp_cialis_.
Assurez-vous que les rev_tements muraux situ_s b. proximit_ de I'appareil peuvent r_sister b. la
chaleur generee par celui-ci.
Pour _liminer le besoin de passer au-dessus de la surface des foyers, _vitez d'avoir un meuble
de rangement situ_ au-dessus de la table de cuisson.
La cuisini_re ne doit pas _tre plac_e sur un socle.
POUR VOTRE SI_CURITI_
AVERTISSEM ENT Si vous ne respectez pas scrupuleusement les
informations contenues dans ce manuel, vous risquez de provoquer un incendie ou un choc electrique
et, par consequent, des deg_ts materiels, blessures ou accidents mortels.
,A, AVERT_SSEM ENT Avant de demarrer I'installation, coupez I'alimentation au
panneau de commande et verrouillez I'interrupteur permettant la mise hers tension ; cette precaution
evitera toute mise sous tension accidentelle de I'appareil. Si vous ne parvenez pas b.verrouiller
I'interrupteur permettant la mise hers tension, fixez fermement au panneau de commande un dispesitif
d'avertissement bien visible.
,&,AVERTISSEMENTCet appareil doit _tre correctement mis a la terre.
17 Installation du four
130513_(IB_Best)NE58F9710WS_DG68-00506A_CFR.indd 17 13/05/2013 08:31:25
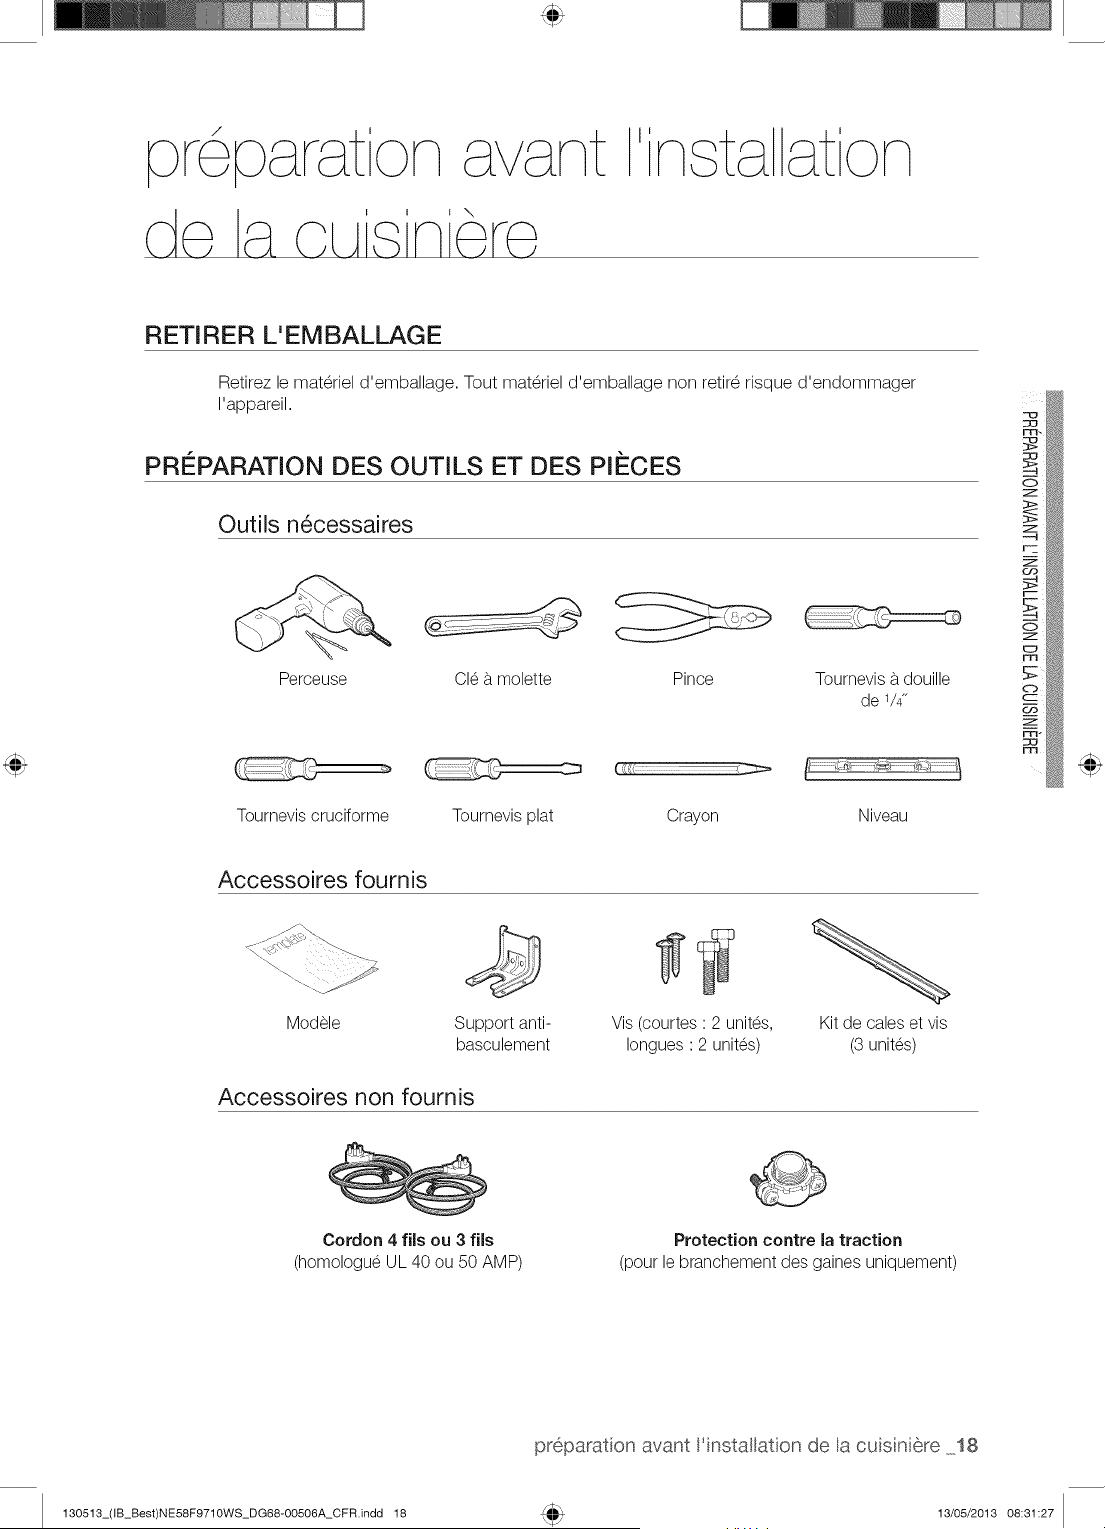
pr6parat on avant
de a c_As nero
ta at on
RETIRER L'EMBALLAGE
Retirez le materiel d'emballage. Tout materiel d'emballage non retir_ risque d'endommager
rappareil.
PRI_PARATION DES OUTILS ET DES PiI_CES
Outils n6cessaires
Perceuse Cle b.molette Pince Tournevis b.douille
de 1/4"
Tournevis cruciforme Tournevis plat Crayon Niveau
Accessoires fournis
Modele
@
Support anti-
basculement
Accessoires non fournis
Vis (courtes ' 2 unites,
Iongues ' 2 unites)
Kit de cabs et vis
(3 unites)
Cordon 4 fils ou 3 fils
(homologue UL 40 ou 50 AMP)
Protection contre la traction
(pour le branchement des gaines uniquement)
preparat on avant l'installation de la cuis n 6re 18
130513_(IB_Best)NE58F9710WS_DG68-00506A_CFR.indd 18 13/05/2013 08:31:27
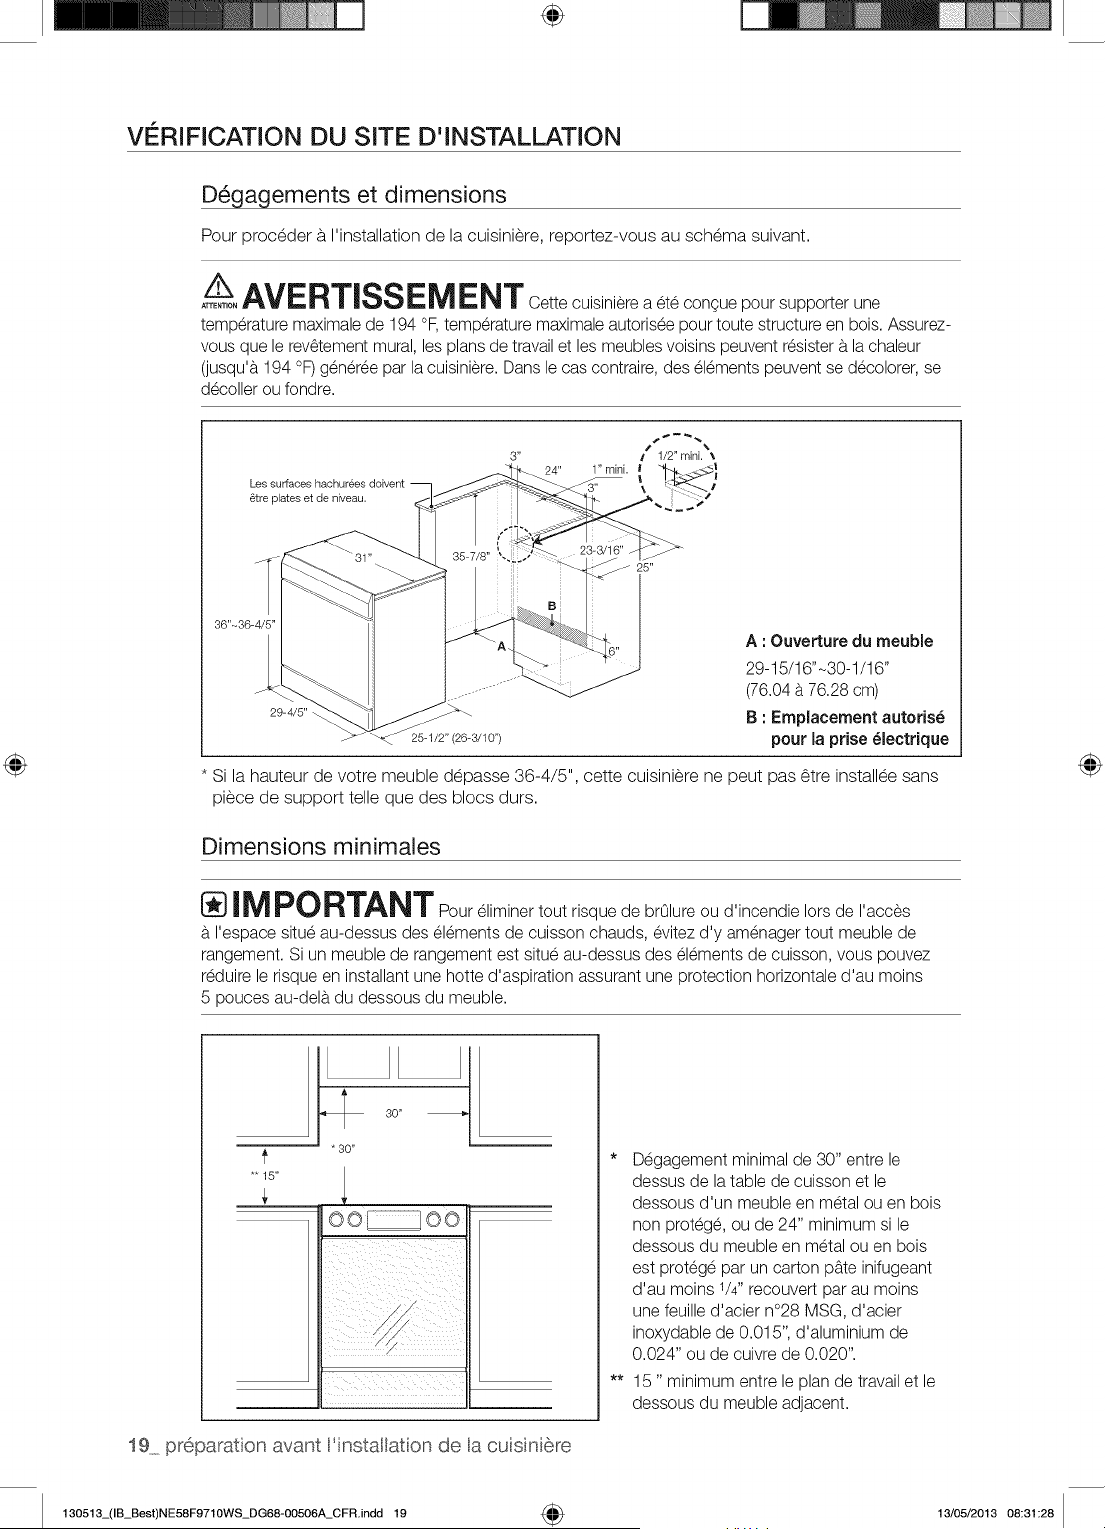
÷
VERIFICATION DU SITE D'INSTALLATION
D_gagements et dimensions
Pour proceder a I'installation de la cuisiniere, reportez-vous au schema suivant.
A__ AVERT_SSEM ENT Cette cuisiniere a ete congue pour supporter une
ATTENTION
temperature maximale de 194 °F, temperature maximale autorisee pour toute structure en bois. Assurez-
vous que le rev6tement mural, les plans de travail et les meubles voisins peuvent resister a.la chaleur
(jusqu'a. 194 °F) generee par la cuisiniere. Dans le cas contraire, des elements peuvent se decolorer, se
decoller ou fondre.
Les surfaces
8tre plates et de niveau.
36"-36-
29-4/5"
25-1/2" (26-3/10")
Si la hauteur de votre meuble depasse 36-4/5", cette cuisiniere ne peut pas 6tre installee sans
piece de support telle que des blocs durs.
Dimensions minimales
A : Ouverture du meuble
29-15/16"-30-1/16"
(76.04 b.76.28 cm)
B : Emplacement autoris_
pour la prise _lectrique
_ IMPORTANTPour eliminer tout risque de brOlure ou d'incendie Iors de I'acces
I'espace situe au-dessus des elements de cuisson chauds, evitez d'y amenager tout meuble de
rangement. Si un meuble de rangement est situe au-dessus des elements de cuisson, vous pouvez
reduire le risque en installant une hotte d'aspiration assurant une protection horizontale d'au moins
5 pouces au-dela du dessous du meuble.
*'15"
30"
* 30"
oo oo
19 preparat on avant 'installaton de a cuisni6re
* Degagement minimal de 30" entre le
dessus de la table de cuisson et le
dessous d'un meuble en metal ou en bois
non protege, ou de 24" minimum si le
dessous du meuble en metal ou en bois
est protege par un carton pb.te inifugeant
d'au moins 1/4" recouvert par au moins
une feuille d'acier n°28 MSG, d'acier
inoxydable de 0.015", d'aluminium de
0.024" ou de cuivre de 0.020".
** 15" minimum entre le plan de travail et le
dessous du meuble adjacent.
130513_(IB_Best)NE58F9710WS_DG68-00506A_CFR.indd 19 4_ 13/05/2013 08:31:28
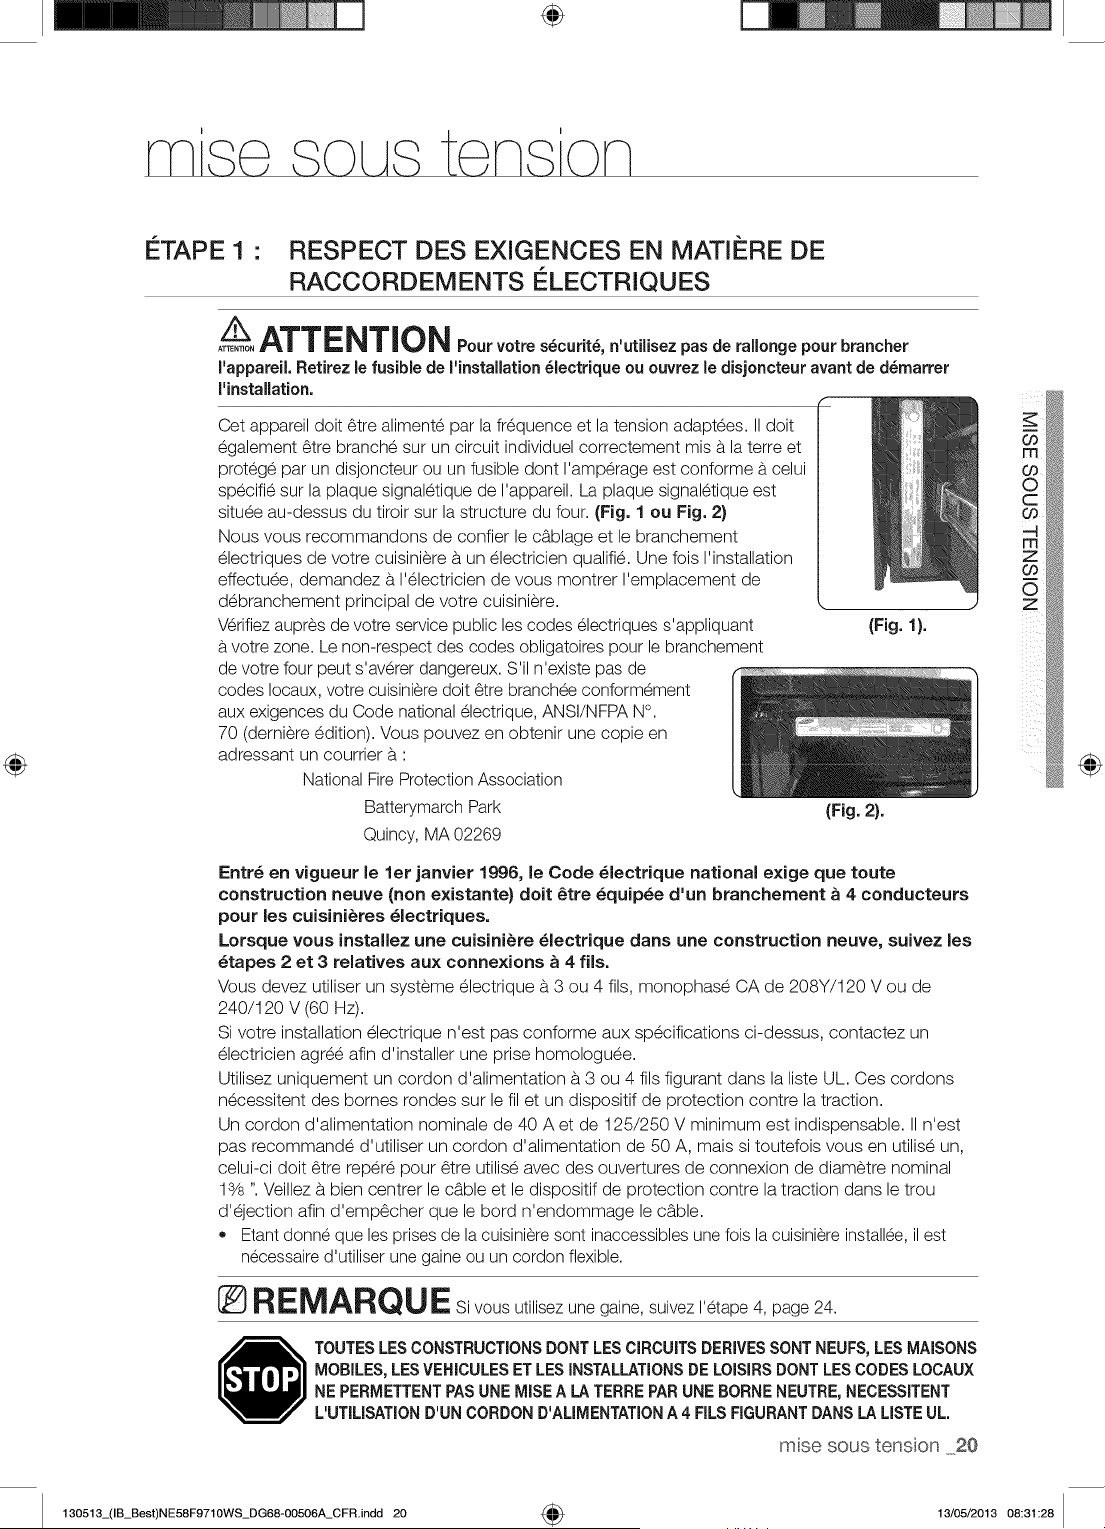
÷
NqS@ SOL tS @NS'ON
ETAPE 1 • RESPECT DES EXIGENCES EN MATIERE DE
RACCORDEMENTS ELECTRIQUES
A__ATTENTION Fourvo,,es cur. , ro,o.ge.ourb=.c,e,
ATTENTION
I'appareil. Retirez le fusible de I'lnstallation _lectrlque ou ouvrez le dlsjoncteur avant de d_marrer
I'lnstallation.
Cet appareil doit 6tre alimente par la fr_quence et la tension adaptees. II doit
egalement 6tre branche sur un circuit individuel correctement mis a la terre et
protege par un disjoncteur ou un fusible dont I'amp@age est conforme a celui
specifie sur la plaque signaletique de I'appareil. La plaque signaletique est
situee au-dessus du tiroir sur la structure du four. (Fig. 1 ou Fig. 2)
Nous vous recommandons de confier le c_blage et le branchement
electriques de votre cuisiniere a un electricien qualifie. Une fois I'installation
effectuee, demandez a I'electricien de vous montrer I'emplacement de
debranchement principal de votre cuisiniere. L
V@ifiez aupres de votre service public les codes electriques s'appliquant (Fig. 1}.
votre zone. Le non-respect des codes obligatoires pour le branchement
de votre four peut s'av@er dangereux. S'il n'existe pas de
codes Iocaux, votre cuisiniere doit 6tre branchee conformement
aux exigences du Code national electrique, ANSI/NFPA N°.
70 (derniere edition). Vous pouvez en obtenir une copie en
adressant un courtier a '
National Fire Protection Association
Batterymarch Park (Fig. 2}.
Quincy, MA 02269
Entr_ en vigueur le let janvier 1996, le Code _lectrique national exige que route
construction neuve (non existante) doit _tre _quip_e d'un branchement _ 4 conducteurs
pour les cuisini_res _lectriques.
Lorsque vous installez une cuisini_re _lectrique darts une construction neuve, suivez les
_tapes 2 et 3 relatives aux connexions _ 4 flls.
Vous devez utiliser un systeme electrique a 3 ou 4 ills, monophase CA de 208Y/120 V ou de
240/120 V (60 mz).
Si votre installation electrique n'est pas conforme aux specifications ci-dessus, contactez un
electricien agree afin d'installer une prise homologuee.
Utilisez uniquement un cordon d'alimentation a 3 ou 4 ills figurant dans la liste UL. Ces cordons
necessitent des bomes rondes sur le filet un dispositif de protection contre la traction.
Un cordon d'alimentation nominale de 40 A et de 125/250 V minimum est indispensable. II n'est
pas recommande d'utiliser un cordon d'alimentation de 50 A, mais si toutefois vous en utilise un,
celui-ci doit _tre repere pour _tre utilise avec des ouvertures de connexion de diametre nominal
13/s". Veillez a bien centrer le c_ble et le dispositif de protection contre la traction dans le trou
d'ejection afin d'emp_cher que le bord n'endommage le c_ble.
• Etant donne que les prises de la cuisiniere sont inaccessibles une fois la cuisiniere installee, il est
necessaire d'utiliser une gaine ou un cordon flexible.
RE_A_QU E Si vous utilisez une gaine, suivez I'etape 4, page 24.
TOUTESLESCONSTRUCTIONSDONTLESCIRCUITSDERIVESSONT NEUFS,LESMAISONS
MOBILES,LESVEHICULESET LESINSTALLATIONSDE LOISIRSDONTLESCODESLOCAUX
NE PERMETTENTPASUNE MISEA LA TERRE PARUNE BORNENEUTRE,NECESSITENT
L'UTILISATIOND'UN CORDOND'ALIMENTATIONA 4 FILSFIGURANTDANSLA LISTEUL.
msesoustenson 20
@
130513_(IB_Best)NE58F9710WS_DG68-00506A_CFR.indd 20 4_ 13/05/2013 08:31:28
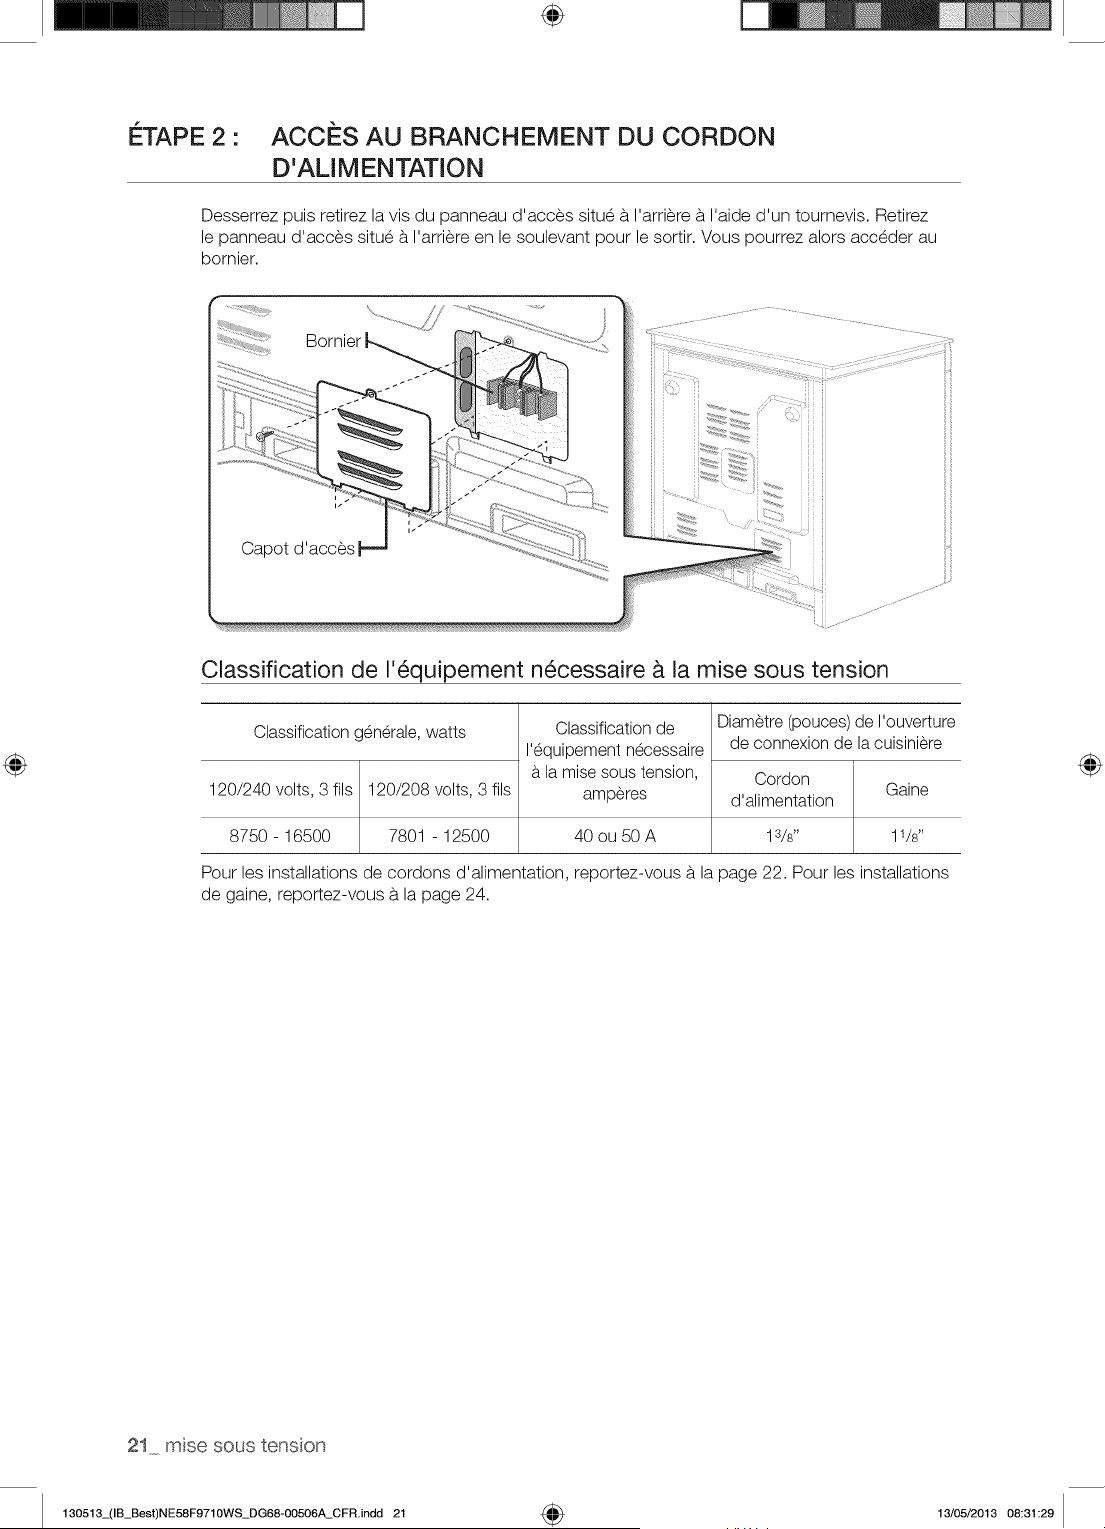
÷
I_TAPE 2 •
ACCES AU BRANCHEMENT DU CORDON
D'ALIMENTATION
Desserrez puis retirez la vis du panneau d'acces situe b. I'arriere b. I'aide d'un tournevis. Retirez
le panneau d'acces situe b.I'arriere en le soulevant pour le sortir. Vous pourrez alors acceder au
bornier.
Bornier
i
Capot d'acces
Classification de 1'6quipement n6cessaire _ la mise sous tension
Classification generale, watts
120/240 volts, 3 ills 120/208 volts, 3 ills
8750 - 16500 7801 - 12500
Classification de
I'equipement necessaire
la mise sous tension,
amperes
Diametre (pouces) de I'ouverture
de connexion de la cuisiniere
Cordon
d'alimentation
40 ou 50 A 1s/s"
Pour les installations de cordons d'alimentation, reportez-vous b. la page 22. Pour les installations
de gaine, reportez-vous b. la page 24.
21 msesoustenson
130513_(IB_Best)NE58F9710WS_DG68-00506A_CFR.indd 21 4_ 13/05/2013 08:31:29
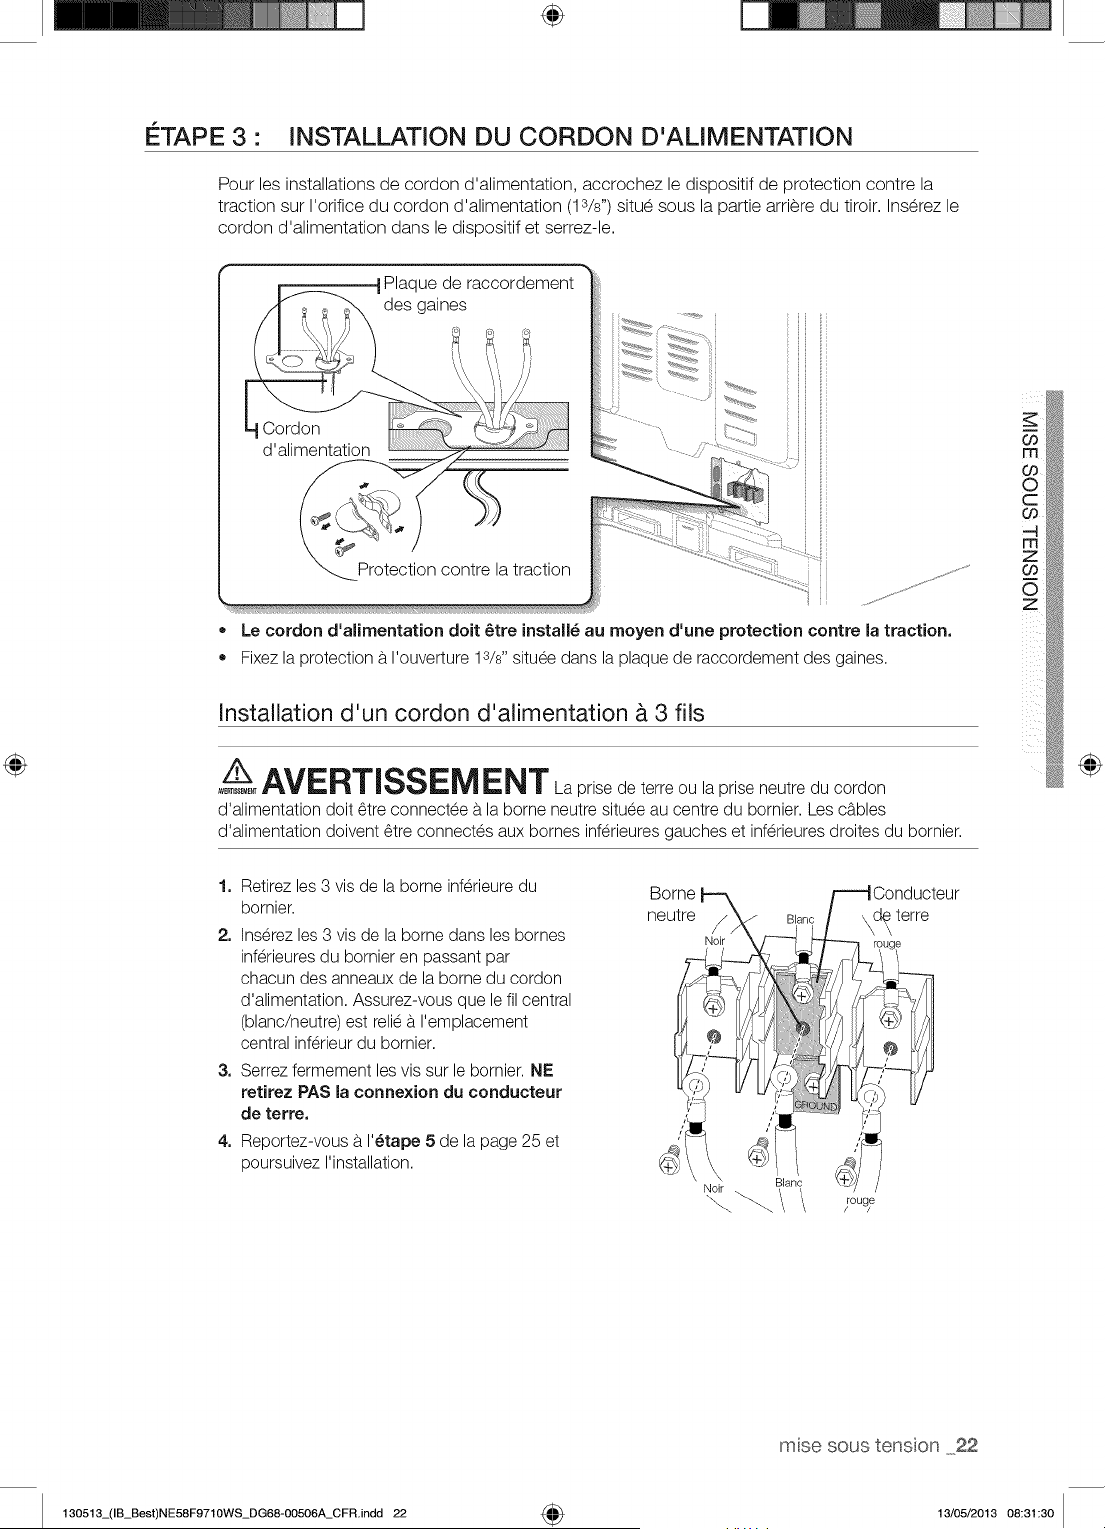
÷
ETAPE 3 • INSTALLATION DU CORDON D'ALIMENTATION
Pour les installations de cordon d'alimentation, accrochez le dispositif de _rotection contre la
traction sur I'orifice du cordon d'alimentation (13/s") situe sous la partie arriere du tiroir. Inserez le
cordon d'alimentation dans le dispositif et serrez-le.
• Le cordon d'alimentation doit 6tre install6 au moyen d'une protection contre la traction.
Fixez la protection a I'ouverture 13/8"situee dans la plaque de raccordement des gaines.
Installation d'un cordon d'alimentation & 3 ills
Z_AVERTISSEM ENT Laprisedeterreoulapriseneutreducordon
AVE_EME_
d'alimentation doit 6tre connectee a la borne neutre situee au centre du bornier. Les cables
d'alimentation doivent 6tre connectes aux bornes inferieures gauches et inferieures droites du bornier.
@
1. Retirez les 3 vis de la borne inferieure du
bornier.
2. Inserez les 3 vis de la borne dans les bornes
inferieures du bornier en passant par
chacun des anneaux de la borne du cordon
d'alimentation. Assurez-vous que le fil central
(blanc/neutre) est relie a I'emplacement
central inferieur du bornier.
3. Serrez fermement les vis sur le bornier. NE
retirez PAS la connexion du conducteur
de terre.
4. Reportez-vous a I'_tape 5 de la page 25 et
poursuivez I'installation.
rou_
rose soustenson 22
130513_(IB_Best)NE58F9710WS_DG68-00506A_CFR.indd 22 4_ 13/05/2013 08:31:30
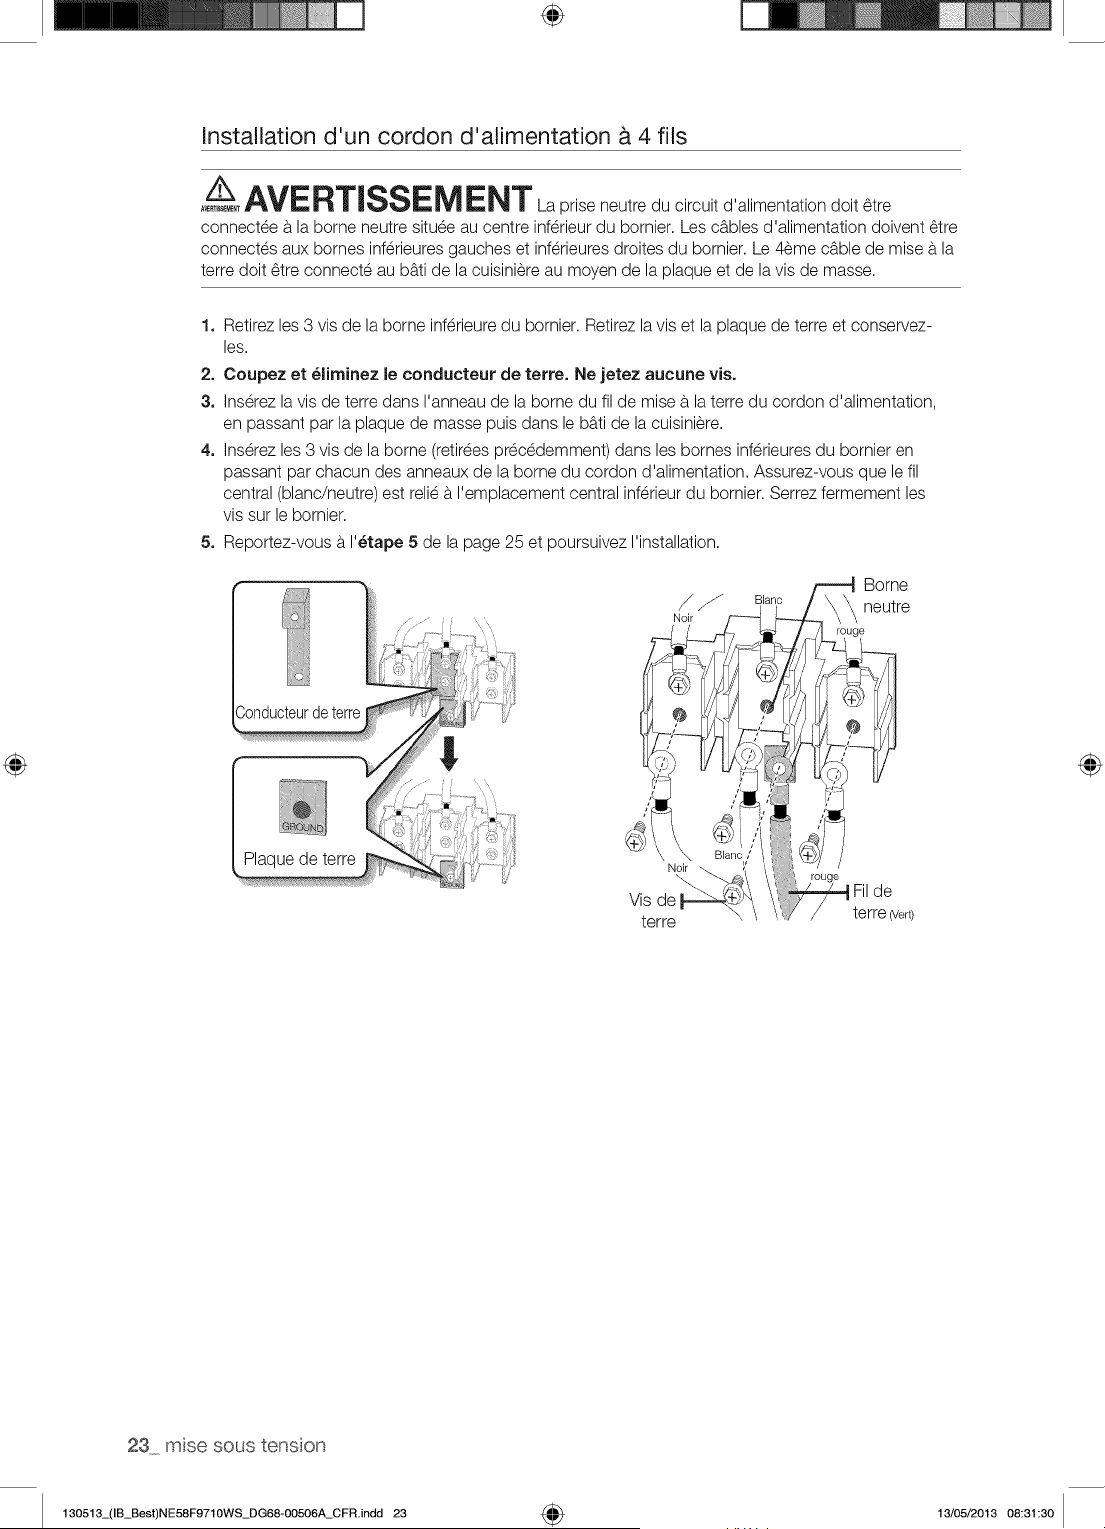
÷
Installation d'un cordon d'alimentation & 4 ills
A_,/_ AVERTlSSEM ENT La prise neutre du circuit d'alimentation doit 6tre
connectee b.la borne neutre situee au centre inferieur du bornier. Les cables d'alimentation doivent 6tre
connectes aux bornes inferieures gauches et inferieures droites du bornier. Le 4eme cable de mise a la
terre doit 6tre connecte au b_ti de la cuisiniere au moyen de la plaque et de la vis de masse.
1. Retirez les 3 vis de la borne inferieure du bornier. Retirez la vis et la plaque de terre et conservez-
les.
2. Coupez et _liminez le conducteur de terre. Ne jetez aucune vis.
3. Ins@ezla vis de terre dans I'anneau de la borne du fil de mise b.laterre du cordon d'alimentation,
en passant par la plaque de masse puis dans le b_ti de la cuisiniere.
4. Inserez les 3 vis de la borne (retirees precedemment) dans les bornes inferieures du bornier en
passant par chacun des anneaux de la borne du cordon d'alimentation. Assurez-vous que le fil
central (blanc/neutre) est relie a I'emplacement central inferieur du bornier. Serrez fermement les
vis sur le bornier.
5. Reportez-vous a I'_tape 5 de la page 25 et poursuivez I'installation.
terre
23 msesoustenson
130513_(IB_Best)NE58F9710WS_DG68-00506A_CFR.indd 23 4_ 13/05/2013 08:31:30
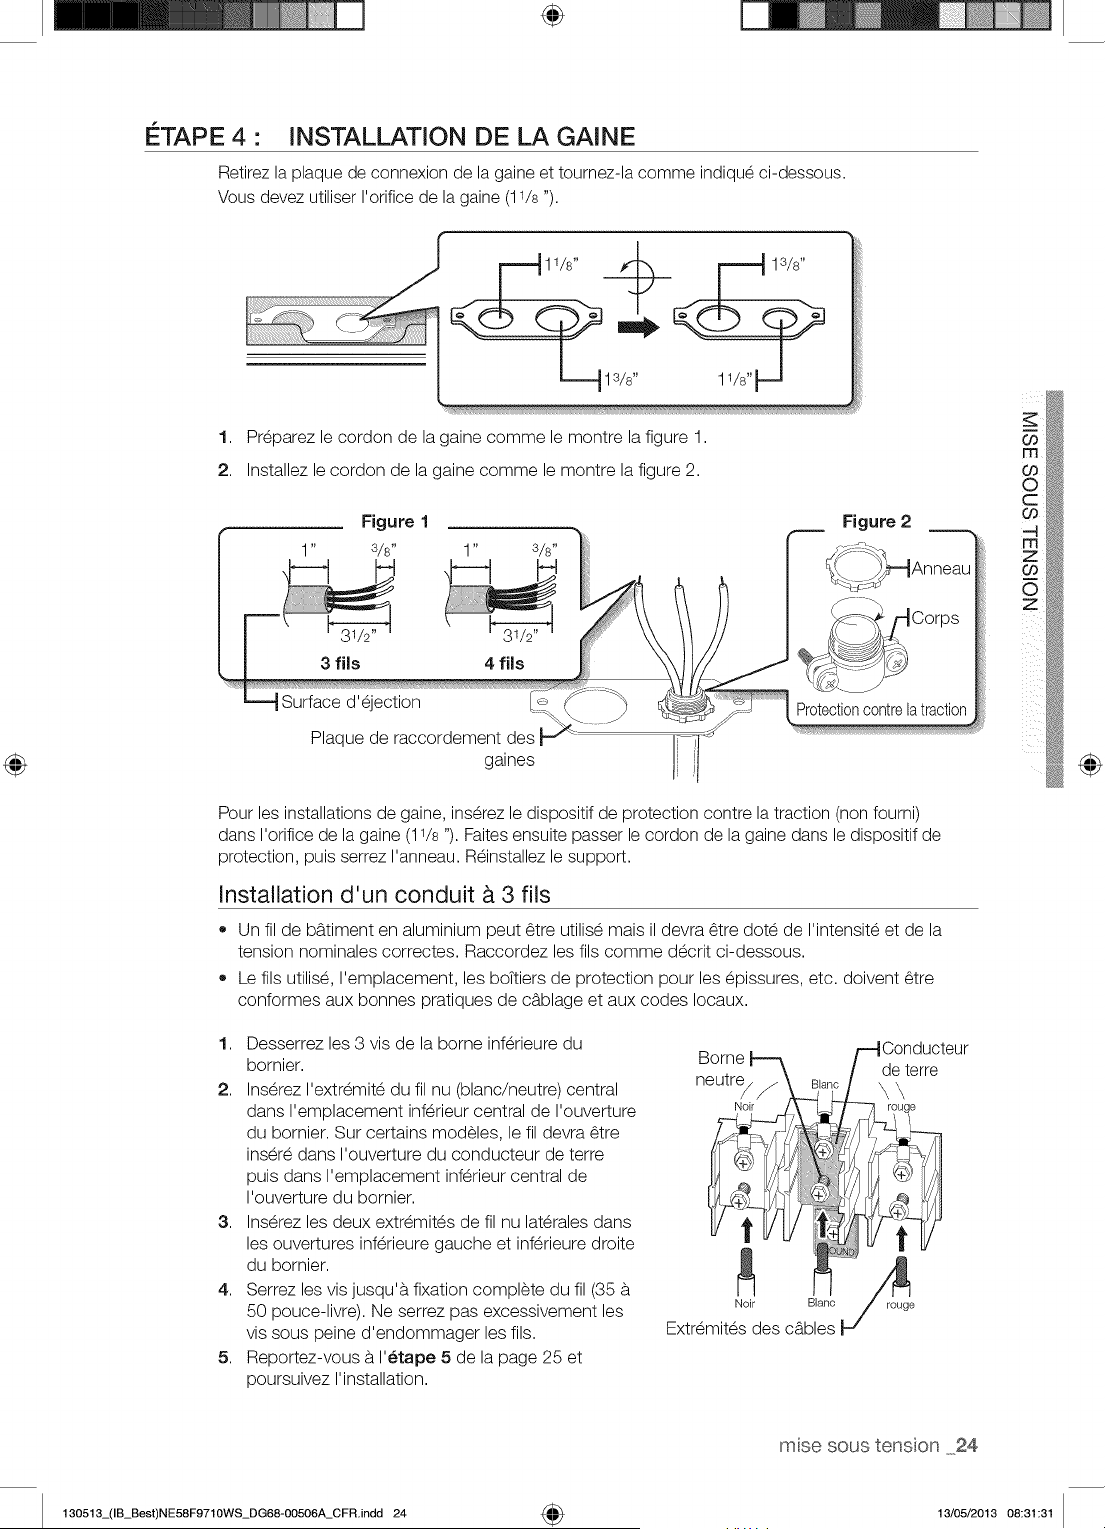
÷
ETAPE 4 • INSTALLATION DE LA GAINE
Retirez la plaque de connexion de la gaine et tournez-la comme indique ci-dessous.
Vous devez utiliser I'orifice de la gaine (11/s ").
1. Preparez le cordon de la gaine comme le montre la figure 1.
2. Installez le cordon de la gaine comme le montre la figure 2.
1" s/s"
3 fJls 4 fJls
Surface d'ejection
Plaque de raccordement des
gaines
Protectioncontrelatraction
Pour les installations de gaine, ins@ez le dispositif de protection contre la traction (non fourni)
dans I'orifice de la gaine (11/s "). Faites ensuite passer le cordon de la gaine dans le dispositif de
protection, puis serrez I'anneau. R_installez le support.
Installation d'un conduit _. 3 fils
• Un fil de bg.timent en aluminium peut 6tre utilise mais il devra 6tre dote de I'intensite et de la
tension nominales correctes. Raccordez les ills comme decrit ci-dessous.
Le ills utilise, I'emplacement, les boTtiers de protection pour les epissures, etc. doivent 6tre
conformes aux bonnes pratiques de cb.blage et aux codes Iocaux.
1. Desserrez les 3 vis de la borne inferieure du
bornier.
2. Inserez I'extremite du fil nu (blanc/neutre) central
dans I'emplacement inferieur central de I'ouverture
du bornier. Sur certains modeles, le fil devra 6tre
insere dans I'ouverture du conducteur de terre
puis dans I'emplacement inferieur central de
I'ouverture du bornier.
3. Inserez les deux extremites de fil nu laterales dans
les ouvertures inferieure gauche et inferieure droite
du bornier.
4. Serrez les vis jusqu'b, fixation complete du fil (35 b.
50 pouce-livre). Ne serrez pas excessivement les
vis sous peine d'endommager les ills.
5. Reportez-vous b.I'_tape 5 de la page 25 et
poursuivez I'installation.
@
msesoustenson 24
130513_(IB_Best)NE58F9710WS_DG68-00506A_CFR.indd 24 4_ 13/05/2013 08:31:31
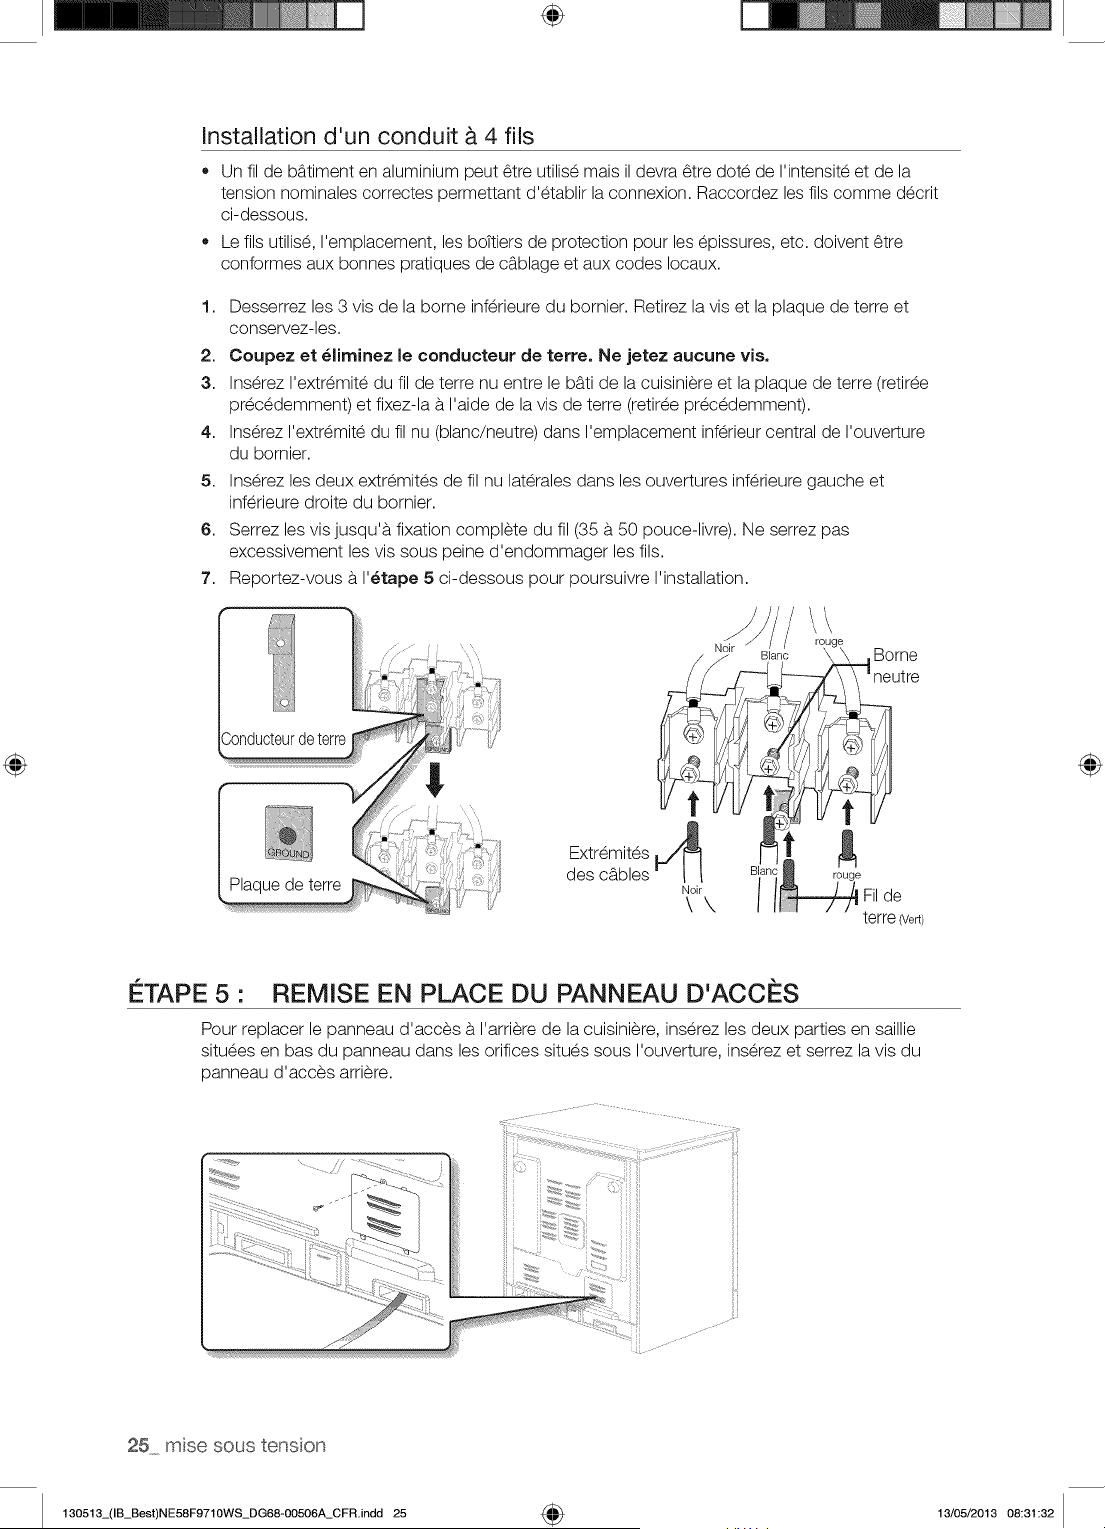
÷
Installation d'un conduit & 4 ills
• Un fil de bb.timent en aluminium peut 6tre utilis_ mais il devra 6tre dote de I'intensite et de la
tension nominales correctes permettant d'etablir la connexion. Raccordez les ills comme decrit
ci-dessous.
Le ills utilis_, I'emplacement, les boTtiers de protection pour les epissures, etc. doivent 6tre
conformes aux bonnes pratiques de c_blage et aux codes Iocaux.
1,
2.
3.
4.
5.
6.
7.
Desserrez les 3 vis de la borne inferieure du bornier. Retirez la vis et la plaque de terre et
conservez-les.
Coupez et _liminez le conducteur de terre. Ne jetez aucune vis.
Inserez I'extremite du fil de terre nu entre le b_ti de la cuisiniere et la plaque de terre (retiree
precedemment) et fixez-la a I'aide de la vis de terre (retiree precedemment).
Ins@ez I'extr_mite du fil nu (blanc/neutre) dans I'emplacement inf@ieur central de I'ouverture
du bornier.
Inserez les deux extremites de fil nu laterales dans les ouvertures inferieure gauche et
inferieure droite du bornier.
Serrez les vis jusqu'a fixation complete du fil (35 a 50 pouce-livre). Ne serrez pas
excessivement les vis sous peine d'endommager les ills.
Reportez-vous a I'_tape 5 ci-dessous pour poursuivre I'installation.
N' / !o!ge
_,r Blanc \ \ ,Borne
_1_ _-1 neutre
y L_y _ /
Extremites
des c_bles I-" !_°_!\ i Filde
terre 7e_)
ETAPE 5 • REMISE EN PLACE DU PANNEAU D'ACCES
Pour replacer le panneau d'acces a I'arriere de la cuisiniere, inserez les deux parties en saillie
situees en bas du panneau dans les orifices situes sous I'ouverture, inserez et serrez la vis du
panneau d'acces arriere.
25 msesoustenson
130513_(IB_Best)NE58F9710WS_DG68-00506A_CFR.indd 25 4_ 13/05/2013 08:31:32
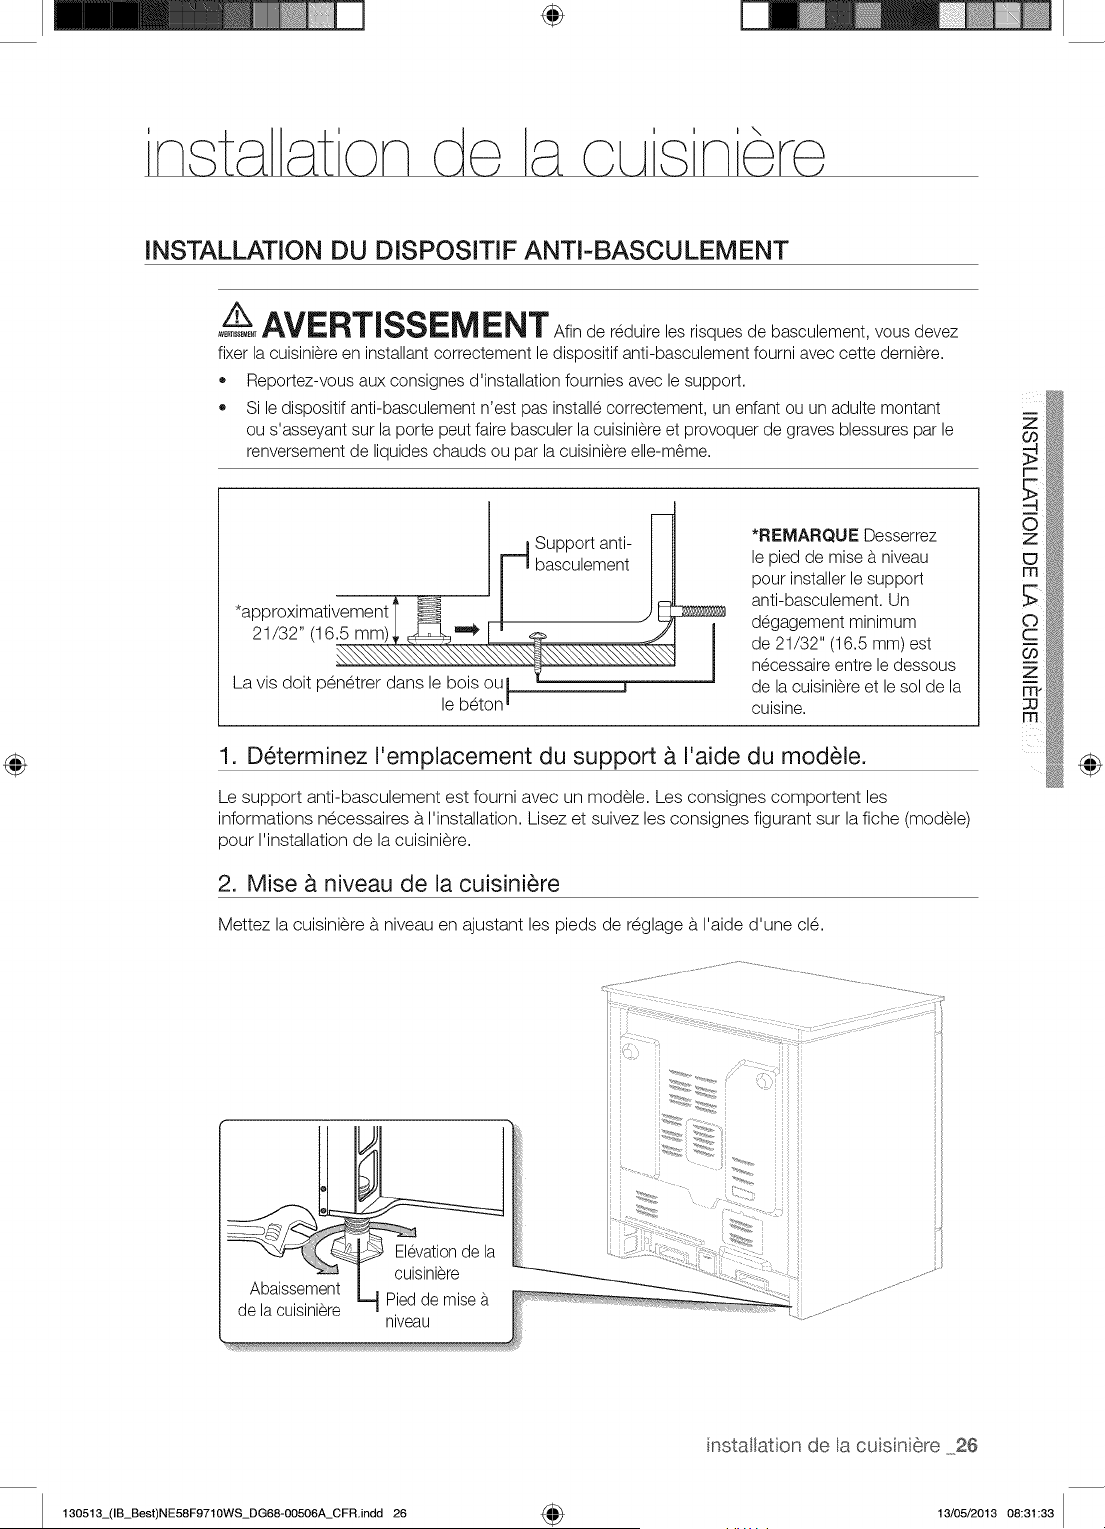
÷
i \
INSTALLATION DU DISPOSmF ANTI-BASCULEMENT
/t,,__AVERTiSSEM ENT Sfin de reduire les risques de basculement, vous devez
_ERT_EME_T
fixer la cuisiniere en installant correctement le dispositif anti-basculement foumi avec cette demiere.
,, Reportez-vous aux consignes d'installation fournies avec le support.
,, Si le dispositif anti-basculement n'est pas installe correctement, un enfant ou un adulte montant
ou s'asseyant sur la porte peut faire basculer la cuisiniere et provoquer de graves blessures par le
renversement de liquides chauds ou par la cuisiniere elle-m_me.
*approximativement
21/32" (16.5 mm)
La vis doit penetrer dans le bois ou
le beton i
Support anti-
basculement
*REMARQUE Desserrez
le pied de mise a niveau
pour installer le support
anti-basculement. Un
degagement minimum
de 21/32" (16.5 mm) est
necessaire entre le dessous
de la cuisiniere et le sol de la
cuisine.
1. D_terminez I'emplacement du support & I'aide du module.
Le support anti-basculement est foumi avec un modele. Les consignes comportent les
informations necessaires b.I'installation. Lisez et suivez les consignes figurant sur la fiche (modele)
pour I'installation de la cuisiniere.
2. Mise & niveau de la cuisini_re
Mettez la cuisiniere b. niveau en ajustant les pieds de reglage b.I'aide d'une cle.
Co
r-
O
z
_D
m
Elevationde la
cuisiniere
Abaissement
Pied de mise b.
de la cuisiniere
niveau
iii ii
iii ii
iii ii
i ii ii
i i_i ii
nstatation de a cuisniere 26
130513_(IB_Best)NE58F9710WS_DG68-00506A_CFR.indd 26 4_ 13/05/2013 08:31:33
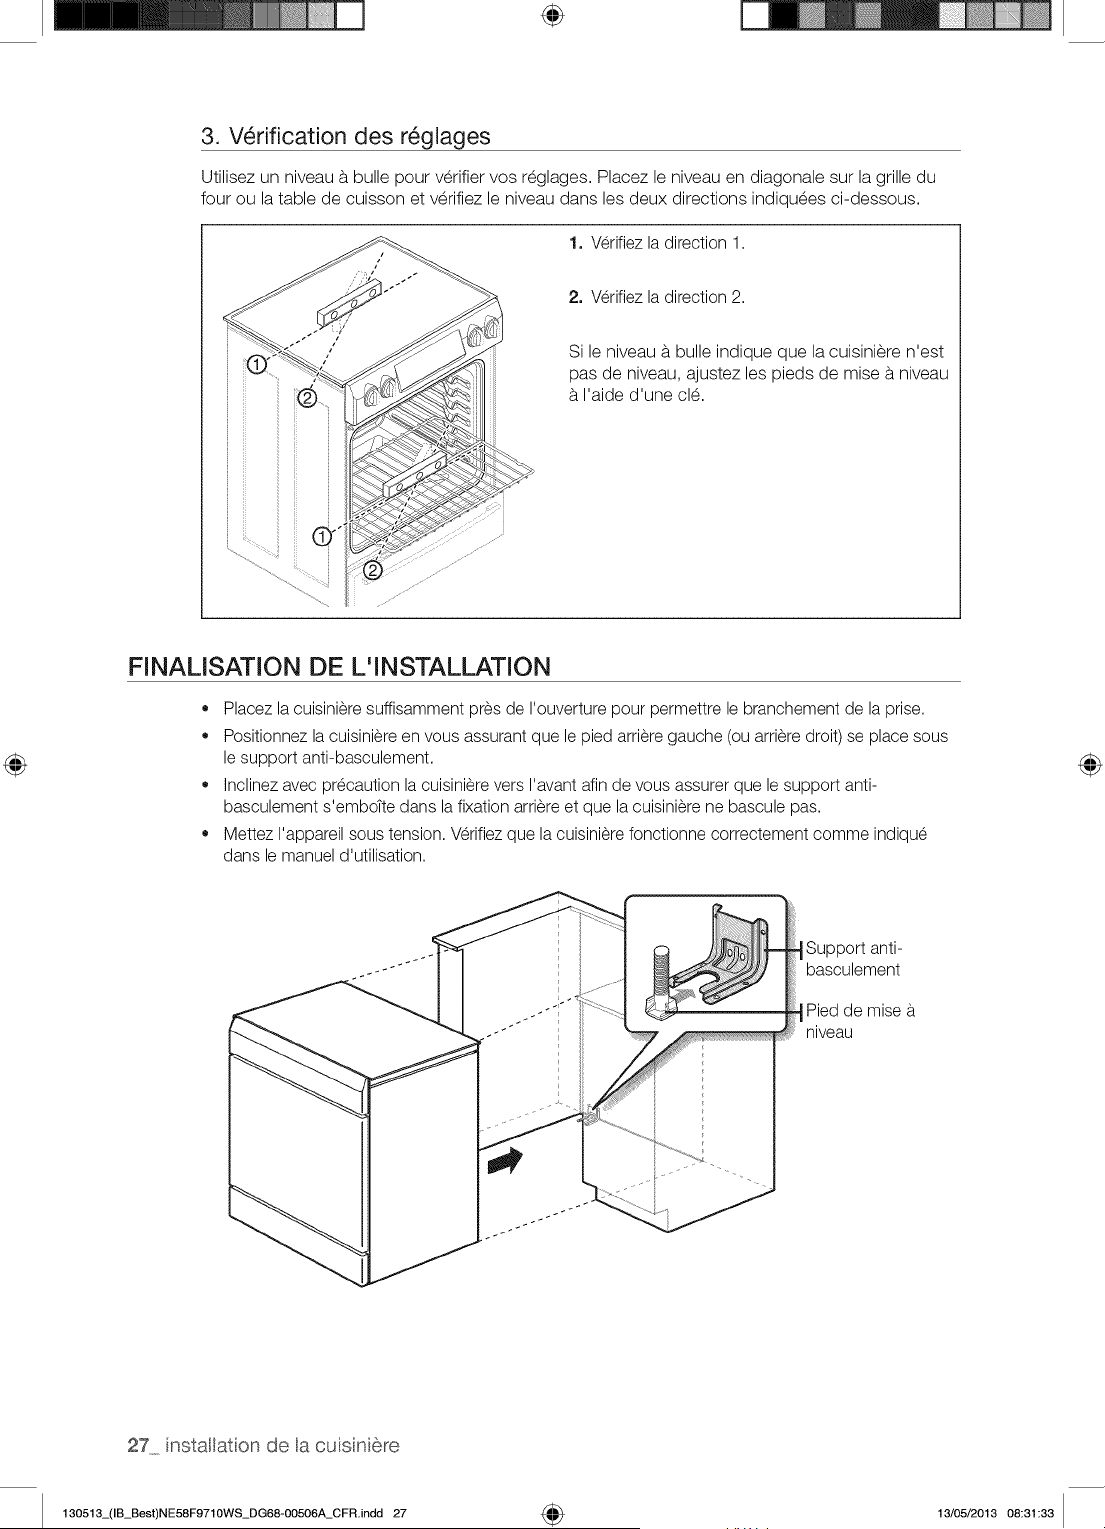
÷
3. V_rification des r_glages
Utilisez un niveau b.bulle pour verifier vos reglages. Placez le niveau en diagonale sur la grille du
four ou la table de cuisson et verifiez le niveau dans les deux directions indiquees ci-dessous.
1. Verifiez la direction 1.
2. Verifiez la direction 2.
Si le niveau b.bulle indique que la cuisiniere n'est
pas de niveau, ajustez les pieds de mise b.niveau
b.I'aide d'une cle.
FINALISATION DE L'INSTALLATION
• Placez la cuisiniere suffisamment pres de I'ouverture pour permettre le branchement de la prise.
Positionnez la cuisiniere en vous assurant que le pied arriere gauche (ou arriere droit) se place sous
le support anti-basculement.
Inclinez avec precaution la cuisiniere vers I'avant afin de vous assurer que le support anti-
basculement s'emboTte dans la fixation arriere et que la cuisiniere ne bascule pas.
Mettez I'appareil sous tension. Verifiez que la cuisiniere fonctionne correctement comme indique
dans le manuel d'utilisation.
Support anti-
basculement
Pied de mise
niveau
27 nstallaton de acusni6re
130513_(IB_Best)NE58F9710WS_DG68-00506A_CFR.indd 27 4_ 13/05/2013 08:31:33
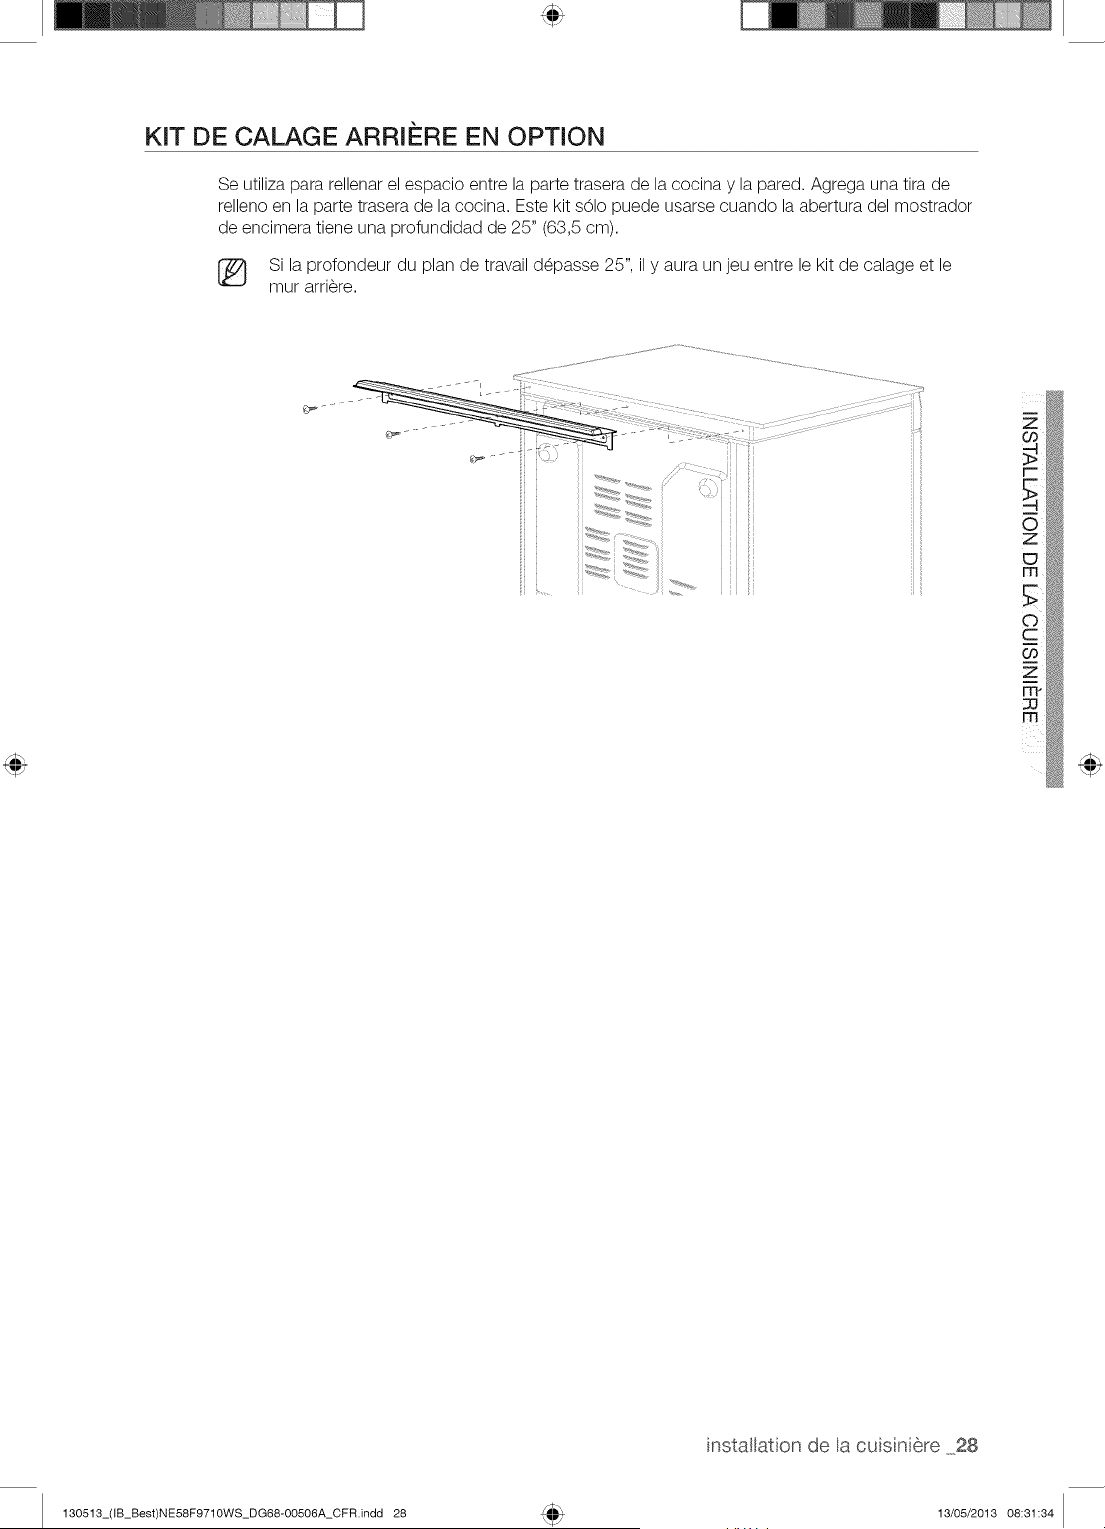
KIT DE CALAGE ARRI#RE EN OPTION
Se utiliza para rellenar el espacio entre la parte trasera de la cocina y la pared. Agrega una tira de
relleno en la parte trasera de la cocina. Este kit sOIo puede usarse cuando la abertura del mostrador
de encimera tiene una profundidad de 25" (63,5 cm).
[_ Si la profondeur du plan de travail d_passe 25", il y aura un jeu entre le kit de calage et le
mur arri_re.
Z
installaton de a cuisnere 28
130513_(IB_Best)NE58F9710WS_DG68-00506A_CFR.indd 28 13/05/2013 08:31:34
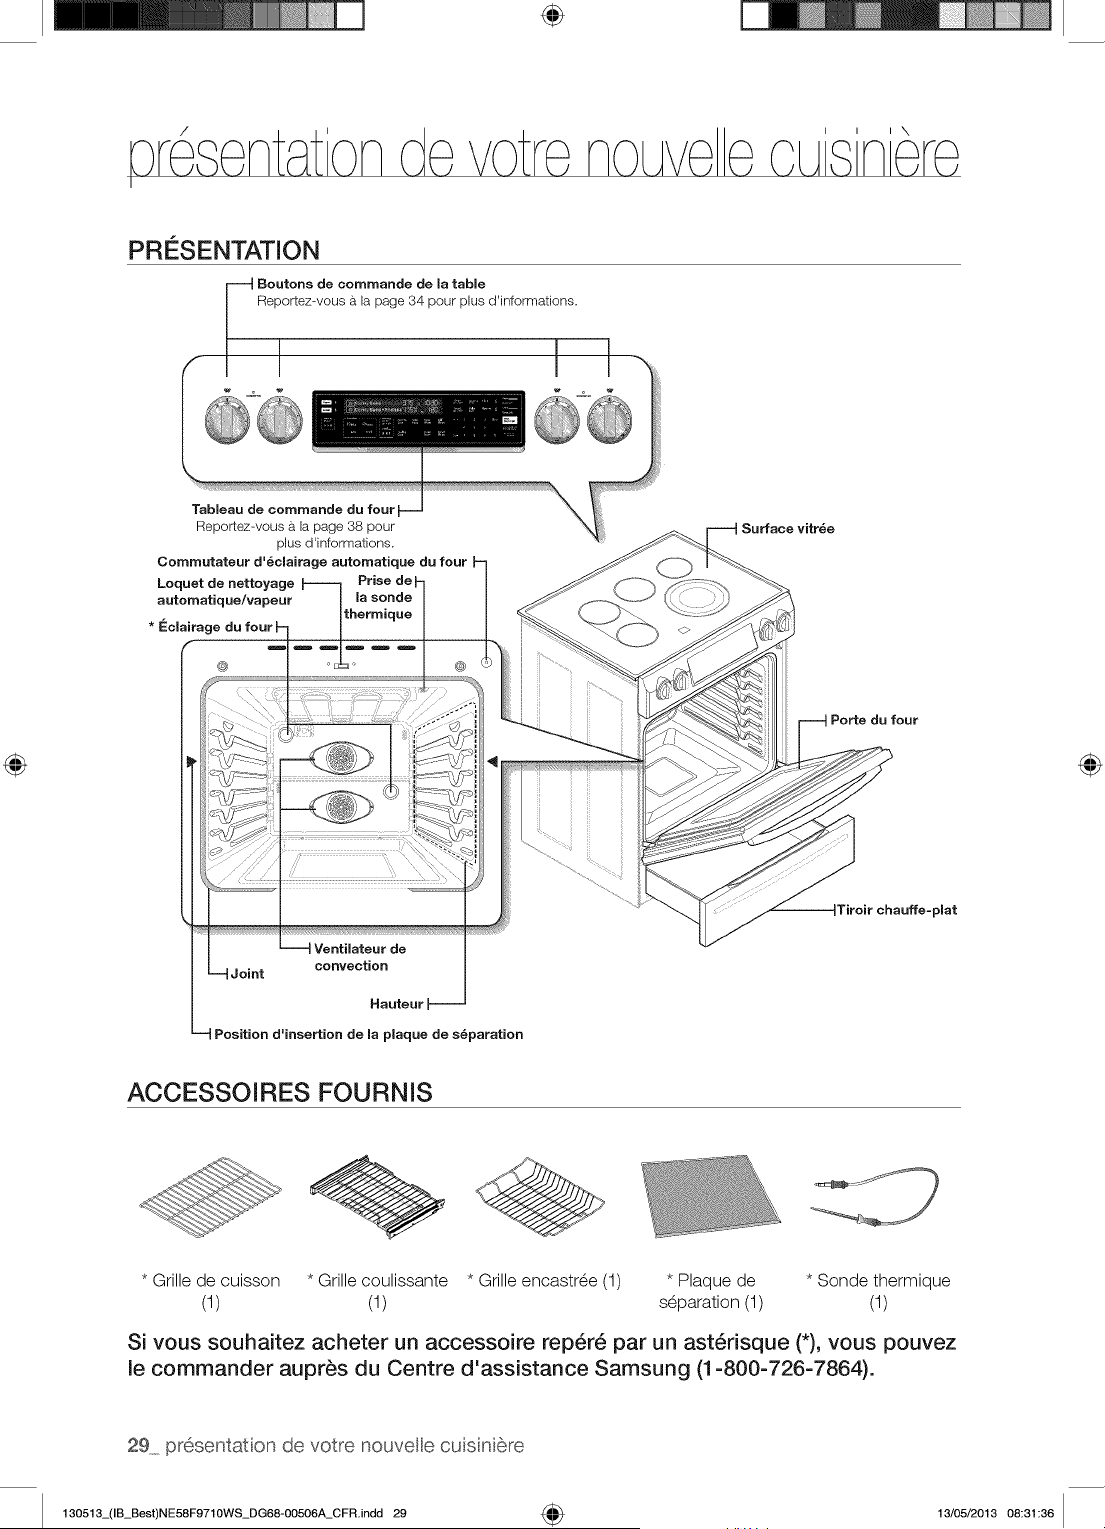
÷
PRESENTATION
Boutons de commande de la table
Reportez-vous b, la page 34 pour plus d'informations.
Tableau de commande du four
Reportez-vous a la page 38 pour
plus d'informations.
Commutateur d'_clairage automatique du four
Loquet de nettoyage Prise
automatique/vapeur la sonde
thermique
Surface vitr_e
@
Ventilateur de
convection
Joint
Hauteur _--
Position d=insertion de maplaque de s_paration
Porte du four
Tiroir chauffe-pmat
ACCESSOIRES FOURNIS
* Grille de cuisson * Grille coulissante * Grille encastree (1) * Plaque de * Sonde thermique
(1) (1) separation (1) (1)
Si vous souhaitez acheter un accessoire rep6r6 par un ast6risque (*), vous pouvez
le commander aupr_s du Centre d'assistance Samsung (1-800-726-7864).
29 presentation de votre nouvele cu sni6re
130513_(IB_Best)NE58F9710WS_DG68-00506A_CFR.indd 29 4_ 13/05/2013 08:31:36
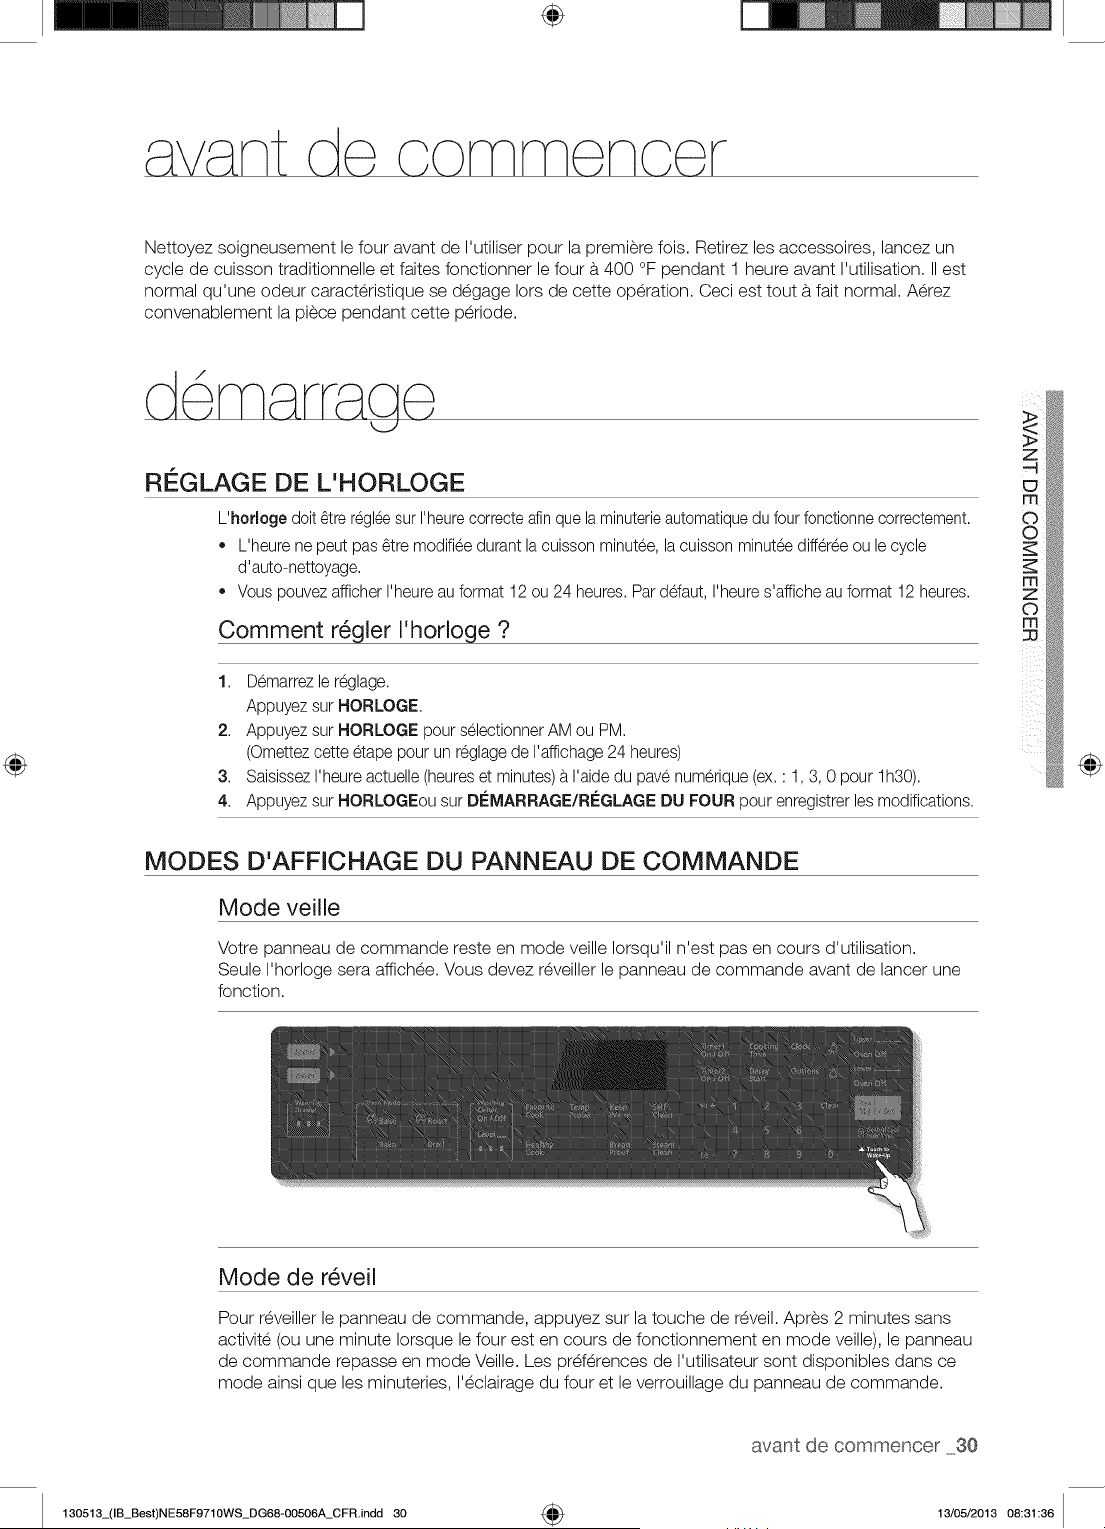
÷
Nettoyez soigneusement le four avant de I'utiliser pour la premiere fois. Retirez les accessoires, lancez un
cycle de cuisson traditionnelle et faites fonctionner le four b.400 °F pendant 1 heure avant I'utilisation. II est
normal qu'une odeur caracteristique se degage Iors de cette operation. Ceci est tout b.fait normal. Aerez
convenablement la piece pendant cette periode.
d ma cjo
REGLAGE DE L'HORLOGE
L'hodoge doit _tre regleesur I'heurecorrecte afinque la minuterieautomatiquedu four fonctionnecorrectement.
L'heure ne peut pas _tre modifiee durant lacuisson minutee, lacuisson minut_ediff6r_e ou le cycle
d'auto-nettoyage,
Vous pouvez afficher I'heureau format 12ou 24 heures, Parddaut, I'heures'affiche au format 12heures,
Comment r_gler I'horloge ?
1, Demarrezle r6glage.
Appuyez sur HORLOGE,
2, Appuyez sur HORLOGE pour selectionnerAM ou PM.
(Omettezcette etape pour un r6glagede I'affichage24 heures)
3, SaisissezI'heure actuelle (heureset minutes)b.I'aide du pave numerique (ex, : 1,3, 0 pour lh30).
4, Appuyez sur HORLOGEou sur DI:-'MARRAGE/RLeGLAGEDU FOUR pour enregistrerlesmodifications.
@
MODES D'AFFICHAGE DU PANNEAU DE COMMANDE
Mode veille
Votre panneau de commande reste en mode veille Iorsqu'il n'est pas en cours d'utilisation.
Seule I'horloge sera affichee. Vous devez reveiller le panneau de commande avant de lancer une
fonction.
Mode de r_veil
Pour reveiller le panneau de commande, appuyez sur la touche de reveil. Apres 2 minutes sans
activite (ou une minute Iorsque le four est en cours de fonctionnement en mode veille), le panneau
de commande repasse en mode Veille. Les preferences de I'utilisateur sont disponibles dans ce
mode ainsi que les minuteries, I'eclairage du four et le verrouillage du panneau de commande.
avant de commencer 30
130513_(IB_Best)NE58F9710WS_DG68-00506A_CFR.indd 30 4_ 13/05/2013 08:31:36
ACTIVATION ET DI_SACTIVATION DE L'I_CLAIRAGE DU FOUR
• L'_clairage du four s'allume automatiquement _tI'ouverture de la porte.
• L'_clairage du four s'_teint automatiquement a la fermeture de la porte.
• Vous pouvez activer et d_sactiver I'_elairage du four manuellement en appuyant sur la touche
ECLAIRAGE DU FOUR.
VERROUILLAGE DES COMMANDES
Le verrouillage des commandes permet de verrouiller les boutons afin qu'ils ne puissent pas _tre
actionnes par accident. Le verrouillage des commandes est uniquement active en mode veille.
Comment activer la fonction de verrouillage des commandes ?
1,
Appuyez sur Verrouillage 3 s. des commandes, pendant 3 secondes.
Le message <<Loc >_,une icOne en forme de verrou ainsi que I'heure actuelle s'affichent b.
I'_cran.
Toutes les fonctions du four doivent _tre annul_es avant I'activation du verrouillage des
commandes.
Cette fonction est disponible uniquement Iorsque la temperature du four est inf_rieure b.
400 °F.
Comment d_verrouiller les commandes ?
1. Appuyez sur Verrouillage 3 s. des cornrnandes, pendant 3 secondes.
L'indication Loc (Verrouillage) ainsi que I'icOne du verrou disparaissent de I'affichage.
RI_GLAGE DE LA MINUTERIE
Le decompte s'affiche et un signal sonore retentit une fois ce temps ecoule. Elle ne permet pas
de demarrer ou d'arr_ter les fonctions de cuisson. Vous pouvez utiliser la minuterie avec toutes les
autres fonctions du four.
Comment r_gler la minuterie ?
1. Activez la minuterie.
Appuyez sur MINUTERIE1 MAR/ARR (MINUTERIE2 MAR/ARR).
2. Saisissez la dur_e souhait_e.
Saisissez la dur_e de votre ehoix b.I'aide du pav_ num_rique (ex. : 1,5). S_lectionnez une
dur_e comprise entre 1 minute et 9 heures 99 minutes. Si vous commettez une erreur,
appuyez sur EFFACER et saisissez la dur_e b.nouveau.
3. Lancez la minuterie.
Appuyez sur MINUTERIE1 MAR/ARR (MINUTERIE2 MAR/ARR) ou Di_MARRAGE/
R_:GLAGE DU FOUR.
4. Une fois le temps r_gl_ _coul_, le four _met un signal sonore et le message End (Fin) reste
affich_ jusqu'b, ce que vous r_activiez le pave. Vous pouvez annulet la minuterie b. tout moment
en appuyant sur la touche MINUTERIE1 MAR/ARR (MINUTERIE2 MAR/ARR).
31 demarrage
130513_(IB_Best)NE58F9710WS_DG68-00506A_CFR.indd 31 13/05/2013 08:31:37
A PROPOS DE LA TABLE DE CUISSON
/_ AVANT LA CUISSON
ATTENTIONO N'utilisez uas a table de cuisson vitree comme ulanche _ decouoer.
o Ne ulacez et ne rangez hen au so_tsusceptible de fondre ou de s'enflarrmer sur 'a
surface vitree, qq6me sJelle n'est oas utilisee,
Allumez es foyers uniouement aDres avoJr ulace un recio'ent sur le foyer.
Ne stocKez uas aouJets Iourds au-dessus de la table de cuisson. IIs oourraJent
tomber et enaommager.
/_ PENDANT LA CUISSON
=/=,.=..?_=_
ATTENTIONO Ne olacez Das ae Dapler aalumlnlum ou aobjet en plastlque tel aue sali@es et
DOlVrleres.Dorte-cuill_res ou emDauages en plast aue sur la CUlSinlereiorsaue vous
utJlJsez.Lair cnaua orovenant ae orifice de ventilation nsaue ae faire fondre le
olastJaue ou d'enflammer les oDjets.
Assurez-vous due le foyer correct est allure&
Ne faites amals culre a aliments dlrectement sur la surface vitree. Utilisez toujours ur
recipient.
Ve lez a toujours centrer I_ casserole sur le foyer que vous utJlJsez.
Ne laissez, amais les foyers sans surveulance iorsaue vous dl:lllSeZune terr oerature
elevee. En cas de debordement, les DartJcules gra_sseuses orovenant des aliments
-'sauent de s'enflammer.
* Etelgnez les foyers avant de retJrer a casserole.
Ne couvrez uas les auments de film plastJque. Le ulastiaue risaue de fondre sur la
surface et de s'averer tres difficile a nettc yer,
Le ventilateur de refroidissement oeut #tre actionne durant I'utilisation de la table de
CUlSSOn,
/'_ APRES LA CUISSON
ATTENTION• Ne touchez Das les foyers avant aU'llS n'alent refroid.
Le foyer peut encore 6tre chaua et vous nsquez ae vous DrOlers_vous toucnez _a
surface vitree avant au'elle n'ait suffisamment refro_c
Nettoyez mmediatement les eclaboussures de la table de cuisson afin d'eviter
oueues ne s Incrustent et solent difficiles a nettoyer.
S un ulacara de rangement est nstalle directement au-aessus ae la table ae culsson.
assurez-vous aue les elements au _ contJent sont rarement utilises et oJus ne sont
oas sensibles a a cna_eur. La chaleur Deut s averer aangereuse darts _ecas de
c Jides volatlls, de nettoyants ou ae oroduJts en aerosol.
/_ propos des foyers radiants
La temp@ature des _l_ments radiants augmente progressivement et uniform_ment. A mesure
que la temp@ature augmente, le foyer radiant devient rouge. Afin que soit conserve le r_glage
s_lectionn_, I'_l_ment se met en marche et s'arr_te alternativement. L'_l_ment chauffant
conserve assez de chaleur pour fournir une temp@ature uniforme et constante durant le cycle de
d_sactivation. Pour une cuisson efficace, _teignez I'_l_ment chauffant quelques minutes avant la
fin de la cuisson. Ainsi, la chaleur r_siduelle permet de terminer le processus de cuisson.
®
Les foyers radiants sont _quip_s d'un limiteur leur permettant de s'allumer et de s'_teindre,
m_me avec le r_glage HI (121ev_).Cela permet d'_viter toute d_t@ioration de la surface de
cuisson en c@amique. L'activation pendant le r_glage HI (Elev_) est normale. IIpeut se
produire _galement si le r_cipient de cuisson est trop petit pour le foyer radiant ou si le fond
du r_cipient n'est pas plat.
tabedecusson 32
130513_(IB_Best)NE58F9710WS_DG68-00506A_CFR.indd 32 13/05/2013 08:31:37

÷
Emplacement des foyers radiants et des commandes
Les boutons de commande permettent d'activer les foyers radiants de la table de cuisson comme
indique ci-dessous.
1. Avant gauche • 7", 1,800 W
(Bridge2,600 W)
2. Arri_re gauche • 7", 1,800 W
3. Avant droit : 6"/9"/12", 3,000 W
4. ArtiSte droit : 6", 1,200 W
5. Zone chauffe-plat : 100 W
6. T_moin de surface chaude
T_moin de surface chaude
• S'allume Iorsque la surface est allumee ou est chaude au toucher.
Reste allume m6me apres la mise hors tension du foyer.
Reste allume jusqu'a ce que la surface descende a environ 150 °R
Zones de cuisson
®
®
Les zones de cuisson de votre cuisiniere sont materialisees par des cercles permanents sur la
table de cuisson vitree. Pour une cuisson plus efficace, utilisez des recipients de m6me taille
que les foyers.
Les r_cipients ne doivent pas d_passer de plus de 1/2"_ 1" la zone de cuissono
Lorsqu'un bouton est active, une lueur est visible a travers la table de cuisson vitree. L'_l_ment
s'allume et s'_teint alternativement afin de maintenir la chaleur pr_r_gl_e, m_me
Iorsque le r_glage de temperature est _lev_.
Pour obtenir plus d'informations sur la selection des ustensiles de cuisine appropries, reportez-
vous au chapitre _ Utilisation des ustensiles de cuisine appropries _, en page 36.
33 table de cuisson
130513_(IB_Best)NE58F9710WS_DG68-00506A_CFR.indd 33 4_ 13/05/2013 08:31:37
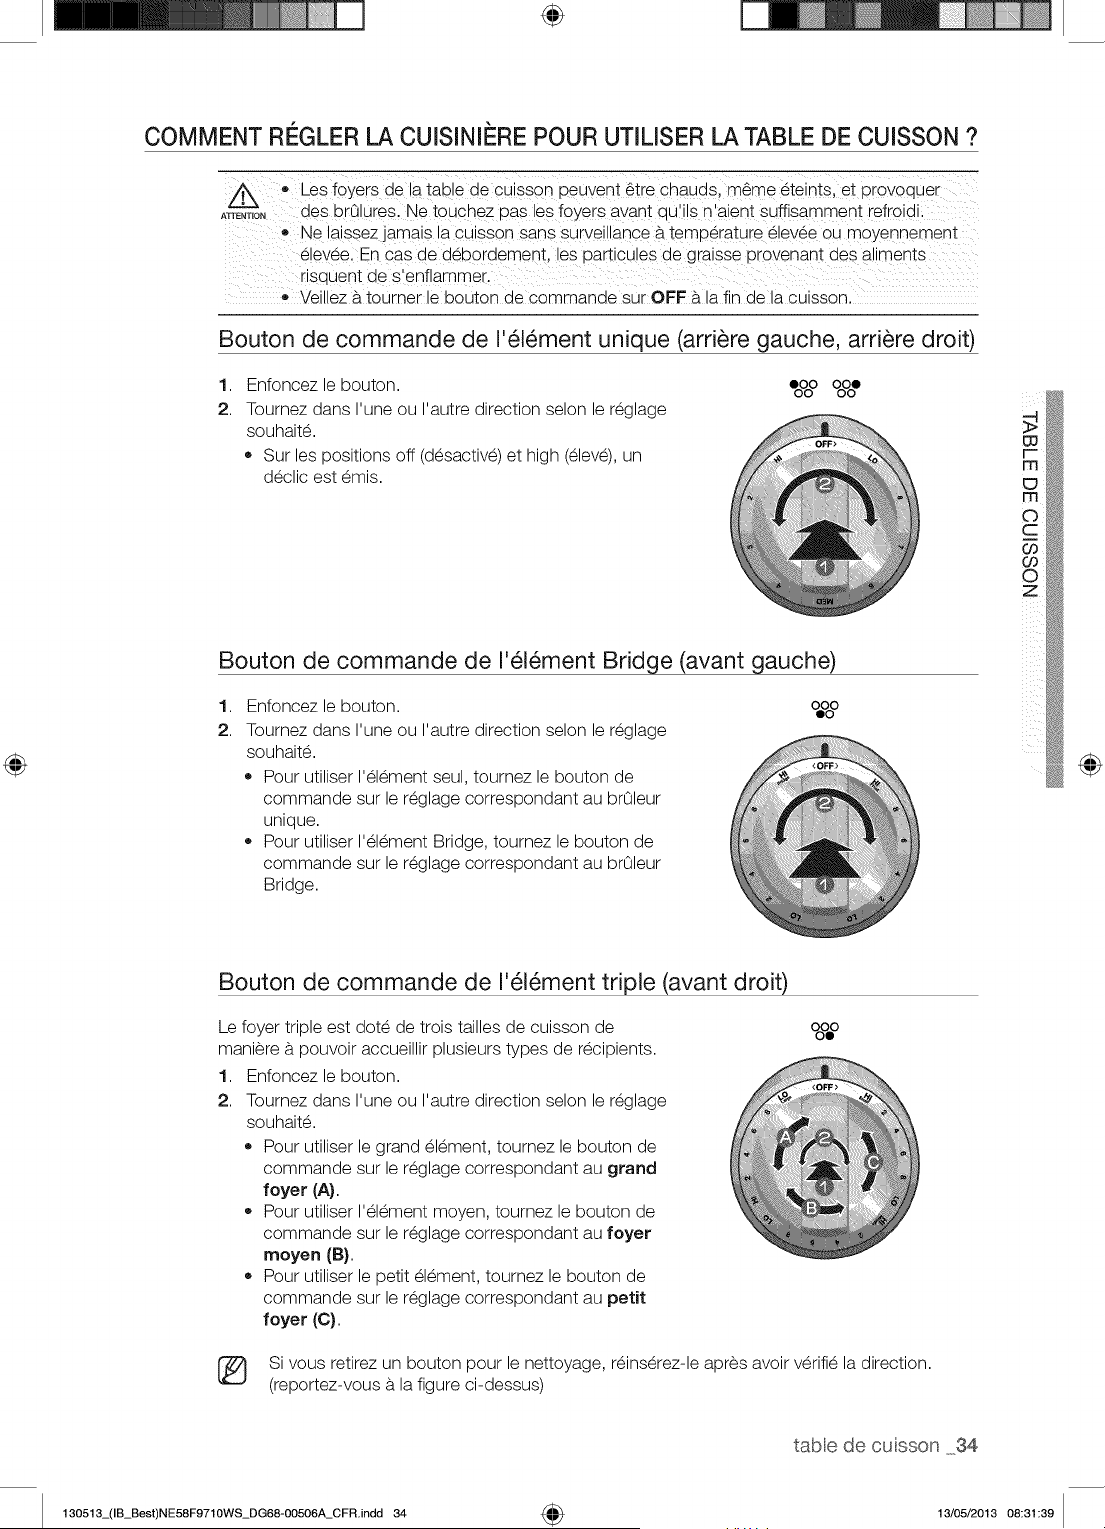
÷
COMMENT RI'--GLERLA CUISINII_RE POUR UTILISER LA TABLE DE CUISSON ?
,, Les ioyers de !a tab!e de CUiSsonpeuvent _tre chauds, meme _teints, et pi0voquei
ATTE,T,O, des brOlures, Ne touchez pas les foyers avant quli!s n'aient suffisamment refroidi:
', laissez ]amais la cuisson Sans SUrVeillanceb. temperature _!evee Ou moYennement
e!e\/eel En Gas de d_bordement, les particu!es de graisse provenant des aliments
risqUent de s'enflammer. ...............
• Veillez a tourner le bouton de commande sur OFF a la fin de la cuisson.
Bouton de commande de I'_l_ment unique (arri_re gauche, arri_re droit)
1. Enfoncez le bouton. OoOoOOoOoe
2. Toumez dans I'une ou I'autre direction selon le reglage
souhaite.
Sur les positions off (desactive) et high (eleve), un
declic est emis.
Bouton de commande de I'_l_ment Bridge (avant gauche)
1. 0%0
2.
Enfoncez le bouton.
Toumez dans I'une ou I'autre direction selon le reglage
souhaite.
Pour utiliser I'element seul, toumez le bouton de
commande sur le reglage correspondant au brOleur
unique.
Pour utiliser I'element Bridge, toumez le bouton de
commande sur le reglage correspondant au brOleur
Bridge.
Bouton de commande de I'_l_ment triple (avant droit)
Le foyer triple est dote de trois tailles de cuisson de
maniere a pouvoir accueillir plusieurs types de recipients.
1. Enfoncez le bouton.
2. Toumez dans I'une ou I'autre direction selon le reglage
souhaite.
Pour utiliser le grand element, tournez le bouton de
commande sur le reglage correspondant au grand
foyer (A).
Pour utiliser I'element moyen, toumez le bouton de
commande sur le reglage correspondant au foyer
moyen (B).
Pour utiliser le petit element, toumez le bouton de
commande sur le reglage correspondant au petit
foyer (C).
o8#
(_ Si vous retirez un bouton pour le nettoyage, reinserez-le apres avoir verifie la direction.
(reportez-vous a la figure ci-dessus)
tabledecusson 34
130513_(IB_Best)NE58F9710WS_DG68-OO506A_CFR.indd 34 4_ 13/05/2013 08:31:39
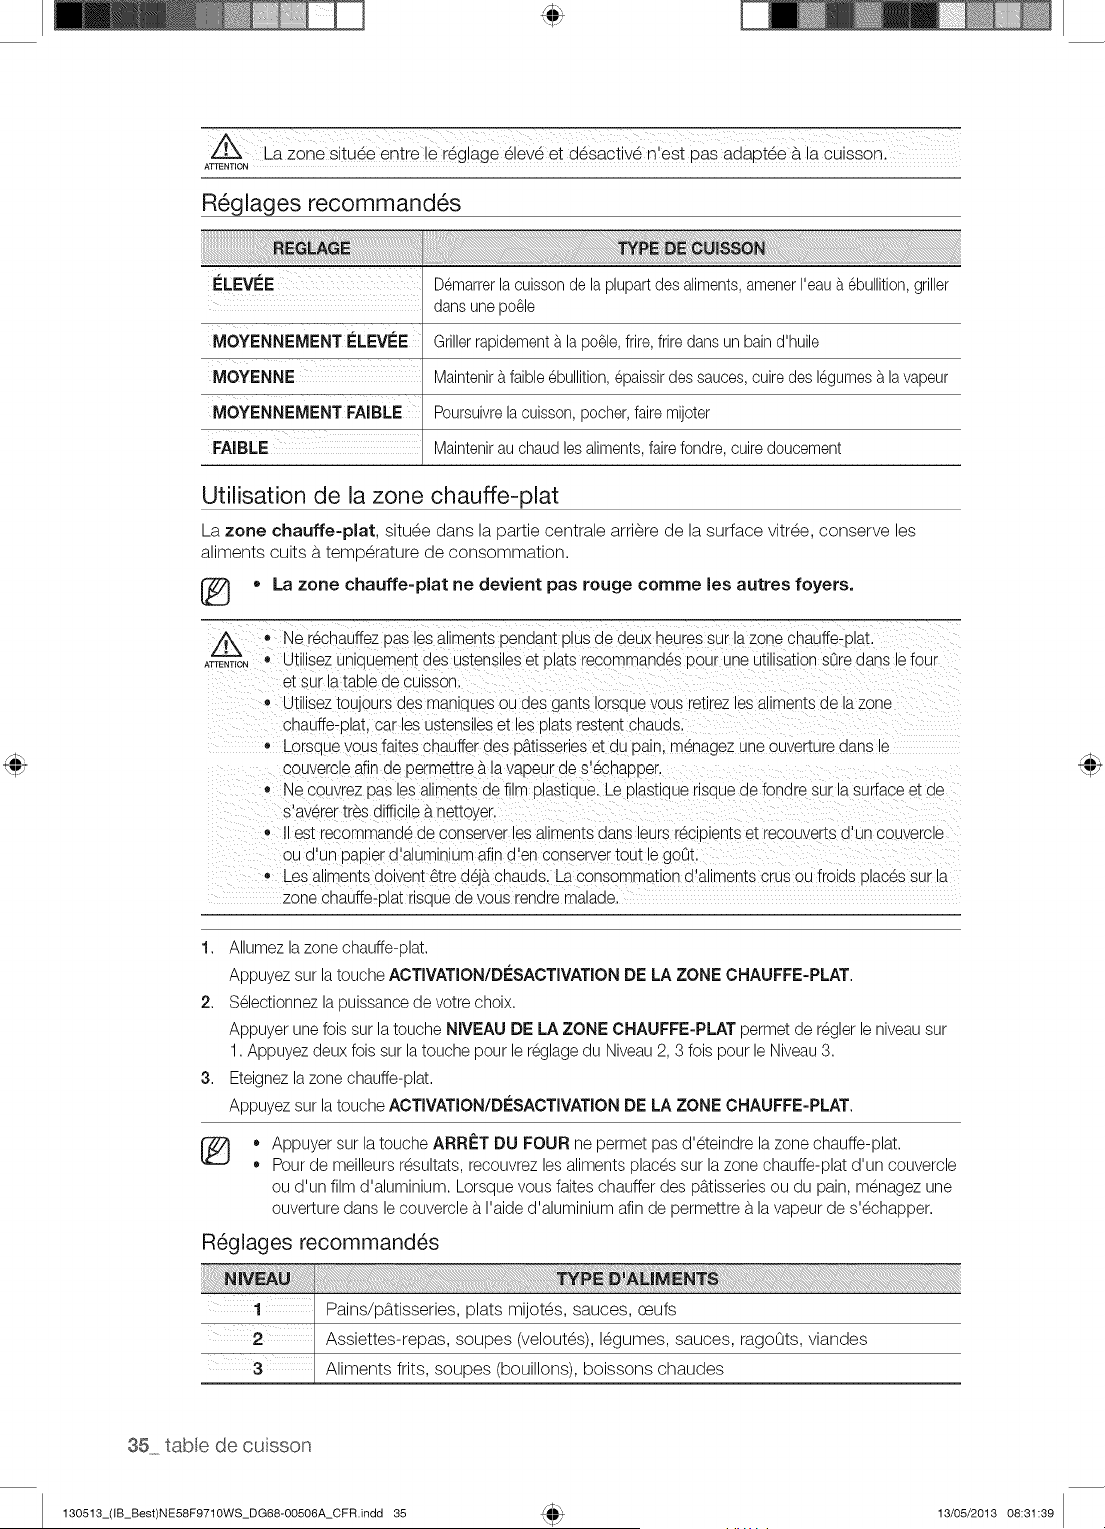
Z@6_s tu_e entFe !e regiage _iev_ et desaclive n'est paS adapt_e b.a cuissonl
R_glages recommand_s
ELEVEE Demarrerla cuissonde laplupartdes aliments,amenerI'eaua ebullition,griller
dans unepo_le
iMOYENNEMENTELEVEE
MOYENNE;
MOYENNEMENT FAiBLE
Grillerrapidementa laparle, frire,frire dansun bain d'huile
Maintenira faible ebullition,epaissirdes sauces,cuiredes legumesa lavapeur
Poursuivrelacuisson,pocher,fakemijoter
Maintenirau chaud lesaliments,fake fondre,cuiredoucement
Utilisation de la zone chauffe=plat
La zone chauffe=plat, situ_e dans la partie centrale arri_re de la surface vitr_e, conserve les
aliments cuits b.temperature de consommation.
• La zone chauffe=plat ne devient pas rouge comme les autres foyers.
®
ATTENTION
, Ne rechauffezpas lesaliments penaant plus ae aeux neuressur la zone chauffe-plat
• Utilisez uniauement des ustensileset plats recommandes aour une utilisationsOredans le four
et s_.rla talolede cuIsson.
® Utiliseztou.ours des manlaues ou des gants iorsquevous retlrezlesaliments de lazone
cnauffe-blat,car les ustensileset les DlaISrestent cnauas.
,, Lorsaue vous faites chauffer des u_.tisserieset du pain, menagez une ouverture aans le
couvercle afir ae germettrea la vabeur de s'echaDDer.
,, Ne couvrez 13asles aliments de film alastiaue. Le blaStlauerlsaue de fondre sur la surface et de
s'averer tres difficile_.nettoyer.
est recommande de conserver les aliments aans leurs recipientset recouverts d'un couvercle
ou d'un Dabierd'aluminium afin d'en conservertout le 9oOt.
• Les aliments doivent _tre d6j_.chauds. La consommation d'aliments crus ou froids olac6s sur la
zone chauffe-blat nsaue de vous renare malaae.
1. Allumez la zone chauffe-plat.
Appuyez sur la touche ACTIVATION/D[sSACTIVATIONDE LA ZONE CNAUFFE=PLAT.
2. Selectionnez la puissance de votre choix.
Appuyer une fois sur la touche NIVEAU DE LA ZONE CHAUFFE-PLAT permet de regler le niveausur
1. Appuyez deux fois sur latouche pour le reglage du Niveau2, 3 fois pour le Niveau3.
3. Eteignezla zone chauffe-plat.
Appuyez sur la touche ACTIVATION/D[sSACTIVATION DE LA ZONE CNAUFFE=PLAT.
[_ ,, Appuyer sur la touche ARRET DU FOUR ne permet pas d'eteindre la zone chauffe-plat.
= Pour de meilleurs resultats, recouvrez les aliments places sur lazone chauffe-plat d'un couvercle
ou d'un film d'aluminium. Lorsque vous faites chauffer des pb.tisseriesou du pain, menagez une
ouverture dans le couvercle b.I'aide d'aluminium afin de permettre b.la vapeur de s'echapper.
R6glages recommand_s
1 / Pains/p_ttisseries, plats mijot_s, sauces, ceufs
Assiettes-repas, soupes (velout_s), I_gumes, sauces, ragoOts, viandes
Aliments flits, soupes (bouillons), boissons chaudes
35 table de cuisson
130513_(IB_Best)NE58F9710WS_DG68-00506A_CFR.indd 35 13/05/2013 08:31:39
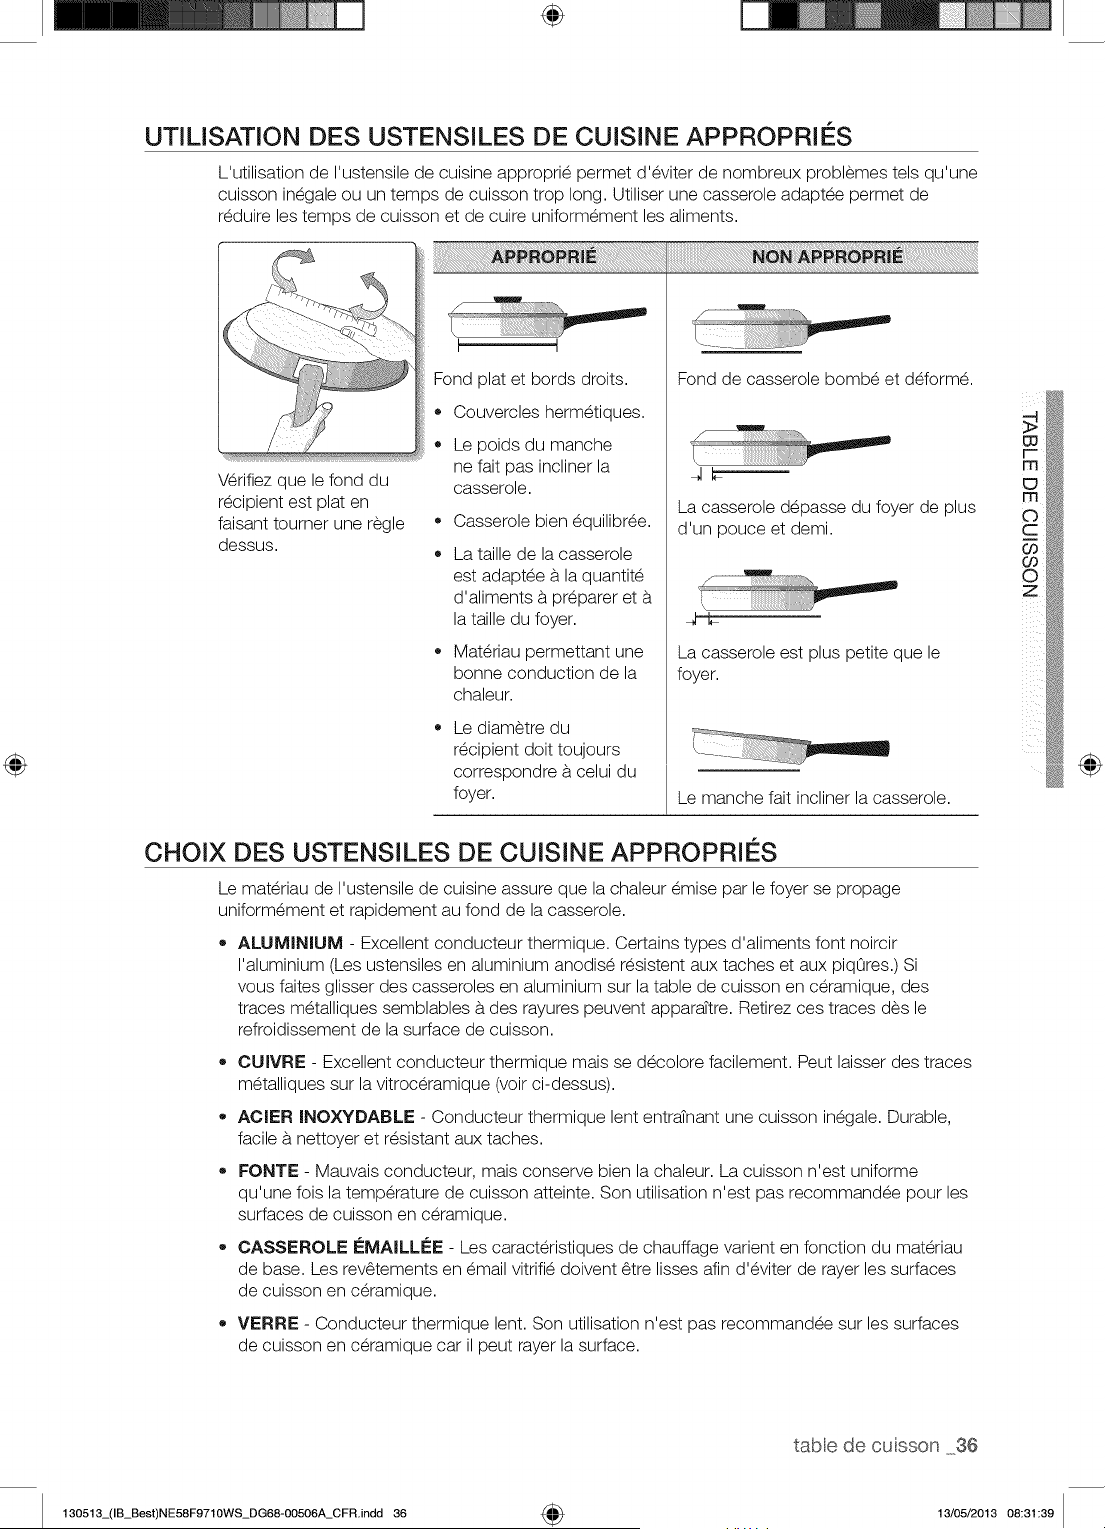
÷
UTILISATION DES USTENSILES DE CUISINE APPROPRIES
L'utilisation de I'ustensile de cuisine approprie permet d'eviter de nombreux problemes tels qu'une
cuisson inegale ou un temps de cuisson trop long. Utiliser une casserole adaptee permet de
reduire les temps de cuisson et de cuire uniformement les aliments.
Wrifiez que le fond du
recipient est plat en
faisant toumer une regle •
dessus.
®
Fond plat et bords droits.
Couvercles hermetiques.
Le poids du manche
ne fait pas incliner la
casserole.
Casserole bien equilibree.
La taille de la casserole
est adaptee b,la quantite
d'aliments a preparer et
la taille du foyer.
Materiau permettant une
bonne conduction de la
chaleur.
Le diametre du
recipient doit toujours
correspondre a celui du
foyer.
Fond de casserole bombe et deforme.
q_
La casserole depasse du foyer de plus
d'un pouce et demi.
_/ .................... °,7-.,
La casserole est plus petite que le
foyer.
Le manche fait incliner la casserole.
CHOIX DES USTENSILES DE CUISINE APPROPRIES
Le materiau de I'ustensile de cuisine assure que la chaleur emise par le foyer se propage
uniformement et rapidement au fond de la casserole.
ALUMINIUM - Excellent conducteur thermique. Certains types d'aliments font noircir
I'aluminium (Les ustensiles en aluminium anodise resistent aux taches et aux piqOres.) Si
vous faites glisser des casseroles en aluminium sur la table de cuisson en ceramique, des
traces metalliques semblables a des rayures peuvent apparattre. Retirez ces traces des le
refroidissement de la surface de cuisson.
OUIVRE - Excellent conducteur thermique mais se decolore facilement. Peut laisser des traces
metalliques sur la vitroceramique (voir ci-dessus).
AOIER INOXYDABLE - Conducteur thermique lent entratnant une cuisson inegale. Durable,
facile a nettoyer et resistant aux taches.
FONTE - Mauvais conducteur, mais conserve bien la chaleur. La cuisson n'est uniforme
qu'une fois la temperature de cuisson atteinte. Son utilisation n'est pas recommandee pour les
surfaces de cuisson en ceramique.
• CASSEROLE i_MAILLi_E - Les caracteristiques de chauffage varient en fonction du materiau
de base. Les rev6tements en email vitrifie doivent 6tre lisses afin d'eviter de rayer les surfaces
de cuisson en ceramique.
VERRE - Conducteur thermique lent. Son utilisation n'est pas recommandee sur les surfaces
de cuisson en ceramique car il peut rayer la surface.
tabledecusson 36
130513_(IB_Best)NE58F9710WS_DG68-00506A_CFR.indd 36 4_ 13/05/2013 08:31:39
PROTECTION DE LA SURFACE LISSE
Nettoyage
Nettoyez la table de cuisson avant de I'utiliser pour la premiere fois.
®
Nettoyez votre table de cuisson quotidiennement ou apres chaque utilisation. Ainsi, vous
conserverez votre table de cuisson en bon _tat et _viterez les dommages.
Si la casserole d_borde durant la cuisson, nettoyez imm_diatement la zone de cuisson tant
qu'elle est chaude ' un nettoyage ult_rieur s'av_rerait plus difficile. Nettoyez prudemment les
_claboussures b, I'aide d'un chiffon sec.
,, Evitez qu'elles ne restent trop Iongtemps sur la zone de cuisson ou la garniture de la surface de
cuisson.
,, N'utilisez pas de poudre b, r_curer ou de tampon abrasif qui risquerait de rayer la table de
cuisson.
,, N'utilisez pas d'agent de blanchiment chlor_, d'ammoniac ou de nettoyant non recommand_
pour une utilisation sur une surface en vitroc_ramique.
Prevention des traces et des rayures
N'utilisez pas d'ustensiles en verre. IIs pourraient rayer la table de cuisson.
,, Ne placez pas de grille ou d'anneau wok entre la table de cuisson et la casserole. Ces
accessoires sont susceptibles de marquer ou de rayer la table de cuisson.
,, Assurez-vous que la table de cuisson et le fond de la casserole sont propres.
,, Ne faites pas glisser de casseroles en m_tal sur la table de cuisson.
Prevention des taches
,, N'utilisez pas de torchon ou d'_ponge sale pour nettoyer la table de cuisson. Un film
subsisterait, provoquant des taches sur la table de cuisson apres son chauffage.
,, Si vous continuez d'utiliser la table de cuisson alors que celle-ci est sale, les taches peuvent
devenir d_finitives.
Prevention d'autres dommages
,, Evitez de laisser du plastique, du sucre ou des aliments b,forte teneur en sucre fondre sur la
table de cuisson chaude. Si cela se produit, nettoyez-la imm_diatement.
Ne laissez jamais chauffer un r_cipient jusqu'b, _vaporation complete de son contenu. Vous
risqueriez de I'endommager.
,, N'utilisez pas la table de cuisson comme plan de travail ou planche b,d_couper.
,, Ne faites jamais cuire d'aliments directement sur la table de cuisson. Utilisez toujours des
ustensiles de cuisine appropri_s.
37 tabe de cuisson
130513_(IB_Best)NE58F9710WS_DG68-00506A_CFR.indd 37 13/05/2013 08:31:40
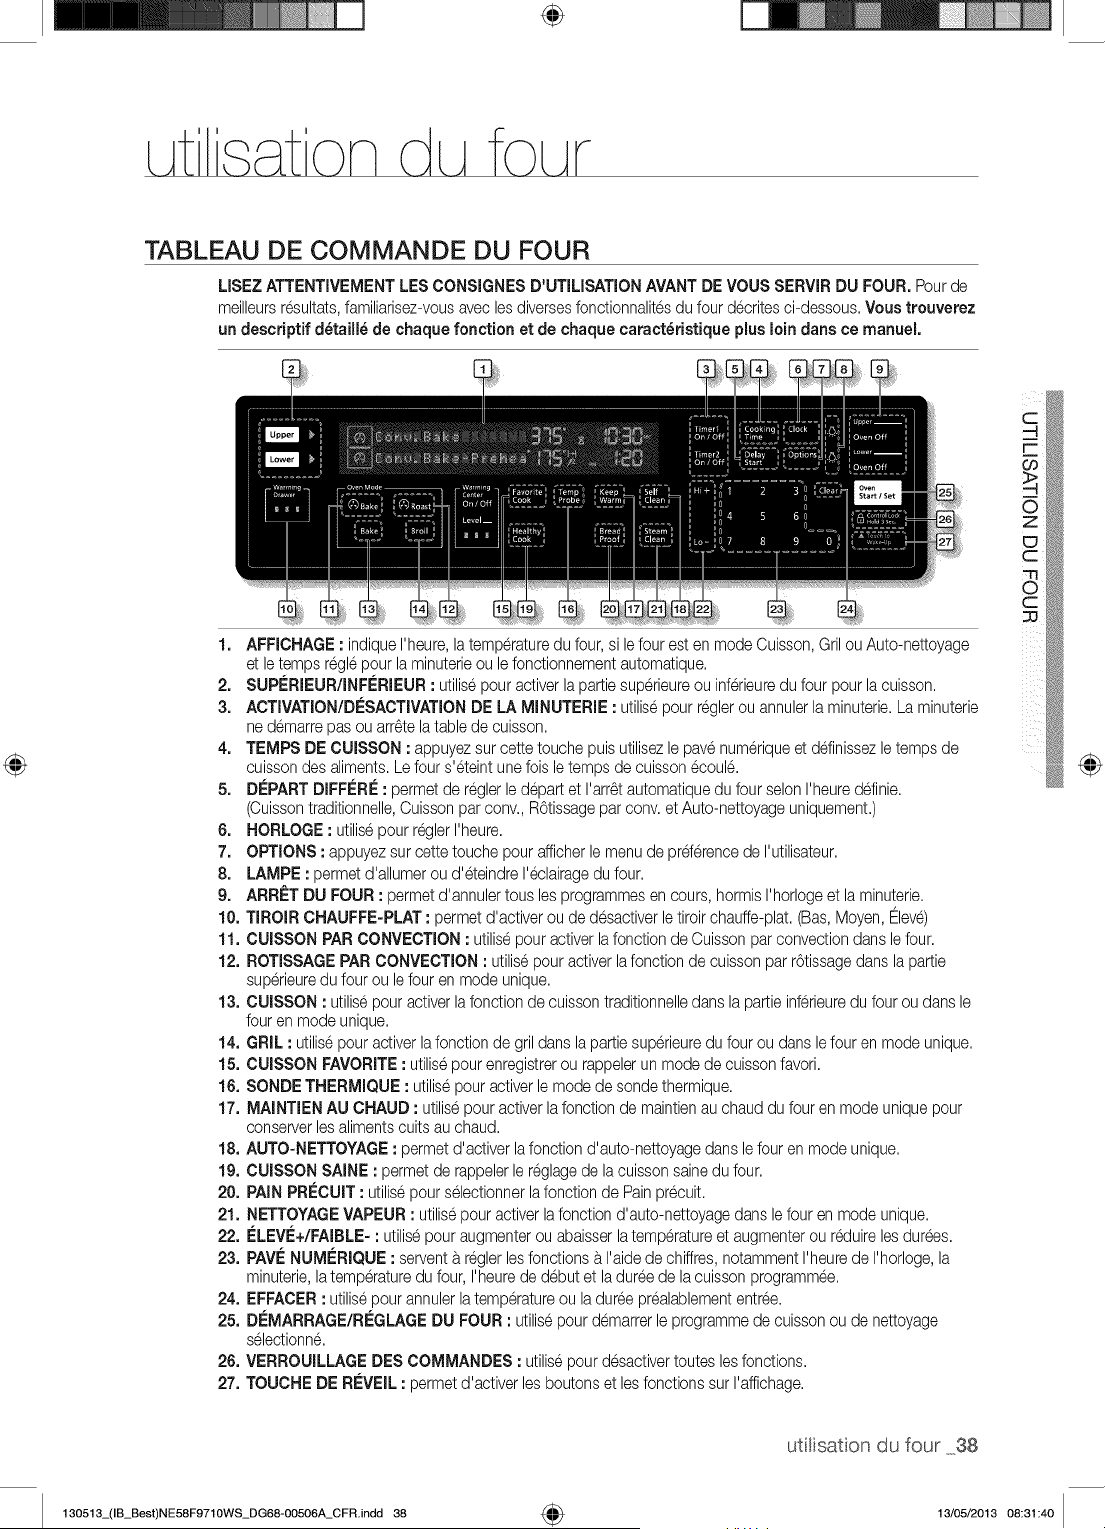
÷
TABLEAU DE COMMANDE DU FOUR
LISEZATTENTIVEMENTLES CONSIGNES D'UTILISATIONAVANTDE VOUS SERVIRDU FOUR. Pour de
meilleursresultats,familiarisez-vousavec lesdiversesfonctionnalitesdu four d@ritesci-dessous.Voustrouverez
un descdptif d_taill_ de chaque fonction et de chaque caract_dstique plus moindarts ce manuel.
1. AFFICHAGE: indiqueI'heure,la temperaturedu four, si lefour est en mode Cuisson,GrilouAuto-nettoyage
et letemps reglepour la minuterieou le fonctionnementautomatique.
2. SUPERIEUR/INFERIEUR: utilisepouractiver lapartiesuperieureou inferieuredu four pour lacuisson.
3. ACTIVATION/DESACTIVATIONDE LA MINUTERIE : utilisepour reglerou annulerla minuterie,La minuterie
ne demarrepas ou arr_telatable de cuisson.
4. TEMPS DE CUISSON : appuyezsur cettetouche puisutilisezlepave numeriqueet ddinissez letemps de
cuissondes aliments.Lefour s'eteint unefois letemps de cuisson@oule.
5. DEPARTDIFFERE: permet de reglerle d@art et I'arr6tautomatiquedu four selonI'heureddinie.
(Cuissontraditionnelle,Cuissonpar conv. R6tissagepar conv.et Auto-nettoyageuniquement.)
6. HORLOGE : utilisepourreglerI'heure.
7. OPTIONS : appuyez sur cette touche pourafficherle menu de prderencede I'utilisateur.
8. LAMPE : permetd'allumerou d'eteindre I'@lairagedu four.
9. ARR_=TDU FOUR : permet d'annulertousles programmesen cours, hormis I'horlogeet laminuterie.
10. TIROIR CHAUFFE-PLAT : permet d'activerou de desactiverletiroirchauffe-plat.(Bas,Moyen,Eleve)
11. CUISSON PARCONVECTION: utilisepour activerla fonction de Cuisson par convectiondans lefour.
12. ROTISSAGEPARCONVECTION: utilisepouractiver lafonction de cuisson par r6tissagedans la pattie
superieuredu four ou le four en mode unique.
13. CUISSON : utilisepouractiverlafonction de cuissontraditionnelledans la pattie inferieuredu four ou dans le
four en mode unique.
14. GRIL : utilisepour activerlafonctionde gril dansla pattiesuperieuredu four ou dans lefour en mode unique.
15. CUISSON FAVORITE: utilisepour enregistrerou rappelerun mode de cuisson favori.
16. SONDETHERMIQUE : utilisepouractiverle mode de sondethermique,
17. MAINTIEN AU CHAUD : utilisepouraotiverlafonotionde maintienau ohauddu four en mode uniquepour
conserverlesalimentscultsau chaud.
18. AUTO-NETTOYAGE: permet d'activer lafonction d'auto-nettoyagedans lefour en modeunique.
19. CUISSON SAINE : permetde rappelerle reglagede lacuissonsainedu four.
20. PAIN PRI_CUIT: utilisepour selectionnerlafonction de Pain pr@uit.
21. NETTOYAGEVAPEUR : utilisepouractiverla fonctiond'auto-nettoyagedansle four en modeunique.
22. ELEVE+/FAIBLE-: utilisepour augmenterou abaisserlatemperatureet augmenterou reduirelesdurees.
23. PAVENUMERIQUE : serventb.reglerlesfonctionsb.I'aidede chiffres,notammentI'heurede I'horloge,la
minuterie,latemperaturedu four, I'heurede debutet laduree de lacuissonprogrammee.
24. EFFACER: utilisepour annulerla temperatureou laduree prealablemententree.
25. DEMARRAGE/REGLAGEDU FOUR : utilisepour demarrerle programmede cuissonou de nettoyage
selectionne.
26. VERROUILLAGEDESCOMMANDES : utilisepour desactivertoutes lesfonctions.
27. TOUCHE DE REVEIL: permetd'activer lesboutonset lesfonctionssur I'affichage.
@
utitisaton du four 38
130513_(IB_Best)NE58F9710WS_DG68-OO506A_CFR.indd 38 4_ 13/05/2013 08:31:40
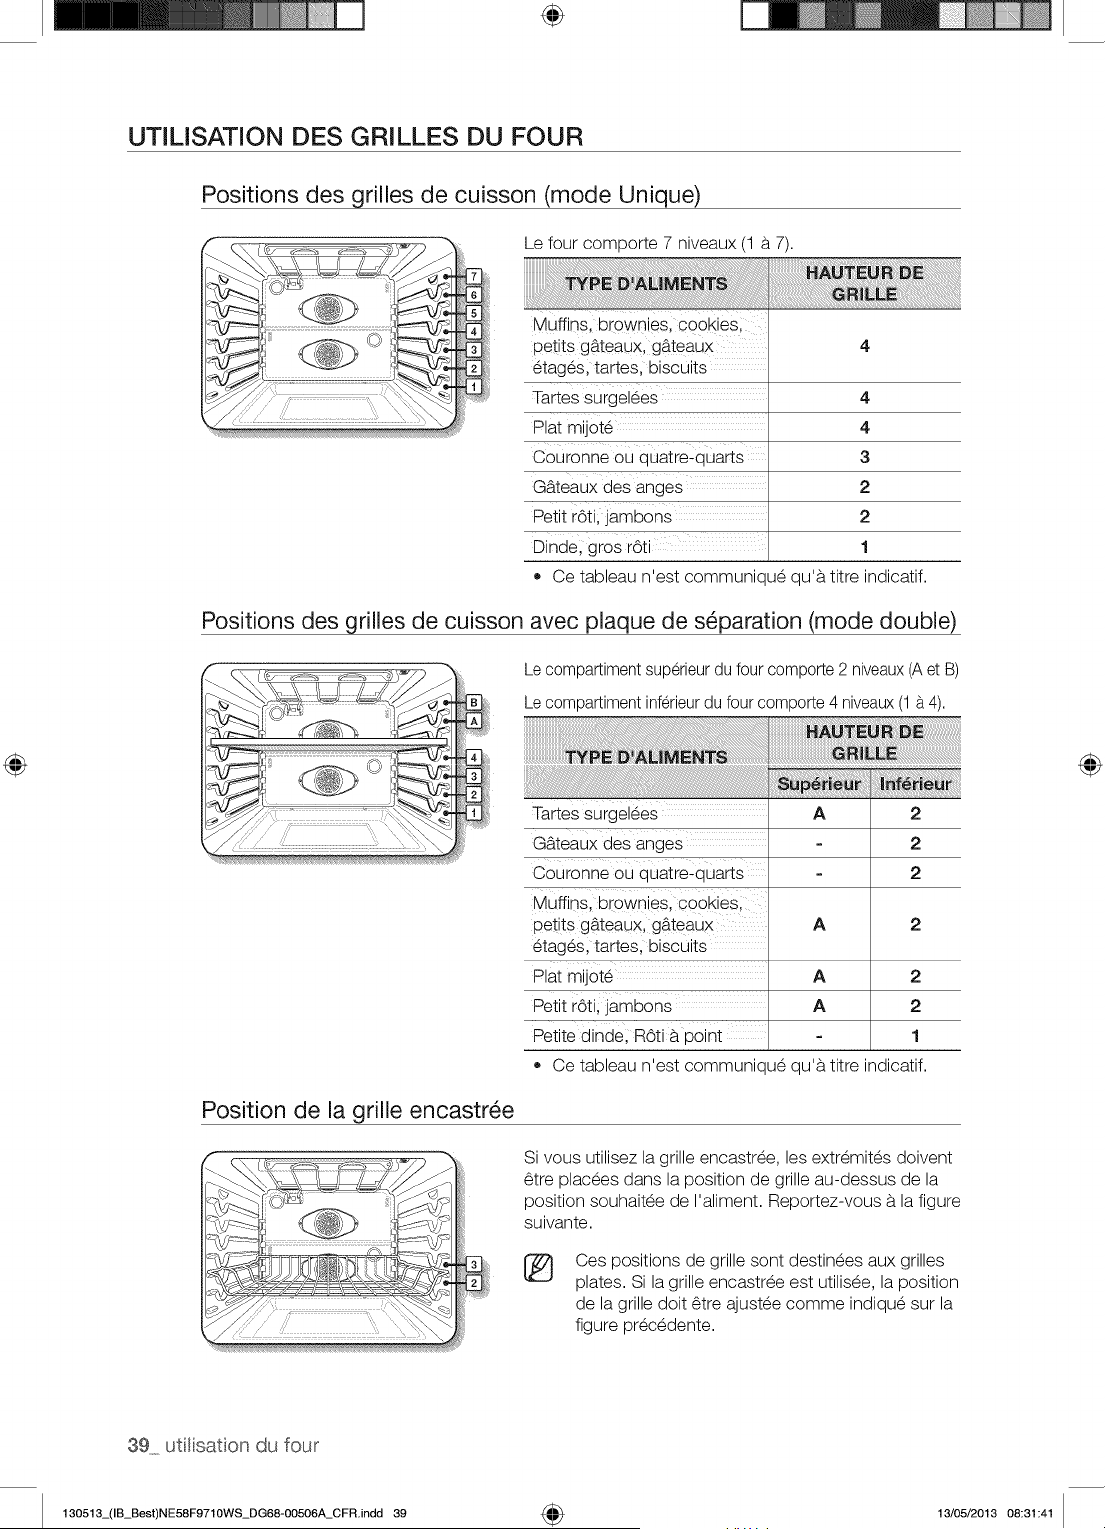
÷
UTILISATION DES GRILLES DU FOUR
Positions des grilles de cuisson (mode Unique)
Le four comporte 7 niveaux (1 a 7).
Muffinsl brownies; cookies;
petit s gb.teaux, gb_teaux 4
etages, tartes, biscuits
Tartes surgelees 4
Plat mij0te 4
Couronne ou quatre:quarts 3
Gb.teaux des anges 2
Petit rOti;jambons 2
Dinde; gros r6ti 1
• Ce tableau n'est communique qu'a titre indicatif.
Positions des grilles de cuisson avec plaque de s_paration (mode double)
Le compartiment superieur du four comporte 2 niveaux(A et B)
Le compartiment inferieurdu four comporte 4 niveaux(1 a 4).
Tartes surgelees
Gb.teaux des anges
Couronne ou quatre_quarts
Muffinsl br0wniesl cookies;
petit s gb.teaux, gb_teaux
etages, tartes, biscuits
Plat mij0te
Petit r6ti; ]ambons
Petite dinde; m6ti b. point
Ce tableau n'est communique qu'a titre indicatif.
A 2
2
2
A 2
A 2
A 2
1
Position de la grille encastr_e
Si vous utilisez la grille encastree, les extremites doivent
6tre placees dans la position de grille au-dessus de la
position souhaitee de I'aliment. Reportez-vous a la figure
suivante.
®
Ces positions de grille sont destinees aux grilles
plates. Si la grille encastree est utilisee, la position
de la grille doit 6tre ajustee comme indique sur la
figure precedente.
39 utitisaton du four
130513_(IB_Best)NE58F9710WS_DG68-00506A_CFR.indd 39 4_ 13/05/2013 08:31:41
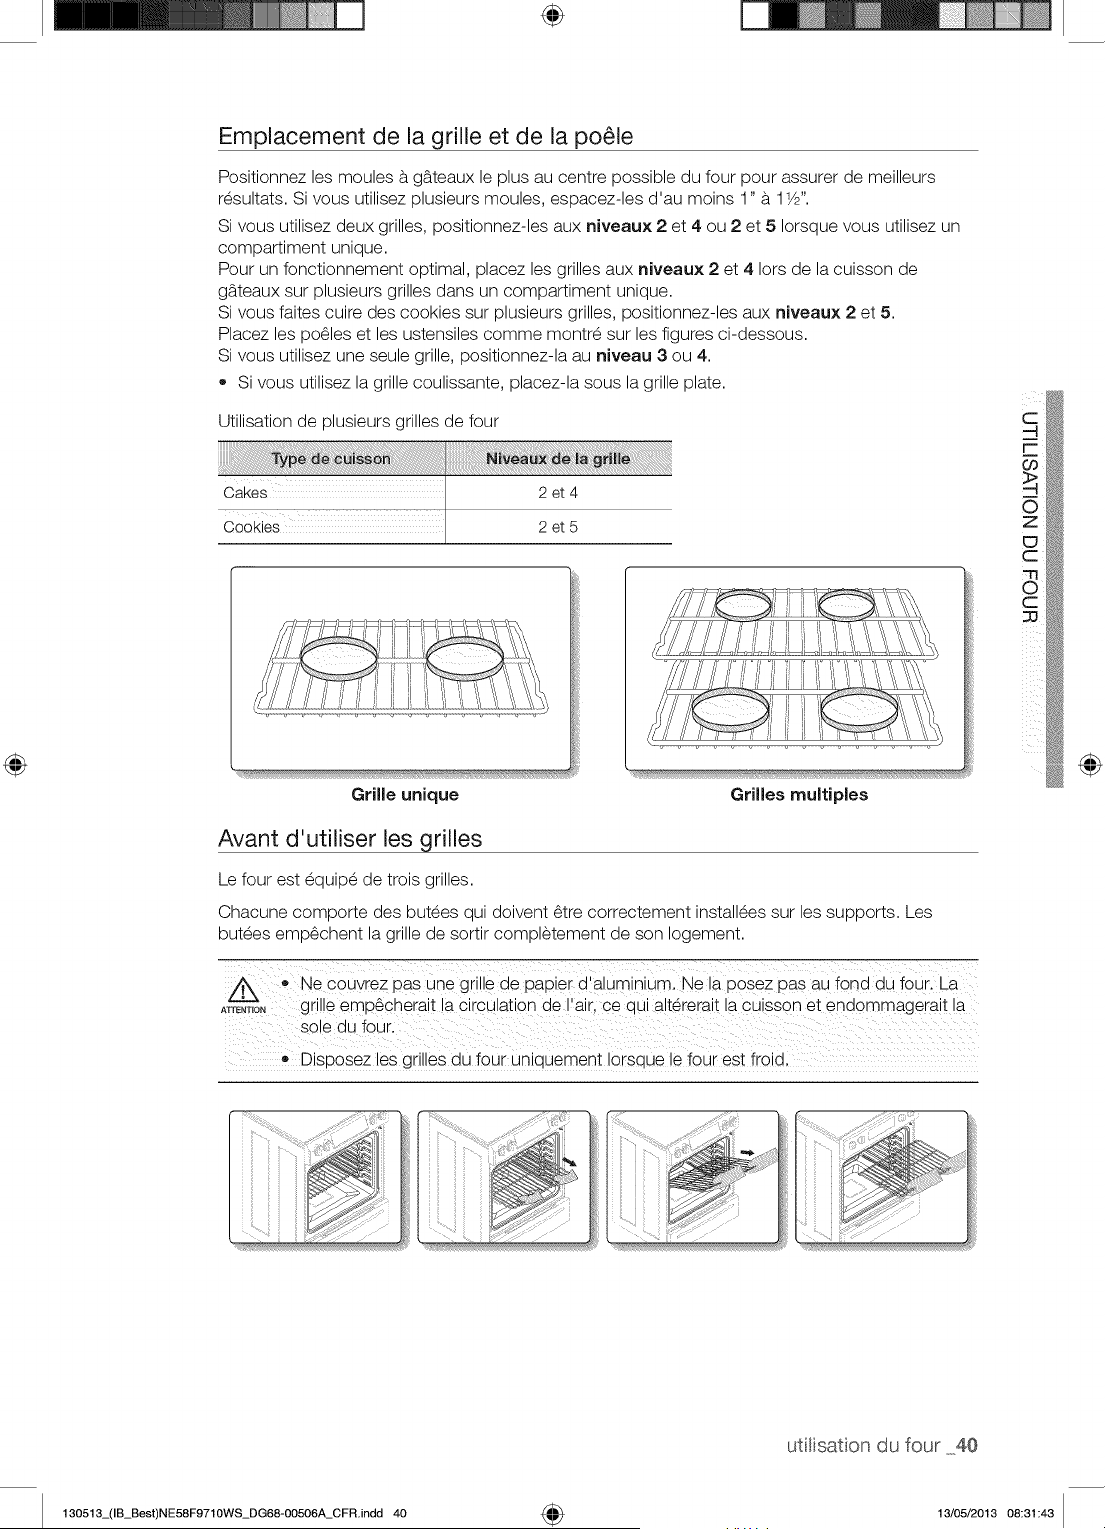
÷
Emplacement de la grille et de la po_le
Positionnez les moules a g_teaux le plus au centre possible du four pour assurer de meilleurs
resultats. Si vous utilisez plusieurs moules, espacez-les d'au moins 1" a 11/2".
Si vous utilisez deux grilles, positionnez-les aux niveaux 2 et 4 ou 2 et 5 Iorsque vous utilisez un
compartiment unique.
Pour un fonctionnement optimal, placez les grilles aux niveaux 2 et 4 Iors de la cuisson de
g_teaux sur plusieurs grilles dans un compartiment unique.
Si vous faites cuire des cookies sur plusieurs grilles, positionnez-les aux niveaux 2 et 5.
Placez les po61es et les ustensiles comme montre sur les figures ci-dessous.
Si vous utilisez une seule grille, positionnez-la au niveau 3 ou 4.
• Si vous utilisez la grille coulissante, placez-la sous la grille plate.
Utilisation de plusieurs grilles de four
Cakes 2 et 4
Cookies 2et5
Grille unique Grilles multiples
Avant d'utiliser les grilles
Le four est equipe de trois grilles.
Chacune comporte des butees qui doivent 6tre correctement installees sur les supports. Les
butees emp6chent la grille de sortir completement de son Iogement.
_ • Ne €OUyrez pas une giilie de papie i d!_luminiuml Ne la pose z pasaU fond du foUK La
ATrENT,O,grille emp6cherait !a circulation de!air, ce qui altererait la cuisson et endommagera t la
so!e du four.
Disposez les grilles du four uniquement Iorsque !e four est froid,
@
utitisaton du four 40
130513_(IB_Best)NE58F9710WS_DG68-00506A_CFR.indd 40 4_ 13/05/2013 08:31:43
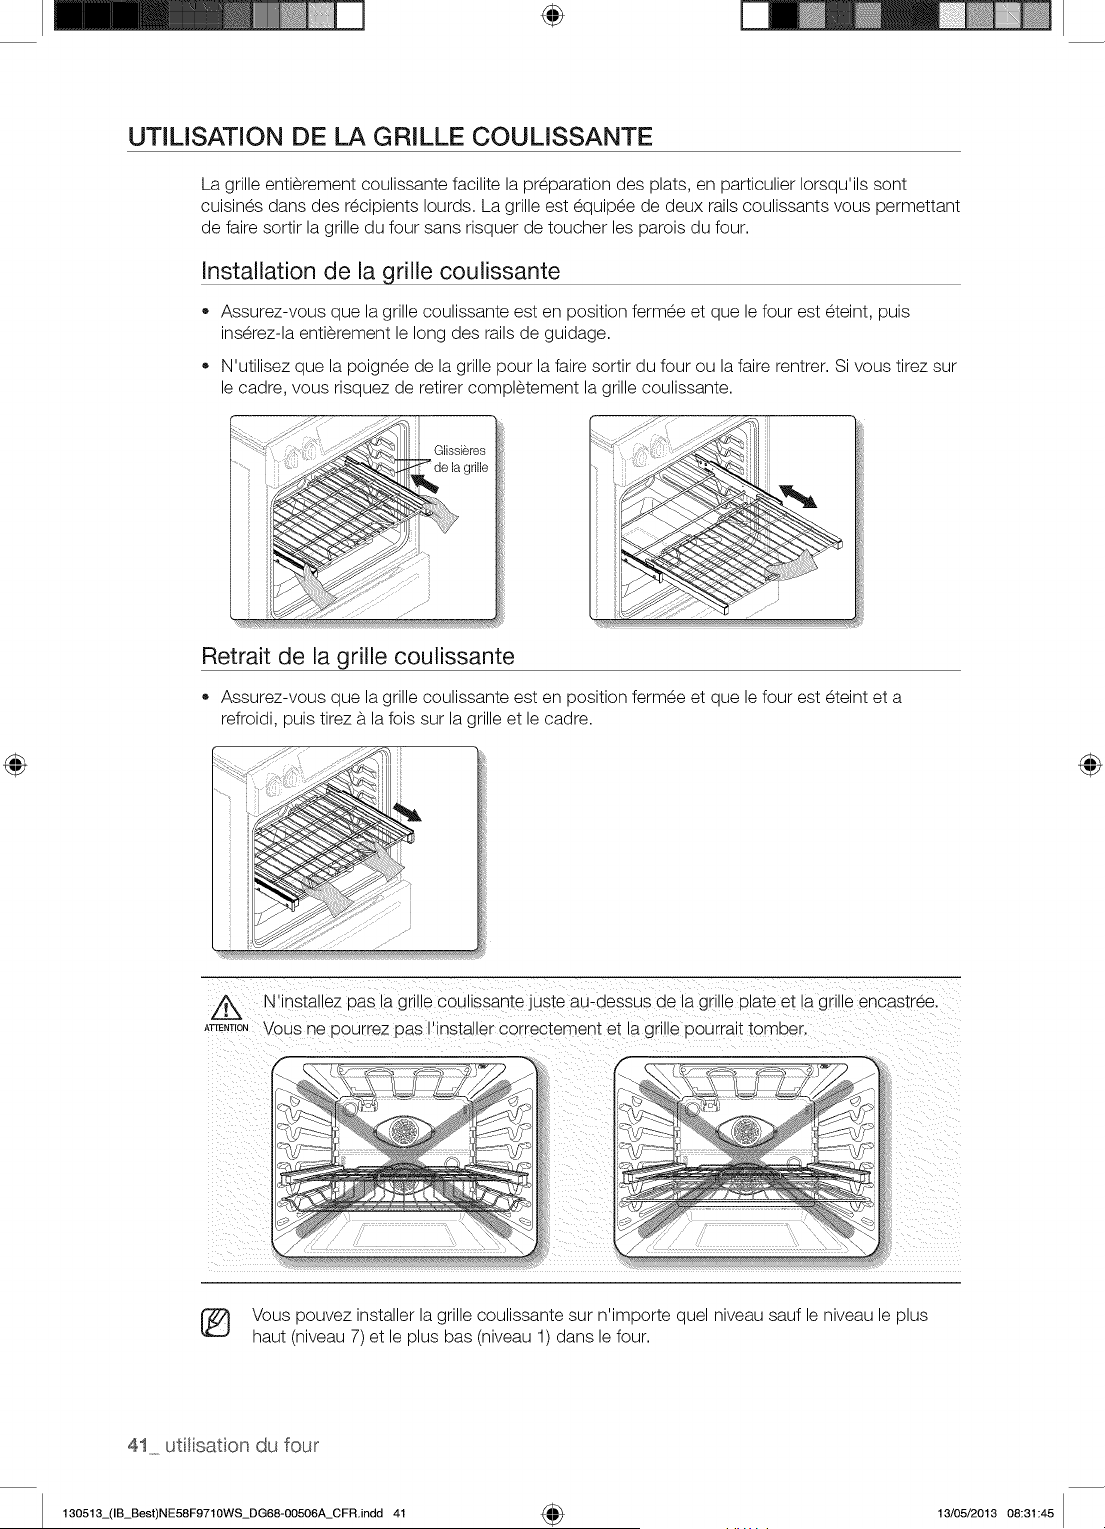
÷
UTILISATION DE LA GRILLE COULISSANTE
La grille entierement coulissante facilite la preparation des plats, en particulier Iorsqu'ils sont
cuisines dans des recipients Iourds. La grille est equipee de deux rails coulissants vous permettant
de faire sortir la grille du four sans risquer de toucher les parois du four.
Installation de la grille coulissante
• Assurez-vous que la grille coulissante est en position fermee et que le four est eteint, puis
inserez-la entierement le long des rails de guidage.
N'utilisez que la poignee de la grille pour la faire sortir du four ou la faire rentrer. Si vous tirez sur
le cadre, vous risquez de retirer completement la grille coulissante.
Glissieres
grille
Retrait de la grille coulissante
Assurez-vous que la grille coulissante est en position fermee et que le four est eteint eta
refroidi, puis tirez a la fois sur la grille et le cadre.
Z_ N'installez Das la gnne cou ssante juste au-aessus ae _agr e plate et la grille encastree.
ATrE,T,O,VOUSne Dourrez Das I'installer correctement et a grille Dourralt tomber.
7
....... y
w
Vous pouvez installer la grille coulissante sur n'importe quel niveau sauf le niveau le plus
haut (niveau 7) et le plus bas (niveau 1) dans le four.
41 uti[isaton du four
130513_(IB_Best)NE58F9710WS_DG68-00506A_CFR.indd 41 _ 13/05/2013 08:31:45
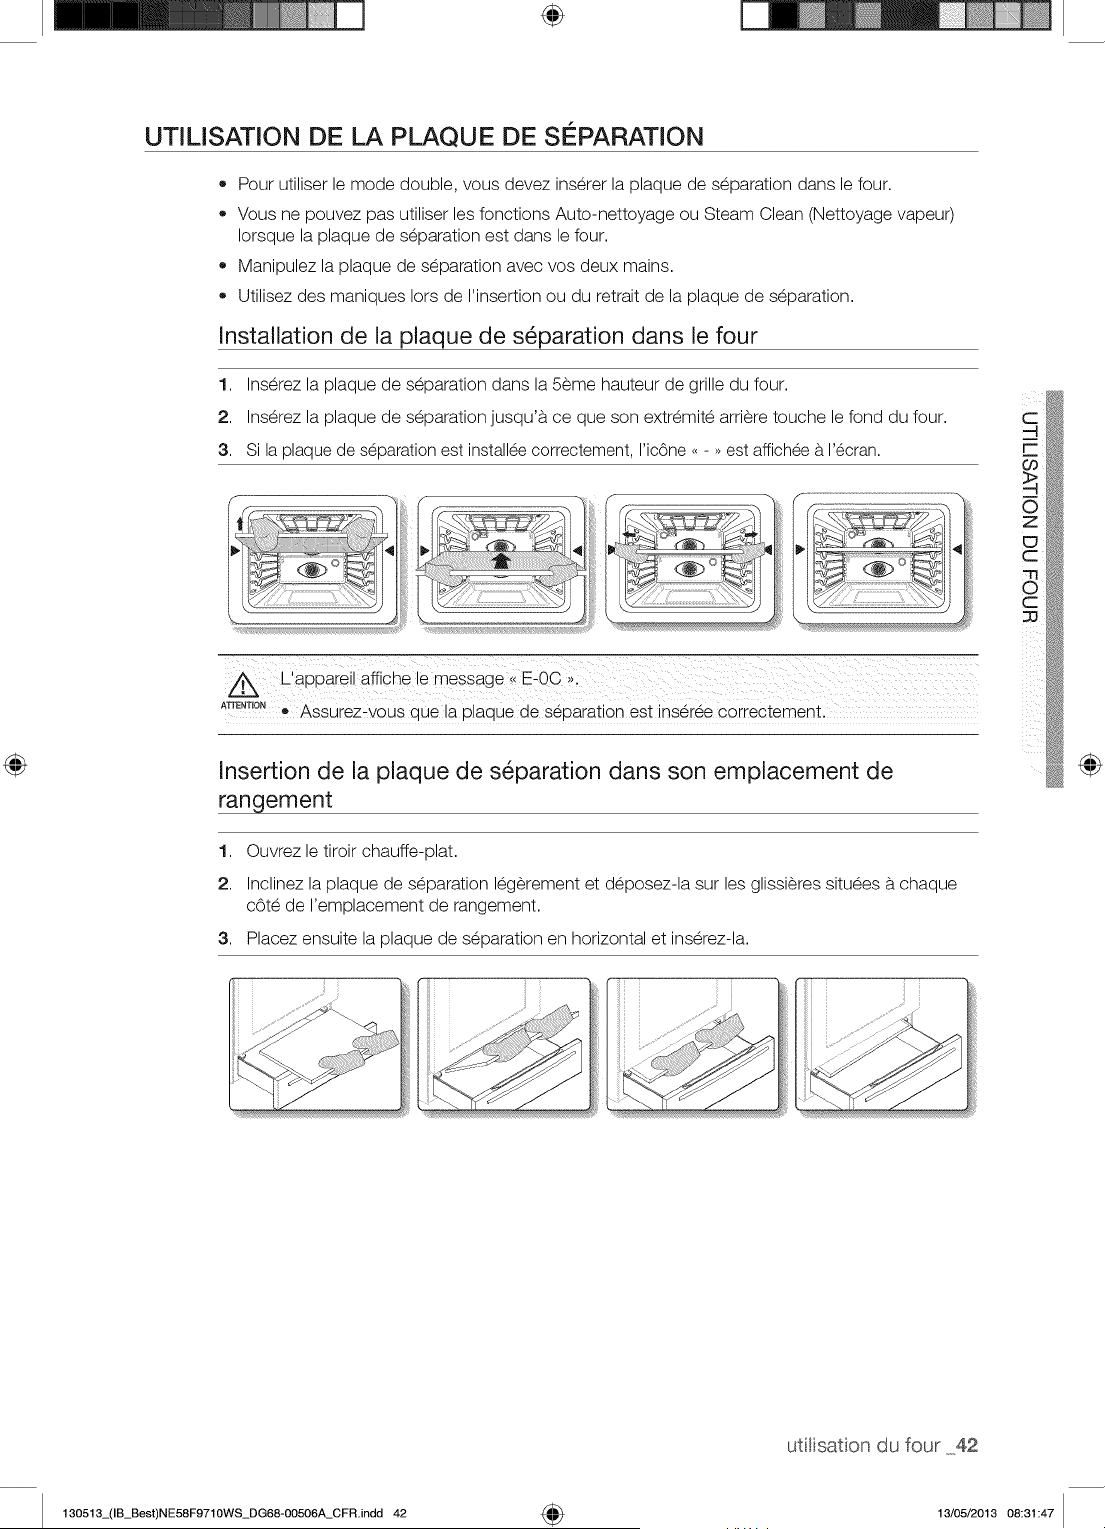
÷
UTILISATION DE LA PLAQUE DE SEPARATION
• Pour utiliser le mode double, vous devez inserer la plaque de separation dans le four.
Vous ne pouvez pas utiliser les fonctions Auto-nettoyage ou Steam Clean (Nettoyage vapeur)
Iorsque la plaque de separation est dans le four.
Manipulez la plaque de separation avec vos deux mains.
Utilisez des maniques Iors de I'insertion ou du retrait de la plaque de separation.
Installation de la plaque de s_paration dans le four
1. Inserez la plaque de separation dans la 5eme hauteur de grille du four.
2. Inserez la plaque de separation jusqu'a ce que son extremite arriere touche le fond du four.
3. Si la plaque de separation est installee correctement, I'ic6ne ..... est affichee a I'ecran.
A_NT_ON! Assurez_vous que la plaque de separation est inseree correctement.
Insertion de la plaque de s_paration dans son emplacement de
rangement
1. Ouvrez le tiroir chauffe-plat.
2. Inclinez la plaque de separation legerement et deposez-la sur les glissieres situees b.chaque
cOte de I'emplacement de rangement.
3. Placez ensuite la plaque de separation en horizontal et inserez-la.
@
utitisaton du four 42
130513_(IB_Best)NE58F9710WS_DG68-00506A_CFR.indd 42 4_ 13/05/2013 08:31:47
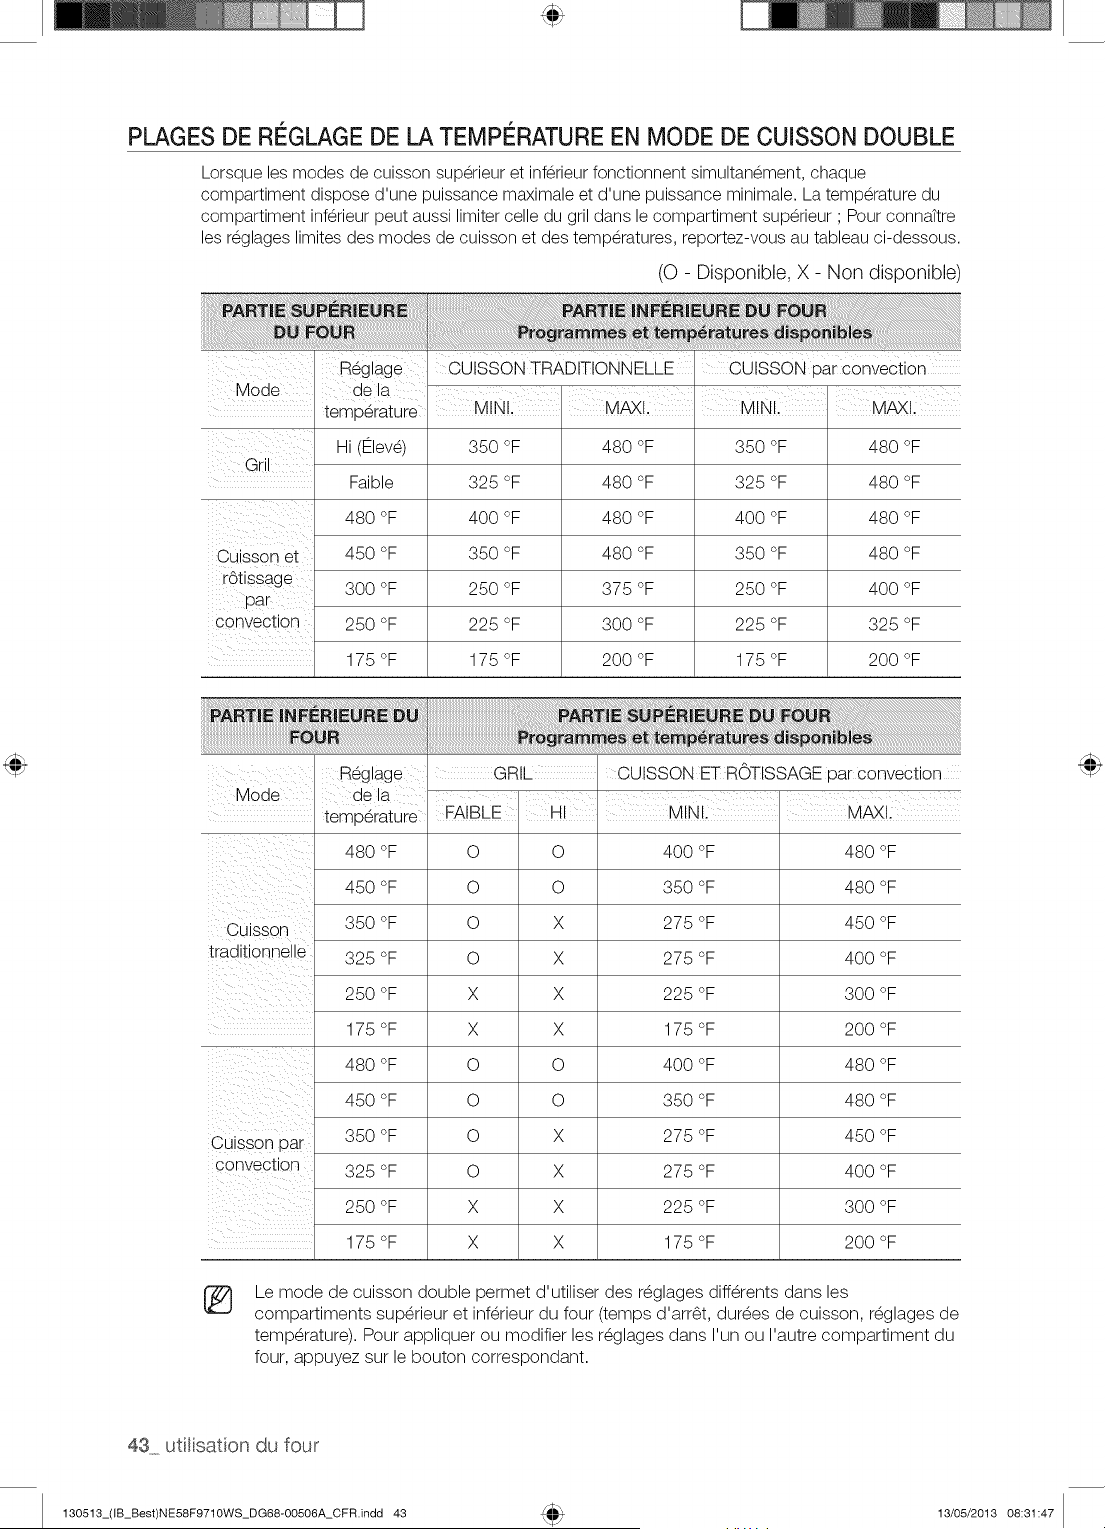
PLAGES DE REGLAGE DE LA TEMPE RATUREEN MODE DE CUISSON DOUBLE
Lorsque les modes de cuisson superieur et inferieur fonctionnent simultanement, chaque
compartiment dispose d'une puissance maximale et d'une puissance minimale. La temperature du
compartiment inferieur peut aussi limiter celle du gril dans le compartiment superieur ; Pour connattre
les reglages limites des modes de cuisson et des temperatures, reportez-vous au tableau ci-dessous.
(O - Disponible, X - Non disponible)
Reglage CUISSON TRADITIONNELLE CUISSON par convection
Mode I dea
temperature MINI, I M_!. I MINI, I M_!.
Gril .....
Hi (Ftlev_) 350 °F 480 °F 350 °F 480 °F
Faible 325 °F 480 °F 325 °F 480 °F
480 °F 400 °F 480 °F 400 °F 480 °F
Cuisson et 450 °F 350 °F 480 °F 350 °F 480 °F
rdtissage 300 °F 250 °F 375 °F 250 °F 400 °F
pa r.
Convection 250 °F 225 °F 300 °F 225 °F 325 °F
175 °F 175 °F 200 °F 175 °F 200 °F
Mode
Cuisson
traditionne e
Ouisson par
convectlc h
Reglage
ae la
temperature
480 oE
450 oc
350 oc
325 oc
250 oc
175 oc
480 oc
450 oc
350 oc
325 oc
250 oc
175 oc
GRIL
FAIBLE HI
O O
O O
O X
O X
X X
X X
O O
O O
O X
O X
X X
X X
CUISSON ET ROTISSAGE oar convection
MINI.
400 °F
350 °F
275 °F
275 °F
225 °F
175 °F
400 °F
350 °F
275 °F
275 °F
225 °F
175 °F
MAXI.
480 oc
480 oc
450 oc
400 oc
300 oc
200 oc
480 oc
480 oc
450 oc
400 oc
300 oc
200 oc
®
Le mode de cuisson double permet d'utiliser des r@glagesdiff@rents dans les
compartiments sup@rieuret inf@rieurdu four (temps d'arr@t, durees de cuisson, r@glagesde
temp@rature). Pour appliquer ou modifier les r@glagesdans I'un ou I'autre compartiment du
four, appuyez sur le bouton correspondant.
43 utlisation du four
130513_(IB_Best)NE58F9710WS_DG68-00506A_CFR.indd 43 13/05/2013 08:31:47
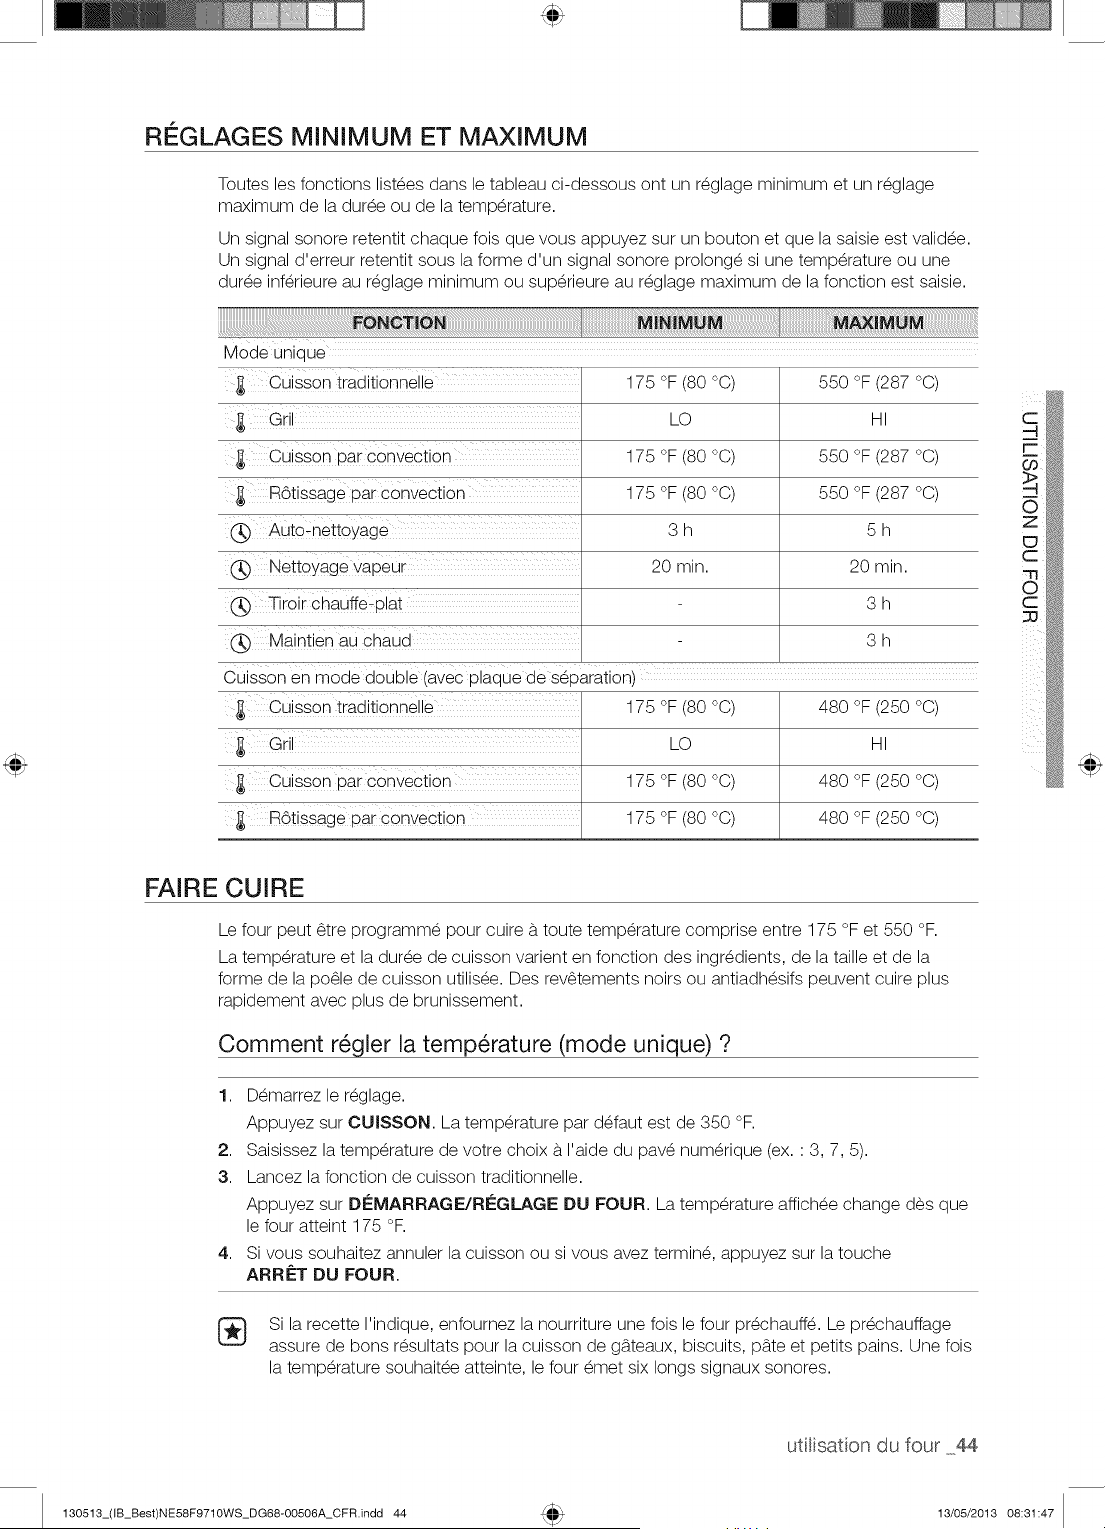
RI GLAGES MINIMUM ET MAXIMUM
Toutes les fonctions list_es dans le tableau ci-dessous ont un r_glage minimum et un r_glage
maximum de la dur_e ou de la temp@ature.
Un signal sonore retentit chaque fois que vous appuyez sur un bouton et que la saisie est validee.
Un signal d'erreur retentit sous la forme d'un signal sonore prolong_ si une temp@ature ou une
dur_e inf@ieure au r_glage minimum ou sup@ieure au r_glage maximum de la fonction est saisie.
Mode unioue
Cuisson trad_t_onnelle
Gr
Cuisson par convection
ROtissage par convection
Auto-nettoyage
Nettoyage vapeur
Tiroir chauffe- olat
Maintien au cnaua
175 °F (80 °C)
LO
175 °F (80 °C)
175 °F (80 °C)
3h
20 min.
550 °F (287 °C)
HI
550 °F (287 °C)
550 °F (287 °C)
5h
20 min.
3h
3h
Cuisson en moae aouDle (avec Dlaaue de seDaration}
Cuisson trad_t_onnelle
Gr
Cuisson par convection
R6tissage par convection
175 °F (80 °C)
LO
175 °F (80 °C)
175 °F (80 °C)
480 °F (250 °C)
HI
480 °F (250 °C)
480 °F (250 °C)
FAIRE CUIRE
Le four peut _tre programm_ pour cuire b.toute temp@ature comprise entre 175 °F et 550 °F.
La temp@ature et la dur_e de cuisson varient en fonction des ingredients, de la taille et de la
forme de la po_le de cuisson utilis_e. Des rev_tements noirs ou antiadh_sifs peuvent cuire plus
rapidement avec plus de brunissement.
Comment r_gler la temp@ature (mode unique) ?
1. D_marrez le r_glage.
Appuyez sur CUISSON. La temp@ature par d_faut est de 350 °F.
2. Saisissez la temp@ature de votre choix b.I'aide du pav_ num@ique (ex. : 3, 7, 5).
3. Lancez la fonction de cuisson traditionnelle.
Appuyez sur DI_MARRAGE/RI_GLAGE DU FOUR. La temp@ature affich_e change des que
le four atteint 175 °F.
4. Si vous souhaitez annulet la cuisson ou si vous avez termin_, appuyez sur la touche
ARR_:T DU FOUR.
Si la recette I'indique, enfournez la nourriture une fois le four pr_chauff_. Le pr_chauffage
assure de bons r_sultats pour la cuisson de g_.teaux, biscuits, pb.te et petits pains. Une fois
la temp@ature souhait_e atteinte, le four _met six longs signaux sonores.
utilisaton du four 44
130513_(IB_Best)NE58F9710WS_DG68-00506A_CFR.indd 44 13/05/2013 08:31:47
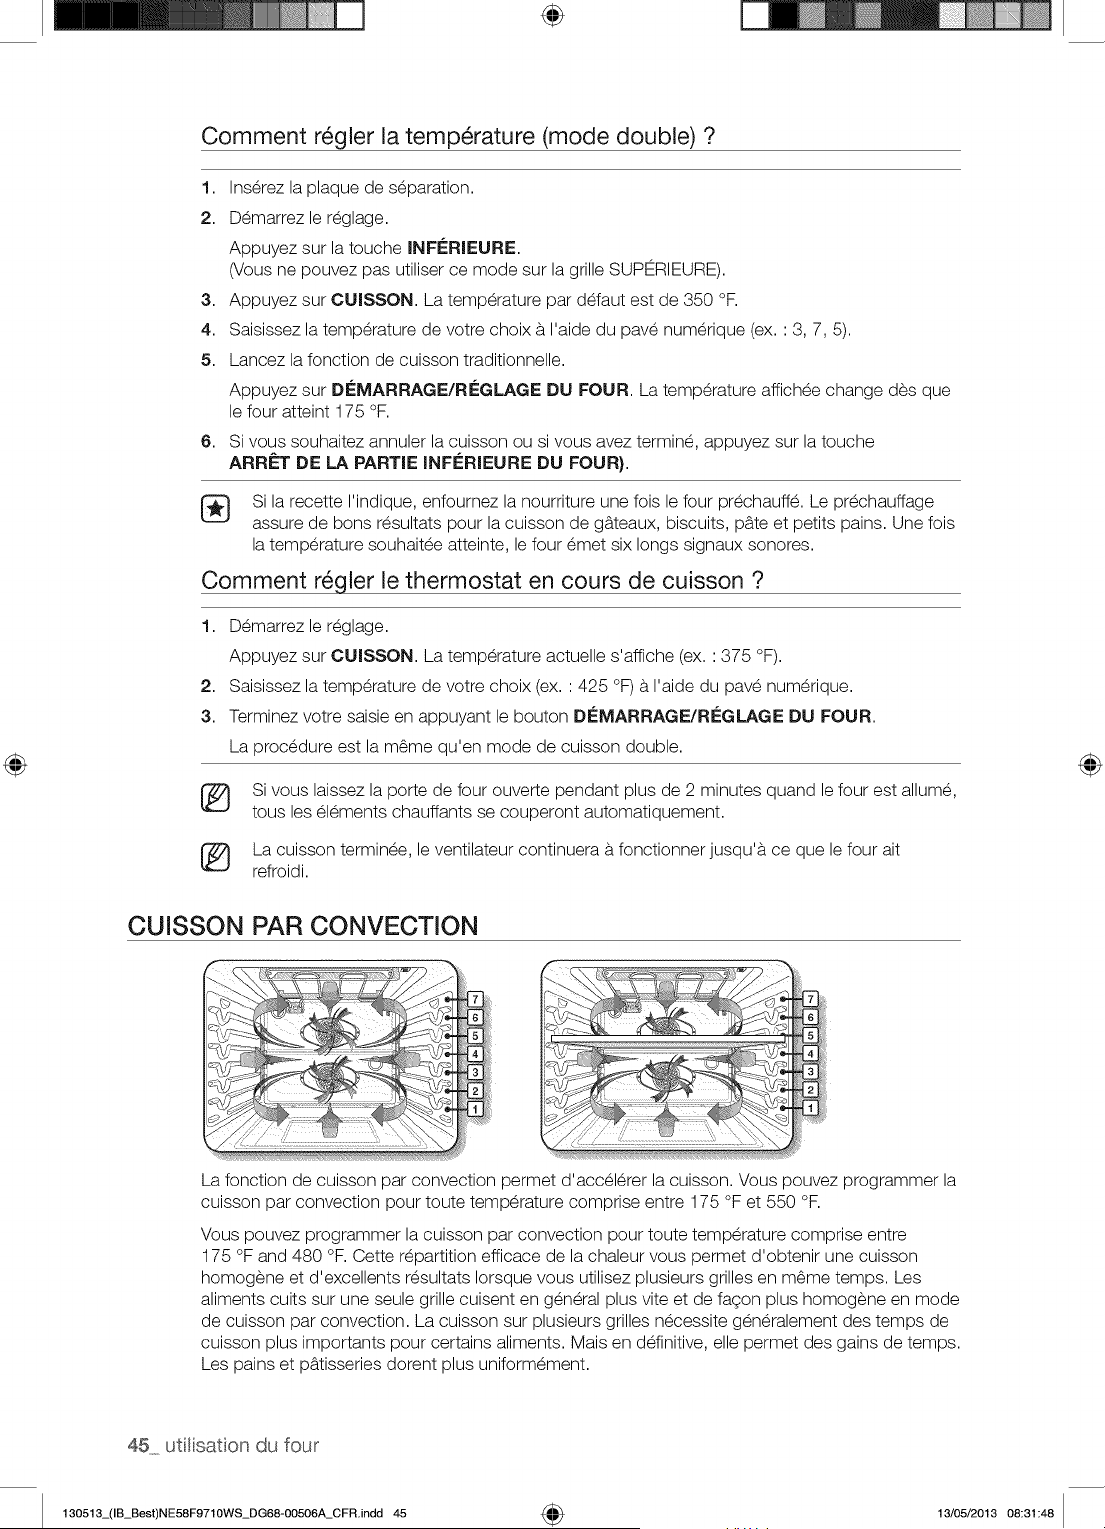
÷
Comment r_gler la temperature (mode double) ?
1. Inserez la plaque de separation.
2. Demarrezle reglage.
Appuyez sur la touche INFi_RIEURE.
(Vous ne pouvez pas utiliser ce mode sur la grille SUPERIEURE).
3. Appuyez sur CUISSON. La temperature par defaut est de 350 °R
4. Saisissez la temperature de votre choix a I'aide du pave numerique (ex. : 3, 7, 5).
5. Lancez la fonction de cuisson traditionnelle.
Appuyez sur DCMARRAGE/RCGLAGE DU FOUR. La temperature affichee change des que
le four atteint 175 °F.
6. Si vous souhaitez annuler la cuisson ou si vous avez termine, appuyez sur la touche
ARRf=T DE LA PARTIE INFi_RIEURE DU FOUR}.
Si la recette I'indique, enfournez la nourriture une fois le four prechauffe. Le prechauffage
assure de bons resultats pour la cuisson de g_teaux, biscuits, p_te et petits pains. Une fois
la temperature souhaitee atteinte, le four emet six longs signaux sonores.
Comment r_qler le thermostat en cours de cuisson ?
1. Demarrezle reglage.
Appuyez sur CUISSON. La temperature actuelle s'affiche (ex. : 375 °F).
2. Saisissez la temperature de votre choix (ex. : 425 °F) a I'aide du pave numerique.
3. Terminez votre saisie en appuyant le bouton Di_MARRAGE/Ri_GLAGE DU FOUR.
La procedure est la m6me qu'en mode de cuisson double.
®
®
Si vous laissez la porte de four ouverte pendant plus de 2 minutes quand le four est allume,
tousles elements chauffants se couperont automatiquement.
La cuisson terminee, le ventilateur continuera b.fonctionner jusqu'b, ce que le four ait
refroidi.
CUISSON PAR CONVECTION
?
m
_h
La fonction de cuisson par convection permet d'accelerer la cuisson. Vous pouvez programmer la
cuisson par convection pour toute temperature comprise entre 175 °F et 550 °F.
Vous pouvez programmer la cuisson par convection pour toute temperature comprise entre
175 °F and 480 °F. Cette repartition efficace de la chaleur vous permet d'obtenir une cuisson
homogene et d'excellents resultats Iorsque vous utilisez plusieurs grilles en m_me temps. Les
aliments cuits sur une seule grille cuisent en general plus vite et de fagon plus homogene en mode
de cuisson par convection. La cuisson sur plusieurs grilles necessite generalement des temps de
cuisson plus importants pour certains aliments. Mais en definitive, elle permet des gains de temps.
Les pains et p_tisseries dorent plus uniformement.
45_ ut[Hsat on du four
130513_(IB_Best)NE58F9710WS_DG68-00506A_CFR.indd 45 4_ 13/05/2013 08:31:48
Conseil pour la cuisson par convection (mode unique)
Le temps gagn_ d_pend de la quantit_ et du type d'aliments que vous cuisinez. Pour cuire des
petits g_tteaux ou des biscuits, utilisez de preference des plats sans rebords ou dont les rebords
sont tres bas afin que I'air chauff_ circule autour de la nourriture. L'utilisation d'un moule b.
rev_tement fonc_ r_duit le temps de cuisson.
Lorsque vous cuisez des aliments par convection sur une seule grille, positionnez la grille sur
la hauteur 4. Si vous utilisez plusieurs grilles, positionnez-les aux niveaux 2 et 5 (Iorsque vous
cuisez des cookies) ou aux niveaux 2 et 4 (Iorsque vous cuisez des g_tteaux).
Comment r_gler le four pour la cuisson par convection (mode unique) ?
1. Lancez le mode de cuisson par convection.
Appuyez sur _ Cuisson. La temperature par d_faut est de 350 °F.
2. Saisissez la temperature de votre choix (ex. : 400 °F) b.I'aide du pav_ num_rique. Veillez b. bien
saisir la temperature correspondant b.la recette.
3. Appuyez sur le bouton Di_MARRAGE/RI_GLAGE DU FOUR pour lancer la cuisson par
convection.
L'icOne Cuisson par convection ainsi que la temperature r_gl_e (ex. : 400 °F) s'affichent
pendant 2 secondes.
La temperature affich_e change des que le four atteint 175 °F.
Un bip retentit 6 fois Iorsque le four atteint la temperature r_gl_e.
4. Appuyez sur la touche ARRf=T DU FOUR pour d_sactiver ou annulet la cuisson par
convection.
Comment r_gler le four pour la culsson par convection (mode double) ?
Ins_rez la plaque de s_paration dans le four.
1. Lancez le mode de cuisson par convection.
Appuyez sur la touche SUPi_RIEURE ou INFi_RIEURE pour s_lectionner la plaque de
s_paration dans laquelle vous souhaitez effectuer la cuisson.
Appuyez sur _') Cuisson. La temperature par d_faut est de 350 °F.
Saisissez la temperature de votre choix (ex. : 400 °F) b.I'aide des paves num_riques.
Vous pouvez choisir une temperature comprise entre 175 °F et 480 °F.
Appuyez sur le bouton Di_MARRAGE/RI_GLAGE DU FOUR pour lancer la cuisson par
convection.
L'icOne Cuisson par convection ainsi que la temperature r_gl_e (ex. : 400 °F) s'affichent
pendant 2 secondes.
La temperature affich_e change des que le four atteint 175 °F.
Un bip retentit 6 fois Iorsque le four atteint la temperature r_gl_e.
Pour d_sactiver ou annulet la cuisson par convection, appuyez sur la touche ARRf=T DE LA
PARTIE SUPERIEURE DU FOUR ou ARRf=T DE LA PARTIE INFi_RIEURE DU FOUR}
selon la plaque de s_paration que vous souhaitez d_sactiver.
2,
3.
4,
5,
La ventilationde la cuisson par convection se desactive des que la porte du four est ouverte.
EVITEZde laisserla porte ouverte pendant une periode prolongee Iorsquevous utilisez lacuisson par
convection. Sinon, vous reduisezla duree de vie de I'elementde chauffepar convection.
Si vous laissezla porte de four ouverte pendant plus de 2 minutes quand le four est allume, tous les
elements chauffants se couperont automatiquement.
(_ La cuisson terminee, leventilateur continuera b.fonctionner jusqu'b,ce que le four ait refroidi.
utilisaton du four 46
130513_(IB_Best)NE58F9710WS_DG68-00506A_CFR.indd 46 13/05/2013 08:31:48
ROTiSSAGE PAR CONVECTION
Le rOtissage par convection est conseill_ pour la cuisson de morceaux de viande tres tendres qu'il
faut preparer sans couvrir.
La chaleur provient de I'_l_ment chauffant sup_rieur. Le ventilateur de convection distribue I'air
chauff_ de mani_re uniforme sur la nourriture et autour. La viande et la volaille sont dories de
toute part, comme apres une cuisson en rStissoire. L'air chauff_ se m_lange rapidement au jus
pour une cuisson moelleuse et tendre du morceau tout en dorant parfaitement I'ext_rieur.
Comment r_gler le four pour le r6tissage par convection (mode unique) ?
1. Lancez le mode de rOtissage par convection.
Appuyez sur (_ R6tir. La temperature par d_faut est de 350 °F.
2. Saisissez la temperature de votre choix (ex. : 400 °F) b.I'aide du pav_ num_rique.
3. Appuyez sur Di'=MARRAGE/Ri'=GLAGE DU FOUR pour lancer le r6tissage par convection.
L'ic6ne Conv.Roast (R6tissage par convection) et la temperature r_gl_e (ex. : 400 °F)
s'affichent pendant 2 secondes.
La temperature affich_e change des que le four atteint 175 °F.
Un bip retentit 6 fois Iorsque le four atteint la temperature r_gl_e.
4. Appuyez sur la touche ARRi'=T DU FOUR pour d_sactiver ou annulet le r6tissage par
convection.
Comment r_gler le four pour le r6tissage par convection (mode double) ?
1. Ins_rez la plaque de s_paration dans le four.
2. Lancez le mode de rOtissage par convection.
Appuyez sur la touche SUPi'--RIEURE.
3. Appuyez sur (2_)R6ti.
La temperature par d_faut est de 350 °F.
4. Appuyez sur le bouton Di'=MARRAGE/RI'=GLAGE DU FOUR pour lancer le r6tissage par
convection.
5, Appuyez sur la touche ARRET DE LA PARTIE SUPi'=RIEURE DU FOUR pour d_sactiver ou
annulet le rOtissage par convection.
®
La ventilation de la cuisson par convection se desactive des que la porte du four est
ouverte. EVlTEZ de laisser la porte ouverte pendant une p_riode prolong_e Iorsque vous
utilisez la cuisson par convection. Sinon, vous r_duisez la dur_e de vie de I'_l_ment de
chauffe par convection.
[_ Si vous laissez la porte de four ouverte pendant plus de 2 minutes quand le four est allum_,
tousles _l_ments chauffants se couperont automatiquement.
[_ La cuisson termin_e, le ventilateur continuera b.fonctionner jusqu'b, ce que le four ait
refroidi.
47 utlisation du four
130513_(IB_Best)NE58F9710WS_DG68-00506A_CFR.indd 47 13/05/2013 08:31:48
CUISSON MINUTI E
Durant la cuisson minutee, le four s'allume immediatement et fonctionne pendant laduree que vous avez
selectionn6e._, la fin du temps de cuisson, lefour s'eteint automatiquement.
* Vous ne pouvez utiliser lafonction de duree de cuisson qu'en paralleleavec une autre option de cuisson
(Cuissontraditionnelle,Cuisson par convection, R6tissage par convection, Cuisson saineou Cuisson
favorite).
Comment r_gler le four pour un temps de cuisson sp_cifi_ (mode unique) ?
1. Entrezle reglage.
Appuyez sur le bouton correspondant b.la fonction de cuisson souhaitee,
par ex : CUISSON PAR CONVECTION. La temperature par ddaut est de 350 °R
C
2. Saisissezla temperaturede votre choix (ex. : 375 °F) b.I'aide du pave numerique. -4
r-
3. Appuyez sur latouche TEMPS DE CUISSON
4. Saisissezle temps de cuisson de votre choix (ex.: 45 min)b.I'aide du pave numerique.
Pour regler le temps de cuisson, selectionnezune duree comprise entre 1 minute et 9 heures 99 minutes. O
5. Appuyez sur le bouton DEMARRAGE/RI#GLAGEDU FOUR pour lancer la cuisson.
C
La temperature affichee change des que lefour atteint 175 °F. m
Le four continue de chauffer jusqu'b,ce que la duree reglee s'ecoule, puis s'eteint automatiquement sauf 8
si lafonction de maintienau chaud a ete reglee(reportez-vousau chapitre relatif b.la fonction de maintien :::u
au chaud, page 55).
6. Vous pouvez annulet un temps de cuisson b.tout moment en appuyant sur ARR#T DU FOUR.
Comment r_gler le four pour un temps de cuisson sp_cifi_ (mode double) ?
Ins@ez la plaque de separation dans le four.
1. Entrezle reglage.
Appuyez sur SUP#RIEURE ou INF#RIEURE pour le mode de cuisson que vous souhaitez.
2. Appuyez sur le bouton correspondant b.la fonction de cuisson souhaitee,
par ex : CUISSON PAR CONVECTION. La temperature par ddaut est de 350 °R
3. Saisissezla temperaturede votre choix (ex. : 375 oF)b.I'aide du pave numerique.
4. Appuyez sur latouche TEMPS DE CUISSON
5. Saisissezle temps de cuisson de votre choix (ex.: 45 min)b.I'aide du pave numerique.
Pour regler letemps de cuisson, selectionnezunevaleur comprise entre 1 minute et 9 heures99 minutes.
6. Appuyez sur le bouton DI£MARRAGE/R#GLAGE DU FOUR pour lancer la cuisson.
7. Vous pouvez annuler un temps de cuissonb.tout moment en appuyant surARRI_T DU FOUR.
Si la recette I'indique, enfournez la nourriture une fois le four prechauffe. Le prechauffage
est essentiel pour la cuisson de g_tteaux, biscuits, pb.te et petits pains. Une fois la
temperature souhaitee atteinte, le four emet six longs signaux sonores.
ATTENTION
Soyez prudent Iorsque vous utnlsezles fonctions de temps de cuJsson ou de d_part differ&
UtlllSeZ ces fonotions Dour a cuisson des viandes salees ou surgelee; alnsl que de la DluDaH
des fruits et legumes. Les aliments Douvant s'alterer facnement (ex. : lalL ceJfs. Doisson.vlande
ou vo_ame,dowent sortir directement du rdrigerateur. M6me rdrigeres, ces aumen[s ne doivent
oas reDoserau four Dendan[ plus d'une heure avant le demarrage de la cuisson. De D_us.us
doivent 6tre retires raDidement une lois la cuisson terminee. La consomma[_on d'aliments gb.tes
oeut entraTnerdes maladies liees b.un emDolsonnement anmentalre.
uti[isaton du four 48
130513_(IB_Best)NE58F9710WS_DG68-00506A_CFR.indd 48 13/05/2013 08:31:49
DISPART DIFFE RI
Durant la cuisson minut_e diff_ree, la minuterie du four permet d'allumer et d'_teindre le four aux
heures que vous avez s_lectionn_es pr_alablement.
,, Vous ne pouvez utiliser la fonction de D_part differ_ qu'en parallele avec une autre option de
cuisson (Cuisson traditionnelle, Cuisson par convection, R6tissage par convection, Cuisson
saine ou Cuisson favorite).
Vous pouvez r_gler le four pour un d_part diff_r_ avant de r_gler les autres options de cuisson.
L'horloge doit _tre r_gl_e sur I'heure actuelle.
Comment r_gler le four pour un d_part diff_r_ (mode unique) ?
1. Positionnez la ou les grilles du four sur la hauteur appropri_e et enfournez les aliments.
2. Entrez le r_glage.
Appuyez sur le bouton correspondant b.la fonction de cuisson souhaitee,
par ex : CUIS$ON PAR CONVECTION. La temperature par defaut est de 350 °R
3. _, I'aide du pave numerique, saisissez la temperature de votre choix (ex. : 375 °F).
4. Appuyez sur la touche TEMPS DE OUISSON
5. Saisissez le temps de cuisson de votre choix (ex. : 45 min) b.I'aide du pav_ num_rique.
Pour r_gler le temps de cuisson, s_lectionnez une dur_e comprise entre 1 minute et 9 heures
99 minutes.
6. Appuyez sur DEPART DIFFERI_.
7. Saisissez I'heure b.laquelle vous souhaitez que le four s'allume (ex. : 4h30) b.I'aide du pav_
num_rique.
8. Appuyez sur D(-=MARRAGE/RC;GLAGE DU FOUR.
I'heure r_gl_e, un court signal sonore retentit. Le four commence alors b.chauffer. Une fois la
temp6rature souhait6e atteinte, le four 6met six longs signaux sonores.
Comment r_gler le four pour un d_part diff_r_ (mode double) ?
Ins_rez la plaque de s_paration dans le four.
1. Positionnez la ou les grilles du four sur la hauteur appropri_e et enfournez les aliments.
2. Entrez le r_glage.
Appuyez sur SUPC;RIEURE ou INFC;RIEURE pour le mode de cuisson que vous souhaitez.
3. Appuyez sur le bouton correspondant b.la fonction de cuisson souhaitee,
par ex : CUISSON PAR CONVECTION. La temperature par defaut est de 350 °R
4. A I'aide du pav_ num_rique, saisissez la temperature de votre choix (ex. : 375 °F).
5. Appuyez sur la touche TEMPS DE CUISSON
6. Saisissez le temps de cuisson de votre choix (ex. : 45 min) b.I'aide du pav_ num_rique.
Pour r_gler le temps de cuisson, s_lectionnez une dur_e comprise entre 1 minute et 9 heures
99 minutes.
7. Appuyez sur DEPART DIFFERI_.
8. Saisissez I'heure b.laquelle vous souhaitez que le four s'allume (ex. : 4h30) b.I'aide du pav_
num_rique.
9. Appuyez sur D(-=MARRAGE/RC;GLAGE DU FOUR.
I'heure r_gl_e, un court signal sonore retentit. Le four commence alors b.chauffer. Une fois la
temperature souhait_e atteinte, le four _met six longs signaux sonores.
®
Si la recette I'indique, enfournez la nourriture une fois le four pr_chauff_. Le pr_chauffage
est essentiel pour la cuisson de g_tteaux, biscuits, pb.te et petits pains. Une fois la
temperature souhait_e atteinte, le four _met six longs signaux sonores.
49 utlisation du four
130513_(IB_Best)NE58F9710WS_DG68-00506A_CFR.indd 49 13/05/2013 08:31:49
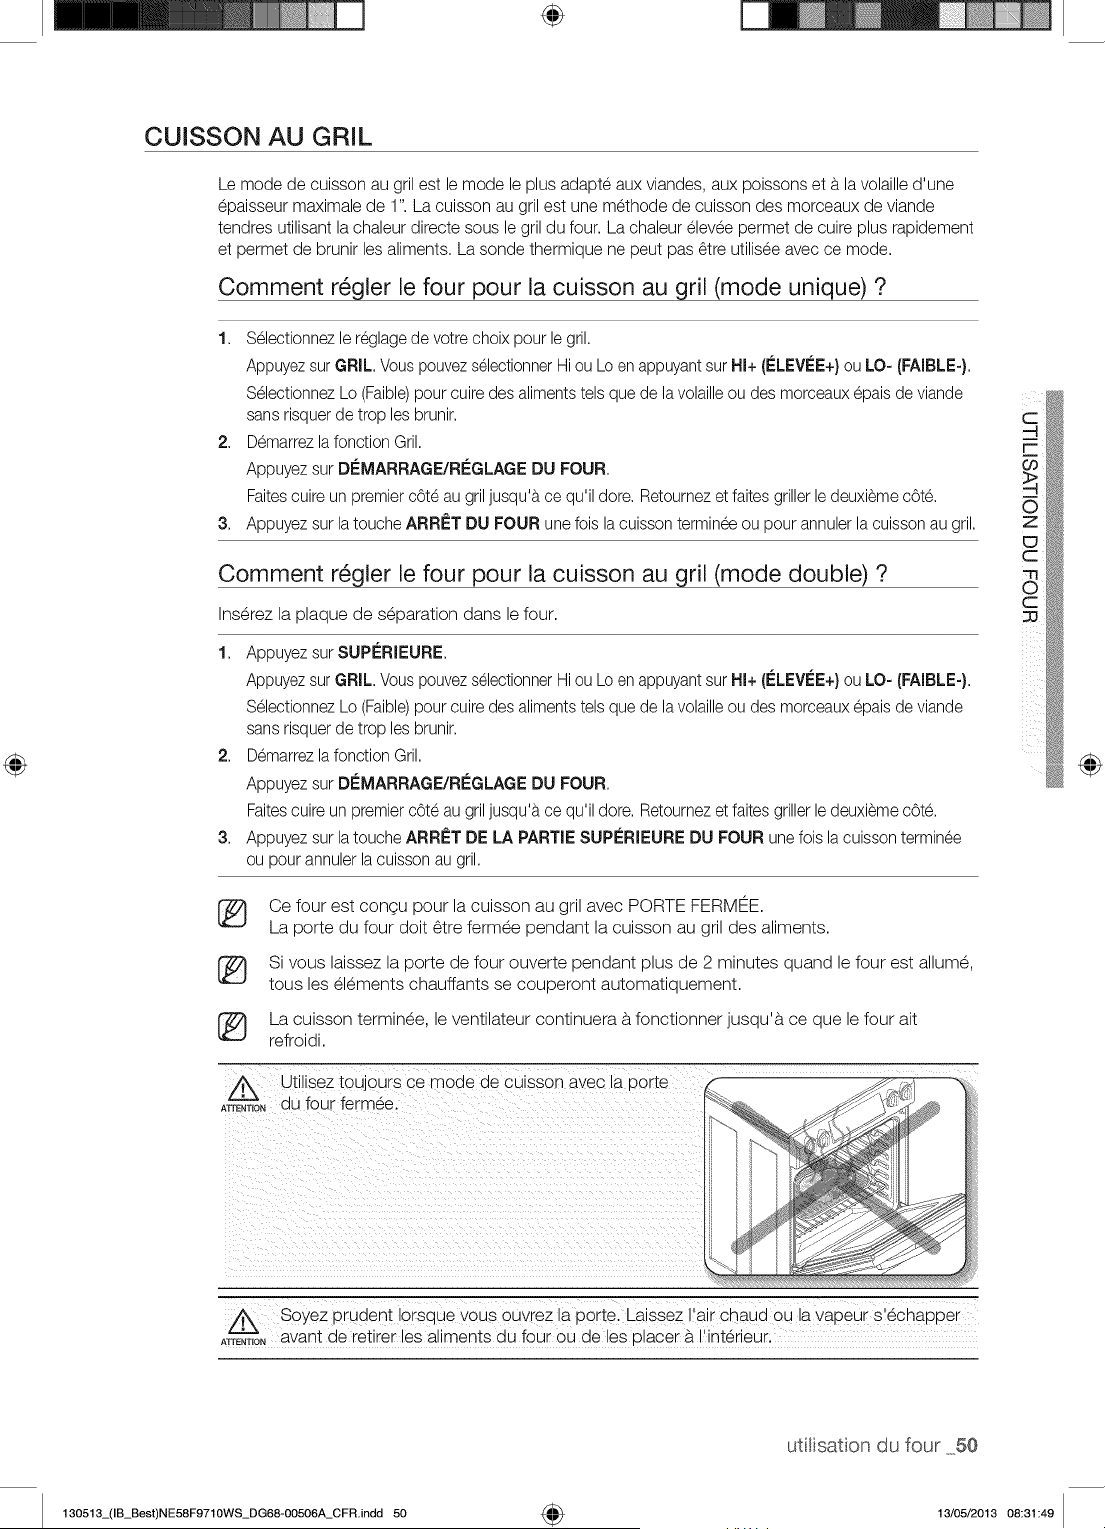
÷
CUISSON AU GRIL
Le mode de cuisson au gril est le mode le plus adapte aux viandes, aux poissons eta. la volaille d'une
epaisseur maximale de 1". La cuisson au gril est une methode de cuisson des morceaux de viande
tendres utilisant la chaleur directe sous le gril du four. La chaleur elevee permet de cuire plus rapidement
et permet de brunir les aliments. La sonde thermique ne peut pas _tre utilisee avec ce mode.
Comment r_gler le four pour la cuisson au gril (mode unique) ?
1. S_lectionnezle r_glage de votre choix pour le gril,
Appuyezsur GRIL, VouspouvezselectionnerHi ou Lo en appuyantsur HI+ (ELEVEE+)ou LO- (FAIBLE-),
S_lectionnez Lo (Faible)pour cuire des aliments tels que de lavolailleou des morceaux@ais de viande
sans risquerde trop les brunir.
2. Demarrezlafonction Gril.
Appuyez sur D_=MARRAGE/REGLAGEDU FOUR,
Faitescuire un premier cOt_au gril jusqu'b,ce qu'il dote. Retoumezet faitesgriller le deuxieme cOte.
Appuyez sur latouche ARR_=TDU FOUR une fois la cuisson termineeou pour annuler la cuissonau gril,
3.
Comment r_gler le four pour la cuisson au gril (mode double) ?
Inserez la plaque de separation dans le four.
1,
2.
3.
Appuyez sur SUPERIEURE,
Appuyezsur GRIL, Vous pouvezselectionnerHi ou Lo en appuyantsur HI+ (ELEVI;E+)ou LO- (FAIBLE-),
S_lectionnez Lo (Faible)pour cuire des aliments tels que de lavolailleou des morceaux@ais de viande
sans risquerde trop les brunir,
Demarrezlafonction Gril,
Appuyez sur D_=MARRAGE/RCGLAGEDU FOUR,
Faitescuire un premier cOt_au gril jusqu'b,ce qu'il dote, Retoumezet faitesgriller le deuxieme cOte.
Appuyez sur latouche ARR_=TDE LA PARTIE SUPLeRIEUREDU FOUR une fois la cuisson terminee
ou pour annuler la cuisson au gril.
®
®
®
Ce four est congu pour la cuisson au gril avec PORTE FERMEE.
La porte du four doit 6tre fermee pendant la cuisson au gril des aliments.
Si vous laissez la porte de four ouverte pendant plus de 2 minutes quand le four est allume,
tousles elements chauffants se couperont automatiquement.
La cuisson terminee, le ventilateur continuera b.fonctionner jusqu'b, ce que le four ait
refroidi.
Z_ Utilisez toujours ce moae ae CUlSSOnavec la Dorte
ATrENT,O.du four fermee.
@
Z_ Soyez pruaent Iorsque vous ouvrez a porte. Laissez ratr cnaua ou tavapeur s'echaDDer
ATrENT,ONavant de retirer les aliments du four ou de les olacer b,I'interieur.
utitisaton du four 50
130513_(IB_Best)NE58F9710WS_DG68-OO506A_CFR.indd 50 4_ 13/05/2013 08:31:49
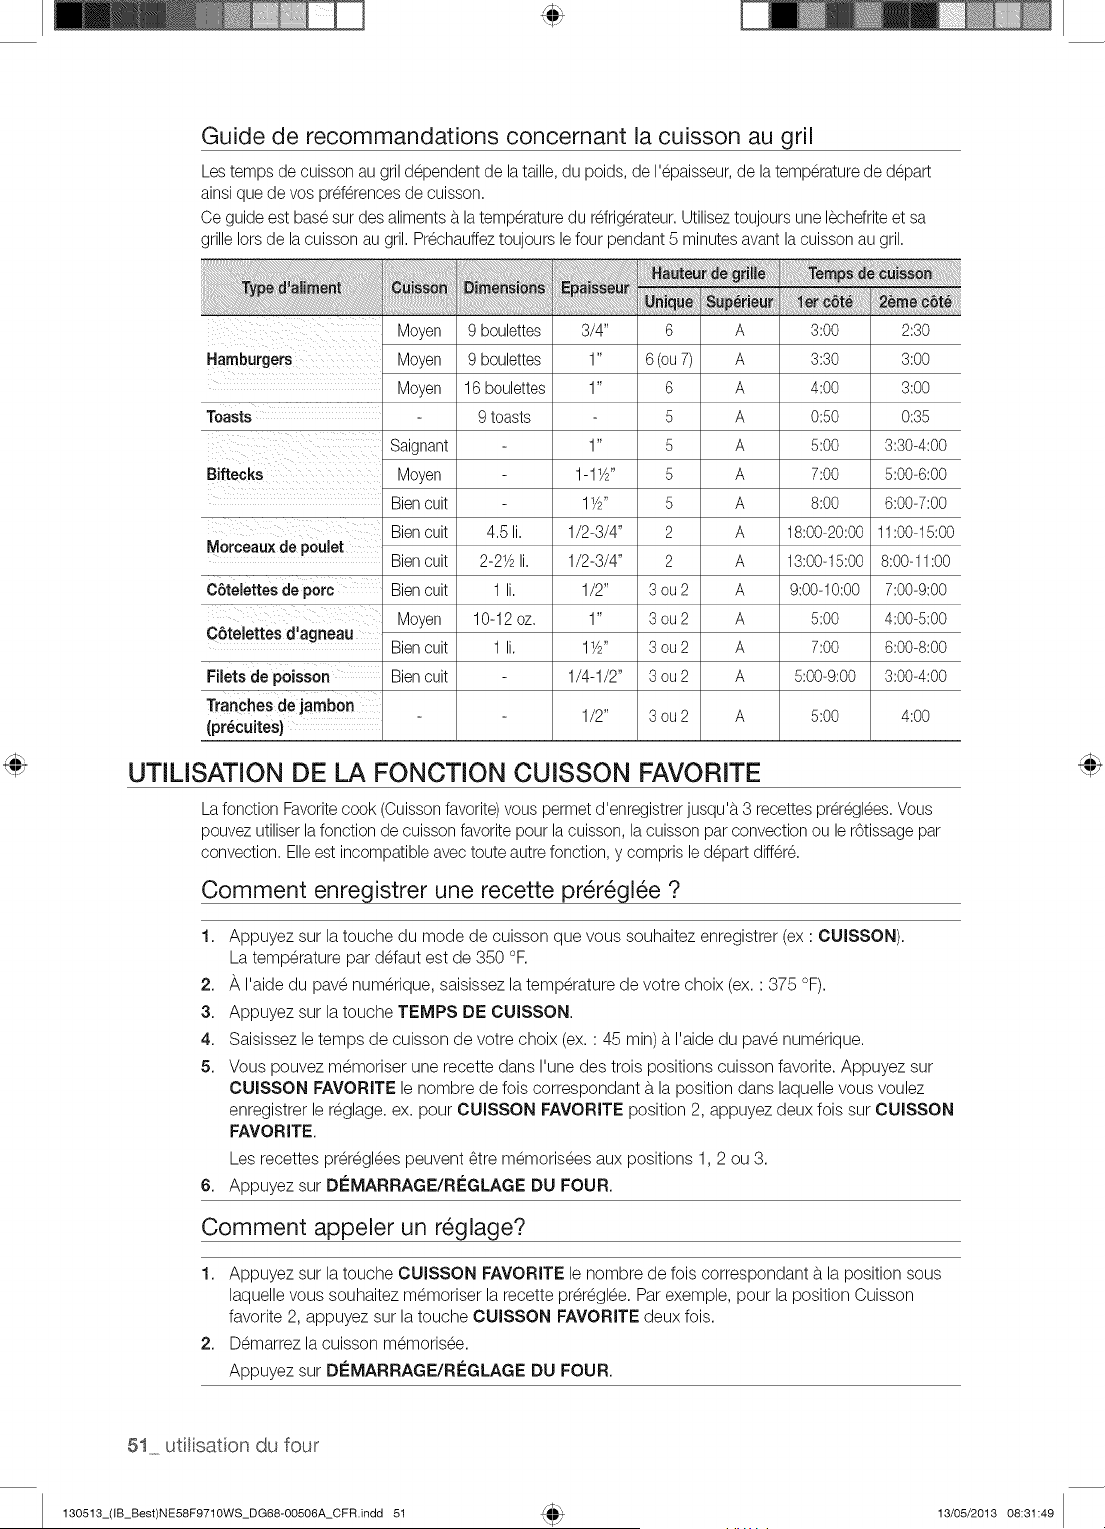
Guide de recommandations concernant la cuisson au gril
Lestemps de cuisson au gril d@endent de la taille, du poids, de I'@aisseur,de la temperaturede d@art
ainsi que de vos pref6rencesde cuisson.
Ce guide est base sur des aliments b.latemperaturedu refrig6rateur.Utiliseztoujours une lechefriteet sa
grille Iors de la cuisson au gril. Prechauffeztoujours le four pendant 5 minutes avant la cuissonau gril.
I I
Moyen 9 boulettes 3/4" 6 A 3:00 2:30
Hamburgers Moyen 9 boulettes 1" 6 (ou7) A 3:30 3:00
Moyen 16 boulettes 1" 6 A 4:00 3:00
Toasts 9 toasts 5 A 0:50 0:35
Saignant 1" 5 A 5:00 3:30-4:00
Biftecks Moyen 1-1Y#' 5 A 7:00 5:00-6:00
Bien cuit 1YS' 5 A 8:00 6:00-7:00
Morceaux de poulet
C6telettes de pore
C6telettes d'agneau
Filets de poisson
Tranches de jambon
(pr_cuites)
Bien cuit 4£ li. 1/2-3/4" 2 A 18:00-20:00 11:00-15:00
Bien cuit 2-21/2li. 1/2-3/4" 2 A 13:00-15:00 8:00-11:00
Bien cuit 1 li. 1/2" 3 ou 2 A 9:00-10:00 7:00-9:00
Moyen 10-12 oz. 1" 3 ou 2 A 5:00 4:006:00
Bien cuit 1 li. 1YS' 3 ou 2 A 7:00 6:00-8:00
Bien cuit 1/4-1/2" 3 ou 2 A 5:00-9:00 3:00-4:00
1/2" 3 ou 2 A 5:00 4:00
UTILiSATION DE LA FONCTION CUISSON FAVORITE
La fonction Favoritecook (Cuissonfavorite) vous permet d'enregistrer jusqu'b.3 recettes prer6gl6es.Vous
pouvez utiliserlafonction de cuisson favorite pour lacuisson, la cuisson par convection ou le r6tissage par
convection. Elleest incompatible avec toute autrefonction, y compris led@art differ&
Comment enregistrer une recette pr_r_gl_e ?
1. Appuyez sur la touche du mode de cuisson que vous souhaitez enregistrer (ex : CUISSON).
La temperature par defaut est de 350 °R
2. A I'aide du pave numerique, saisissez la temperature de votre choix (ex. : 375 °F).
3. Appuyez sur la touche TEMPS DE CUISSON.
4. Saisissez le temps de cuisson de votre choix (ex. : 45 min) b.I'aide du pave numerique.
5. Vous pouvez memoriser une recette dans I'une des trois positions cuisson favorite. Appuyez sur
CUISSON FAVORITE le nombre de fois correspondant b.la position dans laquelle vous voulez
enregistrer le reglage, ex. pour CUISSON FAVORITE position 2, appuyez deux fois sur CUISSON
FAVORITE.
Los recettes preregBes peuvent Ctre memorisees aux positions 1,2 ou 3.
6. Appuyez sur DEMARRAGE/REGLAGE DU FOUR.
Comment appeler un r_glage?
1. Appuyez sur la touche CUISSON FAVORITE le nombre de fois correspondant b.la position sous
laquelle vous souhaitez memoriser la recette preregBe. Par exemple, pour la position Cuisson
favorite 2, appuyez sur la touche CUISSON FAVORITE deux fois.
2. Demarrez la cuisson memorisee.
Appuyez sur DEMARRAGE/REGLAGE DU FOUR.
51 utlisation du four
130513_(IB_Best)NE58F971OWS_DG68-OO506A_CFR.indd 51 13/O5/2013 O8:31:49
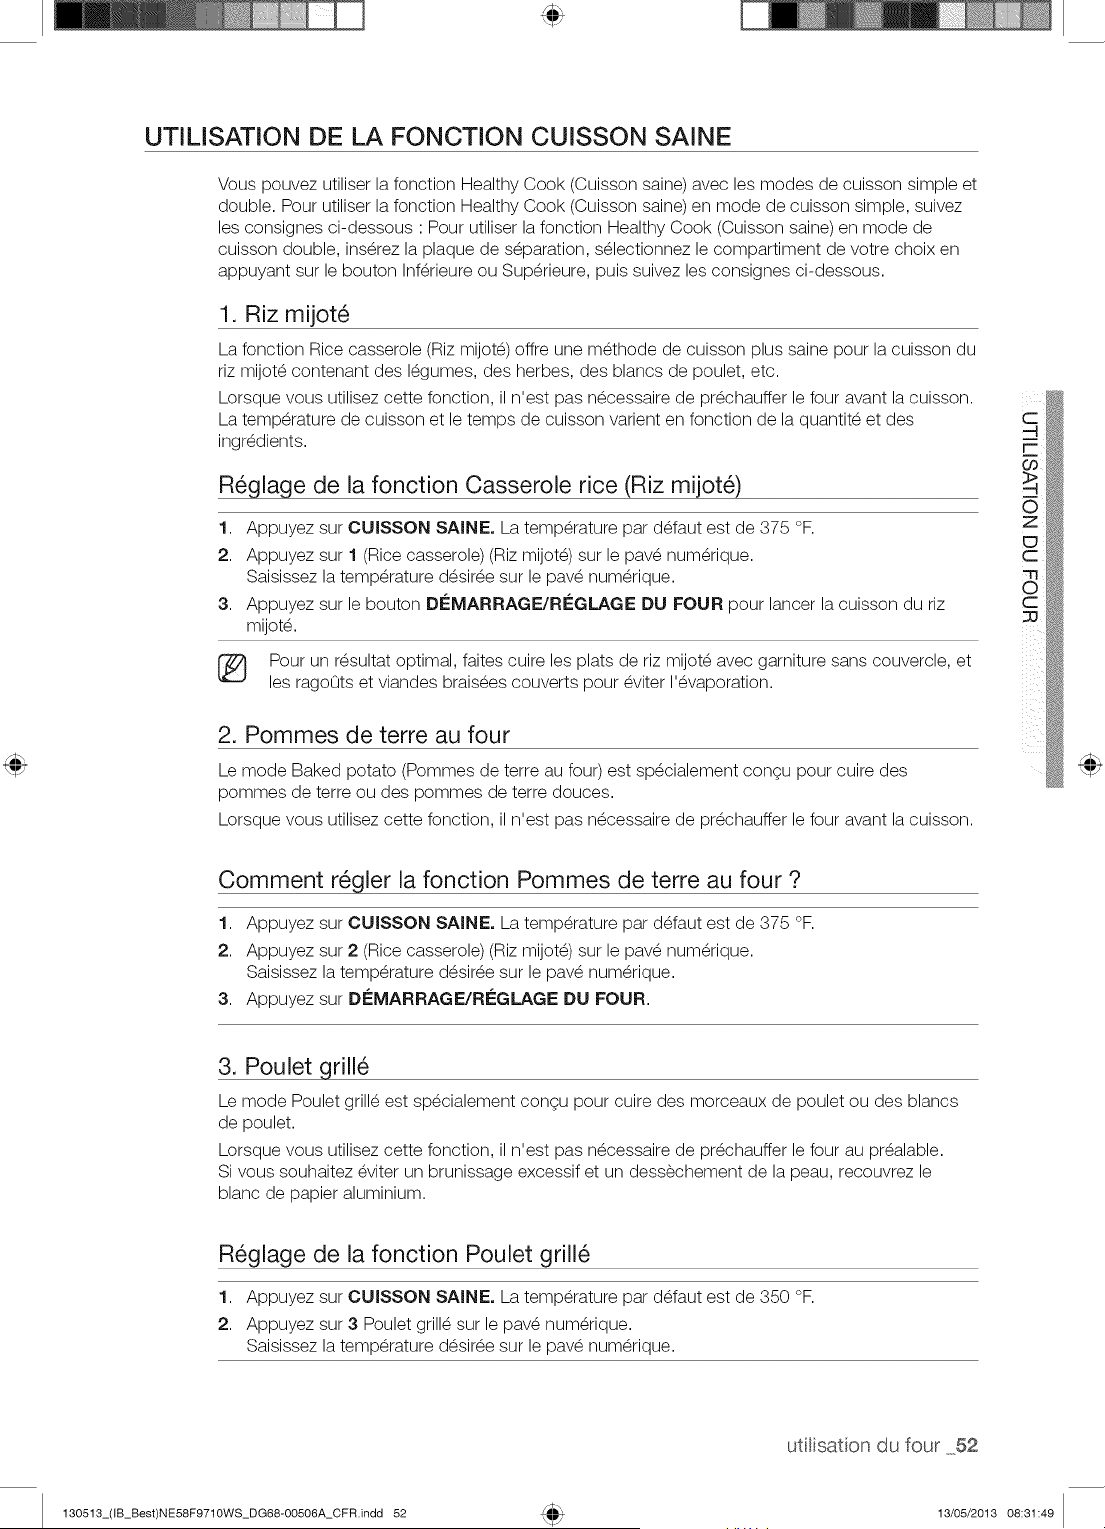
UTILISATION DE LA FONCTION CUISSON SAINE
Vous pouvez utiliser la fonction Healthy Cook (Cuisson saine) avec les modes de cuisson simple et
double. Pour utiliser la fonction Healthy Cook (Cuisson saine) en mode de cuisson simple, suivez
les consignes ci-dessous : Pour utiliser la fonction Healthy Cook (Cuisson saine) en mode de
cuisson double, ins_rez la plaque de separation, s_lectionnez le compartiment de votre choix en
appuyant sur le bouton Inf_rieure ou Sup_rieure, puis suivez les consignes ci-dessous.
1. Riz mijot_
La fonction Rice casserole (Riz mijot_) offre une m_thode de cuisson plus saine pour la cuisson du
riz mijot_ contenant des I_gumes, des herbes, des blancs de poulet, etc.
Lorsque vous utilisez cette fonction, il n'est pas n_cessaire de prechauffer le four avant la cuisson.
La temperature de cuisson et le temps de cuisson varient en fonction de la quantit_ et des
ingredients.
R_glage de la fonction Casserole rice (Riz mijot_)
1. Appuyez sur CUISSON SAINE. La temperature par d_faut est de 375 °F.
2. Appuyez sur 1 (Rice casserole) (Riz mijot_) sur le pav_ num_rique.
Saisissez la temperature d_sir_e sur le pav_ num_rique.
3. Appuyez sur le bouton Di_MARRAGE/RI_GLAGE DU FOUR pour lancer la cuisson du riz
mijot_.
Pour un r_sultat optimal, faites cuire les plats de riz mijot_ avec garniture sans couvercle, et
les ragoOts et viandes brais_es couverts pour _viter I'_vaporation.
2. Pommes de terre au four
Le mode Baked potato (Pommes de terre au four) est sp_cialement congu pour cuire des
pommes de terre ou des pommes de terre douces.
Lorsque vous utilisez cette fonction, il n'est pas n_cessaire de pr_chauffer le four avant la cuisson.
Comment r_gler la fonction Pommes de terre au four ?
1. Appuyez sur CUISSON SAINE. La temperature par d_faut est de 375 °F.
2. Appuyez sur 2 (Rice casserole) (Riz mijot_) sur le pav_ num_rique.
Saisissez la temperature d_sir_e sur le pav_ num_rique.
3. Appuyez sur DleMARRAGE/RC:GLAGE DU FOUR.
3. Poulet grill_
Le mode Poulet grill_ est sp_cialement congu pour cuire des morceaux de poulet ou des blancs
de poulet.
Lorsque vous utilisez cette fonction, il n'est pas n_cessaire de pr_chauffer le four au pr_alable.
Si vous souhaitez _viter un brunissage excessif et un dessechement de la peau, recouvrez le
blanc de papier aluminium.
R_glage de la fonction Poulet grill_
1. Appuyez sur CUISSON SAINE. La temperature par d_faut est de 350 °F.
2. Appuyez sur 3 Poulet grill_ sur le pav_ num_rique.
Saisissez la temperature d_sir_e sur le pav_ num_rique.
utilisaton du four 52
130513_(IB_Best)NE58F9710WS_DG68-00506A_CFR.indd 52 13/05/2013 08:31:49
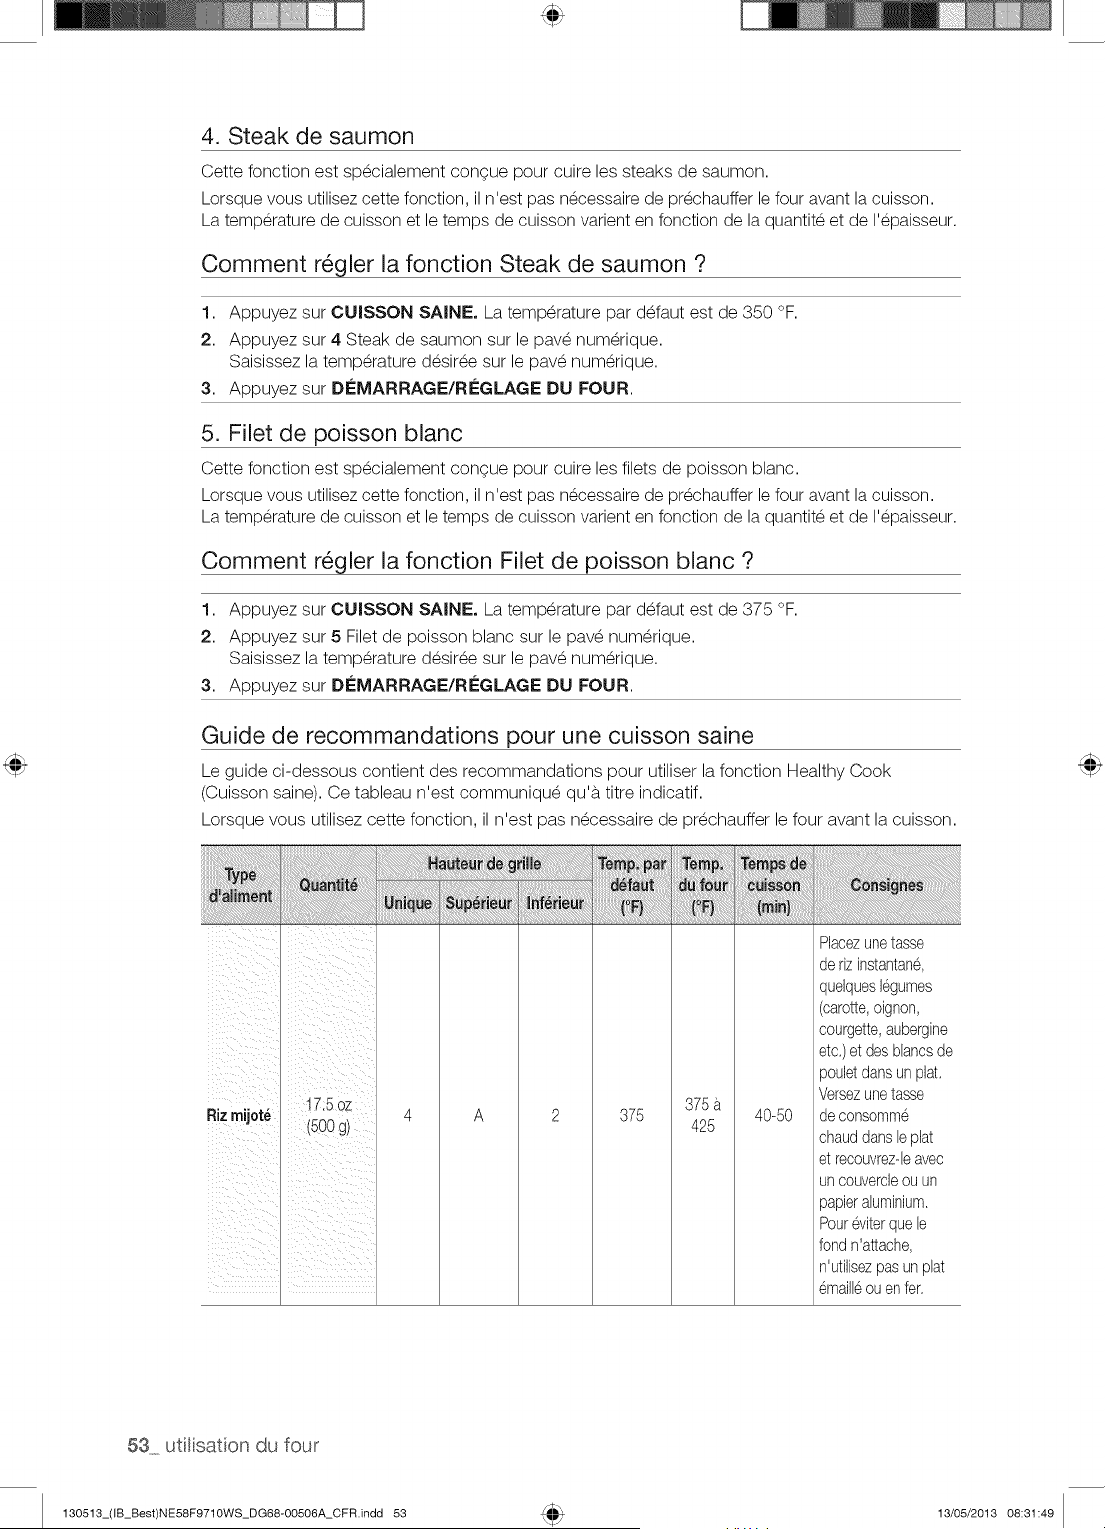
4. Steak de saumon
Cette fonction est sp_cialement congue pour cuire les steaks de saumon.
Lorsque vous utilisez cette fonction, il n'est pas necessaire de prechauffer le four avant la cuisson.
La temperature de cuisson et le temps de cuisson varient en fonction de la quantite et de I'epaisseur.
Comment r_gler la fonction Steak de saumon ?
1. Appuyez sur CUISSON SAINE. La temperature par d_faut est de 350 °F.
2. Appuyez sur 4 Steak de saumon sur le pav_ num_rique.
Saisissez la temperature d_sir_e sur le pav_ num_rique.
3. Appuyez sur DC:MARRAGE/RC:GLAGE DU FOUR.
5. Filet de poisson blanc
Cette fonction est sp_cialement congue pour cuire les filets de poisson blanc.
Lorsque vous utilisez cette fonction, il n'est pas necessaire de prechauffer le four avant la cuisson.
La temperature de cuisson et le temps de cuisson varient en fonction de la quantite et de I'epaisseur.
Comment r_gler la fonction Filet de poisson blanc ?
1. Appuyez sur CUISSON SAINE. La temperature par d_faut est de 375 °F.
2. Appuyez sur 5 Filet de poisson blanc sur le pav_ num_rique.
Saisissez la temperature d_sir_e sur le pav_ num_rique.
3. Appuyez sur DC:MARRAGE/RC:GLAGE DU FOUR.
Guide de recommandations pour une cuisson saine
Le guide ci-dessous contient des recommandations pour utiliser la fonction Healthy Cook
(Cuisson saine). Ce tableau n'est communiqu_ qu'b. titre indicatif.
Lorsque vous utilisez cette fonction, il n'est pas n_cessaire de pr_chauffer le four avant la cuisson.
i!_ii_i!_i_i!_!i!_!i!i!i_iiiiiiiiiiiiiiiiiiiiiiiiiiiiiiiiiiii!i!!!i!_!iii!_!_i_!_i!i_i_i_!_i_i!i_I!_!_!iiiii_i_i_!!_ii_!_¸_i_i!i_iii_!!!!!!!i!_!i!ii!ii!ii!ii!_!!_!_!!_i_i_i!ii_ii!ii!ii!iiiiiiiiiiiiiiiii_iiiiii!i!i_i_i
I
I
375
Rizmijot_ 4 A 2 375 425 40-50
i
I
i
i
Placezunetasse
de rizinstantane,
quelqueslegumes
(carotte,oignon,
courgette,aubergine
etc.)et des blancsde
pouletdansunplat.
Versezunetasse
de consomme
chauddansleplat
et reoouvrez-leavec
un couvercleou un
papieraluminium.
Poureviterquele
fondn'attache,
n'utilisezpasun plat
emaill6ou enfer.
53 utl[sat[on du four
130513_(IB_Best)NE58F9710WS_DG68-00506A_CFR.indd 53 13/05/2013 08:31:49
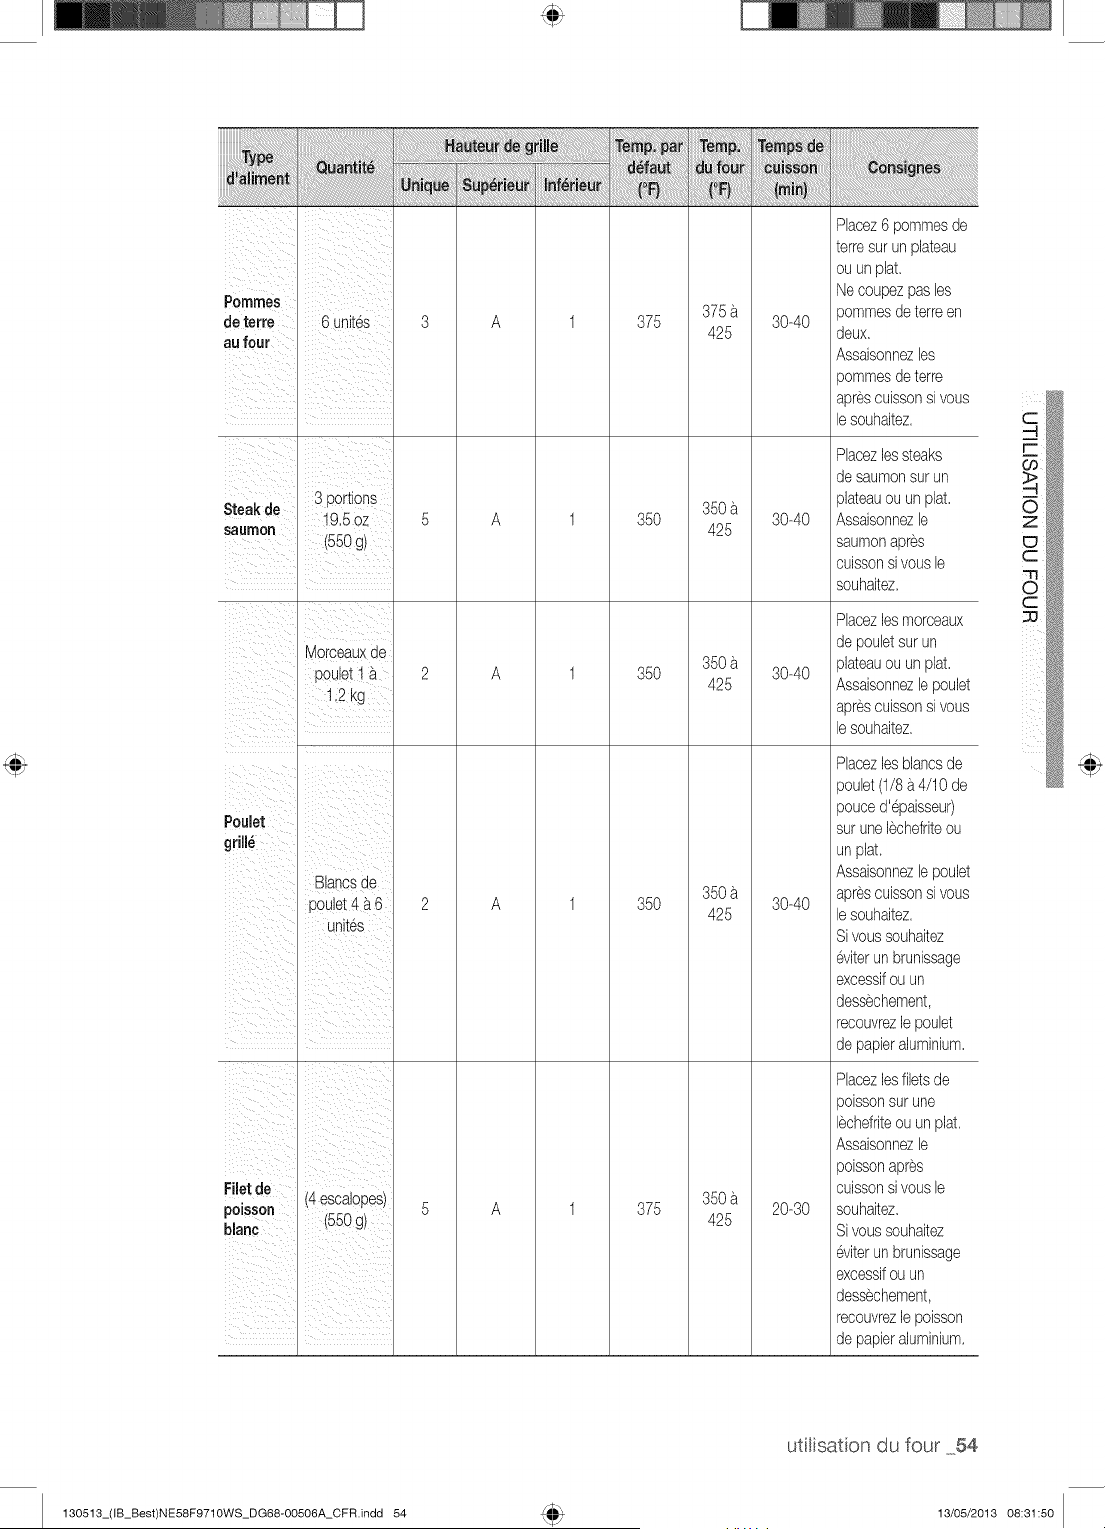
i!iii!ii! i ii ii!i!i i iiii!!i!!iiiiii ! ii! ii I !I!I!I!I
Pomnles
de terre 6 unites
au four
A 375
375
425
30-40
S. ,, 3 portions
_eaKae • _
/_,b OZ
saumon 550
(g)
Morceauxde
pouletI _
A
A
35O
35O
350
425
350
425
30-40
30-40
Poulet
grill_
Blancsde
poulet4 a 6
unites
A 35O
350
425
30-40
Filet de (4 escalopes)
poisson (550 g)
blanc
A 375
350
425
20-30
Placez6 pommesde
terresur un plateau
ou unplat
Necoupezpas les
pommesdeterreen
deux
Assaisonnezles
pommesdeterre
aprescuissonsi vous
lesouhaitez
Racezlessteaks
desaumonsurun
plateauou un plat
Assaisonnezle
saumonapres
cuissonsi vousle
souhaitez
Racezlesmorceaux
de pouletsurun
plateauou un plat
Assaisonnezlepoulet
aprescuissonsi vous
lesouhaitez
Phcezlesblancsde
poulet(1/8a4/10 de
pouced'epaisseu0
surunelechefriteou
unplat
Assaisonnezlepoulet
aprescuissonsi vous
lesouhaitez
Sivoussouhaitez
eviterun brunissage
excessifou un
dessechement,
recouvrezlepoulet
de papieraluminium
Placezlesfiletsde
poissonsur une
lechefriteouun plat
Assaisonnezle
poissonapres
cuissonsi vousle
souhaitez
Sivoussouhaitez
eviterun brunissage
excessifou un
dessechement,
recouvrezlepoisson
de papieraluminium
utilisaton du four 54
130513_(IB_Best)NE58F9710WS_DG68-OO506A_CFR indd 54 13/05/2013 08:31:50
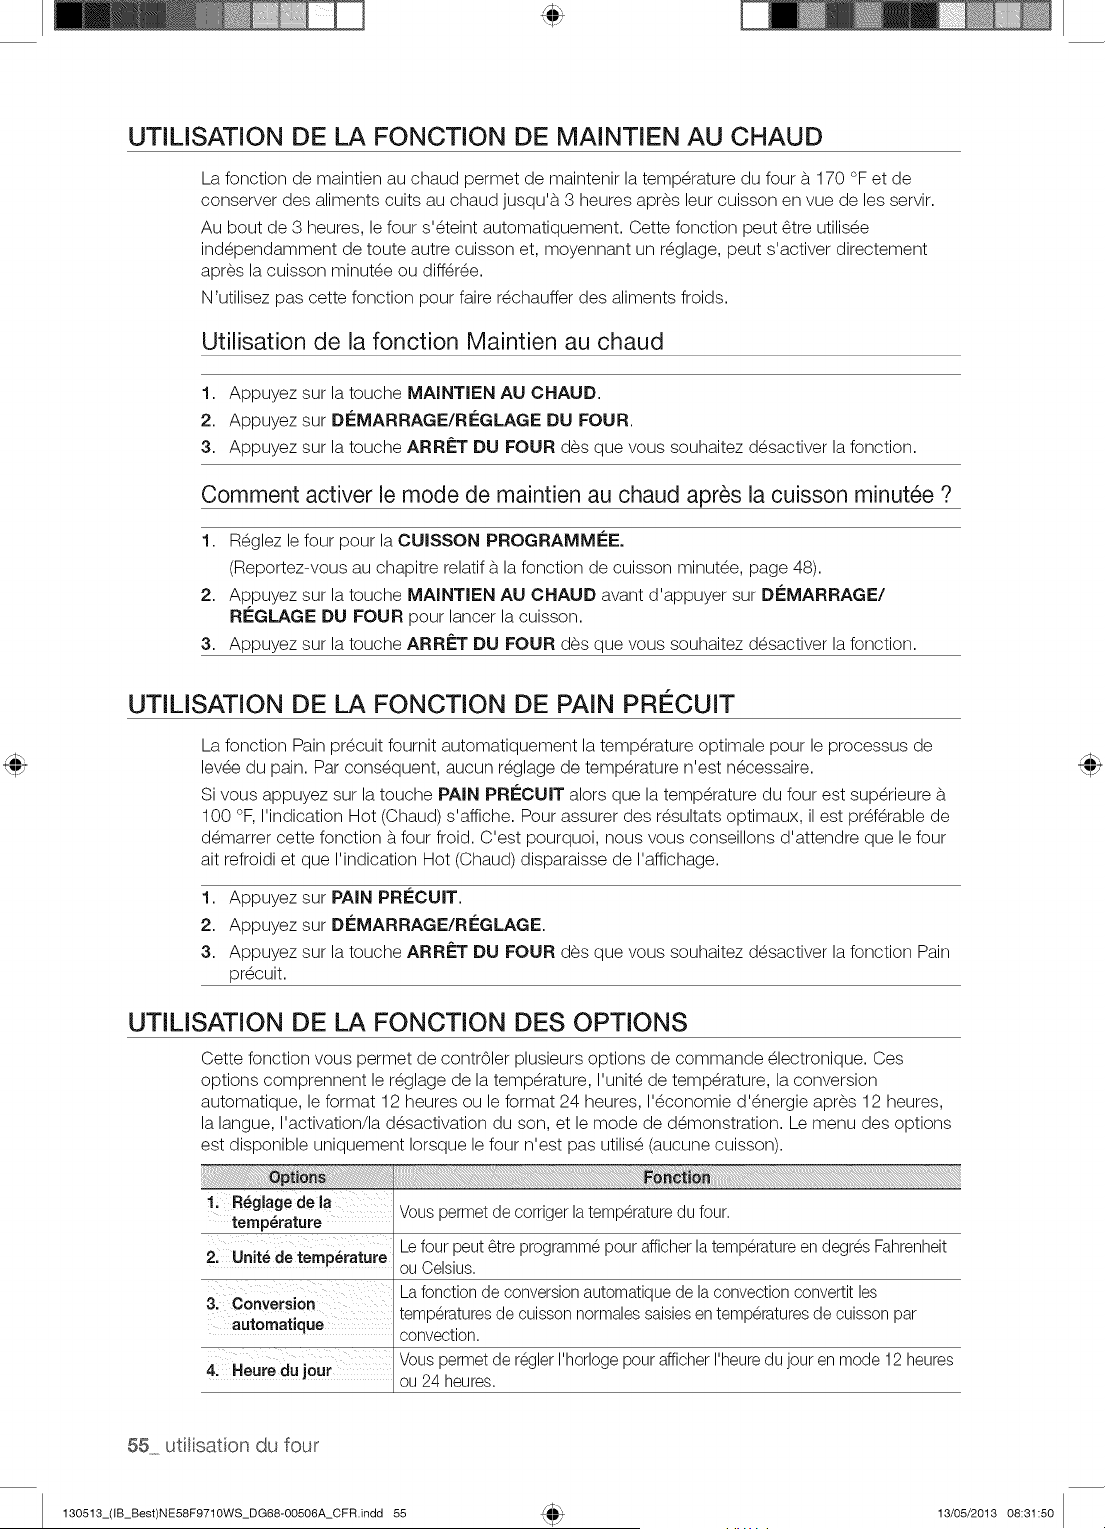
UTILISATION DE LA FONCTION DE MAINTIEN AU CHAUD
La fonction de maintien au chaud permet de maintenir la temperature du four b. 170 °F et de
conserver des aliments cuits au chaud jusqu'b. 3 heures apres leur cuisson en vue de les servir.
Au bout de 3 heures, le four s'_teint automatiquement. Cette fonction peut _tre utilis_e
ind_pendamment de toute autre cuisson et, moyennant un r_glage, peut s'activer directement
apres la cuisson minut_e ou diff_r_e.
N'utilisez pas cette fonction pour faire r_chauffer des aliments froids.
Utilisation de la fonction Maintien au chaud
1. Appuyez sur la touche MAINTIEN AU CHAUD.
2. Appuyez sur DleMARRAGE/RleGLAGE DU FOUR.
3. Appuyez sur la touche ARRf=T DU FOUR des que vous souhaitez d_sactiver la fonction.
Comment activer le mode de maintien au chaud apr_s la cuisson minut_e ?
1. R_glez le four pour la CUISSON PROGRAMMI_E.
(Reportez-vous au chapitre relatif b. la fonction de cuisson minut_e, page 48).
2. Appuyez sur la touche MAINTIEN AU CHAUD avant d'appuyer sur DleMARRAGE/
RI_GLAGE DU FOUR pour lancer la cuisson.
3. Appuyez sur la touche ARRf=T DU FOUR des que vous souhaitez d_sactiver la fonction.
UTILiSATION DE LA FONCTION DE PAIN PRI_CUIT
La fonction Pain pr_cuit fournit automatiquement la temperature optimale pour le processus de
levee du pain. Par consequent, aucun reglage de temperature n'est necessaire.
Si vous appuyez sur la touche PAIN PRECUIT alors que la temperature du four est sup_rieure b.
100 °F, I'indication Hot (Chaud) s'affiche. Pour assurer des r_sultats optimaux, il est preferable de
d_marrer cette fonction b.four froid. C'est pourquoi, nous vous conseillons d'attendre que le four
ait refroidi et que I'indication Hot (Chaud) disparaisse de I'affichage.
1. Appuyez sur PAiN PRleCUIT.
2. Appuyez sur DleMARRAGE/RleGLAGE.
3. Appuyez sur la touche ARRf=T DU FOUR des que vous souhaitez d_sactiver la fonction Pain
pr_cuit.
UTILiSATION DE LA FONCTION DES OPTIONS
Cette fonction vous permet de contr61er plusieurs options de commande _lectronique. Ces
options comprennent le r_glage de la temperature, I'unit_ de temperature, la conversion
automatique, le format 12 heures ou le format 24 heures, I'_conomie d'_nergie apres 12 heures,
la langue, I'activation/la d_sactivation du son, et le mode de d_monstration. Le menu des options
est disponible uniquement Iorsque le four n'est pas utilis_ (aucune cuisson).
1; R_giagedela ....
temperature Vous permet de corriger la temperature du four.
2; Unit_ de temperature Le four peut _tre programme pour afficher latemperature en degres Fahrenheit
ou Celsius.
3: Conversion Lafonction de conversionautomatique de la convection convertit les
automatique temperaturesde cuisson normalessaisiesen temperaturesde cuisson par
convection.
Vous permet de regler I'horloge pour afficher I'heuredu jour en mode 12 heures
4, Heuredu jour ou 24 heures.
55 utlisation du four
130513_(IB_Best)NE58F9710WS_DG68-00506A_CFR.indd 55 13/05/2013 08:31:50
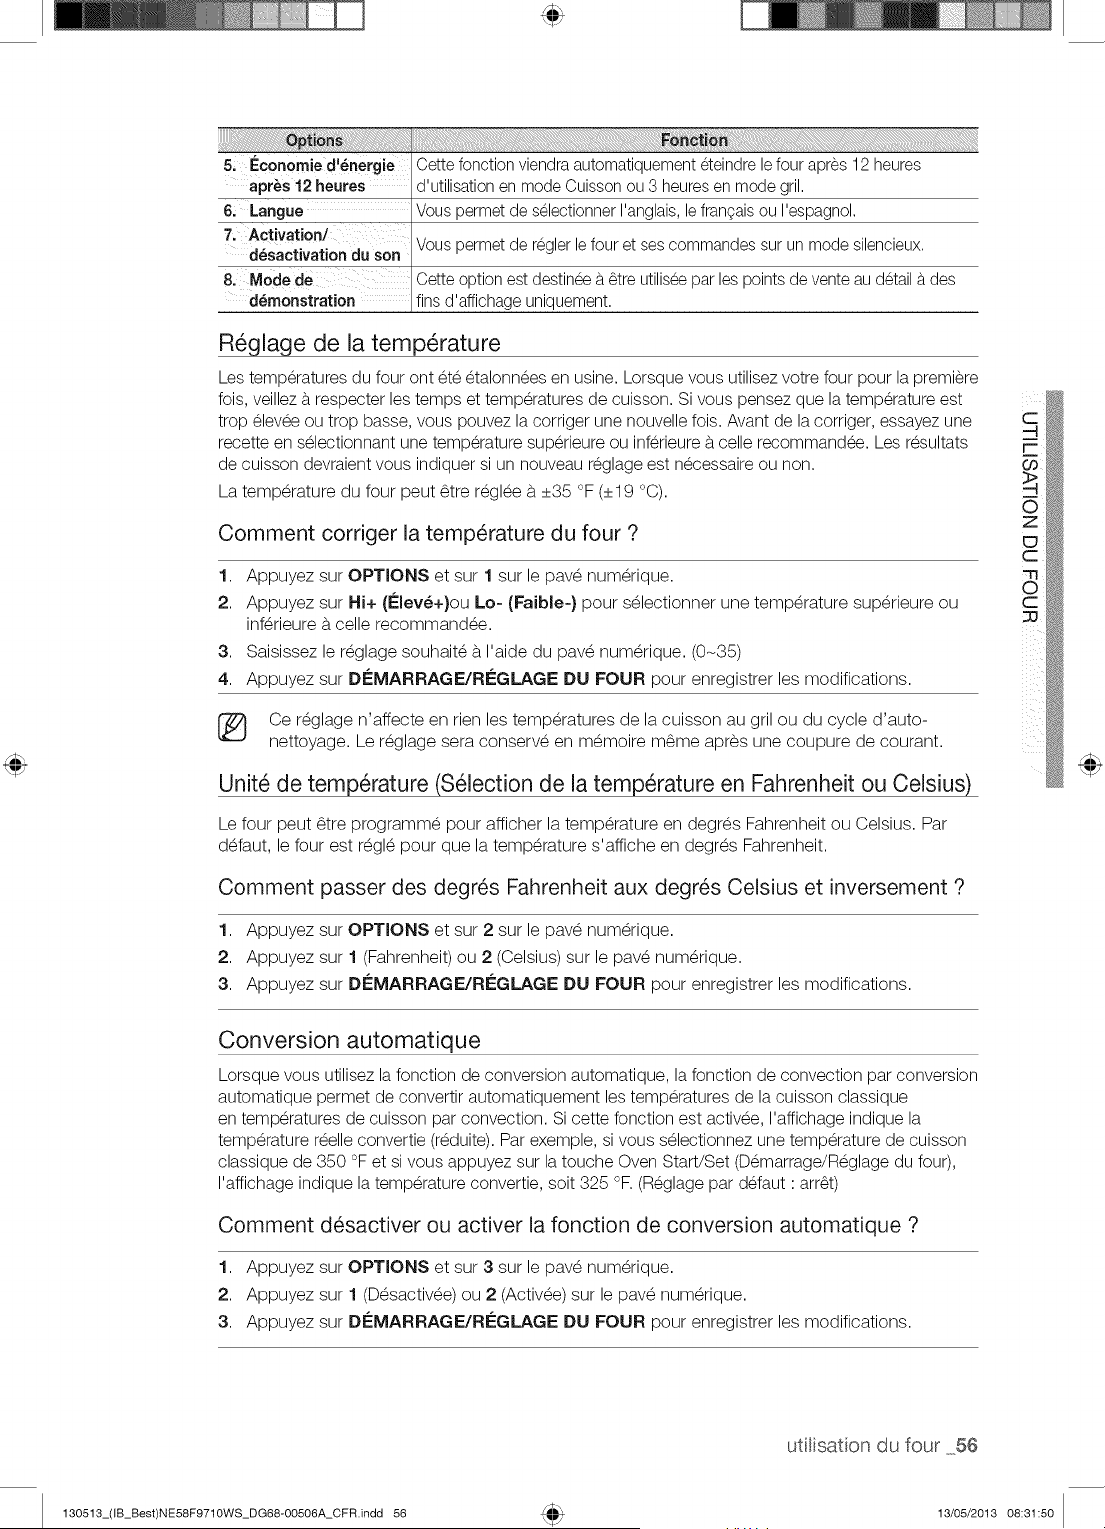
iiiiiiiiii!i!i!i
5i Ec0nomied'_nergie Cette fonction viendraautomatiquement eteindre lefour apres 12 heures
apr_s 12 heures d'utilisation en mode Cuisson ou 3 heuresen mode gril.
6; Langue Vous permet de selectionner I'anglais,le frangaisou I'espagnol.
7, Activation/ Vous permet de reglerle four et ses commandes sur un mode silencieux.
d_sactivationdu son
8. Mode de Cette option est destineeb._tre utiliseepar les points de vente au detail b.des
d_rnonstration fins d'affichage uniquement.
R_glage de la temperature
Les temperatures du four ont ete etalonnees en usine. Lorsque vous utilisez votre four pour la premiere
fois, veillez b.respecter les temps et temperatures de cuisson. Si vous pensez que la temperature est
trop elevee ou trop basse, vous pouvez la corriger une nouvelle fois. Avant de la corriger, essayez une
recette en selectionnant une temperature superieure ou inferieure b.celle recommandee. Les resultats
de cuisson devraient vous indiquer si un nouveau reglage est necessaire ou non.
La temperature du four peut _tre r_gl_e b.+35 °F (+19 °C).
Comment corriger la temperature du four ?
1. Appuyez sur OPTIONS et sur 1 sur le pav_ num_rique.
2. Appuyez sur Hi+ (l_lev_+}ou Lo= (Faible-} pour s_lectionner une temperature sup_rieure ou
inf_rieure b.celle recommand_e.
3. Saisissez le r_glage souhait_ b. I'aide du pav_ num_rique. (0-35)
4. Appuyez sur Di_MARRAGE/RI_GLAGE DU FOUR pour enregistrer les modifications.
Ce r_glage n'affecte en rien les temperatures de la cuisson au gril ou du cycle d'auto-
nettoyage. Le r_glage sera conserv_ en m_moire m_me apres une coupure de courant.
Unit_ de temperature (S_lection de la temperature en Fahrenheit ou Celsius)
Le four peut _tre programm_ pour afficher la temperature en degr_s Fahrenheit ou Celsius. Par
d_faut, le four est r_gl_ pour que la temperature s'affiche en degr_s Fahrenheit.
Comment passer des degr_s Fahrenheit aux degr_s Celsius et inversement ?
1. Appuyez sur OPTIONS et sur 2 sur le pav_ num_rique.
2. Appuyez sur 1 (Fahrenheit) ou 2 (Celsius) sur le pav_ num_rique.
3. Appuyez sur DI_MARRAGE/RI_GLAGE DU FOUR pour enregistrer les modifications.
Conversion automatique
Lorsque vous utilisez la fonction de conversion automatique, la fonction de convection par conversion
automatique permet de convertir automatiquement les temperatures de la cuisson classique
en temperatures de cuisson par convection. Si cette fonction est activee, I'affichage indique la
temperature reelle convertie (reduite). Par exemple, si vous selectionnez une temperature de cuisson
classique de 350 °F et si vous appuyez sur la touche Oven Start/Set (Demarrage/Reglage du four),
I'affichage indique la temperature convertie, soit 325 °F. (Reglage par defaut : arr_t)
Comment d_sactiver ou activer la fonction de conversion automatique ?
1. Appuyez sur OPTIONS et sur 3 sur le pav_ num_rique.
2. Appuyez sur 1 (D_sactiv_e) ou 2 (Activ_e) sur le pav_ num_rique.
3. Appuyez sur Di_MARRAGE/RI_GLAGE DU FOUR pour enregistrer les modifications.
utilisaton du four 56
130513_(IB_Best)NE58F9710WS_DG68-00506A_CFR.indd 56 13/05/2013 08:31:50
Heure du jour (12 heures / 24 heures)
Les commandes du four peuvent _tre programm_es pour afficher I'heure du jour en mode
12 heures ou 24 heures. Le four a _t_ pr@_gl_ par d_faut pour un affichage en mode 12 heures.
Comment passer I'affichage de I'heure du format 12 heures au format 24 heures ?
1. Appuyez sur OPTIONS et sur 4 sur le pav_ num@ique.
2. Appuyez sur 1 (12 heures) ou 2 (24 heures) sur le pav_ num@ique.
3. Appuyez sur DleMARRAGE/RIeGLAGE DU FOUR pour enregistrer les modifications.
I_conomie d'_nergie apr6s 12 heures
Si vous oubliez d'eteindre votre four, cette fonction assure la desactivation automatique des commandes
apres 12 heures d'utilisation des fonctions de cuisson ou apres 3 heures d'utilisation de la fonction Gril.
Comment activer ou d_sactiver la fonction d'_conomie d'_nergie apr6s 12 heures ?
1. Appuyez sur OPTIONS et sur 5 sur le pav_ num@ique.
2. Appuyez sur 1 (D_sactiv_e) ou 2 (Activ_e) sur le pav_ num@ique.
3. Appuyez sur Di£MARRAGE/RI£GLAGE DU FOUR pour enregistrer les modifications.
Langue
Vous pouvez selectionner I'anglais, le frangais ou I'espagnol. Par defaut, la langue utilisee est I'anglais.
Comment changer la langue sur I'affichage ?
1. Appuyez sur OPTIONS et sur 6 sur le pav_ num@ique.
2. Appuyez sur 1 (EN), 2 (FR) ou 3 (SP) sur le pav_ num@ique.
3. Appuyez sur Di£MARRAGE/RI£GLAGE DU FOUR pour enregistrer les modifications.
Sound On/Off (Activation/d_sactivation du son)
Cette fonction vous permet de d_sactiver la sonorit_ des boutons de commande.
Comment activer ou d_sactiver le son ?
1. Appuyez sur OPTIONS et sur 7 sur le pav_ num@ique.
2. Appuyez sur 1 (D_sactiv_e) ou 2 (Activ_e) sur le pav_ num@ique.
3. Appuyez sur Di£MARRAGE/RI£GLAGE DU FOUR pour enregistrer les modifications.
Mode d_mo
Cette option est destin_e b.6tre utilis_e par les points de vente au d_tail b.des fins d'affichage
uniquement. (L'_l_ment chauffant ne fonctionne pas.)
Comment activer ou d_sactiver le mode d_mo ?
1. Appuyez sur OPTIONS et sur 8 sur le pav_ num@ique.
2. Appuyez sur 1 (D_sactiv_e) ou 2 (Activ_e) sur le pav_ num@ique.
3. Appuyez sur Di£MARRAGE/RI£GLAGE DU FOUR pour enregistrer les modifications.
57 utlisation du four
130513_(IB_Best)NE58F9710WS_DG68-00506A_CFR.indd 57 13/05/2013 08:31:50

÷
UTILISATION DE LA SONDE THERMIQUE
Pour de nombreux aliments, en particulier les rOtis et la volaille (bceuf, poulet, dinde, porc,
agneau, etc.), le meilleur moyen de determiner si les aliments sont bien cuits, c'est de mesurer la
temperature interne.
La sonde thermique vous permet de faire cuire la viande b.la temperature interne que vous
souhaitez et vous permet ainsi de determiner plus facilement si la viande est cuite.
Cette fonction peut 6tre utilisee avec la Cuisson, la Cuisson par convection ou le ROtissage par
convection en mode simple.
Une fois que la temperature interne des aliments atteint 100 °F, I'augmentation de la temperature
interne sera affichee b. I'ecran.
Comment utiliser la sonde thermique ?
1,
Enfoncez la pointe de la sonde thermique dans la viande aussi loin que possible, de sorte
qu'elle soit bien au centre de la viande.
• Inserez la sonde completement dans la viande
comme indique dans les illustrations. Elle ne doit pas
toucher les os, le gras ou les cartilages.
Si la sonde n'est pas completement inseree dans la
viande, la fonction Sonde thermique ne fonctionne
pas correctement car la sonde detecte la temperature
du four, et non la temperature de la viande.
Pour la viande non desossee, inserez la sonde au
centre de la partie la plus basse et la plus epaisse de
morceau.
Pour toute la volaille (dinde, gros poulets, etc.),
inserez la sonde dans la partie la plus epaisse de
I'interieur des cuisses, parallelement b.la patte.
Si vous activez la fonction Maintien au chaud pour
maintenir la viande au chaud apres la cuisson
en utilisant la fonction Temp Probe (Sonde de
temperature), la temperature interne de la viande
depassera la temperature souhaitee.
2. Inserez la fiche de la sonde thermique dans la prise sur la paroi superieure du four aussi loin
qu'elle peut aller.
3. Choisissez la fonction de cuisson souhaitee (Cuisson, Cuisson par convection, ROtissage par
Convection) ainsi que la temperature.
4. Appuyez sur SONDE DE TEMP. pour regler la temperature interne souhaitee.
5. Reglez la temperature interne souhaitee en appuyant sur le pave numerique.
TemPeiatuies diSPonibi
[ 100 a00°F
6. Si vous voulez utiliser la fonction Cook time (Temps de cuisson), Delay start (Depart differe) ou
Keep warm (Maintien au chaud), reglez chaque fonction.
7. Appuyez sur DCMARRAGE/REGLAGE DU FOUR.
8. Lorsque latemperature interne souhaitee est atteinte, la fonction s'arr6te automatiquement et I'alarme
sonne.
,/_.\ Afin de proteger la pointe dela sonde thermique, veil!ez b, ne pas inserer la sonde de
A_ENT,"--_--_"sorte que la pointe depasse de la surface de la viandel AssUrez_vous clue la pointe est
au centre de la viande ou pres du Centre.
@
utitisaton du four 58
130513_(IB_Best)NE58F9710WS_DG68-00506A_CFR.indd 58 4_ 13/05/2013 08:31:50
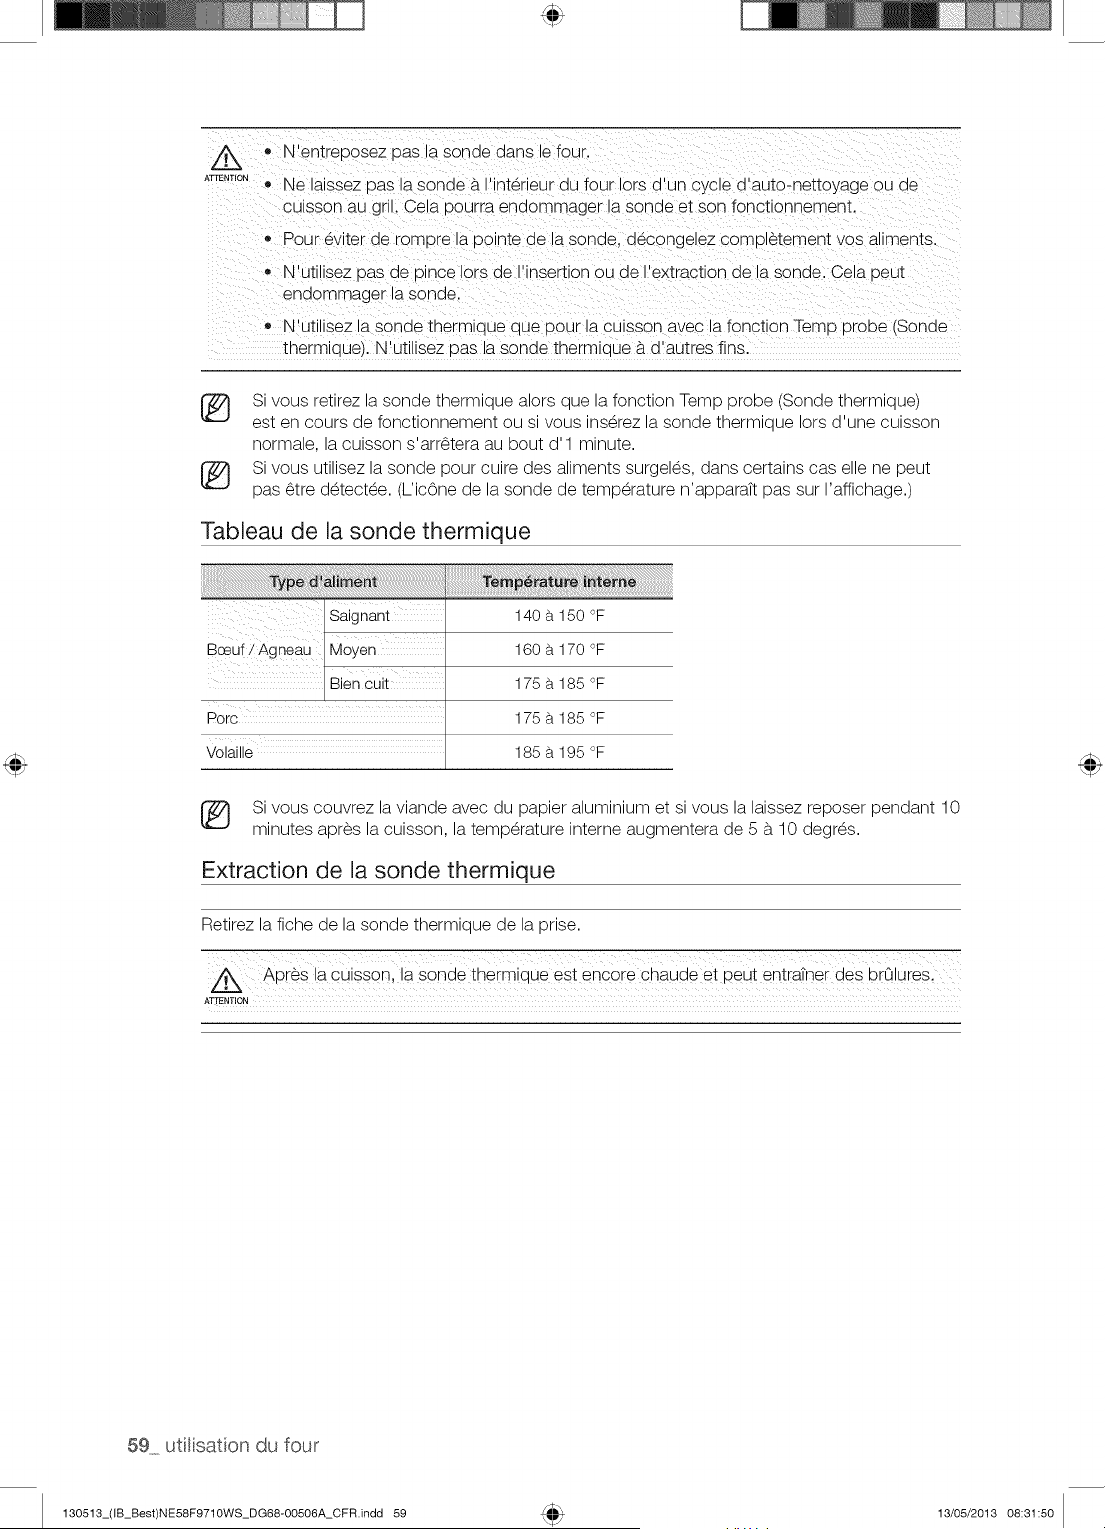
zL
ATTENTION
o N'entreoosez pas a sonae dans le four.
Ne laissez oas la sonde a. nterieur du four lots a-un cycle d'auto-nettoyage ou de
culsson au gril. Cela pourra enaommager la sonde et son fonctlon qement.
• Pour ev ter de romDre la Dointe de la sonde, decongeJez completement vos al_ments.
N'utlllsez pas de Dince iors de I'insertion ou de I'extraction de la sonde. Cela 9eut
endommager la sonde.
N'utilisez la sonde therm_aue aue Dour _acu_sson avec _afonction Temp probe (Sonde
thermloue/. N'utilisez oas la sonde thermJoue #.d'autres fins.
[_ Si vous retirez la sonde thermique alors que la fonction Temp probe (Sonde thermique)
est en cours de fonctionnement ou si vous inserez la sonde thermique lots d'une cuisson
normale, la cuisson s'arr_tera au bout d'l minute.
Si vous utilisez la sonde pour cuire des aliments surgel_s, dans certains cas elle ne peut
pas _tre d_tect_e. (L'ic6ne de la sonde de temperature n'apparaTt pas sur I'affichage.)
Tableau de la sonde thermique
_saignant
B utiAgn#a!/M!Yen
/ Bien cuit
Porc
volai,_
140 a 150 °F
160 a 170 °F
175 a 185 °F
175 a 185 °F
185 a 195 °F
Si vous couvrez la viande avec du papier aluminium et si vous la laissez reposer pendant 10
minutes apres la cuisson, la temperature interne augmentera de 5 b. 10 degr_s.
Extraction de la sonde thermique
Retirez la fiche de la sonde thermique de la prise.
Apr_s la cuiss0n ! la sgnde thermique est encgre chaude et peu! entratner des bra lures,
ATTENTION
59 utlisation du four
130513_(IB_Best)NE58F9710WS_DG68-00506A_CFR.indd 59 13/05/2013 08:31:50
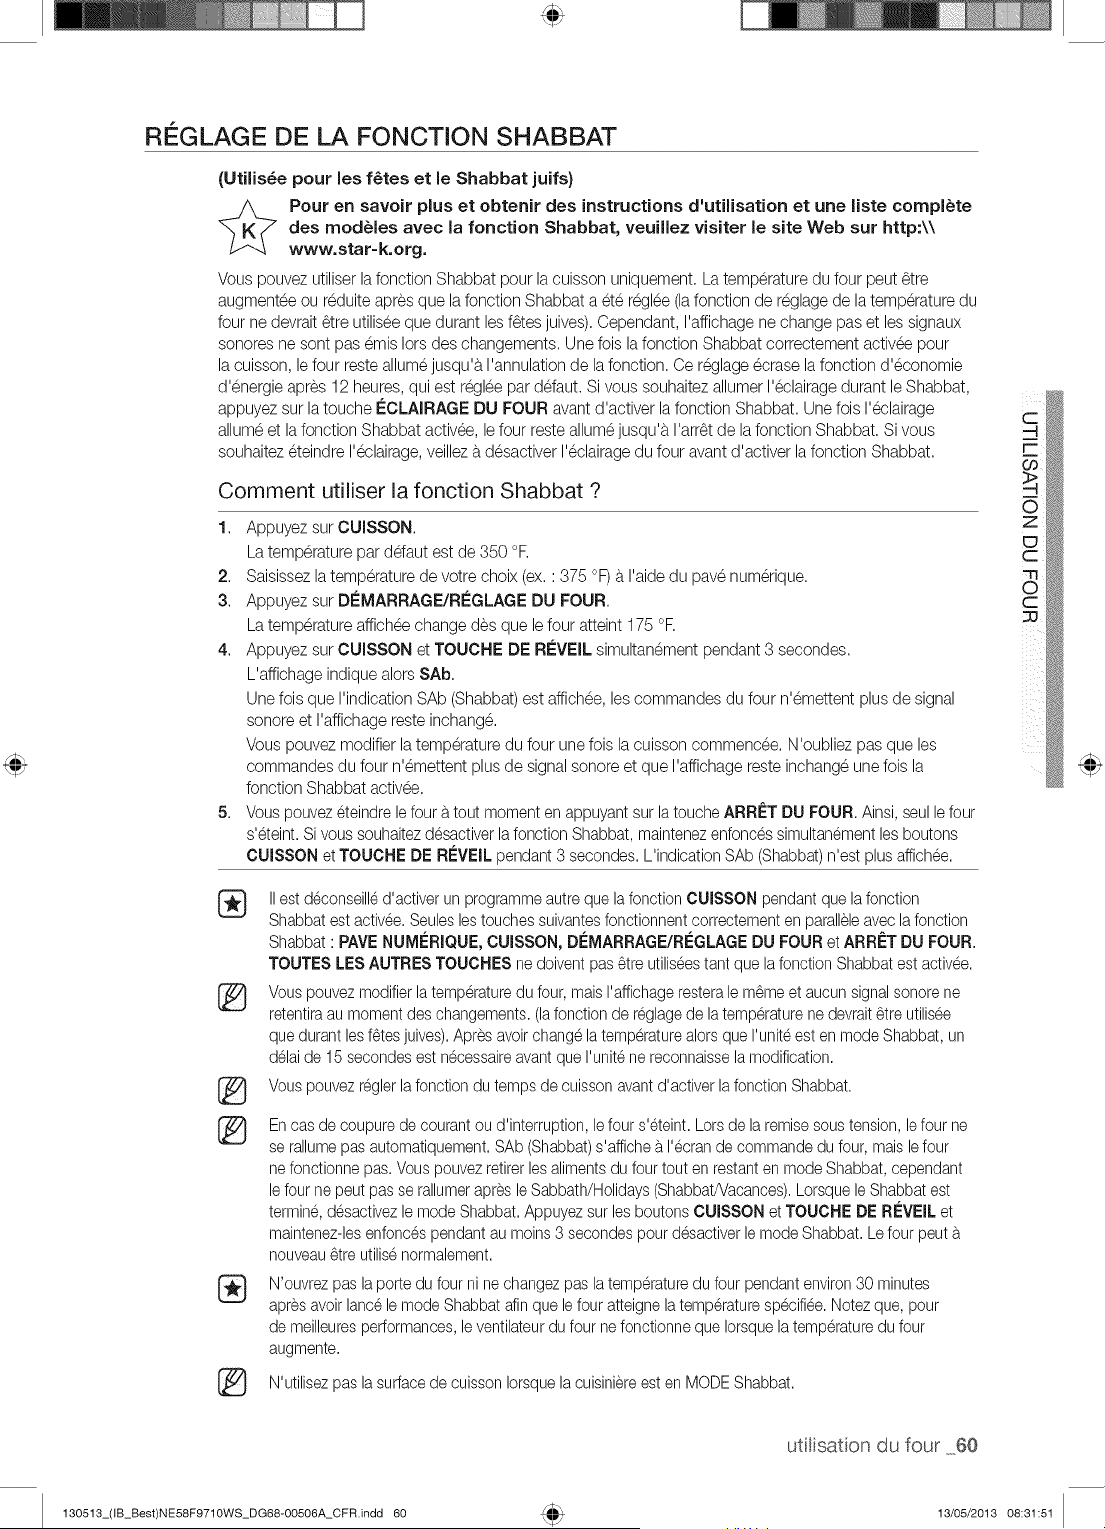
RI GLAGE DE LA FONCTION SHABBAT
(Utilis_e pour les f6tes et le Shabbat juifs)
Pour en savoir plus et obtenir des instructions d'utilisation et une liste complete
des modules avec la fonction Shabbat, veuillez visiter le site Web sur http:\\
www.star-k.org.
Vous pouvez utiliserlafonction Shabbat pour la cuisson uniquement. La temperature du four peut _tre
augmenteeou reduite apres que la fonction Shabbat a et6 regl6e(lafonction de reglage de latemperature du
four ne devrait _tre utilisee que durant les f_tes juives).Cependant, I'affichagene change pas et lessignaux
sonores ne sont pas emis lots des changements. Une lois lafonction Shabbat correctement activee pour
la cuisson, le four reste allumejusqu'a I'annulation de la fonction. Ce reglage ecrase lafonction d'economie
d'energie apres 12 heures, qui est regl6epar defaut. Si vous souhaitezallumerI'eclairagedurant leShabbat,
appuyezsur latouche ECLAIRAGE DU FOUR avant d'activer la fonction Shabbat. Unefois I'eclairage
allumeet lafonction Shabbat activee, le four reste allumejusqu'a I'arr_t de lafonction Shabbat. Si vous
souhaitezeteindre I'eclairage,veilleza desactiver I'eclairagedu four avant d'activer la fonction Shabbat.
Comment utiliser la fonction Shabbat ?
1. AppuyezsurCUlSSON.
La temperature par ddaut est de 350 °R
2. Saisissezla temperaturede votre choix (ex. : 375 °F) b.I'aide du pave numerique.
3. Appuyez sur D#MARRAGE/R#GLAGE DU FOUR.
La temperature affichee change des que lefour atteint 175 °R
4. Appuyez sur CUISSON et TOUCHE DE R#VEIL simultanementpendant 3 secondes.
L'affichage indique alors SAb.
Une fois que I'indication SAb (Shabbat)est affichee,les commandes du four n'emettent plus de signal
sonore et I'affichagereste inchang&
Vous pouvez modifier latemperature du four une fois lacuisson commencee. N'oubliez pas que les
commandes du four n'emettent plus de signal sonore et que I'affichagereste inchange une fois la
fonction Shabbat activee.
5. Vouspouvezeteindre lefour _.tout moment en appuyant sur la touche ARRET DU FOUR. Ainsi, seul lefour
s'eteint.Si vous souhaitezdesactiverlafonction Shabbat,maintenezenfoncessimultanementles boutons
CUISSON et TOUCHE DE REVEIL pendant 3 secondes. L'indicationSAb (Shabbat)n'est plus affichee.
IIest deconseilled'activer un programmeautre quela fonctionCUISSON pendantque lafonction
Shabbat est activee.Seuleslestouchessuivantesfonctionnentcorrectementen paralleleavec lafonction
Shabbat : PAVENUMERIQUE,CUISSON, DEMARRAGE/R#GLAGEDU FOUR et ARR_=TDU FOUR.
TOUTES LESAUTRESTOUCHES ne doiventpas _tre utiliseestant que lafonction Shabbatest activee.
Vouspouvezmodifierlatemperaturedufour, mais I'affichageresterale m_meet aucun signalsonorene
retentiraau momentdes changements.(lafonction de reglagede latemp@aturene devrait_tre utilisee
que durant lesf_tesjuives).Apresavoirchangelatemperaturealors que I'uniteest en modeShabbat, un
delai de 15secondesest necessaireavant que I'unitene reconnaisselamodification.
Vouspouvezreglerlafonctiondu temps de cuissonavantd'activer lafonction Shabbat.
®
En cas de coupurede courantou d'interruption,lefour s'eteint.Lors de la remisesous tension, lefour ne
se rallumepasautomatiquement.SAb (Shabbat)s'affiche_.I'ecrande commandedu four, mais lefour
ne fonctionne pas. Vouspouvezretirerles alimentsdu four tout en restanten mode Shabbat,cependant
le four ne peut passe rallumerapres leSabbath/Holidays(Shabbat/Vacances).LorsqueleShabbat est
termine,desactivezlemodeShabbat. Appuyezsur lesboutonsCUISSON et TOUCHE DE REVEIL et
maintenez-lesenfoncespendant au moins3 secondespour desactiverle mode Shabbat.Le four peut
nouveau_tre utilisenormalement.
N'ouvrezpasla porte du four nine changezpas latemp@aturedu four pendantenviron30 minutes
apres avoirlancelemode Shabbatafin que lefour atteignelatemp@aturespecifiee.Notez que, pour
de meilleuresperformances,le ventilateurdu four ne fonctionneque Iorsquelatemp@aturedu four
augmente.
N'utilisezpas la surfacede cuissonIorsquelacuisiniereest en MODEShabbat.
utilisaton du four 60
130513_(IB_Best)NE58F9710WS_DG68-00506A_CFR.indd 60 13/05/2013 08:31:51
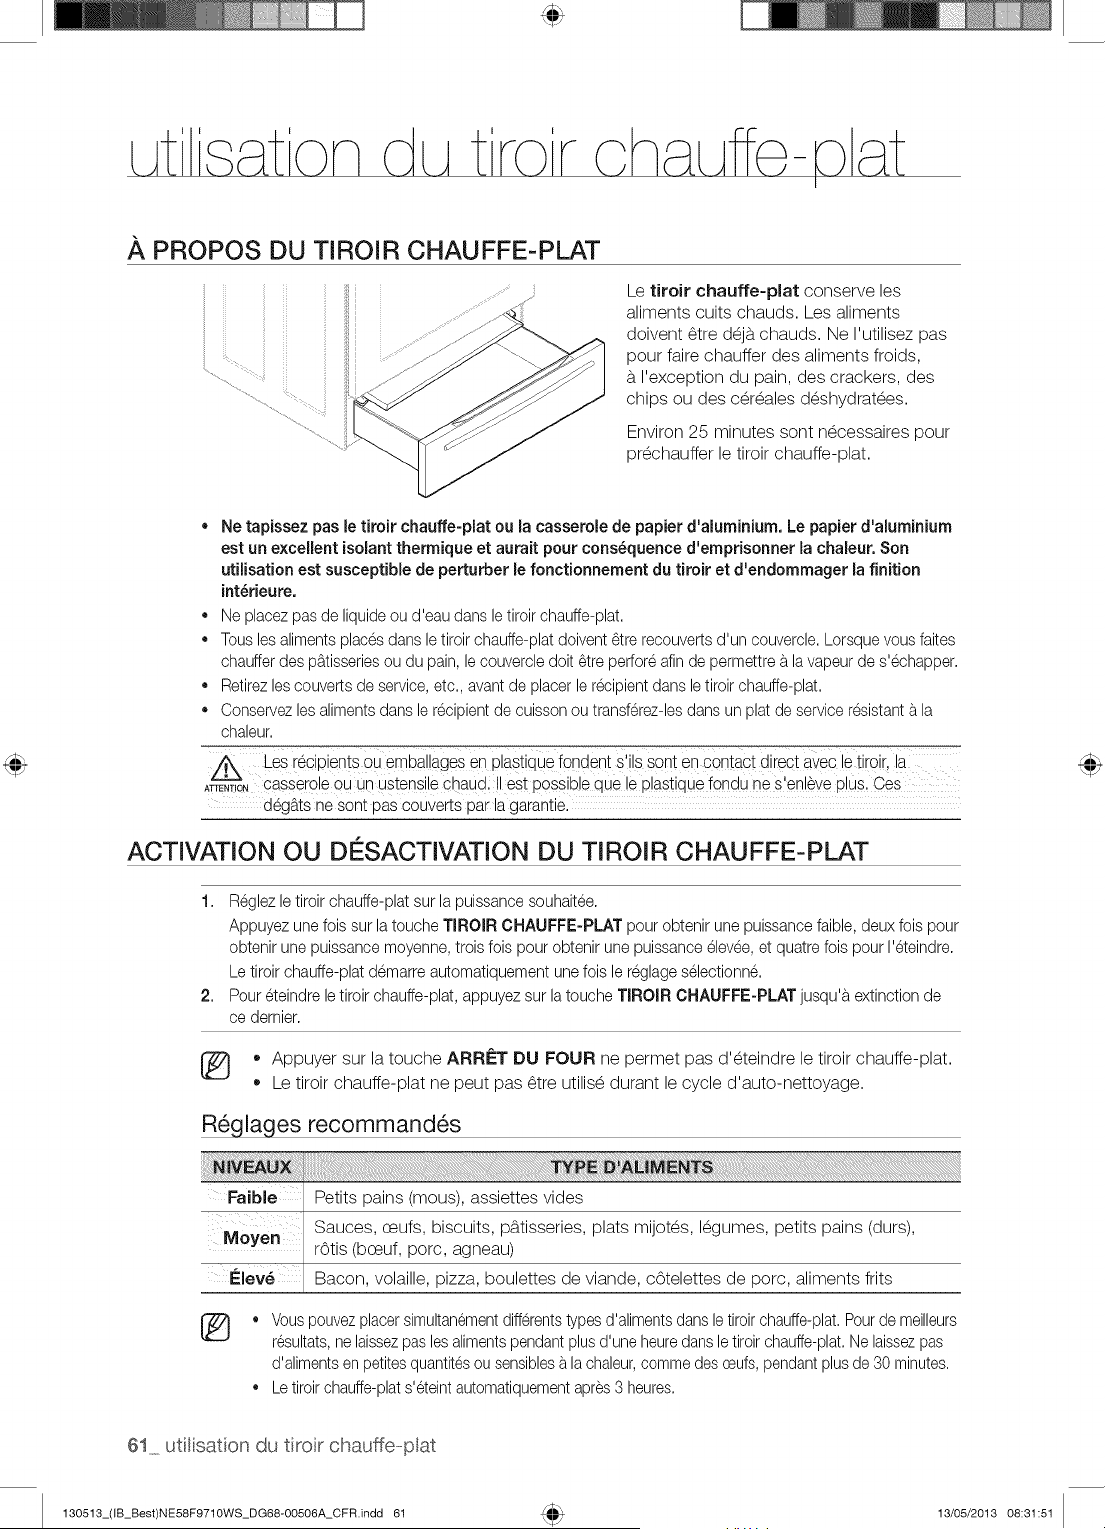
.&,PROPOS DU TIROIR CHAUFFE=PLAT
Le tiroir chauffe-plat conserve les
aliments cults chauds. Les aliments
doivent _tre d_jb.chauds. Ne I'utilisez pas
pour faire chauffer des aliments froids,
b.I'exception du pain, des crackers, des
chips ou des c@_ales d_shydrat_es.
Environ 25 minutes sont n_cessaires pour
pr_chauffer le tiroir chauffe-plat.
• Ne tapJssez pas le tiroir chauffe-plat ou la casserole de papier d'aluminium. Le papier d'aluminium
est un excellent isolant thermique et aurait pour consequence d'emprisonner la chaleur.Son
utilisation est susceptible de perturber le fonctionnement du tiroir et d'endommager la finition
int_rieure.
• Ne placezpas de liquideou d'eau dans le tiroir chauffe-plat.
,, Tousles alimentsplacesdans letiroir chauffe-platdoivent_tre recouvertsd'un couvercle.Lorsquevous faites
chaufferdes p_.tisseriesou du pain, le couvercledolt _tre perforeafin de permettre_.lavapeurde s'echapper.
,, Retirezlescouvertsde service,etc., avantde placer lerecipientdans letiroir chauffe-plat.
,, Conservezlesalimentsdans le recipientde cuisson ou transferez-lesdans un plat deservice resistant_.la
chaleur.
Les i6CipientsoUembaliages en plastiquefondant s'ils SOntan €ontaCt diieCtavec le tiiOii !a
ATTENT,_,cassero e ouun ustens e chaud, est poss b e que e past que fondu ne s en_ve p us.Ces
deg_.tsne sont pas couverts par la garantie.
ACTIVATION OU DI SACTIVATION DU TIROIR CHAUFFE=PLAT
1. Reglez letiroir chauffe-platsur la puissance souhaitee.
Appuyezune lois sur latouche TIROIR CHAUFFE-PLAT pour obtenir une puissancefaible,deux lois pour
obtenir une puissance moyenne,trois lois pour obtenir une puissanceelevee,et quatrelois pour I'eteindre.
Le tiroir chauffe-platdemarre automatiquementunelois le reglageselectionn&
2. Pour eteindre le tiroir chauffe-plat, appuyezsur latouche TIROIR CHAUFFE-PLAT jusqu'_textinctionde
ce demier.
,, Appuyer sur la touche ARRI_T DU FOUR ne permet pas d'_teindre le tiroir chauffe-plat.
,, Le tiroir chauffe-plat ne peut pas _tre utilis_ durant le cycle d'auto-nettoyage.
R_glages recommand_s
FaJble Petits pains (mous), assiettes vides
Sauces, ceufs, biscuits, pb.tisseries, plats mijot_s, I_gumes, petits pains (durs),
r6tis (bceuf, porc, agneau)
Elew Bacon, volaille, pizza, boulettes de viande, c6telettes de porc, aliments flits
®
Vouspouvezplacersimultanementdifferentstypesd'alimentsdansletiroirchauffe-plat.Pourde meilleurs
resultats,ne laissezpas lesalimentspendantplusd'une heuredansle tiroirchauffe-plat.Nelaissezpas
d'alimentsen petitesquantitesou sensiblesa la chaleur,commedes oeufs,pendantplus de 30 minutes.
Letiroir chauffe-plats'eteintautomatiquementapres3 heures.
61 utlisation du tiror chauffe-opat
130513_(IB_Best)NE58F9710WS_DG68-OO506A_CFR.indd 61 13/05/2013 08:31:51
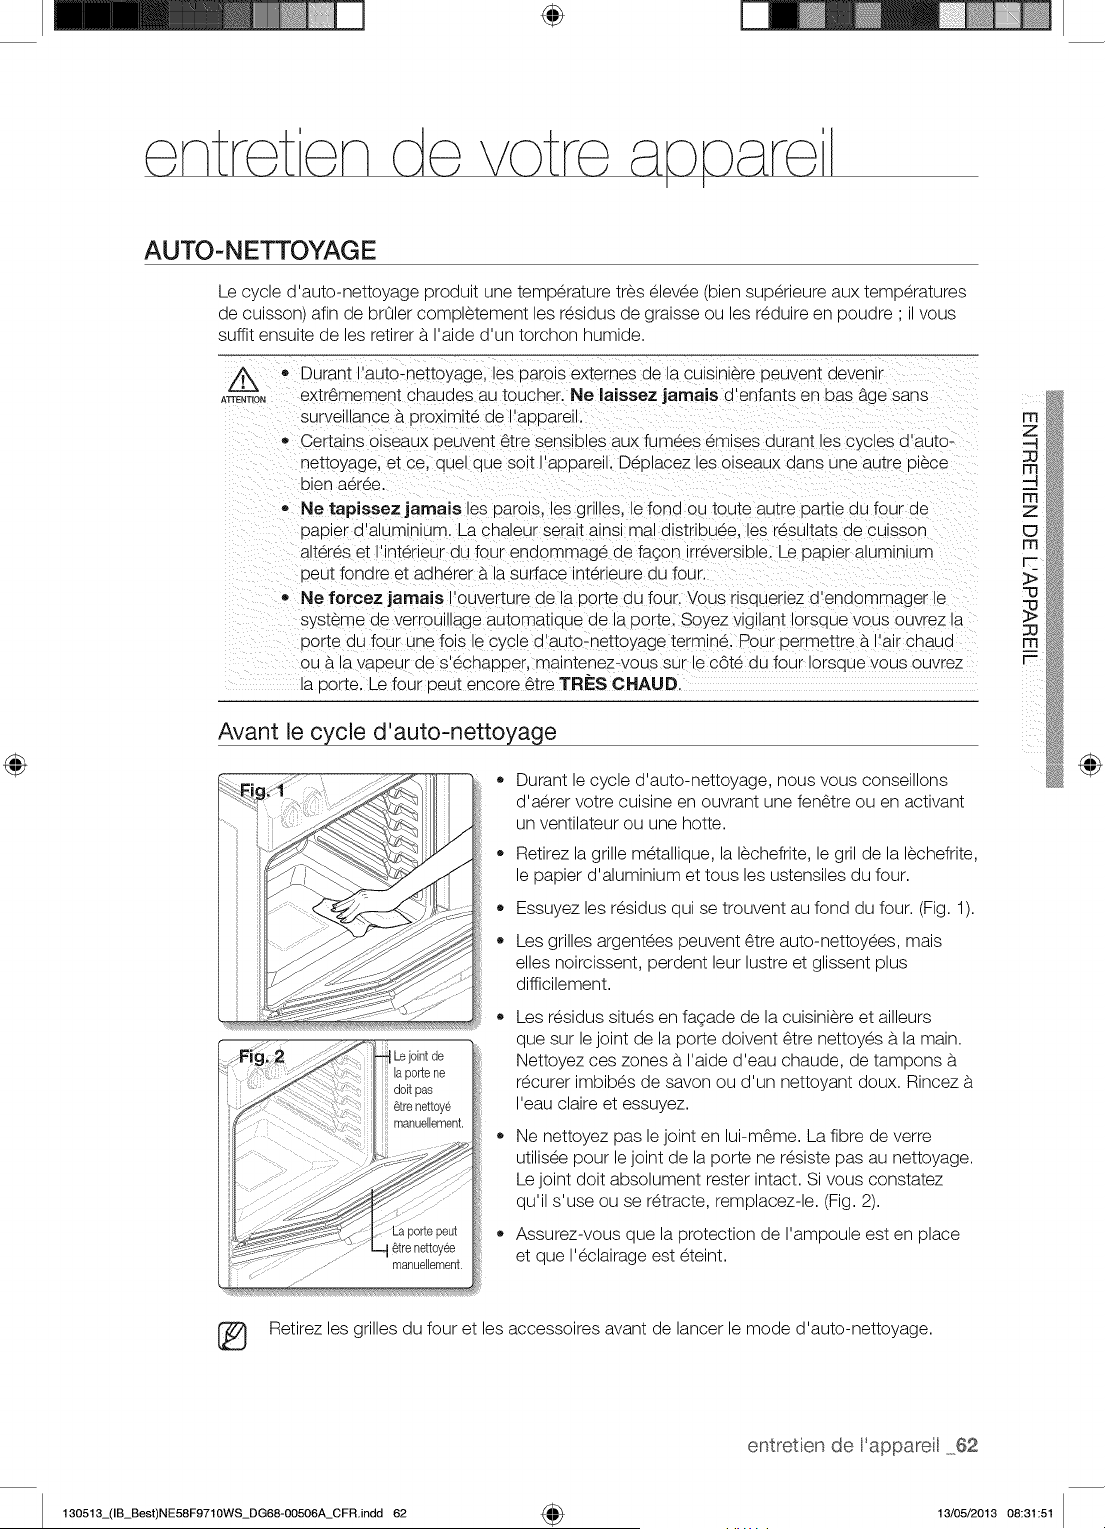
÷
AUTO- NETTOYAG E
Le cycle d'auto-nettoyage produit une temperature tres elevee (bien superieure aux temperatures
de cuisson) afin de brOler completement les residus de graisse ou les reduire en poudre ' il vous
suffit ensuite de les retirer b.I'aide d'un torchon humide.
ATTENTION
o Durant I'auto-nettoyage. _esDarols externes de a culslnlere ueuvent aevenl-
extr_mement cnauaes au toucher. Ne laissez jamais o enfants en t)as b.gesans
surveulance a oroximite de I'at)oareu.
• Certalns olseaux oeuvent _tre sensibles aux fu'-nees emises durant es cyc es a auto-
nettoyage, et ce. auel aue solt I'aooarel Deolacez es olseaux aans une autre u@ce
bien aeree.
,, Ne tapissez jamais les parols, les gr les. le fond ou toute autre oartie au four de
oat)ier d'aluminium. La chaleur serait ains_real distribuee, les resultats de cuisson
alteres et I'lnterieur du four enaommage de fagon rreversible. Le oaoler alumlnlum
oeut fondre et adherer a.la surface interieure du four.
,, Ne foreez jamaJs I'ouverture ae la uorte du four. Vous risauenez aenaommager le
systeme ae verroulnage automatique de la porte. Soyez vigi ant Iorsque vous ouvrez _a
uorte au four une lois le cycle d'auto-nettoyage termine. Pour Dermettre a.I'air chaud
ou b.la vat)eur de s'echaDDer, maintenez-vous sur _ec6te du four Iorsaue vous ouvrez
la oorte. Le four Deut encore _tre TRI=S CHAUD,
Avant le cycle d'auto-nettoyage
o
o
Durant e cycle _ auto-nettoyage, nous vous conselllOnS
d'aerer votre cuisine en ouvrant une fen6tre ou en activant
un ventilateur ou une hotte.
Retirez la grille metallique, la lechefrite, le gril de la lechefrite,
le papier d'aluminium et tousles ustensiles du four.
Essuyez les residus qui se trouvent au fond du four. (Fig. 1).
Les grilles argentees peuvent _tre auto-nettoyees, mais
elles noircissent, perdent leur lustre et glissent plus
difficilement.
Les residus situes en fagade de la cuisiniere et ailleurs
que sur le joint de la porte doivent _tre nettoyes b.la main.
Nettoyez ces zones b.I'aide d'eau chaude, de tampons b.
recurer imbibes de savon ou d'un nettoyant doux. Rincez b.
I'eau claire et essuyez.
Ne nettoyez pas le joint en lui-m_me. La fibre de verre
utilisee pour le joint de la porte ne resiste pas au nettoyage.
Le joint doit absolument rester intact. Si vous constatez
qu'il s'use ou se retracte, remplacez-le. (Fig. 2).
Assurez-vous que la protection de I'ampoule est en place
et que I'eclairage est eteint.
@
Retirez les grilles du four et les accessoires avant de lancer le mode d'auto-nettoyage.
entretien de Fappareil 62
130513_(IB_Best)NE58F9710WS_DG68-00506A_CFR.indd 62 4_ 13/05/2013 08:31:51
Comment lancer un cycle d'auto-nettoyage
1. S_lectionnez la dur_e d'auto-nettoyage (ex. : 3 heures).
Appuyez sur la touche AUTO-NETTOYAGE une fois pour un cycle de 3 heures, deux fois
pour un cycle de 4 heures ou trois fois pour un cycle de 5 heures.
Par d_faut, le cycle dure 3 heures.
2. D_marrez le cycle d'auto-nettoyage.
Appuyez sur Di_MARRAGE/Ri_GLAGE DU FOUR. Le verrouillage entraTn_ par moteur de la
porte s'enclenche automatiquement.
3. Une fois que le cycle d'auto-nettoyage est termine, I'indication End (Fin)s'affiche et un signal
sonore retentit six fois.
* Vous ne pourrez pas d_marrer le cycle d'auto-nettoyage si la fonction de verrouillage des
commandes est activ_e ou si la temperature du four est trop _lev_e.
* La porte du four se verrouille automatiquement. Le temps de nettoyage restant s'affiche.
La porte ne peut pas s'ouvrir tant que la temperature n'est pas descendue b.une
temperature sans danger/basse.
* La fonction d'auto-nettoyage ne fonctionne pas si le tiroir chauffe-plat fonctionne.
Comment diff_rer le cycle d'auto-nettoyage ?
1,
2,
3.
4.
Appuyez sur la touche AUTO-NETTOYAGE.
S_lectionnez la dur_e du cycle d'auto-nettoyage de votre choix en appuyant sur la touche
AUTO-N ETTOYAG E.
Appuyez sur DlePART DIFFleRI_.
Saisissez I'heure b.laquelle vous souhaitez lancer I'auto-nettoyage.
Appuyez sur le bouton Di_MARRAGE/RI_GLAGE DU FOUR.
L'affichage indique delay start, self clean (d_part differS, auto-nettoyage) et I'ic6ne Lock
(Verrouillage). Le verrouillage entraTn_par moteur de la porte s'enclenche automatiquement.
5. Le cycle d'auto-nettoyage d_marre automatiquement b. I'heure d_finie.
Comment d_sactiver la fonction d'auto-nettoyage ?
Vous pourrez arr_ter ou interrompre un cycle d'auto-nettoyage si la fum_e produite Iors de
I'op_ration venait b.vous g_ner.
1. Appuyez sur la touche ARRf=T DU FOUR.
2. Vous pourrez b.nouveau ouvrir la porte du four une fois que le four aura refroidi pendant
environ une heure.
Apr_s un cycle d'auto-nettoyage
* IIest possible que de la cendre reste dans le four. Essuyez-la b.I'aide d'un torchon humide une
fois le four refroidi (Si la cendre laisse des traces blanches, effacez-les b. I'aide d'un tampon b.
r_curer imbib_ de savon et rincez abondamment b. I'aide d'une solution d'eau et de vinaigre
blanc).
* Si le four n'est toujours pas propre apres un cycle, r_p_tez le cycle.
* Le four ne peut _tre r_gl_ pour la cuisson tant qu'il n'a pas refroidi suffisamment pour permettre
I'ouverture de la porte.
63 entretien de 'appareit
130513_(IB_Best)NE58F9710WS_DG68-00506A_CFR.indd 63 13/05/2013 08:31:52
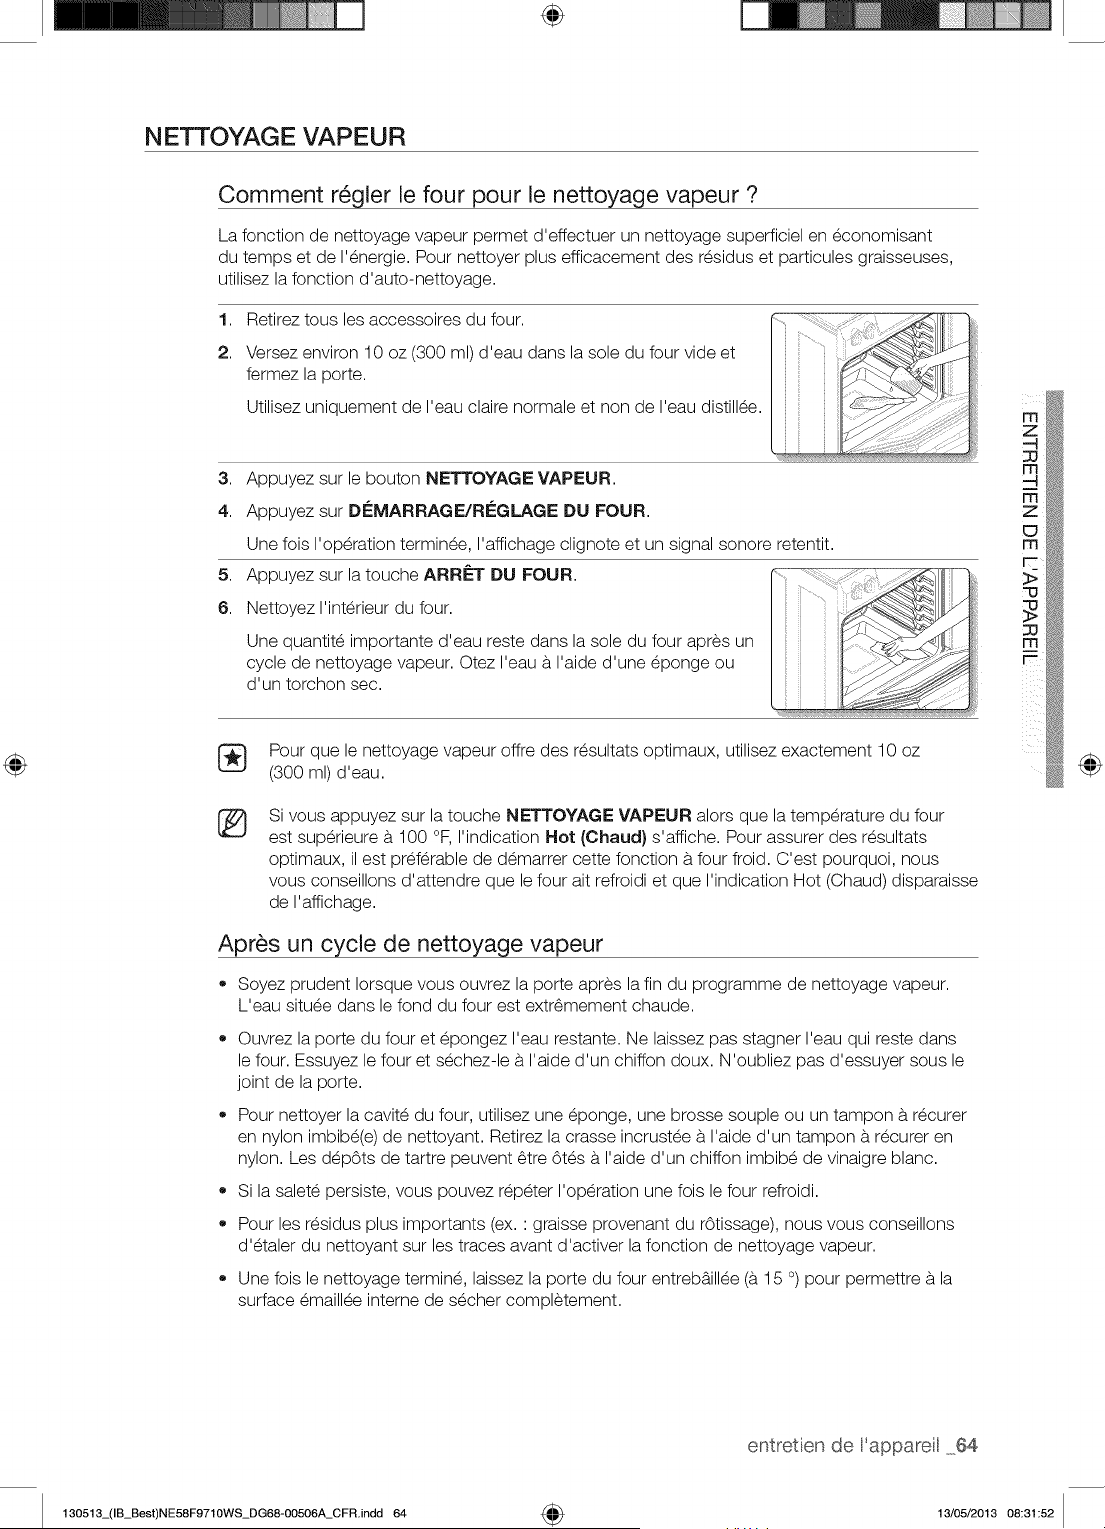
÷
N ETTOYAG E VAP EUR
Comment r_gler le four pour le nettoyage vapeur ?
La fonction de nettoyage vapeur permet d'effectuer un nettoyage superficiel en economisant
du temps et de I'energie. Pour nettoyer plus efficacement des residus et particules graisseuses,
utilisez la fonction d'auto-nettoyage.
1,
2.
Retirez tous les accessoires du four.
Versez environ 10 oz (300 ml) d'eau dans la sole du four vide et
fermez la porte.
Utilisez uniquement de I'eau claire normale et non de I'eau distillee.
3. Appuyez sur le bouton NETTOYAGE VAPEUR.
4. Appuyez sur Di_MARRAGE/Ri_GLAGE DU FOUR.
5,
6.
Une fois I'operation terminee, I'affichage clignote et un signal sonore retentit.
Appuyez sur la touche ARRf=T DU FOUR.
Nettoyez I'interieur du four.
Une quantite importante d'eau reste dans la sole du four apres un
cycle de nettoyage vapeur. Otez I'eau a I'aide d'une eponge ou
d'un torchon sec.
Pour que le nettoyage vapeur offre des resultats optimaux, utilisez exactement 10 oz
(300 ml) d'eau.
®
Si vous appuyez sur la touche NETTOYAGE VAPEUR alors que la temperature du four
est superieure a 100 °R I'indication Hot (Chaud) s'affiche. Pour assurer des resultats
optimaux, il est preferable de demarrer cette fonction a four froid. C'est pourquoi, nous
vous conseillons d'attendre que le four ait refroidi et que I'indication Hot (Chaud) disparaisse
de I'affichage.
Apr_s un cycle de nettoyage vapeur
* Soyez prudent Iorsque vous ouvrez la porte apres la fin du programme de nettoyage vapeur.
L'eau situee dans le fond du four est extr6mement chaude.
®
®
Ouvrez la porte du four et epongez I'eau restante. Ne laissez pas stagner I'eau qui reste dans
le four. Essuyez le four et sechez-le a I'aide d'un chiffon doux. N'oubliez pas d'essuyer sous le
joint de la porte.
Pour nettoyer la cavite du four, utilisez une eponge, une brosse souple ou un tampon a recurer
en nylon imbibe(e) de nettoyant. Retirez la crasse incrustee a I'aide d'un tampon a recurer en
nylon. Les depOts de tartre peuvent 6tre 6tes a I'aide d'un chiffon imbibe de vinaigre blanc.
Si la salete persiste, vous pouvez repeter I'operation une fois le four refroidi.
Pour les residus plus importants (ex. ' graisse provenant du rOtissage), nous vous conseillons
d'etaler du nettoyant sur les traces avant d'activer la fonction de nettoyage vapeur.
Une fois le nettoyage termine, laissez la porte du four entreb&illee (a 15 °) pour permettre a la
surface emaillee interne de secher completement.
130513_(IB_Best)NE58F9710WS_DG68-00506A_CFR.indd 64
÷
entretien de 'appareil 64
13/05/2013 08:31:52
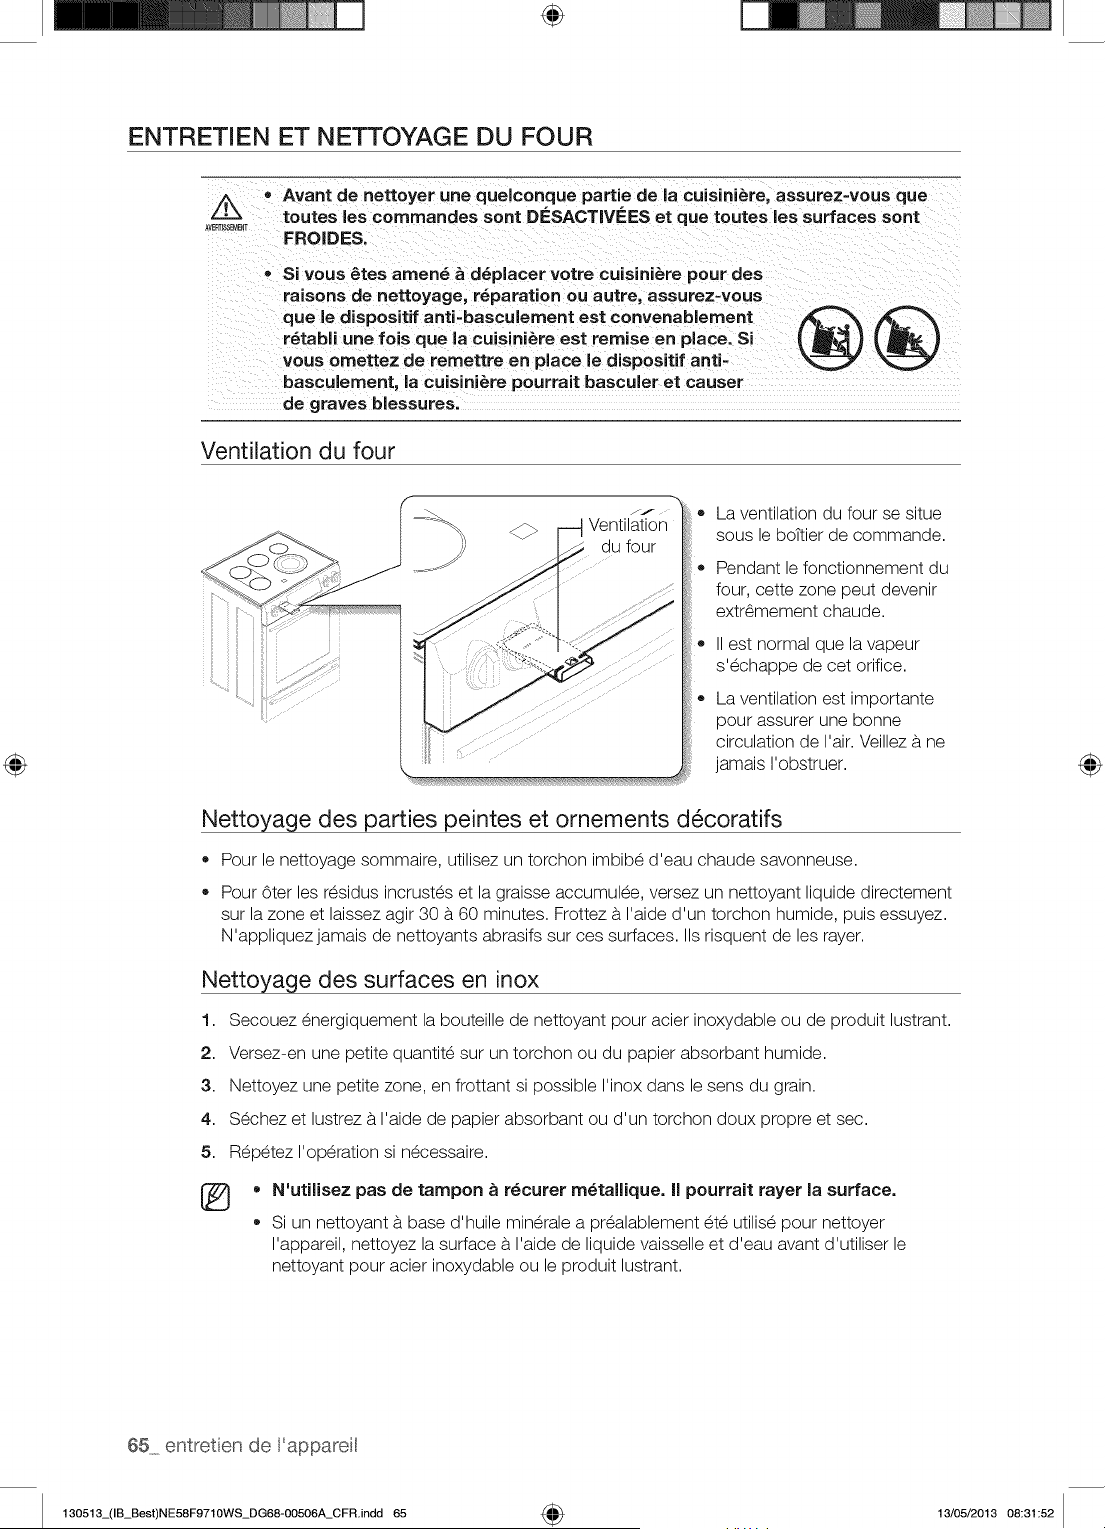
÷
ENTRETIEN ET NETTOYAGE DU FOUR
Z_ _ Avant de nettoyer une quelconque pattie de la cuisini_re, assurez=vous que
AVERT_T toutes les commandes sont DESACTIVEES et que toutes les surfaces sont
FROIDES.
Si vous #._tesamen_ & d_placer votre cuisini_re pour des
raisons de nettoyage, r_paration ou autre, assurez=vous
que le dispositif anti=basculement est convenablement
r_tabli une lois que la cuisini_re est remise en place. Si
vous omettez de remettre en place le dispositif anti-
basculement, la cuisini_re pourrait basculer et causer
de graves bRessures.
®®
Ventilation du four
i ii!i_'_
JJ
Ventilation
du four
o
®
La ventilation du four se situe
sous le bottier de commande.
Pendant le fonctionnement du
four, cette zone peut devenir
extr6mement chaude.
II est normal que la vapeur
s'echappe de cet orifice.
La ventilation est importante
pour assurer une bonne
circulation de I'air. Veillez a ne
jamais I'obstruer.
Nettoyage des parties peintes et ornements d_coratifs
• Pour le nettoyage sommaire, utilisez un torchon imbibe d'eau chaude savonneuse.
Pour 6ter les residus incrustes et la graisse accumulee, versez un nettoyant liquide directement
sur la zone et laissez agir 30 a 60 minutes. Frottez a I'aide d'un torchon humide, puis essuyez.
N'appliquez jamais de nettoyants abrasifs sur ces surfaces. IIs risquent de les rayer.
Nettoyage des surfaces en inox
1. Secouez energiquement la bouteille de nettoyant pour acier inoxydable ou de produit lustrant.
2. Versez-en une petite quantite sur un torchon ou du papier absorbant humide.
3. Nettoyez une petite zone, en frottant si possible I'inox dans le sens du grain.
4. Sechez et lustrez a I'aide de papier absorbant ou d'un torchon doux propre et sec.
5. Repetez I'operation si necessaire.
®
N'utilisez pas de tampon _ r_curer m_tallique. II pourrait rayer la surface.
Si un nettoyant a base d'huile minerale a prealablement ete utilise pour nettoyer
I'appareil, nettoyez la surface a I'aide de liquide vaisselle et d'eau avant d'utiliser le
nettoyant pour acier inoxydable ou le produit lustrant.
65 entretien de 'appareit
130513_(IB_Best)NE58F9710WS_DG68-OO506A_CFR.indd 65 4_ 13/05/2013 08:31:52
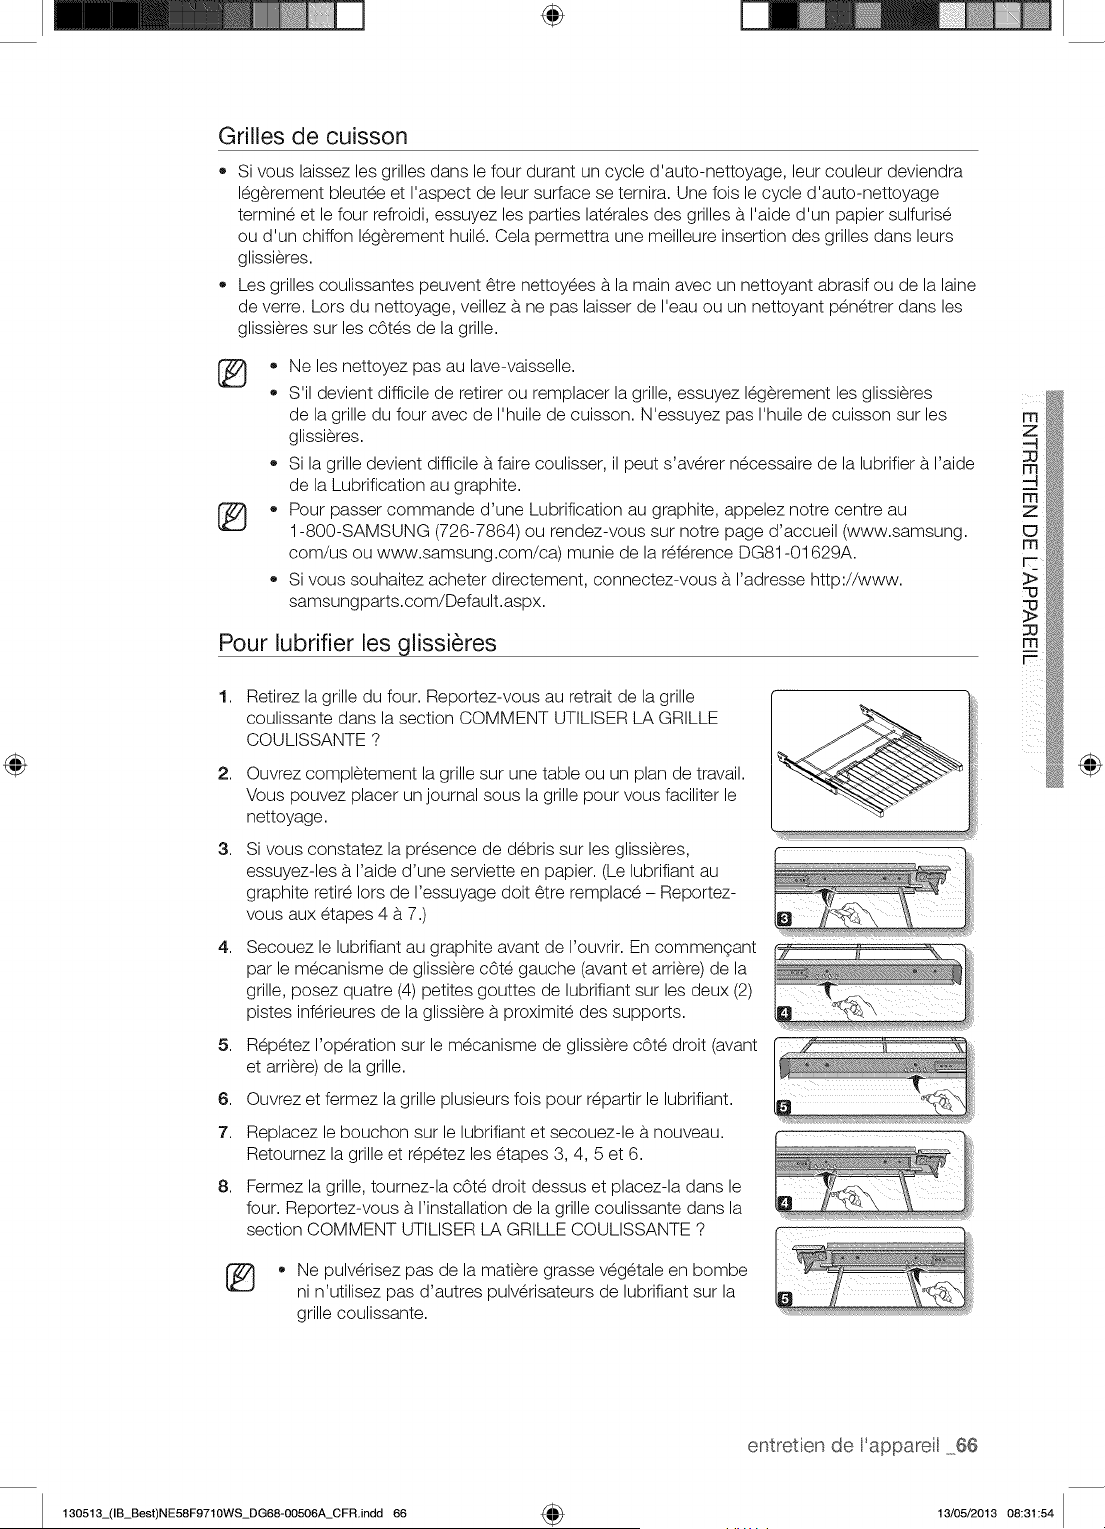
÷
Grilles de cuisson
• Si vous laissez les grilles dans le four durant un cycle d'auto-nettoyage, leur couleur deviendra
legerement bleutee et I'aspect de leur surface se ternira. Une fois le cycle d'auto-nettoyage
termine et le four refroidi, essuyez les parties laterales des grilles b. I'aide d'un papier sulfurise
ou d'un chiffon legerement huile. Cela permettra une meilleure insertion des grilles dans leurs
glissieres.
Les grilles coulissantes peuvent 6tre nettoyees b.la main avec un nettoyant abrasif ou de la laine
de verre. Lors du nettoyage, veillez b. ne pas laisser de I'eau ou un nettoyant penetrer dans les
glissieres sur les cOtes de la grille.
• Ne les nettoyez pas au lave-vaisselle.
S'il devient difficile de retirer ou remplacer la grille, essuyez legerement les glissieres
de la grille du four avec de I'huile de cuisson. N'essuyez pas I'huile de cuisson sur les
glissieres.
Si la grille devient difficile b.faire coulisser, il peut s'averer necessaire de la lubrifier b. I'aide
de la Lubrification au graphite.
• Pour passer commande d'une Lubrification au graphite, appelez notre centre au
1-800-SAMSUNG (726-7864) ou rendez-vous sur notre page d'accueil (www.samsung.
com/us ou www.samsung.com/ca) munie de la reference DG81-01629A.
Si vous souhaitez acheter directement, connectez-vous b. I'adresse http://www.
samsungparts.com/Default.aspx.
Pour lubrifier les glissi_res
1,
2,
3,
4,
5,
6.
7.
8.
Retirez la grille du four. Reportez-vous au retrait de la grille
coulissante dans la section COMMENT UTILISER LA GRILLE
COULISSANTE ?
Ouvrez completement la grille sur une table ou un plan de travail.
Vous pouvez placer un journal sous la grille pour vous faciliter le
nettoyage.
Si vous constatez la presence de debris sur les glissieres,
essuyez-les b. I'aide d'une serviette en papier. (Le lubrifiant au
graphite retire Iors de I'essuyage doit 6tre remplace - Reportez-
vous aux etapes 4 b. 7.)
Secouez le lubrifiant au graphite avant de I'ouvrir. En commengant
par le mecanisme de glissiere cOte gauche (avant et arriere) de la
grille, posez quatre (4) petites gouttes de lubrifiant sur les deux (2)
pistes inferieures de la glissiere b. proximite des supports.
Repetez I'operation sur le mecanisme de glissiere cOte droit (avant
et arriere) de la grille.
Ouvrez et fermez la grille plusieurs fois pour repartir le lubrifiant.
Replacez le bouchon sur le lubrifiant et secouez-le b.nouveau.
Retournez la grille et repetez les etapes 3, 4, 5 et 6.
Fermez la grille, tournez-la cOte droit dessus et placez-la dans le
four. Reportez-vous b.I'installation de la grille coulissante dans la
section COMMENT UTILISER LA GRILLE COULISSANTE ?
* Ne pulverisez pas de la matiere grasse vegetale en bombe
ni n'utilisez pas d'autres pulverisateurs de lubrifiant sur la
grille coulissante.
@
entretien de 'appareil 66
130513_(IB_Best)NE58F9710WS_DG68-00506A_CFR.indd 66 4_ 13/05/2013 08:31:54
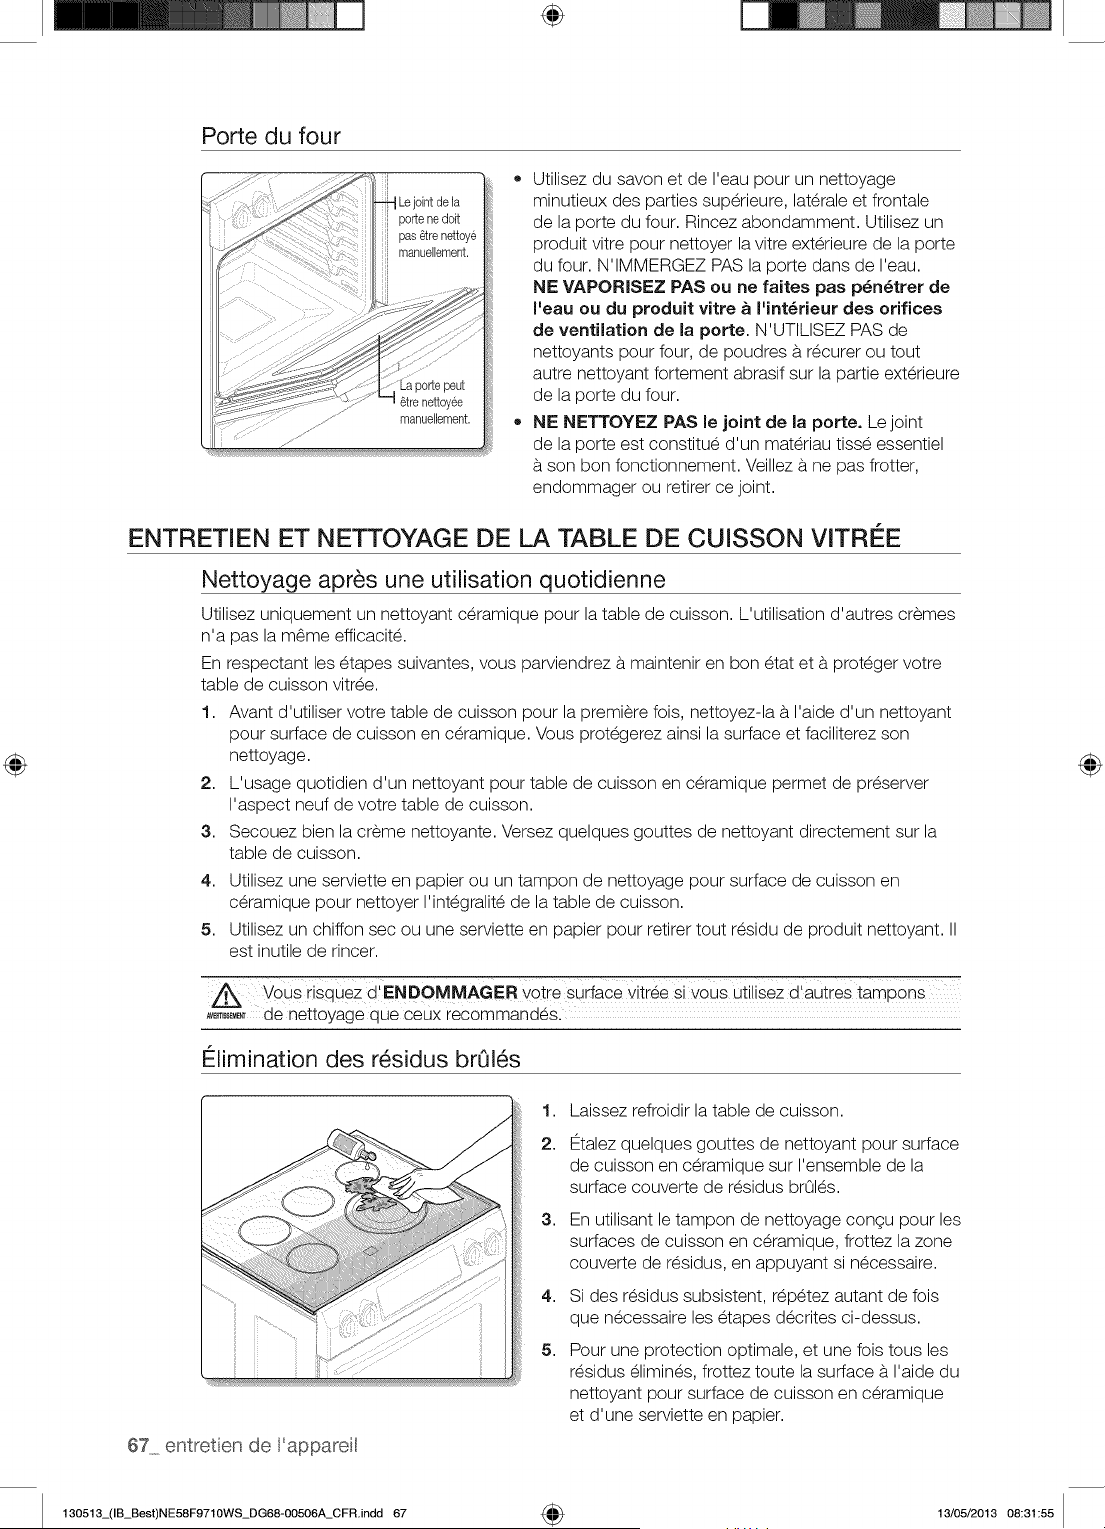
÷
Porte du four
Utilisez du savon et de I'eau pour un nettoyage
minutieux des parties superieure, laterale et frontale
de la porte du four. Rincez abondamment. Utilisez un
produit vitre pour nettoyer la vitre exterieure de la porte
du four. N'IMMERGEZ PAS la porte dans de I'eau.
NE VAPORISEZ PAS ou ne faites pas p_n_trer de
I'eau ou du produit vitre _ I'int_rieur des orifices
de ventilation de la porte. N'UTILISEZ PAS de
nettoyants pour four, de poudres b.recurer ou tout
autre nettoyant fortement abrasif sur la partie exterieure
de la porte du four.
NE NETTOYEZ PAS le joint de la porte. Le joint
de la porte est constitue d'un materiau tisse essentiel
b.son bon fonctionnement. Veillez b. ne pas frotter,
endommager ou retirer ce joint.
ENTRETIEN ET NETTOYAGE DE LA TABLE DE CUISSON VITREE
Nettoyage apr_s une utilisation quotidienne
Utilisez uniquement un nettoyant ceramique pour la table de cuisson. L'utilisation d'autres cremes
n'a pas la m6me efficacite.
En respectant les etapes suivantes, vous parviendrez b. maintenir en bon etat et b.proteger votre
table de cuisson vitree.
1. Avant d'utiliser votre table de cuisson pour la premiere fois, nettoyez-la b. I'aide d'un nettoyant
pour surface de cuisson en ceramique. Vous protegerez ainsi la surface et faciliterez son
nettoyage.
2. L'usage quotidien d'un nettoyant pour table de cuisson en ceramique permet de preserver
I'aspect neuf de votre table de cuisson.
3. Secouez bien la creme nettoyante. Versez quelques gouttes de nettoyant directement sur la
table de cuisson.
4. Utilisez une serviette en papier ou un tampon de nettoyage pour surface de cuisson en
ceramique pour nettoyer I'integralite de la table de cuisson.
5. Utilisez un chiffon sec ou une serviette en papier pour retirer tout residu de produit nettoyant.
est inutile de rincer.
Vous risquez d' ENDOMMAGr=. _0tre sudace vit[_e Si yous utilisez d'autres !amp0ms
,,_,=_ de nettoyage que ceux recommandes.
Elimination des r_sidus broils
67 entretien de 'appareit
1,
2.
3,
4,
5,
Laissez refroidir la table de cuisson.
12talezquelques gouttes de nettoyant pour surface
de cuisson en ceramique sur I'ensemble de la
surface couverte de residus brOles.
En utilisant le tampon de nettoyage congu pour les
surfaces de cuisson en ceramique, frottez la zone
couverte de residus, en appuyant si necessaire.
Si des residus subsistent, repetez autant de fois
que necessaire les etapes decrites ci-dessus.
Pour une protection optimale, et une fois tousles
residus elimines, frottez toute la surface b.I'aide du
nettoyant pour surface de cuisson en ceramique
et d'une serviette en papier.
130513_(IB_Best)NE58F9710WS_DG68-00506A_CFR.indd 67 _ 13/05/2013 08:31:55
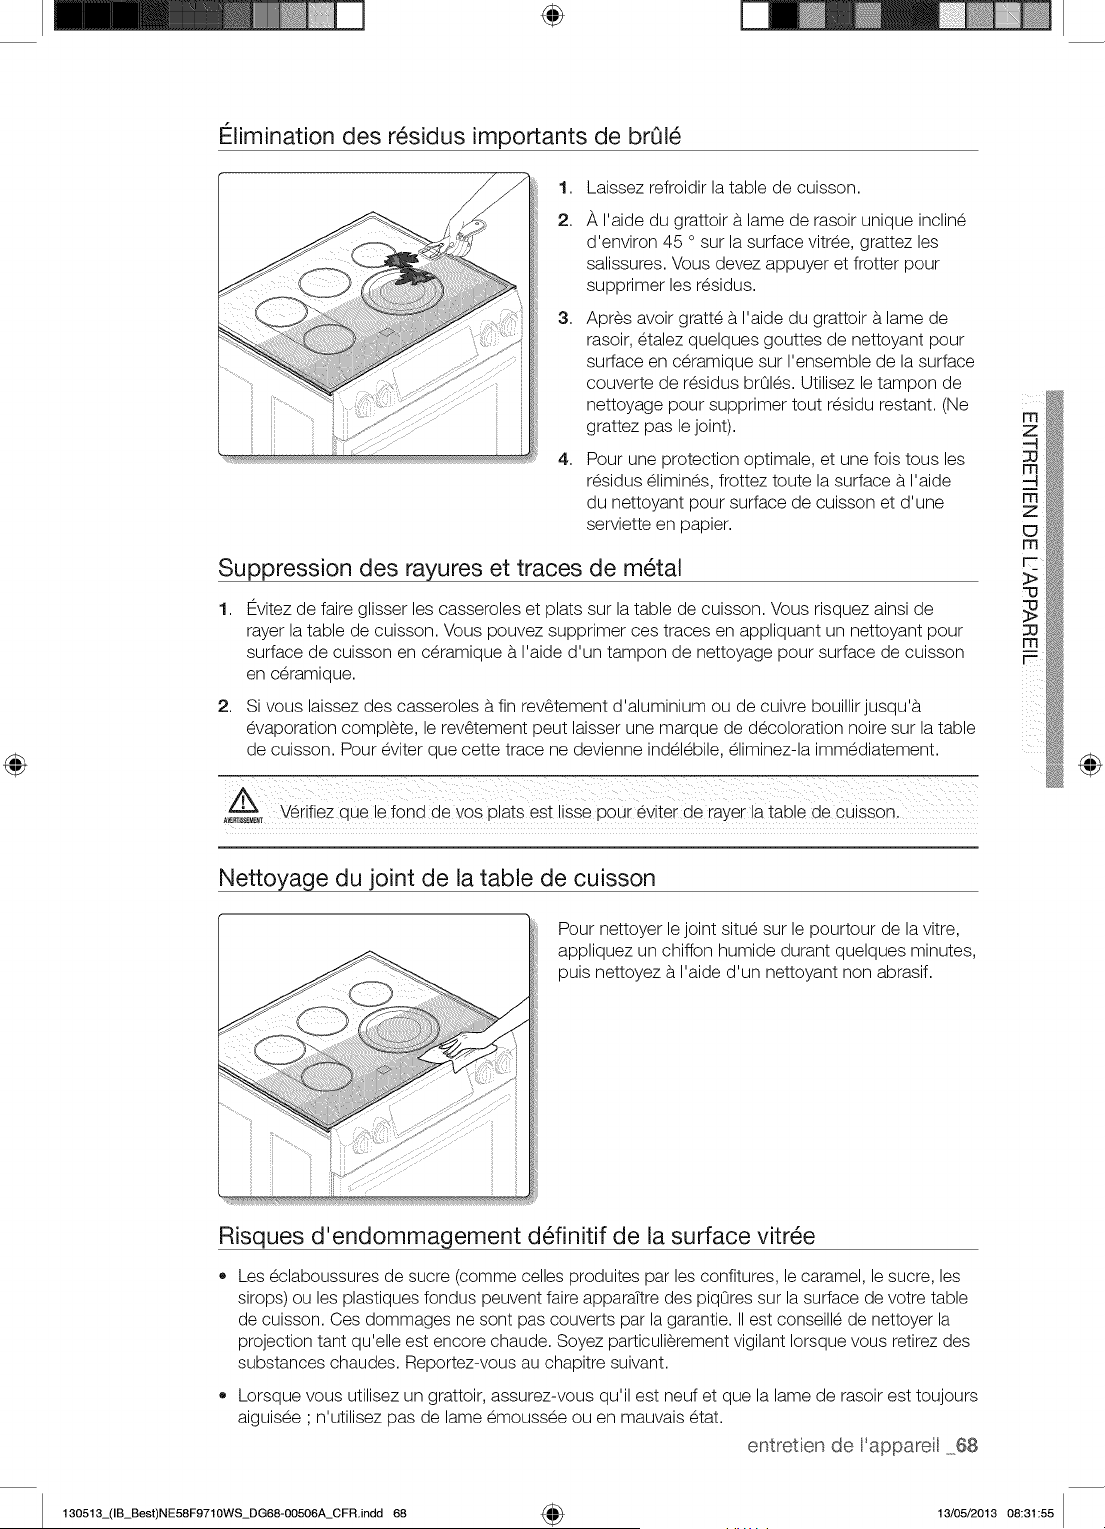
÷
Elimination des r_sidus importants de brOl_
1,
2.
3,
4,
Laissez refroidir la table de cuisson.
_, I'aide du grattoir b.lame de rasoir unique incline
d'environ 45 o sur la surface vitree, grattez les
salissures. Vous devez appuyer et frotter pour
supprimer les residus.
Apres avoir gratte b. I'aide du grattoir b.lame de
rasoir, etalez quelques gouttes de nettoyant pour
surface en ceramique sur I'ensemble de la surface
couverte de residus brOles. Utilisez le tampon de
nettoyage pour supprimer tout residu restant. (Ne
grattez pas le joint).
Pour une protection optimale, et une fois tousles
residus elimines, frottez toute la surface b. I'aide
du nettoyant pour surface de cuisson et d'une
serviette en papier.
Suppression des rayures et traces de m_tal
1, Evitez de faire glisser les casseroles et plats sur la table de cuisson. Vous risquez ainsi de
rayer la table de cuisson. Vous pouvez supprimer ces traces en appliquant un nettoyant pour
surface de cuisson en ceramique b. I'aide d'un tampon de nettoyage pour surface de cuisson
en ceramlo Je.
2. S vous alssez aes casseroles b.fin rev6tement aalumlnlum ou ae cuivre DOUIIIIrJUSQ J'8
evaooratlon comolete, e rev6tement oeut lalsser une _nareue de decoloratior nolre sur la table
ae CUlSSOn.Pour eviter aue cette trace ne aevlenne indelebile, eliminez-la mmediatement
,£
A_,_T Wrifiez oue le fond de vos olats est Ilsse Dour eviter de rayer la table de cuisson.
@
Nettoyage du joint de la table de cuisson
Pour nettoyer le joint situe sur le pourtour de la vitre,
appliquez un chiffon humide durant quelques minutes,
puis nettoyez b. I'aide d'un nettoyant non abrasif.
Risques d'endommaqement d_finitif de la surface vitr_e
Les eclaboussures de sucre (comme celles produites par les confitures, le caramel, le sucre, les
sirops) ou les plastiques fondus peuvent faire apparaTtre des piqOres sur la surface de votre table
de cuisson. Ces dommages ne sont pas couverts par la garantie. IIest conseille de nettoyer la
projection tant qu'elle est encore chaude. Soyez particulierement vigilant Iorsque vous retirez des
substances chaudes. Reportez-vous au chapitre suivant.
Lorsque vous utilisez un grattoir, assurez-vous qu'il est neuf et que la lame de rasoir est toujours
aiguisee ' n'utilisez pas de lame emoussee ou en mauvais etat.
entretien de 'appareil 68
130513_(IB_Best)NE58F9710WS_DG68-00506A_CFR.indd 68 4_ 13/05/2013 08:31:55
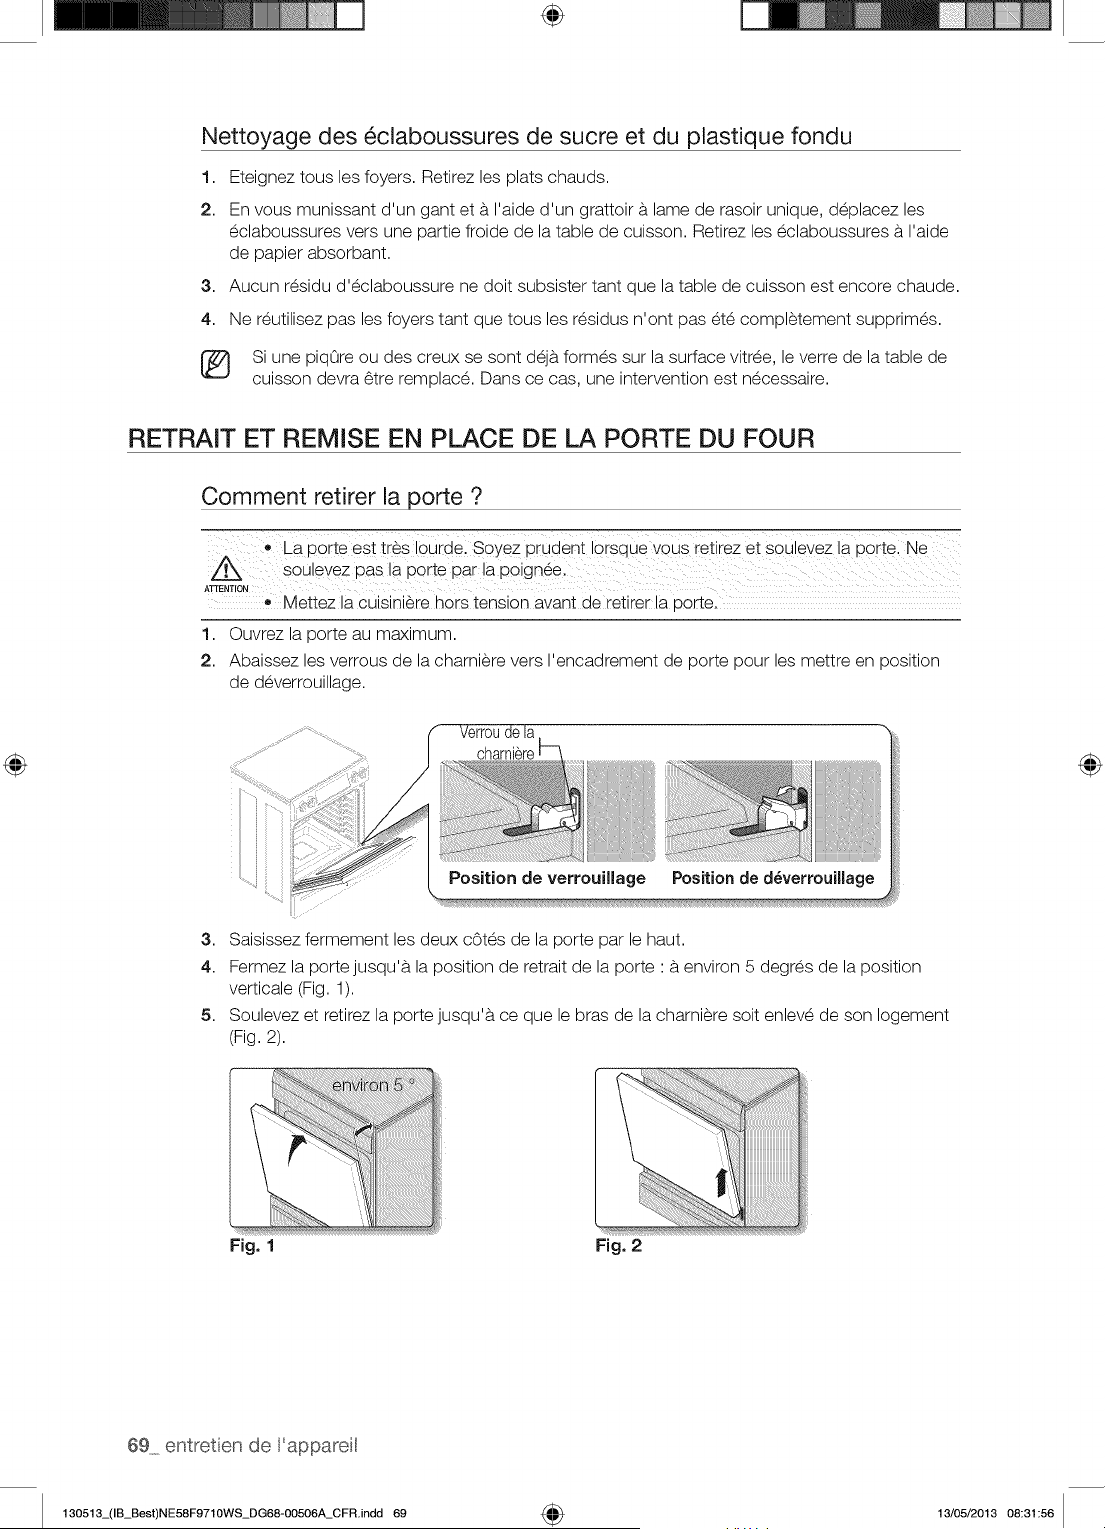
÷
Nettoyage des _claboussures de sucre et du plastique fondu
1. Eteignez tousles foyers. Retirez les plats chauds.
2. En vous munissant d'un gant et a I'aide d'un grattoir a lame de rasoir unique, deplacez les
eclaboussures vers une partie froide de la table de cuisson. Retirez les eclaboussures a I'aide
de papier absorbant.
3. Aucun residu d'eclaboussure ne doit subsister tant que la table de cuisson est encore chaude.
4. Ne reutilisez pas les foyers tant que tousles residus n'ont pas ete completement supprimes.
[_ Si une piqOre ou des creux se sont deja formes sur la surface vitree, le verre de la table de
cuisson devra 6tre remplace. Dans ce cas, une intervention est necessaire.
RETRAIT ET REMISE EN PLACE DE LA PORTE DU FOUR
Comment retirer la porte ?
: _ La porte est tres Iourdel Soyez prudent Iorsque vous retirez et soulevez la portel Ne
Soulevez pas la
ATTENTION
o Mettez la cuisiniere hors tension avant de retirer la porte.
1. Ouvrez la porte au maximum.
2. Abaissez les verrous de la charniere vers I'encadrement de porte pour les mettre en position
de deverrouillage.
f Verroude la
charniere
Position de verrouiUage Position de d_verrouillage
ii!
3. Saisissez fermement les deux cOtes de la porte par le haut.
4. Fermez la portejusqu'a la position de retrait de la porte : a environ 5 degres de la position
verticale (Fig. 1).
5. Soulevez et retirez la porte jusqu'a ce que le bras de la charniere soit enleve de son Iogement
(Fig. 2).
Fig. 1 Fig. 2
69 entretien de 'appareit
130513_(IB_Best)NE58F9710WS_DG68-00506A_CFR.indd 69 4_ 13/05/2013 08:31:56
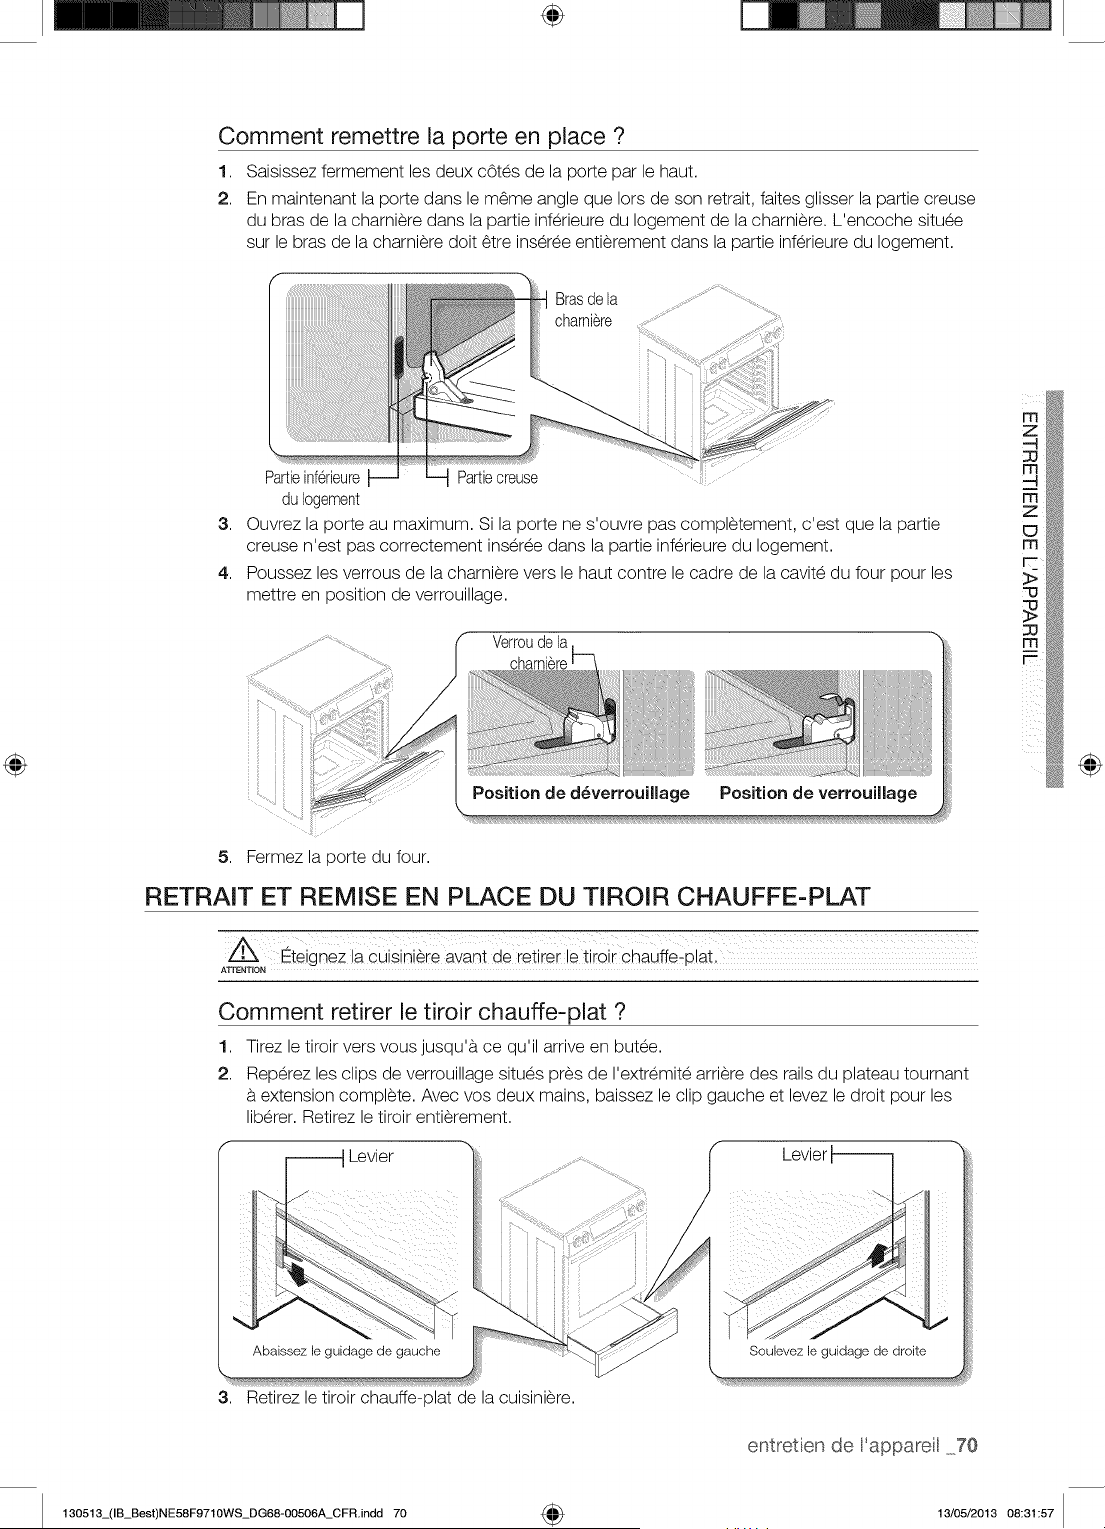
÷
Comment remettre la porte en place ?
1,
2.
Saisissez fermement les deux cotes de la porte par le haut.
En maintenant la porte dans le m6me angle que Iors de son retrait, faites glisser la partie creuse
du bras de la charniere dans la partie inferieure du Iogement de la charniere. L'encoche situee
sur le bras de la charniere doit 6tre inseree entierement dans la partie inferieure du Iogement.
Brasde la
charniere
3,
4.
Partieinferieure Partiecreuse
du Iogement
Ouvrez la porte au maximum. Si la porte ne s'ouvre pas completement, c'est que la partie
creuse n'est pas correctement inseree dans la partie inferieure du Iogement.
Poussez les verrous de la charniere vers le haut contre le cadre de la cavite du four pour les
mettre en position de verrouillage.
Verroude la
5. Fermez la porte du four.
li!i!i!ii!!!!!!!!!!!!!!!!!!!!!!!!!!!iiijiiiiiiiiiiiiiiliiii_iii}}iii
Position de verrouillagePosition de d_verrouiUage
RETRAIT ET REMISE EN PLACE DU TIROIR CHAUFFE-PLAT
_teignez ia cuisini_ie avant de ieiirel le ii;oil Chauffe!pial
Comment retirer le tiroir chauffe-plat ?
1,
2.
Tirez le tiroir vers vous jusqu'a ce qu'il arrive en butee.
Reperez les clips de verrouillage situes pres de I'extremite arriere des rails du plateau tournant
extension complete. Avec vos deux mains, baissez le clip gauche et levez le droit pour les
liberer. Retirez le tiroir entierement.
_ Levier
Levier
@
3,
Abaissez le guidage de gauche
Retirez le tiroir chauffe-plat de la cuislniere.
Soubvez le guidage de droite
entretien de 'appareil 70
130513_(IB_Best)NE58F9710WS_DG68-00506A_CFR.indd 70 4_ 13/05/2013 08:31:57
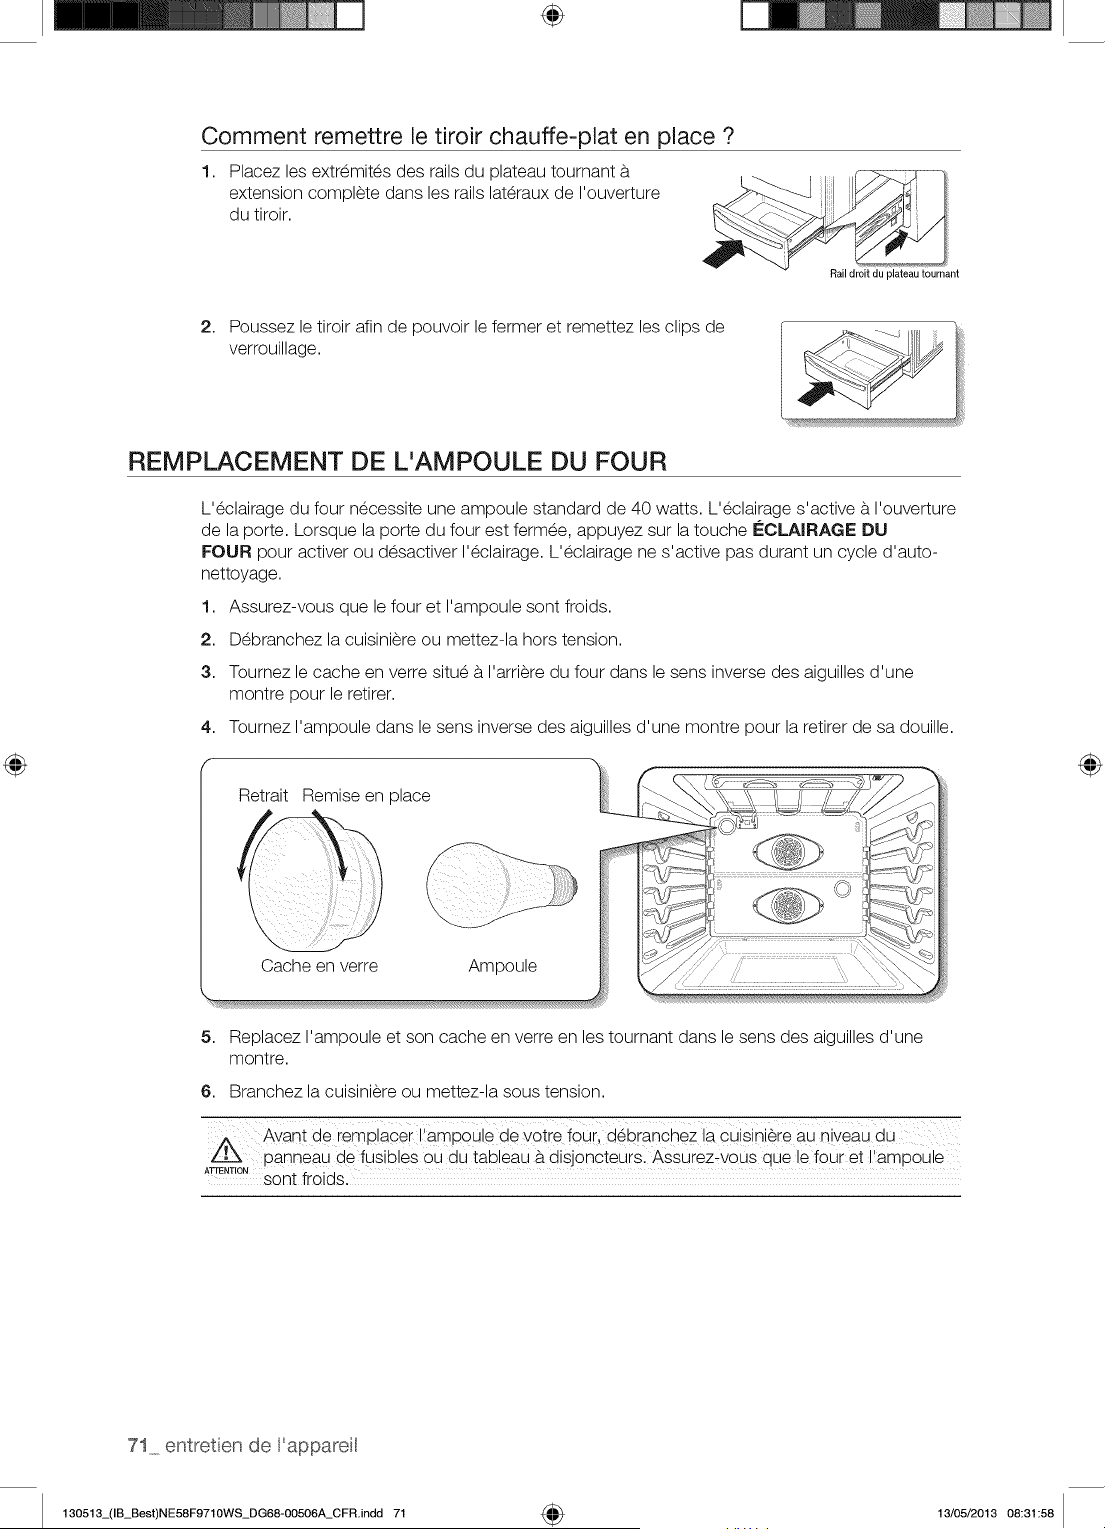
÷
Comment remettre le tiroir chauffe-plat en place ?
1,
Placez les extremites des rails du plateau tournant
extension complete dans les rails lateraux de I'ouverture
du tiroir.
Rail droit du plateautournant
2. Poussez le tiroir afin de pouvoir le fermer et remettez les clips de
verrouillage.
REMPLACEMENT DE L'AMPOULE DU FOUR
L'eclairage du four necessite une ampoule standard de 40 watts. L'eclairage s'active a I'ouverture
de la porte. Lorsque la porte du four est fermee, appuyez sur la touche i_CLAIRAGE DU
FOUR pour activer ou desactiver I'eclairage. L'eclairage ne s'active pas durant un cycle d'auto-
nettoyage.
1. Assurez-vous que le four et I'ampoule sont froids.
2. Debranchez la cuisiniere ou mettez-la hors tension.
3. Tournez le cache en verre situe a I'arriere du four dans le sens inverse des aiguilles d'une
montre pour le retirer.
4. Tournez I'ampoule dans le sens inverse des aiguilles d'une montre pour la retirer de sa douille.
Retrait Remise en place
Cache en verre Ampoule
5. Replacez I'ampoule et son cache en verre en les tournant dans le sens des aiguilles d'une
montre.
6. Branchez la cuisiniere ou mettez-la sous tension.
Avant de ie_placei i,ampoule de yot!e f0uil d_branchez la cuisini_ie aU niveaU d u
panneau de fusiloles ou du tableau a disjoncteurs. Assurez_vous que le four et I'ampoule
ATrE,T,O,sont froids. :
71 entretien de 'appareit
130513_(IB_Best)NE58F9710WS_DG68-00506A_CFR.indd 71 _ 13/05/2013 08:31:58
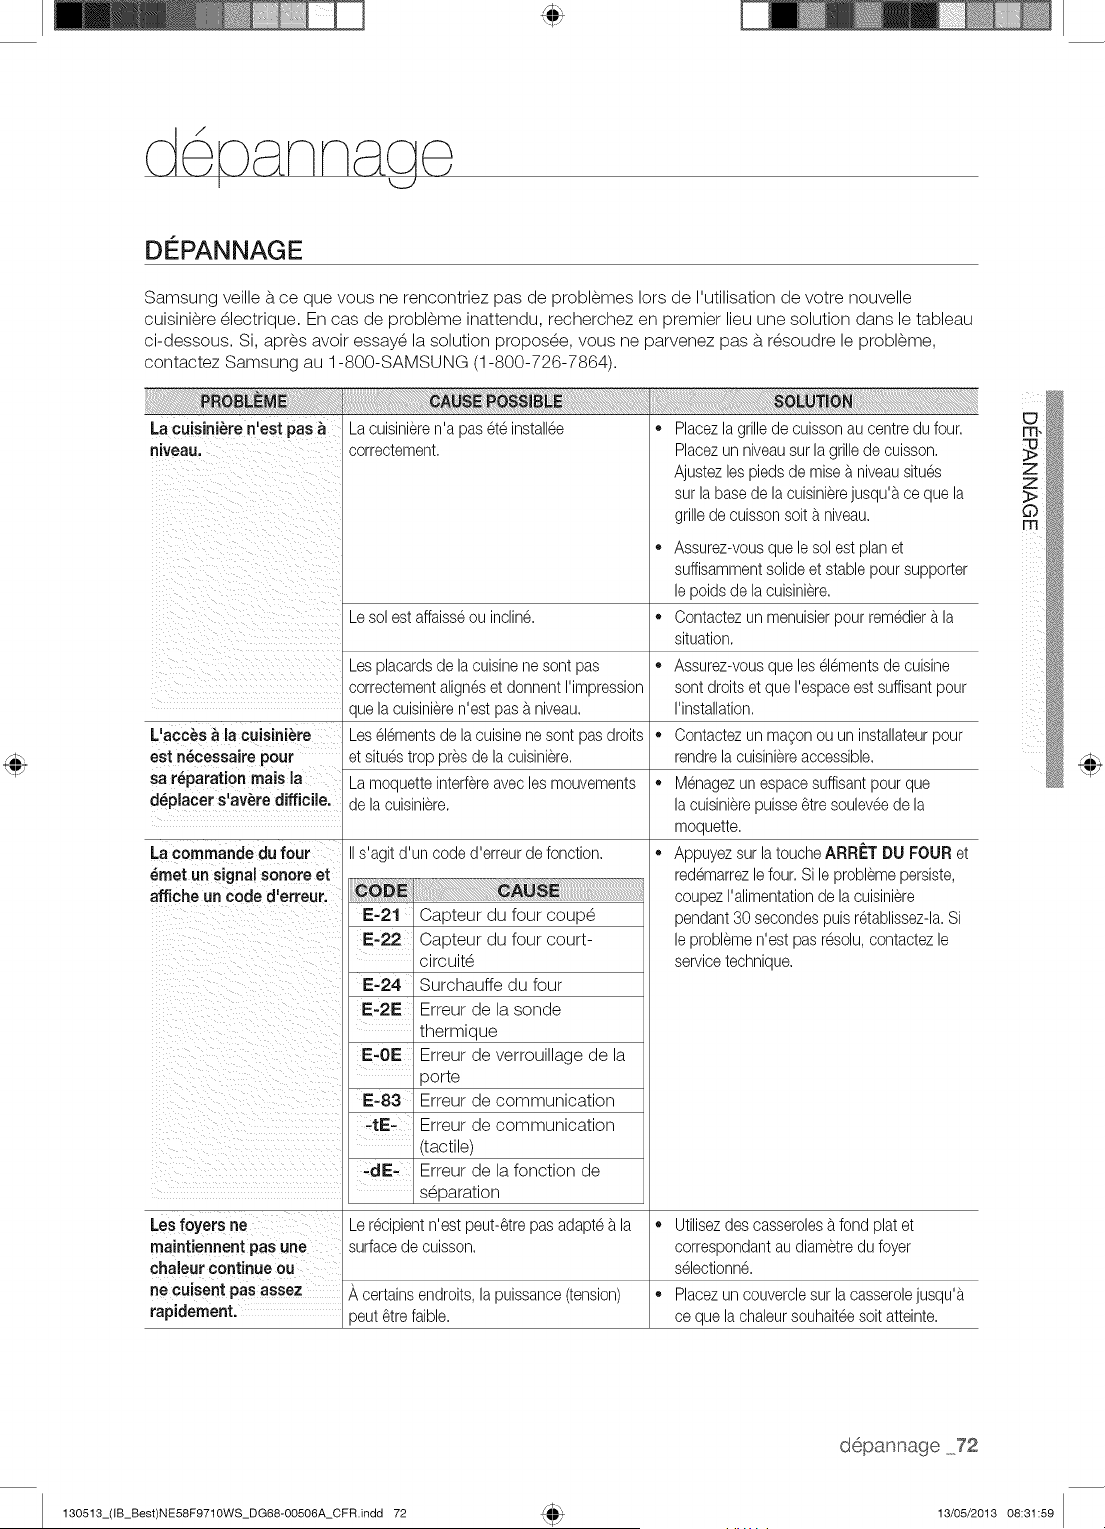
d6p _nn _g
DE PANNAGE
Samsung veille b.ce que vous ne rencontriez pas de problemes lots de I'utilisation de votre nouvelle
cuisiniere _lectrique. En cas de probleme inattendu, recherchez en premier lieu une solution dans le tableau
ci-dessous. Si, apres avoir essaye la solution propos_e, vous ne parvenez pas b. r_soudre le probl_me,
contactez Samsung au 1-800-SAMSUNG (1-800-726-7864).
La cuisJni_ren'est pas
niveau.
La cuisinieren'a pas et6installee
correctement.
Le solest affaisseou inclin& ,,
Les placardsde la cuisinene sont pas ,,
correctementaligneset donnentI'impression
que lacuisinieren'est pas _tniveau.
L'acc_s _ la cuisini_re Les el6mentsde lacuisinene sont pas droits ,,
est n_cessaJrepour et situestrop presde lacuisiniere.
sa r_parationmaisla La moquetteinterfereavec lesmouvements ,,
d6placer s'av_rediffJcJle, de lacuisiniere.
e
Placezlagrillede cuissonaucentredu four.
Placezun niveausur lagrillede cuisson.
Ajustezlespiedsde mise a niveausitues
surla basede la cuisinierejusqu'a ce que la
grillede cuissonsoit_tniveau.
Assurez-vousquele solest plan et
suffisammentsolideet stablepoursupporter
lepoids de la cuisiniere.
La commande du four
_met un signalsonoreet
affiche un code d'erreur.
s'agit d'un coded'erreurde fonction.
E-21 Capteur du four coup_
E-22 Capteur du four court-
circuit_
E-24 Surchauffe du four
Erreur de la sonde
thermique
E=OE Erreur de verrouillage de la
porte
E-83 Erreur de communication
-rE- Erreur de communication
(tactile)
=dE- Erreur de la fonction de
s_paration
Lesfoyers ne Le recipientn'est peut-6trepas adaptea la
maintiennentpas une surfacede cuisson.
chaleurcontinueou
ne cuisent pas assez A certainsendroits,lapuissance(tension)
rapidement, peut _trefaible.
Contactezun menuisierpour remedier_tla
situation.
Assurez-vousqueleselementsde cuisine
sontdroits et que I'espaceest suffisantpour
I'installation.
Contactezun ma;on ou un installateurpour
rendrela cuisiniereaccessible.
Menagezun espacesuffisantpour que
lacuisinierepuisse_tre souleveede la
moquette.
Appuyezsurlatouche ARRf:T DU FOUR et
redemarrezle four.Si leproblemepersiste,
coupezI'alimentationde lacuisiniere
pendant30 secondespuis retablissez-la.Si
leproblemen'est pas resolu,contactezle
servicetechnique.
,, Utilisezdes casseroles_tfond plat et
correspondantau diametredufoyer
selectionn&
,, Placezun couverclesur la casserolejusqu'_t
ce que lachaleursouhaiteesoit atteinte.
m_
z
z
depannage72
130513_(IB_Best)NE58F9710WS_DG68-OO506A_CFR.indd 72 13/05/2013 08:31:59
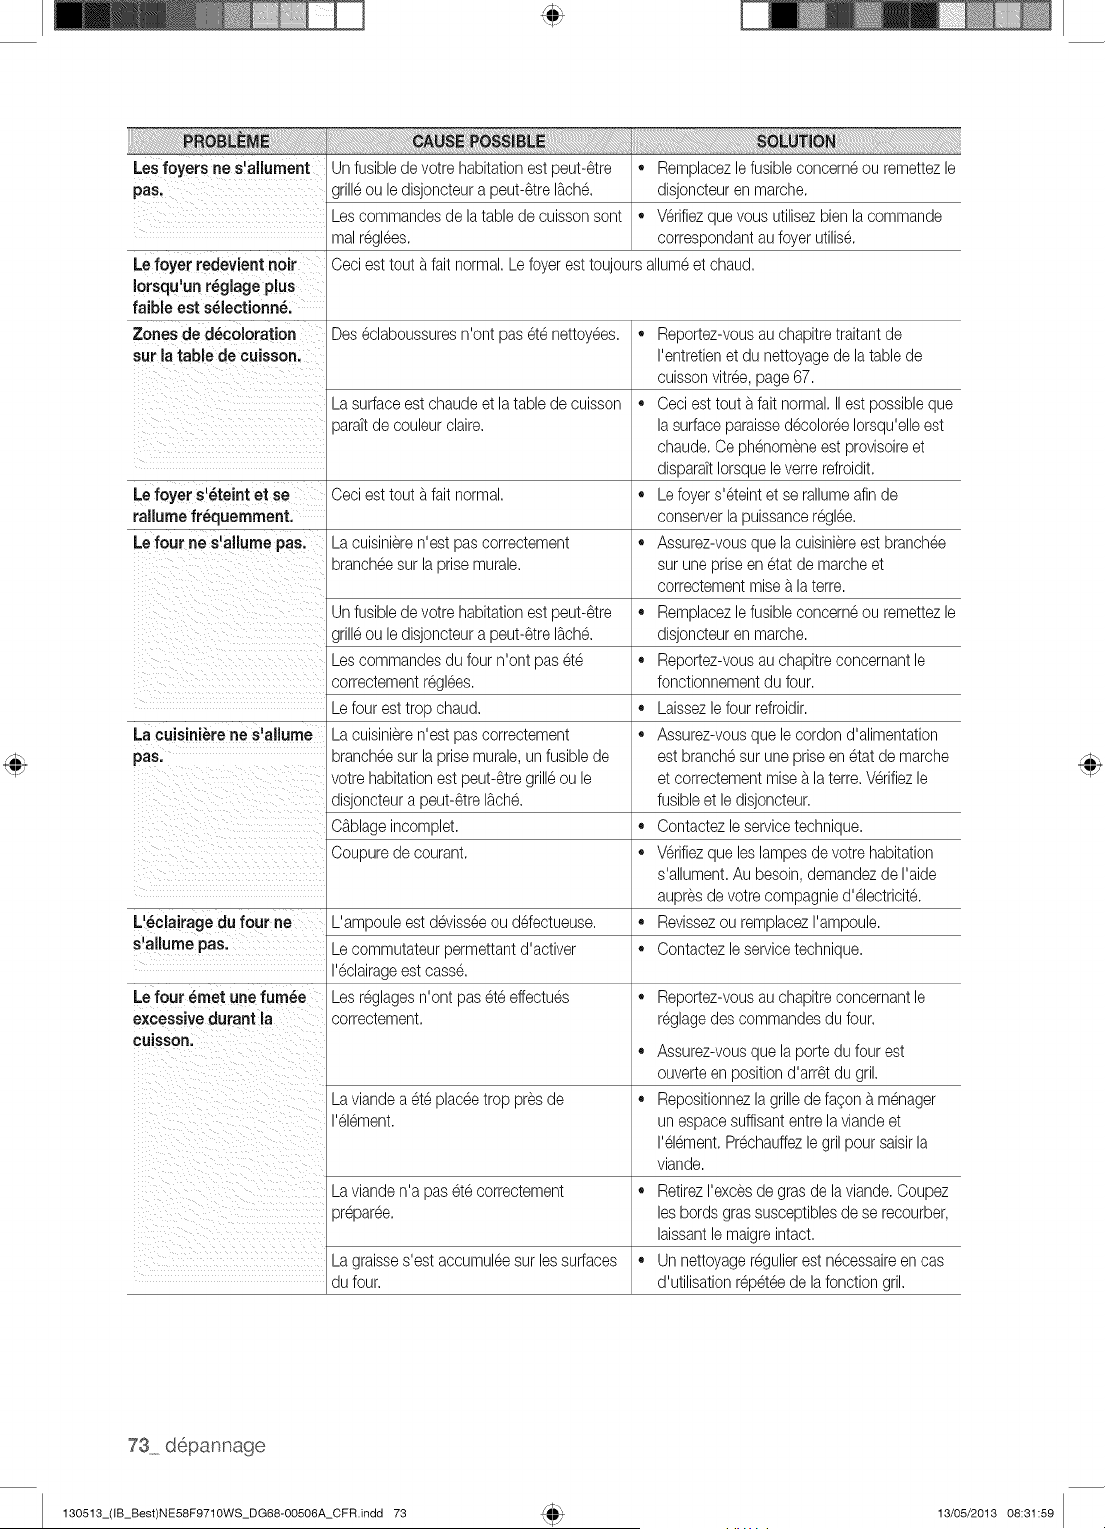
Lesfoyers ne s'allument Unfusiblede votre habitationest peut-_tre ,, Remplacezlefusible concerneou remettezle
pas. grilleou ledisjoncteura peut-_treI_ch6. disjoncteuren marche.
Lescommandesde latablede cuissonsent ,, Verifiezque vous utilisezbienlacommande
malregl6es, correspondantau foyerutilise.
Lefoyer redevient noir Ceci est tout a fait normal.Le foyerest toujoursallumeet chaud.
Iorsqu'unr_glage plus
faible est s_lectionn_.
Zones de d_coloration Deseclaboussuresn'ont pas et6 nettoyees. ,, Reportez-vousau chapitretraitantde
sur la table de cuisson. I'entretienet du nettoyagede latablede
cuissonvitree, page67.
Lasurfaceest chaudeet latable de cuisson ,, Ceci est tout a fait normal.IIest possibleque
_araTtde couleurclaire, lasurfaceparaissedecolor6eIorsqu'elleest
chaude.Ce phenomeneest provisoireet
disparaTtIorsqueleverrerefroidit.
Lefoyer s'_teint et se Ceci est tout a fait normal. ,, Lefoyer s'eteintet se rallumeafin de
rallume fr_quernment, conserverla puissanceregl6e.
Lefour ne s'allume pas. La cuisinieren'est pascorrectement ,, Assurez-vousque lacuisiniereest branchee
brancheesur laprisemurale, sur unepriseenetat de marcheet
correctementraisea laterre.
Unfusibledevotre habitationest peut-_tre ,, Remplacezlefusible concerneou remettezle
grilleou ledisjoncteura peut-_treI_ch6. disjoncteuren marche.
Lescommandesdu four n'ont pas et6 ,, Reportez-vousau chapitreconcernantle
correctementregl6es, fonctionnementdu four.
Lefour est trop chaud. ,, Laissezle four refroidir.
Lacuisini_rene s'allurne La cuisinieren'est pascorrectement ,, Assurez-vousque lecordon d'alimentation
pas. brancheesur laprisemurale,unfusiblede est branchesur unepriseen etat de marche
votre habitationest peut-_tregrilleou le et correctementraise_tla terre.V@ifiezle
disjoncteura peut-_treI_ch6. fusibleet ledisjoncteur.
C_tblageincomplet. ,, Contactezle servicetechnique.
Coupurede courant. ,, Verifiezque leslampesde votre habitation
s'allument.Au besoin,demandezde I'aide
aupresde votre compagnied'electricit6.
L'_clairagedu four ne L'ampouleest d@isseeou defectueuse. ,, Revissezou remplacezI'ampoule.
s'allume pas, Lecommutateurpermettantd'activer ,, Contactezle servicetechnique.
I'eclairageest casse.
Lefour _met une fum_e Lesreglagesn'ont paset6effectues ,, Reportez-vousau chapitreconcernantle
excessive durant la correctement, reglagedes commandesdu four.
cuisson.
,, Assurez-vousque laportedu four est
ouverteen positiond'arr_t du grik
Laviandea et6 placeetrop presde ,, Repositionnezlagrille de faoona menager
I'el6ment. un espacesuffisantentrelaviandeet
I'el6ment.Prechauffezlegril pour saisirla
viande.
Lavianden'a pas et6correctement ,, RetirezI'excesde gras de laviande.Coupez
pr@aree, lesbordsgrassusceptiblesde se recourber,
laissantle maigreintact.
La graisses'est accumuleesur lessurfaces ,, Un nettoyageregulierest necessaireen cas
du four. d'utilisationr@eteede lafonction grik
73 depannage
130513_(IB_Best)NE58F9710WS_DG68-OO506A_CFR.indd 73 13/05/2013 08:31:59
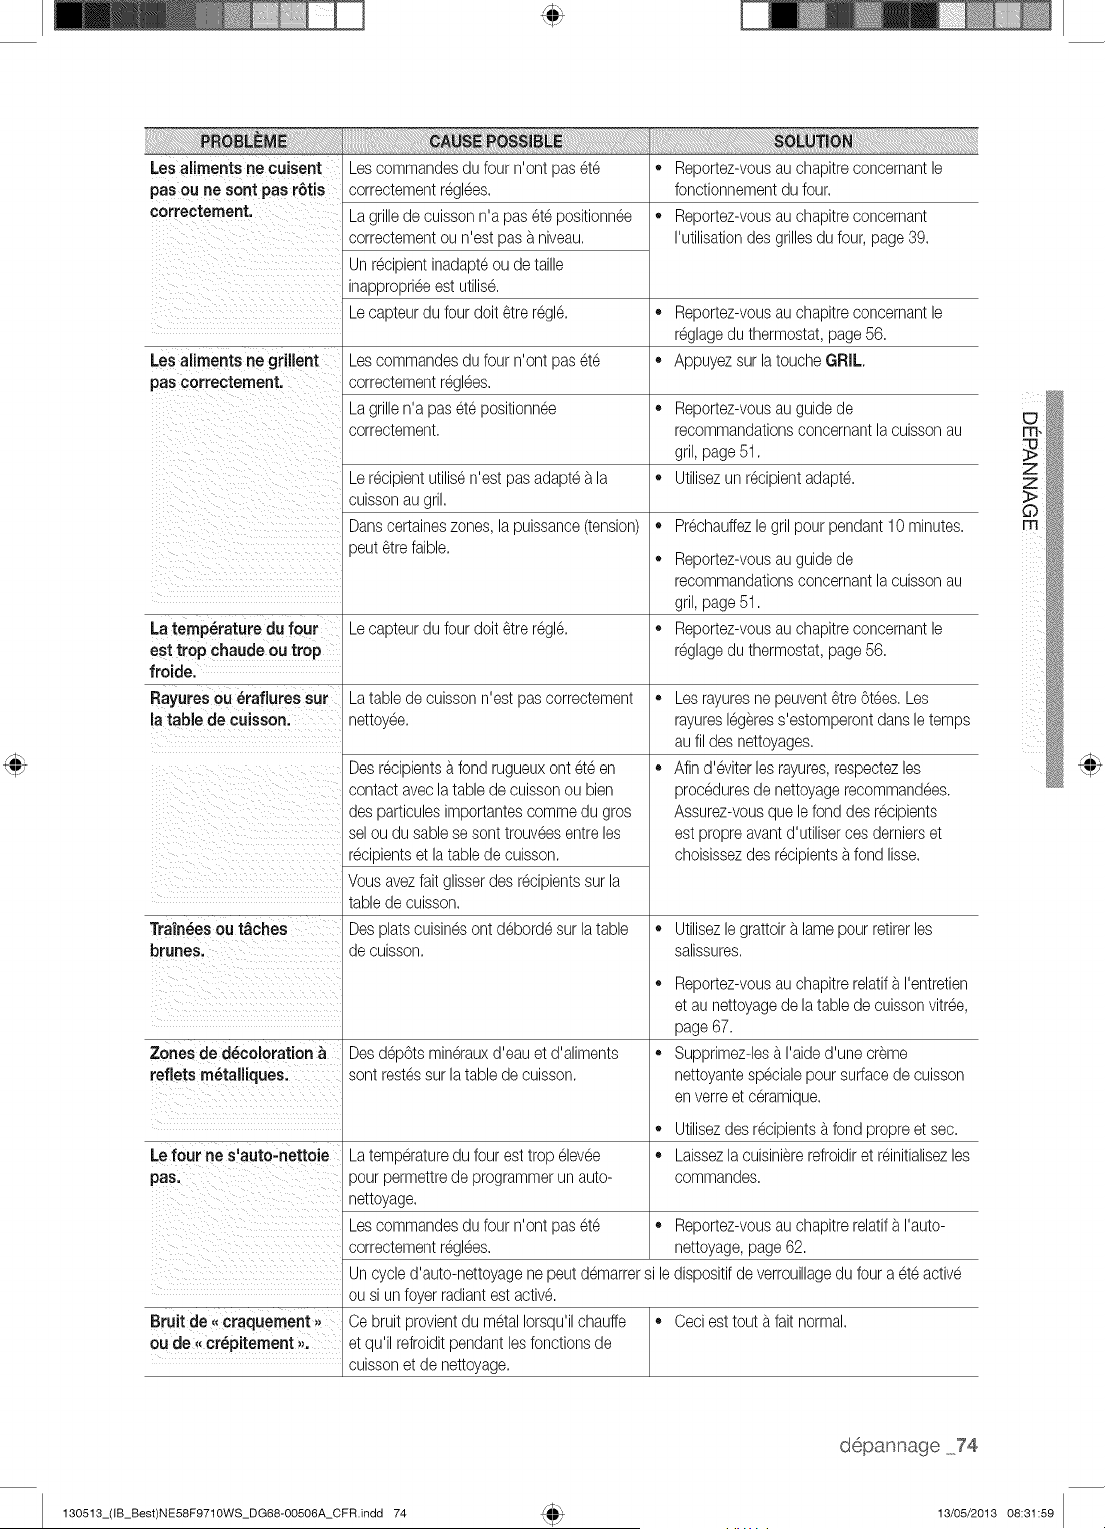
Les ailmentsne cuisent
pas ou ne sont pas r6tis
correctement.
Les commandesdu four n'ont paset6
correctementregl6es.
La grillede cuissonn'a pas et6 positionnee
correctementou n'est pas a niveau.
Un recipientinadapteou de taille
inapproprieeest utilise.
Le capteurdu fourdolt _tre regl6.
,, Reportez-vousau chapitreconcemantle
fonctionnementdu four.
,, Reportez-vousau chapitreconcemant
I'utilisationdes grillesdu four, page 39.
,, Reportez-vousau chapitreconcemantle
reglagedu thermostat, page56.
Les aliments ne grillent Les commandesdu four n'ont paset6 ,, Appuyezsur latoucheGRIL
pas correctement, correctementregl6es.
La grillen'a pas et6 positionnee ,, Reportez-vousau guide de
correctement, recommandationsconcernantlacuisson au
gril, page51.
Le recipientutilisen'est pas adaptea la ,, Utilisezun recipientadapte.
cuissonaugril.
Danscertaineszones,lapuissance(tension) ,,
peut _trefaible.
e
Latemperature du four Le capteurdu four dolt _tre regl6. ,,
est trop chaudeou trop
froide.
Rayuresou _raflures sur La tablede cuissonn'est pas correctement ,,
la table de cuJsson, nettoyee.
o
Desrecipientsa.fond rugueuxont et6 en
contact avecla tablede cuissonou bien
des particulesimportantescommedu gros
selou dusable sesent trouveesentreles
recipientset latablede cuisson.
Vousavezfait glisserdes recipientssurla
tablede cuisson.
Desplats cuisinesont debord6surlatable
de cuisson.
Tra'fn_esou t_ches
brunes.
Prechauffezlegril pour pendant 10 minutes, m
Reportez-vousau guide de
recommandationsconcernantlacuisson au
gril, page51.
Reportez-vousau chapitreconcemantle
reglagedu thermostat, page56.
Les rayuresne peuvent_tre 6tees.Les
rayureslegeress'estomperontdansle temps
au fil des nettoyages.
Afin d'6viter lesrayures,respectezles
proceduresde nettoyagerecommandees.
Assurez-vousquelefond des recipients
est propre avantd'utiliserces demierset
choisissezdes recipientsa fond lisse.
,, Utilisezlegrattoir a lamepour retirerles
salissures.
Reportez-vousau chapitrerelatifa I'entretien
et au nettoyagede latablede cuissonvitree,
page 67.
Supprimez-les_.I'aide d'une creme
nettoyantespecialepour surfacede cuisson
en verreet ceramique.
Zones de d_coloration a Desdep6tsminerauxd'eau et d'aliments ,,
reflets m_.talliques, sent restessur latablede cuisson.
,, Utilisezdes recipients_.fond propreet sec.
Le four ne s'auto-nettoJe La temperaturedu four esttrop elev6e ,, Laissezla cuisiniererefroidiret reinitialisezles
pas. pour permettrede programmerun auto- commandes.
nettoyage.
Les commandesdu four n'ont paset6 ,, Reportez-vousau chapitrerelatifa I'auto-
correctementregl6es, nettoyage,page62.
Uncycled'auto-nettoyagene peut demarrersi ledispositifde verrouillagedu four a et6active
ou si un foyerradiantest active.
Bruit de ,, craquement _, Ce bruitprovientdu metalIorsqu'ilchauffe ,, Ceci est tout _.fait normal.
ou de ,, cr_pitement,,, et qu'il refroiditpendant lesfonctions de
cuissonet de nettoyage.
130513_(IB_Best)NE58F9710WS_DG68-OO506A_CFR.indd 74
depannage 74
13/05/2013 08:31:59
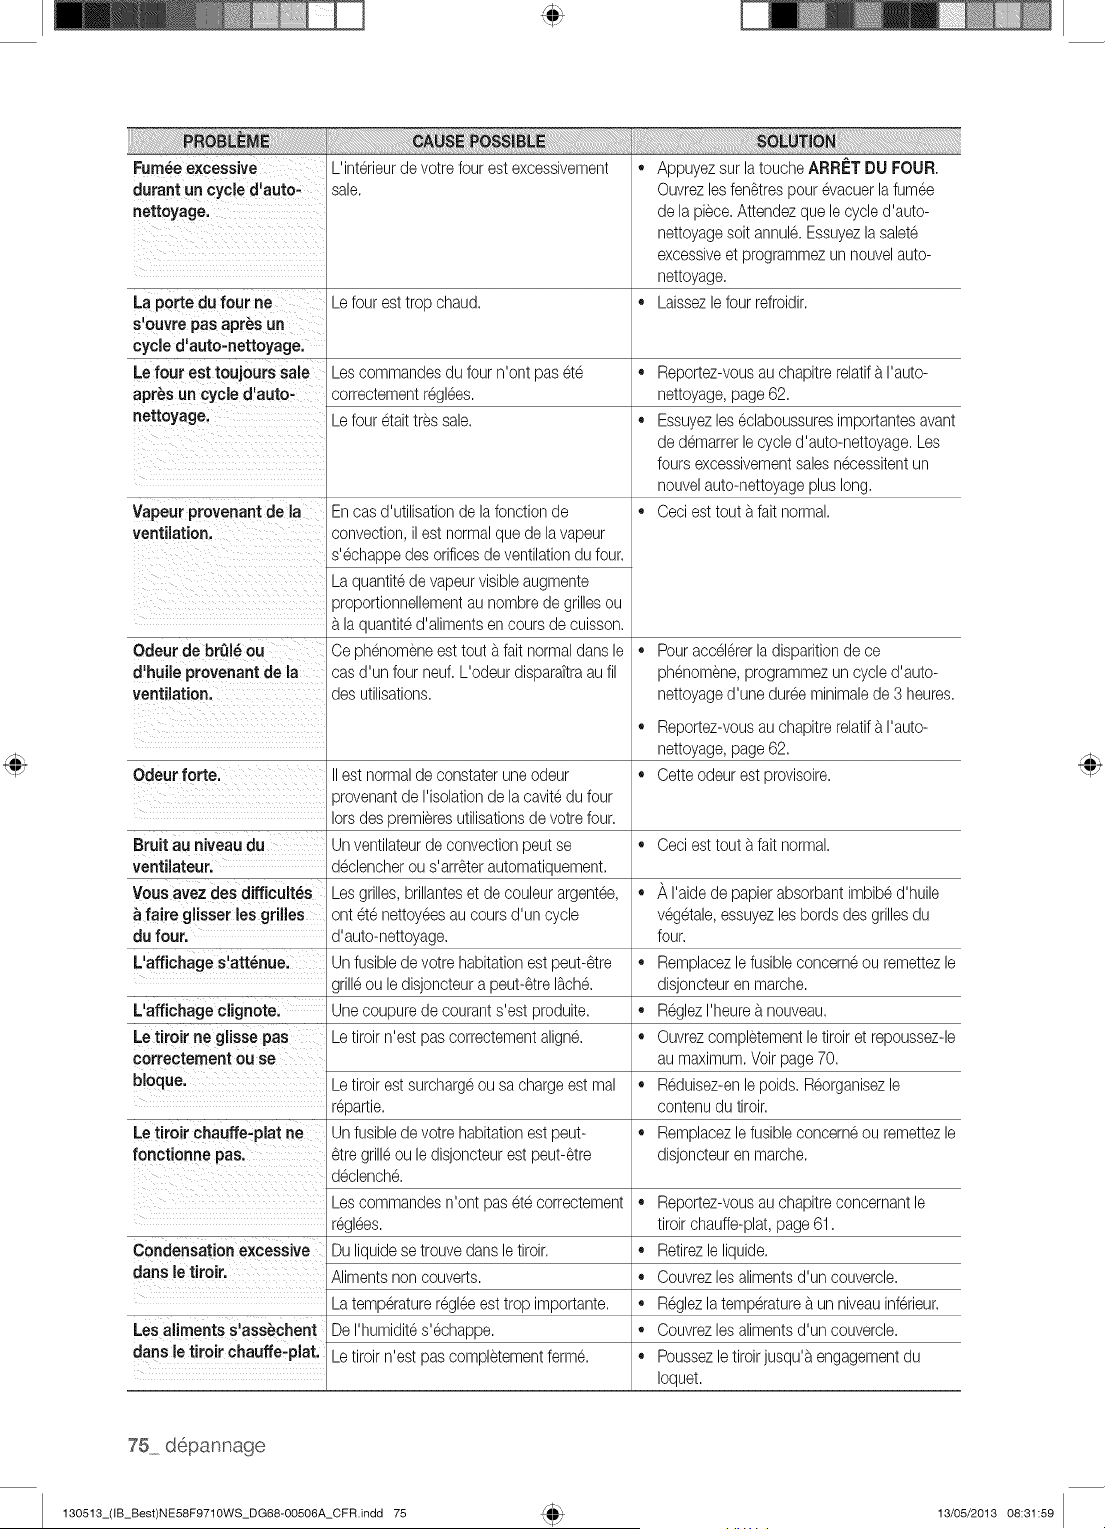
Fum_e excessive
durant un cycle d'auto=
rlettoyage.
L'int@ieurde votrefour est excessivement
sale.
Appuyezsur latoucheARRI=TDU FOUR.
Ouvrezles fen_trespour @acuerlafumee
de la piece.Attendezquele cycled'auto-
nettoyagesoit annule.Essuyezlasalete
excessiveet programmezun nouvelauto-
nettoyage.
Laissezlefour refroidir.
Laporte du four ne Lefour est trop chaud. ,,
s'ouvre pas apres un
cycle d'auto-nettoyage.
Le four est toujours sale Lescommandesdu four n'ont paset6 ,, Reportez-vousau chapitrerelatif_tI'auto-
apr_s un cycle d'auto- correctementregl6es, nettoyage,page 62.
nettoyage. Lefour etait tres sale. ,, Essuyezleseclaboussuresimportantesavant
de demarrerlecycled'auto-nettoyage.Les
fours excessivementsalesnecessitentun
nouvelauto-nettoyageplus long.
Vapeur provenant de la ,, Ceci est tout a fait normal.
ventilation.
Odeur de brQl_ou
d'huJleprovenantde la
ventilation.
Odeur forte,
Bruit au niveau du
ventJlateur,
Vousavez des diffJcult_s
faire glisser les grilles
du four.
L'affJchages'att_nue.
L'affichageclignote.
Letiroir ne glisse pas
correctement ou se
bloque.
Encas d'utilisationde lafonctionde
convection,ilest normalque de lavapeur
s'echappedes orificesde ventilationdu four.
La quantitede vapeurvisibleaugmente
proportionnellementau nombrede grillesou
_tlaquantited'alimentsen cours de cuisson.
Ce phenomeneest tout a fait normaldansle
cas d'un four neuf.L'odeur disparaTtraau fil
des utilisations.
IIest normalde constateruneodeur
_rovenantde I'isolationde lacavitedu four
Iorsdes premieresutilisationsde votre four.
Unventilateurde convectionpeutse
declencherous'arr_terautomatiquement.
Lesgrilles,brillanteset de couleurargentee,
ont ete nettoyeesau coursd'un cycle
d'auto-nettoyage.
Unfusibledevotre habitationest peut-_tre
grilleou ledisjoncteura peut-_treI_ch6.
Unecoupurede courants'est produite.
Letiroir n'est pas correctementaligne.
Letiroir chauffe=platne
fonctionne pas.
Letiroir est surchargeou sa chargeest mal
r@artie.
Unfusibledevotre habitationest peut-
_tre grilleou ledisjoncteurest peut-_tre
declench6.
Lescommandesn'ont pas et6 correctement
regl6es.
Duliquidese trouve dansletiroir.
Alimentsnoncouverts.
Latemperatureregl6eesttrop importante.
DeI'humidites'echappe.
Letiroir n'est pas completementferme.
Pouraccel6rerladisparitionde ce
phenomene,programmezun cycled'auto-
nettoyaged'une dureeminimalede 3 heures.
,, Reportez-vousau chapitrerelatif_tI'auto-
nettoyage,page 62.
,, Cetteodeur est provisoire.
Ceci est tout a fait normal.
,, _, I'aidede papierabsorbantimbibed'huile
veg6tale,essuyezlesbords des grillesdu
four.
,, Remplacezle fusible concerneou remettezle
disjoncteuren marche.
,, ReglezI'heure_tnouveau.
,, Ouvrezcompletementletiroir et repoussez-le
au maximum.Voirpage70.
,, Reduisez-enlepoids. Reorganisezle
contenudu tiroir.
,, Remplacezle fusible concerneou remettezle
disjoncteuren marche.
,, Reportez-vousau chapitreconcernantle
tiroir chauffe-plat,page61.
Condensationexcessive ,, Retirezle liquide.
darts le tiroir. ,, Couvrezlesalimentsd'un couvercle.
,, Reglezlatemperature_tun niveauinferieur.
Lesaliments s'ass_chent ,, Couvrezlesalimentsd'un couvercle.
darts le tiroir chauffe-plat. ,, Poussezle tiroirjusqu'a engagementdu
Ioquet.
75 depannage
130513_(IB_Best)NE58F9710WS_DG68-OO506A_CFR.indd 75 13/05/2013 08:31:59
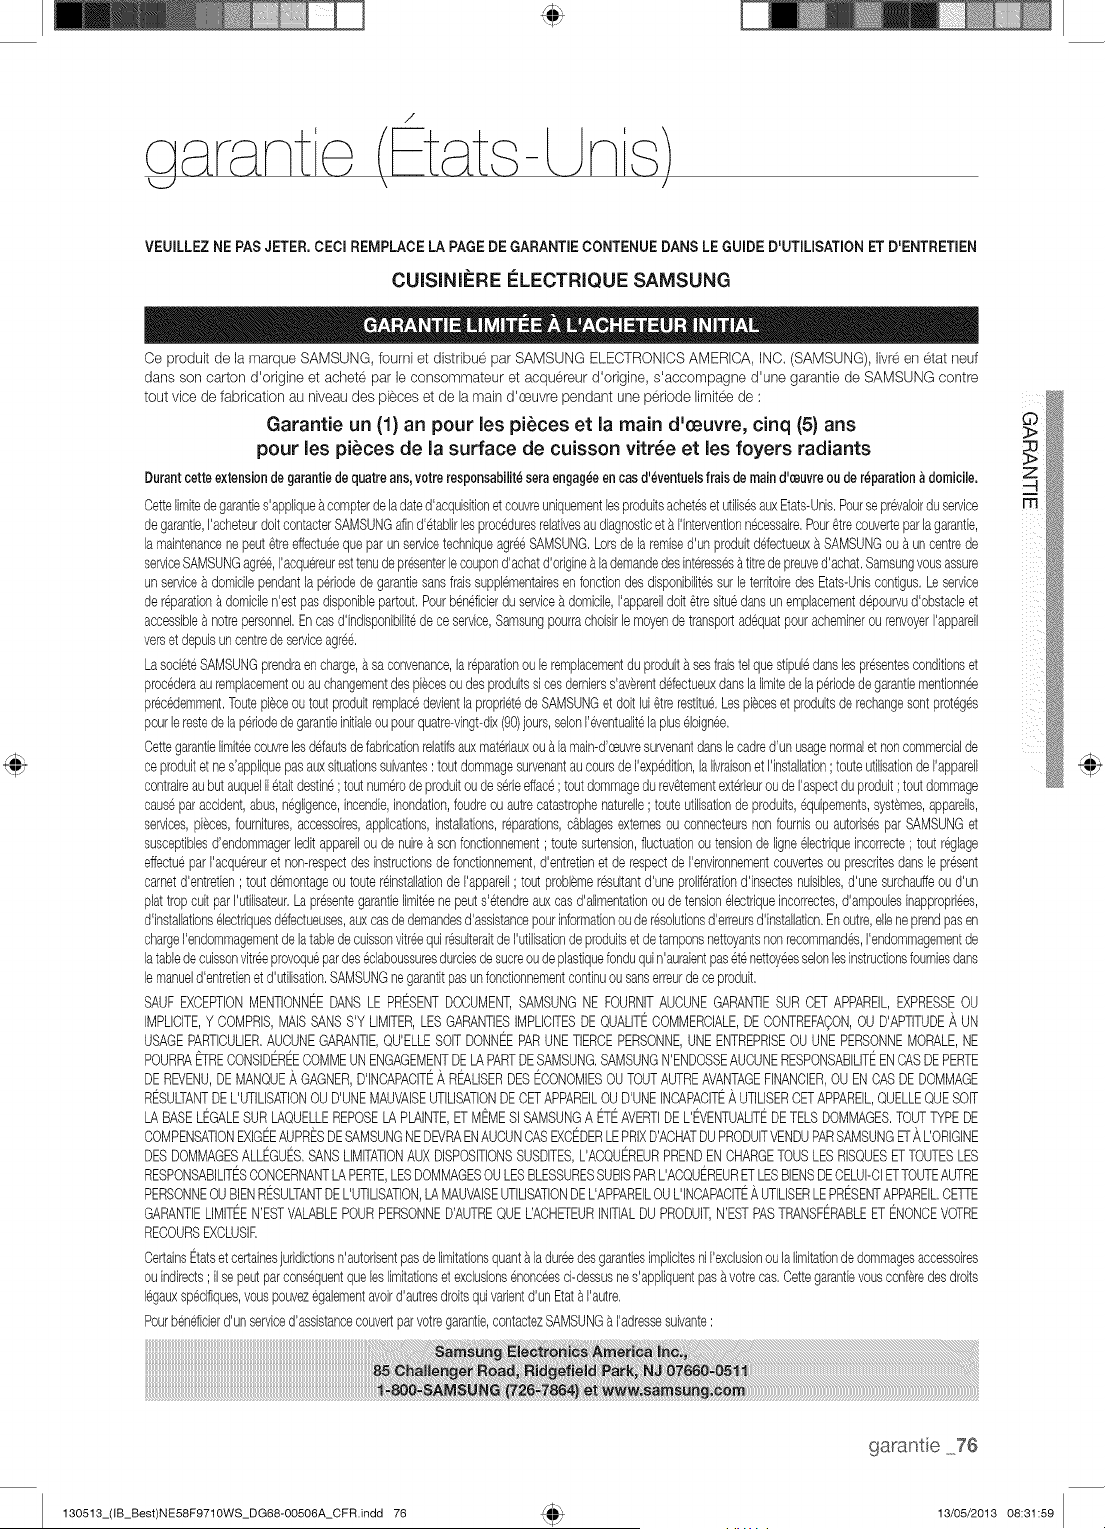
/
\ /
VEUILLEZNE PASJETER. CECl REMPLACELA PAGEDE GARANTIECONTENUEDANS LEGUIDE D'UTILISATIONET D'ENTRETIEN
CUISINII=i:IE ¢:LECTRIQUE SAMSUNG
Ce produit de la marque SAMSUNG, burni et distribue par SAMSUNG ELECTRONICSAMERICA, INC. (SAMSUNG), Iivreen etat neuf
dans son carton d'origine et achete par le consommateur et acquereur d'origlne, s'accompagne d'une garantie de SAMSUNG contre
tout vice de fabrication au niveaudes pieces et de la main d'ceuvre pendant une periode Iimiteede :
GarantJe un (1) an pour les pieces et la main d'oeuvre, cinq (5} arts
pour les pieces de la surface de cuJsson vitr_e et les foyers radiants
Durantcetteextensiondegarantiedequatreans,votrereeponeabilit_seraengag_eencaed'_ventuelefrais demaind'oeuvreoude r_parationa domicile.
CetteIimitedegaranties'appliqueacompterdeladated'acquisitionetcouvreuniquementlesproduitsacheteset utilisesauxEtats-Unis.Pourseprevaloirdu service
degarantie,I'acheteurdoltcontacterSAMSUNGafind'etablirlesproceduresrelativesaudiagnosticeta I'interventionnecessaire.Pour_trecouverteparlagarantie,
lamaintenancenepeut_treeffectueequeparunservicetechniqueagreeSAMSUNG.Lorsdelaremised'unproduitdefectueuxa SAMSUNGou _ uncentrede
serviceSAMSUNGagree,I'acquereuresttenudepresenterlecoupond'achatd'originea lademandedesinteresses_titredepreuved'achat.Samsungvousassure
unservicea domicilependantlaperiodedegarantiesansfraissupplementairesenfonctiondesdisponibilitessurleterritoiredes Etats-Uniscontigus.Leservice
dereparation_domicilen'estpasdisponiblepartout.Pourbeneficierduservicea domicile,I'appareildolt_tresituedansunemplacementdepourvud'obstacleet
accessible_ notrepersonnel.Encasd'indisponibilitede ceservice,SamsungpourrachoisirlemoyendetransportadequatpouracheminerourenvoyerI'appareil
versetdepuisuncentredeserviceagree.
LasocieteSAMSUNGprendraencharge,a saconvenance,lareparationouleremplacementdu produita sesfraistelquestipuledanslespresentesconditionset
procederaauremplacementou auchangementdespi_cesoudes produitssicesdernierss'av_rentdefectueuxdanslaIimitedelaperiodede garantiementionnee
precedemment.Toutepieceou toutproduitremplacedevientlaproprietedeSAMSUNGet doitlui_trerestitue.Lespi_cesetproduitsderechangesontproteges
pourlerestedelaperiodedegarantieinitialeoupourquatre-vingt-dix(90)jours,selonI'eventualitelapluseloignee.
CettegarantieIimiteecouvrelesdefautsdefabricationrelatifsauxmateriauxou_ lamain-d'ceuvresurvenantdanslecadred'unusagenormalet noncommercialde
ceproduitet nes'appliquepasauxsituationssuivantes: toutdommagesurvenantaucoursde I'expedition,lalivraisonetI'installation; touteutilisationde I'appareil
contraireaubutauquelil etaitdestine; toutnumerodeproduitoudeserieefface; toutdommagedurev_tementexterieuroudeI'aspectduproduit; toutdommage
causeparaccident,abus,negligence,incendie,inondation,foudreouautrecatastrophenaturelle; touteutilisationde produits,equipements,systemes,appareils,
services,pieces,feumitures,accessoires,applications,installations,reparations,cablagesextemesou connecteursnonfournisou autorisesparSAMSUNGet
susceptiblesd'endommagerleditappareilou de nuire_ sonfonctionnement; toutesurtension,fluctuationou tensiondeIigneelectriqueincorrecte; toutreglage
effectuepar I'acquereuret non-respectdesinstructionsde fonctionnement,d'entretienet derespectde I'environnementcouvertesou prescritesdanslepresent
carnetd'entretien; toutdemontageoutoutereinstallationde I'appareil; toutproblemeresultantd'uneproliferationd'insectesnuisibles,d'unesurchauffeou d'un
plattropcultparI'utilisateur.LapresentegarantieIimiteenepeuts'etendreauxcasd'alimentationou detensionelectriqueincorrectes,d'ampoulesinappropriees,
d'installationselectriquesdefectueuses,auxcasdedemandesd'assistancepourinformationou deresolutionsd'erreursd'installation.Enoutre,elleneprendpasen
chargeI'endommagementde latabledecuissonvitreequiresulteraitdeI'utilisationdeproduitset detamponsnettoyantsnonrecommandes,I'endommagementde
latabledecuissonvitreeprovoquepardeseclaboussuresdurciesdesucreoudeplastiquefonduquin'auraientpasetenetteyeesselonlesinstructionsfoumiesdans
lemanueld'entretienet d'utilisation.SAMSUNGnegarantitpasunfonctionnementcontinuousanserreurdeceproduit.
SAUFEXCEPTIONMENTIONNEEDANSLE PRESENTDOCUMENT,SAMSUNGNE FOURNITAUCUNEGARANTIESURCETAPPAREIL,EXPRESSEOU
IMPLICITE,Y COMPRIS,MAISSANSS'YLIMITER,LESGARANTIESIMPLICITESDEQUALITECOMMERCIALE,DECONTREFAOON,OUD'APTITUDE_,UN
USAGEPARTICULIER.AUCUNEGARANTIE,QU'ELLESOft DONNEEPARUNETIERCEPERSONNE,UNEENTREPRISEOUUNEPERSONNEMORALE,NE
POURRAFRE CONSIDEREECOMMEUNENGAGEMENTDELAPARTDESAMSUNG.SAMSUNGN'ENDOSSEAUCUNERESPONSABILITEENCASDEPERTE
DEREVENU,DEMANQUE_,GAGNER,D'INCAPACITE_,R_LISERDESECONOMIESOUTOUTAUTREAVANTAGEFINANCIER,OUENCASDEDOMMAGE
RESULTANTDEL'UTILISATIONOUD'UNEMAUVAISEUTILISATIONDECETAPPAREILOUD'UNEINCAPACITE_,UTILISERCETAPPAREIL,QUELLEQUESOft
LABASELEGALESURLAQUELLEREPOSELAPLAINTE,ETMEMESISAMSUNGA ETEAVERTIDEL'EVENTUALITEDETELSDOMMAGES.TOUTTYPEDE
COMPENSATIONEXIGEEAUPRESDESAMSUNGNEDEVRAENAUCUNCASEXCEDERLEPRIXD'ACHATDUPRODUITVENDUPARSAMSUNGEl-_,UORIGINE
DESDOMMAGESALLEGUES.SANSLIMITATIONAUXDISPOSITIONSSUSDITES,L'ACQUEREURPRENDENCHARGETOUSLESRISQUESETTOUTESLES
RESPONSABILffESCONCERNANTLAPERTE,LESDOMMAGESOULESBLESSURESSUBISPARL'ACQUEREURETLESBIENSDECELUI-CIETTOUTEAUTRE
PERSONNEOUBIENRESULTANTDEL'UTILISATION,LAMAUVAISEUTILISATIONDEL'APPAREILOUL'INCAPACITE_,UTILISERLEPRESENTAPPAREILCEqTE
GARANTIELIMITEEN'ESTVALABLEPOURPERSONNED'AUTREQUEUACHETEURINITIALDU PRODUIT,N'ESTPASTRANSFERABLEETENONCEVOTRE
RECOURSEXCLUSIR
CertainsEtatsetcertainesjuridictionsn'autorisentpasdelimitationsquant_ladureedesgarantiesimplicitesniI'exclusionoulalimitationdedommagesaccessoires
ouindirects; ilsepeutparconsequentqueleslimitationset exclusionsenonceesci-dessusnes'appliquentpasavotrecas.Cettegarantievousconf_redesdroits
legauxspecifiques,vouspouvezegalementavoird'autresdroitsquivarientd'unEtat_ I'autre.
Pourbendicierd'unserviced'assistancecouvertparvotregarantie,contactezSAMSUNGa I'adressesuivante:
r'rl
130513_(IB_Best)NE58F9710WS_DG68-OO506A_CFR.indd 76
garant e 76
13/05/2013 08:31:59

VEUILLEZNE PASJETER. CECl REMPLACELA PAGEDE GARANTIECONTENUEDANSLE GUIDE D'UTILISATIONET D'ENTRETIEN
CUISINIERE CLECTRIQUE SAMSUNG
Ce produit de la marque SAMSUNG, fourni et distribue par SAMSUNG ELECTRONICSCANADA, INC. (SAMSUNG), livre en etat neuf
dans son carton d'origine et achete par le consommateur et acquereur d'origine, s'accompagne d'une garantie de SAMSUNG contre
tout vice de fabrication au niveau des pieces et de la main d'oeuvre pendant une periode limitee de :
Garantie un (1) an pour les pieces et la main d'oeuvre, ¢inq (5) arts
pour les pieces de la surface de cuisson vitr_e et les foyers radiants
Durantoetteextensionde garantiede quatreans,votreresponsabiliteseraengageeen¢as d'eventuelsfraisde maind'oeuvreou dereparationa domicile.
Cettelimitedegaranties'appliquea compterdeladated'acquisitionetcouvreuniquementlesproduitsachetesetutilisesauxCANADA.Pourseprevaloirduservice
degarantie,I'acheteurdoitcontacterSAMSUNGdind'etablirlesproceduresrelativesaudiagnosticeta I'interventionnecessaire.Pour_trecouverteparlagarantie,
la maintenancenepeutetreeffectueequeparunservicetechniqueagreeSAMSUNG.Lotsde laremised'unproduitdefectueuxa SAMSUNGoua un centrede
serviceSAMSUNGagree,I'acquereuresttenudepresenterlecoupond'achatd'origine_lademandedesinteressesa titredepreuved'achat.Samsungvousassure
un servicea domicilependantlaperiodede garantiesansfraissupplementairesenfonctiondesdisponibilitessurleterritoiredesCANADAcontigus.Leservicede
reparation_ domicilen'estpas disponiblepartout.Pourbendicierdu service_ domicile,I'appareildoitetresituedansun emplacementdepourvud'obstacleet
accessiblea notrepersonnel.Encasd'indisponibilitedeceservice,Samsungpourrachoisirlemoyendetransportadequatpouracheminerou renvoyerI'appareil
verset depuisuncentredeserviceagree.
LasocieteSAMSUNGprendraencharge,_ saconvenance,lareparationouleremplacementduproduit_sesfraistelquestipuledanslespresentesconditionset
procederaauremphcementouauchangementdespiecesoudesproduitssices dernierss'av_rentdefectueuxdanslalimitedelaperiodedegarantiementionnee
prec6demment.Toutepieceoutoutproduitremplacedevientlaproprietede SAMSUNGet doitlui_trerestitue.Lespieceset produitsde rechangesontproteges
pourlerestede laperiodedegarantieinitialeou pourquatre-vingt-dix(90)jours,selonI'eventualitelapluseloignee.
Cettegarantielimiteecouvrelesddautsdefabricationrelatifsauxmateriauxoua lamain-d'oeuvresurvenantdanslecadred'un usagenormaletnoncommercialde
ceproduitetnes'appliquepasauxsituationssuivantes: toutdommagesurvenantaucoursdeI'expedition,lalivraisonet I'instalhtion; touteutilisationdeI'appareil
contraireaubutauqueliletaitdestine; toutnumerode produitoudeserieefface; toutdommagedurev_tementexterieuroudeI'aspectdu produit; toutdommage
causepar accident,abus,negligence,incendie,inondation,foudreou autrecatastrophenaturelle; touteutilisationdeproduits,equipements,syst_mes,appareils,
services,pi_ces,foumitures,accessoires,applications,installations,reparations,cabhgesexternesou connecteursnonfoumisou autorisespar SAMSUNGet
susceptiblesd'endommagerleditappareiloude nuirea sonfonctionnement; toutesurtension,fluctuationoutensionde ligneelectriqueincorrecte; toutreglage
effectueparI'acquereuret non-respectdes instructionsdefonctionnement,d'entretienet de respectdeI'environnementcouvertesouprescritesdanslepresent
carnetd'entretien; toutdemontageou toutereinstalhtionde I'appareil; tout probl_meresultantd'uneproliferationd'insectesnuisiUes,d'unesurchauffeoud'un
plattrop cuitparI'utilisateur.Lapresentegarantielimiteenepeuts'etendreauxcasd'alimentationoudetensionelectriqueincorrectes,d'ampoulesinappropriees,
d'installationselectriquesdefectueuses,auxcasdedemandesd'assistancepourinformationouderesolutionsd'erreursd'instalhtion.Enoutre,elleneprendpasen
chargeI'endommagementdelatabledecuissonvitreequiresulteraitdeI'utilisationdeproduitsetdetamponsnettoyantsnonrecommandes,I'endommagementde
latabledecuissonvitreeprovoquepardeseclaboussuresdurciesdesucreoudeplastiquefonduquin'auraientpasetenettoyeesselonlesinstructionsfourniesdans
lemanueld'entretienetd'utilisation.SAMSUNGnegarantitpasunfonctionnementcontinuousanserreurdeceproduit.
SAUFEXCEPTIONMENTIONNEEDANSLE PRESENTDOCUMENT,SAMSUNGNE FOURNITAUCUNEGARANTIESURCETAPPAREIL,EXPRESSEOU
IMPLICITE,Y COMPRIS,MAISSANSS'Y LIMITER,LESGARANTIESIMPLICITESDEQUALITECOMMERCIALE,DECONTREFAOON,OUD'APTITUDEA UN
USAGEPARTICULIER.AUCUNEGARANTIE,QU'ELLESOITDONNEEPARUNETIERCEPERSONNE,UNEENTREPRISEOUUNEPERSONNEMORALE,NE
POURRAETRECONSIDEREECOMMEUNENGAGEMENTDELAPARTDESAMSUNG.SAMSUNGN'ENDOSSEAUCUNERESPONSABILITEENCASDEPERTE
DEREVENU,DEMANQUE_,GAGNER,D'INCAPACITEA REALISERDESECONOMIESOUTOUTAUTREAVANTAGEFINANCIER,OUENCASDEDOMMAGE
RESULTANTDEL'UTILISATIONOUD'UNEMAUVAISEUTILISATIONDECETAPPAREILOUD'UNEINCAPACITEA UTILISERCETAPPAREIL,QUELLEQUESOIT
LABASELEGALESURLAQUELLEREPOSELA PLAINTE,El-MEMESISAMSUNGA FE AVERTIDEL'_ENTUALITEDETELSDOMMAGES.TOUTTYPEDE
COMPENSATIONEXlGEEAUPRESDESAMSUNGNEDEVRAENAUCUNCASEXCEDERLEPRIXD'ACHATDUPRODUITVENDUPARSAMSUNGET/_L'ORIGINE
DESDOMMAGESALLEGUES.SANSLIMITATIONAUXDISPOSITIONSSUSDITES,L'ACQUEREURPRENDENCHARGETOUSLESRISQUESEl-TOUTESLES
RESPONSABILITESCONCERNANTLAPERTE,LESDOMMAGESOULESBLESSURESSUBSPARL'ACQUEREURETLESBIENSDECELUI-CIEl-TOUTEAUTRE
PERSONNEOUBENRESULTANTDEL'UTILISATION,LAMAUVAISEUTILISATIONDEL'APPAREILOUL'INCAPACITEA UTILISERLEPRESENTAPPAREIL.CETrE
GARANTIELIMITEEN'ESTVALABLEPOURPERSONNED'AUTREQUEL'ACHETEURINITIALDUPRODUIT,N'ESTPASTRANSFERABLEEl-ENONCEVOTRE
RECOURSEXCLUSIF.
CertainsEtatset certainesjuridictionsn'autorisentpasdelimitationsquant_ ladureedesgarantiesimplicitesniI'exclusionoulalimitationde dommagesaccessoires
ou indirects; il sepeutparconsequentqueleslimitationsetexclusionsenonceesci-dessusnes'appliquentpas_ votrecas.Cettegarantievousconferedesdroits
legauxspecifiques,vouspouvezegalementavoird'autresdroitsquivarientd'unEtataI'autre.
Pourbendicierd'unserviced'assistancecouvertparvotregarantie,contactezSAMSUNGa I'adressesuivante:
77 garant e
130513_(IB_Best)NE58F9710WS_DG68-OO506A_CFR.indd 77 13/05/2013 08:31:59
note_
130513_(IB_Best)NE58F9710WS_DG68-00506A_CFR.indd 78 13/05/2013 08:31:59
VeuilleznoterquelagarantieSamsungn'inclutpaslesdeplacementsduserviceapres-ventepourexpliquerlefonctionnement
de I'appareil,corrigerune installationnon correcteou executerdestravauxde nettoyageou d'entretienreguliers.
DES QUESTIONS OU DES COMMENTAIRES?
www.samsung.com/ca (English)
CANADA www.samsung.com/ca fr (French)
MEXICO
U.S.A
Consumer Electronics
U.S.A
Mobile Phones
1-800-SAMSUNG(726-7864)
01-800-SAMSUNG(726-7864)
1-800-SAMSUNG(726-7864)
1-800-SAMSUNG(726-7864)
www.samsung.com
Code N° ' DG68-00506A
130513_(IB_Best)NE58F9710WS_DG68-00506A_CFR.indd 79 13/05/2013 08:32:00