Do not touch
the screen material
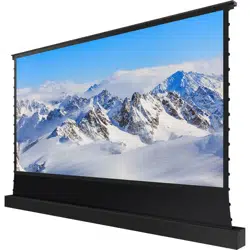
S PRO Electric Tab-Tension Floor Screen

1
Content
The Introduction of Product--------- 2
Appearance------------------------------- 2
Accessories List------------------------- 3
Important safety precautions -------- 4
Matters Needing Attention----------- 5
Precautions for Use-------------------- 7
Matters Concerning Projection ----- 8
Projected Area -------------------------- 8
Screen and projector compatibility --- 9
About Screen Performance -------- 10
Installation Warning ----------------- 13
Before pre installation --------------- 13
Hardware Parts List ------------------ 13
Ground Installation -------------------- 14
Screen Running ------------------------------ 15
Manual Switch------------------------------- 16
Remote control ----------------------------- 17
Screen hight limit setting------------------- 21
Black border down -------------------------- 21
(Lower the fixed height of the screen)
Black border up----------------------------- 23
(Raise the fixed height of the screen)
Screen maintenance ------------------------- 25
Manufacturer's warranty------------------- 26
Certificate ------------------------------------- 27
Product Warranty Card-------------------- 27
2
Do not touch
the screen material
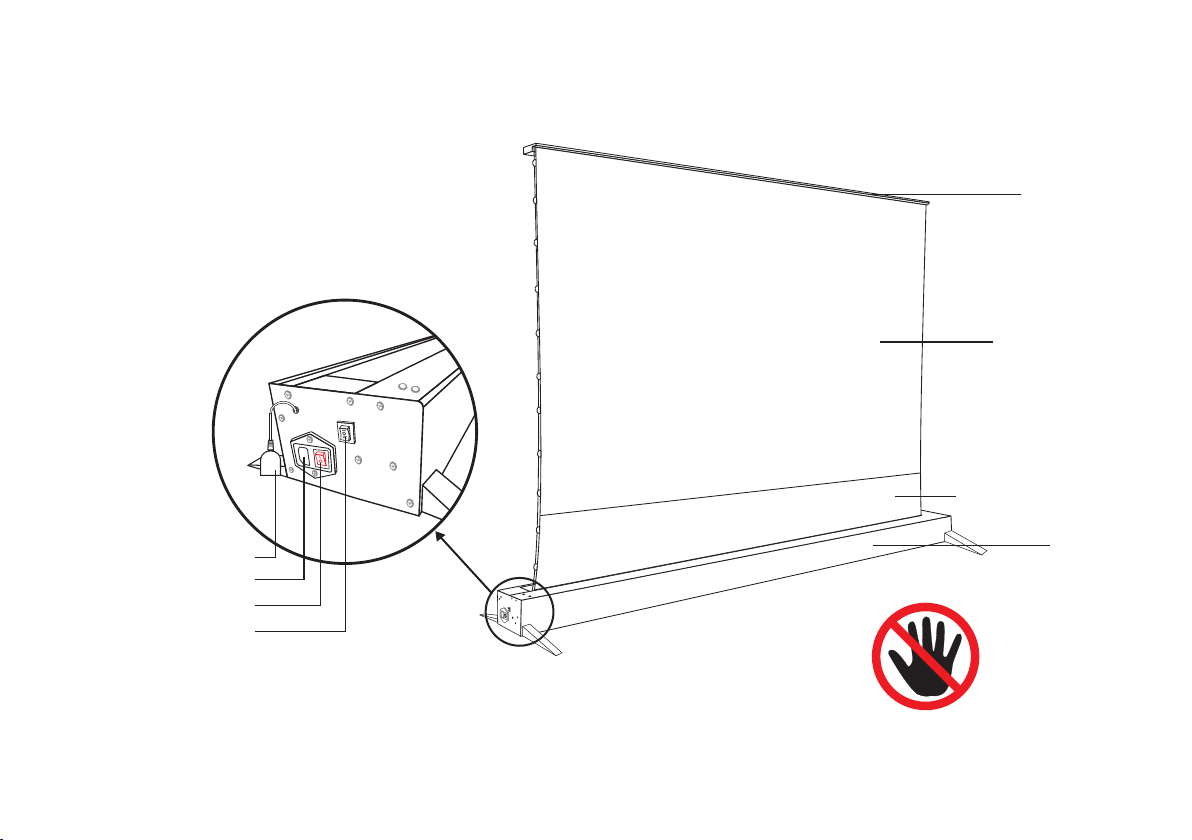
Upper cover
Screen material
Screen Black border
Housing
The Introduction of Product
Appearance
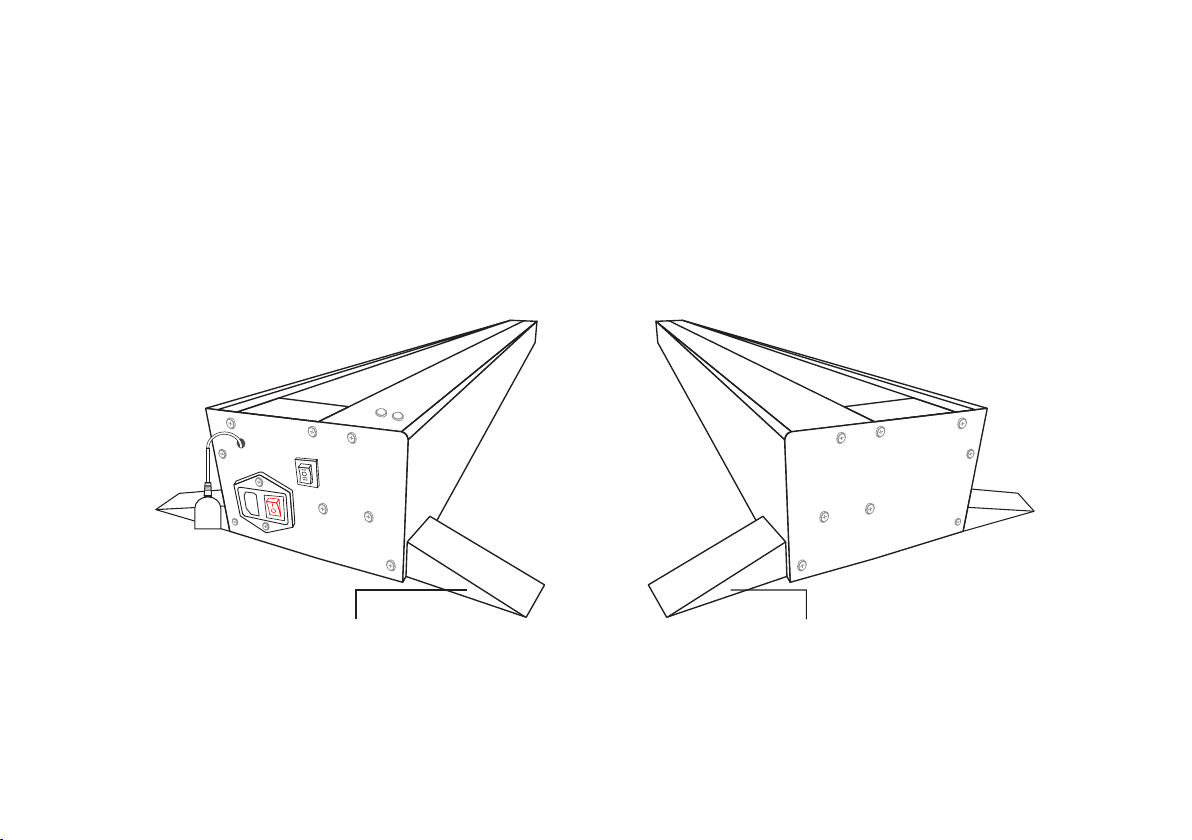
IR receiver
Power cord socket
Power Switch
Screen manual switch
Schematic diagram of left end cover

3
Accessories list
Gifts
Power cordIR
remote control
Adjust Rod
(Hard and soft)
Small Bracket Screw
x4 pcs
Special cleaning brush
for screen material
The two parts on the left are
free gifts, so they are not covered
by the warranty.
Cleaning stickers

4
Important Safety Precautions
Please read all the contents of the user guide carefully
and follow the operation steps below.
For reference when necessary, please keep this user guide.
1. In order to avoid damage to the equipment, please prohibit the use of any accessories not authorized by the
manufacturer.
2. Be sure to handle the products carefully during transportation, so as to prevent product damage caused by collision.
3. In order to ensure the personal safety of the user and realize the reliable operation of the equipment, please make sure
to use the power cord provided by the equipment to connect the power supply for charging.
4. Please place the device close to the power socket to connect the power supply for charging.
5. You need to place the product properly. Please do not place any heavy objects on the power cord and screen to avoid
danger or operation obstacles.
6. In order to avoid electric shock, short circuit or fire caused by loose plug, please use the power cord correctly.
7. Since this product is equipped with a V-spring support system with strong tension, removing the screen without permis-
sion will bring certain risks. Please do not disassemble the screen by yourself. In case of machine failure caused by your
improper operation, the seller and the manufacturer have the right not to be responsible for replace the product. In case
of personal injury, no liability shall be assumed.
8. The tubular motor on the electric screen of this product has a temperature control sensor with overheating protection-
mechanism. If the screen runs up and down continuously for 3-4 minutes, the motor will stop automatically in order to
prevent he motor from being damaged due to overheating. If the motor stops operation due to the start of overheat protec-
tion mechanism, please turn off the power and wait for 30 minutes to 2 hours until the motor cools down.
5
Matters Needing Attention
Before the screen turns off, please make sure there is no debris in the cover.
Please keep this product out of the reach of children.
Please do not put any sundries inside of the cover to avoid damage to the equipment.
The seller and the manufacturer are not responsible for any damage to the equipment caused
thereby.
Warning! If you do not strictly follow the prescribed precauti
ons during use, this may lead to
equipment damage and other unnecessary damage.
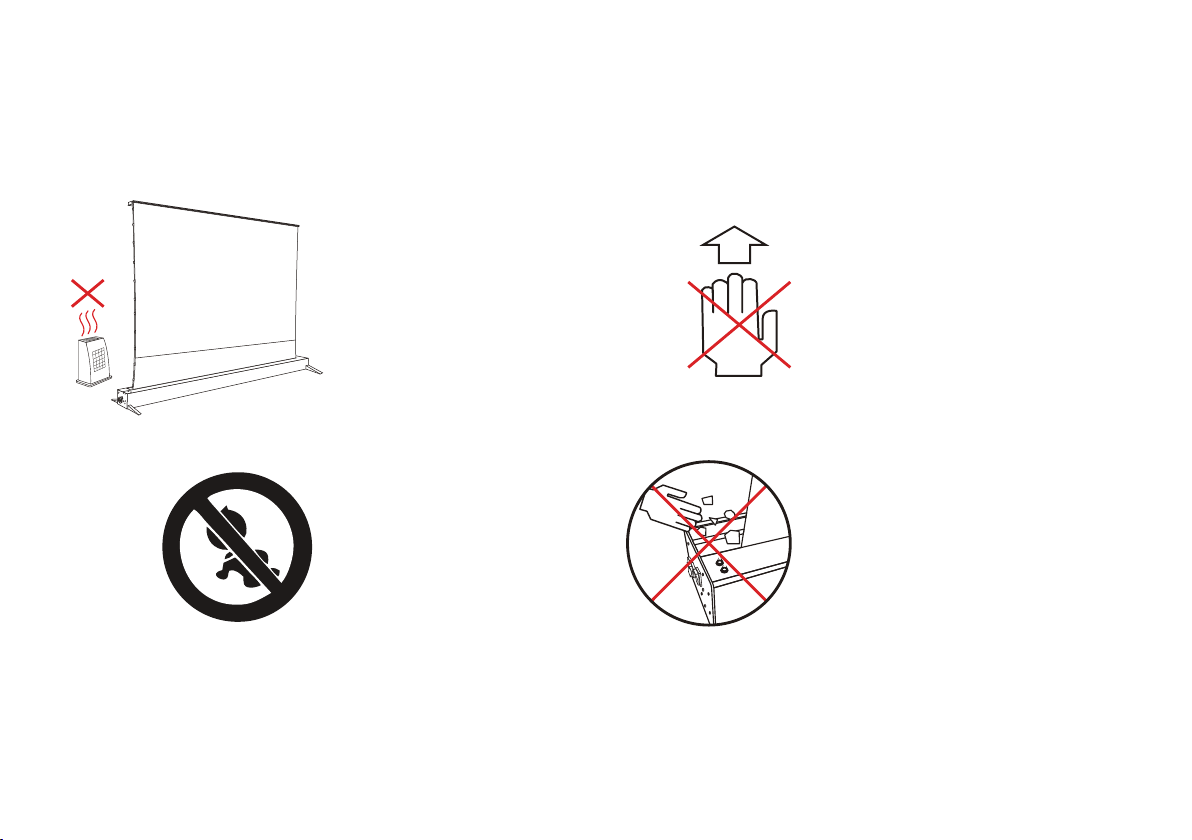
Please observe the family fire safety regulations; do not place the equipment near the fireplace or
high temperature objects such as gas stove, barbecue or heater to avoid equipment damage.
6
Do not place the equipment
near the fireplace or high
temperature objects such as
gas stove, barbecue or heater
Keep children away from
the product
Do not put any sundries
inside of the cover ;
Before the screen turns
off,please make sure there
is no debris in the cover
Do not put your hands into
the cover of the product

7
Precautions for Use
No one is allowed to open the inside of the equipment and repair the product without authorization,except for the
authorized technicians.
1. Please make sure that the power supply connected to this product has stable current.
2. If you need to use the extension cord for this product, please make sure that the power cord rating of the extension cord
is the same as that of this product, so as to avoid equipment damage due to overheating.
3. When your hands and feet are in contact with water, do not operate the power plug in this case.
4. When you encounter heavy rain, wind, thunder or lightning in the process of using this product, please be sure to discon-
nect the power line.
5. The curtain of this product should not be placed in direct sunlight, rain and humid environment.
6. In order to prevent the product from overheating, keep away from fire source and high temperature equipment when
using this product. At the same time, the power supply of this product should be cut off before transportation or mainte-
nance.
7. Like any other household appliances, when this product is not used for a long time, please completely disconnect the
power supply to ensure safety.
8. If there is any obvious damage to any parts of the product, in order to avoid any injury and electric shock, please do not
continue to use.
9. When installing in the residential and commercial buildings, users should provide reasonable protection for the products
to prevent the radiated RF energy from interfering with the operation of the products. However, there is no guarantee that
the product will not be disturbed in special installation.
8
Matters Concerning Projection
Projected Area
s
i
z
e
s
i
z
e
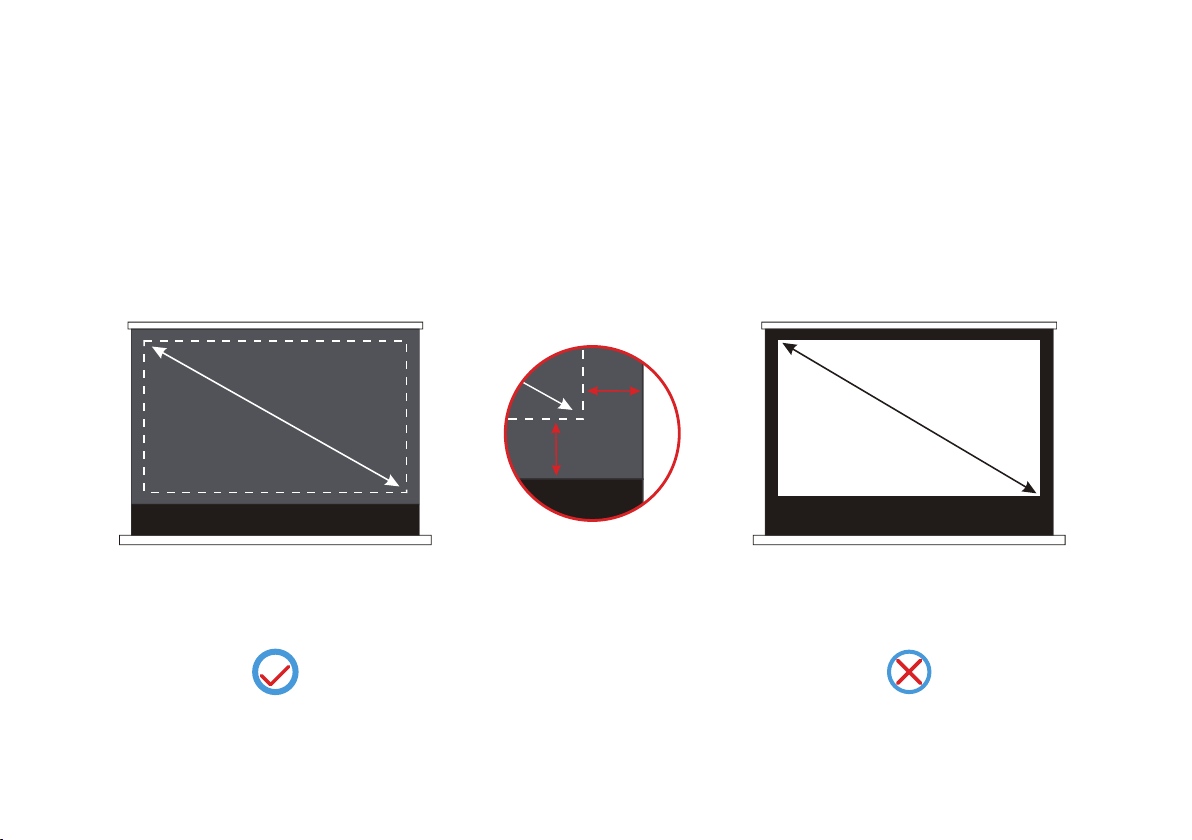
Black border has been preset
1.Please project according to the actual projection size of the screen purchased when using the projector.
2.Since the position of black border has been preset on the screen of this product, please do not exceed the spec-
ified projected area during projection. You should note that the default black border is not the projection area.
Brand-new product design:Screen
without black border, black border
size has been preset
Classic product design: Screen with
black border
9
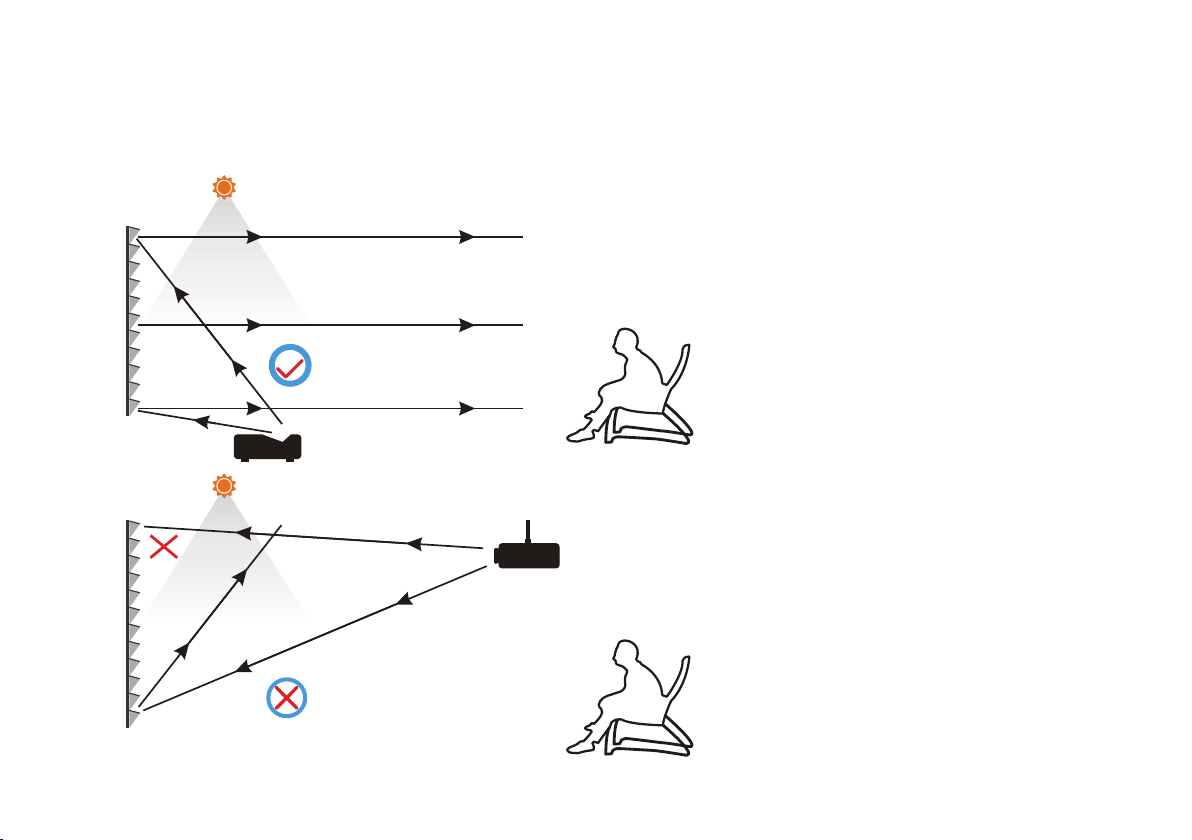
Please note that the screen of this product is only suitable for use with Ultra short throw laser projector. If it is
used with other projector,the effect of picture will be greatly reduced.
Ambient light can be absorbed
The projection content of
theproduct can be well reflected
to the viewer
Screen and projector compatibility
If a part of the projected light is
absorbed, the brightness of the
image will be dimmed, Low
contrast
Ambient light can be absorbed
It is suggested that the ultra short focus
laser projector throw ratio should be ≤
0.4.(please consult the projection man
ufacturer for specific parameters)
In view of the particularity of the
screen structure of the product,projec-
tors other than ultra short focus laser
projectors are not compatible with this
Screen fabric. If other projectors are
used, the projection light may be
absorbed or blocked by the Screen
fabric.
10
About Screen Performance
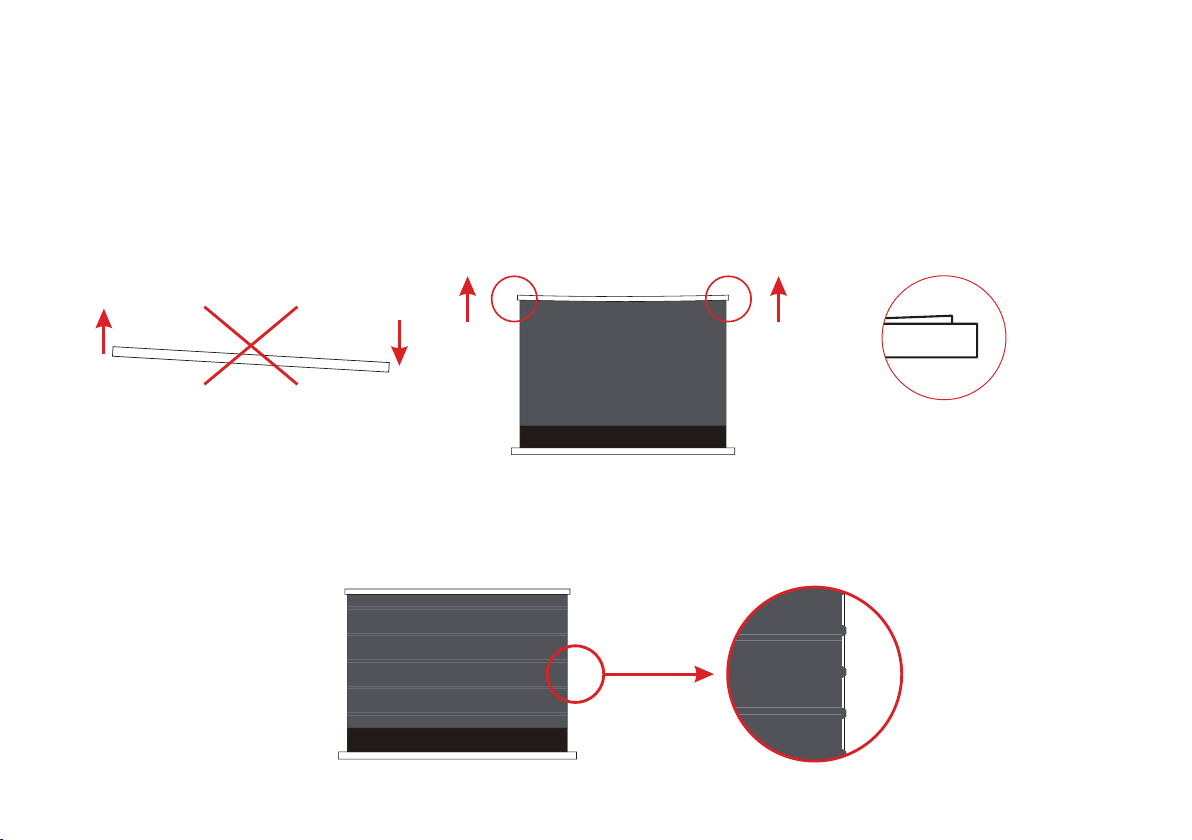
Please make sure the product
is placed horizontally
There was a slight tilt after the
screen was closed
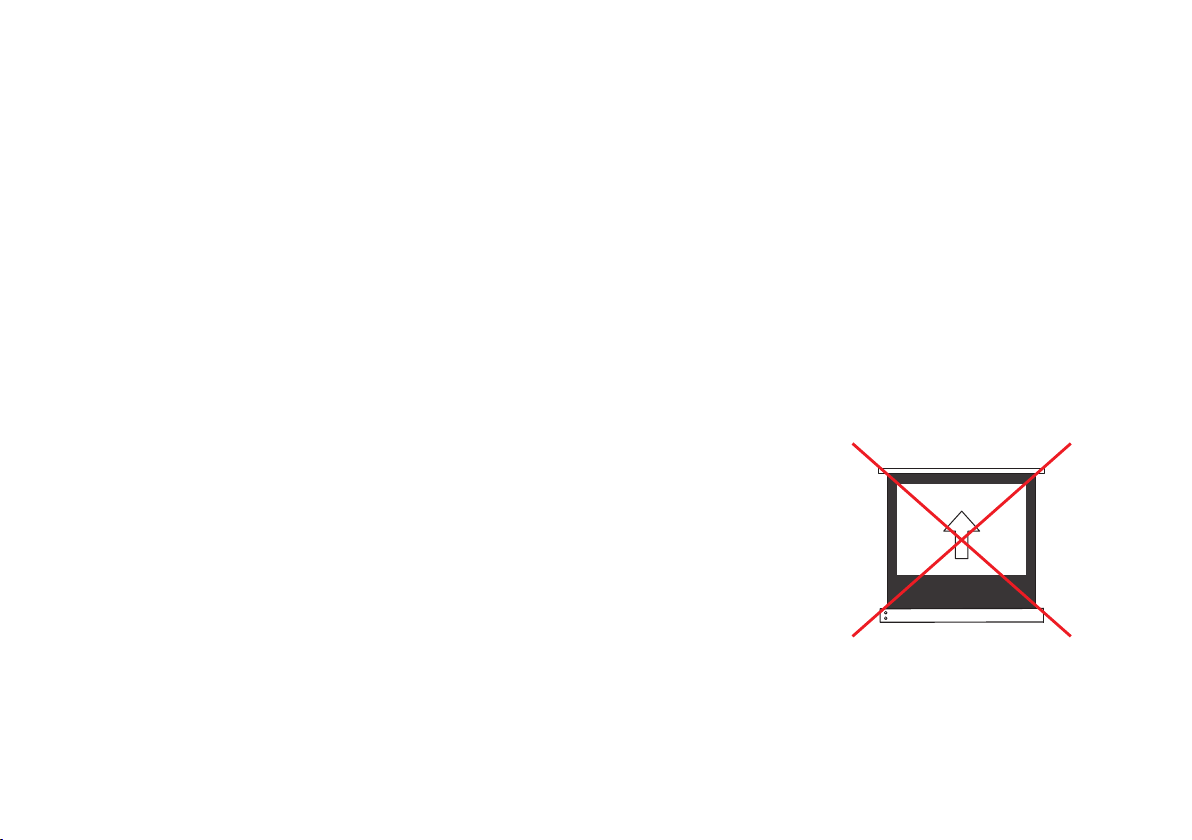
1.Please note that when placing this product, please make sure that the product is always in a horizontal state. Do not place
the screen in an inclined or vertical position.
2. After using for a period of time, if the cover on both ends of the screen is slightly tilted, there is no need to worry. This is
a normal phenomenon and does not affect the viewing and use. In addition, due to the cover warping, there is a gap
between the screen and the housing case after closing, which is also a normal phenomenon.
3.If there are regular creases on the screen surface after the screen is opened, don't worry. This is a normal phenomenon.
It is caused by the screen being curled and tightened for a long time, which does not affect the user's viewing. After opening
the screen for a period of time, you will notice that the stripes on the screen will gradually disappear.
11
4.When there are a few black spots, white spots, stains and other impurities on the screen surface, but if they are qualified
according to the detection method, then such situation is not a product quality problem, and it is within the scope of product
qualification.
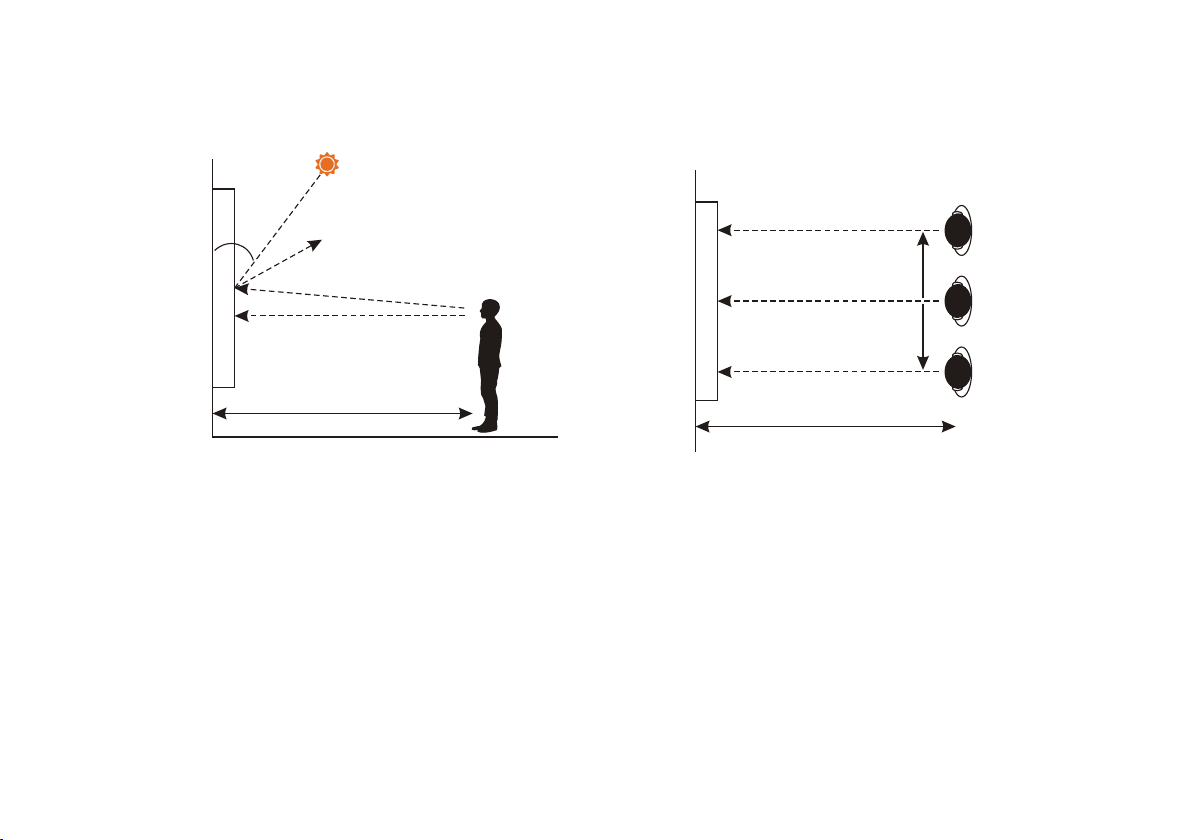
(1).Please raise the screen of this product and close to the wall, and the observer can observe the film at a distance of 3
meters away from the screen;
(2).The observer needs to observe the shadow in the normal light environment (illumination 500-600lx);
(3).The distance between the observer and the front of the screen should be kept at a distance of 3 meters , and the center
point of the screen should be close to or higher than the horizontal line of sight (as shown in Figure 1), and the observation
should be made at the center point, 1 m to the left and 1 m to the right (as shown in Fig. 2).
As long as the test results of the product are within the allowable range, the product is qualified.
The detection method is as follows:
3m
Figure 2 top view
1m
1m
screen
3m
Figure 1 side view
The ambient illumination of the
central point is 500-600lx
The center of the screen
45°
Horizontal line of sight
screen
12
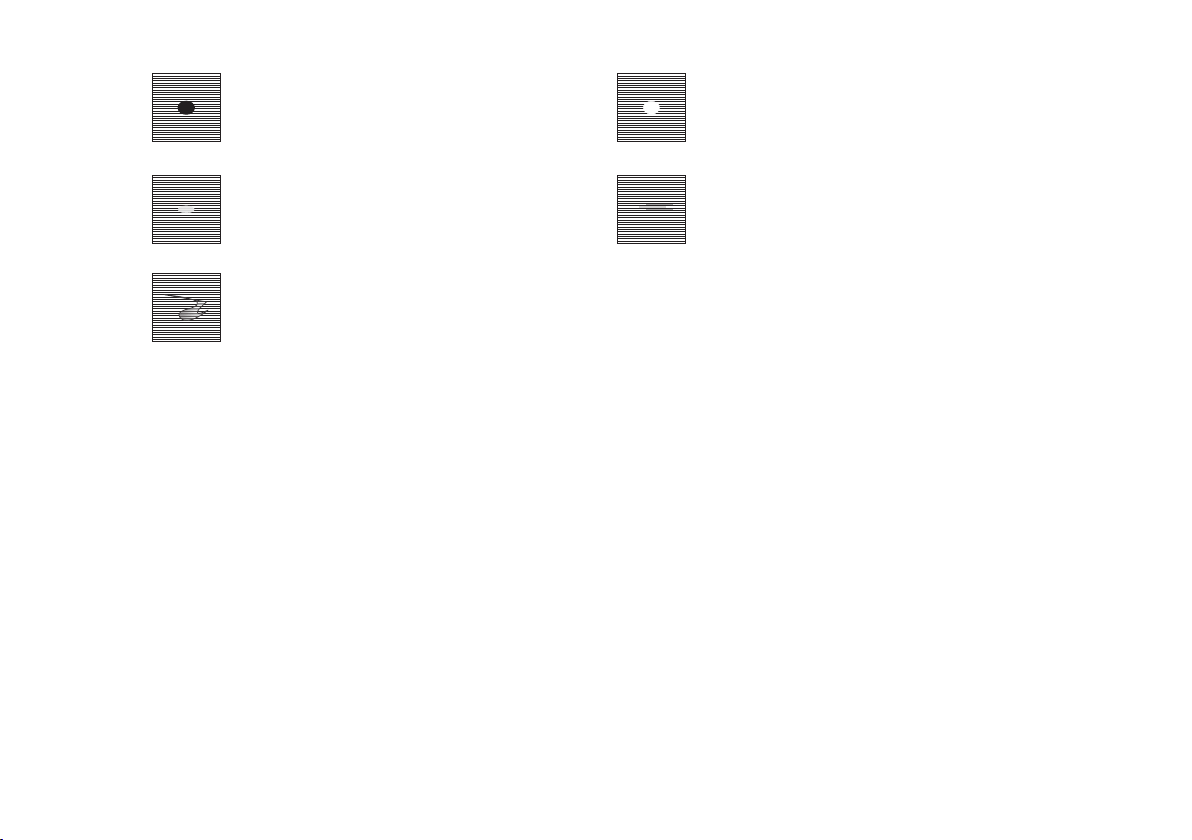
For the black spot defect which can be
measured in appearance, if it can not
be found by visual inspection, the prod-
uct is normal.
For the appearance of specific measur-
able white spot defects, if visual inspec-
tion can not be found, then the product is
normal.
f the visible dirt is within the allowable
range of defects, the product is normal.
For the faint linear printing trace, if within
the allowable range of defects, the prod-
uct is normal.
For the inks caused by uneven printing
traces, if within the allowable range of
defects, the product is normal.
(1).The white screen is listed as the quality standard because it is not only the reflection surface of the projector image (the
black surface is observed from the upper and lower direction, and the white surface is observed from the bottom direction),
but also the main function surface of the viewing image, so the white screen is listed as the quality standard. It should be
noted that if the white screen surface does not exceed the quality specification, it will be regarded as meeting the factory
qualification standard.
(2).Different from the white screen, the black screen is used as a functional surface to absorb indoor ambient light. In view
of the fact that there is no direct correlation between the black screen surface and the image viewing quality, its quality
specifications are quite different from that of the white surface. It should be noted that the slight black marks on the black
screen surface are inevitable appearance phenomena in the production process of industrial products, which meet the
factory qualification standard.
Conclusion: it should be noted that the slight black marks and white spots on the black screen surface of the anti light
projection screen products are normal product appearance phenomena, which will never affect the image viewing quality.
Please use it at ease.

13
Since the installation environment of each user is different, the instructions in this user guide are only for reference. If you
need further installation and safety suggestions, please consult the professional installation company. It should be noted
that no matter what kind of installation method you take, the product should not be loosened or dropped due to vibration or
tension, so as to keep the product stable. The installation personnel of the product must ensure that the bracket accesso-
ries used have sufficient strength to support the product and select the appropriate installation position.
Installation Warning
Before pre installation
Hardware Parts List
1. When you open the package, please carefully open the screen package to avoid the product from rubbing or falling.
2. Please always place the screen in a horizontal position. Do not install the product on an uneven or inclined surface.
3. Please keep the screen away from dust, sawdust and liquid to protect the screen from contamination.
Before you install the product, make sure that all parts of the product are included. Please note that the wall screws
supplied with this product may not be suitable for all mounting surfaces. Please consult the professional installation person-
nel or hardware store to get the correct installation screws and anchors.
14
Ground Installation
Safety tips: it is recommended that two people lift the product and place it horizontally.
1. When using this product, you can place the product on the horizontal ground and fix it. Before placing the product, please
pay attention to cleaning the ground debris to keep the floor dry.
2. The two foot brackets at the bottom of the screen are used to fix the screen and cannot be removed; please pay attention
to reasonable and safe use, and please pay attention to reserve more space for placement.
Bottom fixed baseBottom fixed base

15
Screen Running
Voltage information: make sure your screen is working at the correct voltage, depending on the area.
(Using the wrong voltage may cause the screen to become inoperable)
(1) Plug the screen power cord into the correct power outlet.
(2) When the product power is turned on, a "beep" sound will be emitted for 1.5 seconds, indicating that the product has
been powered on.
(3) When the screen is fully raised, you can choose to turn off the power switch and unplug the power cord due to long-term
viewing. At this time, the screen will remain open and will not be closed due to power off. To turn off the screen, connect
the power cord and turn on the switch to resume operation.
(4) When the left power switch is powered on, you can use any of the methods described below to run the screen.
Note: when the screen is raised, make sure there is no obstacle and enough space on the top of the screen, and do not put
your head on the top of the screen to avoid personal injury and product failure.
16
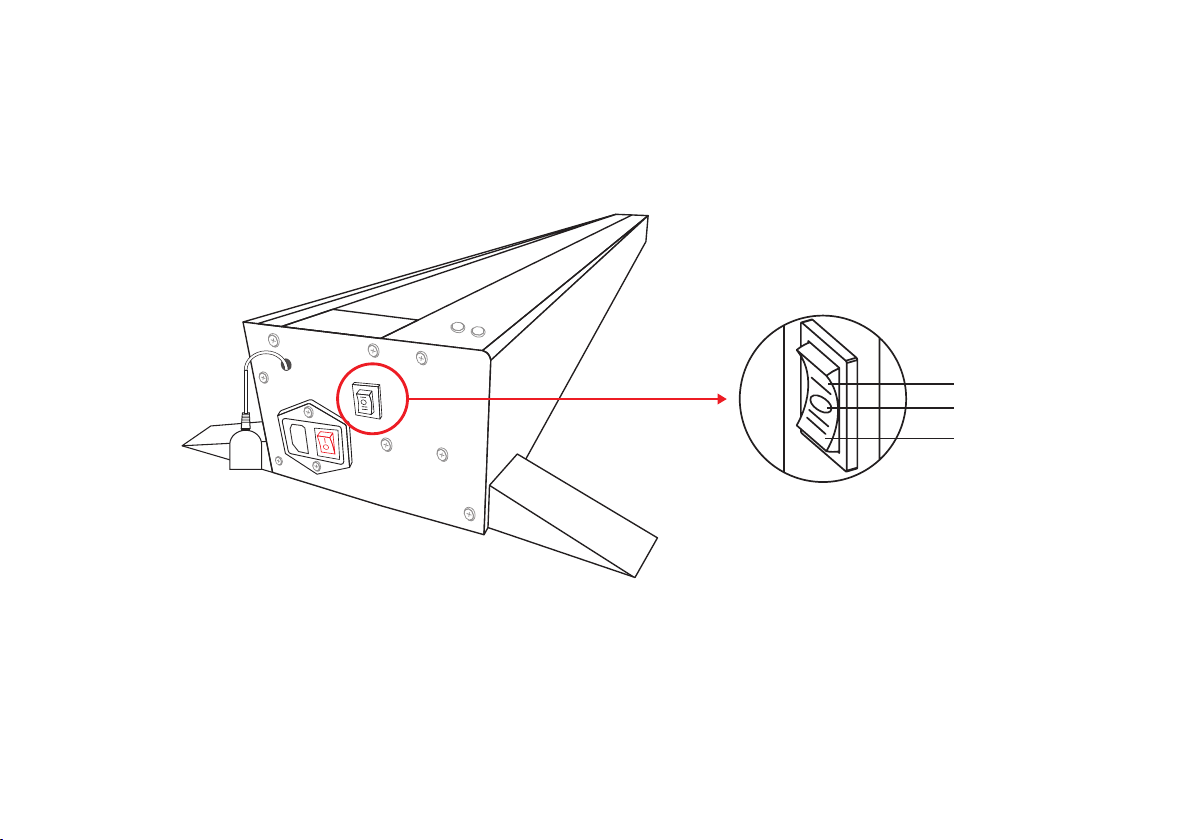
The left side of the screen shell is equipped with a manual switch which can control the screen "up / stop / down".
1.Manual Switch
Up
Stop
Down
Position of manual switch
17
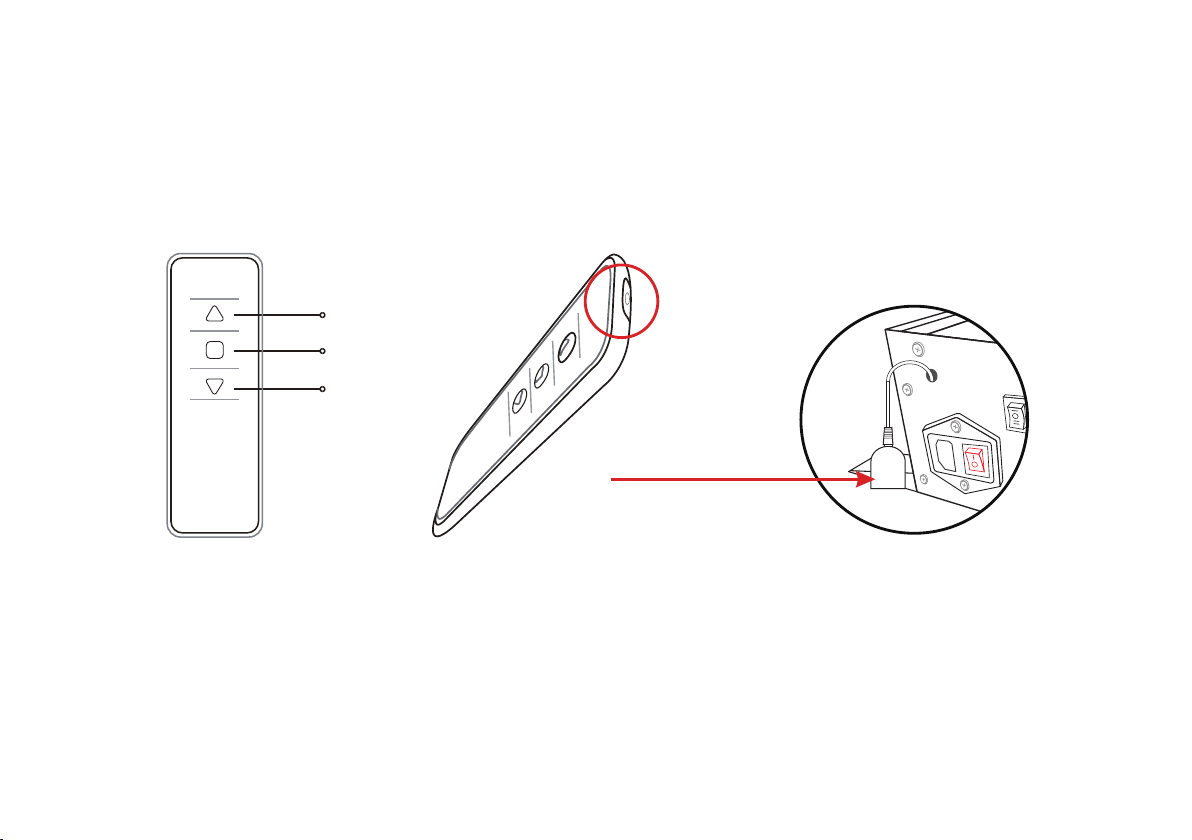
2.Remote control⸺IR remote control
Front of remote control Perspective view of infrared
remote contro
When using, please aim
at the IR receiver
IR receive
Up
Stop
Down
(1)IR remote control needs to be connected with the IR receiver. When using IR remote control, make sure that the power
switch is turned on and aligned with the IR receiver head, so that the IR remote control can operate normally.
18
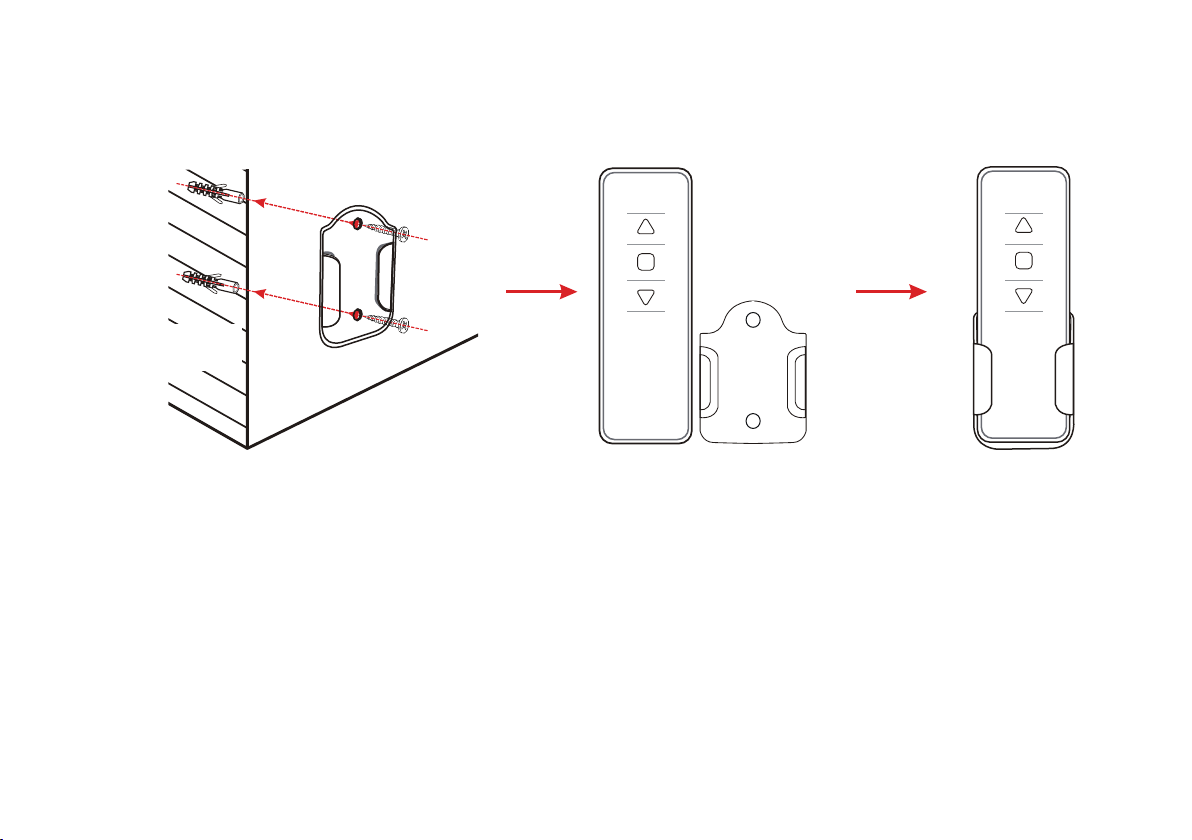
For convenient access,the remote controller can be fixed on the wall surface and other planes through the bracket.(wall
screw or double-sided adhesive tape can be used for fixation)
inside the wall
outside the wall
19
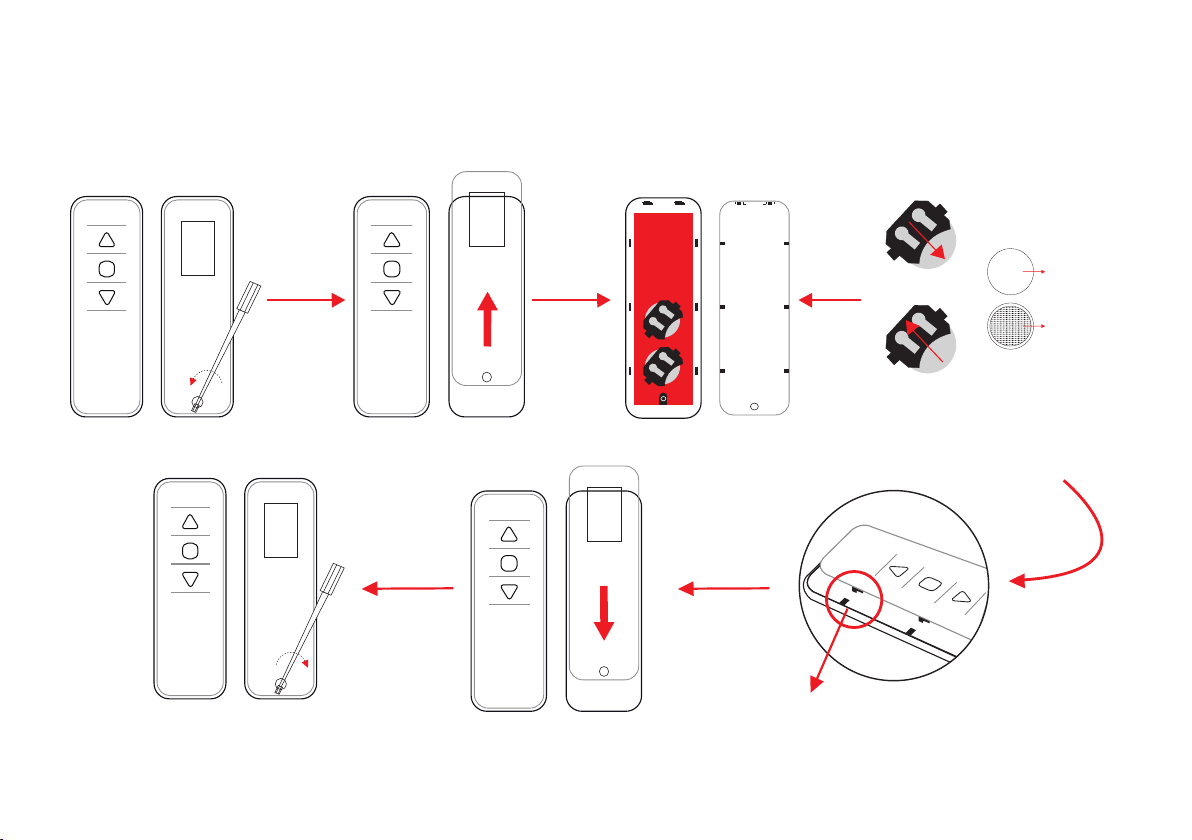
Push up
Push down
Please place the battery face up
and push it in completely.
When the back cover is closed,Please
jam the slot and push it down.
Take out the battery
load the battery
+
3V
CR2032
front up side
bottom
When you need to replace the battery of the remote control, unscrew the screw on the cover of the remote control with a
screwdriver as shown in the attachment, and then use the button battery.Replace the remote control, close the cover and
tighten the screws to prevent the battery from falling off.
20
Do not ingest battery, Chemical Burn Hazard.
The remote control supplied with this product contains a coin / button cell battery. If the coin / button cell
battery is swallowed, it can cause severe internal burns in just 2 hours and can lead to death. Keep new
and used batteries away from children. If the battery compartment does not close securely, stop using the
product and keep it away from children. If you think batteries might have been swallowed or placed inside
any part of the body, seek immediate medical attention.

21
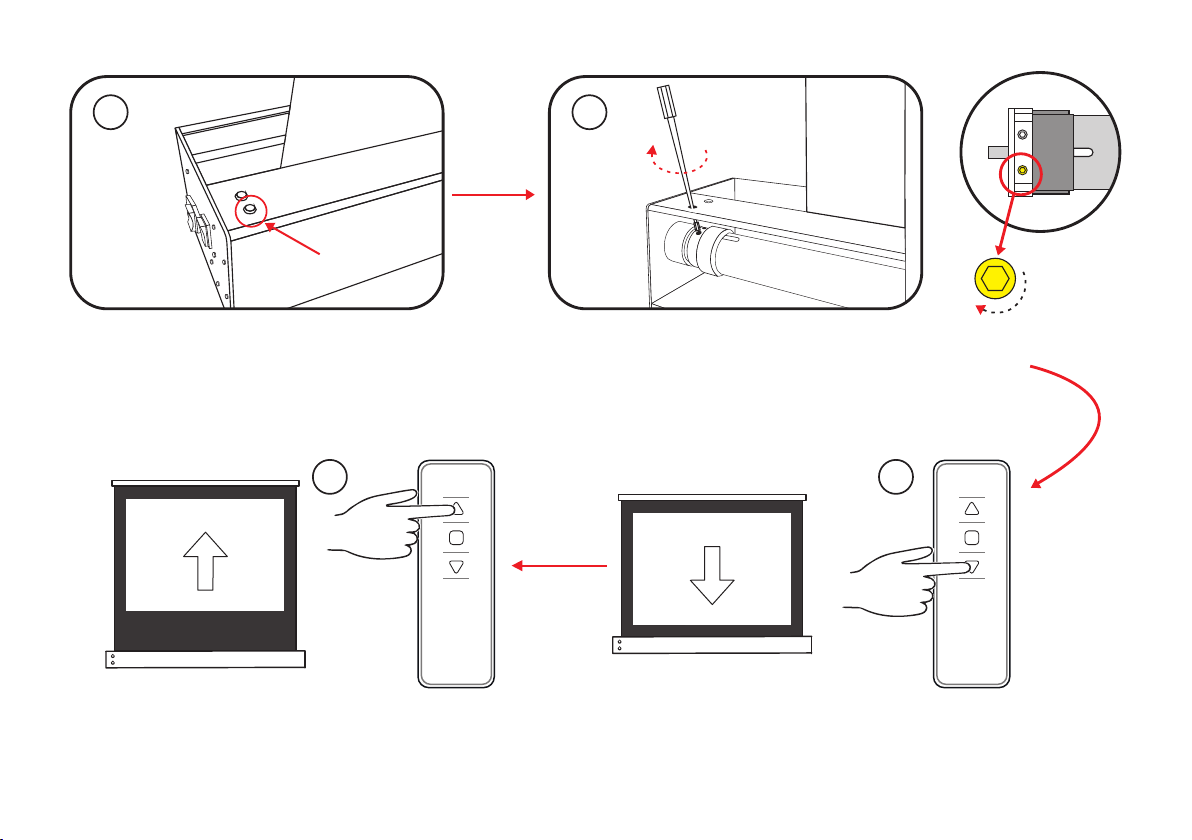
If the screen is too high, follow the steps below to fix the screen to the desired position.
1. Please make sure the product is powered on.
2. As shown in the figure, open the small rubber cover on the lower left of the cover.
3. Insert the debugging rod into the Yellow adjusting hole in the housing, and then slowly rotate it clockwise for several turns
(rotate one circle and adjust the screen height about 2cm). After each rotation, press the "down" switch, and then press the
"up" switch. At this time, the screen will first rise and then drop, and finally stop at a position lower than the factory setting.
Please check whether the height is appropriate.
If you can't find the hole location,You can find the hole position with the light source standing behind the screen.
If the height is still very high, please repeat the above operation to adjust to the appropriate position.
(Please refer to the legend on the right )
Screen hight limit setting
Black border down
(The highest position of the screen has been set when leaving the factory, no higher height can be adjusted)
22
Openthe
rubberplug
1 2
Yellowholeposition
Open the rubber plug under
the left side of the cover
Insert the adjusting rod into the Yellow hole in the housing and
rotate clockwise
(rotate one circle and adjust the screen height about 2cm)
Thenpressthe"up"switchtoraisethescreentothe
appropriateposition,Finally,thescreenstopsalittlelower
thanthefactorysetting
First press the "down" key to lower the screen
4
3
23
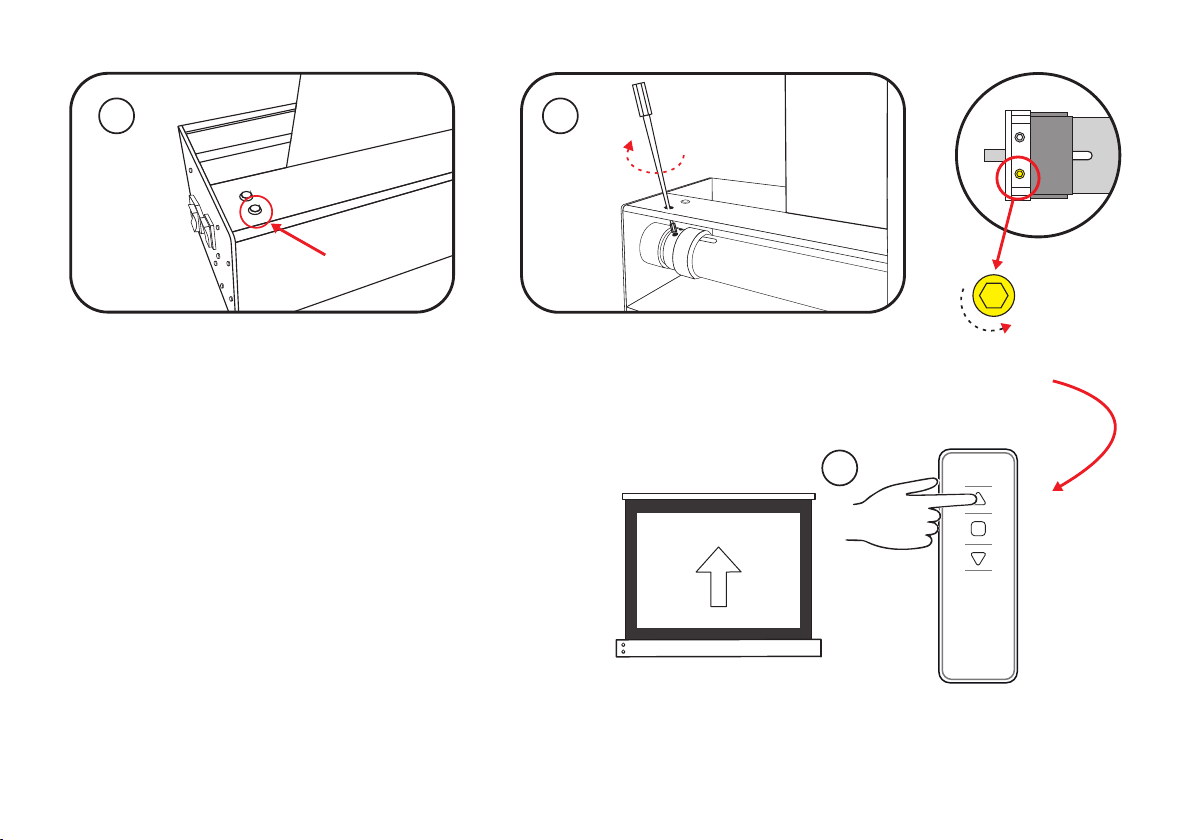
If the height adjustment of the black border of the screen is too low, please follow the following steps:
(please note: it is not allowed to carry out this step directly without adjusting too low)
(1) Please press the "up" button on the remote control, and the screen will rise to the highest point.
(2) Insert the debugging rod into the adjusting hole on the lower left side of the housing, and then rotate it several times
in a counter clockwise direction
(rotate one circle and adjust the screen height about 2cm). Then press the "up" key, the
screen will rise to the adjusted height, that is, stop operation. Please pay attention to control the height, do not exceed the
original highest point, do not rotate too much, otherwise the screen will reverse and cause screen damage.
(Please refer
to the legend on the right )
If the adjustment is too high, please repeat the previous steps to adjust to the appropriate position.
Black border up(Only applicable after the black border is adjusted too low)
Notice:
The highest position of the screen has been set at the factory, no higher height
can be adjusted.
Do not adjust too low or too high at one time. We suggest that you adjust the
screen a little bit.
24
Openthe
rubberplug
Yellowholeposition
Insert the adjusting rod into the Yellow hole in the housing and
rotate clockwise
(rotate one circle and adjust the screen height about 2cm)
1
2
Only applicable after the black border is
adjusted too low!
Open the rubber plug under
the left side of the cover
3
Thenpressthe"up"key,thescreenwillrisetothe
adjustedheight,thatis,stopoperation.
25
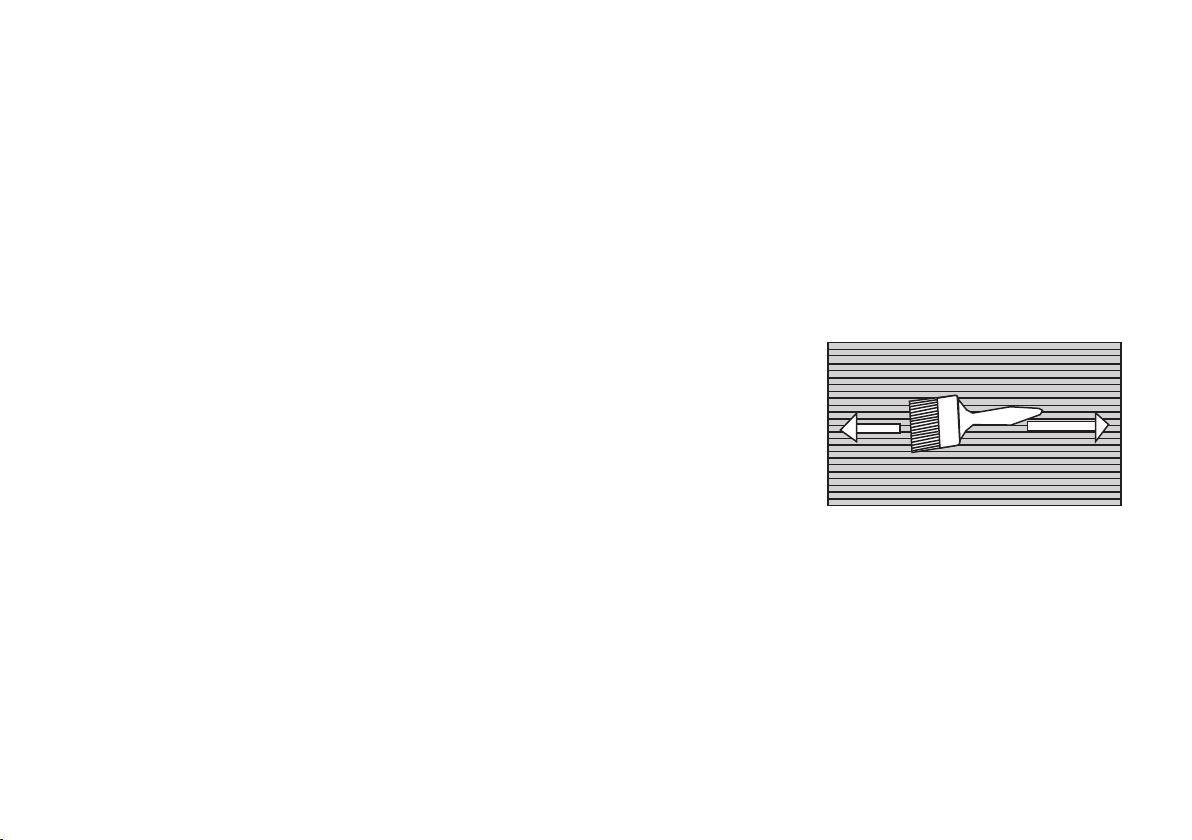
Screen maintenance
Cleaning requirements:
Warning!
1. In general, please use a soft brush to clean the screen surface. Remember to use a special soft brush and gently brush
away the impurities along the screen grain direction.
2. Do not use any cloth (coarse cloth, soft cloth, gauze, wet cloth) to wipe the screen surface.
3. Rough towel or cloth may damage the screen surface and affect the viewing effect.
4. There is a horizontal structure on the screen surface, so please brush away the impurities along the left and right direc-
tion of the grain when cleaning the screen; do not wipe it up and down or round the screen.
5. The backside surface of the curtain can be wiped with cloth, but it should be ensured that the screen is dry before closing
the screen, because the surface of the curtain is not waterproof.
-Do not scribble on the screen.
-Do not touch the screen directly by hand.
-Do not touch the screen with hard or sharp objects.
-Do not clean the screen persistently or vigorously, so as to avoid screen scratch.
-Be sure to turn off the screen when you are not using the product.
-This product is not waterproof, only suitable for indoor use, not recommended for outdoor use.
-Avoid sharp objects directly contacting the screen surface, so as to avoid puncturing or scratching the screen surface.
-Do not use acetone, benzene, alcohol and other organic solvents to clean the screen, which will cause permanent
damage to the screen.
-Do not run the screen up and down for more than 3 minutes, otherwise the screen will stop running. This is the phenome-
non of motor overheating protection shutdown. Please wait 20-30 minutes for the motor to cool down before continuing
operation.
-To avoid possible injury, do not attempt to remove the screen. If there are obvious damaged parts, please contact your
authorized dealer.

26
Manufacturer's warranty
1.VIVIDSTORM products have a 2-year warranty. During the warranty period, in case of any problems caused by the product itself or the product
defects caused by the design, Please contact the after-sales service to inform the situation.
During the warranty period, if the product fails to work normally due to user negligence (not product material or design defects, etc.), not eligible
for a warranty, for serious damage to the product should charge that fee according to the product damage.
After the warranty period expires, all repairs or replacements are charges the fee, and users will get a quote for the repair fee. Only after the user
agrees and accepts the maintenance cost can the maintenance service be started.
2.Within one week after the user receives the product, if there are obvious serious defects in the product, the user shall provide video or photo
proof, and provide the corresponding certificate and warranty card to our after-sales service personnel. After confirmation, the user can return
the product and reship a new product. The user needs to ensure that the returned product is in good condition kept in their original status., free
from any physical damage and that the packaging is complete. We will handle the returned or exchanged products within 7 days (excluding
public holidays).
3.The motors in all products sold by our company enjoy a five-year warranty. It is necessary to ensure that the motor is complete and has not
been tampered with.
4.The company provides corresponding after-sales technical support services for the products sold, and guarantees customer service response
within 24 hours. (except holidays)
5.Within one week after the customer receives the product, due to the special packaging size of the product, it is recommended to save the
carton in order to solve the packaging problem of return and replacement.
6.It should be noted that the product damage caused by the following factors not caused by the company, the damage caused by other human
factors and natural disasters are not included in the warranty scope of the company:
The product is damaged due to incorrect installation of the product;
(1) Product voltage mismatch;
(2) The user does not operate according to the product manual, resulting in improper use and product damage;
(3) Repair or modify the product without authorization of the company;
(4) Failure to provide proper working environment;
(5) Product damage caused by user's secondary transportation;
(6) This product is damaged in natural disasters and accidents. Natural disasters and accidents include flood, fire and human factors. The above
guarantee has the same legal effect for each user. Due to the change of country or region, other rights may only apply to specific customers.
27
The product has been tested and inspectrd after operation,and all the tests and inspections have been in accordance with the
technical requirements,and its quality meets the specified requirements.Only after passing the inspectsion can they be allowed to
leave the factory.
Product Name:
Customer name:
Postcode:
Purchase data:
invoice number:
Customer signature:
Data of production:
Warranty content:
After sale:
Or not satisfied
Data:
Customer telephone:
Customer's address:
Purchasing channels:
User informationCustomer retention sheet
Factory serial No:
Date of proudction:
Product Model No:
Inspector:
Certificate
Product Warrarty Card
Official website of the company: http: //www. vividstormscreens. com
Consultation email: vivids[email protected]om
E-Mail:
Satisified