
Loading ...
Loading ...
Loading ...
English
10
Electronic Speed and Impact Control (Fig. A)
The electronic speed and impact control allows the
use of smaller drill bits without the risk of bit breakage,
hammerdrilling into light and brittle materials without
shattering and optimal tool control for precisechiseling.
To set the speed dial
10
, turn the dial to the desired level.
The higher the number, the greater the speed and impact
energy. Dial settings make the tool extremely flexible and
adaptable for many different appli cations. The required
setting depends on the bit size and hardness of material
beingdrilled.
Overload Clutch
In case of jamming of a drill bit, the drive to the drill spindle
is interrupted by the overload clutch. Due to the resulting
forces, always hold the tool with both hands and take a
firmstance. After the overload, release and depress the
trigger to re-engagedrive.
WARNING: Drill may stall if overloaded causing a
sudden twist. Always expect the stall. Grip the drill
firmly to control the twisting action and avoidinjury.
E-Clutch® System (Fig. A
)
In addition to the integral (mechanical) clutch, the
DEWALT
anti-rotation E-Clutch® system, offers technology capable
of detecting the motion of the tool. This feature senses the
motion of the tool and shuts it down if necessary. The red
indicator LED
11
illuminates when the E-Clutch® System
isengaged.
E-Clutch® and Service Indicator LED
(Fig. A)
Your rotary hammer has two LEDs
11
, indicating the
E-Clutch® (ADC) function and a service indicator. Refer to
the table for more information on LEDfunctionality.
lED Function Description
Red
(permanently on)
E-Clutch®
E- Clutch® is engaged.
Yellow
(permanently on)
service exceeded
Indicates that the tool needs
servicing. After 10 hours the
LED will flash (new lubrication,
hammer mechanismsealing).
Yellow
(flashing)
service required
Indicates that the tool needs
servicing within the next 10 hours
of use (new lubrication, hammer
mechanismsealing).
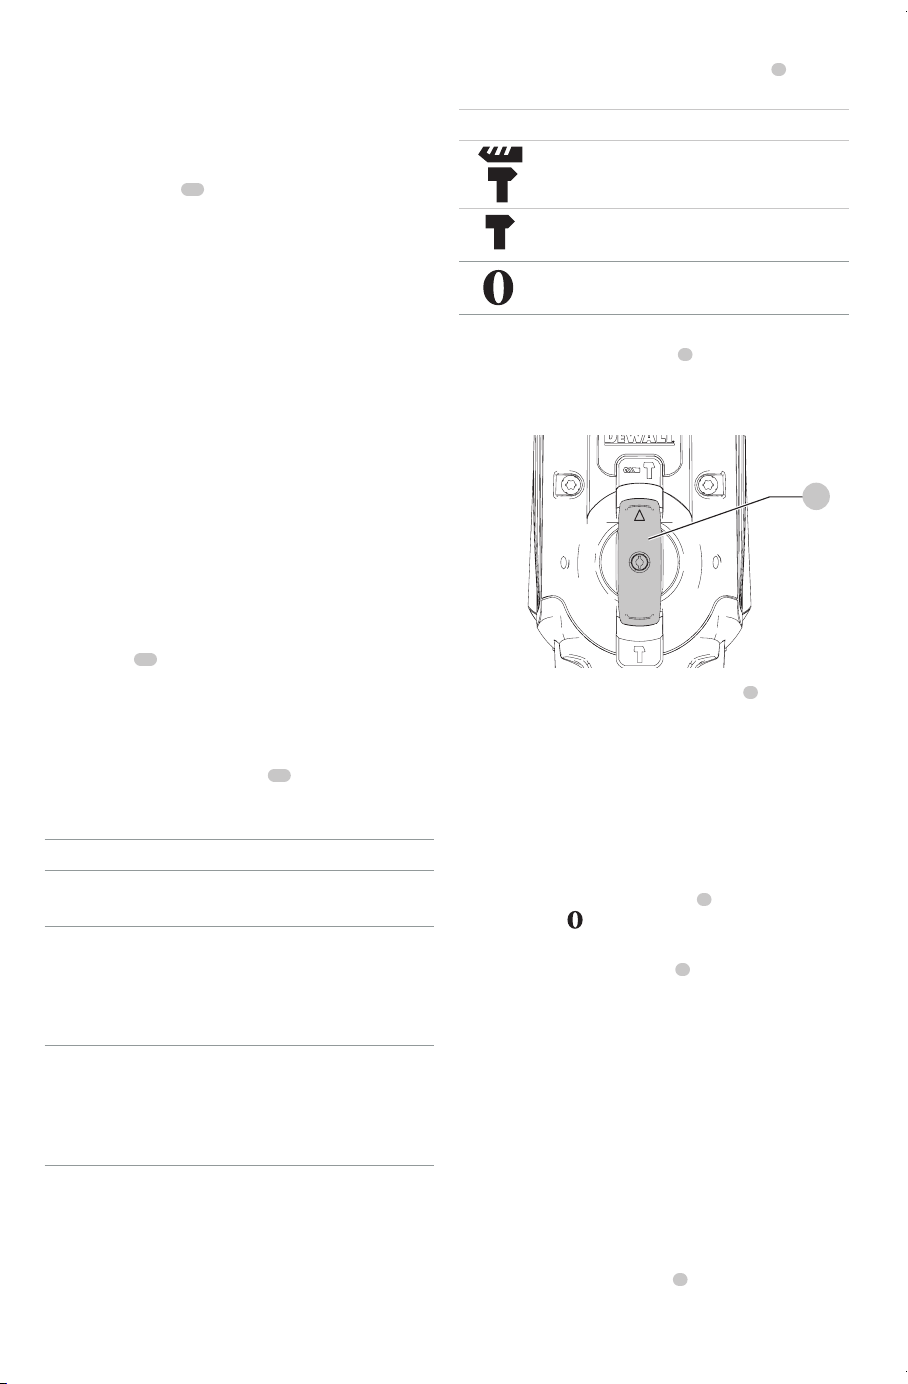
Operation Modes (Fig. H)
WARNING: Do not select the operating mode when
the tool isrunning.
CAUTION: Never use in Rotary Drilling or Rotary
Hammering mode with a chisel bit in the bit holder.
Personal injury and damage to the the tool mayresult.
Your tool is equipped with a mode selector dial
4
to
selectthe mode appropriate to desiredoperation.
symbol Mode Application
Rotary
hammering
Drilling into concrete
and masonry
hammering
only
Lightchipping
Bit Adjustment
Chisel bit position
adjustment
To select an operating mode
• Rotate the mode selector dial
4
so that the
arrow points to the symbol corresponding for the
desiredmode.
Fig. H
4
nOTE: The arrow on the mode selector dial
4
must be
pointing at a mode symbol at all times. There are no
operable positions inbetween. It may be necessary to briefly
run the motor after having changed from 'hammering only'
to 'rotary' modes in order to align thegears or to postion
the chiselbit.
Indexing the Chisel Position (Fig. A)
The chisel can be indexed and locked into 24
differentpositions.
1. Rotate the mode selector switch
4
until it points
towards the
position.
2. Rotate the chisel in the desiredposition.
3. Set the mode selector switch
4
to the “Hammering
Only”position.
4. Twist the chisel until it locks inposition.
Performing an Application (Fig. I)
WARNING: TO REDUCE THE RISK OF PERSONAL
INJURY, ALWAYS ensure workpiece is anchored or
clamped firmly. If drilling thin material, use a wood
“back-up” block to prevent damage to thematerial.
WARNING: Always wait until the motor has come to
a complete standstill before changing the direction
ofrotation.
1. Choose and install the appropriate chuck, adapter, and/
or bit onto to the tool. Refer to Bit and BitHolder.
2. Using the mode selector dial
4
, selectthe mode
appropriate to desired application. Refer to
OperationModes.
Loading ...
Loading ...
Loading ...