ENERGYSTAR
N ITI NE
Please read the operating instructions and safety precautions
care_lly and thoroughly before installing and operating your room
air _nditioner.
AI IClONA
Por favor lea las instrucciones de operaci6n y las precauciones de
seguridad cuiidadosa y totalmente antes de instalar y operar su
a_ndicio, nado, r ,die aire de ventana.
MODELS, MiODELOS: HBLG2504E
Manufadure, d by LG Electronics
FOR YOUR RECORDS
Write the m,_el arid seria_ numbe,rs here:
Model #
Serial #
You can find them on a iabel on the side of each unit.
DealeCs Name
Date Purc_sed
[] S_apie you_ receipt Io this page ¢__heever_t you need
it to prove date of purchase or for warranty issues
READ THIS MANUAL
Inside you wilftfind many help_l hints on how to use
a_d ma;nlain your air conditoner properly Just a little
preve_live care o_ your pa_t can save yo_ a great deal
of time and money over the life of your a_rconditioner.
Youll fir_dmany answers to _mmon preb_ems in the
d_art of troublesh_ling tips If you review our chart ,o_
Troubl!eshootlng Tips first you may no1 need to ca/_
for service at all
• C_ct the authi_izedl servi_ t_hniciaa t_ r,epa_ o_
rr_mtenan_ of this unit,
_taict the in_a!_r for instal_ion of th_suniL
,The air condffion_ is not intended for use by young
chi_n _ inval_dlsw_hout _vls_.
• Young children should _ _per¢t_d to ensure that
_ey do not play w_h the air cond_iener.
• Wh_ the power c_d is to. _ r_l!a¢_,, rep.lace_ent
wo_ sh_ll _ _o_ by auth_iz_ _rs_nel on_
u_ngi _ly genuine. _.lace_nt parts.
• _stal_:ion wo_ mu_ _ p_o_d in accorda_ w_h
_e N_ion_l Ele,_ic Co_e. biy ,quaJl_ _nd author_
peP__ne_ only,
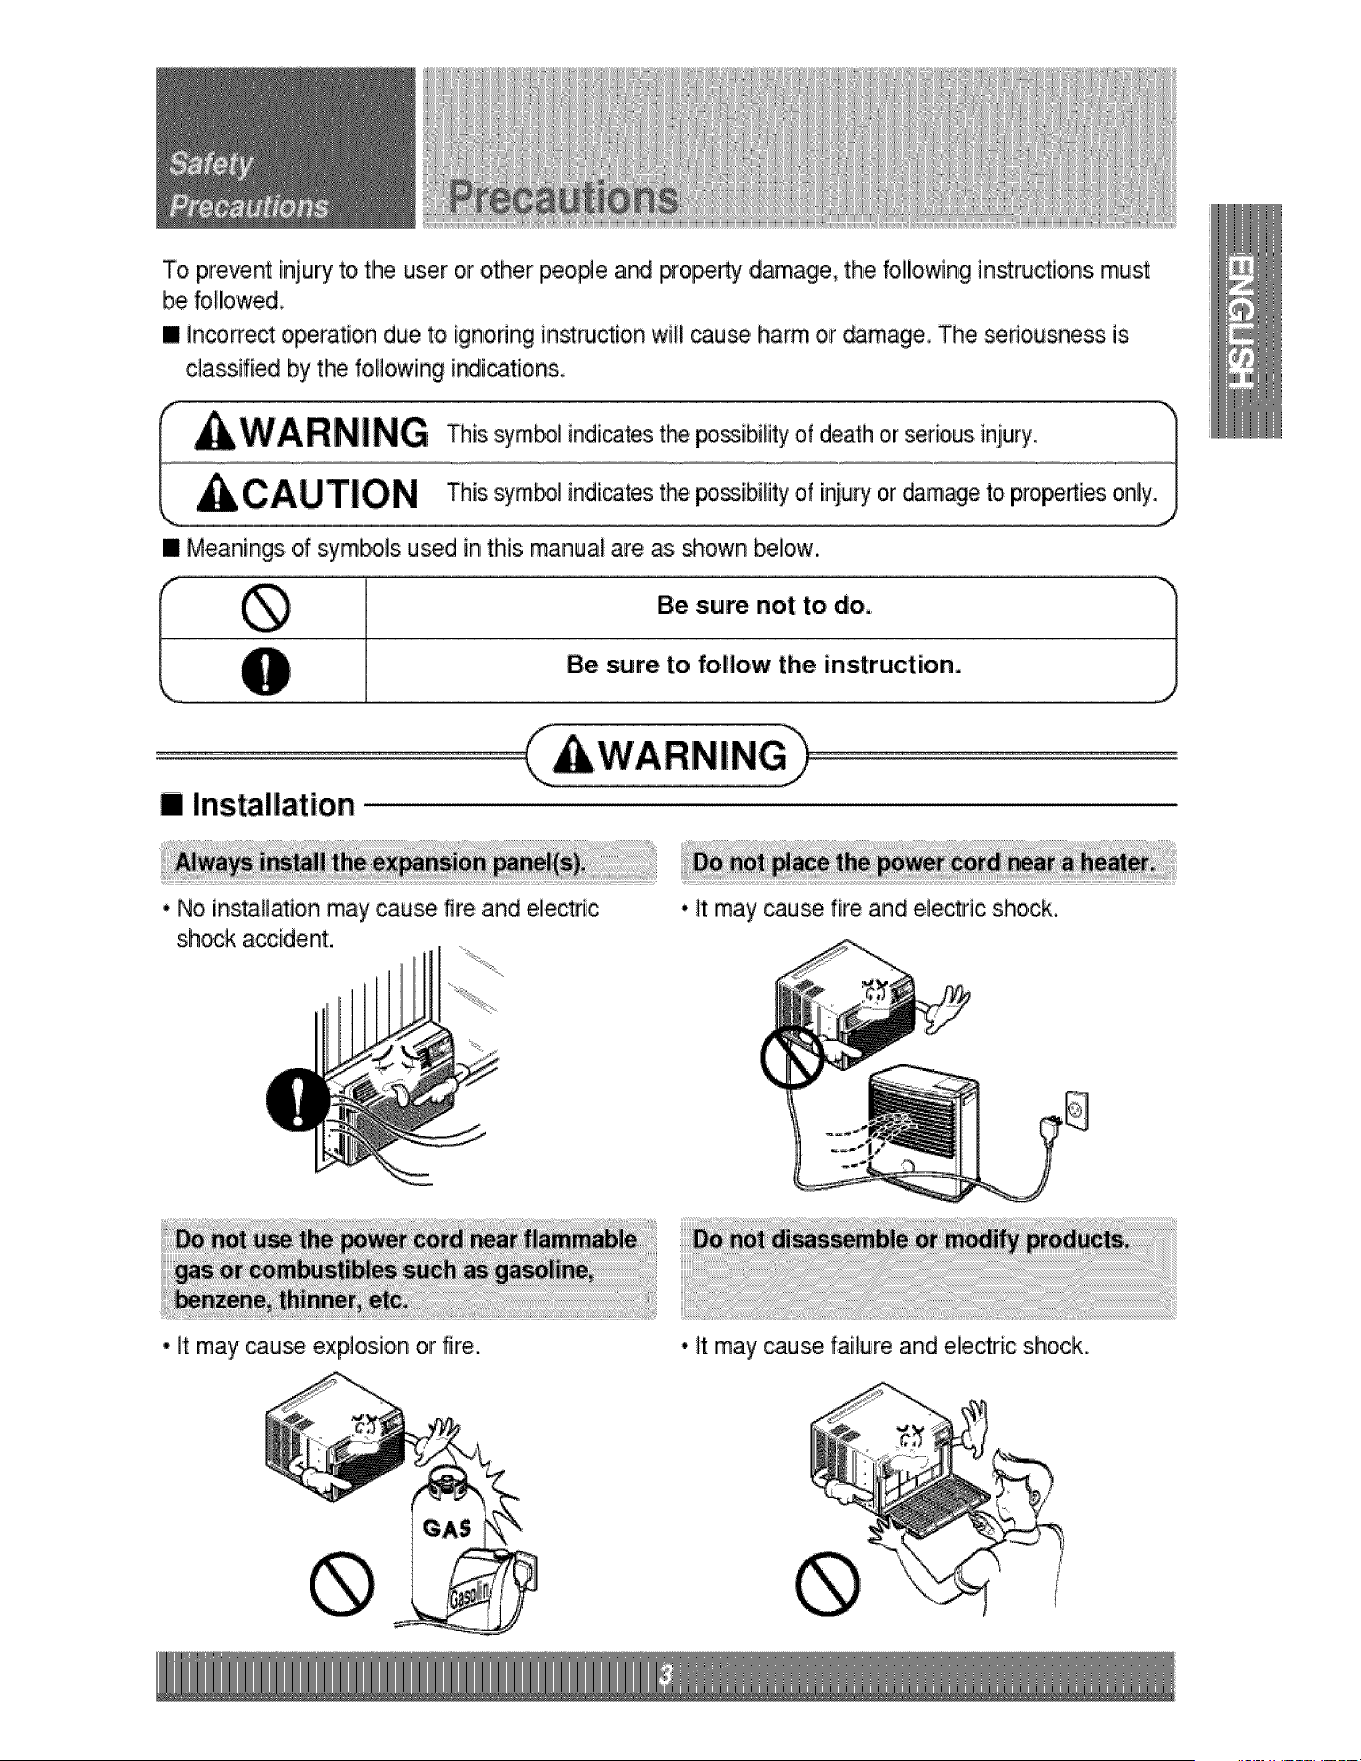
To prevent iniury to the user or other peop4e aM #o_ damage, the following instwctions, must
be fol!owed
• incorrect o_ration due to ignodng instruction 'wi_ _use harm or _mage The seriousness is
classified by the following i_iications,
• Meanings of sym_ls used in this manua_ are as shown below.
I Benot,o°o 1
B,e sure to follow the instruction.,
[] Ins_l|ation
• No installation may cause fire and electric
shock accident.
* it may cause fire and electric shock.
• It may cau_ explos.ion or fire. • it may cause failure and electric shock.
[] Operation
, _herwise,, it will ,_use
ele_dc shock or fire due to
heat generation or electric
_ock.
• It will cause electdc _ock or
fire due to heat generation.
• _he_ise it may cau_ fire
and electric shock accident.
• it wilil cause electric shock or
fire due to heat ger_rationi,
,, It 'willcause e_ectricshock or
fire due to heat gestation
°.It may cau_ fire and electric
shock..
. lit willi cause electdc s._ck or
fire.
• No groundir_ may cause
etectdc shock (See
installation Manual).
• lit wil _.use electdc shock.

• It will cau_ failure of machine
o,r electdc s_ck.
[] Installation
• They are sharp and may
,causeinjur_,_
• It may _use injury,
• it is not designed to cool _e
entire house.
CAUTION
, it may cause failure of
appliance or accident,
/
/
/
• Utmay _use explosiion, fire,
and bum.
• If leaving appliance damaged,
there is concern of damage
due to the f_ling of produ_.
[] Operation
Sharp
edges
, It may cause electric shock
an damage.
• Prevent accidental sta_up
and the possibility of injury.
, _.ere is d_ger of fire or
e]ectdc shock.
, Water may e_.er the unit and
degrade the insulation. It may
_use an electfic shock,
, Since the fan routes at high
_ed during oper_io,n, lit
may cause injury.
, Operation 'without filters wiHI
_use failure.
• This _u]d injure the pet or
pla_.
, It is an air conditioner, not a.
p_'ecisioin refrigeration system.
,,The ap_arance of tP_ air
_ndit[oner may deteriorate,
change color, or develop
surfa_ flaw&
, litcontains containments and
wilil make you sick./This
_u]d damage your health.
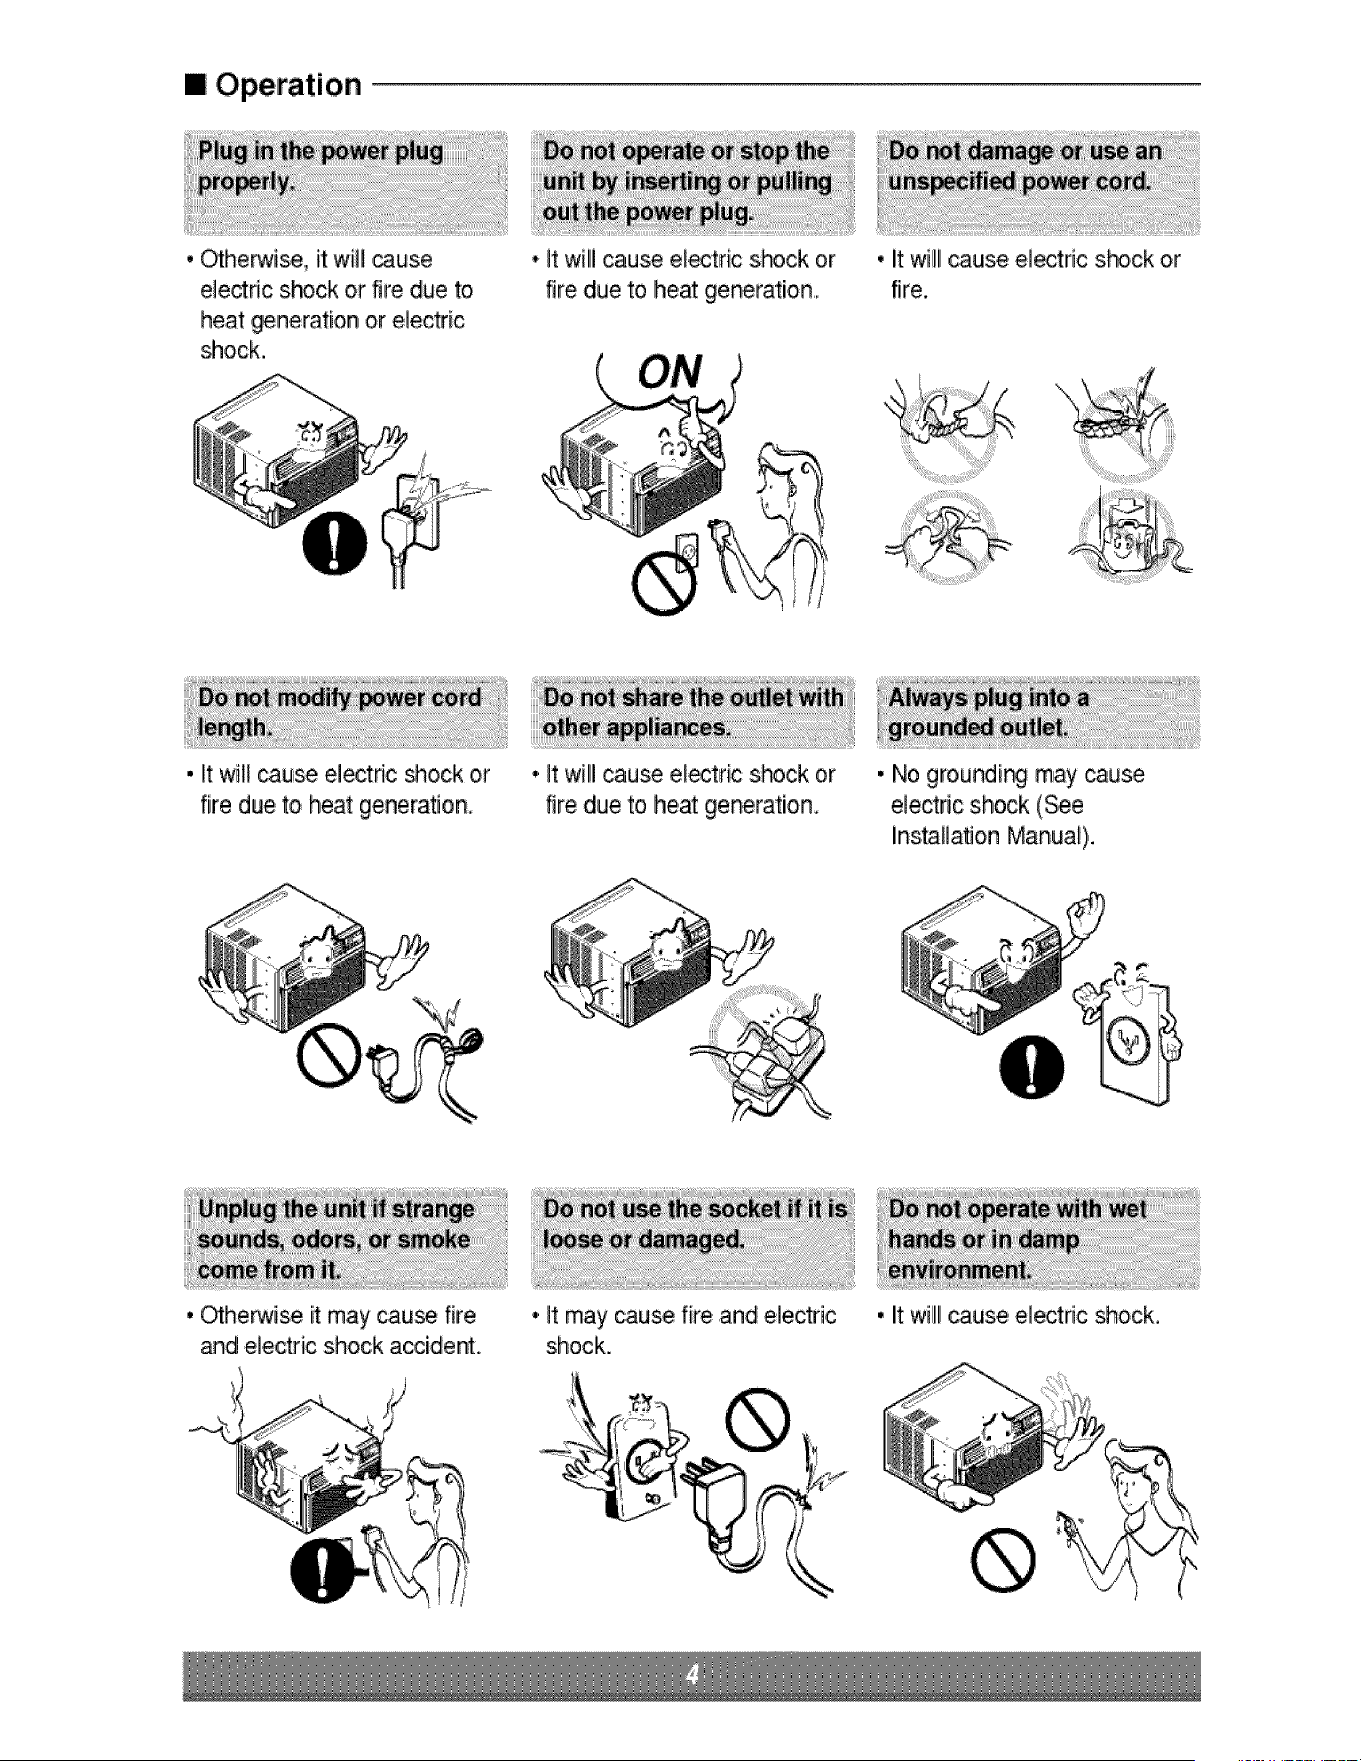
_ Contact an installation specialist for instaHa'5on
P_ugin _e power plug properly.
Do not share,the same outlet with other appliances
_Do not use an extension cord
Do not sta_stop operation by piuggin@_unpiugigingthe _wer cord.
Ifcordp_ug is damaged replace only with an authorized part
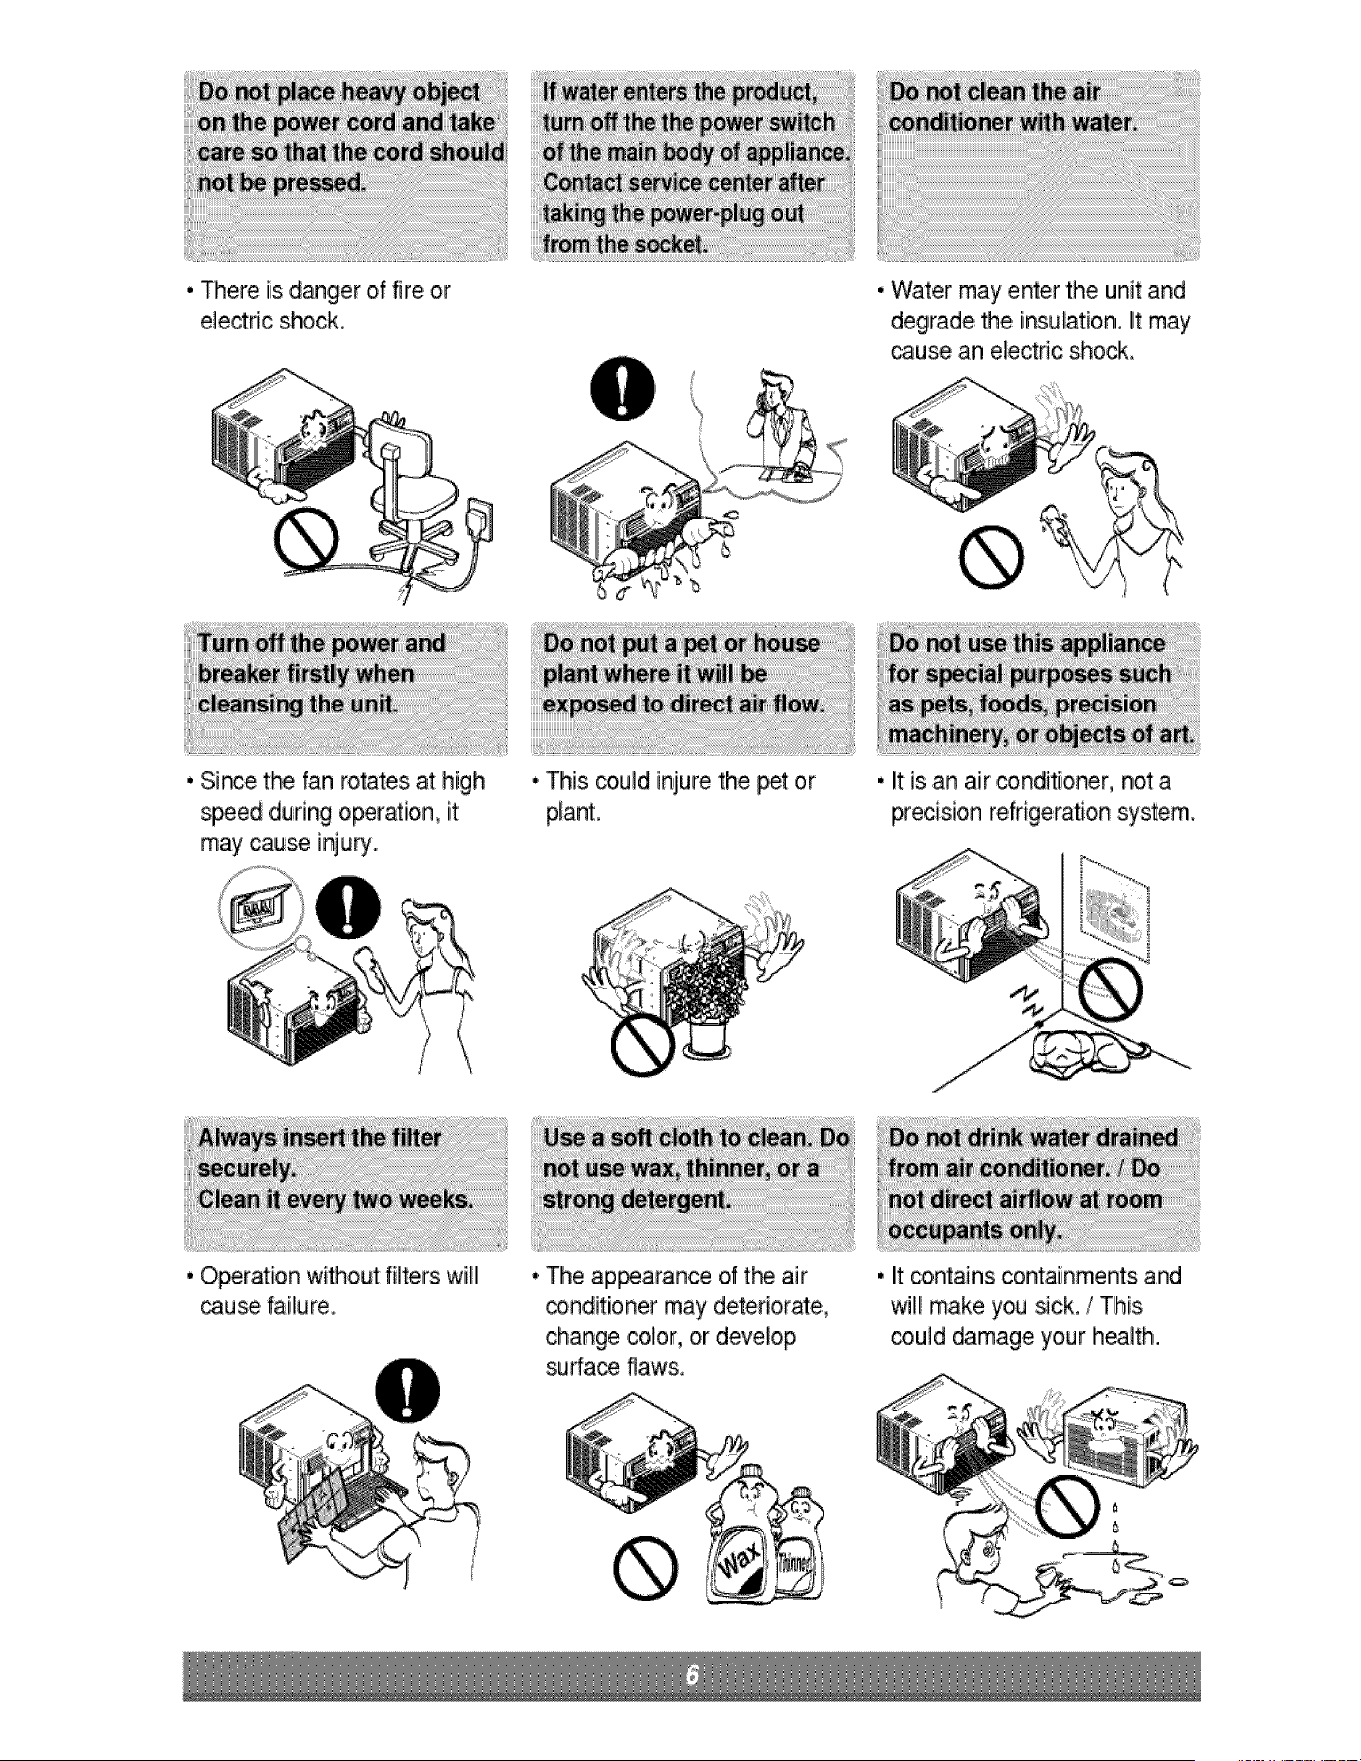
::_ Being ex_sed to direct _fflow for an extended period of time could be hazardous to your health Do not
expose occupants,, _t:s, or plan'tsto direct aidlow for exfend._ periods of:time.
Due to the _ssibi_ity of oxygen deficiency, ventil_e _e room when using t_ether with stoves or other
Do not use this air condi_oner for non-specified special purposes (e.g preserving precision devices,
food,,pets, plants, and _-t obie_s ) Usage in such a manner co_Jl,dharm such property.
Do not:use water to clean inside the air cond tioner,, Exposure to water can destroy _e insulation, leading
to possibie electric:shock.
'¢_en cleaning the unit, first make sure that the power and breaker are turned off The fan rotates at a
very high speed during o_ration, There is a possibility of iniu_ if the unit's _wer is accidentally
'tiggered on while c_eaning inner pa_s of the unit,
For repair and maintenance, contact your authoriz_ sewice dealer.
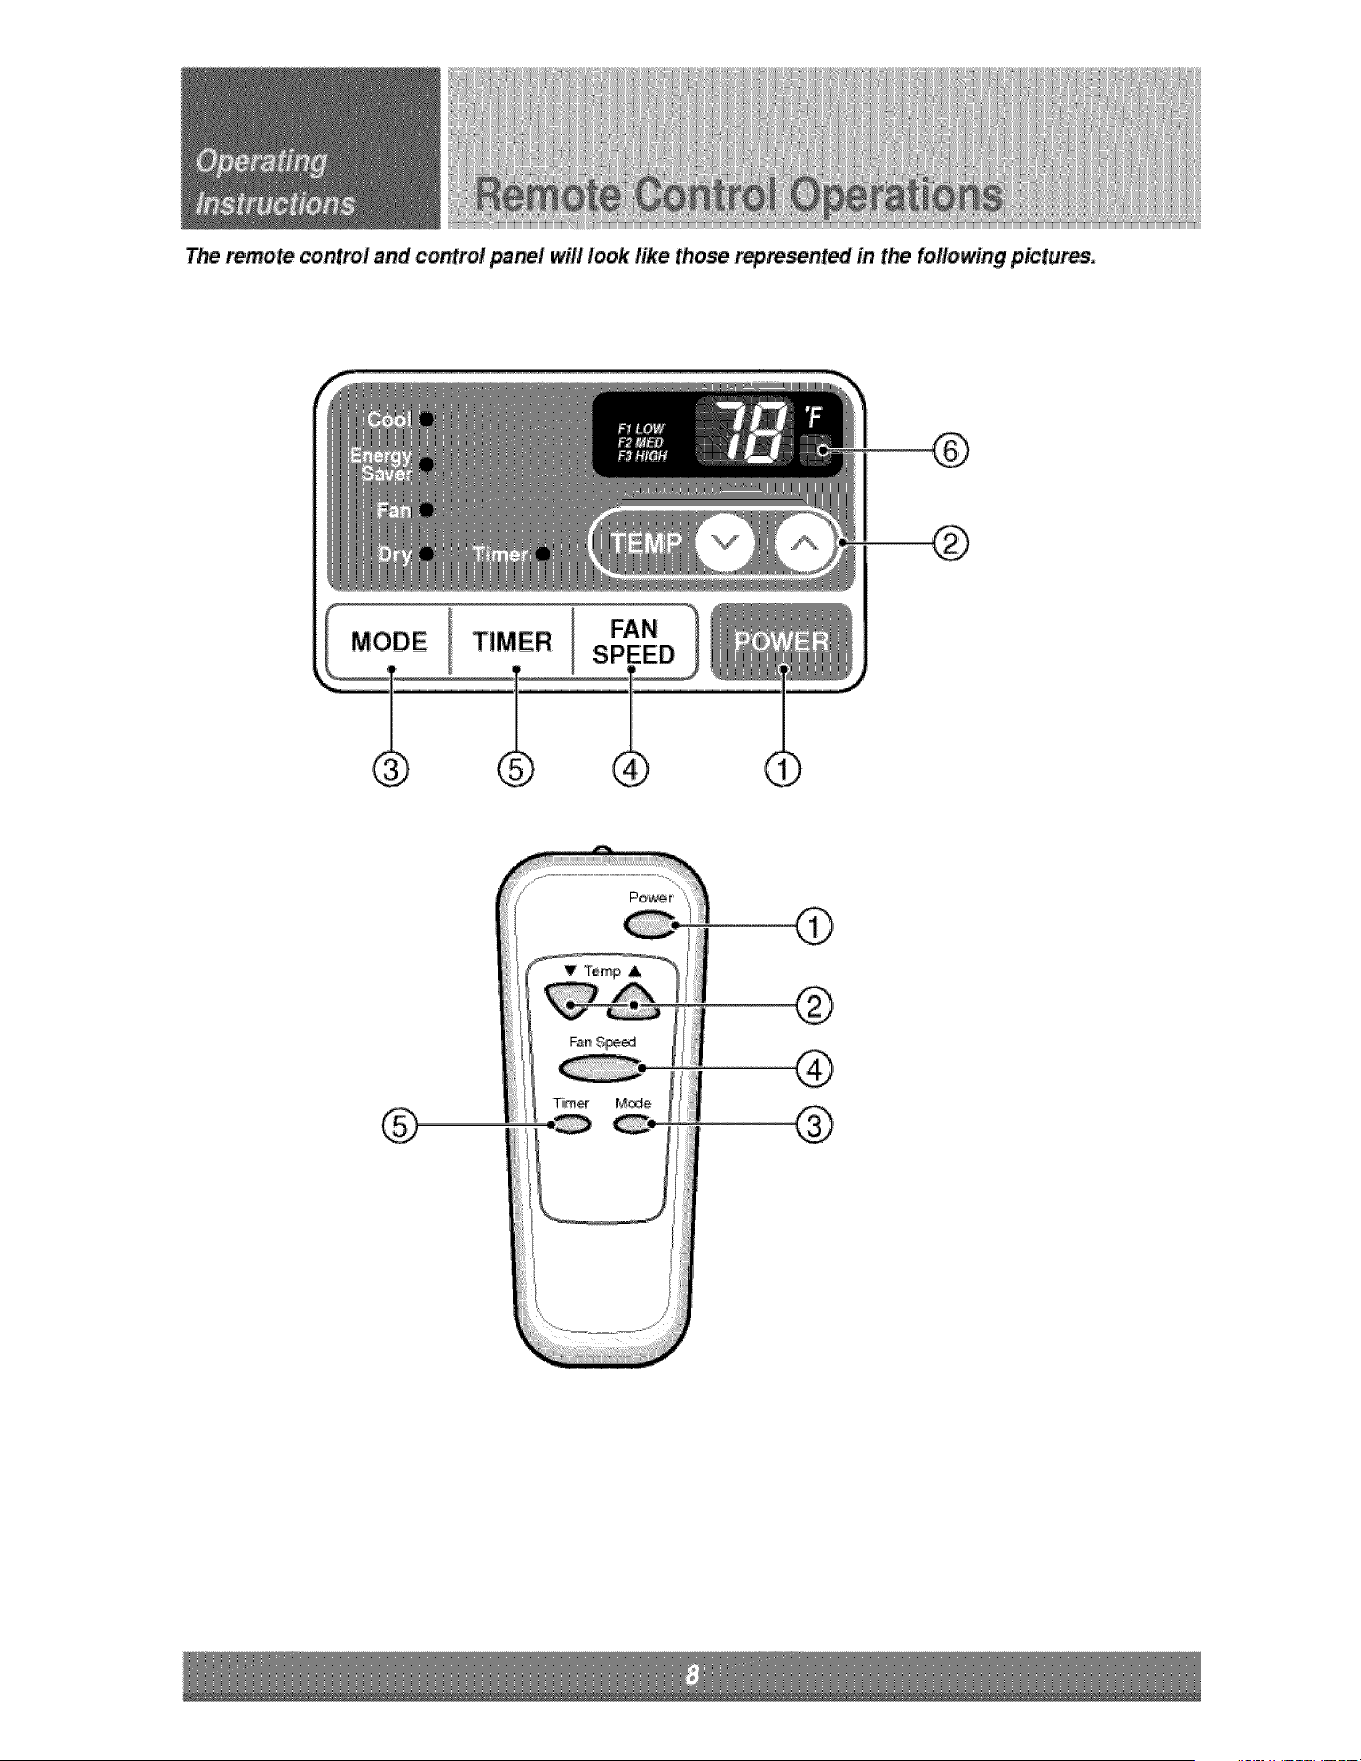
The remote control and contro! pa_! wifl look like tho_ repm_nt_ in the following pictu_'.
S
®
®
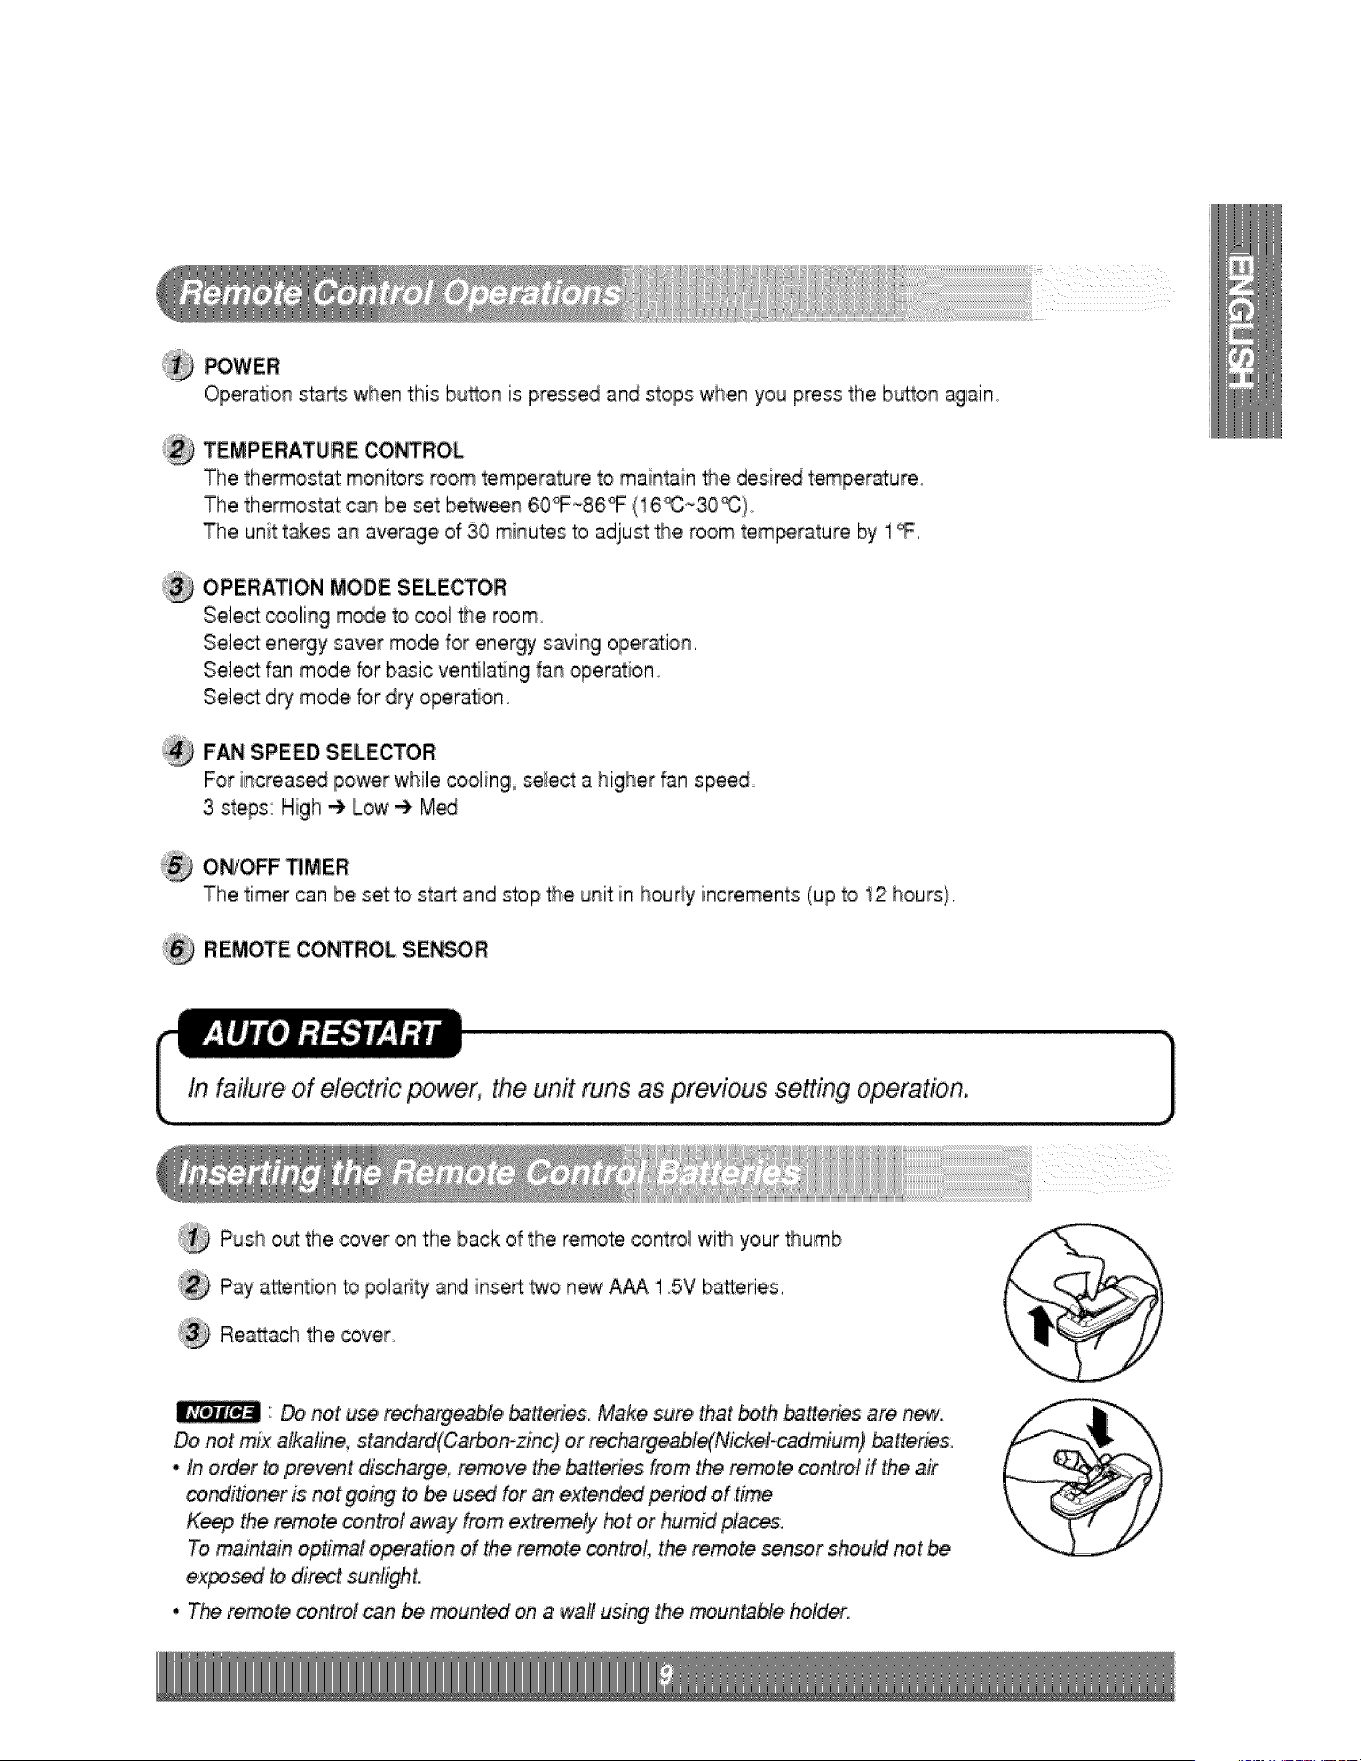
_WER
Operation _a_s when this bu_on is pressed and stops when you press the b_on aglain
TEMPERATURE CO_ROL
The thermostat: monitors room tem_rature to maintain _e desir_ temperature°
The thermostat can be set be_n 60_86°F (16_~30_:).
The unit t_es an average of 30 mi_qutesto adjust the room t,em_rature by 1_.
OPERATION MODE SELECTOR
Select cooling m_e to cool #_eroom.
Select energy saver mode for energy saving opie_io_,
Select fan mode br b_sic venNating fa_ operation
Select d_ mode for dry opera_on
FAN SPEED SELECTOR
For i_qcreas_ power whilecooling select a higher fan speed
3 steps: High _ Low -_ M_
O_O,FF _!MER
The timer can be setto start and stop the unit in hourly increments (up to 12 hours}.
REMOTE CONTROL SE_OR
Push out:the cover on the back o_the remote control wi_ your _umb
Pay attention to pola¢ityand insert two new A_ 15V batteries.
Rea_ach the cover.
'__ not u_ rech,argeable,ba,_eries Make sure that _th _Her_s are ni_.
Do net mix afkafine, standard(Carbo,n-_nc) or _ha_e_le{Nickel-cadmiium) _tteries.
. In order to prev_t di_hi_ge, remove the _tt_°ies from the re.re control if the air
condi#oner is not going to,be us_ for an'exte#_ pe_d of :time
Keep _e re_te cont_l away from extremeS, hot or humid fflace&
To maintain optimal o_ation of _e remote _ntrol the remote sensor shoutd not be
expo_ to direct sunligh,t,
• The re.re centre] can be mounted on a wall using the _untablie holds.

For maximum c_iing efficiency,, CLOSE the vent, This wiil allow intemai air circuiation,
OPEN the vent to discharge stale air,
CLOSE-LVENTJ-OPEN
' Before using the ven#lat_n ,feature,posi#on
the lever, as sh_wnoFirsL pull down p,art _
ho#zontai line _th _# _,
Part
Aidlow can be adiust_ by changing the direction of _e air conditioneCs louvers, This can also increase 9_e
coo_ingefficiency of _e sir conditioner
, Adjusting H,orizontal Air Flow Oir_tion
Adjusting the vertical louvers left a_d right will
change horizontal _rflow
* Adjusting V_tical Air Flow Direction
A,diustingthe horizonta_ vane up and do_ wili
change veRicai airflow, The v&qe can _ _dju_ed
by nudging _e vane backward or forward
Adjusting horlzo,nta_air flow Adjuring vertical air flow
• R_om_nd_ orientation of louvers
Adju_ louvers to face upwards when cool ng to maximize _ling efficiency
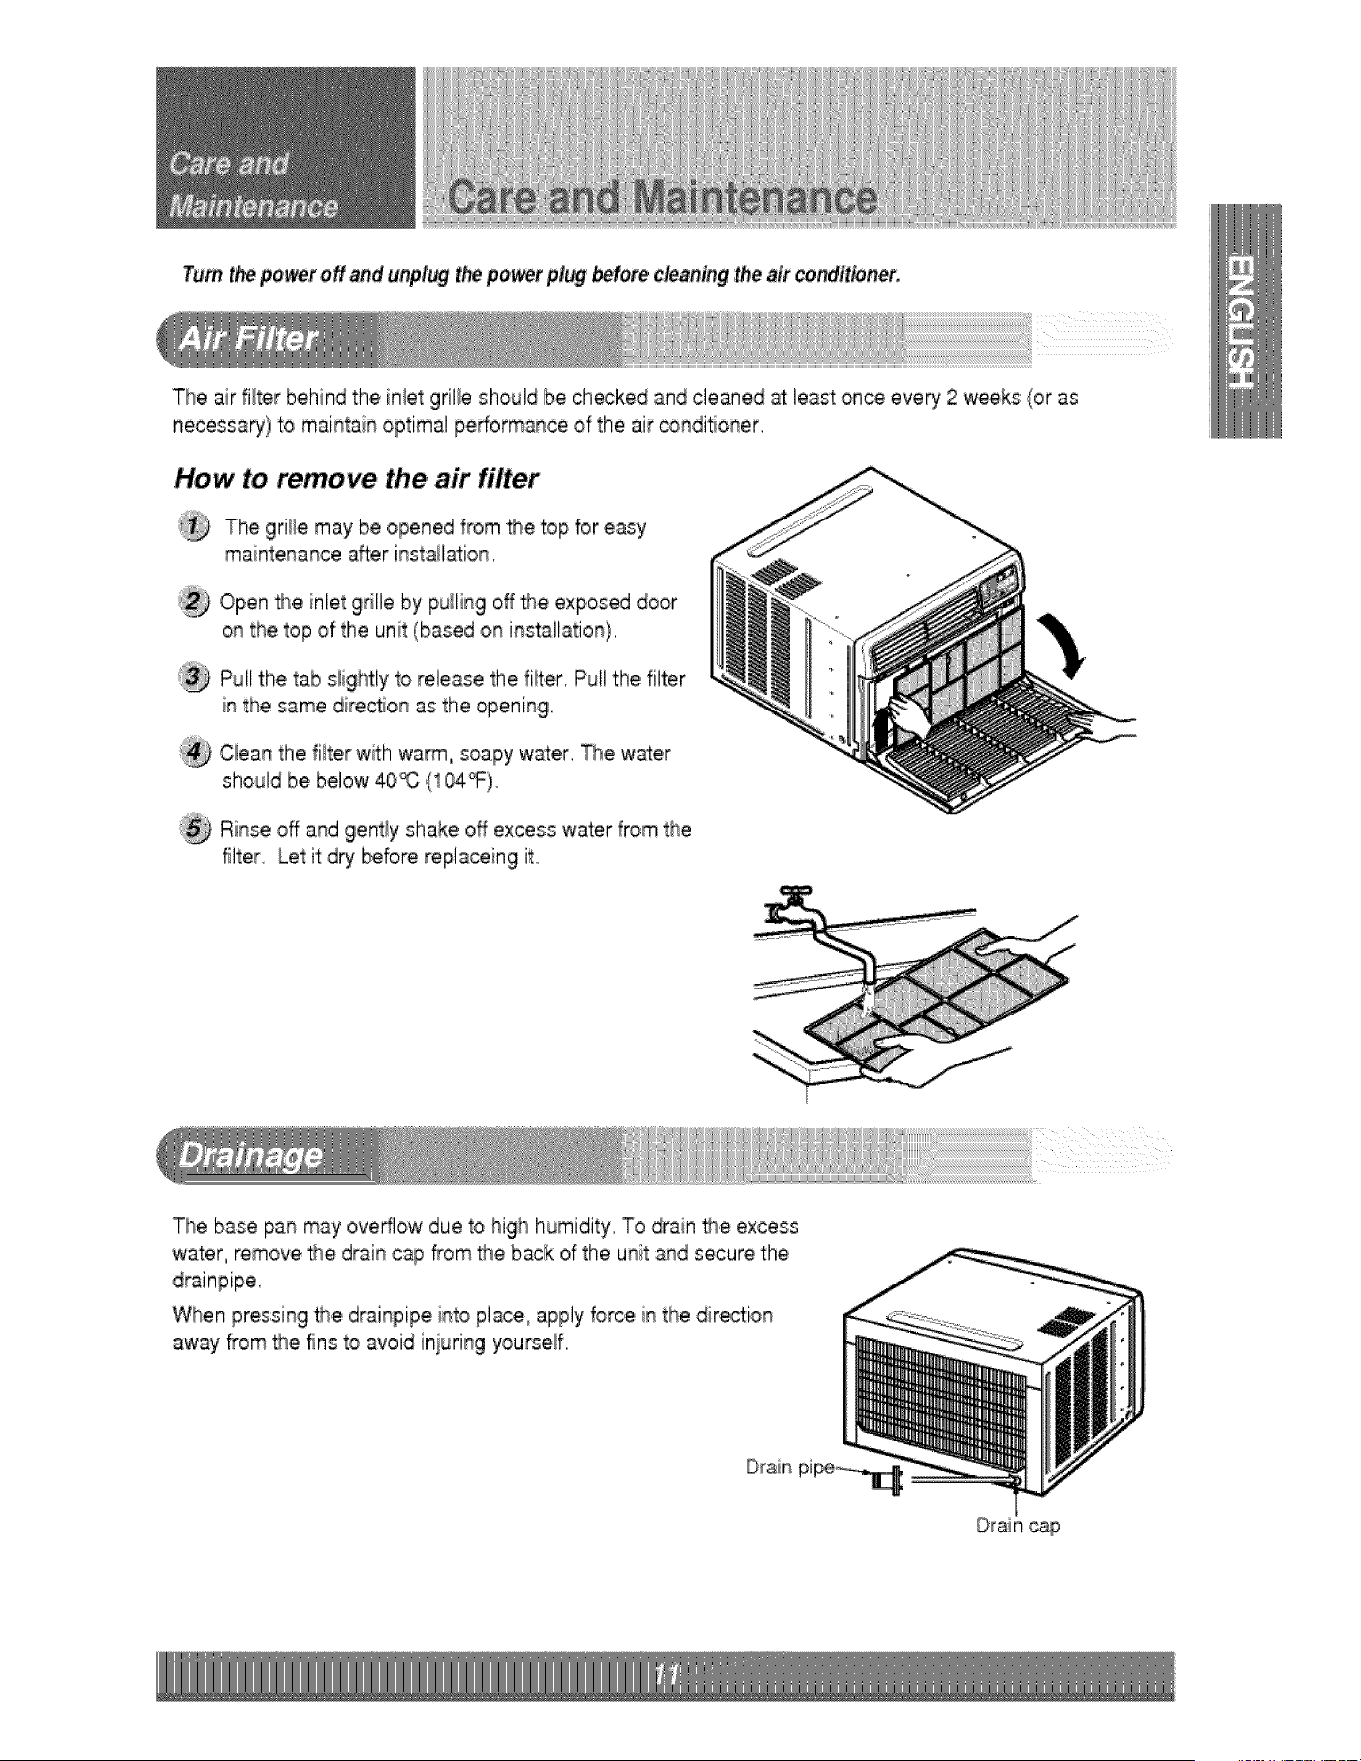
Turnthepower offand unplugthepower plug _fo,te cleaningtheair condit_nero
The air filt,erbehind the inlet grille should be checked and cleaned _ least once every 2 weeks (or as
necessaU) to maintain optimal pedorman,ce of the air _ndiSoner,
How to remove the air filter
The grille may be opened from me top br easy
maintenance after instail_ion,
®
@
®
Open _,e inlet grille by pu_lingoff #_e exposed door
on the top of the unit (based on installation},
Puilthe tab siightly to release the fiiter, Pu!l the filter
in the s_me direction as the ,openin9,
Clean the filter withwarm,soapy water, The water
should be below ,40_ (104_)o
Rinse off and gientiy shake of! excess water from the
filter, Let it dry before replaceing it
The base pan may overflow due to high humidity, To drain _,e excess
water, remove _,e drain cap from the back of the unit a_,dsecure the
When pressing the drainpipe into place,,apply force in the dir_:ion
away from me fins to avoid iniuring yourself,
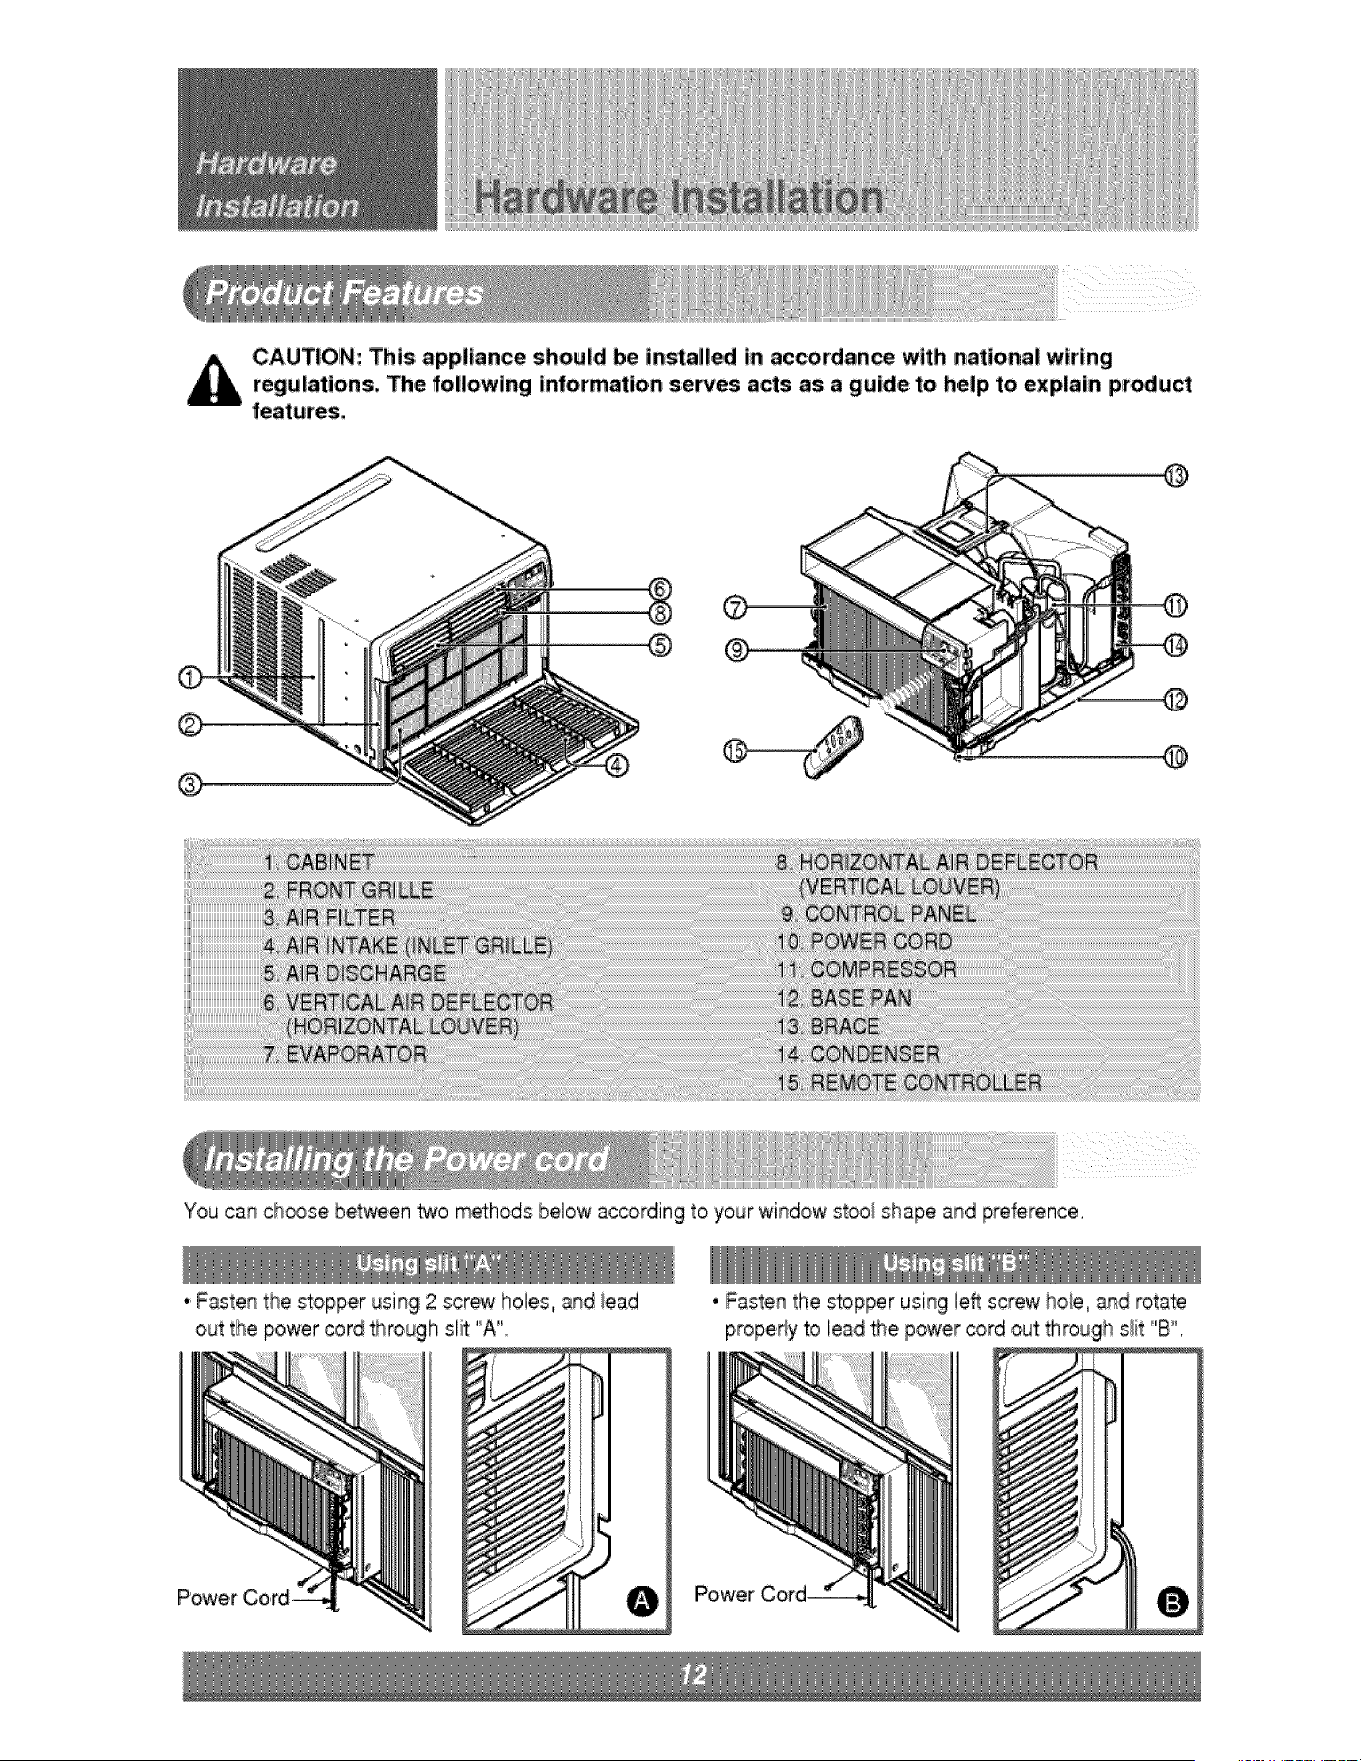
CAUTION: This appliance should be in_aill_ in accordance with national wiring
regulations, The following information serves acts as a guide to h,elp to explain pr_uJct
features,
©
®
®
@
@
You can,chc@sebetween two met:hodsbelow according to 'yourwindow stool shape and preference,
• Fastenthe stopper using 2 screw holes, and lead
out the power ,cord_rough sl_ 'W'
Power
, Fastenthe stopper using left screw hole, and rotate
property to lead _e power cord out through slit 'B",
J
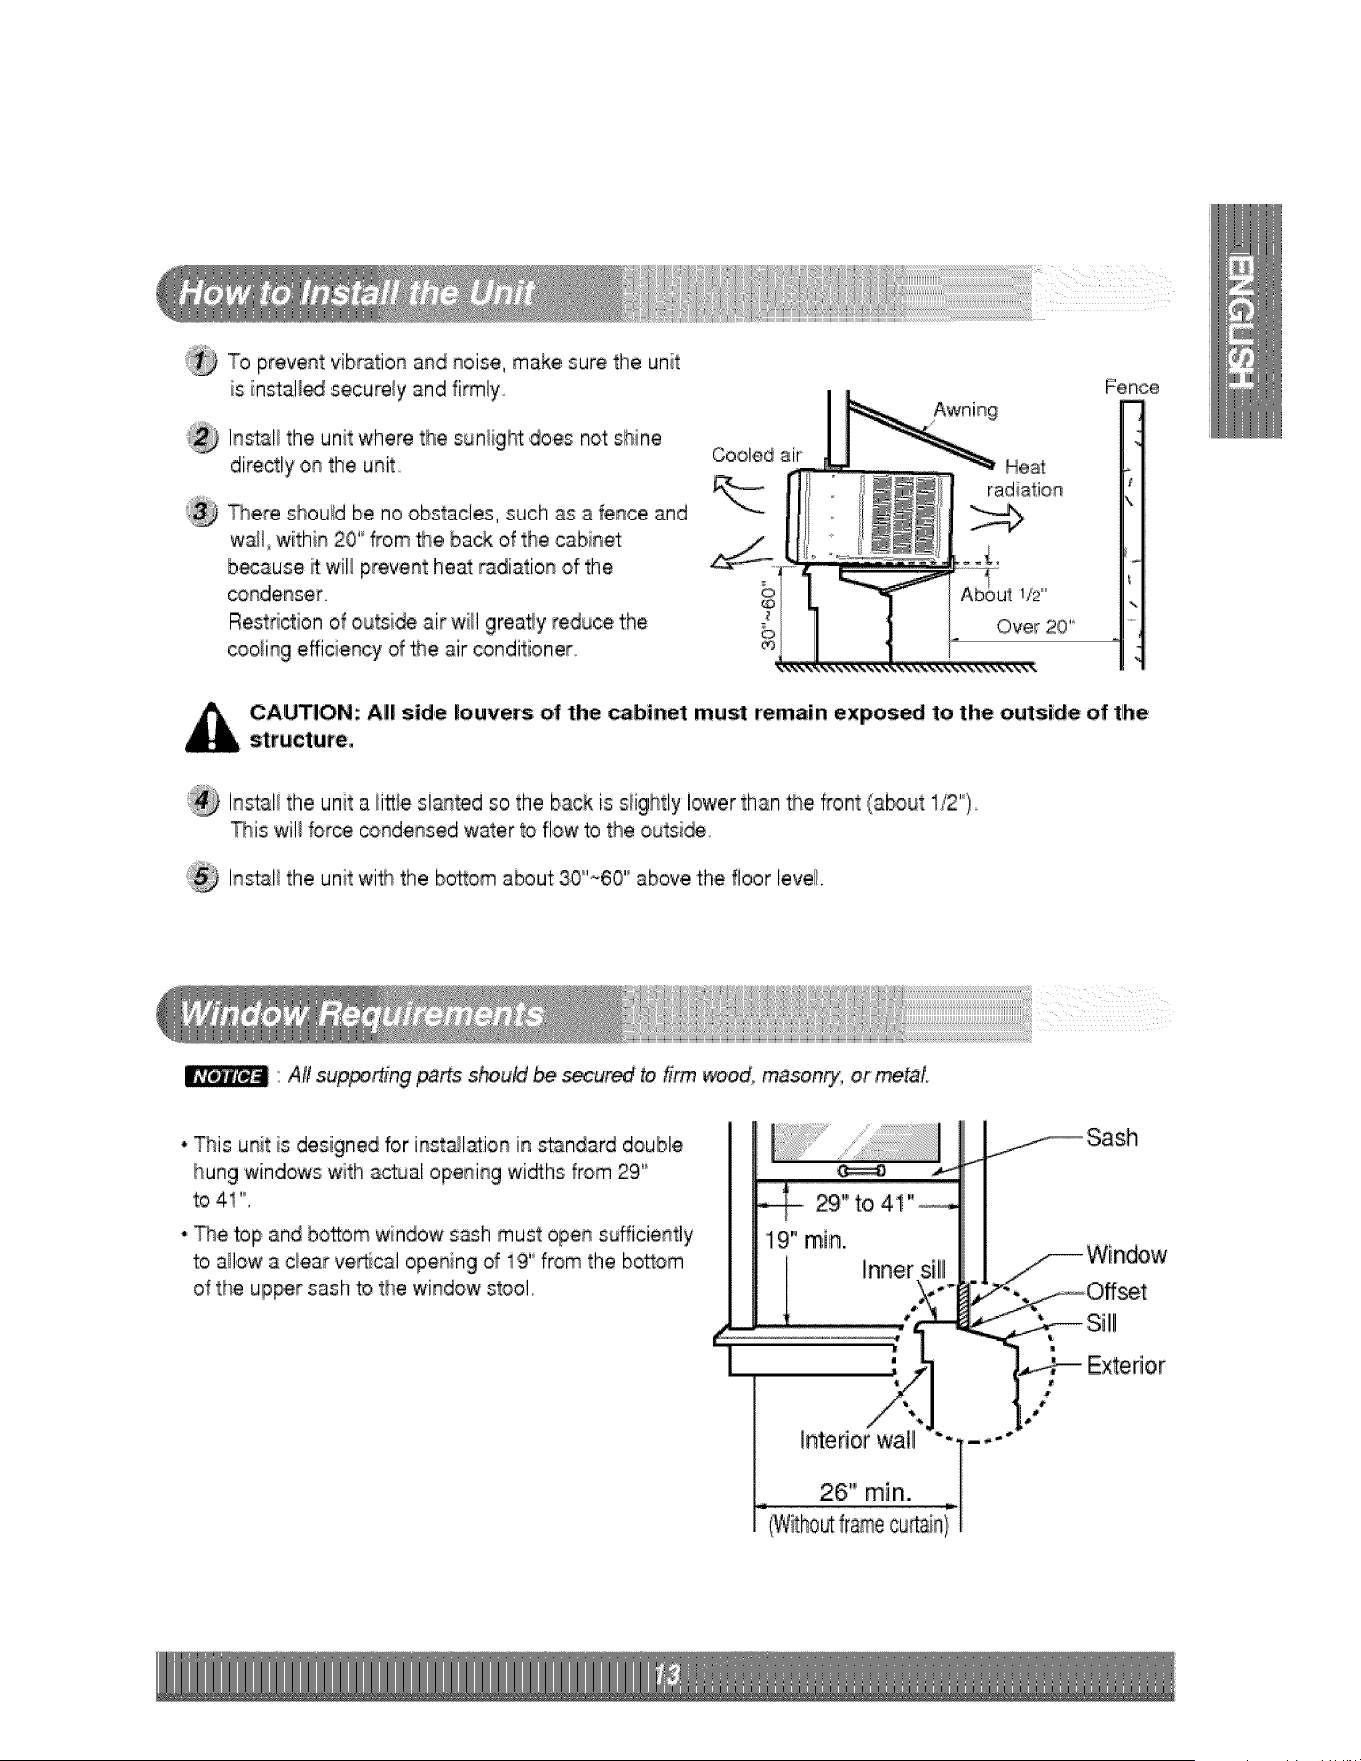
To prevent vibration and noise, make,sure the unit
is ins'tal_ securel'y and fi_ly
Instal_the unit where the sunligi_'rtdoes not:shine
directly on the unit
Them shouid be no obstacles, such as a fence and
w_l within 20" from _e, back of the cabinet
bi_ause _ will prevent heat radiation of the
_ndenser
Restriction of outsi_ air WfL!Igreasy reduce the
_oiing efficiency of _e air conditioner,
Cooled air
Heat
radiation
1/2 °'
Over 20"
Fence
CAUTI'ON; All side louvers; of the cabinet must remain expos,_ to the outside of the
structure,
Instali the unit a litt:ilesi_ted so the back is slightly lower than _e _ont (a_ut I/2")
_is wil_forc,e_ndensed water to flow to the outsi_,
@ Install the unit wi_ the bottom about 30"_60' above,the floor level,
_ " All supporting _rts s_u_ _ se_Jred to #_ wood, masonry, or _tai,
• This unit is designed for inst_la:ion in standard double
hung windows with actual opening widths from 29''
to4! '_
• The top and bottom window s_h must open sufficiently
to allow a c_earve_cal opening of i9" from the bosom
of the up_r sash to the window stool,
_"to 41"_
19" rain.
[ linnet s!!
Interi]r wall -
L 2!6' min_ =
[-(WRh0utframecu_ain[
f __ Sash
y/i_ Window
_ Exterior
[
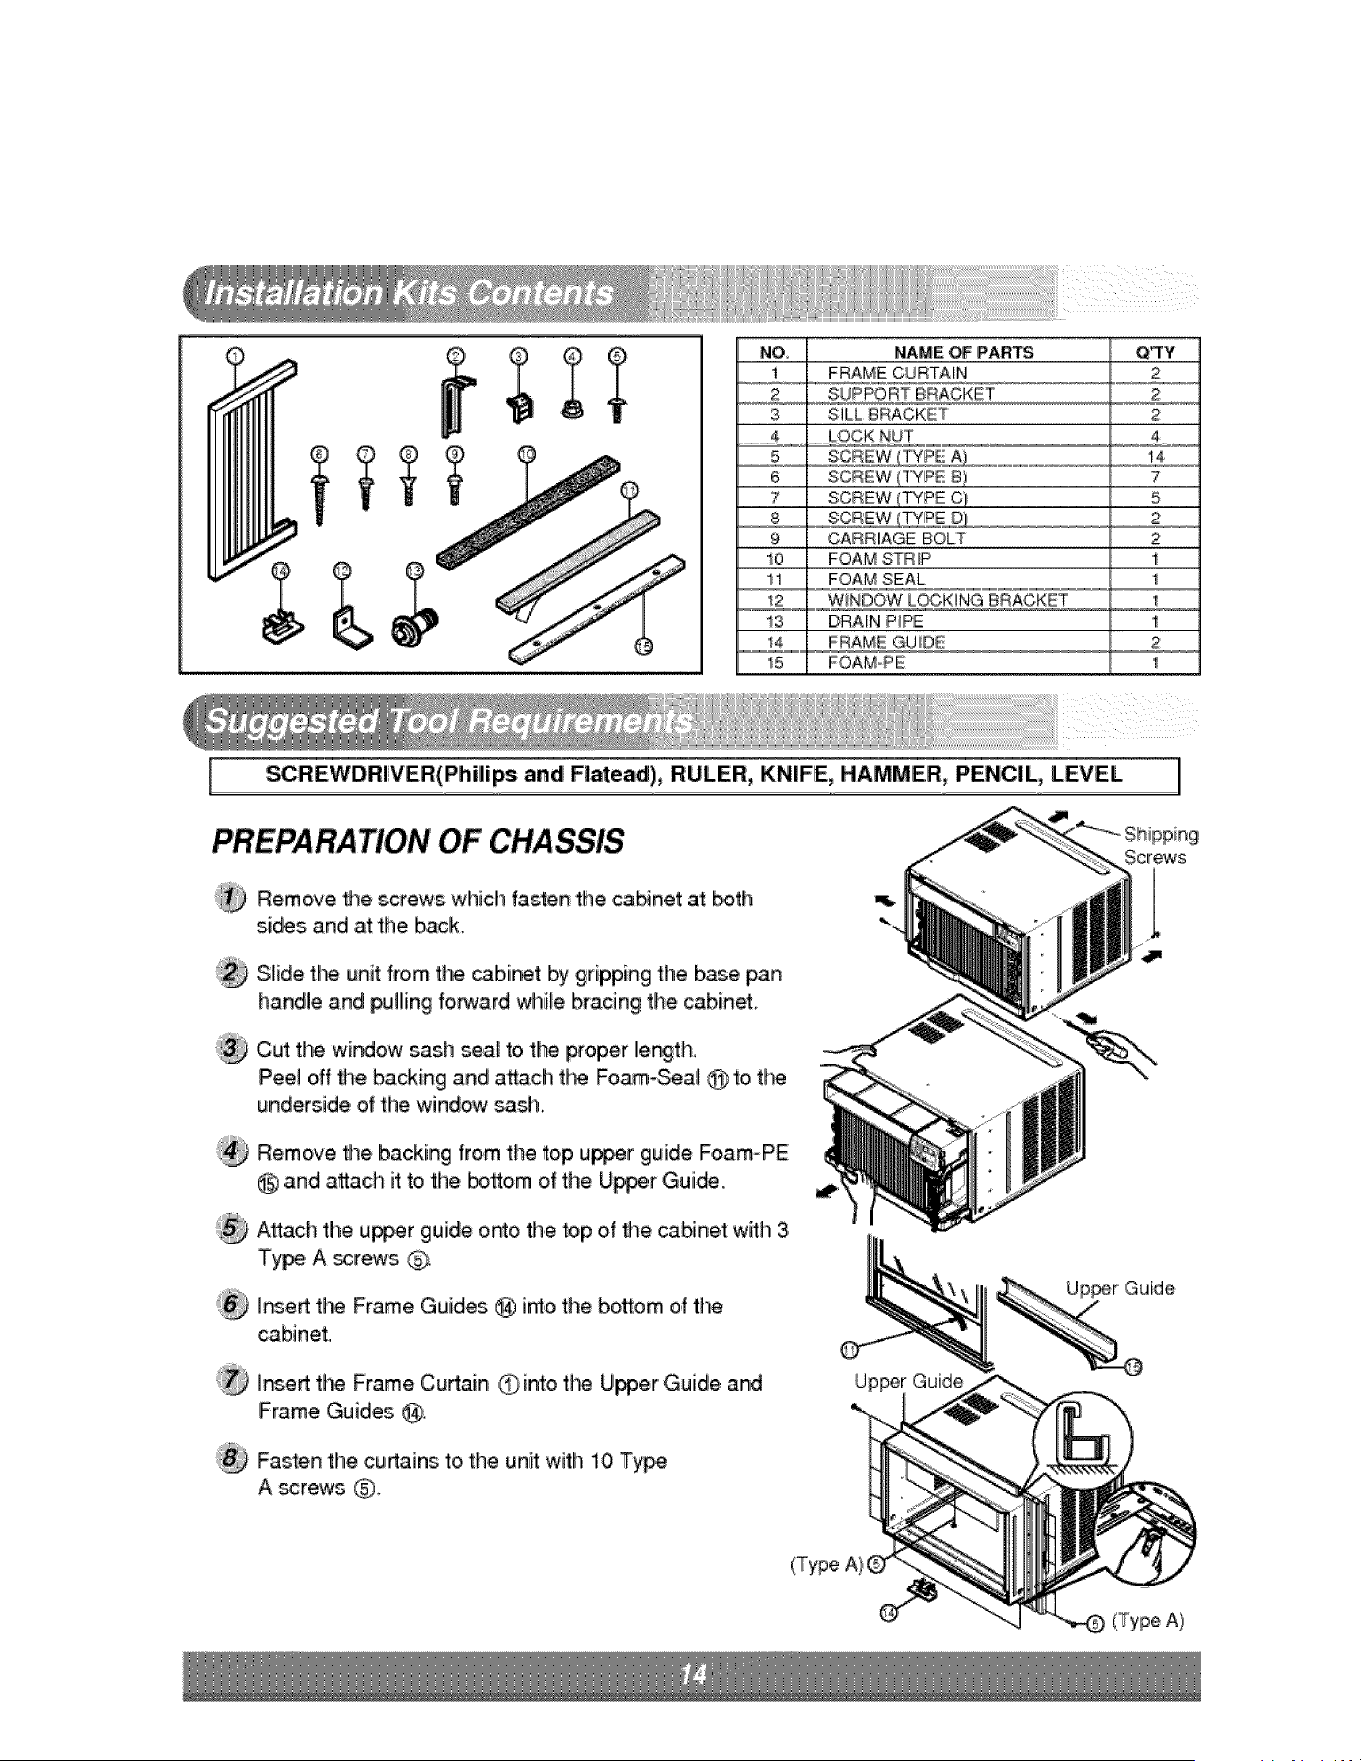
NO_ NAME _ PARTS Q'TY
t
2
3
4
5
6
7
8
9
_0
11
12
13
_o ................
15
FRAME CURTAIN 2
SUPPORT BRACKET 2
SILL BRACKET 2
LOCK NbT 4
SCREW ................................ 14
SCREW (TYPE B) 7
SCREW (TYPE C} 5
SCREW_I:£_oPJ 2
CARRIAGE BOLT 2
FOAM STRIP 1
FOAM SEAL 1
W!NDOW LOCKING BRACKET 1
DRAIN P_PE 1
FRAME GUIDE 2
FOAMoPE 1
_REWDRIVER(Phili_ and Flaead), RULER, KNIFE, HAMMER, PENCIL, LEVEL ]
PREPARATION' OF CHASSIS
;i_ Remove timescrew,s whMl fasten the canner a't _th
si_s and at the back.
Slide the unitfrom th_ _b,[r_t by gripping the base pan
handle and _ffing forward while bracing the cabinet.
,Cutthe widow sash seat to the _oper ler._th,
Pee] off #_ebacking and a_ch t_ Foam-Seal @ to t_
underside of the window _sh,
Remove timebacking from the top u_r guide Foam-PE
@ and attach it to the _ttom of the Up_,r Guide.
Aflach the u_r guide o_o thie lop of fl_e cabinet with 3,
Ty_ A screws _
]_ert t_ Frame Guides @ into the bottom of th_
cabinet.
'_ I_ert tl_ Frame Curtain Oin_o t#_ Uipper Guide and
Frame Guides _[_.
Fasten the curtains to,thie unit with 10 Type
A _rews ($.D_
Uppe
(Type A)
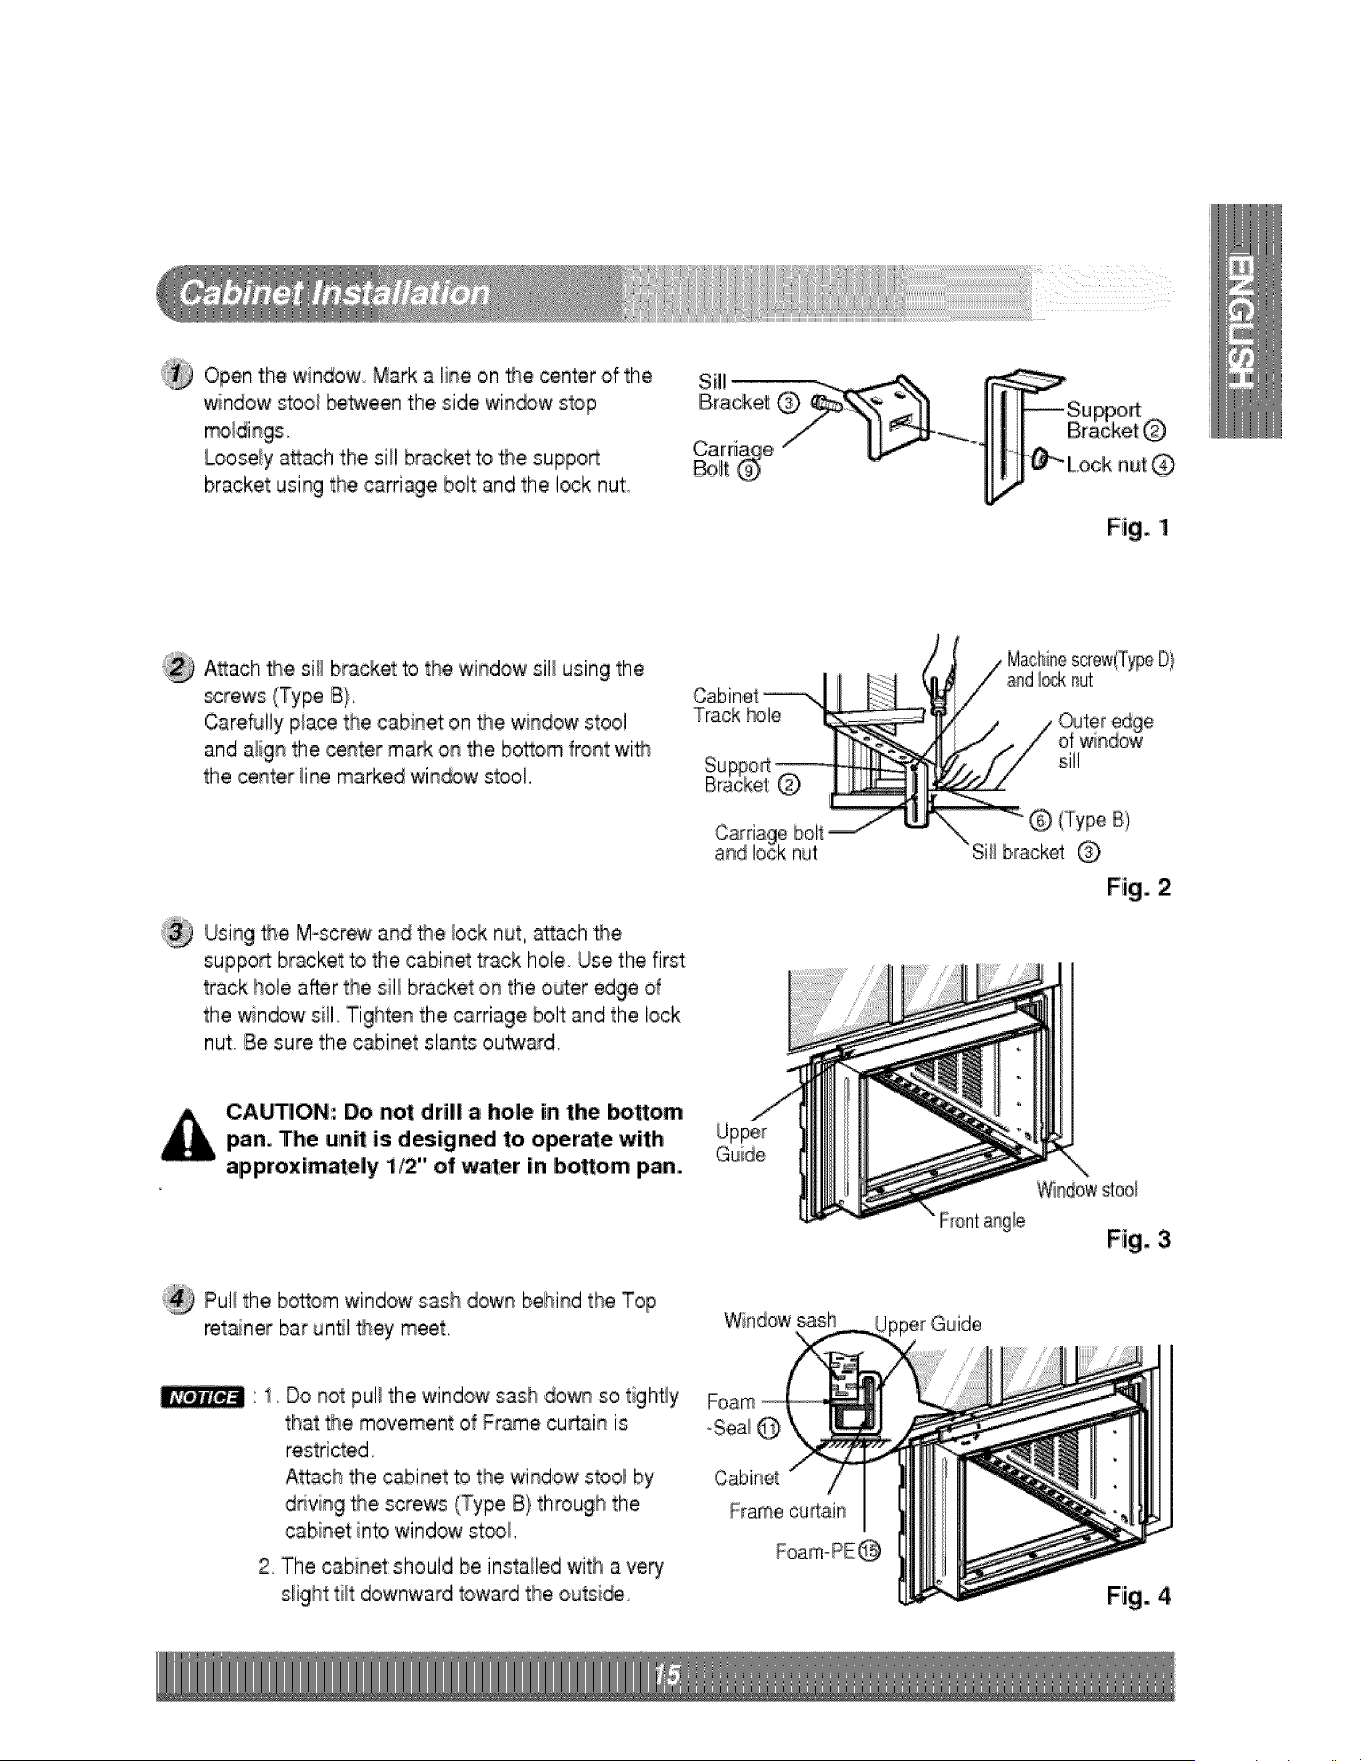
Openthe window Mark a line on _e center of the
window stool between thieside win®w stop
Looseiy a_ac:hthe sill bracket:to _e suppoR
bracket us ng the carriage bolt and the lock nut.
®
Fig. 1
A_ach the sill bracket to the 'window sil_using the
_rews (Type B}.
Care_lly piace the cabinet on _e window stool
and a!ign the center maN, on the bosom front wi_
the center iine marked win_w stool,
Cabinet _.
Track _le
Machinescrew(TypeD}
l_*;knut
sill
Using rise M-screw and _.e lock nut, attach _e
suppo_ bracket 'to the cabinet t-ack hole Use the first
track hole after the sill bracket on the o_er edge of
the window sill 'Tighten the carriage bolt and the lock
nut Be sure the cabinet slants ou'_ard,
Si_ibracket
Fig. 2:
CA_ON: Do not drill a hole in the _ttom
pan. The unit is design_ to operate with Uppe_
Guide
approxim_ely 1/2" of water in bo,_om pan.
Pull the bottom windowsash down behind the Top
retainer bar until _ey meet
Window_sh
_ndow stool
Fig. 3,
' i. Do not pul_the window sash down so tightJy
that _.e movement of Fr&m.ecu_ain is
restricted,
Attach the cabinet to the window stool by
driving _e screws (Type B} through the
cab;net:into window st_i,
2 The ,cabinetshould be installed with a very
slight tilt downward toward the outsi_
Cabinet
F_ame curtain
Fig.4
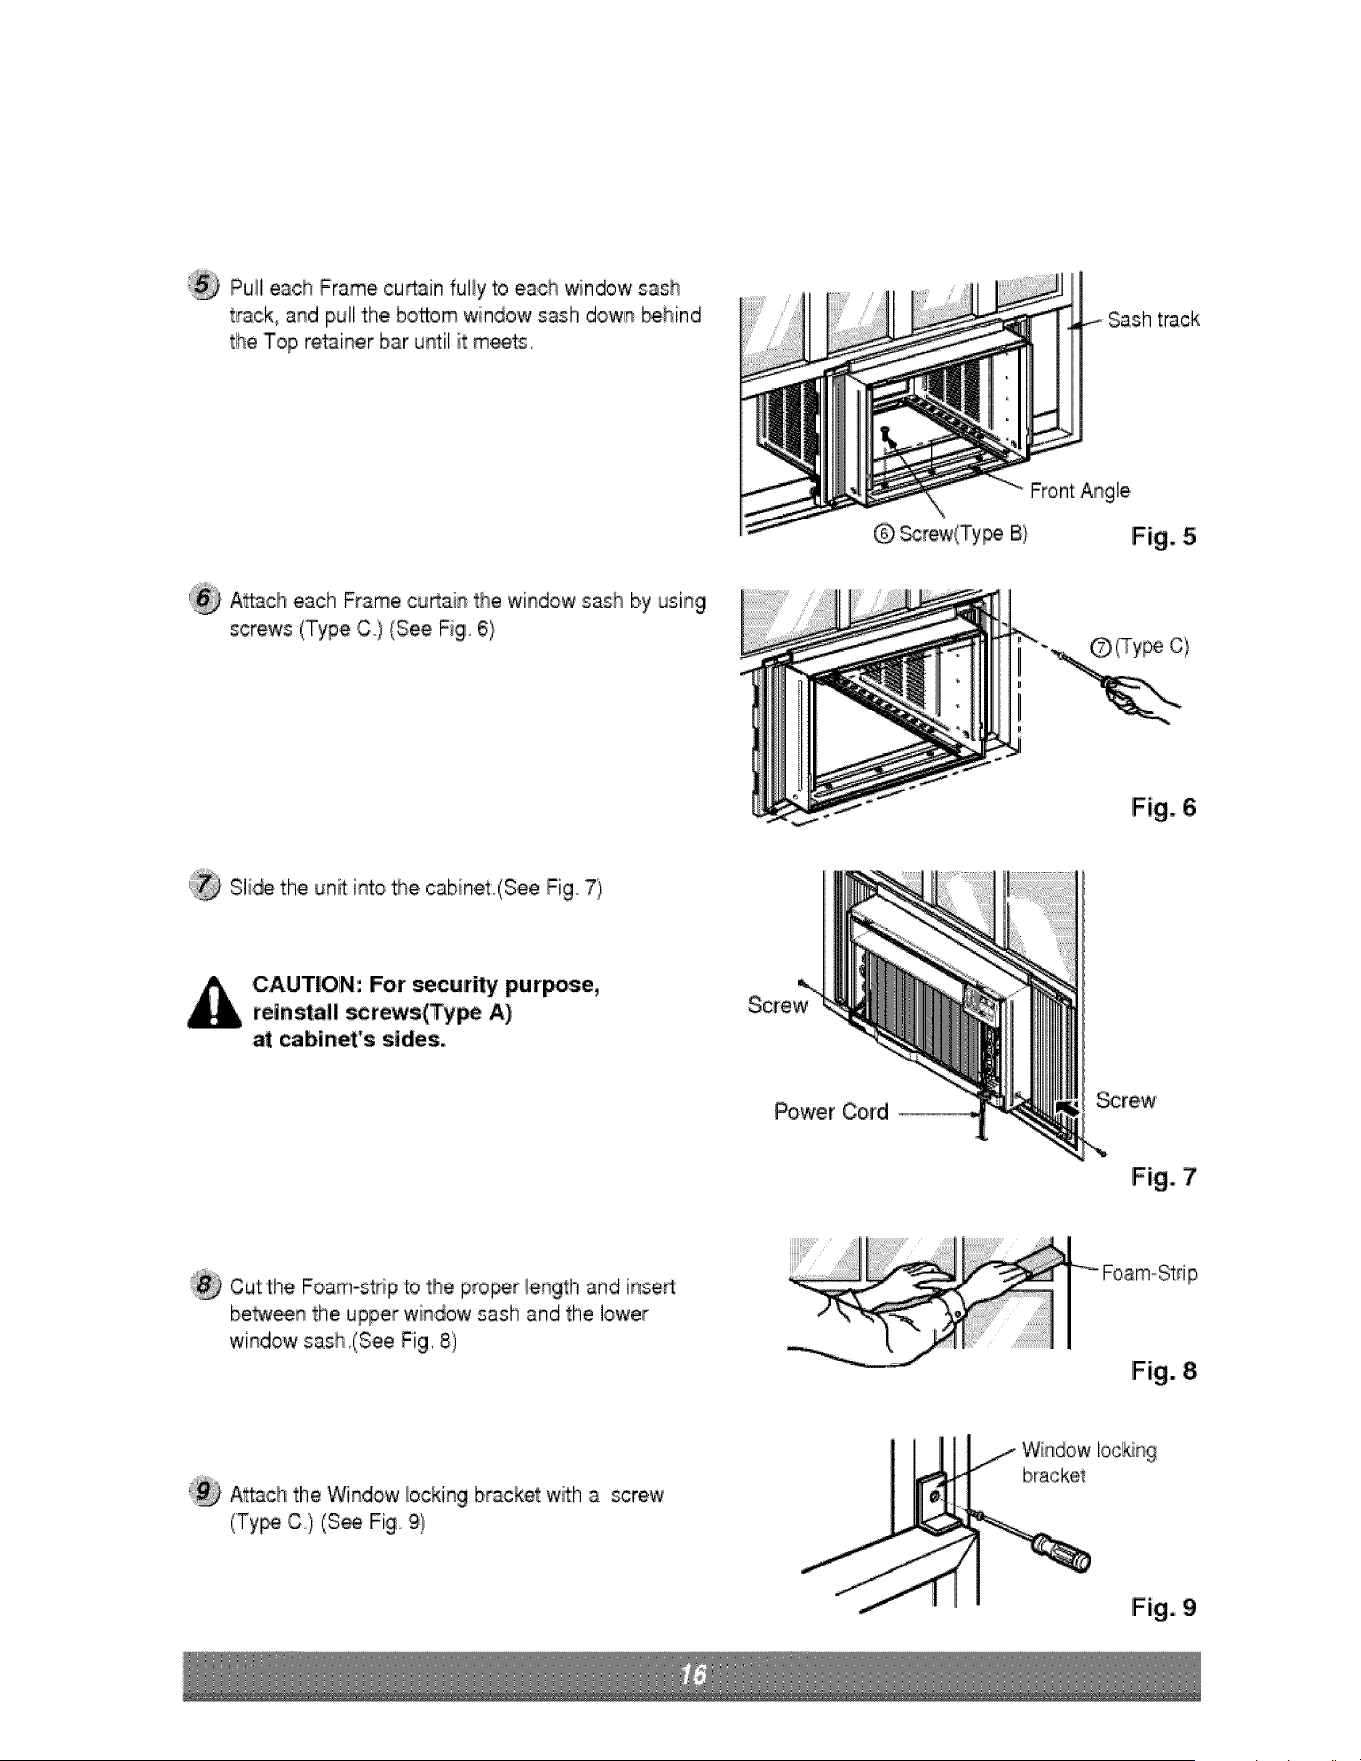
Pull each Frame cudain fully to ,eachwindow sash
track° and pull the bosom window sash dowl_ _hind
the Top retainer bar until it meets,
track
Attaclheach Frame cu_ain the window sash by using
screws (Type C) {See Fig 6}
FrontAngle
Q _rew(Type B} Fig. 5
(Type C)
Fig. 6
'_ Sli_ the,unff i_,o _e cabinet(See Fig°7)
CAUTION: For security pur_e,
reinstal! screws(Ty_ A)
at cabinet's sides.
Power Cord
_rew
Fig. 7
Cut:the Foam-strip to the proof _engthand insed
betw_n the upper window sash and the lower
window sash,(See Fig, 8)
Fig,, 8
Attach the Window bcking bracket with a screw
(Ty_, C) (S_ Fig 9}
I
/t* WikqdowIo0_%
bracket
Fig,. 9
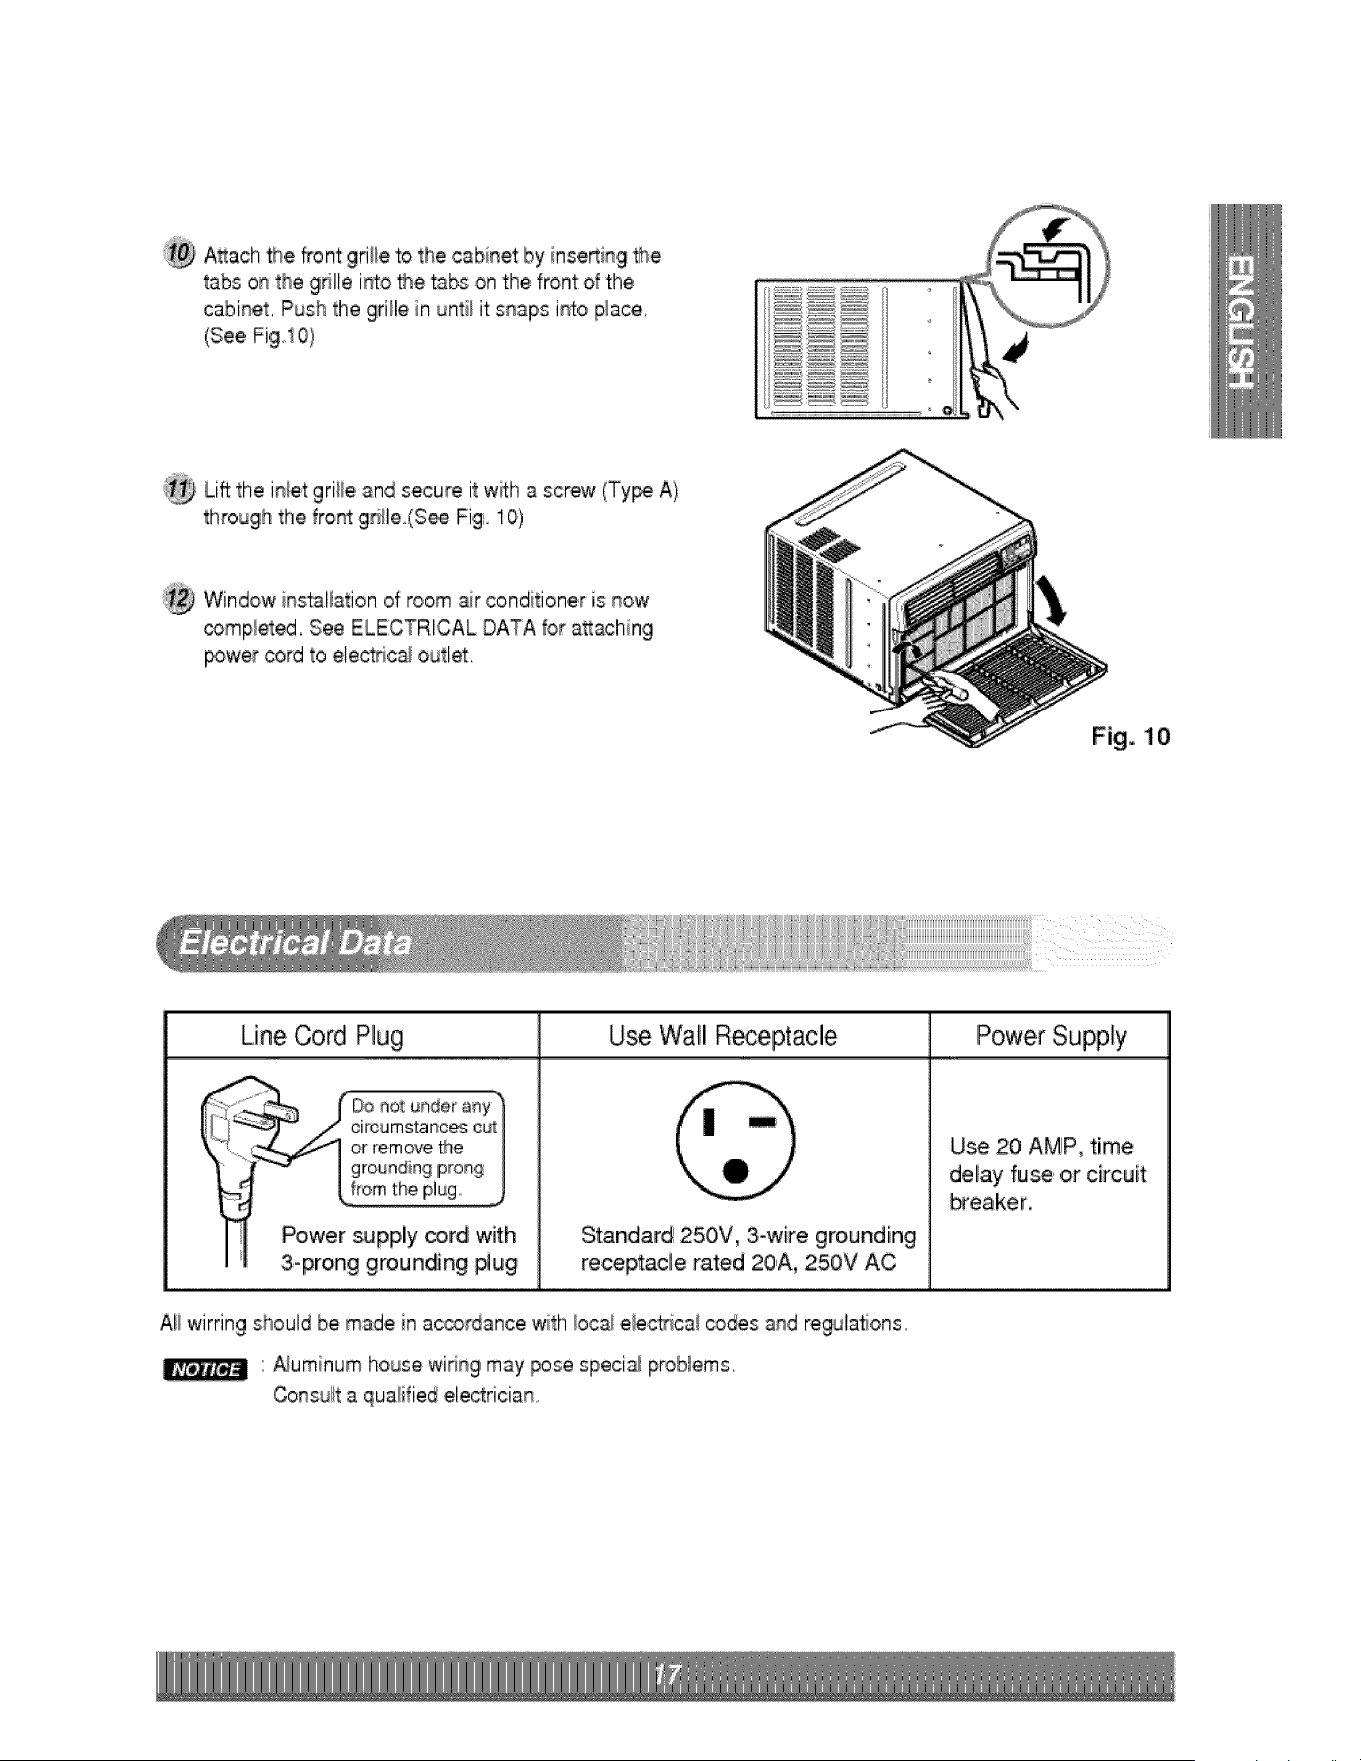
:_ A_ach _e front gri!le to the ,cabinetby inse_ing _e
tabs on the grille into '_e tabs on thie front of the
cabinet, Push the grille in unti_it snaps into p_ace
(See Fig,1O)
Lift:the inie'tgrille and secure it with a screw (Ty_ A)
through the fro_ gd_le.(S_ Fig. 1O)
Window ilnstaliation of room air conditioner is now
completed, See ELECTRICAL DATA for attaching
_wer cord to elec_ica_outlet,
Fig. 1O
Line Cord Plug Use Wall Receptaclle
Standard 250V 3-wire grounding
receptacle rated 20,A, 250V AC
Ali wirring should be made in accordance v_ith_oca_e,lectrica_codes and regulations,
' _uminum house widn9 may pose speci_ proNems,
Consuit a qualified electrician
Power Supply
Use 20 AMP, time
delay fuse or circuit
_eaker.
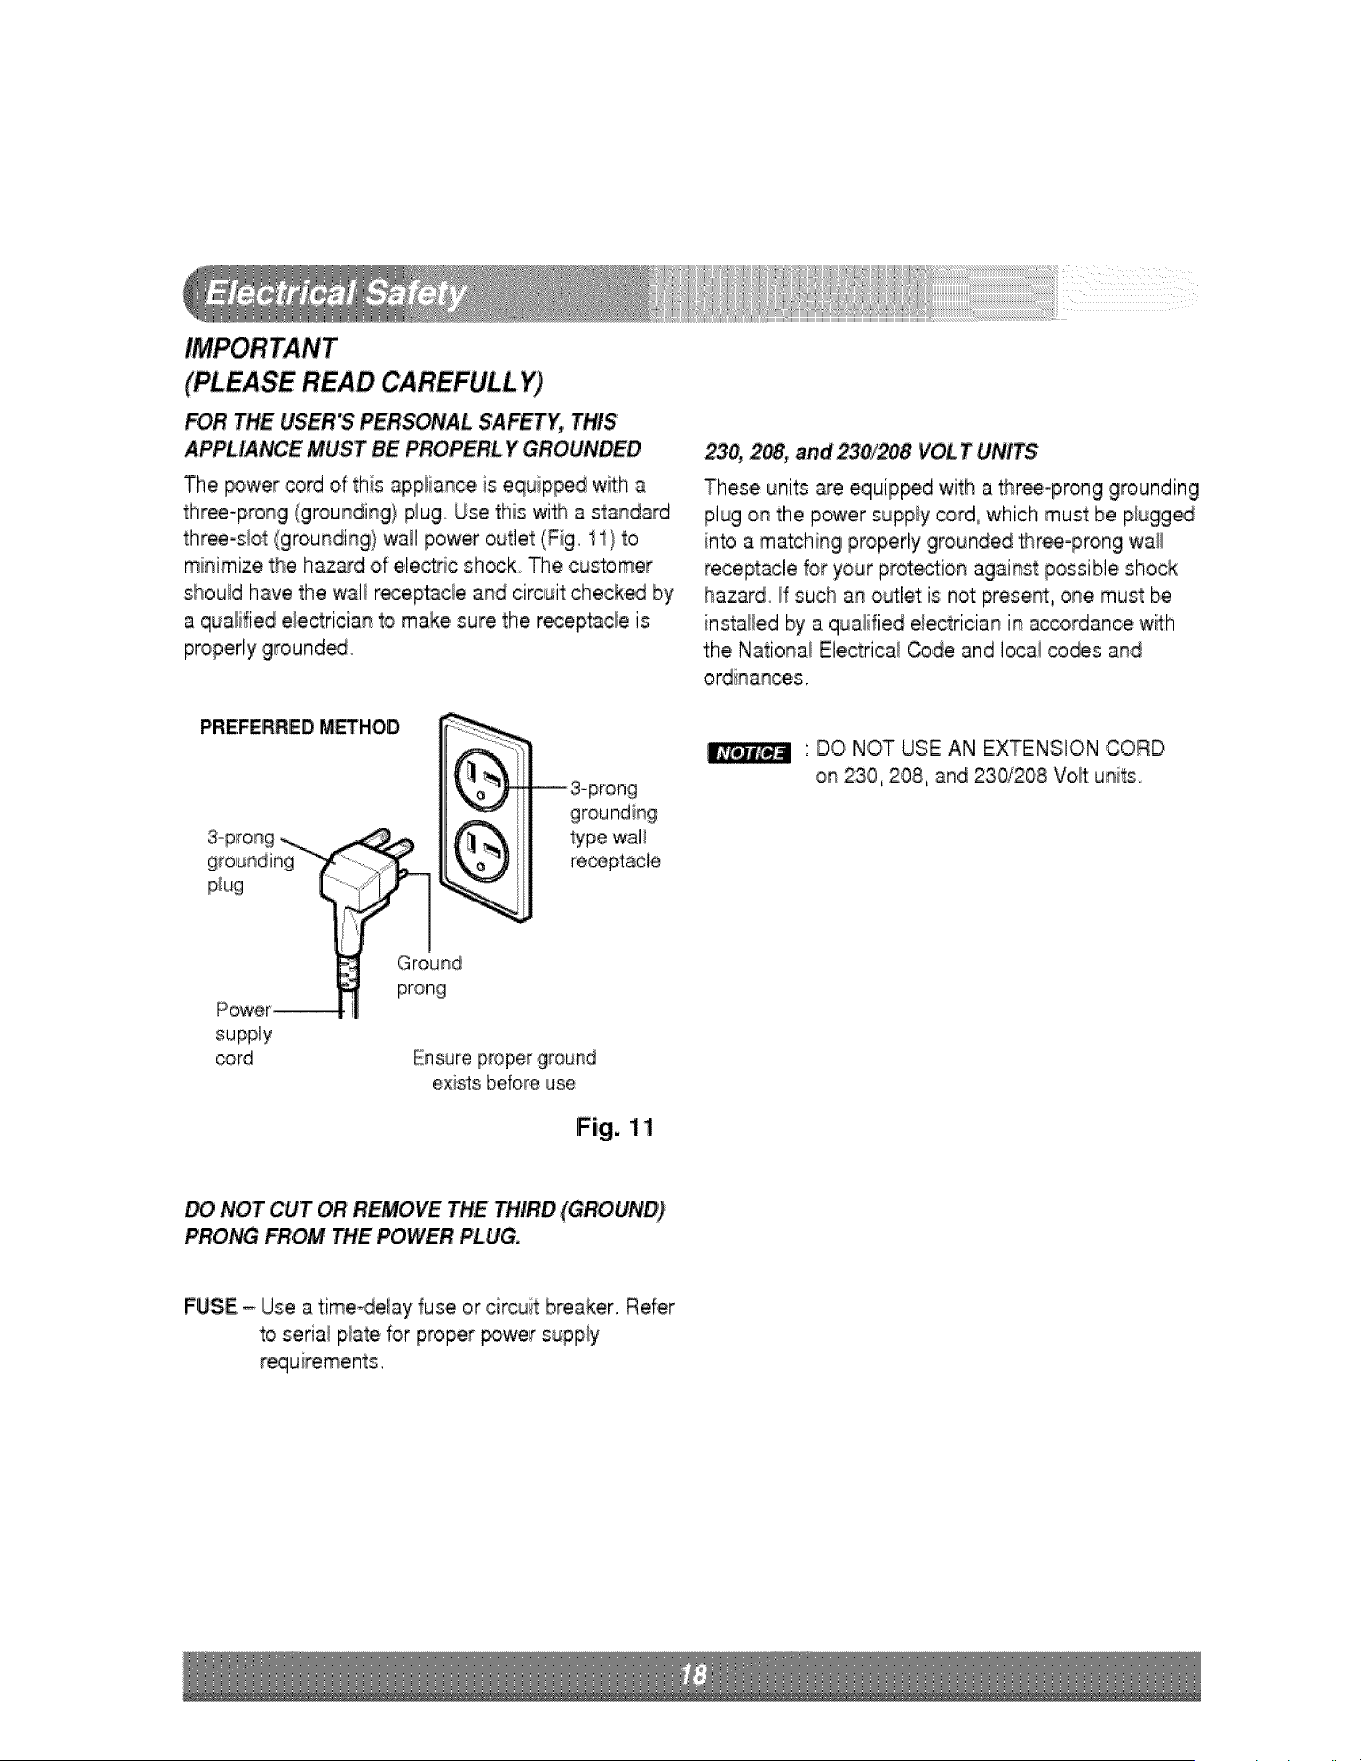
(PLEASE' READ CAREFULLy)'
FOR THE USER'S PERSONAL SAFETY,,THIS
APPLIANCE MUST BE YGROUNDED
The _wer cord of this appiiance, is equipped wffha
three-prong (groulnding}plug. Use this with a standard
three-sl,ot(grounding} wall power outlet (Fig. 11} to
minimize the hazard of ele_ic shock The customer
should have the wa]_receptacle and circuit check_ by
a qualified e_ectricianto make,sure the r_eptacle is
properly 9round_o
23& 208, and 230/208 VOLT UNITS
These units are equip_d with a three-prong grounding
plug on the power supply cord, which must be piugg_
into a matching properly grounded _ree-prong wa_l
receptacle for your prot_io_ against possible shock
hazard_ Illsuch an o_let is not preset, one must be
instal{ed by a qualified e_ec_riciani_qac_rdance with
the Nationa_Elec_rica_Code and Iocai co_s and
ordinances.
: DO NOT USE AN EXTENSION CORD
On 23'0, 208, and 230/208 Volt units
receptacle
supply
Gord
existsbefore use
Fig. 11
NOT CUT OR REMOVE THE THIRD (GROUND)
PRO_ FROM _"tE POWER PLUG.
FUSE - Use atime_e!ay fuse or circuit breaker. Refer
to seriai piate for proper _wer supply
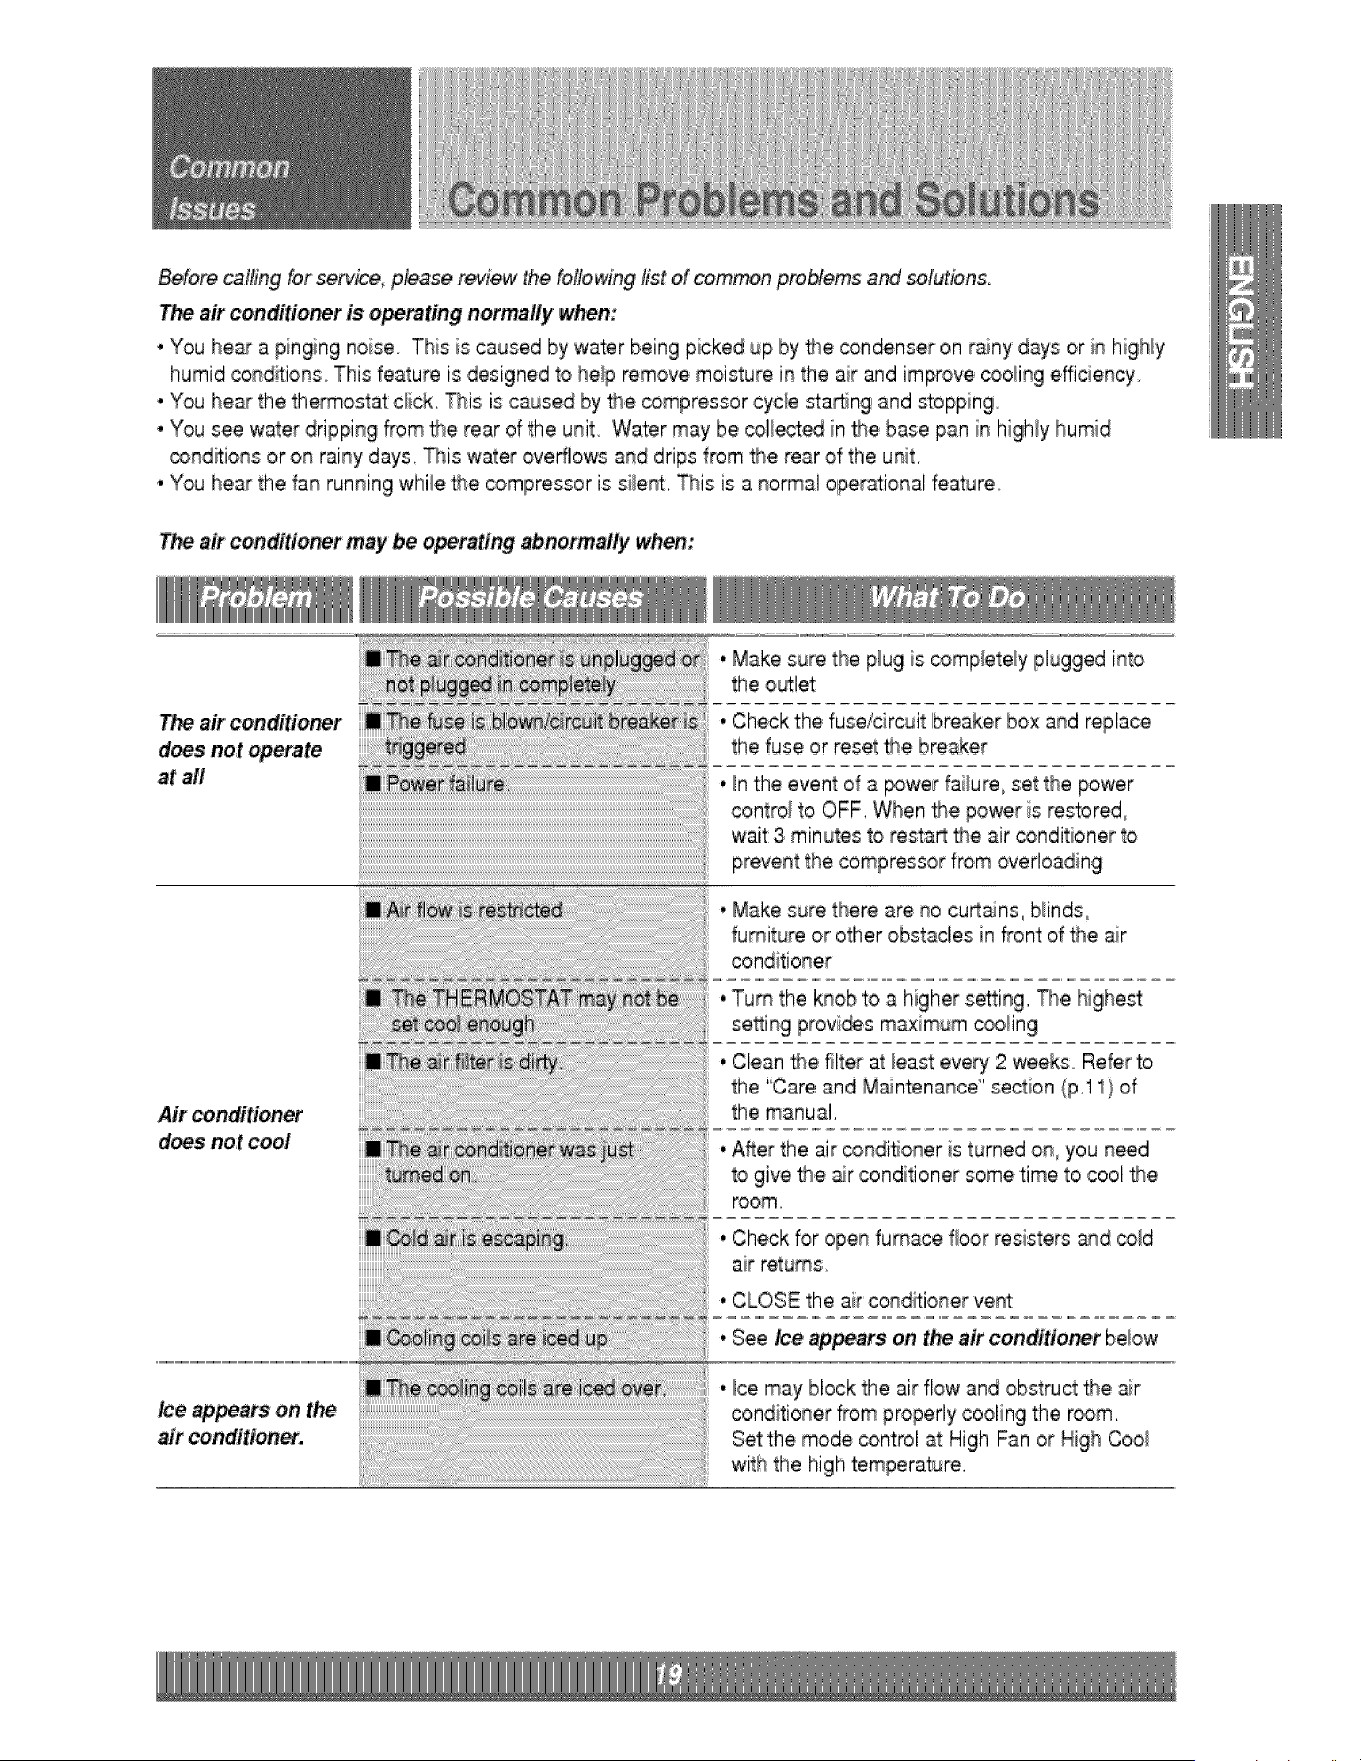
Before cailing for s,e_ice please re,,Jewthe ,folio,wing fist of common p;_blems aM solutions
air conditioner is operating normally when:
• You hear a pinging noise This is caused by water bein9 picked up by _J_econdenser on rainy days or in highly
humid condffions This feature is designed to help remove moisture in the air and improve _o_ing efficiency
• You he__the thermostat c#ck. This is caused by _e compressor cycle _a_n 9 and stoppin9
• You see water dripping from the rear of the unit 'Water may be _llec-t_ in the base pan in high!y humid
_nditions or on rainy days, This water overflows and drips from the rear of the unit.
, You hear the fan running while _e compressor is siient. This is a normal operational feature.
Theair conditioner may be abnormally when;
air'conditioner
does not operate
at all
Air conditioner
does not cool
air conditioner.
,,Make sure the p_u9 is _mp_ete/y plugged into
the outlet
* Check the fuse/circuit breaker box and replace
the fuse or reset _e breaker
,,_nthe event of a _wer failure,, set the power
contro} to OFF. When _e power is restored
wait 3 minutes to resta_ _e air _nditioner to
prevent the compressor from overloading
,,Make sure there are no cu_ains, Ninds°
furniture or other obstacles in front:of the air
conditioner
,,Turn the k_ob ito _ higher se:_ing. The highest
se_ing provi_s maximum _lling
,,Clean _e filter at _easteve_ 2 weeks° Refer to
the 'Care and Maintenance' section (p.11} of
the manual.
• After the air condi_oner is turned on, you need
to give _e air conditioner some time to cool _e
room.
,,Check for open furnace floor resisters and co_d
air returns.
• CLOSE the air conditioner vent
,.See/ce appears o# the air conditlo_r below
, Ice may block the air flow and obstruct _e air
conditioner from properly cooling 'the room.
Set the mode control at High Fan or High Coo_
with the high temperature.

