Loading ...
Loading ...
Loading ...
13
PROBLEM POSSIBLE CAUSE SOLUTION
No espresso coee is delivered No water in the tank Fill the tank with water
The holes in the lter holder are blocked Clean the lter holder spout holes
The espresso boiler outlet is blocked Clean as described in the chapter “Cleaning”
Scale in the water circuit Descale as described in the “Descaling” section
The espresso coee drips from
the edges of the lter holder
rather than the holes
The lter holder has been inserted incor-
rectly or is dirty
Attach the lter holder correctly and rotate rmly
as far as it will go
The espresso boiler gasket has lost elasti-
city or is dirty
Have the espresso boiler gasket replaced by Custo-
mer Services
The holes in the lter holder spouts are
blocked
Clean the lter holder spout holes
The espresso coee is cold The OK light is not on when the coee is
delivered
Wait until the OK light comes on
No preheating was done Pre-heat as indicated in the “Tips for a hotter cof-
fee” section
The cups were not preheated Pre-heat the cups with hot water
Scale in the water circuit Descale as described in the section “Descaling”
The pump is excessively noisy The water tank is empty Fill the tank
The tank is not correctly in place and the
valve on the bottom is not open
Press the tank down lightly to open the valve on
the bottom
There are air bubbles in the tank
connector
Follow the instructions given in the “Hot water”
section until water is delivered
The coee froth is too dark
(delivered from the spout too
slowly)
The pre-ground coee is pressed down
too rmly
Press the coee down less rmly
There is not enough pre-ground coee Reduce the quantity of pre-ground coee
The espresso boiler outlet is blocked Clean as described in the section “Cleaning the
boiler outlet”
The lter is blocked Clean as described in the section “Cleaning the
coee lters”
The pre-ground coee is too ne or damp Use only pre-ground coee for espresso coee ma-
kers and make sure it is not damp
The wrong type of pre-ground coee is
being used
Use a dierent type of pre-ground coee
The coee has an acid taste Inadequate rinsing after descaling After descaling, rinse the appliance as described in
the section “Descaling”
TROUBLESHOOTING
Below is a list of some of the possible malfunctions.
If the problem cannot be resolved as described, contact Customer Services.
No milk froth is formed when
making cappuccino
Model ECP35.31: the ring is in the “HOT
MILK” position
MODEL ECP35.31: push the ring into the “CAP-
PUCCINO” position
Milk not cold enough Always use milk at refrigerator temperature
Cappuccino maker dirty Clean as described in the section “Cleaning the
cappuccino maker”
Scale in the water circuit Descale as described in the section “Descaling”
The appliance switches o Auto-o has been triggered Press the ON/OFF button to turn the appliance on
again
The appliance switches o a
few seconds after switching on
The mode selector dial is not in the l po-
sition (Standby)
Turn the mode selector dial to the l position
(Standby), then press the ON/OFF switch.
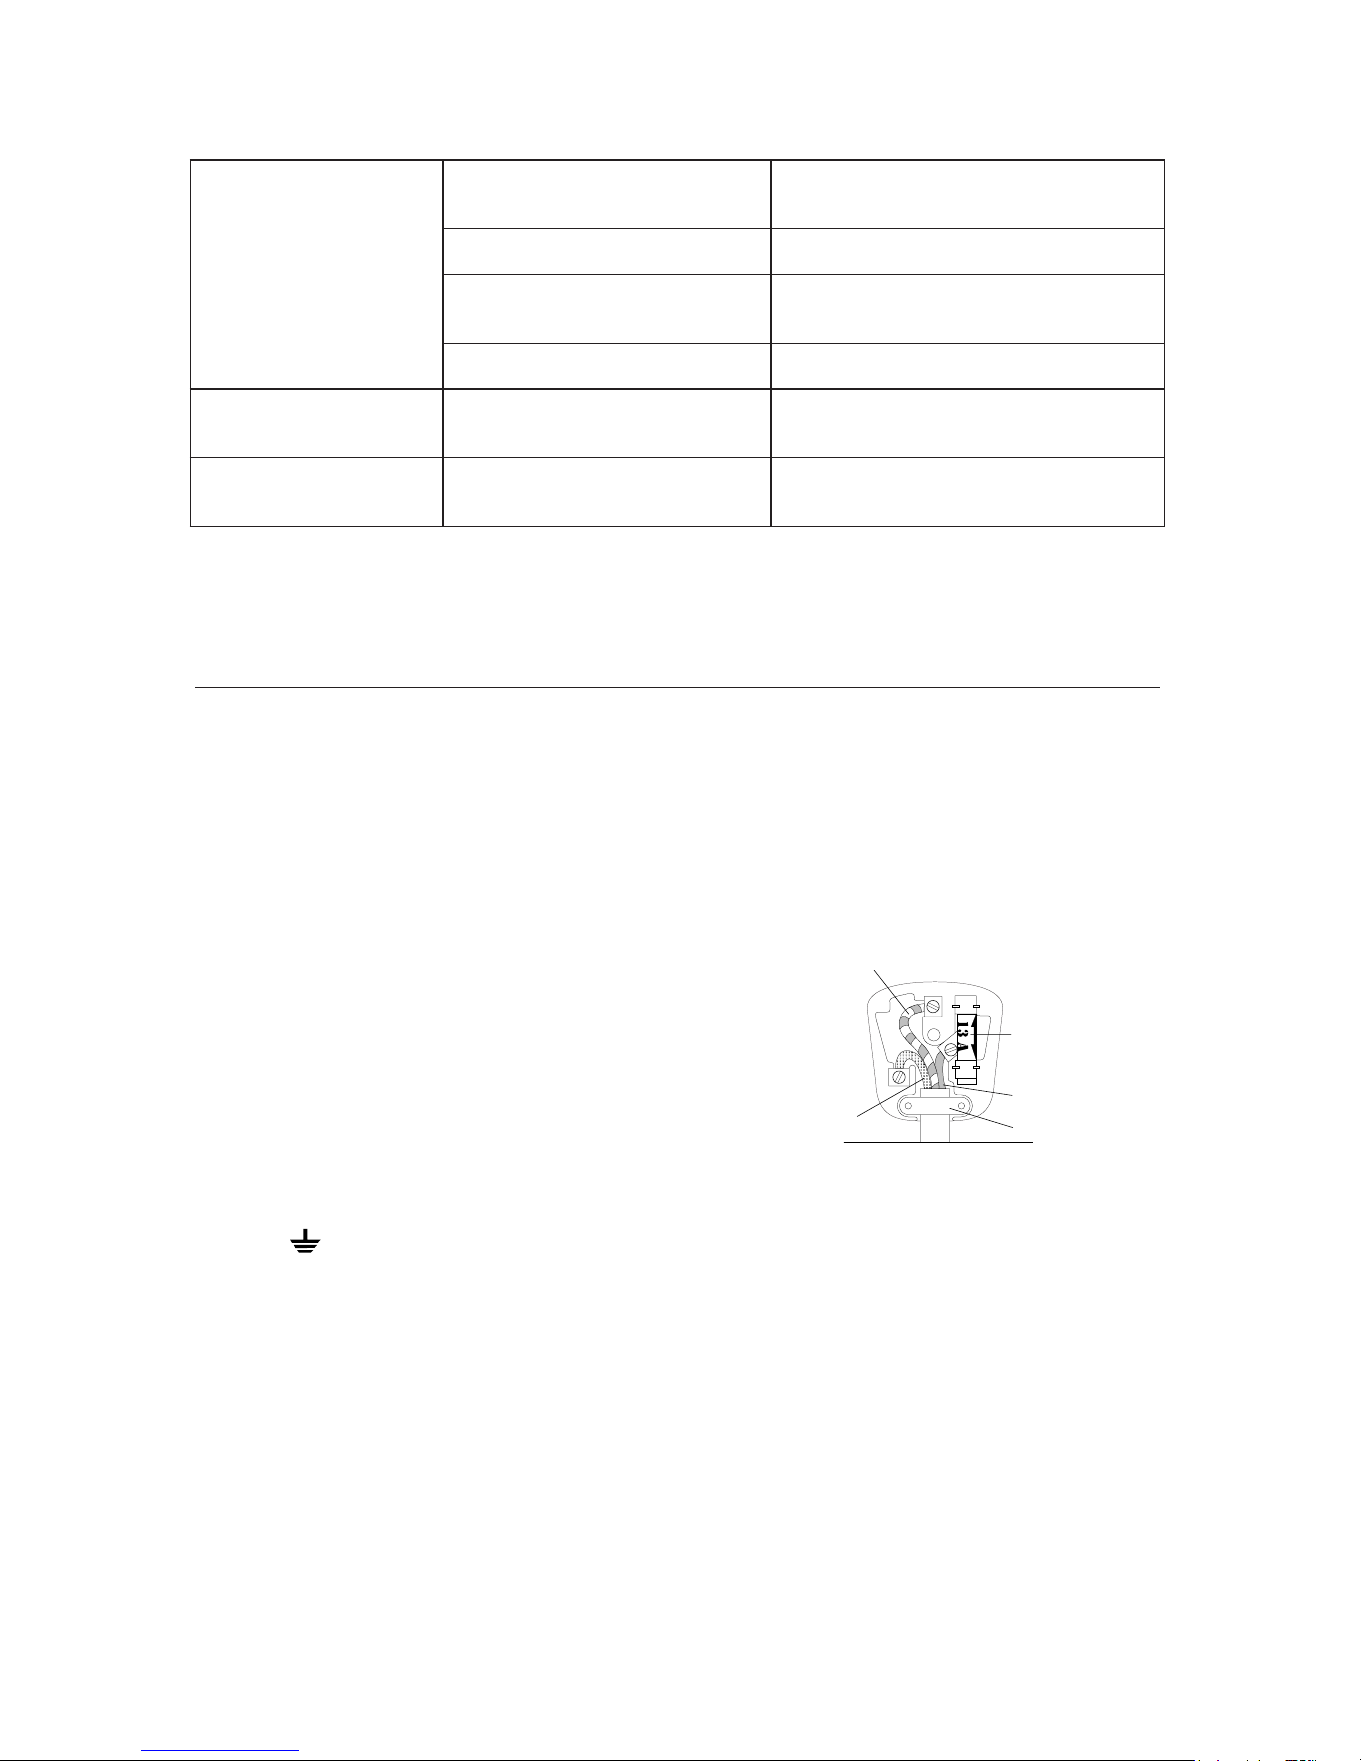
ELECTRICAL REQUIREMENTS (UK ONLY)
Before using this appliance ensure that the voltage indicated on the product corresponds with the main voltage in
your home, if you are in any doubt about your supply contact your local electricity company.
The flexible mains lead is supplied connected to a B.S. 1363 fused plug having a fuse of 13 amp capacity.
Should this plug not fit the socket outlets in your home, it should be cut off and replaced with a suitable plug,
following the procedure outlined below.
Note: Such a plug cannot be used for any other appliance and should therefore be properly disposed of and not left
where children might find it and plug it into a supply socket - with the obvious consequent danger.
N.B. We recommend the use of good quality plugs and wall sockets that can be switched off when the machine is
not in use.
IMPORTANT: the wires in the mains lead fitted to this appliance are coloured in accordance with the following code:
GREEN AND YELLOW EARTH
BLUE NEUTRAL
BROWN LIVE
As the colours of the wires in the mains lead of this appliance may not correspond with the coloured markings
identifying the terminals in your plug, proceed as follows:
- The wire which is coloured green and yellow must be connected to the terminal in the plug which is marked with the letter E or by the earth
symbol or coloured green or green and yellow.
- The wire which is coloured blue must be connected to the terminal which is marked with the letter N or coloured black.
- The wire which is coloured brown must be connected to the terminal which is marked with the letter L or coloured red.
When wiring the plug, ensure that all strands of wire are securely retained in each terminal. Do not forget to tighten
the mains lead clamp on the plug. If your electricity supply point has only two pin socket outlets, or if you are in
doubt, consult a qualified electrician.
Should the mains lead ever require replacement, it is essential that this operation be carried out by a qualified
electrician and should only be replaced with a flexible cord of the same size.
After replacement of a fuse in the plug, the fuse cover must be refitted. If the fuse cover is lost, the plug must not be
used until a replacement cover is obtained. The colour of the correct replacement fuse cover is that of the coloured
insert in the base of the fuse recess or elsewhere on the plug. Always state this colour when ordering a replacement
fuse cover. Only 13amp replacement fuses which are asta approved to B.S. 1362 should be fitted.
This appliance conforms to the Norms EN 55014 regarding the suppression of radio interference.
Warning - this appliance must be earthed
Green and Yellow to Earth
13 amp
Fuse
Brown to
live
Cord Clamp
Blue to
neutral
Downloaded from www.ManualsFile.com manuals search engine