INSTRUCTION MANUAL
BEDIENUNGSANLEITUNG
MANUALE DI ISTRUZIONI
MANUAL DE INSTRUCCIONES
MANUEL D'INSTRUCTION
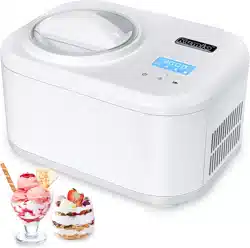
ICE CREAM MAKER
SPEISEEISBERE ITER
MACHINE À CRÈME GLAC ÉE
MAQUNA DE HELADOS
MACCHINA DEL GELATO
ICE-1032
AC 220-240V 50Hz 100W
PLEASE READ INST RUCT IONS CAREFULL Y BEFORE ASSEMBLY
RETA IN THIS MANUAL FOR FUTU RE REFERENCE


1
ENGLISH CONTENTS
SAFETY INSTRUCTIONS ...................................................................................................................................03
PRODUCT DESCRIPTION..................................................................................................................................05
PRODUCING ICE CREAM..................................................................................................................................06
CLEANING AND CARE.......................................................................................................................................09
TECHICAL DATA..................................................................................................................................................10
TROUBLESHOOTING........................................................................................................................................11
WARRANTY .........................................................................................................................................................11
DEUTSCH INHALT
SICHERHEITSHINWEISE....................................................................................................................................13
GERÄTEÜBERSICHT...........................................................................................................................................16
EISCREME HERSTELLEN...................................................................................................................................17
REINIGUNG UND PFLEGE.................................................................................................................................21
TECHNISCHE DATEN..........................................................................................................................................21
STÖRUNG UND BEHEBUNG.............................................................................................................................22
GARANTIE ............................................................................................................................................................23
FRANÇAIS CATALOGUE
CONSIGNES DE SÉCURITÉ...............................................................................................................................24
DESCRIPTION DU PRODUIT.............................................................................................................................26
FABRICATION DE CRÈME GLACÉE...............................................................................................................27
NETTOYAGE ET RANGEMENT.........................................................................................................................31

2
CARACTÉRISTIQUES TECHNIQUES...............................................................................................................31
DIAGNOSTIC DES PANNES...............................................................................................................................32
GARANTIE .........................................................................................................................................................33
ESPAÑOL CONTENIDOS
INSTRUCCIONES DE SEGURIDAD...................................................................................................................34
DESCRIPCIÓN DEL APARATO...........................................................................................................................36
PREPARAR HELADO..........................................................................................................................................37
LIMPIEZA Y CUIDADO.......................................................................................................................................41
DATOS TÉCNICOS................................................................................................................................................41
SOLUCION DE PROBLEMAS.............................................................................................................................42
GARANTÍA ...........................................................................................................................................................43
ITALIANO CONTENUTO
AVVERTENZE DI SICUREZZA..........................................................................................................................44
DESCRIZIONE DEL PRODOTTO........................................................................................................................46
PREPARARE IL GELATO....................................................................................................................................47
PULIZIA E MANUTENZIONE............................................................................................................................51
DATI TECNICI.......................................................................................................................................................51
RISOLUZIONE DEI PROBLEMI ........................................................................................................................52
GARANZIA............................................................................................................................................................53

3
SAFETY INSTRUCTIONS
•
Read all the safety and operating instructions carefully and retain them for
future reference.
• Ensure the voltage is compliant with the voltage range stated on the rating label,
and ensure the earthing of the socket is in good condition.
• If the supply cord is damaged, it must be replaced by the manufacturer or its
service agent or a similarly qualified person in order to avoid a hazard.
•
Do not upend this product or incline it over a 45
°
angle.
•
To protect against risk of electric shock, do not pour water on cord, plug and
ventilation, immerse the appliance in water or any other liquid.
• Unplug the appliance after using or before cleaning.
•
Keep the appliance 8cm from other objects to ensure the good heat releasing.
•
Do not use the accessories which are not recommended by Manufacturer.
• This appliance can be used by children aged from 8 years and above and
persons with reduced physical, sensory or mental capabilities or lack of
experience and knowledge if they have been given supervision or instruction
concerning use of the appliance in a safe way and understand the hazards
involved. Children shall not play with the appliance. Cleaning and user
maintenance shall not be made by children without supervision. Children should
be supervised to ensure that they do not play with the appliance.
• Do not use the appliance close by flames, hot plates or stoves.
•
Do not switch on the power button frequently (ensure 5 min. interval at least) to
avoid the damage of compressor.
• Metal sheet or other electric objects are not allowed to be inserted into the
appliance to avoid fire and short circuit.
•
When take out the ice cream, do not knock the barrel or edge of barrel to

4
protect the barrel from damage.
•
Do not switch on the power before install well the barrel or blender blade.
• The initial temperature of the ingredients is 25±5℃.Do not put the ingredients
into freezer for pre-freeze, as it will easily make the blender blade blocked before
the ice cream is in good condition.
• Do not remove the blender blade when the appliance is on working.
•
Do not use outdoors. Never clean with scouring powders or hard implements.
•
Do not store explosive substances such as aerosol cans with a flammable
propellant in this appliance.
• This appliance is intended to be used in household and similar
applications.Only use this appliance with ingredients appropriate for making ice
cream and frozen yogurt. These include base ingredients such as cream, milk,
yogurt and sugar, and additional ingredients like chocolate chips, melted
chocolate, chopped nuts or small pieces of fruit.
Caution: Risk of fire! This appliance contains the coolant isobutane (R600a),a
natural gas which is environmentally friendly. Although it is flammable, it does
not damage the ozone layer and does not increase the greenhouse effect. The use
of this coolant has,however,led to a slight increase in the noise level of the
appliance. In addition to the noise of the compressor,you might be able to hear the
coolant flowing around the system. This is unavoidable,and does not have any
adverse effect on the performance of the appliance. Care must be taken during the
transportation and setting up of the appliance that no parts of the cooling system
are damaged. Leaking coolant can damage the eyes.

5
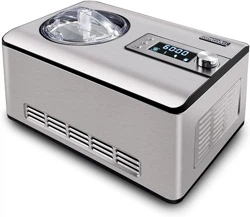
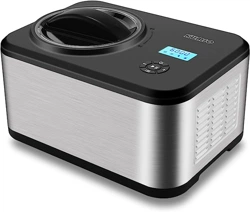
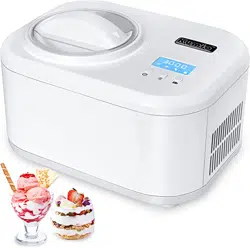
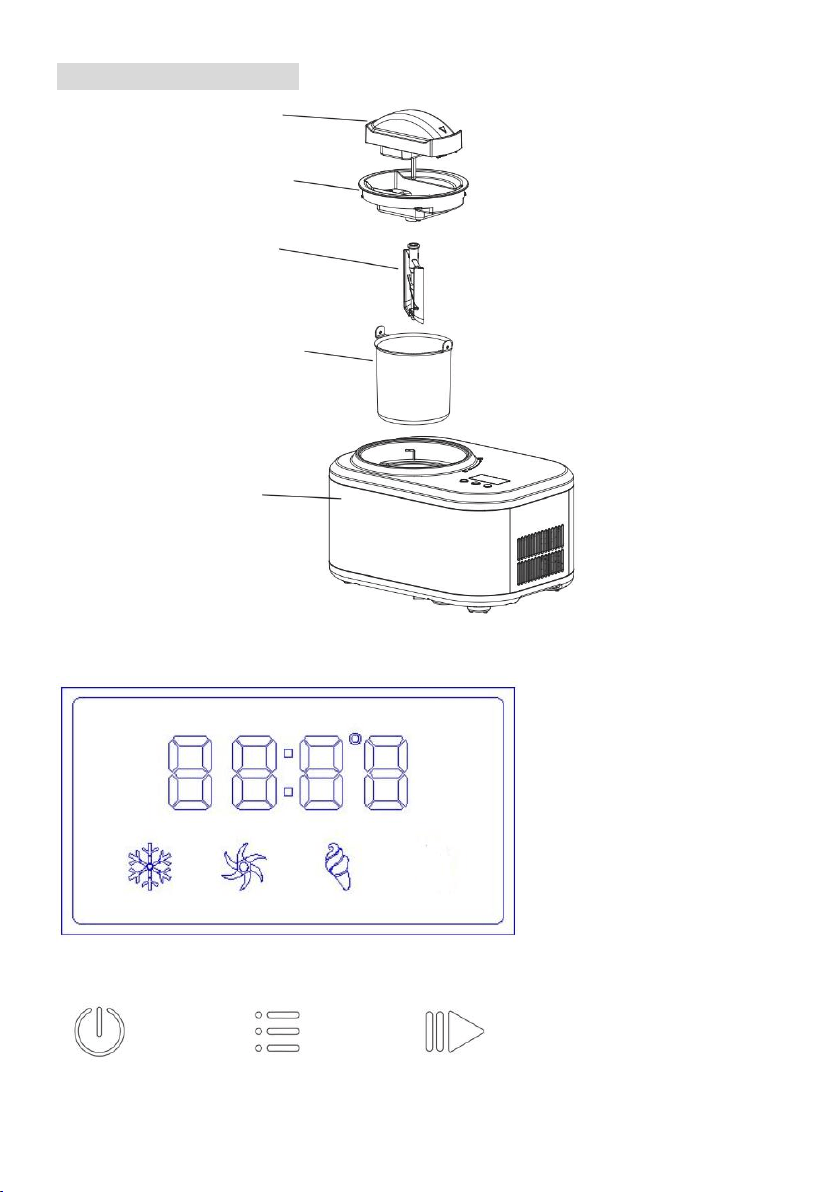
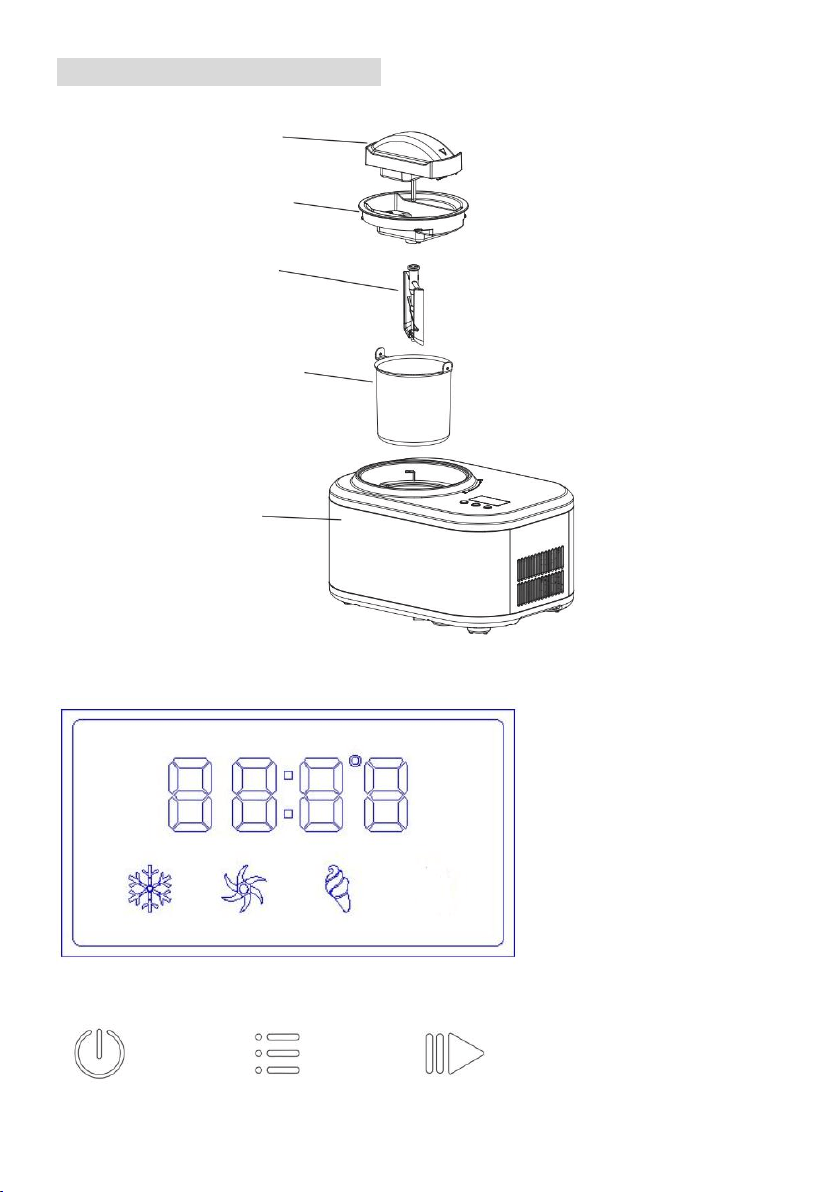
PRODUCT DESCRIPTION
CONTROL PANEL
Lid motor
Transparent lid
Stirring rod
Ice cream container
Housing
POWER
MENU
START/PAUSE

6
POWER: Plug in the power supply, press the power button to turn on the
machine, the indicator light of ice cream mode flashes, and press the power button
again to shut down the machine.
MENU: By pressing this button, there are 3 working modes for option, including:
MIXING ONLY, COOLING ONLY ,ICE CREAM.
• Mixing mode: The appliance stirs for 30 minutes without chilling.
• Cooling mode: The appliance chills for10 minutes without stirring.
• Ice cream mode: The compressor, mixing motor and cooling fan are started, when the ice cream
is finished, there will be 10 short beeps.
START/PAUSE: After setting the menu, press this button to start the working
mode. During operation, by pressing this button, the working mode and time
countdown will be paused. If press this button again, the machine will go on the
working mode.
PRODUCING ICE CREAM
BEFORE FIRST USE
Cleanness: Before use, thoroughly wash all parts that will come into contact with the ice
cream. Warning: Please be sure the power cord is unplugged. Important: Always place
the Ice Cream Maker upright on a flat surface in order that the build-in COMPRESSOR
can provide best performance.
7
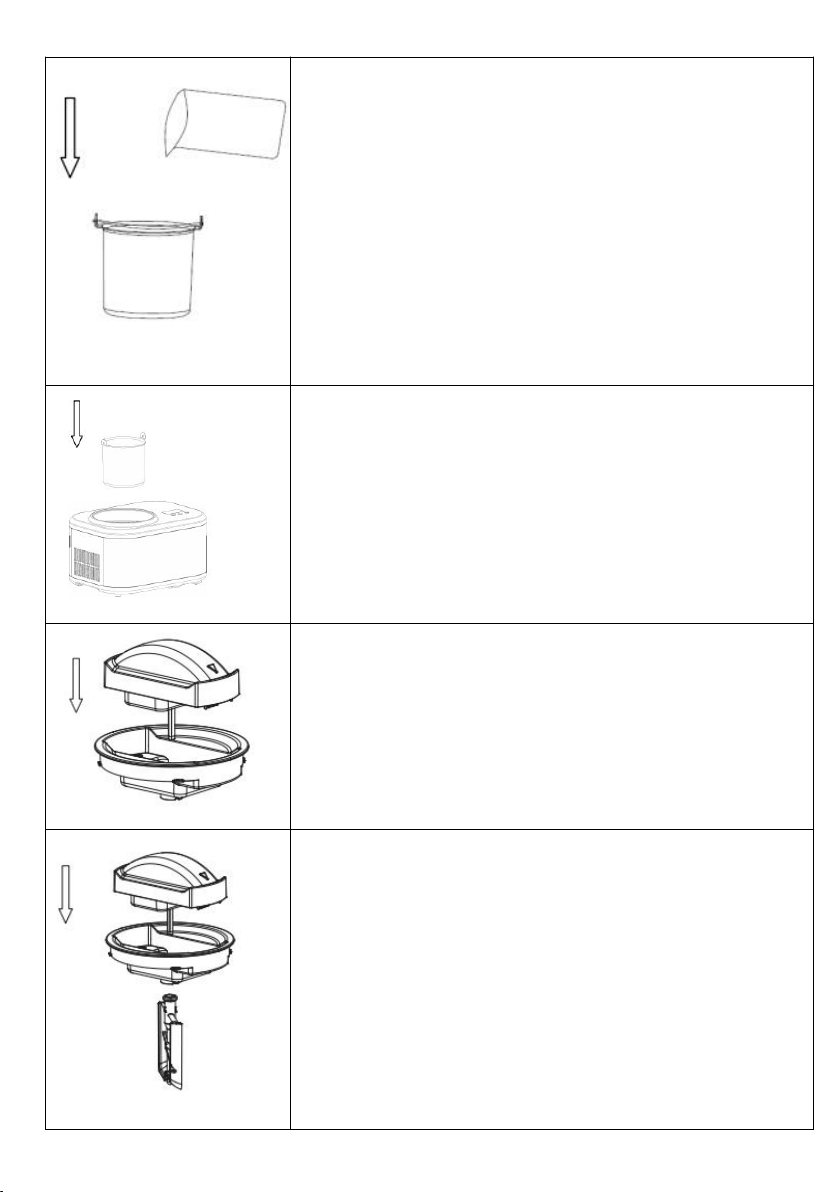
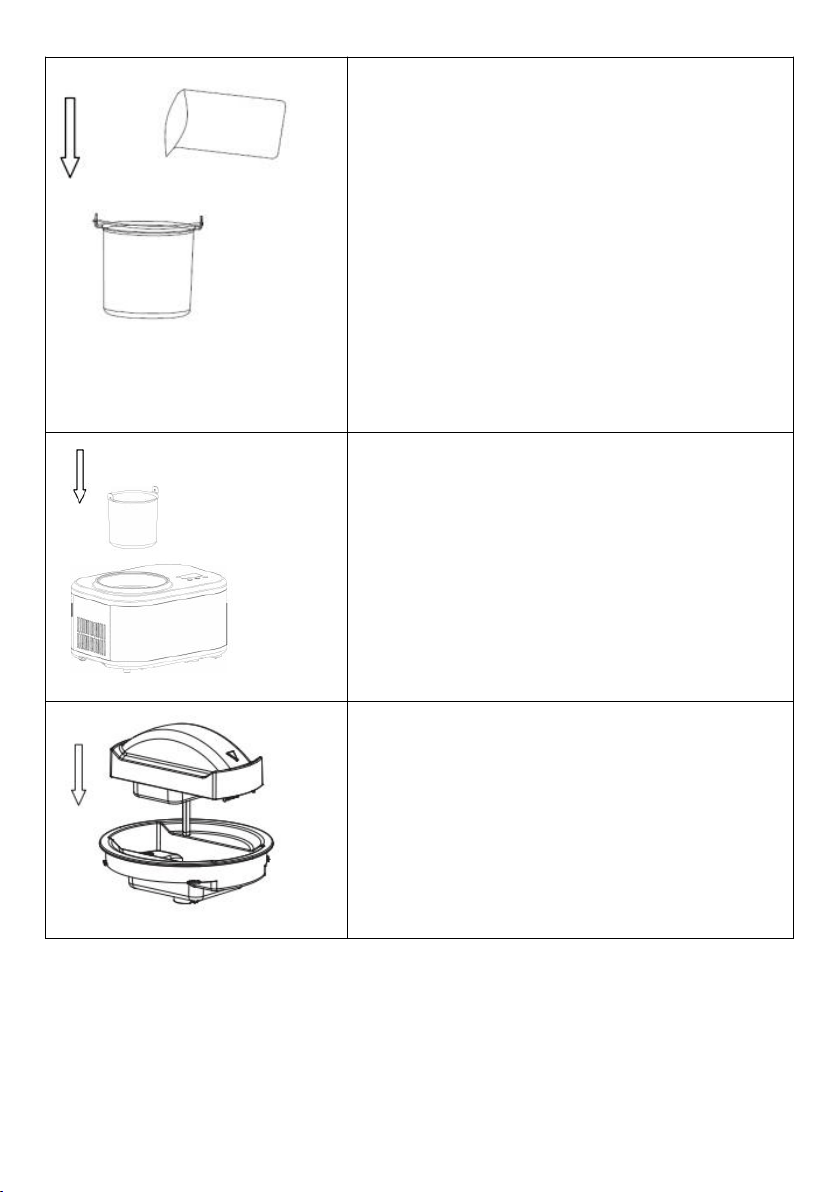
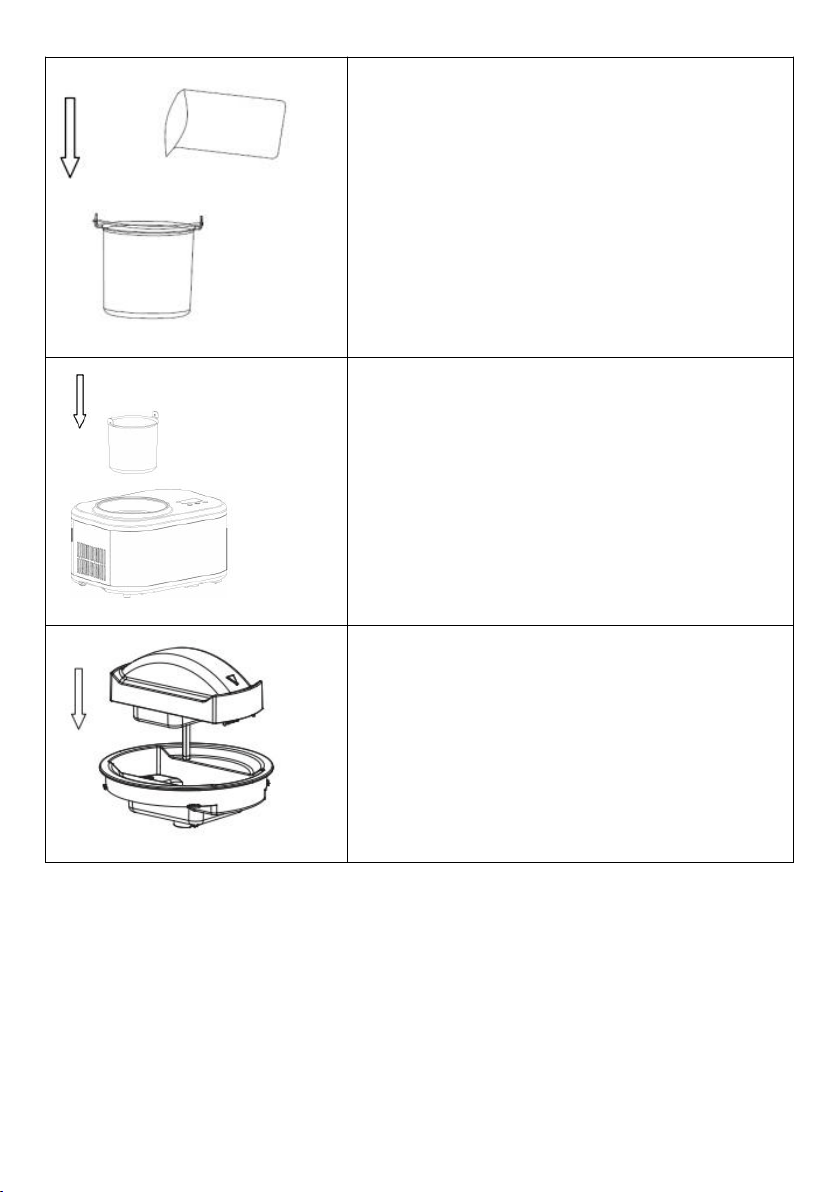
1.Prepare recipe ingredients from your own recipe or from the recipe
provided, and pour the well prepared recipe ingredients into the
removable bowl.
Important Hint on the Volume of the Ingredients:
To avoid overflow and waste, please make sure that the ingredients
do not exceed 60% of capacity of the removable bowl (Ice cream
expands when being formed).
2.Place the removable ice cream container into the corresponding
recess in the compressor housing.
3.Place the lid motor into the transparent lid, making sure it engages
and sits securely.
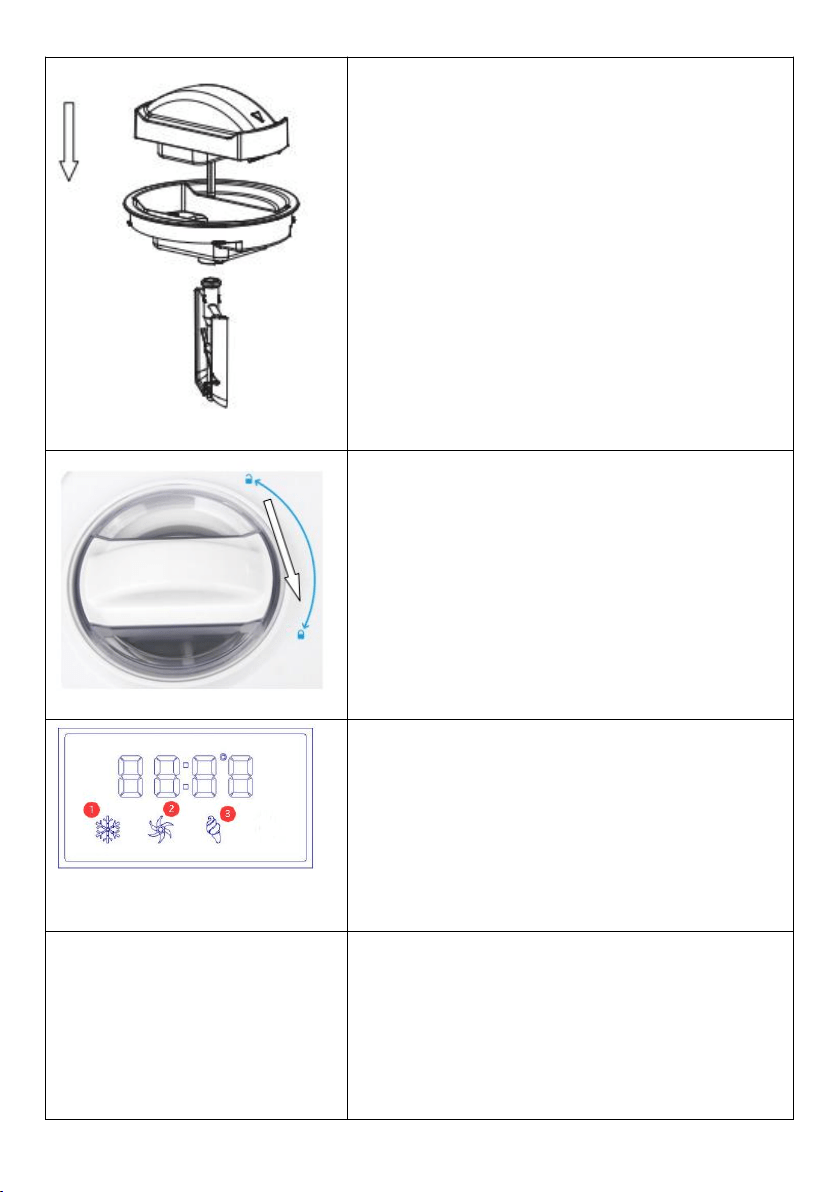
4.Place the stirring rod into the opening on the underside of the lid
until it is sitting securely.
8
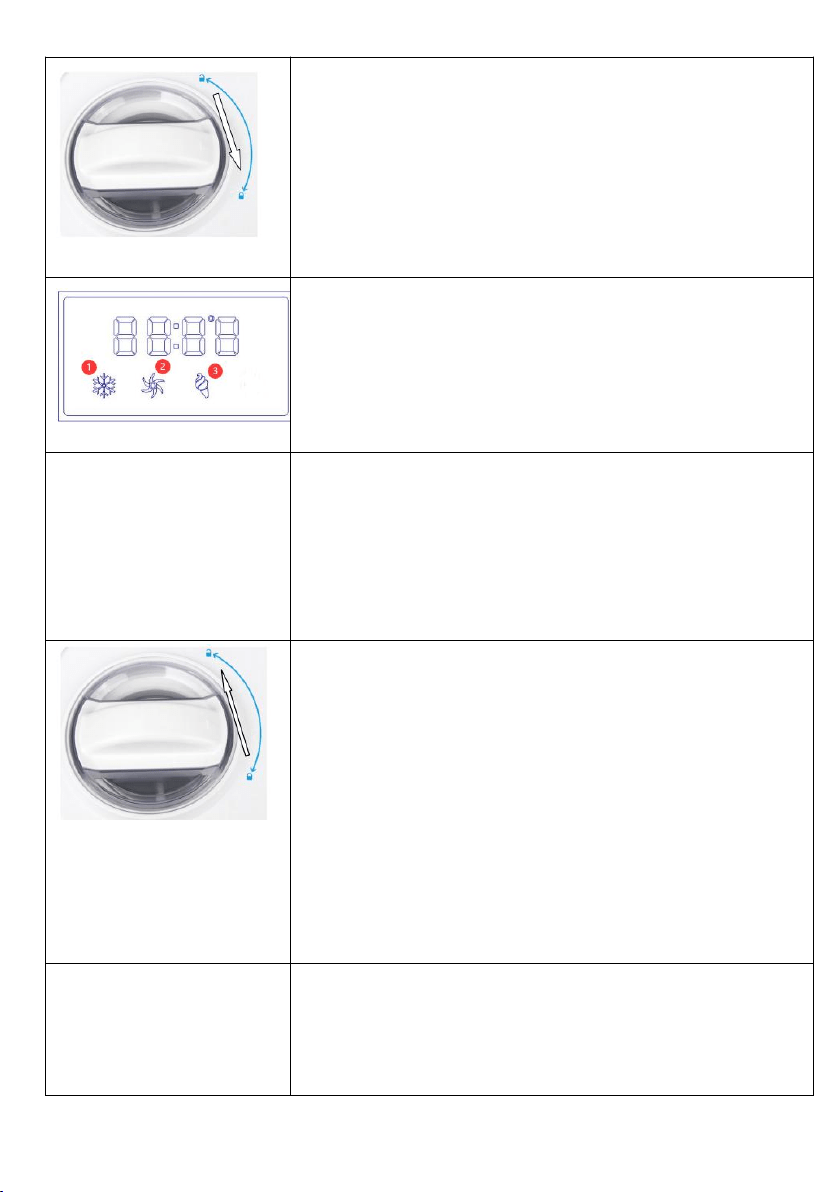
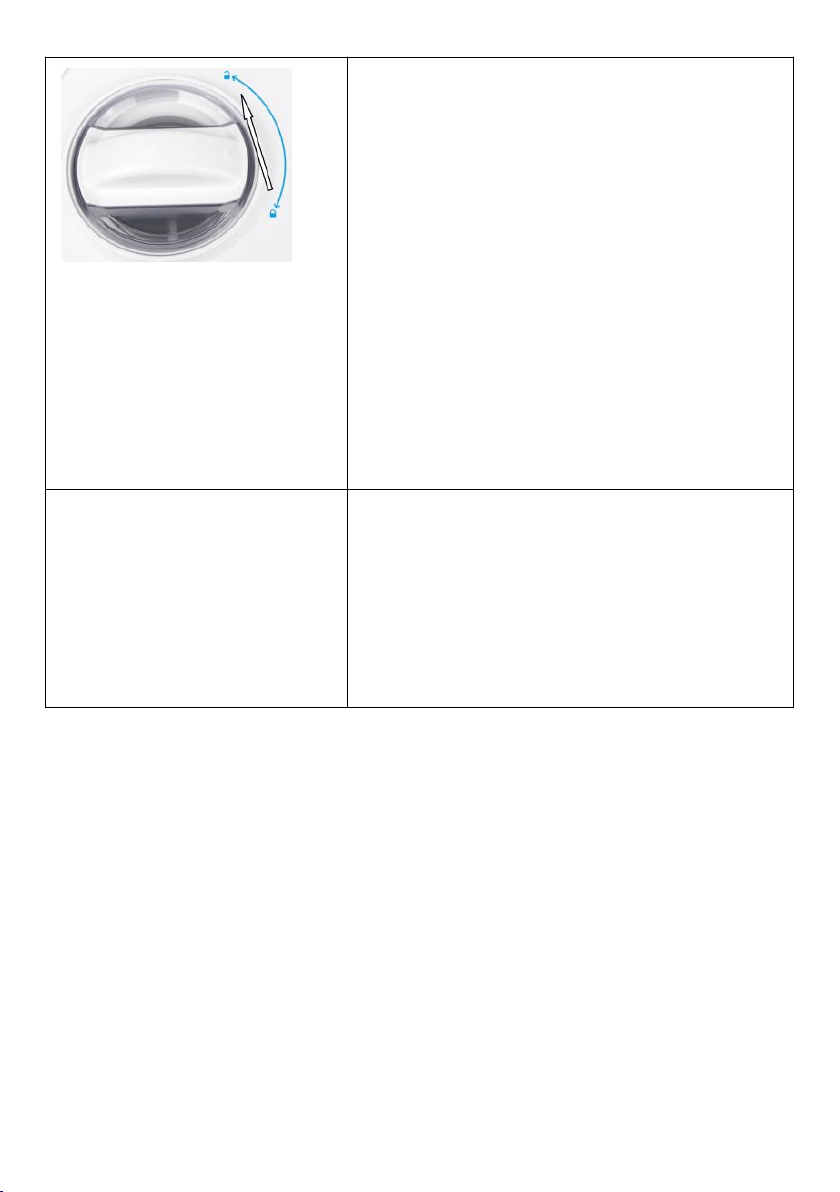
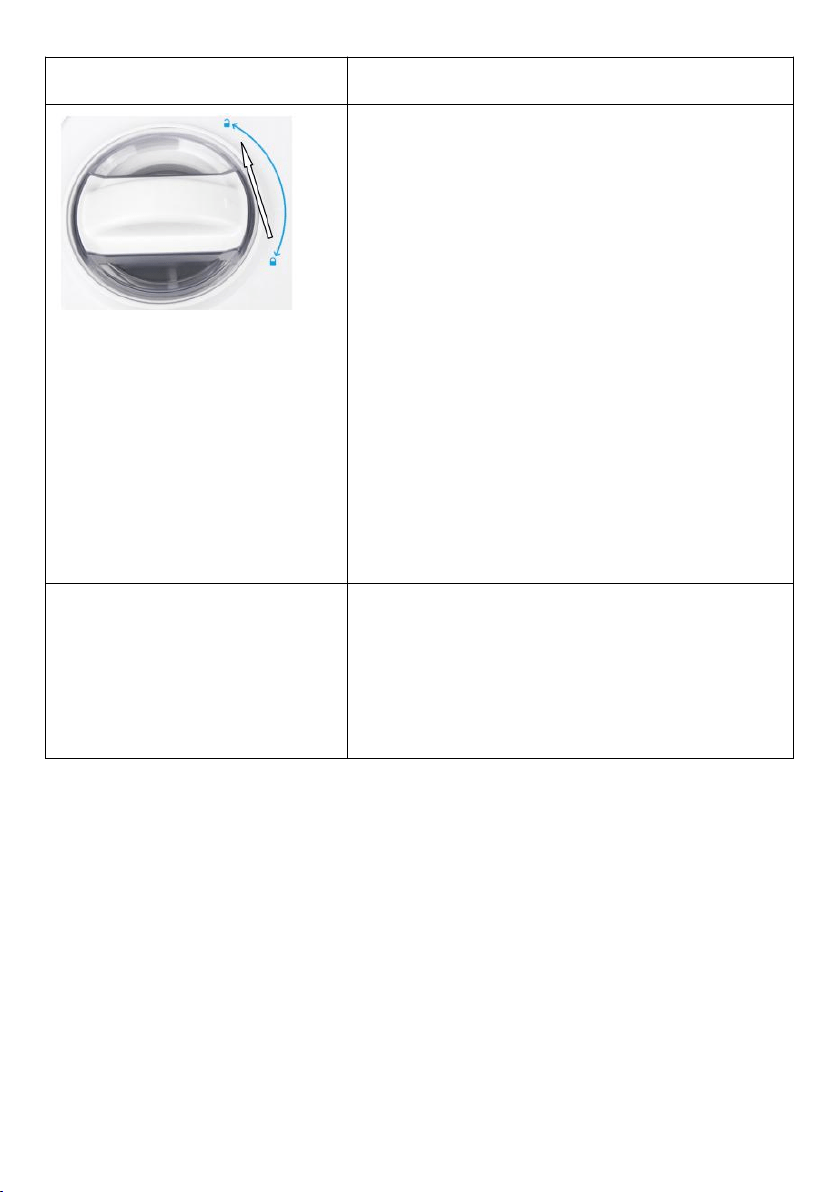
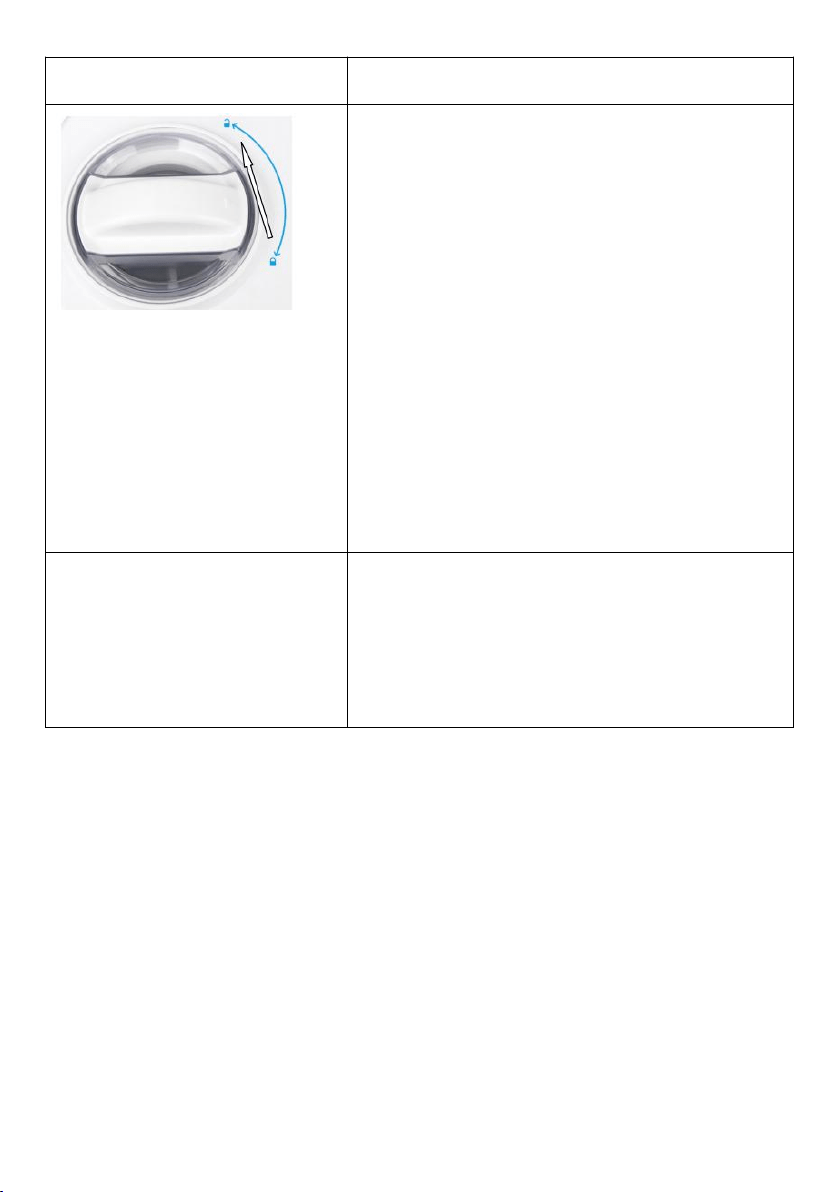
5.Place the lid on the ice cream container and turn it clockwise as far
as it will go to make sure it is firmly attached..
Note: the triangle mark on the components rotates to the "LOCK"
mark.
6.Press the [POWER] button to make the machine electrified. Press
the [MENU] button to choose the working mode:
①
cooling only
②
mixing only
③
ice cream.
7.Press the [START/PAUSE] button to start the operation.
NOTE: You can pause the operation anytime by pressing the
start/pause button. Continue the operation by pressing the button
again.
8.When the operation is finished, an acoustic signal will sound.
Disconnect the power plug from the socket outlet. Turn the
transparent lid and motor components anticlockwise to take out the
lid then take out the ice cream container.
Note: Condensation may form on the outside of the ice cream
container and freeze while the device is operating. This may make it
more difficult to remove the ice cream container from the device. In
this case, wait a little while before removing the ice cream container.
9.Take the ice cream out of the container with the provided ice cream
scoop or with a wooden or plastic spoon. Do not use metal utensils in
the container to avoid damaging it.

9
KEEP COOL FUNCTION
When the ice-cream making is finished, an acoustic signal sounds. If the ice cream is not removed,
the continuous chilling function starts for 1 hour. Once the continuous chilling function is complete,
another acoustic signal will sound.
MOTOR SELF-PROTECTION FUNCTION
When the ice cream becomes harder, the mixing motor might be blocked. Then
the motor protection device makes the mixing motor stop working by detecting its
temperature to ensure the life of the motor.
CLEANING AND CARE
The appliance should be cleaned and dried after each use as follows. Lack of or improper care can
impair the functionality of the appliance.
・
Never clean the appliance using running water or other liquids. The motor and the compressor in
particular must not come into contact with water.
・
Refrain from using scratching or abrasive cleaning agents.
・ Wipe down the housing of the ice cream machine with a damp cloth. Use a little detergent if
necessary.
・ Clean the rest of the accessories with clear, warm water and detergent.
・
Allow all parts to dry completely or dry them before they are assembled or stored away.
・ Store the device horizontally in a cool, dry place which is out of the reach of children and
animals.
NOTE:The device and accessories are not dishwasher-safe.
10
The device meets the requirements of Regulation 2014/35/EU
as well as the applicable standards EN 60335-2-24:2010 +
A1:2019 + A2:2019 ,EN 60335-1:2012 + A11:2014 +
A13:2017 + A1:2019 + A14:2019 + A2:2019 ,EN 62233:2008
Manufacturer:
Zhongshan Donlim Wei li Electrical Appliances Co., Ltd.
Add.: Fusha Industrial Park, Fusha Town Zhongshan City Guangdong Province,
P. R.China
This marking indicates that this product should not be disposed with other
household wastes throughout the EU. To prevent possible harm to the environment
or human health from uncontrolled waste disposal, recycle it responsibly to
promote the sustainable reuse of material resources. To return your used device,
please use the return and collection systems or contact the retailer where the
product was purchased. They can take this product for environmental safe
recycling.
TECHICAL DATA
Model
ICE-1032
MAX.Capacity
1L
Voltage
AC 220-240V
Power consumption
100W
Refrigerant
R600a/18g
11
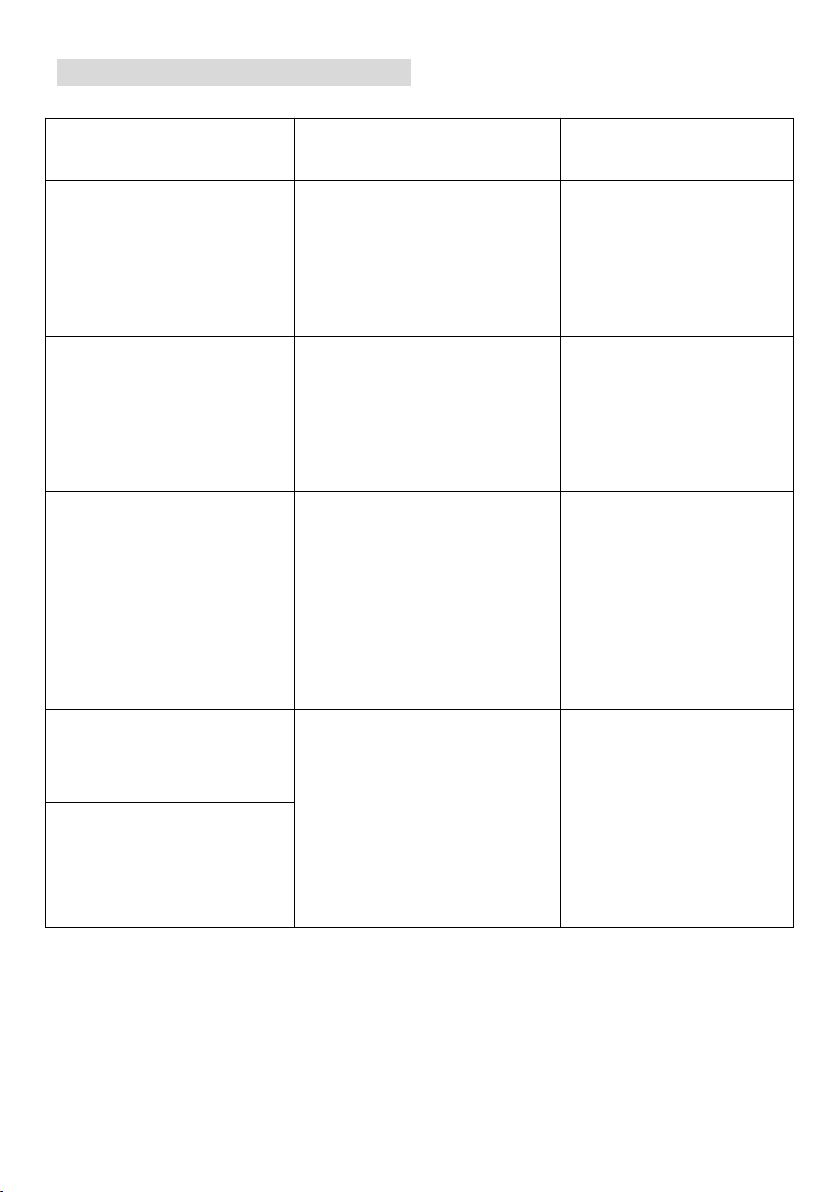
TROUBLESHOOTING
Problem
Possible cause
Solution
Appliance does not start.
Power plug is not connected to
an electrical outlet or not
plugged in tightly.
Connect power plug to a
suitable electrical outlet. Make
sure to plug it in tightly.
After the operation is
finished, the container is
difficult to remove.
Drops of water have frozen
between the container and the
cooling drum .
Wait until the frozen water has
molten. Then remove the
container.
Ice cream is not ready yet,
but mixing blade has
stopped.
When the ice cream becomes
harder, the mixing blade may get
stuck, causing the motor to be
turned off automatically to
prevent overheating.
Remove the container, turn off
the appliance and then restart
it.
Container can not be properly
inserted into the cooling
drum .
Improper use of container has
lead to deformation.
Purchase a new container
from an authorized vendor or
service center.
When operation is started,
the mixing blade severely
scratches the sides of the
container or gets stuck.
Improper use of container has
lead to deformation.
Purchase a new container from
an authorized vendor or service
center.

12
WARRANTY
Limited two-year warranty
This warranty is available to consumers only. You are a consumer if
you own a kumio ice maker that was purchased at retail for personal,
family or household use. Except as otherwise required under
applicable law, this warranty is not available to retailers or other
commercial purchasers or owners.
We warrant that your kumio ice maker will be free of defects in
materials and workmanship under normal home use for 2 years from
the date of original purchase. If your kumio ice maker is prove to be
defective (Non Man-damaged)within the warranty period, we will
offer free replacement or reimburse.
Thank you for using our products. Please contact
[email protected] or Customer Service Online if you have any
questions.

13
SICHERHEITSHINWEISE
•
Lesen Sie sich alle Hinweise sorgfältig durch und bewahren Sie die Anleitung
zum Nachschlagen gut auf.
•
Schließen Sie das Gerät nur an geerdete Steckdosen an, die der angegebenen
Spannung entsprechen.
• Falls das Netzkabel beschädigt ist, muss es vom Hersteller, einem autorisierten
Fachbetrieb oder einer ähnlich qualifizierten Person ersetzt werden.
• Neigen Sie das Gerät nicht um mehr als 45°.
• Um sich vor Stromschlägen zu schützen, halten Sie Wasser fern vom Stecker,
dem Kabel und den Lüftungsschlitzen und tauchen Sie das Gerät nicht in Wasser
oder andere Flüssigkeiten.
•
Ziehen Sie den Stecker aus der Steckdose, bevor Sie das Gerät reinigen.
• Halten Sie um das Gerät herum 8 cm Abstand zu wänden oder anderen Geräten,
damit die Luft ausreichend zirkulieren kann.
• Benutzen Sie nur Zubehör, das vom Hersteller ausdrücklich zugelassen ist.
• Kinder ab 8 Jahren, physisch und körperlich eingeschränkte Menschen sollten
das Gerät nur benutzen, wenn sie vorher von einer Aufsichtsperson ausführlich
mit den Funktionen und den Sicherheitsvorkehrungen vertraut gemacht wurden.
Achten Sie darauf, dass Kinder nicht mit dem Gerät spielen und das Gerät nur

14
unter Aufsicht reinigen.
•
Stellen Sie das Gerät nicht in die Nähe von Feuer, Herden oder Öfen.
• Drücken Sie nicht mehrfach hintereinander auf den Ein-Schalter, um den
Kompressor nicht zu beschädigen.
• Stecken Sie keine Metallgegenstände ins Gerät, um Kurzschluss zu vermieden.
• Wenn Sie die Eiscreme entfernen, schlagen Sie nicht auf den Behälters, um ihn
nicht zu beschädigen.
• Schalten Sie das Gerät nicht ein, bevor Sie den Behälter und den Rührer
befestigt haben.
•
Die Temperatur der Zutaten sollte etwa 25
°
C betragen. Legen Sie die
Zutaten vor der Zubereitung nicht ins Gefrierfach, damit der Rührer nicht durch
harte Stücke behindert wird.
• Entfernen Sie den Rührer nicht während des Betriebs.
•
Benutzen Sie das Gerät nicht in der Nähe leicht entzündlicher Sprays oder
Flüssigkeiten.
• Das Gerät ist nicht für den kommerziellen Gebrauch, sondern nur für Gebrauch
im Haushalt und in ähnlichen Umgebungen vorgesehen.Verwenden Sie dieses
Gerät ausschließlich mit Zutaten, welche für die Herstellung von Speiseeis, und
Frozen Yogurt geeignet sind. Diese umfassen Grundzutaten wie Sahne, Milch,

15
Jogurt und Zucker sowie zusätzliche Zutaten wie Schokoladenstücke,
geschmolzene Schokolade, gehackte Nüsse oder kleine Fruchtstücke.
WARNUNG: Brandgefahr! Dieses Gerät enthält das Kältemittel Isobutan
(R600a), ein Naturgas mit hoher Umweltverträglichkeit, aber brennbar. Obwohl
es brennbar ist, schädigt es nicht die Ozonschicht und verstärkt nicht den
Treibhauseffekt. Die Verwendung dieses Kältemittels führt zu einer etwas
höheren Geräuschentwicklung des Gerätes. Zusätzlich zum
Kompressorgeräusch können Sie den Fluss des Kältemittels hören. Dies ist
unvermeidlich und hat keine negative Wirkung auf die Leistung des Gerätes.
Seien Sie während des Transports vorsichtig, so dass der Kältemittelkreislauf
nicht beschädigt wird. Kältemittellecks können die Augen reizen.
16
GERÄTEÜBERSICHT
Bedienfeld Und Tastenfunktionen
Deckelmotor
Transparenter Deckel
Ruhrstab
Eisbehalter
Gehäuse
POWER
MENÜ
START/PAUSE

17
POWER:Schließen Sie das Netzteil an, drücken Sie den Netzschalter, um das Gerät
einzuschalten, die Kontrollleuchte im Eismodus blinkt und drücken Sie den Netzschalter
erneut, um das Gerät auszuschalten.
MENÜ:Drücken Sie die Taste mehrmals, um einen der folgenden 3 Arbeitsmodi
auszuwählen: NUR MISCHEN, NUR KÜHLEN und EISCREME.
NUR MISCHEN
: Die Maschine ruhrt 30 Minuten, ohne zu kuhlen.
NUR KÜHLE:
Die Maschine kuhlt 10 Minuten, ohne zu ruhren.
EISCREME:
Die Maschine kuhlt und ruhrt.
START/PAUSE: Nachdem Sie mit der Menü-Taste eine Funktion ausgewählt
haben, drücken Sie auf START/PAUSE, um die Funktion zu starten. Wenn das
Gerät in Betrieb ist, können Sie es mit dieser Taste anhalten. Drücken Sie die
Taste erneut, um mit dem Betrieb fortzufahren.
EISCREME HERSTELLEN
Vor dem ersten Betrieb
Bevor Sie das Gerät in Betrieb nehmen reinigen Sie zuerst alle Teile, die mit der
Eiscreme in Berührung kommen. Versichern Sie sich, dass das Gerät ausgeschaltet
und der Stecker gezogen ist, bevor Sie die Teile entnehmen. Stellen Sie das Gerät auf
eine möglichst ebene Arbeitsfläche, damit der Kompressor mit bestmöglicher
Leistung arbeiten kann.
18
1.Bereiten Sie die Zutaten wie in Ihrem Rezept
beschrieben vor und geben Sie sie in die entnehmbare
Schüssel.
Wichtiger Hinweis zum Füllvolumen:
Damit die Eiscreme nicht überläuft, achten Sie darauf,
dass sie den herausnehmbaren Behälter maximal zu 60%
befüllen, da sich die Eiscreme während der Zubereitung
ausdehnt.
2.Setze den entnehmbaren Eisbehalter in die
entsprechende Mulde des Kompressorgehauses ein.
3.Setze den Deckelmotor in den transparenten Deckel,
sodass er einrastet und sicher sitzt.

19
4.Stecke den Ruhrarm in die Offnung in der Unterseite des
Deckels, bis er gut sitzt.
5.Platziere den Deckel aufdem Eisbehalter und drehe Ihn
mit dem Uhrzeiger- sinn bis zum Anschlag, so dass er
festsitzt.
Hinweis: Die Dreiecksmarkierung auf den Komponenten
dreht sich zur Markierung "LOCK".
6..Drücken Sie die POWER-Taste, um das
Gerateinzuschalten. Drucken Sie dann auf dieMenü-Taste,
um die entsprechende FunktinoauSzuwahlen:: ① NUR
Mixen ②NUR Kühlen ③Eiscreme
7.Drücken Sie die Start-/Pause-Taste, um den Betrieb zu
starten. HINWEIS: Sie können den Betrieb jederzeit
pausieren,indem Sie die Start-/Pause-Taste drücken. Durch
erneutes Drücken der Taste wird der Betrieb fortgesetzt.
20
8.Wenn der Betrieb beendet ist, ertönt ein akustisches
Signal. Ziehen Sie den Netzstecker aus der Steckdose.
Drehen Sie den transparenten Deckel und die
Motorkomponenten gegen den Uhrzeigersinn, um den
Deckel herauszunehmen, und nehmen Sie dann den
Eisbehälter heraus.
HINWEIS:An der Außenseite des Eisbehälters kann sich
Kondenswasser bilden und während des Betriebes
gefrieren.Dies kann die Entnahme des Eisbehälters aus
dem Gerät erschweren. In diesem Fall etwas warten, bevor
der Eisbehälter herausgenommen wird.
9..Entnehmen Sie die Eiscreme/den Frozen Yogurt mit
dem mitgelieferten Eisportionierer oder einem Holz- oder
Plastiklöffel aus dem Behälter. Verwenden Sie keine
Metallgegenstände im Behälter, um diesen nicht zu
beschädigen.
Nachkuhlfunktion
Wenn die Eisherstellung beendet ist, ertönt ein akustisches Signal. Wird die Eismasse
nicht entnommen, startet die Nachkuhlfunktion fur 1 Stunde. Wenn die Nachkuhlfunktion
abgeschlossen ist, ertont erneut ein akustisches Signal.
Motorschutz-Funktion
Wenn die Eiscreme härter wird kann es vorkommen, dass Sie den Rührer blockiert. Die

21
Motorschutz-Funktion sorgt dafür, dass der Motor anhält, damit er sich nicht überhitzt und
die Lebensdauer des Geräts verringert.
REINIGUNG UND PFLEGE
Das Gerät sollte nach jeder Nutzung wie folgt gereinigt und getrocknet werden.
Mangelnde oder unsachgemaBe Pflege des Gerats kann die Funktionstuchtigkeit
beeintrachtigen.
• Reinige das Gerat niemals mit oder unter Wasser oder einer anderen Flussigkeit. Insbesondere
durfen der Motor und der Kompressor nicht mit Wasser in Beruhrung kommen.
• Verwende keine kratzenden oder scheuernden Reinigungsmittel.
• Das Gehäuse der Eismaschine mit einem feuchten Tuch abwischen. Bei Bedarf etwas Spülmittel
verwenden.
• Das übrige Zubehör mit klarem, warmem Wasser und Spülmittel reinigen.
• Alle Teile vor dem Zusammensetzen und Verstauen vollständig trocknen lassen oder abtrocknen.
• Das Gerät waagerecht, kühl und trocken außerhalb der Reichweite von Kindern und Tieren
lagern.
Beachten!Das Gerät und Zubehör sind nicht spülmaschinengeeignet.
TECHNISCHE DATEN
Modell
ICE-1032
Max. Füllmenge
1L
Stromversorgung
AC 220-240V
Leistung
100W
Kältemittel
R600a/18g
22
STÖRUNG UND BEHEBUNG
Problem
Mögliche Ursache
Lösung
Gerät startet nicht.
Netzstecker nicht mit Steckdose
verbunden oder nicht fest
eingesteckt.
Netzstecker mit einer geeigneten
Steckdose verbinden. Darauf
achten, ihn fest einzustecken.
Der Behälter ist nach dem Ende
des Betriebs schwierig zu
entfernen.
Wassertropfen sind zwischen dem
Behälter und der Kühl
festgefroren.
Wassertropfen sind zwischen dem
Behälter und der
Kühl-/Wärmetrommel
festgefroren
Eiscreme ist noch nicht fertig,
aber der Rührhaken hat
angehalten.
Wenn die Eiscreme härter wird, kann
der Rührhaken blockieren. Der
Motor wird dann automatisch
abgeschaltet, um ein Überhitzen zu
verhindern.
Entnehmen Sie den Behälter ,
schalten Sie das Gerät aus und
anschließend wieder ein.
Behälter kann nicht korrekt in
die Kühl eingesetzt werden.
Improper use of container has lead
to deformation.
Purchase a new container from an
authorized vendor or service
center.
Wenn der Betrieb gestartet wird,
kratzt der Rührhaken stark an
den Seiten des Behälters oder er
bleibt stecken.
Nicht ordnungsgemäßer Gebrauch
des Behälters hat zu Verformung
geführt.
Erwerben Sie einen neuen Behälter
von einem autorisierten Händler
oder DienstleistungsZentrum.

23
CONSIGNES DE SÉCURITÉ
• Lisez bien toutes les consignes de sécurité et conservez le guide d’utilisation
pour pouvoir vous y référer ultérieurement.
•
Ne branchez l
’
appareil que sur des prises dont la tension correspond à celle de
l
’
appareil.
• Si le câble secteur ou la fiche sont endommagés, faites-les remplacer par le
fabricant, un atelier agréé ou une personne de qualification équivalente.
• N’inclinez pas l’appareil à plus de 45°.
•
Pour éviter les électrocutions, veillez à ce qu
’
il n
’
y ait jamais de l
’
eau sur la
fiche ou le câble ou les fentes d
’
aération et ne plongez jamais l
’
appareil dans l
’
eau ni aucun autre liquide.
• Avant de procéder au nettoyage, débranchez toujours la fiche de la prise.
• Laissez un espace de 8 cm entre l’appareil et les murs ou les autres objets, pour
que l’air puisse circuler librement.
•
Utilisez seulement les accessoires expressément recommandés par le fabricant.
• Les enfants à partir de 8 ans ainsi que les personnes dont les capacités
physiques, mentales ou sensorielles sont réduites peuvent utiliser l ’ appareil
uniquement s’ils ont assimilé les consignes d’utilisation et de sécurité de l’
appareil fournies par une personne responsable de leur surveillance. Veillez à ce
que les enfants ne jouent pas avec l’appareil et à ce qu’ils le nettoient seulement
sous surveillance.
• Ne placez pas l’appareil à proximité d’un feu, de plaques de cuisson ou de
fours.
•
N
’
appuyez pas plusieurs fois de suite sur l
’
interrupteur de mise en marche,
afin de ne pas endommager le compresseur.
• N ’ insérez aucun objet métallique dans l ’ appareil afin d ’ éviter les
courts-circuits.

24
• Lorsque vous retirez la glace terminée, ne frappez pas sur le récipient, pour ne
pas l’endommager.
•
N
’
allumez pas l
’
appareil avant d
’
avoir fixé le récipient et le mélangeur.
• La température des ingrédients doit se situer aux alentours de 25 ° C. ne
mettez pas les ingrédients au congélateur avant la préparation, afin de ne pas
bloquer le mélangeur par des morceaux durs.
• Ne retirez pas le mélangeur pendant le fonctionnement.
•
N
’
utilisez pas l
’
appareil à proximité de sprays ou de liquides facilement
inflammables.
• L ’ appareil n ’ est pas destiné à un usage commercial, mais seulement
domestique et dans des conditions équivalentes. N'utilisez cet appareil qu'avec des
ingrédients appropriés pour faire de la crème glacée, du yogourt et du yogourt
glacé. Ceux-ci comprennent des ingrédients de base tels que la crème, le lait, le
yogourt et le sucre, ainsi que des ingrédients supplémentaires tels que des pépites
de chocolat, du chocolat fondu, des noix hachées ou de petits morceaux de fruits.
Attention : Risque d'incendie ! Le circuit deCet appareil contient du liquide
réfrigérant Isobutane (R600a), un gaz naturel très respectueux de l’environnement
mais inflammable. Bien qu’il soit inflammable, il ne détruit pas la couche d’
ozone et ne renforce pas l’effet de serre. L’utilisation de ce liquide réfrigérant
provoque toutefois un niveau sonore de l’appareil légèrement plus élevé. Outre
les bruits du compresseur, vous pouvez percevoir le flux du liquide réfrigérant.
Cela est inévitable et n’a aucune influence négative sur la puissance de l’appareil.
Faites attention pendant le transport afin de ne pas endommager le circuit
réfrigérant. Les fuites de liquide réfrigérant peuvent irriter les yeux.
25
DESCRIPTION DU PRODUIT
PANNEAU DE COMMANDE ET TOUCHES
Capot moteur
Capot transparent
Tige d'agitation
Bac a glace
Boîtier
POWER MENU
START/PAUSE

26
POWER: Branchez l'alimentation, appuyez sur le bouton d'alimentation pour allumer
la machine, le voyant du mode glace clignote. Appuyez à nouveau sur le bouton
d'alimentation pour arrêter la machine.
Menu: Appuyez plusieurs fois sur la touche pour sélectionner l’un des 3 modes de travail suivants :
MÉLANGE SEUL, RÉFRIGÉRATION SEULE, CRÈME GLACÉE.
• MÉLANGE SEUL : la machine melange pendant 30 minutes sans refroidissement.
• RÉFRIGÉRATION SEULE: la machine refroidit pendant 10 minutes sans melanger.
• CRÈME GLACÉE:Le compresseur, le moteur de mélange et le ventilateur de refroidissement
sont démarrés, lorsque la crème glacée est terminée, il y aura 10 bips courts.
Start/Pause: Après avoir choisi une des fonctions avec la touche Menu, appuyez sur la touche
START/PAUSE pour démarrer la fonction. Lorsque l’appareil est en service, vous pouvez l’arrêter
avec cette touche. Appuyez à nouveau sur la touche pour poursuivre le processus.
FABRICATION DE CRÈME GLACÉE
AVANT LA PREMIÈRE UTILISATION
Avant de mettre l’appareil en marche, nettoyez tous les éléments qui seront au contact de la crème
glacée. Assurez-vous que l’appareil est éteint et que la fiche est débranchée avant de démonter les
éléments. Placez l’appareil sur une surface aussi horizontale que possible pour que le compresseur
puisse travailler avec la meilleure puissance.

27
1.Préparez à l
’
avance les ingrédients de la recette en
suivant les indications de celle-ci, et placez-les dans le bac
amovible.
Remarque importante concernant le volume
deremplissage : Pour que la crème glacée ne déborde pas,
veillez à ce que le bac amovible soit rempli au maximum à
60%, car la crème glacée prend du volume pendant sa
préparation
2.Insere le bac a glace amovible dans la cuvette du boTtier
du compresseur.
3.Insere le capot moteur dans le capot transparent de
maniere a ce quil s'enclenche et se mette en place en toute
securite.

28
4.Insere le bras d'agitation dans Ibuverture du cote
interieur du capot jusqua ce qu'il soit bien ajuste. Si tu
tires sur la tige d'agitation, elle peut etre facilement retiree.
5.Positionne le capot sur le bac a glace et tourne-le dans le
sens inverse des aiguilles dune montrejusqua ce qu'il se
bloque et qu'il soit bien en place.
Remarque: la marque triangulaire sur les composants
tourne vers la marque "LOCK".
6.Appuyez sur la touche POWER pour allumer l’appareil.
Appuyez ensuite sur la touche Menu pour choisir la
fonction correspondante :: ① Mixeur seul ② Froid seul
③Crème glacée
7.Appuyez sur la touche START/PAUSE pour débuter la
fabrication. NOTE: Pour interrompre la confection,
appuyer une nouvelle fois sur la touche démarrage /
pause .
29
FONCTION DE REFROIDISSEMENT ULTERIEUR
Lorsque la fabrication de la glace est terminée, un signal sonore retentit. Si la preparation glacee
nest pas retiree, la fonction de refroidissement ulterieur demarre pour une heure. Lorsque la fonction
de refroidissement ulterieur est terminee, un signal sonore retentit a nouveau.
FONCTION DE PROTECTION DU MOTEUR
Lorsque la crème glacée devient dure il peut arriver qu’elle bloque le mélangeur. La fonction de
8.Lorsque l'opération est terminée, un signal sonore
retentit. Débranchez la fiche d'alimentation de la prise de
courant. Tournez le couvercle transparent et les
composants du moteur dans le sens inverse des aiguilles
d'une montre pour retirer le couvercle, puis sortez le bac à
glace.
Remarque:De l’eau de condensation peut se former sur la
face externe de la cuve à glace. Cette eau est susceptible
de geler pendant le fonctionnement de l ’ appareil. Cela
peut rendre l’extraction de la cuve à glace plus difficile. Si
tel est le cas, attendre un peu avant d’extraire la cuve à
glace de l’appareil.
9.Sortez la crème glacée / le yogourt glacé du récipient
avec la cuillère à glace fournie ou avec une cuillère en
bois ou en plastique. N'utilisez pas d'ustensiles métalliques
dans le récipient pour éviter de l'endommager.

protection du moteur sert à arrêter le moteur pour qu’il ne surchauffe pas en réduisant ainsi la durée
de vie de l’appareil.
NETTOYAGE ET RANGEMENT
Uappareil doit etre nettoye et seche comme suit a pres chaque utilisation. Un entretien incomplet ou
non-conforme de Pappareil peut compromettre son bon fonctionnement.
• Ne nettoie jamais Pappareil sous ou dans Peau ou tout autre liquide. Le moteur et le compresseur
ne doivent pas entrer en contact avec de I'eau.
• N'utilise pas de detergent corrosif.
• Nettoyer le bâti de la sorbetière au besoin avec un chiffon humide. Si nécessaire, utiliser un peu
de produit vaisselle.
• Nettoyer les accessoires restants à l’eau claire et chaude avec du produit vaisselle.
• Laisser sécher complètement toutes les pièces ou les essuyer avant de les assembler et de les
ranger.
• Conserver l'appareil au sec et à l
’
horizontale, au frais et hors de portée des enfants et des
animaux.
À observer !L'appareil et les accessoires ne sont pas lavables au lave-vaisselle.
CARACTÉRISTIQUES TECHNIQUES
Numéro de modèle
ICE-1032
Capacité de remplissage max. 1L
Alimentation électrique AC 220-240V
Puissance 100W
Réfrigérant R600a/18g
30
31
DIAGNOSTIC DES PANNES
Probleme
Cause possible
Solution
L'appareil ne démarre pas. La fiche d'alimentation n'est pas
connectée à une prise électrique
ou n'est pas correctement
branchée.
Branchez la fiche
d'alimentation sur une prise
électrique appropriée.
Assurez-vous de bien le
brancher.
Une fois l'opération terminée,
le conteneur est difficile à
retirer.
Des gouttes d'eau ont gelé entre
le récipient et le tambour de
refroidissement .
Attendez que l'eau gelée ait
fondu. Retirez ensuite le
récipient .
La crème glacée n'est pas
encore prêt, mais la lame de
mélange s'est arrêtée.
Lorsque la crème glacée devient
plus dur, la lame de mélange
peut se coincer, provoquant
l'arrêt automatique du moteur
pour éviter la surchauffe.
Retirez le récipient , éteignez
l'appareil puis redémarrez-le.
Le récipient ne peut pas être
correctement inséré dans le
tambour de refroidissement .
Une mauvaise utilisation du
récipient a conduit à une
déformation.
Achetez un nouveau conteneur
auprès d'un fournisseur ou d'un
centre de service autorisé.
Lorsque le fonctionnement
est démarré, la lame de
mélange raye gravement les
côtés du récipient ou se
coince.

32
INDICACIONES DE SEGURIDAD
• Lea atentamente todas las indicaciones y conserve este manual para consultas posteriores.
•
Conecte el aparato solamente a tomas de corriente con toma de tierra que se adecuen a la tensión
del mismo.
•
Si el cable de alimentación está dañado, deberá ser sustituido por el fabricante, un servicio técnico
autorizado o una persona igualmente cualificada.
• No incline el aparato más de 45º.
• Para protegerse de descargas eléctricas, mantenga el agua alejada del enchufe, del cable y de las
ranuras de ventilación y no sumerja el aparato en agua ni en ningún otro líquido.
• Antes de limpiar el aparato, apáguelo y desconecte el enchufe de la toma de corriente.
•
Mantenga el aparato a 8 cm de distancia de paredes u otros aparatos para que el aire pueda
circular libremente.
•
Utilice exclusivamente los accesorios recomendados por el fabricante.
•
Los niños mayores de 8 años y las personas con discapacidades físicas o psíquicas solamente
podrán utilizar el aparato si han sido previamente instruidas sobre su uso y conocen las indicaciones
de seguridad. Asegúrese de que los niños no jueguen con el aparato y de que solo lo limpian bajo
supervisión.
• No coloque el aparato cerca de fuentes de calor ni hornos.
• No presione varias veces consecutivas el interruptor On para evitar dañar el compresor.
• No introduzca objetos metálicos dentro del aparato para evitar cortocircuitos.
•
Cuando retire el helado, no golpee el recipiente para evitar dañarlo.
• No encienda el aparato antes de haber montado correctamente el recipiente y el removedor.

33
•
La temperatura de los ingredientes debe situarse en unos 25
°
C. No introduzca los alimentos en
el congelador antes de tu preparación para que el removedor no sea vea obstaculizado.
•
No retire el removedor durante el funcionamiento. No utilice el aparato cerca de sprays o líquidos
fácilmente inflamables.
•
Este aparato no ha sido concebido para un uso comercial, sino doméstico o para entornos
similares.Utilice este aparato únicamente con ingredientes adecuados para hacer helado, yogur y
yogur helado. Estos incluyen ingredientes básicos como crema, leche, yogur y azúcar, e ingredientes
adicionales como chispas de chocolate, chocolate derretido, nueces picadas o pequeños trozos de
fruta.
ADVERTENCIA: Riesgo de incendio! Este aparato contiene refrigerante isobutano (R600a), un
gas natural que no es nocivo para el medioambiente pero sí inflamable. Aunque sea inflamable, no
es perjudicial para la capa de ozono ni aumenta el efecto invernadero. La utilización de este
refrigerante provoca un aumento de ruido del aparato. Además del ruido del compresor, podrá
escuchar también el flujo del refrigerante. Este hecho es inevitable y no produce ningún efecto
negativo en el rendimiento del aparato. Durante el transporte, tenga cuidado para evitar dañar el
circuito de refrigeración. Las fugas de líquido refrigerante pueden irritar los ojos.
34
DESCRIPCIÓN DEL APARATO
PANEL DE CONTROL Y BOTONES
Motor de la tapa
Tapa transparente
Varilla de mezclado
Recipiente para el helado
Carcasa
POWER MENÚ
START/PAUSE

35
POWER:Conecte la fuente de alimentación, presione el botón de encendido para
encender la máquina, la luz indicadora del modo helado parpadea. Presione el botón
de encendido nuevamente para apagar la máquina.
MENÚ :Pulse varias veces el botón para seleccionar uno de los 3 modos de trabajo:
SOLO MECLAR, SOLO ENFRÍAR, HELADO.
SOLO MECLAR:la maquina mezcla durante 30 minutos, sin enfriar.
SOLO ENFRÍAR: la maquina enfna durante 10 minutos, sin mezclar.
HELADO:la maquina enfna y mezcla
Start/Pause:Después de haber seleccionado la función con el botón de menú, pulse el
botón Start/Pause para iniciar la función deseada. Cuando el aparato esté en marcha,
puede detenerlo con este botón. Pulse de nuevo el botón para continuar con el
funcionamiento.
PREPARAR HELADO
Antes del primer uso
Antes de poner en marcha el aparato, limpie primero todas las piezas que entrarán en contacto con el
helado. Asegúrese de que el aparato esté apagado y el enchufe desconectado antes de desmontar las
piezas. Coloque el aparato en una superficie plana y estable para que el compresor funcione con la
mayor eficacia posible.
36
1.Prepare los ingredientes como se describe en su receta e
introduzca el recipiente extraíble.
Indicaciones importantes sobre la capacidad:
Para que el helado no rebose, asegúrese de que el
recipiente extraíble se llene a un 60 % de su capacidad,
pues el helado aumentará su volumen durante la
preparación.
2.Coloca el recipiente para el helado extraible en el
orificio correspondiente de la carcasa del compresor.
3.Coloque el motor de la tapa en la tapa transparente,
asegurándose de que se enganche y se asiente de forma
segura.
37
4.Inserta la varilla de mezclado en la abertura en la parte
inferior de la tapa, hasta que encaje bien.
5.Pon la tapa sobre el recipiente para el helado y girala en
sentido de las agujas del reloj hasta el tope, para que
encaje.
Nota: la marca triangular de los componentes gira hasta la
marca "LOCK".
6.Pulse el botón power para encender el aparato. Pulse el
boton Menu para seleccionar una de las siguientes
funciones:①SOLO mezclar ②SOLO enfriar ③Helado
7.Pulse el botón [START/PAUSE] para iniciar la
producción. NOTA: Puede pausar la operación en
cualquier momento presionando el botón
[START/PAUSE]. Continúe la operación presionando el
botón nuevamente.
8.Cuando finalice la operación, sonará una señal acústica.
Desconecte el enchufe de la toma de corriente. Gire la tapa
transparente y los componentes del motor en sentido
antihorario para sacar la tapa y luego saque el recipiente
de helado.
Nota: Es posible que se forme condensación en el exterior
del recipiente del helado y se congele mientras el
dispositivo está en funcionamiento. Esto puede dificultar
la extracción del recipiente de helado del dispositivo. En
este caso, espere un poco antes de retirar el recipiente del
helado.
9.Saque el helado / yogur helado del recipiente con la bola
de helado suministrada o con una cuchara de madera o de
plástico. No utilice utensilios metálicos en el recipiente
para evitar dañarlo.
Función de refrigeración posterior
Cuando finaliza la elaboración del helado, suena una señal acústica. Si el helado no se retira del
recipiente, la funcion de refrigeracion posterior se mantendra encendida durante 1 hora. Cuando se
haya terminado el periodo de la funcion de refrigeracion posterior, volvera a sonar la serial acustica.
Función de refrigeración adicional
Helado: Para evitar que el helado se derrita tras su preparación, el aparato dispone de una función de
mantenimiento de frío. Cuando se haya terminado la producción del helado, el display muestra
38

39
[00:00] y el aparato entra en modo refrigeración. Tras 10 minutos, el display muestra [COOL] y el
compresor comienza a funcionar durante 10 minutos. A continuación, se detienen el motor y el
compresor, suenan 3 pitidos y el aparato entra en modo standby.
LIMPIEZA Y CUIDADO
El aparato debe limpiarse y secarse despues de cada uso como se explica a continuacion. Un
cuidado deficiente o nulo del aparato afectara a su funcionalidad.
・ Nunca limpies el aparato con o bajo un chorro de agua, ni con otro ITquido. En particular, el
motor y el compresor nunca deben entrar en contacto con el agua.
・ No utilices productos de limpieza abrasives o que provoquen aranazos en la superficie.
・ Limpie la carcasa de la máquina para hacer helados con un paño húmedo. Use un poco de
detergente si es necesario.
・
Limpie el resto de los accesorios con agua limpia y tibia y detergente.
・
Deje que todas las piezas se sequen por completo o secarlas antes de ensamblarlas o guardarlas.
・
Guarde el dispositivo en posición horizontal en un lugar fresco y seco que esté fuera del alcance
de niños y animales.
NOTA: El dispositivo y los accesorios no se pueden lavar en el lavavajillas.
DATOS TÉCNICOS
Modelo
ICE-1032
Capacidad
1L
Potencia de alimentación
AC 220-240V
Consumo de energía
100W
Refrigerante
R600a/18g
40
SOLUCION DE PROBLEMAS
Problema
Causa possible
Solutión
El aparato no arranca.
El enchufe de alimentación no
está conectado a una toma de
corriente o no está bien
enchufado.
Conecte el enchufe de
alimentación a una toma de
corriente adecuada. Asegúrese
de enchufarlo firmemente.
Una vez finalizada la
operación, el contenedor es
difícil de retirar.
Se han congelado gotas de agua
entre el recipiente y el tambor de
enfriamiento .
Espere hasta que el agua
helada se haya derretido.
Luego retire el recipiente .
El helado aún no está listo,
pero la paleta mezcladora
se ha detenido.
Cuando el helado se endurece, la
cuchilla mezcladora puede
atascarse y hacer que el motor se
apague automáticamente para
evitar el sobrecalentamiento.
Retire el recipiente, apague el
aparato y luego reinícielo.
El recipiente no se puede
insertar correctamente en el
tambor de enfriamiento .
El uso inadecuado del recipiente
ha provocado deformaciones.
Compra un contenedor nuevo
en un proveedor o centro de
servicio autorizado.
Cuando se inicia la
operación, la paleta
mezcladora raspa
severamente los lados del
recipiente o se atasca.
El uso inadecuado del recipiente
ha provocado deformaciones.
Compra un contenedor nuevo
en un proveedor o centro de
servicio autorizado.

41
AVVERTENZE DI SICUREZZA
• Leggere attentamente tutte le istruzioni e conservare il manuale per consultazioni
future.
• Collegare il dispositivo solo ad una presa che corrisponde alla tensione indicata.
• Se il cavo di alimentazione è danneggiato, farlo sostituire dal produttore, da un centro
assistenza autorizzato o da un tecnico qualificato.
• Non inclinare il dispositivo più di 45°.
• Per evitare il pericolo di scosse elettriche, tenere lontano dall´acqua la spina, il cavo di
alimentazione e le prese d´aria. Non immergere il dispositivo in acqua o in altri liquidi.
• Prima di eseguire la pulizia, staccare la spina dalla presa.
• Lasciare intorno al dispositivo 8 cm di spazio con le pareti o altri dispositivi, affinché l
‘aria possa circolare.
• Utilizzare solo accessori specificatamente approvati dal produttore.
• I bambini a partire dagli 8 anni, le persone con capacità fisiche e mentali ridotte
possono utilizzare il dispositivo solo se una persona responsabile della loro sicurezza ha
prima spiegato loro le avvertenze di sicurezza e come utilizzare il dispositivo.
• Non collocare il dispositivo vicino a fiamme vive, fornelli o forni.
• Non premere più volte ripetutamente l ´ interruttore di accensione per evitare di
danneggiare il compressore.
• Non inserire oggetti in metallo nel dispositivo per evitare il pericolo di scosse elettriche.
• Quando si rimuove il gelato, non sbattere il contenitore poiché potrebbe danneggiarsi.
• Non accendere il dispositivo prima di aver assemblato il contenitore e la lama.

42
• La temperatura degli ingredienti deve essere di circa 25°C. Non mettere gli ingredienti
nel congelatore prima della preparazione del gelato poiché la lama potrebbe bloccarsi.
• Non rimuovere la lama mentre il dispositivo è in funzione.
• Non utilizzare il dispositivo vicino a spray o liquidi facilmente infiammabili.
• Il dispositivo non è destinato ad uso commerciale bensì domestico e in ambienti simili.
Usare l ’ apparecchio esclusivamente con ingredienti adatti alla preparazione di gelati,
yogurt e frozen yogurt, Tali ingredienti includono materie prime come panna, latte, yogurt
e zucchero, e guarnizioni come scaglie di cioccolato, cioccolato fuso, nocciole tritate o
piccoli prezzi di frutta.
Attenzione: rischio d'incendio!Questo dispositivo contiene il refrigerante isobutano
(R600a), un gas naturale ecocompatibile ma infiammabile. Anche se è infiammabile, non
danneggia lo strato di ozono e non aumenta l´effetto serra. Tenere presente che l´utilizzo
di questo refrigerante comporta rumori del dispositivo. Oltre al rumore del compressore si
può sentire anche il flusso del liquido refrigerante. Ciò è inevitabile e non ha un effetto
negativo sulle prestazioni del dispositivo. Trasportare il dispositivo con cautela per evitare
di danneggiare il circuito di refrigerazione. Le perdite di liquido refrigerante possono
causare irritazioni agli occhi.

43
PRODUCT DESCRIPTION
PANNELLO DEI COMANDI E TASTI
Motore coperchio
Coperchio trasparente
Paia mescolatrice
Cestello per il gelato
Corpo dell'apparecchio
POWER
MENU
START/PAUSA

44
POWER:collegare l'alimentatore, premere il pulsante di accensione per accendere la
macchina, l'indicatore luminoso della modalità gelato lampeggia e premere
nuovamente il pulsante di accensione per spegnere la macchina.
MENU: Premere ripetutamente il tasto per selezionare una delle seguenti modalità:
MIXING ONLY (solo miscelazione), COOLING ONLY (solo raffreddamento), ICE
CREAM (gelato).
solo miscelazione: L'apparecchio mescola per 30 minuti senza raffreddare.
solo raffreddamento:L'apparecchio raffredda per 10 minuti senza mescolare.
Modalità gelato: il compressore, il motore di miscelazione e la ventola di raffreddamento vengono
avviati, quando il gelato è finito, ci saranno 10 brevi segnali acustici.
START/PAUSE: Dopo aver selezionato una funzione con il tasto Menu, premere START/PAUSE
per avviare la funzione. Premere il tasto per arrestare il dispositivo. Premere di nuovo il tasto per
continuare ad utilizzare il dispositivo.
PREPARARE IL GELATO
Avvertenze per il primo utilizzo
Prima di mettere il dispositivo in funzione, pulire per prima cosa tutti i componenti a contatto con il
gelato. Prima di rimuovere i componenti, assicurarsi che il dispositivo sia spento e che la spina sia
stata disinserita. Collocare il dispositivo su una superficie piana per garantire il corretto
funzionamento del compressore.
45
1.Preparare gli ingredienti come descritto nella ricetta e
introdurli nel contenitore rimovibile.
Nota importante sul volume degli ingredienti:
Affinché il gelato non trabocchi, non riempire il
contenitore oltre il 60% della sua capacità, poiché il gelato
aumenta di volume durante la preparazione.
2.Inserisci il cestello estraibile del gelato nel
corrispondente alloggiamento del compressore.
3.Inserisci il motore all'interno del coperchio trasparente
in maniera tale che scatti in posizione e rimanga ben
saldo.
46
4.Inserisci la pala mescolatrice nell'apertura sul fondo del
coperchio finche non si adatta bene. Facendo leva sulla
pala mescolatrice la puoi estrarre facilmente.
5.Posiziona il coperchio sul cestello del gelato e ruotalo in
senso antiorario fino all'arresto, in modo che sia ben saldo
Nota: il segno del triangolo sui componenti ruota fino al
segno "LOCK".
6.Premere il tasto POWER per accendere il
dispositivo.Ora premere il tasto menu per selezionare la
funzione corrispondente::①SOLO miscelazione ②SOLO
raffreddamento ③Gelato
7.Premere [START/PAUSE] per avviare il procedimento.
NOTA: è possibile mettere in pausa l'operazione in
qualsiasi momento premendo il pulsante di avvio / pausa.
Continuare l'operazione premendo nuovamente il pulsante.

47
8.Al termine dell'operazione verrà emesso un segnale
acustico. Scollegare la spina di alimentazione dalla presa
di corrente. Ruotare il coperchio trasparente e i
componenti del motore in senso antiorario per estrarre il
coperchio, quindi estrarre il contenitore del gelato.
Nota: la condensa può formarsi all'esterno del contenitore
del gelato e congelarsi mentre il dispositivo è in funzione.
Ciò potrebbe rendere più difficile rimuovere il contenitore
del gelato dal dispositivo. In questo caso, attendere un po
'prima di rimuovere il contenitore del gelato.
9.Rimuovere il gelato/frozen yogurt dal recipiente
con il cucchiaio per gelato o con un cucchiaio
in plastica o legno. Non usare utensili metallici nel
contenitore per evitare di danneggiarlo.
Funzione di mantenimento a freddo
Quando la preparazione del gelato è terminata, viene emesso un segnale acustico. Se il gelato non
viene estratto, viene attivata la funzione di mantenimento a freddo per 1 ora. Quando la funzione di
mantenimento a freddo e completata, viene emesso di nuovo un segnale acustico.
Funzione di protezione del motore
Se il gelato diventa più duro, può essere che la lama si blocchi. La funzione di protezione arresta il
motore per evitare il surriscaldamento e fare in modo che il dispositivo duri più a lungo.

48
PULIZIA E MANUTENZIONE
L'apparecchio deve essere pulito ed asciugato dopo ogni utilizzo come indicate di seguito. La
mancata o impropria manutenzione dellapparecchio pud comprometterne il corretto funzionamento.
•
Non pulire mai l'apparecchio con o sotto I'acqua o con altri liquid!. In particolare, il motore e il
compressore non devono ent rare in nessun caso a contatto con I'acqua.
• Non utilizzare detergent! abrasivi o aggressivi.
• Pulire l'alloggiamento della macchina per gelato con un panno umido. Se necessario, usa un po 'di
detersivo.
• Pulire il resto degli accessori con acqua pulita e calda e detersivo.
• Lasciare asciugare completamente tutte le parti o asciugarle prima di assemblarle o riporle.
•
Conservare il dispositivo in posizione orizzontale in un luogo fresco e asciutto, fuori dalla portata
di bambini e animali.
NOTA: il dispositivo e gli accessori non possono essere lavati in lavastoviglie.
DATI TECNICI
N. articolo
ICE-1032
Max. Capacità
1L
Dati connessione
AC 220-240V
Potenza
100W
Refrigerante
R600a/18g
49
RISOLUZIONE DEI PROBLEMI
Problema
Possibile causa
Soluzione
L’apparecchio non si avvia.
La spina del cavo di
alimentazione non è collegata
alla presa di corrente.
Collegare la spina del cavo
di alimentazione a una presa
di corrente adatta. Collegarla
saldamente.
Al termine del funzionamento,
il recipiente è difficile da
rimuovere.
Gocce d’acqua si sono congelate
tra il recipiente e il cilindro di
raffreddamento.
Attendere che l ’ acqua si
sciolga, quindi rimuovere il
recipiente .
Il gelato non è ancora pronto,
ma la lama di miscelazione si è
arrestata.
Quando il gelato si addensa, la
lama di miscelazione può
bloccarsi, causando lo
spegnimento automatico del
motore per prevenire il
surriscaldamento.
Rimuovere il recipiente,
spegnere l ’ apparecchio e
riavviarlo.
Il recipiente non entra nel
cilindro di raffreddamento.
Un uso improprio del recipiente
ne ha causato la deformazione.
Acquistare un nuovo
recipiente presso un
rivenditore o un centro di
assistenza autorizzato.
All ’ avvio, la lama di
miscelazione gratta i lati del
recipiente o si blocca.