
,16758&7,210$18$/
,&(&5($00$.(5 0RGHO,&(2037<
7+$1.<28)25&+226,1*285,&(&5($00$.(5
3/($6(5($'7+(0$18$/&$5()8//<%()25(23(5$7,1*

2
IMPORTANT NOTICES
When using an electrical appliance, basic safety precautions should
always be followed to reduce the risk of fire, electric shock, and/or
injury, including the following:
1. Please read the instruction manual carefully before use.
2. Remove all packing material and carefully check your ice-cream
maker to ensure it is in good condition and that the appliance, its
power cord and the plug are not damaged.
3. The power cord plug and air outlet should not be drenched. Do
not immerse the machine in water or other liquid to prevent
electric shock.
4. If the supply cord is damaged, it must be replaced by the
manufacturer or its service agent or a similarly qualified person in
order to avoid a hazard.
5. When not in use or before cleaning, the power plug shall be
disconnected from the power socket.
6. Do not turn this product upside down or incline it over a 45㷄
angle.
7. To protect against risk of electric shock, do not pour water on
cord, plug and ventilation, and do not immerse the appliance in
water or any other liquid.
8. Unplug the appliance after using or before cleaning.
9. When using, the inlet and outlet should be kept at a certain
distance (about 15cm) from other items, so as not to affect the
heat dissipation effect of the machine.

3
10. Any accessories not recommended by the manufacturer may not
be used.
11. This appliance can be used by children aged from 8 years and
above and persons with reduced physical, sensory or mental
capabilities or lack of experience and knowledge if they have
been given supervision or instruction concerning use of the
appliance in a safe way and understand the hazards involved.
Children shall not play with the appliance. Cleaning and user
maintenance shall not be made by children without supervision.
12. Do not use the appliance close to flames, hot plates or stoves.
13. Do not switch on the power frequently (ensure 5min. interval at
least) to avoid the damage of compressor.
14. Metal sheet or other electric objects are not allowed to be
inserted into the appliance to avoid fire and short circuit.
15. When taking out the ice cream, do not knock the surface or the
edge of the container to avoid damage to the container.
16. The initial temperature for making ice cream mixture is from 10
to 20㷄㪅㩷 㪠㪽㩷 㫋㪿㪼㩷 㫋㪼㫄㫇㪼㫉㪸㫋㫌㫉㪼㩷 㫀㫊㩷㫋㫆㫆㩷 㫃㫆㫎㪃㩷㫋㪿㪼㩷㫀㪺㪼㩷 㪺㫉㪼㪸㫄㩷 㫎㫀㫃㫃㩷 㪹㪼
completed in advance, resulting in uneven mixing and affecting
the taste. If the temperature is too high, the ice cream
production time will be too long.
17. After the machine starts freezing, do not remove the mixing fan
blade during the working process.
18. If the user needs to freeze or harden the ice cream after
completing the ice cream production within the set working time,
please take out the mixing blade first to avoid damaging the

4
mixing motor, which can better protect the service life of the
motor.
19. This product cannot be used outdoors.
20. Do not use chemical washing liquids and hard tools to clean the
product. The bowl is not dishwasher safe, do not wash the
evaporator directly under water.
21. After the operation, please pull the plug out in time.
22. Retain the instruction manual.
23. Warning: Do not store explosive substances such as aerosol
cans with a flammable propellant in this appliance.
24. This appliance is intended to be used in household and similar
applications such as:
– staff kitchen areas in shops, offices and other working
environments;
– farmhouses and by clients in hotels, motels and other
residential type environments;
– bed and breakfast type environments;
– catering and similar non-retail applications.
25. When positioning the appliance, ensure the supply cord is not
trapped or damaged.
26. The refrigerant and insulation blowing gas is flammable, dispose
of the appliance only at an authorized waste disposal centre. Do
not expose to flame.

5
This symbol indicates the refrigerant R600a and the
non-metallic materials of the appliance are flammable. It’s a
warning symbol. Warning: Risk of fire / flammable materials.
WARNING: When positioning the appliance, ensure the supply cord
is not trapped or damaged.
WARNING: Do not locate multiple portable socket-outlets or
portable power supplies at the rear of the appliance.
Children should be supervised to ensure that they do not play with
the appliance.
To avoid contamination of food, please respect the following
instructions:
– Clean regularly surfaces that can come in contact with food and
accessible drainage systems.
– Clean water tanks if they have not been used for 48 h; flush the
water system connected to a water supply if water has not been
drawn for 5 days.
– If the refrigerating appliance is left empty for long periods, switch
off, defrost, clean, dry, and leave the door open to prevent mould
from growing within the appliance.
Regarding the information pertaining to the use of the appliance,
please refer to the paragraphs below.

6
SPECIFICATIONS
Model: ICE2037Y
Capacity: 2L
Voltage: 120V/60Hz
Anti-shock protection class: I
Climate type: N
Power consumption: 180W
Max overall dimensions (L*W*H): 425X285X262mm
Max packing dimensions (L*W*H): X3X3mm
N.W: 1kg
G.W: 13.kg
PRODUCT FEATURE
1. Microcomputer automatic control, simple and reliable operation
and won’t cost you much trouble.
2. The LCD display screen shows the working status, and it is more
convenient to monitor the working status.
3. Stainless steel metal housing and electroplating buttons, which
are elegant and fashionable.
4. Lower mixing, enough power, well-mixed, more delicious.
5. The parts are detachable, easy to clean, sanitary and safe.
6. Double production function of yogurt and ice cream.
7
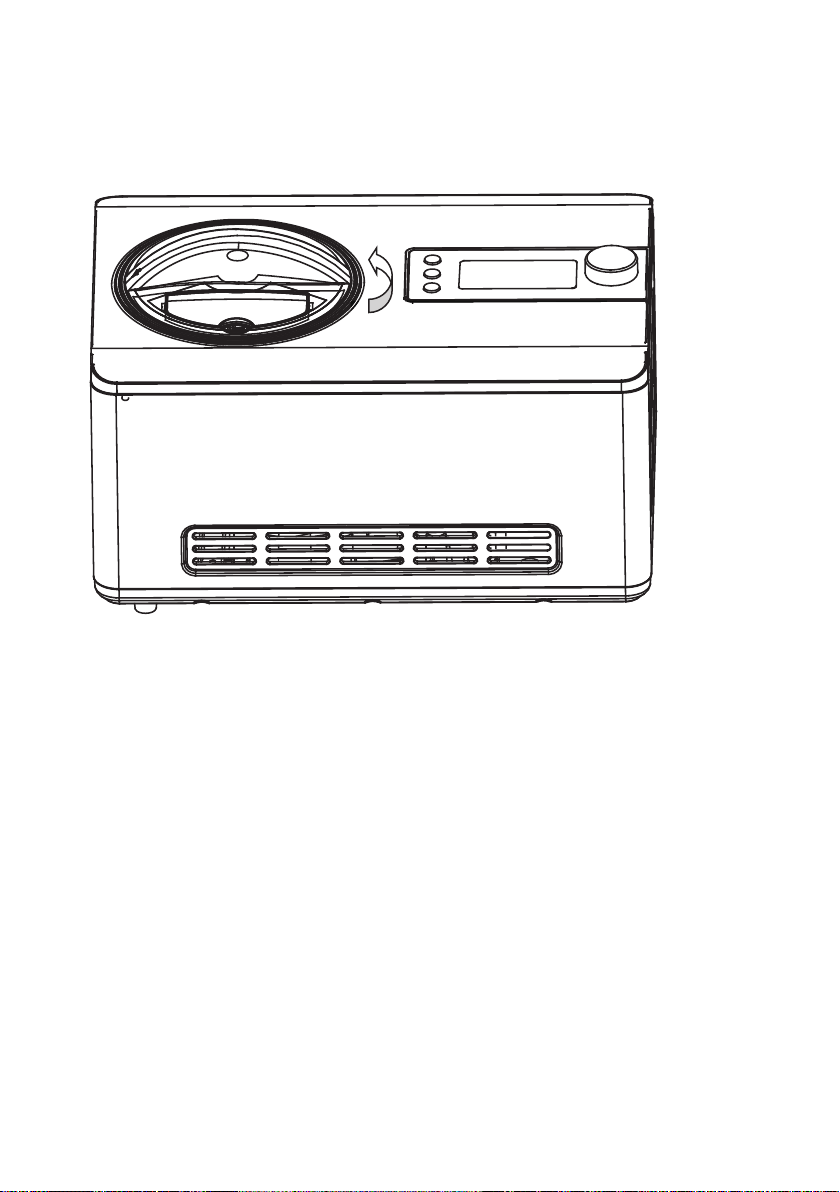
.PRODUCT INSTRUCTION…… ……… ……… ….... .. ......
1) Structure
Figure 1
1. Transparent small lid
2. Mixing blade
3. Removable bowl
4. Metal cover
5. Upper cover
6. Metal housing
7. Air Vent
8. Baseplate
9. Transparent lid
8
2) Function buttons
Figure 2
POWER BUTTON
MENU BUTTON
START/PAUSE BUTTON
HOW TO MAKE ICE CREAM
NOTE: Please thoroughly clean all parts that will contact with ice
cream before use, including: cooling bowl, removable bowl, mixing
blade, transparent cover, refill lid and ice cream shovel, etc.
Before cleaning, you must ensure that the power cord plug is
disconnected from the outlet. When making ice cream, keep the
machine flat on a level surface to ensure that the compressor of the
machine is working properly.
Here are the steps to make an ice cream:
Step 1.
Pour the well prepared recipe ingredients in proportion into the
removable bowl, then have a uniform mixing.
9
Figure 3
Step 2.
Then put the removable bowl into the ice cream machine and press it
tightly (As shown in Figure 4).
Figure 4
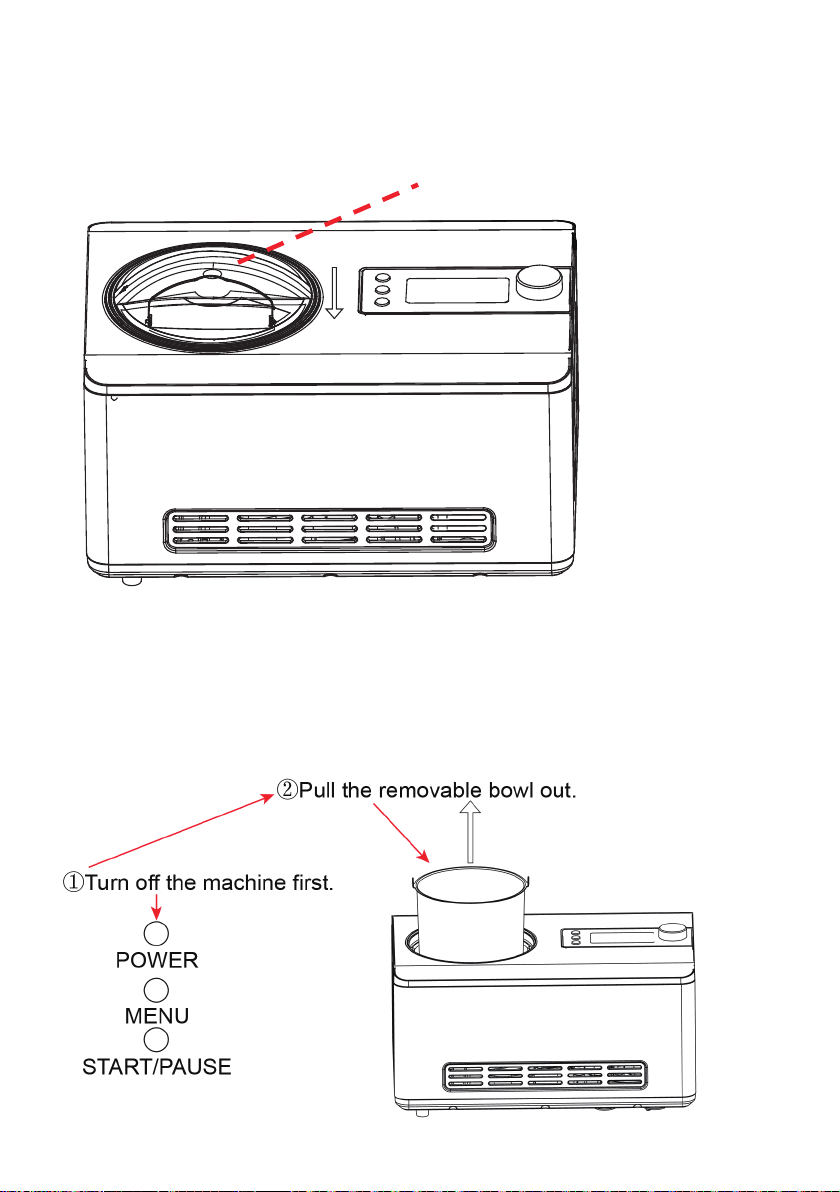
Step 3
In ICE CREAM mode, place the mixing blade into the removable
bowl and keep the mixing blade bottom hole fitted well. In YOGURT
mode, please remove the mixing blade. Then put the transparent lid
onto the machine and lock it anticlockwise.
10
Step 4
Put the transparent lid onto the machine and lock it anticlockwise
(As shown in Figure 5).
Figure 5
Step 5
Plug in power, and press the POWER button to make the machine
electrified.
Step 6
Press the MENU button to choose the working mode.
Step 7
Turn the knob to set the working time.
Step 8
Press the START/PAUSE button to start working.
Step 9
You can add the favorite ingredients by opening the refill cover (As
Lock
11
shown in Figure 6).
Figure 6
Step 10
After the operation is over, turn off the machine first, and then pull
the removable bowl out.
You can add the favorite
ingredients by opening the
refill cover

12
OPERATION
1. Connect the power supply and plug the power cord into a suitable
socket. The shape and voltage of the socket shall be the same as
those indicated. Connect the AC 120V/60Hz power supply.
2. Select control buttons.
2.1 Buttons function description
2.1.1 POWER: ON-OFF button.
2.1.2 MENU: Menu button
2.1.3 START/PAUSE: START/PAUSE button
2.1.4 KNOB: Production time adjustment
3. Operation process
3.1 .1 POWER BUTTON: Press the POWER button, the default
selection is ice cream, and LCD will light and show “60:00”. When no
other operation is performed, the backlight is off 15 seconds later,
and the display is still "60:00" and flashing. If pressing POWER
button again, the machine will return to power-up state.
3.1.2 MENU BUTTON: By pressing the MENU button, enter the
menu to select, the backlight of the LCD screen is on, and the default
mode is ICE CREAM. At the same time, the Ƶ icon in front of ICE
CREAM flashes (the square icons in other modes are not displayed).
If you continue to press the MENU button, you will cycle through the
four modes of [Single Refrigeration], [Single Mixing], [Ice Cream] and
[Yoghurt] in sequence, the Ƶ icon in front of the selected mode
flashes (the square icons of other modes that are not selected are
not displayed). If the backlight is off 15 seconds after no other
operation, the default time of the currently selected mode is
displayed and flashes. In the working state, long press the MENU
button for 3 seconds, and the machine returns to the power-up state.

13
3.2 After the mode is selected, the user can start to adjust the
production time.
3.2.1 The default time of ICE CREAM mode is 60 minutes, and
"60:00" is displayed. Turn the TIME knob to the right once to
increase the time by 1 minute, and turn it continuously to increase
the time rapidly, which can be changed to 60 minutes at most. After
60 minutes, press the TIME knob to turn it to the right and it still
displays 60:00, and the time cannot be increased. Turn the TIME
knob once to the left to reduce the time by 1 minute, and turn it
continuously to reduce the time rapidly, the minimum time can be
changed to 5 minutes. After 5 minutes, when the knob is turned to
the left, it still displays 05:00. The time cannot be reduced any more.
3.2.2 The YOGURT mode production time has memory function.
The factory setting is 8 hours, and the display is "08H". The next time
you turn on the machine, the display time is the production time
adjusted last time (the adjustment time is not saved under the
working state). Turn the TIME knob right once to increase the time by
1 hour, and turn it continuously to increase the time rapidly. It can be
changed to 24 hours at most. After 24 hours, press the button to turn
it right again, and the display time is still 24 hours, and the time
cannot increase anymore. Turn the TIME knob once to the left to
reduce 1 hour, and turn it continuously to reduce the time rapidly.
The minimum time can be changed to 4 hours. After 4 hours, when it
is turned to the left, it still displays 04H, and the time cannot be
reduced any more.
3.2.3 COOLING ONLY: The default time of the mode is 30 minutes,
and "30:00" is displayed. Turning the TIME knob to the right once
can increase the time by 1 minute. Turning the knob continuously
can increase the time rapidly, which can be changed to 60 minutes at
most. After 60 minutes, pressing the TIME knob to the right can still
display 60:00, and the time cannot be increased. Turn the TIME
knob once to the left to reduce the time by 1 minute, and turn it
continuously to reduce the time rapidly. The minimum time can be

14
changed to 5 minutes. After 5 minutes, when the knob is turned to
the left, it still displays 05:00. The time cannot be reduced.
3.2.4 MIXING ONLY: The default time of the mode is 10 minutes,
and "10:00" is displayed. Turning the TIME knob to the right once
can increase the time by 1 minute. Turning the knob continuously
can increase the time rapidly, which can be changed to 60 minutes at
most. After 60 minutes, pressing the TIME knob to the right can still
display 60:00, and the time cannot be increased. Turn the TIME
knob once to the left to reduce the time by 1 minute, and turn it
continuously to reduce the time rapidly. The minimum time can be
changed to 5 minutes. After 5 minutes, when the knob is turned to
the left, it still displays 05:00. The time cannot be reduced.
3.3 After the time is selected, press the START/PAUSE button, and
the machine starts making. During the production process, the
backlight of the LCD display remains on, and the countdown starts
from the selected time. In this process, if you press the
START/PAUSE button, the machine will stop working, and the LCD
will display the time when it stopped. If you press the START/PAUSE
button again, you will continue to press the current mode and the
remaining time to work. If there is no other operation, the backlight
on the LCD screen will automatically turn off 15 seconds later.
During the operation, long press the START/PAUSE button for 3
seconds, the mixing motor stops working, the compressor stops
working 3 minutes later, and returns to the power on state 10
minutes later, with 3 short beeps.
3.4 Completing Reminder: After the machine is completed, the
LCD displays "00:00", and the sound of "Di" sounds once every 0.5
seconds for 1 minute. After that, the LCD backlight is off, and the
display remains "00:00".
4. Completed State
4.1 After the machine finishes single cooling, it will emit three short
beeps to return to the power on state.

15
4.2 After the machine finishes single mixing, it will emit three short
beeps to return to the power on state.
4.3 After the machine completes the ice cream mode, the time bar
displays "00:00".The machine automatically enters the thermal
insulation state, and the system starts timing. After 10 minutes, the
compressor and fan motor start, and the time bar displays "COOL";
After 10 minutes, the machine will stop working, and the cycle will
last for 1 hour. After that, three short beeps will be emitted to return
to the power on state.
4.4 After the machine completes the production of yogurt mode, the
machine automatically enters the refrigeration mode, and the time
bar displays "COOL". The compressor and fan motor shall be started
for 15 minutes. After that, when the temperature sensor detects that
the temperature is higher than or equal to 9 ć, the compressor and
fan motor start to work for 4 minutes. If there is no other operation,
the machine will always be in cold storage mode and will not
automatically shut down.
4.5 When the machine enters the heat insulation/refrigeration state,
all buttons except the POWER button are invalid. To stop
refrigeration, press the POWER button to shut down the machine.
5. High temperature protection function of cooling bowl (for
YOGURT mode):
In the power on state, NTC is abnormally short circuited, and the
nixie tube displays "E1" (to be determined). NTC is abnormally open,
the nixie tube displays "E2" (to be determined), and the whole
machine cannot be started.
6. MOTOR SELF-PROTECTION FUNCTION
It is necessary to detect the temperature of the mixing motor. When
the resistance measured by NTC is greater than 82 degrees, the
mixing motor will automatically stop working. After stopping, it
cannot be reset to continue working. After switching modes, the
16
mixing motor control system resets and the mixing motor can
continue to work as required.
7. COMPRESSOR SELF-PROTECTION FUNCTION
When the ice cream or refrigeration mode is started, the
compressor will be started directly. When the compressor is started
continuously, it will be delayed for three minutes before it can be
started again. However, when the power cord is plugged, the
machine will be started again. By default, it will be restarted without
delay.
8. CONTROLLING THE VOLUME OF THE INGREDIENTS
To avoid overflow and waste, please make sure that the ingredients
do not exceed 60% of capacity of the removable bowl (Ice cream
expands when being formed).
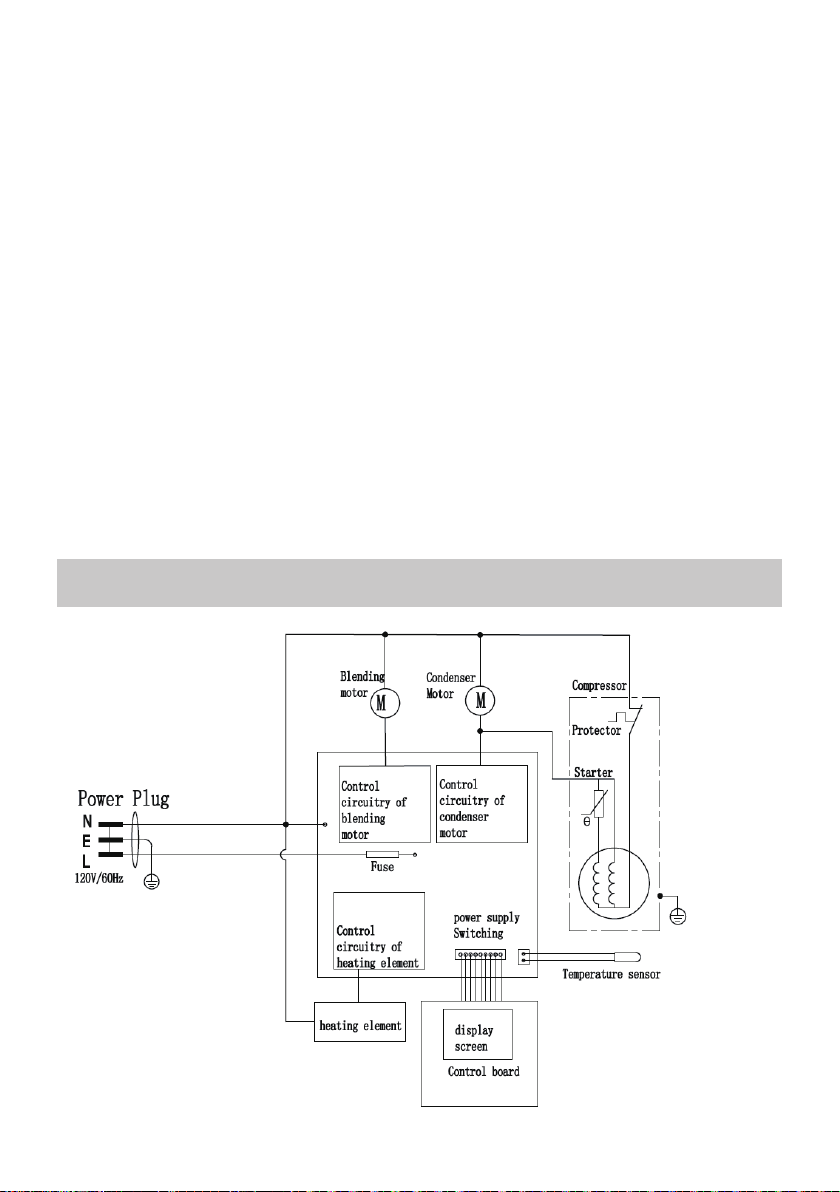
ELECTRICAL DIAGRAM

17
MAINTENANCE
Caution: The plug must be removed before cleaning to avoid electric
shock.
a) Take out the mixing blade, wipe it with a dampened cloth.
b) Take out the removable bowl, clean it with a dampened soft
cloth.
c) Wipe the transparent lid and refill lid with a dampened cloth.
d) Remove the dirty on the body or other places with a dampened
cloth, and do not pour water on cord, plug and ventilation,
immerse the appliance in water or any other liquid.
e) Allow drying thoroughly with a dry cloth, then return the
component to the home position.
COMMON PROBLEM
No. Existing problem Reason analysis Resolutions
1
Not easy to take out
loading bowl after
the ice cream is
finished
There are water drops
between the refrigeration
barrel and the loading bowl
that are
not wiped clean,
resulting in freezing
Wait 1-2 minutes
before taking out
the ice cream
bucket.
2
The production time
of ice cream maker
is not finished, but
the mixing has
stopped
Normal phenomenon: as
the ice cream hardens, the
mixing fan may be stuck.
When the motor
temperature rises, it will
automatically protect and
cut off the power supply of
the motor
Take out the
loading bowl and
restart it after
shutdown to return
to normal.
3
The transparent lid
is lifted to the mixing
fan blade, and it
cannot be stuck in
place
The mixing fan blades not in
place, and pay attention to
the alignment of the
hexagon
Put the mixing fan
in place.

18
4
The removable bowl
cannot be placed in
the cooling bowl
Deformation caused by
improper use of removable
bowl
Buy a new
removable bowl
5
When making ice
cream at the
beginning, the
mixing fan is
severely scratched
or stuck
Deformation caused by
improper use of removable
bowl
Buy a new
removable bowl
AFTER SALES SERVICE
One year warranty service is available from the date of purchase.
The date of purchase of the invoice or after-sales service warranty
card is subject to the warranty service. The problems you encounter
when using our company's home automatic ice cream machine can
be helped and resolved through the service hotline. We provide
technical advice free of charge.
ƔOne of the following conditions is not covered by the warranty;
1) Components are damaged due to improper use, maintenance
and storage;
2) Damage caused by Maintenance personnel or designated
personnel to disassemble the product by themselves.
3) No purchase invoice or purchase invoice does not match the
product;
4) Damage caused by force majeure;
5) Exceeding the warranty period;
ƾ If you find any quality problems, please contact the service
center or special maintenance service point for repair. Do not
disassemble it yourself. The company will not bear any
responsibility for quality problems or accidents caused by
19
self-disassembly.
ƾ If the product is not under warranty, the maintenance fee will be
waived and only the parts fee will be charged. Manufacturer
reserves the right of final interpretation of the above
commitments.
PARTS
Mixing blade 1 User manual 1
Instruction sheet 1
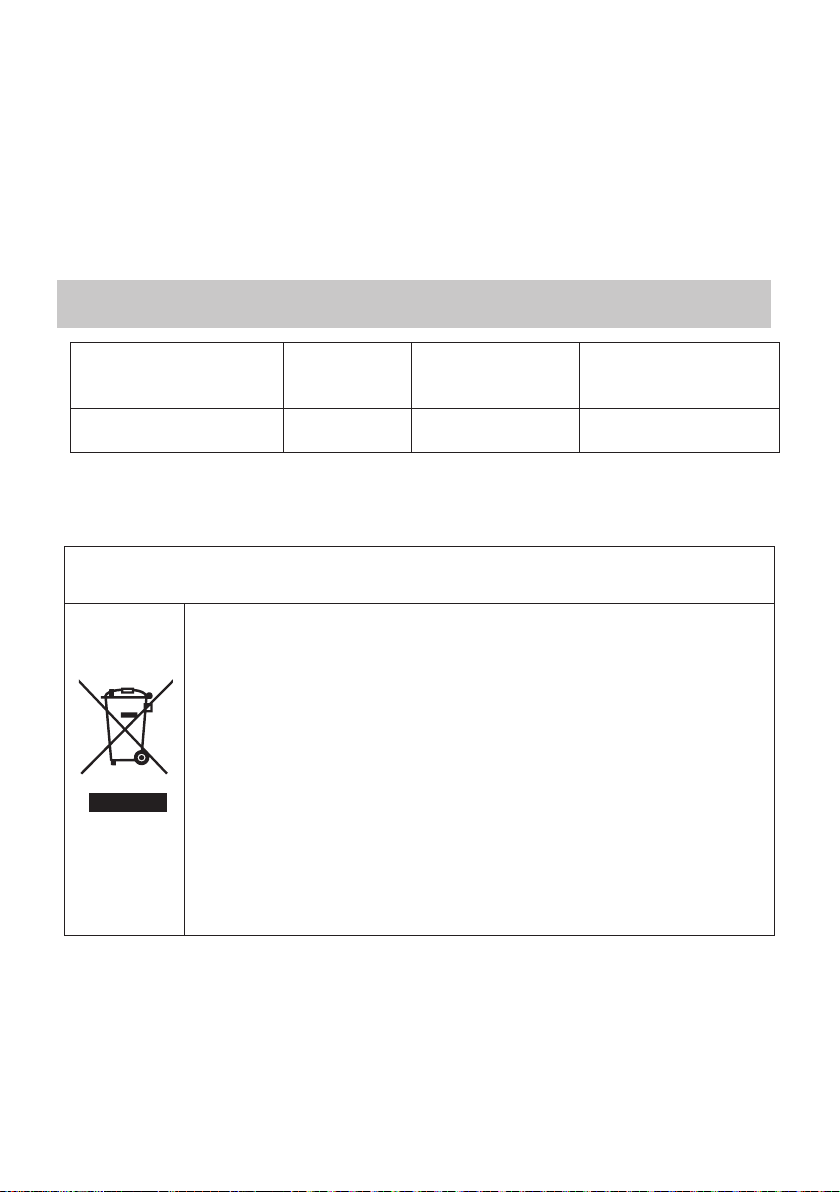
Correct Disposal of this product
This marking indicates that this product should not be
disposed with other household wastes throughout the
EU. To prevent possible harm to the environment or
human health from uncontrolled waste disposal,
recycle it responsibly to promote the sustainable
reuse of material resources. To return your used
device, please use the return and collection systems
or contact the retailer where the product was
purchased. They can take this product for
environmental safe recycling.

20
YOGHOURT RECIPE MANUAL
Make the materials according to any one of the below recipes. And distribute
the material well.
Recipe 1: merchant refrigerated fresh milk 1000ml + ferment or 50ml
refrigerated pure yoghourt.
Recipe 2: aseptic encapsulation pure milk 1000ml + ferment or 50ml
refrigerated pure yoghourt.
Recipe 3: milk made from the milk powder and water mixture 1000ml +
ferment or 50ml refrigerated pure yoghourt.
Recipe 4: cooked Soya-bean milk 1000ml + ferment or 50ml refrigerated
pure yoghourt.
Attention濐
1. Check the above ingredients to see whether they have exceeded the
time limit or have gone bad.
2. The quantity of addition of lactobacillus ferment according to the using
instruction.
3. When making the milk by mixing the milk powder with water, please mix
it with water as the percentage labeled on the mark of the merchant milk
powder or according to this percentage: 250ml milk powder + 750ml
water.
4. You cannot add lactobacillus ferment or pure yoghourt to the cooked
Soya-bean milk or the milk made from milk powder until the temperature
is cooled to below 40ć.
5. The fermentation time will be affected by the environment temperature
and the initial material temperature, therefore, if the environment
temperature is low or you use the cooled milk for making, you should
extend the time properly), but it should not exceed 14 hours (if you use
the pure yoghourt as the fermentation source, it should not exceed 10
hours)

21
Suggestion:
Consider using the active lactobacillus ferment as the ferment source prior to
other fermentation source. You can use the merchant pure yoghourt or the
pre-made pure yoghourt as the fermentation source if it is not convenient to
buy the ferment.
ICE CREAM RECIPE MANUAL
BA
SIC ICE CREAM
Make according to the following formula. After mixing the formula mixture
evenly, it can be made into ice cream within 60 minutes.
375g cream
250g powdered milk
375g water
VANILLA ICE CREAM
320g whole milk
152g granulated sugar
240g heavy cream, well chilled
2 – 3 teaspoons pure vanilla extract, to taste
In a medium bowl, use a hand mixer or a whisk to combine the milk and
granulated sugar until the sugar is dissolved, about 1 – 2 minutes on low
speed. Stir in the heavy cream and vanilla to taste. Turn machine on, pour
mixture into freezer bowl through ingredient spout and let mix until thickened,
about 50 – 60 minutes.
BASIC CHOCOLATE ICE CREAM
320g whole milk
152g granulated sugar
320g semi-sweet chocolate (your favorite), broken into 1.2cm pieces

22
320g heavy cream, well chilled
1.2 teaspoon pure vanilla extract
Heat the whole milk until it is just bubbling around the edges (this may be
done on the stovetop or in a microwave). In a blender or food processor fitted
with the metal blade, pulse to process the sugar with the chocolate until the
chocolate is very finely chopped. Add the hot milk, process until well blended
and smooth. Transfer to a medium bowl and let the chocolate mixture cool
completely. Stir in the heavy cream and vanilla to taste. It is best to
pre-cooled in the refrigerator for about 15 minutes before making.
Turn the machine on, pour mixture into removable bowl through ingredient
spout and let mix until thickened, about 30 – 40 minutes.
FRESH STRAWBERRY ICE CREAM
334g fresh ripe strawberries, stemmed and sliced
70g freshly squeezed lemon juice
152g granulated sugar
320g whole milk
320g heavy cream
1.2 teaspoon pure vanilla extract
In a small bowl, combine the strawberries with the lemon juice and 80g
granulated sugar, stir gently and allow to the strawberries to macerate in the
juices for 2 hours.
In a medium bowl, use a hand mixer or a whisk to combine the milk and
granulated sugar until the sugar is dissolved.
Stir in the heavy cream plus any accumulated juices from the strawberries
and vanilla. Turn the machine on, pour mixture into removable bowl through
ingredient spout and let mix until thickened, about 30 – 40 minutes. Add the
sliced strawberries during the last 5 minutes of freezing.

23
FRESH LEMON SORBET
470g granulated sugar
560g pure water
160g freshly squeezed lemon juice
0.5 tablespoon finely chopped lemon zest *
Combine the granulated sugar and water in a medium saucepan and bring to
a boil over medium-high heat. Reduce heat to low and simmer without stirring
until the sugar dissolves, about 3 – 5 minutes. Cool completely. This is called
a simple syrup, and may be made ahead in larger quantities to have on hand
for making fresh lemon sorbet. Keep refrigerated until ready to use.
After cooling, add the lemon juice and zest; stir to combine. Turn the machine
on, pour the lemon mixture into freezer bowl through ingredient spout and
mix until thickened, about 50 – 60 minutes.
CHOCOLATE FROZEN YOGURT
320g whole milk
180g bittersweet or semisweet chocolate, chopped
536g low-fat vanilla yogurt
66g granulated sugar
Combine the milk and chocolate in a blender or food processor fitted with the
metal blade and process until well blended and smooth, 15 seconds. Add the
yogurt and sugar; process until smooth, about 15 seconds. Turn the machine
on, pour mixture into removable bowl through ingredient spout and let mix
until thickened, about 50 – 60 minutes.

:$55$17<
Limited two-year warranty
This warranty is available to consumers only. You are a consumer if
you own a kumio ice cream maker that was purchased at retail for
personal, family or household use. Except as otherwise required
under applicable law, this warranty is not available to retailers or
other commercial purchasers or owners.
We warrant that your kumio ice cream maker will be free of defects
in materials and workmanship under normal home use for 2 years
from the date of original purchase. If your kumio ice cream maker is
prove to be defective (Non Man-damaged)within the warranty period,
we will offer free replacement or reimburse.
Thank you for using our products. Please contact
VXSSRUW@kumio.net or Customer Service Online if you have any
questions.