Loading ...
Loading ...
Loading ...
9
GENERAL ASSEMBLY INSTRUCTIONS
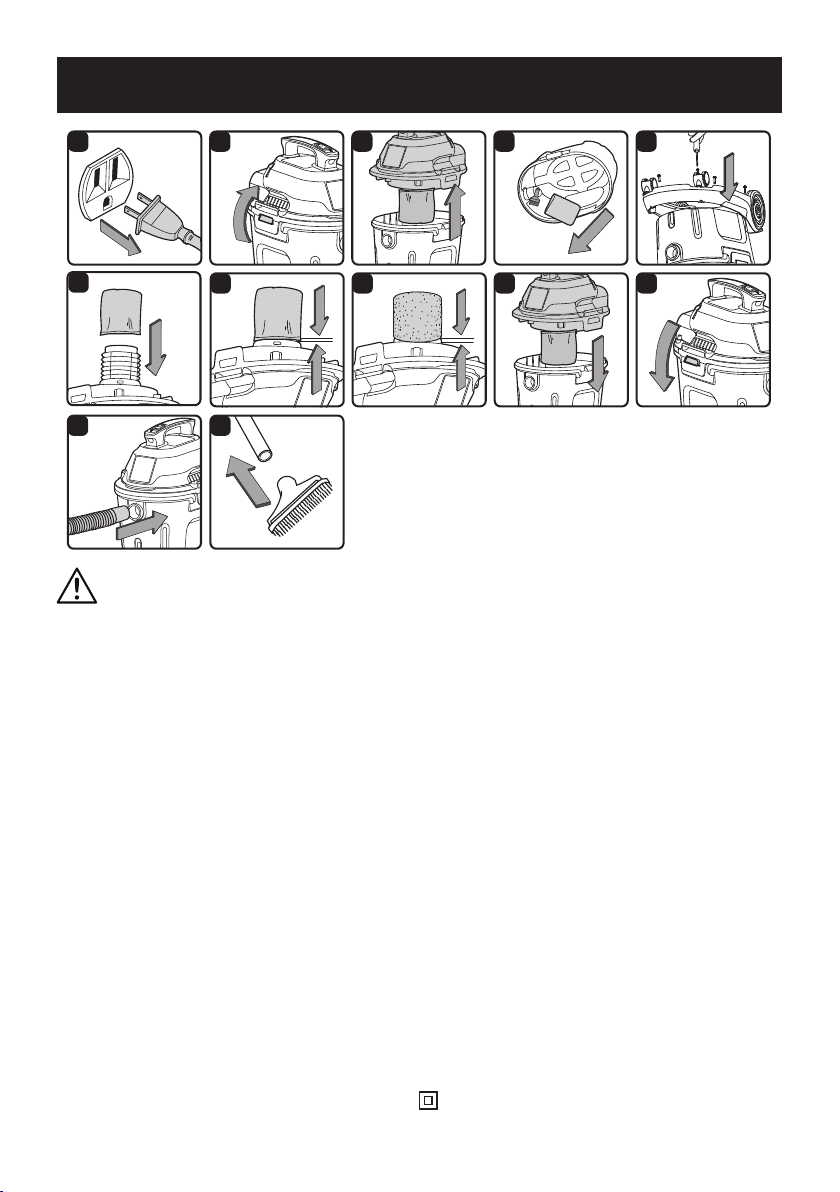
UNPACKING YOUR WET/DRY VACUUM & GENERAL ASSEMBLY
1. Verify that the power cord is disconnected from the outlet (Fig. 1).
2. Undo the latches (Fig. 2).
3. Lift the powerhead o the collection tank (Fig. 3).
4. Remove the contents from inside the collection tank. Make sure you have all contents as listed on
page 8 (Fig. 4).
5. Turn the collection tank upside down and t the base assembly onto the tank. Secure the base to
the tank with the supplied screws. Verify that the base is assembled correctly. Do not over-tighten
the screws (Fig. 5).
6. Your vacuum comes ready for dry vacuum cleaning. If the reusable cloth lter is not installed, refer
to page 14 for installation instructions (Fig. 6 & 7).
7. For wet vacuum cleaning, remove the reusable cloth lter, and install the supplied foam wet lter.
See page 15 for the foam wet lter installation instructions (Fig. 8).
8. Place the powerhead back on the collection tank, aligning the top section with the latches, and
snap into place (Fig. 9 & 10).
9. Insert the larger end of the hose into the vacuum port on the collection tank (Fig. 11).
10.
Choose the desired accessory and insert onto the free end of the hose or extension wand (Fig. 12).
POLARIZED PLUG
To reduce the risk of electrical shock, this appliance has a polarized plug (one blade wider than the
other). This plug will t in a polarized outlet only one way. If the plug does not t fully in the outlet,
reverse the plug. If it still does not t, contact a qualied electrician to install the proper outlet. Do
not change the plug in any way. Double insulation eliminates the need for the three-wire grounded
power cord and grounded power supply system.
WARNING: DO NOT PLUG THE POWER CORD INTO A POWER OUTLET. MAKE SURE
THE PLUG IS DISCONNECTED BEFORE ASSEMBLING THE WET/DRY VACUUM. TO
REDUCE THE RISK OF ELECTRIC SHOCK, DO NOT EXPOSE TO RAIN.
1 2 3 4 5
7 8 9 10
11 12
6
Loading ...
Loading ...
Loading ...