Loading ...
Loading ...
Loading ...
11
LIQUID VACUUM OPERATION
1 2 3 4 5
7
9
8
6
LIQUID VACUUMING
WARNING: BE SURE TO READ, UNDERSTAND, AND APPLY INFORMATION ENTITLED
“IMPORTANT SAFETY INSTRUCTIONS”. DO NOT VACUUM IN AREAS WITH
FLAMMABLE GASES, VAPORS, OR EXPLOSIVE DUSTS IN THE AIR. FLAMMABLE
GASES OR VAPORS INCLUDE BUT ARE NOT LIMITED TO: LIGHTER FLUID, SOLVENT
TYPE CLEANERS, OIL-BASED PAINTS, GASOLINE, ALCOHOL, OR AEROSOL SPRAYS.
EXPLOSIVE DUSTS INCLUDE BUT ARE NOT LIMITED TO: COAL, MAGNESIUM, GRAIN,
OR GUN POWDER. TO REDUCE THE RISK OF HEALTH HAZARDS FROM VAPORS OR
DUST, DO NOT VACUUM TOXIC MATERIALS.
WARNING: DO NOT PLUG THE POWER CORD INTO A POWER OUTLET. MAKE SURE
PLUG IS DISCONNECTED BEFORE CHANGING THE FILTERS.
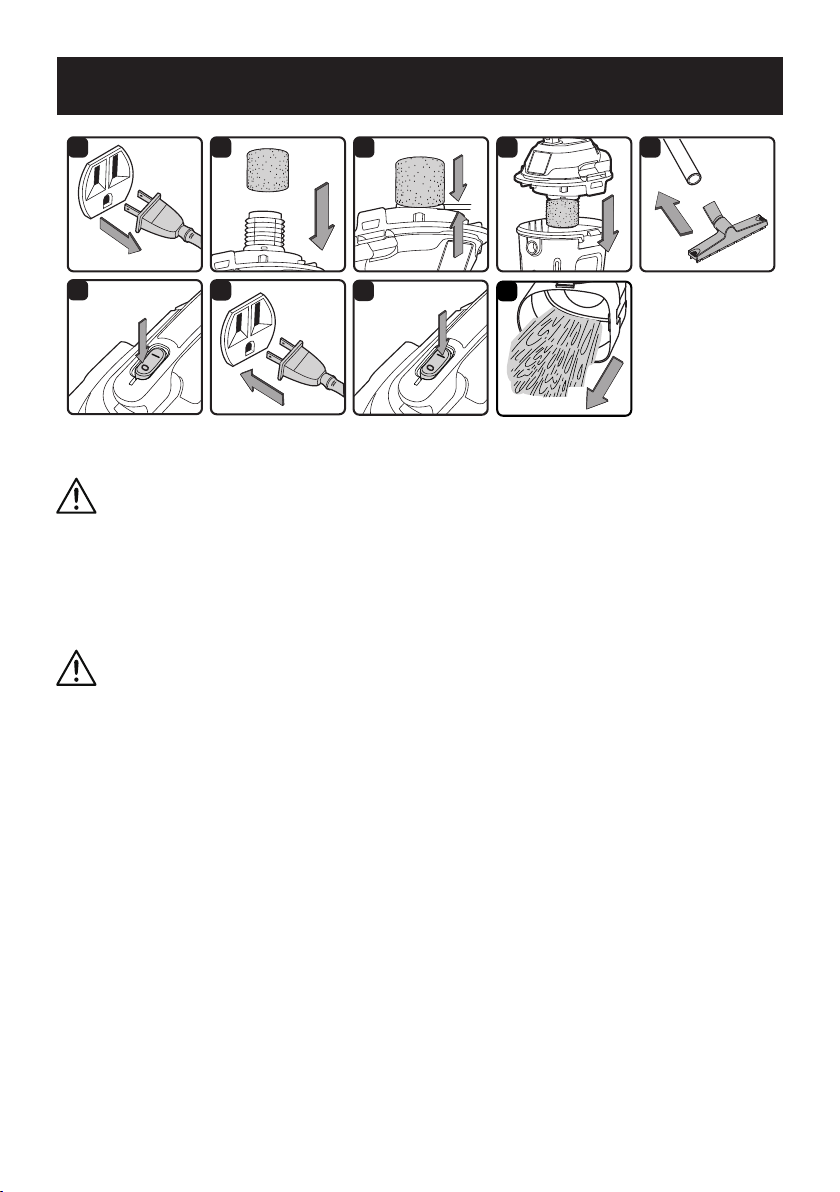
1. Verify that the power cord is disconnected from the outlet. Make sure that the collection tank is
clean and free of dust and dirt (Fig. 1).
2. Remove the reusable cloth lter, then carefully install the foam wet lter over the lter cage and
place the powerhead back on the collection tank. For foam wet lter installation instructions, see
page 15 (Fig. 2 & 3).
3. Place the powerhead back on the collection tank and secure it in place using the latches (Fig. 4).
DO NOT USE THE REUSABLE CLOTH FILTER FOR LIQUID VACUUMING.
OPERATING INSTRUCTIONS: WET VACUUMING
4. Insert the larger end of the hose into the vacuum port on the collection tank.
5. Push the required accessory onto the free end of the hose or the extension wand (Fig. 5).
6. Verify that the on/o switch is in the ‘O’ OFF position before plugging the power cord into the outlet.
Plug the power cord into the outlet (Fig. 6 & 7).
7. Turn the motor on by ipping the switch to the ‘I’ ON position (Fig. 8).
8. Once you have completed vacuuming, ip the on/o switch to the 'O' OFF position and unplug the
power cord from the outlet.
9.
After use, empty the collection tank, clean and dry the inside and outside of the collection tank (Fig. 9).
IMPORTANT! When vacuuming large quantities of liquids, do not immerse the nozzle completely in
the liquid; leave a gap at the tip of the nozzle opening to allow air inow. The machine is tted with a
Loading ...
Loading ...
Loading ...